AD Simulations Bombardier CRJ700
Review Summary
The modelled AD Simulations Bombardier CRJ700 is a 3D masterpiece. The external model is crafted with love, and eye for many details and razor sharp decals. The same for the Virtual Cabin that comes with “unexpected” animations, ready to eat from the well modelled oven or would you like a cup of coffee?
In the 3D cockpit all modelling skills come together. It comes with weathered panels, scratches where ever applicable, awesome realistic photo material, sharp decals on all panels but also sharp EFIS and EICAS DUs.
Although 99 percent of all systems are simulated, some systems are for the moment using default X-Plane programming like the Auto Pilot, FMS and a couple of others. Overall a well balanced CRJ700 with extraordinary 3D skills. Curious what your personal reporter Angelique van Campen for other findings has and how all the testing worked out? Take a cup of coffee or tea, relax and enjoy the review..
Introduction
Do you know that the nickname for the Bombardier CRJ jets is/was “Canadian Rookie Jet” or that the longer CRJ900 was named “Longdart”? Anyway, the Bombardier CRJ700, CRJ900, and CRJ1000 are a family of regional jet airliners that were designed and manufactured by Canadian transportation conglomerate Bombardier between 1999 and 2020. Their design was derived from the smaller CRJ100 and 200 airliners, the other members of the Bombardier CRJ aircraft family.
The CRJ program was acquired by Japanese corporation Mitsubishi Heavy Industries in 2020, which ended production of the aircraft.

During the 1990s, Bombardier initiated development on the CRJ-X, a program to produce enlarged derivatives of its popular CRJ100/200 family. Officially launched in 1997, the CRJ700’s maiden flight took place on 27 May 1999; it was soon followed by the stretched CRJ900 variant. Several additional variants of the type were subsequently introduced, including the elongated CRJ1000 and the CRJ550 and CRJ705 which were modified to comply with scope clauses. Competitors included the British Aerospace 146, the Embraer E-Jet family, the Fokker 70 and the Fokker 100.
In Bombardier’s lineup, the CRJ Series was formerly marketed alongside a family of larger jets, the CSeries (now majority-owned by Airbus and marketed as the Airbus A220), and a twin-turboprop, the QSeries (now owned by De Havilland Canada and marketed as the Dash 8). (Source Wikipedia)
But first this else you could be confused and that’s not what we want. Delta Wing Simulations first launched the X-Plane F-16 BLOCK 52+, then AD Simulations (AD stands for the first letters of the team member names Andrzej (AJ) and Dimitris) was born with Dimitris and AJ and now both teams have merged. The overall team consist of 4 members; AJ (Andrzej Borysewicz), Dimitris and Kostas (Konstantinos) Koronakis and Gary Hunter.
As you can read in the first section, the real production was stopped recently. Is it then not a shame that Bombardier stopped with this or doesn’t it make a difference for the X-Plane model? To me as reviewer and long time technical trainer and ex-ground engineer, it doesn’t make a difference what I review. Look to the recent long haul Airbus A340 models from ToLiss and JARDesign. They both modeled the Airbus A340-500/-600. In fact, Airbus models that are already for a while out of production.
Finding “real information” like FCOMs, AMM (Aircraft Maintenance Manual), drawings of the CRJ700 isn’t difficult. Just via a simple search I found this technical familiarization manual, or the official Bombardier Airport Planning Manual, or at the dedicated SmartCockpit website.
But now it’s time to explore the modeled AD Simulations Bombardier CRJ700, but first a couple of more words about the developer. As you might know, the F-16 BLOCK 52+ fighters where developed by DWS while the CRJ700 comes from AD Simulations. According to the AD Simulations team “There are two companies: Delta Wing Simulations and AD Simulations. Yes, we merged as far as the team. There are the same people in both organizations namely Kostas, Dimitris and AJ. The merger meant that with new team there are like two divisions, one making fighter jets and the other civilian aircraft.”
Installation and Documentation
I know, not the most interesting section, but it’s needed. The installation is easy although a serial number is needed. As of this writing, you can buy the AD Simulations only via X-Plane.Org. Once you ordered the model, you will find a serial number under the dedicated Org store page of your Org account. Logically, the serial number is needed to activate the aircraft. Then you need to copy and paste the unzipped “CRJ-700” folder in the X-Plane Aircraft folder, but you’re also free to create a sub folder like DWS or AD Simulations and install it in this newly created sub-folder.
The package comes with a couple of manuals located in the “documents” folder. Besides the real manuals I highlighted in the previous section, this modeled CRJ700 comes with the following Acrobat files, a Word document and a regular text file:
– AD_Sim_CRJ_Checklist.pdf
– CRJ-700 Changelog.docx
– CRJ-700 Changelog.txt
– CRJ-700_Quick_Start_Guide.pdf
As of this writing, I’m reviewing model version 1.01 with hot fix. From the above list of documents, the quick start guide is “the” manual that explains hopefully all what is needed to fly the CRJ700. Just to clarify, it doesn’t offer any of the previous mentioned real FCOMs or extractions of these manuals. Ok, lets check it out the AD Simulations manuals.
The CRJ-700_Quick_Start_Guide Acrobat file is not the FCOM (Flight Crew Operating Manual) which means you won’t find any normal or abnormal procedures or performance tables. Instead it explains in depth all the simulated systems and also those who are not simulated. Text related to systems or parts of these systems that aren’t simulated are colored red. The start guide includes also a tutorial flight from KCHS to KCLT which was compiled by a real pilot and this means, a typical USA flight. Personally I had hoped that with an update also the complete normal and abnormal procedures where included as well as performance tables. Not sure if everybody needs performance tables, but better included them then having nothing.
Back to the manual.
It’s the almost perfect manual for those simmers who start new with X-Plane since it explains in detail all kind of typical X-Plane settings and adjustments. Perhaps even experienced simmers will or can find on these pages things they didn’t know or have forgotten that it was possible. What I don’t know, if the modeled CRJ700 has a dedicated Auto Flight system, so that’s something I need to ask. While reading the quick start guide, I can’t conclude if it is modeled in-house or not. I know that the real aircraft didn’t had an Auto Throttle system or Thrust Control System.
I also know that the installed FMS is the default X-Plane device, but the AD Simulations team remodeled the popup 2D CDUs that reflect the real installed Collins FMS-4200 CDU which is also applicable for the build in 3D CDU. Anyway to AD Simulations “At the moment – from the launch till at least the beginning of 2022 – the automated flight is based on X-Plane default with some coded additions one, but we are planning on more customized autopilot in the future. Regarding the FMS There are plans to make custom FMS.”
As said before, the quick start guide comes with a kind of tutorial flight. It’s not a full tutorial, but helpful although, in particular related to the FMS CDU, many text blocks are red meaning this is not yet implemented. The tutorial or sample flight starts at page 61. It runs till and including the end of the manual. It, of course you and I would say, includes the FMS CDU flight plan programming. Actually, the first part of the flight is more related to the flight plan and how to save it and to reload it. The actual sample flight starts at page 68.
Although I will make my own test flight, I’ll use their sample flight later in this review and see if every step is described and/or explained in detail.
One last note about this manual and for you as simmer; to get familiar with the modeled AD Simulations CRJ700, it is a good idea to use their KCHS to KCLT flight. The reason to tell you is that the checklist file seems to me a bit short, and not much explanation is given, the sample flight steps are then a much better option.
I think it’s time to explore the external model or shall I first highlight a bit of the modeled features and the EFB (Electronic Flight Bag)?
The AD Simulations EFB
Although the manual highlights this EFB or tablet in detail, some additional notes are welcome. With the round button on the left-hand side you can switch the tablet ON/OFF. When you have switched the tablet ON, you can popup the 2D version by clicking on the AD Simulations logo in the right-hand lower corner. The 2D popup of the tablet is a floating window that can be moved to another monitor or for Mac users to your iPad. The advantage of the own electrically powered EFB is that even with a not electrically powered aircraft, the EFB is active so there’s no need to switch ON the aircraft BAT first, before doing anything.
With the EFB switched ON, the display stays dark however, on the top ofd the screen you’ll find different icons for the different pages. These pages are:
– Door Handling
– Cockpit (states like cold and dark, ready to taxi and external power connected)
– Passengers
– Fuel Load
– Settings with three tabs – Glasses, Sounds and Misc
– Info

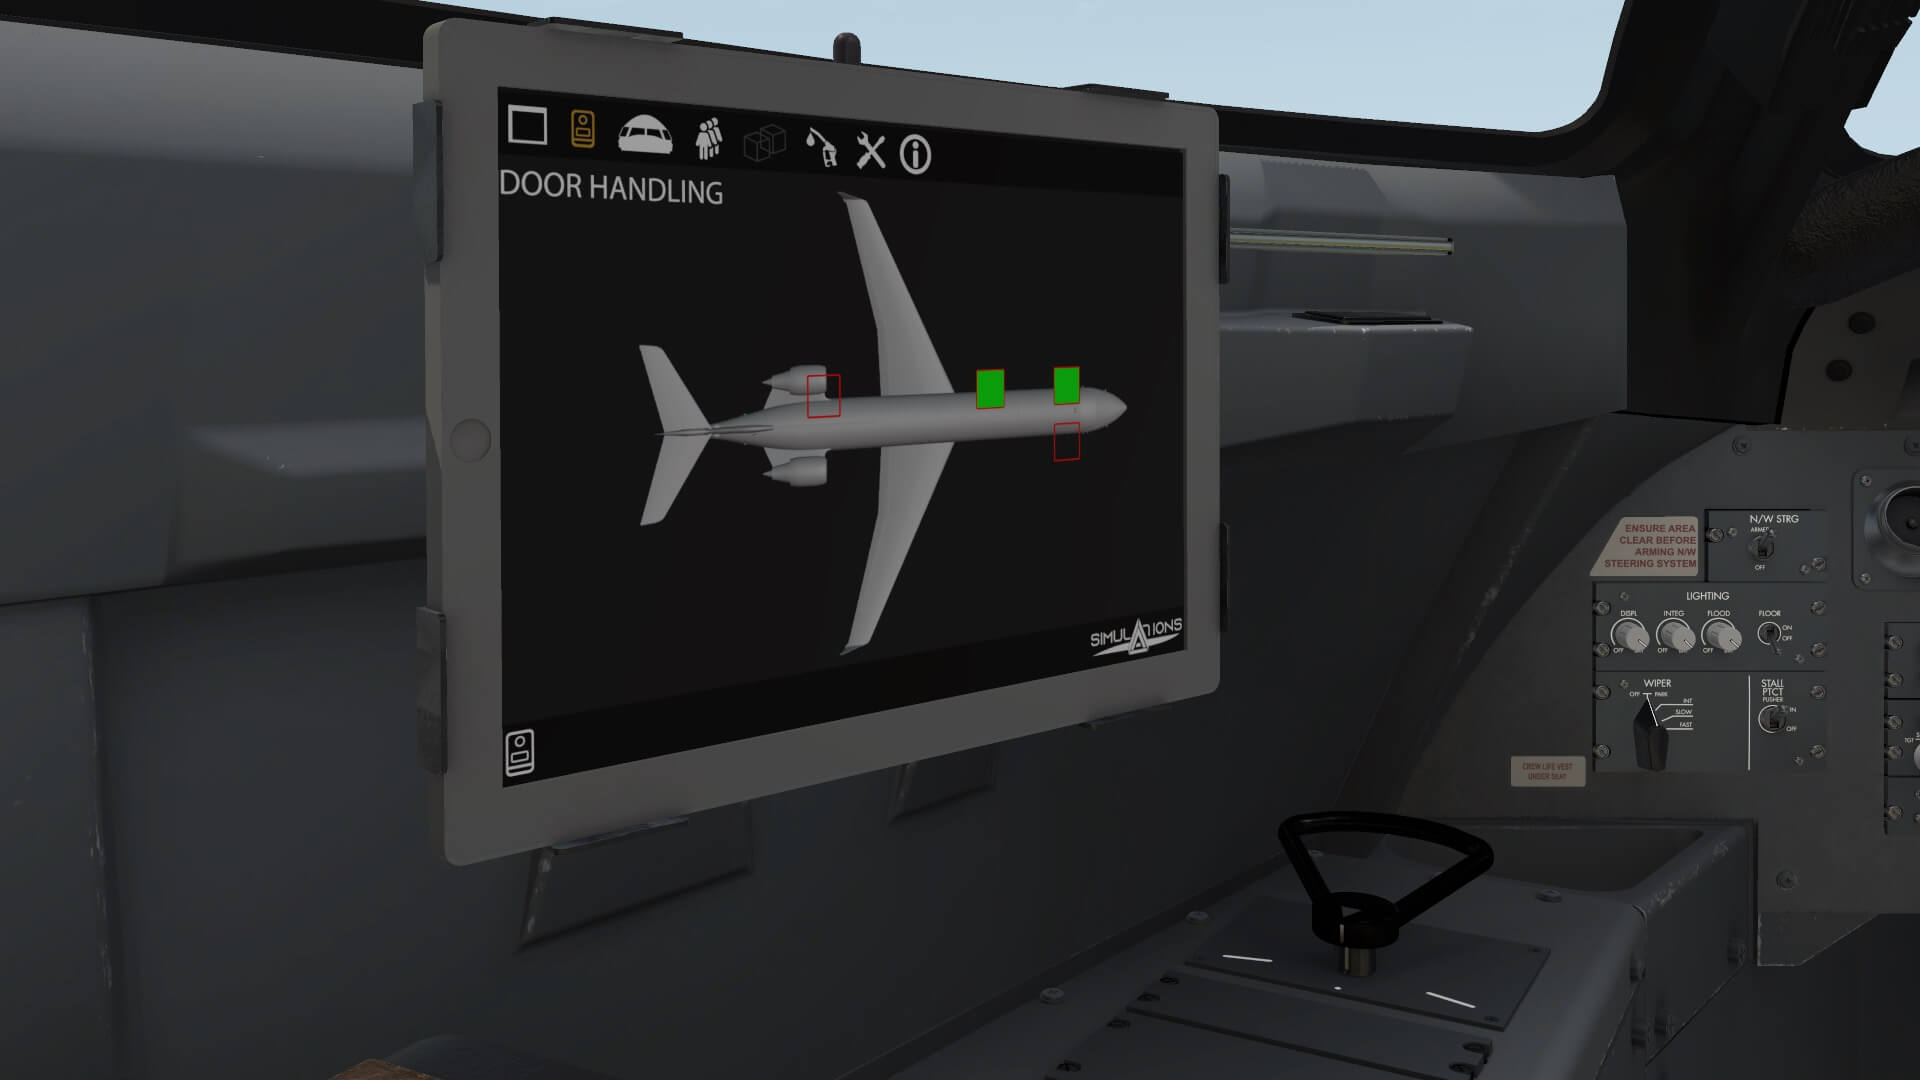
Lets go quickly thru them. With the door handling page you simple click the red square to control the door or panel. When the door/panel is open, the red square will be filled green. When you click it again, the door or panel closes and the green filled square turns to a red lined. Straight forward.
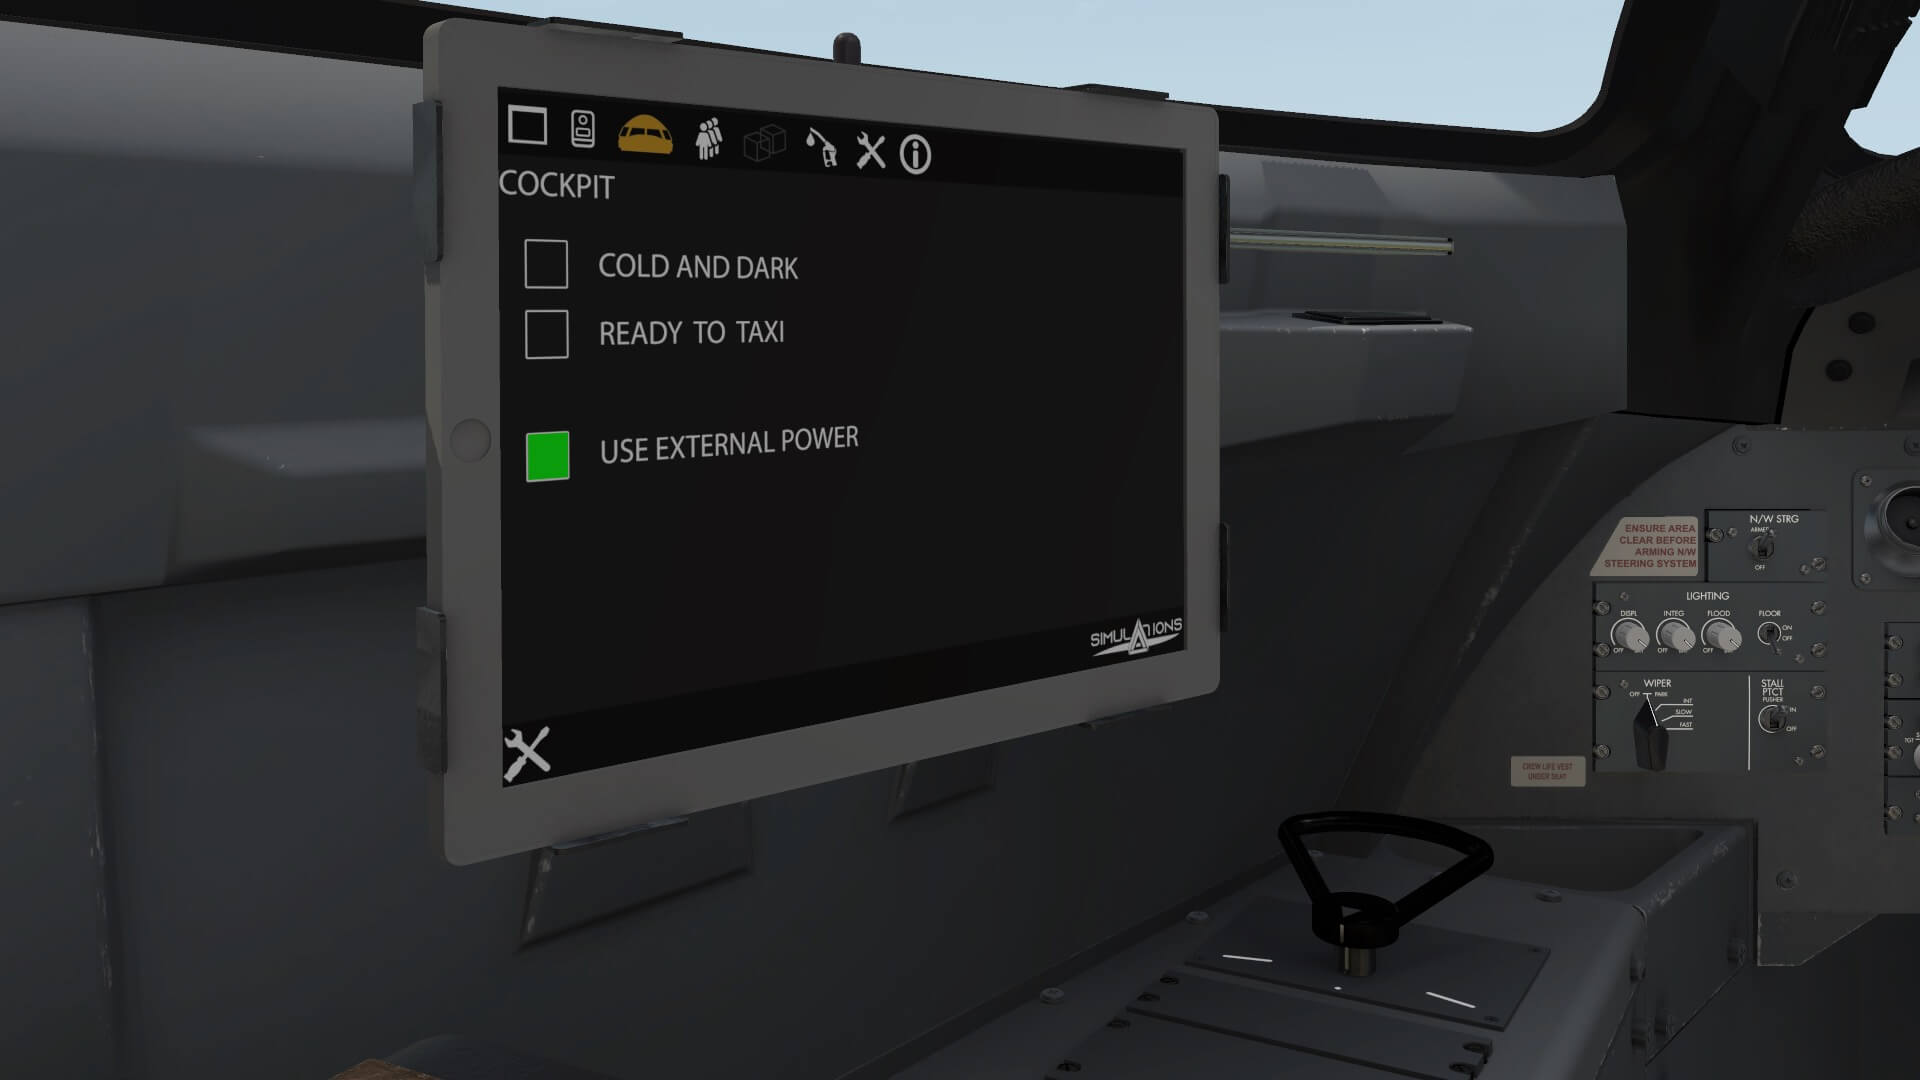
On the cockpit page you can control the state of the aircraft that is either cold and dark or ready to taxi. There’s no option to save a “current aircraft condition”, for example when you’ve done all the checks and entered all the data in the FMS CDU or an aircraft condition like “ready for takeoff at a specific airport runway”. Further on, you’re able to switch ON external power that comes with an external GPU (Ground Power Unit) object and, logically, the belonging GPU sound.
Never forget to switch OFF the EXT PWR from the EFB. Switching it OFF at the overhead panel isn’t enough for the GPU object. As it is now, you can fly the CRJ700 with externally hanging outboard with the cable connected, the GPU object. Hopefully the team is able to modify this in a way that when you forget to switch OFF the EXT PWR from the EFB, that when you’re on the runway or in flight, the GPU object automatically disappears.

The passengers page. You can change the amount of passengers in two ways. You either click the passenger value, type on your keyboard the amount you prefer, and press enter. The value has then changed and the green bar in the aircraft synoptic has changed its length. And yes, you can also control the amount of passengers with the green bar. Put your mouse pointer in the red square, press and hold the left-hand mouse button and slide the mouse pointer left (less passengers) or right (more passengers). Perhaps AD Simulations will change the following in the future; I would prefer that not only the amount of passengers is shown, but between brackets also their weight in either kilograms (Kgs) or pounds (Lbs).

Next is the fuel load page. The way you control the amount of fuel in the wings and center tanks is the same as on the passenger page. That said, you either enter the required fuel directly in the text box or you move the green slider in the respective fuel tank by, again, moving your mouse pointer in the respective tank, click and hold the left-hand mouse button and slide the mouse left or right. This time the individual fuel tank quantities are given either in pounds or in kilograms and in the lower right-hand corner you’ll find the total fuel quantity. Depending on your preference, you can change between Lbs and Kgs at the Info page.

The Settings page consist of three tabs; glasses, sounds and misc(ellaneous). The first tab (glasses) allows you to enable/disable tinted glass of the external and internal cockpit windows and the EFIS and EICAS displays. The only reason for this tab and its settings is for those who have less powerful computers and thus to increase at lower performance PCs the FPS (Frames Per Second). The sounds tab speaks for itself and the misc(ellaneous) allows you to control the flight model. By default this is set to “simulation”.
According to the AD Simulation quick guide “Option simulation is the version that emulates the real CRJ-700 flight model without computer alteration while the option fly-by-wire is the version that makes flight model more computerized (as in real life with aircraft that are equipped with life fly-by- wire systems). The controls inputs are being analyzed by a computer and cause corresponding servos actions.”
Just to clarify; the real CRJ700 is not a fly-by-wire aircraft. An extraction of the FCOM tells you and me that “The ailerons, elevators and the rudder are controlled by a network of cables, pulleys, push/pull rods and levers that transmit control inputs to the related hydraulic power control units (PCUs).” That’s then also the reason why the flight model is by default set to “simulation.”
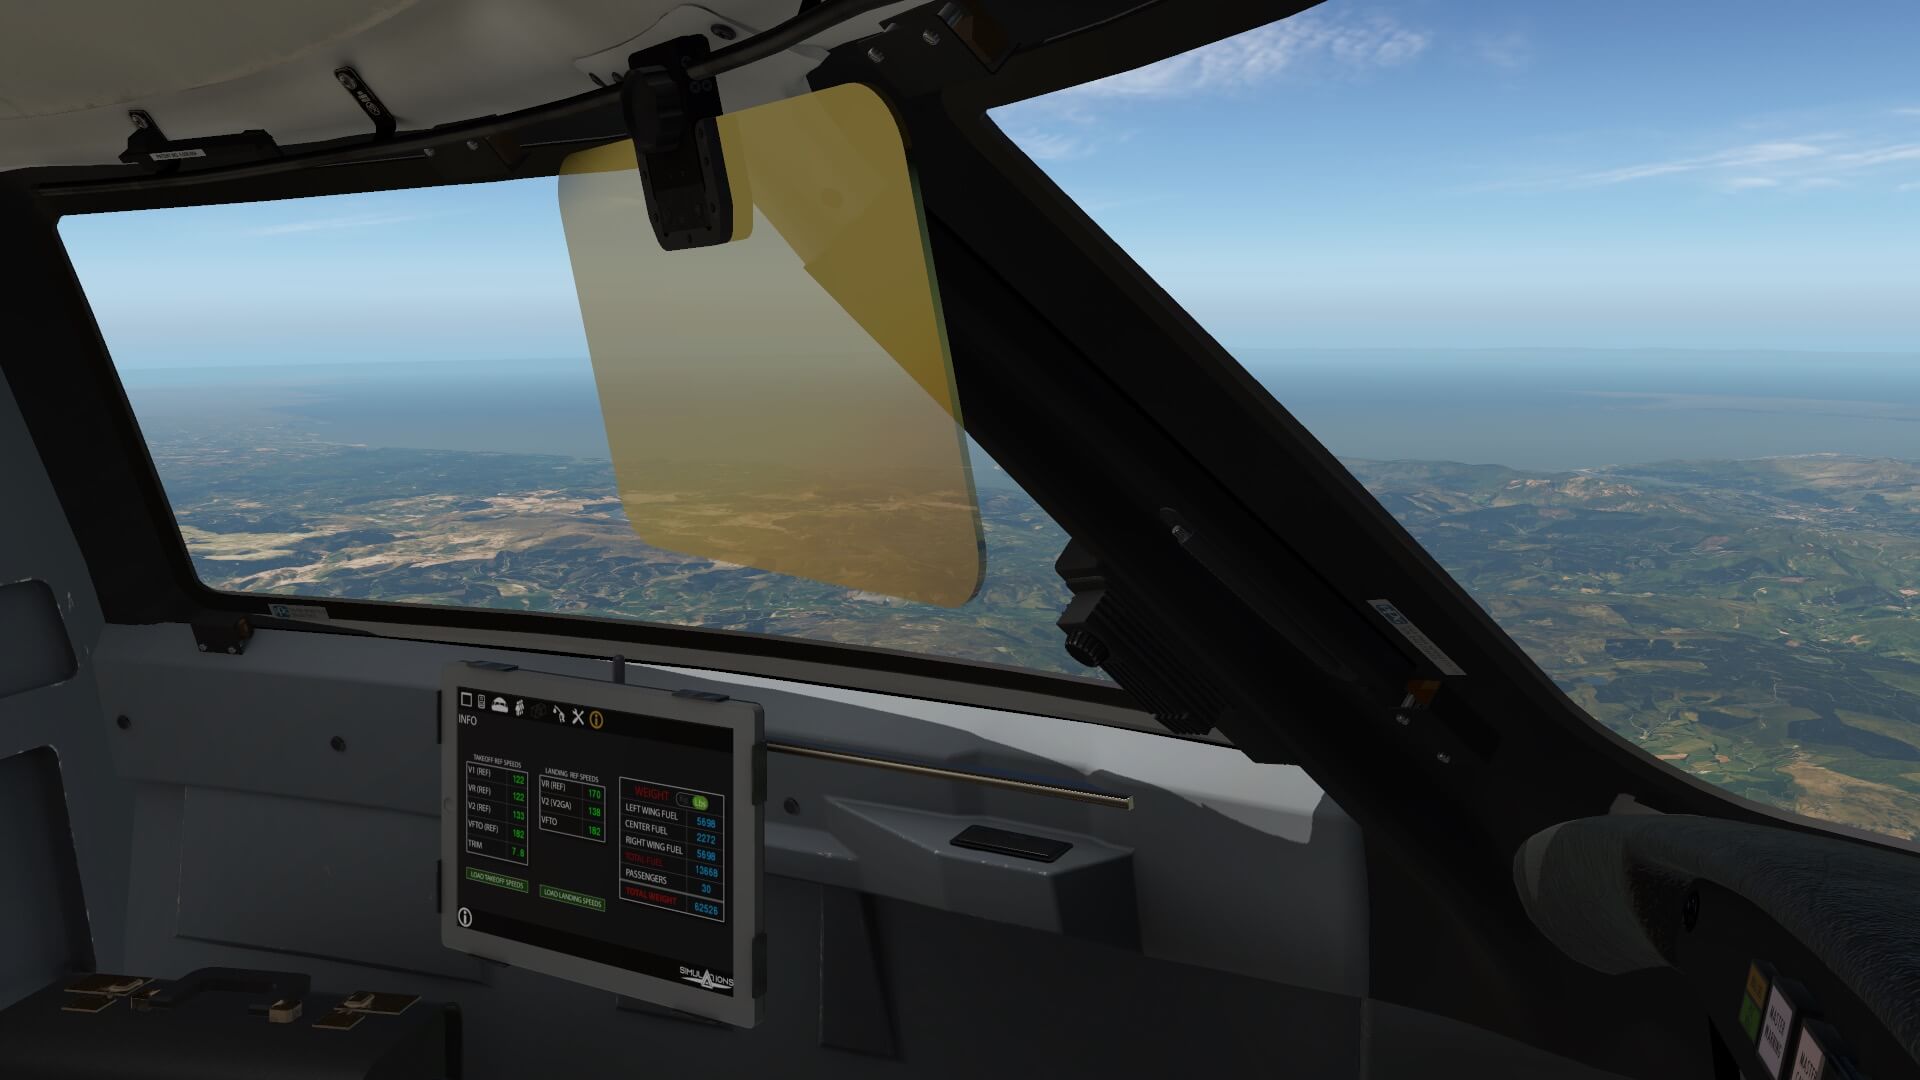
Last but not least, the info page. It shows you the required takeoff- and landing speeds including the possibility to load them in the CRJ700. Further on, it shows the overall aircraft weight which is a combination of total fuel and passenger weight. That said, I miss the possibility to load cargo or luggage. I hope this will be changed with a future update, but the passenger weight is shown in the amount of passengers while I would expect, logically, the passenger weight in Kgs or Lbs, whatever has been set. I’m not sure if the indicated takeoff- and landing speeds are according to the performance manuals. That’s something I can’t check, but it’s good to have them else you would guessing and that’s not good either.

I’ve got also my thoughts how it is possible that with a dead aircraft the EFB shows already speeds. In my humble opinion it can only show speeds when you have entered data in the FMS, not before. I informed the AD Simulations about this “thought”, so we need to wait and see if something can or will be modified with an update.
Time to explore the modeled AD Simulations 3D model and the interior. Are you ready to join me?
Walk Around Check
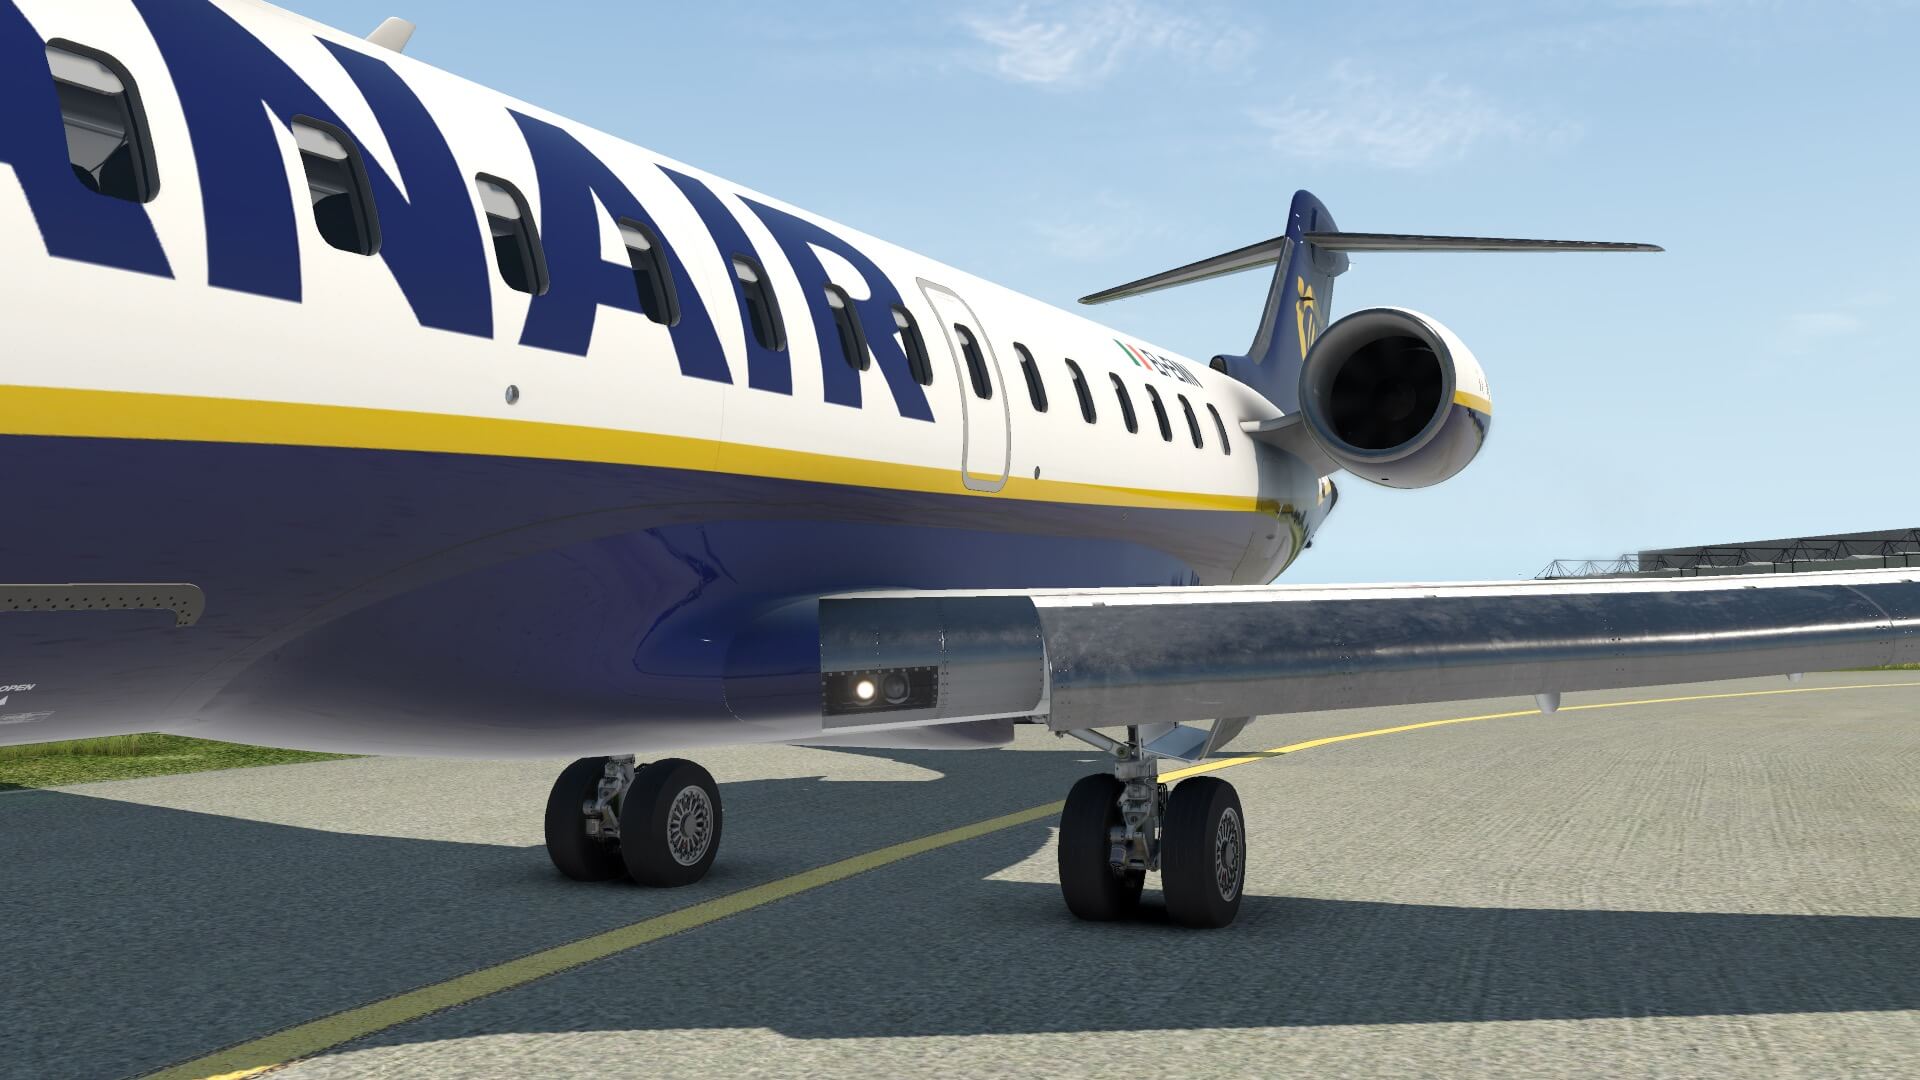
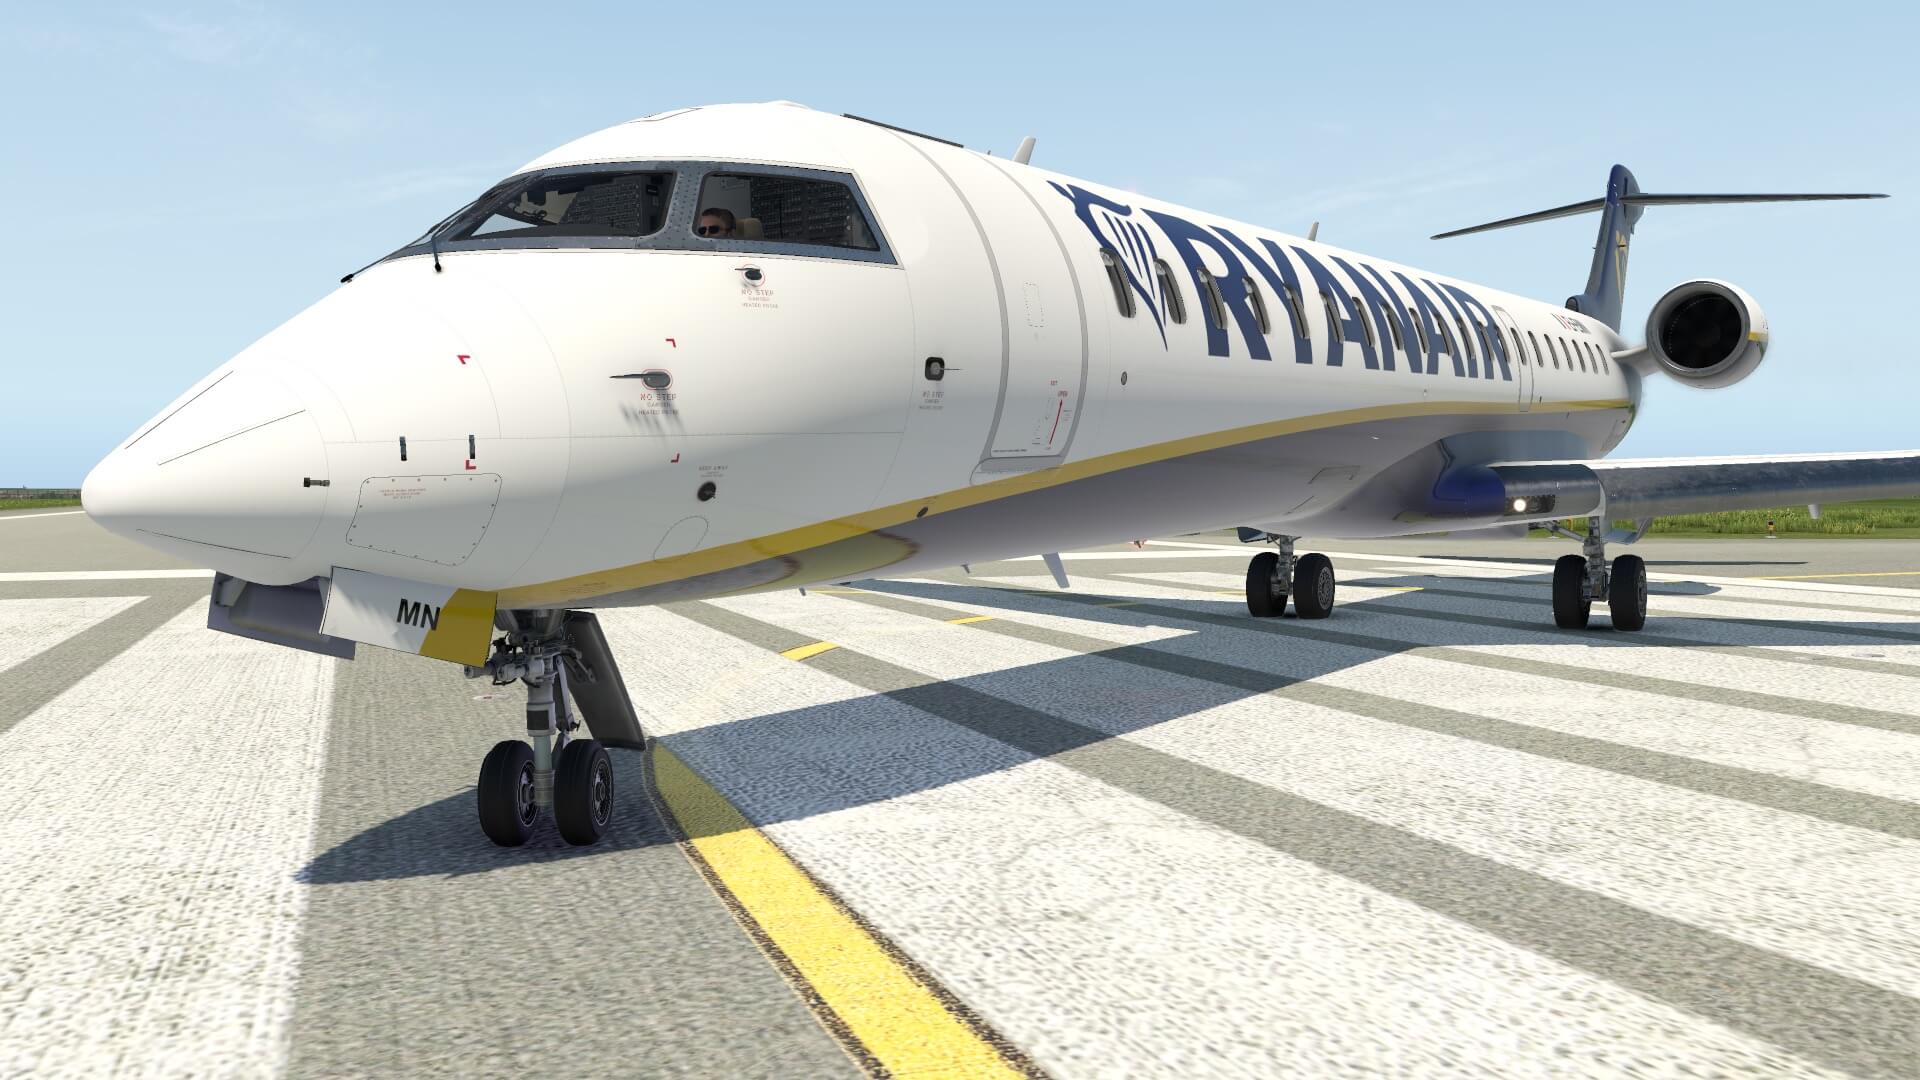
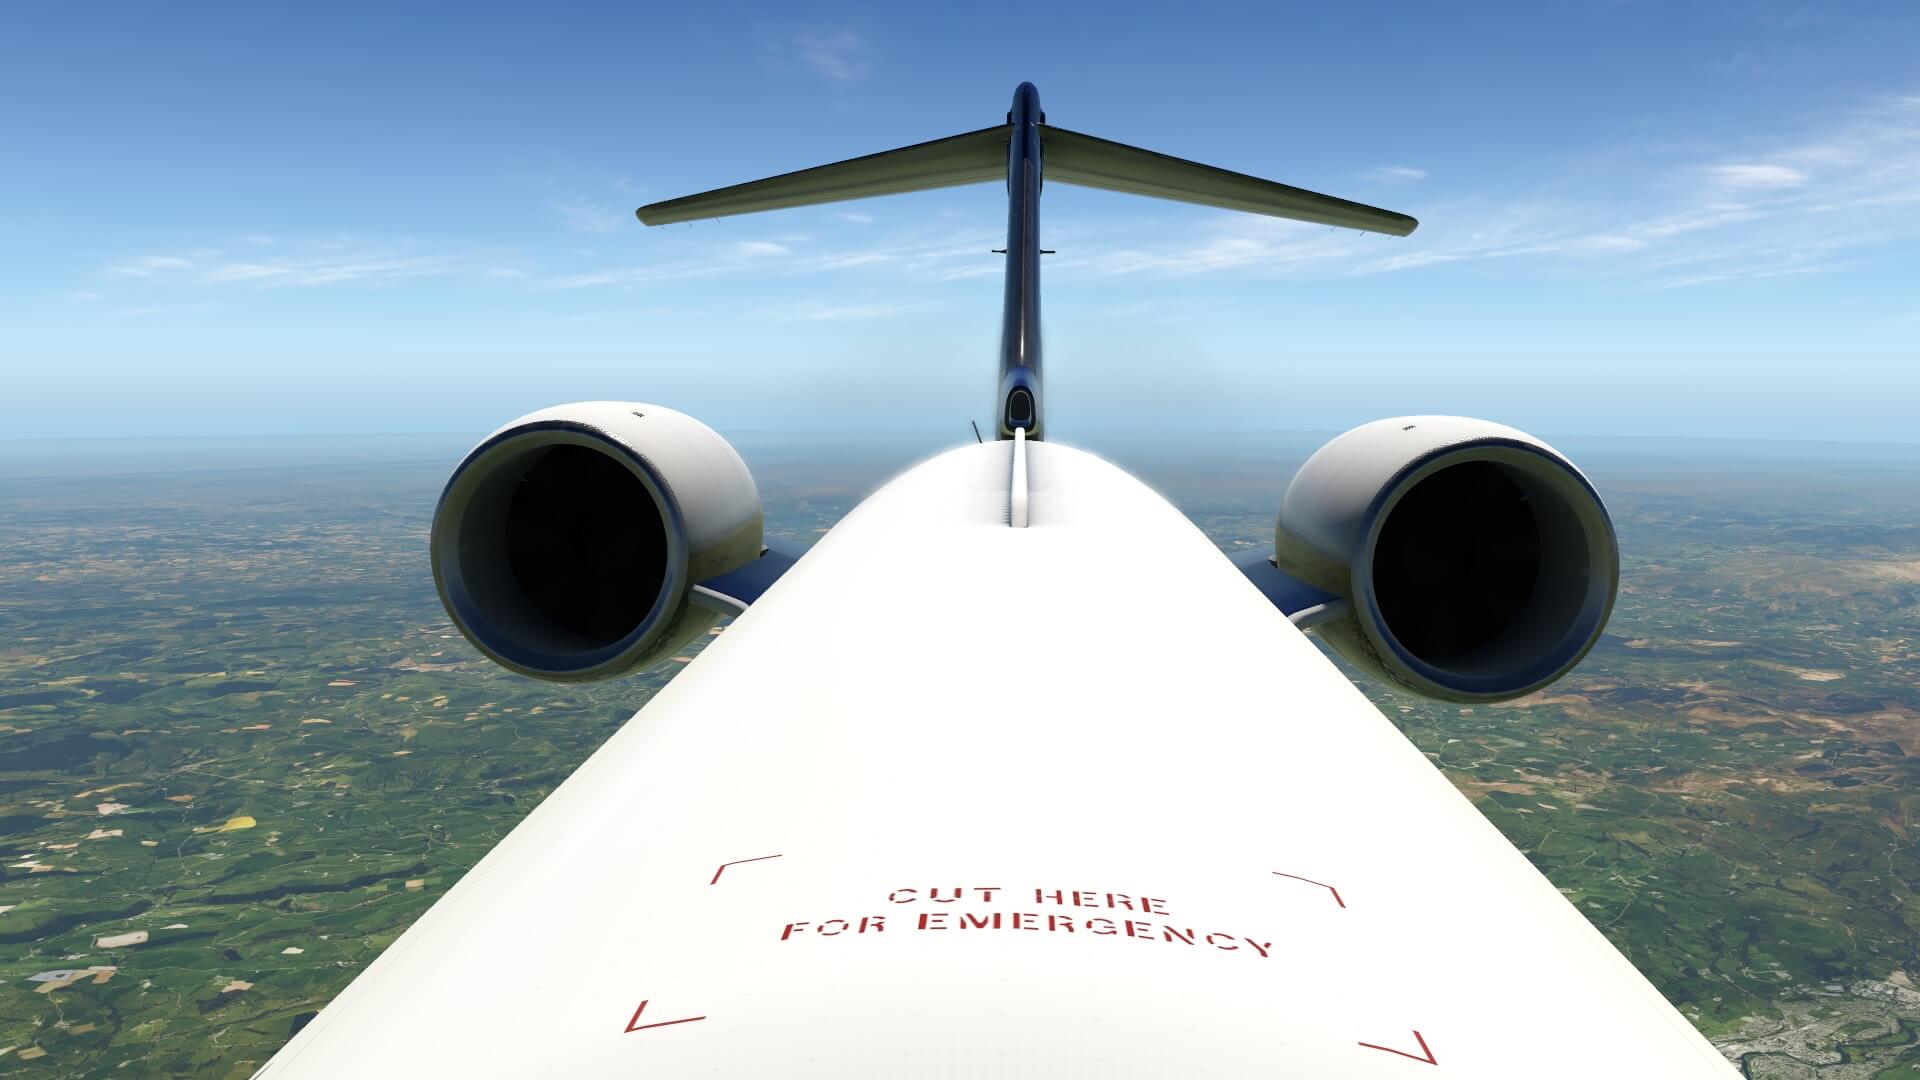
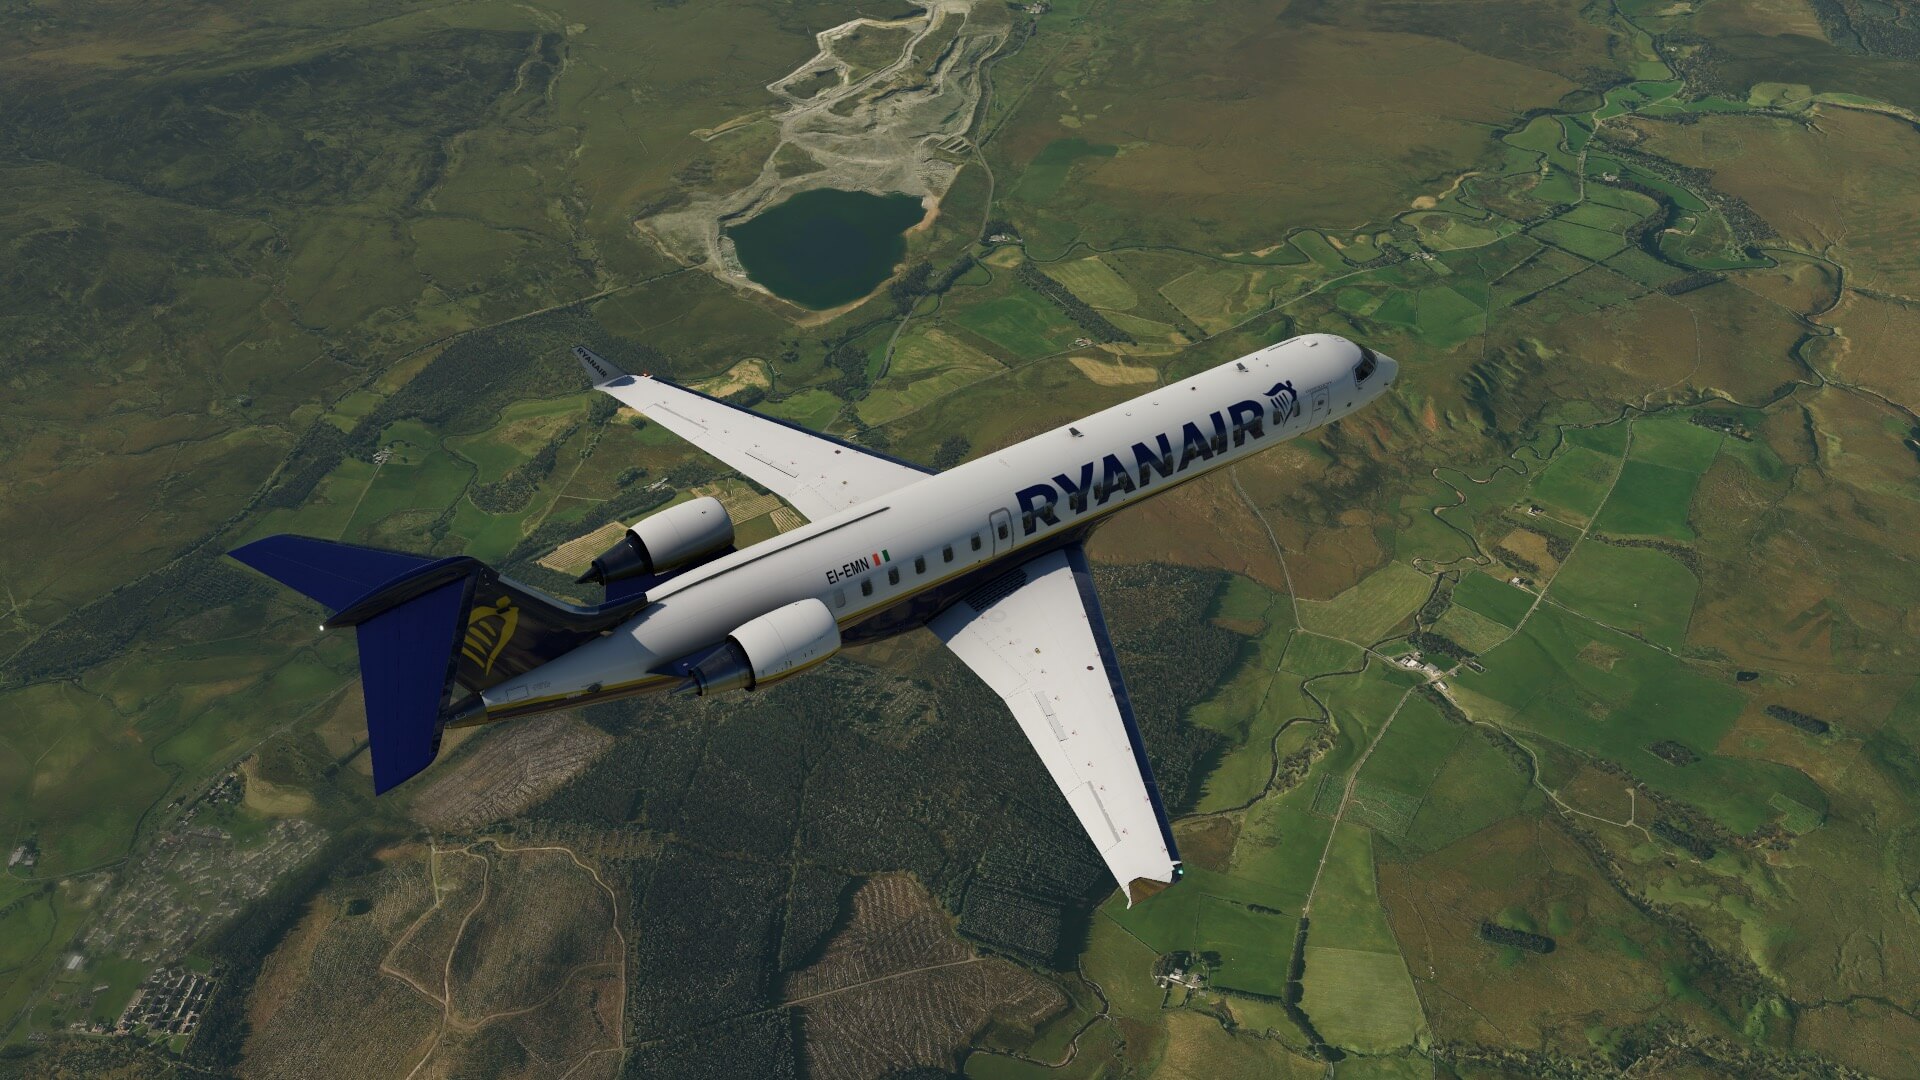
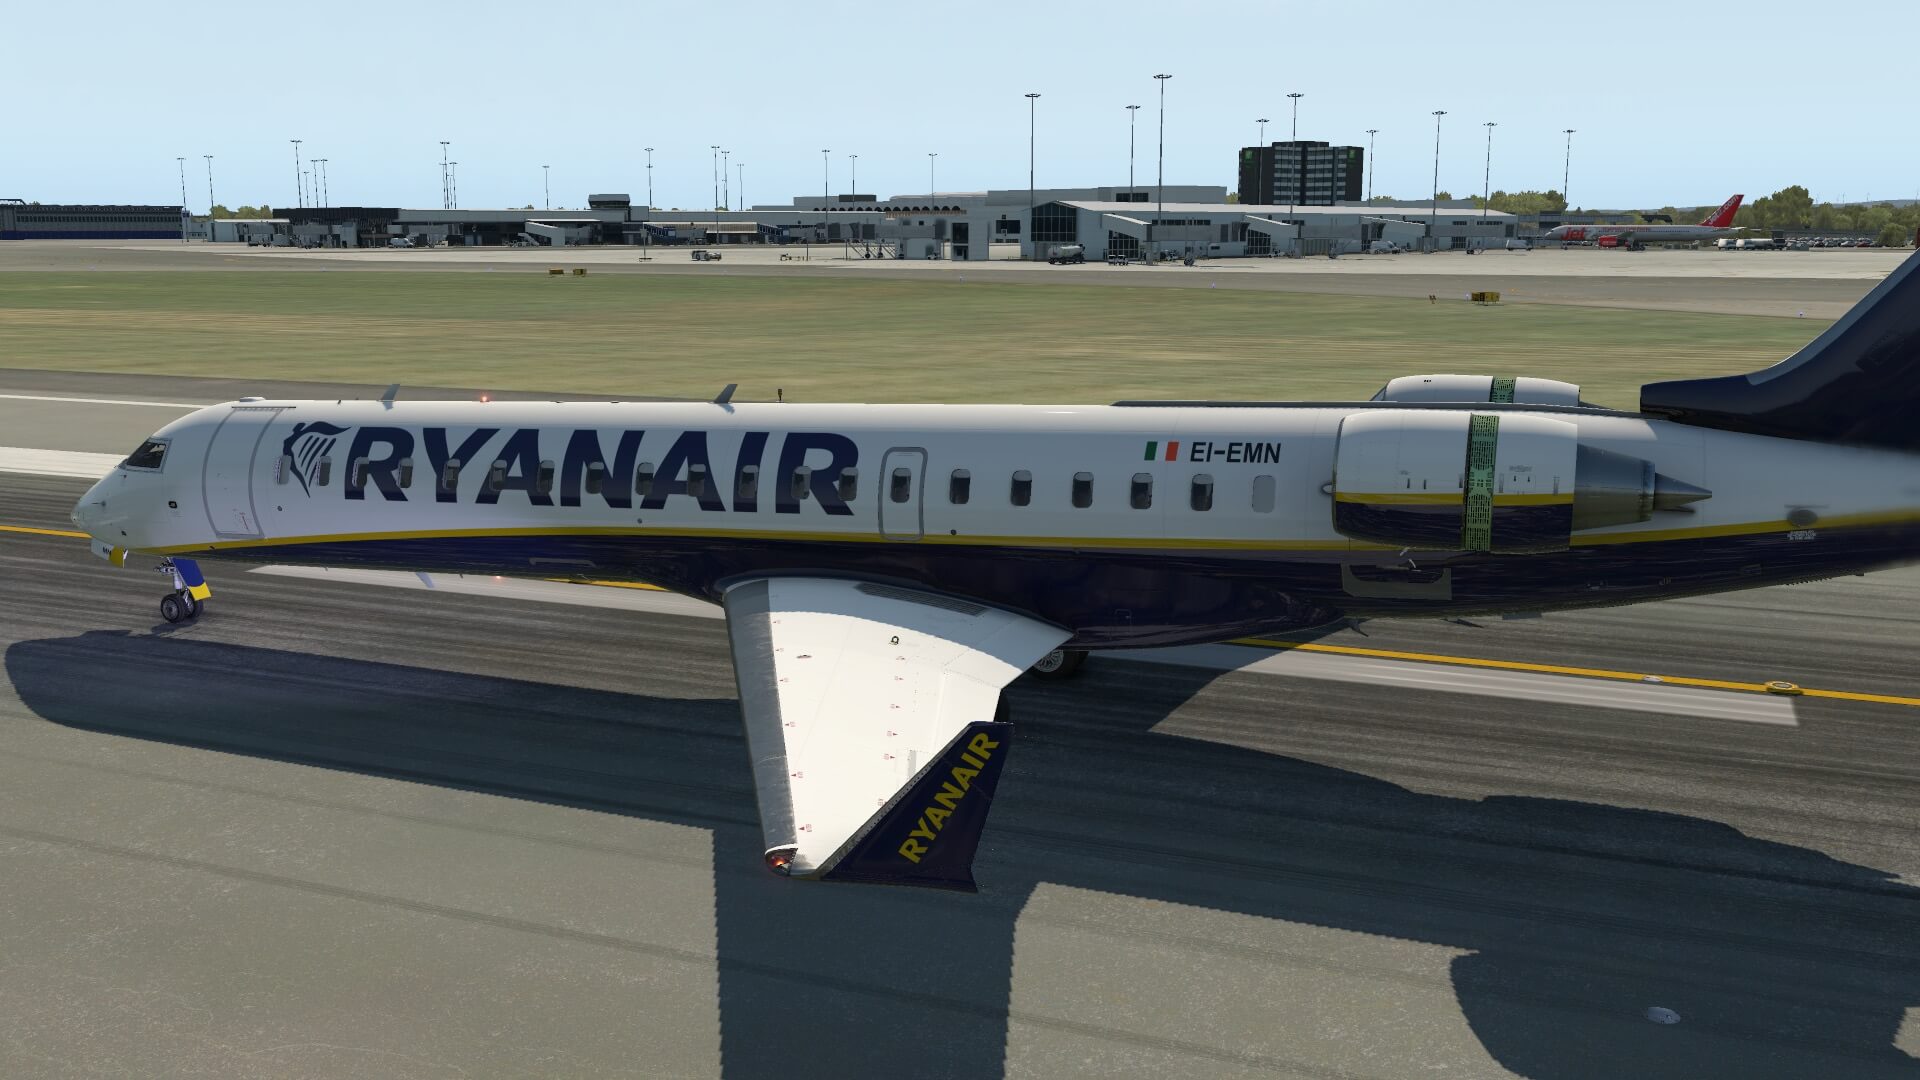
Let me start with … wow, that looks gorgeous! And yes, I’ve seen some small issues, but reported them already to the AD Simulations team and knowing the team, they will solve these small items I’d seen with the next update. But really, I’m impressed. Decals or text or placards, whatever name you prefer, on the aircraft are all razor sharp and even the aircraft stainless steel data plate is perfectly readable. Many “round” or “curved” objects you see like the wheels, engine model and inlet/exhaust, doors, door frames, are all almost perfectly and realistically modeled. Enough … time to start my check.
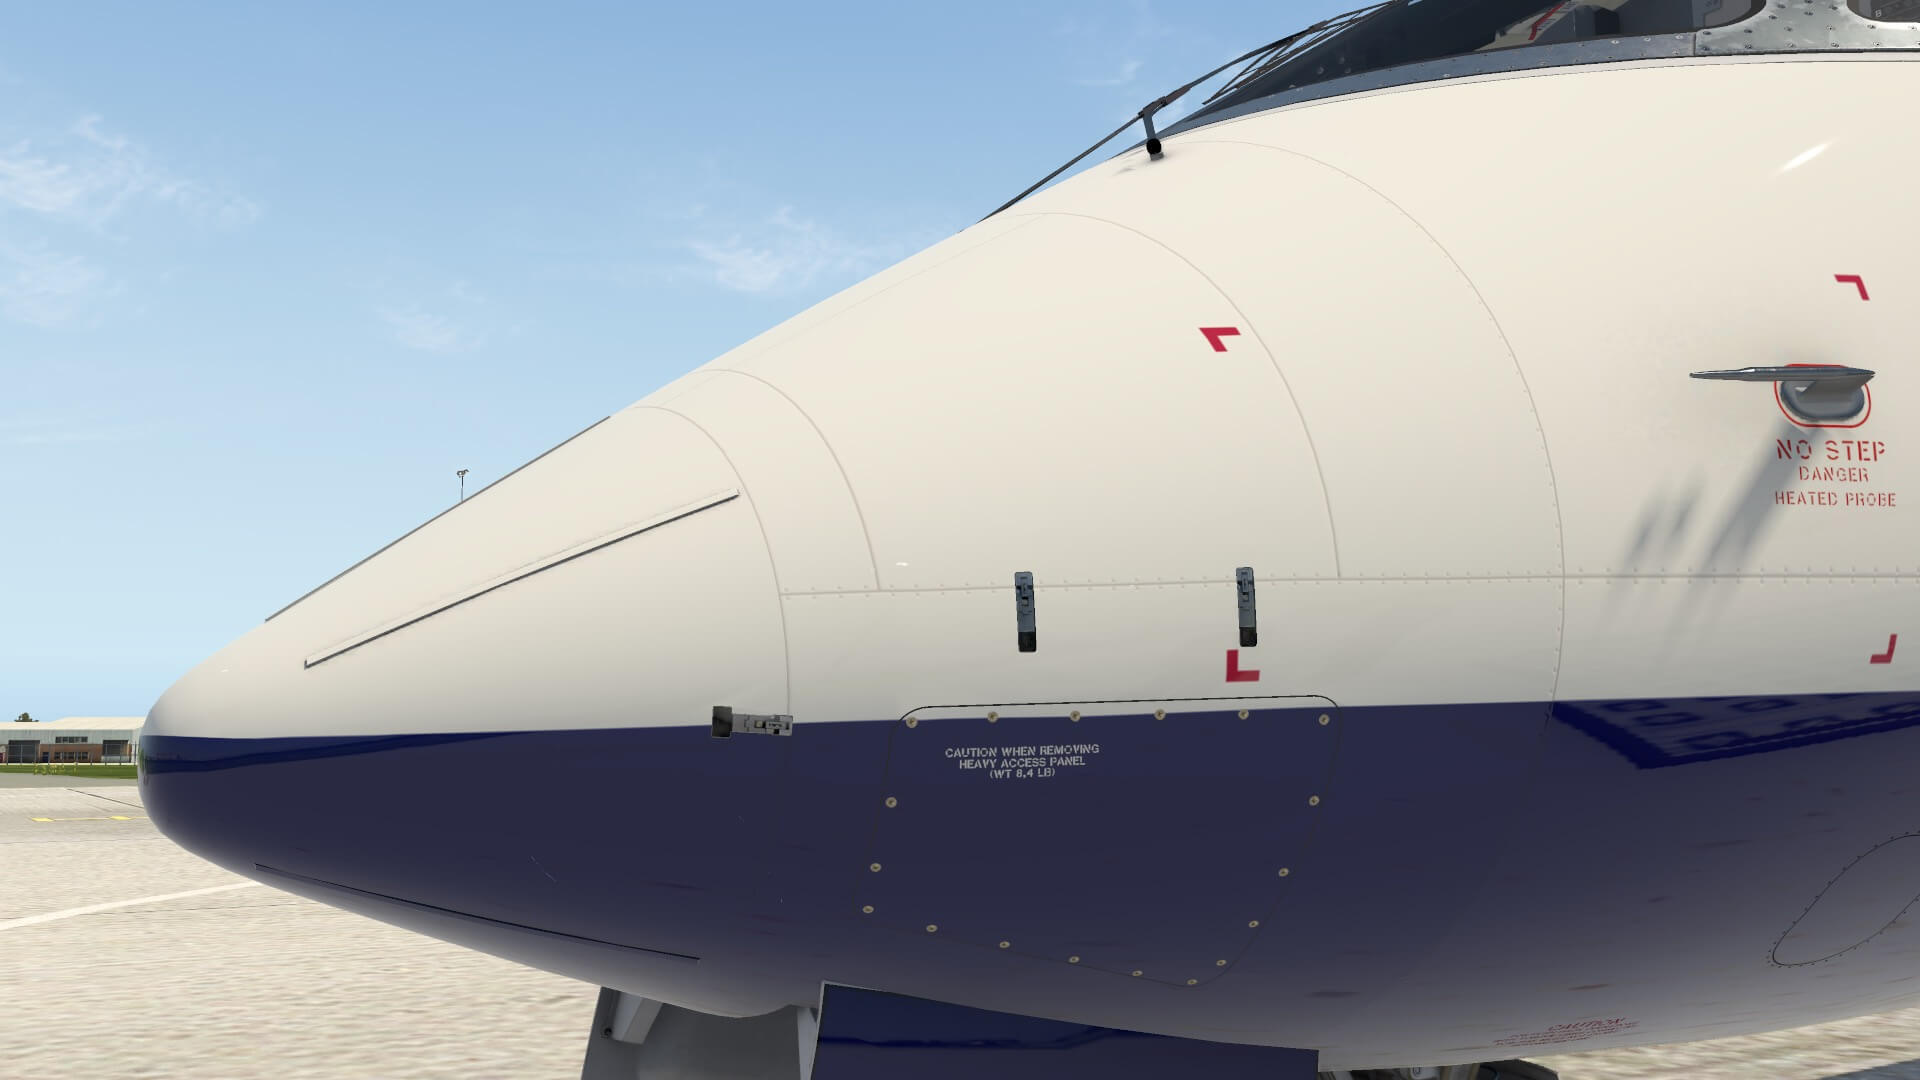
A big advantage, keeping in mind my real external ground checks on the DC-9, MD80 Series, Fokker F-28, is the easy way you can inspect all the items. It’s all of a normal size and low to the ground that never a part to check is far away e.g. the nose of the aircraft. Looking to the nose, all decals are sharp, all Aluminum skin plates are modeled in a elegant way – the grey line between the plates is just of the right “thickness” – with all the rivets visible. Logically, the small OXYGEN panel on the right-hand nose section is nicely modeled, but not animated as it is with other small panels. I wrote on purpose “logically” since each animated panel means useless polygons needed as well as having an additional impact on the FPS (Frames Per Second).
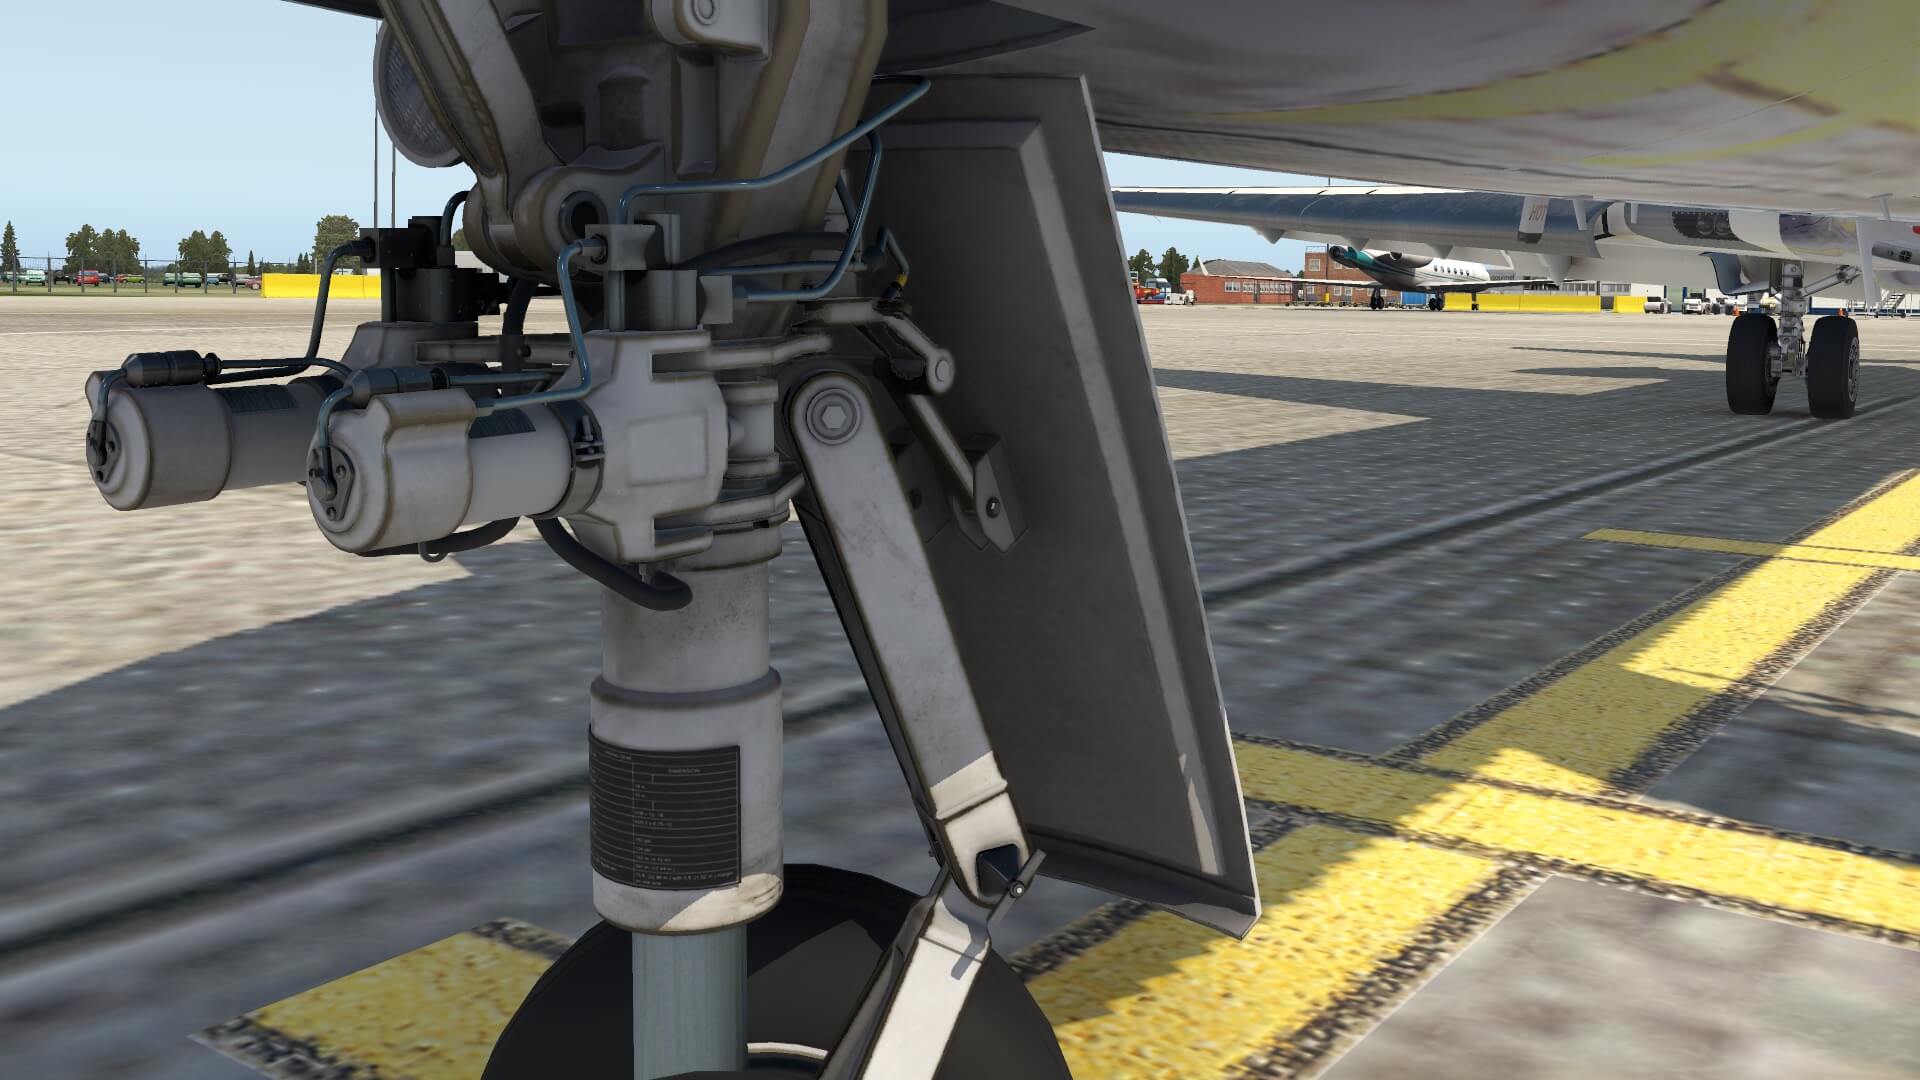
Looking down to the NLG (Nose Landing Gear) I’m impressed how this is modeled. I like the textures on the strut although I personally would love to see a bit more weathering. Besides this small thought since it’s a bit my personal feeling, the wheels or tires are great. They even haven’t forgotten the nitrogen nipple with the yellow cap. On the nose gear strut you can clearly see the strut pressure graph – even readable so not blurry at all – the NWS (Nose Wheel Steering) cylinders, the hydraulic lines, the torque links at the back with the disconnection pin, the mid strut. Well done.


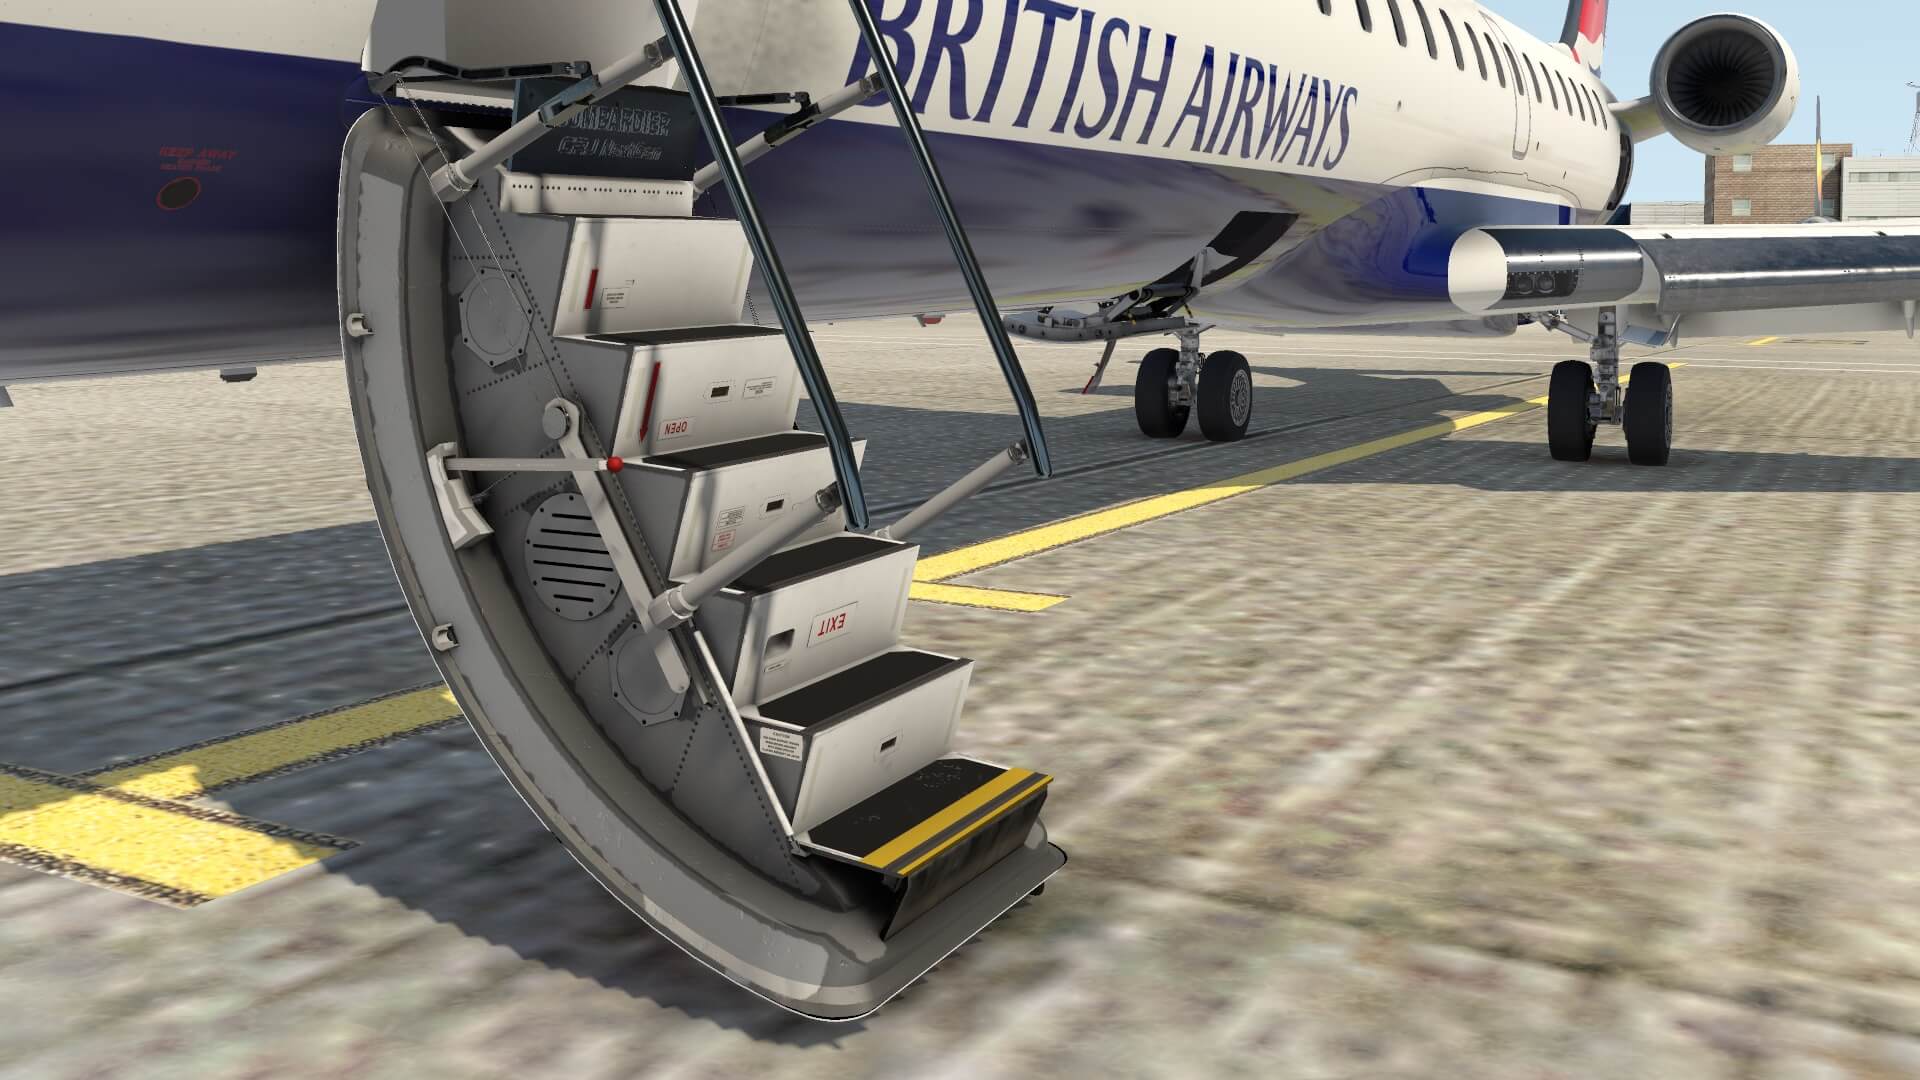
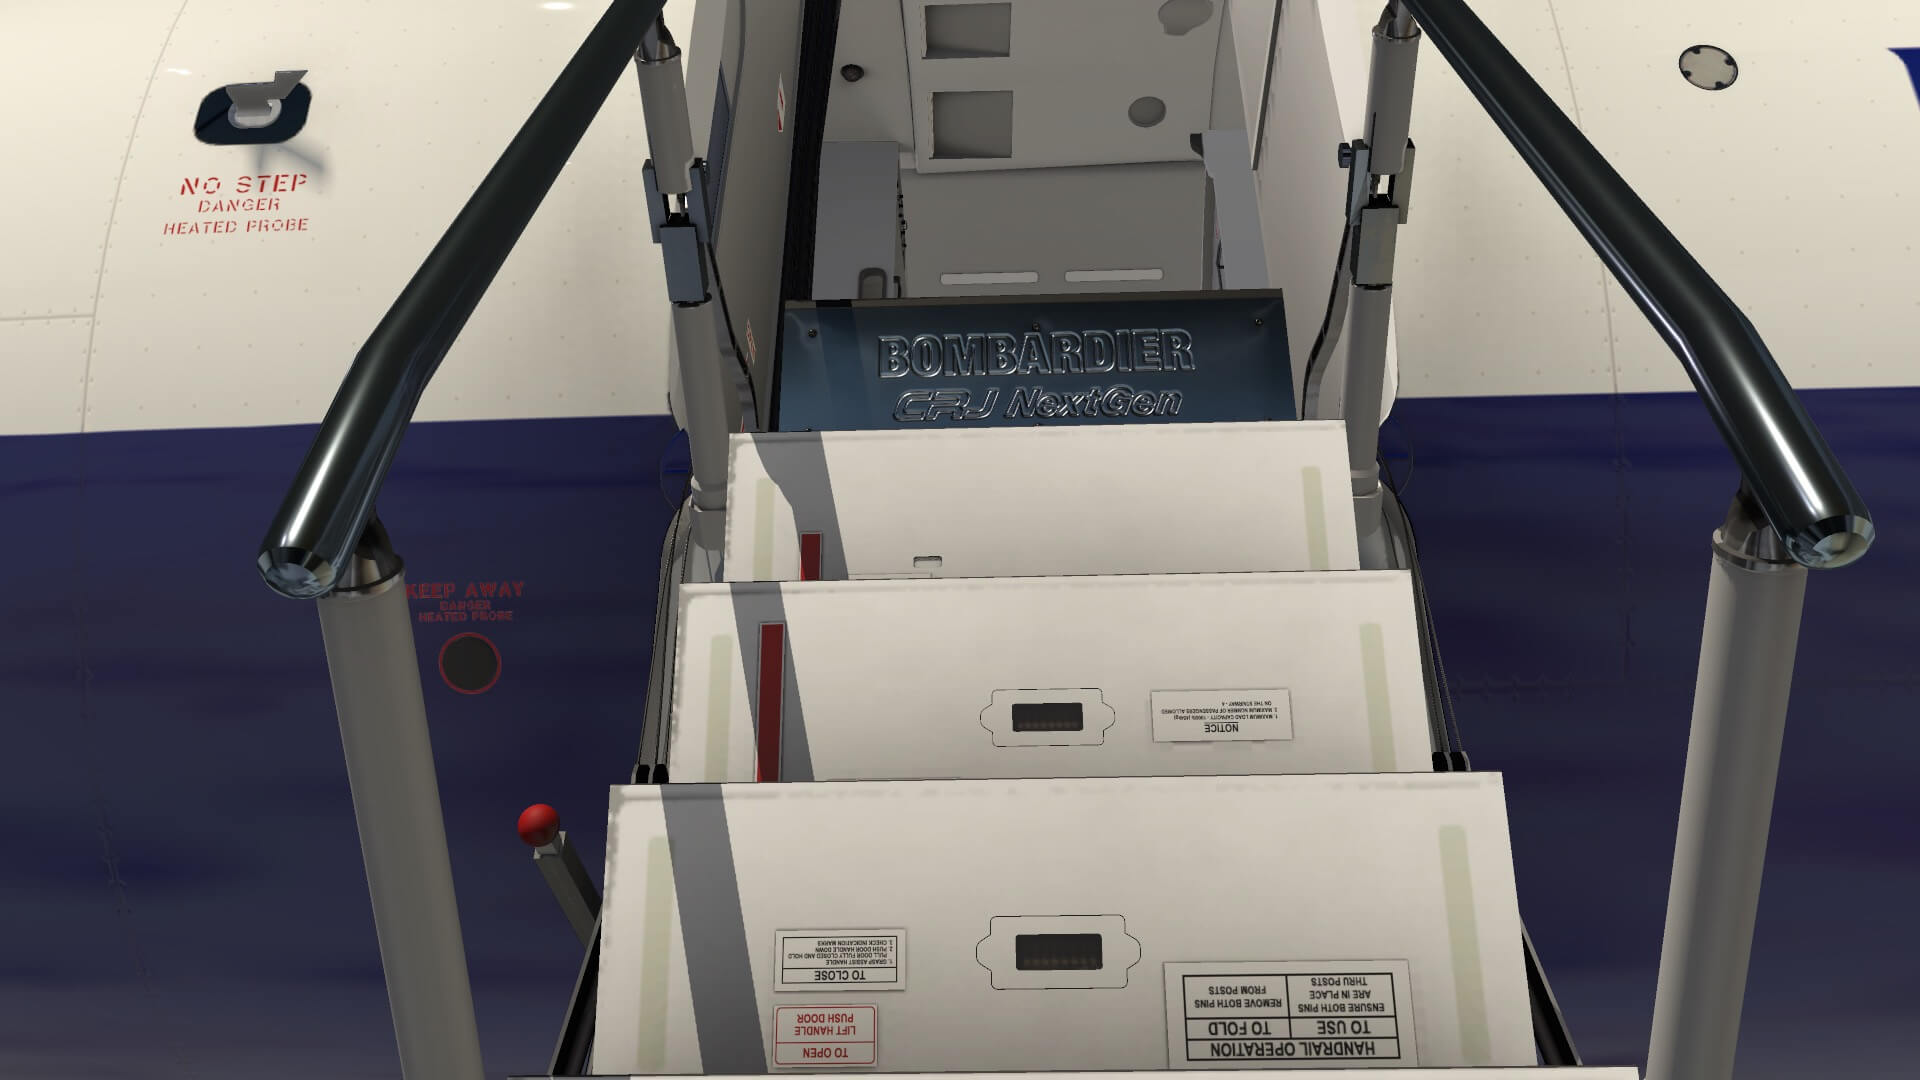
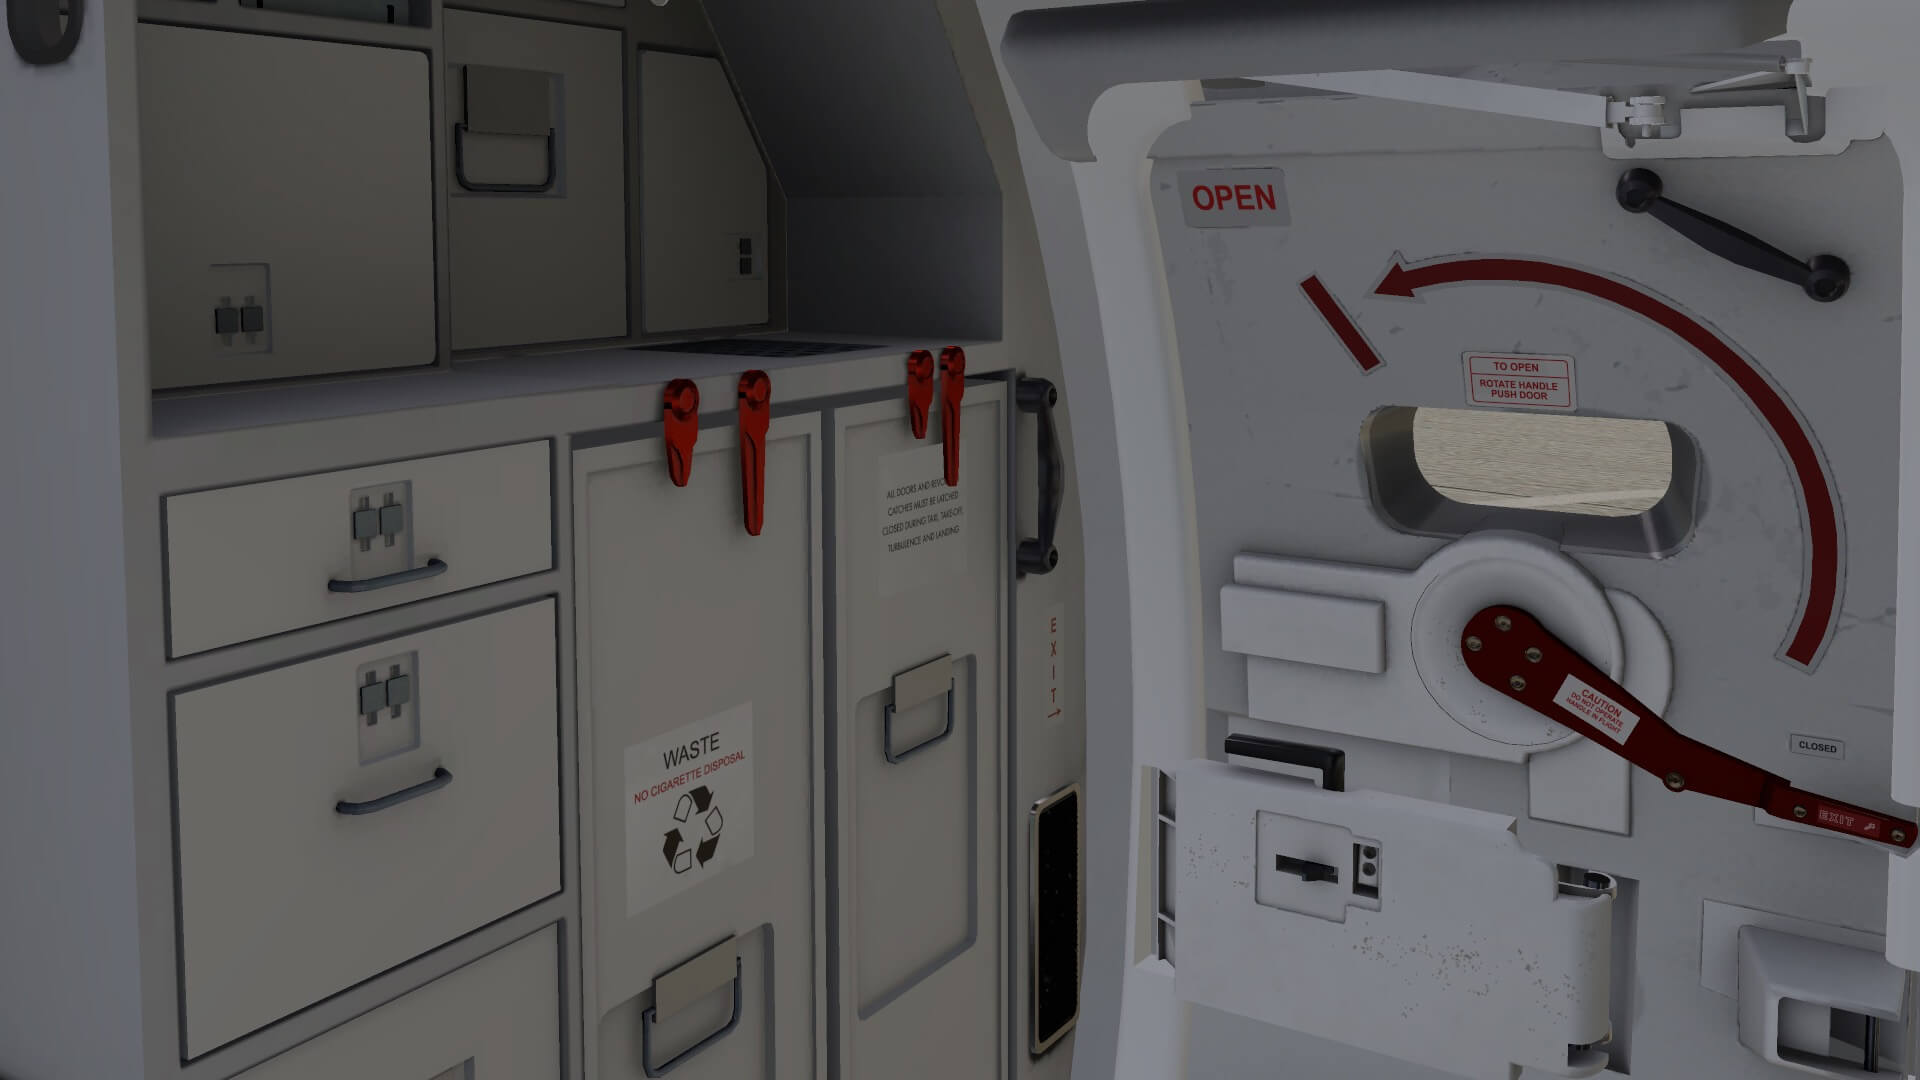
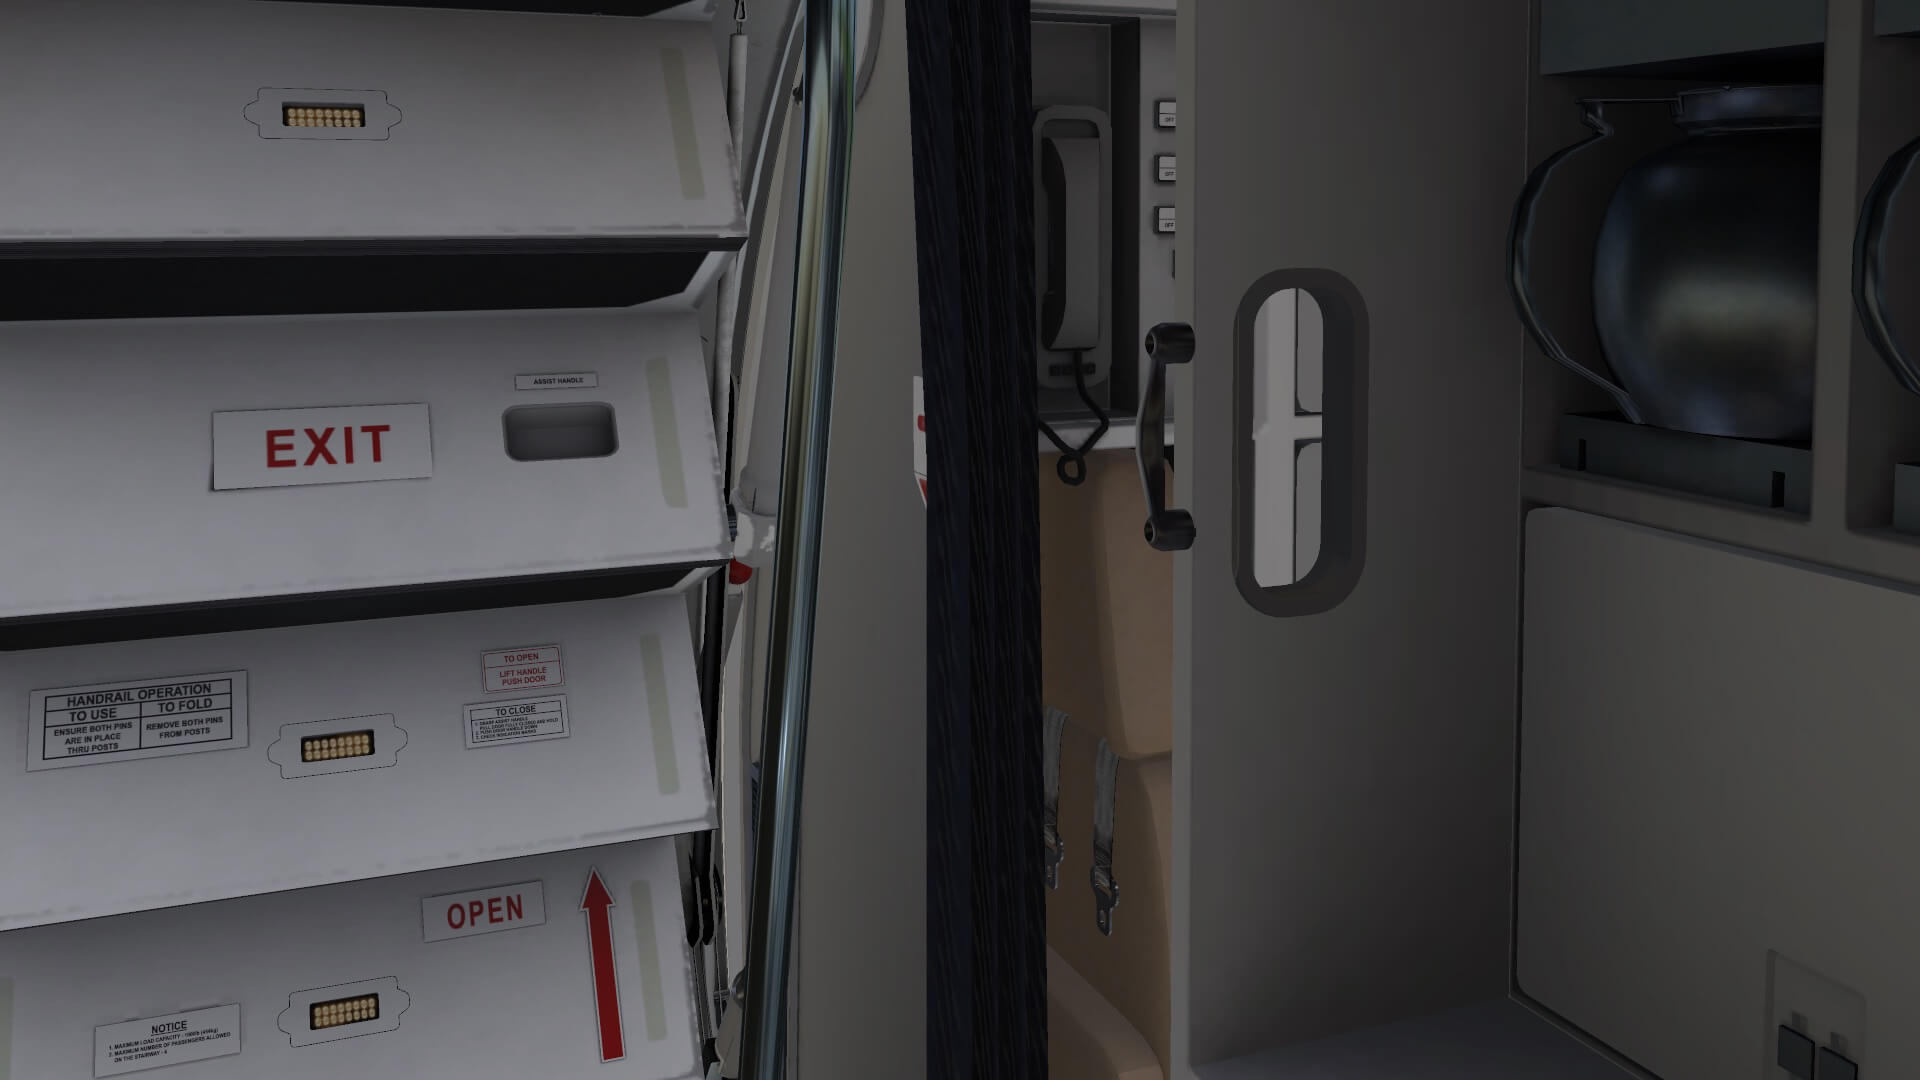
Since I have opened the FWD entrance door/stair, I’ve got a close look how this is modeled and again, although it’s just a build in-stair, it’s done with eye for all those tiny details. The door and frame hardly have any visible polygons which is great news, but also the handrails, the stairs, the panels on the side, the decals and so on, it’s all there and looks beautiful. Just in case you’re looking for it; the handrail doesn’t have a slidable part. Belonging to the FWD entrance door are the two hooks on the top and all the rollers in the frame.
Although it’s all simulated and has not really a function, it seems nothing has been forgotten. What I also like, I assume, is the stainless steel stair plate at the top with the BomBardier CRJ NextGen inscription. You might think that the OPEN and EXIT signs on the stair as well as the red arrow are placed in the wrong direction, but what you see is correct. The idea is that when you’re in the pantry looking to the door stair construction, all the words and arrow are shown in the correct way to go out. One thing that isn’t working yet as expected are the lowering of the handrails in case you connect a jetway. According to the AD Simulations team “the lowering of the handrail has been corrected”.


Time to move on to the next item, the FWD cargo hold or I should say the door construction itself. It amazing to see how much time and effort is put into this door. The door comes with so many tiny details ranging from the sharp decals, the handle, the correct colors, latches, locks, weathering at the hinges, etc. All together “almost” a master piece. The only small remark is the inside of the cargo area which is also applicable to the AFT cargo hold. All the walls inside this cargo hold are weathered with scratches, but in my humble opinion a bit dark. Ok, that’s not really a big issue since it depends how often you open/close the cargo doors.
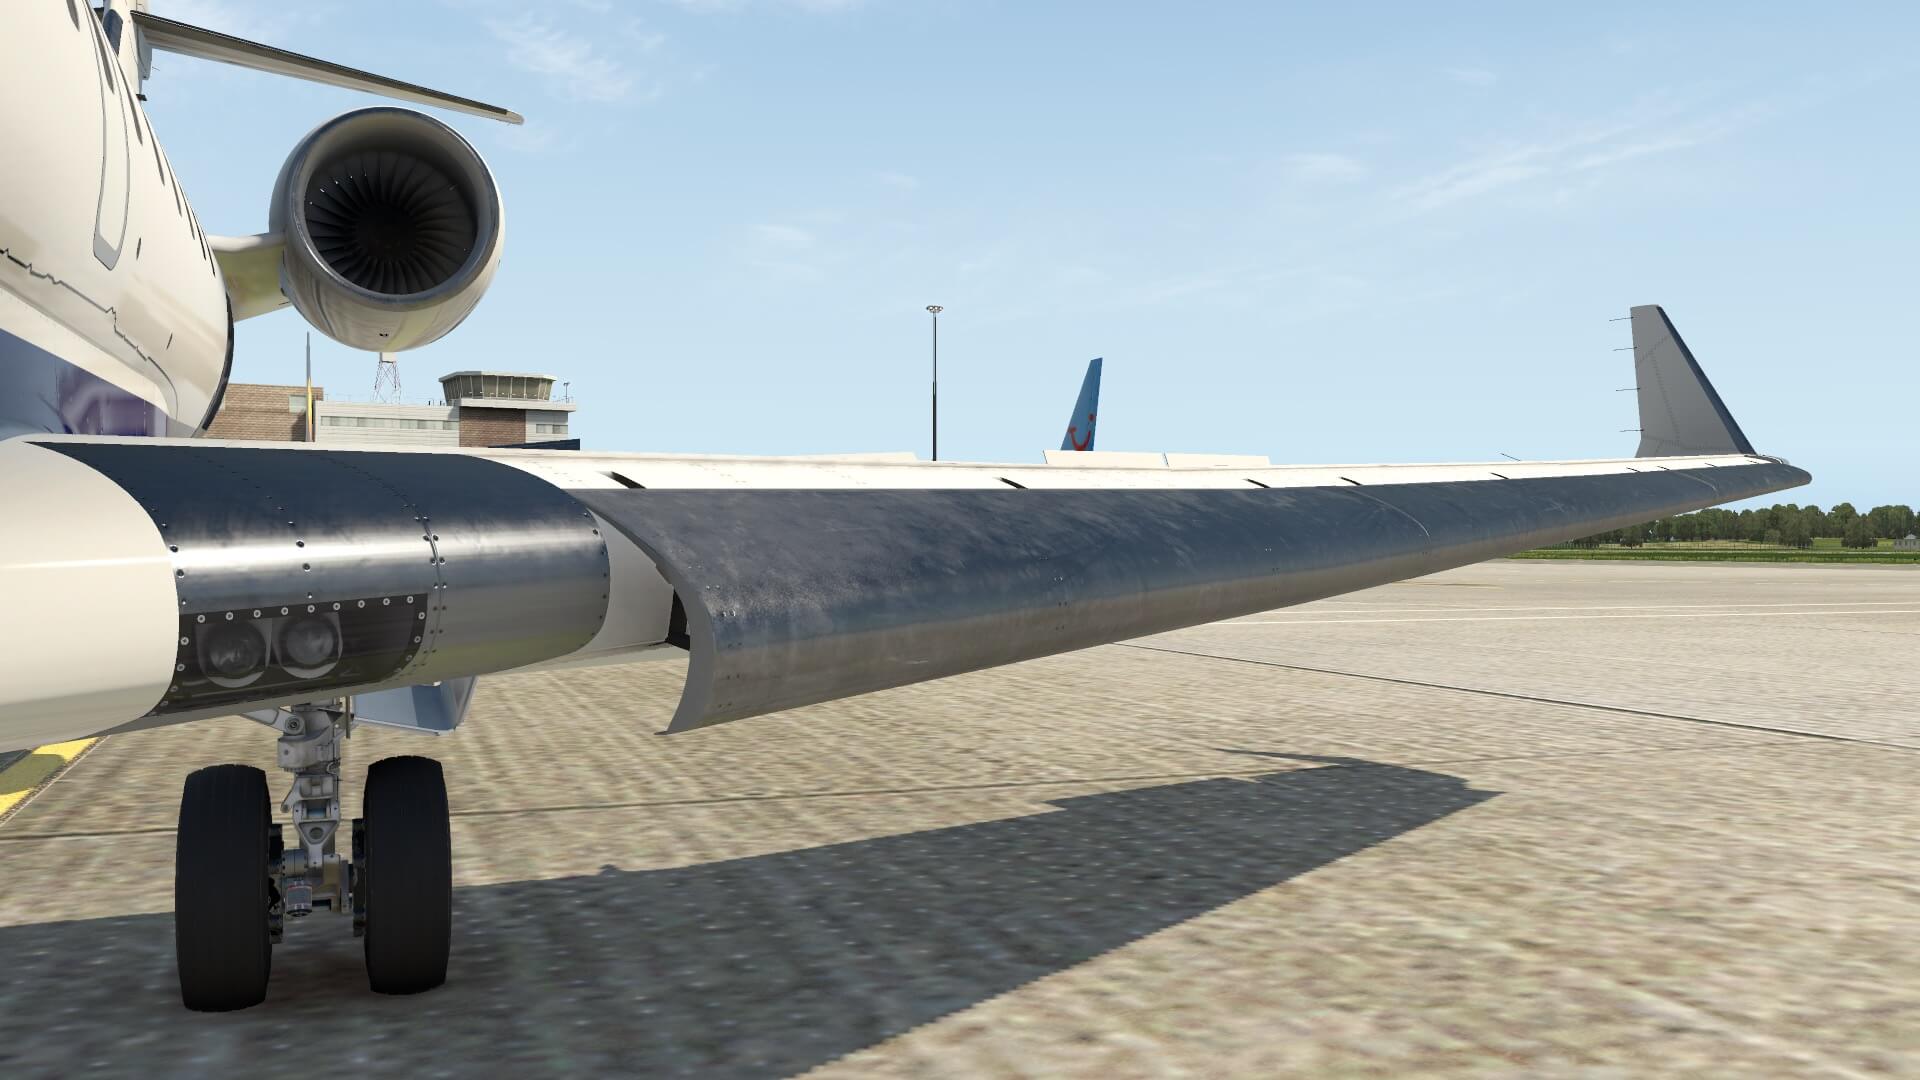
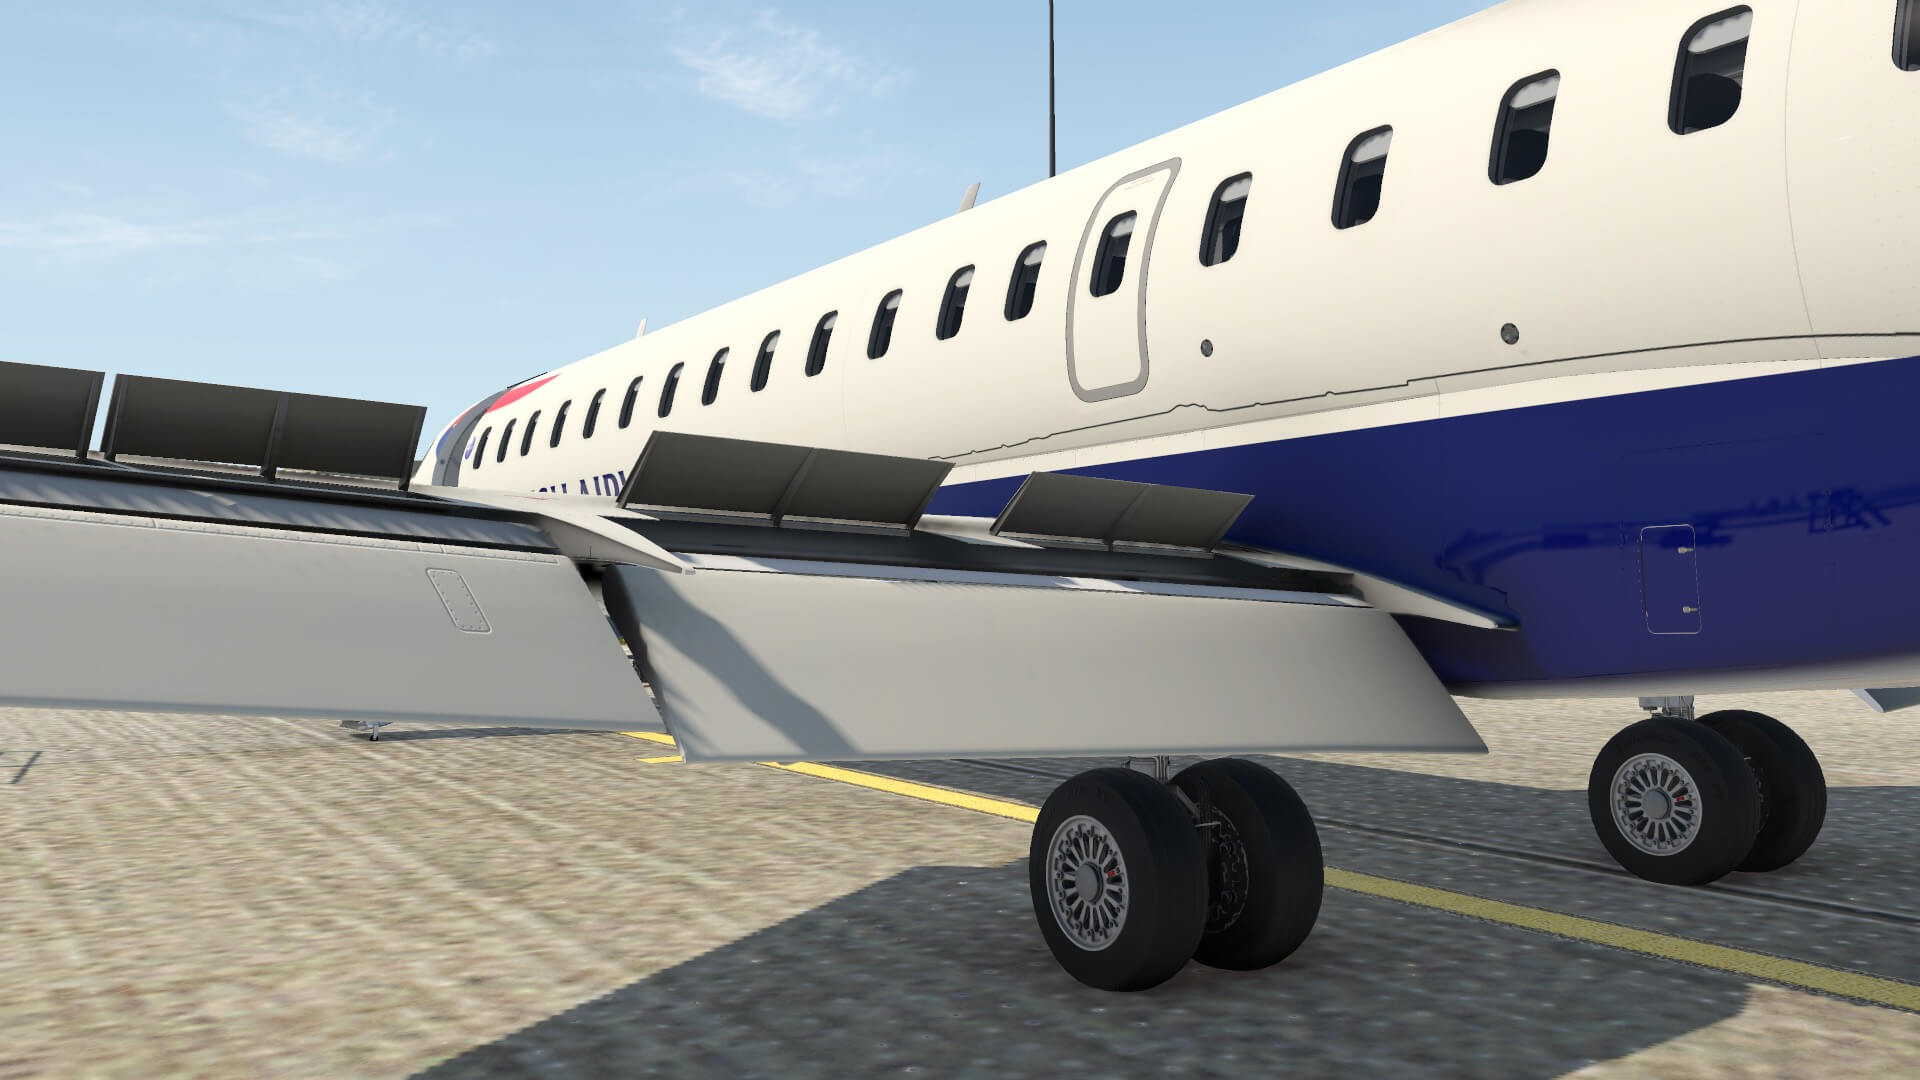
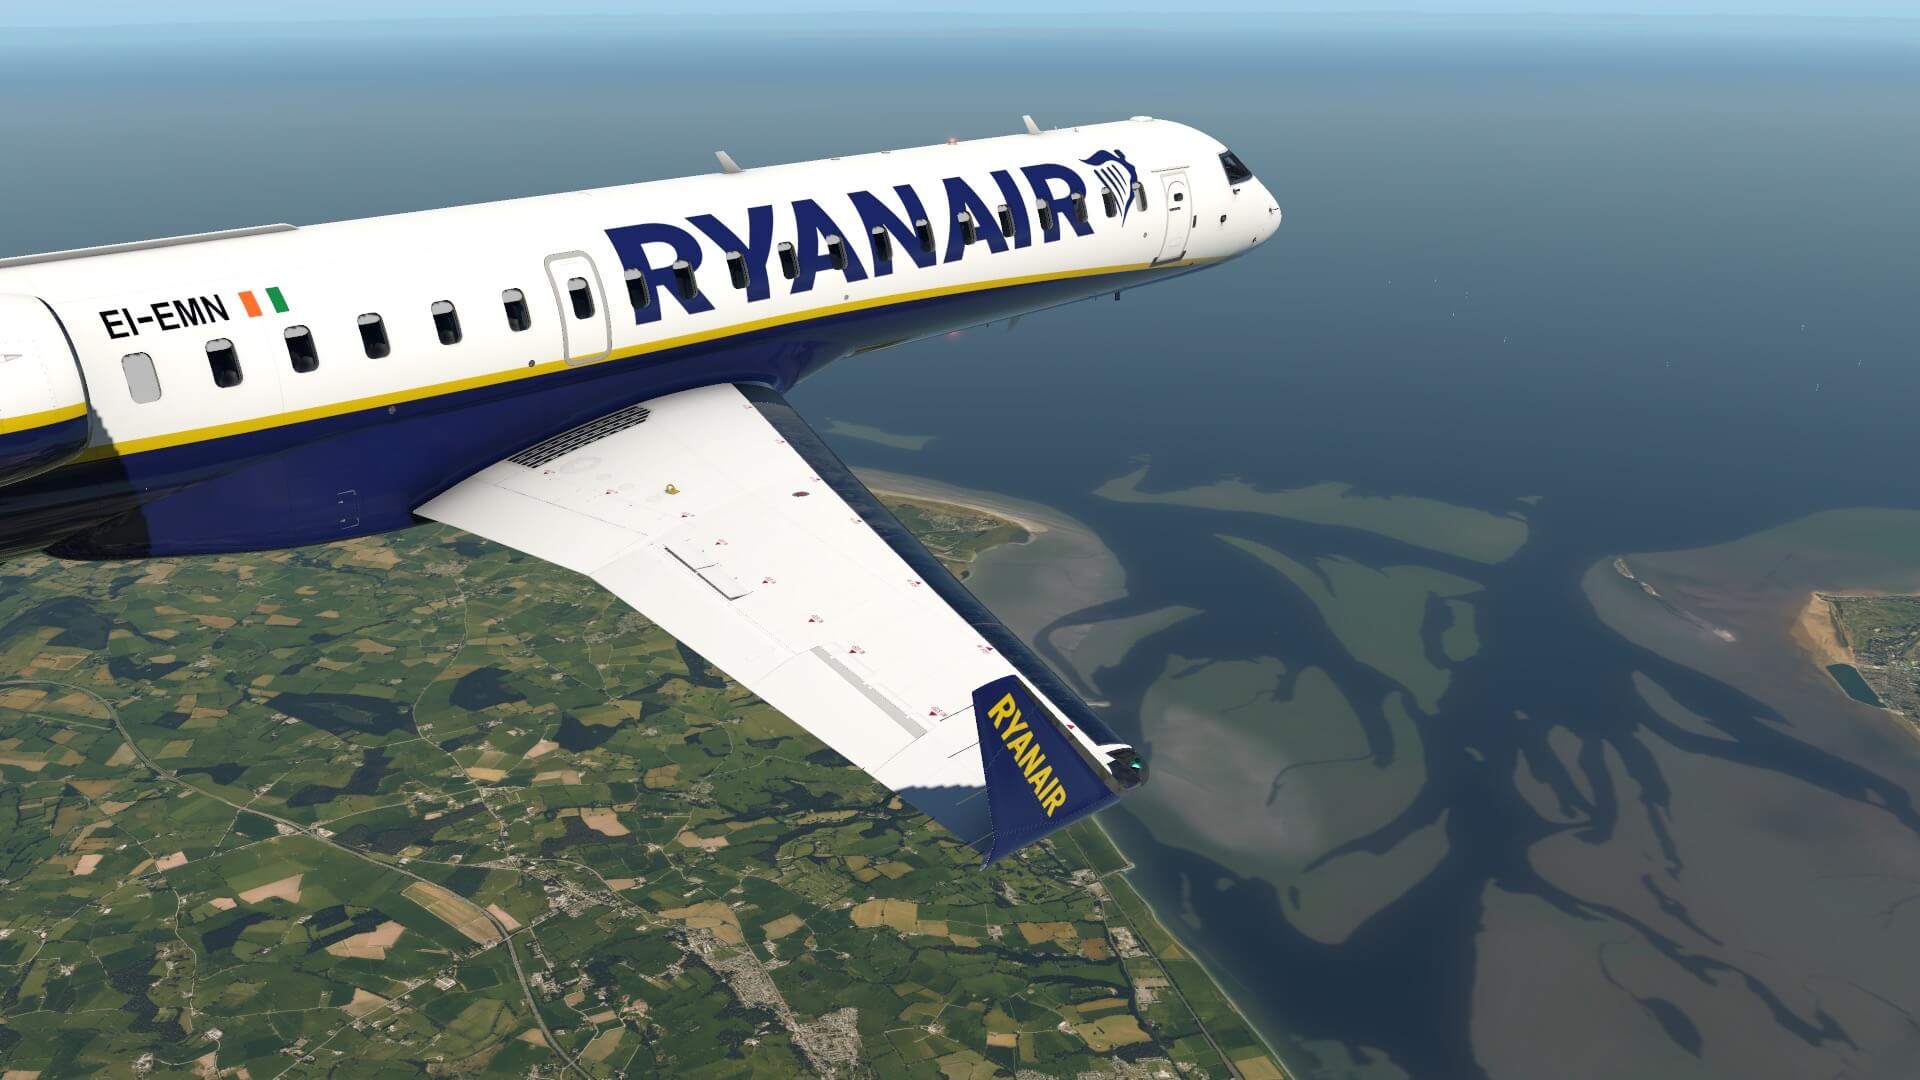
From the adjacent wing leading edge with the landing lights, I move towards the wing tip with the wing fence. The wing leading edge is simulated stainless steel for the wing anti-ice. The wing fence with the navigation light unit and integral lights are well modeled, and how tiny they are, the static dischargers are in place.
A small note about these static dischargers, they are perfectly modeled since the tip of each discharger is slightly thicker, as they are in reality too. What I “perhaps” mentioned before, all the screws or rivets you see are to my humble opinion of the right size versus the surface. You could ask yourself the question why everything is soooo clean, but that’s also a matter of taste. I would personally see a bit more weathering on the aircraft surfaces.
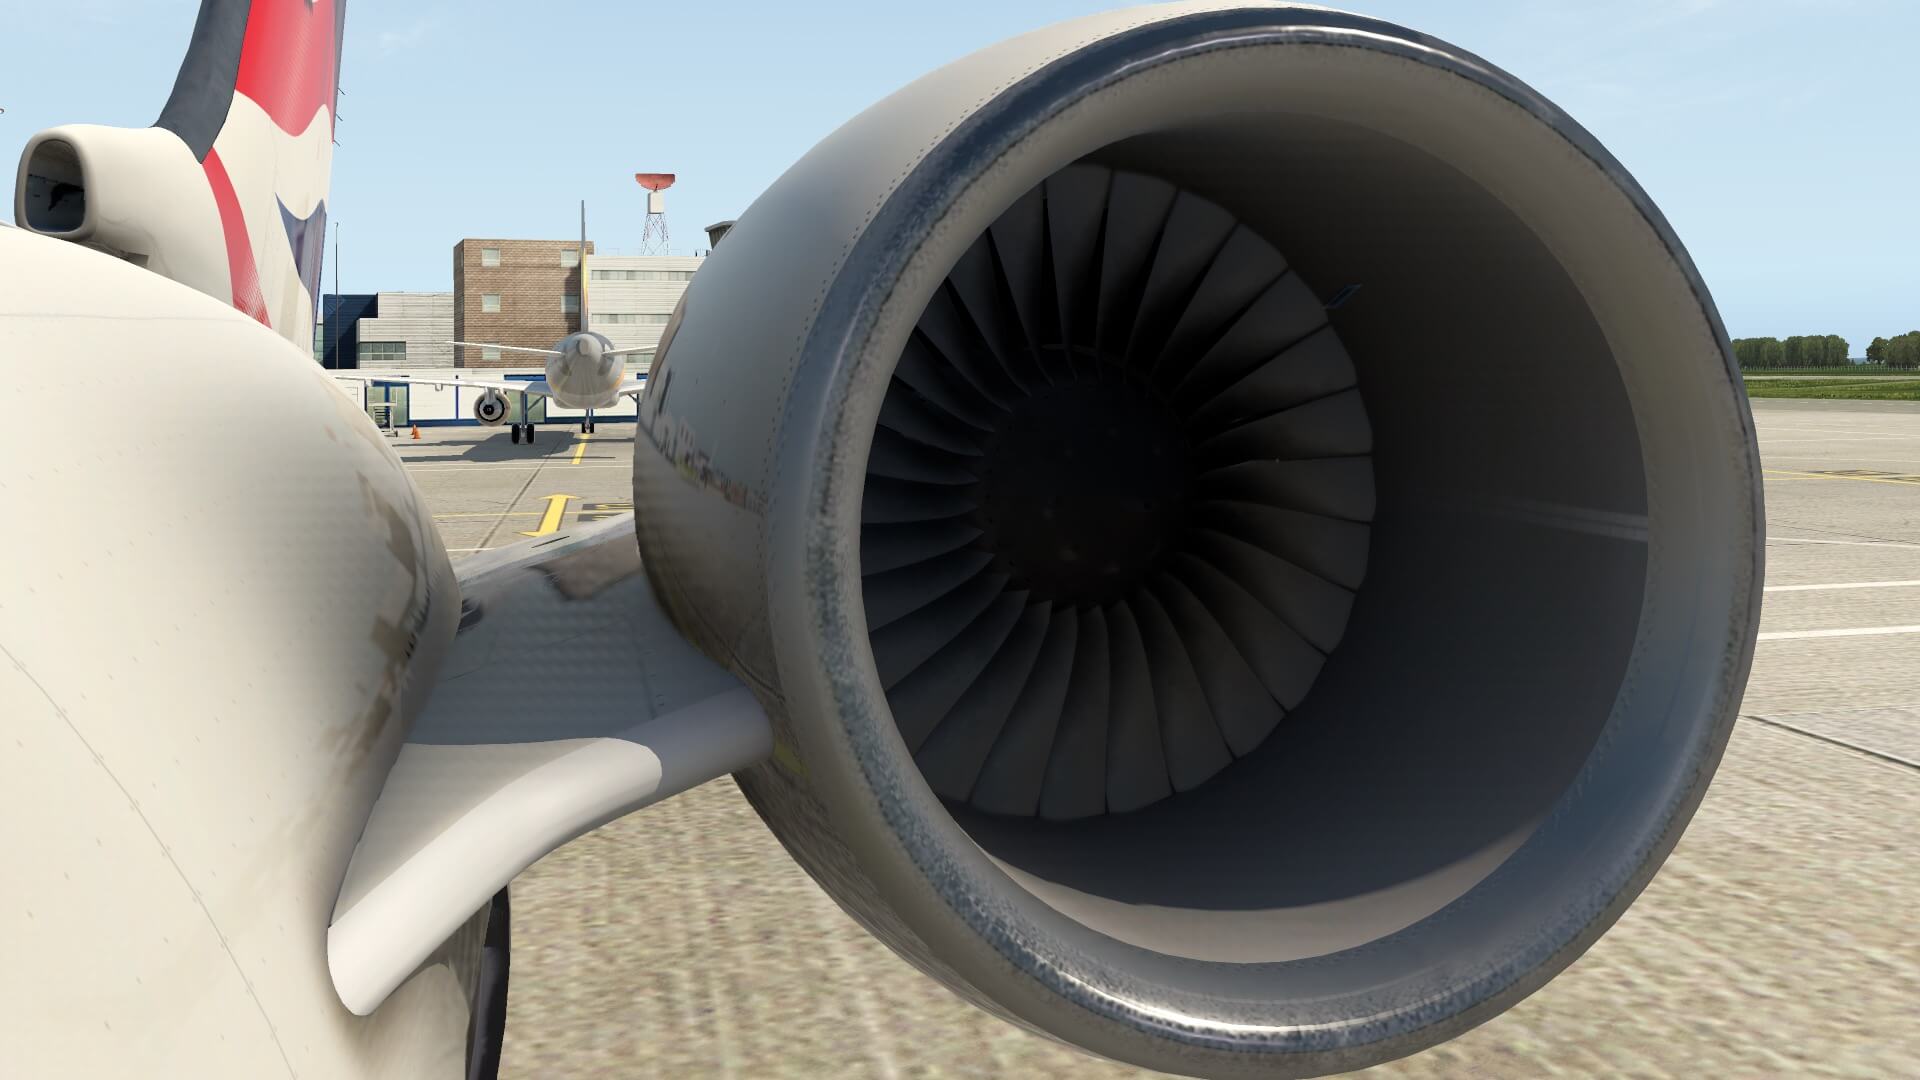
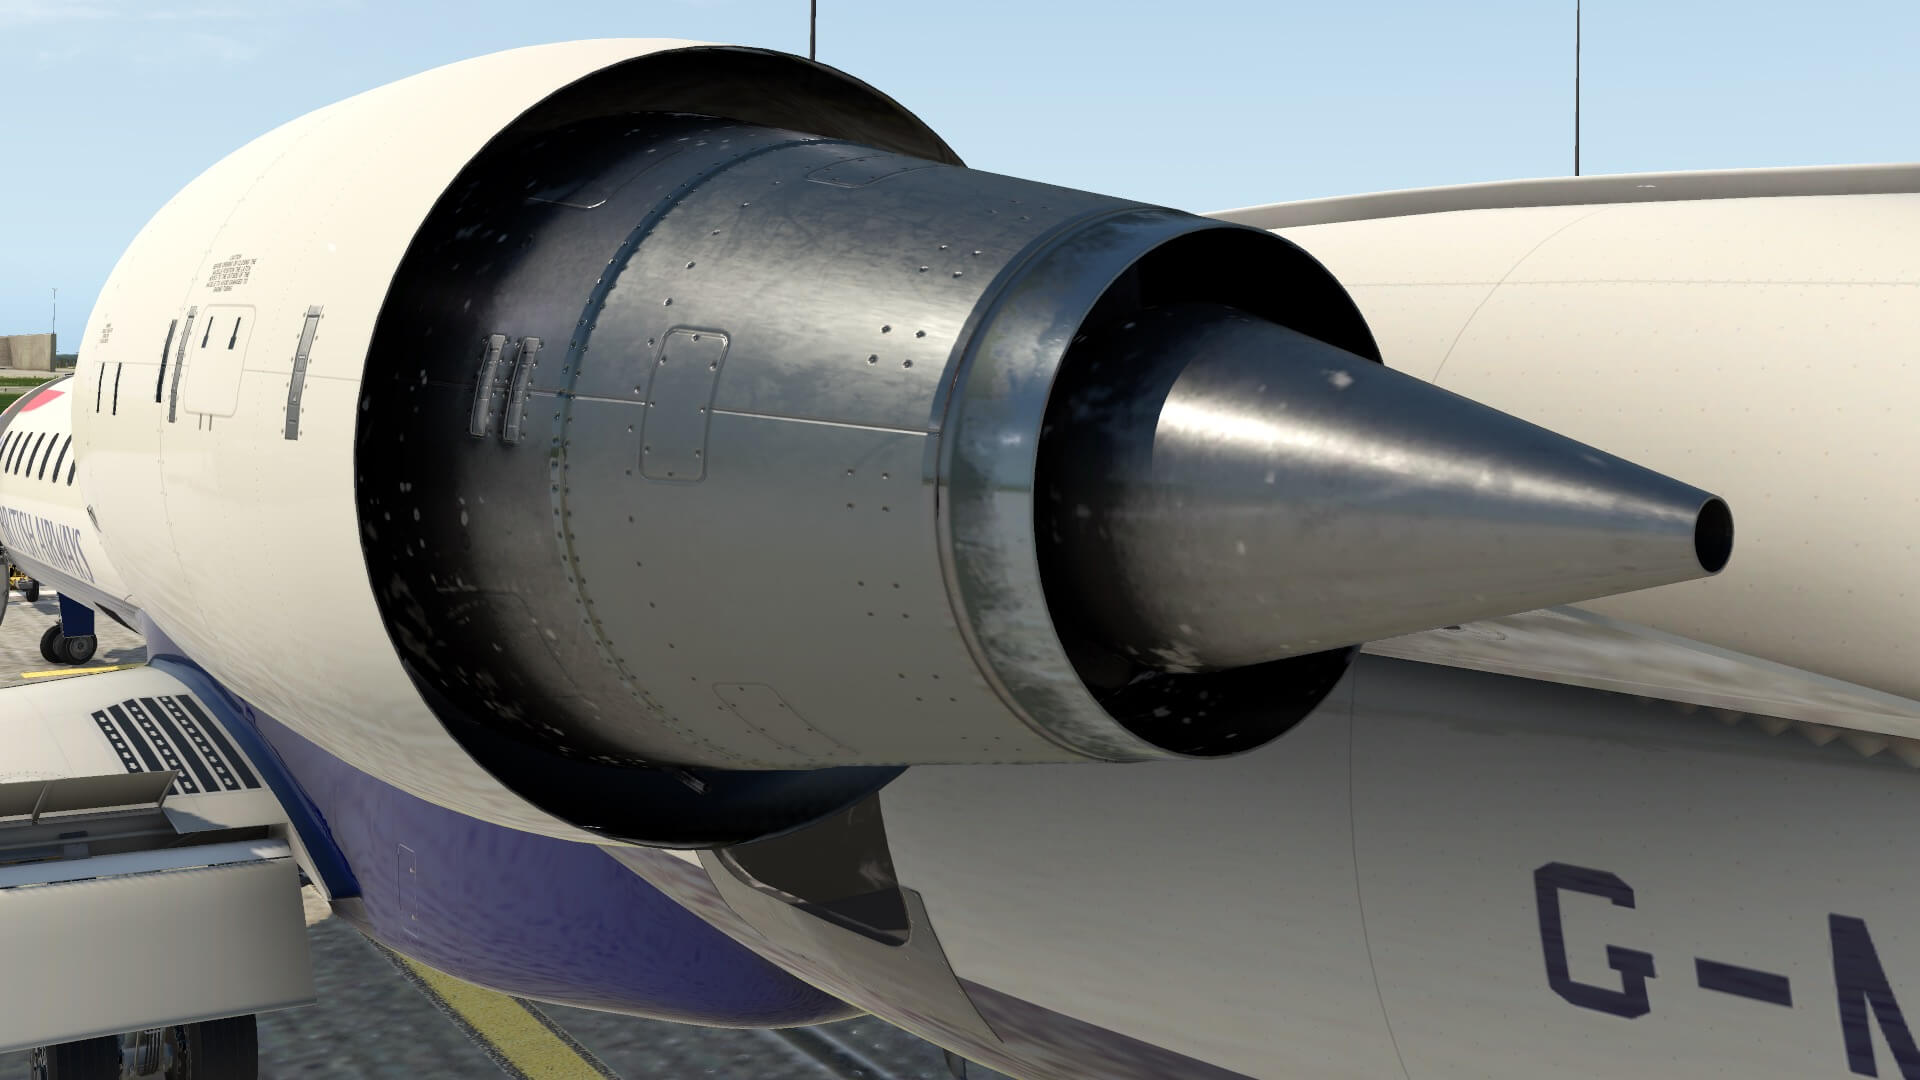
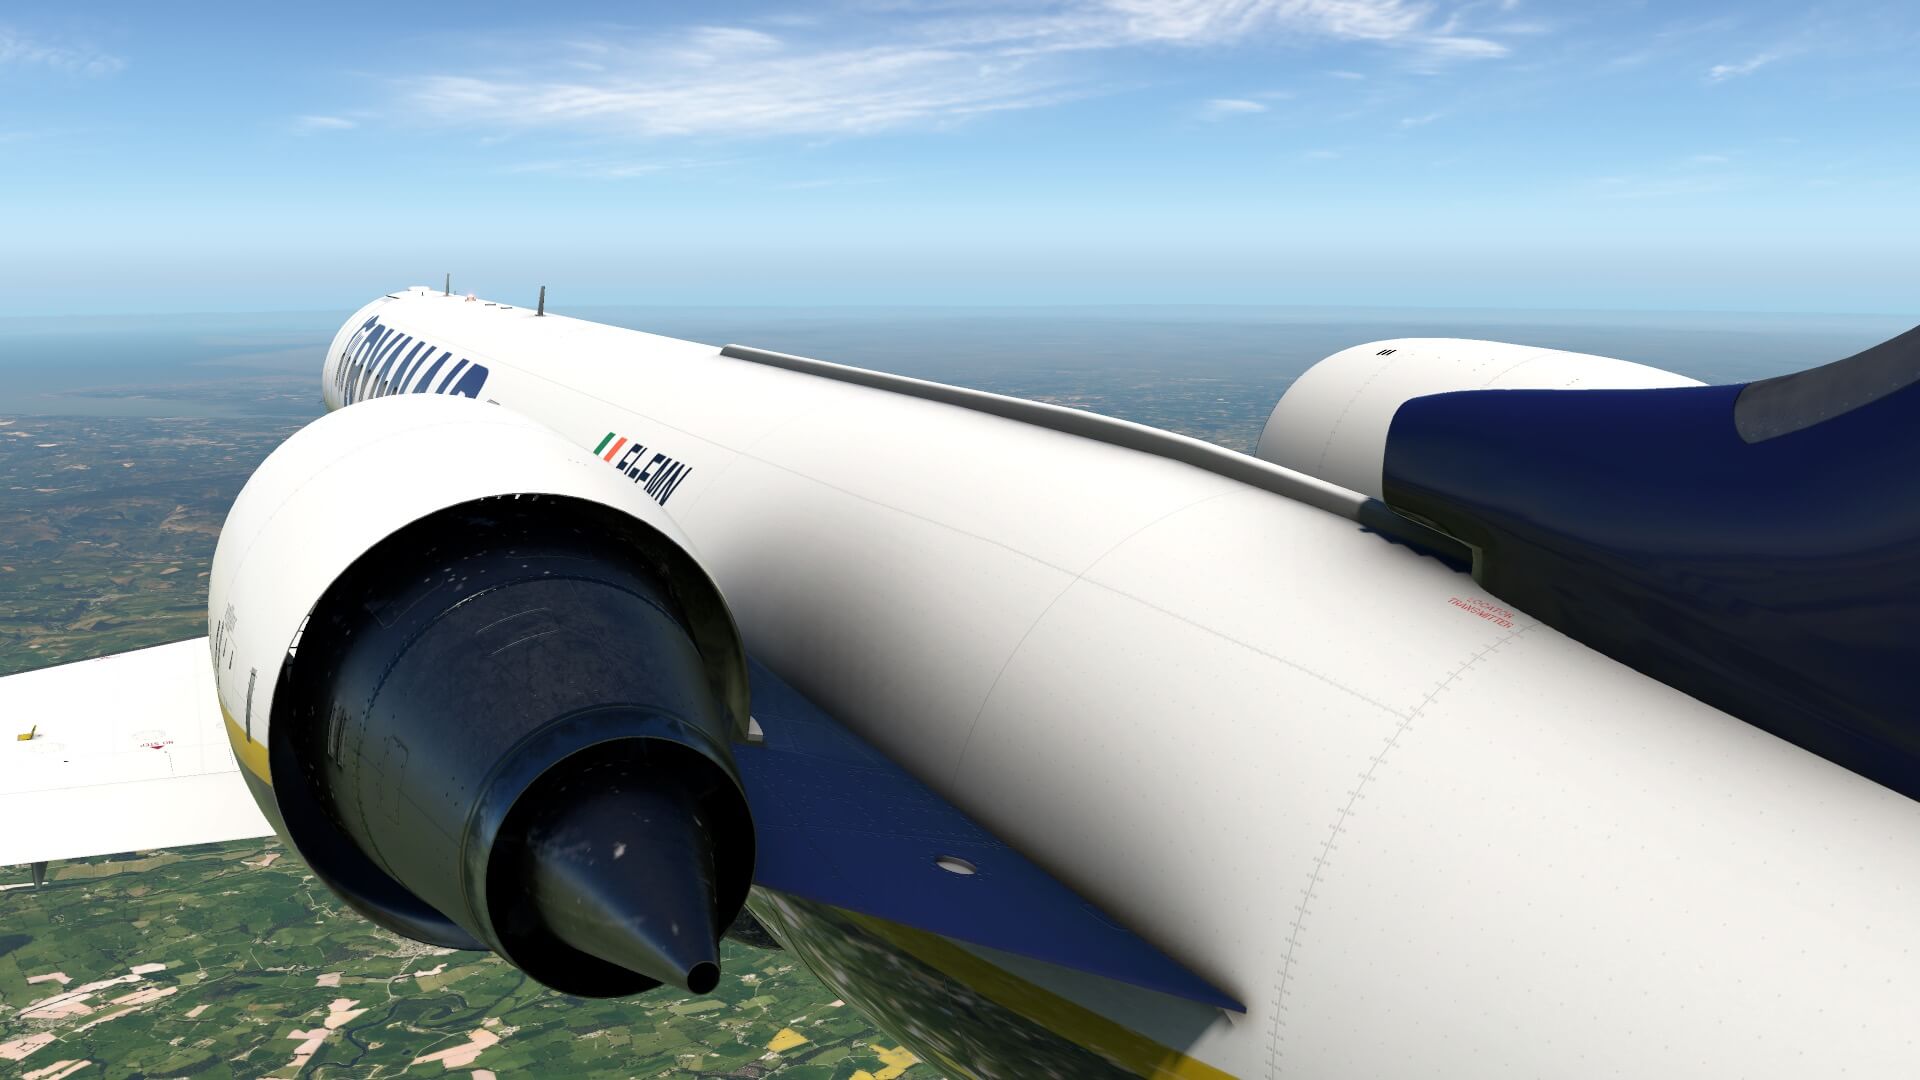
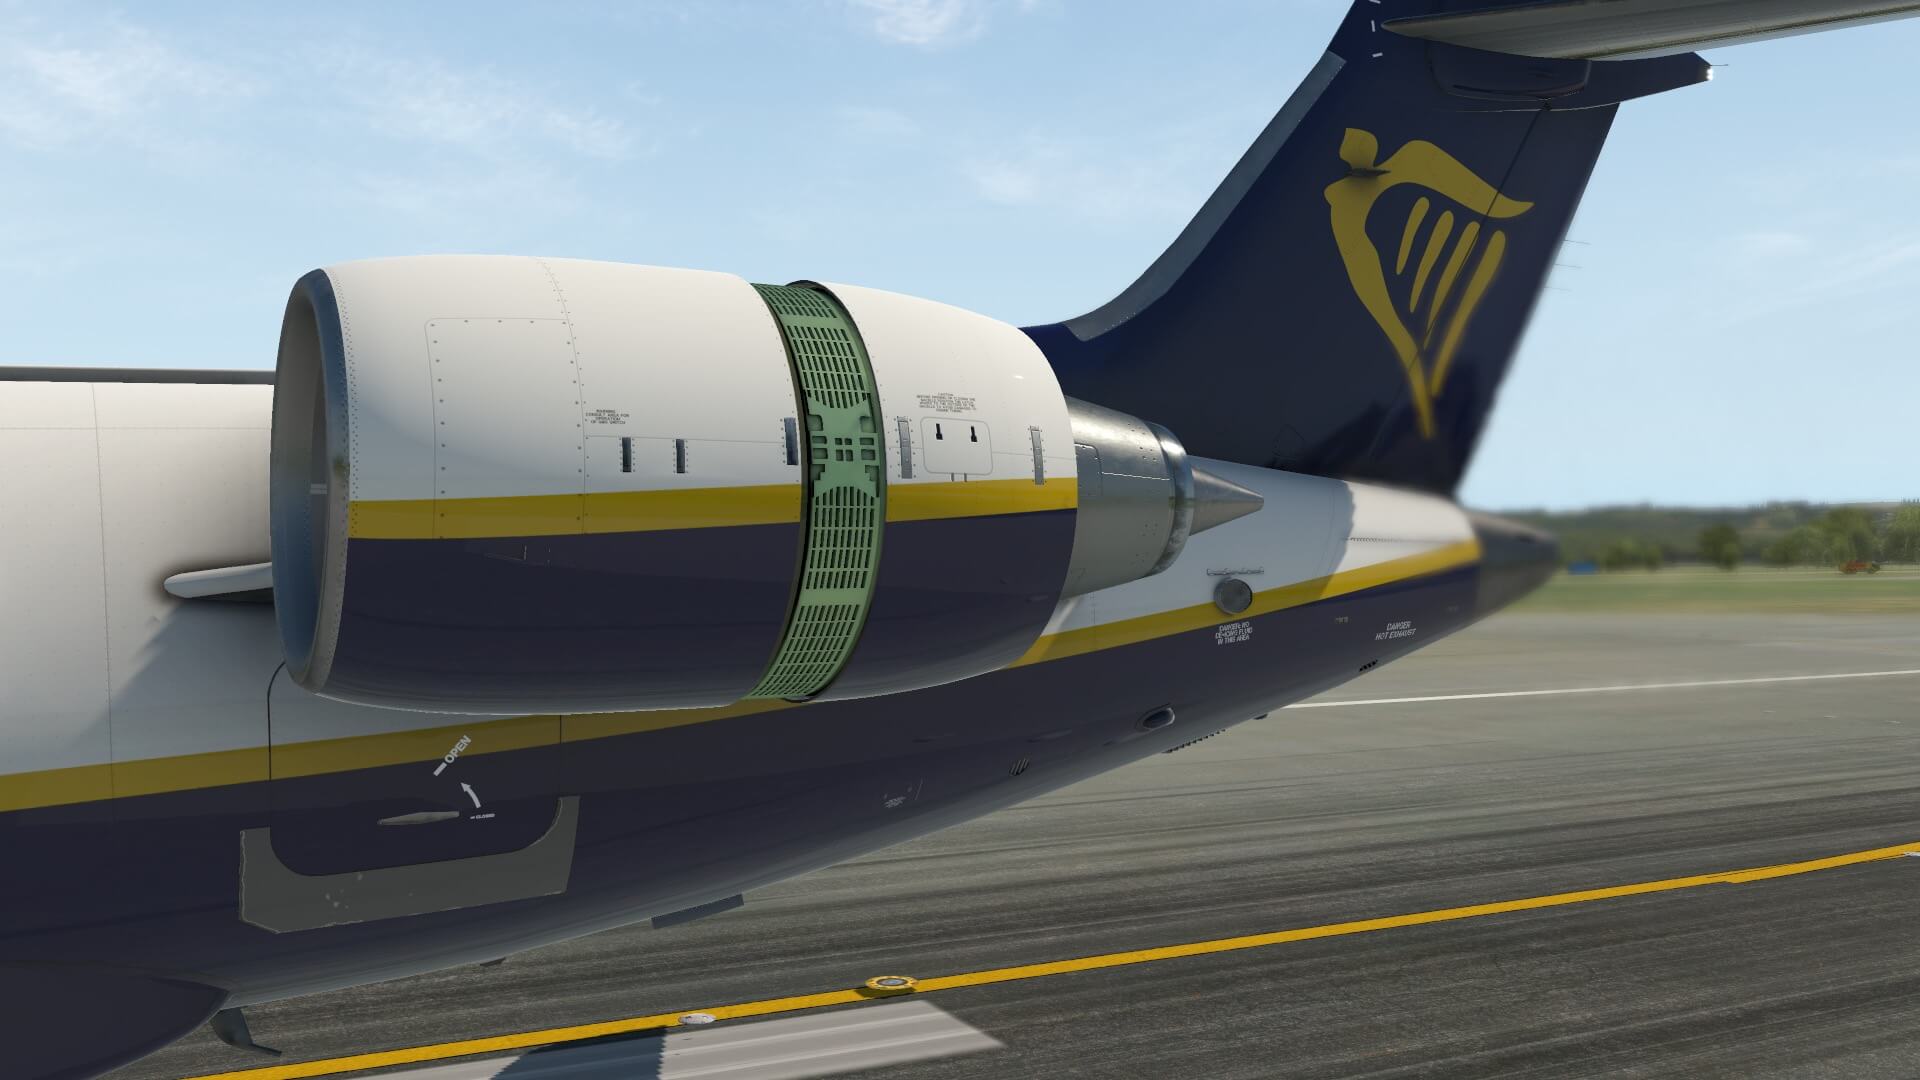
I walk back to the wing root, but not before I check the top of the wing. All NO STEP signs are not forgotten, and there’s also the manual FUEL FILLER cap and near the root the indications for the manual over-wing exit. While near the root, I have also access to check the engine inlet. This looks good, no, great. The engine nose cowl inlet circumference looks nicely round and the simulated stainless steel inlet is slightly weathered. I assume it’s simulated stainless steel since it does come with nose cowl anti icing system. The fan looks good as well as the black spinner and the simulated sound reduction material.


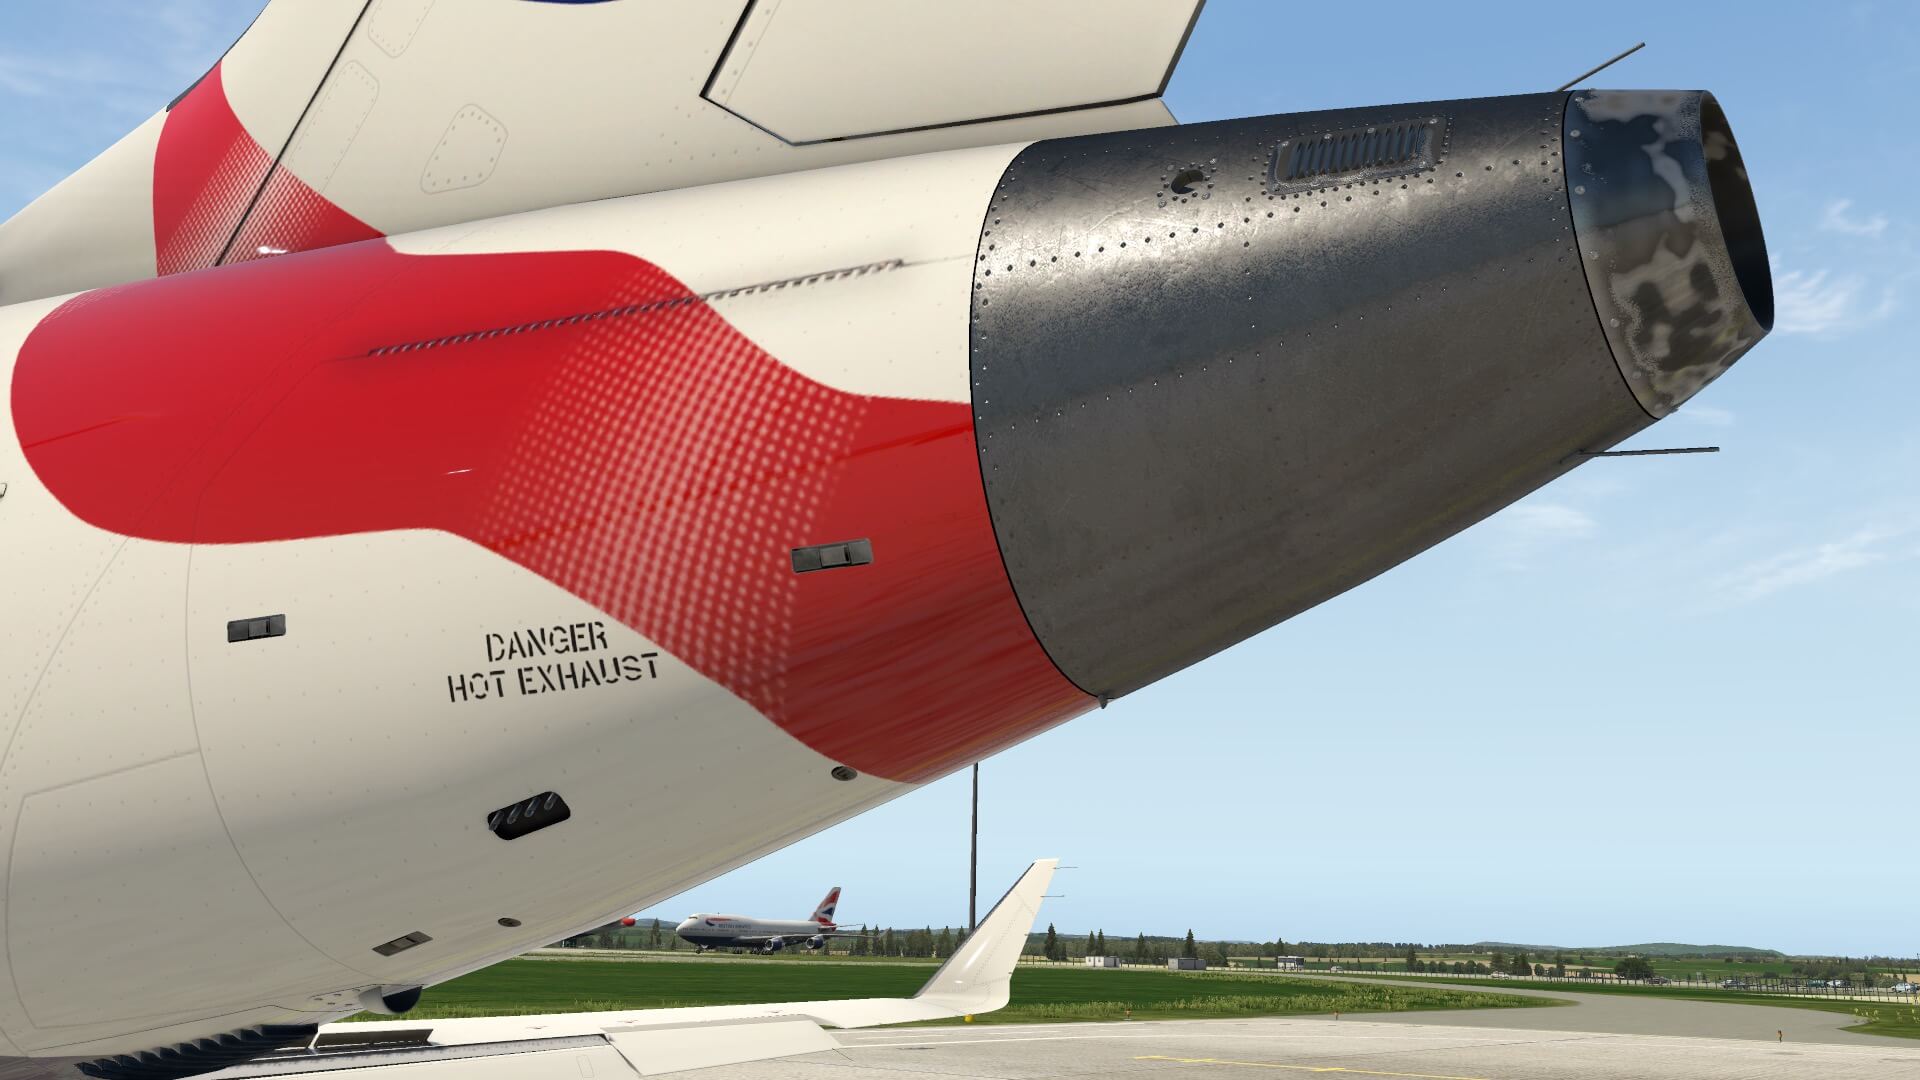
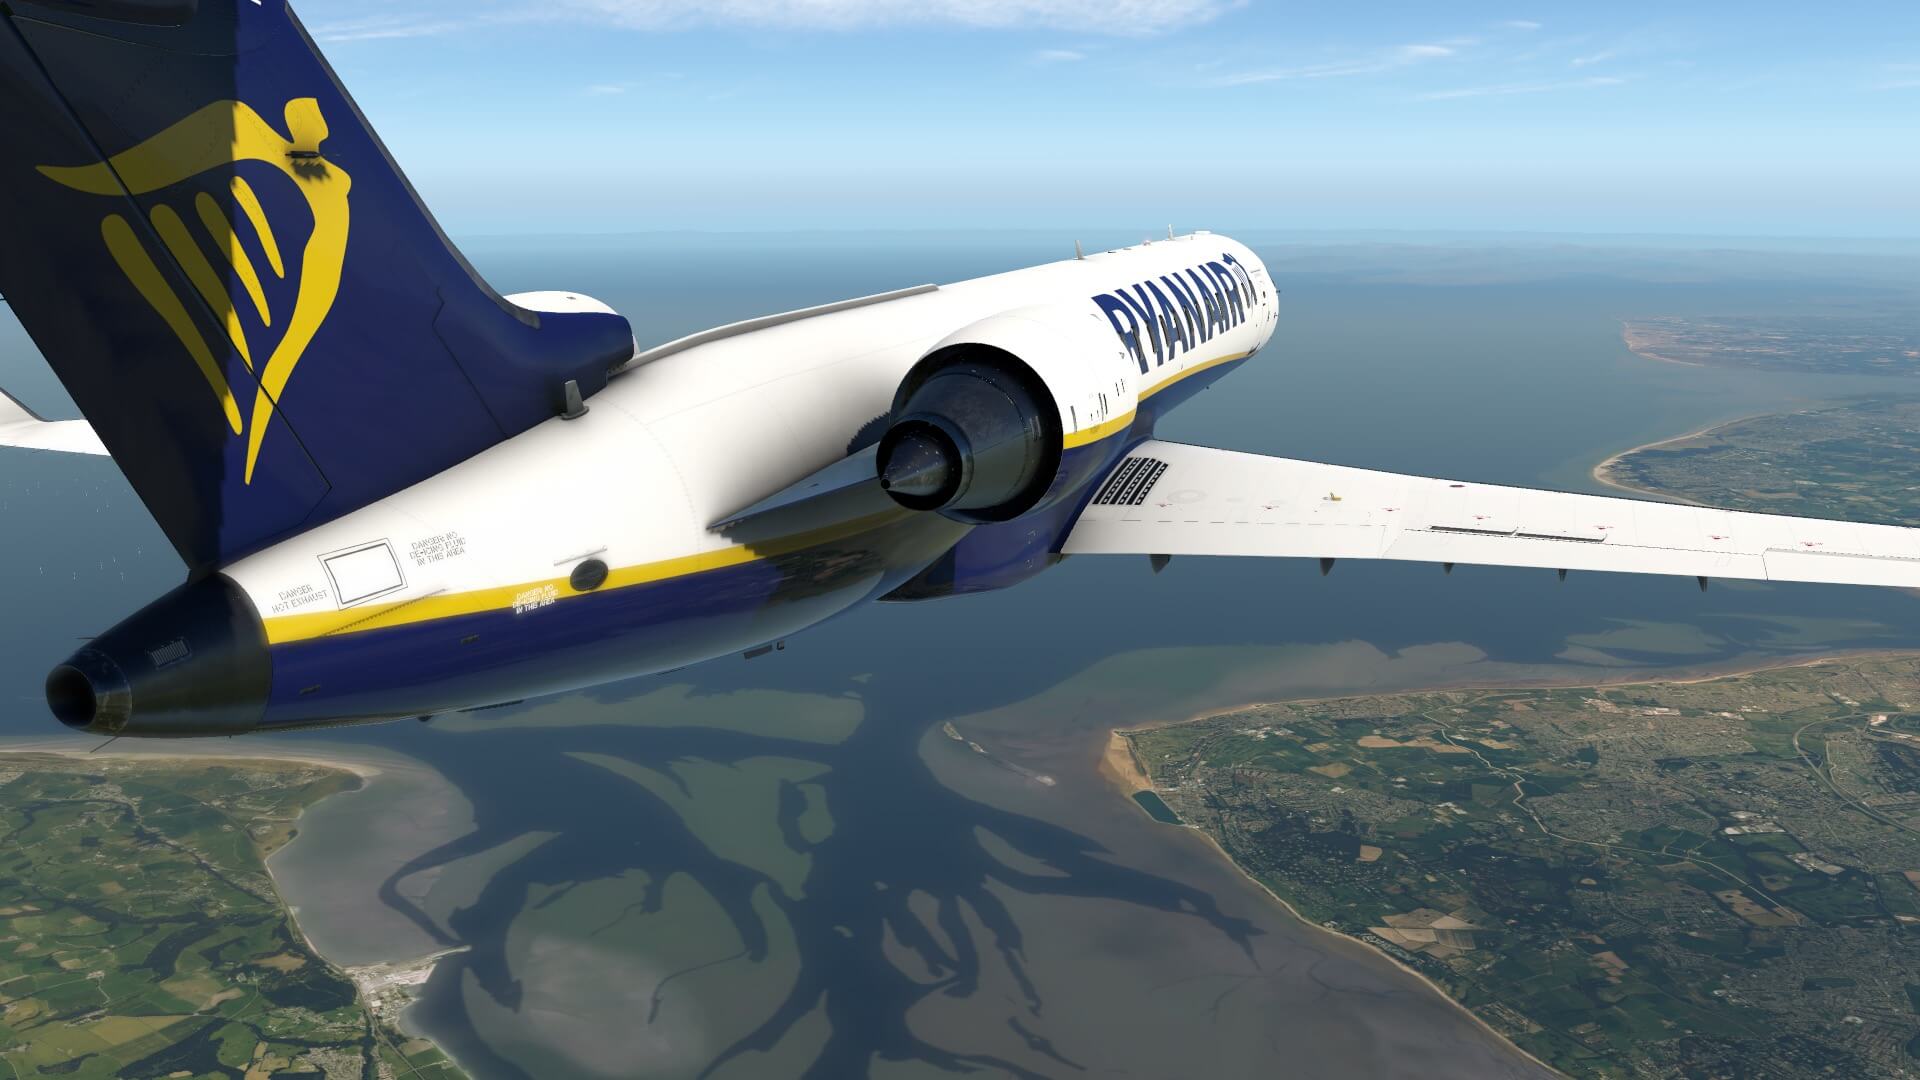
All together well done and this is also the case of the engine cowling, the decals and non animated panels. You can even spot the stainless steel aircraft ID plate. Worth to mention and to check is the engine exhaust section. Clearly made of different virtual materials to withstand the heat and also slightly discolored and weathered. When “you” do your inspection, don’t forget to check the presence and functionality of the logo lights as they are mounted on the engine pylon top surface.
I mentioned it before and honestly, it makes sense. Although all the engine cowling latches looks gorgeous and realistic, the engine cowling half’s aren’t simulated so you can’t remove the lower half of the engine cowling. When this was also animated, lots of useless polygons where needed with absolutely a negative impact of your FPS.
Then via the fuselage tail with APU (Auxiliary Power Unit) and again, all those razor sharp decals, and well modeled panels, rivets and screws that makes up the vertical fin. The end of the fuselage tail cone characterizes the APU outlet with on the far top end of the vertical fin the white navigation light and static dischargers.
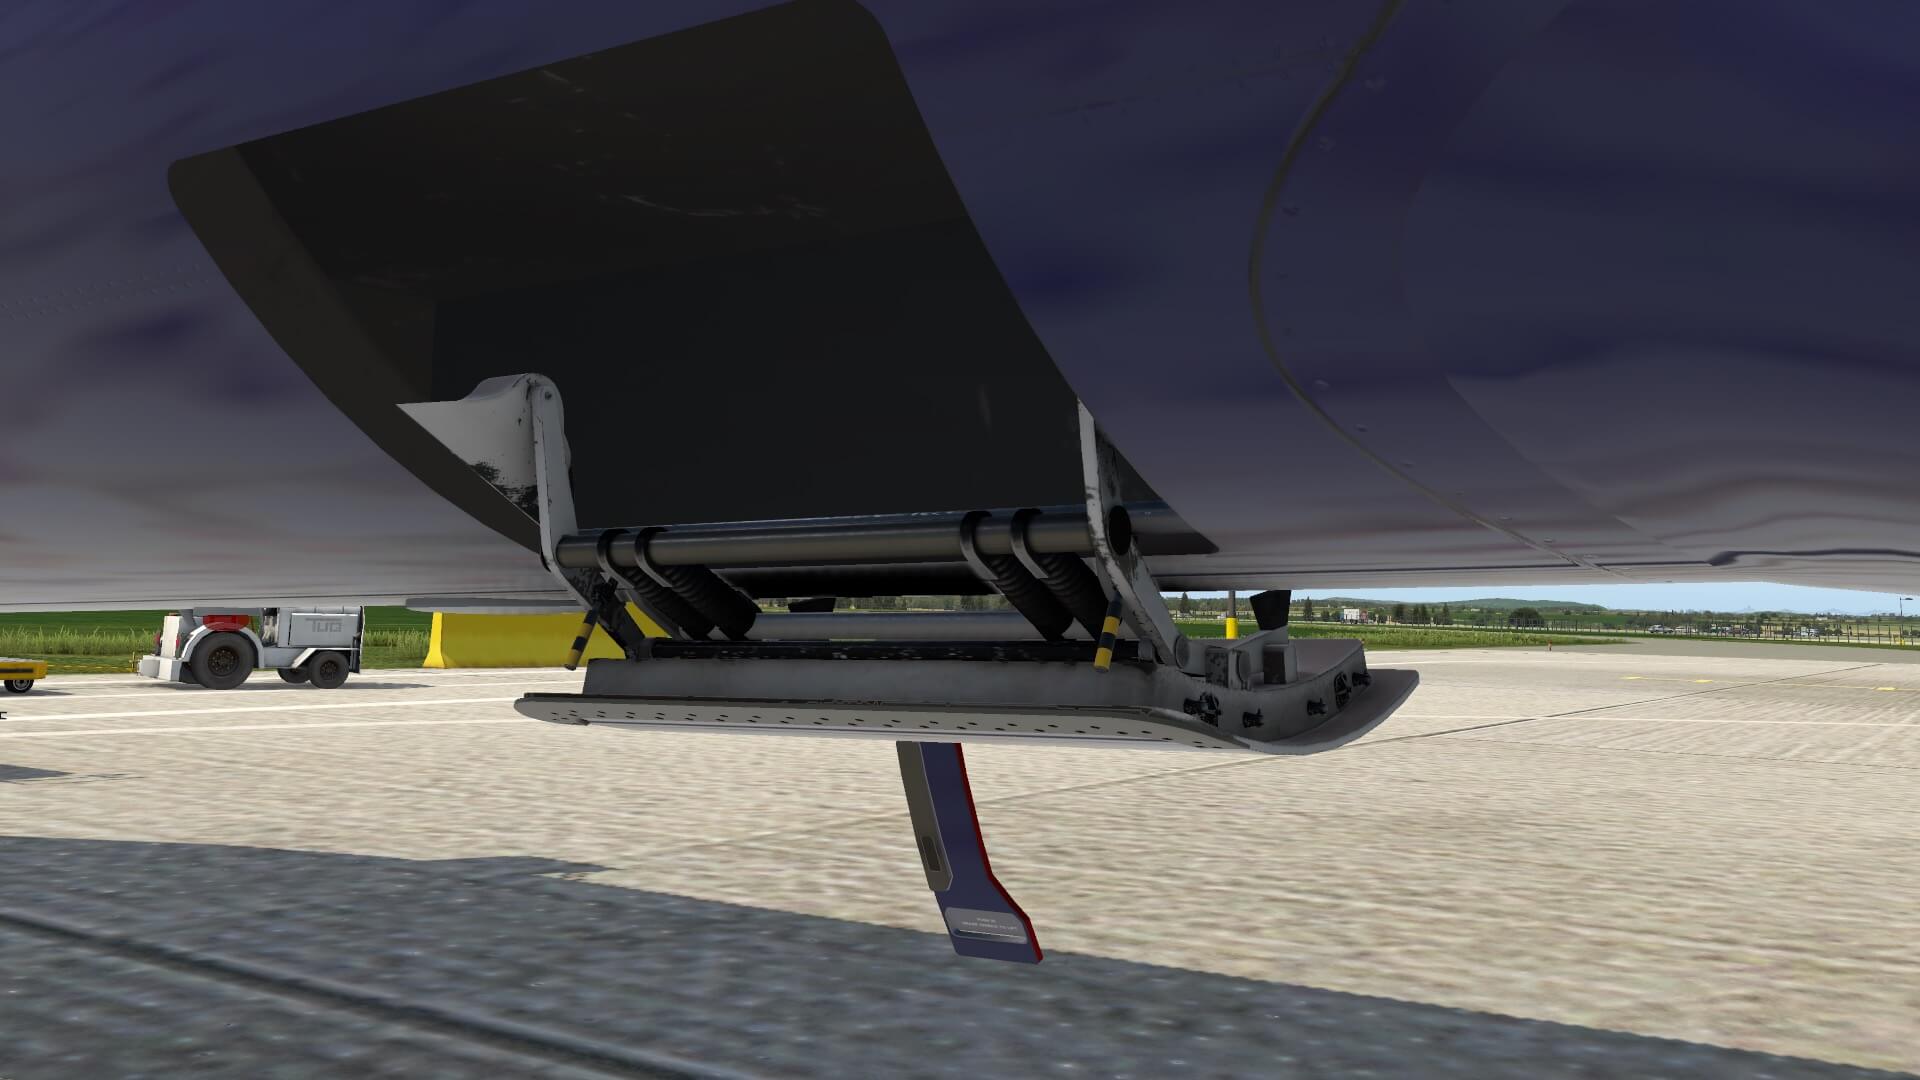
For inspection reasons I had opened the reverser on the right-hand engine. This looks awesome. The AFT engine cowling is therefore movable, which creates a gap of approximately 20 centimeters or roughly 8 inch, but that’s not really that interests me. What interests is the green primer grills that become visible. That’s great to see how much details these grill panels have. Almost as real as it gets!


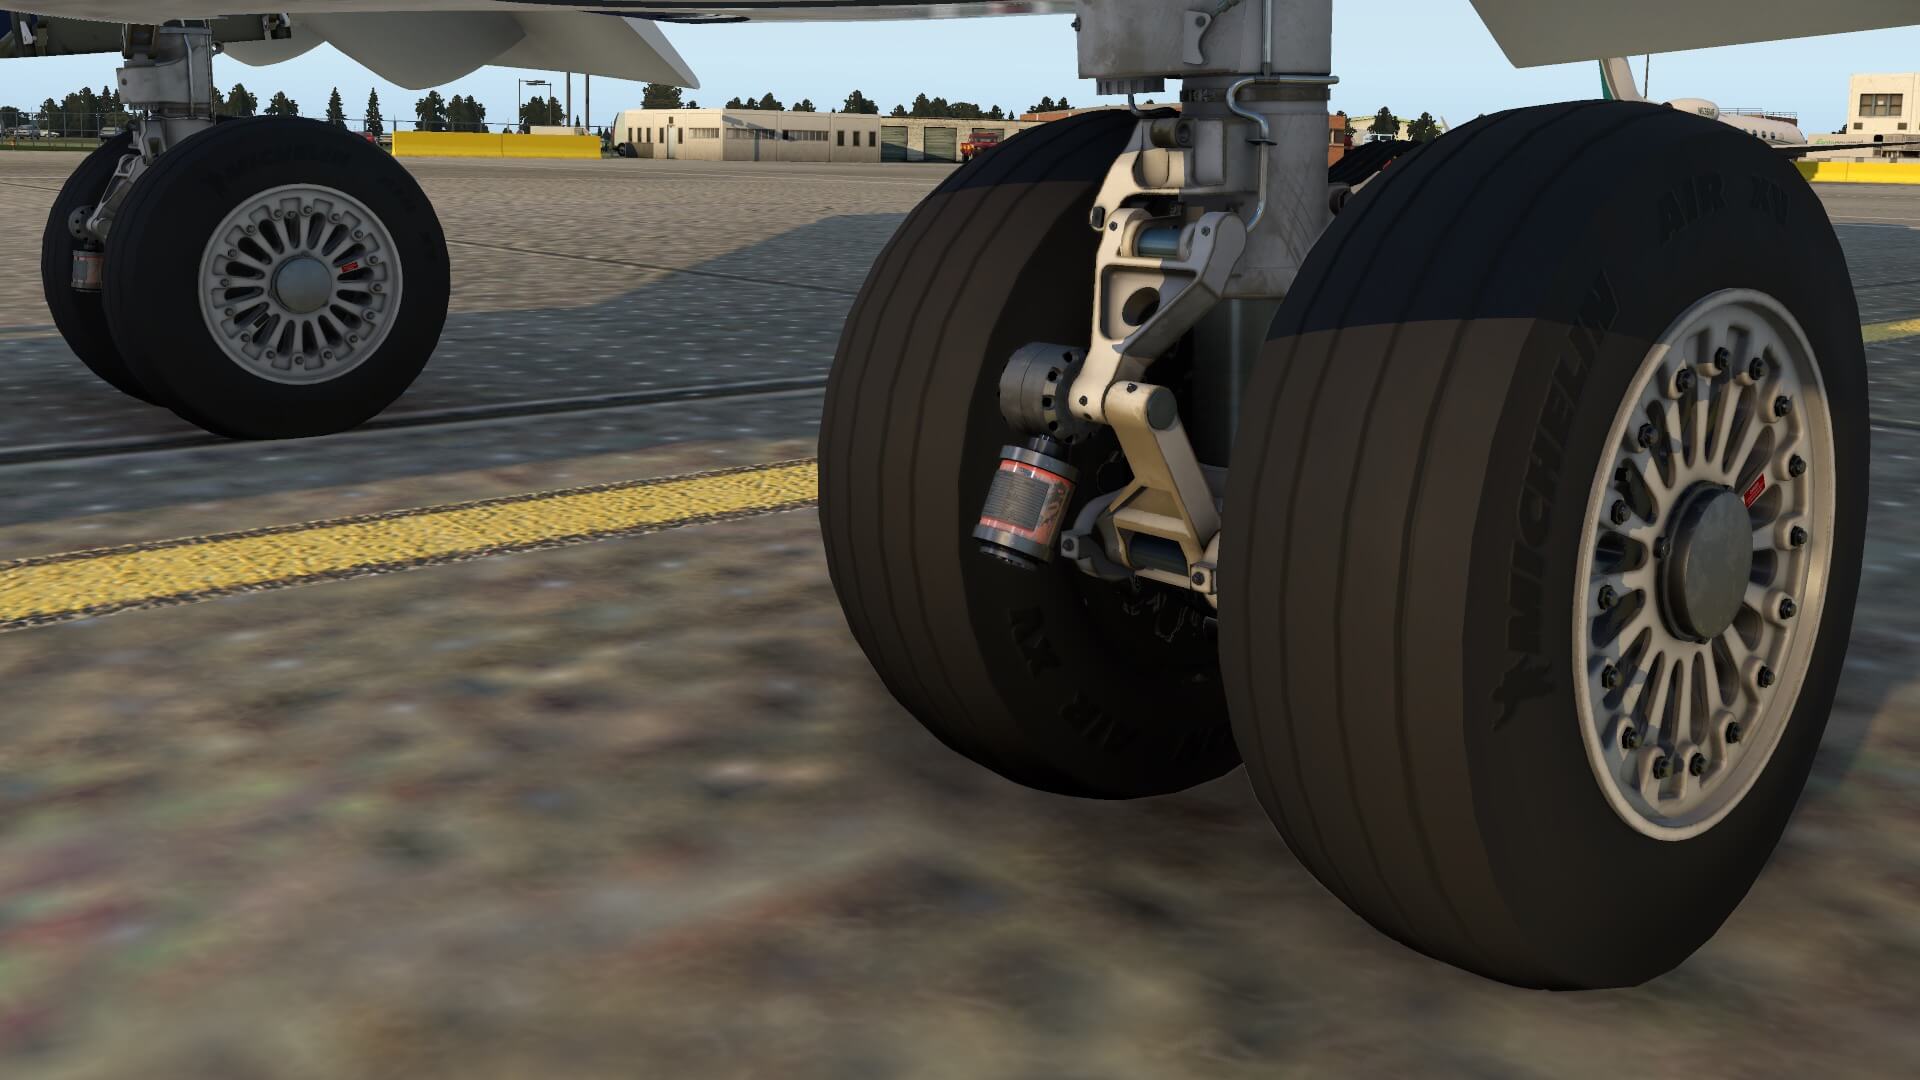
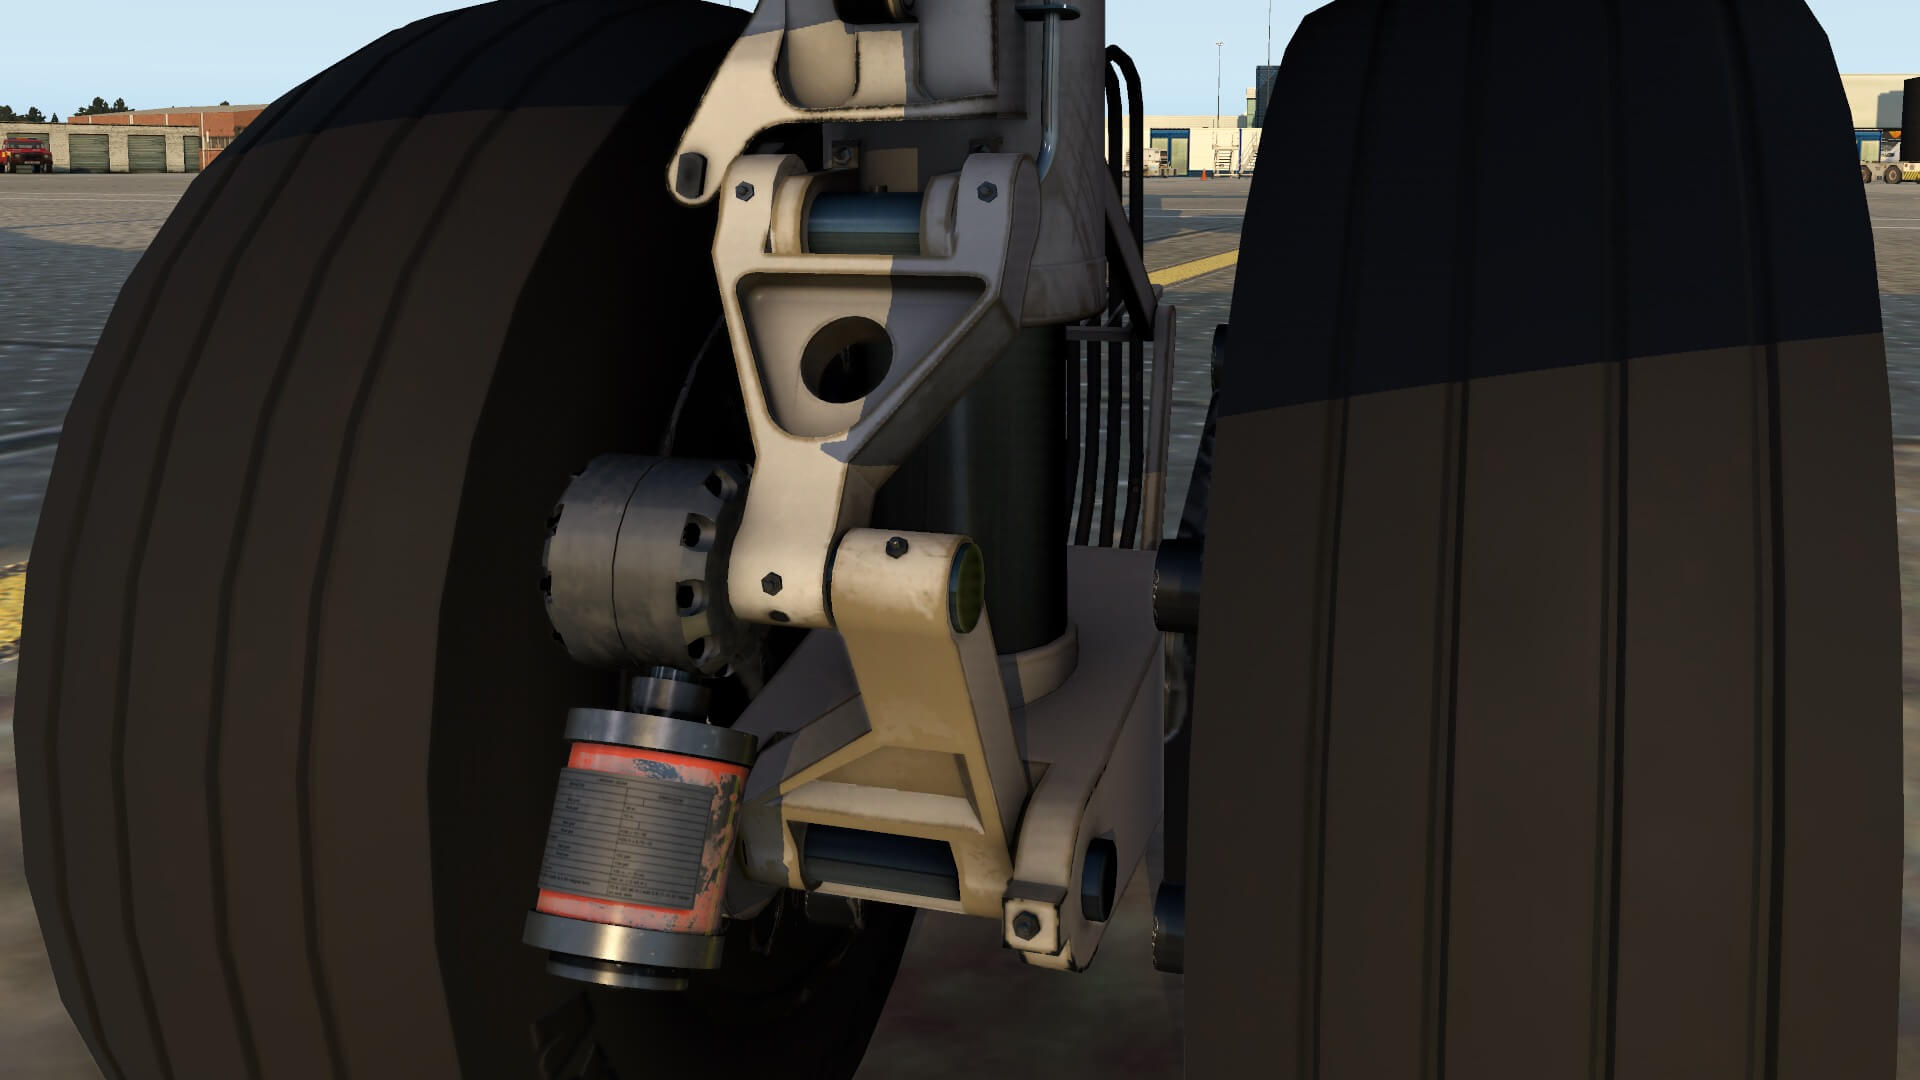
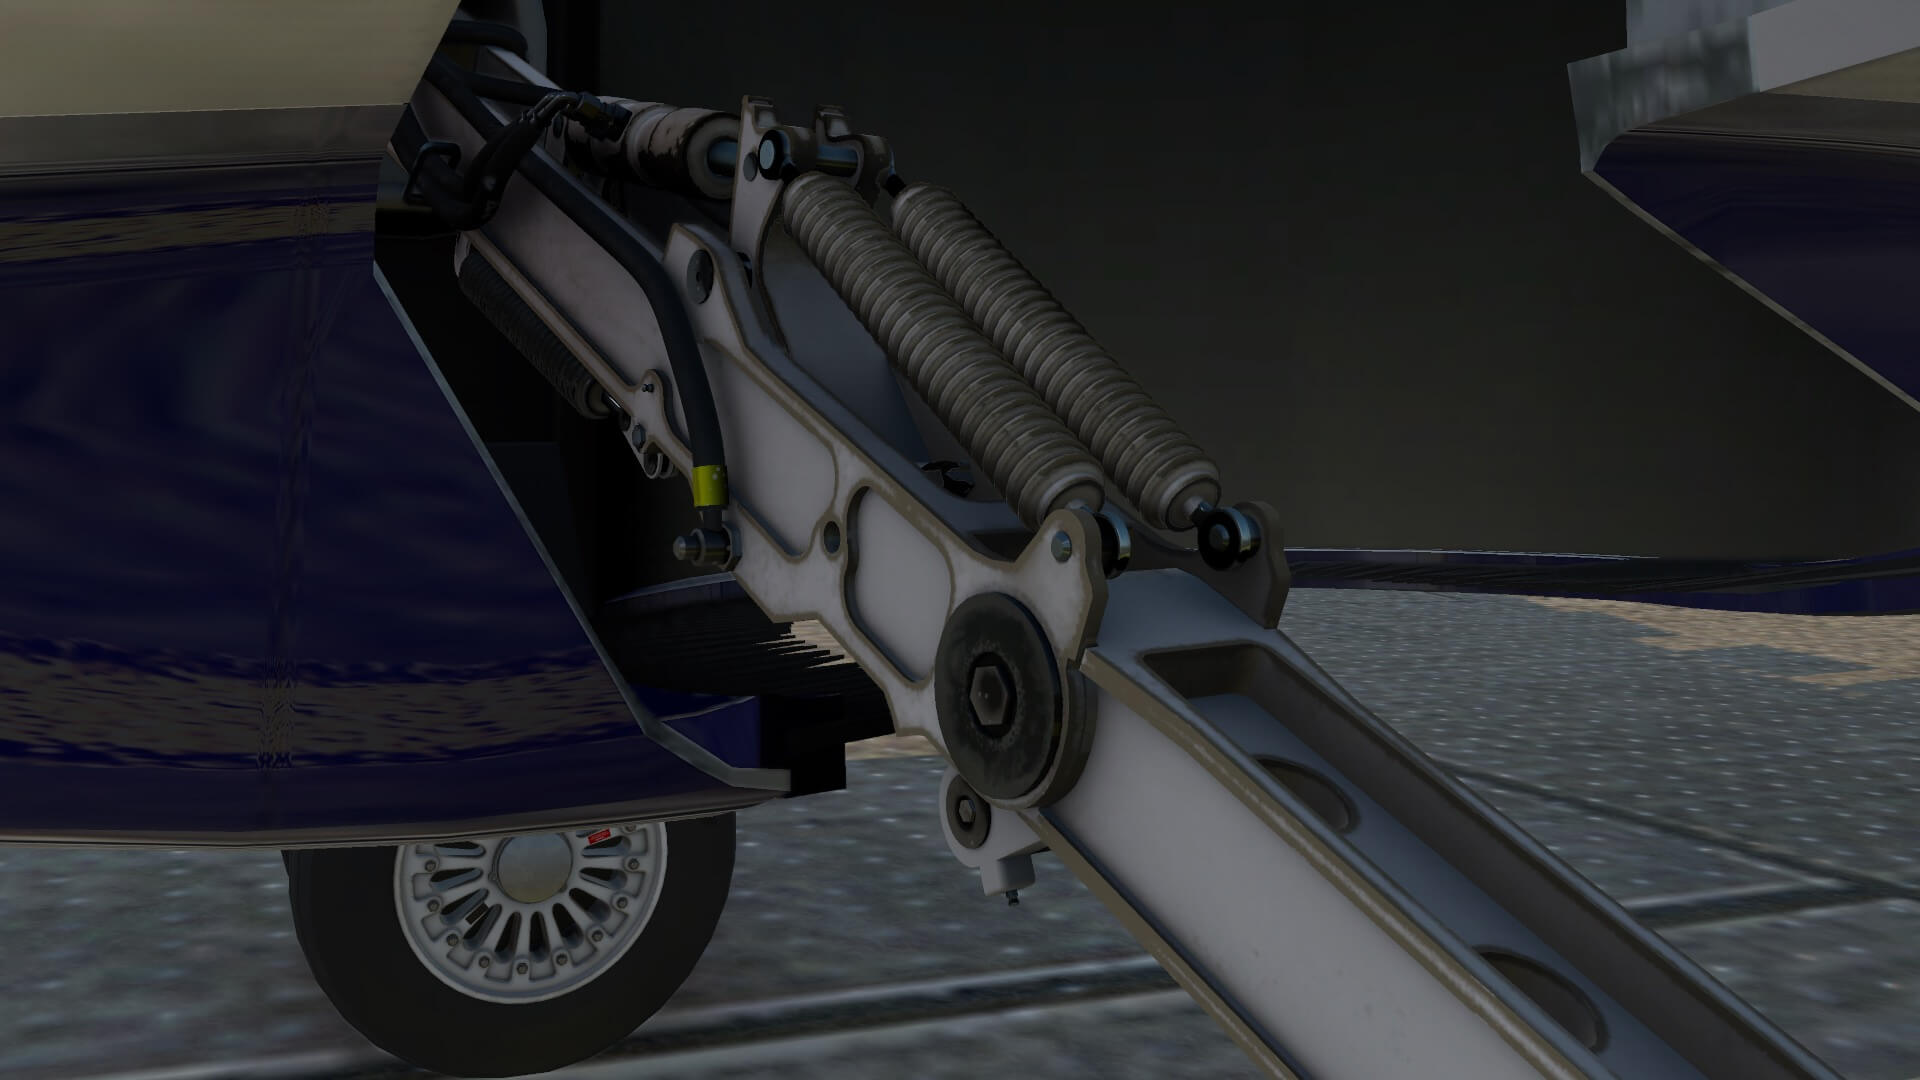
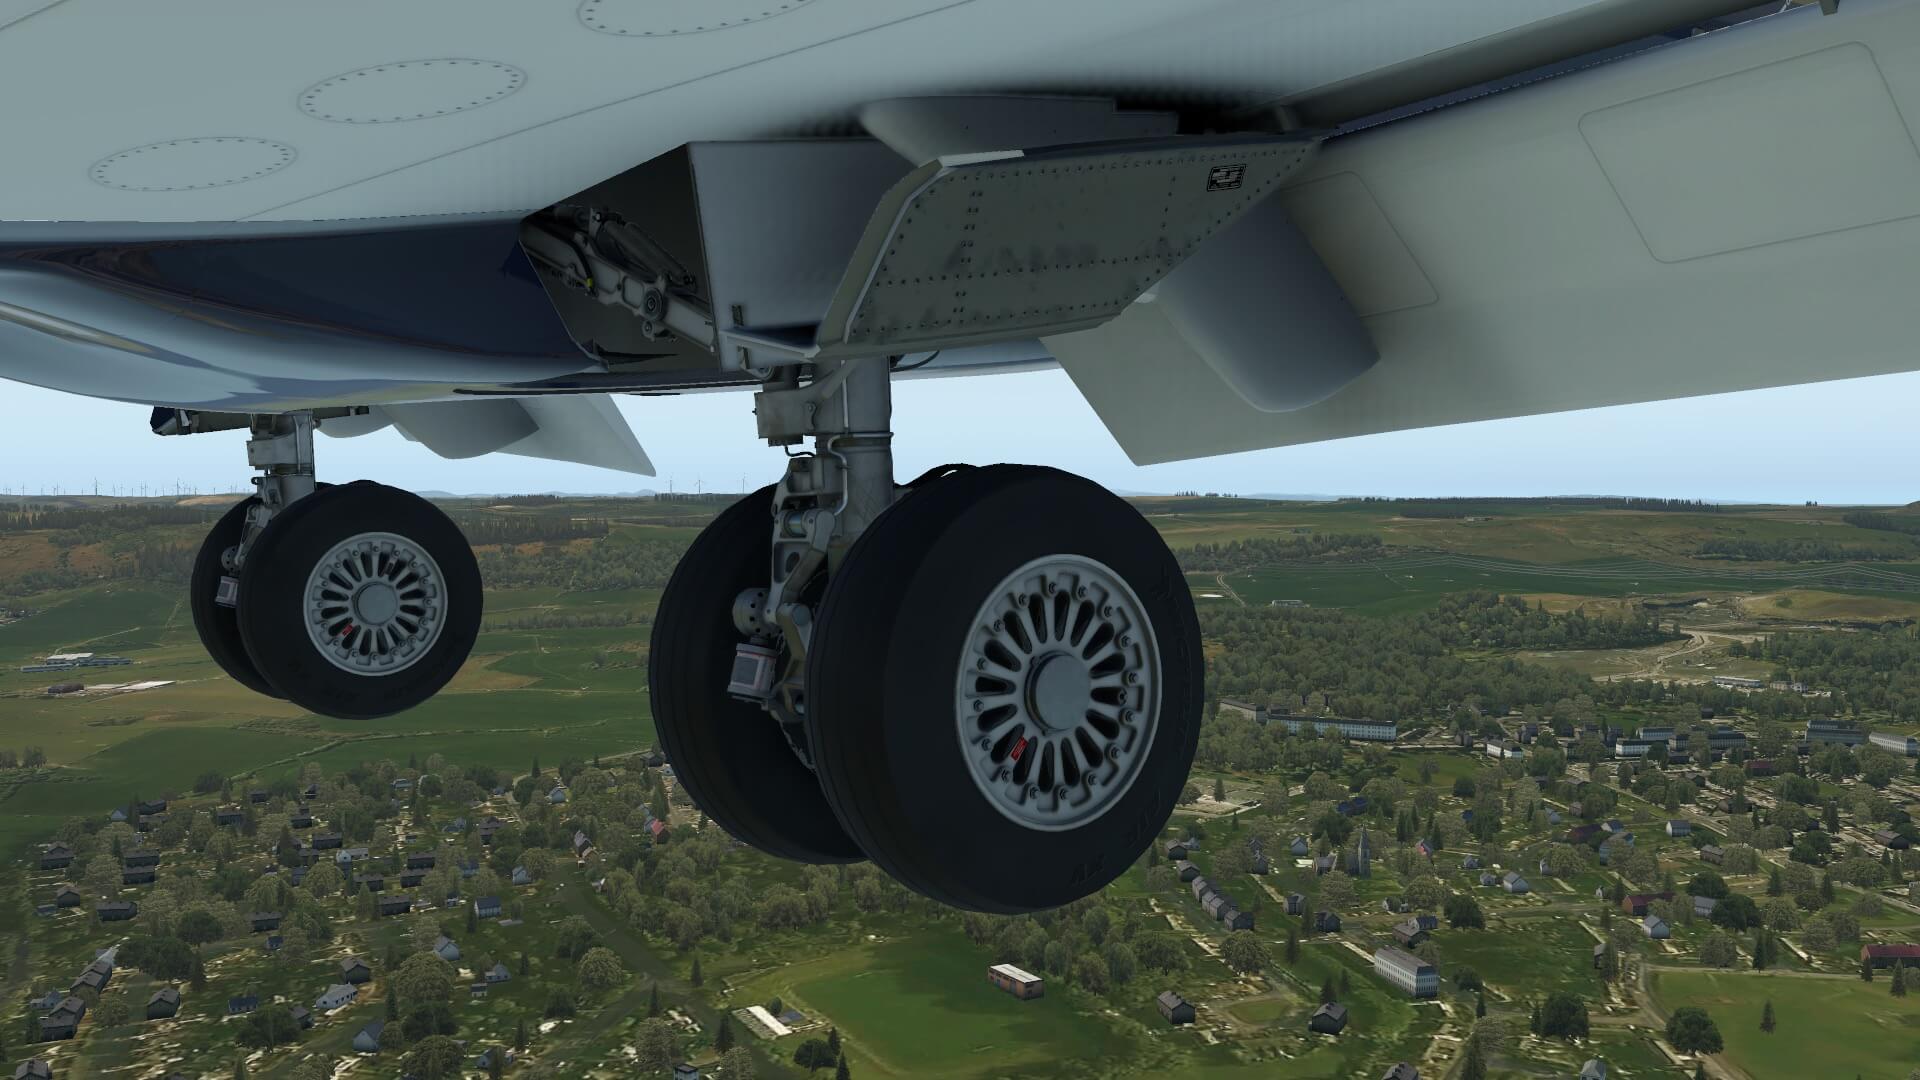
And before I forget it, on my way back to the entrance door, I quickly look to the modeled MLG (Main Landing Gear) with its tires. This is another master piece of quality modeling. The landing gear strut looks very good with eye for all these tiny details like the hydraulic lines, the electrical conduit, dirt and weathering, the torque links with the shimmy damper, but also the inner strut from the MLG into the wheel well is modeled with many details. Clearly you can see the hydraulic lines, the actuator, the bungee springs and I even I believe I can spot the down-lock proximity sensors. Awesome!


I think I’ve got it all. Seen almost all parts of the overall very well modeled CRJ 700 which is for such a medium size aircraft, a masterpiece.
Virtual Cabin and Virtual Cockpit
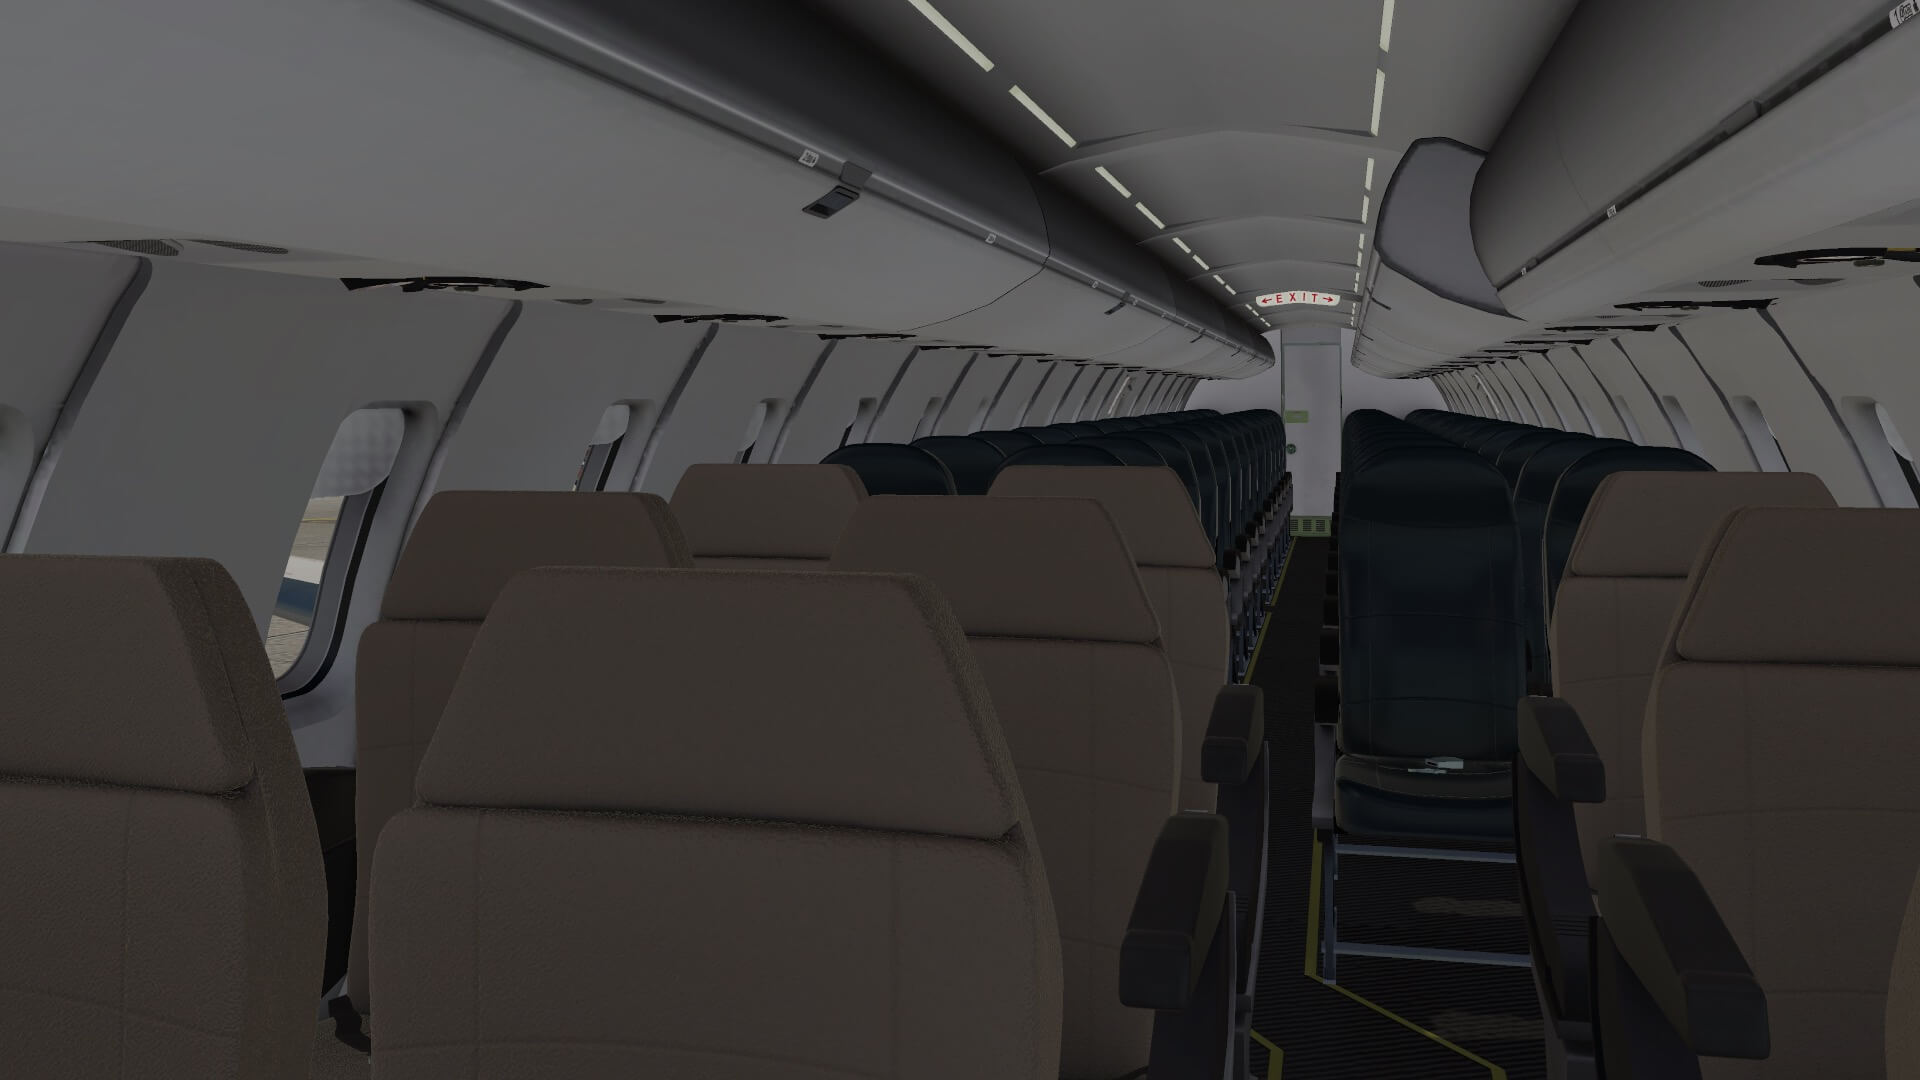
Via the FWD entrance stair I enter the modeled virtual cabin and oh oh my goodness, this is all modeled with great precision and so many details are included, but not only that, decals are again, all sharp. The entrance or galley / pantry is done with eye for many tiny details. I see the ovens, coffeemakers, heaters, the well modeled interior walls and ceiling as well as the service door inner panel with all levers and indications which is also the case with the entrance passenger stair which I described before. But there’s of course much more. Facing towards the cockpit wall you find the potable water system control panel and although nothing is simulated, it’s all done with great precision and the text and decals are, again, razor sharp. Gorgeous!
From the pantry you can open the animated cockpit door and enter the cockpit or you turn the other way into the virtual cabin. Walking into the cabin it seems many things are animated, but above that, many polygons are used to give the overall cabin a look as “it look that is as real as it gets”. The window blinds are all functional and therefore animated to position them to the full close, full open or any other position. Logically, this is the same when you look to the fuselage windows from the outside.
I personally find the sliders a bit bleach, but that could be me. Anyway, when you are at the far end the cabin, you open the lavatory door or just toilet and again, I’m blown away. A fully modeled interior. Ok, the lavatory flush button or the water tap aren’t working – just kidding – but what is left in the lavatory is of a high 3D modeling quality. It seems, what I’ve seen from Andy’s review, the same quality level as can be found with the FlyJSim Dash NextGen.
While walking back to the FWD pantry, I noticed that the folding tables for the applicable seats aren’t simulated, but to me that’s not an issue. How often are you eating in the virtual cabin, right? Before I enter the modeled 3D cockpit, I would like to highlight two other things. I noticed that AD Simulations included an animated extendable and folding attendant seat and I’m very happy to see that the service door, located in the FWD pantry right-hand side, is not only modeled as it is in real, but the panel comes full with scratches, as it is also in real too. Yes, that makes me day “great”.
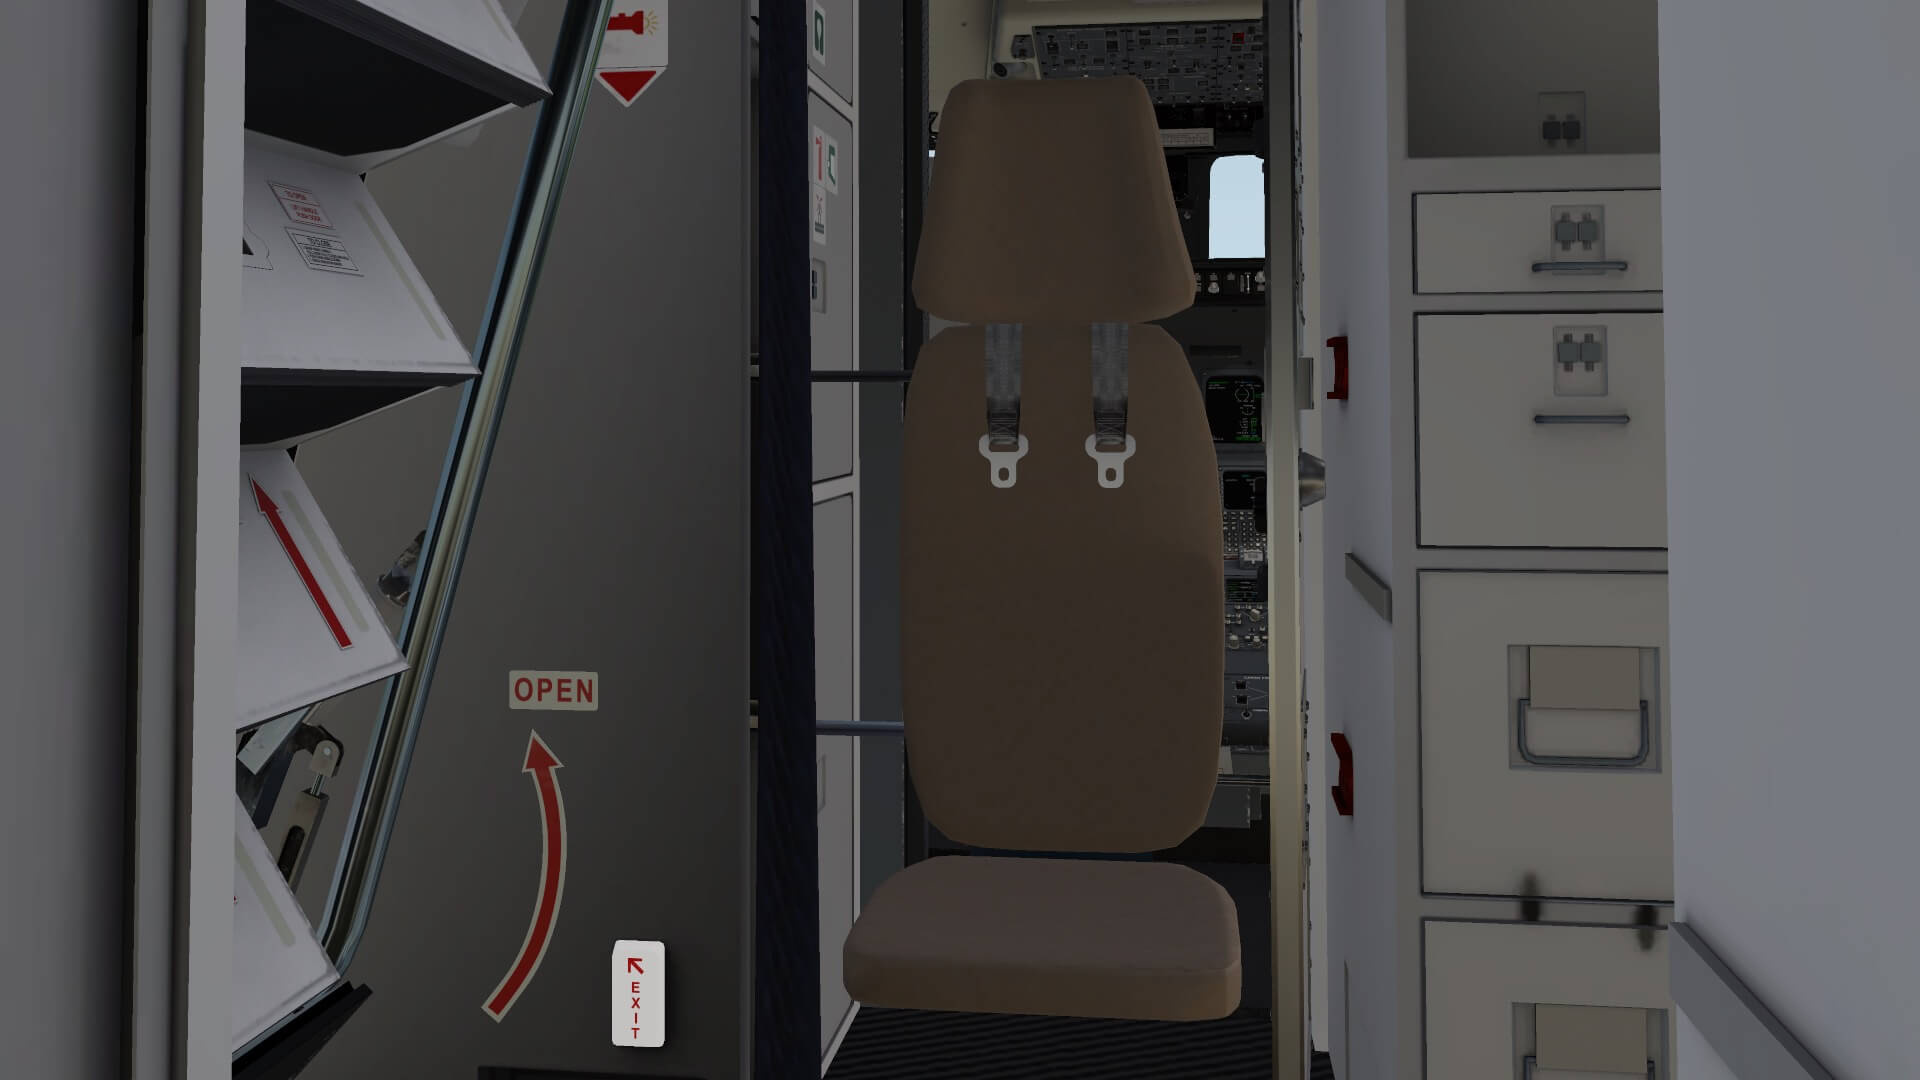


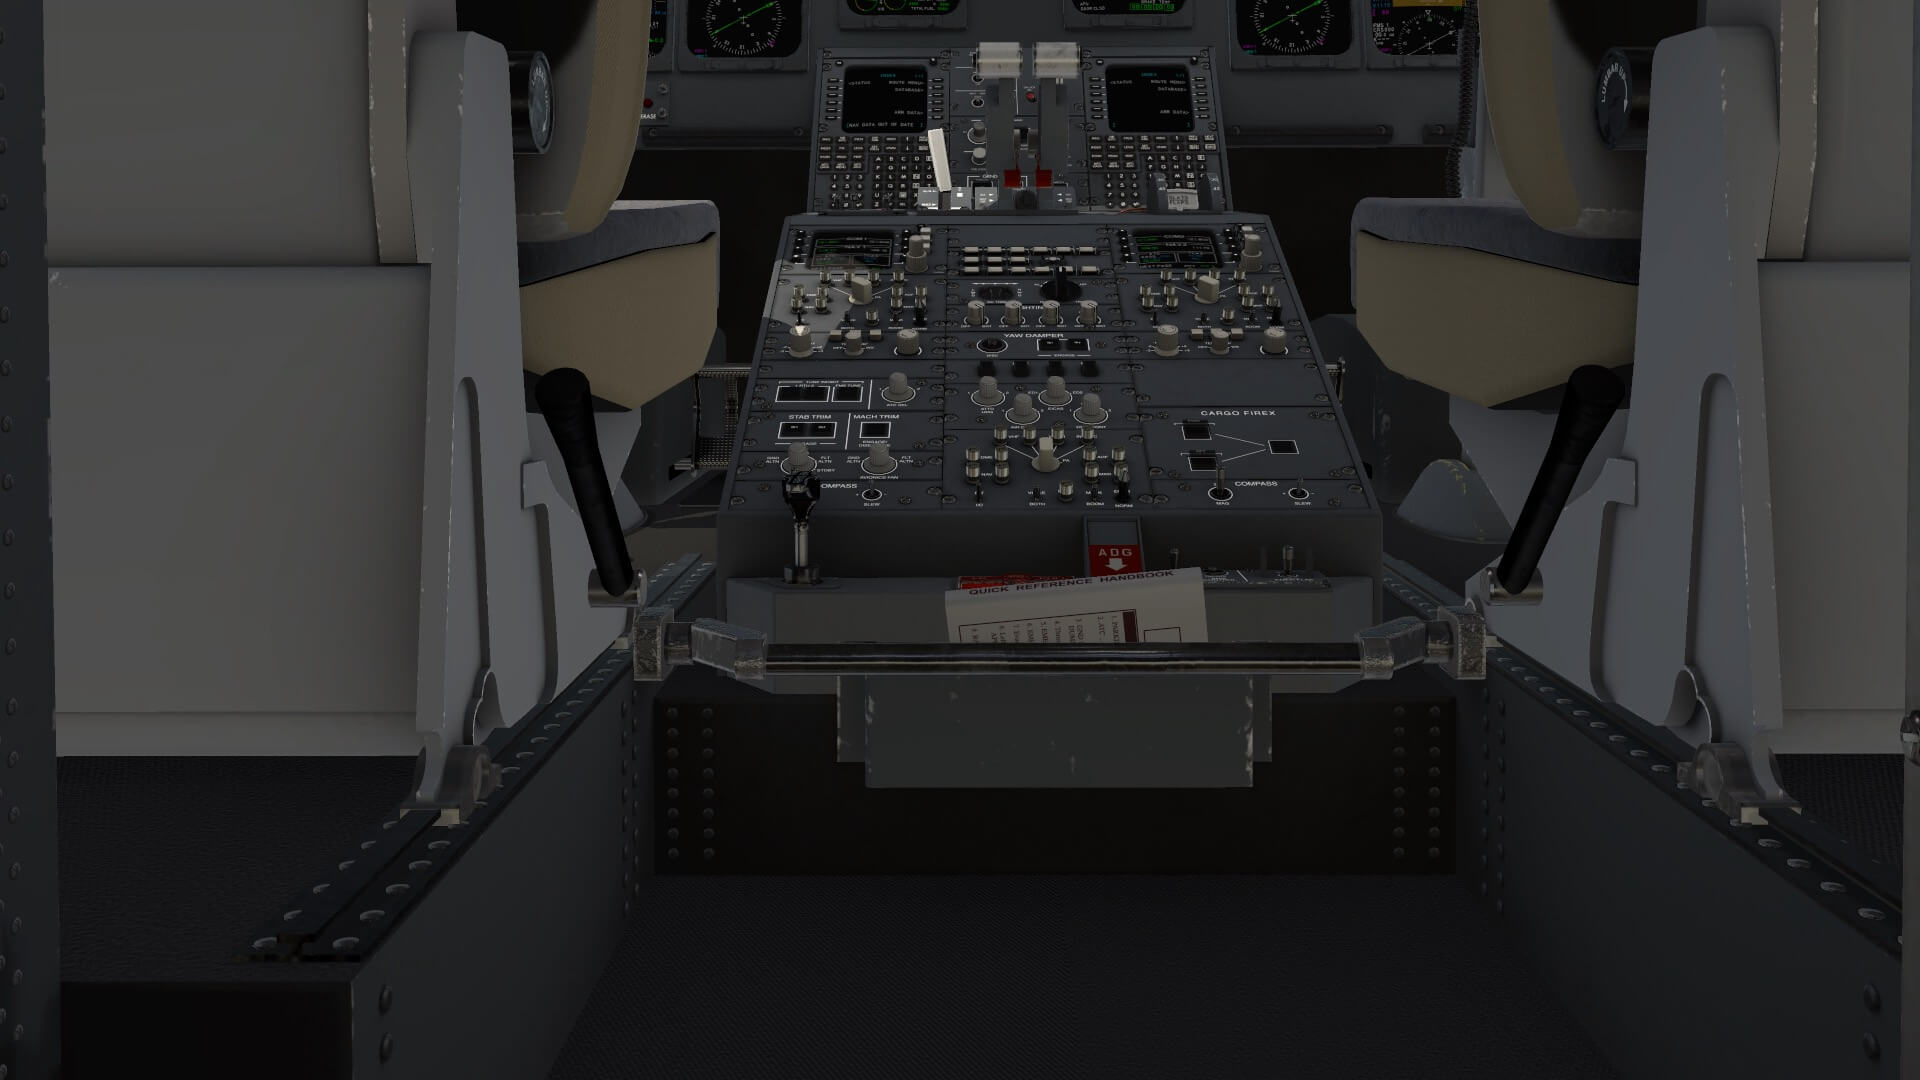
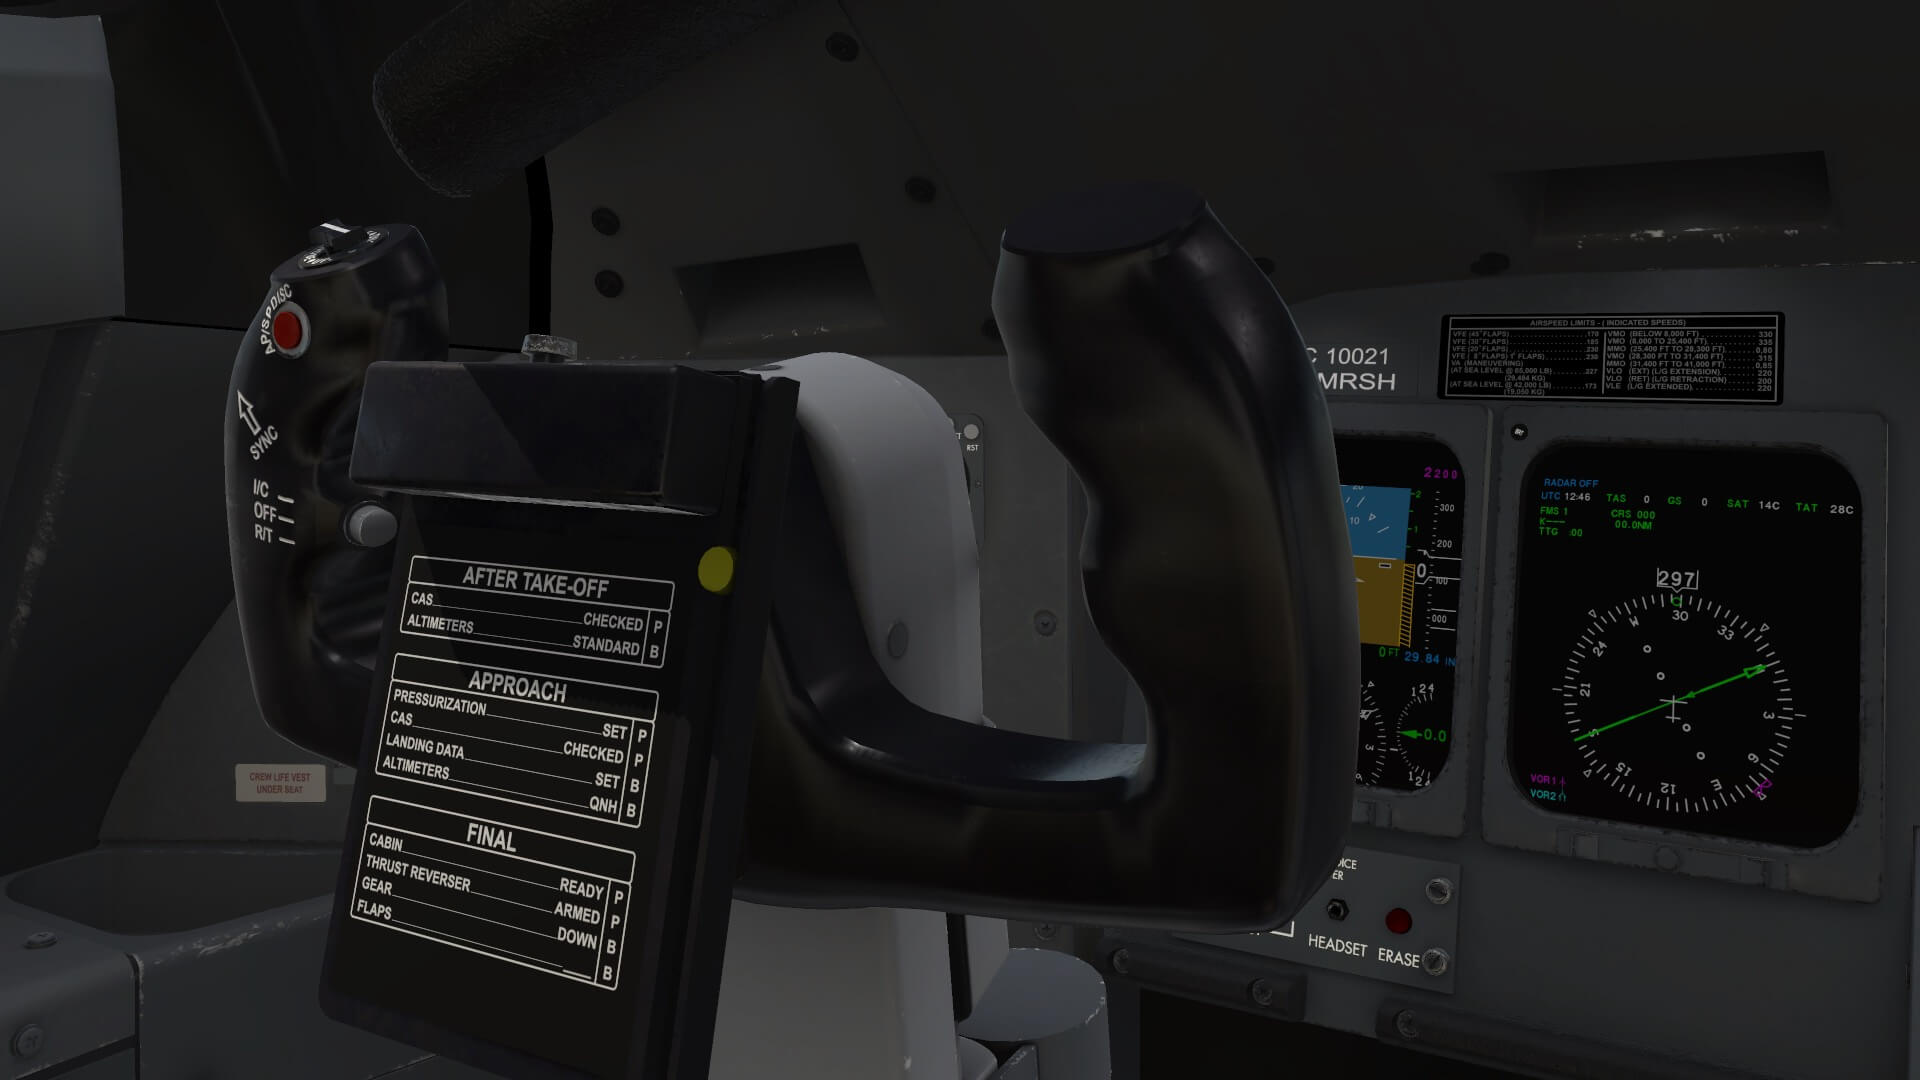
When you and I enter the modeled 3D cockpit via the FWD pantry you will be impressed too, I’m sure about that. The CRJ700 and most likely the other real CRJ models too, have a small cockpit. The space is limited, the pilot seats are, when moved to the fully AFT position, almost against the wall, but it stays a small cockpit. And yes, the CAPT and FO pilot seats can be moved forward and aft, so these are fully animated which is also applicable for the arm rests.
And yes, many of you will ask if these animations are all needed, but that’s also a personal matter. The same with another beautiful animation. The sliding pilot blinds and of course, moving these blinds down. Very nicely done. I can’t say anything else.

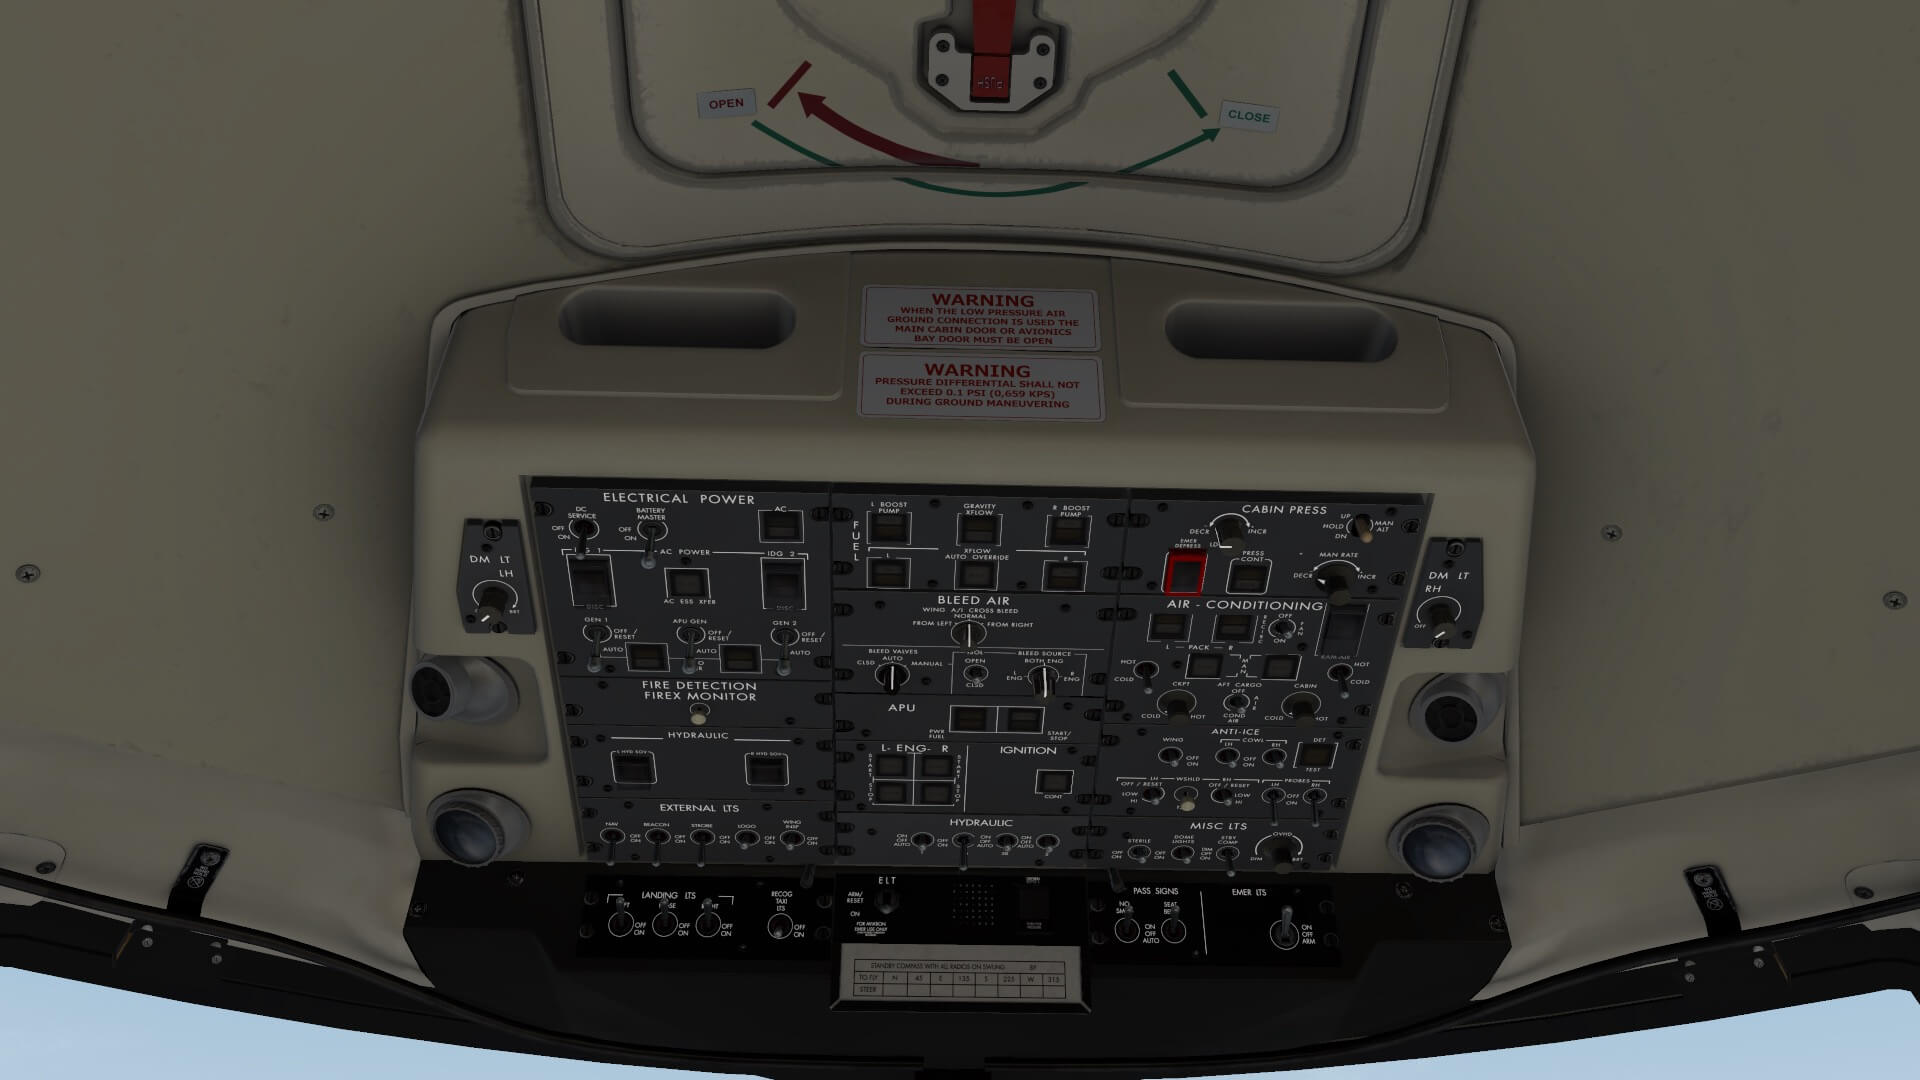
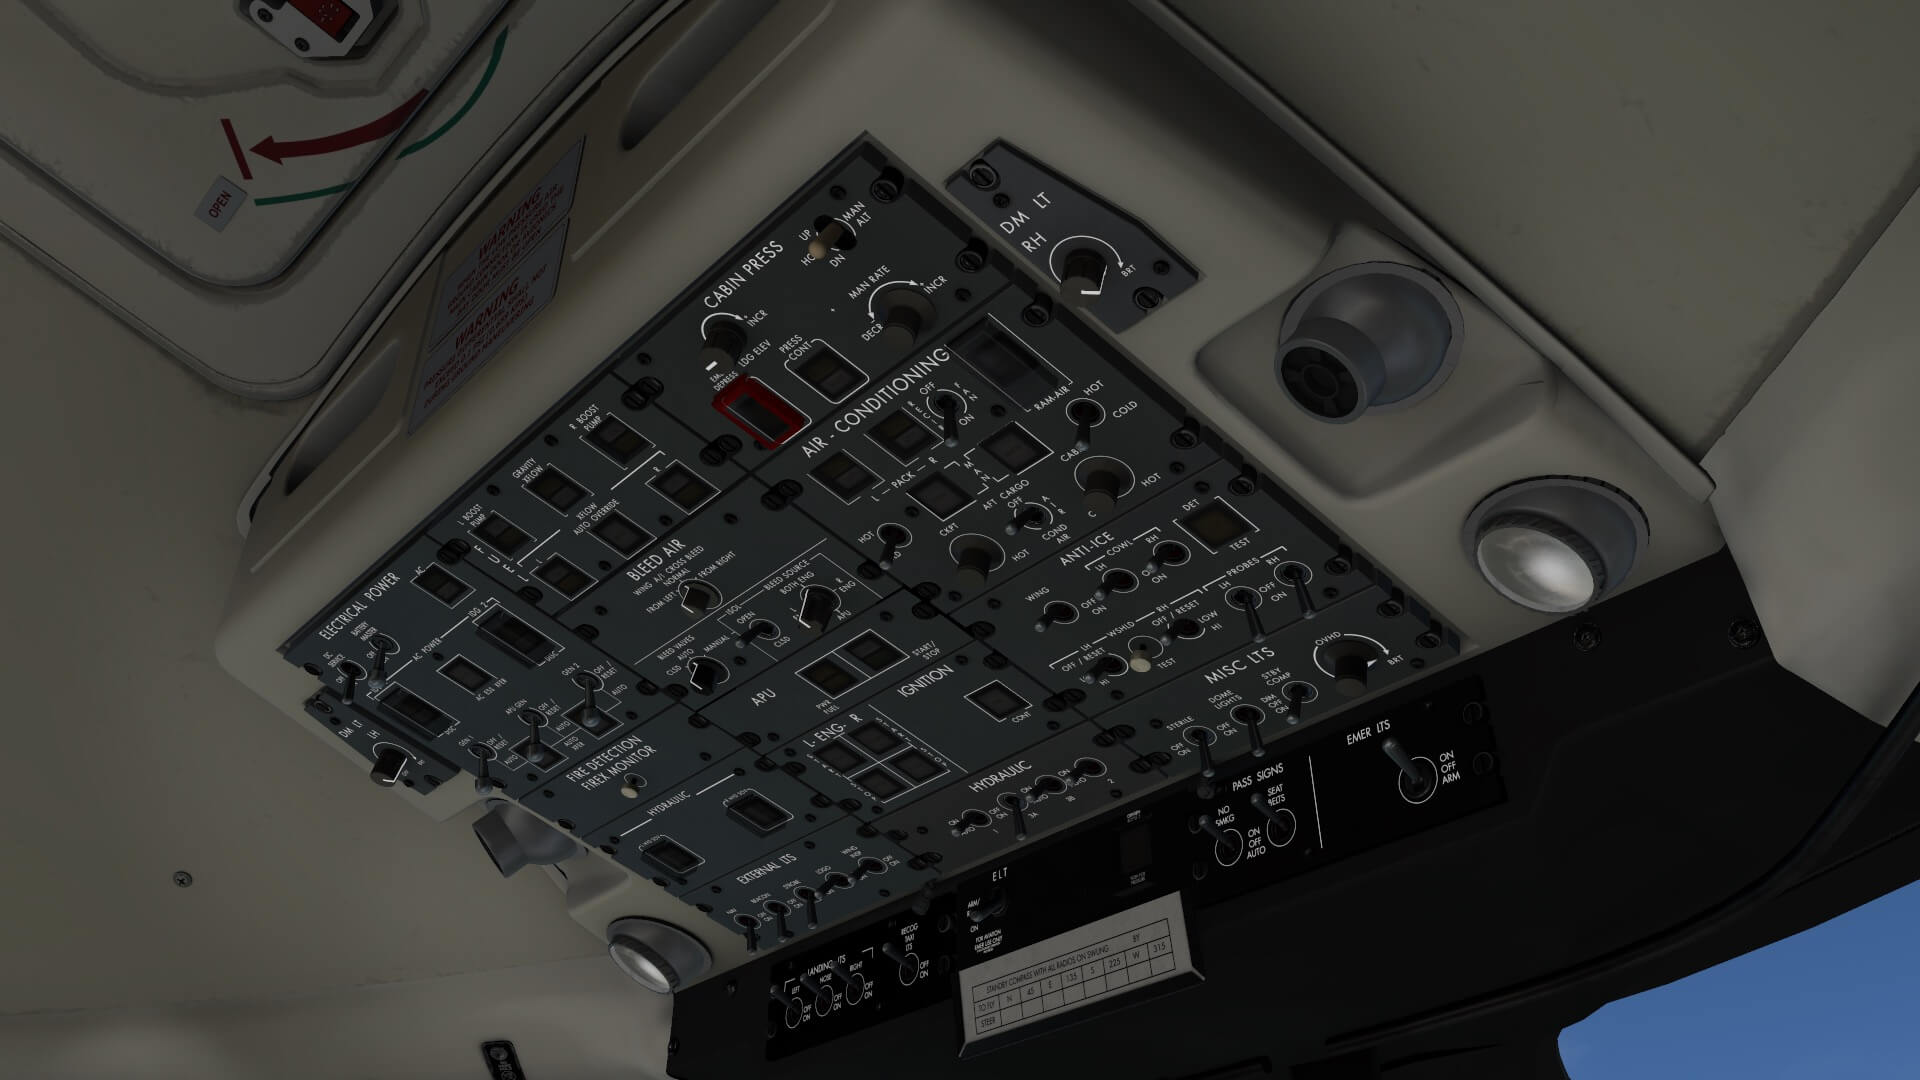
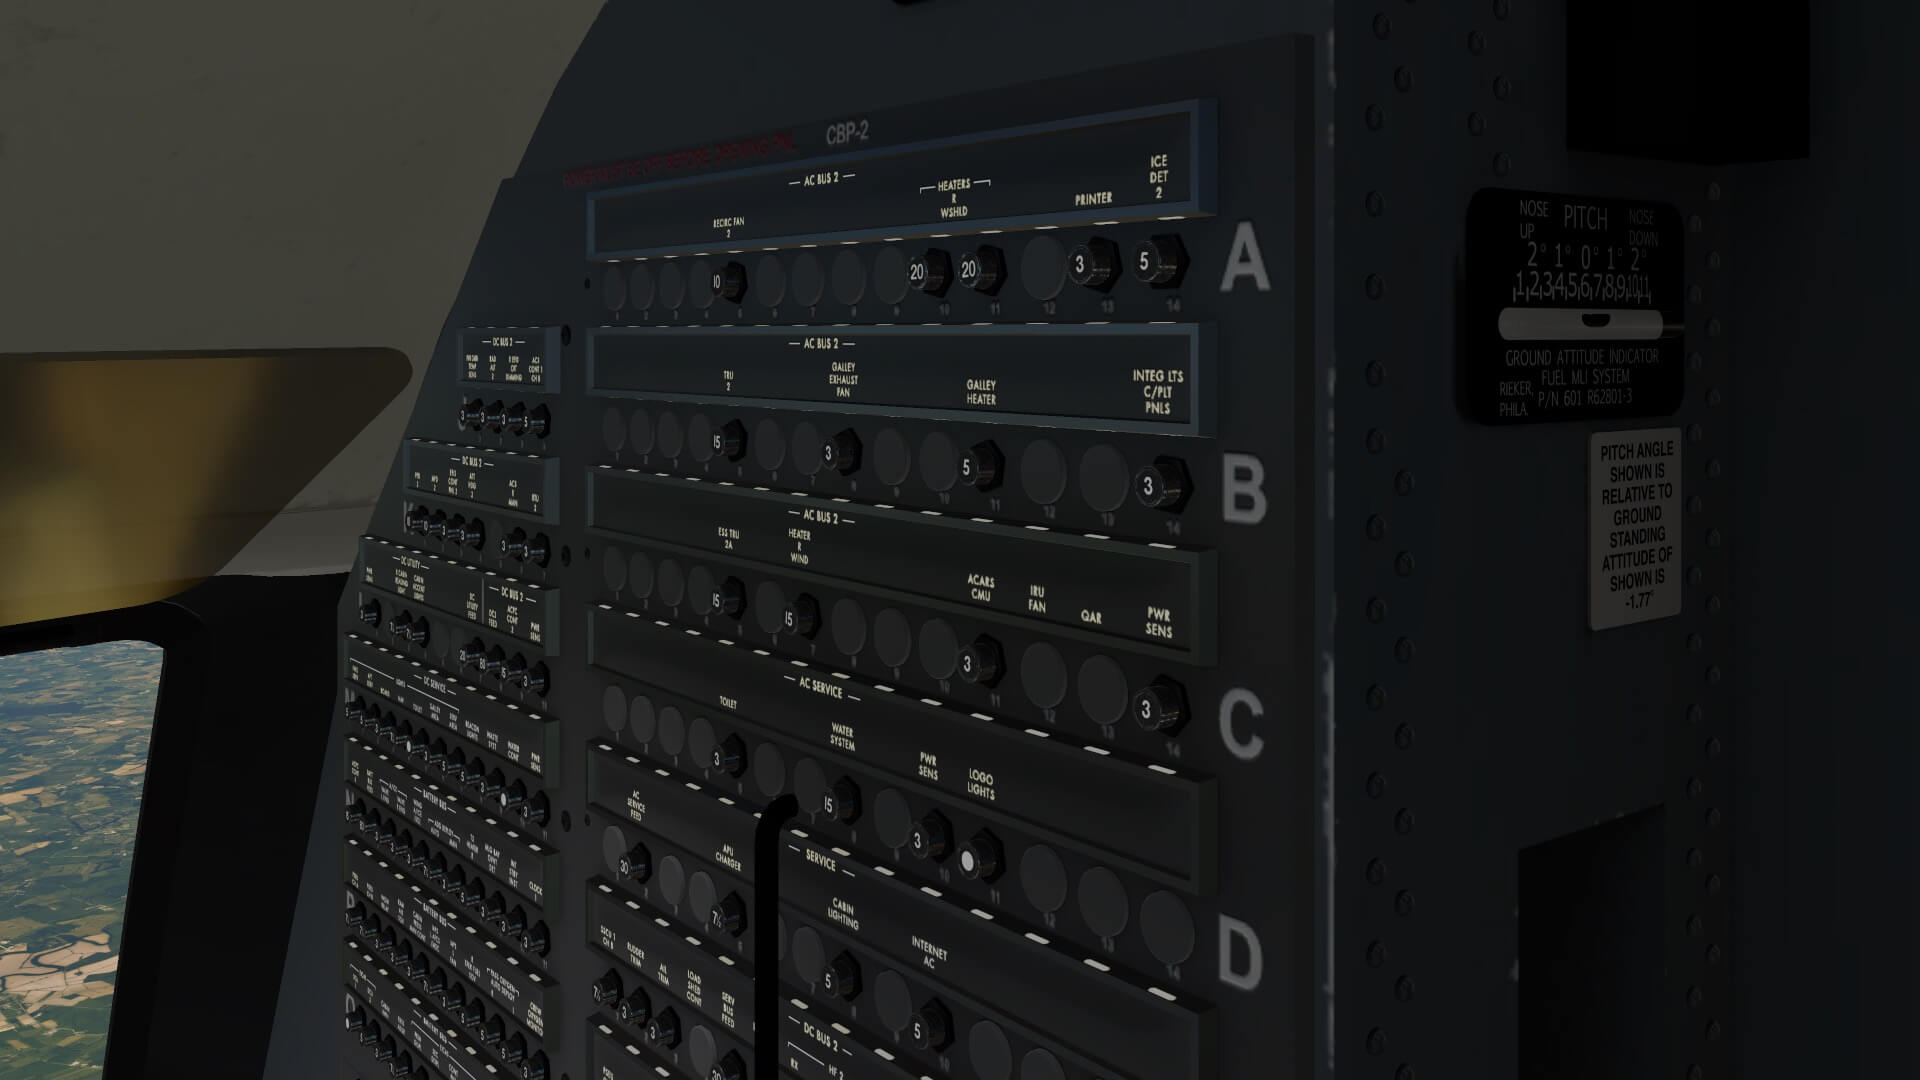
But there’s more. I’m happy to say and to see that the AD Simulation 3D modeling team added a lot of weathering and scratches to the panels or display. That said, some parts are less weathered while other parts are more worn out or more used. And believe it or not, panel text, indicators, switches, selector knobs, lighting, pushbutton switches and so on, it’s modeled with a lot of love! And no, the circuit breakers on the rear panels aren’t simulated nor that the manuals you see around in the modeled 3D cockpit aren’t animated too. But the sidewalls with briefcases, the Quick Donny oxygen masks, the ceiling, it all has a used look and feel. And no, the overhead EXIT hatch isn’t modeled, but who of you will jump out of this hatch?
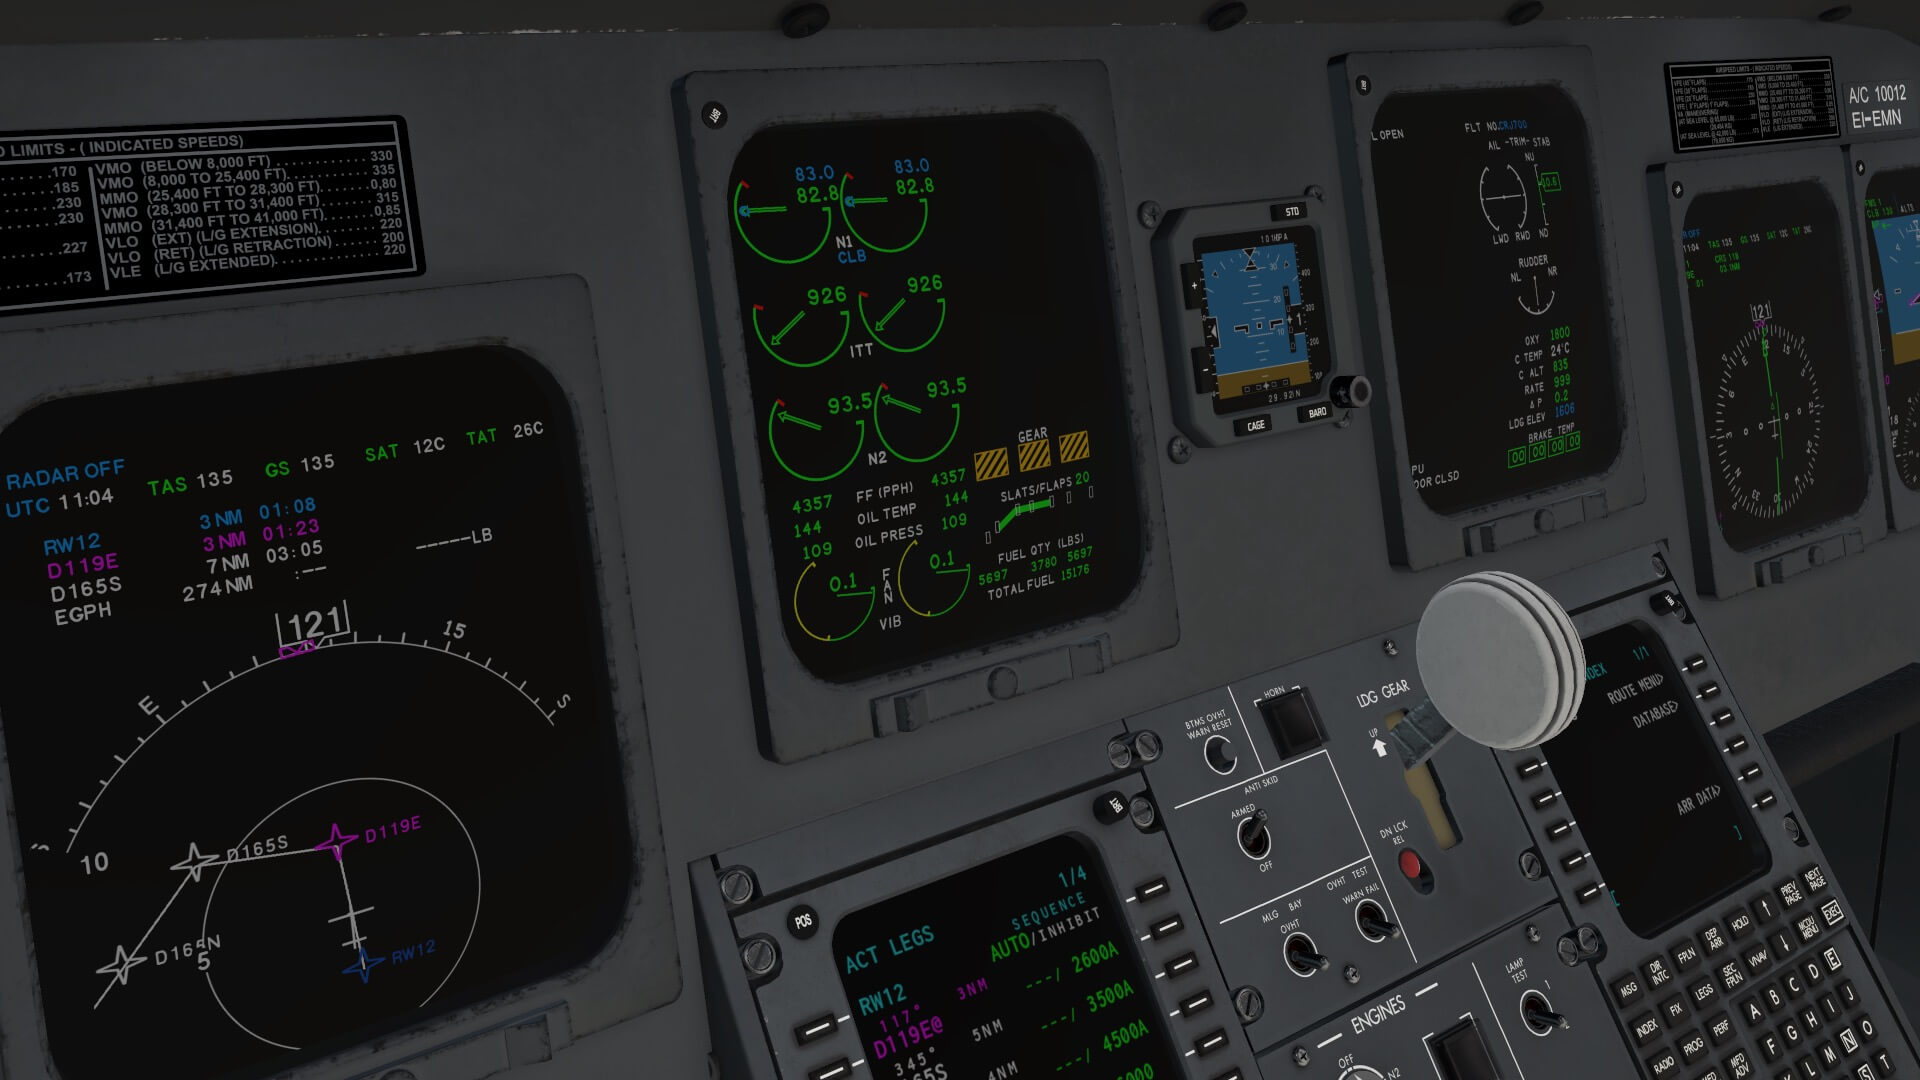
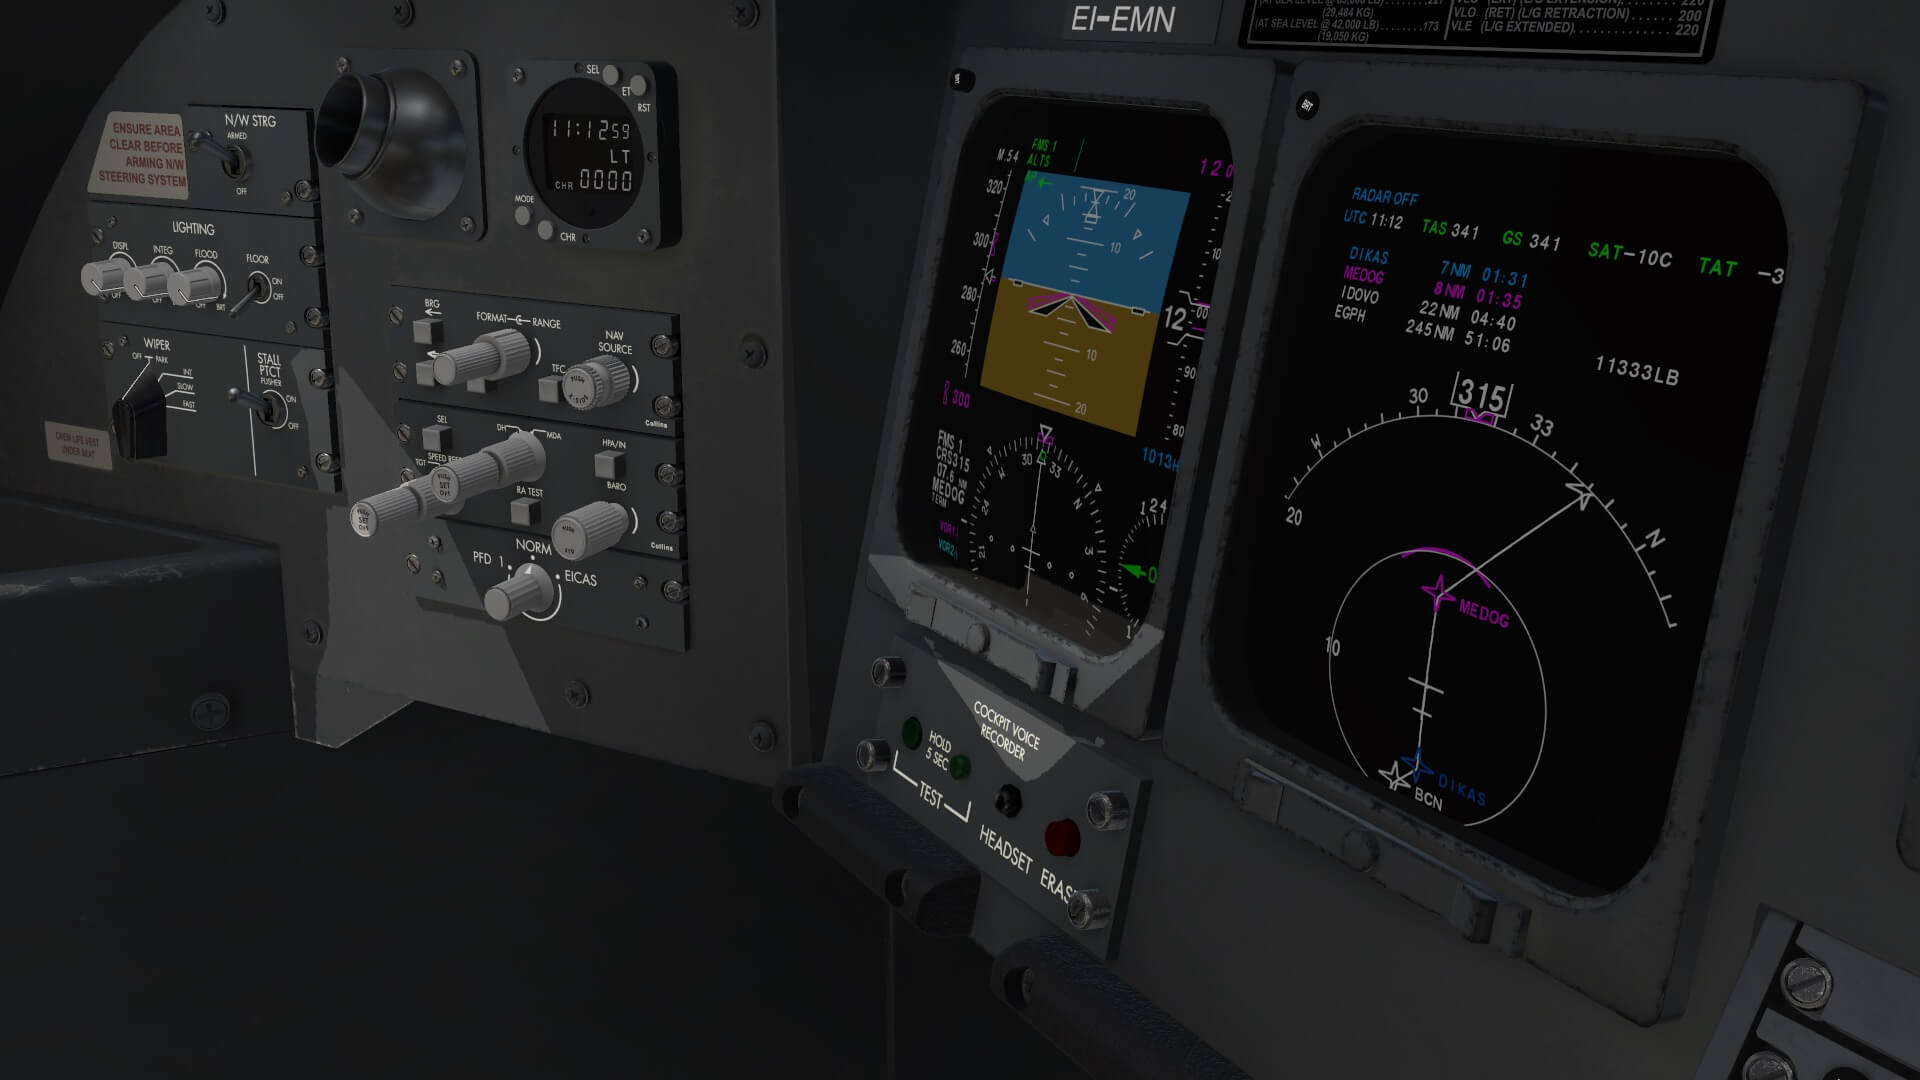
I’m happy to see that the EFIS and EICAS DU’s have 2D popup displays that can be moved to another monitor or for those who have Mac, to an iPad via Sidecar. The display quality of the EFIS and EICAS DU’s is perfect. It’s razor sharp, also when you put your nose on the display. It just stays sharp!
The same is applicable for the popup DUs. I couldn’t find any other instruments or panels that have pop-us. What is nice is the “remodeled” FMS CDU look and feel. The build in 3D FMS CDU is exactly the same as the 2D popup, but for now it’s using the default X-Plane technology, so it’s not yet dedicated developed by the AD Simulation team.
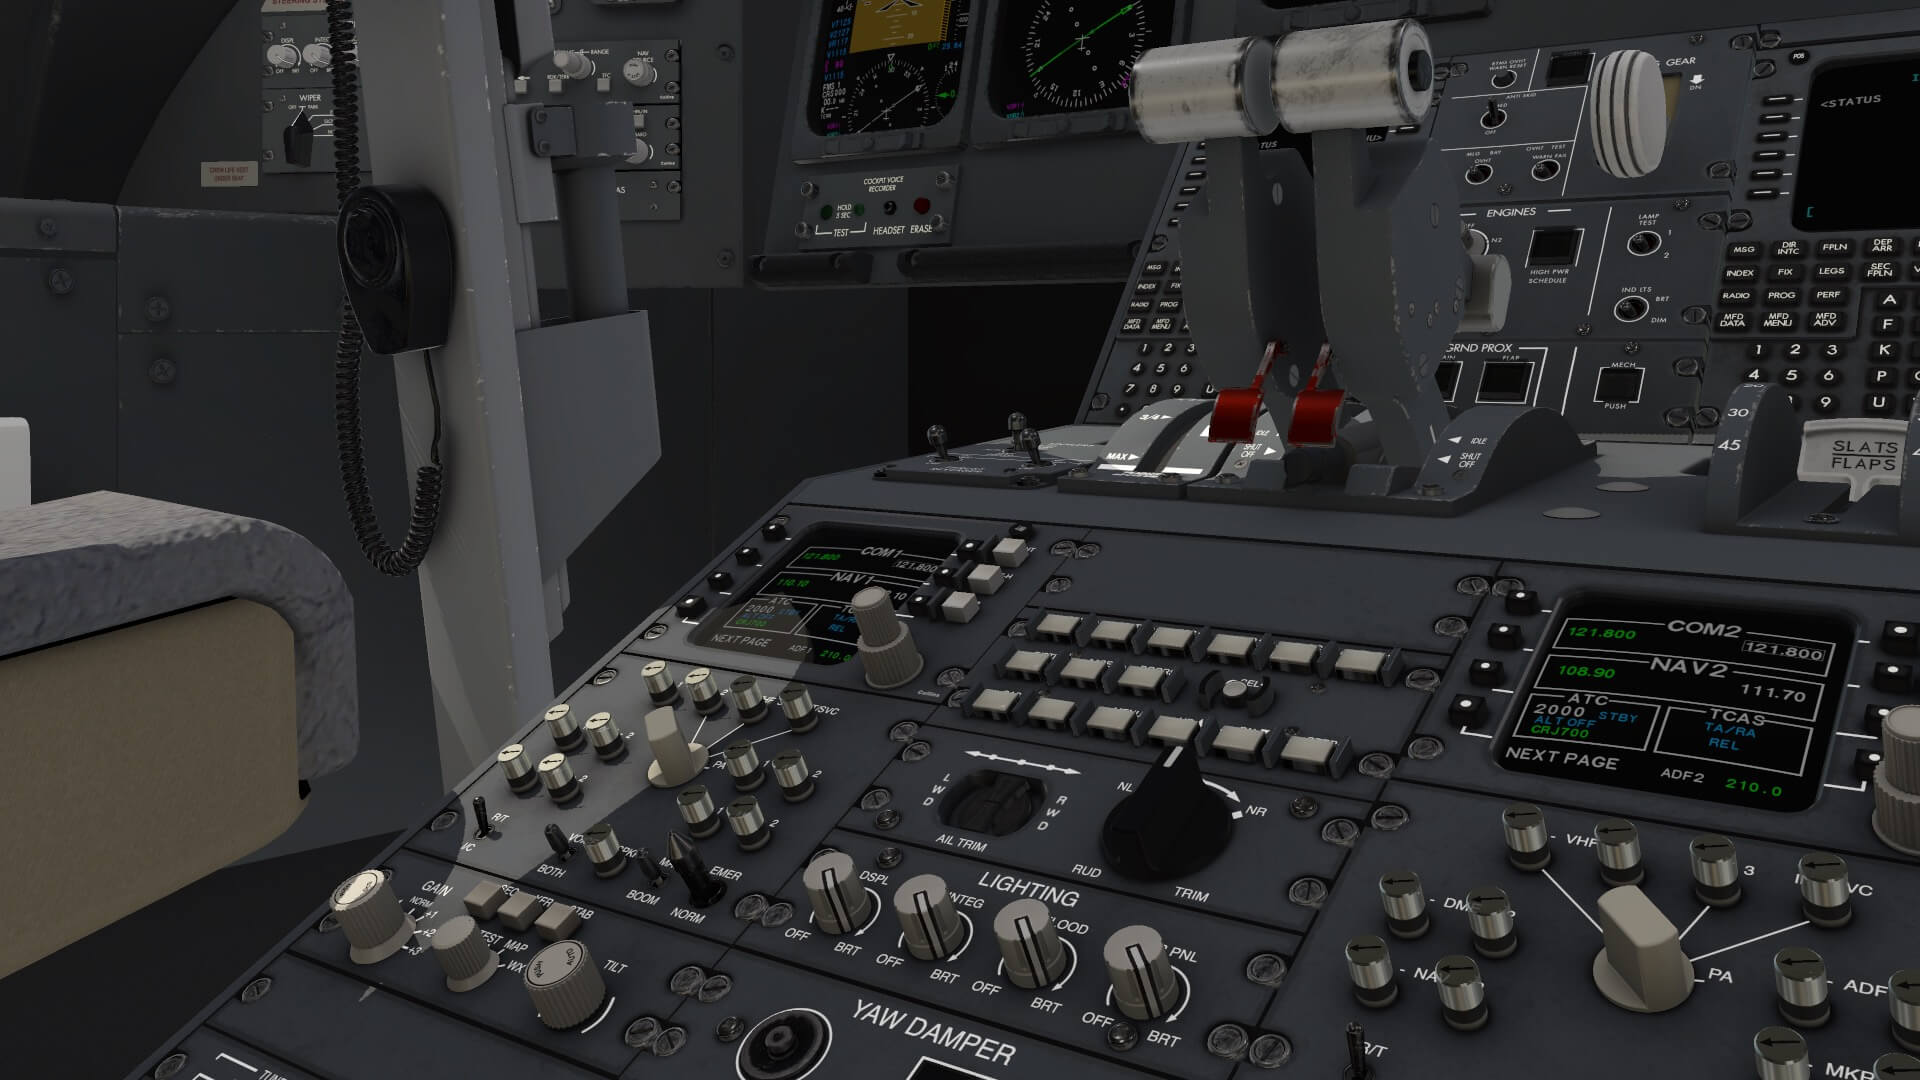


I almost forgot to mention the animated air outlets and movable light units. Turning the middle mouse wheel, you can turn these devices or just by grabbing the unit with your mouse, and move your mouse which in turn will move the light or outlet unit. Don’t ask yourself the question; can you and I open or close the cockpit sliding windows? The answer is, no, you can’t because the real CRJ700 cockpit has no sliding windows, so logically, the modeled one doesn’t have it either. This is it so far. My first impression – more to come when I fly – leaves a beautiful cockpit behind. Up to see how the aircraft systems are modeled.
What systems are modeled and what not?
A couple of aircraft systems that I highlighted before aren’t modeled, but lets put them all together in this section. The following systems aren’t simulated or dedicated modeled by the AD Simulations team, although it must be said that they have the intentions to model these systems in the near future. Although I have access to the real FCOM, I did check every aircraft systems in detail, so I can’t judge if every system is dedicated simulated. All-right, the FMS thus the FMCs and CDUc are using the default Laminar Research FMS.
Time to contact AD Simulations for some additional information. According to Dimitris Koronakis “Currently the CRJ-700 does not have a dedicated flying system, as we are using the X-Plane’s default system with some tweaks, but we do plan on having our own system in the future. As of this writing, February 2022, we currently working on the implementation of our own Electrical system for the plane.”
That said, other dedicated AD Simulations systems are in one way. As time progresses, new updates are released with dedicated developed CRJ700 systems.
The AD Simulations “FMS”
FMS or FMC
Actually, the title is a bit misleading since the current modeled AD Simulations CRJ700 doesn’t have an in-house modeled FMS. This is no secret since the quick guide says “AD Simulations FMS (Flight Management System) functionality is based on X-Plane default FMS. There are two CDUs (Control Display Units) that can show independently configured different screens. AD Simulations CRJ-700 package is using default X-Plane navigation data.”
A small note regarding the constant confusion between FMS and FMC. FMS means the whole system. That said, the real CRJ700 FMS is all the components together which are the two CDUs (Control Display Units), the two FMCs (Flight Management Computers) and the input from the DME (Distance Measuring Equipment) , VOR (VHF Omnidirectional Range), IRS (Inertial Reference System) and GPS (Global Positioning System).
The installed 3D build in FMS CDU (Control Display Unit) is exactly the same as the 2D popup CDU. That sounds so logic, isn’t it, but too often you see in modeled aircraft that the popup (M)CDU is different then the 3D build in (M)CDU. Anyway, that not the case with this AD Simulations CRJ700 CDU.


Since the included FMS CDU is the default X-Plane FMS, it means that the default X-Plane 11 “fms” flight plan format is used. That said, what or which options are there to create and enter a flight plan. You can of course use the FMS CDU to enter waypoint by waypoint or you can use external online or offline programs to create your own flight plan, save it in the X-Planed Output/FMS Plans folder and load the “co-route” flight plan into the CDU.
Flight Plan Programs
For creating a flight plan you’ve got the choice out on many online and offline programs. Let me highlight a couple of these possibilities. First of all, you can use the online website of Routefinder that offers you the possibility to quickly create a flight plan, but this is not in “X-Plane fms” format. Then you’ve got the well known real flight planning program FlightAware, but again, this doesn’t allow you to export it to an fms file format and it’s only based on real flight plans.
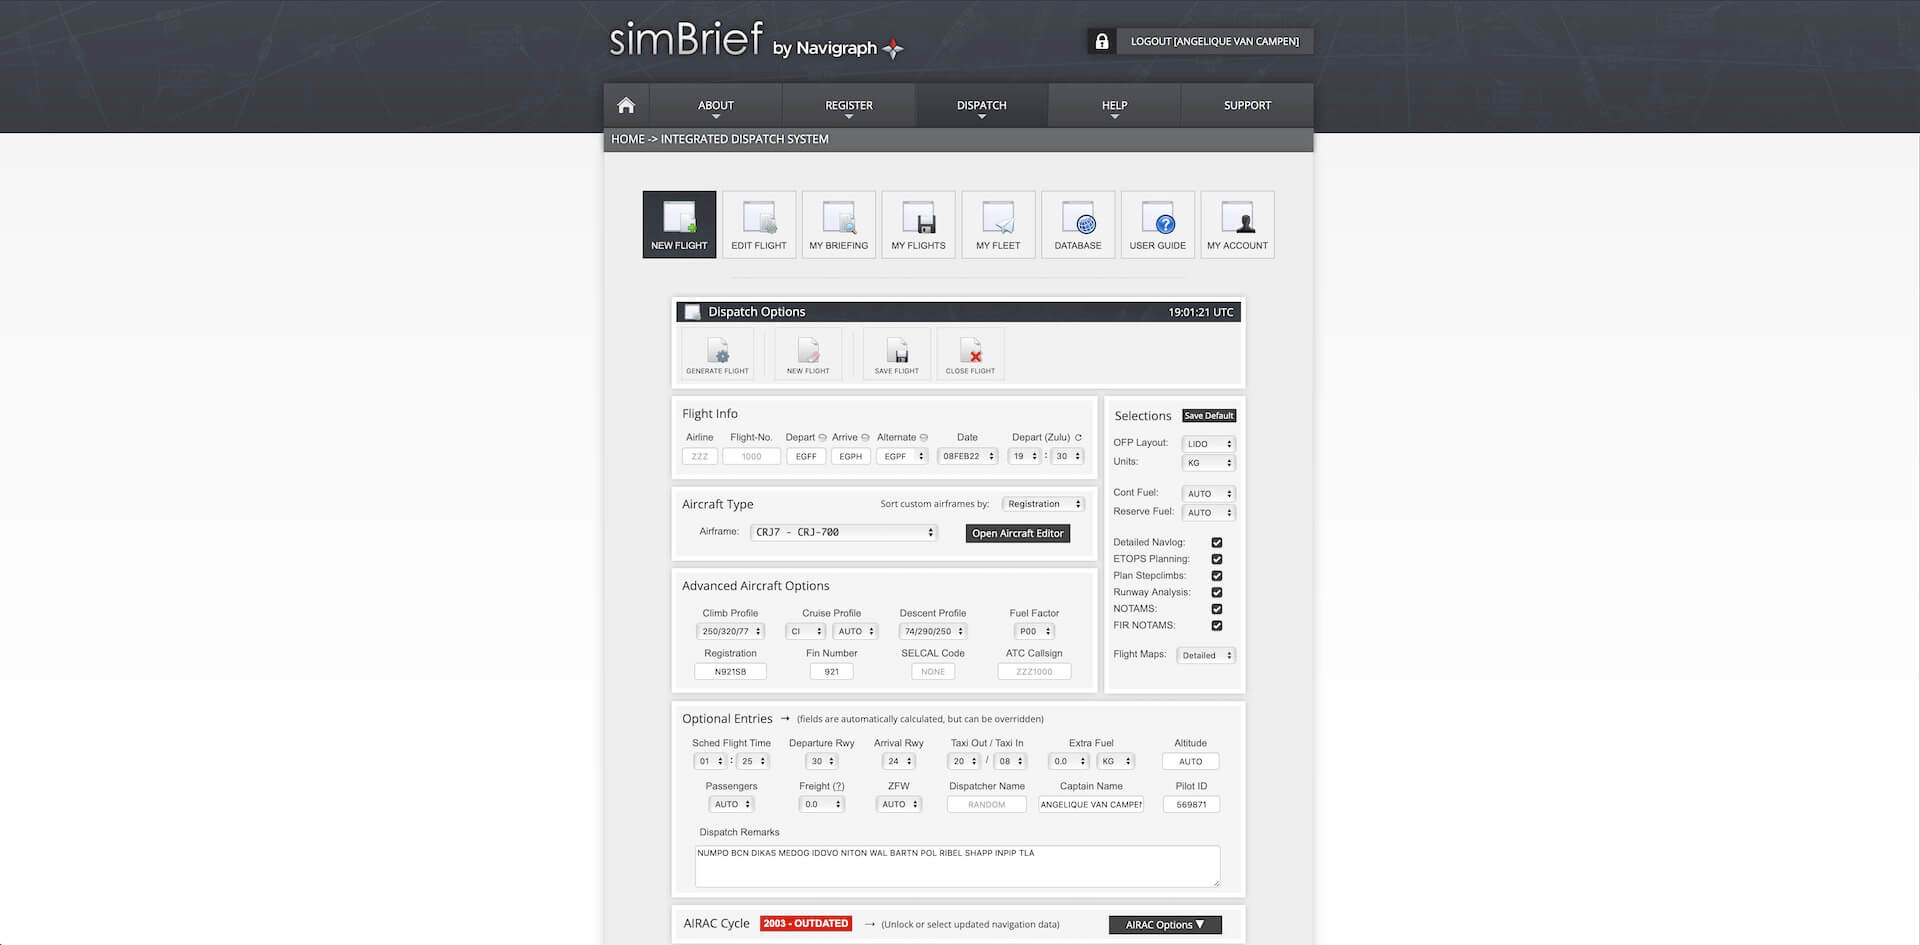
Another very interesting option is simBrief. Although you need an account – which is free – to get access, it comes with a wealth of flight planning information. In case you use SimBrief then you’ll be happy to see that their database offers the different CRJ models which allows you to make realistic flight planning. Worth for those simmers who aren’t aware of it, a Navigraph account is more or less needed to create your flight plans with the latest AIRAC cycle else if uses an old AIRAC cycle.

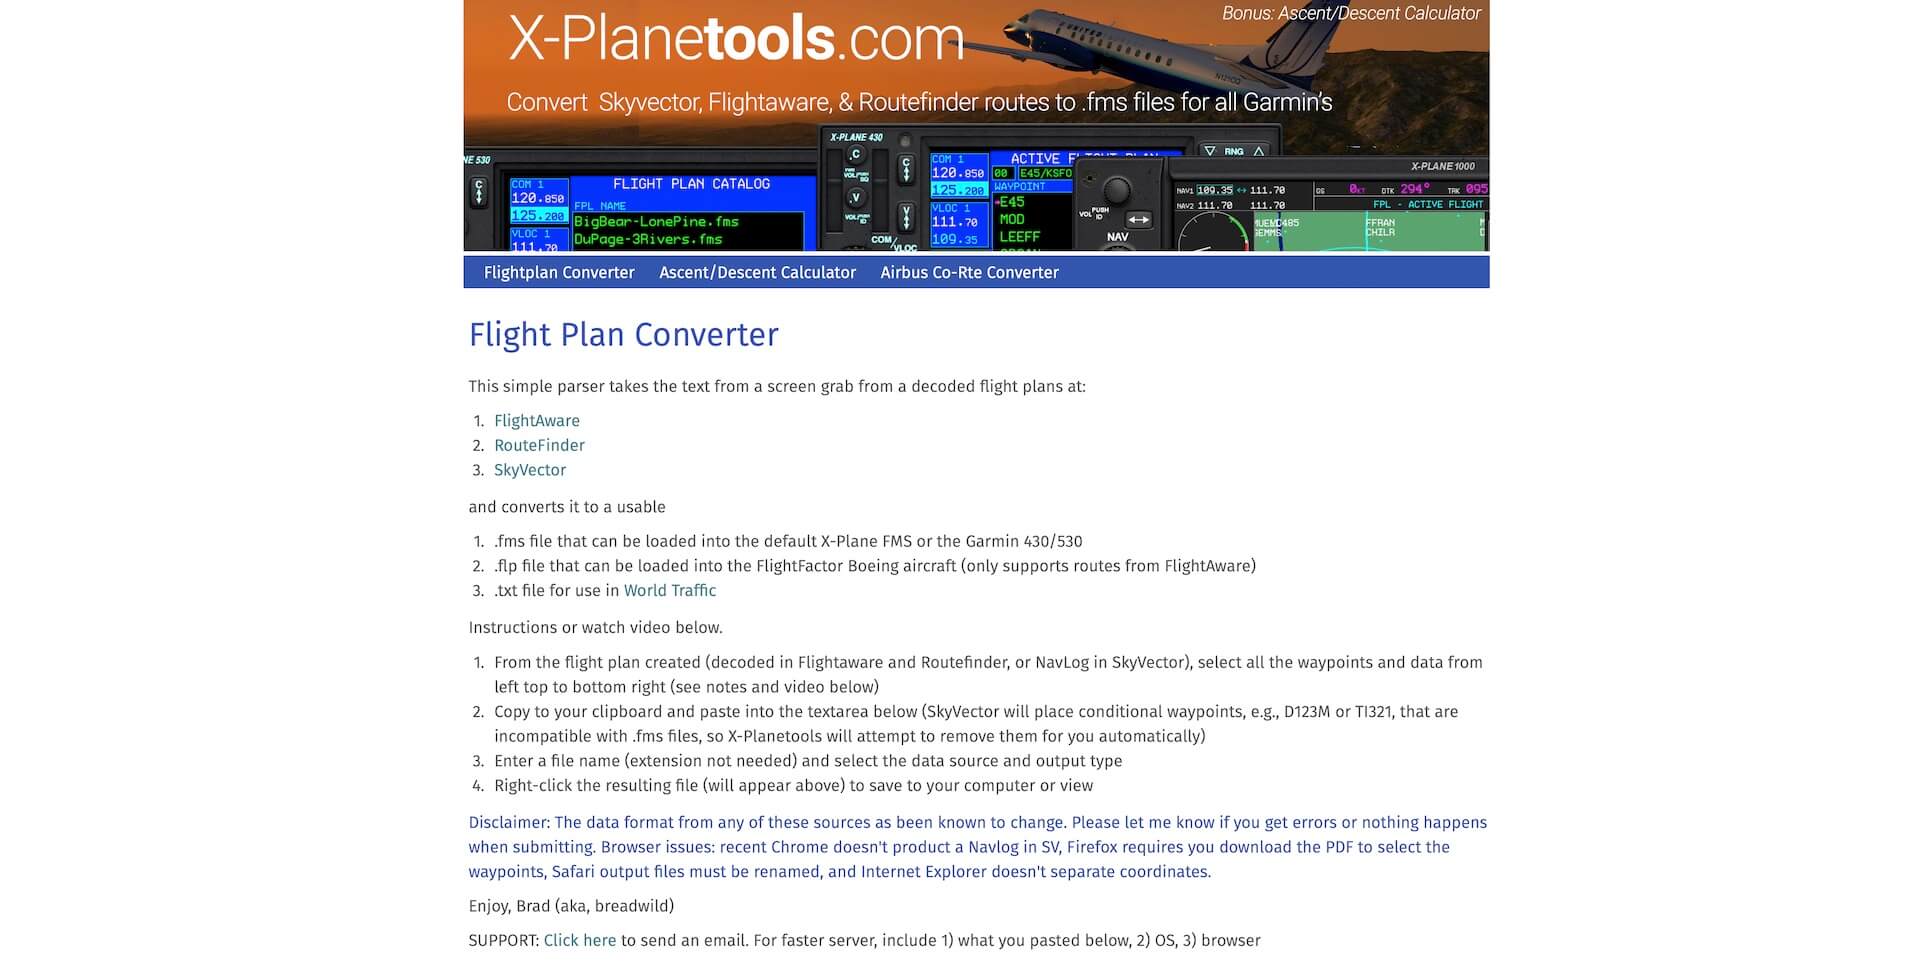
And what about SkyVector?
SkyVector needs when you use it, the online program X-PlaneTools to convert the SkyVector file format to fms, so again a lot of problems on the way, but when you use it in combination with simBrief, then there’s no problem since simBrief can import the SkyVector flight plan and save it as fms format.


Another interesting planning tool that I’m using already for many years is the offline freeware LittleNavMap and I can tell you that it can do much more then just flight planning. It does basically the same as SkyVector, but offers a bit more flexibility. Perhaps most important is that it’s a program that can be downloaded and installed on your Windows PC, Mac computer or Linux computer. It offers many “save as” options including the fms extension from X-Plane 11. One thing to keep in mind is that Little Navmap needs it’s one AIRAC cycle and take care that the AIRAC cycle is the same as the one used in X-Plane.
The only problem is that LittleNavMap has no aircraft performance database installed. Via this link you can download X-Plane related performance files and load them into LNM, but as of this writing, February 2022, there’s no AD Simulation CRJ700 performance file available. You can use instead although this is a slightly different, the Aerosoft MSFS 2020 CRJ700ER. Not perfect, but better something then no performance file at all.
Once you and I have decided which online or offline flight plan program is used, you must save it as “fms” and, as said before, store the flight plan file in the X-Plane 11 Output/FMS Plans folder. When you’ve electrically powered the CRJ700, you can load the flight plan in the FMS CDU, but one thing I would like to remind you; take care that the flight plan you created uses the same AIRAC cycle as the one in your X-Plane 11 else you get during loading an error message. When you use for example Little NavMap, then you need to update the dedicated AIRAC cycle. When you use SimBrief, then you always need an Navigraph account since these programs are linked together. Without a Navigraph account, you can still create flight plans, but with an old AIRAC cycle.
Flight Preparations EGFF – EGPH
Introduction
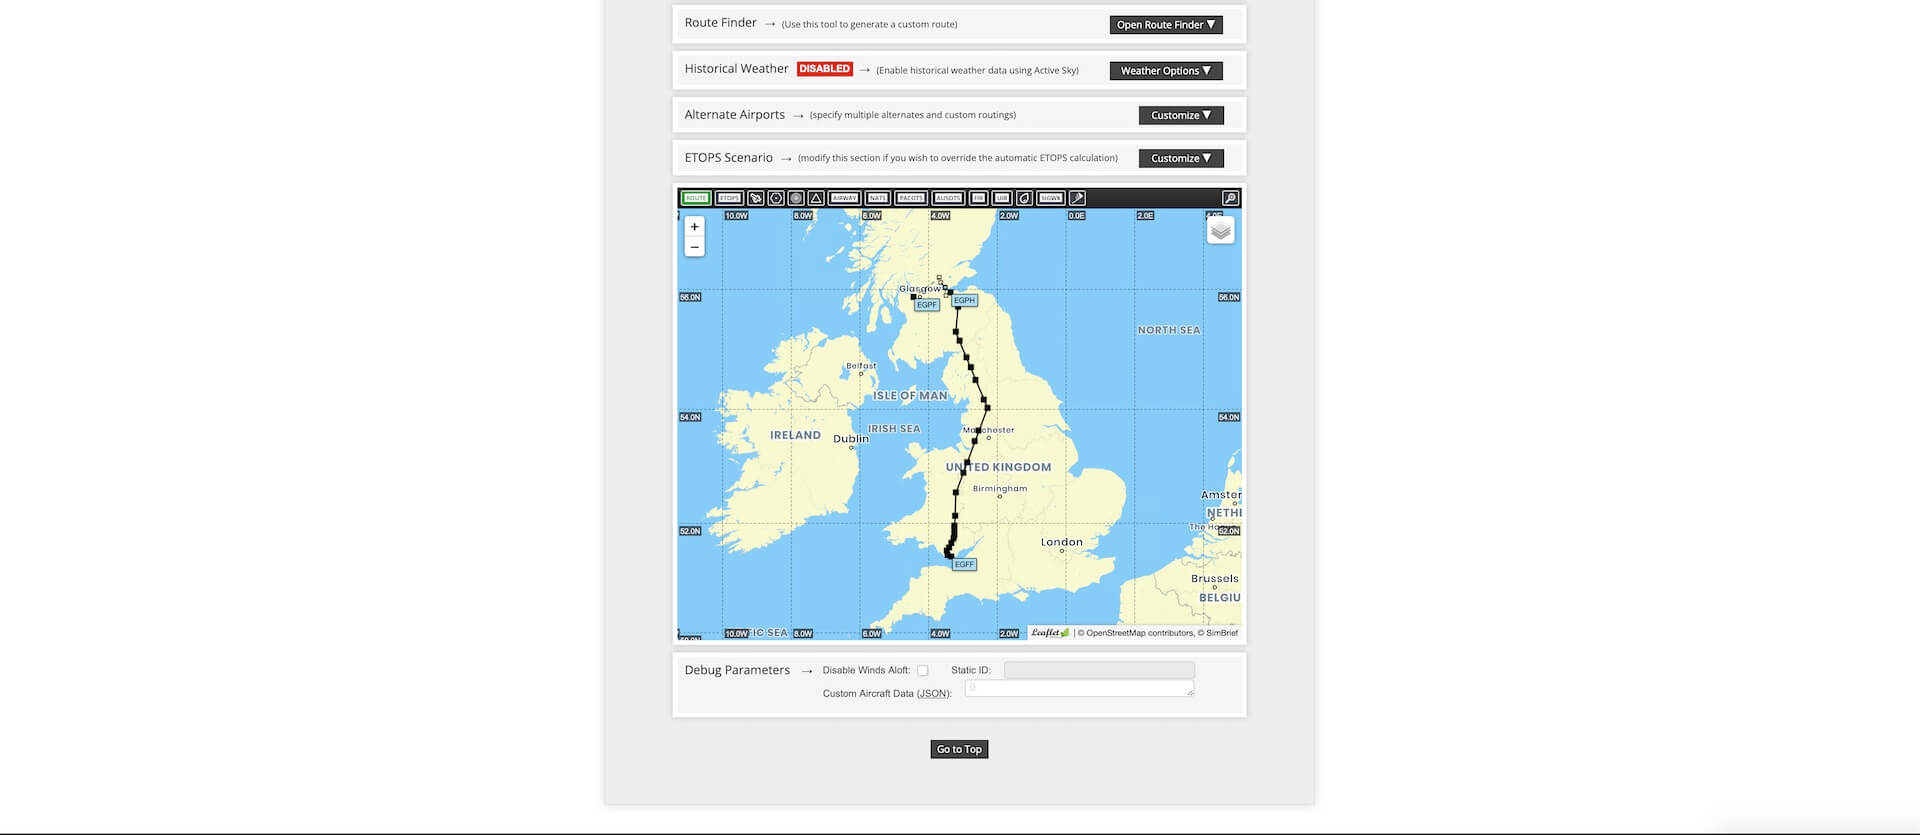
For many reasons I’ve decided to go for a British test flight and as you can see in the title, it will be a flight from Cardiff Airport (in Welsh Maes Awyr Caerdydd – EGFF) to Edinburgh Airport (EGPH) with a possibility to divert to Glasgow International Airport (EGPF), using ortho ground textures from Orbx GB TrueEarth.
As mentioned and explained in the previous section, I use Little Navmap to plan my flight plan. I could also look for a real flight plan, but I want to create my own and add a bit scenic route in it. That said, I export my LNM file and save it as “Export Flight Plan as X-Plane 11”, found via the LNM File menu. I’ve said it before, take care that the AIRAC cycle in LNM is the same as the one in X-Plane else you get an error message while loading the aircraft.
The flight will have a cruising level of FL210 while the overall distance is approximately 320NM. The flight plan looks as follows: EGFF – NUMBO – BCN (VOR/DME Brecon – 117.45) – DIKAS – MEDOG – IDOVO – NITON – WAL (VOR/DME Wallasey – 114.10) – BARTN – POL (VOR/DME Pole Hill – 112.10) – RIBEL – SHAPP – INPIP – TLA (VOR/DME Talla – 113.80) – EGPH.

Clist or XChecklist
For using the clist file from X-Plane.Org user GoofyJP version 1.5 you actually need the X-Plane plugin XChecklist from X-Plane.Org user sparker. And, when you’re not familiar with this XChecklist plugin, you can also use the AD Simulations checklist and tutorial as previously described.
Anyway, just download these two packages, unzip them and place the clist file in the root of the CRJ700 folder and the XChecklist plugin in the X-Plane Resources/plugins folder. When at start-up and after loading the CRJ700 you don’t see or hear anything, then check X-Plane menu plugins and seek for XChecklist and start the checklist from here.


To wrap it up; the AD Simulations checklist and the quick guide are OK, but I must admit that the clist with XChecklist is also a serious option to use and to learn the modeled CRJ700 since it goes much deeper into the aircraft systems. Either way is OK, so it’s at the end also your preference. Want to see all the steps to perform in real? Then check out these SkyWest checklist flow movies: CAPT flow 1, CAPT flow 2 and CAPT flow 3.
Using the Flight Plan
As mentioned in the previous section, you can use the AD Simulations checklist, and/or in combination with their quick guide or for all the checklist items you use the clist file and the quick guide although the AD Simulations covers a different flight, the overall that can be used as a guideline. But you also need to do complete the CDU steps. Therefore is this paragraph.
I mentioned it before, either you use mine fms flight plan, or you create your own, but for either way, you copy the file into the Output/FMS Plans folder or you enter waypoint by waypoint in the CDU. That’s entirely up to you. When you want to know all the ins and outs of the included Laminar Research FMS CDU, then it’s also a good idea to check out the original Laminar Research manual via this link. By the way, the link can also be found in the Quick Start Guide.
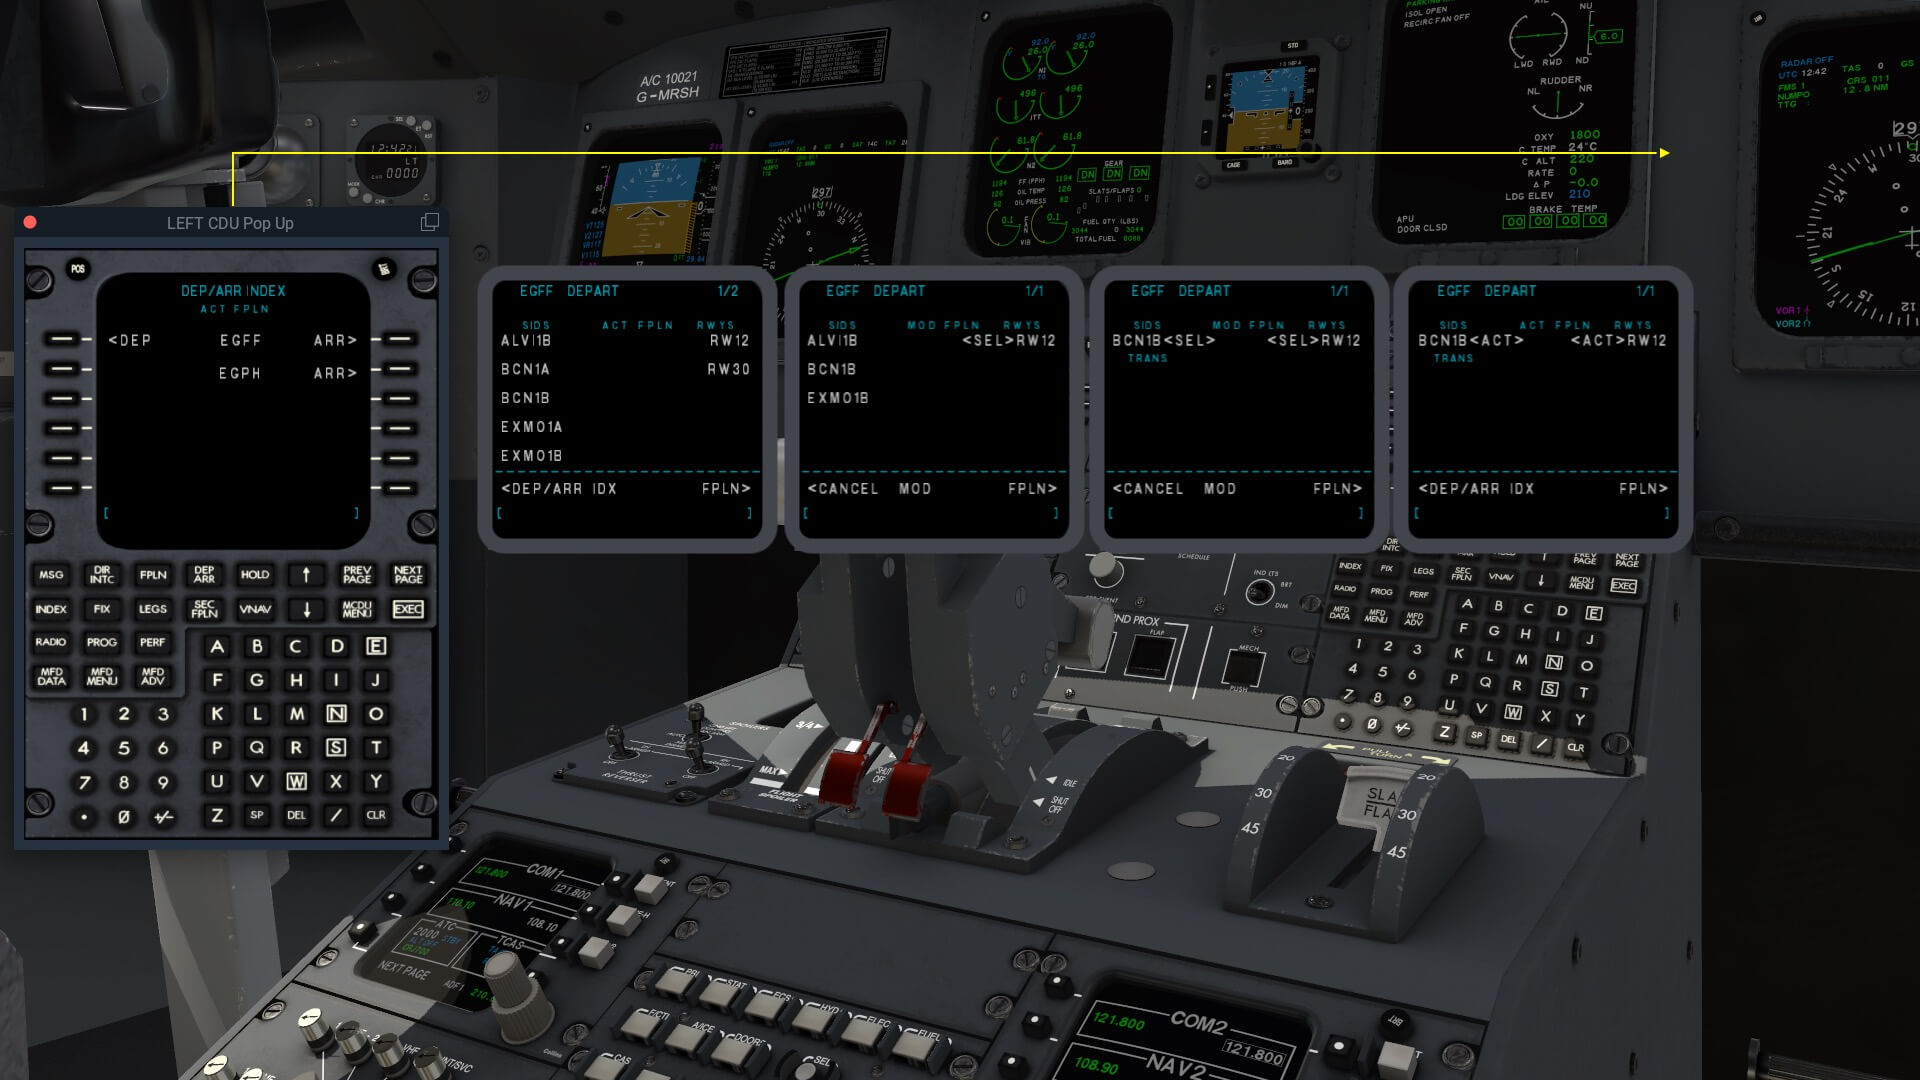
Loading the prepared flight plan or co(mpany)-route is easy and straightforward. You can start the following on either CDU. If the INDEX page isn’t visible, then click the INDEX key on the CDU. Next click LSK (Line Select Key 1R) indicating ROUTE MENU. On the ROUTE MENU page you click LSK 2L that shows CO ROUTE LIST. On the next page you’ll see all the stored fms flight plans in the X-Plane Output/FMS Plans folder. In my case I select LSK 1L that indicates EGFF-EGPH, but when you have more then one flight plan stored, then it might be located on another LSK or even on another page. In that case, use the NEXT PAGE key on the CDU.

After I’ve added to the flight plan the actual SID (Standard Instrument Departure) by selecting the runway and the SID – noticed the “SEL” on the upper LSK – you need to click the EXEC key on the CDU to confirm – now you will see on the upper line “ACT” – and to add the departure info to your flight plan. The original Laminar Research CDU EXEC button has a blue light indication that you need to confirm “something”. This light isn’t visible at the remodeled CRJ700 CDU, so as long as you see SEL on the upper CDU page, changes you made aren’t stored!
Since both CDUs work independently from each other, you can select on the left-hand CDU the LEGS page while on the right-hand CDU you select the PROG or RADIO page. When you want to implement the calculated speeds from the EFB into the aircraft they becoming visible on the PFD. When you click this EFB button to load the takeoff speeds, I found it difficult to see if this action was done correctly. Of course, you see the speeds on the PFD page, but there’s no confirmation on the EFB page and that feels odd. I’d expected to see a small message that the speeds are loaded or that the button LOAD TAKEOFF SPEEDS changes e.g. from color. Is it an issue? Not at all. Just a thought and perhaps a reminder for you and the AD Simulations development team.
As of this writing – February 2022 – the EFB doesn’t have an option to jump to the AviTab – I mean being integrated – which comes with e.g. maps or charts of the airport, on-route, AD Simulations manuals and so on. Perhaps this can and if so, will be implemented in one way or the other with a later update.
What to Expect
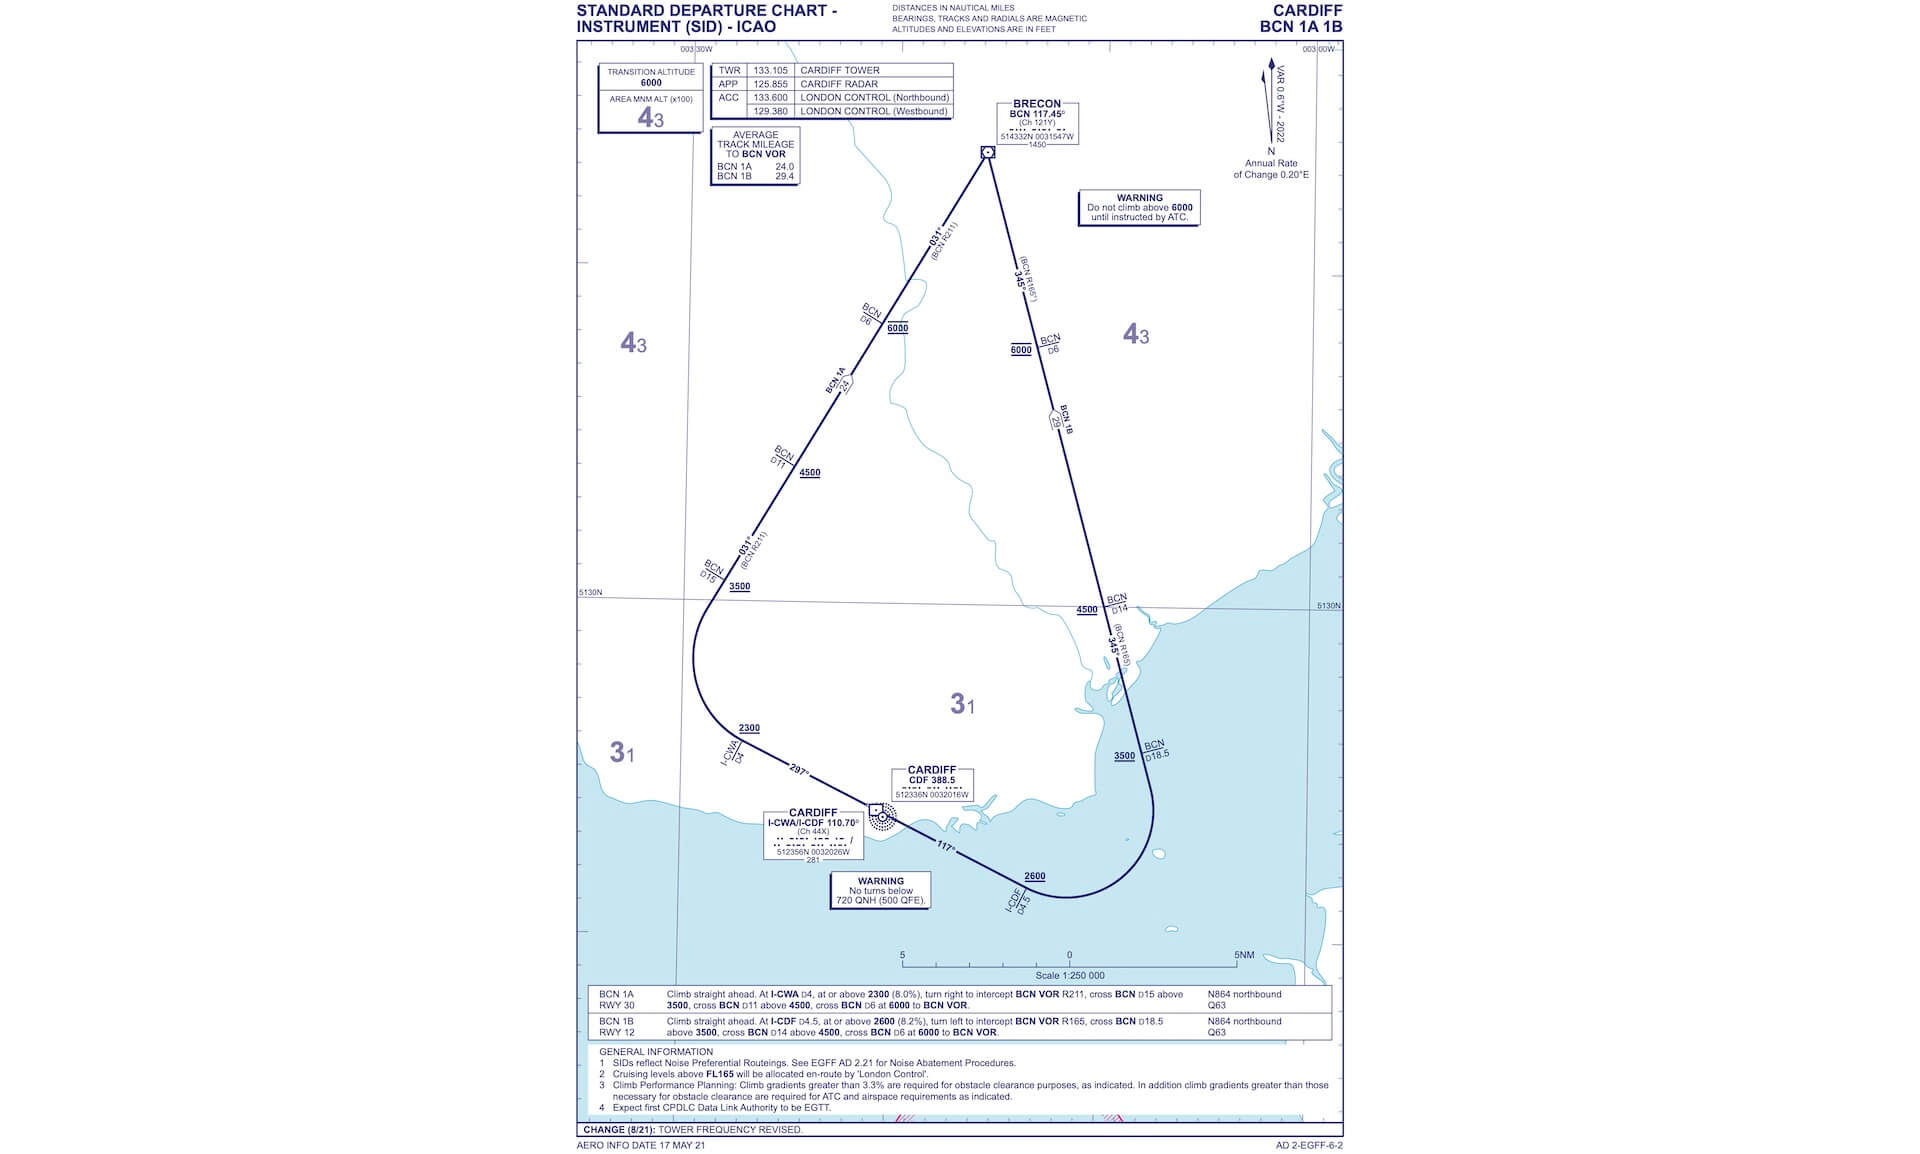
That’s a title that needs some explanation, right? I’ve parked the modeled CRJ700 at EGFF at the northwest side of the apron. On the first screenshot below that’s the light blue dot. Via taxiway A – B I taxi to holding point B1 before turning onto runway 12. I can set the HDG to 117 degrees as indicated on the chart which means that after lift off I fly initially the HDG before switching to the NAV (FMS) mode.
But, before I forget it, I need to connect runway 12 EGFF via a SID to the first (NUMPO) or second (BCN) waypoint. As you can see on the second screenshot I select SID BCN 1B. There’s also a BCN 1A, but this is only applicable for runway 30. By the way, I downloaded these EGFF charts from this official UK AIP link.

Actual Flight EGFF – EGPH
Pushback, taxi and takeoff
Parked at Cardiff, I’ve taken a spot far away from the gates, but still far enough from runway 12. The reason for this parked position is to feel, to hear and to see how the CRJ700 taxies. And to get the right feeling, I’ve disabled XPRealistic. Then I feel for the fully 100 percent how this CRJ700 is modeled and if any taxi sounds are implemented. After finishing my checklist the taxi sequence can start. Do I hear something special besides the cockpit sounds or far away the engine sounds?
Yes, it seems that taxi sounds or the well known rumbling sound is implemented. I’m also curious about the engine sound. I do hear the engines, but not really quite well, but after checking several movies I can confirm that the low engine sound level in the cockpit, even at high power settings, is correct.
But what when you need a pushback. The modeled CRJ700 doesn’t come with ground equipment and also no pushback truck or pushback function is included. As we all know or when you’re new, X-Plane offers a limited pushback function, but you can also decide to download and install the awesome freeware Better Pushback plugin. And for ground equipment you can use either the payware JARDesign GHD (Ground Handling DeLuxe) or the freeware SGS (Simple Ground Service) from X-Plane.Org user laurenso. Keep in mind that for this SGS FlyWithLua plugin you need additionally to have installed FlyWithLua, the MisterX library and the 3D people libraries.


Before reaching runway 12, I brake a bit and when stopped at the holding line, I set the parking brake for my final checks. The sound when I set the parking brake is realistic, but this is also applicable for all other switches, and selectors in the cockpit. All other sounds you hear in the fully powered CRJ700 cockpit is as real as it gets, again, after verifying with YouTube movies.
Doing my final checks before turning on runway 12, I double check my first assigned altitude, and the moment I turn on the runway, I click the HDG knob to sync the current heading with the runway centerline. By the way, I’d selected all tinted glass for the displays and for the windshields. The consequence of this tinted glass is that it becomes noticeable darker in the cockpit. Keep that in mind when you do that too and of course, monitor your FPS.
For a better clarify, I select the PFD and resize it which works for me, but this doesn’t work in the same way with the MFD. When I resize that 2D popup, the contents doesn’t resize. Also something to keep in mind unless I follow the wrong steps. This issue was already known by the AD Simulations team. Issue of a non resizable MFD will be solved with the next update.

Then you need to remember, also indicated in the manual, that the real CRJ700 doesn’t come with Auto Throttle, however they implemented a kind of speed control system.
So, what’s the plan?
I takeoff with on the PFD TO mode indicated. You see this TO TO green indication on the PFD once you clicked the TO/GA button on either throttle lever. I apply thrust by moving forward the throttles, and since the V speeds are “printed” on the PFD speed scale, I pull at VR the stick or whatever hardware you have – remember that no aural sound is implemented – and look closely to the PFD where you can see the speeds in the speed scale.


Climb
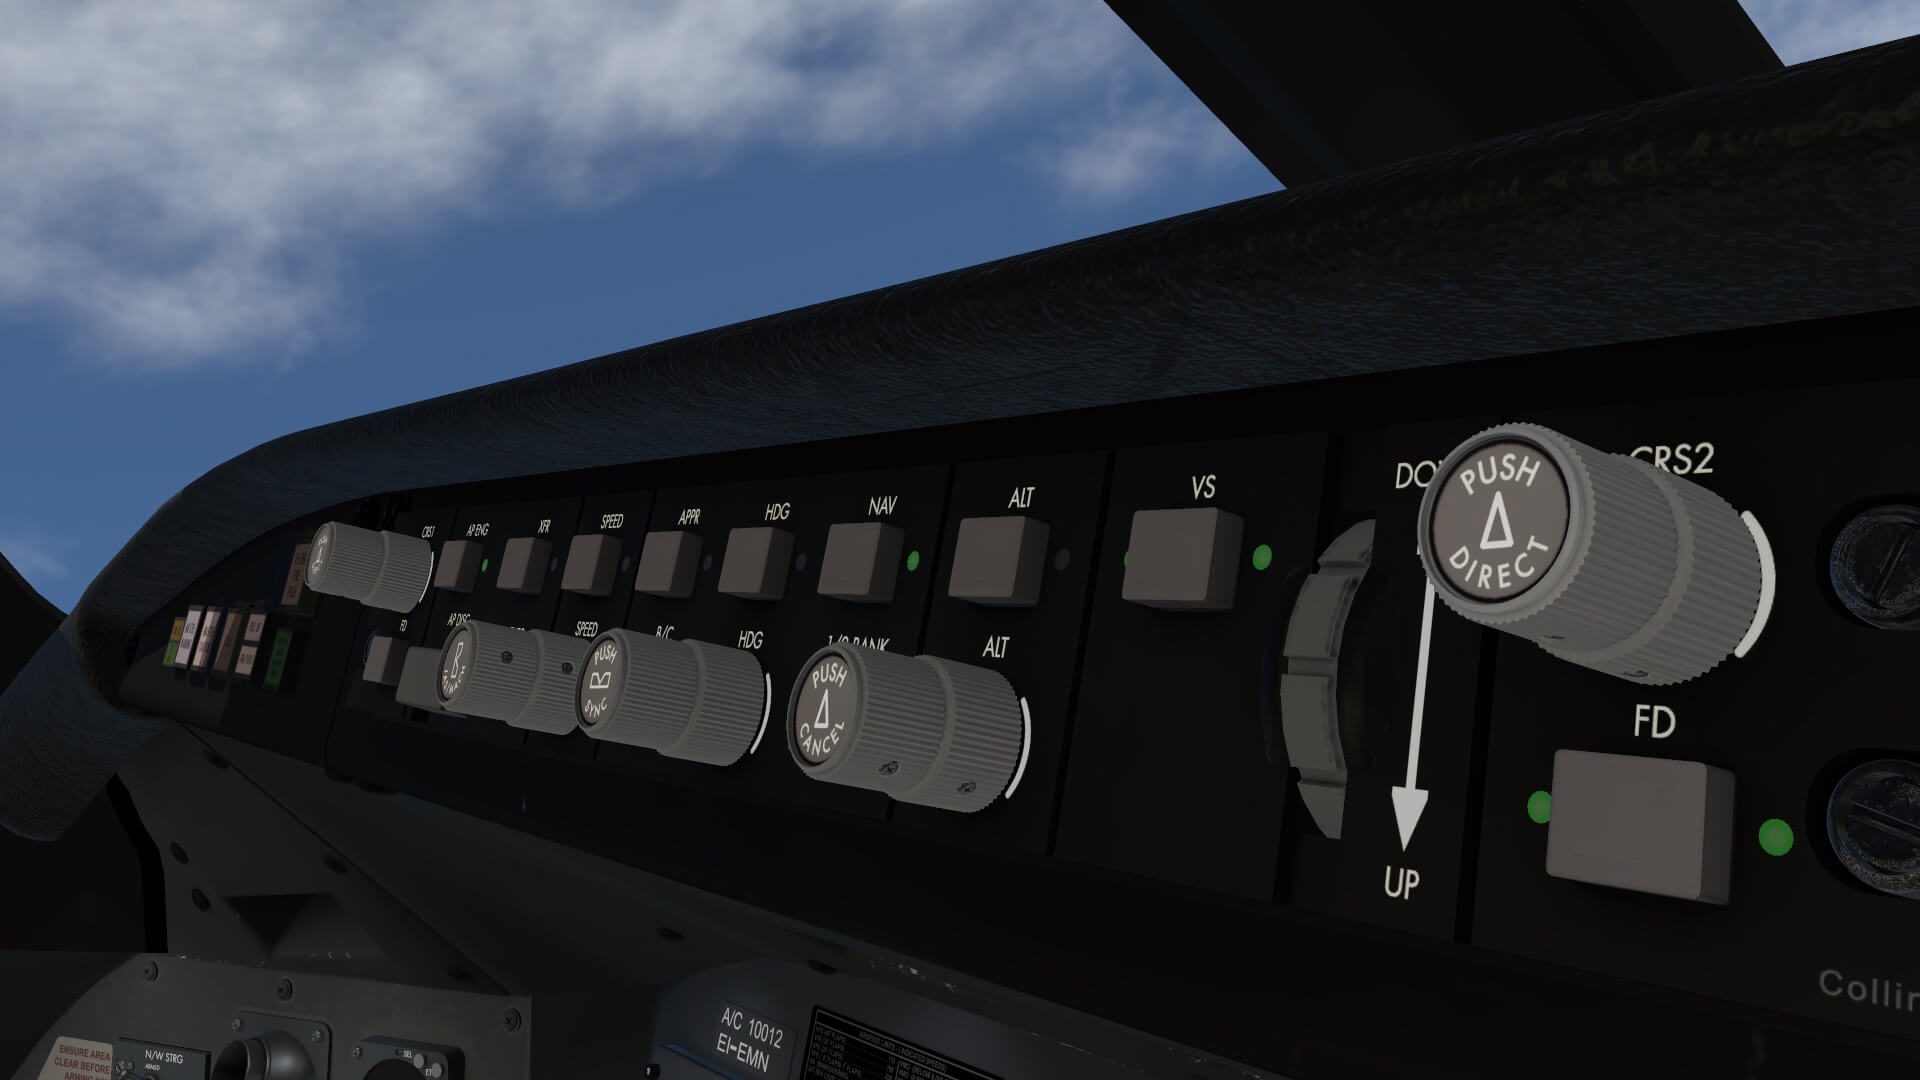
After establishing my rate of climb which means following the FD V-bars (Flight Director), and watch out that you don’t oversteer since that happens very easy unless you’ve changed the sensibility of the flight control channels, then I connect the SPD button which pops up on the PFD as CLB, a bit later I click the HDG or NAV button and after passing 1000 feet, I click the AP button. When I clicked the NAV button, the FMS flight plan is connected to the Auto Pilot. And yes, I haven’t forgotten to retract the landing gear after I had a positive climb and no, I also haven’t forgotten my flaps. I decided to select a VS (Vertical Speed) which also means that the SPD mode I had is lost.
Some words about the “by default” shown FD V-bars instead of perhaps the also known crosshair bars (the separate pitch and roll bars). As far as I can see, the modeled CRJ700 does only come with the V-bar and yes, real CRJ700 can be equipped with either the V-bar or crosshair FD. Most of the time this is via pin programming done. Pin programming is not applicable for X-Plane thus I need to contact the AD Simulations team. According to them “This is not implemented yet, but it will be in the future.”
Perhaps you’re already aware of it, but for example during my climb you can see on the MFD the so called “magenta banana”. Yes yes, I know, a weird name, but it is actually an indication on the flight plan route that shows you under the current flying conditions when to reach the selected altitude. When you increase the VS and assume you monitor your KIAS, the magenta banana comes closer along the flight plan since you will reach your selected altitude earlier.


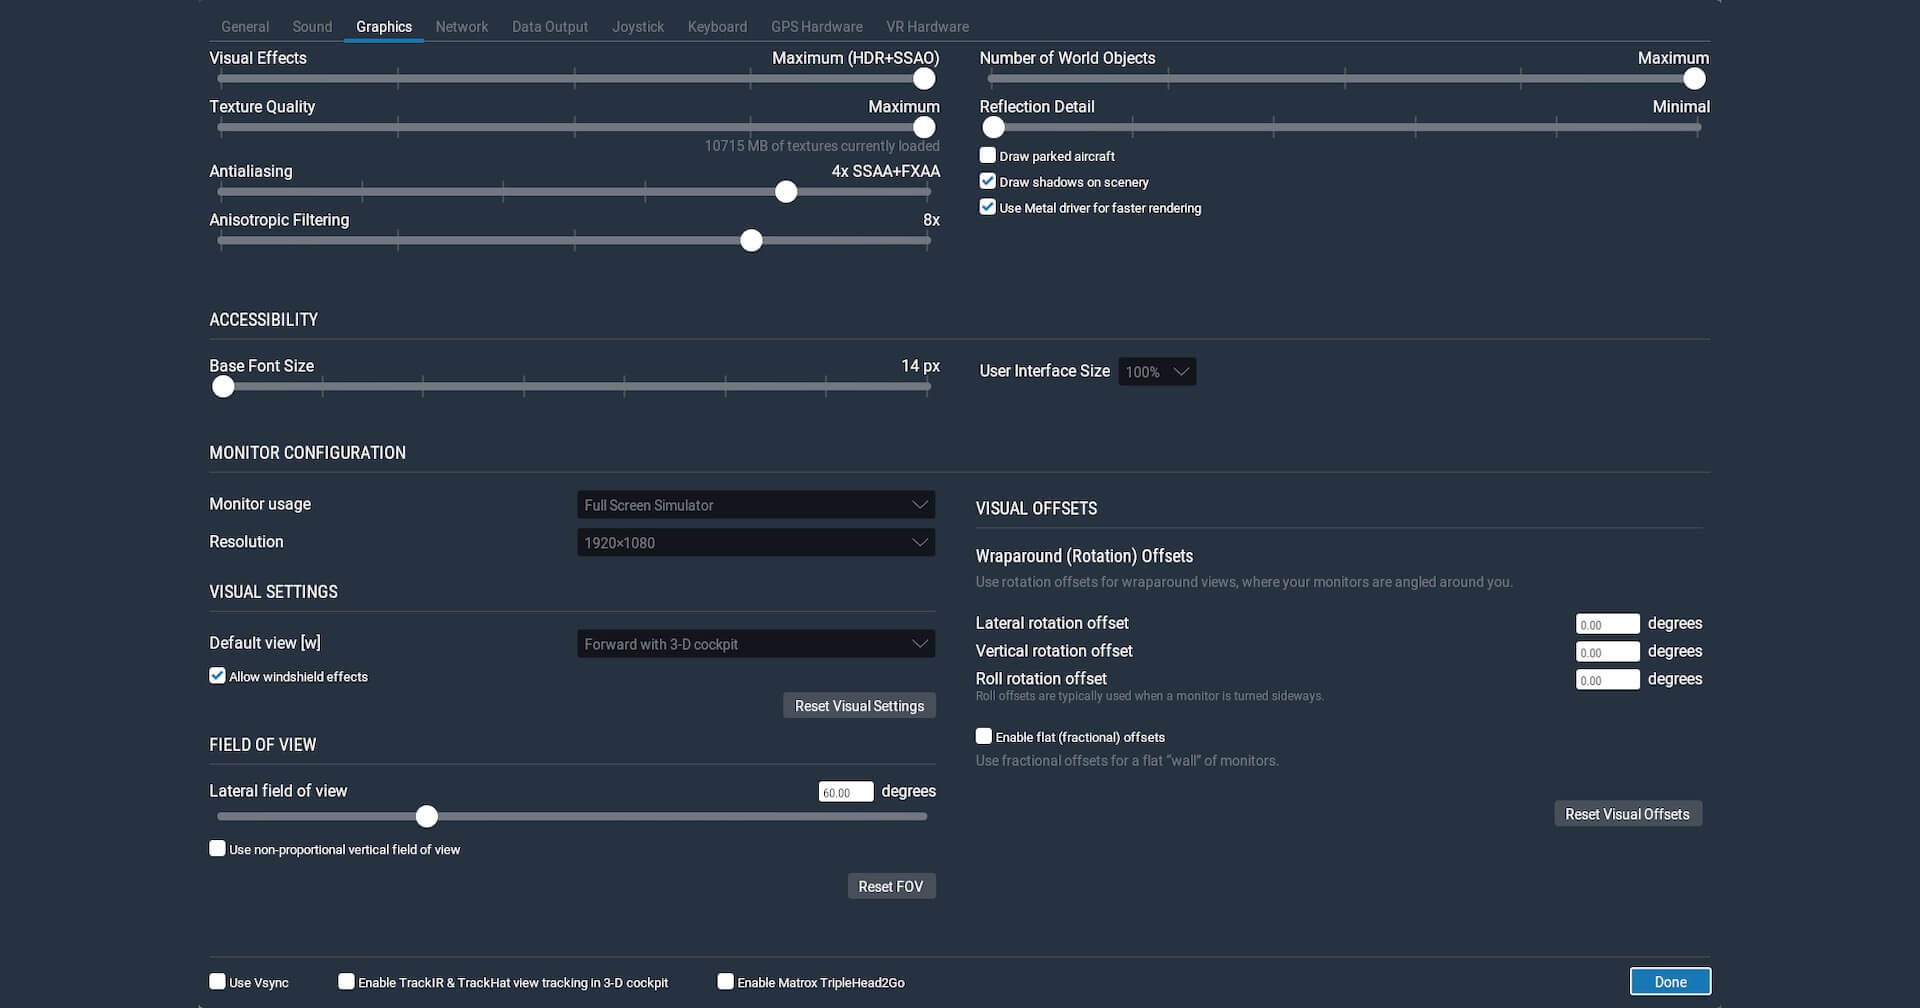
On purpose, I wrote in the previous paragraph that you need to move the flight controls gently. As it is now, the modeled CRJ700 out-of-the-box aircraft is on PITCH and ROLL in my humble opinion way to sensitive resulting in oversteering. Therefore, I suggest to adjust the control response. You can find these via X-Plane Settings – Joystick – Control Sensitivity button on the lower part of the window. By default all sliders are set to 50 percent. Set these slightly lower to fit your preference.
With the CRJ700 now flown by the AP in NAV and VS mode, you and I need to monitor the IAS (Indicated Air Speed). As I mentioned already earlier; or you control the IAS or the VS including ALT HLD modes. Once the CRJ700 has leveled at my first assigned altitude which is in my case FL120, it nicely reduces the VS and stops with hardly any overshoot at FL120. Once leveled OFF, I could select for SPD, but remember that with the first click of the SPEED button, it shows either DES or CLB.
At the second click, it shows IAS on the PFD FMA (Flight Mode Annunciator). That would be nice, but then I noticed that the moment you set and activate the SPD mode in IAS, the ALT HLD mode is lost or actually, any pitch mode is lost, yes, I’ve said this before. You and I need to live with this since it’s as real as it gets. Let me give you an example; during climb you can click the SPEED button. On the PFD FMA it shows then CLB. When in CLB mode, set with the speed knob a certain climb speed. Depending on the speed you’ve set or change, the CRJ700 will follow a certain VS. Or you set a certain altitude to level off, for that you select a certain VS and during this climb you control manually the KIAS.


There’s one thing I noticed during a leveling off period thus intermediate altitude levels. The modeled Laminar Research Auto Pilot has the tendency to slightly move away from an assigned ALT HOLD. When you apply a bit more or less thrust, it will stabilize again, but it’s something you need to keep in mind. I learned from the many flights as being a ground engineer, that pilots when flying in NAV mode, they constantly sync the HDG with the actual course they are flying. This is just in case the Auto Pilot or Auto Flight reverts to the basic AP modes which are the HDG and VS modes.
Cruise
The CRJ700 levels off at my cruizing altitude of FL210. The ALT HOLD mode becomes active and I need to monitor and adjust my throttles since there’s no speed control. This is as real as it gets since the real and thus also the modeled CRJ700 has no Auto Throttle.

With the AP connected in ALT and NAV mode, and keeping an eye on my speed, it’s time to thoroughly check the modeled EICAS synoptic pages. In modern commercial aircraft you find either EICAS or ECAM systems. EICAS means Engine Indicating Crew Alerting System while ECAM stands for Electronic Centralized Aircraft Monitoring. Although both indicating systems are very similar, there’s still one big difference and that’s the presentation of faults and what to do. With EICAS the crew is informed about a problem, but not what action has to be taken while ECAM shows the issue that pops up including the action(s) to be taken.
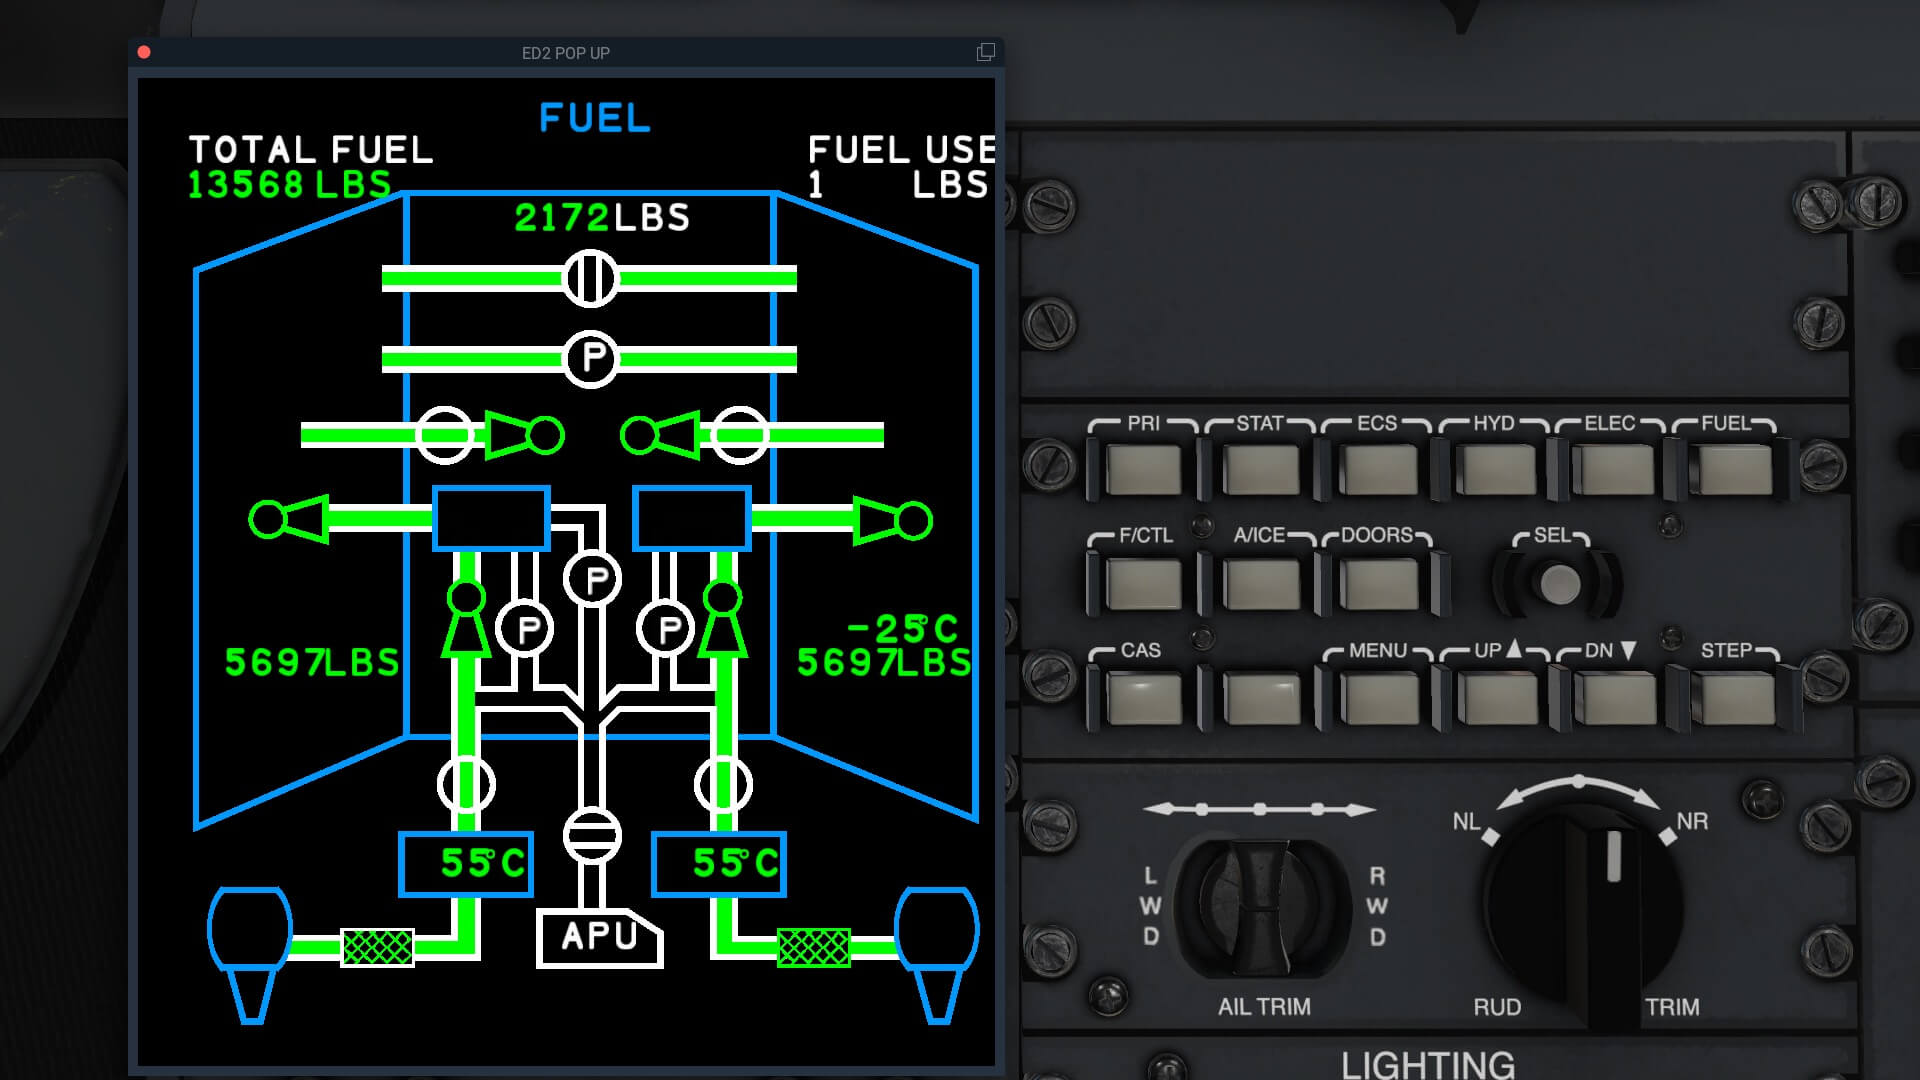
As of this moment, EICAS doesn’t show me any issues or whatsoever, so I can have a look into the system synoptics. I write on purpose “synoptics” since the presented system pages are a simplified overview of the installed system. In case you’re lost; the HYDRAULIC, FUEL, ELEC pages are perfectly modeled by the AD Simulations team, but the same as in real, what you see on the EICAS DU is a basic representation of the aircraft system. I don’t know in “what” depth each system is modeled, and if basic X-Plane 11 system behavior is used or that dedicated CRJ700 behavior is programmed. but I know from the AD Simulations team that they are working and modeling the dedicated CRJ700 electrical system.
Each EICAS system page looks great with eye for details. Perhaps not every page represents the 100 percent CRJ700, for the moment it looks not only good, but it also works OK as far as I’ve tested the systems by, for example, switching ON/OFF switches or turning selector knobs whenever applicable.
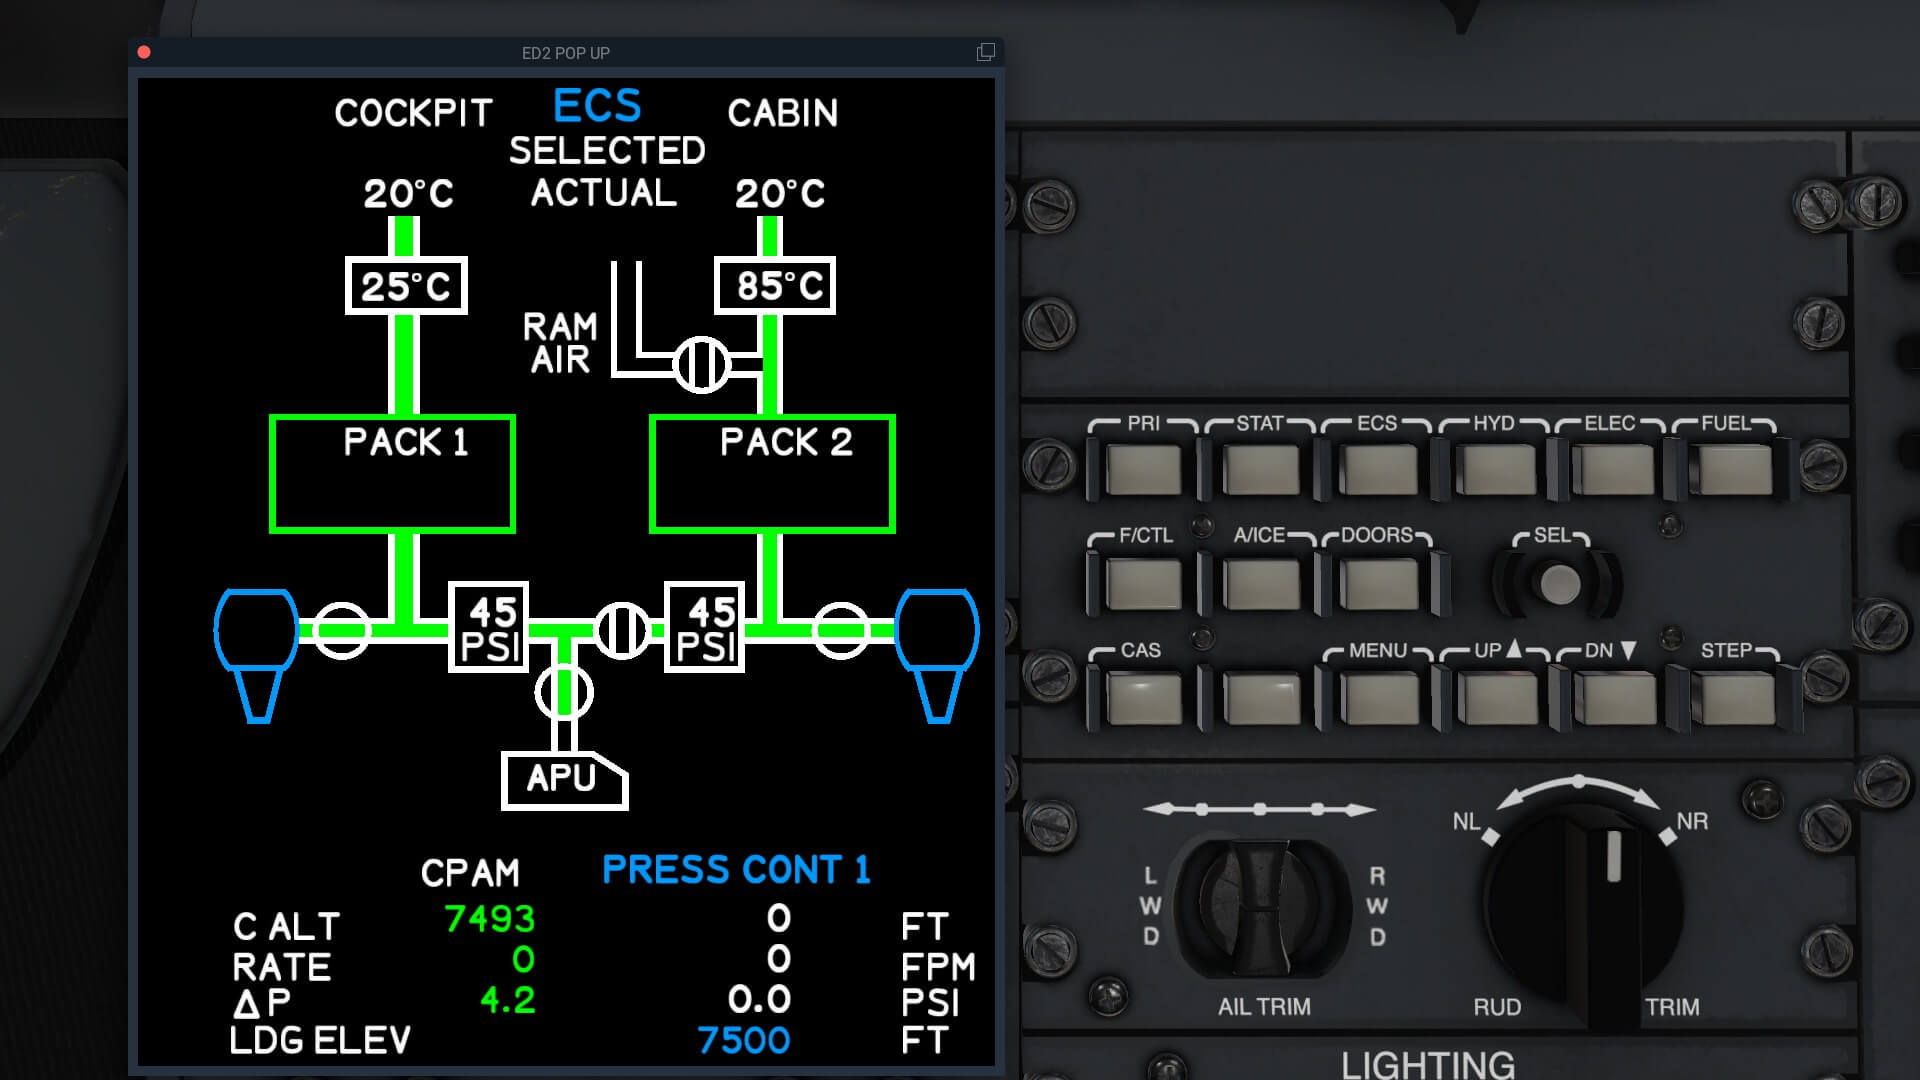


Via the build in 3D EICAS Control Panel – no 2D popup available – you can select manually which system you want or you use the STEP button to jump thru each of the synoptics. Keep in mind that the CAS (Crew Alerting System) button only works when you have the STAT (Status) page selected. As far as I could see, the SEL (Select) knob on the control panel isn’t functional. All other buttons are working as expected and as can be found in the FCOM.
As you might have read or seen already, the modeled CRJ700 comes with a couple of popup 2Ds. Implemented popups are the EFIS DUs, the EICAS DU’s and last but not least both FMS CDUs. As of this writing – February 2022 – all popups can be resized whereas the image adjust itself to its new size however the MFD can’t be correctly resized, but no worry and as I mentioned earlier, this is a known issue and will be updated with the next update.
Using the 2D popup PFD and MFD is always great and prevents cluttering your X-Plane main screen. For those who are using Windows X-Plane, they can easily connect another monitor from within X-Plane, but for those who are on Mac, they and me too, need to use the SideCar option to connect for example and iPad.
Once more I take the time to check how the 3D cockpit or Virtual Cockpit is made and I come to the same conclusion; awesome! During this review I had constant contact with the AD Simulations team whenever I had issues or questions. Every time there reply was fast and professional, something you may expect from every X-Plane developer although the reality is not always like this. From the AD Simulations team members I learned that there’s a lot in the “pipeline” to dedicated their CRJ700 to a as real as it get aircraft. That said, there’s still some work to do for the AD Simulations team, but the start CRJ700 is promising.
Descent Preparations
Since this flight is offline, I’m free in which runway I take for my landing at Edinburgh. As it looks now I go for runway 24. That said, I normally need to connect the end of the flight plan to either a STAR (Standard Terminal Arrival Route), or I fly to VOR/DME TLA as planned and from there I follow the charts for an ILS landing at runway 24.
When I go for a STAR then I go for INPIP 1E. This STAR starts at waypoint INPIP which is also a waypoint in our flight plan, and then it goes to INREV, ESKDO and ends at TARTN where I can enter a holding if my altitude it still too high or because I have to wait due to too much traffic. And from waypoint TARTN, I can switch to HDG mode and enter different headings that brings me to the ILS of runway 24.
But I can also decide not to take any STAR and fly to VOR/DME TLA according to the flight plan and then with heading vectors I go to the ILS 24. On the following screenshot I made a compilation of STAR INPIP 1E and the ILS 24. As you can see/read on the Instrument Approach Chart, that you can also go for a direct arrival from VOR DME TLA. See the line of the chart, but together with the line there’s also a description at the bottom. There’s stated DIRECT ARRIVAL VIA VOR DME TLA From overhead VOR DME TLA (IAF) as cleared, fly outbound on VOR TLA R028 descending not below 6000. From TLA VOR R028 DME 13 continue descent to cross EDN NDB(L) QDM 284 degrees not below 4000. (See plan for continuation). Nominal track distance from VOR DME TLA to lead radial NDB(L) EDN QDM 260 degrees is 32NM. TLA VOR R028 becomes tangential to nominal I-TH DME 12 arc at TLA DME 23.5.

It’s not up to me to explain every word or parts of the sentences, but we first descent after passing TLA to 6000 feet or above. When I’m 13NM out from VOR/DME TLA, I descent further to 4000 feet or above. Although the last part to the ILS is indicated how that could be, we will use heading or radar vectors and finally we descent to 3000 feet for the correct altitude to pickup the ILS localizer and glide-slope.
Interested in the official charts? Then check out this URL. That I discuss the STAR and runway now – in flight – and not at the beginning when I did the CDU preparations at EGFF, is because I didn’t know yet which runway I would take in EGPH. In real, the weather can change in such a way that a different runway for landing could be the consequence and then I have to start all over again in the FMS CDU.
Additional Preparations
What else is important to know for my descent, approach and landing? The EFB offers also the required approach and landing speeds, but the CDU doesn’t offer the TOD (Top Of Descent), so it’s either a bit guessing when to descent or we decide to calculate it. When you seek for a descent calculator you’re overwhelmed with options. One of these website is this online calculator from <a href=”https://descent.vercel.app” rel=”noopener” target=”_blank”>Epranak.com. Hold on, within the X-Plane community there’s also the website from Brad X-PlaneTools.com. I mentioned this website already in a previous section when I discussed how to convert a flight plan to fms, but Brad also offers an online calculator for the descent and ascent (climb). You can find that page via this URL.
Since the included FMS CDU doesn’t offer any TOC (Top Of Climb) nor the TOD and no climb / descent calculations, you and I need to this by hand.
Descent, approach and landing
With the X-PlaneTools.com I calculate the amount of NM I need to start my descent (being at FL210) to reach 6000 feet with a VS of approximately 1500 feet/minute. Around 50NM before my destination I need to start the descent. It may sound logic, but let me highlight it for those who are new; when I increase the VS to more then 1500 but less then 2000 feet/minute, then I’ve needed, when leveling off at 6000 feet, less NMs and visa versa of course.
Before I reach my “calculated” TOD, I’ve turned the altitude knob to 6000 feet, and at the TOD, we descent with a VS of 1500 feet/minute. Since there’s no Auto Throttle, I need to monitor the KIAS and thus I need to adjust the throttles to maintain my descent speed. And again, as I explained before, you can either descent in VS mode and control the throttle to maintain your KIAS or you select the SPEED in DES mode.
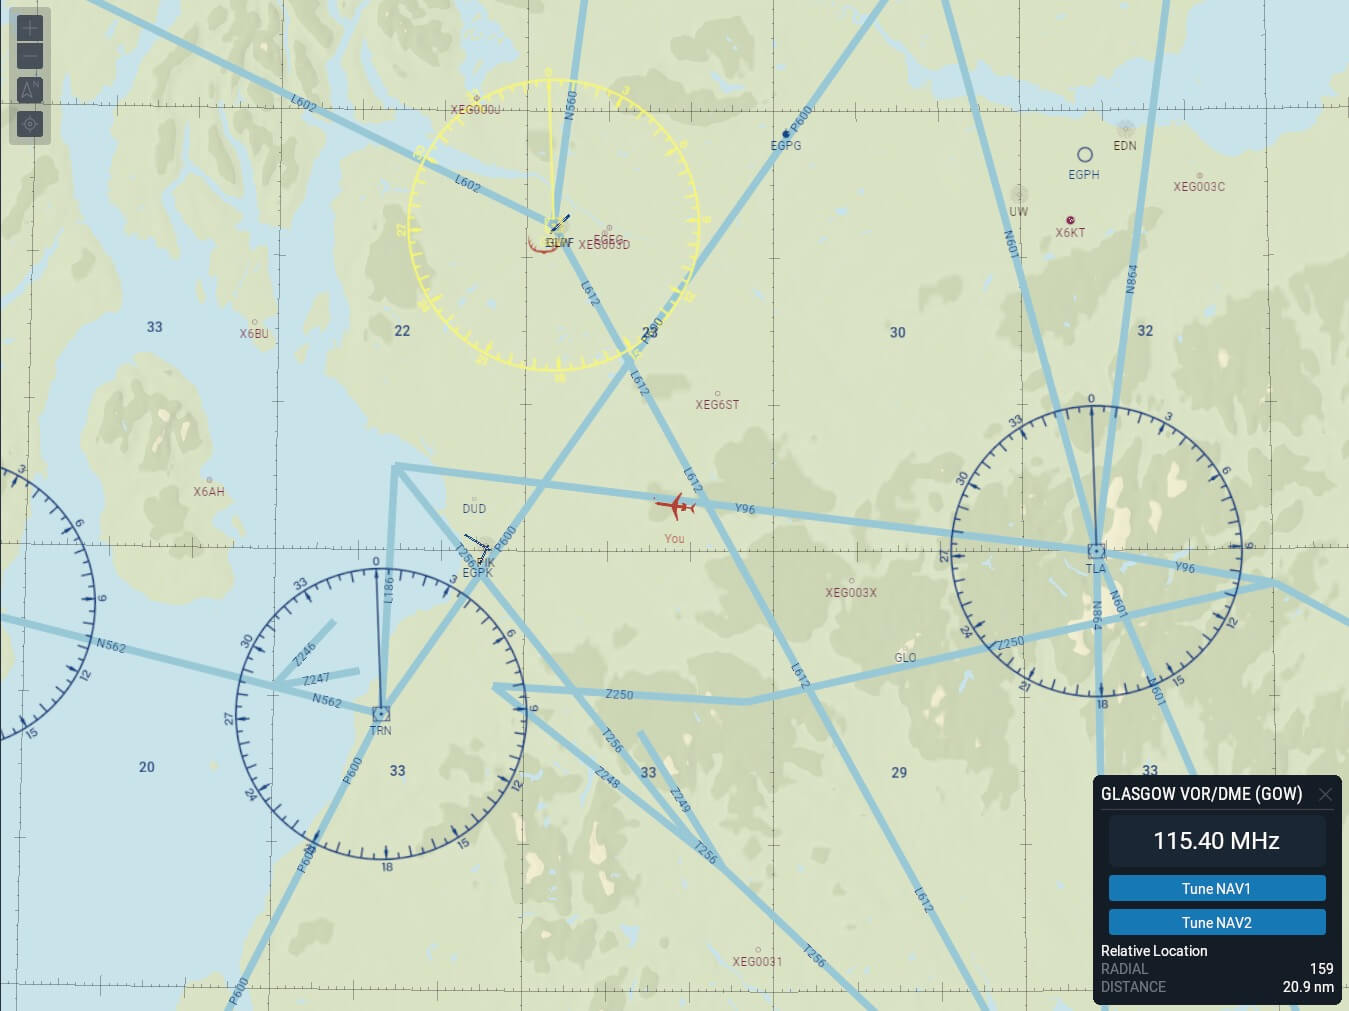

Oops, I’ve got a problem. I’ve been told that Edinburgh (EGPH) is closed for an unknown reason. Ok, we need to act quickly. So the question right now is ….. which airport(s) lies nearby? Found Glasgow International Airport (EGPF) and Dundee Airport (EGPN) ands since we had already Glasgow as an alternative in case of, this will be used. Since we haven’t reached yet waypoint (VOR/DME) TLA, it won’t be a long detour. That said, here is the plan; from waypoint TLA we fly to waypoint NORBO and when we approach NORBO, we select waypoint GOW (VOR/DME Glasgow). I will aim for runway 05 with ILS frequency 110.10 CRS 051.


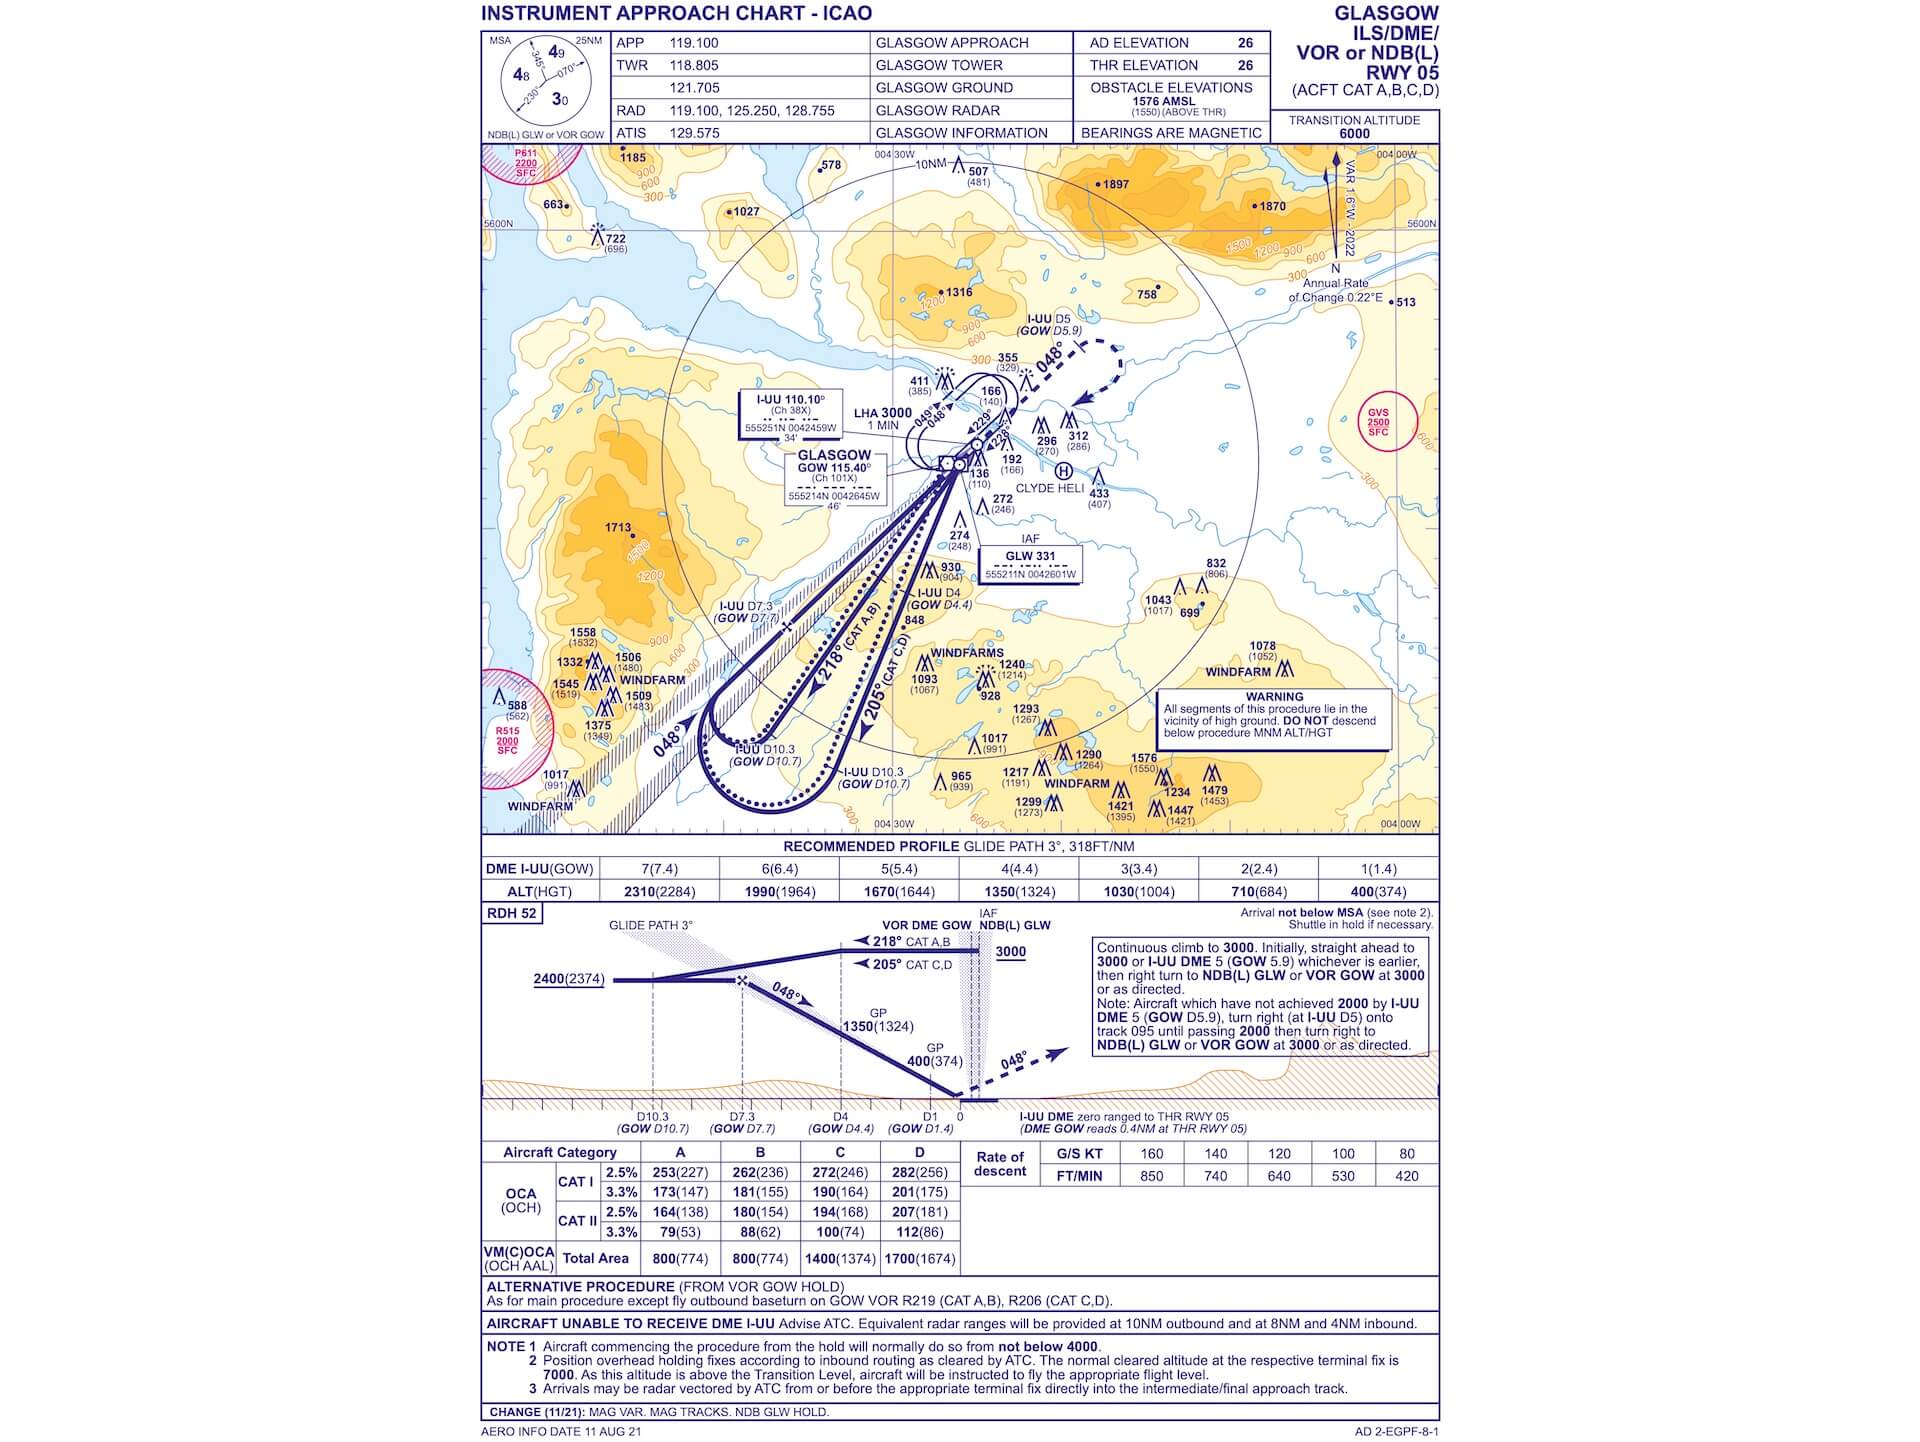
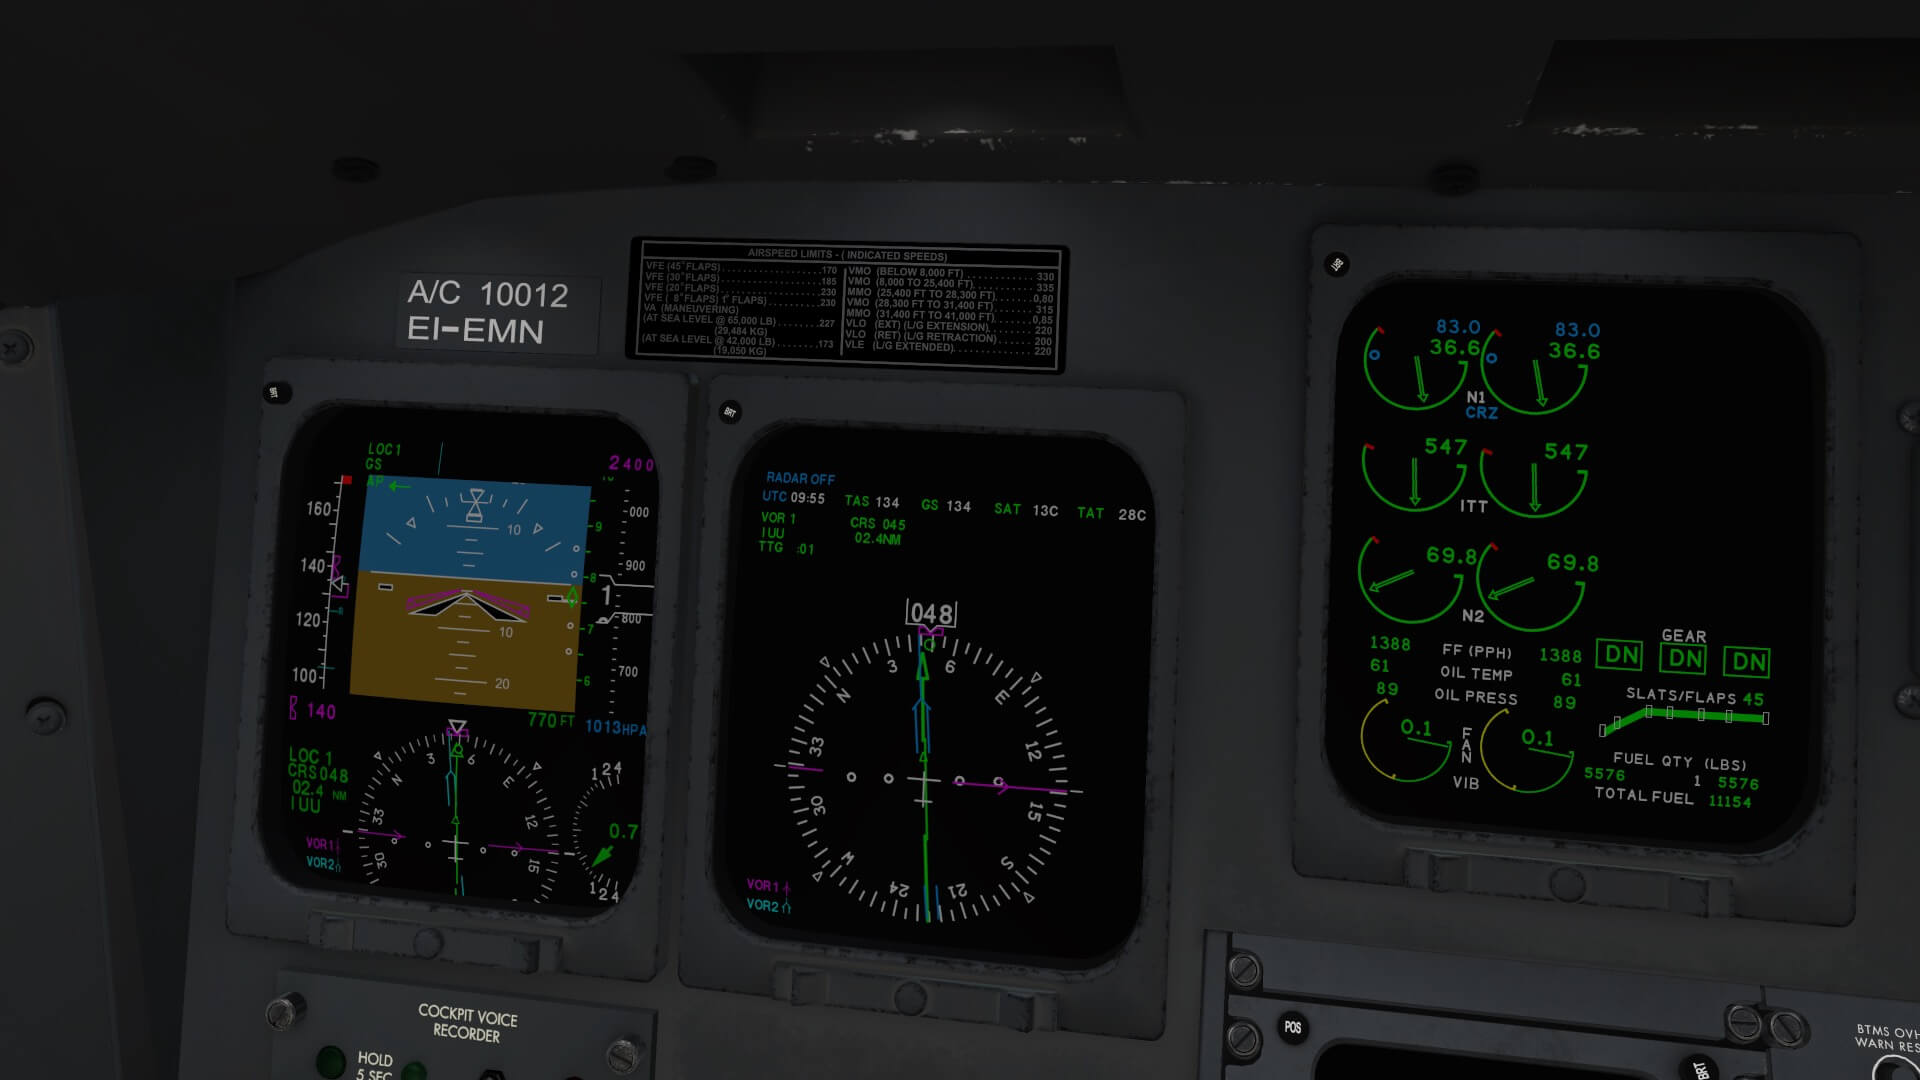
Basically what we calculated for our TOD stays the same except then that the level off altitude for the ILS EGPF runway 05 will be 2400 feet. The only thing you and I need to keep in mind is that we need to switch to VOR1 or VOR2 depending in which you’ve entered the ILS I-UU 110.10. You can enter the ILS frequency in the RTU (Radio Tuning Units) located at the pedestal or, perhaps even faster since you most likely have one or both CDU(s) selected via the CDU key RADIO. For now we leave it like it is. After I’ve passed waypoint NORBO, and the aircraft has stabilized itself on a track to Glasgow, I press the HDG knob once more to sync the current heading with the selected heading, and then select the HDG mode by clicking the HDG button on the FCP (Flight Control Panel) and leave the NAV mode behind me.
The next step, on the CAPT side panel, is that I turn the NAV SOURCE selector knob that changes the indication on the lower part of the PFD between FMS 1, NAV1 or NAV2. Suppose that I entered the ILS frequency in NAV1, then we turn the NAV SOURCE selector knob to the green VOR indication. There’s no VOR1 shown, but it is VOR1 while the yellow indication is for VOR2. Anyway, when the green VOR is shown on the PFD, and the ILS frequency is received, it also shows the ILS ID which is/was I-UU.
Also check the AD Simulations EFB and load the LANDING SPEEDS. I think, just a personal note, that it is also a good idea to write it down. When our CRJ700 has leveled off at 2400 feet, and we’re close by, we select the APPR button on the FCP. On the PFD FMA (Flight Mode Annunciator) you see LOC and GS in white, so armed. The moment the LOC signal is received, and valid, it turns green. Check the PFD when to select slats and flaps. The moment the GS is captured and turns green, the CRJ700 starts following the glide-slope, and then it’s also time to lower the landing gear. When you’re used to modern Airbus aircraft, keep in mind that there’s no FLARE or ROLLOUT mode. So follow the quick guide and disconnect the AP when the aircraft is at a stabilized path down to runway 05.

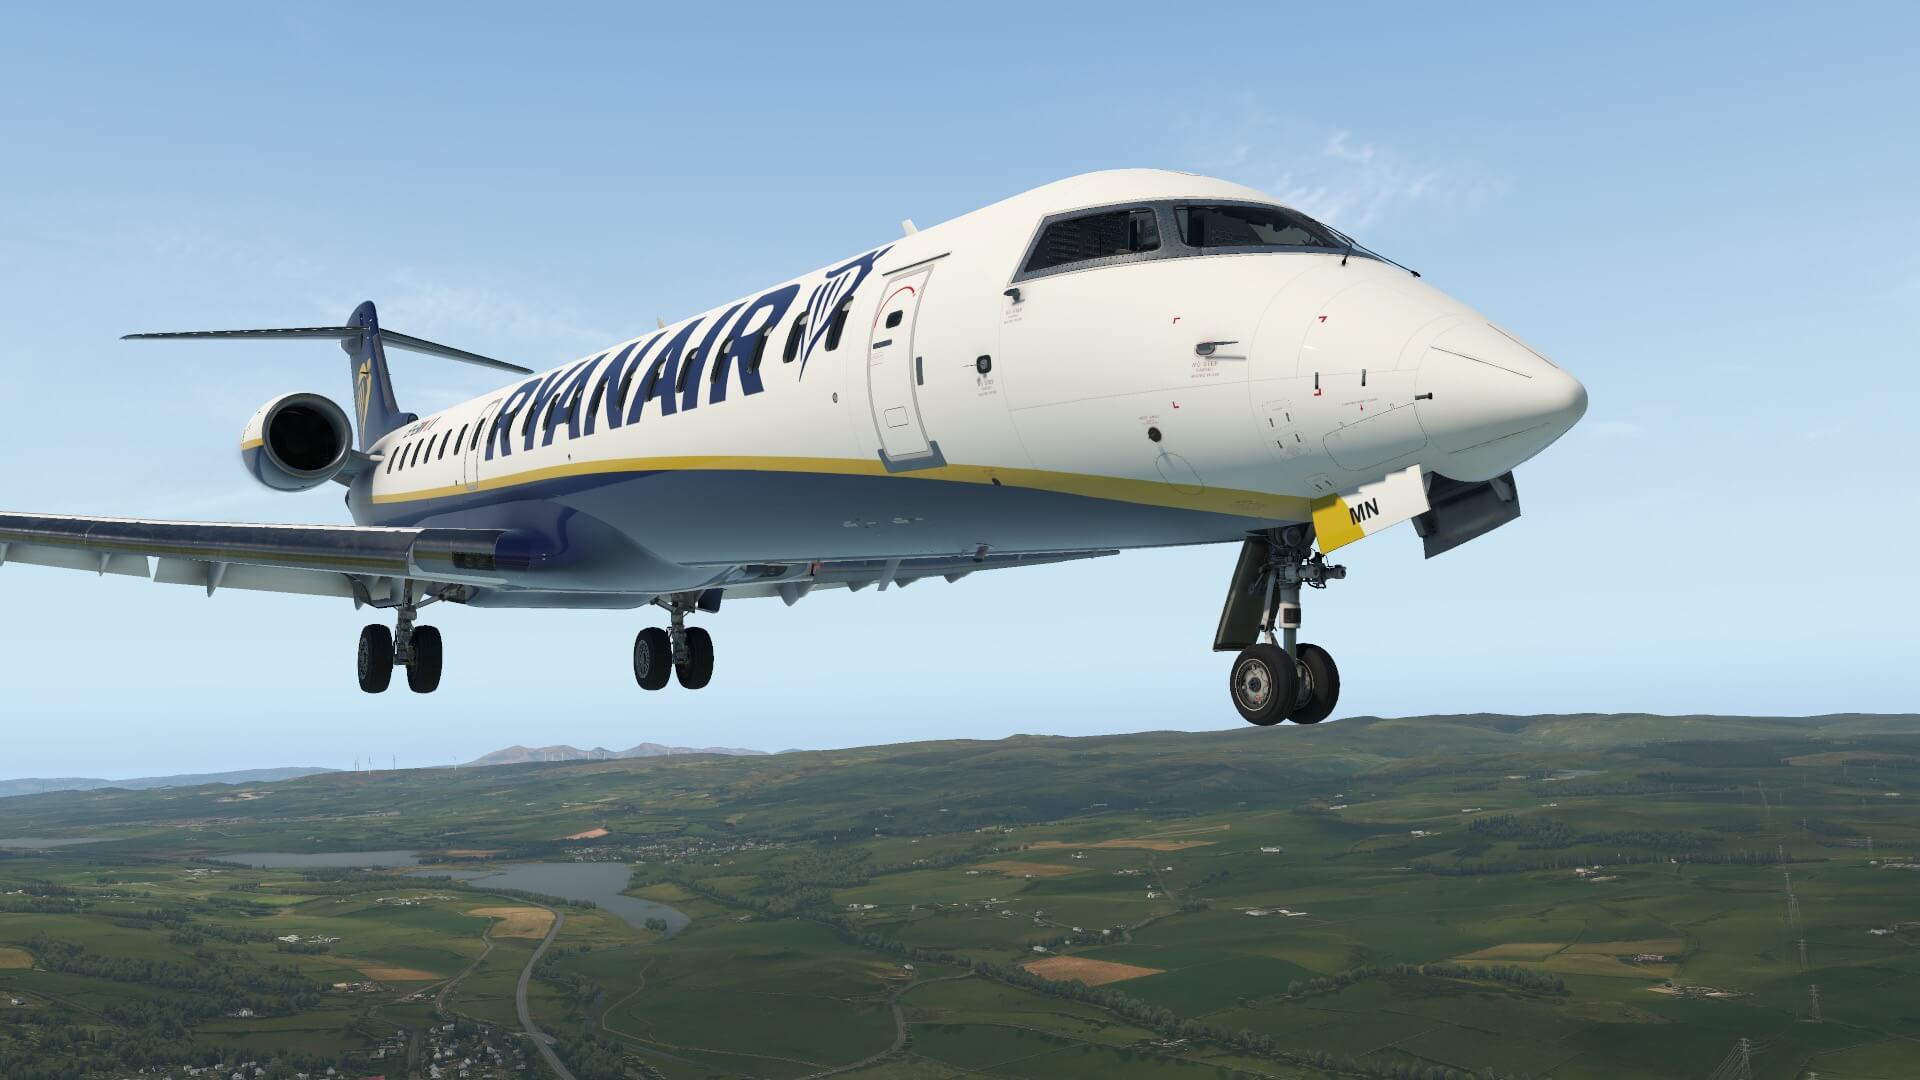

So finally the CRJ700 lands safely at Glasgow International Airport. Not so surprising since the installed or used Auto Pilot is the one from Laminar Research and you may expect that this is working correctly. With one of the future updates I sincerely hope that the AD Simulations team has modeled their own Auto Flight system. Not an easy task, but a challenging task!
What Else?
I could add some information related to the FPS (Frames Per Second) although I know that this is so difficult to compare. Do you have a Windows, Linux or Mac system? And what kind of monitor resolution do you have/used? And of course, what hardware specifications do you have? Those who know me, I own an iMac Pro and although a Mac in general isn’t the best choice for being a game computer, this iMac Pro does a great job.
But there’s more that will influence the available frame rates like your X-Plane Rendering settings for both the GPU and CPU, but also the scenery you’re using and thus do you start from a complex add-on airport or do you have environmental packages installed like SkyMAXX Pro, xEnviro or others. All of this can and will influence the available frame rates. Check out the following screenshots, taken at Orbx Cardiff Airport, and in flight, but with no environmental programs installed. The rendering settings as indicated on the first screenshot and, oops, almost forgotten, Just Flight Traffic Global active.

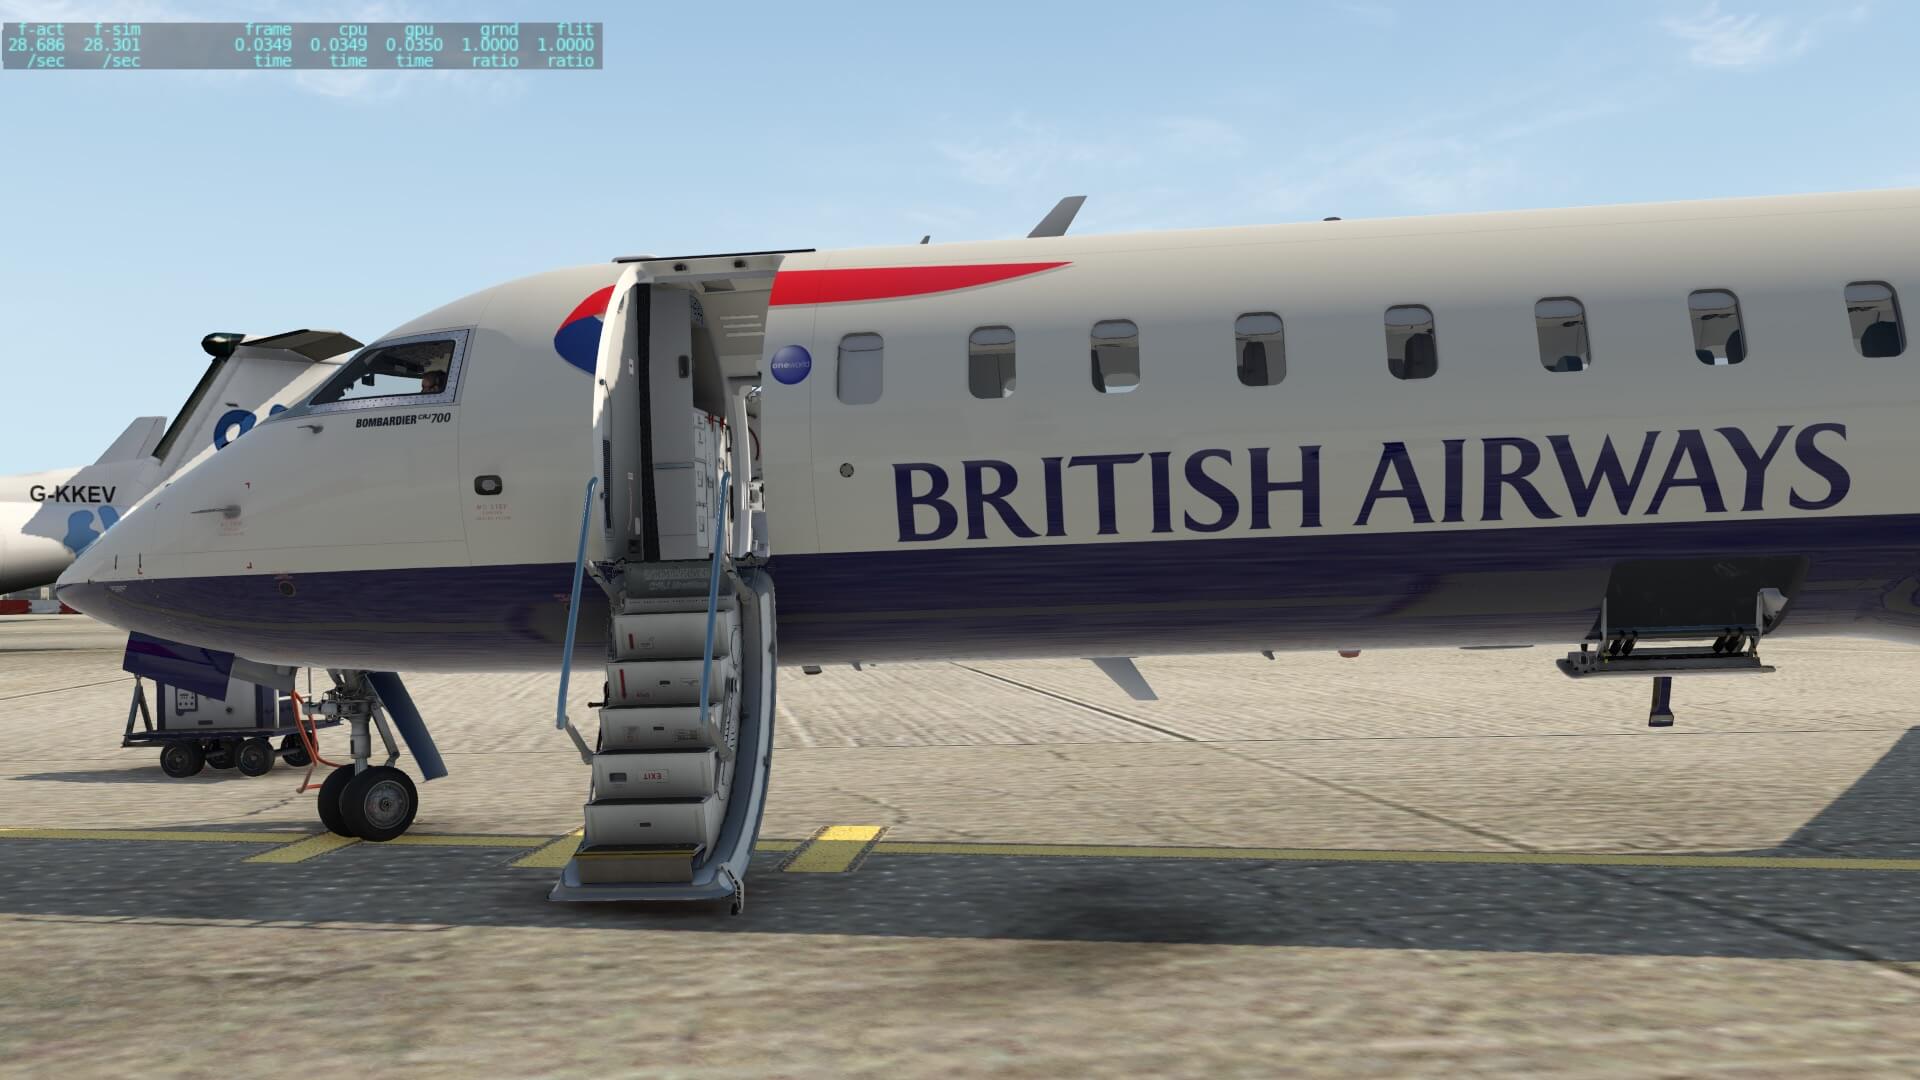
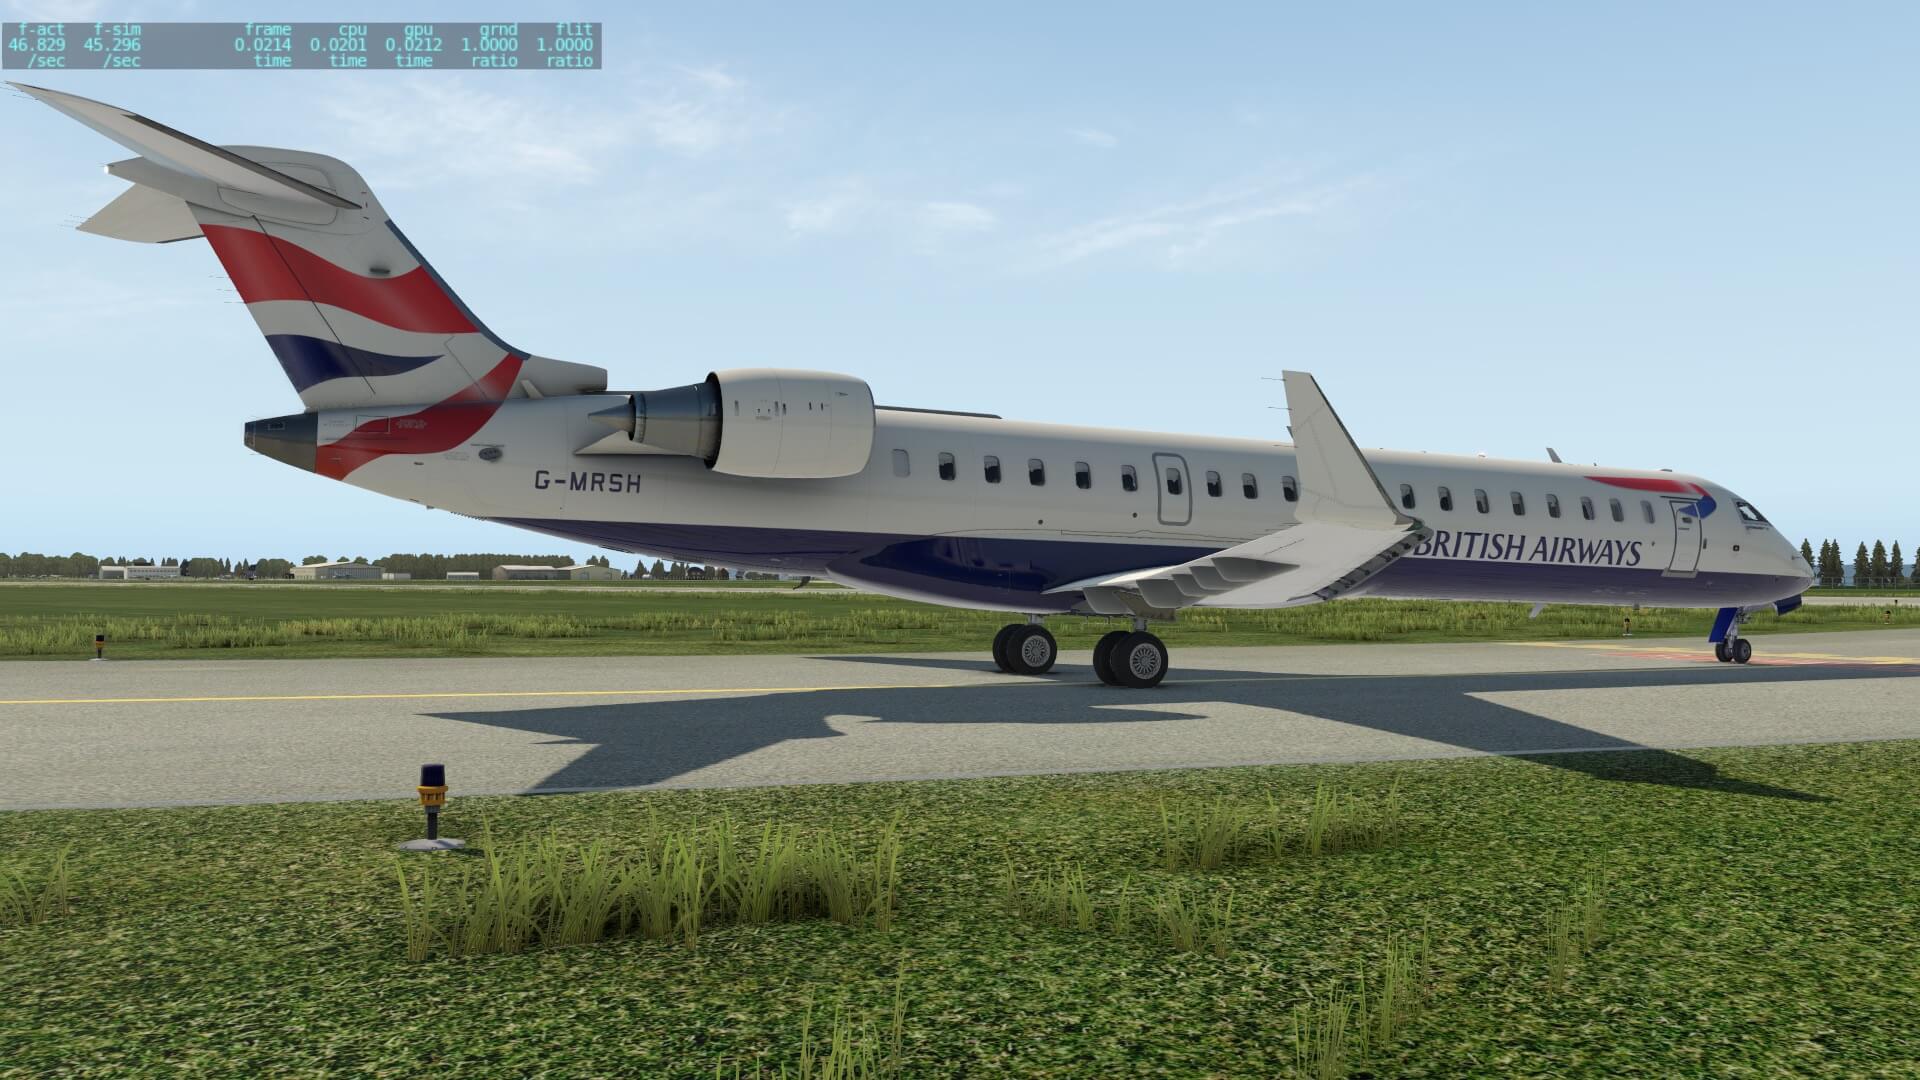
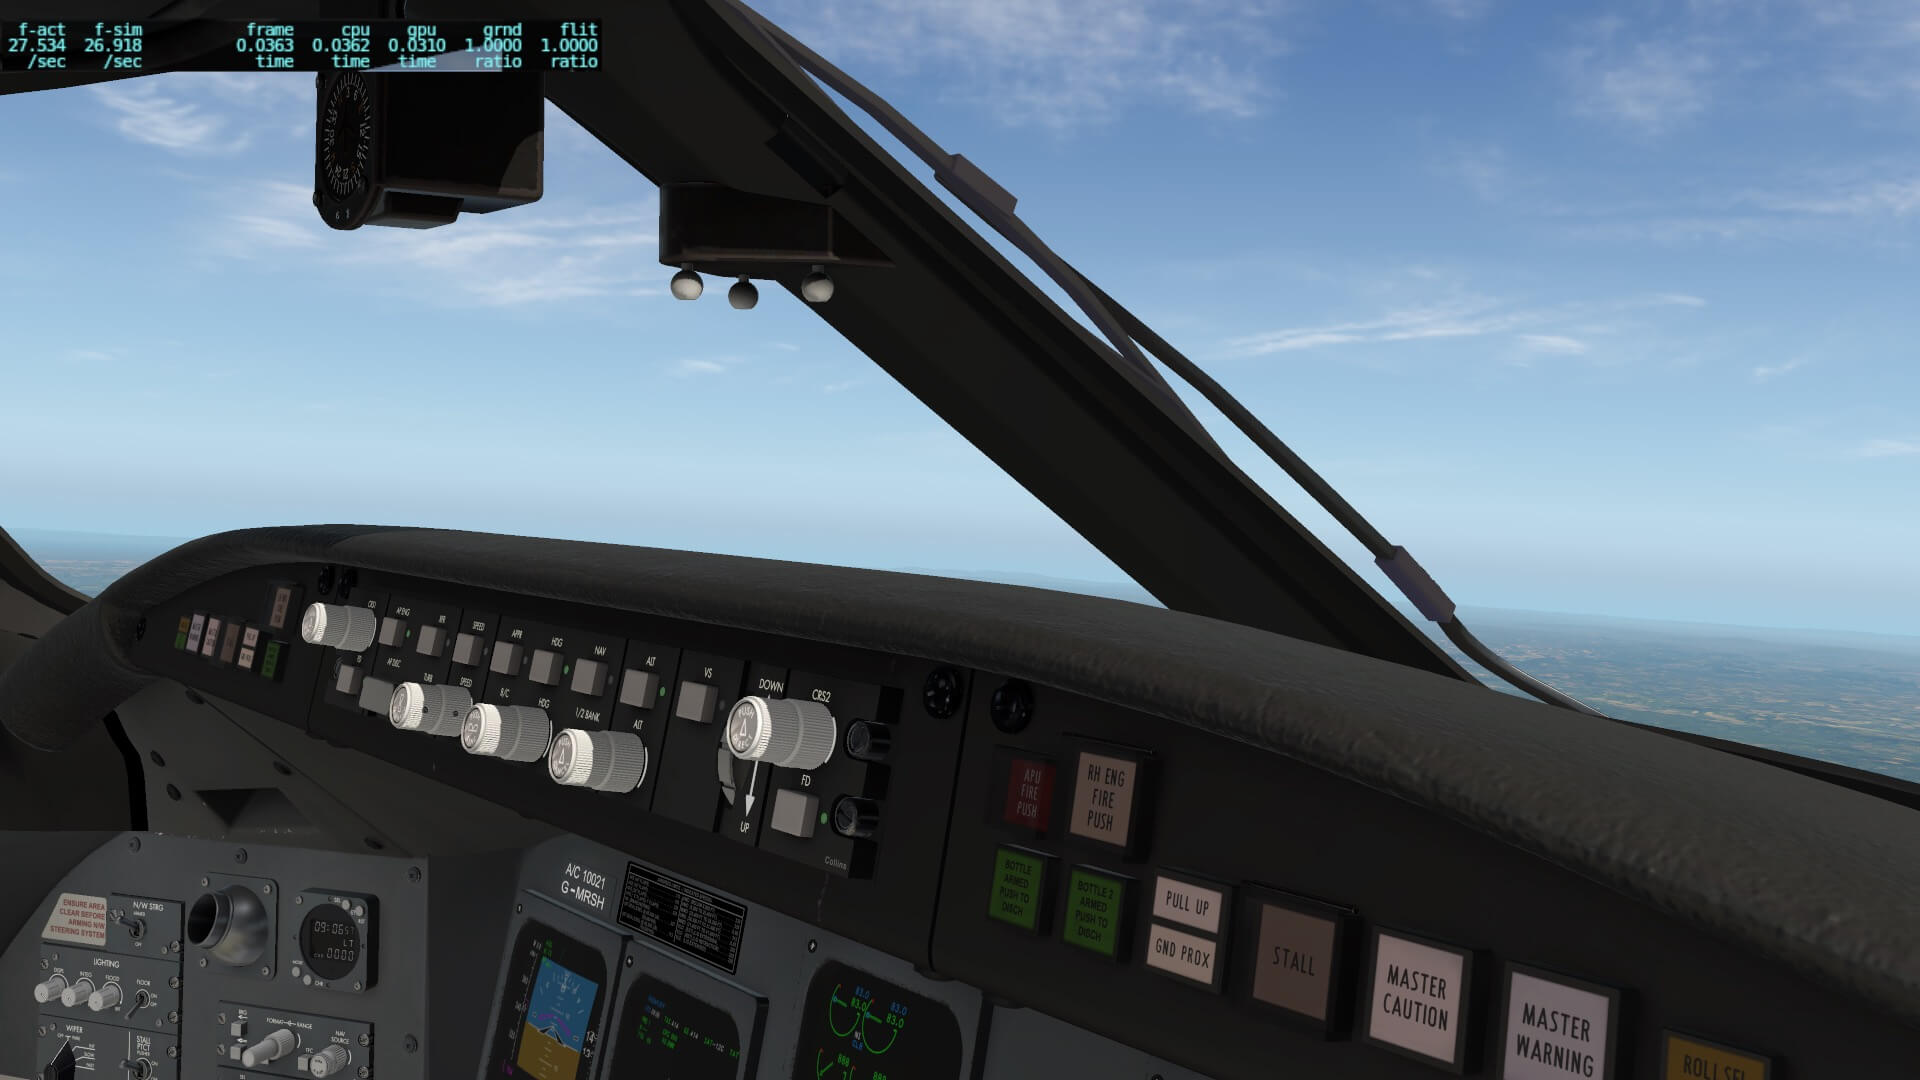

With that in mind, I’m positive with the amount of frame rates the AD Simulations CRJ700 produces. No, it doesn’t produce 50 or more FPS, but even when I have set my Rendering Settings high, and all kind of CRJ700 EFB reflections ticked, it produces acceptable frame rates.
Summary
With more then 12.000 words this review has become a bit longer then expected, but it was worth my time. Writing short reviews or quick impressions is not my style. I prefer quality reviews that not only cover the product, but a review where I can also add some background information or adding some tutorial style paragraphs. A review like this is not written in one day, or a couple of days. Although I have a lot of real aviation experience as ground engineer, and as long time reviewer; complex modeled aircraft do cost time to check them and to try them out and write about that too. What said, it was worth my time although some systems need to be refined or are waiting for own dedicated programming.
But first this; I reviewed version 1.01 with the hot fix of the AD Simulations CRJ700 in combination with X-Plane 11.55 on an iMac Pro with macOS Monterey. There’s one thing you need to keep in mind and that’s the loading time of the aircraft. It loads, but it takes a very long time, compared e.g. to other complex aircraft. According to AD Simulations this is due to the complex plugin. At the Org forum AD Simulations replied that they will try to reduce the loading time when possible, but no guarantee is given that it will work.
The 3D external modeling is well done. It comes with lots of tiny details including high quality textures, which are all 4K pixels. Using 4K textures is quite normal these days so that’s not spectacular however the CRJ700 fuselage which is only a medium size aircraft, consist of 3x 4K texture sheets meaning that a lot of details can be included.
The many decals on the fuselage, wings, engine cowling and so on, are all provided via a separate texture sheet. This way decals stay razor sharp. Does it come with less or more weathering; I guess not that much weathering is included. Perhaps the team can try to add in their paint kit an additional weathering layer and then painters can decide to add it or not.
The idea of high quality external modeling is something you also see at the inside of the aircraft. The virtual cabin and 3D cockpit are modeled with love and again, with eye for many tiny details. Although many animations are added in the cabin, I’m always wondering if every simmers sees it and/or uses it. The 3D cockpit is very well modeled, lots of realistic weathering is included and many animations. Some animations we see with every developer, but in this CRJ700 I see a sliding and movable sun visors and pilot seat that are movable. Never seen this before. Gorgeous to see, but I could ask myself the question; was/is it worth the additional time to model this, but anyway, it looks and functions great.
The CRJ700 package comes with a quick guide that comes with lots of details of the aircraft, but it also offers a kind of tutorial flight however, it’s not always 1-to-1 with the modeled aircraft and all parts that aren’t yet applicable or simulated are marked in red. That’s in particular the case with the FMS CDU. And yes, the FMS, Auto Flight and a couple of other systems are using the default X-Plane systems.
That said, these systems are not yet dedicated programmed by the AD Simulations team, but according to what they told me and what can be read on the dedicated X-Plane.Org forum, work is in progress and dedicated systems will be implemented step by step. As far as I could read, first the electrical system will be programmed, then the hydraulic system and so on. The FMS is a way more complex system to program, so till that time you and I need to work with the Laminar Research FMS. Last update – February 10th 2022 – from the AD Simulations team “Actually, we decided that we will start working on Custom FMS starting with the update after the coming up one. We will slowly introduce new sections of the Custom FMS as time goes by instead of waiting to do it at the end.”
The current version doesn’t use yet a Skunkcrafts updater, but will be implemented soon. That said, right now you need to download a new package, uninstall the old version, register again and you’re ready to continue with your CRJ700 flights. When a Skunkcrafts.cfg file is included, updating is quick and easy and straightforward.
Want to follow what other simmers say about this aircraft or what’s happening at the dedicated X-Plane.Org forum, then you should check out this URL. The model comes with a couple of liveries, but additional liveries can be found via this Org link.
Want to know more about the modeled AD Simulations Bombardier CRJ700? Then you can check it out at their own website or you check out the dedicated X-Plane.Org page. As of this writing, the AD Simulations CRJ-700 cost 49.95 USD.
Have I forgotten something? Have I covered, seen all the ins and outs, tested the aircraft thoroughly? Most likely there’s always something that slipped my mind,. but I think I’ve seen enough for now.
Feel free to contact me if you’ve got additional questions related to this impression. You can reach me via email Angelique.van.Campen@gmail.com or to Angelique@X-Plained.com.
With Greetings,
Angelique van Campen
| Add-on: | Payware AD Simulations |
|---|---|
| Publisher | Developer: | X-Plane.Org | DWS/AD Simulations |
| Description: | Realistic rendition of Bombardier CRJ700 |
| Software Source / Size: | Download / Approximately 1.6GB (unzipped) |
| Reviewed by: | Angelique van Campen |
| Published: | February 10th 2022 |
| Hardware specifications: | - iMac Pro - Intel 3GHz Intel Xeon W / 4.5Ghz - Radeon Pro Vega 64 16368 MB - 64 GB 2666 MHz DDR4 - 1 internal shared 1TB SSD (Monterey 12.2) - 1 external 2TB LaCie Rugged Pro SSD (Bootcamp Windows 10) - Saitek Pro Flight System X-52 Pro and X-56 Rhino - Honeycomb Alpha Flight Controls - Honeycomb Bravo Throttle Quadrant - Thrustmaster TCA Captain Pack Airbus |
| Software specifications: | - macOS Monterey (12.2) - X-Plane 11.5x |
0 Comments