AOA Simulations F-22A Raptor
Introduction
Although one of the official names for the F-22 is Raptor, initially it was going to be called the Lightning 2 in honor of the old Lockheed P-38 Lightning, but then it got changed to Raptor.
The Lightning 2 name eventually was applied to the F-35 JSF aircraft. Both aircraft are being produced by Lockheed-Martin Corporation. Lockheed Martin Corporation is an American aerospace, arms, defense, security, and advanced technologies company with worldwide interests. It was formed by the merger of Lockheed Corporation with Martin Marietta in March 1995. Lockheed Martin is one of the largest companies in the aerospace, military support, security, and technologies industry. (Courtesy of Wikipedia)
The F-22 Raptor
As I mentioned in the previous section, the current Lockheed Martin top model is the JSF (Joint Strike Fighter) F-35, but the F-22 is still hot! That said, we – Andy Clarke and Angelique van Campen – are pleased to offer you an in-depth review of the AoA Simulations F-22 Raptor.
The review is based on model version 1.1 and is reviewed on iMac with macOS Big Sur and X-Plane 11.53r1. The AOA F-22 Raptor package is, of course, also available for Windows and Linux simmers. Andy who’s our dedicated reviewer loves historical and modern fighters which led to his request to review this well modeled fighter, in conjunction with your personal reporter and long time reviewer Angelique van Campen.
The Real F-22 Raptor
The Lockheed Martin F-22 Raptor is an American single-seat, twin-engine, all-weather stealth tactical fighter aircraft developed exclusively for the United States Air Force (USAF). The result of the USAF’s Advanced Tactical Fighter (ATF) program, the aircraft was designed primarily as an air superiority fighter, but also has ground attack, electronic warfare, and signal intelligence capabilities.
The prime contractor, Lockheed Martin, built most of the F-22’s airframe and weapons systems and conducted final assembly, while Boeing provided the wings, aft fuselage, avionics integration, and training systems.
The aircraft was variously designated F-22 and F/A-22 before it formally entered service in December 2005 as the F-22A. Despite its protracted development and various operational issues, USAF officials consider the F-22 a critical component of the service’s tactical air power. Its combination of stealth, aerodynamic performance, and avionics systems enable unprecedented air combat capabilities.
Service officials had originally planned to buy a total of 750 ATFs. In 2009, the program was cut to 187 operational production aircraft due to high costs, a lack of clear air-to-air missions due to delays in Russian and Chinese fighter programs, a ban on exports, and development of the more versatile F-35. The last F-22 was delivered in 2012.
The Raptor variants/models that have been designed, made or cancelled are the:
- YF-22A – pre-production technology demonstrator for Advanced Tactical Fighter (ATF) demonstration/validation phase; two were built.
- F-22A – single-seat production version, was designated F/A-22A in early 2000s.
- F-22B – planned two-seat variant, cancelled in 1996 to save development costs with test aircraft orders converted to F-22A.
- Naval F-22 variant – a planned carrier-borne variant of the F-22 with variable-sweep wings for the U.S. Navy’s Navy Advanced Tactical Fighter (NATF) program to replace the F-14 Tomcat. Program was cancelled in 1991.

The previous paragraphs are just a small collection of what can be found at the dedicated F-22 Raptor Wikipedia web page, but there’s of course so much more to read, to see or to view. I’d included only two YouTube movies in this review, but oh my goodness, I’ve seen so many other awesome movies. Worth for you to search for them after you’ve read our review.
The Package – Installation
That’s more or less straightforward. After you’ve downloaded the AOA F-22A Raptor package from your X-Plane.Org account, unzip it, and copy the complete folder to your X-Plane 11 Aircraft folder or, when you own more AOA fighters, then you can also decide to first make a sub folder AOA Simulations and then paste the F-22A Raptor in this folder. It keeps all the installed aircraft, helicopters and fighters – whatever is applicable for you – a bit more organized.
This also means that no serial number or key is needed. The AOA Simulations F-22A Raptor package doesn’t have an update option build in like we know from STMA or Skunkcrafts which means that the only way to update your model is downloading the updated package from X-Plane.Org and re-install it in your X-Plane Aircraft folder. Perhaps the AOA Simulations team will decide in the future to add a kind of updating possibility to their models.

The AOA Simulations F-22 Raptor comes with popup options. Via the X-Plane menu Plugins – AOA Simulations F-22 Raptor you’ve got options to change many things of the modeled F-22A Raptor like the livery, changing the weapons mode, toggle ground equipment, toggle glass reflection (for those simmers with a low performance PC/Mac) and many others. This will be discussed in detail by Andy when he discusses the Systems.
The Package – Manuals
The AOA F-22 comes with the following manuals:
– F-22A Convention Paper (Acrobat)
– F-22A Custom Sliders (Microsoft Excel sheet)
– F-22A Flight Manual 1.1 (Acrobat)
The F-22A Convention Paper – 13 pages – is the original F-22A FLIGHT TEST PROGRAM UPDATE document. To be more precise, this technical paper was presented recently at the Society of Experimental Test Pilots’ annual convention. The paper remains unedited to retain its original flavor. See it as a background document with all kind of interesting details from the moment the document was published in April 9th, 1999.
The Custom Sliders is a Microsoft Excel sheet – 1 sheet – and is as the name says, an Excel sheet with X-Plane datarefs and their role. It’s that I have on my iMac Apple’s Numbers installed, else I wasn’t able to read this sheet. Even for Windows users, it’s not that simmers always have a calculation program installed. I personally would suggest that the AOA Simulations team also saved this Excel sheet as an Acrobat Reader document. That’s at least something that can be read by every one.
The most important manual for the modeled F-22A Raptor is the Flight Manual – 94 pages – including the version number. It is divided in the following sections:
– Chapter 1 | Introduction 1-7
– Chapter 2 | Cockpit Familiarization 2-12
– Chapter 3 | Detailed Description 3-23
– Chapter 4 | Flight 4-58
– Chapter 5 | Weapons 5-71
– Chapter 6 | Abnormal Procedures 6-85
– Technical Support 6-90
– Appendix 1 | Glossary 6-91
It’s a well balanced and detailed manual and therefore yes, I say it already now, worth to read the contents on your tablet or to print it and do that before you make any flights. A lot of time and effort is put into the creations of this document, so take a moment, relax and read it before you start fiddling around with the F-22A unless you’re of course a real F-22A pilot, but I don’t think you are, so read the manual before. That’s my advice!
Each of these sections, depending on the subject, is split into sub-chapters. All information needed how to set up the hardware and the correct installation can be found in chapter 1. Chapter 2, just as important as chapter 1, deals with general familiarization of the cockpit, but it also offers detailed description and operation of the modeled systems. When you think you know everything after reading chapter 2, then guess what, an even more detailed description and operation of specific system can be found in chapter 3.
Chapter 3 covers the systems HUD (Head Up Display), the Up Front Control, the Auto Pilot, the NAV/COM Select Panel, L, R and C MFD (Multi Function Display).
Chapter 4 is titled “Flight” but actually it’s more a tutorial. Ok, it’s not really mend to be a tutorial, but all the steps from pre-flight till and including maneuvering are discussed. What is missing in my humble opinion are the description of the descent, approach and landing, but hold on, I’ll come back to that when discussing chapter 6.
Chapter 5 deals with overall weapons. This can be F-22A configurations for A2A (Air to Air) and A2G (Air to Ground). Although the F-22 EFT (External Fuel Tank) configuration has nothing to do with missiles or bombs, it is also included in this chapter. It’s not only explained hat to expect, it explains in depth how to configure your F-22A with the right weapons. And perhaps you don’t expect this, but this chapter also discusses refuelling. In fact, it discusses three different possibilities of refuelling namely GFR (Ground Refuelling), virtual in-flight refuelling and in-flight refuelling from AI aircraft.
Chapter 6 has everything to do with the abnormal procedures, but while checking out this chapter, I found out that it includes regular approach and landing instructions so it is there although the descent is not a part of it.
The Package – Others
Liveries
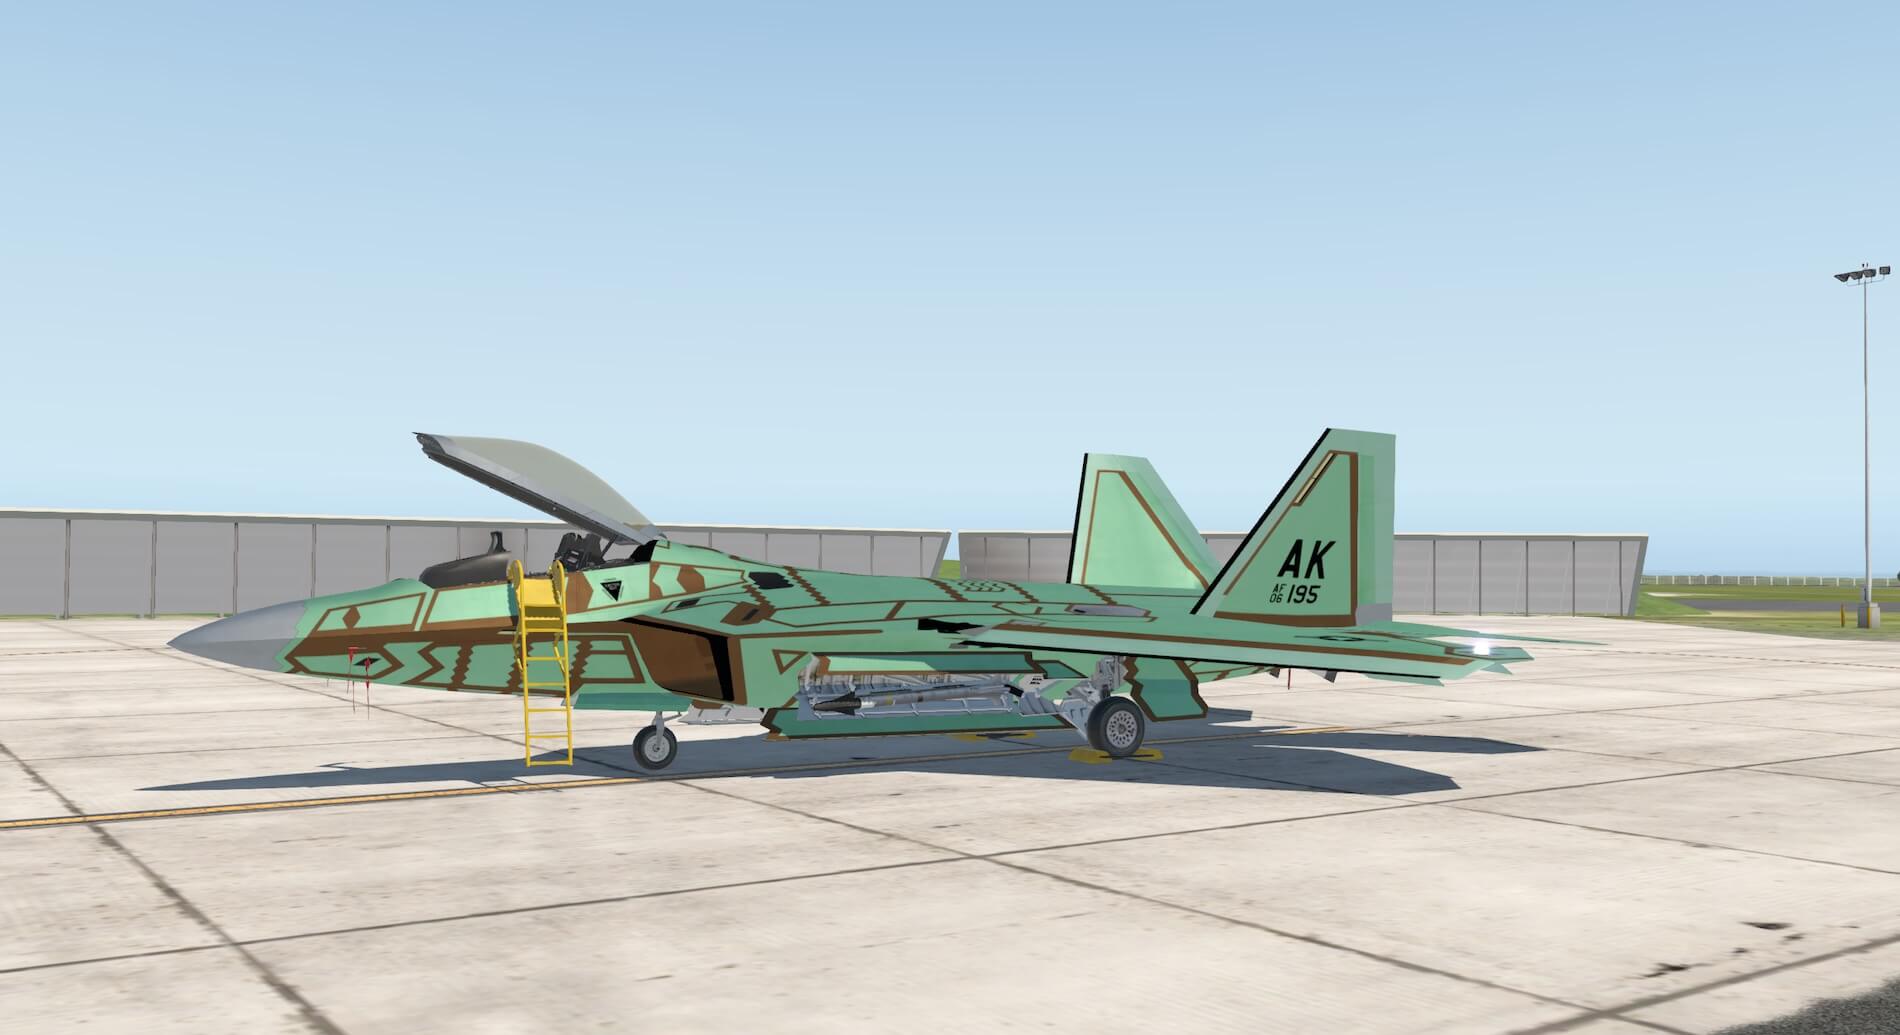
The current model – version 1.1 – comes with a couple of liveries (8) of which one is the so called default livery. Other interesting liveries are the factory rollout (the primer version), pre-production, raptor 01 and four squadrons (FS Mytai Fighters, FW Wing King, FS Hornets and FS Bulldogs) paintings.
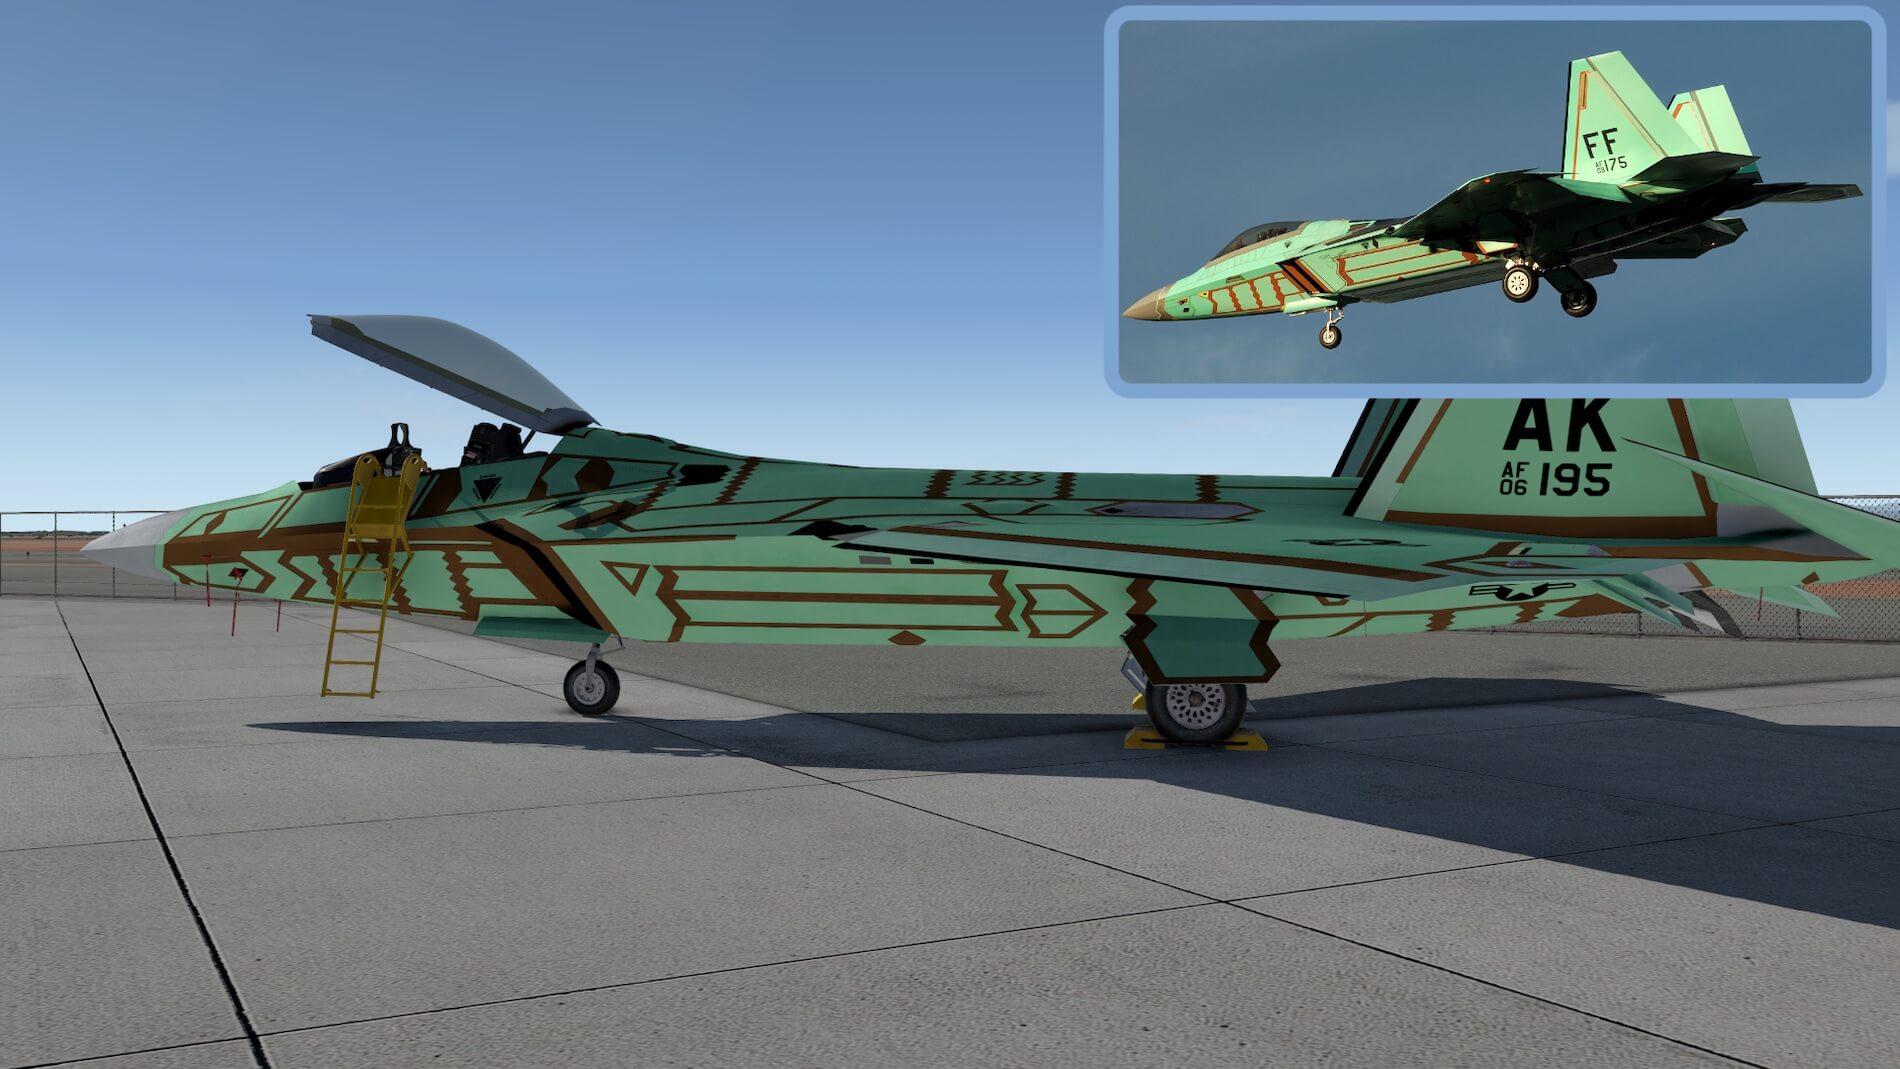
A couple of words about the factory rollout or primer color painting. Although we quickly say this is a livery, actually it’s not a livery since every F-22A Raptor has this primer layer underneath the actually painting. When you think this is a weird combination of green and brown primer, you’ll be surprised to find that it is reality. It’s not easy to find, but I found a couple of real F-22A Raptor primers that looks like the one of AOA Simulations. Check out the following screenshot that shows with the insert that it is as real as it gets!
Models
When you check the AOA Simulation models or just look for the installed fighters within X-Plane, you’ll noticed that you have three different F-22 configurations namely:
– F-22 A2A (Air to Air – missile)
– F-22 A2G (Air to Ground or Surface – bomb)
– F-22 EFT (External Fuel Tank)
These different models and thus their weapons except for the EFT configuration are in depth explained in the flight manual chapter 5 – Weapons, starting at page 71, but even more important, covered by Andy.
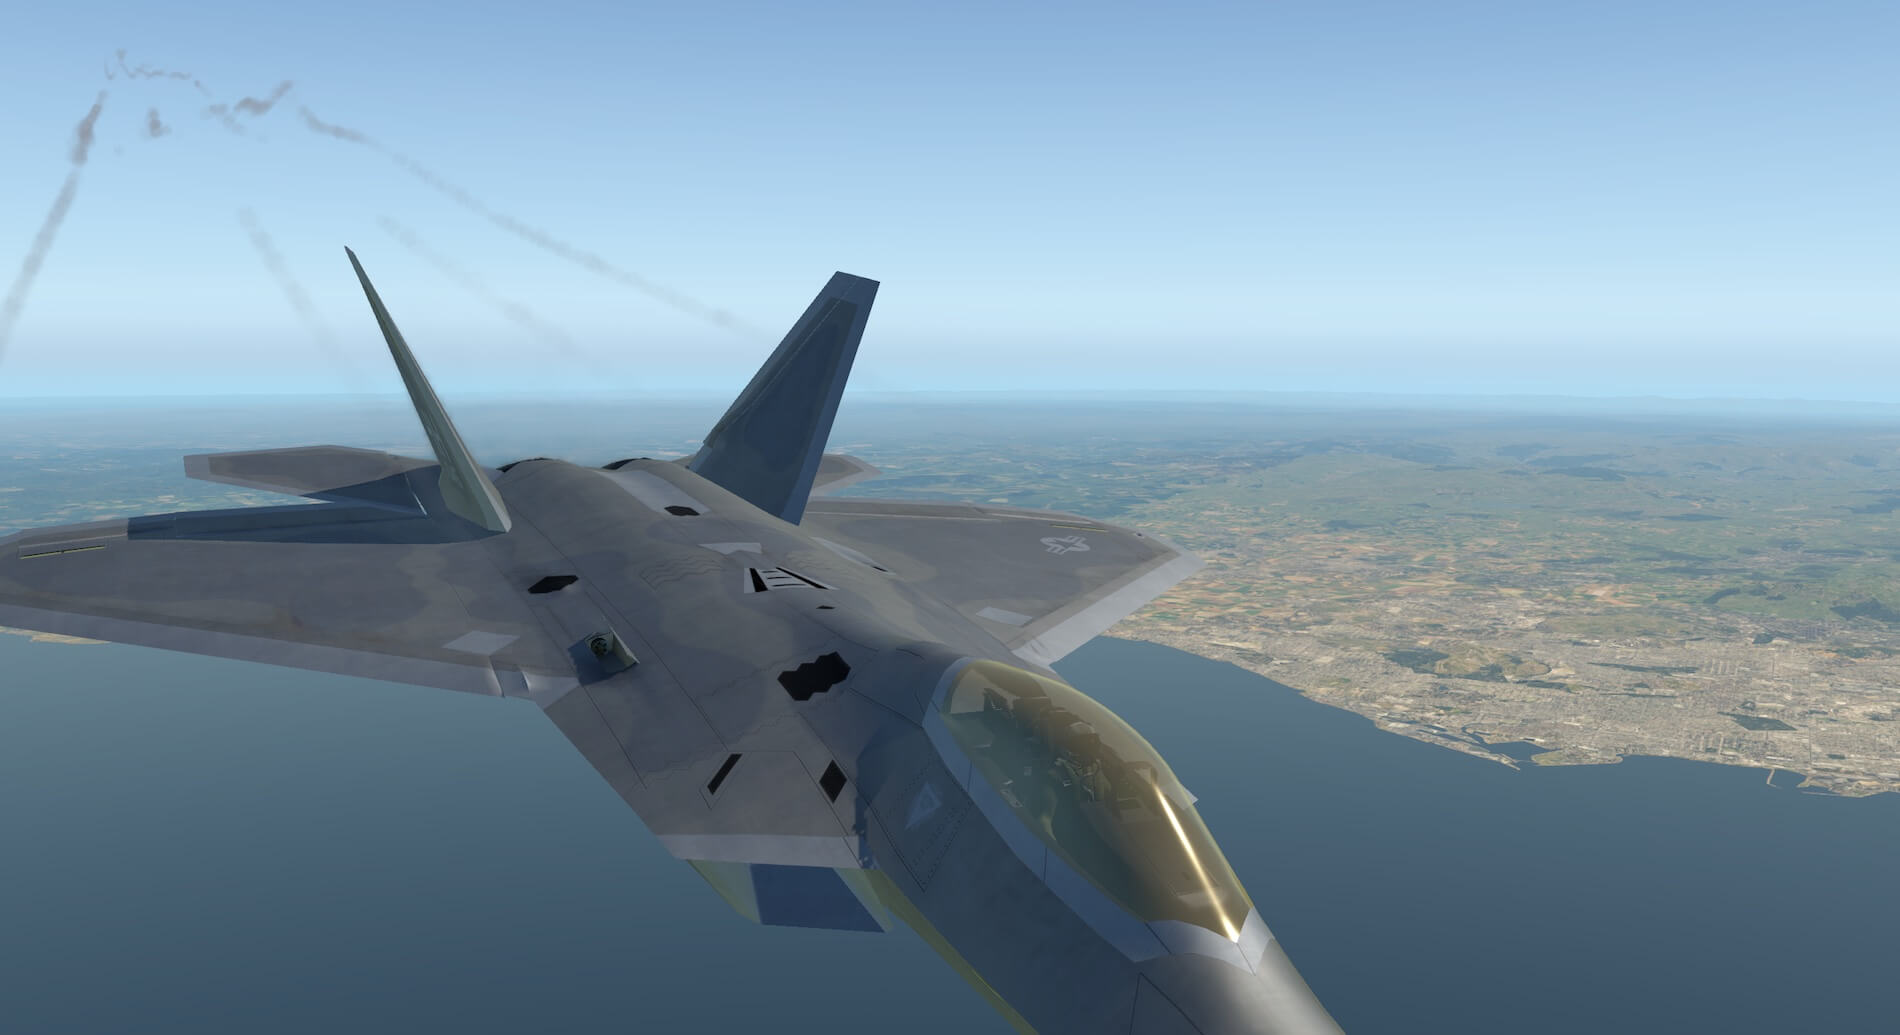
Exterior Modeling
Approaching the aircraft from the front left the aircraft colour scheme is immediately evident. The colours and signage are not as vivid as some models apart from the factory roll out livery. Like commercial and private aircraft this variant is designed to be noticed whereas the operational aircraft are coloured to not to be seen at all. The colour scheme for the model is entirely appropriate and realistic for its military context.
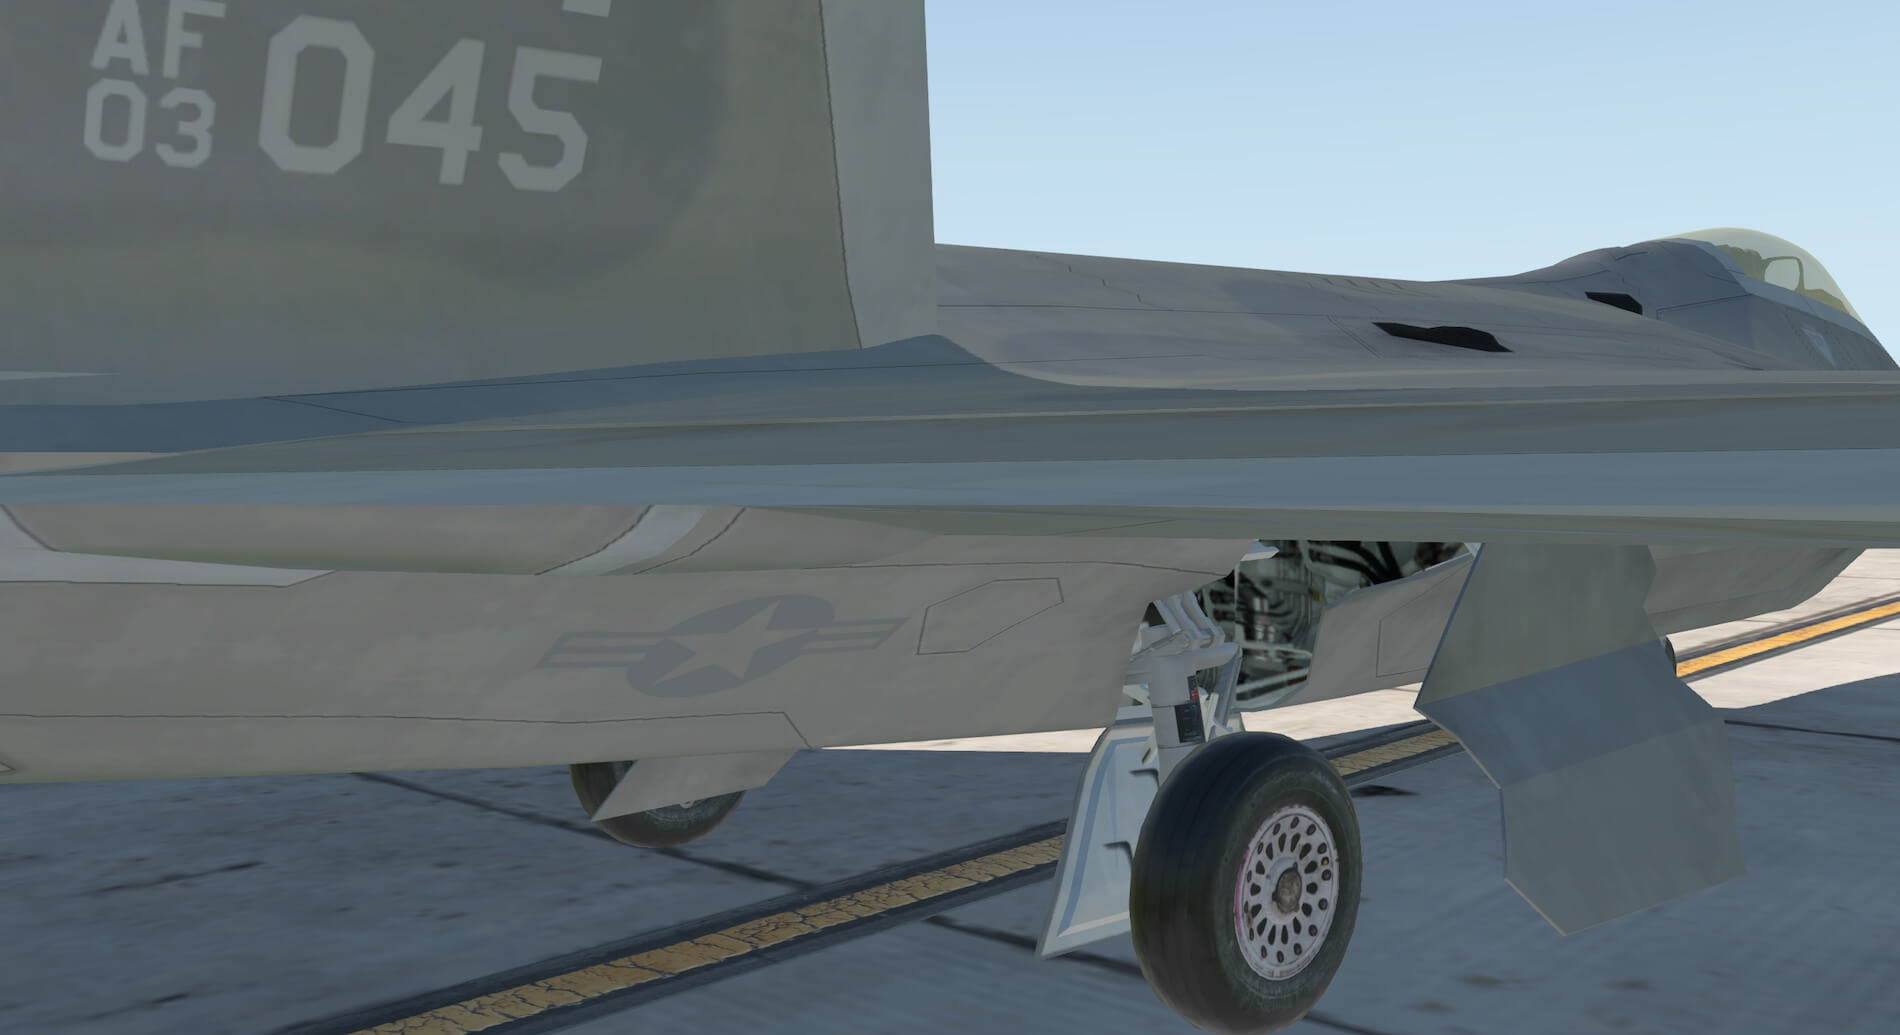
Moving closer reveals detailed modeling of undercarriage struts, wheels, weapons and the weapons bay itself. Turning towards the front of the aircraft shows the crew ladder and remove before flight ribbons in place. Raising the view allows views of the surface detail and the realistic glass effect on the canopy.


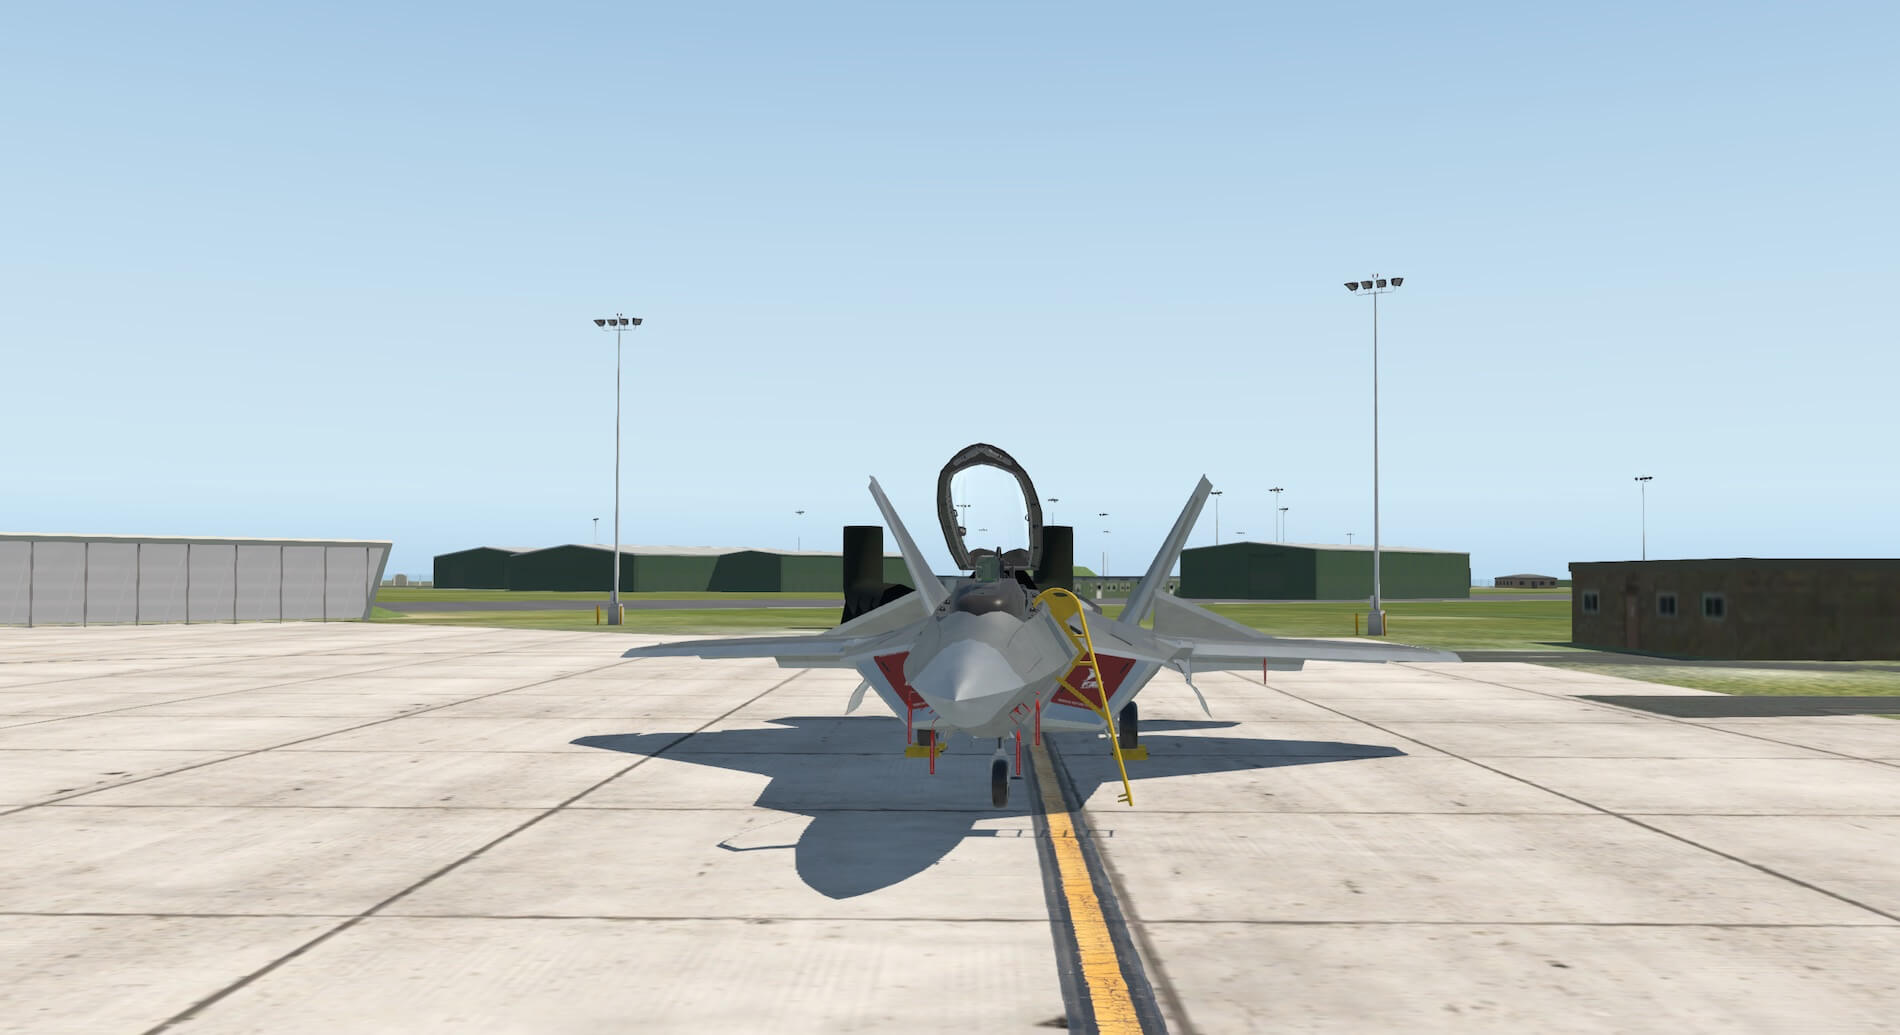
Moving to the front of the aircraft the intake covers are visible and the well known front appearance of the aircraft becomes evident. Removing the ground objects and closing the canopy adds to this image.

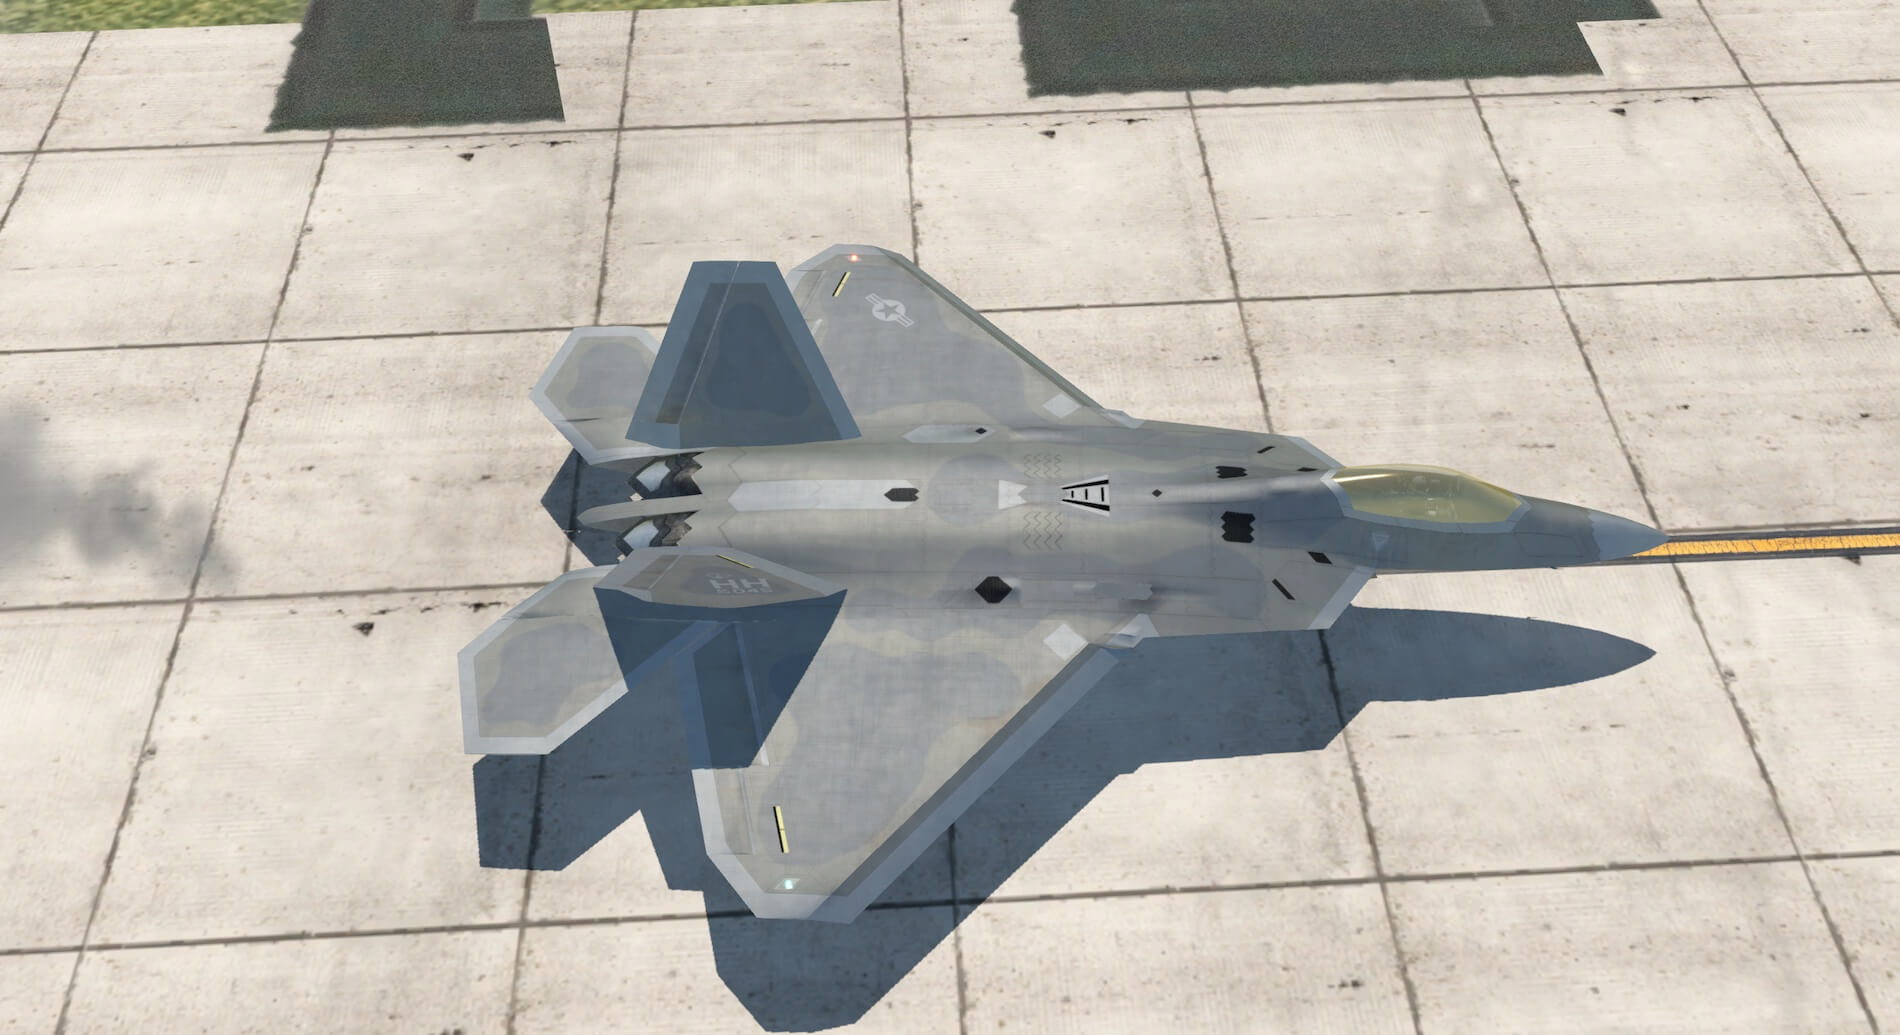
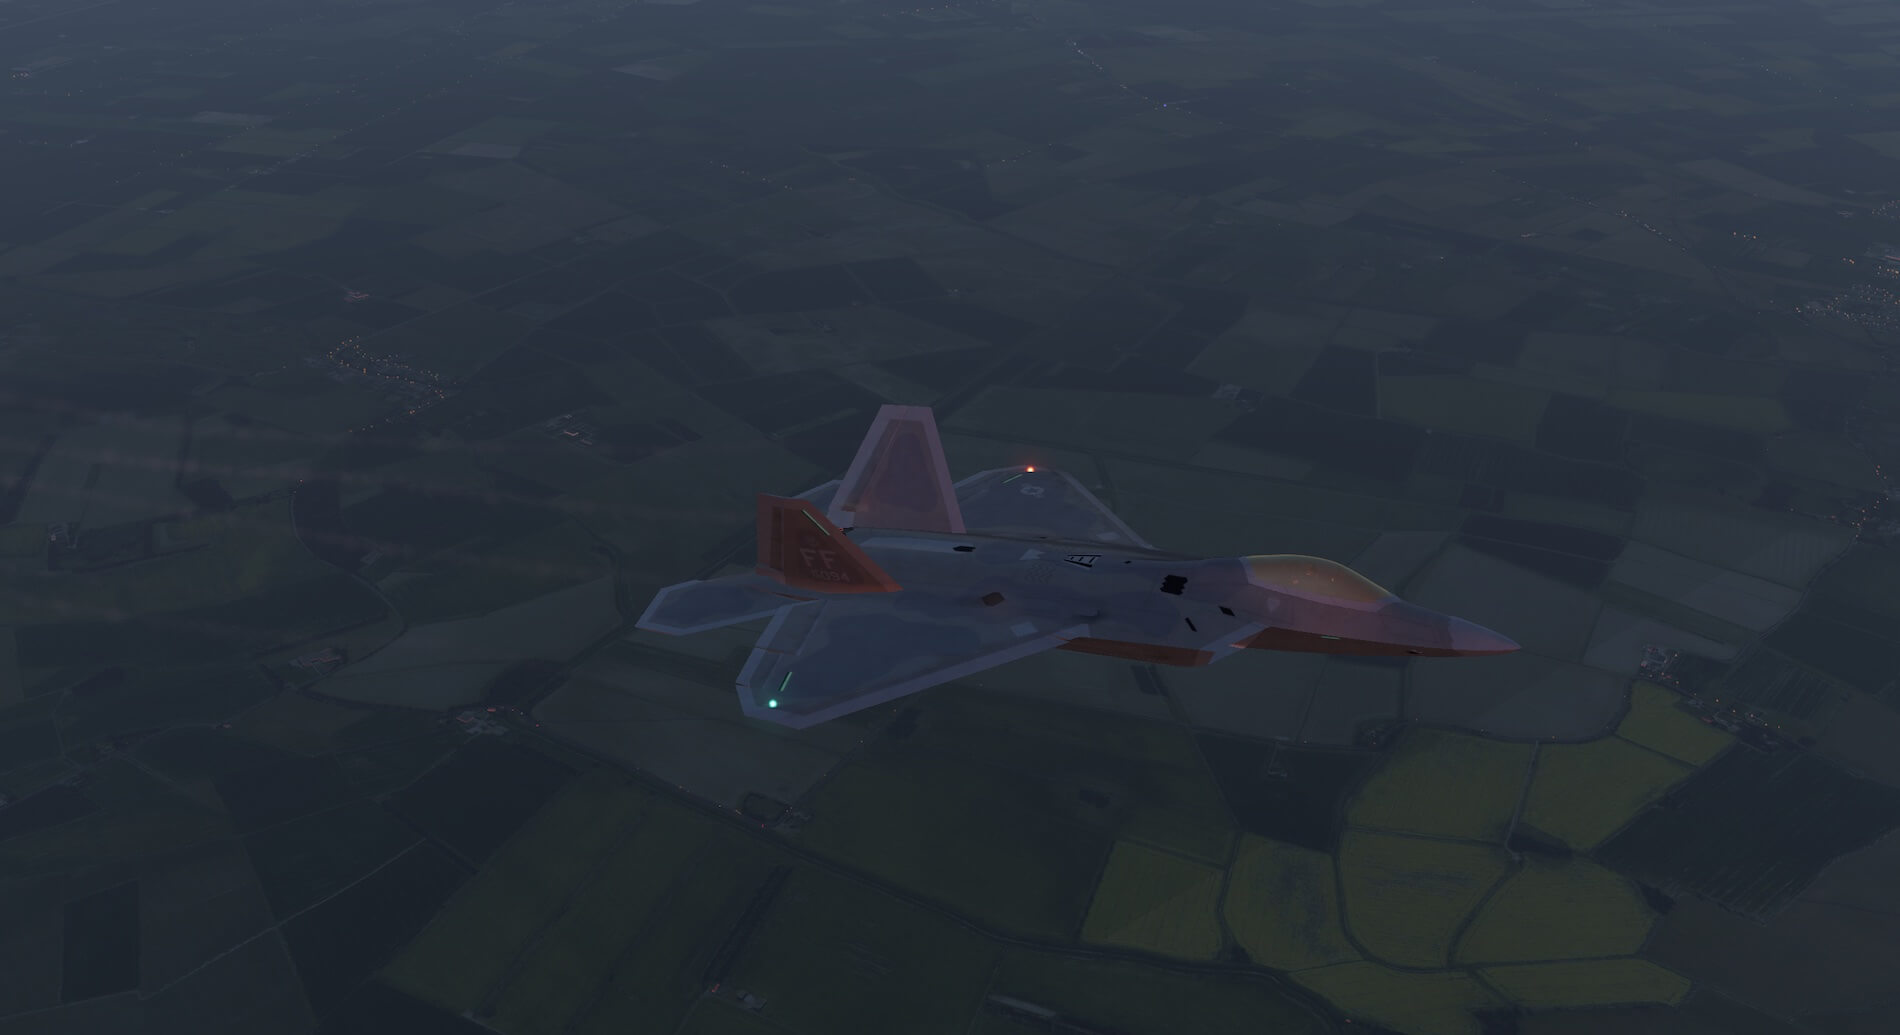
Views from the front left of the aircraft allows a sight of the detailed pilot figure and again the understated military colour scheme. With the engines off the control surfaces are in a relaxed position. The under wing pylons and weaponry are conspicuous by their absence showing the stealthy outline of the aircraft. With the engines running the exhaust is visible and raising the view, and moving to the right wing, shows the size of the wing area, surface markings and the lack of surface attachments. Lights are clear and bright and light works well across the aircraft surface.


Moving to the rear right of the aircraft shows the horizontal and vertical stabilizers on the tail and closer views show high attention to detail to the characteristic undercarriage doors and the interior of the wheel wells.

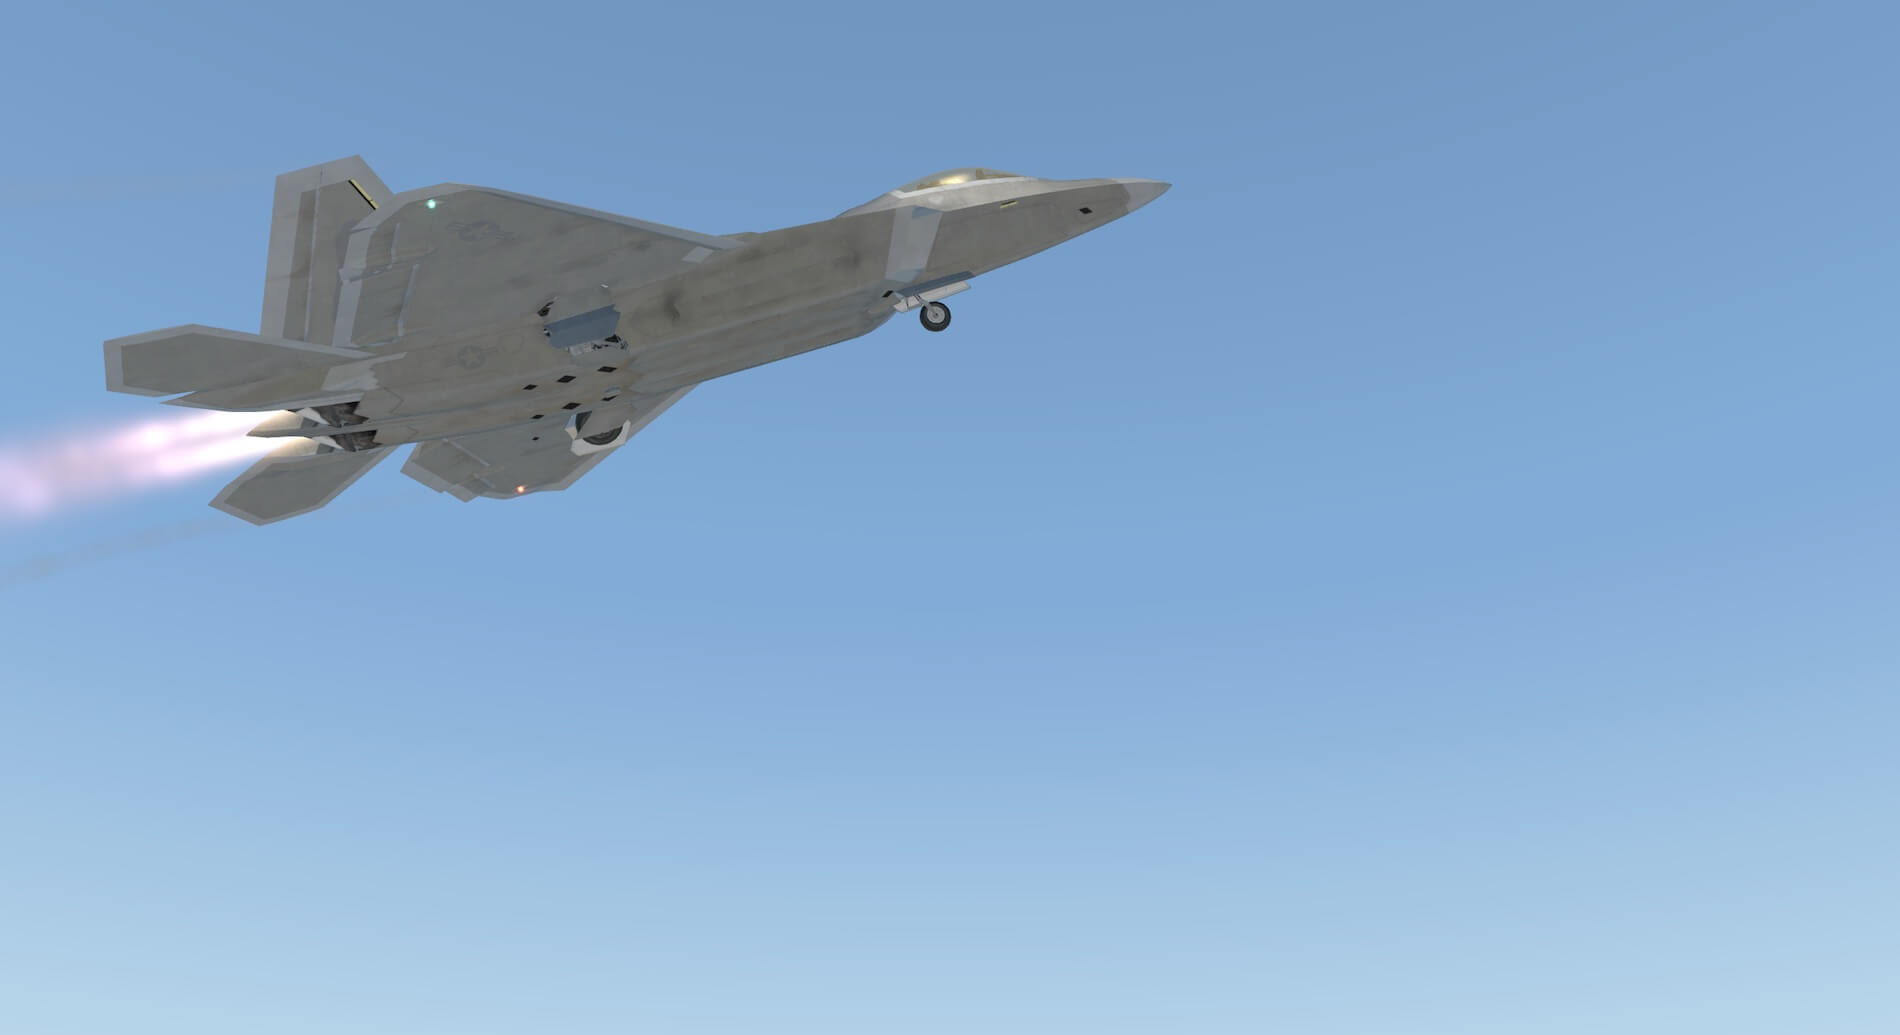
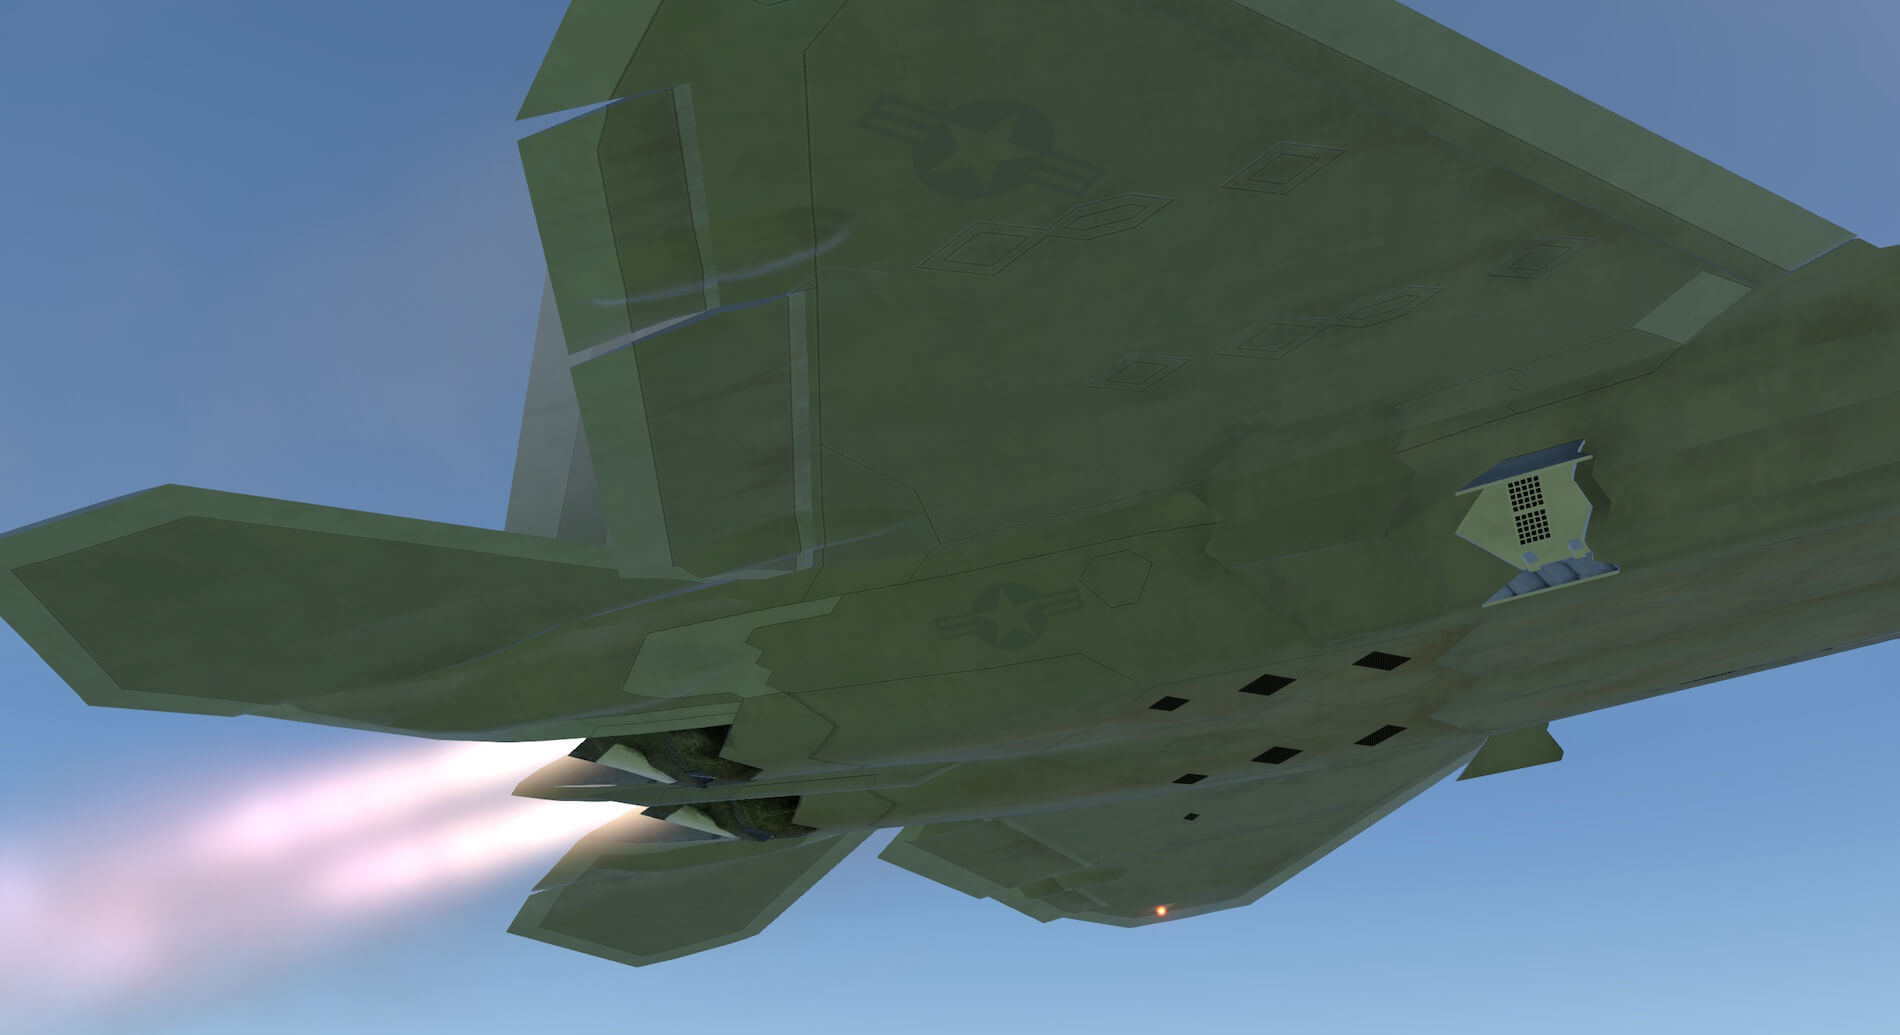
Views from the rear show the well known tail profile, good engine and exhaust detail and the thrust vectoring nozzles which work together in pitch. The weathering and wear marks are evident over the paintwork and the exhaust effects are also very convincing.
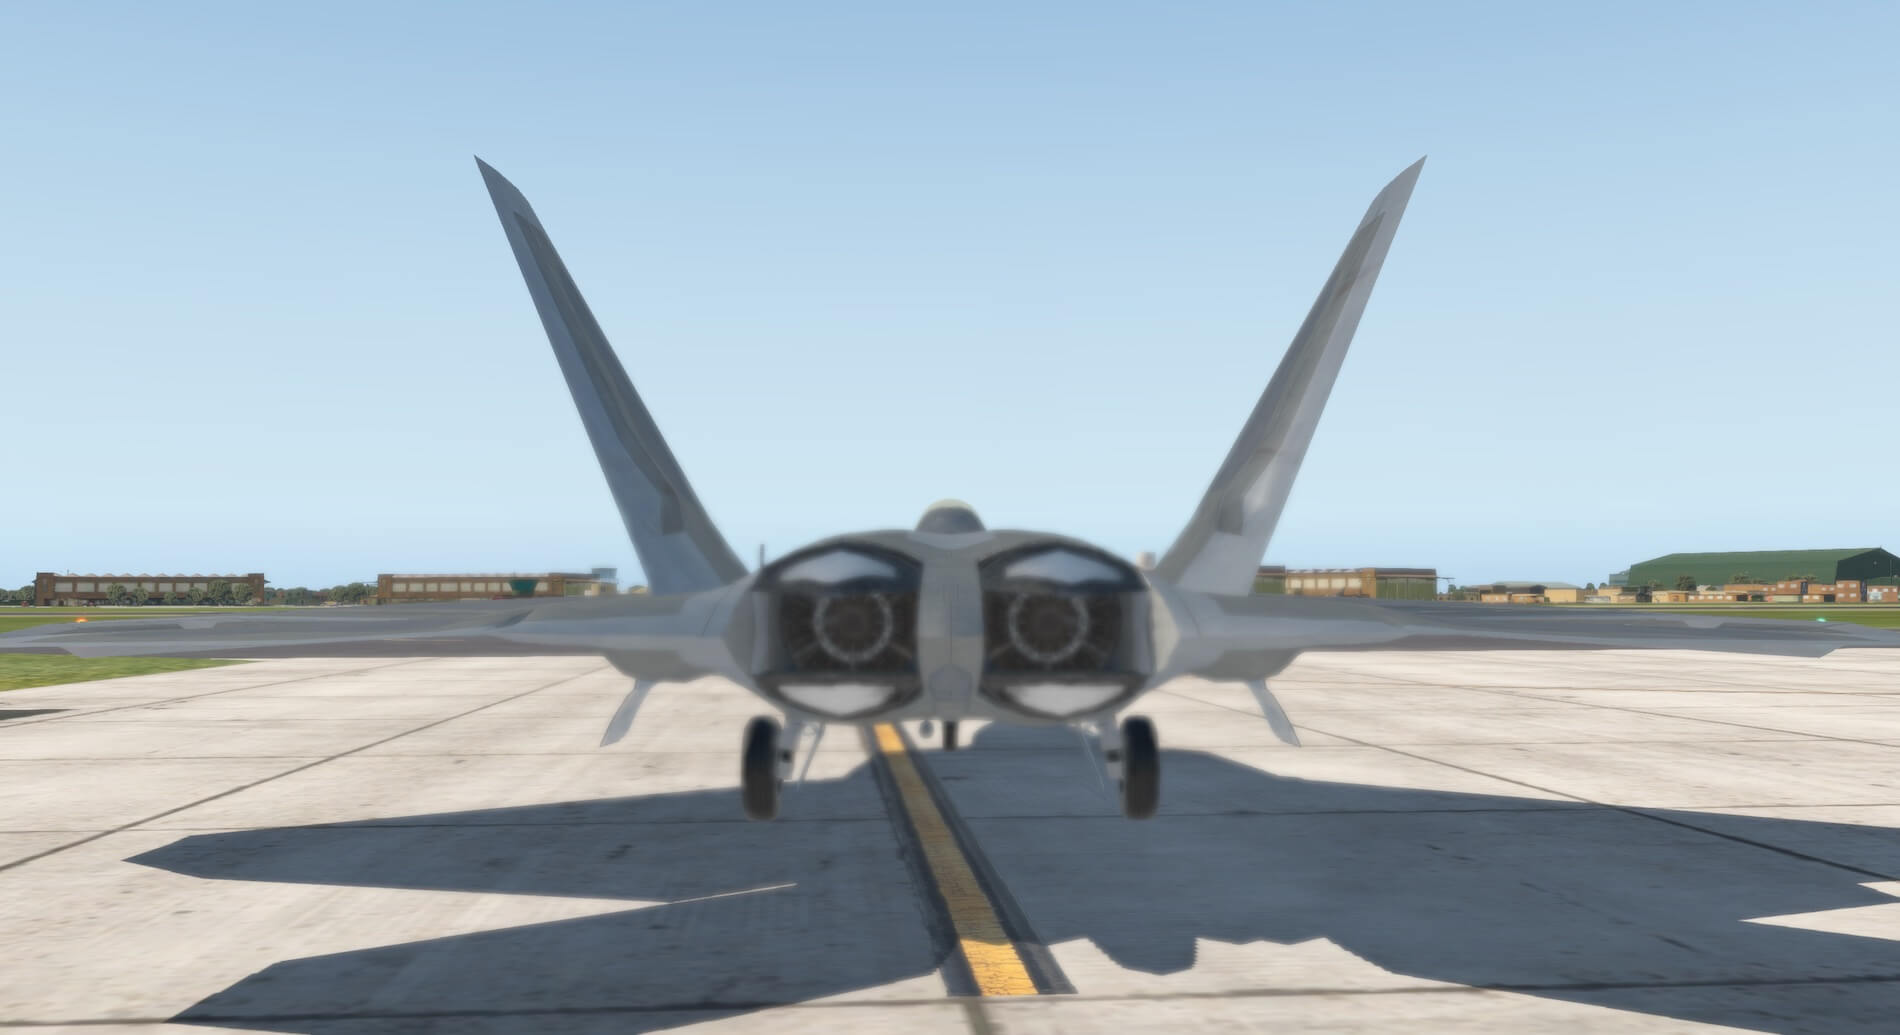
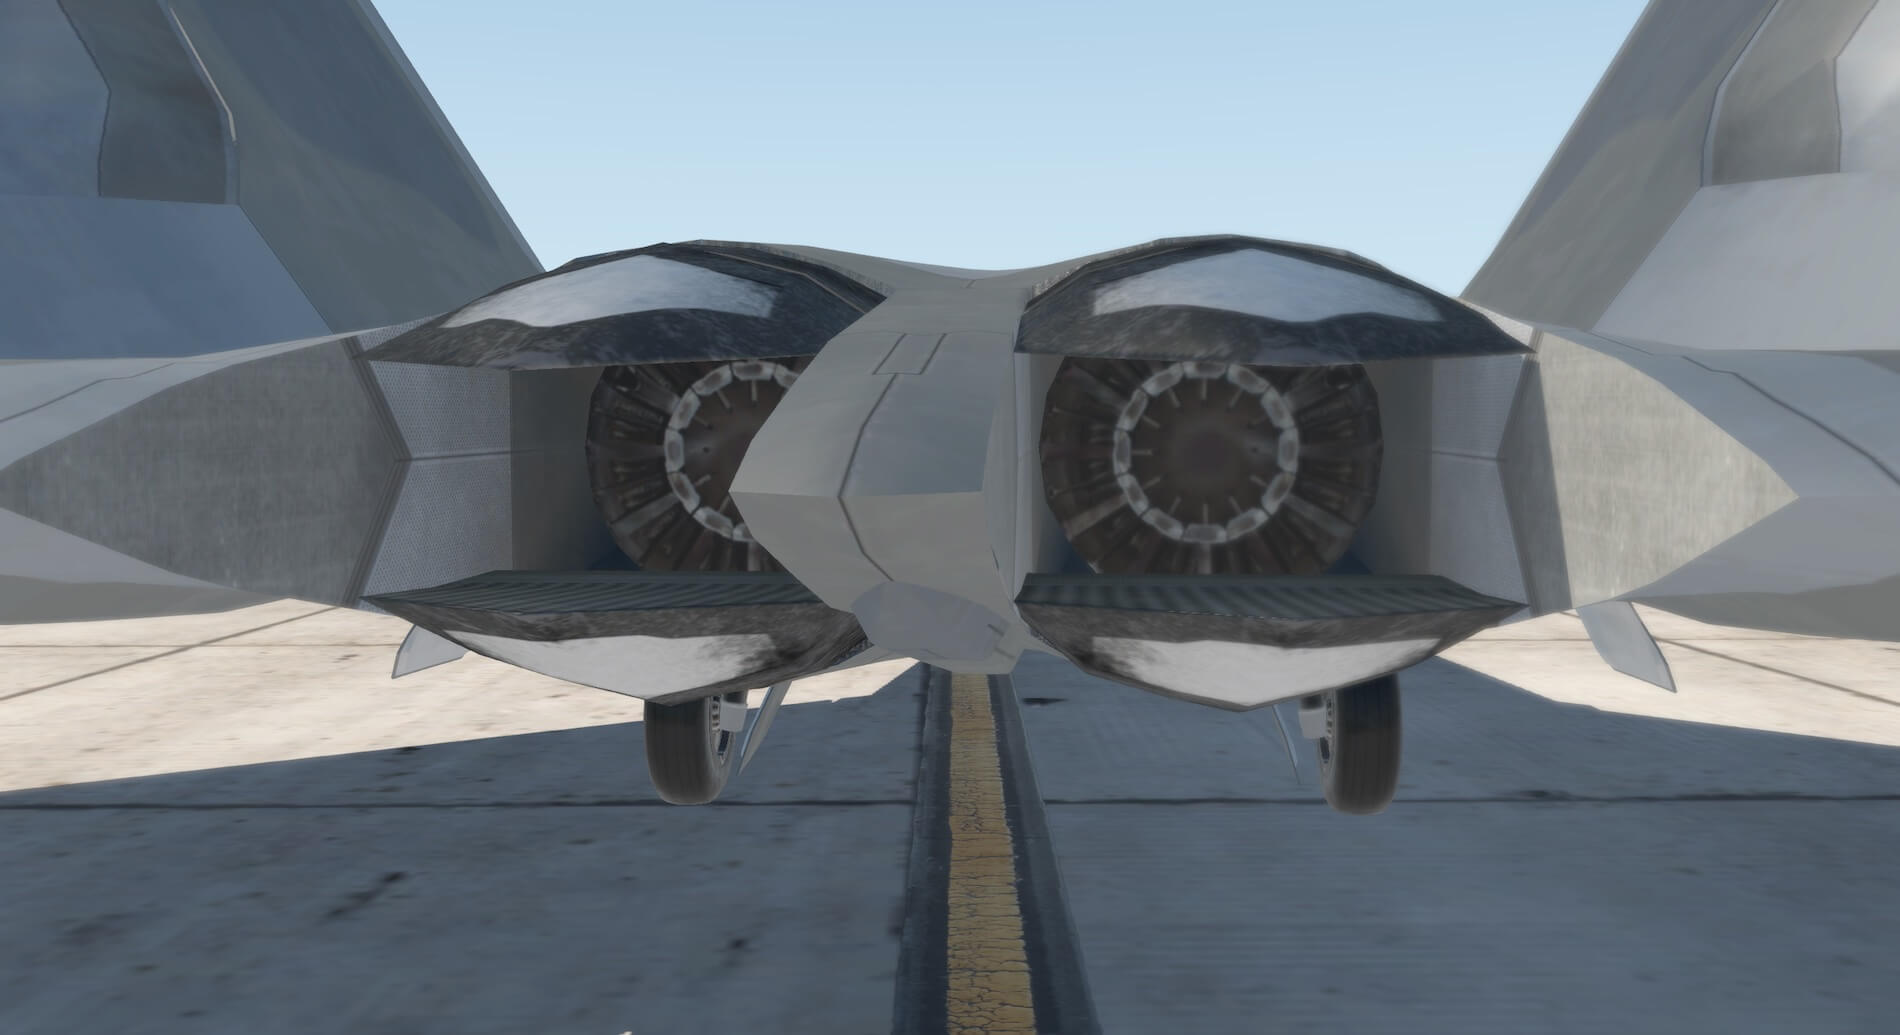
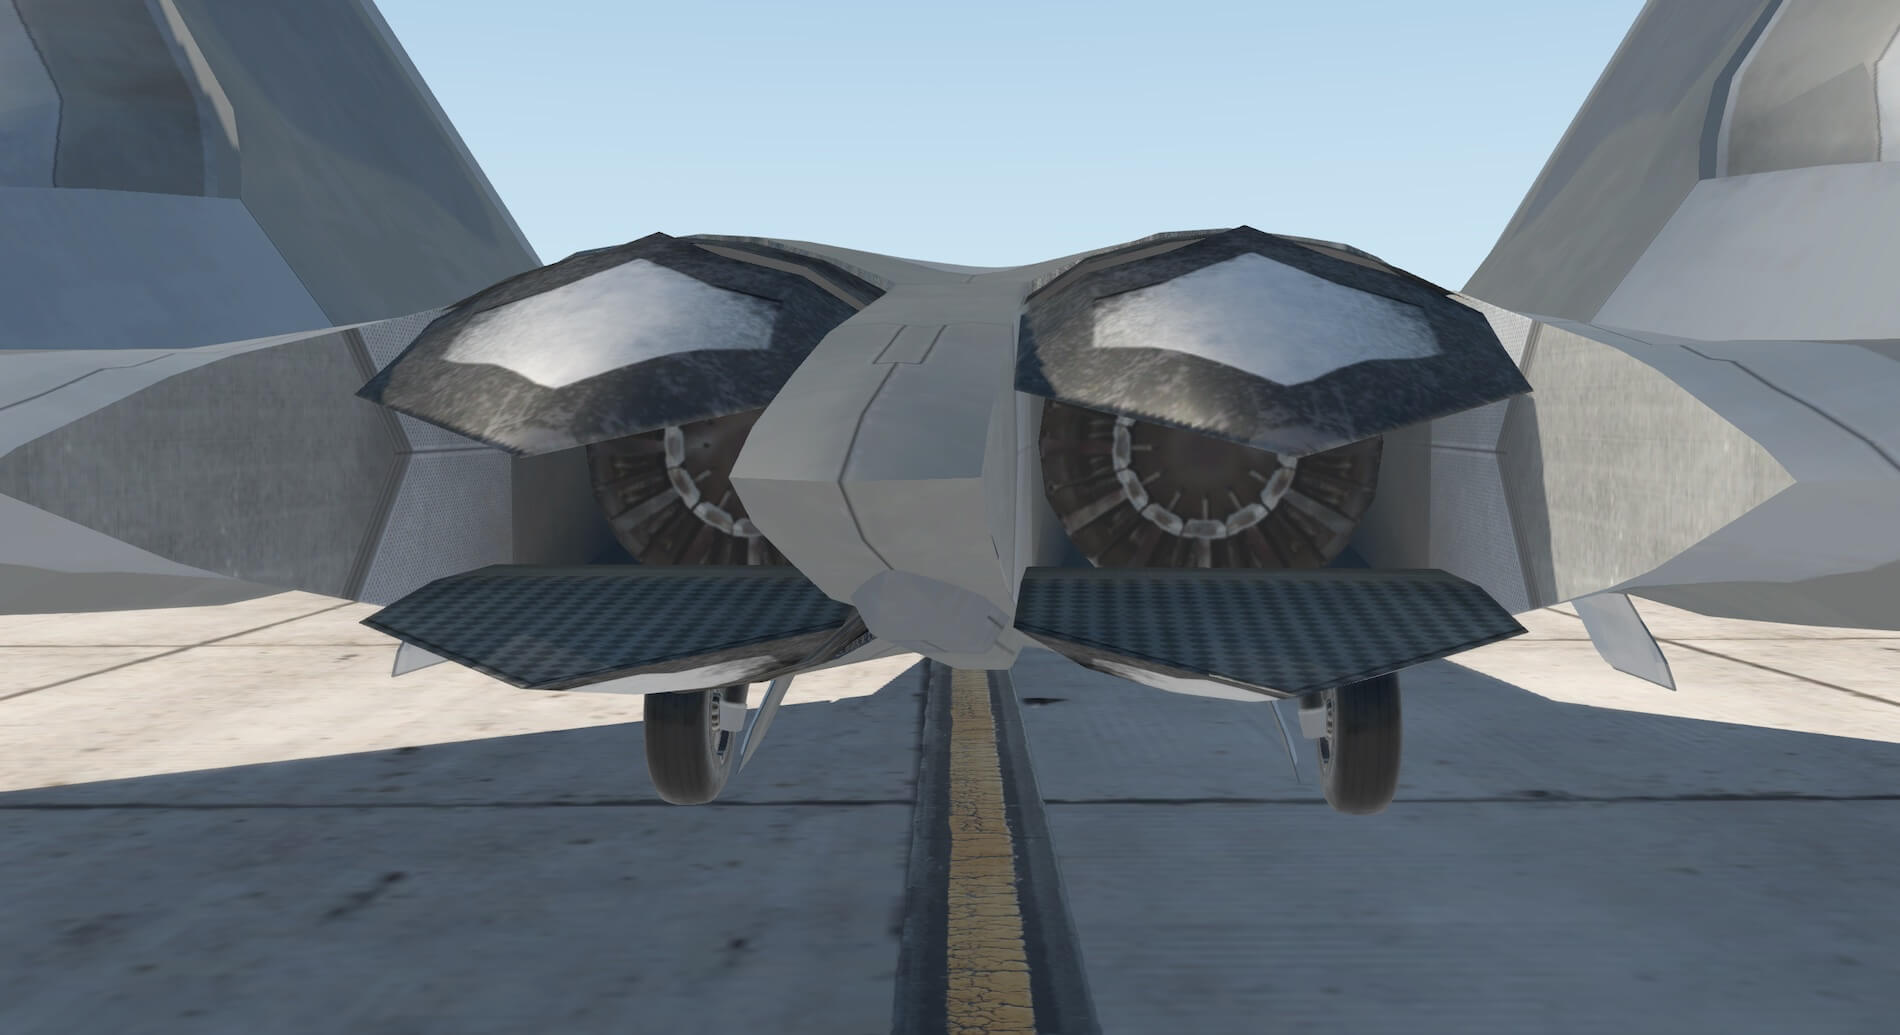

Moving to view the aircraft from an angle at the rear right and moving the joystick shows how the control surfaces and nozzles work together to deliver the required result from a particular control input. This illustrates how the aircraft achieves impressive maneuverability. The colours and signage continue to work well together and with the light and shadow.


Views from the right wing shows the aircraft attitude on the ground and a higher view shows good views in to the cockpit and pilot and the further surface colours of this livery.


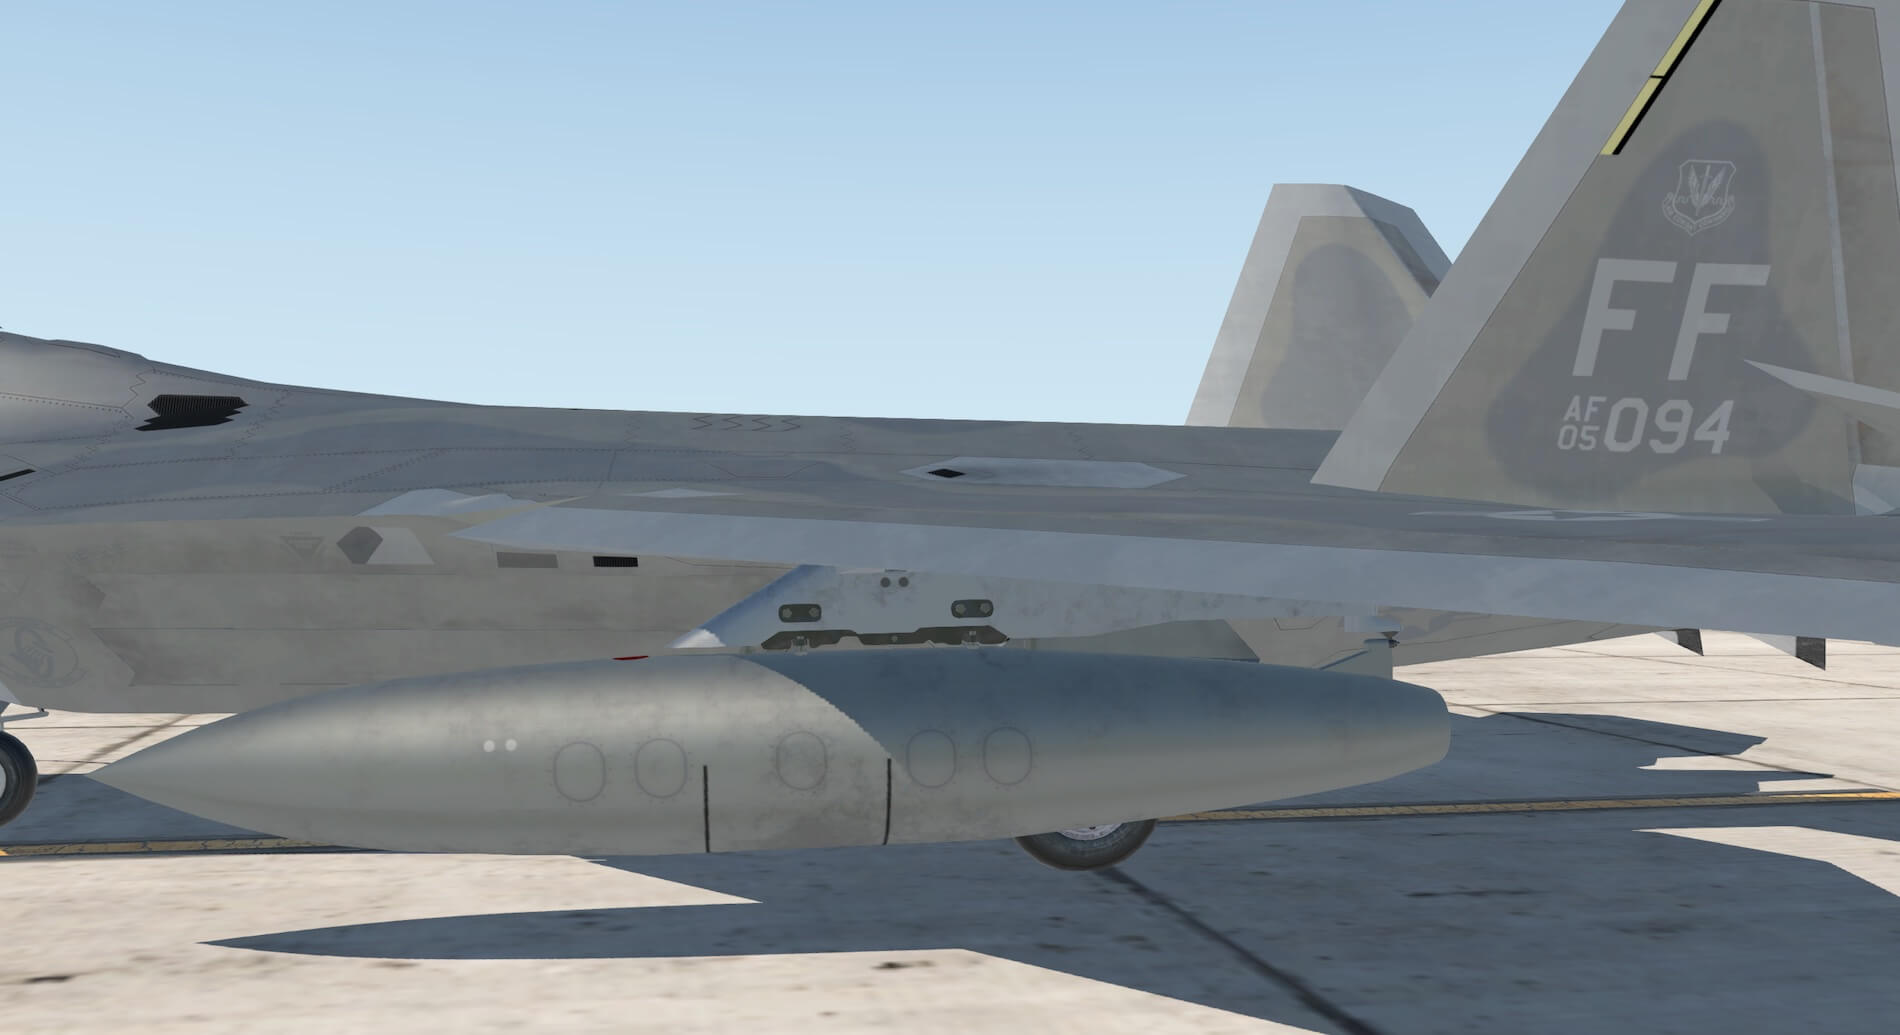
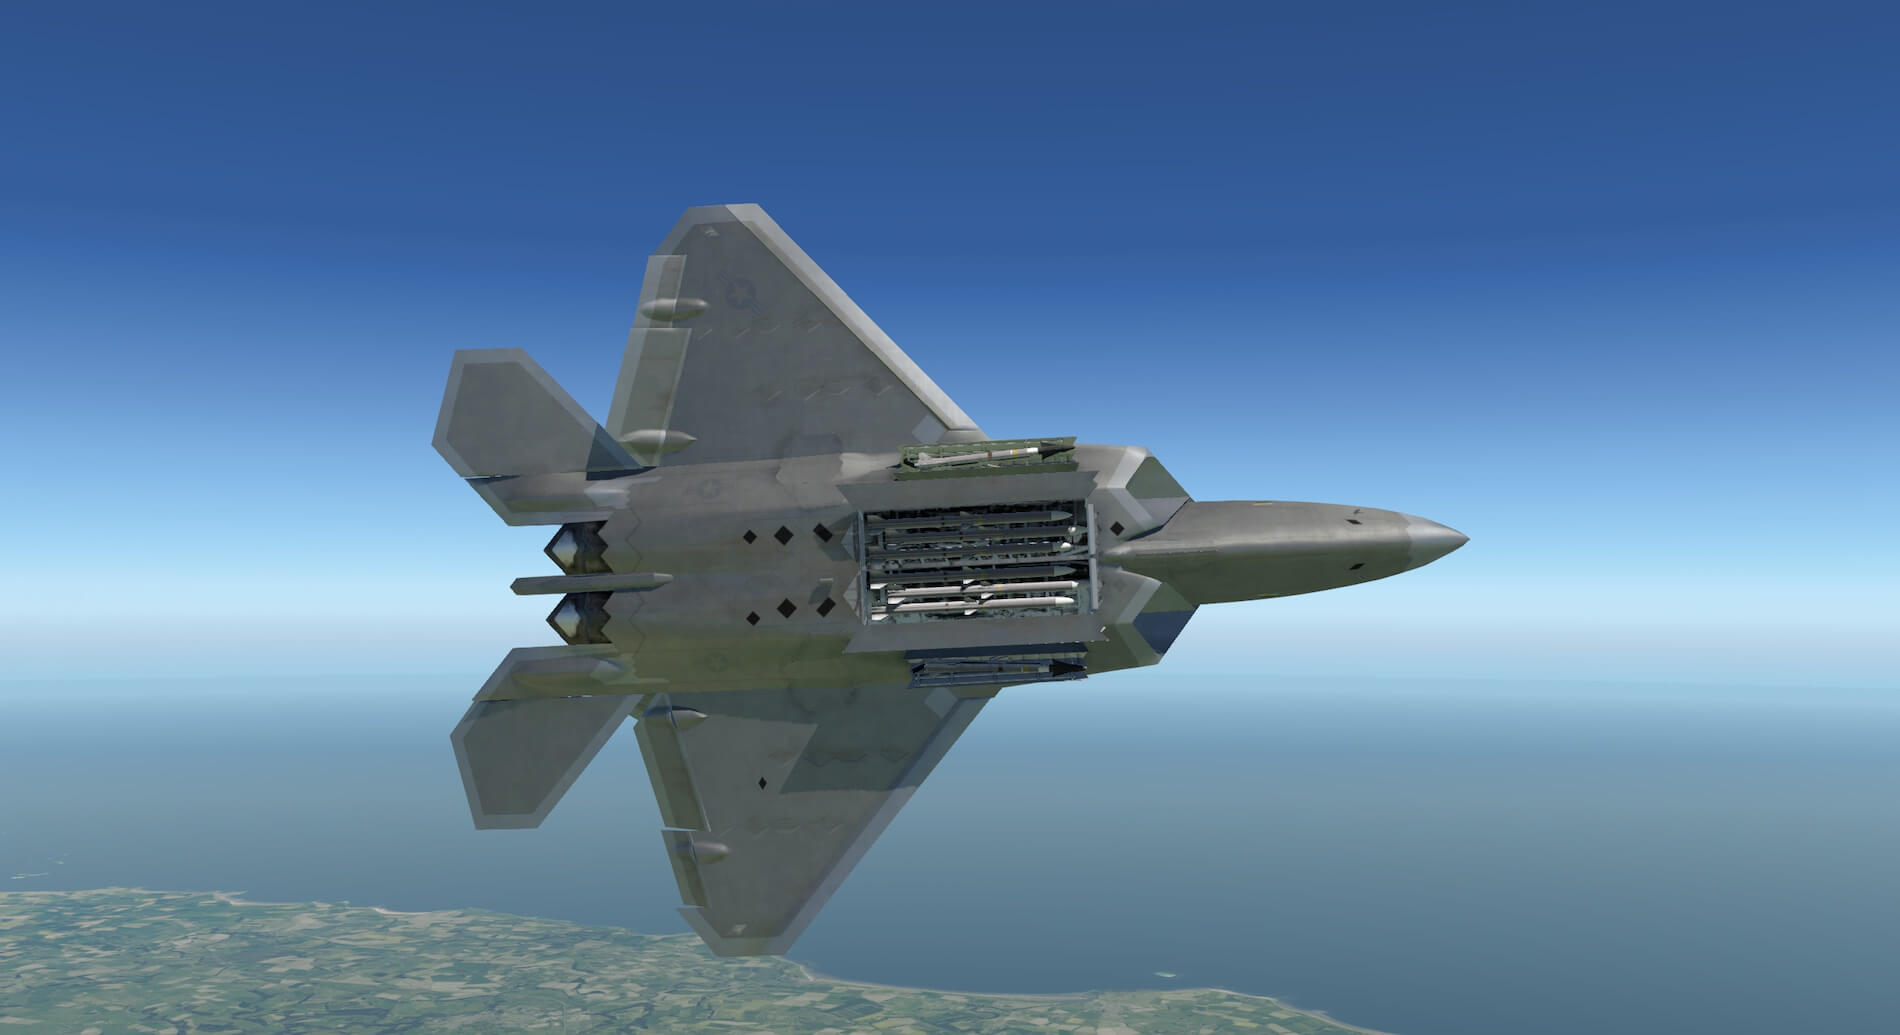
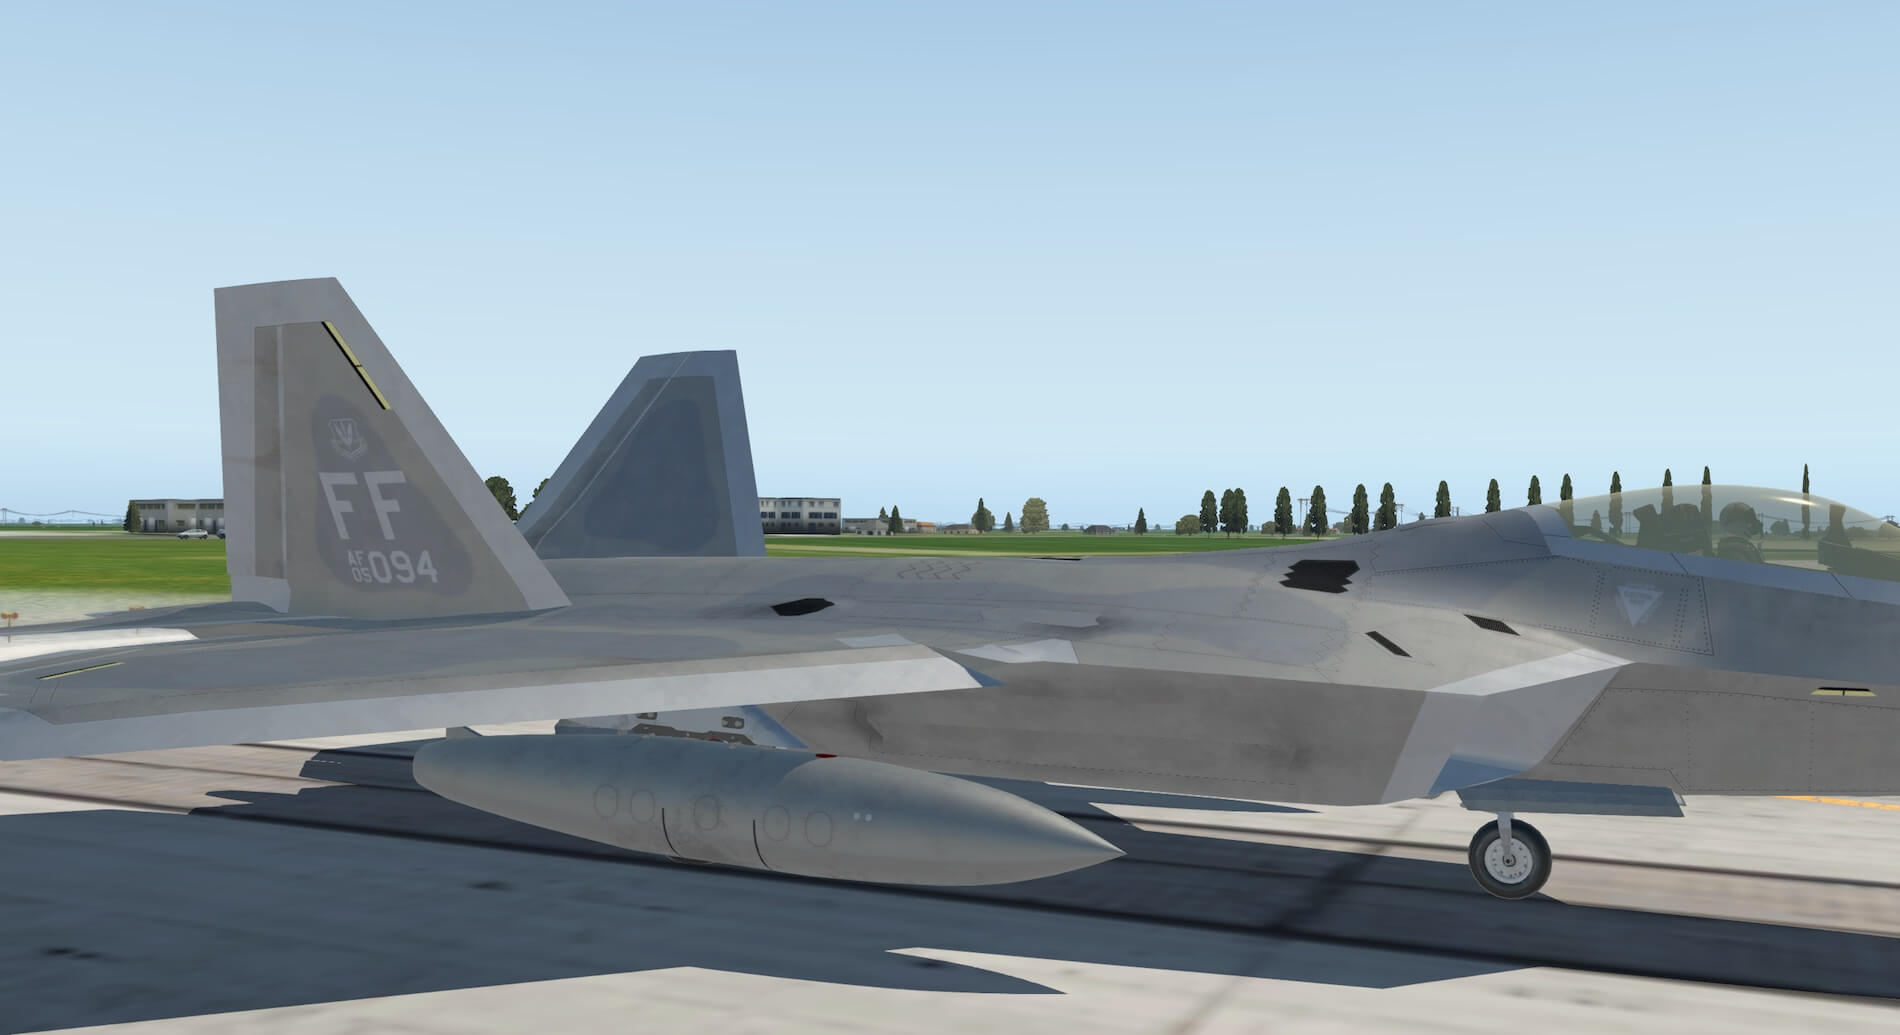
Both the air to air and air to ground load outs look the same externally as the weapons are stowed in their own bays. The aircraft carrying external fuel tanks does look different as the stealthy outlines are broken by the tanks. The tanks and their rails are modeled in detail are entirely in keeping with the rest of the model.

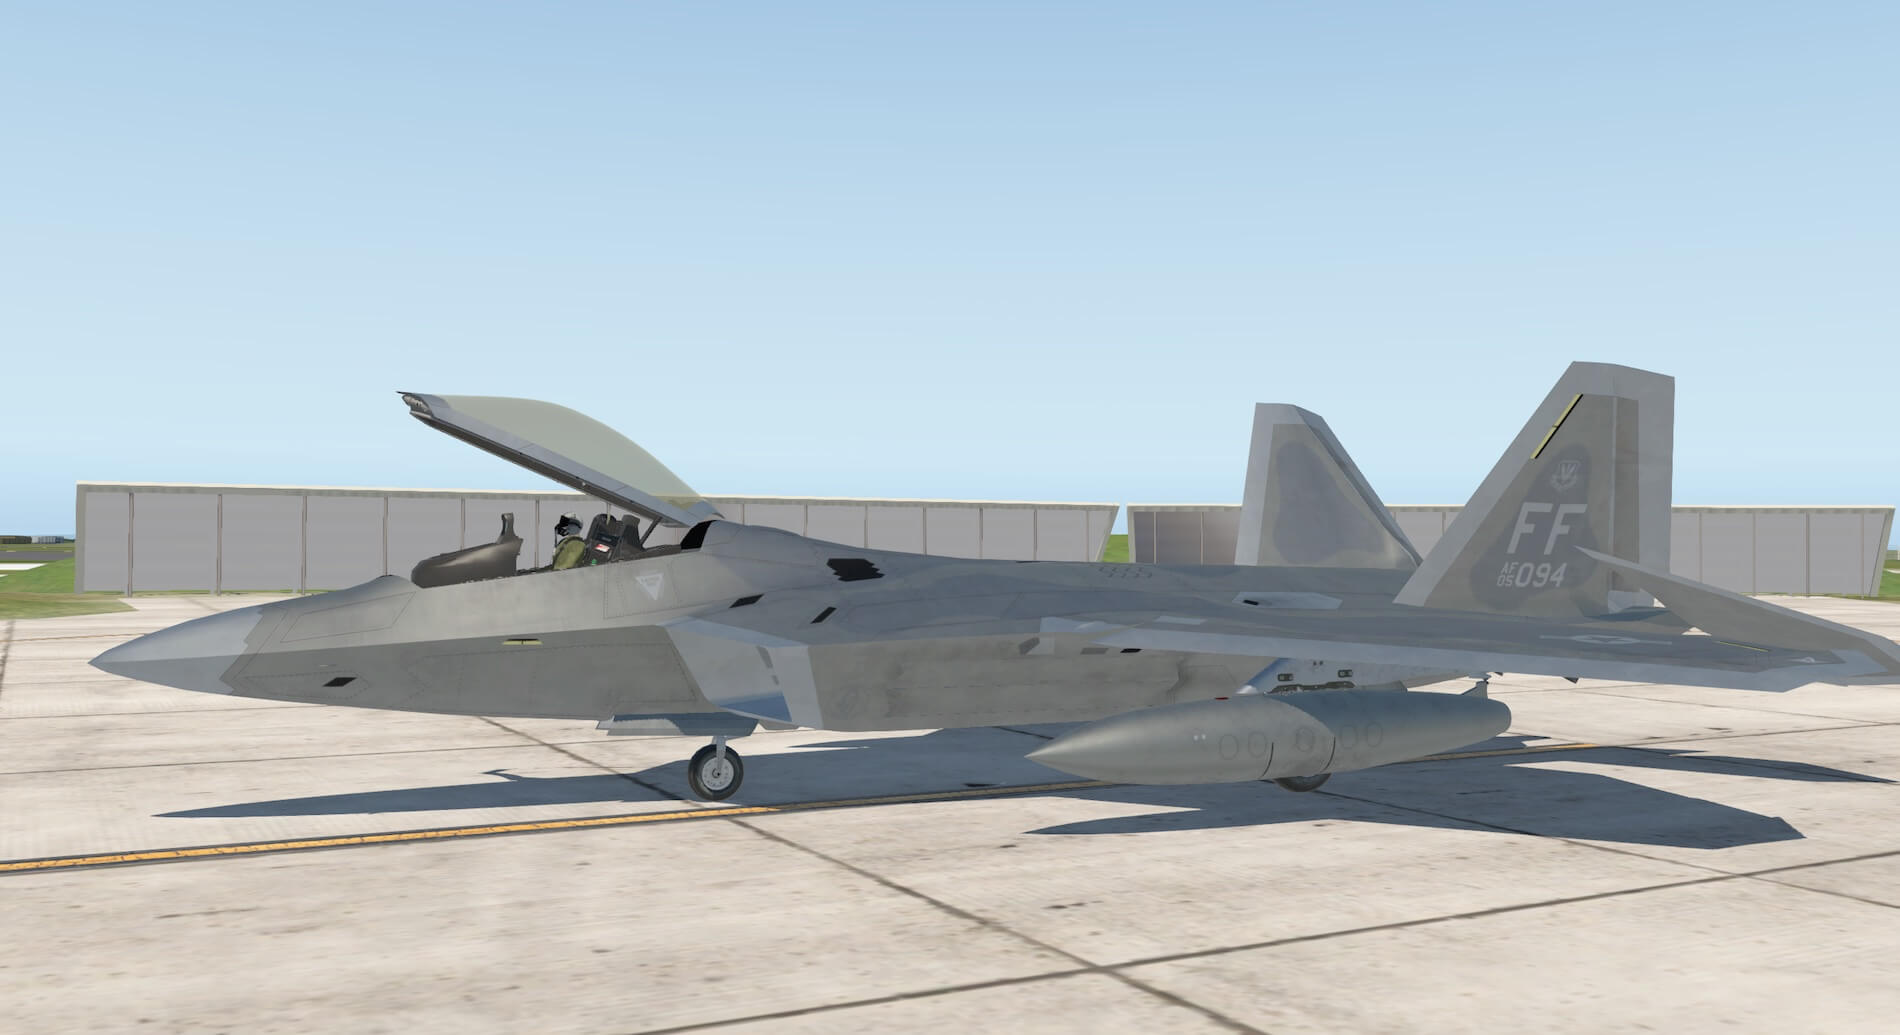
The exterior modeling is realistic and impressive. The recognizable aspects of the model are created accurately and the military colour schemes work well. The aircraft has little surface equipment and detail in real life through its smooth, stealthy design and yet through good signage and markings, good flight control surfaces and detailed modeling of weapons bays and wheel wells the developers have produced and convincing and realistic model.
Interior Modeling
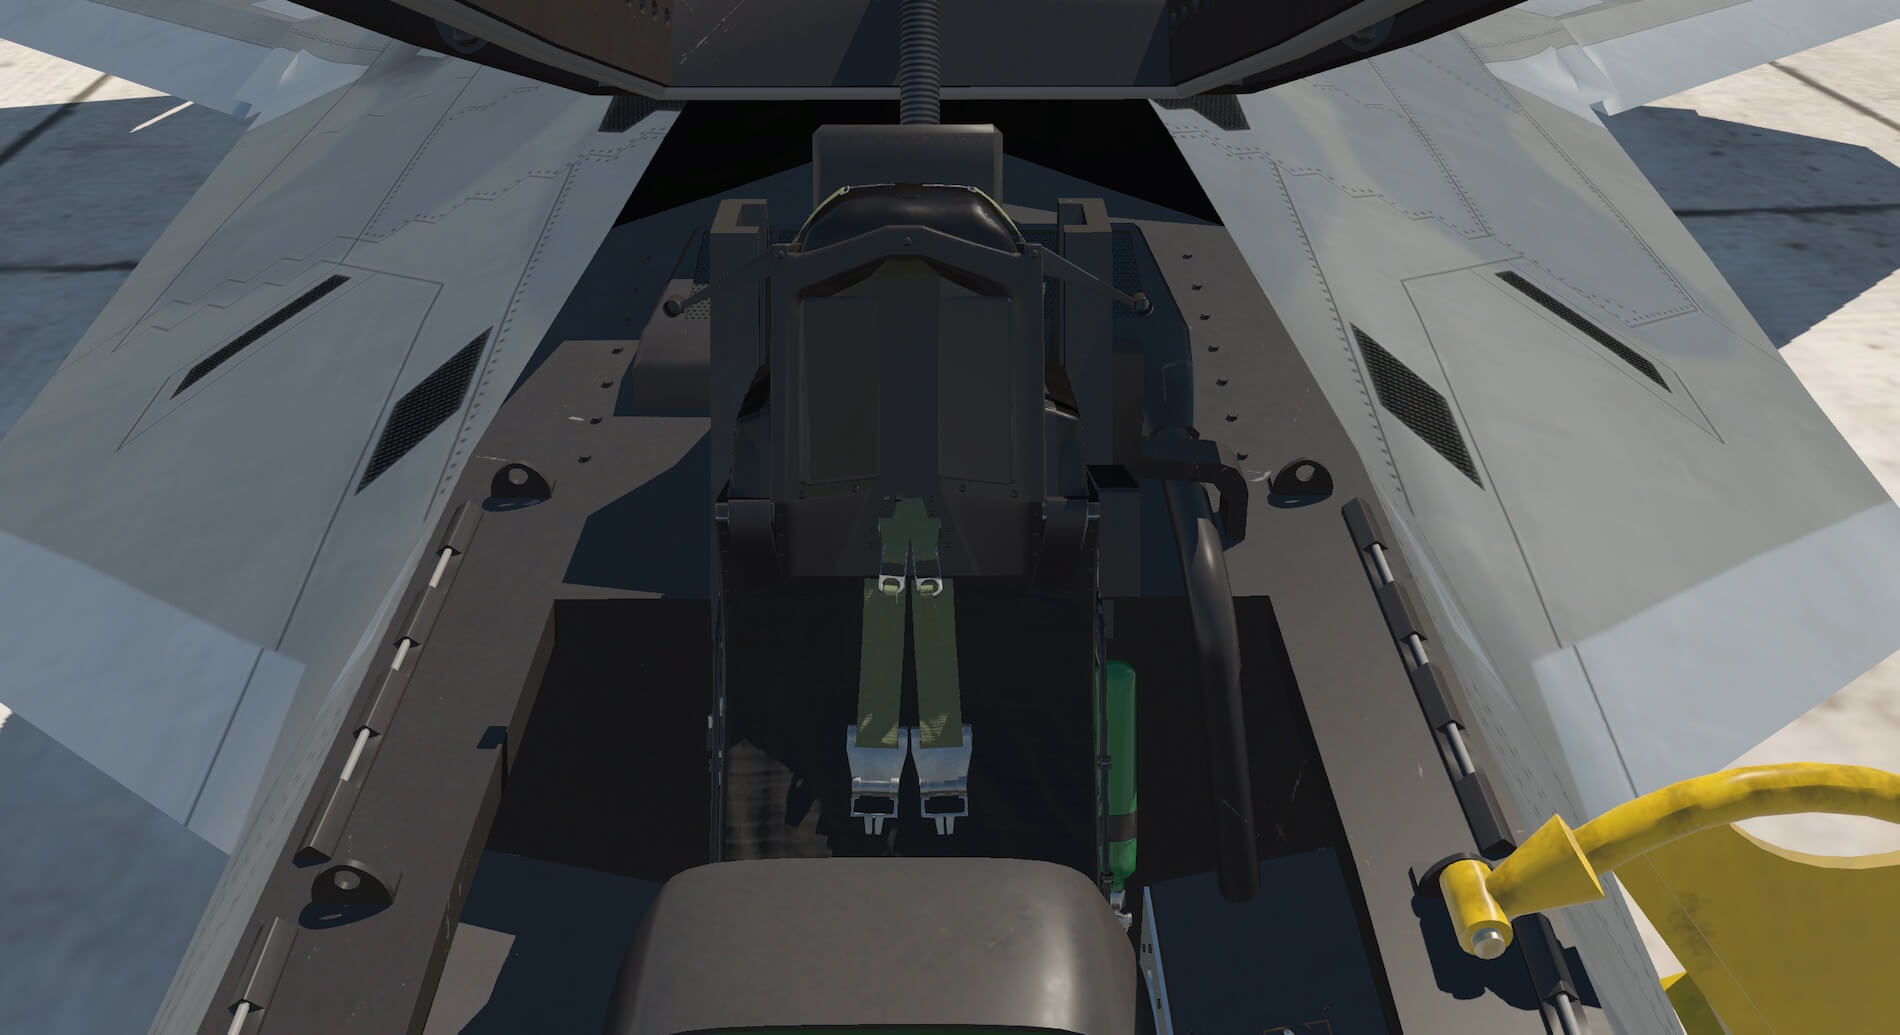
Climbing the crew ladder to view the cockpit as cold and dark the hybrid nature of the switches, controls and displays is apparent. The manual explains that the F-22 cockpit falls between the switches, dials and knobs used in the F-16 and the glass cockpit of the F-35. The front displays of the F-22 are glass cockpit style whilst the sign consoles carry the more traditional switches and dials.
The colours in the cockpit are more vivid than the external ones especially on equipment such as the ejection handle and fire extinguisher. The signage and labeling on the ejector seat is easy to read and the textures of the fabrics, belt, buckles and instrumentation is modeled to a high standard. As in all military cockpits, materials and appearance are very functional.
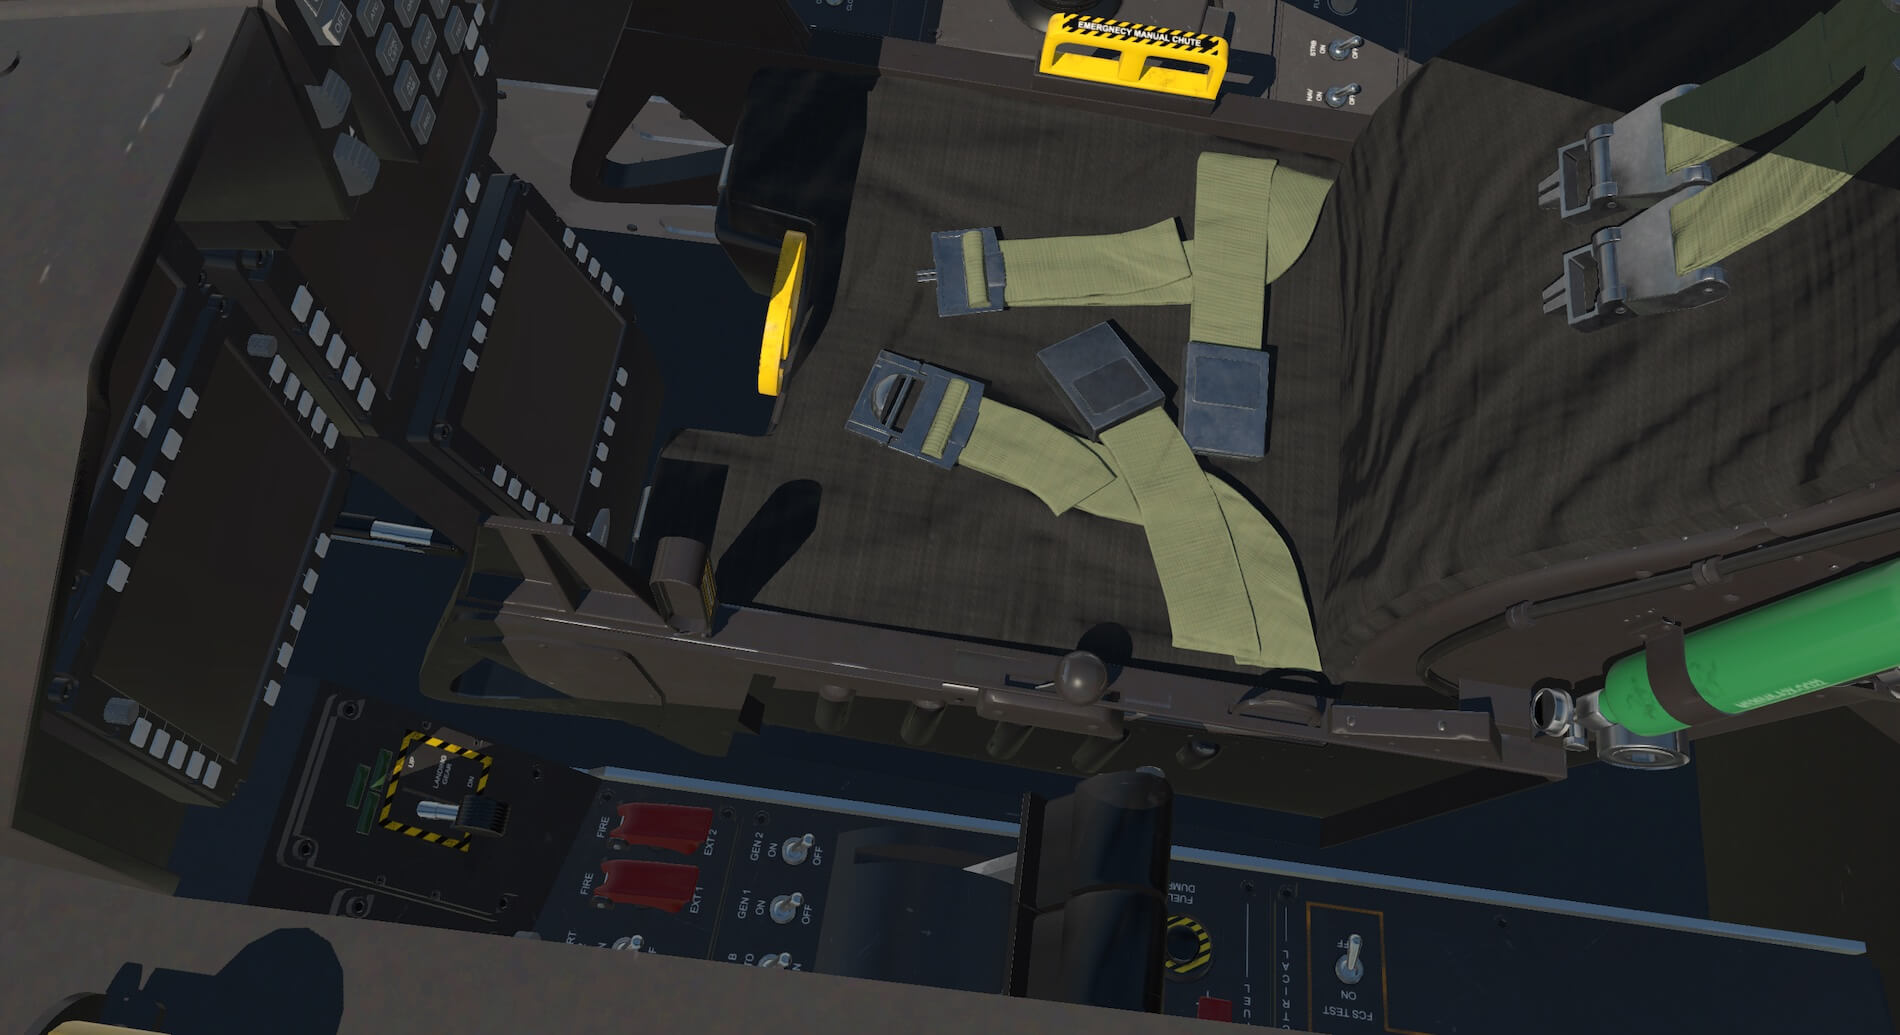


Sitting in the cockpit with engines and instrumentation off allows a view of the screens and more standard consoles. Everything is laid out in a logical manner and switches, buttons and levers are clearly marked. The utilitarian nature of a military cockpit is clear to see and the wear marks are realistic and not overdone. The light and shadow works well throughout and looking back from above the panel the ejector seat is very well presented.


Once the engines are on and the screens come to life the amount of information and systems available becomes apparent. Whilst the user will need to use the manual to learn about everything provided the colours and clarity throughout the cockpit are to a high standard. Signage is legible and hovering over any switch, screen or button creates a flag to identify its use.


Views from the pilot’s seat show very good all round visibility as would be expected from a fighter aircraft.


The developers explain in the manual that the cockpit of the F-22 is a secret place and therefore they have not had photographs and other information to refer to create a completely accurate replica. They have produced a highly detailed and convincing cockpit and supplied numerous instruments and systems, which will be discussed later, for the pilot to use. Some of these will be familiar, involving clever use and adaptation of X-Plane systems and others are bespoke to AOA and will need to be understood. A great environment in which to fly the model.
Systems
I am certainly not an expert on the F-22 and as the developers state the interior of the aircraft is highly secret so its layout and systems are not entirely known. The developers have created a cockpit and systems with a degree of educated guess involved. They have built in their own systems to make the use of the model more straight forward and I will therefore use their manual as a guide when discussing the systems in the aircraft.
The developers also explain that the F-22 cockpit falls between that of an F-15, which is mainly switches and the glass cockpit of the F-35. This means the instrumentation is a mixture of both. Whilst I will endeavor to be as comprehensive as possible I am sure there will be extra items I do not mention or do not manage to learn.
The manual works from the rear left around the front of the instrumentation and then backwards down the right hand side of the pilot. I will follow their description whilst highlighting the systems and equipment available.
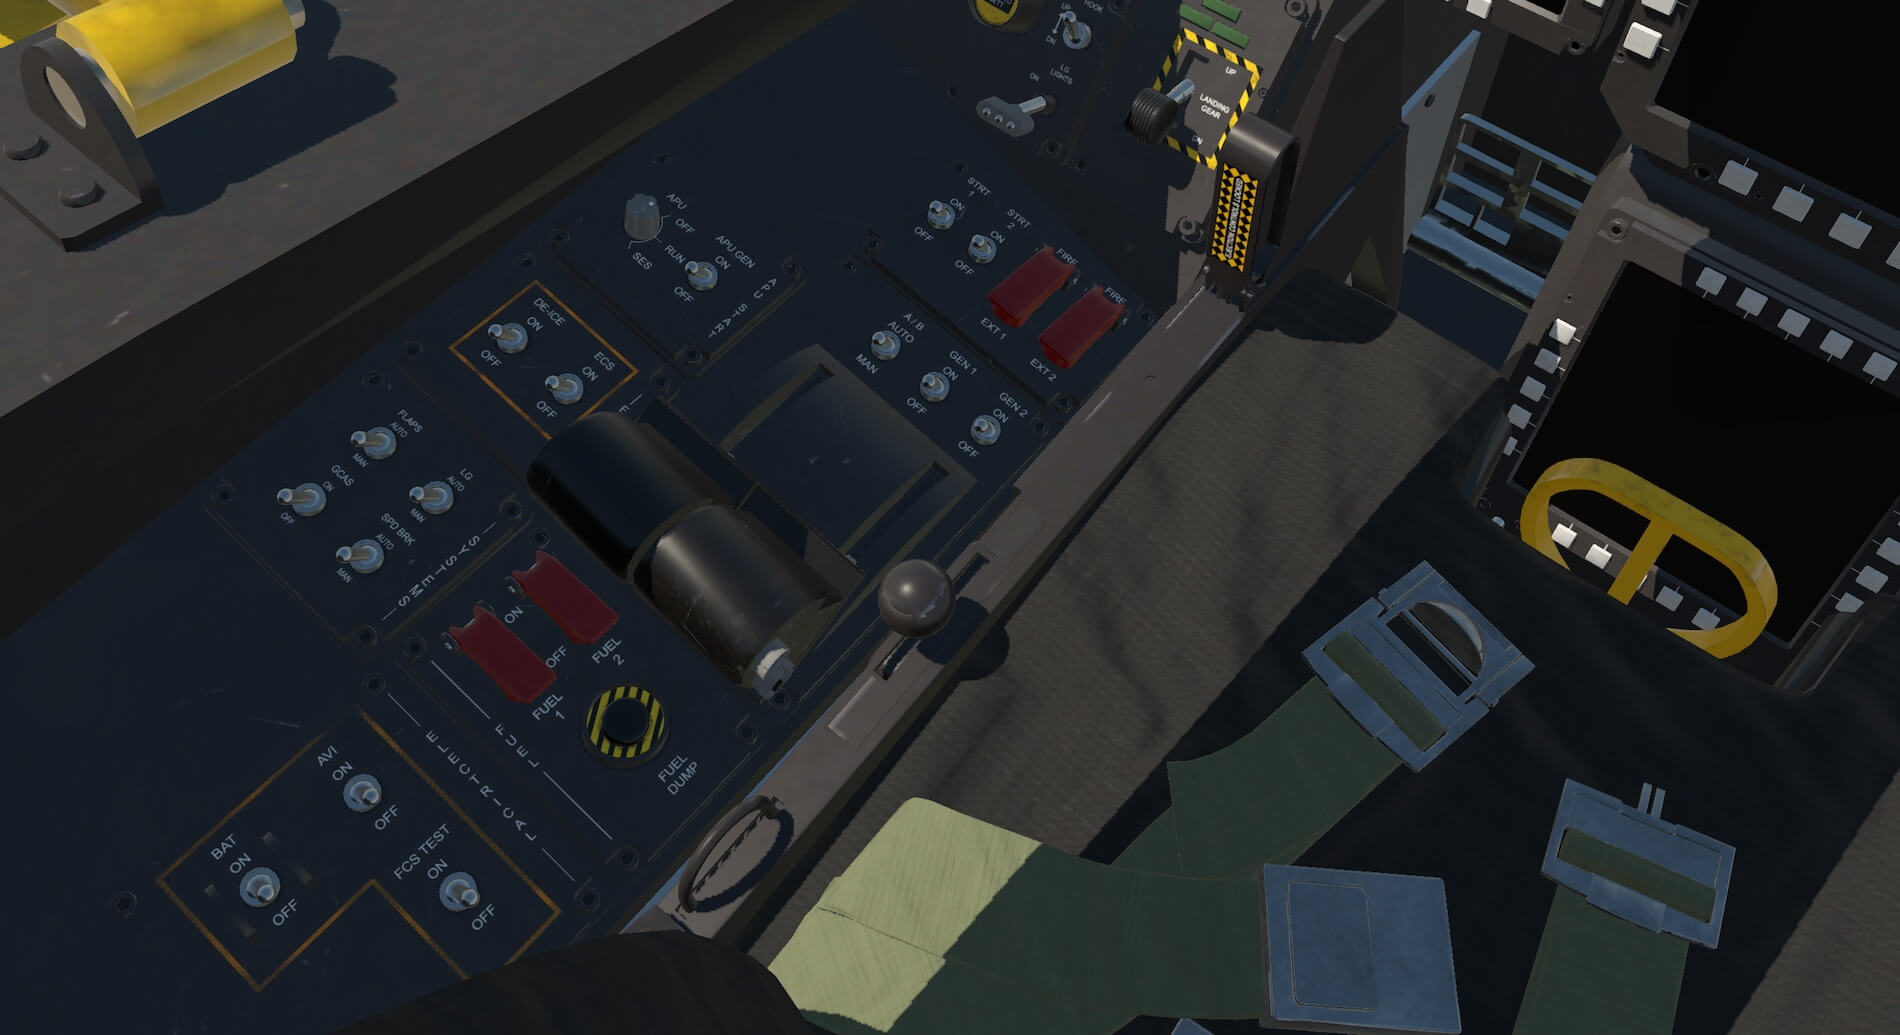
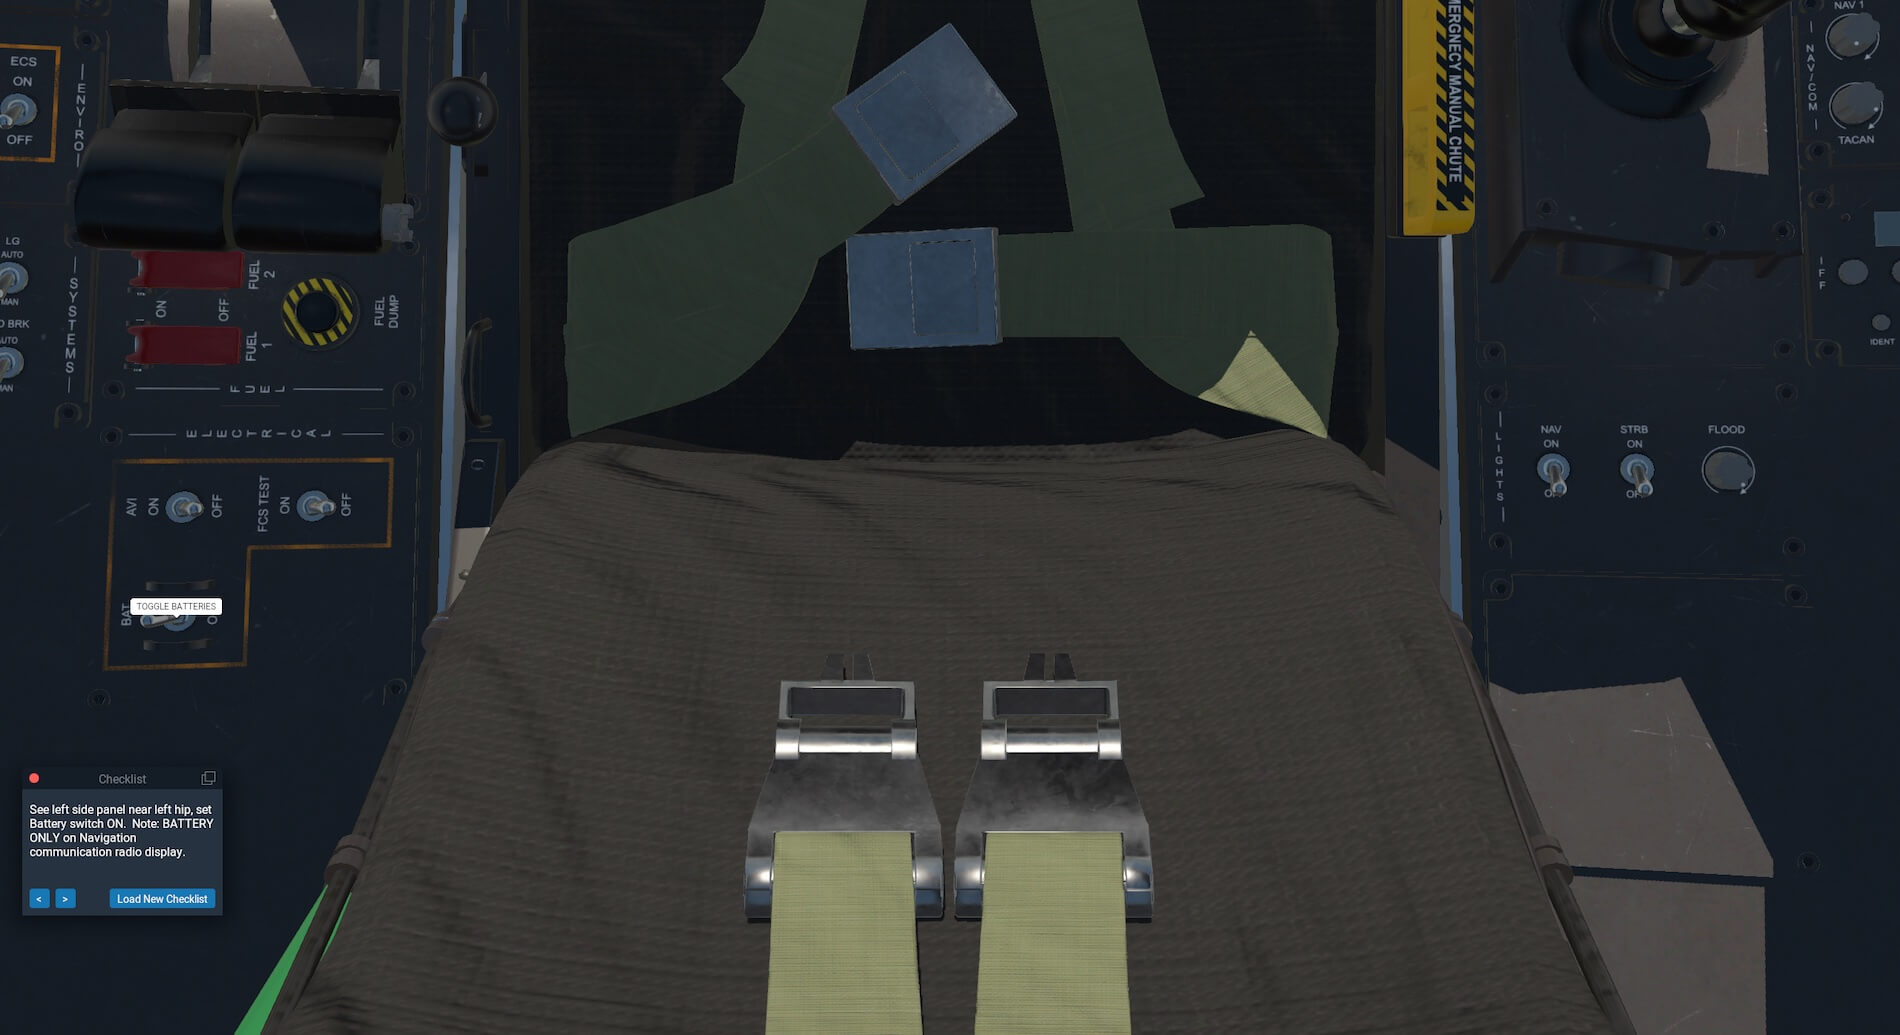
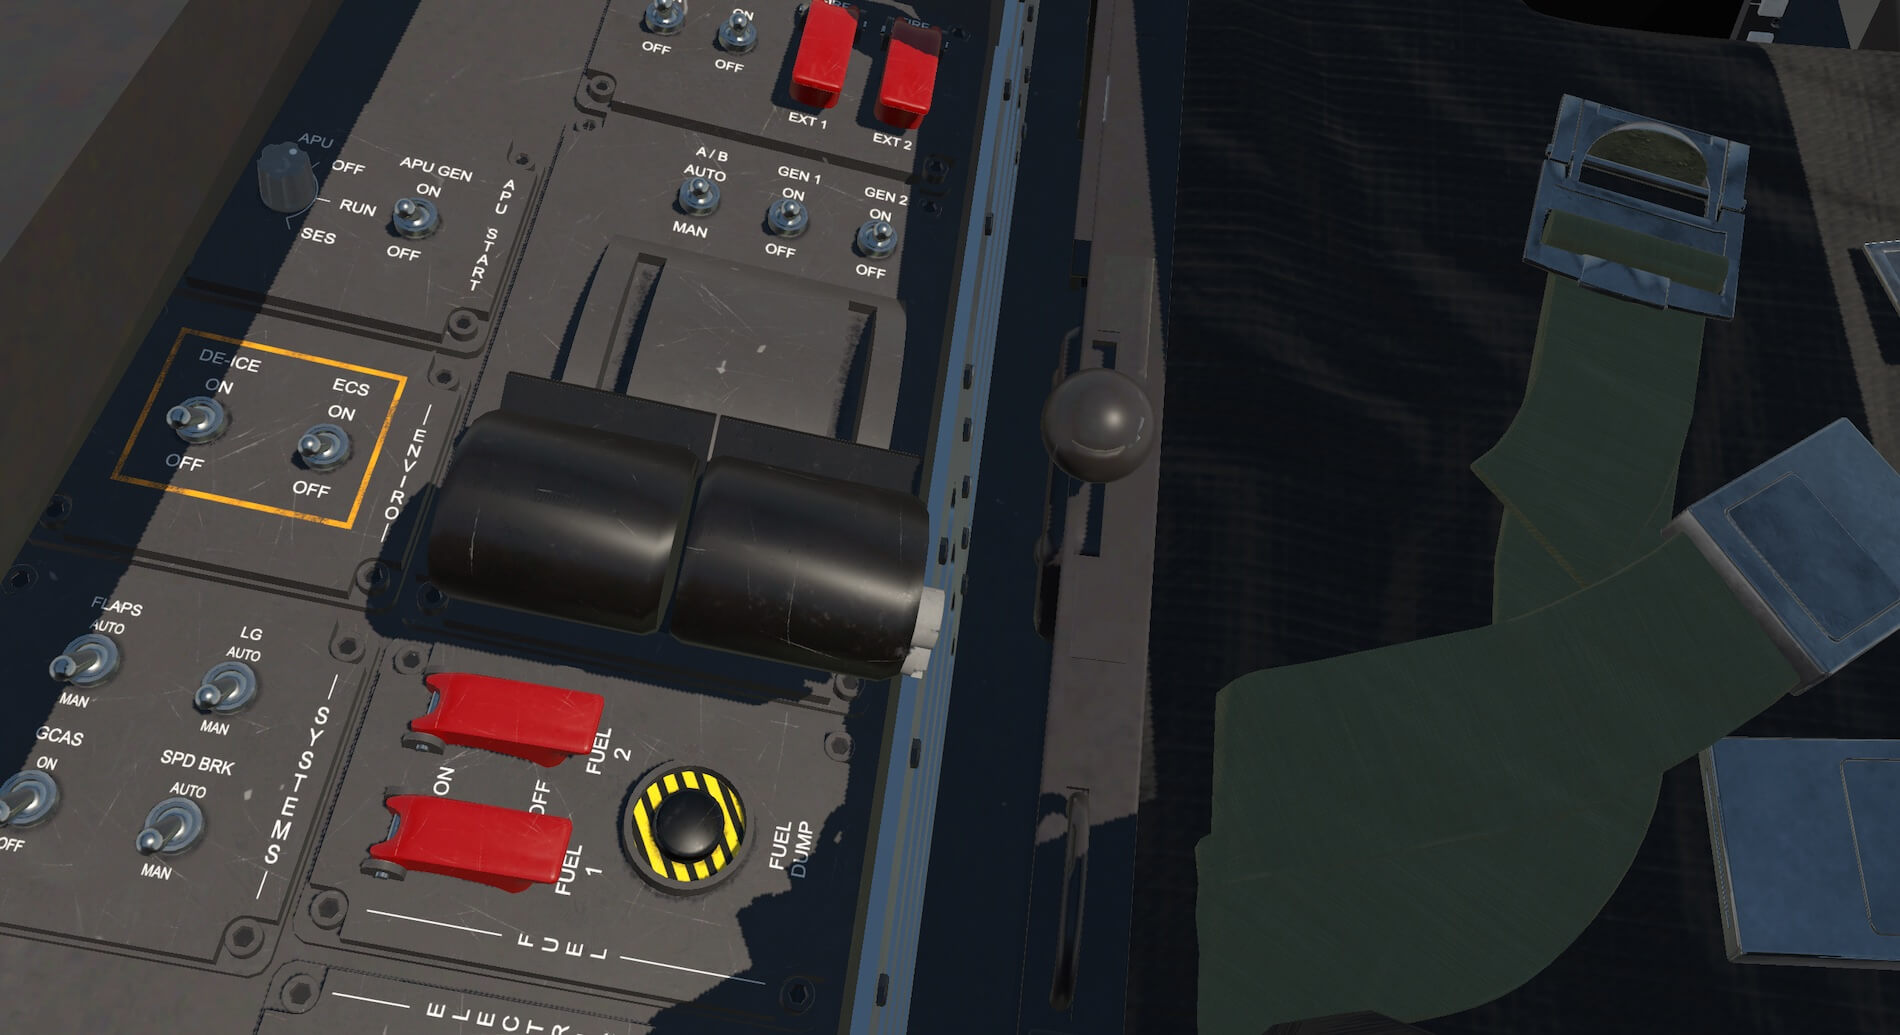
The first system described is the electrical system. The electrical panel has three basic switches as opposed to a glass panel. One switch switches the battery on and off which enables the Nav/Com equipment and the back up displays and a second avionics switch enables further displays and checklists.
Below those two switches a third Flight Control System switch causes the system to check the aircraft flight controls are ready for flight. Alongside the electrical panel is a fuel panel which contains fuel cut off switches and a fuel dump button. Using this button jettisons fuel from a port in the left wing and the system prevents the pilot dumping all the fuel!
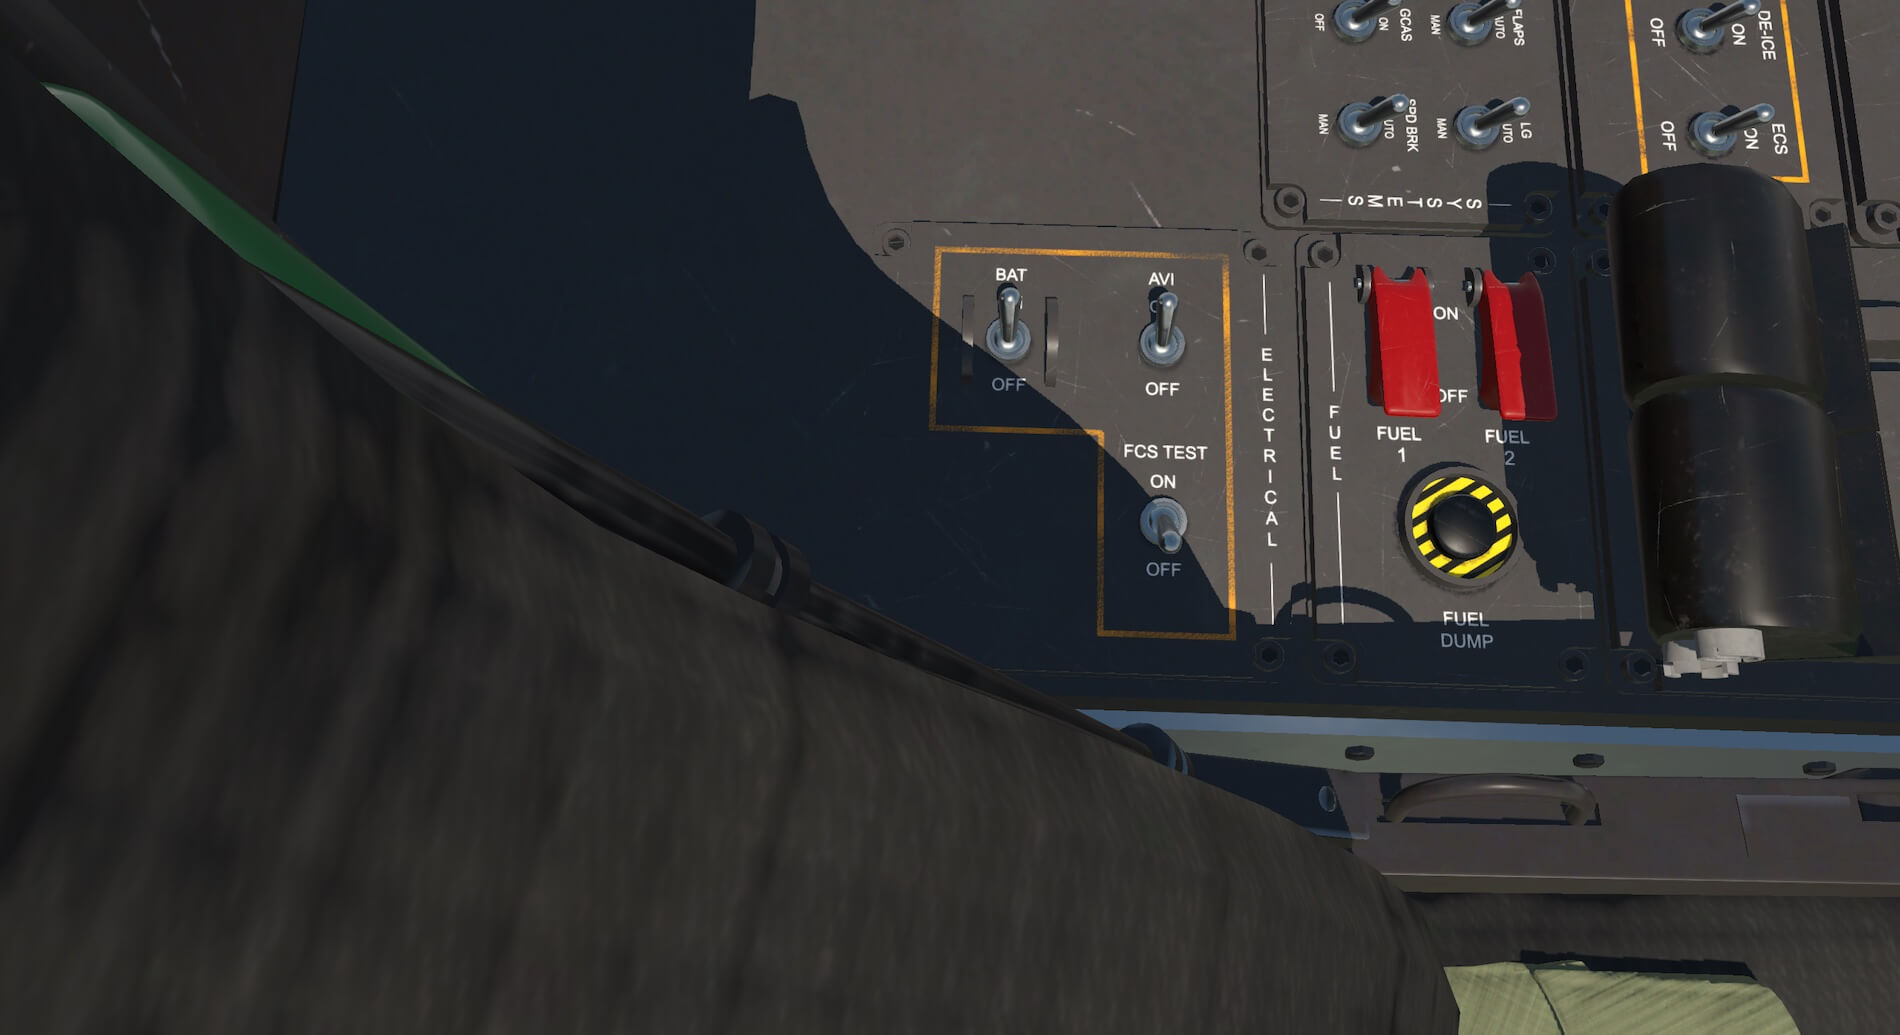
Outboard of the electrical and fuel switches are what the manual calls Auto Systems Logic Switches. They allow the functions of flaps, landing gear, speed brakes and the Automatic Ground Collision Avoidance System to be automated. The flaps, speed brake and Ground Collision Avoidance Systems reflect systems that are known to equip the F-22. Auto Landing Gear is an additional system provided to help the pilot. The switches allow for these systems to be toggled on and off. The speed brake system works to keep the jet within flight limits.

Beyond the APU, and part of the engine start panel, the afterburner logic switch automatically switches off the afterburners when the aircraft exceeds speed limits and switches it back on when the jet goes under those limits.

The Brake With Stick switch is situated at the front of the right panel. This system works through an AOA plug in and allows the pilot to apply the parking brake and varying levels of anti-skid braking dependent on the speed of the aircraft. Using this system allows for the pilot to control the braking of the aircraft without having to use keyboard inputs. Further switches on the right panel control the doors and the IFF transponder.

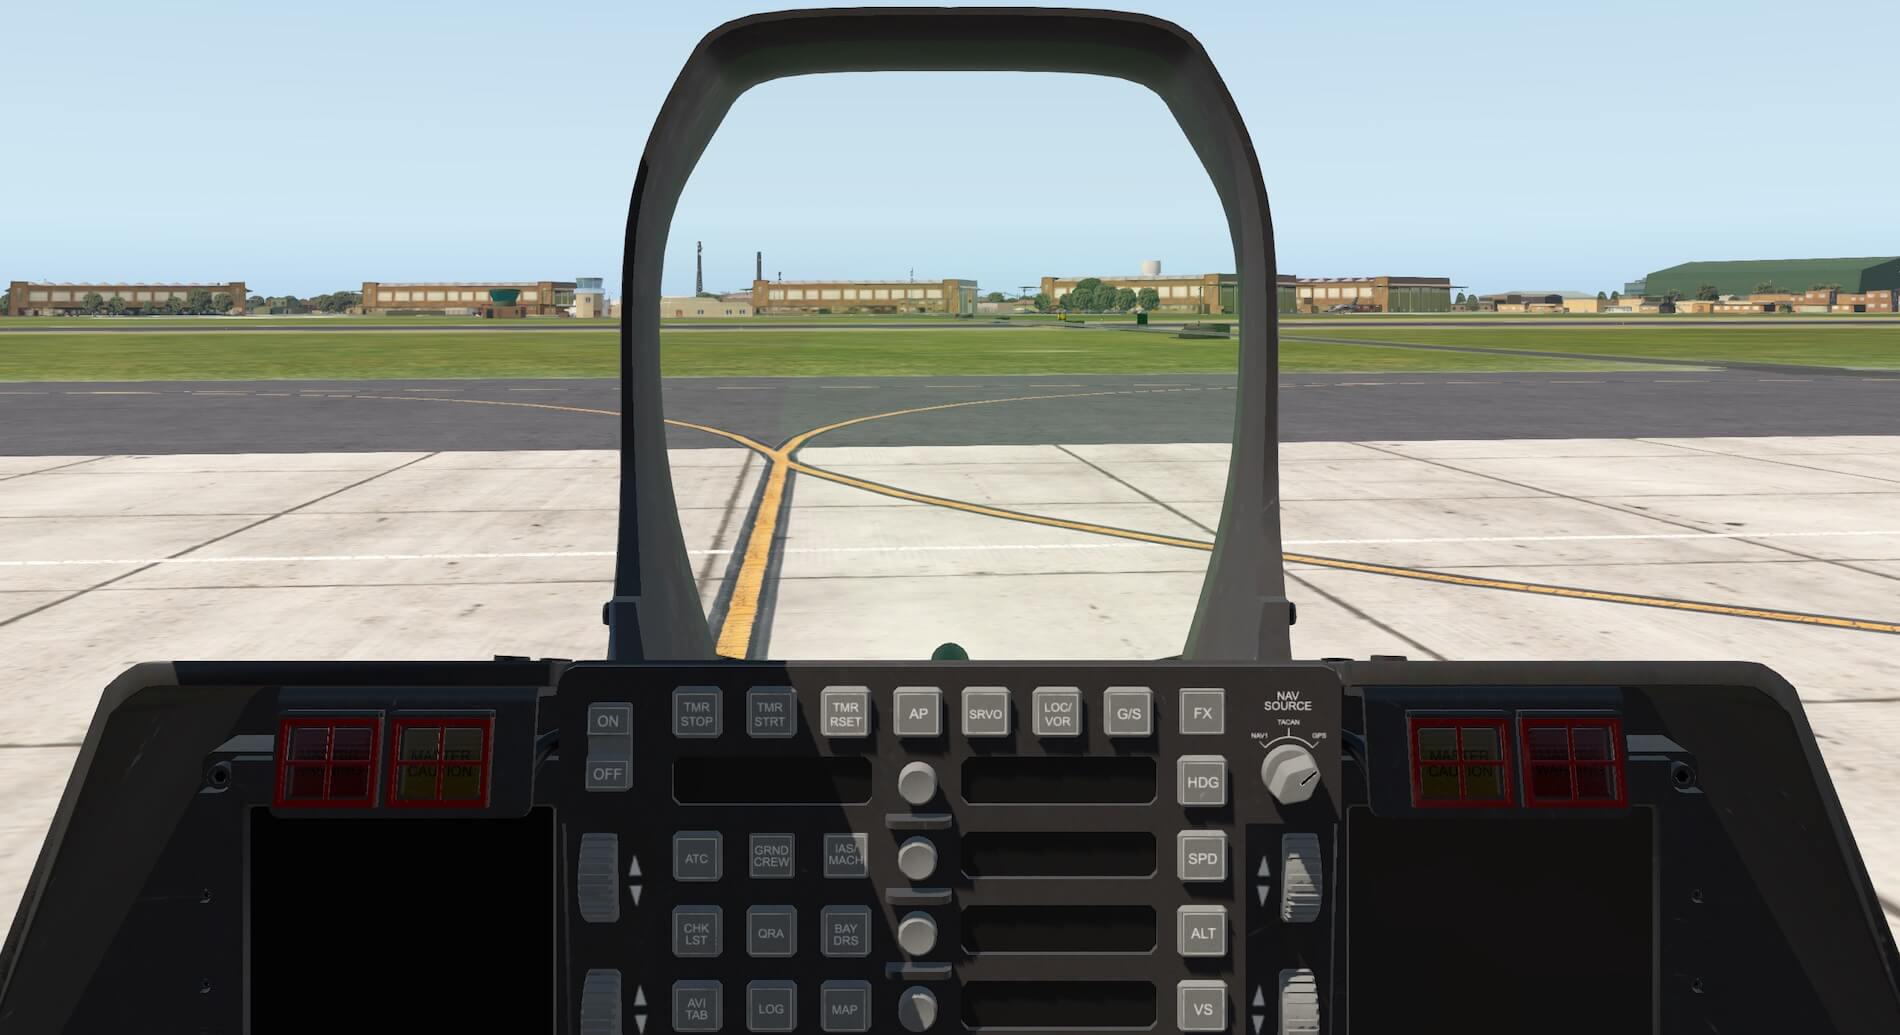
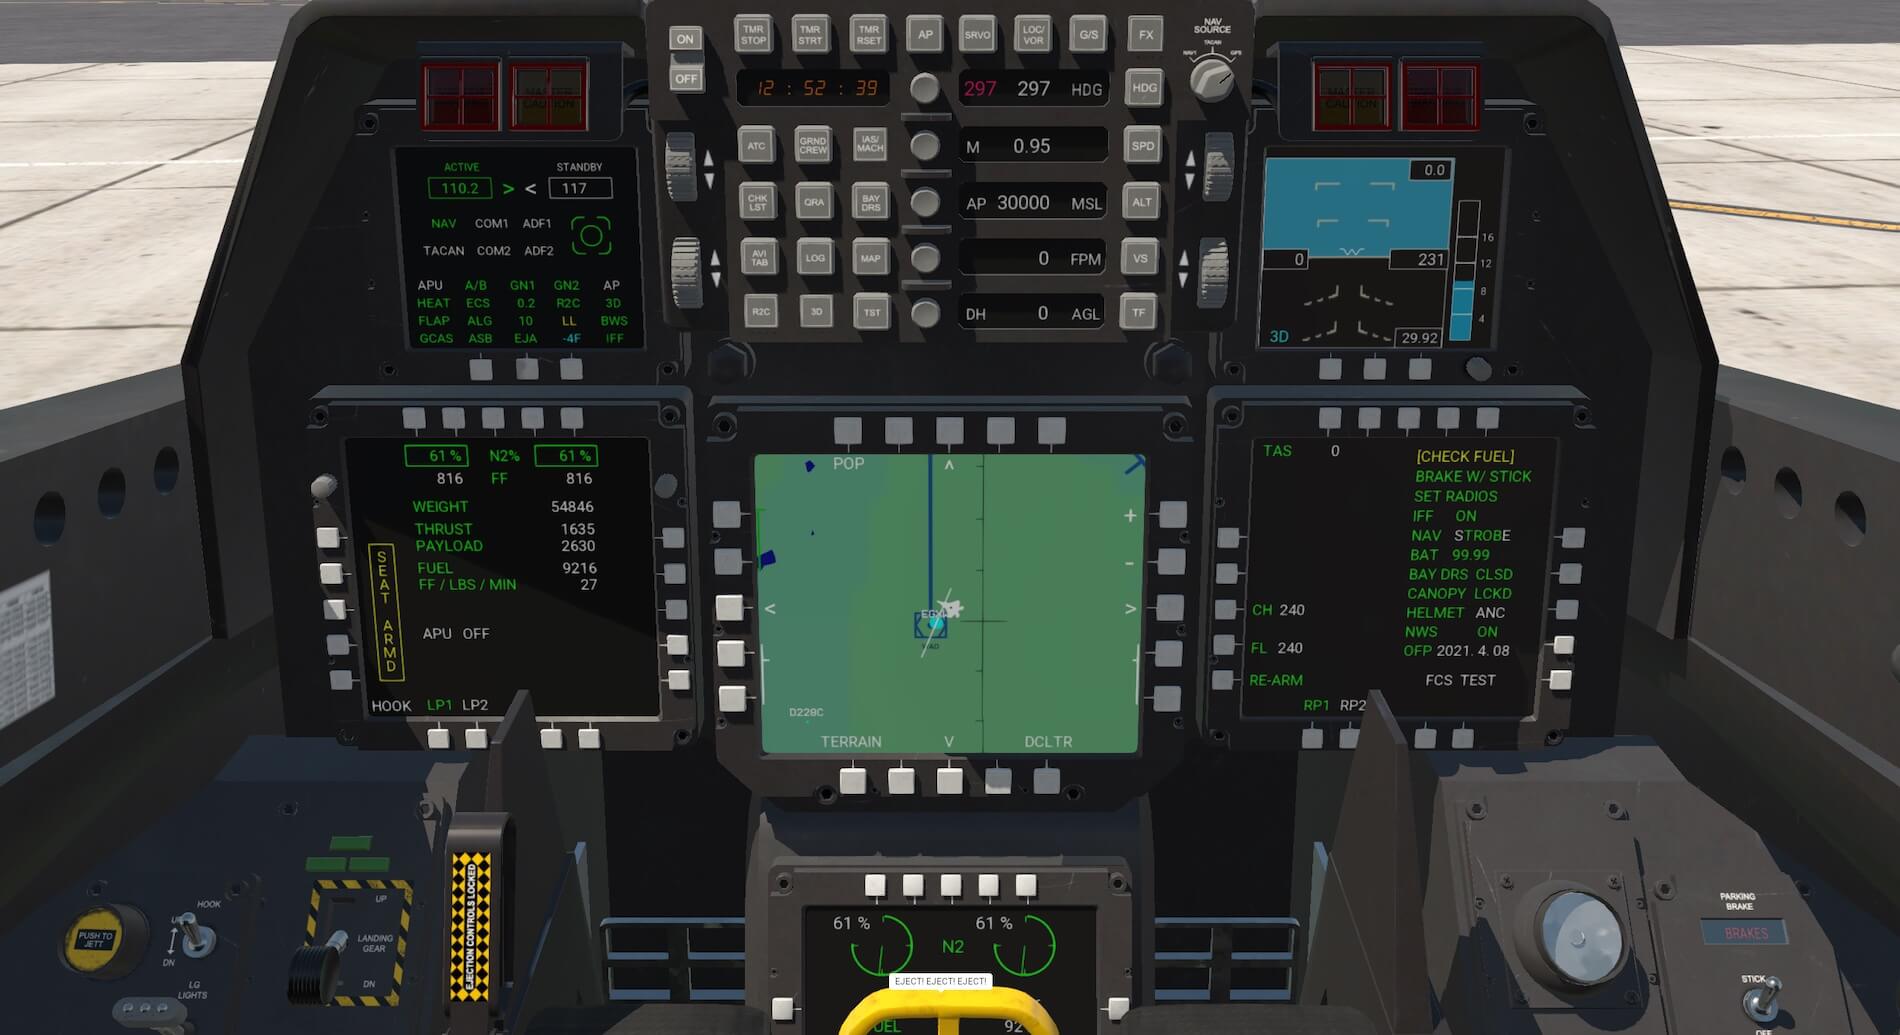
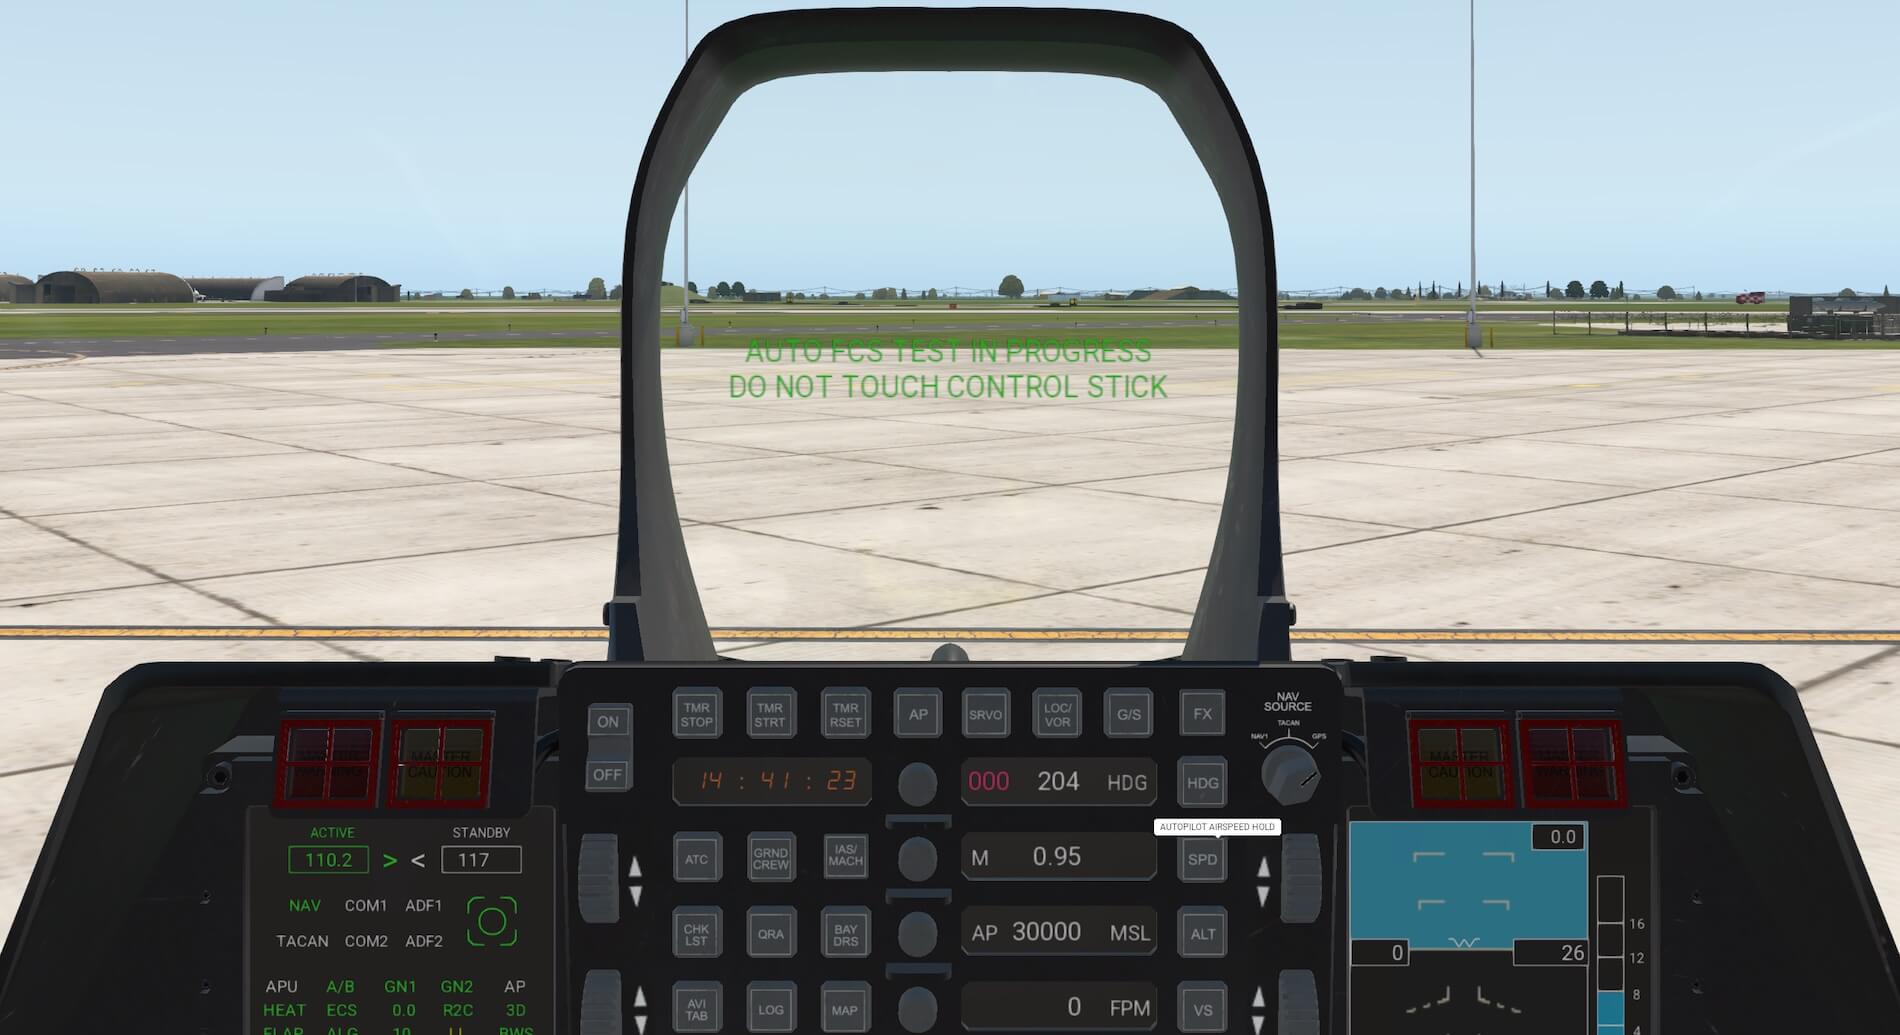
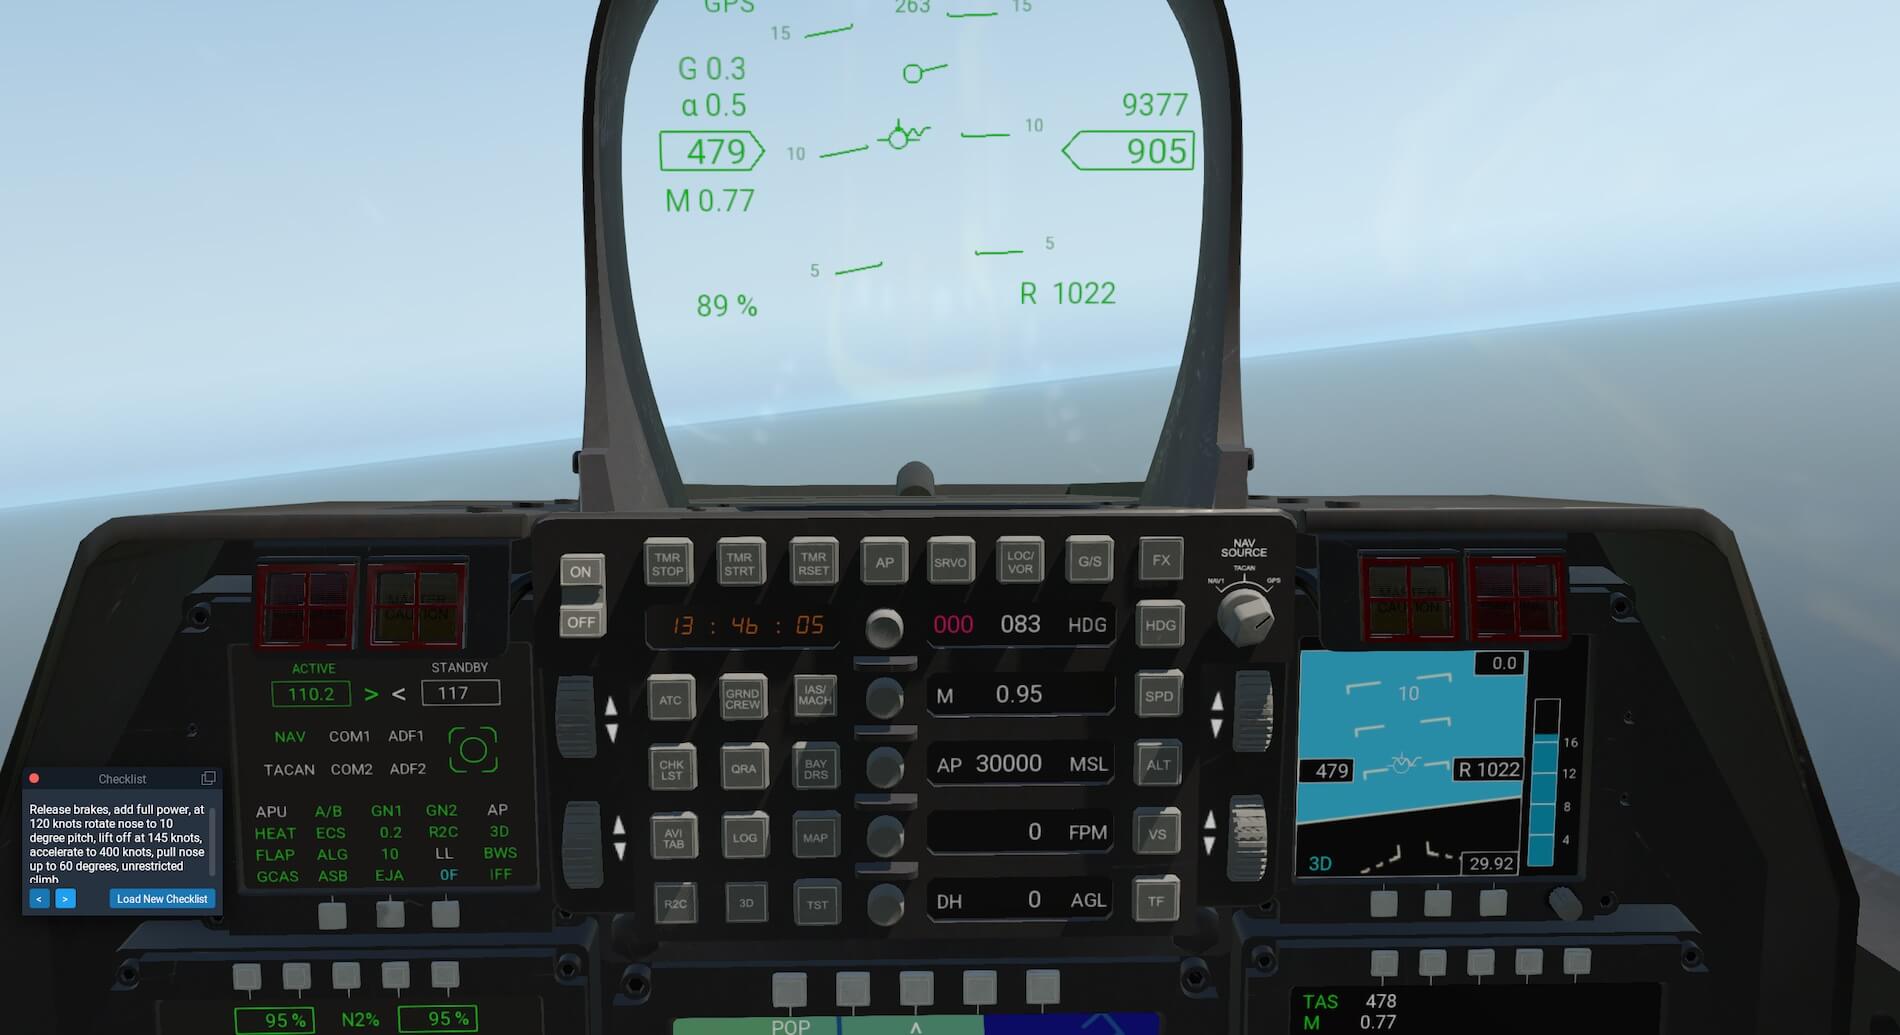
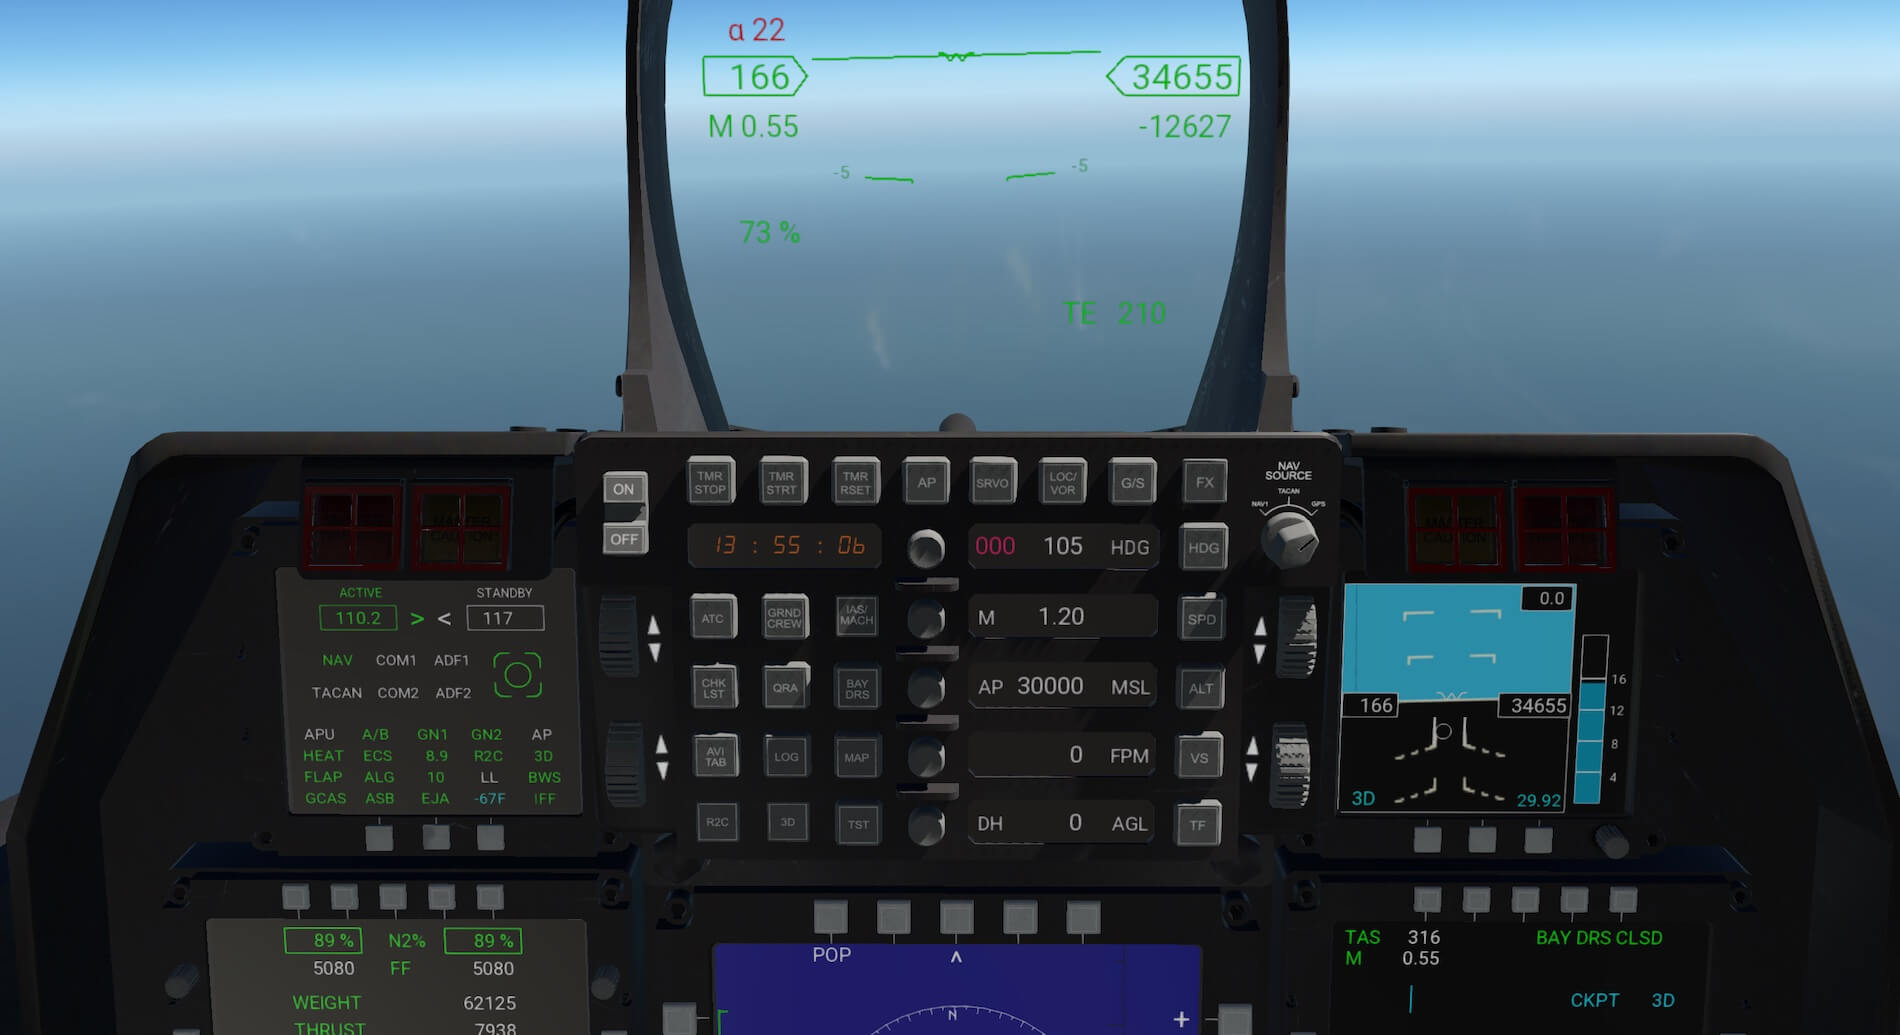
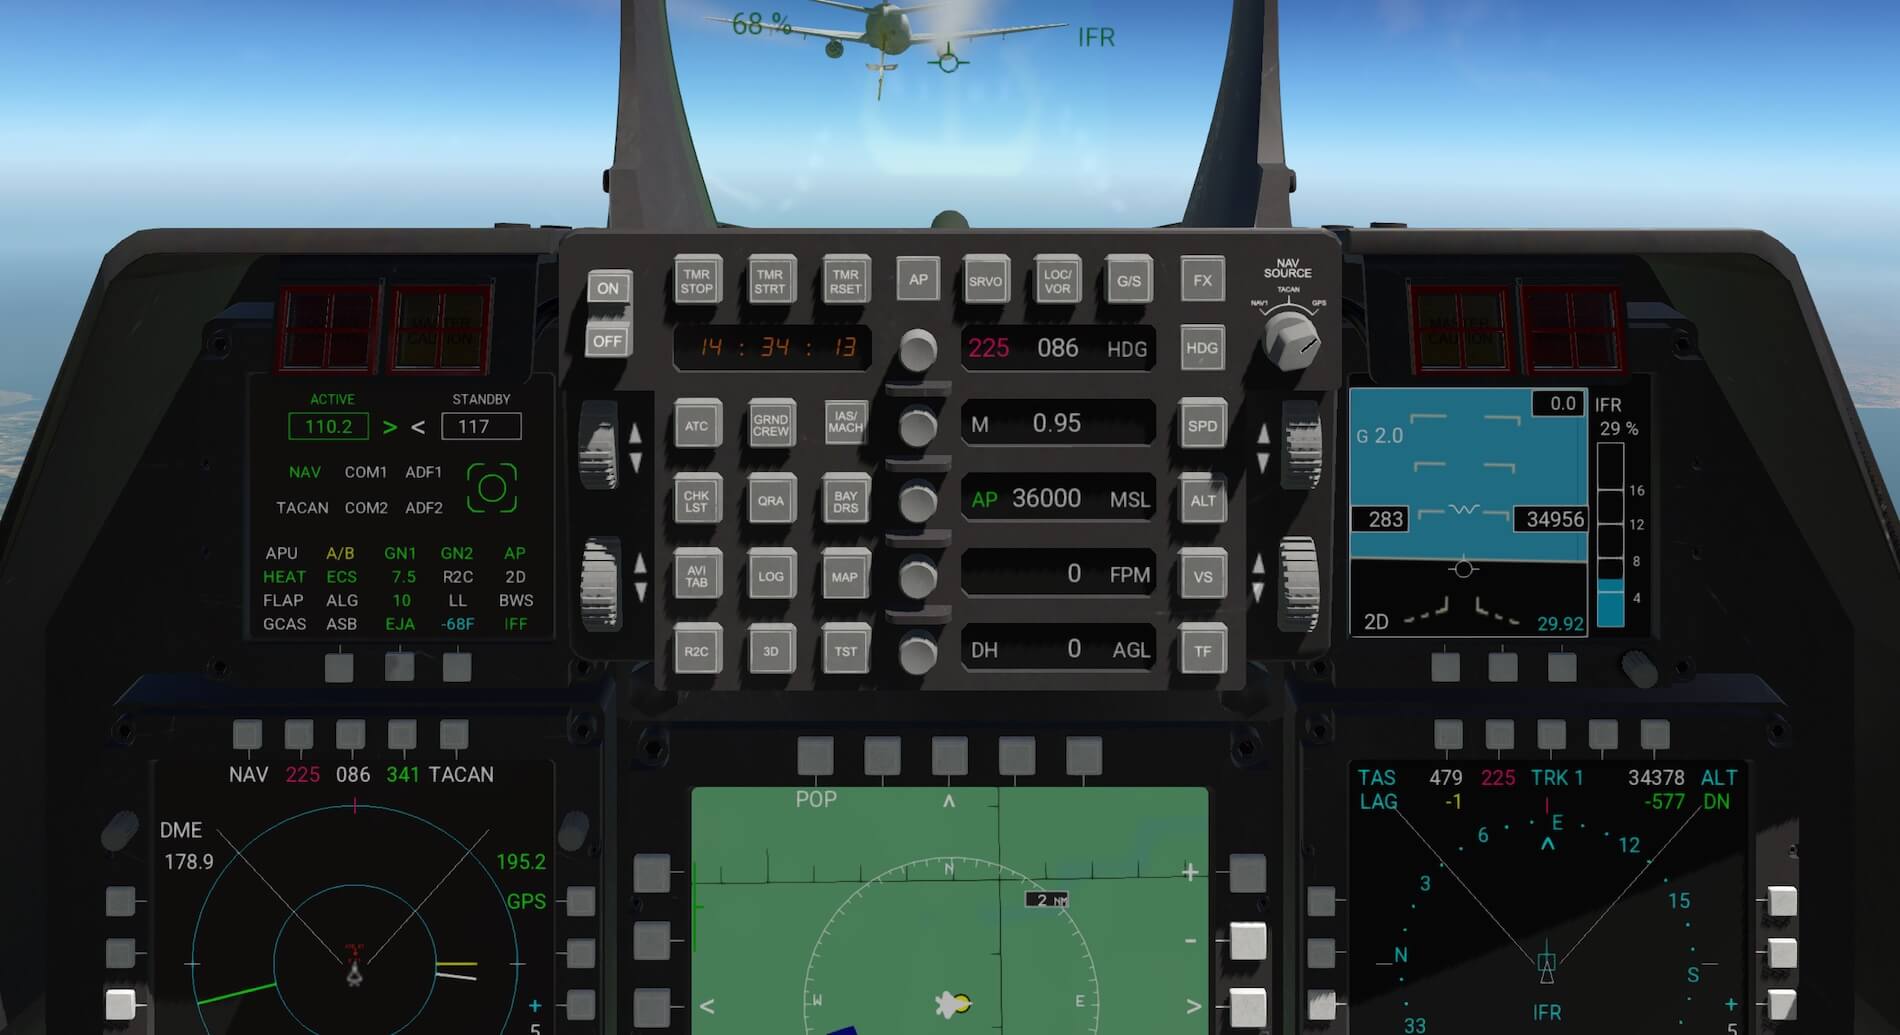
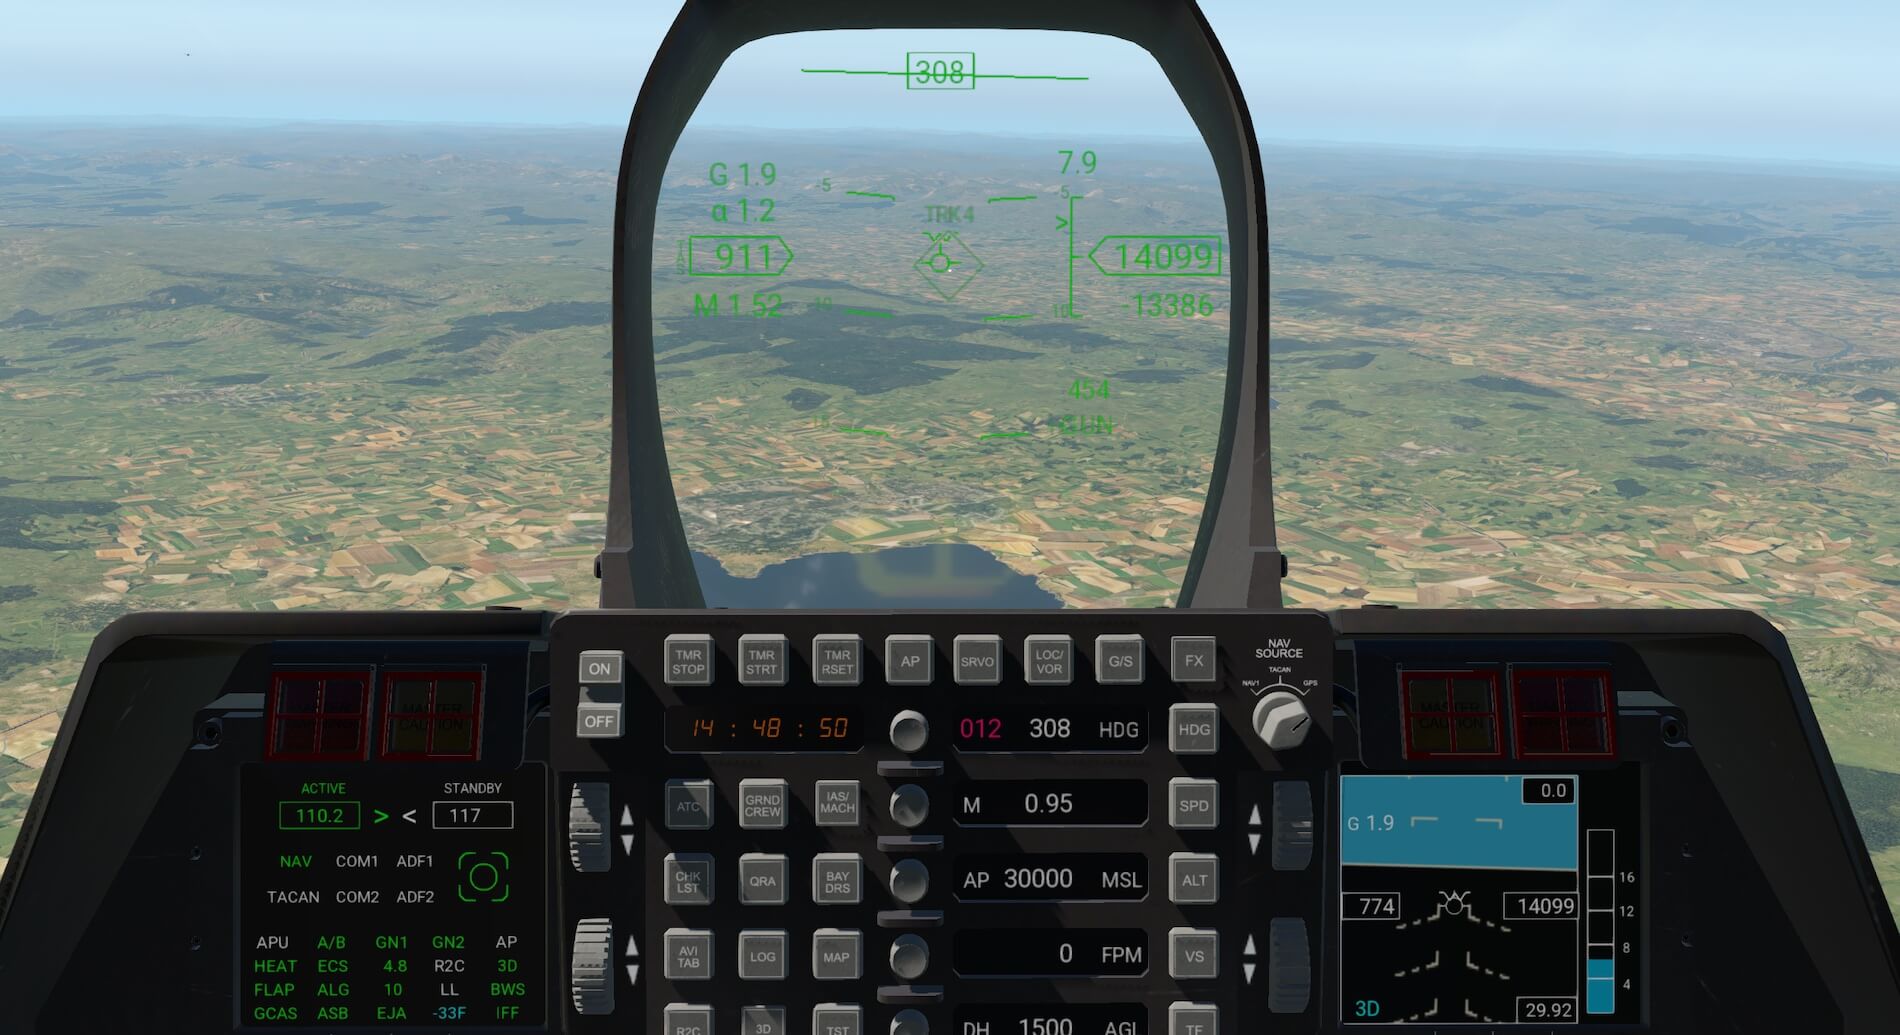
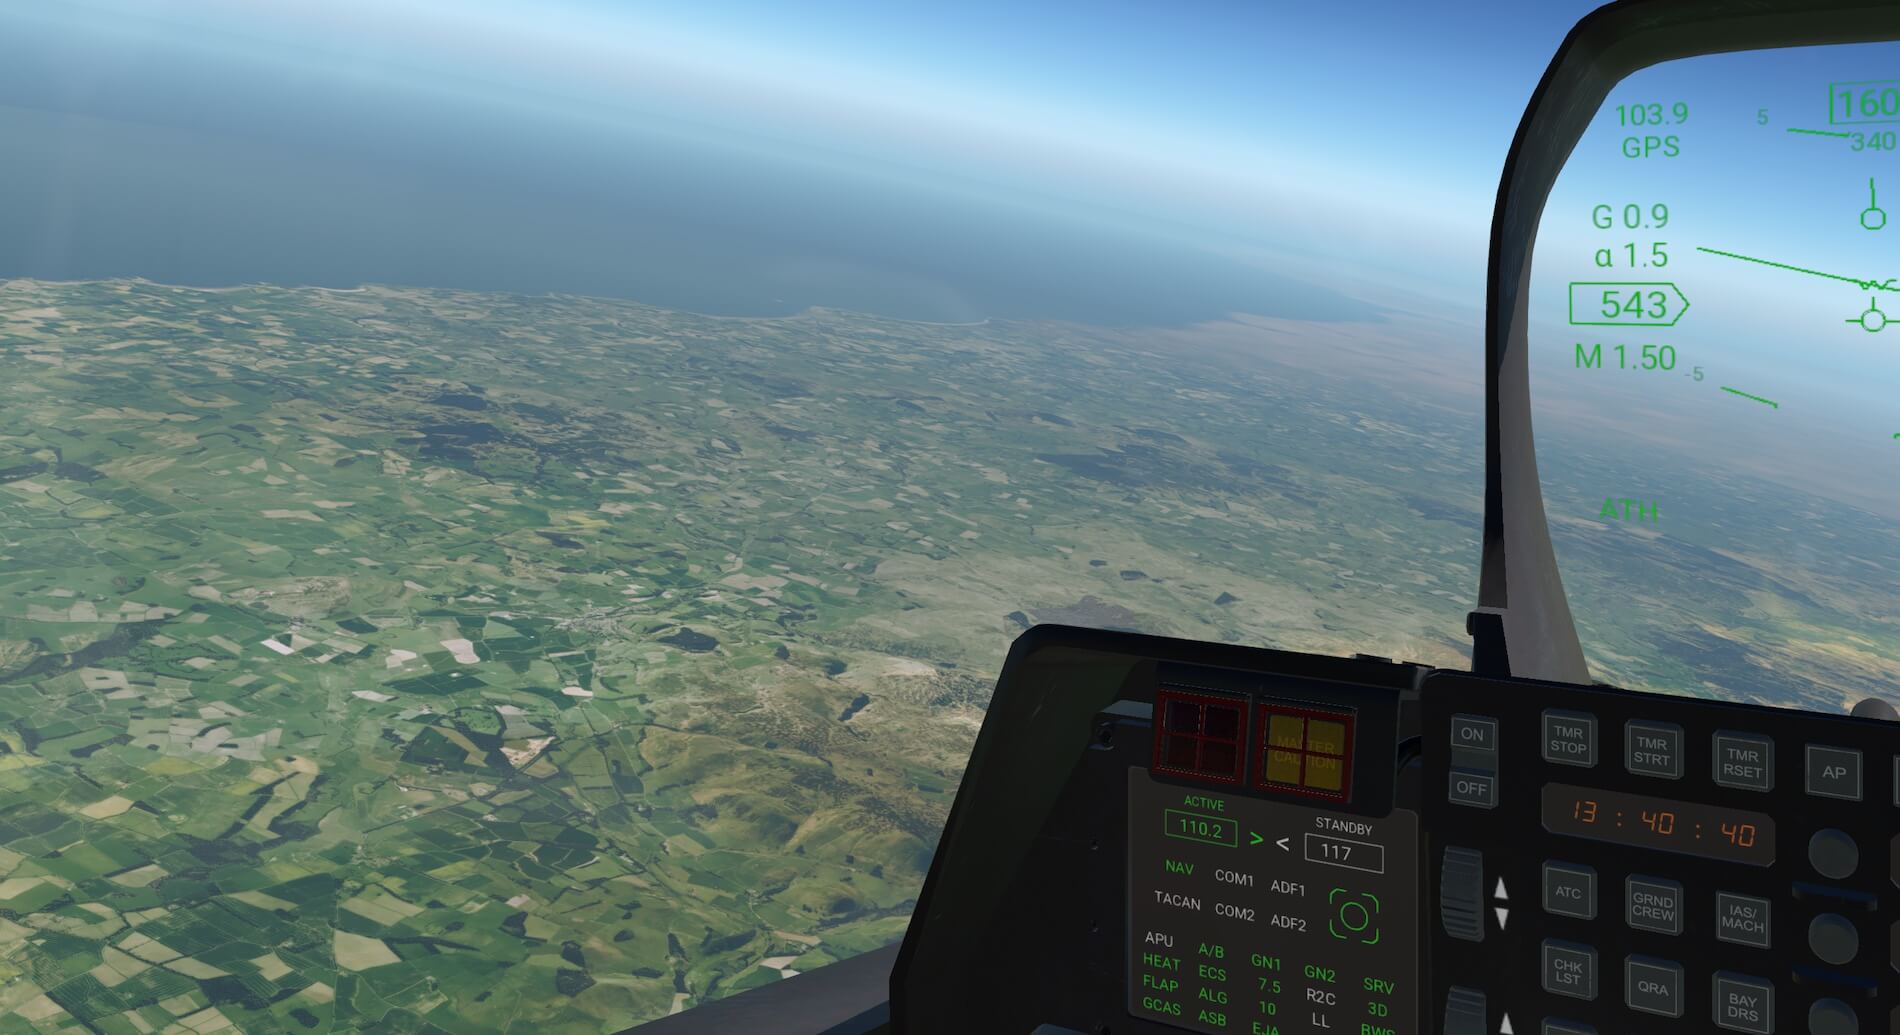
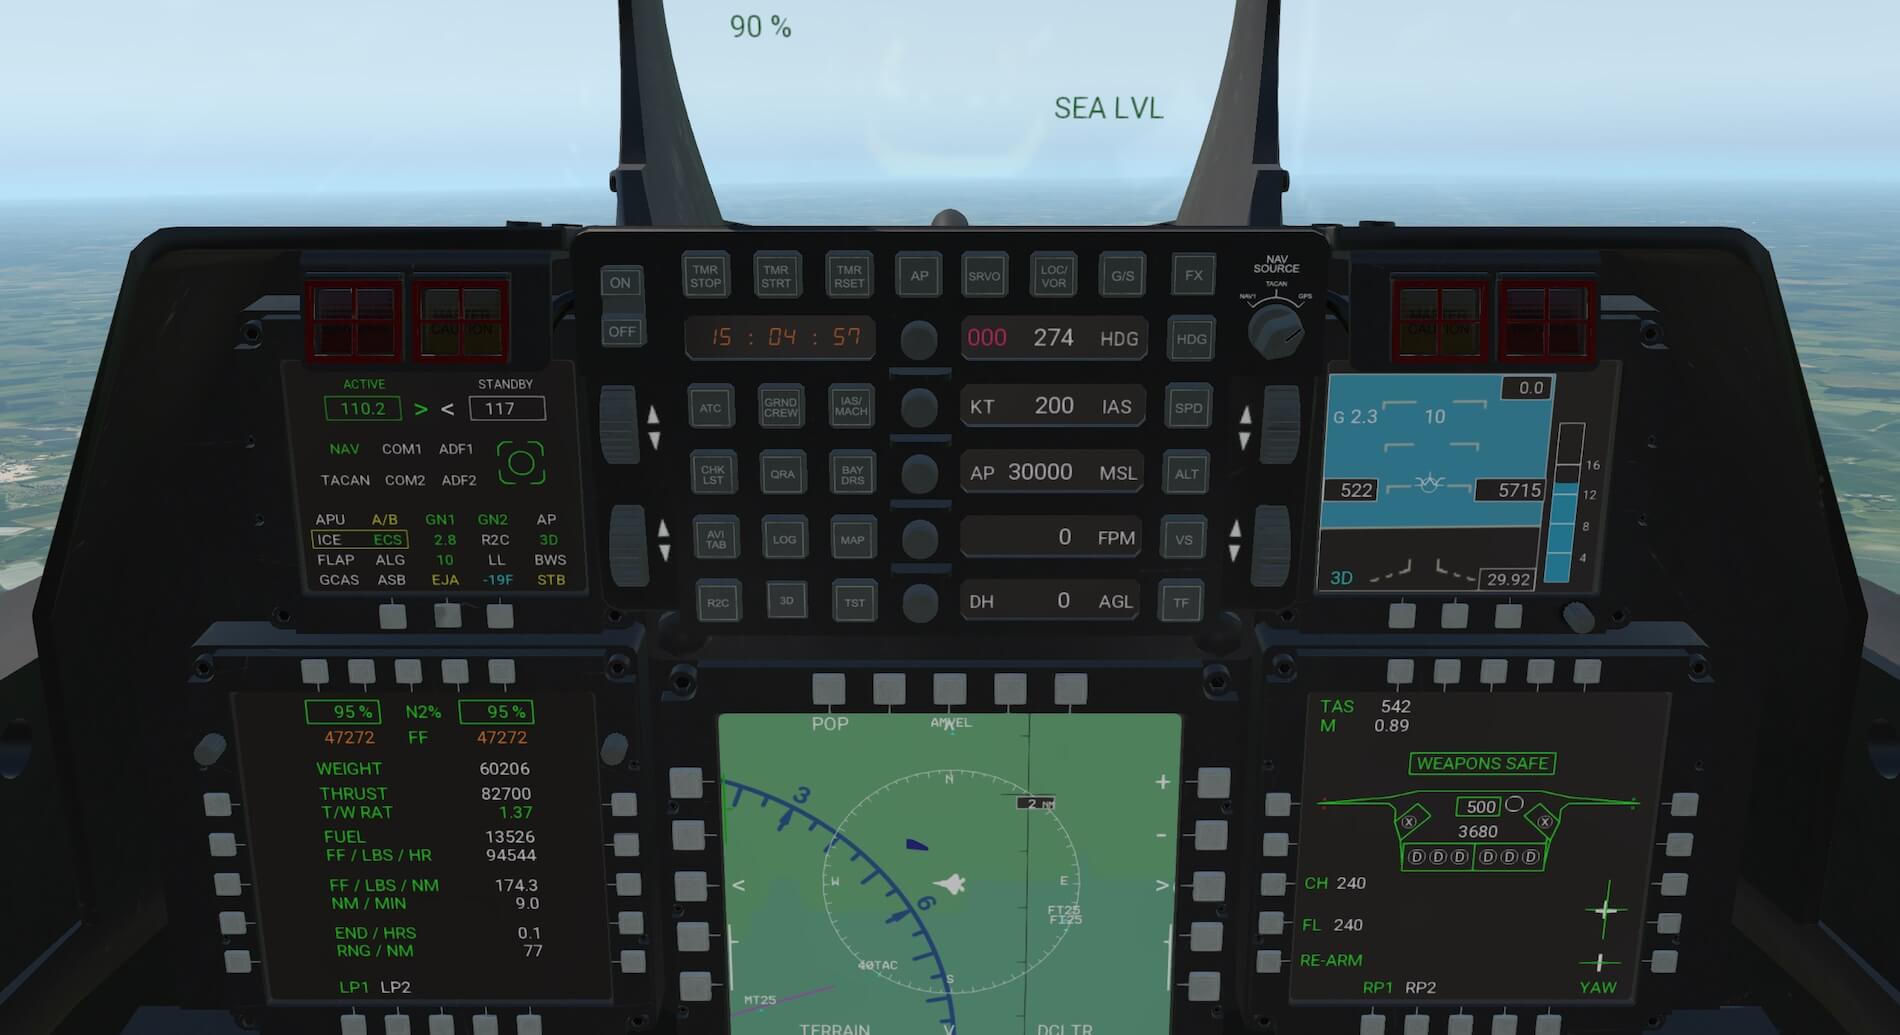
This covers the systems controlled by conventional switches and knobs. The glass cockpit instruments form the screens in front of the pilot. The Head Up Display is directly ahead of the pilot and provides information relating to navigation, GPS, Indicated Airspeed, ILS information, Angle of Attack, Mach speed, altitude, rate of climb and descent, engine throttle percentage and auto throttle.
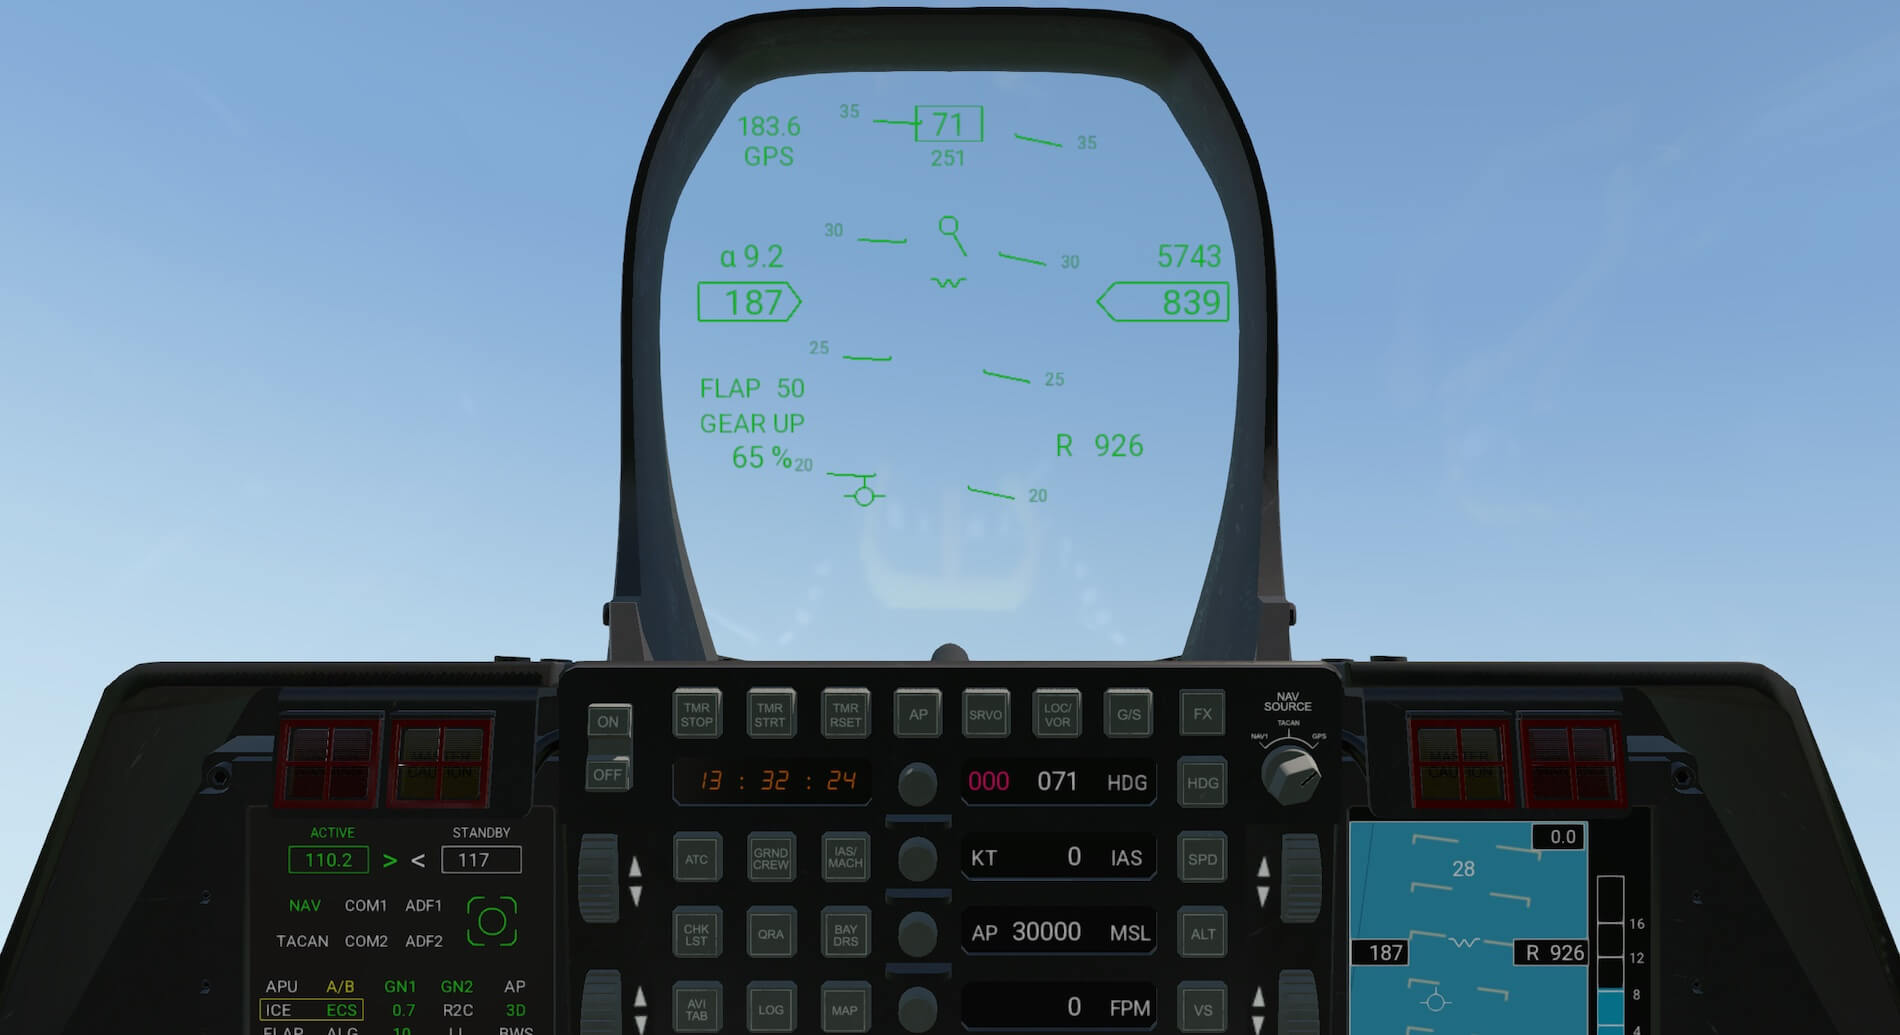
Below the Head Up Display is the Up Front Control Panel. This gives the user access to more systems, either actual aircraft systems or additional functionality created by the developers. To the left of the panel the switches allow for control of the HUD and instrumentation brightness. Buttons across the top of the panel control various issues such as the timer, autopilot, ILS glide-slope and a means of canceling glare on the glass displays. The knob to the top right of the panel allows the pilot to select the navigation system.
Twelve buttons to the lower left quarter of the panel give the pilot quick access to further systems. The ATC button pops up the X-Plane ATC panel to allow quick tuning of the aircraft radios, the Ground Crew button prompts the ground crew to remove the ground equipment from the aircraft, the IAS/Mach button toggles the autopilot airspeed display, the checklist button allows the user to load checklists and have an automated announcement of each item, the QRA button auto starts the APU and engines, the Bay Doors button opens and closes the weapons bay doors, the avitab button opens the Avitab tablet, as long as the plug in is loaded, the log button opens the X-Plane log book and the Map button brings up the X-Plane map.
The R2C button opens an AOA plug-in which automatically moves the pilots view in to turns on the ground and in the air and look back when the pitch attitude of the aircraft moves above 30 degrees. The remaining two buttons toggle between a 2D and 3D view and allows the various warning messages to be tested. The manual recommends assigning a button to toggle between 2D and 3D screens. This is useful as the R2C and control the views in 3D cockpit mode and sometimes you need to look elsewhere. Toggling into the 2D cockpit to view instrumentation and then back to 3D to see the specialist view is very useful.
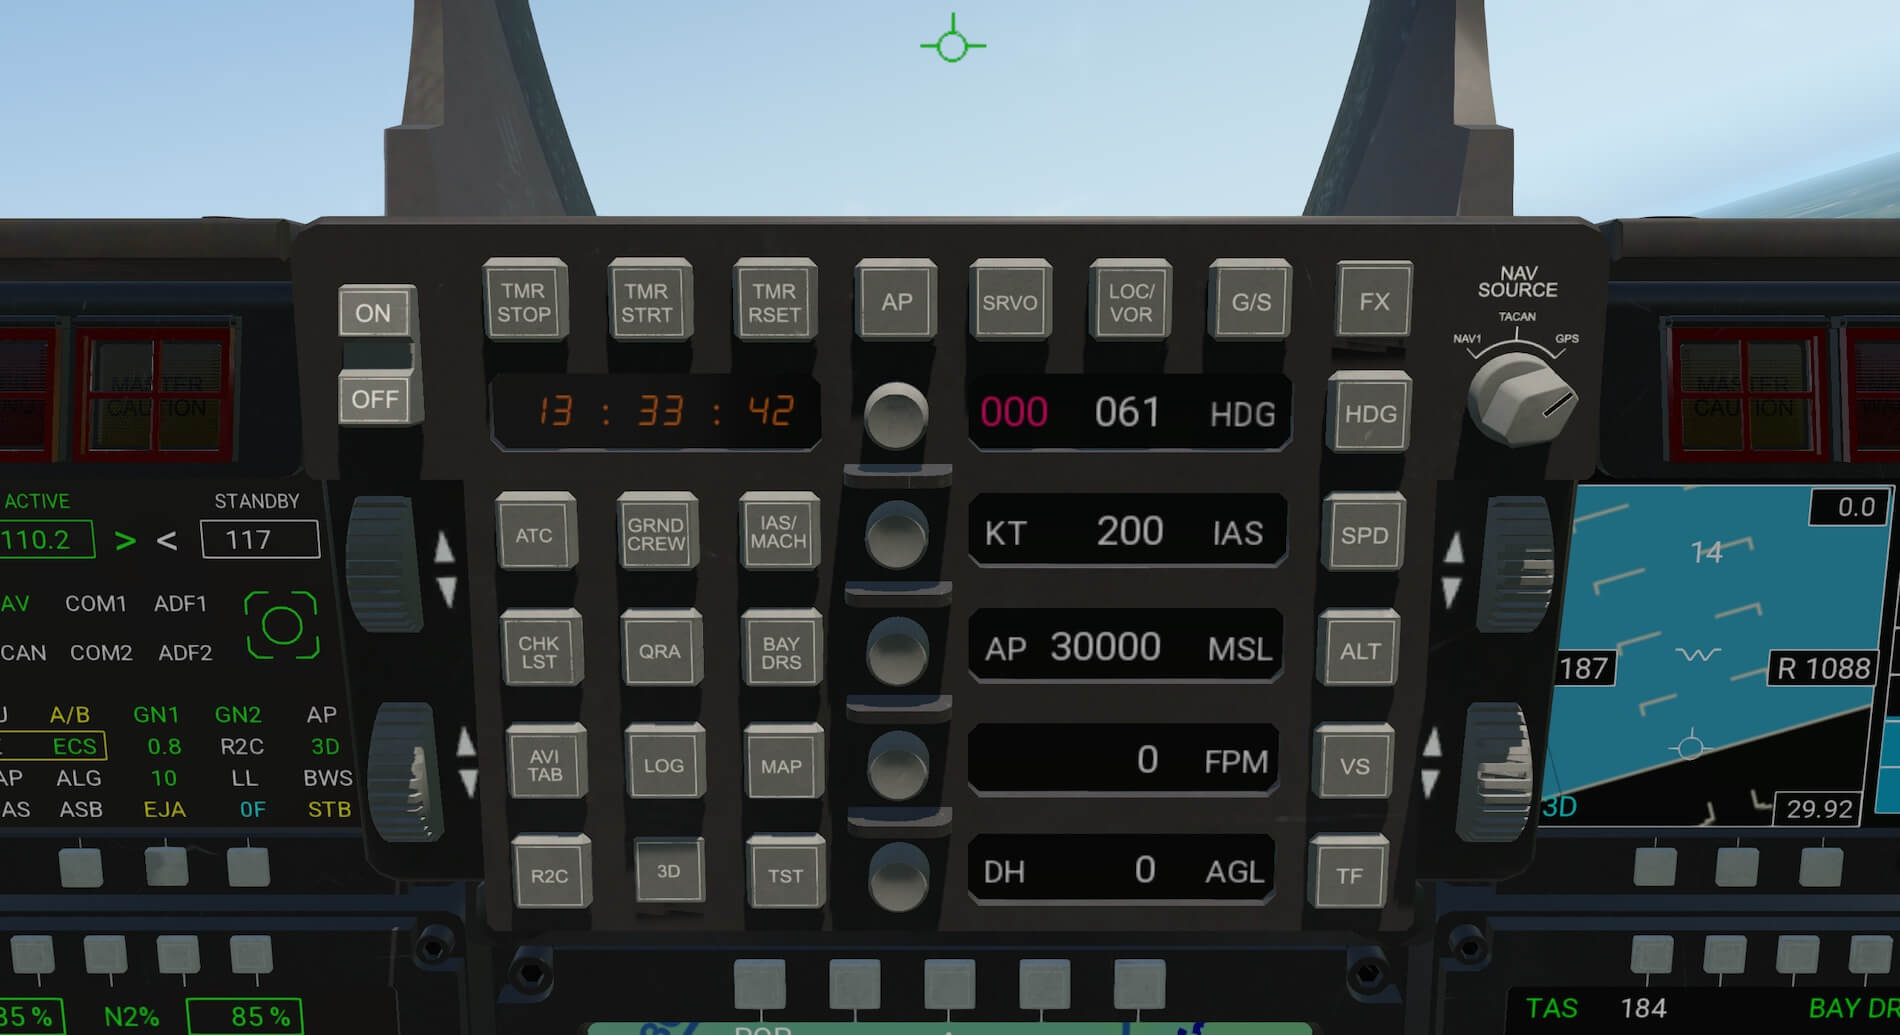
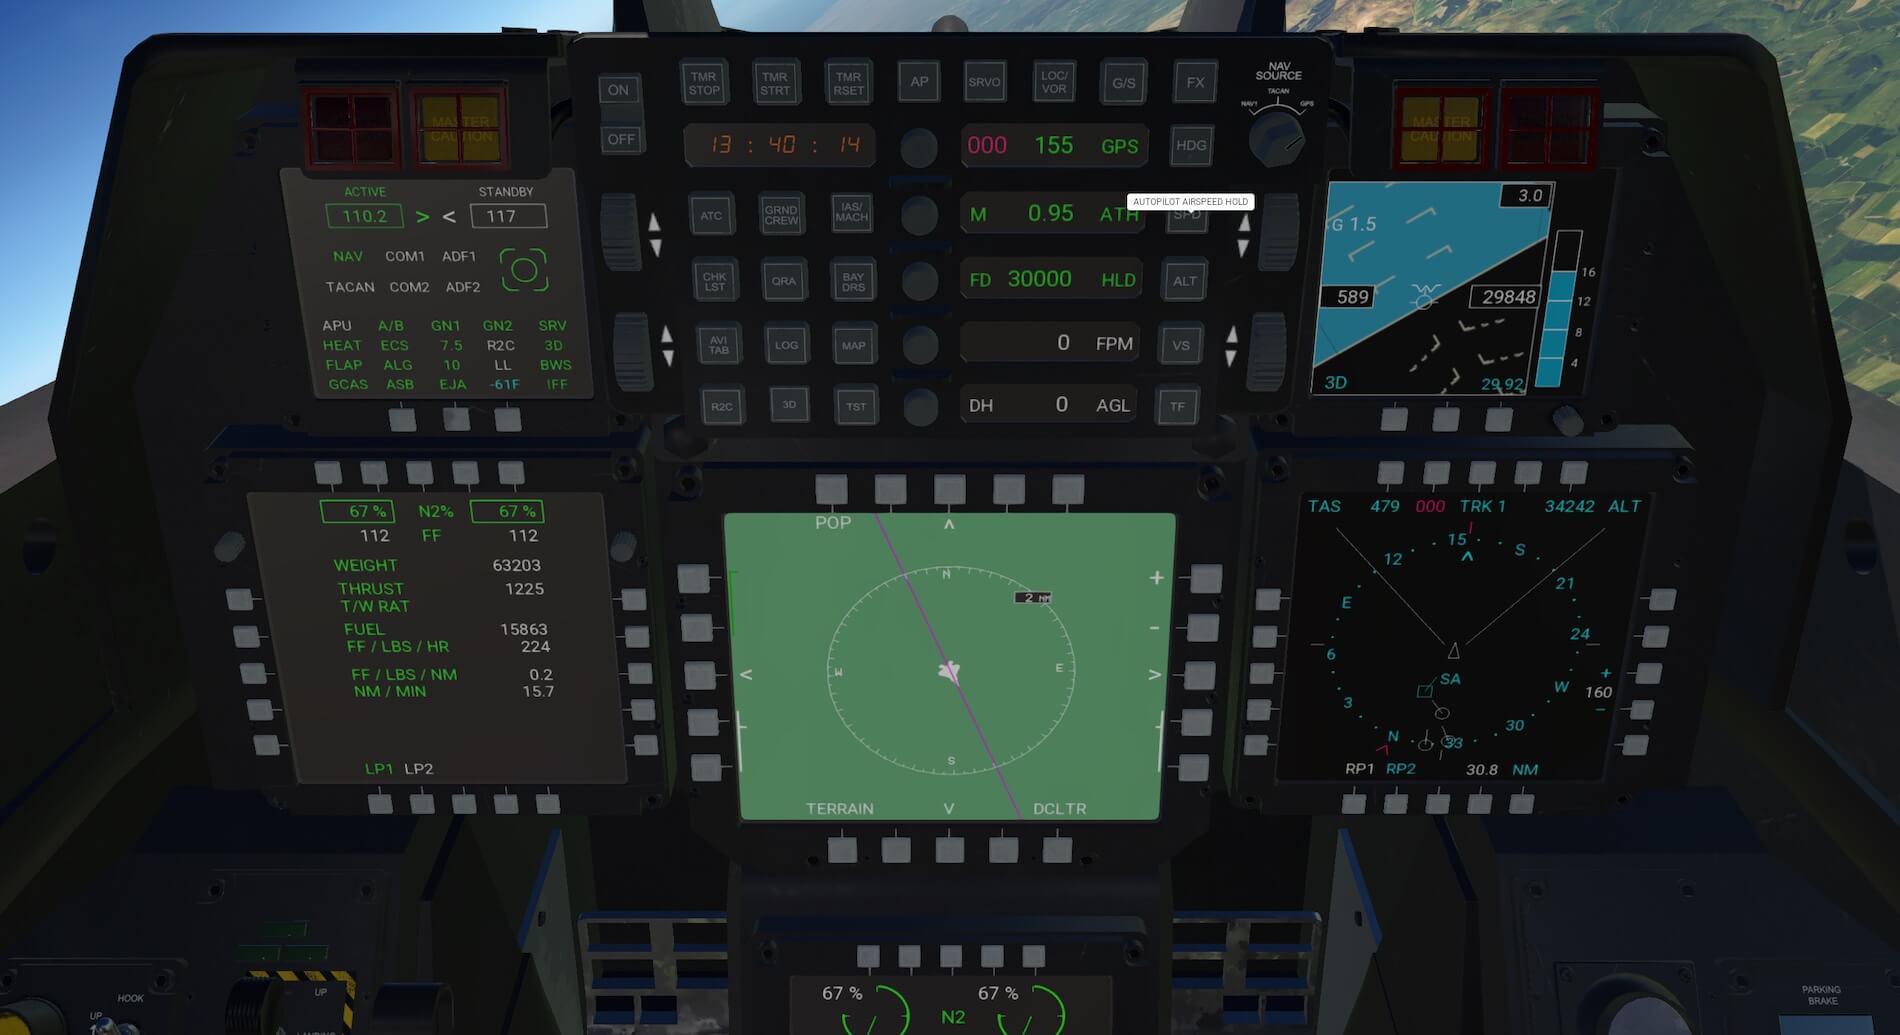
The right hand side of the display controls the autopilot along with the autopilot ON/OFF and servo buttons on the top row. The autopilot button alone controls the auto throttles but it is not until the servo button is also switched on that the flight controls are initiated. The auto pilot command buttons are down the right hand side. The heading button is alongside the heading display window and the heading is set by the rotary knob to the left of the window.
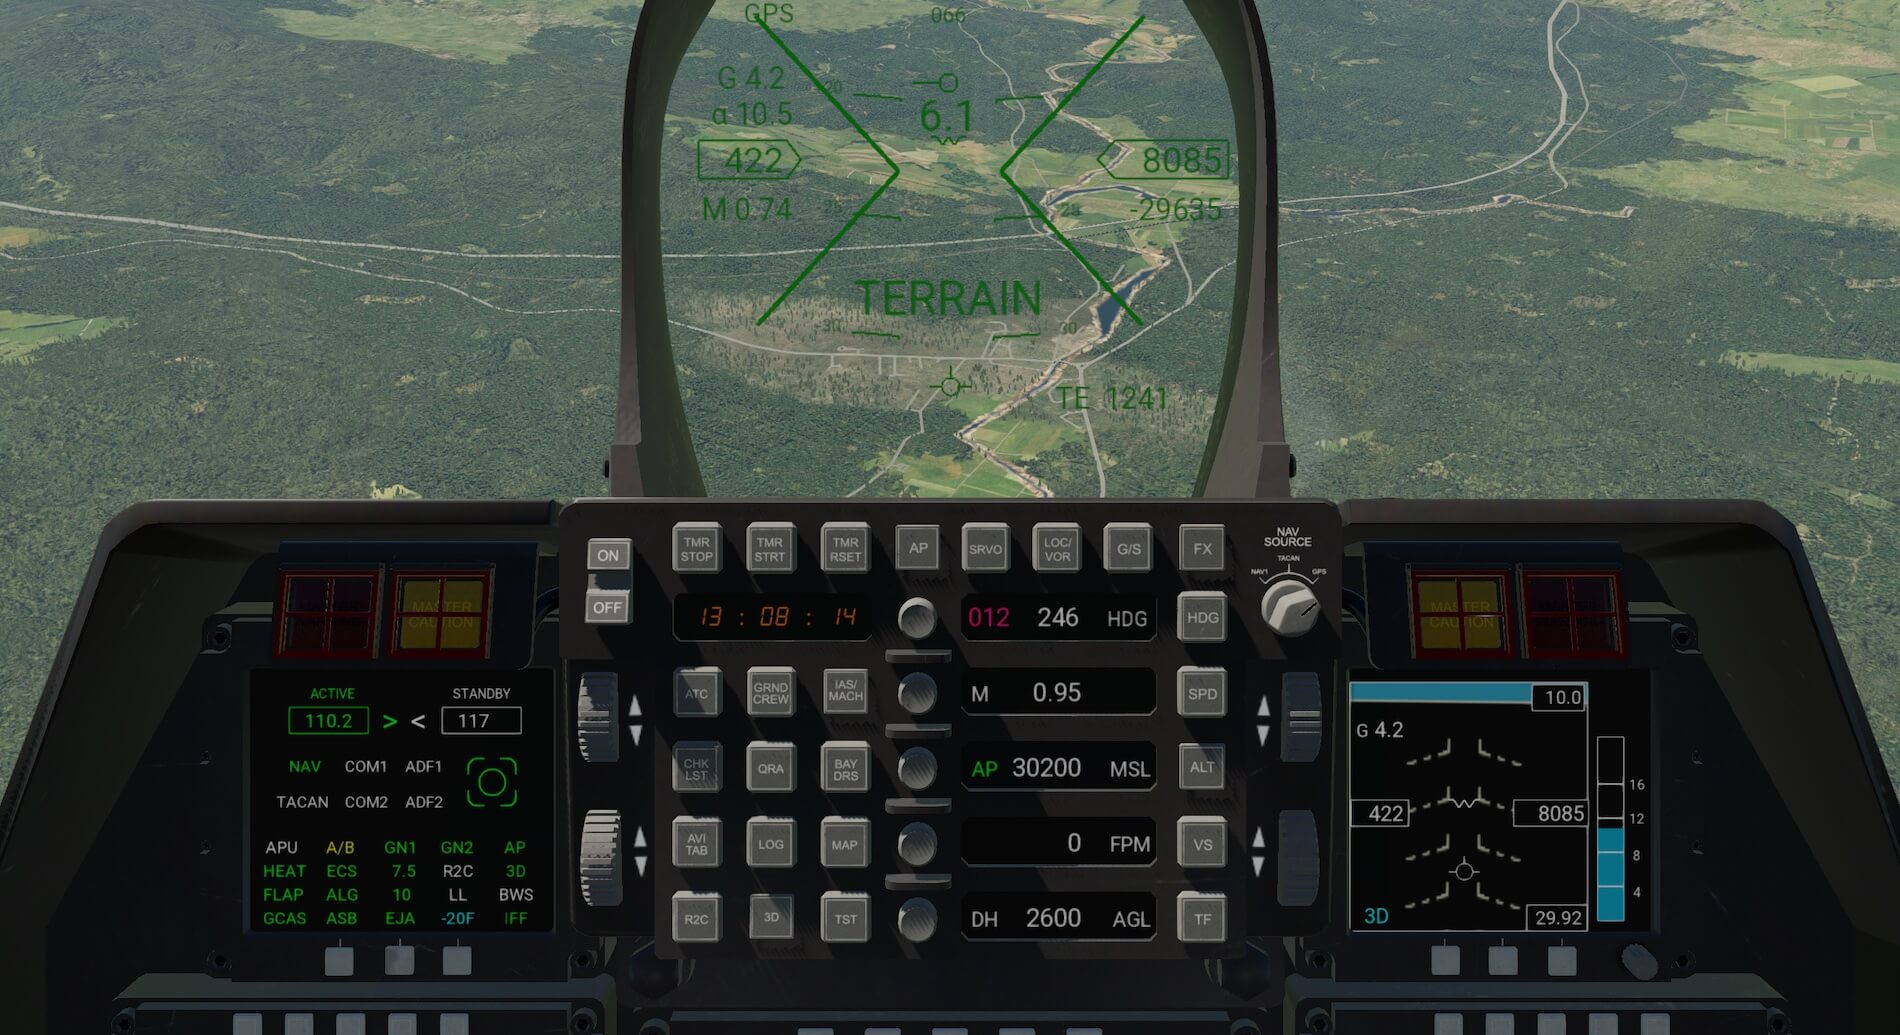
The display window displays the required heading, the actual heading and the navigation source. The next row down, with the same layout, controls autopilot speed and can be displayed in knots or a fraction of mach, the next row controls altitude and the next vertical speed. The bottom row inputs the settings for terrain following.
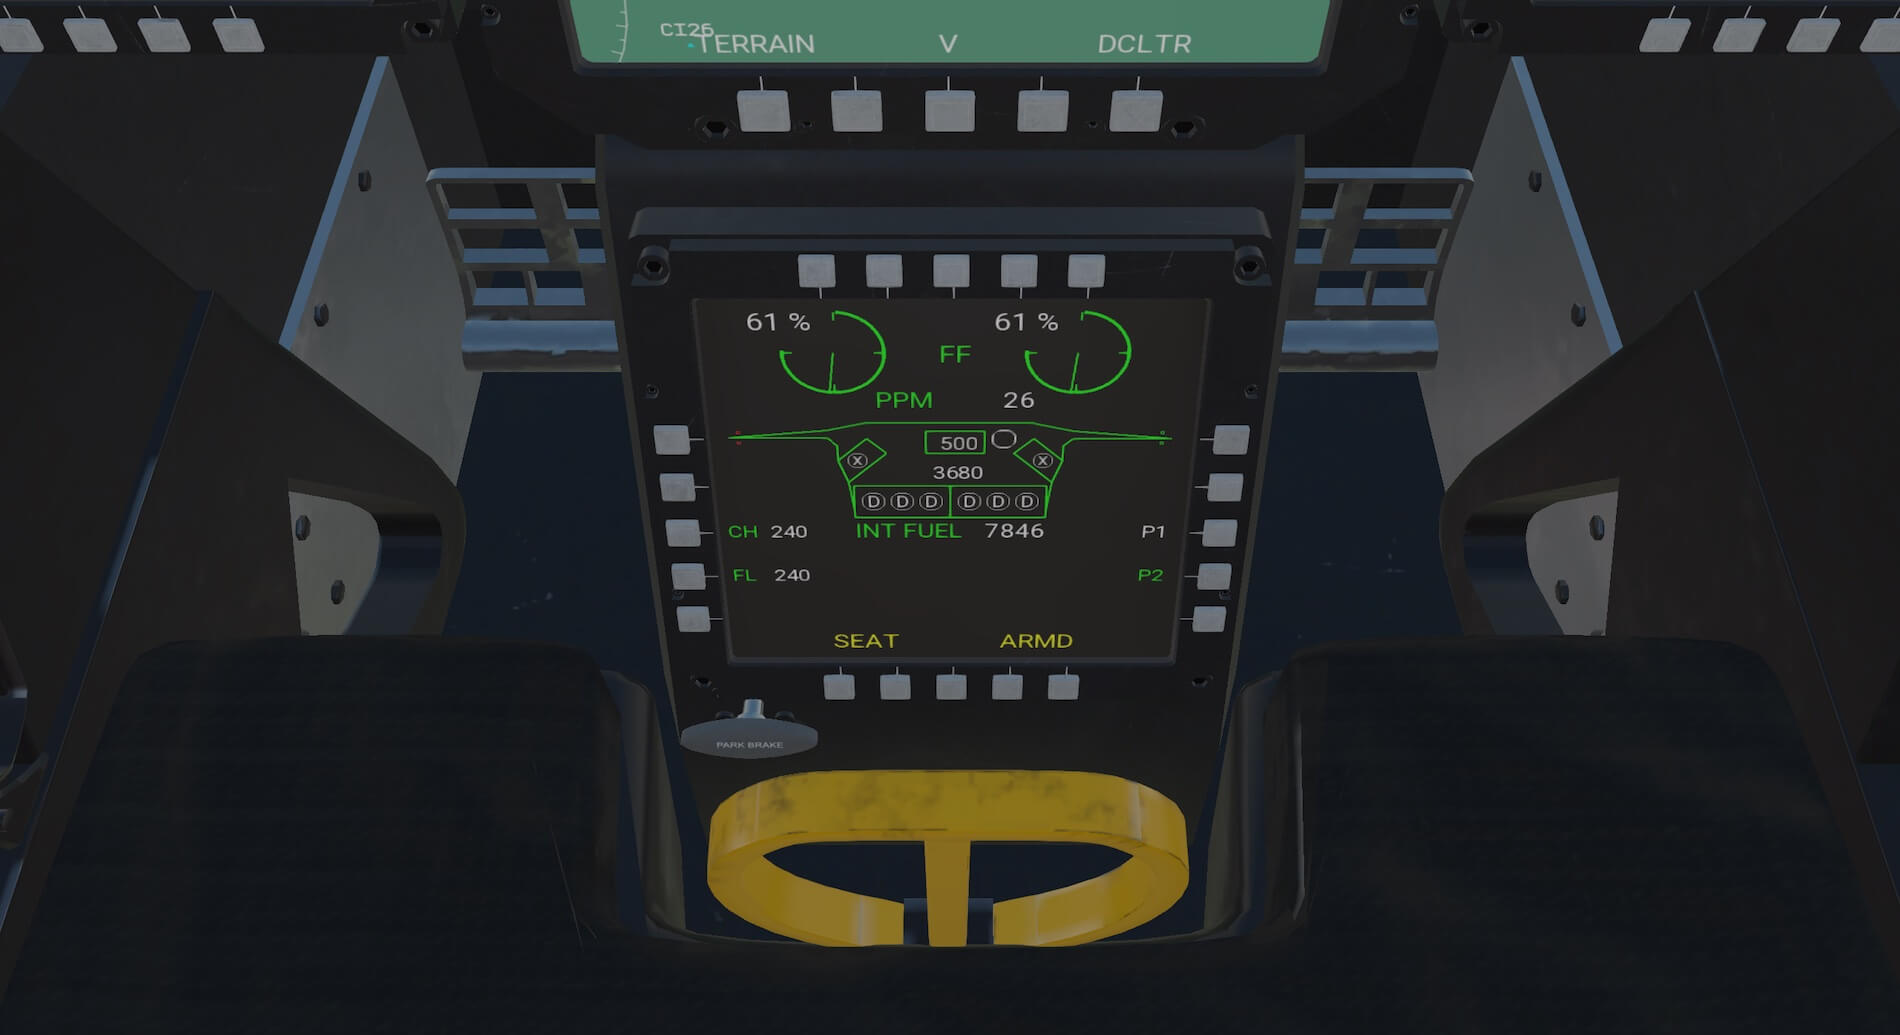
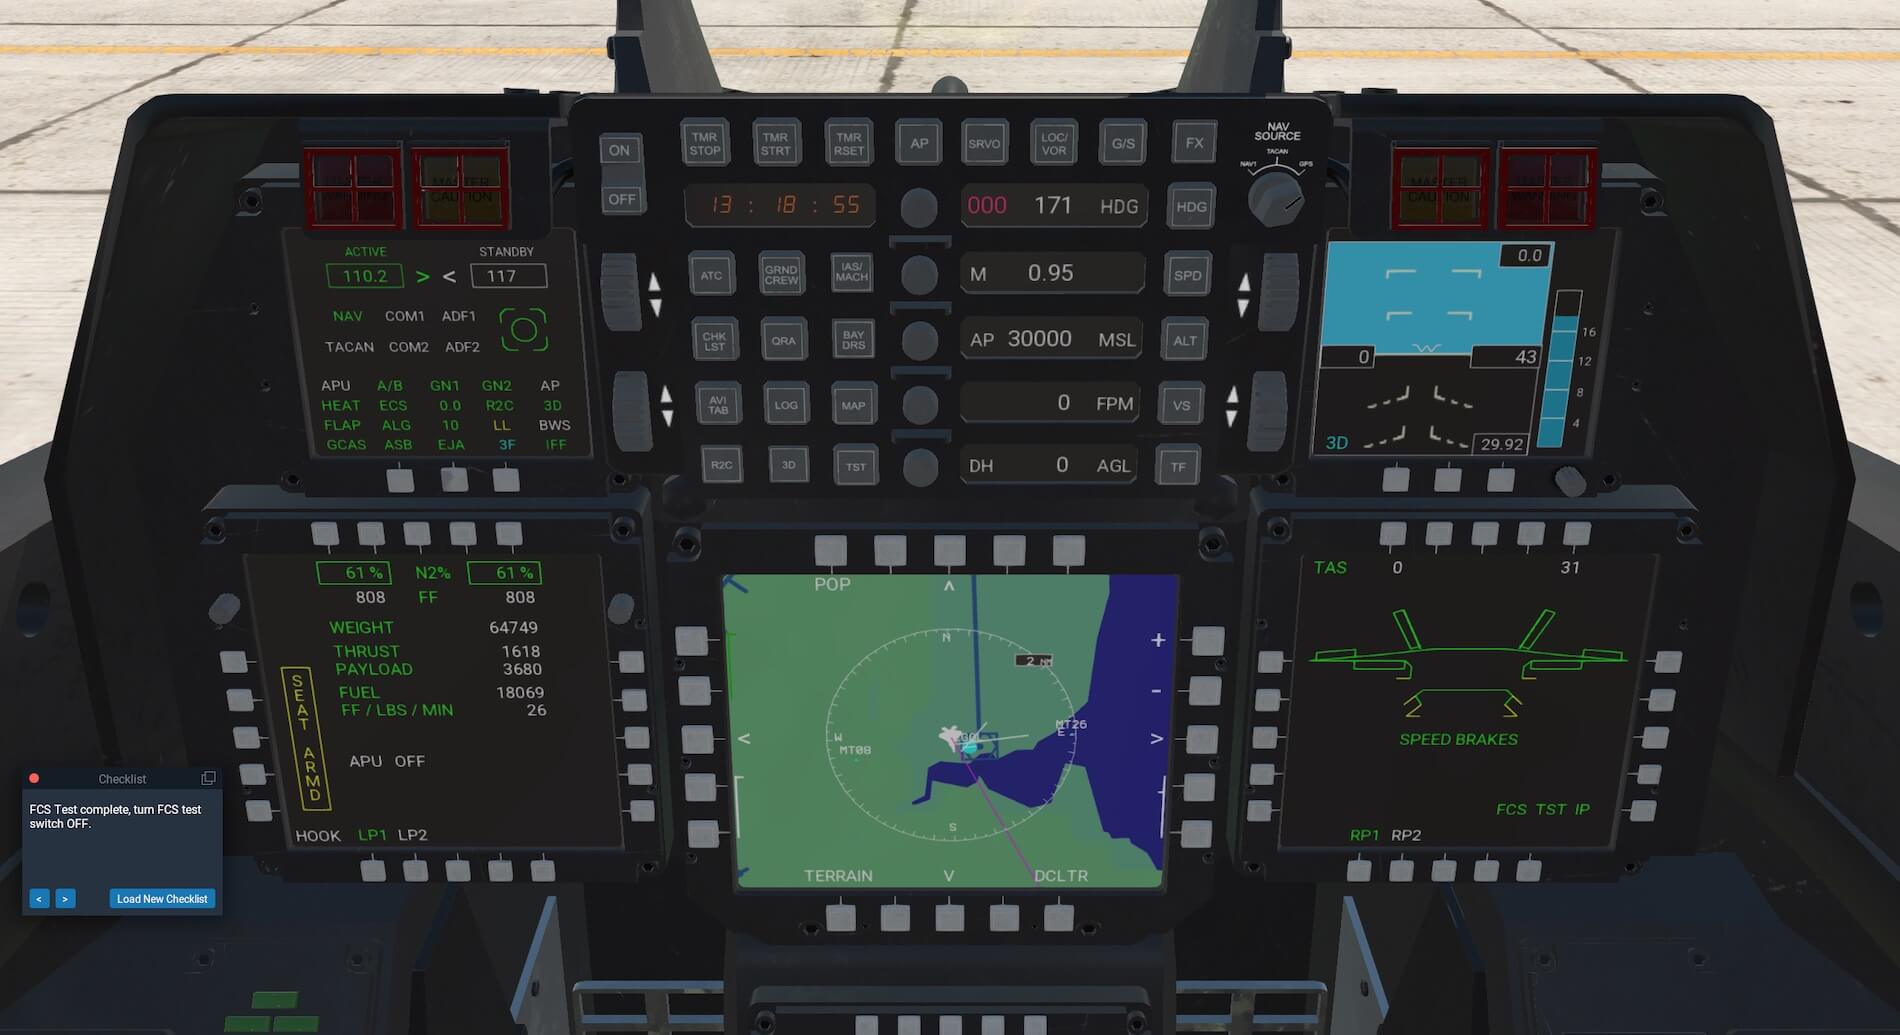
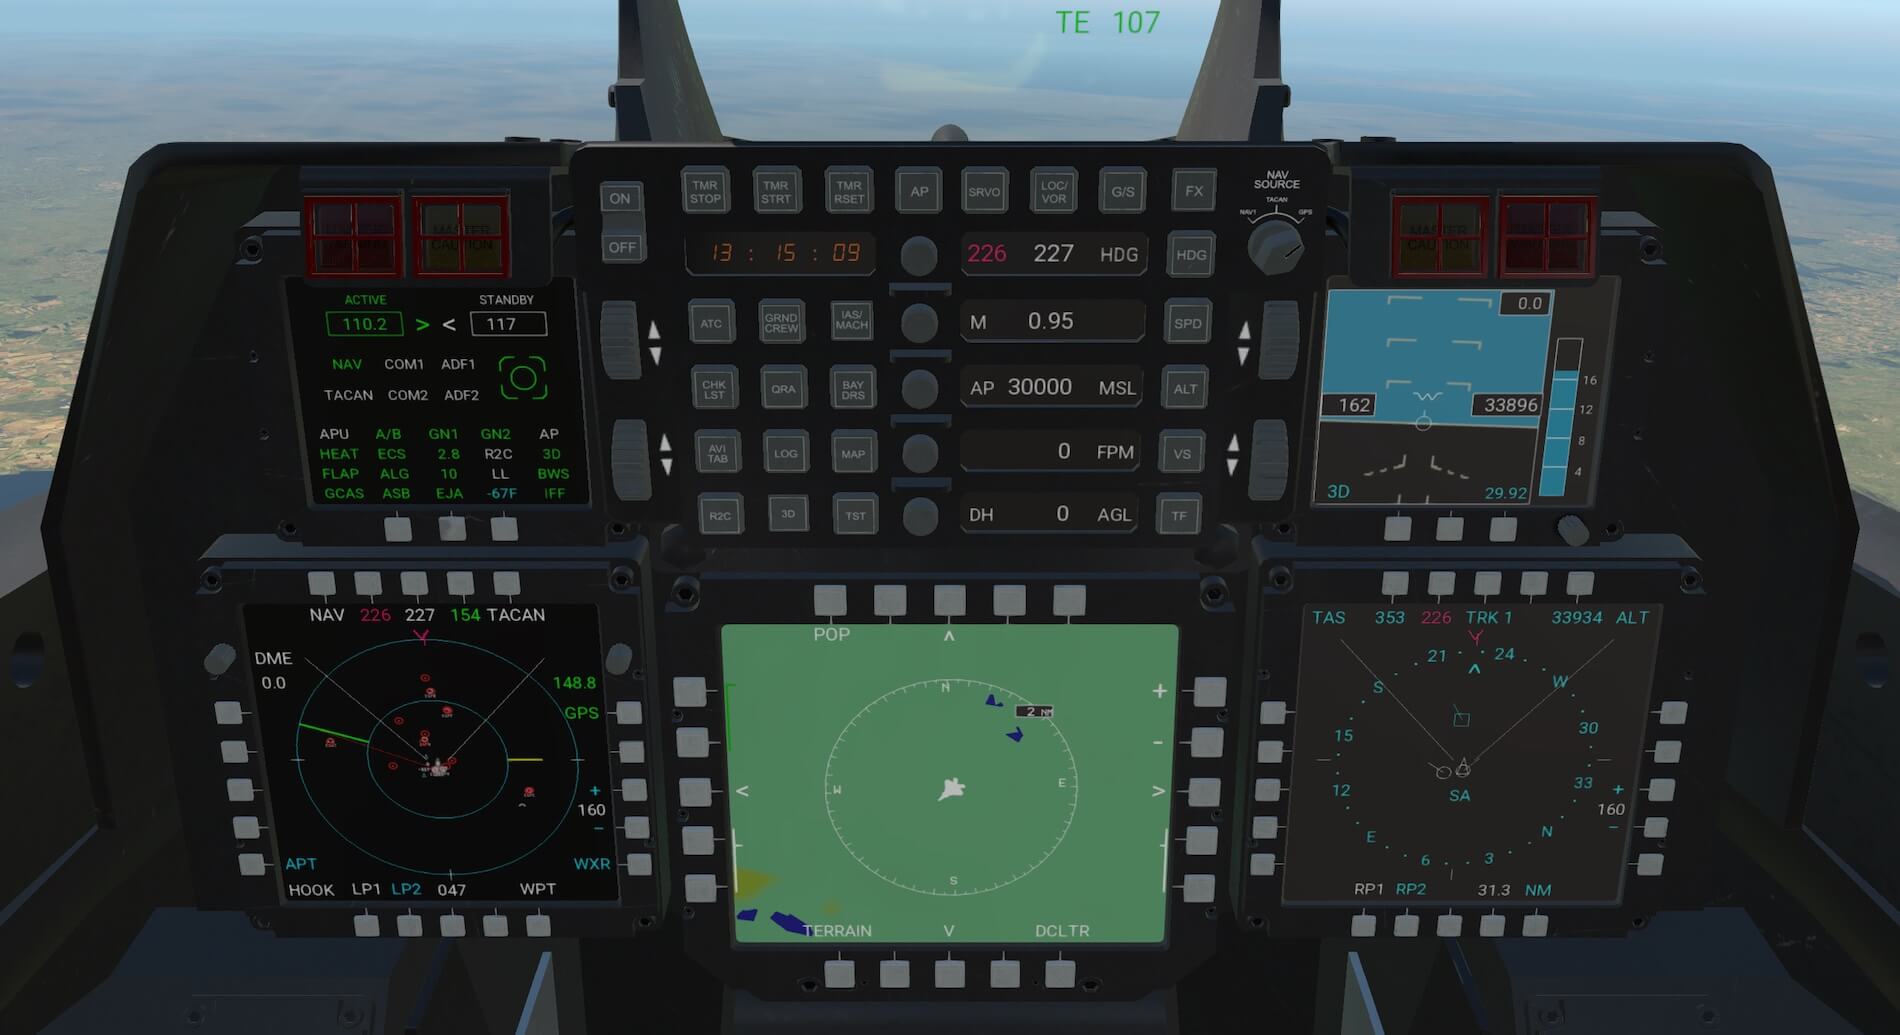
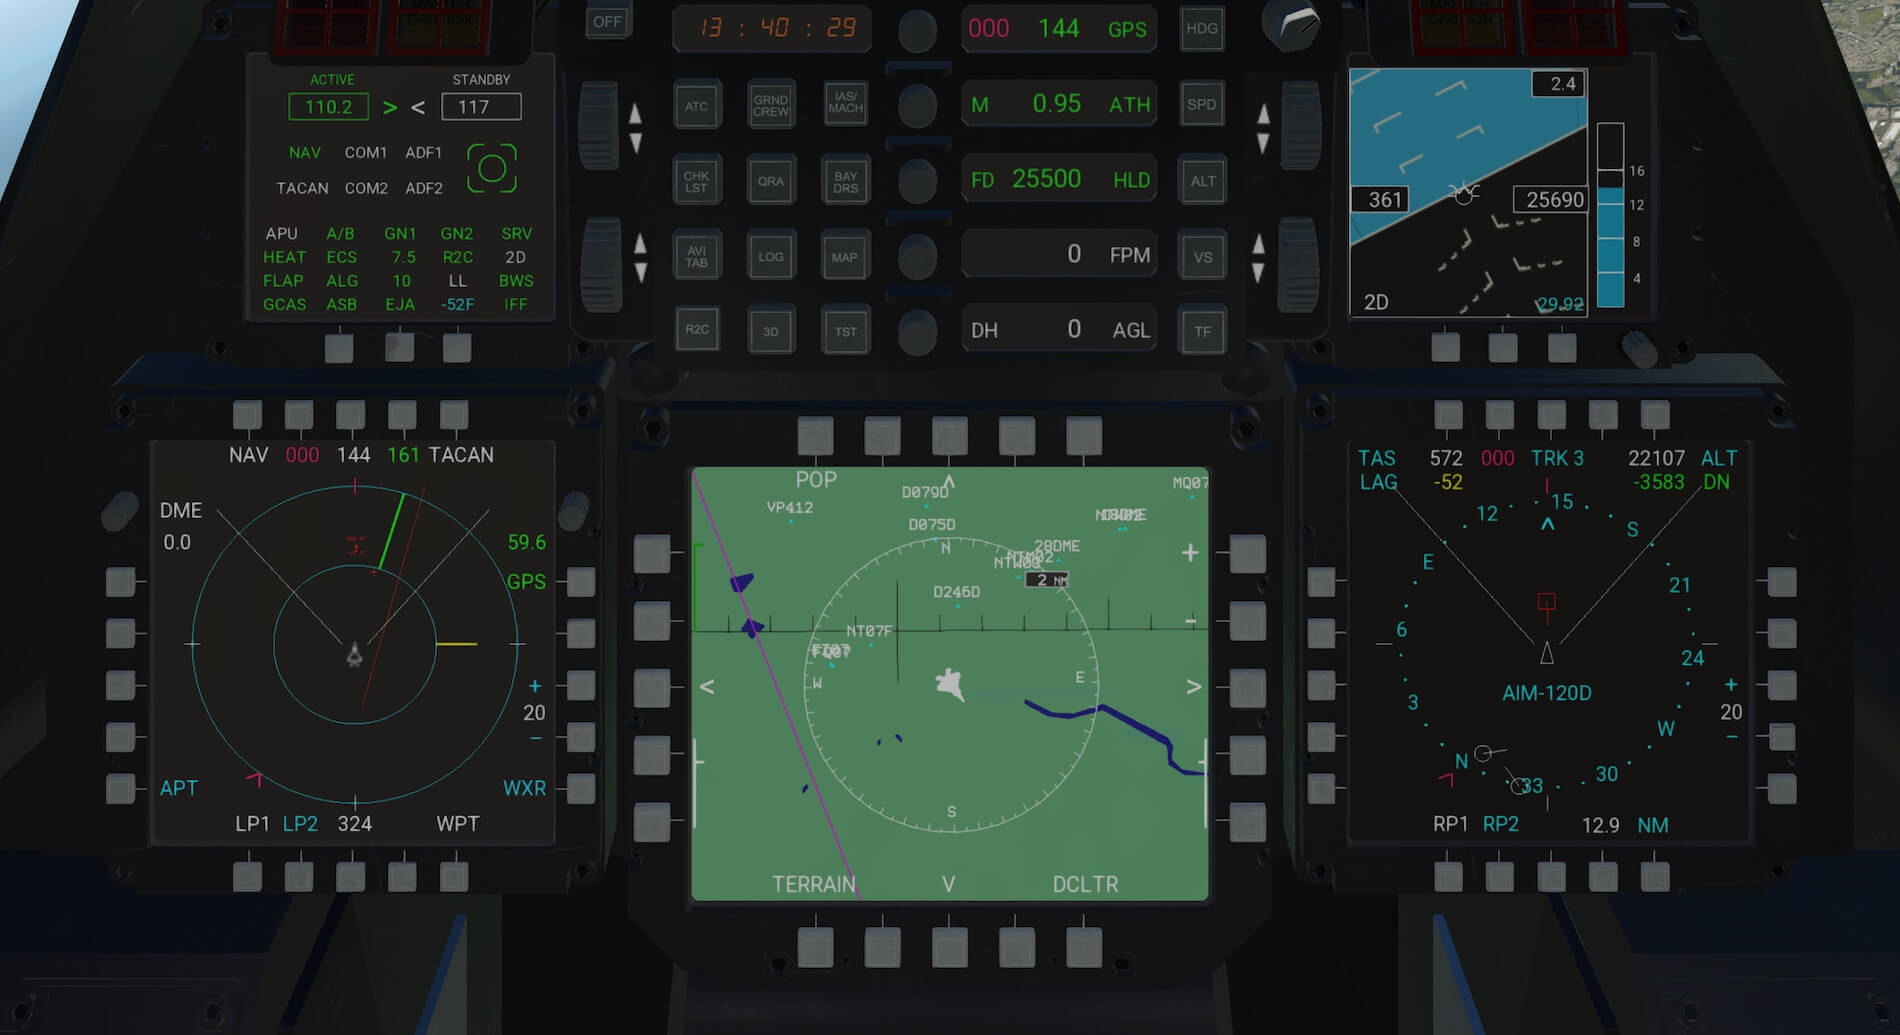
The nav/com control panel sits to the left of the up front display. As well as controlling the communications systems, and allowing the radios to be selected and tuned by a mouse, the panel has an aircraft systems status display which shows the status of twenty aircraft systems.
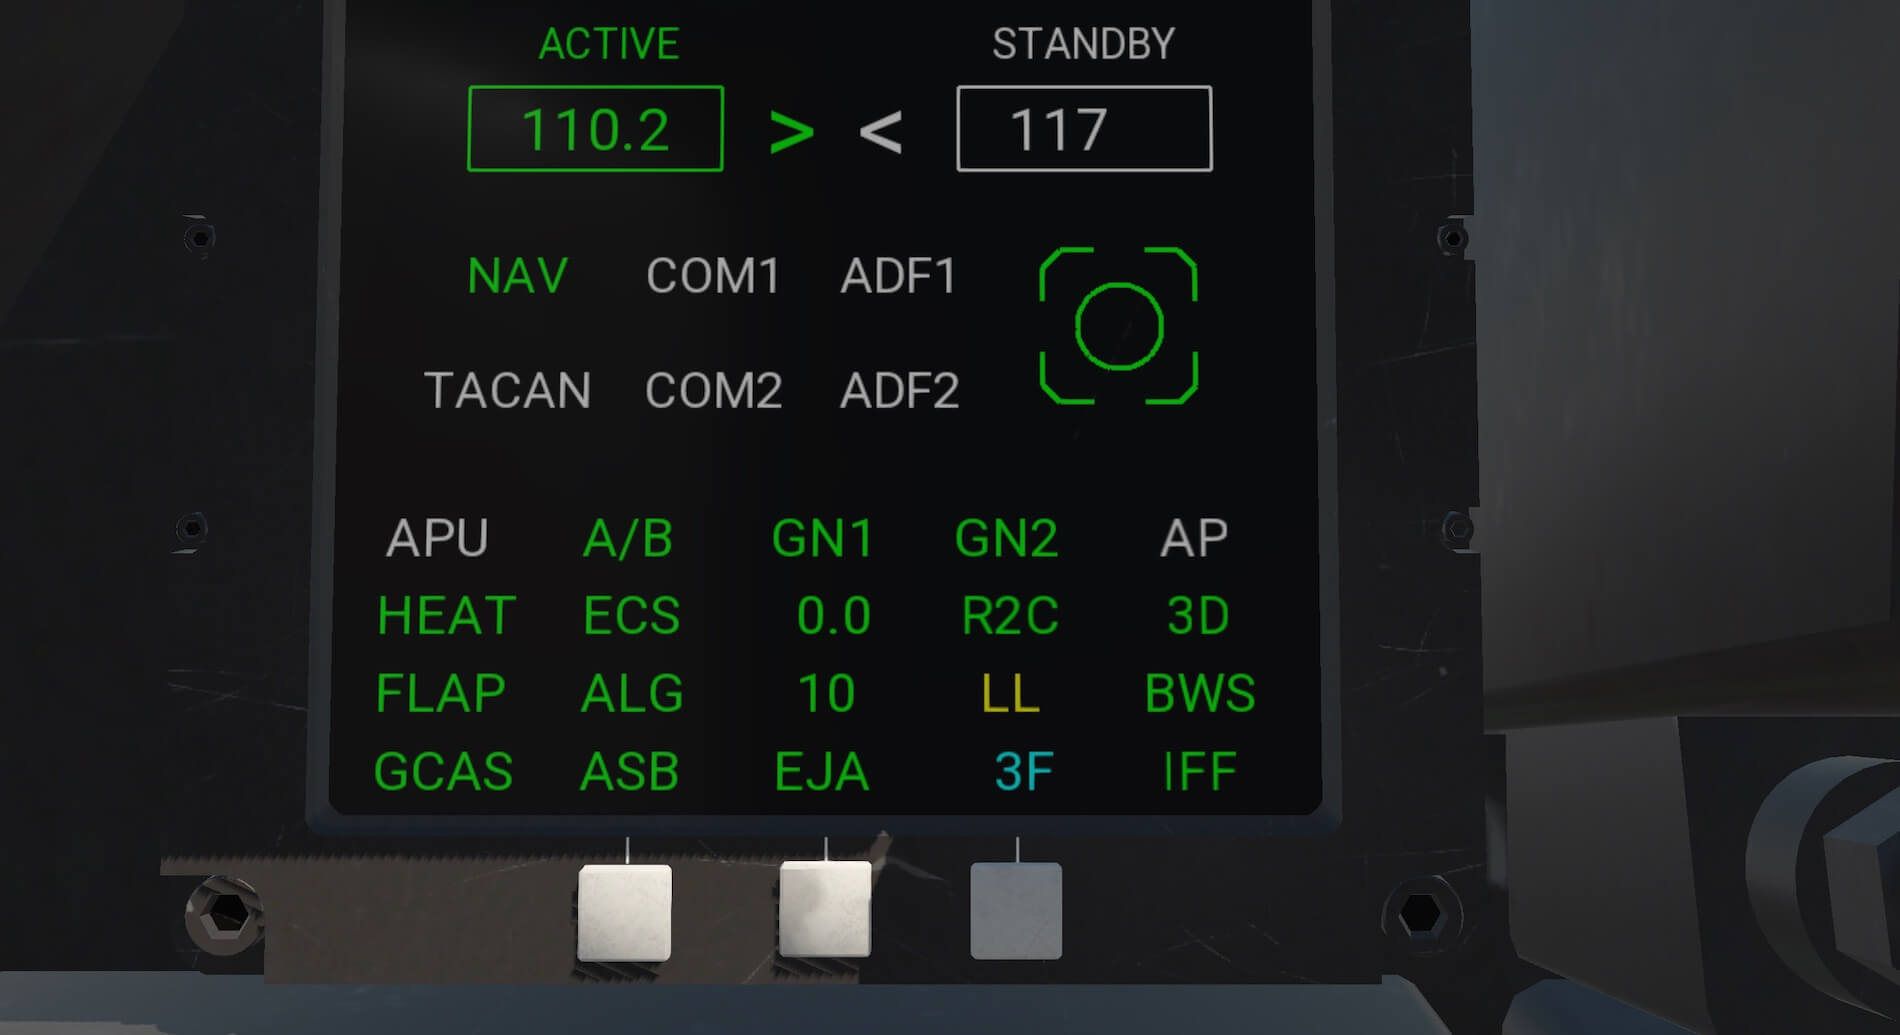
The left multifunction display (MFD) first page shows information on the engine systems and also the status of the automated systems mentioned earlier. There is also APU information as well as the status of the avionics and battery switches; once engines are started a page of engine and fuel information becomes available. Selecting the second page select button and a radar-moving map becomes available.
Soft keys give the user the opportunity to show airport symbols, waypoint symbols and weather. Navigational information is supplied through this system and headings and navigation source can be changed by soft key short cuts rather than the other display systems described earlier.


The centre console provides a colour moving map display. This is based on the default X-Plane G1000 and therefore most users should be familiar with it. The display is initially surrounded by soft key buttons mainly used for panning around the map and zooming in and out. This looks like a G1000 with limited capability but it is modeled this way to look authentic in the aircraft. Clicking on the Pop Out soft key at the top left of the display produces a fully functional G1000.


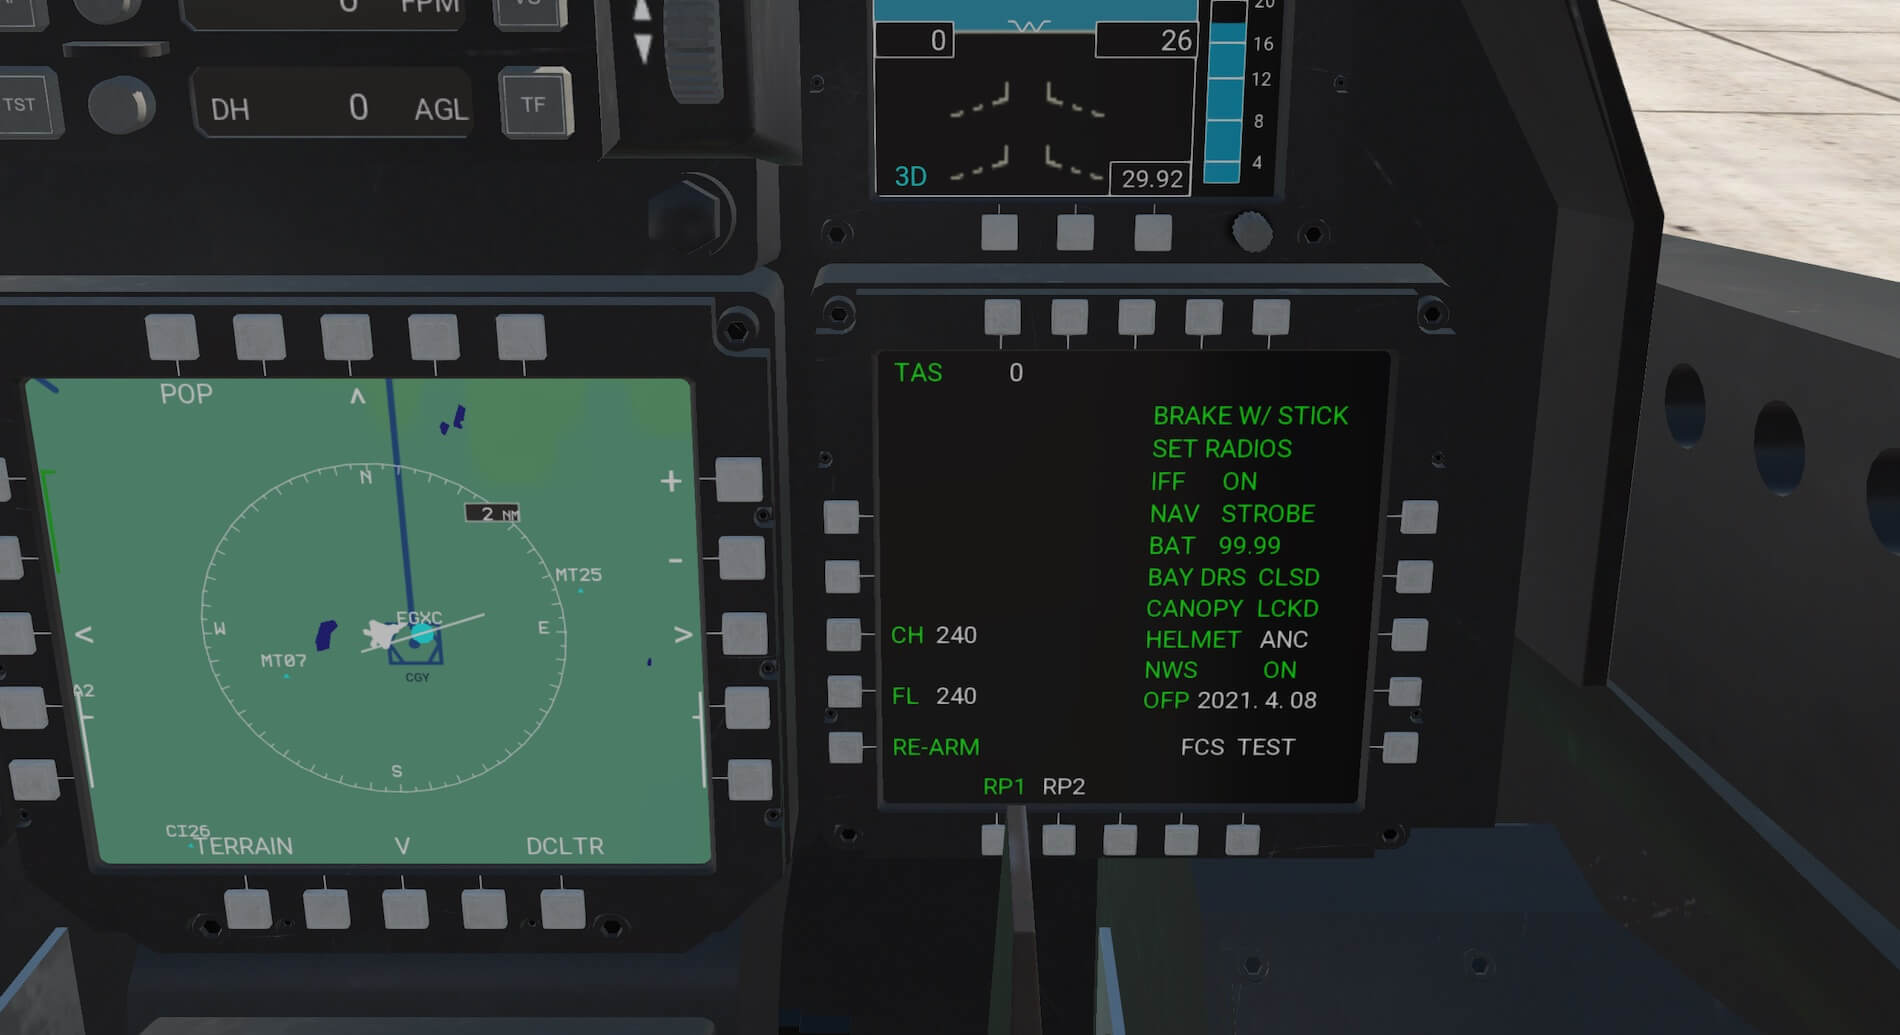
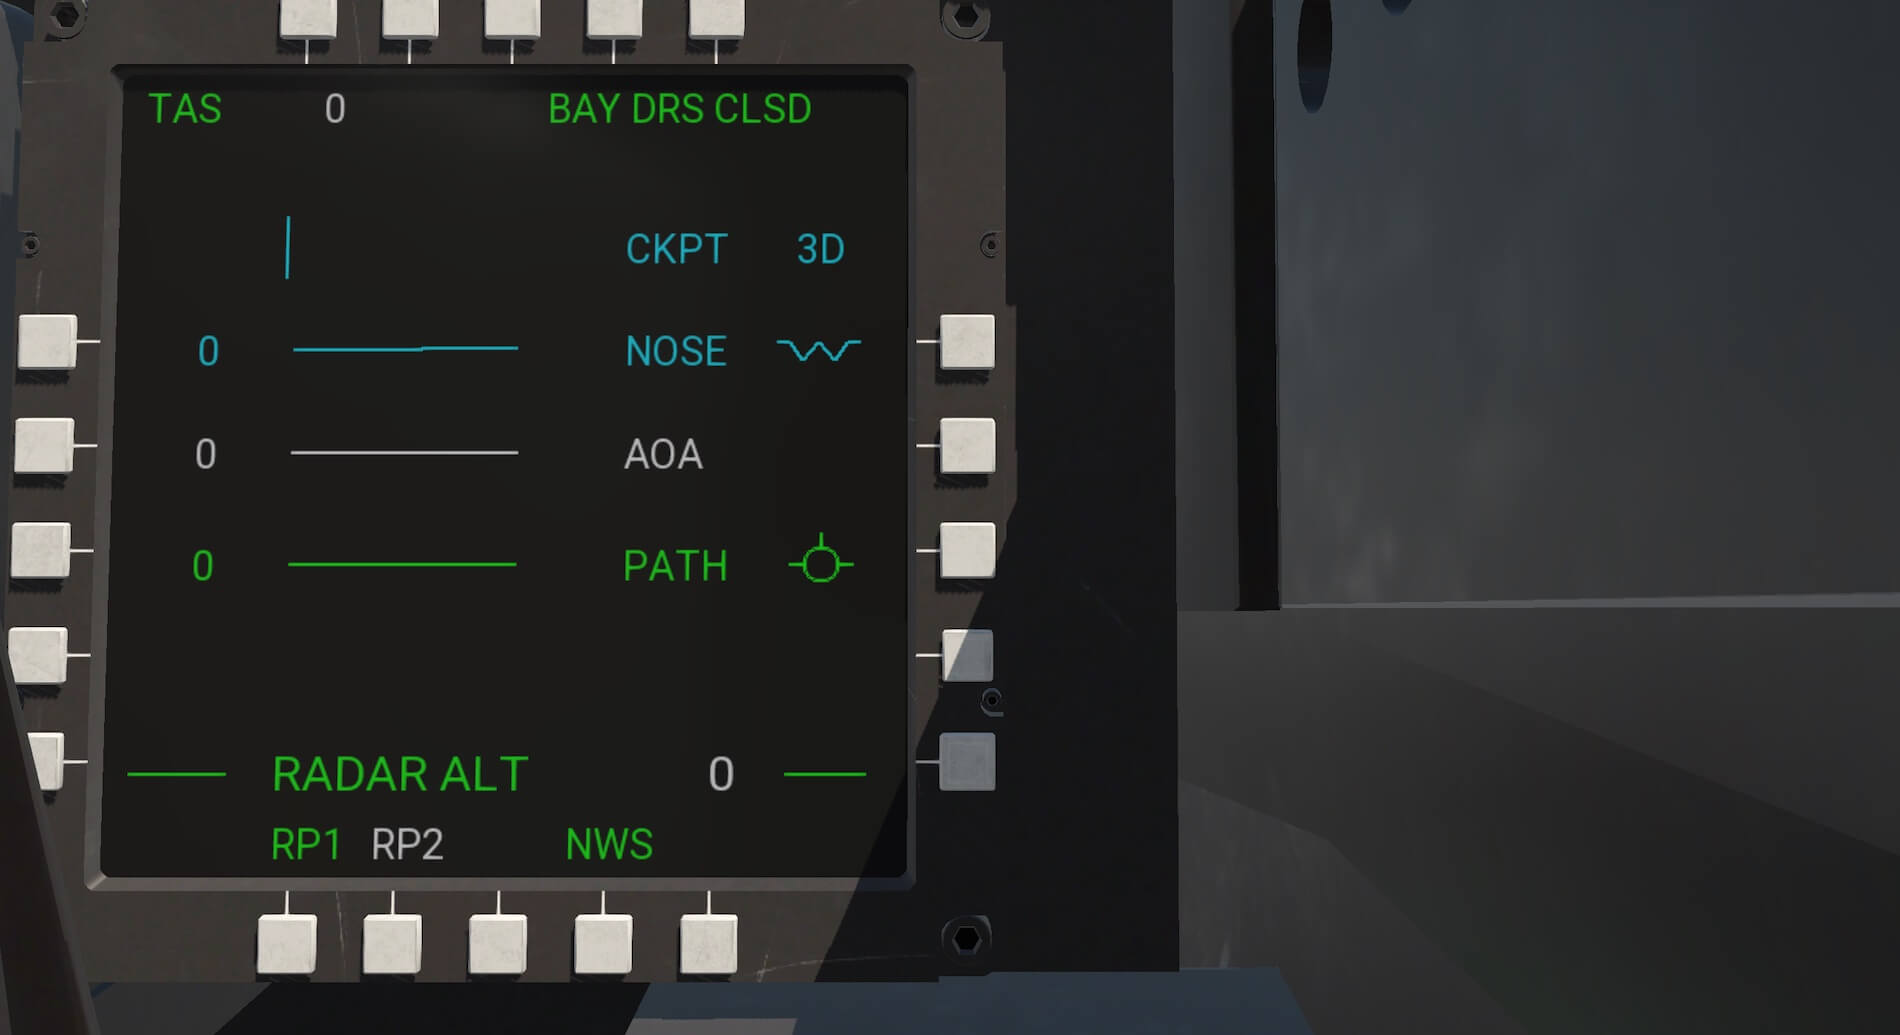
The first page of the right side MFD has four modes dependent on the speed and activity of the aircraft. When the parking brake is set and the aircraft is stationary a checklist page is presented. This checklist relates to things to check before taxiing the aircraft. It also shows the amount of chaff and flares available and allows for the aircraft to be re-armed to the default weaponry. This page also gives access to a flight control system test.
This test moves the various surfaces individually and also together to ensure they are functioning correctly. When viewed externally the flight control surfaces can be seen to be moving in line with the test. There is also a warning on the HUD. The battery test part of the checklist shows the percentage charge of the battery. From 95 percent to 100 percent the figure is displayed in green, below 95 percent the figure is displayed in yellow and the battery state may effect the engine start. This then requires the GPU to raise the battery charge above 95 percent again.


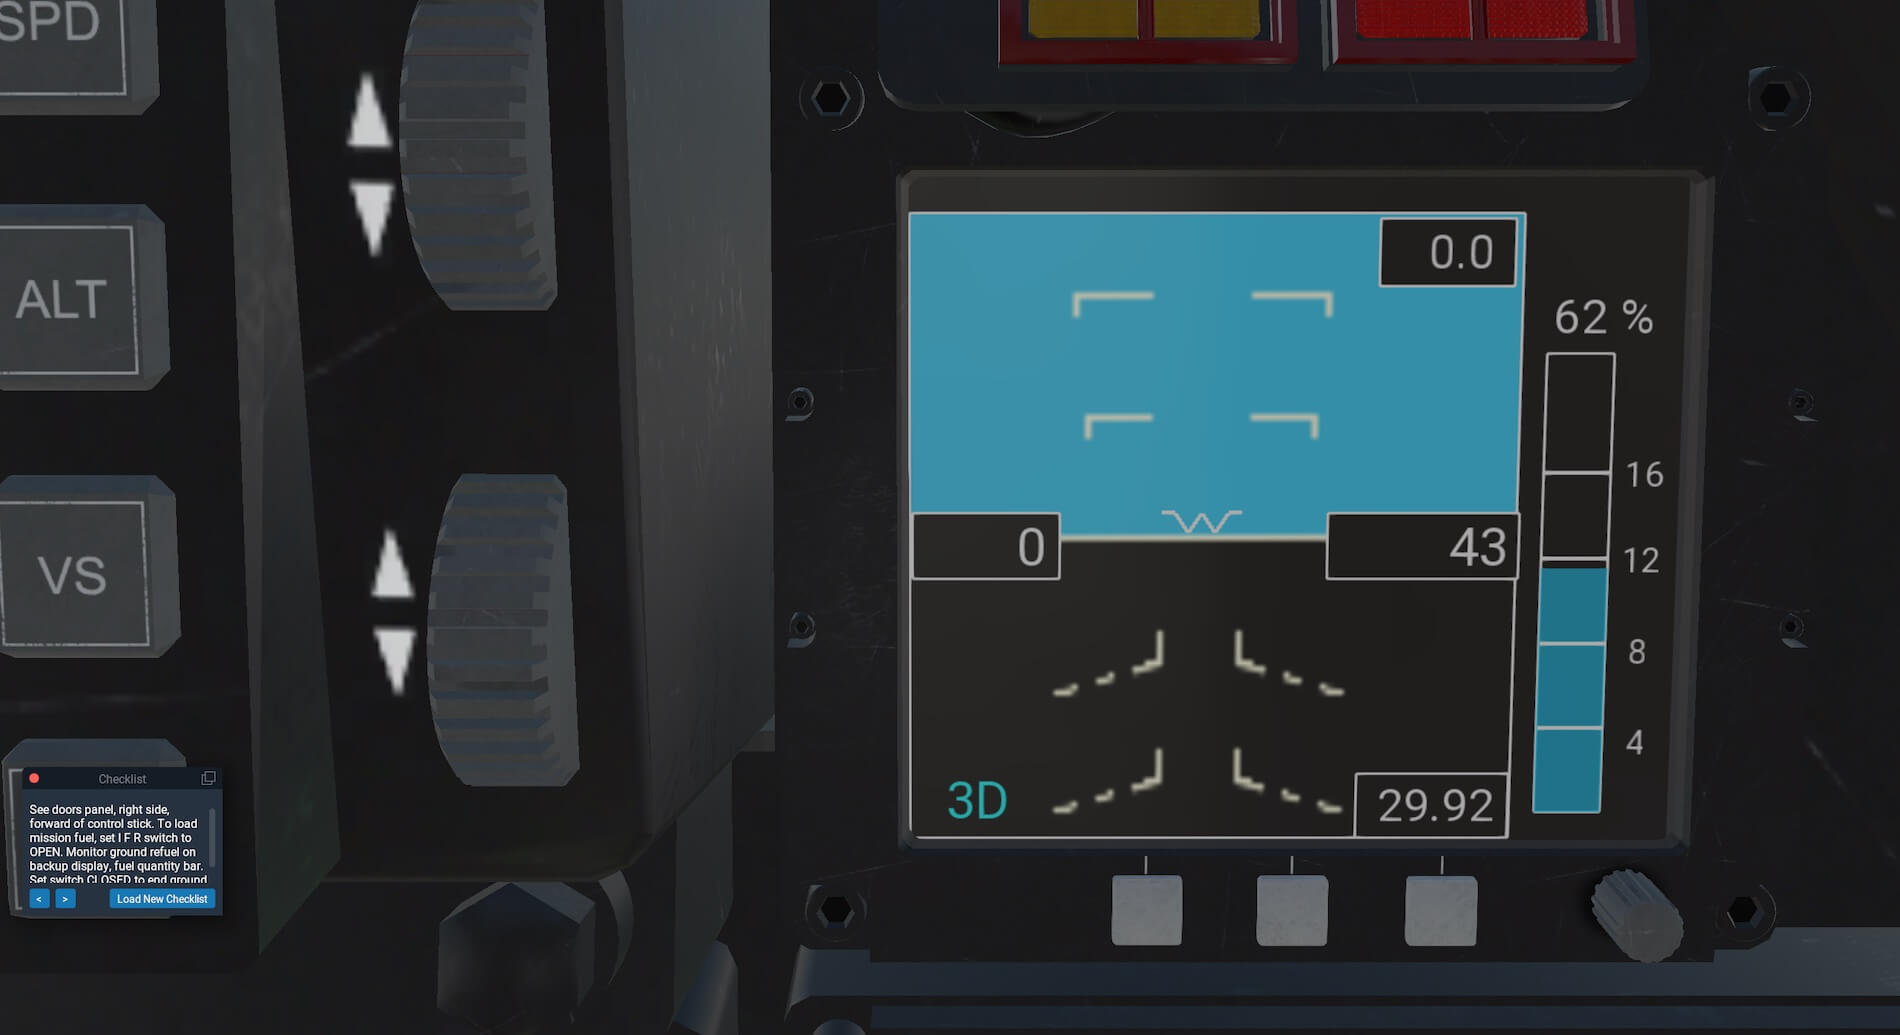
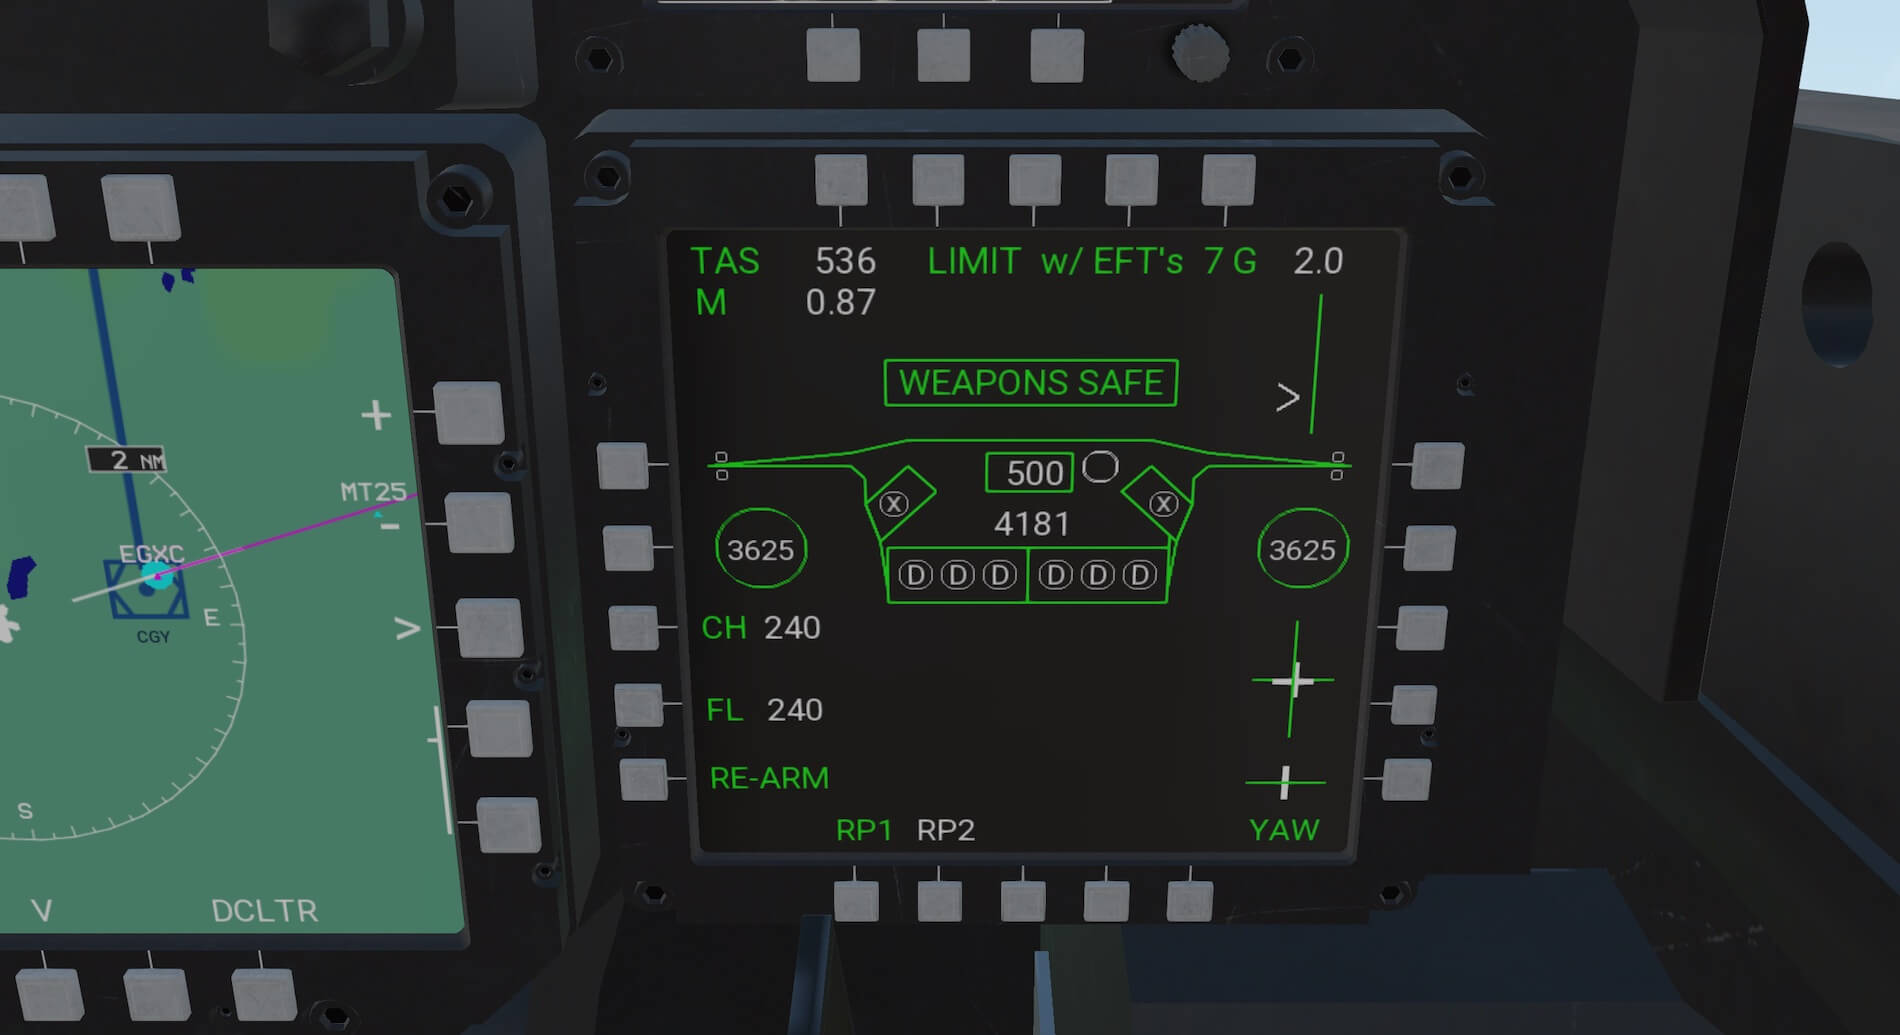
When the aircraft true airspeed is below 400 knots a low speed display is shown. This shows the nose pitch attitude, angle of attack and flight path. The lines on the screen change colour to show whether the aircraft is pointed towards the sky, level and in safe limits or towards the ground. There is a radar altitude display at the bottom of the screen.
In high speed mode the display shows the weapon system status, true air speed, chaff and flare levels, a re-arm option, a yaw diagram and a graphic representing the aircraft when seen from behind. Chaff and flares are fired by clicking the adjacent soft key buttons. The graphic shows the weapons in the aircraft and whether external fuel tanks are present. Buttons allow for tanks to be jettisoned, or the same thing can be done with the use of the jettison button in the cockpit. Nav and strobe lights can be operated from this screen as can the flight control test.

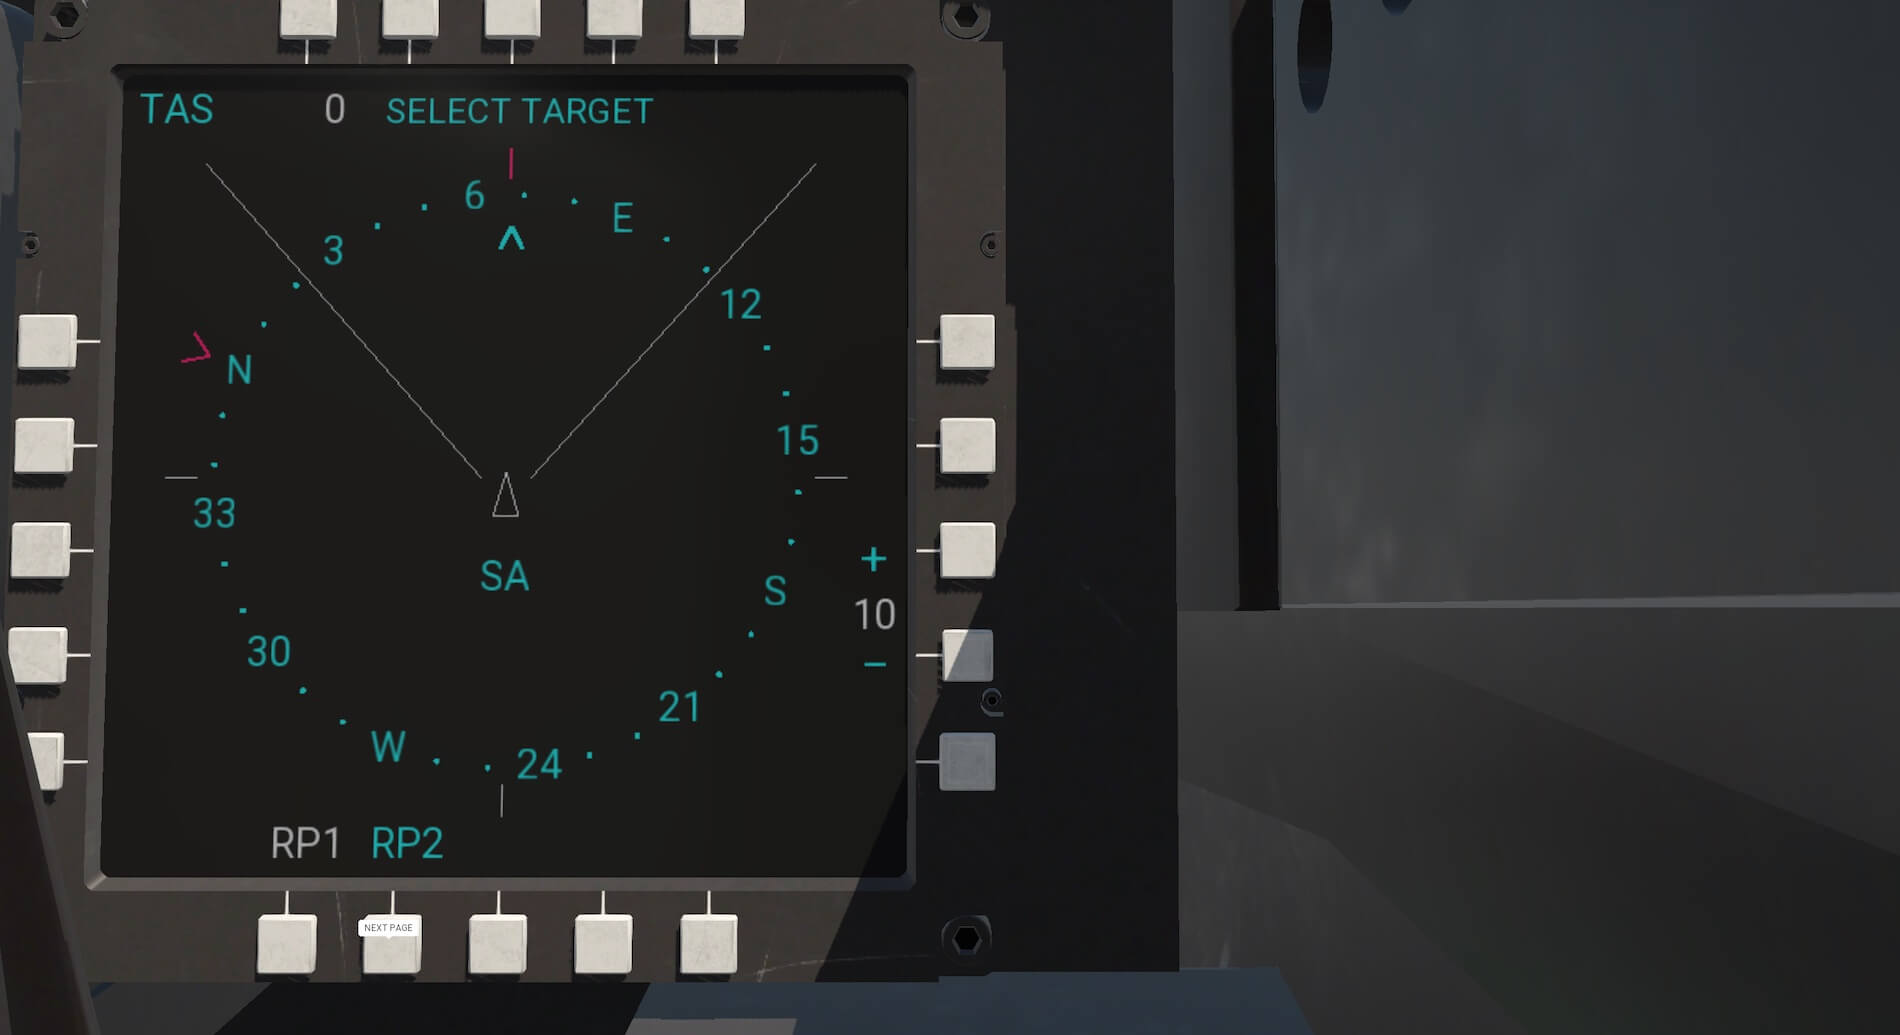
The second page of the display is the radar situation display. This system can track up to ten AI planes around the aircraft. The display can show a friendly aircraft, for example a refuelling tanker, and also enemy aircraft. The planes are shown as white circles with a direction pointer. The display also shows the F-22 true airspeed compared to a target and likewise your speed and altitude compared to the target. Colours change to show if you are losing ground or gaining. The range to target is also shown.
There is also a lower central console between the pilot’s feet. This shows engine and fuel information. The soft keys allow for chaff and flare release and nav and strobe light controls. It is possible to hide the ejection seat pull handle to view the screen better and the ejector seat can still be operated by pressing the middle bottom soft key. Page two shows the same view of the aircraft as the high-speed mode of the right hand display.

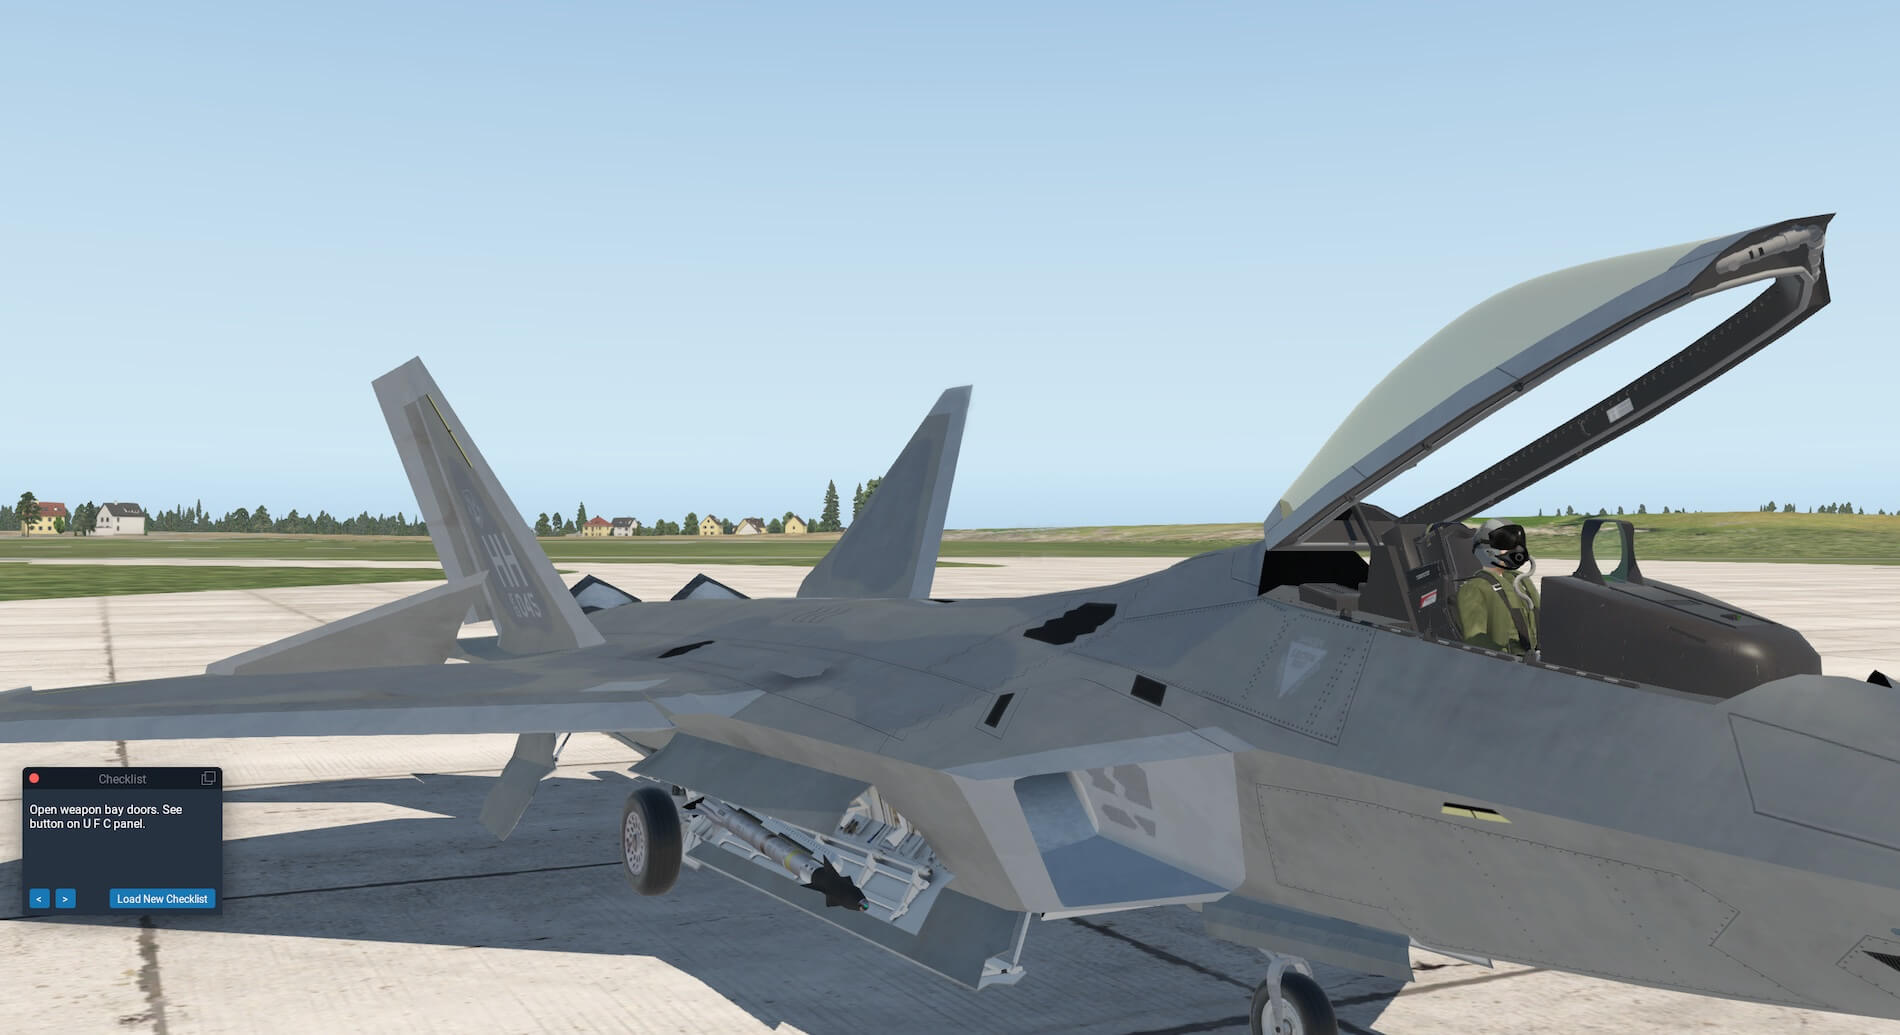
The Raptor has different weapons for different roles but all are kept in bays and not on under wing pylons, so as to maintain the stealth characteristic of the aircraft. The bay doors automatically open to fire the weapons and close again after discharge. The aircraft carries six medium range missiles in its central weapons bay and a further two short range missiles one each in a bay on either side of the aircraft.
The aircraft also has a rotary cannon which fires from a door on the right side of the fuselage. The F-22 can carry 2 1,000 lb bombs which replace the inner two missiles in the central weapons bay. The jet can carry two external fuel tanks to increase range and flight time. The aircraft cannot pull more than 7.5 G with these attached and AOA have written code which automatically causes them to jettison should this be exceeded.
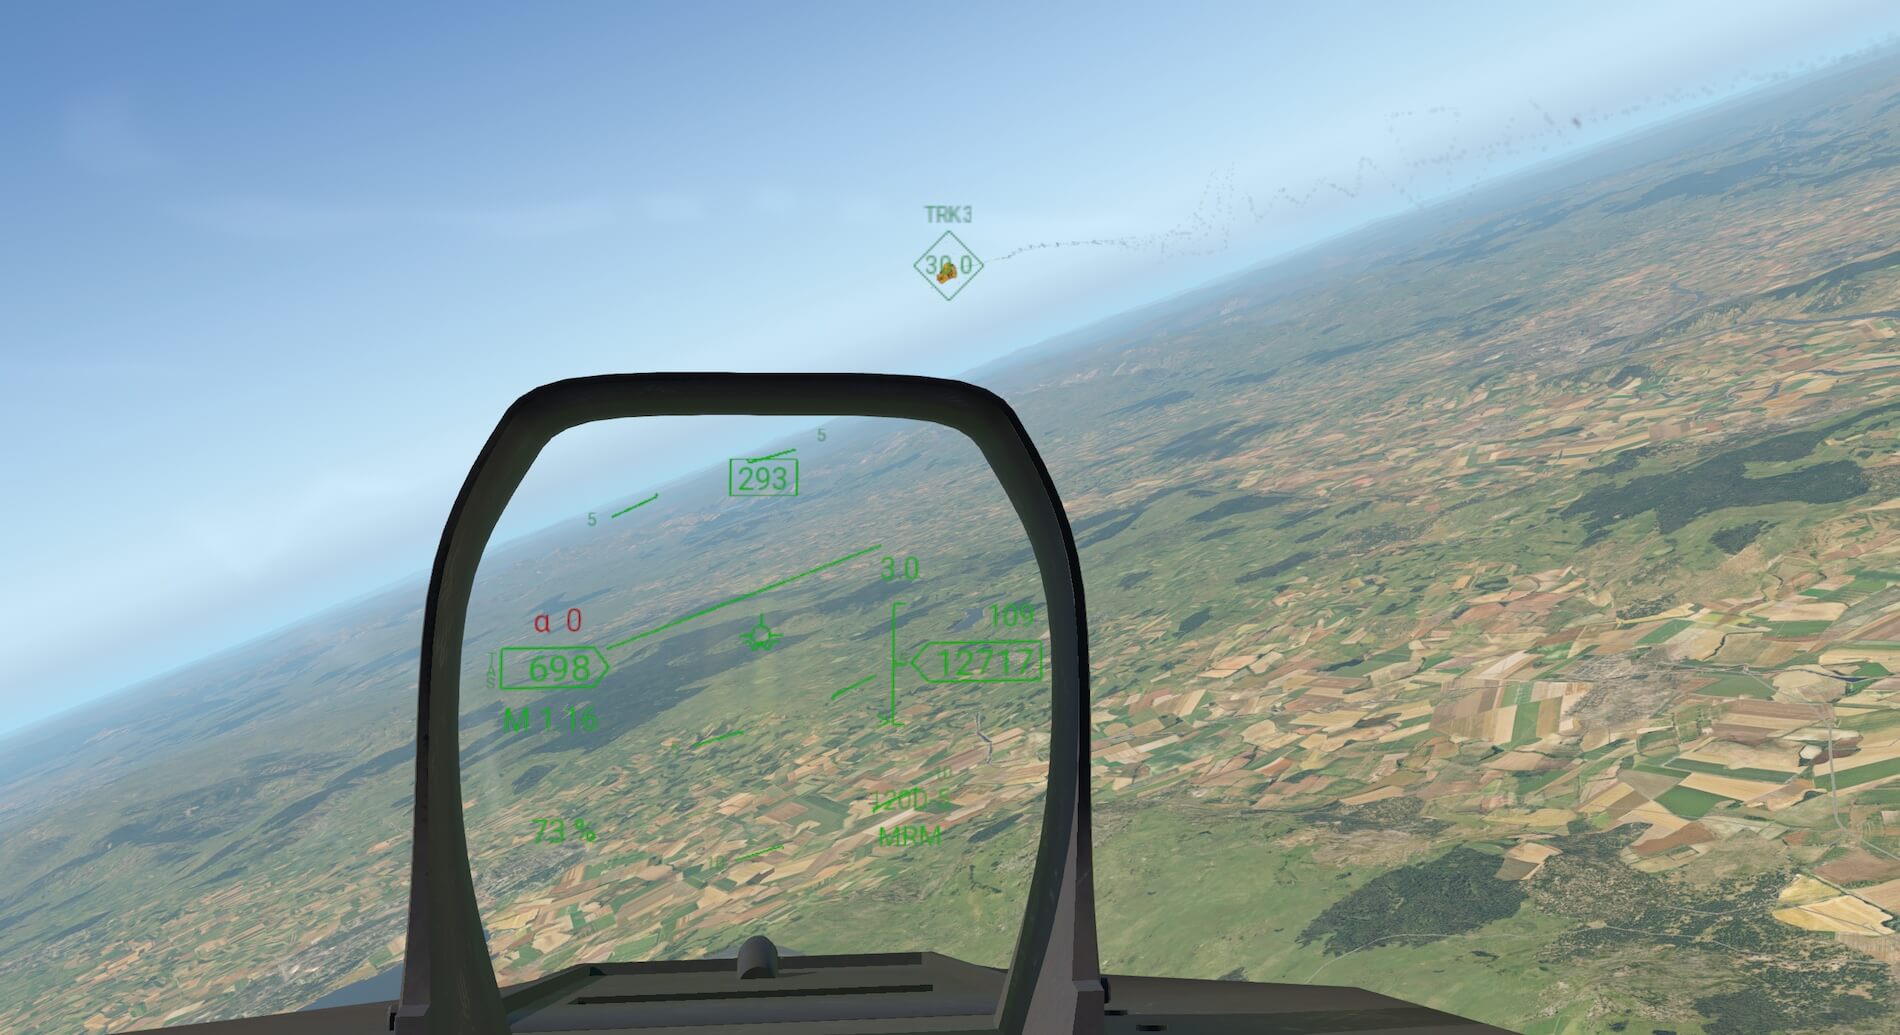
All of the weapons are described in more detail in the manual. The joystick needs to be configured to be able to move between targets and weapon modes. There are five weapon modes available Navigation mode where no weapons are selected, gun mode, target track, missile and bomb modes. The function of each mode is described in the manual but each guides the pilot towards the selected target whilst feeding information in relation to comparative speed and range depending on the selected weapon.
The track mode allows for stealthy tracking of targets without a weapon selected and the corresponding loss of stealth. The weapons and targeting systems are quite involved and take some practice. The developers have produced a checklist/tutorial which can be loaded into the aircraft checklist system, run from the up front control panel, which takes the user through the use of these systems and is very useful. This can be found at the following link.
The aircraft also has a refuelling system where the jet can be refuelled on the ground before engines are started, the virtual refuelling system can be used by flying within certain parameters for altitude, attitude and airspeed, and using the in flight refuelling switch, or the in flight refuelling from AI planes can be used. The latter involves tracking a friendly tanker type aircraft, or commercial airliner, and flying in close formation behind them. Fuel is then transferred from one aircraft to another. The aircraft can be refuelled from the X-Plane special starts menu also.
I will attempt to use the aircraft weaponry and to refuel when carrying out my flights in the next section of this review.
The Raptor also has a system to assist with landing. Approach Power Compensation (APC) Mode is a system that works out what the best approach speed is for the aircraft in a given configuration and then flies the aircraft at that speed down to 100 ft AGL. The system then disconnects so you can land the aircraft yourself. The system works through the auto pilot airspeed control.
This model comes with numerous systems in an attempt to reproduce the capabilities of the real aircraft. These systems involve direct copies of systems on the aircraft, bespoke systems written for the Raptor and creative adaptations of existing X-Plane systems. This model is very capable and I make no apologies for using the manual closely as a guide to this section of the review as the developers know the aircraft far better than me and took the time to produce a comprehensive guide.
The manual is thorough and helpful and I would stress that this Raptor cannot be used to its full potential, and in the manner the developers intended, without taking the time to study it. Even experienced users of X-Plane will not have used some of these systems before as they are written by AOA for the Raptor.
Basic Flight Experience
I am not a qualified pilot and I use X-Plane on a recreational basis and I write reviews from that point of view. Whilst I have seen the F-22 displayed I have not been very close to one. As many recreational users like to fly a model “out of the box” I initially loaded the aircraft with engines running at the end of the runway and attempted a flight. This certainly is not how the developers recommend the model is used as it is a sophisticated aircraft with many facets that need to be understood through reading and understanding the aircraft manual.
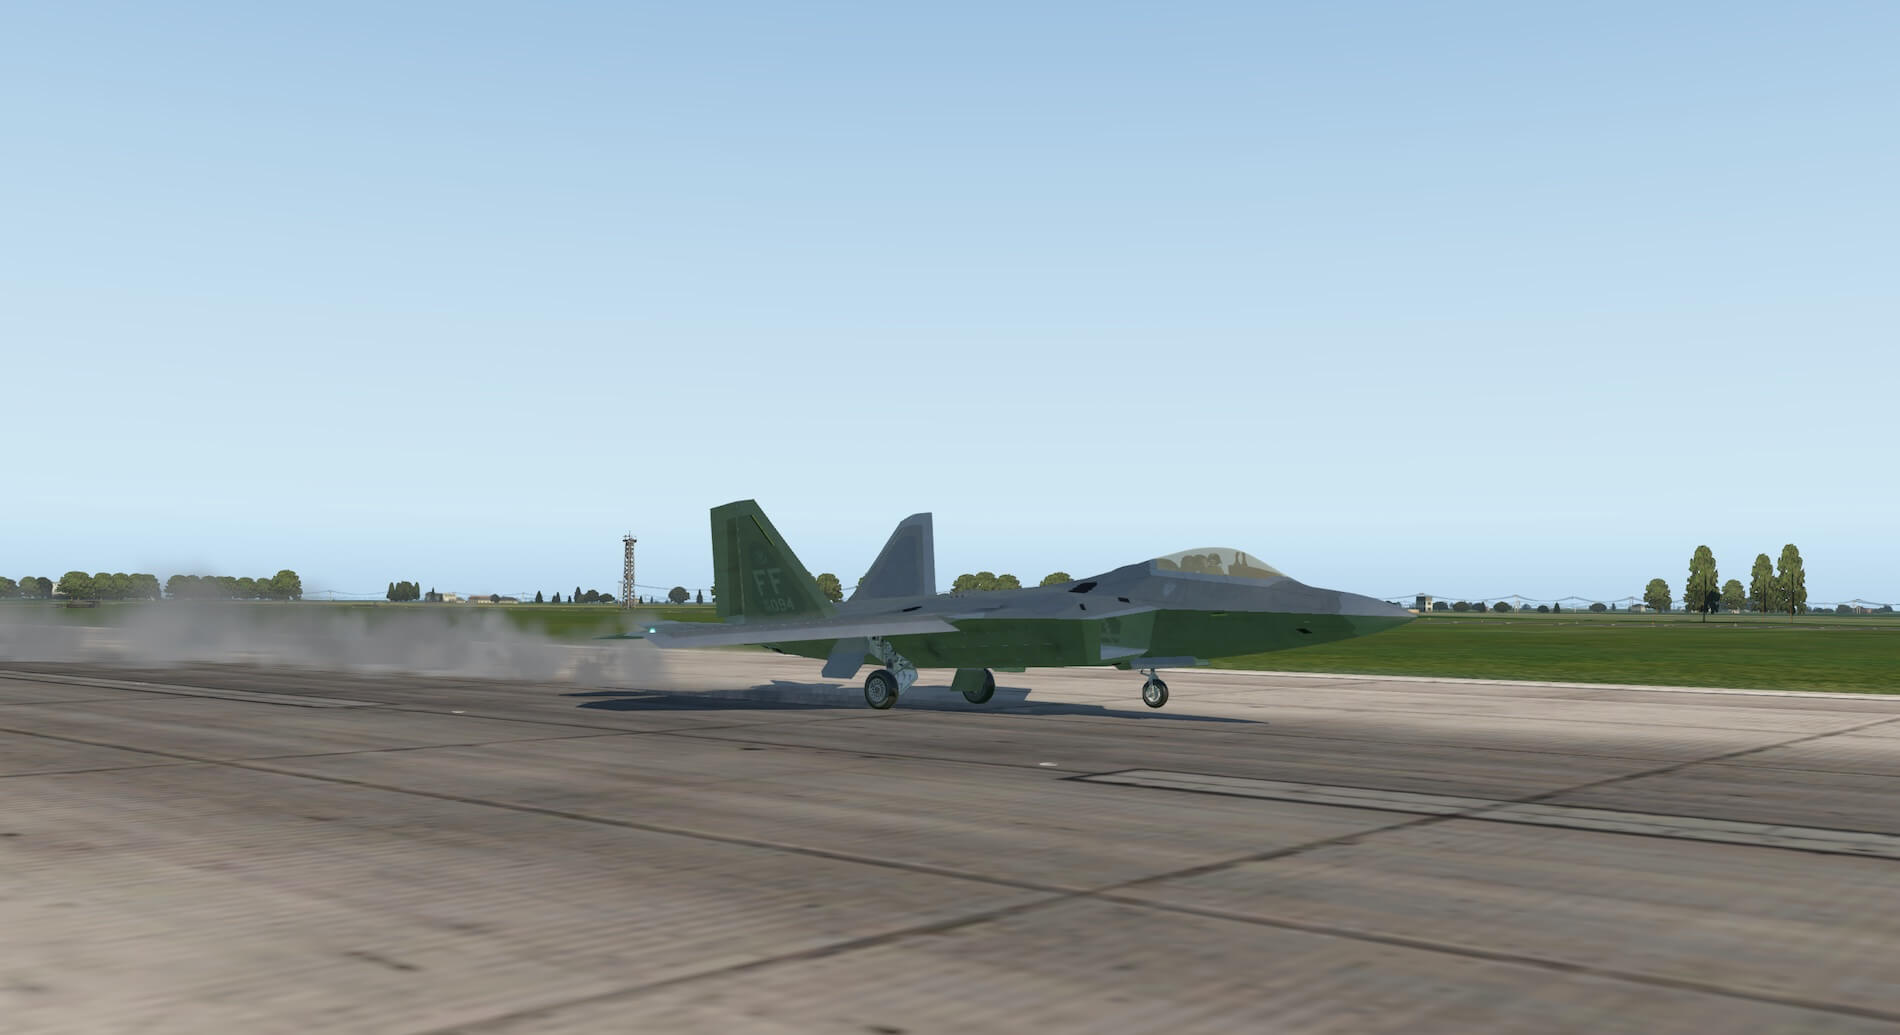
This initial flight was just to see if it was possible to just jump in and fly. I released the brakes and increased the throttle. The aircraft moved forward slowly at first but accelerated quickly and was easy to keep straight on the runway. The F-22 virtually told me it was ready to fly and slight backwards movement on the stick caused me to leave the ground and climb quickly.

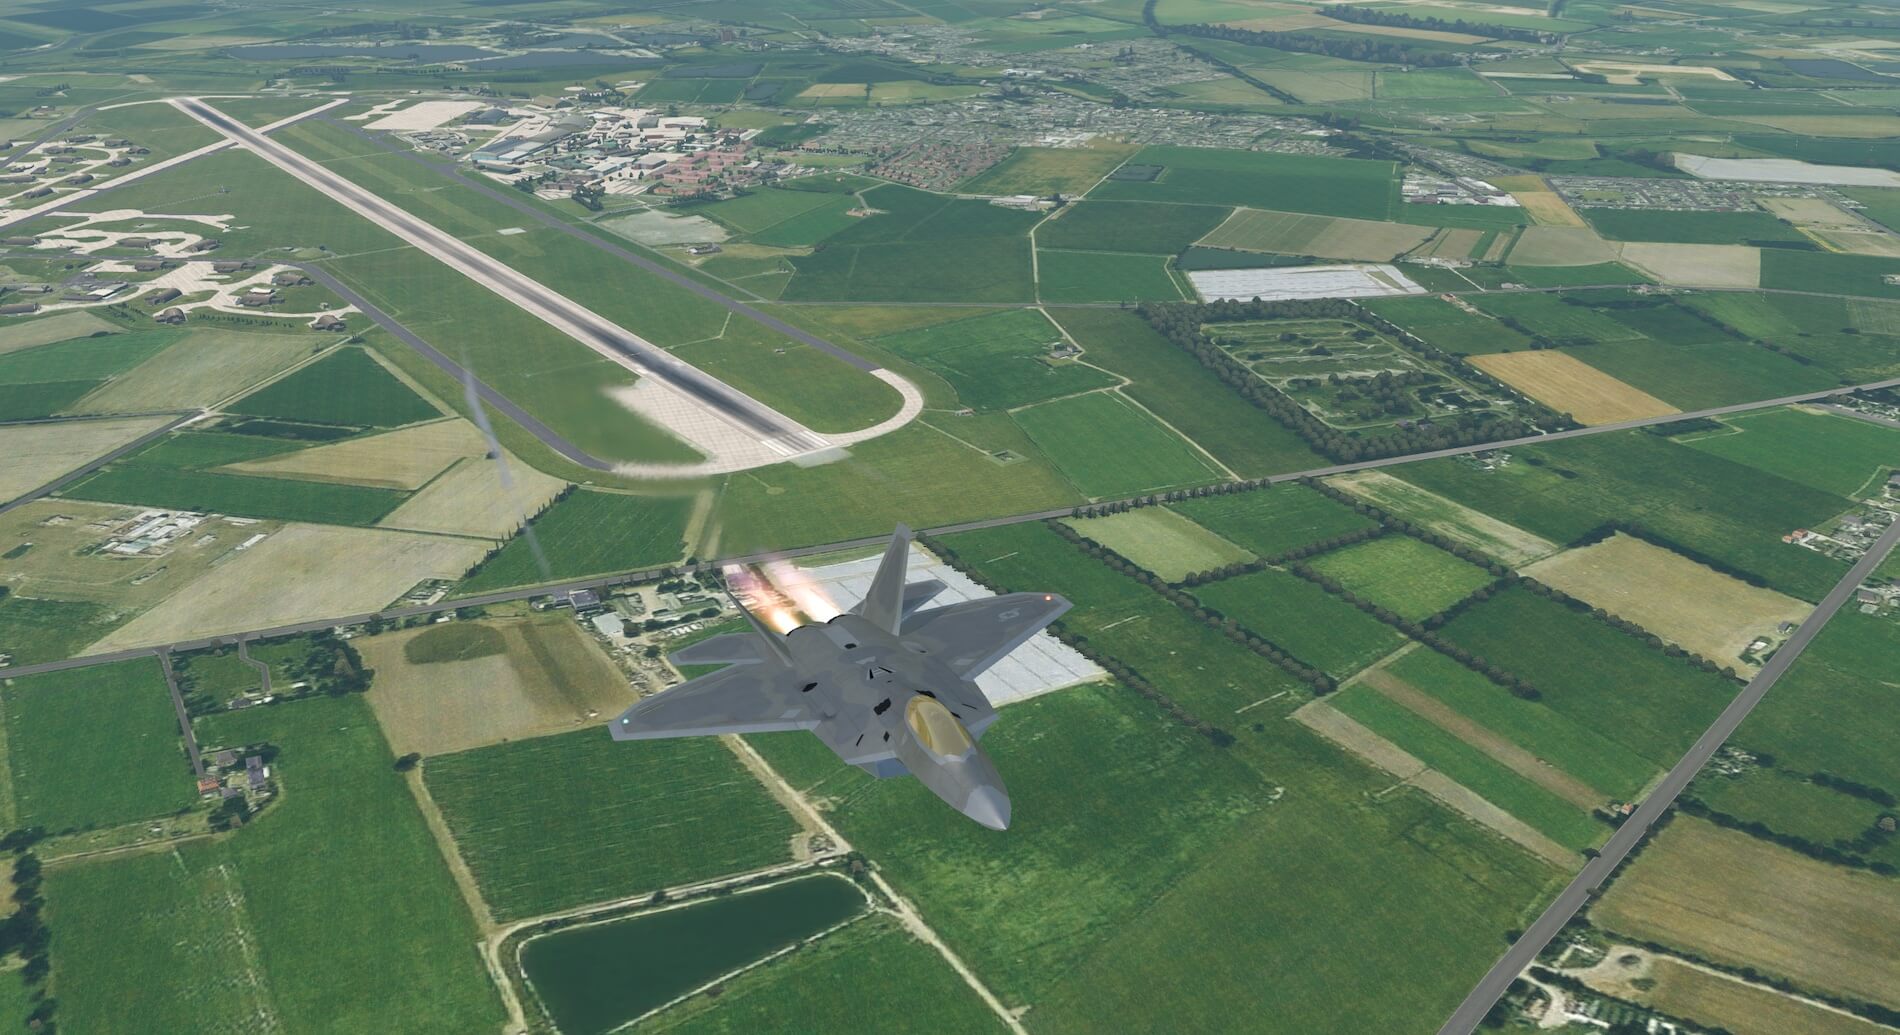
I decided to carry out a circuit. The aircraft climbed quickly and traveled across a lot of ground in a short time. I was able to keep the airfield in sight as I continued with the course I was using. The aircraft responded well to inputs and was very sensitive. The flight was smooth and the model looks very good in flight and its sleek, uncluttered outline stood out well.


I was soon completing the circuit and lining up with the runway. I reduced throttle and descended to land successfully before taxiing to hard standing.


This was a successful first flight but in no way a perfect one. Yes it is possible to jump in and fly this aircraft and the experience is fun but I did not understand many of the buttons and switches nor all of the information I was given. I clearly did not use the model to anything like its full potential and this is why the developers recommend studying and understanding the manual before serious use. A good start but off to study!
Having gone through the manual and having understood its content I decided to make a flight from RAF Leuchars to RAF Coningsby. I loaded the aircraft on the flight line in cold and dark condition. I clicked on the Checklist button on the Up Front Control Panel and loaded the cold and dark checklist to be read to me. The instructions are very clear with guidance as to where to find the switches and controls.
The ground crew button does not just remove the ground equipment; the communication to the ground crew can be heard. Having set the refuel switch to on I watched the back up display show the increasing fuel load. The take off guidance states that the aircraft always takes off with full fuel load so I let the refuelling continue to 100 percent. I switched on the first fuel switch and then went through the APU start procedure.
The voice guidance continued to be very useful and the sound effect for switches and the APU were very convincing. The left MFD showed my actions on a checklist as I went through them.

The next item was to open the weapon bay doors via the button on the Up Front Control Panel. This shows the bi-folding doors in action and the missiles in the side pods. I heeded the warnings in the manual and switched all of the auto logic switches on. I also set after burner logic to auto. The next item was to set the noise canceling to on if required.
This makes quite a difference but I decided to leave it off in order to hear the sound package supplied with the model. I then went through the engine start procedure, which was accompanied by very good sound effects. The instrumentation and displays all matched my actions and it was a great feeling to feel the engines spooling up. Closing the canopy also made a marked difference to the engine sounds.


I then switched on the environmental control system and the de-ice system and switched off the APU. The checklist then moved on to the before taxi section. I checked the landing hook was shown as up and the undercarriage was shown as down. Following the checklist I ensured HUD was on, R2C was initiated, meaning the view followed where I was to taxi and later to turn in flight automatically, and exterior and cockpit lighting was set as required. I set the IFF code and armed the ejector seat.
A note from the AOA Simulations team; “the R2c plug-in only works if the customer does NOT have a Track-IR or VR headset attached to their flight simulator computer. If either one of those devices is detected by the simulation our R2c plug-in is automatically disabled. Otherwise there would be a conflict between our plug-in and those other systems fighting for
control over the pilot’s head camera.”


I switched on the flight control test and watched the right hand MFD as this took place.


I then closed the bay doors and was able to check this on the right hand display. I set the brakes to be controlled by stick input and increased power to taxi to the end of the runway. It was easy to see how the R2C plug in, provided by the developers, influenced the view from the cockpit and automatically moved to view the direction in which I was steering. The aircraft handled well on the ground responding to stick and throttle inputs.


I followed the checklist instructions and released the brakes and increased to full power. The aircraft moved smoothly down the runway and at 145 knots I raised the nose to 10 degrees. The aircraft lifted off and an external view showed the auto logic retracted the undercarriage. As I passed 400 knots I lifted the nose to 60 degrees and continued to climb.
The R2C rearward view appeared. The aircraft climbed very quickly and once I had retrieved my bearings I leveled out at about 35,000 ft. I then set the autopilot to control altitude, speed and follow my GPS route. The aircraft responded well to these inputs.


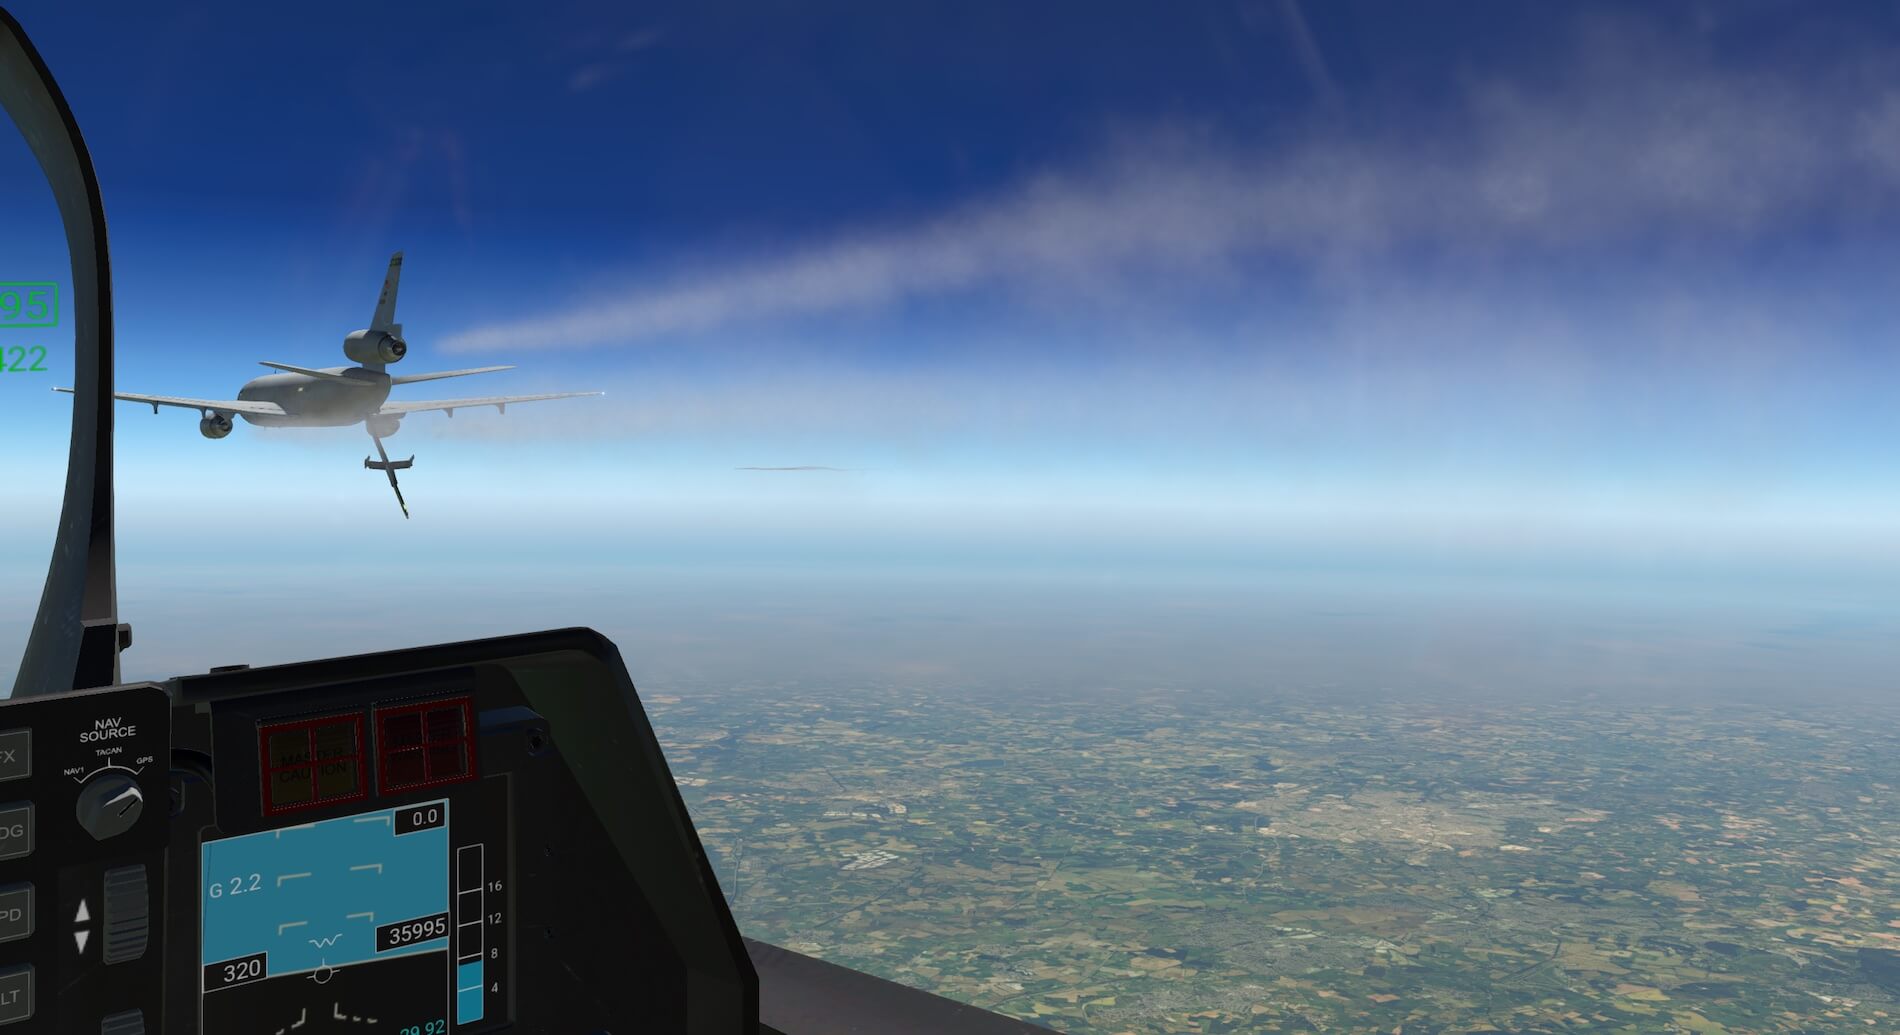
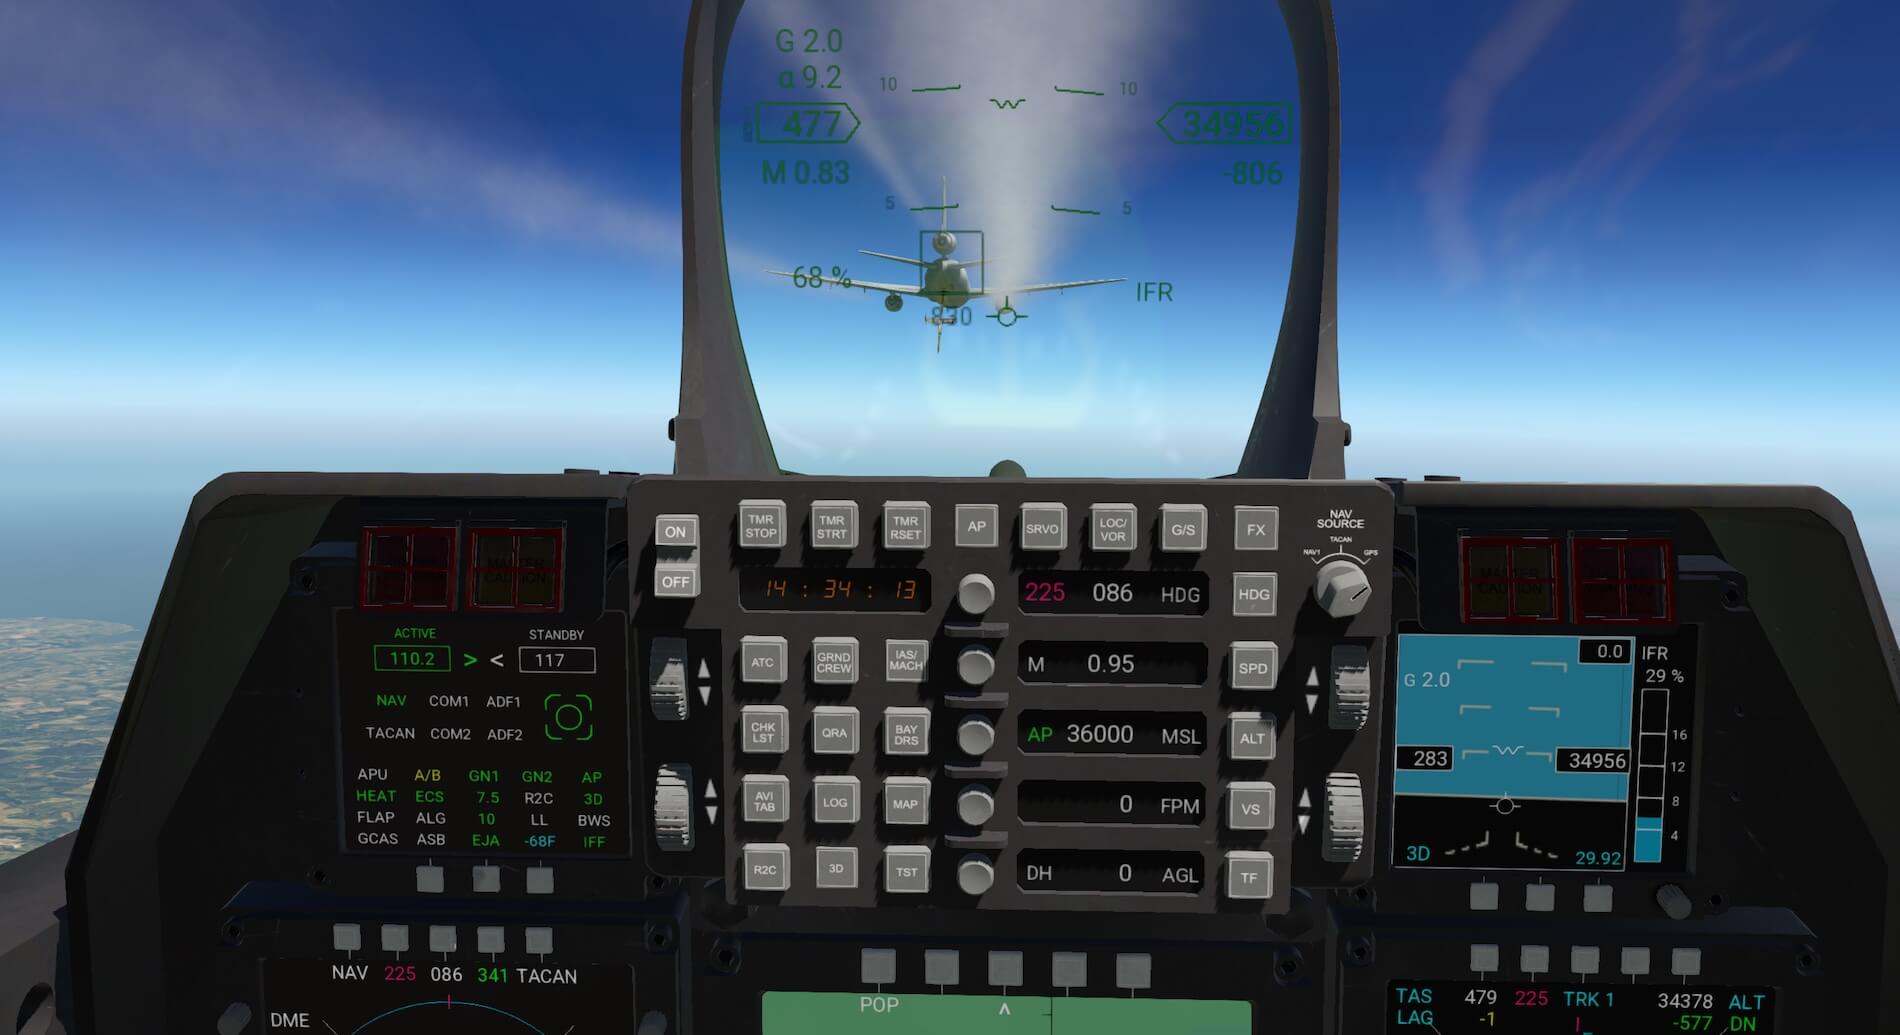
Having taken off I decided that my first task should be topping up the fuel and decided to use the in flight refuelling system. I had loaded a KC-10 Extender as aircraft 1 in the AI aircraft and then further aircraft marked as enemy to test the weapons system. I initially loaded the Extender as friendly but could not find it in the tracking system.
Some helpful advice from the developers caused me to edit it to non-combatant and it appeared as aircraft one in the Nav display. I then adjusted the weapon system to target track and found the Extender as aircraft 1 represented by a blue square, whilst the aircraft itself was followed in the camera view by a green square, even when not looking through the head up display.
The F-22A Raptor has a basic version of the F-35 Lightning’s advanced Helmet Mounted Display (HMD). Where the F-35 pilot’s helmet has ALL flight and target information projected onto the pilot’s helmet visor and NO HUD in the cockpit, the F-22A Raptor was built with a HUD, so the pilot’s helmet visor displays only target information.


It takes some time to get used changing from 2D to 3D cockpit and also gathering the information from the various screens but it worth the practice and once I became accustomed to where to look for the information I required it all became much more straight forward. The right hand MFD page 2 is a really useful screen with information about the difference in altitude between me and the tanker and also the lag speed or closing speed.
After a little while this really helped me determine throttle inputs. Once I had a good visual view of the tanker I could follow easily and also judge my speed of approach. Once I was close I switched in flight refuelling on and this was confirmed on the HUD. Once I was in close formation with the tanker my fuel level began to rise. It takes considerable concentration to keep in formation but we all enjoy a challenge don’t we!
There is a great sense of satisfaction on achieving refuelling and it adds extra challenge and realism. Just to highlight, this feature is available in the AOA F-35’s and T-7A Red Hawk models.

Having practiced my tracking following the tanker I decided to use the weapons system.
I cycled through the weapons and having moved to missiles I was able to take an external view and see the bay doors open revealing the weapons. I was able to view the weapons system on the right MFD. I then returned to target tracking mode in order to return to a stealthy state.

I used the techniques I had learned from tracking the tanker and switched between 2D and 3D and various views before my selected target was “captured” in the HUD inside a red diamond. I pressed the button to fire my selected weapon and was able to watch a missile leave the aircraft and hit the target.


I then returned to target track mode with the intention of trying to use the aircraft gun. I tracked a target and switched to gun mode. The gun door on the starboard wing opened. I tried several passes at the target but never lined everything up correctly and missed the enemy aircraft. I refined my approach to follow the target and successfully targeted the aircraft and score a hit with the gun.

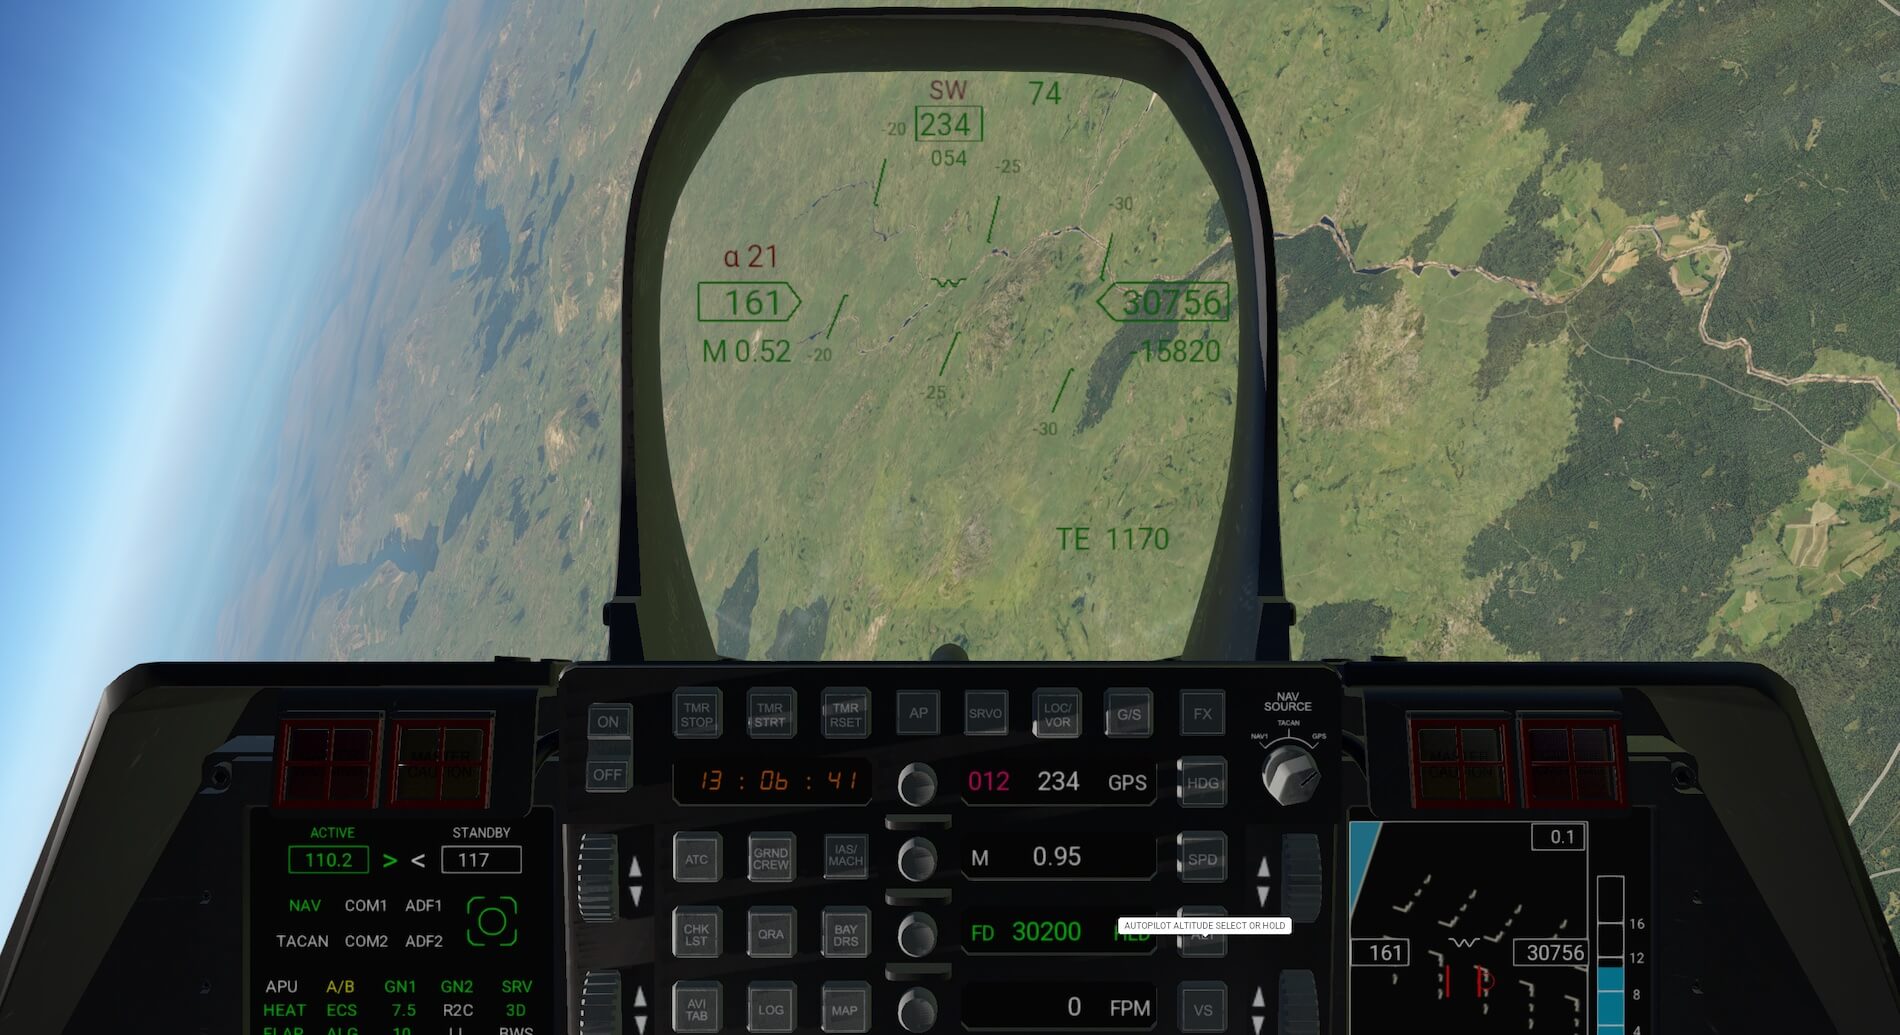
I next decided to follow the manuals guidance and test the Terrain Following and Ground Collision Avoidance Systems. I flew to about 25,000 feet and set the Terrain Following decision height to 2,600 AGL. I then switched off the other autopilot controls. The aircraft immediately began to dive and lost height quickly. As I approached the decision height the aircraft smoothly leveled out and followed the terrain. This system really gives the pilot confidence. It is worth remembering that the aircraft will not necessarily level out when the altitude is the same as the decision height as the height is Above Ground Level and not Mean Sea Level.


I then climbed to 30,000 ft and adjusted my speed to 0.95 Mach. Following the manual I ensured Auto GCAS was on, reduced power to 50 percent and turned the aircraft on its back. I then lowered the nose and set the throttles to idle. I let go of the stick, as stick inputs cause the system to calculate the pilot is still in control, and watched as the aircraft began to descend very rapidly. Warning signs appeared in the HUD and the aircraft moved to being cockpit upward and leveled off. Quite an experience! The system works.
I then returned to autopilot control and GPS navigation and continued my flight. I was able to enjoy views from the cockpit. The aircraft followed the GPS route and was smooth and accurate when following course changes. The auto throttle maintained the desired speed and the engine sounds changed as auto throttle made adjustments. I used the Avitab button on the up front display to see how the tablet was presented. It appeared immediately and was easy to use.


I reached my next waypoint over RAF Scampton and started my descent for RAF Coningsby. I intended to test the Approach Power Compensation (APC) mode, which means that the auto throttle will control the correct speed for a 12 degree AOA approach. I used the GPS to guide me on to the approach and set the autopilot speed to 202 knots.
I descended below 1,000ft and, as explained, the APC controlled the throttle inputs to maintain the correct speed for the aircraft. I found, on my first two attempts to land, that I was descending too much too soon and was going to fall short of the runway. On both occasions I switched auto throttle off and went round again. I realized I was concentrating on making the system work rather than landing properly. I went through the landing process as I normally would and the system assisted the process rather than taking it over. A lesson that when systems are used properly they assist rather than add complications! I landed successfully and taxied to the apron.


I then loaded the automated Shutdown Checklist. I followed the instructions to check the brakes, switch off external lighting, switch to the APU, move system switches to off, make the ejector seat safe, call up the ground crew for the installation of ground objects, shut down the engines, switch off avionics and battery and leave the aircraft. The APU is interesting as it continues to run when switched off whilst it cools down and then it can be heard to stop after a couple of minutes.


I then made another flight in the F-22 with external fuel tanks to view this version. The tanks clearly take away the stealth of the aircraft and will automatically depart the aircraft if it experiences more than 7.5G. The tanks are represented on page 1 of the right MFD and the amount of fuel in them is displayed. If required the tanks can be jettisoned via soft keys on the MFD or by double clicking the jettison button on the left console. The tanks are jettisoned with their mounting rails so that once they are dropped the aircraft can assume its stealth mode.


I then carried out another flight in the air to ground variant. Once the bay doors are opened it is easy to see how the bombs replace some of the missiles. The bombs can be dropped but AOA state they have not focused on a bomb aiming system. The release of the bombs is very realistic.


I used the magic of X-Plane to move time forward to view the aircraft in low light. It is clearly designed not to stand out too much but it continues to look good with excellent lighting effects.

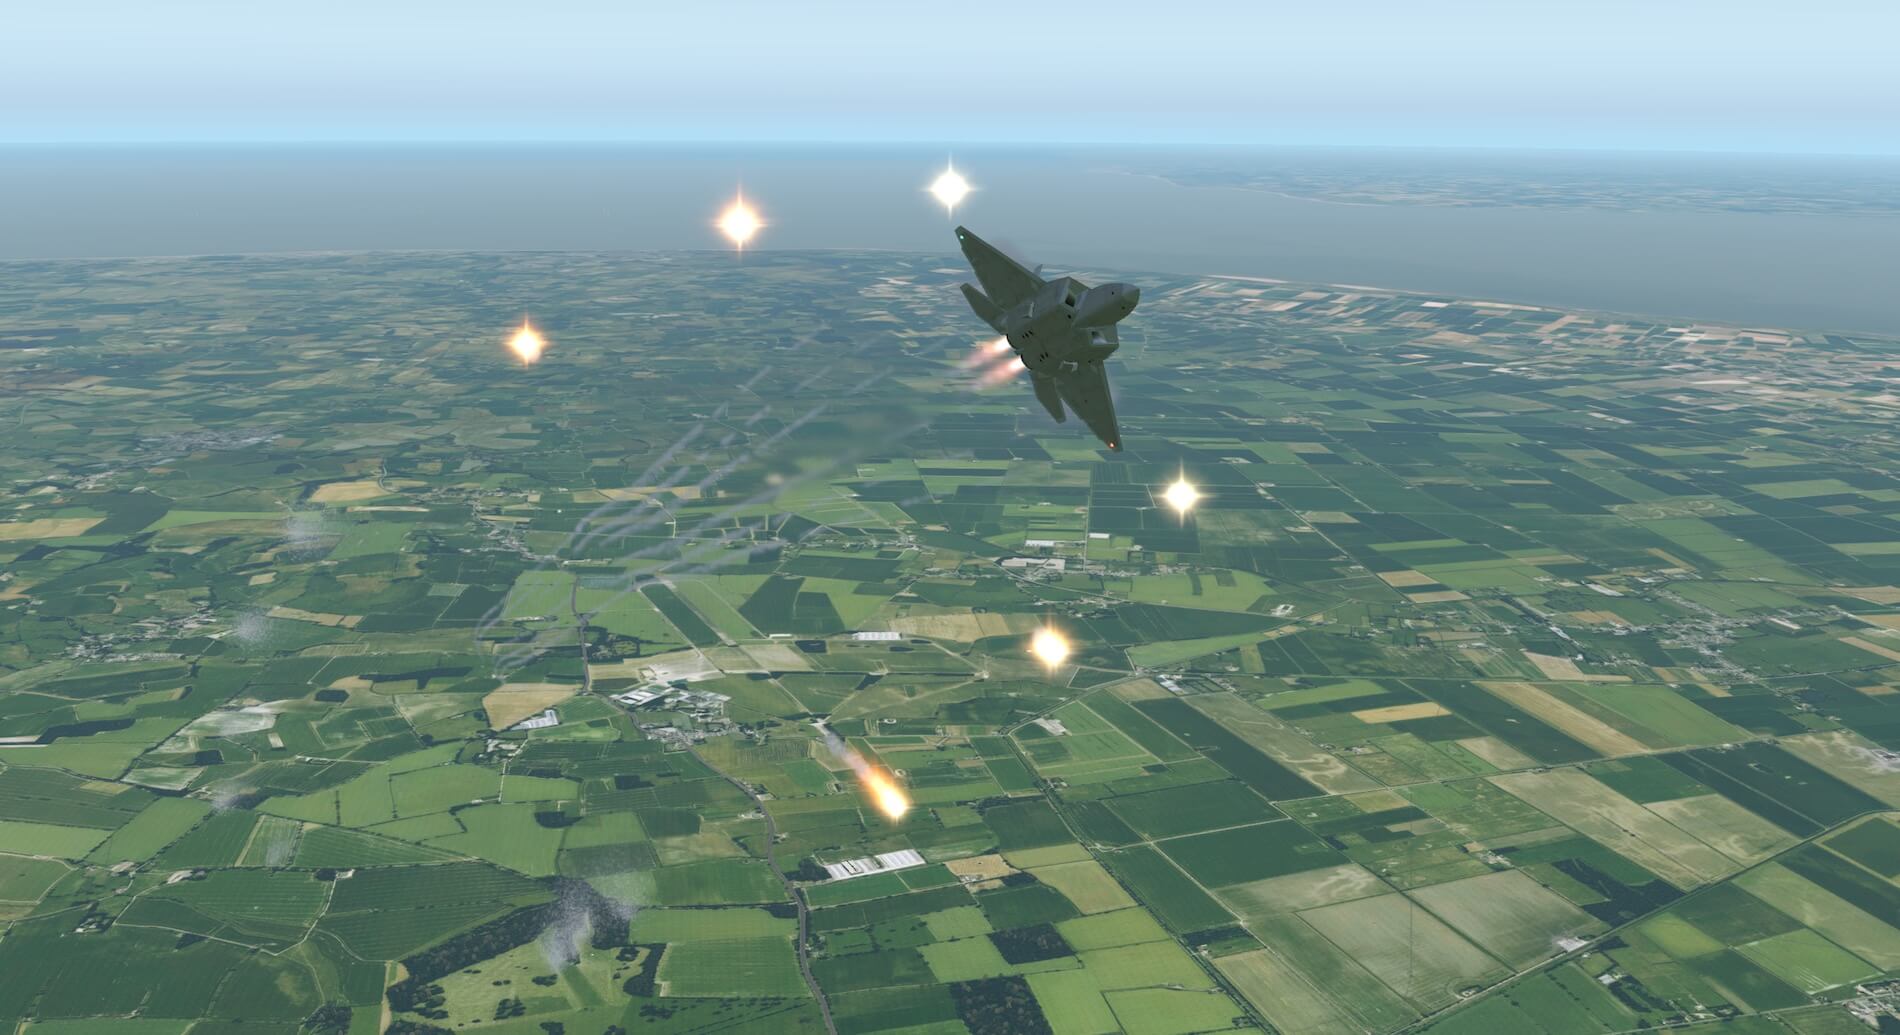
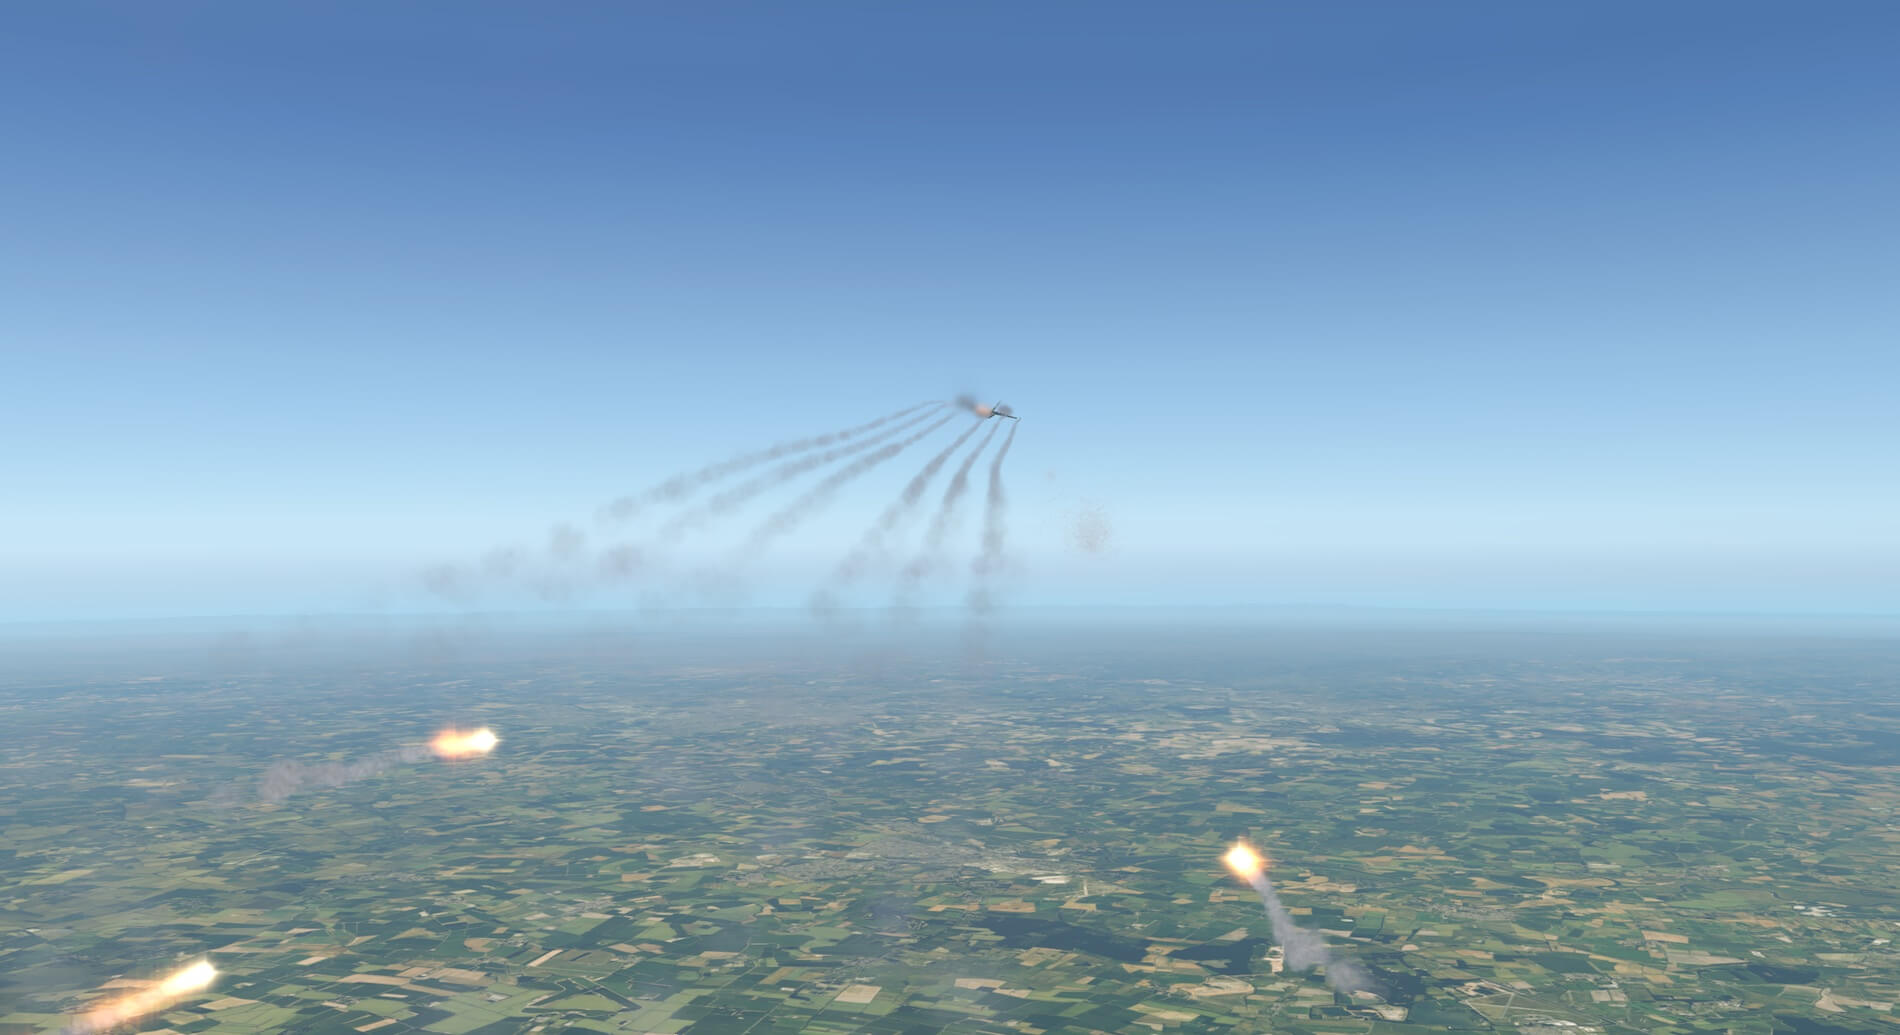
I also used the flight to view the release of chaff and flares from the aircraft. I used the right MFD soft keys to release the defensive measures. This looked very realistic including the opening of the small release doors on the underside of the model.
There are so many different things to do with this model. Flights can be repeats of earlier ones to master a technique, exploring the envelope of the aircraft or finding and learning a new system or process. The F-22 itself is fun to fly and then adding the various skills makes the user constantly come back for more. The aircraft is responsive and smooth in flight and the capabilities of the real thing are well represented.
Summary
This is an extremely interesting model. Yes it can be flown “out of the box” but this means it is not being used to anywhere near its potential. To use it properly the manual has to be thoroughly studied and used as a constant reference. This is because the developers have created a blend of X-plane systems, adapted generic systems and their own bespoke systems to produce an aircraft that carries much of the equipment known to be in the real F-22, some systems that are likely to be in the real thing and others that help the pilot use the model.
The learning process for all of the equipment cannot be rushed as it needs concentration and practice but the challenge is part of the enjoyment and I found it quite addictive. The model flies well and responds to the equipment provided in a realistic manner. A straight forward flight is enjoyable and the capabilities of the aircraft enhance this and allow the model to be used in many different ways. Once the extra potential of the model is learned and used it creates an immersive and convincing experience. I thoroughly impressive and enjoyable model.
More information about the modeled F-22A Raptor can be found at the AOA Simulations website and of course at X-Plane.Org. As of this writing – June 2021 – the AOA Simulation F-22A Raptor cost 40 USD.
Feel free to contact me if you’ve got additional questions related to this impression. You can reach me via email Angelique.van.Campen@gmail.com or to Angelique@X-Plained.com.
With Greetings,
Angelique van Campen
| Add-on: | Payware AOA Simulations F-22A Raptor |
|---|---|
| Publisher | Developer: | X-Plane.Org | AOA Simulations |
| Description: | Highly realistic rendition of the F-22A Raptor |
| Software Source / Size: | Download / Approximately 499MB (unzipped) |
| Reviewed by: | Andy Clarke and Angelique van Campen |
| Published: | June 10th 2021 |
| Hardware specifications (Angelique): | - iMac Pro - Intel 3GHz Intel Xeon W / 4.5Ghz - Radeon Pro Vega 64 16368 MB - 64 GB 2666 MHz DDR4 - 1 internal shared 1TB SSD (Big Sur 11.x) - 1 internal shared 1TB SSD (Bootcamp Windows 10) - 1 external 2TB LaCie Rugged Pro SSD (Big Sur 11.x) - Saitek Pro Flight System X-52 Pro and X-56 Rhino - Honeycomb Alpha Flight Controls - Honeycomb Bravo Throttle Quadrant |
| Hardware specifications (Andy): | - iMac Intel i5 27" - 3.5 GHz Intel Core i5 - AMD Radeon R9 M290X 2048 MB - 16 GB 1600 MHz DDR3 RAM - Logitech Force 3D Pro |
| Software specifications (Angelique): | - macOS Big Sur (10.15.x) - X-Plane 11.5x |
| Software specifications (Andy): | - macOS Big Sur (10.15.x) - X-Plane 11.5x - A variety of freeware and payware airports |
0 Comments