Carenado Cessna 172S G1000
Introduction
Wikipedia tells us that the Cessna 172 (referred throughout this article as the “C172”) has been in production since it became an “overnight” success in 1956.
Measured by its longevity and popularity, the Cessna 172 is the most successful aircraft in history. Cessna delivered the first production model in 1956 and as of 2015, the company and its partners had built more than 44,000. The aircraft remains in production today.
The Cessna 172 may be modified via a wide array of supplemental type certificates (STCs), including increased engine power and higher gross weights. Available STC engine modifications increase power from 180 to 210 hp (134 to 157 kW), add constant-speed propellers, or allow the use of automobile gasoline. Other modifications include additional fuel tank capacity in the wing tips, added baggage compartment tanks, added wheel pants to reduce drag, or enhanced landing and takeoff performance and safety with a STOL kit. The 172 has also been equipped with the 180 hp (134 kW) fuel injected Superior Air Parts Vantage engine.
More information can be found at the dedicated Wikipedia web page.
Based on an earlier “tail-dragger”, the C170, Cessna added a new engine and some changes to the empennage, in addition to a tricycle undercarriage. First known as the Cessna 170C, it eventually obtained it’s own type certificate. There have been many different variants of the aircraft, with suffixes ranging from “A” model in 1960 through “S” model in 1998, through the use of supplemental certifications.
Notable variants throughout this range of models were the “D” that included a lower fuselage allowing for a rear window which Cessna called “Omni-vision”; the “F” introduced electric flaps; “I” was the change to a Lycoming (from the previous Continental) engine. The “J” which introduced a cantilevered wing- and while not included in subsequent C172’s this became the C177 Cardinal (see our review here at X-Plained). The “M” that had a modified instrument panel and could be equipped for IFR flight; the “P” that moved the landing light from the nose strut to the wing to improve lamp life.
The “Q” that was renamed the Cutlass and featured a retractable landing gear- this was not continued due to the additional weight introduced by the landing gear mechanisms and liability concerns over gear failing to extend on landing; and the “S” model (sometimes known as the “SP”)- still in production- and offered with the Garmin glass G-1000 avionics as an option- this is the model the Carenado have recently released and is featured in this review.
Many pilots started their flight training in a C172, or it’s smaller sibling the Cessna 152. It competes in this role with the Piper Cherokee, the Diamond Da-40, among others. It is not designed for speed or endurance, but for stability which is key for flight training. It is a 4-seater aircraft, although at “hot and high” airports- while still within gross weight limits- it is unable to provide the lift necessary for this passenger load.
Installation and Documentation
Installation is very simple, placing the C172 folder in the download into the XP11 Aircraft folder. An activation window will spawn and allows the use of the “paste” function to populate the registration key.
Documentation includes Emergency Procedures, Normal Procedures, Performance, Airspeed table, Version History, Credits and Copyright, Recommended Settings (in XP11), and an excellent G1000 manual highlighting all of the features in the glass panel.
Exterior Modelling
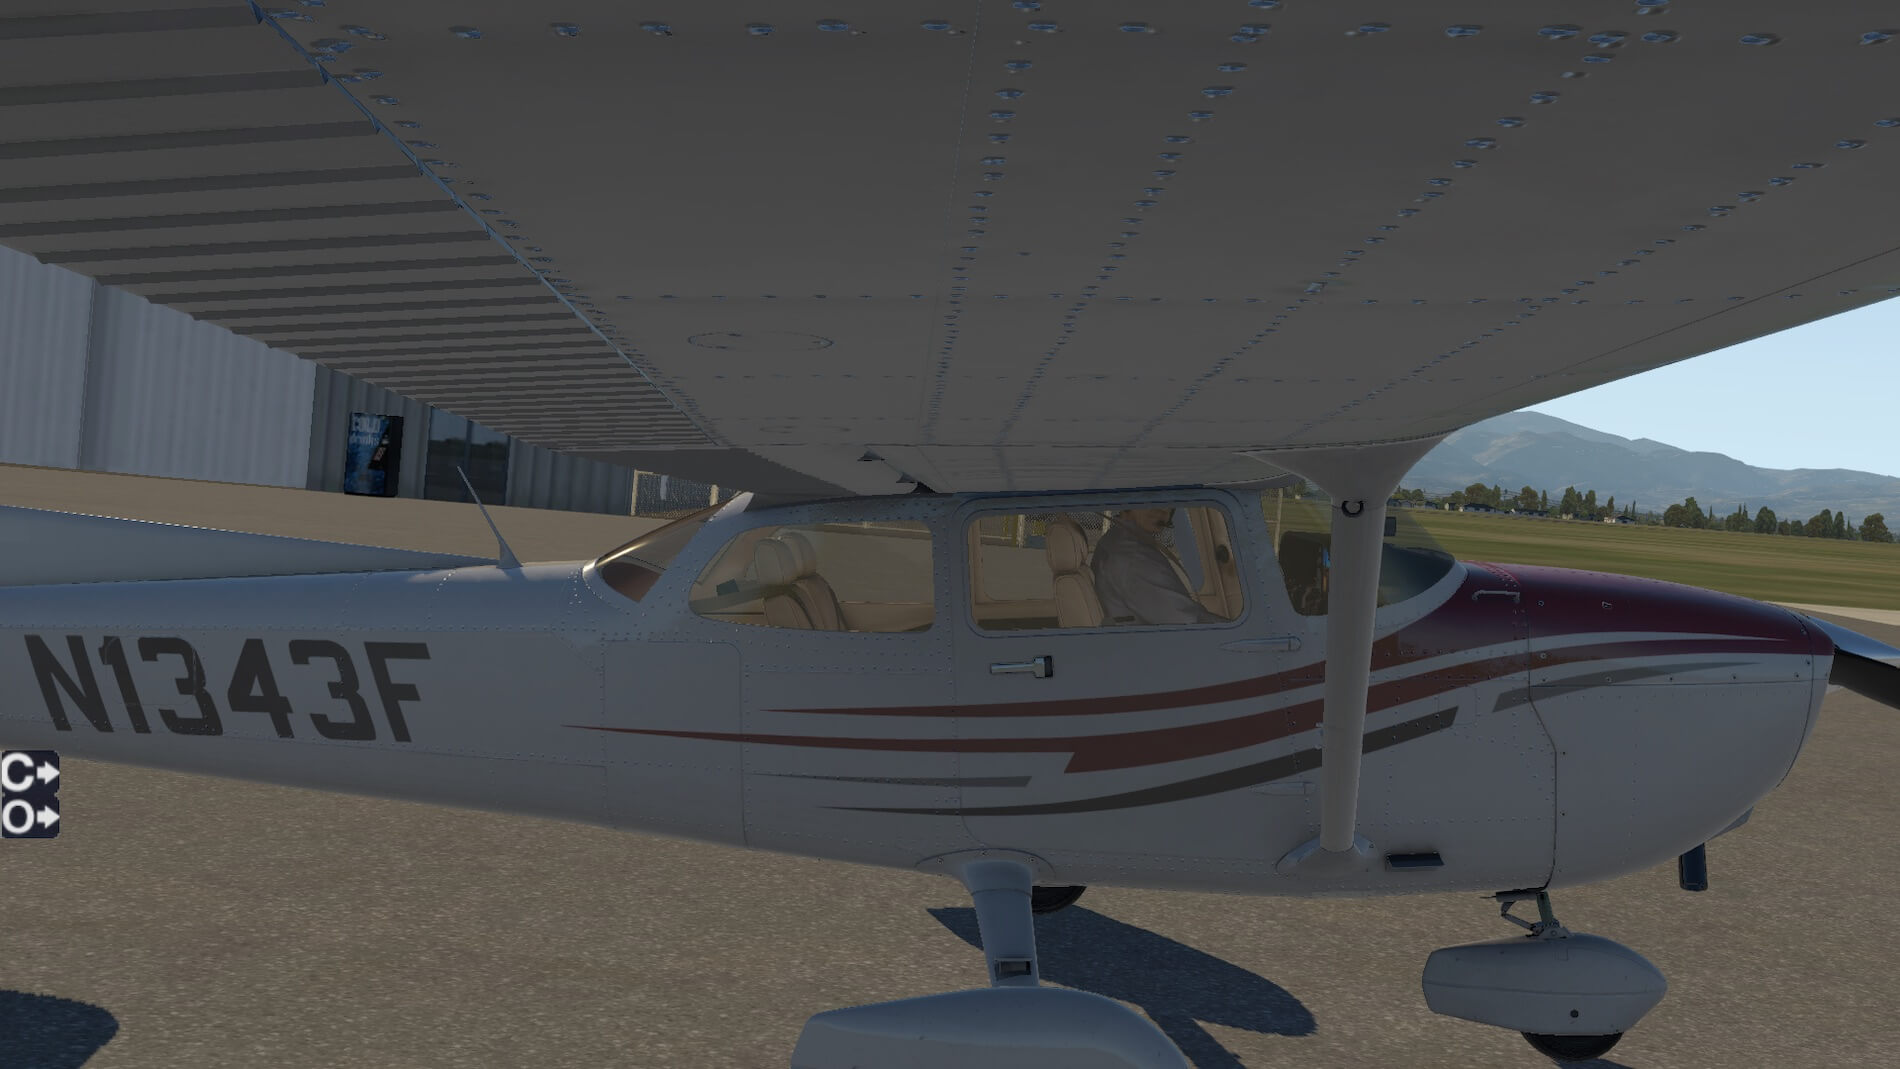
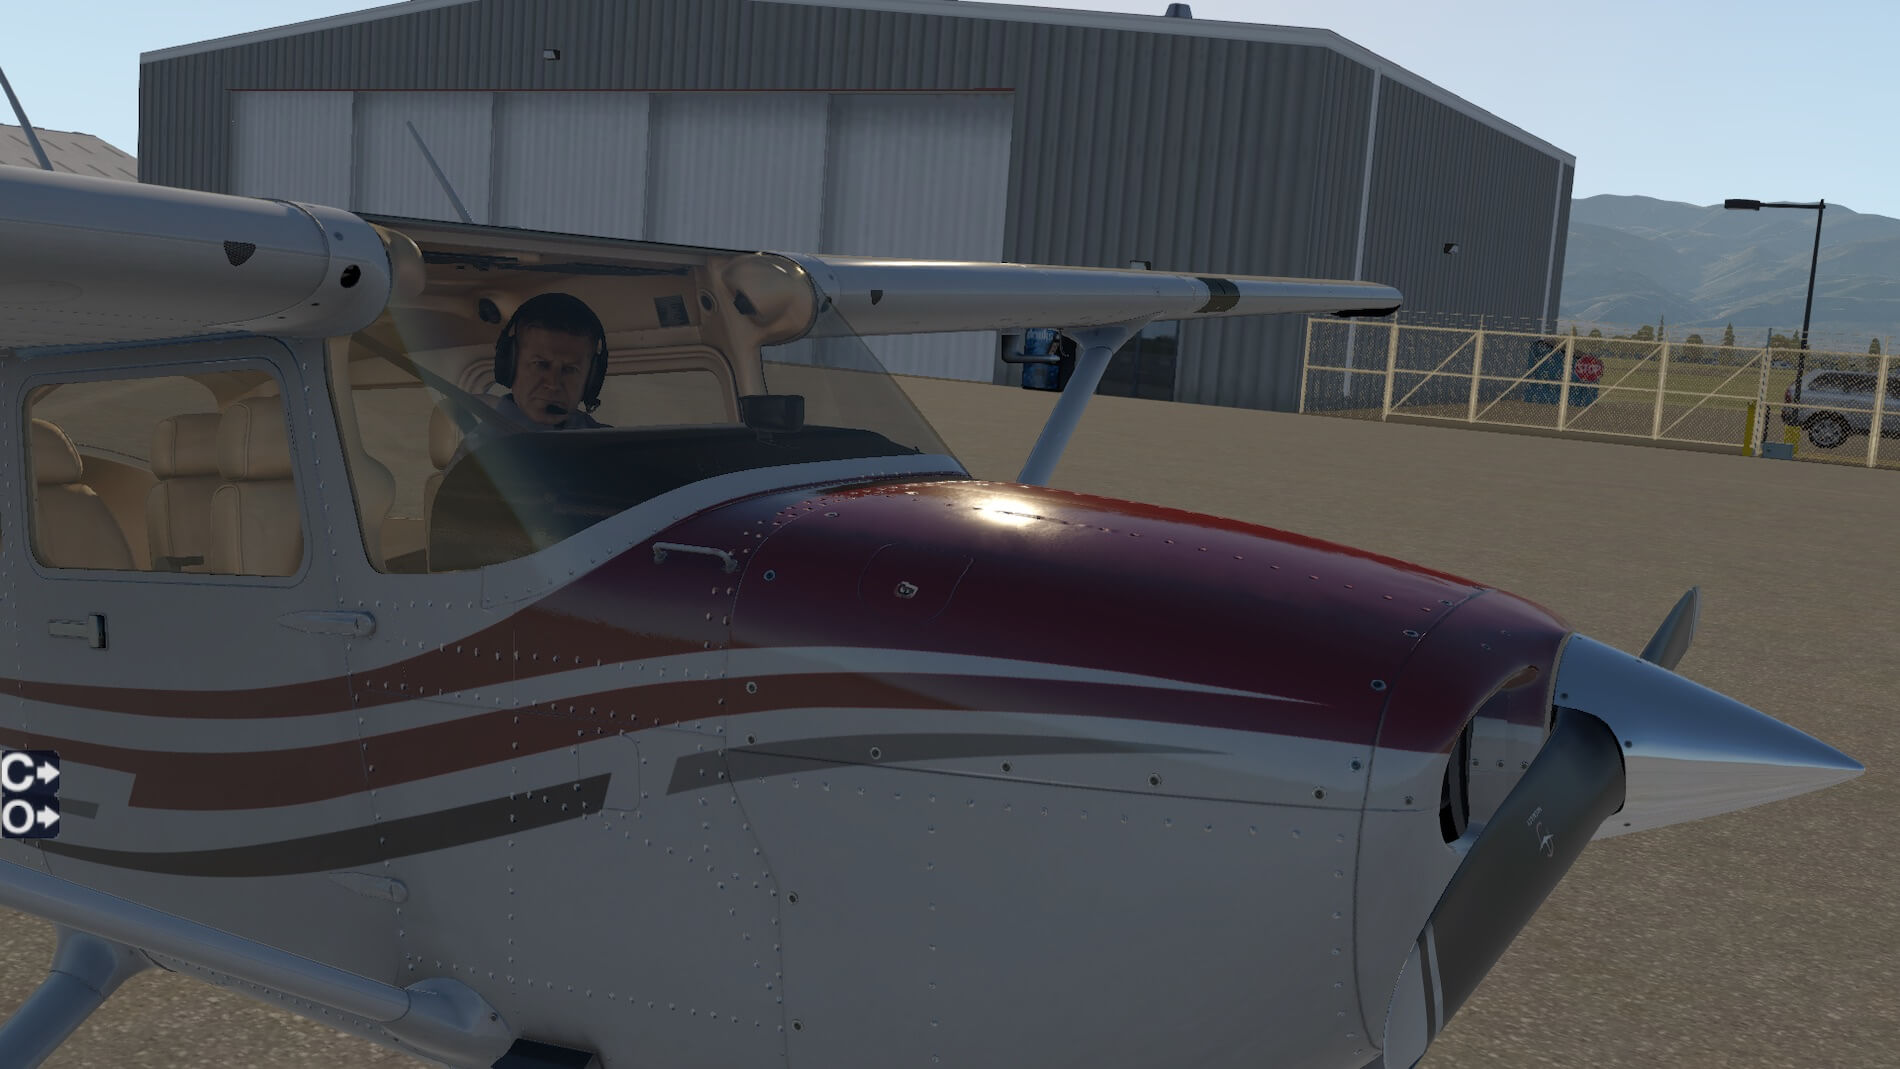
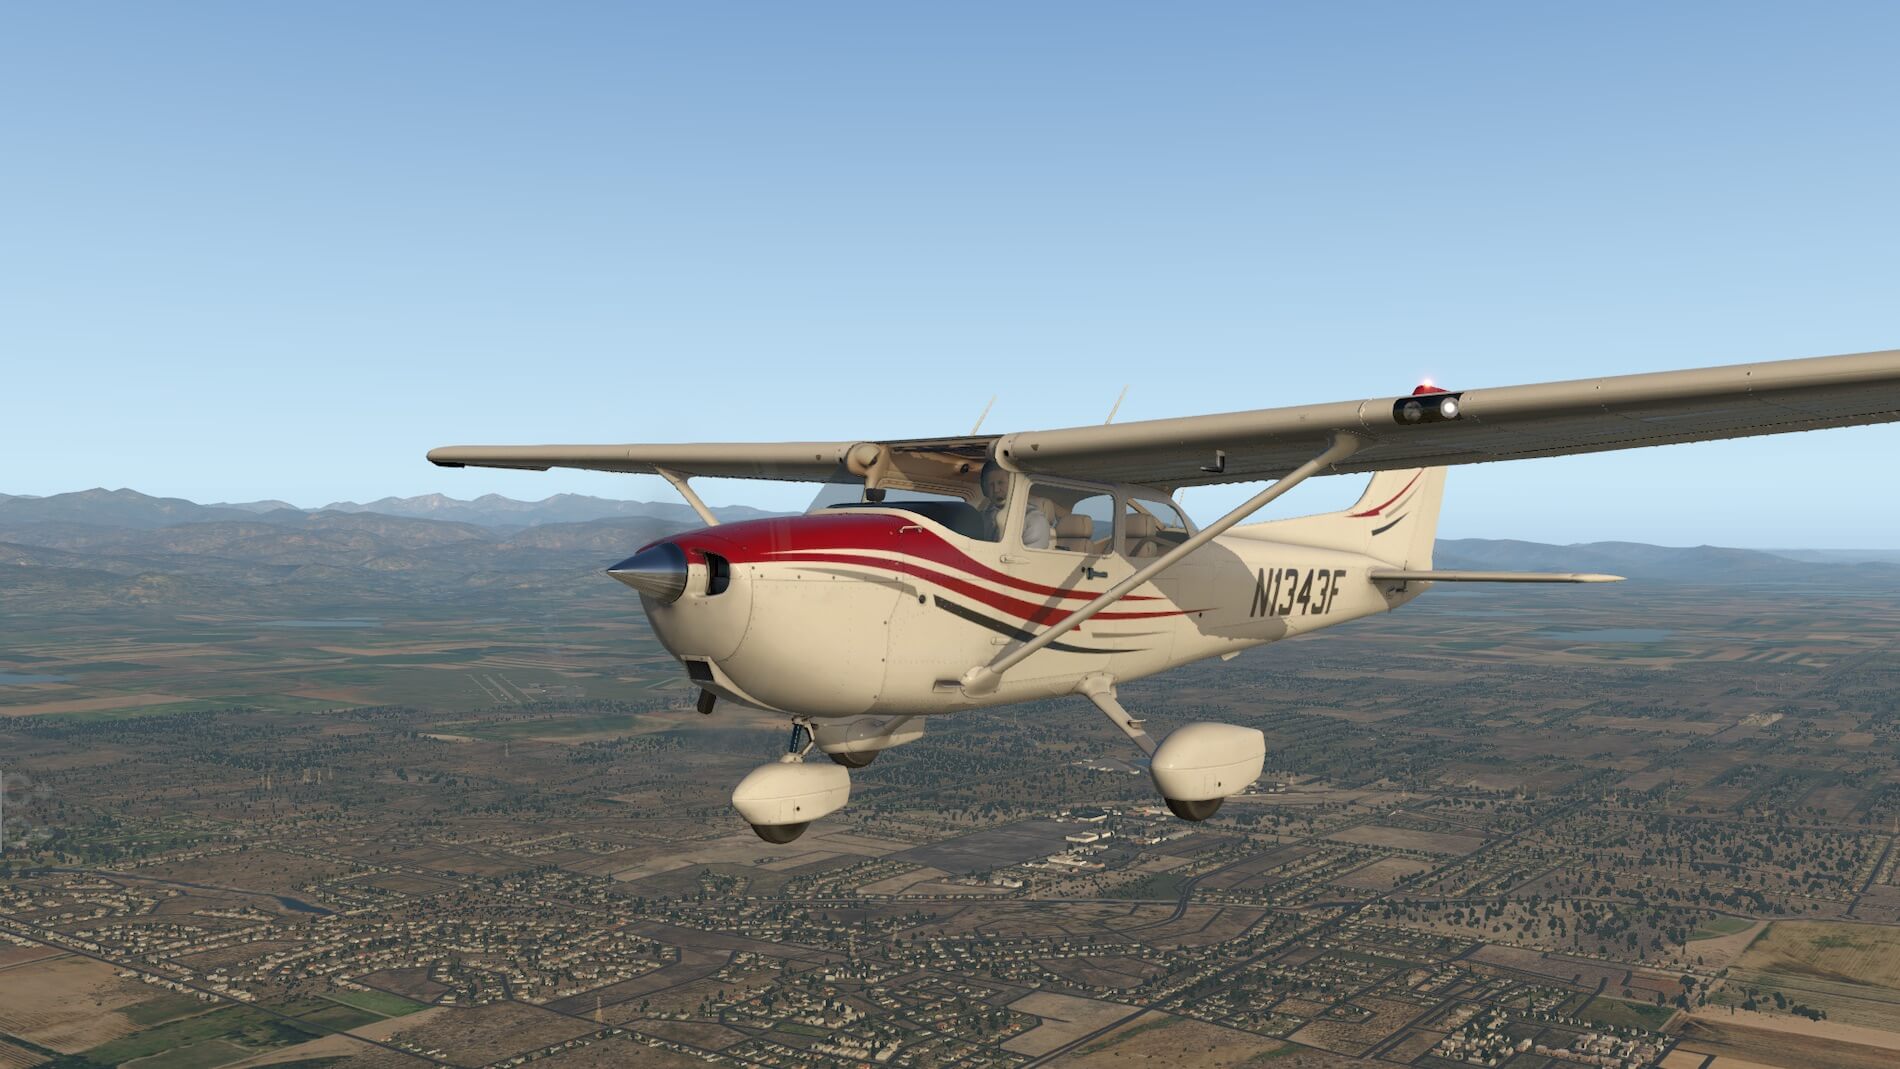
It’s very evident that a lot of time has gone into the visual modelling for this aircraft. Close up to the skin on the fuselage, wings and empennage I can see panels and rivets that correspond almost exactly with the real aircraft. Having confirmed that by comparing some screenshots I made (not included here) to the real thing, I decided to look a little closer at some not-so-obvious features. I started by selecting two of the preset views, using the “C” (for Camera) icon.
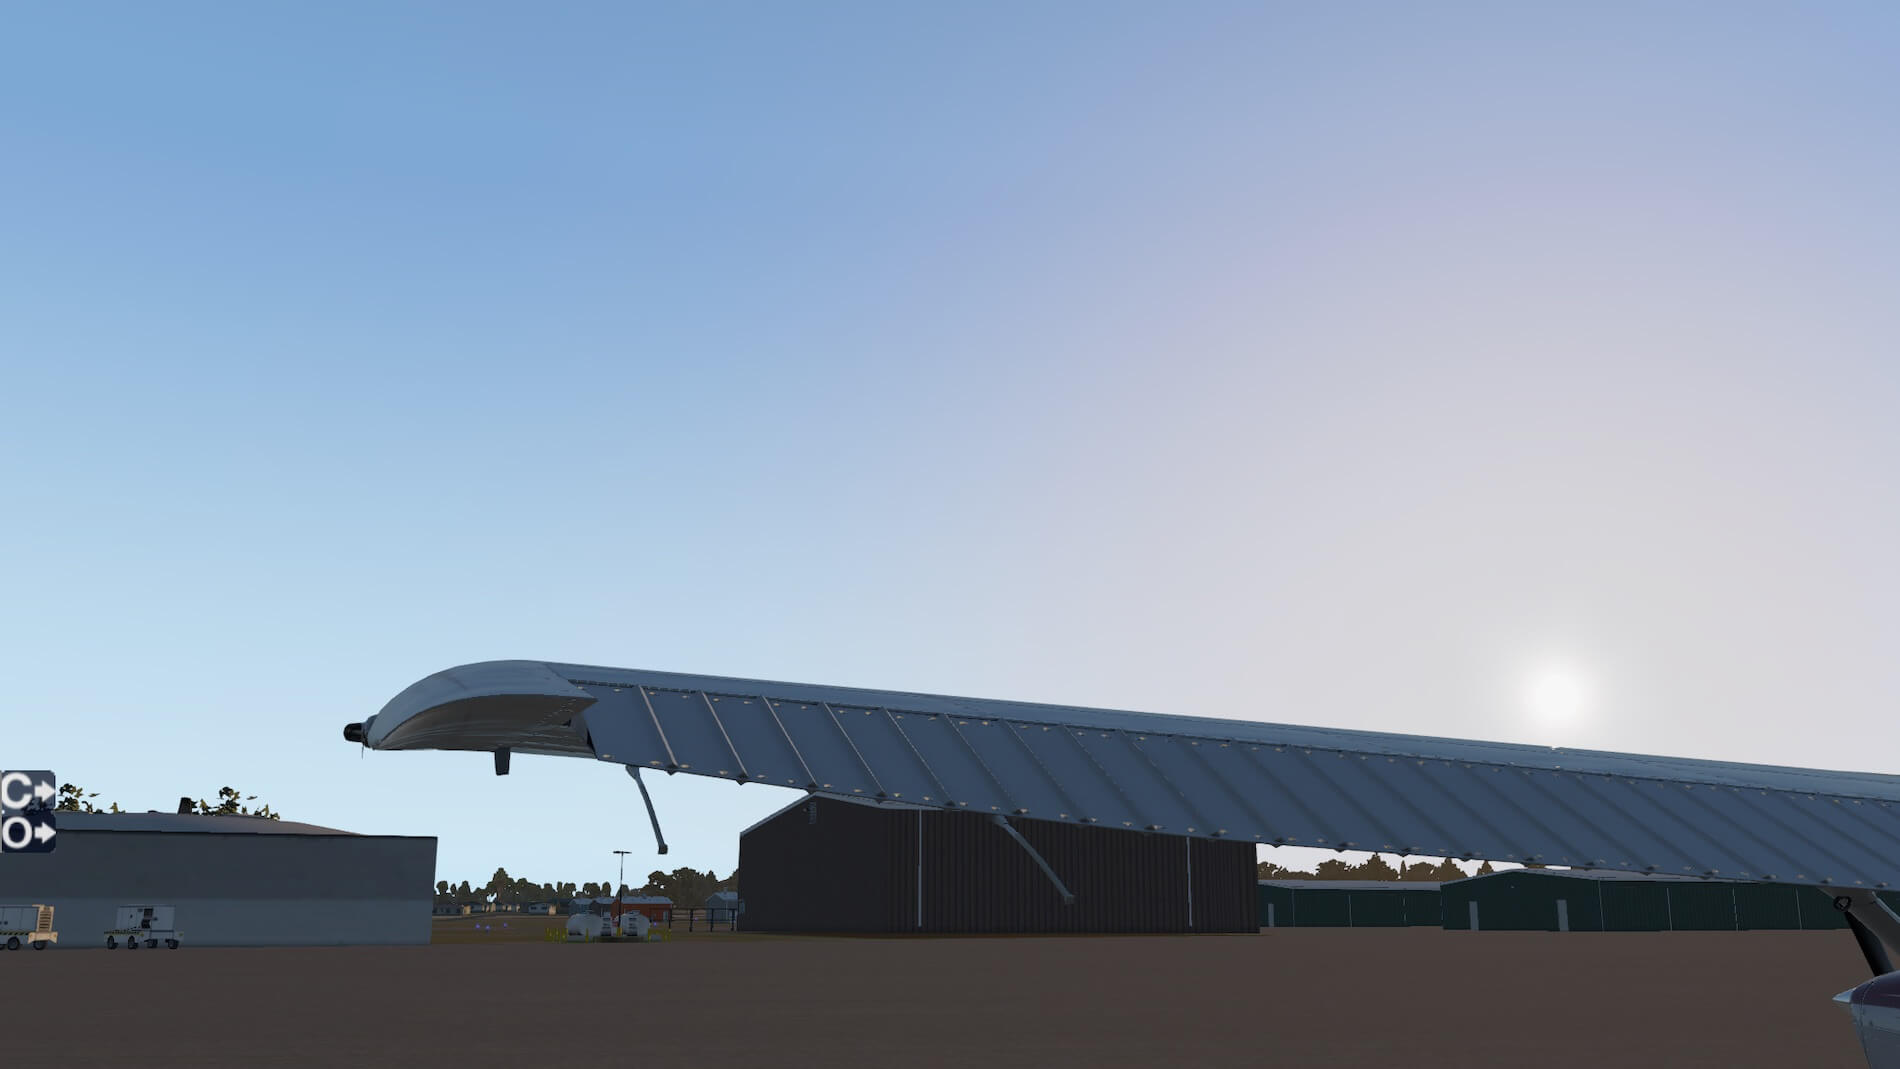
These are XP11 “quick-look” views programmed for this aircraft specifically (more on these in the Internal Modelling section). Note that the “C” and “O” icons can be dimmed to full transparency by hovering the mouse over them and scrolling. I started with the “Left Wing” and “Right Wing” presets- views that anyone who has pre-flighted a C172 would know well! Our intrepid pilot, looking very much like the same guy in other Carenado aircraft- maybe a twin brother! It’s cool how he looks towards the camera.
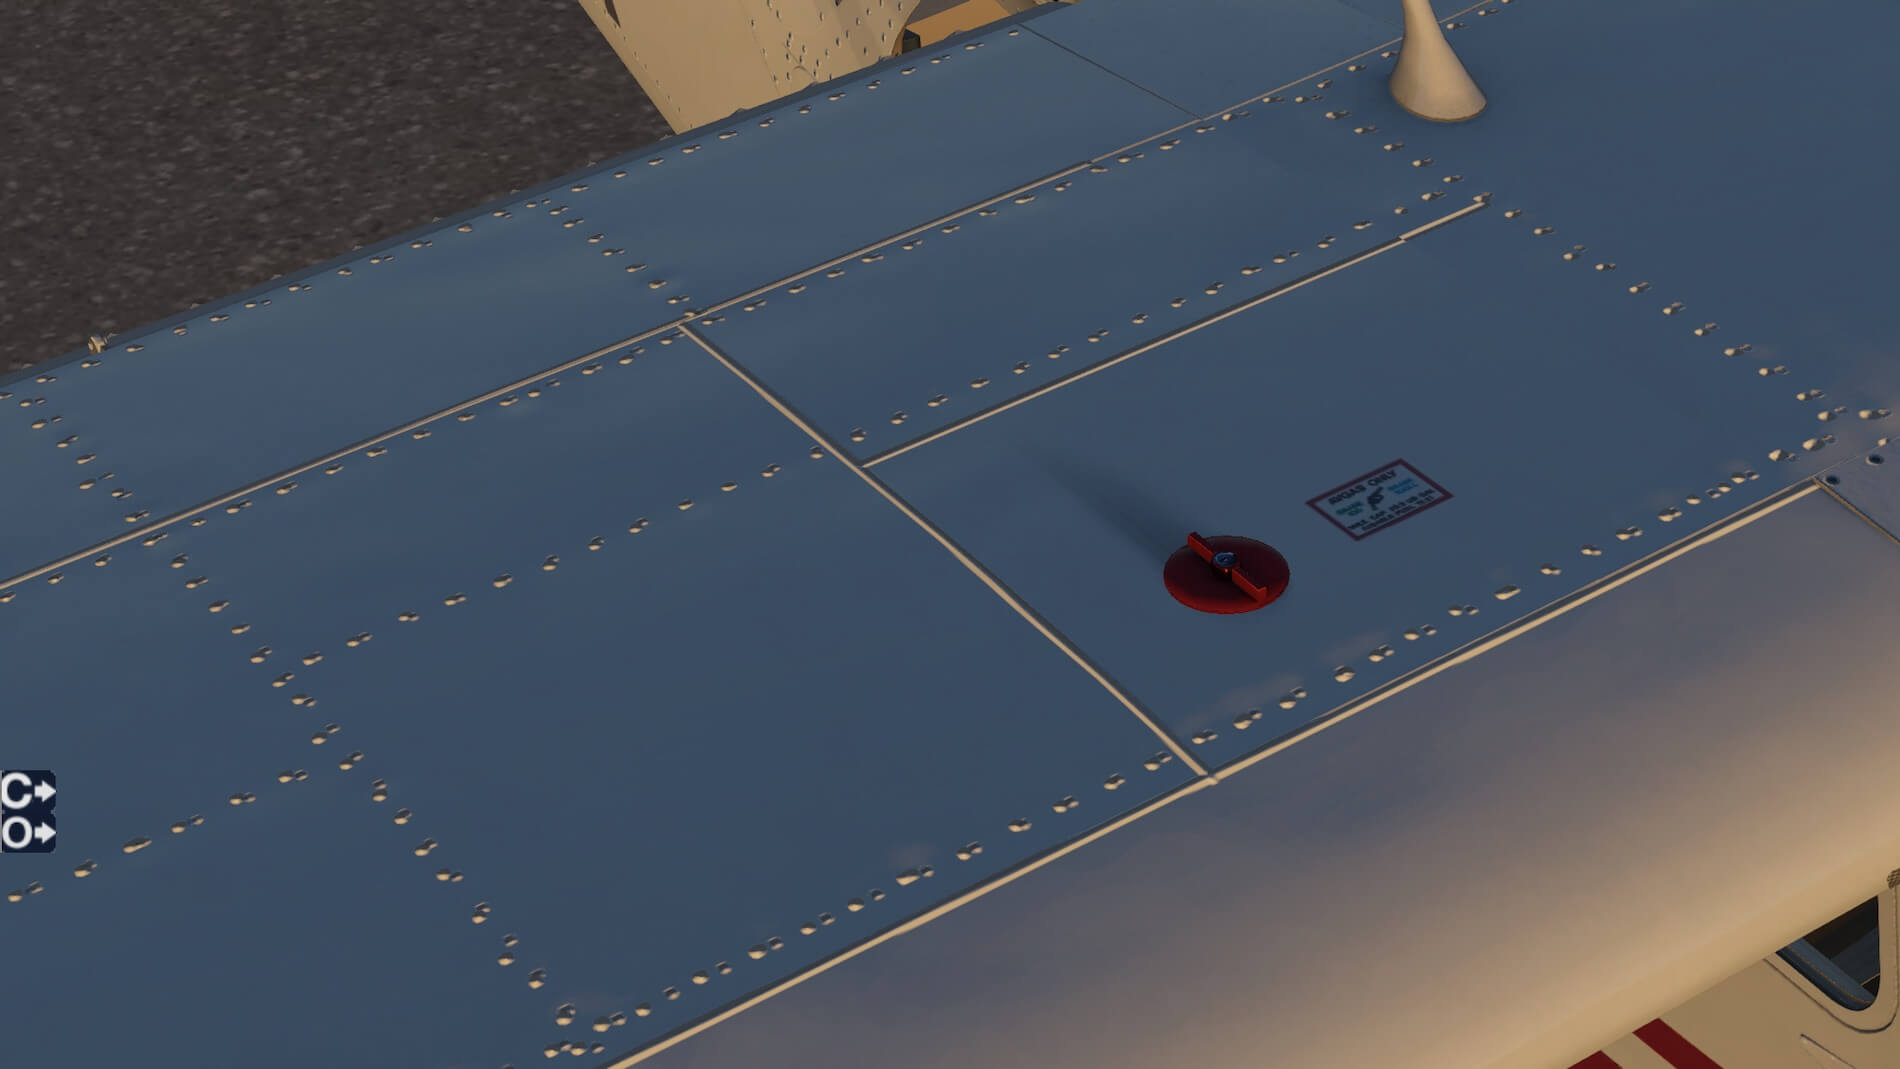
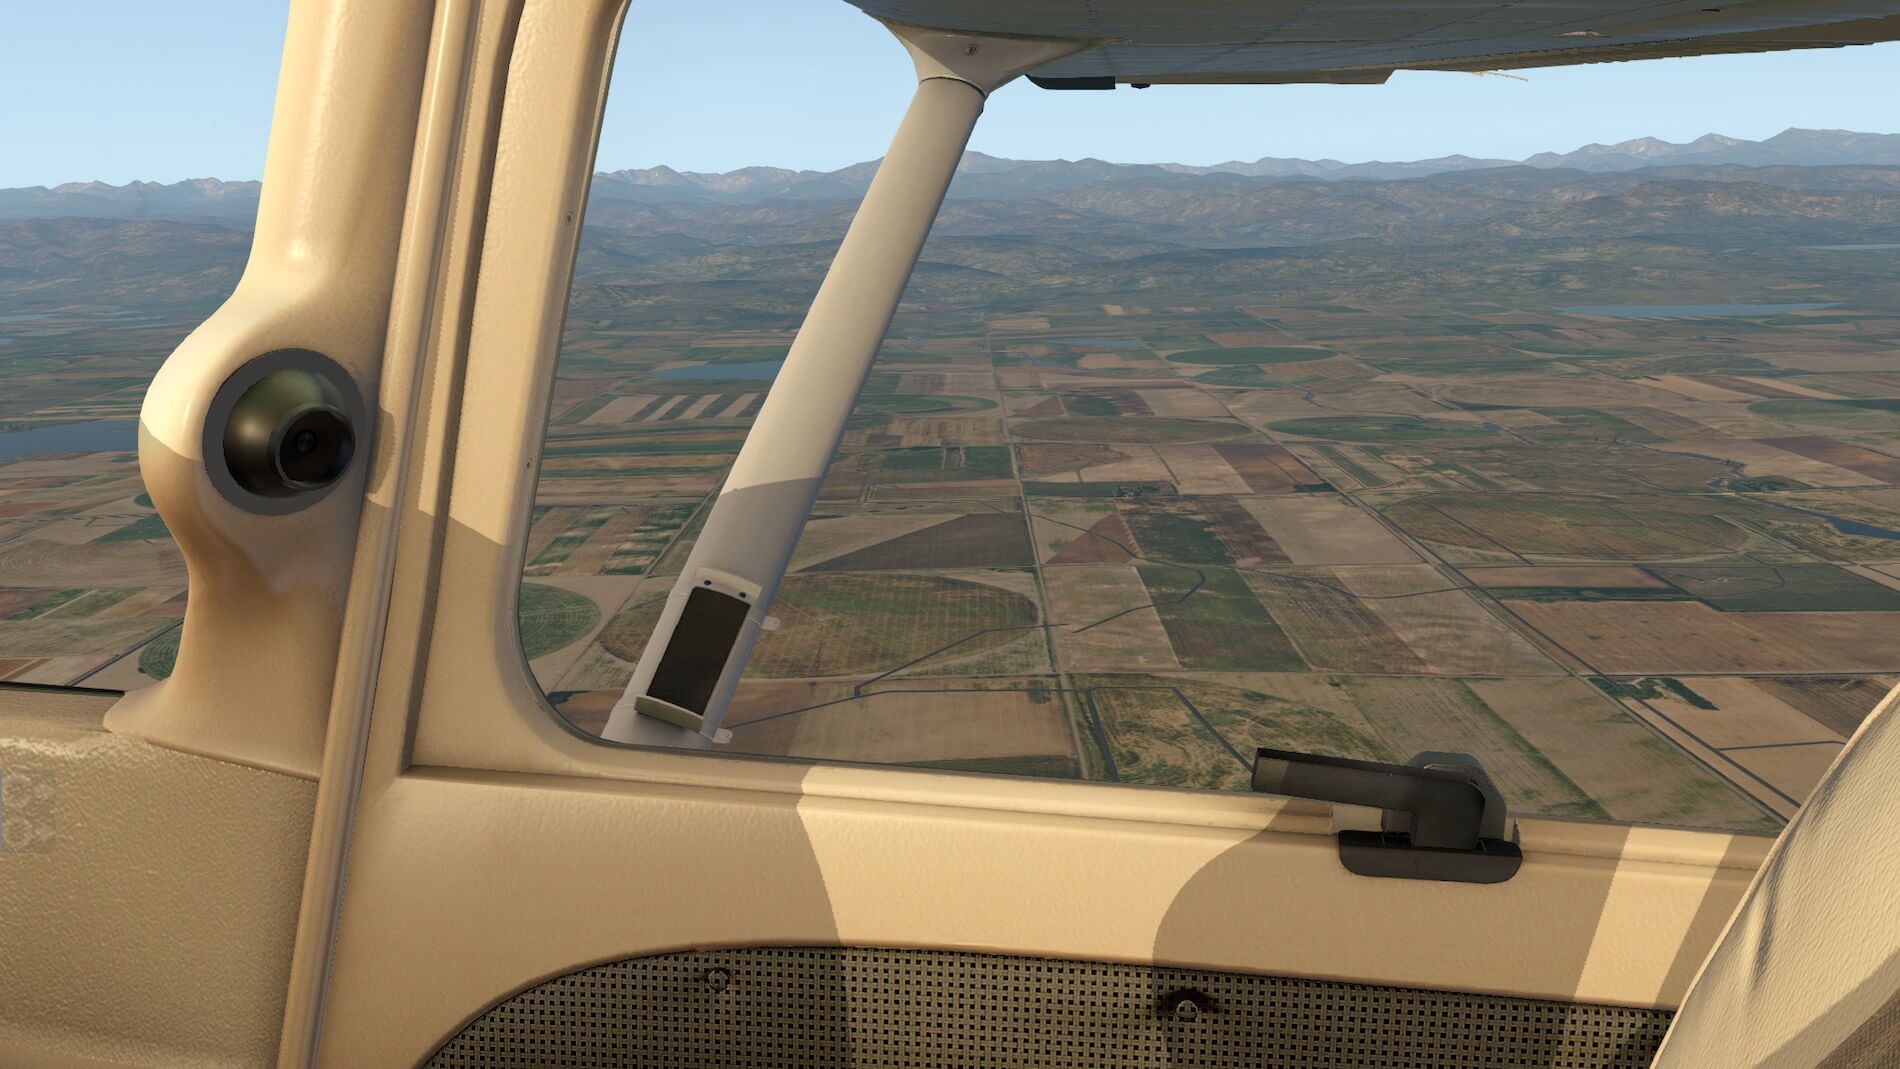
I then travelled in closer to the right door, opened the door (one of the functions under the “O” icon). The right wing tie down loop is very visible, as is the step to check the upper surface of the right wing and the right fuel tank. Note the detail provided of the rivets and where the strut meets the underside of the right wing. This is a view that should be ingrained in anyone who has been taught in the C172 (sans pilot)!
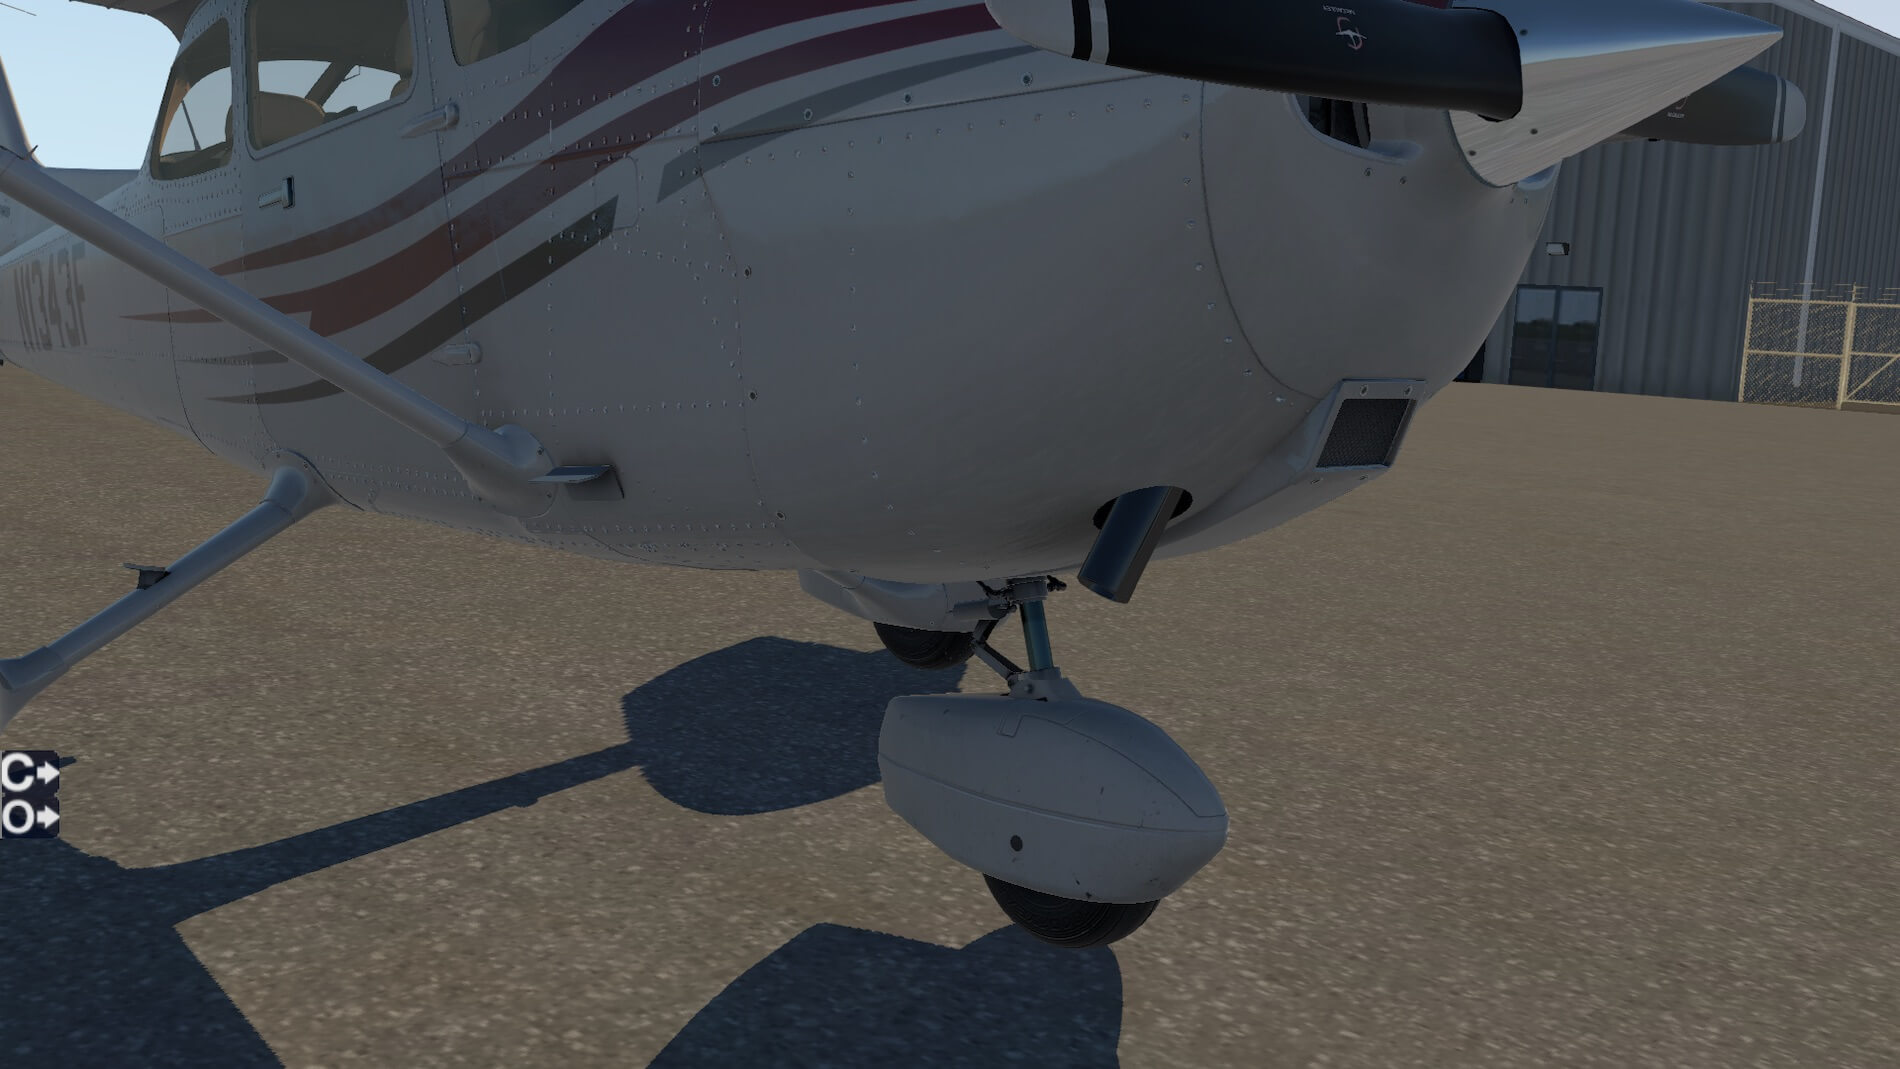
Looking from the right front of the aircraft, the spinner looks remarkably unchipped, and the oil dipstick hatch is clearly visible. Dropping down to the underside of the aircraft, the air intake and exhaust are well done, as is the nose wheel (in this case with the faring fitted). I couldn’t resist a closer look at the steering and suspension mechanisms on the front wheel assembly- beautifully done!


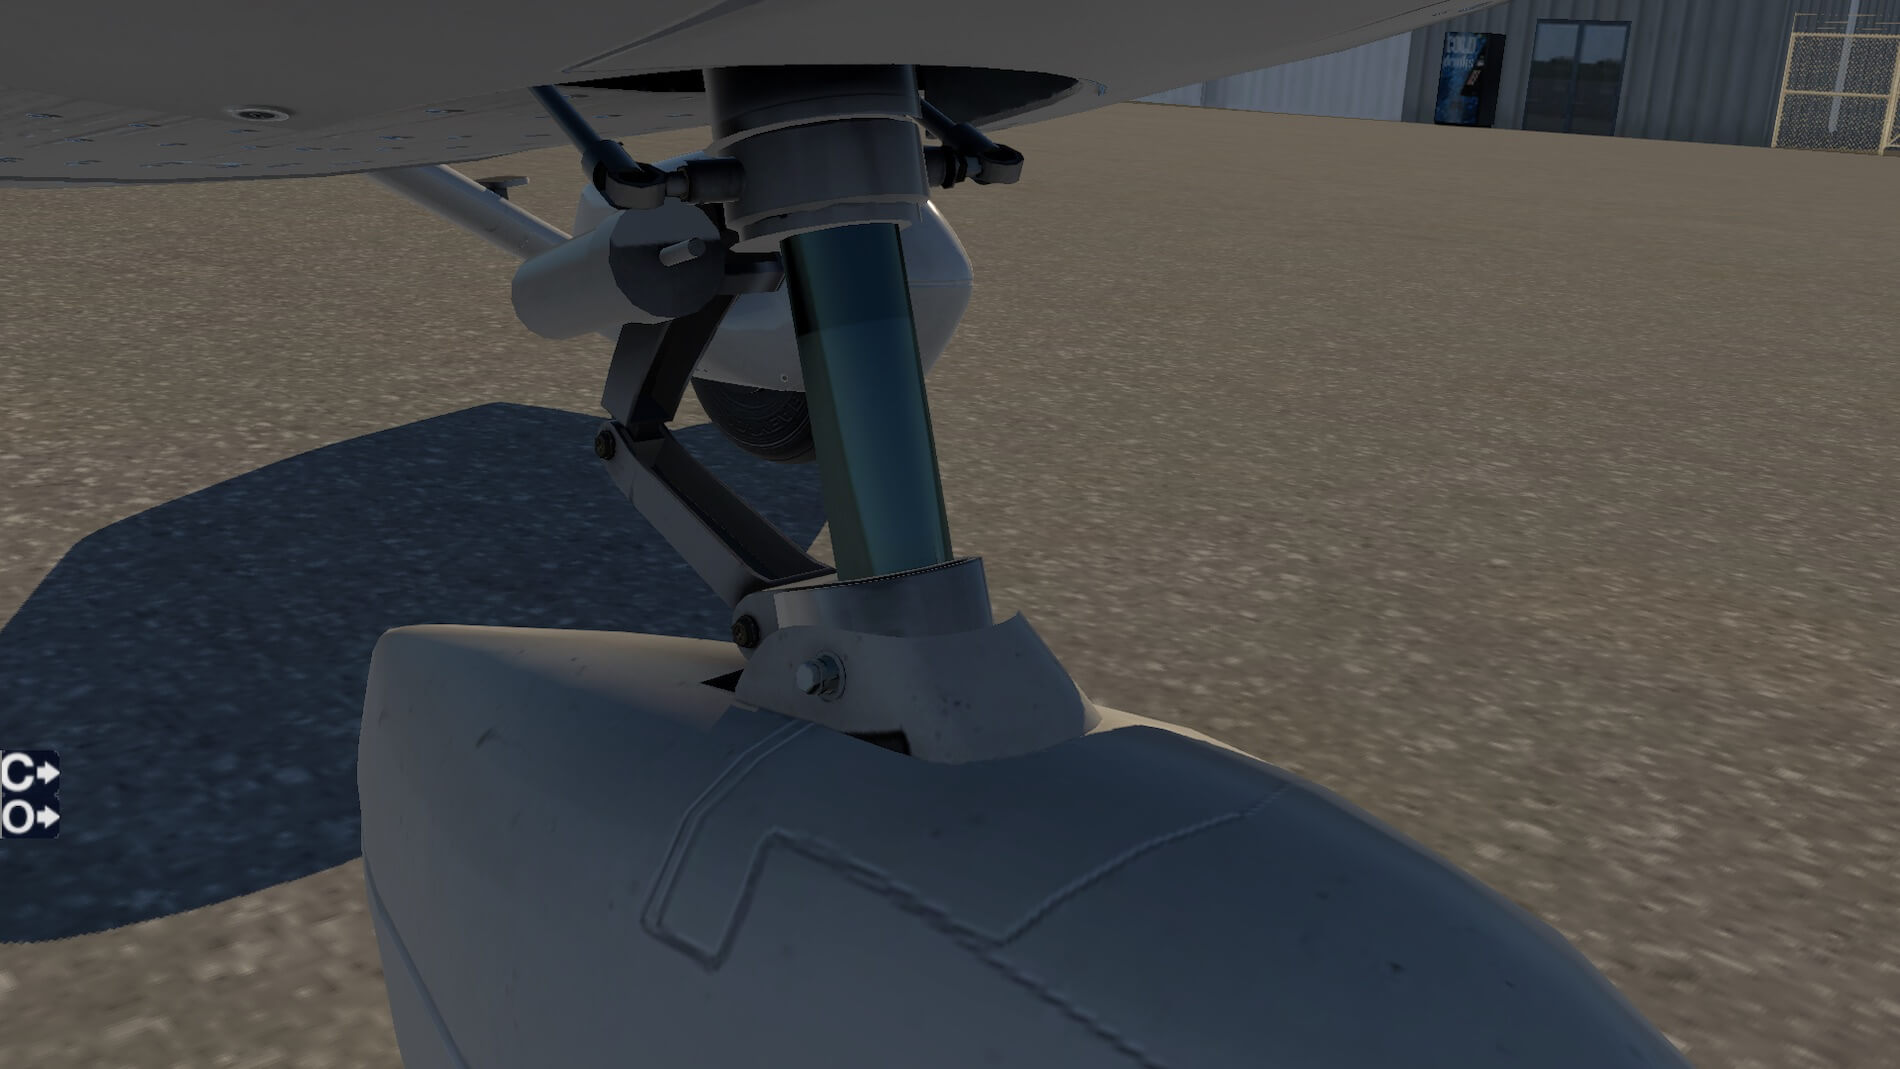
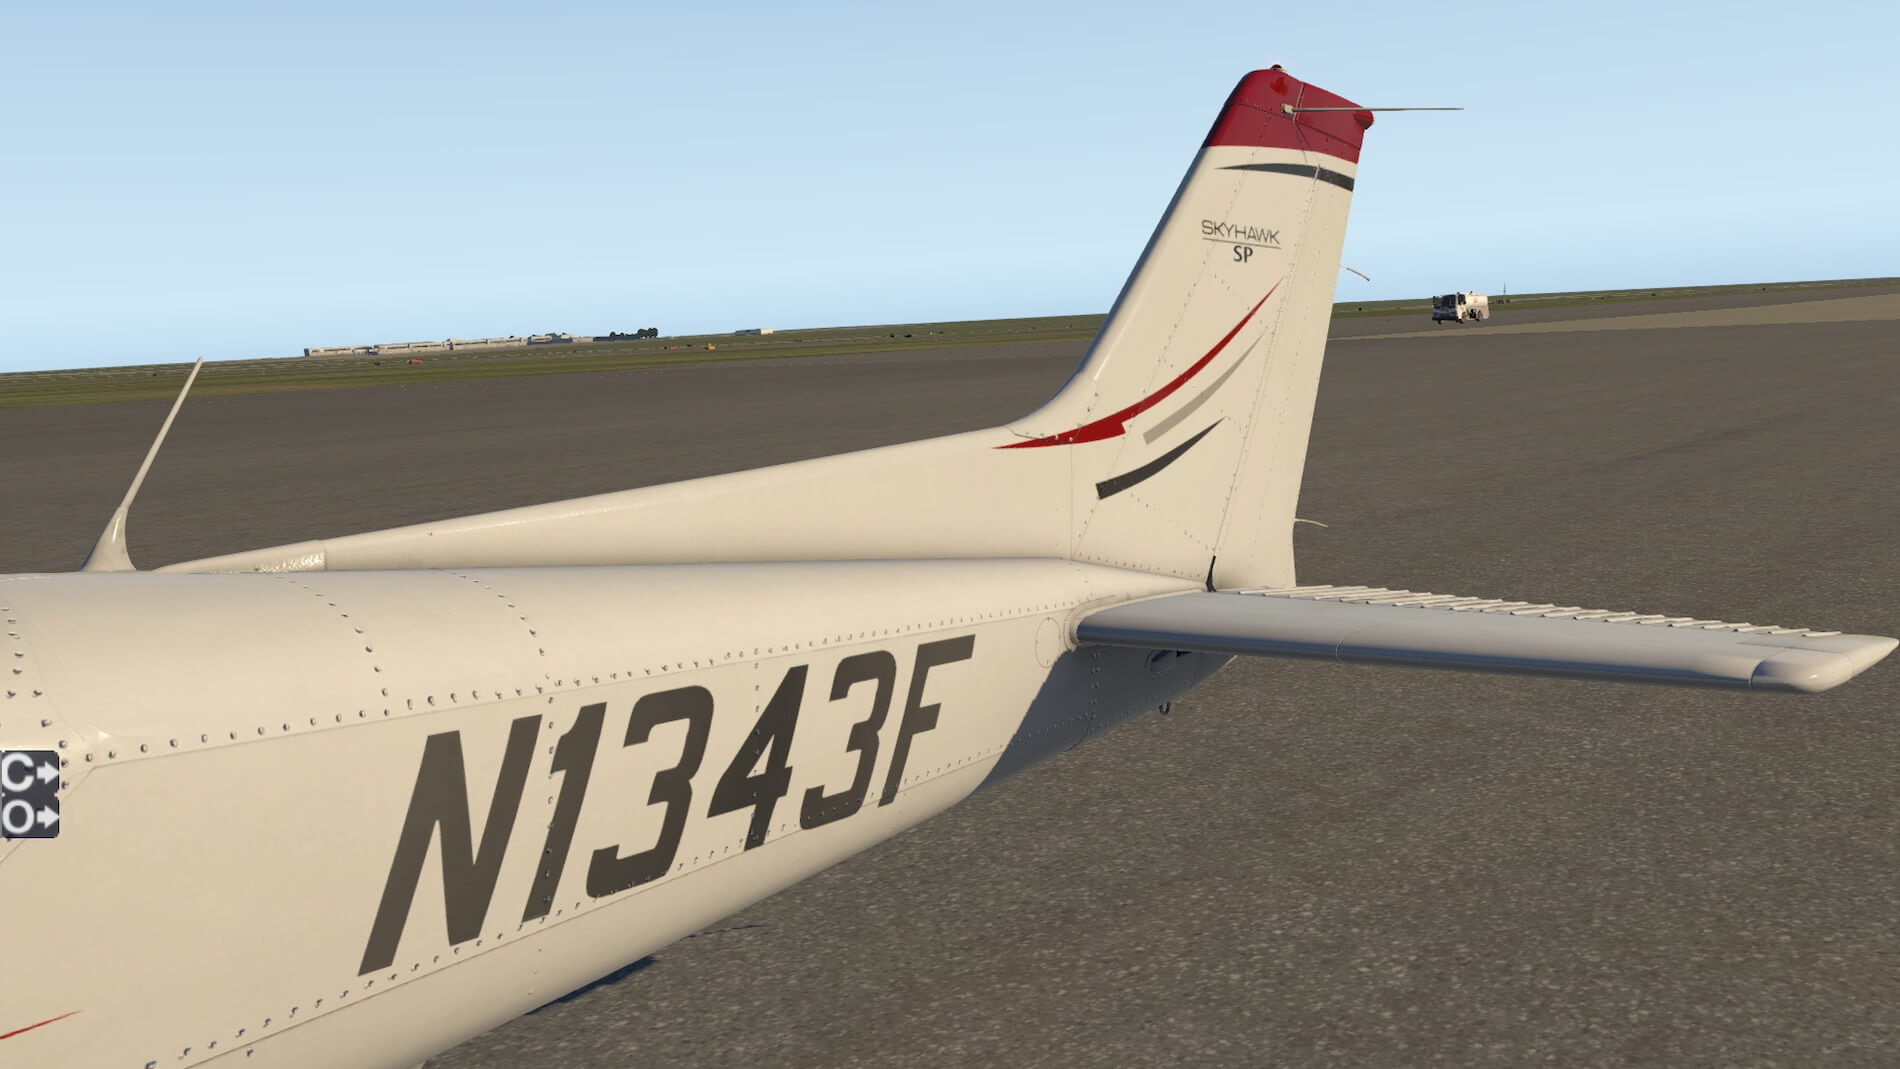
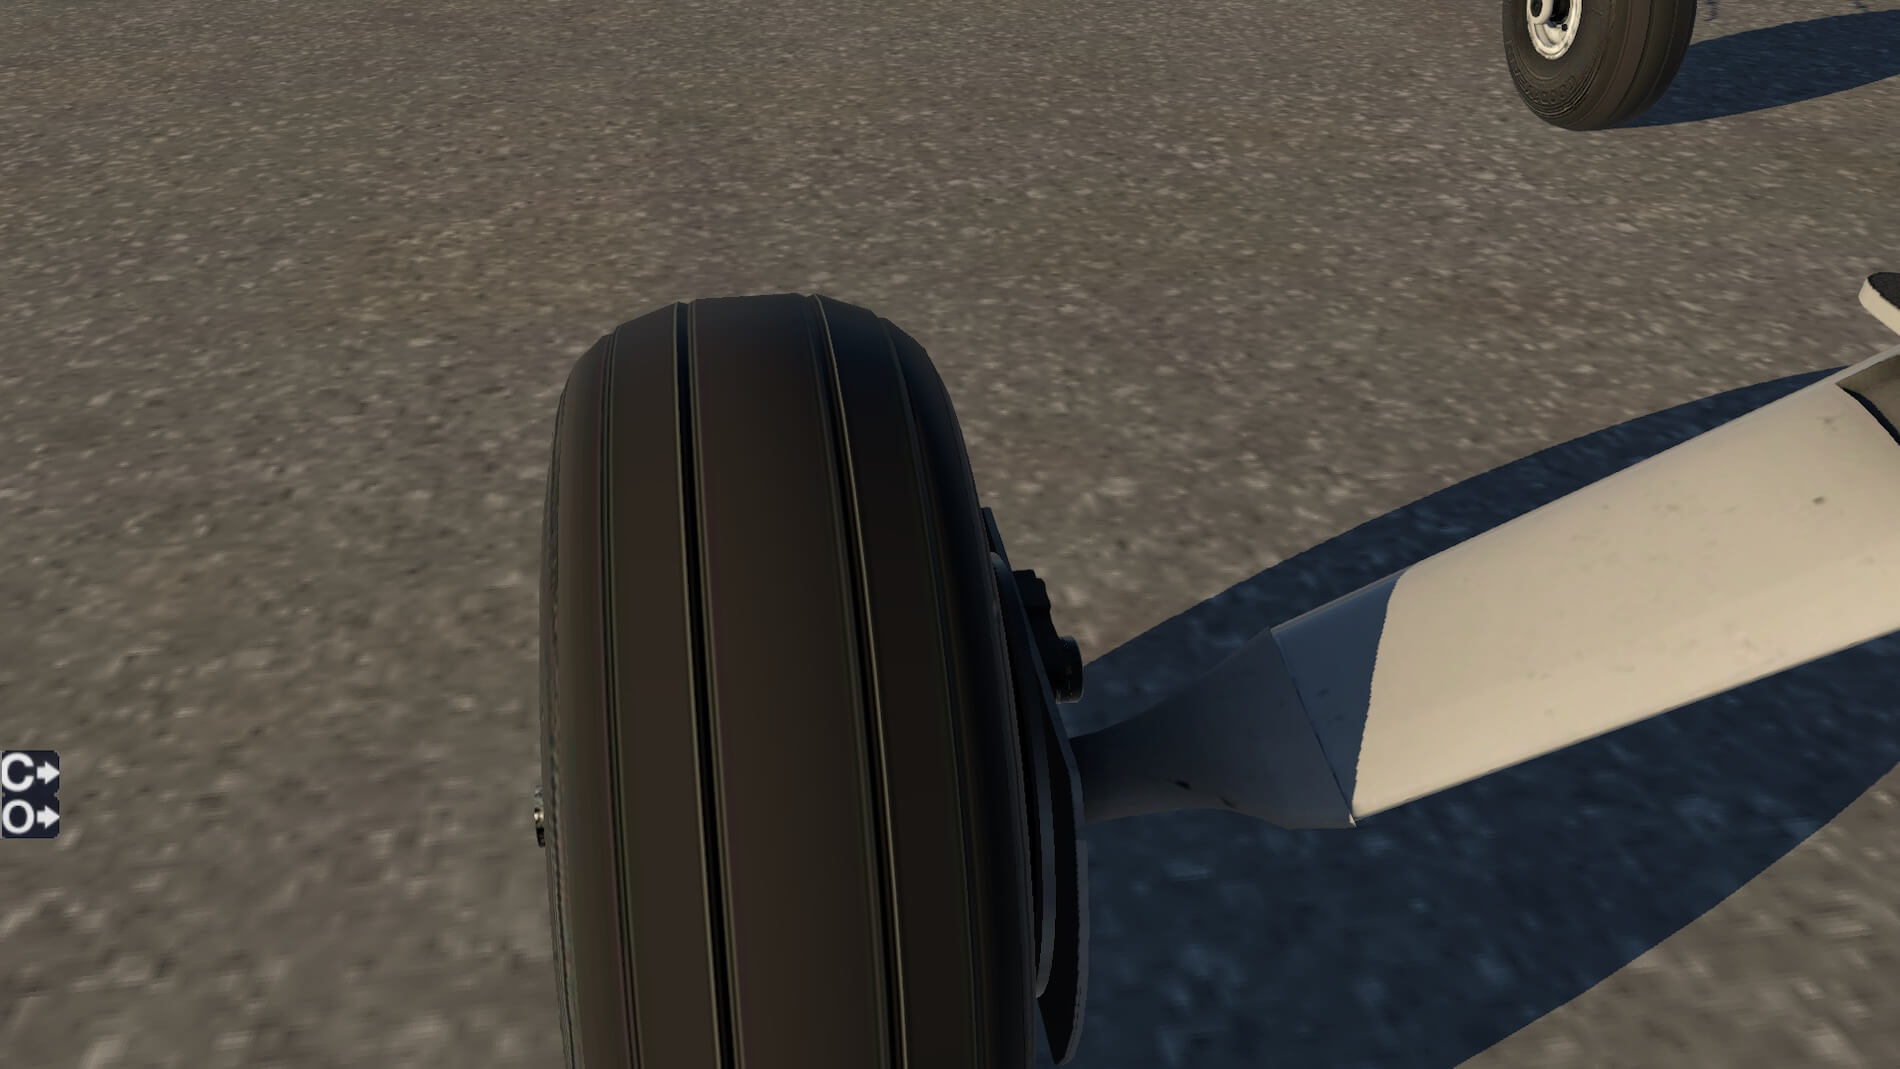
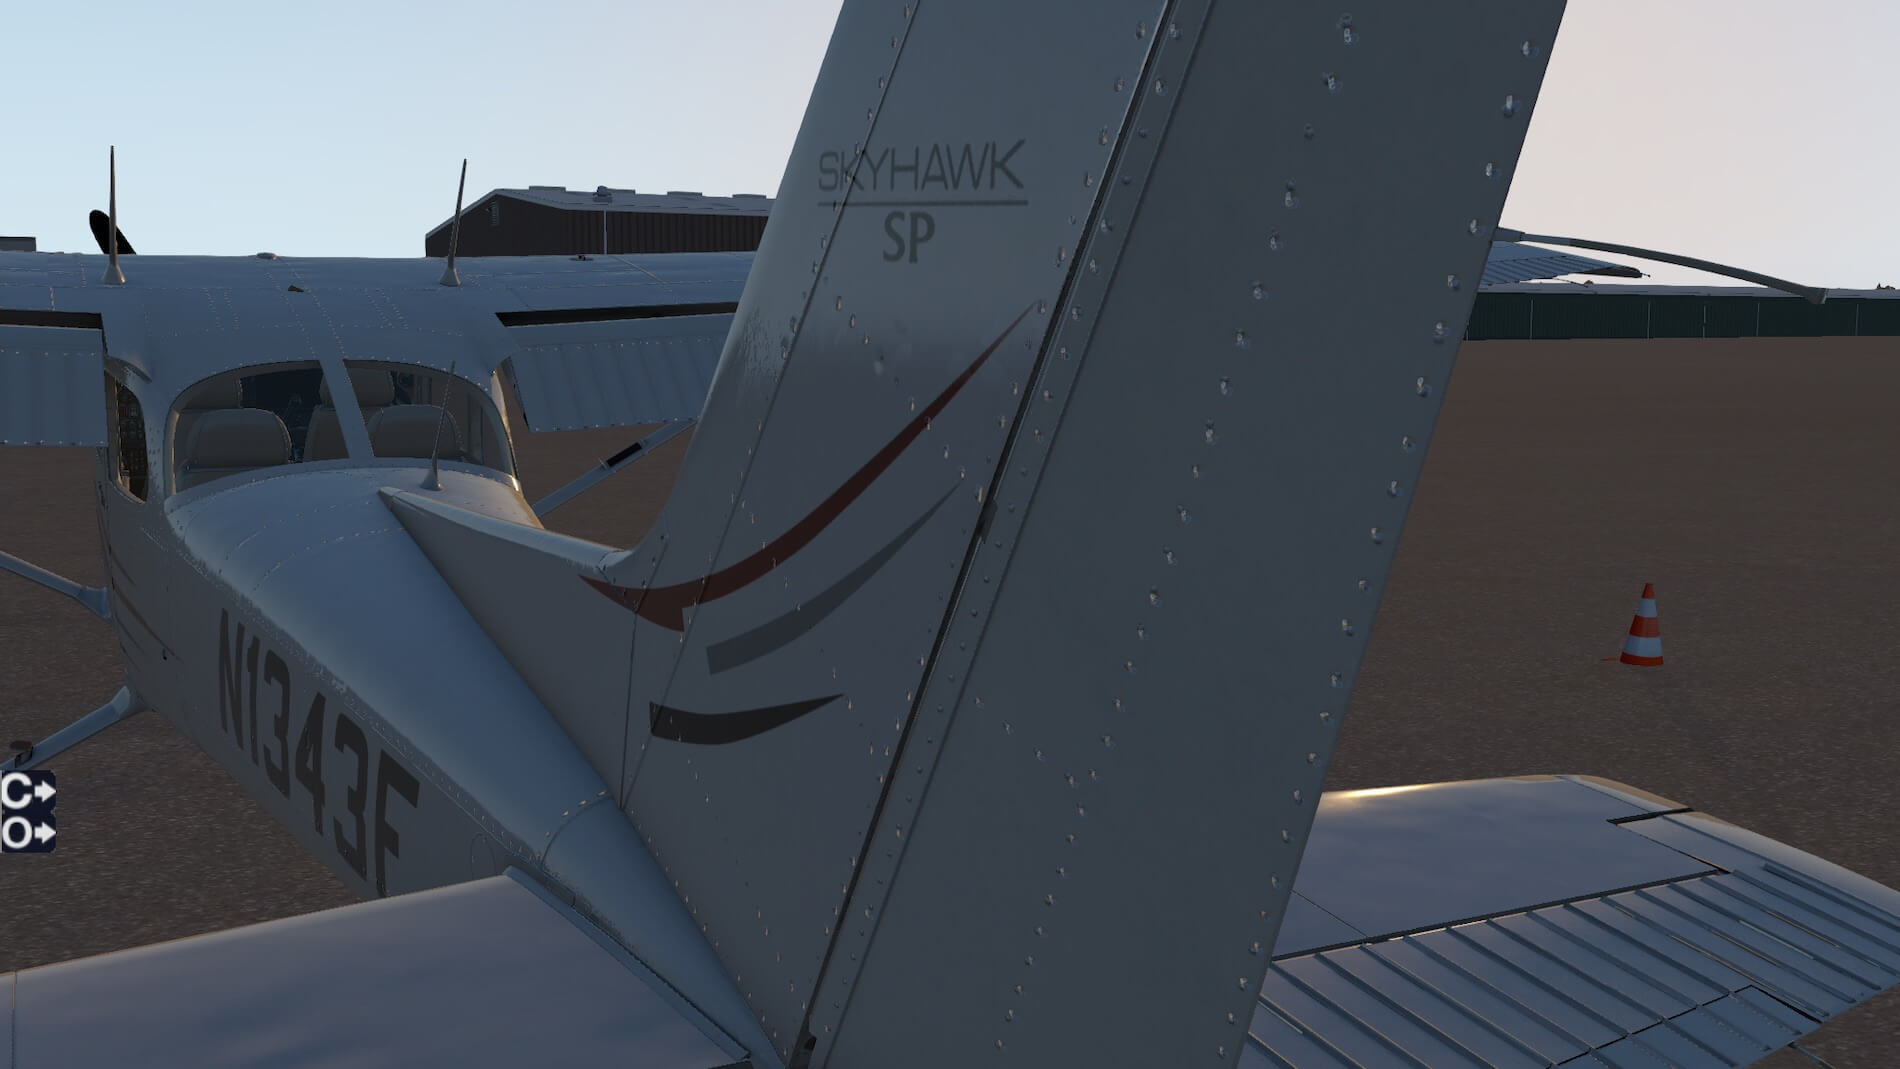
A look from the left side rearwards towards the empennage shows plenty of details along the fuselage. Then comparing the wheel with faring option to no faring- in both cases the step can be seen to get up into the cabin. Let’s take a closer look at that tire- nice tread, also showing the colored striping along the tire to measure wear. The preset view of above the rudder, and a close look at the elevator hinge point- both with elevator up and down. The raked vertical fin looks good, along with the VHF NAV antennas. Finally a look at the right flap (retracted), showing more of this incredible detail in the model.


Internal Modelling
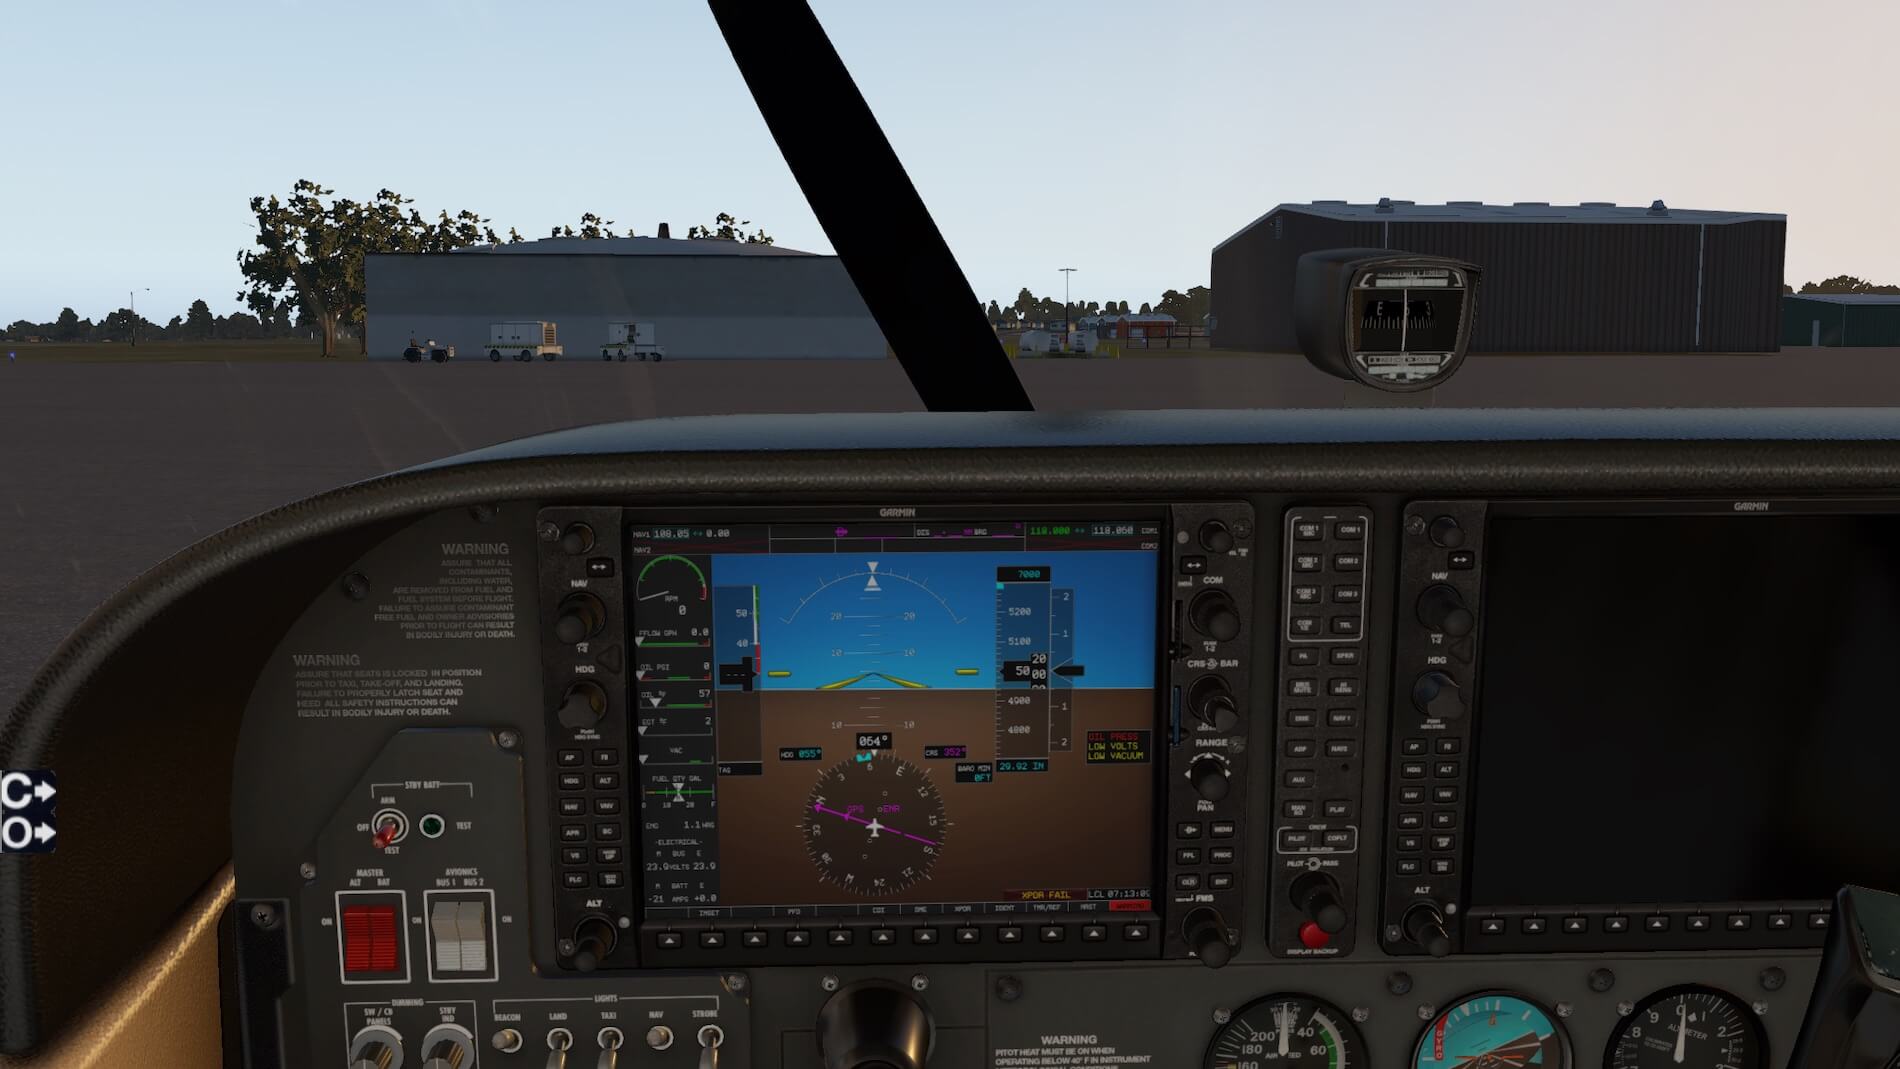
As most readers would be aware, a C172 is quite simplistic on the inside- for a good reason, it’s designed to teach people how to fly, not to carry a useful load. So it’s basically an instrument panel with seats and controls. Even though it’s sparse inside, all of it is well modelled here. The instrument panel is very well done, representative of the latest iteration of the aircraft and including the G1000 panel- which is the LR stock version (at 11.32) with some customization including an overlay added by Carenado.
It looks very realistic compared to the “real thing“. It’s almost possible to sense the faint small of avgas that results from the fuel lines coming through the cockpit allowing for the fuel selector valve and mixture control to have influences on the fuel flow to the engine.


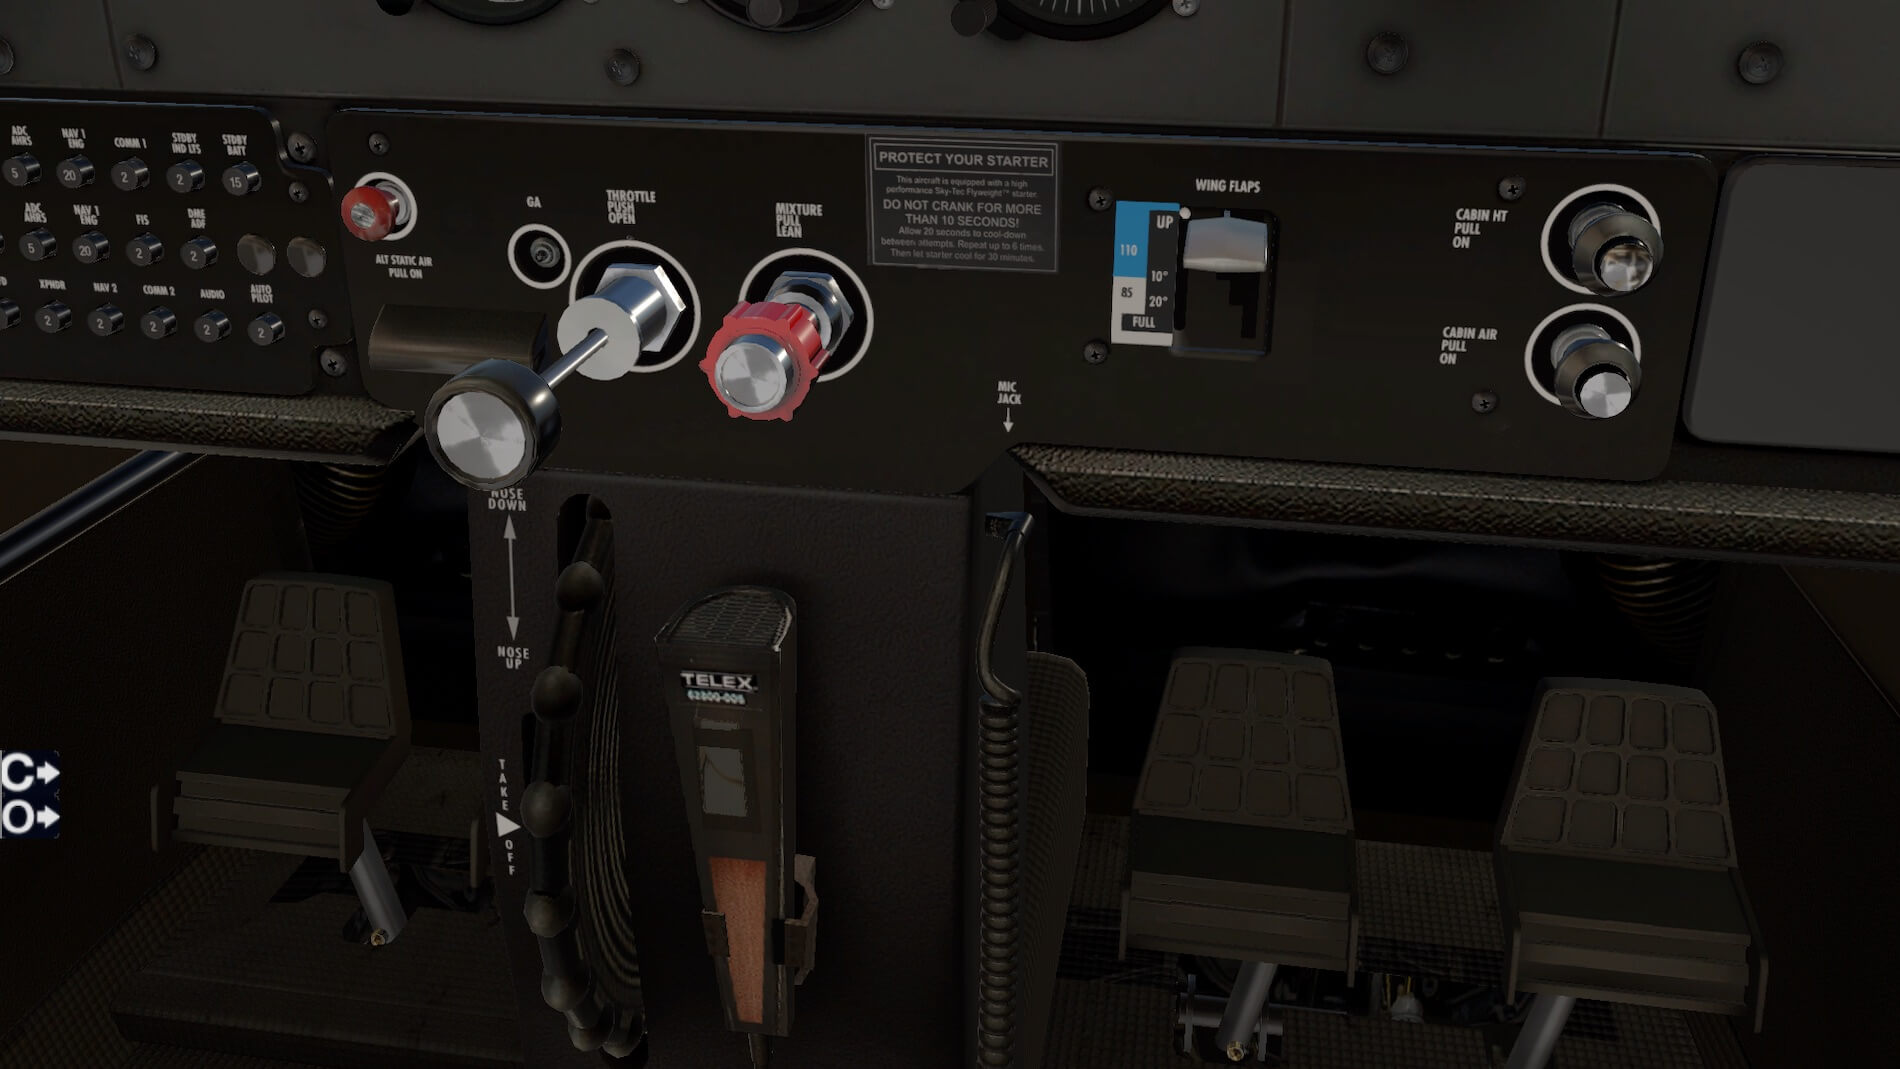
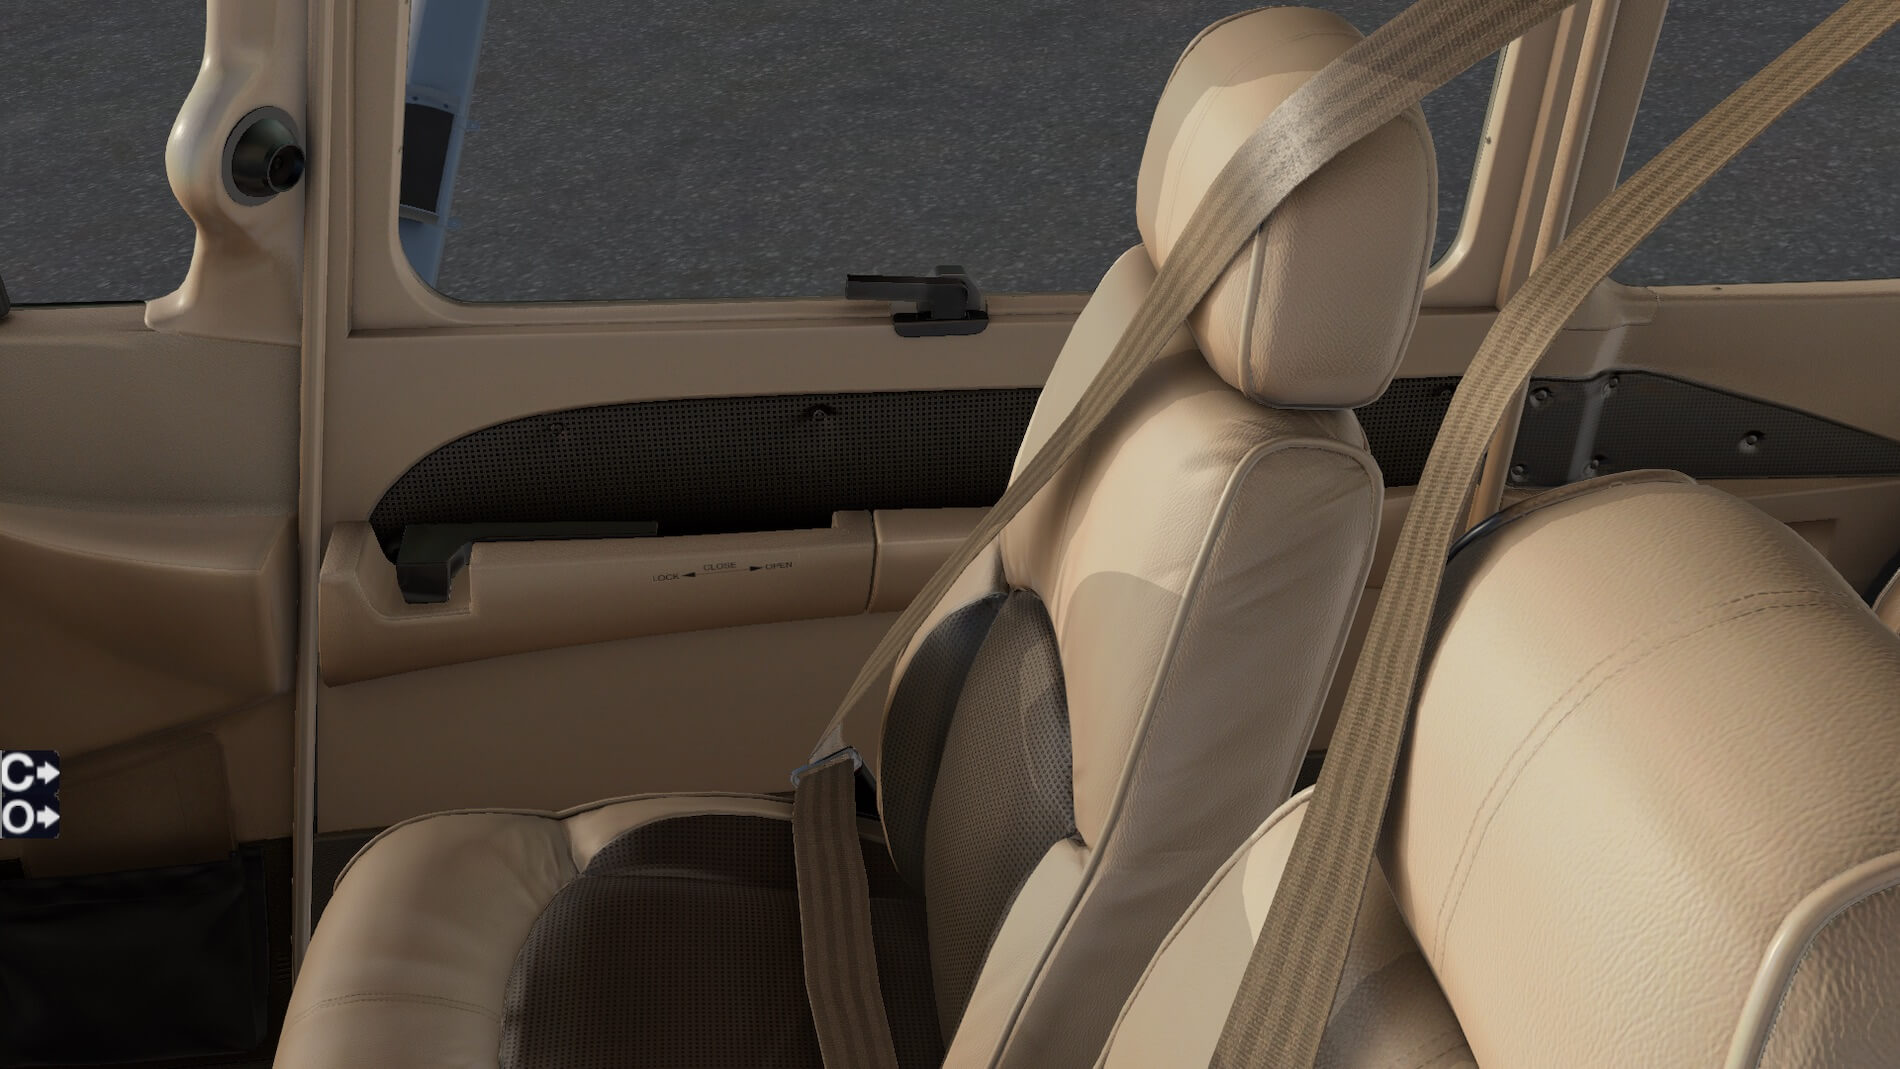


I took as closer look at the light switches and circuit breaker panel; the throttle / mixture controls with the trim wheel below; a look at the copilot seat (the seats look like a brand new aircraft!); the rear two seats, similarly pristine; the rear window; the front window with visors deployed- each can be deployed individually; and the storage compartment behind the two rear seats. This modeling is very well done- I can almost smell the newness of an aircraft just arrived from it’s delivery flight!
Systems
As mentioned before, the C-172 is purposely a simple aircraft. Other than brake lines there are no hydraulic systems, no APU and no fly-by-wire, all of these are superfluous to it’s mission of basic VFR and IFR training. Fuel is stored in two over-head wing tanks and gravity fed into a valve assembly where either tank- or both- or neither tank (off) can be selected. The usable fuel load is 53 US gallons which at 10,000 feet and 45% power provides a range of 6.72 hours, equating to 638 nm.
The power plant is a Textron Lycoming air cooled four-cylinder, fuel injected engine generating 180 horsepower at 2700 RPM. It drives a two-bladed, one-piece, fixed pitch Aluminum propeller.
By far the most complexity in the aircraft is contained in the Garmin G1000 avionics suite. Although I have flown this aircraft that has the G1000 fitted I used a subscription at Sporty’s to view a sample instrument flight with the G1000 that explored some of the advanced features, including the V-NAV function, creation of a TOD based on a vertical profile, and the FLC (flight level change) function.
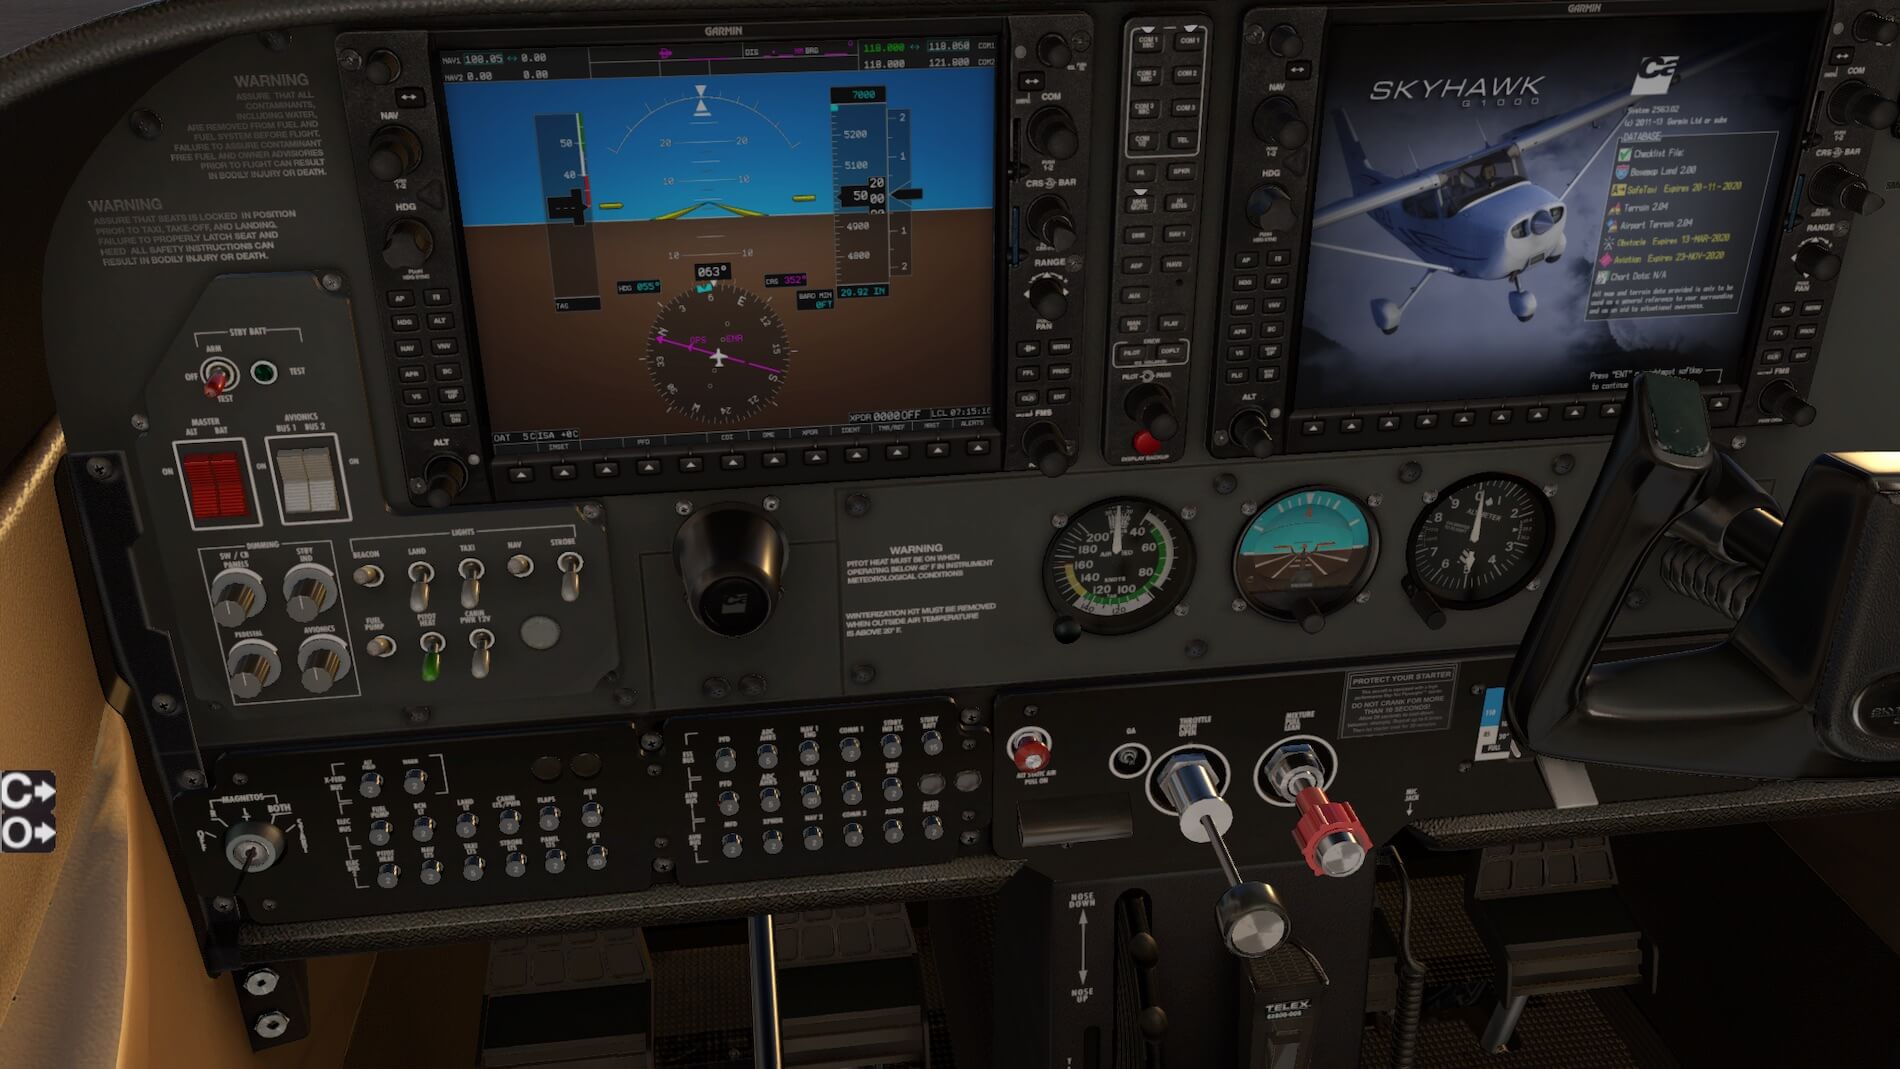
While the basis of the G1000 is the LR stock version (which we all have access to), with some added overlays and logic, I found that the basic functionality in this aircraft largely matched that of the “real thing”. There are some exceptions to this, mostly in the button / soft key sequences. Carenado have done some neat stuff with added overlays and logic, including the PFD screen colors, and wrapped it into the SASL plugin, which also draws the popup PFD / MFD.

This platform will allow for future development of the G1000, especially with more complex aircraft, while having the base functionality kept current from LR updates. At the previous screenshots I tried to show you the following; the upper screenshot is of the LR C-172 G1000, the lower screenshot is that of the Carenado model on the right.
Sound
I liked the wind noise, and the engine noise is also well done- although a faint indication that the sound is looped can be heard. The stall horn is realistic, as is the flaps motor.
Flight Experience
For the flight portion of this review I have chosen a routing between two airports close to my home town in Colorado, and which I have flown to and from many times. One- Denver Metro airport, KBJC- is my “home airport” where my flight club is located. My goal is to firstly do a VFR flight to explore the flight characteristics of this Carenado Cessna 172, along with some observations of interior / exterior of the aircraft.
Secondly I plan to do an IFR flight where we can explore the G1000 system in this aircraft.
The VFR flight is from KFNL Northern Colorado Regional, also referred to as Loveland-Fort Collins, to Denver Metro or KBJC. The direct route is 38 miles, so a short flight for a relatively slow but very stable aircraft. I won’t be going into too much depth regarding the flight planning and theory as we want to focus on this C172.
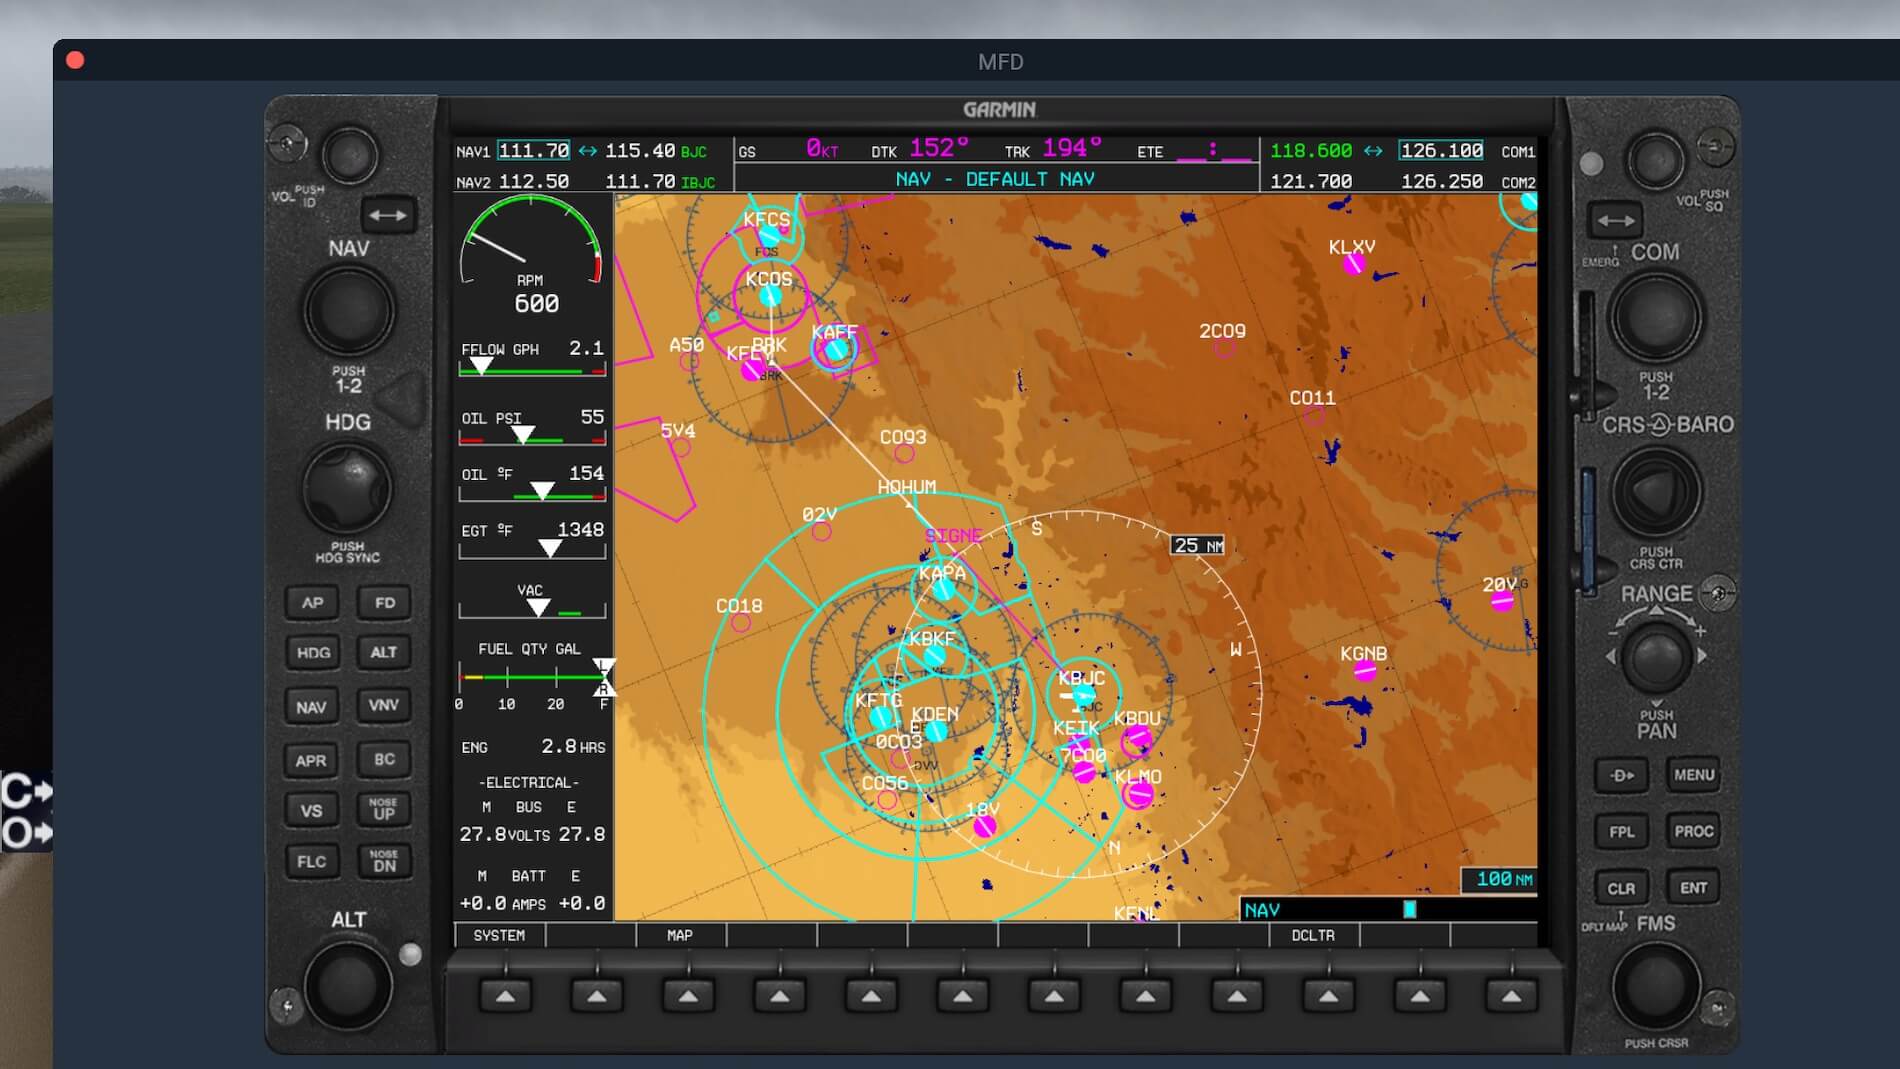
Looking at our Denver VFR Terminal chart we note the following:
- The dotted magenta circle around KFNL denotes controlled airspace (Class E) to the surface at an uncontrolled airport (it’s colored magenta). That’s a warning to us that there may be jet aircraft operations into this airport that are on an IFR flight plan. We also note that KBJC is colored blue (airport has a control tower), and has a blue dotted circle around it denoting Class D to the surface to 8,000 feet. We need to contact the tower prior to entering the area contained within this circle.
- We plan to fly to KBJC on airway V81, a magnetic track of 179 degrees.
- We also note that at approximately 10 miles to the south of KFNL there’s a thin magenta circle that we will cross- it’s called a “Mode C Veil”. This is a 30 nm radius circle based on the Class B airport (KDEN), inside of which we must have a transponder with Mode C (altitude reporting), and have it functional.
- We also note that just north of KBJC we fly under a portion of the Class B airspace, where the floor of that airspace is 10,000 feet. We know that unless we have spoken to Denver TRACON and been cleared into the Class B, we need to make sure that we are below this Class B floor.
- Finally, since we are flying a course between 0 and 179 degrees, we will fly at an odd altitude plus 500 feet. 9,500 feet is too close for comfort to that Class B floor, so we plan to fly at 7,500 feet. We check for obstacles that would penetrate our safety margin- there are none.
I am barely “scratching the surface” on the planning I need to do to ensure a safe VFR flight, including NOTAMs for departure and destination airports, a fuel consumption profile for the flight (from the charts in the POH), runway lengths at departure and arrival airports to ensure a safe takeoff and landing with adequate margins for runway surface conditions, and much more.
But we want to fly, and in the virtual world we can skip some of this. Having watched the weather forecasts and the Terminal Area Forecast (TAF- valid for an 18 hour period and usually very accurate), we are not surprised to see a beautiful “Colorado Bluebird” sky in the morning as we drive to the airport (this is typical of winter weather here, especially following a winter storm). We had previously done our on-line aircraft reservation from the flight club- it’s N1343F, a Cessna 172S with the G1000 panel.
We show the club dispatcher our planned flight, planned fuel on board, and that we have seen the METAR for KFNL and the TAF and METAR for KBJC. We get the keys and the logbook for the aircraft and walk out into the morning sun to see our aircraft waiting.


After unlocking the doors we place the key on the visor so it’s visible outside, enter the Hobbs time into the logbook (which will determine the starting point for our billing today), turn the Master switch on, lower the flaps, check the fuel gauges (although we will visually inspect the fuel tanks as a part of the walk-around), perform an annunciator check, and then turn on all lights for a cursory light and pitot tube heating inspection before turning the Master, pitot heat and all lights other than the Beacon to off. We also remove the gust lock, and commence the walk around.
Referring to the screenshots below: I used the “C” key to decouple the views from the aircraft, so that I can get some good closeup views of the detail on the outside skin of this excellent product.
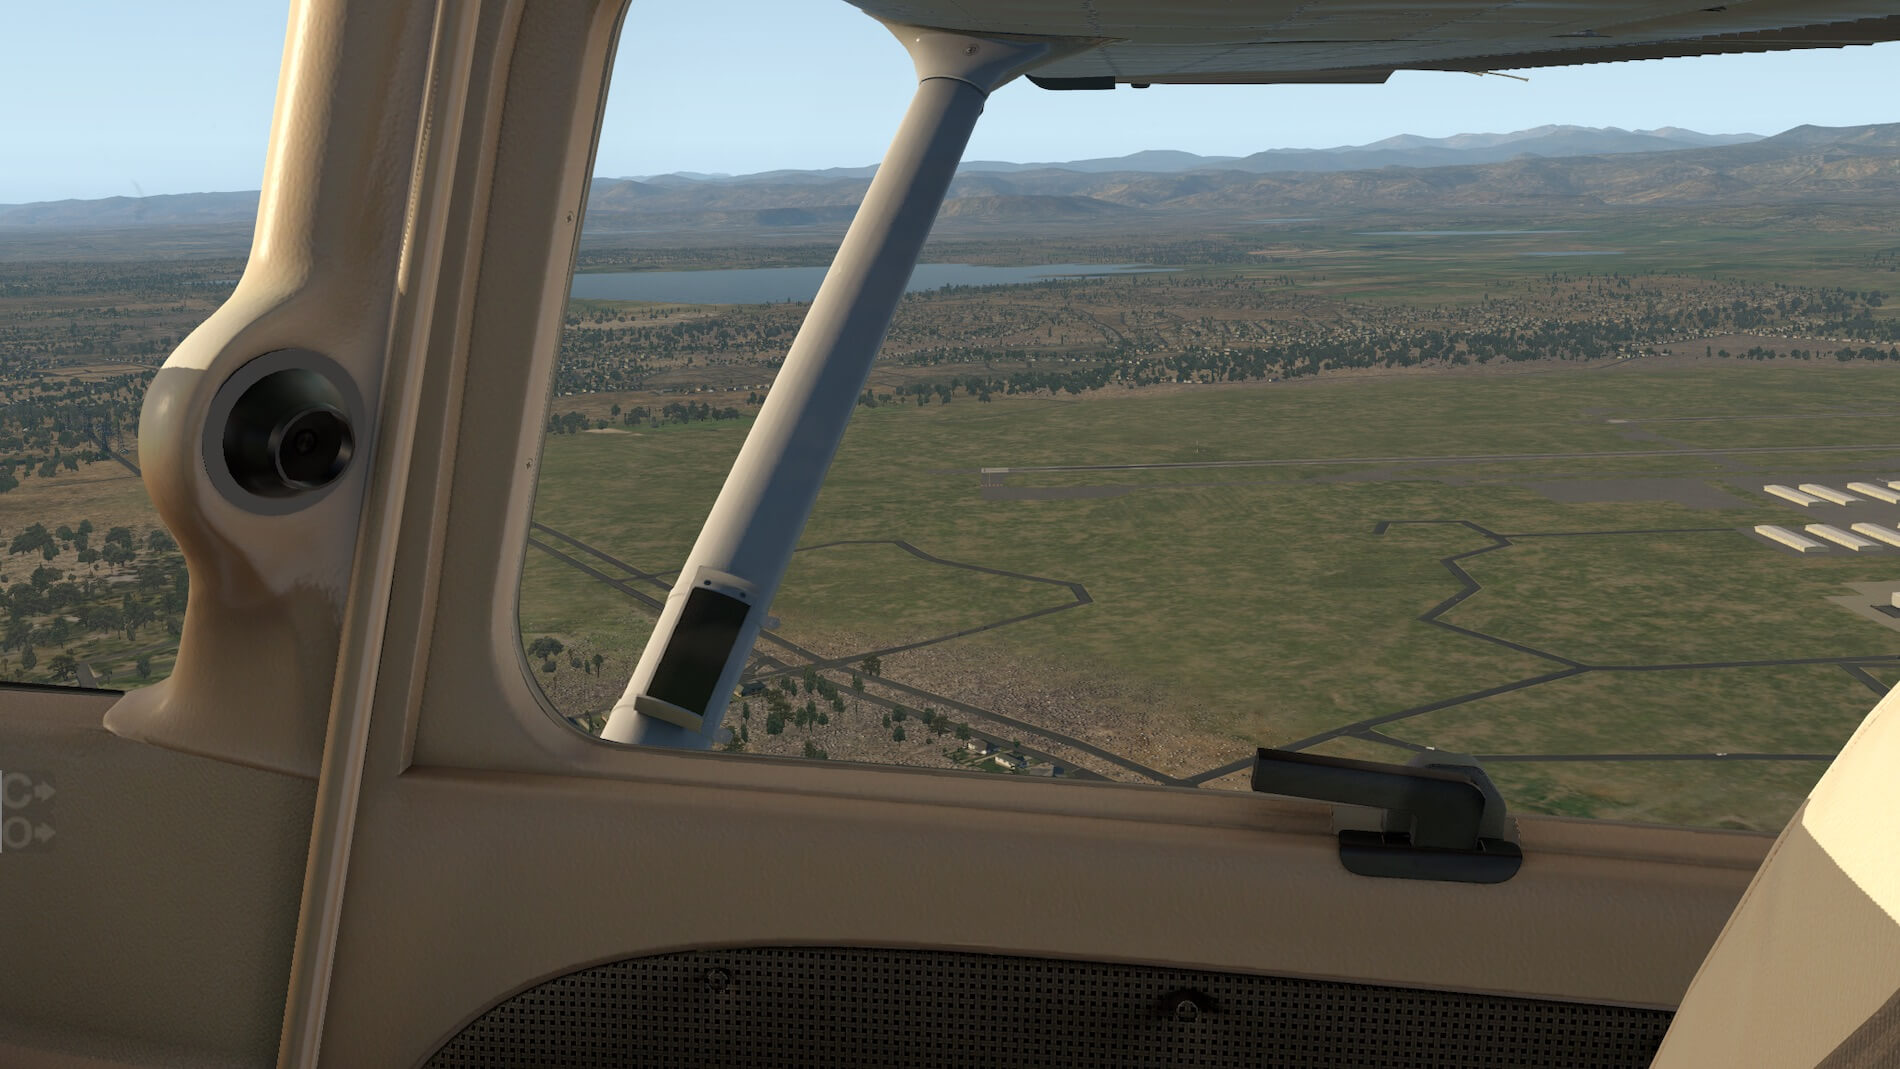
Our first part of the walkaround begins at the pilot’s door and moves towards the rear. Note the detail of the rivets and flaps, the early morning sun makes for some nice lighting effects. Moving to the empennage we inspect the tail-fin and tail-plane, checking for adequate and free movement of the rudder and elevator. Note that we are moving the control surface with our hands- if the gust lock was not removed this might be the first indication where these surfaces would not move. Once again, the attention to detail is evident in the texturing.


Moving forward to the right wing, we ensure that the right flap is securely positioned at “full”, we check tires (with the wheel pants on we may need to push the aircraft slightly to see the total surface area of the tires), we climb using the step and check the right fuel tank for fuel on board, and that the radio antenna and fuel cap are secure, and check the oil quantity and condition through the flap above the engine.


On the left side, ahead of the pilot’s door, we check the static port that vents air from the airspeed indicator and provides the air source for the altimeter and vertical speed indicator, we check left aileron movement (as we did previously on the right wing).

After a final walkaround to ensure that all tie-downs are removed, we step into the pilot’s seat of the aircraft. All is “cold and dark”. We turn on the Alternator and Battery switches to apply electrical power to the aircraft, while turning on the NAV lights so that anyone can see that we now have power applied. The PFD becomes alive in it’s startup mode which shows the RPM and other engine data on a strip to the left (this is normally displayed on the MFD).
We then check the throttle and mixture are off, turn on the fuel pump and then advance the mixture to prime the motor. You will see the fuel flow registering at 0.9 GPH. We then return the mixture to off and turn off the fuel pump.
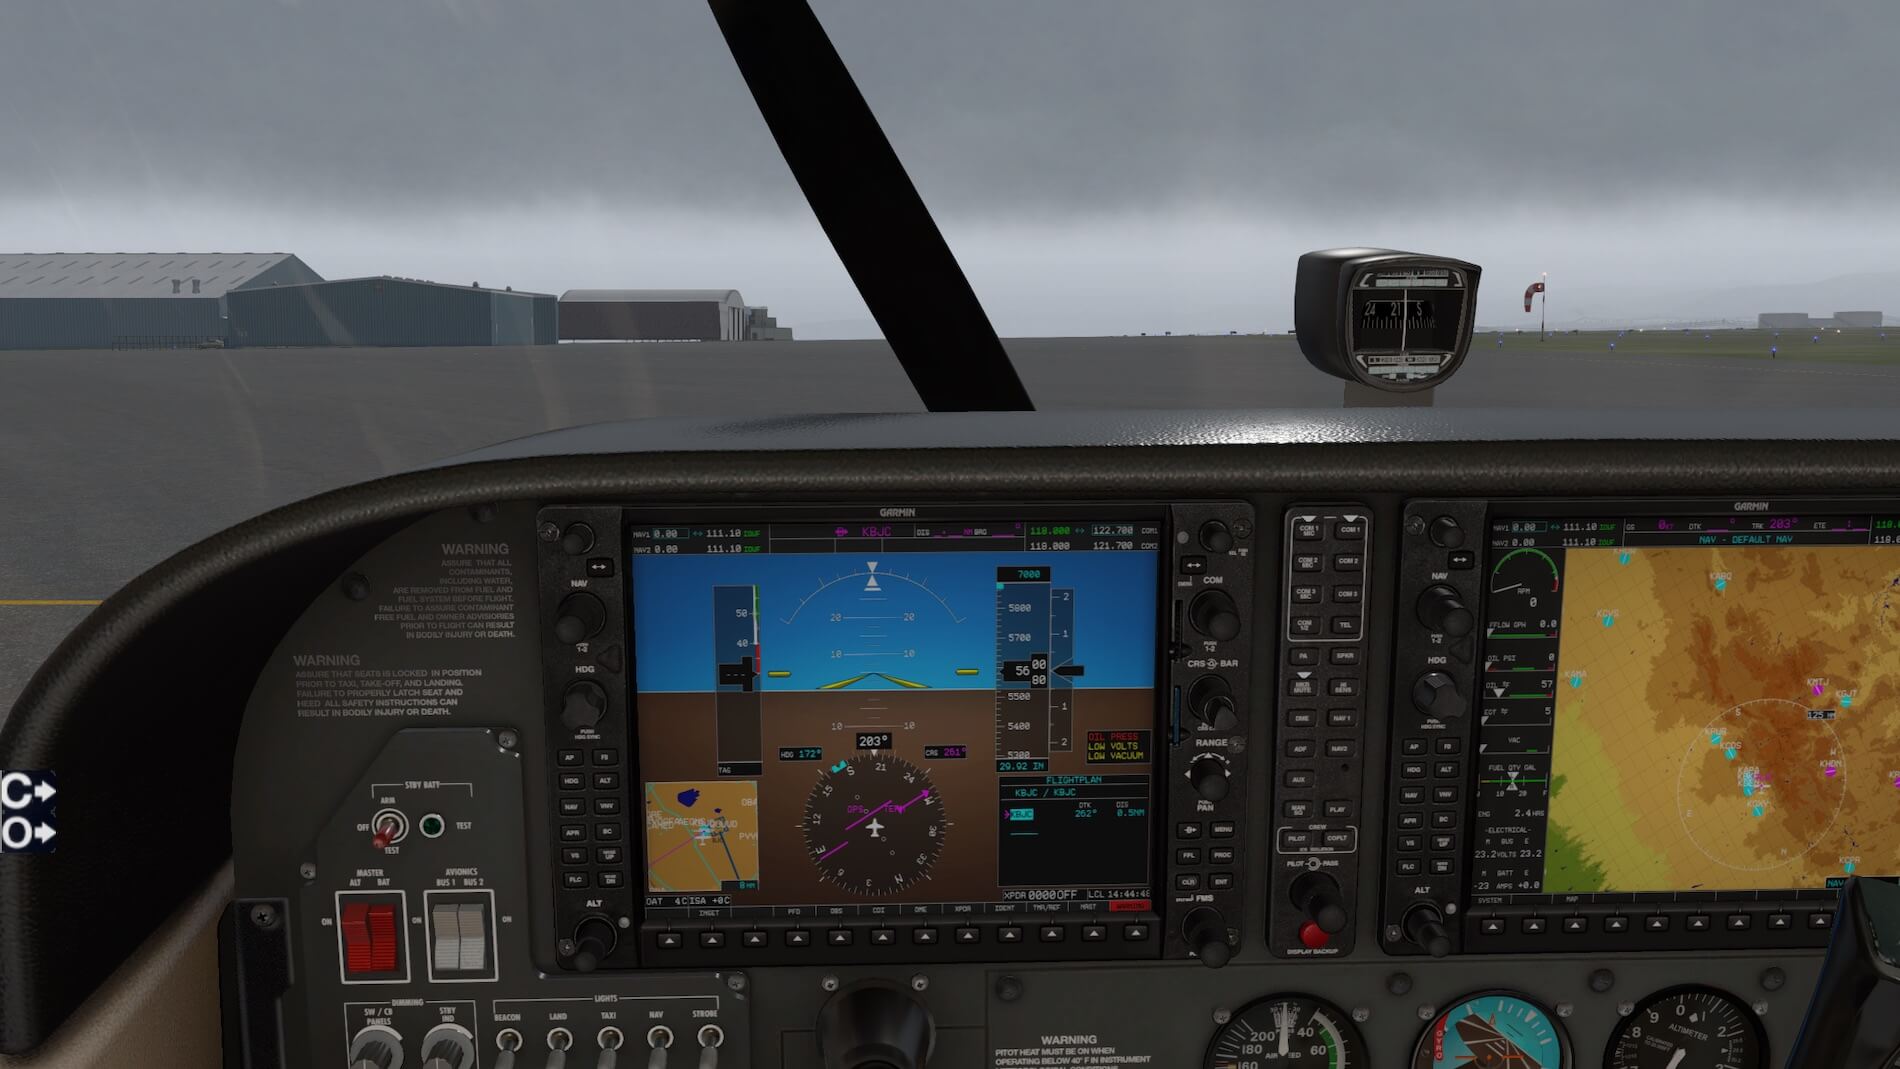
We crack the throttle and turn the key- the engine coughs and comes alive, and we quickly move the mixture to full, and reduce the throttle to keep engine RPM to at or below 1,000 (the engine is still cold, and we don’t want too much prop wash throwing stones around in the parking area). We now turn the avionics switches to on (we do that now to avoid electrical impulses when the engine was earlier started from reaching the avionics). You will note that the strip on the left of the PFD showing engine and RPM data has now disappeared. We finally activate the MFD by the right most soft key, where we see a map and the engine data strip again.
We are now ready to taxi. We want to minimize what we do here in the parking lot- we are making noise from the engine and someone could walk into our prop. But to know which way to taxi for runup and takeoff we need the current weather. We tune the local AWOS on COMM 2, 135.075, indicating no wind, and we know the calm wind runway is 33. We also get the current altimeter of 29.95, a little higher than a standard day. Taxi light to on, we use enough throttle to get the aircraft moving and check brakes. We taxi to the runway 33 run-up area.
I’m not going to talk about runup other than to highlight entries we make on the G1000 platform. We dial the CTAF (local aircraft frequency) for KFNL on Comm 1 and make it active, 122.7. We enter the KBJC Tower frequency on the Comm 1 standby, 118.6, the CTAF frequency for KFNL is already set as active.
On Comm 2 we enter the KBJC ATIS as the active frequency, 126.25; and KBJC Ground on Comm2 standby, 121.7. We enter the BJC VOR into NAV 1 and 2, and make it active, 115.4, and set the course to 179. We also ensure our Transponder is on, in Mode C altitude reporting, and squawking 1200 (VFR). We set the autopilot altitude knob to 7,500, we won’t use the autopilot on this leg but use the altitude setting for the audio annunciation.
We also set the heading bug for 179. You may note that I have positioned the aircraft for runup with the nose angled towards the approach to 33- that’s because I want to keep a good lookout for approaching traffic.
I always use a shortcut for setting the mixture when not at sea level. In the run-up at 1500 RPM I adjust the mixture for highest RPM without touching the throttle- it means that the engine is developing as much power as is possible at that elevation. I also check that the trim is set for takeoff, and that the fuel valve is set to ”both” (it should always remain on “both” unless some type of fuel issue is encountered).

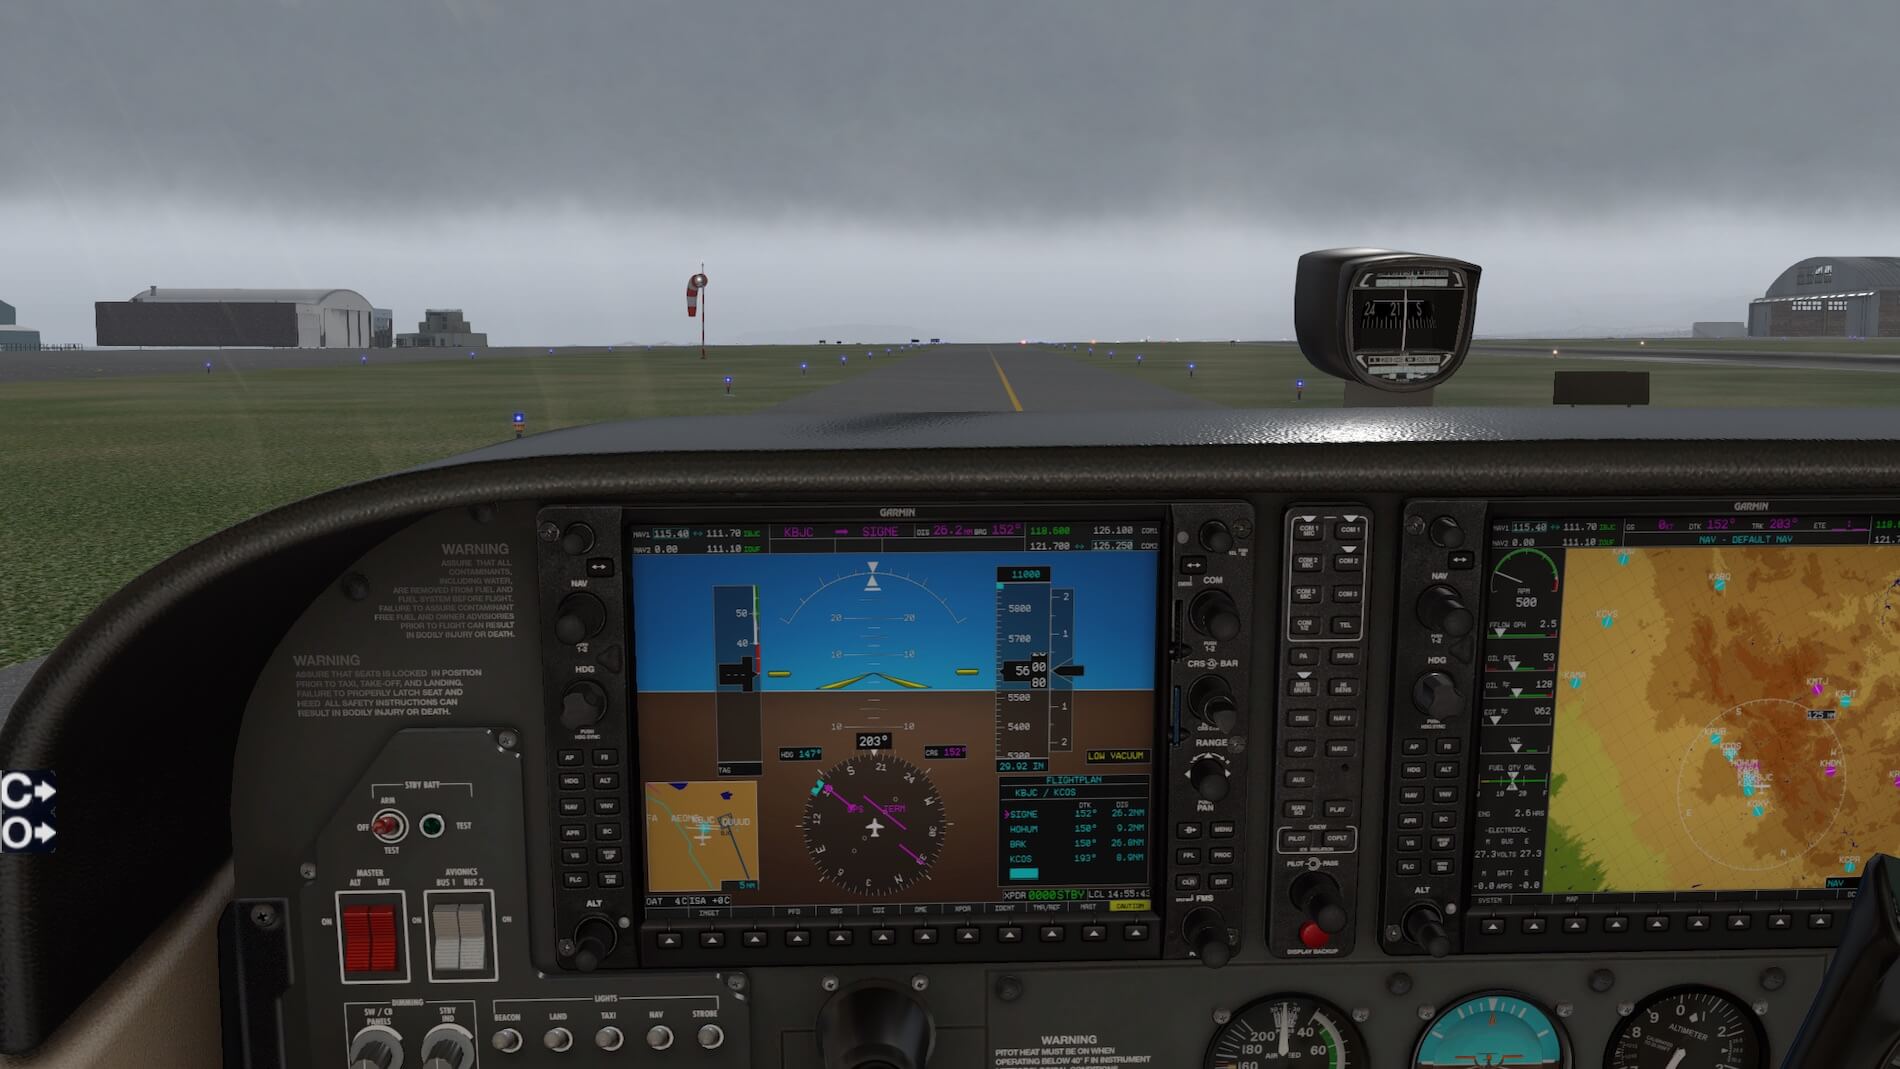
We check left and right for approaching traffic, or traffic on the runway, and seeing none we announce “Fort Love Traffic, Cessna 1343Foxtrot entering runway 33 at Alpha 1 for departure to the south, Fort Love”. Strobe lights on, a final check and we are lined up on runway 33. One final touch- I start the timer so I know elapsed time- this is not an IFR flight so timing is not critical, but if we get lost and the map function has an issue on the G1000, it’s comforting to know how long we have been flying and be able to determine our position.
Landing light to on, Here’s the part where we will review the performance of this C172S.You will also note that I have reduced the intensity of the Camera and Options popup icon to the lower left of the screen- by scrolling the mouse while the pointer is over one of these you can soften or even eliminate them.

At around 60 knots we feel that the aircraft wants to fly. We pull back on the yoke and the aircraft lifts off easily, accelerating since the friction of the wheels with the runway has now disappeared. We shouldn’t turn from the runway heading until at least 400 feet above, and beyond, the departure end of the runway (DER). We turn crosswind to the left as this airport has a standard left traffic pattern, and reduce our RPM for a cruise climb.
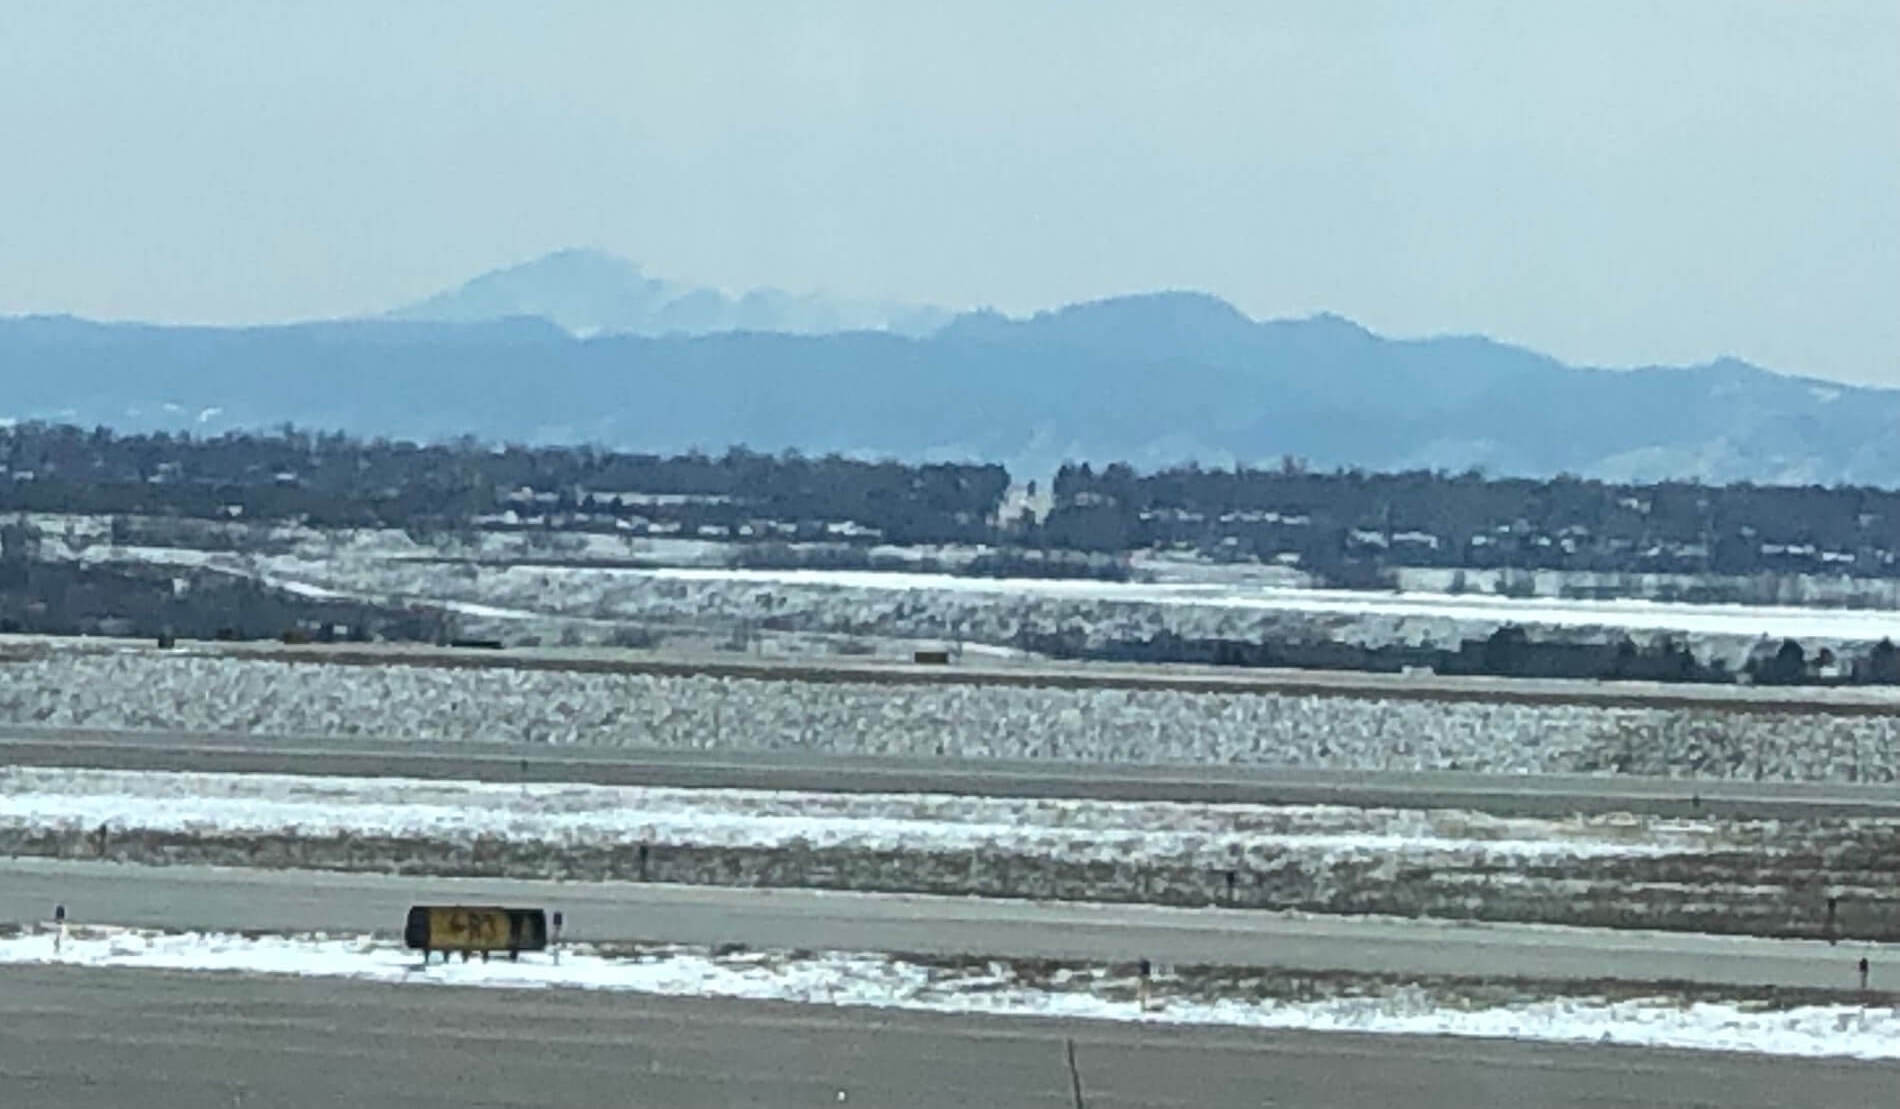
The nose drops with the power reduction as the aircraft seeks the speed that it’s trimmed for- and ahead we see Long’s Peak, the most northern “fourteener” in Colorado. We announce our south-bound flight again, in case any traffic is incoming from the south but was too far away to hear our departure call from the ground.
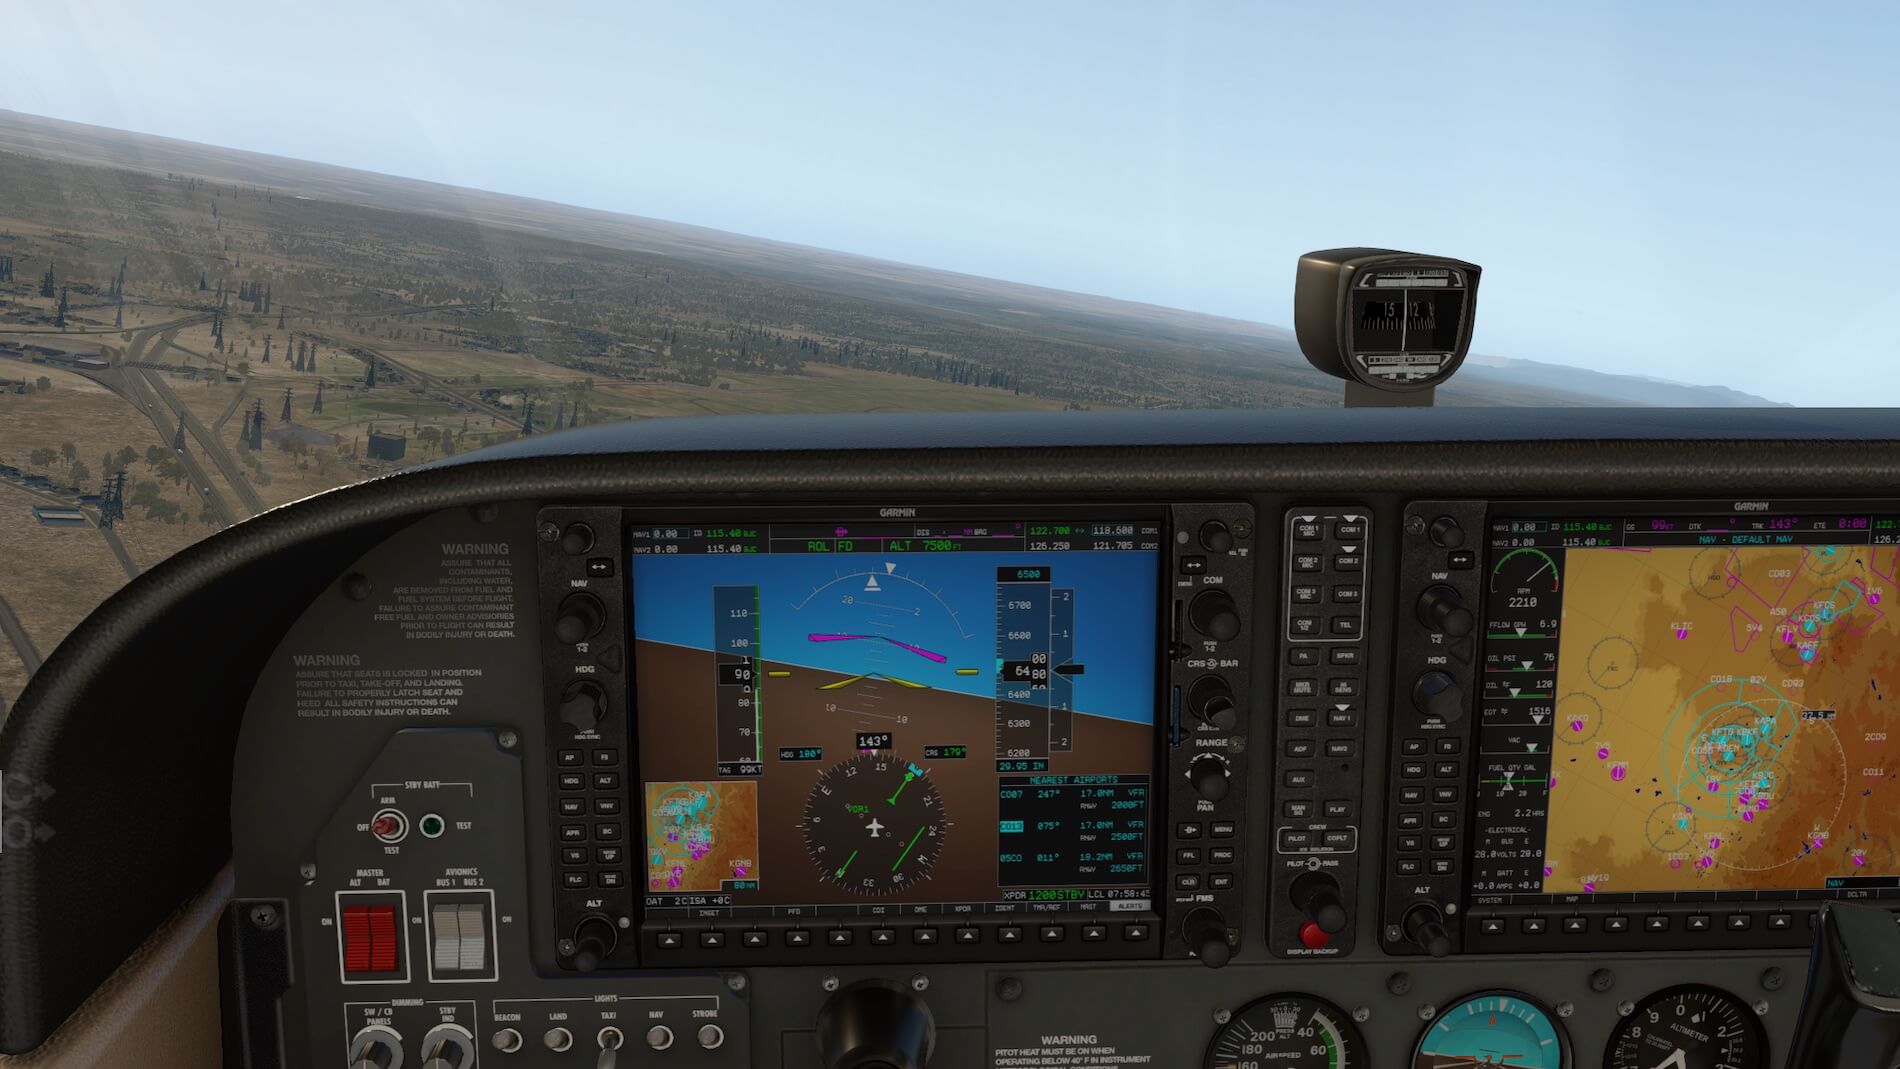
We then fly an intercept heading for our 179 degree track to the BJC VOR, while still climbing to our planned cruise altitude of 7,500 feet. We intercept the 359 radial (179 track), and once at cruise altitude we reduce the throttle to 2200 and trim for level flight- this combination will give us a 90 KIAS speed. One thing we need to remember- our track is 179 degrees inbound to BJC, and so we fly at an odd altitude plus 500 feet.
But turn to the right just 1 degree and we would fly at an even altitude plus 500 feet. Whether southbound traffic on our airway are at odd or even altitudes doesn’t worry us, but it would be a problem if we encounter northbound traffic at our altitude- so our eyes are busy looking for visual clues of other aircraft. In real life, on this track, I would probably request Flight Following from ATC for a VFR flight.


As mentioned before, I always set up my own quick-look views. I set up one for the left under-wing view to show the superb texturing on the wing, and a right hand view that assumes I am leaning over the right seat to get a better view. The Rocky Mountains are in the distance to the west. We take a quick look again at the interior of the aircraft- although a 4-seater, at these altitudes in Colorado unless the back seats are occupied by children it’s really a 2-seater. Ample room for storage is also provided behind the rear seats and accessible through a separate door.

A look at the throttle and mixture controls- note that the trim wheel is still very close to the “takeoff” position. Looking out the front windshield I can see the Flatirons coming up on the right, so it’s time to get prepared for landing. But first some outside screenshots of the aircraft, the morning light reflects off the textures and highlights the detail put into the model.
I have purposely flown this leg without the autopilot as I wanted to see how stable the flight model is. The altitude, RPM and airspeed have changed slightly which is realistic. After all we are not on a “magic carpet ride”, we do have to fly the airplane. But even with those slight changes the aircraft is as close to being stable as I would ever wish to see.


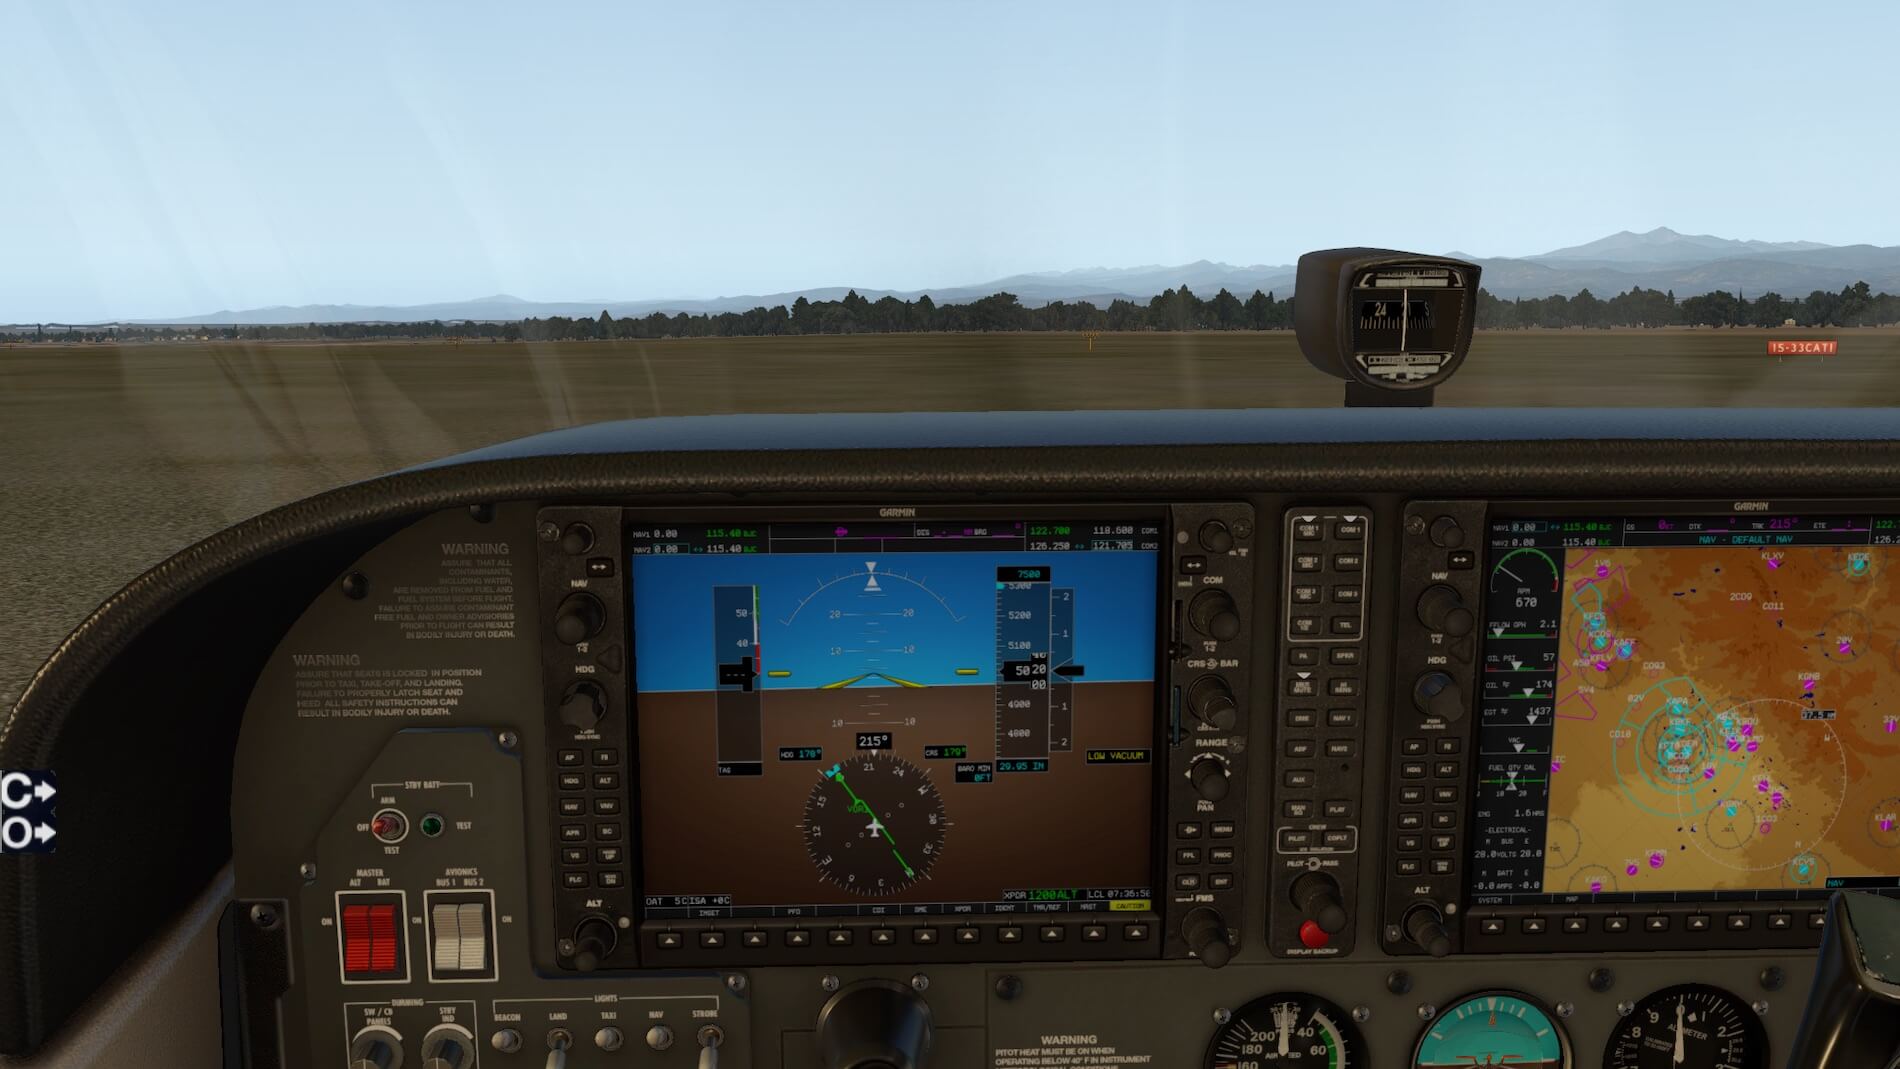
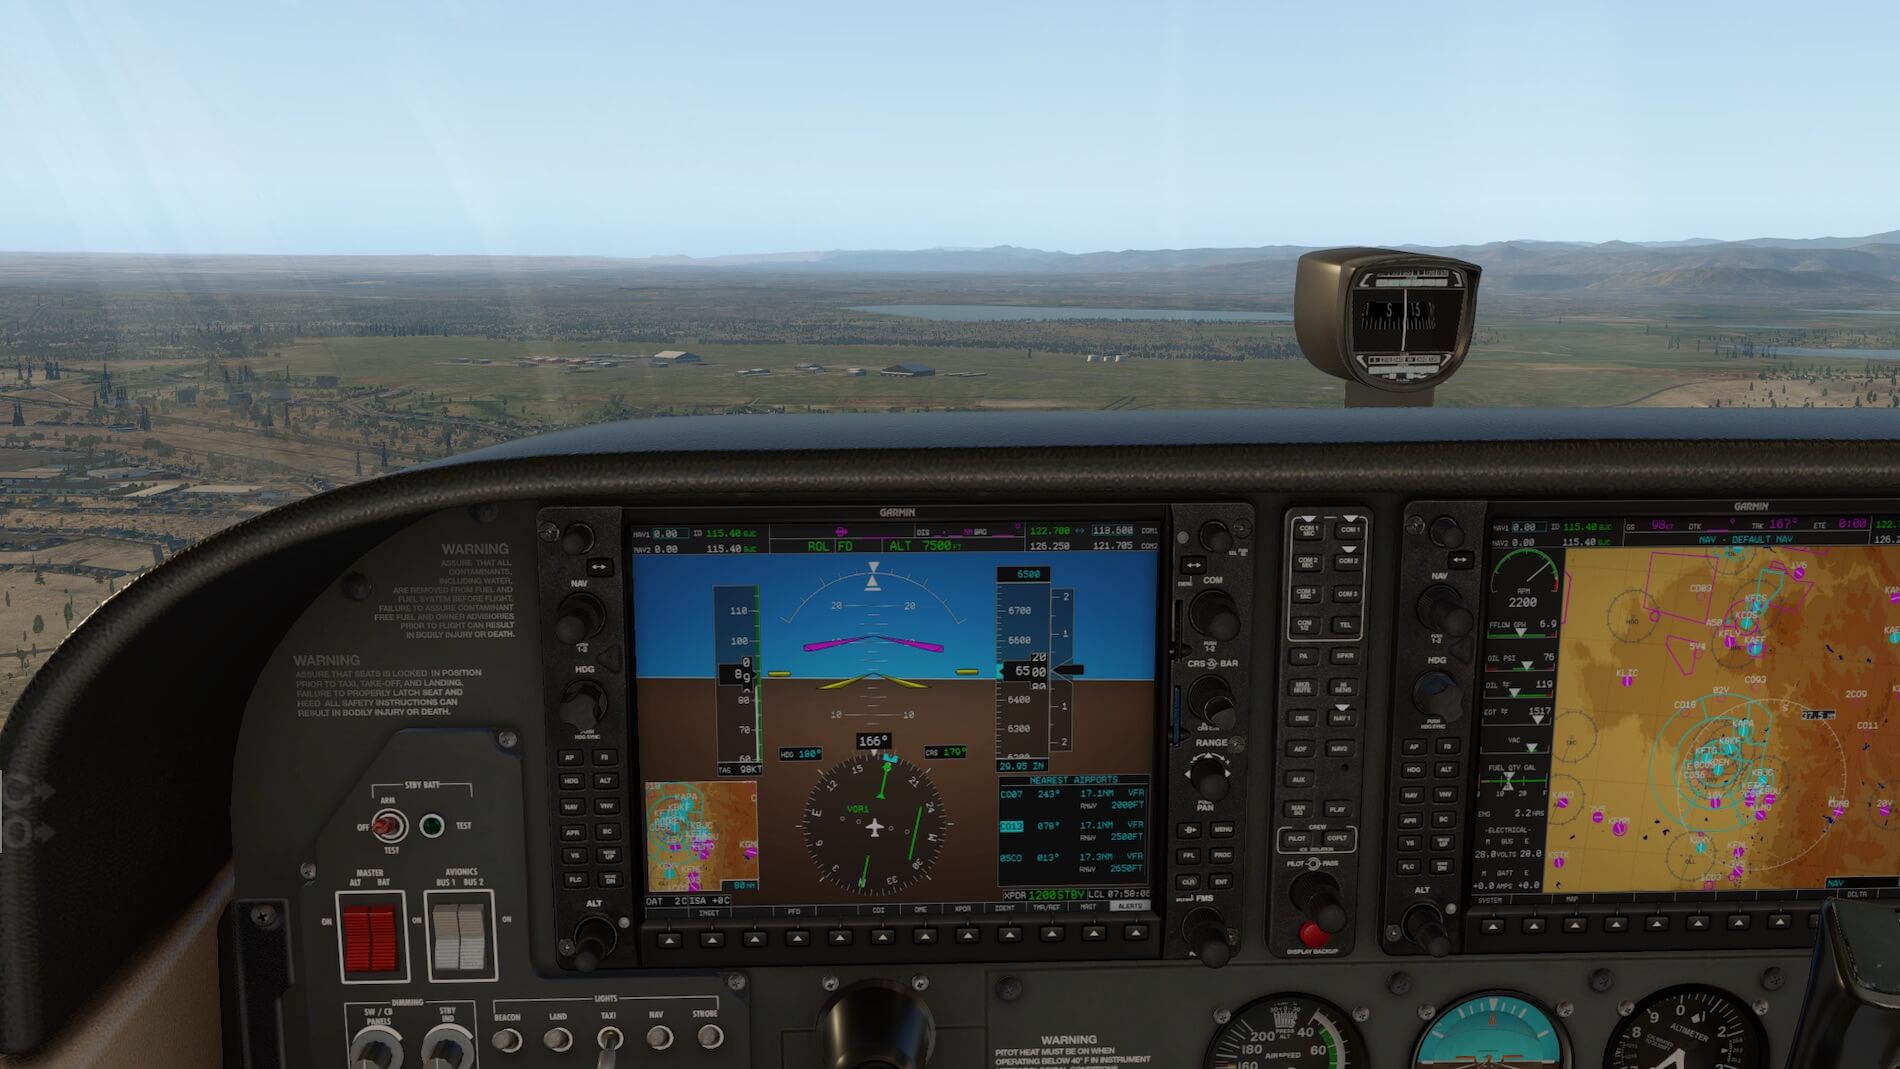
We select the NRST function on the PFD, and scrolling down we get to KBJC, we’re 11.8 nautical miles (nm) from the airport. The NRST function also tells us the Tower frequency, that there is an ILS and the longest runway is 8,980 feet in length. We select Comm 2 to listen to the KBJC ATIS Zulu- they are landing on 30 Left and Right. We note that the altimeter setting and all other weather variables are identical as they were at KFNL when we left. The standard lateral size of Class D airspace is 5 statute miles- that’s 4.6 nm.
We are 11.8 nm out, but controllers like lots of notice so we call the Tower “metro Tower, Skyhawk 1343F is 11 north at 7,500 feet, inbound with Zulu, full stop”. Tower replies “Skyhawk 1343F, make right traffic for 30 Right”. We acknowledge.


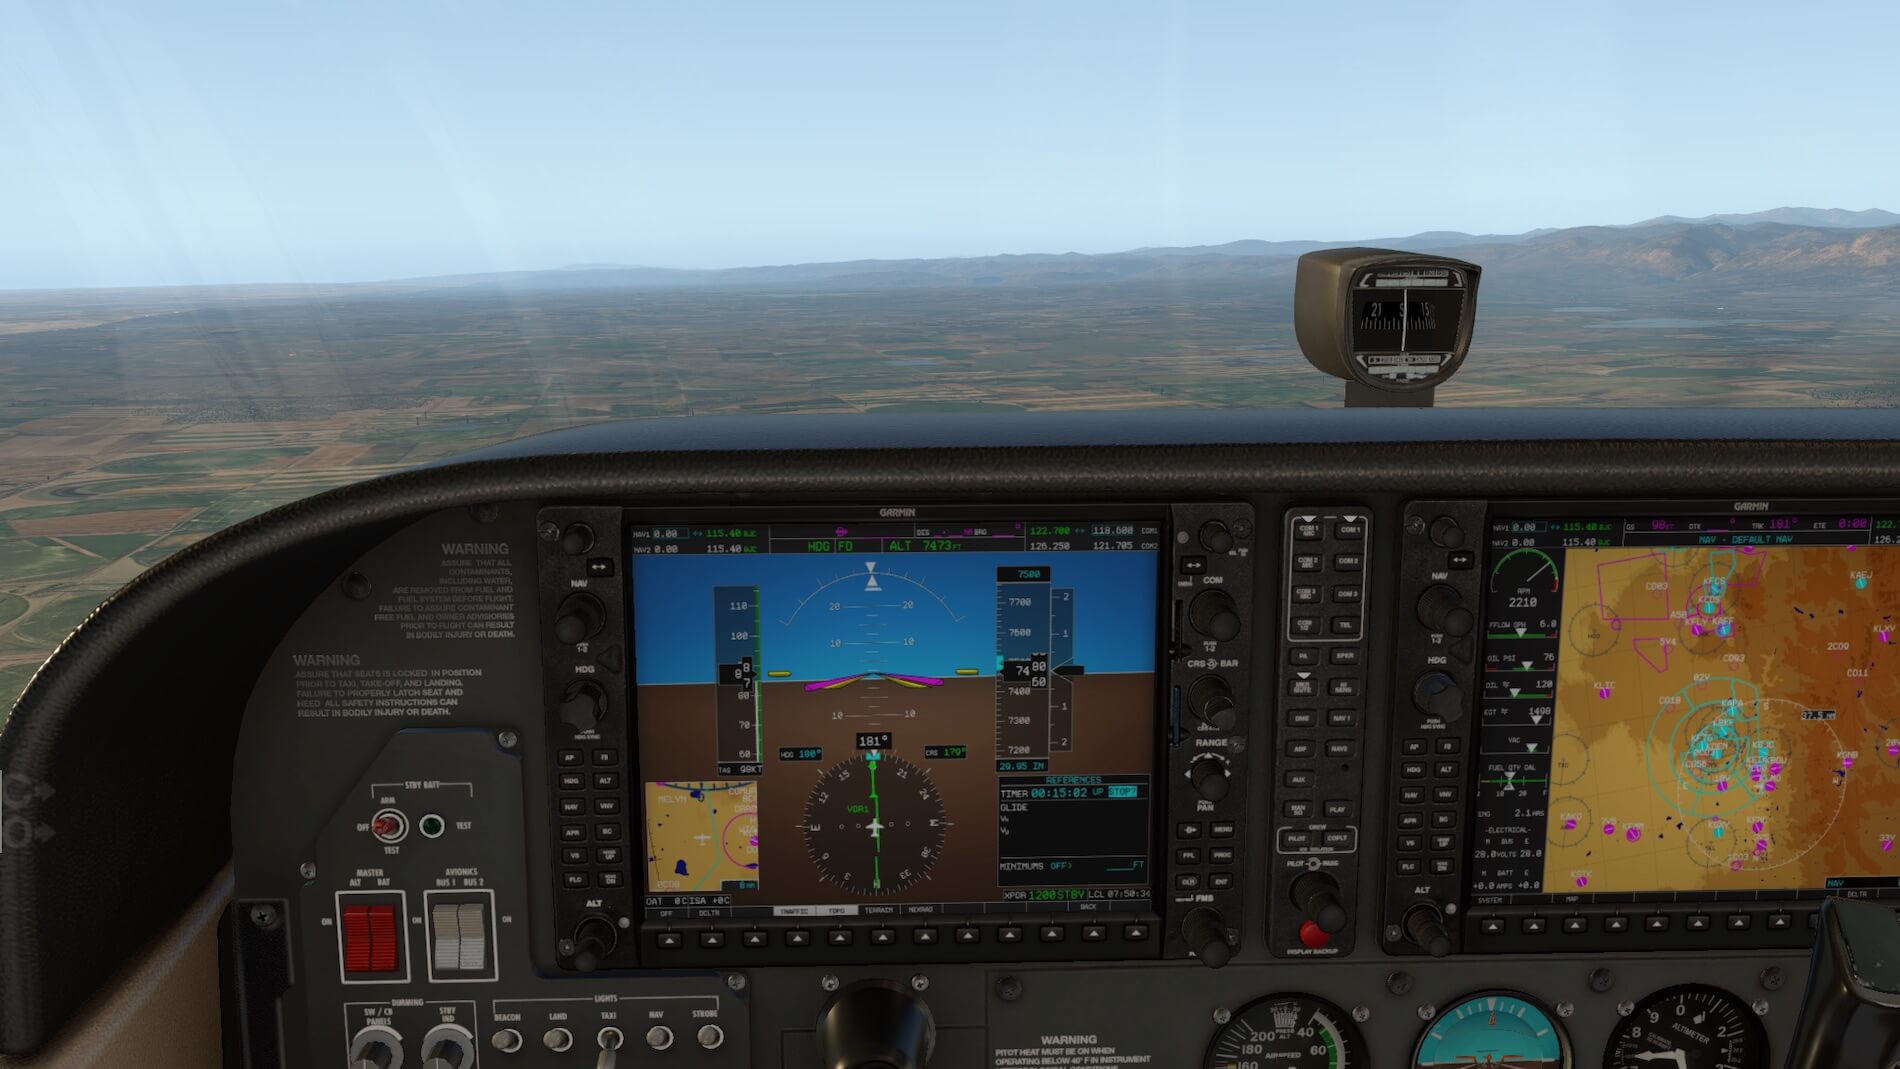
It’s time to descend to the traffic pattern altitude- for small aircraft like ours it’s 6,500 feet MSL. Without touching pitch we reduce RPM to approximately 2000, the airspeed oscillates up and down but eventually settles at very close to the 90 knots that it’s trimmed for- the aircraft will always seek the airspeed that it’s trimmed for unless there is a configuration change, such as flaps.
When close to 6,500 feet we reset the RPM to 2200 and the aircraft levels out nicely. Note that I haven’t changed trim or made any large changes to the yoke. We approach the airport and change heading towards mid-field. Once over the US-36 highway we turn left to downwind on heading 120, while maintaining 90 knots and 6,500 feet.

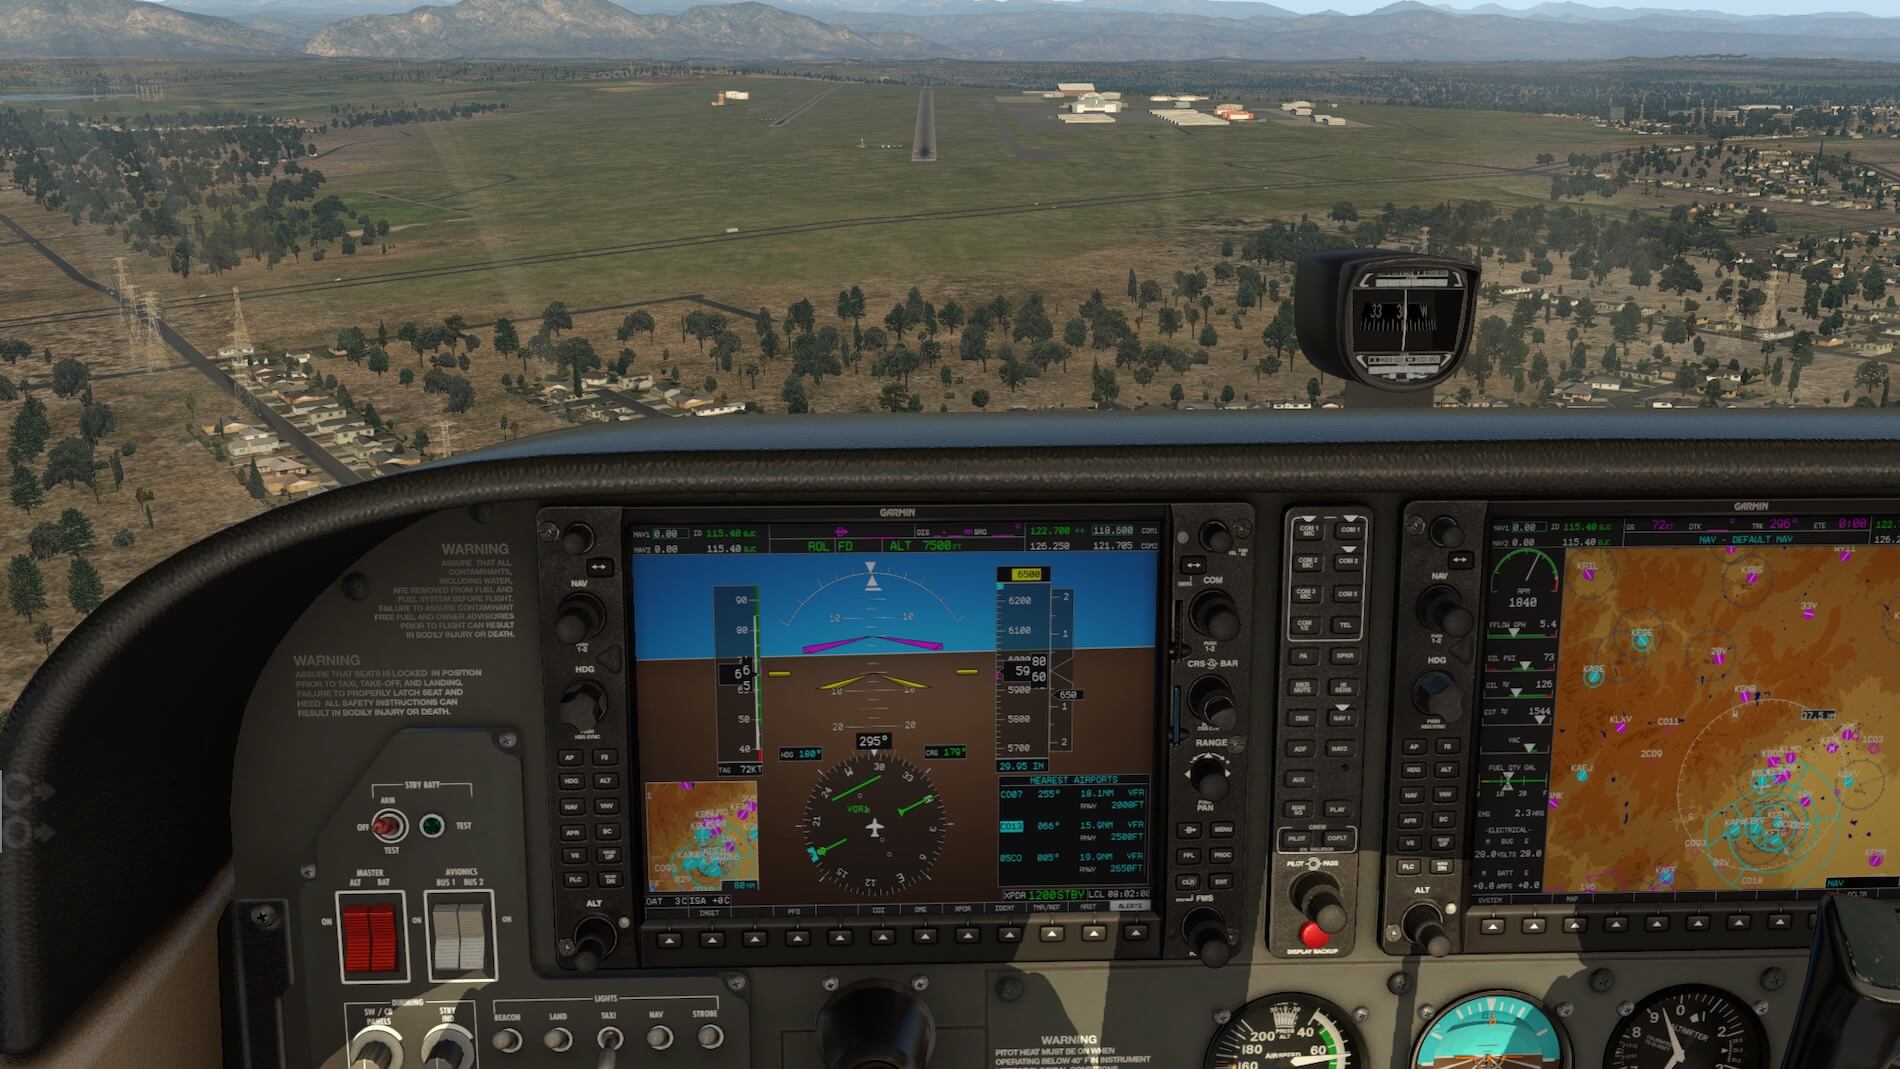
We check when the right wing is abeam the end of runway 30R, reduce RPM to 1800 and apply the first notch of flaps. Turning base we add the second notch of flaps, the aircraft is now seeking an airspeed of 66 knots due to the configuration changes of adding flaps. The Tower calls “Skyhawk 1343F, cleared to land on runway 30 Right”. We acknowledge.
We roll out on final to runway 30R and all looks good. Here we need to start making trim, power and attitude changes. We do our “GUMPS” check (Gas valve on “both”, Undercarriage down and welded, Mixture set, Propeller fixed, Seatbelts).


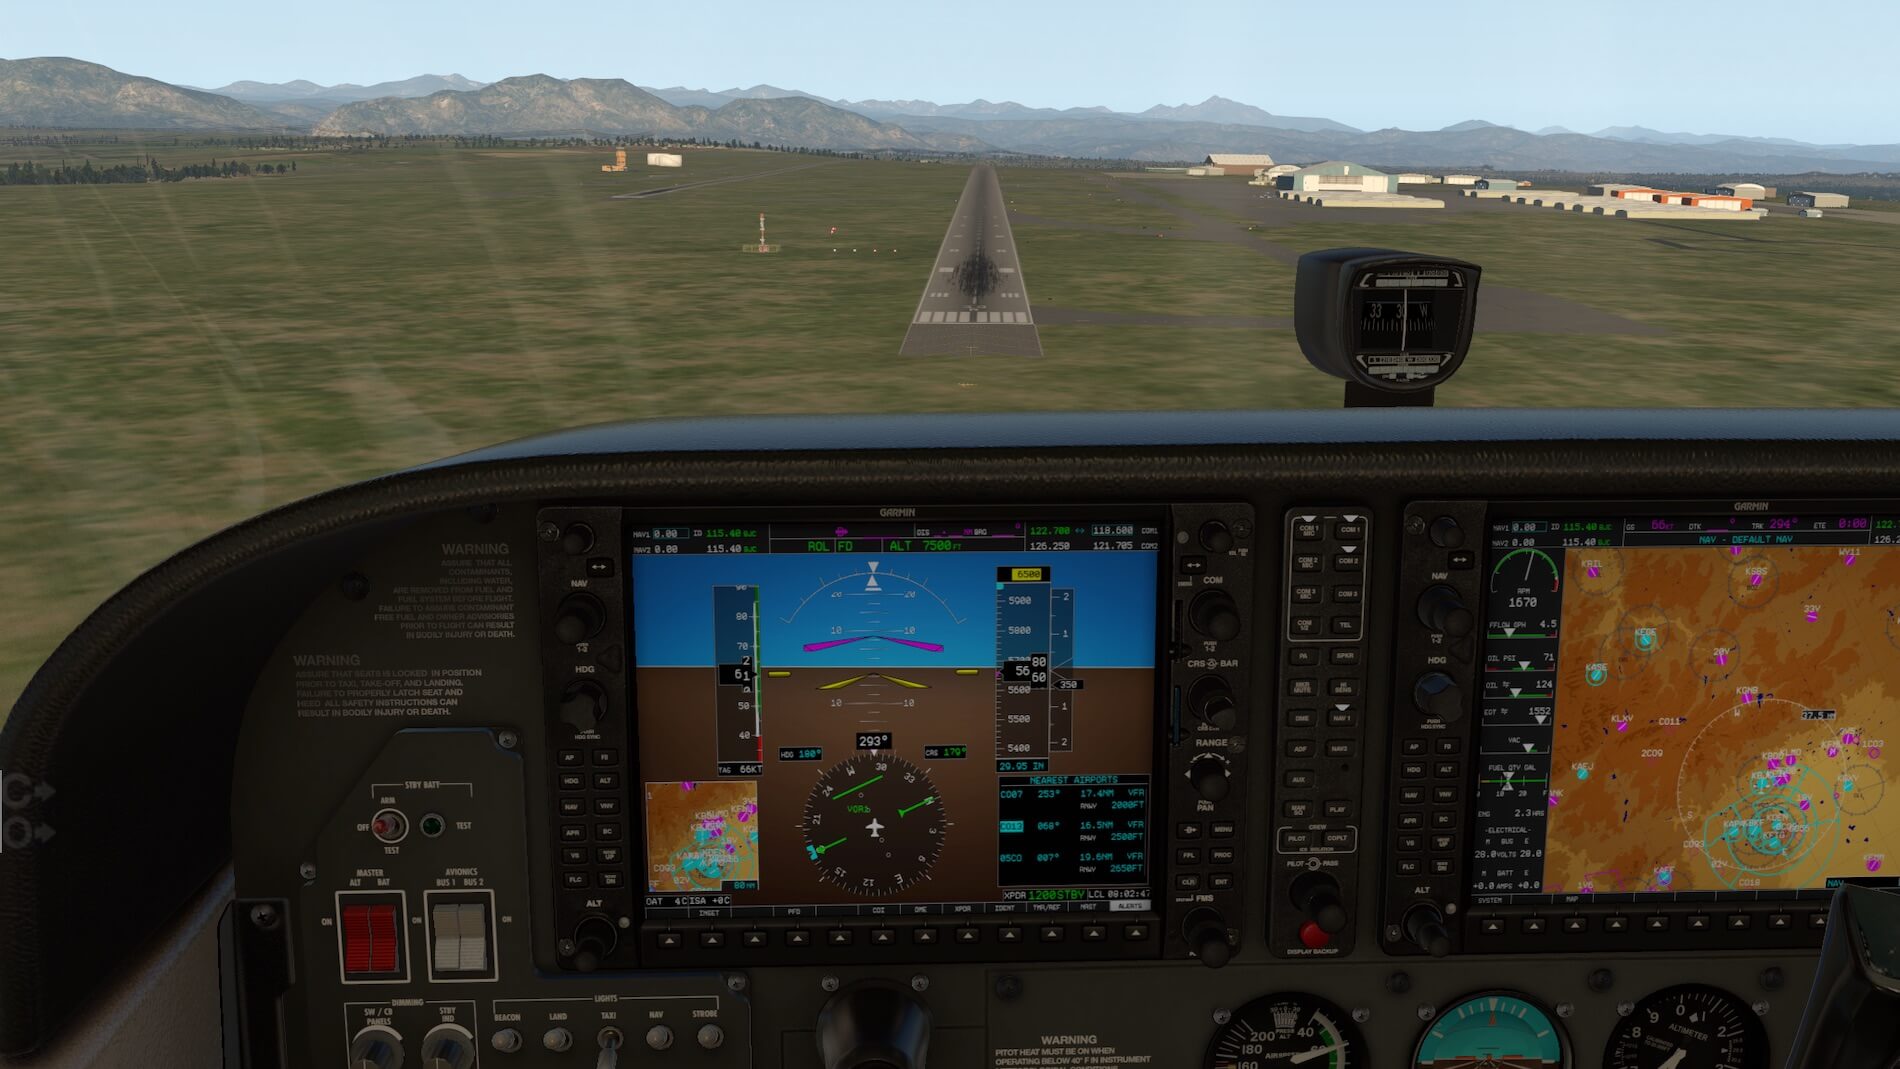
Touching down we plan to exit at Alpha 4. As we cross the hold short line Tower asks us to call Ground on “point seven”- that’s a shorthand for 121.7, since many ground frequencies at towered airports start with “121”. We change frequency and tell Ground that we are at ‘alpha 4” and request taxi to McAir Aviation. Ground clears us for the taxi.

In summing up this very simplified VFR flight, the aircraft has behaved as I would expect, Cessna 172’s are not known for their speed or agility, but they do excel at their stability and predictability- just what a student pilot needs!
Finally, just to add some real photos of KBJC (my home airport), one of the Tower and one looking north-west to Long’s Peak, part of the Continental Divide.

Instrument Flight
After dropping off our friend at KBJC, we relax for a bit, have some coffee and join in on some “hanger talk”. Soon it’s time for our second leg, on to Colorado Springs KCOS. The weather has changed- a Canadian cold front has arrived in the area and there is low cloud forecast for our flight which will call for an instrument flight plan. While the flight down from KFNL was over mainly rural country and outside of the KDEN Class Bravo, we’re about to track through a great deal of Class Bravo, be closer to KDEN, and KCOS is a Class Charlie (Class C) – for which we will need to make contact with Springs Approach prior to contacting the Tower.
This also makes it better to be flying on an IFR flight plan. Of course, we knew all of this yesterday, having meticulously looked at weather forecasts for today, and we had filed an instrument flight plan to KCOS last night: KBJC-SIGNE-V81-BRK-KCOS.
We file our altitude to be 11,000 feet, as there is some high terrain over the Palmer Divide on the way to KCOS. We have been to this airport before so know of an excellent FBO there- Jet Center. We could add this to our flight plan for information but we decide to not do so. We also must include our anticipated True Airspeed (KTAS) so that ATC can project what time we will be at certain waypoints, making sure that the airspace can be reserved for us. Page 4 of the included Performance document has a cruise performance table for altitudes of 8,000, 10,000 and 12,000 feet.
Our flight is at 11,000 feet, so we need to interpolate between 10,000 and 12,000 feet. Today is a standard temperature day (not so usually with a cold front but I don’t want to take too long with this IFR planning for this document- we reviewing the Carenado C172S G1000 aircraft after all). So we read the center columns and decide to use 2600 RPM. There’s a spread of only 1 KTIAS between the 10,000 and 12,000 feet altitude tables so we settle on 116 KTAS- which we use for the filing of the IFR flight plan.
We do a quick calculation to find what Indicated Airspeed will be which comes to be close to 90 knots KIAS- this is what our airspeed indicator should read at 11,000 feet on a standard day for 116 KTAS, and we can use that to check that our KTAS is correct. We recall that any deviation in KTAS of 5 percent or 10 knots (whichever is greater) needs to be reported to ATC. We also note that fuel burn will be 9 GPH- we take the higher number from the charts for more conservative planning. We will have full tanks for a total of 53 US gallons of usable fuel, so we won’t have a fuel problem.
I am not bothering here to calculate the climb and descent performance, nor the TOC and TOD points, as this is beyond the scope of this article. What is important in IFR flight is to arrive at the exact location you said you would be at, at very close to the scheduled time.
As time gets nearer we do a final pre-flight briefing, noting current and forecast weather for our departure and arrival airports respectively. We walk to our aircraft, do all of the basic checks that I mentioned in the VFR flight section, but this time pay special attention to pitot heat and making sure that our antennas are all physically secure. Flying IFR we are now able to fly in clouds, and recognize that we need to communicate and aviate with much more precision than in the VFR flight.
The Flight
In the interim time in between doing the review on the VFR flight and starting this instrument flight, LR have released a final version of 11.32 as well as Carenado releasing v1.2 of this product. This latest version provides changes to the AP around the FLC mode, and rain effects- for which you need to download the Librain plugin, and install it into the aircraft’s plug-in folder. This flight is performed with V1.2 of the aircraft as well as 11.32 ox X-Plane.
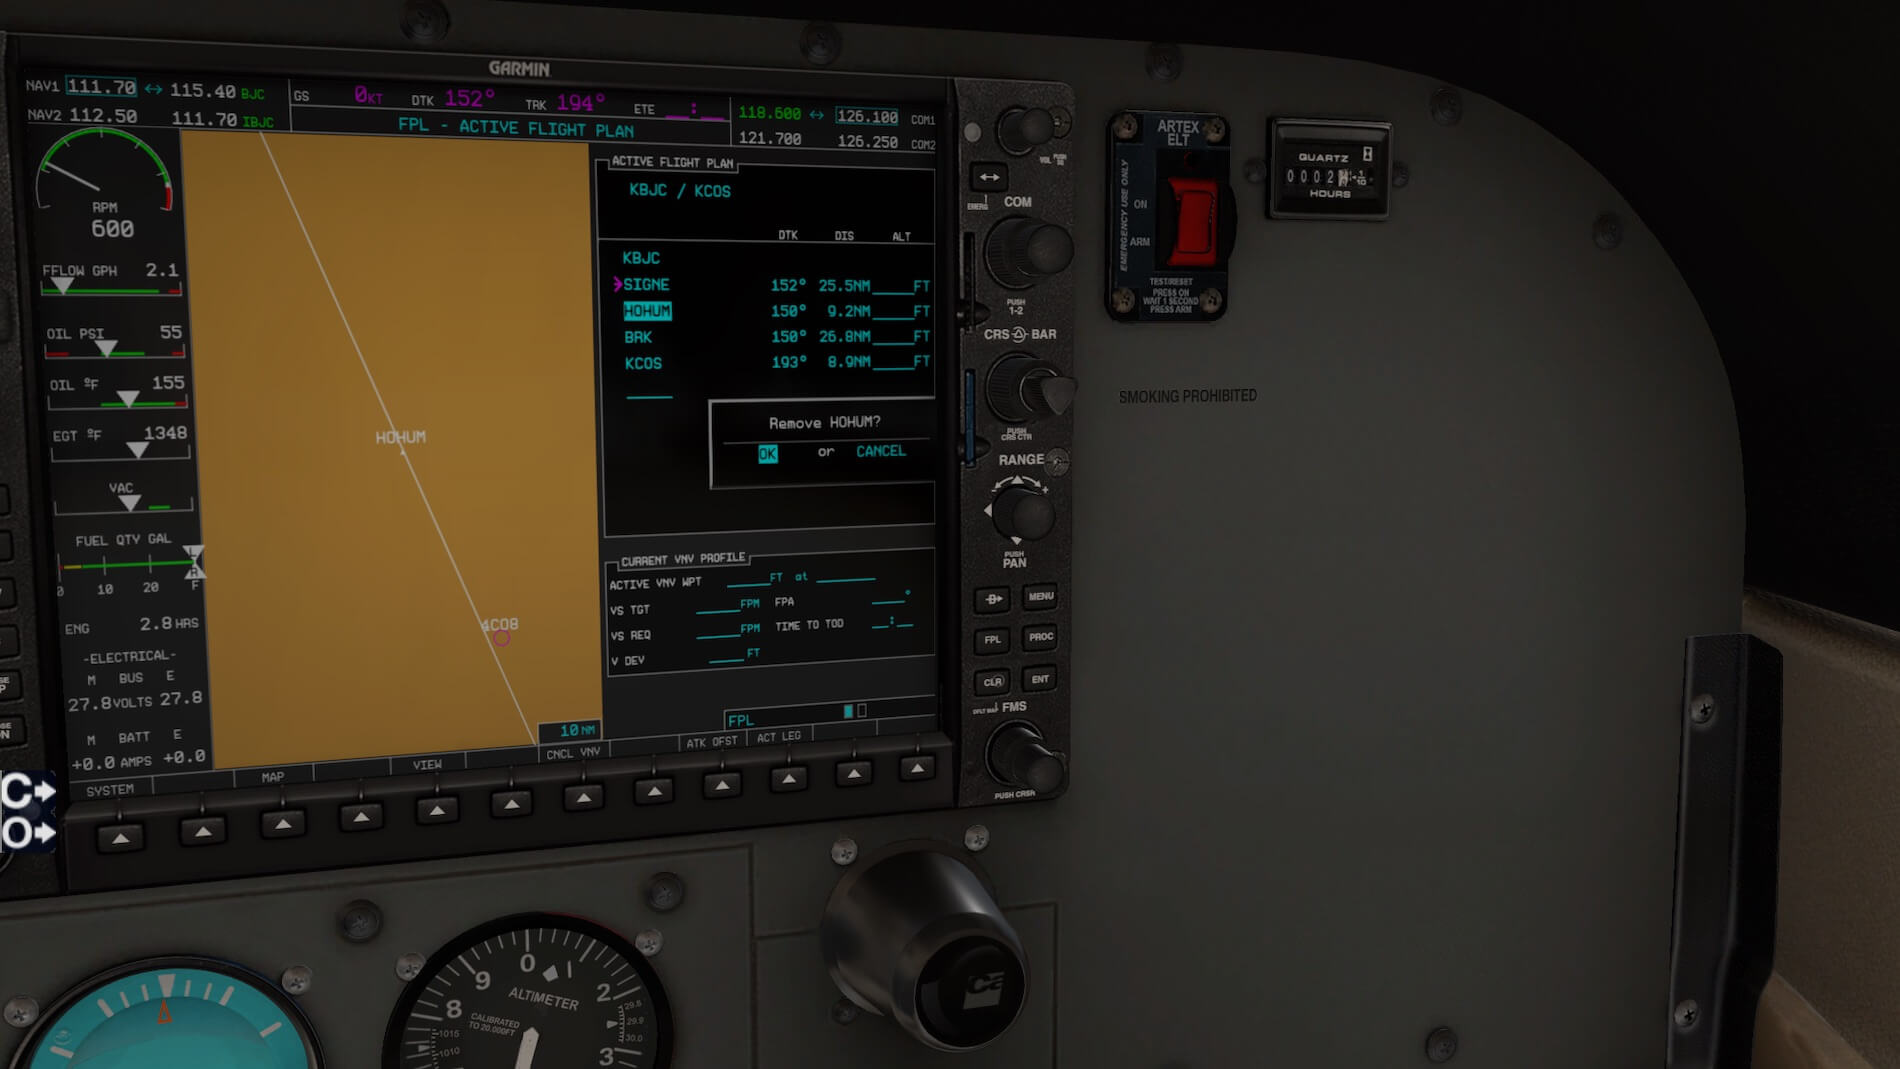
In this instrument flight I am focusing on the G1000 functionality, as it is a notable part of this Cv172 trainer aircraft- especially with the enhancements that have been added. We make use of the battery cart, and fire up the avionics prior to engine start to enter our planned flight. Although airway V81 passes through KBJC, the actual navigation aid that defines the airway is the VOR, BJC. We close to plan to pick up V81 at the next waypoint, SIGNE.
I enter this into the flight plan of the aircraft, noting that the destination airport is already set, a neat feature. There is an intermediate waypoint, HOHUM, that we need to enter into the flight plan along V81, and then we enter BRK (Black Forest VOR), and KCOS. We then set our altitude to our filed altitude, with the knowledge that we will most likely be given a preliminary altitude to fly with our clearance. We set our radio frequencies, using Comm 2 for ATIS and Ground, and Comm 1 for Tower and Departures (a part of Denver TRACON).
We now start up and taxi out of the parking area, adjacent to the threshold of runway 21, where the Ground control has authority, get the ATIS for KBJC, and call Ground: “Metro Ground, Skyhawk 1343F requesting clearance to Colorado Springs, and we have information Tango”. “Skyhawk 1343F, cleared to Colorado Springs via SIGNE, direct LUFSE. Climb and maintain 7,000, expect 11,000 ten minutes after departure, Denver TRACON is on 126.1, squawk 2524.”
We repeat back, get the “readback correct” confirmation. Ground then asks us if we are ready to taxi- we are so we confirm. We are cleared to runway 30 Right via Romeo 4, Alpha. Ground also tells us to let her know when we are ready so she can start working with Denver TRACON on our flight release.

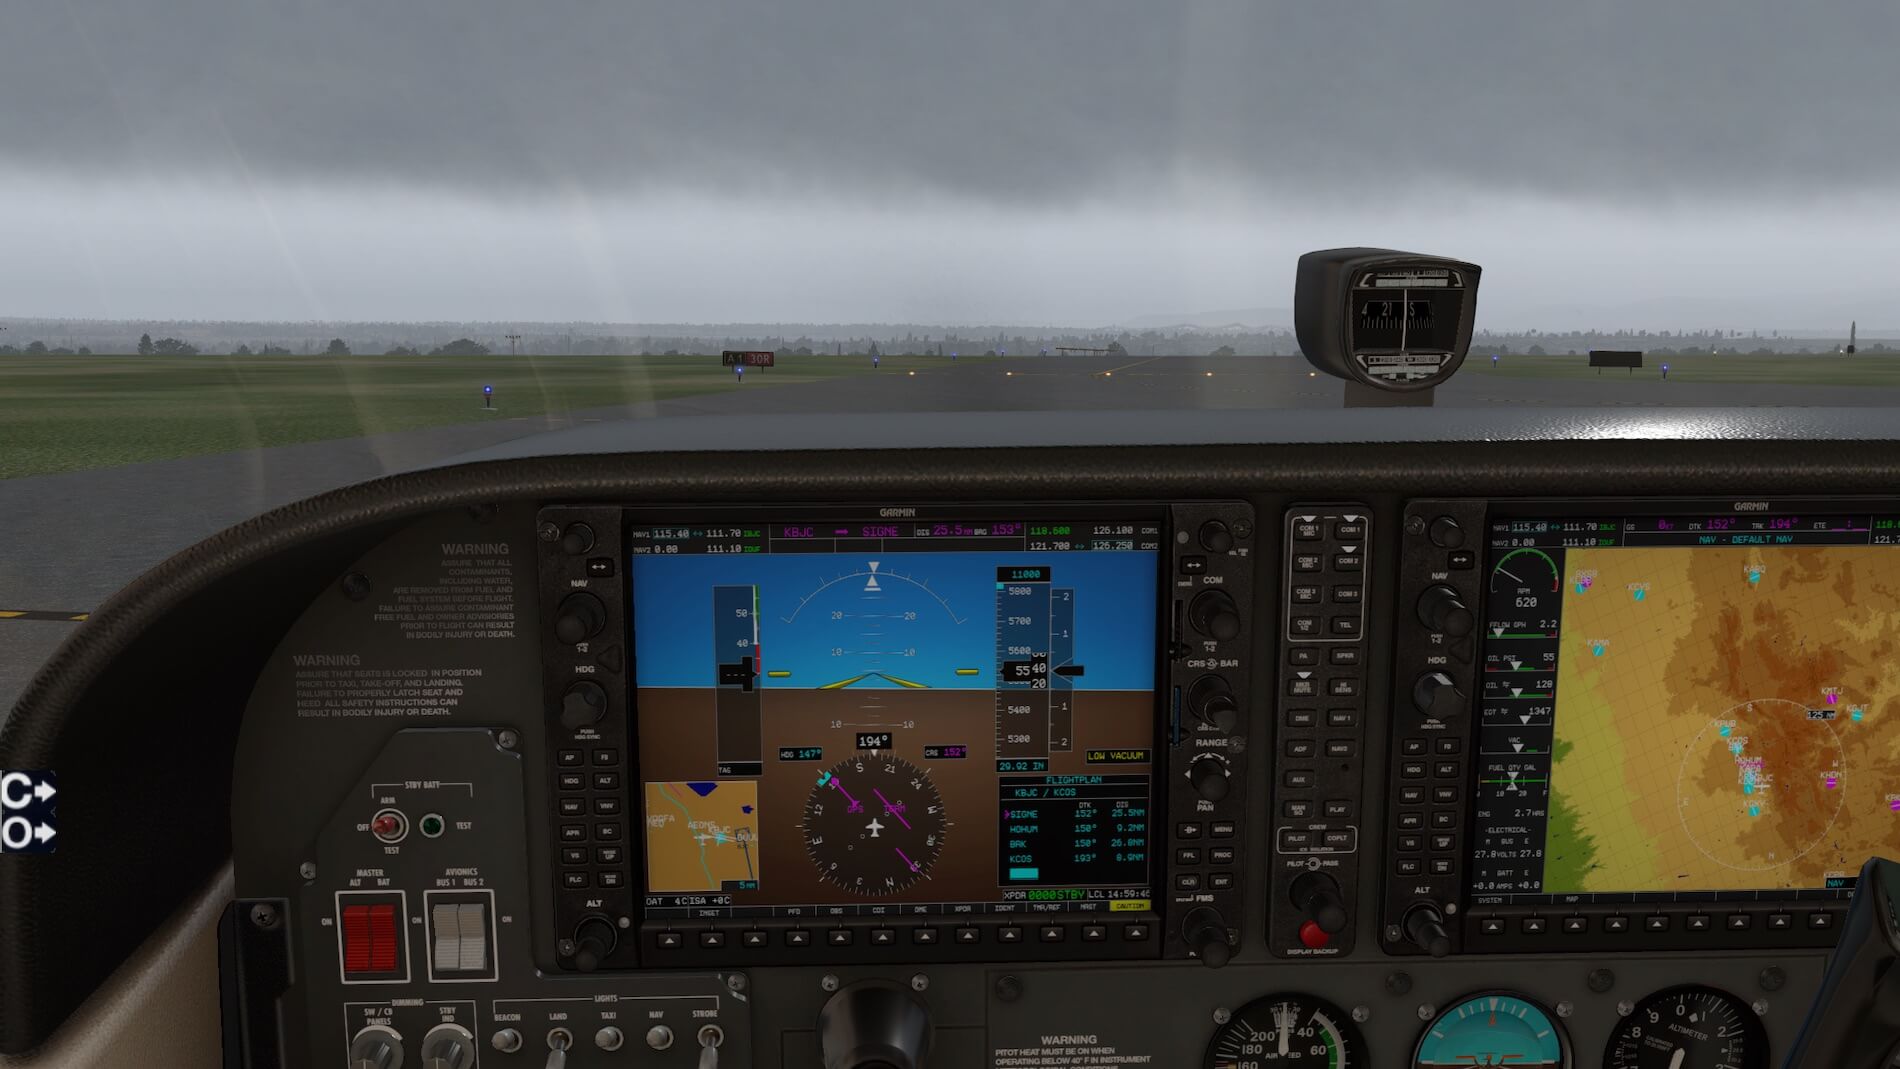
We now know we need to edit our filed flight plan to match our clearance. This is exactly the way that my first instrument cross country was, the same route, the same filed and then cleared route. My CFII had suggested the filed route, knowing full well that I would need to edit that route to match the clearance. But we need to taxi to the runup point to do all of this, so we taxi via our cleared ground route to adjacent to the threshold of 30R, where the runup area is located.
Below the screenshots show the view from the runup area with the hold short lights for 30R. I check and set where necessary the Comm and Nav frequencies- you will note that my Nav frequencies include the ILS for KBJC, in. case we get into the clouds and need to return for any reason- then is not a good time to be setting frequencies.
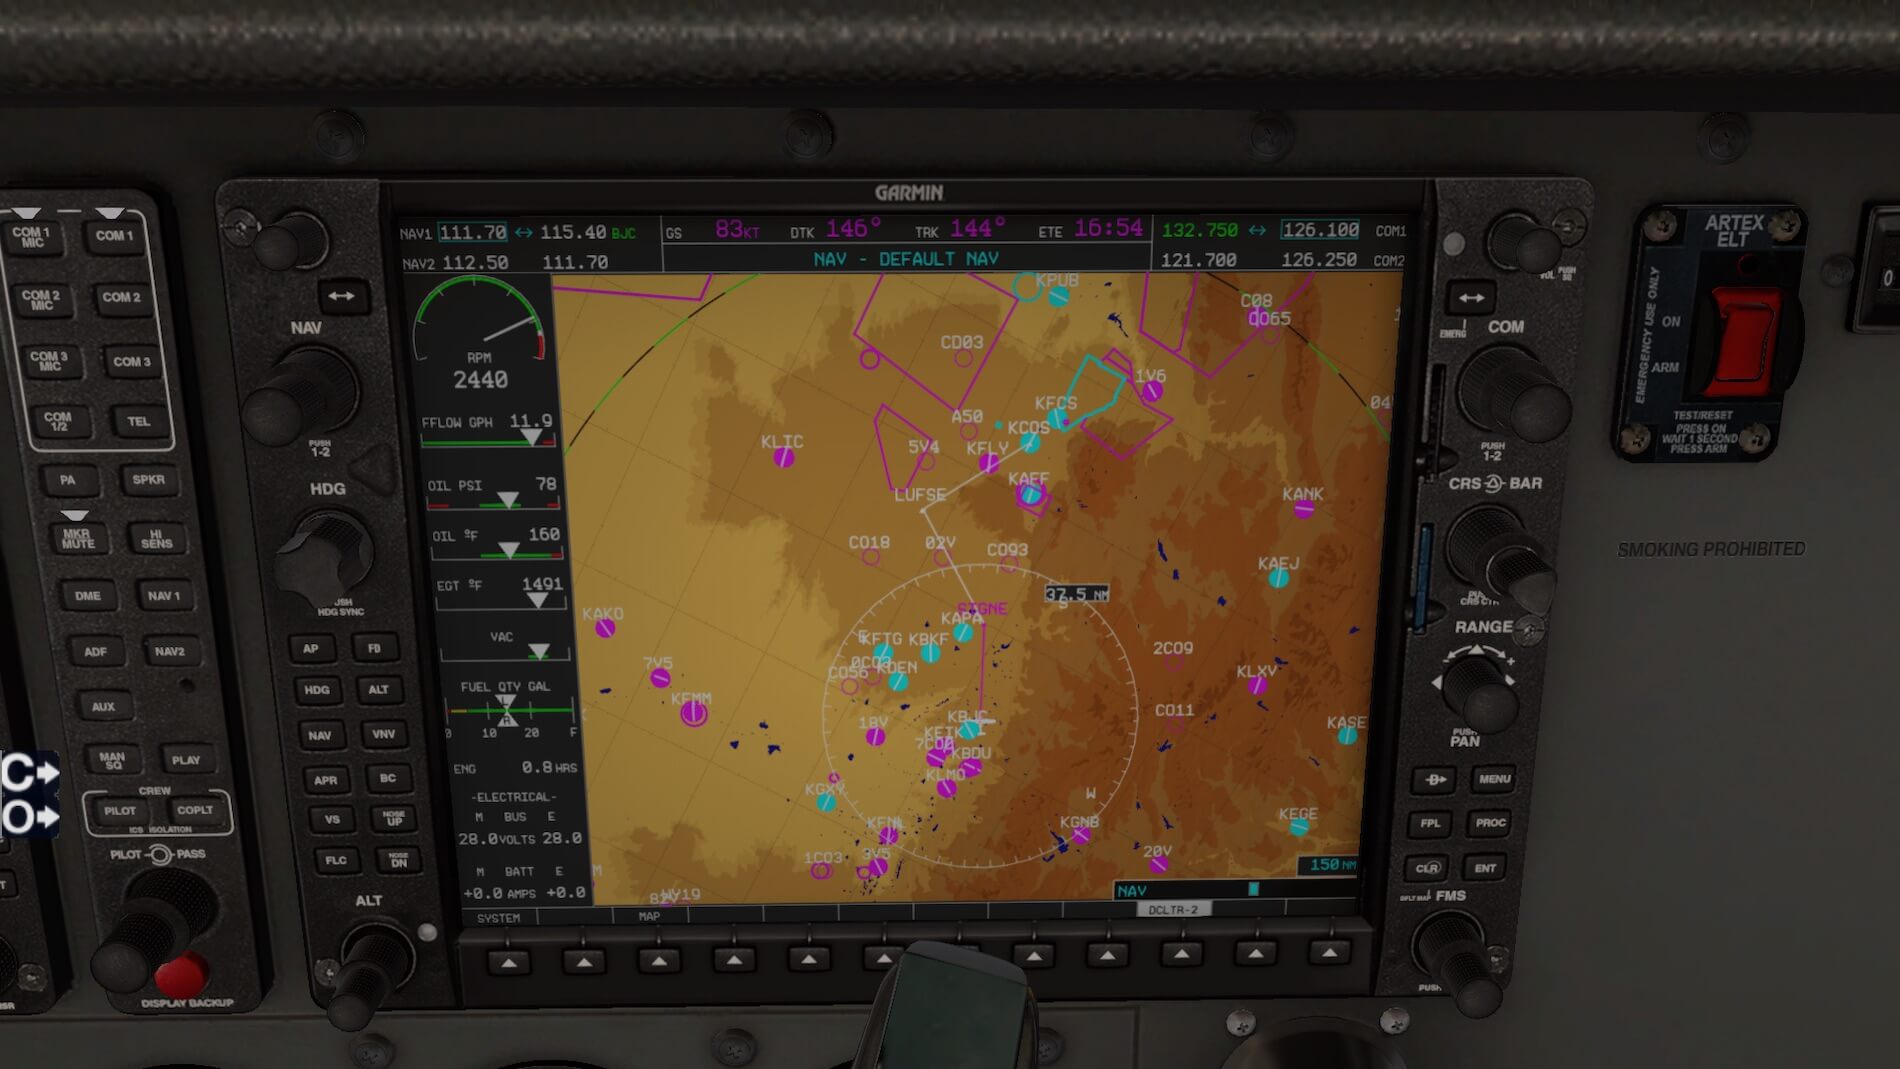
From here we do most of our setup using the MFD- many features can be done on either the PFD or the MFD. One look at that map indicates that we need to declutter some of the map, so we press the DCLTR soft key twice to show only airports. We then edit our flight plan to match our clearance, using the MFD this time. With some further checks done we contact Ground to say we are ready.


We are told to contact Tower as our release has been received from Denver Departures, and we are told to “line up and wait”. We taxi out to the runway, with our strobes and landing lights turned on and we double check our transponder to ensure it is in Mode C (altitude reporting). Tower then clears us for takeoff on runway 30 Right and instructs as to turn left to 180 degrees as an initial heading (this heading is received by Tower from Denver Departures so we fly to where they want to take up controlling our flight.
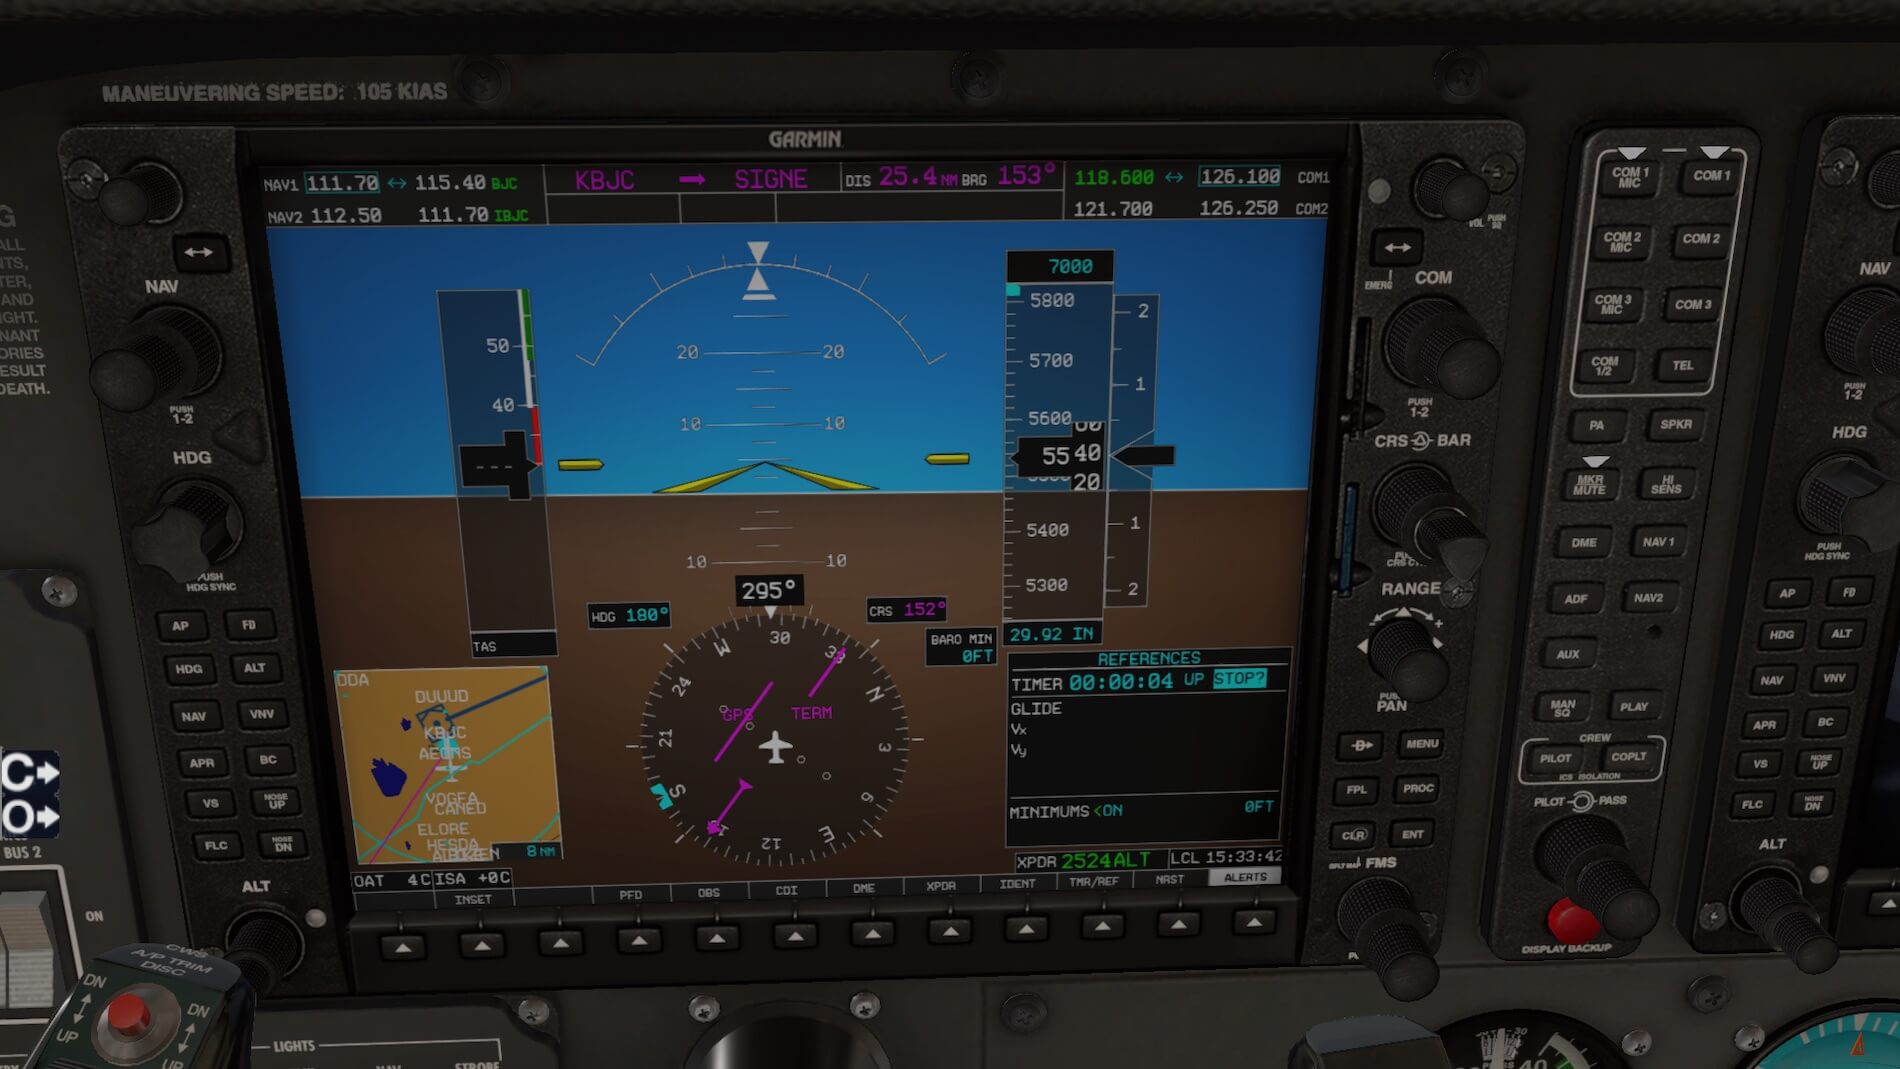
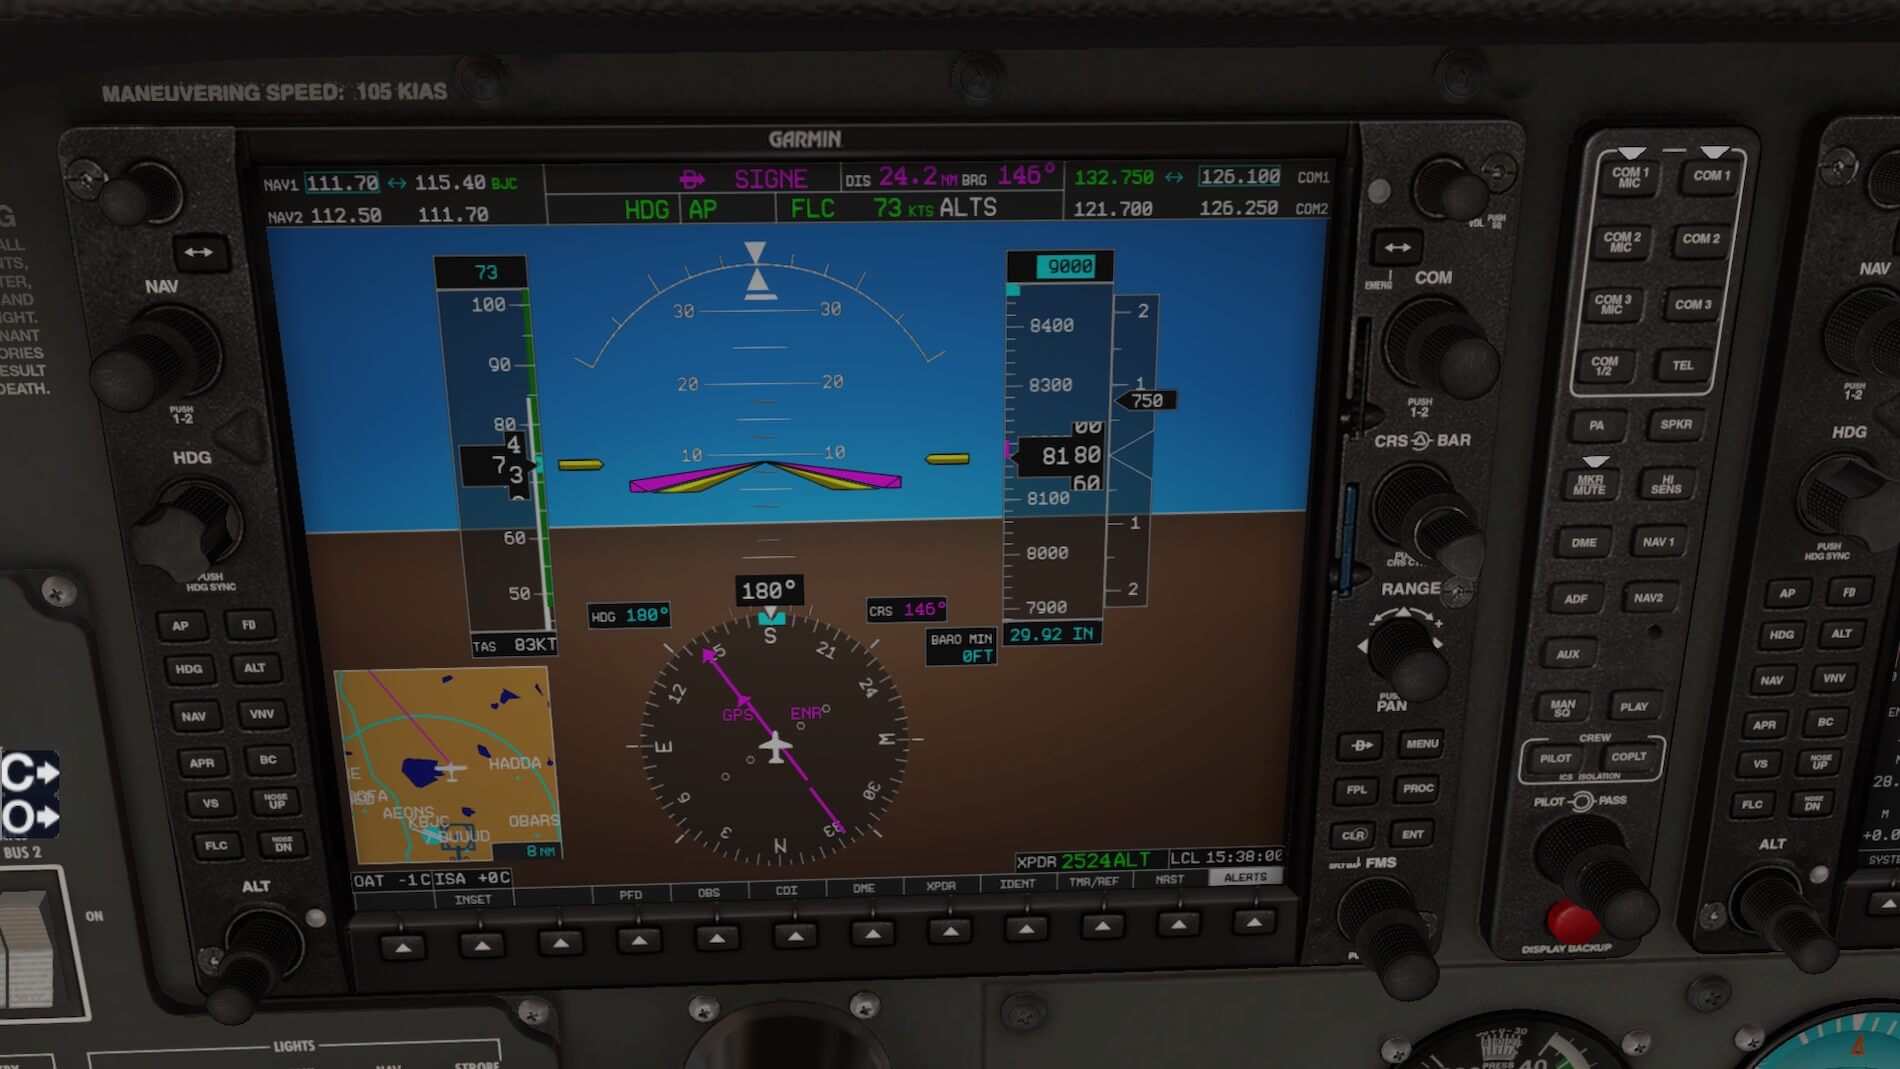
We set the heading bug for 180, start our elapsed time on the timer, briefly confirm that our runway is correct, and we initiate our takeoff run. Once we are past the end, and above 400 feet, of the departure end of the runway (DER), we commence our left turn to 180. We then also set our autopilot to “Heading” and “Flight Level Change” (which captures the current KIAS speed- since we are about to climb to 11,000 feet I have ensured that I am close to Vy of 74 KIAS ). Tower asks us to “contact departure”…. “Denver Departure, Skyhawk 1343F is at 6,500 feet for 7,000”. They reply with “radar contact”, and we are initially cleared for 9,000 feet.


Departures then hands us off to another sector, where we receive “Fly direct SIGNE, climb and maintain 11,000”. Since lateral changes from ATC can be for immediate traffic avoidance, they are always given first and should be executed first. We scroll in the FP to SIGNE, activate “Direct-to”, and select NAV as our AP lateral function. We then change our top altitude to 11,000.
We note the information regarding our track, the direct track, our ground speed and our ETA on the MFD, as well as our changed route which is direct from our present position to SIGNE. We need to also monitor our vertical speed- if it falls below 500 fpm this becomes a compulsory reporting issue to ATC
I did this same instrument flight with two passengers -my CFII and my grandson- and was similarly cleared for 11,000 feet- above 9,500 feet I had to make that call to ATC, and got some humorous wisecracks from some airlines pilots on frequency!


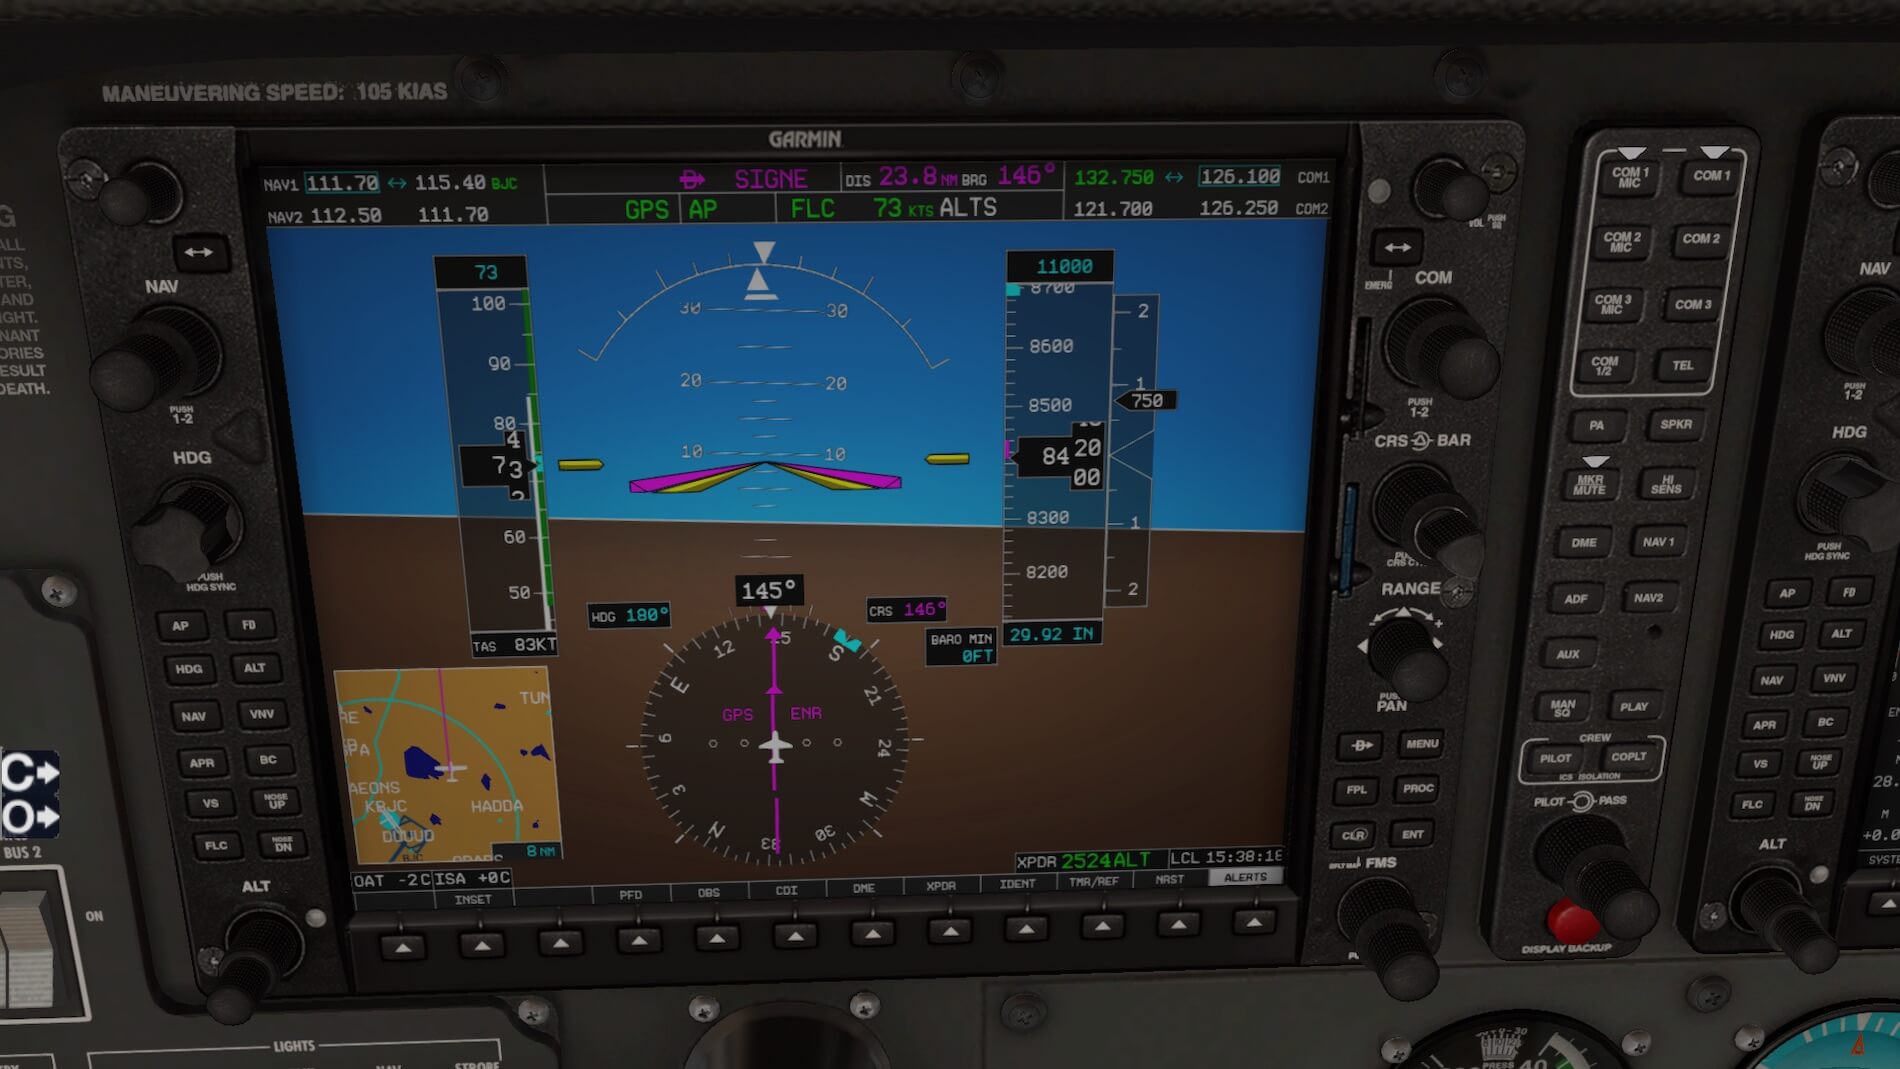
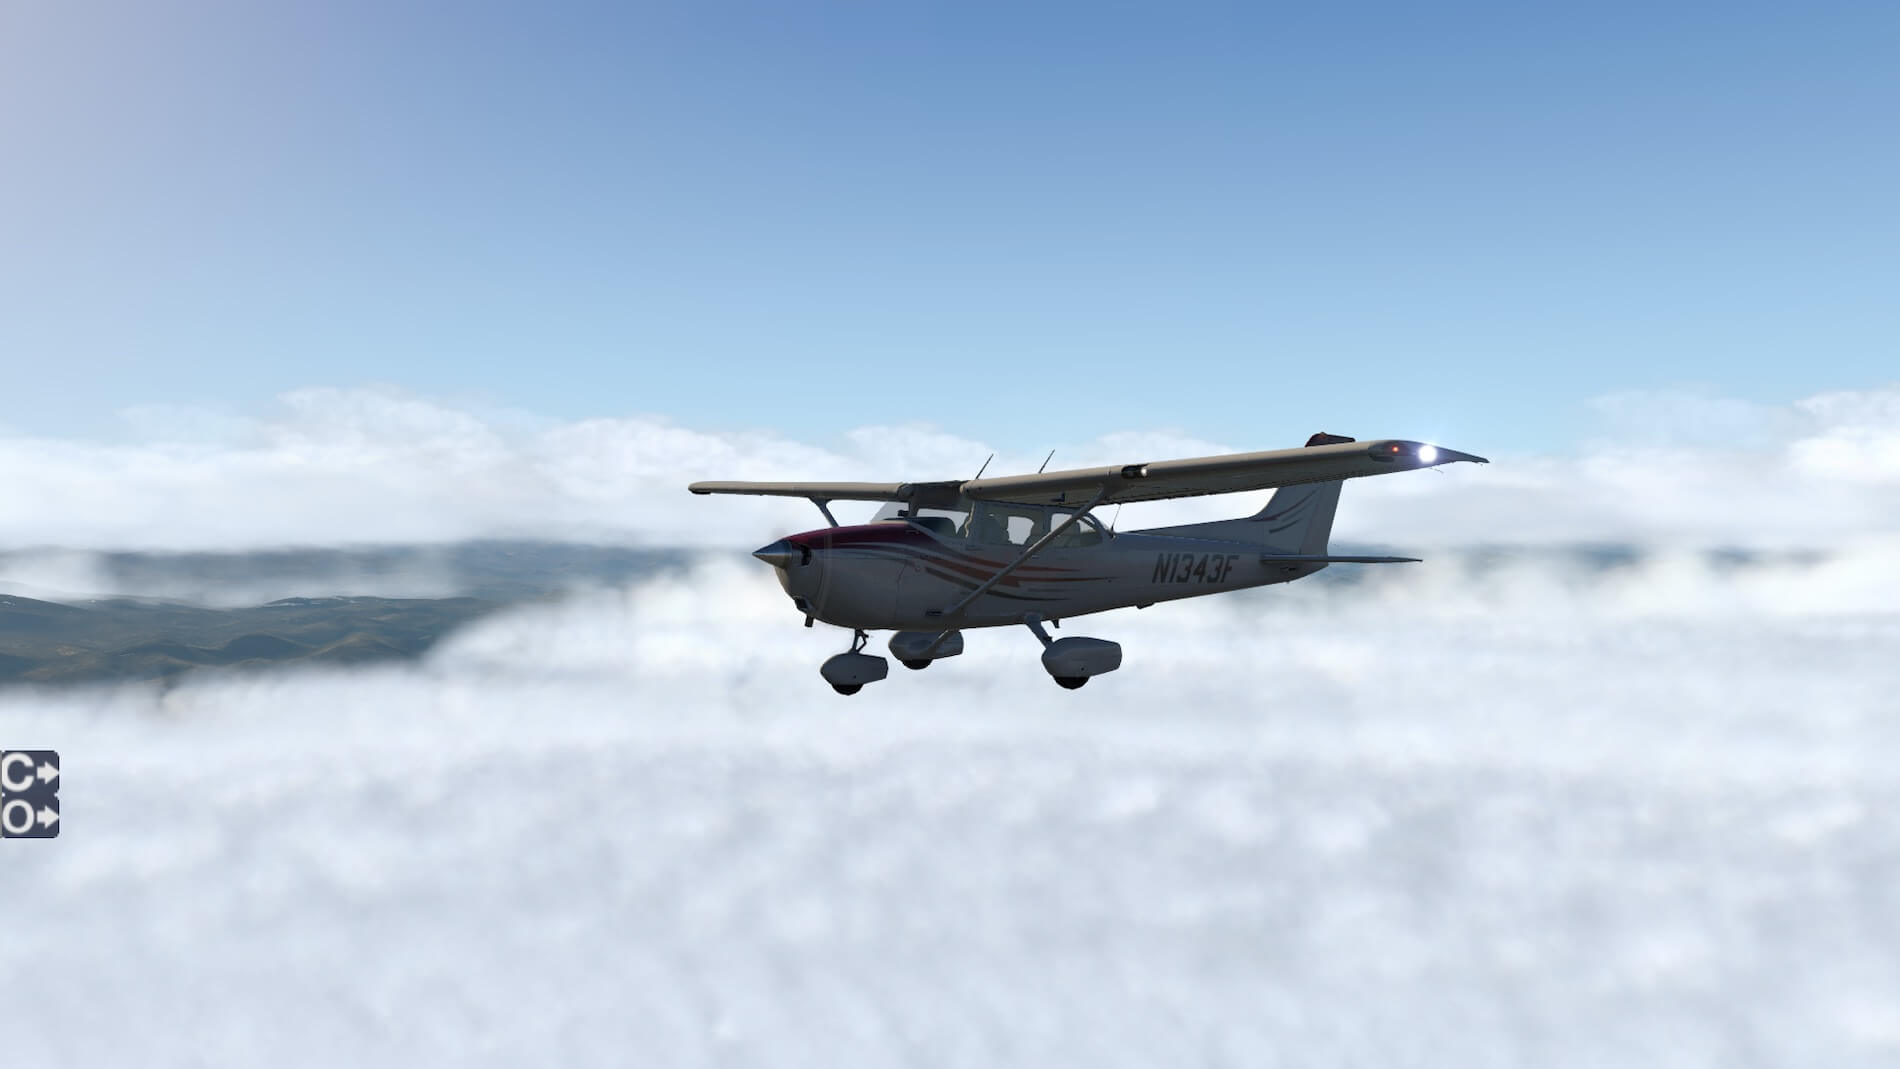
We note that at 11,000 feet we are just above the tops:


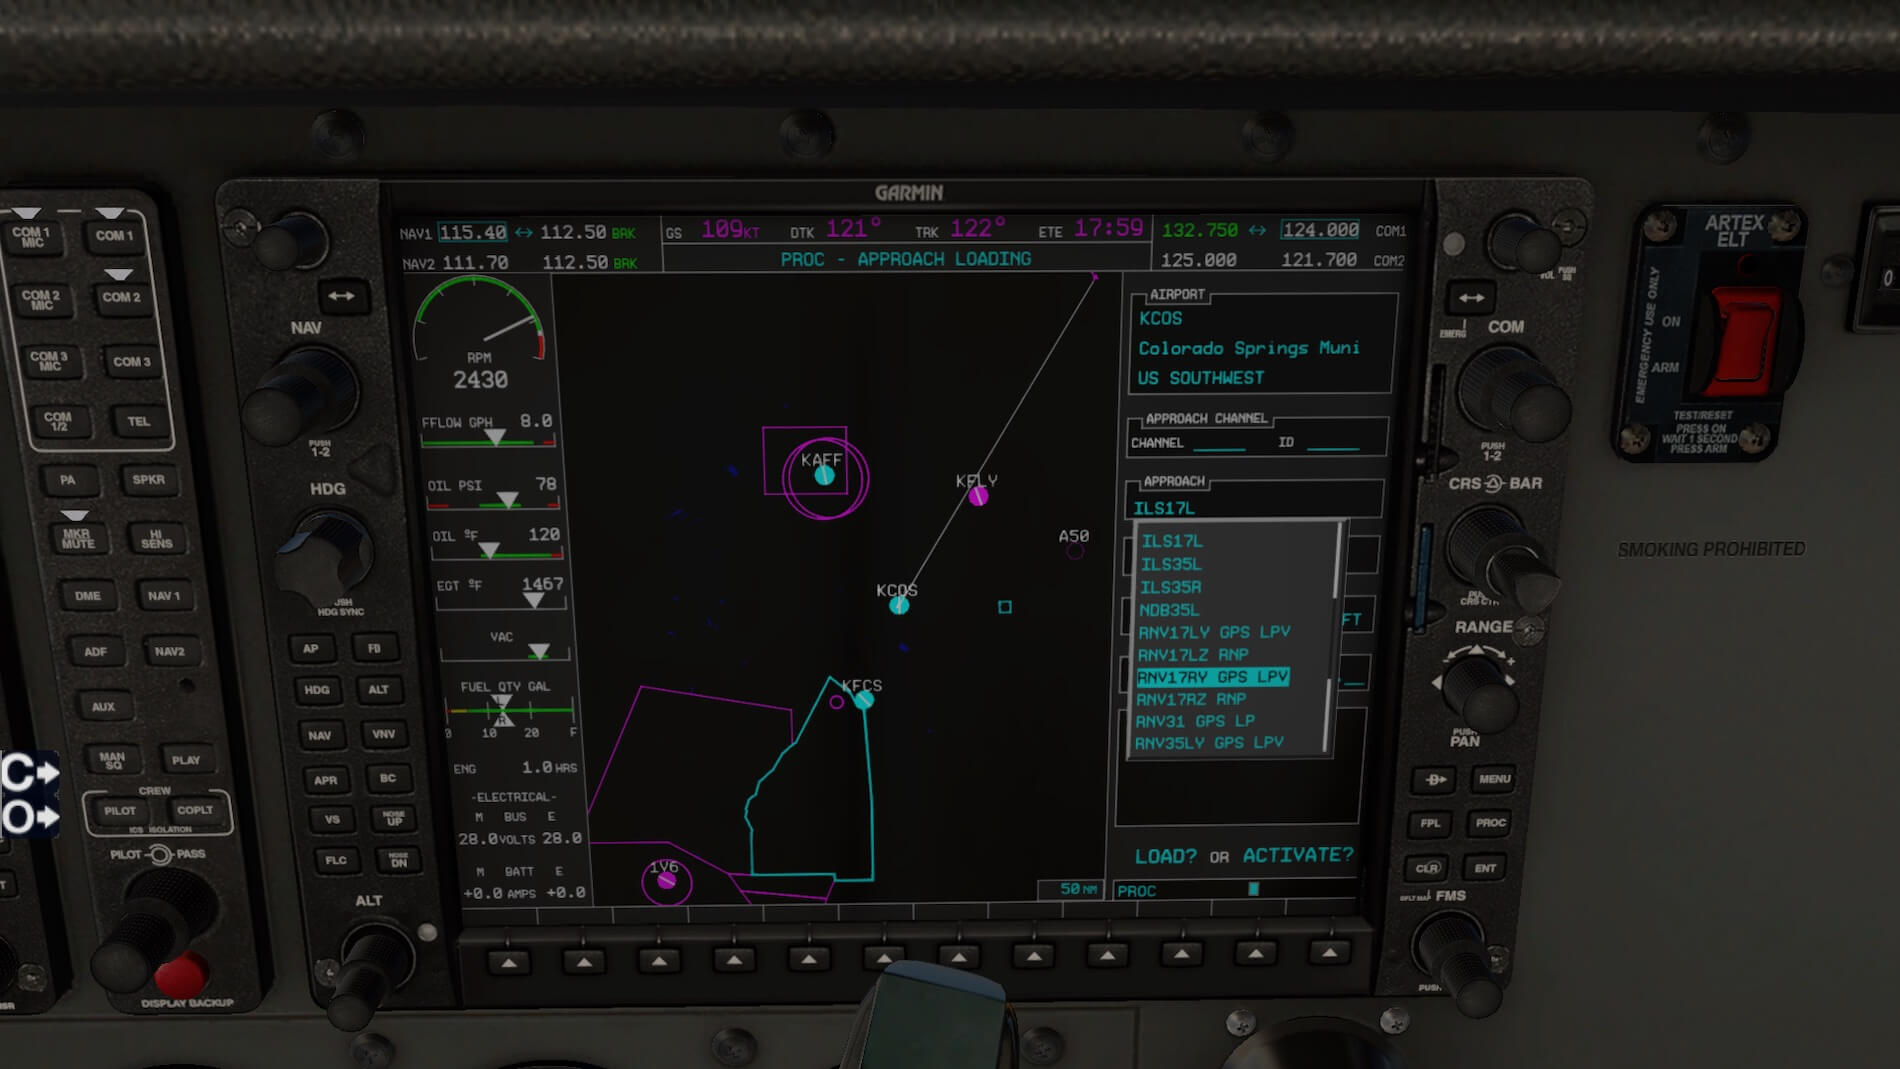
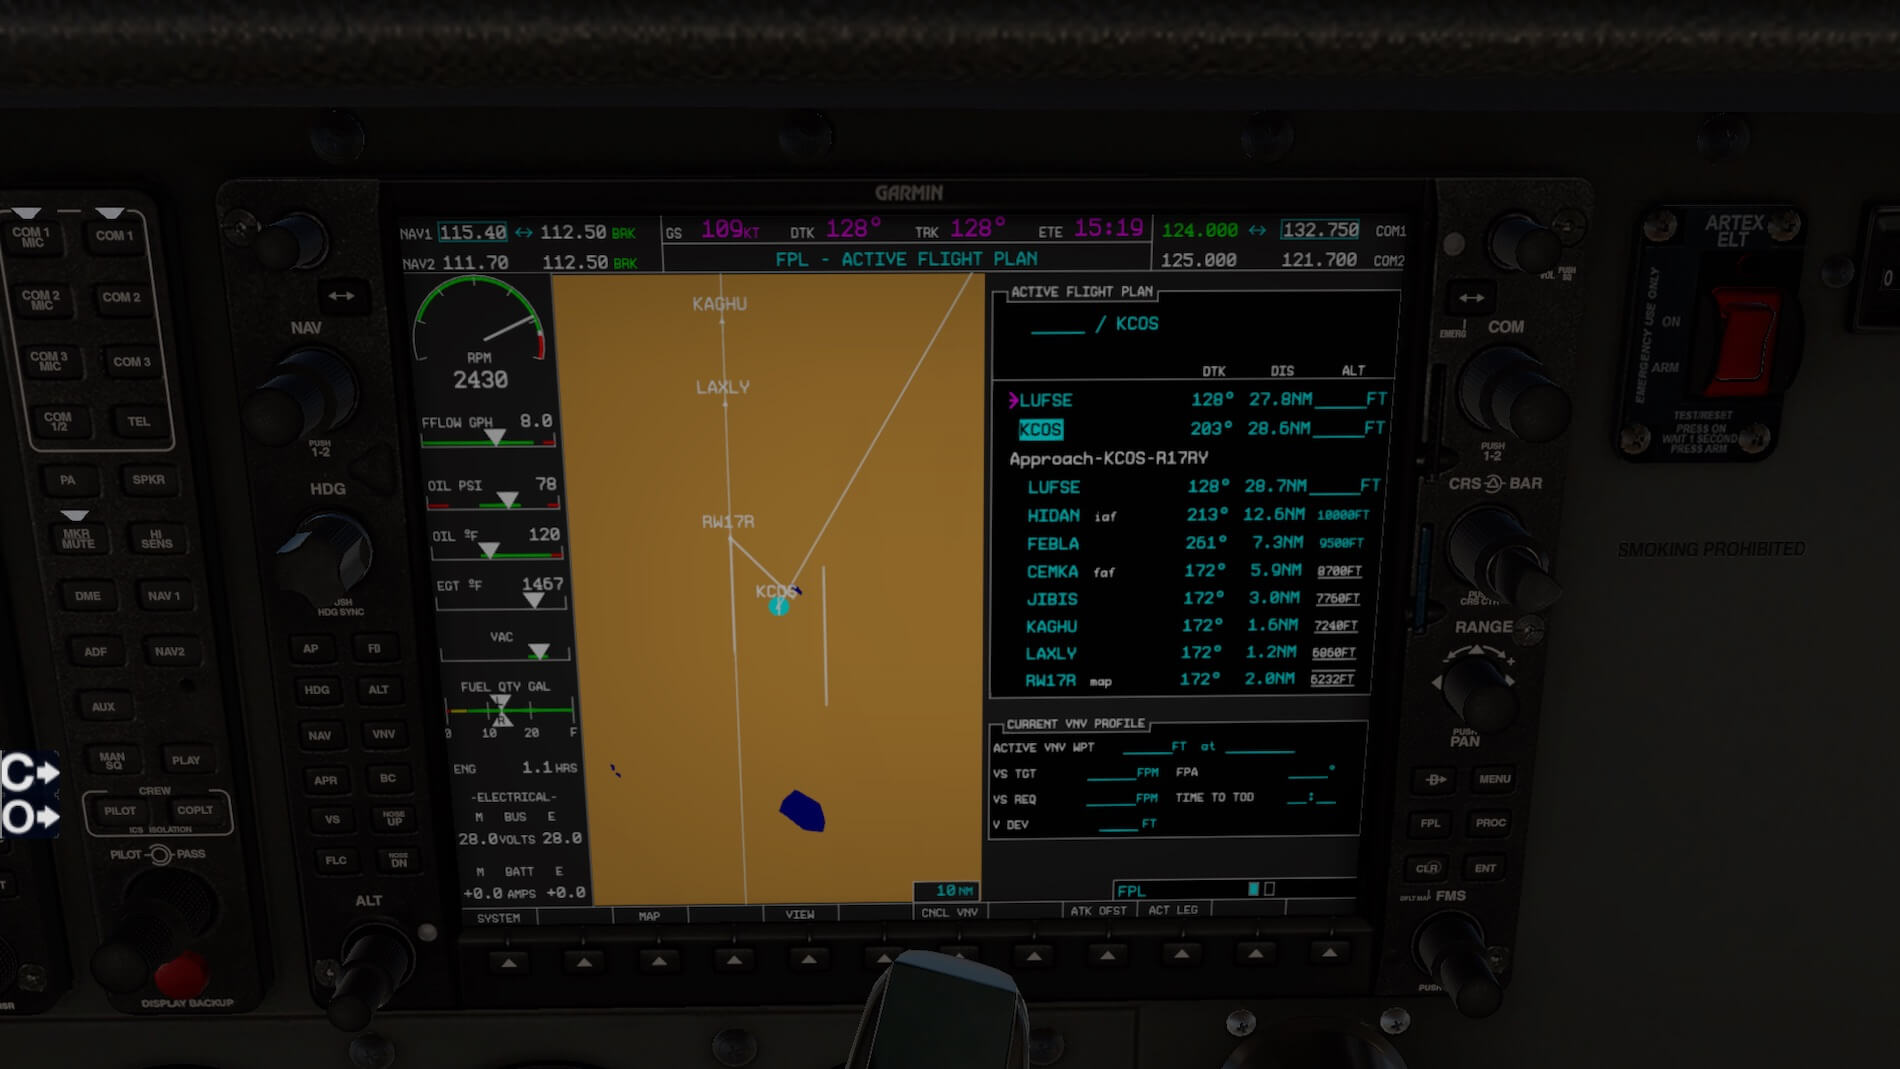
Shortly before SIGNE we get a “Direct LUFSE” instruction from ATC, then told to “expect RNAV Y approach to 17 Right”. We select and load (not activate yet) the approach, noting that the map of the procedure is presented on the MFD while we are making this selection. We also note the presence of an RNAV Z approach to 17 Right, and see that is requires RNP (Required Navigation Performance”, for which neither the aircraft nor I are eligible to use.
We choose the LUFSE transition. We also make a request for a frequency change so we can obtain KCOS ATIS, and are told “frequency change approved, advise when back on frequency within 2 minutes”. We need the ATIS prior to contacting Springs Approach, and having been approved for a frequency change ATC now knows that for the next 2 minutes they will have no radio contact with us. We get the ATIS and advise ATC that we are “back up”.


We are then handed off to Springs Approach, and we check in telling them that we have the ATIS (we would be asked to get it at this point if we didn’t have it). We then get a strange request from Springs Approach: “Skyhawk 1343F, say destination”.
When I first encountered this statement at this same point on this same flight in real life, I thought that the new controller didn’t know which airport I was flying to, so I replied “ the Colorado Springs airport”- there was 10 seconds of silence followed by the controller trying to control her laughter and other laughing in the background, whereby she clarified her question to ask which FBO I was wanting to go to after I landed so she could advise the Tower of my expected taxi route and which runway would be best suited to that location- I now always say the “destination” when I initially check in with Approach).
Incidentally, TRACONs for Denver, Colorado Springs, Eagle, Grand Junction and possibly others are all collocated at KDEN, at the south-west corner of the property.
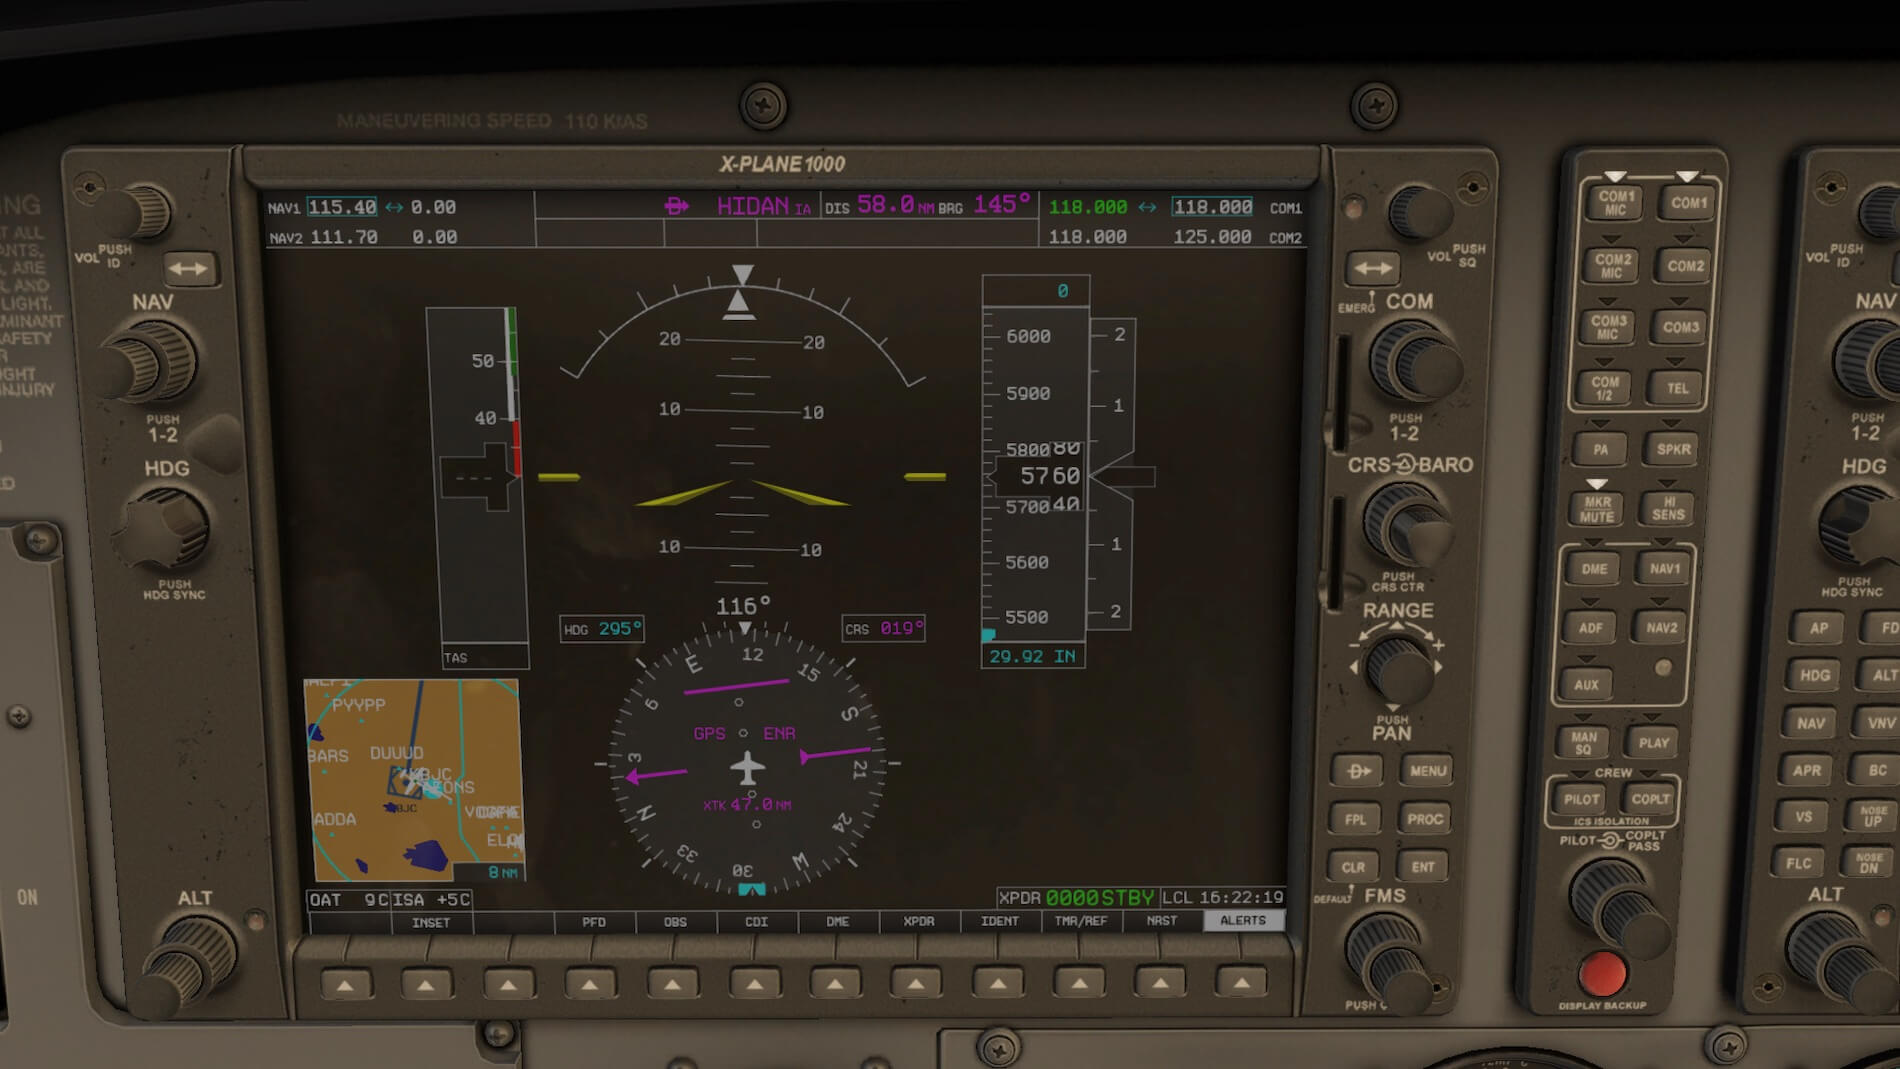
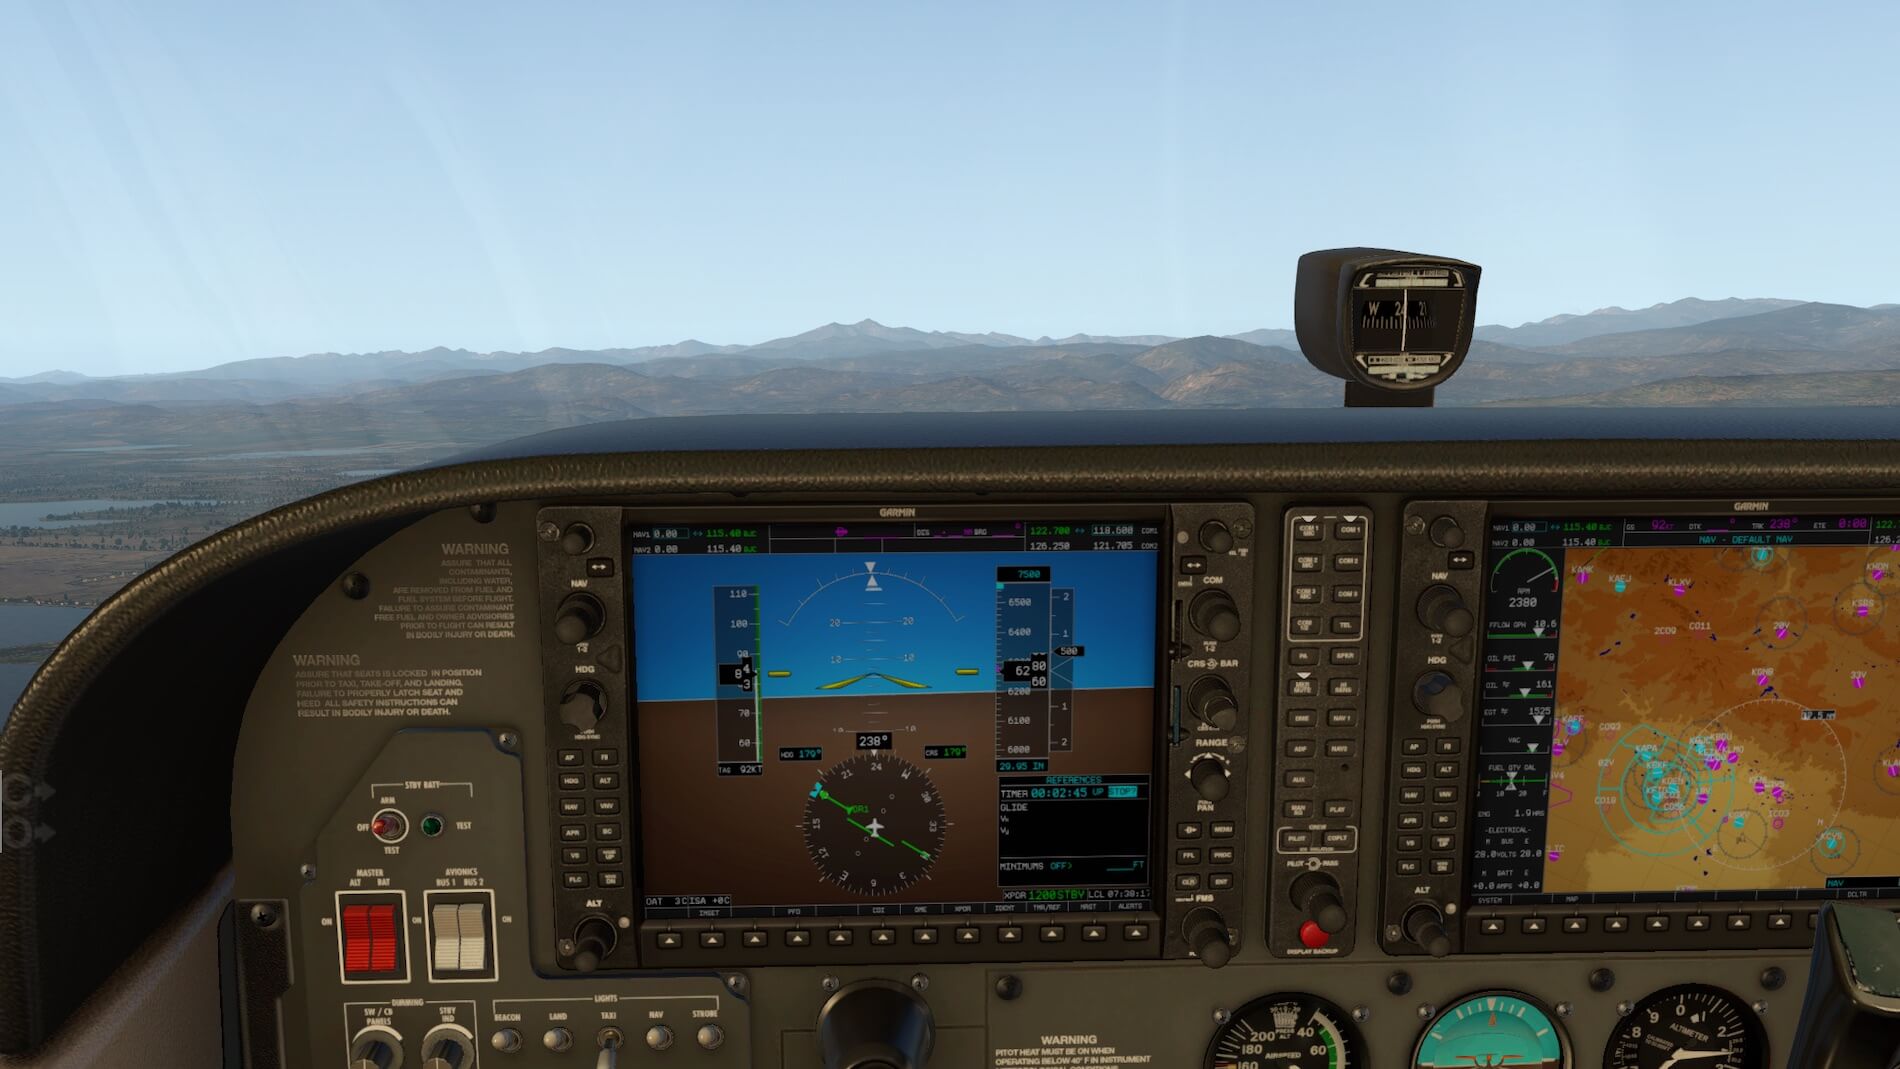
ATC then clears us to descend at pilot’s discretion and to cross LUFSE at 10,000 feet. We now want to use the VNAV function, so we open the flight plan and with the cursor scroll to the right of LUFSE where there is an altitude field- currently it is unpopulated, and when first placing the cursor in that field it turns to 0. We use the FMS knob to scroll to 10,000. We then activate VNAV on the MFD- this creates a VNAV profile box, where we can set the vertical speed- we choose a 500 fpm descent.
We now see a small white circle on the flight path, on the MFD, which is our Top of descent (TOD) point. We now activate VNV on the AP. We initially see VPTH on the PFD in white, showing it is armed but not yet activated. We see the VNAV altitude on the PFD in magenta, so we now change the AP altitude to 10,000 in green. Note that a small column has appeared to the left of the altitude tape with a magenta “V” and a pointer similar to a glidepath indicator. As we get closer the magenta pointer starts moving downwards, and once the it reaches the middle of the column we start to descend.


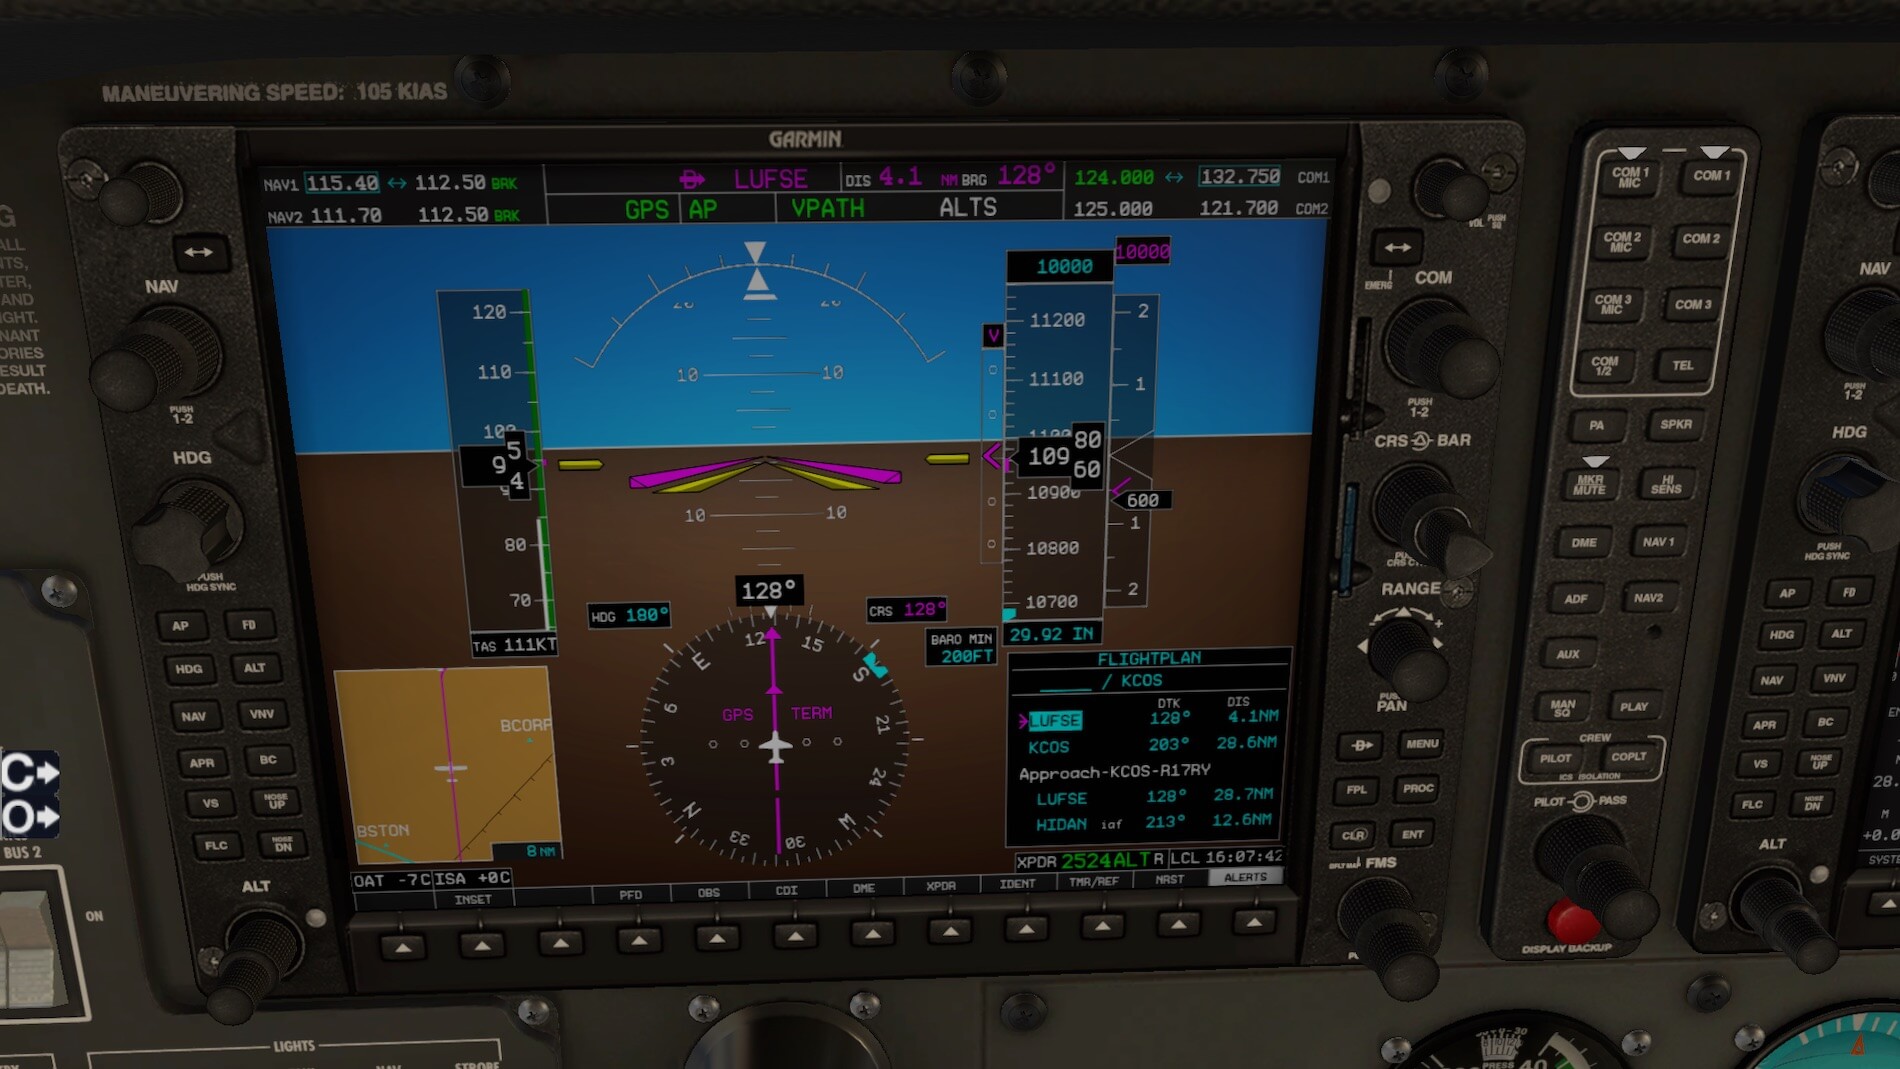
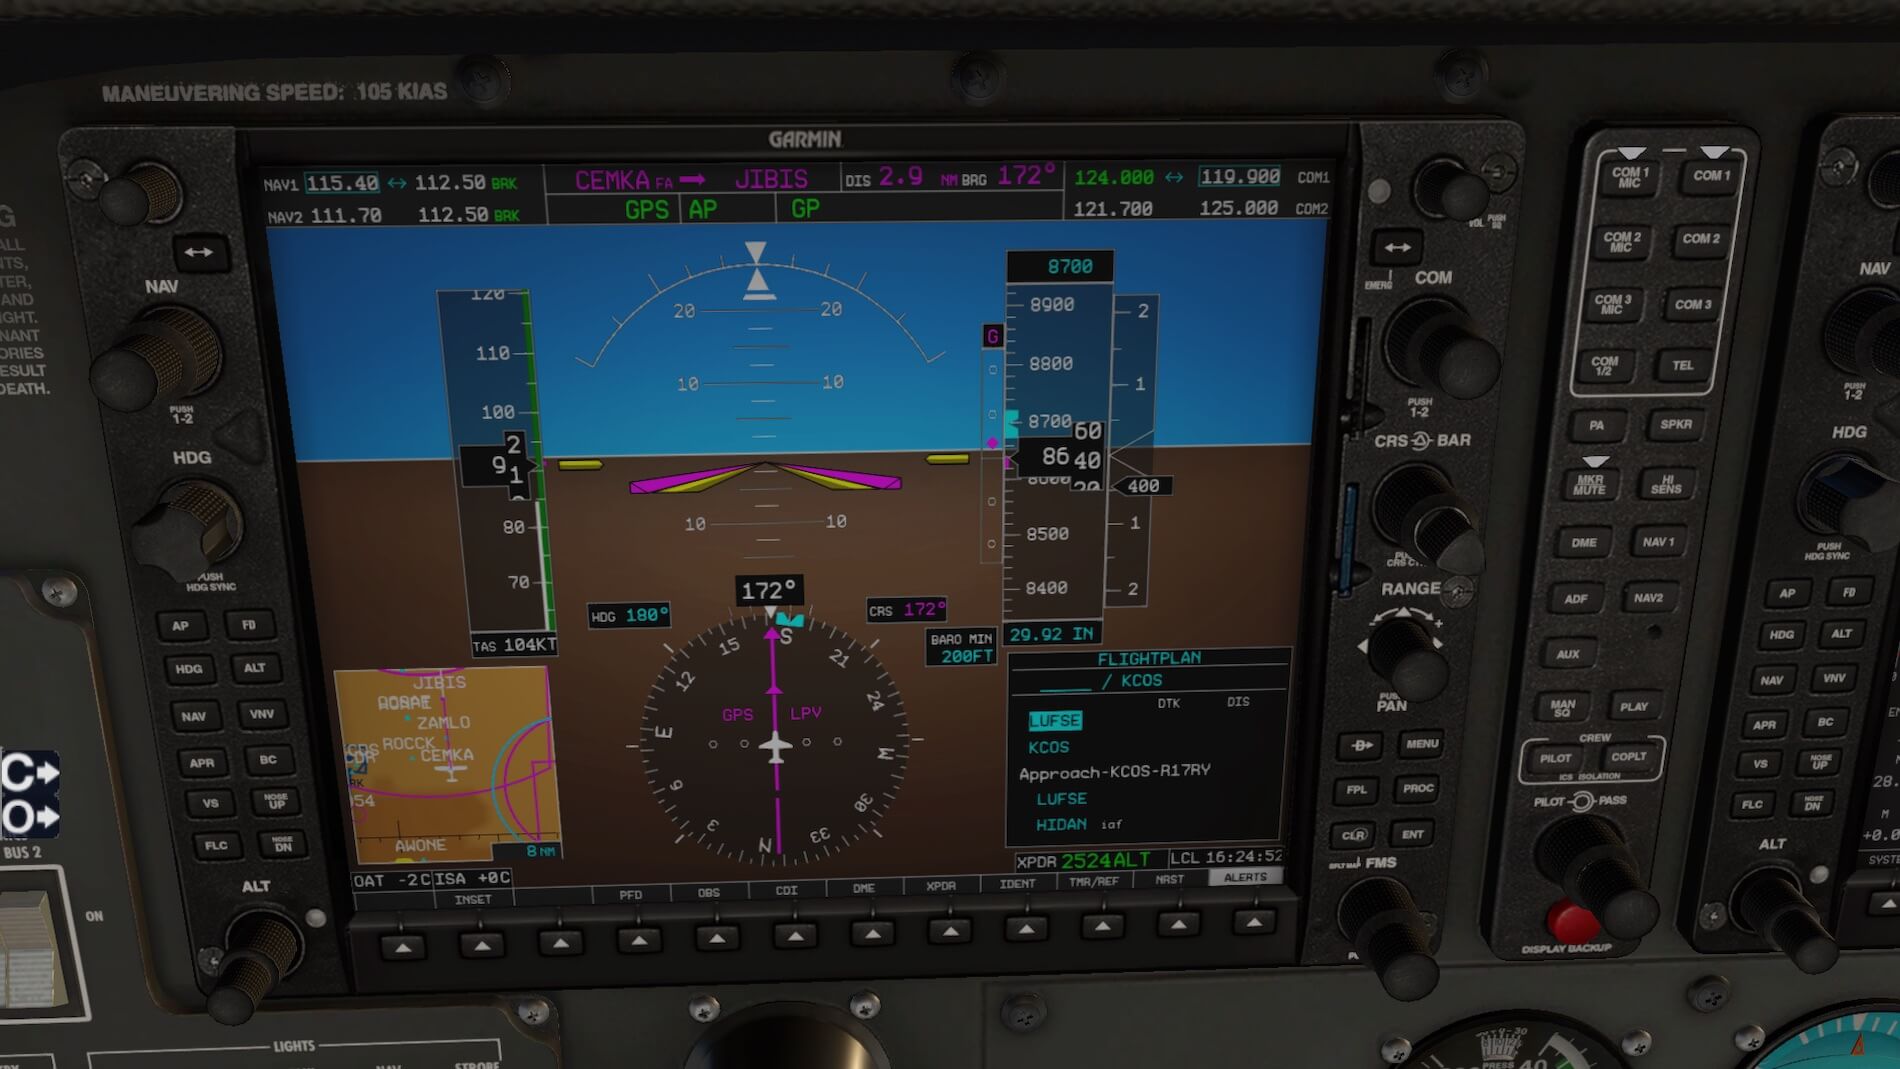
As we fly along the approach, after LUFSE, we pass an Initial Approach Fix (IAF) of HIDAN, and enter 9,500 for the leg to the FEBLA, the Intermediate Approach Fix I(IF). I use the FLC mode this time for descent, capturing a speed of 90KIAS. As we approach CEMKA, we see a small column to the left of the altitude tape with a heading “G” for Glidepath (the term “Glidepath” applies to RNAV approaches, whereas “Glideslope” refers to an ILS). We select the APR mode on the AP, which is armed, and then activated when the glidepath pointer is at center on the column.


Obviously, with the ceiling being as low as it is I would need to have filed an alternate for this flight (a good idea regardless of weather). Also I would enter the Decision Height into the altimeter to make use of the aural and visual warnings as additional clues, or possibly entered the missed approach altitude kin anticipation of a go-around situation.
In the event of a missed approach the G1000 will guide the aircraft laterally to the Missed Approach Holding Point, and manage the hold entry, whereby it will go into Suspend mode until further instructions are entered. However, we leave the instrument flight here on final approach.
Summary
The venerable C-172 may not be everyone’s aircraft to fly, realizing that there are so many more complex, faster and larger aircraft modelled for XP11.30+. For those that have an ambition to fly in later life, or want to emulate realism, it’s true that almost every pilot in real world aviation has “cut their teeth” on this or other similar aircraft.
A basic trainer usually takes someone with little or no knowledge and experience through flight training with a goal of making them Pilot In Command (PIC), having the ability to take non-revenue passengers into some of the world’s busiest airspace (with some limitations).
This Carenado model performs close to my actual experience in type. The additional work done around the G1000 suite is well done and enhances realism. It is stable in flight and predictable- good for learning how “flying by the numbers” always works to one’s benefits (power, airspeed, etc.). For those who just want to do traffic]c pattern work (which all pilots do from time to time, if only to keep up the 90-day landing currencies required), this model is perfect.
For those wanting a more complex flight route the G1000 offers more sophistication than the avionics in some airliners flying the skies today, especially non-glass and semi/early glass flight decks).
I found the controls to be slightly too sensitive, comparted with Carenado’s earlier Cardinal release, and also could never get the Librain plugin to work with Stormy weather- most likely my lack of knowledge with this addon. However, these issues are small in comparison with the advantages that this model offers.
More information can be found at the Carenado website or have a look at the X-Plane.Org dedicated store page.
Feel free to contact me if you’ve got additional questions related to this impression. You can reach me via email Angelique.van.Campen@gmail.com or to Angelique@X-Plained.com.
With Greetings,
Bruce Knight
| Add-on: | Payware Carenado C172SP G1000 |
|---|---|
| Publisher | Developer: | X-Plane.Org | Aerosoft | Carenado |
| Description: | Realistic rendition of Cessna 172 S with G1000 Avionics |
| Software Source / Size: | Download / Approximately 491MB (unzipped) |
| Reviewed by: | Bruce Knight |
| Published: | March 15th 2019 |
| Hardware specifications: | - iMac late 2017 - Intel i7 4.2 GHz - AMD Radeon Pro 580 8192 MB - 32GB 2400 MHz RAM |
| Software specifications: | - Mojave (10.14.5) - X-Plane 11.40 |
0 Comments