Wow … the Digital Replica C310L
Introduction
Digital Replica … I haven’t heard of it before unless I missed something in the past, but what I know when I had a quick look at this modeled C310L twin engine aircraft, it looks awesome. Perhaps you’re aware of it, but the C leading the 310L means the aircraft is developed by Cessna. And yes, again I could write that many developers popup with their GA single and multi engine aircraft. Some are worth it, some add-on packages aren’t and this one, yes, I wrote it before, looks awesome. Ok, I didn’t tested it yet, but my first look and feel is great. Recently I reviewed the old fashioned Just Flight / Thranda Design Duchess 76, and now I’m up for this old fashioned C310L. Yes, it’s indeed and again and old Cessna model.
Actually “the Cessna 310 is an American four-to-six-seat, low-wing, twin-engine monoplane produced by Cessna between 1954 and 1980. The 310 first flew on January 3, 1953, with deliveries starting in late 1954. The sleek modern lines of the new twin were backed up by innovative features such as engine exhaust thrust augmenter tubes and the storage of all fuel in tip tanks in early models. In 1964, the engine exhaust was changed to flow under the wing instead of the augmenter tubes, which were considered to be noisy.”
“The 310L, one of the many models that came out, was the first model with increased fuel capacity via fuel tanks inside wings and optional fuel tanks in engine nacelles, also single-piece windshield, redesigned landing gear, and minor changes; 207 built in 1967.”

“The Cessna 310 was a common charter aircraft for the many air taxi firms that sprang up in the general aviation boom that followed World War II. The advantages of the Cessna 310 over its contemporaries, such as the Piper PA-23, were its speed, operating costs and aftermarket modifications, such as the Robertson STOL kits that made it popular worldwide for its bush flying characteristics.”
“It could use short runways, while at the same time carrying a large useful load of 2,000 lbs (910 kg). or more, at speeds that were high for a twin engine piston aircraft. And although this paragraph only refers to commercial applications, the C310 Series where also popular with military organisations like the USAF who had for example the L27A nicknamed Blue Canoe.”
When you want to know a bit more about the C310 Series, check it out at the dedicated Wikipedia web page.
VFR or IFR?
Oops, that a short sentence. VFR or IFR, but I think you know what to expect or what I mean with it. No, I won’t make a VFR flight with the modeled Digital Replica C310L. It’s intended to use it under Instrument Flight Rules thus using it for IFR flights and for that, you can choose out of many configurations and even more interesting, you can change that on-the-fly.
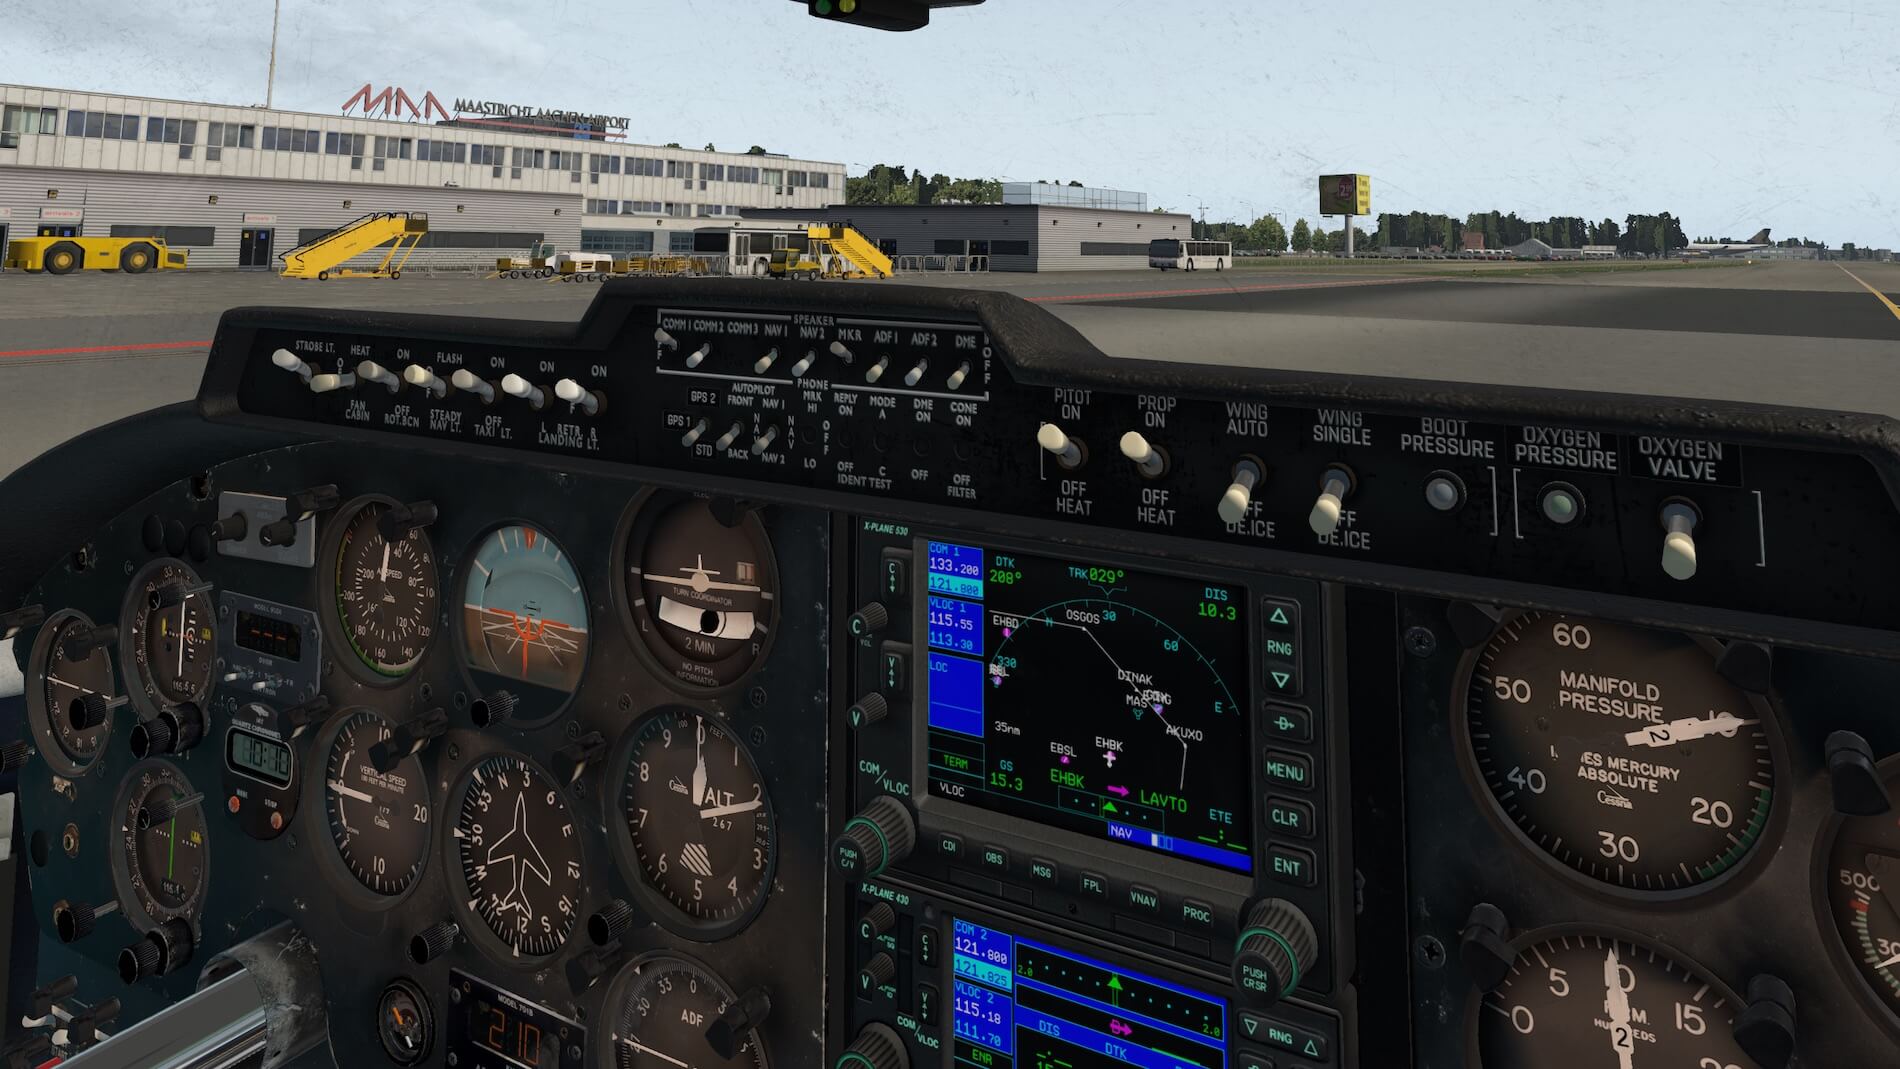
Let me quickly highlight this. You can choose different navigation instruments situated at panel section E – see C310L manual page 3 – namely the default Laminar Research GNS 430, GNS 530 or having them both or nothing. Nothing means that you still have the VOR and ADF (NDB) equipment, but no Garmins. What said before, you can change this on-the-fly, but the most logical way is that you choose what you want before you power up the C310L.
That said, I’ll make a comprehensive IFR flight and see how the C310L flight characteristics are and a further look into the 3D cockpit and “cabin”. As with many aircraft, I don’t have anymore the real flying experience with these twin engine aircraft, but I think I can check many things during the flight and see how it behaves although there’s no real motion available. But first, the modeled exterior- and interior aircraft, installation and manuals. Right on, here we go!
Install, Manuals and Configurations
Install
The installation is straight forward although a serial number is needed to activate it. As of this writing, May 2019, I’m reviewing version 1.1.1a and after I’ve downloaded the ZIP package from X-Plane.Org, I unzipped it and placed the unzipped folder in the X-Plane 11 aircraft folder or feel free to make a dedicated sub folder Digital Replica and paste the contents in this folder. After you’ve started X-Plane, select from the Aircraft list the Digital Replica C310L and enter the serial number. Activate it, reload the aircraft and you’re ready to go.
Hold on, isn’t it an idea to check out the manuals first?
Manuals
The C310L comes with one Acrobat manual, a Microsoft Word Checklist document and a Microsoft Excel Performance Chart sheet. The C310L manual is only 14 pages of which the last two pages cover the performance charts. These performance chart pages are of the same contents as the Excel sheet. The Checklist Word document isn’t included in this C310L manual, but it is included in the Digital Replica widget. Personally I would love to see that the Checklist Word document is also available in an Acrobat document since not every body has or uses Word while Adobe Acrobat files are more commonly used and for sure multi platform thus for Windows, Mac and Linux simmers.
Back to the C310L manual.
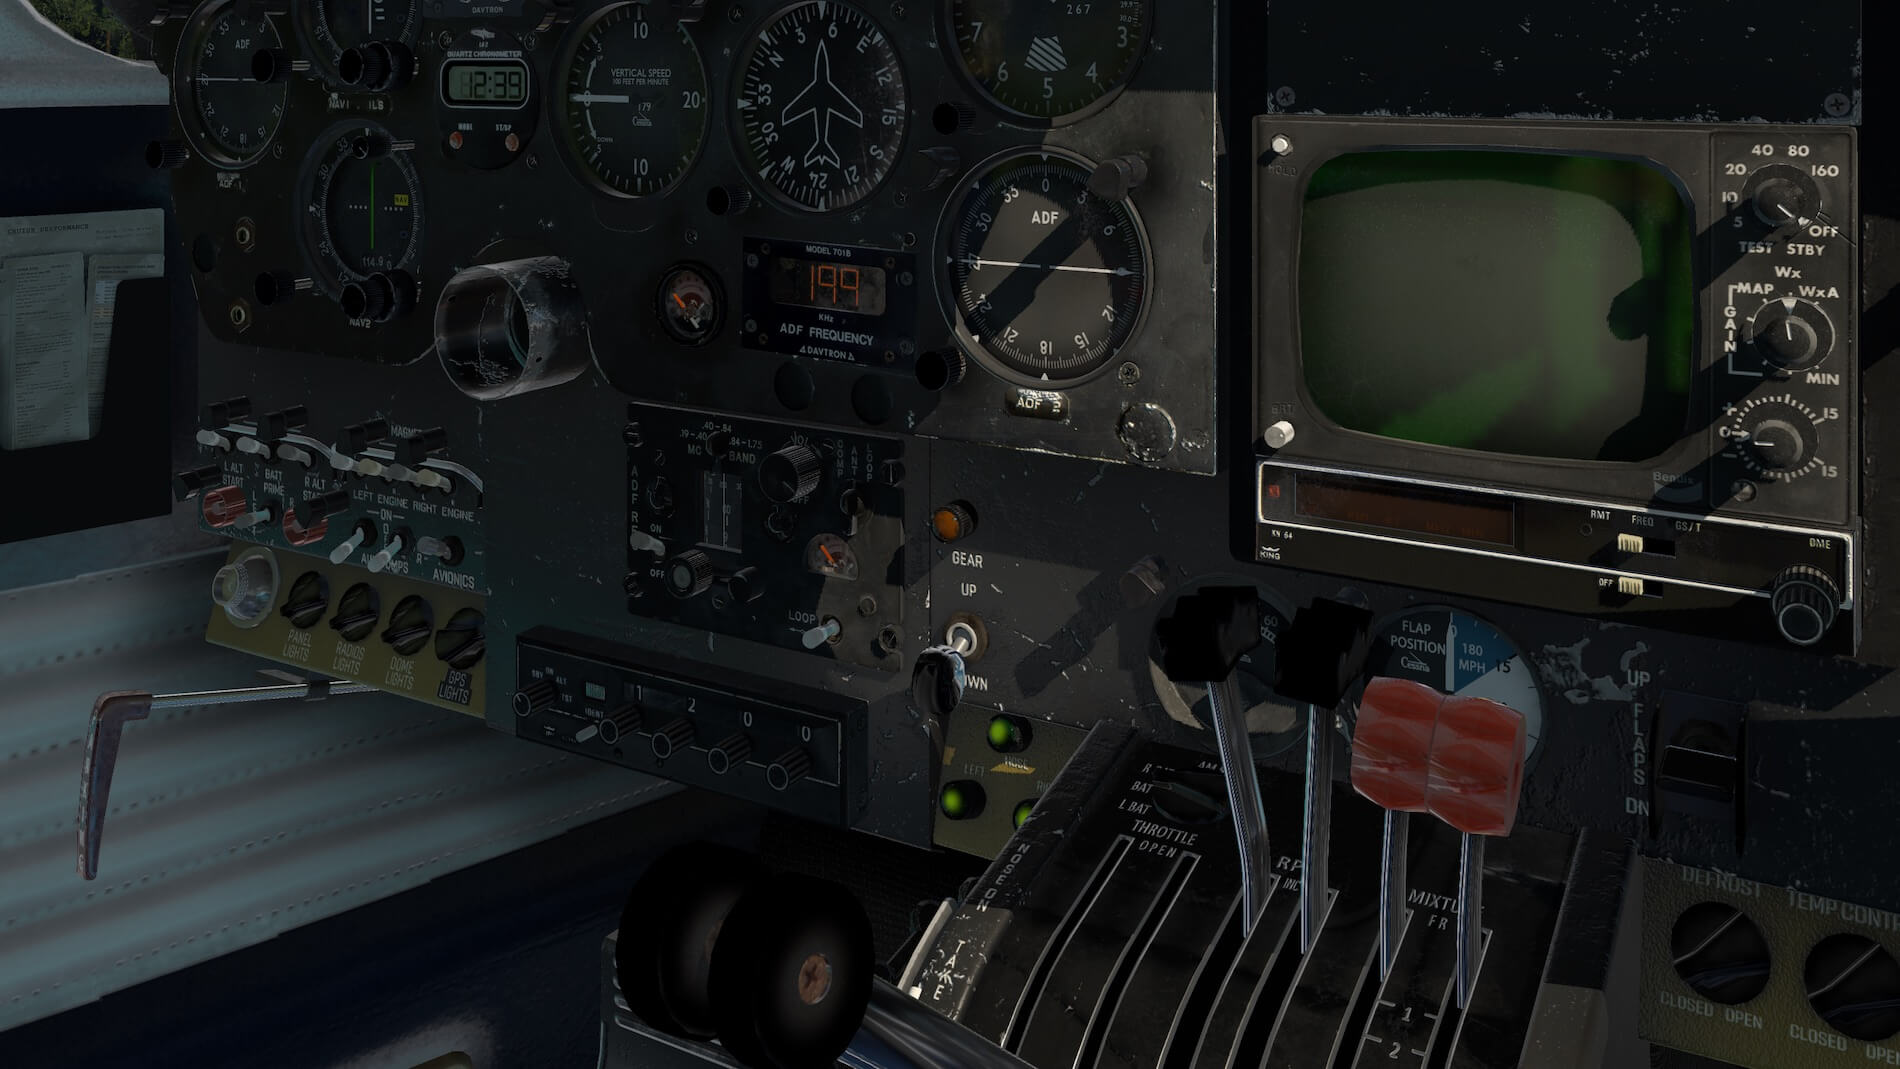
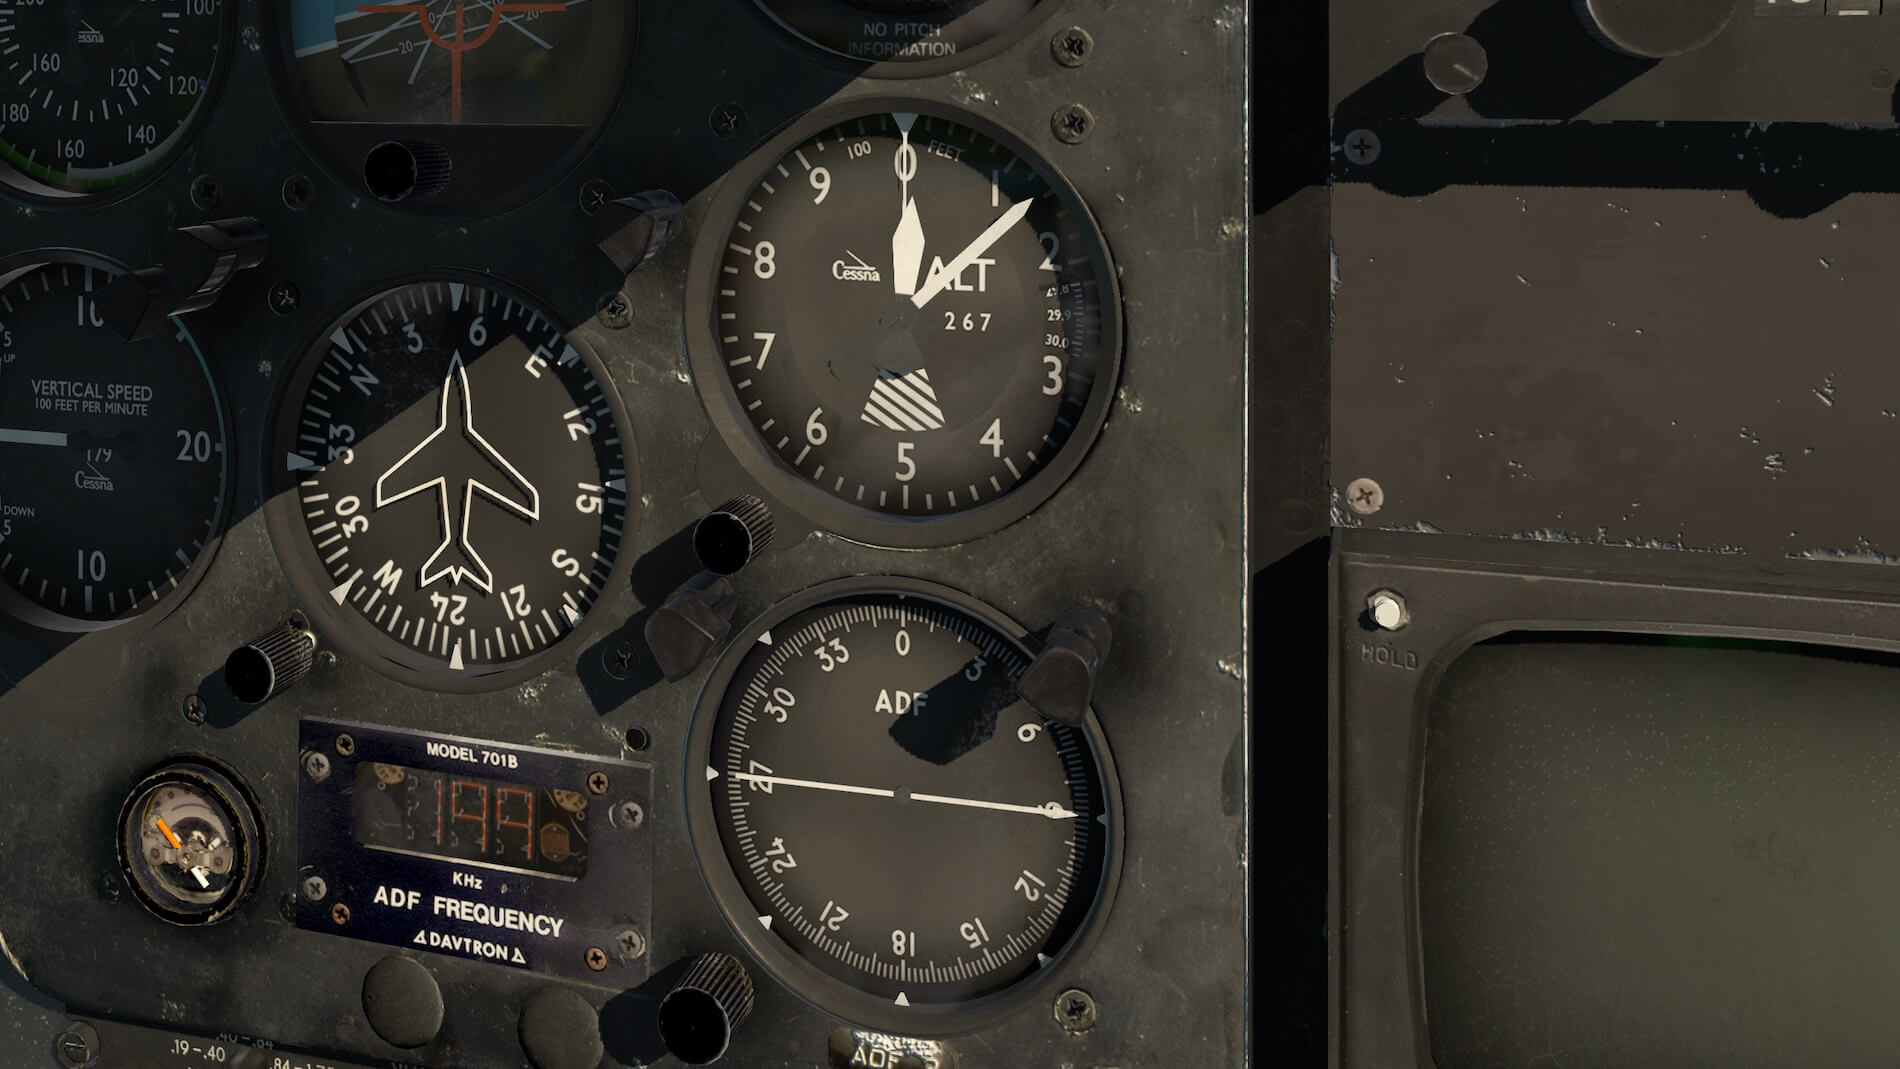
It explains what is needed but when you want to know a bit more about the C310L, then you need to search the Internet for the official C310 POH. On the other hand, the provided manual explains the AP (Auto Pilot), the ADF (Automatic Direction Finding) and VOR (VHF Omnidirectional Range) equipment in detail. Other attention is given to the EGT indicator and the leaning procedure, cockpit miscellaneous interactions, de-ice and oxygen systems, of course the fuel system, the default Laminar Research radar and a quick look of the instrument panel sections. Other then this is not explained.
Configurations
When it comes to the Digital Replica Widget, I think it’s better to go a bit deeper into the Digital Replica “widget” as briefly described in the manual. As described in the manual page 2 “When the mouse is set over the down and left corner of the screen, a widget will pop up, from there you can select to open the different popup windows.”
The popup shows you four options; AP, performance charts, checklist and weight and fuel.
When you click the Auto Pilot section, it turns red and a 2D AP panel, the same as the one mounted in the 3D cockpit, pops up. The same for the performance charts and checklist. These last two popup floating windows speak for themselves. The charts are just static tables which can be used as reference while the checklist is handy although the checklist isn’t interactive. In other words, when you activate or deactivate “a” system, it isn’t monitored by the checklist. Not weird to be honest since it’s just the same as having a paper checklist in your hand and following all the steps that are needed and verify for yourself if you’ve done it or not.
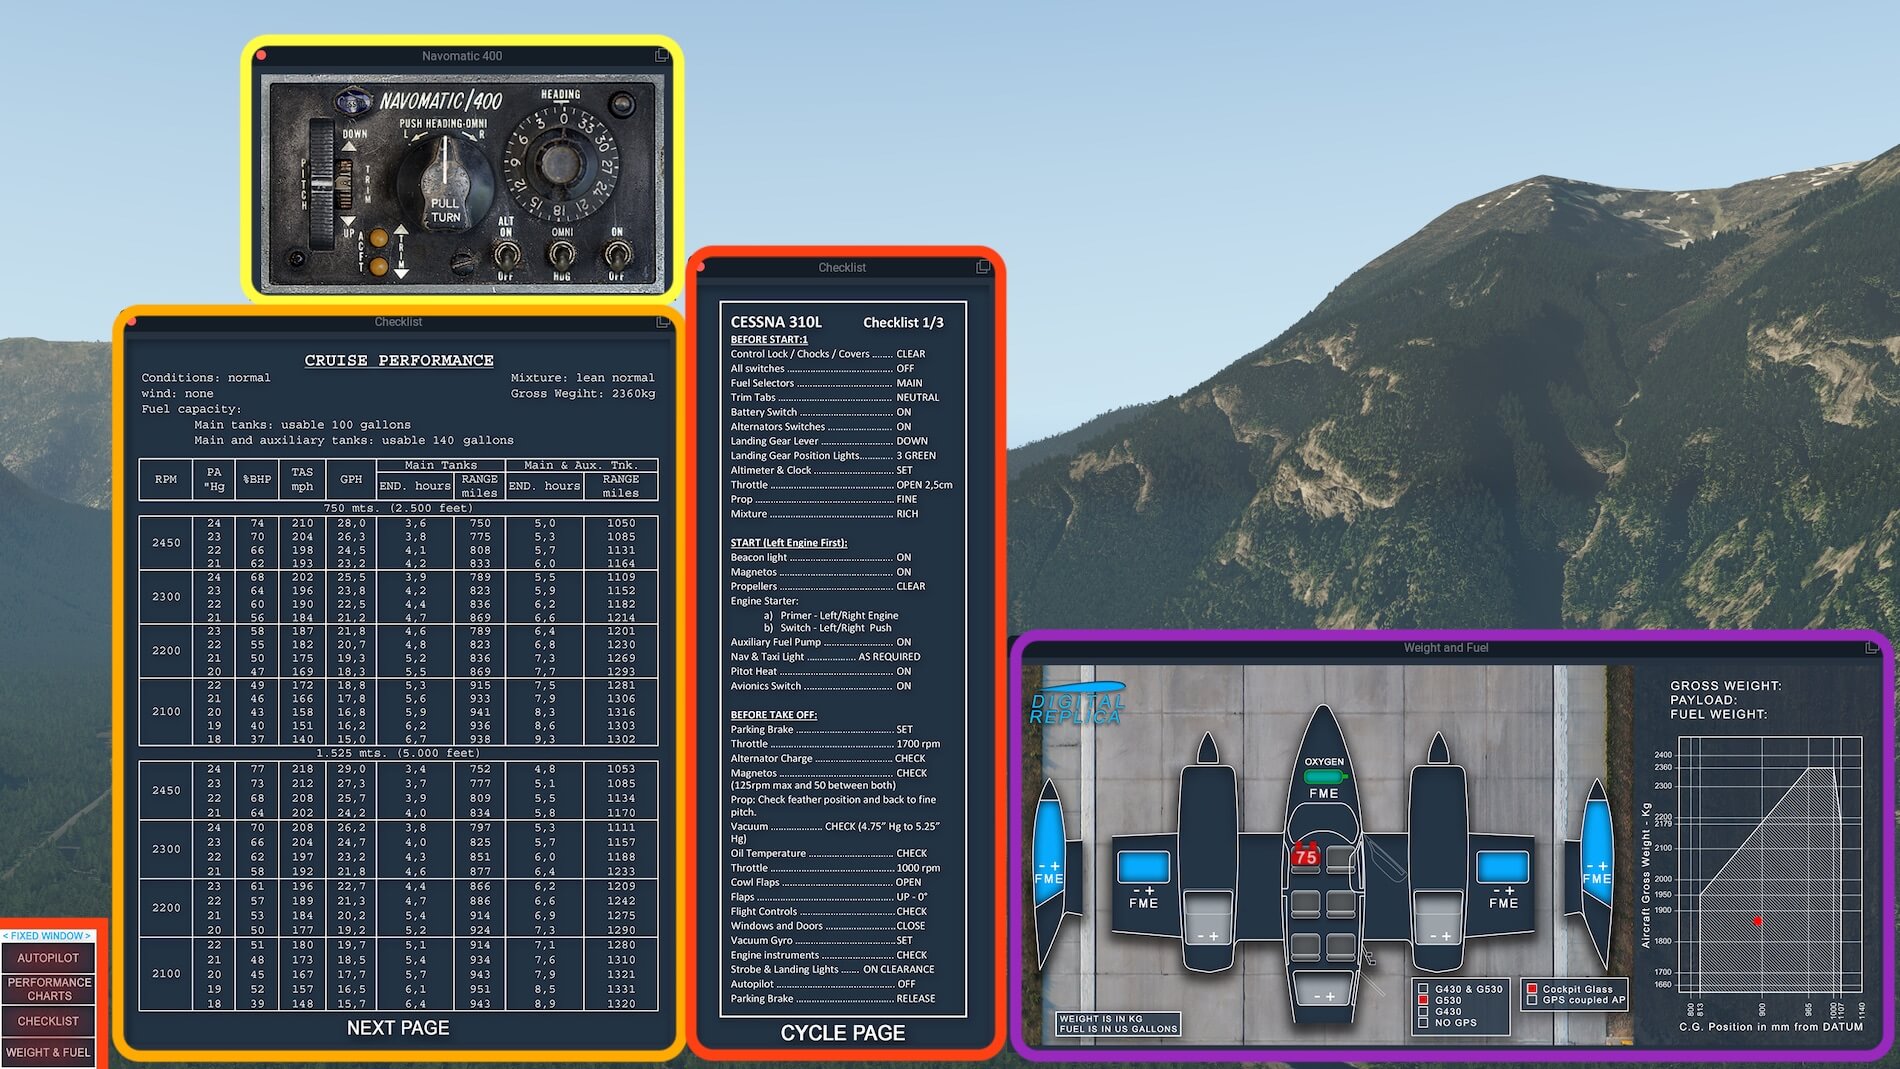
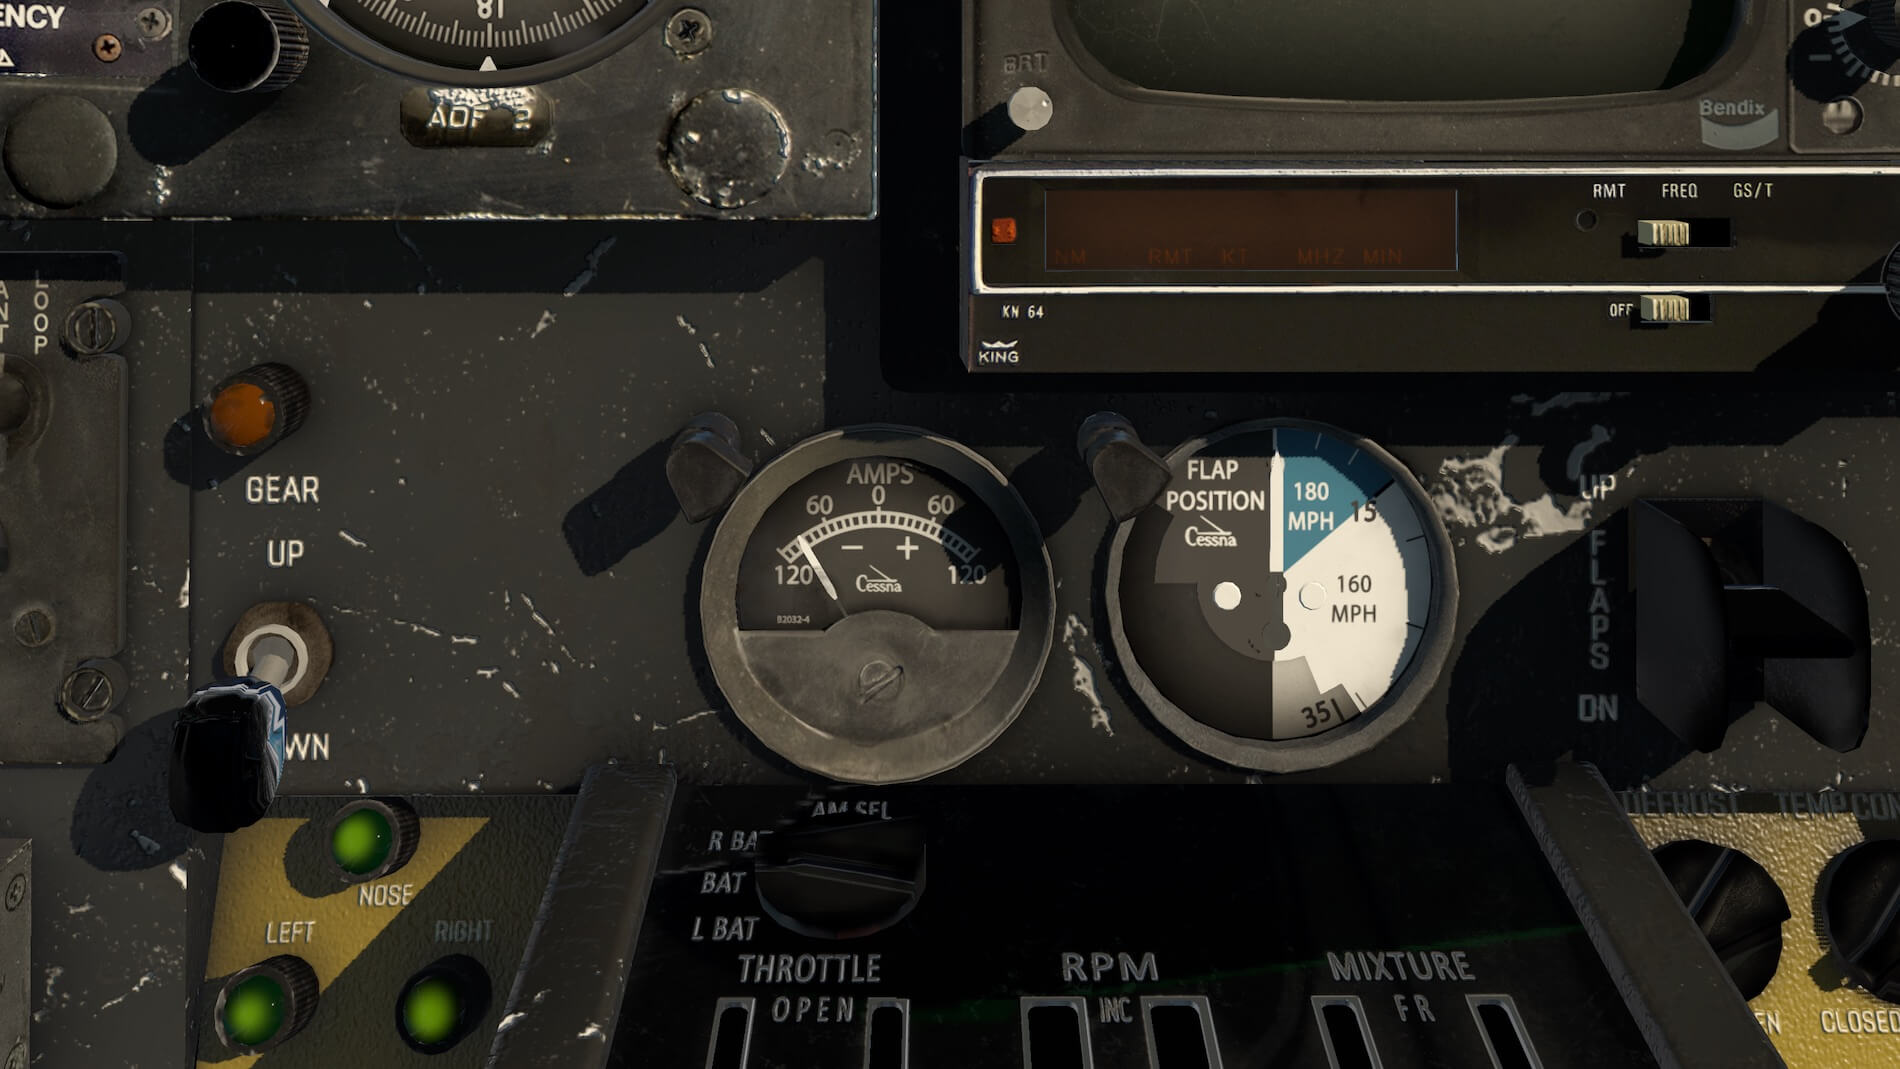
The weight and fuel popup floating window is already a bit explained in the manual page 2, but some additional notes are welcome. When you click within the blue squares on the “+” or “-“, you can adjust the amount of fuel in the main (wing tip)- or auxiliary bladder tank (mounted within the wing itself). The only thing you need to keep in mind is that when you click for a tank on the “+” or “-“, nothing changes in the blue tank, instead you need to look in the center of gravity chart.
You’ll see that the red dot changes position when you are increasing/decreasing the amount of fuel thus the center of gravity. Personally I expected that the blue tank would have a kind of simulation that the blue level indicates the amount of fuel which is not the case. Perhaps it will become a future update that the actual fuel level is simulated in a blue tank.
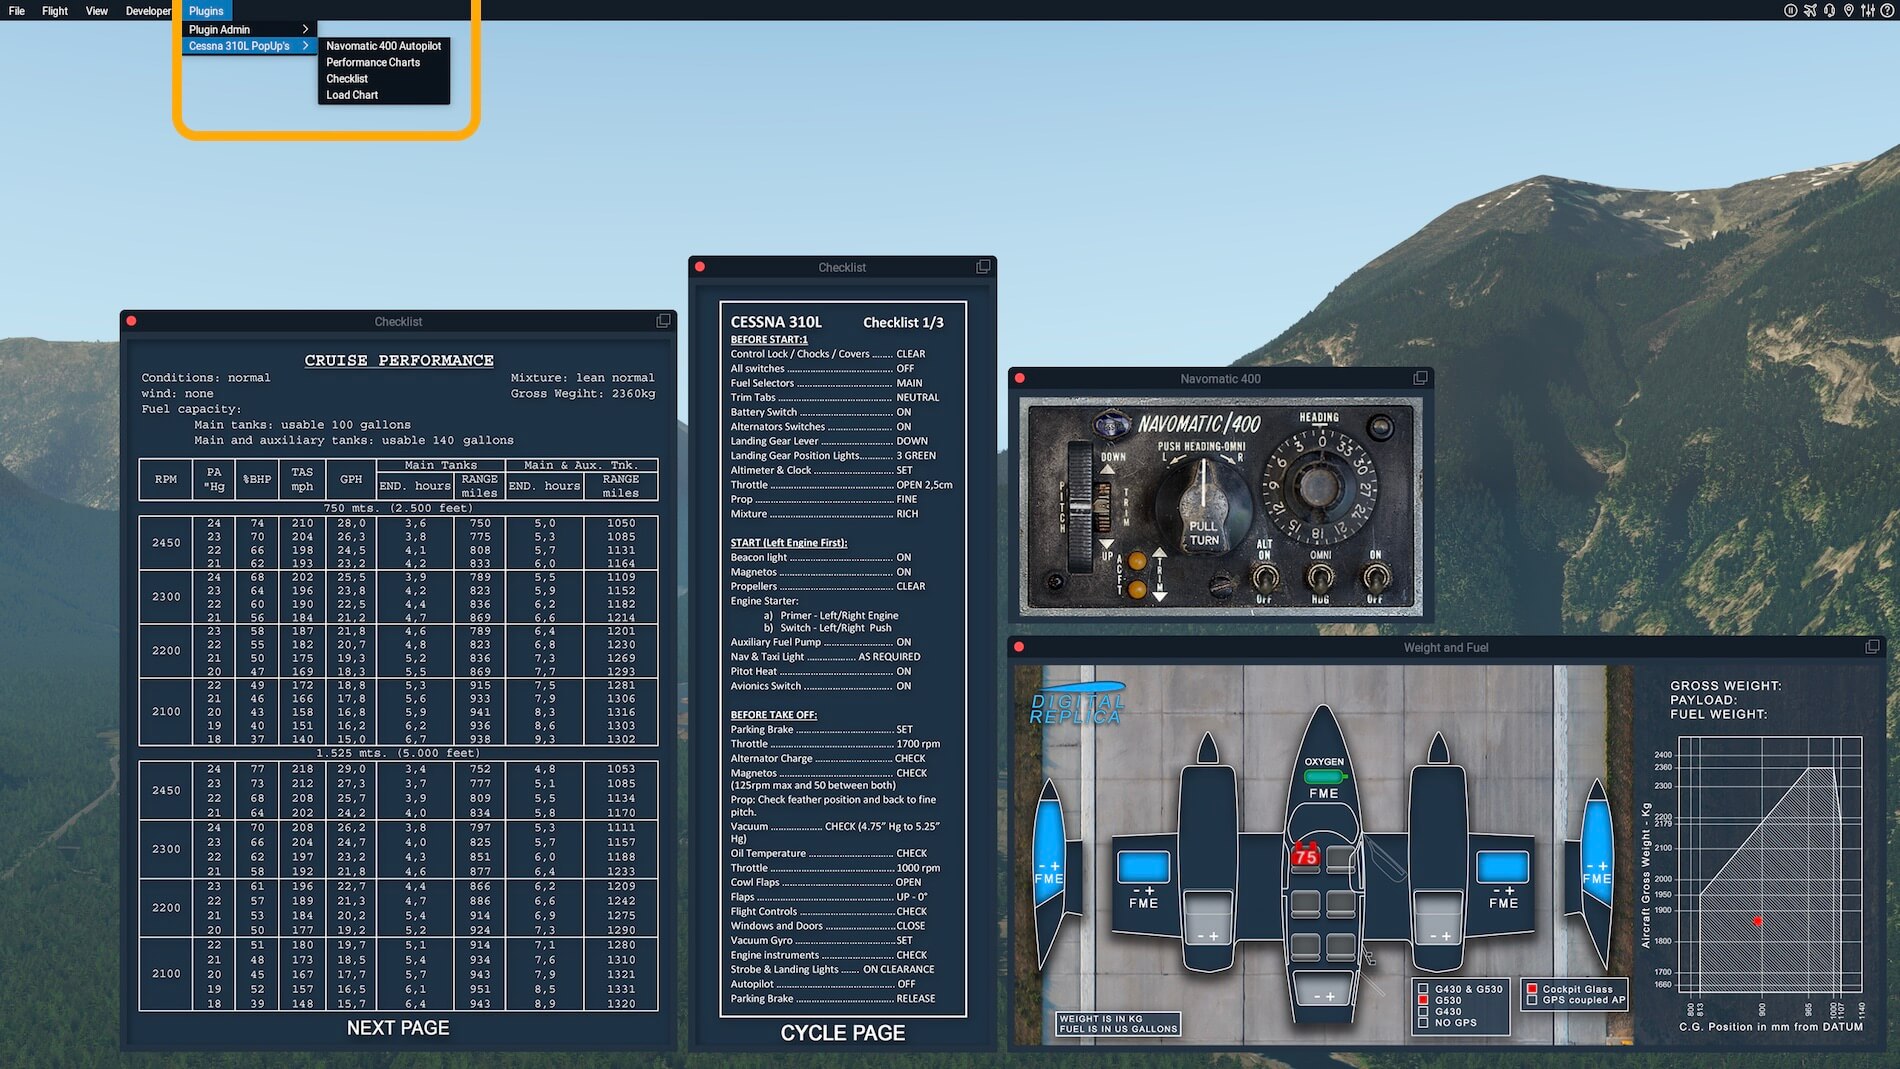
Before I forget it; when you don’t want to use the widget, you can also access these Digital Replica popup windows via X-Plane menu Plugins – Cessna 310L Popup’s (see the last screenshot in the above section).
The External C310L
Walk-Around Check
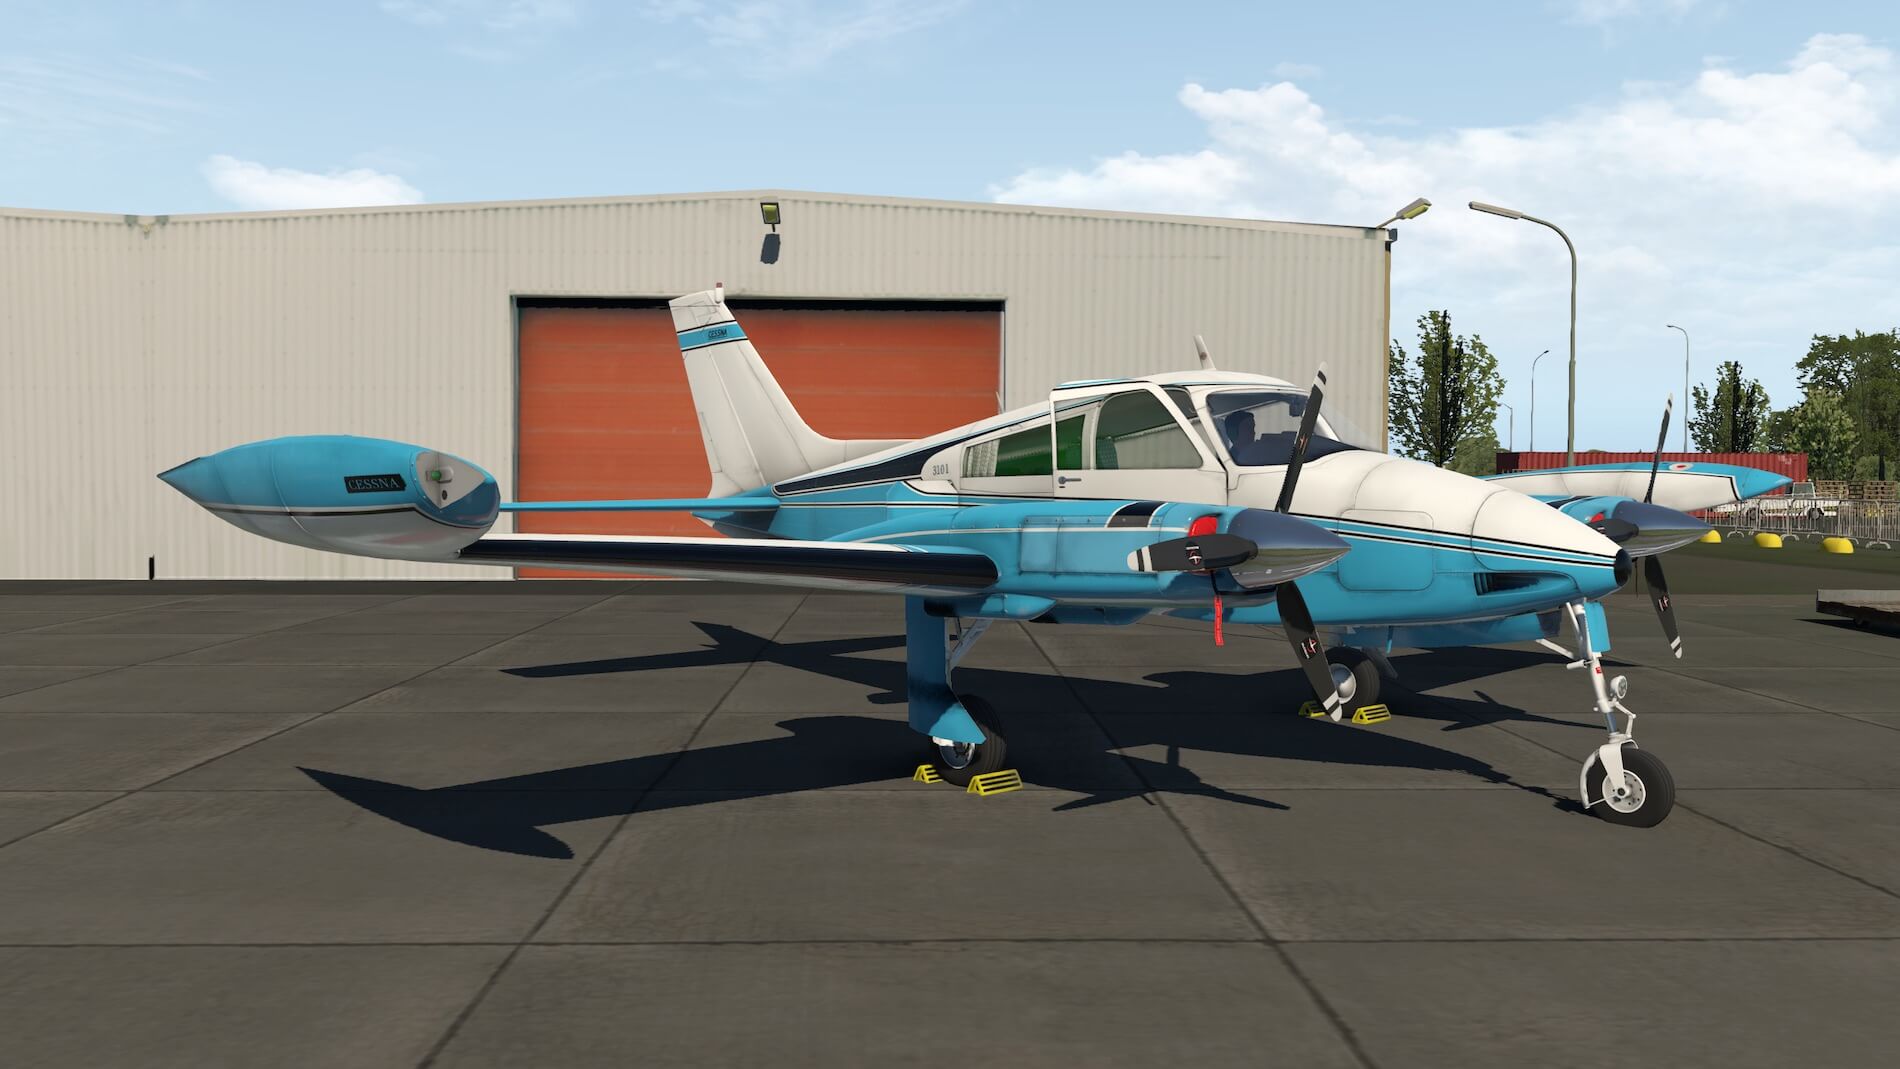
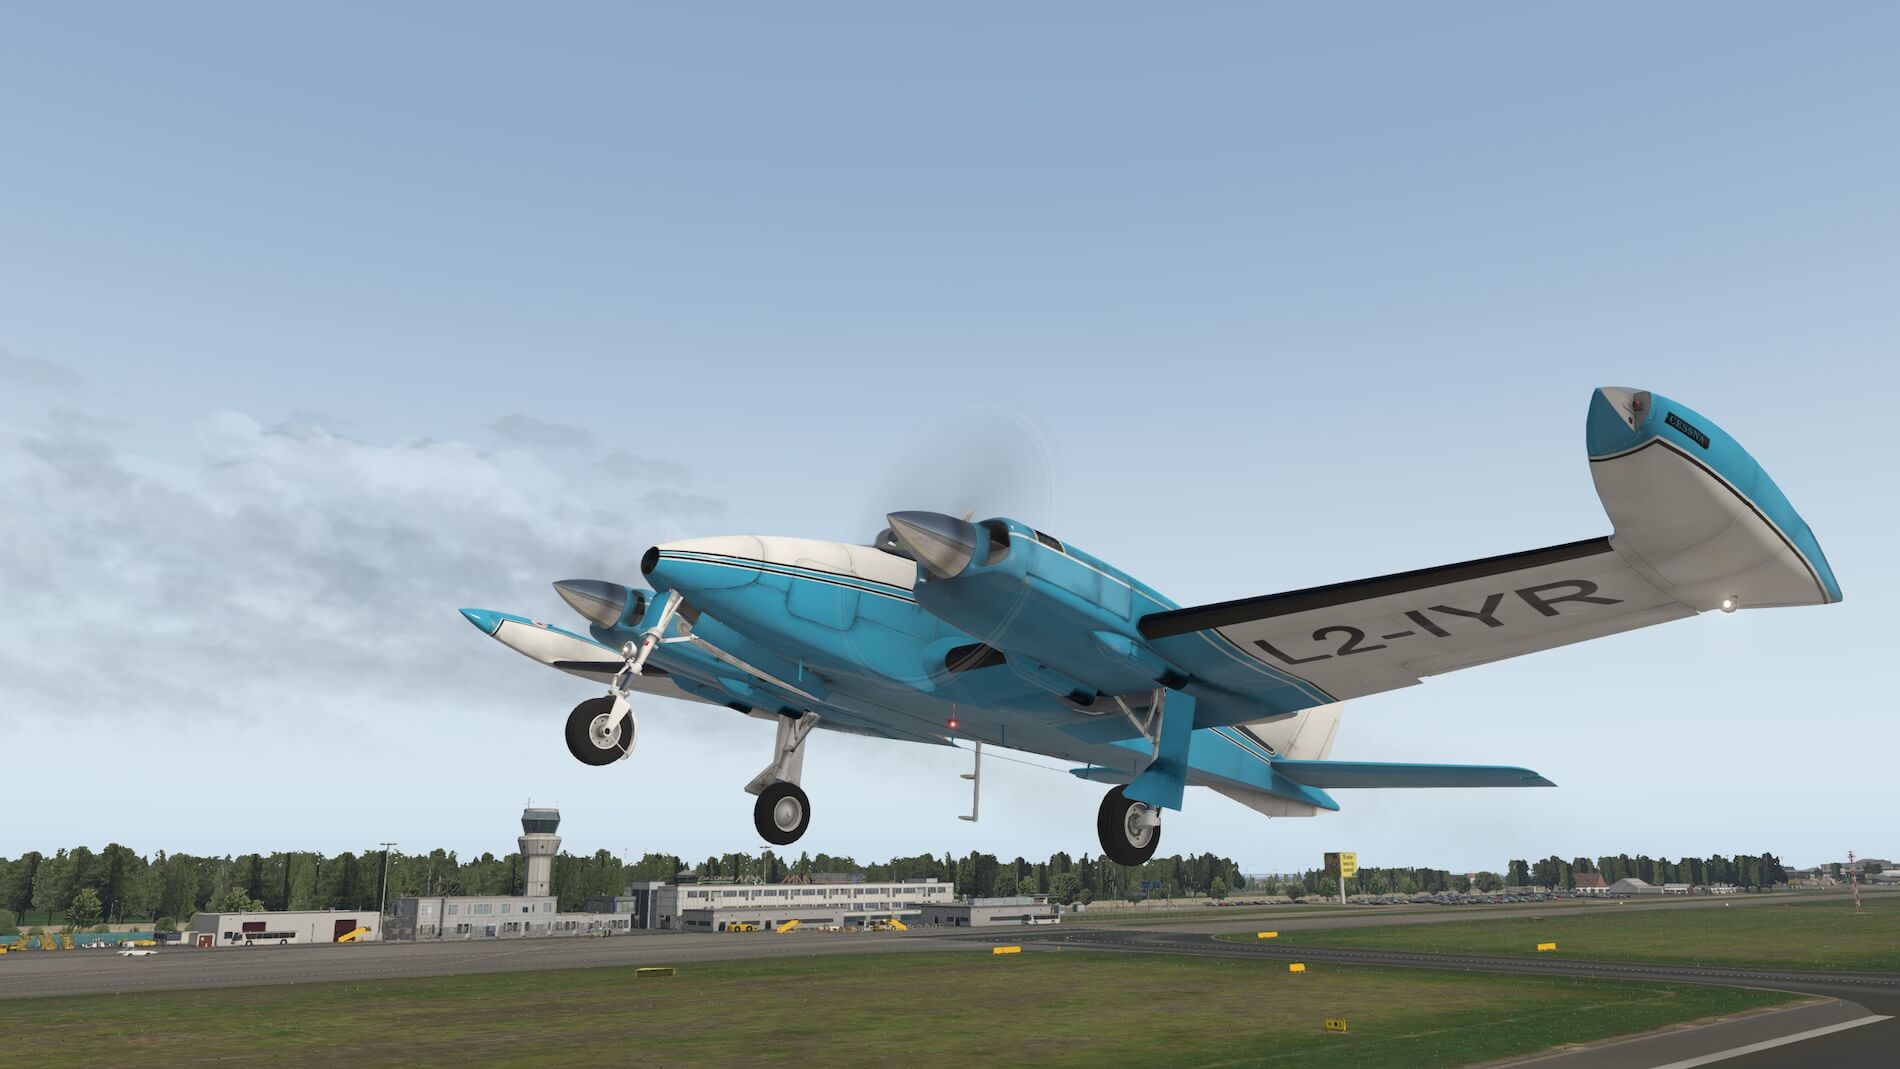
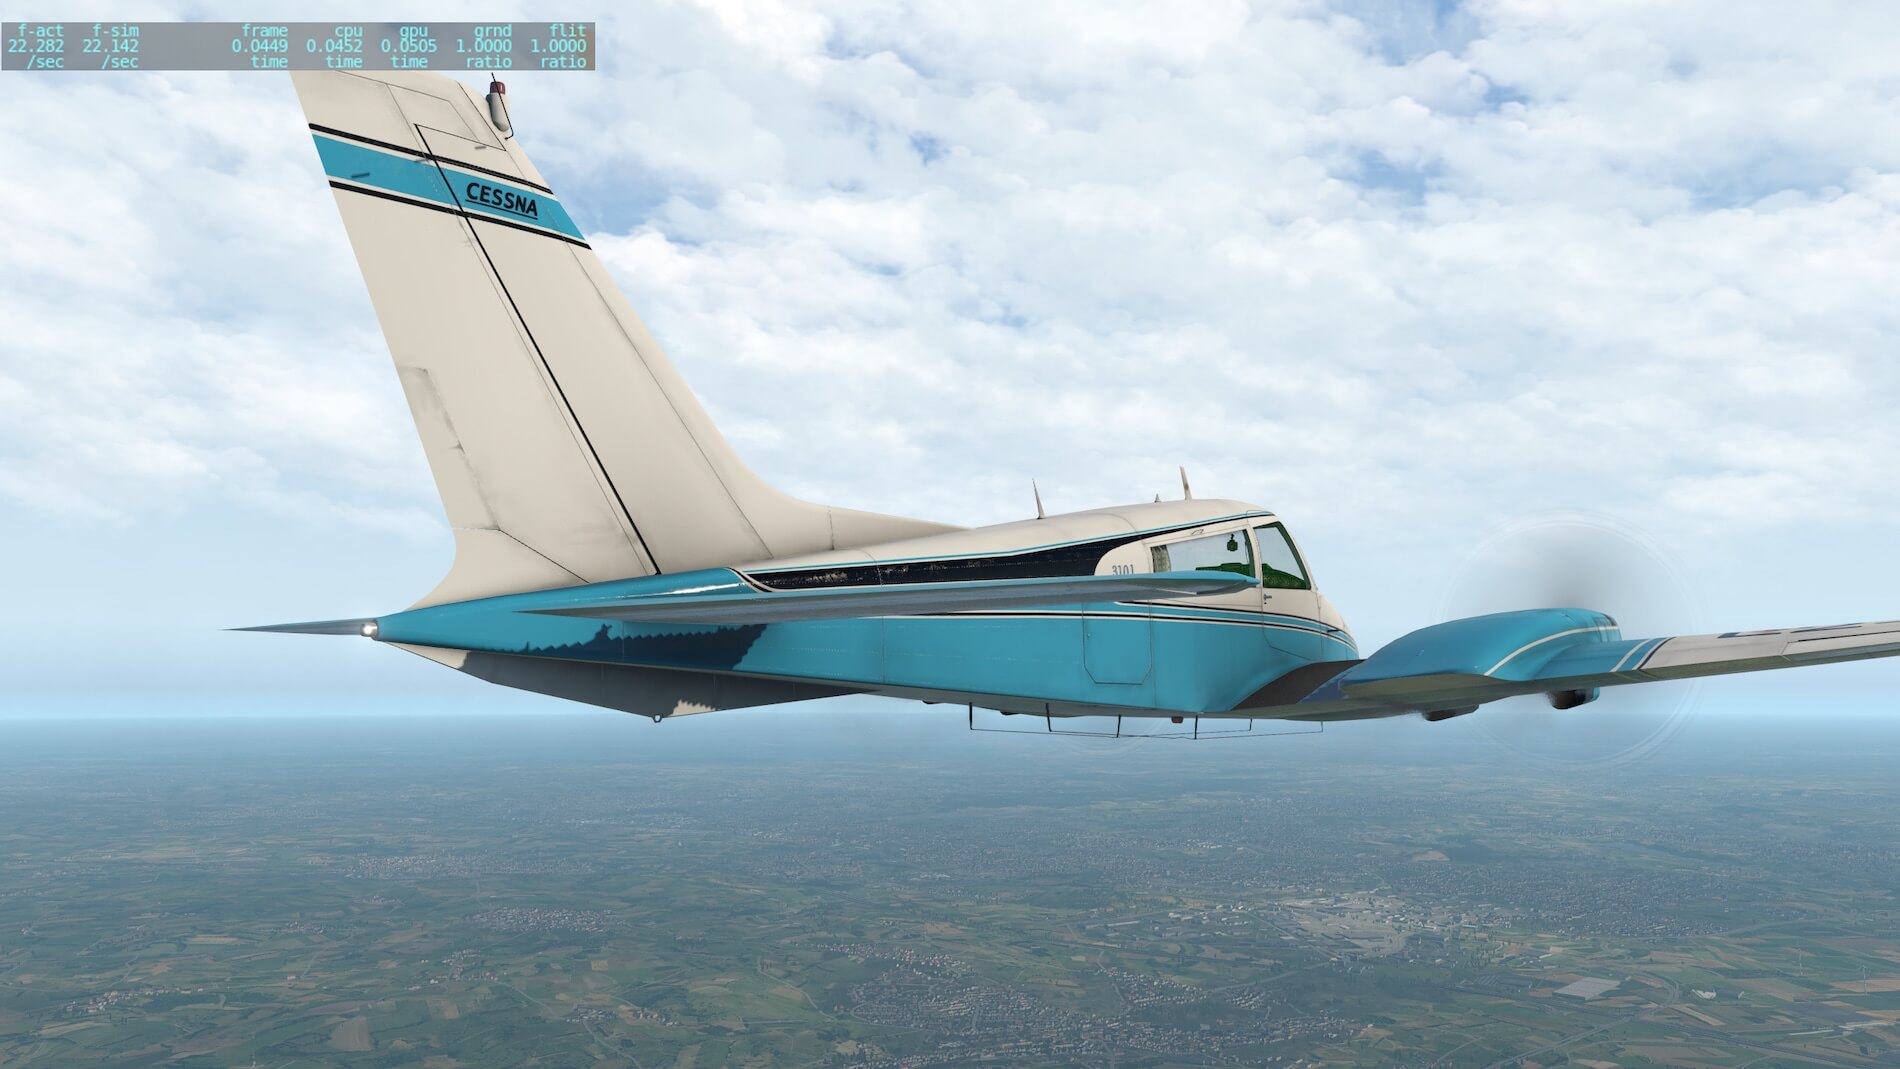
What I actually have in mind with this “section” is a thorough walk-around check on the Cessna 310L. During a walk-around check you could look only to the paintings, you could look to the overall 3D model, you could look to tiny details and how they are modeled like the landing gear structs, flap supporting beams, flight control construction, flap construction, wheel wells and so on. Some developers like brand new aircraft, other developers like it a bit weathered or used while only a couple of developers prefer to give it a realistic look keeping in mind the age of the aircraft.
One is Thranda Design / Just Flight with their GA models and the other is Digital Replica. If you like a weathered or used look is and stays always a matter of taste but I think Digital Replica succeeded in this although a bit more “worn out” look of the painting would have my preference. One thing is for sure; it’s not a clean model, it has a lot of dirt so it looks used.
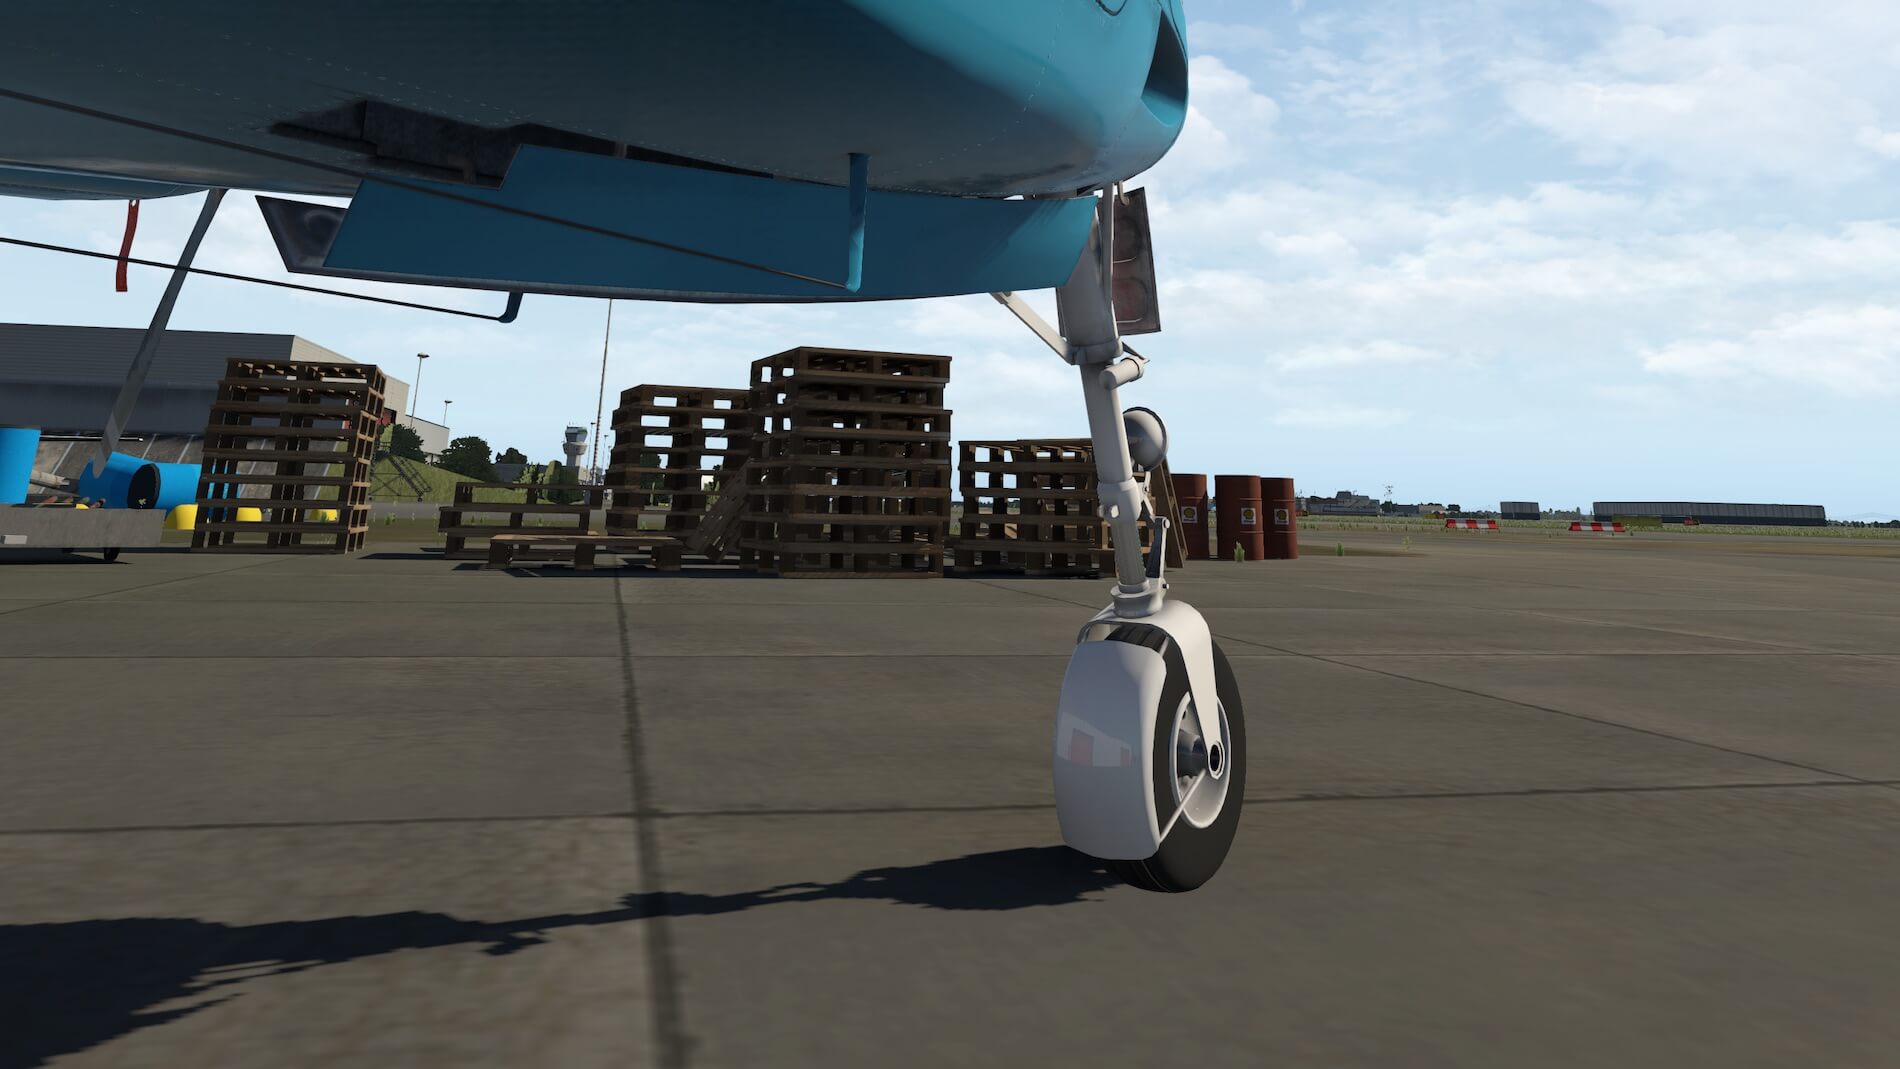
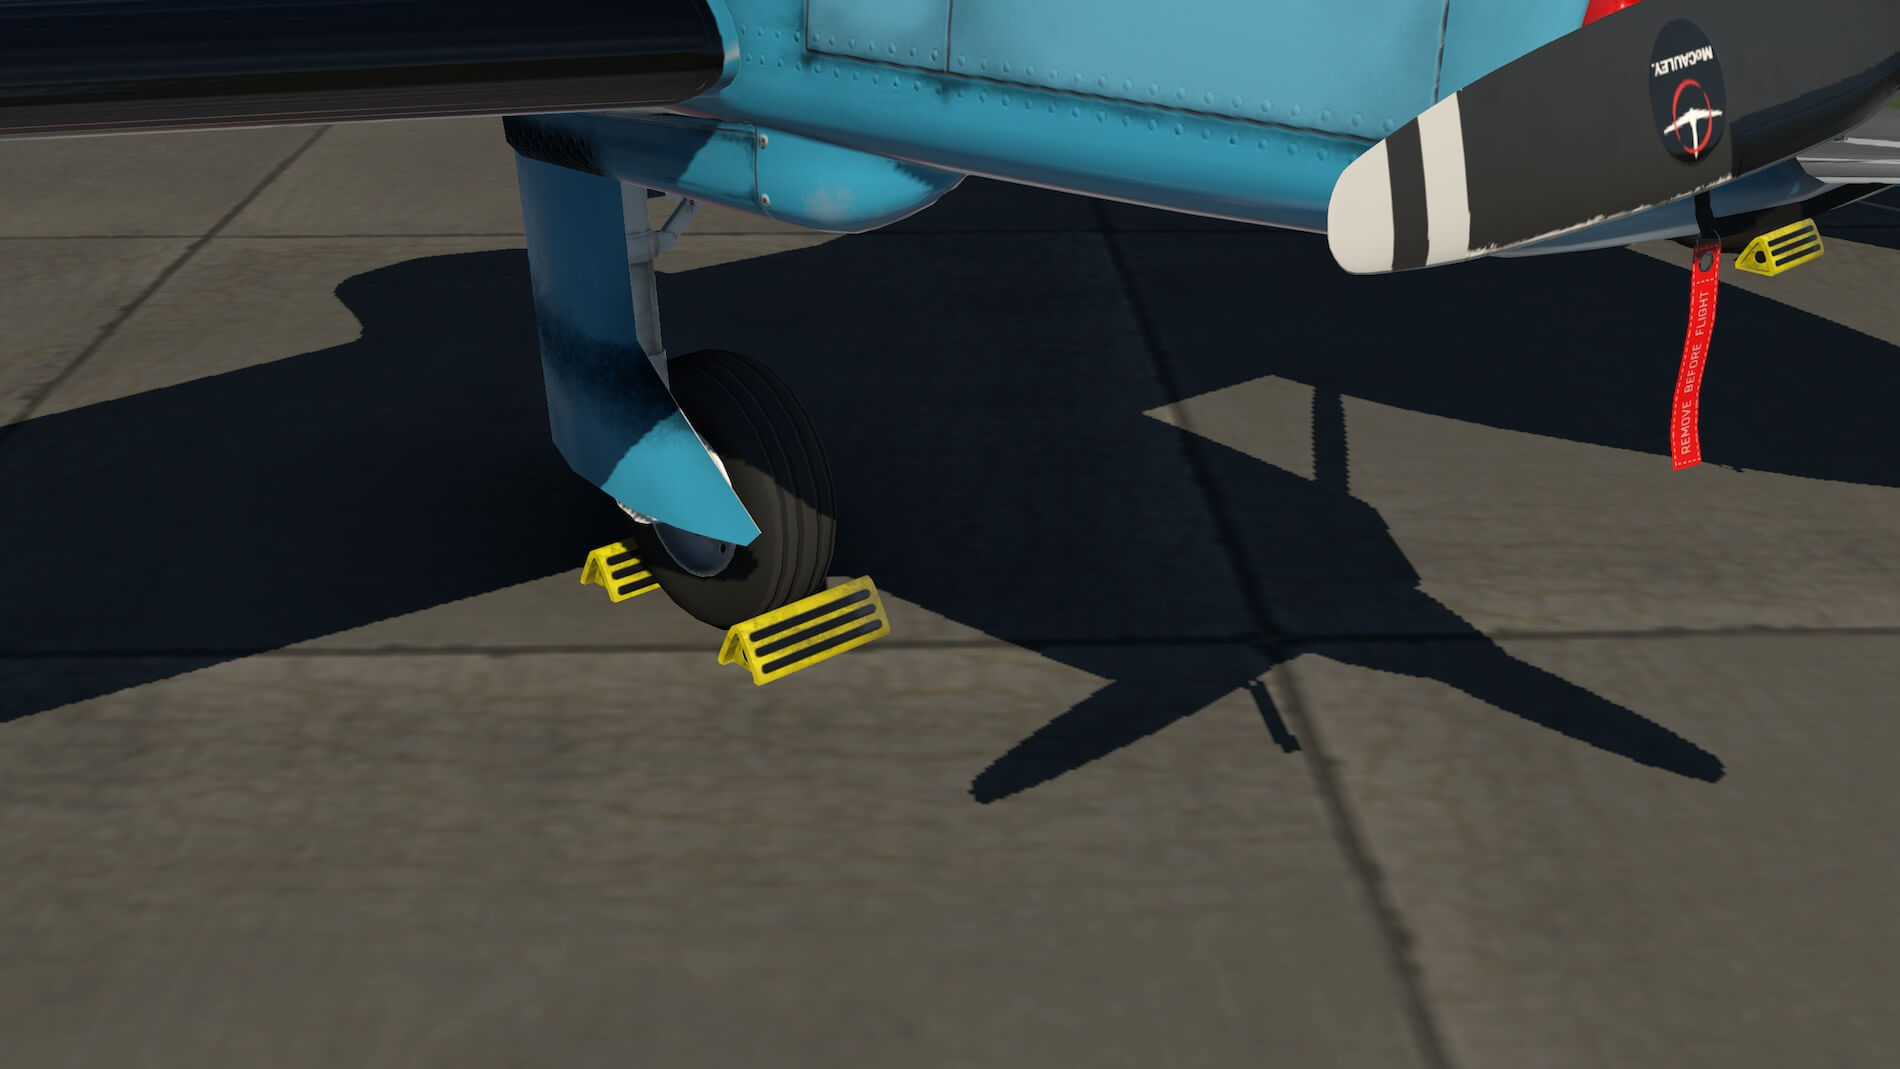
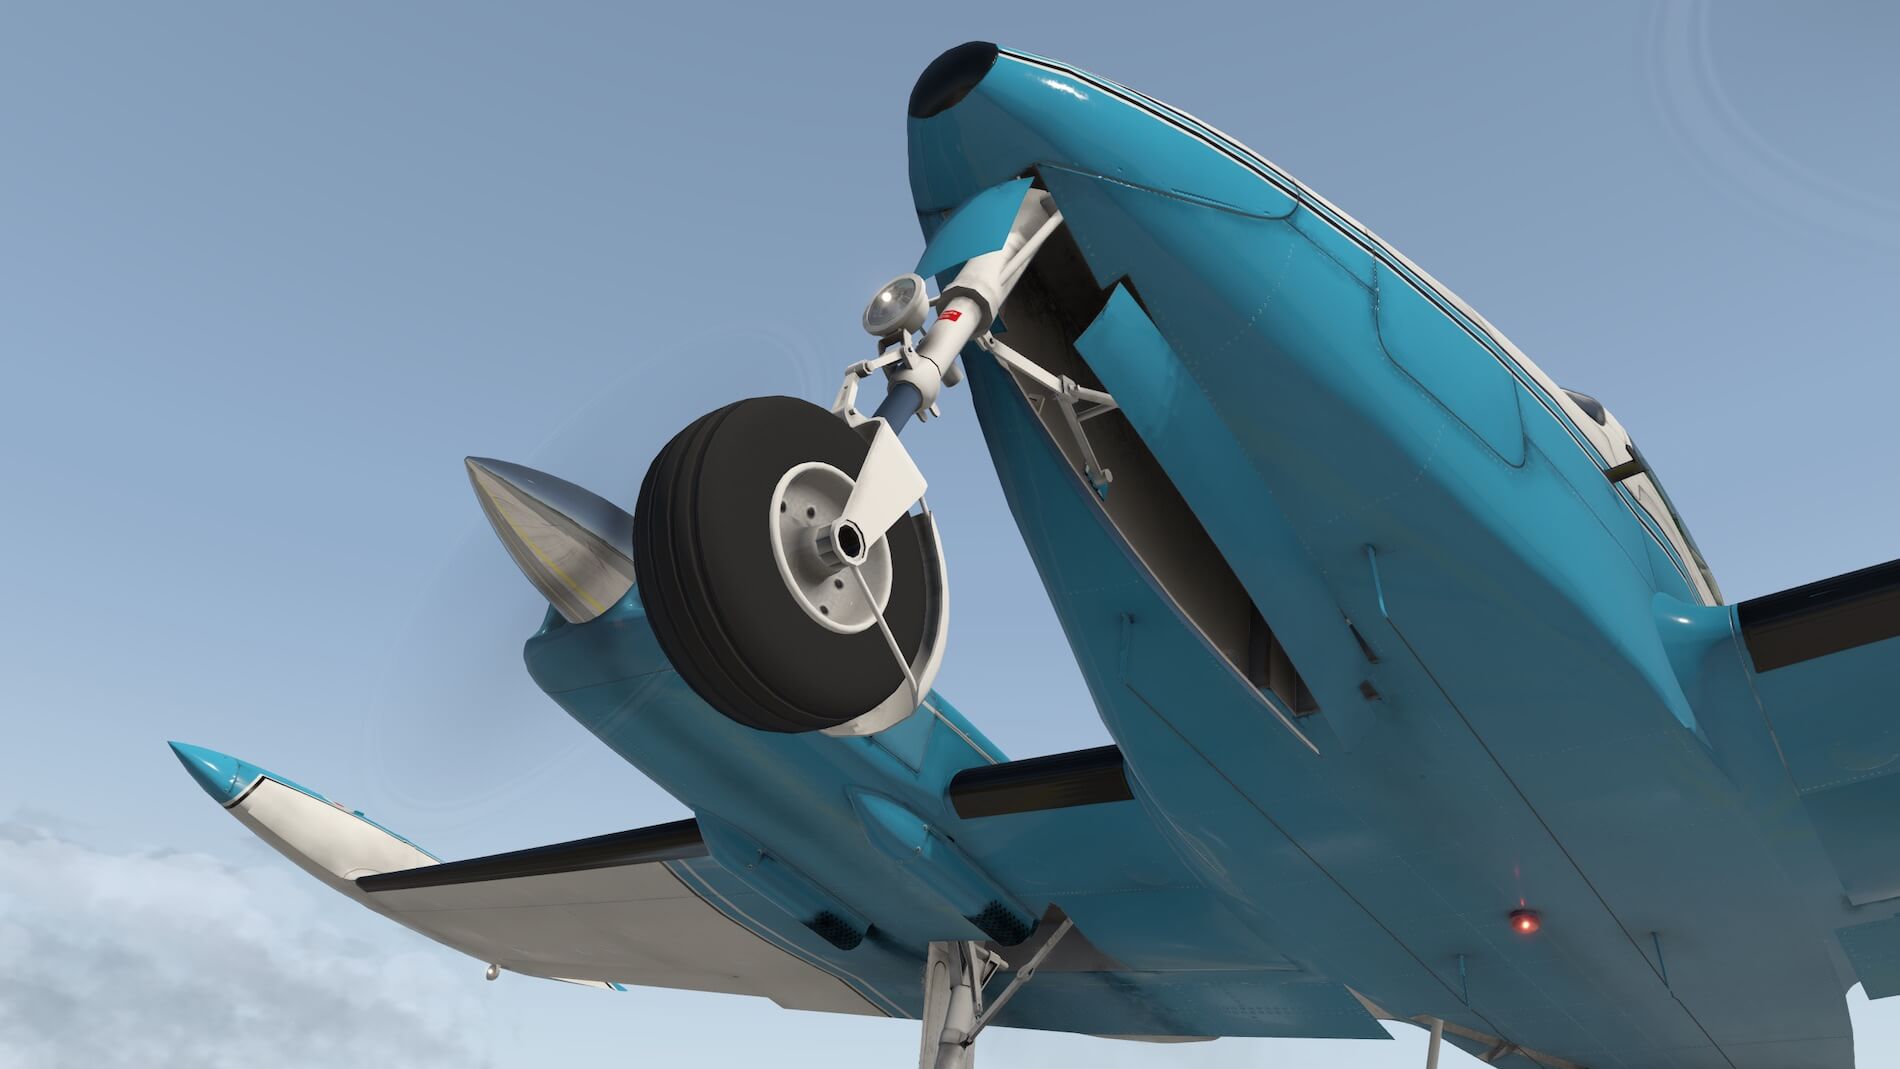
While starting with the nose of the aircraft, I’m impressed by the way the landing gear and its components with the nose wheel looks like. Very detailed and that for such a small gear construction. Although just a small detail, the red placard on the NLG (Nose Landing Gear) strut isn’t blurry, no, it’s sharp and easy to read. At the aircraft nose, but the following is basically typical for the whole fuselage, wings and tail, I see dirty spots, stripes or whatever you call them on all the Aluminium skin ends. One note for the gears in general, they are a bit too clean as well as the wheel assemblies.


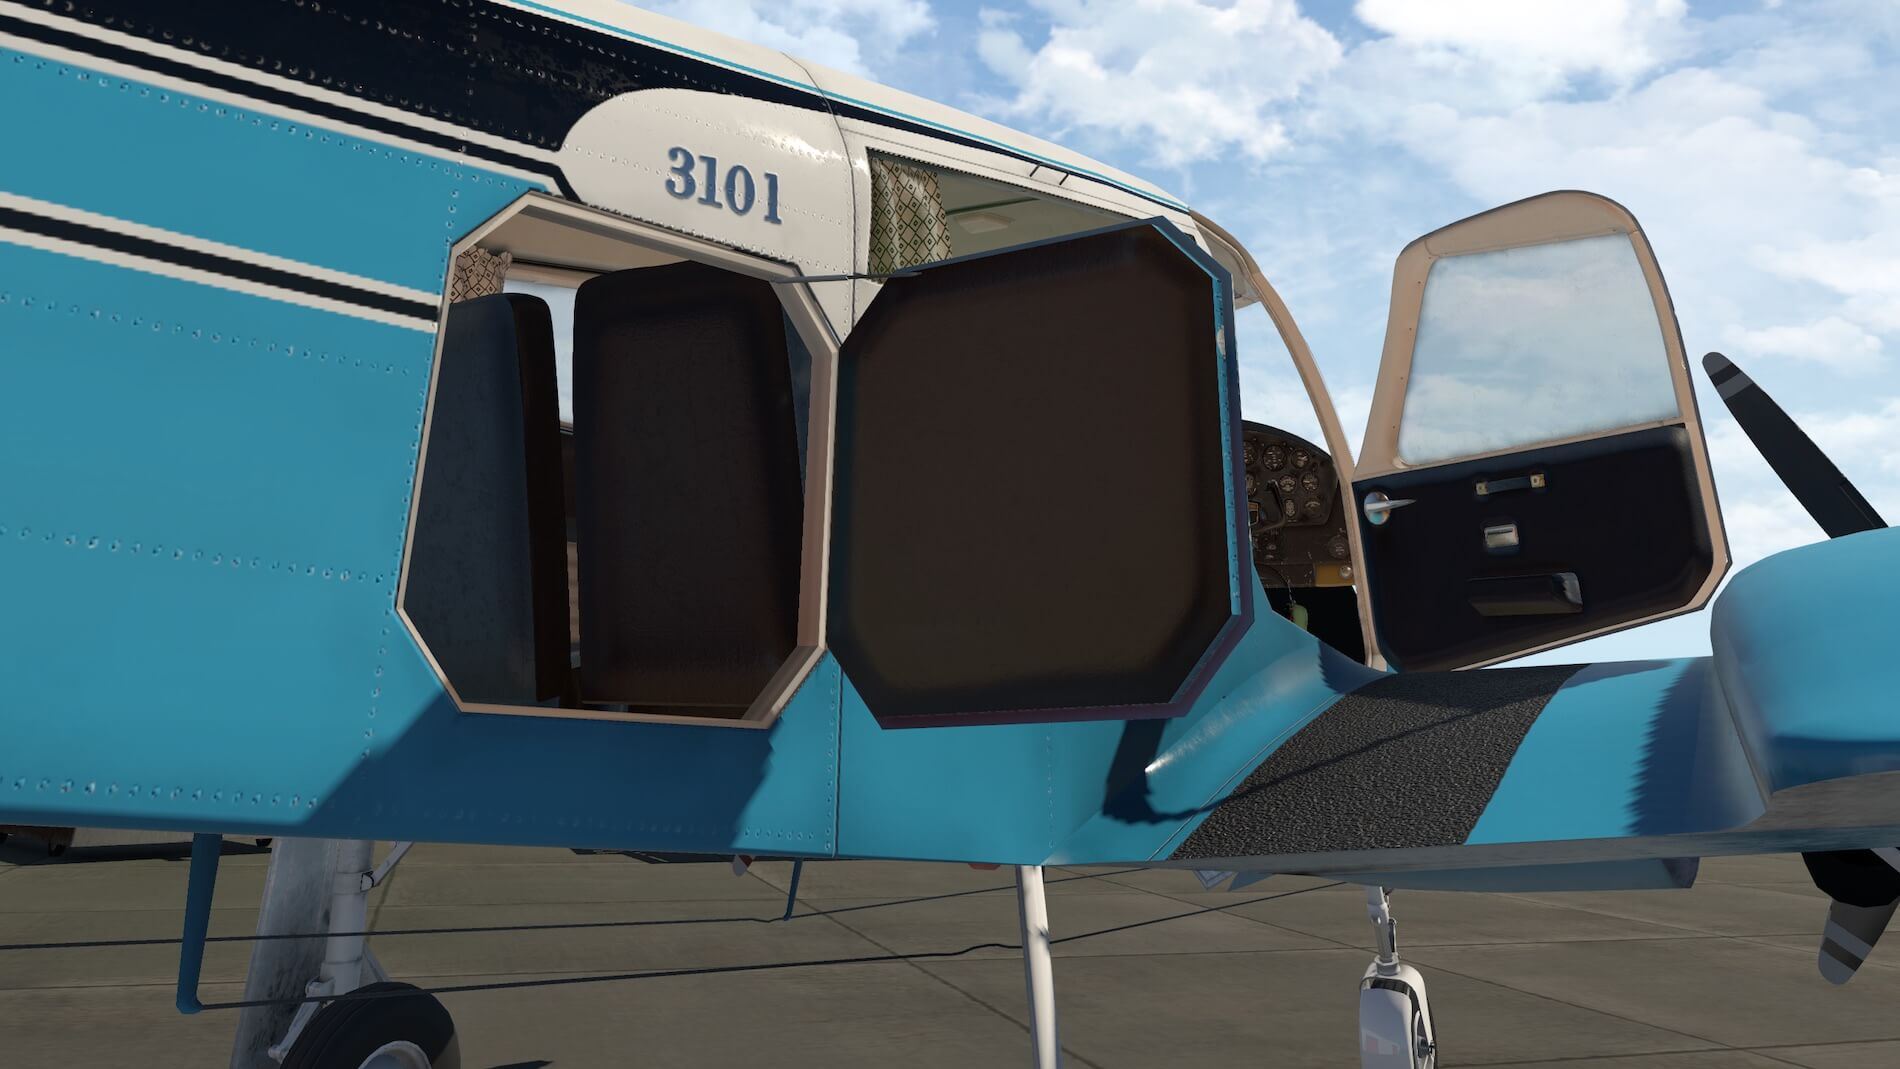
What I don’t see are scratches or dents. As far as I’ve seen the model comes with two animated doors/panels namely the passengers/pilots door on the right-hand side and the baggage door, also on the right-hand side. Just to clarify this a bit; the C310L doesn’t has on the left-hand side any door or panel, so therefore you find it all on the right-hand side.
The engine spinner cones are nicely modeled and simulated as being stainless steel or highly polished objects. Even the tiny screws are nice, but the blades are worth to have a closer look. Paint is missing at the blade leading edges which feels quite realistic and with the engines not running, I spot the inlet covers, very nice! And I shouldn’t forget to mention that the manufactures decals on each blades are sharp, no, razor sharp. Well done!
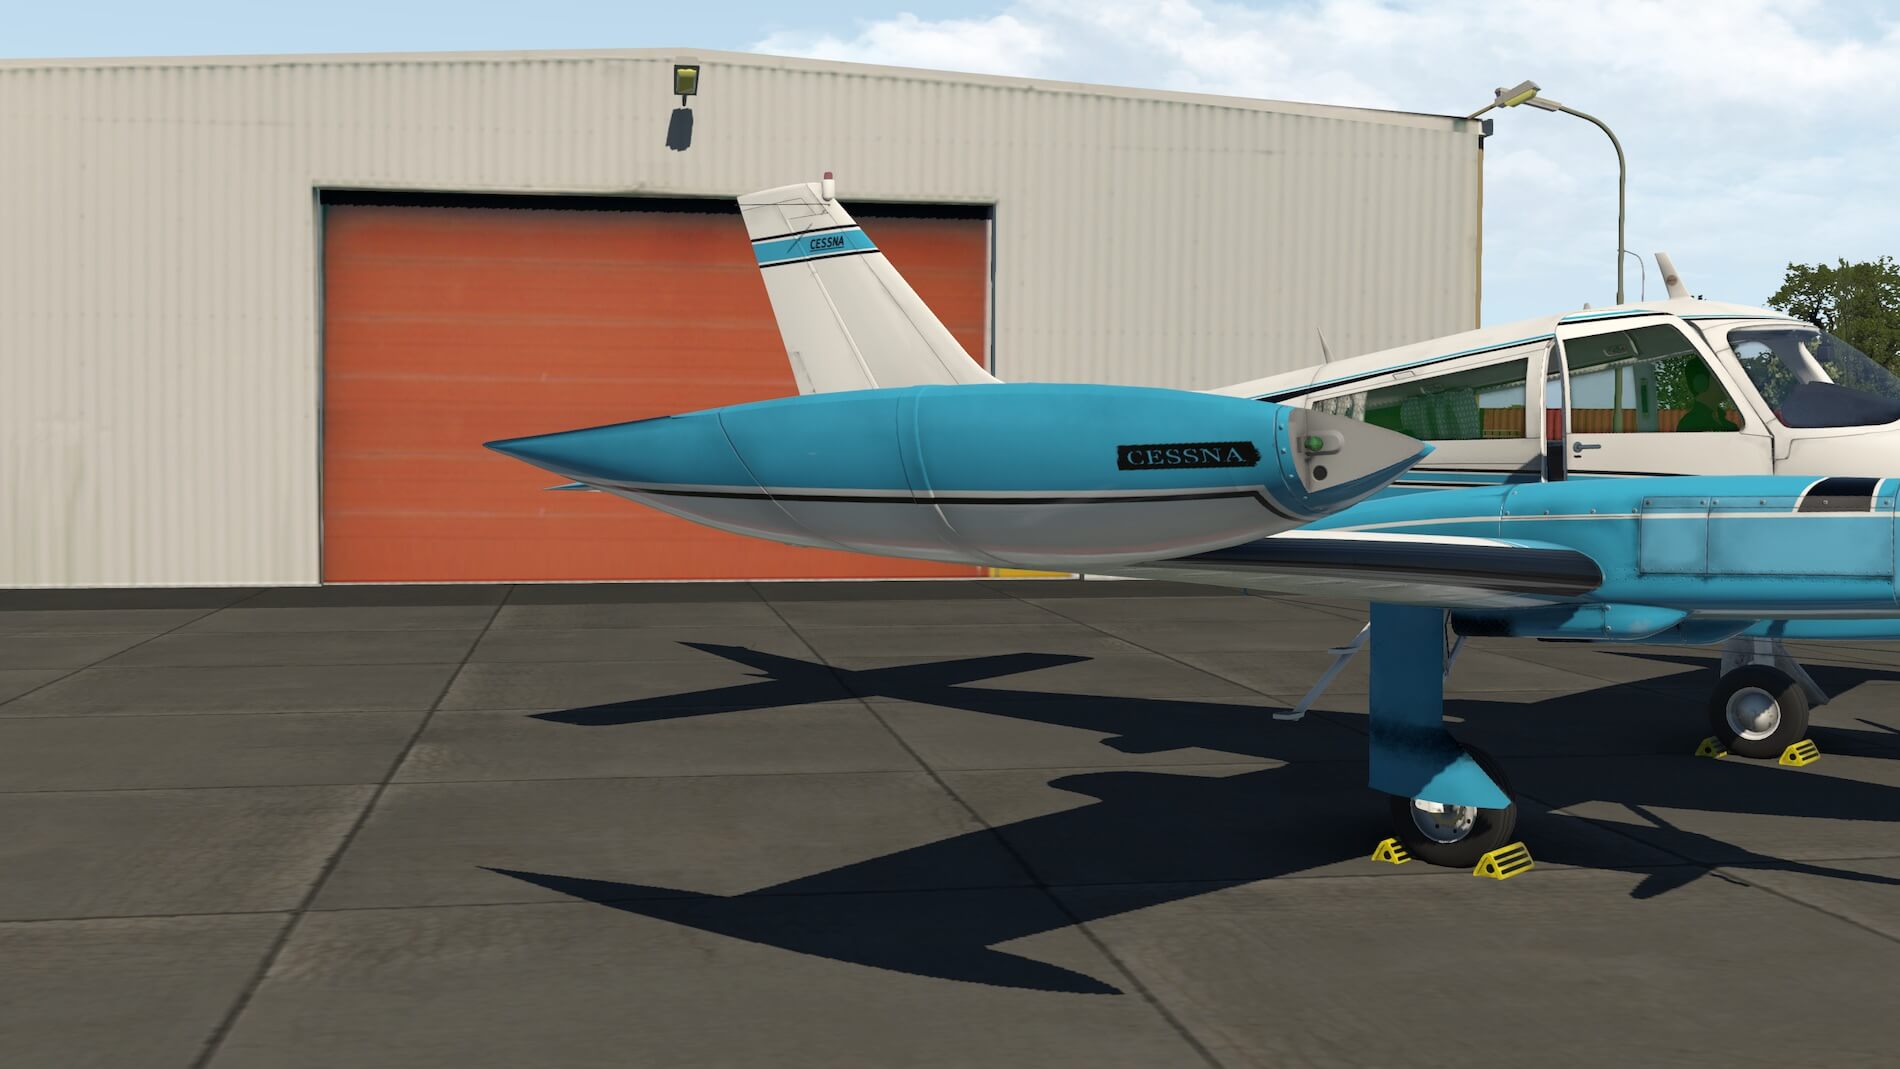
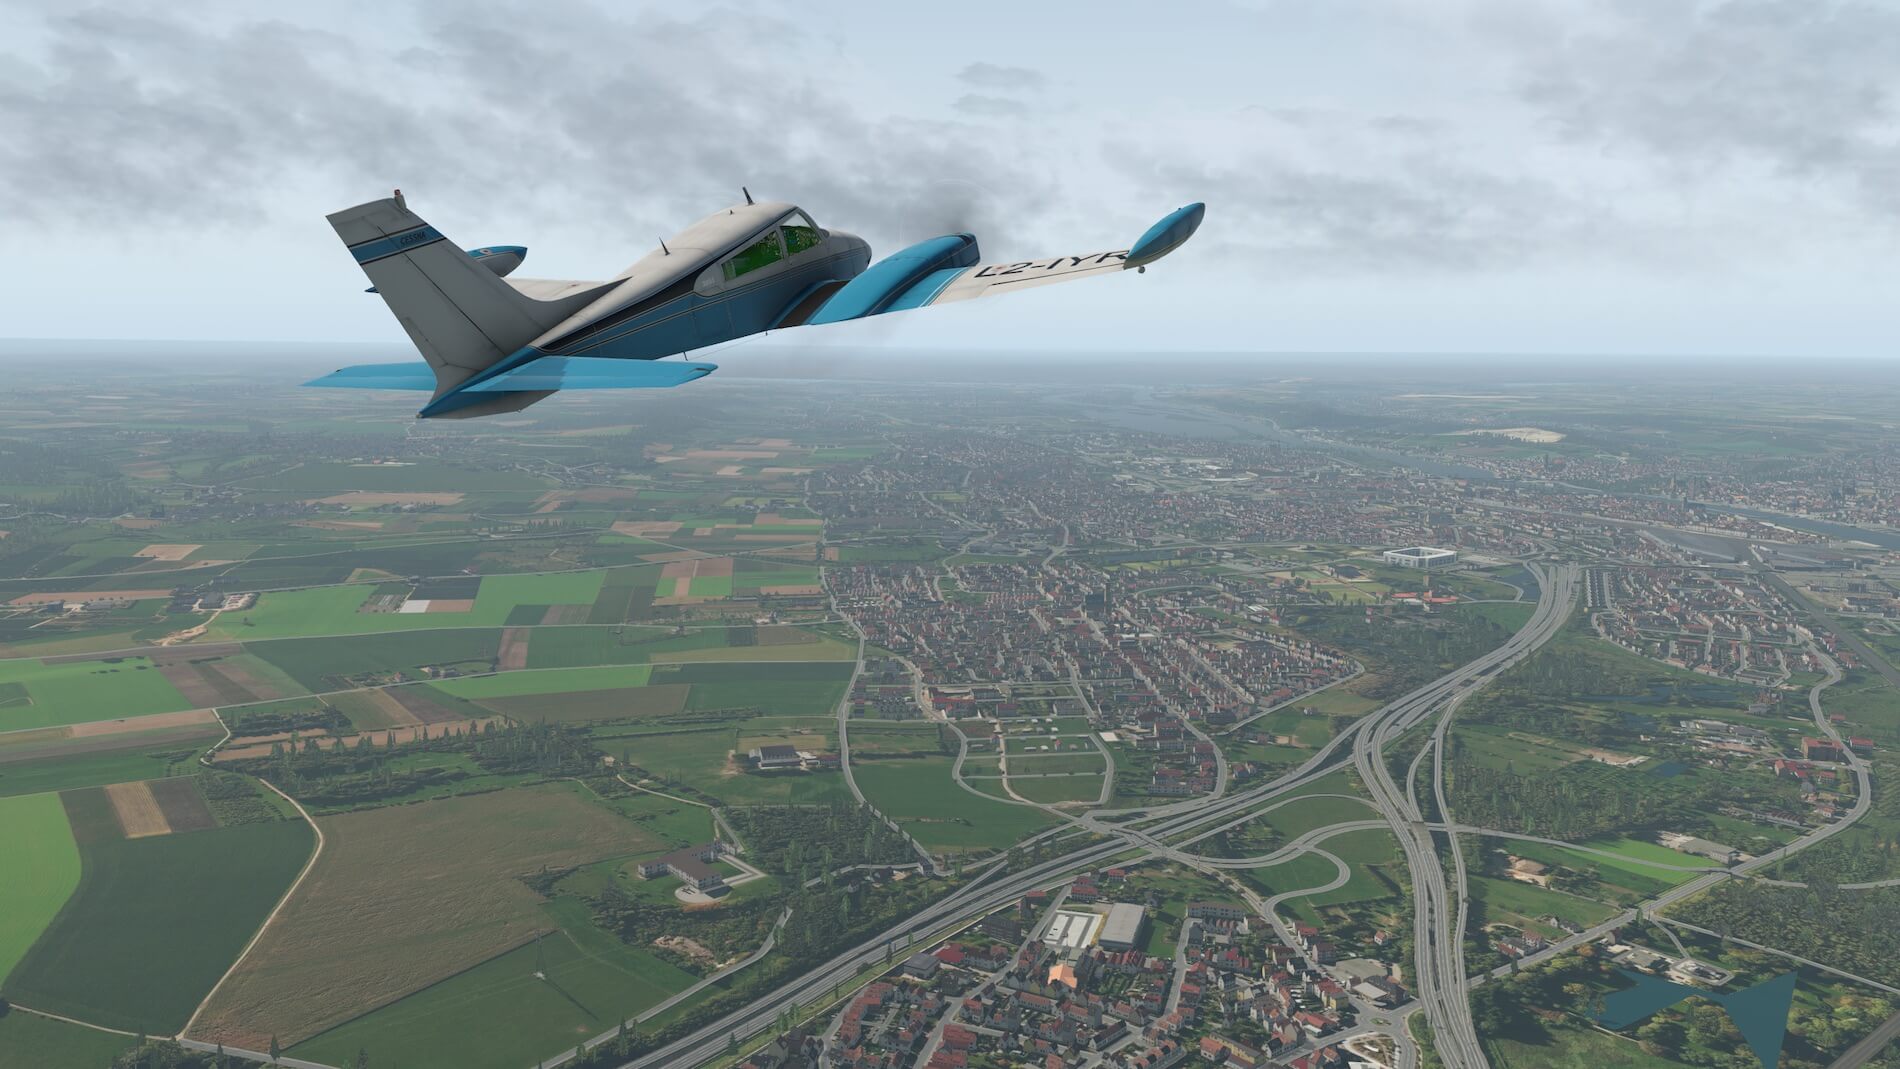
While walking from the engine to the wingtip I can’t miss the huge wingtip tanks which are actually the main fuel tanks. Inside a section of the wing you find the auxiliary tank which is not an integral part, but a bladder tank construction. At the top of the tip fuel tank you’ll see the fuel cap with no decal and I’m not sure if no decal is correct. The reason to mention this, not a big issue, is that normally there’s a decal that tells you what kind of fuel has to put into the tank.


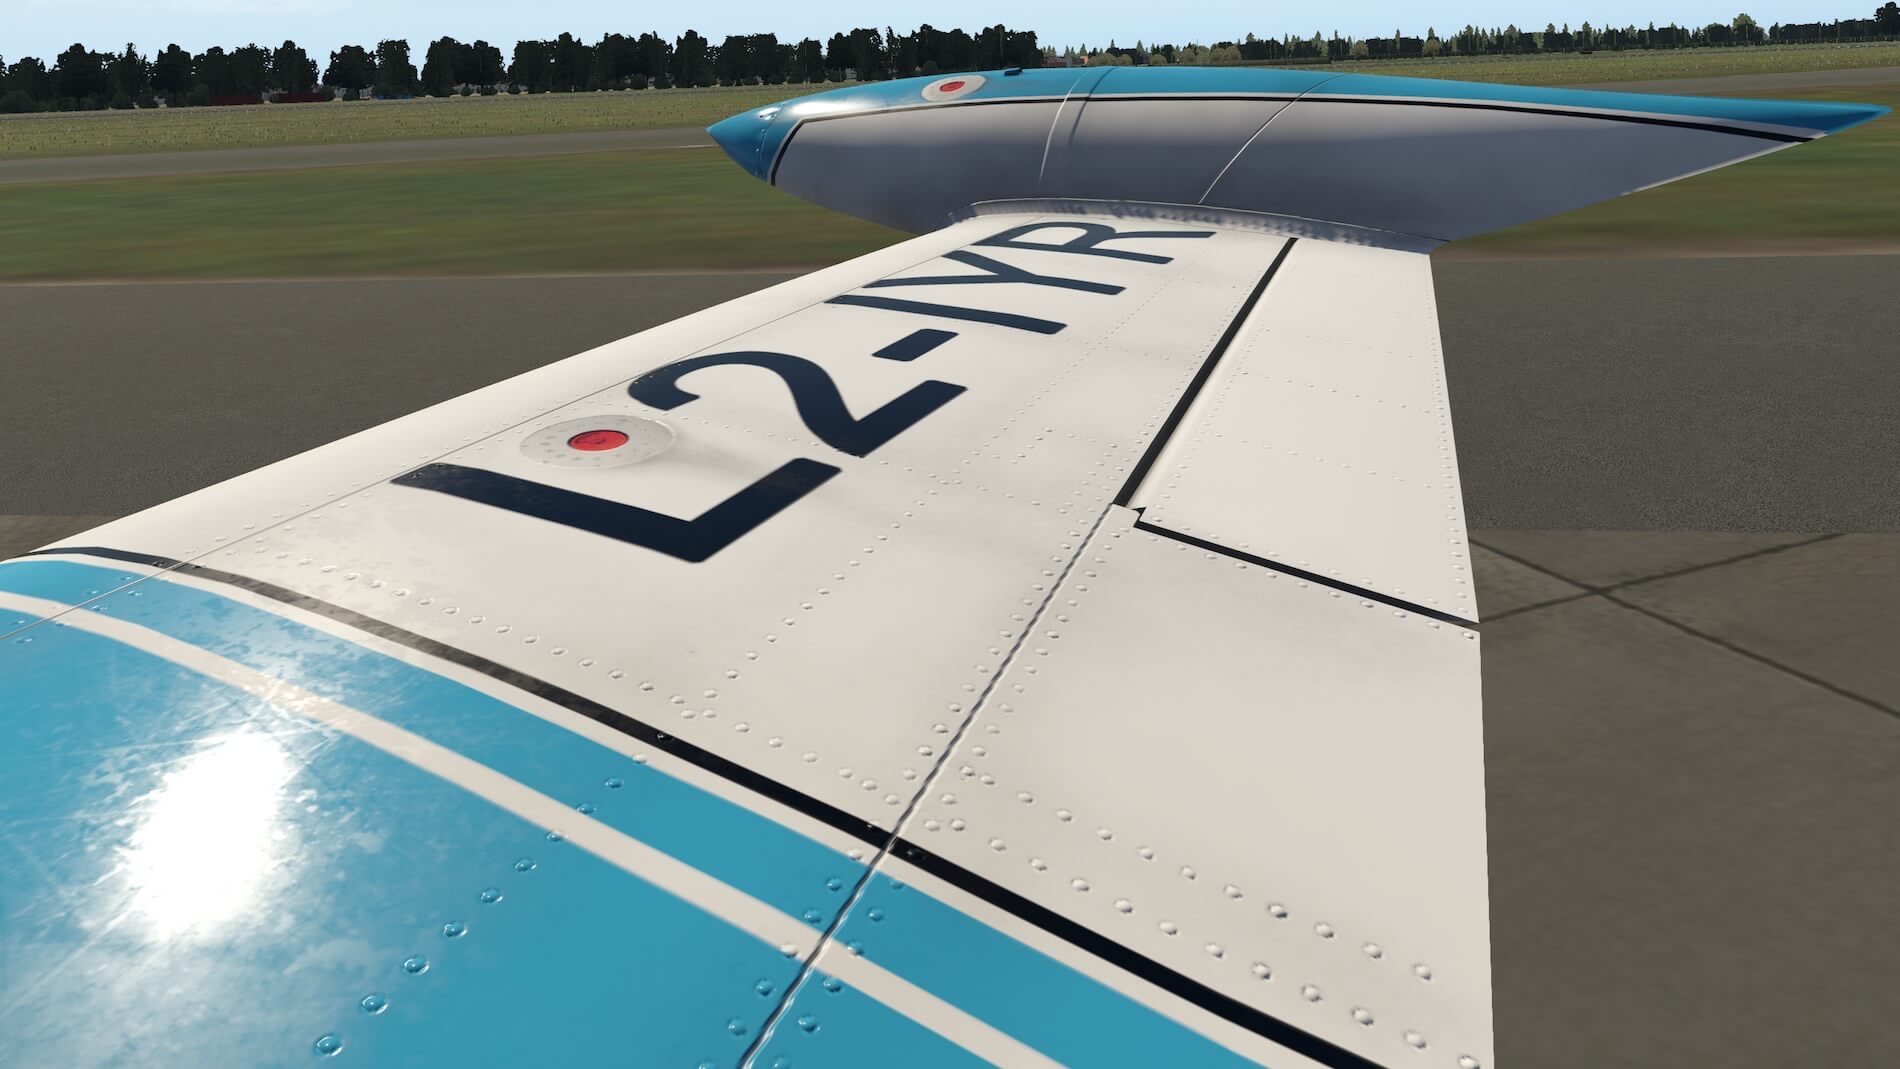
The wing top surface is on both sides clean, no scratches, no dents and it doesn’t really gives you a used or weathered look. What I mentioned before; a matter of taste! From the wing and MLGs (Main Landing Gears) which are in detail of the same quality as the NLG, I walk towards the tail. The tail is well modeled, but it should be noted that it is a bit clean although you see some dirt at the Aluminium skin edges, but it misses in my humble opinion a bit of the used or weathered look and feel.
The white navigation tail light which is mounted at the far end of the fuselage is OK, but the glass or plastic cover is not really transparent, but has a milky look. This is also something I noticed at the beacon light at the top of the vertical fin. Not 100 percent sure if this is as real as it gets. Anyway, overall a well modeled 3D Cessna 310L.
The Internal C310L
3D Cockpit
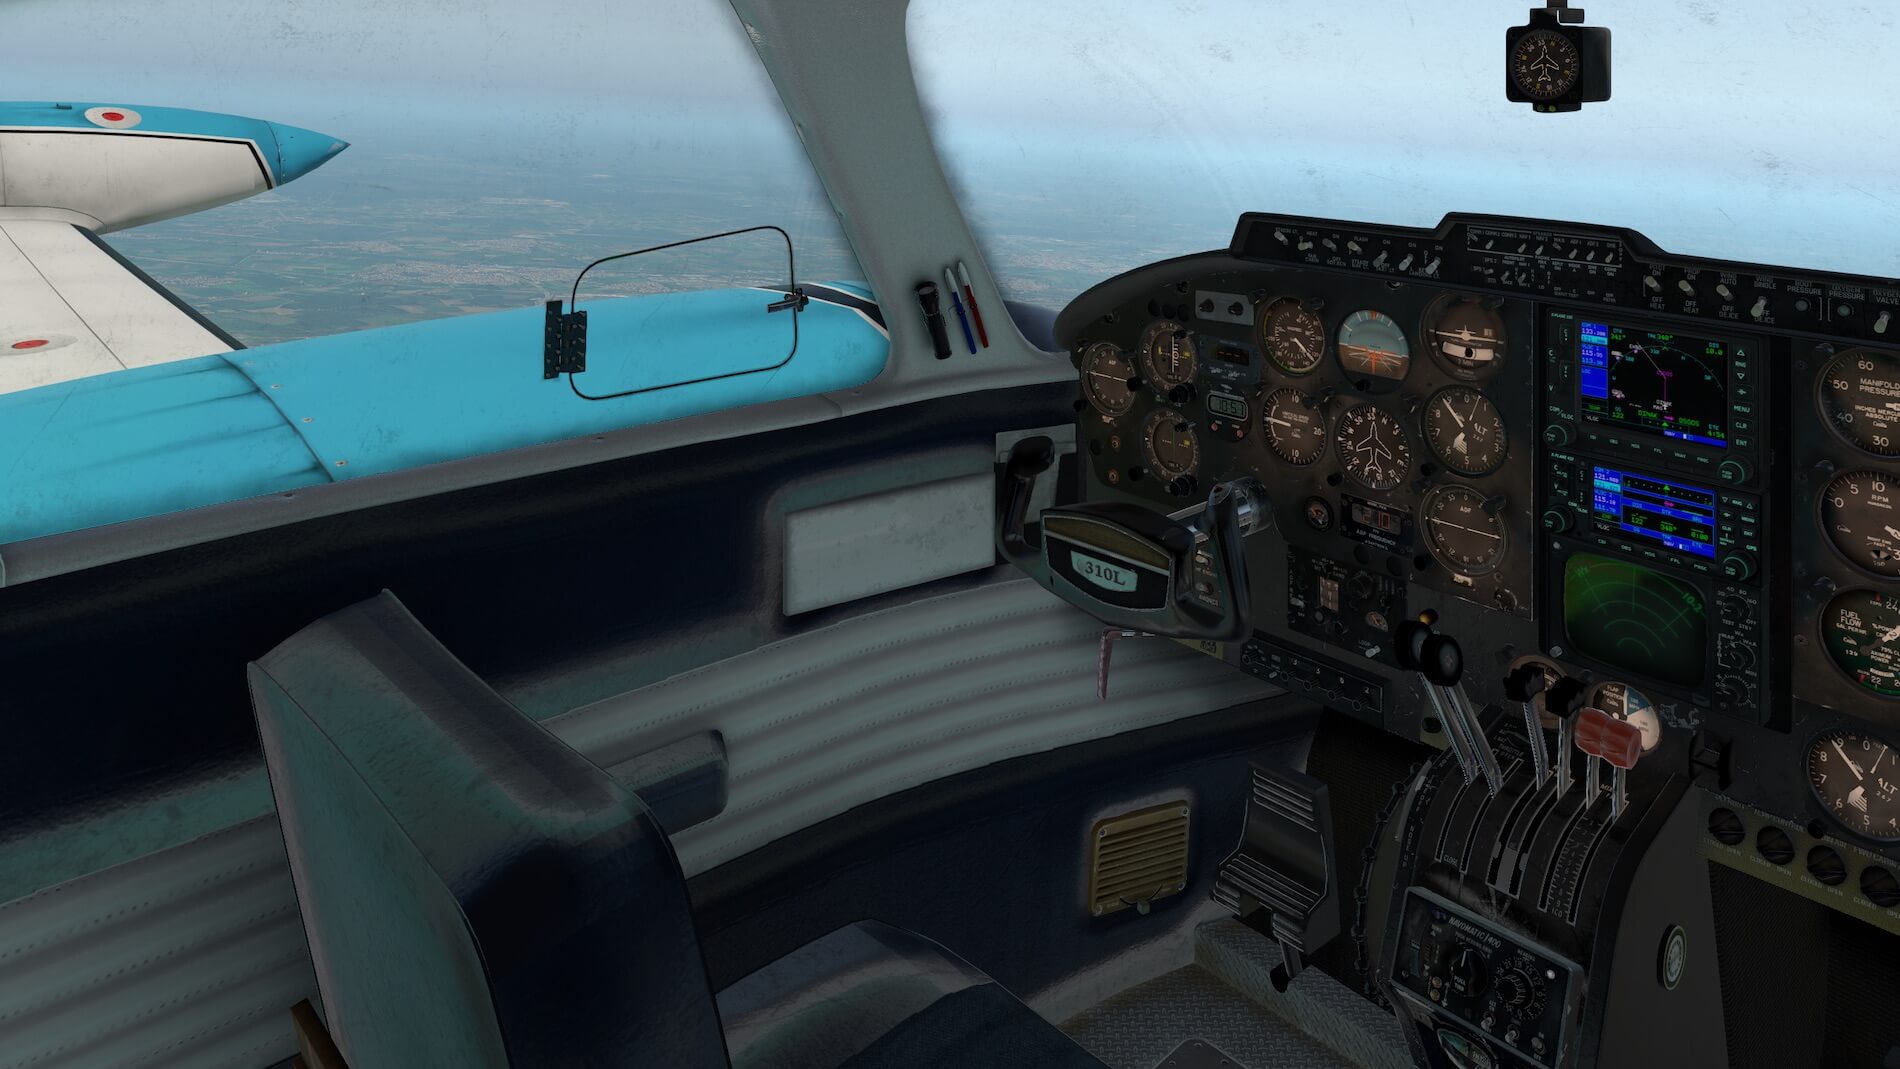
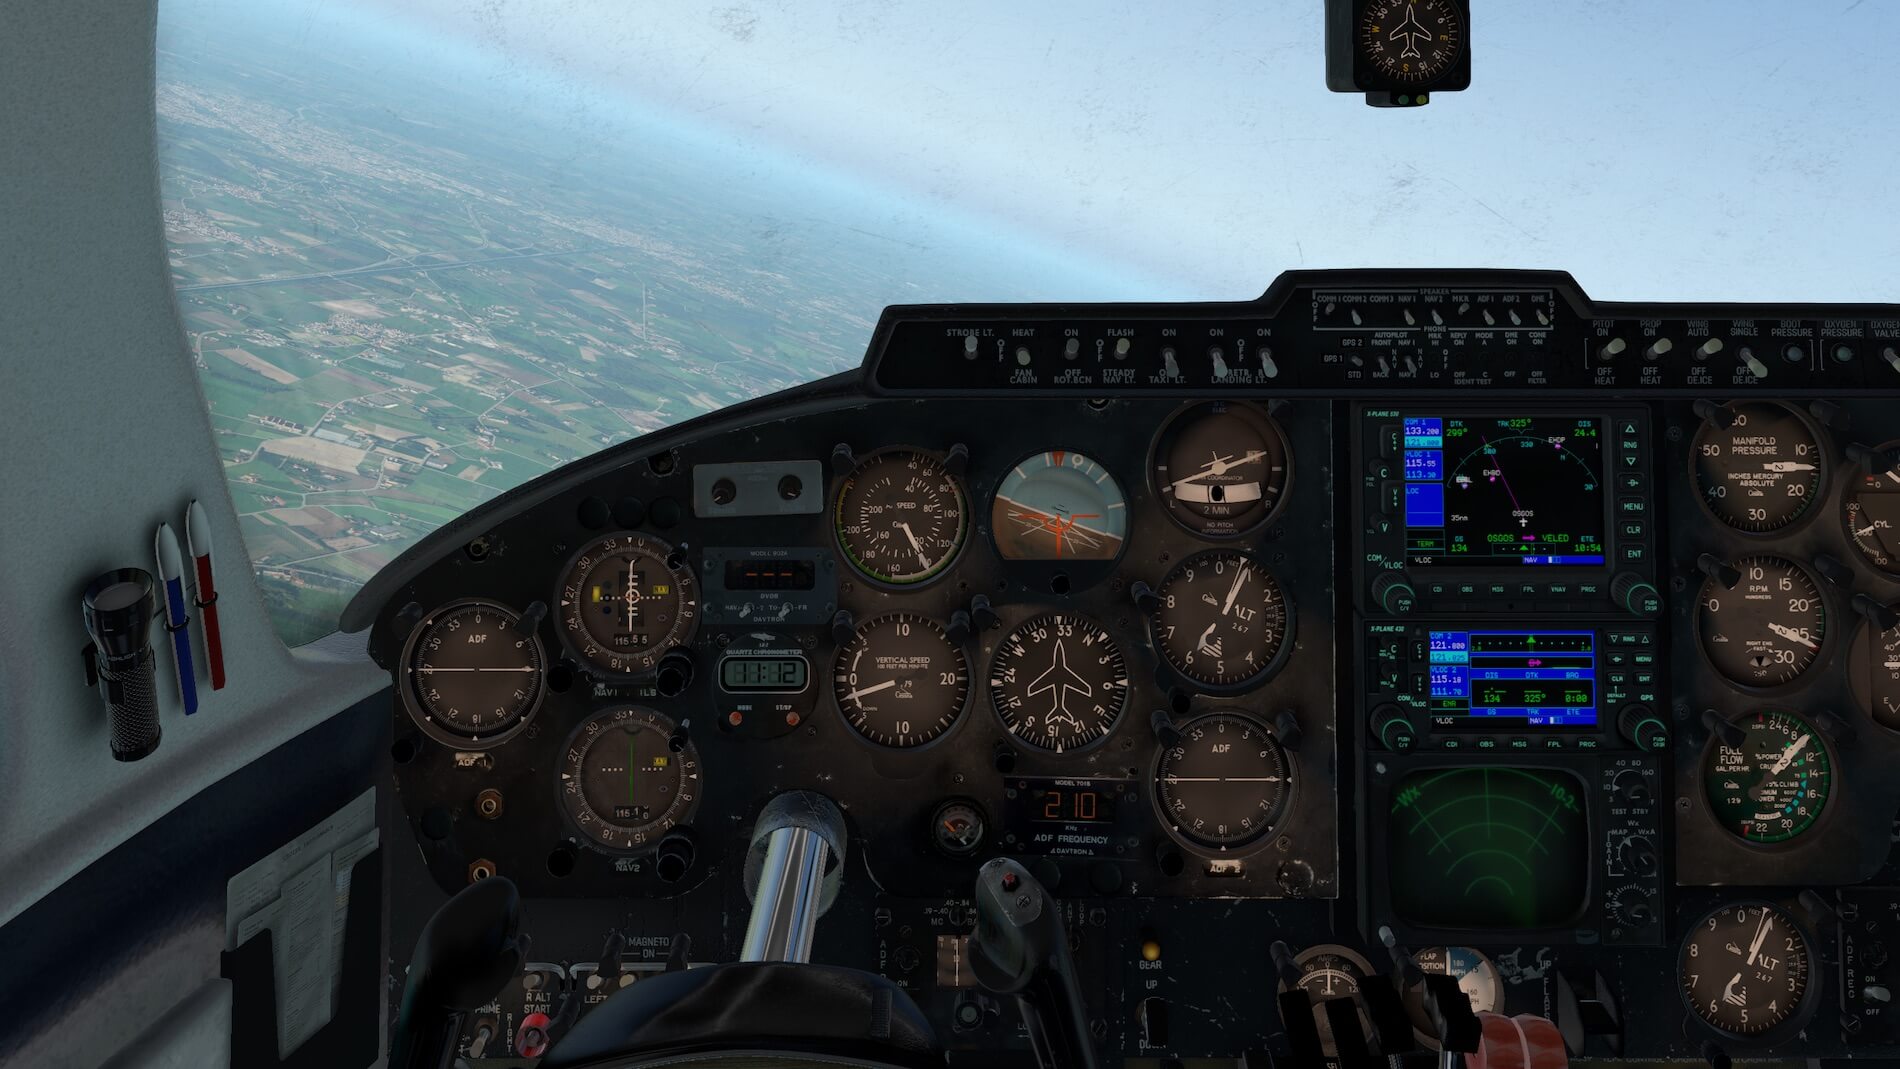
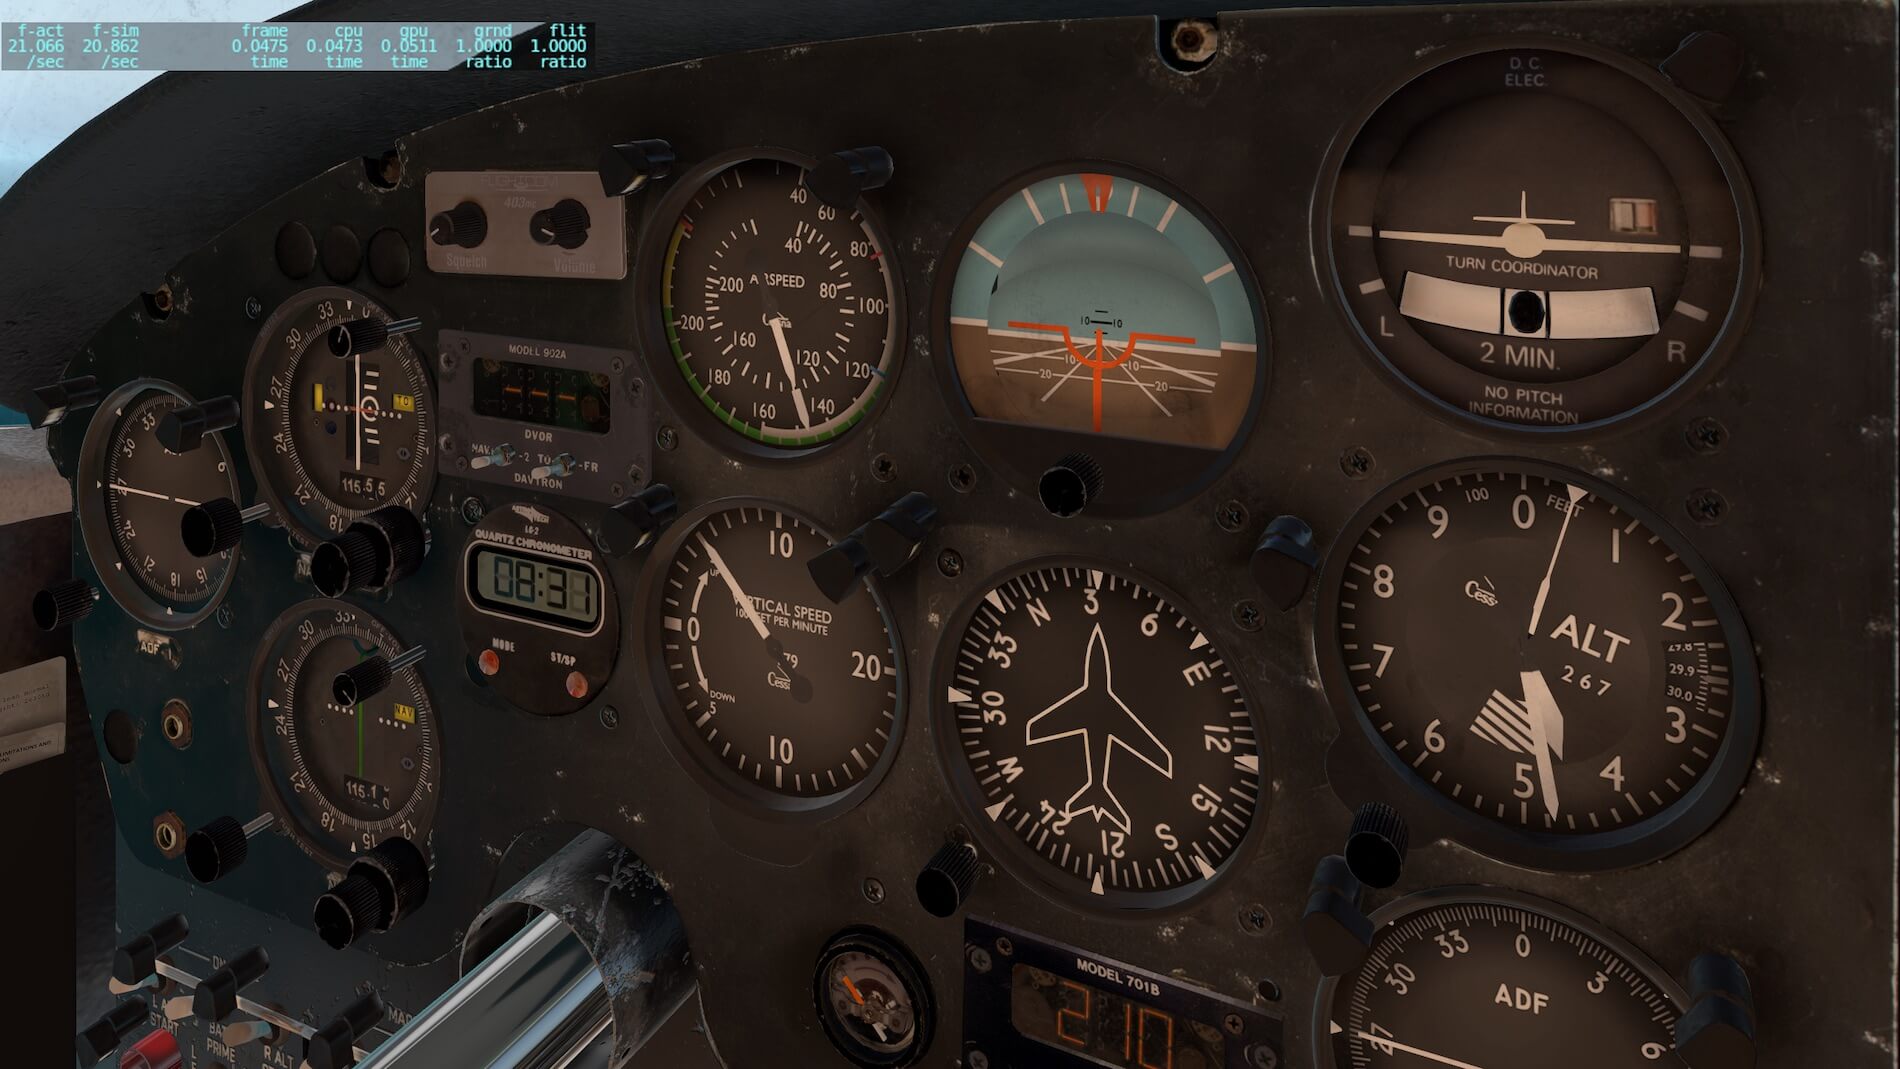
This section will give the look and feel of the modeled 3D cockpit. I’ve seen many GA instrument panels, some are good, some have slightly blurry text on the panel and some belong to the category … excellent, brilliant, awesome. I’m always impressed when I see what’s all done by the developer to give the panel itself, the instrument, switches, lights and others the “as real as possible” look and feel. You can imagine, this is also the case with the Digital Replica C310L. Knowing all other well respected aircraft developers in the X-Plane community, I’m very enthusiastic when I had my first look at the instrument panel or in general, the 3D cockpit.
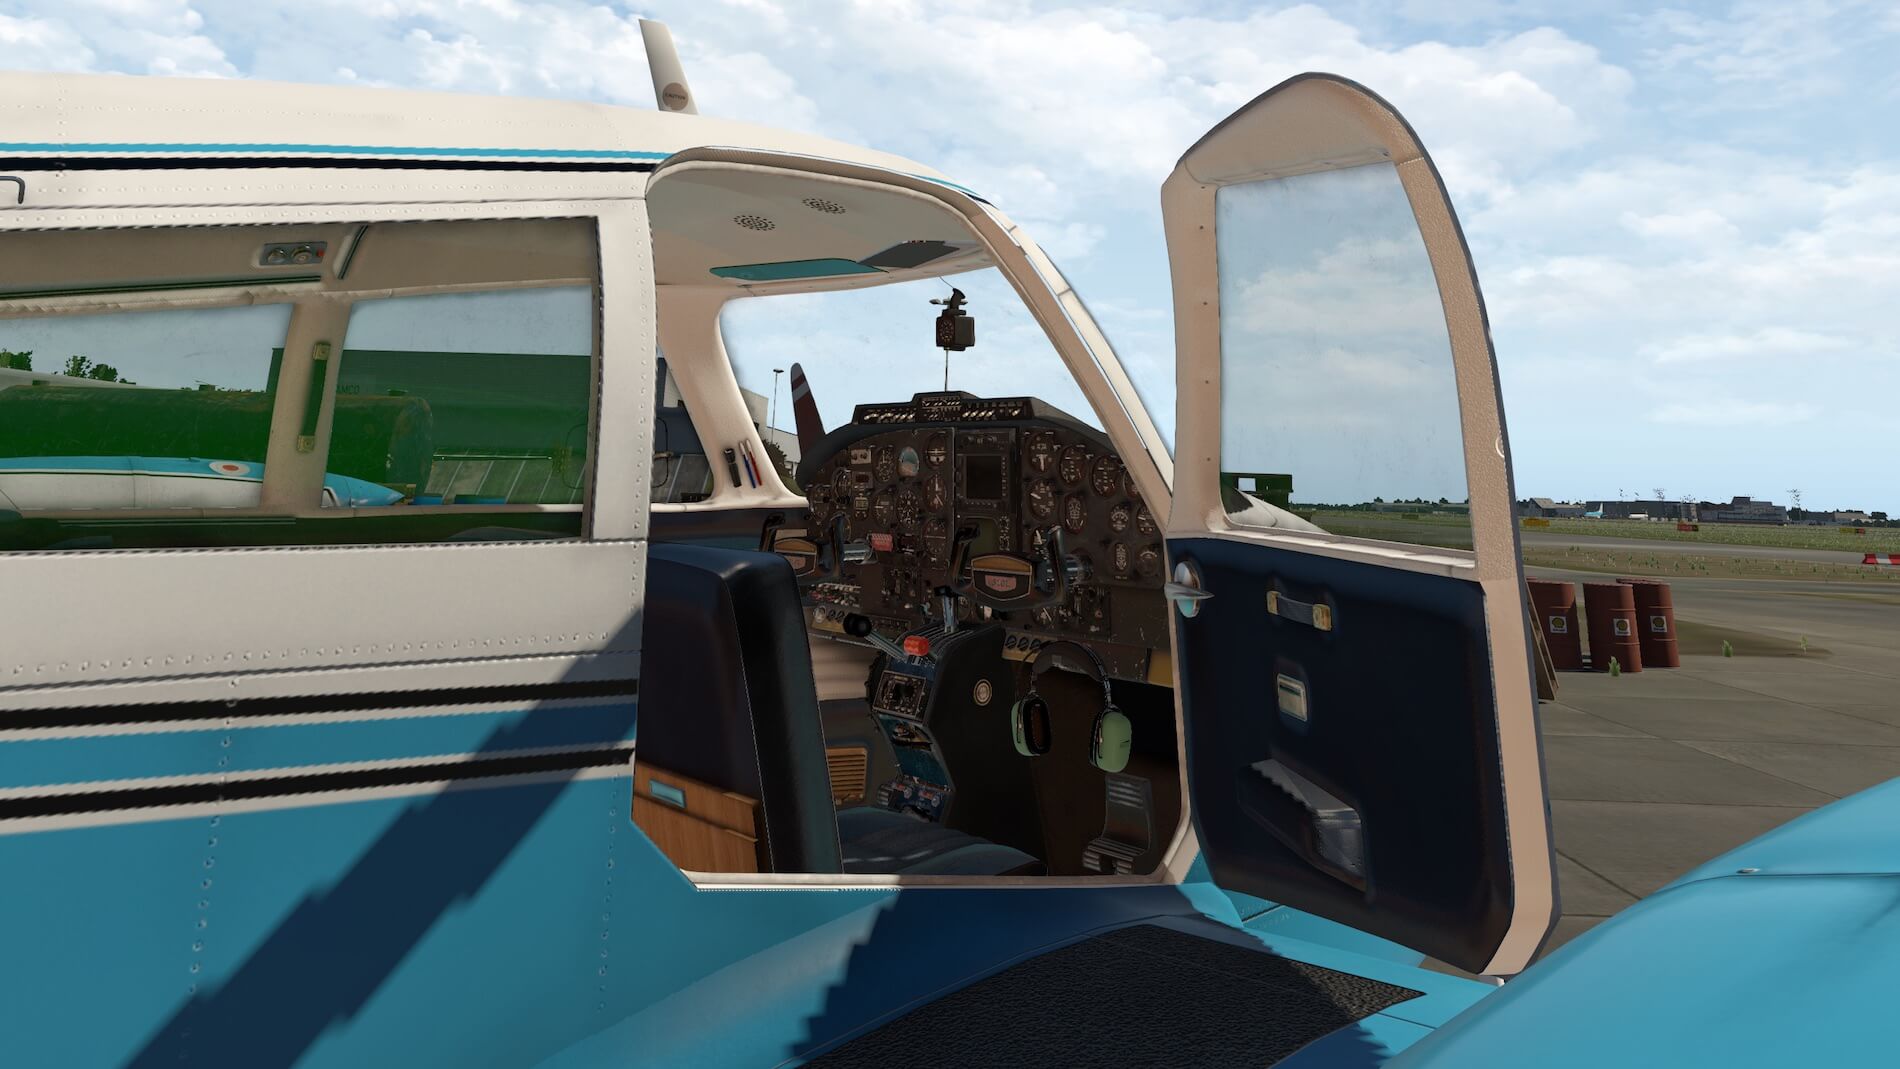
I’ve opened the passenger/pilot door on the right-hand side of the C310L and start immediate playing with the external lighting condition. The door panel rim is made of white plastic, the door itself is covered with either leather or something from another material. Whatever it simulates, and to me it looks like that real photo material is used to texture it, it looks awesomely realistic. Not sure if this is English, but you got the picture. The astray, the handle, the armrest, and the grip, it’s all modeled with eye for all those tiny details.


While under these lighting conditions, some of the sun shines inside the lower part of the cockpit. To be precisely, the right-hand front seat position rudder pedal area. Oh oh, that looks great. Oh yes I’m sure that photo real texturing is used to cover the lower side walls under the instrumentation panel, for the rudder pedals – a bit rusty – for the carpet, the stainless steel parts and when I look up, I see the right-hand lower instrument panel full with scratches, missing paint, dents and so on. In other words, it’s modeled as being an old and used panel. Very well done!
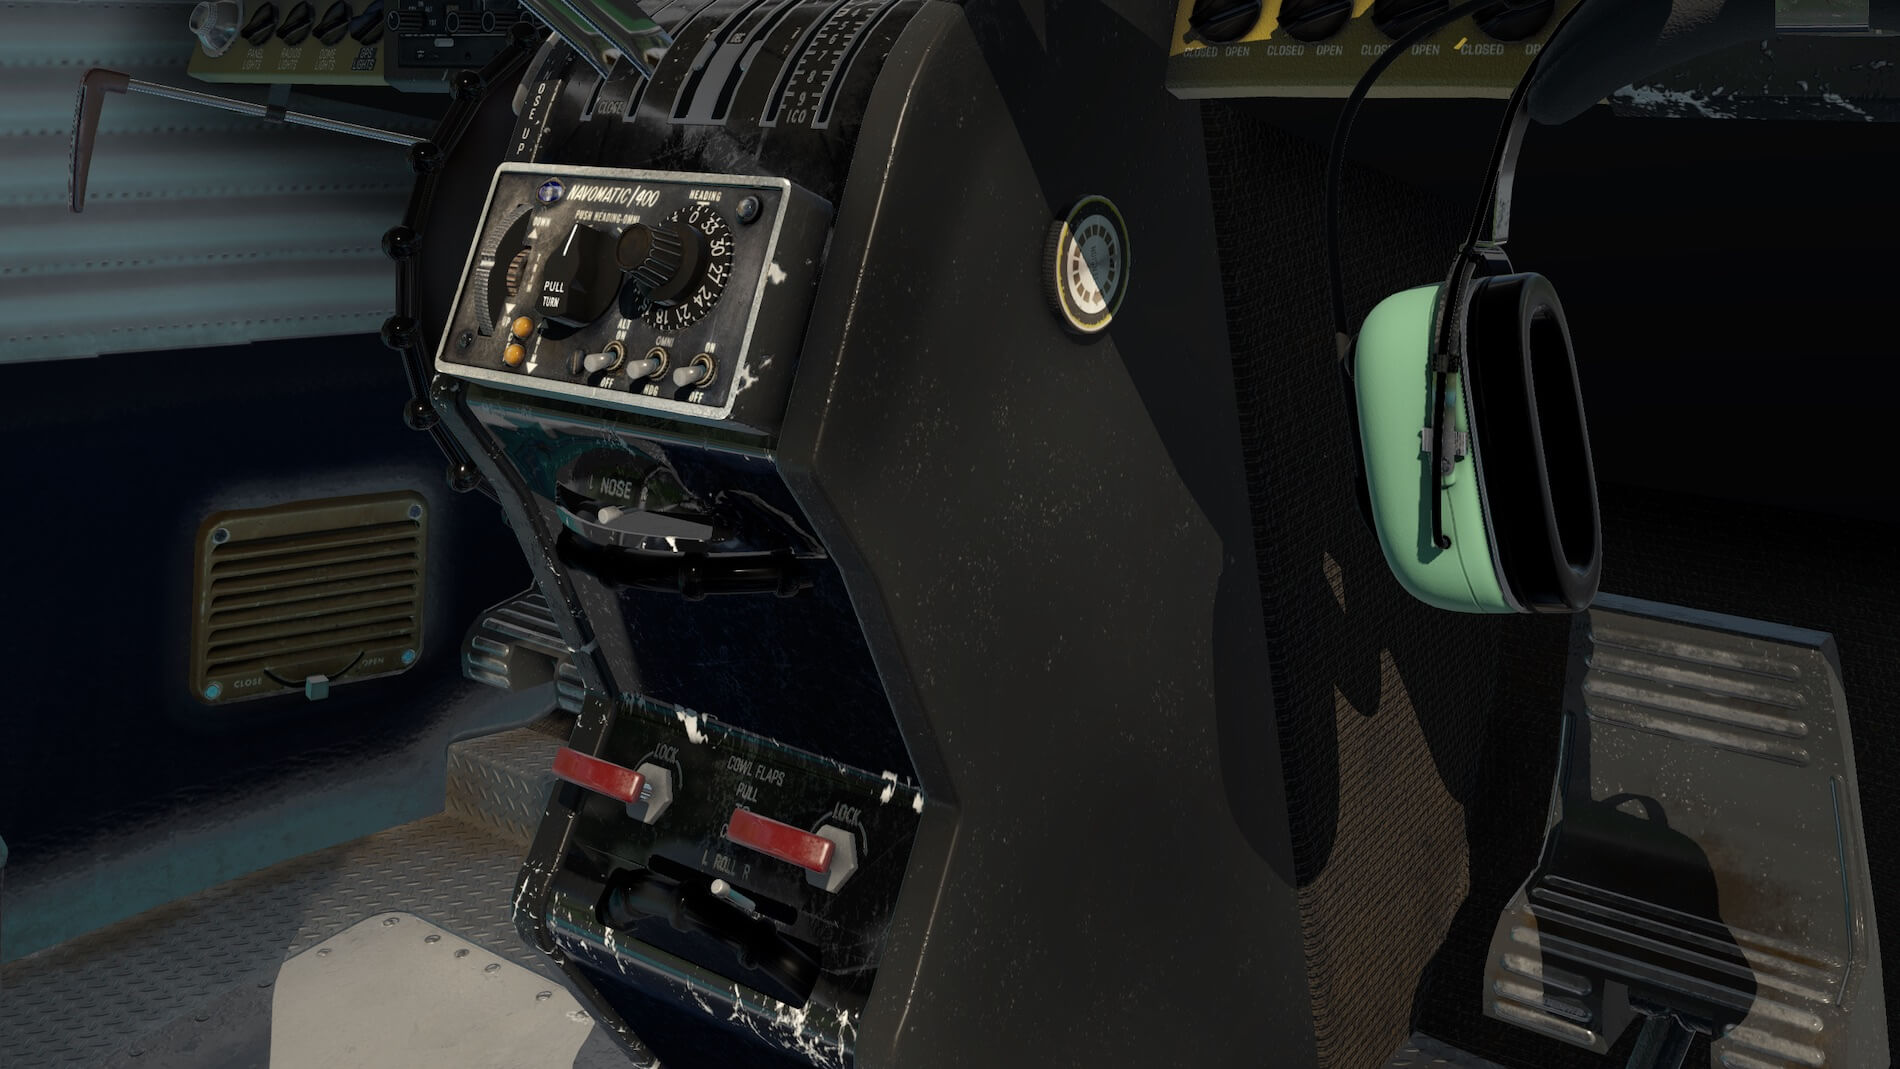
The same – used and weathering – is also applicable for the well modeled and covered mid console with, again, an Auto Panel that’s full with dents, missing paint and so on, but this is also for the cowl flaps section and the rudder trim. When I move up I spot the control wheels with wooden inlay. No more words are needed, the screenshots should say enough!
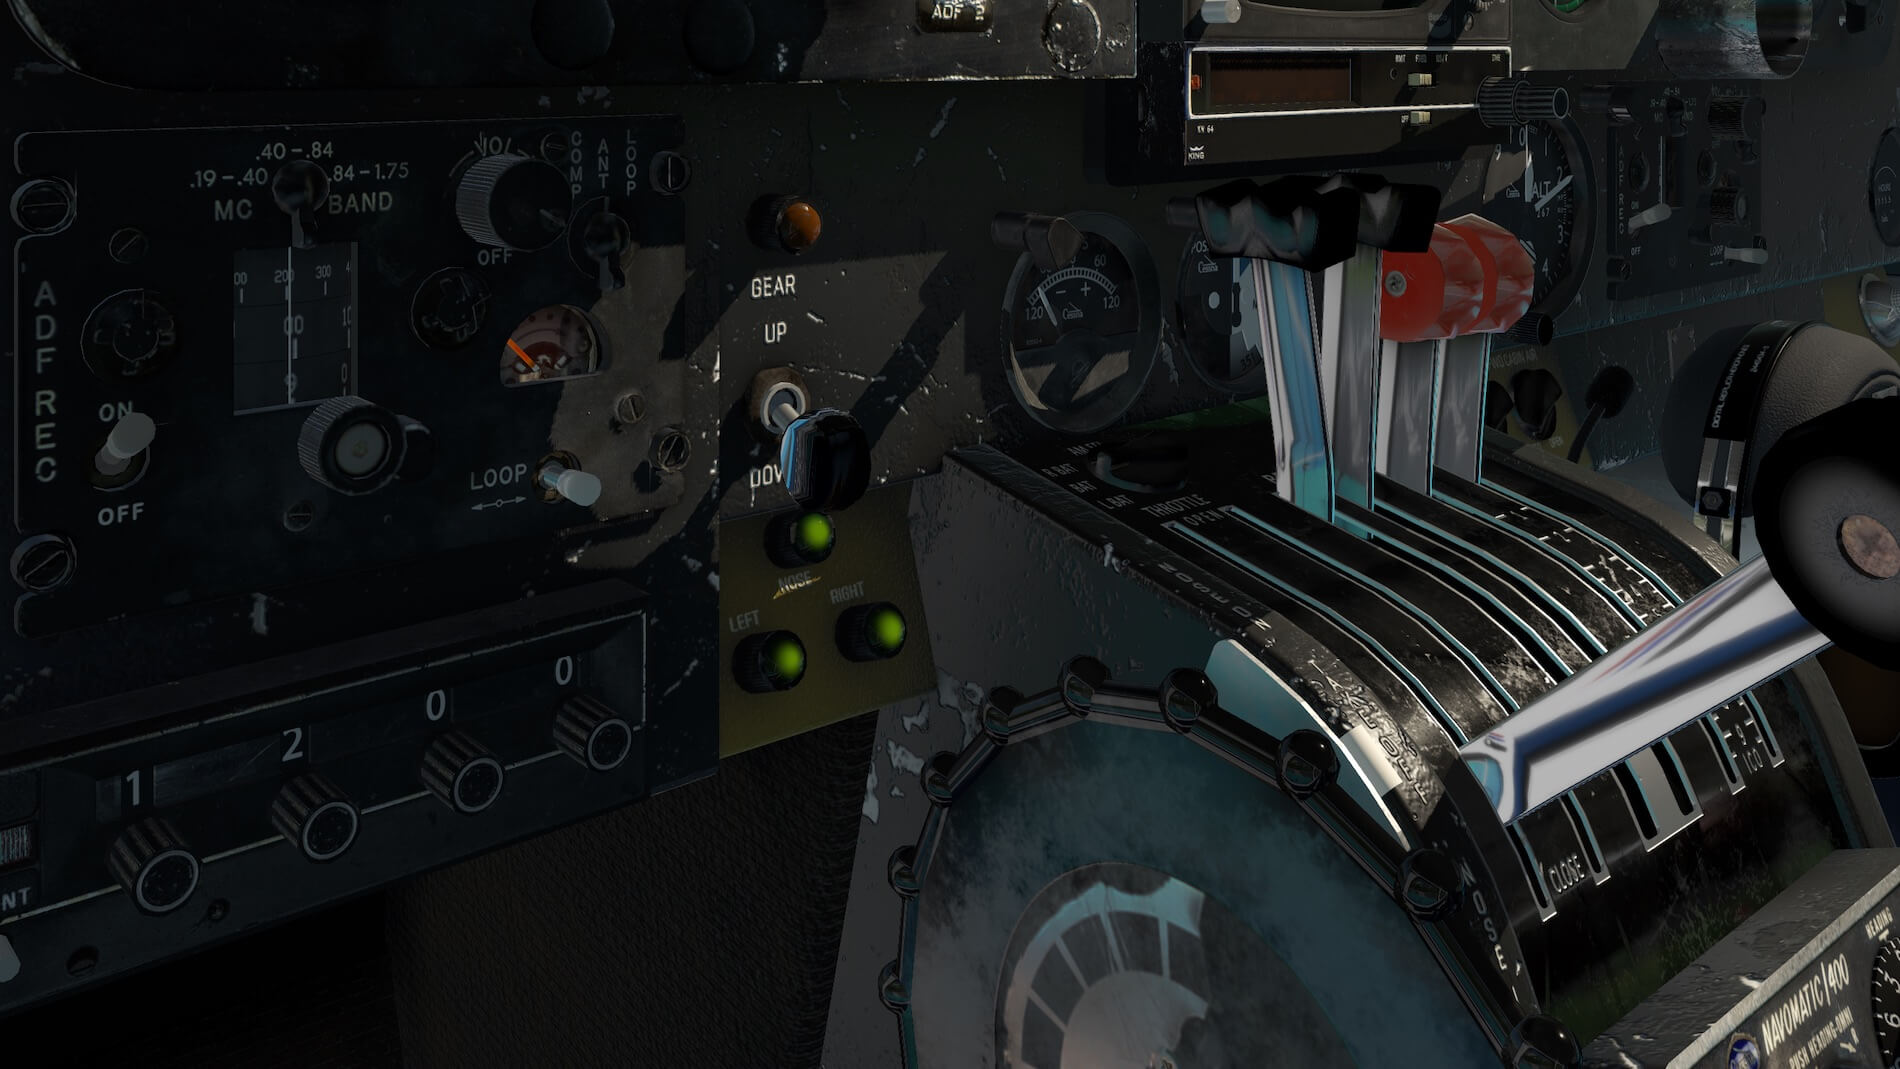
By the way, the same as with all other developers, click the control wheel control rod, and it disappears. For the following screenshots I’ve chosen for the No GPS configuration. It’s indeed then very basic with two COM control panels, the Bendix radar which uses the default X-Plane weather radar and below that, the King KN-64 DME unit. When you look closely to the screenshots, I hope you agree with me that the indicators are awesome. So sharp, so realistic, and even the indicator dial plates are razor sharp. Add to this a 3D effect and you’ve got the “almost” perfect instrument. And look further, have a look to the panel screws. I’ve seen many screws, but these are so good, so real, so … ah, you got it!


I move on to the left-hand side of the instrument panel. This is officially the place you need to sit to fly the aircraft. I’m not sure if the right-hand side is really for an additional pilot. It could be also a passenger seat. Anyway, Looking to this side of the instrument panel makes me so happy. I’ve said this before, I know, but such an old-fashioned aircraft should be looking used or weathered, whatever you prefer. And that’s absolutely what the Digital Replica has .. a great looking used instrument panel with all the build in objects that are full with scratches, missing paint, dents and so on. While exploring the modeled 3D cockpit, I moved the MIXTURE levers out of view and I’m positively surprised that the developer added the rattling sound when you move these levers.
I like the way the passenger area with in total at least 4 seats behind the two in the front, and the small curtains at the back. The end part of the passenger or cabin area isn’t a seat although it looks like that. It’s the baggage compartment. Back to the other seats. They look simple and straight forward, but that’s also the way they are in real, photo’s confirmed this.


I think this is it for the moment. I think you and I have already a good idea how this 3D cockpit is modeled. It’s clearly to me that Digital Replica team did a great job. Ok, the model still has a couple of glitches, but I’m sure the developer will solve this. Additional checks and how systems work, we’ll see that during my Dutch IFR flight.
Flight Preparations
Part I – Garmin Equipment
As you know now, the Digital Replica C310L comes with the default Laminar Research GNS 430, 530 or you can select both build in. And, that can be changed on-the-fly as I explained before. Besides that, you can also decide to leave all the Garmin equipment out and navigate the old-fashioned way with the VOR OBS and using NDB beacons. Because the aircraft can be equipped with the default Garmin units, we use “fms” flight plans which are installed in the Output/FMS Plans X-Plane folder, but how are they made, which program is used to create your flight plans or do you want to use real flight plans? Let me highlight this a bit more.
Part II – Creating a Flight Plan
To create a flight plan you can use/choose many programs, but let me highlight a couple of freeware possibilities. First Routefinder that offers you an easy to create flight plan, but this is not in “X-Plane fms” format. I’ll come back later to this how to solve this problem.
If you don’t like Routefinder, you could check out FlightAware, but again, this doesn’t allow you to export it to an fms file format; however, it offers real flight plans. Another very interesting website is simBrief. Register for free and a wealth of flight planning information becomes available. It should be noted that simBrief prefers that you have a Navigraph account else it will use the data from RouteFinder.
Then there’s the browser-based Online Flight Planner which seems to be a good one although I’m not 100 percent sure if the generated flight plans are as real as they should be. The good news is that it seems to do the same as RouteFinder, but with several export options, of which one is “X-Plane fms”.
Another possibility could be SkyVector, but that requires two steps. The first is Sky Vector flight planning followed by X-PlaneTools. We all know SkyVector, but SkyVector saves your flight plan in fpl format which in turn can be converted to fms with X-PlaneTools.
By the way, when you insist on using RouteFinder or FlightAware, you can use the same X-PlaneTools website also for converting these flight plan extension to a “fms” extension. Anyway, copy the created fms file into the X-Plane root folder Output/FMS plans. With the fms file in this folder, you’re able to load the flight plan into the Garmin GNS 430.
As of this writing my preferred flight planner is the freeware flight planning tool is – and it can do a bit more then only flight planning – LittleNavMap. Besides many other things, this is a great tool in case you need to create flight plans with many types of flight plan extension.
Part III – Where to Store?
I mentioned this briefly before, flight plans that are used in combination with the default Garmin equipment, are stored in the X-Plane Output/FMS Plans folder. Be sure that you have saved the fms flight plan in version format 11, and then drop the fms flight plan in the designated folder and you’re done. Be sure that when you use for example Little Navmap for your flight plan, that both Little Navmap and X-Plane 11 have the same AIRAC cycle installed else when you load the flight plan in. the Garmin unit, X-Plane will tell you that there’s a discrepancy between AIRAC cycles.
Part VI – Loading FP into GNS430, GNS530 or ….
Before you’re able to load the flight plan in the GNS430 or the GNS530, we need to power up the C310L according to the checklist. When you’ve followed all those aircraft power up steps and selected which GNS you want (430, 530 or both), it’s time to load it into either the GNS430 or the GNS530 or … or what?
Keep in mind that when you have both the GNS430 and GNS530 selected as being build in the instrument panel, loading the flight plan in the GNS530 won’t load the same FP into the GNS430 and visa versa. In other words, although you have selected both GNS units build in, they stay two separate devices.
Let me highlight how to load my FP into the GNS 430 although the steps of using the GNS 530 aren’t much different. The display is larger, but that’s it basically. When you’ve powered the AVIONICS system, the GNS430 will normally startup with the page you see which is the NAV page showing a TO waypoint or airport ID with the DIS, DTK and BRG (DIStance to go, DesIred Track to follow and the BeaRinG to fly). Click the FPL button below the display. Now you will see, no, now you should see the ACTIVE FLIGHT PLAN page with the previous flight plan if applicable or perhaps I should say if applicable, what is left from that previous flight plan.
Click on the right hand inner ring of the PUSH CRSR knob (small curved arrow being visible). The previous page (ACTIVE FLIGHT PLAN) is replaced by a “FLIGHT PLAN CATALOG” page/display. If you have only one flight plan in this folder then it’s the only one you see and need else you see more “fms” named flight plans. Whatever is applicable, click once on the middle of this PUSH CRSR knob.
The first flight plan in the list (or perhaps the only flight plan), will be highlighted green. When the first flight plan in the FLIGHT PLAN CATALOG list is highlighted and it’s the one you and I need, you click the ENT (ENTER) button on the right-hand side of the Garmin unit. If the first flight plan in the list is not the one you and I need, then move the mouse to the right-hand outer ring (large curved arrow visible) and click as many times as needed to highlight the flight plan, followed by the ENT (ENTER) button.
What when you can’t follow the above description or what when you want to have more background information?
Amongst others, Laminar Research has a very nice GNS 430 manual although it’s not really a tutorial, but starting at page 42 they explain the same procedure for loading a flight plan. I had the possibility to load a self created flight plan and placed it in the Output/FMS Plans folder, but in real you don’t have that option. In real, the pilot needs to enter a flight plan waypoint by waypoint. Lucky for you and I, this is explanation – Programming a Flight Plan – that starts at page 28, in the Laminar Research manual. But what when you prefer the GNS530? No problem I would say. This Laminar Research link brings you straight to the GNS530 manual. What I wrote before, basically it’s the same manual and thus it offers the same kind of setup and idea. These Laminar Research manuals are just one of the many being available. When you search at the Web, you’ll find more manuals and even movies.
Part V – When and How to connect the AP to GNS430/530
I was asking myself “where, what and how to write about connecting the AP to either the GNS530 and/or GNS430”. I’m not sure if the modeled Digital Replica Auto Pilot is using the default X-Plane 11 Auto Pilot or that this AP is dedicated made by Digital Replica themselves.
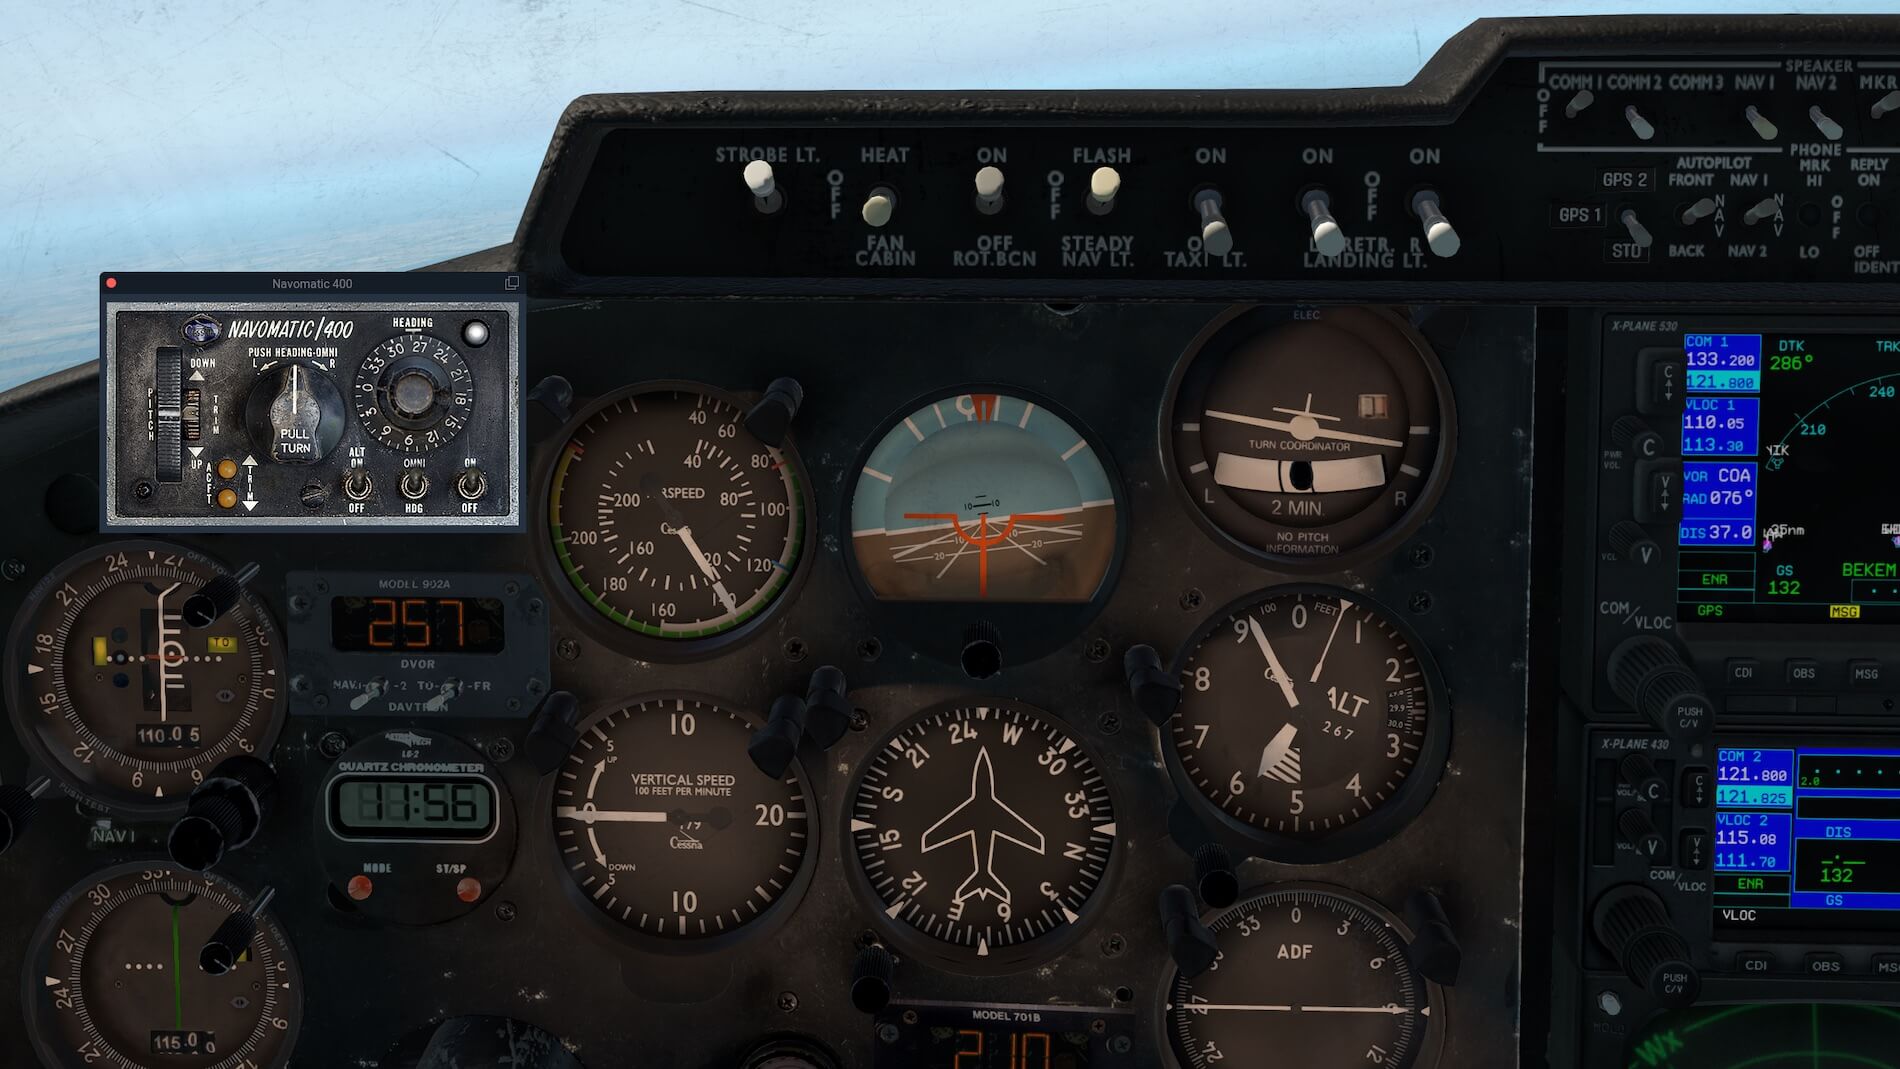
I think it’s a good idea to ask Digital Replica Miguel to help me with this question. According to Miguel “It is a custom coded autopilot. It has some features like the PULL-TURN knob which wasn’t available on X-Plane. I also want it to make it dependant from the artificial horizon, like in real life. The Navomatic 400 “vertical speed” also works with the artificial horizon pitch angle, so it has some specific features.”
Great news that the modeled AP is custom made, but first, I needed to check what’s in the provided manual regarding the AP. The pages 5 and 6 of the C310L manual gives you all the information needed to understand the AP. Remember that this AP is a basic AP. That has nothing to do who modeled it, it has to do with the simple look and feel compared to the commercial glareshield controlled and monitored AP or Auto Flight panels.
Switching on the AP ON (switch 1 on page 5) isn’t enough when you want to use the AP in combination with the Garmin GNS equipment. You need to tick the option “GPS coupled AP” on the weight and fuel popup window. Further on you need to be sure when you have one GNS active – either the GNS430 or the GNS 530 – thus in view, that also the STD – GPS1 – GPS2 switch on the switching panel is set to either GPS1 or GPS2, depending if you have one or both Garmin units installed.
Let me give you an example; I’ve selected/ticked at the weight and fuel popup window GNS530 and I also ticked GPS coupled AP. This means that I have installed in the instrument panel only the GNS530, this is then identified as number 1. That said, in this GNS530 I load my flight plan, and select the previous mentioned STD – GPS1 – GPS2 switch to GPS1. And don’t forget to select on the GNS530 the CDI to GPS instead of VLOC. Oops, I need to correct this. During my Dutch IFR flight I noticed that there’s no need to set the CDI switch on the active GNS to GPS. I left it in VLOC and the AP still follows the GPS flight plan, so in one way or the other the modeled AP / GPS is overridden.
Suppose you’ve selected in the weight and fuel popup window both GNS430 and GNS530, then GNS530 will be the upper unit (GPS1), while the GNS430 will be the lower unit (GPS2). When you load your flight plan in the upper unit, the the STD – GPS1 – GPS2 switch has to be set in GPS1. I hope this paragraph and the previous paragraph makes a bit sense, right?
IFR Flight | EHBK – EHTX
Preparations
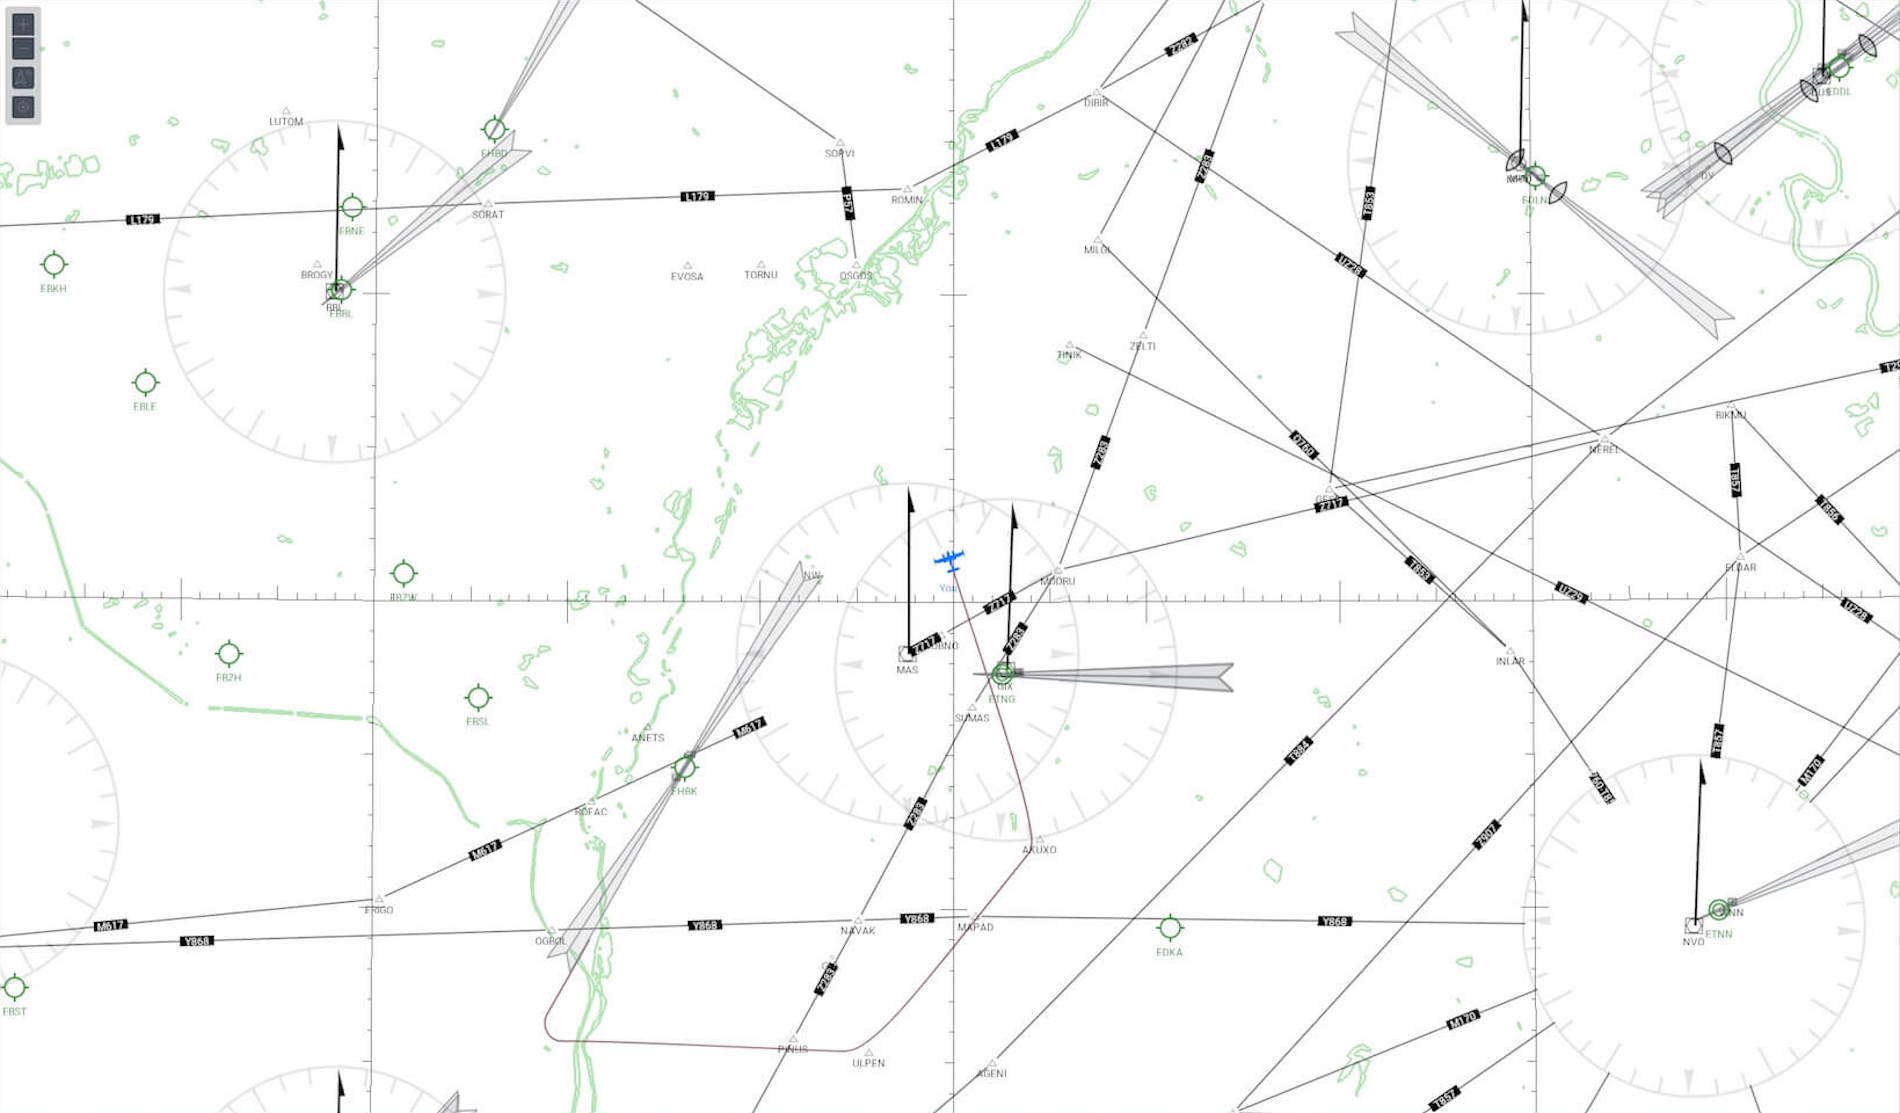
I’ve prepared a scenic IFR flight plan. With and during this scenic flight I hope to see a lot down there on the ground while flying from EHBK to EHTX, but the intention is not to fly in a straight line to EHTX (Texel). I fly from waypoint to waypoint, once and a while I’ve added a VOR beacon while at the end at Texel, it’s visual. The scenic flight plan gives me hopefully enough time to re-check the modeled C310L.
Further on, I go for the dual Garmin installation which means the GNS530 and the GNS430. The flight plan is loaded into the GNS530 for AP guidance, but feel free to load the flight plan also into the GNS430 for additional information.
Following the items on the checklist, starting with a cold and dark aircraft. Believe me, it isn’t difficult, but you and I need to take the time to follow each step to get all the systems up and running. And please, don’t start the modeled C310L with engines up and running. The modeled aircraft deserves that you do all the checklist items from a cold and dark start situation. Ok, you’ll probably a bit struggling when starting the engines and to get them running, but no, no engines up and running option!
It’s a weird day while planning my IFR flight. It’s the beginning of May 2019 (yes, yes, it’s really May 2019), the real weather isn’t really what I expected so heating up the cockpit area could be nice else it will be too cold in the 3D cockpit. The real day temperature right now is around 6 Celsius – roughly 43 F – which is way too low for the time of the year and so will be the real implemented weather in the simulator too.
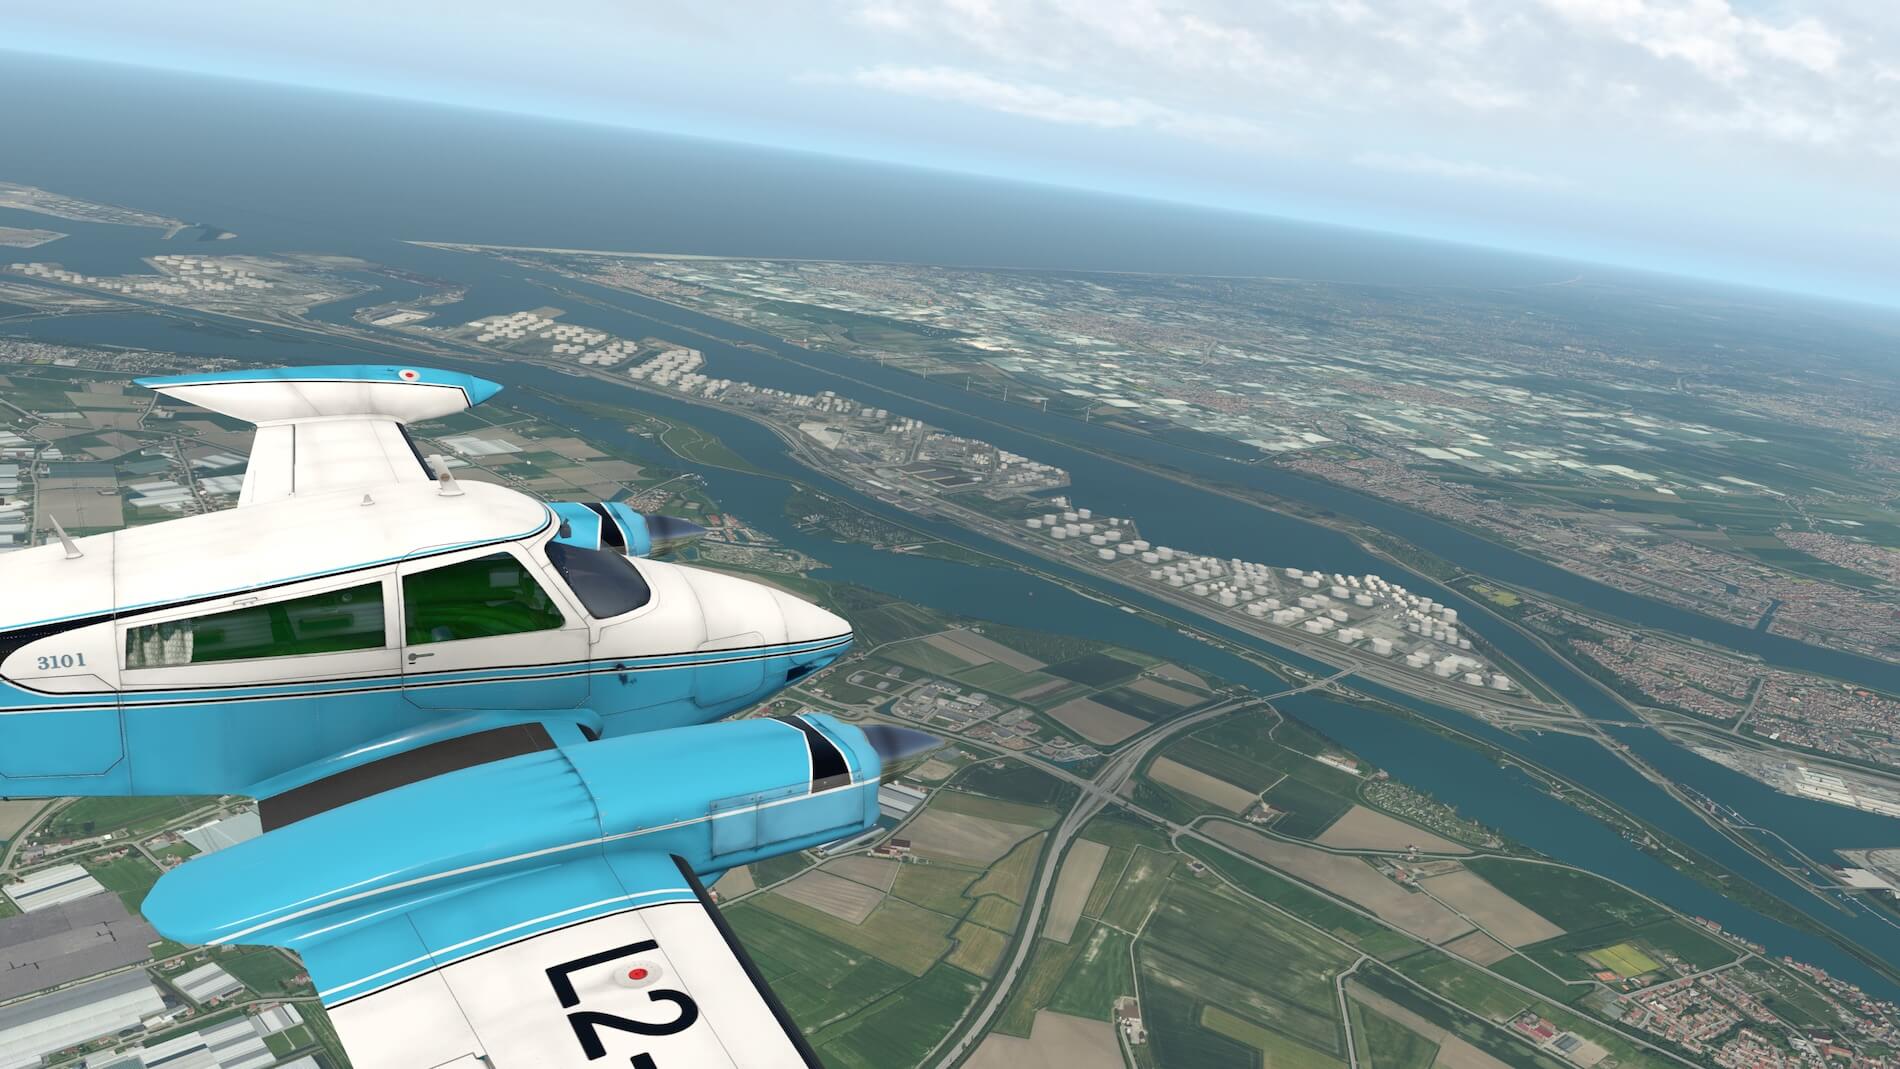
Between the clouds I think it will be sunny and allows me to look down so that helps and makes me happy while the intended cruising level will be 6000 feet. I still have, as I just mentioned, a good view on the ground and together with the photorealistic packages from Zone Photos it gives it all the look where we’re hoping for.
Off we go!
I’ve parked the C310L at the GA apron EHBK and after I followed the checklist items, I leave the engines running for a while to let them warm up. The takeoff is planned from runway 21 in a southern direction towards Belgium. Although everything with the AP is set, I climb out manually to 4000 feet, following my flight path on the GNS530. As said before, from runway 21 I climb out, first following runway heading and after passing thru 4000 feet, I connect the AP as well as that I connect the AP to the flight plan as previously discussed.


The Actual Flight
I noticed that with the AP connected and real weather active, the AP has a difficult job to keep a certain vertical speed or ALT HOLD. Maintaining the right heading or track by following the flight plan isn’t a problem, but real weather seems to have a lot of influence on the pitch channel of the AP. I’m aware that real weather tells me that I’ve got a lot of side wind, but I’m a bit surprised that I can’t control via the AP panel the vertical speed as I want.
I noticed that once ALT HOLD is set, it’s difficult to maintain that altitude. It seems that trim is always too late and at the end when the aircraft is stabilised again, I’m at a different altitude while the ALT HOLD switch is still in the ON position. Just in case you think that too; yes, I’m also aware this is an old-fashioned Auto Pilot and perhaps not so accurate as todays Auto Pilots or Auto Flight systems, but yes, I also informed Miguel from Digital Replica about my experience.
With that experience, I decide to set the simulator environmental conditions back to CAVOK and see how the C310L then behaves and how I can control the PITCH channel via the AP panel. Am I able to use the V/S wheel on the AP panel and what happens when I now set the ALT HOLD switch to ON?
When I have the V/S trim wheel on the AP panel a bit to PITCH UP, and select after that the ALT HOLD switch to ON, I expect that the V/S trim wheel returns to no V/S and that the aircraft levels OFF at the moment I set the altitude switch to ON. Initially it looks like that this happens, but the V/S trim wheel doens’t return to 0 and in a sudden, with the ALT HOLD switch in ON, the aircraft starts climbing.
While playing around with the above, I came to the conclusion that when you have the ALT HOLD switch ON, you can use the V/S trim wheel on the AP panel and then you can control the vertical speed UP/DOWN and the moment you click the white line in the middle of the V/S trim wheel, the aircraft vertical speed levels OFF the aircraft at that altitude. Perhaps this is the way it works. I informed with Miguel about this V/S issue I have. His answer helped me and for sure you too.
Miguel explains “V/S is a bit confusing. Be aware that the Auto Pilot may be overpowered if the aircraft is out of trim. If that is the case, one of the “PITCH TRIM LIGHTS” will turn on, indicating the pilot need to trim up or down the aircraft. That is why the aircraft must be trimmed in a constant pitch behavior before engaging the Auto Pilot pitch servo. If you are flying on a level flight, it must be trimmed on level flight and pitch wheel must be centered.”
Miguel continues “If you are climbing, you need to trim the aircraft in a way that it more or less maintains the actual pitch angle and the pitch wheel will need to be more or less in the pitch up position (wheel down). Then, if you want to change the pitch angle, you just use the pitch wheel. Just be aware that if one of the autopilot trim light is on, you´ll need to correct with the trim until it turns off.”
“That is one of the various reason I didn’t use X-Planes Auto Pilot because it disengages when the manual trim is used. If the aircraft is trimmed and in a constant speed then you may never need to adjust the trim while the Auto Pilot is engaged, but if the aircraft is accelerating or decelerating, sooner or later you’ll need to adjust for that. Whenever the Auto Pilot pitch is not doing what you expect it to do, look at the trim lights.”
While approaching waypoint OSGOS, coming from waypoint DINAK, I decide to test the HDG mode on the AP panel.
First I set on the AP panel the HDG scale to the same heading as I’m flying at the moment. The advantage of having the HDG or HDG bug at the same position as the track you’re flying is that when you switch to HDG mode, no weird roll movements are made by the AP. At this moment, the AP follows the flight plan which means as of this writing, it passes waypoint OSGOS. Nothing special you would say, but I find that the modeled AP is quite aggressive when making that turn read roll input. It’s not a gently roll input and increasing slowly the roll, no, it does enter a roll that’s almost the full calculated angle. Normal or not .. perhaps the modeled AP is not as gently as todays APs!


While the C310L is cruising at 6000 feet, passed OSGOS, heading for waypoint VELED, I do another trick; clicking the TURN selector on the AP panel. It turns green which means the selector is active. The moment the selector is green I can click on the LH or RH side from the middle line, the selector turns in that direction and we’re no longer in the AP following GPS thus the flight plan. So with this ROLL selector we can give a direct ROLL input to the AP. Nice try, but how to get back to the GPS mode? Click the ROLL selector once more and it turns back in neutral, but it stays green which means it is still active. Oops, what now?
No worries!
Click the green centered selector once more and the green coloured selector goes OFF and the AP is automatically connected to the GPS flight plan. Lets do another trick and play with the HDG mode. Although the switch on the AP panel is in the HDG (either OMNI or HDG) position, we’re not flying the selected heading as set by the HEADING wheel on the same panel. No, instead we’re flying a selected track according to the flight plan.
So how can we change to a selected heading? Remember the switch STD – GPS1 – GPS2? Set this switch back to STD and automatically the AP reverts to the SEL HDG I would say thus the heading you’ve set with the HEADING wheel on the AP panel. When I play around with the heading with the switch on the AP panel still in HDG, the heading is changing the moment I set another heading with the wheel, but again I noticed that the heading change thus the ROLL inpt is aggressive. Again, no gently input, it seems to me that immediately the full ROLL input is given.
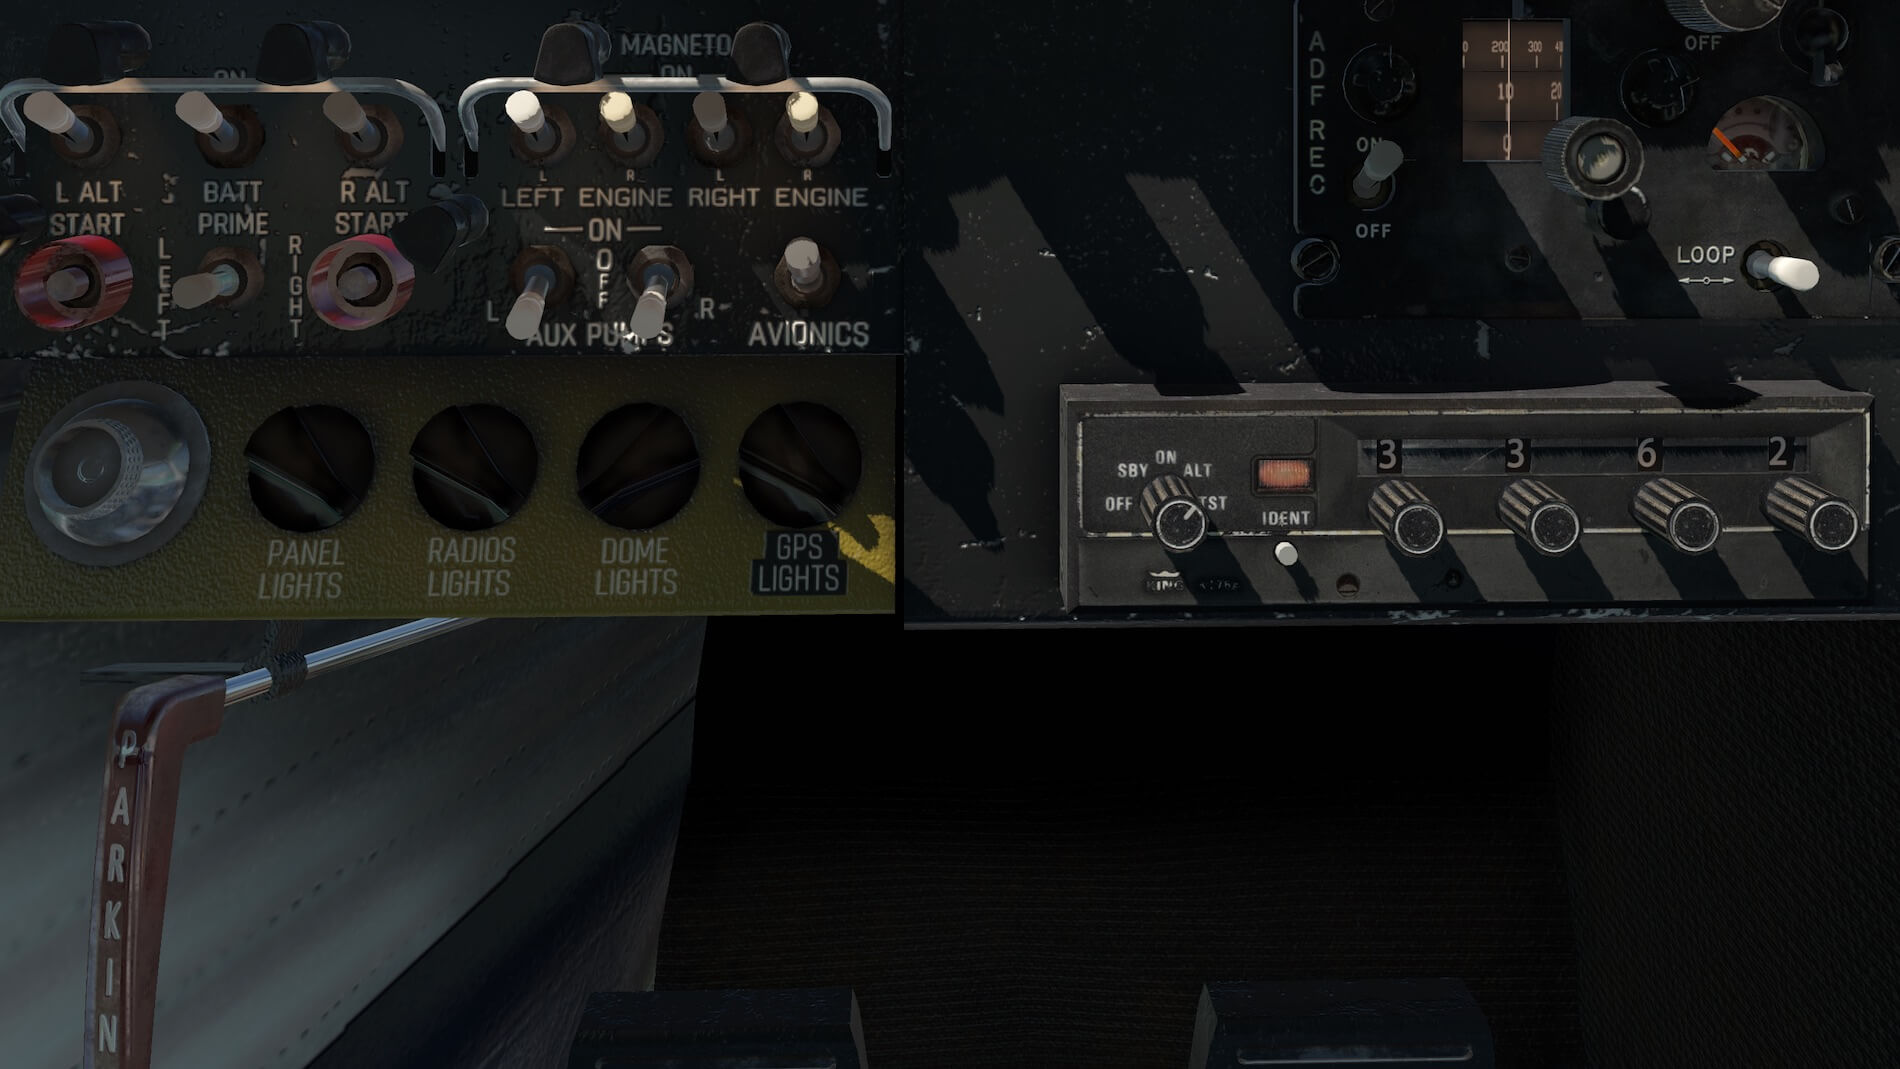
It’s time to explore a bit in more detail the lower instrument panel. On the left-hand side you’ll find at the lower end a couple of illumination rheostats, at least, it should be like that.
With a rheostat you can control within a range the light intensity of the following lights: Panel-, Radios-, Dome- and GPS lights, but it seems to me these are just ON-OFF switches, so you can’t dim or control the intensity of the lights. On the other side of the mid console, you’ll find a couple of rotary switches – Defrost-, Temp Control-, CAbin Air- and FWD Cabin Air – that aren’t simulated yet. I write on purpose “yet” since I’m not sure if this will be simulated with a future update.
Perhaps you’ve seen it on previous screenshots; glass and instrument reflection. When your PC or Mac can’t handle high rendering settings or you’re facing low frame rates, you can always decide to switch OFF these reflections although I love the window reflection. It really gives the window a used and old look an when it’s switched OFF, it looks like there’s no window at all.


I ended the previous section with what and how when you want to fly a selected/entered HDG or a manually entered ROLL input. One other possibility needs to be discussed; flying to or from a VOR or VORTAC beacon. Ok, in the Netherlands we have as far as I know no VORTAC beacons, but enough VOR and/or VOR/DME stations. How to do this? We’re approaching waypoint BERKEM so then you know a bit where I am namely reaching out for the Dutch province Zealand.
I tune for VOR Costa (COA 110.05) and do that for VOR1. When the VOR station signal is detected, it will show you on the left-hand instrument panel, situated right of the OBS 1 indicator the heading/track to fly. Set with the LH selector knob on the upper OBS (OBS 1) the same heading/track to fly. Then on the AP panel be sure that the switch is in the OMNI postion. And finally, set the following switches on the “glareshield” panel to STD, FRONT and NAV1. With these steps you’re able to fly VORs or VORTACs.
I’m approaching the city of Rotterdam and wondering if I missed something in the cockpit. Perhaps other switches that aren’t simulated or aren’t functional? I mentioned already a couple of rotary switches on the lower left-hand and right-hand instrument panel, but there’s at least one more. On the switching panel above the instruments, I noticed that the CABIN HEAT FAN switch doesn’t work. When you think about it, it makes sense, but perhaps it’s an idea to simulate that the switch functions although the system behind isn’t.
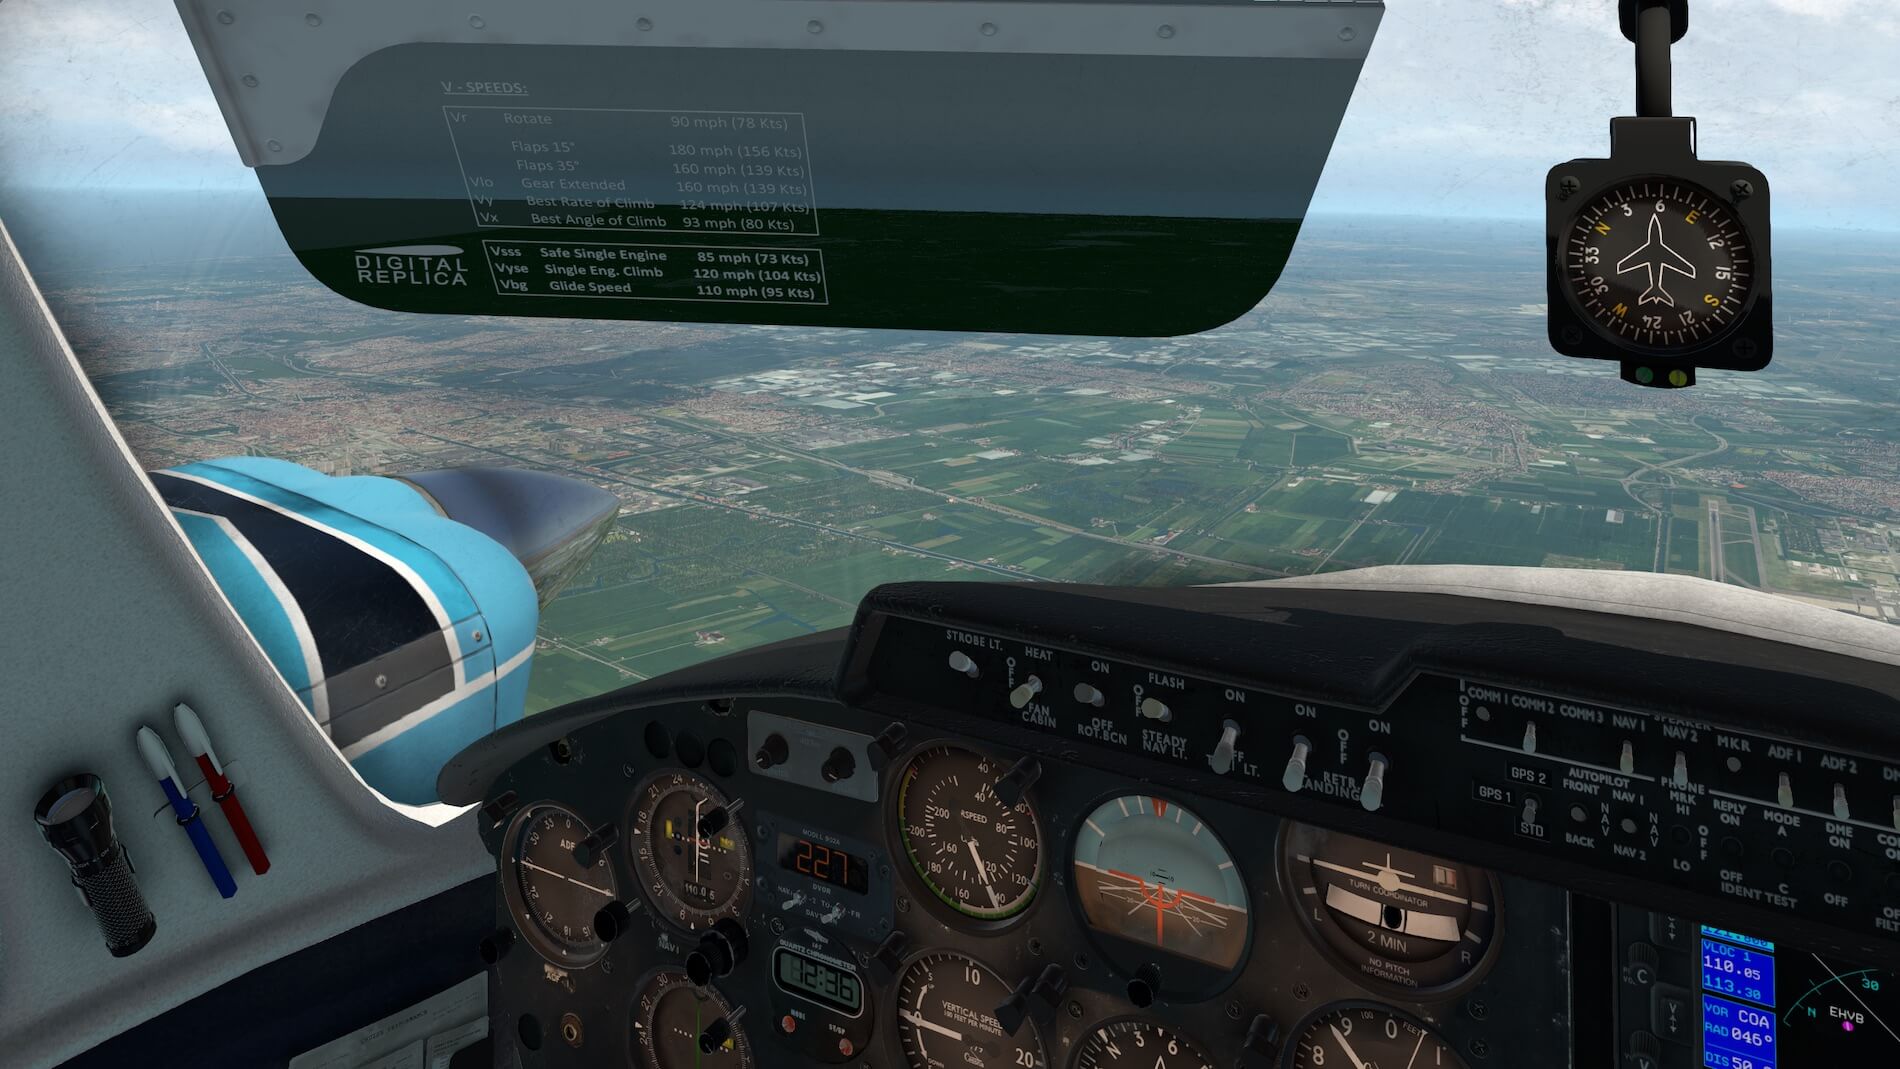
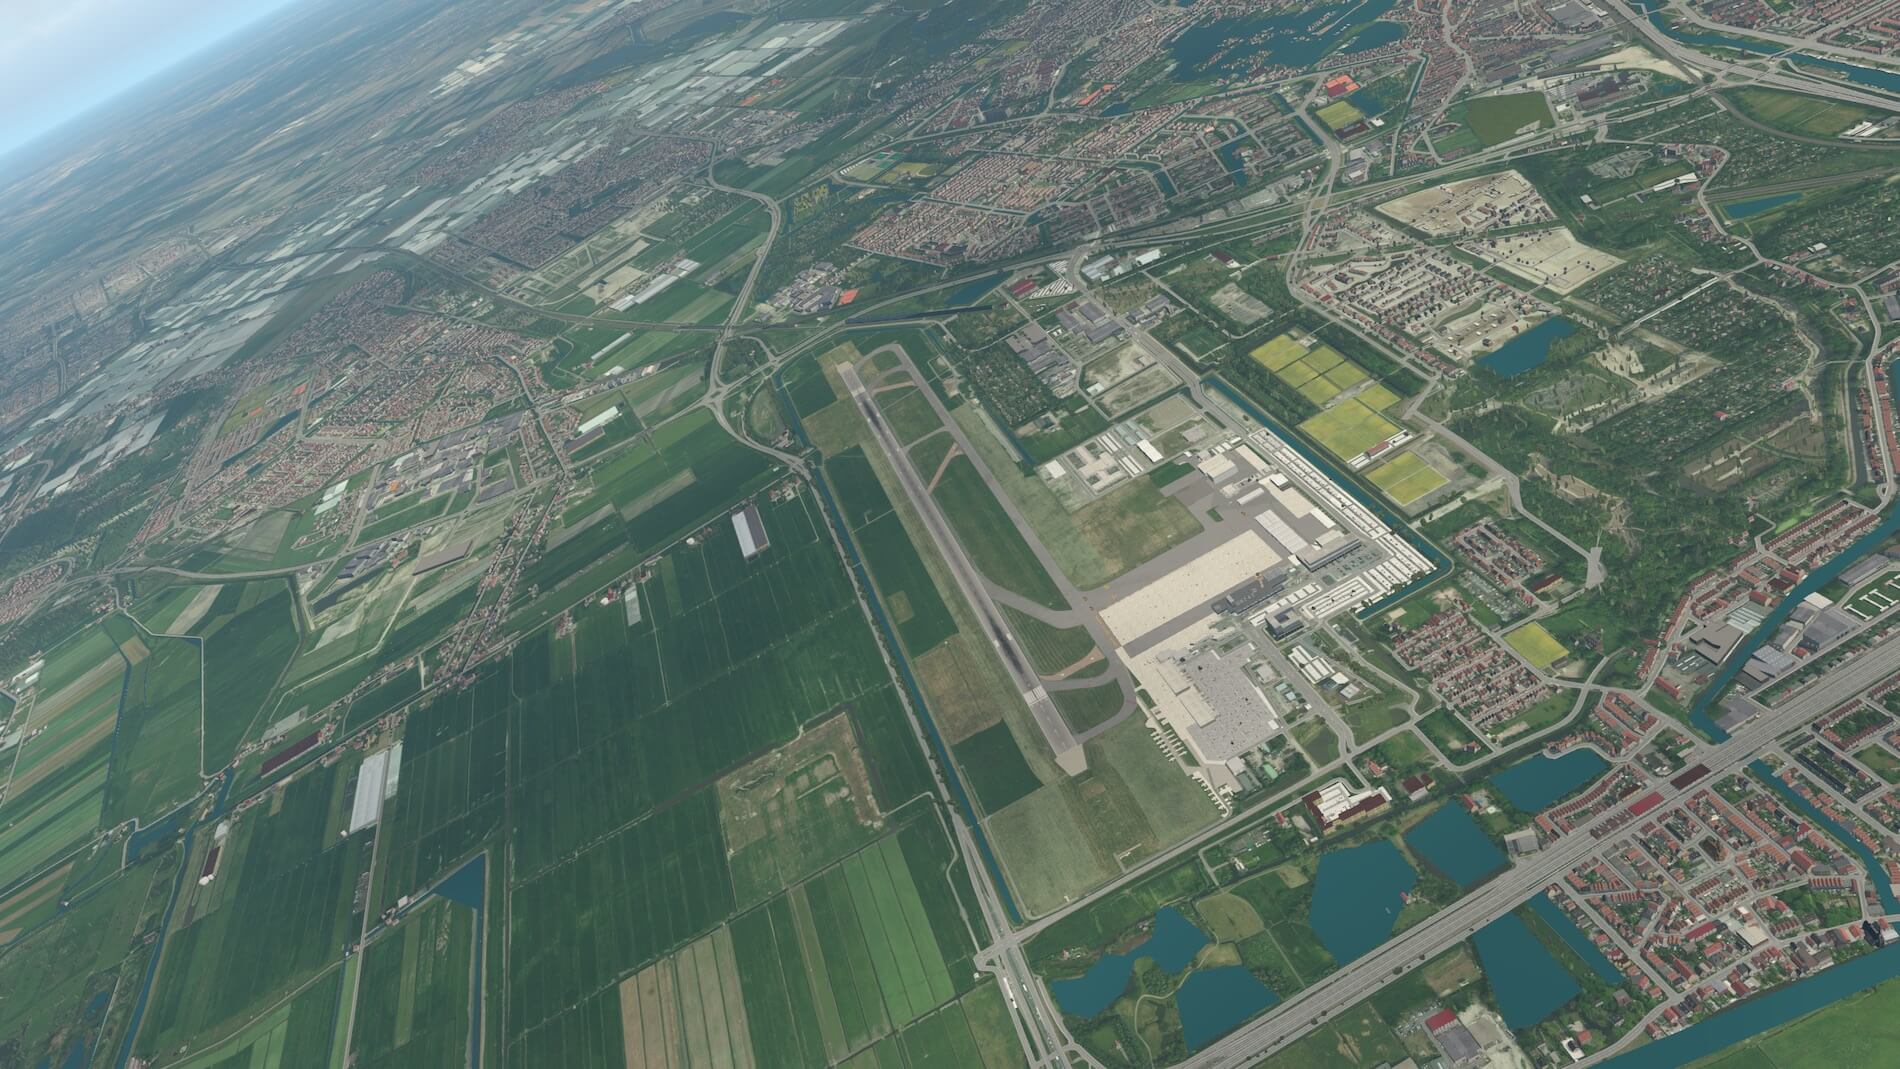
While staring to the ceiling I need to highlight that the sun-visors are movable and worth to mention that the left-hand sun-visor has on the inside all kind of V-speeds on it. He, hold on, on one of the screenshots below I spot the default – not bad at all – X-Plane EHRD airport. I mentioned this before, but perhaps it’s worth once again to bring to your attention and that is the presence of the SimHeaven X-Europe add-on scenery package used for this flight. It gives in this case the Netherlands a much more realistic look when it comes to all kind of realistic Dutch or European objects.


One of the things I want to try is to see and feel for myself how easy it is to fly the C310L. That said, I disconnect the AP and it should be trimmed, so I shouldn’t see or feel any unexpected movements which is indeed the case. Adding a roll, or pitch, goes as expected. The modeled aircraft responds slowly on pitch and roll, so that’s good news. How realistic it is versus the real C310L, that’s something I can’t confirm. Keep on thing in mind that when you connect the AP back, that it will pick up the intended track from our flight plan but the altitude hold mode is now either the same altitude as before or higher or lower. The higher/lower is because of me that it slept and didn’t monitor my altitude change. That said, the AP connect with the ALT HOLD switch ion ON, so use the V/S trim wheel to adjust an altitude of roughly 6000 feet.


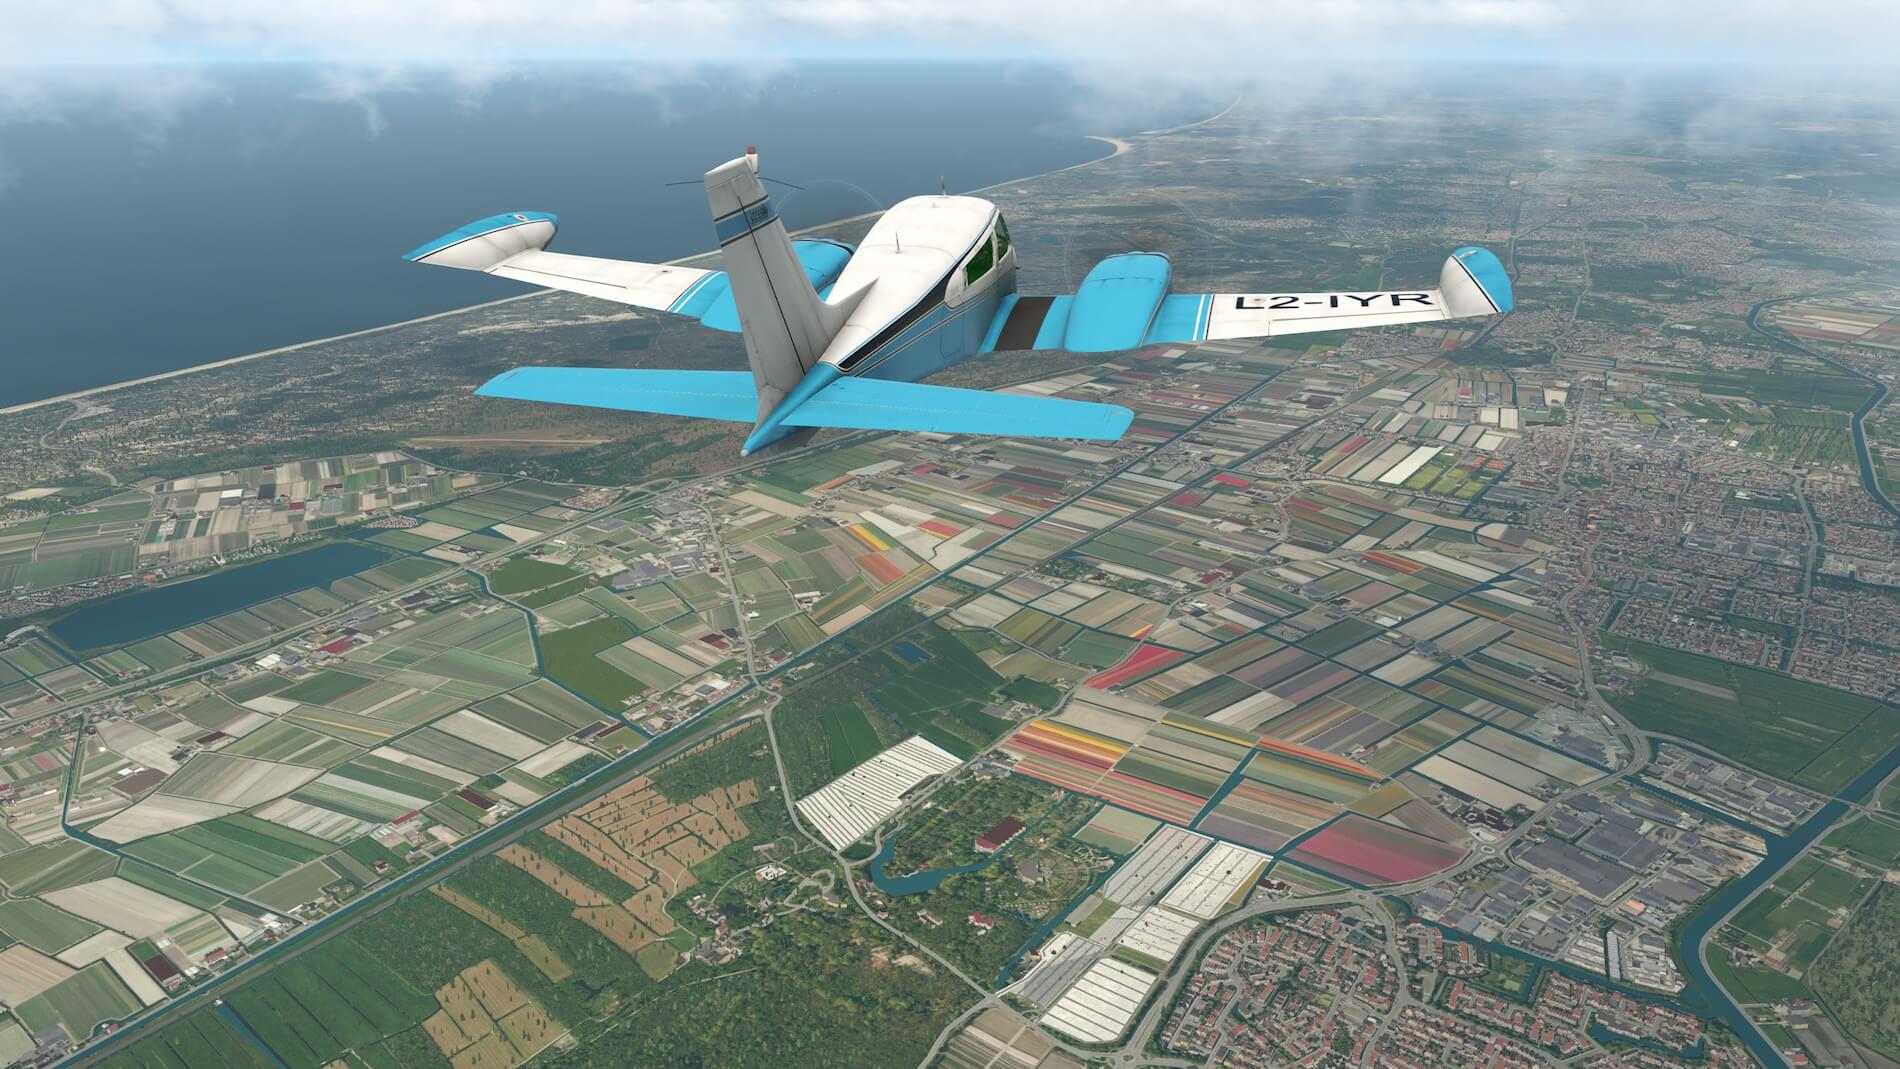
The flight continues via IJmuiden, Spijkerboor towards the city of Den Helder. Approaching the far north of the main land, its item to cross over the Wadden Sea. I’m officially not free to cross the Wadden Sea as I want it. There’s a special corridor between the main land near Den Helder and Texel. As far as I know and can remember that this corridor has to be used when you intend to go to Texel.
So slowly I’m reaching the end of this IFR flight. I had enough time to test a couple of things related to the Auto Pilot. It turned out it wasn’t as easy as I expected, but I succeeded. I hope you do that too when you buy or perhaps bought this aircraft already and find things in this review that triggers your mind. Once I’ve crossed the Wadden Sea, I do it on visual. The visibility is OK so no need to use my flight plan anymore. After a bit circling around at Texel, I go for a northern entry, so via the island of Vlieland.
Frame Rates (FPS)
Although the Digital Replica isn’t as complex as the big jets, it still cost you frame rates, but is it a lot of is it well balanced?
The C310L is a nicely modeled externally and internally GA twin engine aircraft with a lot of tiny details. It should be noted that not always tiny details means frame rates impact. Although it does influence, also the amount of polygons are responsible for frame rate reduction or not. Besides that, complex computer simulation systems thus a lot of calculations thus a possible reduction of frame rates installed within aircraft that have EFIS, EICAS, ECAM, CMC or whatever system is normal for those big jets. The Digital Replica C310L doesn’t have a Garmin G1000 or equivalent system, instead, it is all old-fashioned controlled and monitored except for the option of selecting the GNS 530, GNS 430 or both build in.
Because of that, you may expect good or reasonable frame rates. And yes, I know, the frame rates are not only depending on the aircraft. Another impact could be airports, sceneries, the environment like clouds and so on. And lets not forget you PC or Mac hardware specifications, your monitor native resolution. Is it 2K, 3K or like I have on my iMac 5K and what is the active X-Plane resolution which isn’t necessarily the same as your monitor native resolution (by default these two resolutions are the same), but lets not forget the graphical settings.


Some notes about the frame rates. When you study the frame rates you probably think … could be higher, it could be better, but I would like to warn you that the screenshots are taken with a relatively high rendering setting, real weather was implemented and it was not a sunny day. Besides that, and according to SimHeaven, I added freeware add-on X-Europe that eats frame rates. From the takeoff (EHBK | Maastricht-Aachen airport) I climbed out to 5000 feet to the south, then made a 180 turn to fly in a northern direction.
In other words, there’s a lot to see down there and X-Europe is therefore doing a great job, but this cost frame rates. Most likely this is also the reason that the frame rates are somewhere between 20 and 24 FPS. When I remove X-Europe, then they easily go up. Just a thought when you fly around in Europe and use the awesome package X-Europe from SimHeaven!
For this review I used a complication of different freeware add-ons:
– FlyWithLua for X-Plane 11 NG 2.7.9
– FlyAGI Tweak Utility 1.10j
– X-Visibility 1.0.3
– Environment+ 1.1 (only the cloud textures)
– EHTX Texel by LPNils
– EHBK Aerosoft Maastricht-Aachen | Aerosoft or X-Plane.Org
– Zone Photos ZL16 Ortho packages for the Netherlands
– Libraries needed for EHTX (see EHTX X-Plane.Org page)
– SimHeaven X-Europe v2.1.1
Summary
With such a long review, it’s always a struggle for me what “to write down” in this summary, but let me give it a try. I’m also not sure if I covered every bit and piece of this modeled C310L, but also for that I think I covered most of it. Miguel from Digital Replica was very helpful in answering my questions and issues, which helped me a lot. That the Auto Pilot is custom-made is awesome for such a package price. That some AP functions need perhaps some additional tweaking is no problem for me. As I flew the C310L also manually so with no AP connected, it’s a lovely aircraft to fly by hand.
As of this writing May 2019, I tested model version 1.1.1a which still has a couple of glitches, but according to Miguel – the developer from Digital Replica – they will be solved with the upcoming update. A hotfix is available at the dedicated Digital Replica X-Plane.Org forum that solves for the moment the zero fuel quantity indications.
With a package price of 24.95 USD it’s a lot cheaper then other twin engined X-Plane 11 models and it’s worth to mention that the Digital Replica model is build new from scratch for X-Plane 11 and not ported from another simulator.
I’m impressed by the way the 3D cockpit looks like. It’s full with tiny details, it shows a lot of “used” panels, indicators as well as the panel construction. It’s something like painted and repainted. The modeled cockpit really gives you the idea you’re sitting and flying in an old-fashioned aircraft and I’m also aware that you like this or you don’t like it. That’s always the question! Knowing the real age of this aircraft, I think it’s good to see that the developer or his team tried to make it as real as possible.
The same implies for the external texturing look and feel although a bit more “used” or “weathering” would be welcome knowing the age of the C310L. But I must immediately add to this that 3D modeling is awesome like the landing gears. What I saw during my walk around inspection with how many details the NLG (Nose Landing Gear) and MLG (Main Landing Gears) including the wheels are modeled, very well done and even the decals on the struts and other places on the aircraft are perfectly readable.
The Digital Replica widget seems at first a bit simple, the popup checklist and performance charts, but in particular the weight and fuel popup looks very professional, oops, and I shouldn’t forget the 2D Auto Pilot popup. Overall flying experience, as far as I looked to many YouTube movies, is good and then I mean the flight characteristics. No, in case you ask or wondering that, I have no FAA Twin Engine rating license so I can’t speak from own flying experience.
Wrapping it all together, keeping in mind the price, this Digital Replica aircraft model is nearly half the price from twin engine competitors which makes it a good choice to try out this Cessna C310L. And yes, I’m absolutely aware that it’s becoming very difficult to make the right choice when you like to fly twin engined modeled aircraft. The market for these type of aircraft seems to be booming! Just to mention a couple; Carenado has released recently several twin engines aircraft, vFlyteAir did, Just Flight/Thranda Design came out with the Duchess 76, AirFoillabs with their King Air 350 and many other developers do that these days or did that a while ago.
To me Digital Replica is a new developer within the X-Plane community. I sincerely hope that the developer can and will update the aircraft whenever necessary and to keep it compatible with future X-Plane 11 updates. I also hope that once the C310L is almost 100 percent perfect, the developer continues with other models and not that it stops with this one. Why? The more developers we have in this GA twin engine X-Plane market, the more competition there is and normally that would mean better products.
A last word to the developer …. keep up the good work Miguel!
With Greetings,
Angelique van Campen
| Add-on: | Payware Digital Replica C310L |
|---|---|
| Publisher | Developer: | X-Plane.Org | Digital Replica |
| Description: | Realistic rendition of the Cessna 310L |
| Software Source / Size: | Download / Approximately 570MB (zipped) |
| Reviewed by: | Angelique van Campen |
| Published: | May 7th 2019 |
| Hardware specifications: | - iMac Pro - Intel 3GHz Intel Xeon W / 4.5Ghz - Radeon Pro Vega 64 16368 MB - 64 GB 2666 MHz DDR4 - 1 internal shared 1TB SSD (Big Sur 11.x) - 1 internal shared 1TB SSD (Bootcamp Windows 10) - 1 external 2TB LaCie Rugged Pro SSD (Big Sur 11.x) - Saitek Pro Flight System X-52 Pro and X-56 Rhino - Honeycomb Alpha Flight Controls - Honeycomb Bravo Throttle Quadrant |
| Software specifications: | - macOS Big Sur (10.15.x) - X-Plane 11.5x |
6 Comments
Submit a Comment
You must be logged in to post a comment.
This already was a great plane to fly, but with the new update 1.1.2 ,with the new Garmin G5 PFD and HSI with GFC600 digital autopilot it’s even better. If you like flying 2 motor propellor planes, you have to by this one, because it’s really great.
Leo
After reading your excellent review I bought this plane and have been enjoying it since.
It offers the flying experience I had when learning to fly in a Cessna 172 without GPS and all analog instruments.
Great fun!
Good to hear Robert. Enjoy!
Great Review, Enjoy your spring break. Thank you.
Excellent review! I appreciate the time and effort you put into writing it.
I don’t have any payware aircraft so far, but after reading this I may have to get the C310L. Thank you for such a thorough and thoughtful review!
Thanks Ken.