JARDesign JD340-500 Airliner, the Ultra-long Range
Introduction
While your personal reporter Angelique is writing and writing, and seeking for additional information and adding interesting sections in this review, the review has become huge and therefore, she found it a good idea to add a TOC (table of contents), so let’s check that out.

Table of Contents
Introduction
The Real A340-500
Installation and Manuals
– JD340-500 Airliner Installation
– Manual and Videos
Walk-Around Inspection
Modeled Virtual Cabin
Modeled 3D Cockpit
– Differences JD340-500 Airliner versus JD330
– The JD340-500 Airliner Cockpit
Preparations I – Things To Know
– Important ….wait wait wait!
– X-Plane JD340-500 Airliner Menu
– Using MCDU
– 2D Popup Displays
– Dual or Single MCDU
– Adding a SID and STAR
– Interactive Checklist
– Your Virtual Co-Pilot “Linda”
– Wingflex
Preparations II – Adding Add-Ons
– The Year 2002
– Adding Scenery
Preparations III – Flight plan
– Creating a Flight Plan
– Creating a JARDesign Flight Plan
Preparations IV – Other data MCDU
– Checklist, MCDU and CI (Cost Index)
JD Flight Part I | LFBO – LFBO
– MCDU, Equipment, Engine Start, Pushback and Taxi
– MCDU LOAD and FUEL page
– Enter MCDU CO RTE (Company Route)
– Enter MCDU SID (Standard Instrument Departure)
– Enter and confirm MCDU INIT B page
– Enter and confirm MCDU PERF page
– Check and Set FCU
– Ground Equipment
– ENG START
– Pushback
– Taxi
JD Flight Part II | LFBO – LFBO
– Take Off (TO) and Climb (CLB)
– Cruise (CRS)
JD Flight Part III | LFBO – LFBO
– Descent / Approach Preparations
– Descent, Approach, Final Approach and Landing
Sound and FPS (Frames Per Second)
Summary
Introduction
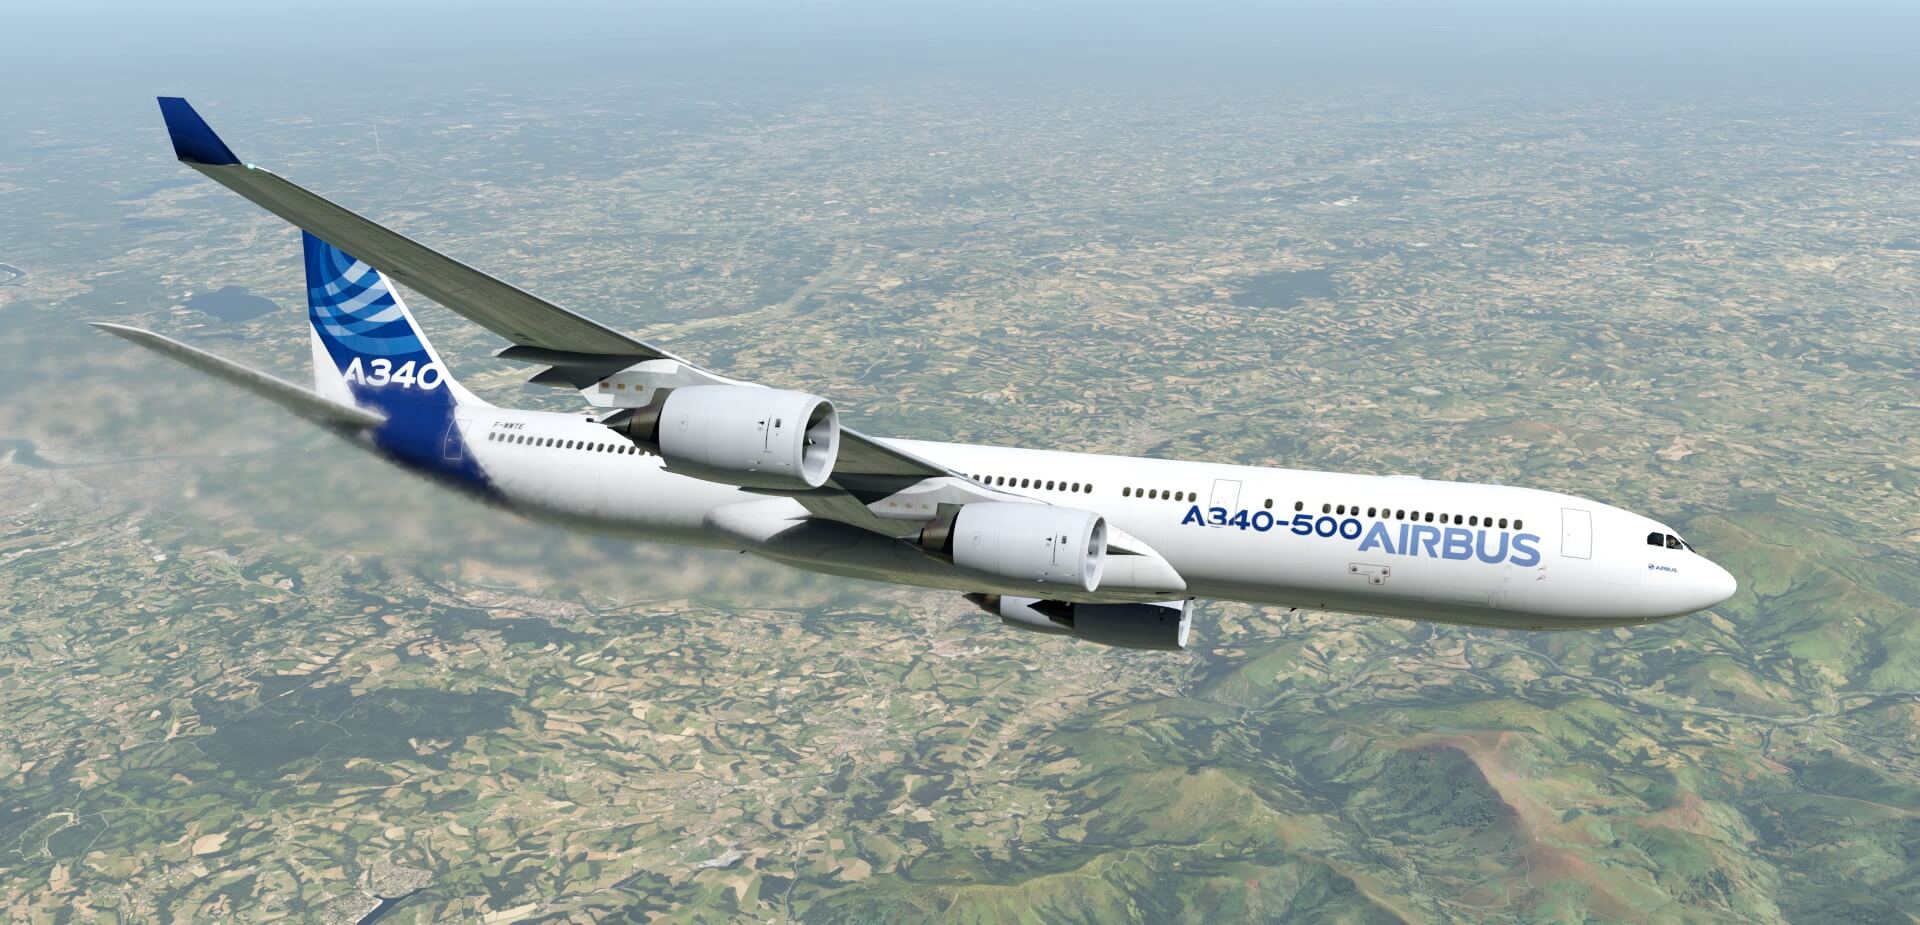
Your personal reporter and long time reviewer Angelique van Campen welcomes you onboard the latest JAR flag ship, the JD340-500 Airliner.
The real Airbus A340 aircraft aren’t really new, actually, it all started many years ago with the A340-200 that was equipped with CFM engines. Although the A340-200 and -300 was a great aircraft, it had it’s limitations, but that all changed with the making of the A340-500 and the even longer A340-600. And yes, the A340-600 is longer, but the overall range is less then the -500. To be precise; the maximum ultra-long range of the -500 is 16670 kilometers or 9000 nm.
Anyway, JARDesign is the first well known X-Plane developer that releases their JD340-500 Airliner while later this year, ToLiss releases their Airbus A340-600. For now, this review deals with the JD340-500 Airliner version 1.2.

Before Angelique can start with this review, she would like to offer some background information about the real A340-500, but first this. Airbus Industries – later renamed to EADS and in 2014 to Airbus Group – doesn’t build anymore the A340 aircraft. Actually, on November 10th 2011, Airbus announced the end of the A340 program. The decision to terminate the program came as A340-500/600 orders came to a halt, with an analyst pointing out that the A340 “was too heavy and there was a big fuel burn gap with the Boeing’s 777”.
In an environment where the fuel price where high, the A340 has had no chance to compete against similar twin engines, and the current lease rates and values of this aircraft reflect the deep resistance of any airlines to continue operating it.
With the initial development and work on the A340, the Airbus Group developed parallel to the A340 the A330 Series. Basically identical aircraft except that the A330 has two engines while the A340 has four engines, but besides the amount of engines, other systems where very similar or identical. For example the aircraft AC and DC systems are more or less the same even though the A340 has 4 IDGs (Integrated Driven Generator) that provide the AC power which is basically a CSD (Constant Speed Drive) and AC generator build in one housing.
With the previous paragraph in mind, it was for JARDesign a logical step with the already available A330 knowledge, to add to their success story the A340. The cockpit layout of both the A330 and A340 due to the DUs makes it easy to change from an A330 to an A340 as well as it is for real pilots, and of course, it’s not just that. There are still a lot of differences that makes this A345 unique. Knowing this doesn’t make is less interesting to check out the modelled JARDesign A340-500 Airliner.
The Real Airbus A340-500
The Airbus A340 is a long-range, wide-body passenger jet airliner that was developed and produced by the European aerospace company Airbus. In the mid-1970s, Airbus conceived several derivatives of the A300, its first airliner, and developed the A340 quad jet in parallel with the A330 twin jet. In June 1987, Airbus launched both designs with their first orders and the A340-300 took its maiden flight on 25 October 1991. It was certified along with the A340-200 on 22 December 1992 and both versions entered service in March 1993 with launch customers Lufthansa and Air France. The larger A340-500/600 were launched on 8 December 1997, the A340-600 flew for the first time on 23 April 2001 and entered service on 1 August 2002.
When the A340-500 was introduced, it was the world’s longest-range commercial airliner. It first flew on 11 February 2002 and was certified on 3 December 2002. Air Canada was supposed to be the launch customer, but filed for bankruptcy in January 2003, delaying delivery to March. This allowed early deliveries to the new launch customer, Emirates, allowing the carrier to launch nonstop service from Dubai to New York—its first route in the Americas.

According to Airbus the A340-500 can have a maximum of 440 passengers although a typical 3-class seating is ranging from 270 up to 310 passengers. can fly 313 passengers in a three-class cabin layout over 16670km. Compared with the A340-300, the -500 features a meter (14.1 ft) fuselage stretch, an enlarged wing, significant increase in fuel capacity (around 50 percent over the -300), slightly higher cruising speed, a larger horizontal stabilizer and a larger vertical tailplane. The centerline main landing gear was changed to a four-wheel bogie to support the additional weight.
The A340-500 is powered by four 240kN (54,000lbf) thrust Rolls-Royce Trent 553 turbofans and uses the Honeywell 331–600 APU. Designed for ultra long-haul routes, the -500 has a range of 9,000 nautical miles. Due to its range, the -500 is capable of travelling non-stop from London to Perth, Western Australia, though a return flight requires a fuel stop due to headwinds. Singapore Airlines used this model between early 2004 and late 2013 for its Newark–Singapore and Singapore–Newark nonstop routes SQ21 and SQ22.
The former was an 18-hour, 45-minute ‘westbound’ (actually a polar route northbound to 130km (70nm) abeam the North Pole, then south across Russia, Mongolia and the People’s Republic of China) and the latter was an 18-hour, 30-minute eastbound, 15,344 kilometres (8,285nmi) journey.


At the time, the flight was the longest scheduled non-stop commercial flight in the world. Singapore Airlines even added a special compartment to the aircraft to store a corpse if a passenger were to die during the flight, though it was reported it had not been necessary. Singapore Airlines suspended operating the flight from 2013 onwards partly due to high fuel prices then and returned its aircraft to Airbus in exchange for ordering new Airbus A350 aircraft. The SQ21/SQ22 route was eventually resumed, flown by A350-900ULR aircraft.
The A340-500IGW (Increased Gross Weight) version has a range of 17,000km (9,200nmi) and a MTOW of 380t (840,000lb) and first flew on 13 October 2006. It uses the strengthened structure and enlarged fuel capacity of the A340-600. The certification aircraft, a de-rated A340-541 model, became the first delivery, to Thai Airways International, on 11 April 2007.
Nigerian airline Arik Air received a pair of A340-542s in November 2008, using the type to immediately launch two new routes, Lagos–London Heathrow and Lagos–Johannesburg; a non-stop Lagos–New York route began in January 2010. The A340-500IGW is powered by four 250kN (56,000lbf) thrust Rolls-Royce Trent 556 turbofans.
This is only a small section of what can be found at e.g. Wikipedia, but it’s also a good idea to check the dedicated Airbus A340-500 site.
Installation and Manuals
JD340-500 Airliner Installation
The installation of the JARDesign JD340-500 is easy and straightforward, but you need to enter a serial number else you can’t activate the product. JARDesign offers a free update service different then we know from e.g. Skunk crafts Updater or updates by using the STMA Auto updater. Keep in mind that the JD340-500 Airliner package doesn’t come with any livery except then the JAR house livery that can be found in the aircraft Objects folder. Additional JD340-500 Airliner liveries painted by house painter Salva can be downloaded separately from the JARDesign A340-500 forum. You also need a subscription for the AIRAC cycles. And, if you like, you can also download the AviTab freeware add-on.
What is also different with JARDesign – not new since it’s already for years like that – you can download for free the aircraft package from the JAR forum but you always need a serial number to activate the product thus you need to buy the product via X-Plane.Org. Next you need – same as with the A330 – the GHD (Ground Handling Deluxe) package which can be downloaded via this URL.
Last but not least is the add-on JD340-500 Airliner CO-PILOT. You can download dedicated JD340-500 Airliner CO-PILOT Linda via this URL. To activate Linda you need to buy the product which cost 14.95 USD. Not sure if you like Linda? Then you can check out Linda in action at the YouTube URL youtu.be/6u2hQQt8Jxc or test Linda first out by yourself. Linda is fully operational on the ground till you lift off from the ground.
Manual and Videos
With the release of the JD340-500 Airliner, Evgeny Romanov also included a manual “how to install and use”. The manual includes a short product description with the main features, OS requirements, how to install the JD340-500 Airliner aircraft- and the GHD (Ground Handling Deluxe) package as well as the AIRAC cycle and not to forget for those who prefer the AviTab freeware add-on.
For those who use X-Plane on an iMac and using Catalina and Big Sur, an explanation is given to prevent loading issues of the mac.xpl file. When it comes to the required or suggested X-Plane 11 settings, a couple of pages explain how to do this including those simmers who own the ThrustMaster TCA hardware. You won’t find any system description and operation nor a flight tutorial, but in the Operations section of the manual some links are given to the SmartCockpit website and how to deal with the MCDU JARDesign settings.
Evgeny Romanov doesn’t offer additional manuals, but JARDesign is known about training videos and in the Operations section of the manual you find this Youtube learning video link (youtu.be/lO7h3CLmAM4). Although the movie is made for the A320- and A330, it can be used for the modeled A340 too, but it is better when a dedicated video would become available. Always something to worry about is whenever you have trouble, or whenever the JD340-500 Airliner doesn’t work as expected. That said, in the last section of the manual you find a section “troubleshooting”. Many examples of issues or failures are given including what to do.
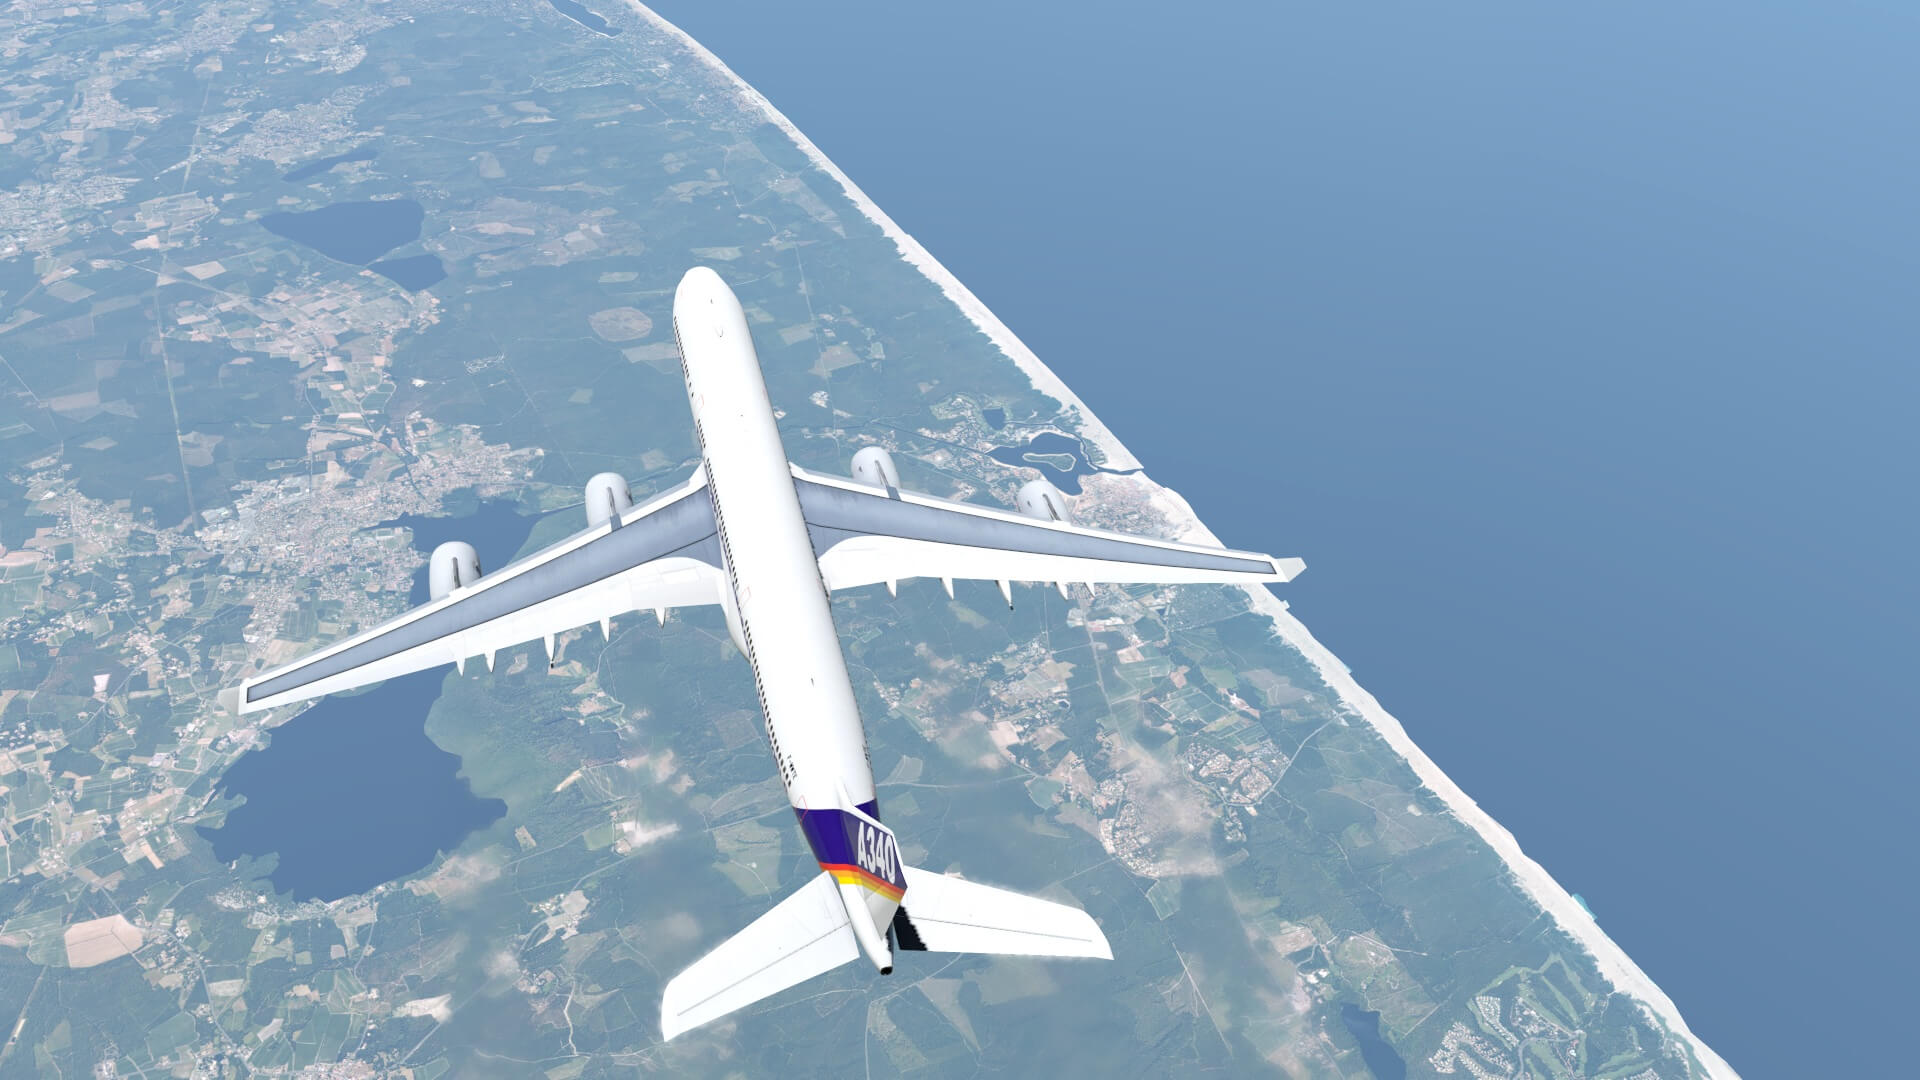
Walk-Around Inspection
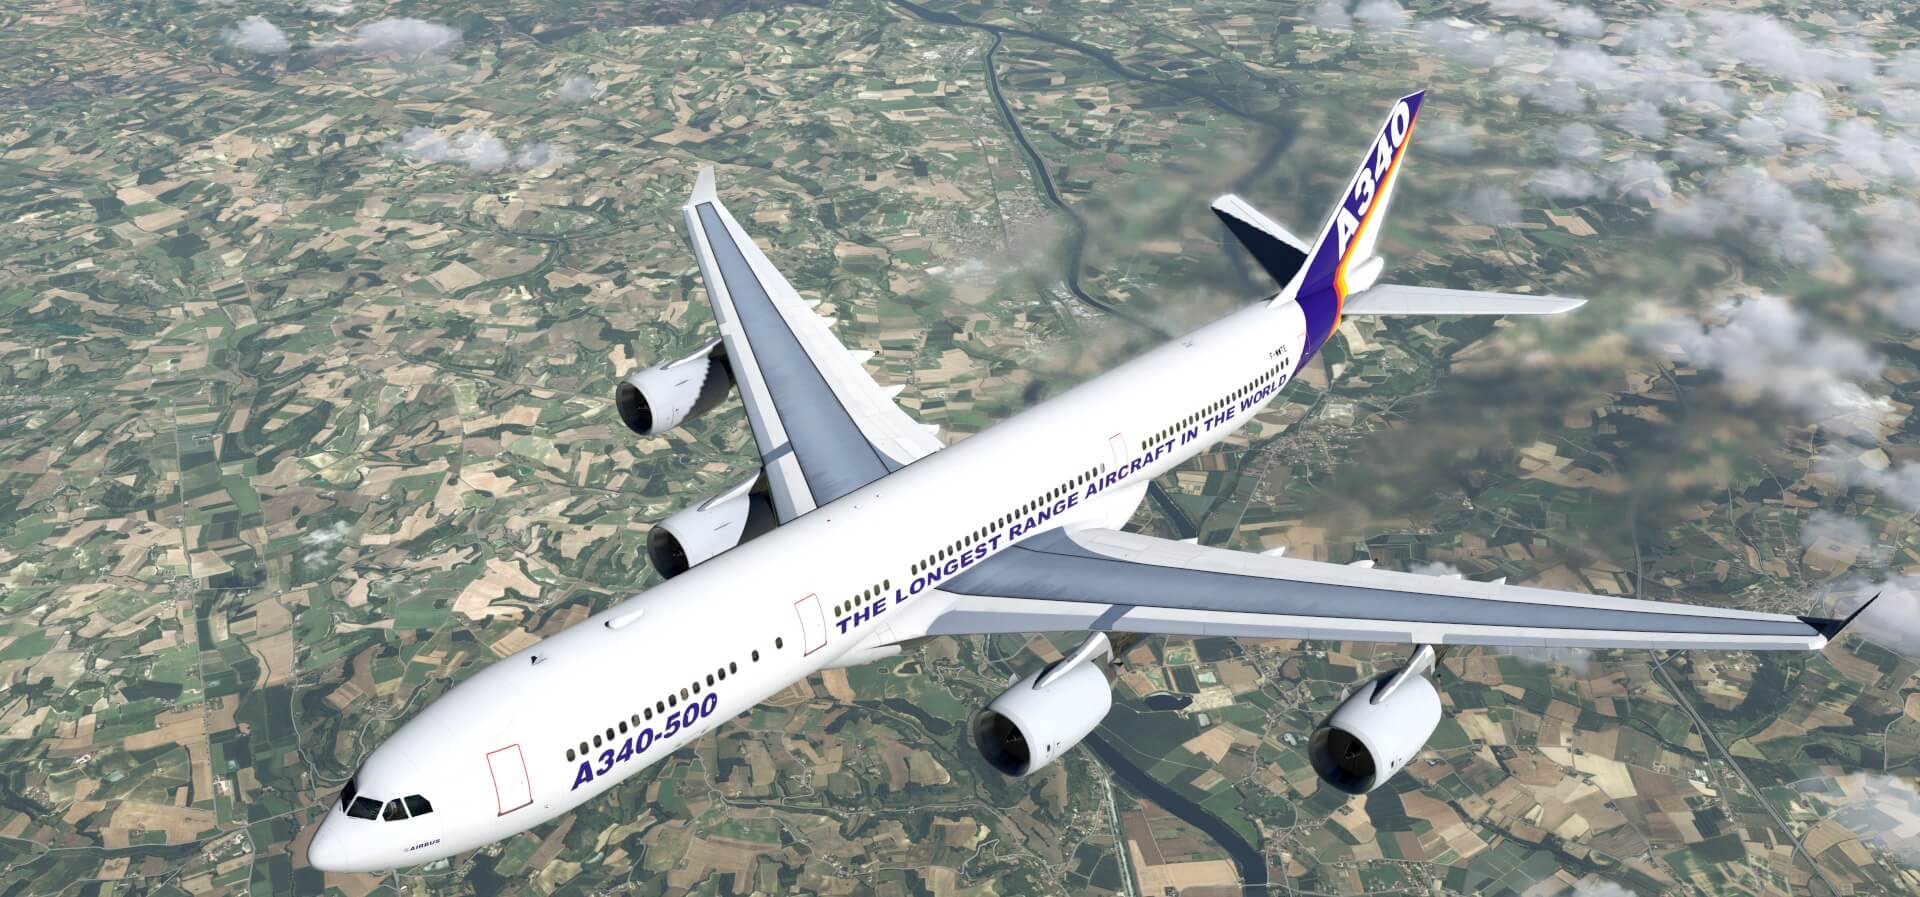
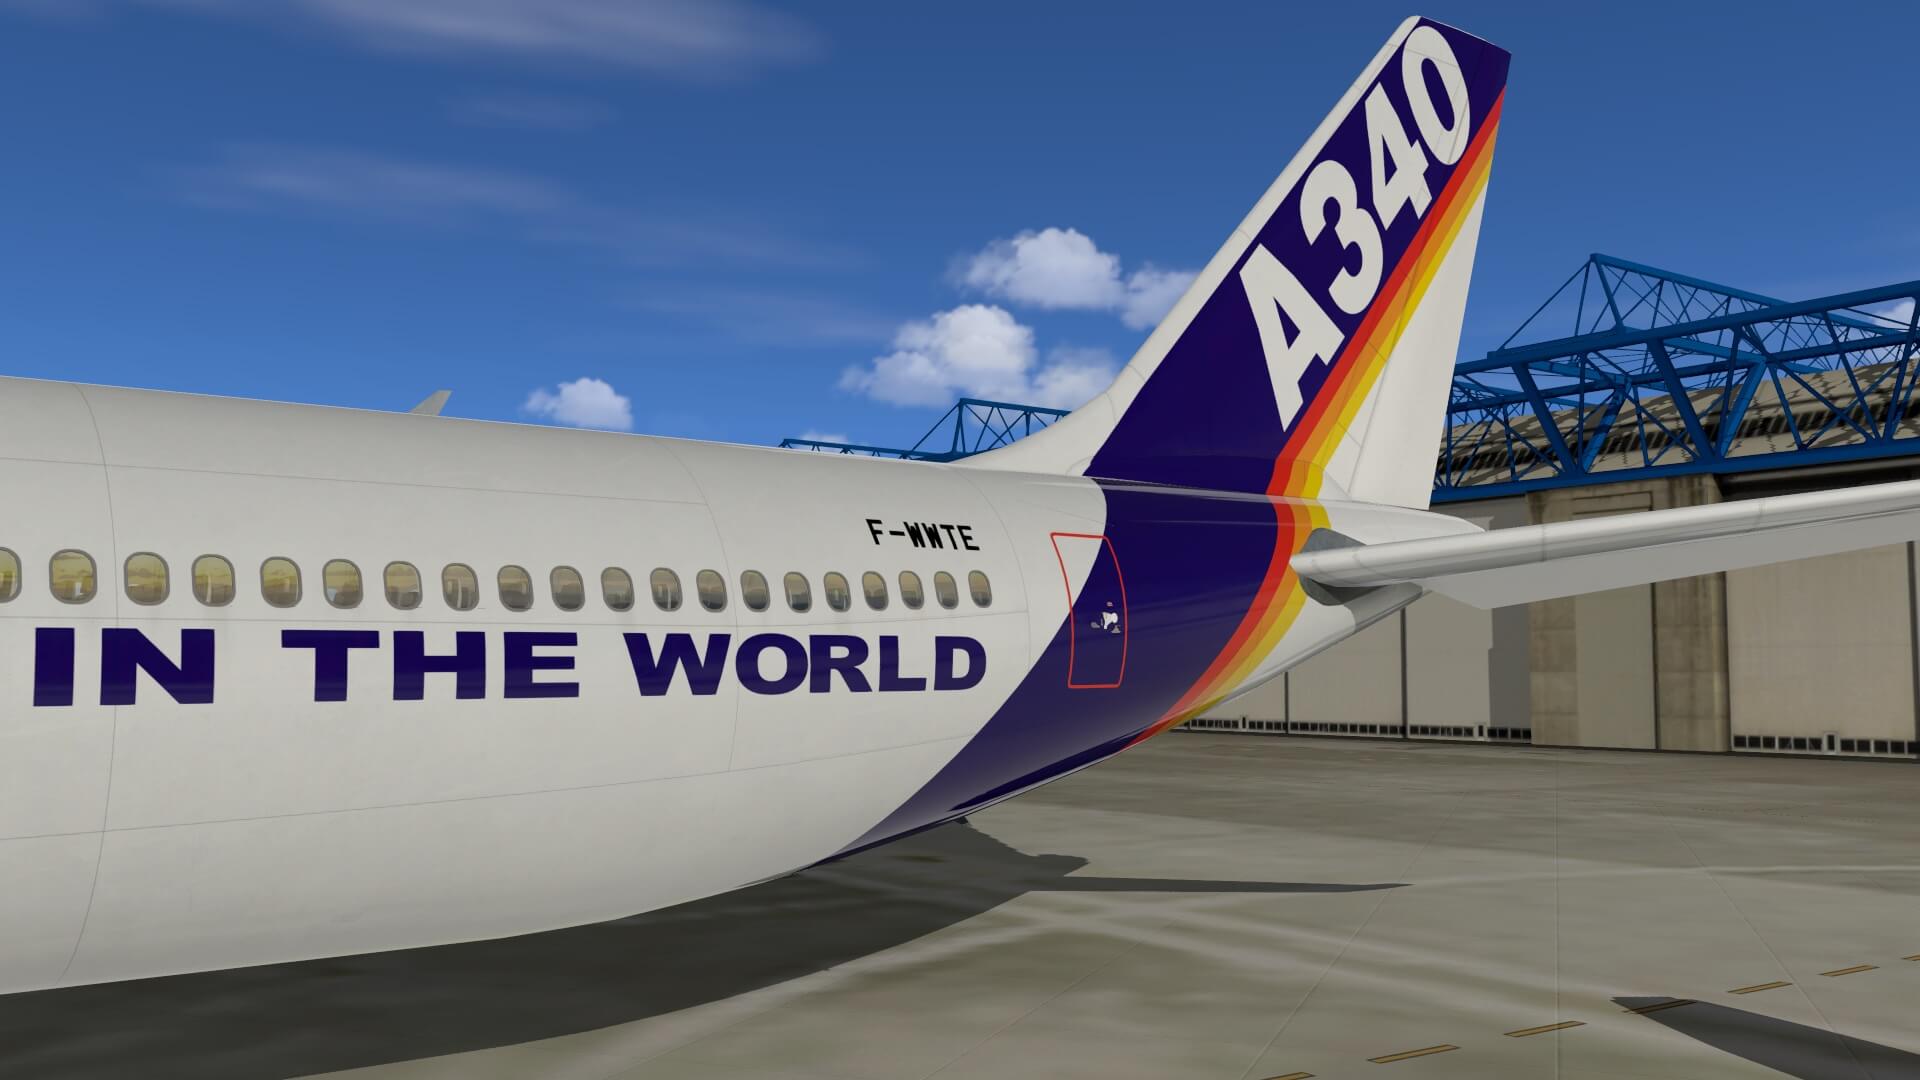
Lets first go for a walk-around inspection and oh oh, my goodness, what a huge aircraft is this. I was transported by the Airbus shuttle directly to the aircraft and besides the JD340-500, the Clément Ader hangar is also huge or actually, it was huge. During the years Airbus build many other hangers which are much bigger and intended for the A380. Anyway, to get all the ground equipment around the JD340-500, we use the GHD option.
You either do that from the cockpit MCDU (Multifunction Display Control Unit) or via the X-Plane menu Plugins – GroundHandling – Show Control Widget or Control – Control Panel. It’s worth noted that you use either way to start simulating your ground equipment, but keep in mind that once you’ve started via the MCDU, you can’t use the GHD option via the X-Plane menu or visa versa. According to Evgeny Romanov from JARDesign “GHD just catch only one control channel”. A remark from Angelique is that on her macOS Big Sur configuration she wasn’t able to see the GHD control panel or floating window.


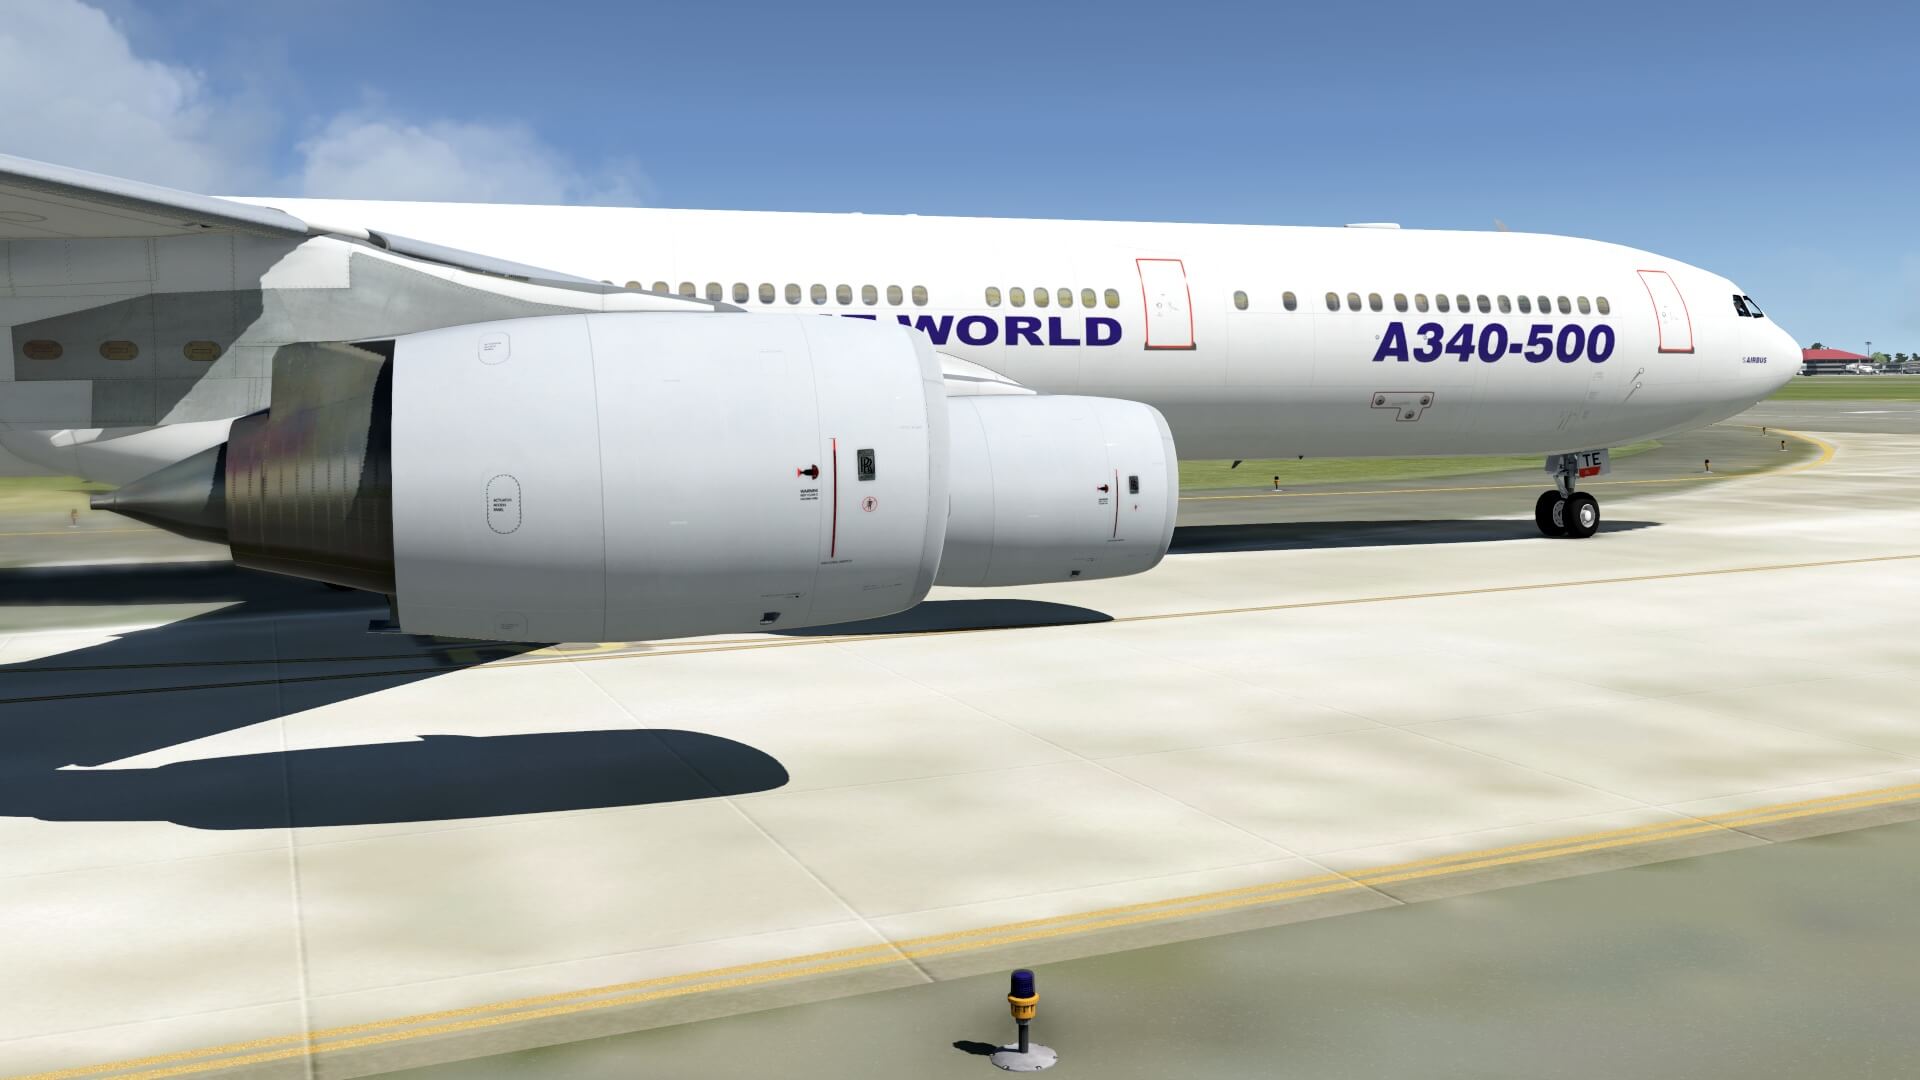
The first thing Angelique noticed while looking to the aircraft was “how clean the JD340-500 is”, and how flush the fuselage skin looks like, with no weathering to be seen, and even the wheel rims are very clean. You could say “hold on, you’re at the Airbus flight line and every aircraft standing here is brand new, even this JD340-500 in the Airbus house livery”.
And yes, you’re right with this though, but I’d seen many brand new aircraft in my real aviation life as ground engineer and wheel assemblies are never clean, rivets all over the fuselage are always seen, how flush the Aluminium plates are positioned on the ribs and so on.
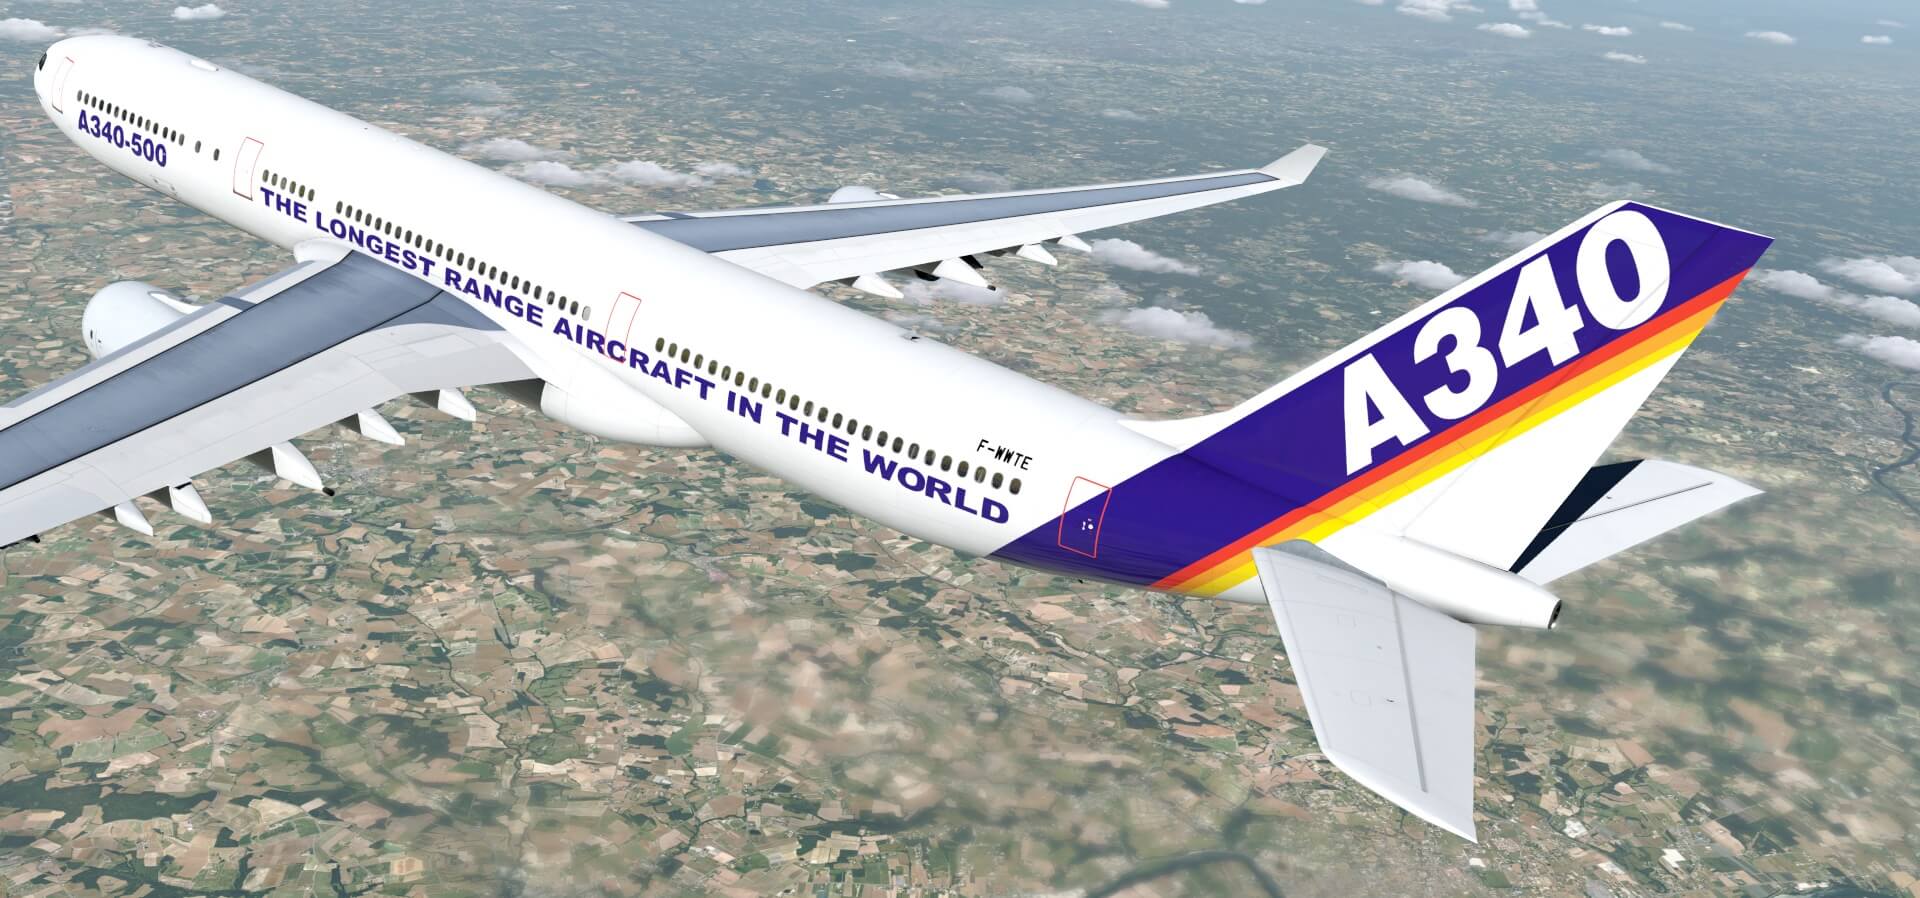
Since I had my doubts and not 100 percent sure, I compared the JAR house livery of the JD330 with the JD340-500 and it turned out that my feelings where correct. Something is different. The JD330 had more rivets painted near the PAX DOORS, and at other places on the fuselage texture sheets. I’d informed Eugeny from JARDesign and he also saw what I mend and passed this issue to Slava who’s responsible for the artwork.
But at the same time I also checked close-up photos from the real A340-500 and A340-600 fuselage skin plates and their rivets. Yes, you can see rivets on real photos, but not as even I expected and when you play a bit with the external lighting, you will see rivets on the modeled JD340-500 fuselage skin. Actually, due to the primer and paint the rivets are hardly visible. So in that respect that you hardly see on the JD340-500 Airliner rivets is basically correct, but still something is missing.
Weathering is not really an option with brand new painted aircrafts, so that’s also not fair to highlight. But overall I must say that the modelled JD340-500 Airliner looks great although the model is sooooooo clean. Clean means that there is hardly any weathering available although you may expect that certain parts on the fuselage, engines, wing or even on the tail should show some weathering including the engine cowling and landing gears.
Anyway, let’s start at the Nose Landing Gear.
It is well modeled but in my humble opinion a little bit to clean. The chroom part of the gear isn’t really what I expected and as far as I can see there is also no decal on the gear that shows the relation between strut extension and internal pressure. The nose wheel assembly is clean which is quite normal since there is no wheel brake installed.
There’s something I want to highlight and that are the amount of polygons used for the nose wheel. The JARDesign team could have decided to increase the amount of polygons which could gives the wheels a more “round look and feel” then it is right now. As it is modeled, you can clearly see the polygons of the wheels, but when more polygons where used this could lead to less frame rates. In other words, there’s always for every developer a balance in the amount polygons used for objects versus the amount of frame rates the overall aircraft will produce. That said, the JD330 and the JD340-500 are relatively frame rates friendly models keeping in mind the size and the 3D cockpit with complex systems.

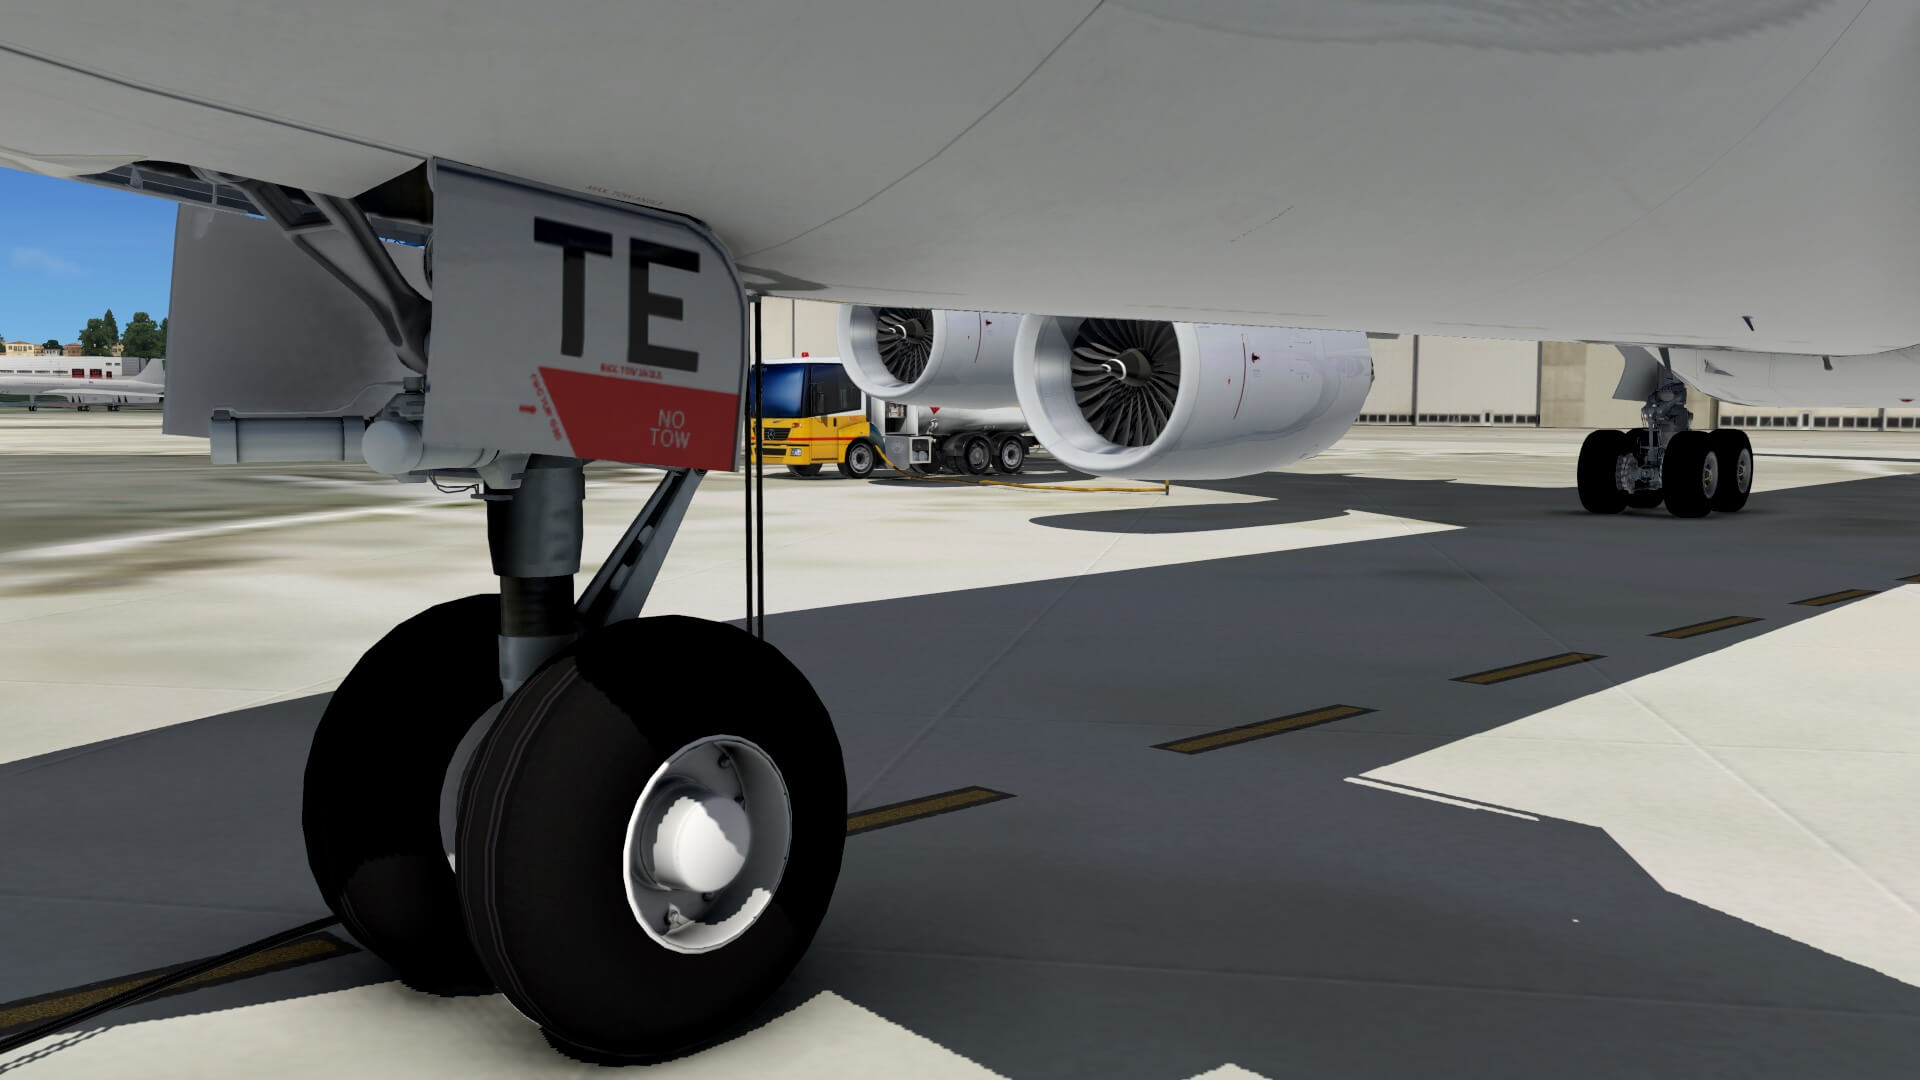

The text related to the NWS (Nose wheel Steering) on the small NLG doors is a bit blurry. I did noticed this on the Airbus House liveries from Homer Jay, but all other liveries provided by JAR don’t have anything on the small landing gear door which should be. I reported this to the JARDesign team and hopefully changes will be made available with future updates.
From the NLG I walk in the direction of the aircraft belly and modelled Rolls Royce Trent engines, but first I pass the static ports. This looks awesome and this is an example where a decal with text is “printed” on the fuselage texture, so actually this is not painted on the texture sheet itself. By using this methode, it’s razor sharp.
The belly panels are screwed to a rib construction and lucky you can see something that looks like screws. Of course, you won’t see razor sharp screws since that’s more or less impossible, but you can see them. I leave the MLG (Main Landing Gear) for later, and while walking to engine number 2 (left-hand inner), I quickly look upwards to the wing skin. The skin looks clean, and as previously mentioned not much weathering can be found. When it’s all brand new with real aircraft, you won’t see any weathering, but even after a couple of flights, you will see dirty spots, in particular around the fuel inspection panels and Aluminium skin plates.


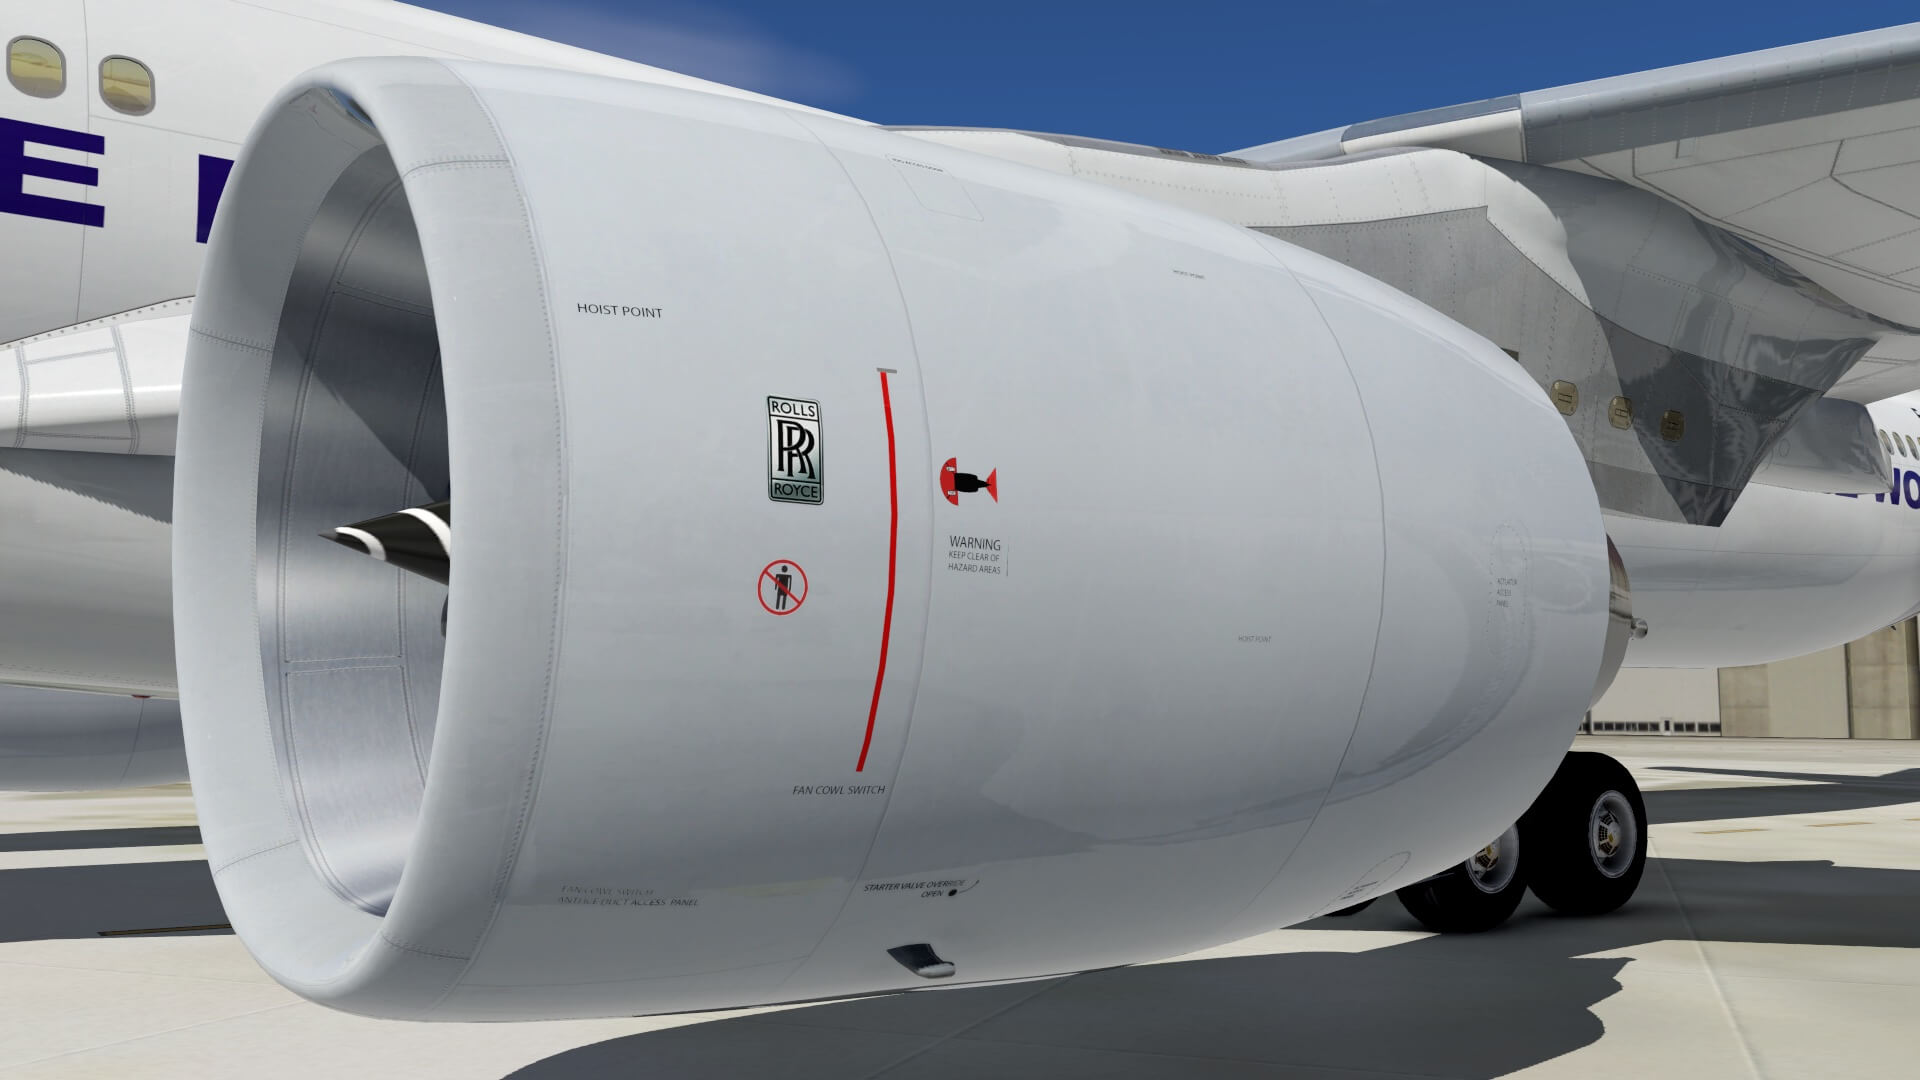
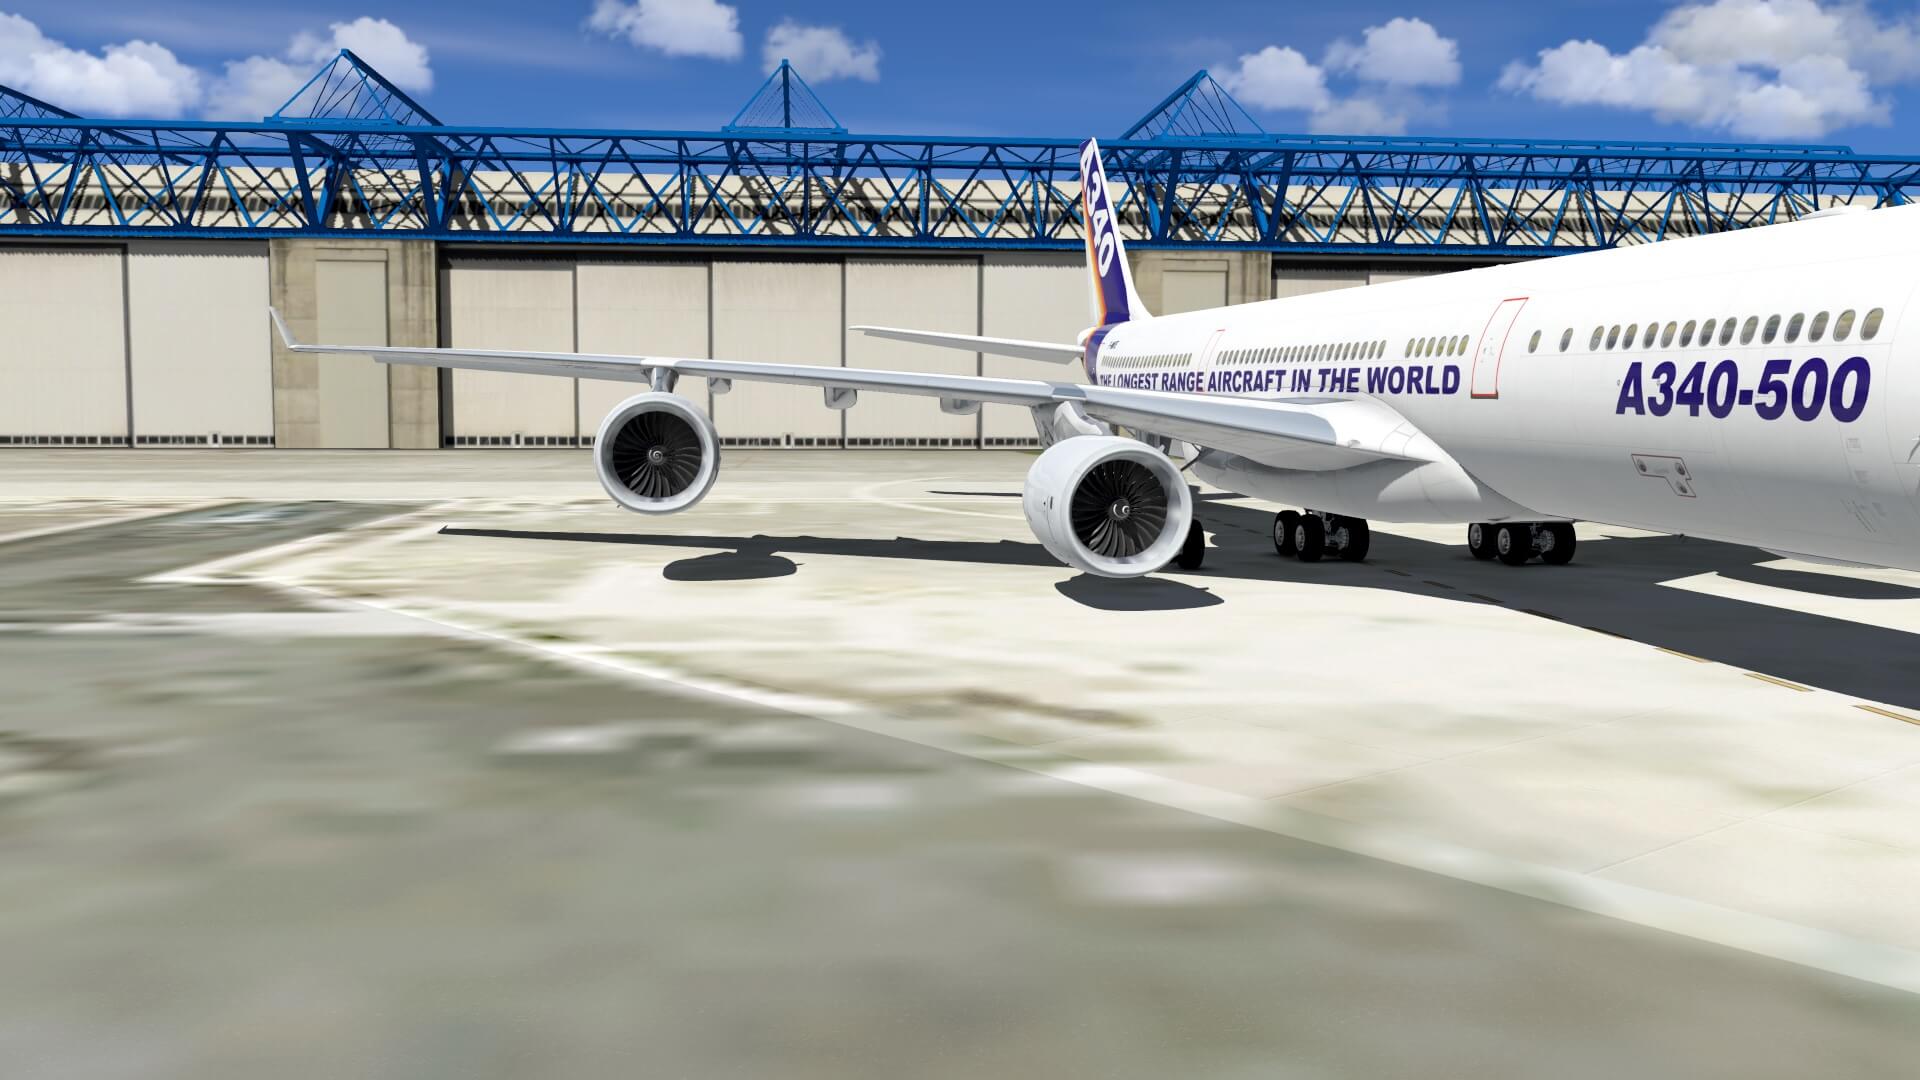
The Rolls Royce Trent engines are well modelled with in the engine nose cowl inlet, the sound reduction mess. Since each engine has a lot of decals/stickers/text on it, this is done in the same way as I previously explained around the static ports. This is so great to see, so sharp and accurate. The inlet with fan blades and spinner are so nice to see, so real!
The turbine section of the engine is clean, but it looks like that the texture of the turbine is a bit blurry. Further on, the turbine construction is as expected and looks like as a brand new engine as well as is the tail cone. Clearly visible is the open end of the engine tail cone. This is, same as for other hi-bypass engines like the large Rolls Royce Trents 900 Series, PW Engine Alliance GP7000, GE90, GE9X, but also the smaller CFM engines connected to the internal shaft ventilation of the engine. The inspection panels at the engine cowling are well crafted and completed with decals whenever applicable and screws. The engine pylons do come with on the texture sheet lots of screws which is correct and makes it complete, but hardly any sign of weathering.


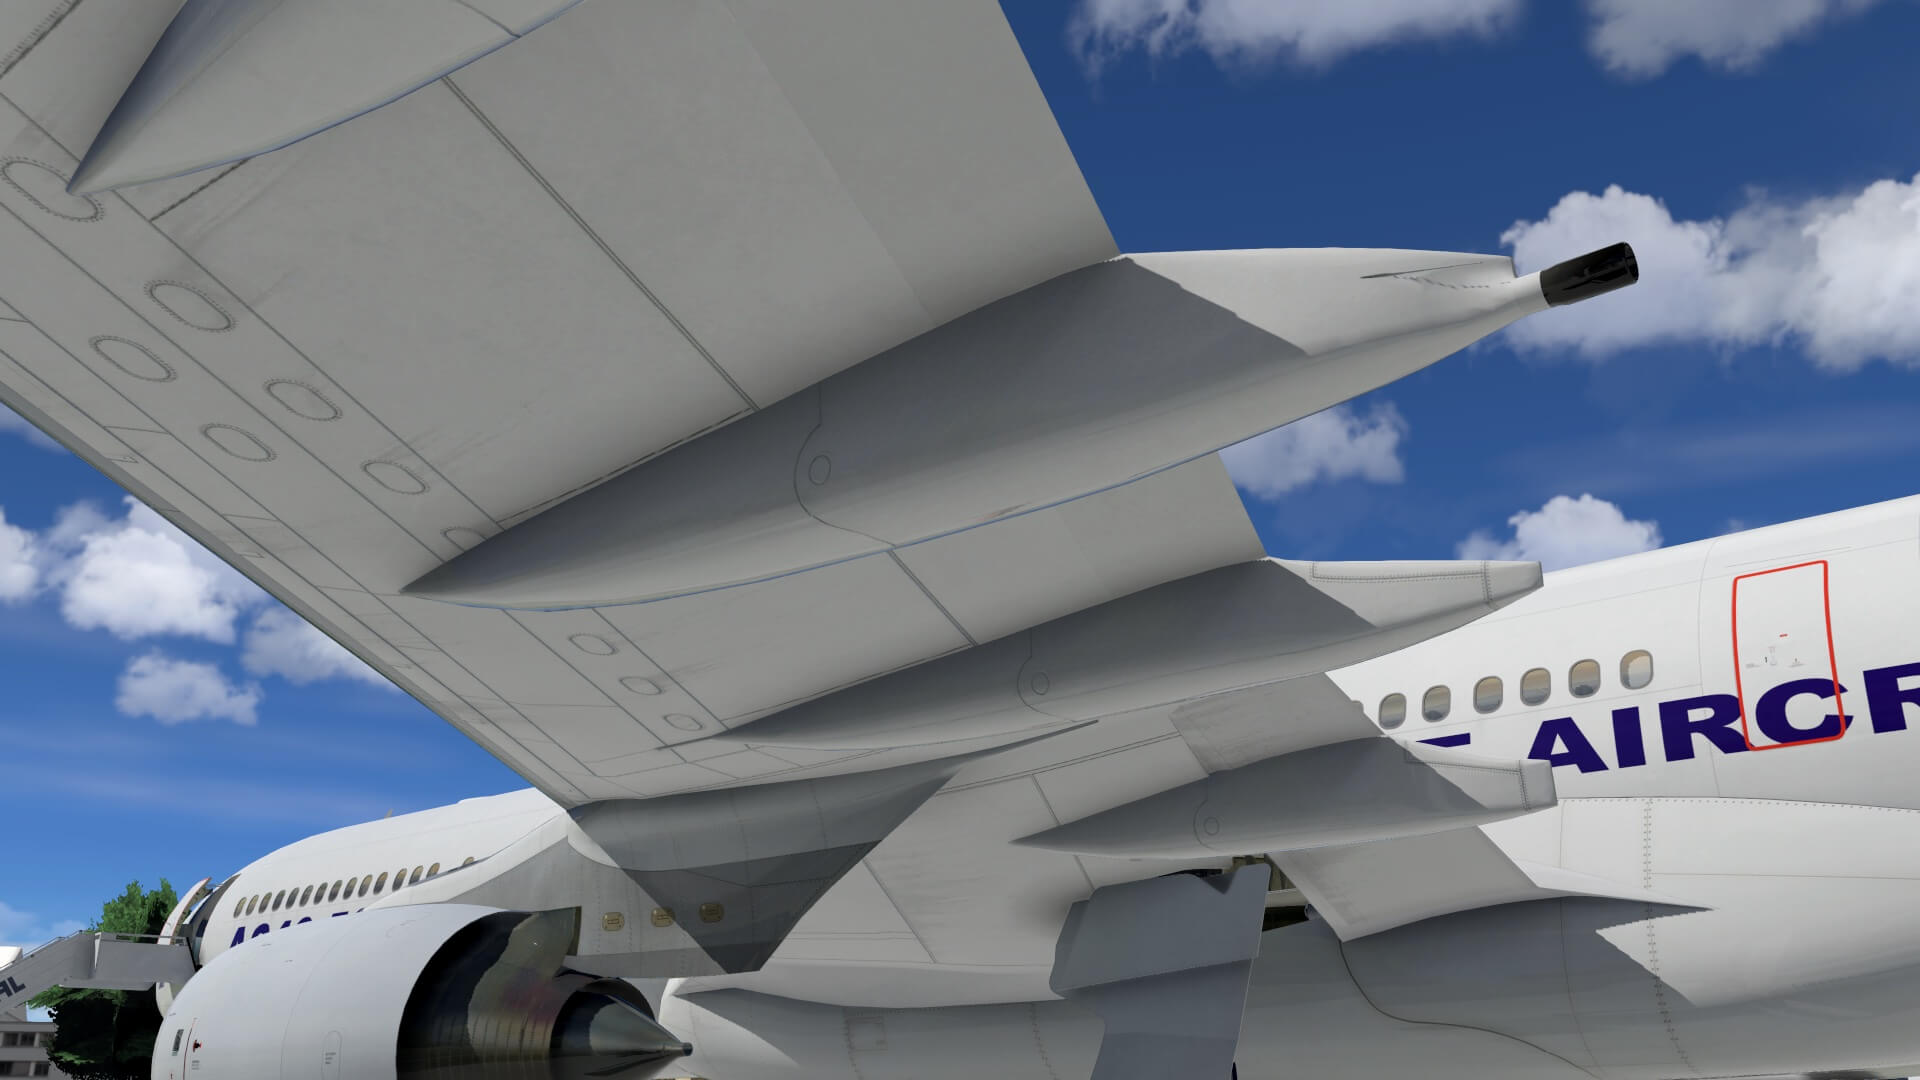
While walking to the wing tip, I look up to the wing, the leading edge and tip construction with navigation and strobe light units. At the bottom of the wing I can clearly spot the fuel access panels, the rivets, the flap, the aileron construction and the fuel dump exhaust. With the current version I see several static dischargers at the wingtip, but on the rear of the flap fairings I miss them. Reported this back to the JARDesign team and action will be taken to add them.
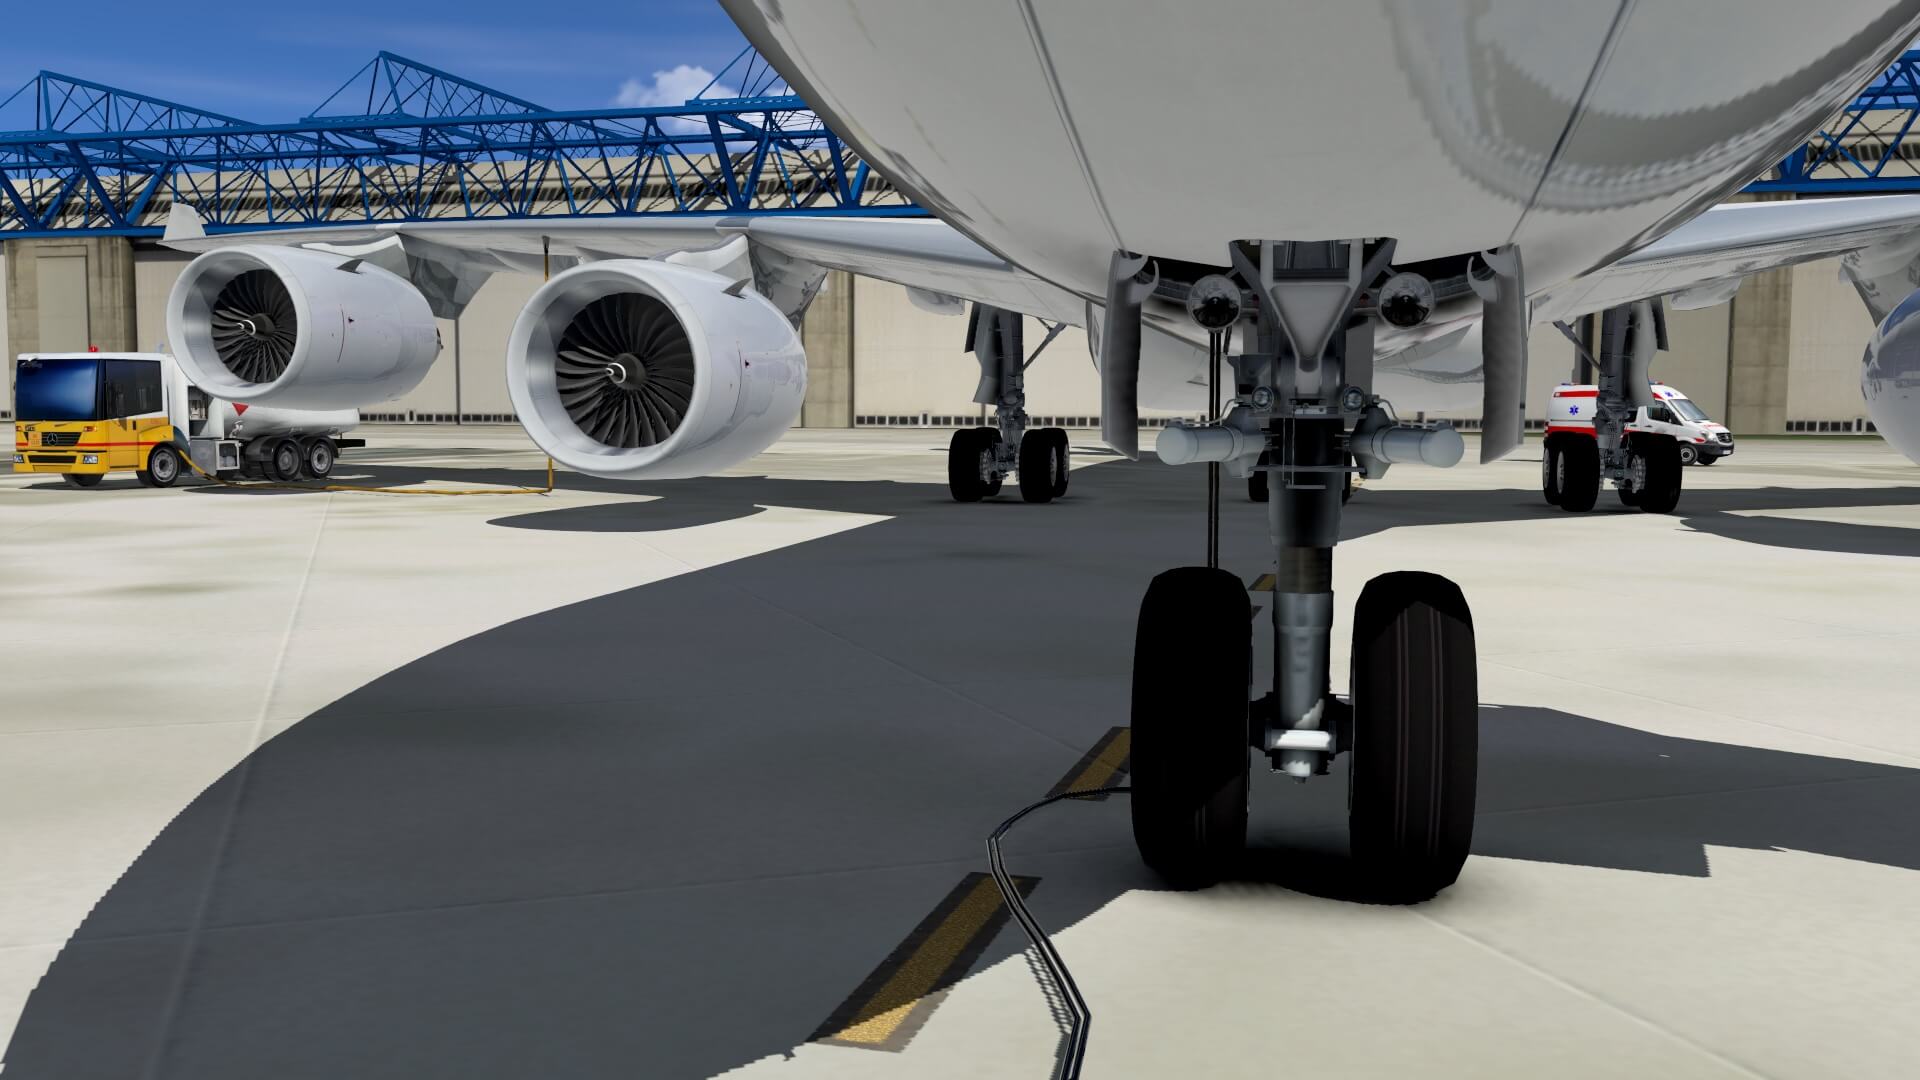
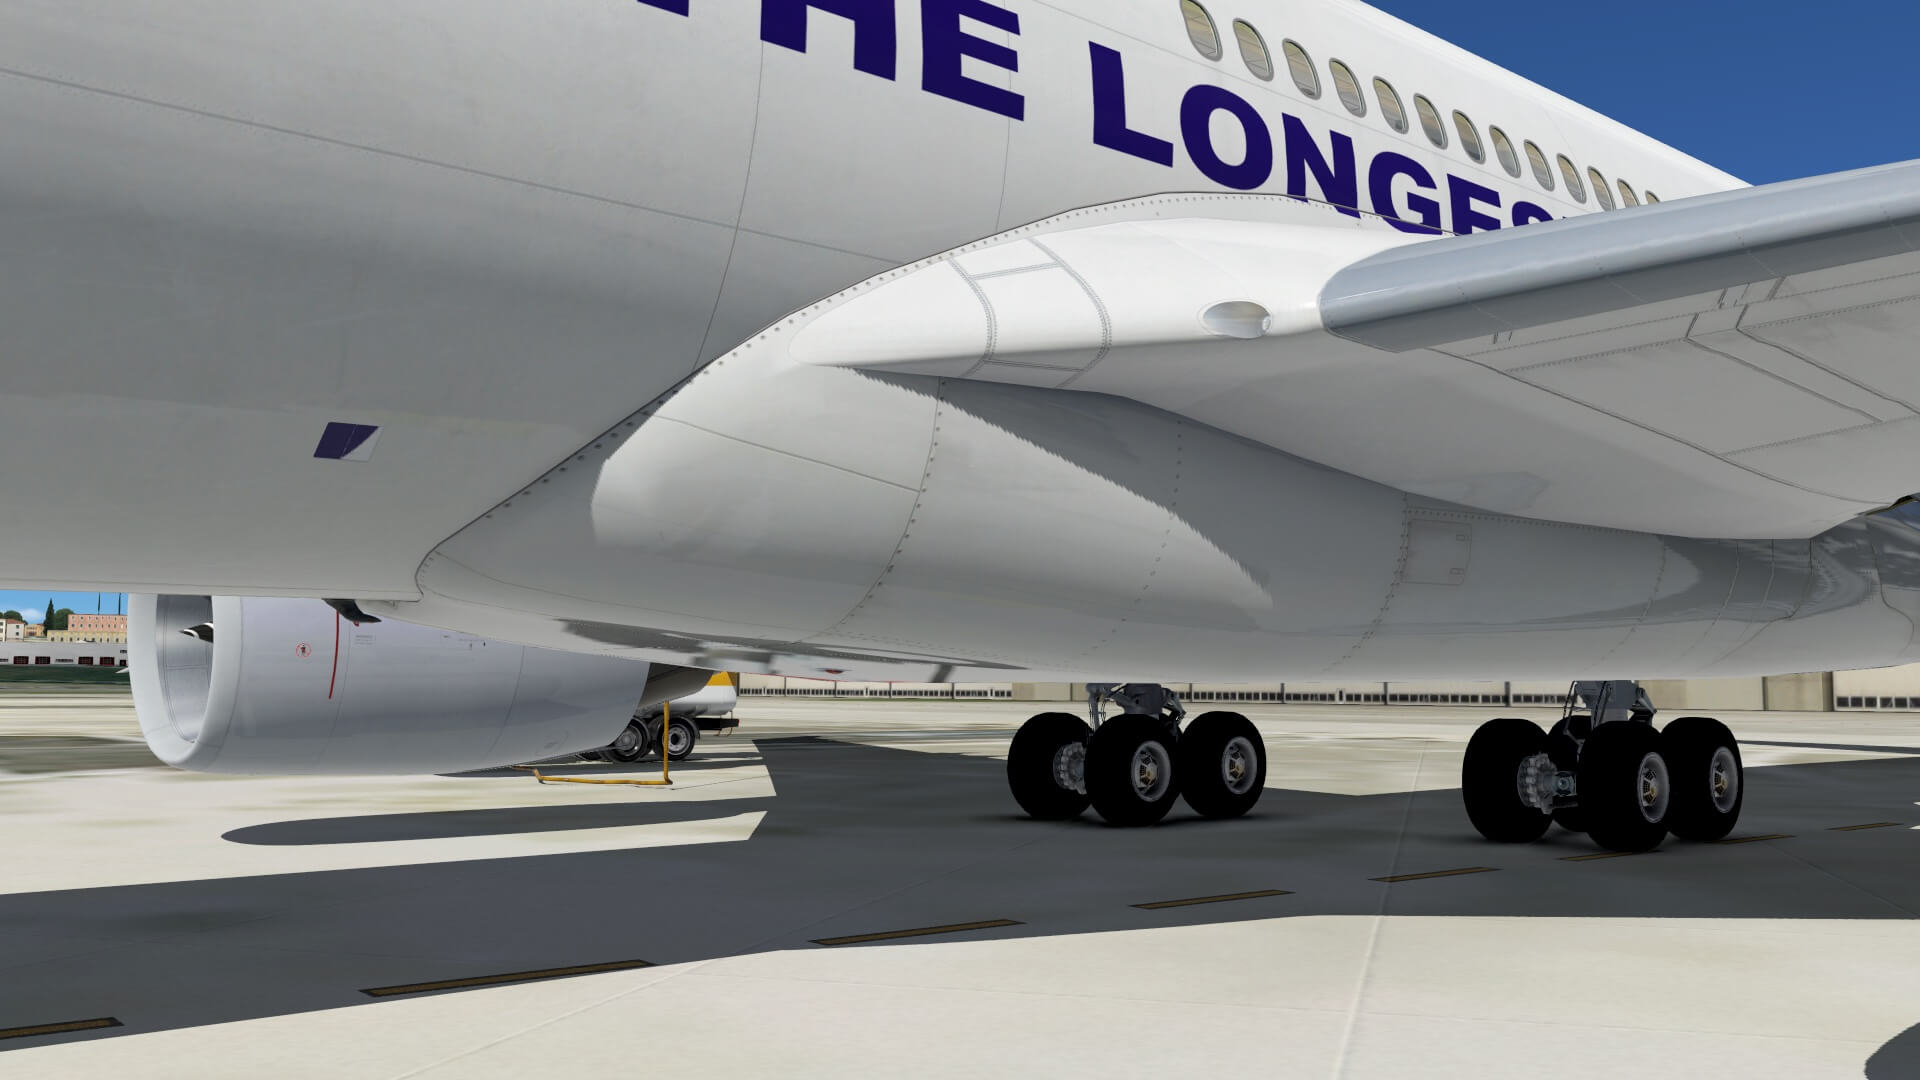
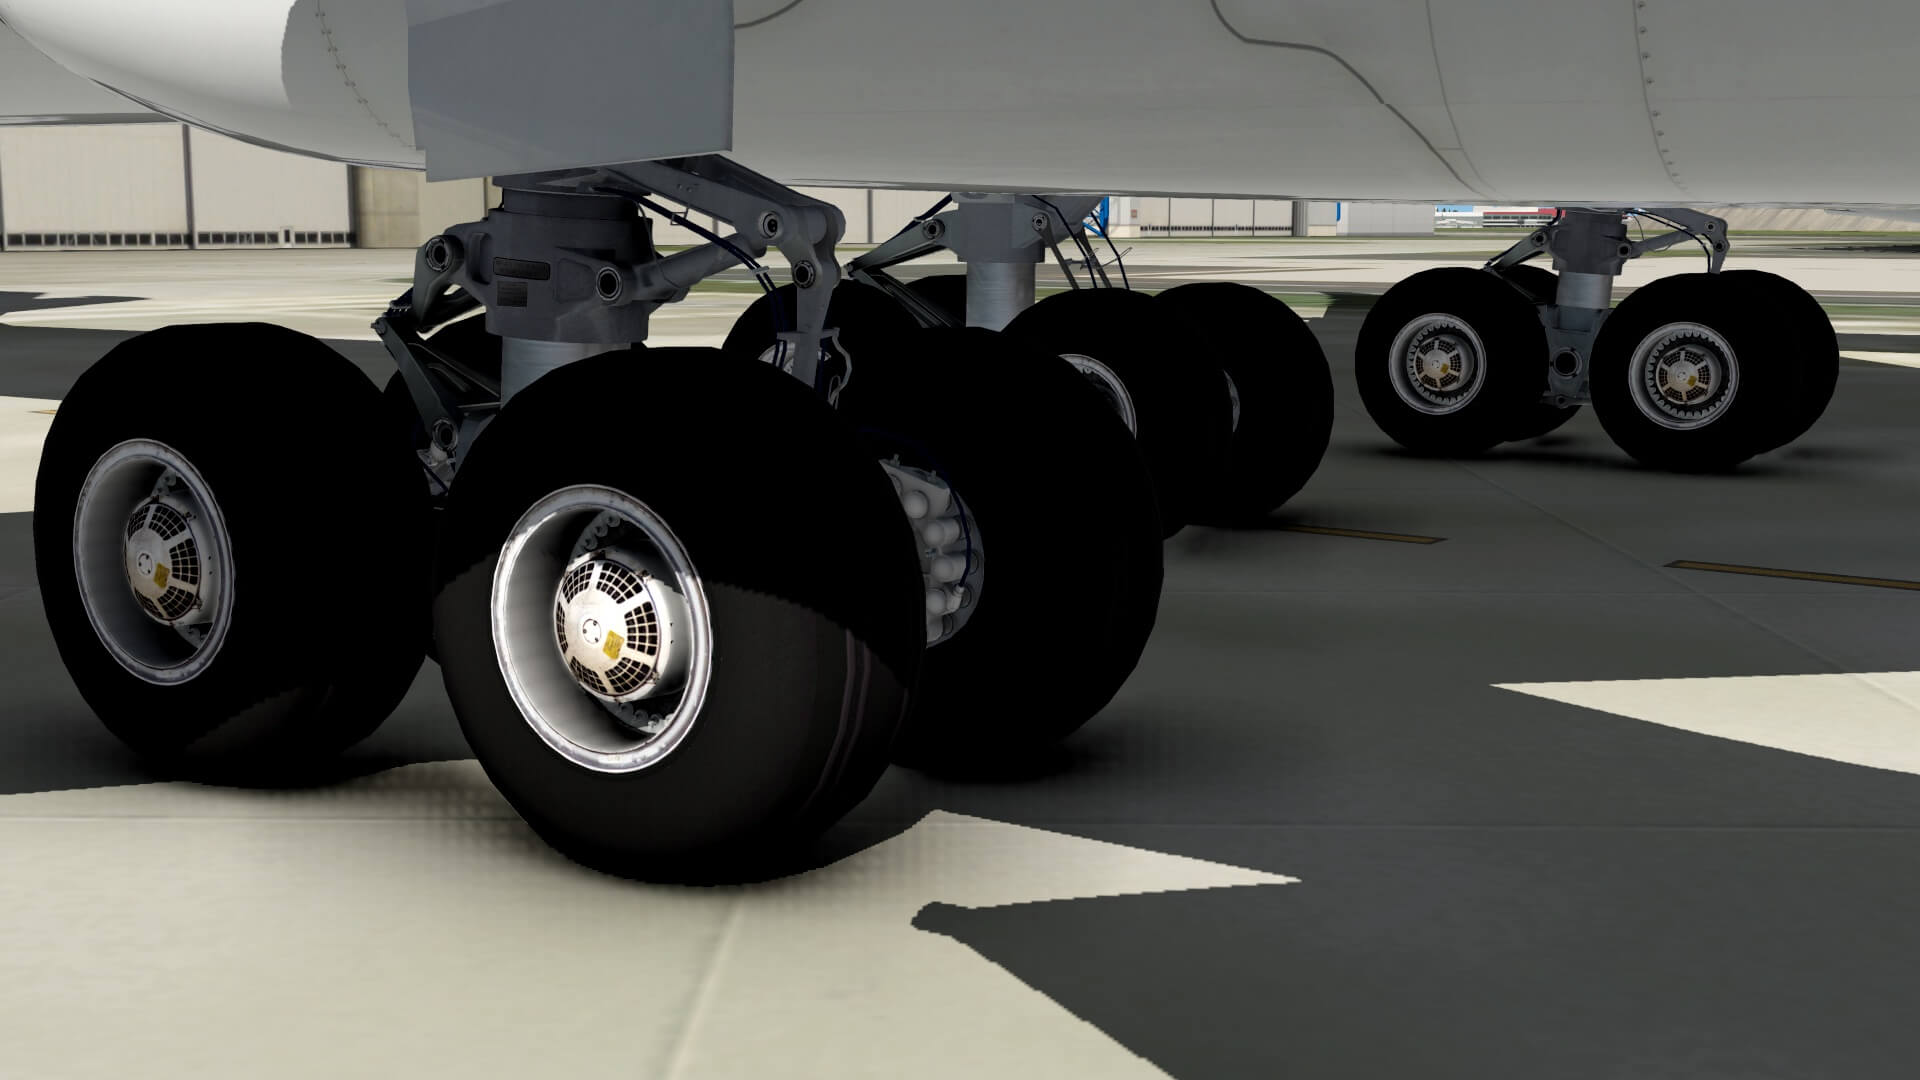
With a high stair placed in position I can quickly check the upper wing structure too and that looks OK to me. I see some weathering near the root of the wing. And then, moving back to the fuselage belly I can’t miss the modeled MLG and CLG (Center Landing Gear). The A340-500 and -600 are equipped with a center gear. The reason for the additional landing gear is that it gives the A340 a higher maximum take-off weight. The additional wheel helps the aircraft to support more weight, as well as spreading it out over more points of contact with the ground.


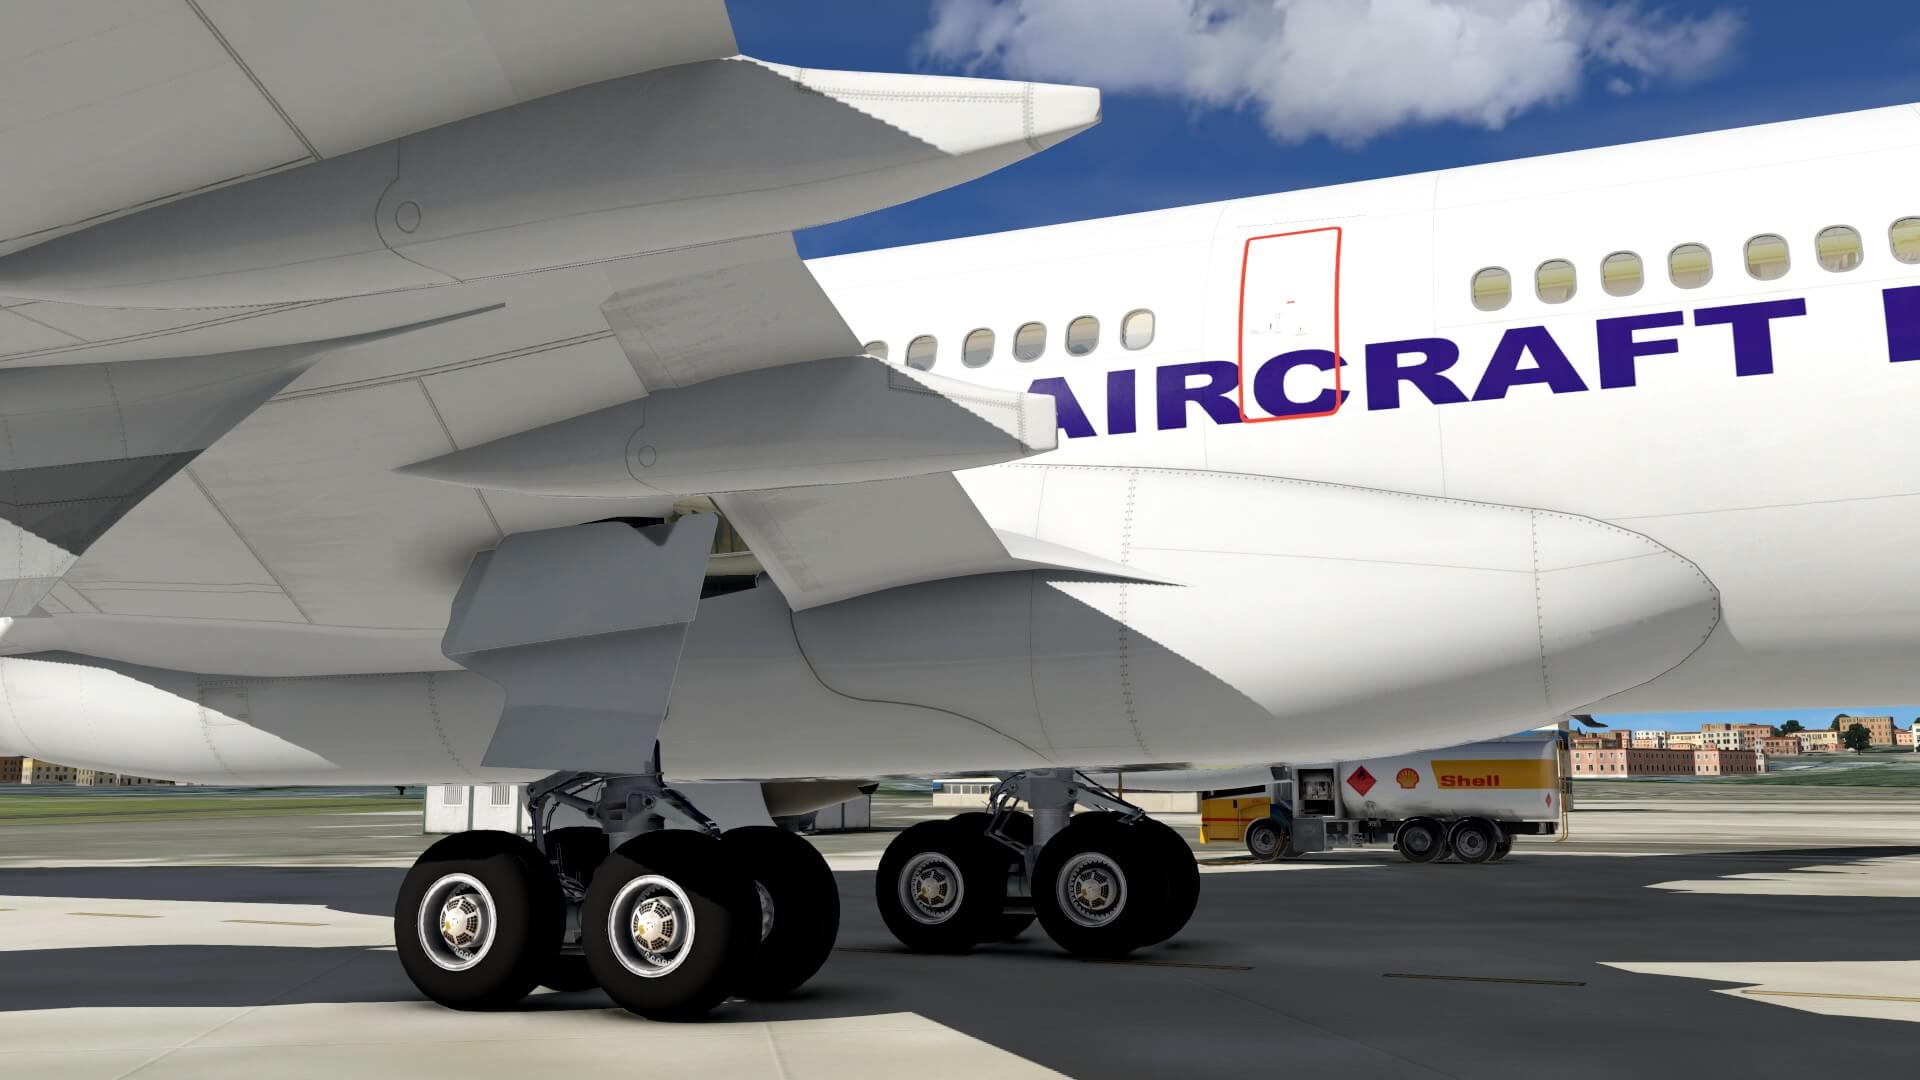


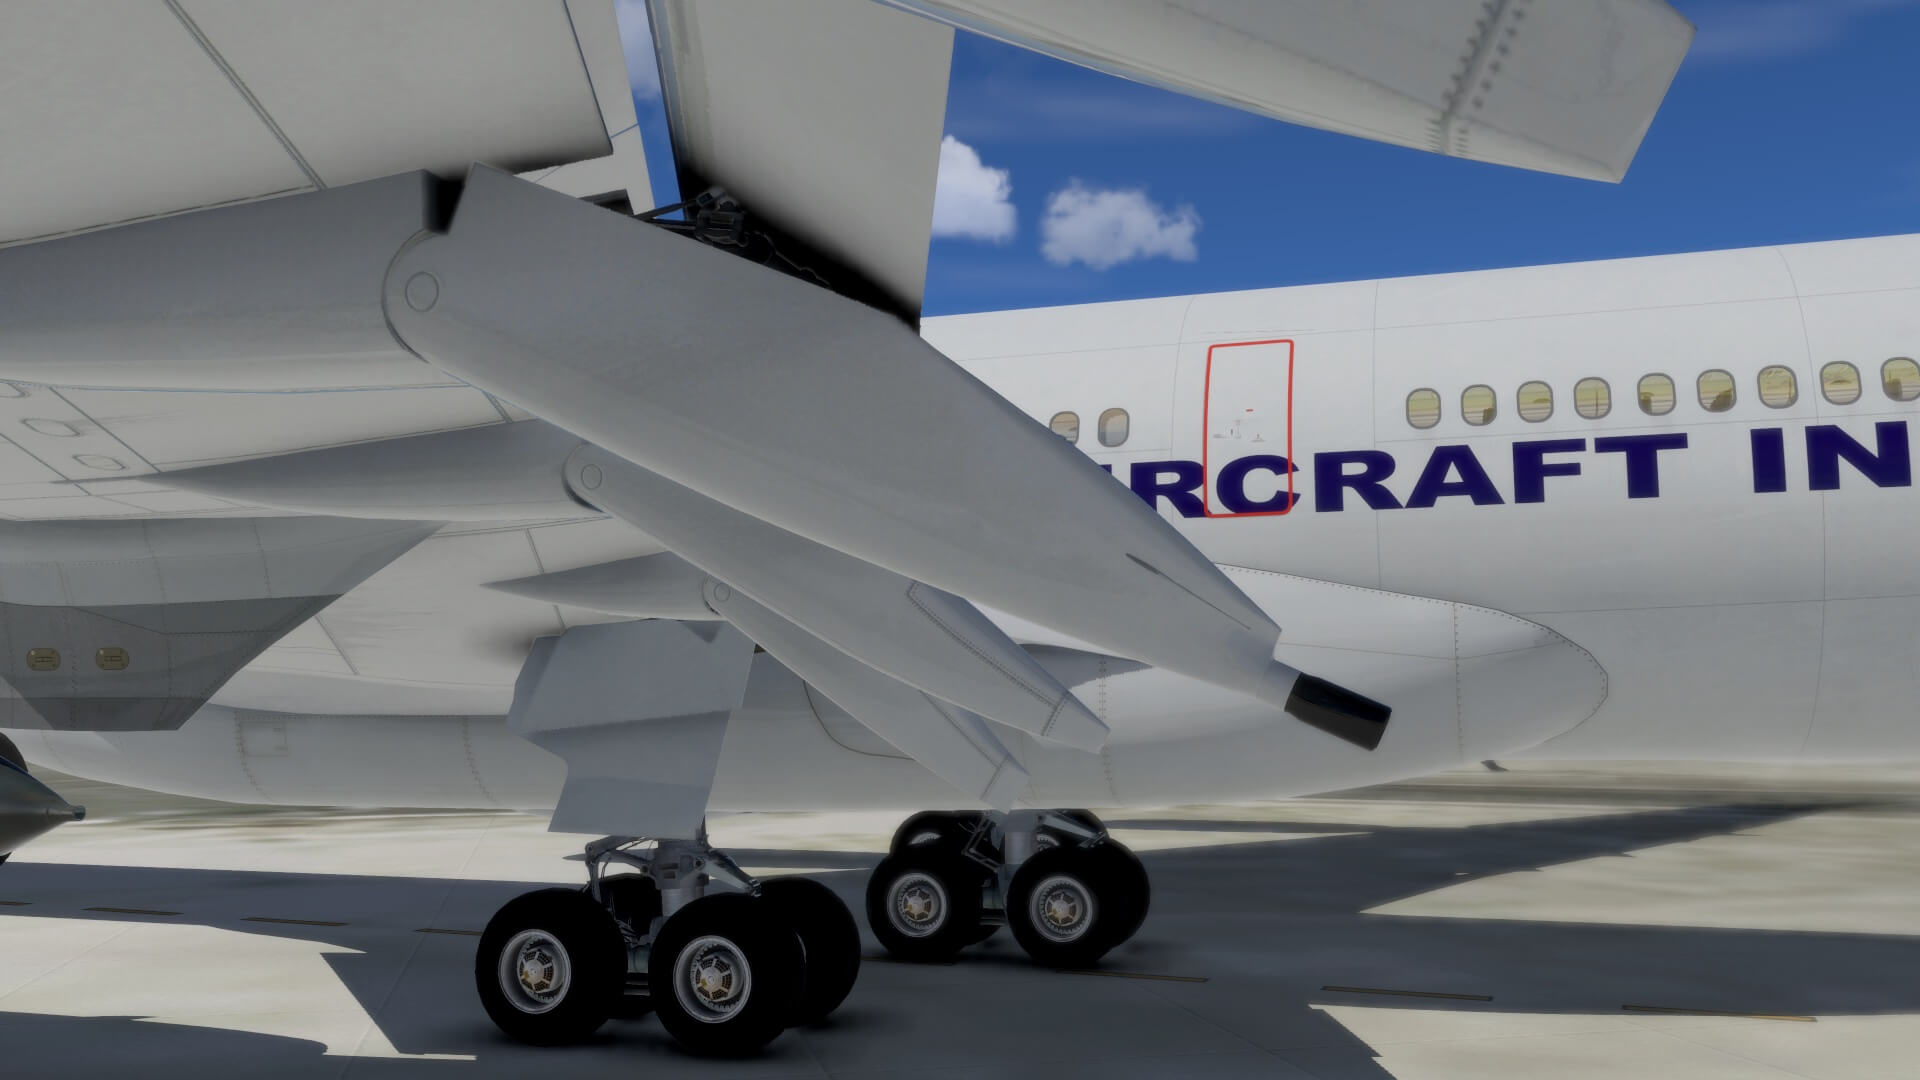
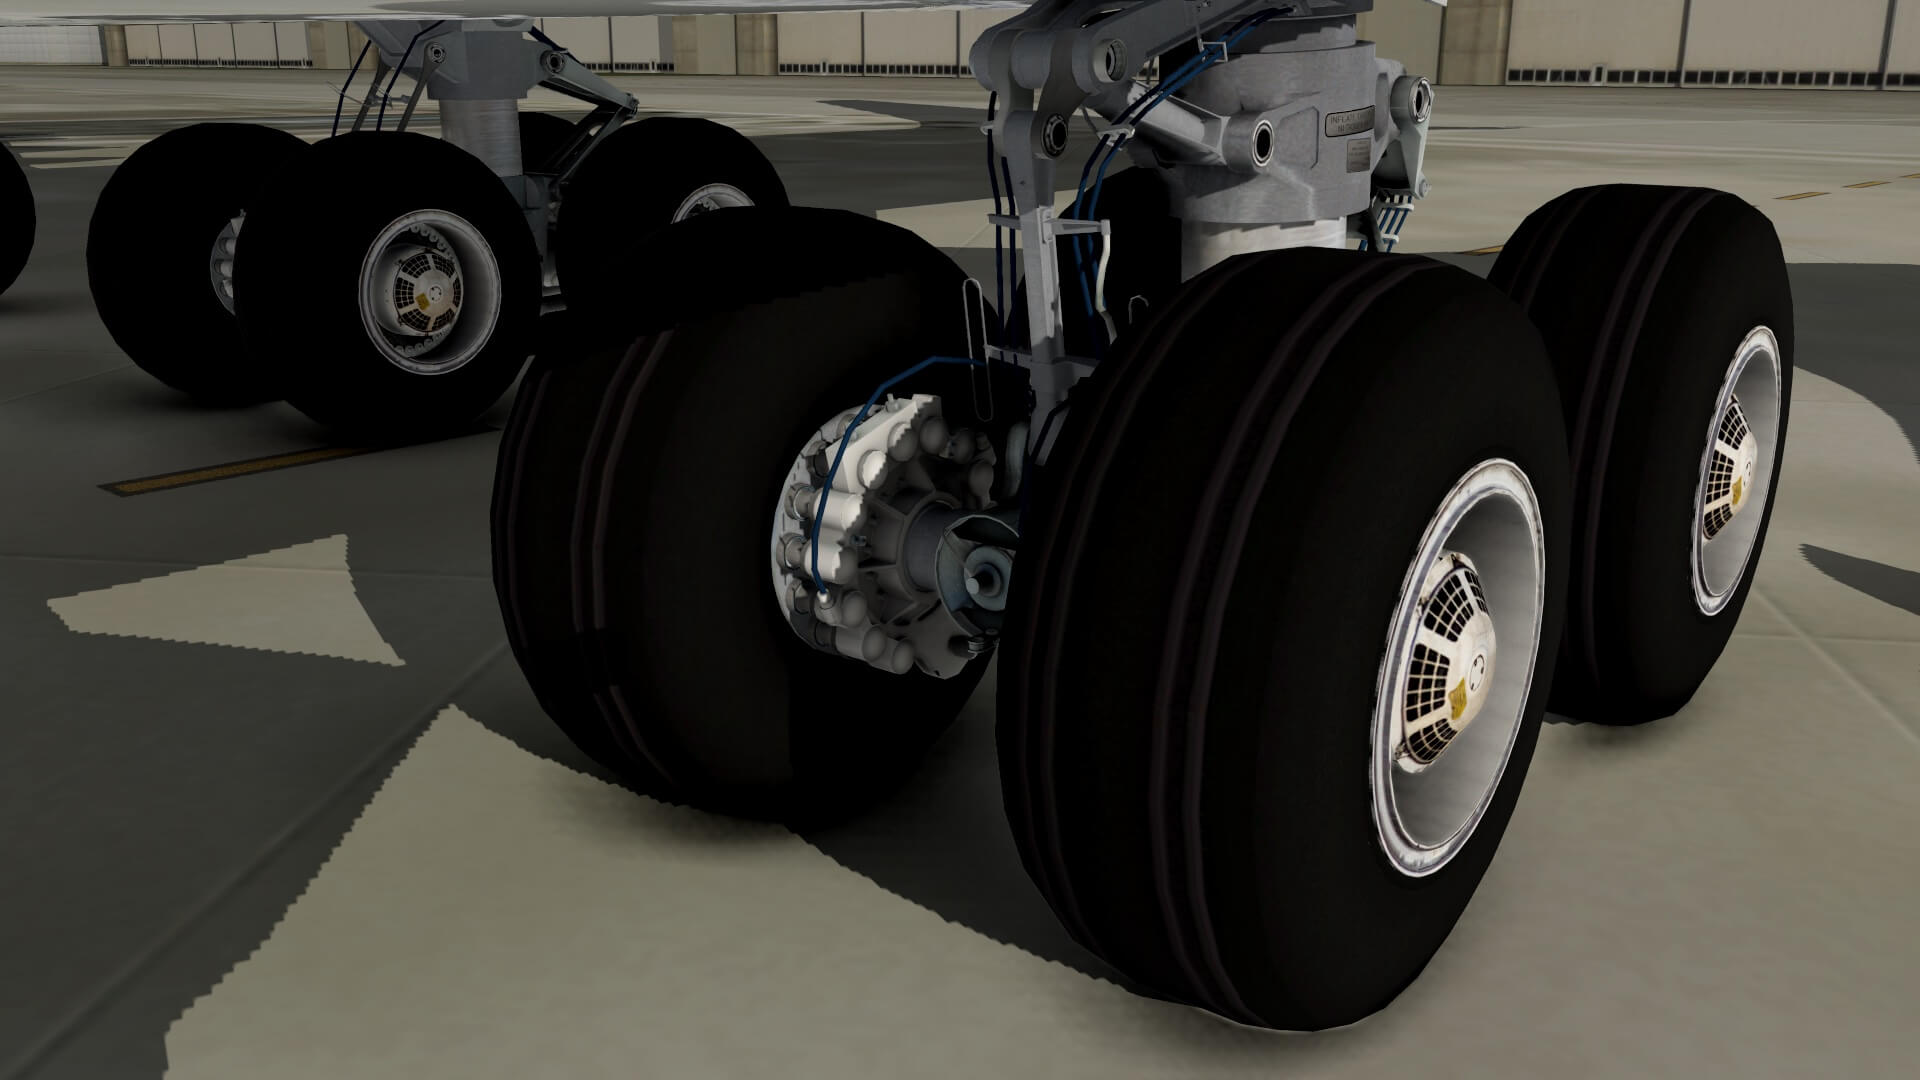
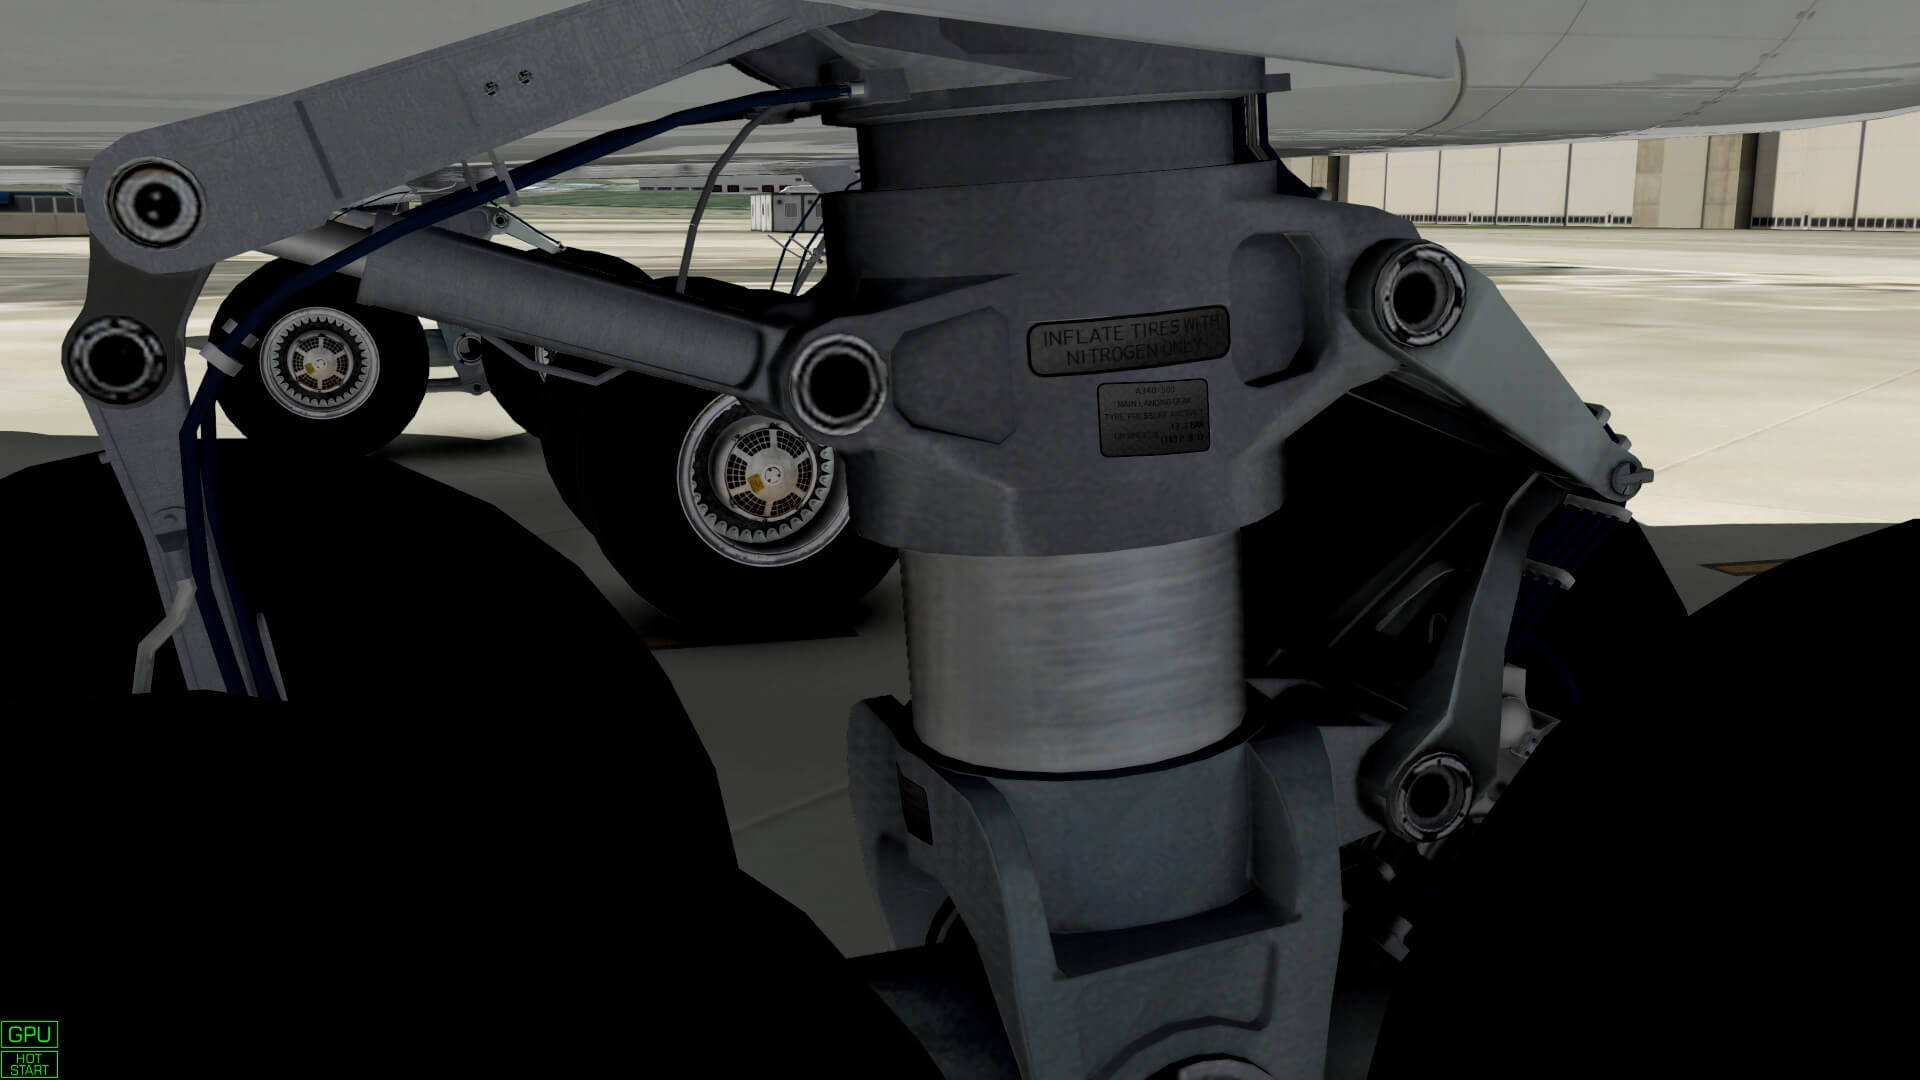
The MLG and CLG are modeled with eye for the tiny details, and the gear construction is a bit dirty or weathered. The only thing that is a bit weird is the chrome part of the inner landing gear strut. This steel part is in real highly polished so a bit glossy and that’s something I miss on all these landing struts. The wheel assy is perfect and yes, JARDesign could have used more polygons for the wheels to give them an even rounder look, but the more polygons are used, the less FPS can be expected. The MLG strut have some decals on the strut but not sure if there’s also the pressure graph versus strut extension.
Back to the wheels; the wheel rim is a bit dirty and weathered. On the other hand, a bit more dirt, or grease on for example the carbon brake units would give it a bit more realistic look. The brakes are now clean which is not really realistic unless the brakes are brand new. Regarding the above items to add a bit more dirt or weathering on the gears and main wheels, this has been suggested to the JARDesign team.


The tail of this JD340-500 Airliner isn’t unique in a way that the fuselage is the basic fuselage design of the previous A300B, A310, A300-600, A330 except then of course for the cockpit layout. The same for the tail. The tail construction except for the THS (Trimmable Horizontal Stabiler) and vertical fin are different then the older A310 and A300-600. The first thing I noticed was that there’s no longer a stainless steel plate between the THS root and fuselage tail. After checking real photos I can confirm that the older A340-200 / -300 models did had this plate, but all newer A340 models don’t have this anymore as well as that there are no longer THS indication marks on the fuselage.
The tail itself is well done and wherever applicable, rivets are included on the texture sheets. Personally I expected to see a bit more weathering on the THS and vertical fin to add some realism. Although the modeling is OK, it feels some real look and feel is missing. The same, but I was wrong again, are the leading edges of the THS and vertical fin. I thought these where polished, but no, many photos and YouTube movies confirmed that this isn’t the case anymore. Mounted in the rear of the fuselage tail cone are, same as with A330, and older A340 models, the white navigation light and strobe light.


Via the right-hand fuselage side I walk back, but before moving to the wingtip, I open the AFT cargo- and BULK doors. There’s no text/decal on the external of the BULK cargo door handle that explains me how to open/close the door. Not really an issue, but on every other cargo door there’s a decal, so not sure why it’s not on this BULK door. This is also reported back to the JARDesign team so I’m confident that this will be added with a future update. With the cargo doors opened the interior is basic. No more details then actually needed, but what said before, the reason that JAR didn’t model the cargo areas in detail is to reduce frame rates. And you can ask yourself, it a 100 percent accurate cargo hold worth all the drawing and 3D investment. The answer is simple, no need to do that!
While walking further forward, ands mentioned before on the left-hand side, I see that static dischargers are missing at each end of the flap fairings, but perhaps at other places like the ailerons, elevators and rudder. If this is done on purpose to reduce the amount of polygons or that it’s forgotten, I don’t know. Anyway, I did inform the JARDesign team.


With the FWD cargo door opened, you’ll see a basic interior, the same as with the AFT cargo compartment. While my walk around inspection may be more or less finished, I want to highlight one thing and that are the screws around the front cockpit windshield panels. With package version 1.2 it seems to me that rivets are used for the strips holding the front windshield panels in position however, in real these are screws and in less quantity. For this I’ll also inform JAR and leave it up to them if they change these dots by screws on the texture sheet. Work in progress.


A lot of time and effort is put in the modeled JD340-500 Airliner with the result a great looking A340-500 with eye for tiny details although for a couple of things I’d seen that aren’t correct or missing, I know out of experience that the JARDesign team can and will adjust these issues and update them with the release of a new package.
Time to check out the modeled 3D cockpit, but first the cabin.
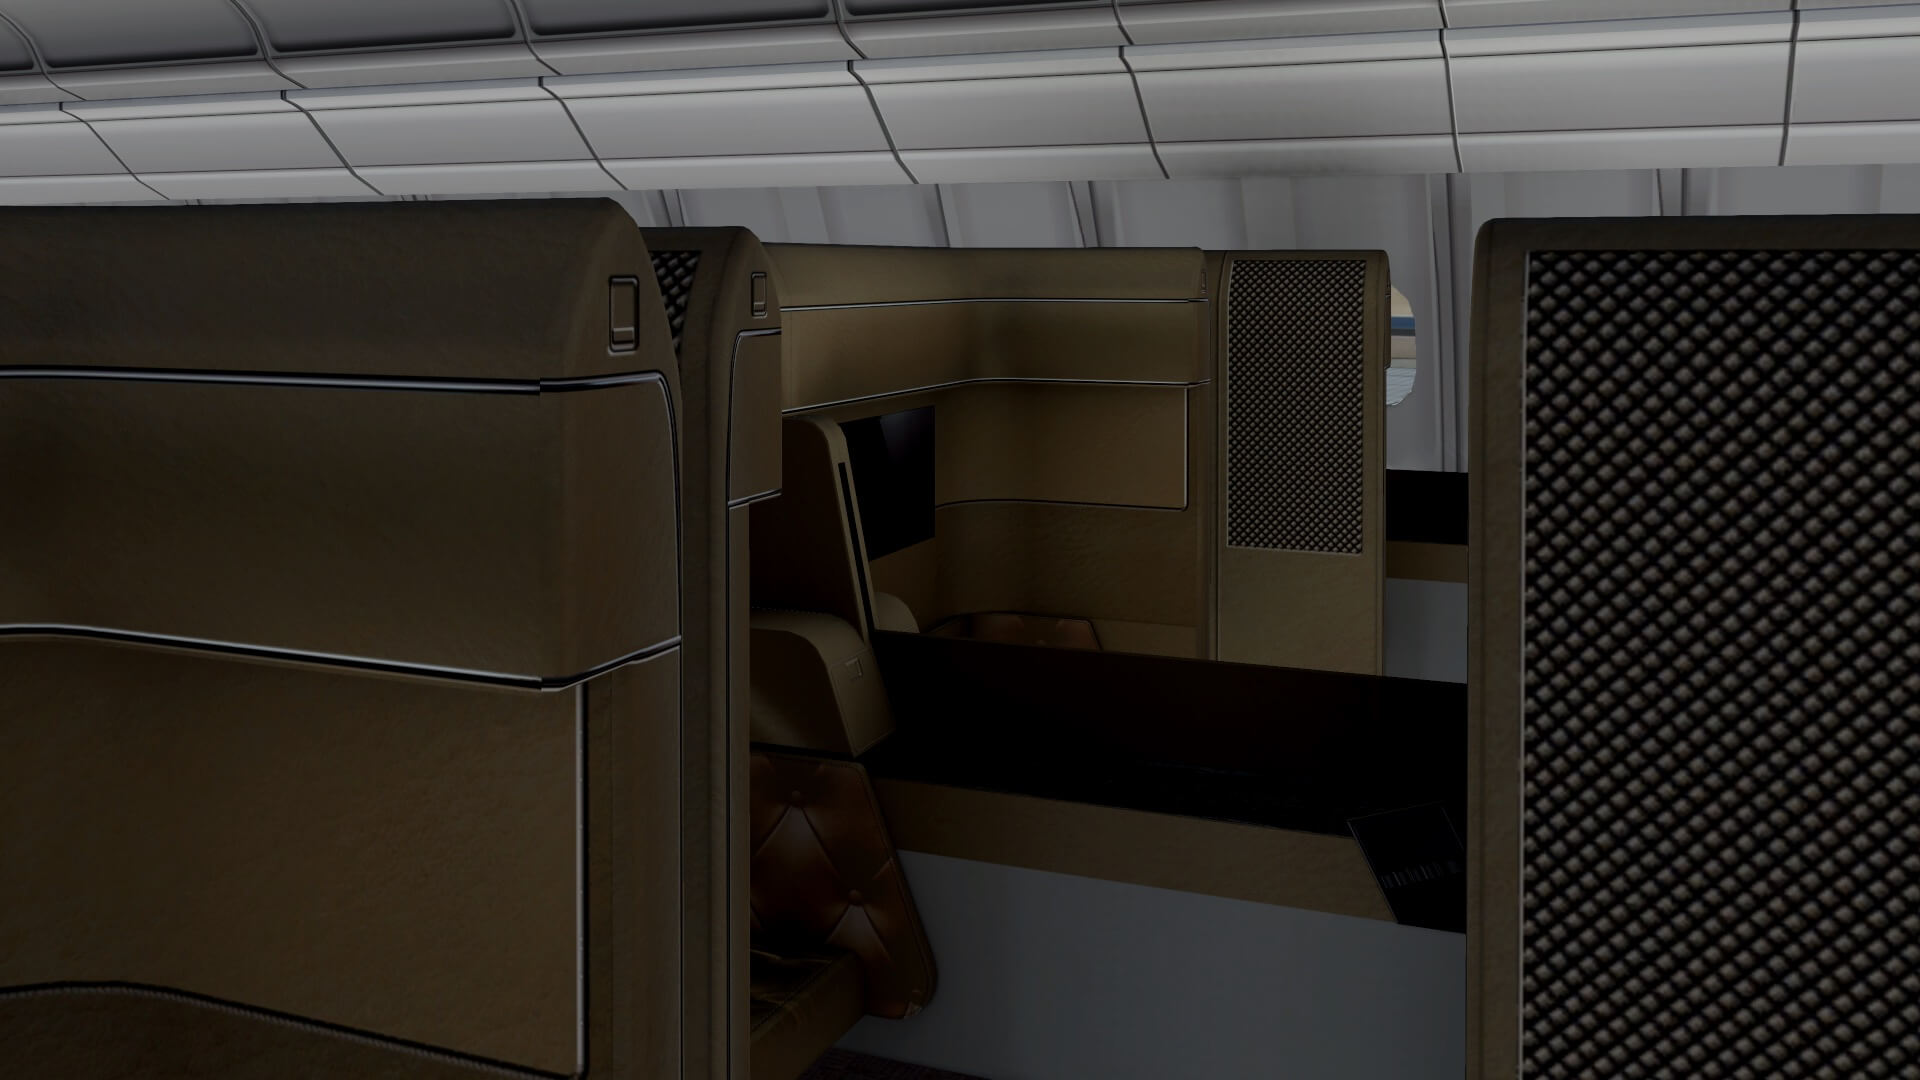
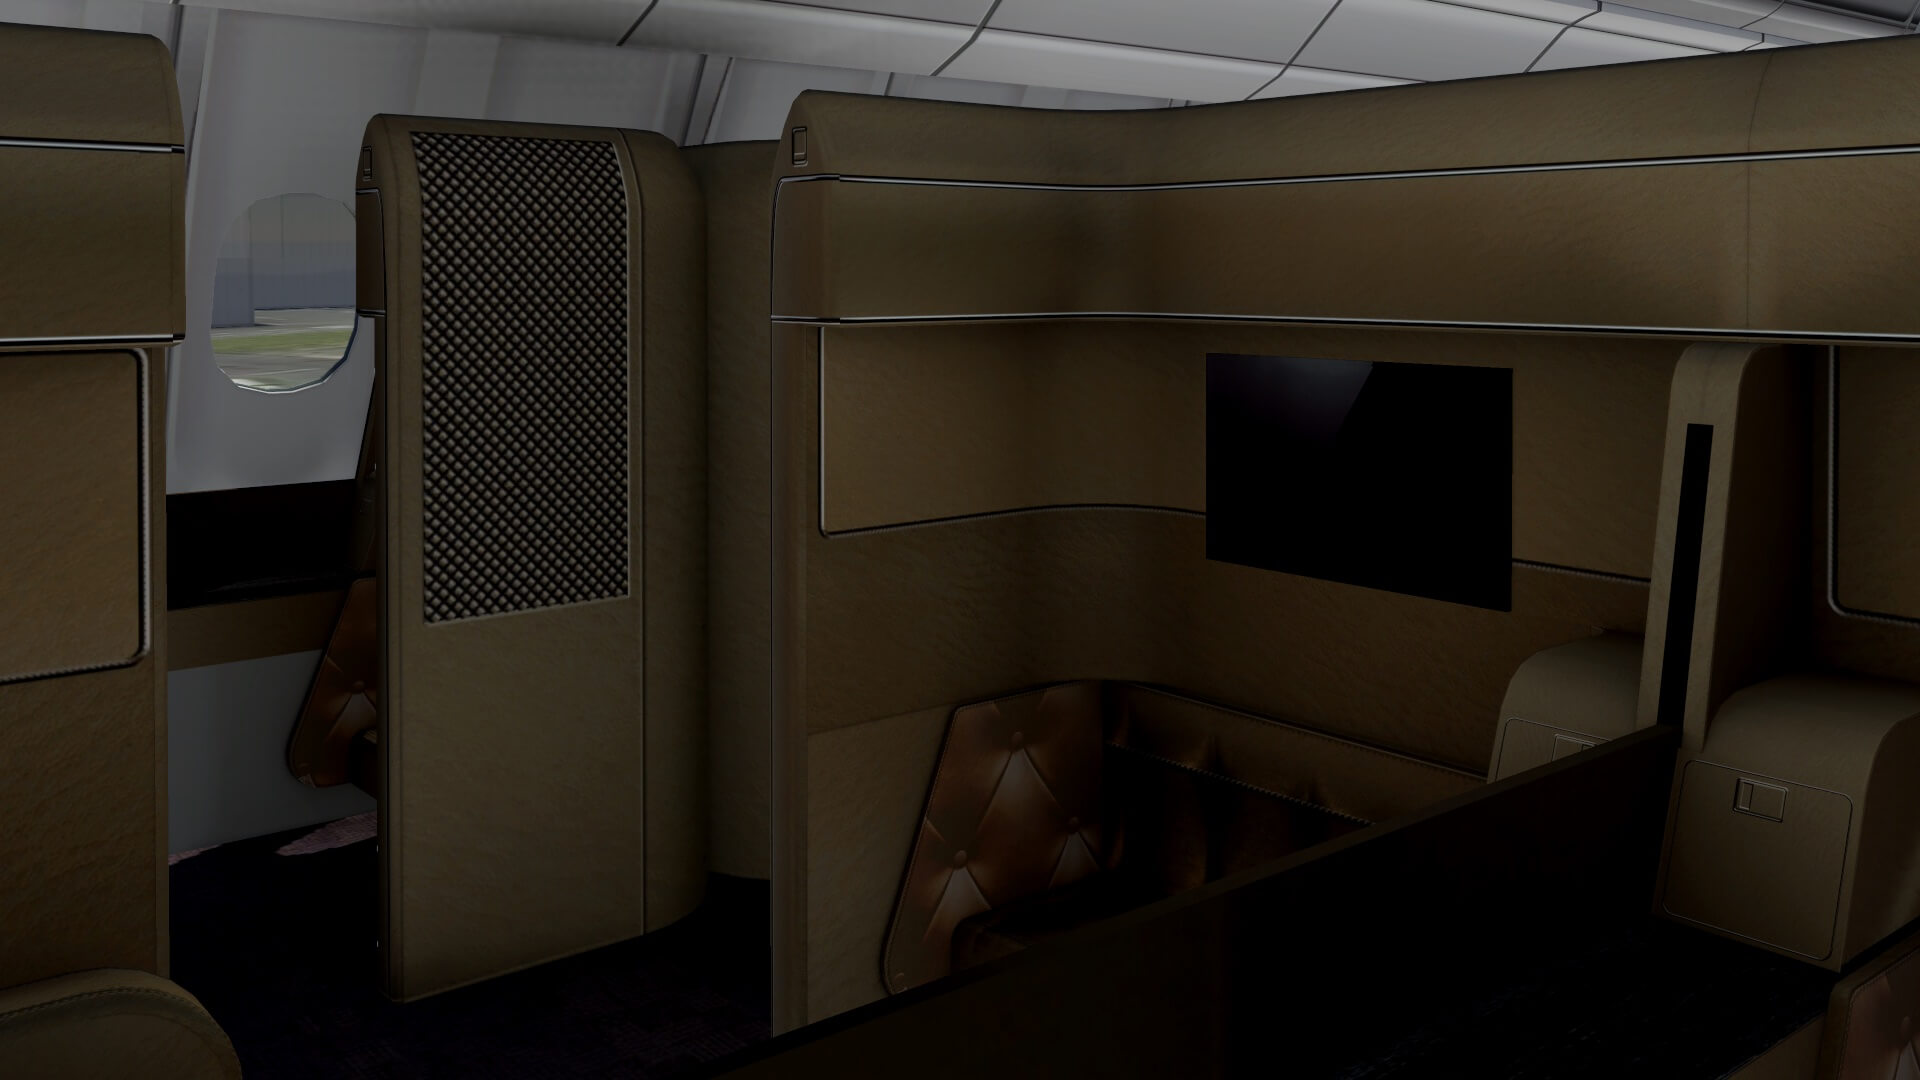
Modeled Virtual Cabin
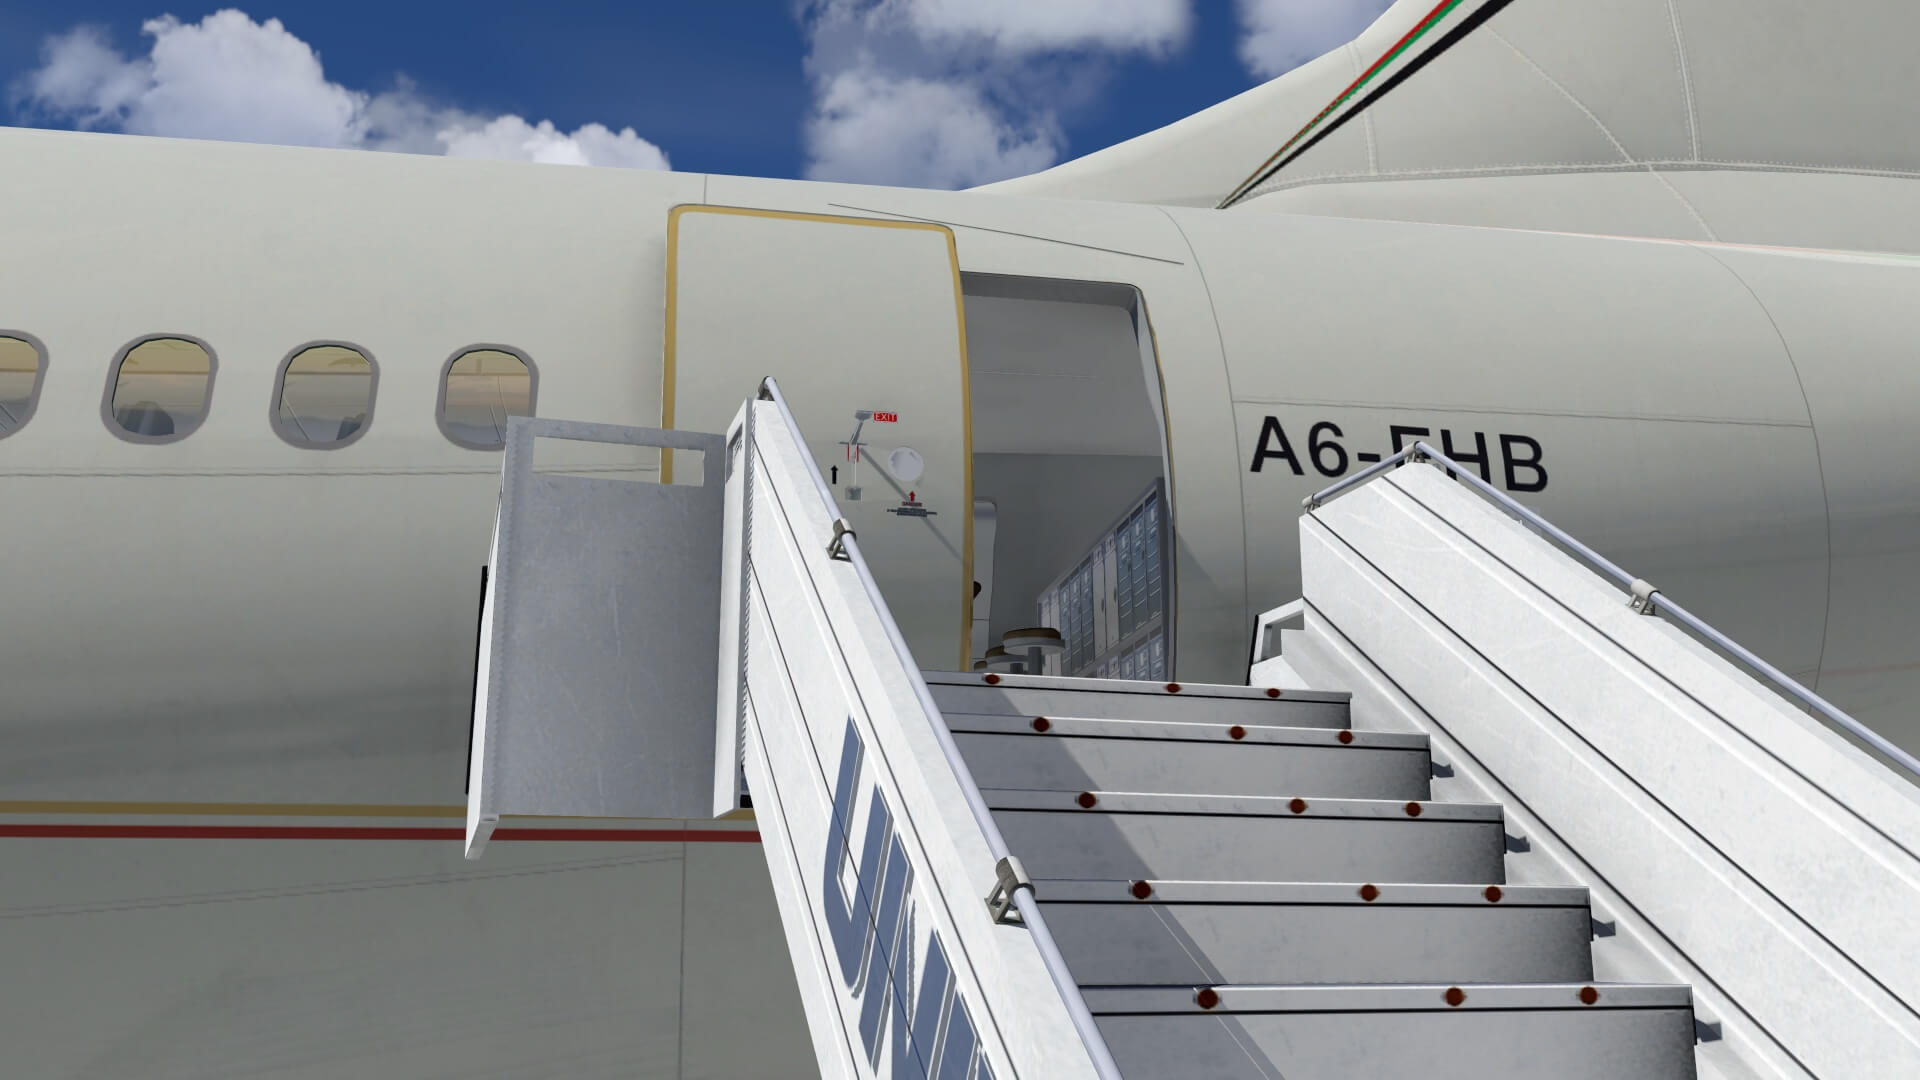
With the MCDU MENU page in front of you, select LSK (Line Select Key) 3L DOORS, then LSK 3L LEFT BWD. This actions opens the left-hand AFT door with a gently speed. To add a stair to this door, you select on the MCDU MENU button, then LSK 2L GROUND HANDLING, followed by LSK 4L STAIR BWD and a stair is added to the opened door.
Together with the selection of the stair you also get a passenger transport bus as well as an ambulance. I would prefer that you where able to select via the same ground equipment MENU only buses and/or and ambulance. As it is now, these additional objects are added when you select a stair while I prefer it in a different way.
The first thing I noticed at the entrance of the fuselage is the limited amount of inner passenger door lining, the simplified slide cover, the missing door handle with decals, no missing EMER handle and a couple of other decals. That said, you ask yourself if a highly detailed virtual inner cabin door lining is needed. Remember, we’re sim pilots and not sim passengers which means, at least for me, we’re sitting in the 3D cockpit and do perhaps our inspection at turnarounds, but we’re not often sitting in the cabin.

So indeed, you can ask yourself if a detailed virtual cabin with accurate door lining and handle is needed. Remember what I mentioned before, the more polygons for all tiny things, the more it can reduce your frame rates. The balance between what is needed, what is important, what is fun to see and so on, is up to the developer and of course, also up to you.

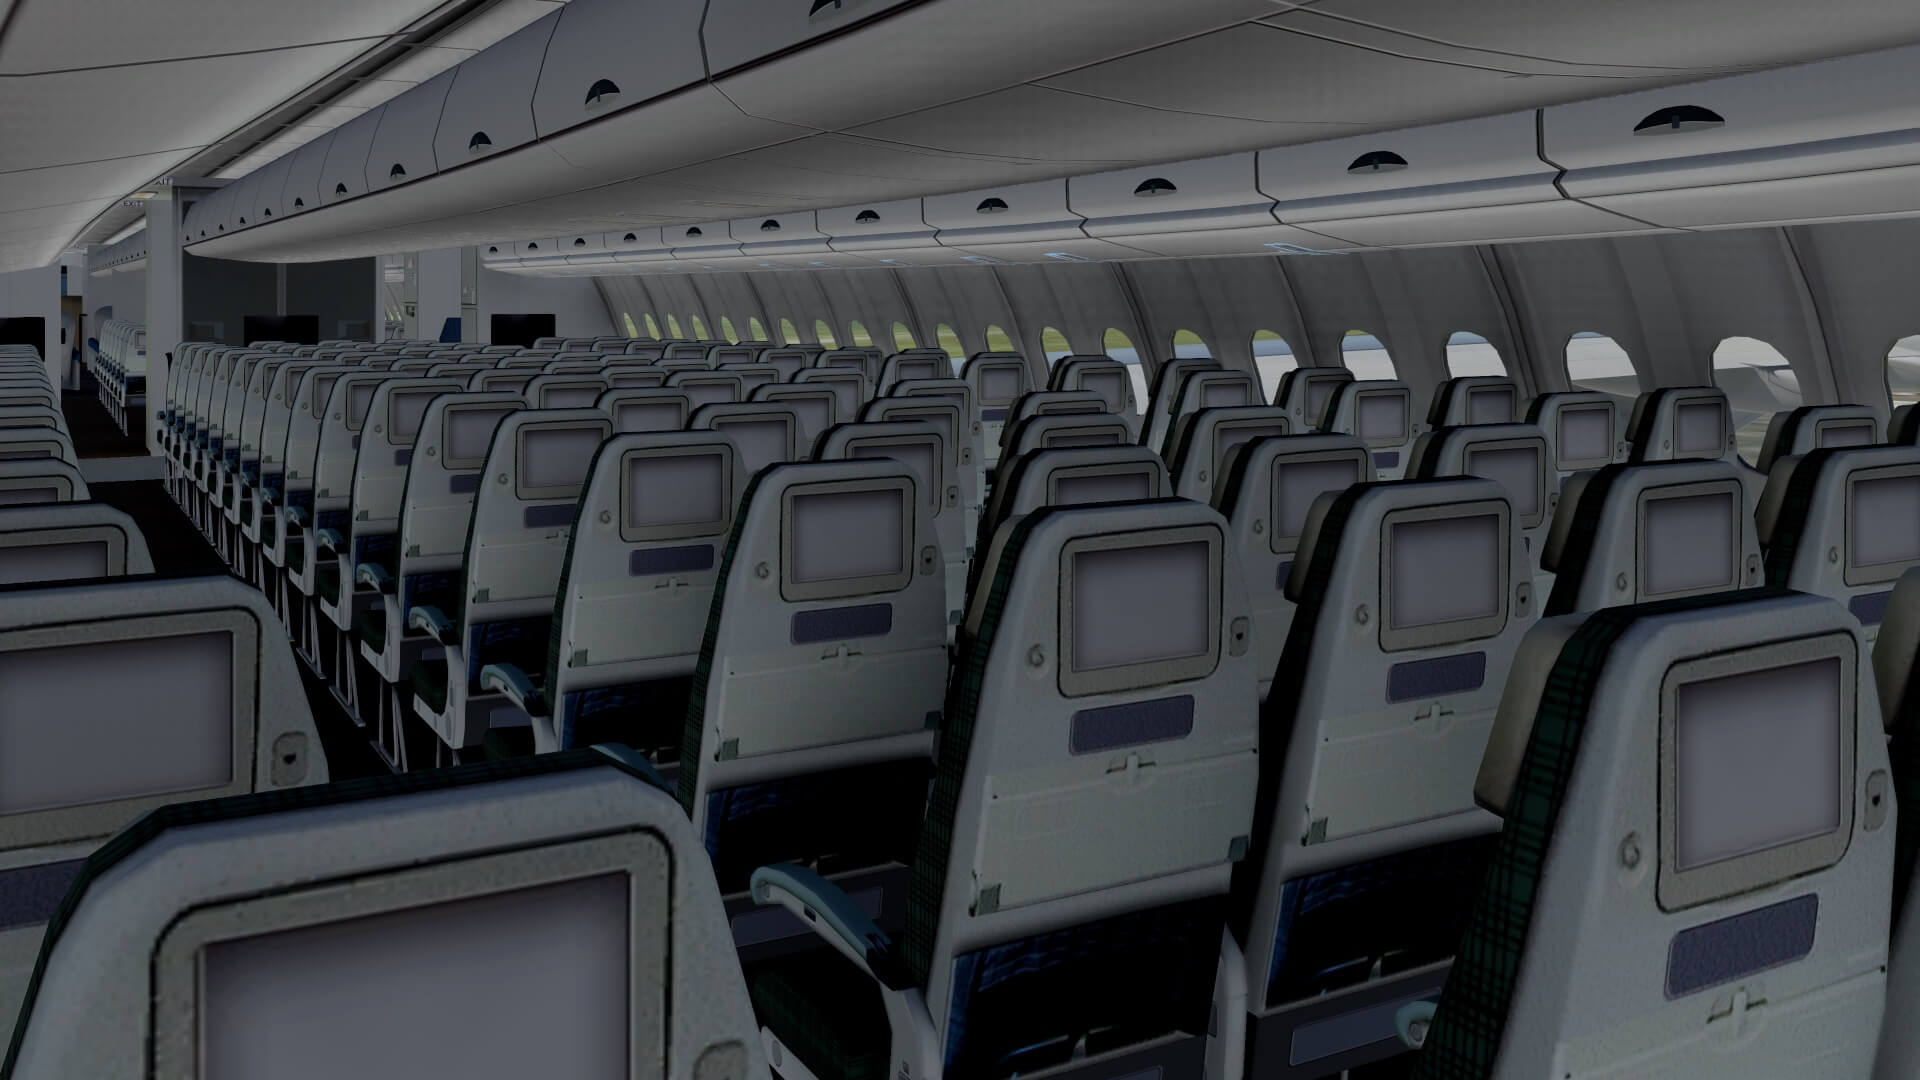
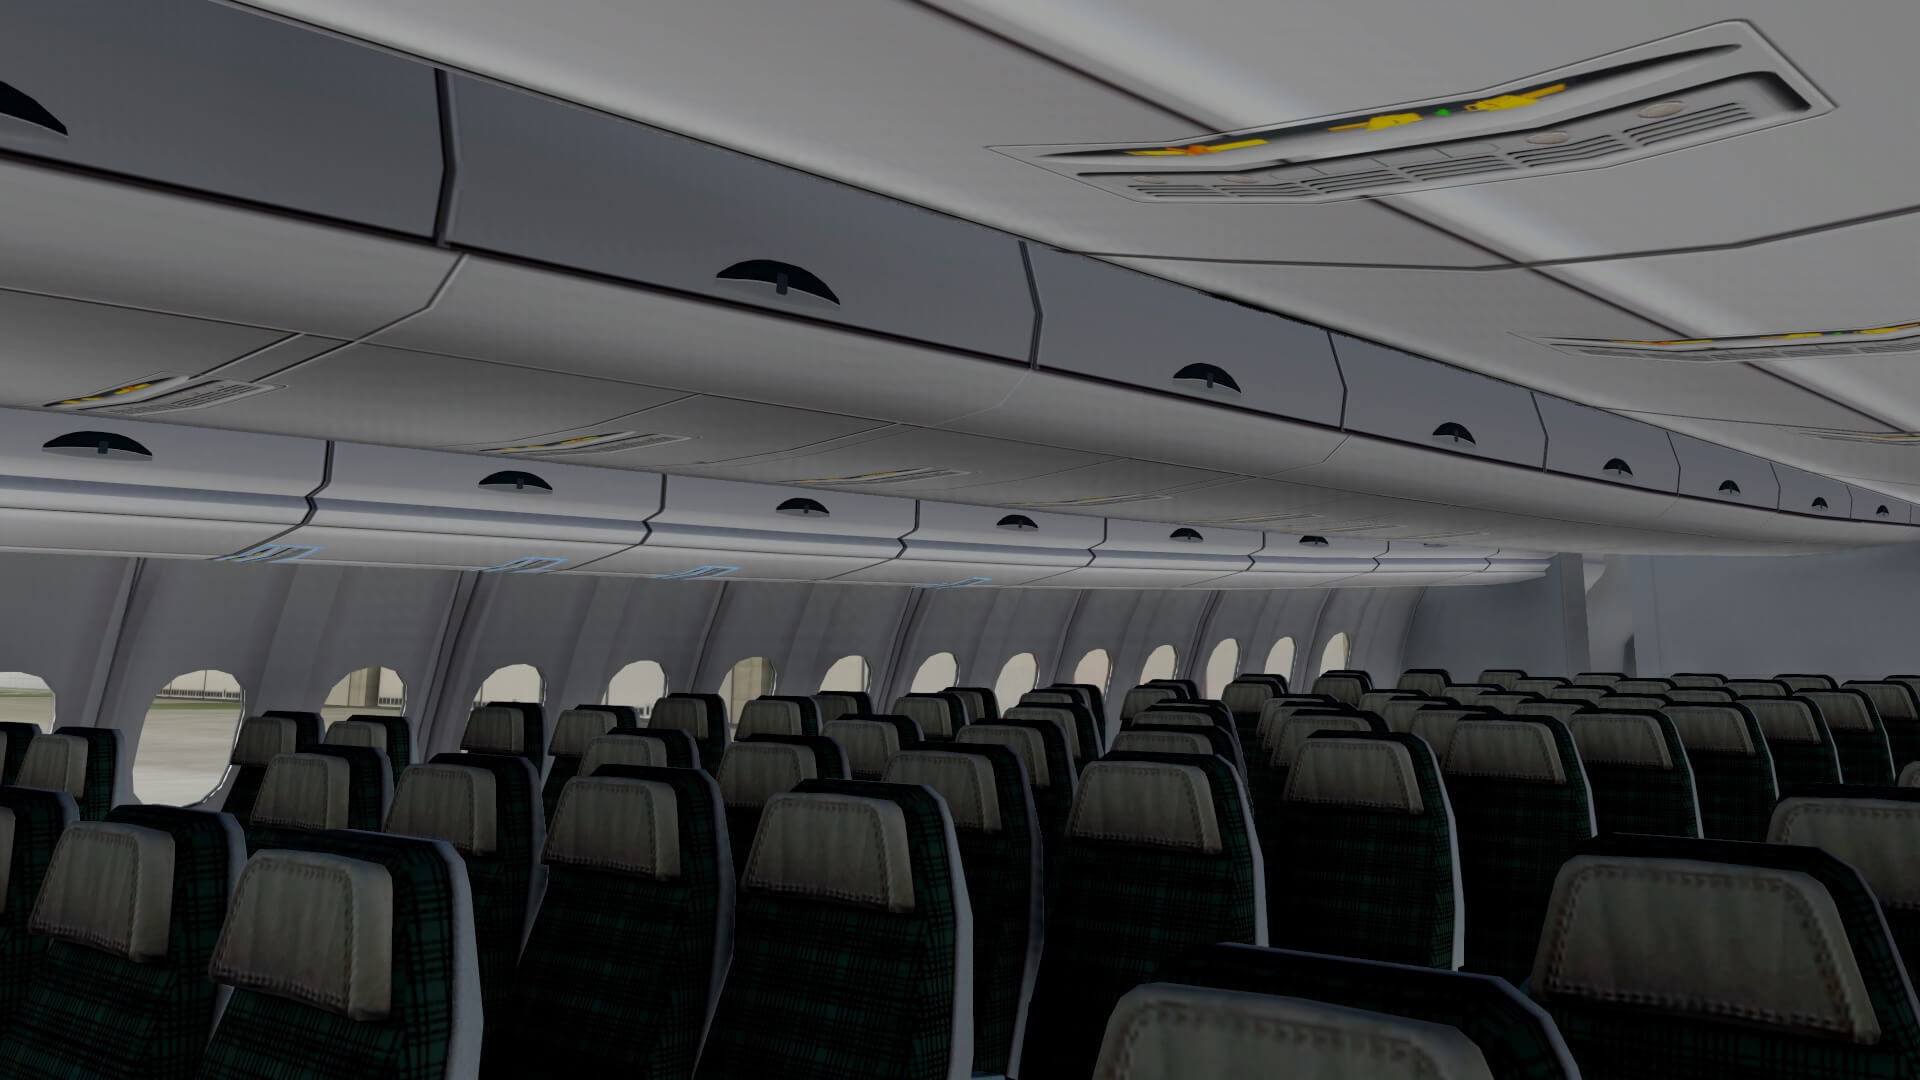
The cabin layout consist of three classes; economy, business and first class. Although the cabin is well modeled, the more tiny things in the cabin are modeled, the more frame rates it will cost and some would love to see much more details while others prefer a well modeled but an accurate 3D cockpit. Whatever you prefer, the cabin is OK, but the cabin window frames are modeled in a way that the overall window has an angular shape. In my humble opinion this is due to less polygons. If this can be changed so easily, is something I don’t know.
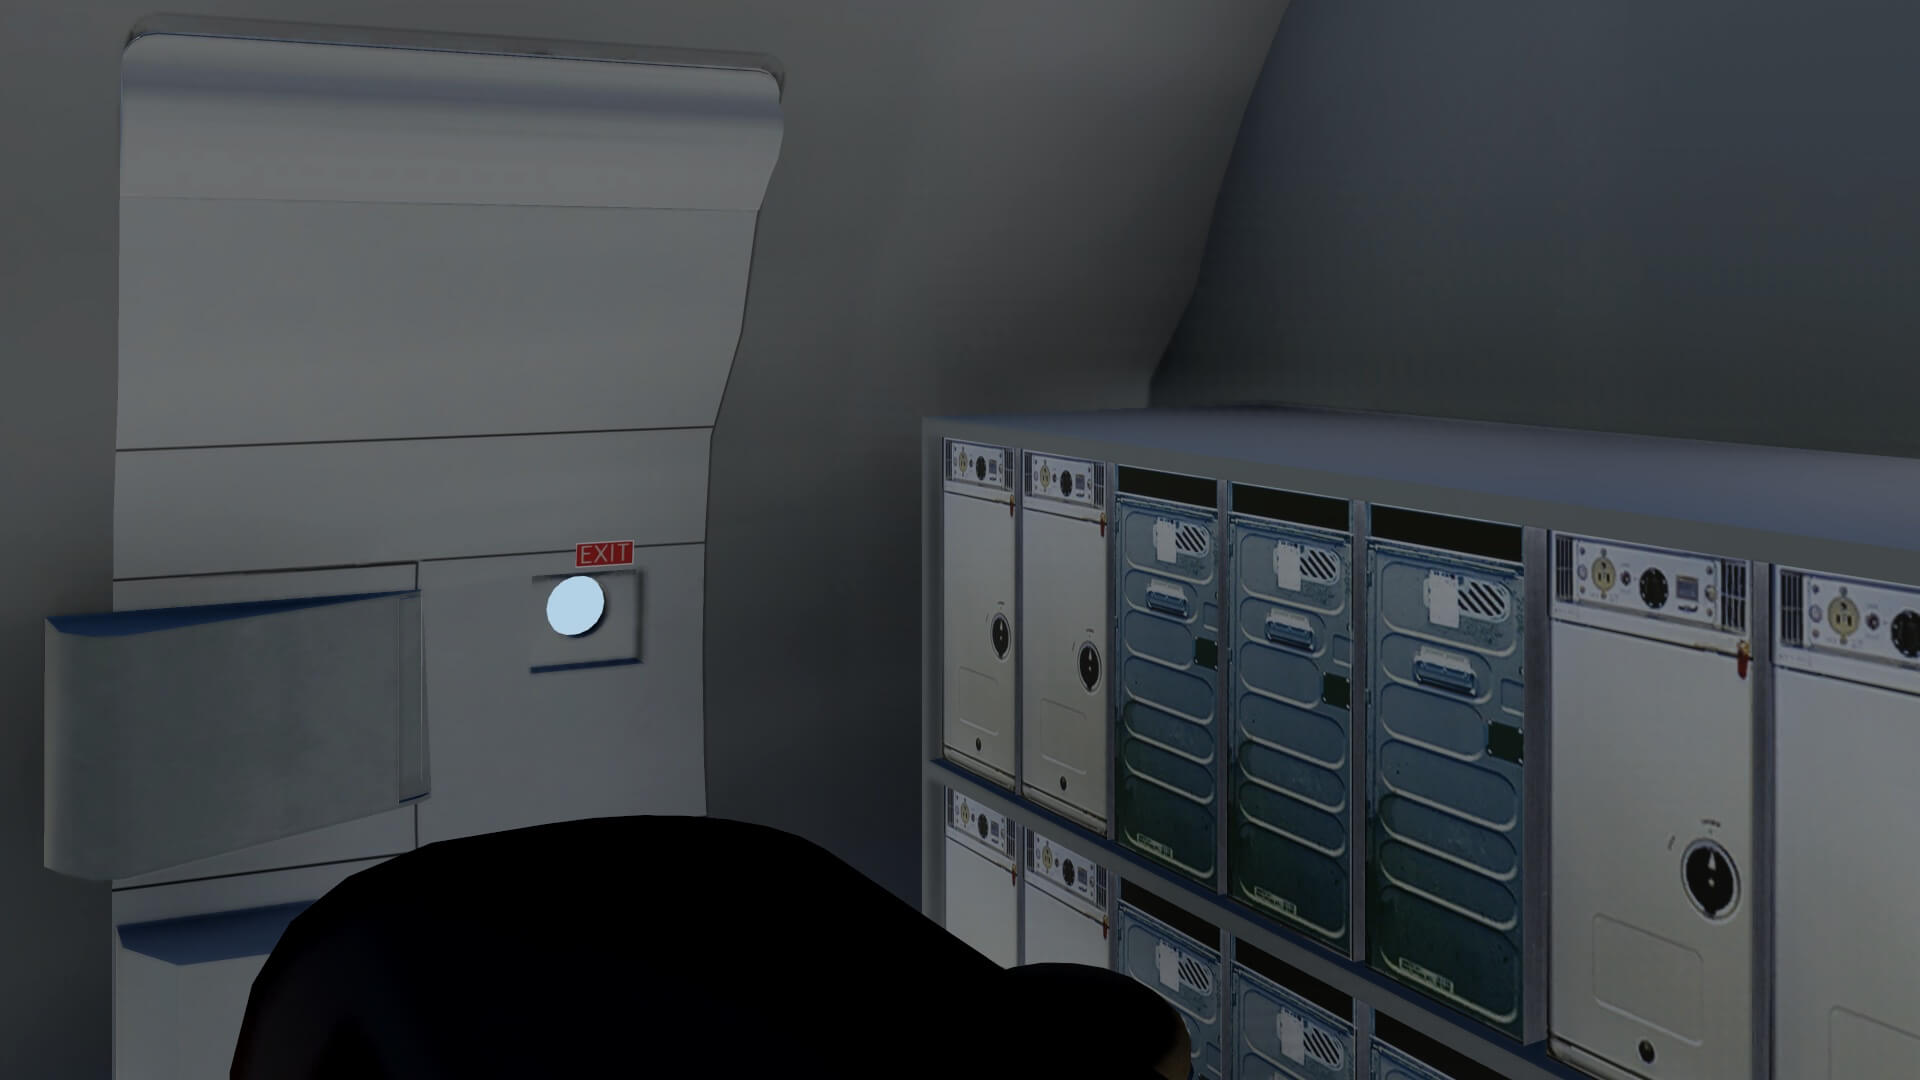
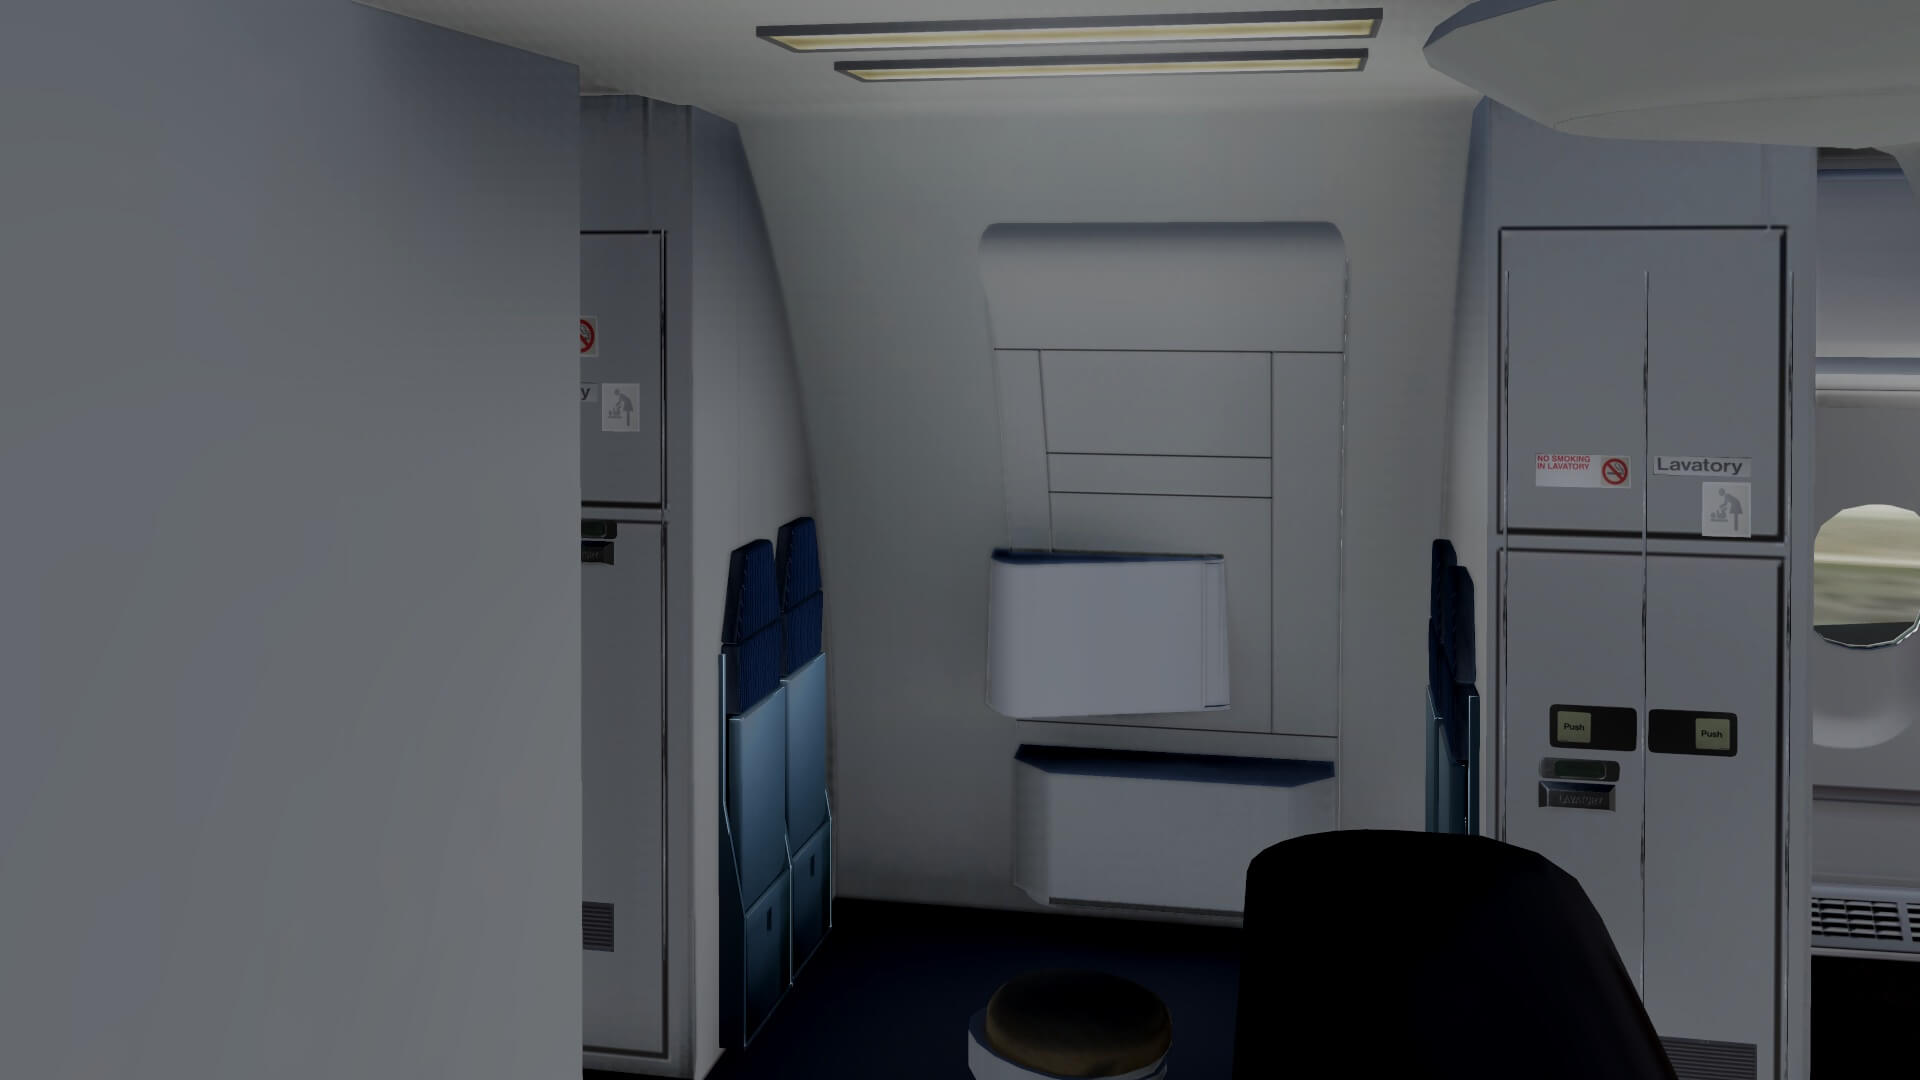
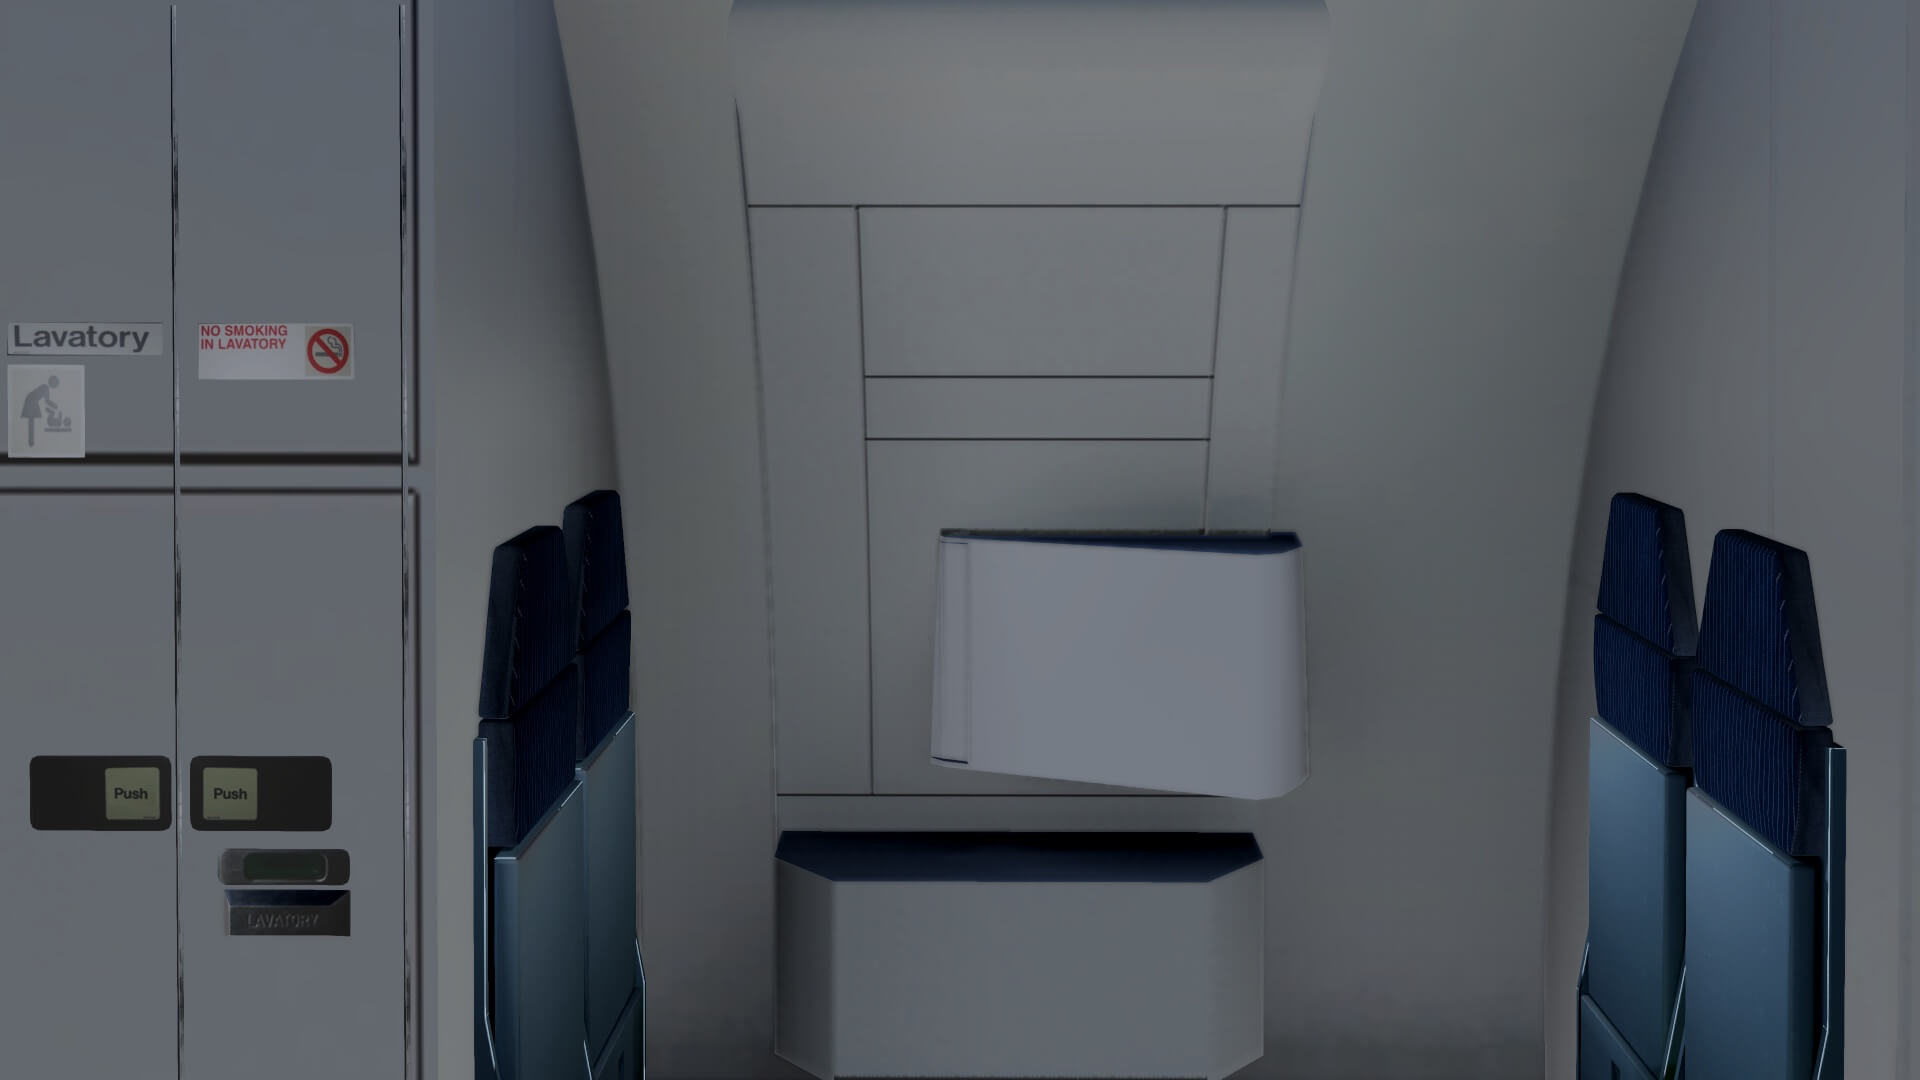
So all the seats, stowage bins, sidewall panels, ceiling panels, attendant seats, lavatories and galleys, all are modeled OK and worth to highlight that the flight attendant seats are very nice. The passenger windows are no equipped with animated blinds, but that’s also logic since it would be awesome to have it, but it also means useless costs of polygons and thus at the end lower FPS. What I really miss unless I’m mistaken is the Floor Path Emergency Marking System. Not a big deal but worth to highlight and bring it to your attention. I contacted Eugeny from JARDesign about this and Eugeny told me that “it was for the moment planned not to install it.”


Overall I must say that a lot of effort if put into the creation of the virtual cabin although not every tiny details are included. Keep in mind that the larger the aircraft becomes, the more complex they are, the more polygons they need with at the end less available frames. That certain things like the passenger internal door mechanics isn’t modeled as well as the slide system, can be added but that’s up to the developer.
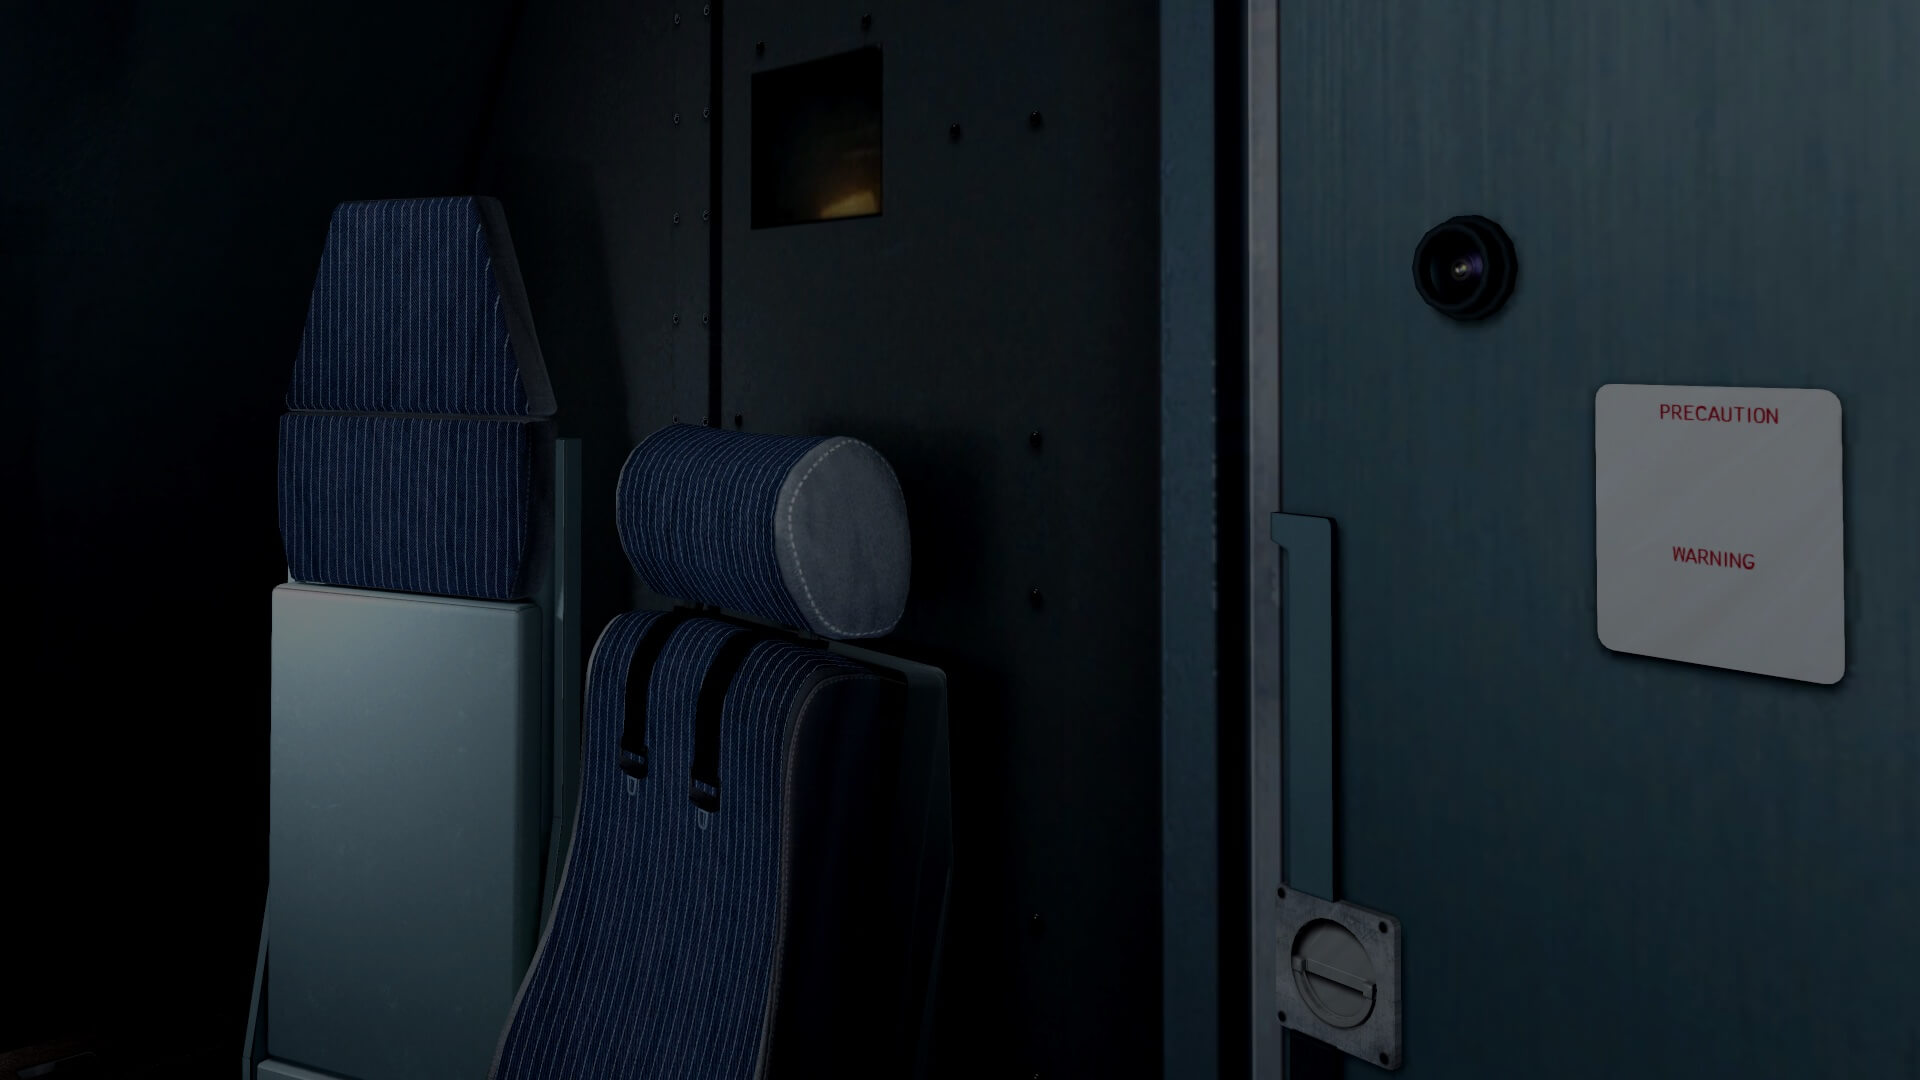
What I miss unless I did something wrong is the animation of the cockpit door. In other words, I’m not able to open the door, nor that I can open is from the cockpit.
Modeled 3D Cockpit
Differences JD340-500 Airliner versus JD330
But first this question, how much differ the A330 and A340 cockpits from each other? As we all know, JARDesign did develop already the A330 with Rolls Royce engines and now they added to their growing list of aircraft the A340-500. Knowing this, how much differs the cockpit or how much differ systems and perhaps then also the question “is it easy to step into the A340-500 world when you’re known with the A330 systems?
Out of own experience I can tell you that ground engineers and mechanics who are trained for the A330 or A340 get the same information for both aircraft. This means when they get a license, they are instructed about the A330 and A340. Besides this, there’s also a difference course for those who are already known with the A330. Adding to this, this is not only applicable for technical personal. This is also applicable for pilots.
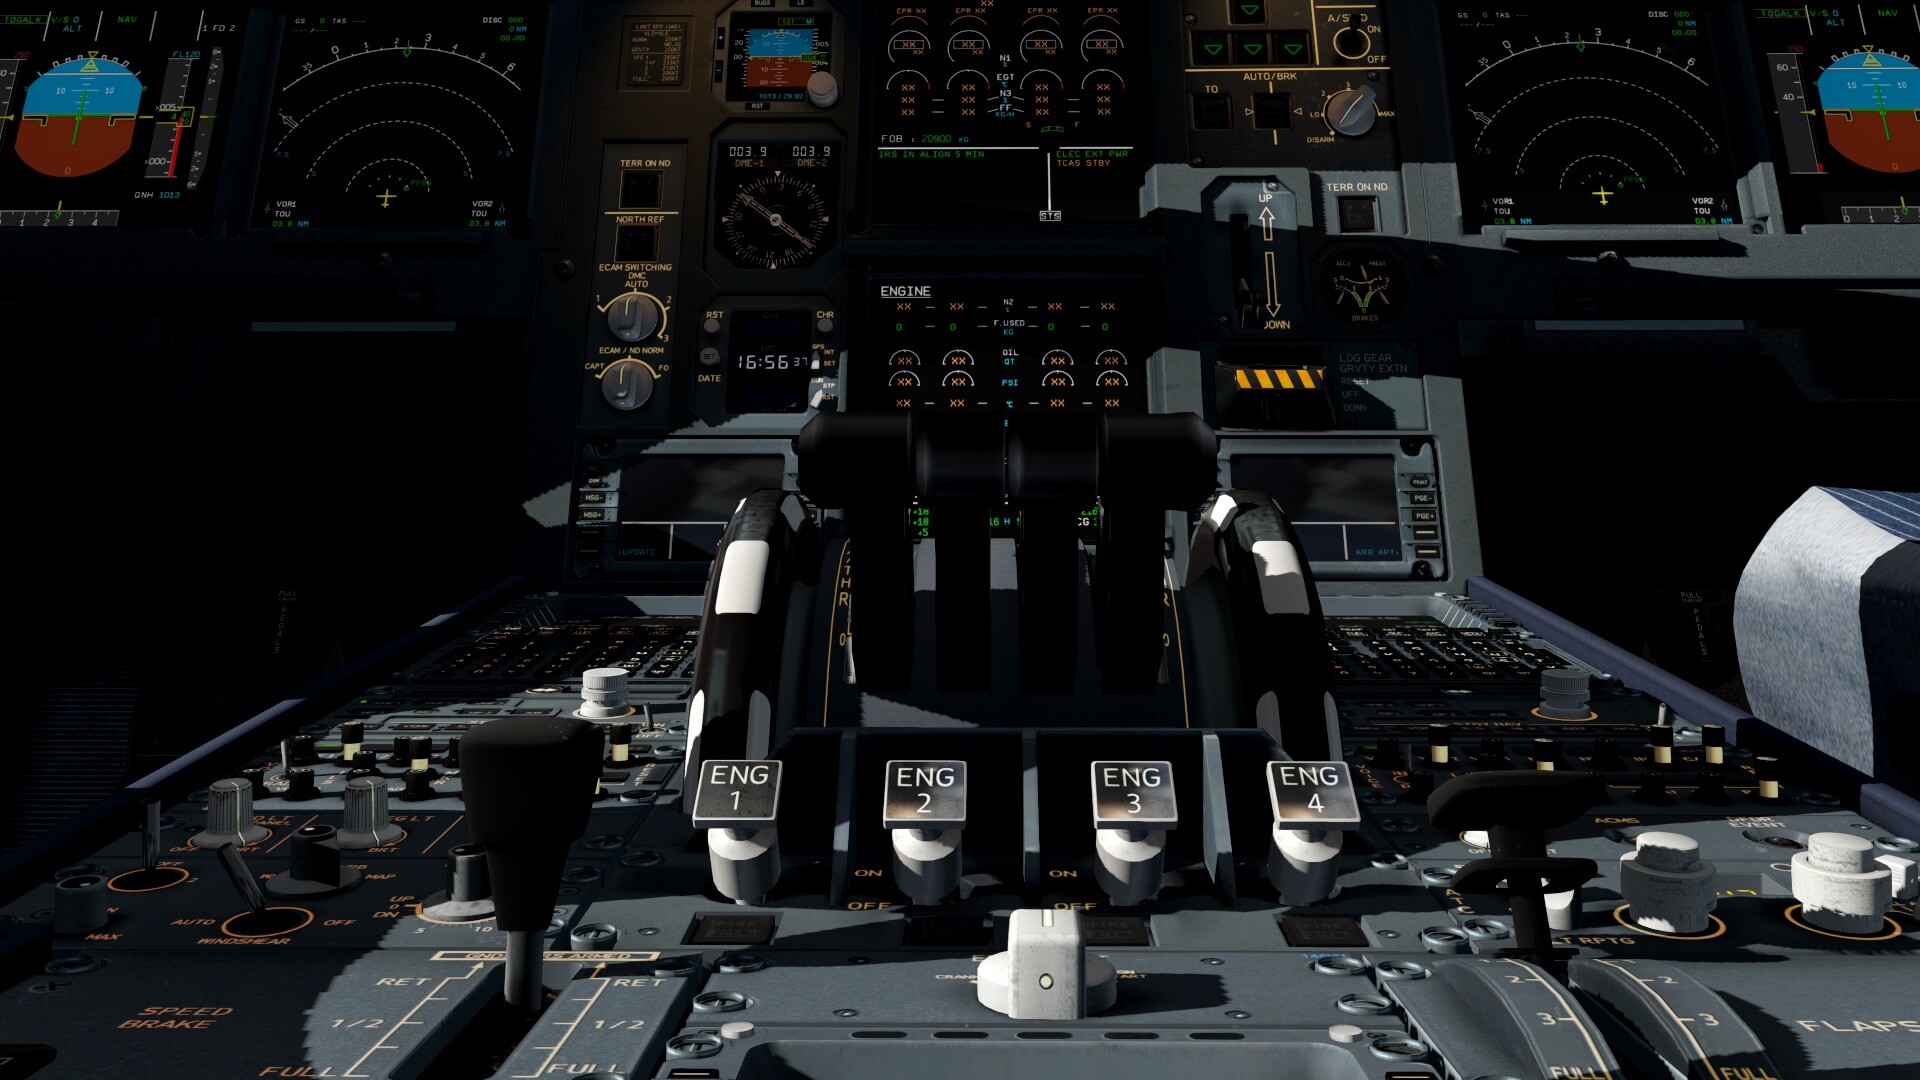
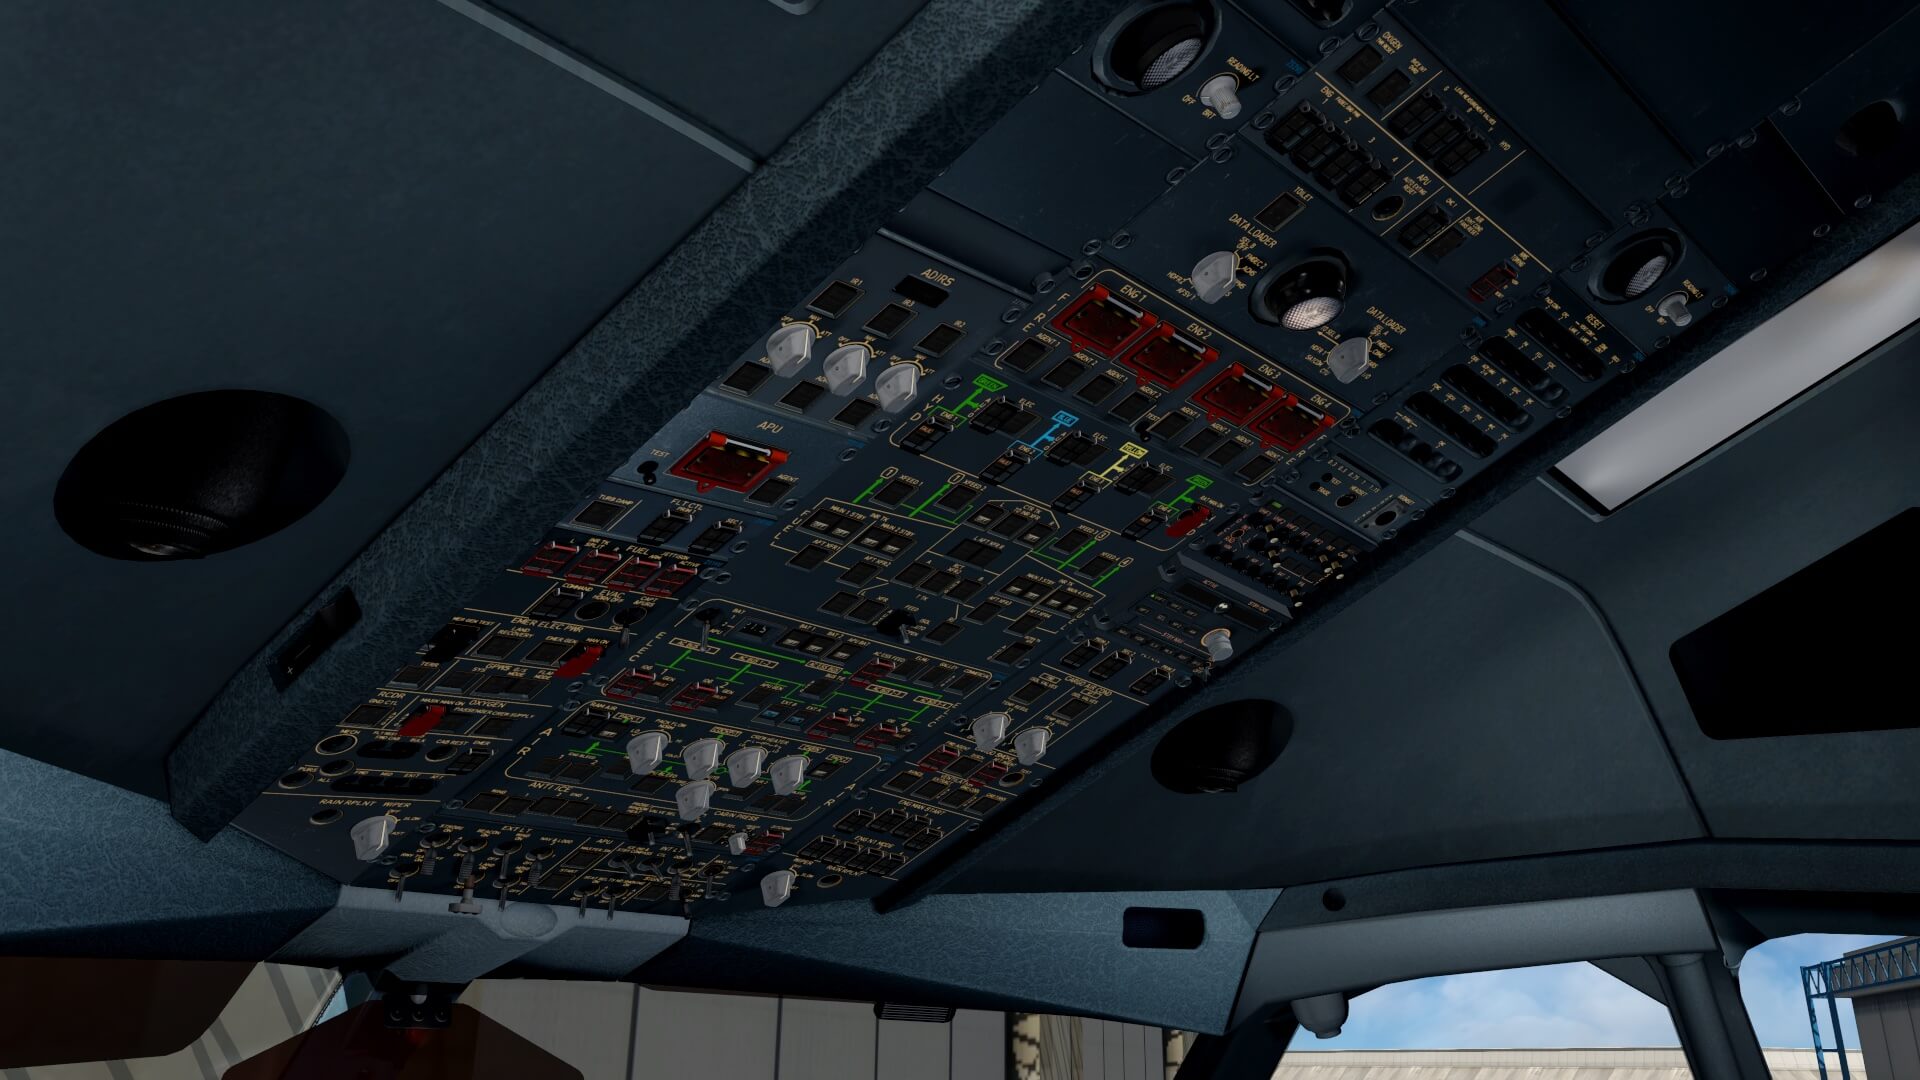
And yes, the A330 versus the A340 has different weights, speeds, performances, calculations and so on. With that in mind, pilots are trained to know those differences, but looking to systems weither it is the Auto Flight, FADEC engine control, navigation- and aircraft systems, they are either the same or slightly different. Check out the following screenshots that shows a comparison between the JD330 and the JD340-500 Airliner.


Yes, I’m aware that these screenshots are only showing the pedestal, center instrument panel and the overhead panel, but it’s only to show you that the cockpits are very similar. When you apply AC and DC (Alternate and Direct Current) power to the aircraft, EFIS PFD/ND (Electronic Flight Instrument System Primary Flight Display / Navigation Display) and ECAM DU’s (Electronic Centralized aircraft Monitoring Display Unit) are showing very similar images or synoptics.
But why did I start this section?
I started this section because those simmers who own already the JD330 have it easy. They only need to read this review since I will try to add a bit more into it. It was also easy for the JAR team to add to the JD330 a similar aircraft. No no, it’s not that there was nothing to do. The aircraft is longer, the wings are different, wing flex is different, perhaps the MLGs are different, a CLG had to be added, the cockpit had to be modified, and systems had to be modified to fulfill the different performances of the real A340-500. Time to check out in more detail the modeled 3D cockpit, right?
The JD340-500 Airliner Cockpit
When you’re familiar with the JD330, you won’t be surprised what you see and perhaps most simmers who own already that aircraft, bought also the JD340-500 Airliner. For those who are new to JAR aircraft, they either decide to buy the JD340-500 Airliner or wait for the ToLiss Airbus A340-600. That decision is a bit up to everybody.
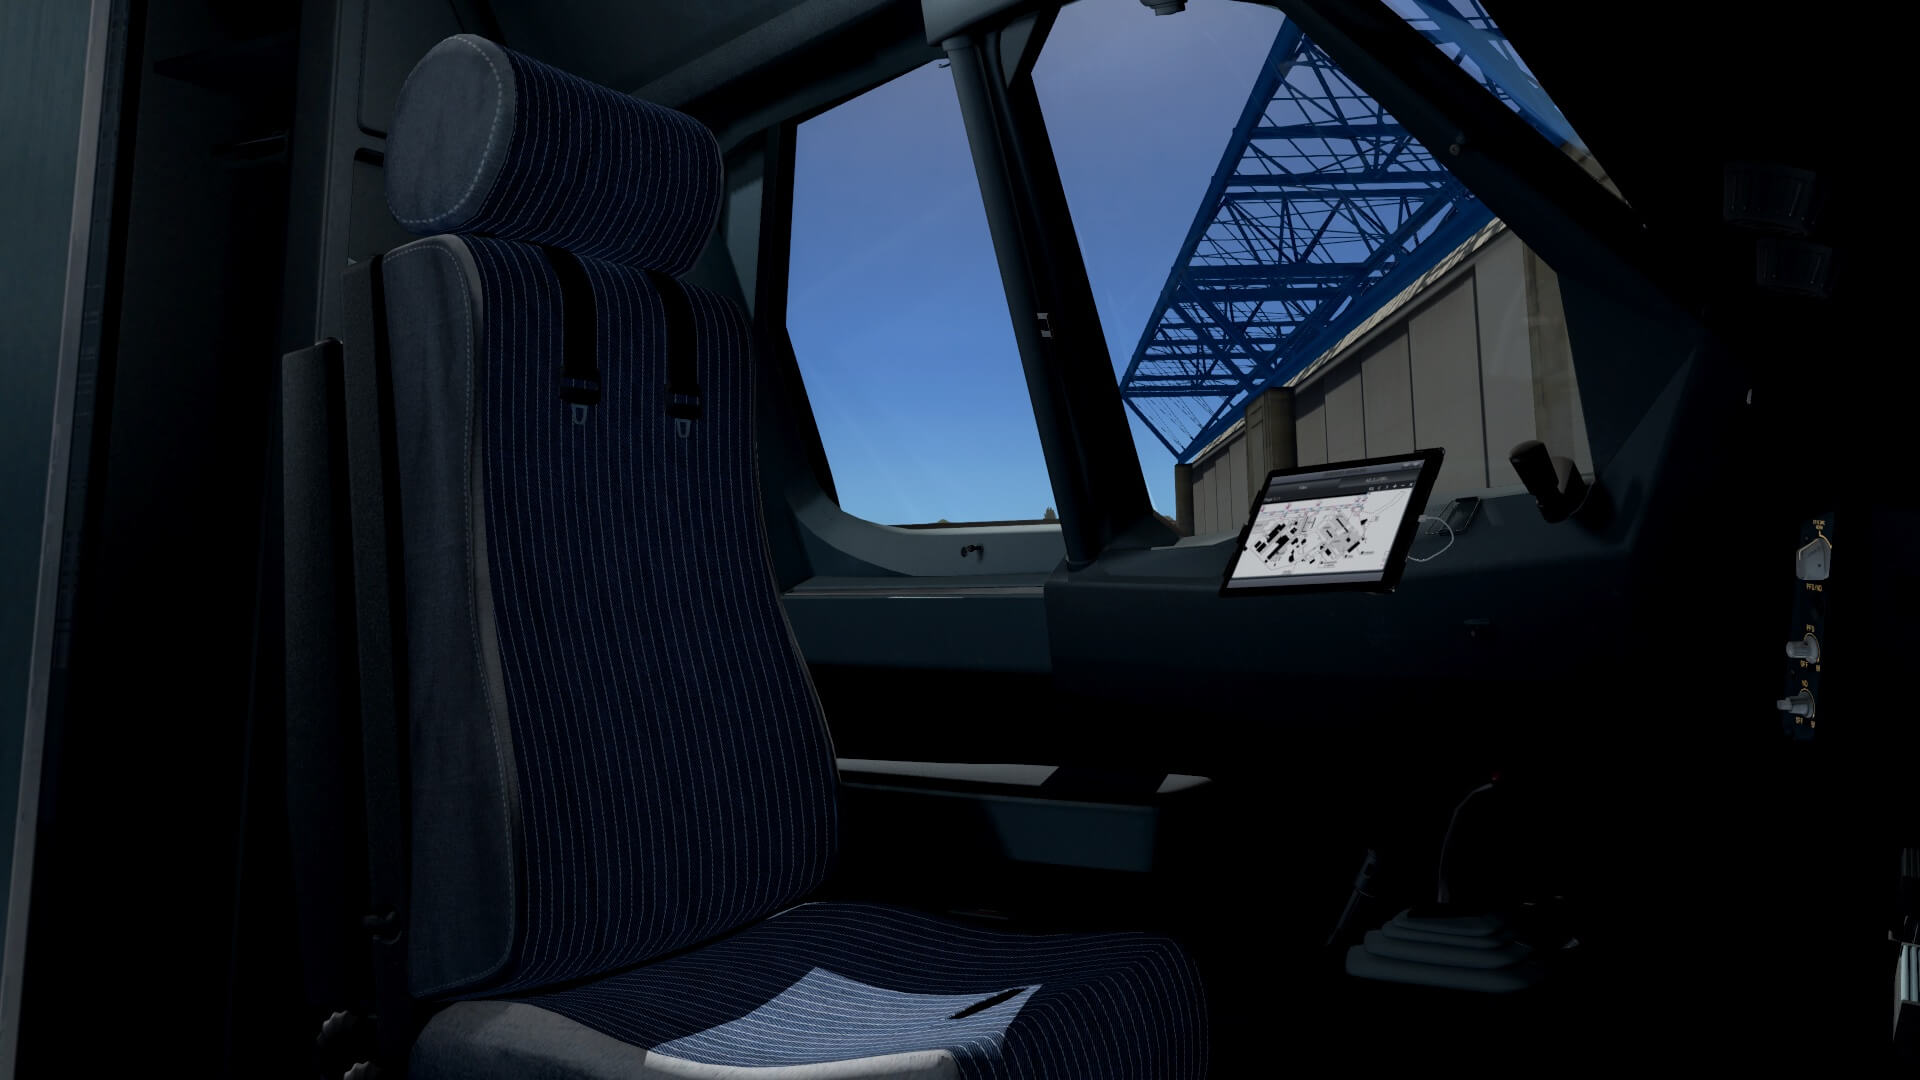
When you enter the modeled 3D cockpit, we can say without doubt that a lot of time is put into the making of this 3D cockpit. And yes, the 3D modeler had an advantage that they did had already modeled an A330 since the cockpit dimensions are the same as well as are the sidepanels, ceiling, rear wall and pilots seats. Even the basic instrument panel, pedestal and overhead panel are the same except of course minor differences and differences related to a two or four engine aircraft.
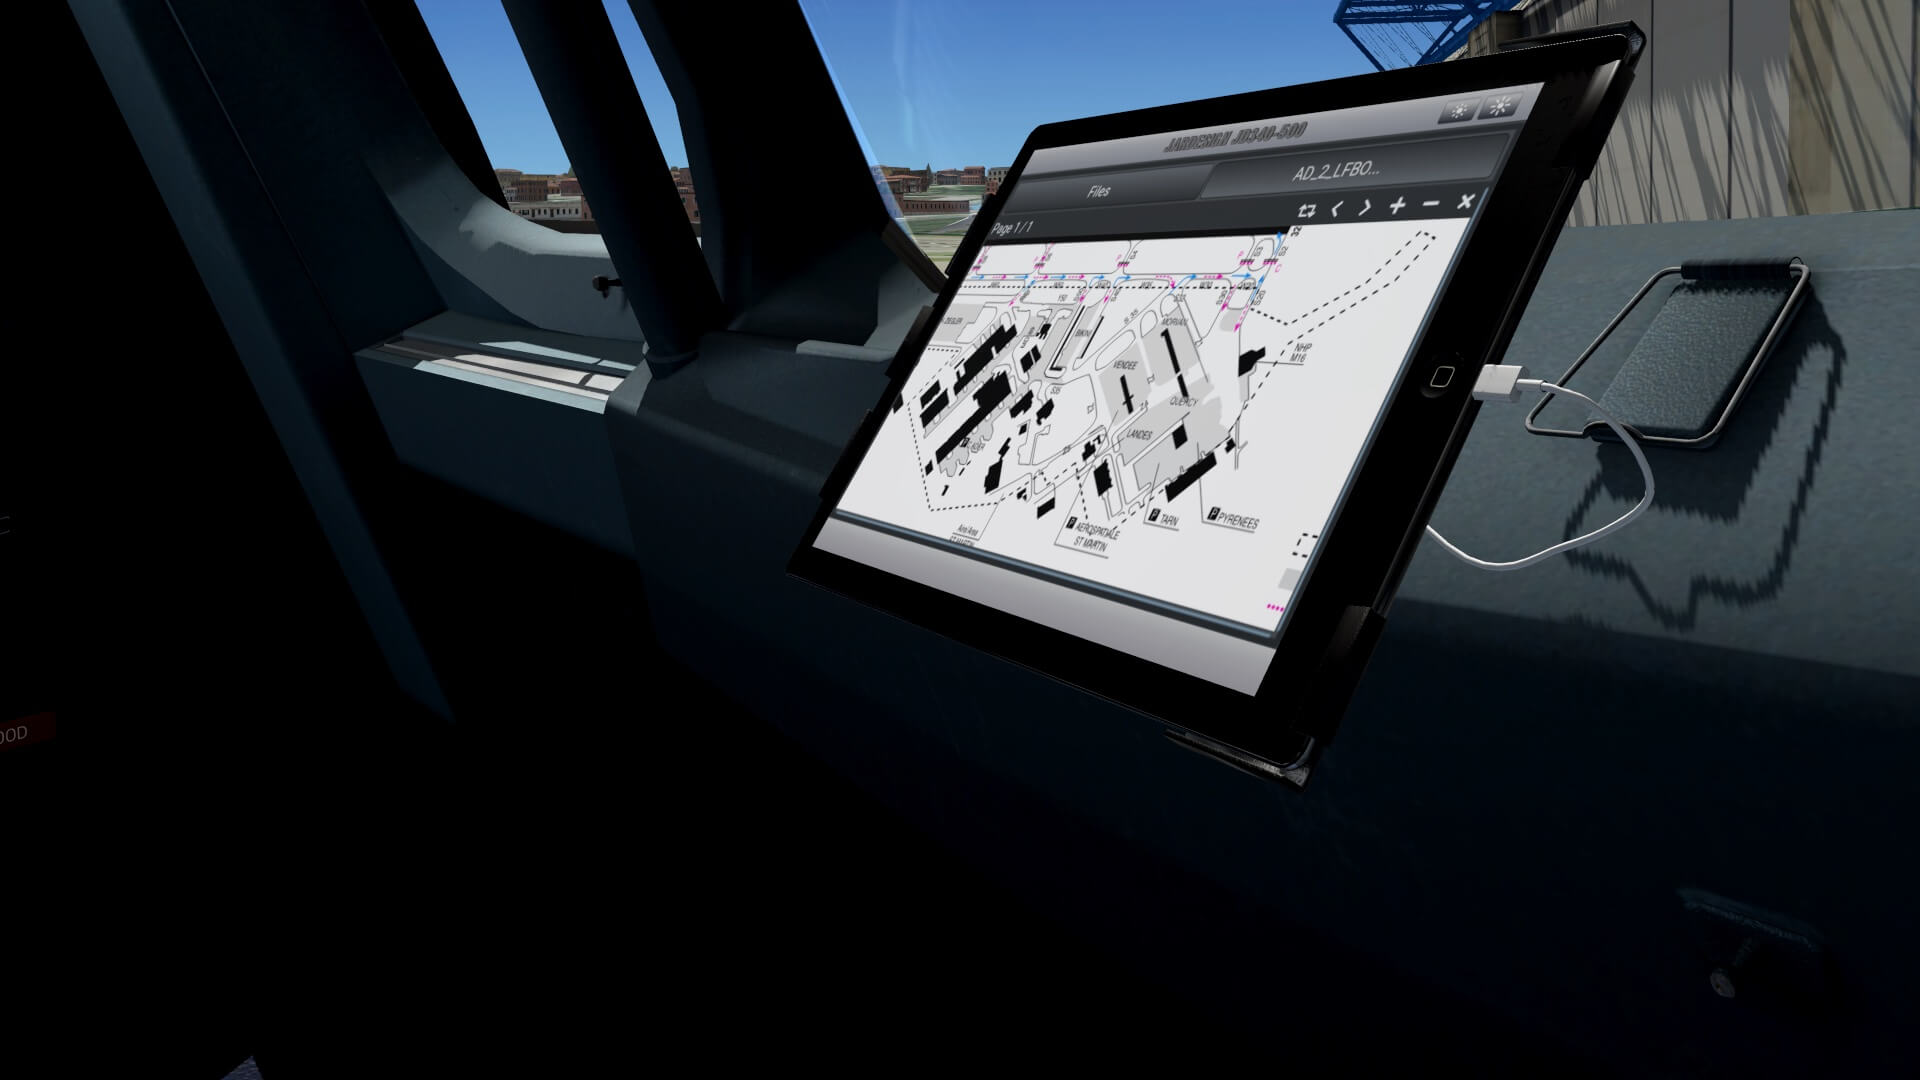
The modeled 3D cockpit is gorgeous. The textures for all the panels and sub-panels are either real photo material that has been used or the modeler is a great graphical artist. I’m impressed with what we see, but only a good looking 3D cockpit isn’t enough. First a couple of things that aren’t modeled. The sliding windows aren’t animated as well as that the pilot seat armrests aren’t functional either. On the other hand, you have animated front window blinds. mid strut blind and on both sliding windows you have the AviTab. I didn’t find a way to completely vanish the AviTab for those who don’t want it or don’t need it. That said, I contacted Evgeny and ask him if there’s a possibility in the future that you can with a simple click enable or disable the present of the AviTab. Lets say, work in progress.
Anyway, the AviTab allows you to connect your Navigraph Ultimate account in a way that from your Ultimate account charts can be presented on the AviTab. In case you only have a regular Navigraph account for only the AIRAC cycles, you can use ChartFox as alternative since it’s free.
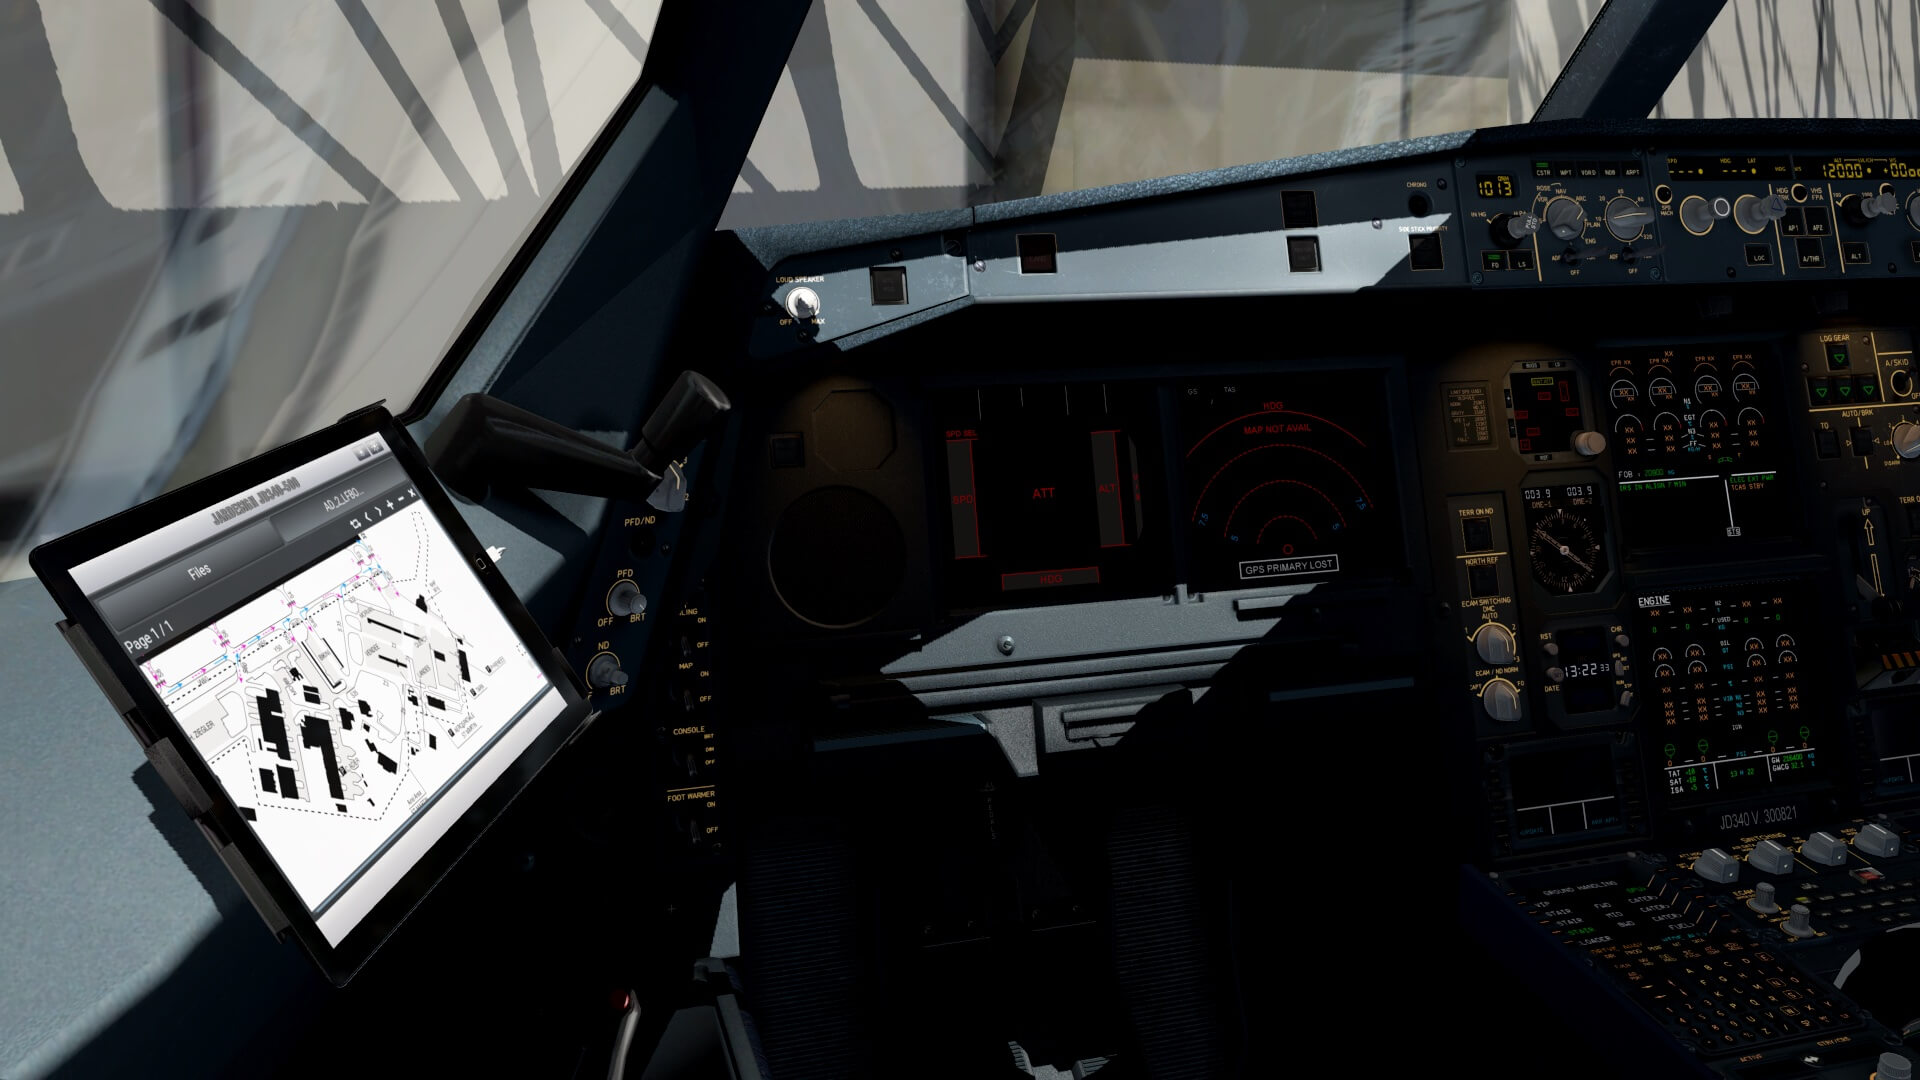

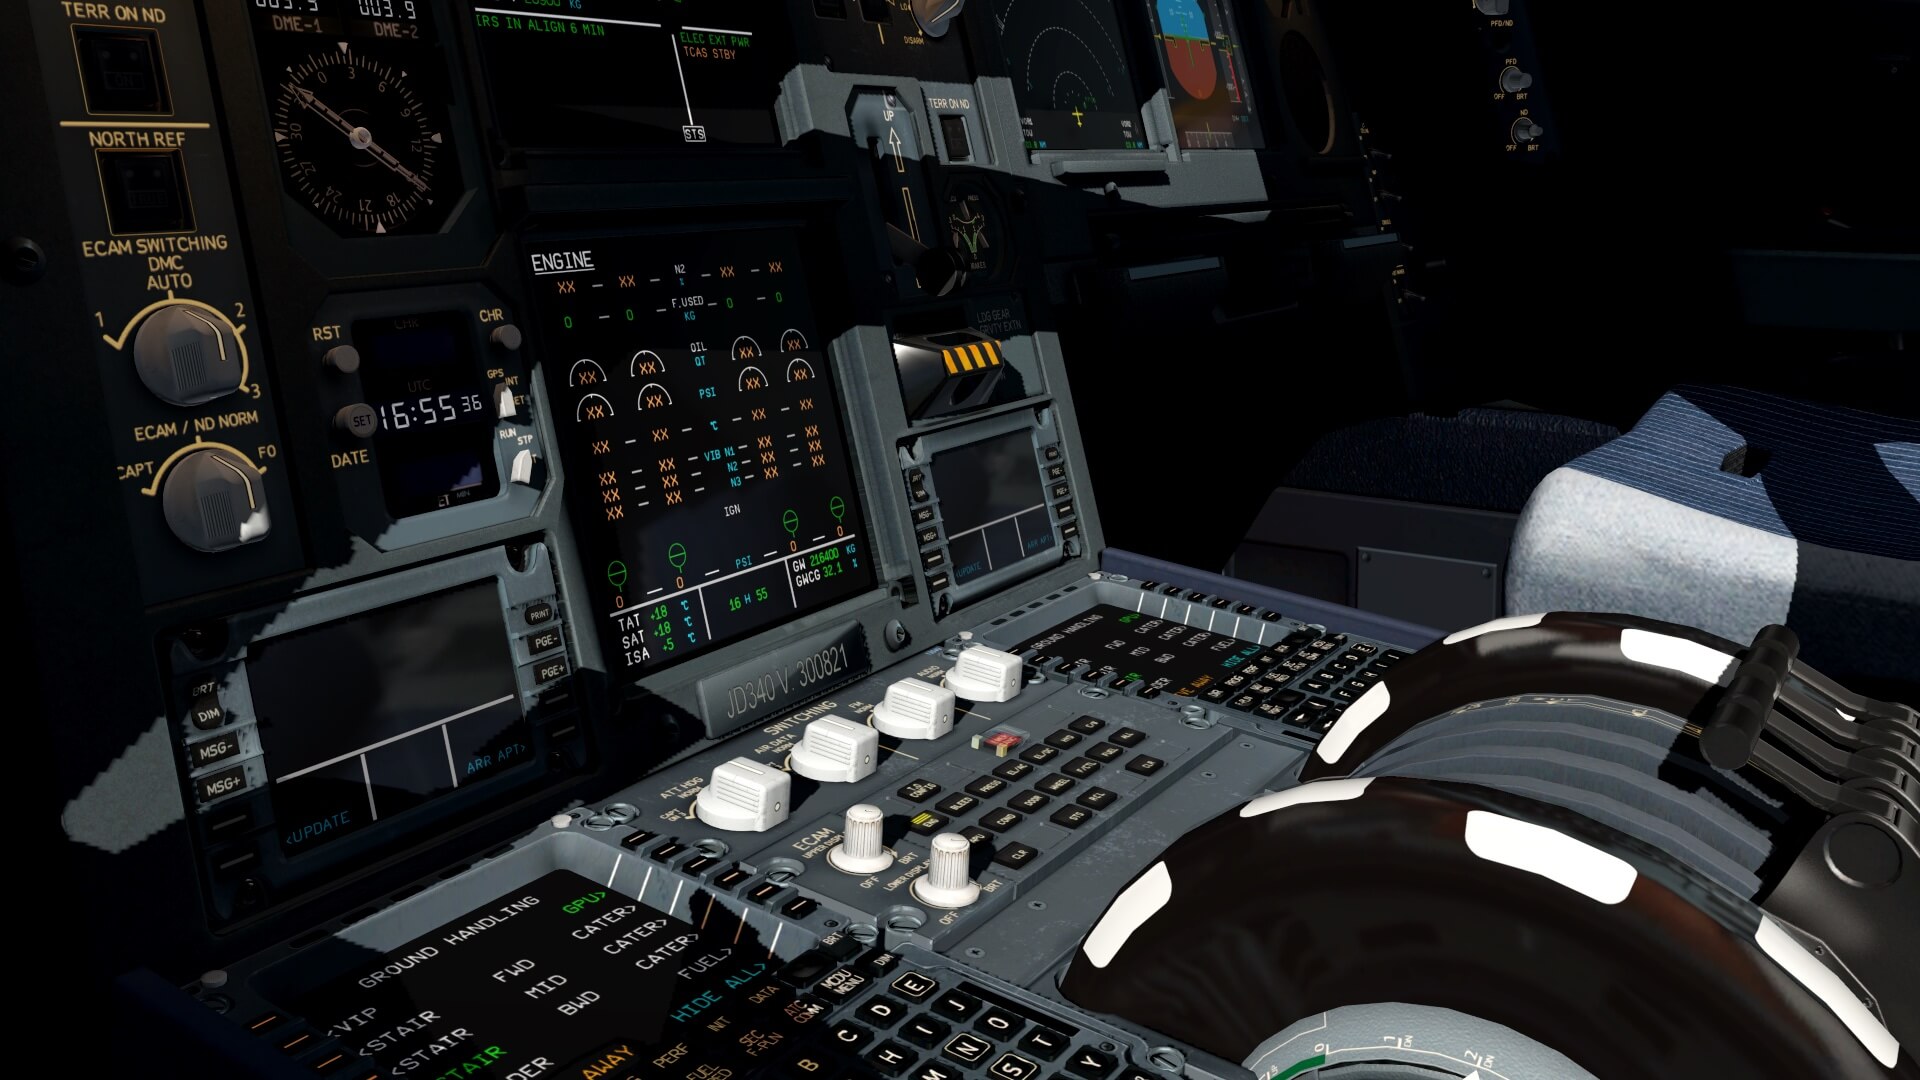
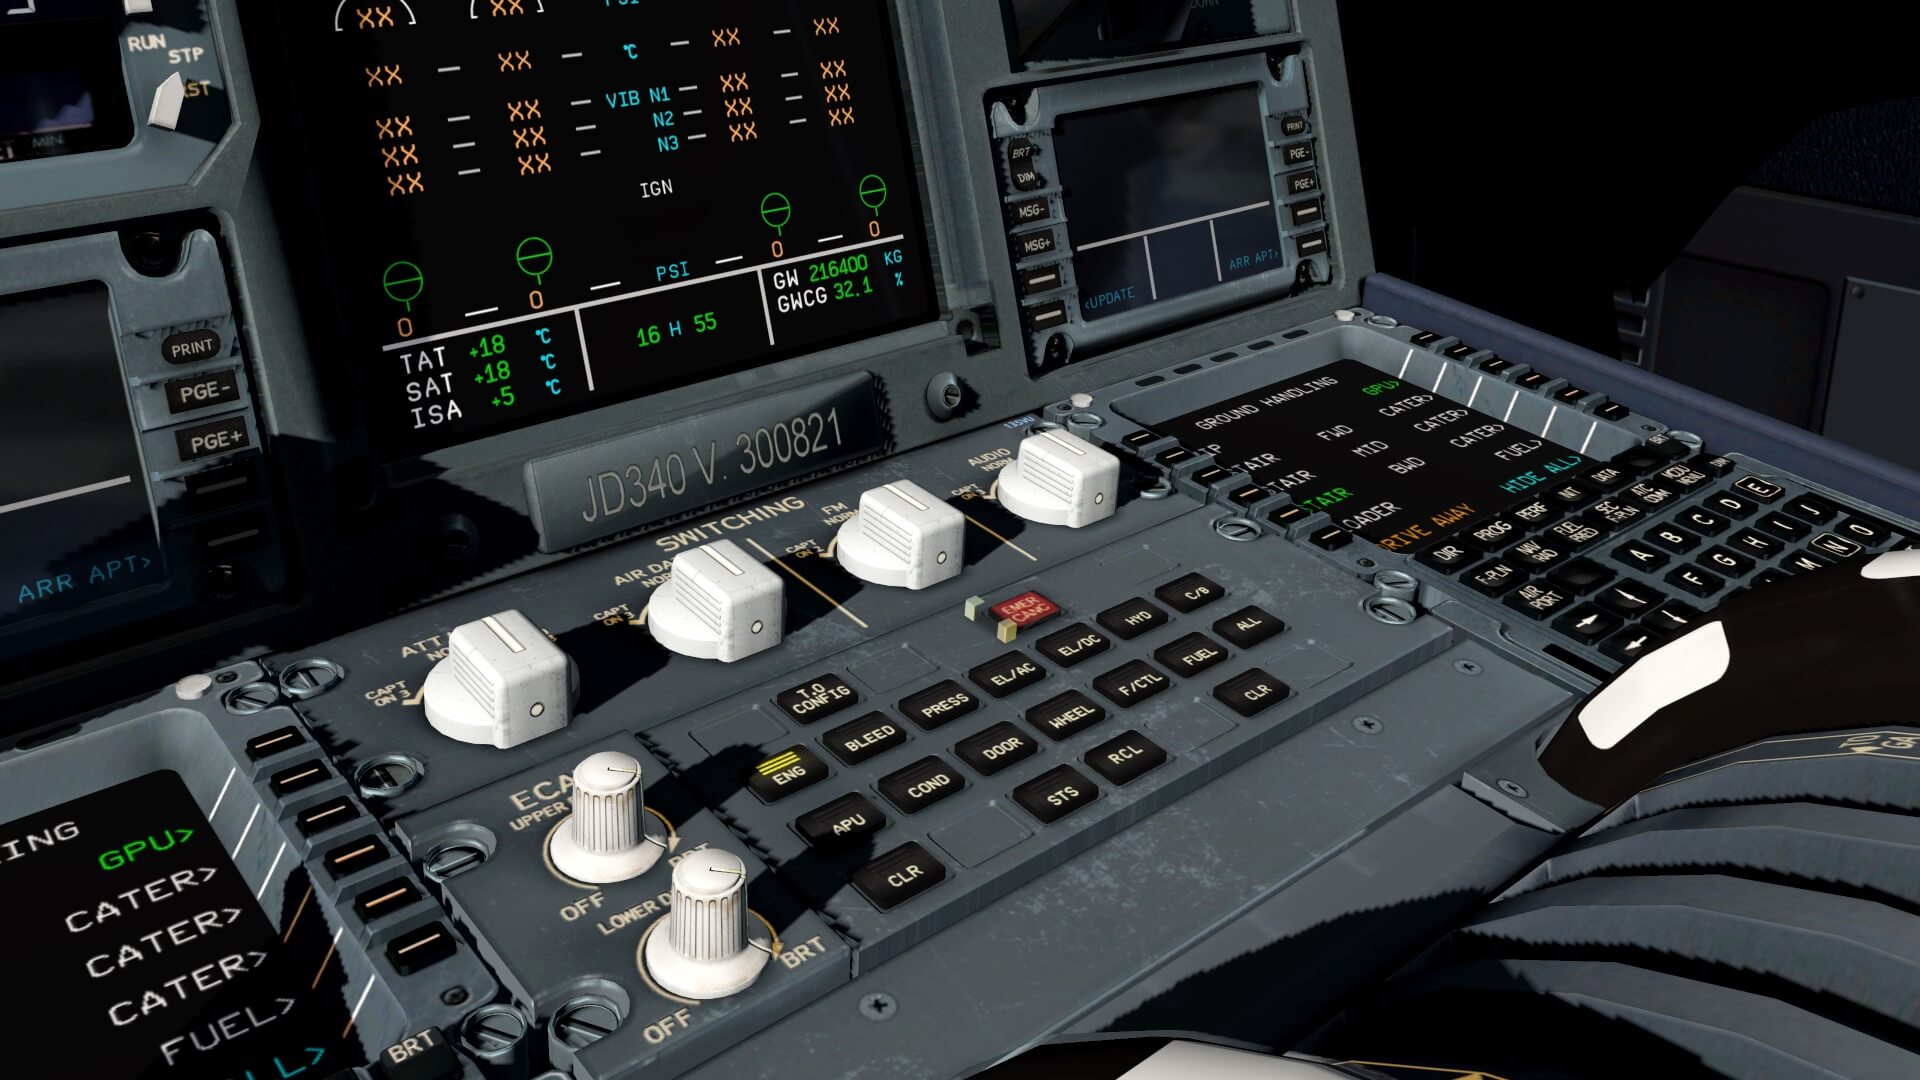
When I zoom in on the different panels you can clearly see the weathering, so yes, the cockpit is being used and I like that. It’s real! The text on every panel is sharp and even the build in EFIS and ECAM DUs are sharp too as well as the popup 2D EFIS/ECAM DU’s. Besides that, you can zoom the popup 2D DU’s and/or you can drag them to another location.
Not sure what the DU resolution is, but you can zoom in and it stays sharp, so that’s great news. I noticed that not all switches are working like for example the several mounted red/black guard work, but not the switch underneath it. When you look closely to a knob or selector on the FCU (Flight Control Unit) you hardly see that it’s based on polygons since each knob or selector is almost round. It’s good to see that the 3D cockpit is modeled with lots of love and that even with all these simulated systems, the frame rates are still very good although I’m aware that it depends on every sim computer and the rendering settings.
Let me give you another example of a weathered part in the cockpit; the pedestal. When I look closely to the ECAM rheostats and the panel itself, I see a lot of weathering on the panels as well as the rheostats that are all used, dirty, and a bit brown. Awesome! And while writing this, it’s a bit weird that the cockpit is gorgeous and it is used while the external model does not reflect this used cockpit. In other words, I’d expected that the external aircraft are also a bit more weathered then it is now.
Looking to the overhead panel I see basically the same as what I saw before, a very well modeled panel with nicely modeled side-panels, ceiling, weathered panels and also used knobs, switches or selectors. Almost every knob or other curved panel has so many polygons and therefore every rounding looks round. Well done, but at the same time the reading lights houses is modeled with less polygons.
I mentioned before that the cockpit door isn’t animated which is also applicable for the third seat armrest while the folding seat at the right-hand AFT side can’t be folded down. Looking from the AFT of the cockpit to the two pilots seats in the front, I’m impressed how it is all modeled. A great job.


When I’ve switches ON the electrical power by starting first the APU (Auxiliary Power Unit), systems become alive and I can tell you, it really looks nice and for example, the integral lighting on the pedestal, overhead panel and FCU are so beautiful. It’s even for me difficult to find out what isn’t simulated and what’s not since the A340-500 is a complex system. Many systems are connected to each other or are controlled and monitored by a master and slave computer.
So even for me with all kind of manuals available, it’s almost impossible to check if every system is accurately simulated as in the real aircraft. Even ECAM is complex with the E/WD (Engine / Warning Display) and SD (System Display) since it’s connected to every system in the aircraft. One thing I know for sure that isn’t simulated is the Central Maintenance System. For me as ex-ground engineer that would be awesome when it was simulated, but for X-Plane and our fellow simmers it’s of no use.

Anyway, the way the most important systems are simulated is worth for me to check out like the Auto Flight, the navigation systems, the IRS (Inertial Reference System), the fuel-, air-, and landing gear, and many other systems that are used to handle this aircraft.


One last item I would like to highlight in case you’re looking for it and that is the taxi aid camera which is not installed in the JD340-500 Airliner. The TACS (Taxi Aid Camera System) consists of two externally-mounted video cameras, one on the vertical fin looking forward along the fuselage, and the other under the belly looking forward towards the nose wheel. These will provide a composite display, which will be available by selection on either the EFIS PFD or ECAM SD DUs. Symbology will be added to the displays to assist maneuvering, and external lights provided to ensure the system is usable at night. The TACS will be standard equipment on the A340–600, and optional on the A340–500. It is intended as an aid to pilots and is a “go item”!
Preparations I – Things To Know
Important ….wait wait wait!
When you’re new JAR aircraft, then you should pay attention to the following paragraph. When you startup and select the JD340-500 Airliner please wait till all systems are loaded and the JD340-500 Airliner is ready to use, so don’t start doing things in the cockpit when the systems are still busy configuring.
But how do you know that? When the JD340-500 Airliner is loaded you will first see in the middle of the X-Plane screen the JARDesign logo with the System Created! line, followed by green text Systems Created! After this last message you can use the aircraft and start doing your preparations.


X-Plane JD340-500 Airliner Menu
From the X-Plane menu JD340-500 Airliner you can choose Aircraft and Failures.
The Aircraft menu option allows you to select HOT START which is the same as the green option button in the X-Plane lower LH corner. The Aircraft menu also allows you to control the 3D sound which is set by default to 70 percent. Click the menu Aircraft – Sound Volume and a popup window allows you to change several sound options.

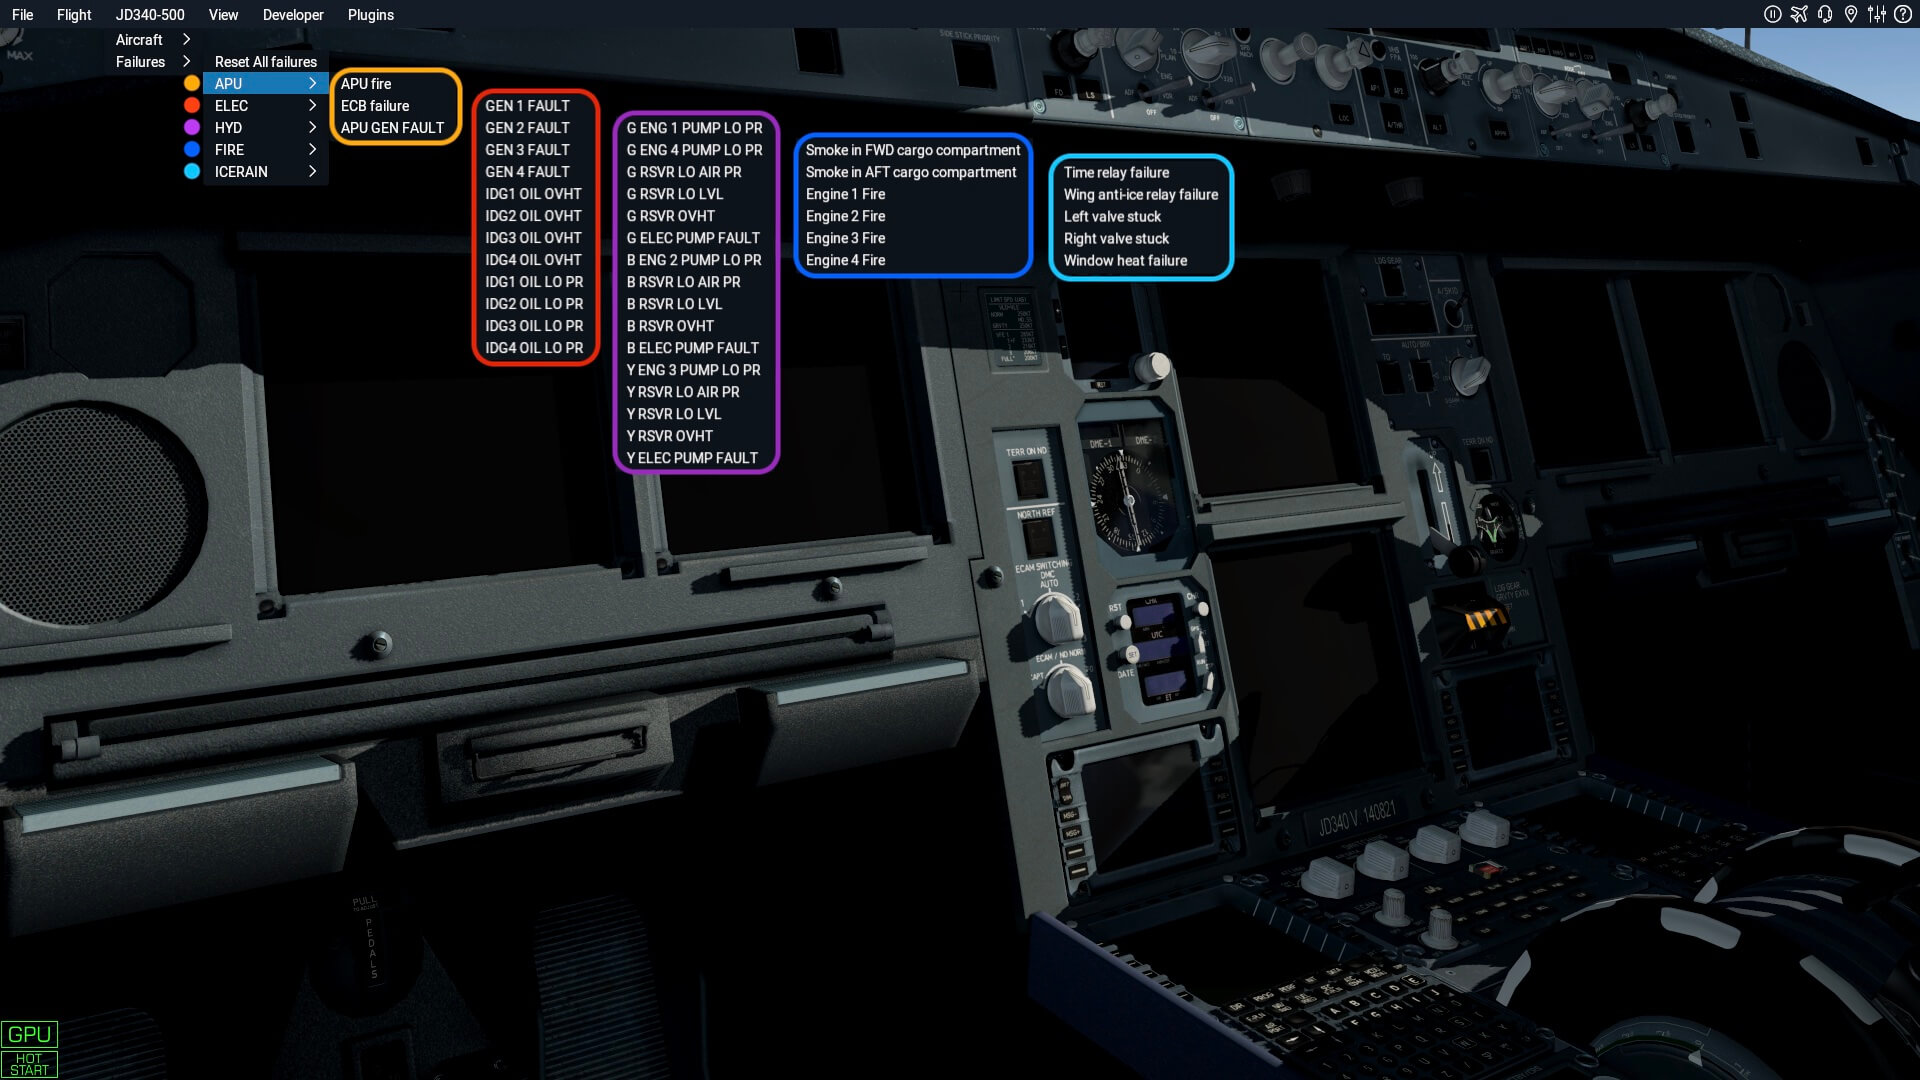
The JD340-500 Airliner – Failures menu – allows you to introduced failures or to reset failures. A range of system failures from the APU (Auxiliary Power Unit), ELEC (only failures related to the AC (Alternate Current) system), HYD, FIRE and ICERAIN (Anti-Icing and Rain protection system). See the following compiled screenshot of all possible failures that can be introduced.

When you’re familiar with JAR aircraft, you’re for sure aware that the MCDU has also several pages to make the necessary changes or configurations.
Using MCDU
First of all, by default the MCDU pops-up when you load the JD340-500, but I can imagine that you don’t want this. More about that later and how to disable this MCDU popup feature.
From the modeled MCDU the following keyboard button isn’t active namely the SEC F-PLN. Both the ATC COMM and MCDU MENU buttons have the same output namely showing you the JD340-500 Airliner MCDU MENU page. Anyway, you can click on the build in 3D modeled MCDU or, much easier, you assign a keyboard combination to it. With this keyboard combination you can request a floating 2D popup MCDU, but with the same key combination you can also let it disappear. See for this the following screenshot and check out the assigned “CommandShowMcdu” f6.

The popup MCDU is not resizable which means, it can be a bit small. The higher your monitor resolution, the smaller will be the popup MCDU. Another thing, the MCDU has a “close cross” in the RH upper corner of the MCDU. Click this and the MCDU disappears. When you want to drag the 2D popup MCDU to any other location on your screen, place your mouse cursor somewhere on the display. hold the LH mouse button and drag the MCDU. You can only drag is within the current X-Plane screen. You can’t undock the MCDU and move it to either another monitor or to an iPad / tablet.
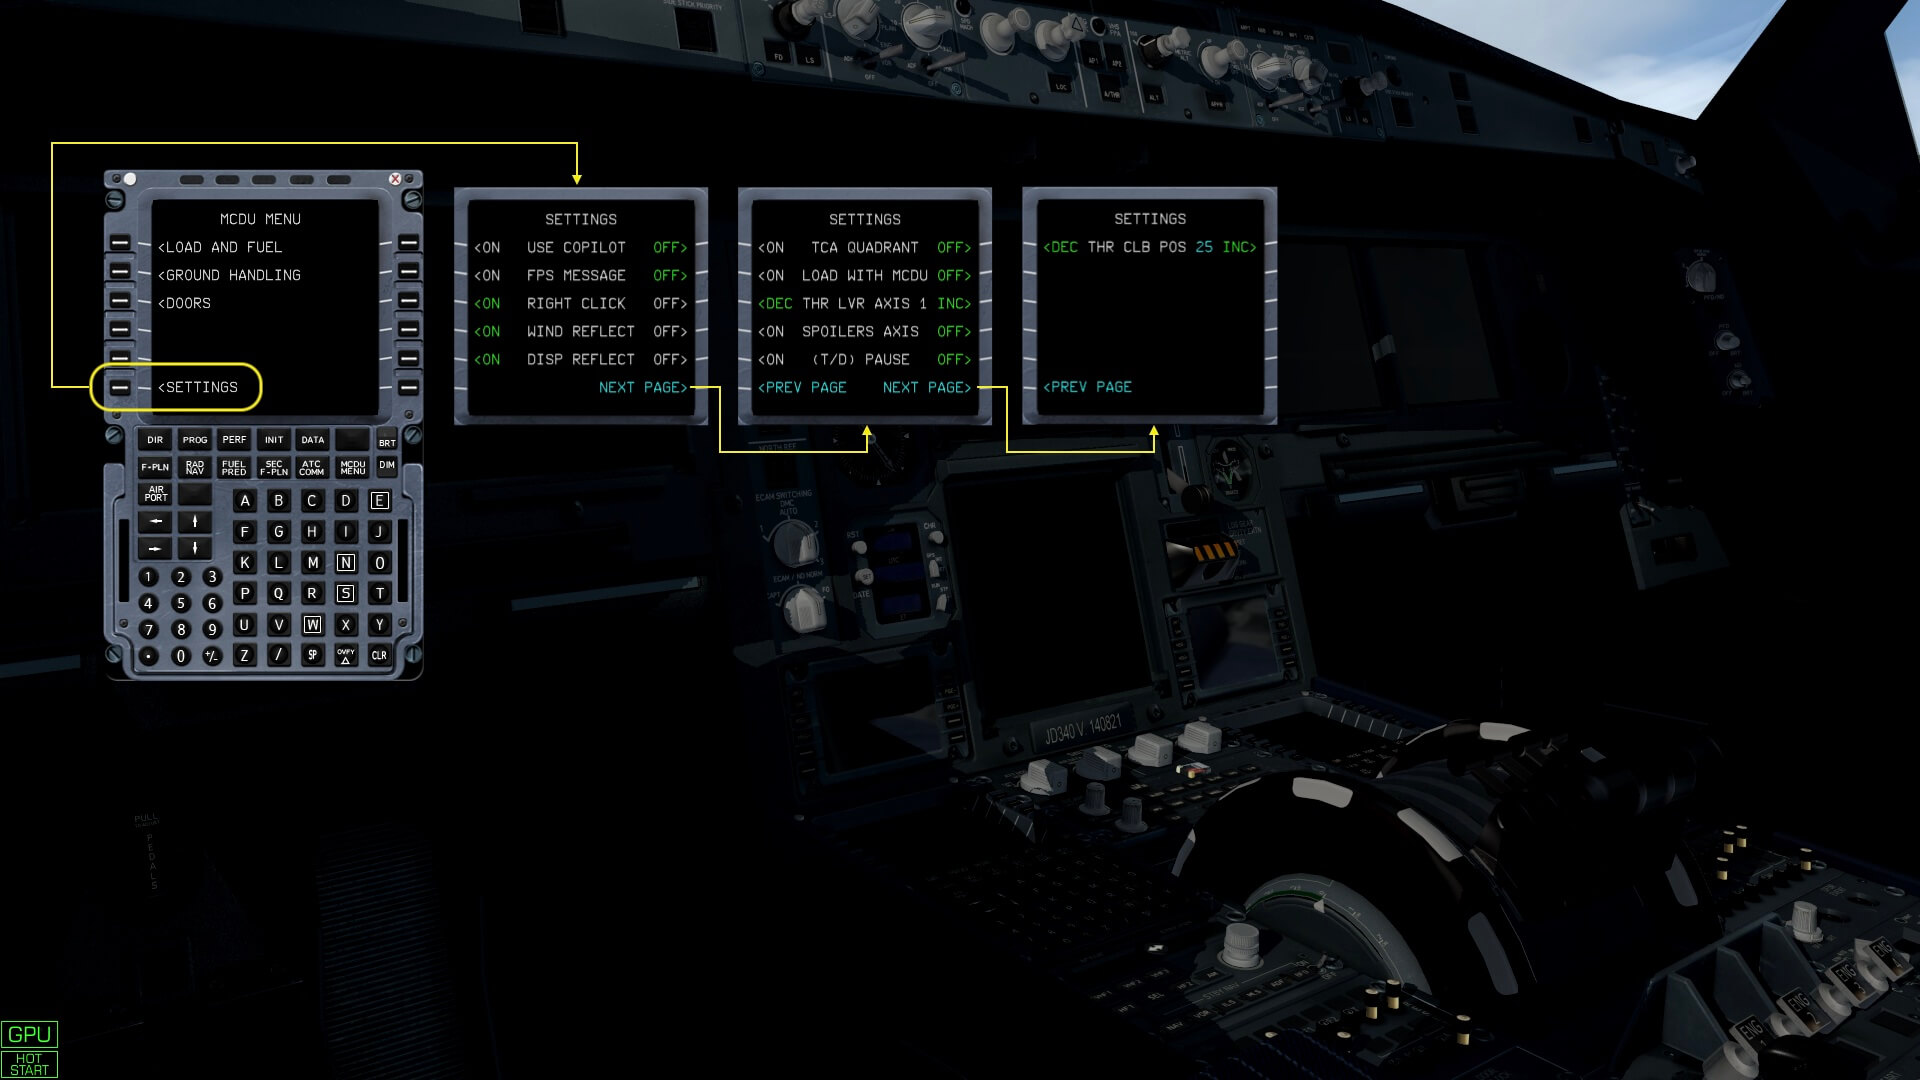
The JAR MCDU is not only used to load your flight plan or to make the necessary changes into the flight plan and much more related to your flight, but it’s also the place via the keyboard MCDU MENU button to make configuration changes as well as to control the aircraft doors, ground handling and to adjust the fuel and payload.
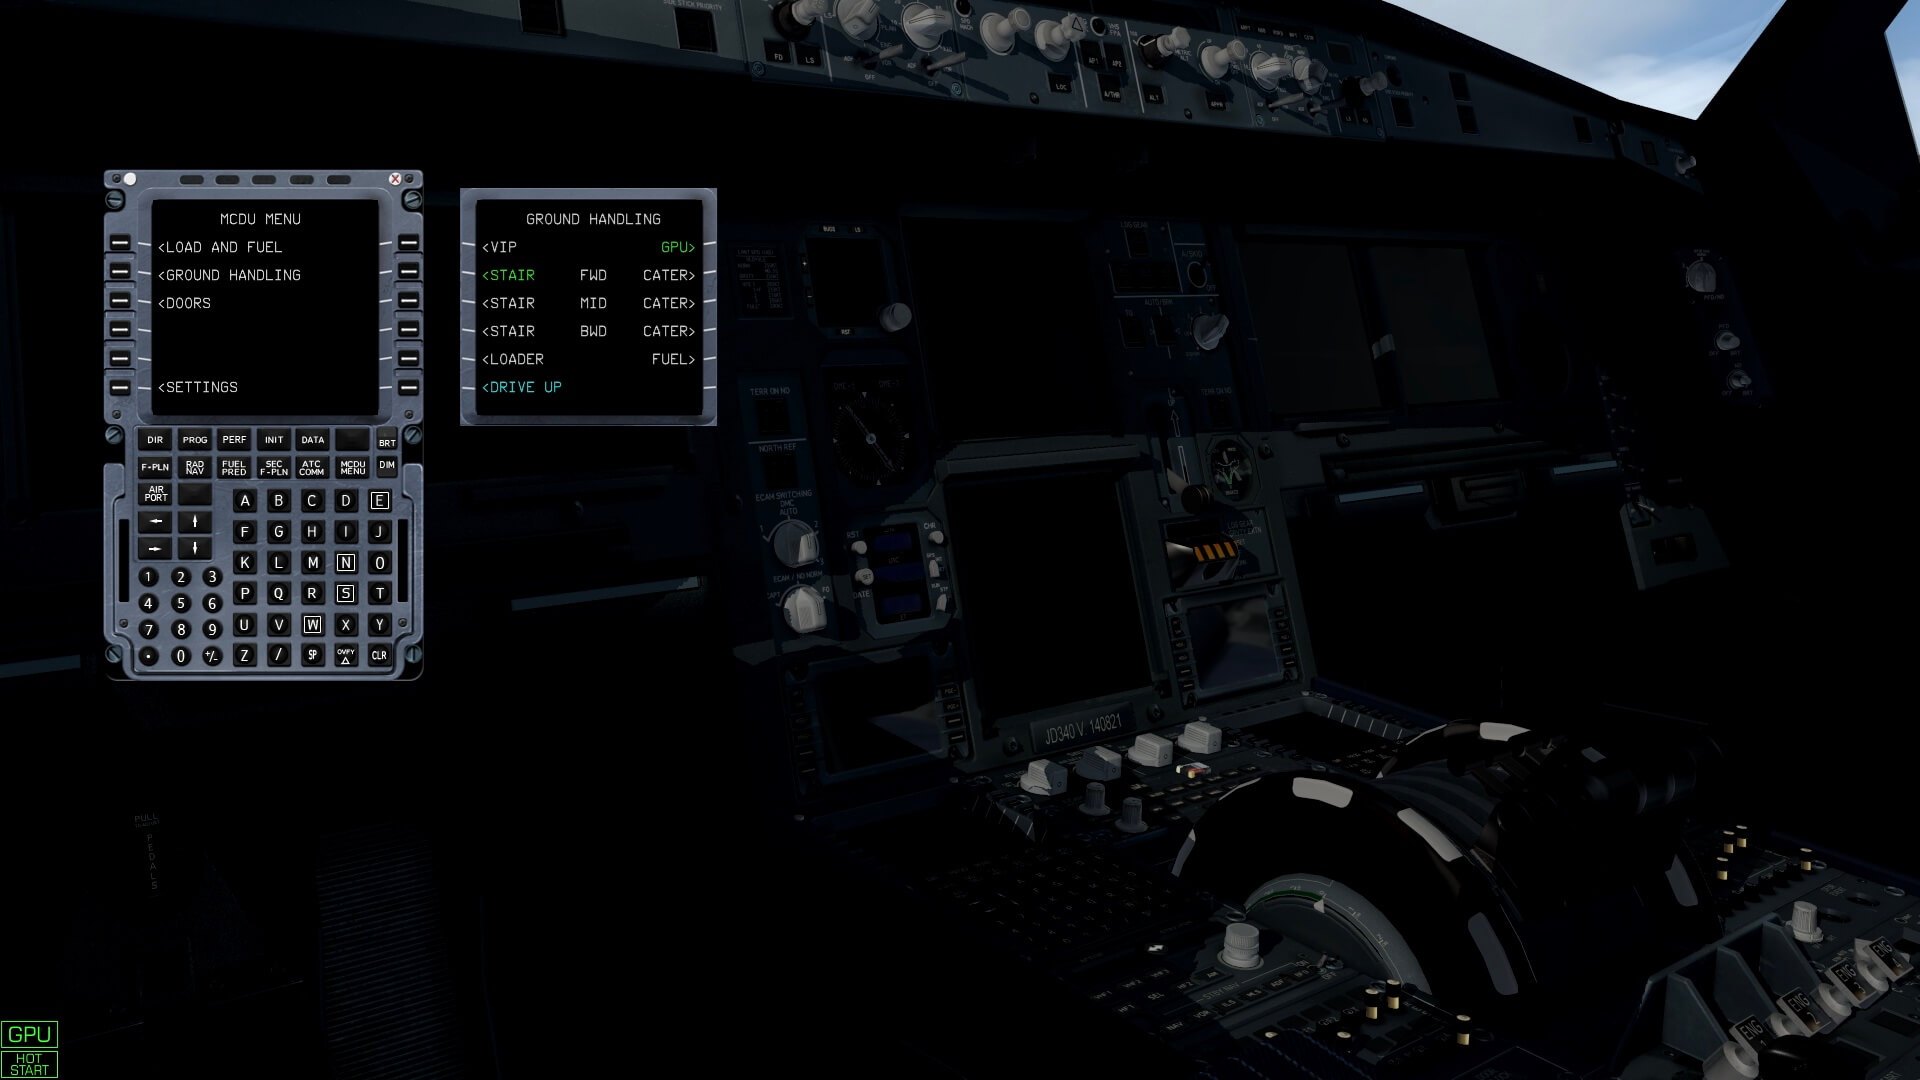
The MCDU MENU consist of:
– LOAD AND FUEL
– GROUND HANDLING
– DOORS
– SETTINGS


The LOAD AND FUEL MCDU page is more or less self-explanatory and allows you to change certain values as well as that it offers the THS (Trimmable Horizontal Stabilizer) position to be set, the ZWF and ACT (actual) CG in percentage. There’s no weight and balance graph included with this aircraft, but it is the place where you enter your total fuel, your cargo load and the amount of passengers. Don’t use the default X-Plane menu Flight – Edit Weight and Balance!
The separate GROUND HANDLING plugin is a requirement as it is also with the JD330. It allows you to add ground equipment around the aircraft and/or position stairs, buses, a VIP car, hi-loaders, fuel truck, catering trucks and the GPU. It can be downloaded for free from the JARDesign website and offers in combination with the JD340-500 Airliner full ground equipment.
The DOORS MCDU page is easy to go. When the respective door is green, it’s is closed. When you click on the respective door LSK, is becomes amber and officially means the door is no longer locked. In the above screenshot I clicked LSK 1L for the LH FWD PAX door, and LSKs 4R, 5R and 6R to open all the cargo doors.
And finally the SETTINGS MCDU page. Can you remember that I wrote that upon loading of the JD340-500 Airliner the MCDU pops-up? The SETTINGS consist of 3 pages and on page 2 LSK 2L – 2R you see LOAD WITH MCDU. This is by default ON so the LSK 2L shows green ON. As you can see, I clicked already LSK 2R and now OFF is green which means this is the active function, and the MCDU will not show up with every aircraft start.
2D Popup Displays
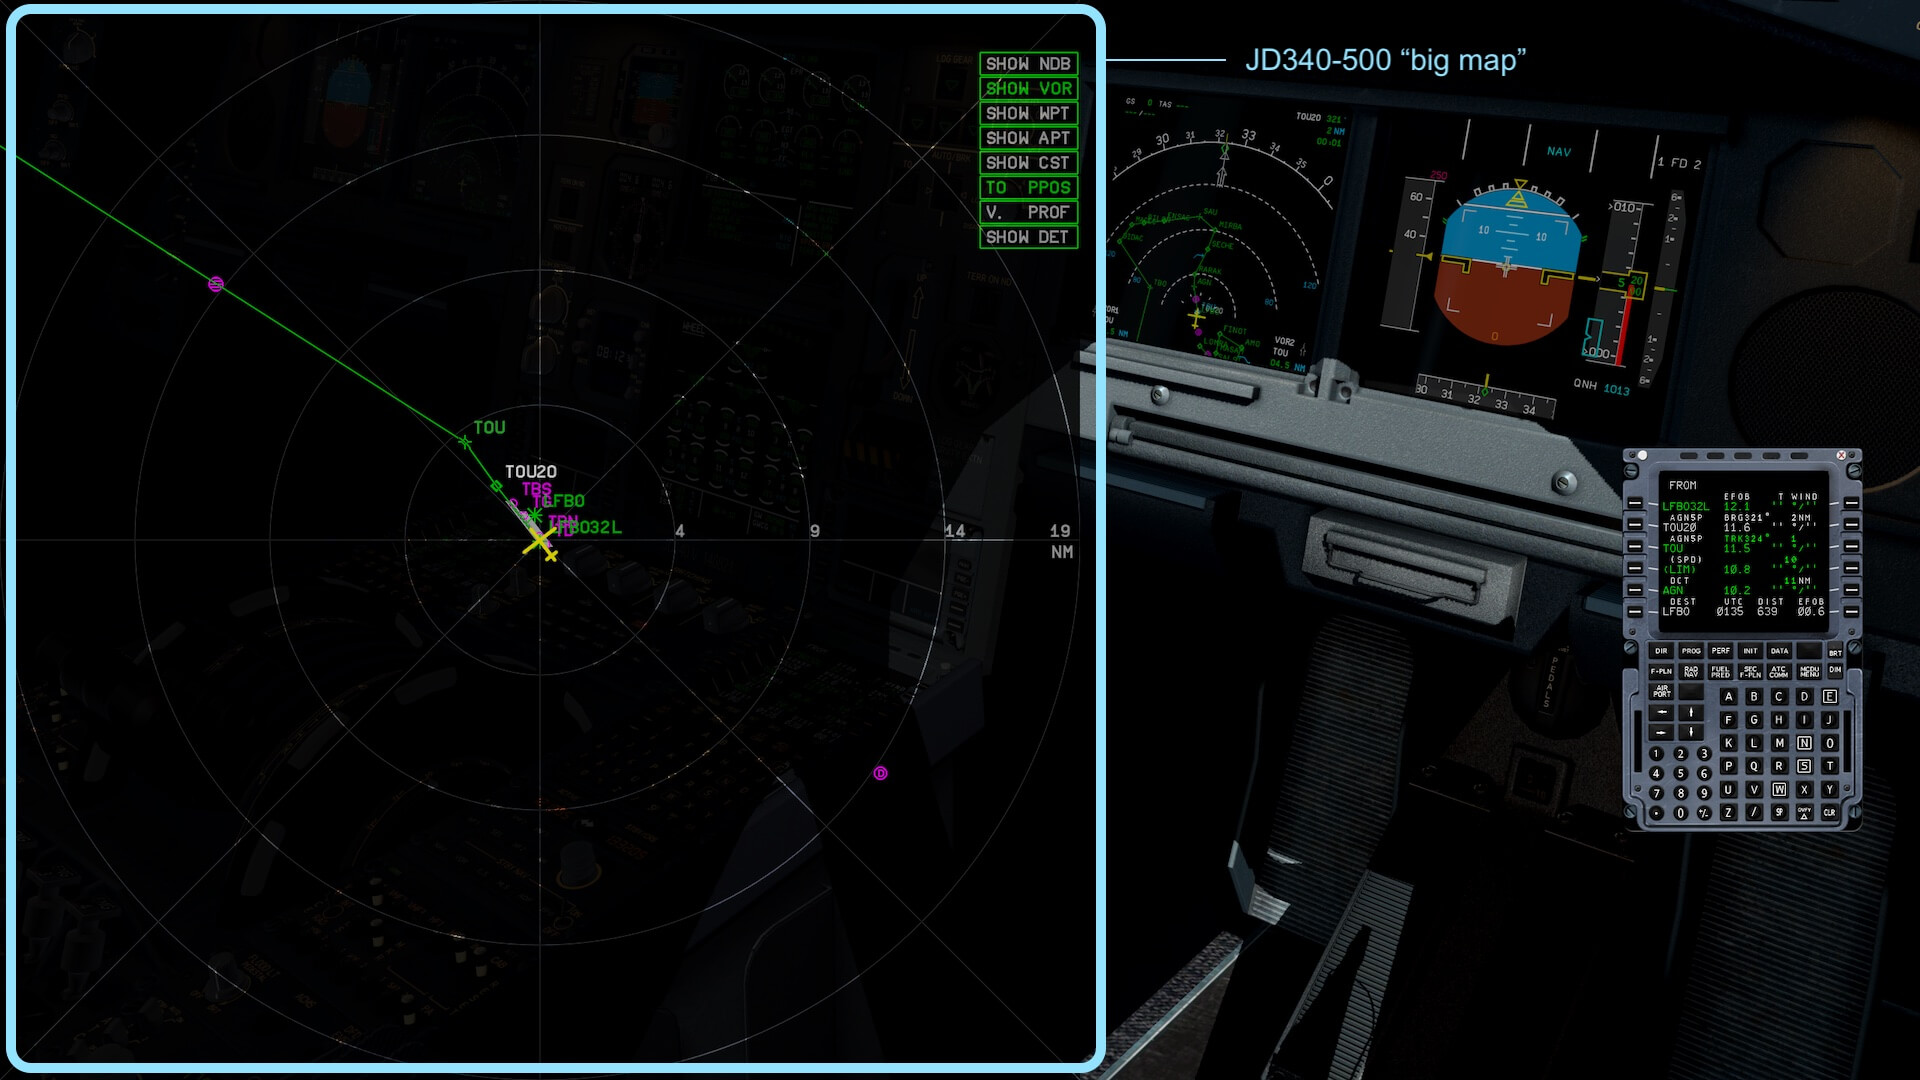
The JD340-500 Airliner comes with several popup displays. One of them is the previous discussed MCDU, as well as the EFIS DUs (PFD and ND) and the ECAM E/WD and SD, but there’s also the big map. It looks a bit like a semi transparant ND (Navigation Display), but according to Eugeny from JARDesign they call it the big map. To get it in view you can assign a keyboard combination to it. When you look closely to the screenshot, I assign F6 for the MCDU and F5 for the big map screen.
Dual or Single MCDU
I noticed this also with the JD330 that the modeled JD340-500 Airliner isn’t equipped with a dual FMS (Flight Management System) since selecting a page on one MCDU for example the F-PLN, the same page also appears on the other MCDU. Adding to the simulated single FMGEC is that the JD340-500 Airliner uses an in-house or dedicated developed Auto Flight System.
The real A330/A340 aircraft are equipped with a Flight Management Guidance and Envelope System or in short FMGES. It consist of 2 identical FMGCs (Flight Management and Guidance Computer) or sometimes known as FMGEC whereas the E stands for Envelope, 3 MCDUs (Multipurpose Control and Display Unit), 1 FCU (Flight Control Unit) and finally, 1 FM source selector. The FMGECs are responsible for three different functions; flight management (as we know from the FMS/FMCs), flight guidance (FD, AP and A/THR) and finally, flight envelope. There’s of course much more to tell about the FMGES and all what’s related to it, but that goes far beyond what’s needed for this review.
Adding a SID and STAR
A clean flight plan normally doesn’t contain a SID (Standard Instrument Departure) and STAR (Standard Terminal Arrival Route). You can add a SID and STAR with for example Little Navmap or add a SID and STAR with the JD340-500 MCDU as it is mostly done in real. When you think about adding SIDs and STARs in advance, you don’t know yet which runway is in use, so you don’t know in advance which SID you need and the same implies for the approach and landing runway. You don’t know if the wind comes out of a different direction or ATC orders to and on another runway then expected or perhaps there’s no wind at all, then in consult with ATC, you can request a certain runway which is convenient to land and so on.
Interactive Checklist
I discussed already the included manual which has no procedure list and checklist and I couldn’t find any in the AviTab nor that I’d seen – as of this writing mid of August 2021 – a clist text file that can be used in combination with the XChecklist plugin. For me and other simmers there’s a need to check with Evgeny from JAR if something is hanging in the air. According to Evgeny “there’s no paper checklist or Acrobat file included. On the other hand, when you decide to buy JARs Co-Pilot Linda, you have your own virtual interactive checklist. Even better, download Co-Pilot Linda for free, test it yourself snd Linda helps you till the takeoff phase.”
Your Virtual Co-Pilot “Linda”
Let me first start with … your personal co-pilot Linda isn’t included with the JD340-500 Airliner package. When you don’t own the JARDesign Co-Pilot package for this aircraft then you should disable Linda which is it by default.
When you decide to buy JARs Co-Pilot Linda, you won’t regret to have Linda next of you helping you with the procedures and checklists. No idea what Linda can do for you and if it’s worth to buy it? To guide you in the right direction I urge you to check out this JARDesign A340-500 Co-Pilot movie, but even better, test Linda yourself.
Feel free to download the JAR Co-Pilot package from the dedicated JAR forum, install it and test it out by yourself. Linda helps you out till the TakeOff phase. When you think Linda was a good help, then buy it from the dedicated X-Plane.Org store page or from the dedicated SimMarket store page.
Although it’s not my intention to discuss all the ins and outs of your Co-Pilot Linda, I will highlight a couple of things about her. This section is for those simmers who have read the review till so far and would like to test Linda. When correctly installed (see the included manual), you’ll notice that an additional JD340-500 sub-menu, namely CoPilot is added. The sub Co-Pilot menus however aren’t available yet till you select them ON (LSK 1L) at the MCDU MENU SETTINGS page USE COPILOT. The following screenshots shows you a couple of these steps.


In real the captain and co-pilot interact with each other in for example completing the procedures and checklists, so you can do it also in the JD340-500 Airliner. You can even ask Linda your co-pilot, to do all the steps for you. Up to You!
Wingflex
Always a hot item. Always a point of discussion. Always a difficult item since it’s not something like this or that is the correct wing flex. Of course, Airbus knowns it, Airbus also tests every new aircraft for their wing flex after it was designed on the computer, made by machines, bolded and riveted together by machines and employees and finally, it is tested. But how is it tested and what can a wing flex be … one meter up/down, perhaps two meters up/down or perhaps even more then 5 meters up/down? During the many discussions I had with Eugeny from JARDesign, I also found this awesome Airbus movie of a typical test for wing flex on an A350. I know, it’s the wrong aircraft, but it will give you a good idea what and how it can be.
The amount of flex is really a product of the material. The wing requires a specified ultimate strength; with metal, that translates into a given amount of flex. This can be varied within limits, but it is really the material, its stiffness to yield point ratio, and its fatigue properties, that control how much flex you are going to end up with. CFRP is a very different material, and has much less stiffness for the same yield point, and has essentially no fatigue problems. This is beneficial in that it provides a smoother ride in turbulence; the wing acting essentially like a giant leaf spring. There is some lift lost due to the nature of the curvature, though. However, this is relatively small. (Source https://aviation.stackexchange.com/)
Preparations II – Adding Add-Ons
The Year 2002
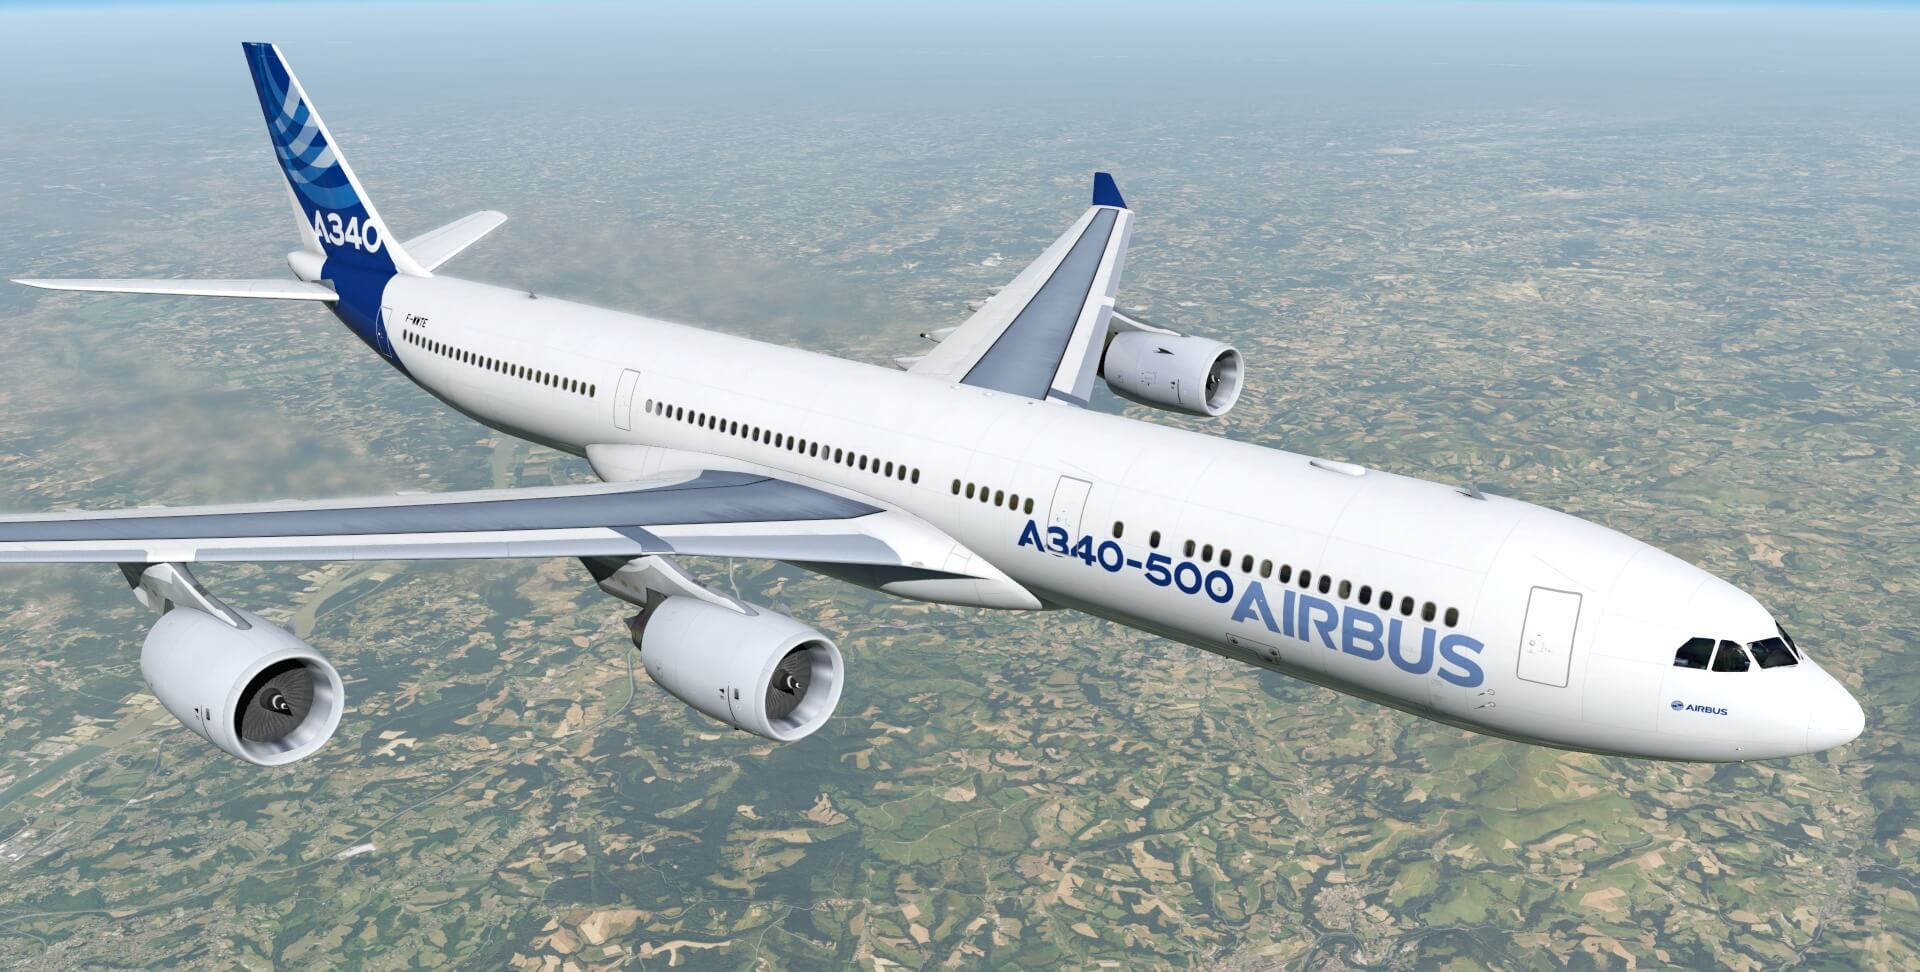
It’s the virtual year 2002, February 21st which is 10 days after the real A340-500 made his/her maiden flight. Finally, Airbus Industries main assembly facility had completed the ultra long range A340-500. The real Airbus A340-500 is history, but the JD340-500 Airliner is alive and how! For this review I used two outstanding liveries from X-Plane.Org user Homer Jay who painted the current and original old Airbus house liveries.
My JD340-500 Airliner is parked at one of the Airbus Flight Centers opposite of the Clément Ader hangar.

Adding Scenery
For a realistic overview I try to use the Aerosoft Toulouse/Blagnac Airport package version 1.03. You and I can also use the freeware XPFR LFBO package but this is officially not for X-Plane 11.
Further on, I use for photo realistic ground textures the tiles from Zones-Photo. The ortho texture tile you need is +43+001, but since Zones-Photo offers these photorealistic packages for free, you can decide to download a couple more of ground texture packages. But there’s more that you can add or need. I also added from SimHeaven X-Europe, Vegetation library and vegetation overlay ortho.
Preparations III – Flight Plan
Creating a Flight Plan
Some more background information on how to create a flight plan and what or which programs we can use for this is always a struggle. First, what kind of flight plan extension is the JD340-500 Airliner using? Not only applicable for the JD340-500 Airliner, but also applicable for all other JARDesign aircraft; flight plan extension must be txt.
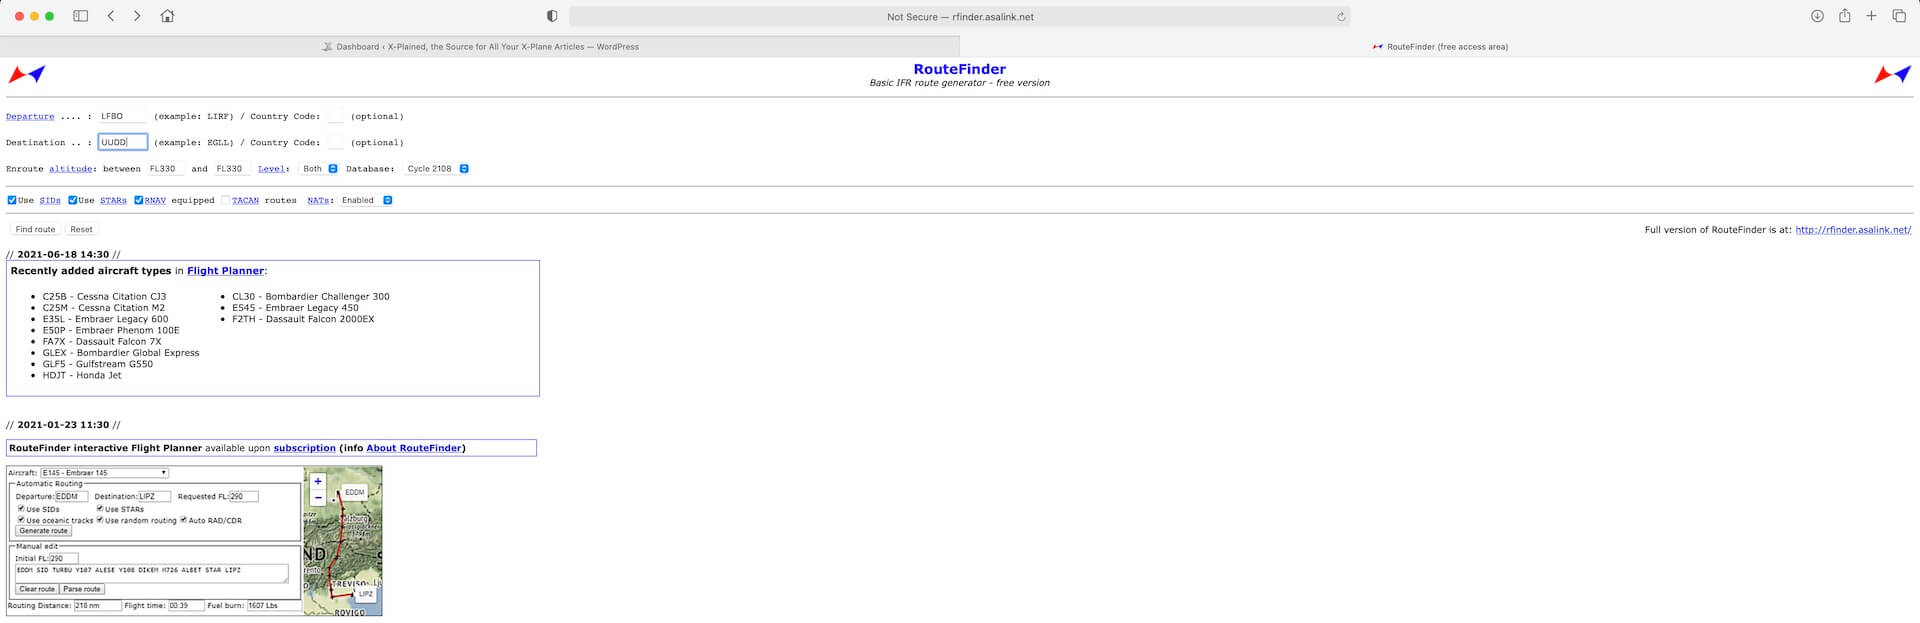
To create a flight plan you can choose from many online and offline programs or websites. The first is Routefinder that offers you quickly a flight plan.

Another option is simBrief. For simBrief you need an account which is free. SimBrief offers a wealth of flight planning information, but you need a legal license from your Navigraph account to update the AIRAC since the default AIRAC that is used within Simbrief is a very old version. But let me concentrate on saving the flight plan in txt format, but first you select within SimBrief the option JARDesign Airbus.

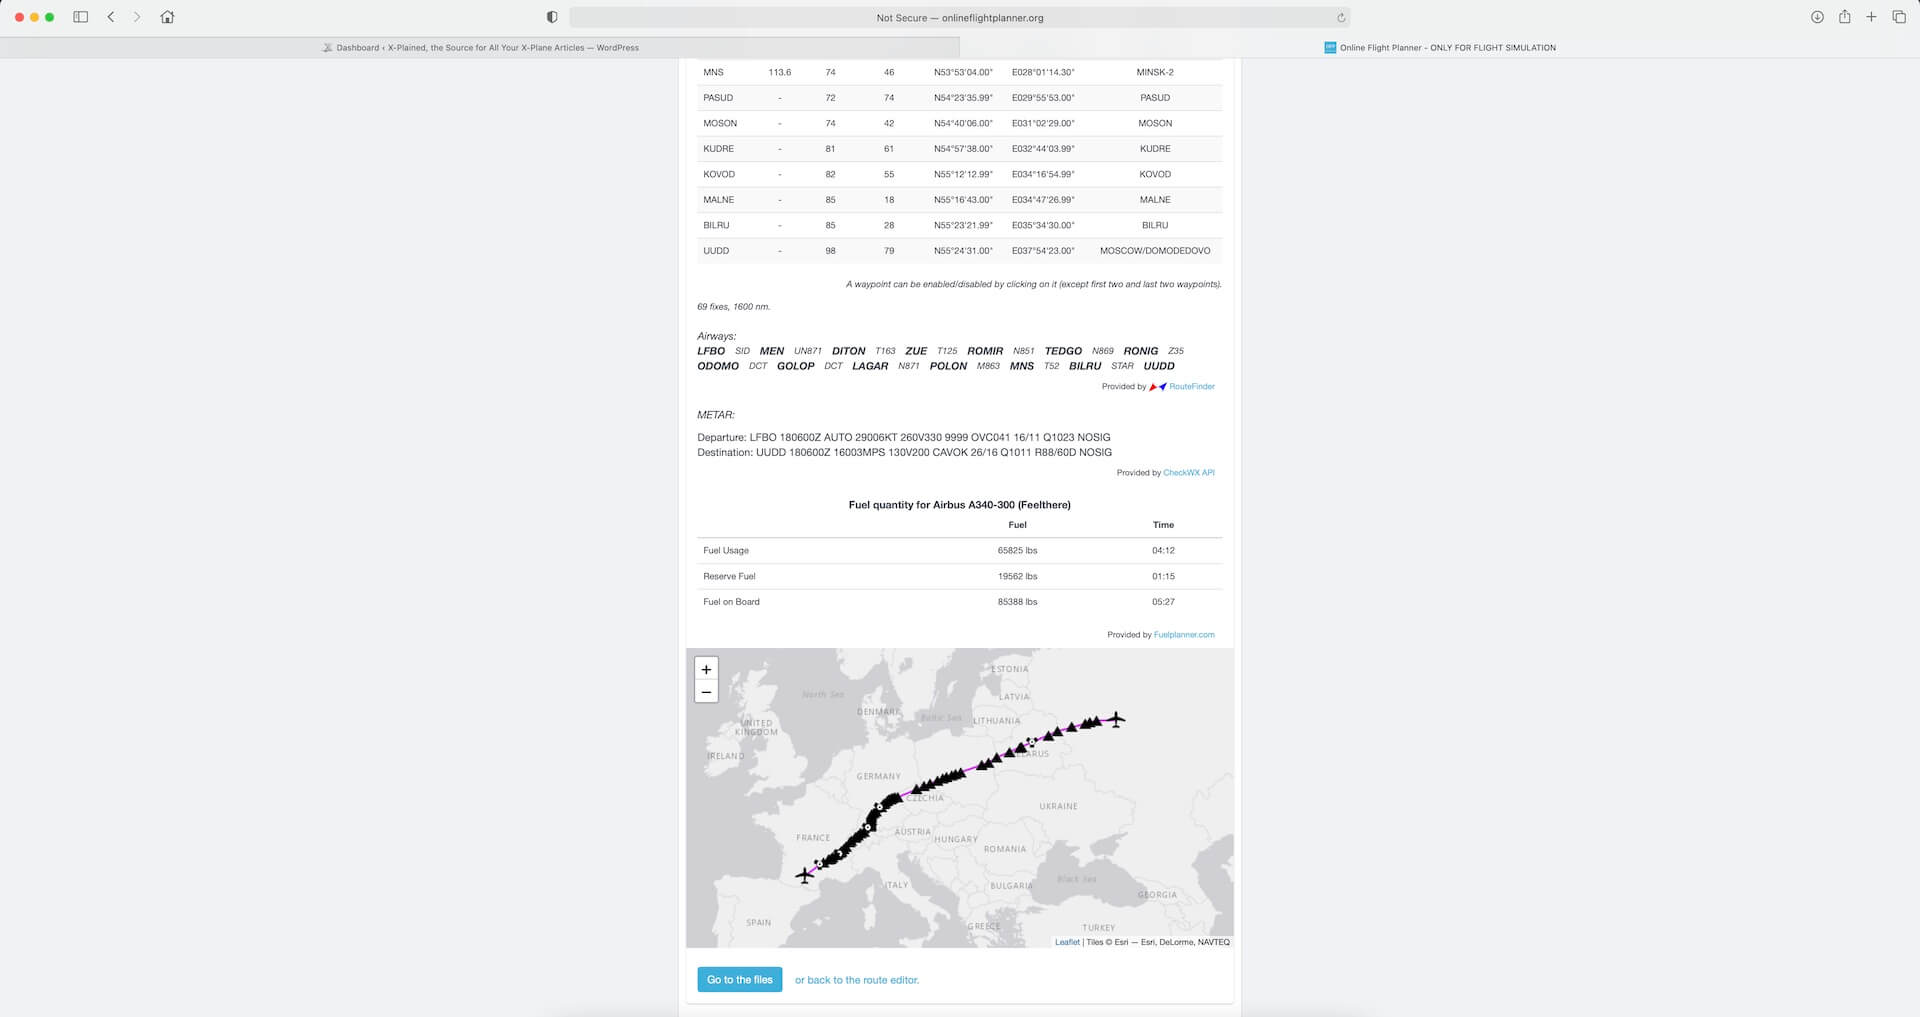
Then there’s also the browser-based Online Flight Planner. I used this online flight planner a lot, but you have no control over the waypoints you want which is a disadvantage while for others it is as real as it gets.


You can also use an offline program like the freeware downloadable LittleNavMap package and use it on your computer. I can tell you that this is an awesome planning program, but it can do much more then just flight planning. Besides many other things, this is a great tool in case you need to create flight plans for other aircraft that can be saved in many formats.

I saved in LittleNavMap my LFBO-LFBO flight plan as txt format (LFBOLFBO.txt) and copied and paste the txt file into the X-Plane dedicated JD340-500 Airliner FlightPlans folder. You find this “txt” in Little Navmap via menu File – Export Flight Plan to Aircraft Formats – Export Flight Plan to TXT.
Creating a JARDesign Flight Plan
In the previous section I explained the possibility to use dedicated flight planning programs to create my flight plan. If you don’t like to use other programs or websites to create your flight plan, you can also decide to use the JD340-500 Airliner MCDU. Ho ho, hold on, does the JD340-500 Airliner has a flight planning program build in?
The answer is YES!
Lets go you an example.
I’m at LFBO Toulouse/Blagnac and my destination is Domodedovo, one of the Moscow airports. At the MCDU INIT page I type in the scratchpad LFBO/UUDD and click LSK 1R FROM/TO. At the next MCDU page select LSK 2L . You understand it already, when you click LSK 2L it will generate a flight plan for you.
Next click LSK 6R INSERT* and the generated flight plan becomes active, and the MCDU page goes back to the INIT page. To see the flight plan, click the F-PLN MCDU key. It seems we’ve got a F-PLN DISCONTINUITY at LSK 2L what we can’t remove yet. Another thing is, the EFIS ND map doesn’t show you the flight plan, but believe me, it’s there.
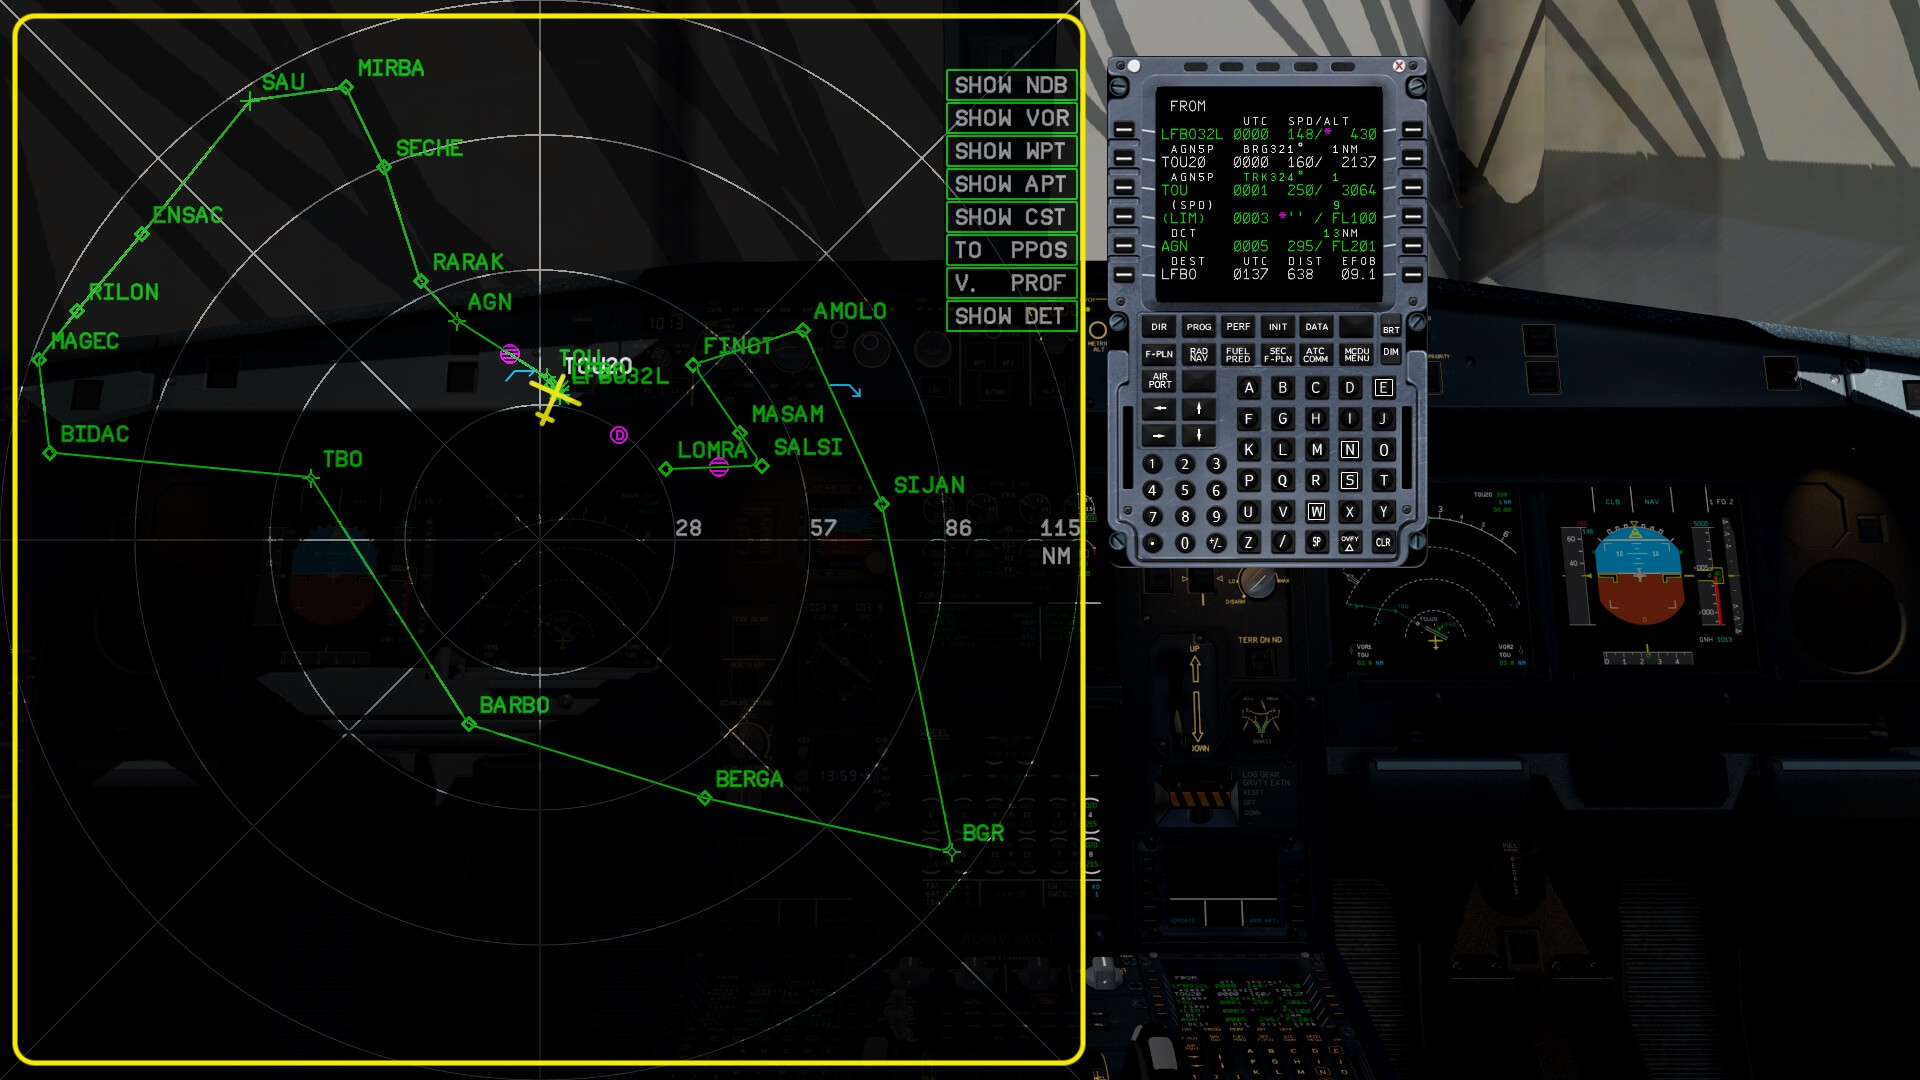
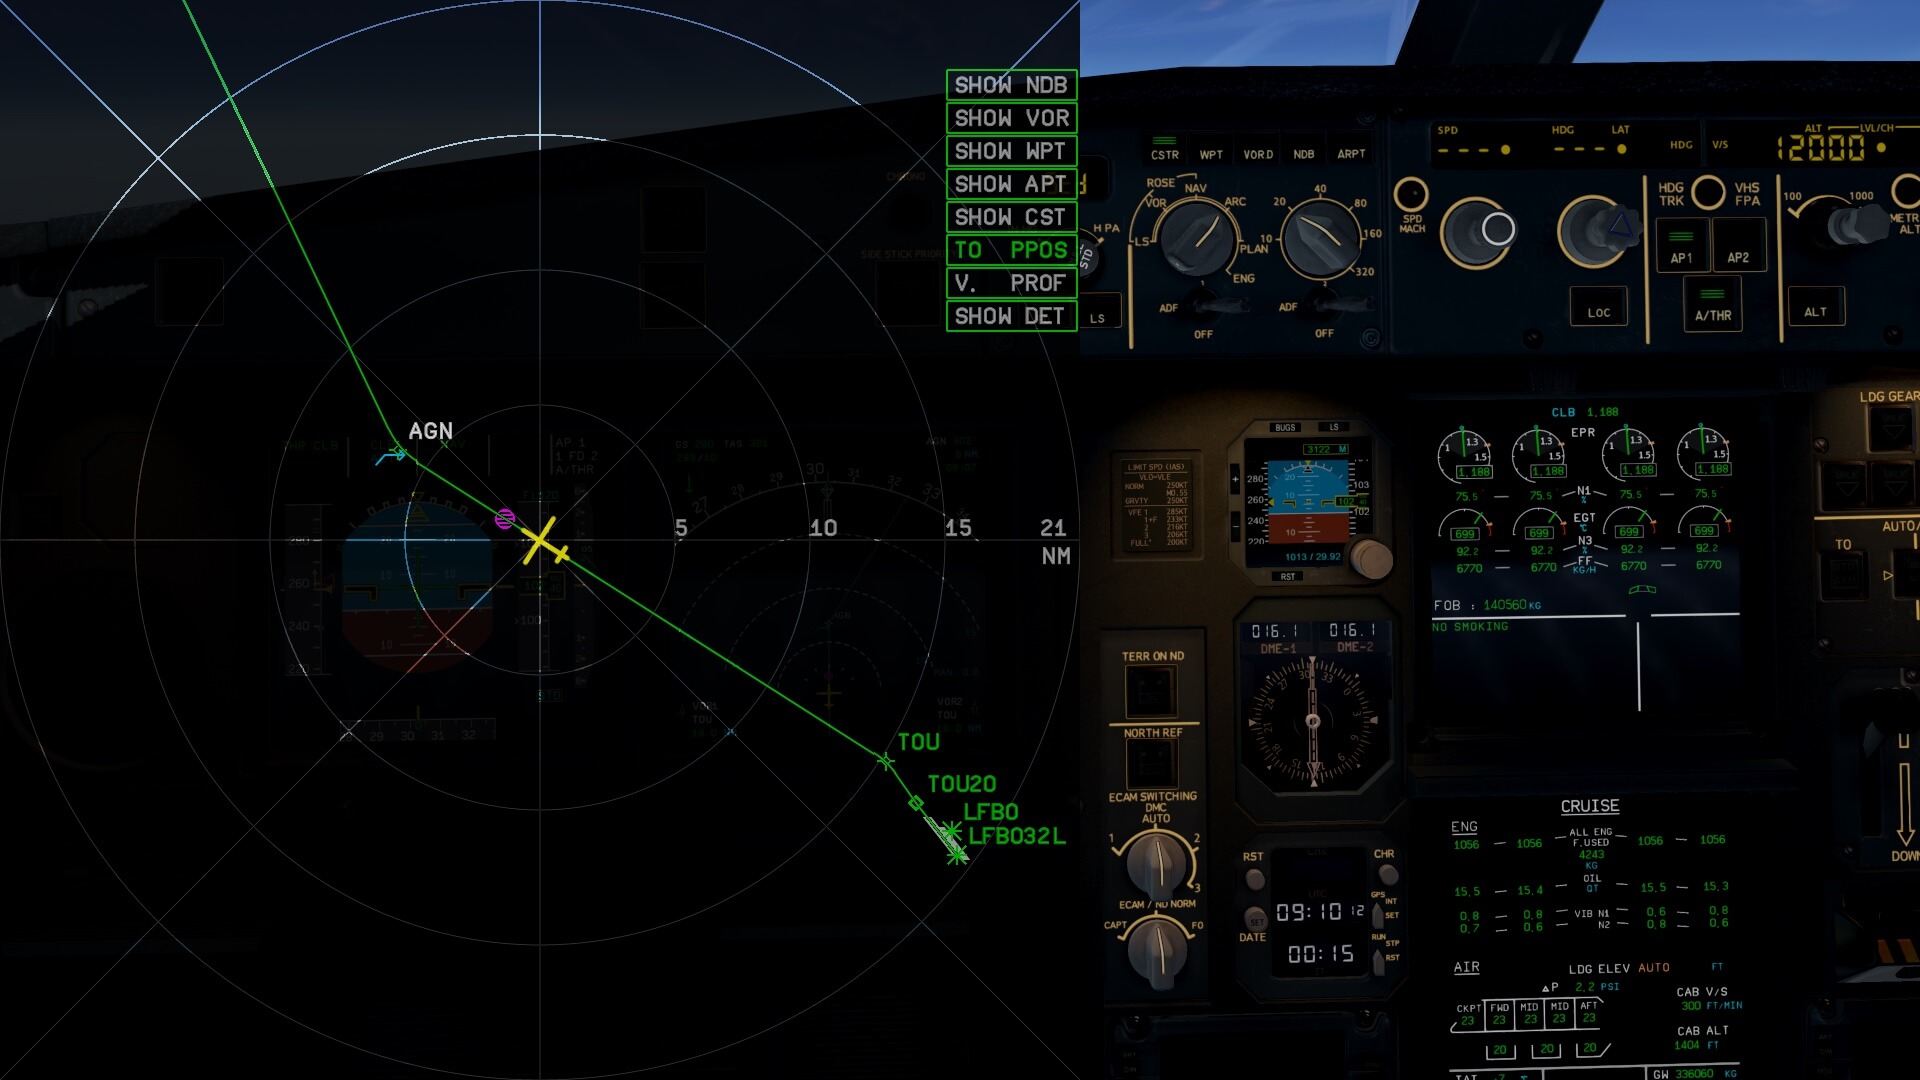
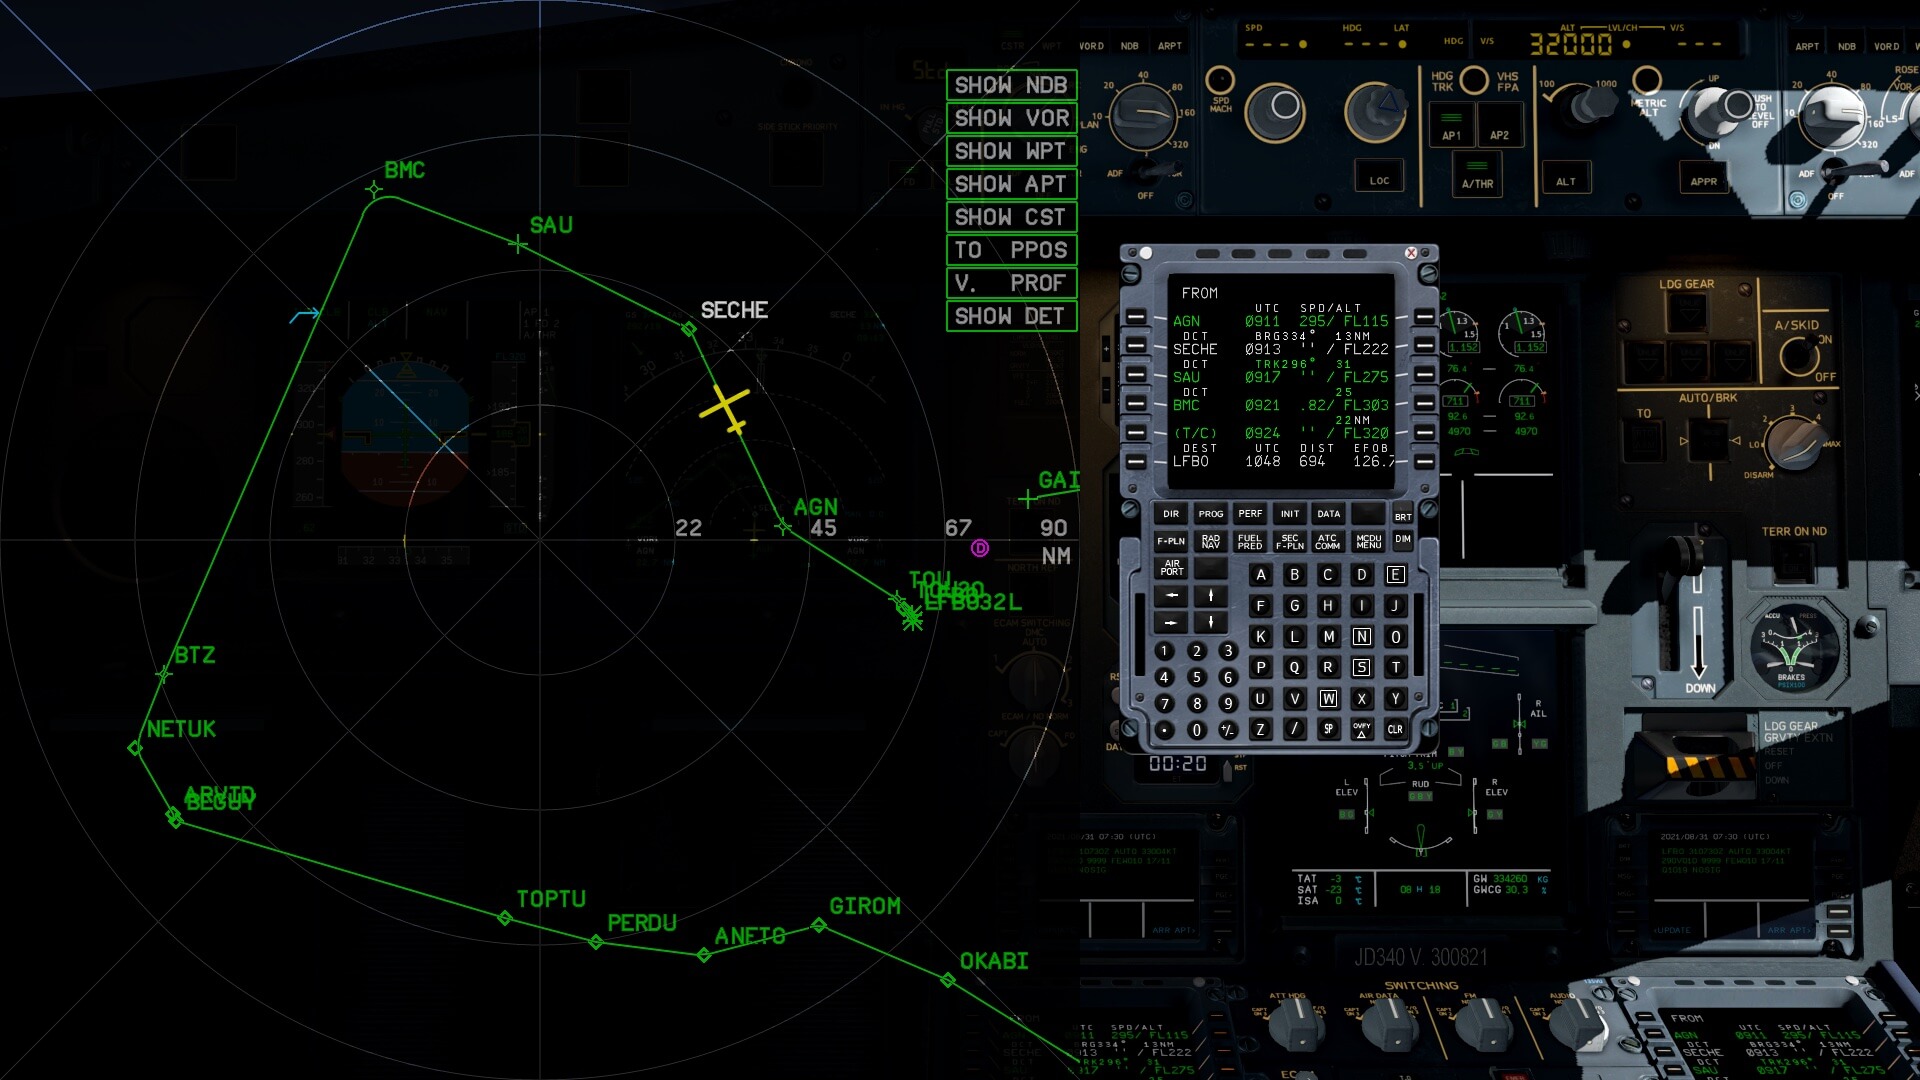
Bring forward the big map what I discussed before. To see the whole flight plan, click the TO PPOS button – it will become white – on the big map. This will unlock the PPOS of the aircraft at LFBO from the center.


First, move your mouse pointer to the center of the rose, then press the left-hand mouse button and sliding the mouse while holding the left-hand mouse button down for zooming out and up for zooming in. With the mouse pointer not in the middle of the rose, you can do with the same previous mouse actions – click the left-hand mouse button and hold – and move the whole flight plan on the map.
Preparations IV – Other data MCDU
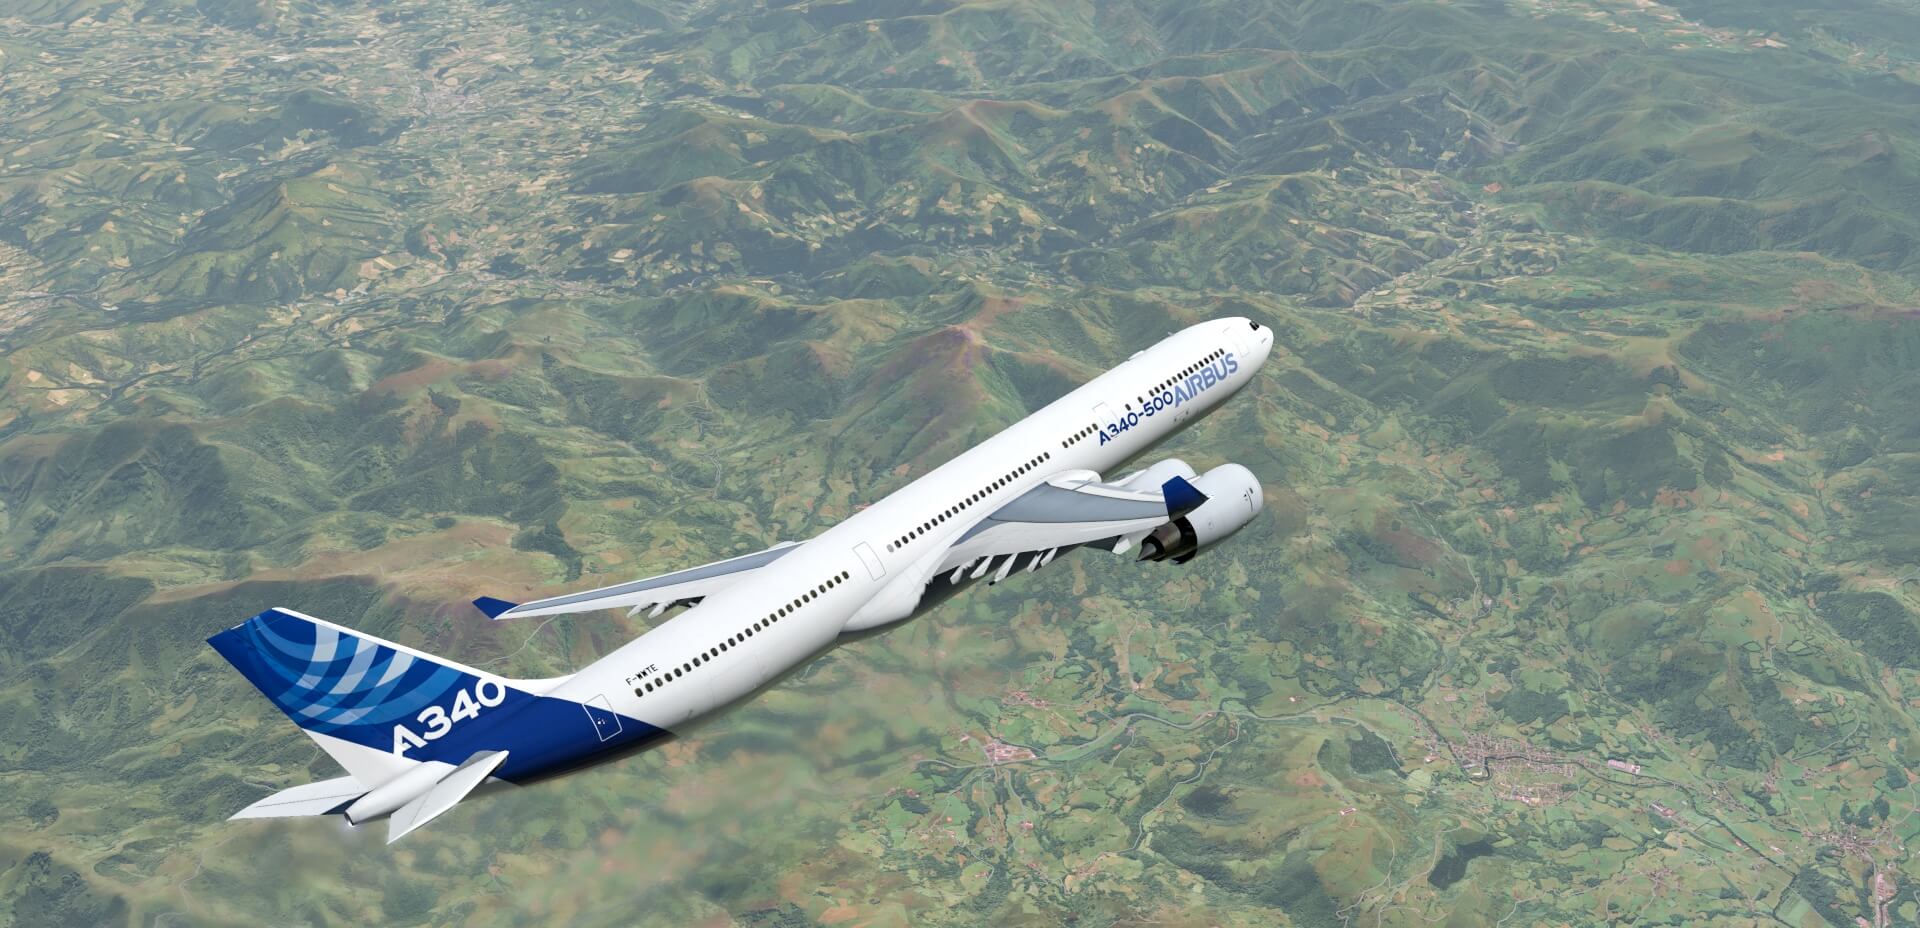
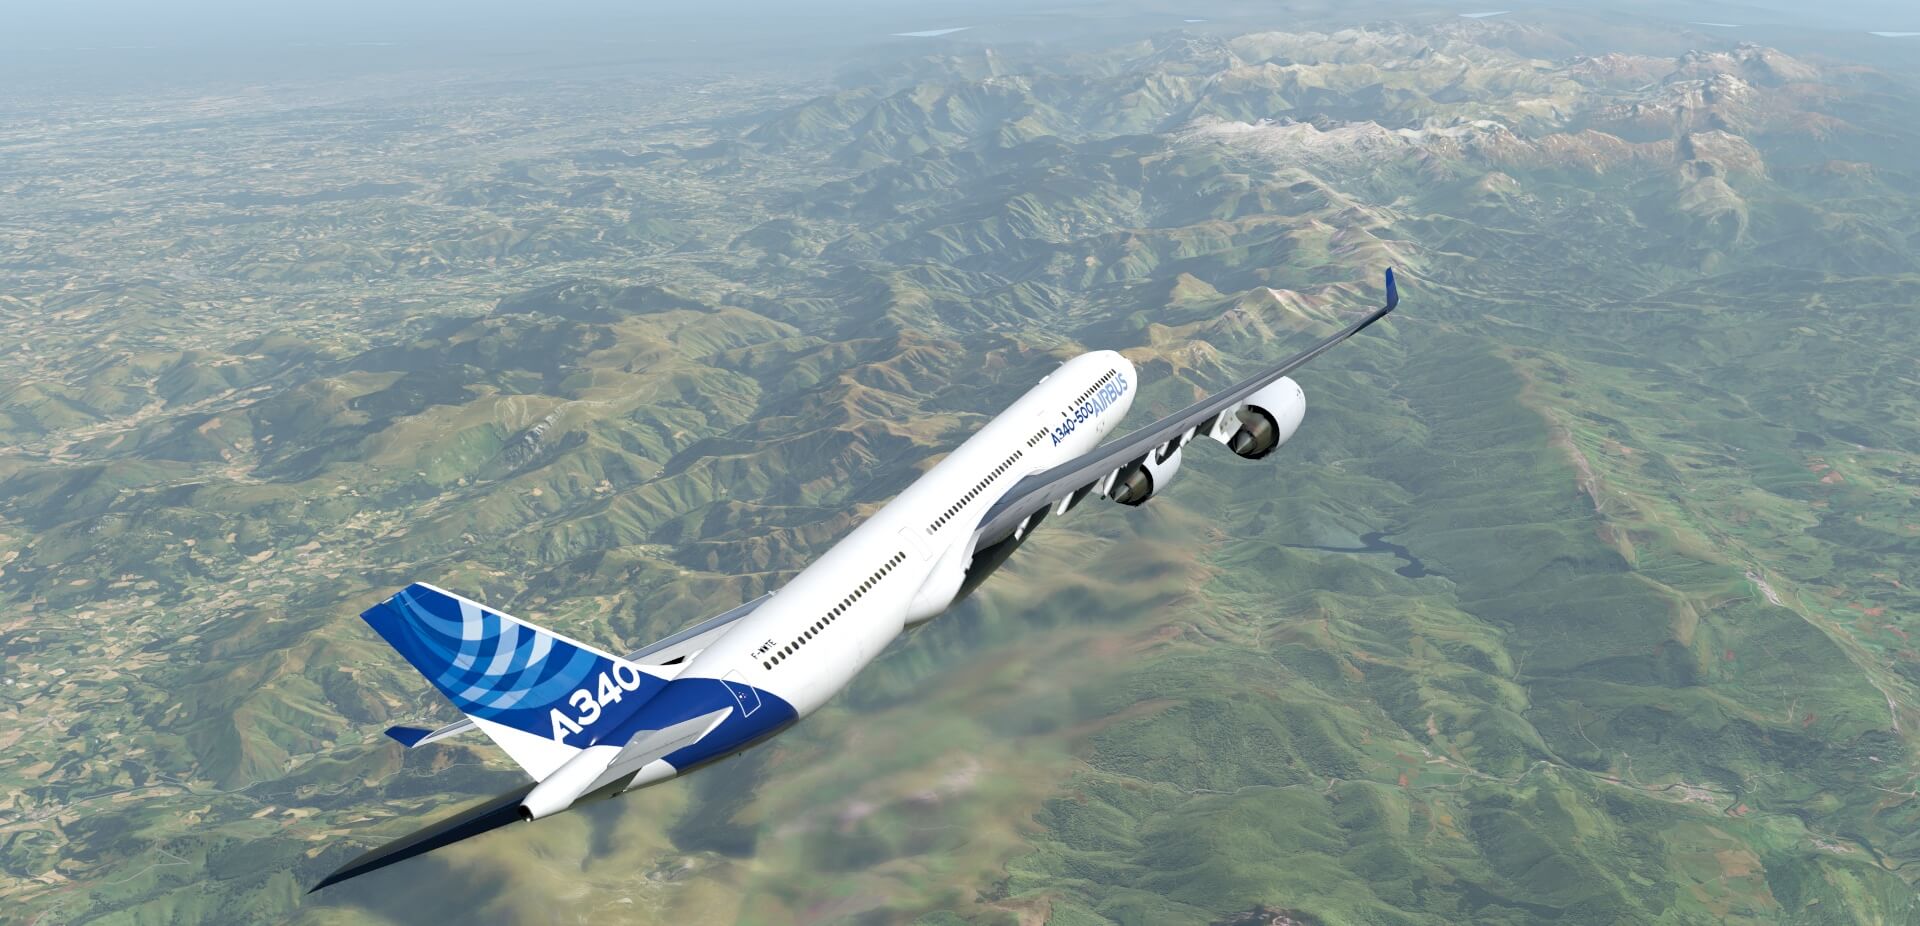
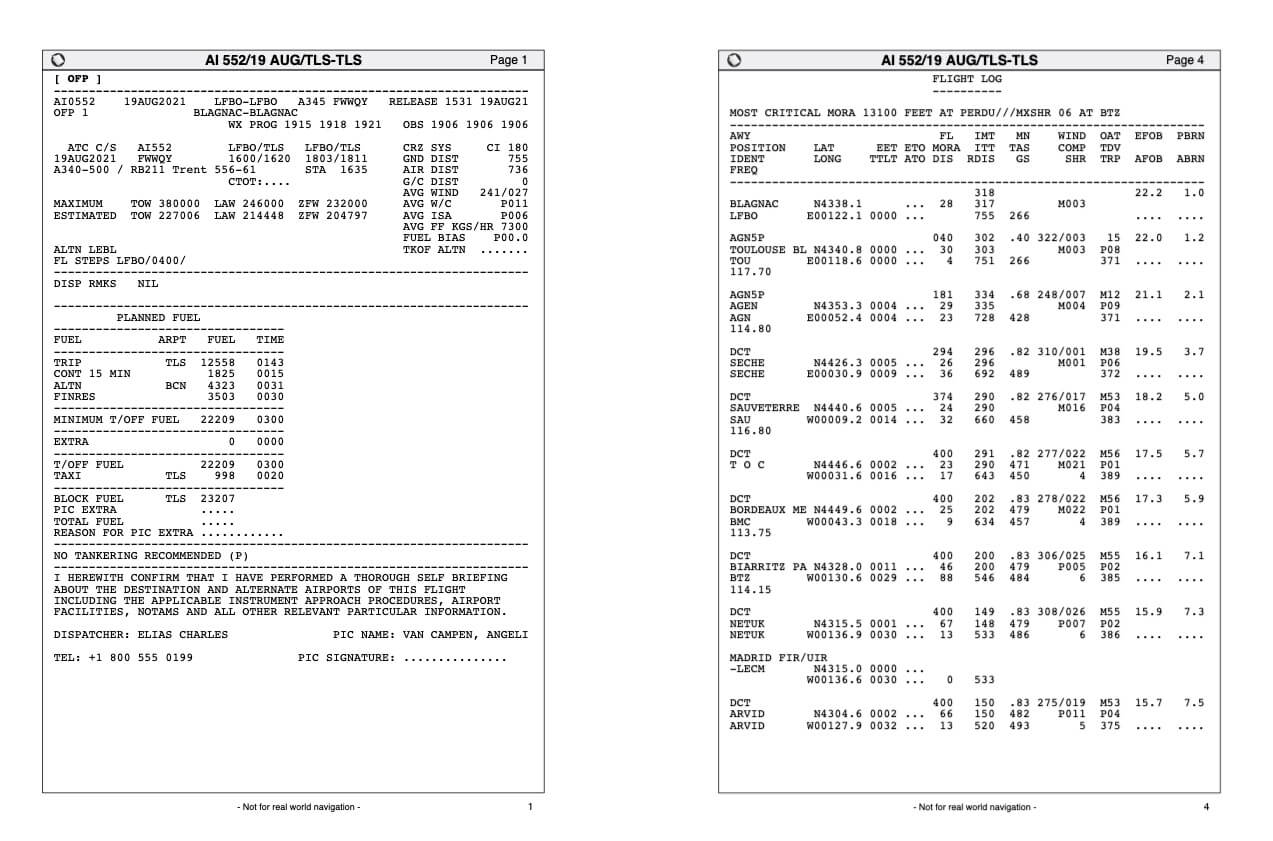
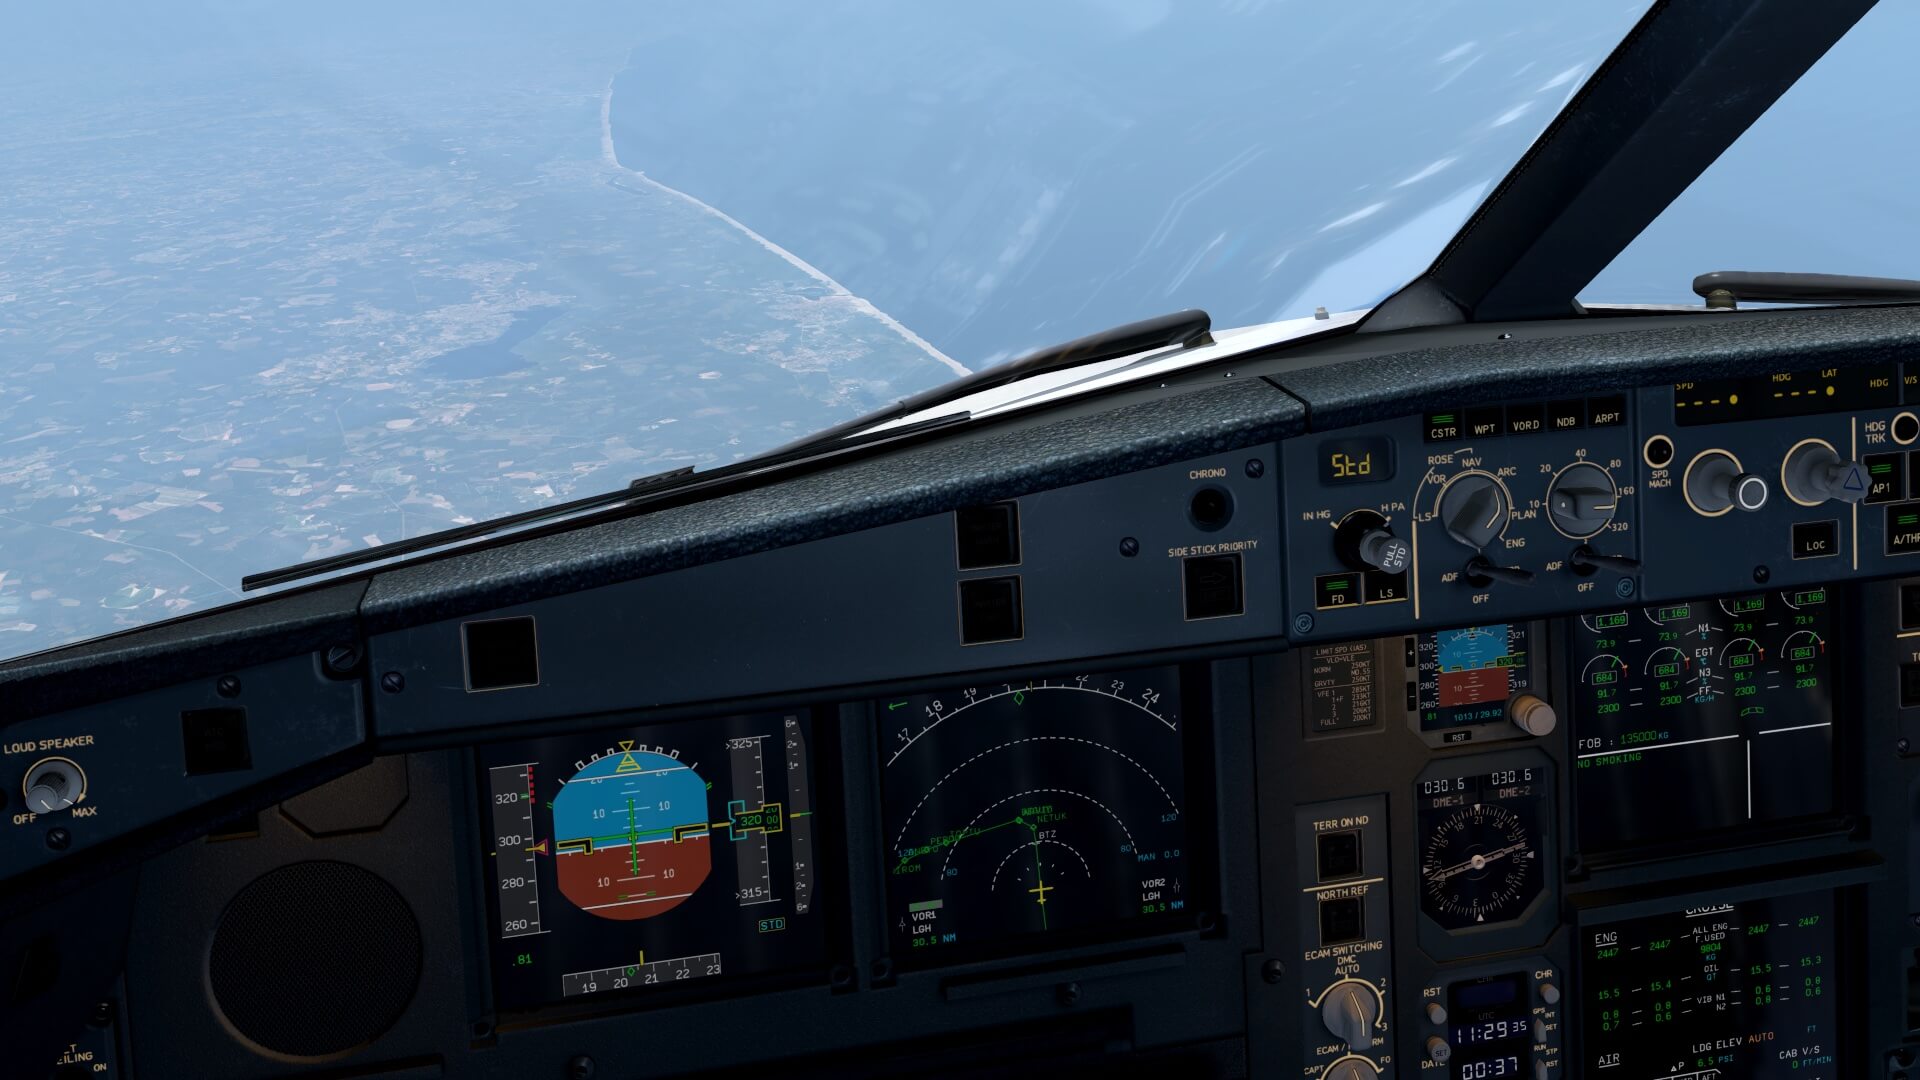
My test flight starts at LFBO Toulouse/Blagnac and my return will be again LFBO, but the test flight is really a test flight and allows me to test the simulated systems and do some special maneuvers like slow flights, behavior with the gear extended and so on. I’m not aware or have no access to real Airbus test flights, but I know they are held near the French-Spanish Pyrenees.
So it will be a bit as Airbus is doing their test flights. My cruising flight level will be FL320 and I will after departure fly in the direction of Bordeaux, then in a southern direction to the Pyrenees, over the Mediterranean Sea and via the southeast of France back to LFBO.
In case you want to fly my test flight plan too, this is how the LFBOEXTT.txt file content looks like: LFBO SID TOU DCT AGN DCT SECHE DCT SAU DCT BMC DCT BTZ DCT NETUK DCT ARVID DCT BEGUY DCT TOPTU DCT PERDU DCT ANETO DCT GIROM DCT OKABI DCT PUMAL DCT VEVUT DCT SOSUR DCT DIVKO DCT FJR DCT BADAM DCT GAI STAR LFBO and here’s the download link for this flight plan.

Checklist, MCDU and CI (Cost Index)
The first item deals again with the checklist. I did discuss this before that currently there’s no NORMAL PROCEDURES checklist or any other included unless you buy the JAR add-on Co-Pilot Linda. I do have the NORMAL PROCEDURES part, but it’s much easier when it is available via the Web, right?
I found 2 interesting Acrobat documents – link Flight Office and link SmartCockpit.
You know that you need to enter the COST INDEX (CI), but since there’s no automatic function for this like e.g. the aircraft TO speeds, it would help when you know what to enter. The following is a link to an official Airbus document from 1998 named Gettings to grips the COST INDEX. Yes yes, I know, it’s an old document and I’m not 100 percent sure if it’s still up-to-date, but with this document you get a better understanding about the cost index value.
Starting at page 12, the CI explanation begins for the A330 and A340 and at page 21 there’s a small table, and yes, I know, it’s for PW engines, but it shows that the CI value starts at 0 and goes up to 200. In other words, when you enter a value of 50, or 100, you’re always in a good range. The idea is this; the higher the CI value, the more fuel you use. If this is programmed in this way that it’s noticeable, is something I’ve not tested yet.
I found at skybrary.aero the following information. Hopefully this helps a bit understanding the differences between a low or high CI. According to skybrary.aero “There is great variation between operators on the CI that they use for a given type or in a given situation. For example, one airline generally uses a CI of around 9 in the A320 which results in a climb speed of about 290, a cruise speed of about .76 and a descent speed of about 260. However, if the aircraft is running late, the crew may use a CI of 50 or more which would give speeds of 320, .79 and 330 for the same phases.”
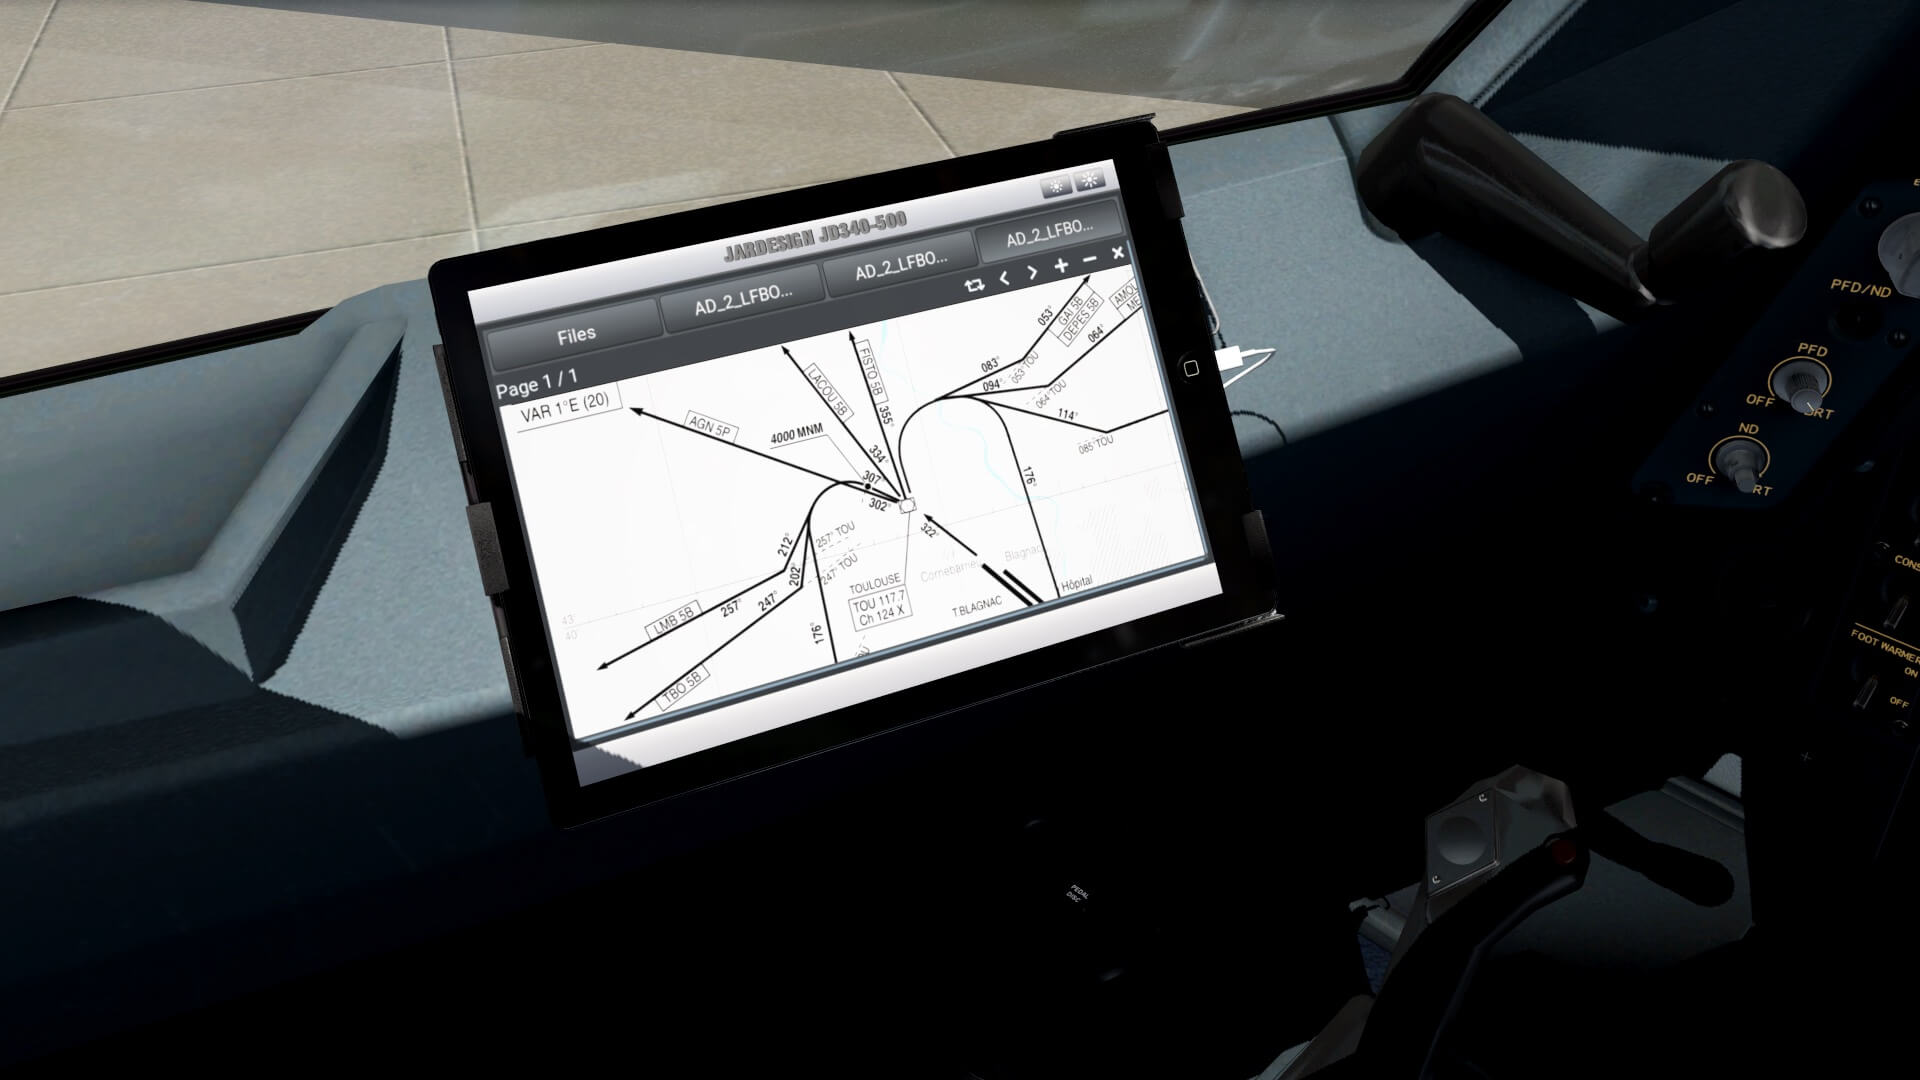
Unless you have an Ultimate account with Navigraph or one from Aerosoft, you have access to all kind of a charts. If you don’t have such an account, you need to search the Internet for charts. And since I need LFBO charts, I’ve been looking for you too. You can seek for the official charts at the SIA website from France and in this case the link is the one that points directly to Toulouse/Blagnac.
Since this new JD340-500 Airliner is fitted with the AviTab, you can store downloaded Acrobat files directly in the charts folder of AviTab. The advantage of doing this is that you have always your charts nearby whether it is the airport diagram, a SID, STAR or ILS approaches. Although I’ve given you the official link, find below some of the charts I need.
JD Flight Part I | LFBO – LFBO
MCDU, Equipment, Engine Start, Pushback and Taxi
Before I start with my actual MCDU preparations, first these two items; RAAS or actually X-RAAS for X-Plane and your co-pilot Linda.
The official announcement of Honeywell in 2008 was this “Honeywell announced at the Farnborough Airshow 2008 that its Runway Awareness and Alerting System (RAAS) has been added to the Airbus catalog as a product available for all Airbus aircraft.”
That said, it’s not a part of the JD340-500 Airliner package, and therefore I don’t want to include it in this review, but in case you want X-RAAS you can download/install the freeware package from this dedicated X-Plane.Org link. It’s a plugin for X-Plane 10 and X-Plane 11, but I’m not sure if it still works with X-Plane 11.55r2 since the X-RAAS download link goes back to November 2017. What I can remember when I did together with Bruce Knight the JD330 review, it was not fully integrated in the JD330 PFD.
RAAS (and X-RAAS) is an electronic detection system that notifies aircraft flight crews on the ground of their position relative to their allocated runway but it also warns the (virtual) crew in flight.
I use Linda for all her “co-pilot” steps to perform. While Linda starts with the Preliminary Cockpit Preparation Procedure, followed by the Cockpit Preparation Procedure, provided I agree that she can continue, I start with the MCDU. Most of the MCDU items that I need to enter are calculated by JARDesign, but it’s worth to enter your flight data and other stuff of the A340-500 via Simbrief in a newly created flight. The Simbrief output offers a lot of additional information that can either be used during the flight and also to enter data in the MCDU.
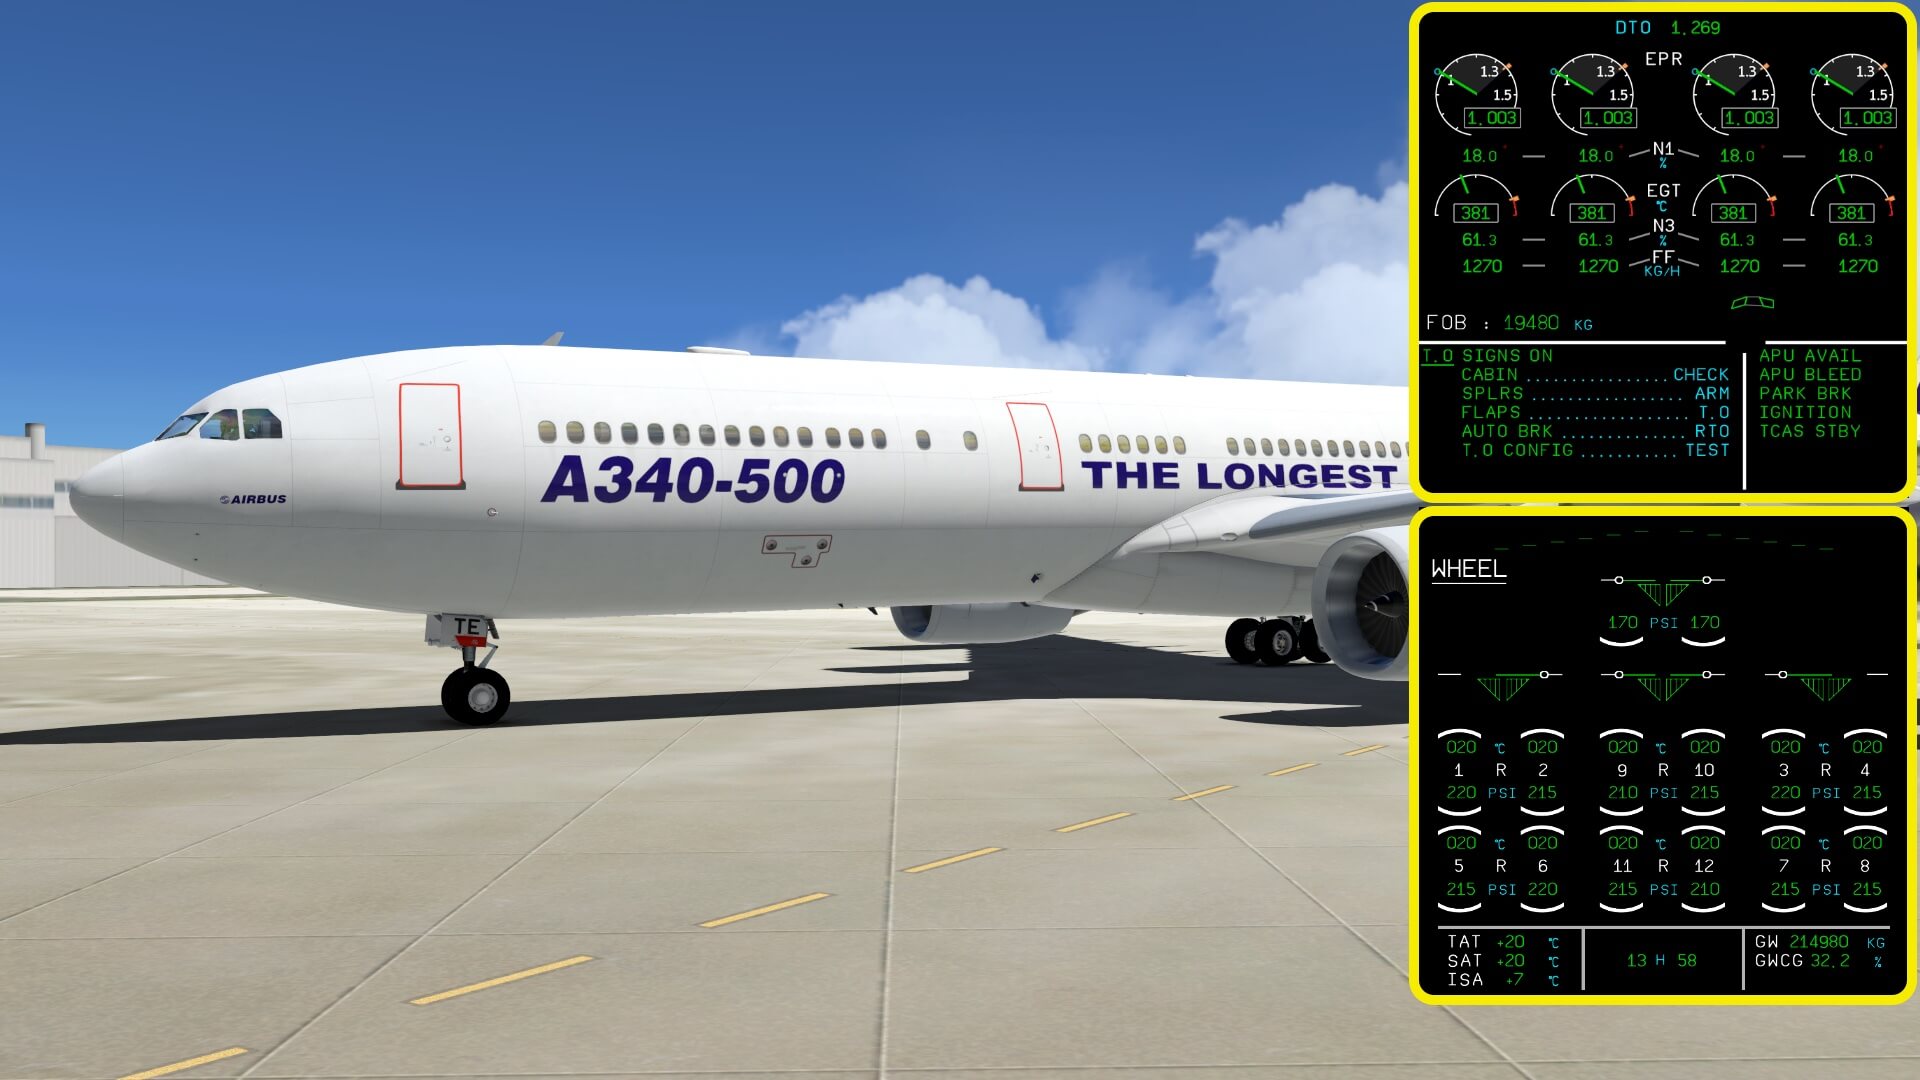
MCDU LOAD and FUEL page
At the MCDU MENU page LSK 1L LOAD and FUEL you enter the amount of fuel on board (LSK 1L), cargo on board (LSK 2L) and the amount of passengers on board (LSK 3L), all in kilograms. On the opposite side of the MCDU thus on the lines LSK 1R, 2R and 3R you see the cyan (light blue) maximum values.
When I’ve entered these values, the MCDU calculates for you and me all the other values like ZFW, GW (Gross Weight), ZFW CG percent, ACT CG percent and THS TO SET values. There’s no need to write them down since we can, with a simple click, enter these in the INIT B and PERF pages.

Enter MCDU CO RTE (Company Route)
Before I do any other steps, let’s first enter the flight plan. I created my LFBOEXTT.txt file, pasted it into the JD340-500 Airliner FlightPlans folder, and enter in the scratchpad LFBOEXTT on the INIT A page. Then LSK 1L to enter it as a CO RTE (Company Route). Unless the flight plan is long else it’s shown on one page, in this case and on the screenshot below you see that the flight plan covers the pages 1 and 2. If OK and no error message, click LSK 6R. We’re back at the INIT A page. Linda has already switched ON the IRUs, so to align the IRU’s I click LSK 3R. This action will lead to the alignment procedure of IRU’s.

Enter MCDU SID (Standard Instrument Departure)
When I click on the MCDU keyboard F-PLN I notice that I have a F-PLN DISCONTINUITY and that I need to enter my runway, my SID (Standard Instrument Departure) and if applicable my TRANS(ition). So here we go.
Click on the F-PLN page LSK 1L. On the next MCDU page click again LSK 1L < DEPARTURE. At the MCDU DEPARTURE page I click the LSK with runway 32L, then LSK with SID AGN5P and then, since there’s no TRANS, LSK 6L < TMPY F-PLN. Now we need to activate the flight plan by LSK 6R TMPY INSERT*. We’re finally back at the F-PLN page without the F-PLN DISCONTINUITY.

Enter and confirm MCDU INIT B page
We go back to the INIT page by clicking the INIT pushbutton on the MCDU keyboard. This is the so called INIT A page. To go to the INIT B page – available as long as the engines aren’t running – click the RH arrow. On INIT B page we need to transfer the ZFW and BLOCK fuel by clicking LSK 1R and 2R. By doing this, all other data on the same page is calculated and entered in green.

Enter and confirm MCDU PERF page
Finally we go to the PERF(ormance) page. Click the PERF button on the MCDU keyboard. First I click LSK 1L, 2L and 3L which will automatically calculate and enter for you and me the TO speeds V1, VR and V2. The same page also shows you the MAX F(lap) and S(lat) speeds as well as the clean configuration which means all retracted. Click LSK 5L to update the THR RED/ACC, then LSK 3R to enter the FLAP and THS position, LSK 4R for the DERATED Thrust and finally, click LSK 5R to update ENG OUT ACC. And that’s it for the moment.

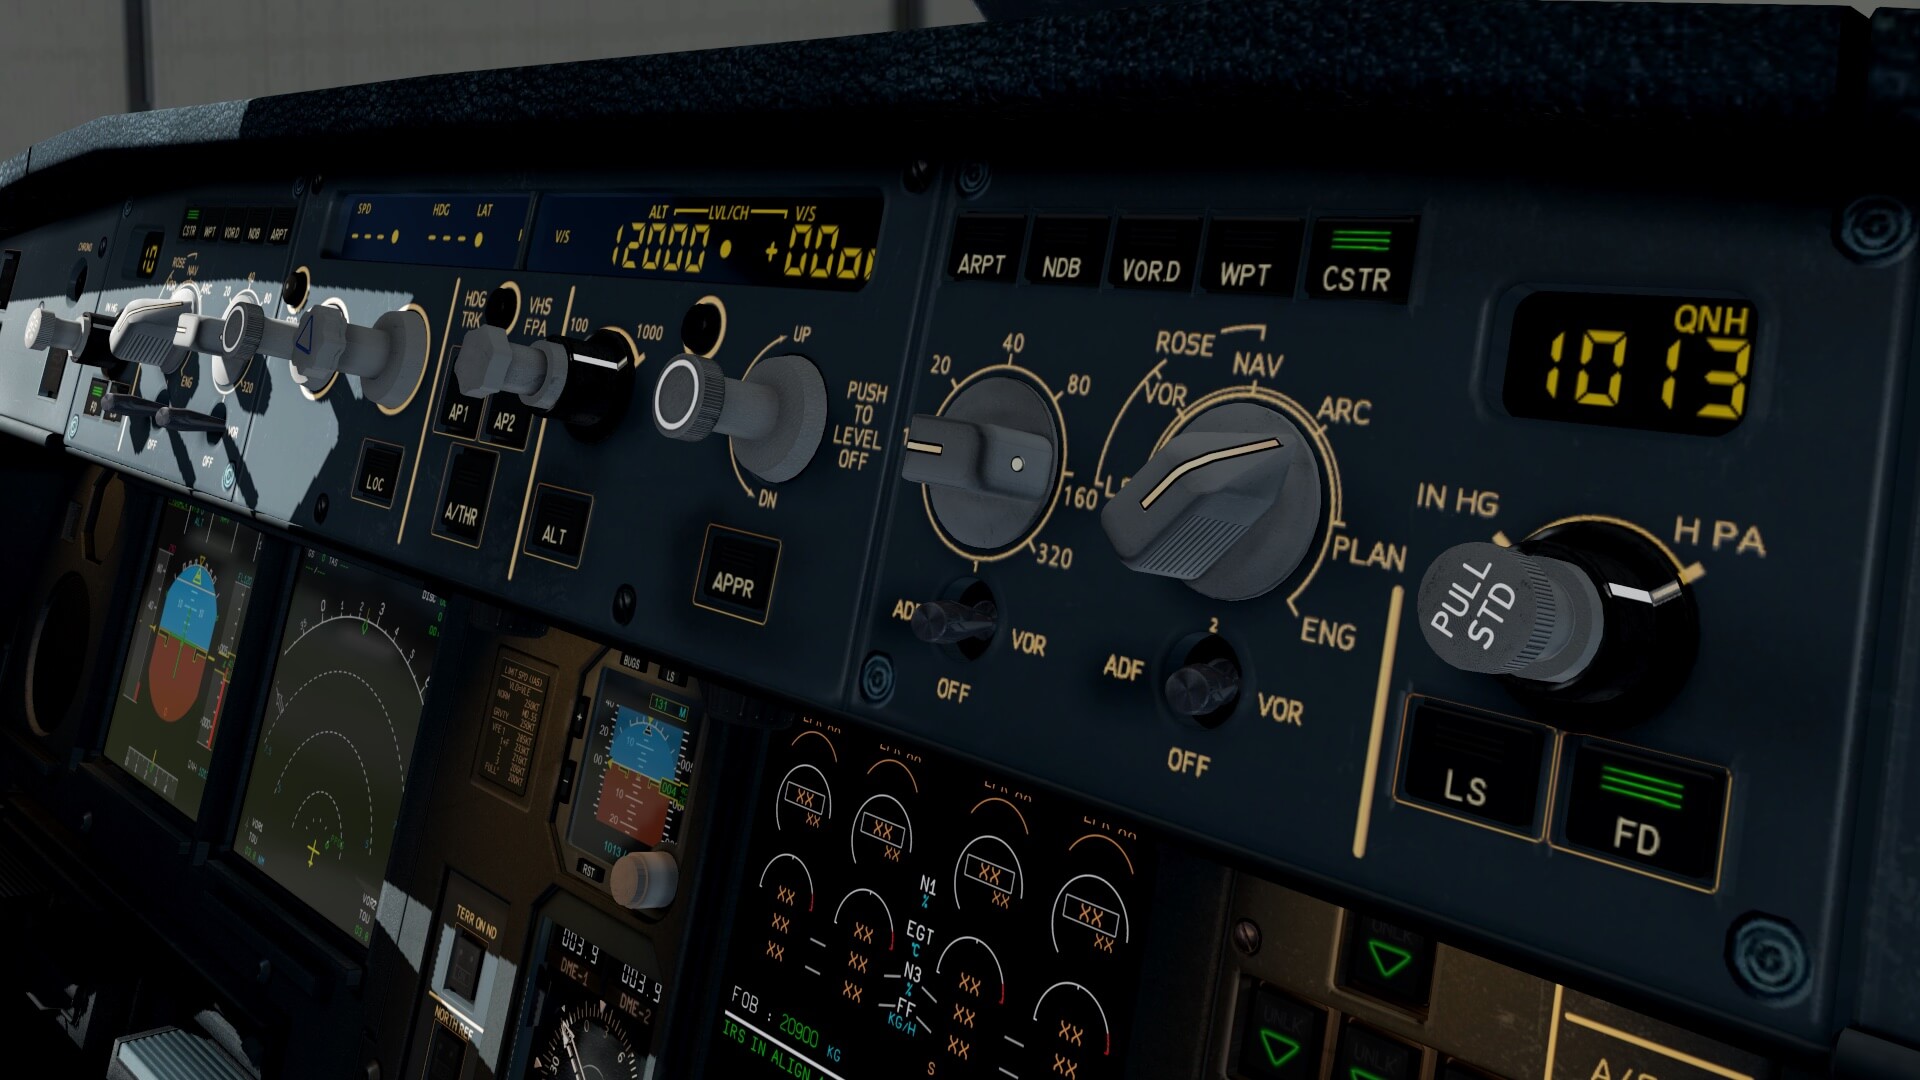
Check and Set FCU
There’s not so much to do on the FCU, but we need to set the initial altitude which will be FL120. Verify that the ALT mode is in MANAGED MODE. You see a dot behind the selected altitude. If all is OK, the other windows for SPD and HDG are already in the MANAGED MODE. I check from left to right the settings on the FCU like on the LH EFIS Control Panel the MODE selector and RANGE selector. FD (Flight Director) switch active with green flow bar, followed by the middle section. And finally the RH EFIS Control Panel. but this is a slave of the LH EFIS panel so no different adjustments can be made. From the current parked position I may start my engines first followed by the pushback. That said, I’ll wait for Linda till she’s ready.
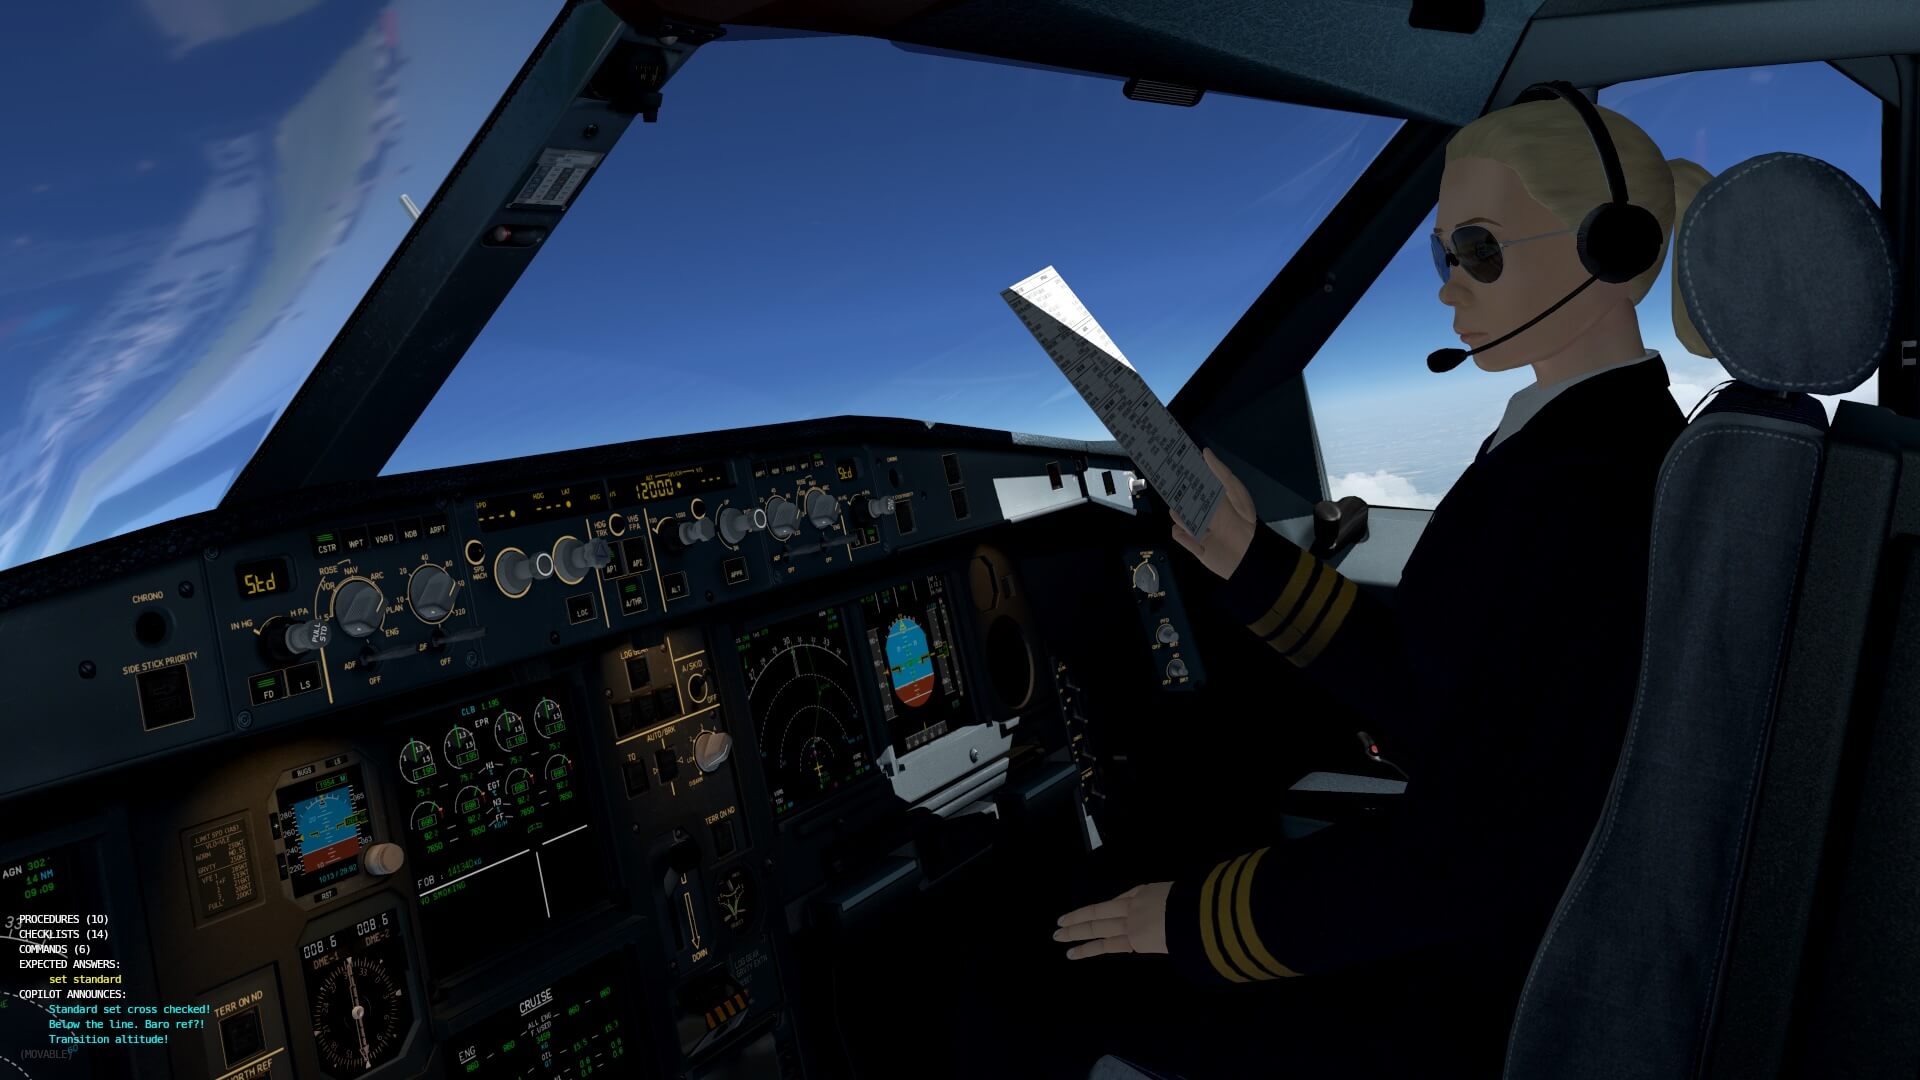
Linda is ready for the “Before Start Checklist down the line”. This means that I need to interact with Linda. She’s reading the checklist – she’s literally holding a checklist in her hands – while I confirm the steps. You can either speak to Linda or you can click with the LH mouse button on the yellow expected command line. And so we run from one checklist into another procedure and then we’re at the ENG START procedure.
Ground Equipment
Removing ground equipment, or the fuel truck, hi-loaders, stairs and so on, is as I discussed before, done via the MCDU MENU GROUND HANDLING page. You either remove then individually or all by clicking HIDE ALL. With this one click, all ground equipment objects are gone. What I don’t understand is that the drive IN and OUT isn’t always logic and sometimes these objects drive thru a gate or other ground equipment.
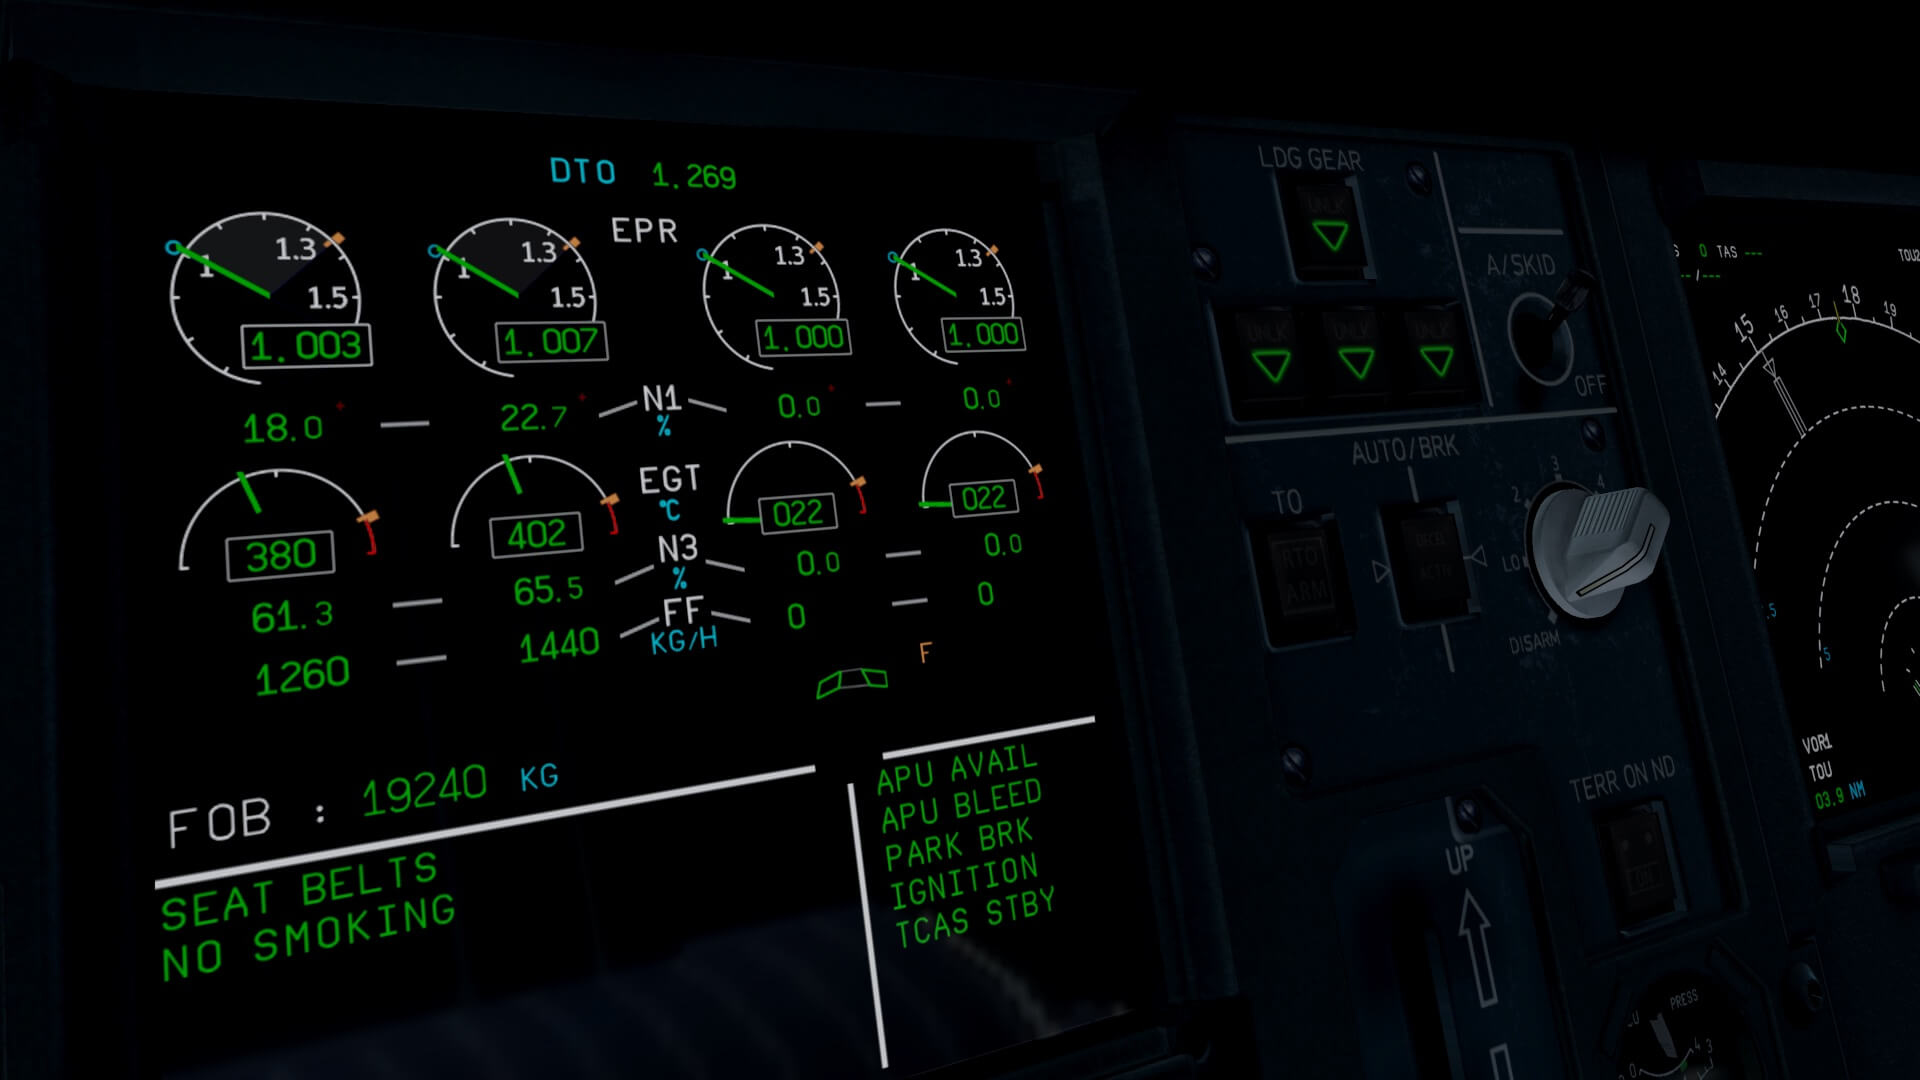
ENG START
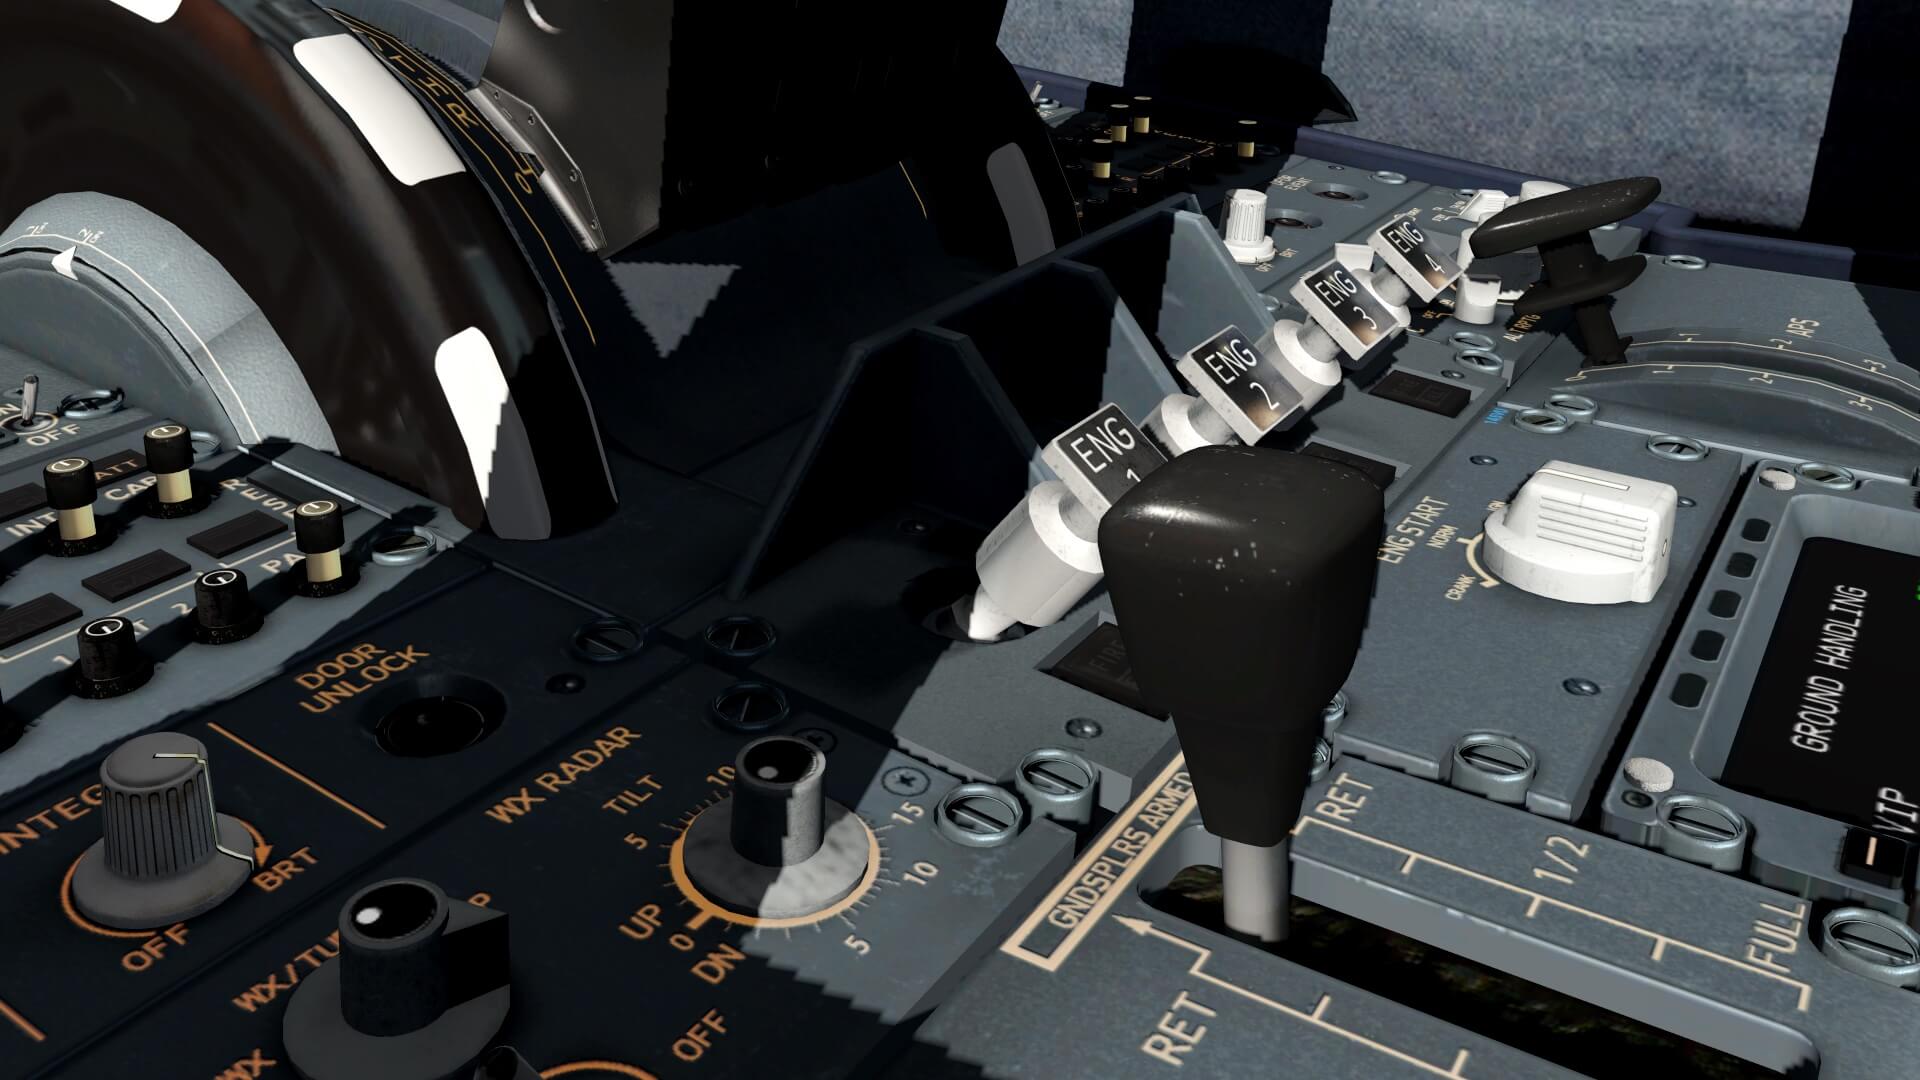
When I had to do the engine start myself it wasn’t difficult since the complete engine start cycle is monitored and controlled by the FADEC. The only thing you need to do is to set the ENG START selector to ING START and one after the other the ENG FUEL LEVER to ON. OK, it’s a good habit to monitor yourself the engine parameters on the E/WD and the SD, but FADEC is much faster in case of problems. But this time it’s even easier, Linda is doing all the work for me, but having a co-pilot or not, I will also monitor the procedure myself.
Perhaps that’s the only disadvantage of having Linda near you. She can do “her procedures and checklist items” but she can also do all the work for you thus including the steps of the captain. So when you don’t want to do anything then this can be an option. No no, not for me. Linda works perfect, but I let her do not more then what a co-pilot normally does.
I select on my AviTab MAPS which gives me access to the LFBO charts I uploaded before. Well, it’s time to request the pushback truck.


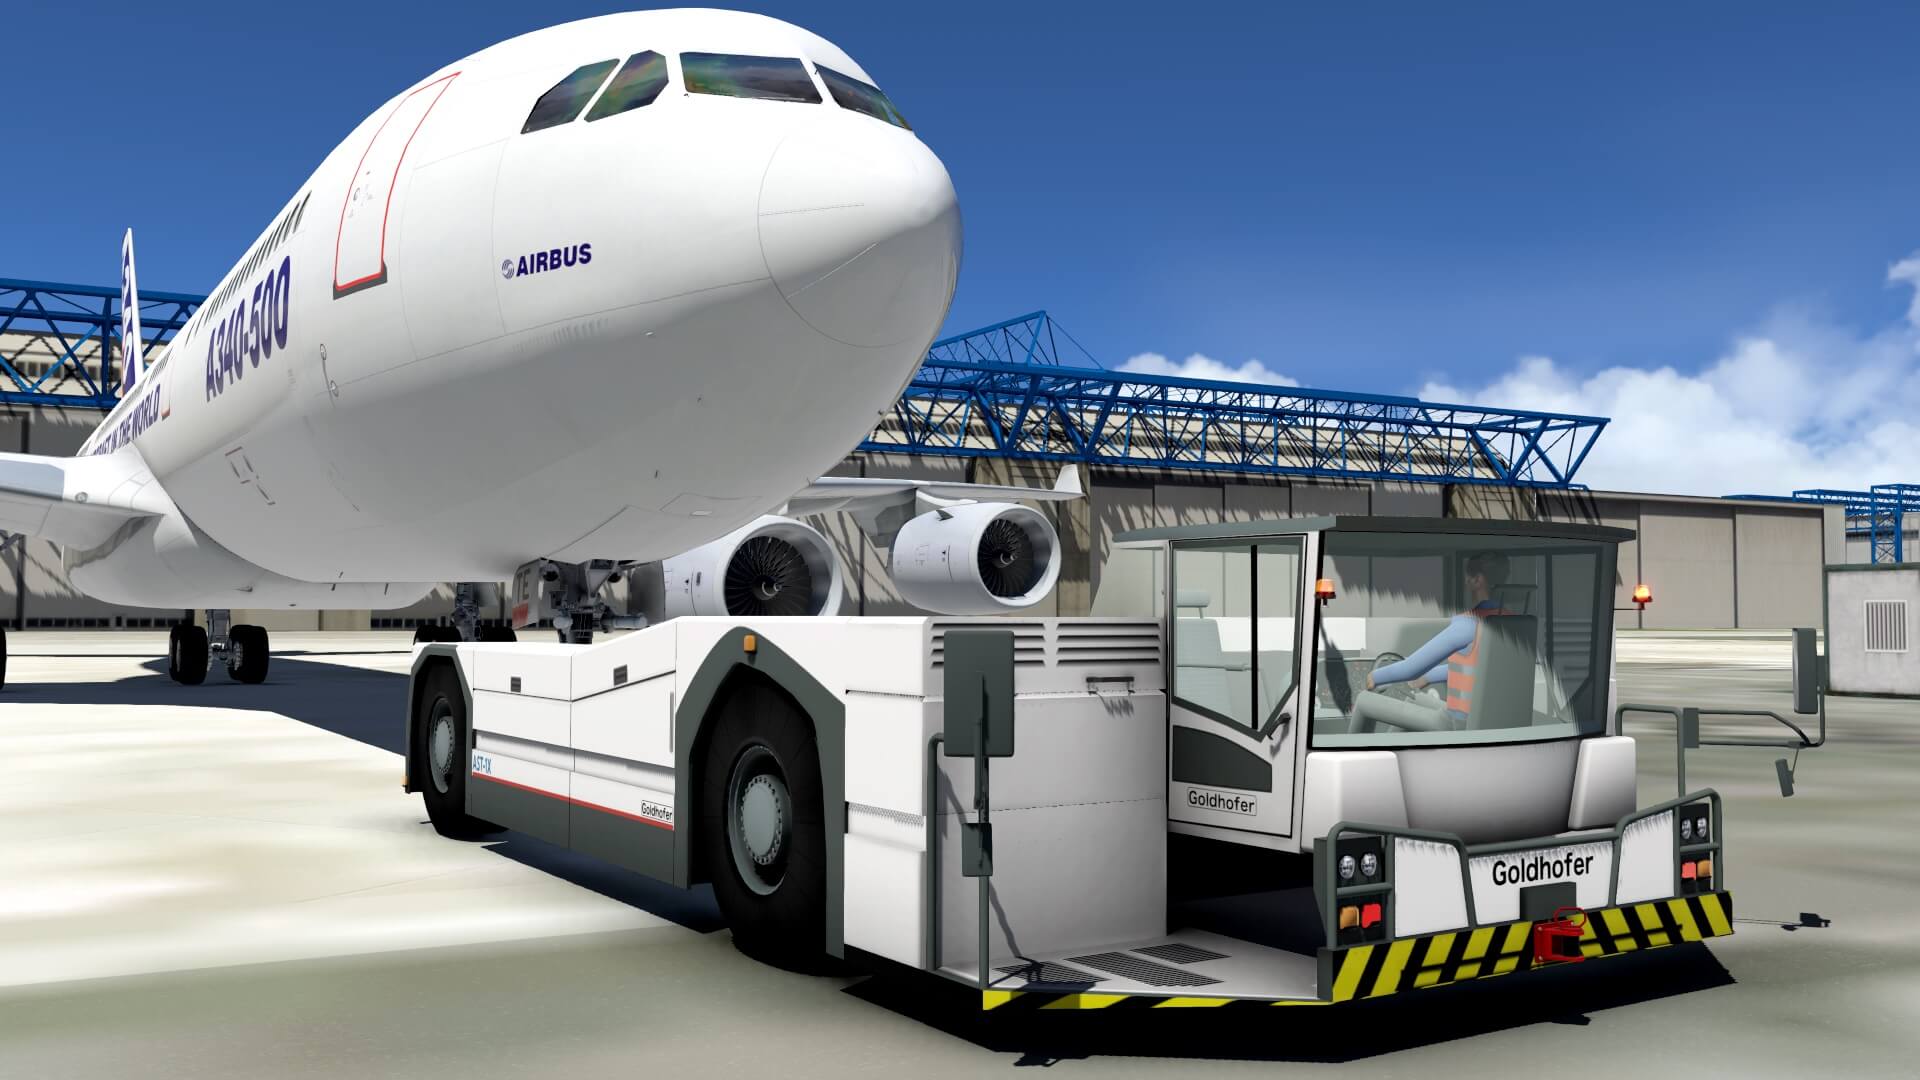
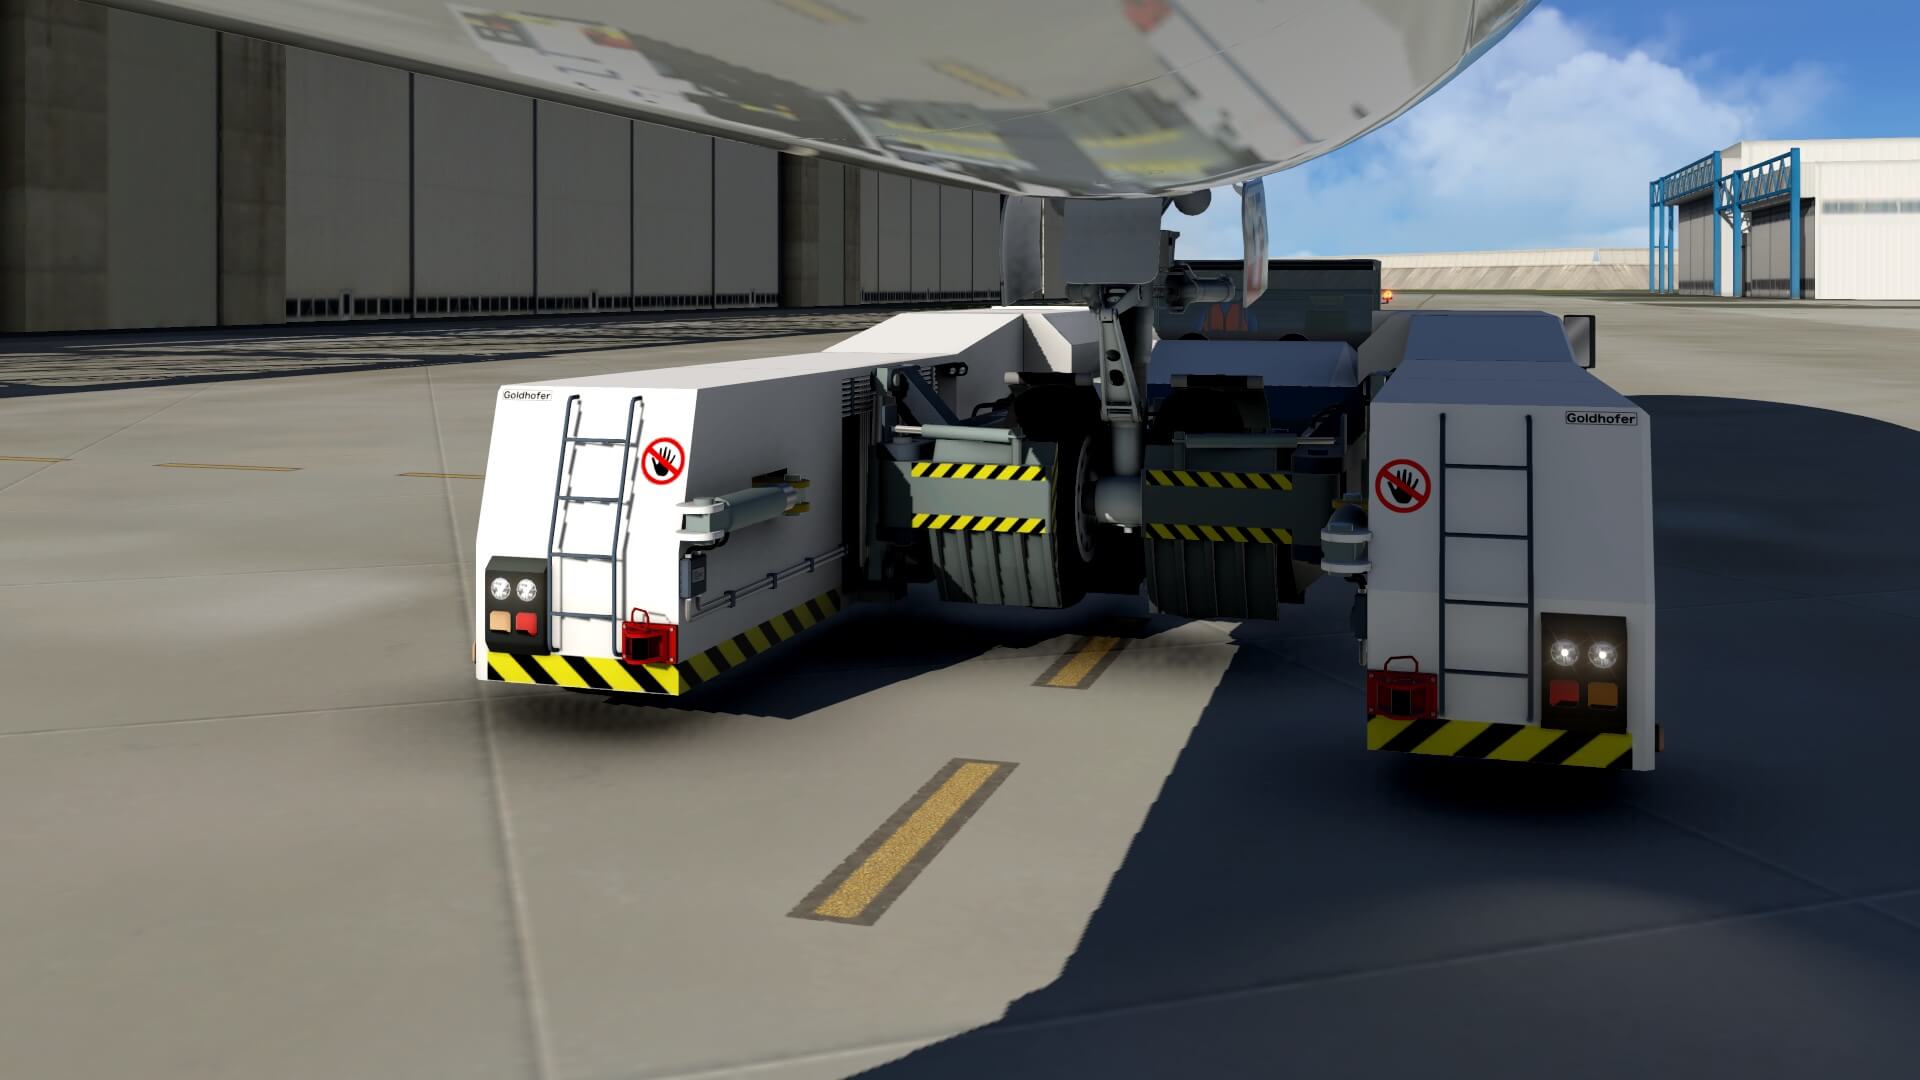
Pushback
It’s a matter of what you’re used to. In real live the pushback truck is already near the aircraft or the truck is ordered the moment the pilots are ready with their preparations. Most of the time when it’s busy at the airport, a pushback truck is not always available and therefore you need to wait before one comes around the corner.
And now a pushback truck for the JD340-500 Airliner. Requesting the pushback truck was easy with the JD330, but with the introduction of the JD340-500 Airliner there’s no longer the pushback option in the MCDU available, at least with version 1.2. This means I have to download and install the freeware add on plugin Better Pushback . Personally I like the Better Pushback truck above the JD330 pushback truck. The Better Pushback “truck” has much more detail. When the pushback is completed, I set the parking brake, request a disconnection of the pushback truck and we’re – me and Linda – ready to taxi.


Taxi
Via taxiways S50 – W40 – W35 – W30 – W20 – S2 I end up t the beginning of runway 32L. Although the taxi from our parking position to the 32L isn’t long, it gives me a good idea how this JD340-500 taxies. You need to keep in mind that when you make turns, that you do this first placing or positioning yourself outside the aircraft and learn when to make a turn else the MLG and CLG will be way off from the taxi centerline. During taxi you’ll hear a rumbling noise simulating that you taxi over the center line and lights. Due to the length of the JD340-500 Airliner it will cost some time to taxi while keeping the aircraft at the centerline.


JD Flight Part II | LFBO – LFBO
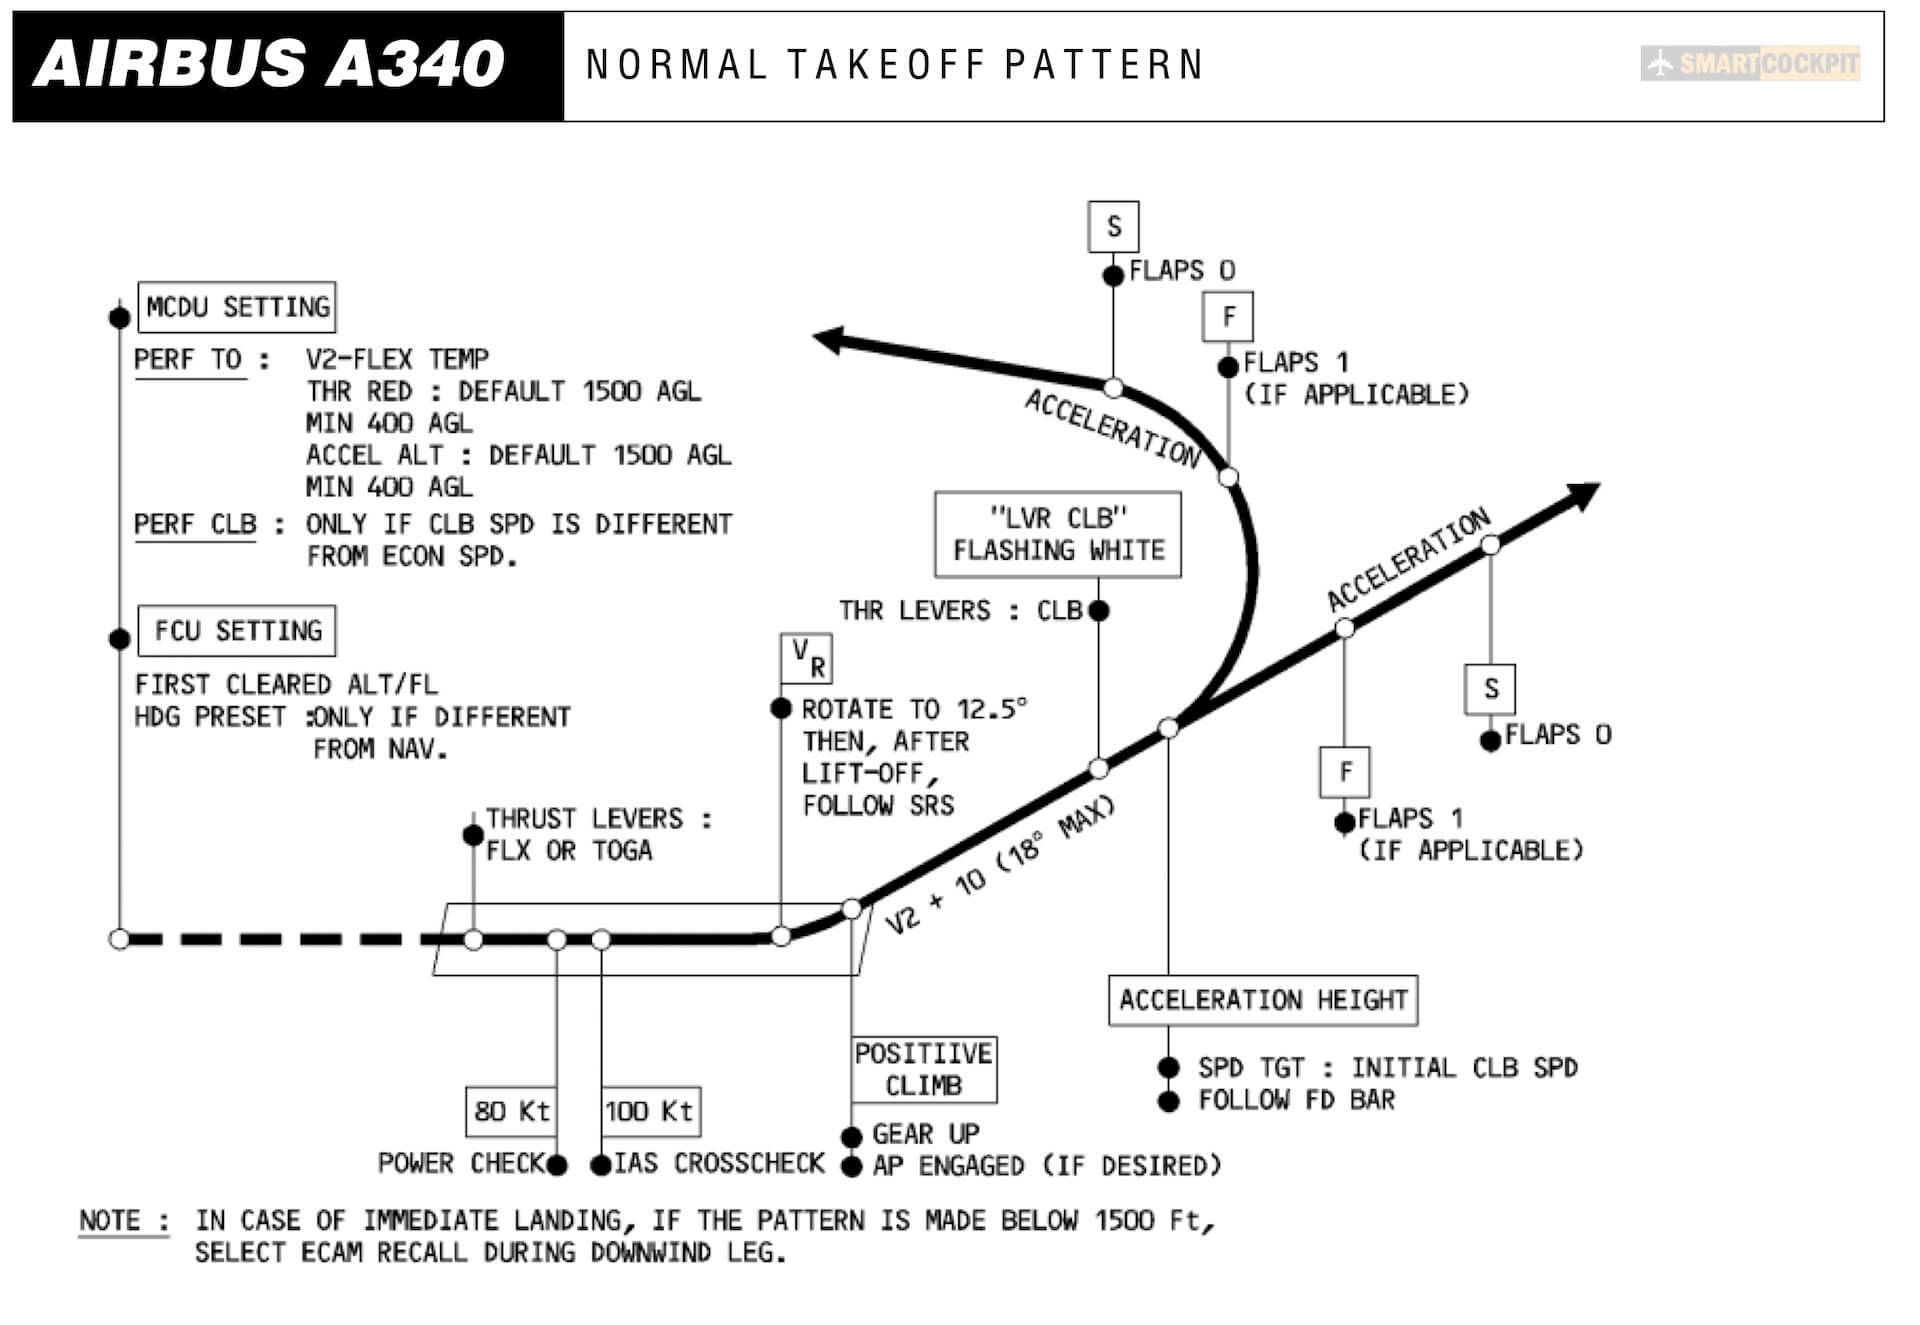
Take Off (TO) and Climb (CLB)
It’s a good habit to rehearsal all what’s coming the moment you and I start with the actual TO. Before the actual TO, I’ll check all the items needed, but this time I did it with the help of Linda and believe me, that makes life much easier and you will not forget anything. The disadvantage of using Linda or rely completely on her is that you never learn how to do all the preparations.
I double checked the FCU if all windows are in MANAGED MODE including my first level off ALT(itude). After cleared for TO, I turn onto 32L, make a rolling TO, move the throttles forward till I see on the PFD FMA (Flight Mode Annunciator) DERATED THR set – SRS – HDG.
A/THR (Auto Thrust) is automatically engaged as with all JD (Airbus)) aircraft, and the only thing I needed to do is to keep the aircraft on the center line which is not that easy, but I monitor and correct as long as that the YAW BAR on the PFD stays in the center. The different speeds are announced and at VR I gentle move the side-stick, oops, that’s in the real aircraft. Hold on, one small remark I’d seen during the flight control check. Linda’s widget was telling me to move the joystick to the FULL LEFT/RIGHT and UP/DOWN but hold on, the aircraft is equipped with a side-stick and not a joystick. If this is done on purpose by saying the joystick I don’t know, but I’ll prefer to use the names as they are in the real A340-500 thus side-stick. Inform Eugeny about this so for sure this will be corrected with a future update.
There’s no need to ask yourself the question what PITCH angle is needed to climb out? Easy, just follow the PITCH bar on the PFD which actually moves to a pitch of 12.5. degrees. Without a serial number entered for the JAR Co-Pilot Linda, it’s the right moment to let you know that Linda is no longer active. A red message appears on the X-Plane screen telling you that Linda is now in the DEMO mode.


While in a positive climb, I ask Linda – I entered during another flight the serial number to activate Linda for the whole flight envelope – to retract the GEAR UP. When it had worked for me, I could have asked Linda to select the GEAR handle to UP, but for some reason my speech recognition didn’t work or she didn’t understand me. Then it’s also easy to press the G key on your keyboard. I’m climbing out so I could have connected AP1 or AP2, but as I mostly do, I will trim the aircraft and fly for the moment by hand. Not weird since I’ve seen many pilots doing this. Although I have assigned PITCH and ROLL trim to my joystick, officially the FBW Airbuses have no dedicated trim anymore. Using the sidestick means you’re also trimming.
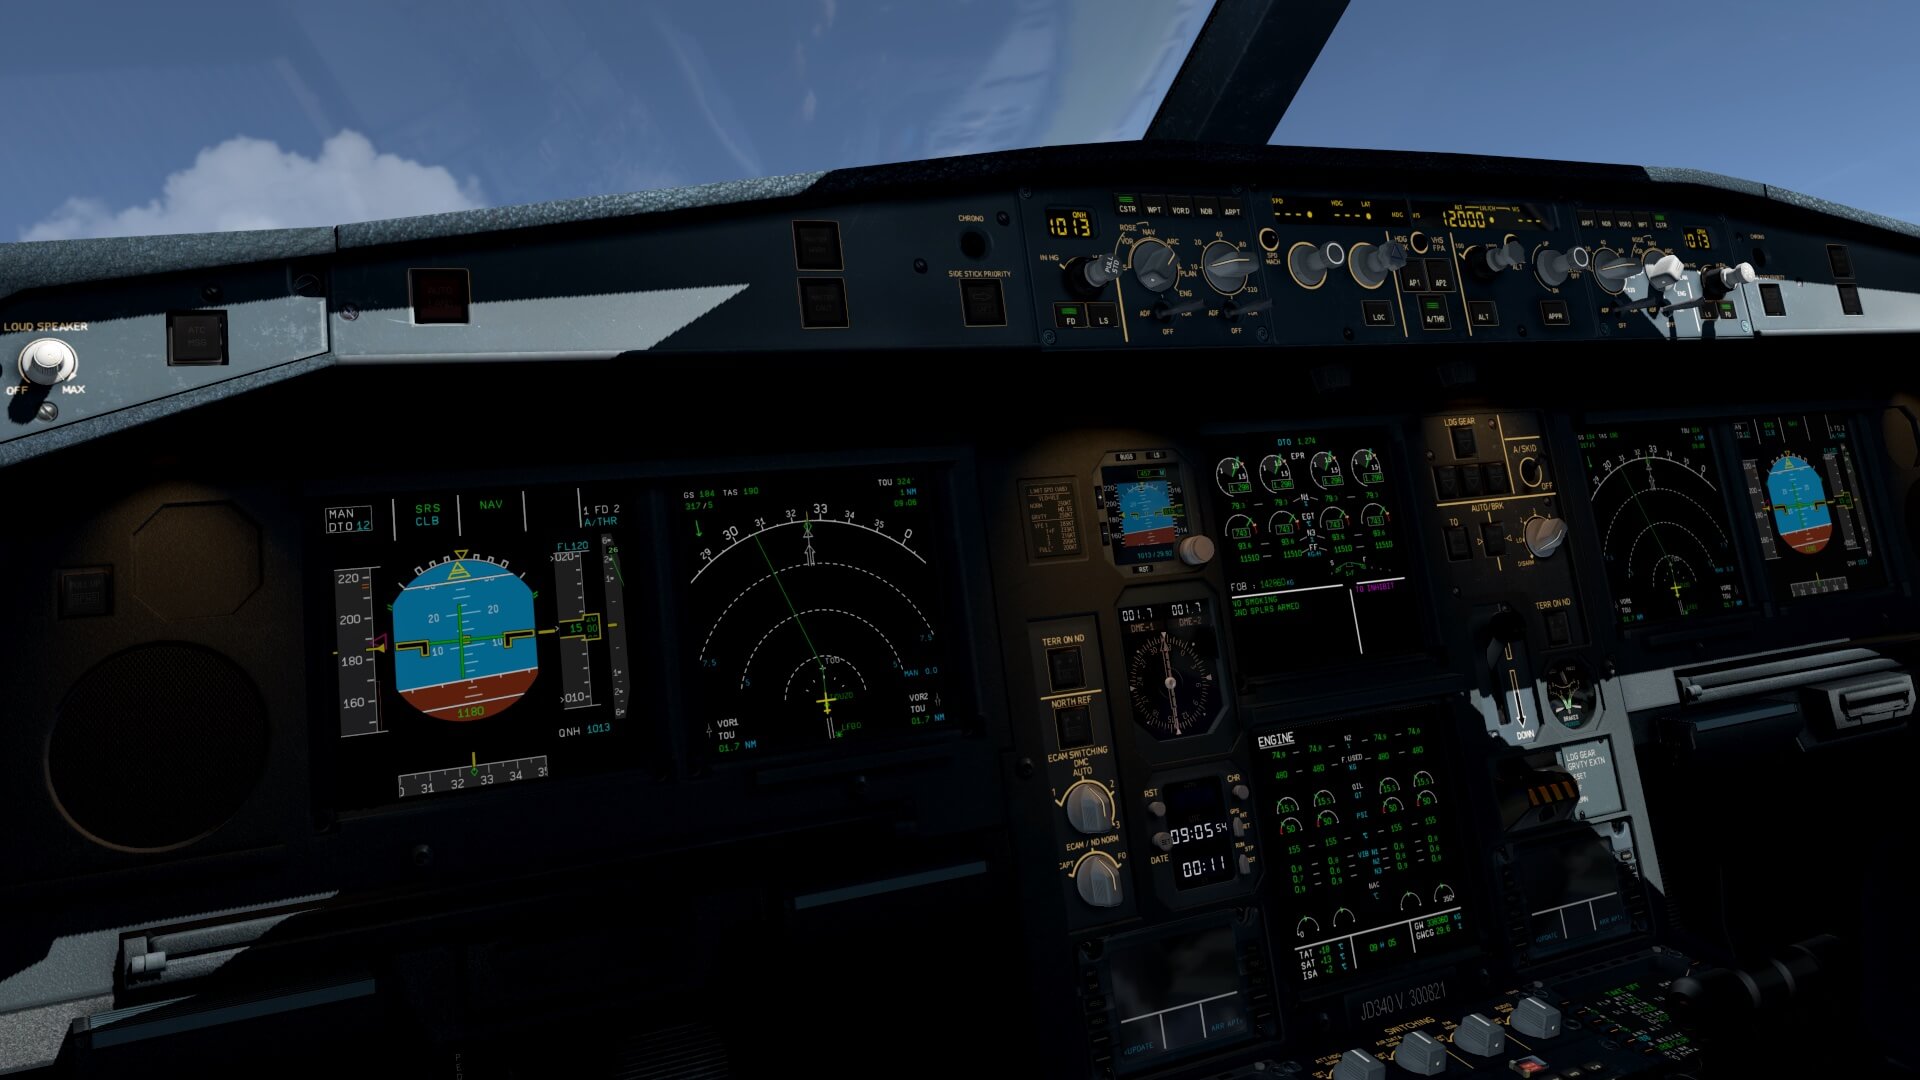
While climbing out, the PFD shows me the “S” on the speed scale which means, I need to retract the FLAPS or set the FLAP handle to the RETRACT position or Linda can do this for me too. After I engaged AP1, Linda continues with the AFTER TAKEOFF checklist. After that and double checking the FCU with all windows showing me MANAGED MODE, there’s not so much to do. What is needed, is done by Linda as previously explained.
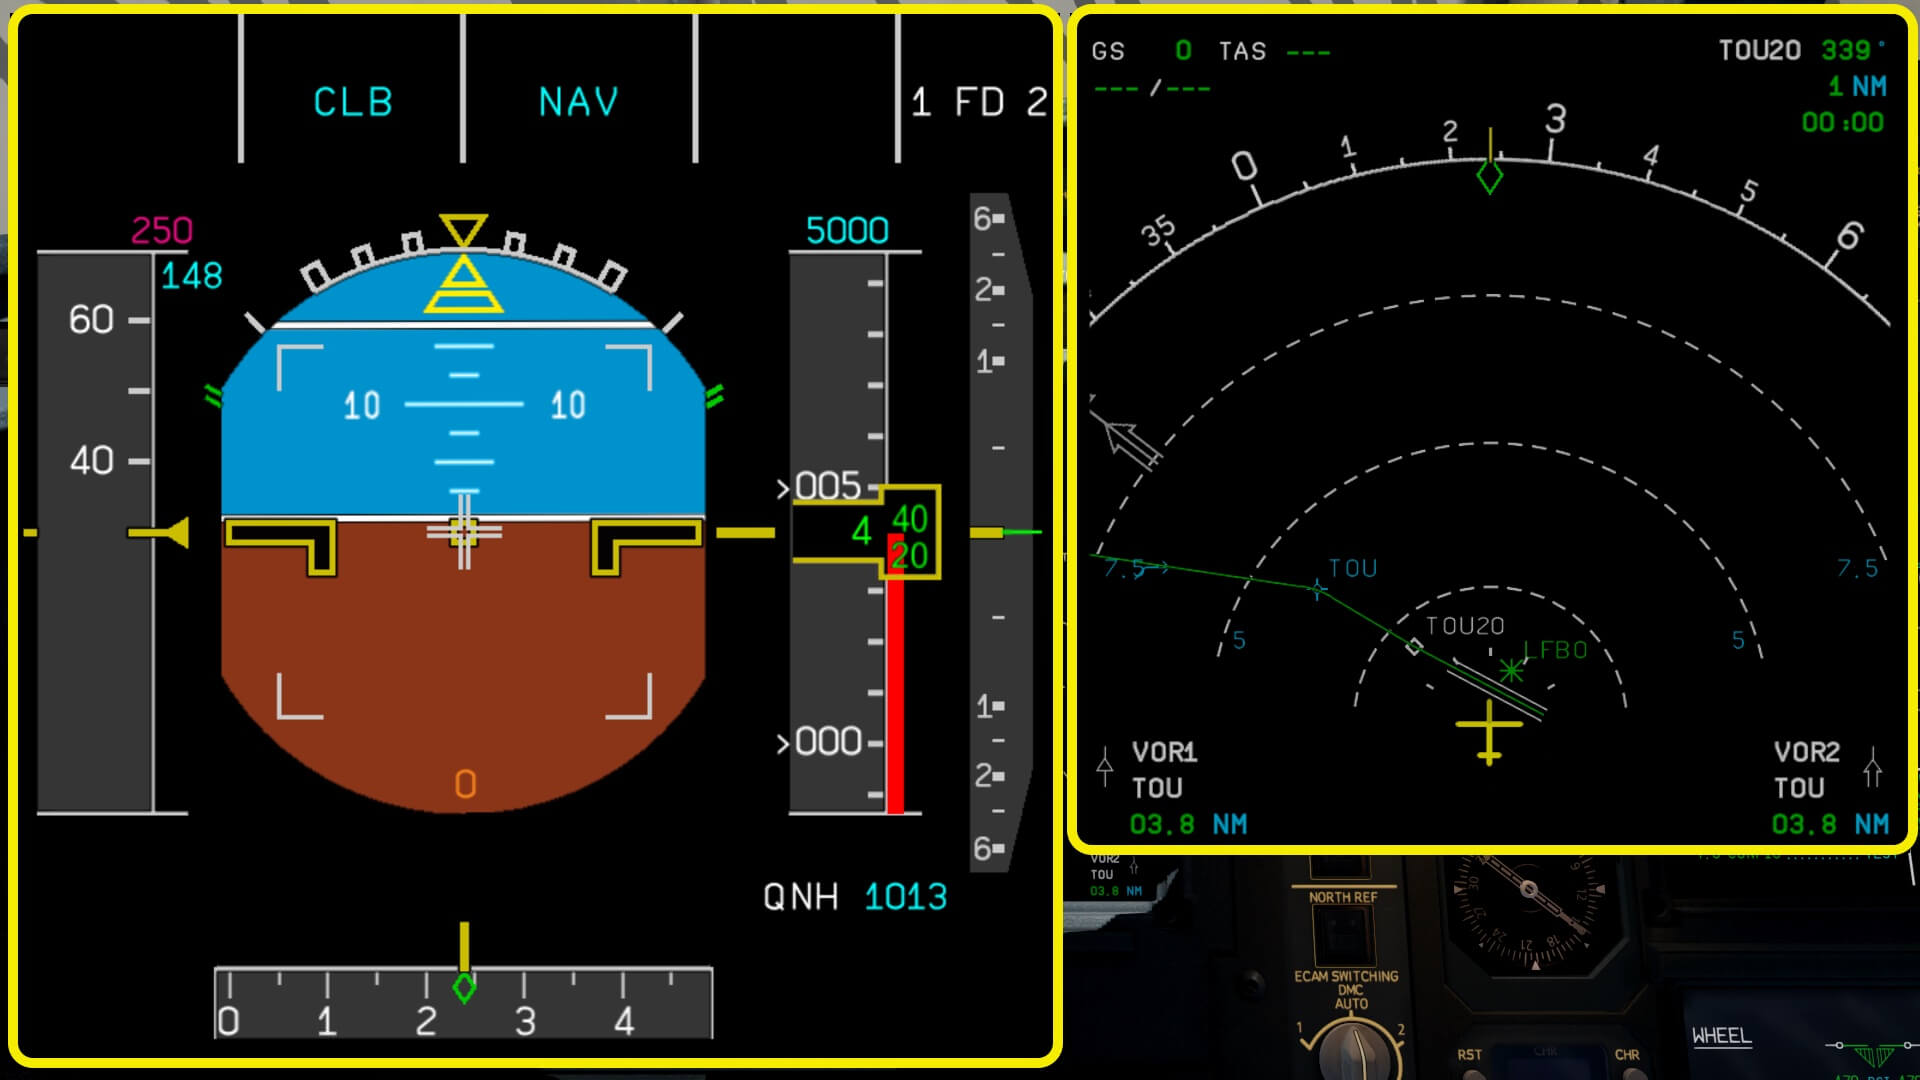
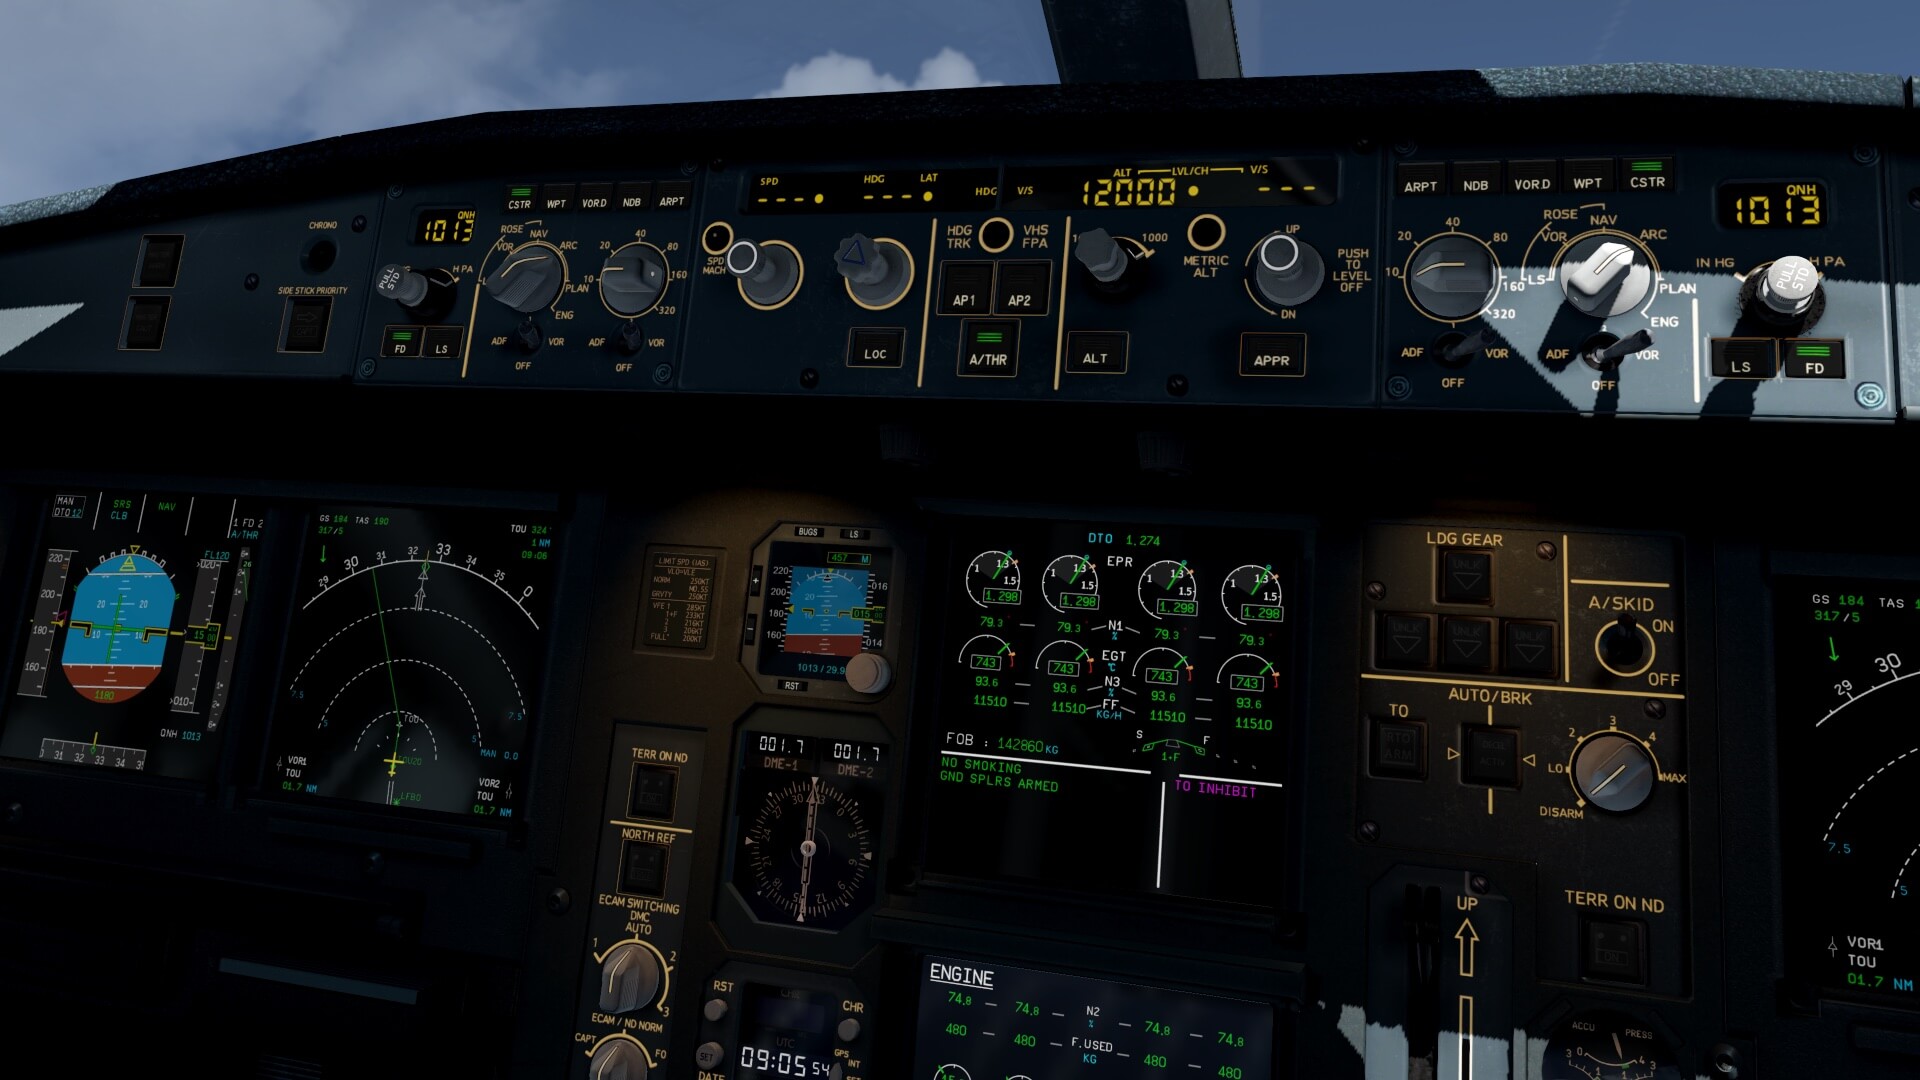
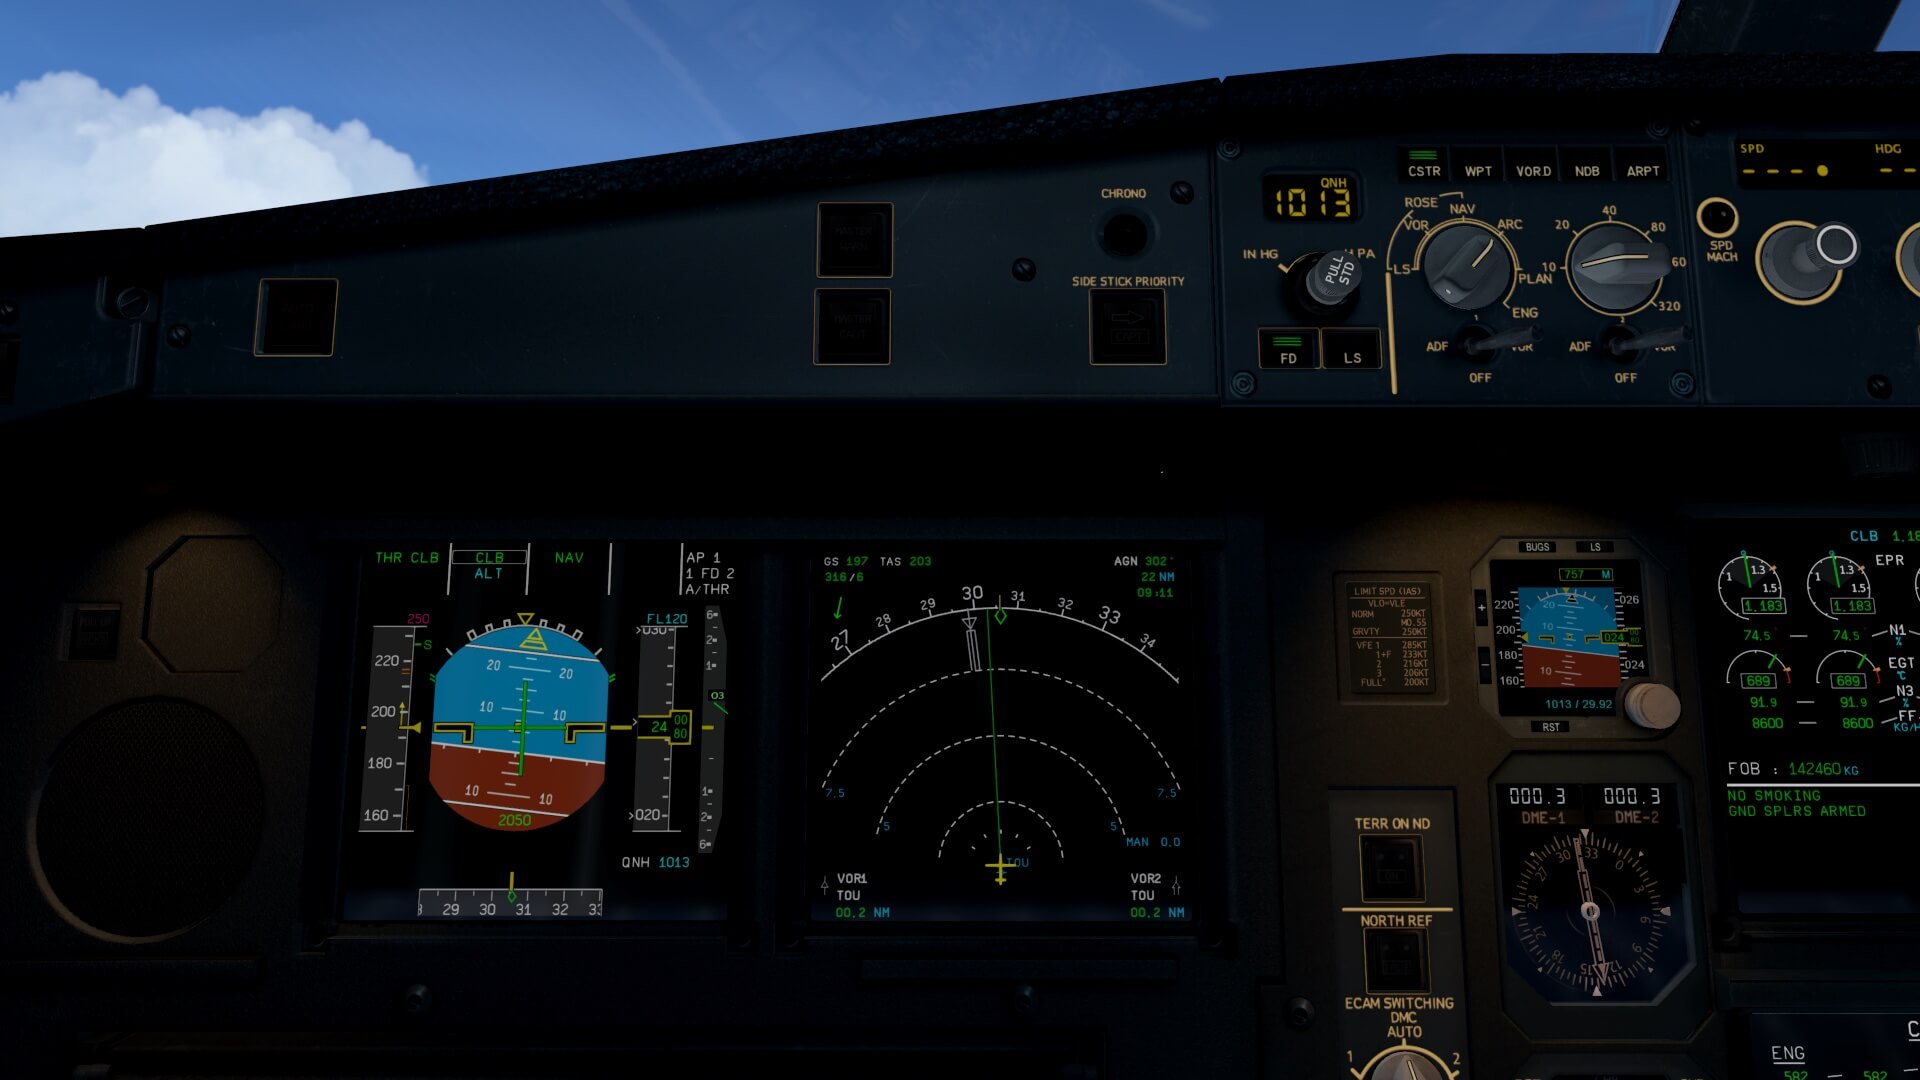
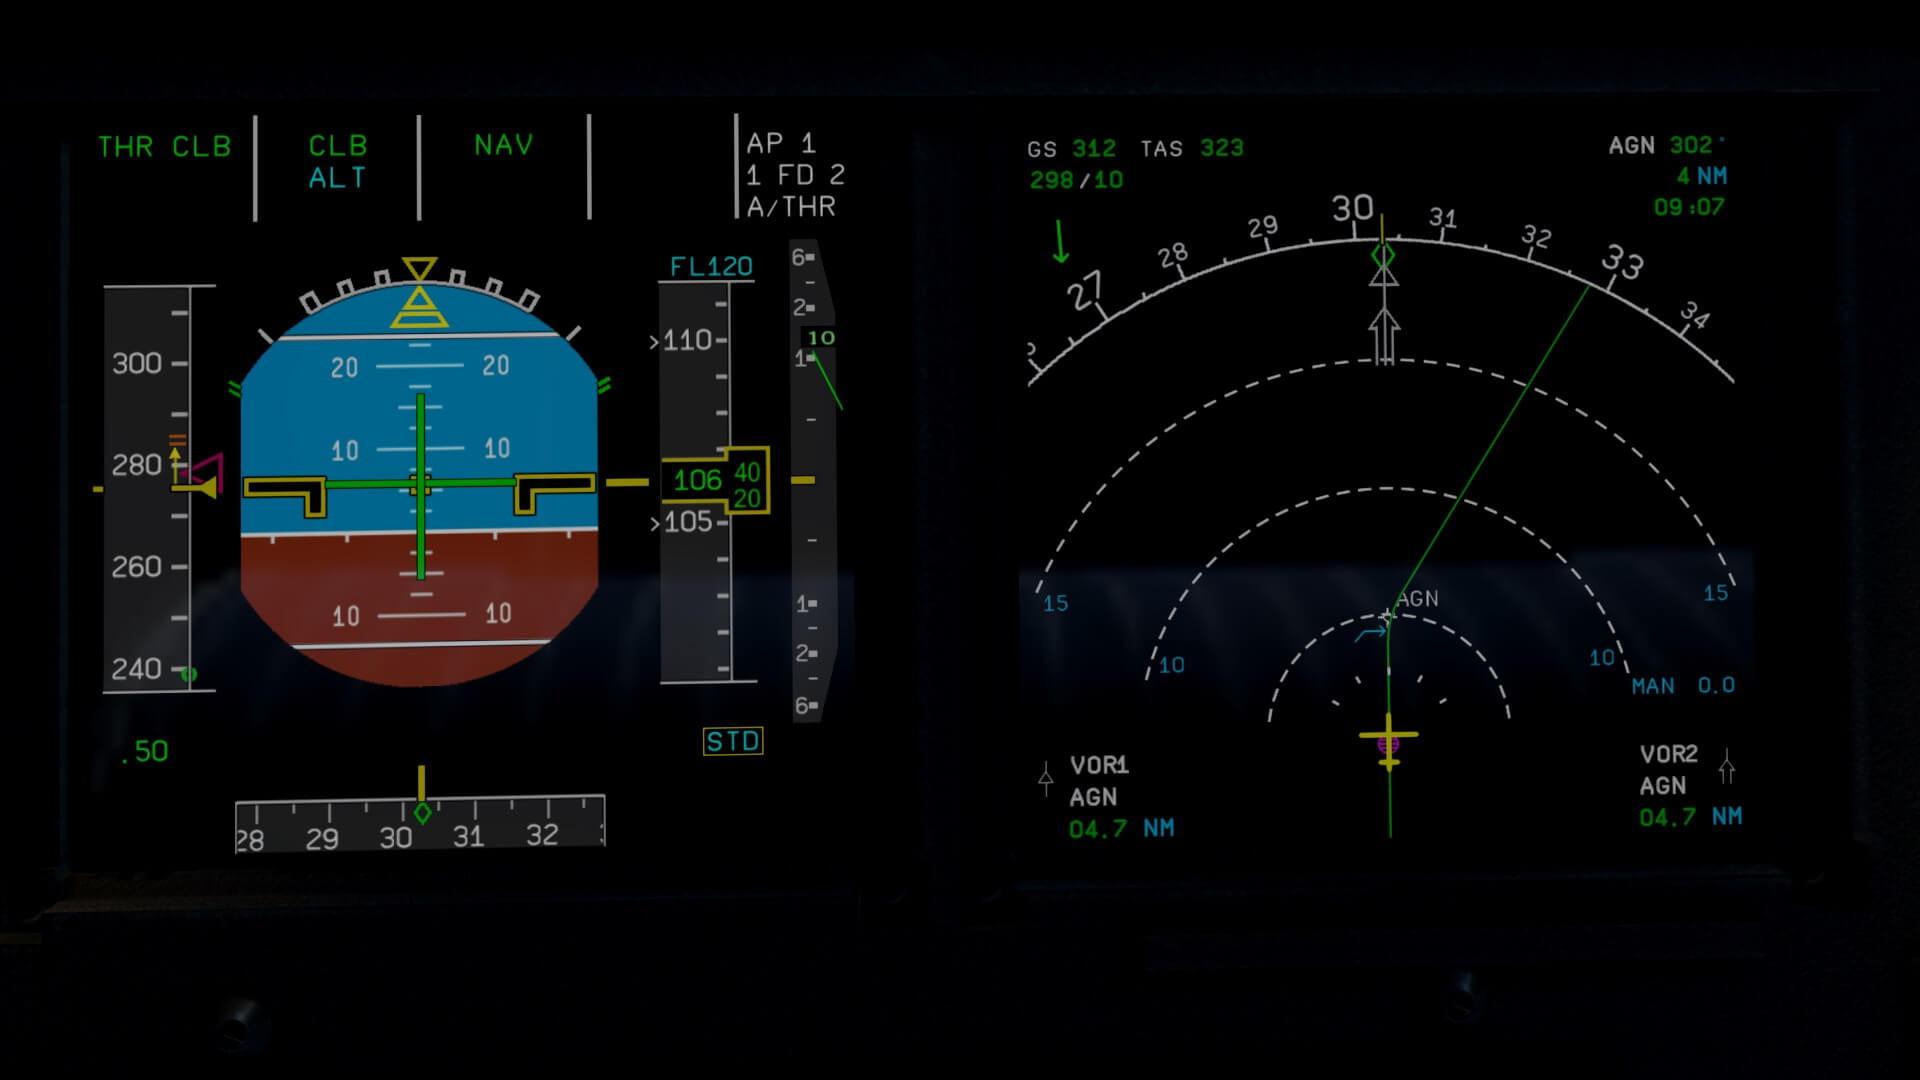
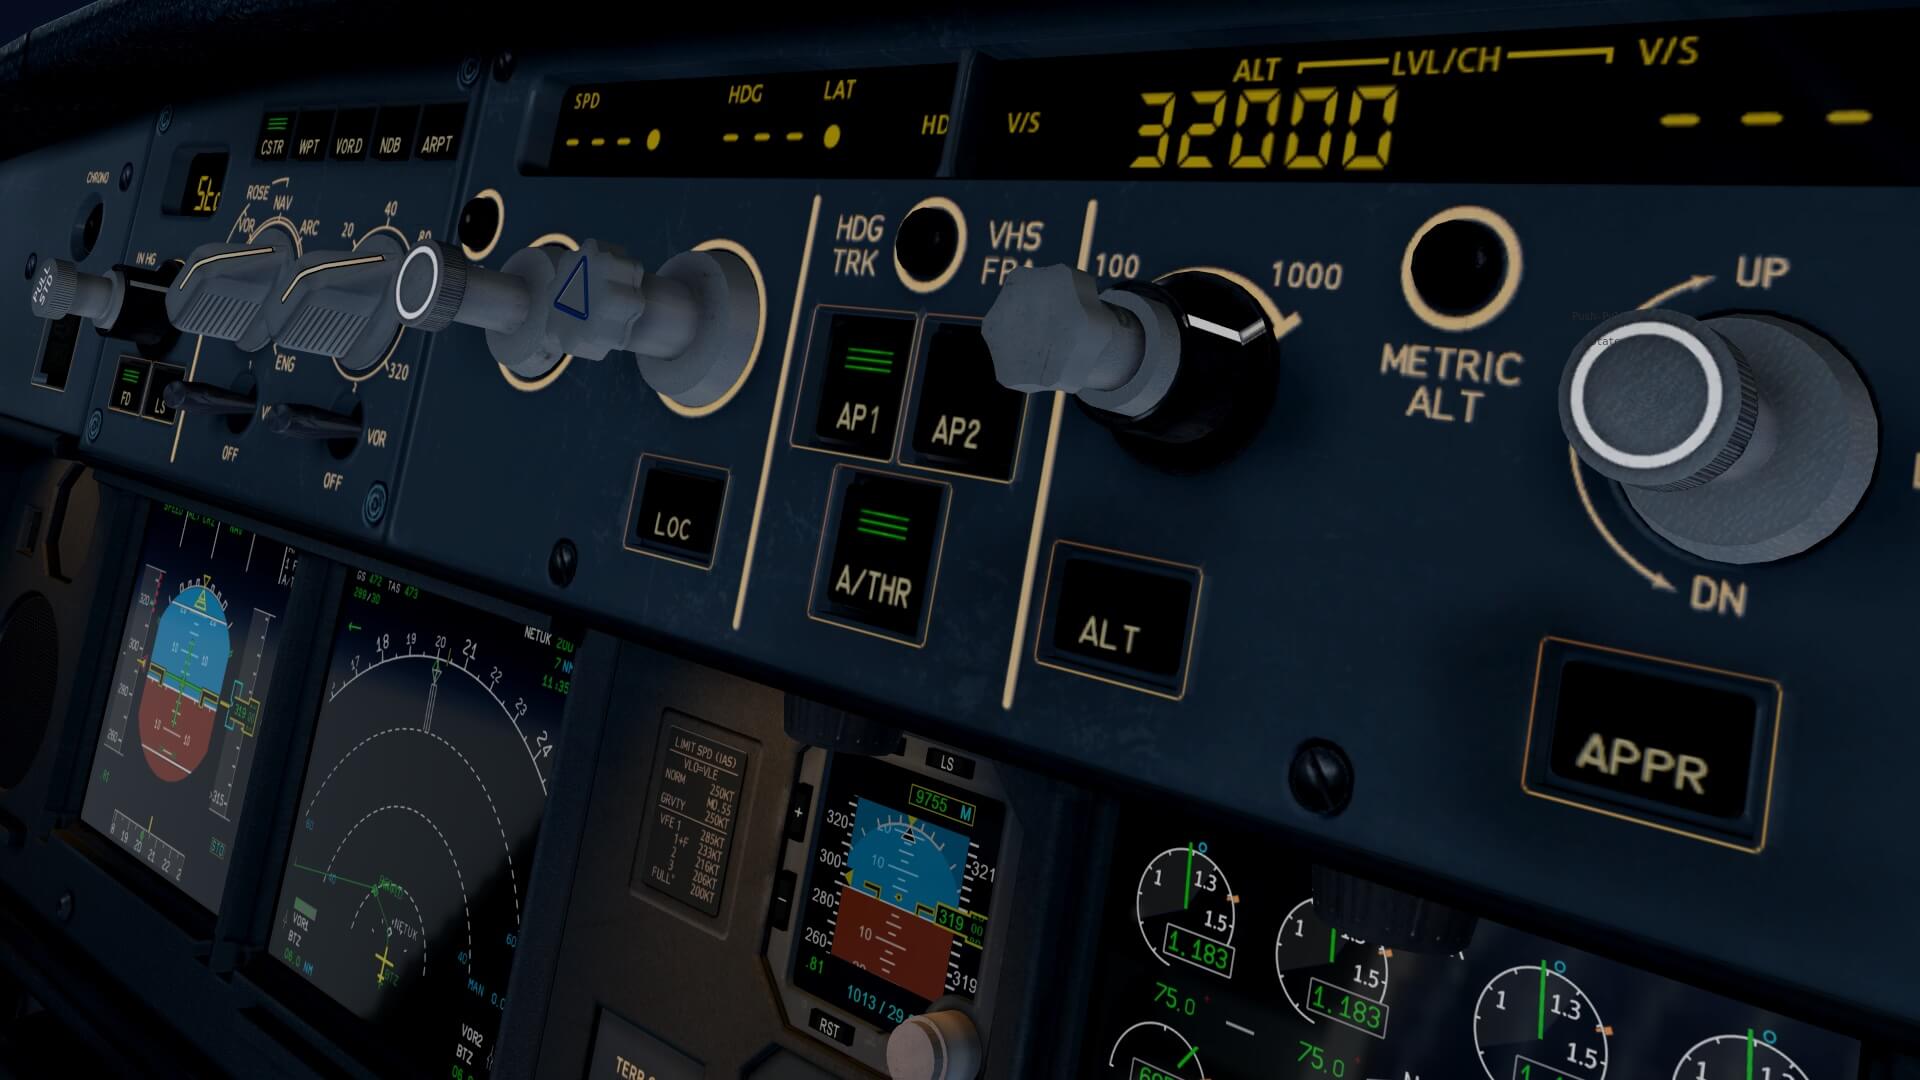
As with every other modern JD320NEO, JD330 and this JD340-500 Airliner, the Flight Management is taking care for almost everything. I’d set my first level off altitude at FL120, but that’s a bit up to you. I can change this value to my planned cruising altitude of FL320 before approaching the entered altitude, but I decide to wait and see how Auto Flight reacts and what happens on the PFD and FMA (Flight Mode Annunciator). Reaching FL120, the thrust mode changes to SPEED, the pitch mode changes to ALT* and later on to ALT. So the FCU and the belonging FMA shows now SPEED – ALT – AP1 while the FCU shows dashes and dots except for the ALT.
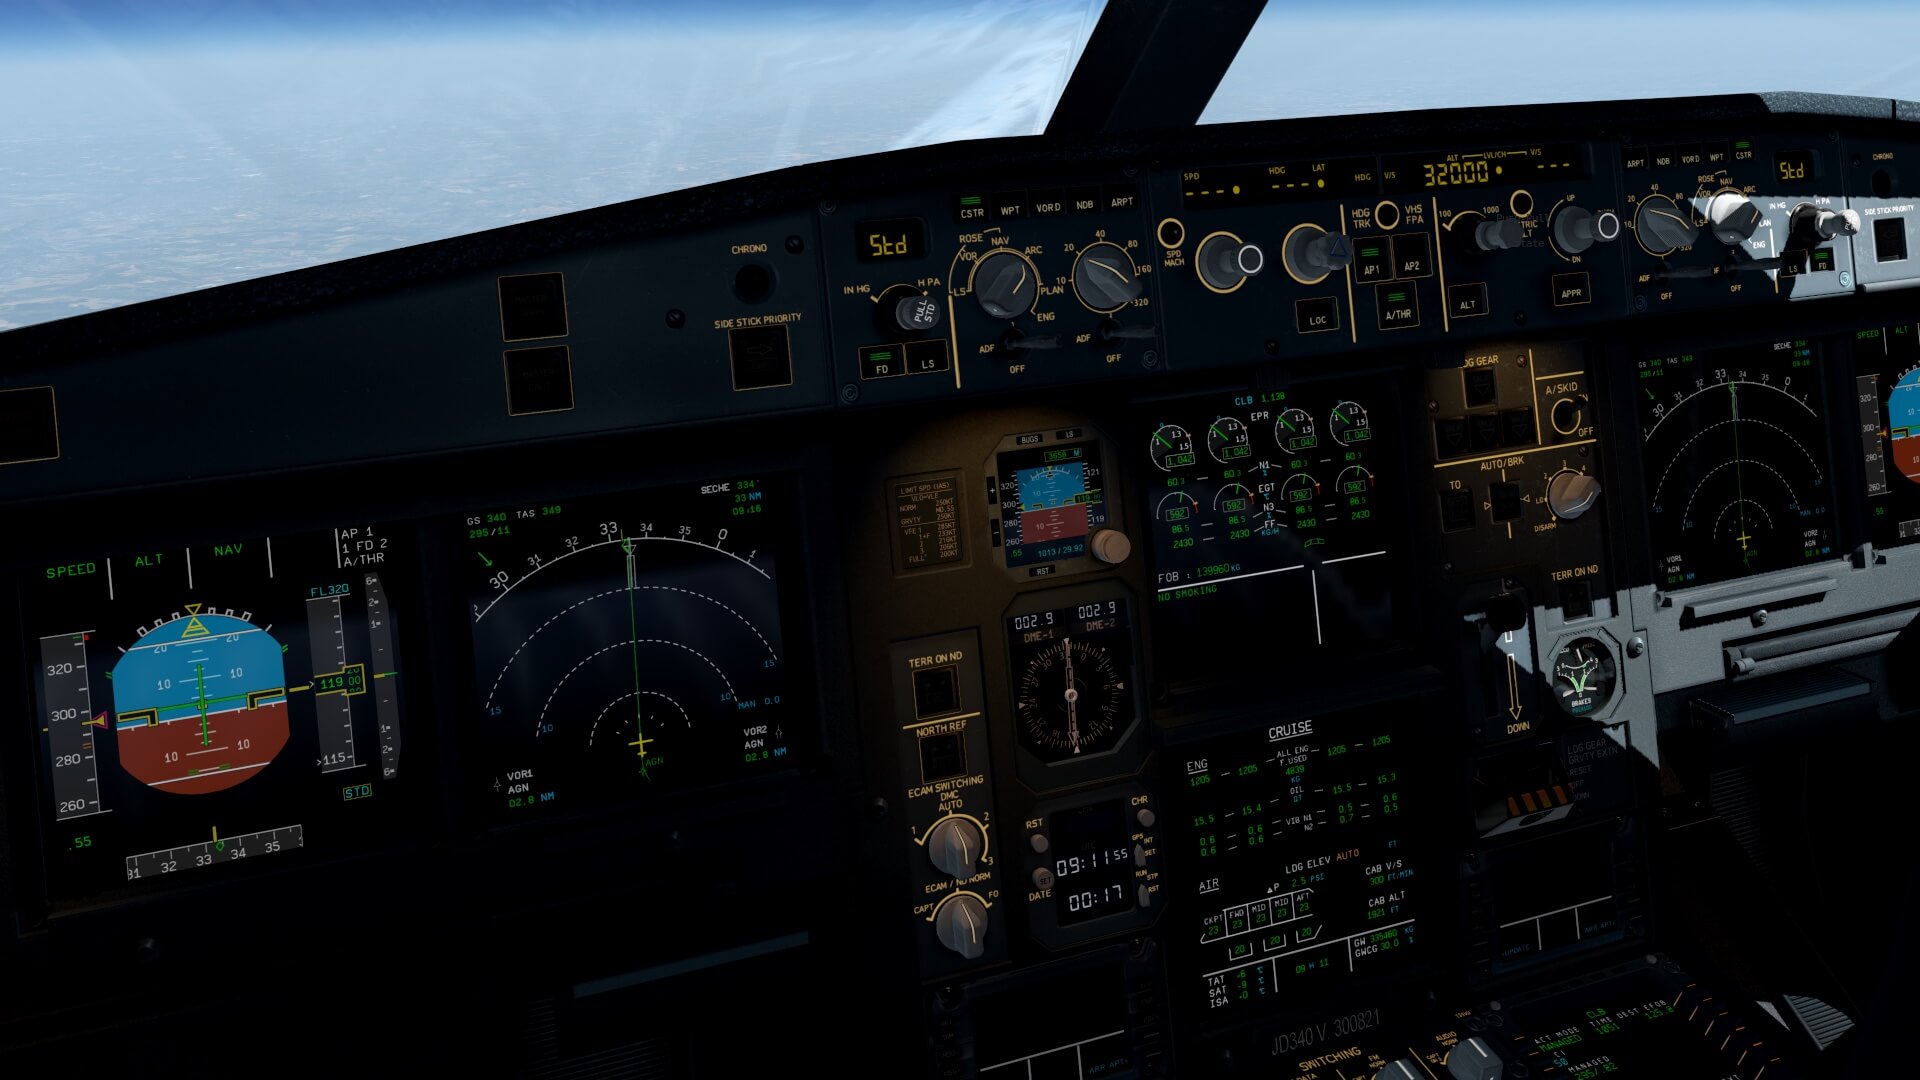
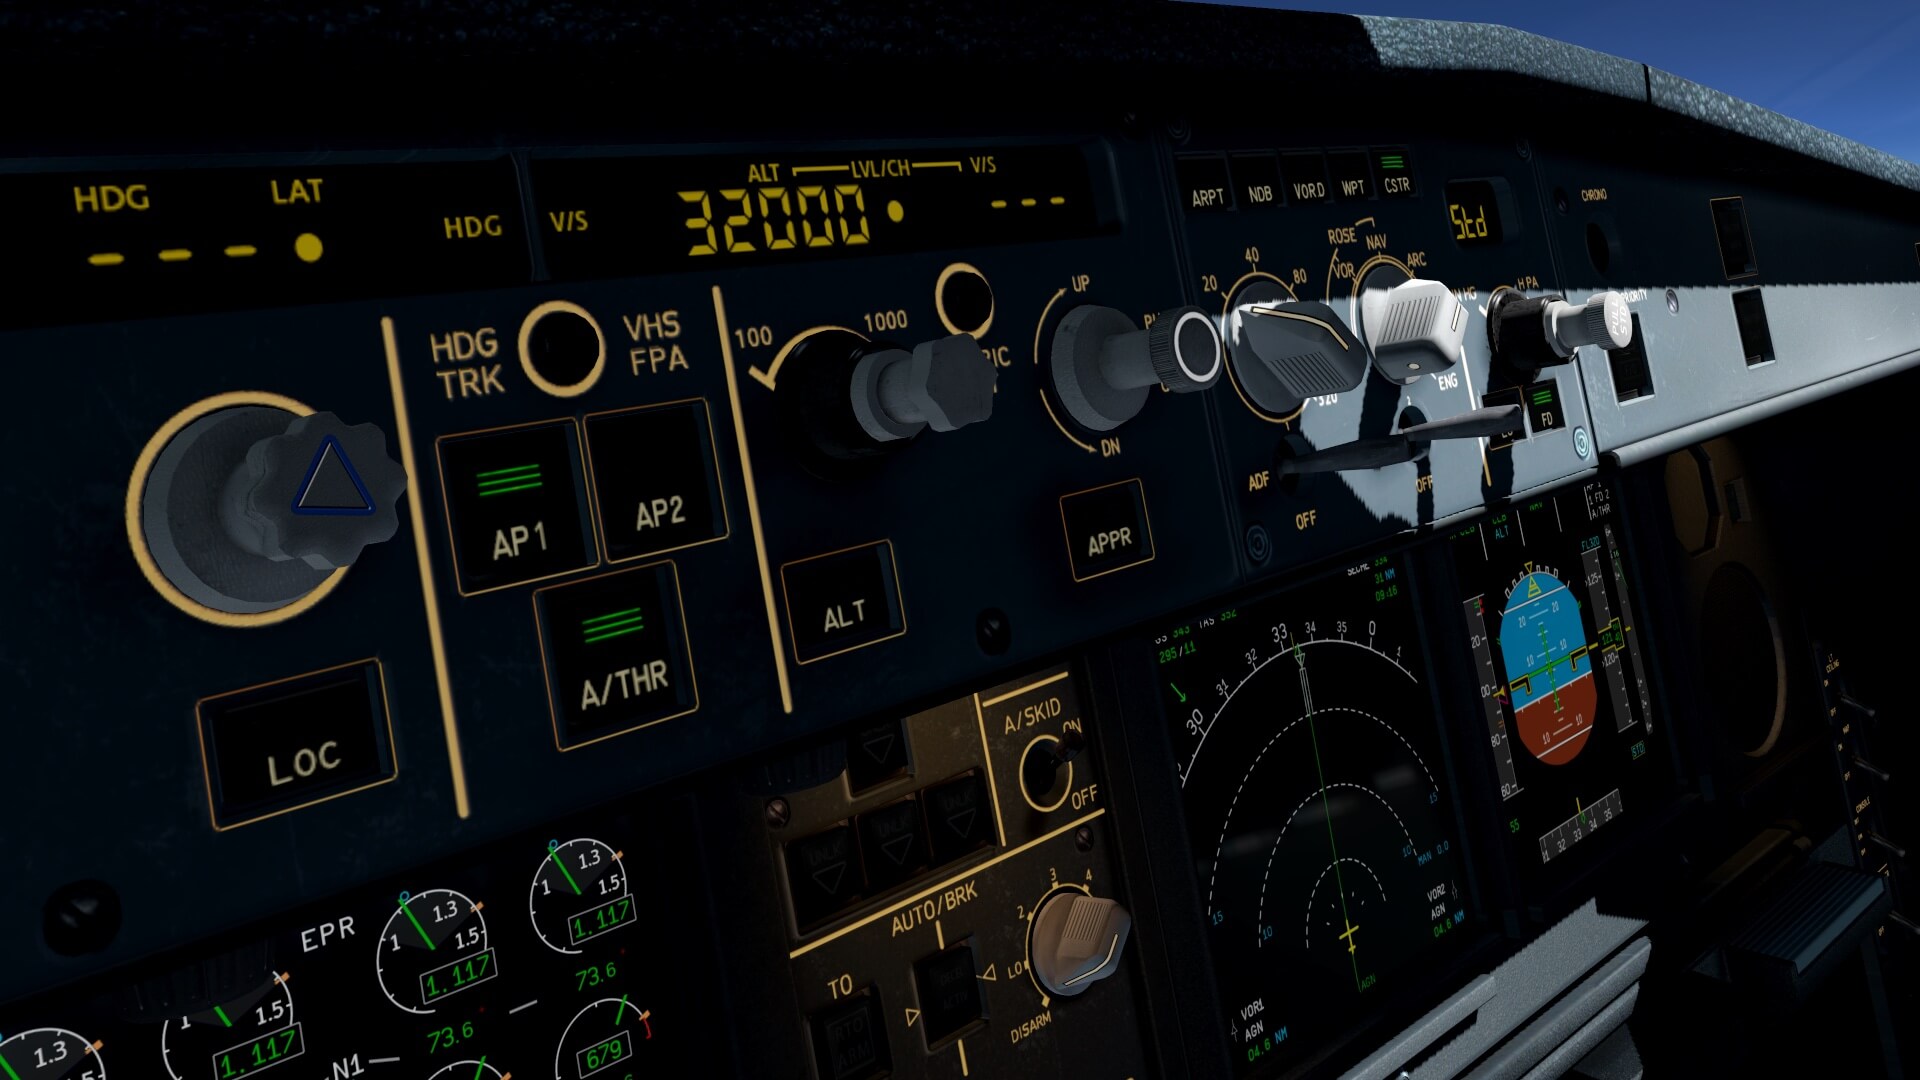


Since I’m flying offline, I’m in control what to do. That said, I enter on the FCU my cruising altitude of FL320, click or push the ALT knob, and the Auto Flight changes again to THR mode and a vertical speed, calculated by the FMGES. Suppose I had pull the ALT knob, you;ll see on the PFD FMA OP CLB which means you’re in the Open Climb mode without flight management. So always check that when you fly this flight too, that you press the ALT button and that the FMA shows CLB.
Since everything is handled by the Auto Flight, you can click the EFIS PFD and ND and zoom these 2D popup DUs to the size you want. Instead of the ND you can also request the big map which offers a bit more information then the ND. The advantage of the big map is that it’s a semi transparent while the ND popup isn’t. Just a preference! I can decide to play a bit with the NAV versus HDG mode, but it’s better to wait till I’m at my final cruising altitude. When I do that, it’s a good habit to, on a regular time base, click the HDG button to sync the HDG bug with the current HDG in NAV mode. The advantage of doing it this way is that when you change from NAV to HDG mode, no unexpected HDG changes happen.
Cruise (CRS)
The JD340-500 has reached my final cruising level of FL320. When everything is settled, it’s a good idea to play around as I explained before. I go out of the NAV mode and want to see the HDG SEL behavior. Pull the HDG knob (right hand mouse click) and the actual HDG is displayed in the window. See this as HDG HLD. On the PFD FMA the green NAV is replaced by a green HDG and the CLB is replaced by OP CLB. Turn the HDG knob to the heading you want to fly. Remember, lateral navigation is no longer performed by the FMGES. When you want to go back to the NAV mode you push the HDG button and you’ll see on the PFD MFA in green NAV and the aircraft will change its heading accordingly to fly towards the waypoint in the flight plan.


Under normal conditions and as far as my knowledge goes, pilots always fly in MANAGED MODES for SPD/MACH, ALT (CLB or DES) and NAV. During the approach it is common that ATC commands pilots to follow a different course and thus no longer following the flight plan path. In those conditions HDG SEL is used. The same is also applicable when pilots need to descent different then calculated by the FMGES and thus pilots will use the V/S button.
I explained already that the simulated FMGES isn’t a split system and thus the CAP and CO-PILOT EFIS control panels, but what does this mean? When you select on the CAPT EFIS CTL PNL a different ND (LS (Localizer), VOR, NAV, ARC or PLAN) mode, it will also change on the other EFDIS control panel as well as the right-hand side ND. The same for RANGE selector. In the real A340-500 these are split systems as with many other aircraft, so not only Airbus, but also Boeing, Embrear and so on. Perhaps you noticed this with the JD330, this is also the same for the FD (flight Director) knob on the EFIS control panel. When you click this FD button on one panel, it happens also no the other panel while in real this is split too.
Is it an problem that the system is not split?
In real you fly with two pilots while in the sim you normally fly alone so you either sit in the CAPTs- or CO-PILOTs seat. That said, it doesn’t matter if the other EFIS systems shows the same since you can’t be at two places at the same time.
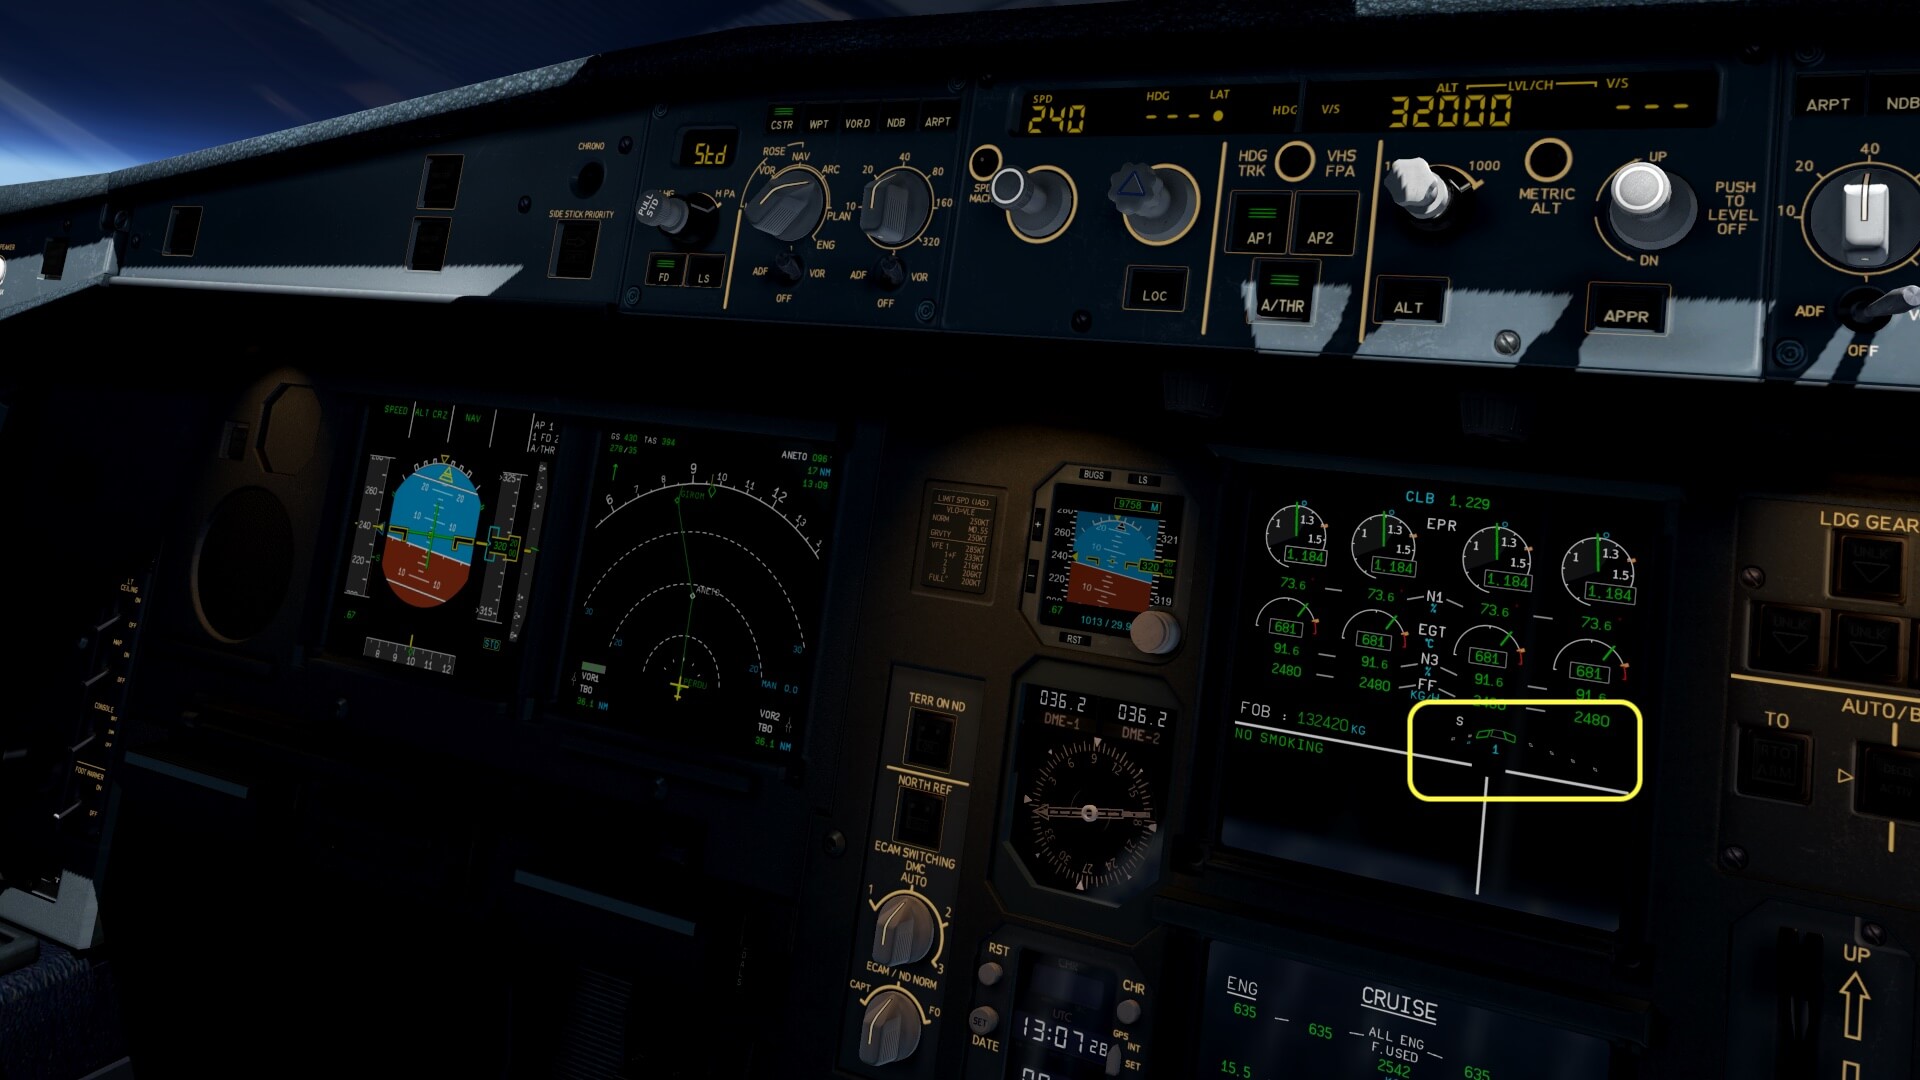
Its time to do some tests. Let’s start testing the aircraft behavior with GEAR DOWN and later on a slow flight with and without SLATS/FLAPS extended. At the moment I’m cruising so the speed I’m flying to test the GEAR DOWN if too high. In other words, during my stable cruise I lower the speed till the safe speed to extend the landing gear, and see what all happens. I right click the SPEED knob. The speed window shows me the actual Mach value.
Next I click the small SPD/MACH button to change to speed indication and select with the SPD knob 240 knots which is 10 knots below the VLE. After the aircraft has decreased to 240 knots, I select the GEAR DOWN. The extended NLG Nose Landing Gear can be clearly heard, and the FF (Fuel Flow) will dramatically increase which is logic. If the FF I see on ECAM is the correct value, is something I can’t confirm. Also the VMO red tape on the PFD SPD tape appears and stops at 250 knots. When I’ve seen enough and checked al the parameters, I select the GEAR UP and increase my speed again, or is it better to wait for the SLAT/FLAP test.


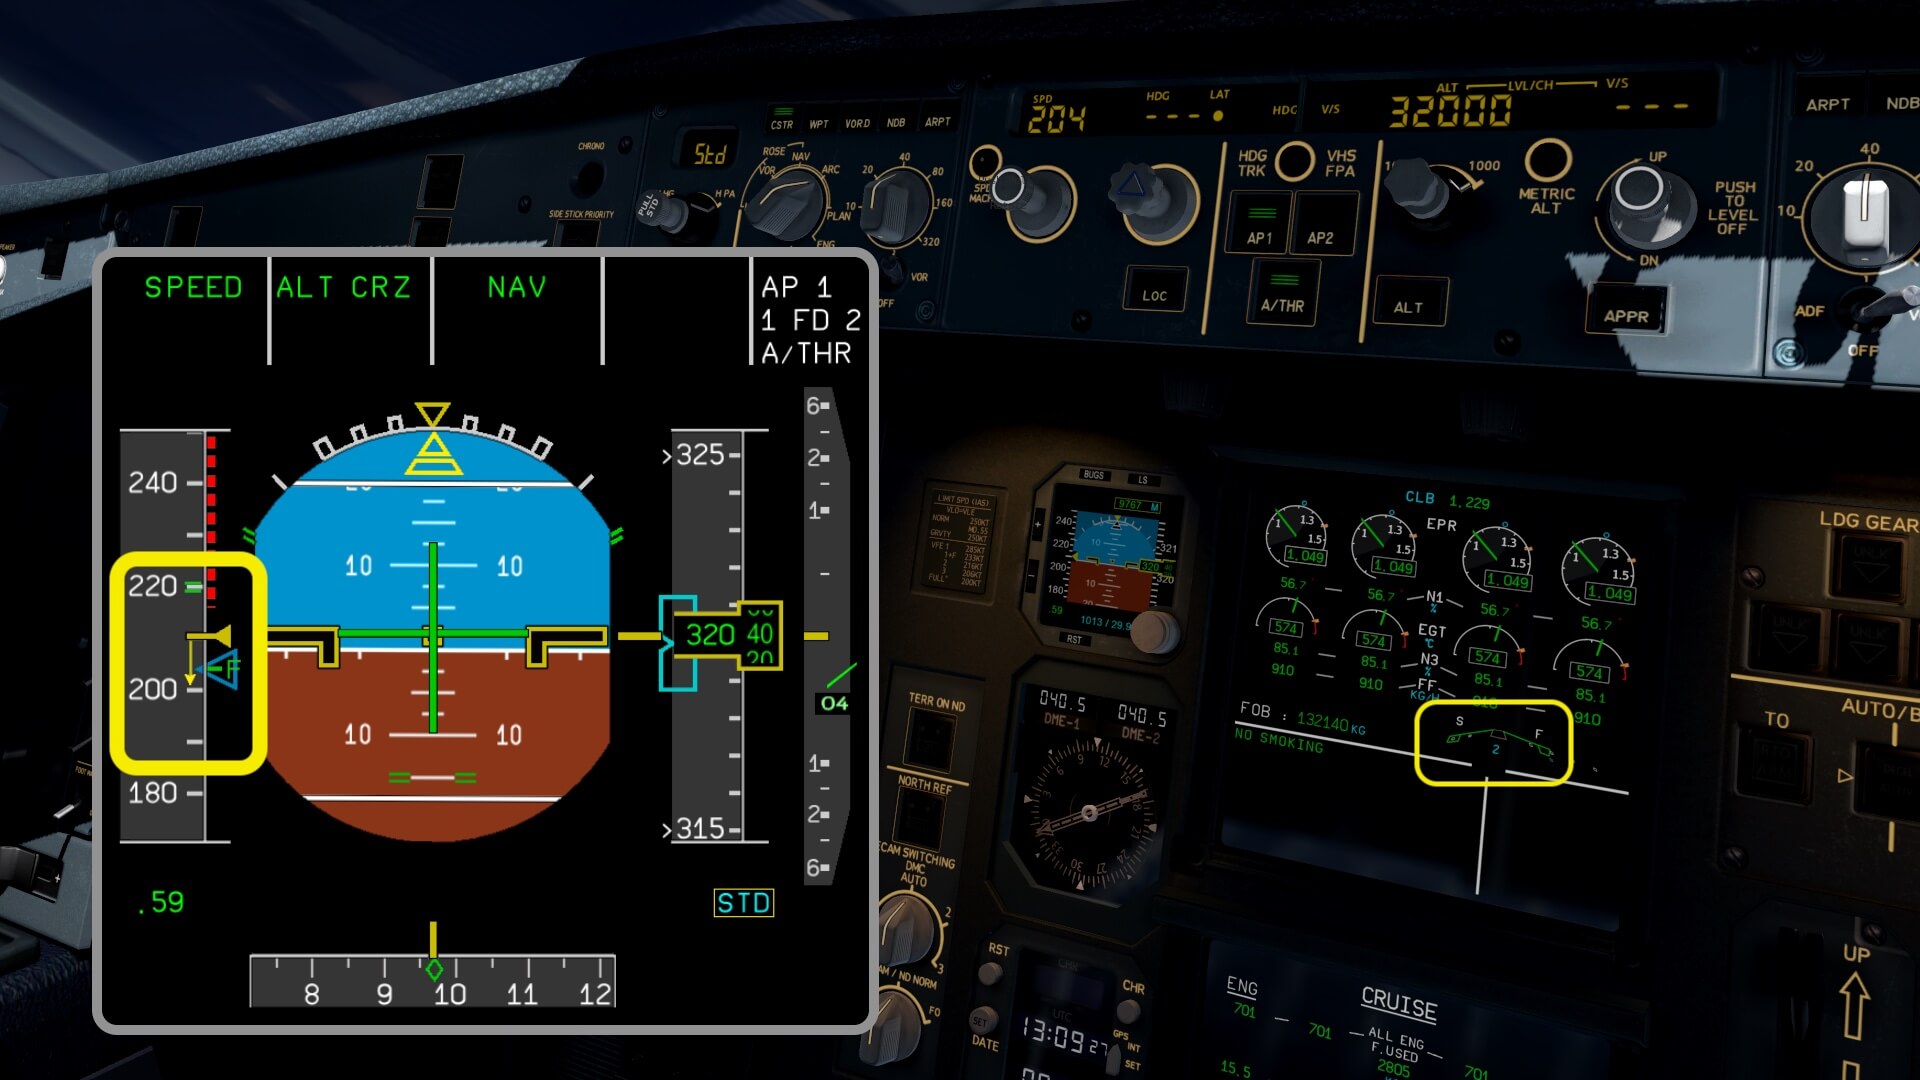
My starting point is still FL320, with the SPD out of MANAGED MODE and changing the aircraft speed to the green dot speed which is roughly 232 knots. The SLATS/FLAPS are still retracted/up. With FLAPS 1 there’s no problem yet. Before I select FLAPS 2, I first decrease the IAS that points to the “S”. When the aircraft has reached 200 knots, I select FLAPS 2. I go one step further and decrease my IAS again to the point where I see the “F”. Then, when the aircraft is reached 170, I select FLAPS 3, and after I have set the speed again to the “F”, I’m able to select FLAPS 4. All is going well but I need to keep in mind that I’m very close to the Vls (Lowest Selectable Speed) and below that, oops, the Alpha Protection speed.
By the way, the term “green dot” speed I used is according to an Airbus article “the green dot (GD) speed is the managed speed target in CONF CLEAN when the FMS approach phase is activated. It is also the recommended speed to extend flaps to CONF 1 and for a holding in clean configuration, but how is GD speed determined?
The Auto Flight System (AFS) computes GD speed using the aircraft weight, based on the Zero Fuel Weight (ZFW) entered in the FMS during flight preparation, and the pressure altitude. The GD formula has been set up so that the resulting airspeed provides the best lift-to-drag ratio for a given altitude and aircraft weight, in clean configuration with one engine out. In some phases of flight, GD is computed to minimize drag and thus, the fuel consumption (for example during the HOLD phase).”
I retract the FLAPS, but as a consequence, Vls and Alpha speed protection and the Alpha Max speed scale move up and bring me in the A.FLOOR protection situation. For a short moment I see on the ECAM UPPER DU A.FLOOR in amber while the PFD MFA shows TOGALK (TO GALOCK). Although the AP has been disconnected, I can control the pitch myself, the thrust is set to full to bring me out of the A.FLOOR situation. This is done well. Not that I’ve seen it in real, but double checking with the manuals tells me that this is correctly simulated.
Following the way back to normal configuration isn’t difficult. I go back to the MANAGED SPD MODE, retract the SLAT/FLAP and let the JD340-500 stabilize. By the way, during this A.FLOOR protection you can’t deselect the A/THR button. The only way to get out of the TOGALK is to retard the throttles completely to IDLE. This will disengage A/THR and thus removed the TOGALK mode. Then put the throttles slowly forward, A/THR will automatically engage and on the PFD MFA you see by yourself THR or SPEED whatever is applicable.


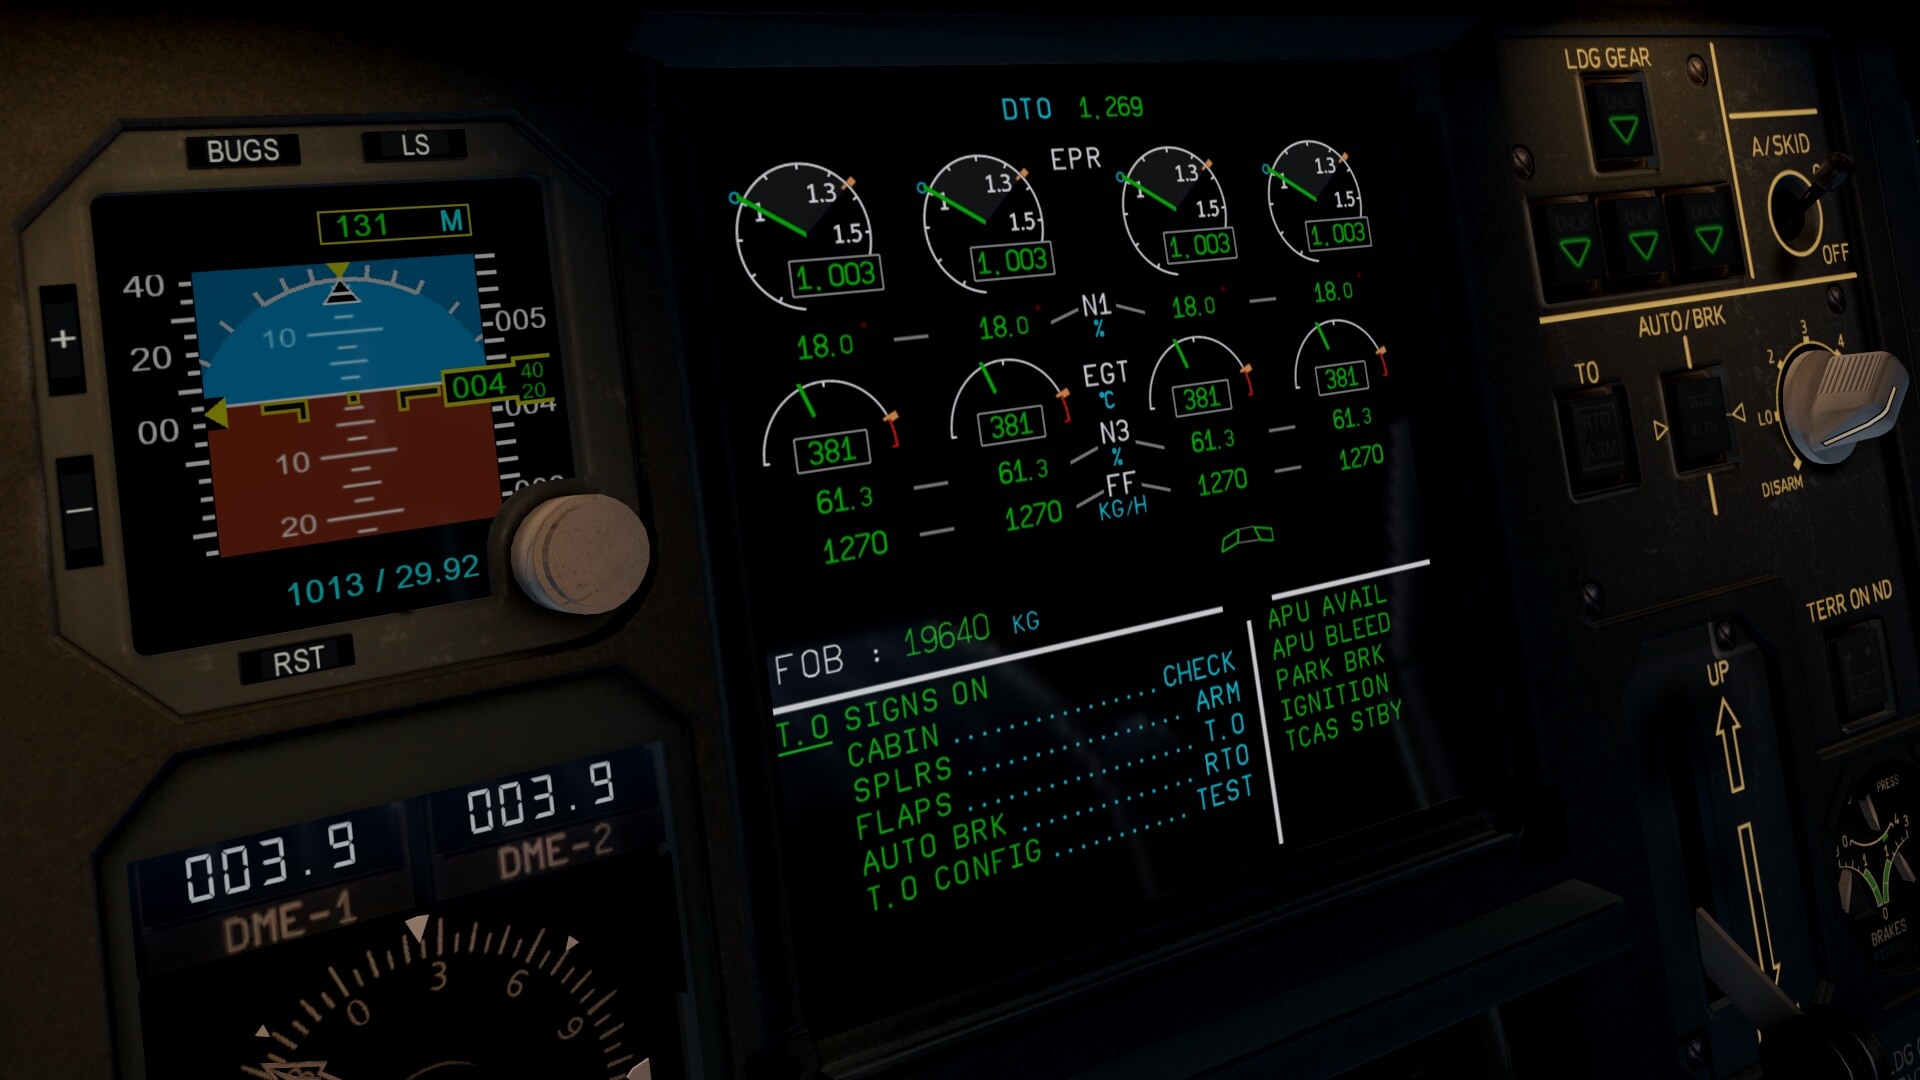
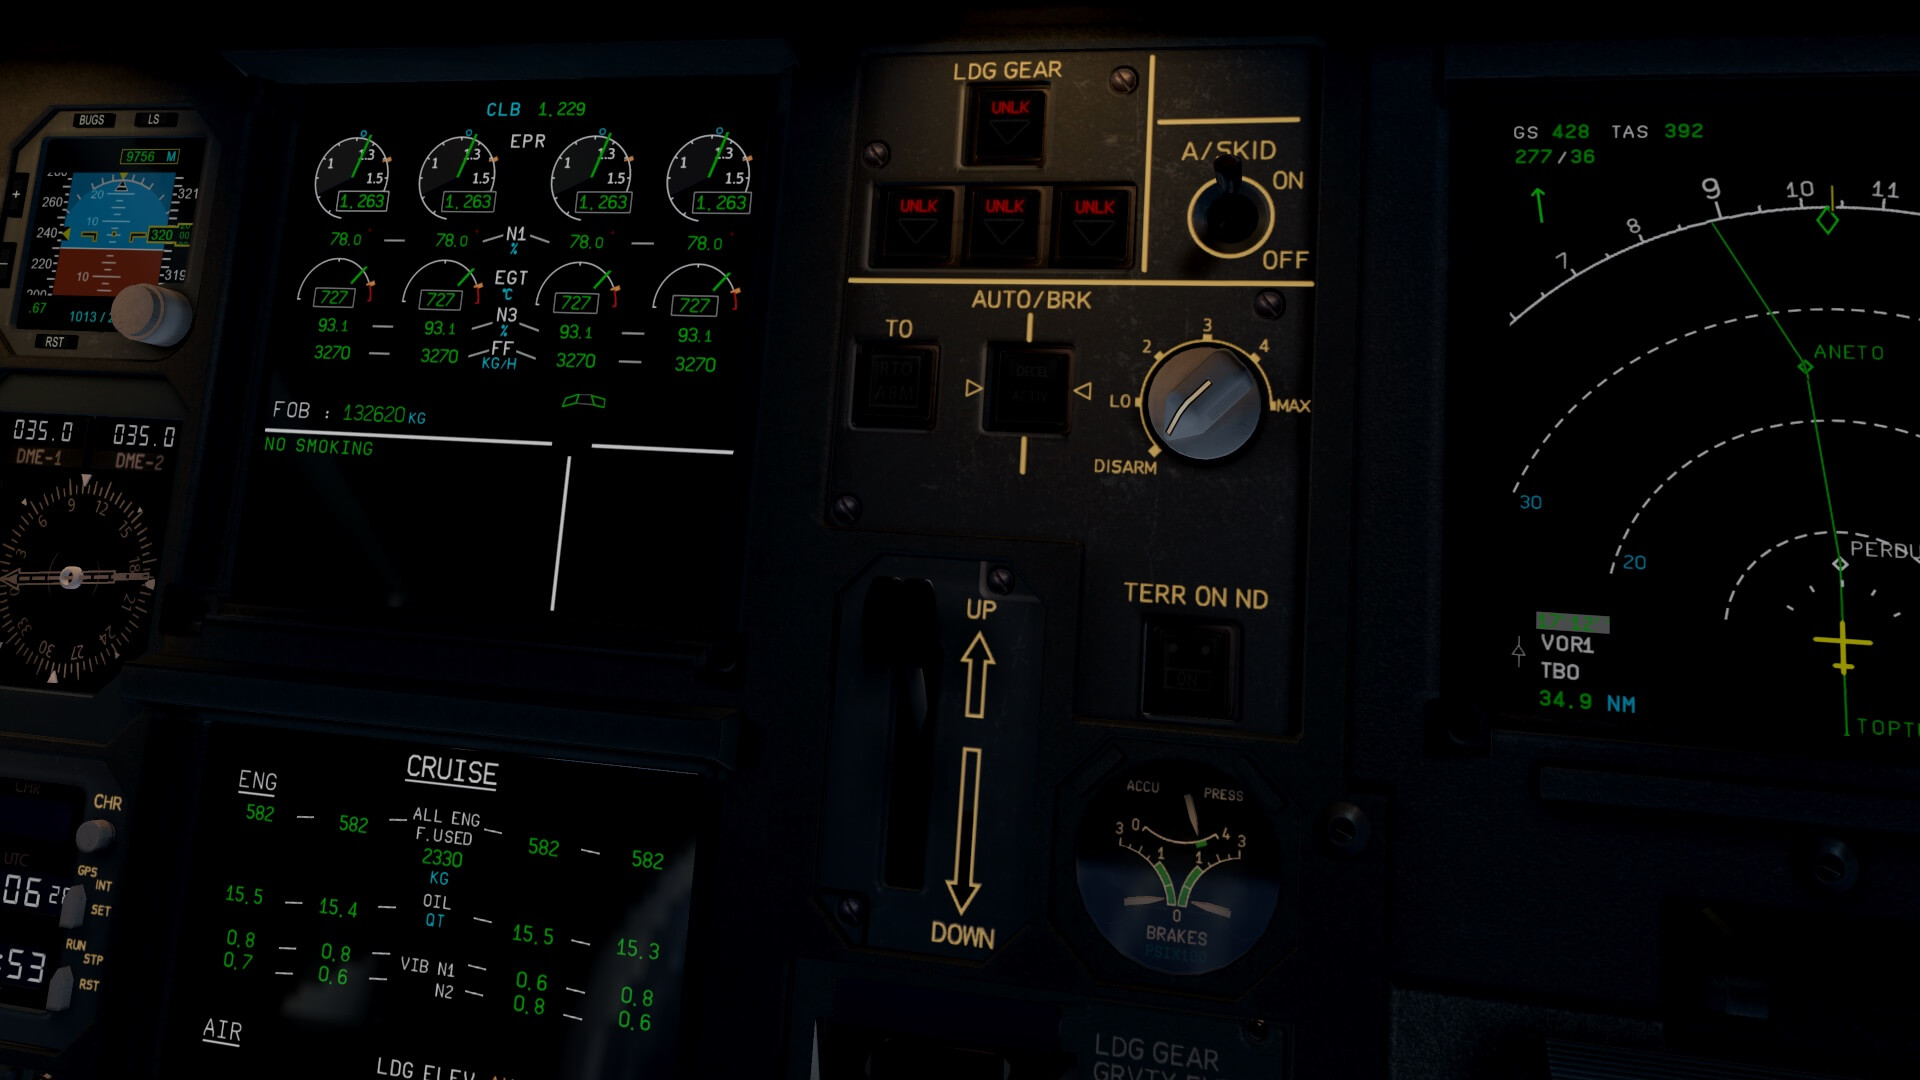
While relaxing a bit from the previous exercises, it is time to explore ECAM and all the available synoptics. Although the lower ECAM DU is called System Display, the presented pages of all the modeled aircraft systems are called synoptics which means a simplified representation of the system involved. Besides all the available systems pages, ECAM is also equipped with an automatic Flight Phase selected page system which is for those who don’t know Airbus well, a very old system that goes back to the Airbus A310-200. One of the flight phase related pages is the CRUISE page that can be seen during the whole flight.
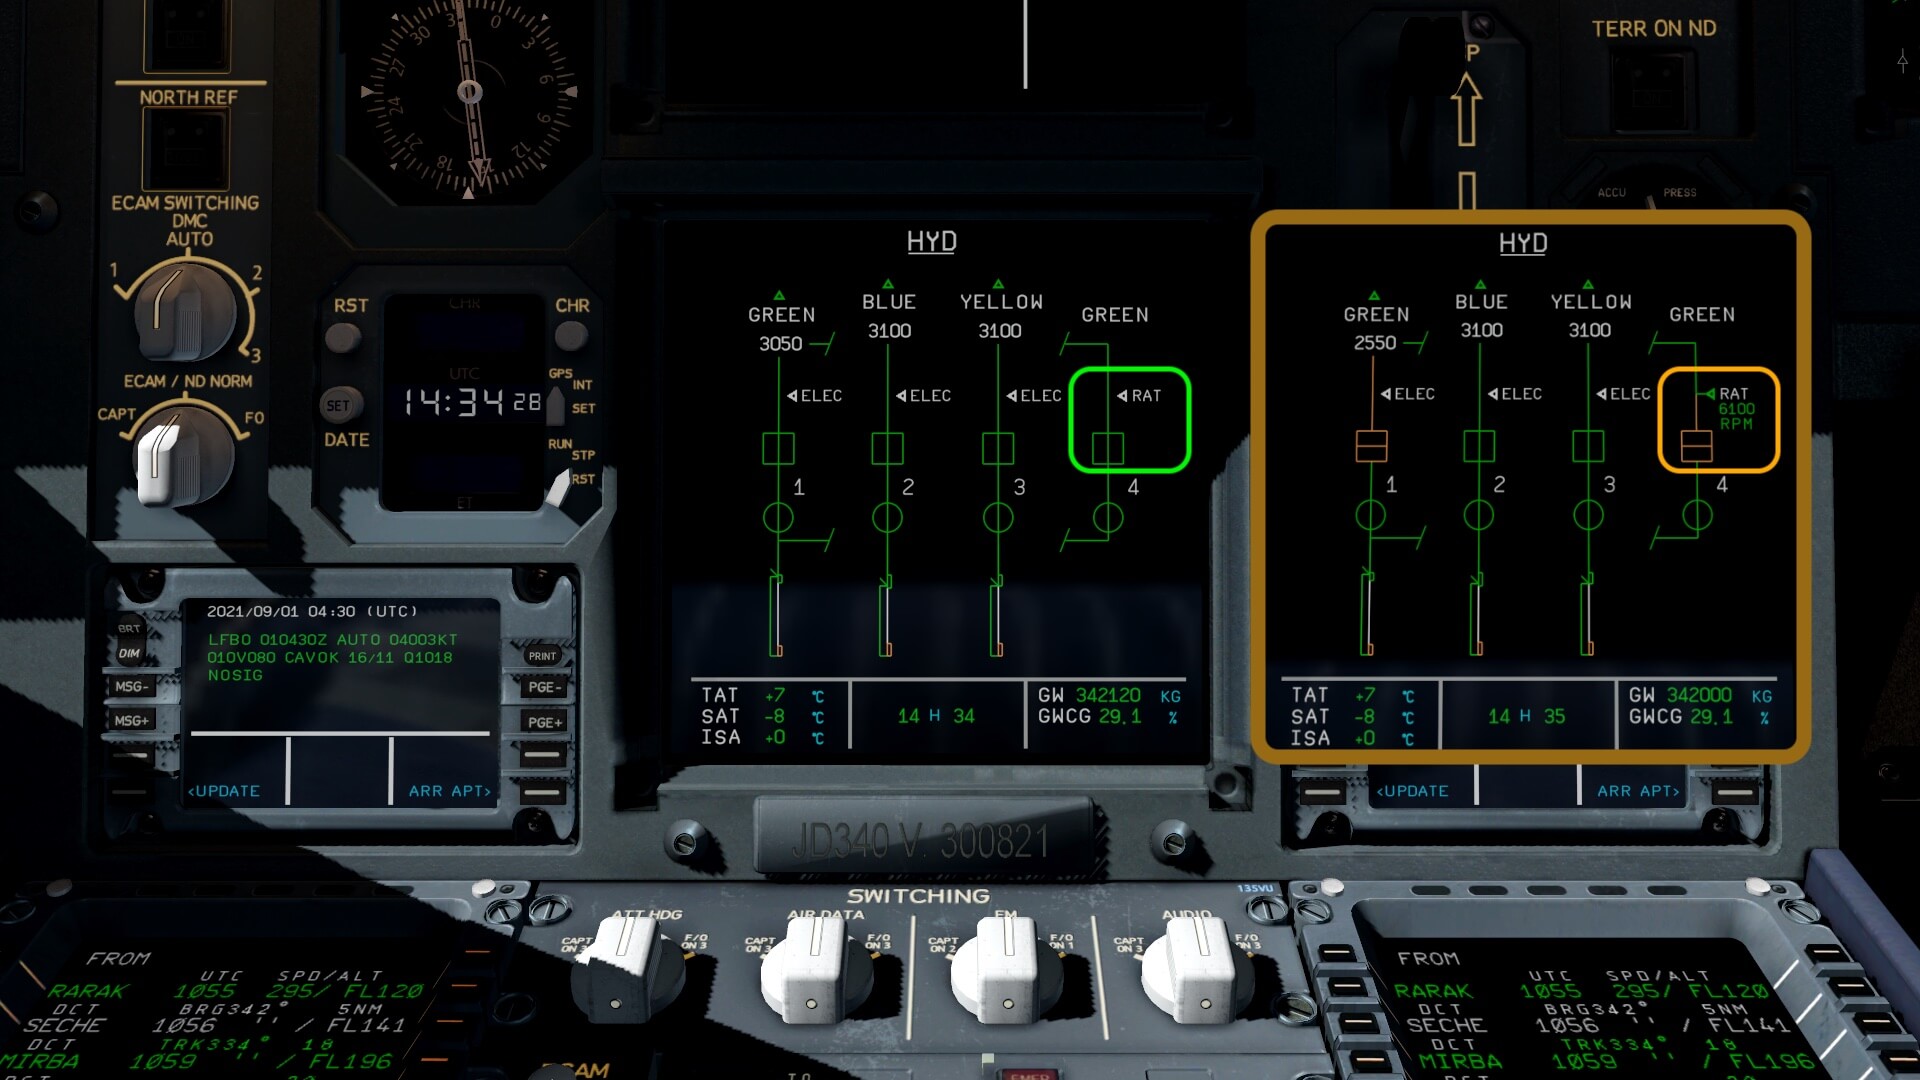
I honestly didn’t check with the FCOM if the flight phase related pages are all showing up at the right moment, but what I see seems OK to me. You can play around with a selected ECAM system page, but I have to keep in mind that I’m flying so I can’t without thinking what I’m doing, switch OFF systems. I’m also not sure if the RAT (Ram Air Turbine) is modeled and thus functional. I did see under the right-hand wing at the designated flap fairing the doors of the RAT, but not sure if a RAT pops out when all hydraulic systems fail.
According to Eugeny from JAR it is fully simulated including the 3D RAT object BUT before you decide to do it too during your flight, you should remember this. Once the RAT is extended you can’t retract it anymore. You need to be on ground or, after consulting Eugeny from JAR, reload the aircraft. So on one of the screenshots below I selected the RAT manually to extend which was not on the same flight.


JD Flight Part III | LFBO – LFBO
Preparations
But first, lets check out our descent and approach preparations and what to expect.
As I mentioned before, I’m not flying online, so I’m free in what I do as well as which STAR I take. Since I loaded all the necessary charts in the AviTab, I can study a bit what I do and what I want. For me it’s important to see how the JD340-500 reacts once I’ve entered my intended runway and the belonging STAR. Besides reading the charts, I can use for this the popup 2D ND or the big map. I know already that I intend to land on runway 32L since the weather conditions haven’t changed since my departure and it’s the regular used runway for Airbus aircraft.
I could select STAR MEN6L or AFRIC6L. My last waypoint or actually it is a VOR station, is GAI (Gaillac) that lies in-between either NARAK north of it which belongs to the MEN6L or is lies above AFRIC. I decide to go for STAR MEN6L.
So I do the following steps.
I select on the MCDU F-PNL page LSK 6L my arrival LFBO, shown in white. On the next page I select LSK 1R ARRIVAL and choose ILS32L and select MEN6L. Then as before when I entered a SID, I select LSK 6L TMPY F-PLN, followed by LSK 6R TMPY INSERT. And yes, I know, it’s now a bit of a mess on my MCDU so we have to skip a couple of waypoints, but to do that correctly, select on the CAPTs EFIS control panel PLAN mode, use the right range for it that you have a good overview of the flight plan or you can also select the big map, whatever you and I prefer.
By using the PLAN mode with the ND you can scroll thru the flight plan and see which waypoints to remove to create a smooth line to the runway. I see on the MCDU that I’ve got a F-PLN DISCONTINUITY, so I first remove this by selecting the CLR MCDU keyboard button and then the LSK next of the DISCONTINUITY. Next to create a smooth line to between my flight plan and STAR MEN6L, I delete waypoint GAI. Same procedure, click the keyboard CLR key and CLR appears in the scratchpad. Then click the LSK next of GAI. The flight plan become temporarily, so to get back to normal click LSK 6R TMPY INSERT*. The result of this action is that we have now again a F-PLN DISCONTINUITY. Remove it as previously described. The final flight plan including STAR MEN6L can be seen below.


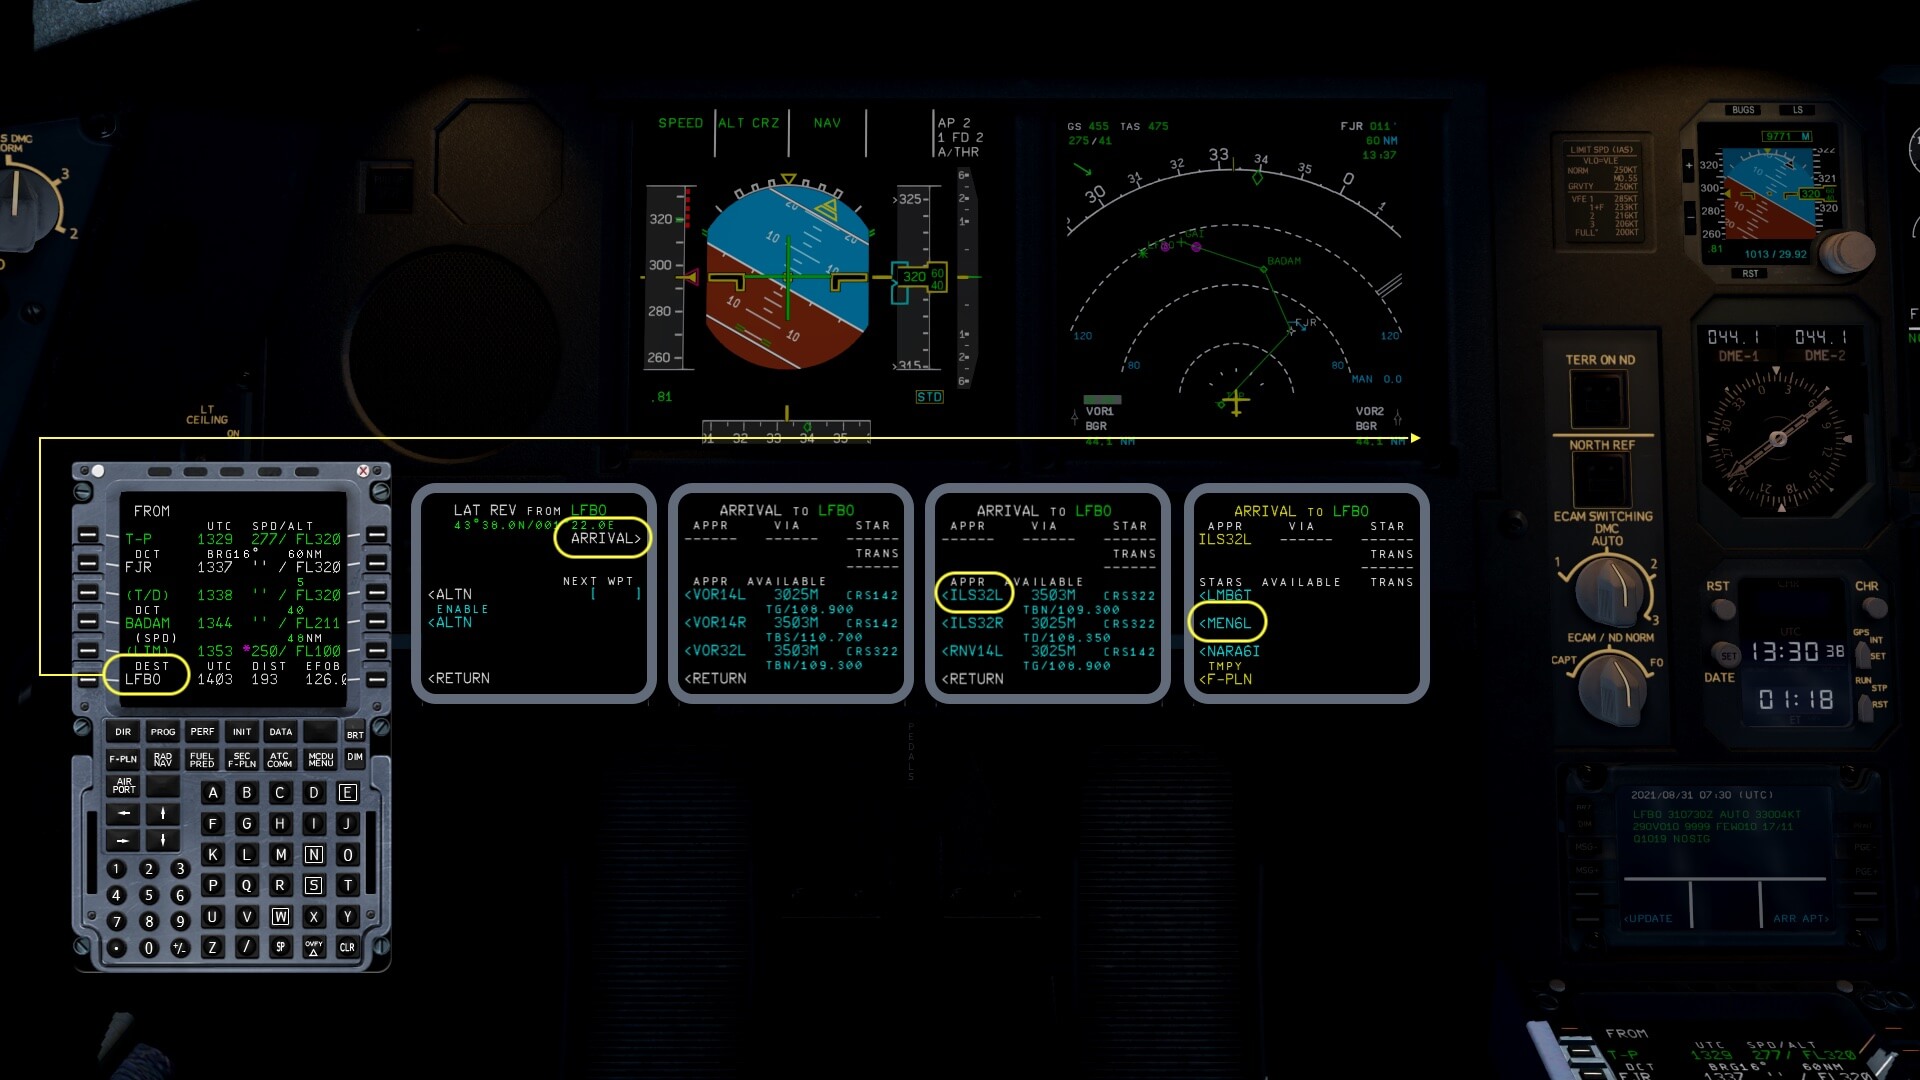
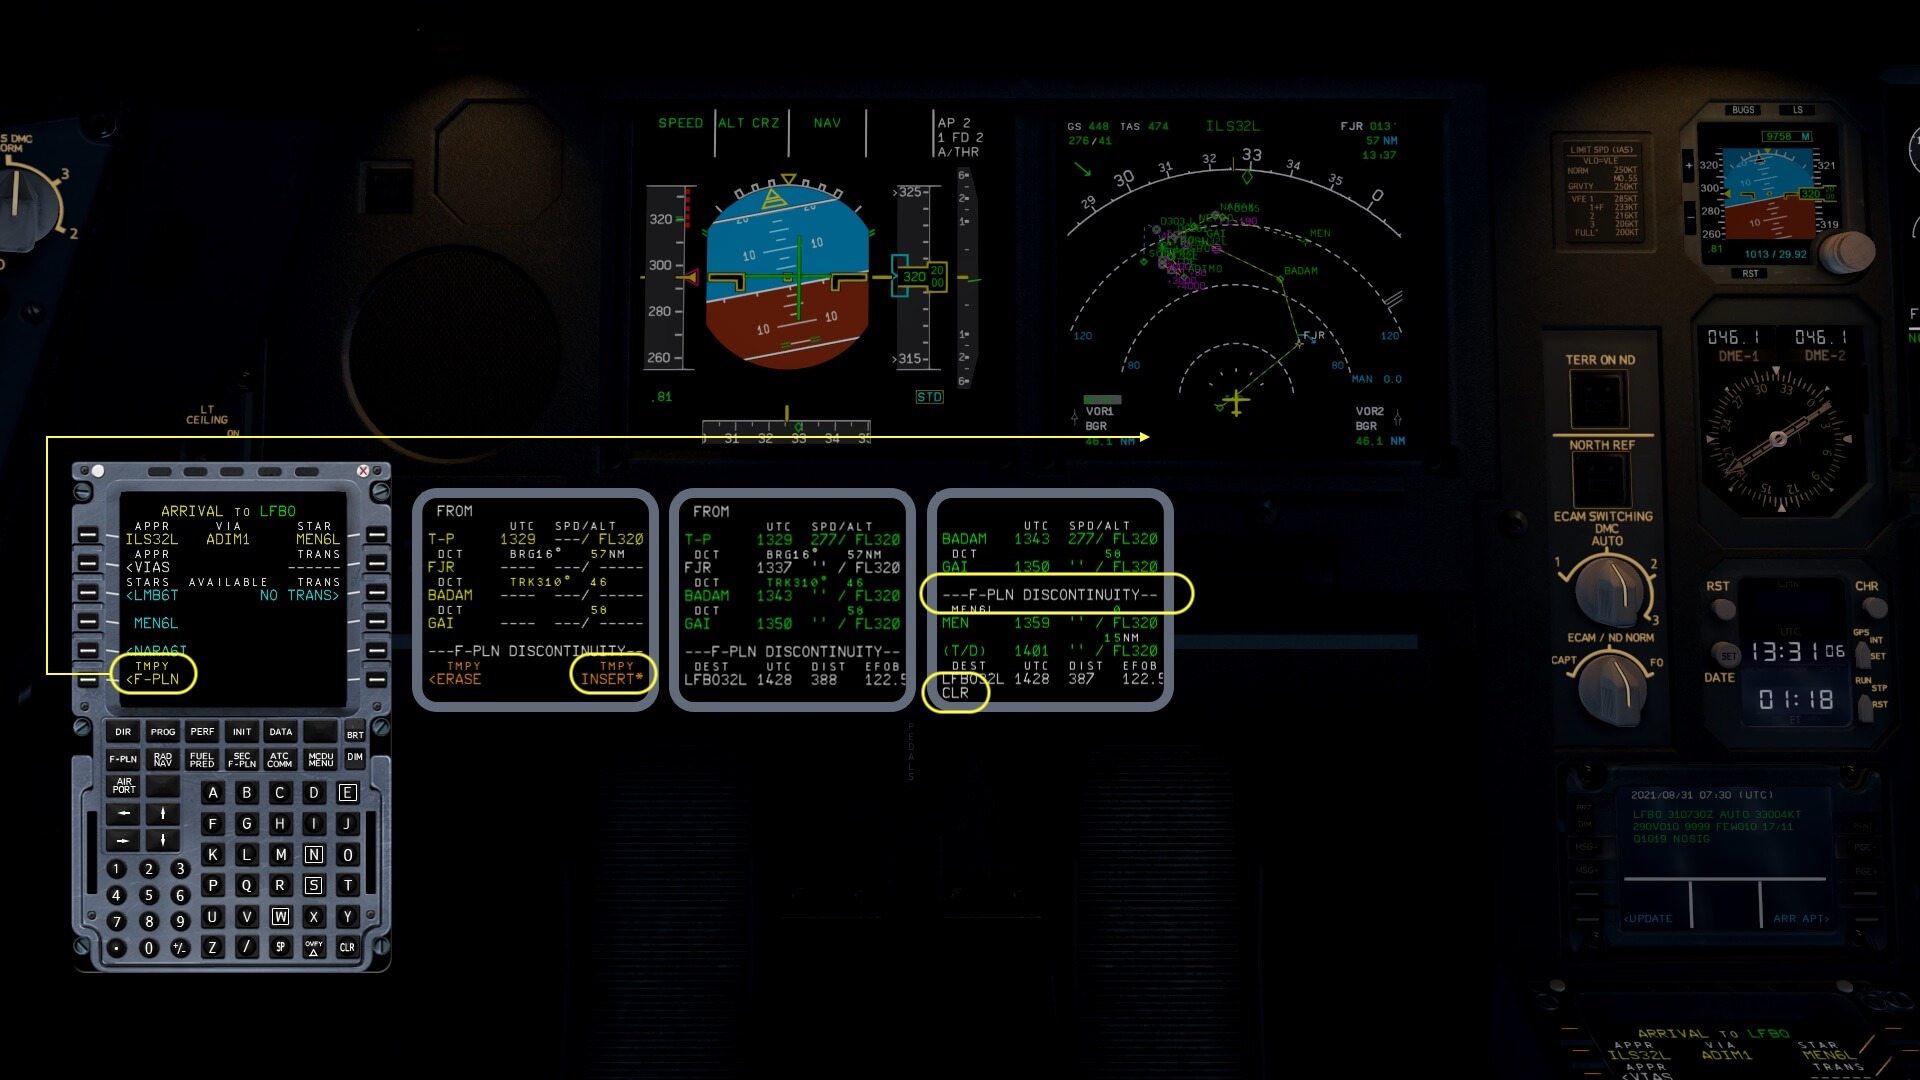


When you check the flight plan, you can see that we fly from waypoint BADAM to MEN and then to NARAK. Although it’s nice to have this, I prefer to delete waypoint MEN too. The end result is that you and I fly from from FJR (Montpellier Mediterranean) direct to NARAK. And because of this, the TOD (Top Of Descent) is also recalculated. Just in case you’re new to modern Airbus aircraft. The TOD is shown on the ND as a cyan arrow pointing downwards.


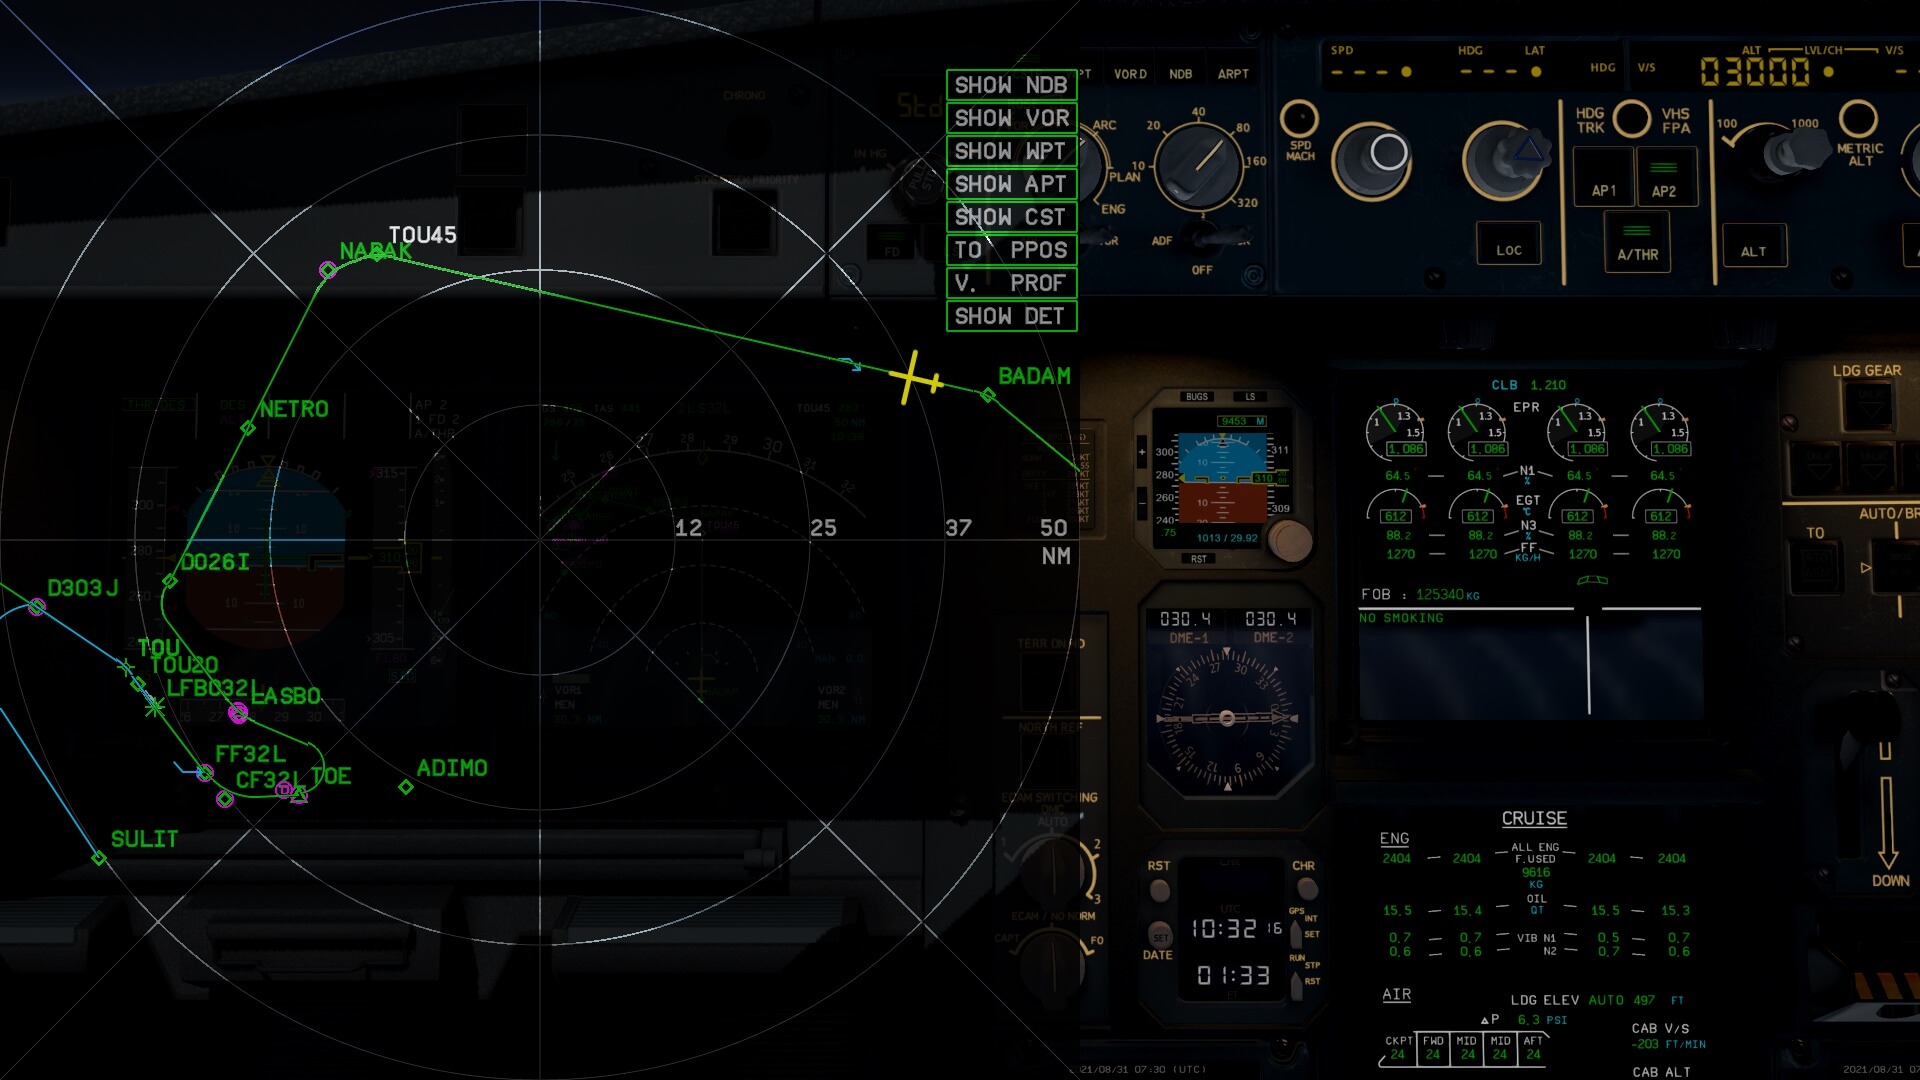
What’s important right now are the altitudes to be at when arriving at the waypoints and if applicable, the maximum speeds that apply. The first waypoint on the STAR was MEN, but I deleted this so now the first one with restrictions is NARAK with a altitude constraint of FL190 or below. Then, when we reach IAF LASBO, we need to max at FL080, speed constraint 190 knots. In-between there’s also a constraint of FL100 with a max speed of 250 knots. From LASBO you can leave it all in MANAGED MODE unless you want, you can change to HDG SEL and V/S, but there’s no need to do. What has to be done only once is that we set before TOD our final altitude for the ILS which is 3000 feet. That’s what we enter in the ALT window a couple of NMs before the TOD and push the ALT button.
Although I made many flights with the JD340-500, for this particular review flight I left the Auto Flight in MANAGED MODE. That said, you don’t have to do much except that you need as written before the final ILS altitude which is according to the chart 3000 feet (AD_2_LFBO_IAC_RWY32L_FNA_ILS_LOC.pdf). And when I’ve passed LASBO and heading for ADIMO, I need to select the APP button on the FCU. That’s all when you want to see how this is all modeled and believe me, it’s working as expected. There’s also no need in case you think you need to do that, to select on the MCDU SELECT APP MODE. As long as you stay in the NAV mode, all is done for you.
Ok, one more thing has to be done. I need to enter some data on the MCDU APPR PERF (ormance) page. Click the PERF key on the MCDU, and scroll with LSK 6R to the APPR page. With the help of the DCDU (Datalink Control and Display Unit) you can retrieve the correct airport information of your arrival airport. The arrival airport information is known because it’s taken from the entered arrival airport in the MCDU.
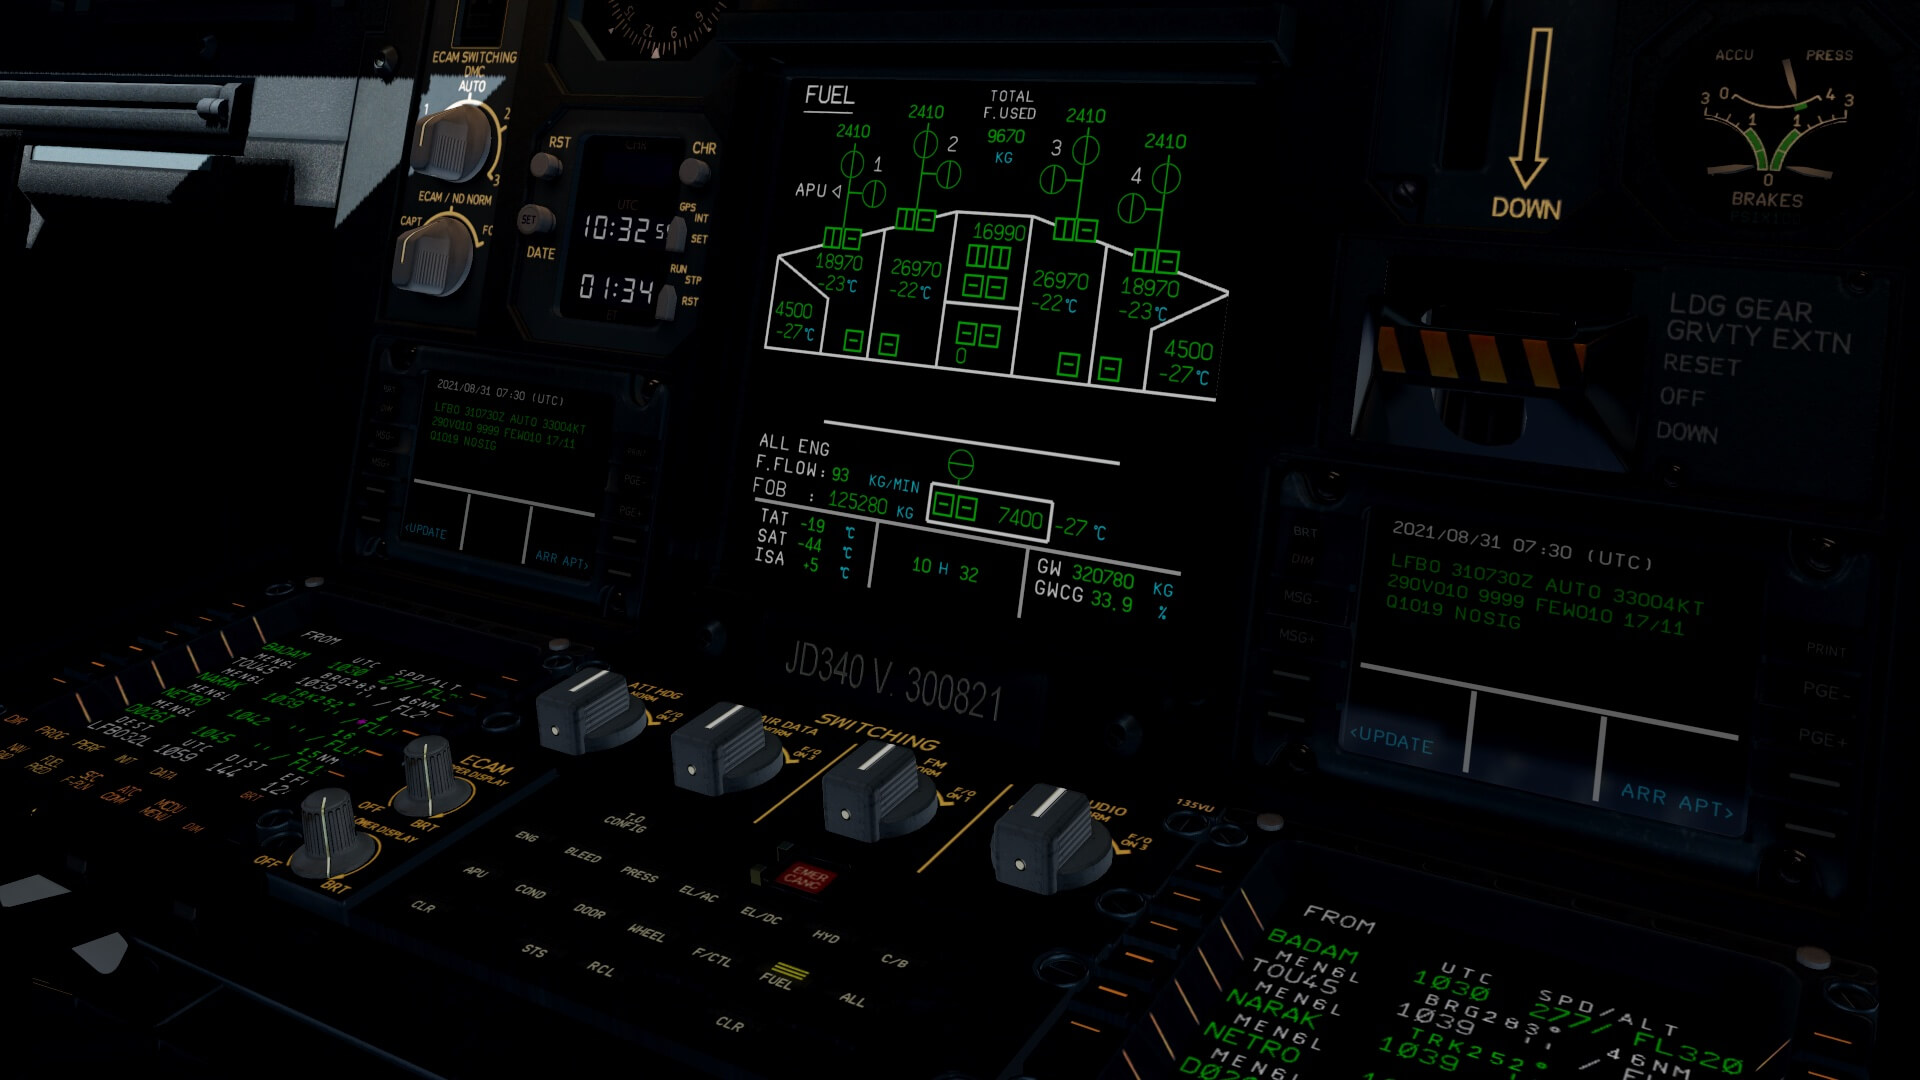
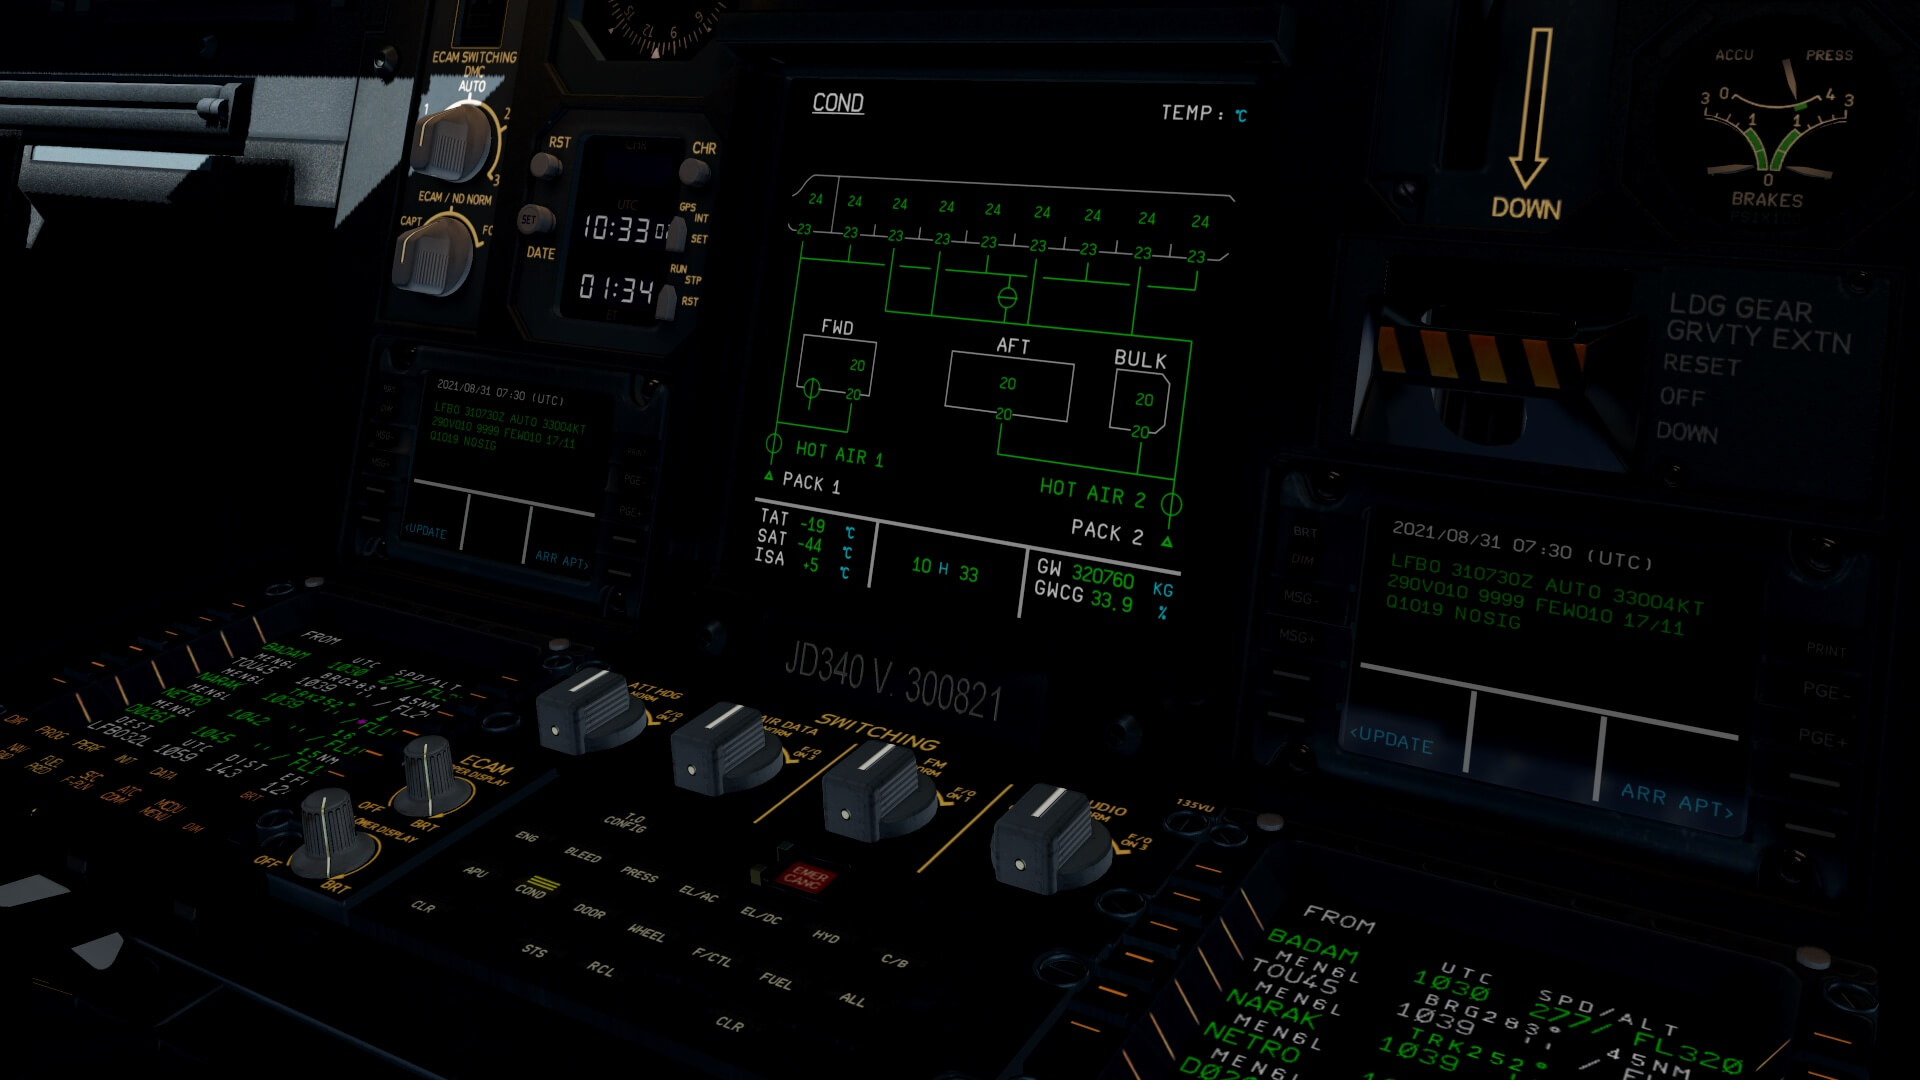


At the APPR page we need to enter the arrival QNH, the local temperature, wind information, and the DH although for a CAT3 landing a DSH is not really needed, but anyway. The DH can be found at the ILS32L chart. Further on, we need to check if the TA (Transition Altitude) is correct. This can also be found on the chart. We can also decide which landing configuration we want; either CONF3 or FULL. Just click the LSK next of what you prefer. I go for the FULL FLAP position. No need to enter anything else. Since we selected a landing for runway 32L, there’s no need to check if the ILS frequency is entered. That’s already done by the MCDU DB. So far all what was needed for the descent and approach preparations.
Descent
I’m approaching the TOD (Top Of Descent) or T/D on the MCDU which means that I can enter the final altitude (3000 feet) in the ALT window on the FCU. That’s in my case the altitude for my landing at runway ILS 32L. Just before reaching T/D, I push the ALT knob which brings it in the MANAGED DES mode. When I had pulled the knob, I bring the Auto Flight in an OP DES. so the PFD FMA should show DES.
I noticed that I need to be ADD or BELOW waypoint NARAK at FL190. This seems for the modeled aircraft not really a problem. In other words, the vertical navigation or vertical profile is well modeled. I’d seen this already during many flights that the modeled Auto Flight is doing a great job. On the MCDU you can see at which altitude we need to be at the next waypoint and believe me, every time I approach another waypoint, I’m perfectly on that altitude as indicated. If for any reason the Auto Flight can’t manage to descent fast enough and the speed increases, it will show you on the PFD MORE DRAG. Add in that case some speedbrake to it to control the speed and as expected, the Auto Flight controls and stabilizes the further descent to the waypoint.
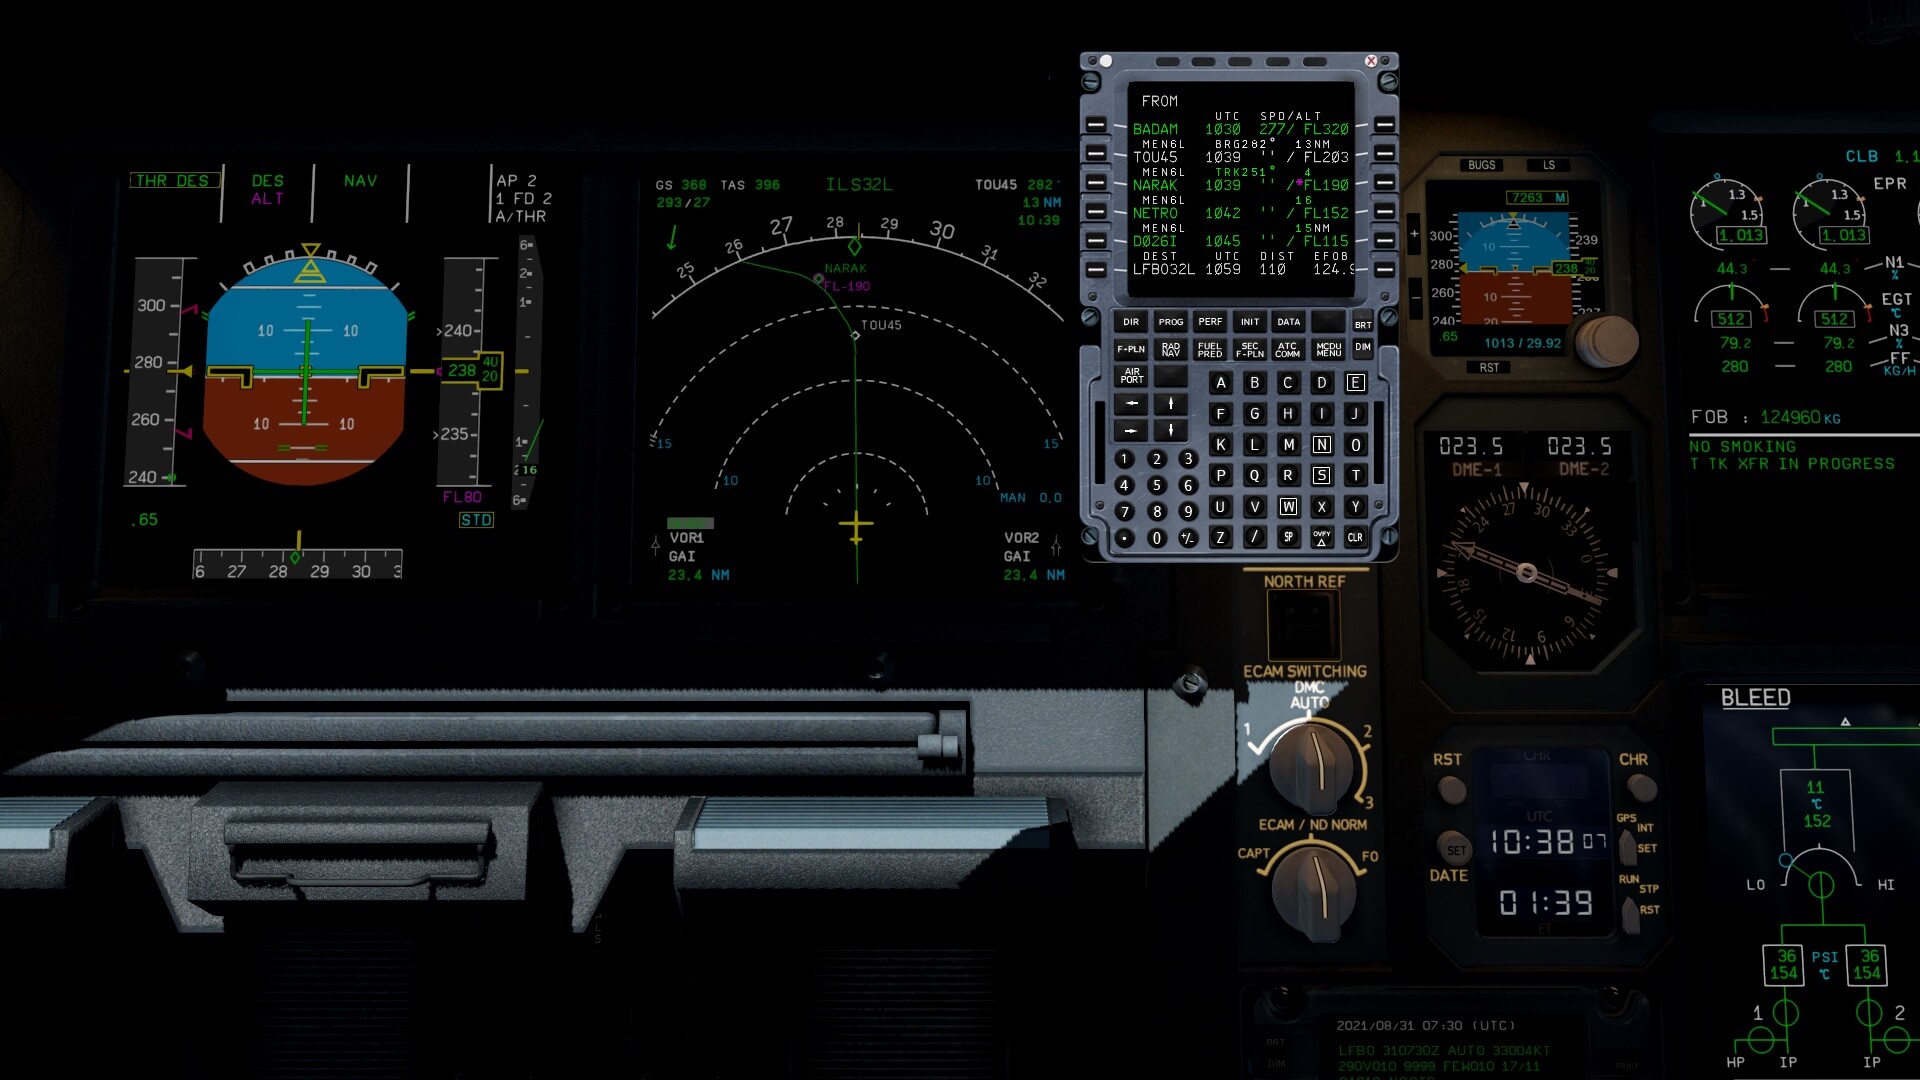
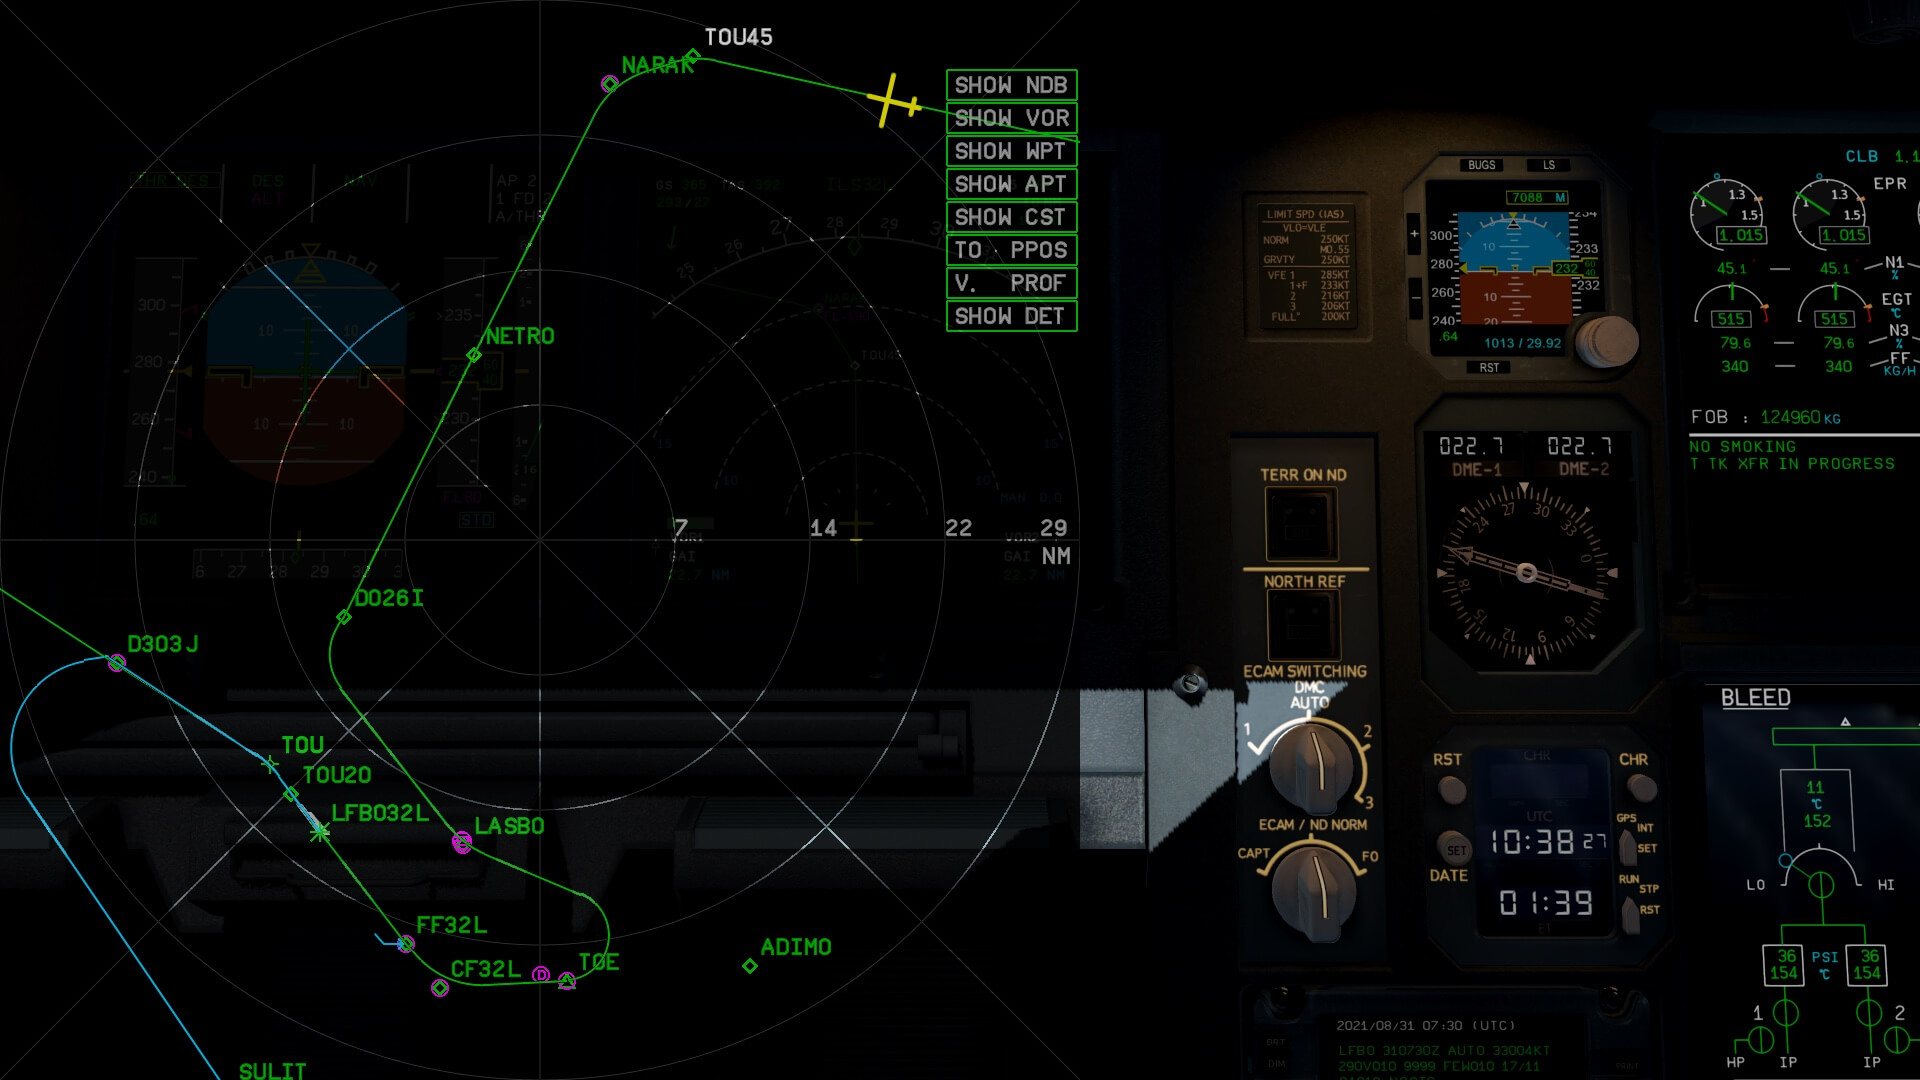

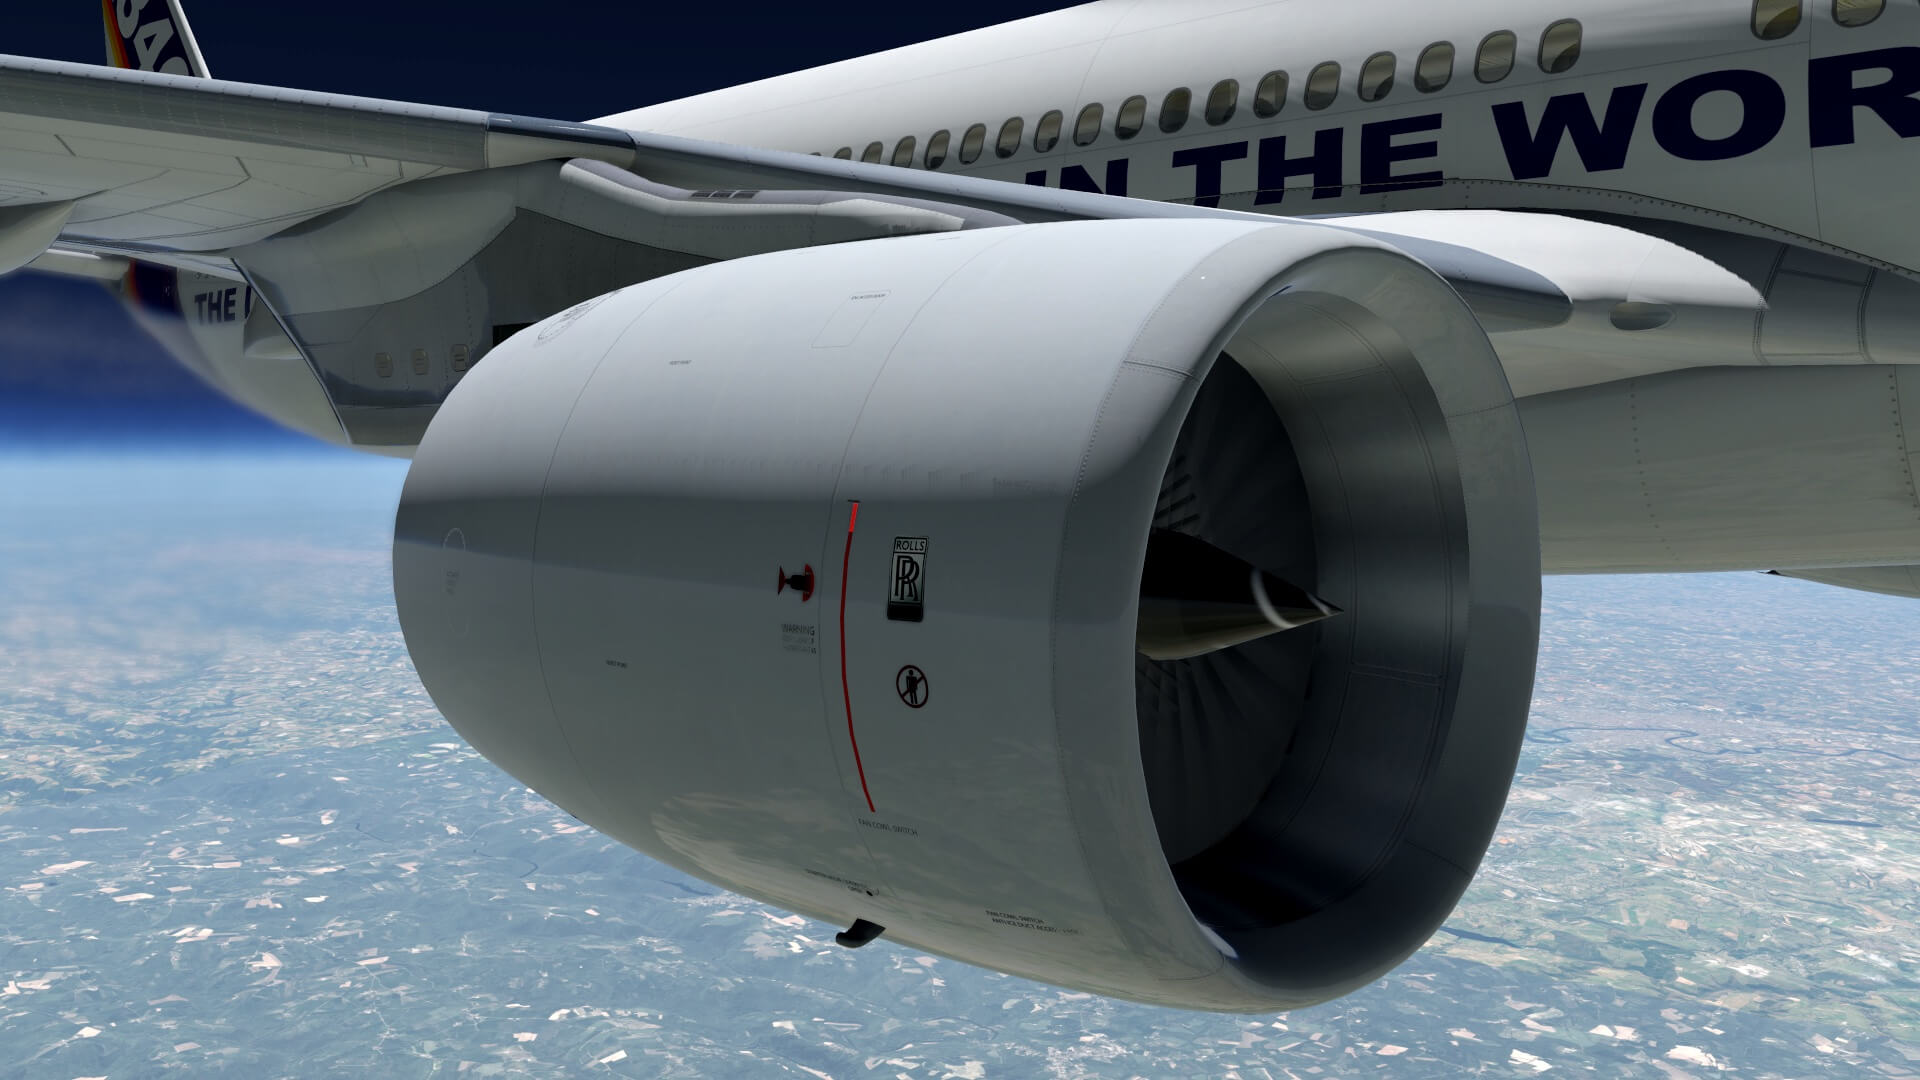
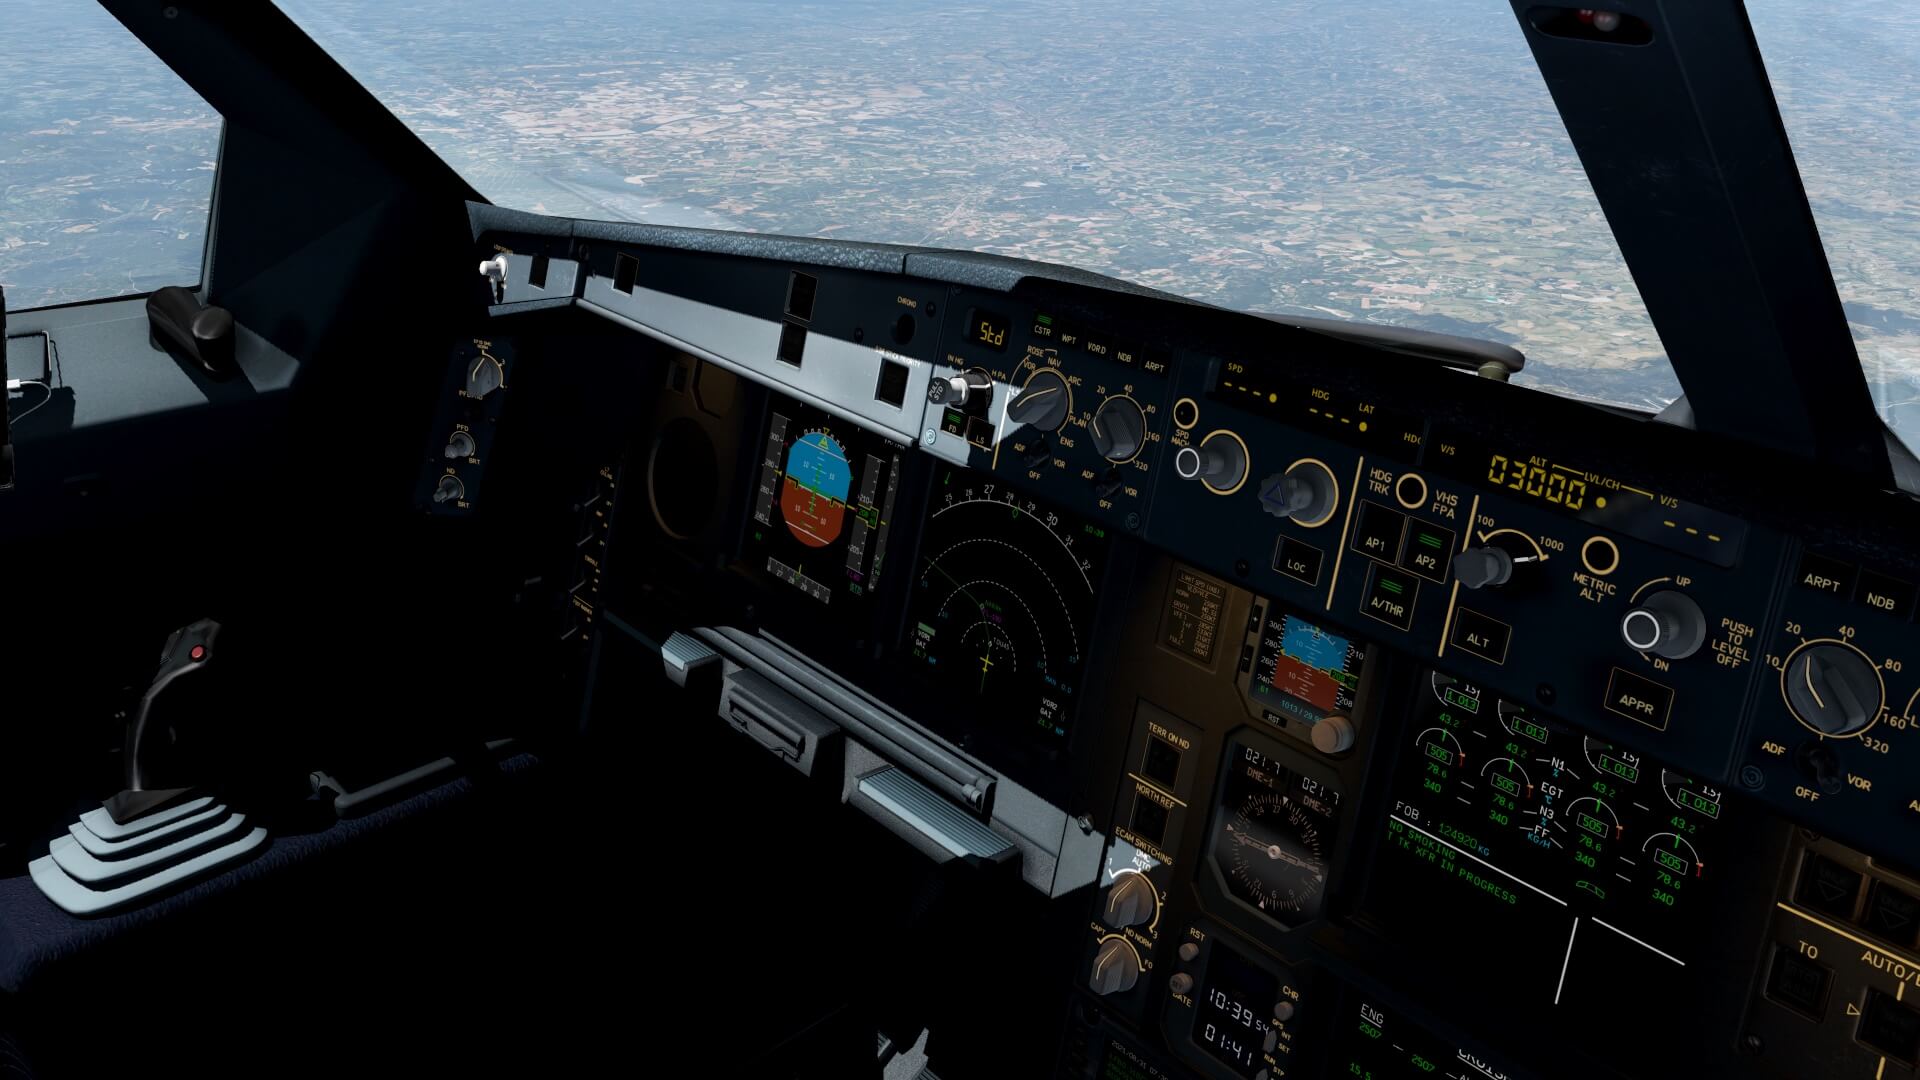
While approaching NARAK I’m at FL190, so that goes as expected, but there’s a bit more on the road ahead. I need to reduce my speed to 250 since I’m passing through FL100 and besides that, ahead lies waypoint IAF (Initial Approach Fix) LASBO. Again, the vertical speed managed is doing a great job. This means that the modeled JD340-500 reaches LASBO at FL080. Suppose you experience different then I do, you can always add a holding right at LASBO. So when you experience that you’re still too high and want to leave the Auto Flight in MANAGED MODE, you can add a holding and reduce the altitude while making your turns.
Adding a holding at waypoint LASBO is easy and lucky for you and me, adding a holding is very similar with Airbus aircraft in general. Click in the flight plan at the LSK next of LASBO. This will show you the MCDU LAT REV from LASBO page. Next click LSK 3L . This results in a new MCDU page that shows you the information of the computed holding. When OK, click LSK 6R. The computed holding is a R hand holding, but suppose you prefer a L hand holding, you can always delete the holding, do it again, but instead of the computed R holding, you enter in the scratchpad L, click the LSK and the MCDU has generated for you a L holding.
I leave LASBO behind me and heading for ADIMO, but as I see on the ND, we will not fly to ADIMO but far before we make a nice turn towards the next waypoint. Besides that, for everything is taken care, but don’t forget to select the APP button on the FCU. That’s the only thing that’s left. The rest is all controlled by the Auto Flight system. When we reach the (DECEL) line in the flight plan which is a pseudo waypoint, the APPROACH PHASE should become automatically active.

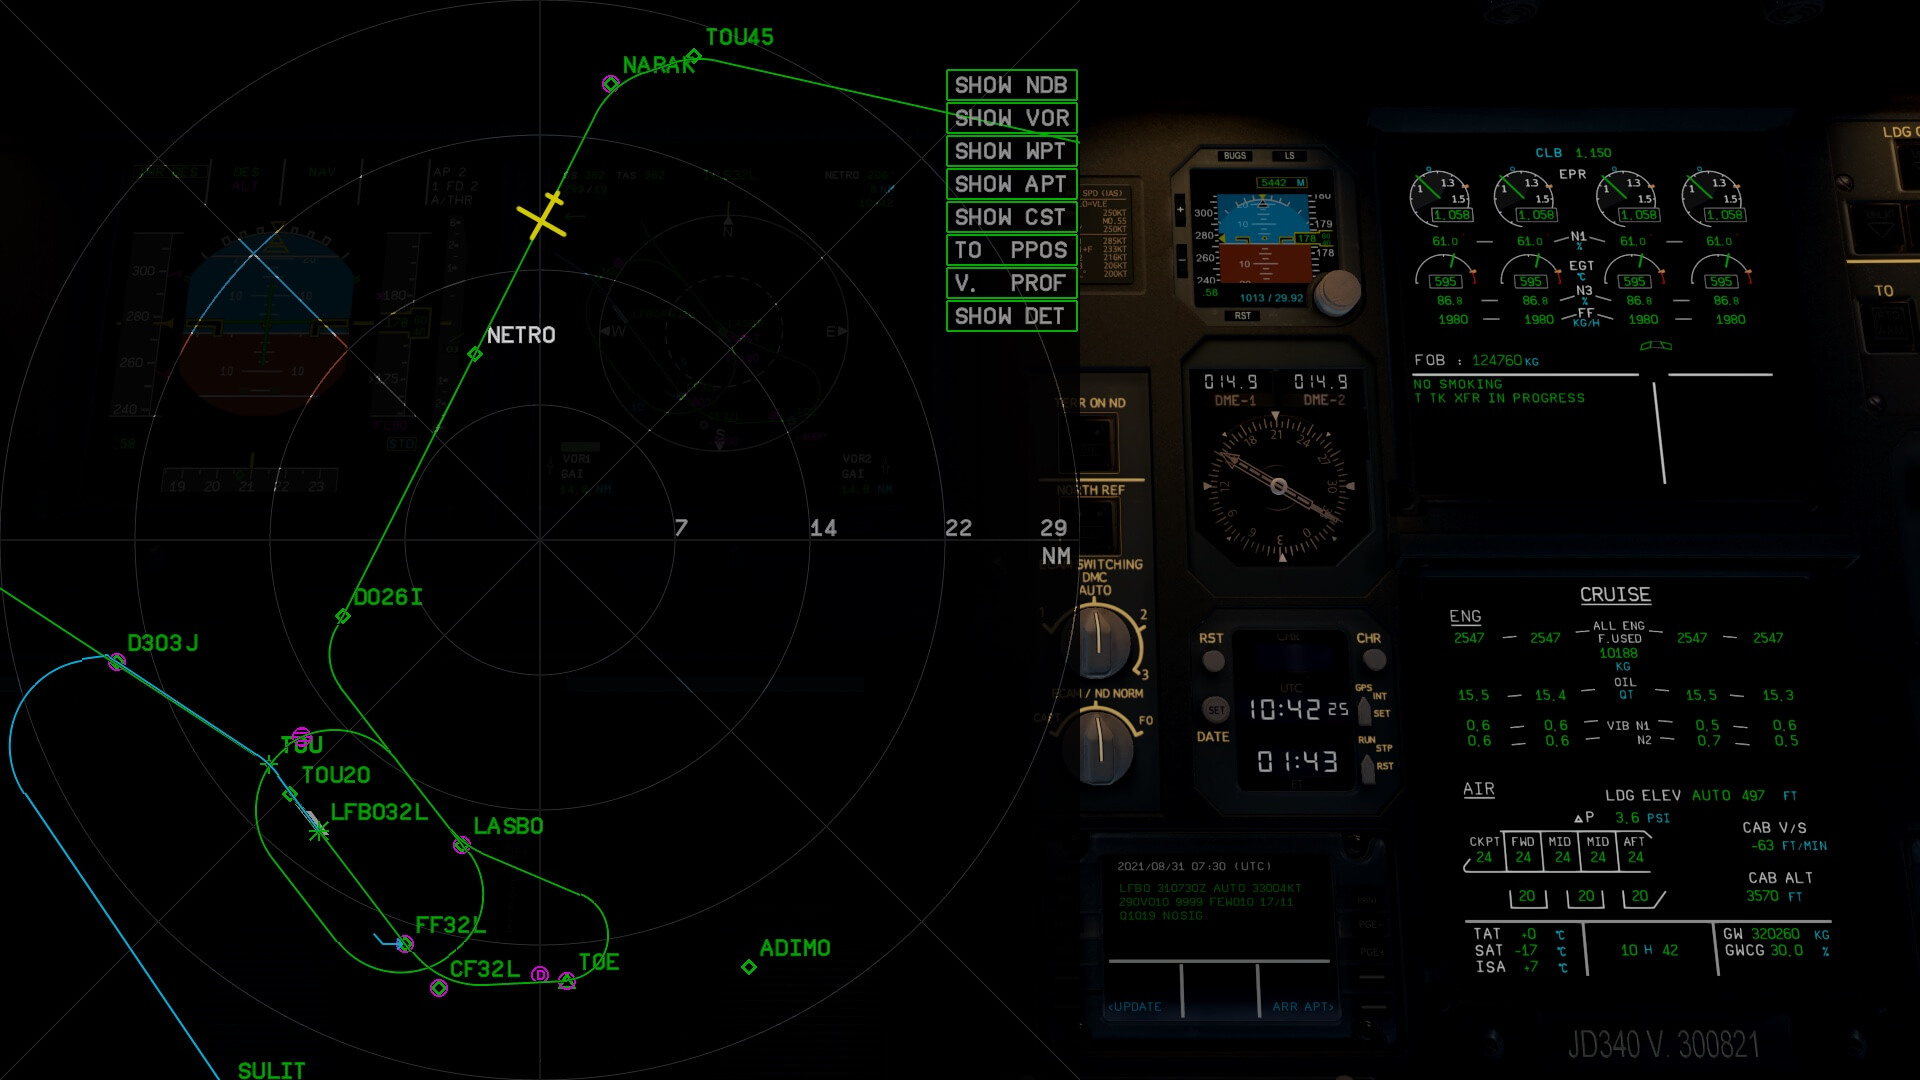
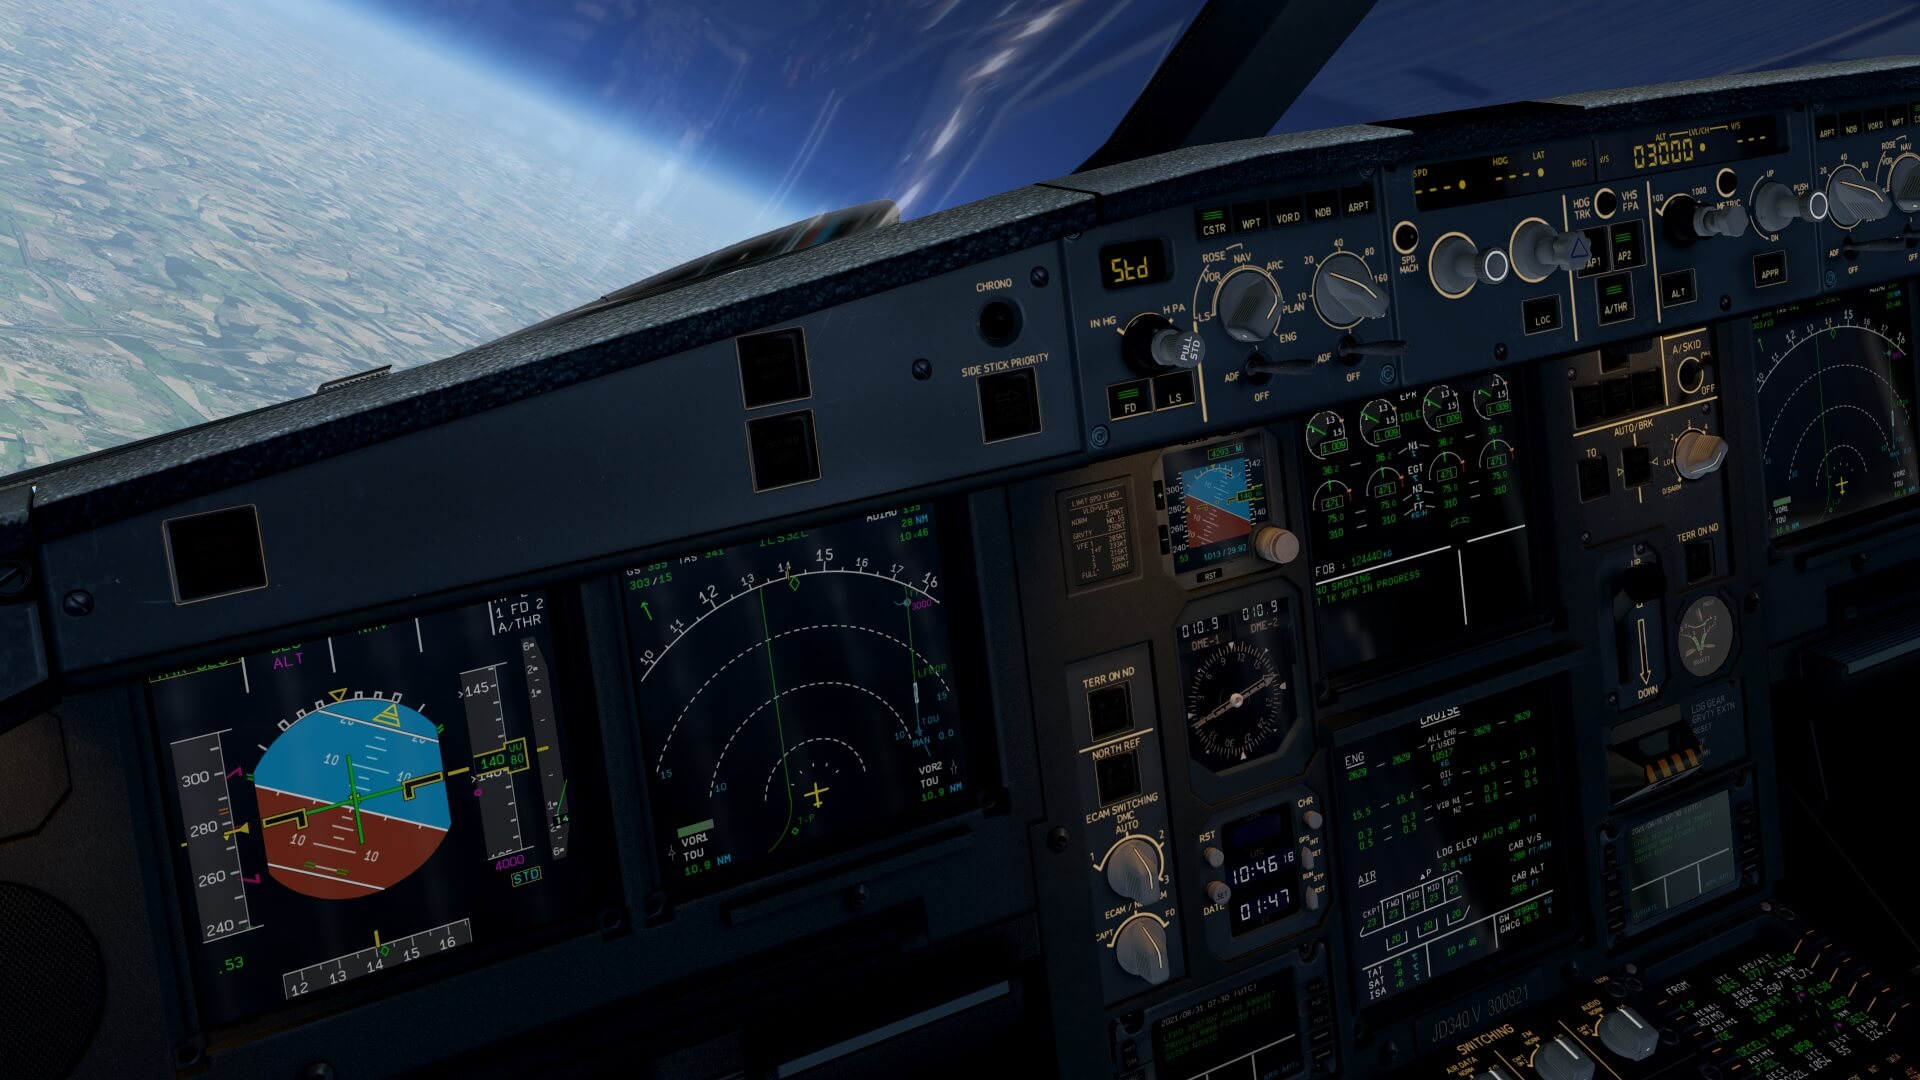


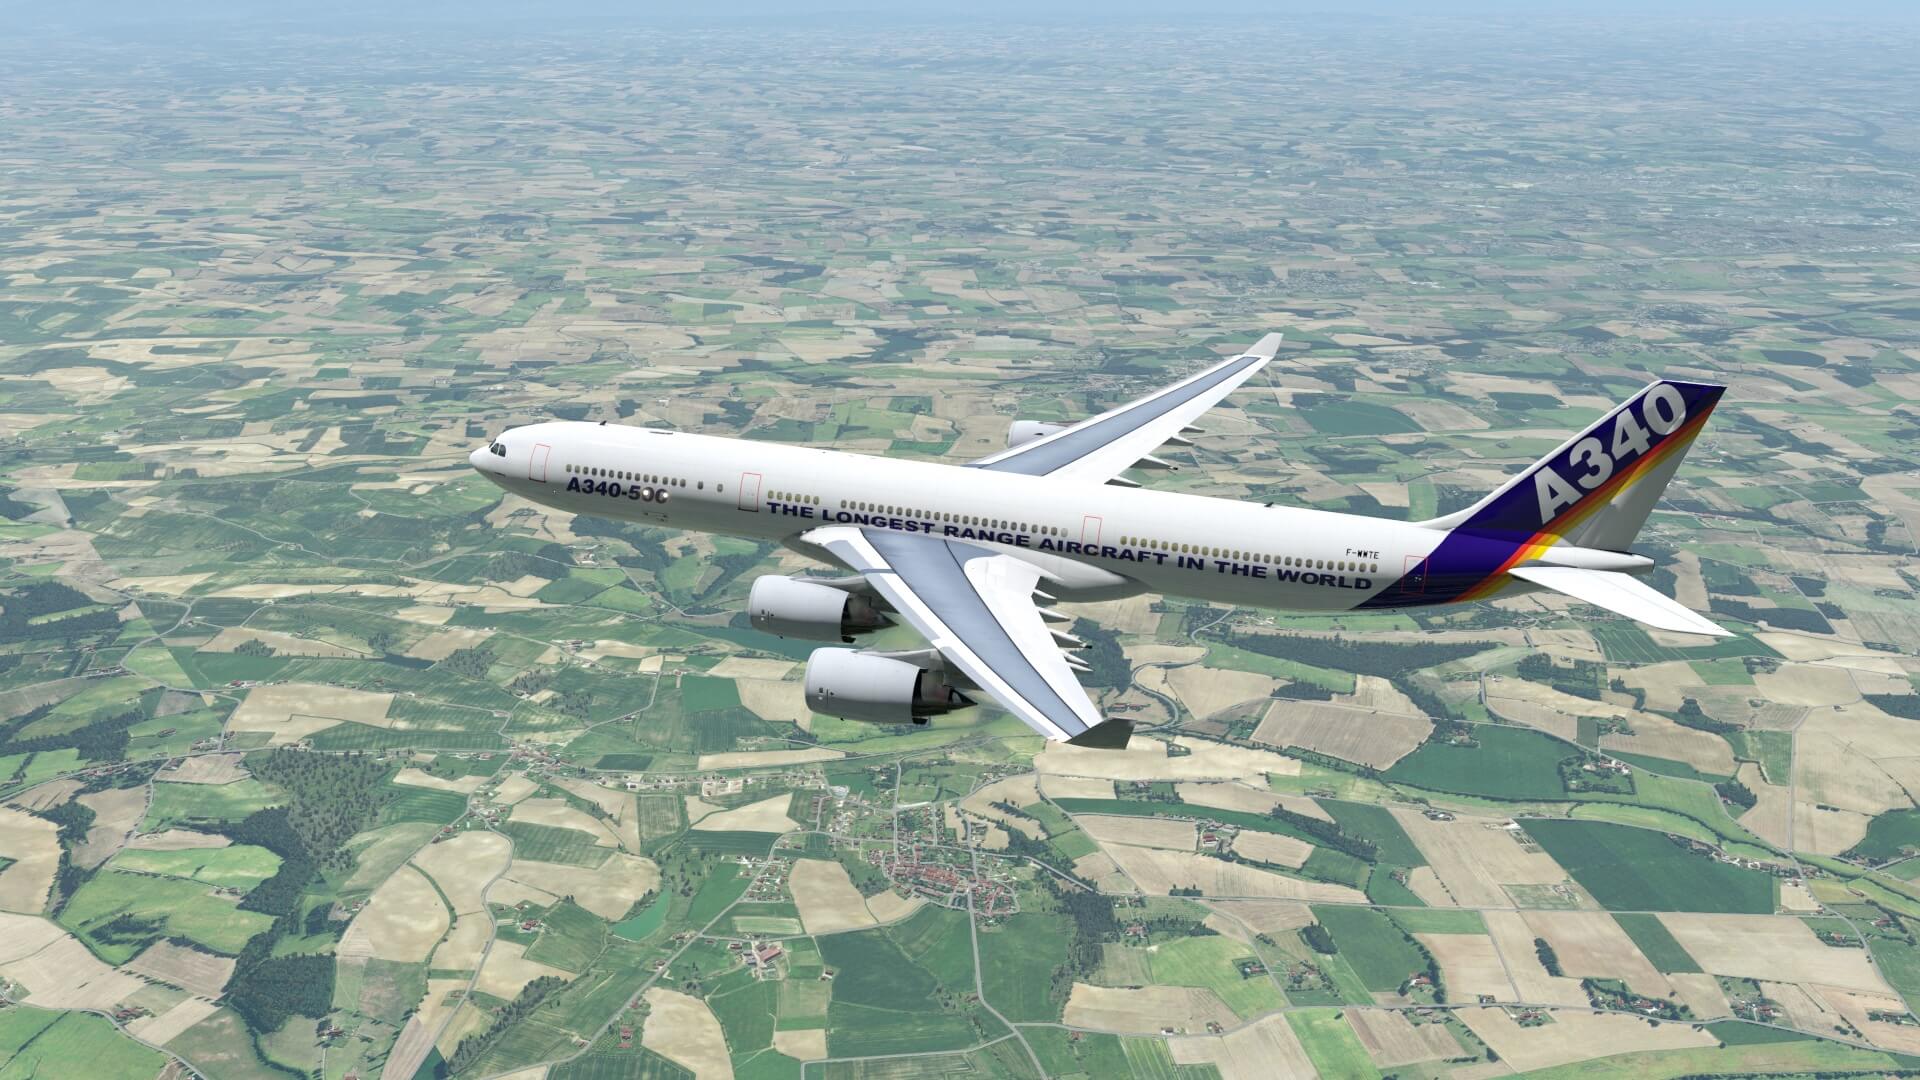
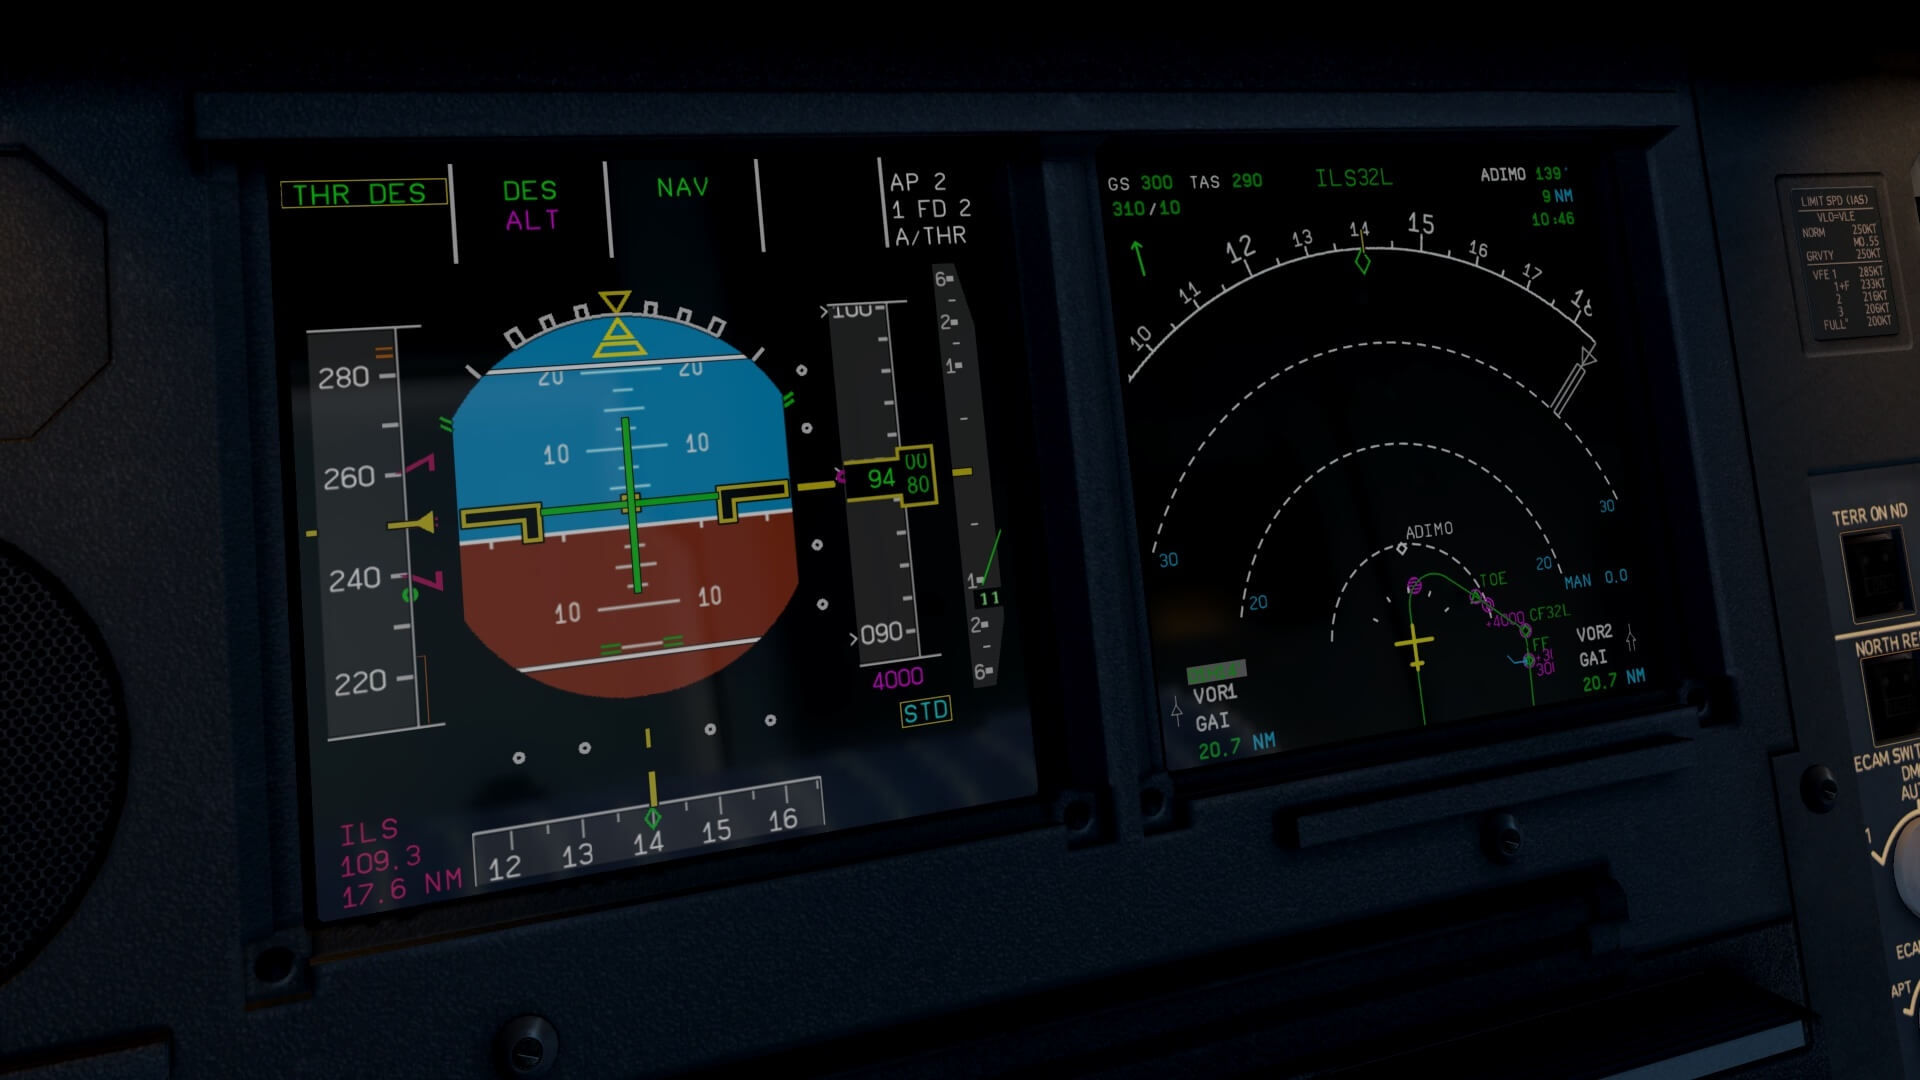
I can confirm that the automatic APPROACH PHASE activation works the moment the DECEL pseudo waypoint has been passed. I mentioned this before, when you’re not in NAV mode, I repeat not in the NAV mode, you need to active yourself the APPROACH PHASE. You do this by selecting the PERF button on the MCDU and scroll to the DES or APPROACH page. With the APP button action on the FCU, the PFD FMA shows on the 2nd line in cyan G/S and LOC. Further on, I spot the CAT 3 and SINGLE lines as well as my DH (Decision Height) I entered before. In case the LOC signal is already picked up, the cyan LOC changes to green LOC.
Linda will so do her checklist part, but I need to monitoring the PFD when to select FLAPS so I keep on looking to the PFD SPEED scale since a small S or F should appear, indicating when to select my FLAP handle. Oops, almost forgotten to mention. Select on the CAPT EFIS control panel the LS button to see the LOC and G/S deviation lines on the PFD. You can if you want to, select the ND to ROSE LS mode. I’d seen many pilots doing this to monitor with the magenta needles on the ROSE mode to see if the ILS is picked up correctly. As expected – at FAF approx 7NM out of TBN – the G/S changes from ARMED (cyan) in green 1st line G/S* (CAPTURED) and then G/S TRACK. That’s for me the moment to select the landing gear DOWN and a bit later the FLAPS to FULL.
The moment I’ve selected the APP mode on the FCU, I’m also able to select the second AP. Under all other conditions you can never select both APs to ON, only with the APP button and conditions are met. I’ve got now both AP’s connected although I need to say that only one AP is the master and the other is the SLAVE, so one is backup in case one is lost. The FMA will show DUAL (AUTO LAND). Linda is doing the last checklist items for me. Several aural warning are heard, starting at 1000 feet RA (Radio Altimeter).
Then there’s another aural waning at 500 feet RA, and one at 400 feet while at this RA the FMA G/S and LOC are replaced by LAND. At 300 RA, another aural including 100 ABOVE. The 100 RA above is our DH since DH was set at 100, right? Just before landing, I notice that LAND is changed into FLARE and during the roll out at the runway, you guess it already, the FMA shows ROLL OUT. Since Linda has set AUTOBRAKE, I can if I want also select ENGINE REVERSE THRUST, and depending on the decreasing speed, I can add a bit more reverse thrust this to reduce the brakes.

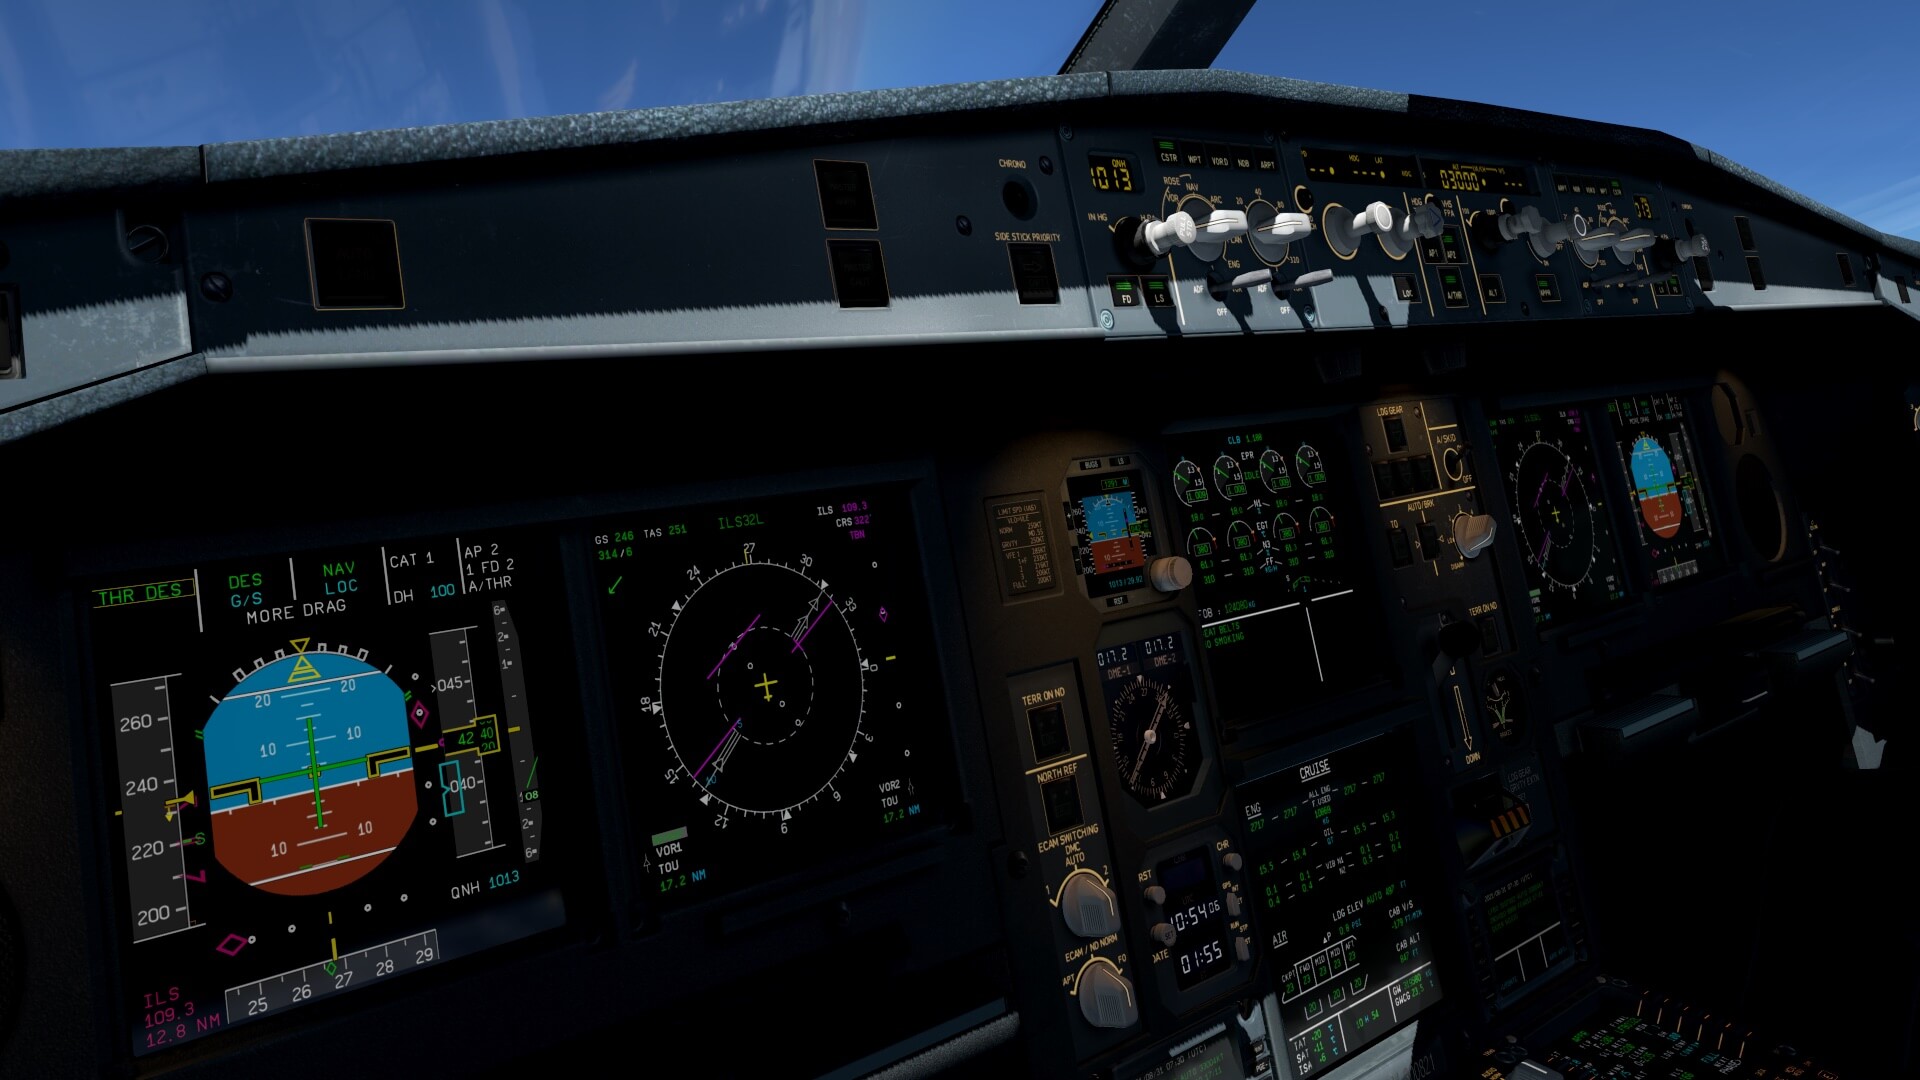

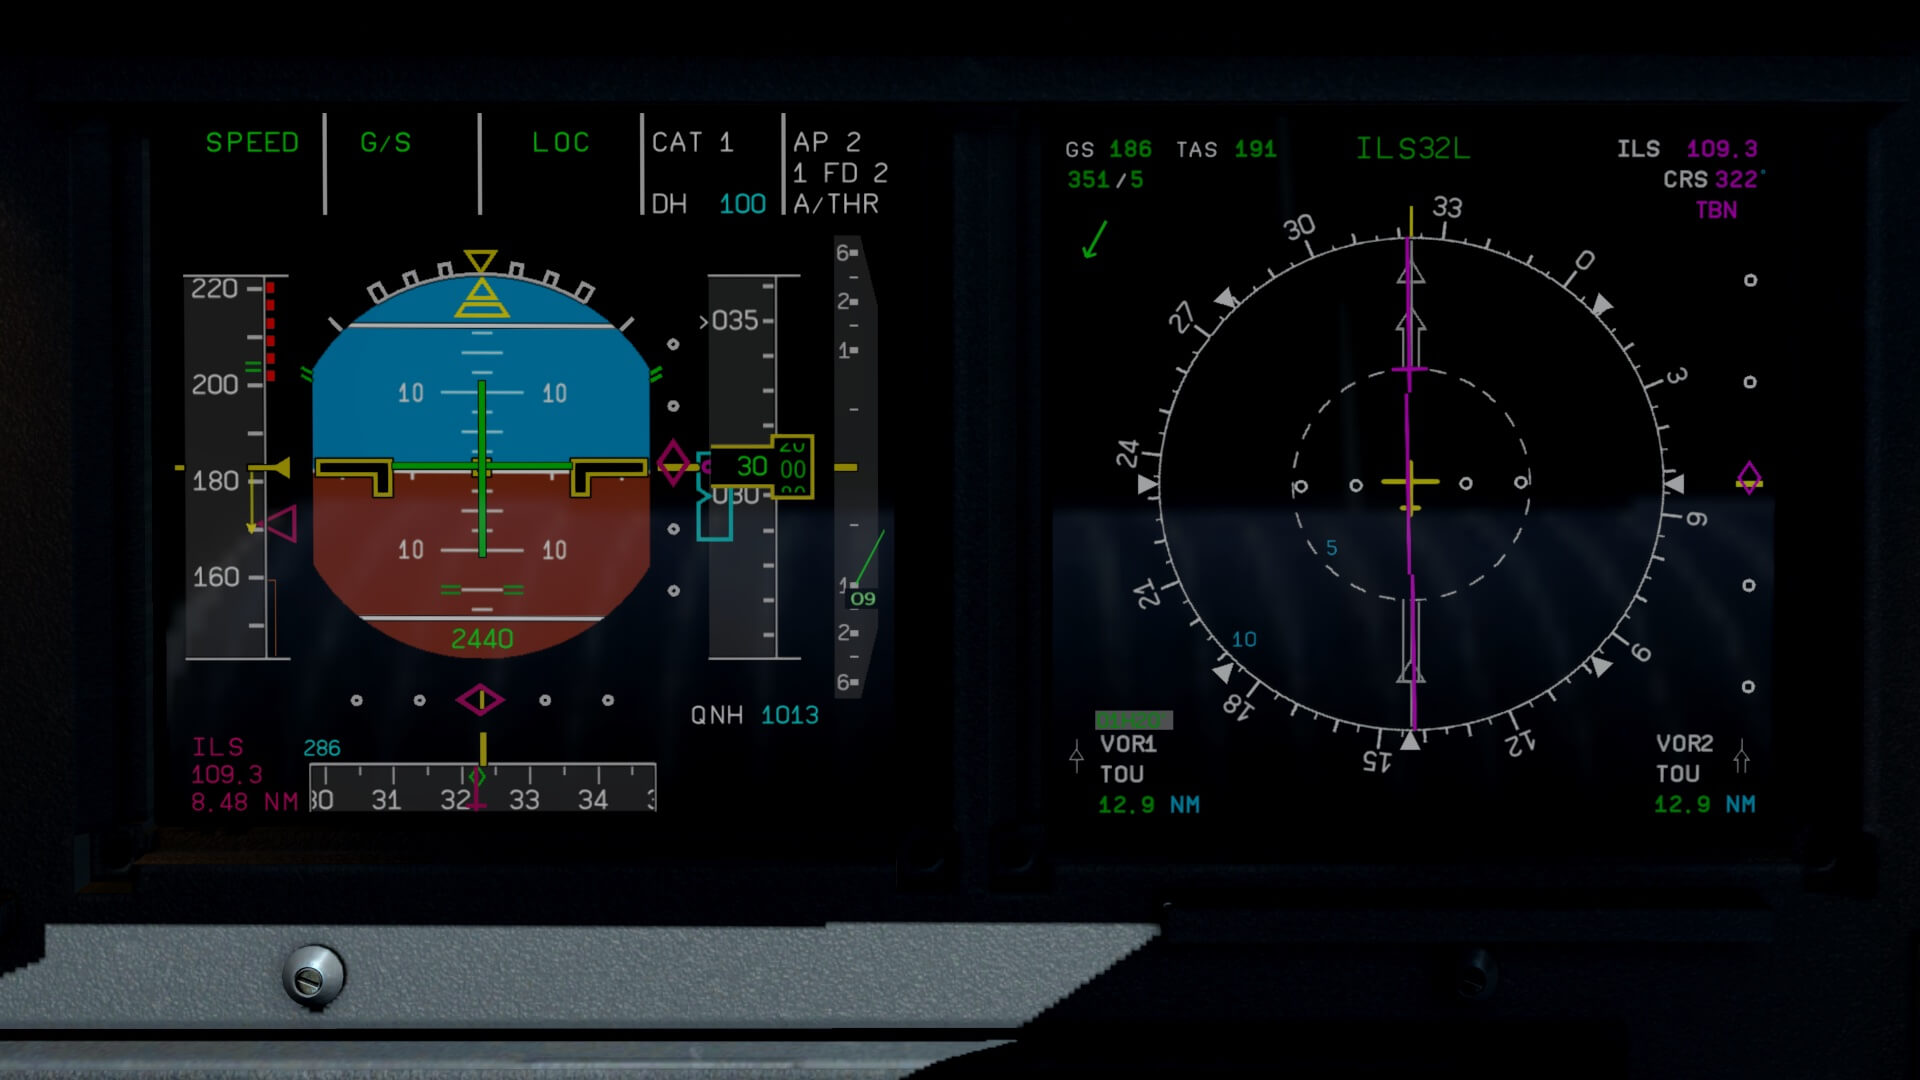


Did I see and tested everything on this test flight? Did I see all odd things? Did I check the MCDU, EFIS, ECAM and aircraft systems thoroughly? I did cover a lot of possibilities and most say that I’m happy what I see and how the aircraft behaves during a fully automatic descent. The small issues I’ve seen are reported to Eugeny and I’m confident that he takes care for it. It was a long flight, but I enjoyed every minute.


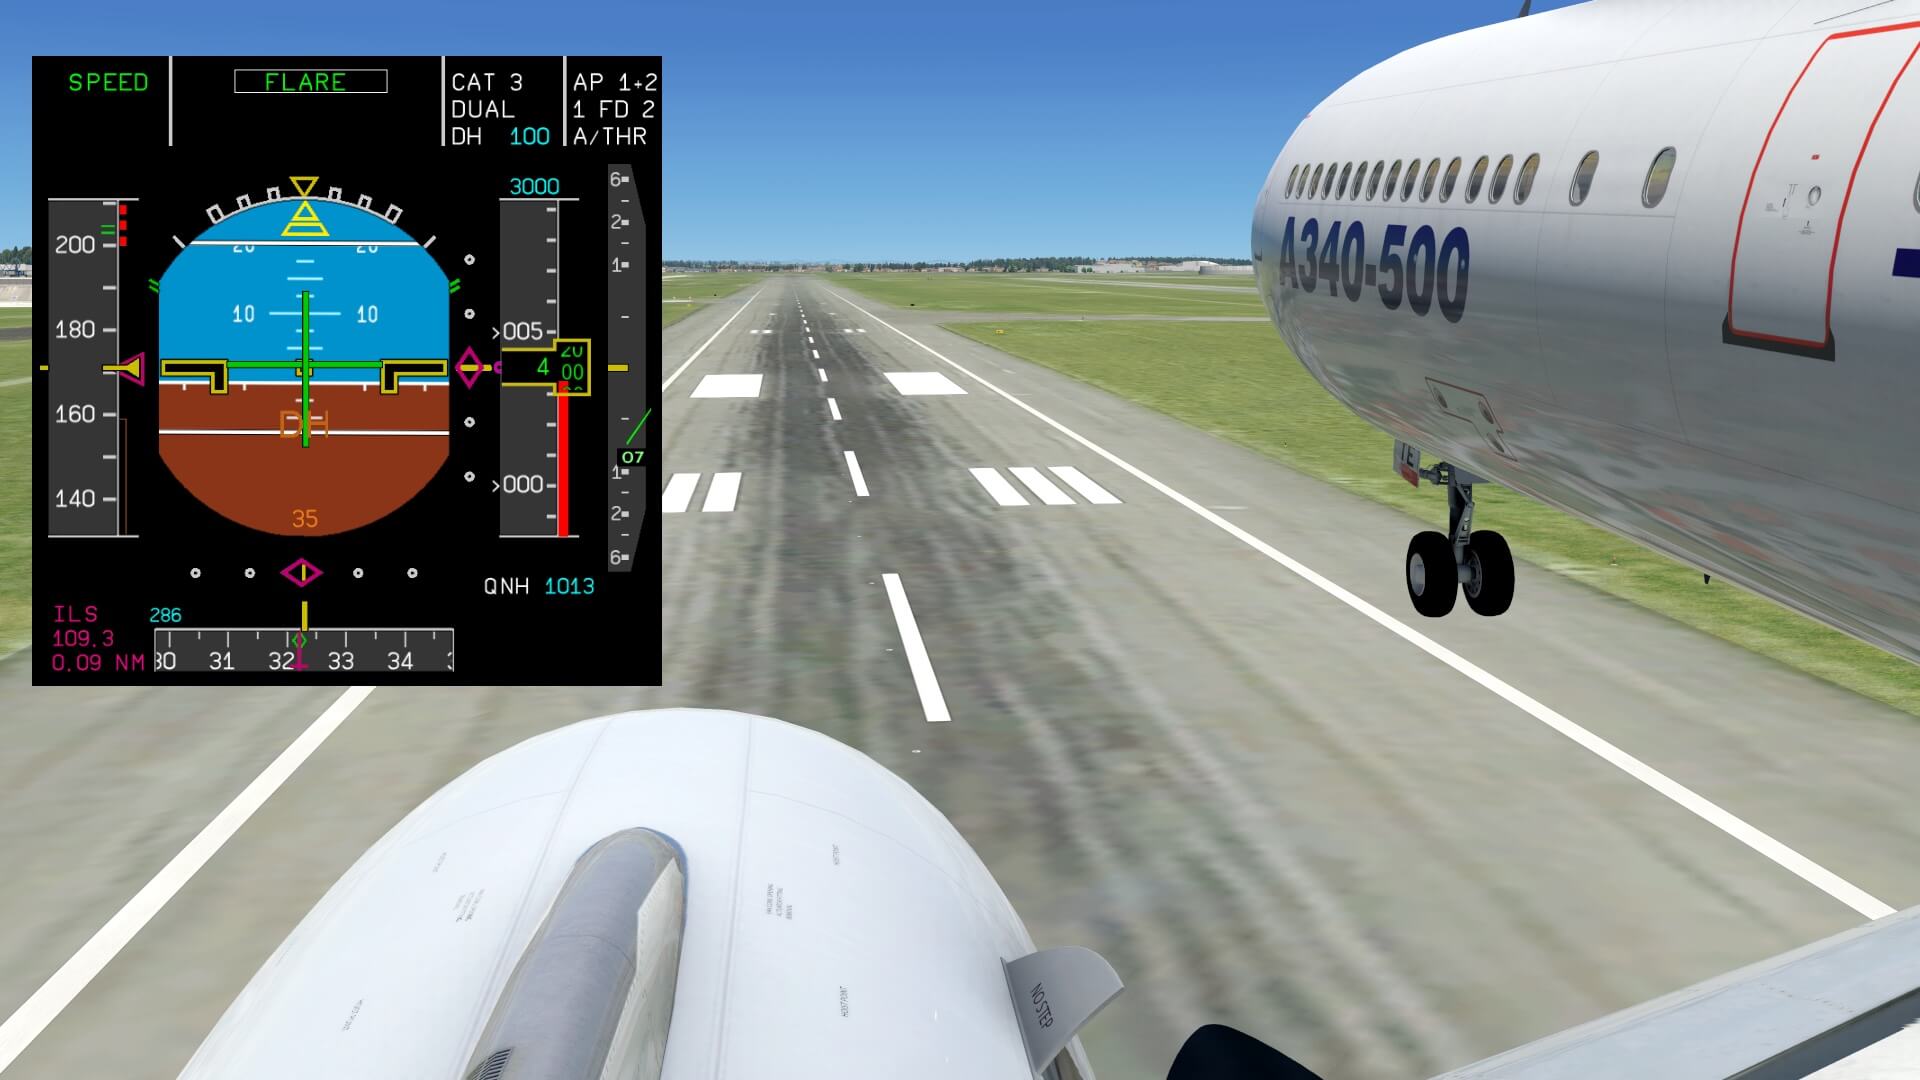
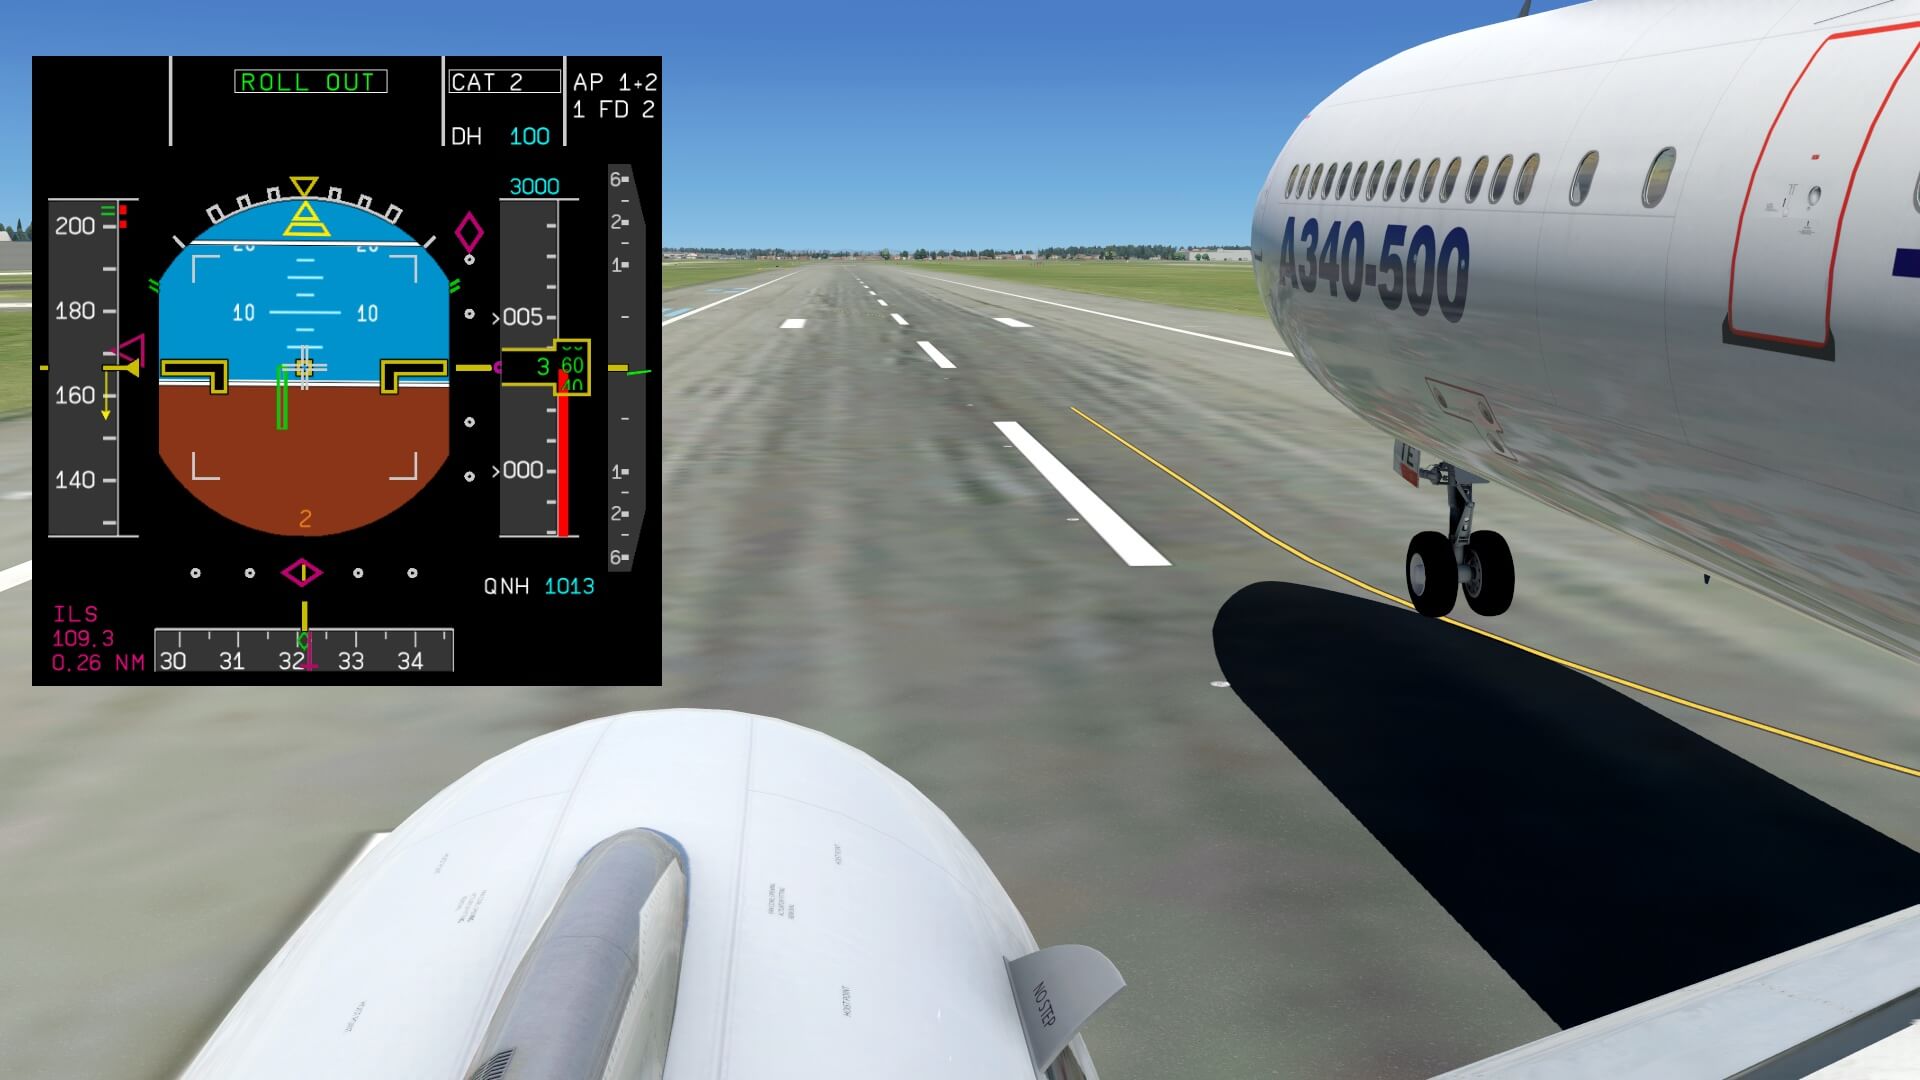

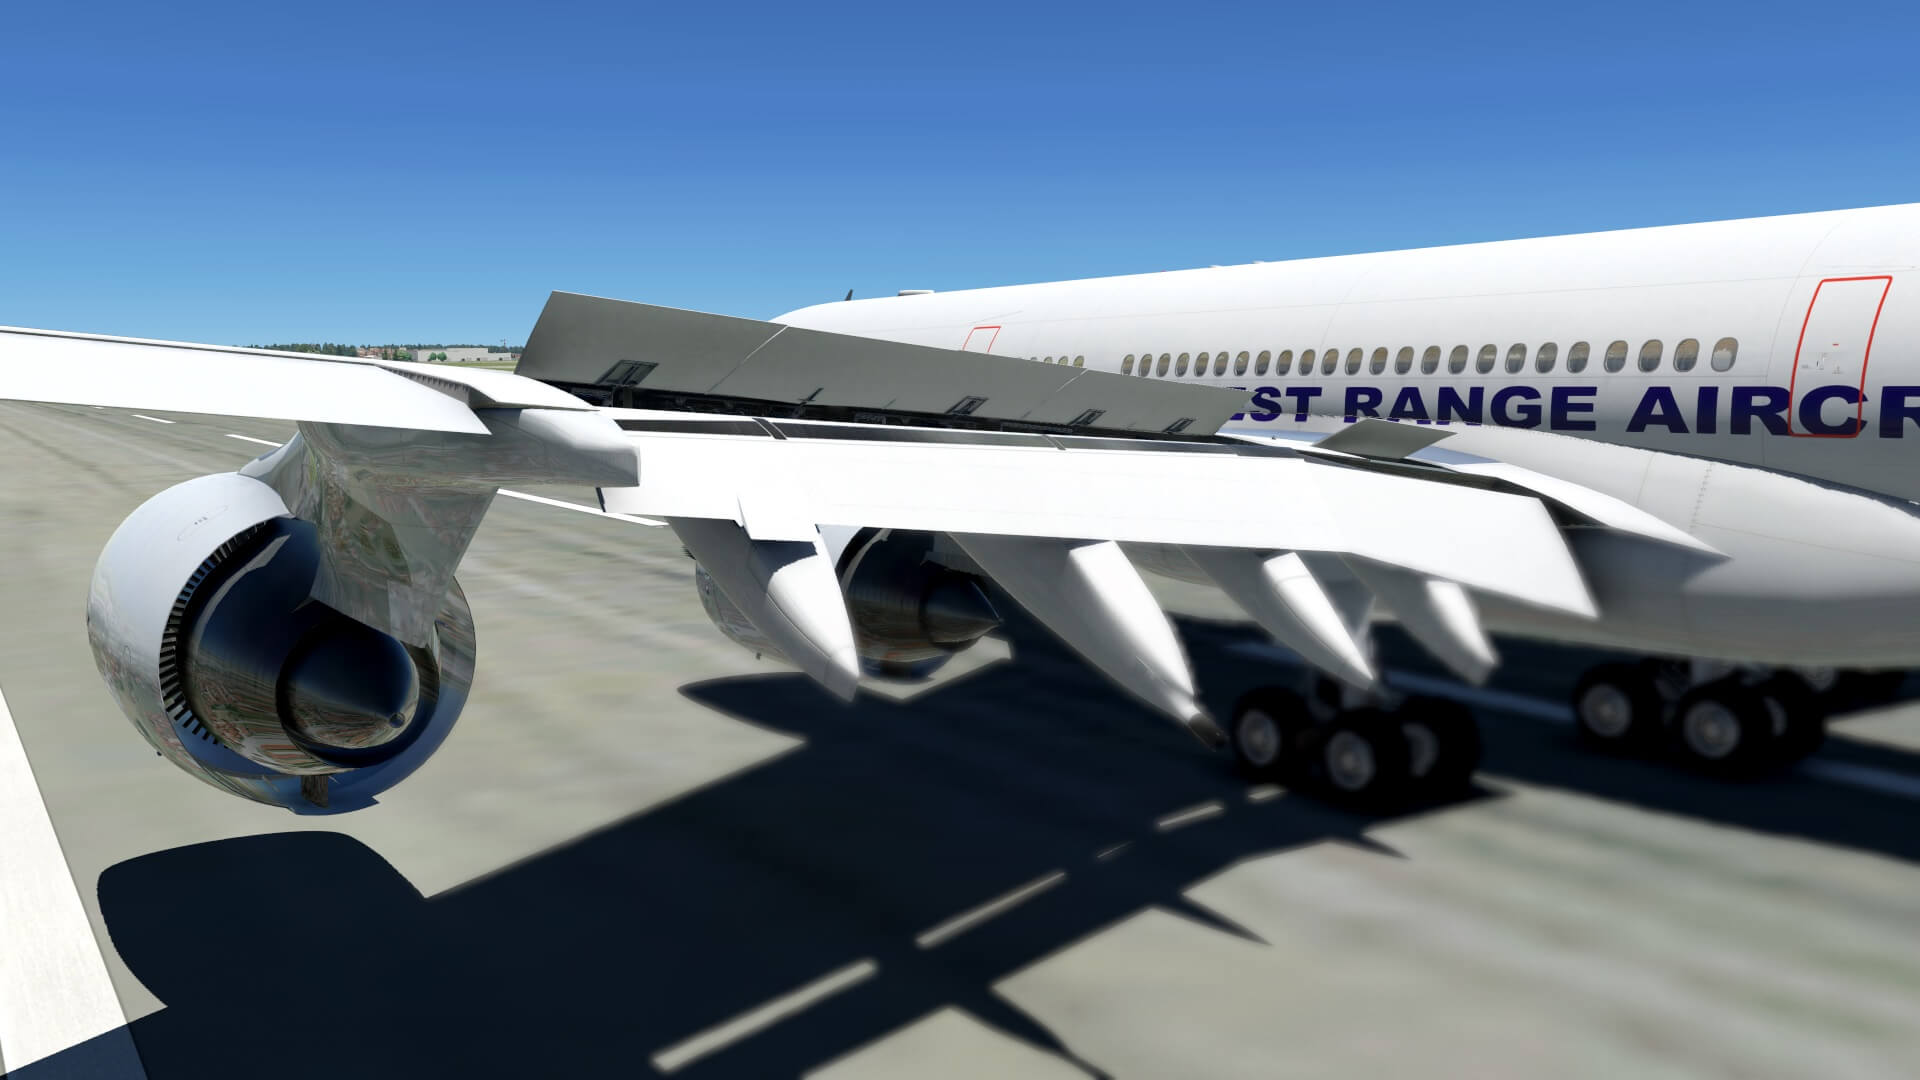
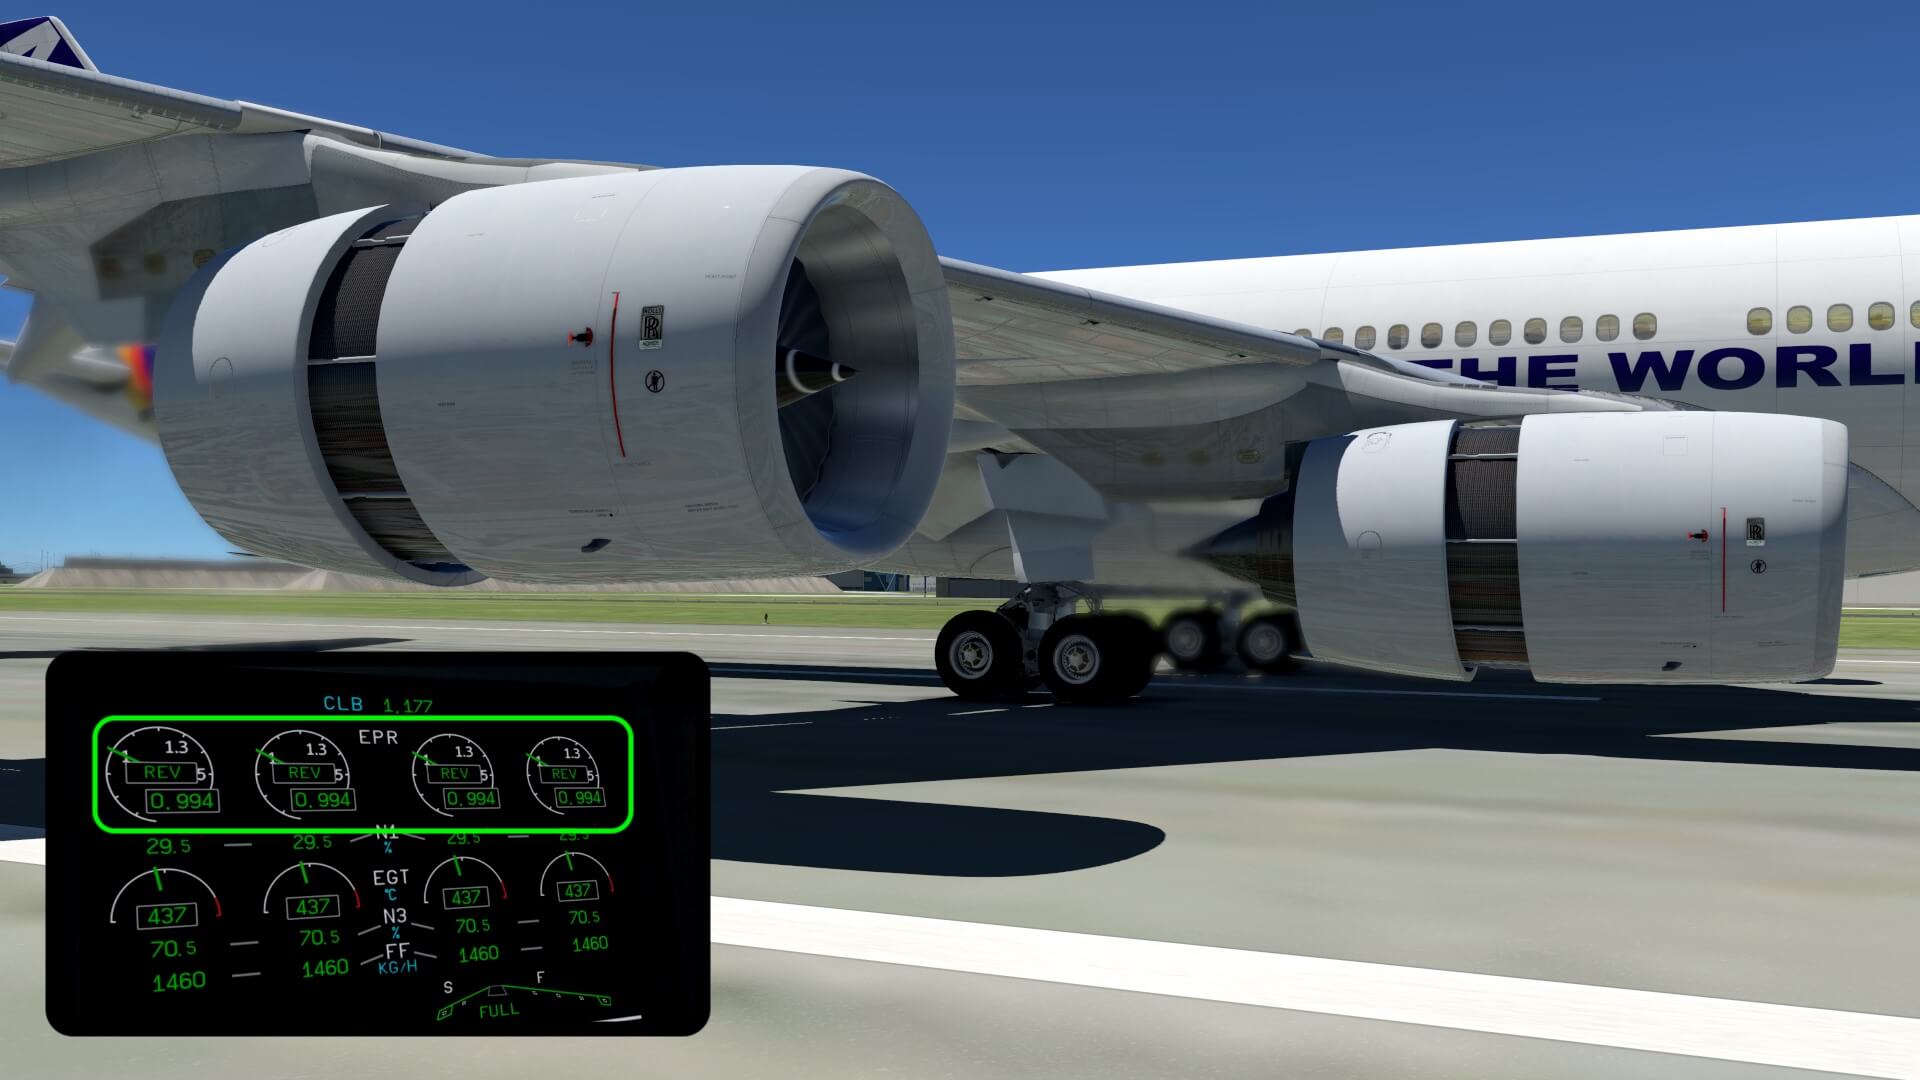
Sound and FPS (Frames Per Second)
Sound is amongst others a difficult item to discuss since you can’t see it, you can only hear is so screenshots won’t work. I could make a movie, but that’s for later. It is hard to find a real A340-500, and even more difficult to find one A340-500 or -600 to record sound from or if you wish, to record Rolls Royce Trent 500 engine. I noticed one thing and it is a bit personal feeling, but after checking many YouTube movies I have the idea that the engine sound during startup and once stabilized a bit too high is.
The engines of the real / modeled A340-500 are far away from the cockpit and like with JD340-500 you can’t open the sliding windows nor that you can open the cockpit door, I feel that the engine sound is too dominant. That’s also when you switch them OFF. I won’t say it incorrect thus the sound is wrong, but it feels to me with the engines mounted far away from the cockpit, that the shutdown sound is not OK. Most of the other sounds are familiar like the clicking sound from switches, selectors, handles and of course the sounds belonging to ECAM, EFIS messages and the ENG/APU FIRE tests. I did understand that as far as it was possible, real Trent 500 sounds is implemented in the model.
Before I can discuss the overall frame rates (FPS) of the modeled JD340-500 Airliner, first this. As mentioned in the beginning of this review, the JD340-500 Airliner is reviewed on an iMac with macOS Big Sur. The overall frame rates are with Metal enabled, for such a large and complex aircraft, very good although “your” frame rates and mine depends on many other things then only your computer or Mac. What monitor resolution are you using, what are your rendering settings, what other add-on packages do you have installed like complex airports or perhaps a lot of plugins.
I’ve highlighted already that, which was already the case with the JD330, the JARDesign team uses for the 3D aircraft model less polygons then you would like to see. Remember, many polygons can lead to less frame rates. Therefore it’s up to the developer if he/she want to draw a circle with visible lines or something that’s completely round. The round object will look much nicer from close-up, but it also means much more polygons are needed to draw and this will most likely mean less frame rates. This same philosophy can be found in the JD330.

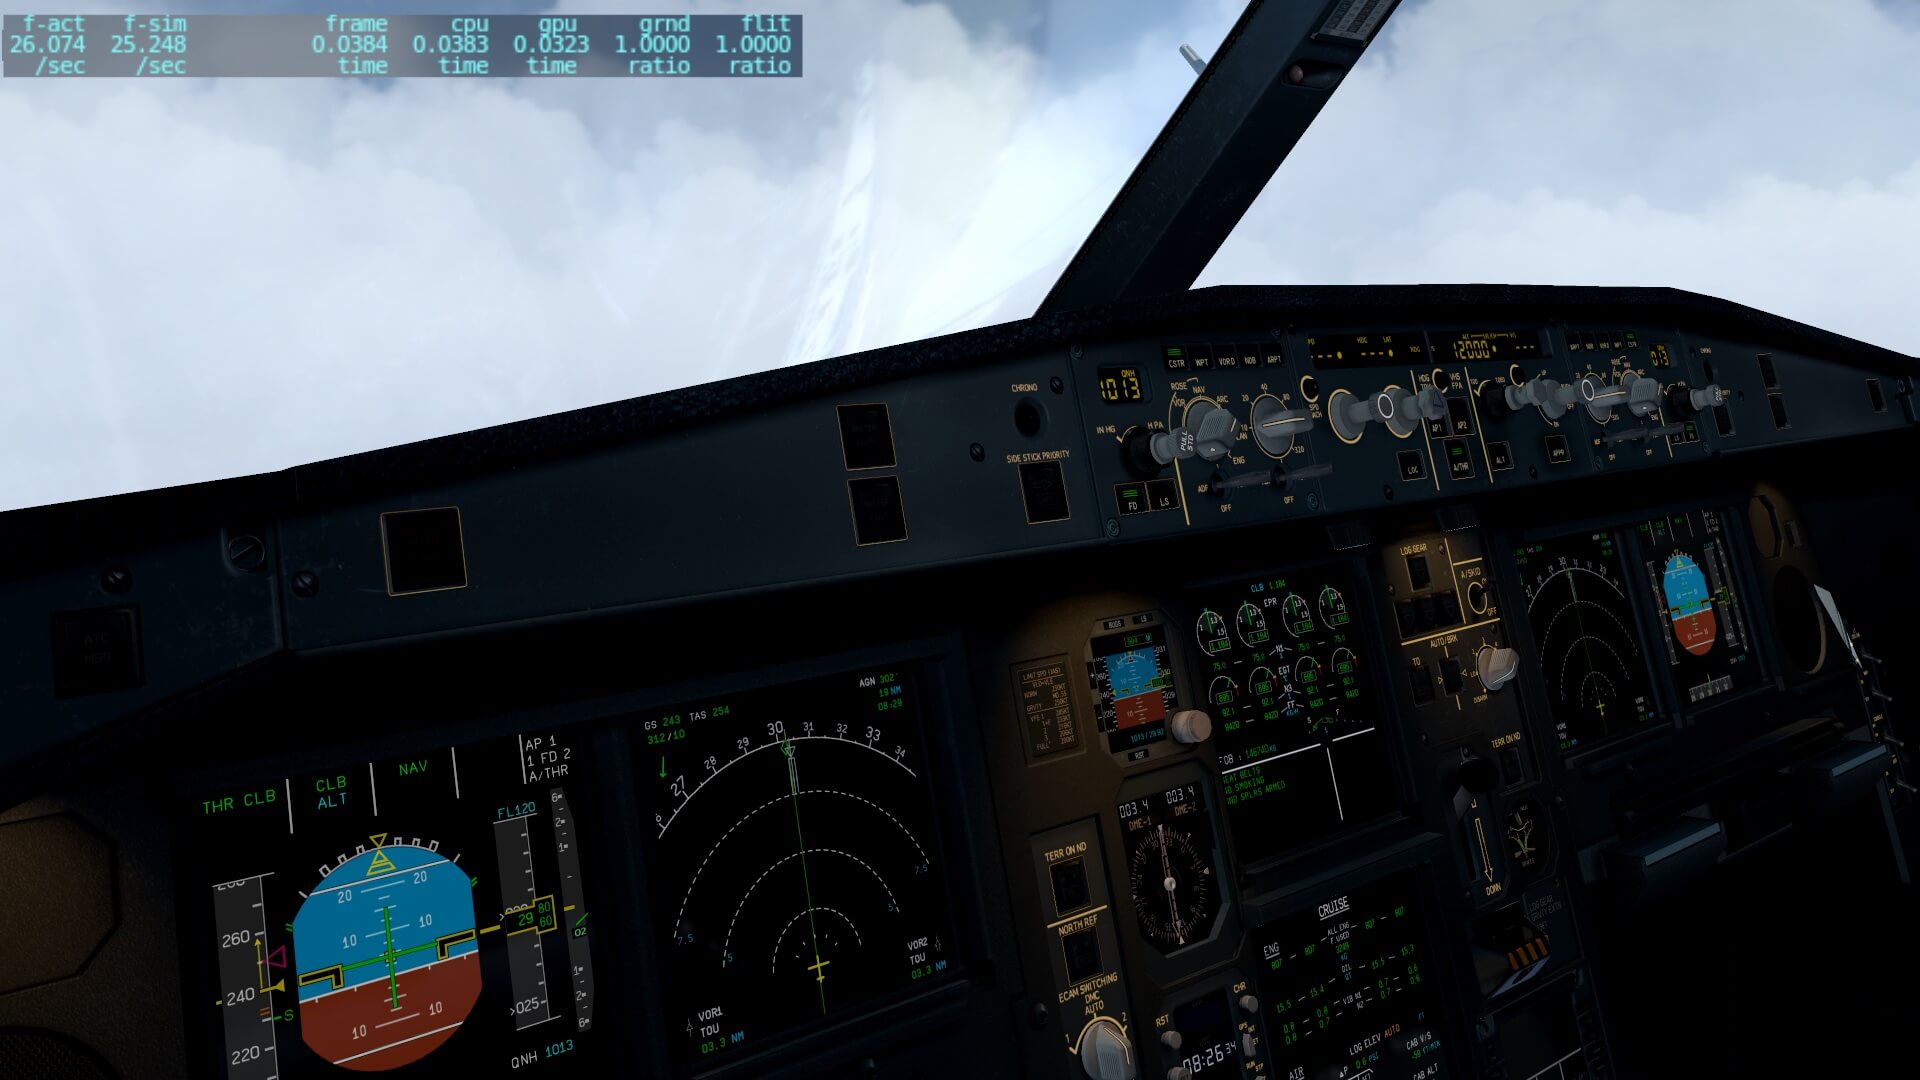
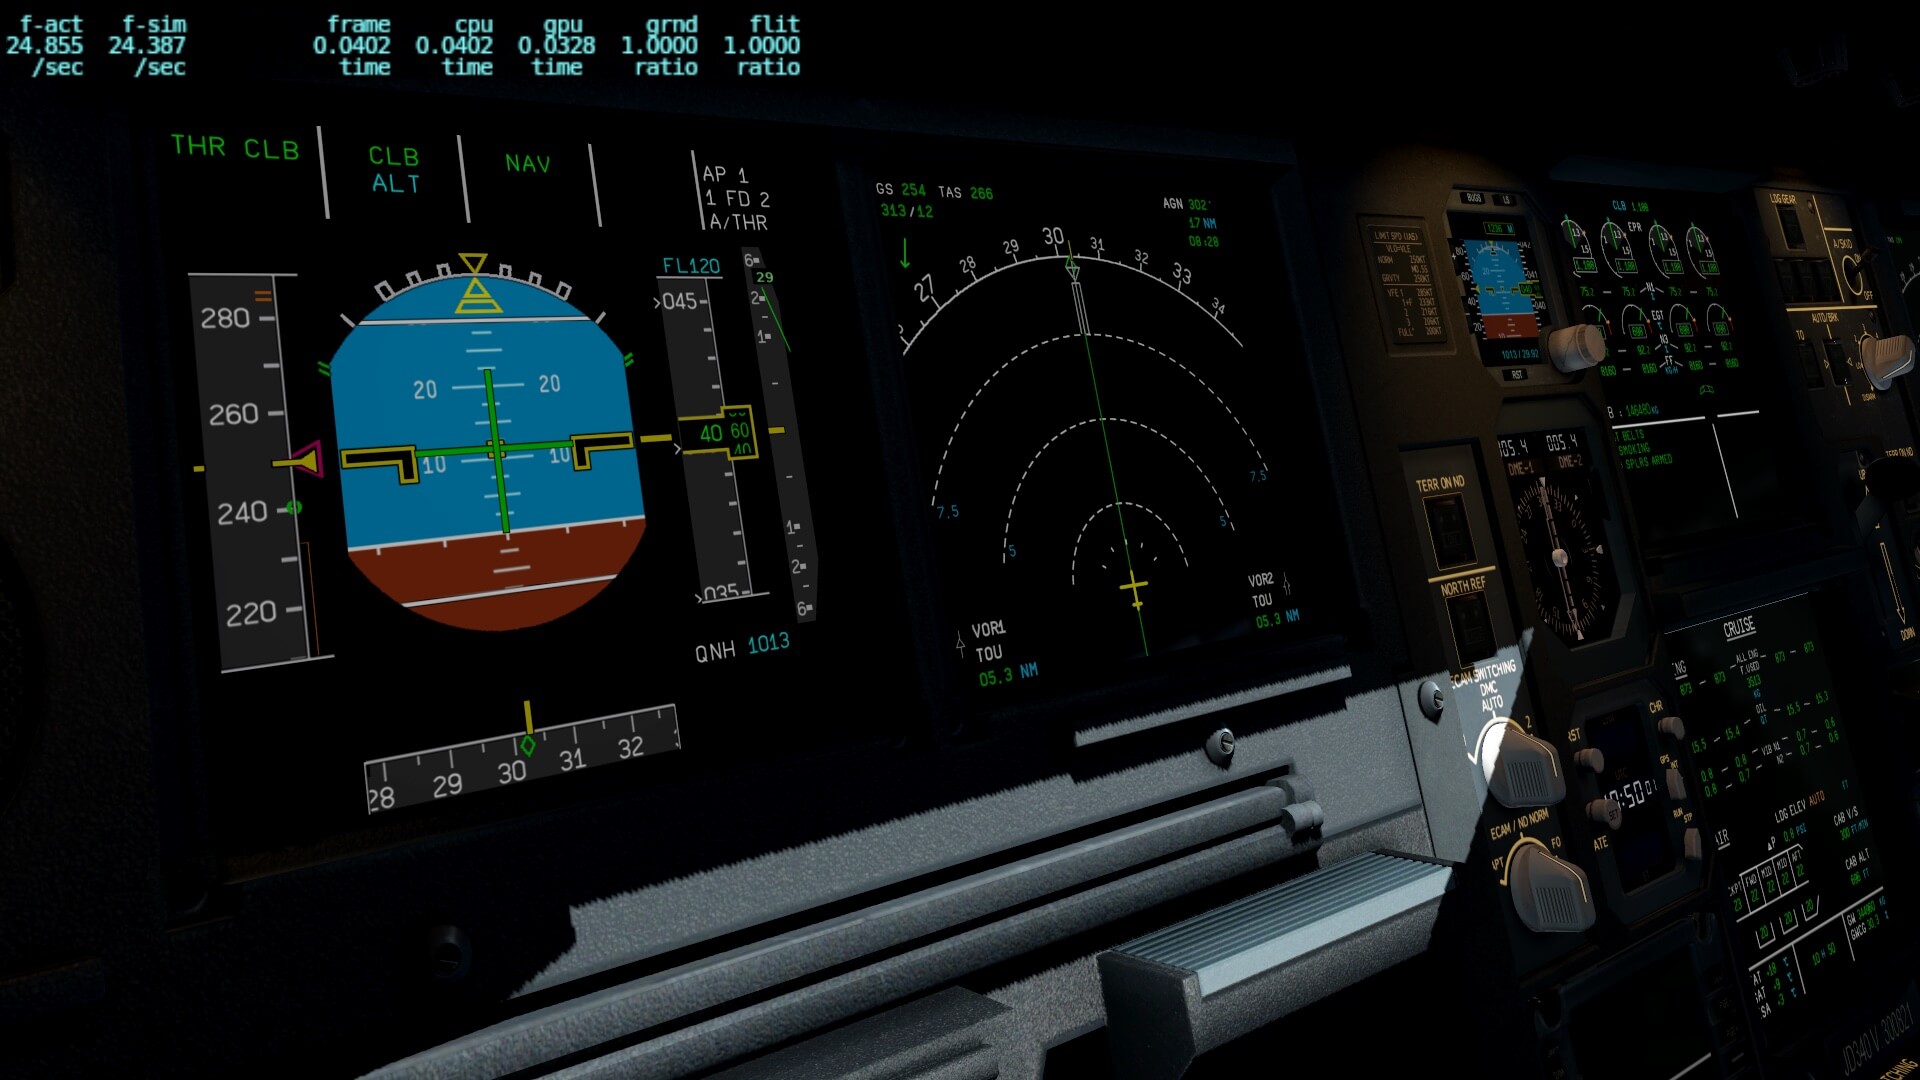


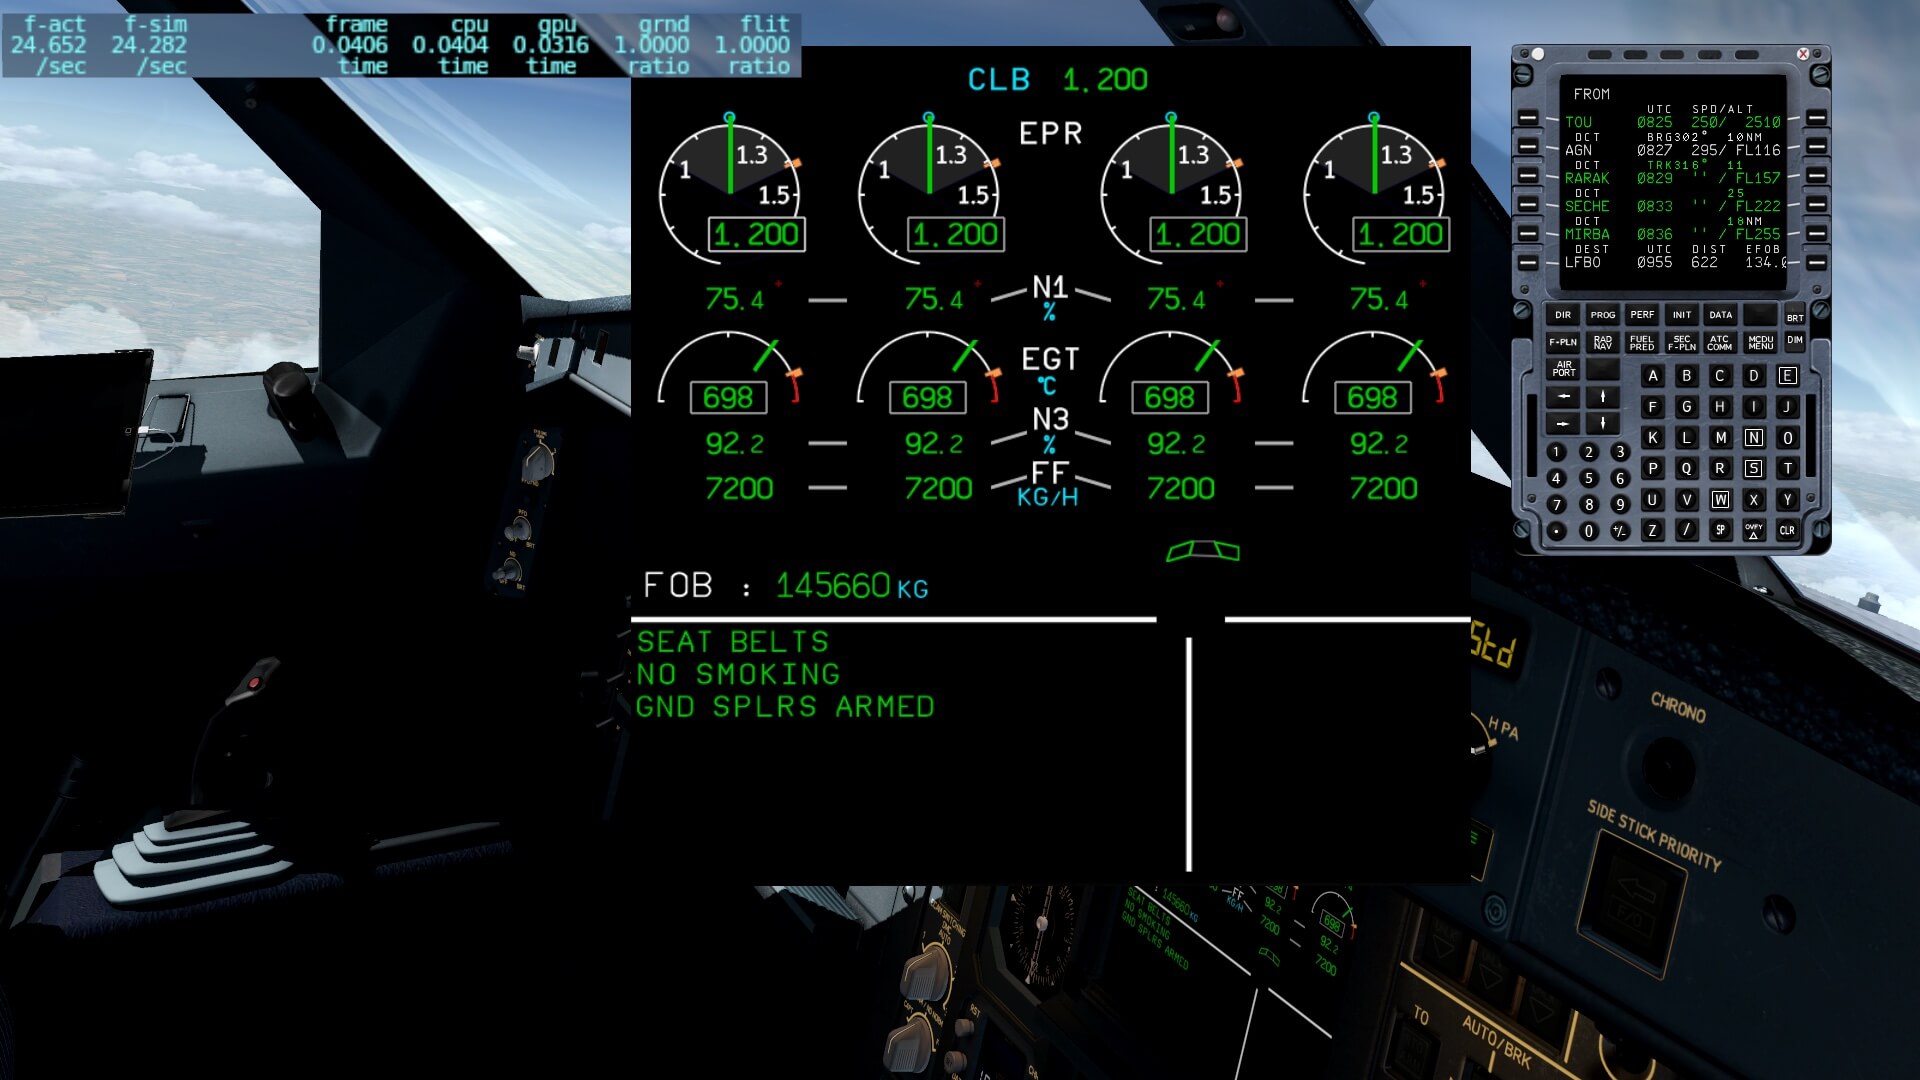
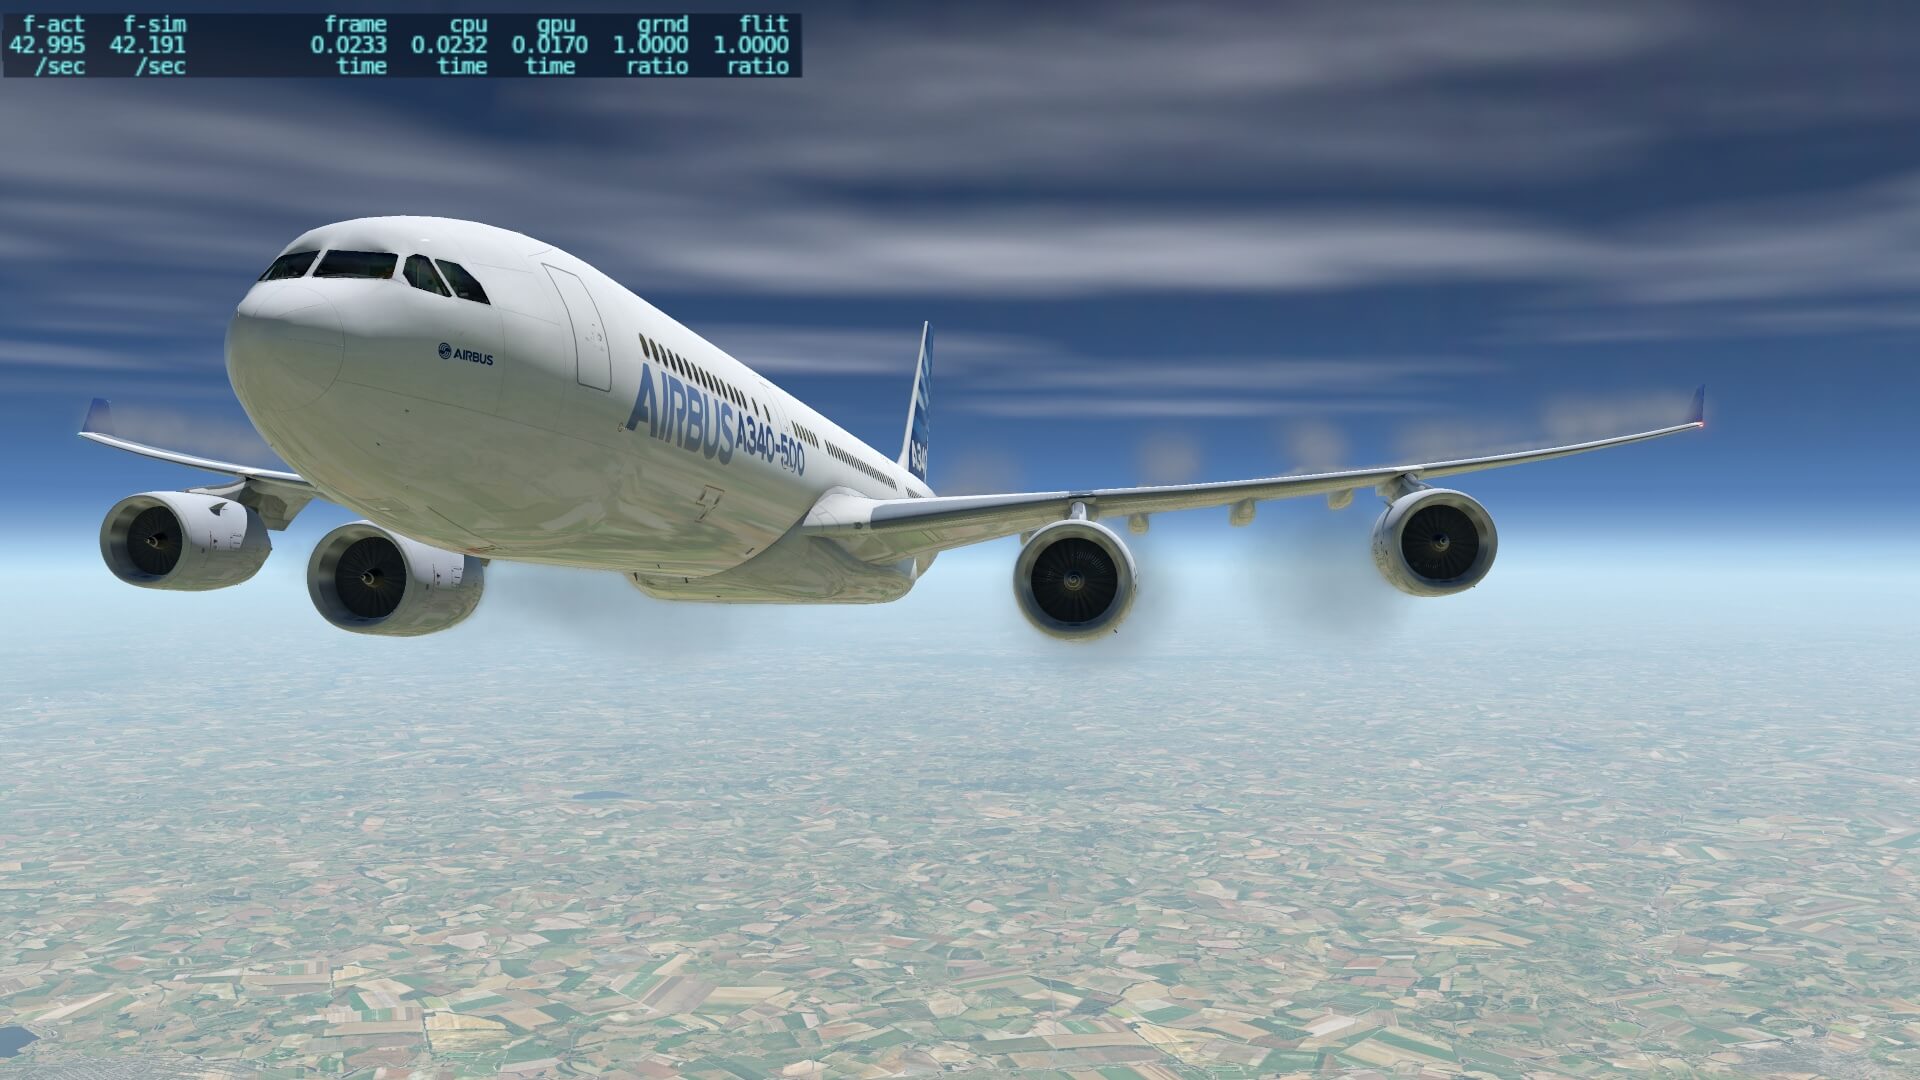
On the other hand, a beautiful well crafted model that is build with many many polygons but lacks of frame rates versus a model that is still beautiful but with less polygons at those places that aren’t directly needed, and has high frame rates, then I’m in for the 2nd 3D aircraft model. I know my iMac isn’t the same as your Mac or PC, but I can easily manage high frame rates with high rendering settings. I also know that when you’re a Windows 10 simmer, you most likely have higher frame rates then I have.
Summary
Oops, this is the longest review I’ve ever written. Our reviews offer you not only if it is worth to buy or not, but also what the product can do for you. And do for you means what additional information can we add to each review in a way that you can enjoy every bit and piece of, in this case, the JD340-500 Airliner.
I guess you’ve read the complete review, at least, I hope you did since I’d included also JAR CO-Pilot Linda. She has become my personal co-pilot. Although I did struggle with speaking to her on/with macOS Big Sur, I succeeded to talk to Linda on macOS Mojave. To make this clear to you, I had only those issues. I did ask Andy and Eugeny from JARDesign to check this on their Big Sur Macs and they had no problems. Anyway, having Linda next to you is great. Procedures where completely performed by Linda while the checklists we did together. I used the microphone for this to talk to her and confirmed my actions to be taken, bu you can also click the expected command line.
So, did I cover everything?
Oh well, for sure I’ve forgotten to pay attention to “something”, but I dare to say that this review covers most of what I’ve seen. You can imagine that Angelique didn’t wrote this review is a couple of days. It’s almost 20K words and that takes time. While exploring the inside and outside of the aircraft, checking out the modeled systems, making the necessary flights and the fact that the model was constantly updated, and thus Angelique had to correct her text.
In my humble opinion a review that will be a good starting point to decide if you buy it or not.
Is the JD340-500 Airliner perfect?
No add-on aircraft I’ve seen at X-Plane is perfect, but he, I’m not perfect either, nobody is perfect, but what I know is that many well known and accepted aircraft modelers update and improve their product on a regular base. As long as that’s the case as it is with JARDesign, I think it’s worth the modeled JD340-500.
And yes, I’m aware that ToLiss will also release a new Airbus aircraft, the A340-600. It’s not the same Airbus model as the JD340-500. It is like a brother or sister. As of this writing, August 2021, I don’t know yet what to expect from the ToLiss A340-600, and therefore further speculations aren’t fair. Do you need to wait for the ToLiss A340-600 or buy the JD340-500 Airliner? I can’t answer that for you since I don’t know yet what the ToLiss A340-600 will cost and I also don’t know what simmer you are.
What said before, flying the JD340-500 was fun, testing all the systems was fun and yes, I’m aware not all is simulated. I’m also aware that the MCDU FMS part is slightly different then the official FMS MCDU pages and no, you have no option to add a SEC flight plan. But you get a lot of things extra like a build in flight plan generator, a co-pilot without license active till the takeoff or better to say, as long as you’re on the ground, razor sharp 2D popup DUs and the big map. Not to forget the well crafted 3D cockpit and all of that for a reasonable price.
More information about the JD340-500 Airliner can be found at the JARDesign website and their forum. When you’re ready to buy this aircraft, then you surf to this dedicated JD340-500 Airliners store page from Aerosoft or to X-Plane.Org.
Feel free to contact me if you’ve got additional questions related to this impression. You can reach me via email Angelique.van.Campen@gmail.com or to Angelique@X-Plained.com.
With Greetings,
Angelique van Campen
| Add-on: | Payware JARDesign JD340-500 Airliner |
|---|---|
| Publisher | Developer: | X-Plane.Org / Aerosoft / | JARDesign |
| Description: | Realistic rendition of the A340-500 |
| Software Source / Size: | Download / Approximately 436MB (zipped) |
| Reviewed by: | Angelique van Campen |
| Published: | September 1st 2021 |
| Hardware specifications: | - iMac Pro - Intel 3GHz Intel Xeon W / 4.5Ghz - Radeon Pro Vega 64 16368 MB - 64 GB 2666 MHz DDR4 - 1 internal shared 1TB SSD (Bootcamp Windows 10) - 1 external 2TB LaCie Rugged Pro SSD (Big Sur / Mojave) - Saitek Pro Flight System X-52 Pro and X-56 Rhino - Honeycomb Alpha Flight Controls - Honeycomb Bravo Throttle Quadrant |
| Software specifications: | - macOS Big Sur (11.15.2) - X-Plane 11.55r2 |
0 Comments