Part I – Workhorse Thranda DHC-2 “Beaver”
At first
This review has, as many of our reviews, become a bit longer than planned and for this particular review is will also be split into a Part I and Part II, but more about that later.
Due to the length of this review and the in-depth discussion of the chapters/sections, I’ve decided to include a Table of Contents. I sincerely hope you will enjoy this review that covers my own explorations of this well designed, beautiful DHC-2 Beaver, brought to you by Thranda.
Table Of Contents
Introduction
Flight Impression KORS – 2W3 | I
– What to Expect?
– The Modeled Cockpit
– The Virtual Cabin
Flight Impression KORS – 2W3 | II
– On my way to Swanson (2W3)
The Thranda Popup Window
General tab
Livery tab
Weight and Balance tab
Camera and Audio/Slew tab
Panel tab
– LAYOUT PAGE
– 3D PANEL EDIT MODE
– INDIV INST
Thranda Popup Window – Misc(ellaneous) tab
And now …. the Walk-Around Check
Miscellaneous Section
– Installation and Documentation
– Frame Rates
Summary
Introduction
A well known aircraft, the de Havilland Canada DHC-2 or better known as the Beaver. According to the Air Classics Museum “De Havilland conceived of a light bush transport aircraft during World War II. They, however, did not act on their concept until 1946 after they finished the design of the DHC-1 Chipmunk trainer. They conceived of a completely utilitarian bush transport. The final aircraft – the DHC-2 or Beaver – had a number of interesting features such as a drop hatch in the cabin floor, a side door large enough to allow 55 gallon fuel drums to be rolled in the cabin, a fuselage mounted fuel tank to eliminate the need for over wing fueling, and the ability to add oil to the engine while the aircraft was flying.”
“The DHC-2 Beaver utilizes all metal construction, with landing gear that can use wheels, skis or floats, and hinged wing trailing edges carrying both slotted flaps and drooping slotted ailerons for Short Takeoff and Landing (STOL) capability.” Courtesy of Air Classics Museum.
As we all know, the DHC aircraft family seems to be a favorite aircraft to model. No idea why this is, but perhaps it has to do with the straightforward aircraft designs, the basic cockpits, easy to control and to fly. When we look to the DHC aircraft, you’ve got the following payware models; DHC-1 Chipmunk from Khamsin Studio, the DHC-6 Twin Otter and the DHC-3 Otter from RWDesigns, the DHC-2 from Soulmade Simulations, DHC-3 Turbo Otter modeled by vFlyteAir and recently added to this the Thranda DHC-2 DGS (Dynamic Generation Series).
Besides these payware models, there’s also the freeware DHC-6 Twin Otter from AeroPedro as well as his DHC-3 Otter. Some of these models where designed during X-Plane 9 and updated for X-Plane 10 and sometimes once more updated for X-Plane 11 while others are exclusively made for X-Plane 11. I think this was the list of the most well known de Havilland Canada aircraft models. For sure I’ve forgotten a couple, but the intention was that many developers love in one way or the other DHC aircraft.
That said, let me stick ot the DHC-2 or Beaver models. The Soulmade Simulations DCH-2 was originally modeled for X-Plane 10 and updated for use with X-Plane version 11.50+ while the Thranda Beaver uses all the features of X-Plane 11.50+ and is also exclusively for X-Plane 11.
Attention … attention;
Just to warn you that this review deals with the Thranda Designs Beaver and I won’t compare the Soulmade Beaver with the Thranda Beaver. Ok ok, a couple of comparison words then.
The Soulmade Beaver was and still is a beautiful replica of the famous Beaver which was as I mentioned before, X-Plane 10 native, and in the end of 2020 updated to version 1.3 thus compatible with X-Plane 11.50+.
But – yes, there’s a but – the external texture qualities and thus the liveries including the 3D effect of ribs, rivets, screws and so on, is not spectacular. The interior is very nice, but it doesn’t come with many features like panel modification options, weight and balance overview, on-the-fly livery changes and creating weathered looks. All these “features” I just mentioned are part of the Thranda DHC-2 package and as far as I’ve seen, there’s not much difference in the FPS (Frames Per Second), so that’s all good news.
Anyway, I leave it with this “comparison” and move on with the Thranda DHC-2. During this review I’ll take you on a flight from KORS to 2W3 and use for this the Orbx airfields as well as TrueEarth US Washington HD/SD. I write on purpose HD or SD since it depends on what PC or Mac have and how high you want to fly. Since I’m flying the Thranda Beaver at an altitude of roughly 3000 feet, I prefer to have the higher quality Orbx HD package.
A note to all of you : you’ve probably seen the title at the beginning of this review, right? Yes, you’re right … this review will cover Part I which means that there’s also a Part II. It turned out that the review has become a bit longer then expected, and then I didn’t discuss the seaplane version yet. Because of that, I decided to split the review. In other words, this will be Part I of the impressive Thranda Beaver wheel model while Part II will cover the seaplane version. Time to continue, and as we say “Enjoy Part I of the “wheeled” Beaver version.
And now, ready for a scenic flight and cockpit impression?
Flight Impression KORS – 2W3 | I
What to Expect?
Yeah, this will be different approach then you’re normally expected from us. It’s the beginning of 2021, so lets start with another approach, lets try this out by jumping in the Beaver when it’s already on the way to Orbx 2W3 Swanson airfield. Don’t worry, your personal reporter Angelique will cover all the other aircraft features too.
Personally I would love to fly the Beaver under VFR conditions and if possible or applicable for this area, adding VOR or NDB beacons to it. That the Beaver is also equipped with Garmin GNS equipment is not something new. It’s most likely a FAA requirement to have such navigation equipment onboard, also in the real Beavers flying around. The moment you’ve decided to add for example the GNS 530 to the instrument panel, you can also create a flight plan before, and load it into the GNS 530 which means you can now also use waypoints to fly to.
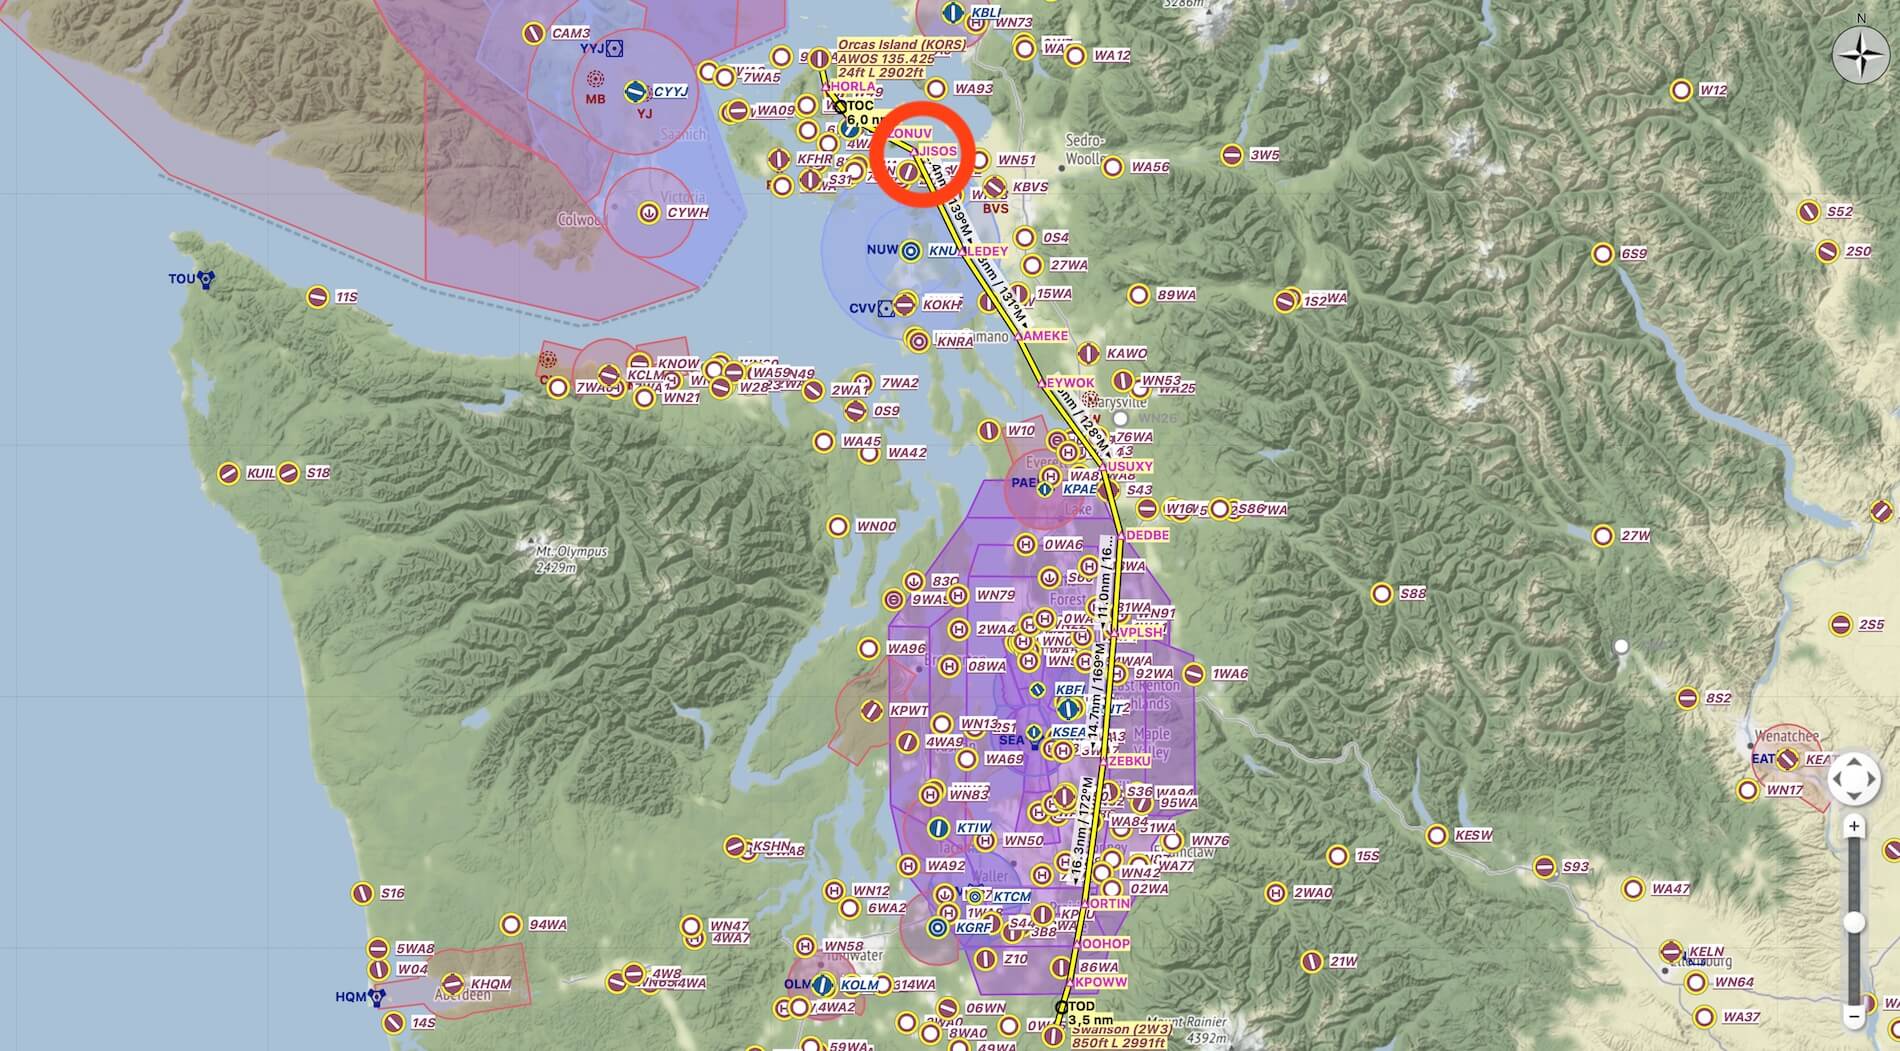
Departing from KORS and heading for 2W3, that will be handy to have such a flight plan since during this first stretch there are hardly any VOR and/or NDB beacons on the ground. But you can also virtually add a VFR chart in your hand and use this to navigate by using ground obstacles or other landmarks, in the same way as I did my PPL lessons in Florida.
This brings me to one thing I didn’t see in this aircraft package and that’s the possibility to add the AviTab to the Thranda Beaver. I also checked the dedicated AviTab forum at X-Plane.Org, but as of this writing – January 2021 – I haven’t seen anything to integrate this iPad look alike device in the Beaver. For some simmers it may be a disappointment that there’s no AviTab integration while other simmers like myself say, it’s the way the Beaver is modeled and how it should be flown thus without the AviTab. And let’s not forget that you can configure the instrument panel already with the Garmin GNS 530 and 430 and position it at a location of your preference.
But that’s for later. As previously said, I’ve started this flight impression at the moment the Beaver is heading for waypoint JISOS.
This means that on this flight I use the optional built in Garmin GNS 530. I write on purpose that I’ve built in a Garmin device since you’re able to modify your instrument panel, or to position or rearrange the Garmin equipment where you want or even change the look of the throttle section. Again, that’s for later.
The Modeled Cockpit
While the Auto Pilot is connected and flying the Beaver, I’ve got some time to explore the modeled 3D cockpit. The Thranda Beaver 3D cockpit comes with a “typical” lay-out. This modeled Thranda lay-out is a possibility since I checked on the Web for possible real cockpit panels and I was surprised. Either you see them with creme coloured panels, light grey, darker grey, black, polished metal and even one with an old grey/green panel.
Besides that, I also spotted many instrument configurations ranging from the old fashioned basic design – whatever the basic design may be – till models with a lot of radio and navigation equipment and installed at different positions, a Garmin GNS device. And believe it or not, I’ve seen at the DHC-2 dedicated website with a completely remodelled “real” DHC-2 instrument panel with besides a couple of basic required flight instruments, only DUs (Display Units). One is for sure a Garmin G1000. Impressive to see and with a modern lay out like this, the panel and controls are creme-white.
Anyway, the previous paragraph has nothing to do with the modeled Thranda DHC-2, but I found it worth to bring other possibilities to your attention.
So, my current DHC-2 instrument panel uses the basic old fashioned instruments and for my navigation I’d installed the Garmin GNS 530. You are able to modify the panel with for example both Garmin GNS 530 and 430 devices, or any other combination and that all on-the-fly. However, when you want to change while flying for example the GNS 530 into a GNS 430 or visa versa, you need to reload the aircraft. Further than that, you can change many things while flying.
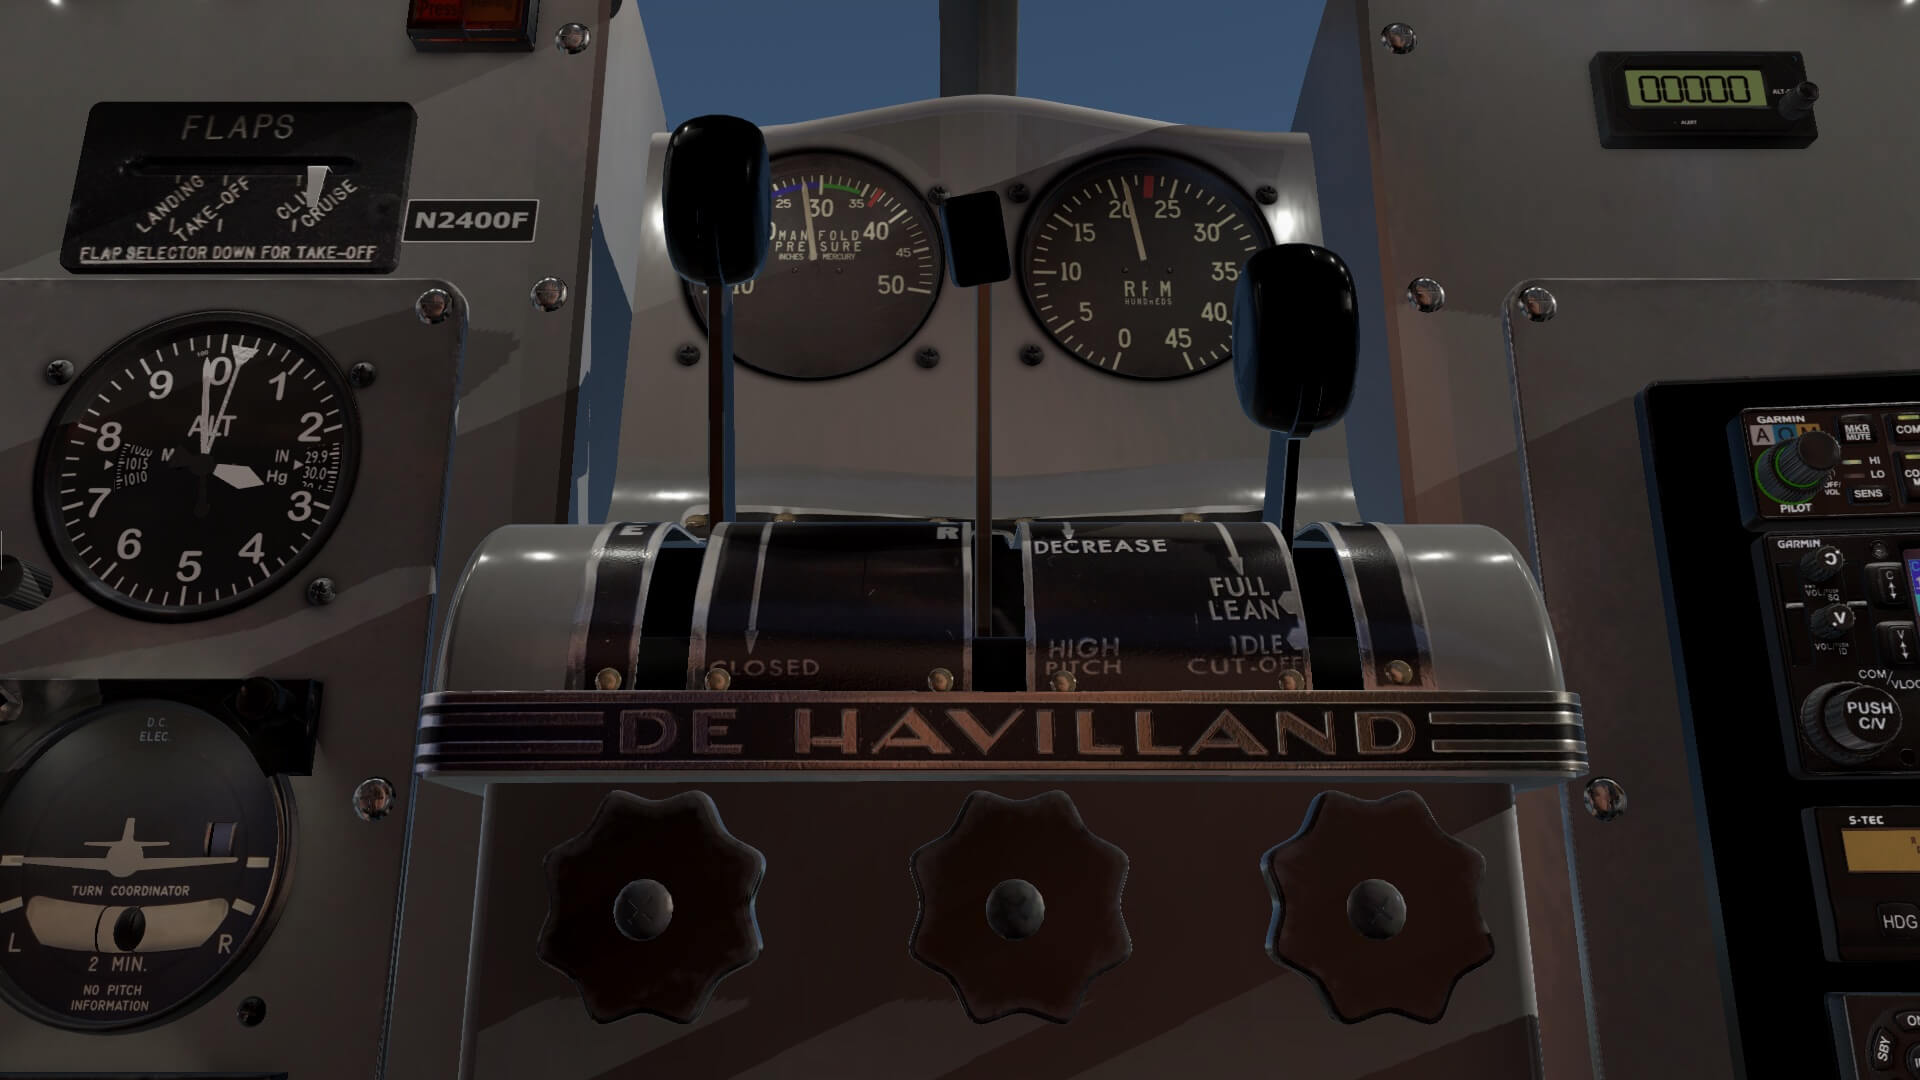
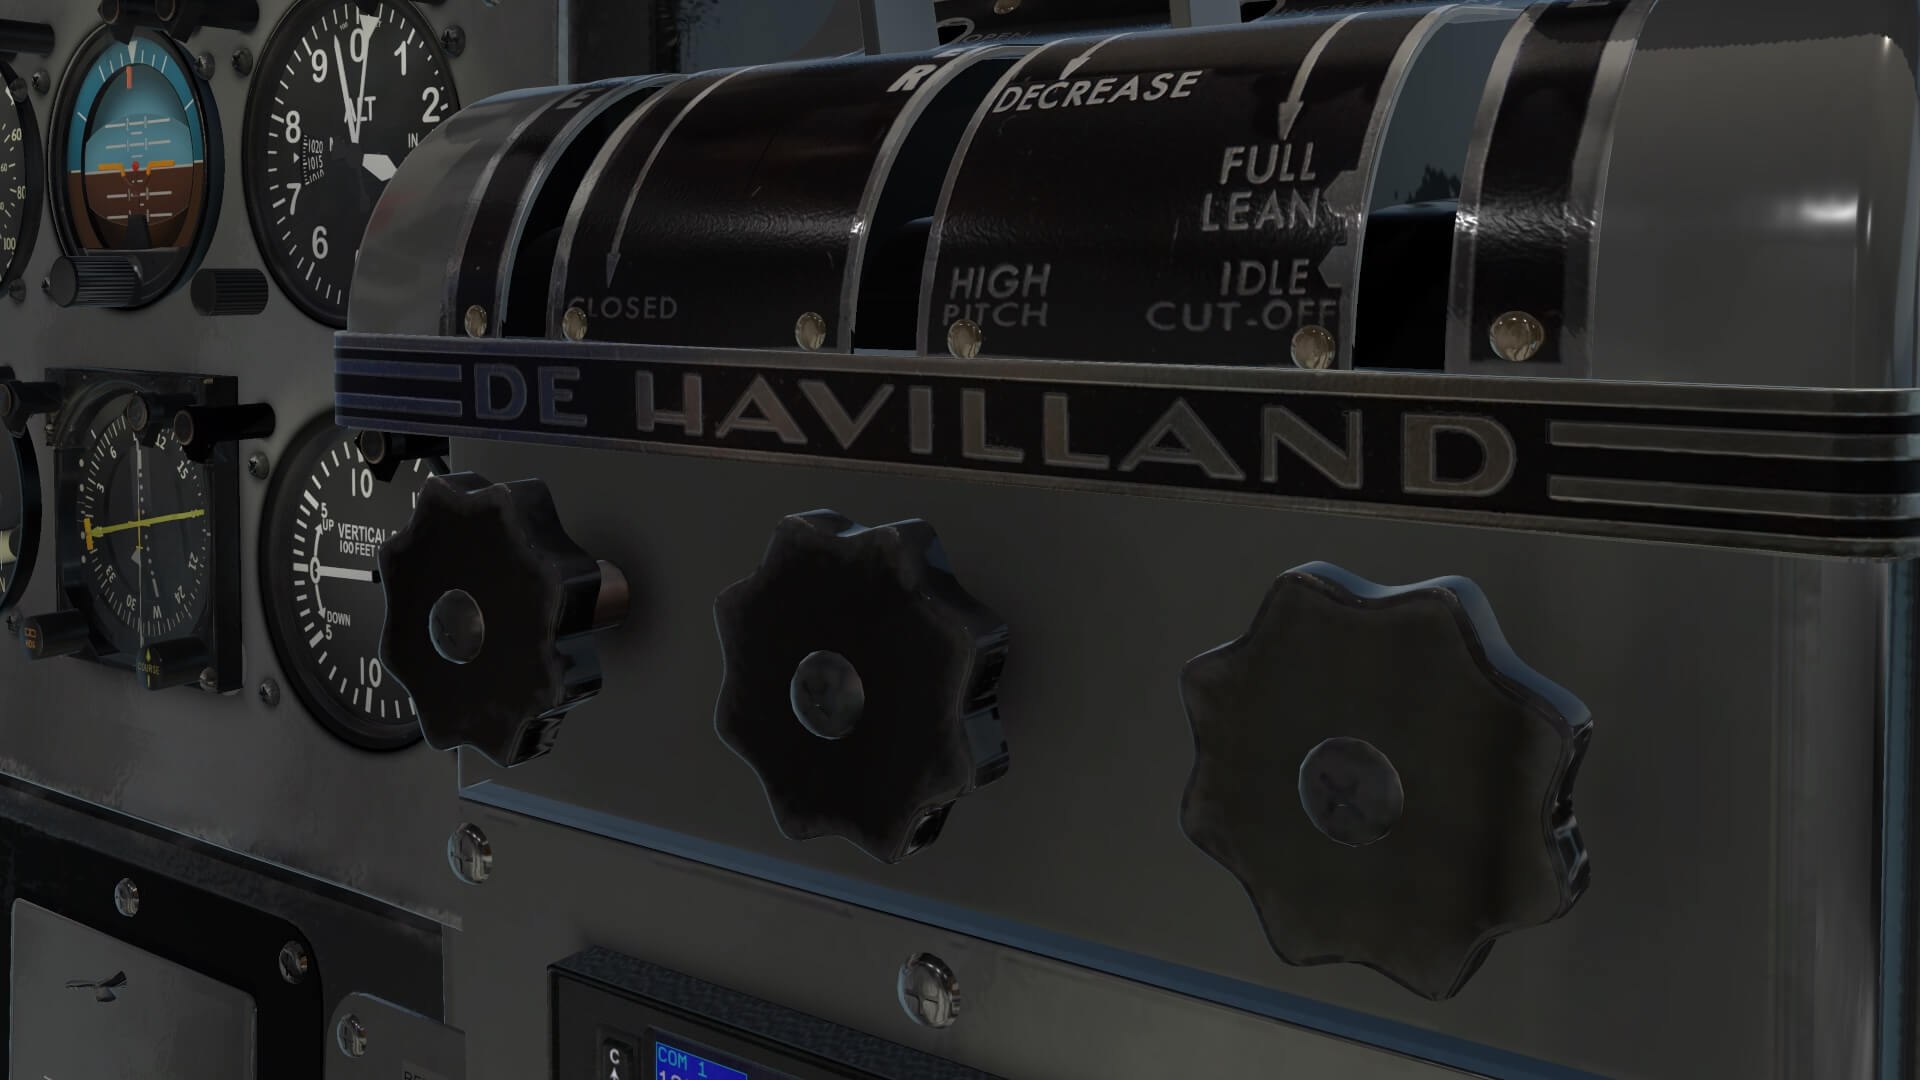
Further on, I use the default throttle panel and not the flat one. That’s a matter of taste, but perhaps more important; you’re able to change the look and feel of Your panel which is not new. Not new since you see that with other developers too, but the way you can modify the overall panel with what you can imagine, is possible. That’s something you won’t see with other developers, so a big plus for Dan from Thranda.
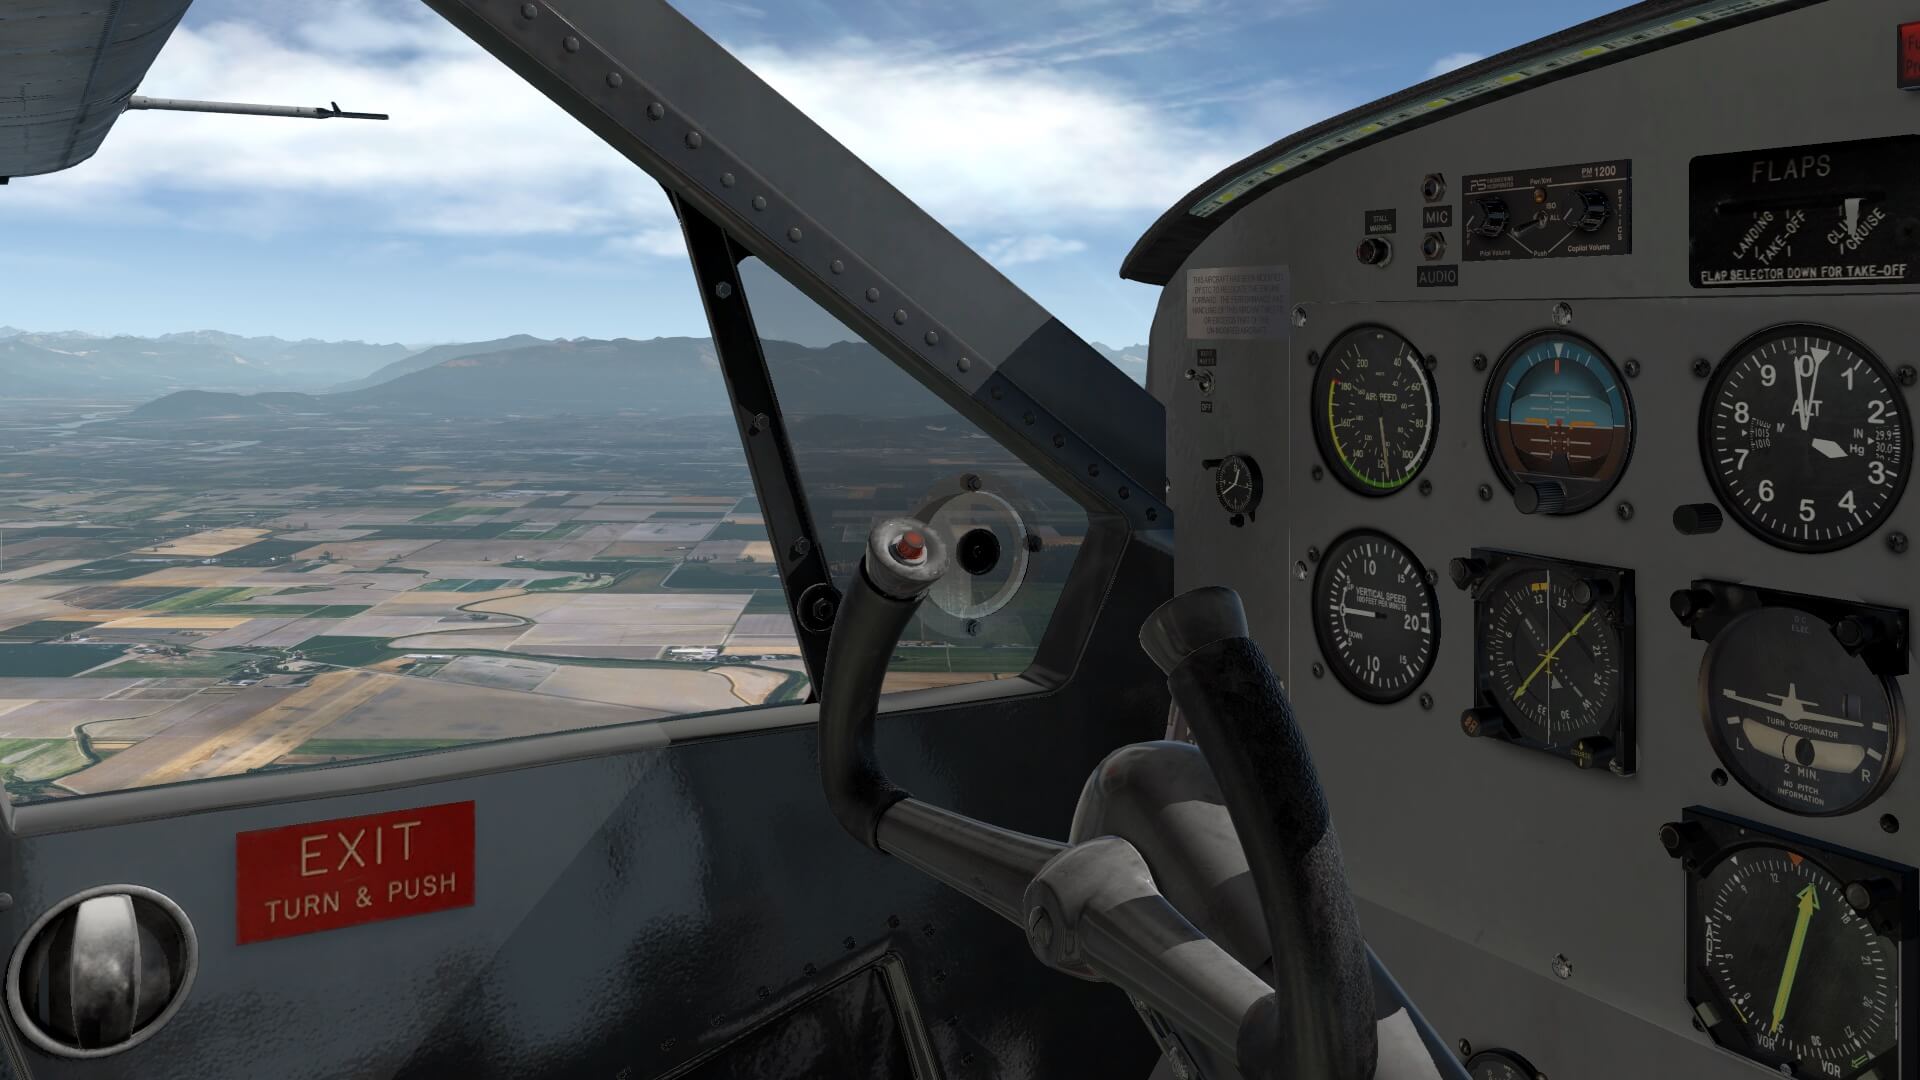
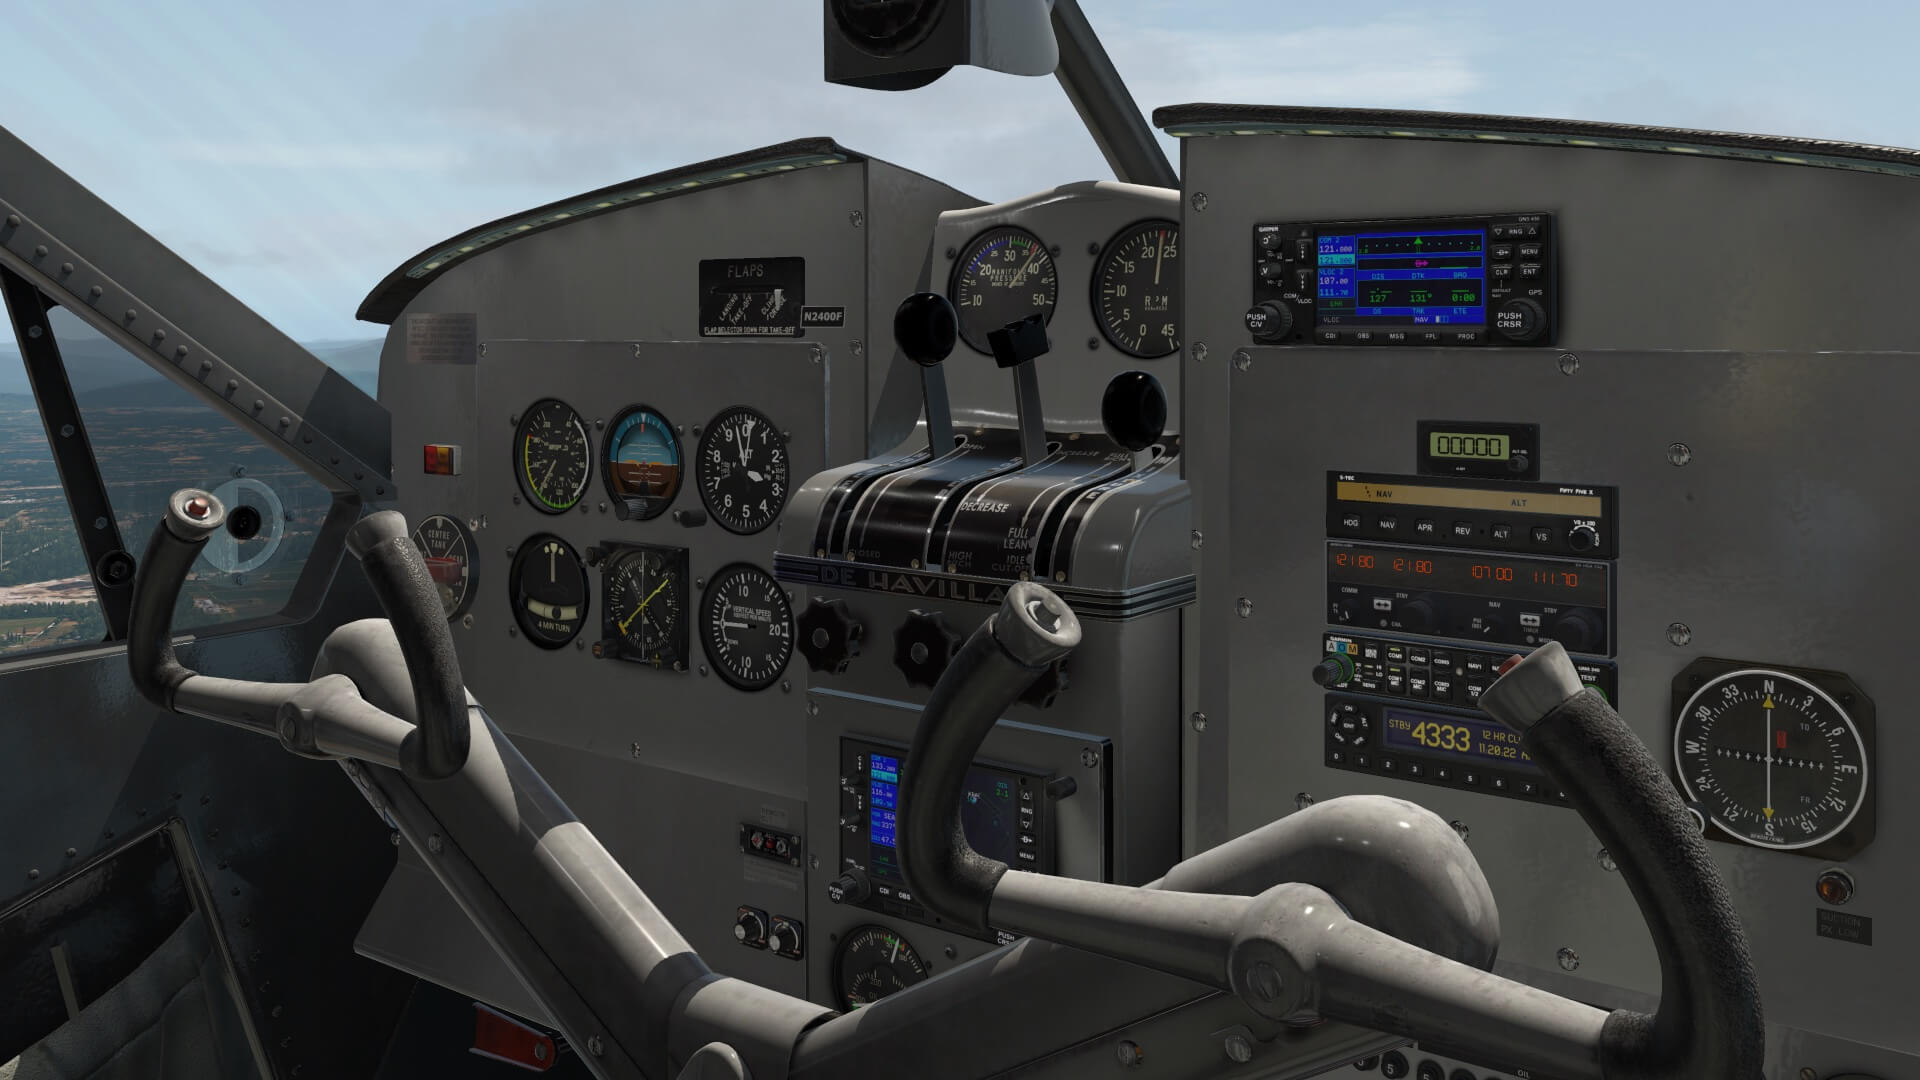
Ok, I started this section that I’ve passed JISOS, and since the Auto Pilot is connected in NAV and ALT mode, I have the time to look around in the modeled 3D cockpit and I can tell you … I’m blown away! Wow, it looks awesome. Yes, I know, I mentioned this already in a previous paragraph, but I mean it. It just looks gorgeous!
This is really well modeled and that all with so many tiny details included, razor sharp indicators and sharp decals on the panels whenever applicable, panel structure, even small scratches and weathering can be found on the instrument panel and indicators.
The following screenshots show you “a” panel with “a” lay-out which is as you can see with a Garmin GNS 530 installed. On purpose I writer “a” panel and “a” lay-out since you are able to change the panel look and feel as well as the indicators or which or what Garmin GNS equipment you would like to have.
But there’s so much more to see. Look to the engine handles, the controls, the seat straps, the pilot seats itself, the fuel selector valve, and the instrument dimming selectors. These are so beautiful although it’s just a dimmer, but it’s of course not only the selector, it’s also the way the 3D dimmer or rheostat with text is modelled. On the right-hand side of the panel you find at the lower end the switches.
Most speak for themselves except for one which is named “Custom”. This means you can assign yourself a function to it. You could say “not so spectacular”, but it’s something I haven’t seen before with GA developers, so in that respect it is something new. Above the switches you find the aircraft circuit breakers. It’s not a good idea to pull one while flying for testing since they are all functional, so watch out while flying when you pull one!
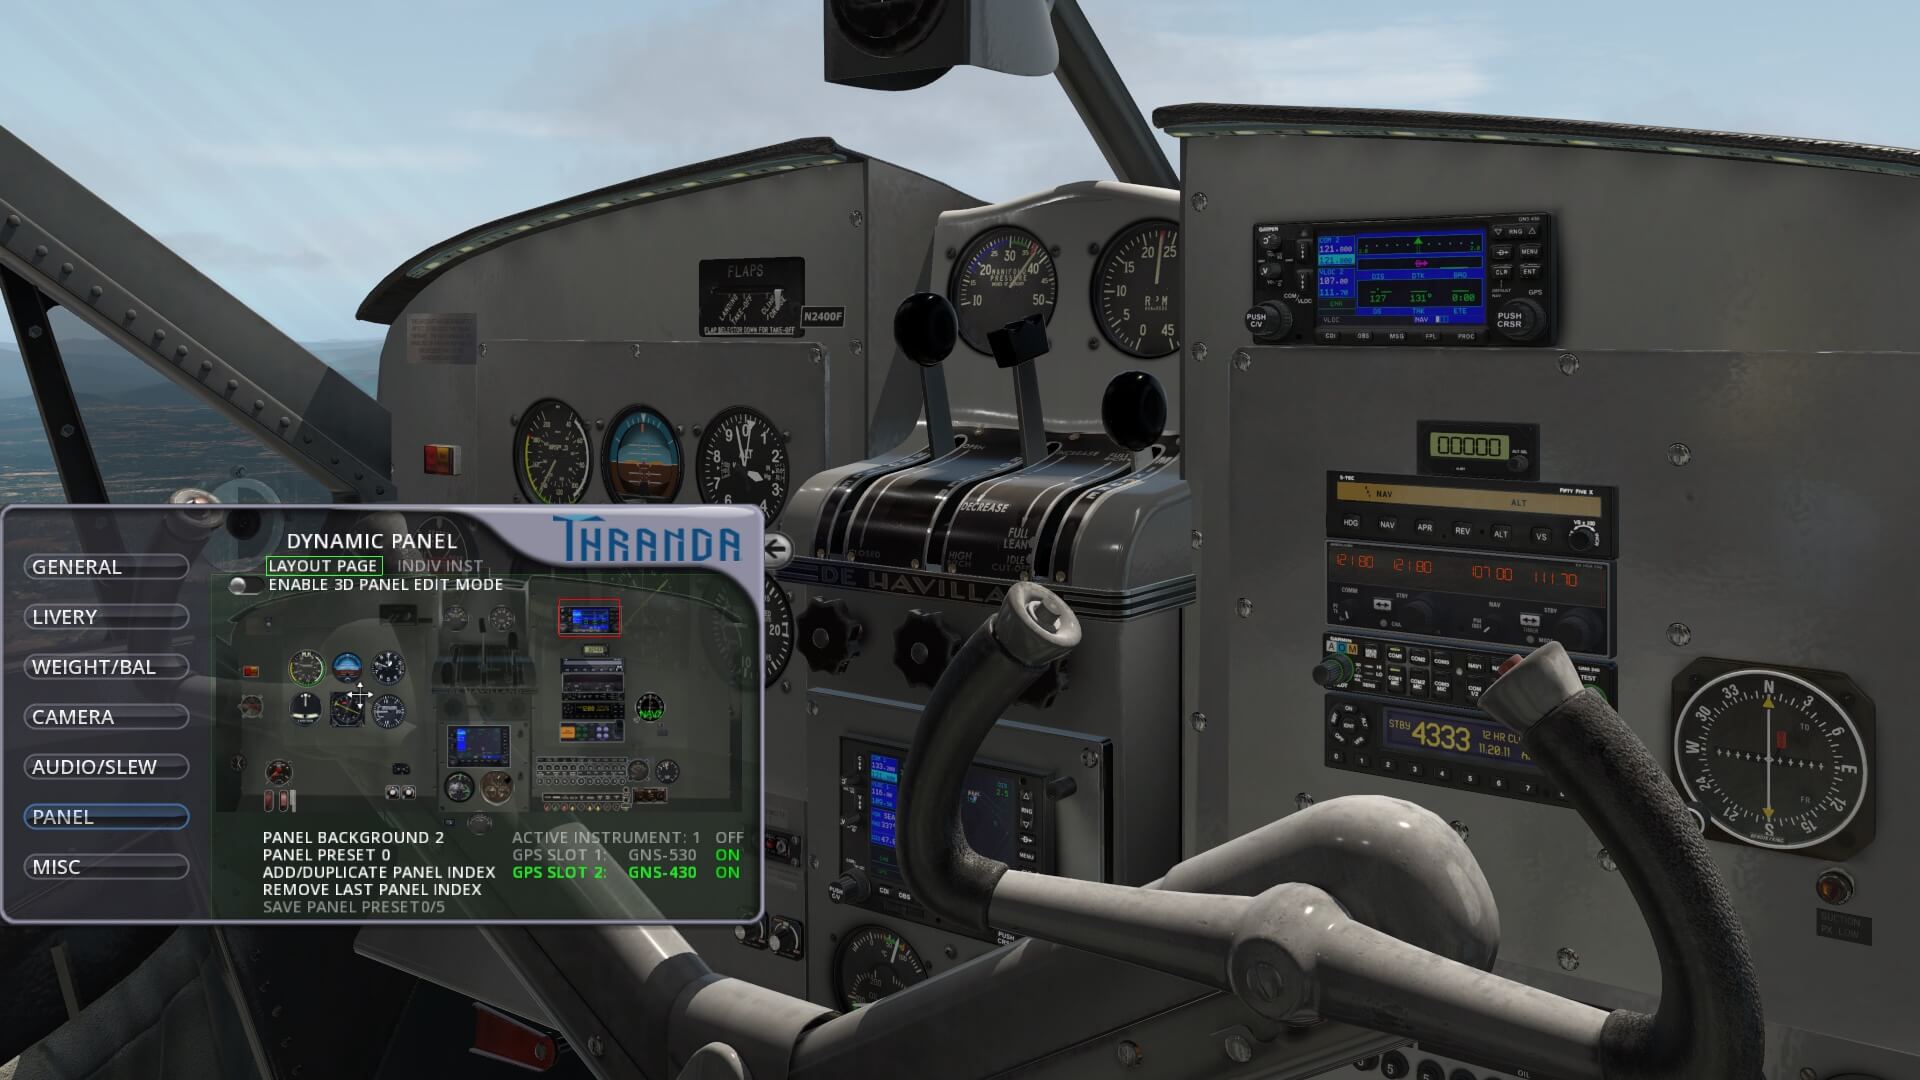
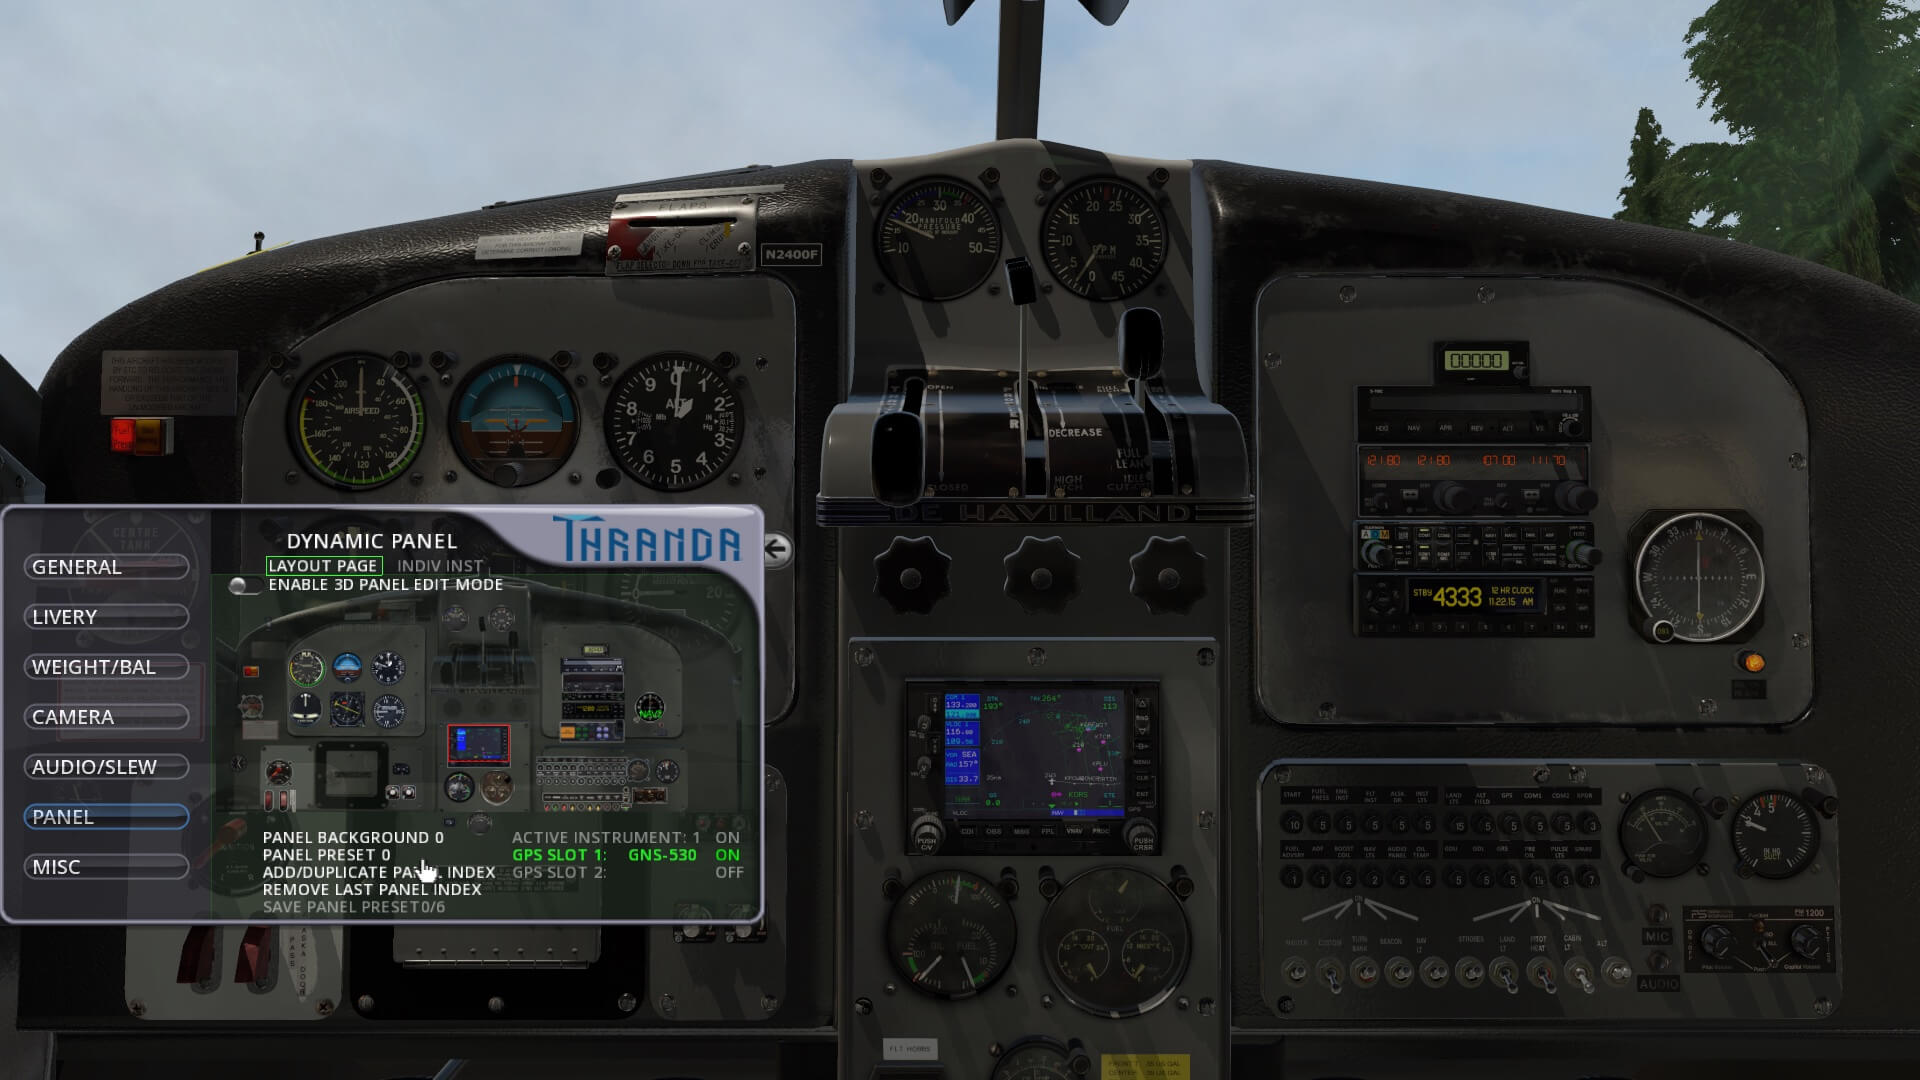
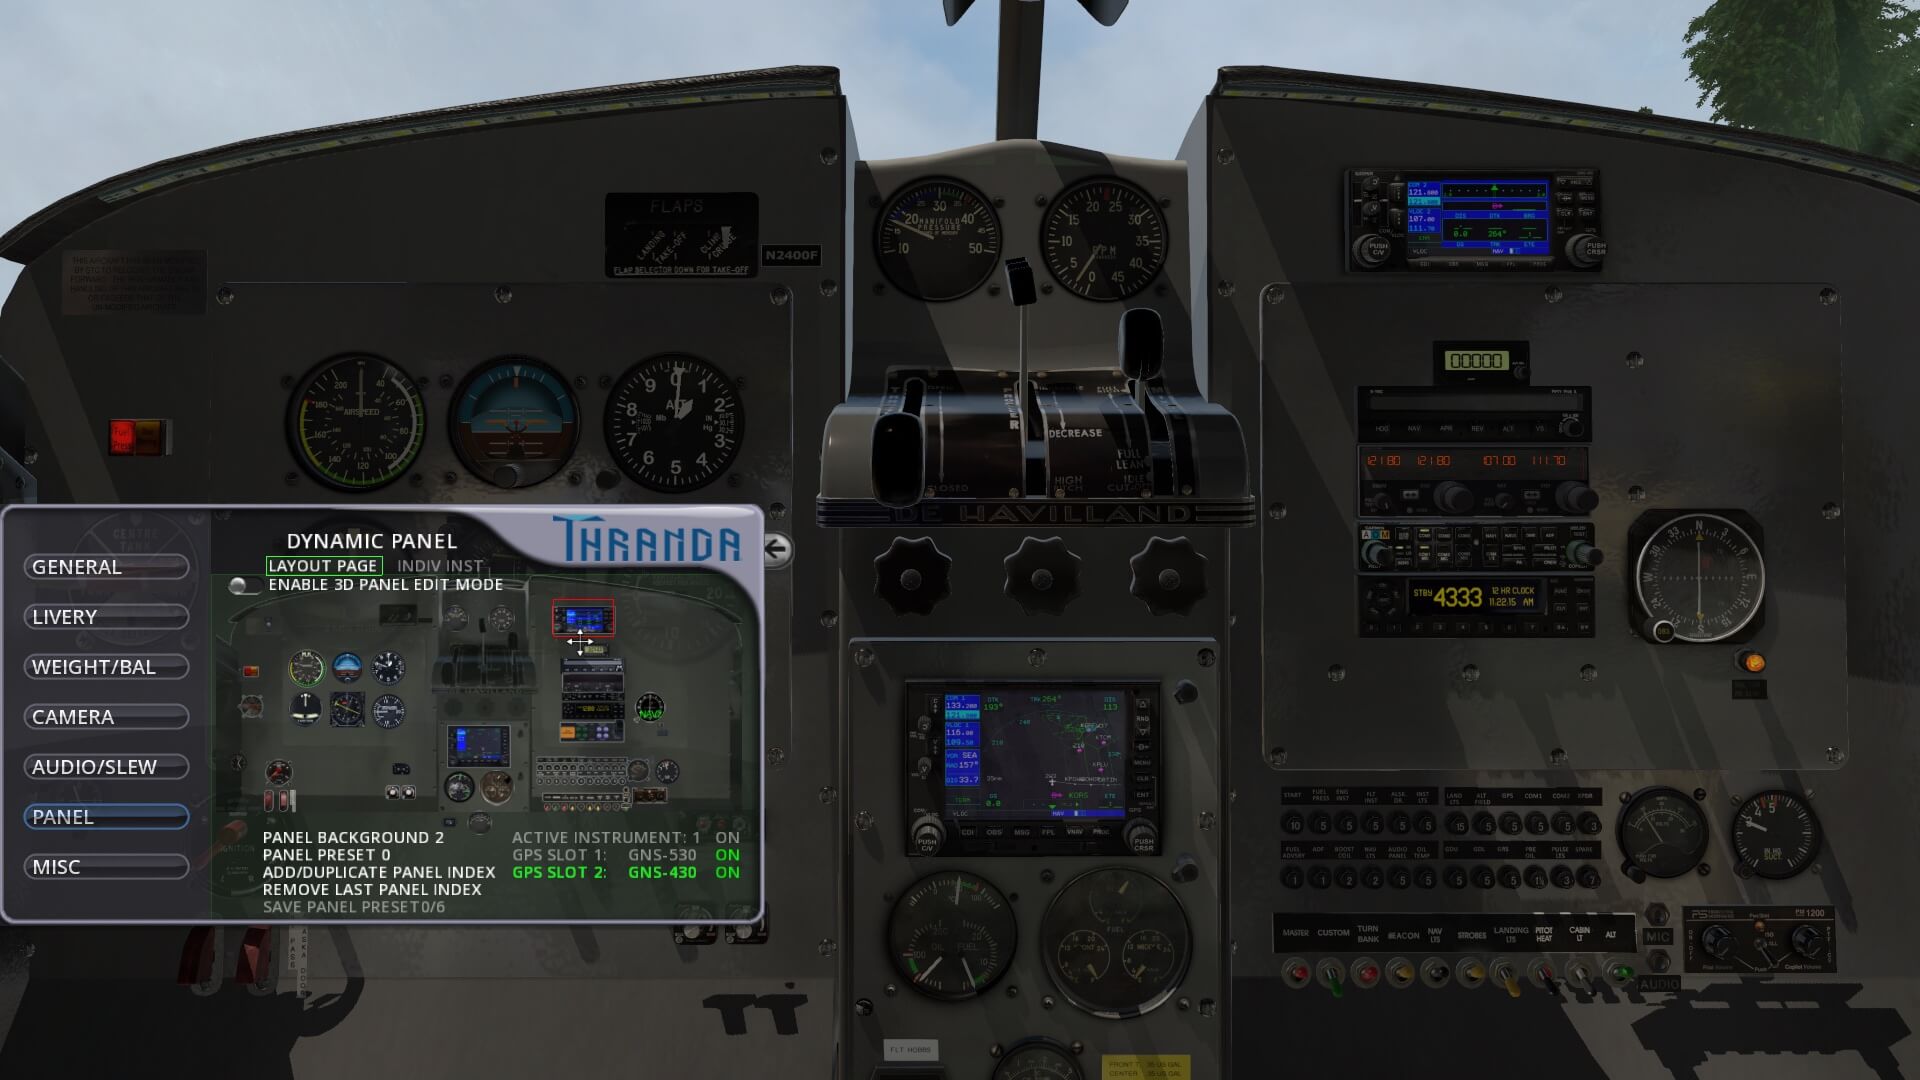
All the previous screenshots are representing the 3D cockpit with a panel and the GNS 530, but as I wrote before, you’re able on-the-fly to change anything including adding another Garmin navigation device. The only problem is that when you keep the panel configuration, it’s not easy to find a place where to put that second Garmin unit. No problem I would say; when you can’t find a good spot in the “panel configuration 0”, you change the panel configuration and in the following screenshot example that’s then panel 2. Now I’m able to position the second GNS 430 at a good place.
But let me highlight this once more. When I want to change the GNS530 which I had from the start to a GNS 430, you need to restart the aircraft which is not a good idea in my case while flying. No worry that you’ve missed this, a popup window will tell you that an aircraft restart is needed so I don’t do it right now.
When you’ve added like me the GNS 430 at a location with a different panel configuration, click the ADD/DUPLICATE PNEL INDEX and one line lower in red you’ll notice SAVE PANEL PRESET 6/6. At the next X-Plane Thranda DHC-2 startup the panel configuration isn’t PRESET 6 so click the PANEL PRESET line as many times till it shows 6 and then you’ve got your saved configuration with both GNS units at the places you want them and saved them.
The Virtual Cabin
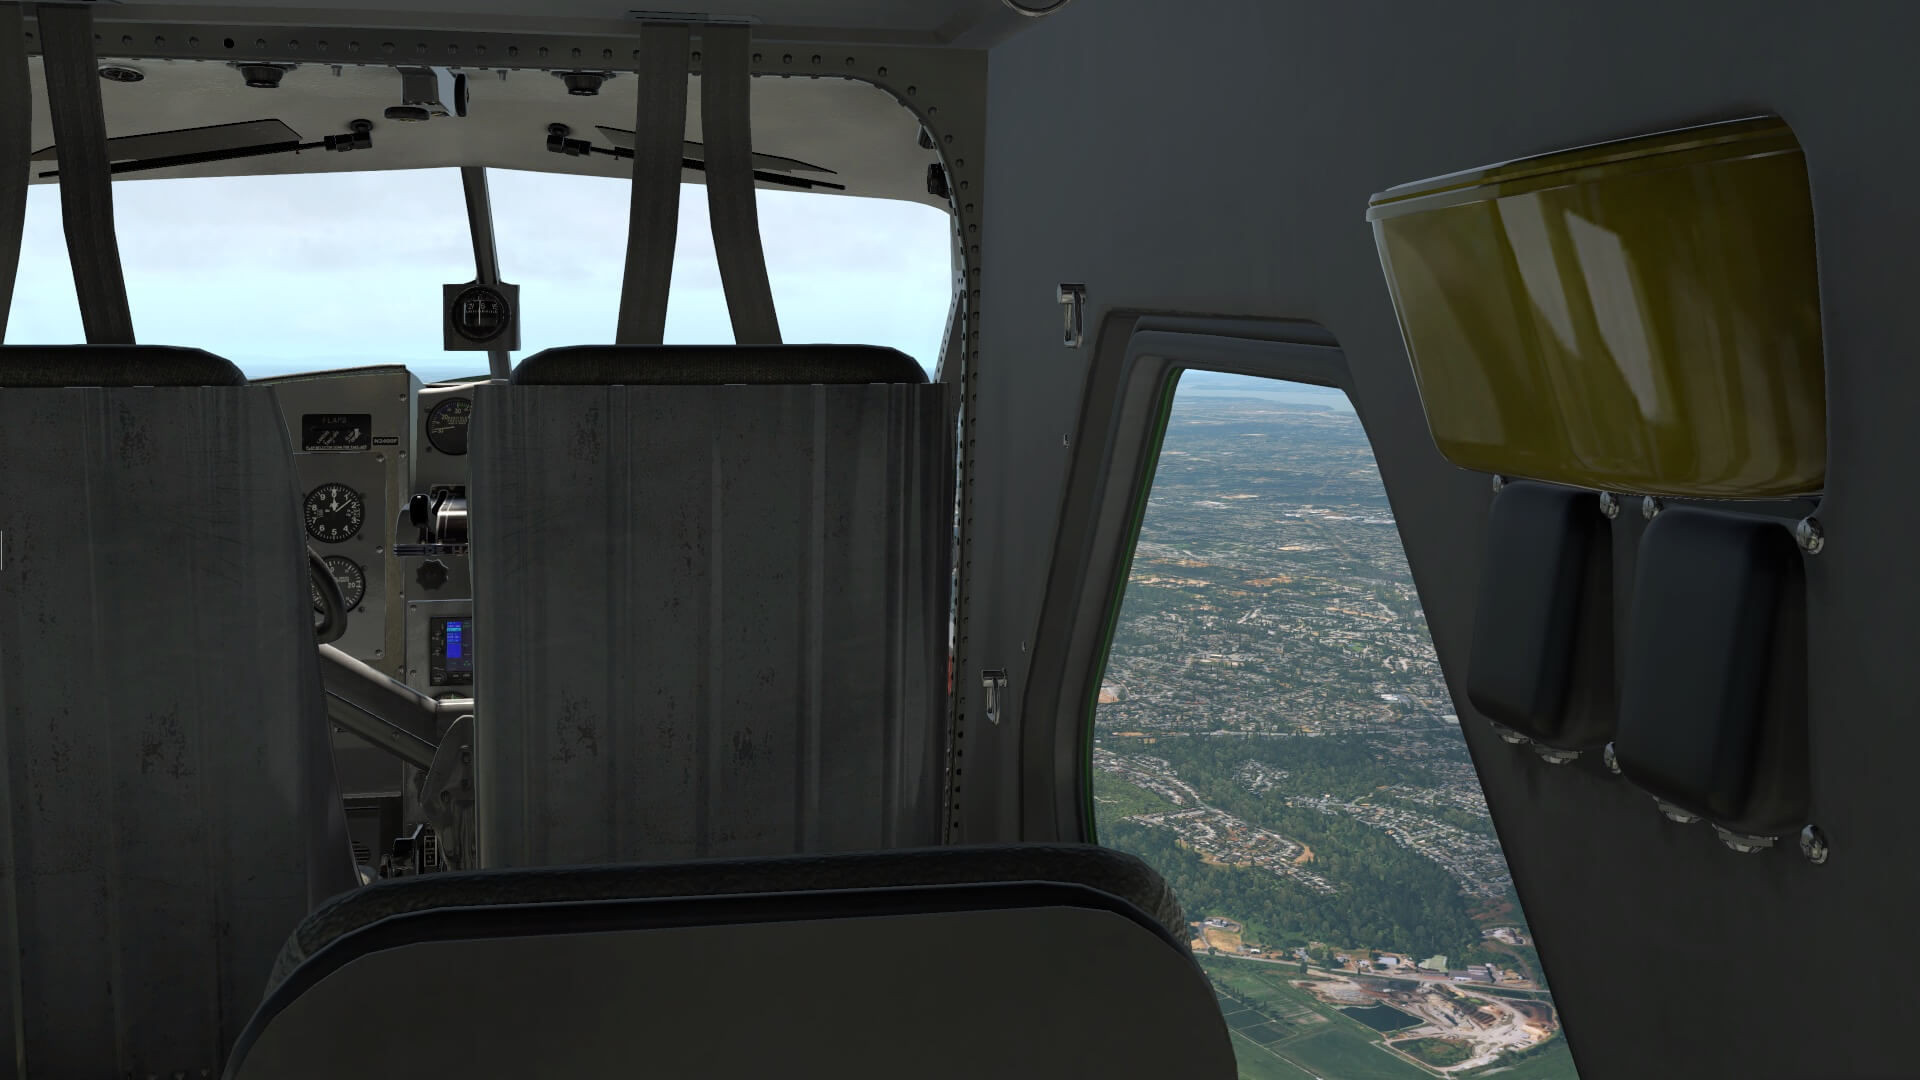
Perhaps cabin is not the right word, but the DHC-2 comes with a couple of passenger seats and all what belongs to this. It’s a basic cabin lay-out, but this doesn’t mean I’m not happy with it. Absolutely not. I looks nice, well finished and all the tiny details or objects are modeled/included. And let’s be honest, it’s not a first or business class interior. The modeled Thranda DHC-2 comes only with one cabin configuration so perhaps painters will when they include a new livery, also include another coloured cabin lay-out or perhaps even a different lay-out.
Flight Impression KORS – 2W3 | II
On my way to Swanson (2W3)
Now that you and I know a bit more how the modeled 3D cockpit looks like, it’s time to check a bit more in depth the modelled systems. To do that it’s a good idea to print the “Thranda Beaver Documentation v7” manual. It can be found in the DOCUMENTATION folder and besides this Acrobat file, you’ll find some other interesting documents, but that’s for later.
I know what you think “is this really needed and can’t I just start the engine and fly away”? Yeah, you can do that if you want, but the developer has put a lot of time in the creation of this manual, so reading it or at least have a look into it, would be welcome and I’m sure you’ll learn something. I’ll discuss this manual and the others later in this review, but for now I can say that this manual has no flight tutorial, but it does have thorough sections that deal with the aircraft systems. These sections are Operations – Flying the Beaver, the Performance Charts and the checklists. Perhaps you prefer an electronic checklist like the clist.txt file. Then there’s good news. Follow this URL for the clist file from Org user royaloak and this X-Plane.Org URL for the Xchecklist program from Org user sparker.
Anyway, I’m on my way to Swanson.
Till now I’d connected the Auto Pilot so lets fly the Beaver by hand and oh oh, that means a lot more muscle power and attention what you don’t expect when the AP is controlling the aircraft. The original Beaver had only trim for PITCH and YAW while Thranda made it a bit more convenient for you and me by adding also ROLL trim. This means you’ve got full trim control over the aircraft. By the way, to get the most realistic feeling when flying the Beaver by hand, it’s good to check the included Thranda DHC-2 Beaver Joystick Settings manual. It points out the recommended settings for the X-Plane Control Sensitivity page.
What I miss during this test flight is that with or without the AP connected, the Beaver doesn’t shake or vibrates at all and flies straight thru the air without any effect of shaking, wobbling or whatsoever. Even with “Cinema Varite” active, it feels too good. It feels a bit unrealistic. With such a radial engine in the front, you should feel – ok, feeling is impossible on a computer screen – but you should see the vibration produced by the engine. A possible solution is adding payware add-on XP Realistic to the Resources/plugins folder.
By the way, for this test flight I use both the available Honeycomb hardware which is the Alpha Flight Controls and the Bravo Throttle Quadrant. Knowing that the Thranda Beaver has an advanced Auto Pilot, you can still use the Auto Pilot section of the Honeycomb Bravo. What is not working or partly working on the Honeycomb Bravo are the integral AP button lights and the annunciator panel lights. Some AP lights are illuminated at moments you don’t want them, but that has nothing to do with the modeled Beaver.
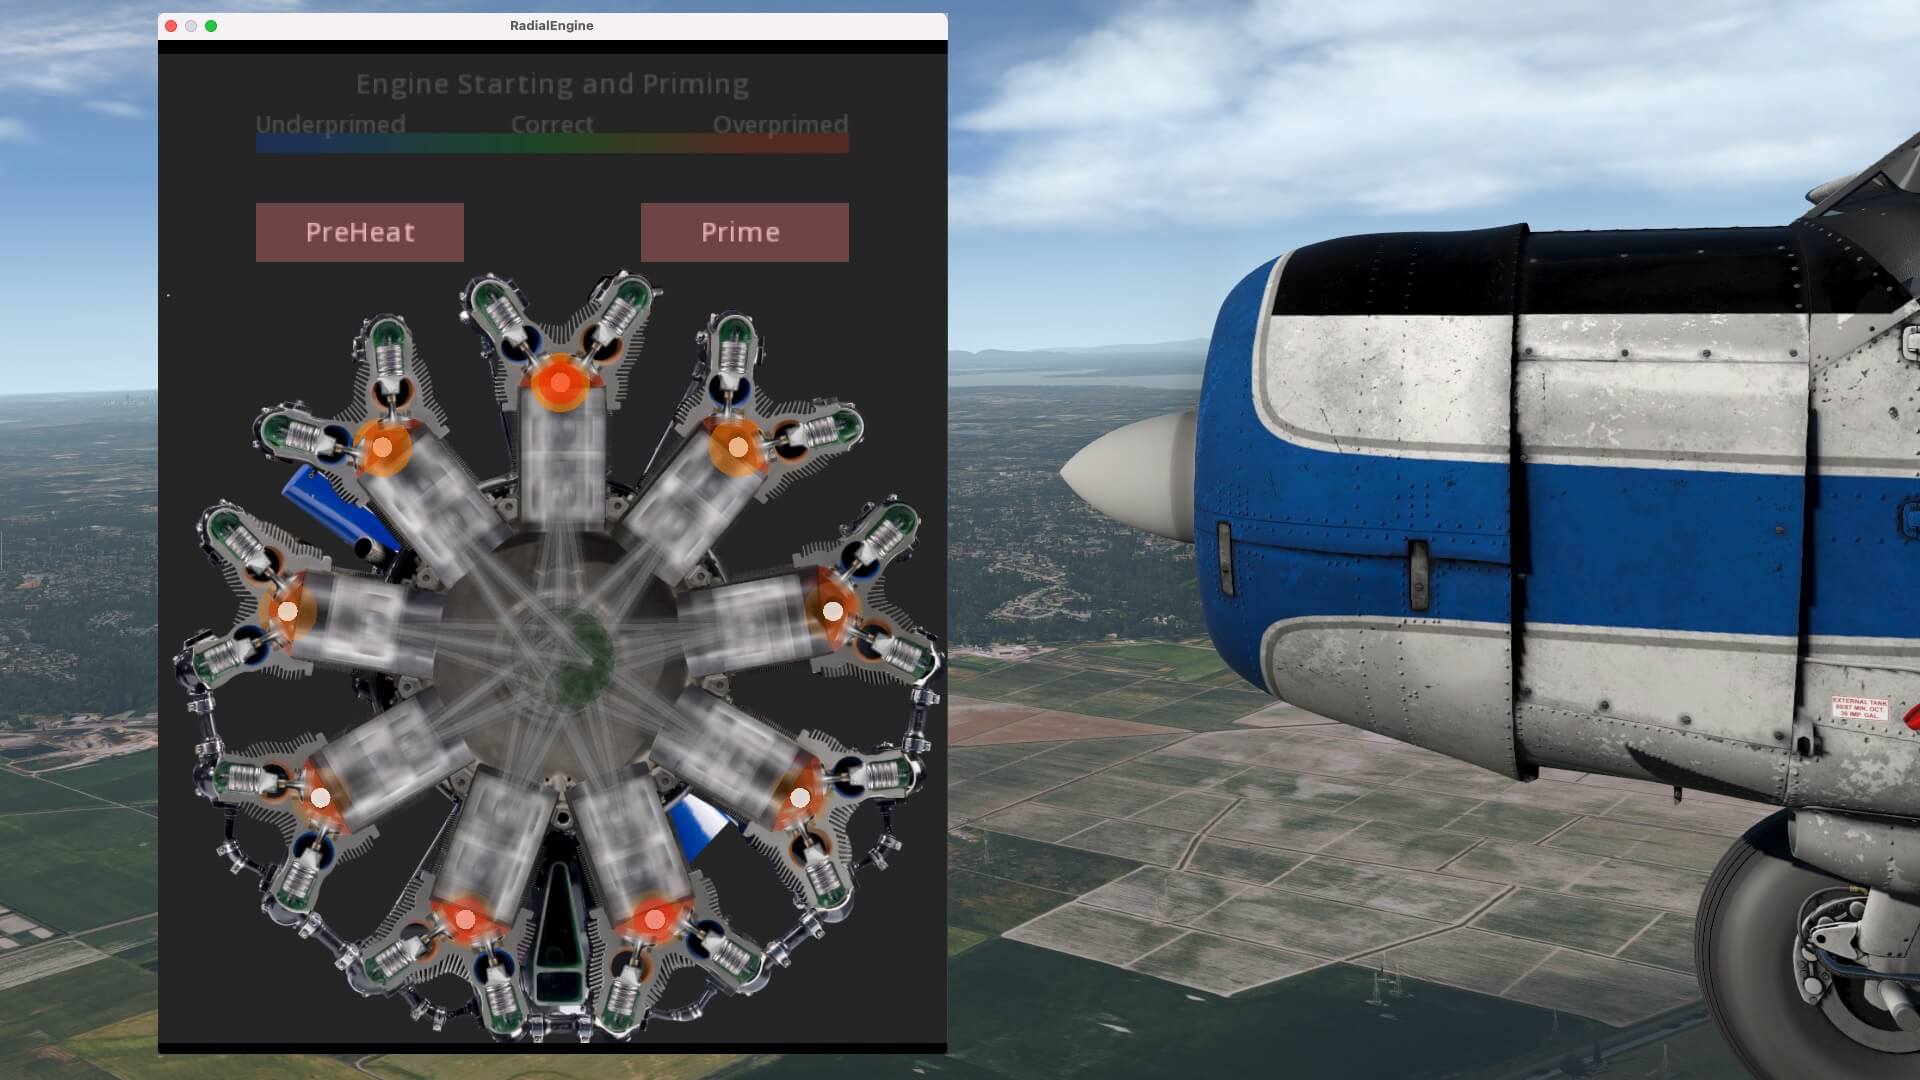
For a short moment I connect the AP again since I want to show you something and that’s better when the Beaver is flown not by you. It’s nice to learn a bit more about radial engines like the one mounted in the Beaver which is a 9 cylinder model, assuming you like the idea too. Unlike inline piston engines, radial engines have cylinders mounted in a circle and you’ll always find an odd amount of cylinders while most inline piston engines have 4, 6 or 8 or even 12 cylinders. Finding an radial engine animation on the World Wide Web isn’t difficult, but it’s even more fun that Thranda has included this animation. That said, open the Thranda popup menu and tick from the General tab Radial Engine Animation. For me as ex-ground engineer and worked during my aviation school time on a real Beaver, an extraordinary popup window as well as an awesome animation!
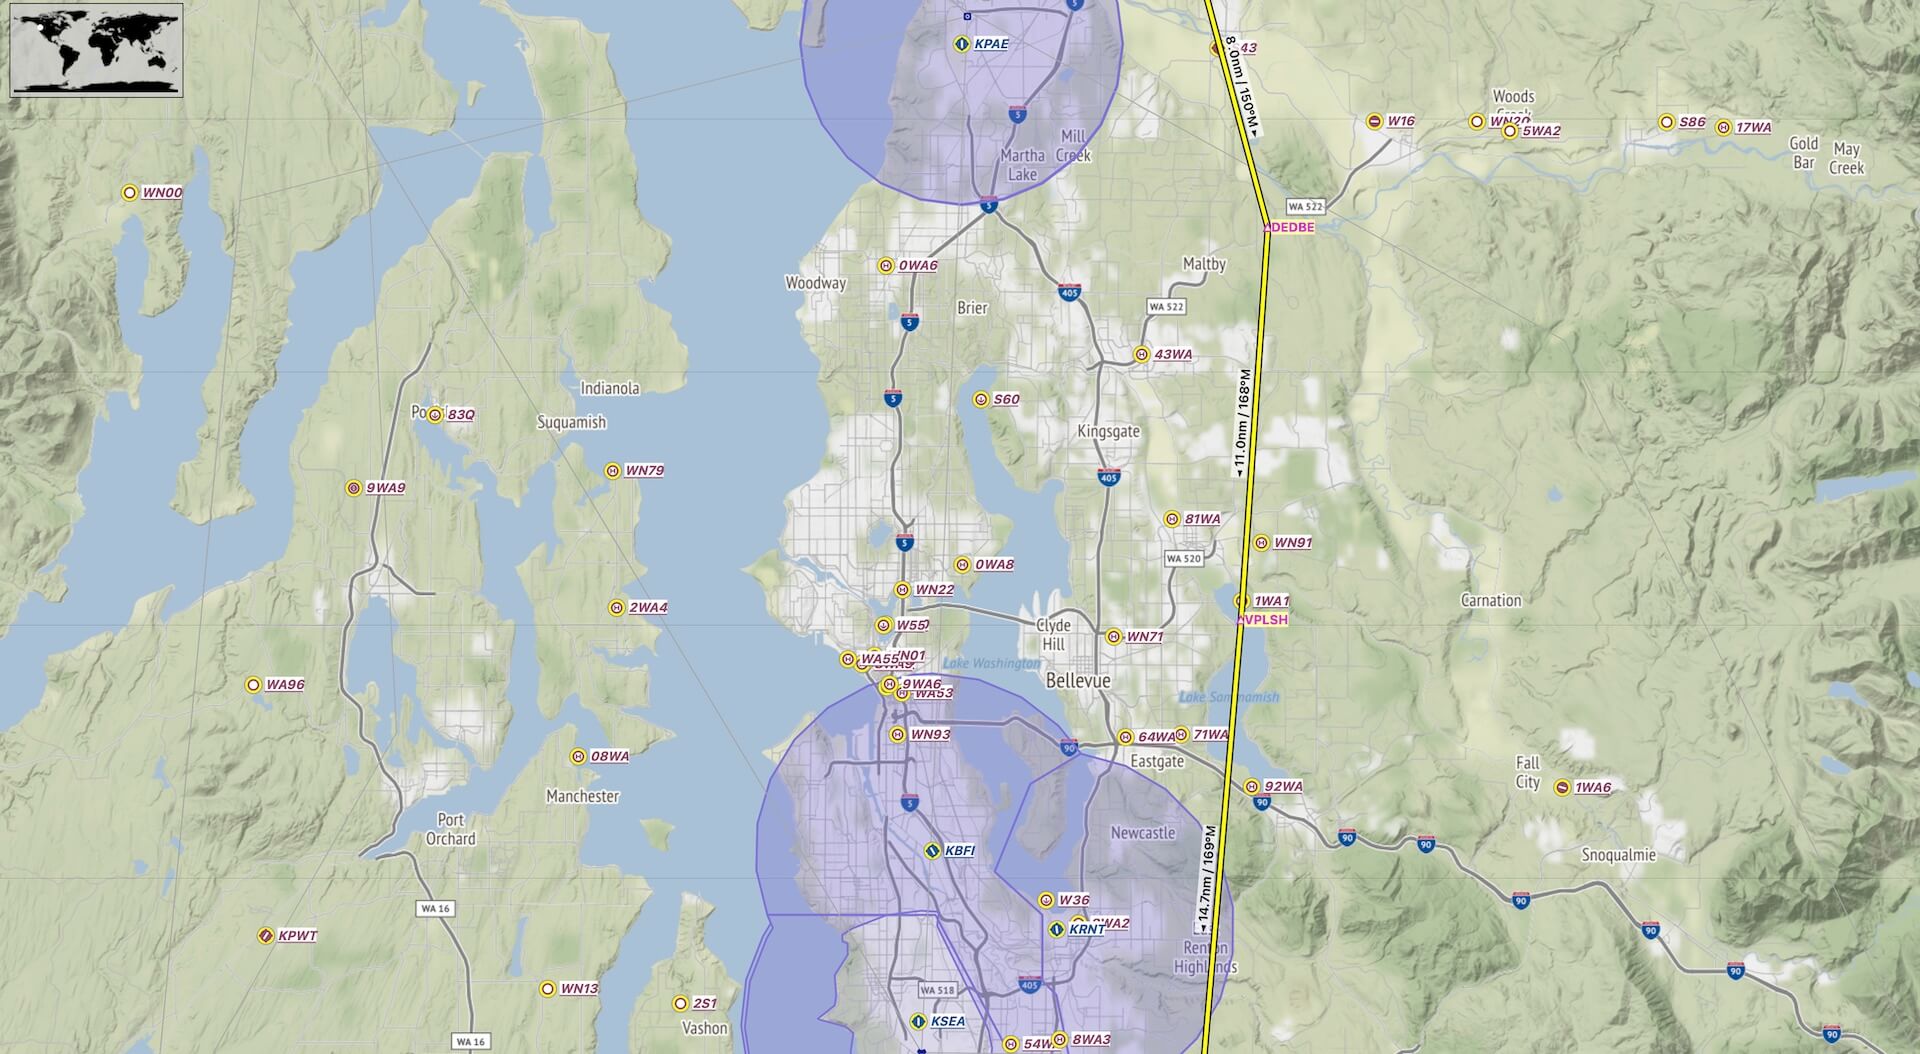
After this radial engine animation, I disconnect the AP again. So flying the Beaver by hand and using the GNS 530 fully zoomed in allows me to check if I’m still more or less on track. In the mean time I’ve reached main land so I’m somewhere northeast of Paine Field (KPEA), and then further south I should see later on, on my right-hand side, Boeing Field King (KBFI) and then Seattle Tacoma International (KSEA). Although not visible on the map below, I can also tune for the many VOR or VORTAC beacons that are available in this area. The same also implies for NDB beacons. For sure I’ll find a couple of beacons and then I can tune for these since the Beaver has ADF equipment onboard. An example for tuning for an ADF beacon is WATON (Arlington) AW NDB (382 kHz).
Another interesting item to highlight in the 3D cockpit is the fresh air inlets on each side window. The real fresh air inlet is equipped with a variable control, and so is the modeled Beaver too. Just find the right click spot on the periphery of the vent. What is more interesting this the implemented sound that is heard when you open the fresh air inlet, and the reduced sound when you close it again. This is also applicable to the sliding window. Grasp the handle and slide the window down and up again. You can do that during the flight although now very logic since it will cost you a lot of fuel. Anyway, when you open the sliding window during flight for a moment, you can hear clearly the engine sound, so lets close it quickly.
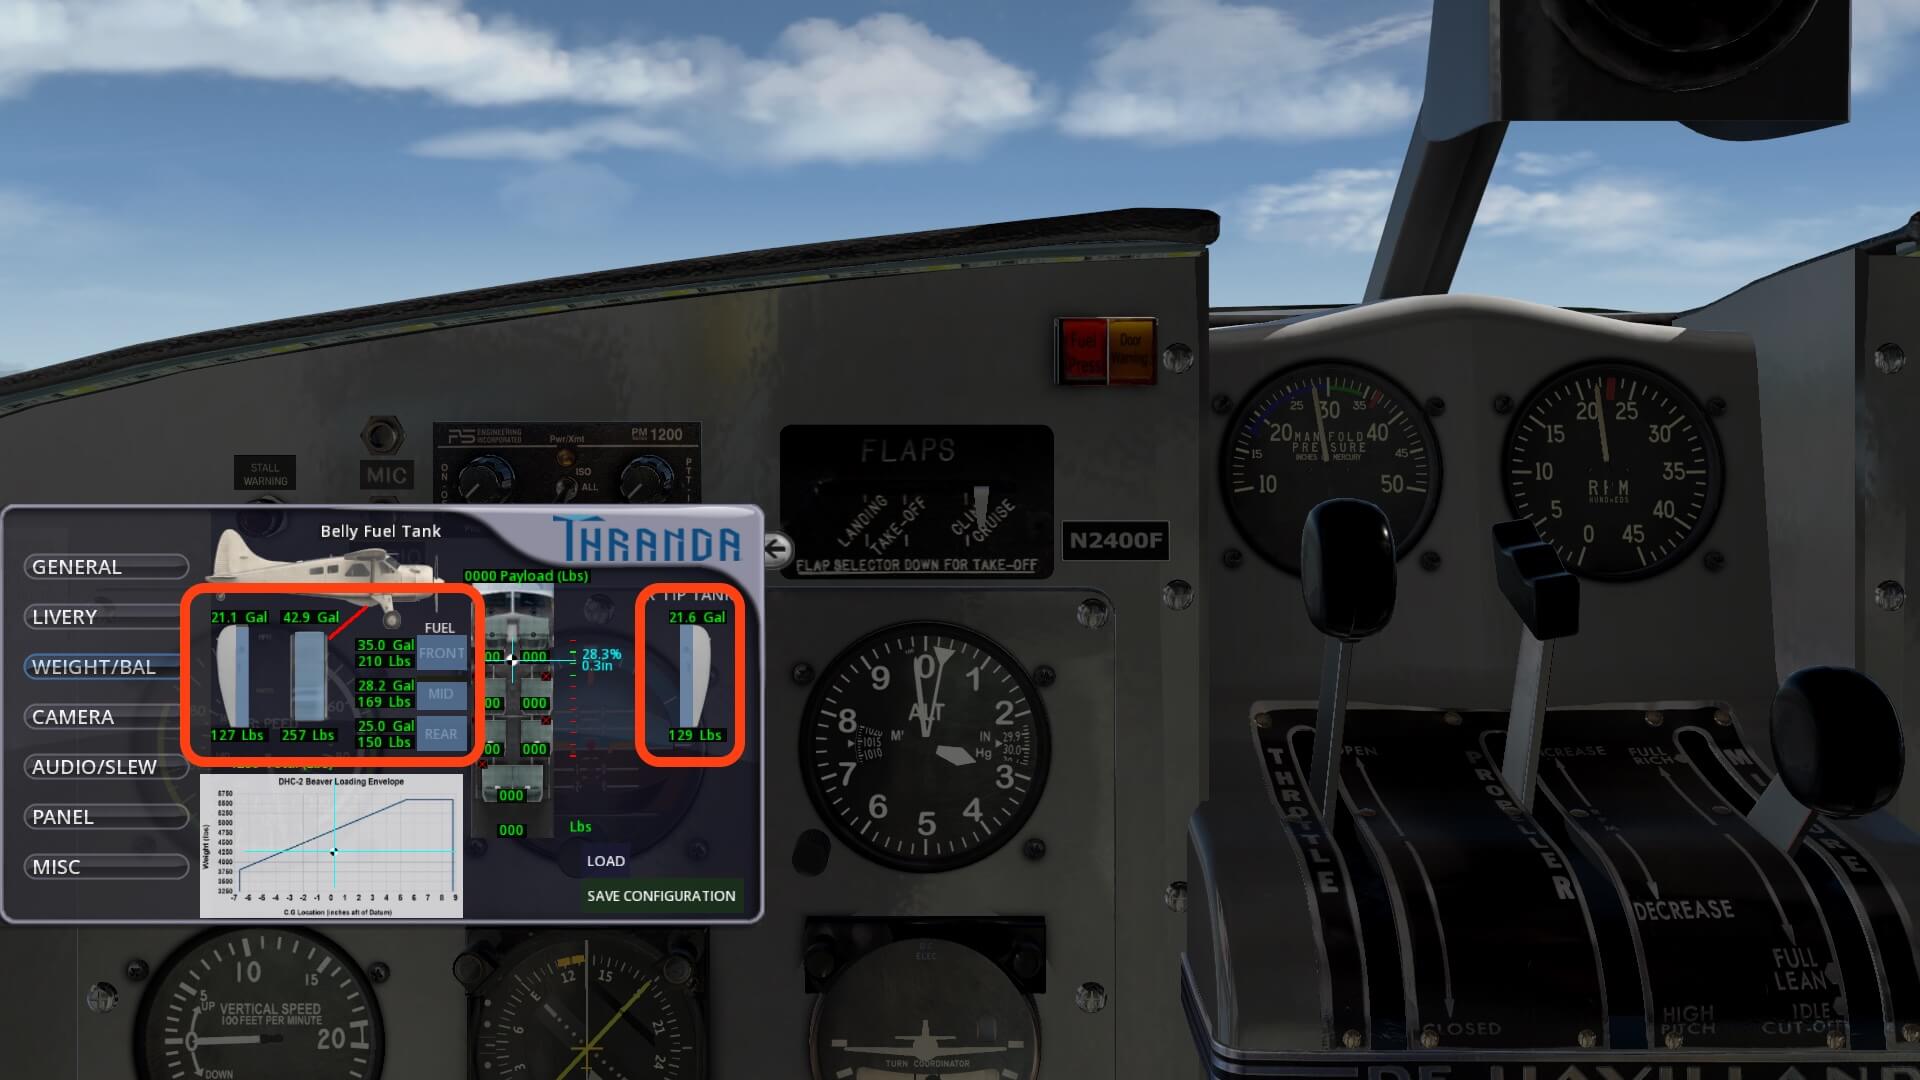
Unless I’m mistaken, but when making longer flights, keep track of the fuel tank level and switching in time to another tank. At the left-hand pilot seat towards the ceiling you’ll find a fuel selector for BOTH – LEFT – RIGHT, and at the left-hand side of the instrument panel provided you haven’t repositioned it to another location, you find a selector valve for the FORWARD – REAR -CENTER tank. When you’re lost, you can always check the actual fuel quantity in each tank via the Thranda Popup Window Weight and Balance.
There’s a lot to play around in this tiny cockpit. It’s full with animations. I mentioned already the fresh air inlet, but there’s so much more. All of these animations can be found in the manual, but let me highlight one more; the sun visors. Not something new you would say, but you can adjust these in almost every position to give them the best and most comfortable position. You can flip them, you can slide them, but you can’t clean them. Oh, yeah, they are a bit dirty but please accept that.
While the Beaver is doing her work, I reduce the PROP and MIXTURE a bit to save fuel, but what I didn’t notice is that I did it a bit too enthusiastically. The result of this is that the Beaver is slowly descending. Logically when the produced power isn’t enough to keep the intended altitude of roughly 3000 feet. The reason that I bring this up is that it flies as real as it gets and perhaps not directly an implementation of the Thranda Beaver, but a basic feature of X-Plane.
The flight itself is easy besides that you need to keep in mind the fuel balance and where you take the fuel from, but then slowly I see Swanson, and believe me, it’s not a long runway so attention is needed. Flaps are welcome, but this also means a lower speed, and this means that the Beaver will be less flexible on final.
Perhaps it’s me, but perhaps you feel the same with every tail dragger, they aren’t the easiest aircraft to land. As long as the speed is high enough, you can keep the Beaver level, but the moment I touch down and the speed drops, there will be a moment that the tail drops down, the tail wheel hits the ground and you forward view is very limited. Every tail dragger has this problem, so it’s not unusual that this Beaver has this. Practicing is the only way to tackle this problem.
The Thranda Popup Window
Before I start with my walk-around check, it’s good to highlight the Thranda popup window that can be accessed via the Thranda arrow symbol on the left-hand side of the X-Plane screen. By the way, with the mouse wheel you can change the clarity and make it invisible. Just rotate the mouse wheel or with a Mac Magic Mouse slide your finger up or down and on-the-fly you see the arrow disappears.
Although the previous mentioned Thranda Beaver Documentation v7 manual explains a lot regarding the Thranda popup window, it’s good to mention a couple of things related to my planned walk-around check and beyond that. As you can see on the following screenshot, the popup window comes with the following tabs:
– General
– Livery
– Weight/Bal(ance)
– Camera
– Audio/Slew
– Panel
– Misc(ellaneous)
General tab
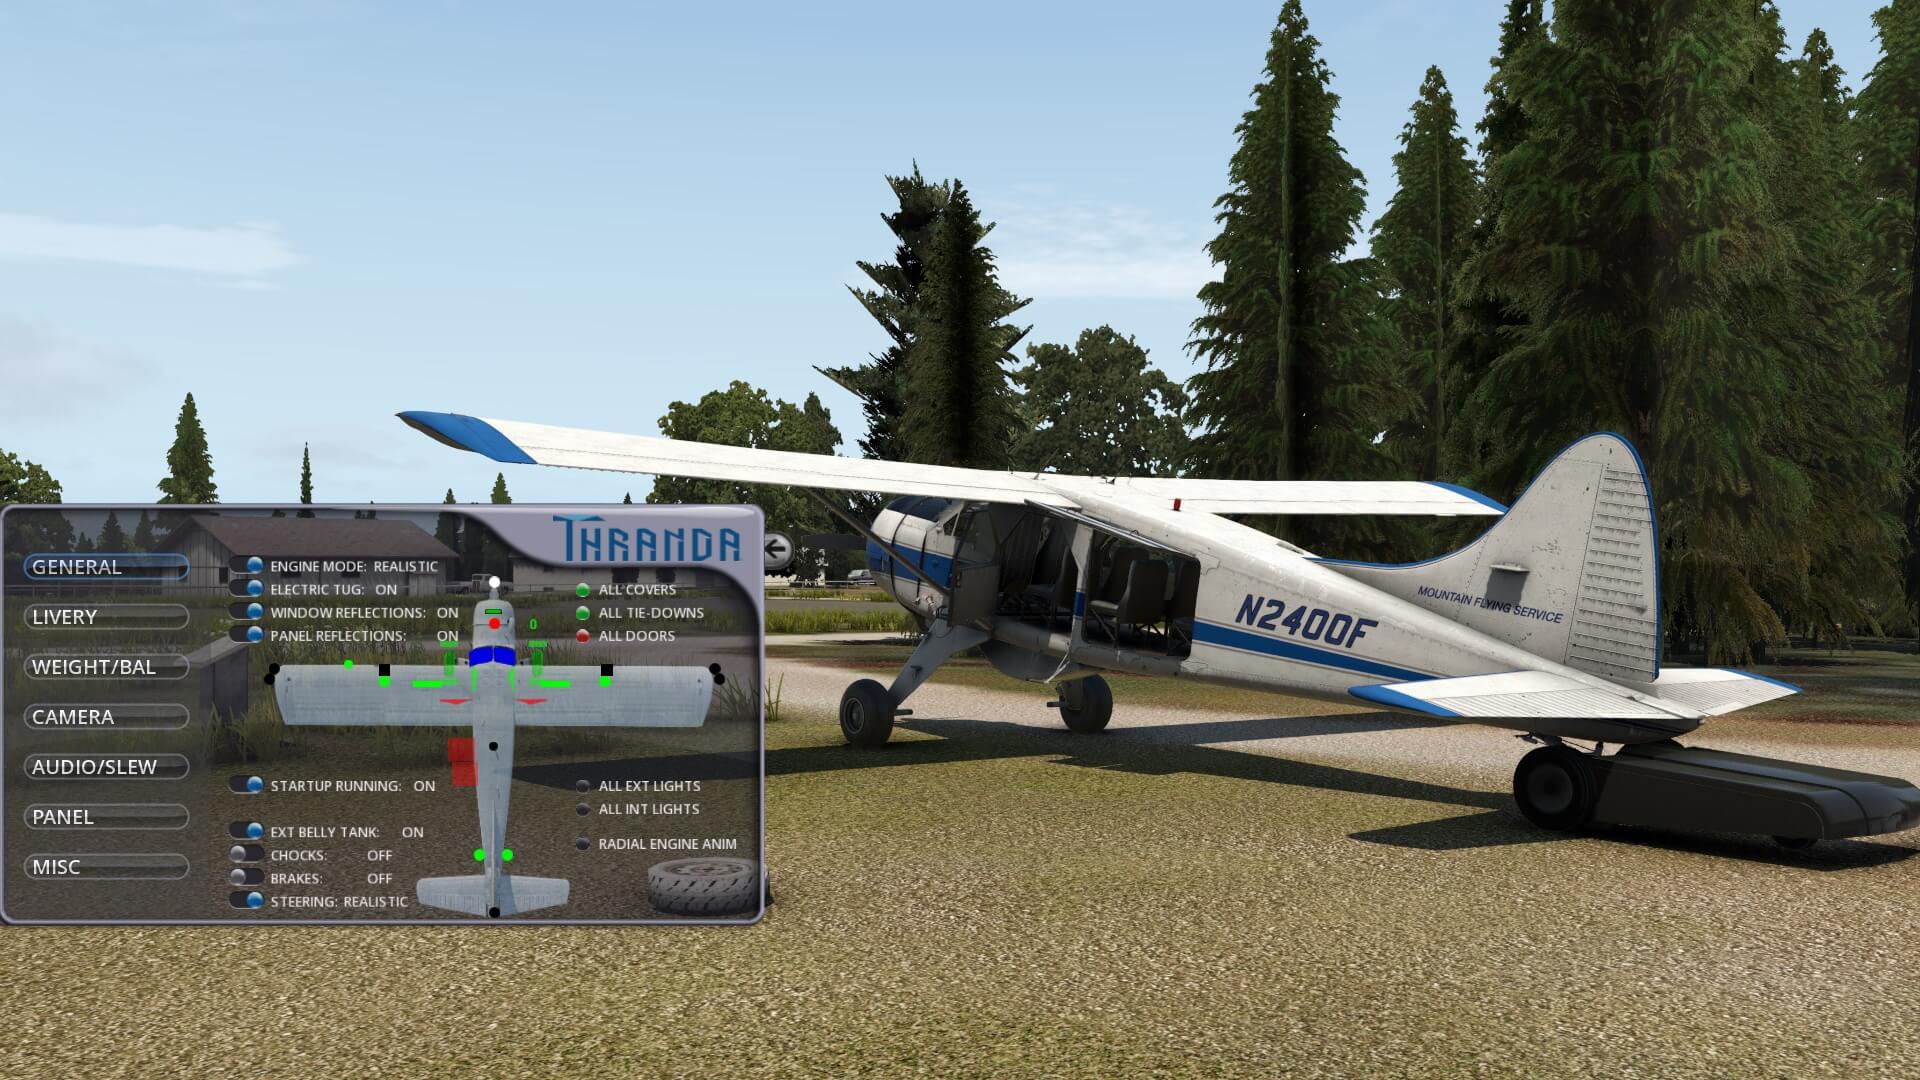
With the General tab you’ve got full control over the included animations and beyond these, since some animations are available on the aircraft synoptic like seat back reclining, side window movements etc. Some functions and/or animations are just activated by the slider where grey is disabled and blue is enabled. As an example; the electrical tug, window reflections, wheel chocks and so on.
Some words about the electrical tug. It’s not just a tail wheel tug. It works too. As you can see on the previous screenshot, there’s a red dot just before the windshield panels. When you click this, the tug appears and with the mouse wheel you’re able to activate the electrical tug FWD or AFT. When nothing happens while the indicator shows lets say 15, then I think you need to release the brakes first!
Additionally, you can also click each square or circle on the aircraft synoptic. Green means active, red means inactive. On the second previous screenshot you can see that I’d opened a couple of passengers- and cargo doors. Besides that, with the cargo doors opened, I click on the seats in that area and gone are the seats and thus it can carry some freight.
I mentioned before that you can even adjust the seat backrest by placing your mouse on it, hold down the left-hand mouse button, and slide the mouse which will move the backrest and yes, another logical thing although I didn’t expect it that it works this way.
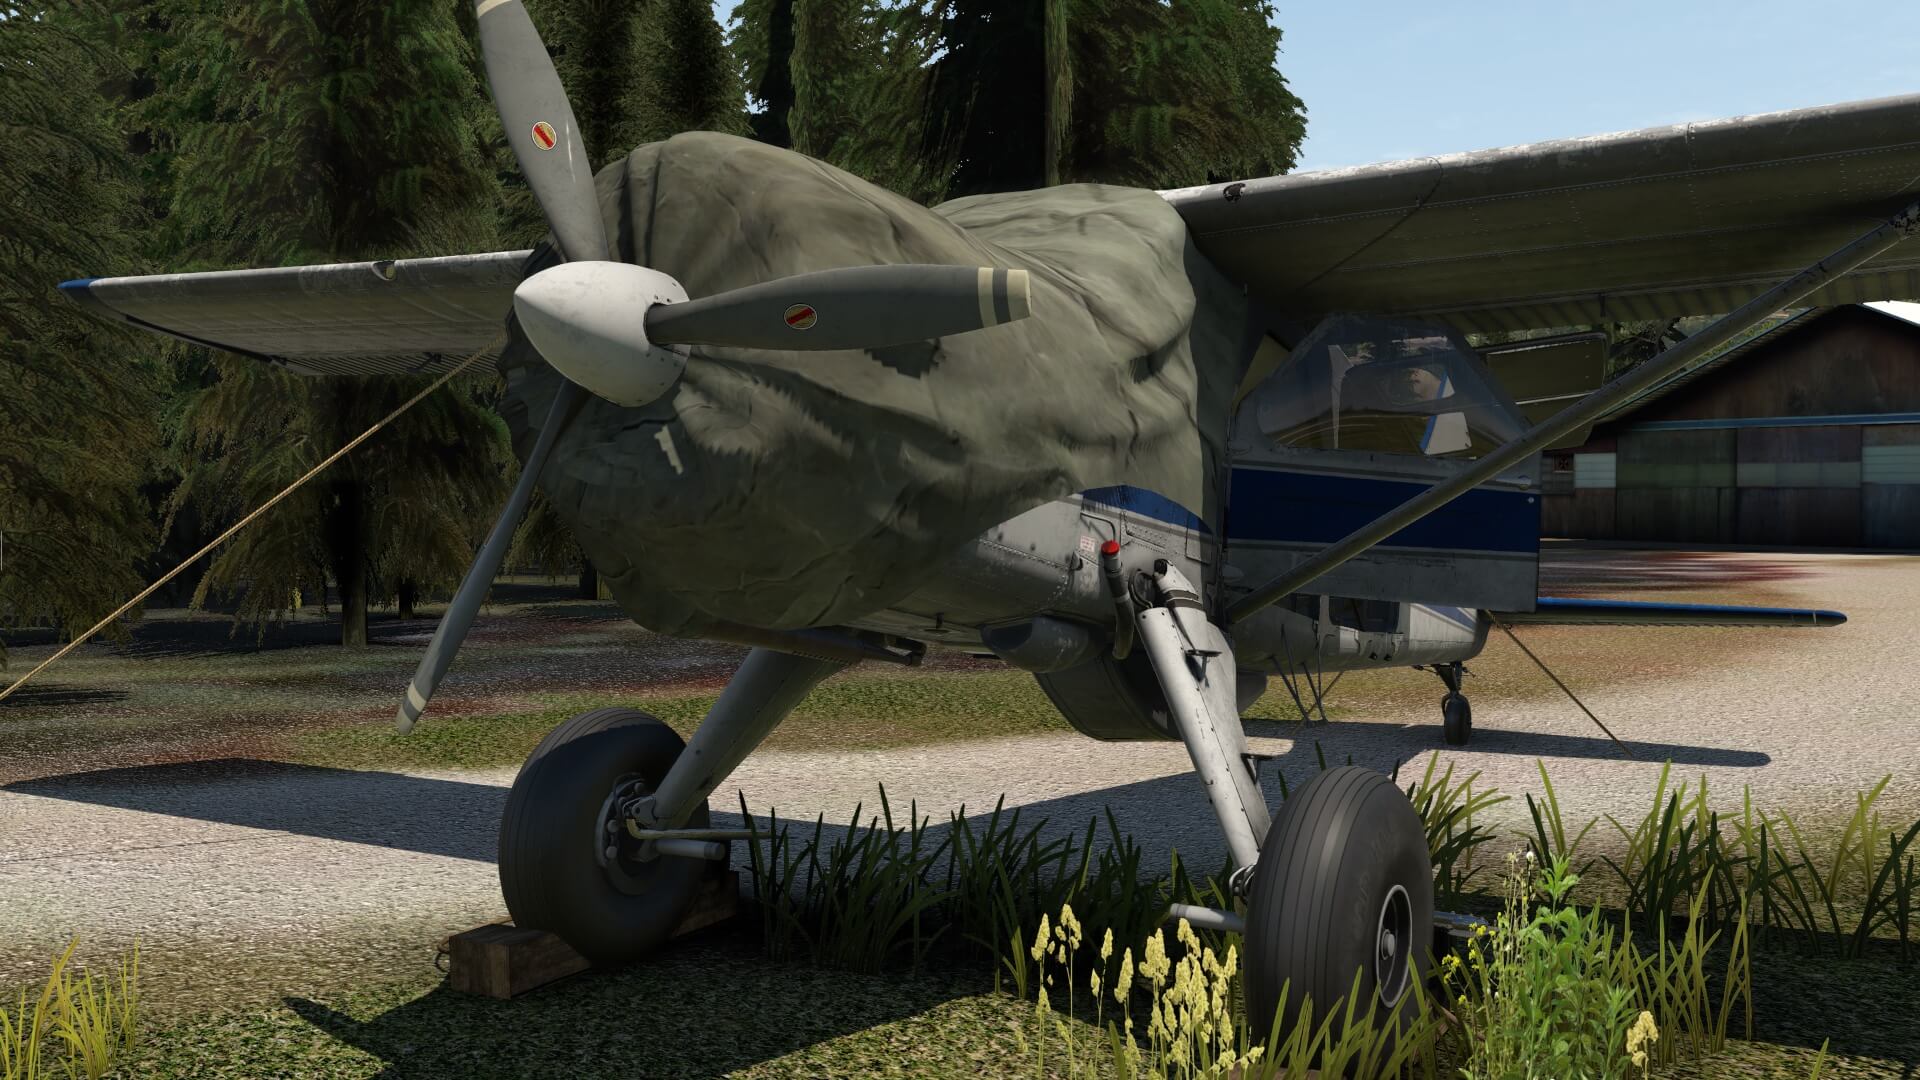
And then, when you have the pilot doors open, and decide to wrap around the awesomely modeled green engine nose cover, the pilot doors are closed before it is wrapped and tightened.
Livery tab
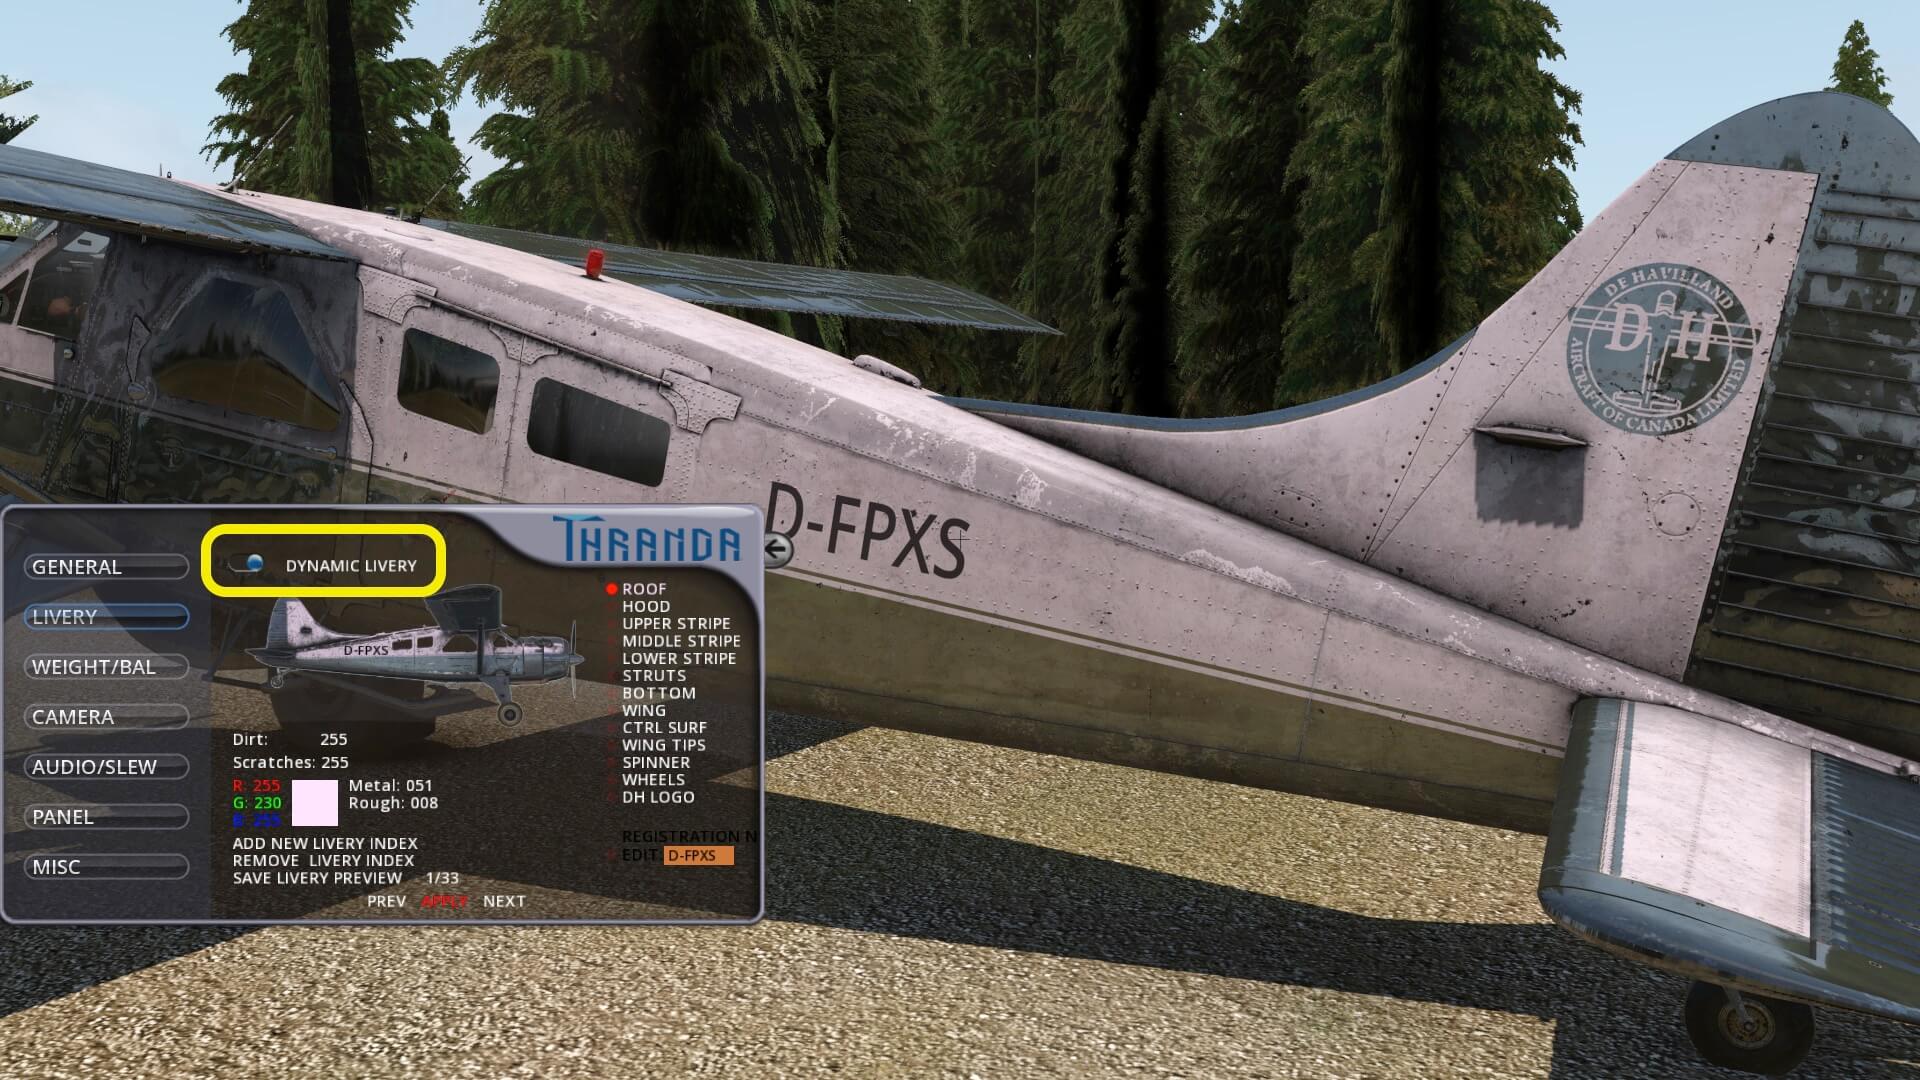
The Livery tab has two features; selection of the painted liveries and dynamic liveries. For each painted livery you can change the dirt and scratches on-the-fly. This is, since I don’t own the Thranda Pilatus PC-6, great news. Either stock liveries represent brand new aircraft or aircraft that are dirty, and/or weathered. With this Thranda feature you’re able to change the look of your favorite livery.
This means you can add more or less dirt as well as some scratches or a lot of scratches. Choose your favorite livery, place your mouse over the dirt/scratches value and turn the middle mouse wheel in either direction. When the value is “0” it means a clean and scratch free aircraft, while value “255” means the maximum amount of dirt/scratches. When done, click the apply text to store this.
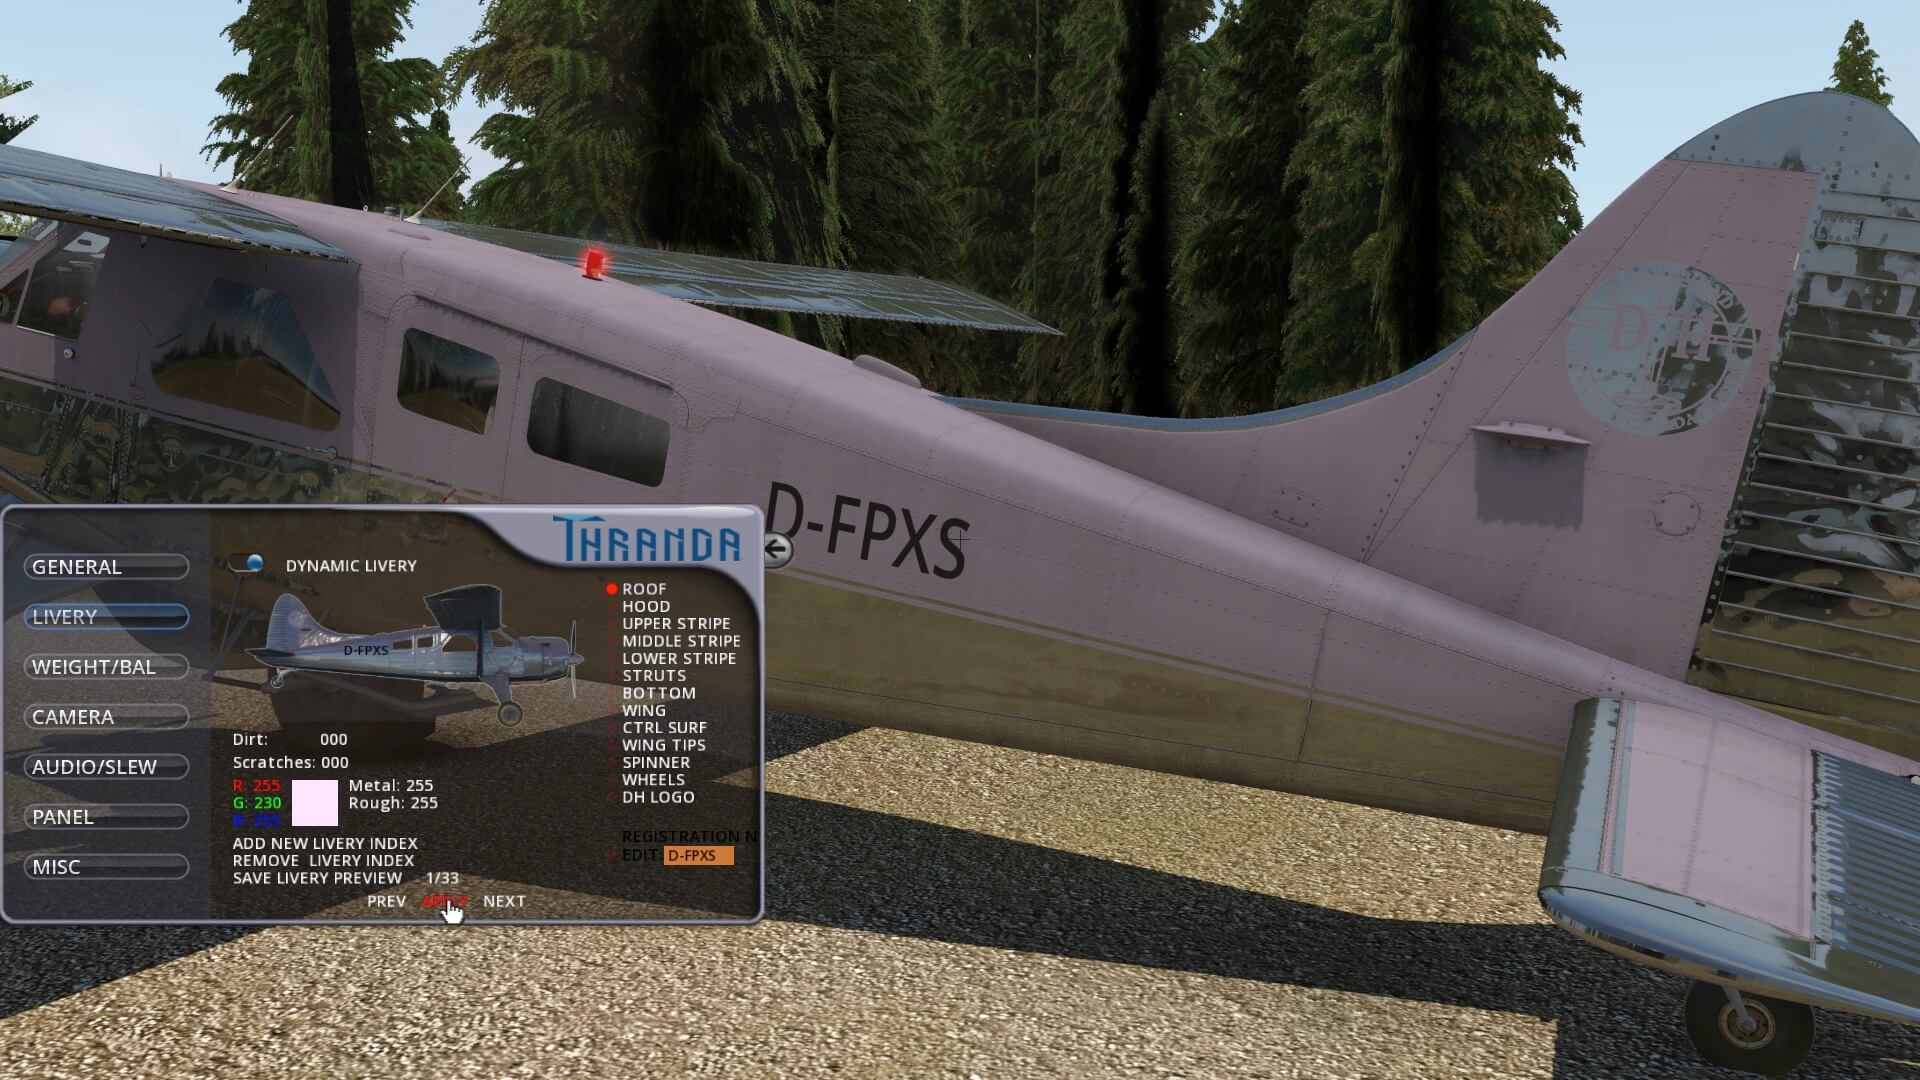
When I move the slider to “Dynamic Livery”, you can change the overall livery or better to say, you can create your own livery. You can create your own livery that has a certain dirt, scratches, paint colours, registration, but also add a metal look as well as toughness. This can be done for all the different parts on the Beaver by using the list on the right-hand side, starting with ROOF.
When done, click the APPLY text and after some storage time, a livery is added to the list. See the counter above APPLY. It was in this example first 32 and after I changed a couple of things, it changed to 33. The previous screenshots including the last one represents my own modification. There’s however one thing that I hope can be changed in the future; the aircraft registration is using a basic modern font. As of this writing, you’ve got no possibility to change this font type or font family. I got the following follow-up from Dan regarding the registration font change “unlike to change much, since text would have to be rasterized and algorithmically added to the livery which is not very possible”.
Weight and Balance tab
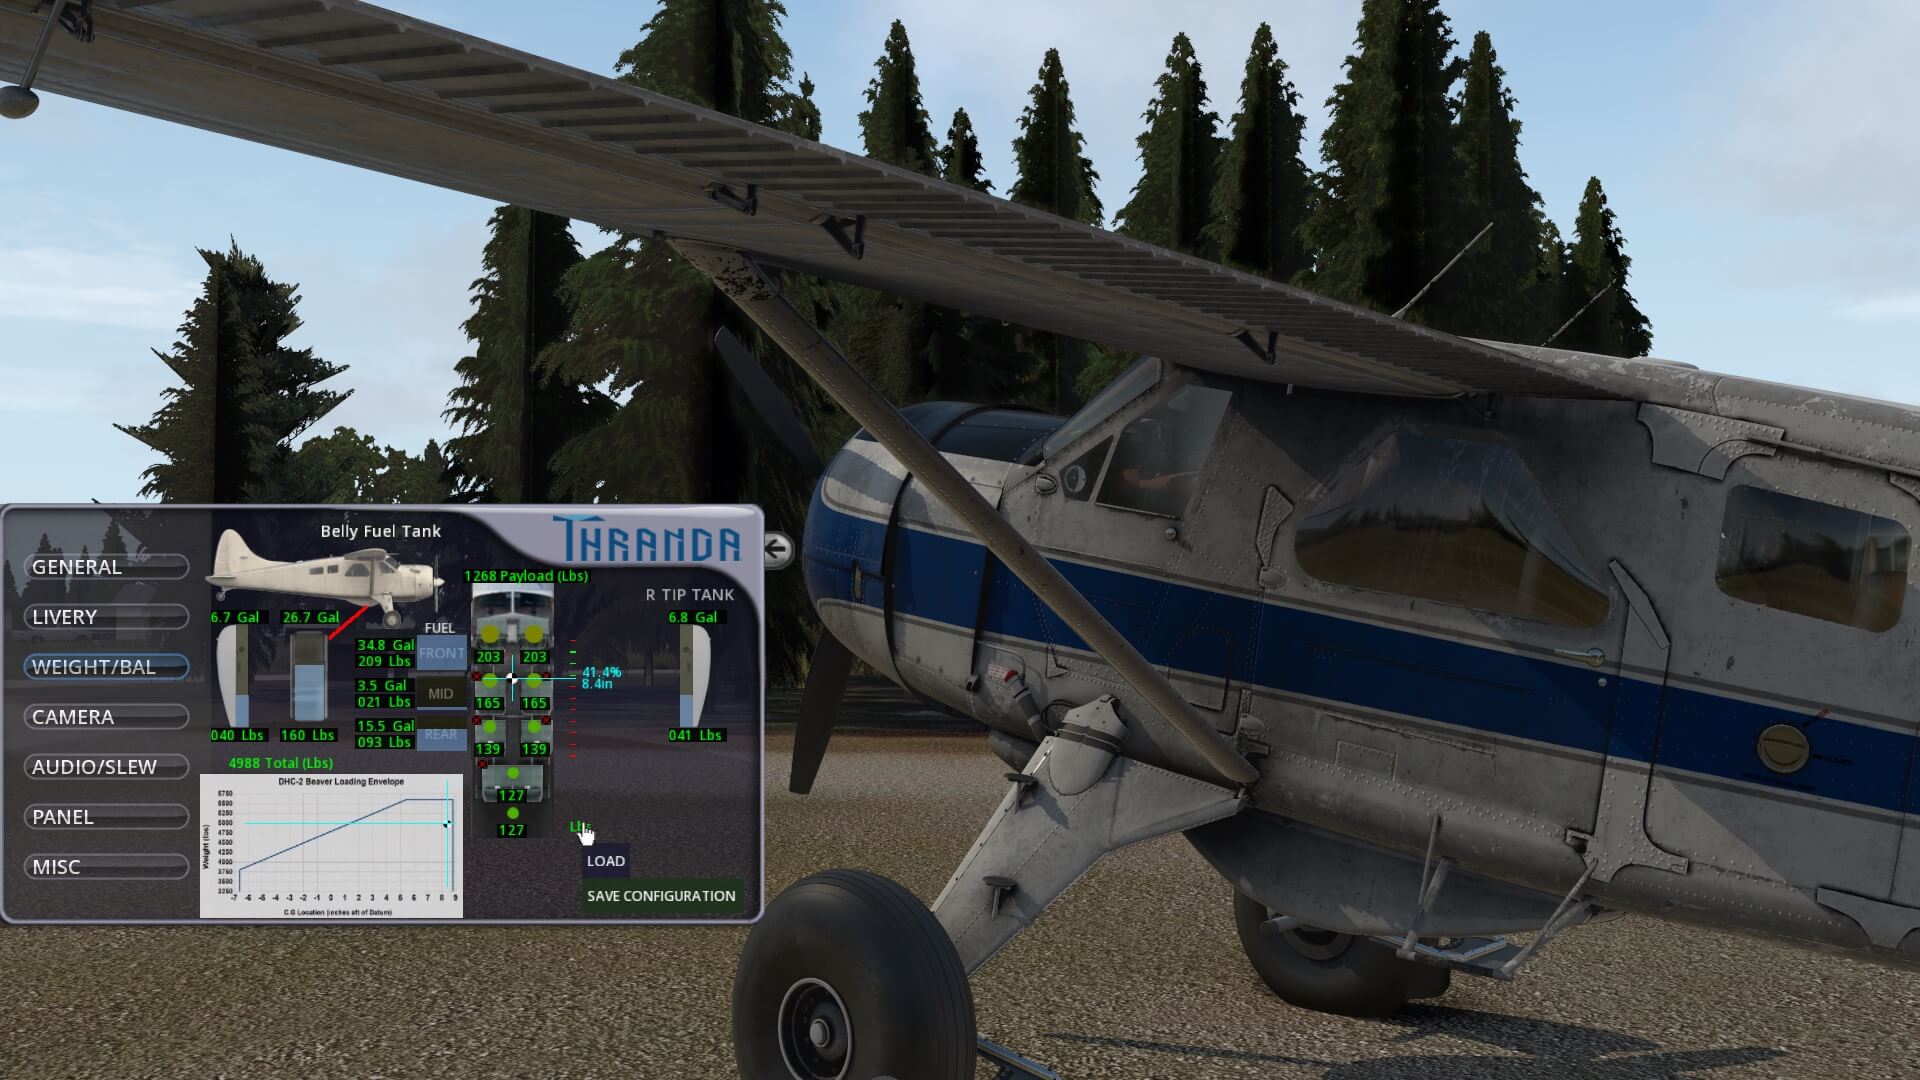
The Weight and Balance tab offers you a kind of slider function or middle mouse wheel functions to change the amount of fuel and the passenger loads in Pounds or in Kilograms. To change from Lbs to Kgs or visa versa, click the Lbs/Kgs text above the LOAD button. I’ve you’d installed the external belly fuel tank, then this will be also visible on this Weight and Balance popup window. Every change in weight you make is directly visible in the graph as well as in percentage and inches MAC (Mean Aerodynamic Chord). The MAC is also represented as a line in-between the red and green lines. The safe area is when the MAC line is within the green area/stripes. With the LOAD button you can load the fuel and payload values in the Beaver or save this configuration for later flights.
Camera and Audio/Slew tab
Let me first start with the Camera tab. It allows you to use the custom camera presets, but it also allows you create your own camera presets. According to the manual “These presets can be reprogrammed by positioning the camera in X-Plane, then holding the CTRL key while tapping one of the numpad keys. This will save the current view to that number key.” I will double check this, but when you’re a Mac simmer, I think you need to use the COMMAND key instead of the CRTL key on your keyboard, assuming you also have an Apple Magic keyboard with numpad.
I can confirm this. It works on Mac keyboards, but then use instead of the CTRL key the COMMAND key. When using the default views, you either click the green circle on the aircraft synoptic, or the number on the popups window numpad or the name. Last but not least, with the FOV (Field Of View) you can change with the mouse wheel this value.
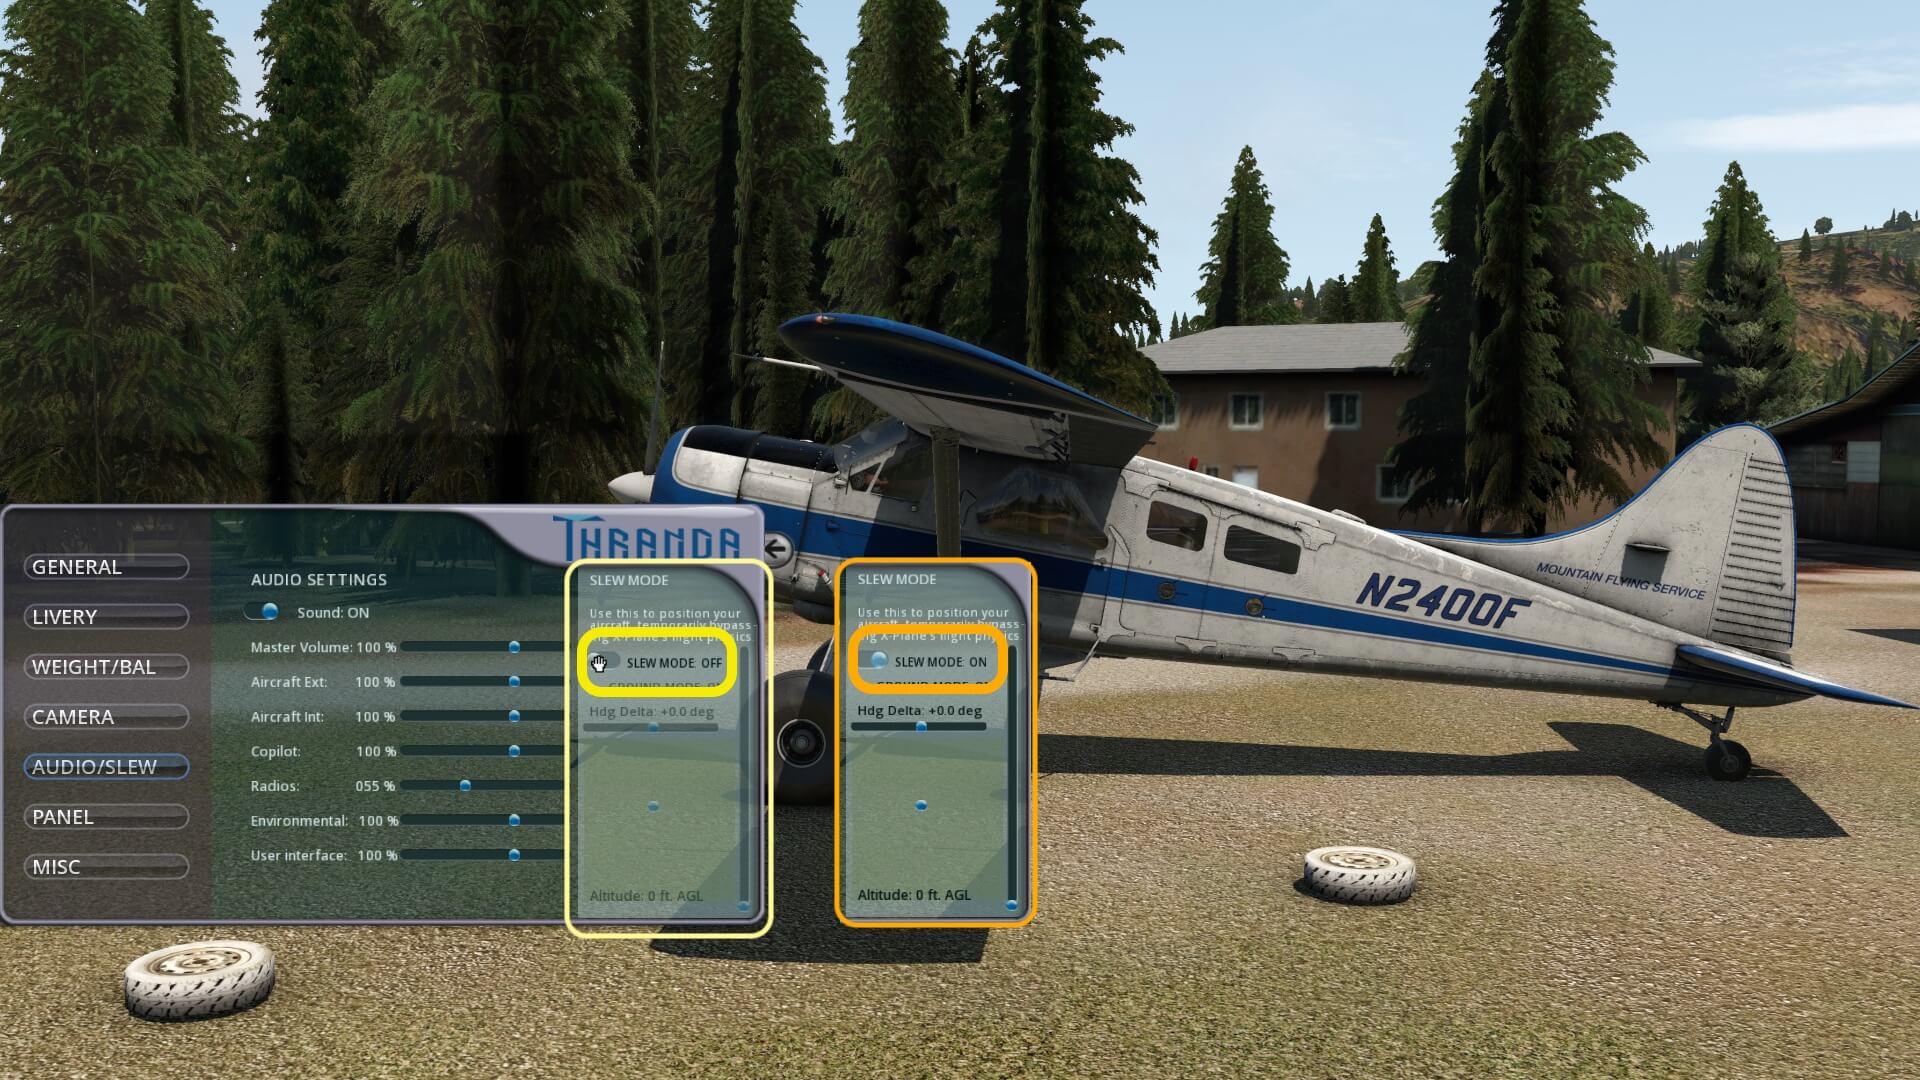
The Audio/Slew tab is a straightforward audio popup window however, it’s worth to highlight that you can reposition the Beaver’s spot. This can be doen with the build in slew option and that believe me, this feature reaches far. The slew option is OFF by default, but when you select it ON you’re able to change the Beaver heading, altitude, left/right or forward/aft movements. A very nice option that’s been included. As far as I can see, this was already the case with the Pilatus PC-6, but we never reviewed this aircraft from Thranda.
Panel tab
Although I briefly highlighted the panel tab already during my first flight impression, I would like to go a bit deeper into this, knowing that the Thranda documentation explains it all in great depth. The name panel tab seems basic, but oh oh, it’s amazing what you can modify. Actually, you can dump the whole panel lay-out and create one yourself. Ok, that most likely goes a bit too far for most simmers, but when you don’t like one of the standard or preset panel configurations, you can create your own. Besides that, Thranda made it possible that you and I can create or change the panel lay-out and therefore, the popup window is called Dynamic Panel.
You’ve got three options on this dynamic panel window namely:
– layout page
– 3D panel edit mode
– individual instruments
LAYOUT PAGE
The layout page is perhaps the one that will be most used and also the easiest way to make some modifications. In this popup window you can first choose out of a small selection of panel backgrounds, secondly choose from a selection of panel preset lay-outs or change on-the-fly the GPS slot 1/2 and active instruments. Got that last part? I think it’s good to offer some additional explanation.
Changing on-the-fly instruments on the layout page is done as follows; click what you want to change. This is either “GPS SLOT 1 (2) or ACTIVE INSTRUMENTS”. When it’s active, the line turns from grey to green and a red square appears on the panel around the respective Garmin GNS or instrument.
Lets focus now a bit more on the GPS lines. At the end of the GPS SLOT lines you see ON or OFF. OFF means that the GPS isn’t shown on the panel and ON it is. Then you can choose if you want at GPS SLOT 1 (2) to see the GNS 530 or 430. By default GPS SLOT 1 is always the GNS 530 and GPS SLOT 2 the GNS 430.
When the GPS line is active (green), you can position your mouse within the red square and move it around to a position on the panel where you want to have the GNS model. When you’ve decided where to place it, but don’t want that GNS model but the other one (530 versus 430), then a message appears telling you that an aircraft restart is needed to apply the correct settings for this other GNS model.
When you want to change something to the ACTIVE INSTRUMENTS, an additional step is needed. You first need to select the instrument or indicator. Place your mouse over the ACTIVE INSTRUMENTS line and while your mouse pointer changes into a “hand”, you use your mouse wheel and turn the wheel or for Mac users with Apple Magic Mouse, slide you finger up/down, to select the object (instrument, switch, knob, light unit etc) you want.
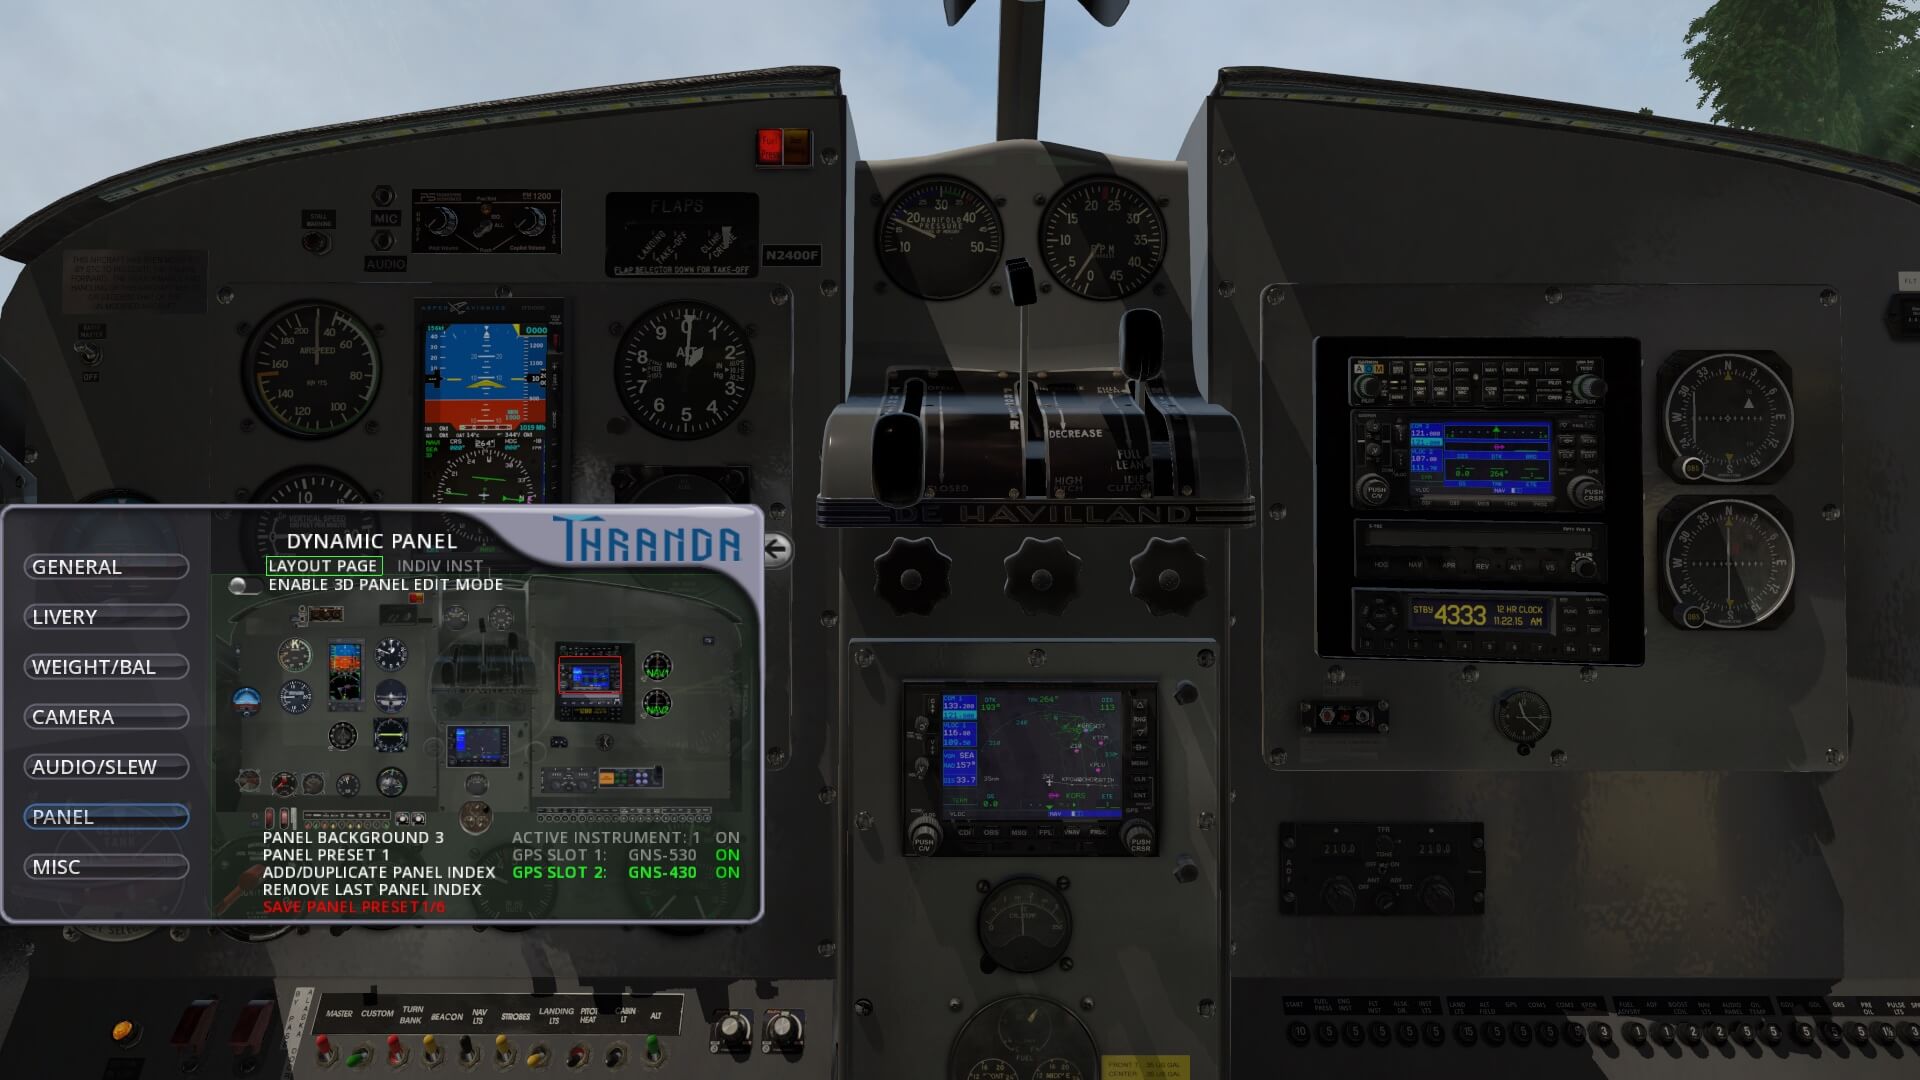
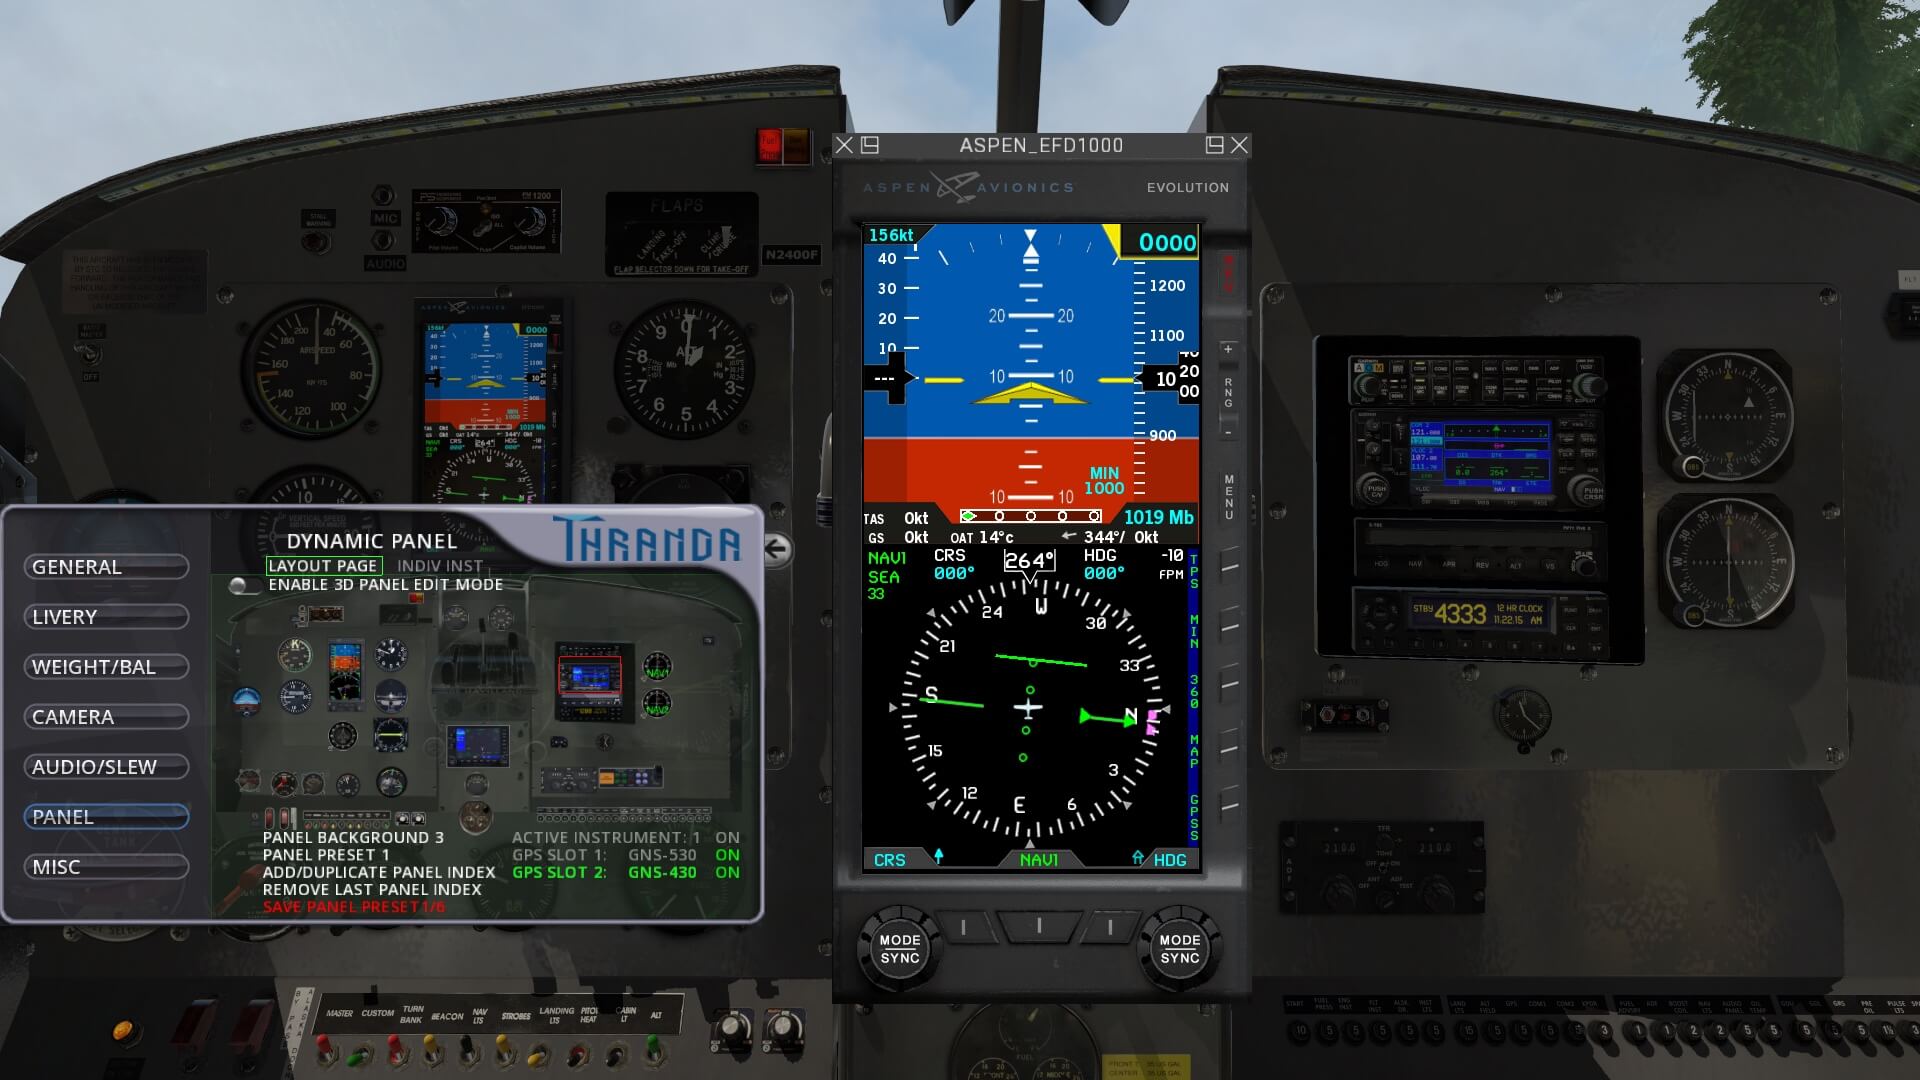
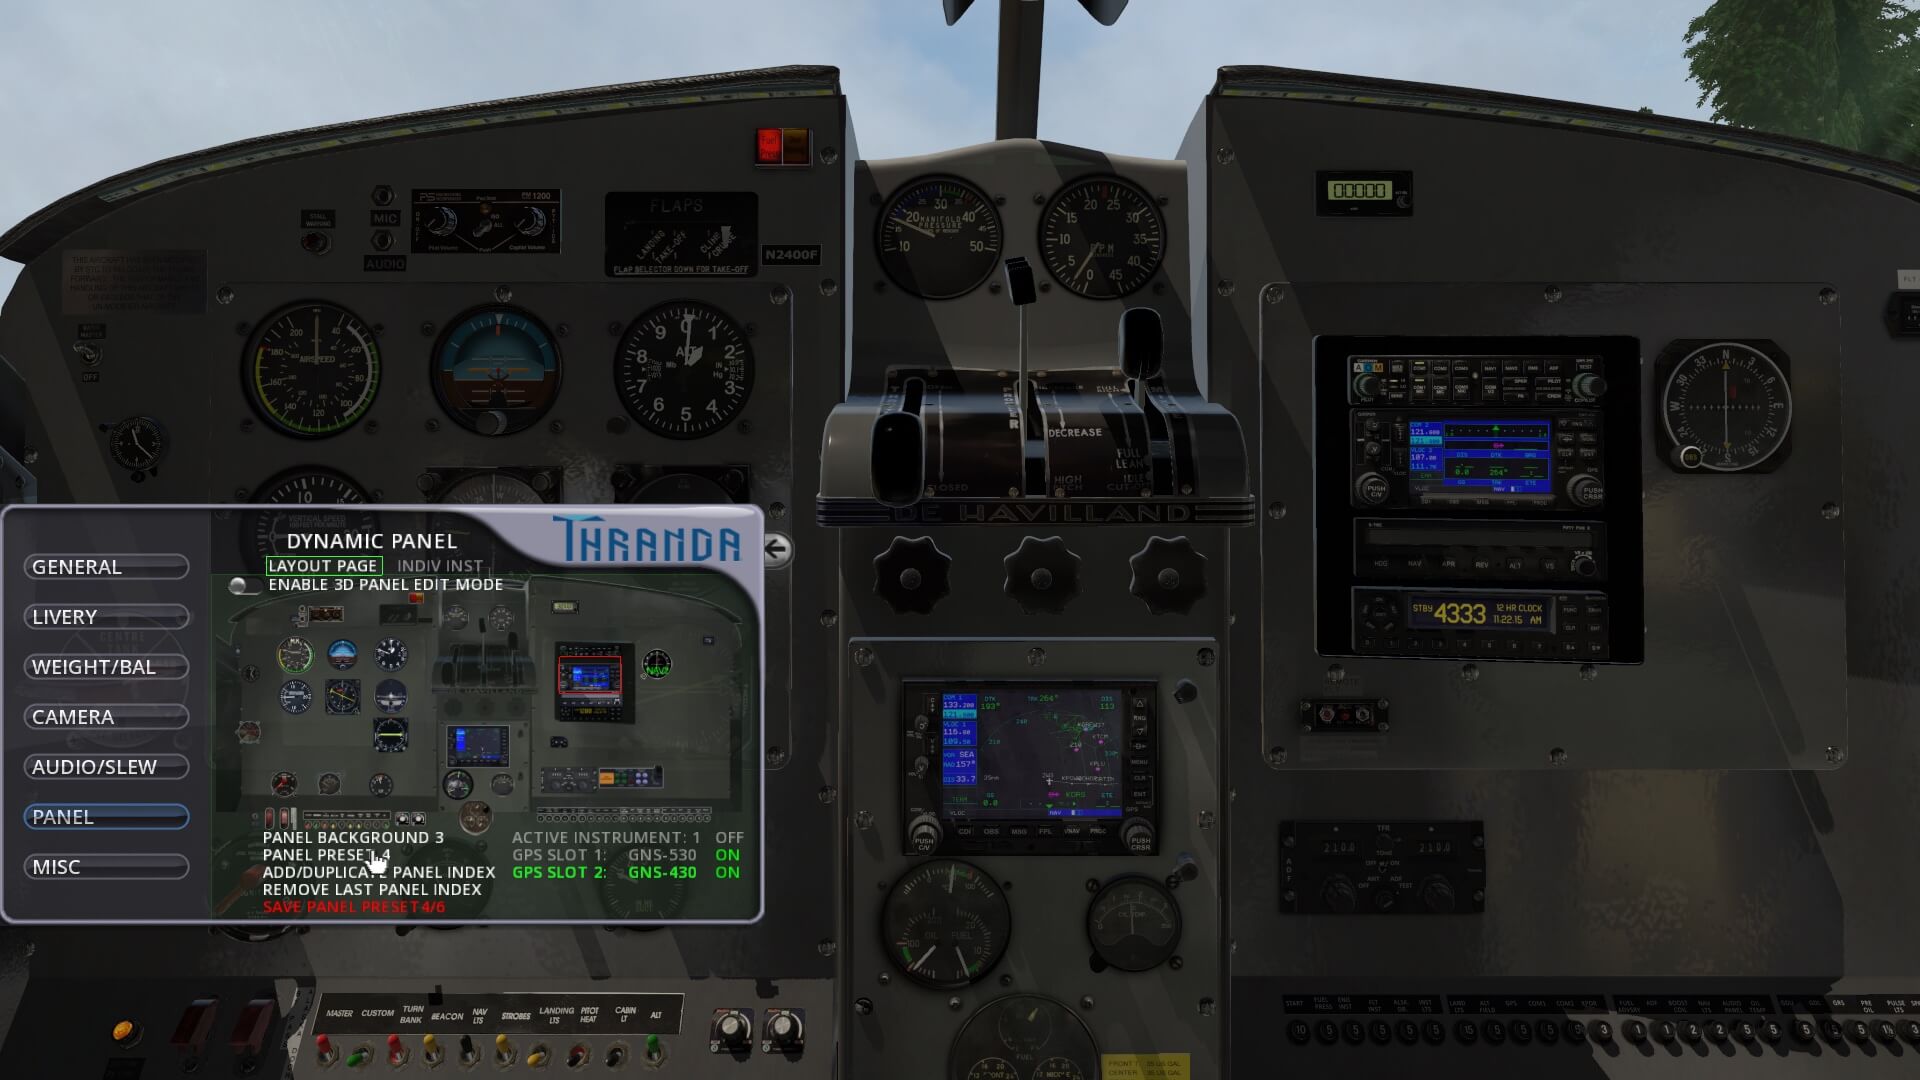
When the above feels to you a bit too complex you can also go for the PANEL PRESET options. As you can see on the first screenshot below, it is representing PANEL PRESET 1. Place your mouse pointer right of the number in this case “1”, and click once on the left-hand mouse button. A “2” appears which mens this is PANEL PRESET 2. This preset panel shows you the Aspen EFD1000 (and the Aspen EFD1000 has a 2D popup window as you can see on the second screenshot) while the third screenshot shows you another possible panel preset, this time with both Garmin GNS 530 and 430 equipment installed.
3D PANEL EDIT MODE
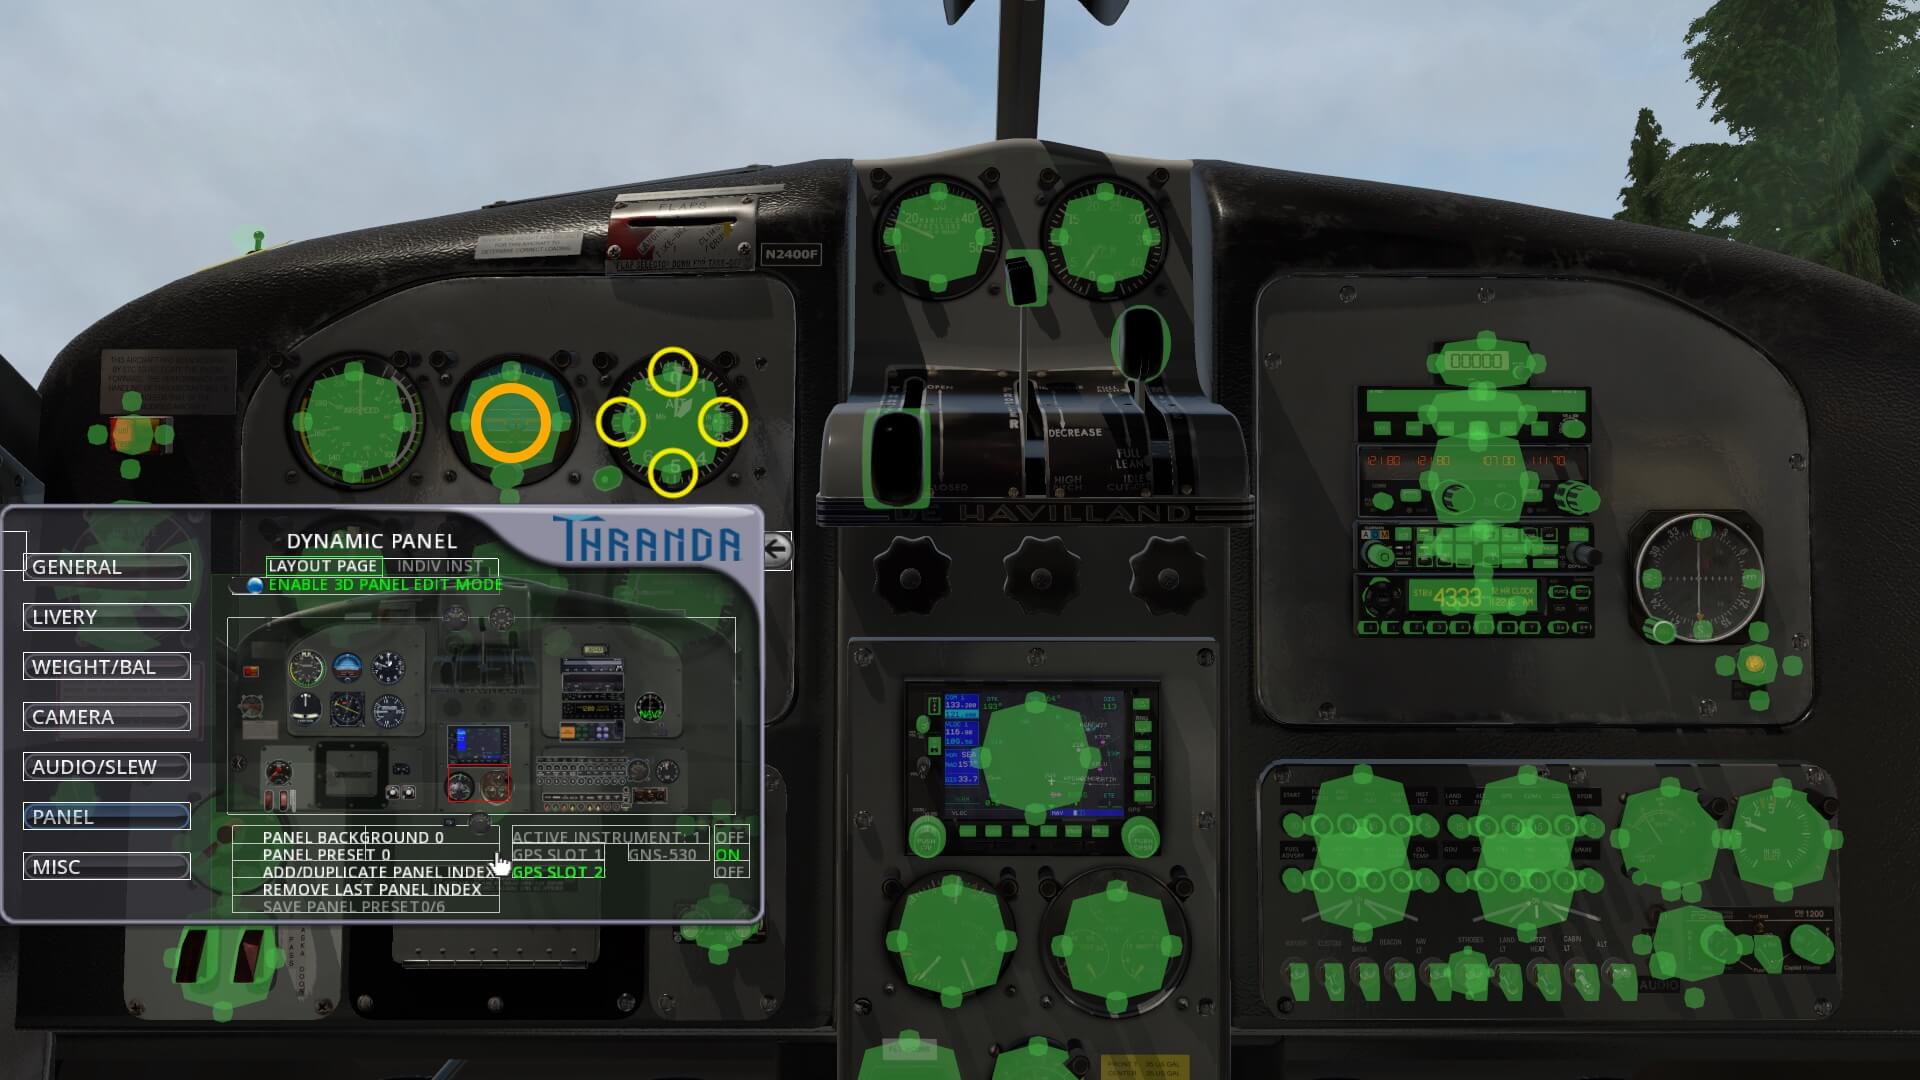
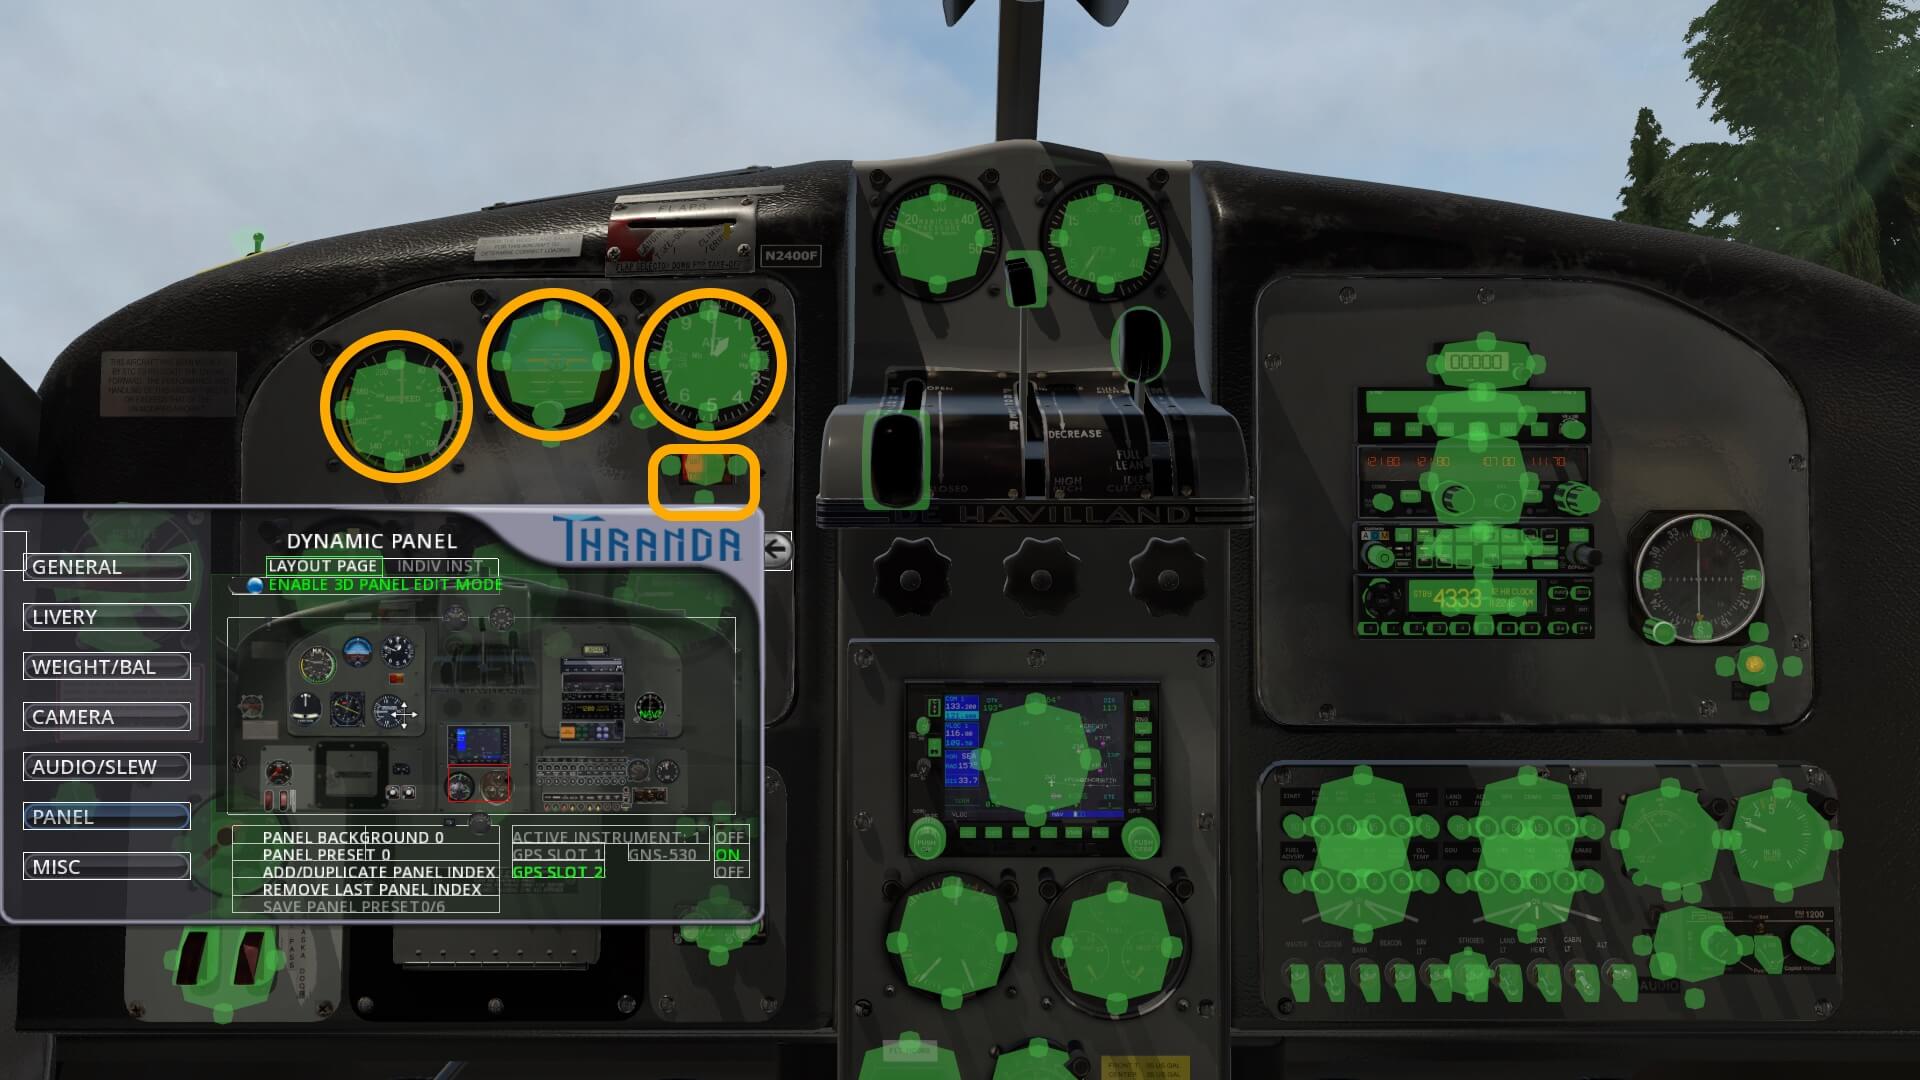
The 3D panel edit mode is really an awesome feature. Perhaps not all of you will use it or try it, but believe me, when you got the idea, it’s a great way to make your own instrument panel. This feature allows you do change the whole panel or create your own instrument panel. Move its slider to the right which turns blue or click the line “ENABLE 3D PANEL EDIT MODE” which will become green. Either way makes the feature active. The moment this mode is active, you’ll notice that every indicator, switch, light, GPS, valve, lever and so on, gets a semi transparant green overlay object (amber circle on screenshot) with several small overlay green circles (yellow circles on screenshot).
The large green overlay allows you to move with your mouse, the object to any other place on the instrument panel. The semi transparant smaller circles at each position allows you to rotate or angle the object. Check out the following screenshots and in particular the upper three main instruments; airspeed, horizon and altimeter. On the second screenshot I moved these indicators by dragging them to a different location as well as I did with the red warning light unit. Just by simple dragging them! When you’re happy with the new location, then deselect the ENABLE 3D PANEL EDIT MODE line and the green “circus” disappears and my three indicators and lamp unit have now a new postion.
INDIV INST
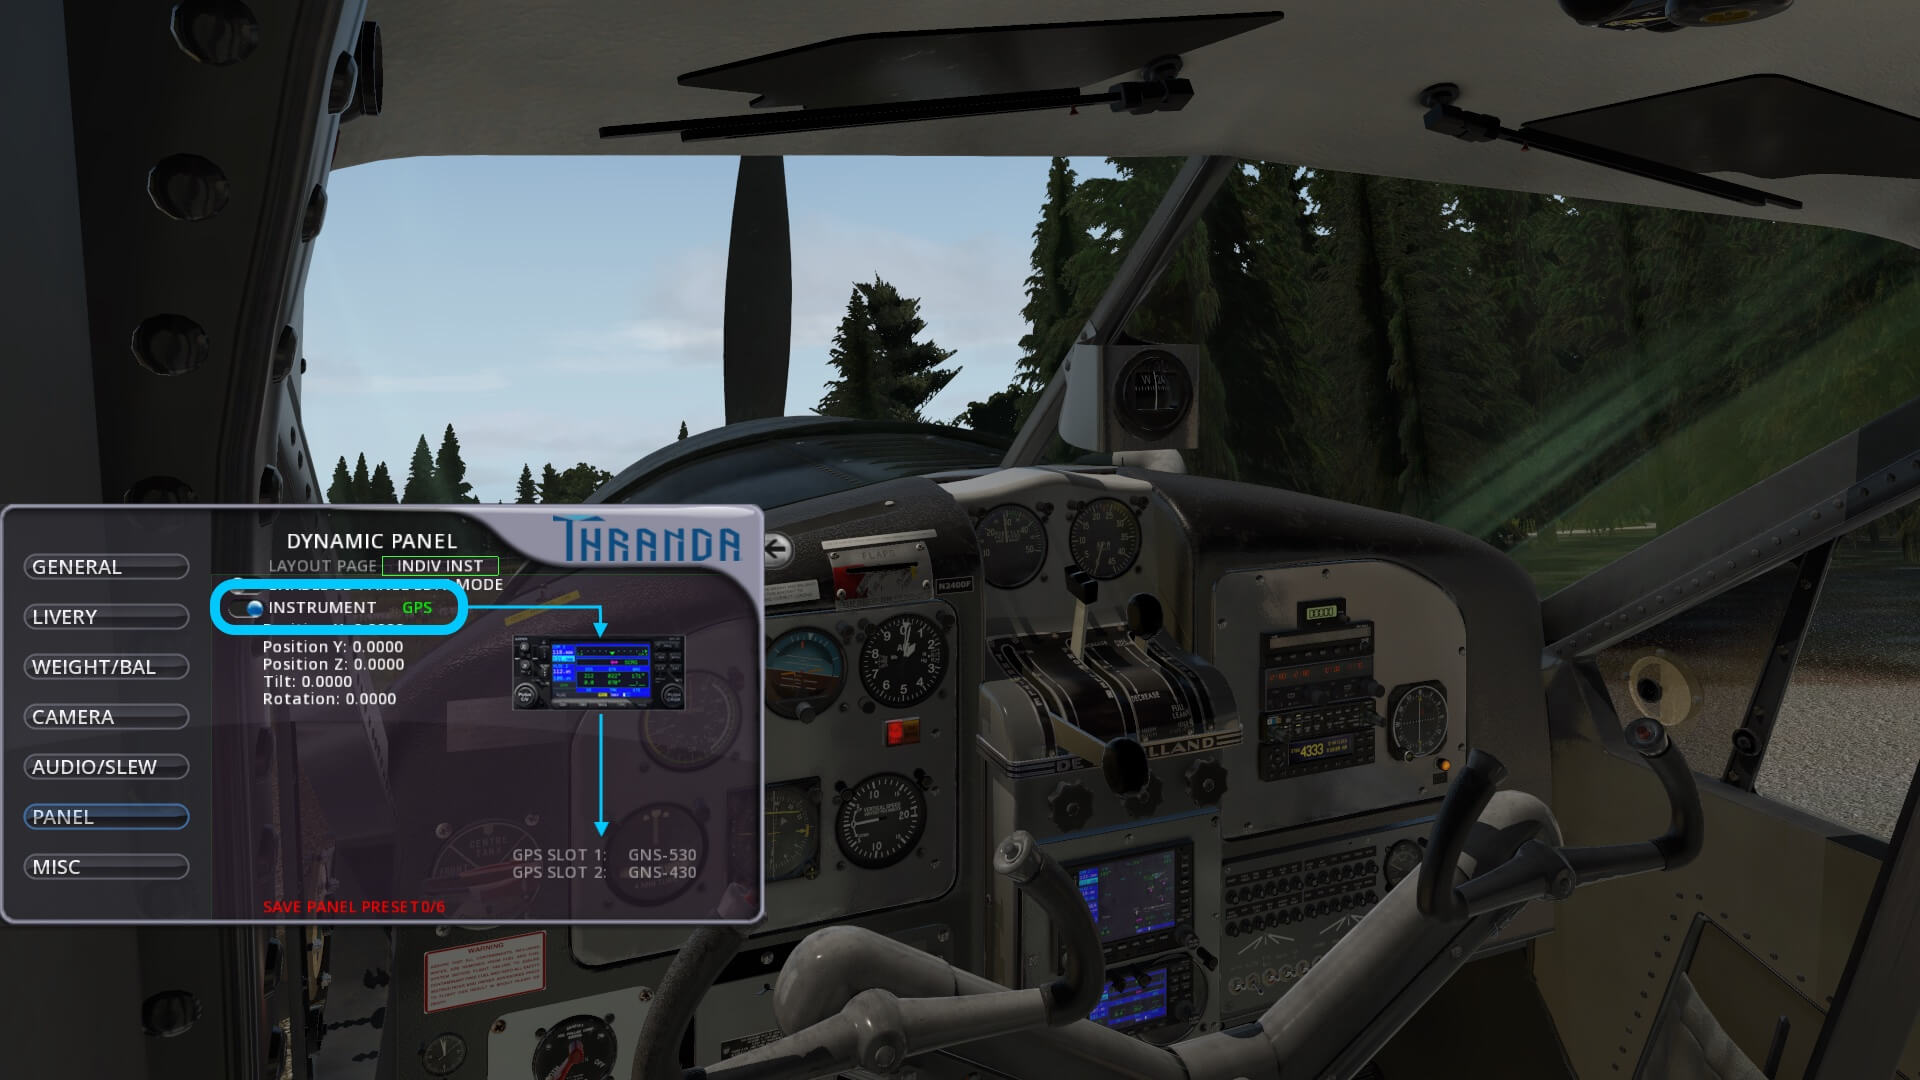
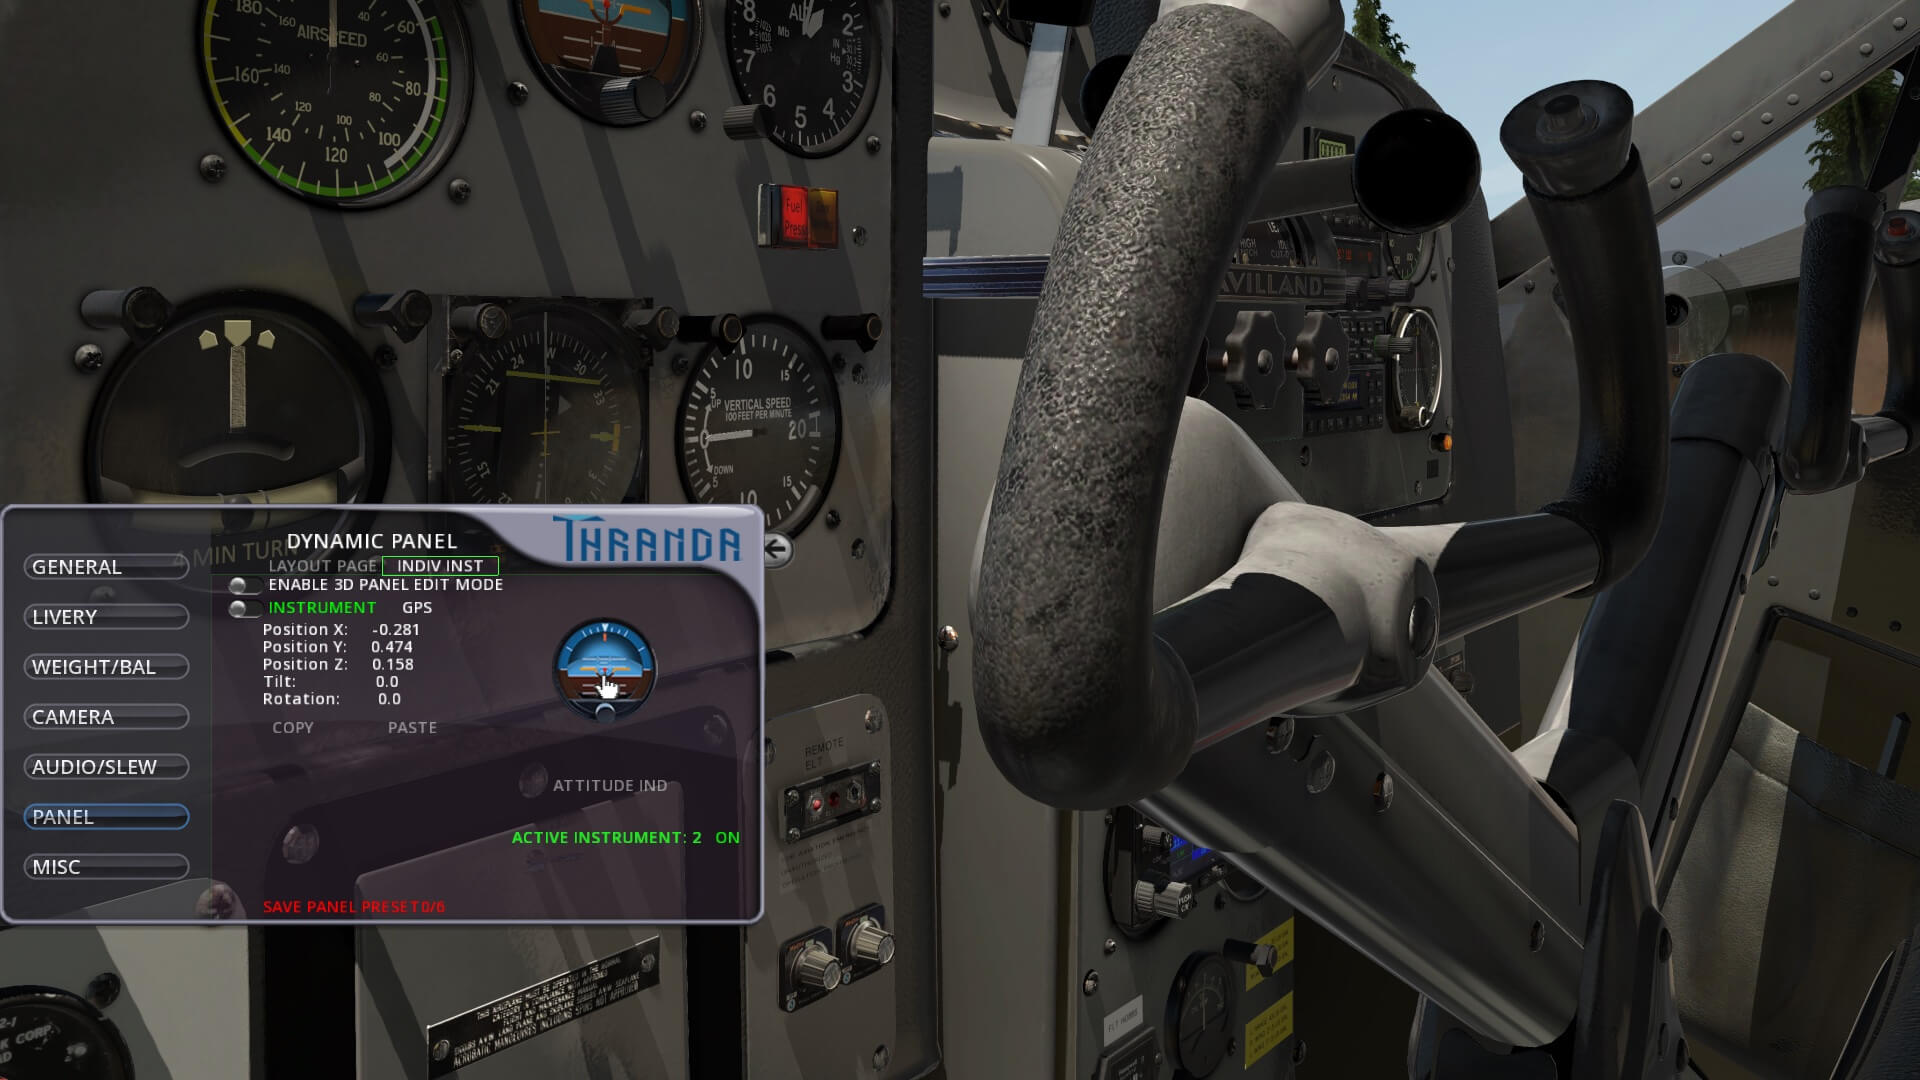
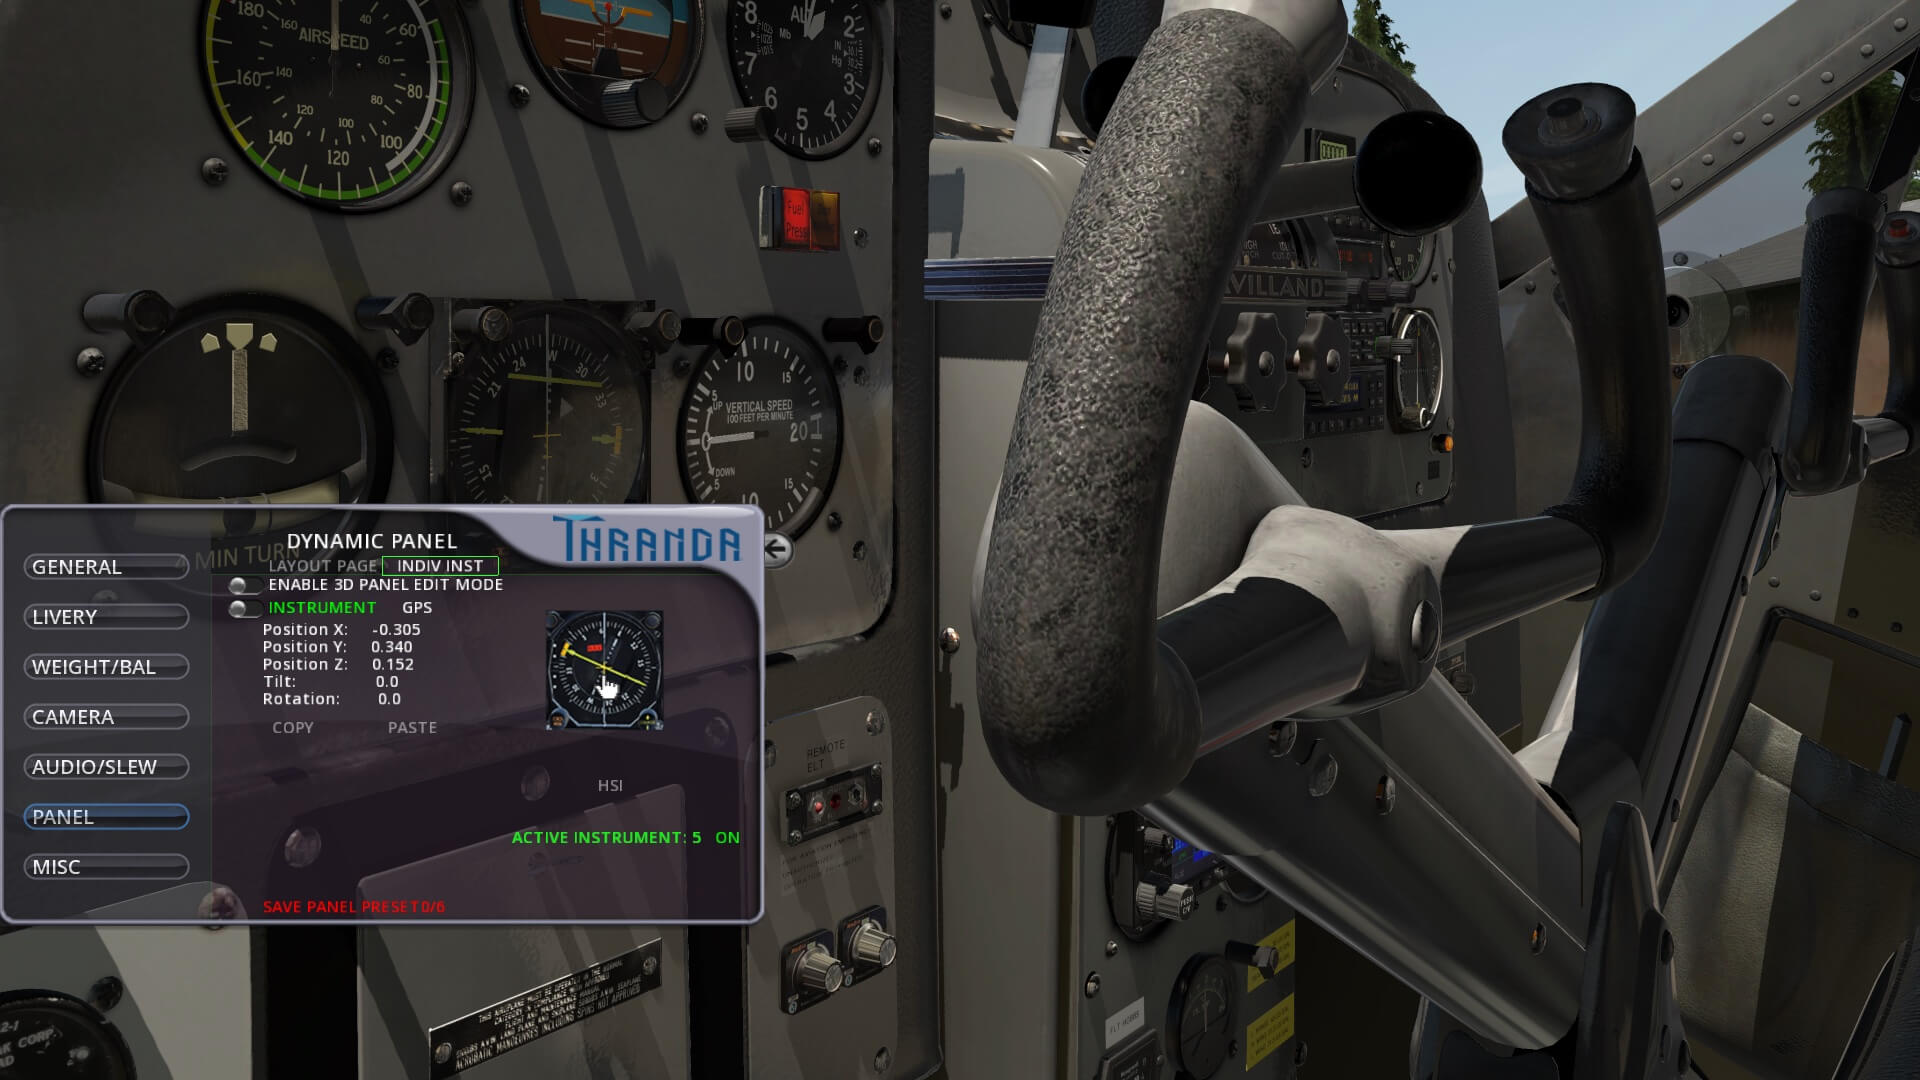
The INDIV INST (individual instruments) is the third option to discuss. By default the INSTRUMENT modification is active since it’s green. To make GPS active, you either select the slider left of the word INSTRUMENTS or you click the grey GPS word which turns to green. The whole idea of this feature is that you can change for every object – indicator, light unit, switch, lever, handle, knob and so on – its position (X, Y and Z), the tilt and rotation. To do that, you select first the object you can to modify and then add the X, Y, Z, tilt and/or rotation to it.
Got that?
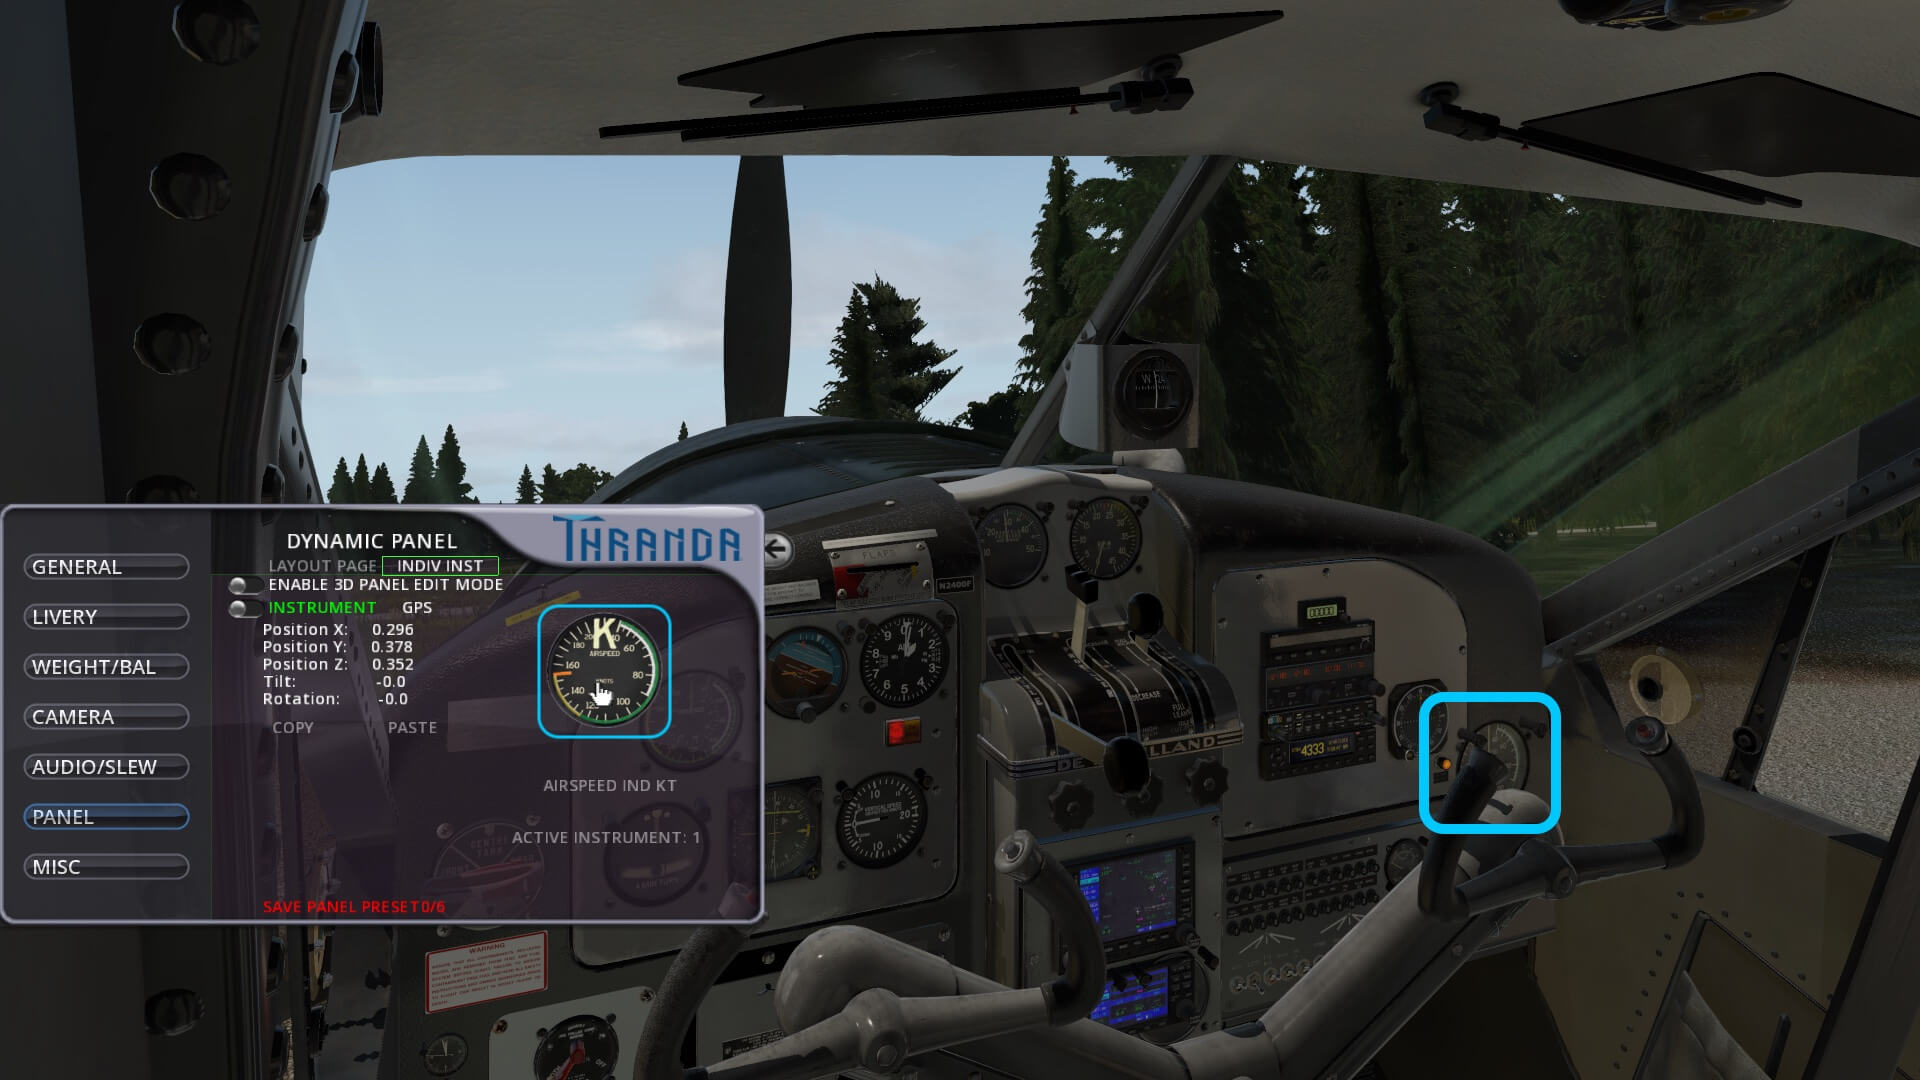
No, that was probably too quick. To select the object you move your mouse over the object which is currently in view. An example; in the following two screenshots that’s the IAS (Indicated Air Speed). When the indicator is dark, it’s not active and therefore not available at the instrument panel. When you click the IAS indicator, it’s highlighted and active and seen on the instrument panel. I marked that in the second screenshot. When you don’t see a difference of the IAS indicator, you will notice that below the IAS indicator the ACTIVE INSTRUMENT : 1 is either ON or OFF. ON is green, OFF is grey.
Now that you know that, how and what can I change?
With the IAS indicator active, you can move your mouse to one of the values you want to change. You’ll notice that when your mouse if over for example Position Y: xxx, the mouse pointer has changed from a pointer to a slide symbol. Now you can, by turning the mouse wheel UP/DOWN, this value and for the Apple Magic Mouse, slide your finger UP/DOWN.
In this case I highlighted value Y which means you move the IAS indicator UP/DOWN. Value X is LEFT/RIGHT while value Z is FWD/AFT. When you move value Z “FWD”, then it becomes a floating IAS indicator. The same works for the tilt and rotation.
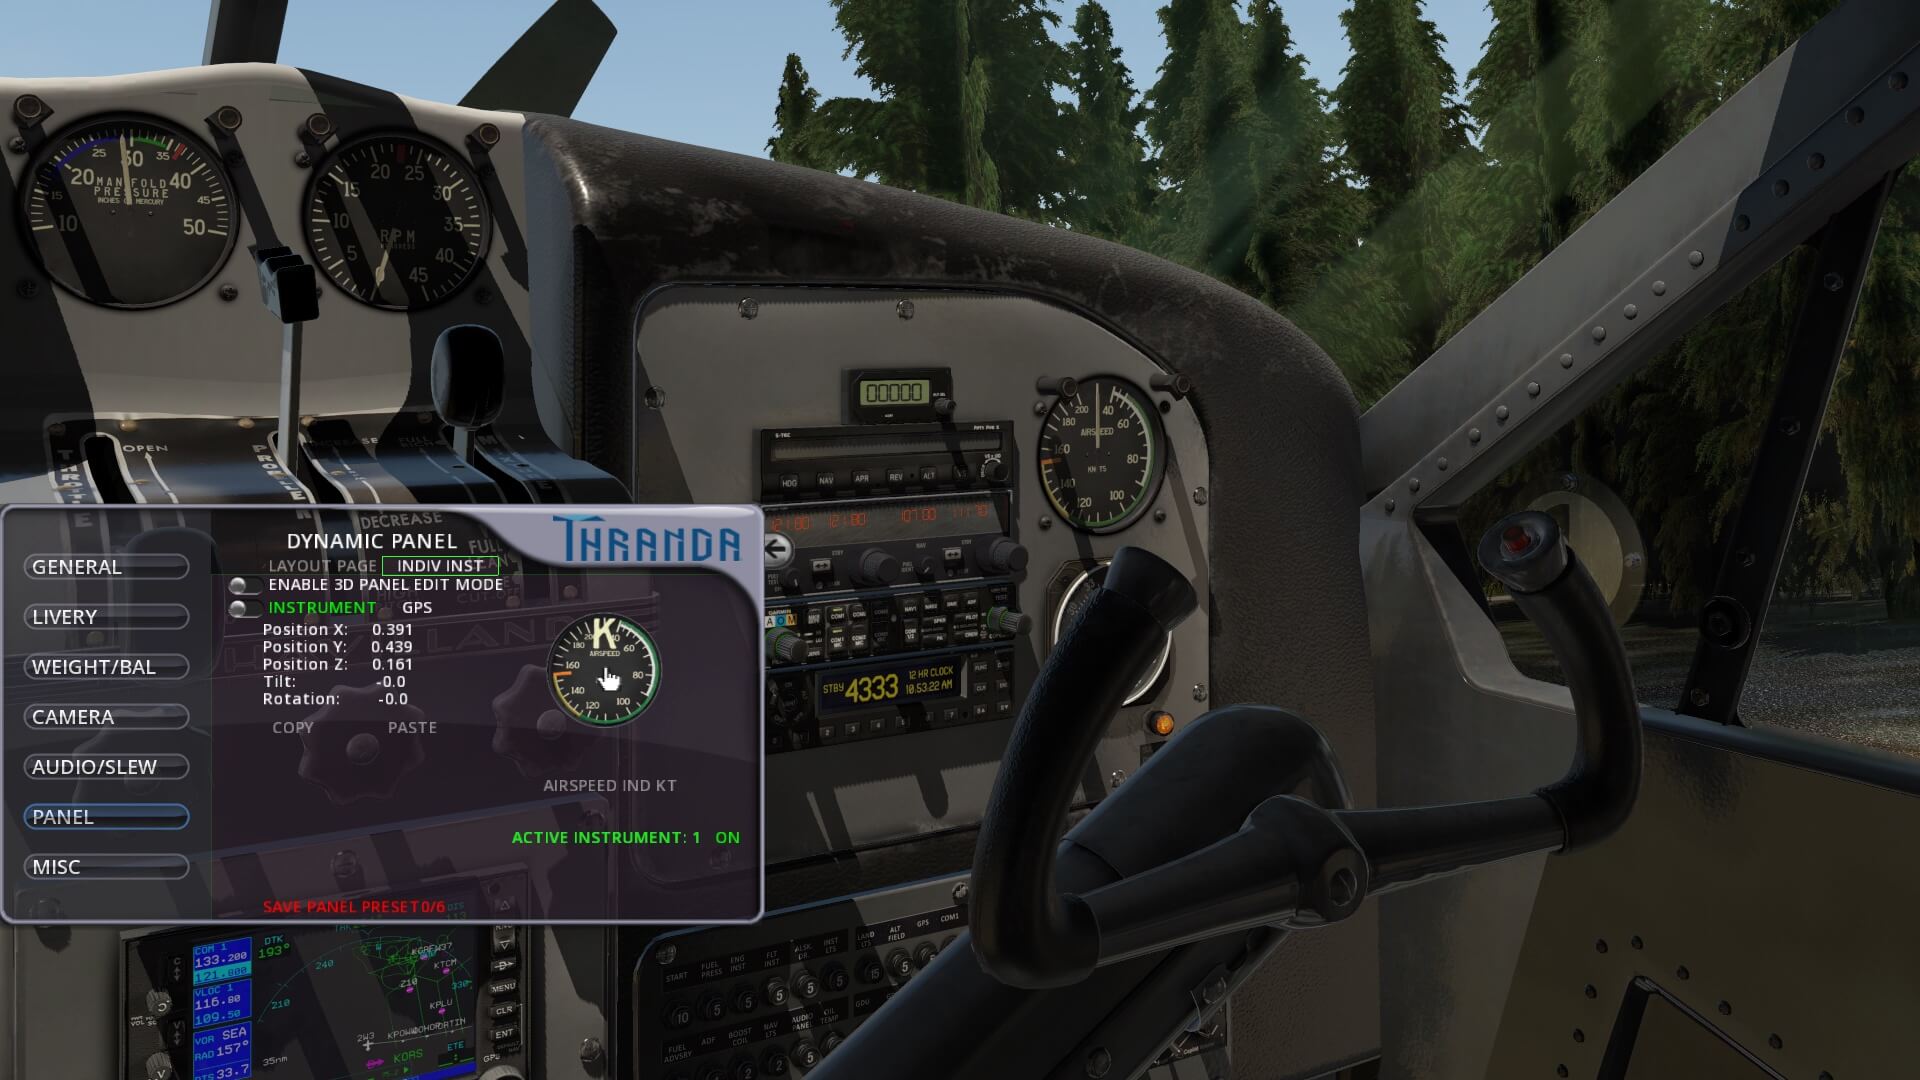
As you can see on the following screenshots, the IAS indicator is inactive. The indicator itself is greyed out and the ACTIVE INSTRUMENT text is grey too. To make the IAS active, you either click the IAS indicator or the OFF word at the end of the ACTIVE INSTRUMENT line. Oops, on the second screenshot I noticed that the IAS indicator is somewhere handing in space.
Do you see that too?
I move my mouse over Position Z (FWD/AFT) and with the mouse wheel I turn as much as needed to align the indicator with the panel. If it’s aligned with the instrument panel -third screenshot – I click the red line SAVE PANEL PRESET 0/6. It will ask to confirm my change what I will do.
Although this was just an example, the procedure is applicable to all other objects that can be found at the instrument panel. Just put your mouse over the object. In the following screenshot that’s the horizon, and when the mouse pointer is moved over the indicator, it becomes a hand. Now turn the mouse wheel, and all other objects pass by in the list. When you’ve got the object you want to reposition, stop turning the mouse wheel or stop sliding your finger and continue with the X, Y, Z tilt or rotation. In case you want to use these previous steps for the GPS equipment, you first click as explained before, the word GPS or you move the slider on the left of the word INSTRUMENT to the right. Since there are no more then two GPS options available, you can click the either line thus GPS SLOT 1 (2): GNS-530 (430) ON/OFF.
Misc(ellaneous) tab
At the Misc(ellaneous) tab you’ll find other features not related to a system. This popup window doesn’t need any explanation since it’s self-explanatory. When you click an option, you’ll see the result right away except then for the throttle quadrant since for this you need to sit in the cockpit.
And now …. the Walk-Around Check
The previous sections where a bit off track, but I think it was worth that I got much deeper into the Thranda popup window then I initially planned. This Thranda feature has become very popular since you can literally change the whole instrument panel and/or create your own livery. But now, my promised walk-around check. After my arrival at Swanson 2W3, and relaxed a bit, it’s time to start with the inspection.
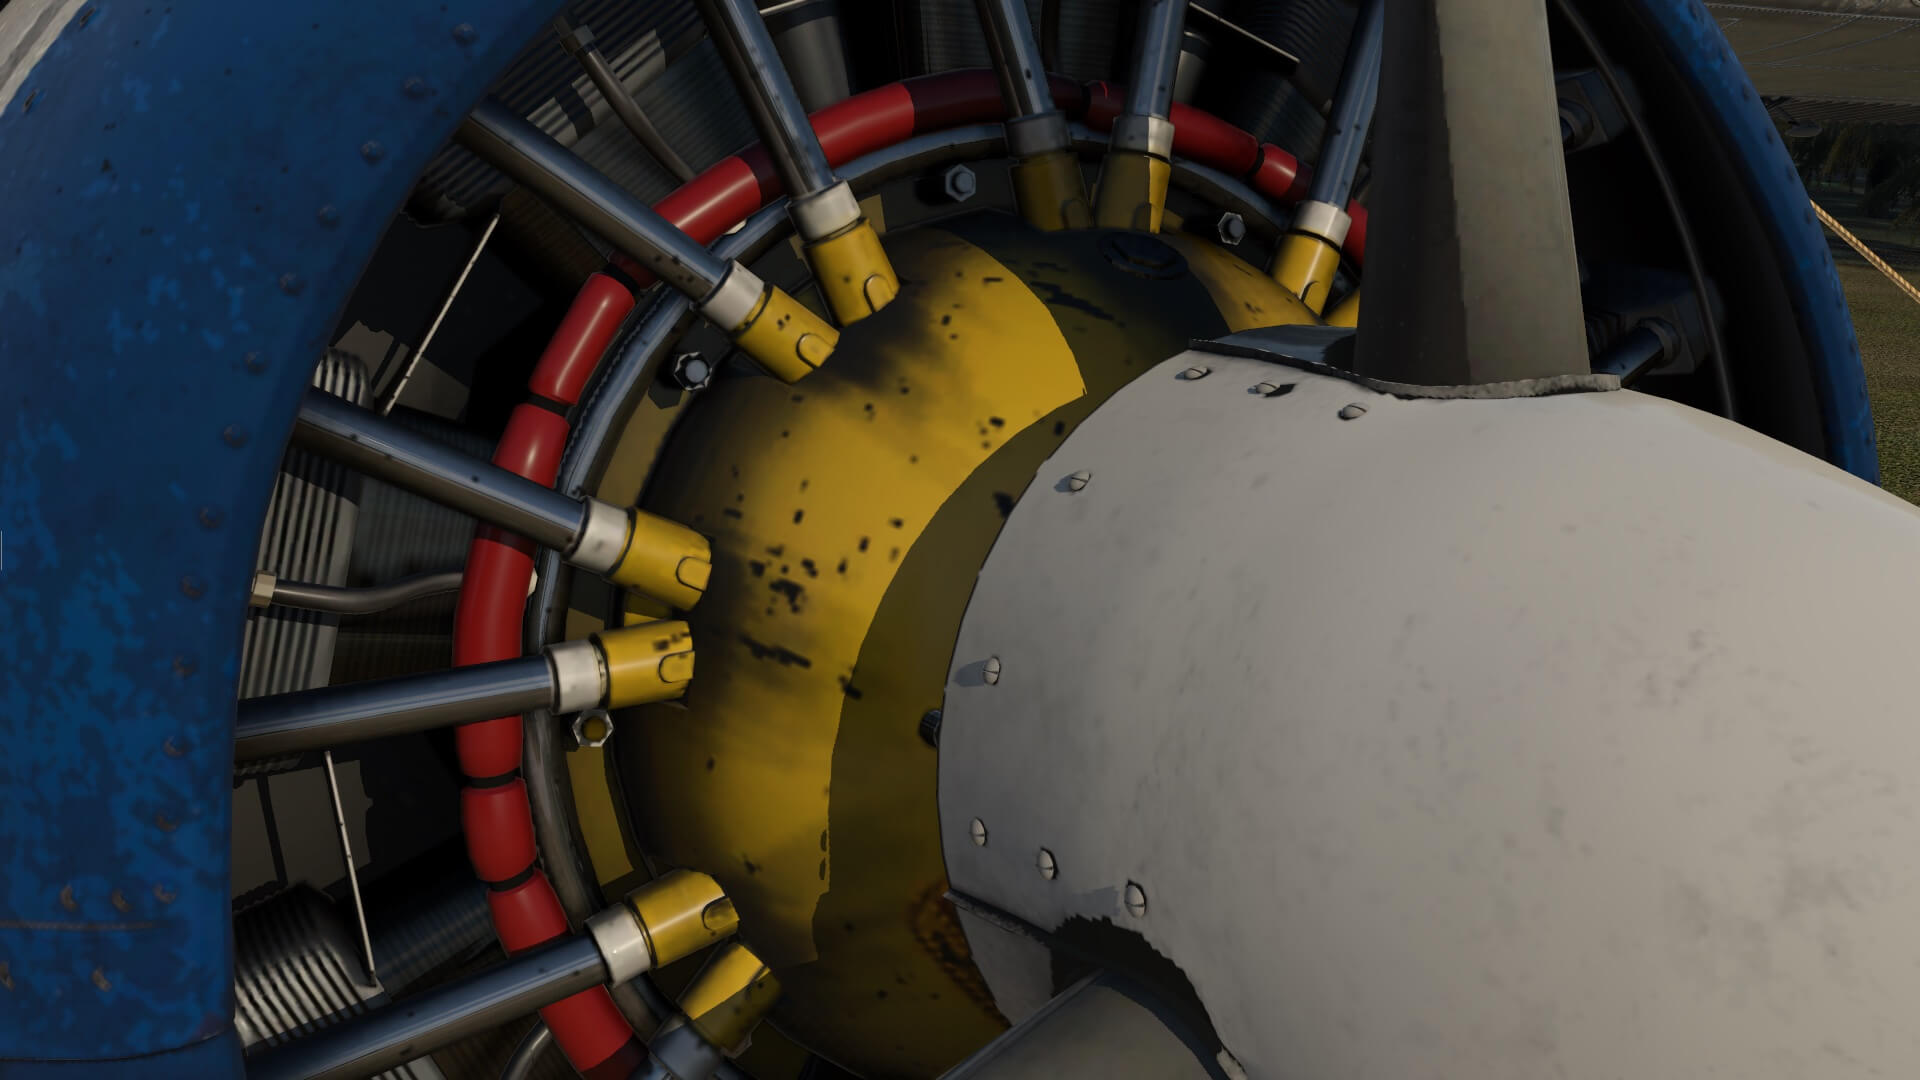
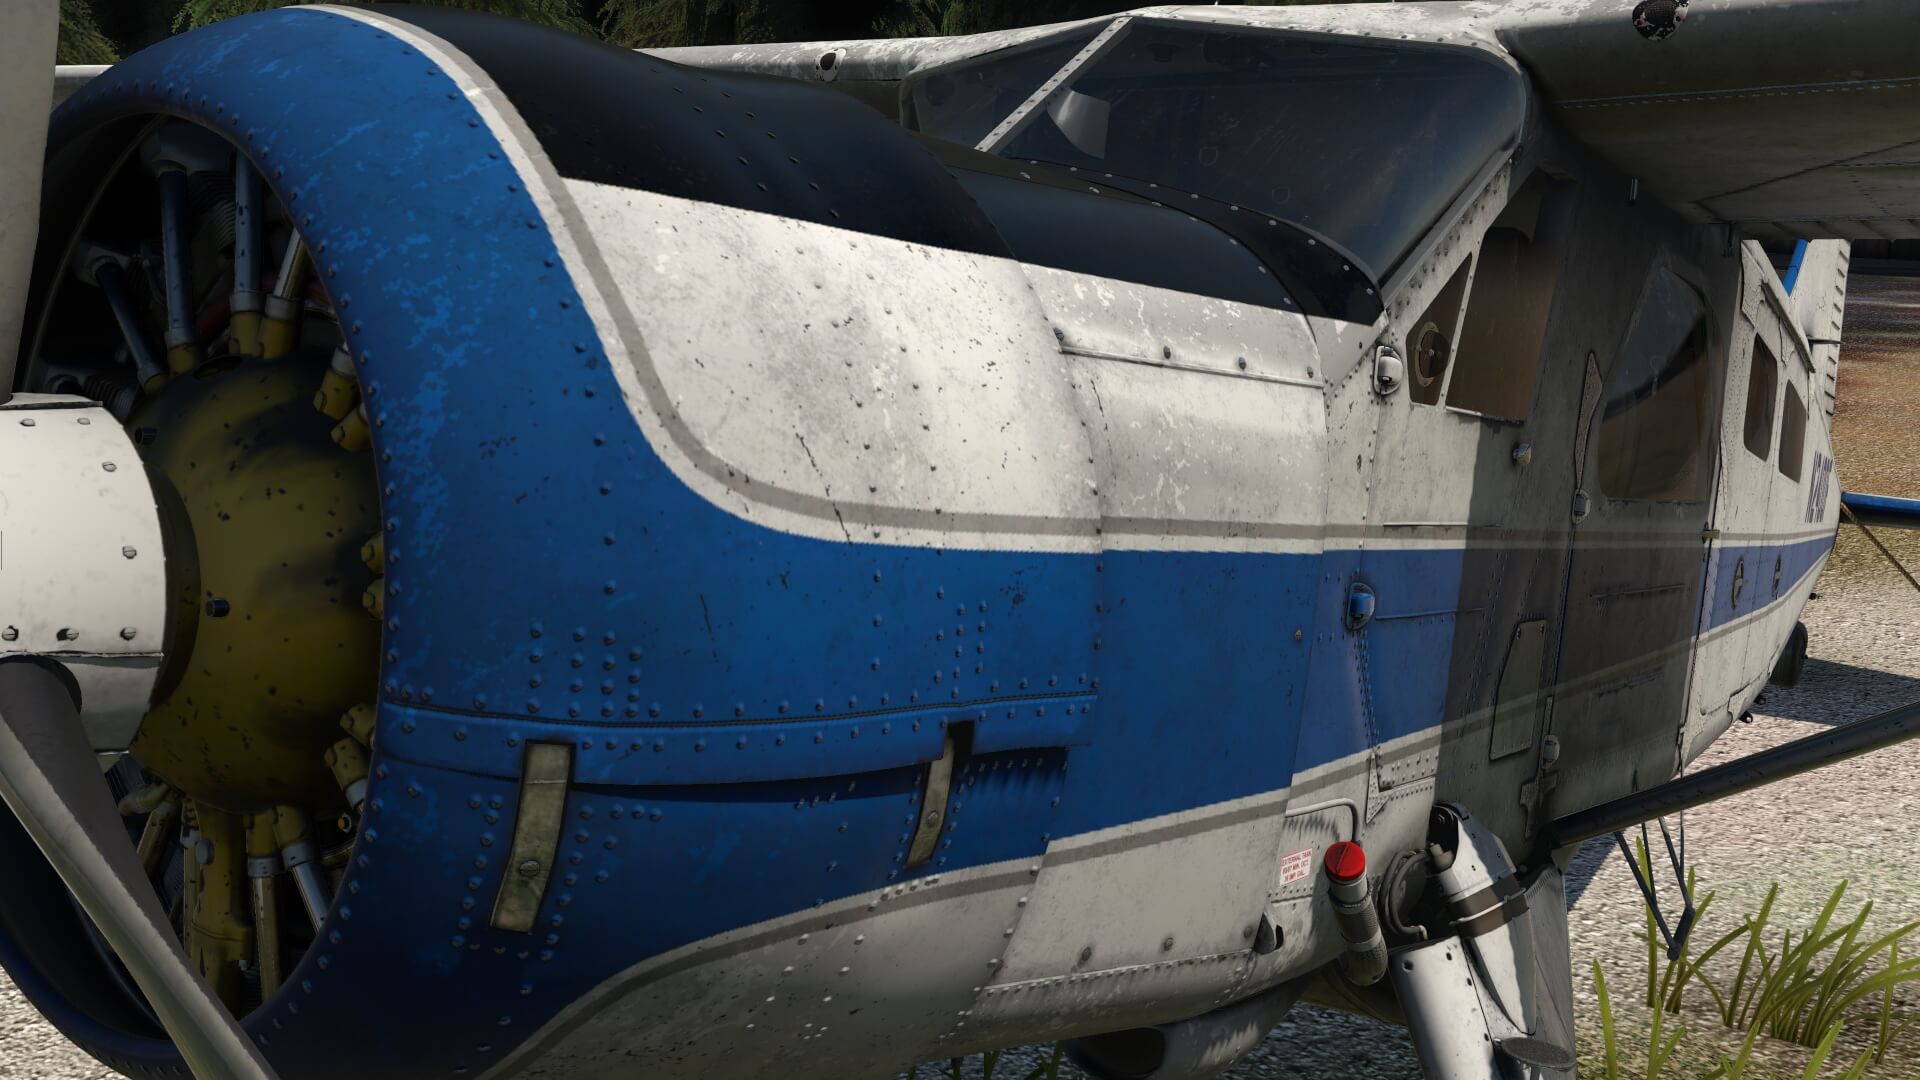
I’m impressed by what I see. The external model offers so many tiny details, it’s just awesome. As ex-ground engineer it starts for me with the radial engine inlet. Ok, you can’t open the engine cowling, but there’s no need for. Suppose an opened cowling was animated, then you’d need to model the external engine completely with all the lines, wires, pipes and so on and that means, more polygons are needed and this means most likely frame rates reduction. So, no need for this.
Back to the engine inlet.
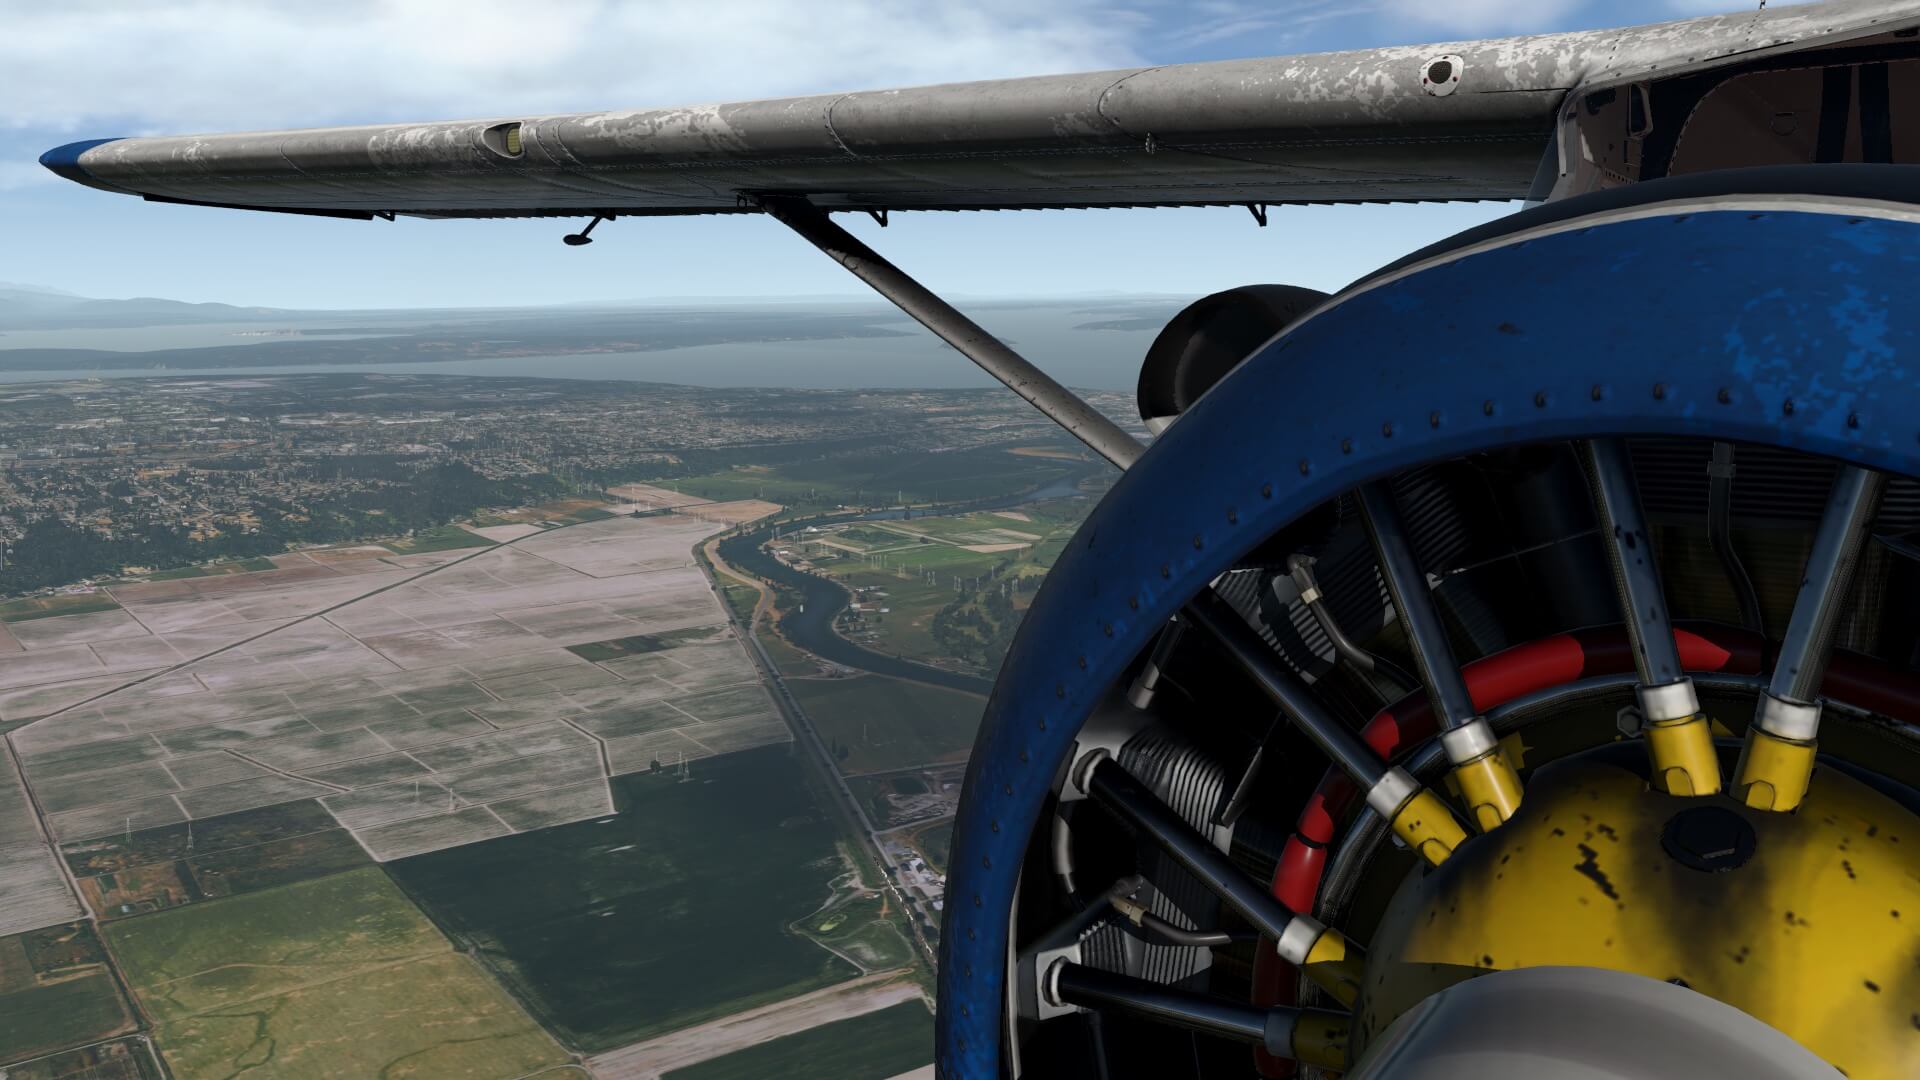
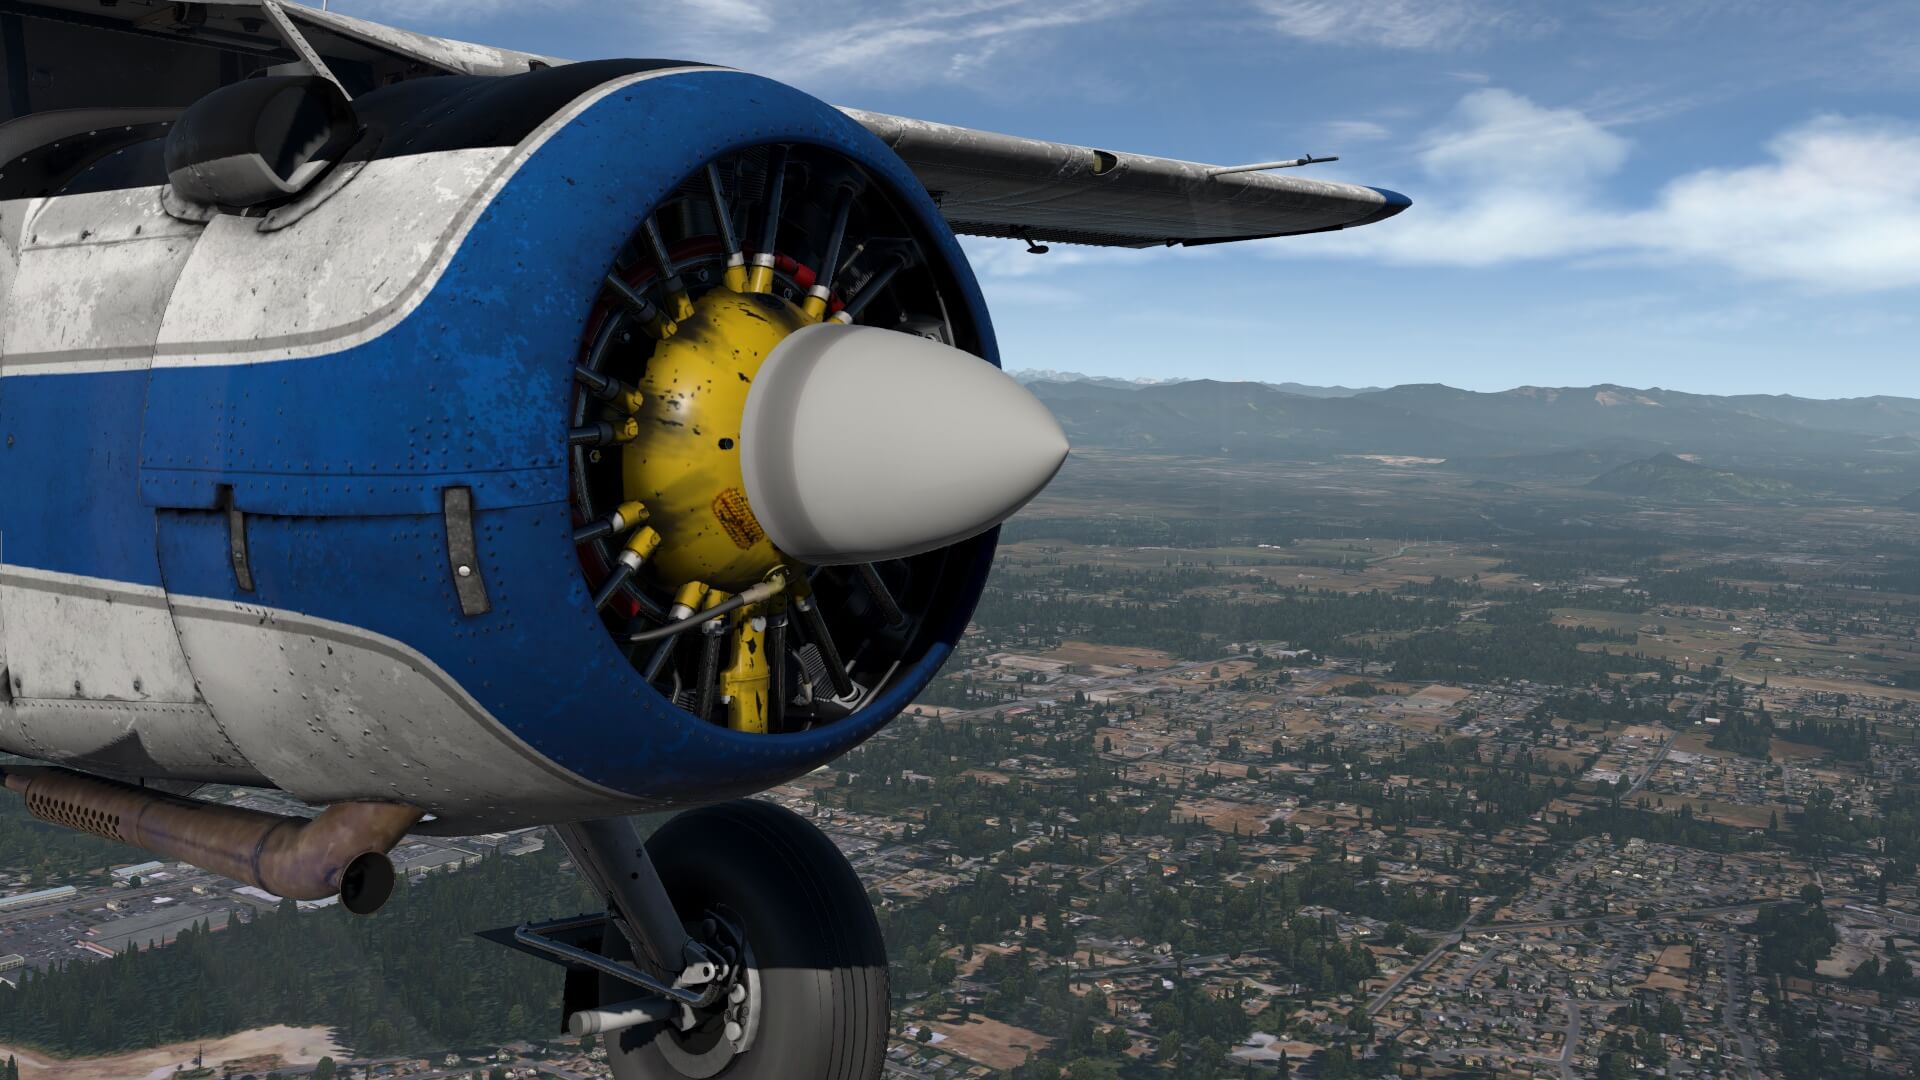
The inlet is modeled with great detail. After I checked it with real photo’s, I’m positively surprised to see that as far as my knowledge goes almost every component has been modeled with accuracy like the yellow front engine casing, nuts, the cylinders, the control rods, igniter cables and so on. I wasn’t sure when you create your own livery via the dynamic livery page, if you’re also able to change the yellow engine casing, but that’s not possible.
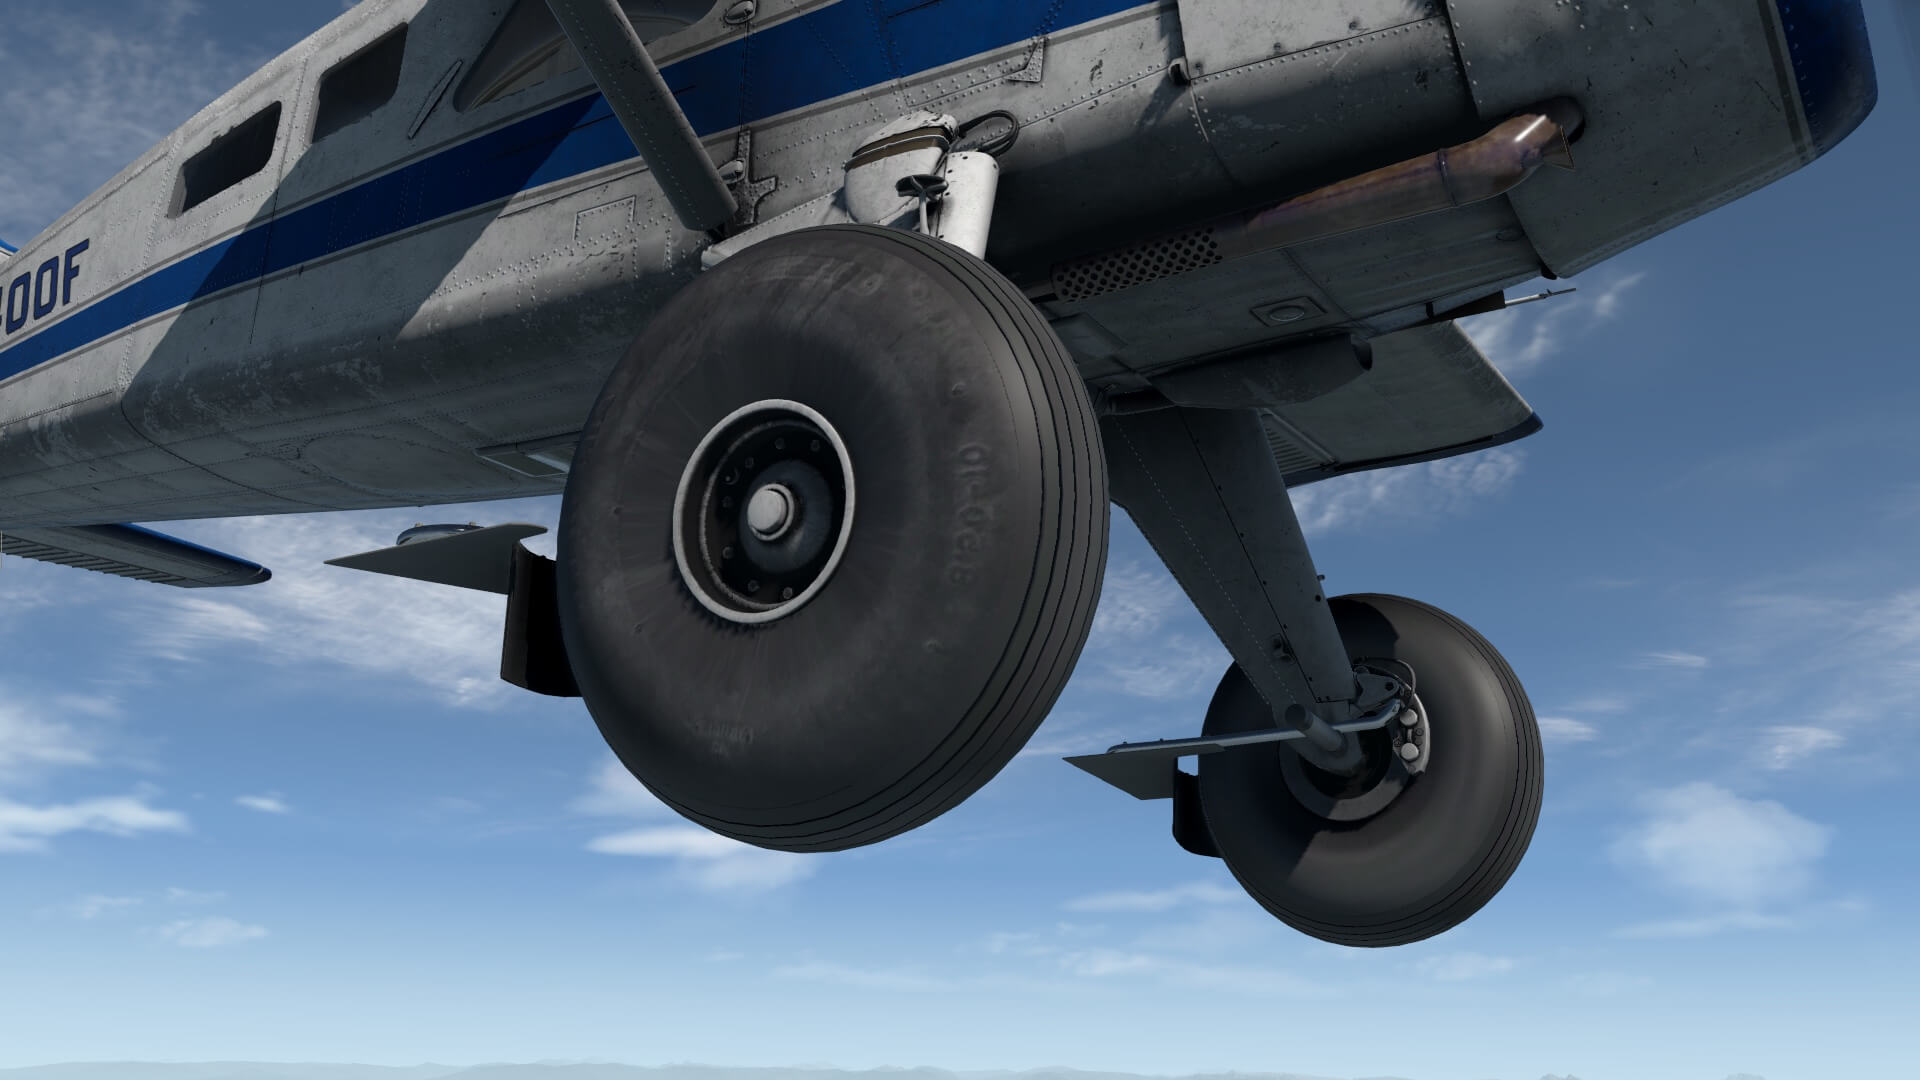
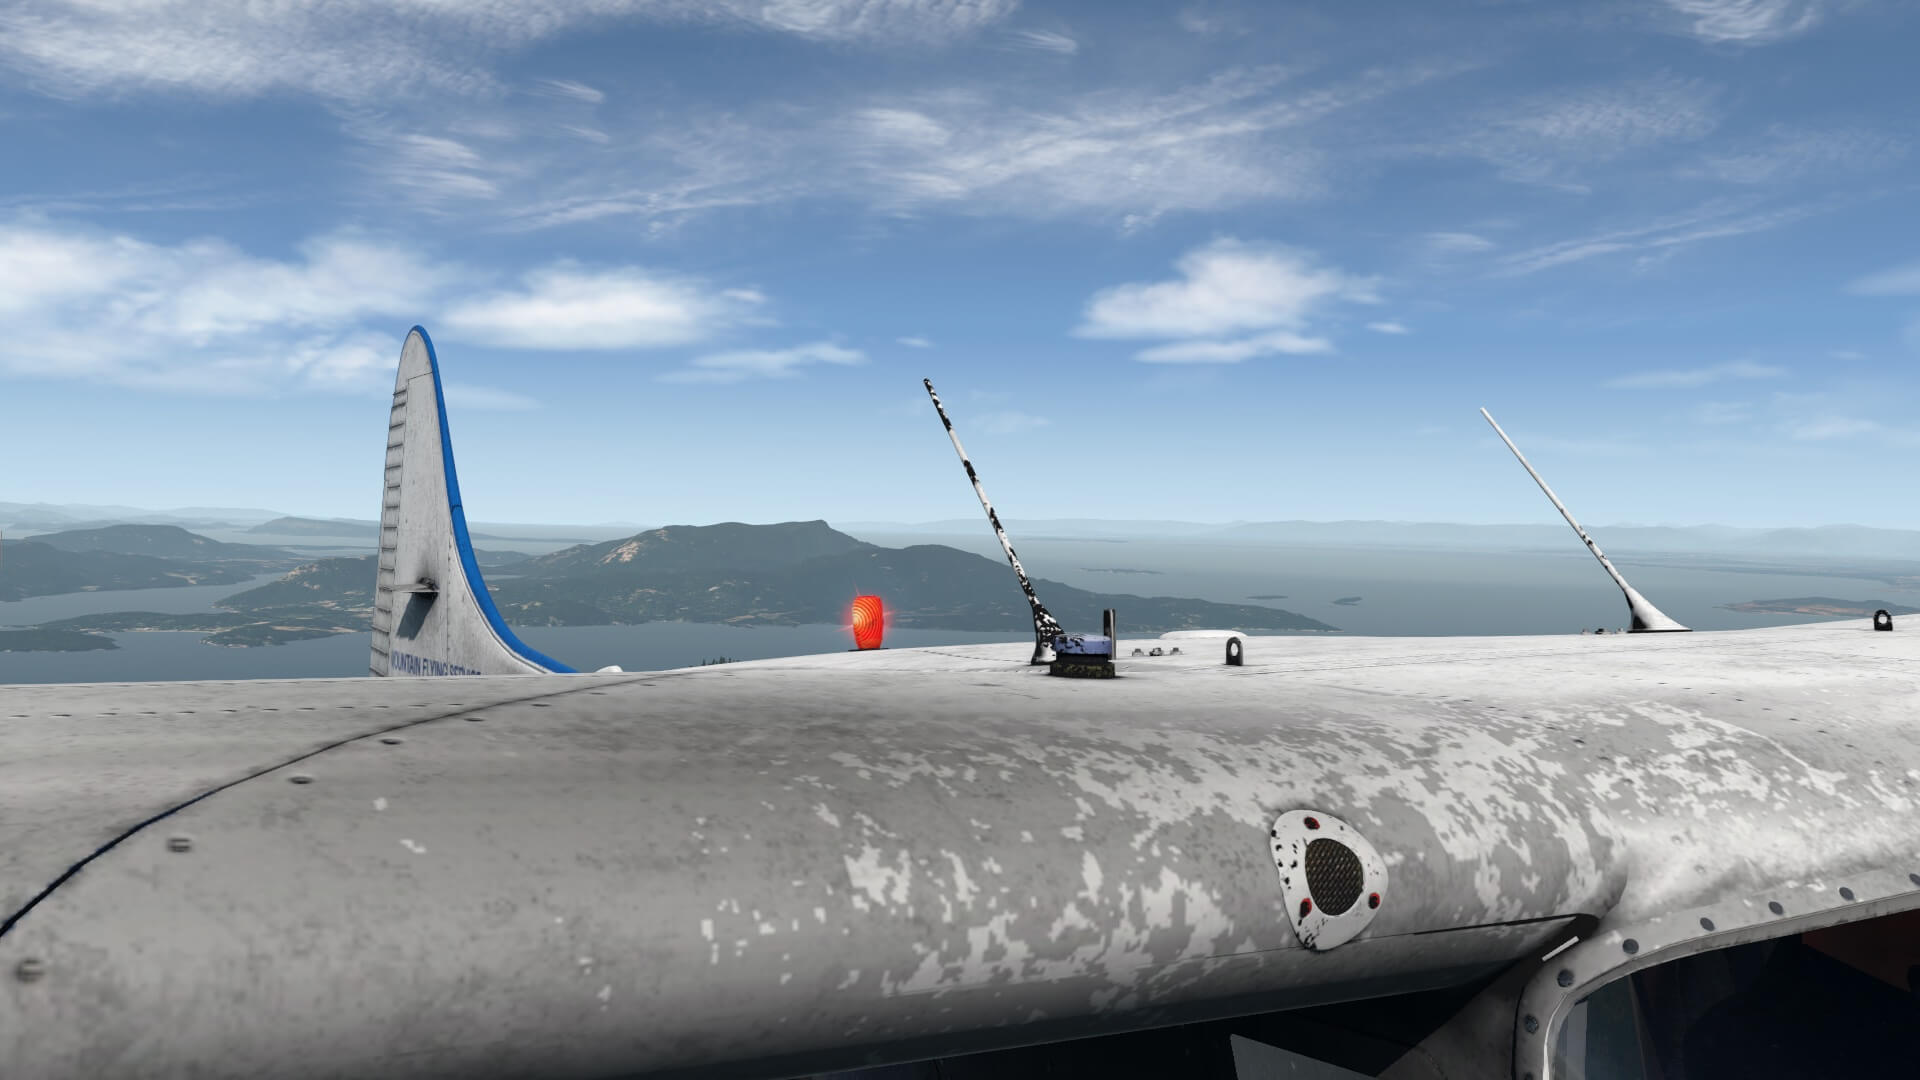
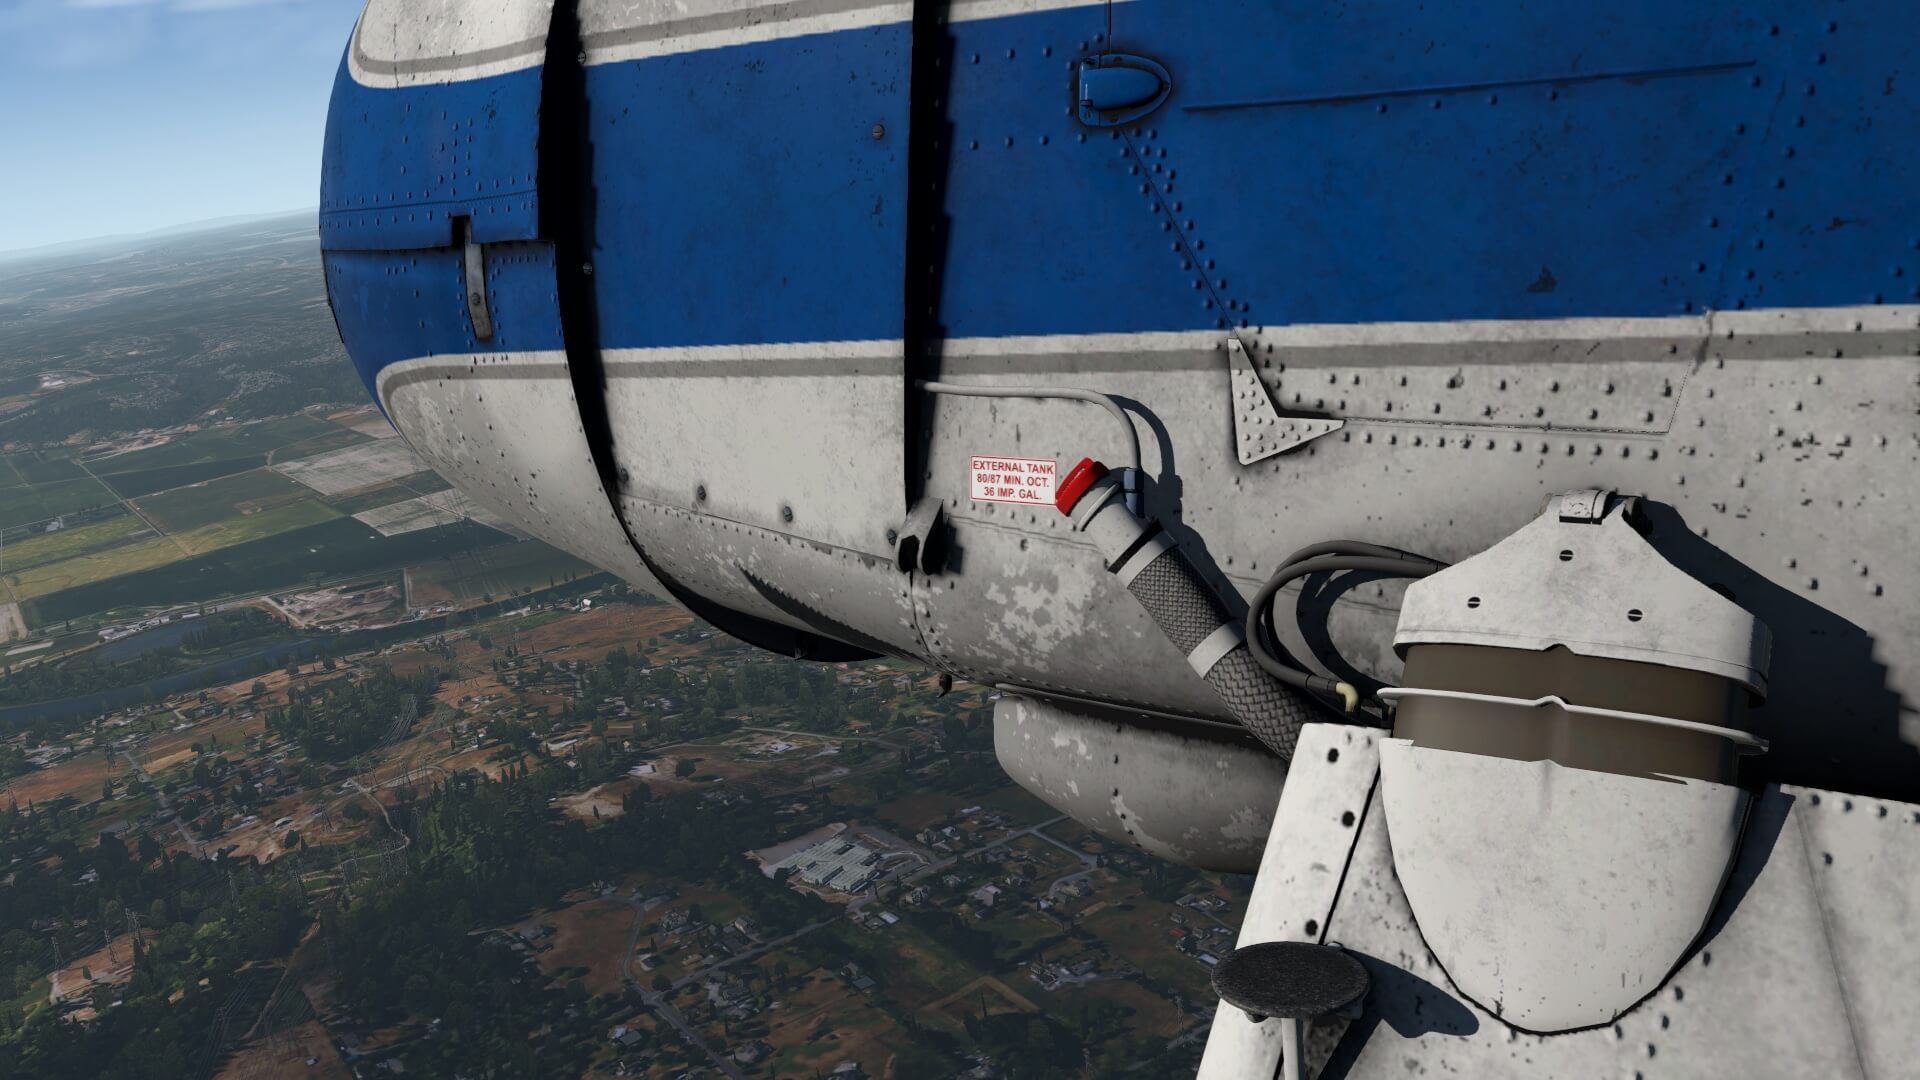
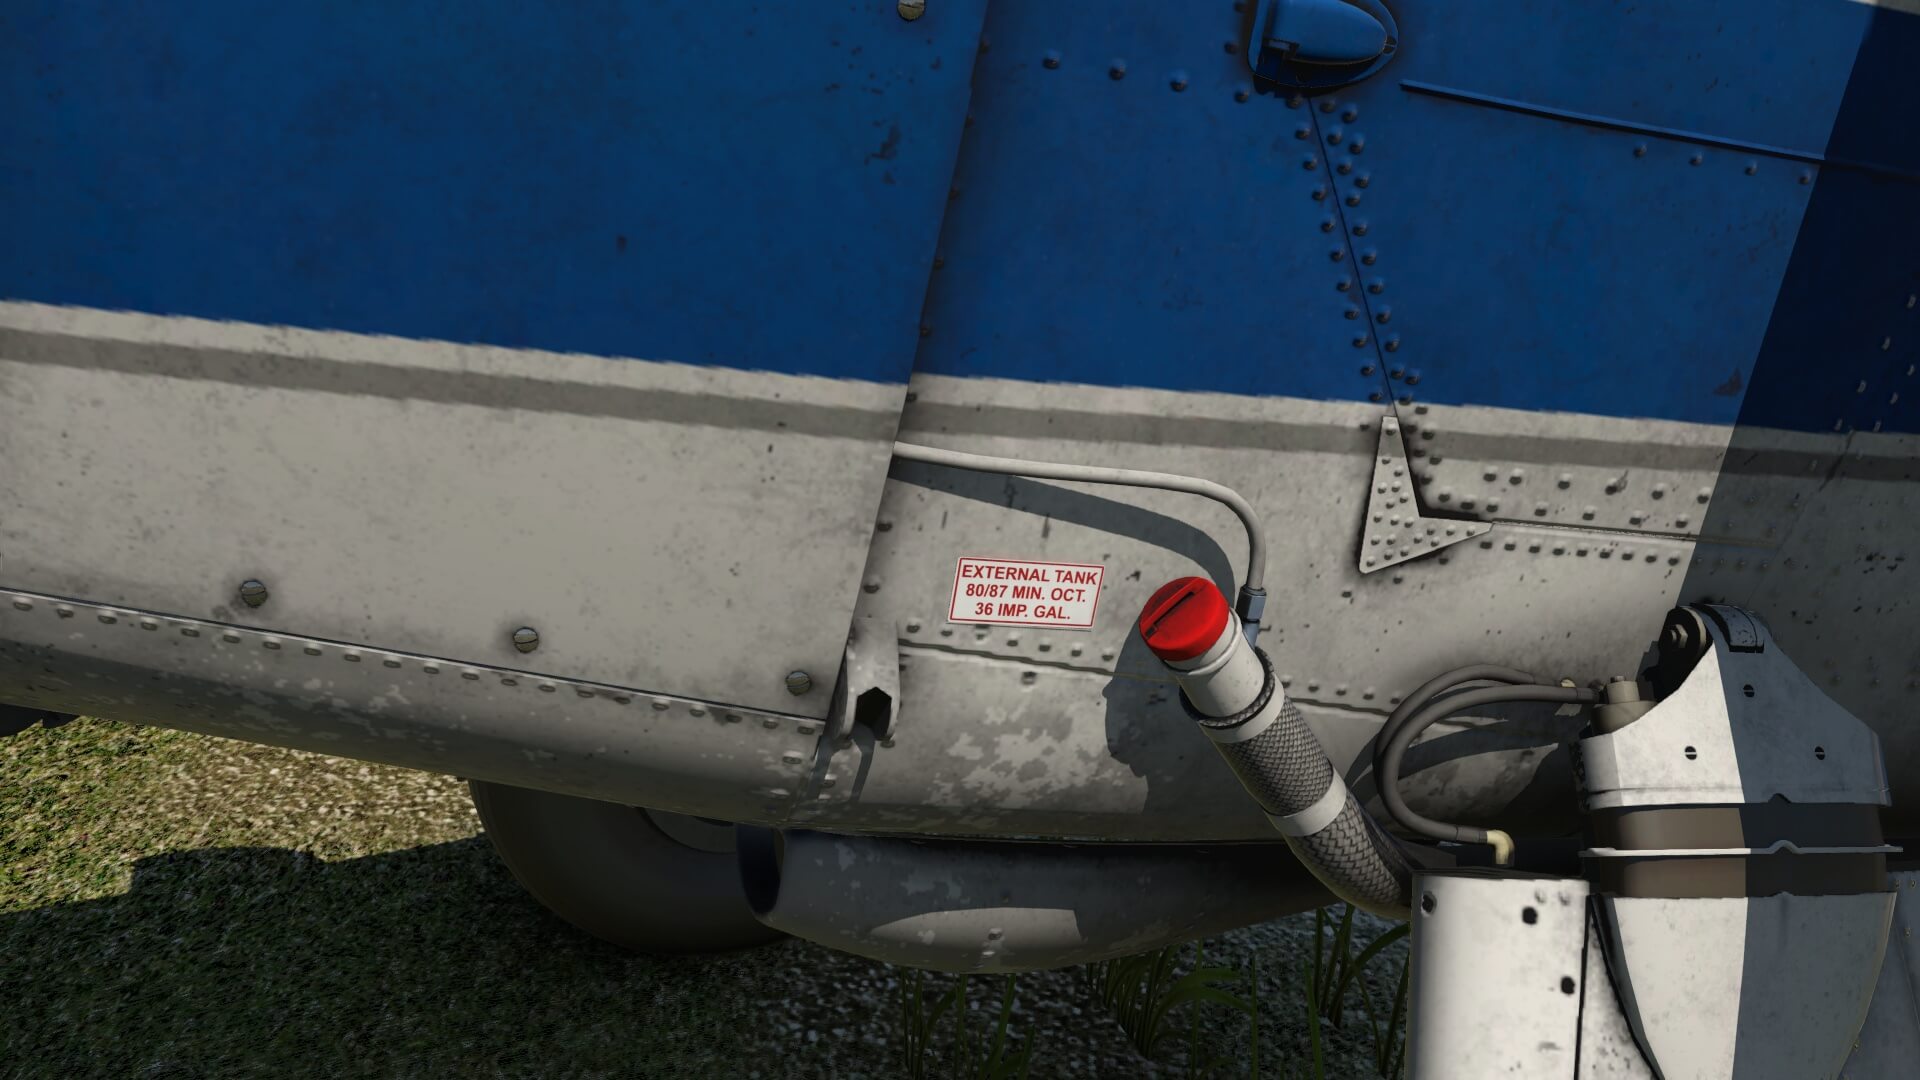
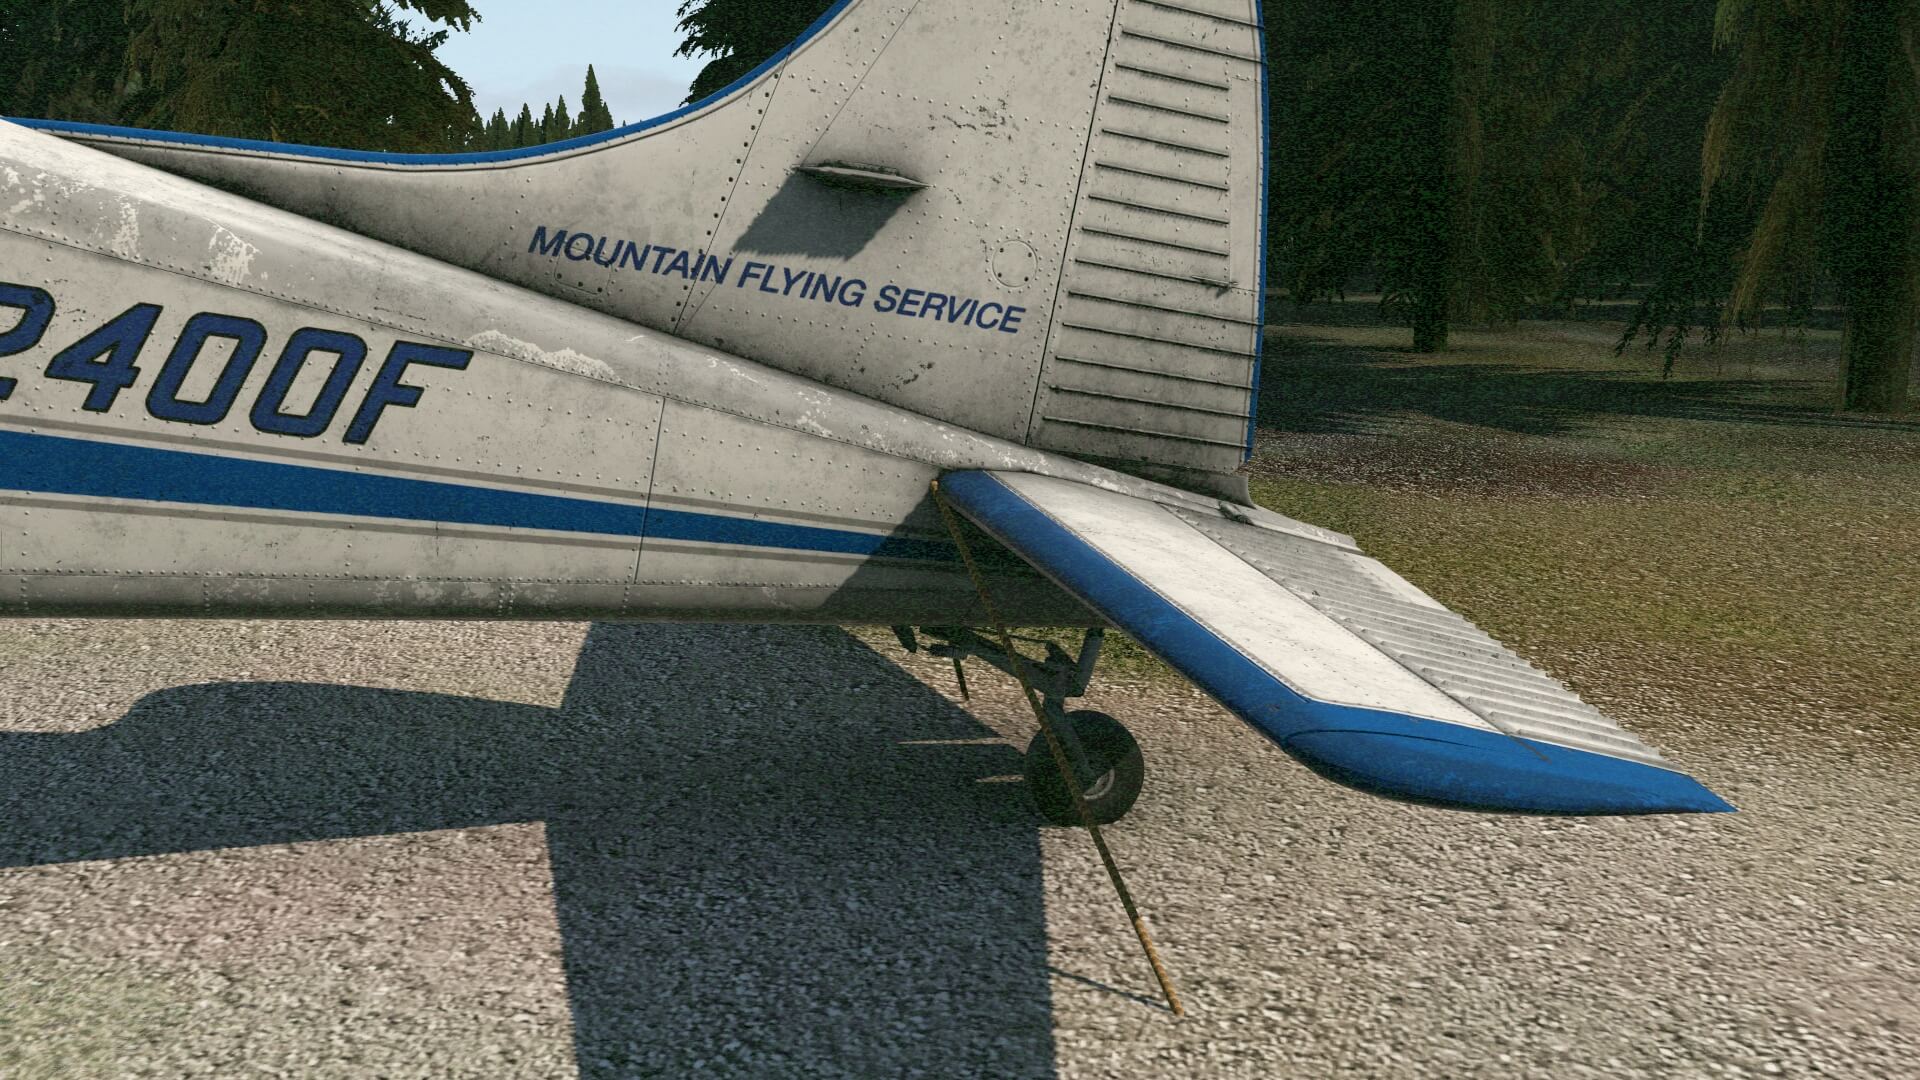
Ok, then the propellor blades. The Hartzell decal and the many other decals I’d seen on the fuselage are all razor sharp. Gorgeous to see that this is well done. But there’s more that inspires me. Initially I thought that all the modeled rivets are too much and too big, but I’ve to correct myself. I won’t say that the correct amount of rivets is used, but the size is OK, compared to many photos I’d seen. As you can clearly see in particular on the last of the upcoming screenshots, I used a dirty and full with scratches skin.
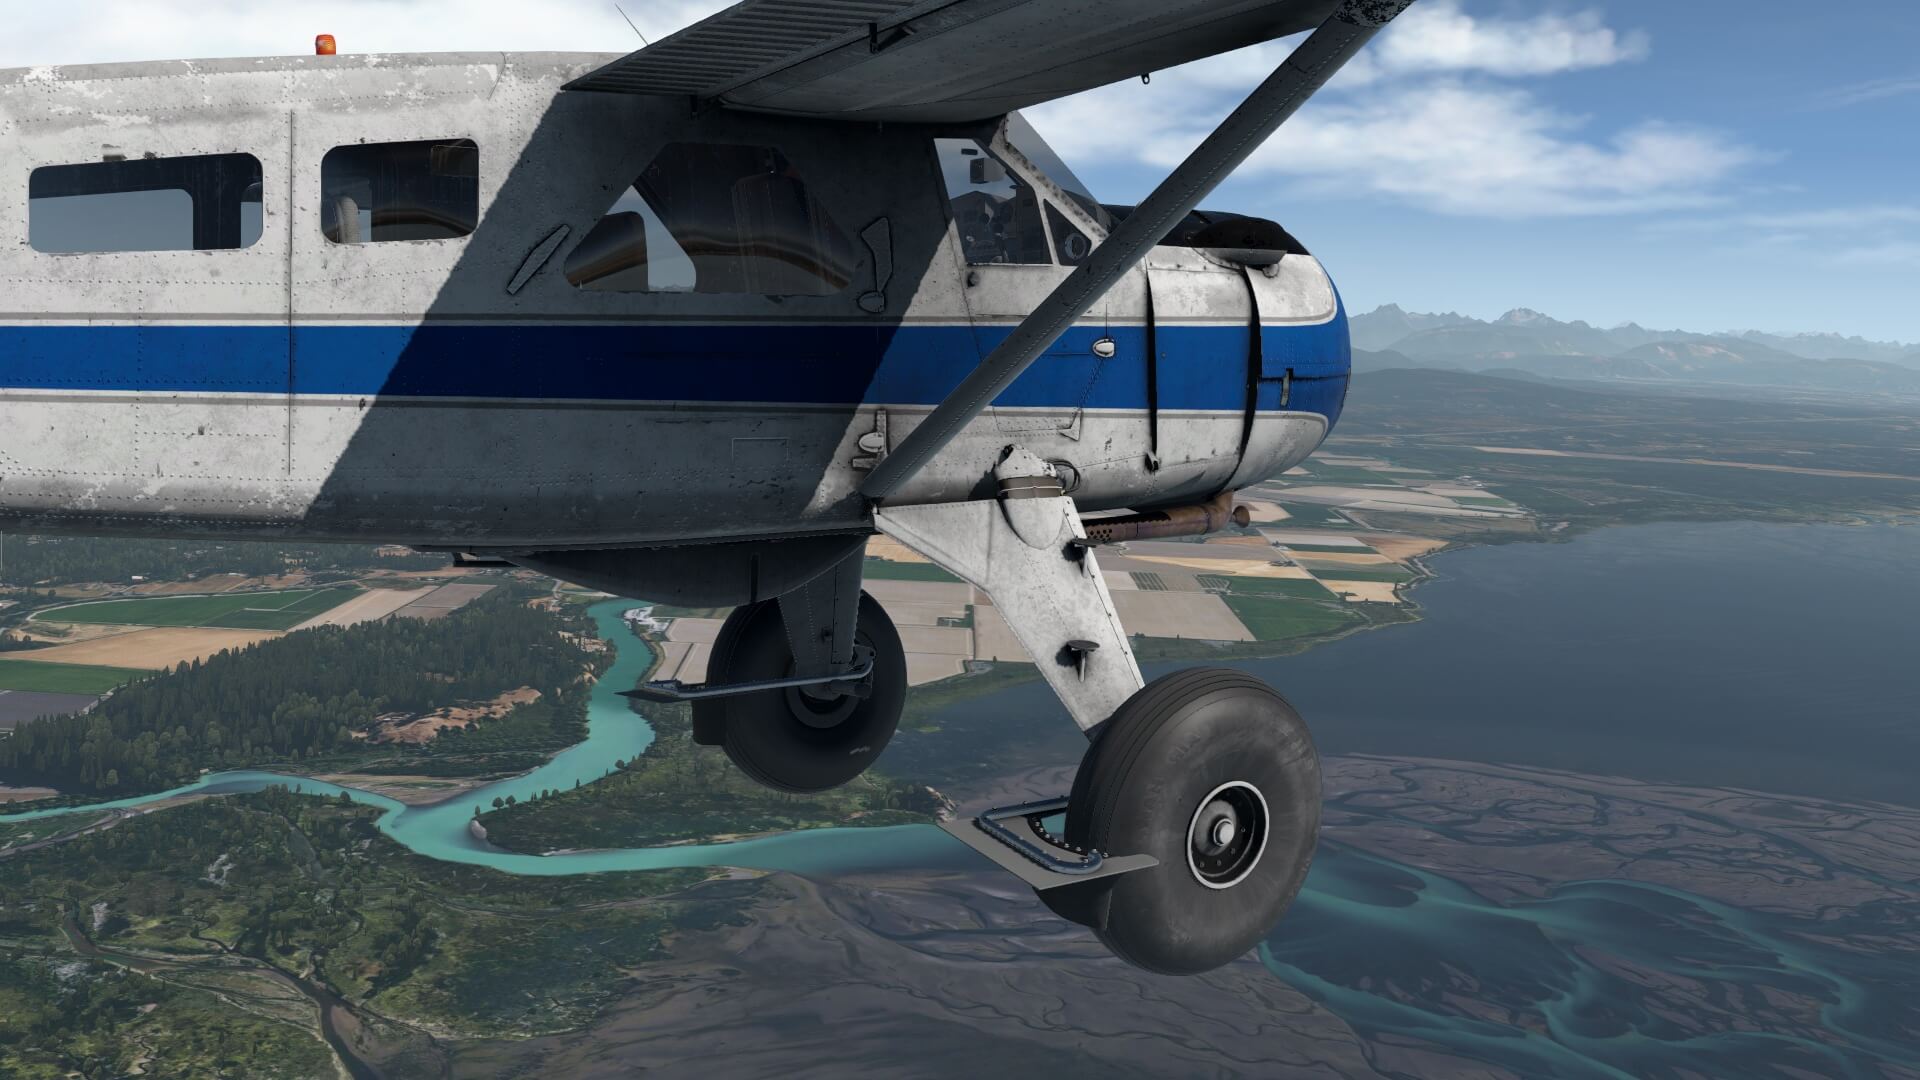
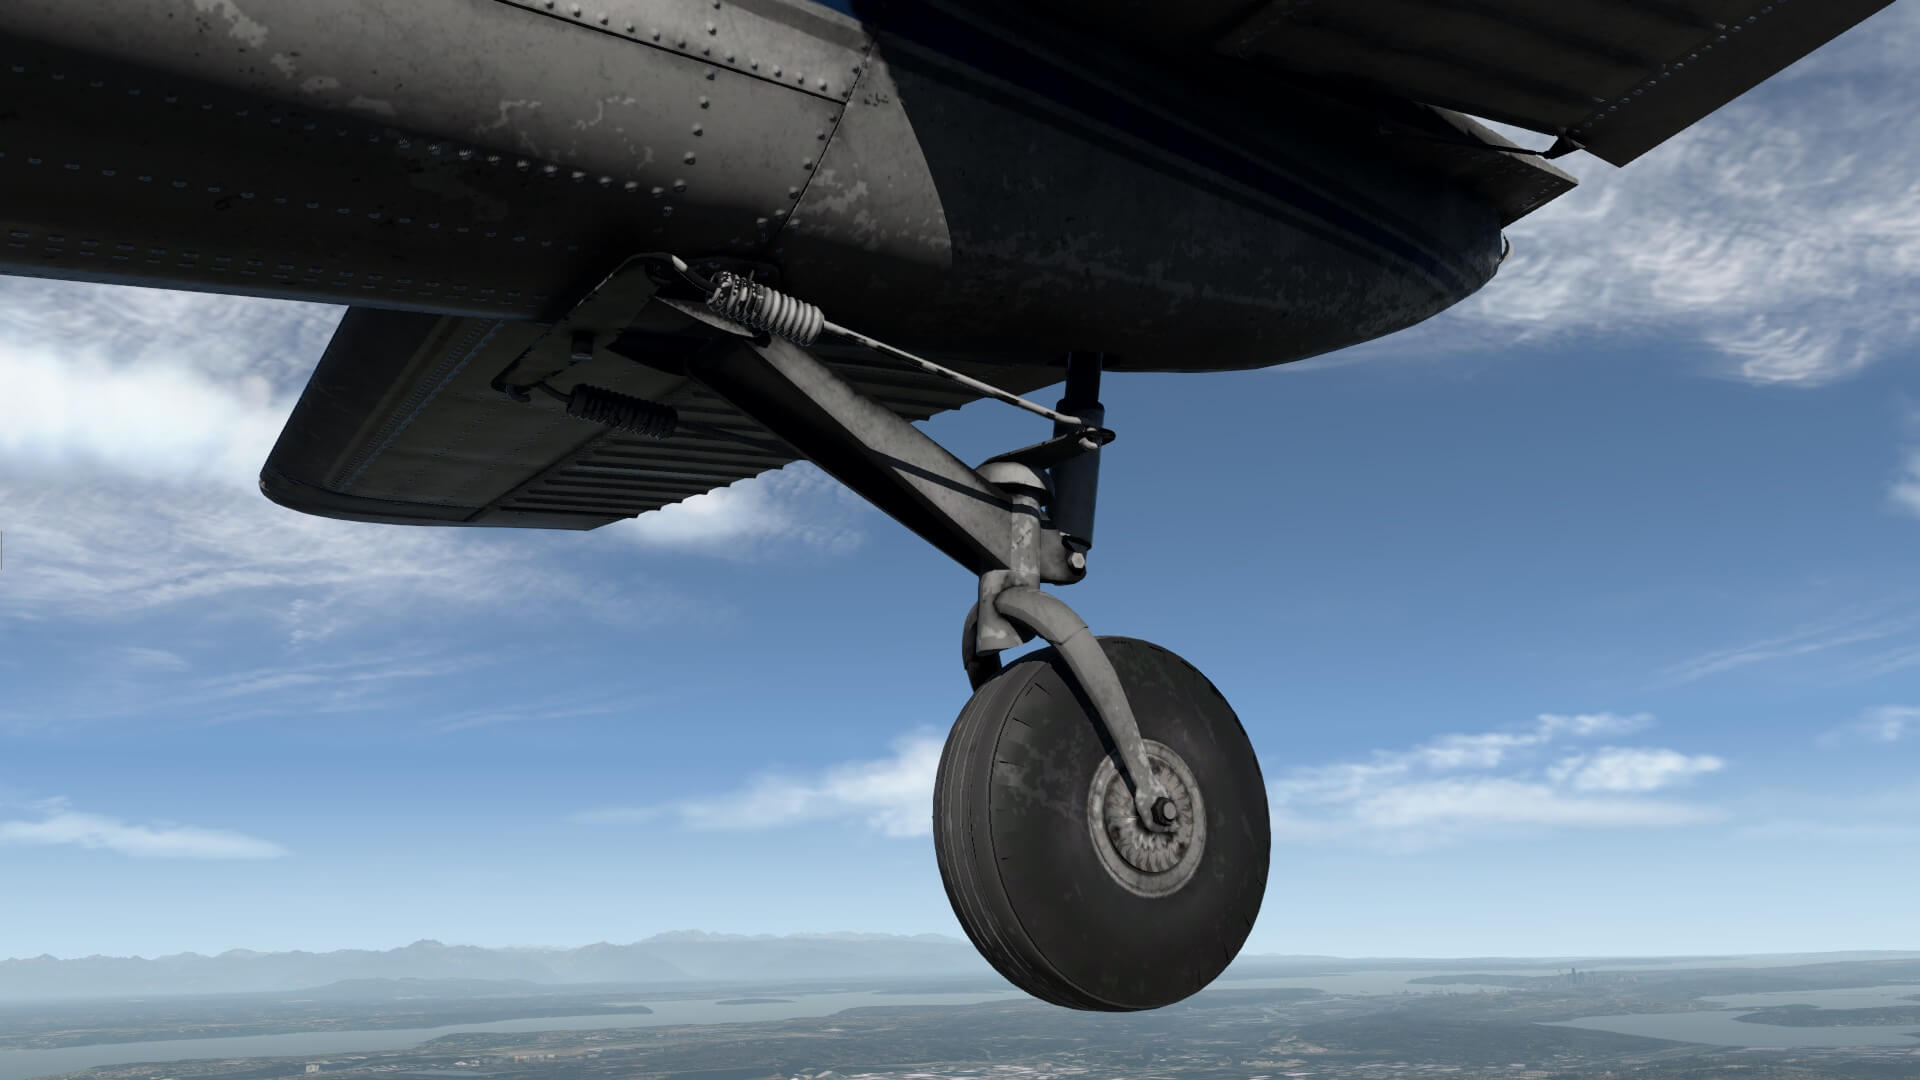
Perhaps a bit too much, but that’s also a personal taste. Anyway, on the last screenshot you see the decal of the external fuel tank. Razor sharp as I wrote before, but look to those tiny details like the fuel refill line, fuel cap, the connectors, hydraulic lines for the wheel brakes, the connection of the landing strut to the fuselage and so on. Wow … I’m so happy with this!
Also modeled with accuracy is the lining of the engine cowling and then you and I should have a good look to the fasteners that hold the upper and lower cowling together. When you look closely to the cowling you can see that the forward latch and cowling skin is more flush with each other when the aft latch. This is the same as seen on real photos and that means very good news, right?
Another item I’m happy with is the original positioned structure reinforcements. You find these at crucial positions where you have doors or windows. On the edges or along the lower side of the freighter doors, you see them. As real as it gets.
While walking to the tail of the Beaver, you’ll noticed that I had opened all the doors including the so called “Alaska doors” although freighter is perhaps not the right word. By the way, these “Alaska doors” are an after market modification as well as the possibility for a Beaver with an extended nose.
These double doors give access to the last two set of seats, but when you click the individual seats, they disappear and then we have a kind of cargo area. I know, my modeled Beaver is a bit dirty, but when you look to the horizontal and vertical fin, you can clearly see the presence of the rudder (YAW) and elevator (PITCH) trim surfaces. Remember what I wrote before, the original Beaver has only YAW and PITCH trim while for our convenience, the modeled Bever also has ROLL (aileron) trim.
I think I’ve seen enough. I could continue and continue, but the overall is a well modeled Beaver with lots of tiny details included besides that you’re able to add your own weathered look and feel. In fact, the modeled Thranda Beaver is just gorgeous.
That said, it’s time to close the Beaver to wrap it in, to protect the engine inlet and take a brake. See you.
Miscellaneous Section
Installation and Documentation
I didn’t discuss this yet, so now it’s the time to see what to expect and how to install. Once you bought the product from X-Plane.Org, download it, unzip it and install the package in the X-Plane Aircraft folder or create a sub folder “Thranda” and install it in this folder. That’s up to you and handy in case you own more Thranda aircraft.
The activate the Thranda Beaver you need a serial number which is available on your dedicated X-Plane.Org Thranda account page. At first start-up of X-Plane, loading the Beaver, you enter the serial number in the popup window, reload the aircraft and you’re done. To keep your Beaver up-to-date, you need to download the Skunkcrafts plugin via this URL. More information about the Skunkcrafts plugin can be found at this dedicated X-Plane.Org forum page. When you’re new to the Skunkcrafts updater, then check this X-Plane.Org web page for the belonging documentation.
The Thranda Beaver package comes with a couple of manuals and although I briefly highlighted the Thranda Beaver Documentation v7 Acrobat document before, there’s a bit more to explain and what else is included. In the Beaver folder you find the DOCUMENTATION folder which contains the following files:
– Changelog (text)
– Thranda Beaver Documentation v7 (Adobe Acrobat)
– Thranda DHC-2 Beaver Graphics Settings XP11 (Adobe Acrobat)
– Thranda DHC-2 Beaver Joystick Settings (Adobe Acrobat)
– X-Plane G430 Manual (Adobe Acrobat)
– X-Plane G530 Manual (Adobe Acrobat)
Lets start with the easy ones. The X-Plane Garmin G430 and G530 Acrobat documents are made and maintained by Laminar Research. That said, these navigation instruments are not written by Thranda.
I think the changelog text file speaks for itself. As of this writing, the model has been updated to the latest version 1.1.1. The graphical and joystick settings manuals are needed to fly the Beaver correctly in respect to the joystick settings. In fact, the joystick manual refers to the X-Plane Control Sensitivity page. The graphical settings and thus the sliders for the CPU and GPU are recommandations. Depending on your PC, iMac or Mac Pro specifications, you have to set them lower or higher, but the settings showed are recommended.
The Thranda Beaver Documentation v7 is the most important one since it explains all the ins and outs of the modeled Beaver. When the document is opened with Acrobat Reader or a similar program, I notice that it’s divided in a Landplane and Seaplane section. Keep in mind that when you select Seaplane that starts at page 24 and runs till and including 25, that only these pages are related to Seaplane. After page 25 the manual continues with general information for the landplane and seaplane.
The manual offers a lot of general information, but also detailed system description and operation. Further on, the Thranda popup window is well explained and there’s also a section dedicated to the general operation on how to fly the Beaver. This starts at page 48. Although you might over look these pages, the manual offers performance charts, the checklists and the emergency procedures.
Although I mentioned this before, but I think it’s a good idea to bring this again to your attention: perhaps you prefer an electronic checklist instead of the Acrobat version included in this manual. An electronic checklist is then a clist.txt file. Follow this URL for the clist file from Org user royaloak and this X-Plane.Org URL for the Xchecklist program from Org user sparker.
I could write that I miss a tutorial, but on the other hand, the Beaver isn’t such a complex aircraft and the included checklist as well as the “Operations – Flying the Beaver” should give you enough grip to master this modeled Beaver.
Frame Rates
After playing around with the Beaver for days under different environmental conditions and departing/arriving several from medium complex airports, I noticed that the modeled Beaver with all the possible features doesn’t need too many frame rates. Keeping in mind the very well modeled 3D external and 3D cockpit, it’s surprising that you still get good frames. Ok, we are all lucky that X-Plane 11.50+ uses either Vulkan or Metal and that this resulted in higher FPS (Frames Per Second) and less stutter, but still, I’m pleased with the amount of frame rates.
Because of that, I didn’t want to add another section with screenshot only related to the frame rates. I’m also aware that it can make a huge difference in respect to the FPS if you fly the Beaver on Windows 10 with Vulkan or on macOS with Metal. On my iMac Pro I have a dedicated or native Windows 10 drive to be able to test Windows only add-on products.
Summary
What else can I say? It was an awesome experience to review the modeled Beaver by Thranda and perhaps we will review the Pilatus PC-6 too since I’m impressed by what I’ve seen and how it’s made. And this also concludes our Part I of the Thranda Beaver with wheels. As I mentioned before, our Part II of the Thranda Beaver will cover the seaplane model.
The Beaver package offers all kind of aircraft configurations. For those who like to fly in the bush bush they need the tundra wheels or when just fly to/from paved airports, you can equip them the Beaver with normal sized wheels. But for those who love to fly to snowy sceneries, they can equip their Beaver with skis. Although not specifically mentioned, when you like to fly some freight, remove the rear two sets of seats from the cabin, and load the virtual cargo you need to carry. At this moment there’s no option to add visually cargo stuff, but perhaps that will be added with future updates.
That the Beaver is an easy aircraft to fly won’t surprise you, but you need to watch out for your actual center of gravity. And that shouldn’t be a problem with the Weight and Balance popup window. Besides this popup window, the Thranda Beaver offers many other options and own modifications to make it Your Beaver. All Thranda aircraft – Kodiak Quest, Pilatus PC-6 and the Beaver – are equipped or build with Thranda’s “Dynamic Generation Series” that takes full advantage of X-Plane’s flexibility for in-sim, real-time modifications to the currently loaded plane! Existing Thranda planes have just been updated, and are already a part of this series, but highlighting the features of this series should help communicate the value these planes provide.
I sincerely hope that this review offers you with my personal touch, a strong foundation to check out the dedicated Thranda Beaver X-Plane.Org sales page and hopefully you decide to buy this multifunction GA aircraft. As of this writing – January 2021 – the Beaver has a retail price of 39.95 USD and as I mentioned before, updates are free via the Skunkcrafts updater.
Not a part of this review nor a part of the Thranda Beaver sales package is the possibility to add from SimCoders.com their “Reality Expansion Pack” to it. This expansion pack offers ultra realistic flight and ground dynamics, economic system, interactive walk-around, realistic Pratt and Whitney R-985 Wasp Junior engine logic, engine preheater, realistic landing gear, and electrical and avionics system behavior.
I haven’t reviewed it yet so it’s difficult to judge about what it does, but knowing Thranda or Dan for a while, when he models or programs something, it’s reflecting reality. That the SimCoders.Com Expansion pack offers also an interactive walk-around, ok, that’s something Thranda doesn’t offer.
Another add-on product that can be use in combination with not only the Thranda Beaver, but with every aircraft is “XP Realistic” version 2.x. XPRealistic V2 brings a whole new world of immersion into X-Plane. With a growing list of 40 realistic camera and sound effects, you will experience X-Plane like never before. XPRealistic V2 bring realistic effects for GA, Jets, Turboprops, Gliders, Helicopters, Seaplanes and more.
See you at Part II of the Thranda Beaver Story.
Feel free to contact me if you’ve got additional questions related to this impression. You can reach me via email Angelique.van.Campen@gmail.com or to Angelique@X-Plained.com.
With Greetings,
Angelique van Campen
| Add-on: | Payware Thranda Design |
|---|---|
| Publisher | Developer: | X-Plane.Org | Thranda Design |
| Description: | Ultra Realistic rendition of the DHC-2 Beaver |
| Software Source / Size: | Download / Approximately 1.67GB (unzipped) |
| Reviewed by: | Angelique van Campen |
| Published: | January 29th 2021 |
| Hardware specifications: | - iMac Pro - Intel 3GHz Intel Xeon W / 4.5Ghz - Radeon Pro Vega 64 16368 MB - 64 GB 2666 MHz DDR4 - 1 internal shared 1TB SSD (Big Sur 11.x) - 1 internal shared 1TB SSD (Bootcamp Windows 10) - 1 external 2TB LaCie Rugged Pro SSD (Big Sur 11.x) - Saitek Pro Flight System X-52 Pro and X-56 Rhino - Honeycomb Alpha Flight Controls - Honeycomb Bravo Throttle Quadrant |
| Software specifications: | - macOS Big Sur (10.15.x) - X-Plane 11.5x |









































0 Comments