Cessna C337F Skymaster | Thranda Leaves the Bush
Introduction
The first thing of notice about Thranda Design’s C337F Skymaster comes from Thranda having produced a number of very successful and acclaimed aircraft models that are as much at home on dirt, rocks, snow and water as they are on a paved runway. The C337F does not boast this capability even though some people do fly the Skymaster from dirt and grass strips. A scan of a Skymaster owners message board, however, shows this is done with a lot of caveats and without specific instructions in the handbook on the settings for doing so.
So why is this pavement bound aircraft coming to us from the studios of Thranda Design? My curiosity got the better of me, so I posed this very question to Dan Klaue, Thranda’s Project Manager.

Dan’s reply is both personal and professional. He has long admired the C337 “ever since I was a kid” and “could really not wait to do this plane as a Thranda DGS project.” His admiration of the C337 stems from his finding the concept of the push-pull configuration ” … so amazing, and such an ingenious way to deal with the torque issues, especially during engine failures”. Well, thanks to Dan, we know one issue we’ll be focusing on in this review.
Dan added to the personal with the professional and business model perspective that Thranda embraces. “At Thranda, we also don’t JUST want to be stuck in the bush plane category, but still like the quirky, experimental, and more creative designs out there, especially those that also fit in well with our dynamic generation series concept.” I suspect that we can expect to see some very interesting and intriguing products emanating from their studios during the life span of X-Plane 12 and beyond.
Turning to the aircraft itself, the Cessna 337F Skymaster is not a performance maven, nor does it boast an advantage in fuel consumption. What it is, is the most successful (in terms of numbers built) of the push-pull twin engine aircraft brought to market. Dan’s admiration of this configuration’s effect on the torque issue is shared by many and this is what made it so successful. The FAA went so far as to create a specific class rating for the aircraft that limits pilots to centerline thrust.
The Skymaster boasts the safety of a second engine and the ease of dealing with an engine out condition that most twin-engine aircraft can’t touch as a result of the centerline thrust configuration. Identify which engine quit, feather it, and skip the dead-foot / dead engine routines. Other favorable features of the Skymaster include its having the best visibility of any of Cessna’s high wing aircraft since the pilot is seated far enough in front of the wing to have a clear upward view.
The Skymaster never entered the realm of the most popular twin-engine aircraft, and it appears that fuel consumption and noise levels in the cabin may certainly have been contributing factors. One other recurring complaint about the 337 is its lackluster rate of climb. The low stall speed allows for one of the shortest runway length requirements of any twin, but the slow climb rate extends the take-off roll / object clearance distance considerably. The aircraft also became known as a bit of a maintenance hog while other twins offer the same performance, or better, on less fuel and with less money spent on wrenching.
Some average numbers for the 337 gleaned from a few different sources are:
Top speed: 173 kts
Cruise speed: 165 kts
Stall speed: 61kts
Gross weight: 4,630 lbs.
Empty weight: 2,695 lbs.
Fuel capacity: 93 lbs.
Range: 920 nm
Takeoff ground roll: 1,000 ft.
Rate of climb: 1,100 fpm
Service ceiling: 18,000 ft.
Landing ground roll: 700 ft.
Installation and Documentation
The Thranda Skymaster is available as a 1.4 GB download from the X-Plane.org store.
Installation is a straightforward matter of expanding the archive file into the X-Plane aircraft folder. This should result in your now having a folder named Thranda_C337_Skymaster” in that aircraft folder. The expanded folder will be about 1.73 GB in size.
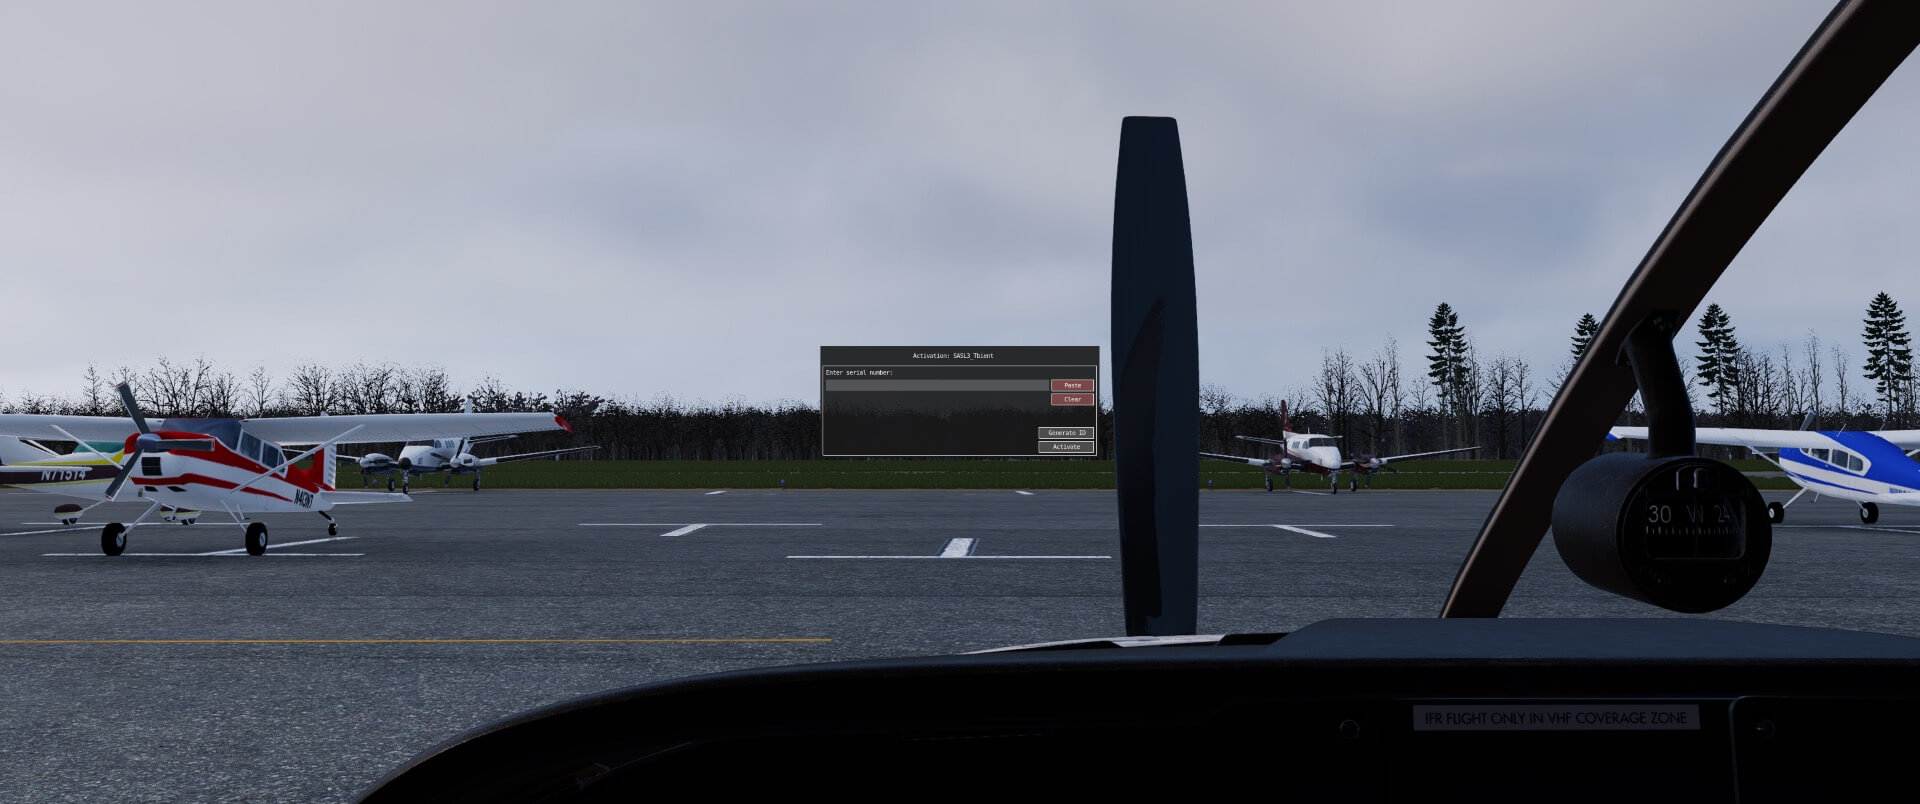
When you first launch the Skymaster inside of X-Plane, you will be greeted with two error messages regarding issues related to the aircraft. This happens because the license has not yet been entered. Clear the error related to the sound bank and you will see the license activation box. Enter your code and click the activate button. You will then need to either reload the aircraft from the Developer menu or restart X-Plane. The recommended best practice is to opt for the restart.


If you are using the Skymaster in the X-Plane 12 environment, you will also be prompted to change the aircraft to the XP 12 version. This is explained in the ReadMe.txt file found in the XP12_ACF folder. If you respond to the prompt in the affirmative, you will need to again reload the aircraft or restart X-Plane.

Finally, it is also recommended to run the Skunkcrafts updater to ensure you have the latest version of the aircraft. The updater may have a more current version than that available in the store. You can check for an update with the Skymaster loaded although you will need to have a different aircraft loaded in order to apply any updates that Skunkcrafts finds.
The Thranda Menu
Much of what constitutes the dynamic generation series of aircraft from Thranda is found on the Thranda pop up menu. The menu is accessed by clicking on the grey arrow button that you will see on the left side of your screen once the Skymaster is loaded. One note on the arrow button: if you do not want to see it while flying, you can hover your mouse cursor over it and use your mouse wheel to change the transparency level of the button. Note the small vertical grey bar against the edge of your screen.
You will need to know where it is if you make the button transparent and want to position your mouse cursor where using the mouse wheel will bring it back to opaque. By the way, this menu does not move to different locations on the screen. It does, however, respond to the user interface size option on the X-Plane graphics settings page. If you are running the simulator at a very high resolution and are having trouble reading the Thranda menu, increase this setting and the menu will increase in size.
With the pop-up menu, you can control the operating parts of the aircraft such as the doors, cowl covers, and ground equipment. You can change your livery on the fly, configure the interior of the aircraft and adjust the weight and balance. Adjusting the sound volumes and camera views as well as activating the slew mode are done here as well. One of the most exciting features, customizing your instrument panel, is done through this menu.
Finally, you can adjust the DynaFeel Intensity and change your preferred yoke style.
General
This menu is broken into four quadrants by the presence of the aircraft representation. The first option in the upper left corner provides access to the electric tug you operate with your flight controller to move the Skymaster around. Pulling forward moves the tug and the Skymaster forward while pushing back does the opposite. You can turn the tug using whatever you have assigned to the yaw axis or by using your mouse scroll wheel when you see a double arrow cursor over the white dot that appears just in front of the spinner. When you activate the tug, the green click point on the bonnet, that can also be used to activate the tug, should turn red. You will also see a green “zero” to the right of the nose that will give you an indication of how fast you are moving the plane with the tug.
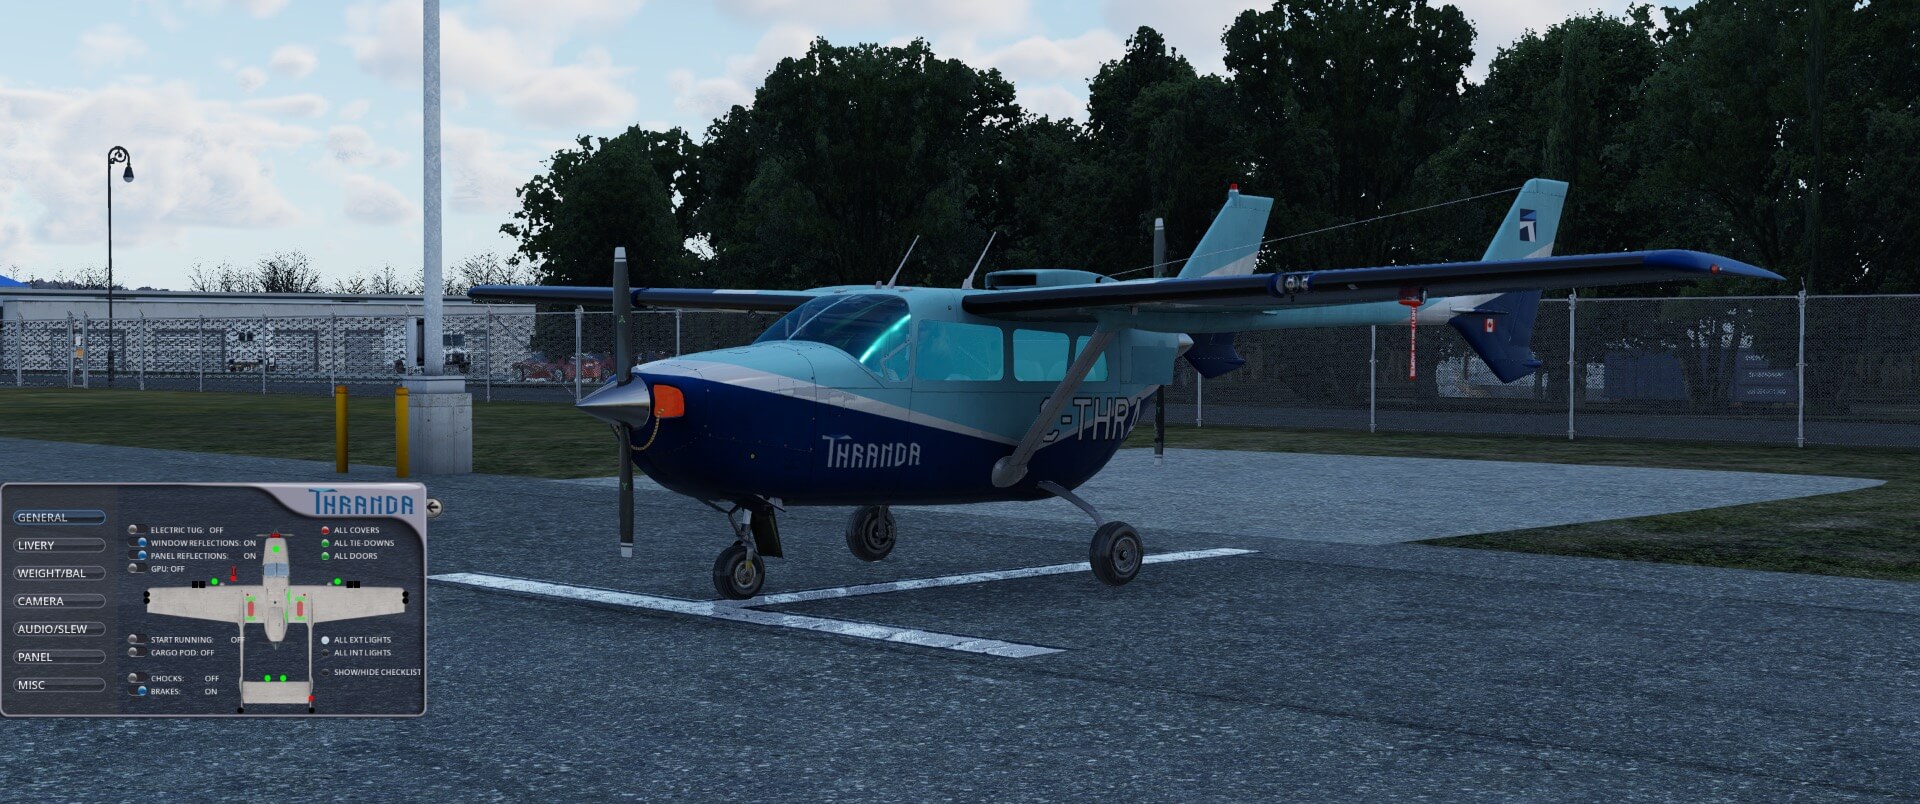

Window reflections and panel reflections will provide you with a more realistic, as well as more obscured, view of the instruments and the view outside the cockpit. Some of the instruments, and the windscreen, have particularly high amounts of reflection as we shall see. Lastly, you can choose to use the GPU as a source of power
The top right quadrant contains three options for controlling the covers, tie downs, and doors. The position or state of an item is indicated by its color, red or green. In the case of the covers and tie-downs, green is the proper color for flight and red means they are in place and the aircraft is parked. You have the option of clicking on the individual spot for the item you wish to manipulate or selecting the “all” option in this upper right quadrant to change the status of all items in that category at one time. The doors are selectable and can be manipulated directly with click points on the aircraft representation as are the individual covers and tie downs. The engine bonnet is removed and replaced by clicking on it anywhere around the tug control dot.

The lower right quadrant contains options for the external and internal lights. These two items work the same way the selections above them do. You do need to have the battery turned on to enable the lights to work. If one or more exterior lights are on, the indicator will be a white dot. If all are off, the indicator is black. You can select individual lights to turn them off or on. The interior lights are also individually selectable on the aircraft schematic. A tiny oddity exists if you turn on all the lights with the menu selection and then individually turn them off. In this case the white menu button does not extinguish to indicate all the lights are off.
At the very bottom of this quadrant is the Show/Hide Checklist option which brings up the Skymaster’s normal procedures checklist for you to follow from pre-flight inspection to shutting down and securing the aircraft. This is followed by the emergency procedures check list. The checklist is both movable and resizable and can be assigned to either a keystroke or controller button.

In the final quadrant at lower left, are four additional options that allow for control of ground operations. This is one way to set the brakes if you care not to do it from within the cockpit. You may control the chocks individually from the “all tie-downs” options.
This menu provides the option to add the cargo pod for your freight carrying missions. Thranda’s penchant for details means that selecting the pod will add 35 pounds to the Skymaster. This weight is reflected in the Weight and Balance menu and affects cruise speed due to the additional drag. In one flight, after attaining a stable cruise speed during straight and level flight, activating the empty cargo pod decreased my speed by five knots. Adding the cargo pod will also add a door control button to the menu that you click on to open or close that door.

The final option for this menu is the Startup Running option. This will allow you to have the Skymaster load into the simulator with engines running. As soon as you click on this, your current flight will end, and X-Plane will go into its load new flight routine. The Skymaster comes back with everything ready for takeoff. It is advisable to double check all your switch settings. When you tick this off, the same thing happens except the Skymaster reappears in its cold and dark state and again, checking switch settings is a good idea.
Livery
The next section of the menu controls the appearance of your Skymaster. There is a lot of depth to this menu that allows for many customizations. You can select an existing livery from the aircraft’s livery folder by scrolling through the preview images using the Prev and Next buttons or by using your mouse scroll wheel while hovering over the image. You can also enter the Dynamic Livery area where you have the capability to create your own paint scheme based on either a Classic or Modern design. This menu also allows you to control how shiny and or reflective your aircraft will be and how dirty it will be.

By default, when you select this menu, you will see that painted liveries is active and there is a small preview of your current livery. Under the preview are the notations “Dirt” and “Scratches” followed by numbers. You position your mouse over the number and use the wheel to change it. The higher the number, the dirtier and more scratched up your plane becomes. Now you can have your aircraft looking just as new or beat up as you think it should.

The Skymaster Manual found in the Documentation folder of your Skymaster installation exhaustively covers every part of this menu. There are a couple of things to be aware of about the dynamic livery options that are not mentioned. The first is that assigning a high level of metalness or roughness results in a grey preview image that impedes the display of your chosen color. For this reason, you may want to complete your color scheme first and then assign your selections for metal and rough.
Secondly, your color tones or shades will change as you change the metal and rough characteristics of your aircraft surface. Lastly, you may need to swap out to a painted livery and come back to your custom livery to get all the changes to take effect if applying your dynamic livery a couple of times does not reflect the change you made.
A few additional notes about this menu. If you want a visual guide of what area each item on the paint list covers, go to the MYEYES liveries and see the wild schemes created by Thranda. You can swap between Classic and Modern themes and the livery will uniquely color each area mentioned in the list.
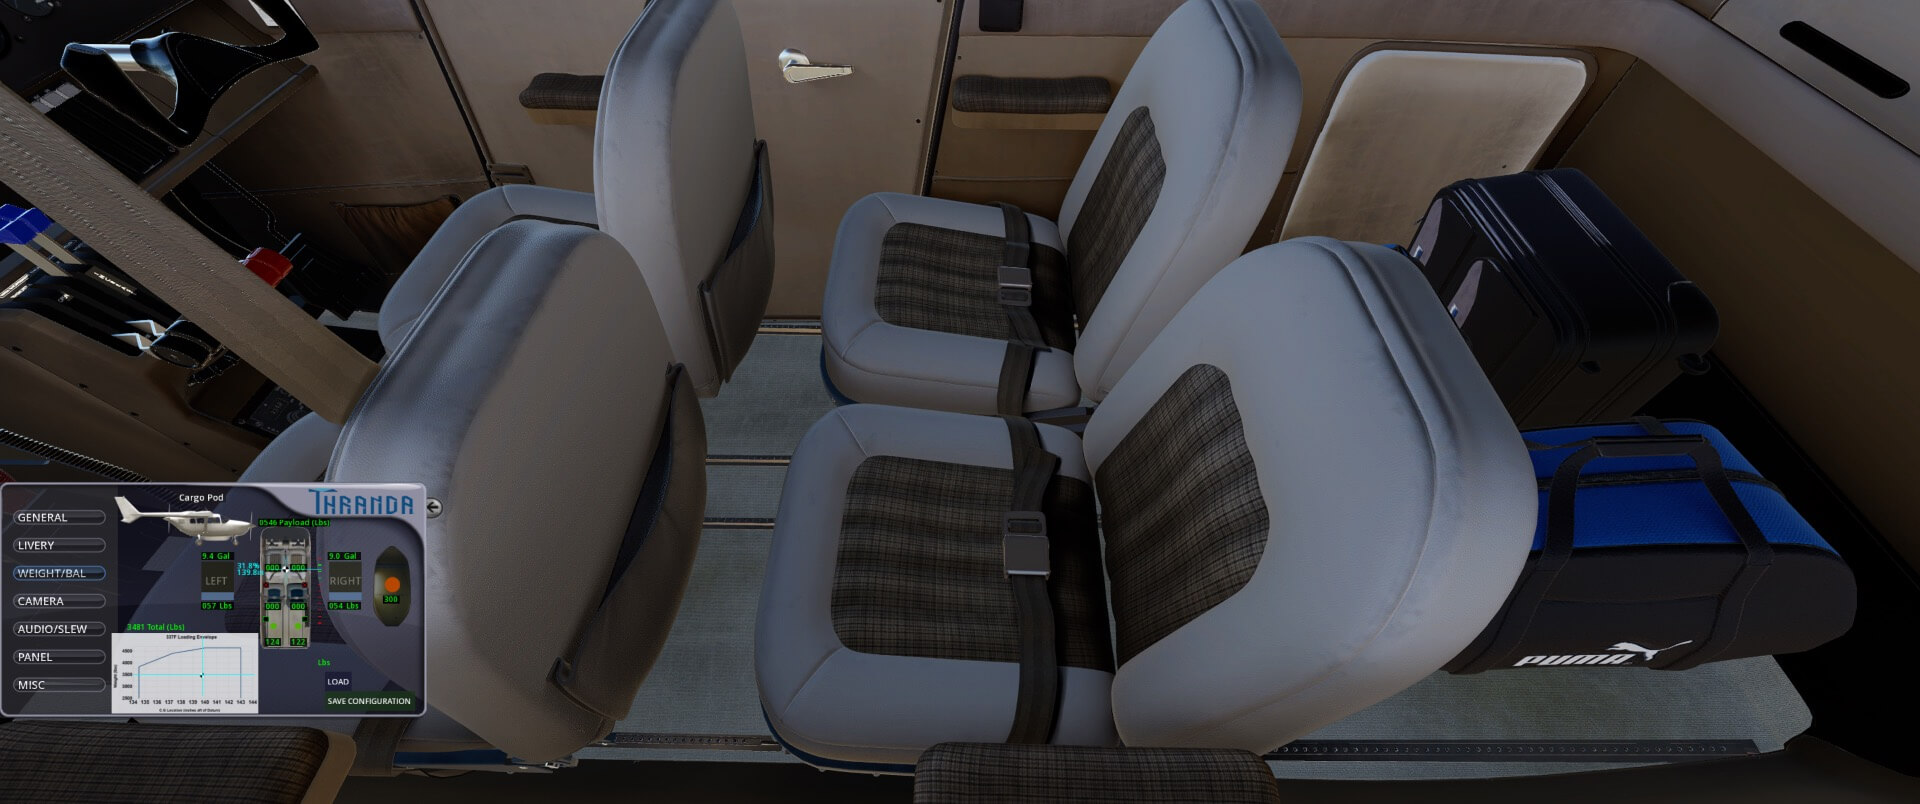
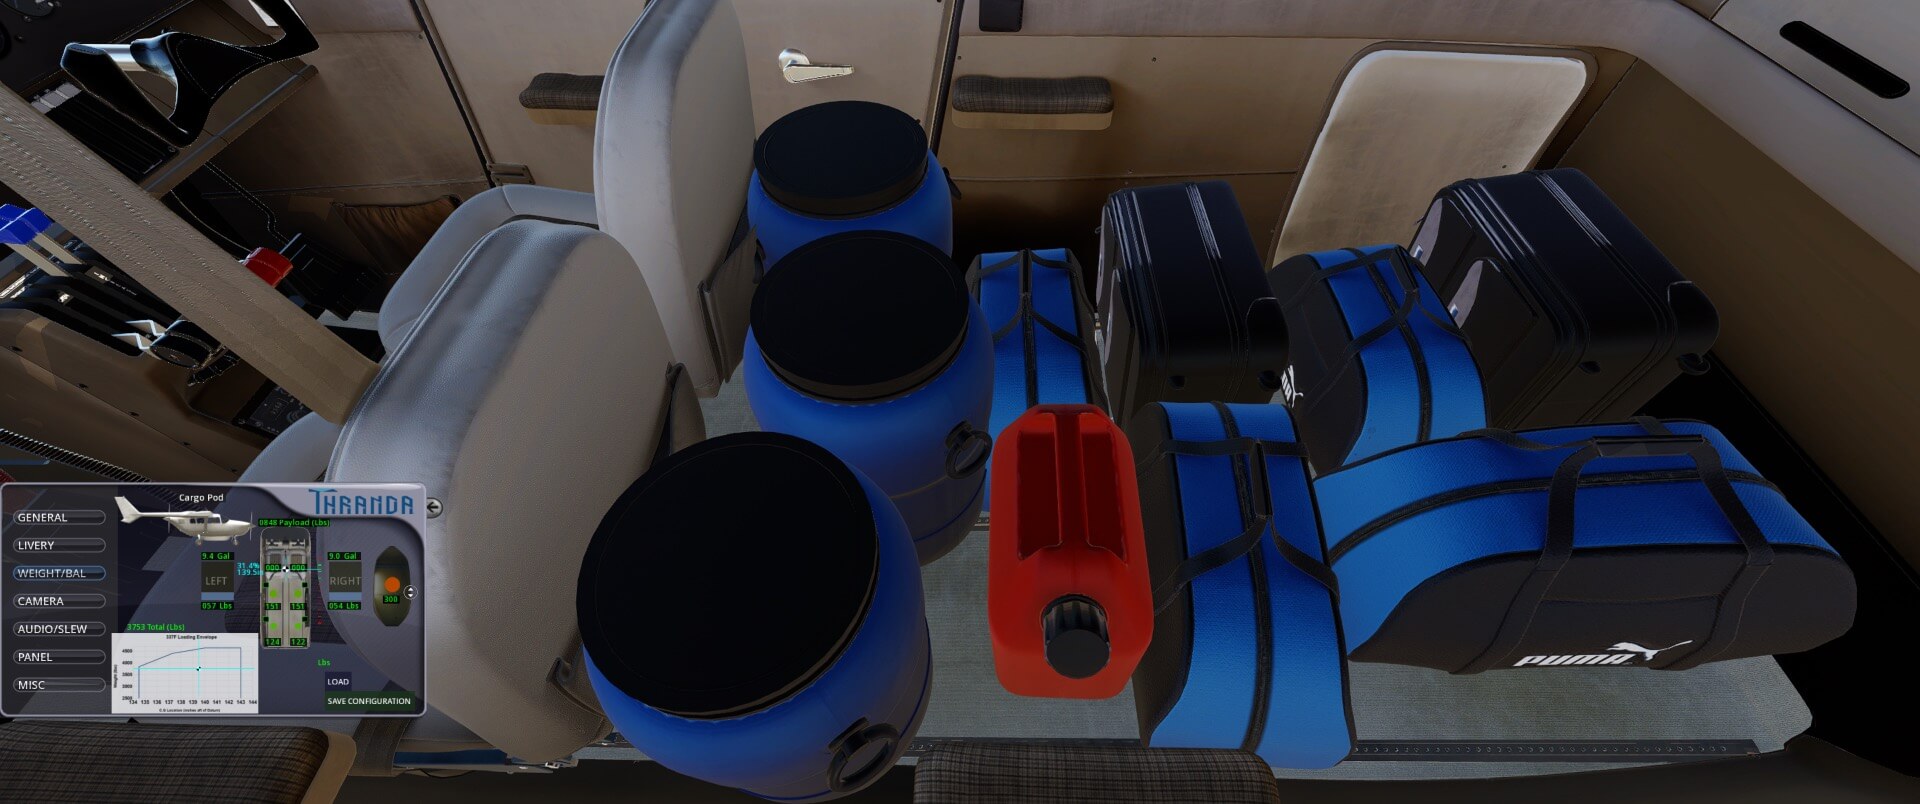
Weight/Bal
This interactive screen gives you more control over passenger and cargo weight than the default X-Plane options does. Additionally, you can remove the four passenger seats to increase your cargo capacity. This is done by toggling the red “x” at each seat location on the diagram. Each seat adds or subtracts 15 pounds from the total weight of the aircraft and can have a maximum weight of 350 pounds. The cargo pod, if you are using it, possesses a maximum capacity of 300 pounds.


The cargo depiction is different for each seat with differing minimums to get the first item to appear. The visuals for the cargo reach their maximum prior to reaching the maximum capacity for each area.
Camera
This menu is pretty much self-explanatory. It is a handy way to switch your viewpoints if you don’t want to assign them to your controller or keyboard. These are the defaults set by Thranda. If you reassign the view number to your own selected view, the simulated keypad will take you to those set views and not the default views listed. You can still access the Thranda default views by clicking on the green dots around the airplane silhouette.


The FOV slider is a convenient way to widen or narrow your field of view without having to interrupt your flight to go out to X-Plane’s graphics setting menu where this setting is otherwise located. I was only able to get this control to move by moving the mouse cursor over it until I got a two headed arrow cursor, and then scrolling with my mouse wheel button in the direction I wanted the slider to move. Clicking on either side of the button or attempting to click and drag the button provided no result.
Audio / Slew
This menu allows you to alter sound volumes per channel. Again, these are native X-Plane settings, but Thranda has been providing a way to do this while you are in flight since the beginning of the dynamic generation series. This can be very convenient particularly when the engine sounds are drowning out the radio volumes. This seems to happen arbitrarily with several aircraft I have flown, and I have found this option to come in handy more than once. Another option is to click on the headset jack in the 3D cockpit to mute the engine sounds temporarily.

The slew feature allows you to quickly change the position of the Skymaster. You can do this while the aircraft is on the ground or in the air. There is an indicator informing you if ground mode is active directly under the Slew Mode button. This feature tends to be more precise than the built in X-Plane function found on the sectional map. The one variable missing here that is on the default is the ability to set pitch angle. Other than that, heading, altitude, and location are easily set by clicking on the corresponding buttons and dragging them to move your aircraft.
Panel
This menu allows the operator to customize their aircraft instruments to their liking. You can choose from any of fifty-two different instruments including the Reality XP GTN 750 and GTN 650 if you own those add-ons. If you want to know more about the RealityXP package, you can find the information here.
I highly recommend you reference the Thranda manual in the Documentation folder if this is your first time with this feature. So, let’s get an overview of how this works and then you can follow up and get all the details in the Skymaster Manual.


The panel menu is a bit crowded and can seem a bit overwhelming the first time you see it. The image of the panel is a preview image of the currently in use panel. The panel number is shown under the preview image. There are many options included on this one screen that allow you to select a preconfigured or saved panel, enter panel layout mode that will cover the panel with all kinds of green highlights, and add, save, and delete panel presets. A new panel will always start with duplicating the currently active panel. The Skymaster ships with 6 pre-configured options.


A word of caution for all click points on this menu. They are very close together and, at high resolution settings, you can very easily think you are clicking on one and hit the other. I lost a completed panel doing this when I clicked on the “Add Duplicate” area and “Remove Last” is what happened, and I lost my panel. You may find that you want to increase the X-Plane interface size on the X-Plane graphics settings screen, but you will need to reload the aircraft either by using the option on the X-Plane developer menu or by switching to a different aircraft and coming back to the Skymaster. If you reduce the interface size after you are done with your panel, you will need to repeat the reloading. At this point, it is best practice to close X-Plane and restart it. Make sure you save your panel first.
The layout feature utilizes the X-Plane feature for highlighting instrument click spots. For this reason, you need to keep in mind that not everything that is highlighted can be moved or removed from the panel. The gauges and features that can be customized are highlighted with a green octagon, most of which have circles at the four cardinal points.
The center of the octagon allows you to click and drag the item on the x- and y-axes. The bottom green circle allows you to click and drag to adjust the location along the z-axis. The top circle will tip the instrument and the right one will rotate it. The left one is listed as controlling the lighting intensity.
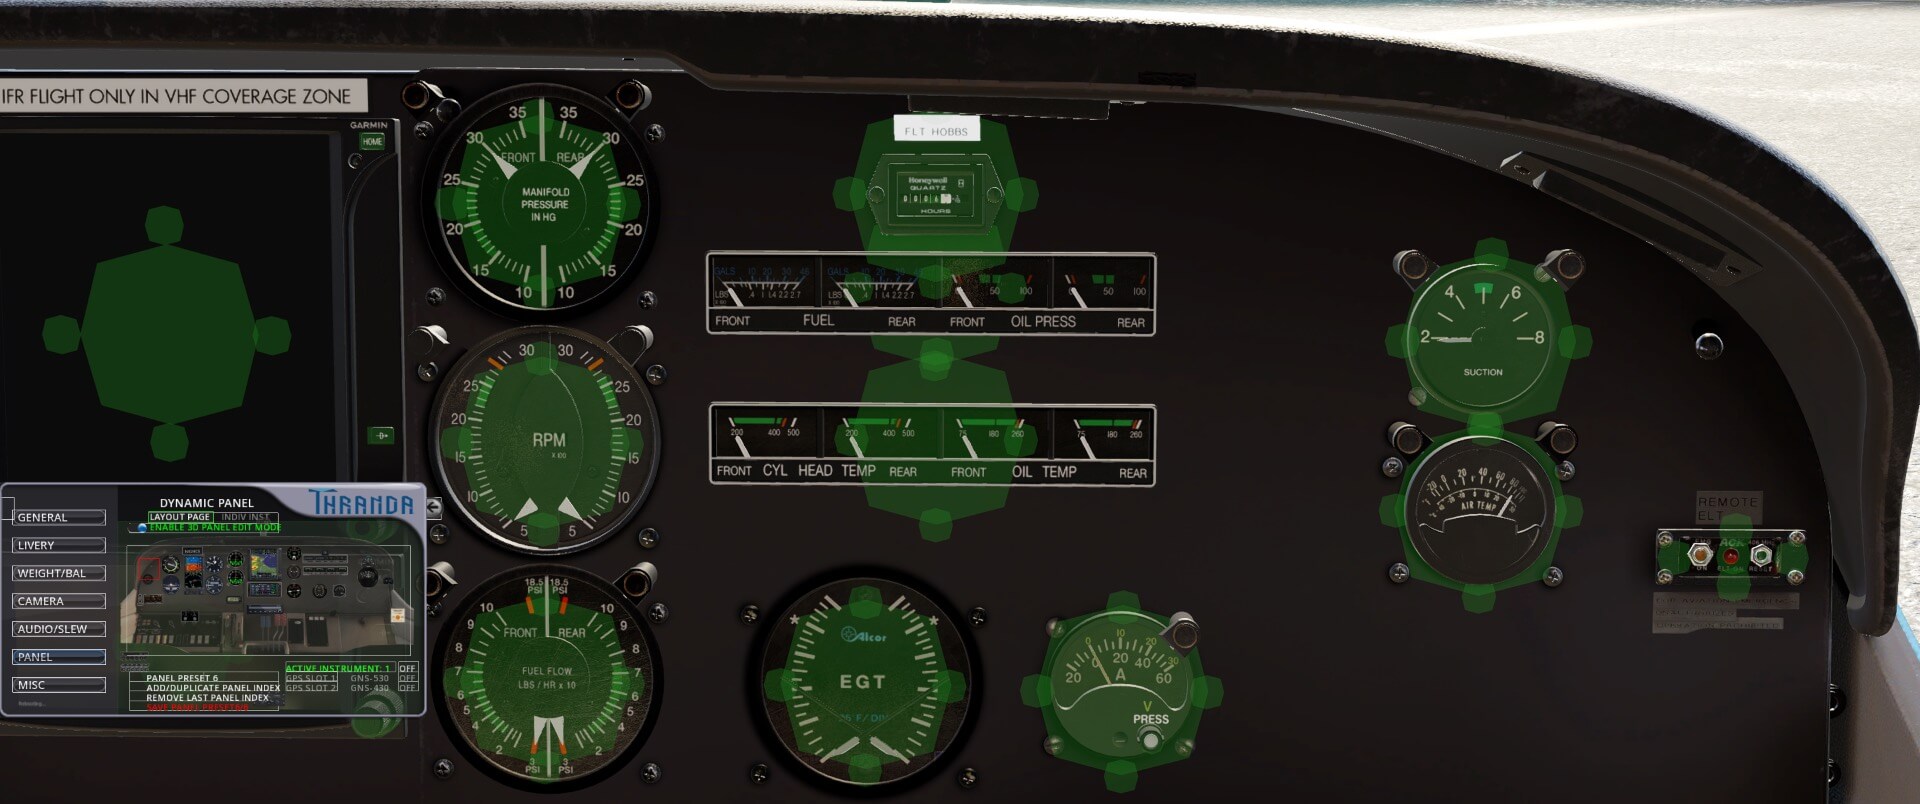
The individual instrument tab allows you to work with each instrument. Here is where you activate an instrument you want and deactivate the ones you don’t want. The instrument is bright and opaque when “on” and dim and translucent when “off”. Of note on this tab is the second button from the top. That button allows you to change from working with an individual instrument to working with the GPS units. Towards the bottom, there is a lighting index number. This allows you to dictate what group an instrument is assigned to when it comes time to turn on the lights.
One glitch that can happen and is good to be aware of is the “lost” instrument. If you are activating an instrument using the individual instrument tab and cannot find it on screen, it may have become “lost” behind the panel by being set too far back on the z-axis.

Once there, it cannot be selected and moved by the mouse. There are two ways to get it back. The first is utilizing the numerical method on the individual instrument tab as described above. The other is to move the camera behind the panel to find it and then you can click on the lower circle to drag it on its z-axis to bring it out in front again.
It is a good idea to back up the file that defines your panel once you are satisfied with it. The file bears the name Panel#.json where # is the number assigned to your panel noted in the red text at the bottom of the menu. Those files are found in the “Thranda_C208_Skymaster\objects\Inst” folder. Always remember to save your panels because they do not survive restarting or reloading the aircraft if you haven’t.
Misc
We now arrive at the last section of the Thranda menu that has four sections for miscellaneous configuration options and flight adjustments.
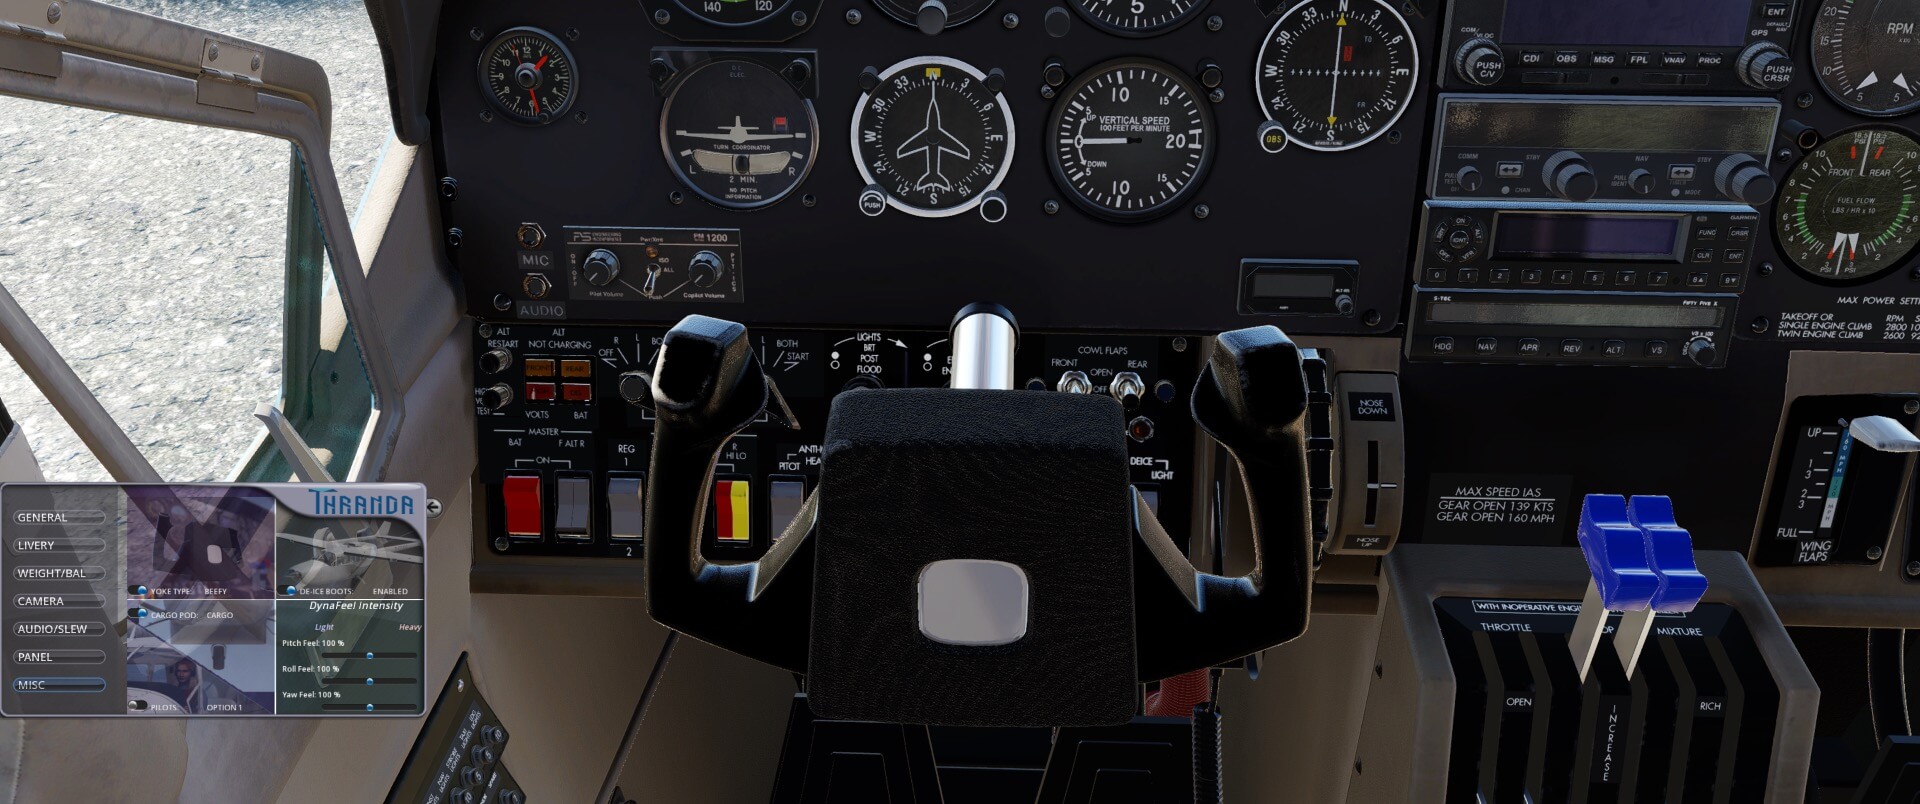
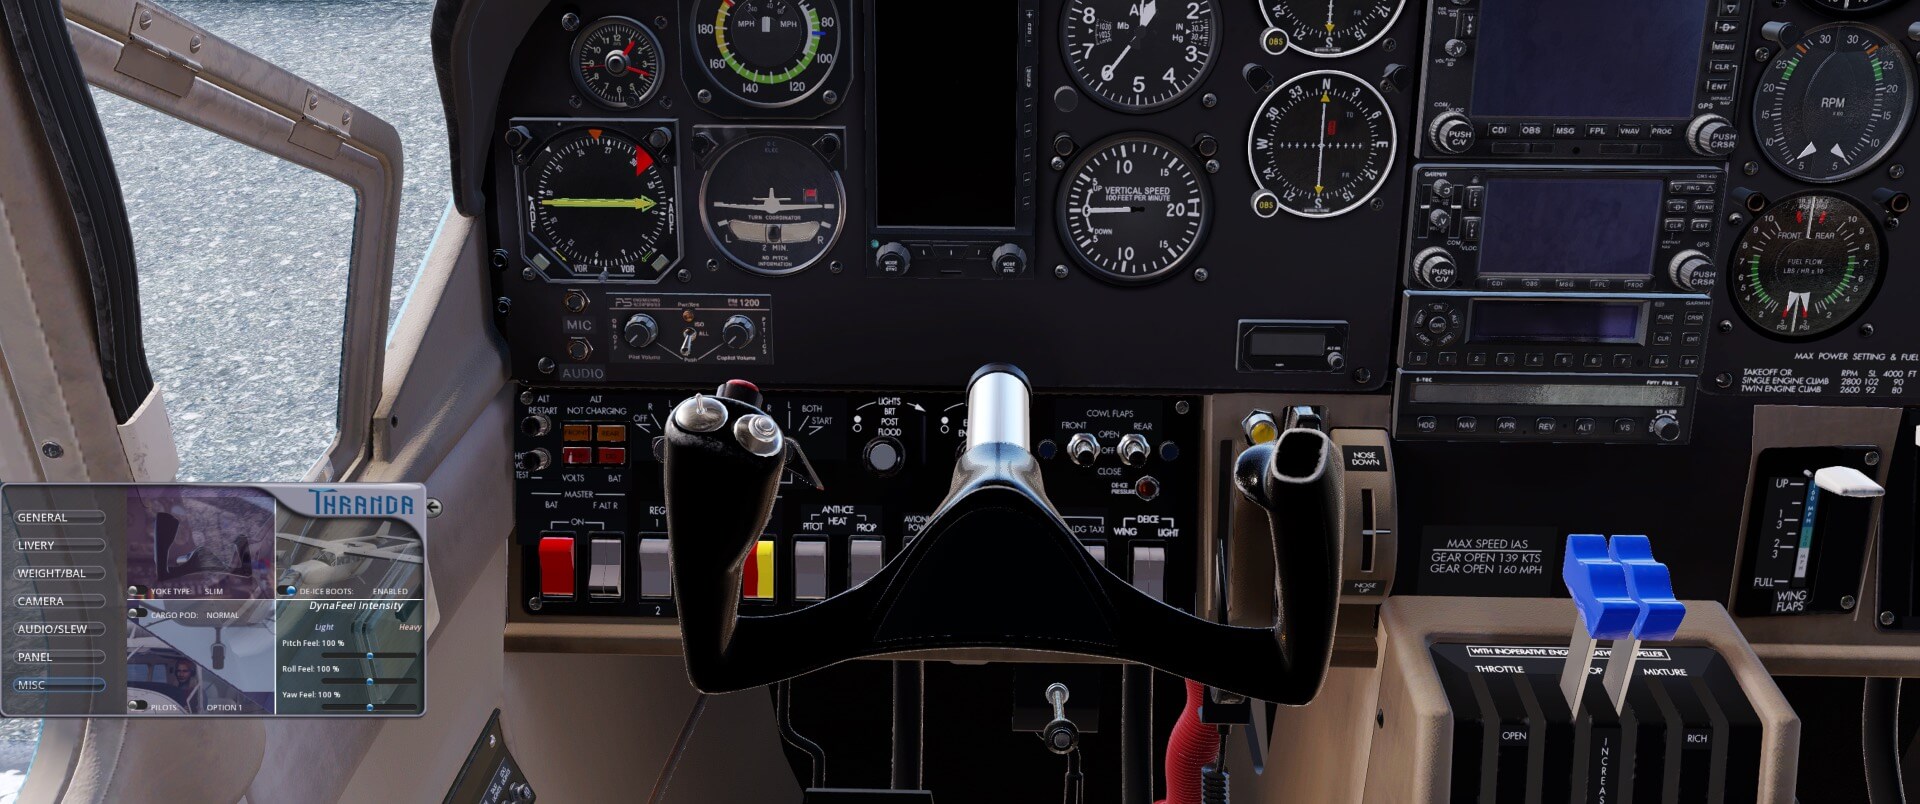
The upper left introduces a new option for the 337. Thranda has provided you with a choice of yoke type. You can choose between the “beefy” Cessna yoke or a slimmer profile yoke that features thumb-tip controls.
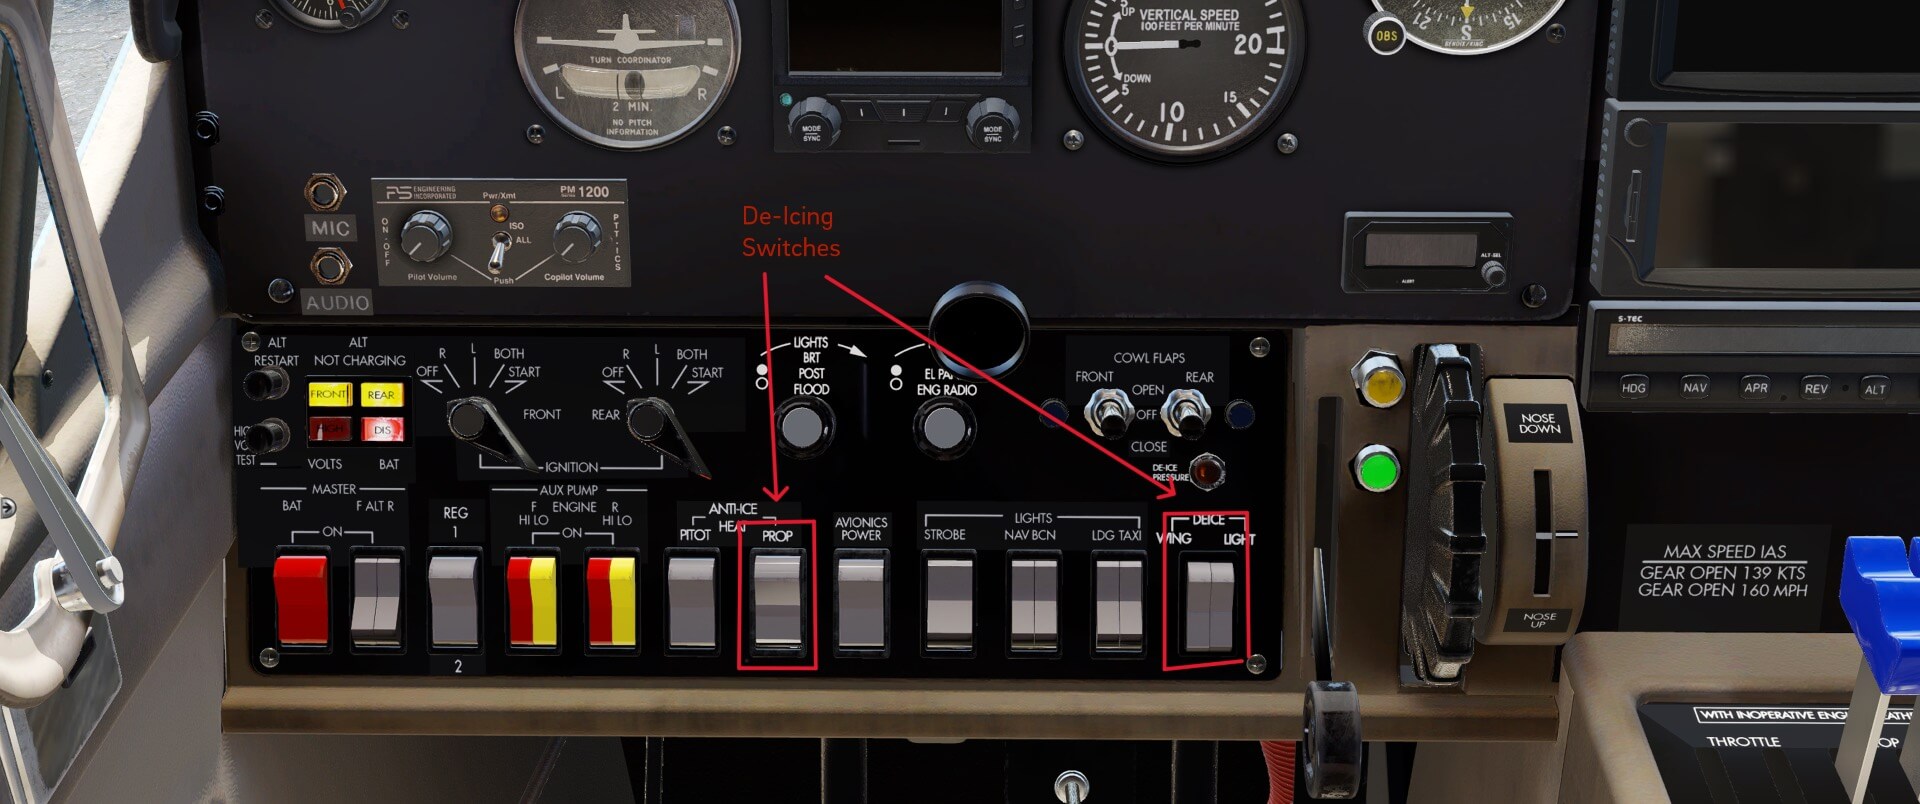
The upper right allows you to configure your Skymaster with De-Icing boots. This adds switches to the panel for controlling de-icing equipment and the added left wing light. Boots are added to the wing and horizontal stabilizer leading edges and electric propellor heat is now available for the front propellor only. For this simulation, the equipment does not add any weight to the aircraft.


At lower left is another location to activate the cargo pod. Here is also the location of another new option Thranda introduces with the Skymaster. We now have the the choice of a female or male pilot. The default is the female pilot (Option 1).
Control “feel” is controlled by the DynaFeel Intensity sliders for pitch, roll, and yaw. I refer you to page 19 of the Skymaster Manual for the technical description of what light and heavy means. The simple version is that light means the Skymaster responds the same at all speeds while heavy means the pilot must exert more energy at the controls to get similar results at high speeds that he or she would get at lower speeds with less effort.
Does this work?
To be honest, I don’t know how exactly how one describes “feel” in a simulator that is entirely visual but, I did notice a difference in flying the Skymaster when I changed this setting. Some of it seemed subtle, but an experienced pilot that knows what they are looking for may discern more than I. That said, the manual makes the point that the plane has been carefully tuned to respond accurately with this setting at 100 percent.
Exterior Modelling
Having considered all of the options available for the Thranda C337F Skymaster, we can now turn our attention to how well they built their aircraft. We will start with a tour around the exterior of the plane.
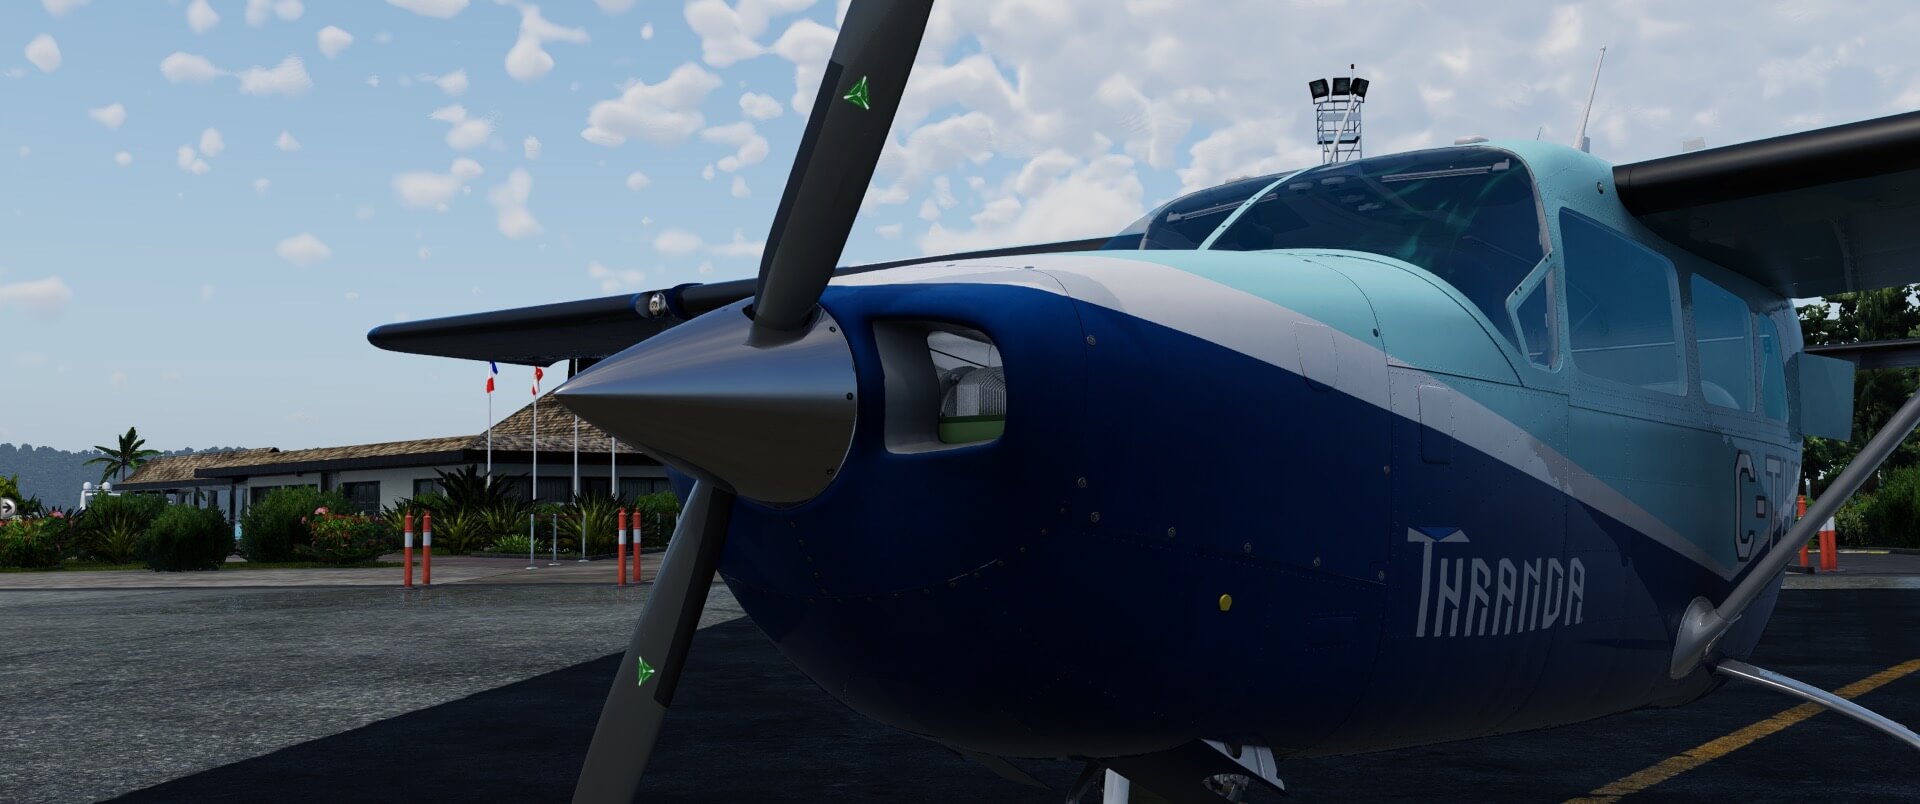
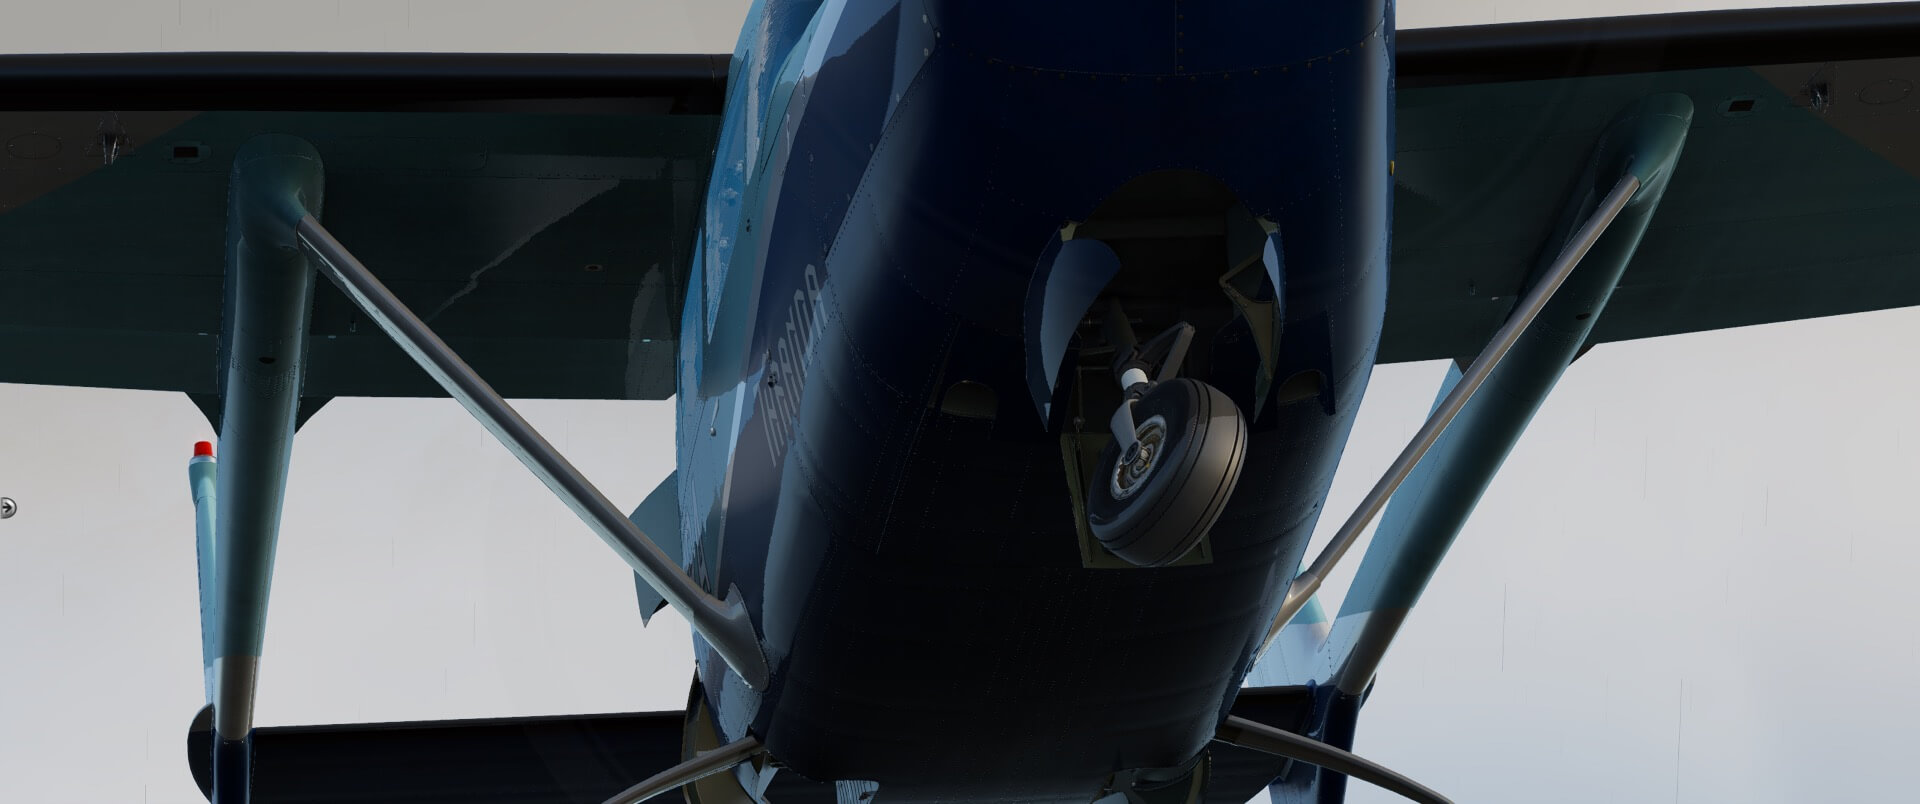
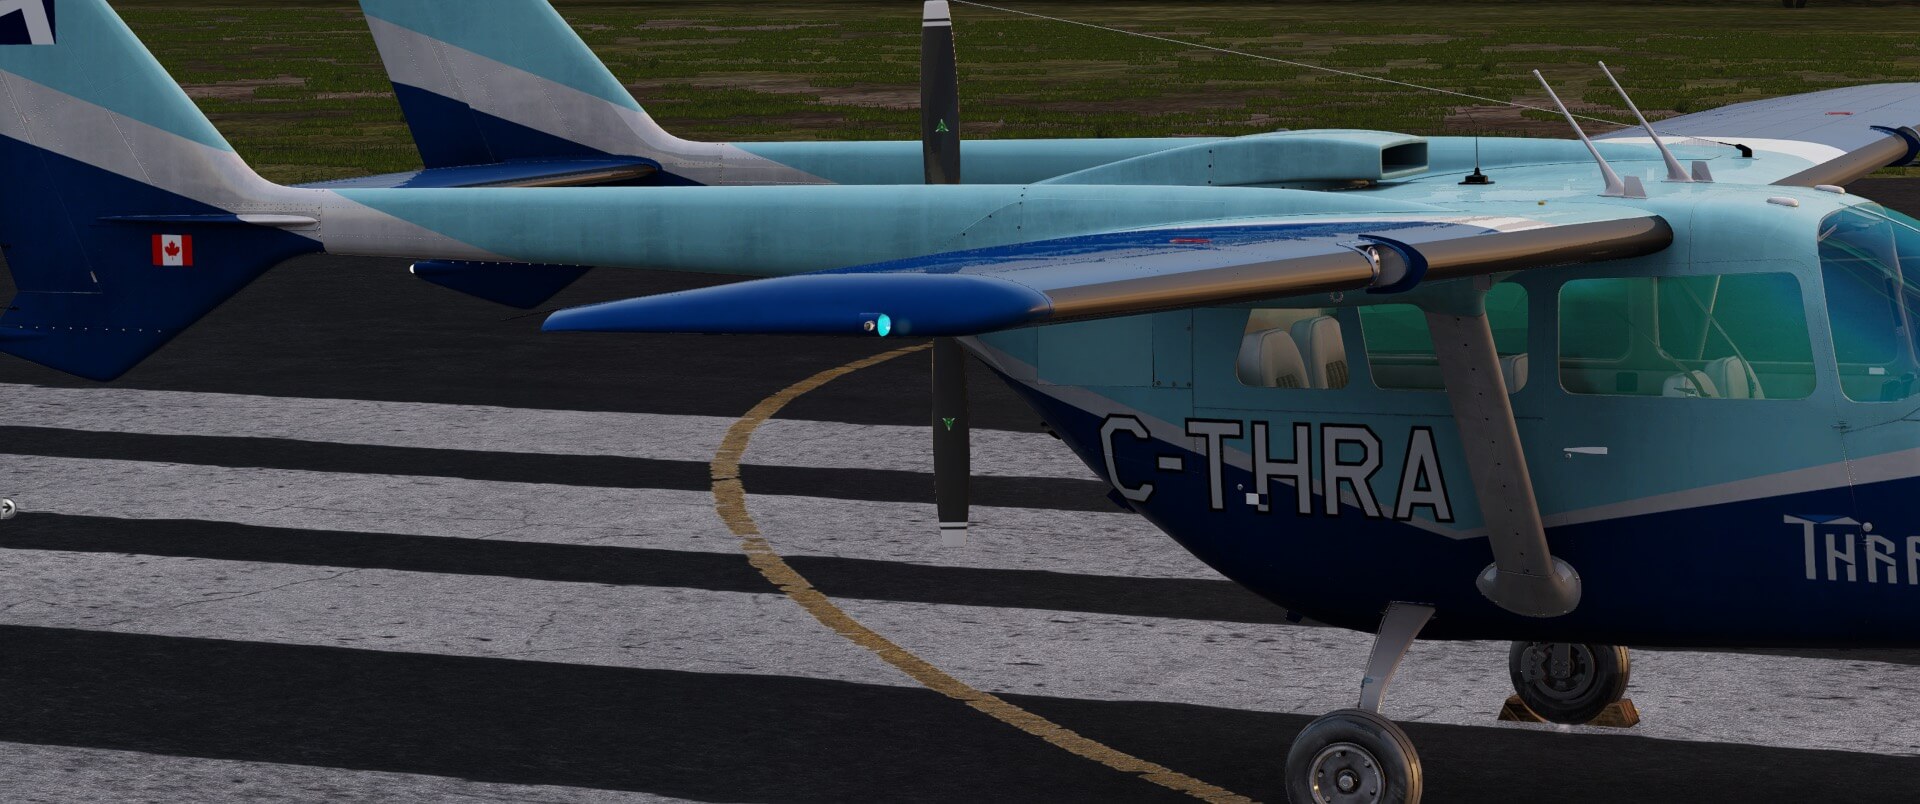
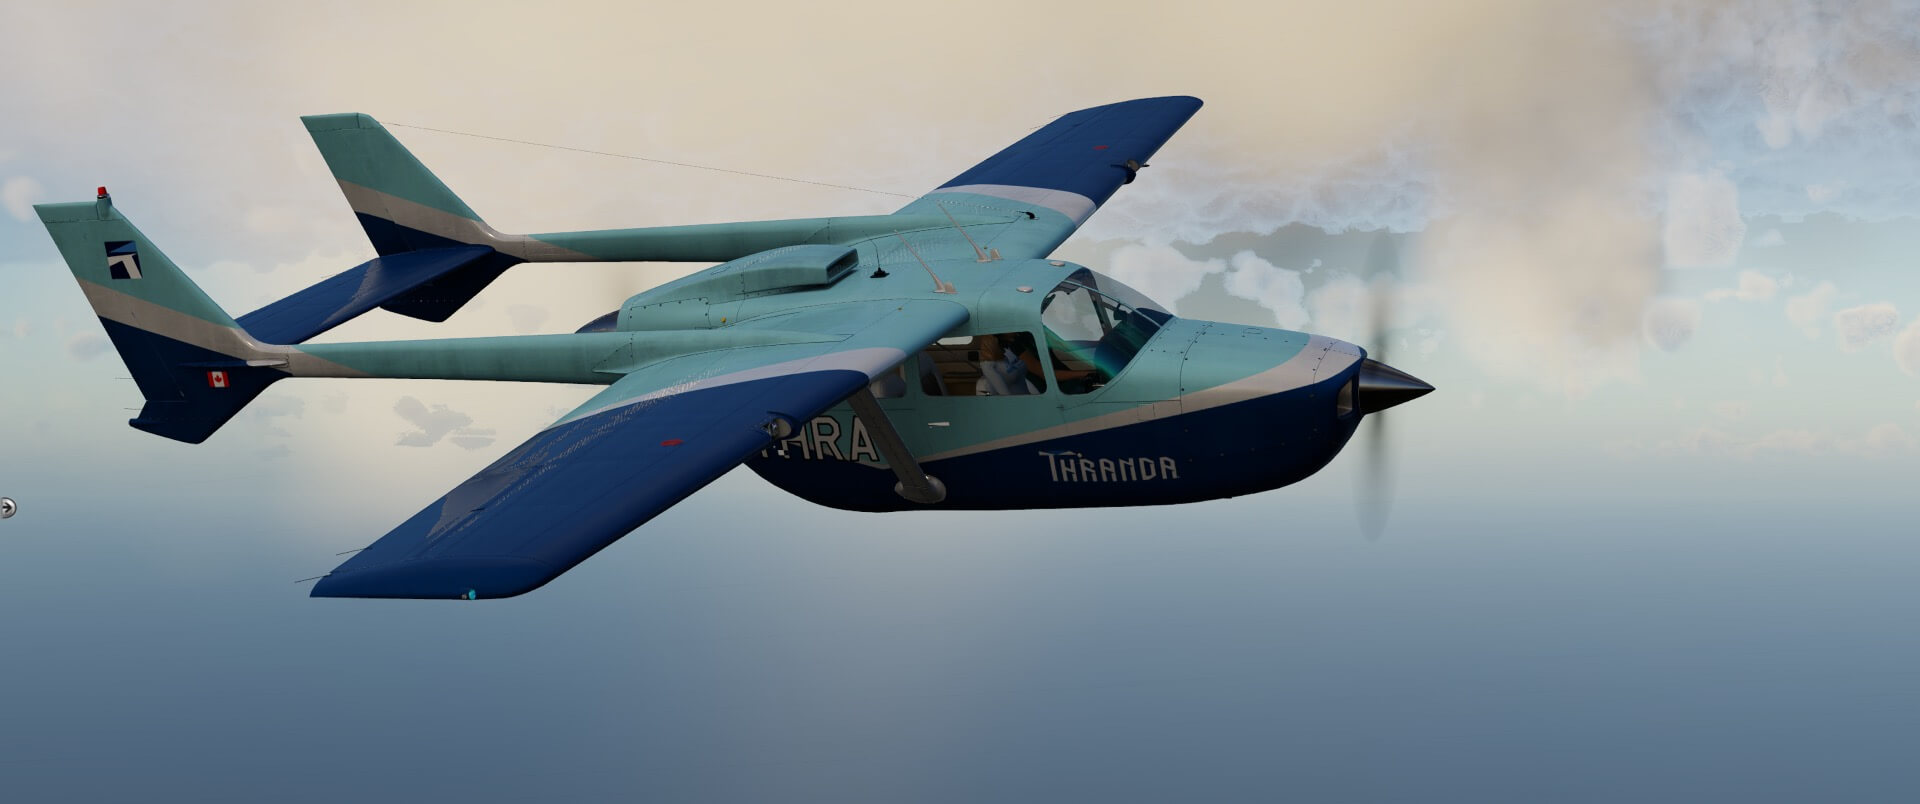
Consistency, quality, and detail have all become hallmarks of Thranda Design work and the Skymaster continues in that tradition. People familiar with the developer’s models will find no surprises here, which is fortunate since the only surprises would be shortcomings in the modeling. Overall, the model is exemplary for the skin textures, rivet work, and well-constructed seams. This is apparent in our first view of the nose and propellor of the Skymaster where all these features are on display right down to the accurately placed propellor heating elements.
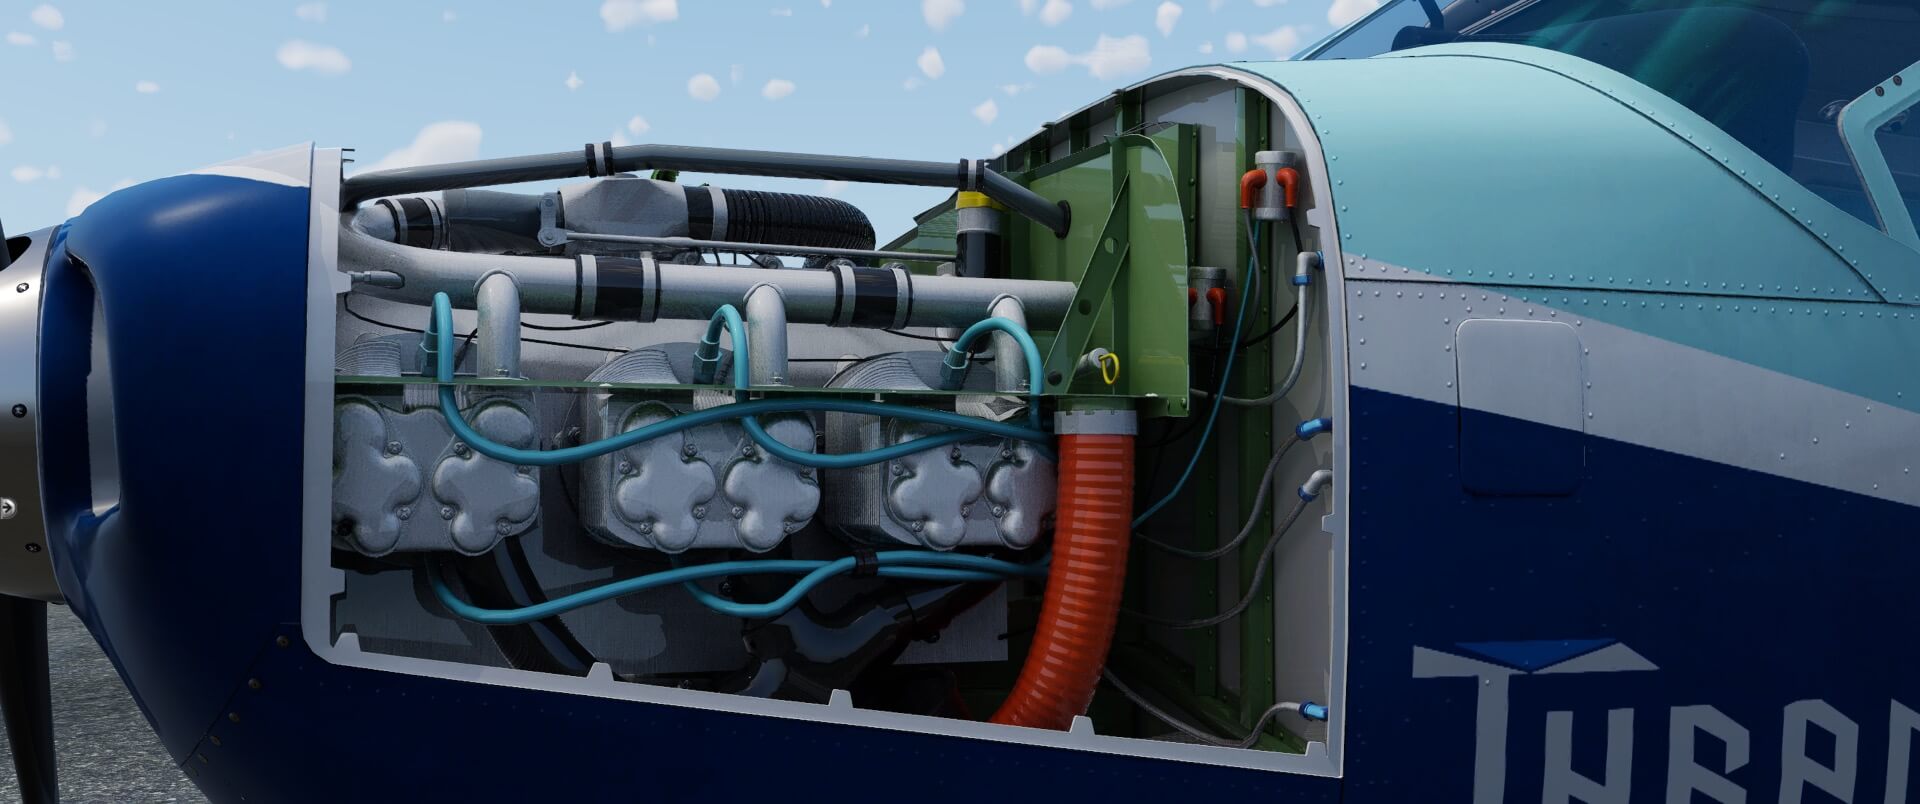
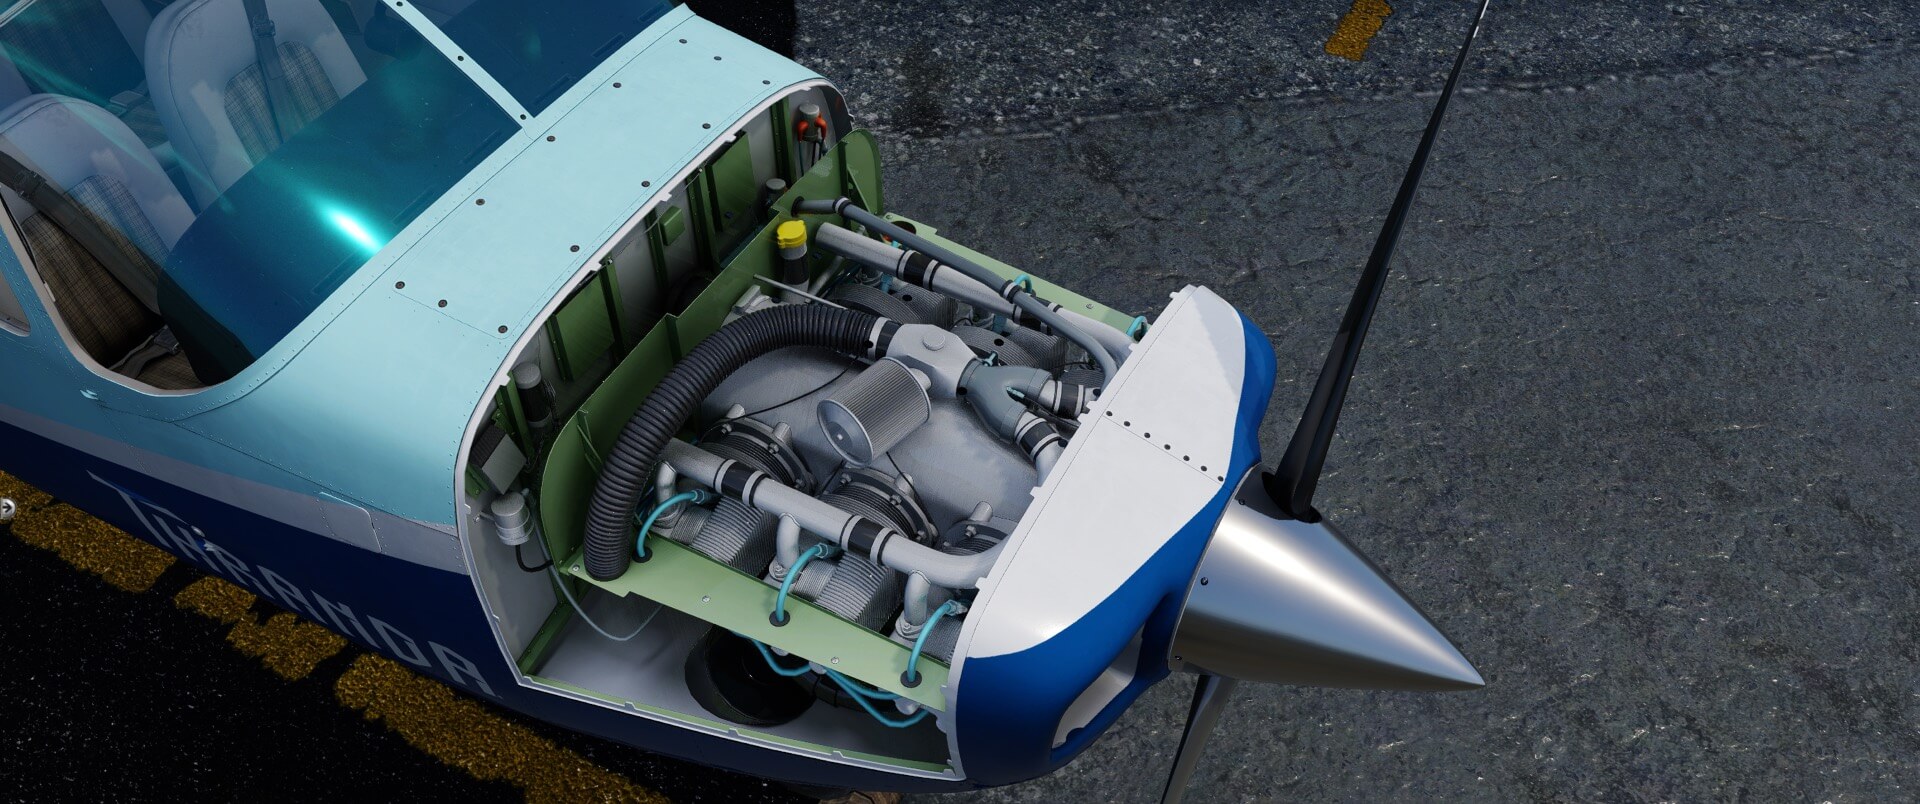
Popping the bonnet provides us with a view of the six-cylinder Continental IO-360-C engine that shows off the talent of the designers with a plethora of intricate, and appropriately colored, parts fitted smoothly together. Textures vary according to surface as does the reflective properties.
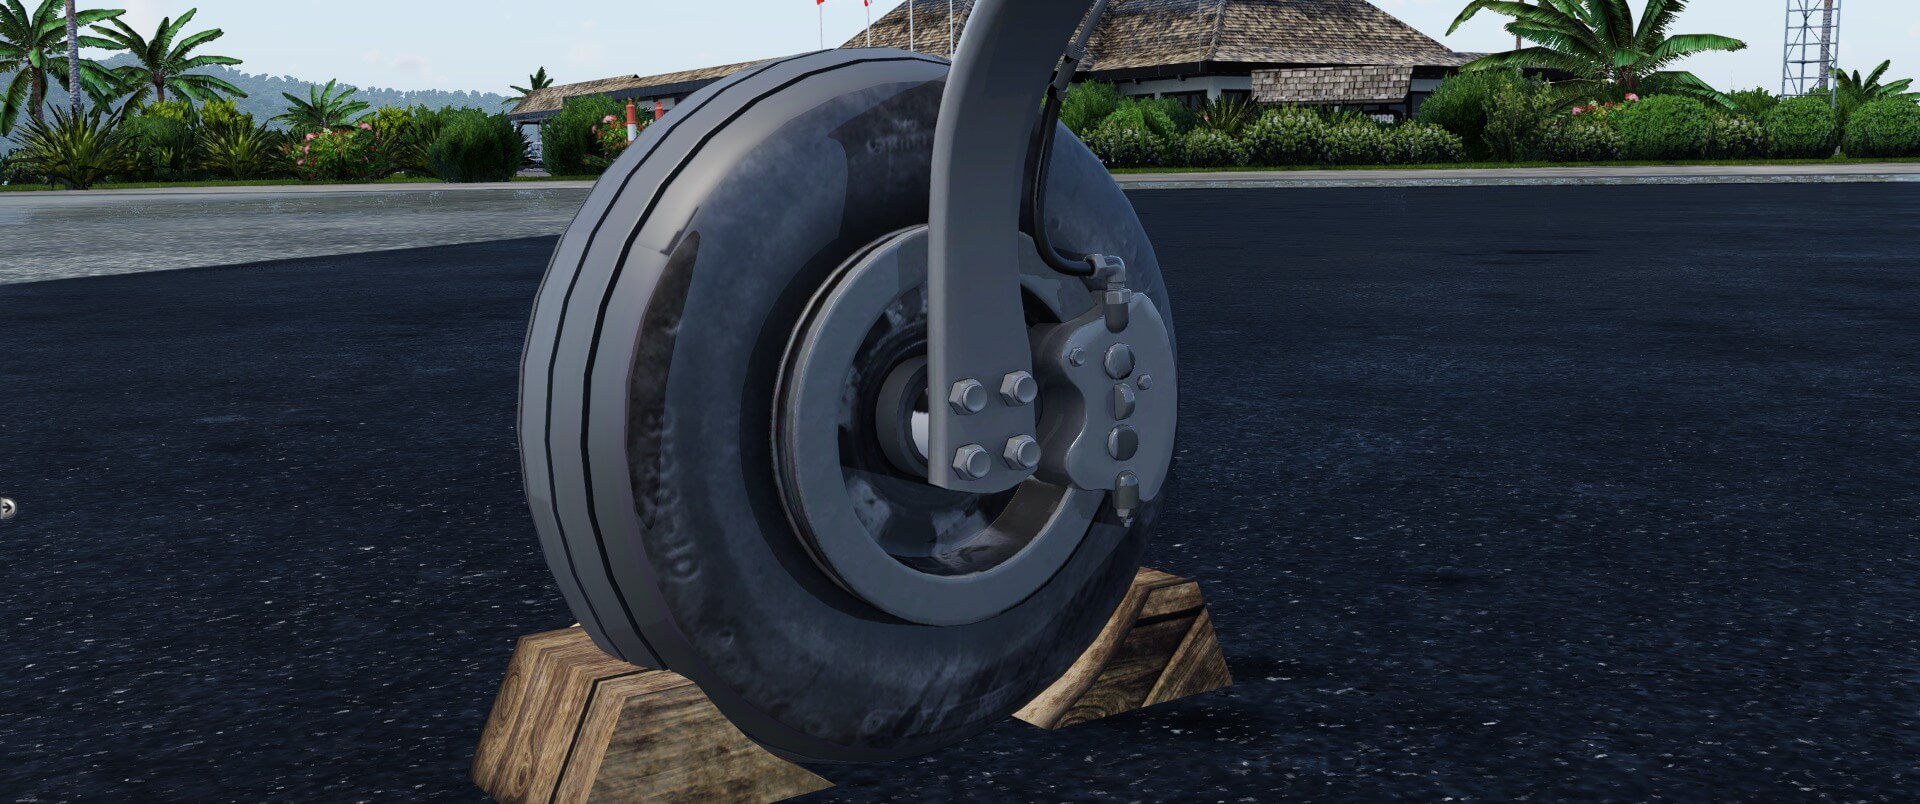
A further study in detail and intricacy is to be found in the modeling of the landing gear. Bolts, hoses, and brackets are accurately presented. The tire tread has a nice depth to it and the lettering is legible. The only thing that stands out a bit is the rather reflective nature of the rubber tire surface. This level of reflectivity is apparent on other aircraft but the Laminar Research Stinson and Sikorsky do not display this surface property. They, however, have a lot less detail and depth.

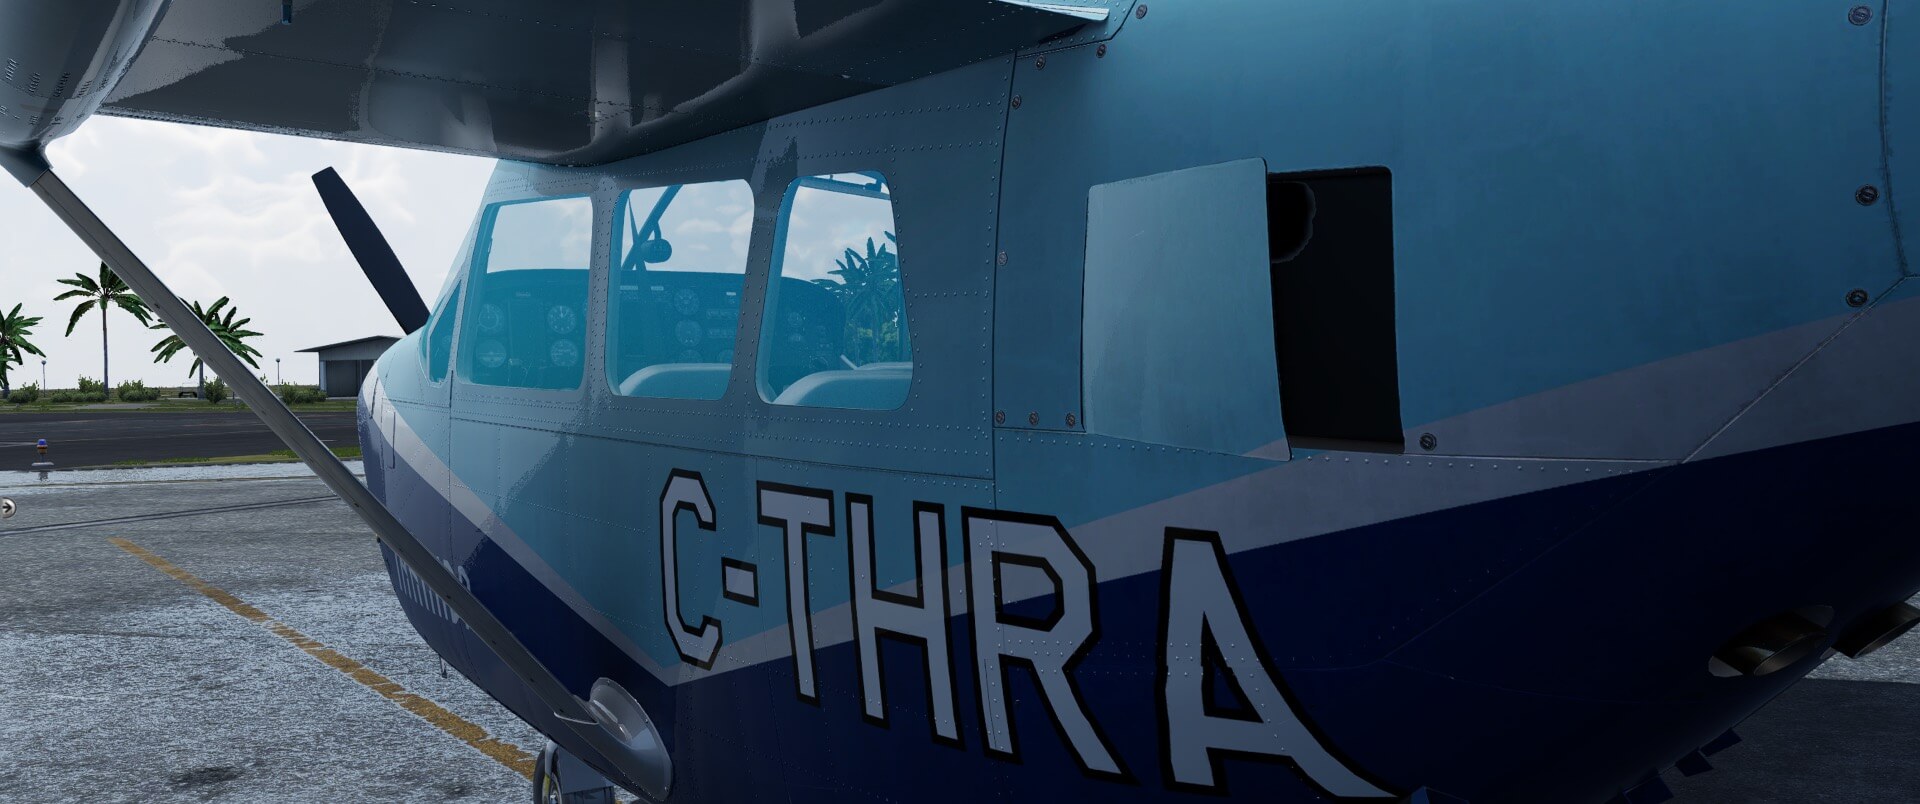
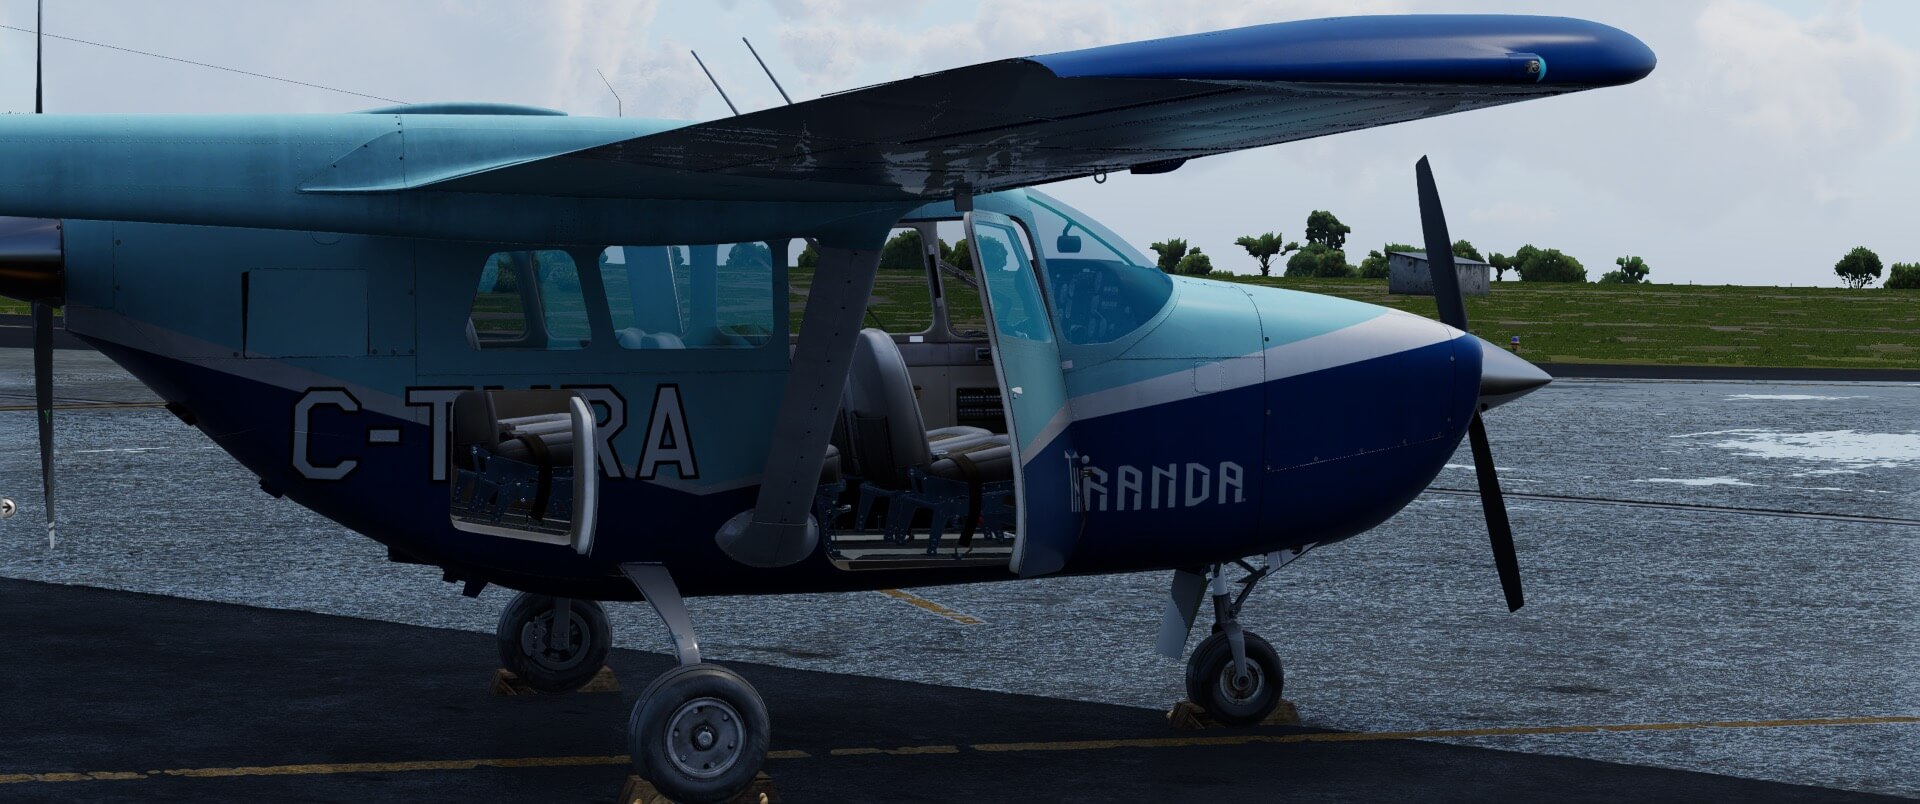
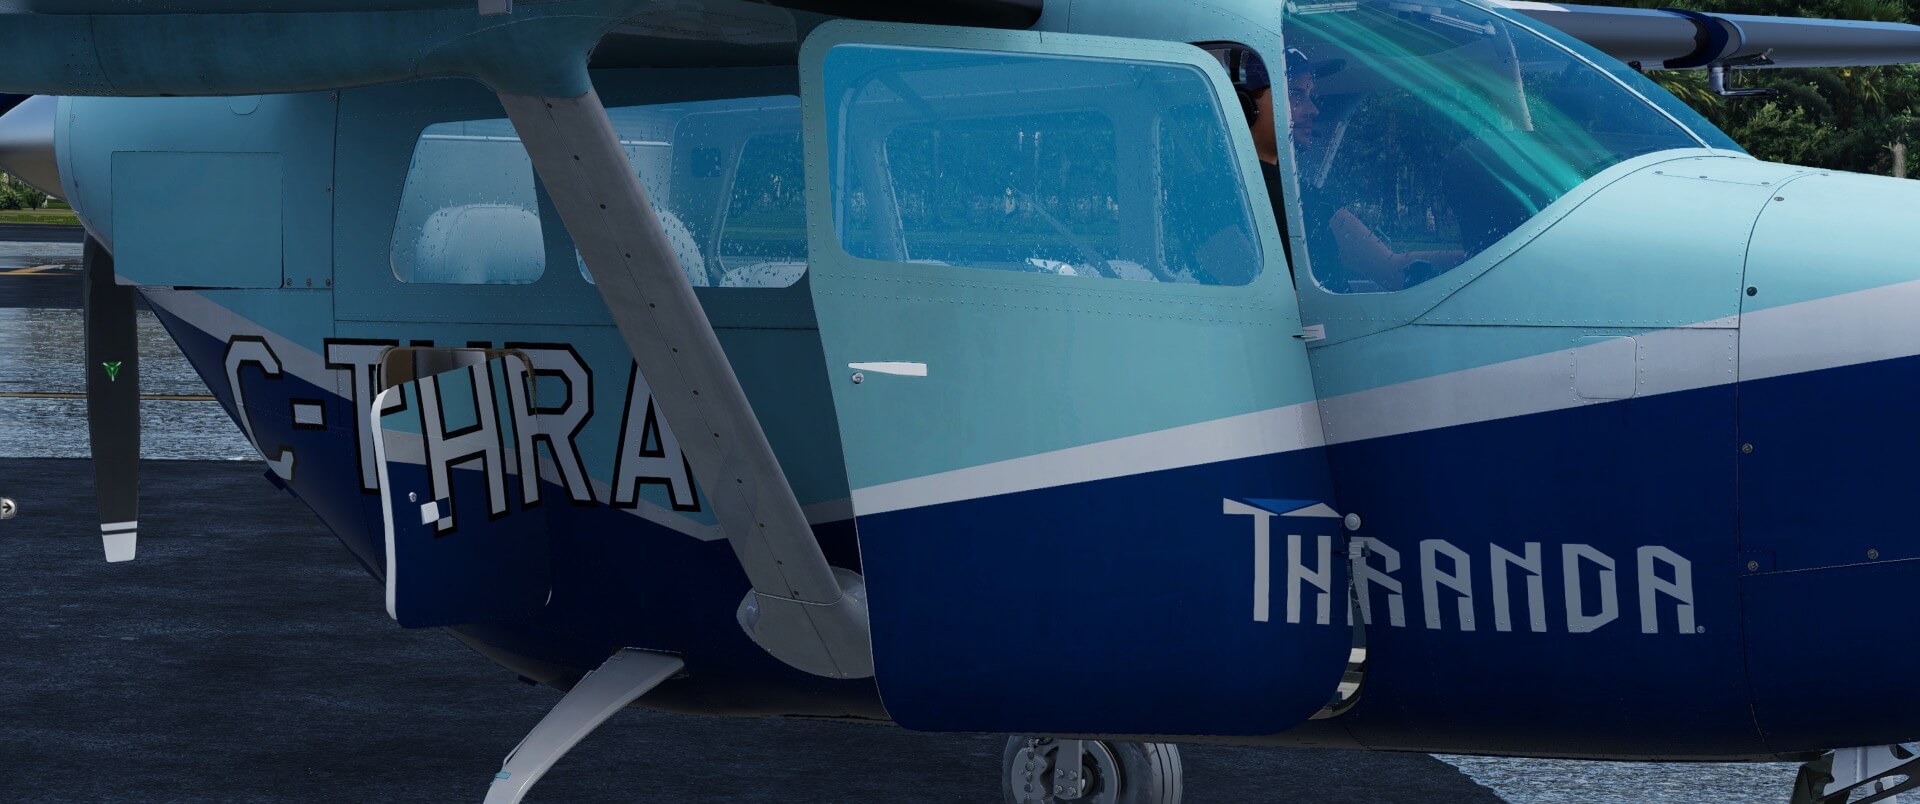
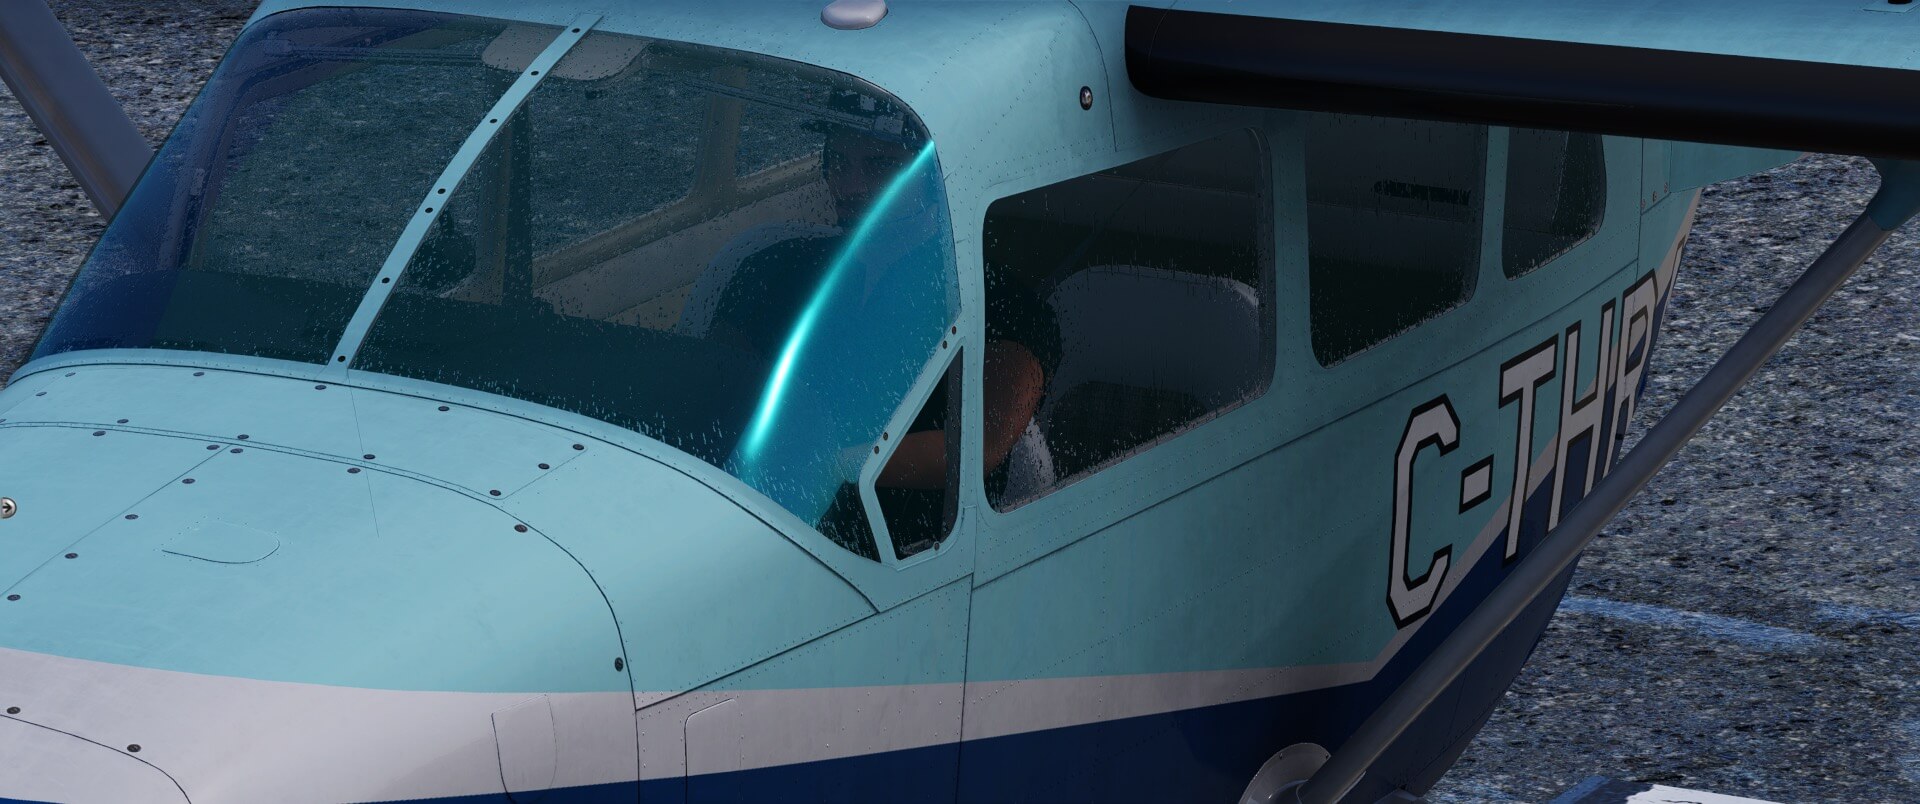
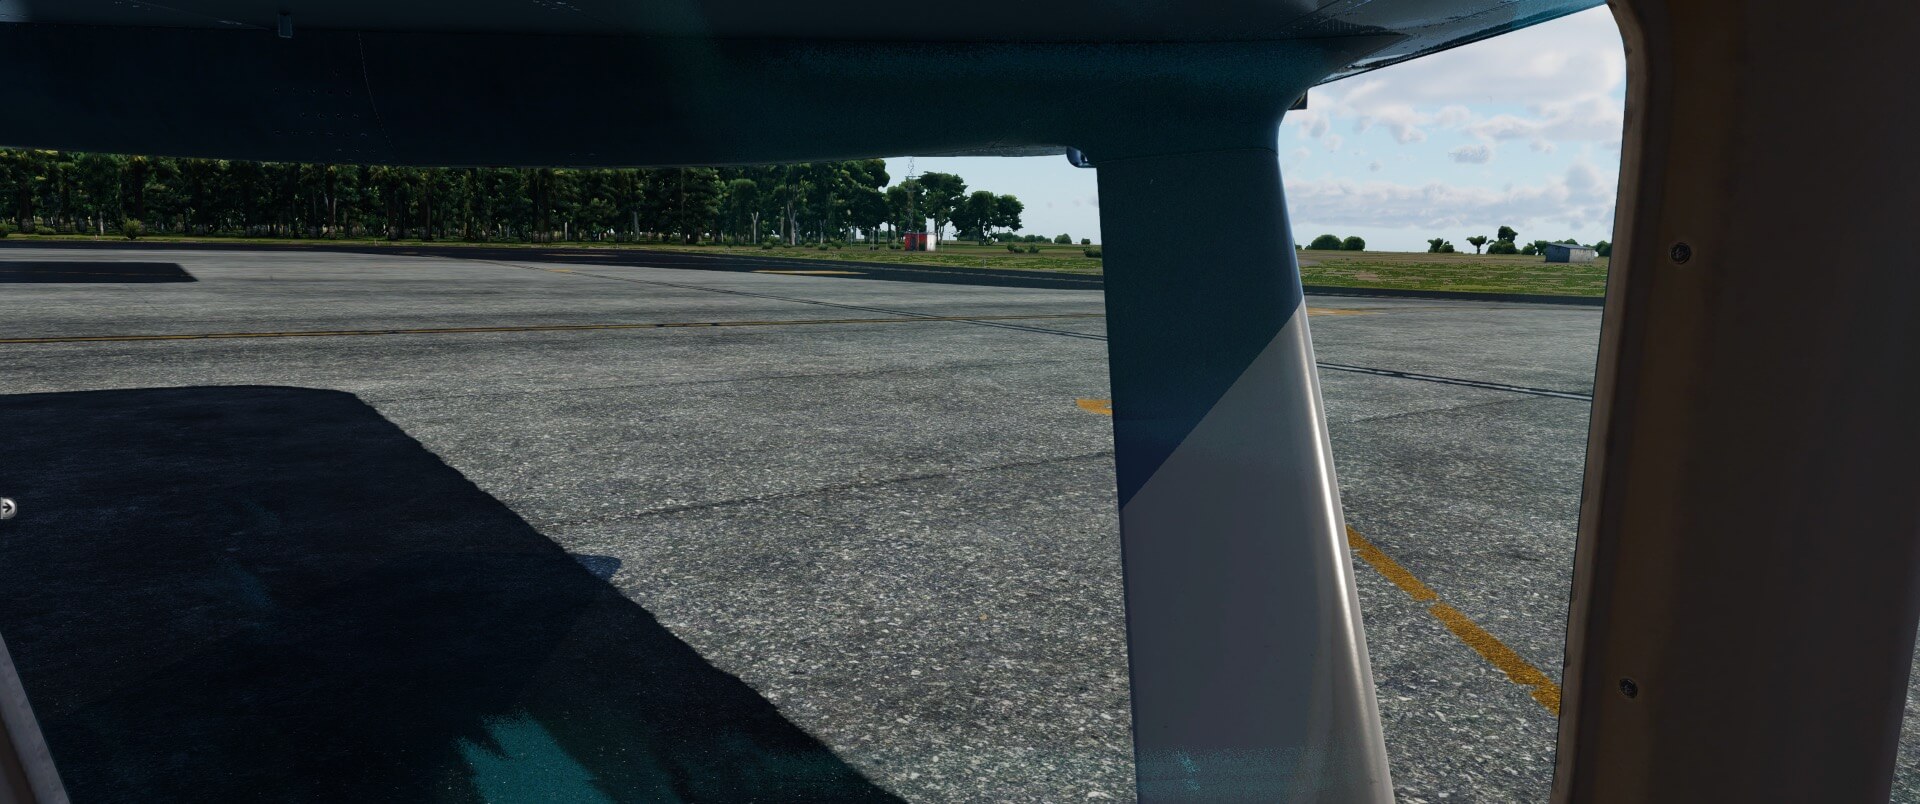
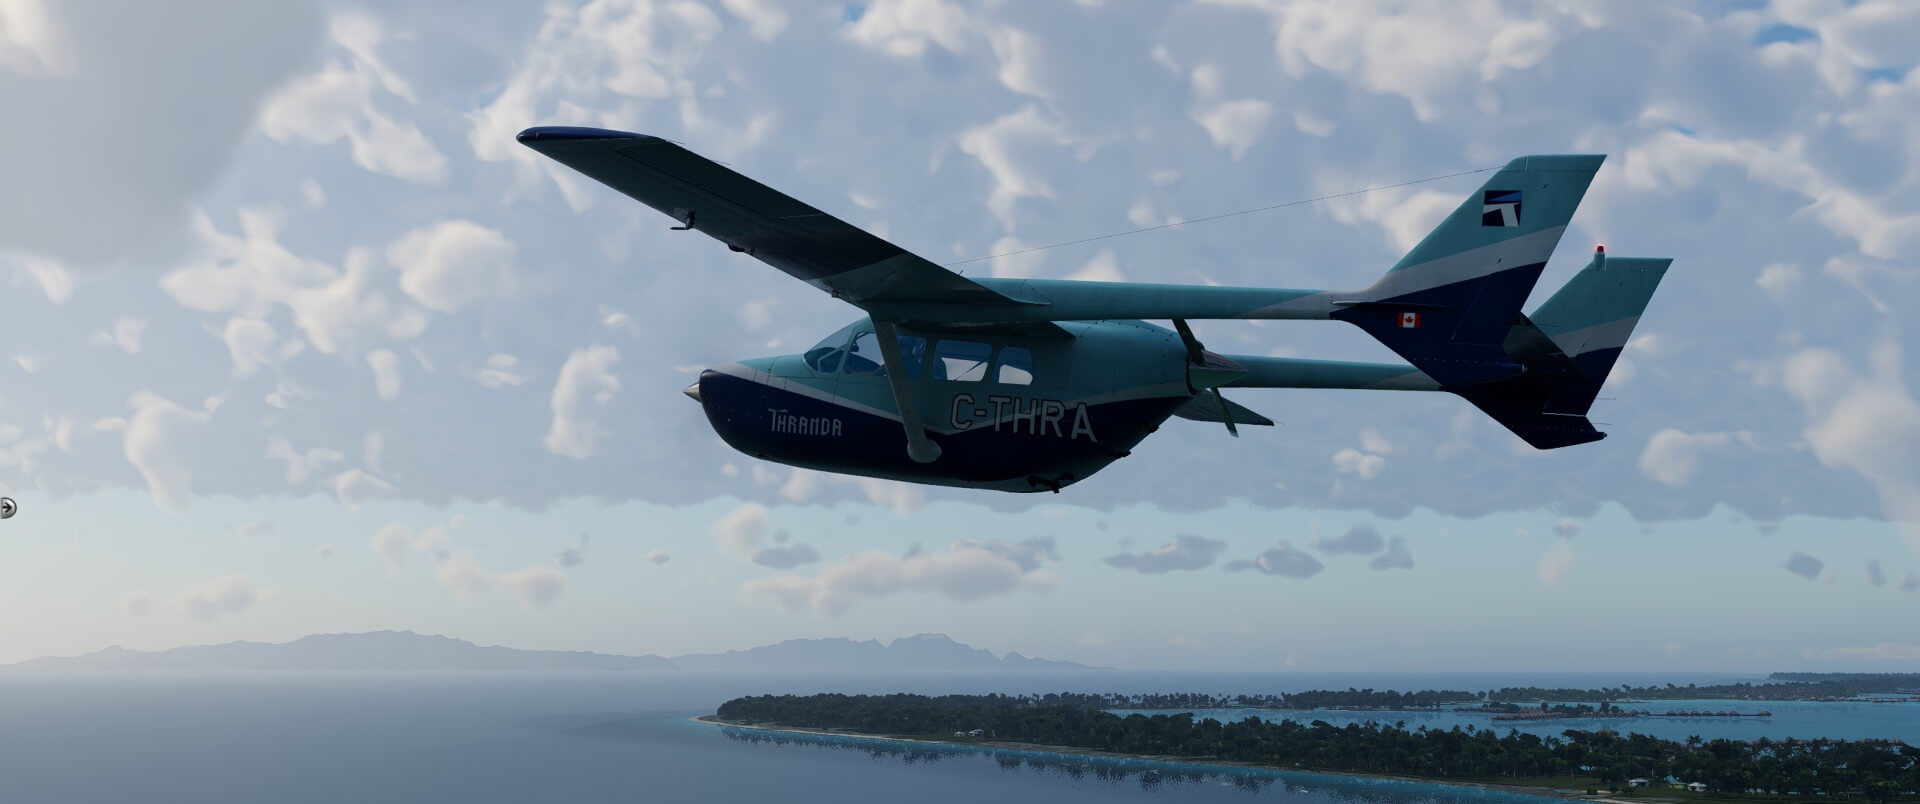
Moving out to the pilot’s side of the aircraft, we notice there is no door. This is the design of the aircraft. The surface ripples and texture continue with the quality we have already observed. The cowl door to the rear engine is open by default. In this view, we also get our first close up of the glass which diffuses the view of the interior in a very realistic manner. The wing struts and brackets as well as the exhaust pipes are also well done.
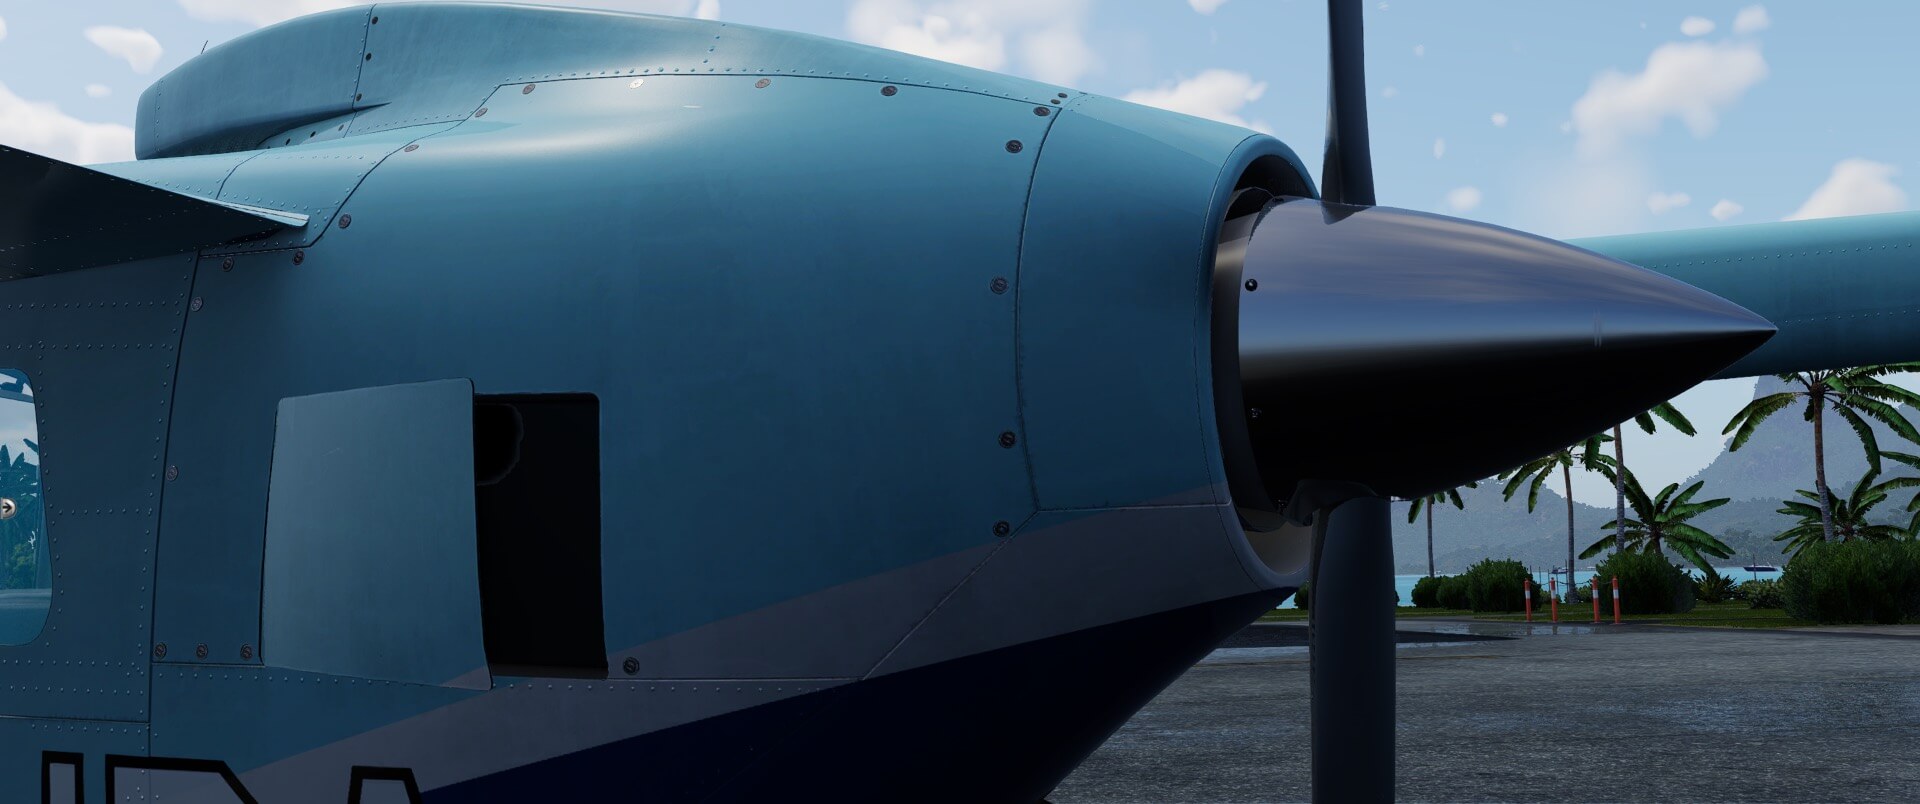
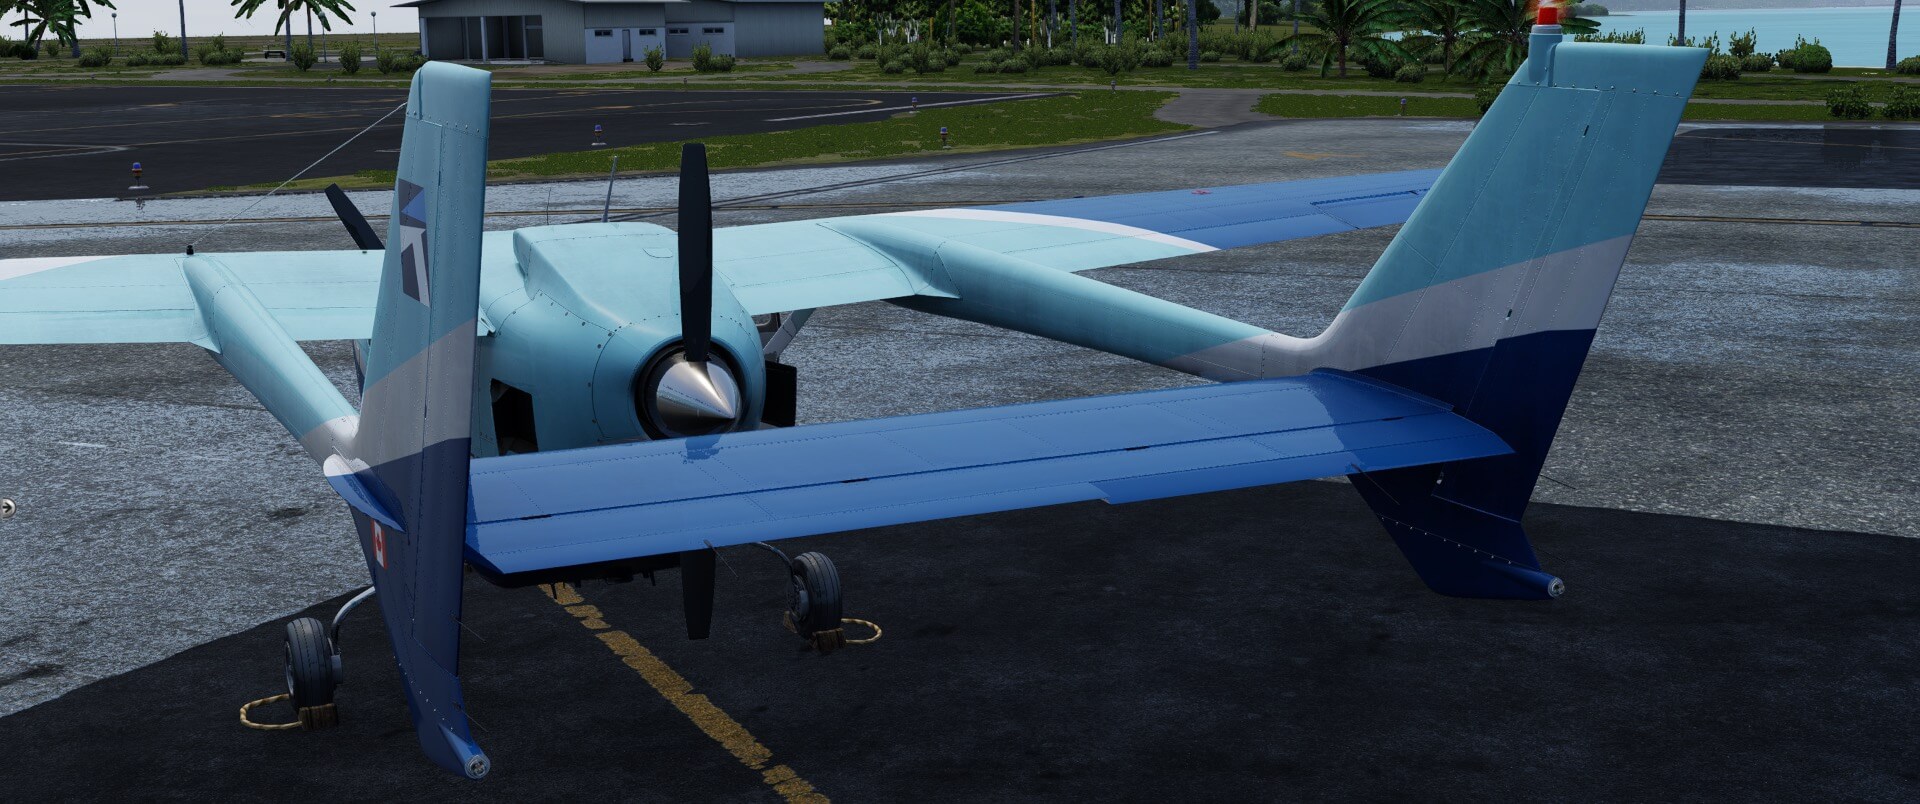
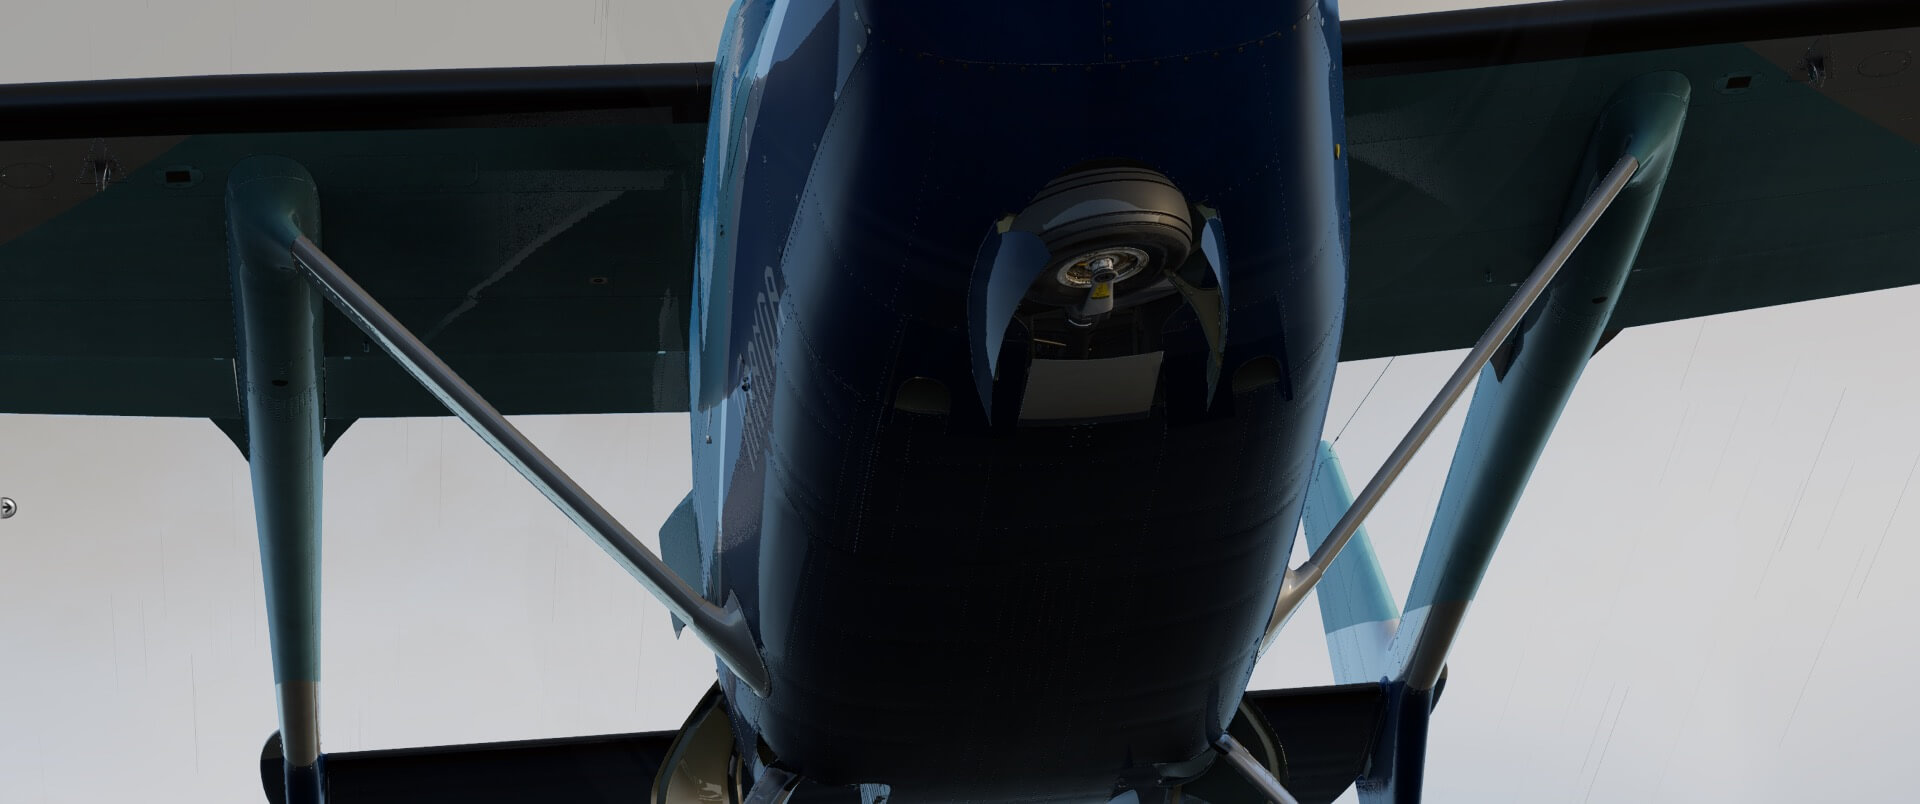
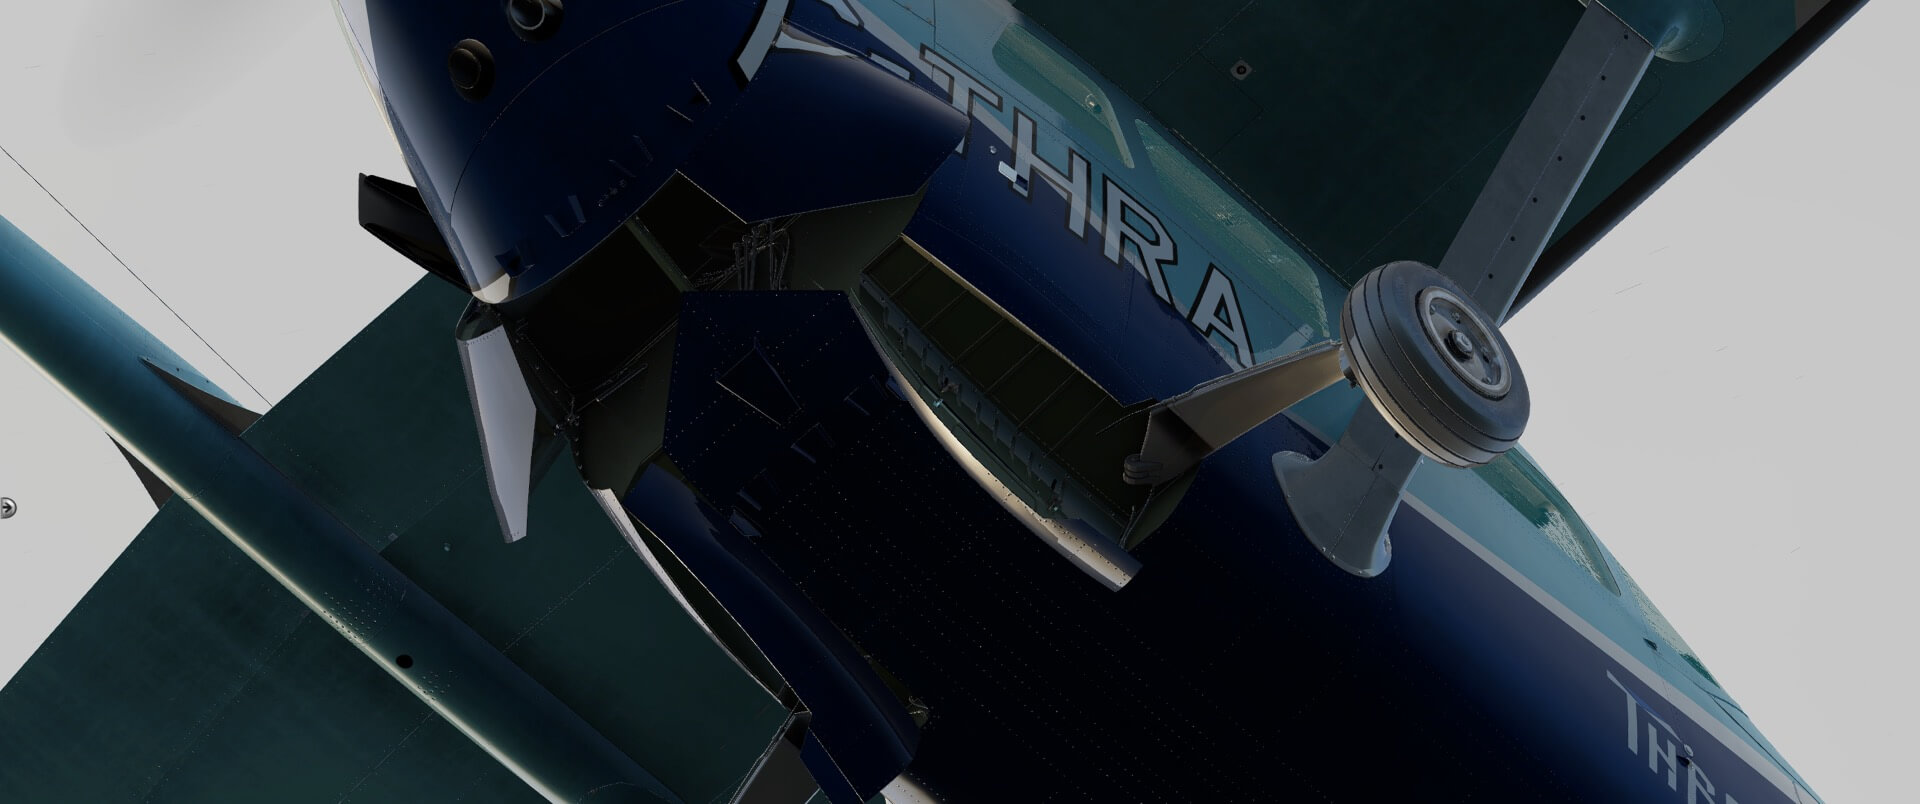
The rear engine nacelle is no exception with regards to the modeling skill utilized in building the 337. The astute eye will notice the absence of heating elements on the propellor. This is not an error; this is the way the aircraft de-icing system is designed.
The twin-boom empennage is laid in place with accurate dimensions and gap-free construction. All the details are captured from rivets to nav lights and the half stabilizer length trim tab. The animation of control surface deflections is very smooth and realistic.
The significant difference between the pilot side and co-pilot side of the aircraft is the presence of the doors. The small cargo door opens upon the third row of seats which makes this door virtually useless if that row of seats is installed. The cabin door is large enough to allow access to the middle and front row of seats. Access to the third row is by a rather awkward climb over the middle row. The door animation is smooth and properly aligned with the fuselage. The detail of the locks, handle, and hinges are worth noting.

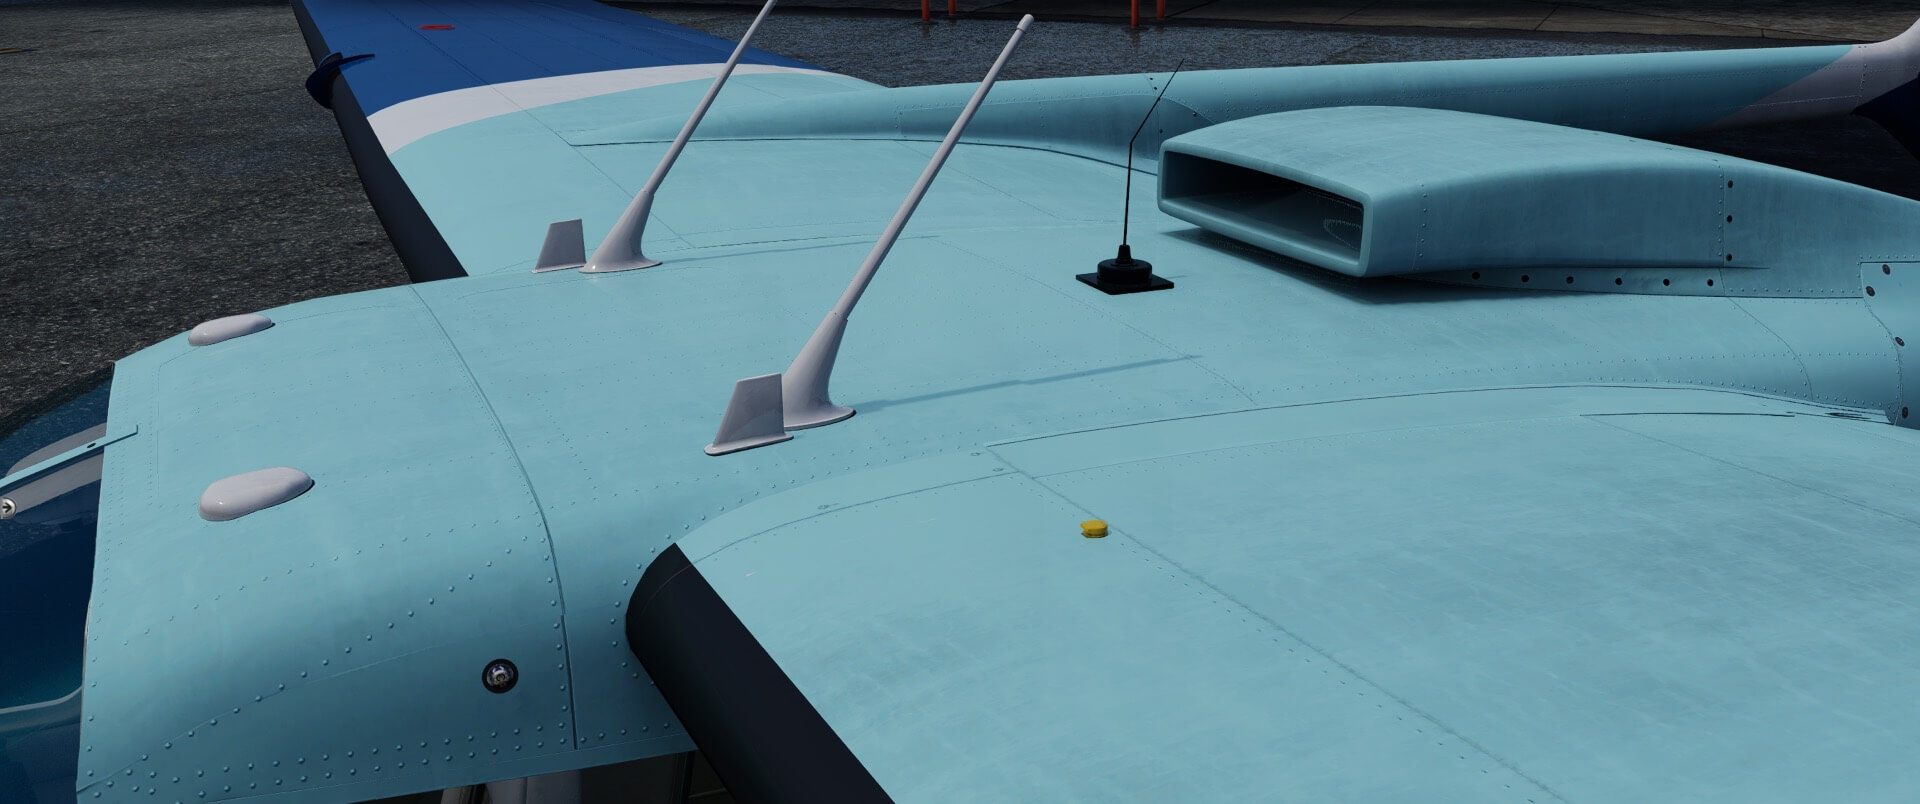
Going topside, the consummate level of modeling remains to showcase the various antennae and the intake for the rear engine. Note the small light over the pilot’s window. This is the de-ice kit wing light and is not present if you turn off that option in the miscellaneous section of the Thranda menu.
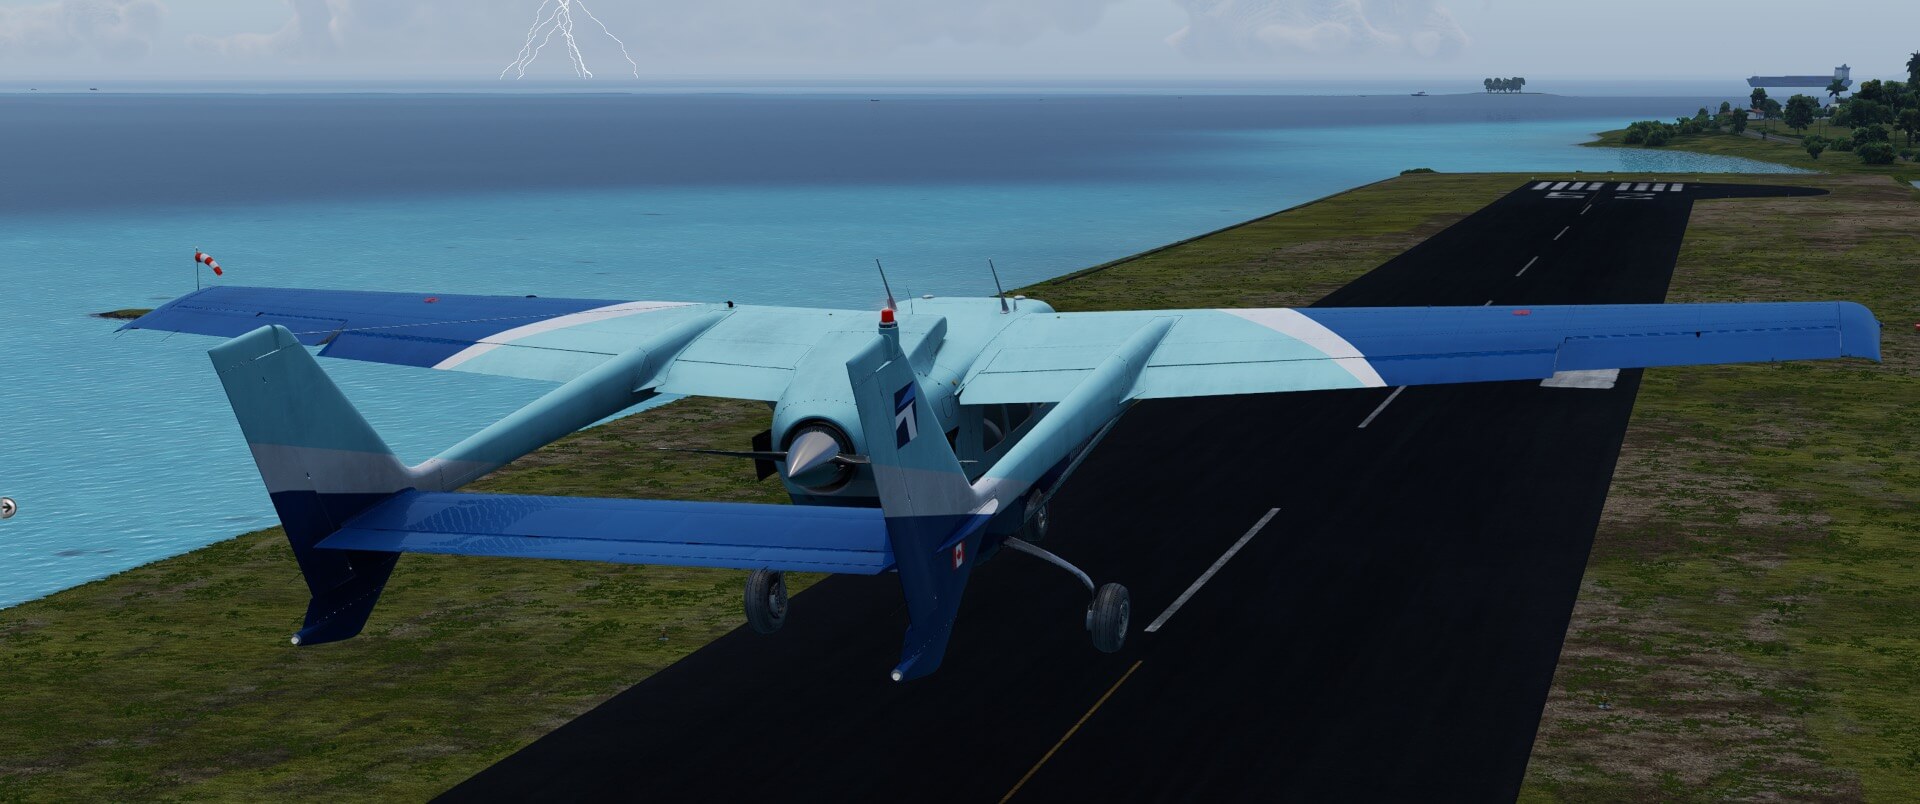
A view over the wings allows us to take in the excellent landing / taxi light fixtures and fuel fill caps. Thranda has done an admirable job with the complicated flap arrangement that is split by the empennage boom. The flap and aileron deflection animations are perfect.
Making our way back to the front, we can see the windscreen glass representation exhibiting detailed amounts of tinting, reflections, dirt, and scratches. The external depiction of rain is well done and the pattern of moving water changes when the front engine starts.


The final part of the exterior modeling is not viewable until in flight and that is the functioning retractable landing gear. The gear was borrowed from the complex hydraulic system of the C210 and was modified to be more reliable in 1973 when it was upgraded to an electrohydraulic system. The gear on the 337 has a rather odd arrangement in that the nose gear must twist to fit into the recess and the rear must fold in on an angle. The details of this operation are captured nicely in the animation created by Thranda.


Interior Modelling
The Skymaster cabin certainly does not seem to boast any sense of roominess especially with the six seats installed. Those seats are very well represented with detailed textures and surfaces. Each seat is fashioned with a pocket on the back and those pockets are curved and puckered quite convincingly. The seatbelts have a nice realistic drape to them while the cushions they rest upon appear as if they’ve seen some use as demonstrated by the visible indentations. In a testament to their commitment to detail, the front row seats show more wear and soil then do the passenger seats.
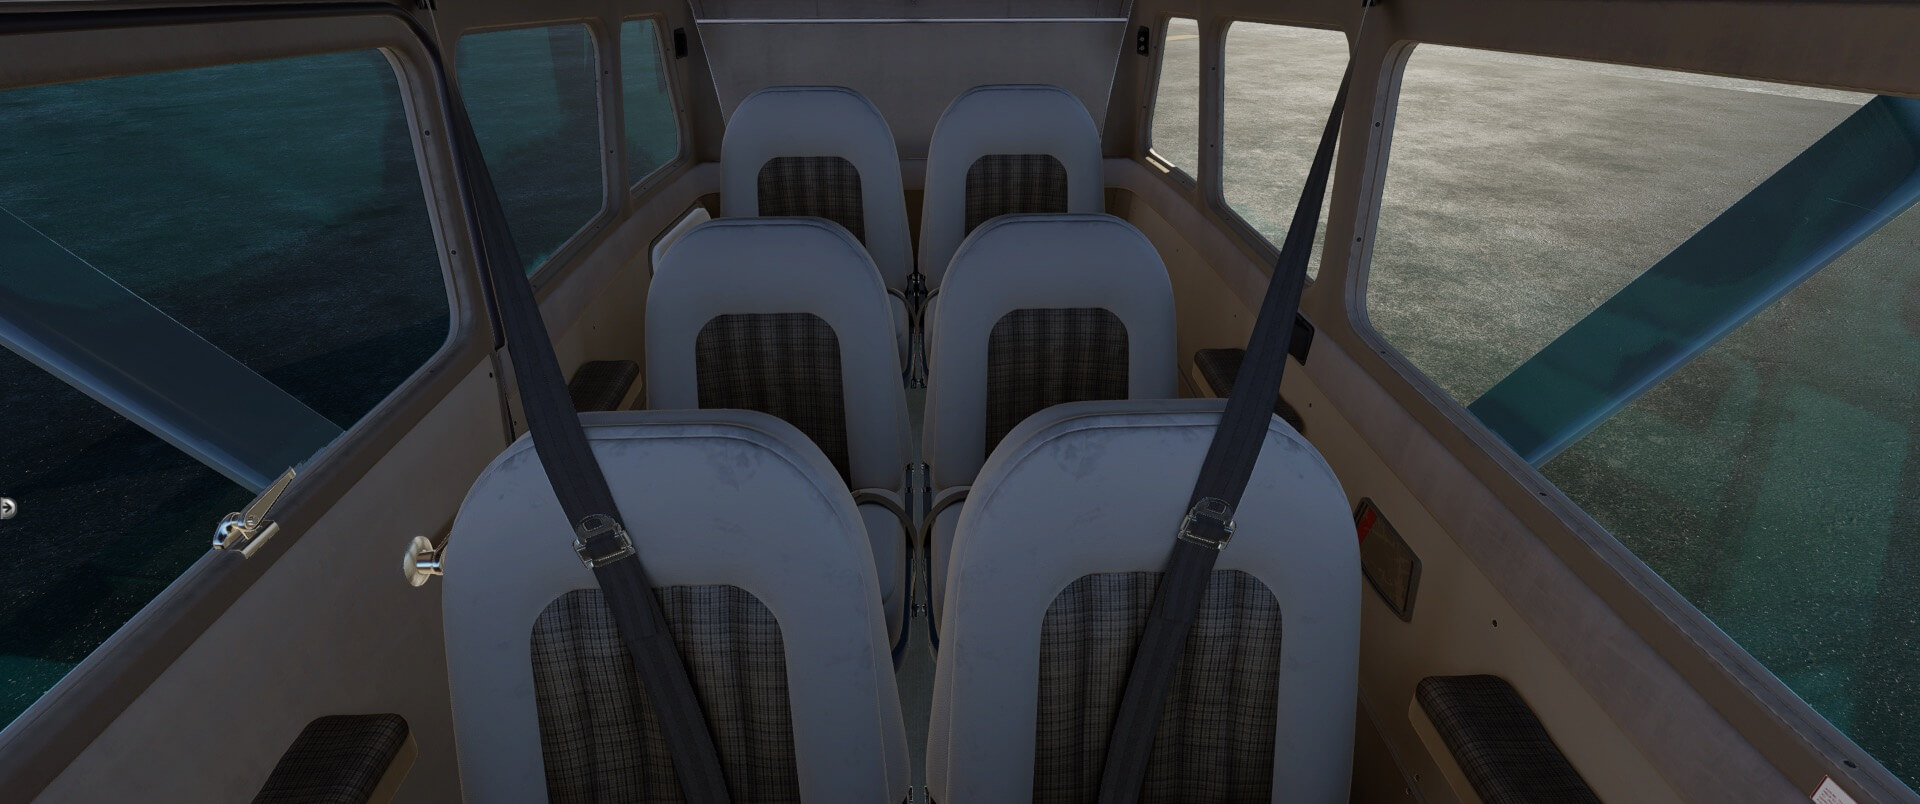
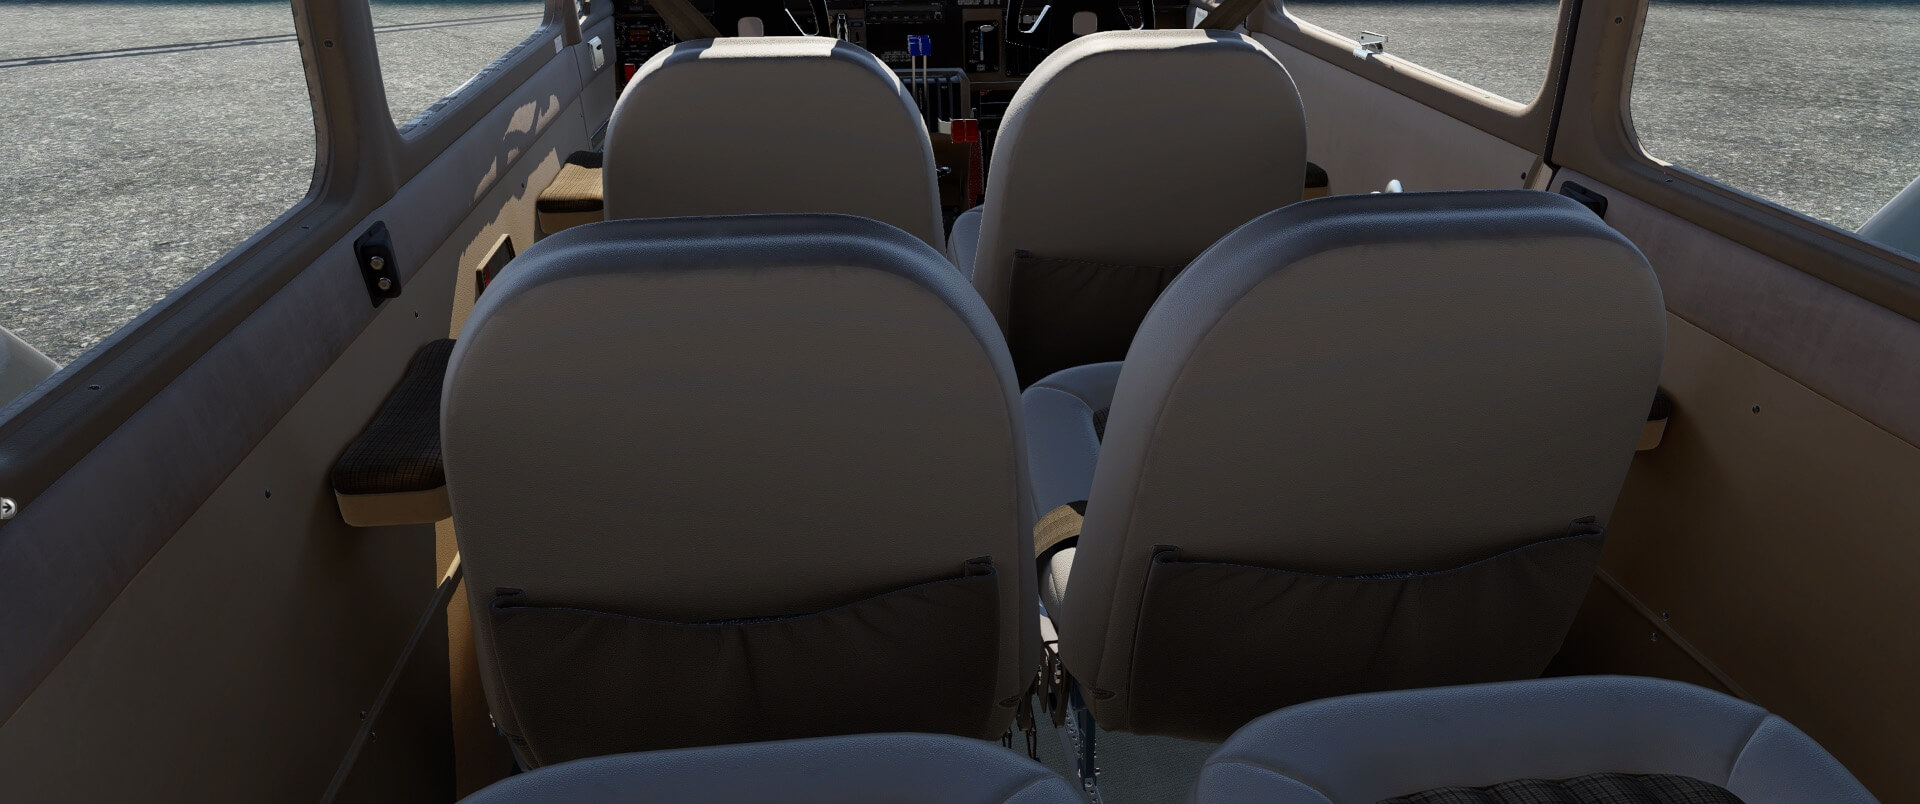
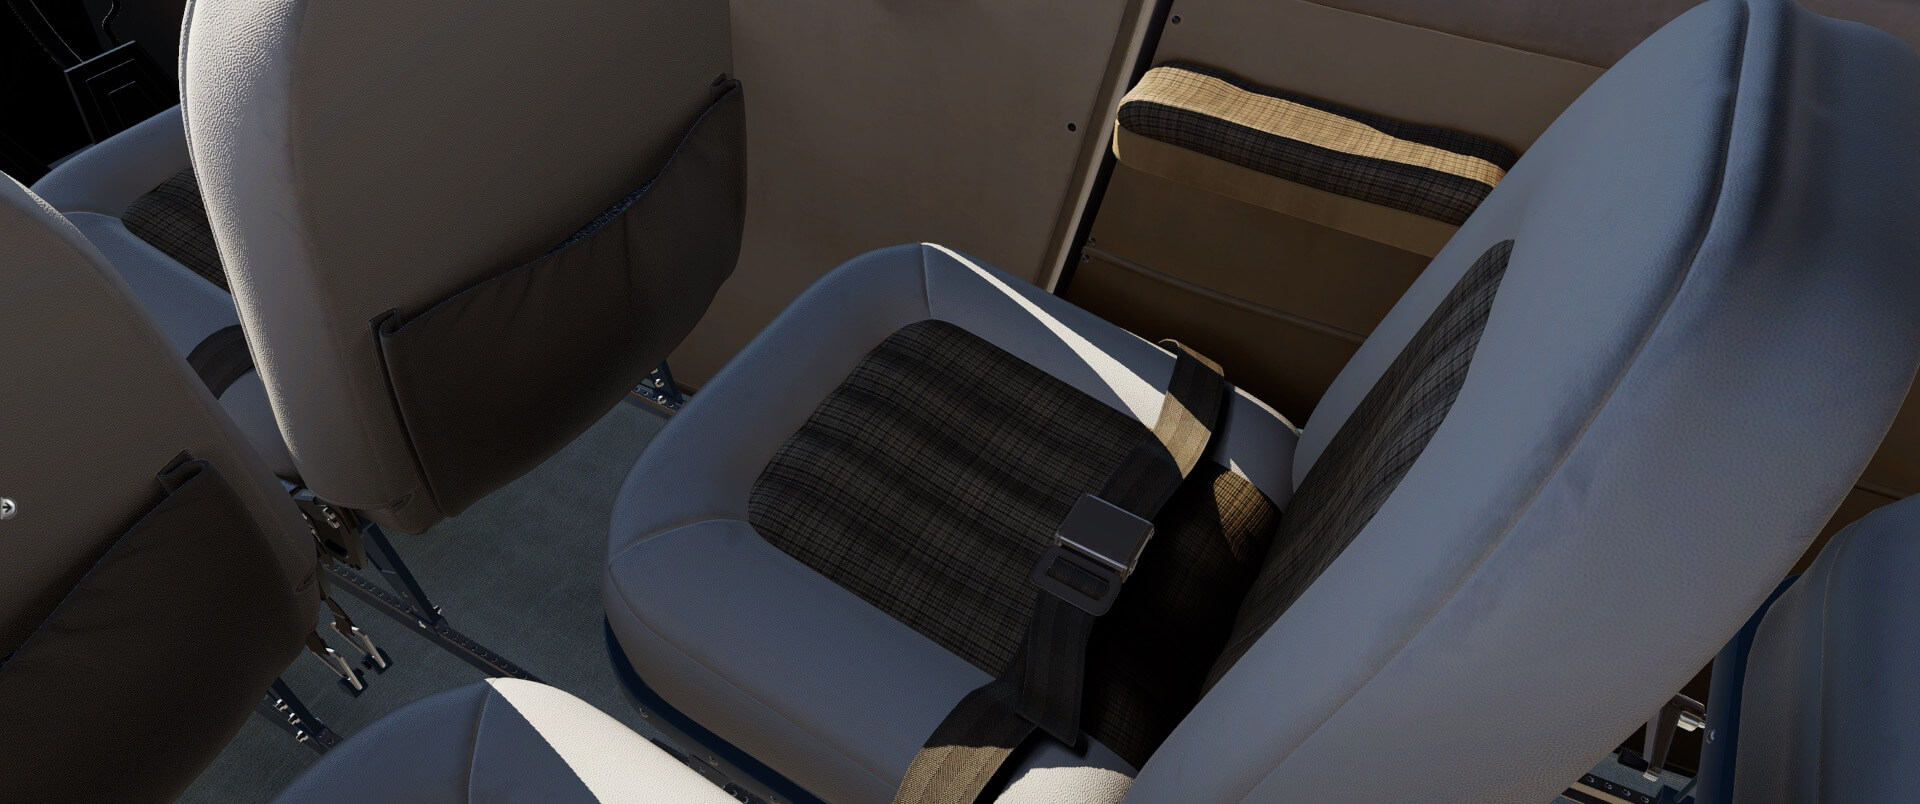
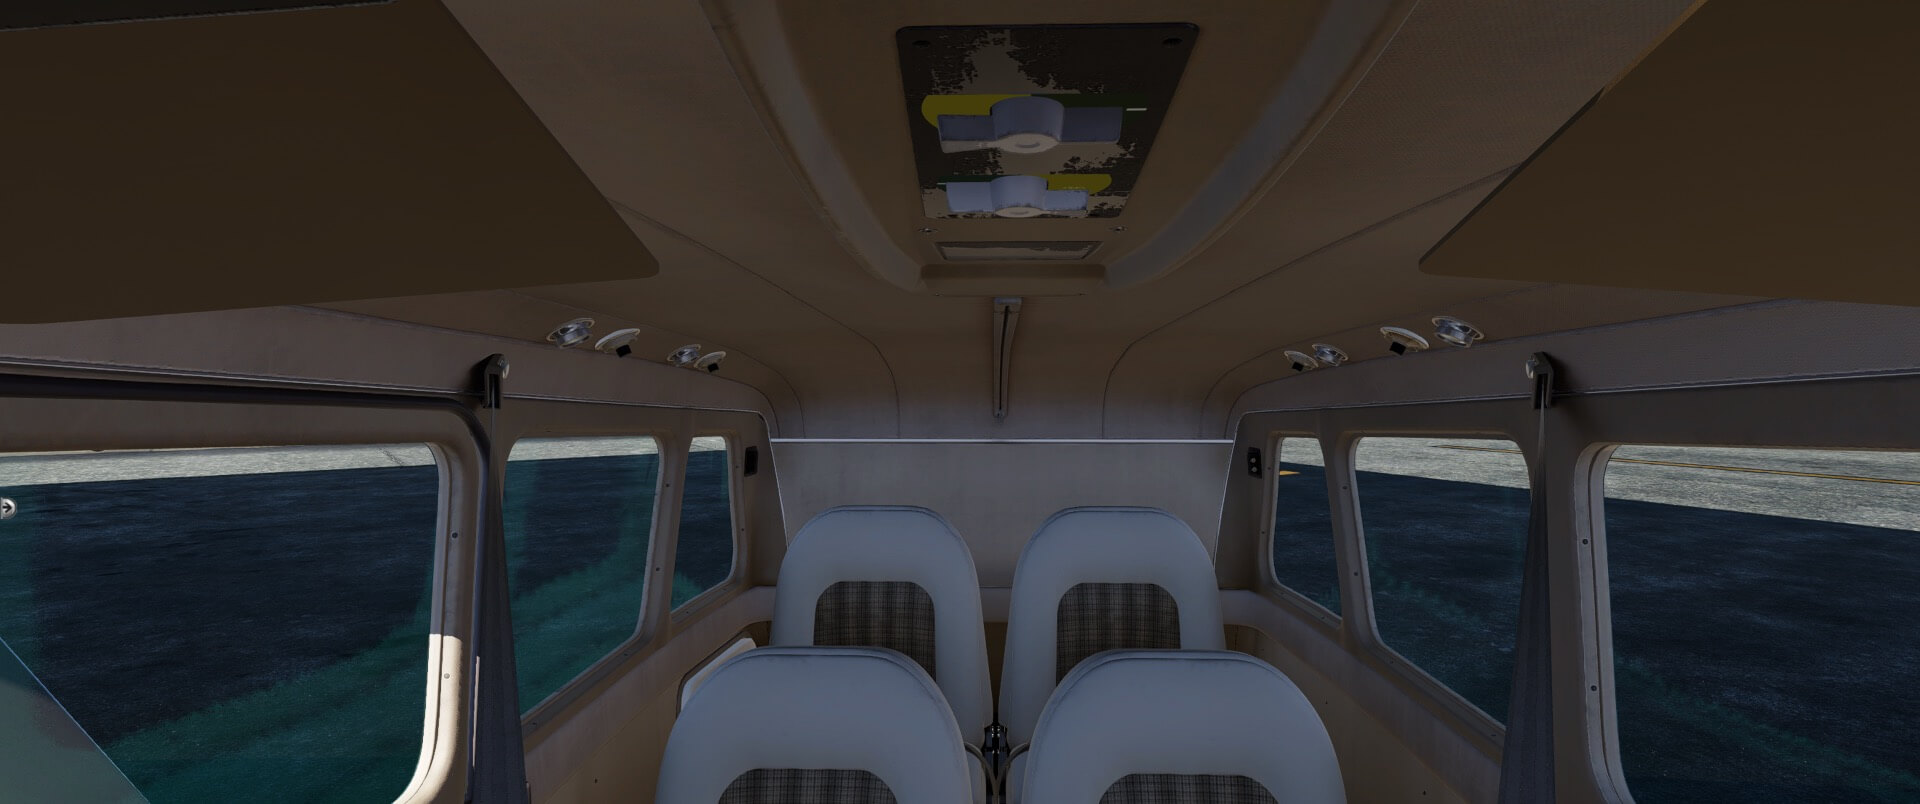


Surrounding the cabin is a worn headliner above and a well-used carpet on the floor below. From the outside to the inside, this is an aircraft that has seen many hours of use. Additional use of detail includes operational air vents and lights overhead for each seat.
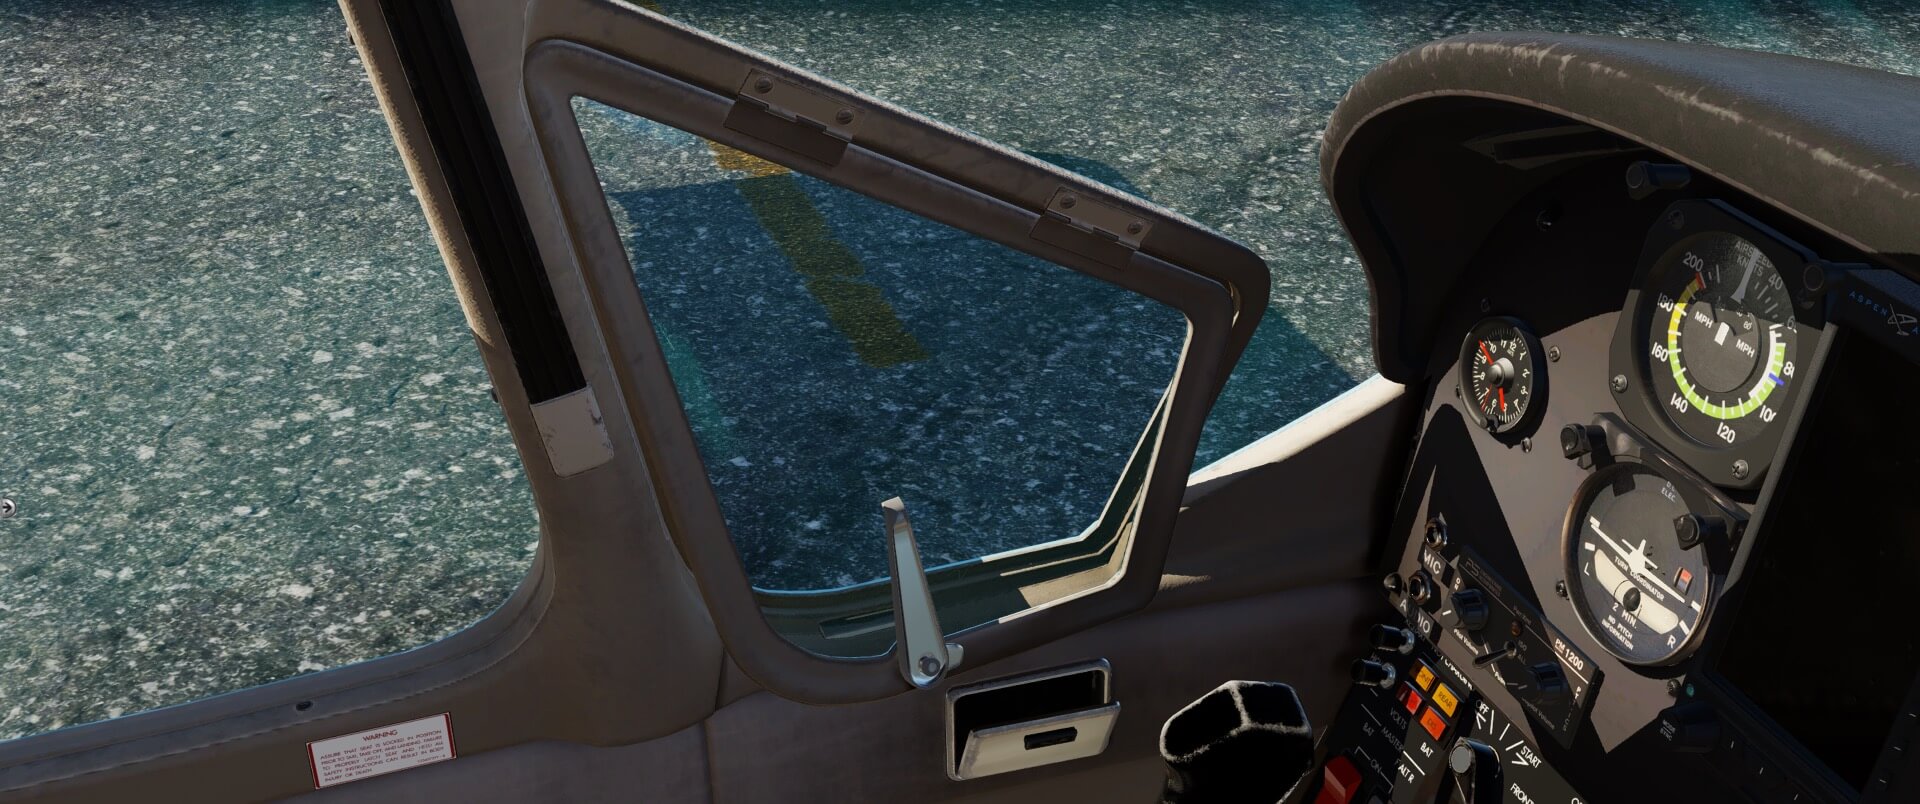
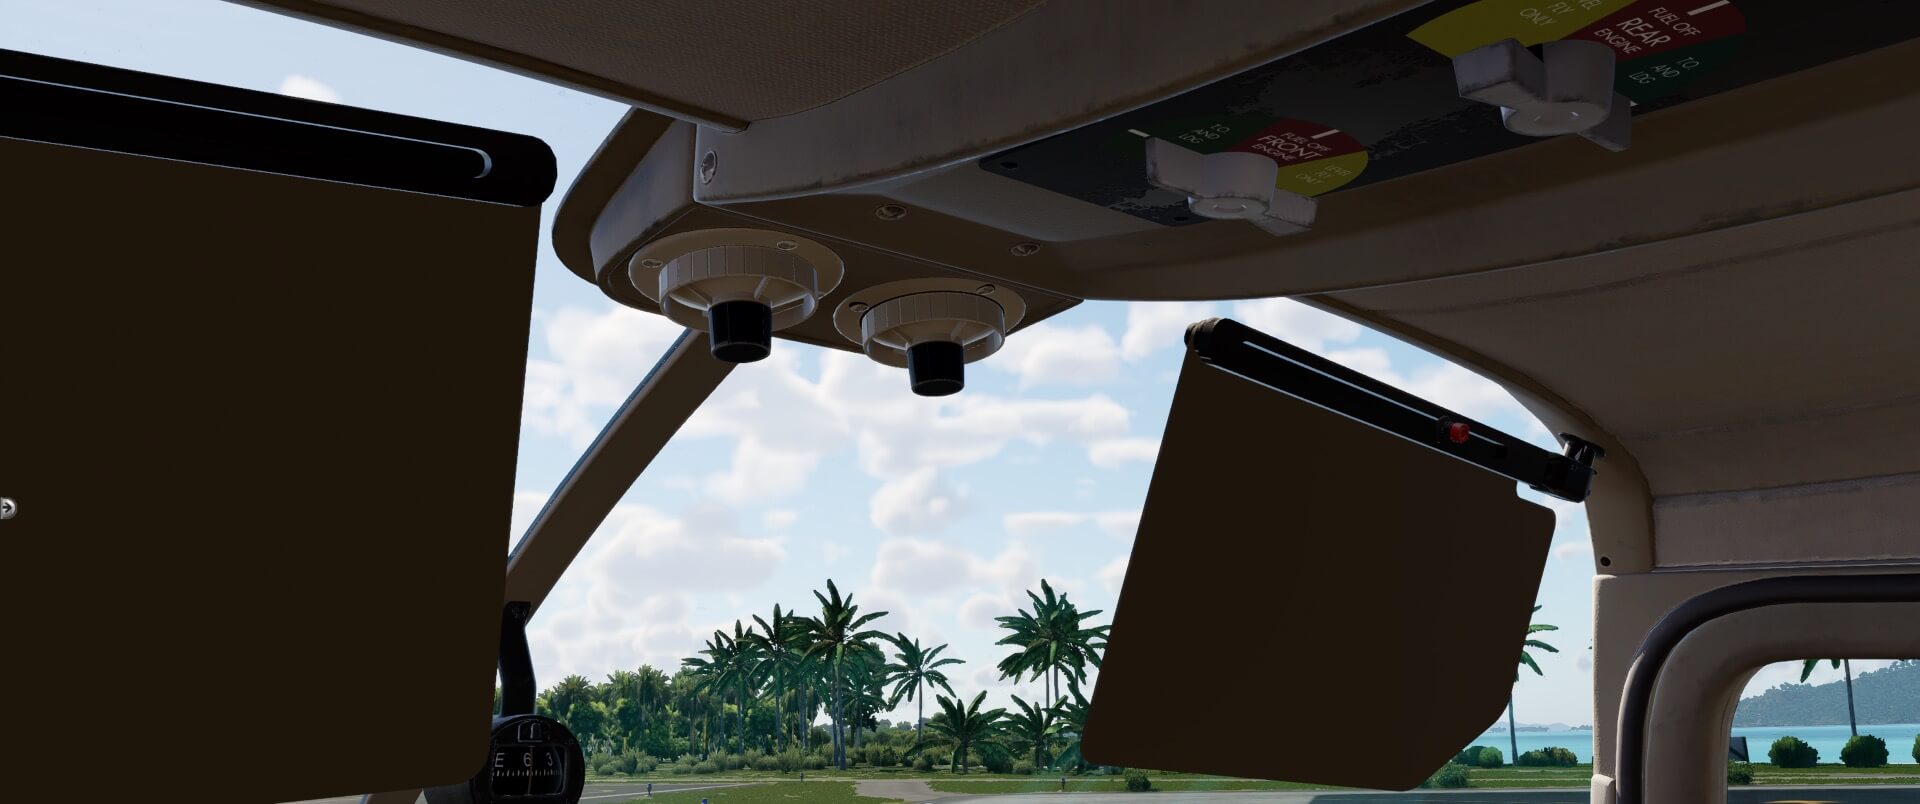
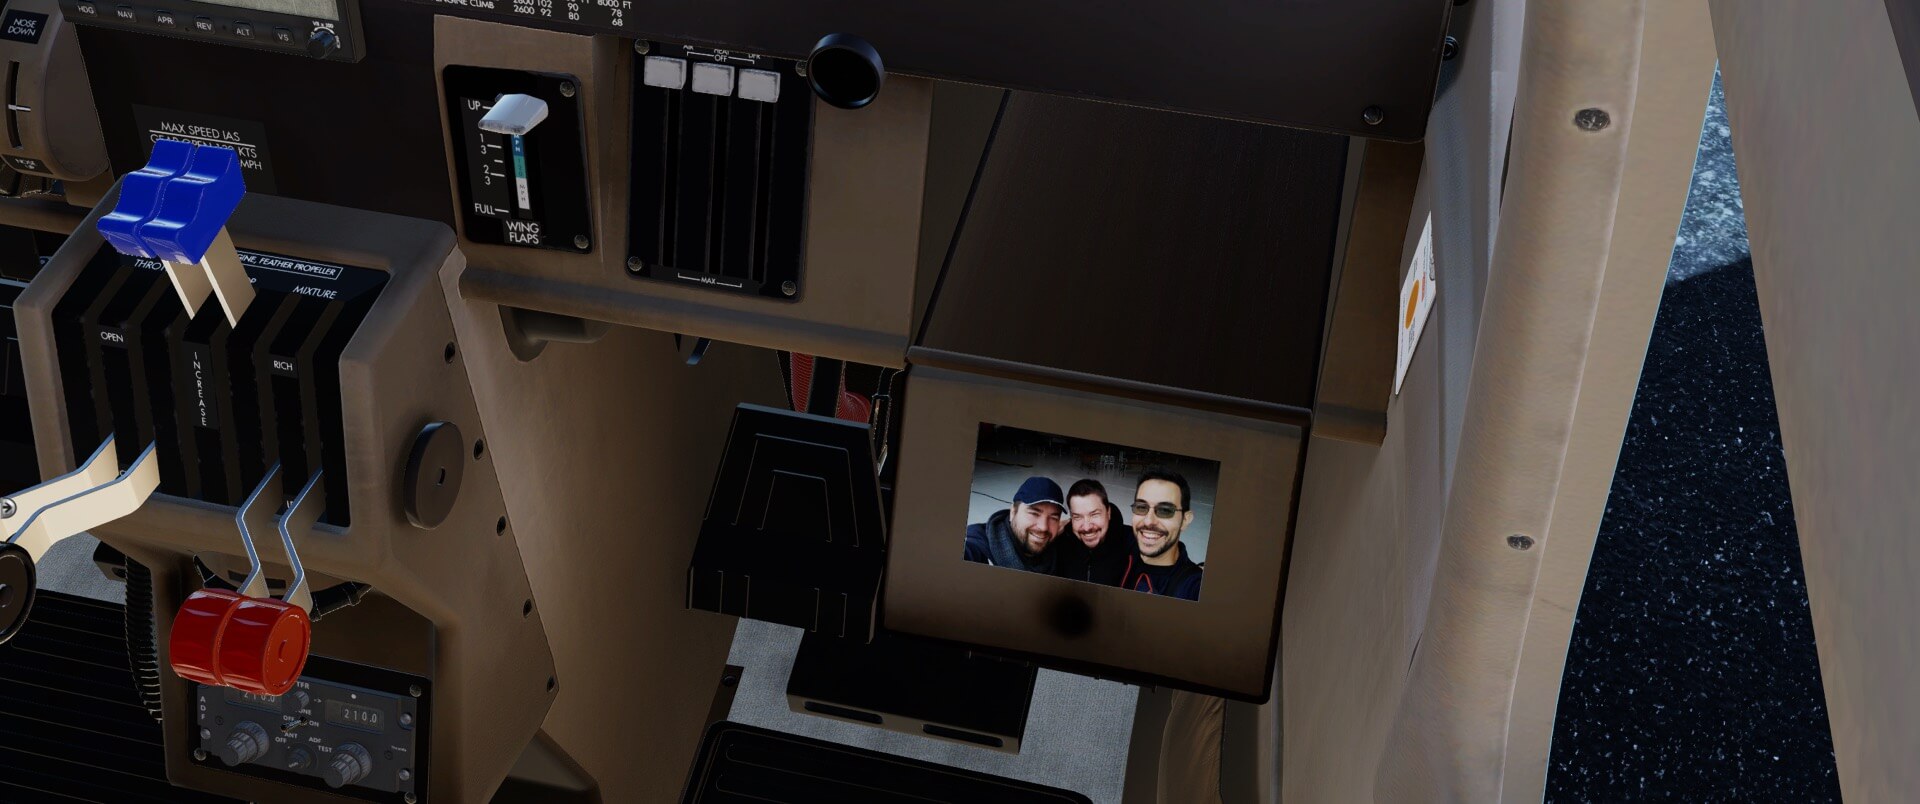
Other accoutrements scattered about the interior include window hardware, an operational door window, a functioning vent window near the pilot’s seat, and usable sunscreen visors. The view looking out reveals the tinting and wear of the glass as seen from the outside remains consistent from this angle. Finally, the animated glove box includes the photo of Thranda designers.

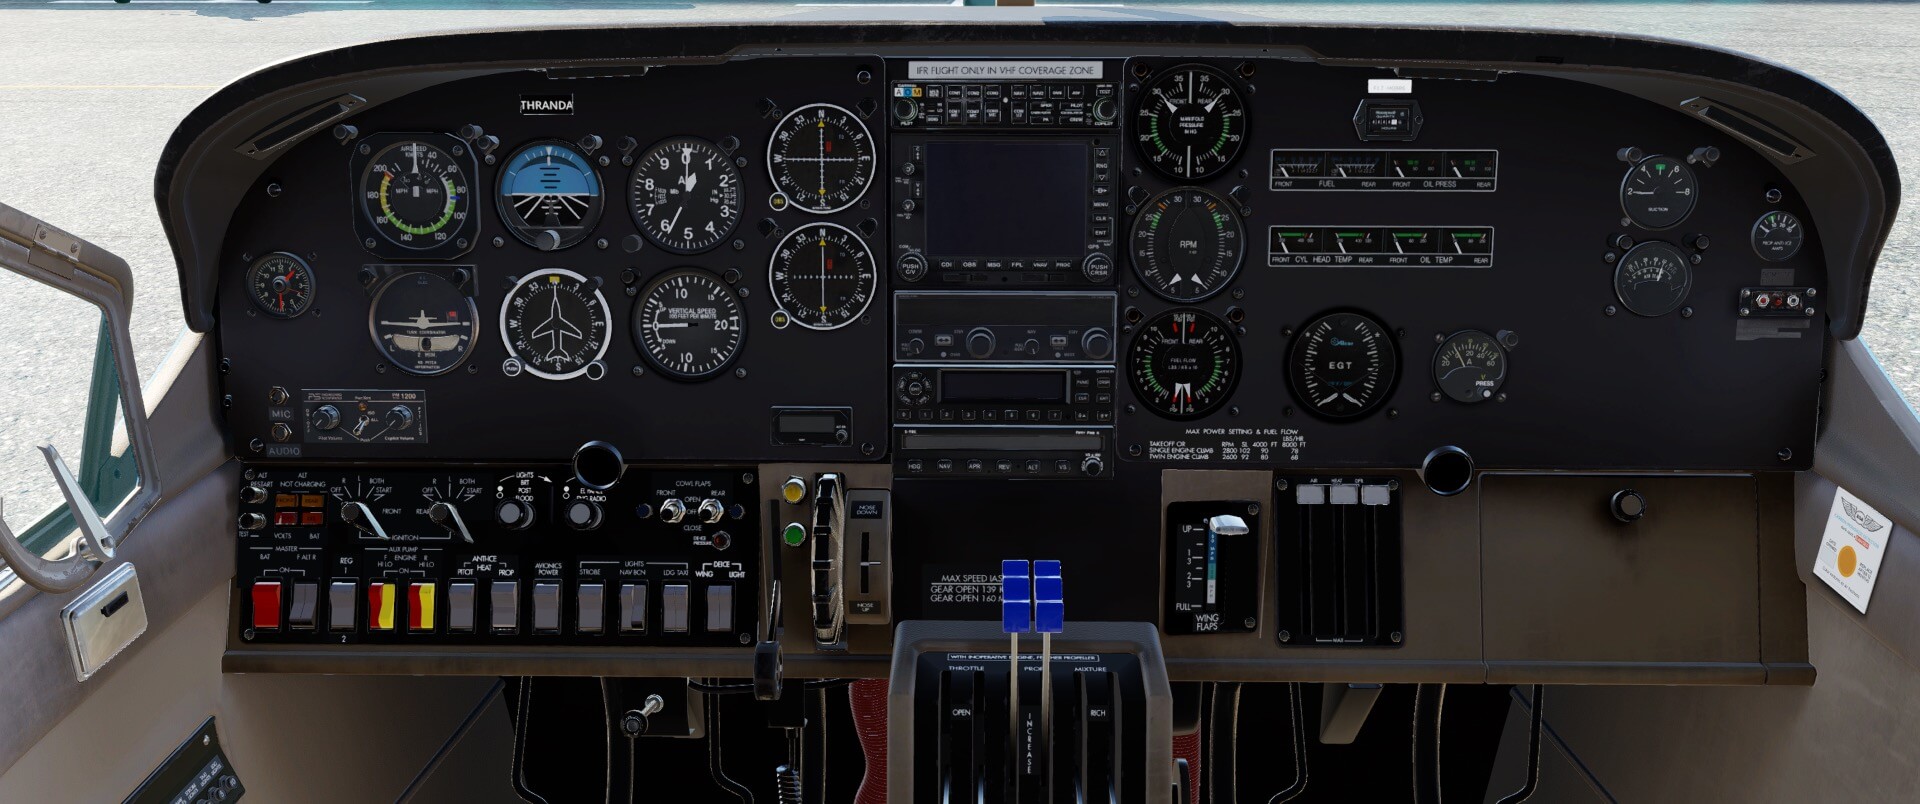
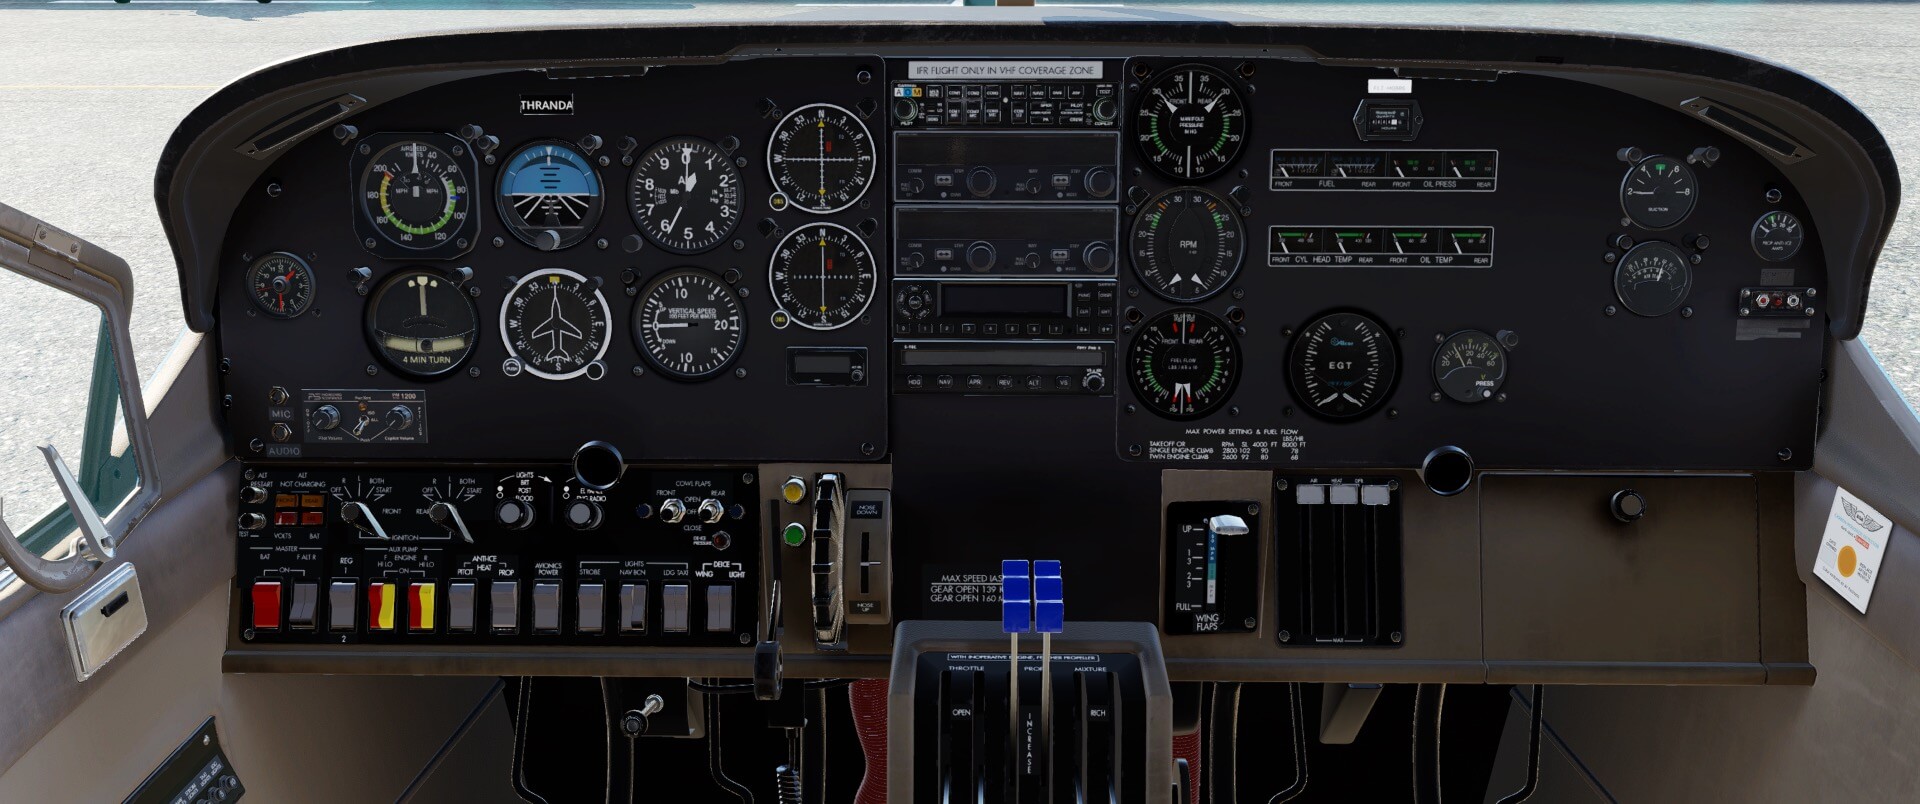
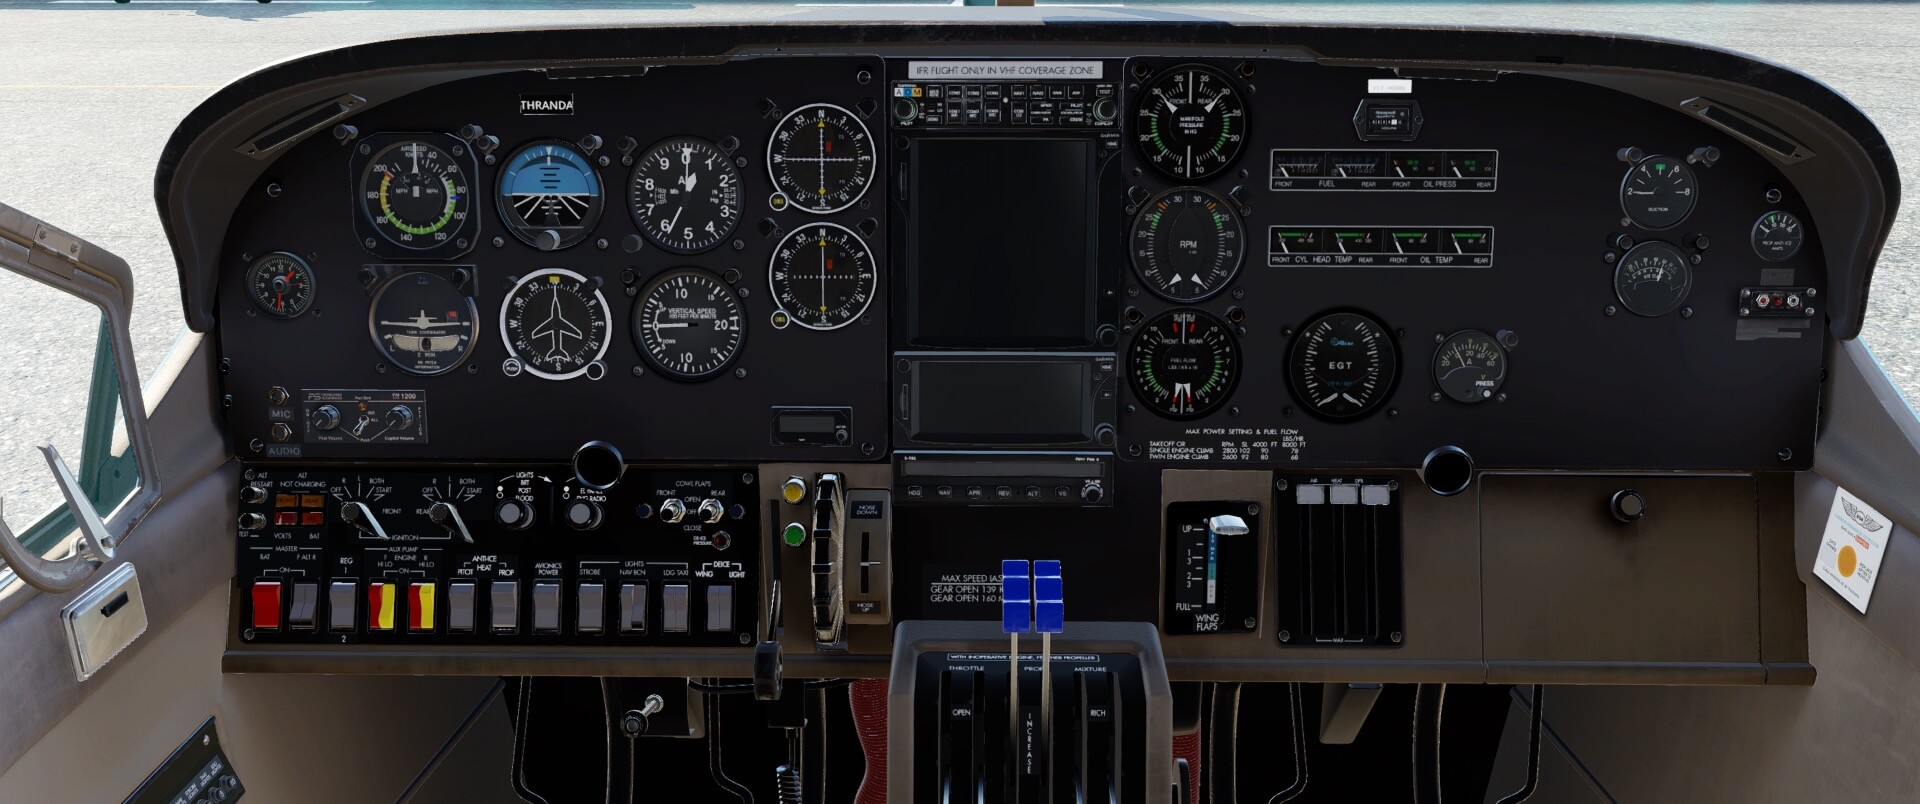
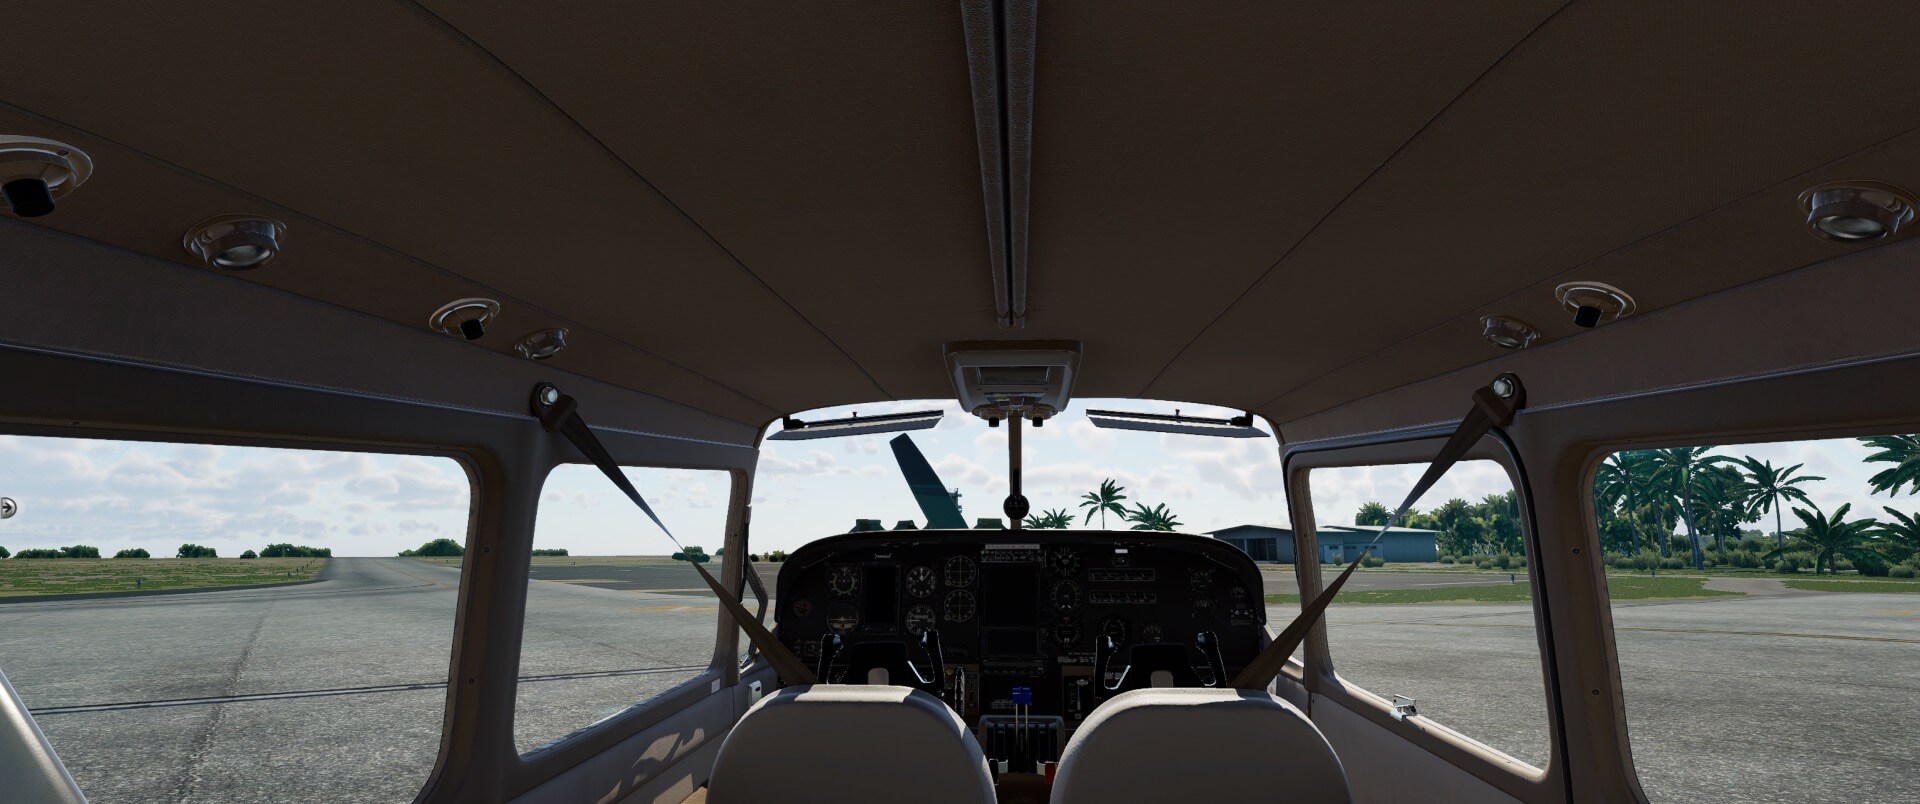
Flight Controls and Instruments
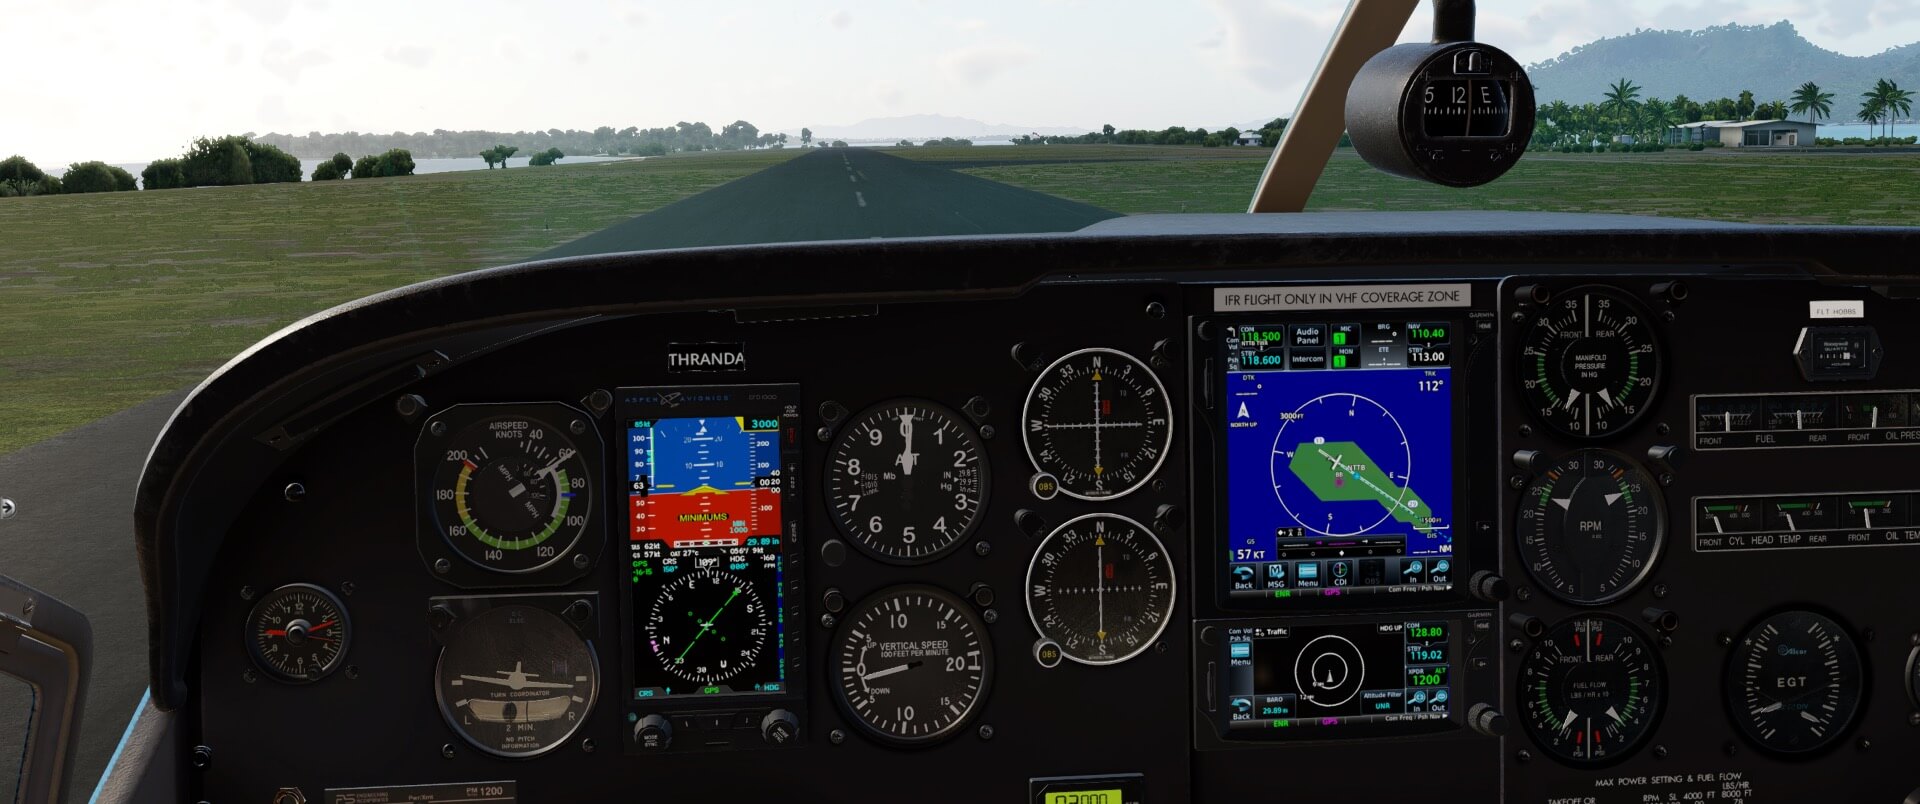
It is impossible to review every flight instrument available to prospective pilots of this C337F since Thranda has included over fifty instruments that can be applied to the customizable panel. All the instruments are accurately rendered, very legible, and will be obscured under certain lighting conditions if you have instrument reflections active on the “General” menu.
The identification plate above the pilot’s yoke will change to reflect the tail number assigned to the aircraft using the “Dynamic Livery” menu. Clicking on the audio jack of the headphone connection panel near the pilot’s yoke will mute the engine noises in a simulation of wearing a headset.


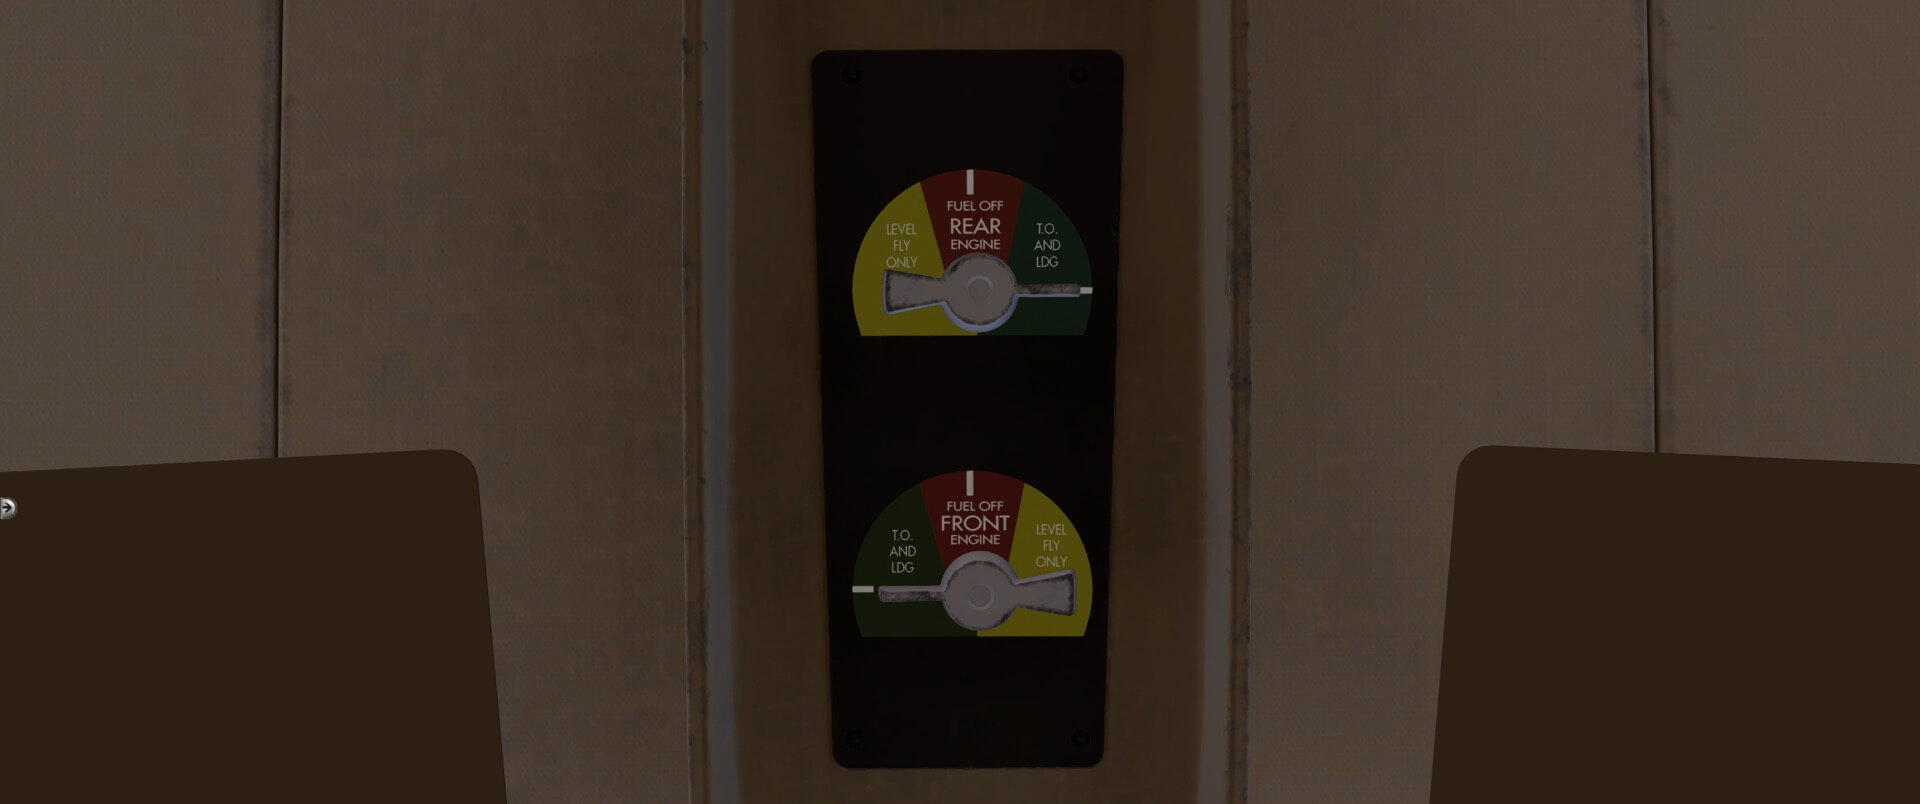
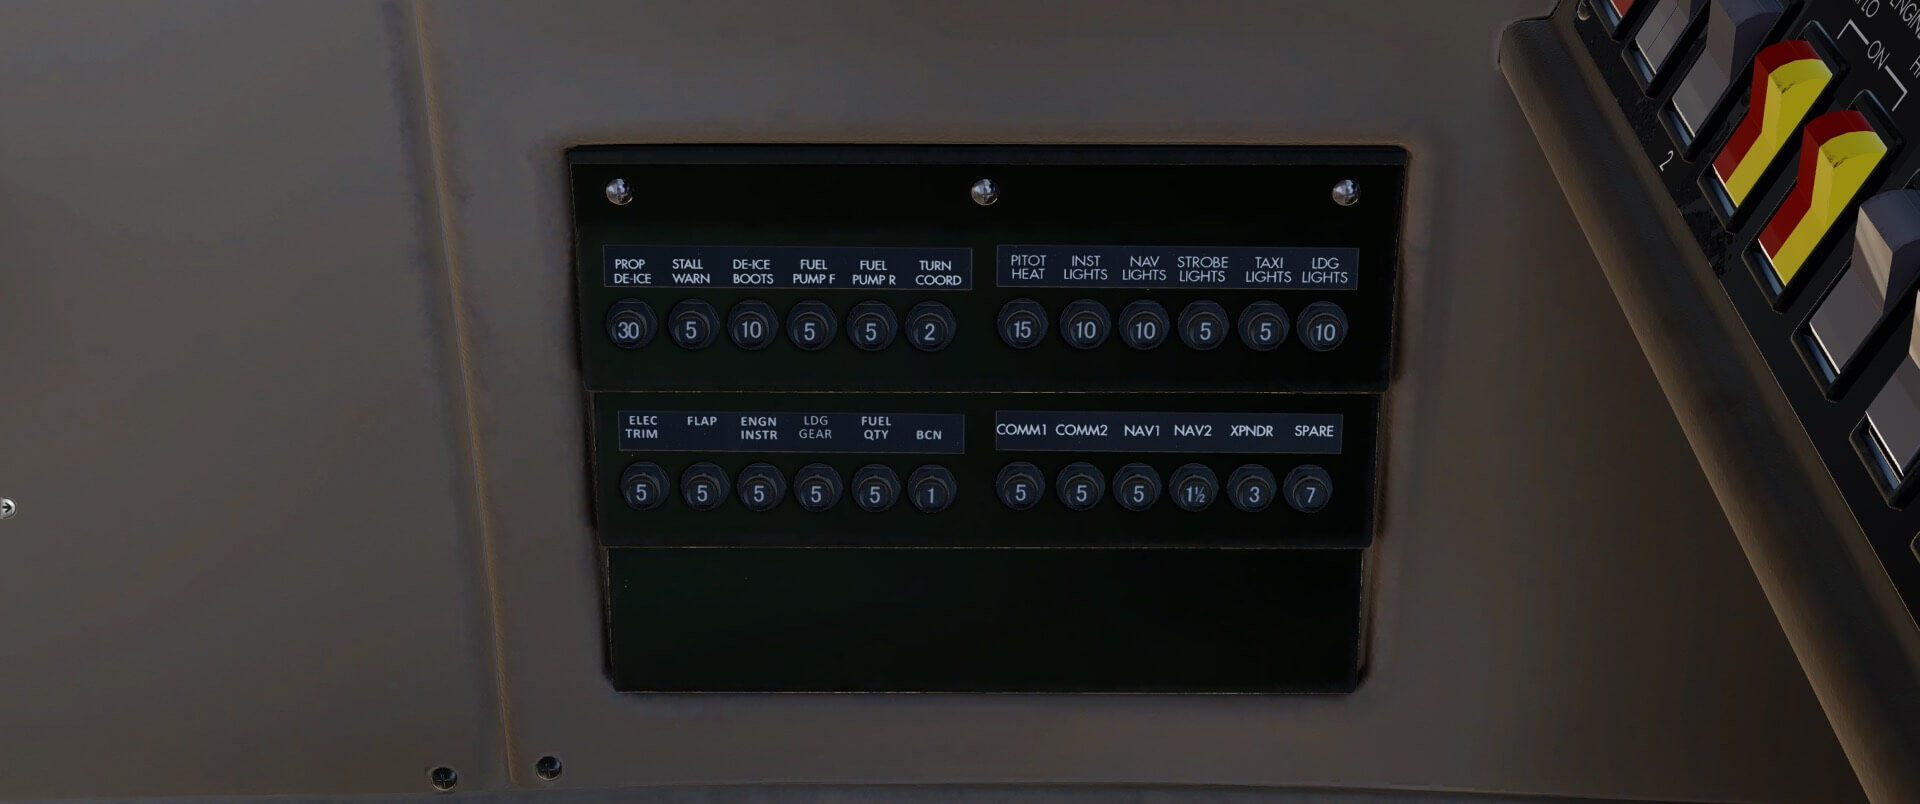
Overhead, you will find the fuel control valves which are fully functional and explained in detail in the manual. To the left of the pilot’s seat is the operational circuit breaker panel and below and to the left of the pilot’s yoke is the switch panel. The switch panel will change dependent on your de-icing equipment selection.
The one flaw with the switches is that, occasionally, it can be difficult to tell what position the switch is in because of the way the light is reflecting off it. Below and to the left of the co-pilot’s yoke lies the environmental control levers. The only functional one in this triad is the defroster which will apply heat to the windshield to aid in keeping it clear of ice.
At the base of the panel, centered between the front seats, lies the expertly crafted throttle quadrant that continues the used aircraft motif with a multitude of scratches along both sides of each lever slot. The leftmost of each lever set is for the front engine while the rightmost is for the rear engine. The quadrant also contains the rudder trim wheel that you will find just below the lever pairs.


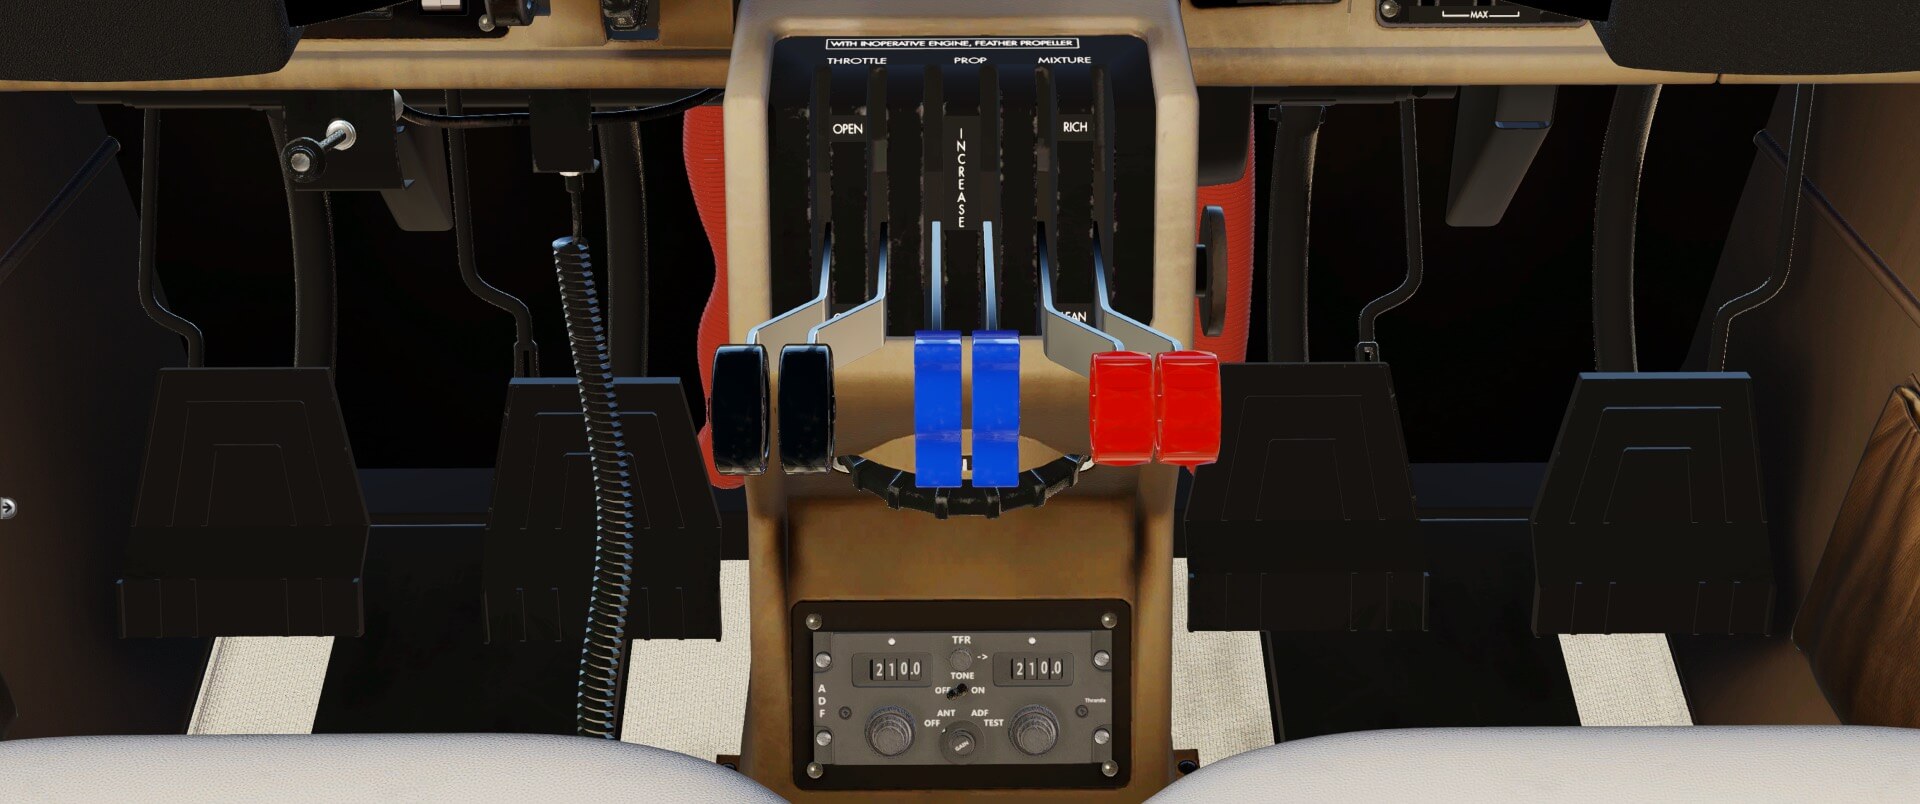


The last control is the emergency landing gear manual pump handle. This lever is on the floor between the seats. The handle slides back and forth to extend or stow it. According to the emergency procedures, you extend the handle and then pump it up and down until you see the green light on the landing gear controls.
Lighting and Sound
Lights
The physical light fixtures on the 337 are modeled with detail and accuracy. The visibility of the red and green nav lights changes accordingly from barely visible during daylight hours to highly visible at night. The white nav lights and the beacon have a higher degree of visibility in all conditions though they, too, are much more visible at night.
The landing and taxi lights are bright in all conditions, but the cones do not materialize until the ambient light is sufficiently muted. When they do appear, they are properly aligned and functional. The usefulness of the landing and taxi lights seem to be realistic in terms of the covered range.


The panel lights are organized into four sections controlled by four rheostats. As you saw in the “Panel” menu, you can assign instruments to these sections using a numeric value. The lighting, in practice, is comprehensive and very effective.
Sounds
The sound package is comprised of several high-quality sounds that cover everything from the door squeaking as it opens and closes to engine sounds that are distinct for each engine. An external fly-around treats us to a directionally correct experience of these sounds as one engine becomes dominant to be replaced by the next as the camera circles about the aircraft. Inside, the Skymaster lives up to its billing as a very noisy aircraft. One thing I noticed when doing the one engine out test is the engine noise seems to be connected more to the propellor angle than to the engine. The sound package eminently enhances the flight experience and does absolutely nothing to detract from it.
The Test Flight
This flight was conducted under a variably cloudy sky with some convective storms in the distance. Wind speeds were in the high single numbers to low teens coming mostly from the north. Altimeter setting was 2989. The aircraft TOW was 3433 lbs. with the CG at 137. The flght itself was a low altitude test flight involving climb, descent, and level flight around the French Polynesian Leeward Islands.


For the sake of this test flight, speeds and flap settings were done “by the book”. My purpose in writing about this test flight is to provide what must be considered a very opinion-centric report of what it is like to fly the Skymaster. My perceptions may or may not be validated by yourself in your own experiences. For the most part, this is to help folks new to flight simulation get an idea of how easy it is to start with, and learn with, the Skymaster should they think they might want to make this choice.
The Skymaster may be a good twin engine for the first-time multi-engine pilot to get used to the twin engine controls since it is so forgiving in terms of one engine not being precisely balanced with the other. For the pilot first getting used to dual controls, this can be a real bonus since you won’t burn up the plane if one RPM or manifold pressure has a slightly different number while you coordinate your levers.
However, don’t fall into the trap of thinking the Skymaster is an easy aircraft to operate. While the 337 greatly reduces the engine-out rollover type accidents, its pilots have found other ways to keep its accident rate on par with other twins once instructors stopped killing engines on takeoff on those other twins. (Yes, this was a common practice once upon a time for twin engine aircraft pilot training.)
So, with the engines started, it’s time to release the brake and begin our taxi to the runway. The book states taxiing should be done at slow speeds with the engines near idle. Yes, and Yes! This ship starts rolling a little too fast, especially in my current wind conditions, and it gets real chippy real fast. If you have hardware rudder and toe brake controls, be gentle and smooth or you will be all over the tarmac and maybe off it.
At the threshold, props are full, mixture set according to the manual, and the throttle is slowly advanced. As the Skymaster picks up speed, it becomes more susceptible to the influences of the crosswind ultimately getting very bouncy right before the roll out and requiring the use of rudder and aileron to keep the nose straight. As promised, there is little veering tendency resulting from engine torque.
Roll out is smooth and the Skymaster will easily jump to a high angle of attack with a rapid altitude increase if you are not smooth with the controls. Dialing back the manifold pressure and RPM’s, the airplane slips into a smooth easy climb at published speeds. Its susceptibility to air turbulence and cross winds reminds me of a smaller singe engine aircraft which I wasn’t expecting from a twin.
A tap of the toe brake stops rear tires from spinning and air speed increases when the gear is stowed. It also showed a tendency to pitch up after the gear doors closed. What I did not see is the replication of the statement in Aviation Consumer that the act of stowing the gear comes at a cost of 240 fpm resulting from the drag created by opening the gear doors. Raising the flaps gave me a little surprise when the nose pitched up to a very high angle of attack.
Dialing in nose down trim is required rather than nose up. Perhaps this has something to do with airflow over that large horizontal stabilizer.


At straight and level flight, the Skymaster reaches and maintains about 140 knots true air speed. I was unable to get the plane to the 165 knots published cruise speed until I flew it on a “perfect day” with the fuel burn, RPM’s, and manifold pressure all at the top of the green arc. Plan on spending plenty of money if you want to maintain 165 knots!
The aircraft does prove to be very susceptible to an attitude change on entering a turn. Either left or right leads to a very quick nose down such that I found myself starting to dial in trim prior to initiating a turn and then trying to stay ahead of the curve to keep the turn level and coordinated.
Approach and landing are smooth. Landing the 337 doesn’t seem all that much different than landing the 172 other than not letting your speed get away from you. If your approach is too fast, the 337 will float over the runway. If it’s too slow, it will let you know you’ve touched the ground with a pretty nasty bump. Power off landings are not the easiest since the 337 seems to have a tendency to sink like a brick when the throttle alarm is going off. For my landing, I had to crab it a little to counter the 11 kt wind coming from the northeast.


The 337 does not replicate physical damage resulting from improper handling to the only trouble you will get into is engaging in too fast of a dive too close to the ground where you won’t have the time or ability to pull out of it.
Single Engine Operation
Single engine operation with the Skymaster is modeled pretty much as advertised. Either engine can go out and the trajectory of the aircraft will not change. Identifying the engine out is not easily done by sound with this model. What you will notice is a rapid drop in airspeed and, if you wait long enough, a precipitous nose drop. You will need to identify which engine is responsible with the manifold or RPM gauges.
Reducing the throttle beyond a certain minimum sets off an alarm in the cockpit. This alarm will sound even if you reduce the throttle on the inoperative engine so you might just want to cut off the mixture, feather the propellor, and adjust your trim while leaving the throttle lever as is.
With the front engine inoperative, my airspeed stabilized at about 110 knots. With the rear engine inoperative, it was about 88 knots.


On two separate attempts, I found it incredibly difficult to maintain any semblance of climb when I killed an engine right after my roll out. I found it necessary to get the nose level and allow speed to build up prior to attempting a climb. This was better, though, than having a wing tip down and drag the ground. Several pilots have gotten themselves into serious trouble attempting single engine takeoffs with the Skymaster by stalling the plane and hitting the ground. So, apparently, the advantage of the inline engines isn’t all that advantageous when the engine quits right after takeoff.
Summary
The Cessna C337F “Skymaster” is a noteworthy addition to the Thranda lineup of aircraft for X-Plane 12. Thranda has set a very high bar of expectations over the course of their aircraft releases and they live up to it with this presentation. The modeling is precise, and the texture work is incredible if not the best available. The only niggle here is the overly glossy tires.
The flight model appears to follow what the published numbers would lead one to expect and the behavior of the aircraft appears accurate judging by what I have read. The single engine experiments bore out what has been published including the lack of climbing power when the engine is out too close to the ground with an insufficient amount of speed built up.
The one issue I did find related to the flight model is that the documented climb rate penalty created when operating the landing gear doors does not exist. [“Also unusual is the fact that while leaving the gear down produces a climb penalty of a bit over 100 FPM, the act of raising it carries a 240 FPM hit.” For more information check out this Cessna 337 Skymaster – Aviation Consumer URL.
The aircraft engages in a wild pitch up or down when the gear are operated depending on whether you are raising or lowering them, and the airspeed changes correspondingly when the action is completed and level flight is regained.
If you are a fan of unusual aircraft, this is a model for you. If you want to make the step up from a single engine plane to a twin engine, this is as good a plane as any to use for getting used to managing a dual set of engine controls. If you are a fan of Thranda aircraft, this is very much a must buy if you are willing to step out of the bush with them. Admittedly, if you have turned to Thranda specifically for those float, ski, and tundra tired equipped aircraft that will go almost anywhere, this family sedan is probably not going to fill that bill since it is not a STOL achiever and it’s delicate gear is likely best left on the tarmac.
The final “bottom line”: for 39.95USD, you can’t go wrong if you have an interest in the type of aircraft the Cessna C337F represents. As always, any helpful comments, constructive critiques, or factual corrections are always welcome. You can grab your copy at the dedicated X-Plane.Org store page.
Until next time from somewhere in the world, Cheers and Blue Skies!
Feel free to contact me if you’ve got additional questions related to this impression. You can reach me via email Angelique.van.Campen@gmail.com or to Angelique@X-Plained.com.
With Greetings,
Paul Beckwith
| Add-on: | Payware Thranda Cessna C337F Skymaster |
|---|---|
| Publisher | Developer: | X-Plane.Org | Thranda |
| Description: | Cessna C337F Skymaster X-Plane 12 |
| Software Source / Size: | Download / Approximately 1.4 GB (download) |
| Reviewed by: | Paul Beckwith |
| Published: | March 25th 2023 |
| Hardware specifications: | - Ryzen 9 5950X CPU @ 3.40GHz - 64 GB DDR4 3200MHz RAM - Nvidia GeForce RTX 3080 10 GB GDDR6X - Honeycomb Alpha Yoke - Honeycomb Bravo Quadrant - CH Products Pedals |
| Software specifications: | - Windows 11 - X-Plane 12.04 |
0 Comments