The 208(B) 675 (Grand) Caravan “Dynamic Choice(s) is Yours”
The Long Review and Table of Contents
In what seems to become a growing trend in the X-Plane world, we here at X-Plained.com are finding ourselves completing longer reviews as aircraft models become more detailed with more in depth systems presentations and additional options such as configuration menus. Due to the length of these reviews, you may not want to read through the entire thing at once or you may have an interest in only certain areas. As a result, I will be following upon the approach taken by Angelique van Campen and providing you with a table of contents for the lengthy project that follows. I hope you find it helpful.
Table of Contents
The Long Review and Table of Contents
Thranda Design 208 675 Caravan / 208B Grand Caravan
– Introduction
The Cessna Caravan
Installation and Documentation
The Thranda Menu
– General
– Livery
– Weight/Bal
– Audio / Slew
– Camera
– Panel
– Misc
Exterior Modelling
Interior Modelling
– Passenger / Freight Cabin
– Interior Lights
The Cockpit
The Flight Experience
– Checklist and Instrumentation Overview
– From Engine Start to Shutdown
RealityXP Flight
Summary
– A Word on Frame Rates
– The Final Note
Thranda Design 208 675 Caravan / 208B Grand Caravan
Introduction
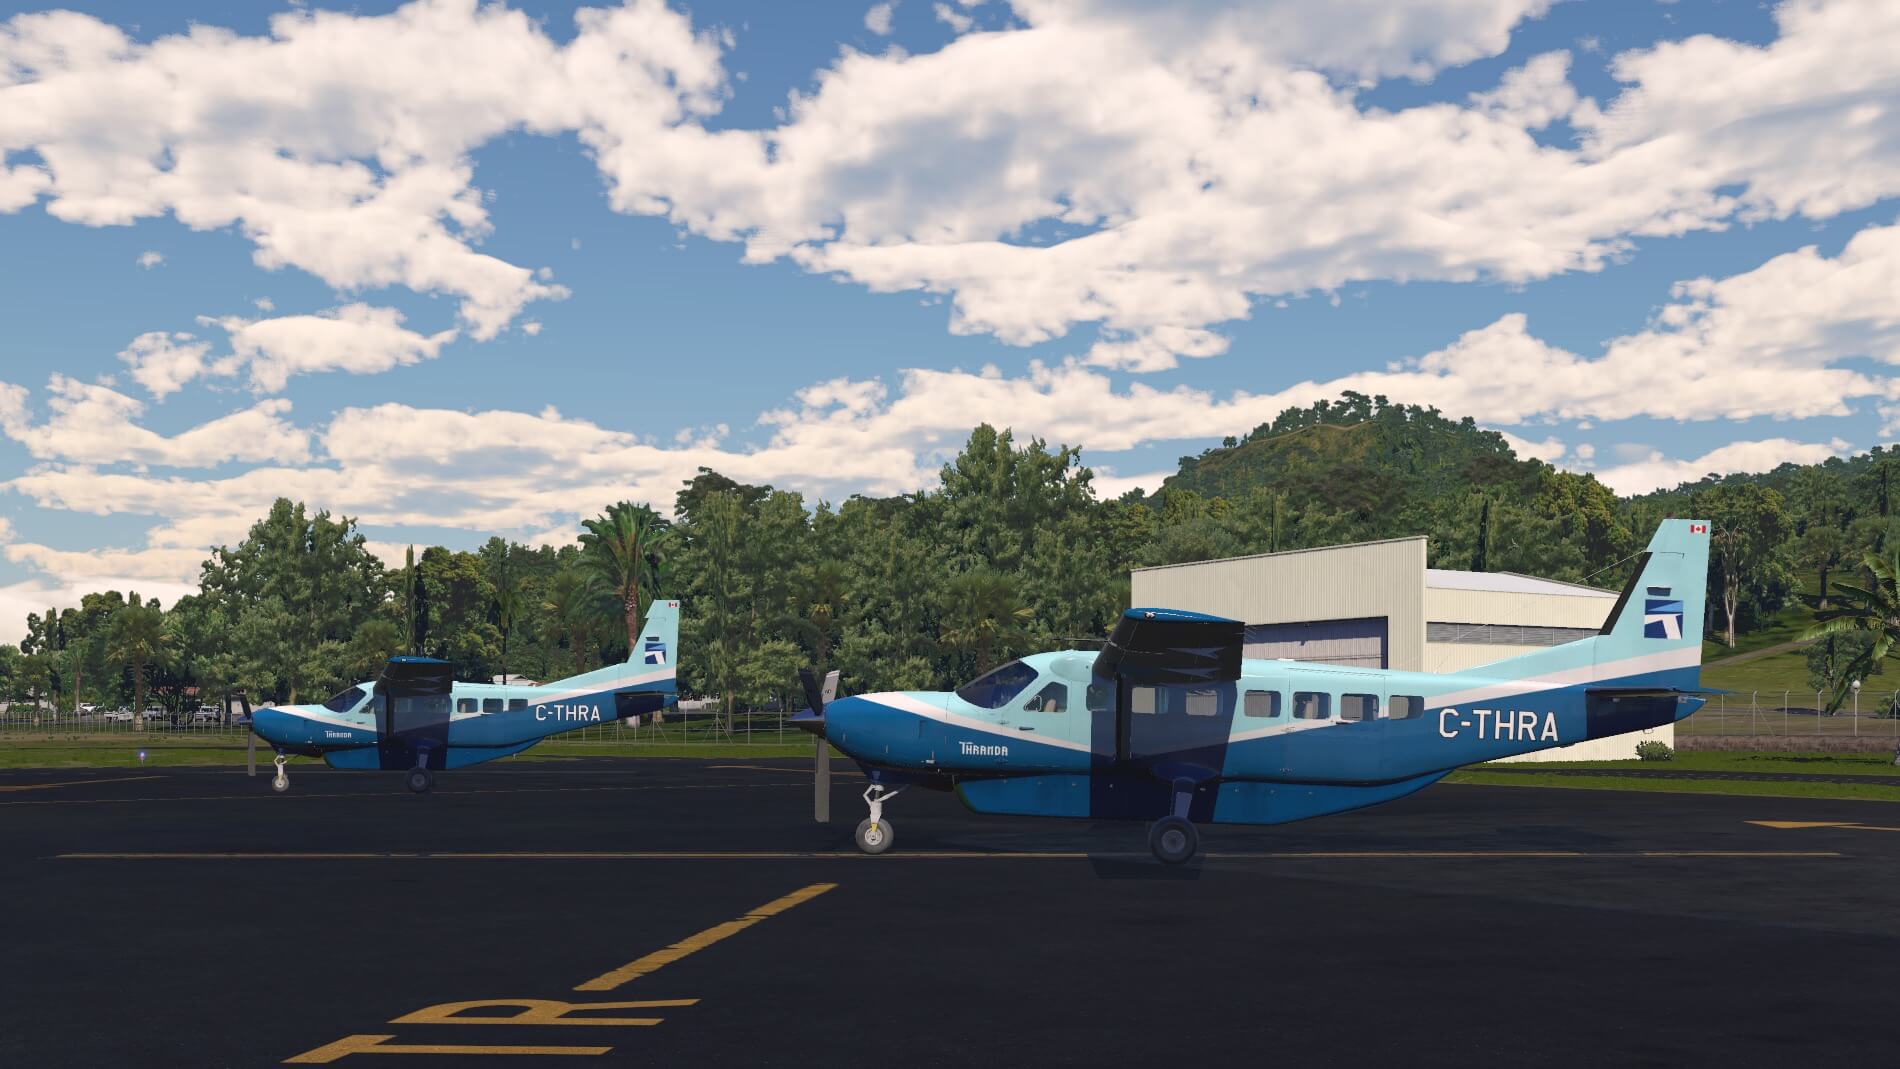
On November 1, 2016, Thranda Design unleashed their first in-house creation on the X-Plane world in the form of the Quest Kodiak, an aircraft close to the heart of Thranda Design Project Manager Daniel Klaue. Now, six years later, Thranda Design releases the latest in a line of aircraft begun with the Kodiak that is also the principal competitor to the Kodiak in the modern-day bush plane world. The Caravan package is the latest in the Dynamic Generation Series line and the favorite of Thranda Design contractor, Joe Noe or, as more commonly known on the forums, NoJoe.
What, you may ask, is a Dynamic Generation aircraft? Well, here to answer that question is Thranda’s own Dan Klaue.
- Want to customize a livery? You can do it live, in-sim! Now even with PBR! Experiment with Metalness and Roughness values without leaving the sim!
- Want to move around instruments on the panel for different panel configurations? Do so in real-time! And save presets of your favorite layouts!
- Want to adjust and save weight and balance more visually, without using X-Plane’s W&B menu, and see your edits affect the plane in real-time? You got it!
- Want to seamlessly move your plane around in slew mode to position it precisely where you want it in real-time? That’s all possible in the DynaGen series!
- Want to switch between different aircraft configurations on the fly, without reloading the plane? Cargo, executive, tundra, skis, etc. right at your fingertips!
- Want to enjoy highest fidelity and precision in flight dynamics, making use of X-Plane’s very latest physics engine advances? Look no further!
- Want to immerse yourself in ultra-realistic, multi-layered soundscapes, inside and out, with unrivaled nuance and depth? It’s all here!
- Want to customize your aircraft? Our planes feature a unique Manifest system, which breaks out logic variables for you to edit. SimPit builders rejoice!
If you are familiar with Thranda’s models, you will have noticed that each subsequent release in this line of aircraft seems to push that window further and further as they almost obsessively challenge the limits of X-Plane development as much as they possibly can. The result is an incredibly feature rich aircraft with many “bells and whistles” that is going to take quite a bit of time to accurately review.
As some of you may be aware, your intrepid reviewer’s preferred method of air conveyance is the turboprop bush plane. The piston powered DeHavilland Beaver is, perhaps, the one occasional exception to that rule. With that being said, I must admit to personally owning every Thranda aircraft apart from the Wilga and accumulating many hours in the cockpit of these planes. I have been excitedly waiting the release of the Caravan since NoJoe started teasing us with the early release photos and revealing some of the features that would be included in this release. Admittedly, I have a bias in favor of the Thranda creations, but I will make every effort to control that bias as I share my experience of the Caravan with you.
The Cessna Caravan
In the thirty-three years since the first Caravan rolled off the Wichita Kansas production line in August,1984, the venerable aircraft has taken on multiple roles in one-hundred countries. Statistics recorded by Cessna in 2017 totaled the world Caravan flight time at about 8.4 million hours accumulating at a rate of about 71,000 flight hours annually. FedEx, the largest single Caravan operator, reported a 99 precent dispatch reliability rate. The milestone twenty-fifth-thousand aircraft was delivered in 2015.
The new aircraft envisioned by Cessna was designed to respond to market research indicating a need to replace the old designs of the De Havilland Beavers and Otters as well as the Beech 18s being flown by bush pilots in Alaska and Canada, and as an upgrade to replace the Cessna 206 and 208 aircraft in use in remote areas of Africa.
The increasing difficulty of obtaining avgas contributed to the decision to develop this replacement around a turbine engine that would use more widely available kerosene-based fuels like Jet-A. The turboprop would also allow for larger loads, increased performance, and greater reliability over the piston engine counterparts. These benefits were already being realized by converted De Havilland Otters and Beavers. Another early decision by Cessna was to create a design to incorporate float and ski operations to make it a flexible utility aircraft to operate in remote areas.
The Caravan design team, of which two consultants came from De Havilland of Canada, started with the Stationair 206 that had already been slightly stretched into the Stationair 207. The 206 was stretched further and wider to haul fifty-five-gallon fuel drums and four- foot by eight-foot sheets of plywood. The cargo door was made huge in order to accommodate loading and off-loading this cargo.
Other challenges faced in creating the Caravan was achieving a speed above 175 knots with fixed gear and wing struts, and providing for good short field performance. Having learned from the failure of the C-308 design of 1951, Cessna provided the Caravan with huge flaps which meant shorter ailerons thus the addition of spoilers to the wings. Corrosion proofing became a factor when it was realized that the size of the aircraft would be prohibitive to keeping it in hangars at smaller airports.
The model 208 Caravan prototype flew in December,1982, the aircraft was certified in 1984, and deliveries began in 1985. In 1983, while Cessna was awaiting orders from bush pilots, which did come, founder and CEO of Federal Express, Fred Smith, spotted a Caravan on the cover of Flying Magazine. The result was the first large order for the Caravan with Federal Express – now FedEX – working with Cessna to design the cargo variant to meet their specific needs.
The now familiar cargo pannier was added, windows and passenger doors were removed, additional cargo tiedowns were added along with an additional cargo net, and the jet pipe was extended so exhaust would travel away from the pannier. Apparently, the FedEx Cargomaster (208A) variant became the first single-engine aircraft the FAA certified for ILS Cat II conditions.
Over the years, only relatively minor changes have been made to the original Caravan. The most noticeable of these is the engine upgrade to the current Pratt and Whitney PT6A-114A, flat rated at 675 shp, from the original 600 shp engine. This change was made as a result of FedEx wanting a larger version of the 208A cargomaster. By October 1985, the 208B Super Cargomaster, with 113 extra cubic feet of cargo space and a 750-pound larger MTOW, was certified.
By 1986, Cessna was delivering them to FedEx at the rate of three per month. This variant, with modifications that allow it to be converted from a freight hauler to a passenger transport became the fourth in the Caravan series and was named the 208B Grand Caravan. The Caravan became the Caravan 675 when the new engine was fitted to the 208A.
Other changes include the Garmin G1000 glass cockpit being added in 2008, and the Grand Caravan EX introduced in 2012 with the PT6A-140 engine producing 867 shp allowing for better high altitude and hot temperature operation. An updated suite of avionics has also been added to the fifth variant of the Caravan series. (The above was compiled from AOPA, Caravan Nation, Textron Aviation, and Covington Aircraft.)
Installation and Documentation
The Thranda Caravan is available for download from the X-Plane.org store or Aerosoft. Installation is the standard process of extracting the “Thranda Caravan” folder and placing it into your X-Plane aircraft folder. It is highly recommended that you avoid placing it into the “Laminar Research” folder as this will likely cause errors when you try to use the aircraft.
The folder size on disk is 5.08 Gigabytes and includes a “Documentation” folder that I highly recommend familiarizing yourself with if you are unfamiliar with the Caravan or unfamiliar with Thranda Design aircraft. Thranda user manuals are thorough, well written, and essential if you want to get everything possible out of your copy of the model. It is so comprehensive that I will not be covering in detail in a tutorial manner what is so well explained in the Caravan Manual.
This folder also contains performance charts for both variants of the Caravan and two documents with Thranda’s recommendations for starting points for controller and graphic settings. In a testament to the thoroughness of the documentation, Thranda has included the Laminar Research manuals for the Garmin 530 and 430 GPS units that are used in the Caravan models in case you no longer have the ones that came with X-Plane. In addition to all of that, you can find YouTube tutorial videos by Joseph Noe.
The final part of installation involves starting X-Plane and selecting one of the Caravan models to start you flight. Once everything is loaded, you will be prompted to enter your serial number in the activation dialogue. Normally, this process takes only a moment, and you will be asked to reload the aircraft. The recommendation is to not use the “Reload Aircraft” option in the Developer’s menu in X-Plane. The preferred method is to shut down and restart X-Plane. The second method would be using the Flight Configuration menu to load the default Cessna 172 and then use it again to swap out the 172 for the Caravan model you select.
Keeping your model up to date requires either re-downloading when an update occurs or using the Skunkcrafts updater plug-in which you can find here. This is the recommended suggestion from Thranda.
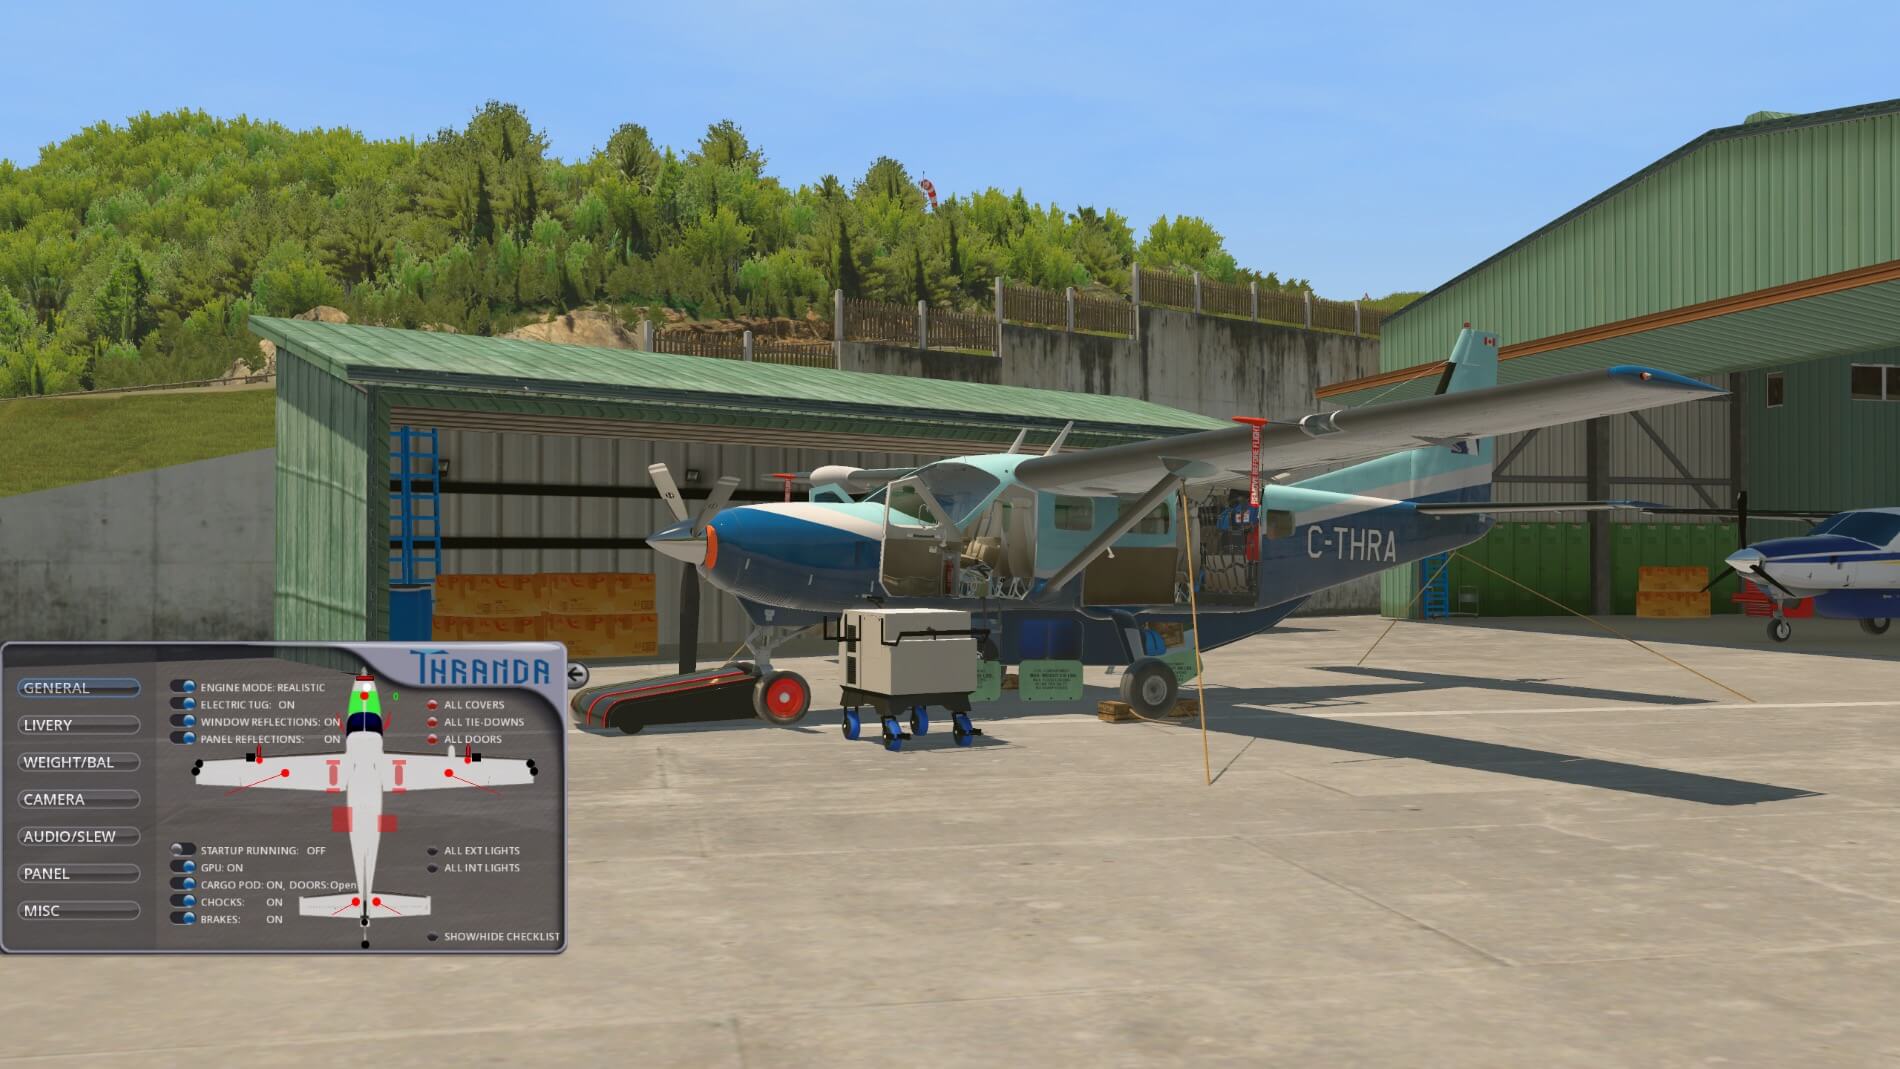
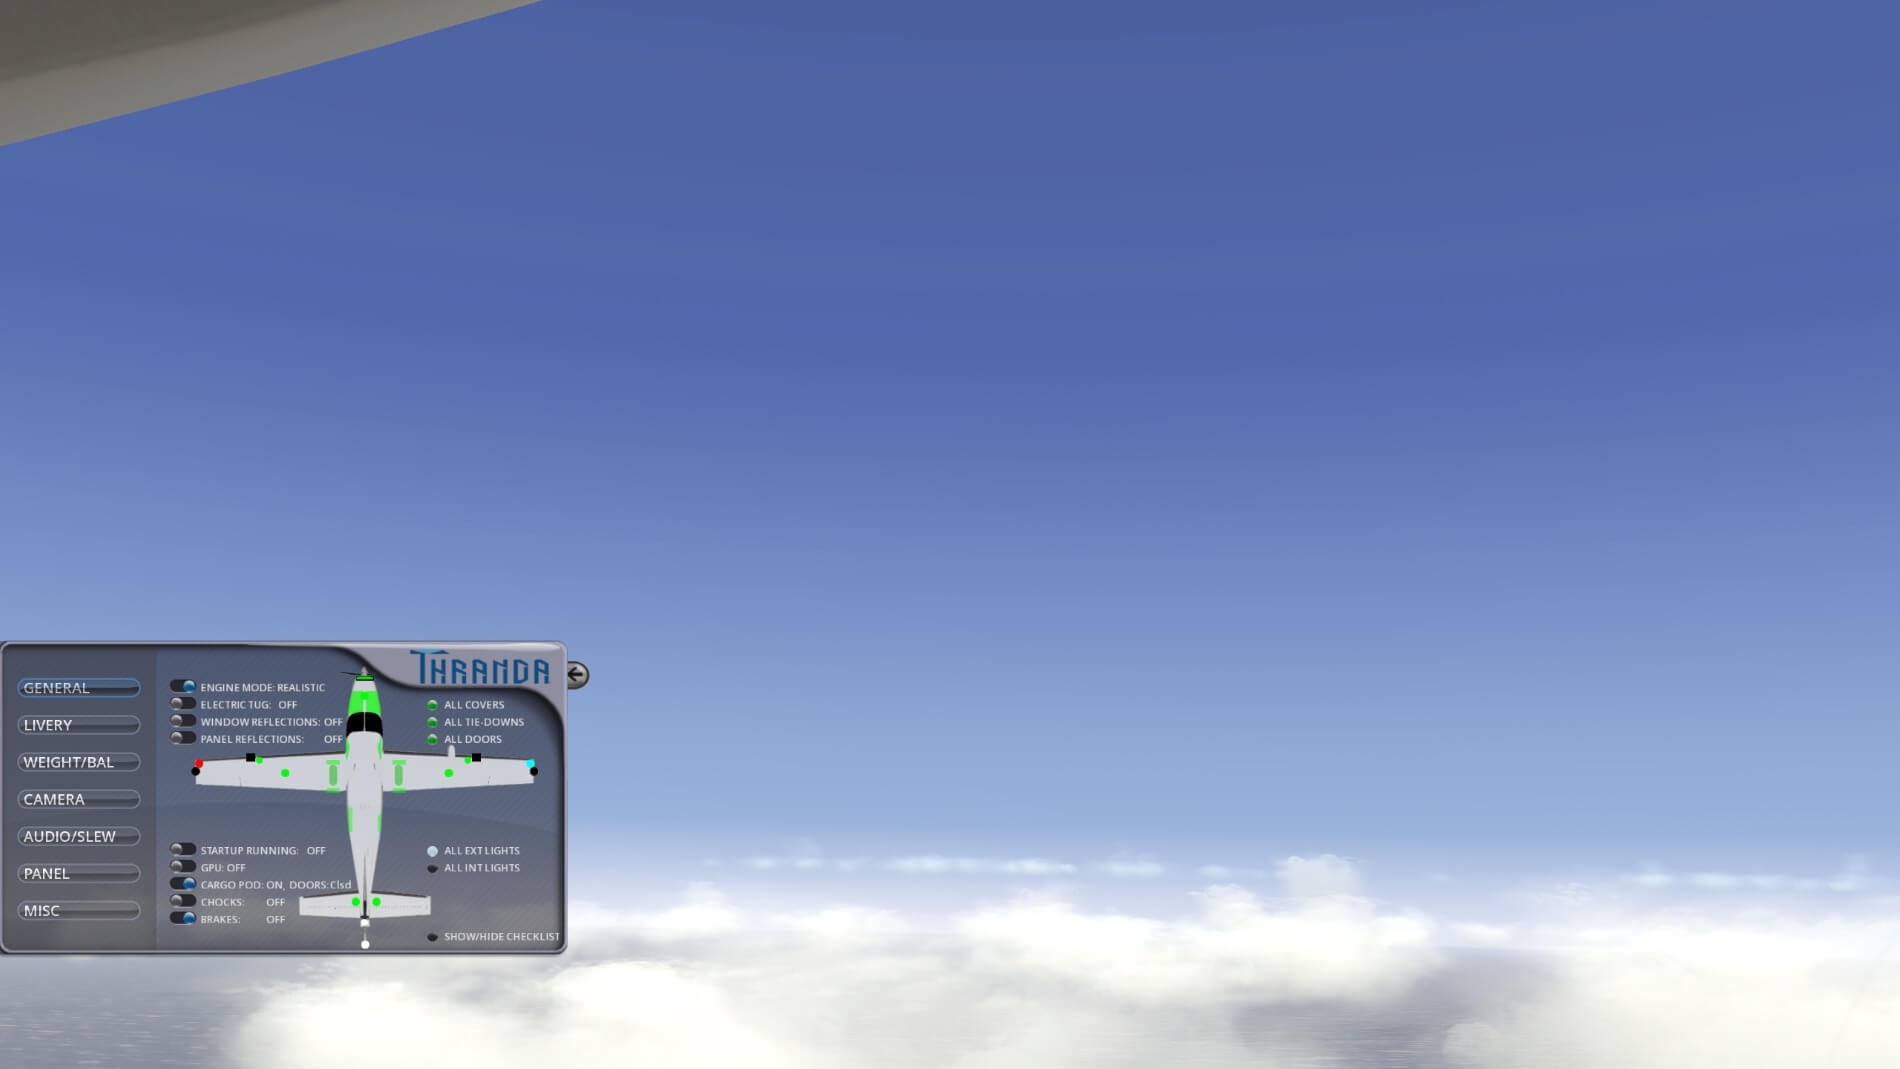
The Thranda Menu
Much of what constitutes the dynamic generation series of aircraft from Thranda is found on the Thranda pop up menu. The menu is accessed by clicking on the grey arrow button that you will see on the left side of your screen once the Caravan is loaded. One note on the arrow button: if you do not want to see it while flying, you can hover your mouse cursor over it and use your mouse wheel to change the transparency level of the button.
Note the small vertical grey bar against the edge of your screen. You will need to know where it is if you make the button transparent and want to position your mouse cursor where using the mouse wheel will bring it back to opaque. By the way, this menu does not move to different locations on the screen. It does, however, respond to the user interface size option on the X-Plane graphics settings page. If you are running the simulator at a very high resolution and are having trouble reading the Thranda menu, increase this setting and the menu will increase in size.
With the pop-up menu, you can control the operating parts of the aircraft such as the doors, cowl covers, and ground equipment. You can change your livery on the fly, configure the interior of the aircraft and adjust the weight and balance. Adjusting the sound volumes and camera views as well as activating the slew mode are done here as well. One of the most exciting features, customizing your instrument panel, is done through this menu. Finally, you can adjust the DynaFeel Intensity and see the features that are planned to be added with the coming expansion pack.
General
This menu is broken into four quadrants by the presence of the aircraft representation. The first option in the upper left corner lets you choose between the simulator controlling the engine variables for you, or you doing it yourself. The Caravan does not have an automatic engine control system. Choosing the simple mode allows the Caravan to be simulated as if it did have one. Flying in the realistic mode requires you to manage the engine torque, interstage turbine temperature (ITT), and compressor turbine speed (Ng) to avoid damaging the engine. This setting will also create the necessity for you to monitor for fuel imbalance due to the nature of the Caravan’s fuel system.
The electric tug option will provide you with a tug you operate with your flight controller to move the Caravan around. Pulling forward moves the tug and the Caravan forward while pushing back does the opposite. You can turn the tug using whatever you have assigned to the yaw axis. When you activate the tug, you should see a red dot appear between the cowl doors and a small number to the right side of the nose. The small number will give you an indication of how fast you are moving the plane with the tug.
Window reflections and panel reflections will provide you with a more realistic, as well as more obscured, view of the instruments and the view outside the cockpit. Some of the instruments and the windscreen have particularly high amounts of reflection as we shall see.
The top right quadrant contains three options for controlling the covers, tie downs, and doors. The position or state of an item is indicated by its color, red or green. In the case of the covers and tie-downs, red is the proper color for flight and green means they are in place and the aircraft is parked. The opposite is the case for the doors. You have the option of clicking on the individual spot for the item you wish to manipulate or selecting the “all” option in this upper right quadrant to change the status of all items in that category at one time. The doors are selectable and can be manipulated directly with click points on the aircraft. The covers and tie-down status can only be changed from this menu.
The lower right quadrant contains options for the external and internal lights. These two items work the same way the selections above them do. If one or more exterior lights are on, the indicator will be a white dot. If all are off, the indicator is black. You can select individual lights to turn them off or on. Here’s a hint if you can’t find the click point, turn on the “Show Instrument Click Regions” option from the X-Plane “View” menu, and you will see every click point in the menu represented with a white box drawn around it. The interior light option is a simple “all or none” option with no individual lights represented on this schematic.
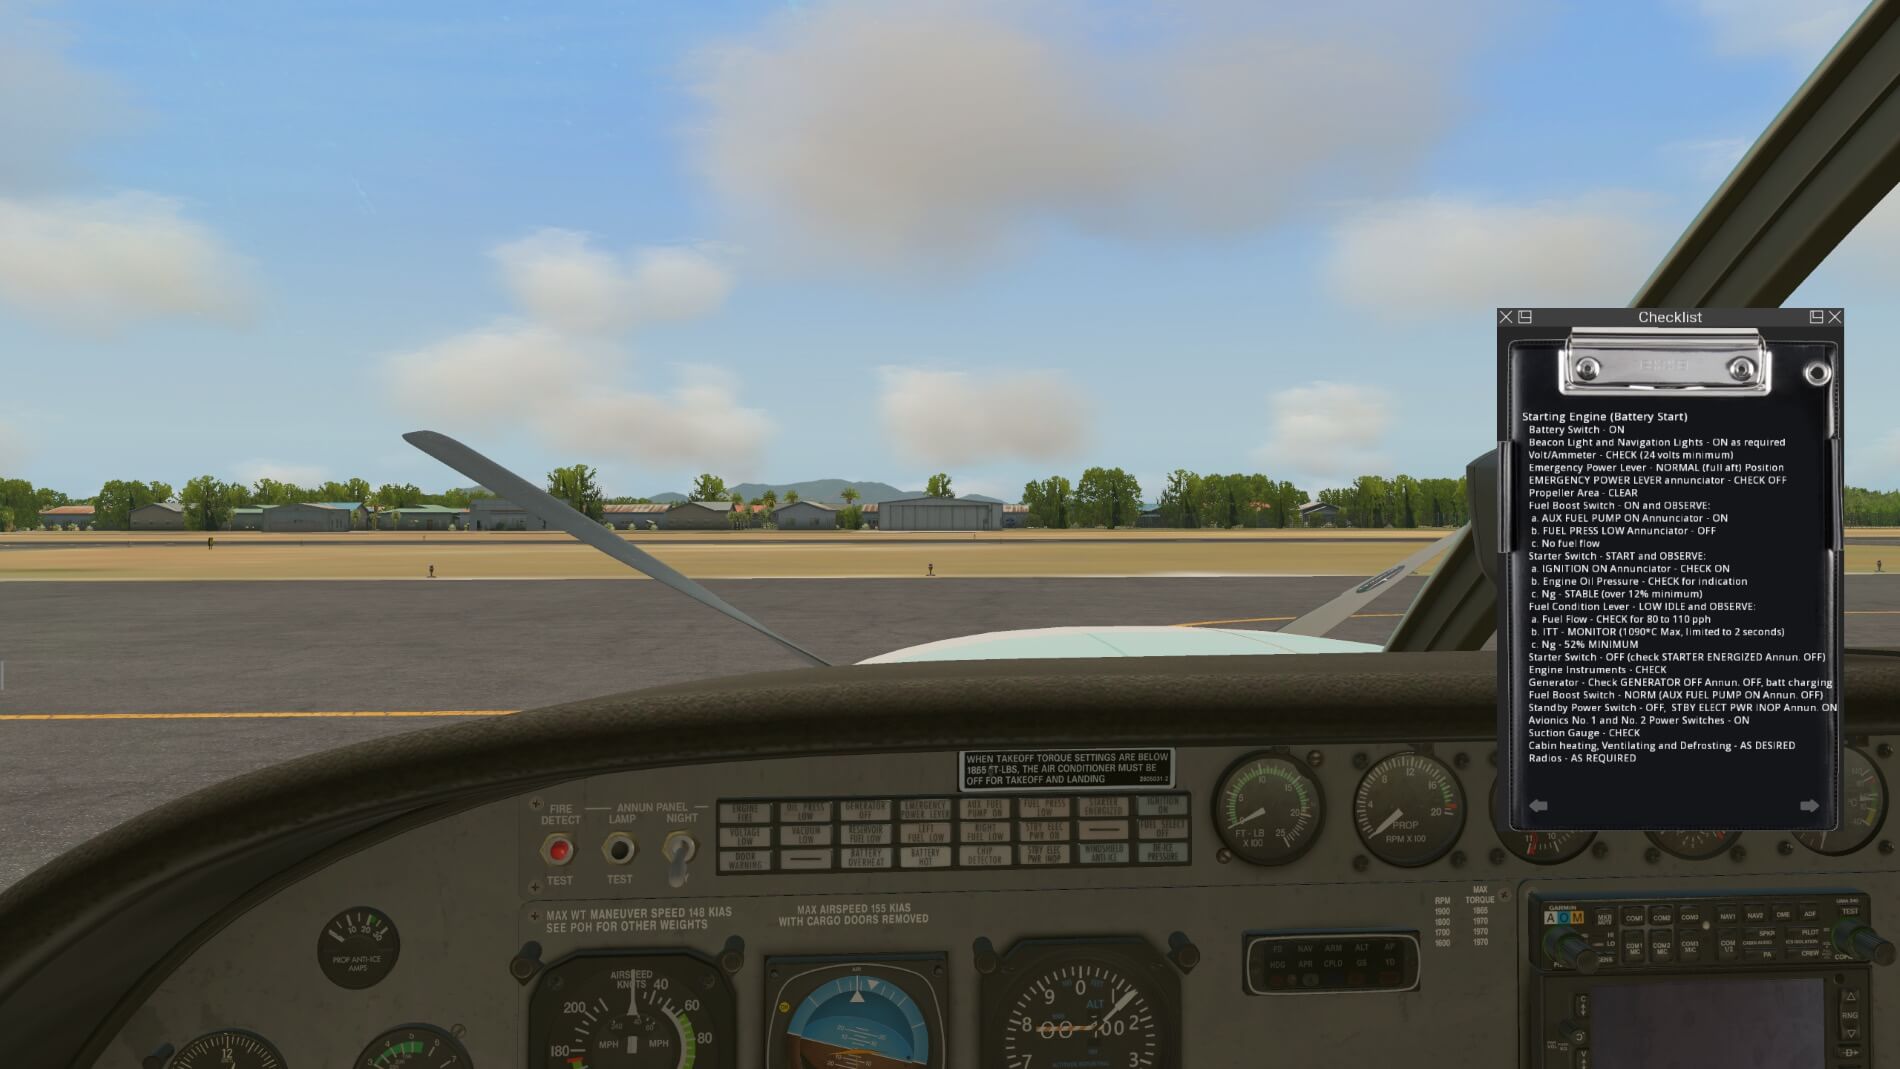
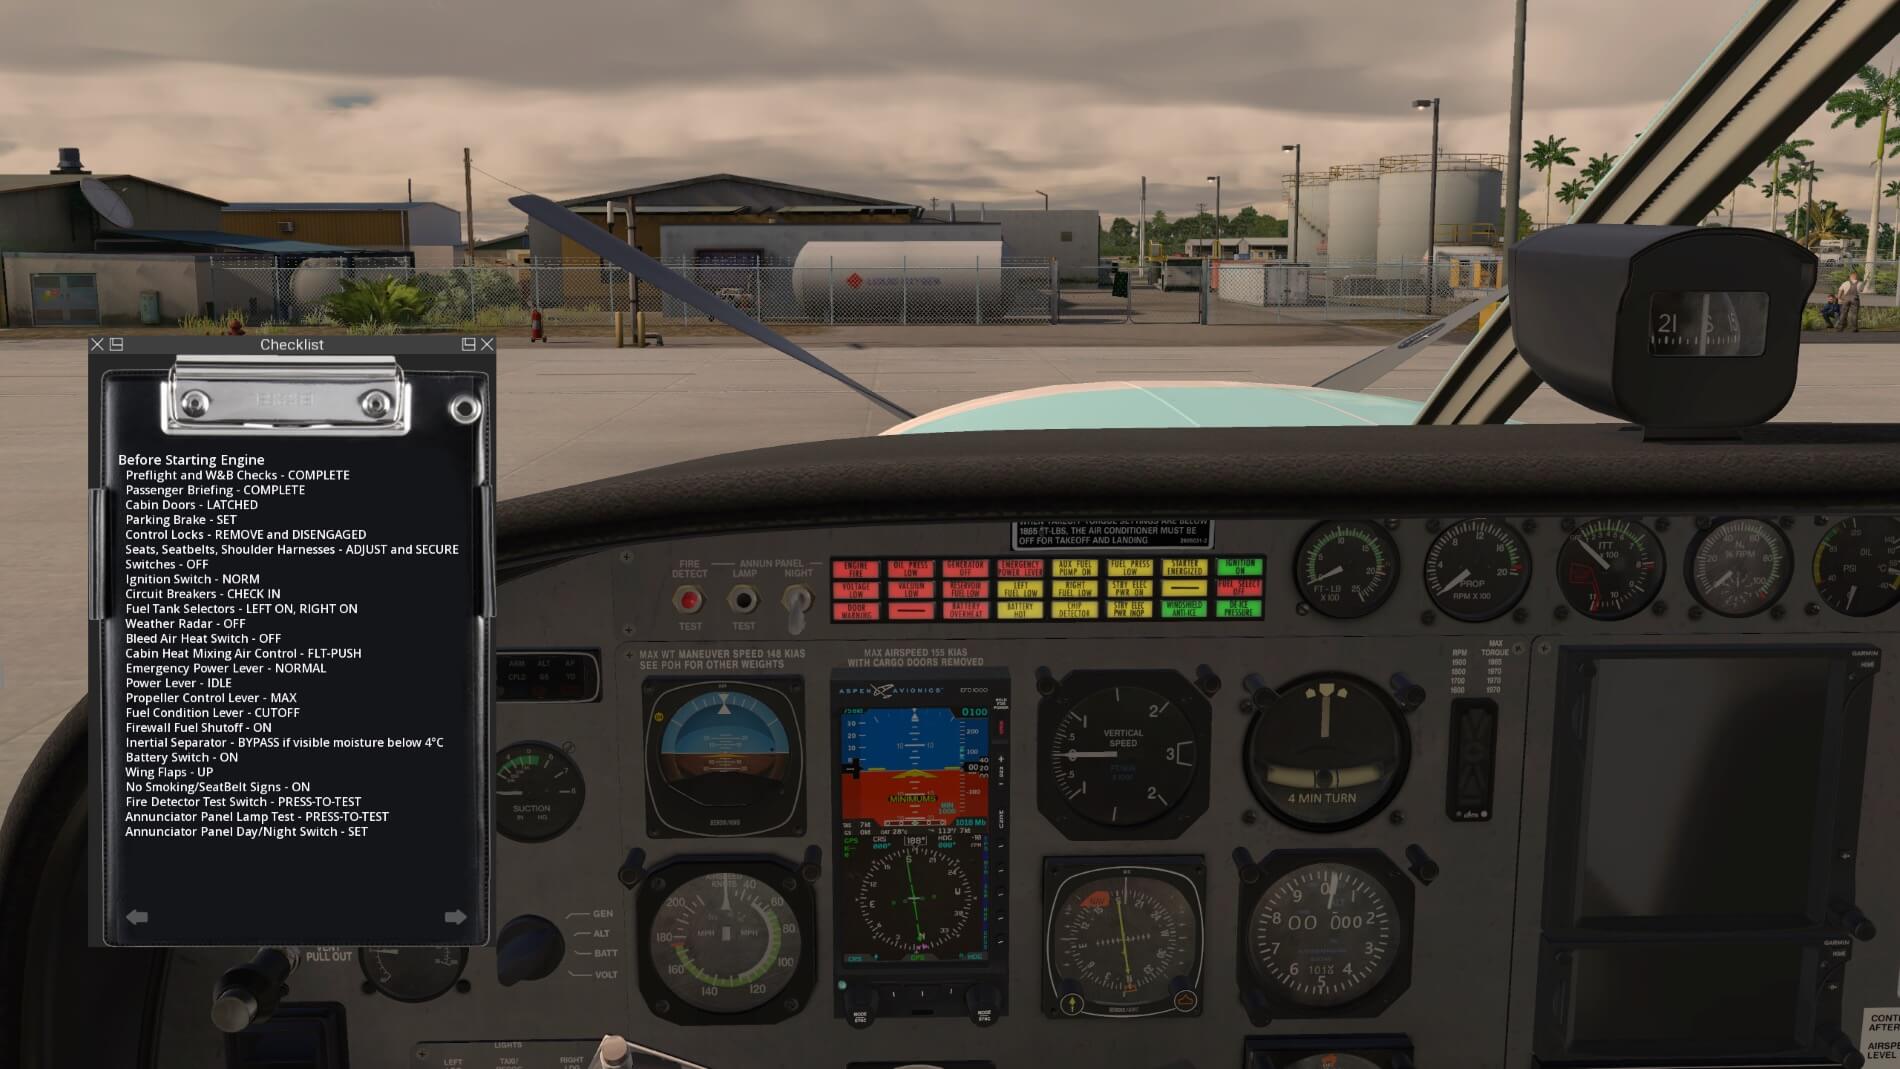
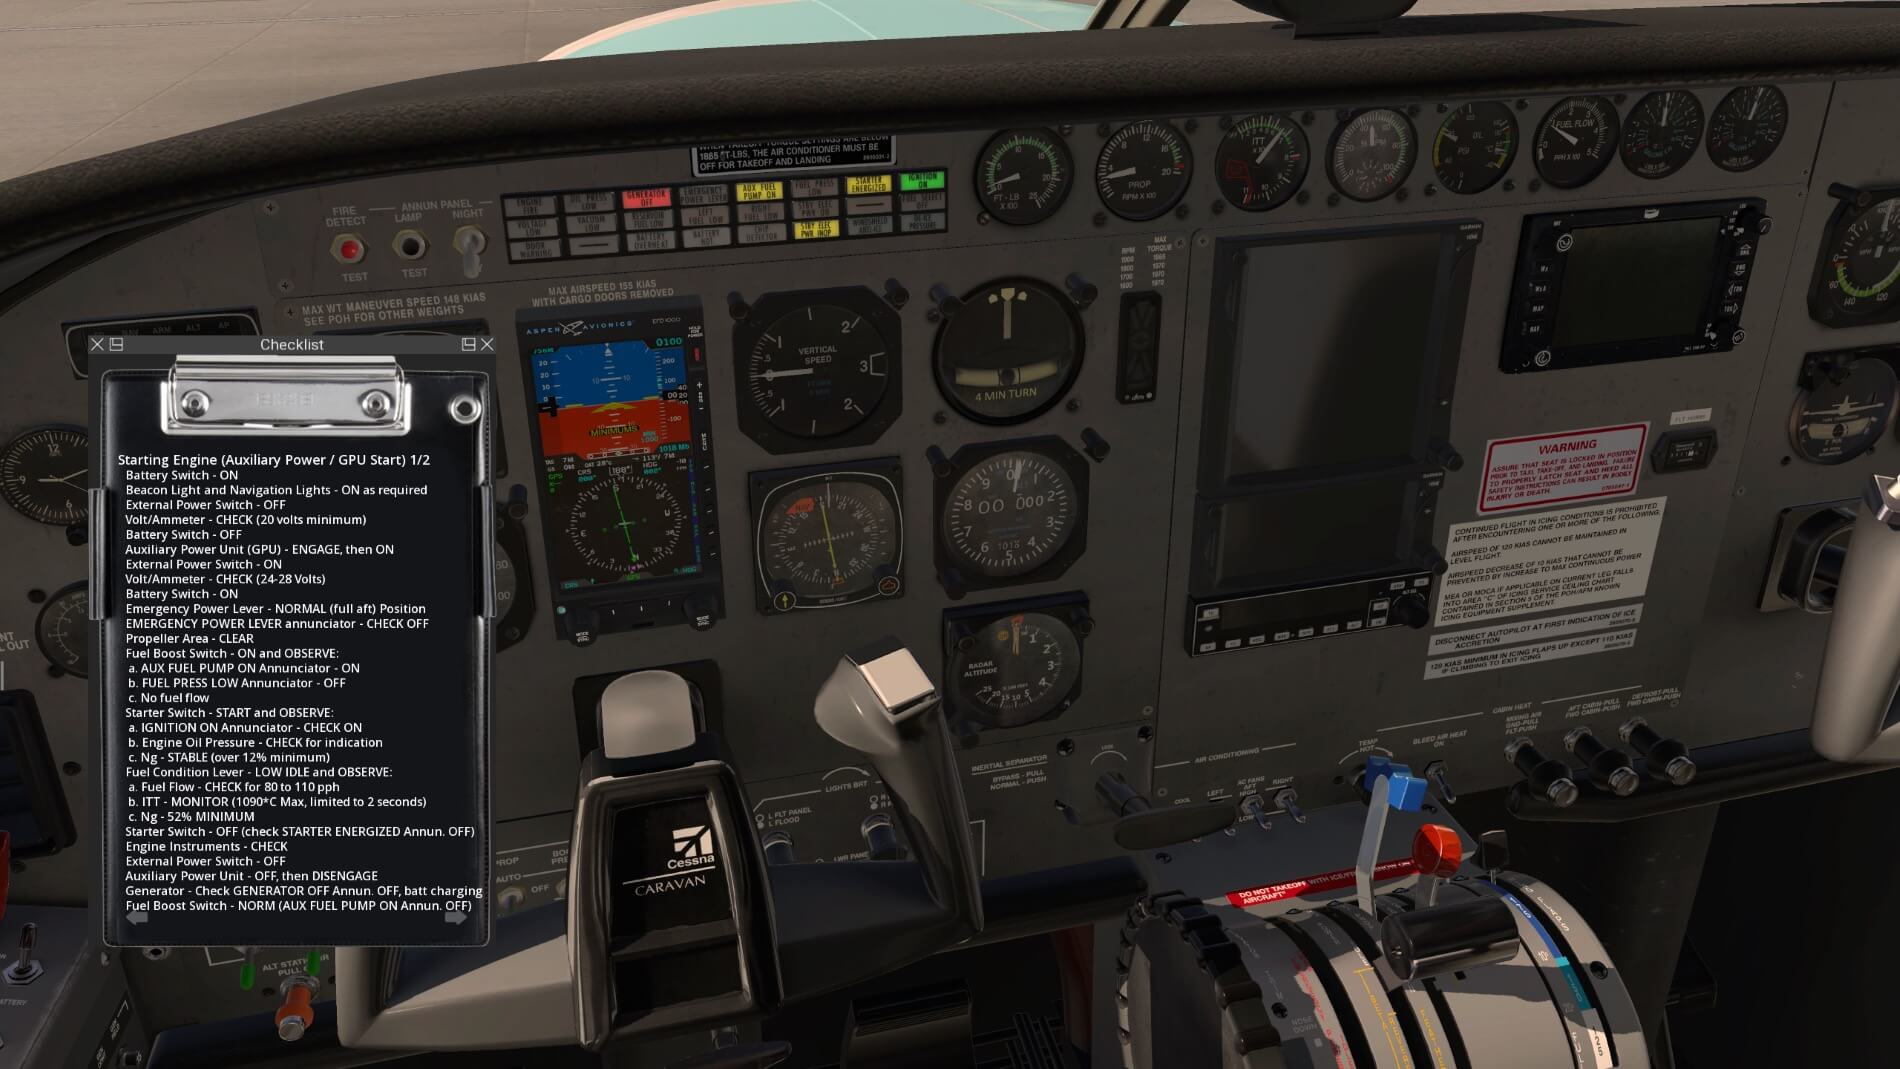
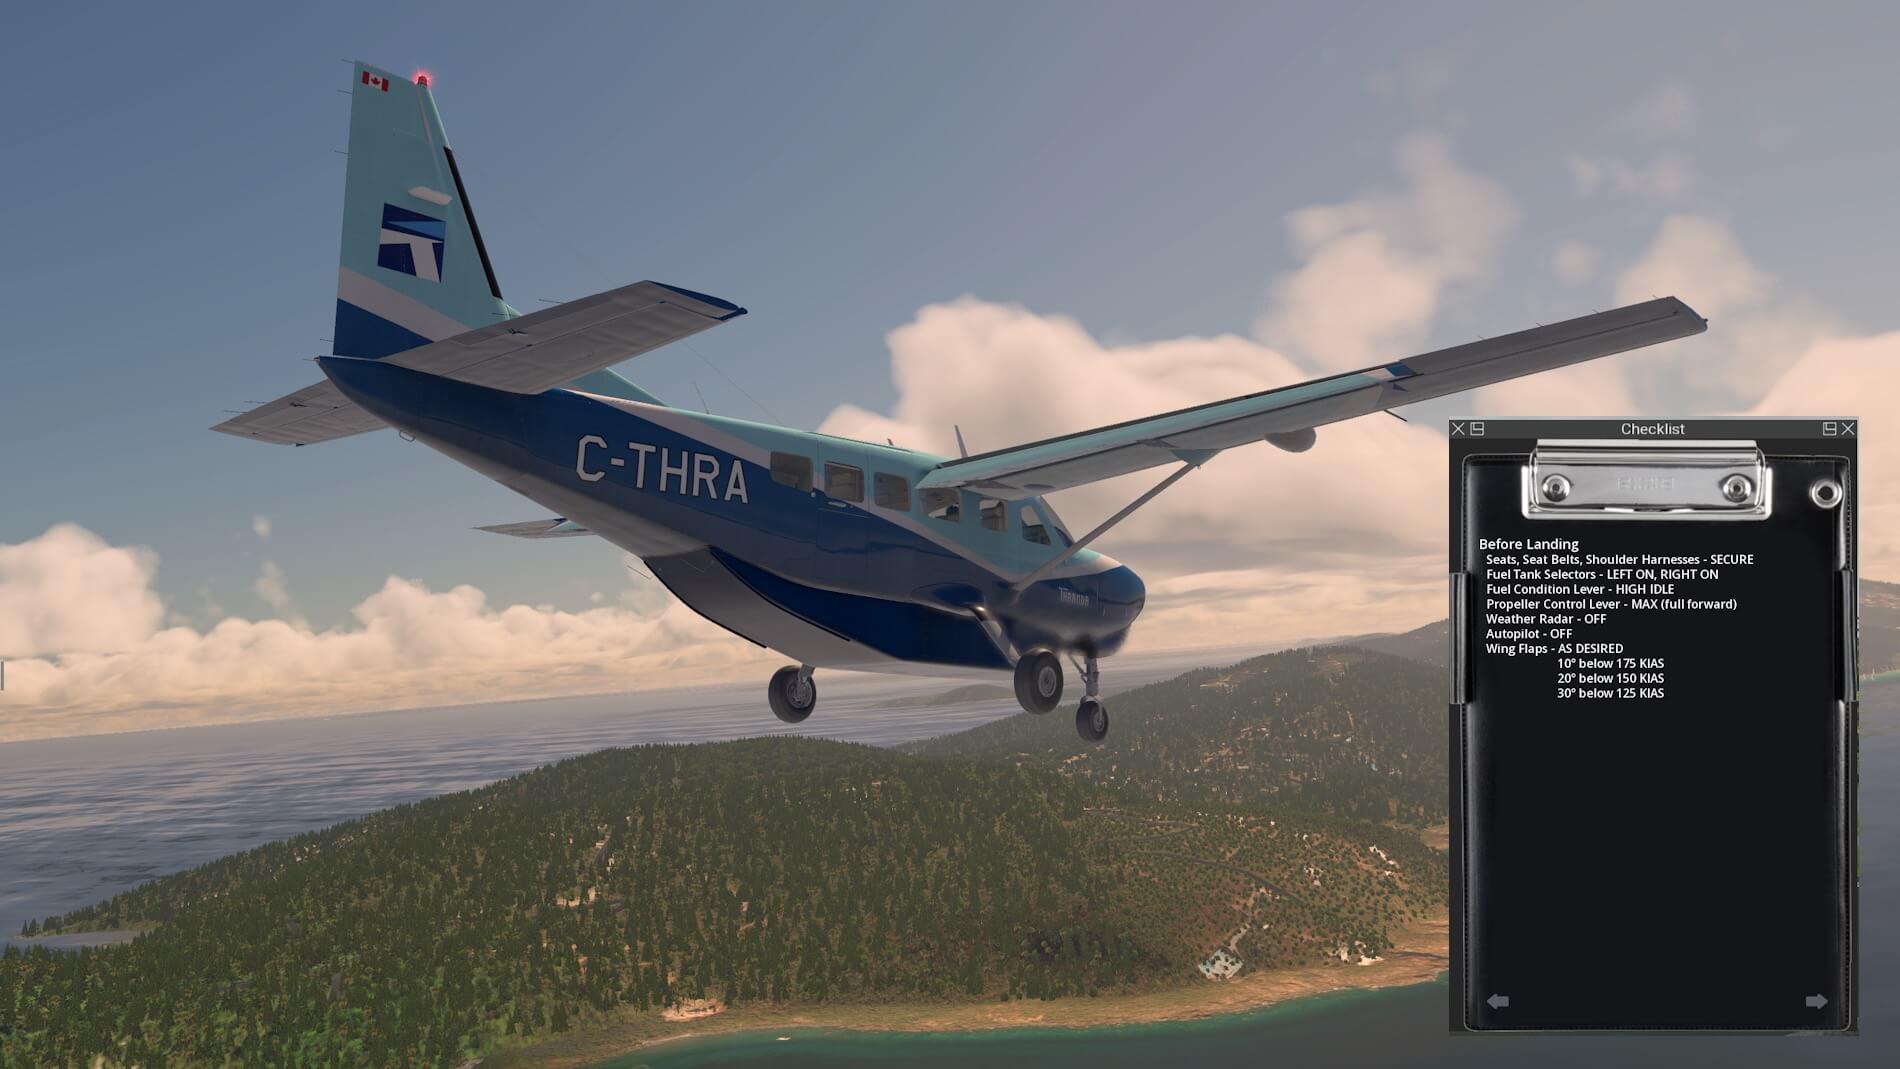
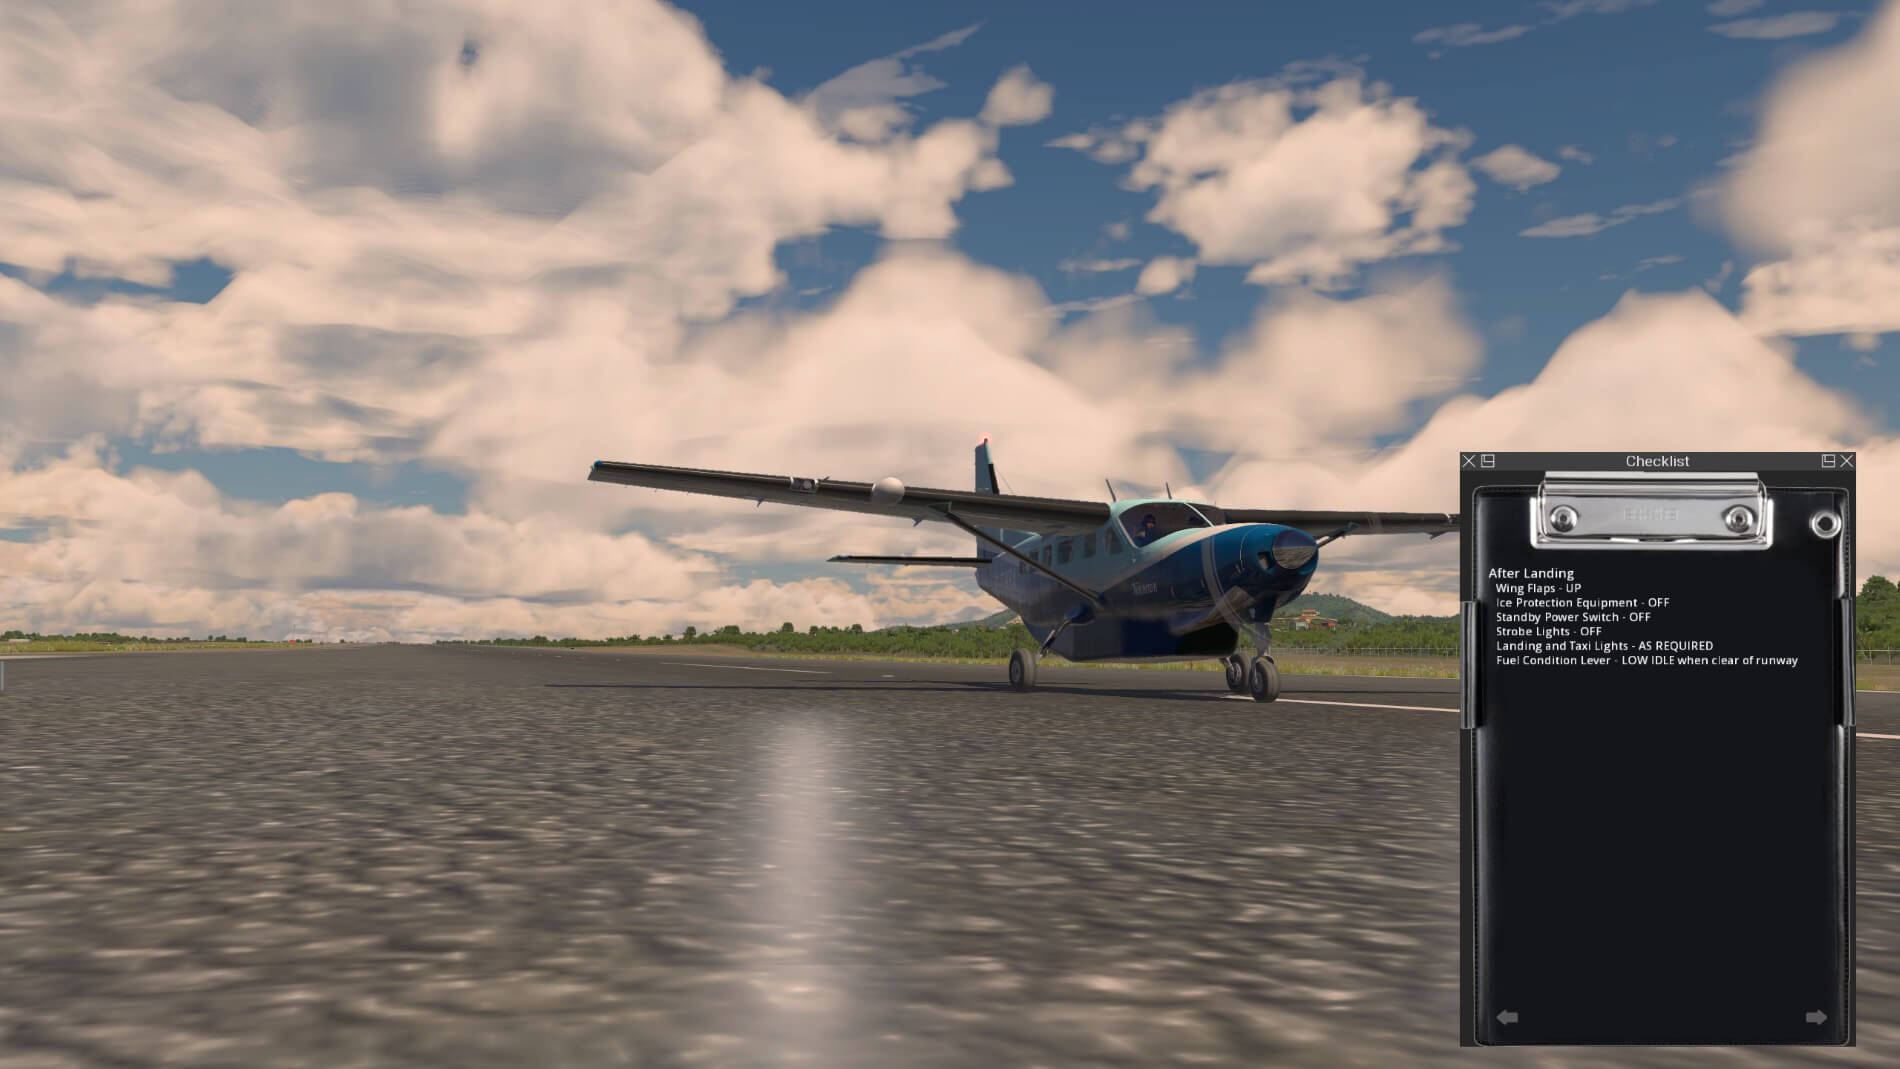
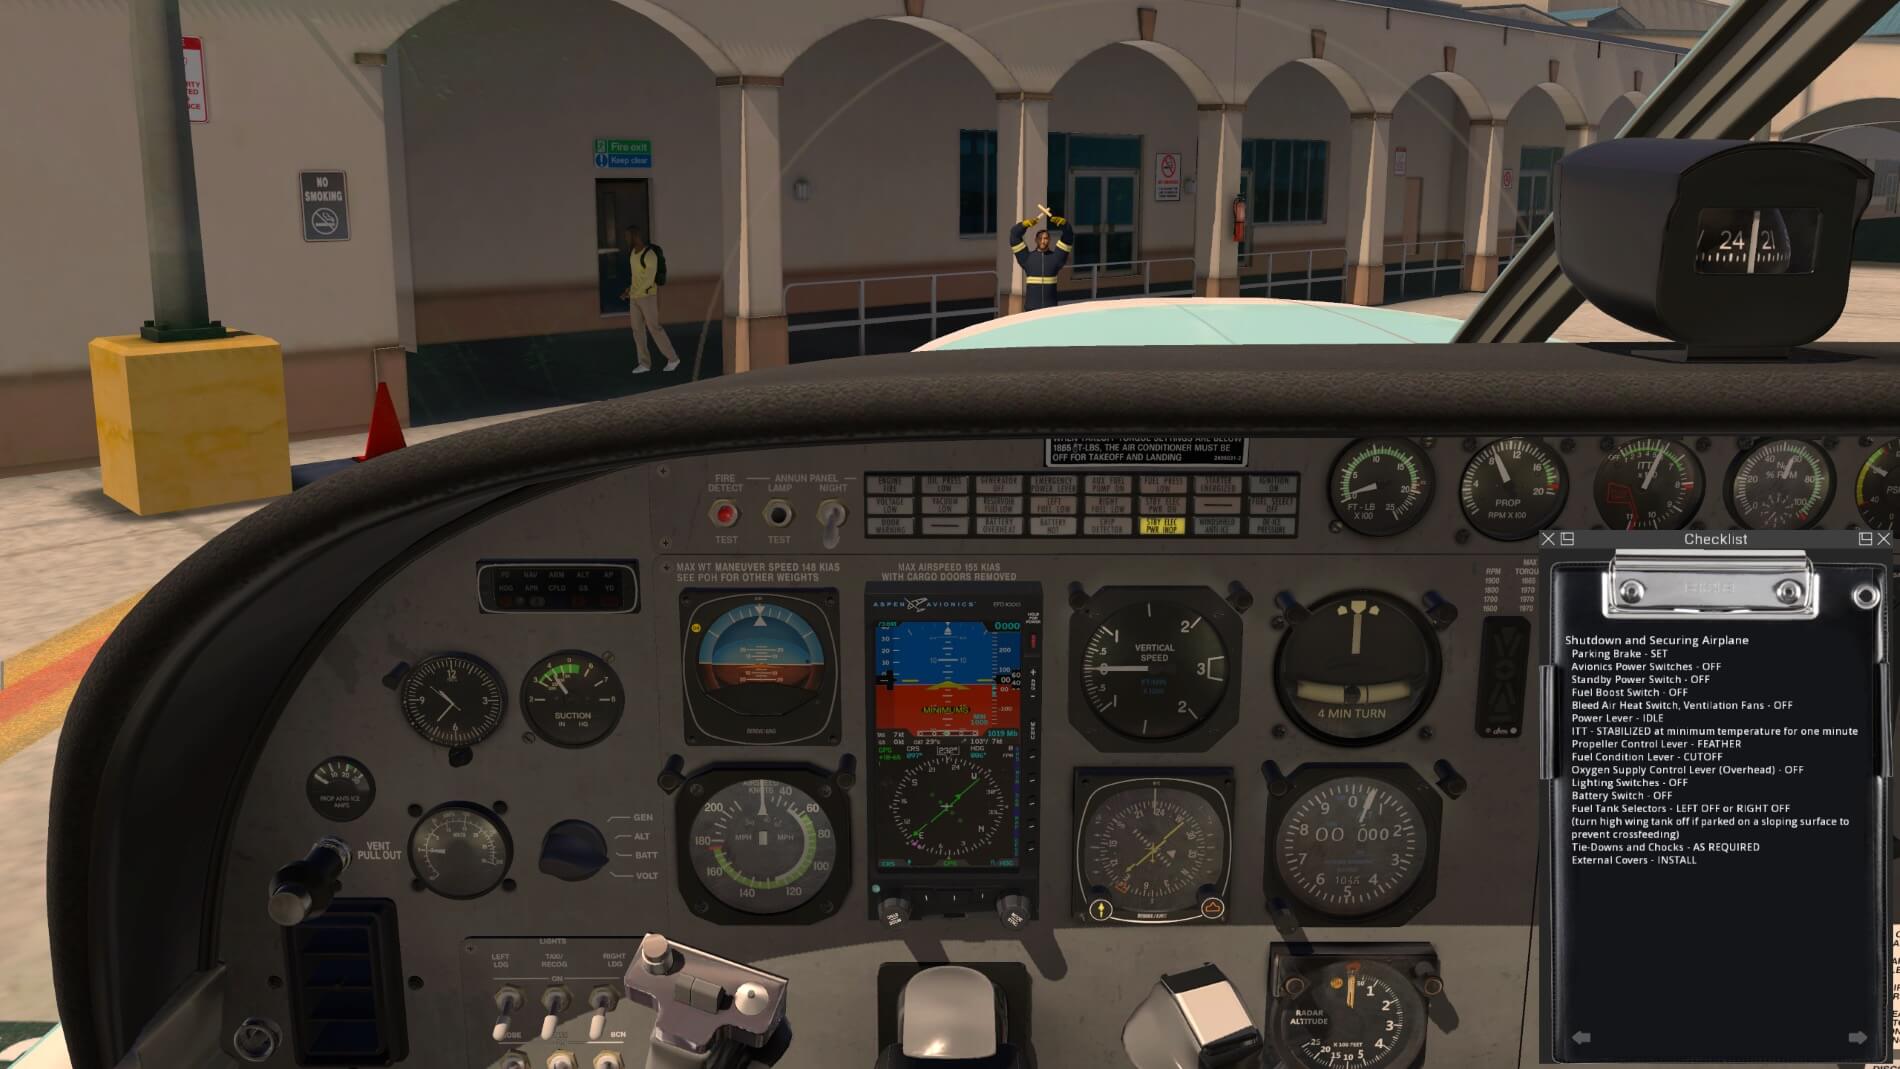
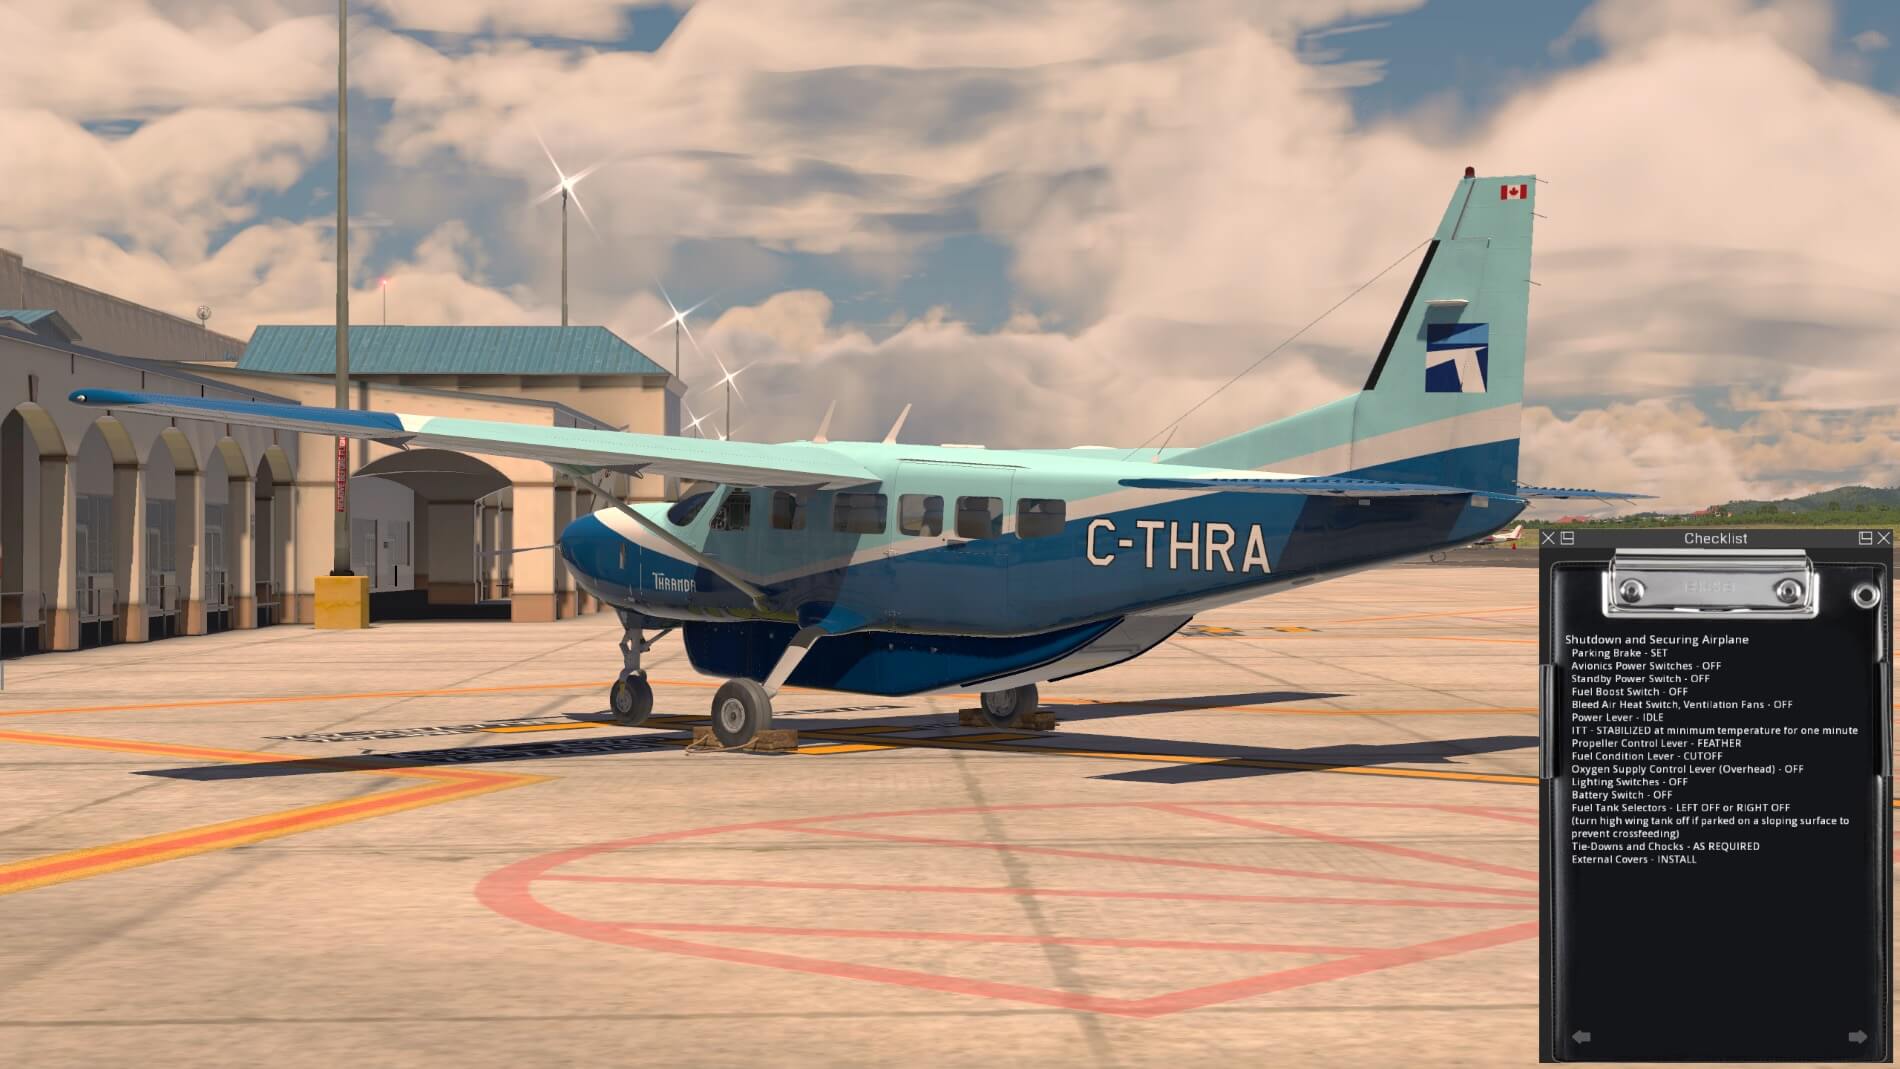
At the very bottom of this quadrant is the Show/Hide Checklist option which brings up the Caravan’s normal procedures checklist for you to follow from after your pre-flight inspection to shutting down and securing the aircraft. If you are not familiar with starting the Caravan’s engine, you may want to review that procedure first because there are a few things that need to be done quickly that does not allow for reading each item and then performing the task. beginning to end. The checklist is both movable and resizable and can be assigned to either a keystroke or controller button.
In the final quadrant at lower left, are five additional options that allow for control of ground operations. This is one way to set the brakes if you care not to do it from within the cockpit. You may control the chocks individually from the “all tie-downs” options and access the ground power unit (GPU) for external power starts. Interestingly, the GPU cannot be assigned to that command within X-Plane, so this is the only way to access it.
This menu provides the option to add the cargo pod for your freight carrying missions. Thranda’s penchant for details means that selecting the pod will add 140 pounds to the Caravan 675 and 160 pounds to the Grand Caravan. These weights are reflected in the Weight and Balance menu and affect cruise speed due to the additional drag. Note that the “Doors” option that becomes available when the pod is installed, even though there is no button, is clickable and will open and close the pod doors.
The final option for this menu is the Startup Running option. This will allow you to have the Caravan load into the simulator with engines running. As soon as you click on this, your current flight will end, and X-Plane will go into its load new flight routine. The Caravan comes back with everything ready for takeoff. Note the landing lights are on and the taxi lights are off. When you tick this off, the same thing happens except the Caravan reappears in its cold and dark state.


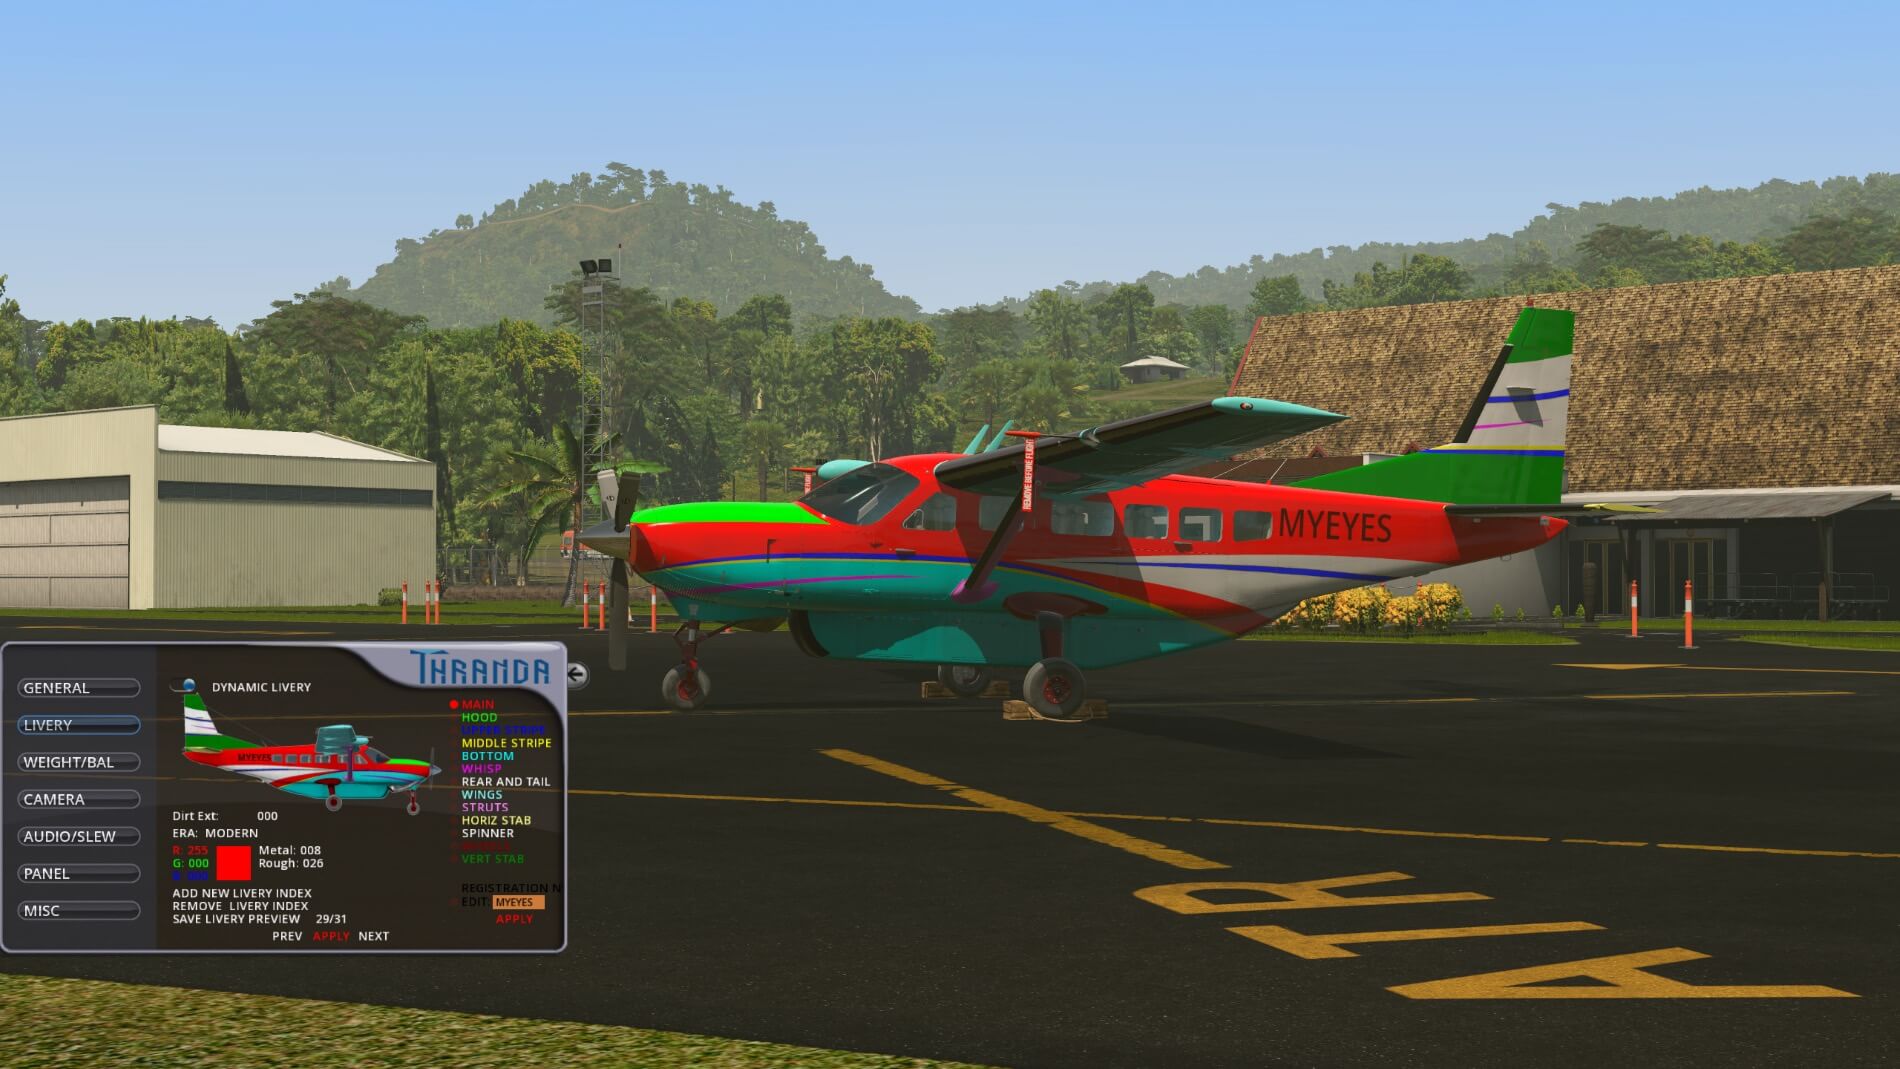
Livery
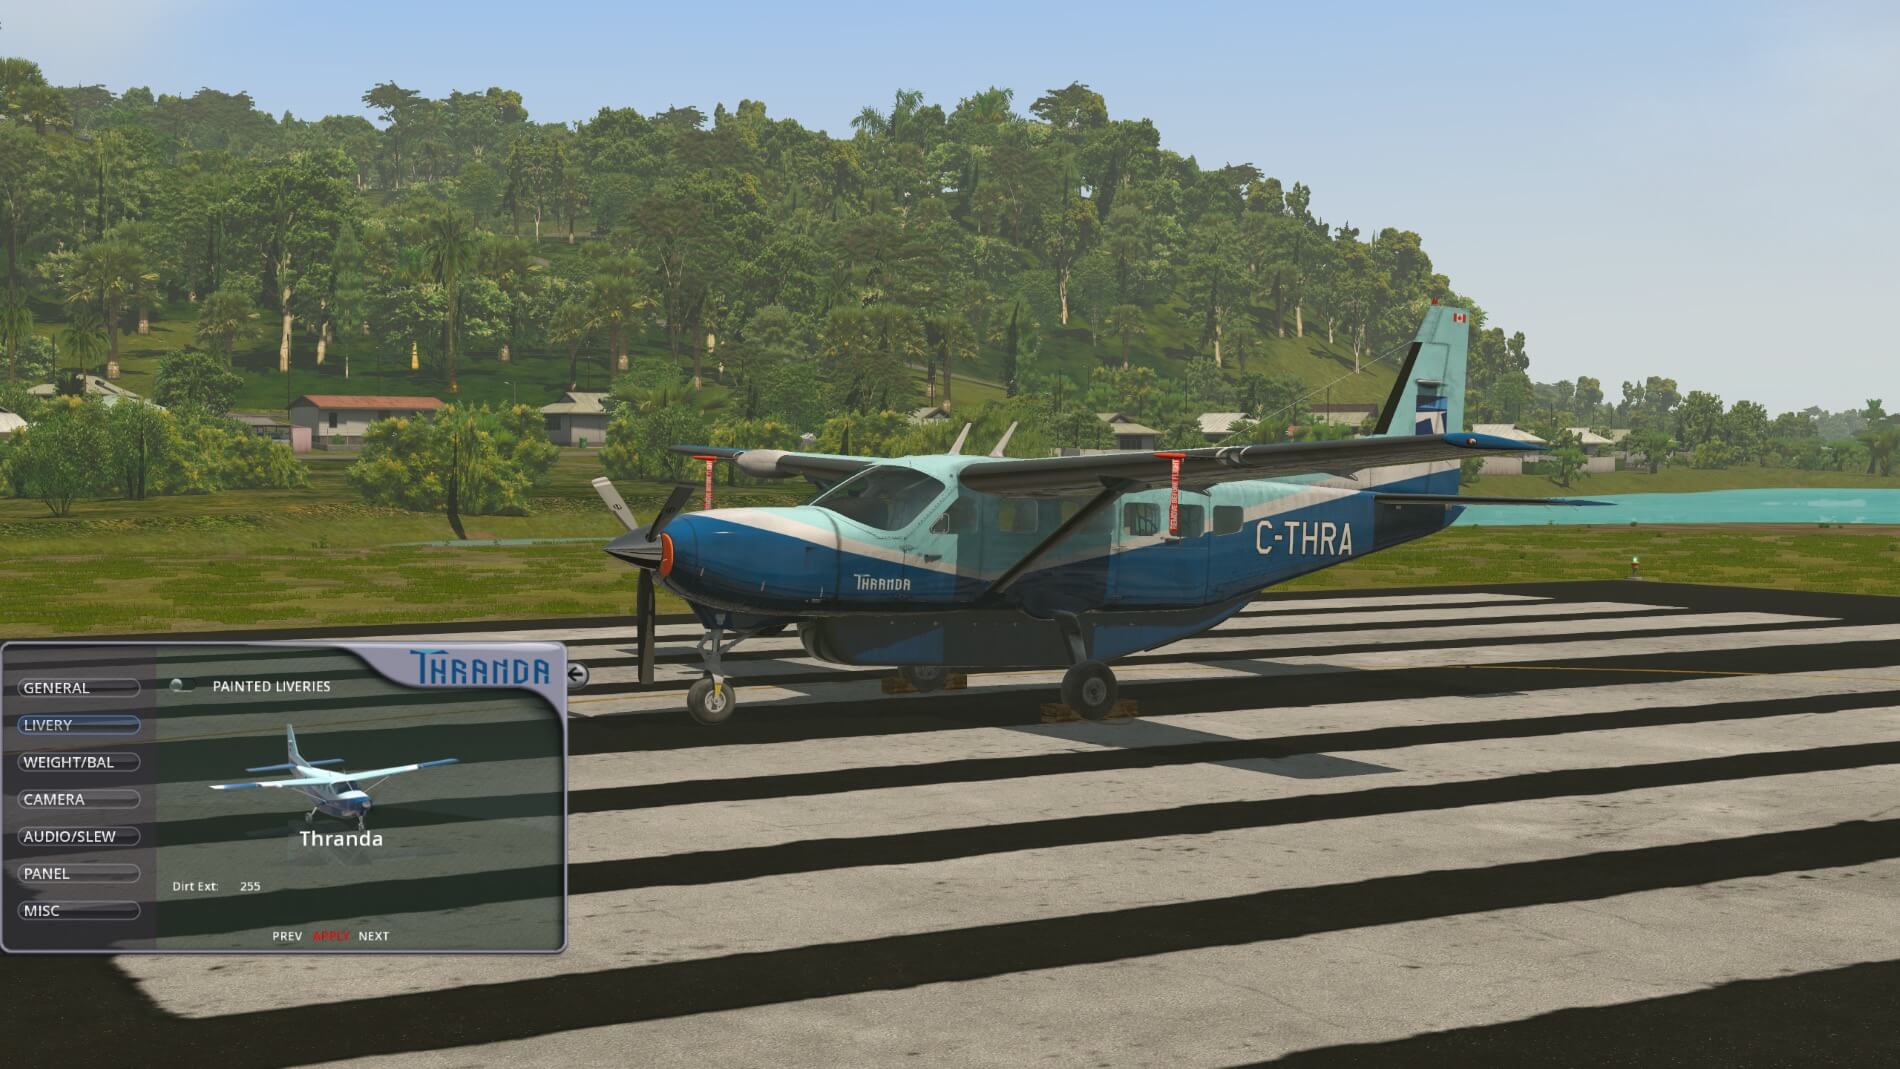
The next section of the menu is all about how the Caravan looks. There is a lot of depth to this menu that allows for many customizations of your Caravan. You can select an existing livery from the aircraft’s livery folder by scrolling through the preview images using the Prev and Next buttons or by using your mouse scroll wheel while hover over the image.
You can also enter the Dynamic Livery area where you have the capability to create your own paint scheme based on either a Classic or Modern design. This menu also allows you to control how shiny and or reflective your aircraft will be and how dirty it will be.
By default, when you select this menu, you will see that painted liveries is active and there is a small preview of your current livery. Under the preview is the notation “Dirt Ext:” followed by a number. This is Thranda’s brilliant response to an ongoing debate amongst armchair aviators about whether an aircraft should appear new or used. Then, if used, how used. Models have been criticized for being too much in one direction or the other.
Well, here, you position your mouse over the number and use the wheel to change it. The higher the number, the dirtier the plane. Now you can have your aircraft looking just the way you think it should! Unlike the Beaver, though, the Caravan’s aerodynamics are not affected by the amount of dirt.
The Caravan Manual found in the Documentation folder of your Caravan install exhaustively covers every part of this menu. There are a couple of things to be aware of about the dynamic livery options that are not mentioned. The first is that assigning a high level of metalness or roughness results in a grey preview image that impedes the display of your chose color. For this reason, you may want to complete your color scheme first and then assign your selections for metal and rough.
The second item is one that became functional following the manual being written. New to the Caravan is the ability to assign a tail number without having to apply the entire livery. Enter the tail number and press the apply button directly beneath and your aircraft instantly sports that number.
A few additional notes about this menu. If you want a visual guide of what area each item on the paint list covers, go to livery 29 and see the wild scheme someone at Thranda created. You can swap between Classic and Modern themes and the livery will still uniquely color each area mentioned in the list. Every dynamic livery you create is available for both the Caravan 675 and the Grand Caravan. If you select the DHL or FedEx liveries from the painted liveries, you will have a freight variant of the Caravan that sports a different interior, has no passenger door, and from which the windows have been removed.


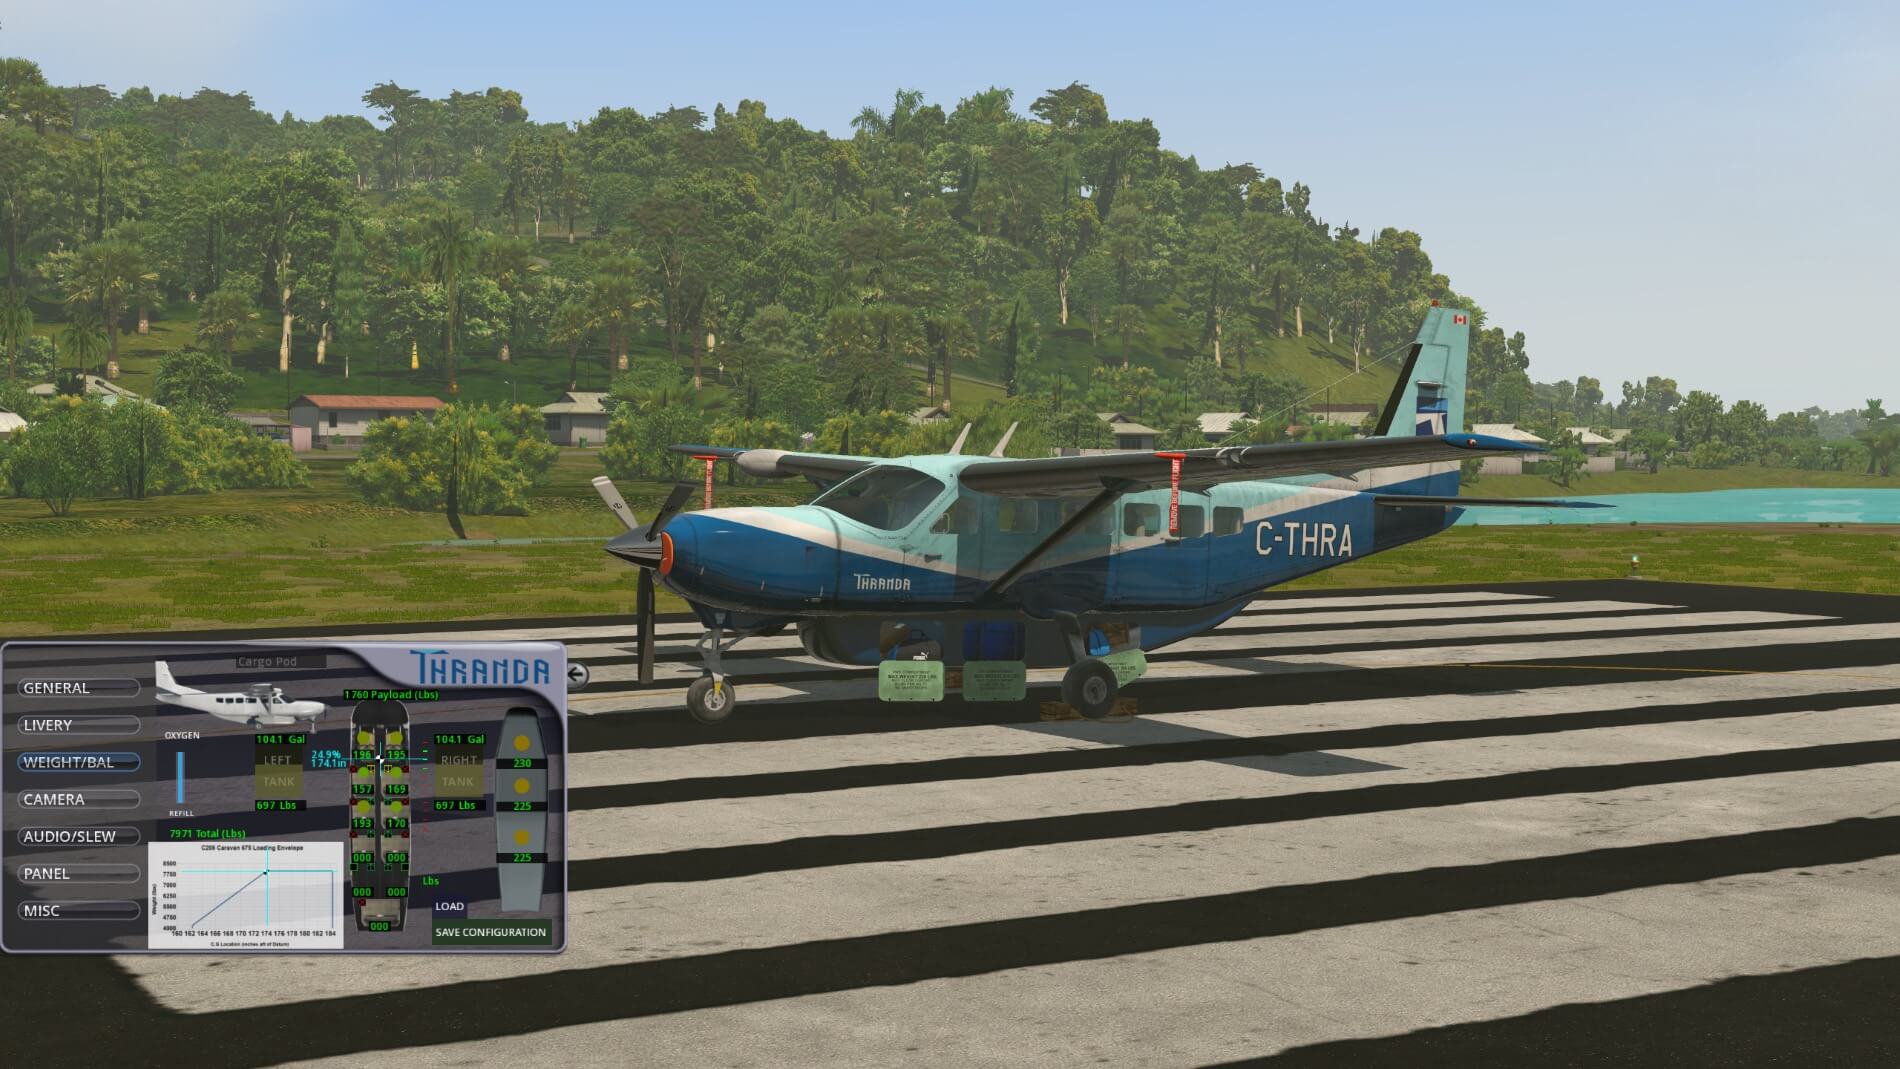
Weight/Bal
This interactive screen was introduced by Thranda with the release of the Kodiak. For the Caravan, it has been modified to manipulate more seating variables that are unique to this aircraft. The ability to visibly add or remove seats has been around since the Porter but the ability to change the type and orientation of the seats is new to the Caravan. You can have forward facing seats or rear facing ones.
Those seats can be double wide or single. You can remove the seats altogether and have cargo take the place if you add weight to that location. For the cabin seat places, you will get one crate per location regardless of how much weight you add to that spot once you cross the minimum necessary for the crate to appear (approx. 100 lbs. per location). As with installing the cargo pod, any change to seating affects the empty weight of the Caravan.
The rear most seating position can be occupied b a bench seat or a cargo net. If you add weight to this location without the seat present, various bits of luggage will mount up behind the net.
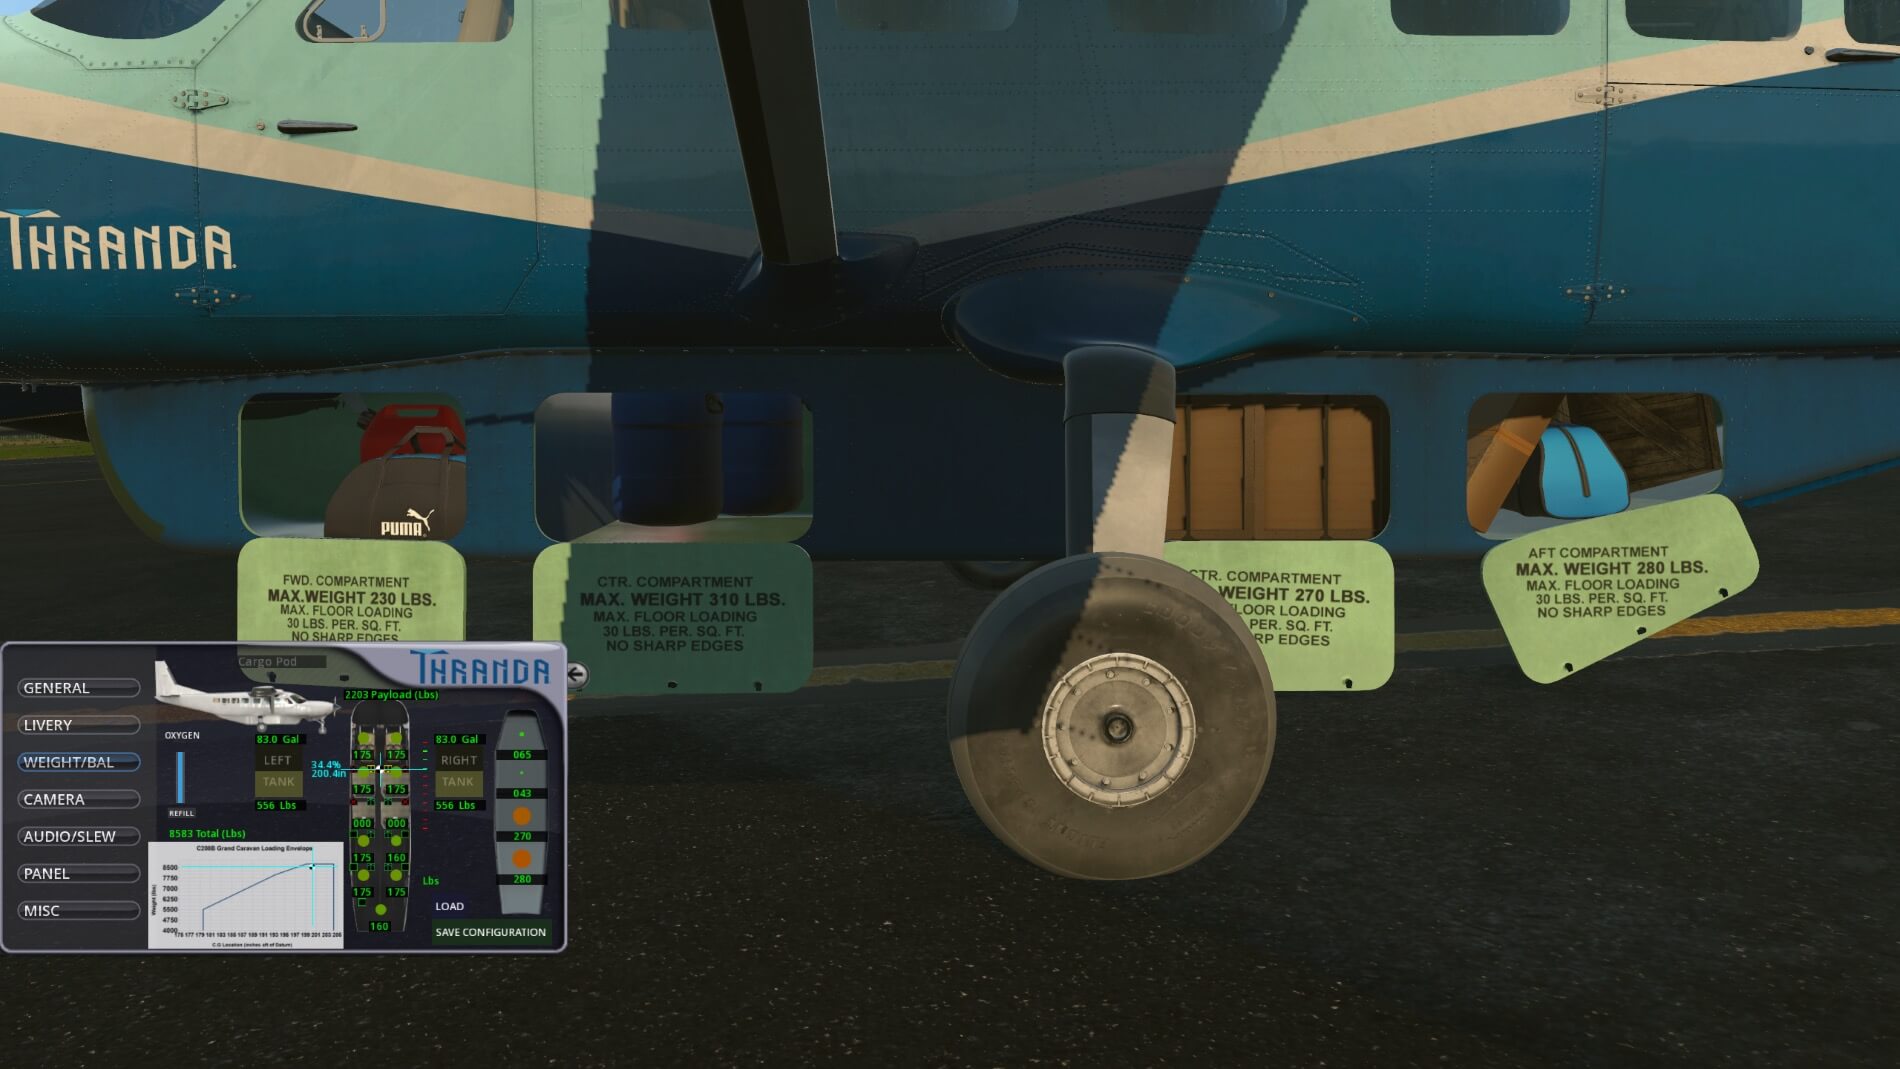
You can open the doors to the cargo pod and add cargo weight to each section. As you do, various items will appear loaded in the respective section. Pay attention to the notices on the interior of the pod doors. These weights cannot be exceeded in the weight and balance screen per the manufacturer’s specifications. The Caravan 675 has three sections to its pod while the Grand Caravan has four.
The details of this screen are covered in the aircraft manual with multiple detailed images to show you exactly where to click to accomplish a specific task. One of the little click boxes at the seat location has three options: single seat, double seat, and add / remove. Clicking in the middle adds weight that you can then use your mouse wheel to fine tune, and clicking the other seat click box changes the direction the seat faces. There are also click points within the 3D cabin for accomplishing this and we shall see that later.

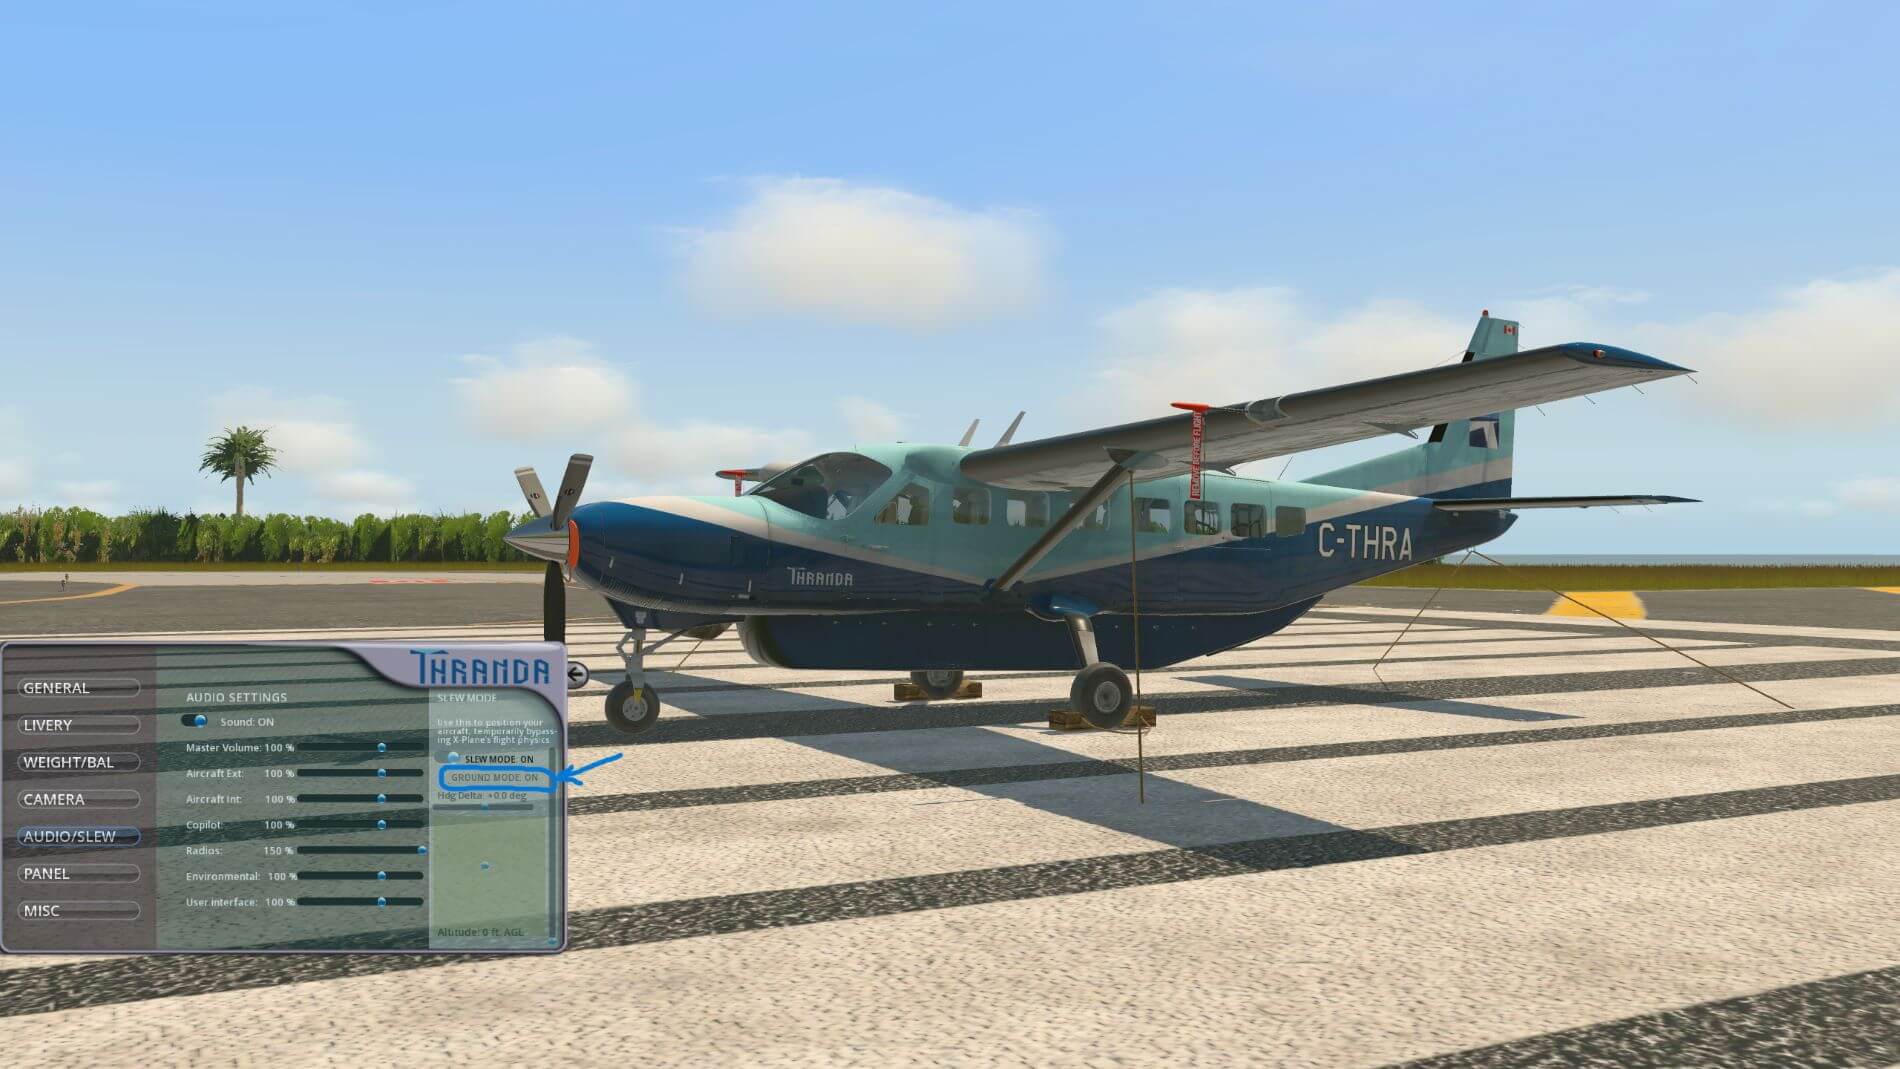
Audio / Slew
This menu allows you to alter sound volumes per channel. Again, these are native X-Plane settings, but Thranda has been providing a way to do this while you are in flight since the beginning of the dynamic generation series. This can be very convenient particularly when the engine sounds are drowning out the radio volumes. This seems to happen arbitrarily with several aircraft I have flown, and I have found this option to come in handy more than once. Another option is to click on the headset jack in the 3D cockpit to mute the engine sounds temporarily.
The slew feature allows you to quickly change the position of the Caravan. You can do this while the aircraft is on the ground or in the air. There is an indicator informing you if ground mode is active directly under the Slew Mode button. This feature tends to be more precise than the built in X-Plane function found on the sectional map. The one variable missing here that is on the default is the ability to set pitch angle. Other than that, heading, altitude, and location are easily set by clicking on the corresponding buttons and dragging them to move your aircraft. An option that is available is the ability to click on the areas next to the buttons and move the aircraft in increments that way.
The altitude slider is very much on the sensitive side. First off, if you use this while Ground Mode is “on”, you can plan on restarting your flight because no matter what you do, you cannot prevent the Caravan from crashing. Using this control in flight is risky because you can very easily find yourself at altitudes where hypoxia has set in and you can see nothing unless you have that effect turned off in X-Plane.
If you aren’t blacked out, you may very well find yourself looking at a red screen because of the intense dive being taken by the Caravan while it tries to restabilize after it’s vertical travel. In a word, use this control at your own peril – yes, it goes beyond risk! At least, it no longer sends your plane out of the atmosphere where other Thranda aircraft have been spotted after this control was used. If you need to adjust your altitude, your best bet is using the X-Plane map, pausing the sim, setting altitude, and then resuming the sim. The aircraft adjustment to this change is a bit more graceful.

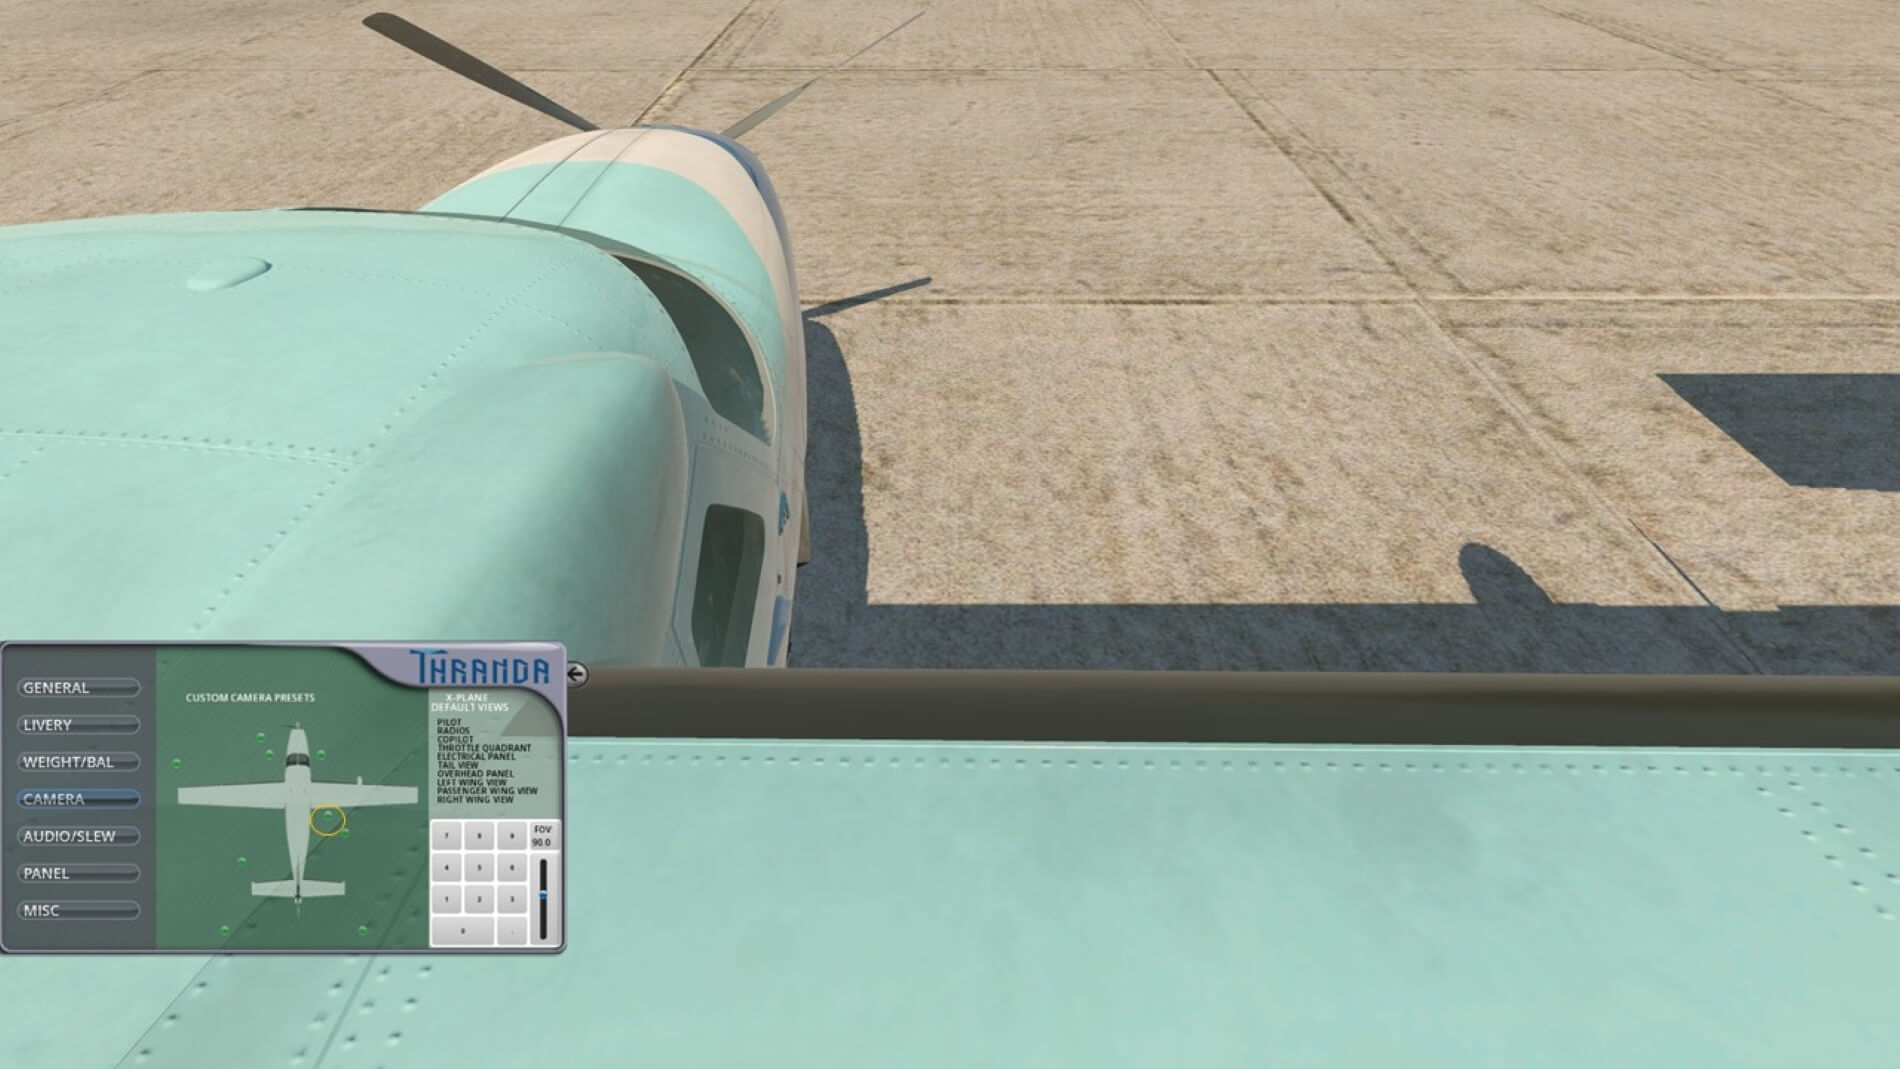
Camera
This menu is pretty much self-explanatory. It is a handy way to switch your viewpoints if you don’t want to assign them to your controller or keyboard. These are the defaults set by Thranda. If you reassign the view number to your own selected view, the simulated keypad will take you to those set views and not the default views listed. You can still access the Thranda default views by clicking on the green dots around the airplane silhouette.
The FOV slider is a convenient way to widen or narrow your field of view without having to interrupt your flight to go out to X-Plane’s graphics setting menu where this setting is otherwise located. I was only able to get this control to move by moving the mouse cursor over it until I got a two headed arrow cursor, and then scrolling with my mouse wheel button in the direction I wanted the slider to move. Clicking on either side of the button or attempting to click and drag the button provided no result.


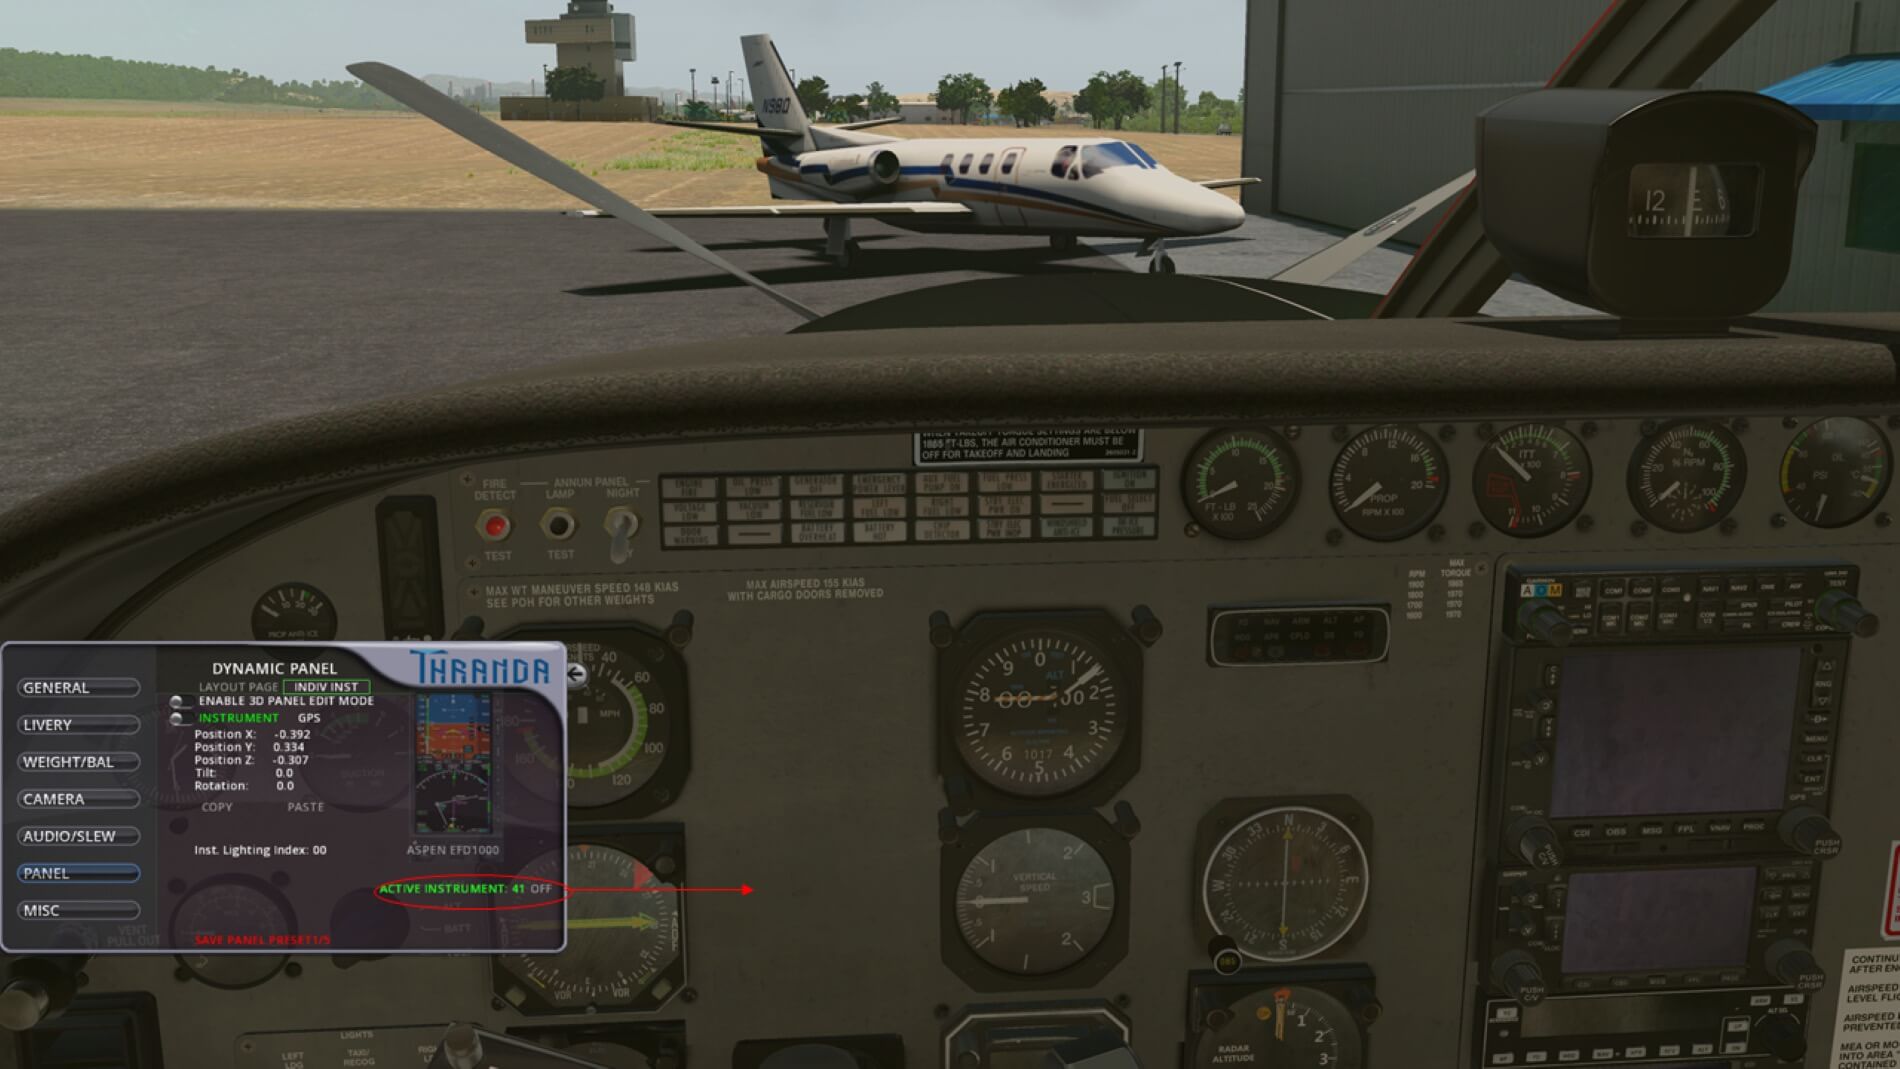
Panel
This menu is one of the most exciting features Thranda has brought to their aircraft starting with the Porter PC-6. The Caravan comes with three panel presets and gives you the ability to design your own using any of fifty-three different instruments. Thranda also includes support for the Reality XP add-in if you own that package. At the request of several users, Thranda added support for the Garmin 650 with an update to the Caravan that now allows the user to configure the panel with both the Garmin 750 and 650 if you choose.

I’m going to briefly go over this brilliant piece of programming that allows the armchair pilot to really duplicate the real world where many older planes get updated and upgraded with different instruments as the pilot sees fit and can afford. With the Caravan, we start with the basic “six pack” and steam gauges. When the expansion pack is released in the coming months, we’ll be able to go as far as the full glass cockpit with the G1000.
So, let’s get an overview of how this works and then you can follow up and get all the details in the Caravan Manual. Before I forget, there is one instrument you can place on your panel that seems to be one of the best kept secrets in terms of finding out what it is telling you. That is the Angle of Attack, or AOA, indicator.
It has all kinds of colored shapes that wink and blink at you, but it is darned difficult to find out what they mean. If you don’t already know and would like to, this link is to the manual for this particular AOA and will tell you all you need to know about it. We here at X-Plained.com are always happy to share any relevant information we can manage to get our hands on.
On to the panels. These are the three panels that ship with the Caravan. The third is set up for the RealityXP GTN 750.


This is a panel I made after the support for the RealityXP GTN 650 became part of the model with both the 750 and 650 installed.


If you want to know more about the RealityXP package, you can find the information via this link.
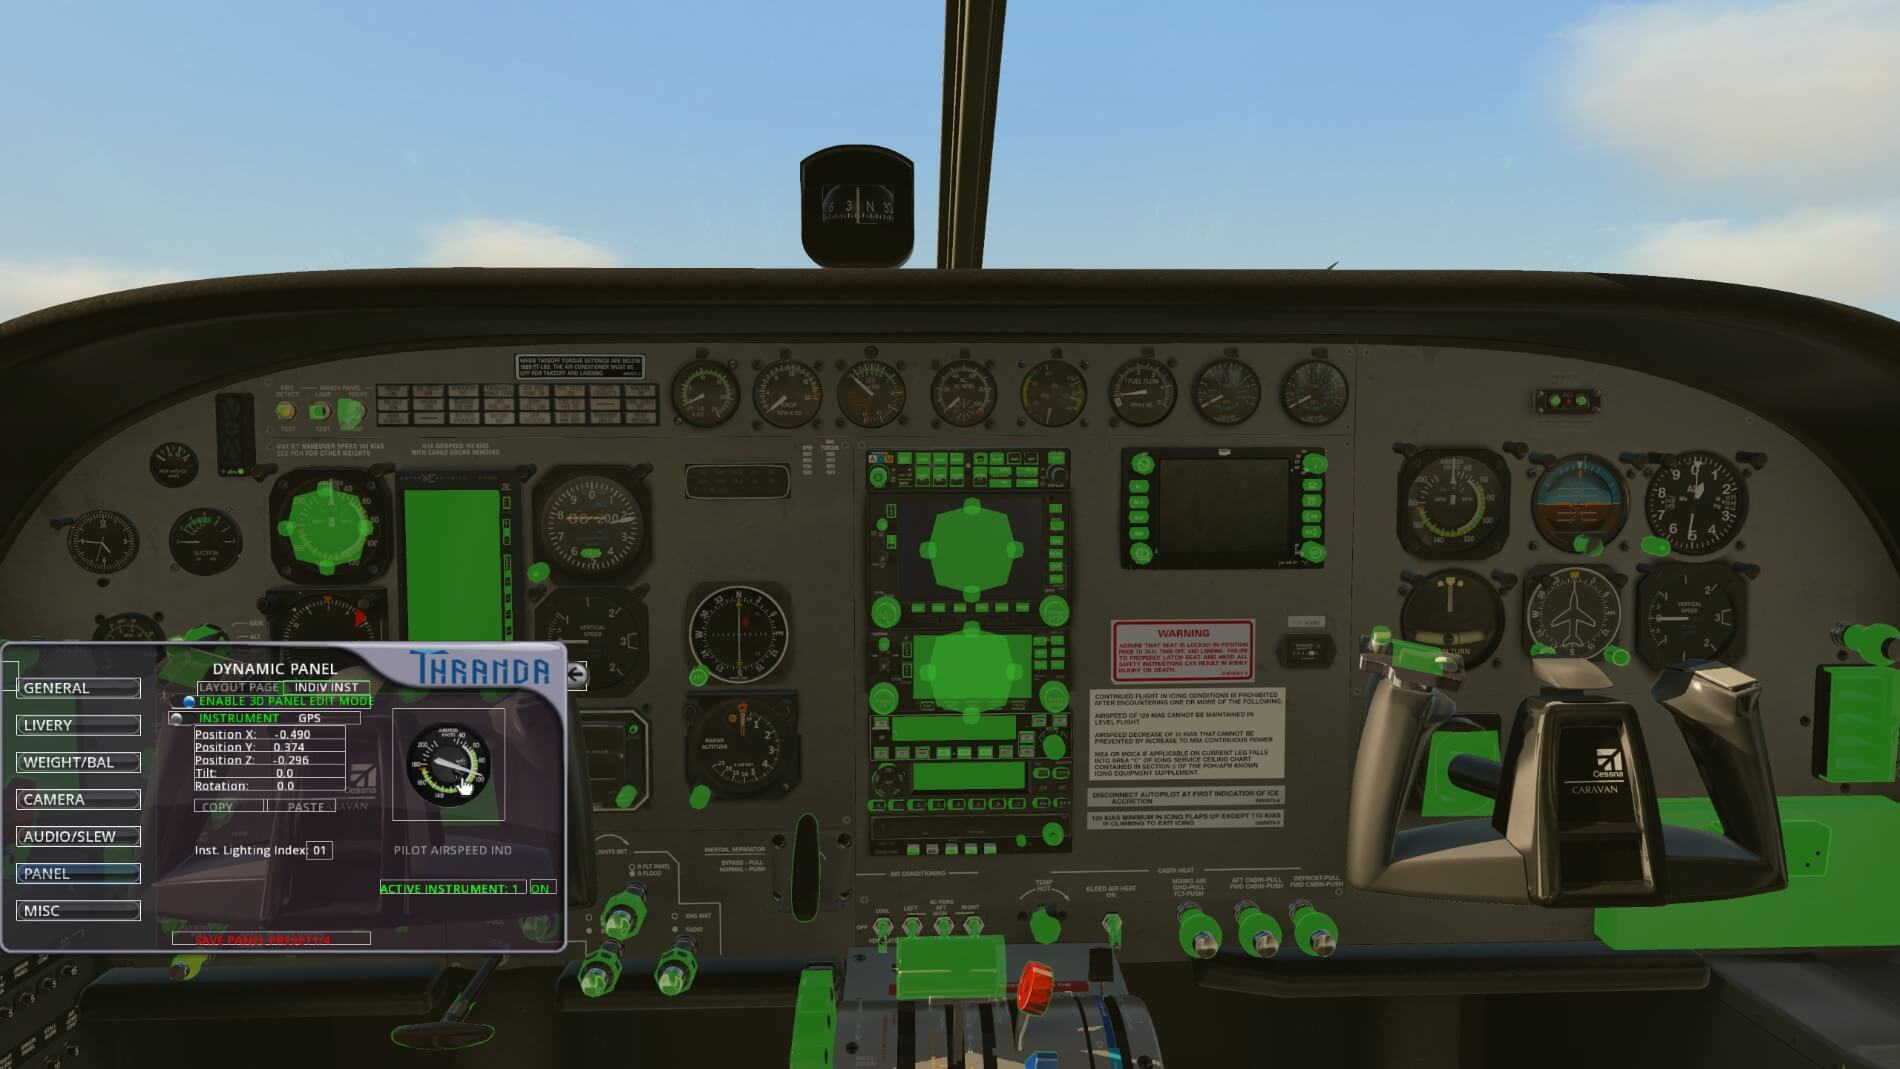
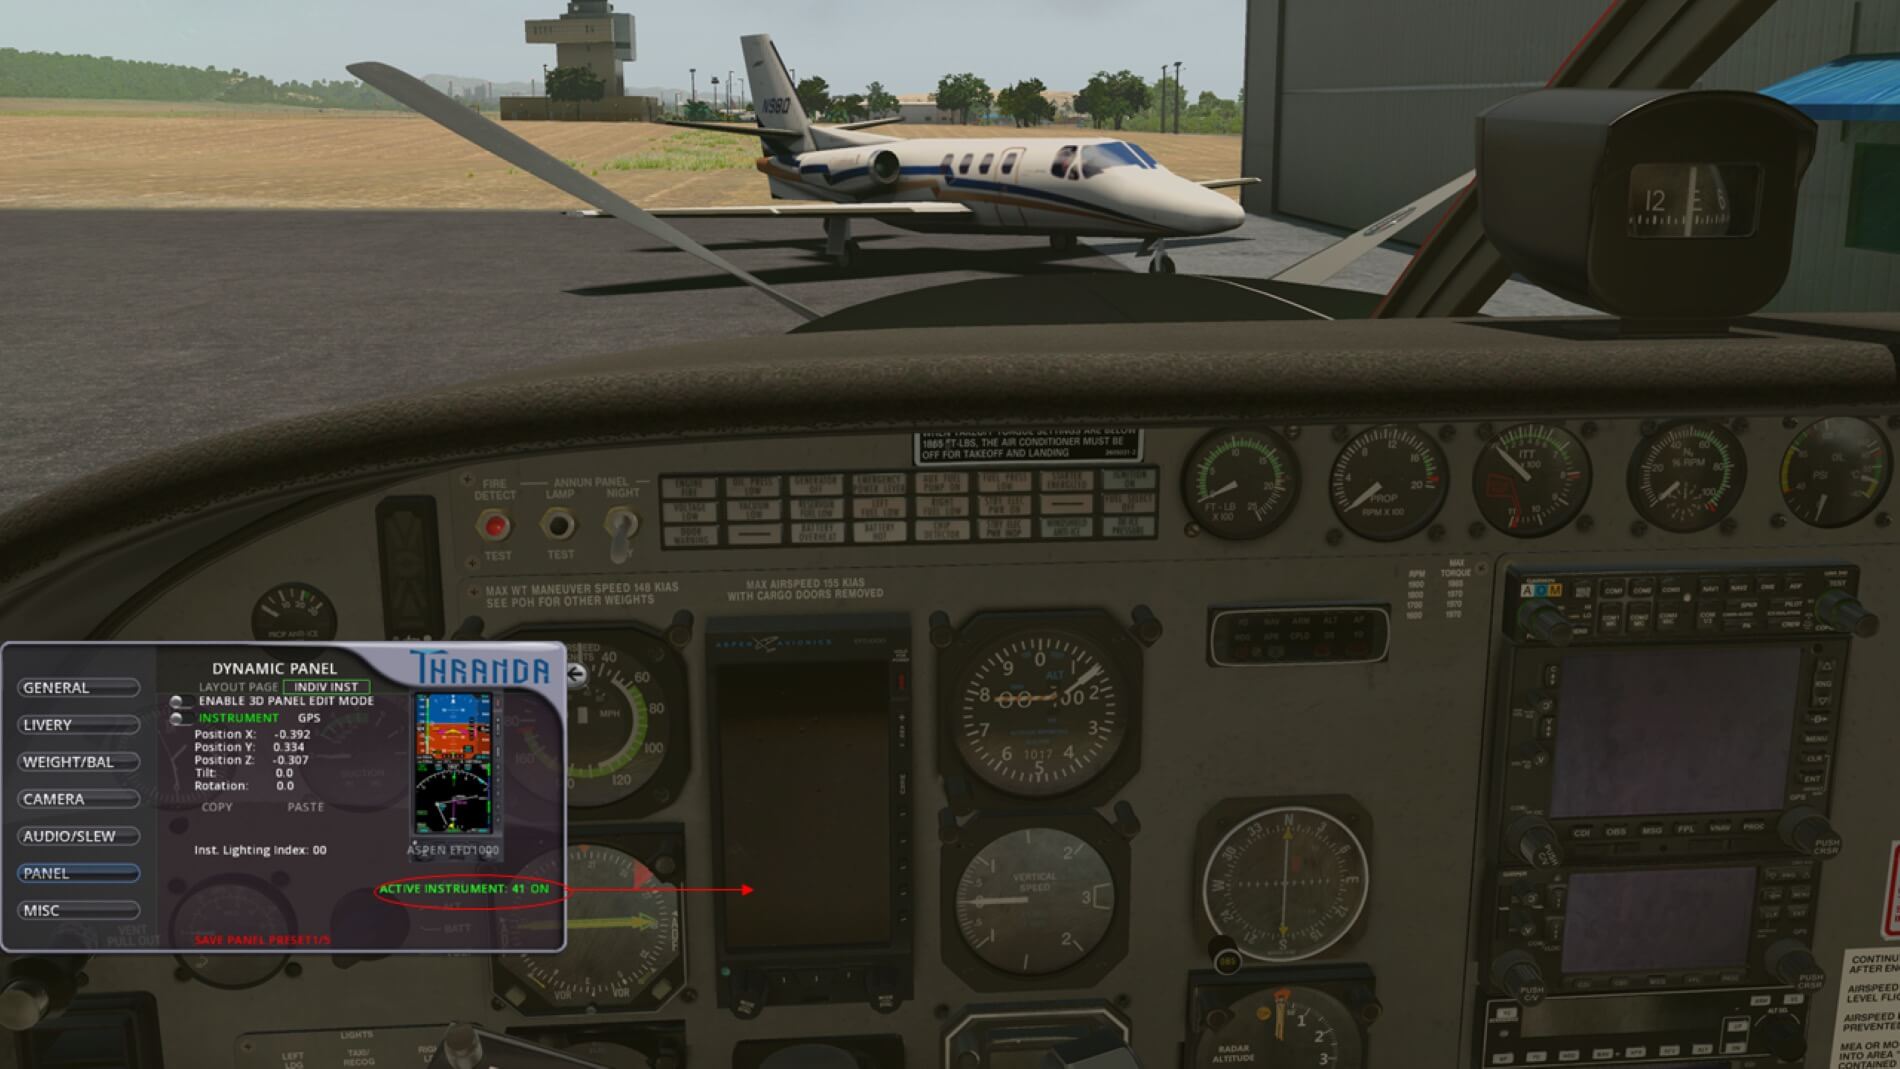
The panel menu is a bit crowded and can seem a bit overwhelming the first time you see it. The image of the panel is a preview image of the currently in use panel. The panel number is shown under the preview image. There are many options included on this one screen that allow you to select from available backgrounds for your panel, select a preconfigured or saved panel, enter panel layout mode that will cover the panel with all kinds of green highlights, and add, save, and delete panel presets. A new panel will always start with duplicating the currently active panel.
A word of caution for all click points on this menu. They are very close together and, at high resolution settings, you can very easily think you are clicking on one and hit the other. I lost a completed panel doing this when I clicked on the “Add Duplicate” area and “Remove Last” is what happened, and I lost my panel.
You may find that you want to increase the X-Plane interface size on the X-Plane graphics settings screen, but you will need to reload the aircraft either by using the option on the X-Plane developer menu or by switching to a different aircraft and coming back to the Caravan. If you reduce the interface size after you are done with your panel, you will need to repeat the reloading. At this point, it is best practice to close X-Plane and restart it. Make sure you save your panel first.
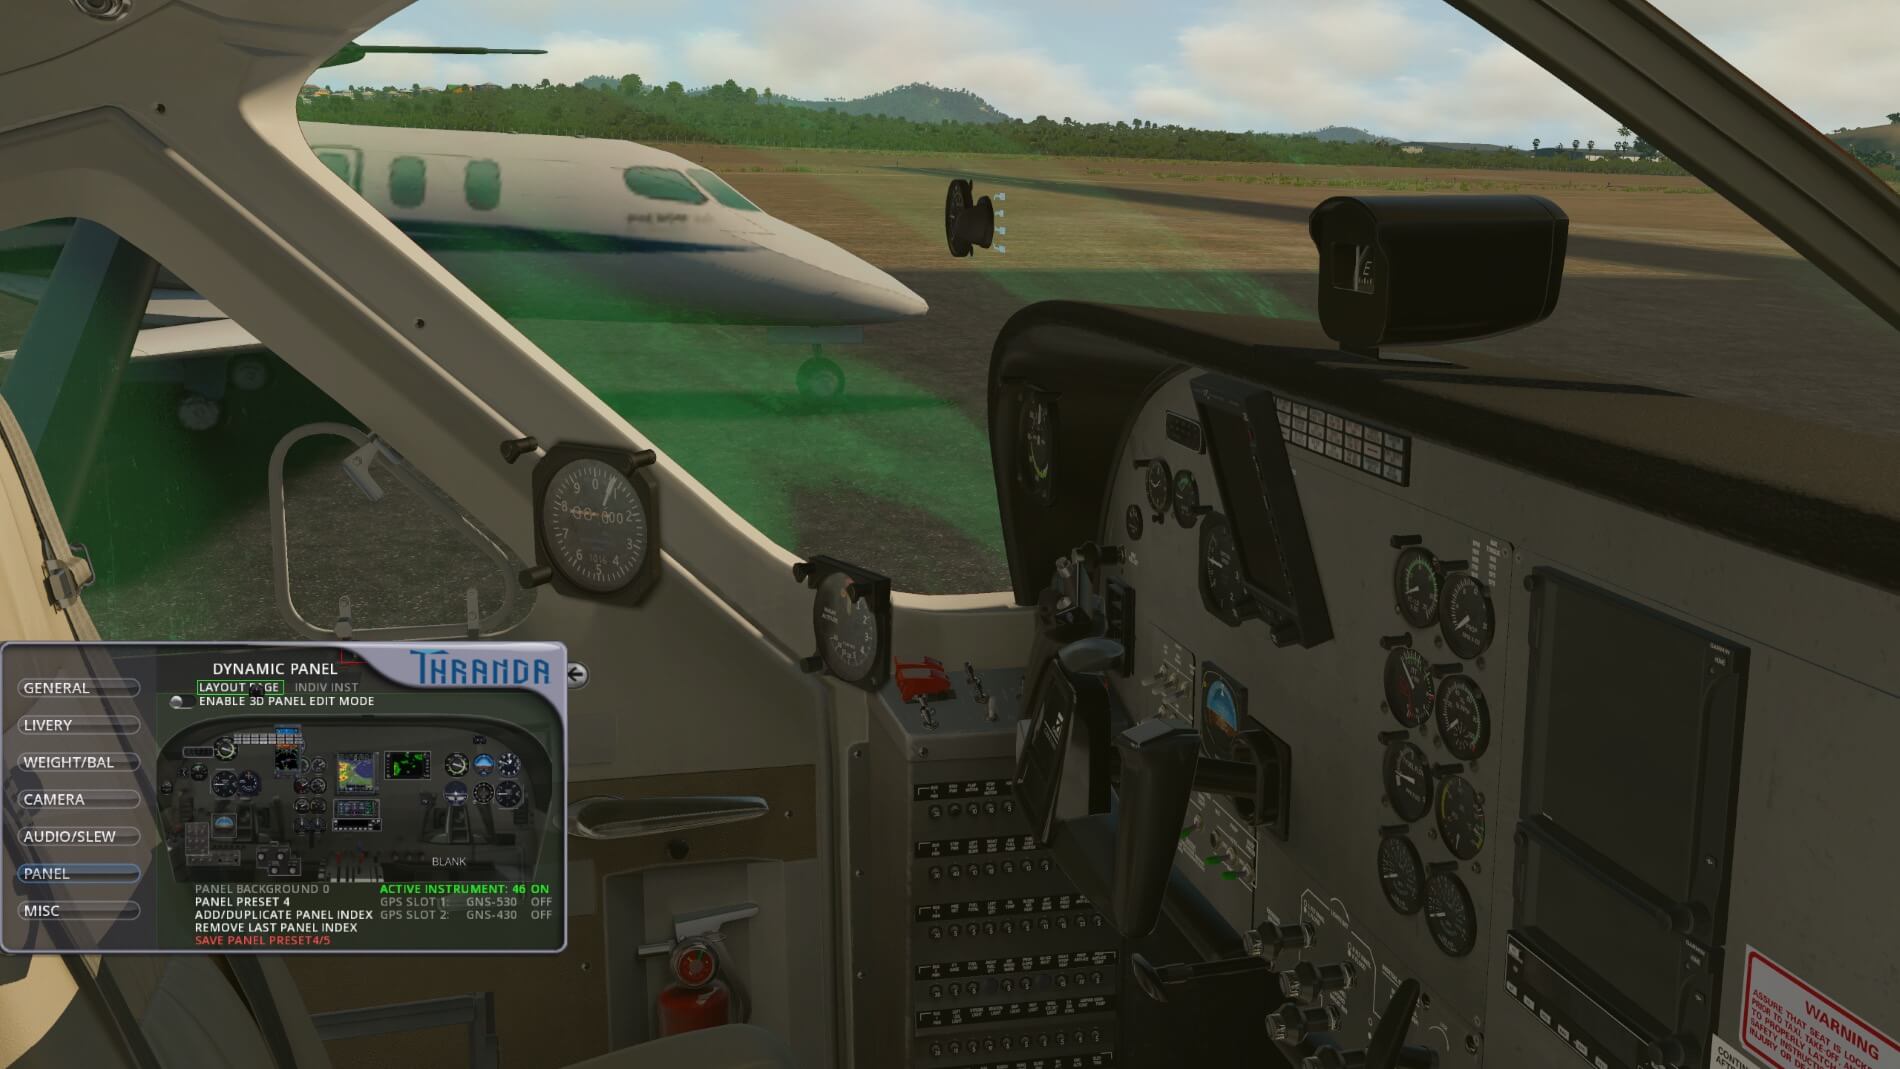
The layout feature utilizes the X-Plane feature for highlighting instrument click spots. For this reason, you need to keep in mind that not everything that is highlighted can be moved or removed from the panel. The gauges and features that can be customized are highlighted with a green octagon, most of which have circles at the four cardinal points.
The center of the octagon allows you to click and drag the item on the x- and y-axes. The bottom green circle allows you to click and drag to adjust the location along the z-axis. The top circle will tip the instrument and the right one will rotate it. The left one is listed as controlling the lighting intensity, but I have yet to get that to do anything.
The individual instrument tab allows you to work with each instrument. Here is where you activate an instrument you want and deactivate the ones you don’t want. The instrument is bright and opaque when “on” and dim and translucent when “off”. Of note on this tab is the second button from the top. That button allows you to change from working with an individual instrument to working with the GPS units.
Towards the bottom, there is a lighting index number. This allows you to dictate what group an instrument is assigned to when it comes time to turn on the lights. There are four options, one for each light control switch on the panel. The chart can be found in the Caravan Manual.
With regards to the instrument lighting, you may find the co-pilot’s turn coordinator is installed on the pilot’s side of the panel and the pilot’s is on the co-pilot’s side. It’s a little confusing but it’s only a naming issue. If you switch these to where they belong, you will need to reassign them to the proper light grouping. Pilot’s instrument light group is “1” and co-pilot group is “2”.


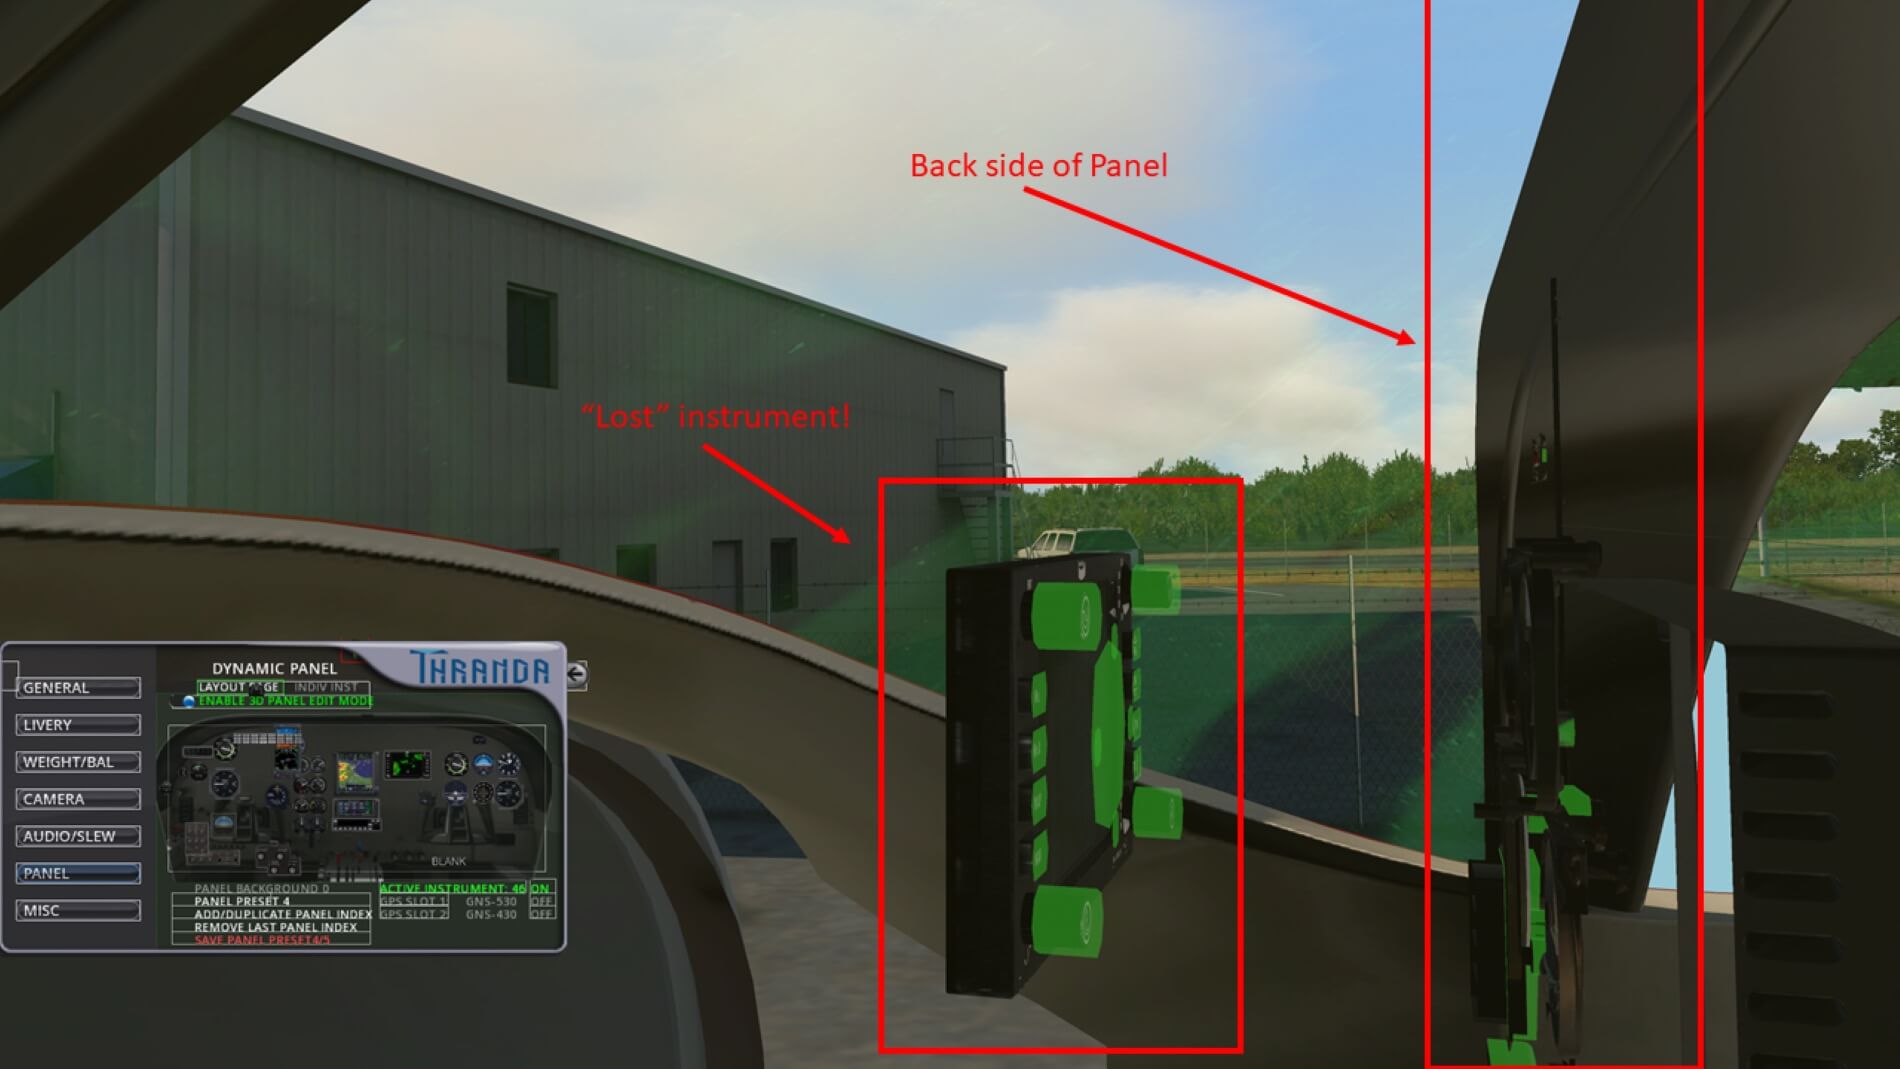
As brilliant as this concept is, it does have some issues especially for the first-time user. The first is there are many different ways of accomplishing the same thing. You may end up undoing in one way something you did in another. In other areas, there is only one way to get something done. The second is you can actually “lose” instruments.
Okay, let’s consider the first point. Moving an instrument can be done in at least four different ways. Most often you will likely be working with “Enable 3D Panel Edit Mode” active. In this mode, you can click directly on the instrument in question and move it along the x or y axis. You can click and drag on the lower green dot to move it on the z axis. It has been my experience that when doing this, you can travel long distances quickly and there is nothing to stop your selected item from travelling outside the cockpit.
Another method for moving the instrument is to position your cursor over the lower dot and use your mouse wheel to move along the z axis. As soon as the dot moves out from under the cursor, you will need to move the cursor over the dot again. Lastly, if you select the instrument on the panel preview with the red square, you can drag the instrument around on the preview and it will also move on your panel.
Here is another method for moving instruments that is not described in the manual. You can move instruments by using the mouse with the “3D Panel Edit Mode” active on the
“Individual Instrument” tab”. On this tab you will find the numerical reference points for each axis upon which the instrument can travel. When you have an instrument in the small window, that instrument, if it is on your panel, will be highlighted with the green octagon.
If you position your cursor over any of the three numerical values, you can use your mouse wheel to increase or decrease the value, which, quite naturally, moves the instrument along the selected axis. Here is where you will find something that is not in the manual: With the individual instrument tab active even with “3D Panel Edit Mode” turned off, the instrument will move if you adjust the numbers or if you click on it and drag it on the x or y axis. This last feature may result in some inadvertent position changes.
Finally, the “lost” instrument. This happens when an active instrument ends up behind the panel. Once there, it cannot be selected and moved by the mouse. There are two ways to get it back. The first is utilizing the numerical method on the individual instrument tab as described above. The other is to move the camera behind the panel to find it and then you can click on the lower circle to drag it on its z-axis to bring it out in front again.
It is a good idea to back up the file that defines your panel once you are satisfied with it. The file bears the name Panel#.json where # is the number assigned to your panel noted in the red text at the bottom of the menu. Those files are found in the “Thranda_C208_Caravan\objects\Inst” folder. Always remember to save your panels because they do not survive a restarting or reloading of the aircraft if you haven’t.
Misc
We now arrive at the last section of the Thranda menu. The miscellaneous section currently houses one active option and two Internet links. The links will take you to the Thranda forum at x-plane.org. I will take a moment to share with you one of the reasons I have so many Thranda aircraft: their customer support. One visit to their support forum and you will see just how active Dan Klaue and Joseph Noe are.
If you have a question or a problem with the Caravan, you will generally get a quick answer or response from Joe, Dan or a fellow Caravan pilot. Thranda was considering using the expansion pack method of release for the Caravan when Dan Klaue sought customer opinions about doing it and, if they did do it, what should be included. The idea of more than one expansion pack was also discussed. The single upcoming expansion pack and what it includes is very much a product of Thranda customer feedback and is exemplary of the level of involvement Thranda has with its user base.
SkunkCrafts Updater is the other link. This is essential to you since this is the preferred method of keeping your Caravan (as well as all other Thranda aircraft) up to date. Once you have it set up to maintain your Caravan installation, you will see there is a beta channel available. When I asked about the benefits of activating this, I was told that for most folks, it would not be a good idea. If you are interested in the cutting edge, and probably unstable, releases as they become available, then you might activate this channel. Personally, I would advise against it since it just caused some confusion because the beta version of the Caravan was older than the release version.
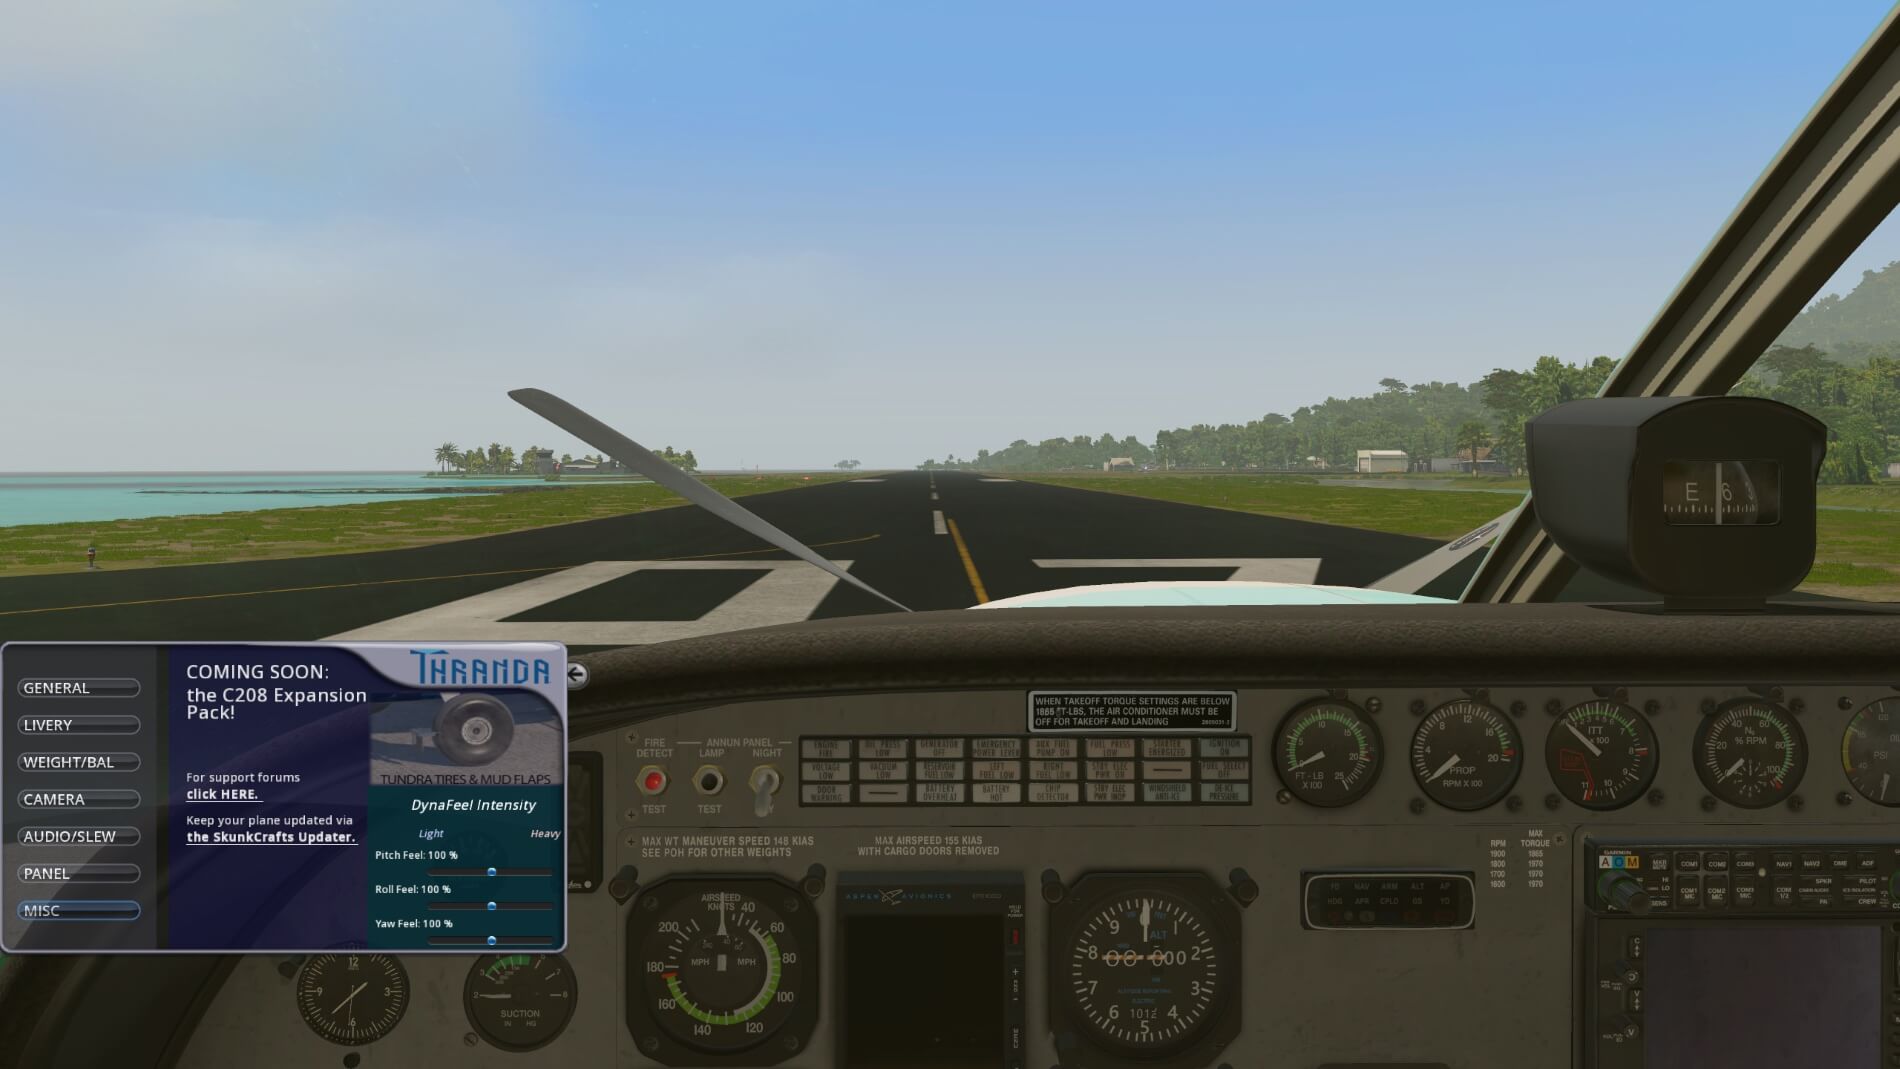
The active option available on this menu is the DynaFeel Intensity. I will again refer you to the Caravan Manual (page 15, to be exact) for the technical description of what light and heavy means. The simple version is that light means the Caravan responds the same at all speeds while heavy means the pilot must exert more energy at the controls to get similar results at high speeds that he or she would get at lower speeds with less effort.
Does this work?
To be honest, I don’t know how exactly how one describes “feel” in a simulator that is entirely visual but, I did notice a difference in flying the Caravan when I changed this setting. Some of it seemed pretty subtle, but an experienced pilot that knows what they are looking for may discern more than I. That said, the manual makes the point in bold text that the plane has been carefully tuned to respond accurately with this setting at 100 percent.
For myself, the take-away from this is the ongoing demonstration of Thranda’s commitment to craft and to their desire to keep pushing the X-Plane envelope as far as it can go.
Exterior Modelling
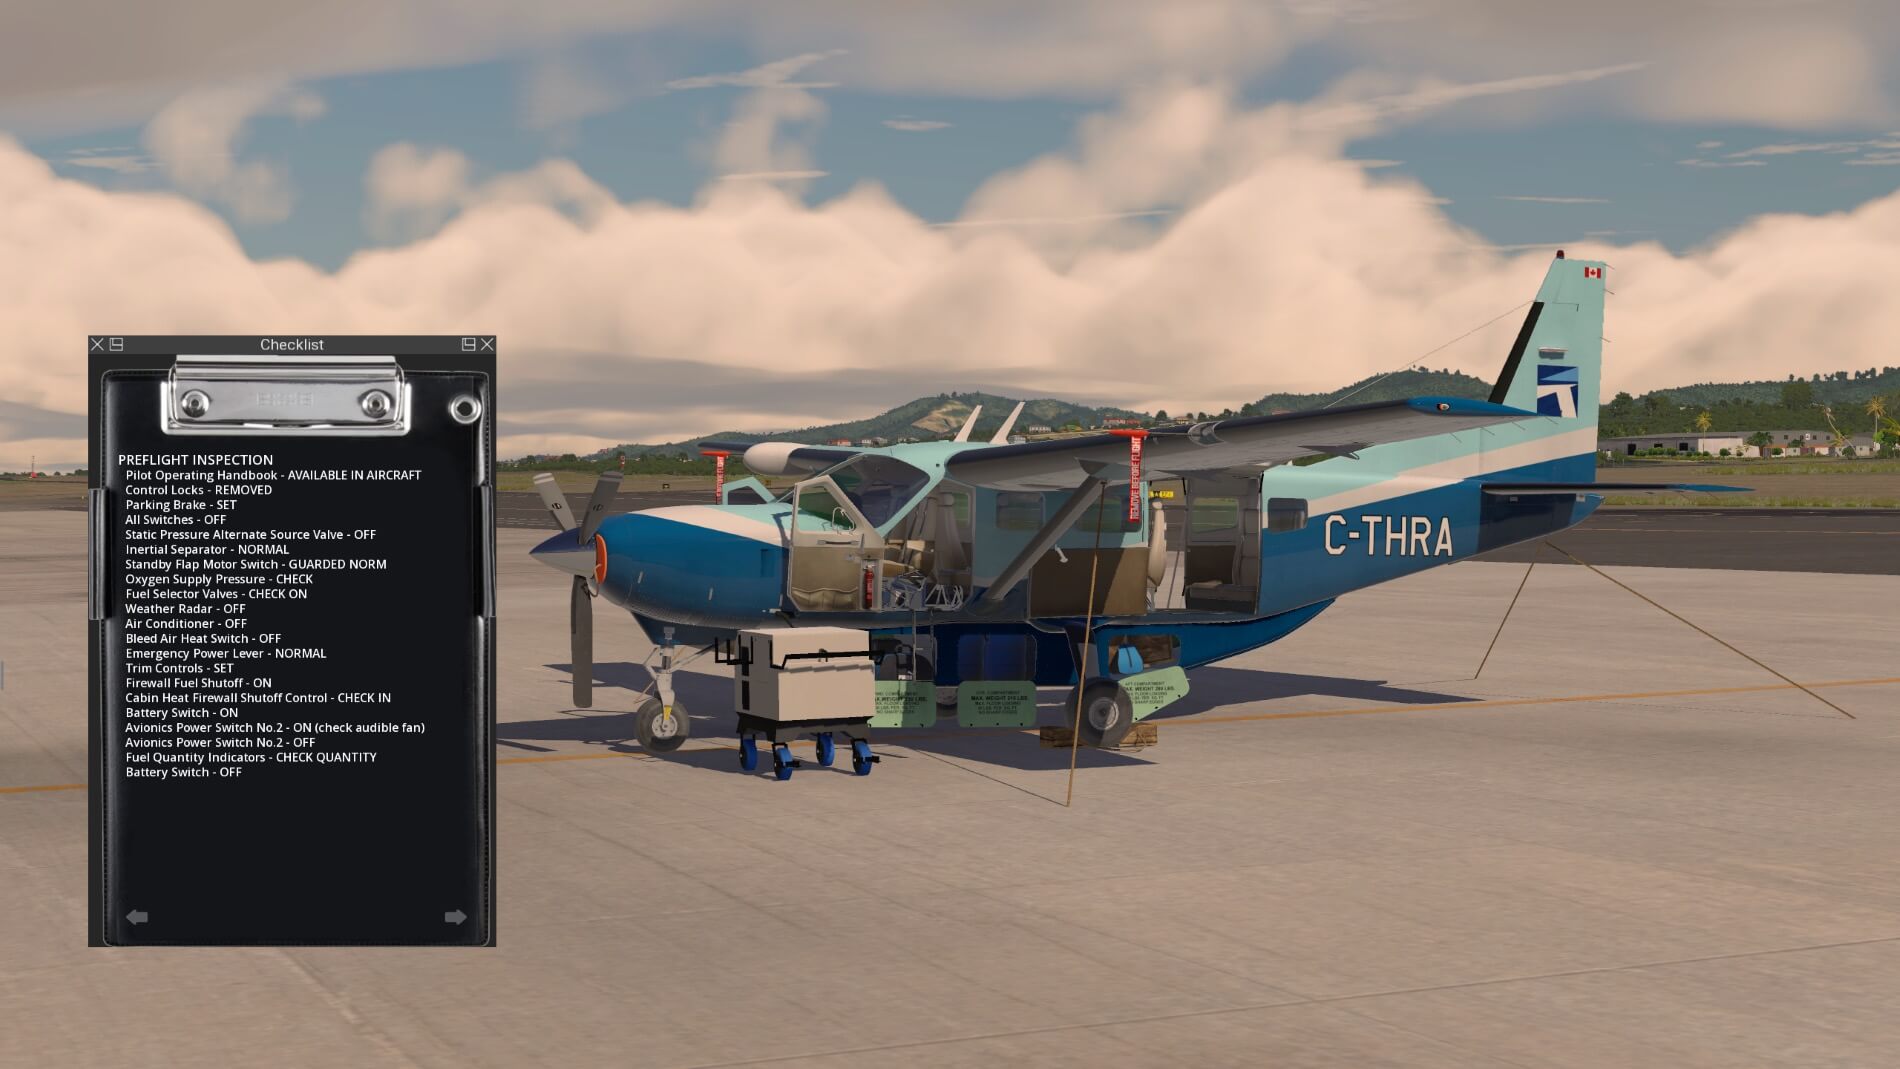
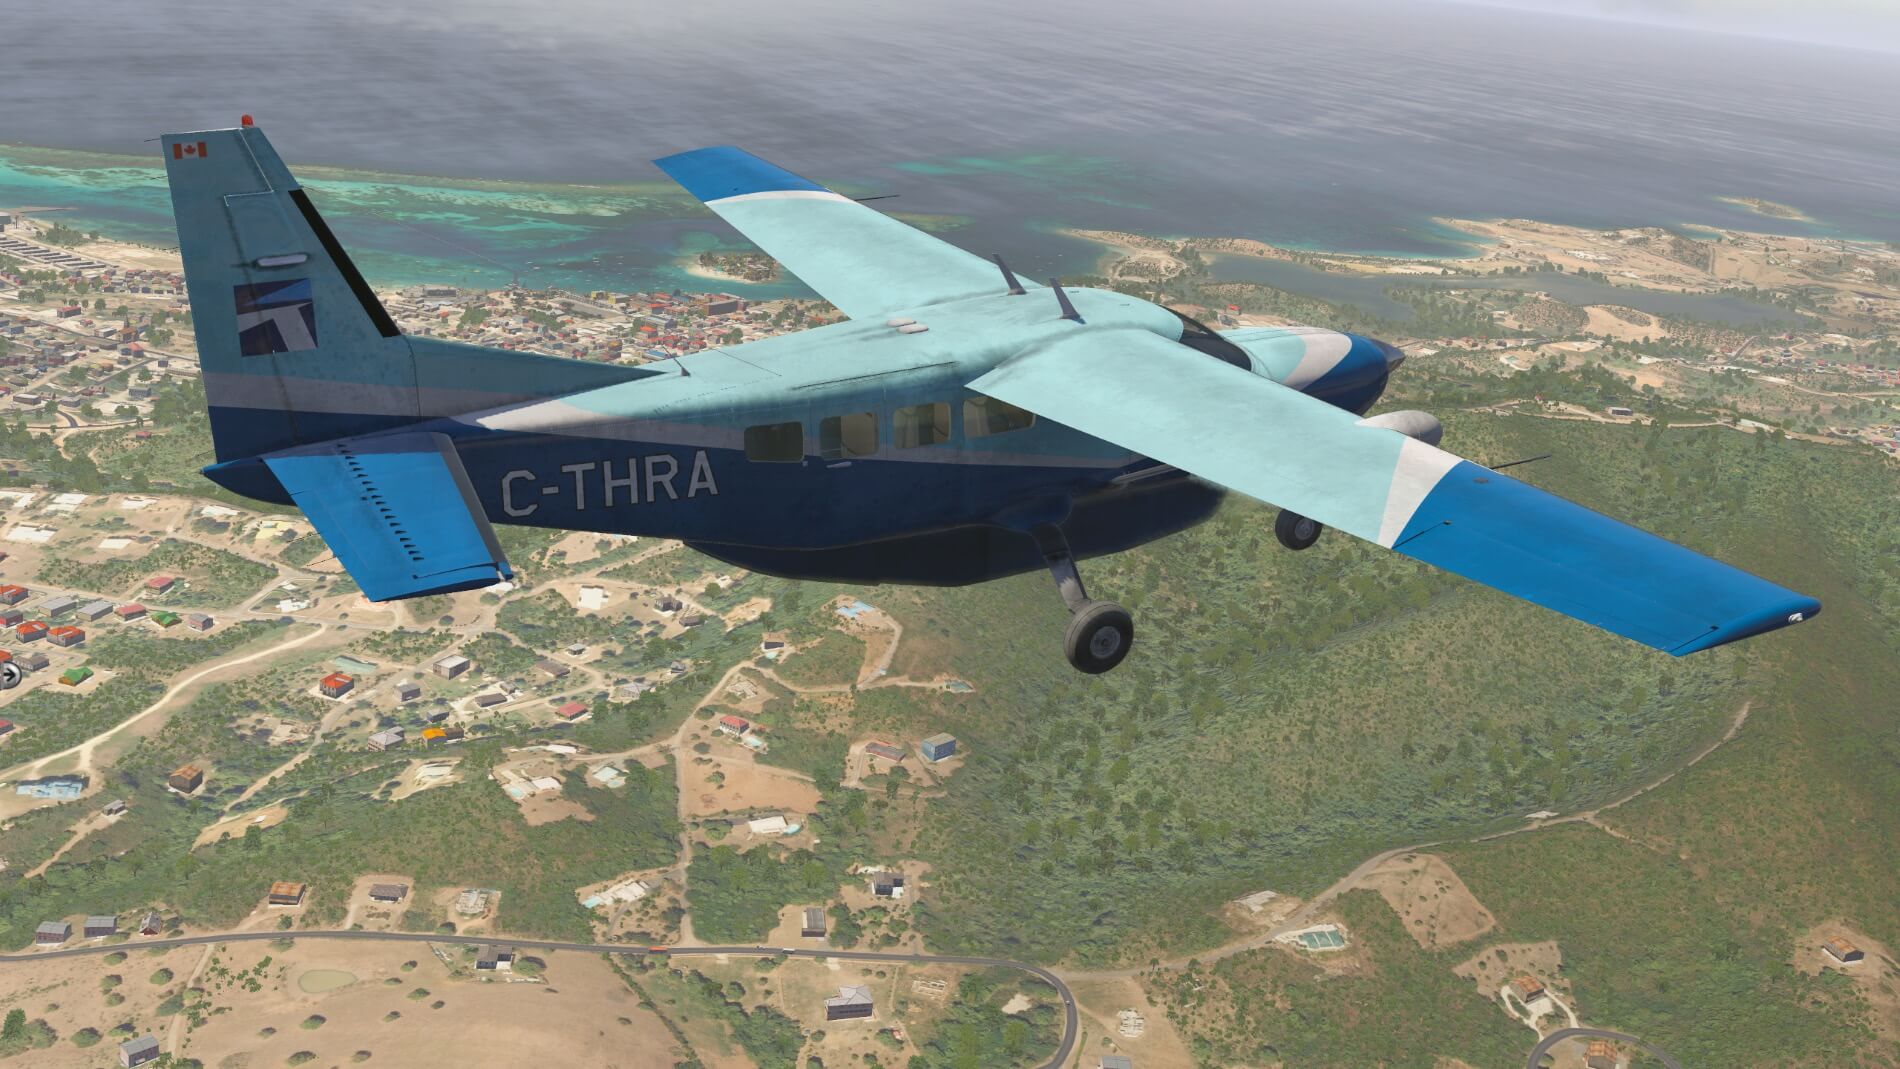
Now that we’ve finally completed the preparatory portion of the review, let’s set about our pre-flight inspection. As we approach the aircraft tied down on the tarmac, the first thing we see is that bright red cover protecting the intakes under the spinner. As we head up to remove them, we need to check the spinner and propellor for damage. One thing we can see is neither the spinner nor the propellor are brand new. Each has its own variation and share of dirt and wear.
However, other than dirt, there is no physical damage or compromise to either, so we move on. Pulling the covers from the intake, we can see they are not obstructed or damaged. We can also see some excellent modelling of the smooth curves that are a large part of this area. Well defined hardware is present, holding the spinner in place, and securing the two halves of the nose piece. The propellor blades are properly aligned for the holes in the spinner. The manufacturer’s tag on the prop is legible and the deicing elements can be seen on the propellor’s leading edges.


Ducking down before moving on, we examine the front gear apparatus. That tire looks a little worn but remains useable. The clear raised lettering on the sidewall makes it clear what we will need when it comes to replacing it. Bolts and nuts are all in place, oh, wait, it does look like a bolt is missing (I hope it’s not essential)! The strut and wheel are free of any damage. The entire structure is modelled with detail and all parts are well fit to one another. As we come out from under, it is hard to miss the wonderful detail of the vent work.
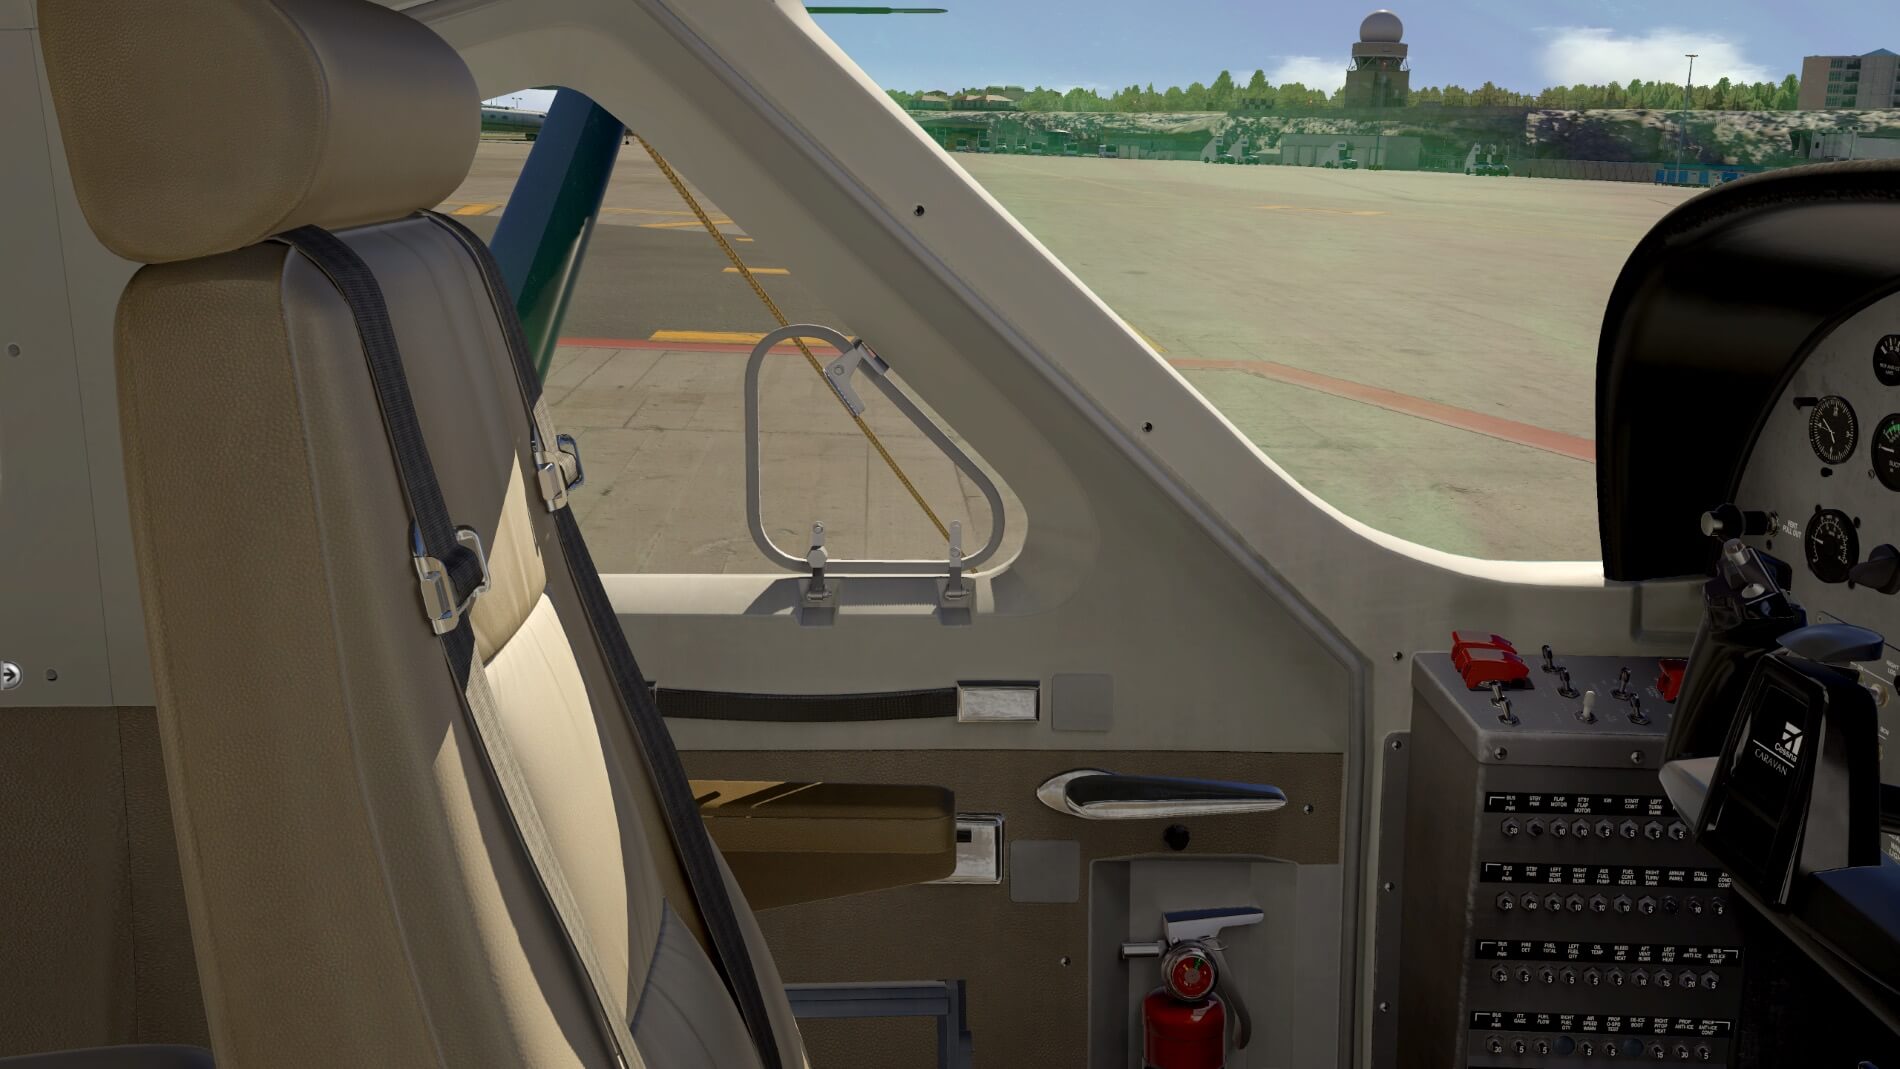
Before we do the engine check, we’ll finish the walk around to remove the tiedowns and covers as well as inspect various surfaces. The first we check is the pilot’s door to make sure it latches securely and has no visible damage. The rivet and hardware details in the vicinity of the door hinges is incredible. Some rivet heads are slightly scraped while the lower hinge on the door seems to exhibit a bit more wear. The support for the wing strut is detailed and looks like it could use a little touch up paint.
Now to the wing to remove the tie down and pitot cover. The tie down is an example of how some things would be fine anywhere else but, because Thranda captures so much detail, it doesn’t work as well here. The rope could use a little flex since the winds aren’t yanking on the wing constantly. The texture could be more defined and some type of anchor at the end would be a welcoming finishing touch to the rope doesn’t just disappear into the ground. On the other hand, the pitot cover has a nice fabric drape and curl to it and it fits the pitot snugly. There is no missing the color and large, clear lettering unless your eyes are closed while doing the walk around.
Removing the cover reveals the pitot’s gleaming metallic tip. The modelling accurately places it running through the edge of the light cover. The light cover and modelling of the lights themselves is very convincing. We’ll check the lights later. Turning our attention to the leading edge of the wing, we see the black de-icing boot securely attached. At first, I thought this was a simple black edge representing the boot, but when the light hit it just right, the texture and definition of a rubber boot appeared. I half expected the boot to animate but, alas, it doesn’t.


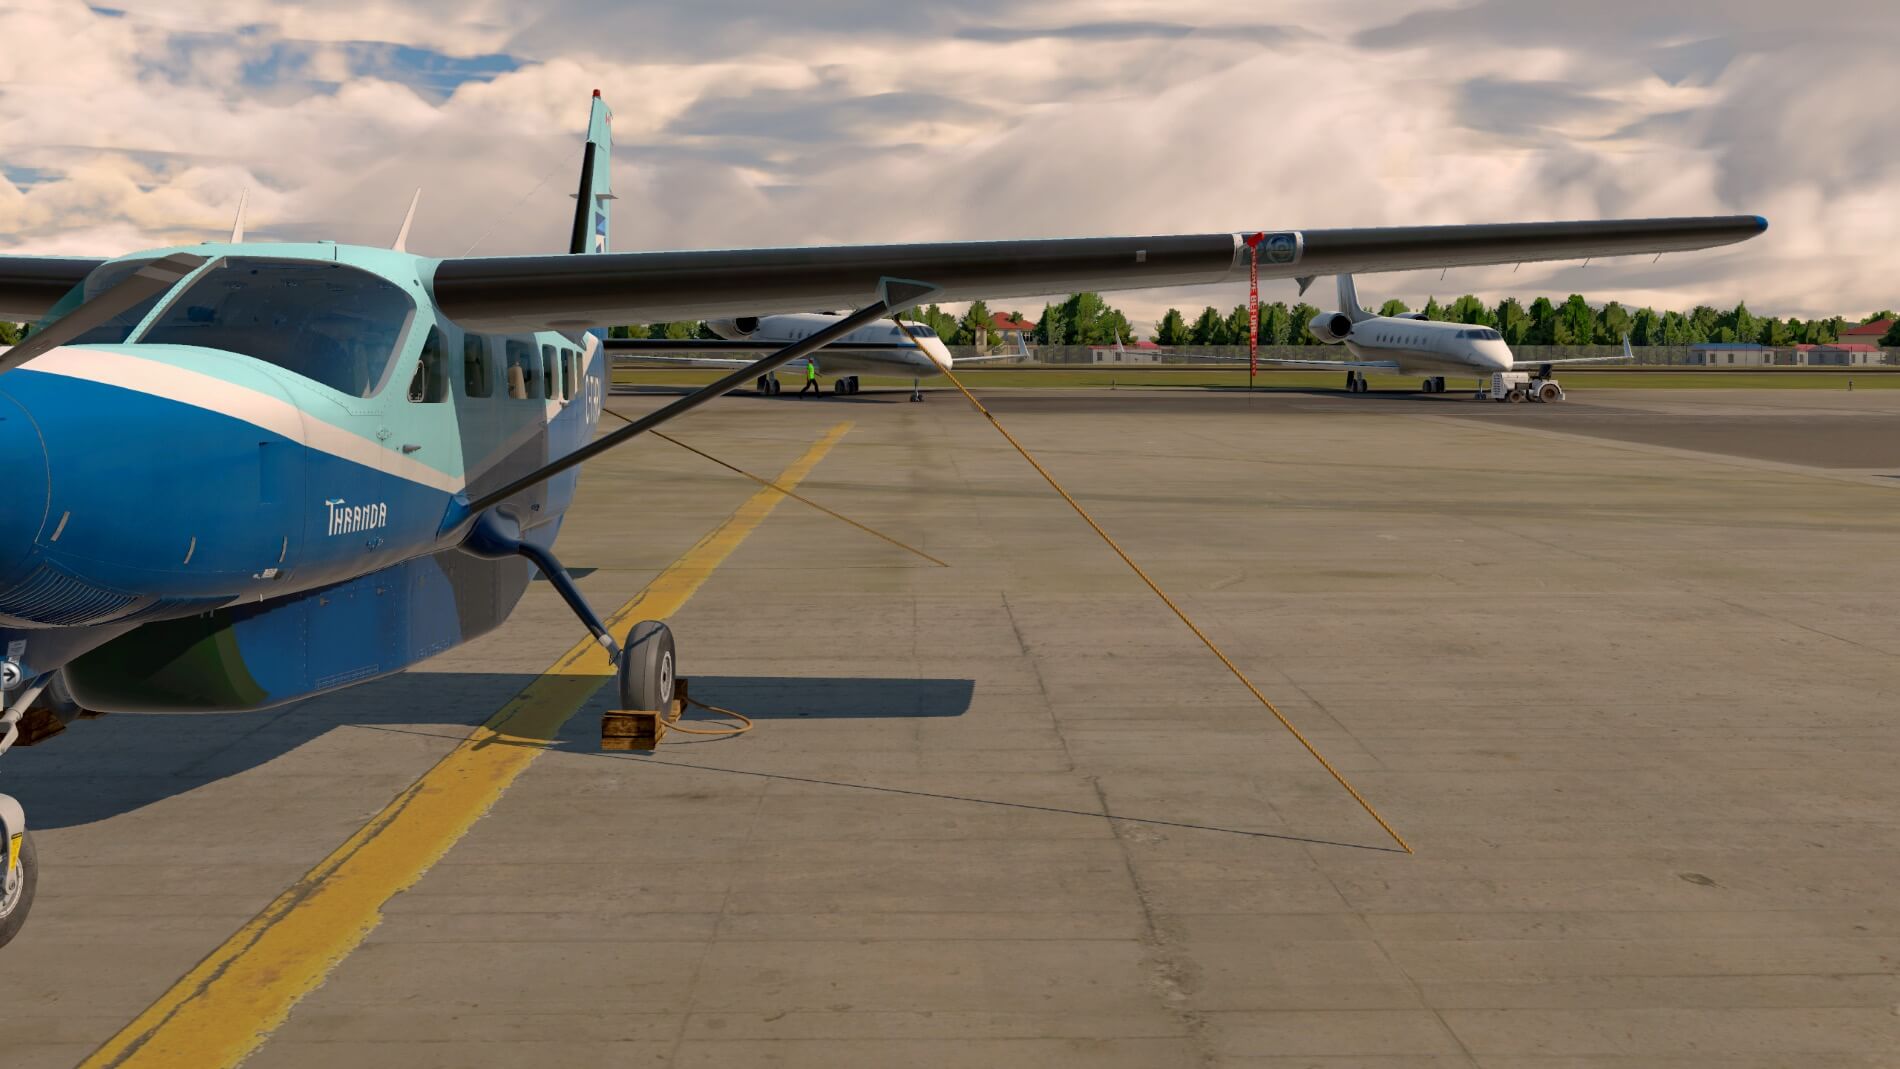


Our next point of inspection is the main landing gear and ensuring the cargo pod is properly loaded and the doors secured. The landing gear is chocked by some good, sturdy, chocks that fit the wheel well. Notice the work on the wheel. Brake lines, brakes, bolts, brake dust and dirt on the inside of the rim, dirt on the exterior, and everything fit together with no dangling parts or unsightly gaps. The tire has some wear but is quite usable, so we’ll move on to securing the cargo pod.
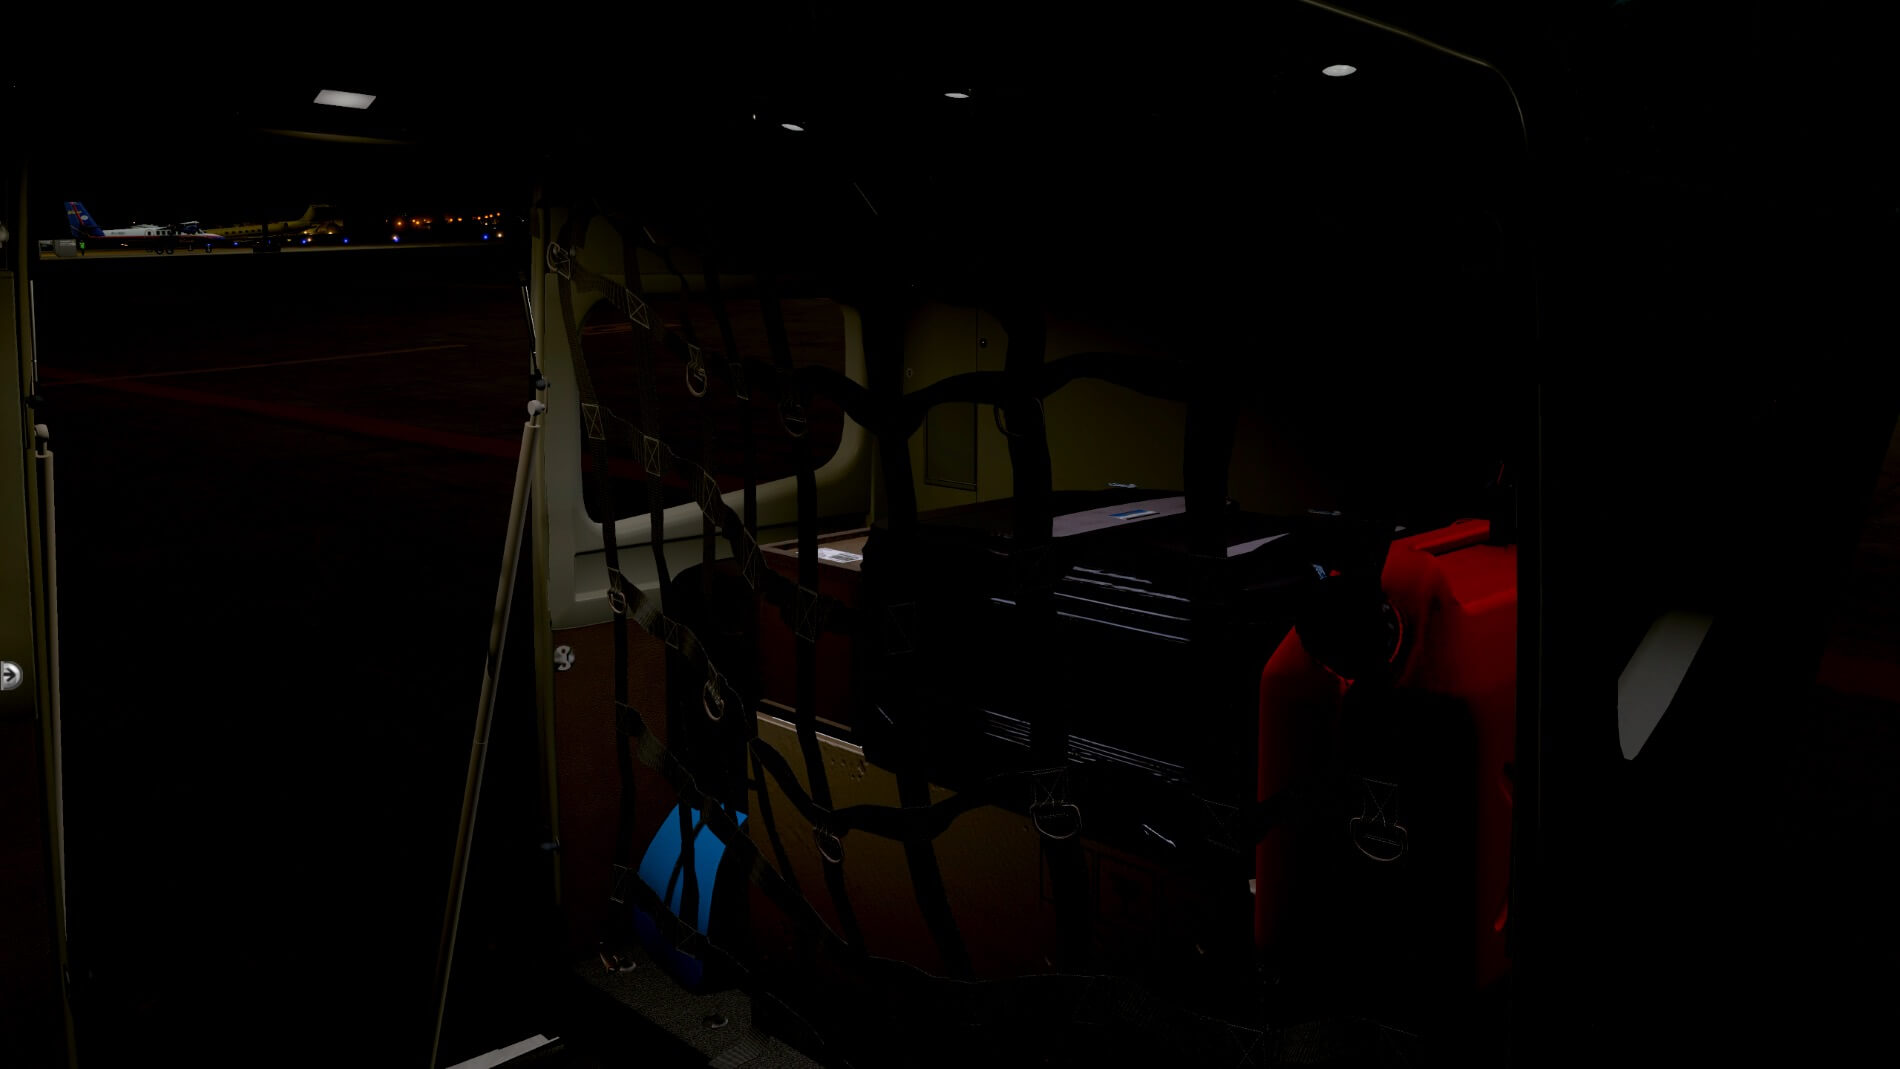
We briefly saw the cargo pod in context of the weight and balance section of the Thranda menu. Now we’ll take a very close look at it while we secure it for the flight. The cargo door pods are controllable by the click point on the Thranda menu as we saw, but they can also be open and closed by clicking on any one of the six or eight (the 675 has a three-door pod, the Grand has four) door fasteners as illustrated by the X-Plane “show instrument click regions” option from the View menu. All three or four doors open or close simultaneously with a single click. The immersion factor would be increased if each door was operated independently, but I imagine that would make a menu option for the doors very cumbersome.
The doors drop as if there is no one there to hole them (which, of course, there isn’t) and I was waiting for the heavy metal thud as a result (didn’t happen, again, of course). What the doors do offer is very large and legible load limit instructions. You will need to pay attention to these as previously mentioned, since you are unable to exceed these published weights when loading the pod. As you add weight, items appear in the appropriate section.
There are two predetermined weights for each section that you access by one or two clicks on each section in the weight and balance menu. The contents of the sections correlate with those clicks and do not change if you set an in-between weight. No complaints can be lodged here against the textures of the cargo because anything more would unnecessarily have a negative impact on frame rates. The Caravan has so much going on that some things have to be forgone for the sake of more important ones. Other details given up, for what I assume to be the same reason, are modelled hinges on the doors and detailed textures on the inside of the doors.

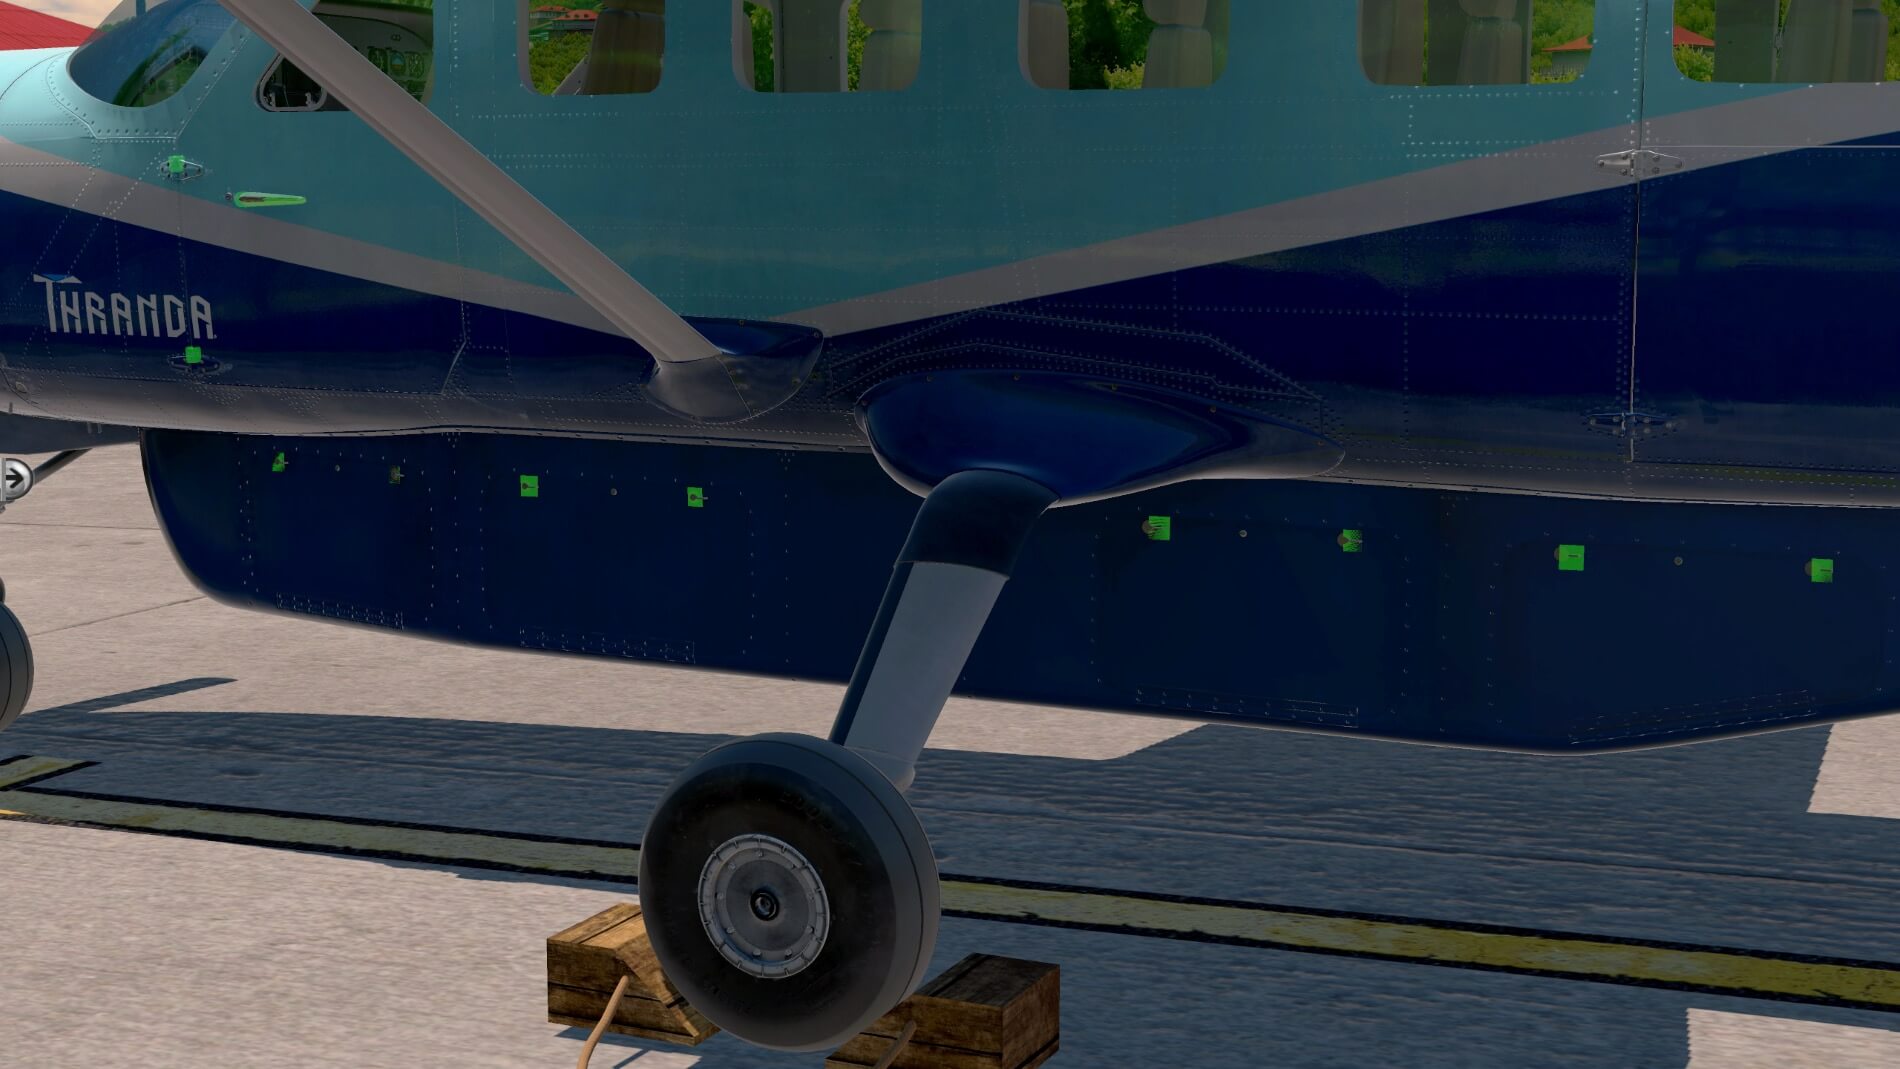


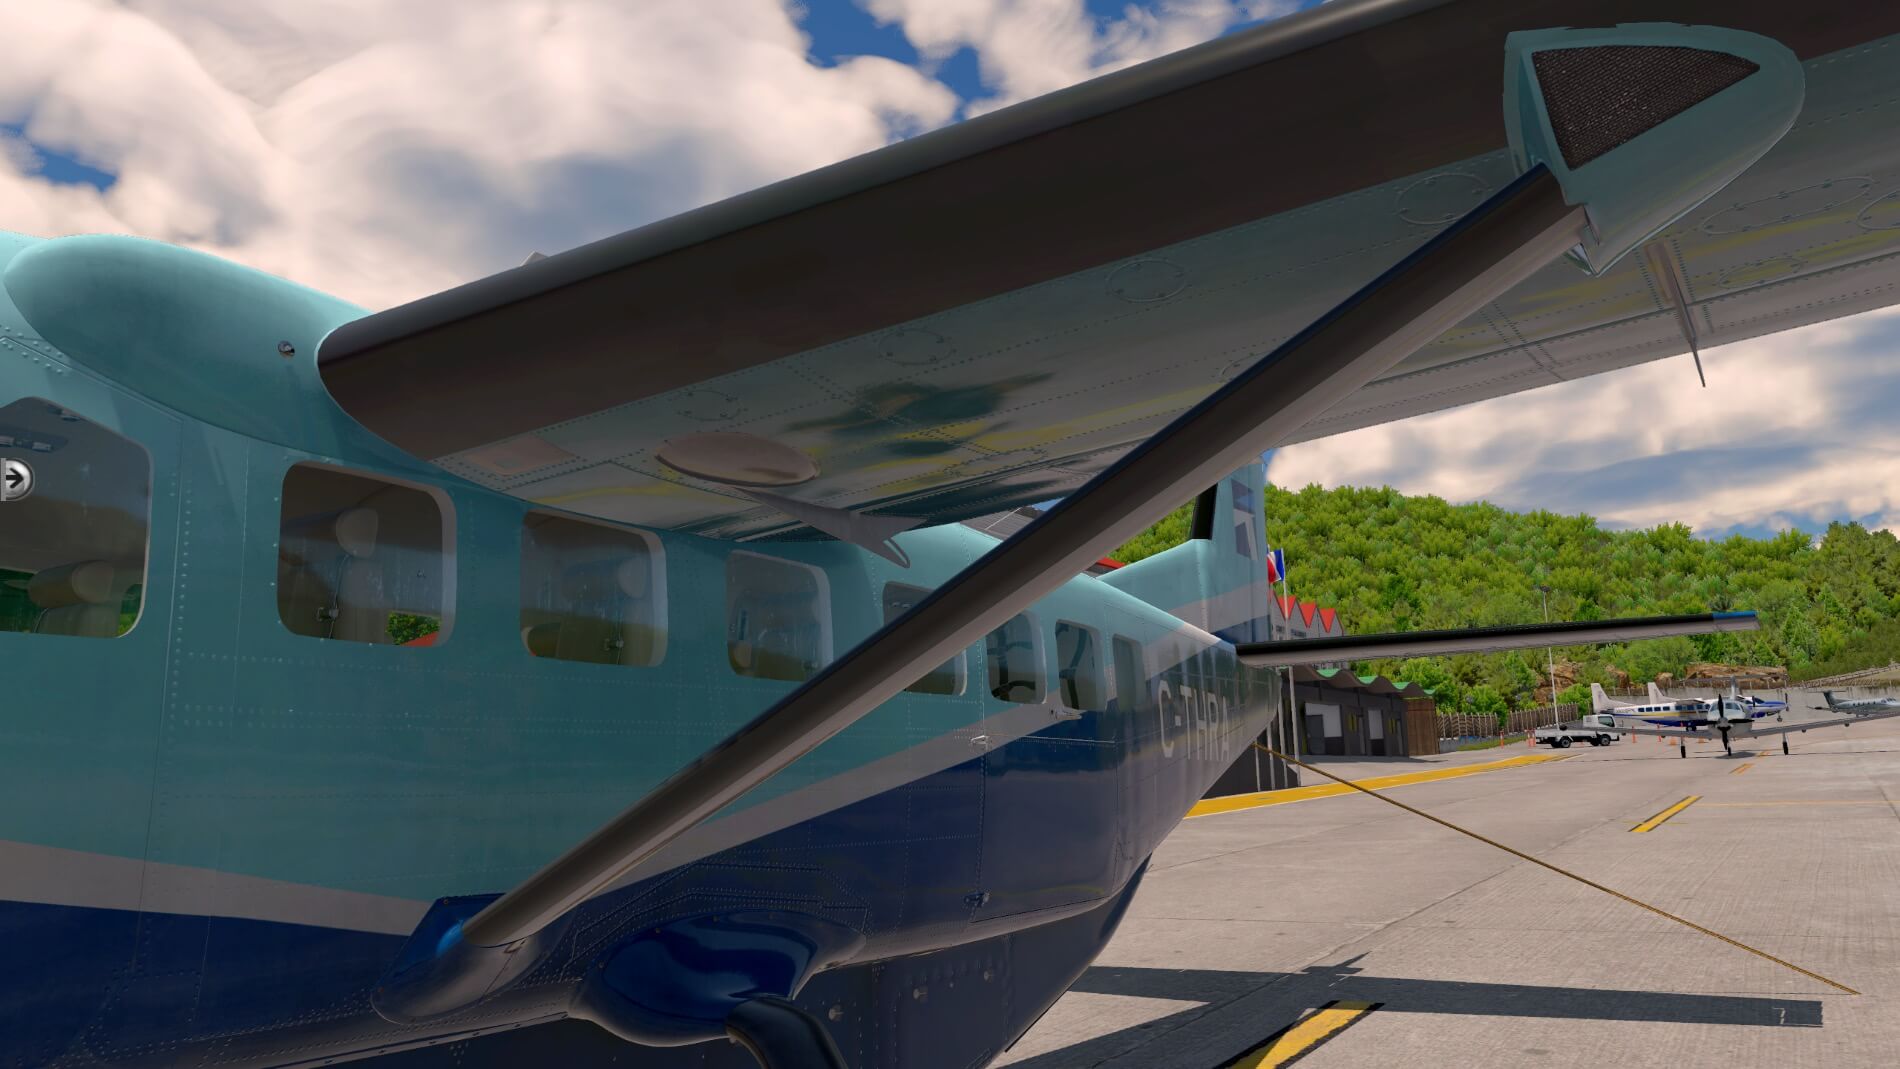
Coming away from the expertly modelled exterior of the cargo pod, we look along the side of the Caravan. With the light reflecting at the proper angle, we can see the detailed riveting, the ripples in the metal fuselage, and the joins between the fuselage and the wing strut support bracket as well as the connection between the fuselage and the landing gear strut. Reflections undulate with the surface, joins are flush, and connecting bolts are all present. The bend in the fuselage beneath the pilot door is just incredible detail. At the top end of the wing strut, the fresh air intake is mounted between the strut and the wing. The mesh work is captured realistically.
Under the wing, while checking for the proper operation of the flaps, we find more detail woven into the skin of the wing and underside of the flap. Flap hinges are accurately represented which I had to confirm with a photograph because, somehow to my eye, they look flimsy. (maybe it’s because the last time I was underwing examining flap hinges was on a heavy aircraft)
Here we also find another decision made to avoid a heavier tax on frame rates. The slots for the flap actuators are simply black stripes painted on the wing structure. This seems like a reasonable place to leave out some polygons since it is something that will hardly ever be looked at. There are however, a couple of missing polygons that should be here and that is the outermost hinge. Perhaps this will be corrected in a later update.
Now we check the top side of the wing and see the fuel cover is secured. We need to check for proper operation of the flight controls, and this gives us a chance to observe the ailerons and spoilers in operation. Due to the Caravan’s long flaps, the ailerons are too short to be as effective as they should be, so Cessna added spoilers to the wing. As we test the controls, we can observe the spoilers functioning in unison with the ailerons.


Next up is to ensure the cargo door is closed and secured. This door lifts open at the top and swings open at the bottom. The animation of the doors opening is well done, but the bottom half closes in a way that looks like it could seriously hurt someone. The door sounds sometimes play inconsistently, and the sound of the top door closing, when heard, comes before the door locks in place. So far, we’ve had to look pretty hard to find things that could be better about this model.
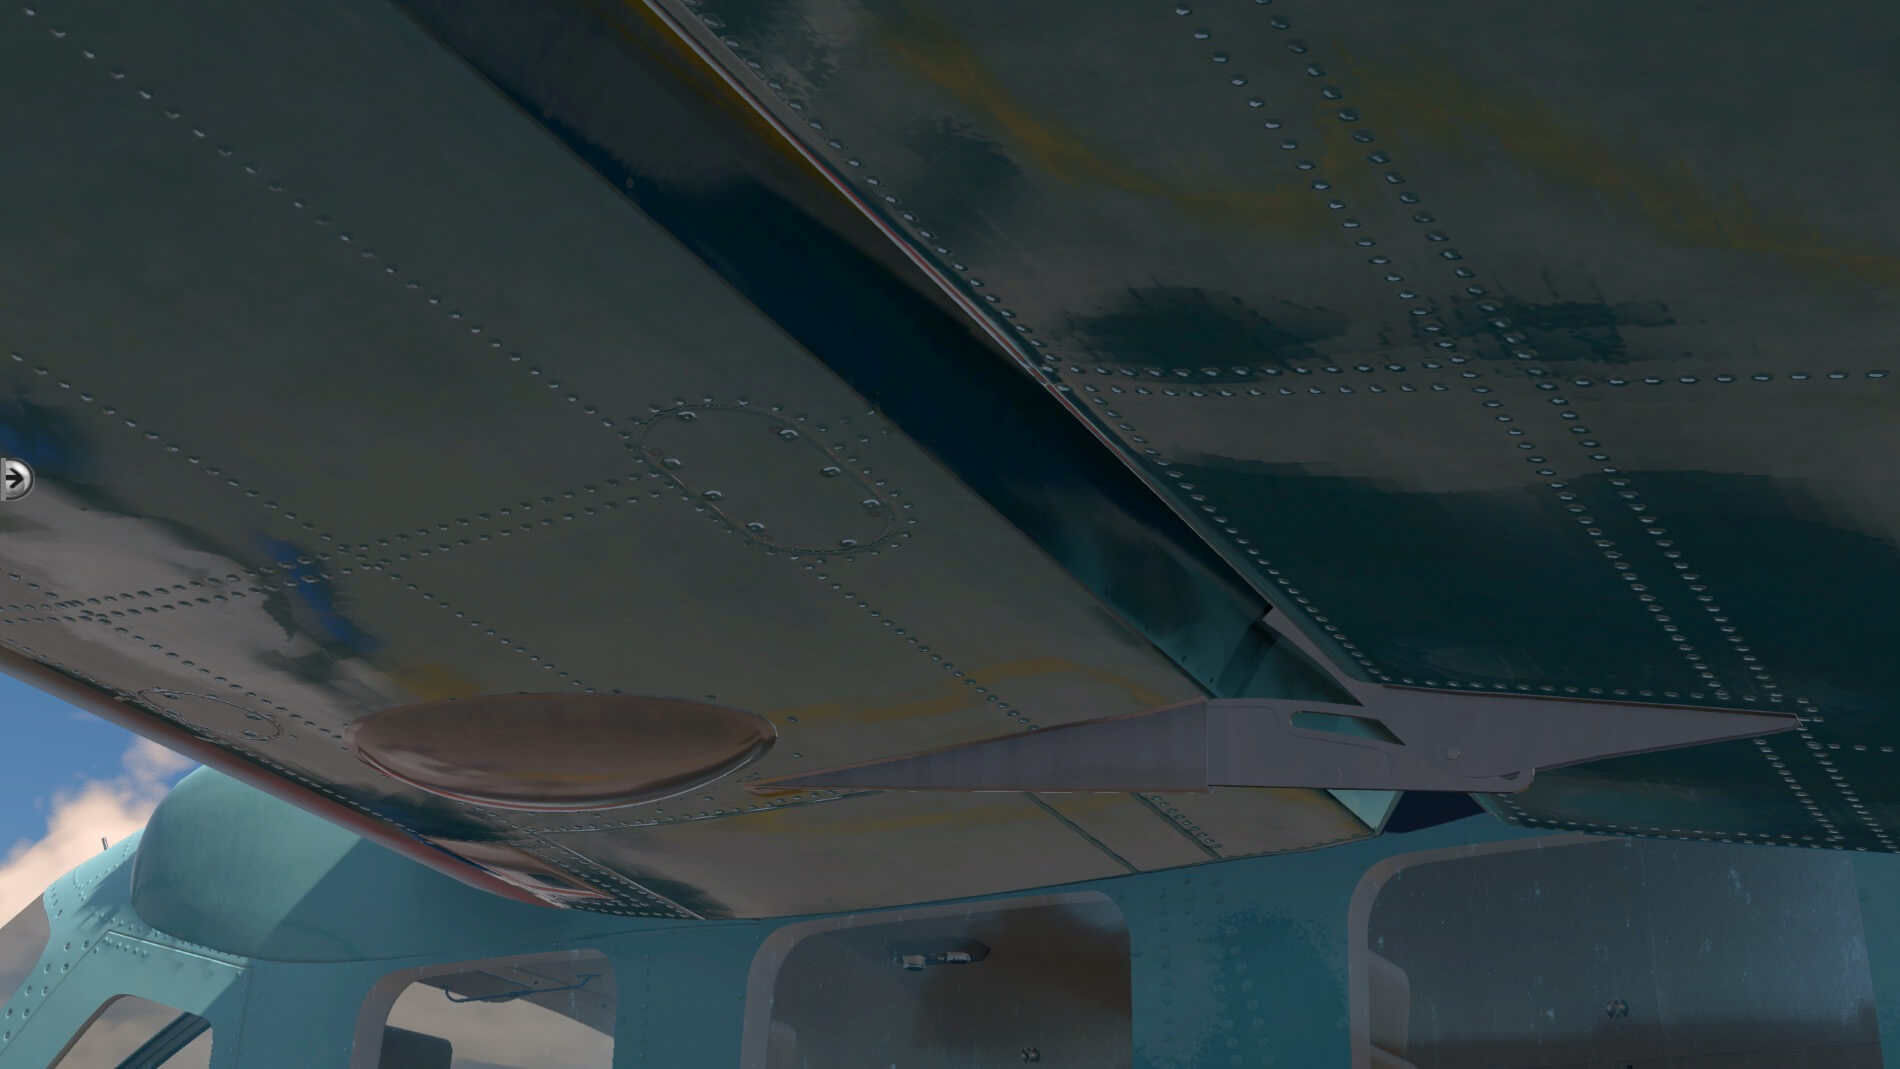
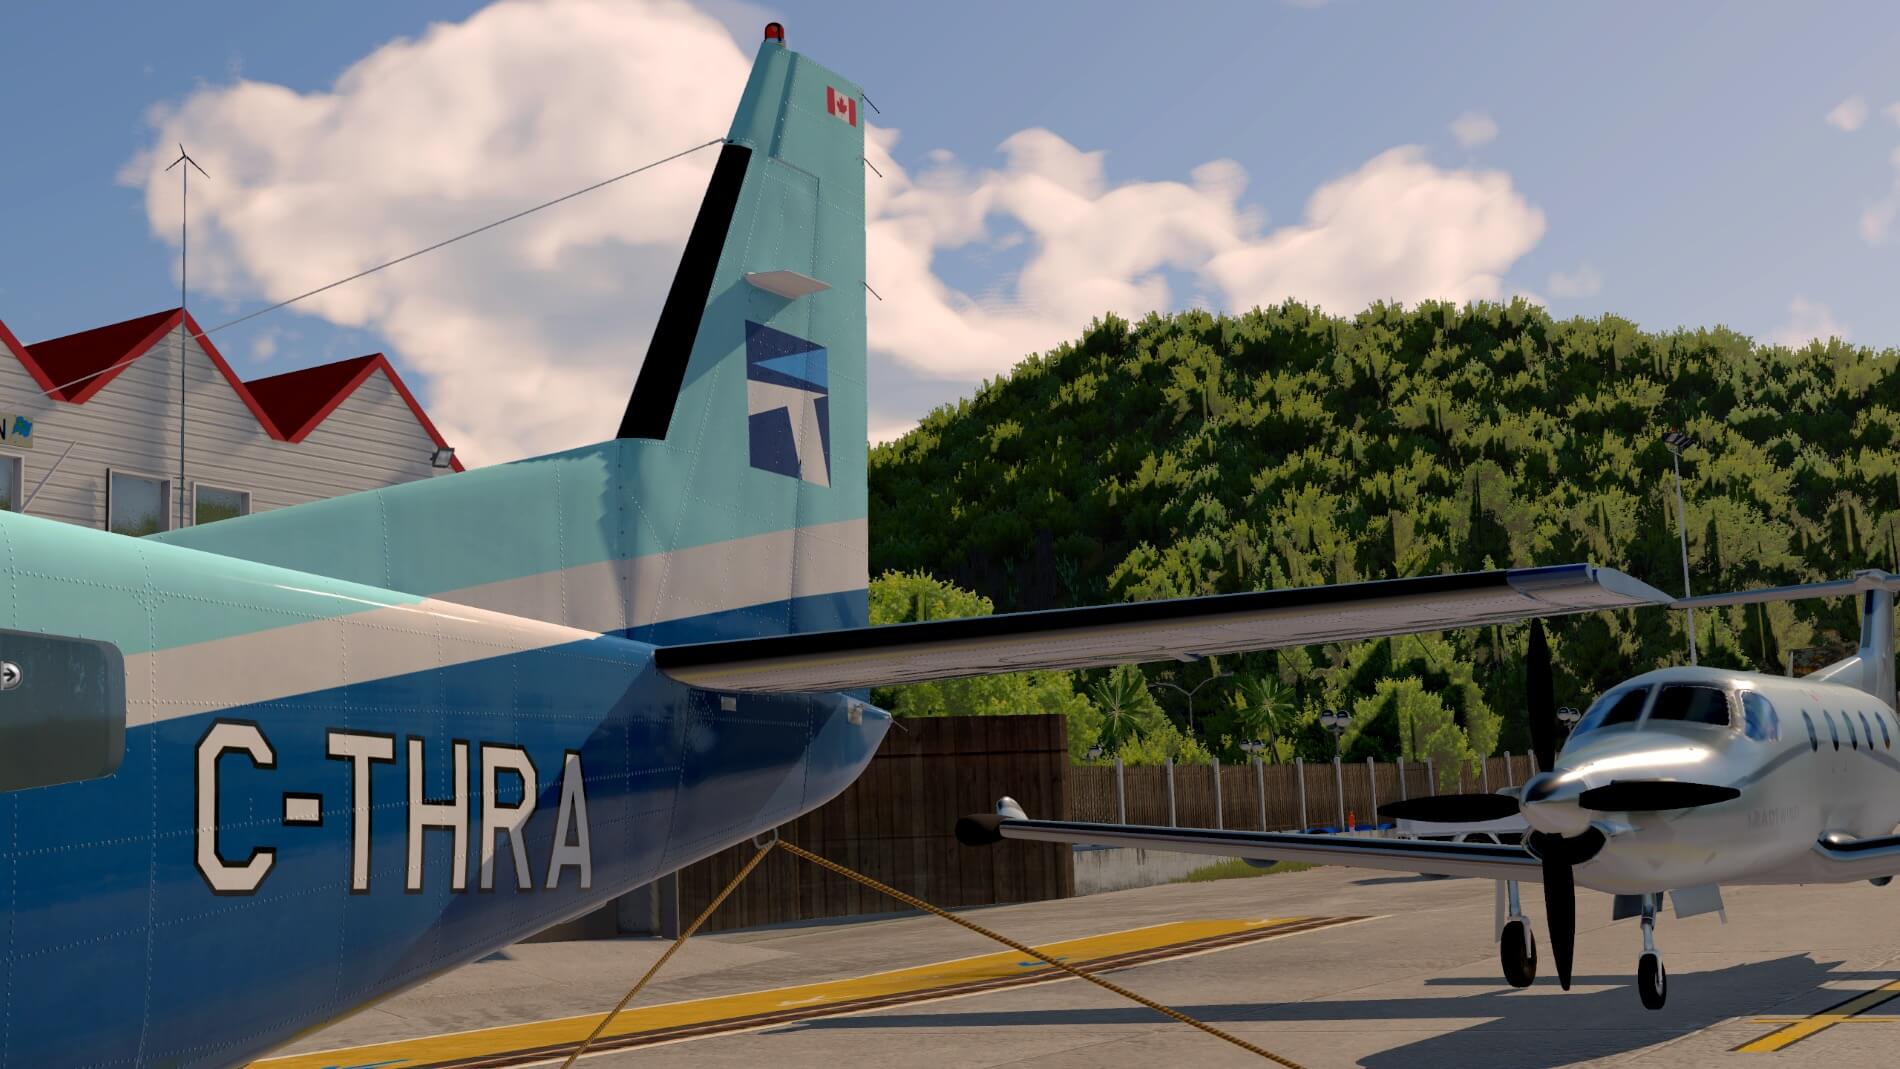
We finally get to the empennage where we can see the de-icing boots covering the leading edges of the horizontal and vertical stabilizers. We also see the fine texture and detail work continuing all the way to the light at the very end. The manufacturer’s tag is under the horizontal stabilizer and the tail lock is provided with accuracy though it is not functional.
While checking on the proper operation of the control surfaces, we can see the vortex generators across the top of the horizontal stabilizer. We can also see the fluid animation of the rudder and flaps. The trim tabs are well done and travel a full range in response to control input. The only area for improvement here is the tab hinges are a little on the short side when the tab is in a full upward deflection.
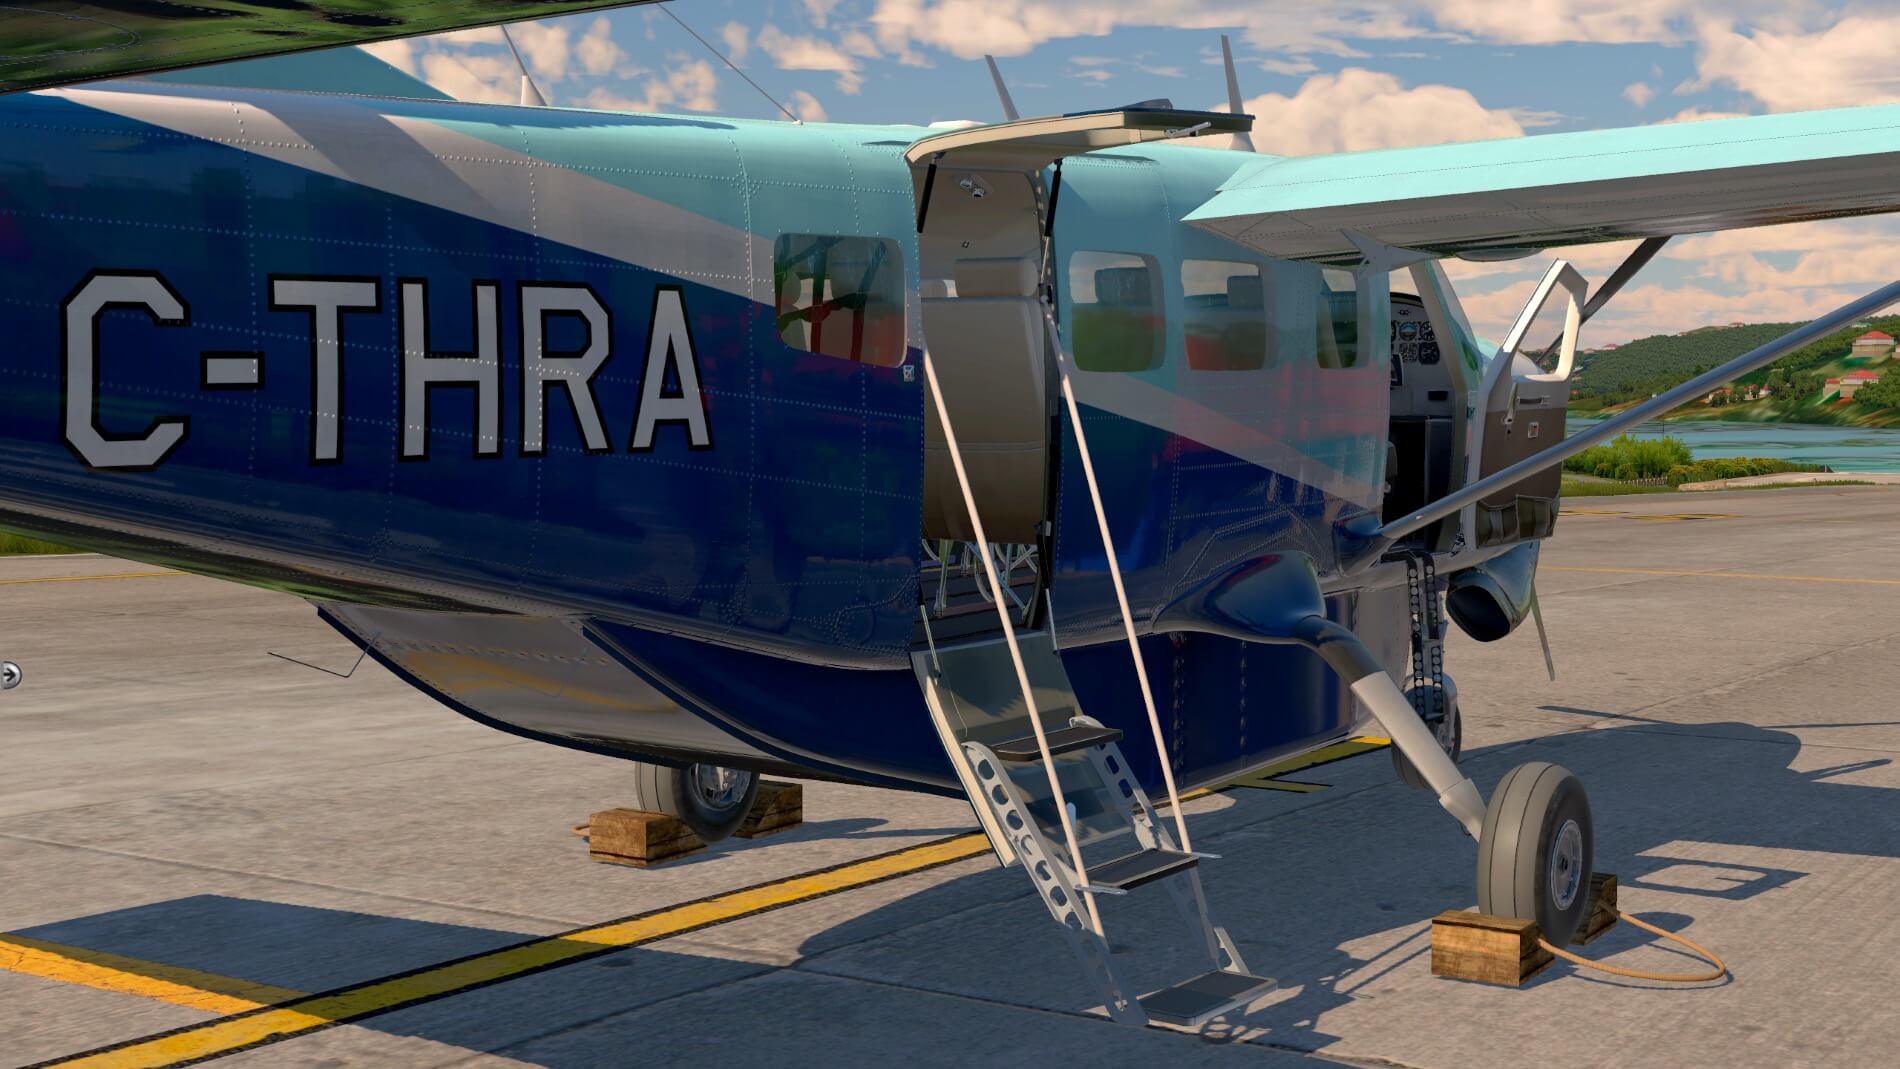
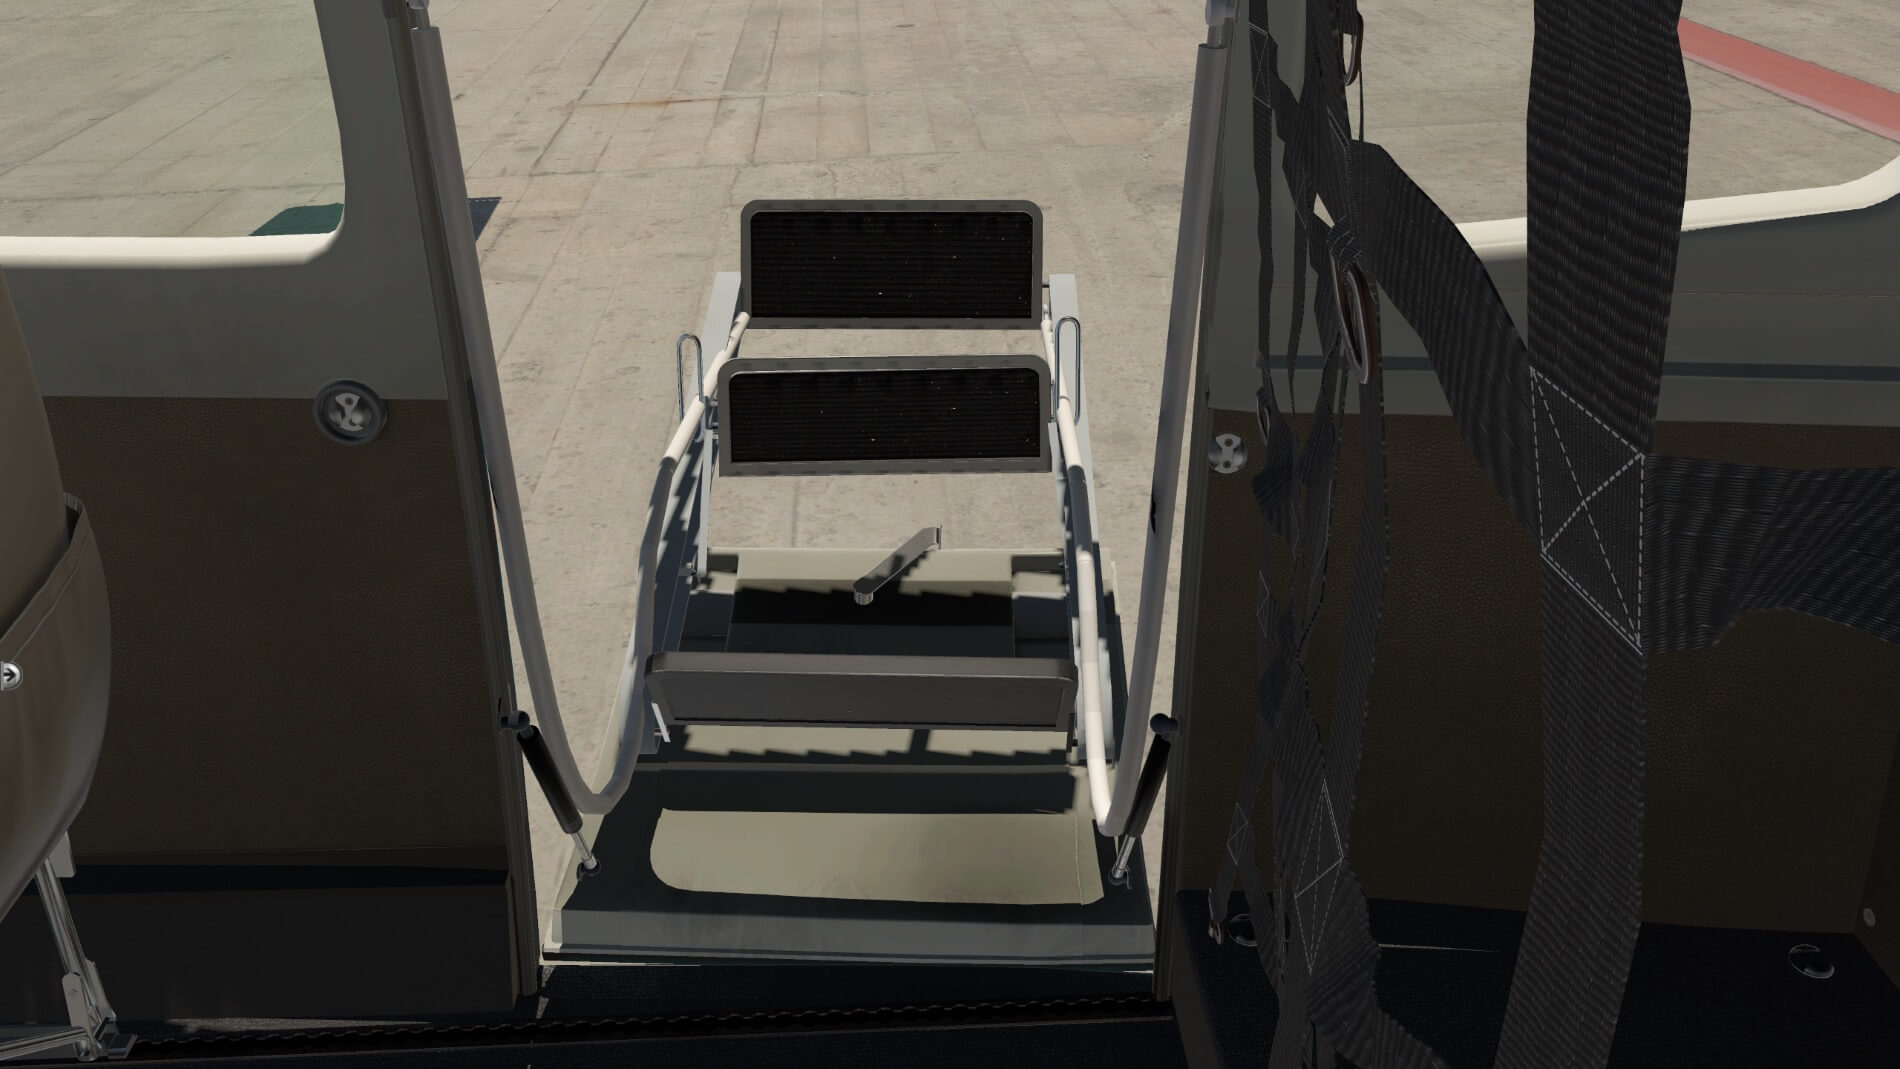
There are only two notable differences on this side of the Caravan that we come across as we complete our exterior inspection. The first is the two-section passenger door with the steps integrated into the lower section. This door, like the cargo door, has a very smooth animation when opening and closing the top half. Again, watch your hands when closing the bottom – it comes up fast. The sound associated with closing the top half also has the identical timing issue as the cargo door.
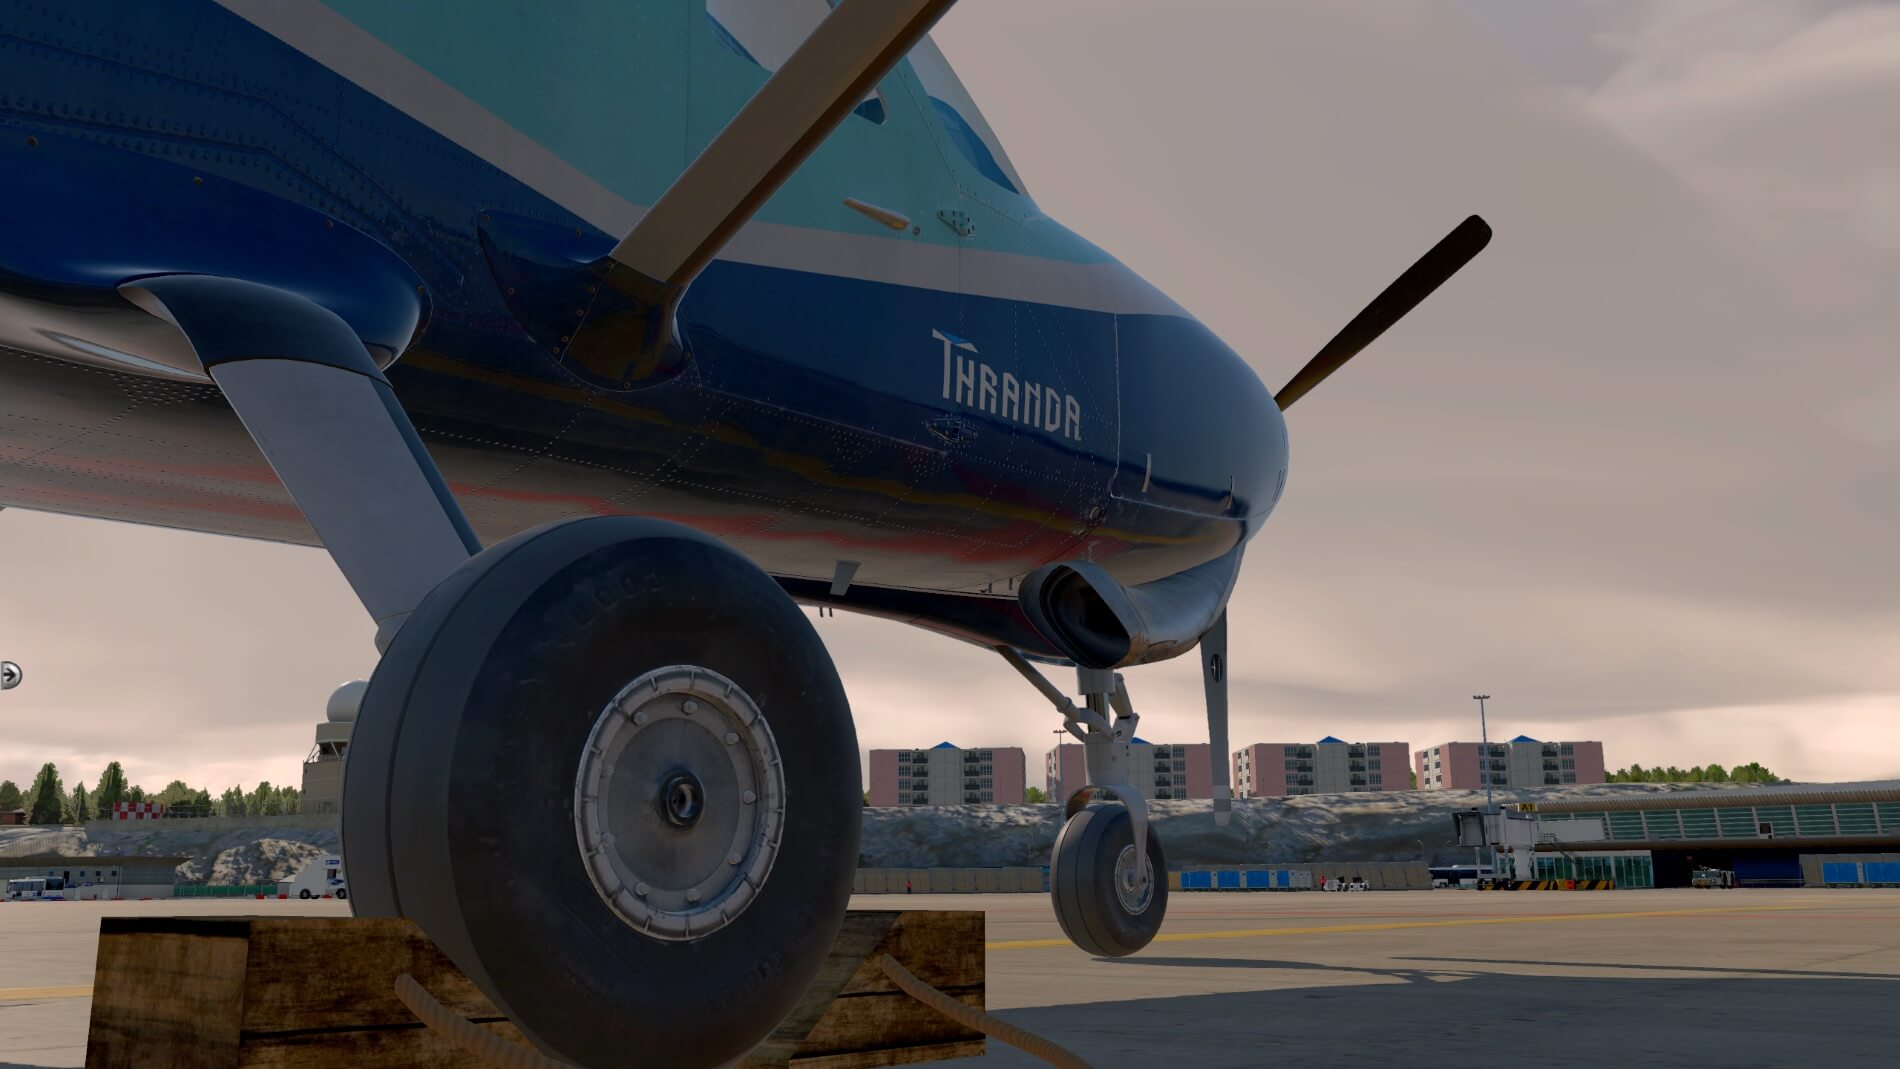
At the front of the plane on the co-pilot’s side, we see the large, single, exhaust that is characteristic of the Caravan. The exhaust is properly shaped and well textured with evidence of some weathering and dirt. The reflectivity bends objects in accordance with the surface shape of the exhaust. The single exhaust allows for loading and unloading the aircraft through the cargo door with the engine running. The other benefit of the single exhaust is a minimization of carbon monoxide being introduced into the cabin since the exhaust is deflected downward and the fresh air intakes are, as we’ve already seen, under the wings.


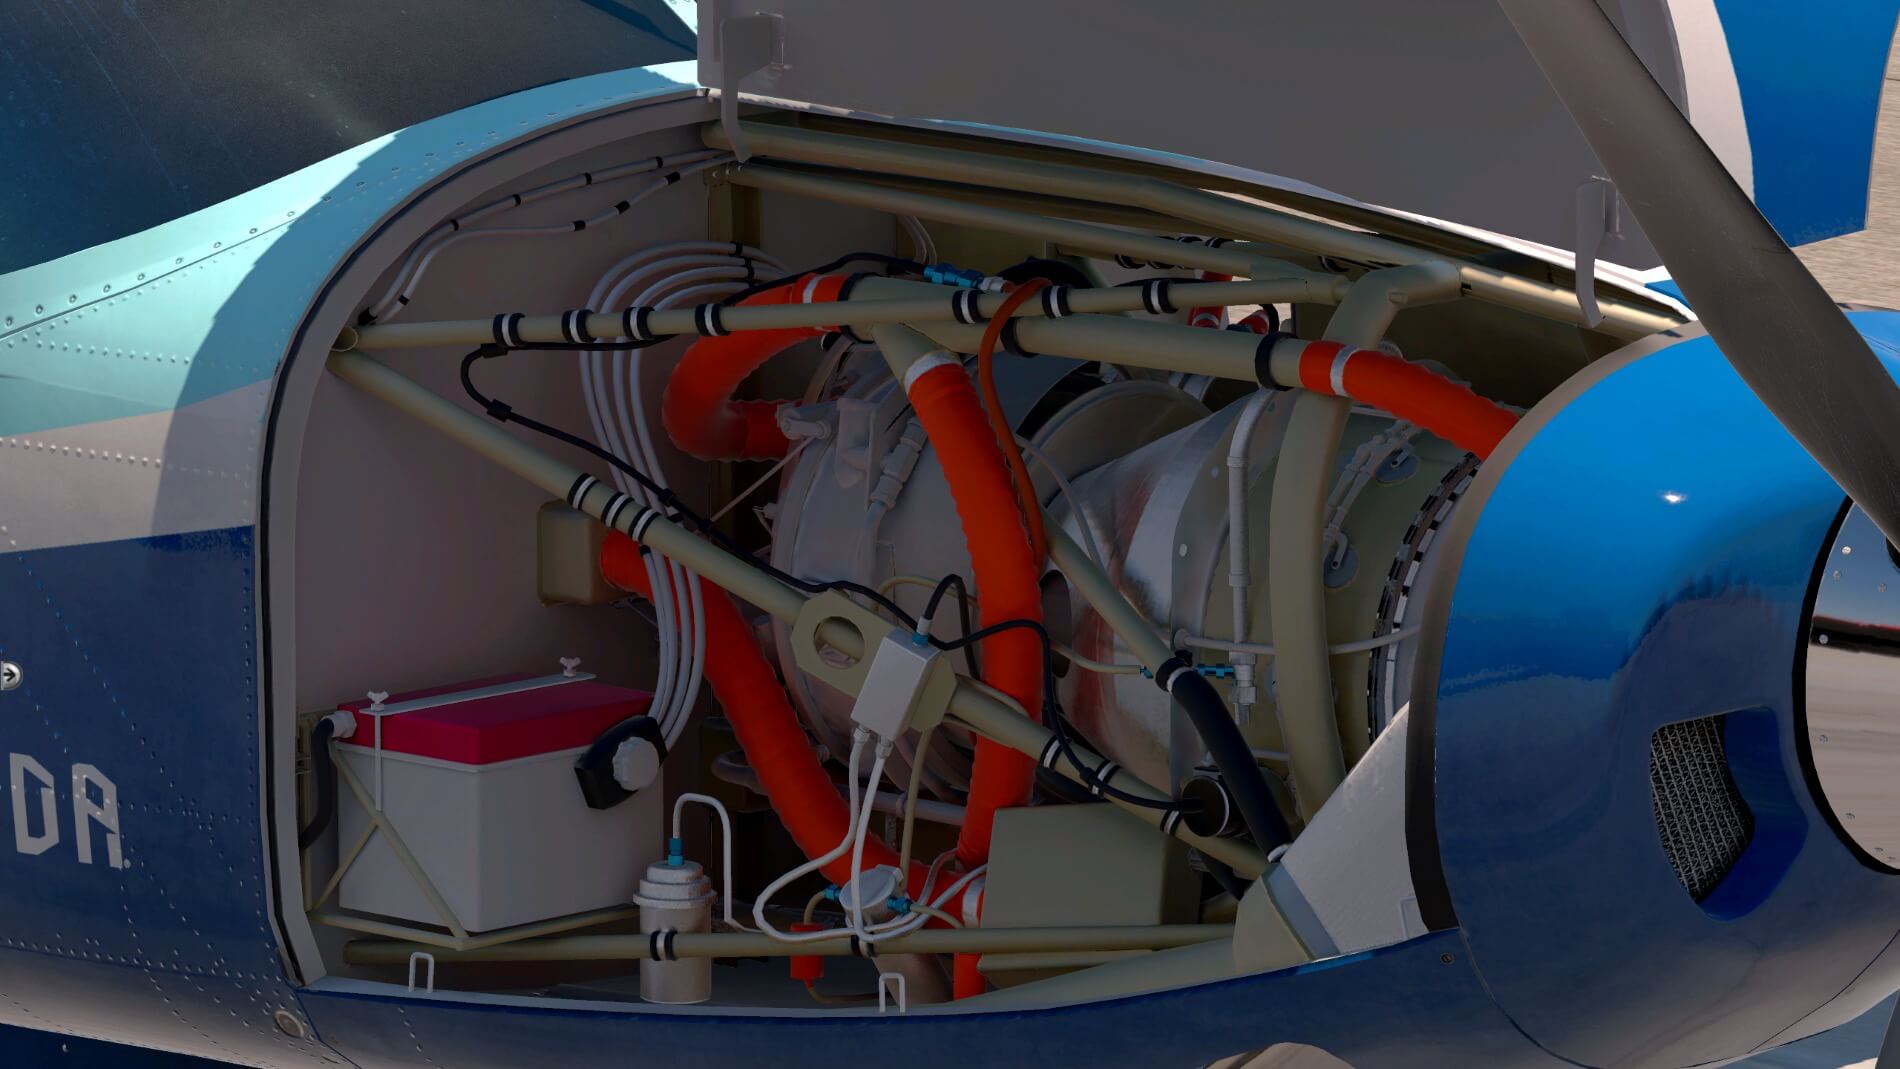
The last two items on our list are the engine and the exterior lights. Lifting the covers over the engine reveals a detailed model of the P & W PT6A-114A. Engine structure, fluid pipes and hoses, electrical cables, and the fuselage support structure for the engine are all modelled in exacting detail. Since everything looks fine, we close the cowl and move on to the light check.
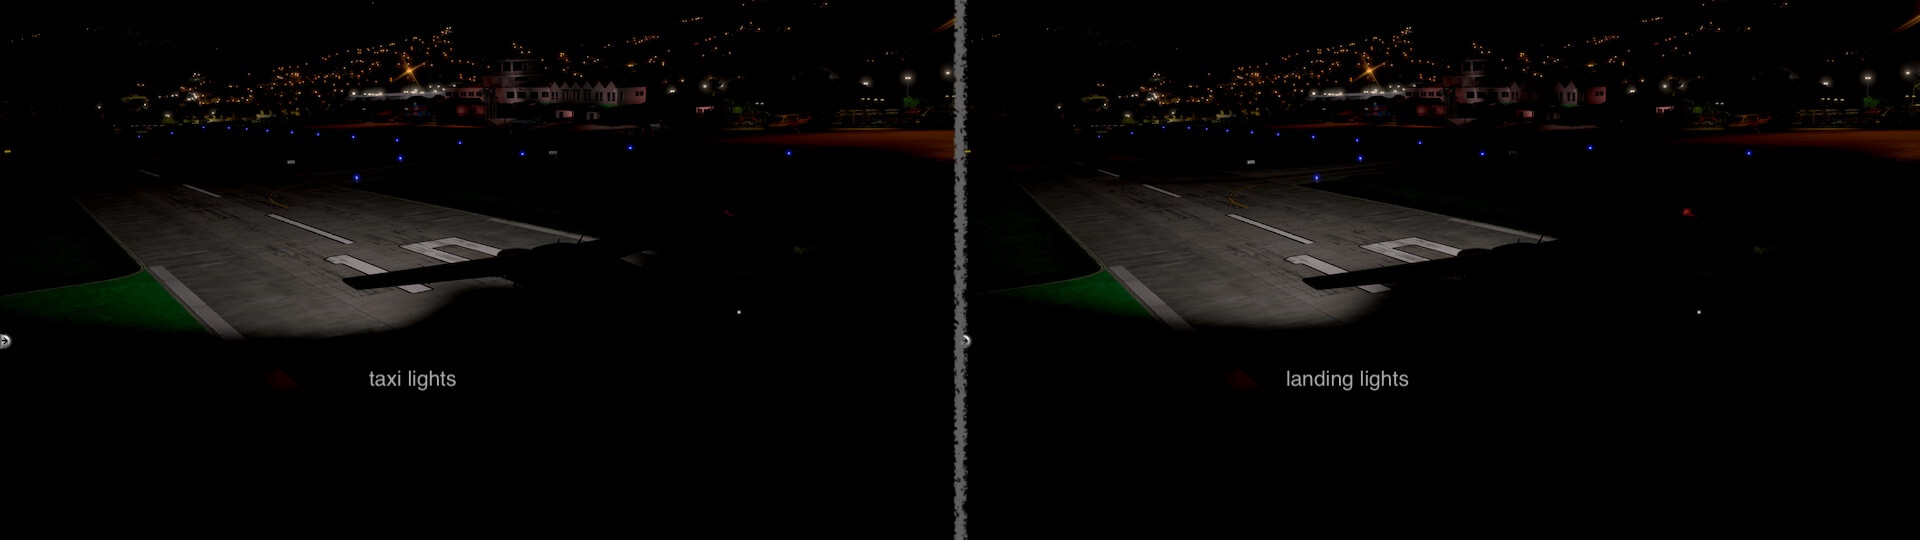
The Caravan is equipped with separate taxi and landing lights with one of each type being mounted in the leading edge of the wing adjacent to the pitot. There is one beacon at the tip of the vertical stabilizer, position lights at the tip of each wing – green on the right, red on the left – and a white one at the base of the vertical stabilizer, and a white strobe on each wing tip. The modelling of each light is without fault and the taxi and landing light illumination is realistic and useful on those night flights. Once we have verified that all lights are in good order, it is finally time to move into the interior.


One last note about the exterior. If you turn on the “show instrument click regions” as mentioned earlier, you will see the Caravan has several exterior spots where a mouse-click can induce an action. What you won’t see is the multiple spots on the interior. These spots are active and can be triggered from the outside. This can easily be done when the click regions are turned off. Frequently, I found something happening to one of the seats inside the plane when I was attempting to manipulate something on the exterior.
Interior Modelling
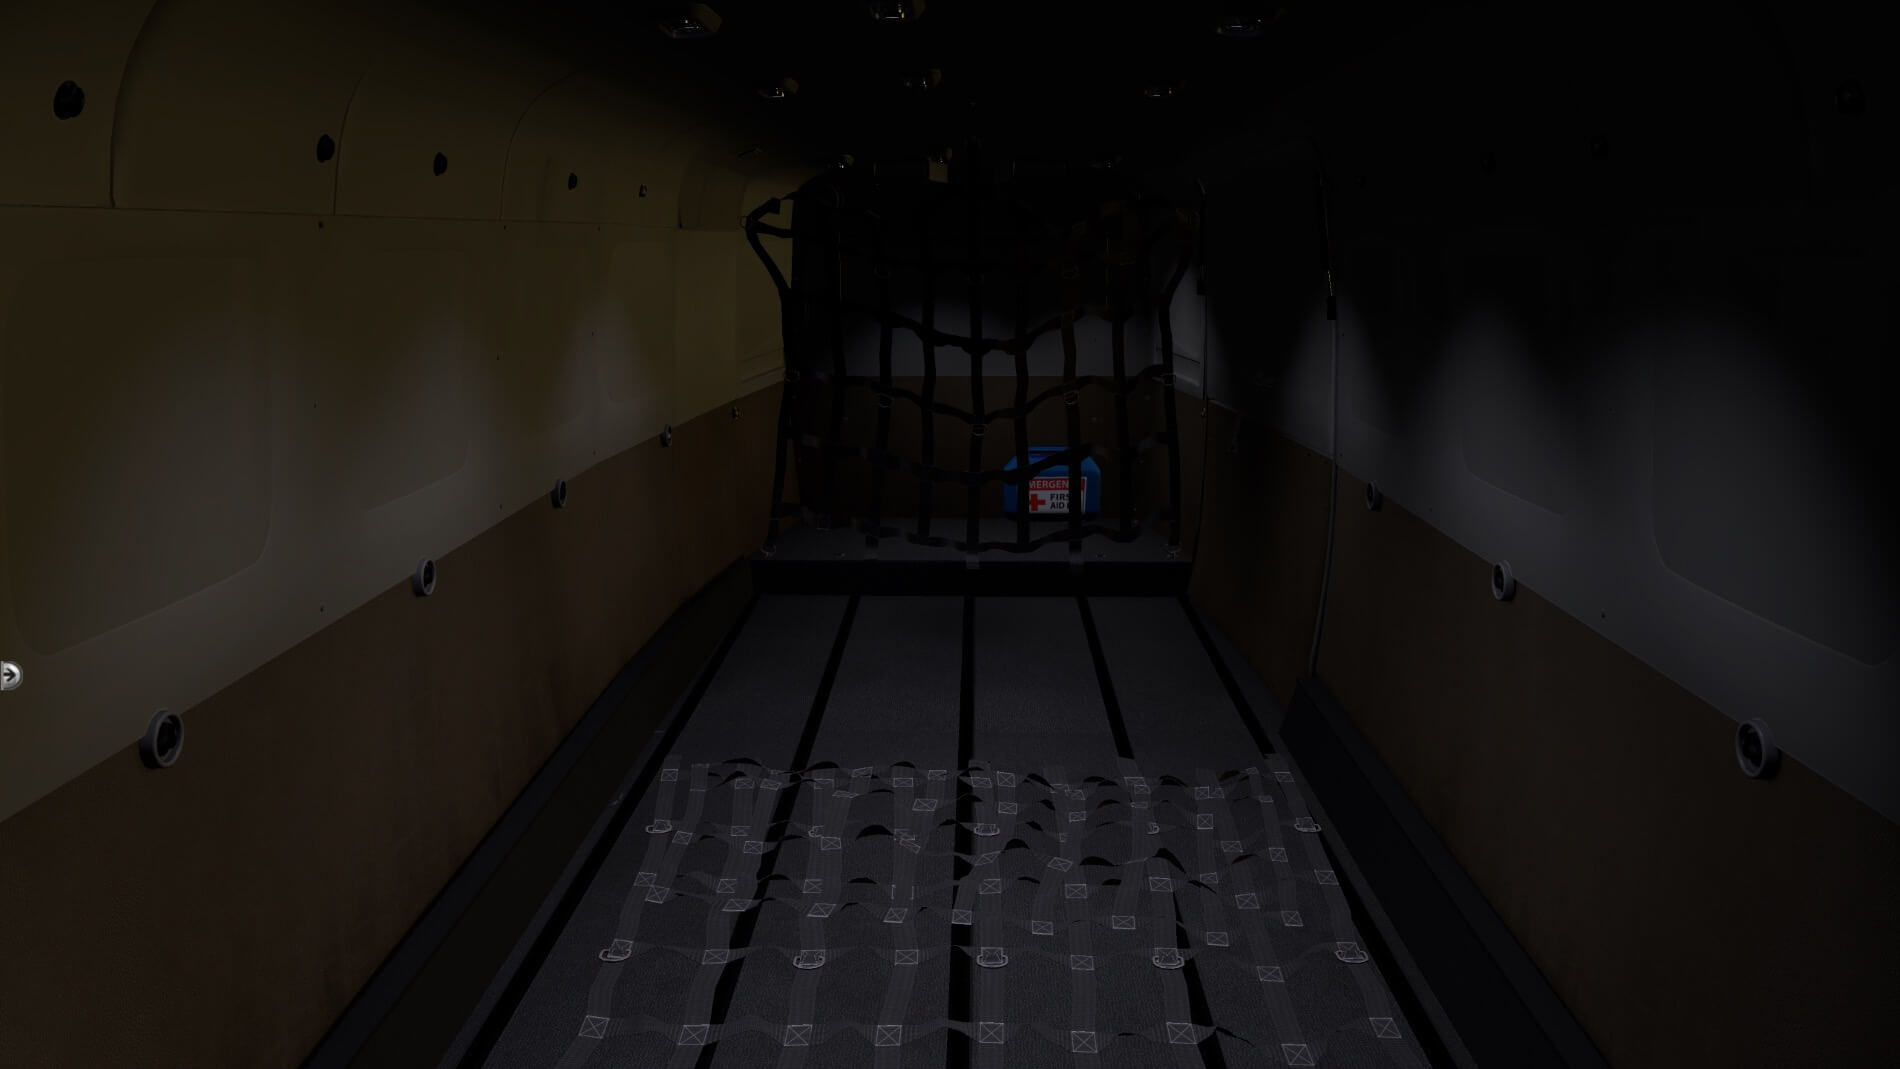
Passenger / Freight Cabin

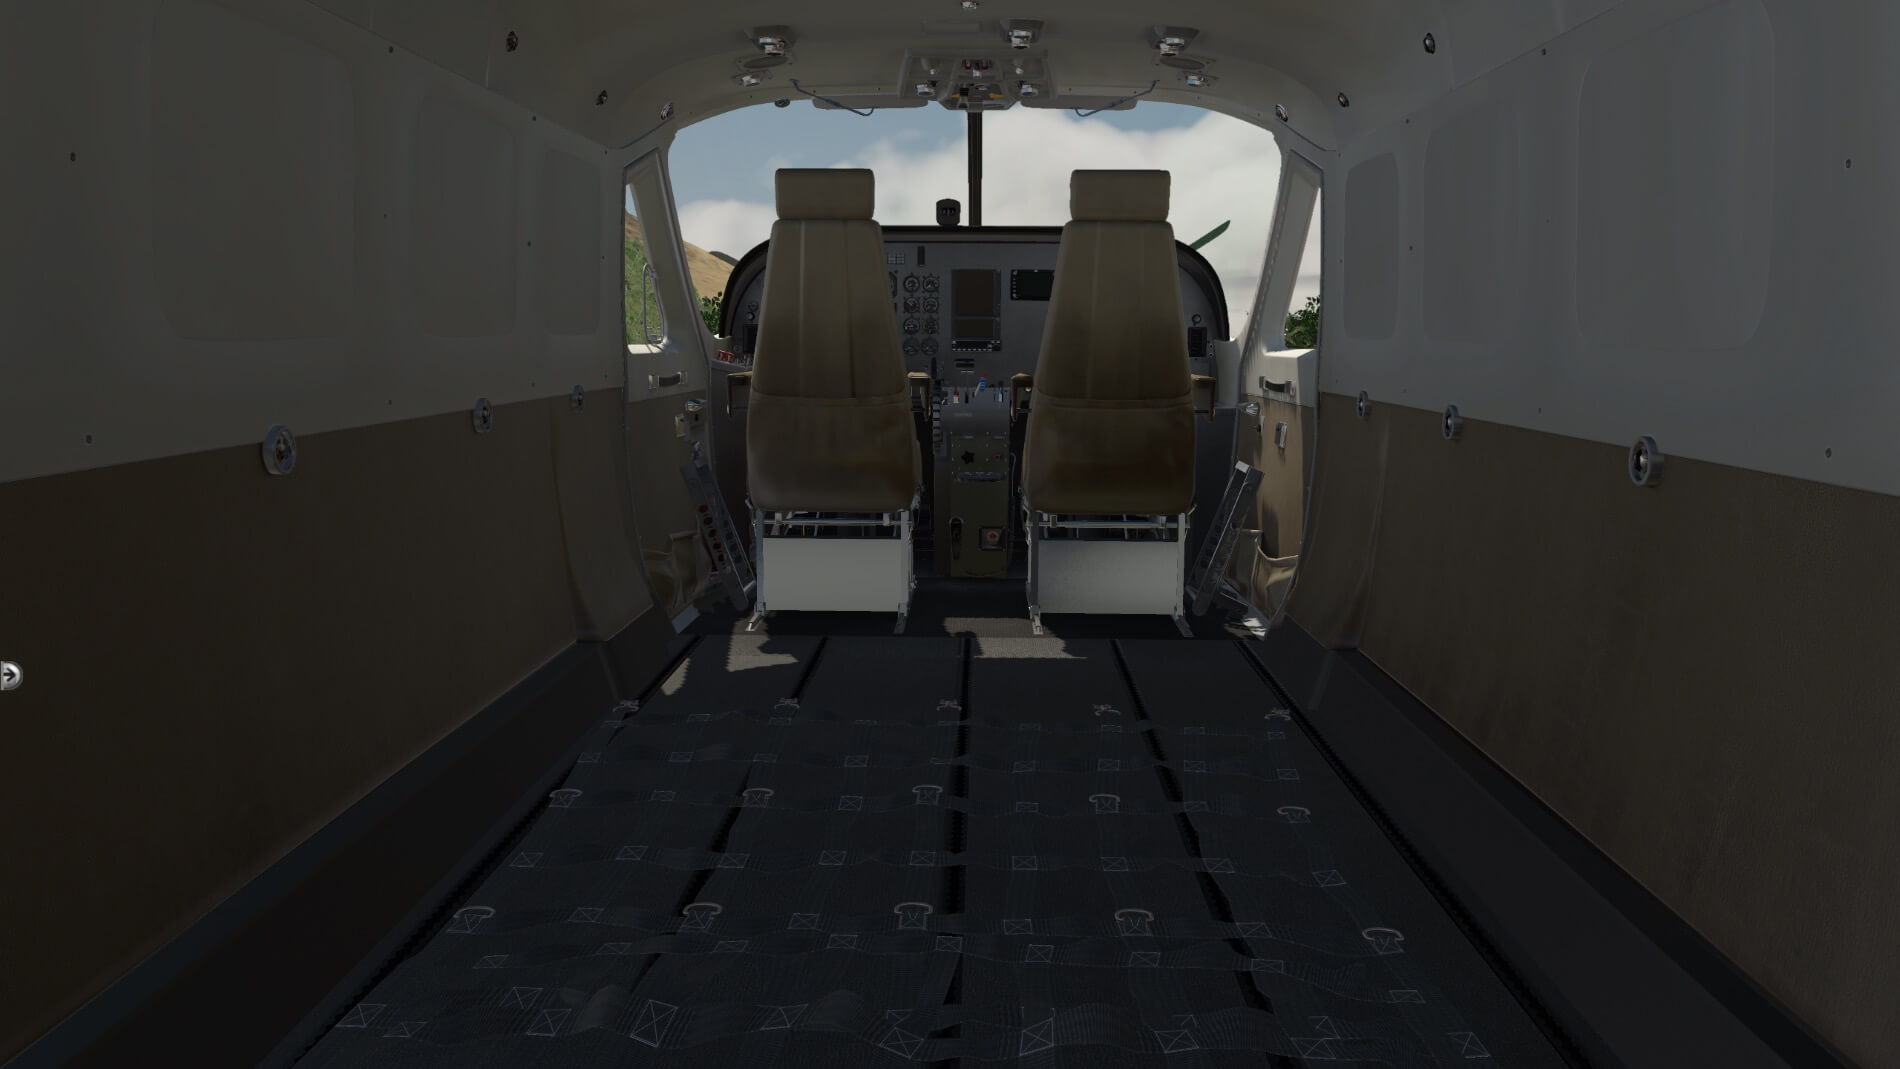
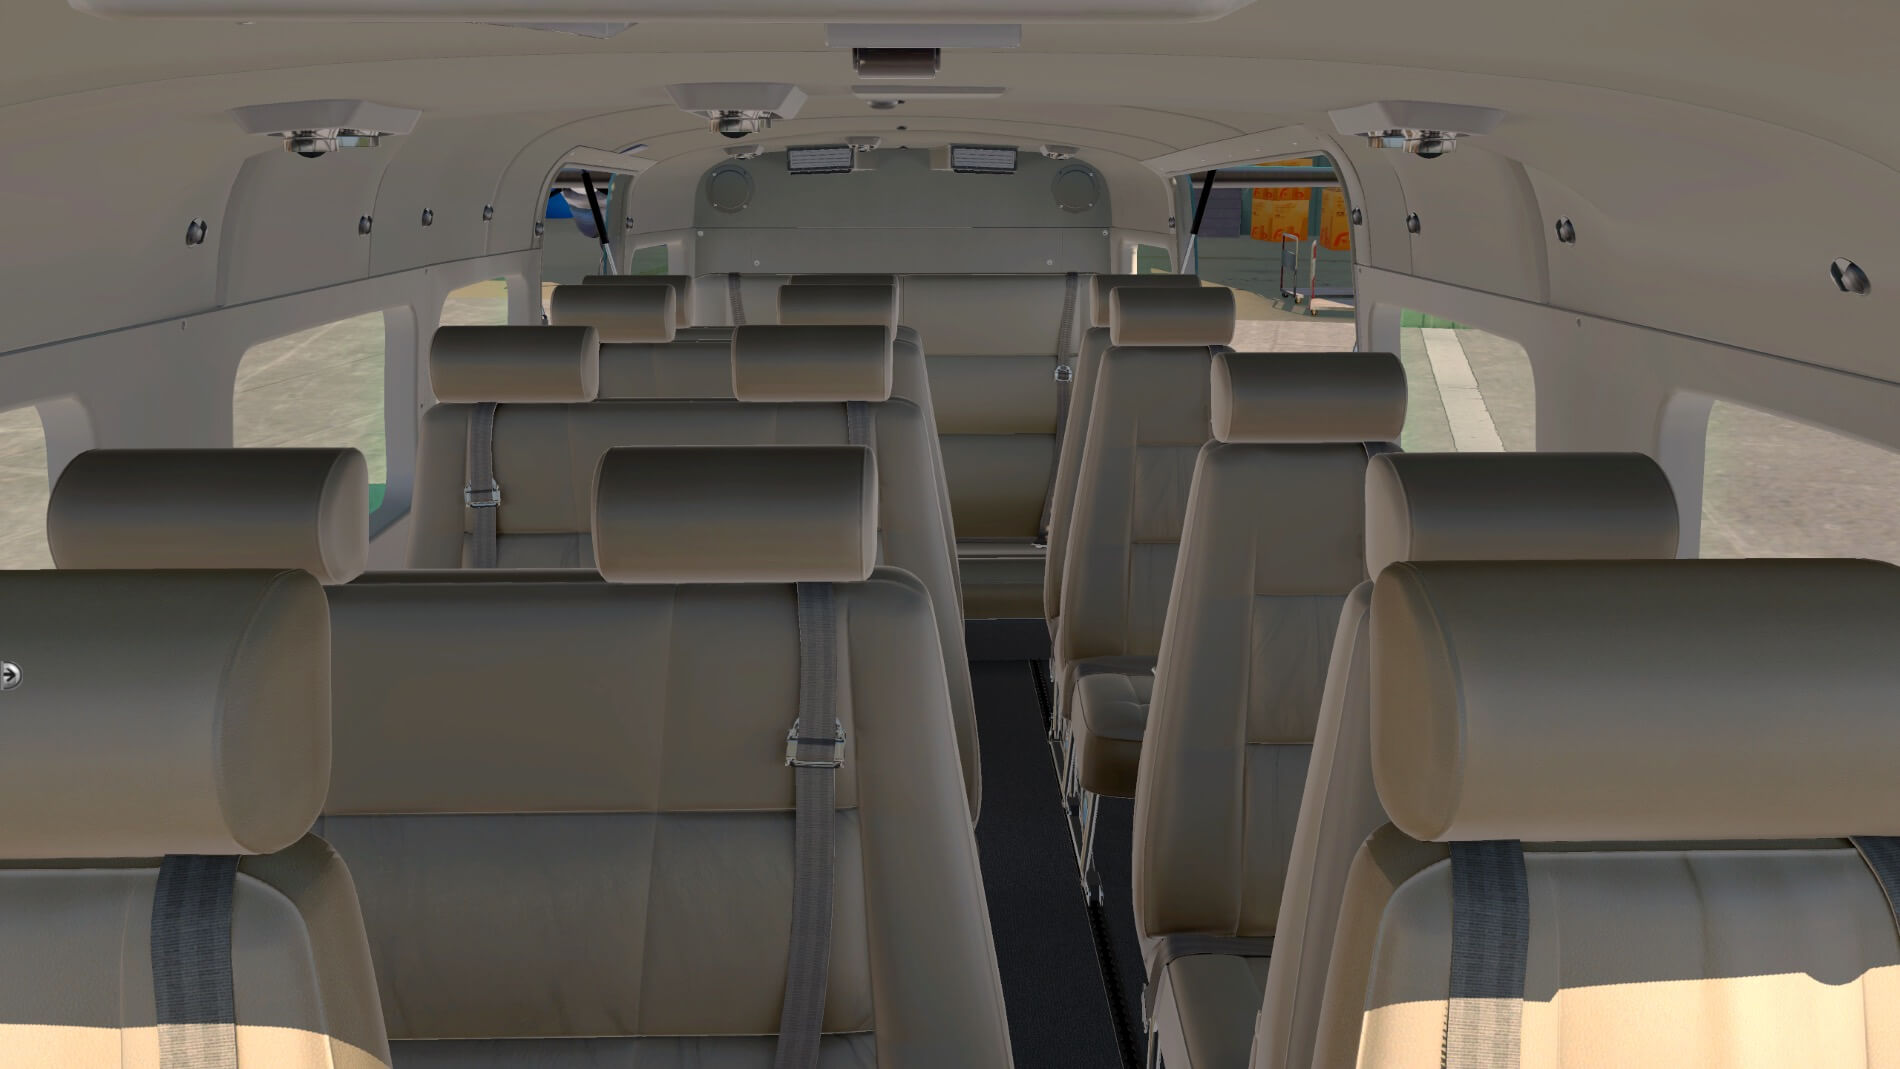
The Caravan 675 and Grand Caravan are nothing if not flexible. By default, we are greeted with single row seating on either side of the aisle, or an empty freight cabin if it is one of the freight carrying liveries, when we step through the passenger door or the cargo door at the back of the plane. This is an airplane model made for everyone, but it will be especially appealing to those pilots who like to go through the aircraft and play with buttons and devices. There is almost more to do in the back of the plane than there is in the captain’s chair.
We’re going to start with the interior of the freight model since that lets us look at everything except the seats while the seats are not in the way. The difference between the cargo variant and the passenger variant is the cargo variant will not let you “mix and match” your interior. There is a cargo net on the floor awaiting whatever you wish to carry. As we saw in the weight and balance section, adding weight to the positions will provide you with various and sundry bits of cargo. You will not find a passenger door or windows here and you cannot put seats in this cabin.
While standing in an empty cabin, we can see the modelling work involved in creating the floor with its carpet texture and tie down rails that accommodate cargo tie downs or passenger seats. The metal rails present as such with a nice metallic shine and reflectivity while the carpet texture deepens when indirect light creates a better separation between shadow and highlight. Currently, the carpet is the same in both the freight and passenger versions. The expansion pack announcement on the Thranda menu lists a freight variant as part of that pack. It is unknown if that will be anything different than what we see here.


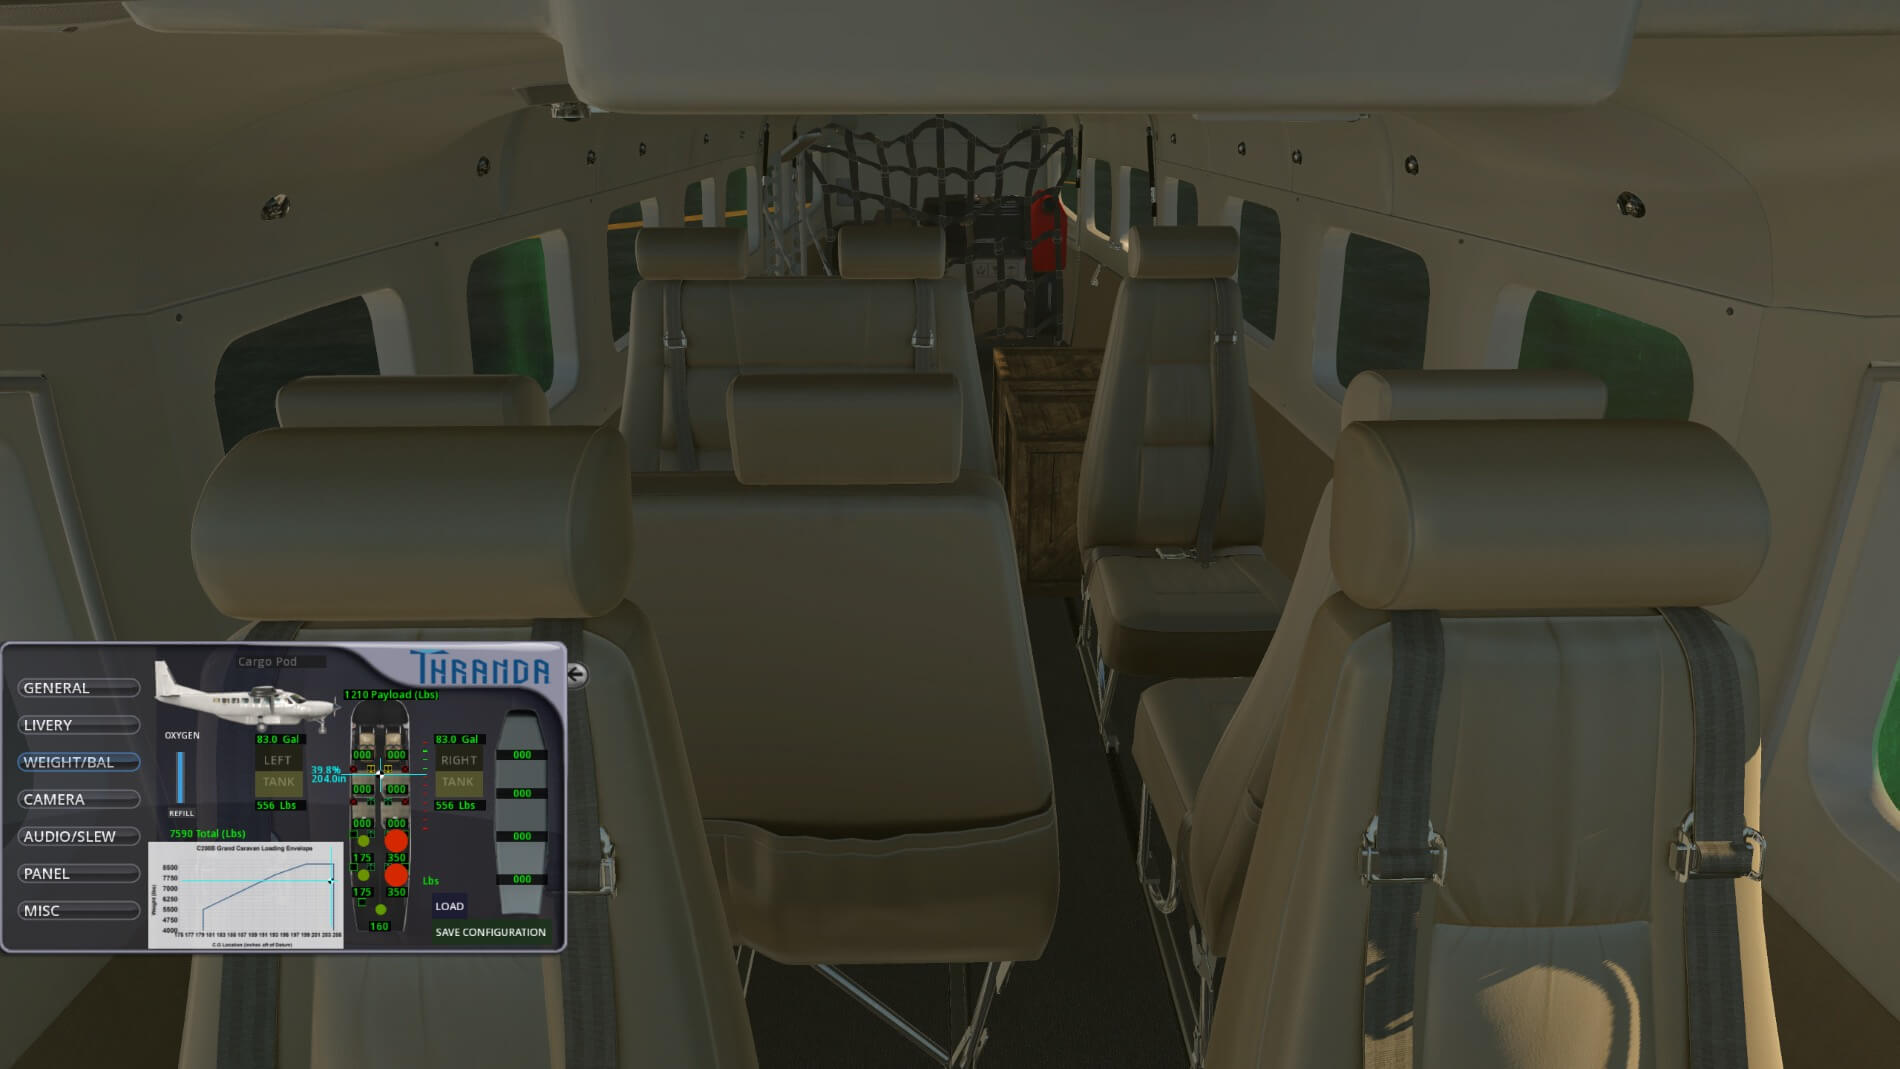
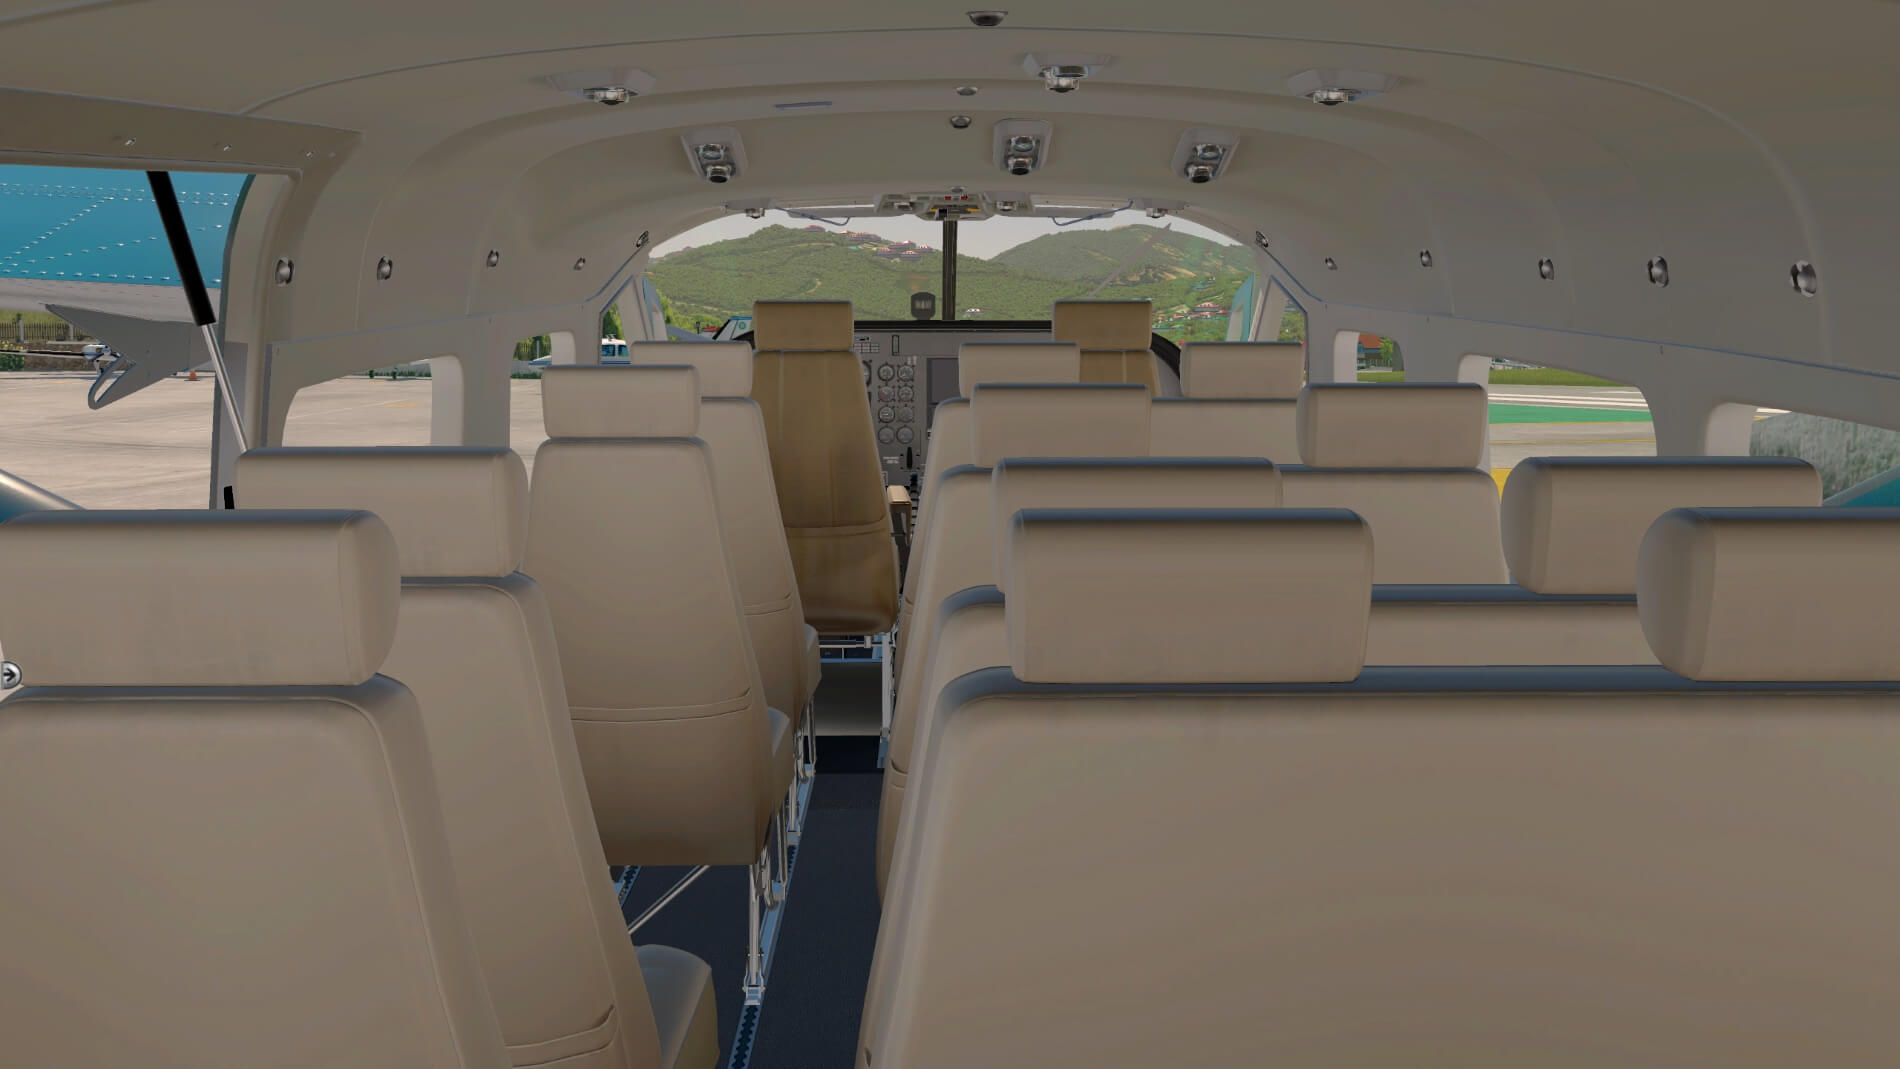
So, now we introduce the seats and have a look at the passenger and passenger freight combination arrangements. Again, as mentioned under the weight and balance discussion, if seats are not present and weight is assigned to that location, it will be filled with a wooden crate. Unlike the freight variant, the crate does not change based on the weight assigned. The very back of the cabin provides an option for a cargo area or for a bench seat. The amount of cargo behind the net has both a partially and completely filled appearance based on the weight assigned to this area. The various cargo items are surprisingly detailed, and the textures are quite good for what is arguably an unnecessary item. The good news is having the cargo present does not appear to have an impact on frame rates despite their accurate handling of ambient light. The red gas can should be moved back a little, so the net doesn’t permeate the neck.


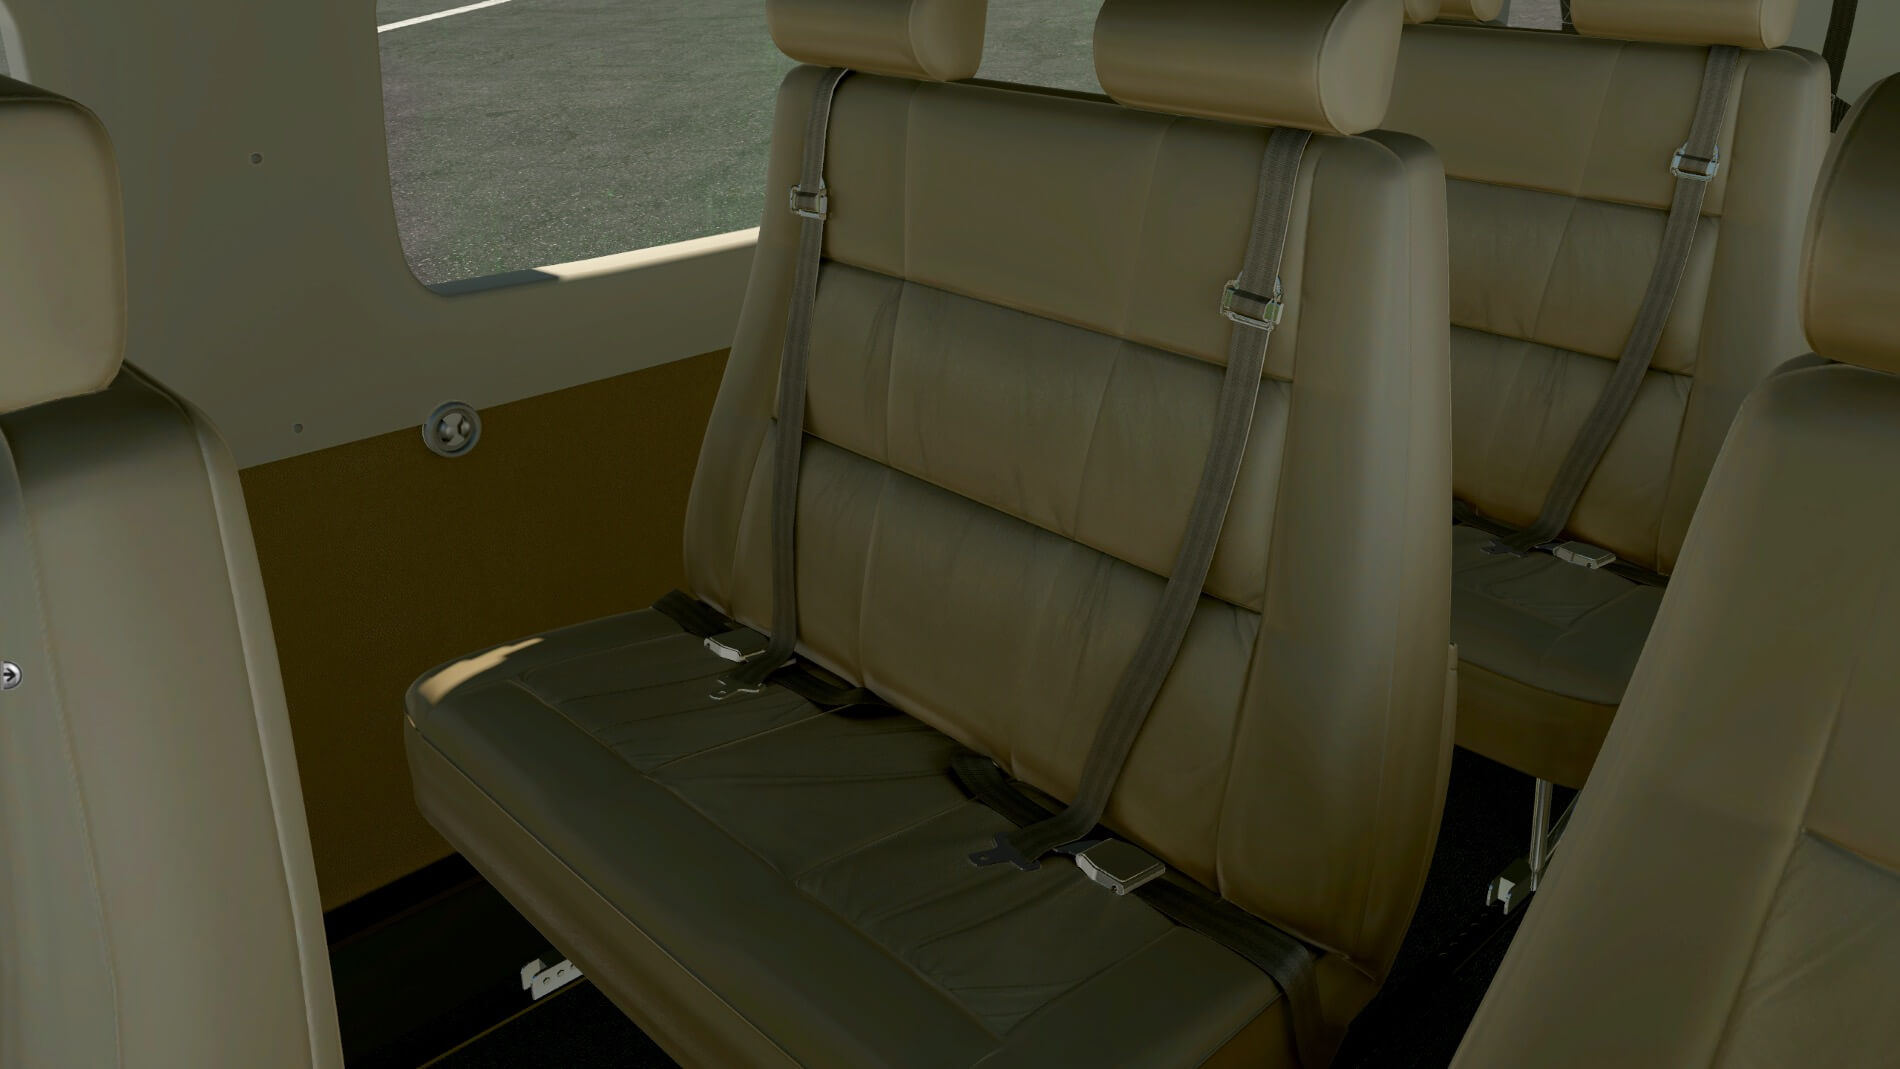
The quality of the seat models is evident at first glance. You can almost feel the leather as you look over the folds leading into the seams. The seat belts drape in a very natural manner, following the contours of the seats. The seat frames match to the floor rails and are presented in a detailed chrome construction. Reflections and light effects are just as they should be. There are several options for the seat configuration as we saw when looking at the weight and balance section of the Thranda popup.
Seats are capable of being installed or removed, single or double, facing front or rear, and sliding back and forth. These options, except the sliding, may be done from the weight and balance tab of the menu. All these options, inclusive of the sliding, may be done on a seat-by-seat basis within the cabin by using click points present on each seat. Be aware that a roll of the mouse wheel can produce changes in some cases if the cursor is over a click point.
The click points are shown in the manual and are also included here for your convenience. What is not made clear in the manual is that, when the seats are converted from single to double, the click points for the seat rails and for resizing it back to a single seat, do not move to the outside edge of the double-wide seat. In order to move the seat, you need to click on, and drag, what is now the center rail. In order to resize it back to a single seat, you need to click on what is now the middle of the seat, not the edge. The click point to slide the seat is only over the seat rail which can, at times, almost seem as if it is a continuation of the install / remove click point and is easily missed if the show instrument click regions option is not in use.

The remaining interactive items in the cabin include the seat lights and the doors. The doors can be operated by clicking on the interior latches. As we saw from the exterior view, they both have a top and bottom split that are controlled independently. From within the cabin, it is possible to click on each door latch and that section will subsequently open. It is possible to close the doors, but it takes a little hunting to find the click spots for both lower doors as they are outside the field of view from within the cabin. The animation speed and sound anomaly noted during the external inspection is also true of door operation from inside.
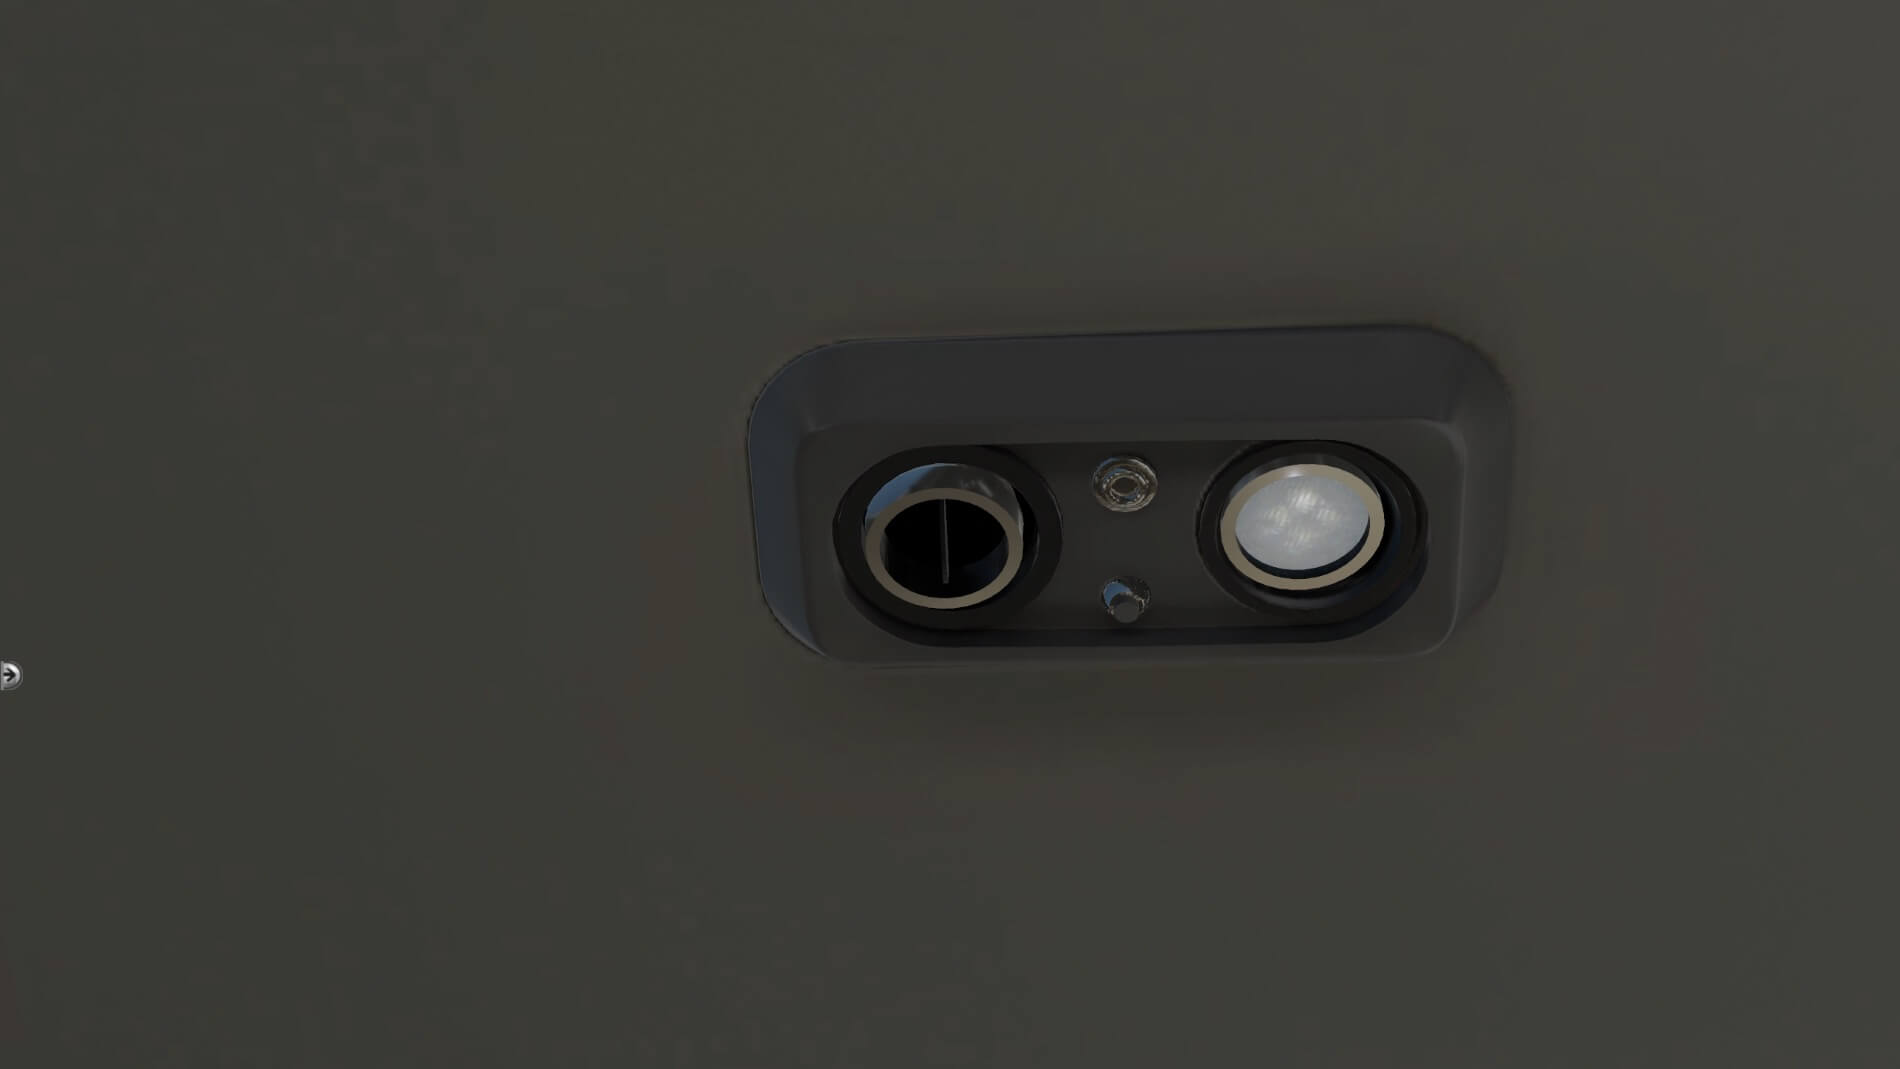
Overhead, there are twelve individual light and ventilation fixtures in the Caravan 675 and fifteen in the Grand Caravan. The light and vent can both be positioned and the vane within the vent can be moved from opened to closed and vice versa. Each light is turned on or off with a click on the small round button between the light and the vent. Getting the right spot is a little difficult because the manipulation points for moving the light and the vent are larger and easily block access to the small point used for turning the light on and off.
There are also two cabin lights that are managed by the switch on the instrument panel or by clicking on the main light at the center of the cabin. The one over the passenger door does not have a click spot. The individual seat lights do not have a controlling switch. The interior lights option on the general tab of the Thranda pop up is the only way to turn all of these on or off at once.
The last row of lights that are in the cargo section or over the bench seat, if installed, are only controlled by the individual switch on the fixture which makes things a little cumbersome. It is a little misleading to have an “all interior lights” menu option that does not control all the interior lights.
So, overall, the interior cabin is a modelling achievement and a visual delight. It is an interactive playground. The only complaints are the minor inconsistency of the “all interior lights” wording versus actuality, and the difficulty in getting to some of the points used to perform an action.
Interior Lights
We leave our survey of the interior with a look at the effectiveness of the interior lights. We have already looked at the functioning of the lights in the cabin area. Those lights are very well modelled in terms of appropriate intensity and area of influence. The individual seat lights form a nice parade of cones along the outside walls as one would expect.
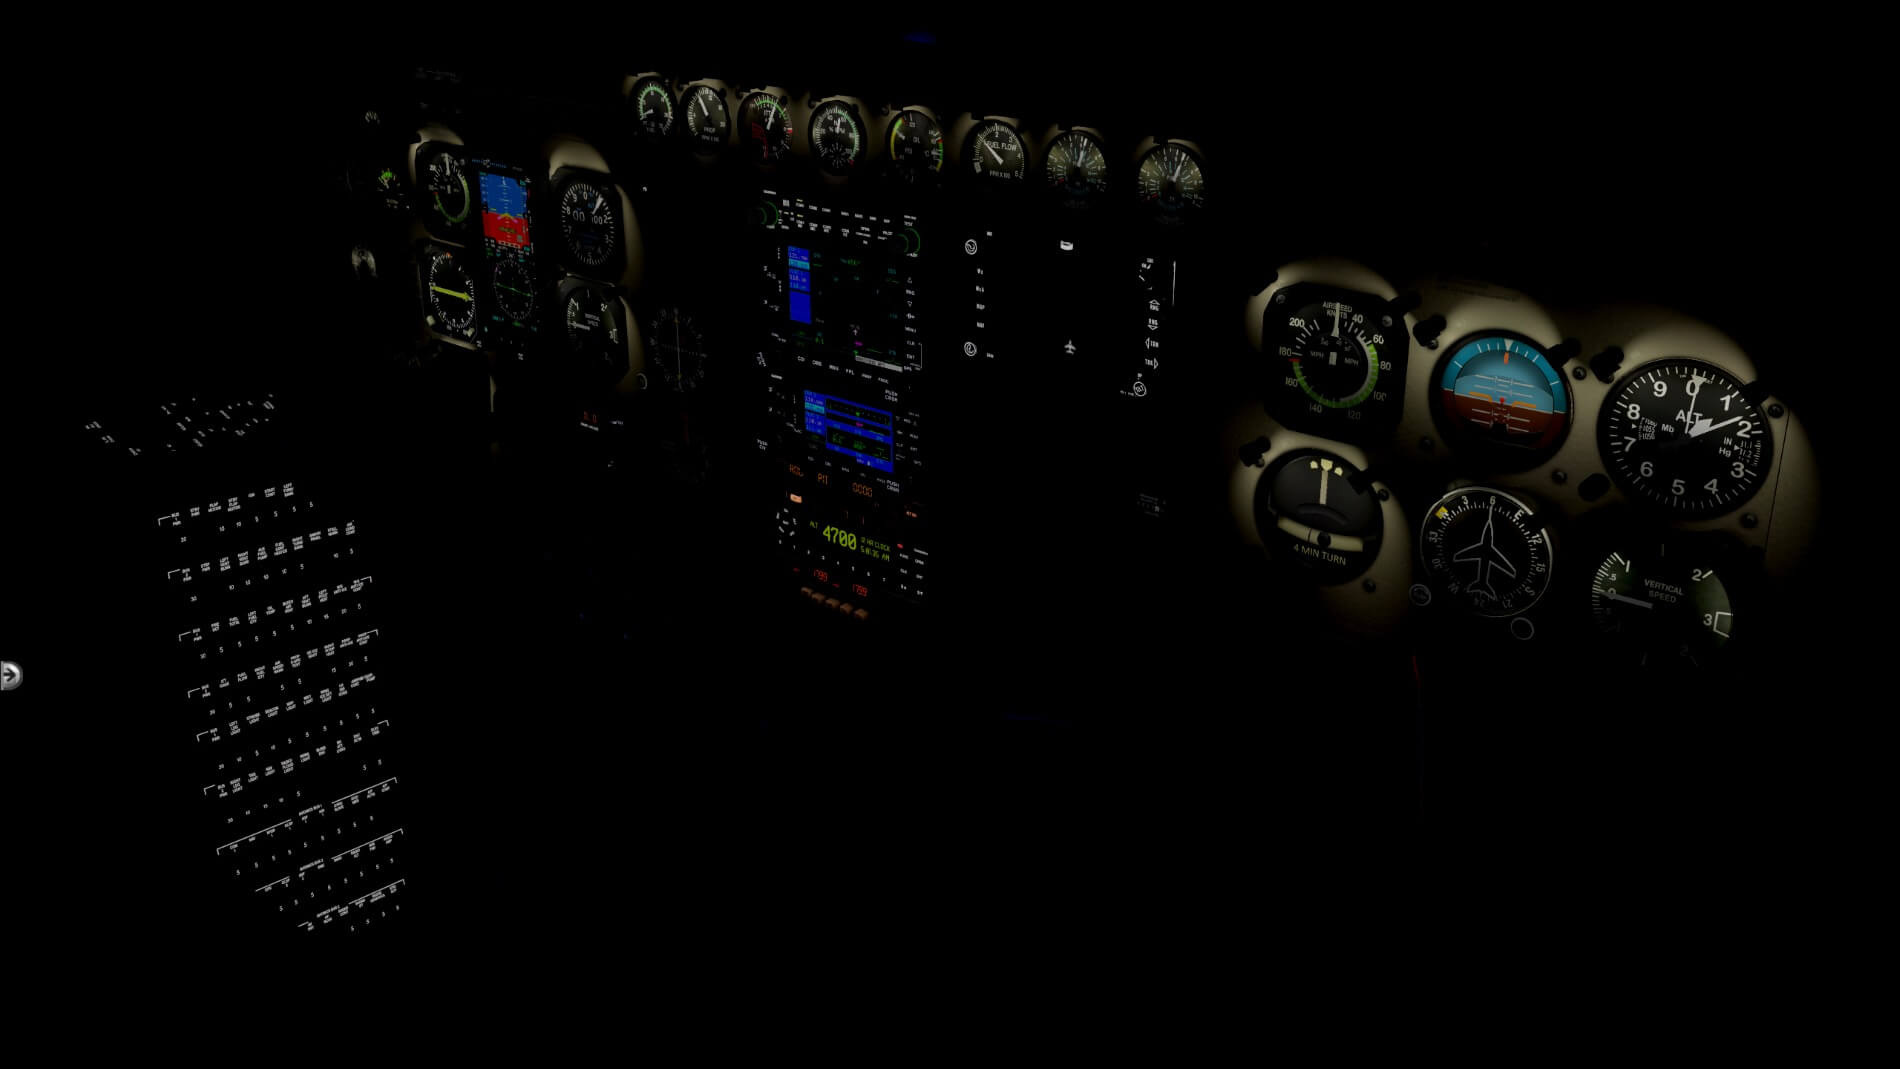
Up front, lighting is controlled by four groups of two rheostats located by default down and to the right of the pilot’s yoke. They break down the cockpit functional areas into five regions: The left flight panel, the right flight panel, the center panel, which by default, is the engine gauges and radios, the overhead panel, and the electrical panel. There is a flood light for both the left and right front panels as well as the individual gauge lights.
There is a third floodlight for the center panel and pedestal area that is not controlled by the labelled rheostat. According to the developers, this was a design decision made to reduce the hit on frame rate created by the processing demands of too many area lights. If you want to use that center light, you can do so by clicking directly on the middle of the lens (it’s a very small and specific click point).
The cockpit flood lights do exactly what they should, flood the area with bright light. The light is adjustable for intensity by the rheostat, and direction by direct manipulation of the fixture. The center flood light does not have a brightness adjustment. Back lights on switch labels illuminate those labels clearly. Gauge lights are adjustable for brightness via the rheostat. Be aware that not all gauges are lit gauges. The ones that do light are very clear and legible at all levels of intensity.


The Cockpit
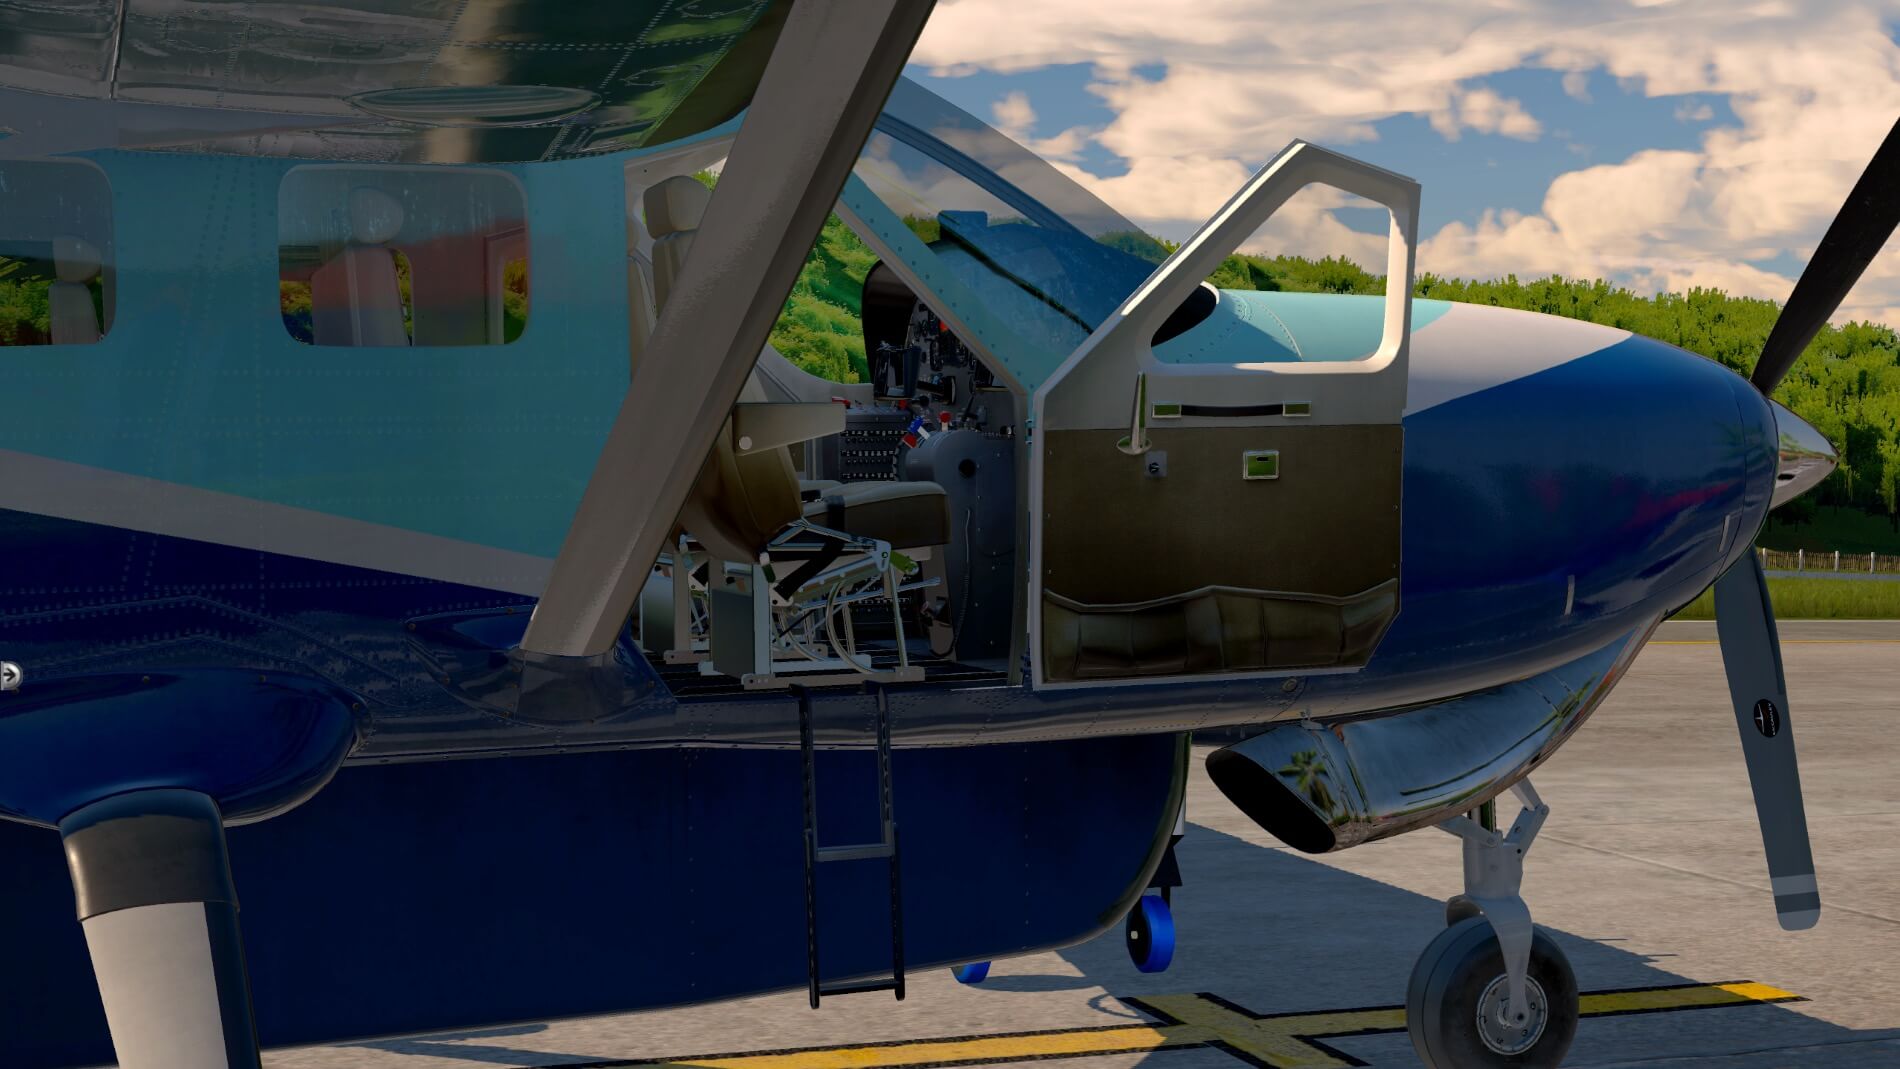
Most parents who have done any extensive automobile traveling with children have indubitably heard the age-old question “Are we there yet?” If we are referring to flying the Caravan, the answer is “almost”. Before we can fly, we need to step into the cockpit and try it on for fit and function. When we do, we are greeted with the ongoing modelling skills and depiction accuracy that we have seen everywhere else.
The seats are the same as the cabin with the addition of movable arm rests and complete safety harnesses. The safety harnesses are so realistic I keep expecting them to move. These seats do not move back and forth but our esteemed pilot is treated to an operational utility window.

The area presents with a gently used feel with smudges of dirt here and there, some scraped metal on the corner of the circuit breaker panel, spills on the floor mat, and some imperfections in the instrument panel surface along with signs of wear on the glare shield. Some instruments have indications of wear, and the GPS screens are smeared with fingermarks and other instruments have scratched surfaces if you have instrument reflections turned on.
The area beneath the panel shows some use while the rudder pedals look like the pilots using this aircraft know how to taxi using beta over toe brakes. Given the overall appearance of a gently used and well-maintained aircraft, the panel background has, perhaps, a little too much use heaped upon it. What is not worn but done in a very clear and legible manner, are the various advisory and warning labels as well as the switch and button identifiers.
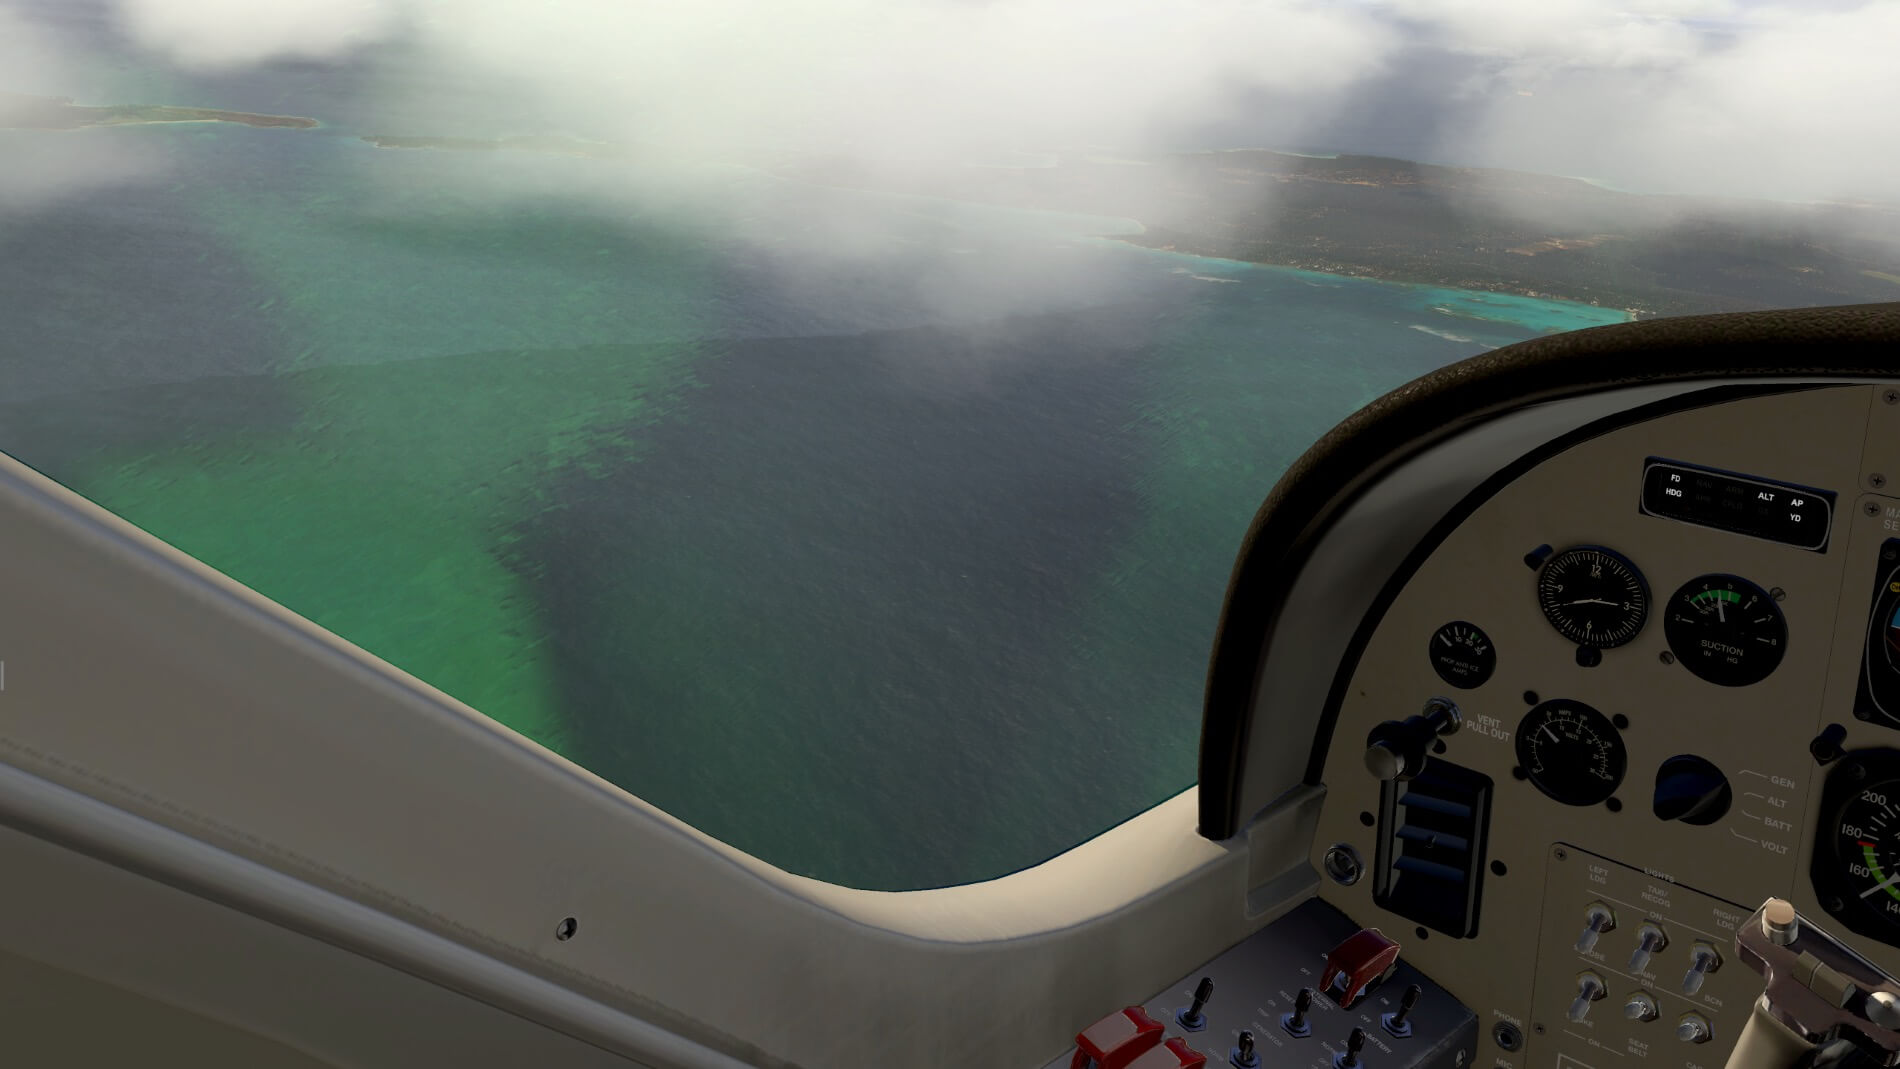
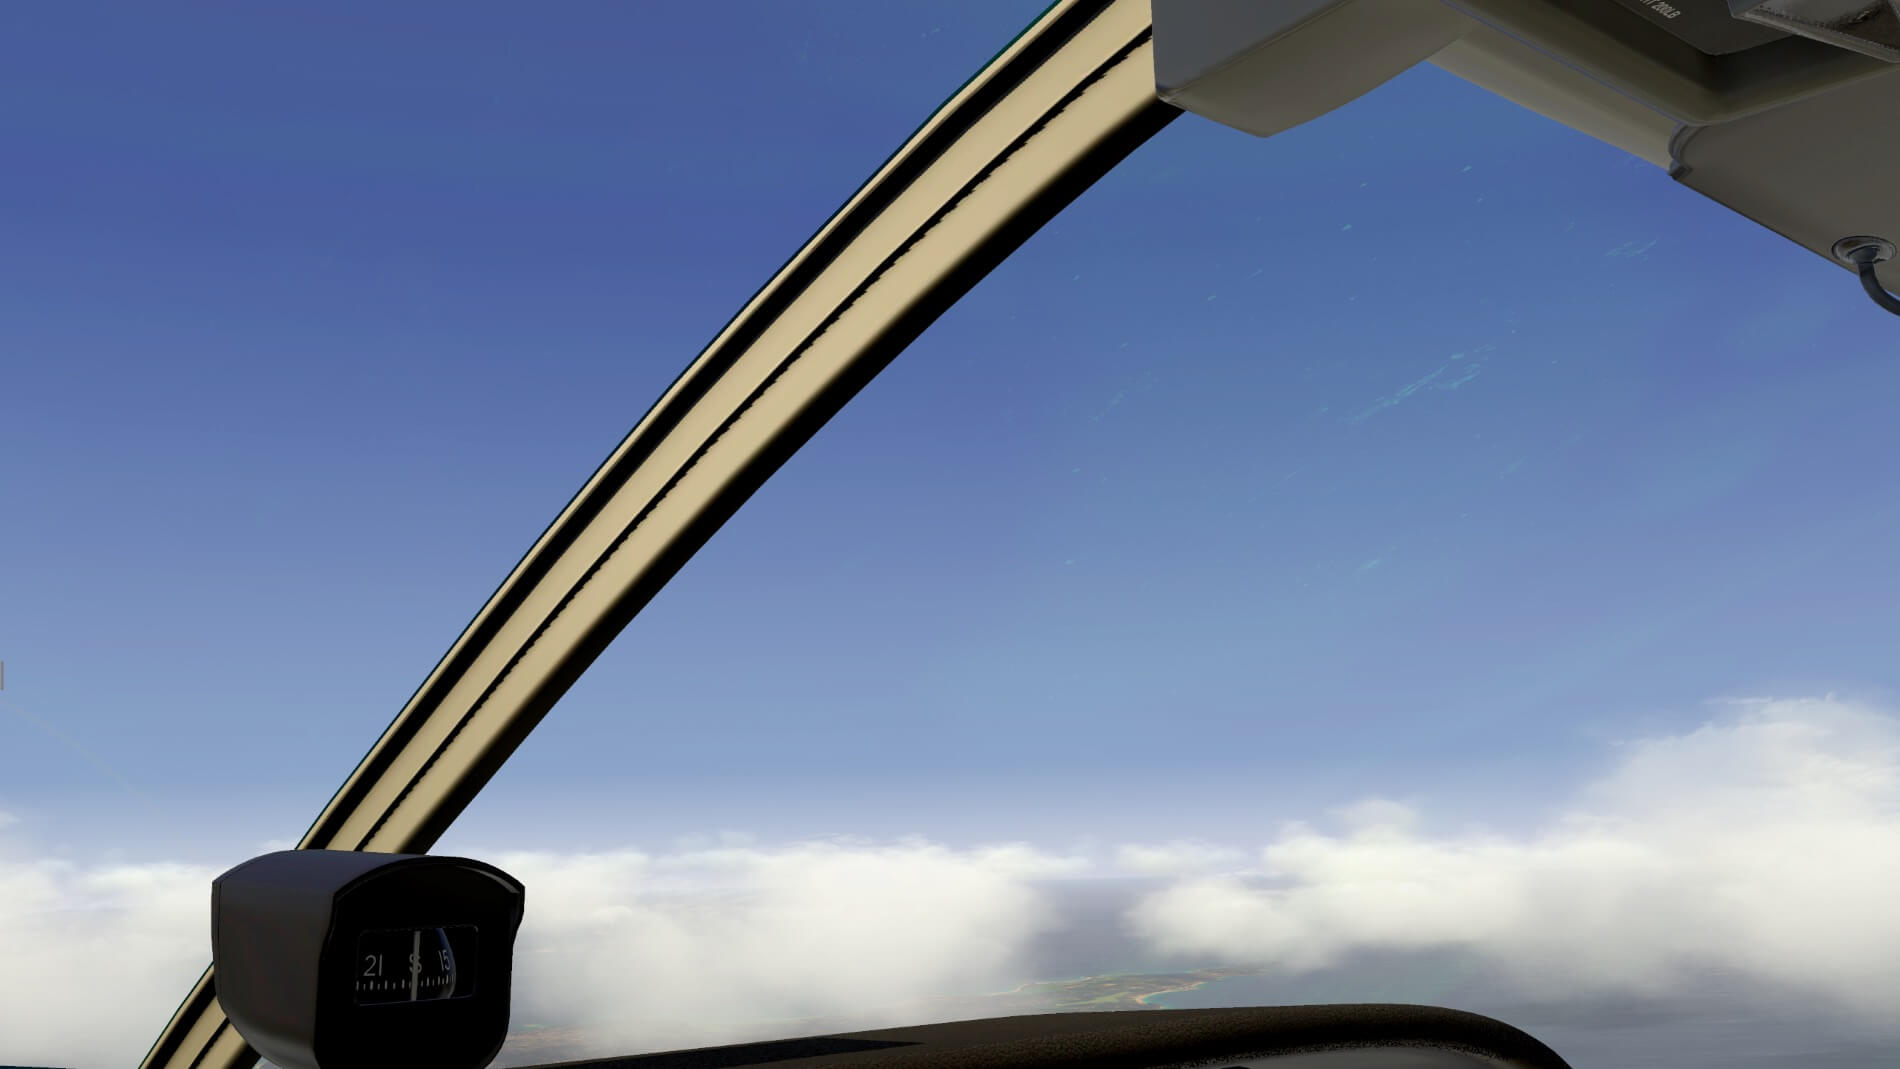
Before moving on, we need to look at one other set of reflections. The windows. The reflective work done here is admirable. The inclusion of a green tint gives the effect of light refracting in the glass. Along with the reflections, the right light reveals the dirt streaks that have accumulated in various spots along the windscreen and side windows.
Thranda provides the option to turn off the reflections on the General tab of the Thranda menu as we have seen but that also removes the dirt. My impression of turning off reflections is it feels like there is no glass there at all. During night flying, the dirt will occasionally show up if the lighting is suitable, but the interior lights of the Caravan are not reflected in the cockpit windows.


Now, I know the discussion (argument?) about how used an aircraft in X-Plane should be is forever ongoing from those who like them show room new to those who want them as if they’ve been in the air for one-hundred years and have never seen as much as a damp cloth. Okay, so a little exaggeration but, you get the point! I wondered about the condition of this Caravan that has many uses, so I went to the internet to search for photos of the Caravan cockpit. I found plenty and, of those, only a couple showed beat up yokes.


The rest did not have them and they all, beat up yokes included, seemed to be in pretty good shape otherwise. This is not an air academy rental plane we’re flying and, given the expense of the aircraft, it is not surprising that they may seem to receive a little more care than others. Based on this very rudimentary survey, I would have to say that Thranda appears to have captured the wear and tear factor quite well.
The Flight Experience
Checklist and Instrumentation Overview
Finally! Time to say the pre-flight stuff is done and break out the checklist to get the engines started and get the Caravan 675 in the air. For this part of the review, I’m simply going to report to you my experience with the Cessna Caravan as it unfolds on this test flight. I am not going to concern myself with how “real” that is because I have no basis for comparison.
Thranda has stated that several Caravan pilots have been involved in the development process thereby assuring the accuracy of the flight model. Yes, every developer says that so, how much you believe it is up to each individual to determine. Based on Thranda’s reputation, I’m inclined to accept those statements at face value especially since they have not made this statement for any of their other models.
I have also set my flight controls in accordance with Thranda’s recommendations for the purposes of this review. They state plainly in the manual that the Caravan is tuned for the DynaFeel sliders at 100 so that’s where I am leaving them for this flight. Later on, I plan on moving them to either extreme to see if I can notice any difference in the way the Caravan flys.


First thing is to have a look around the cockpit to familiarize myself with instrument placement. Due to the wide variety of panels that can be designed for this aircraft, I am going to use a slightly modified version of the default panel that includes the RealityXP GTN because I want to see how well it ties into the Caravan’s autopilot system. This has been known to be an issue with some aircraft models.
I had to modify it to fit in the 650 along with the 750 and position a couple of gauges where I could better see them. The alternatives to the RealityXP system include using no GPS unit or using the default GPS units alone or in combination. I am going to assume the default GPS units are well connected to the Caravan autopilot.
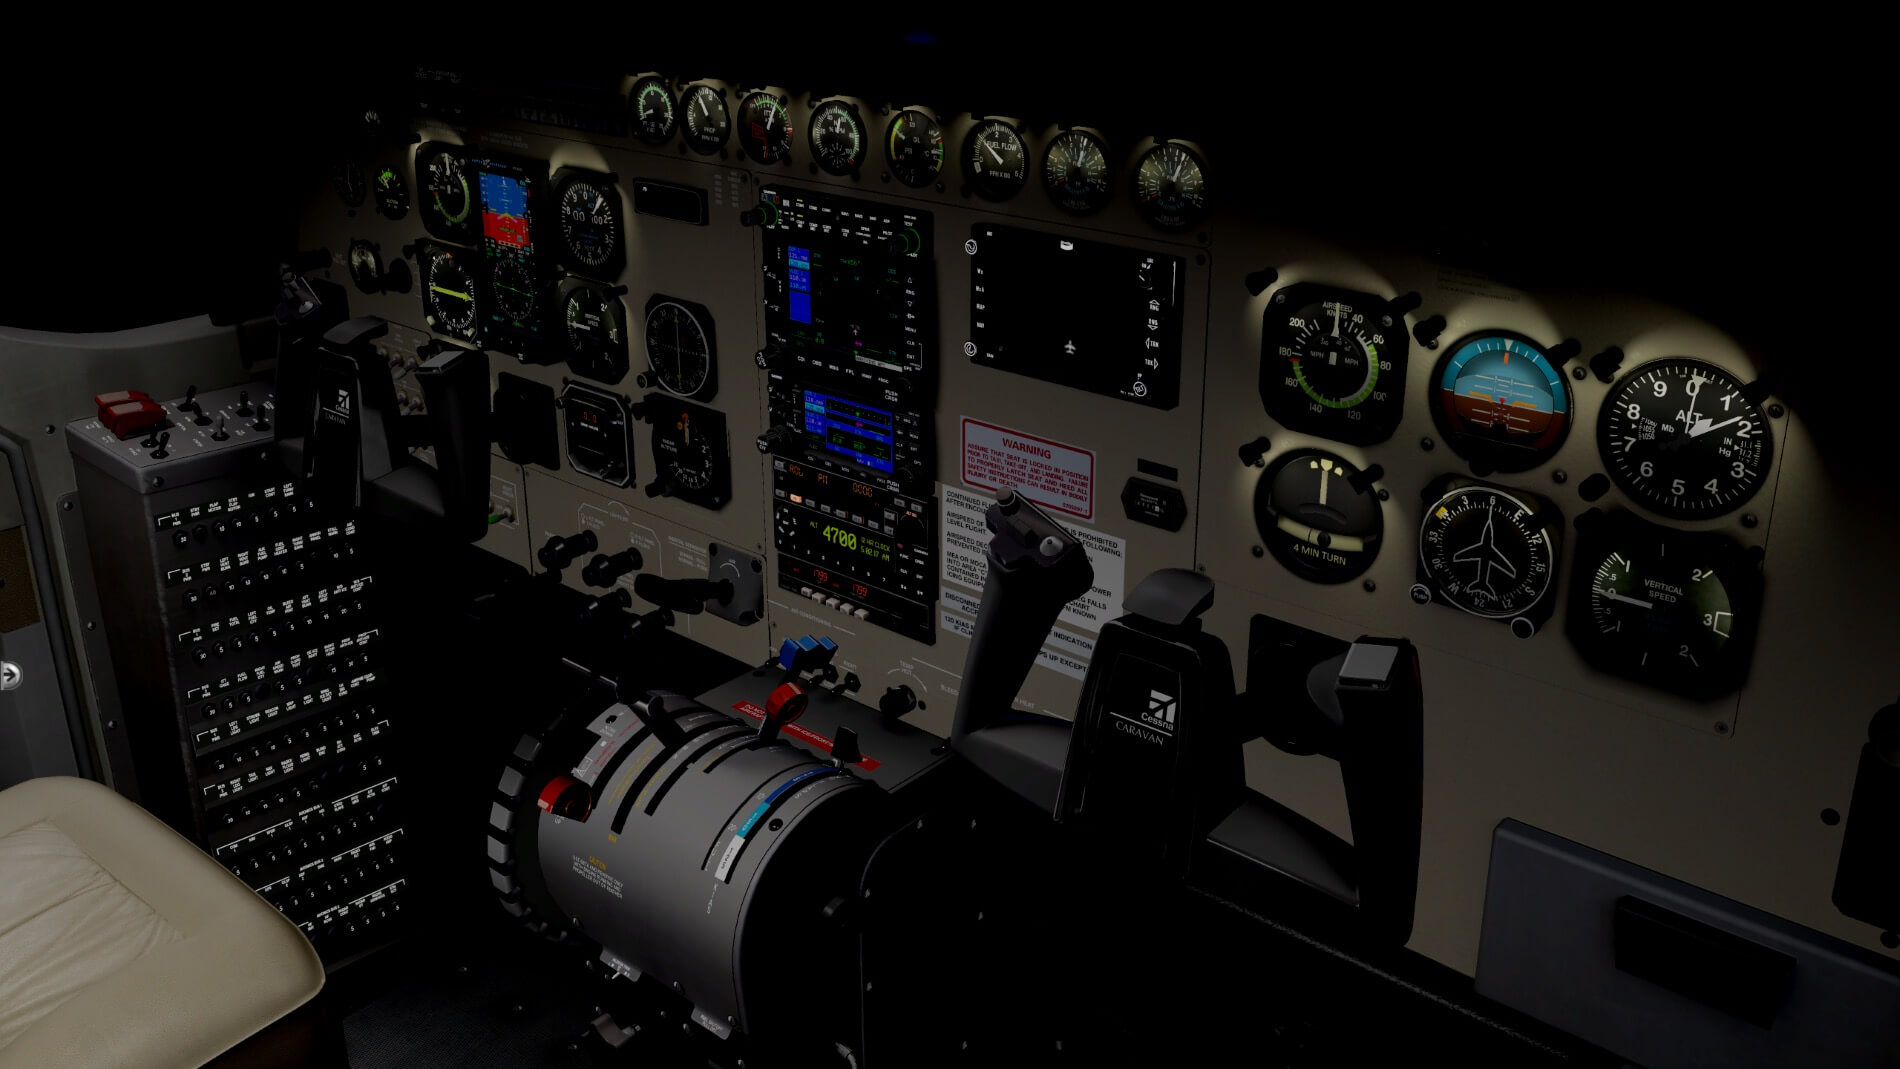
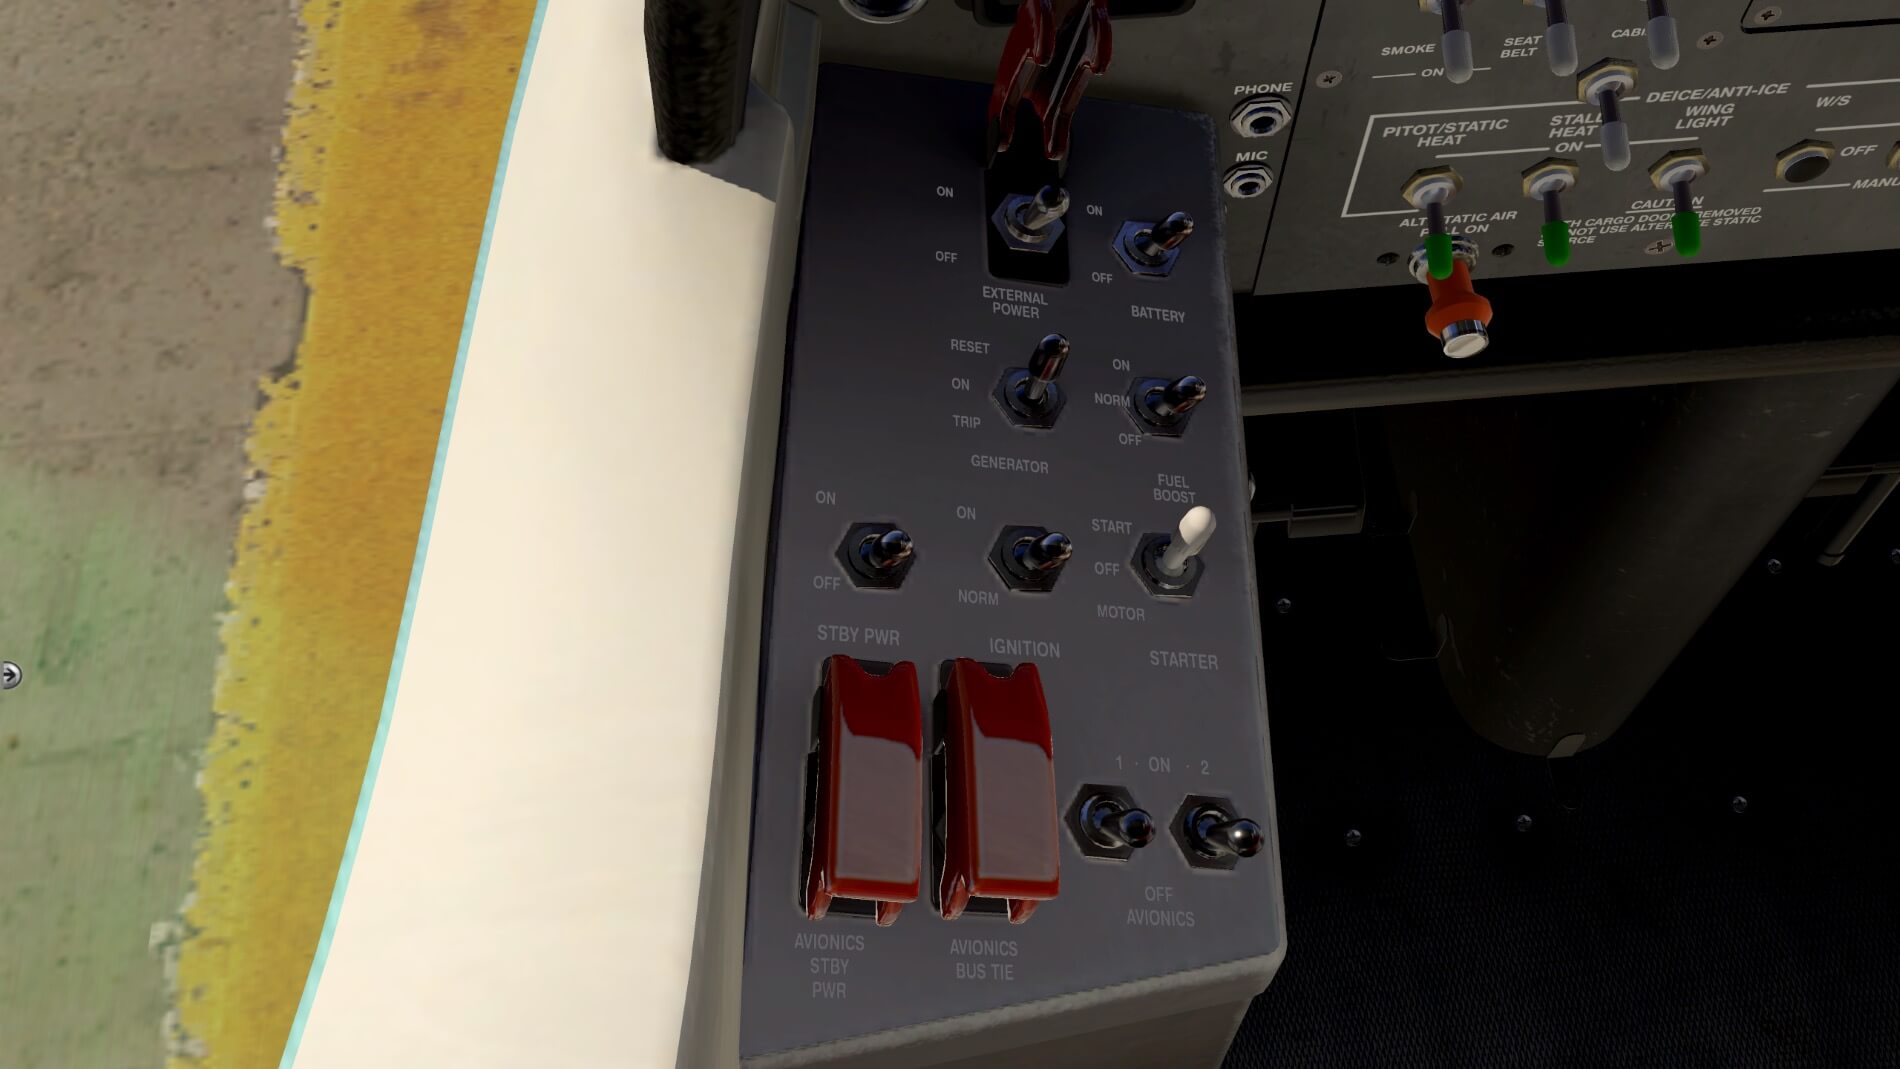
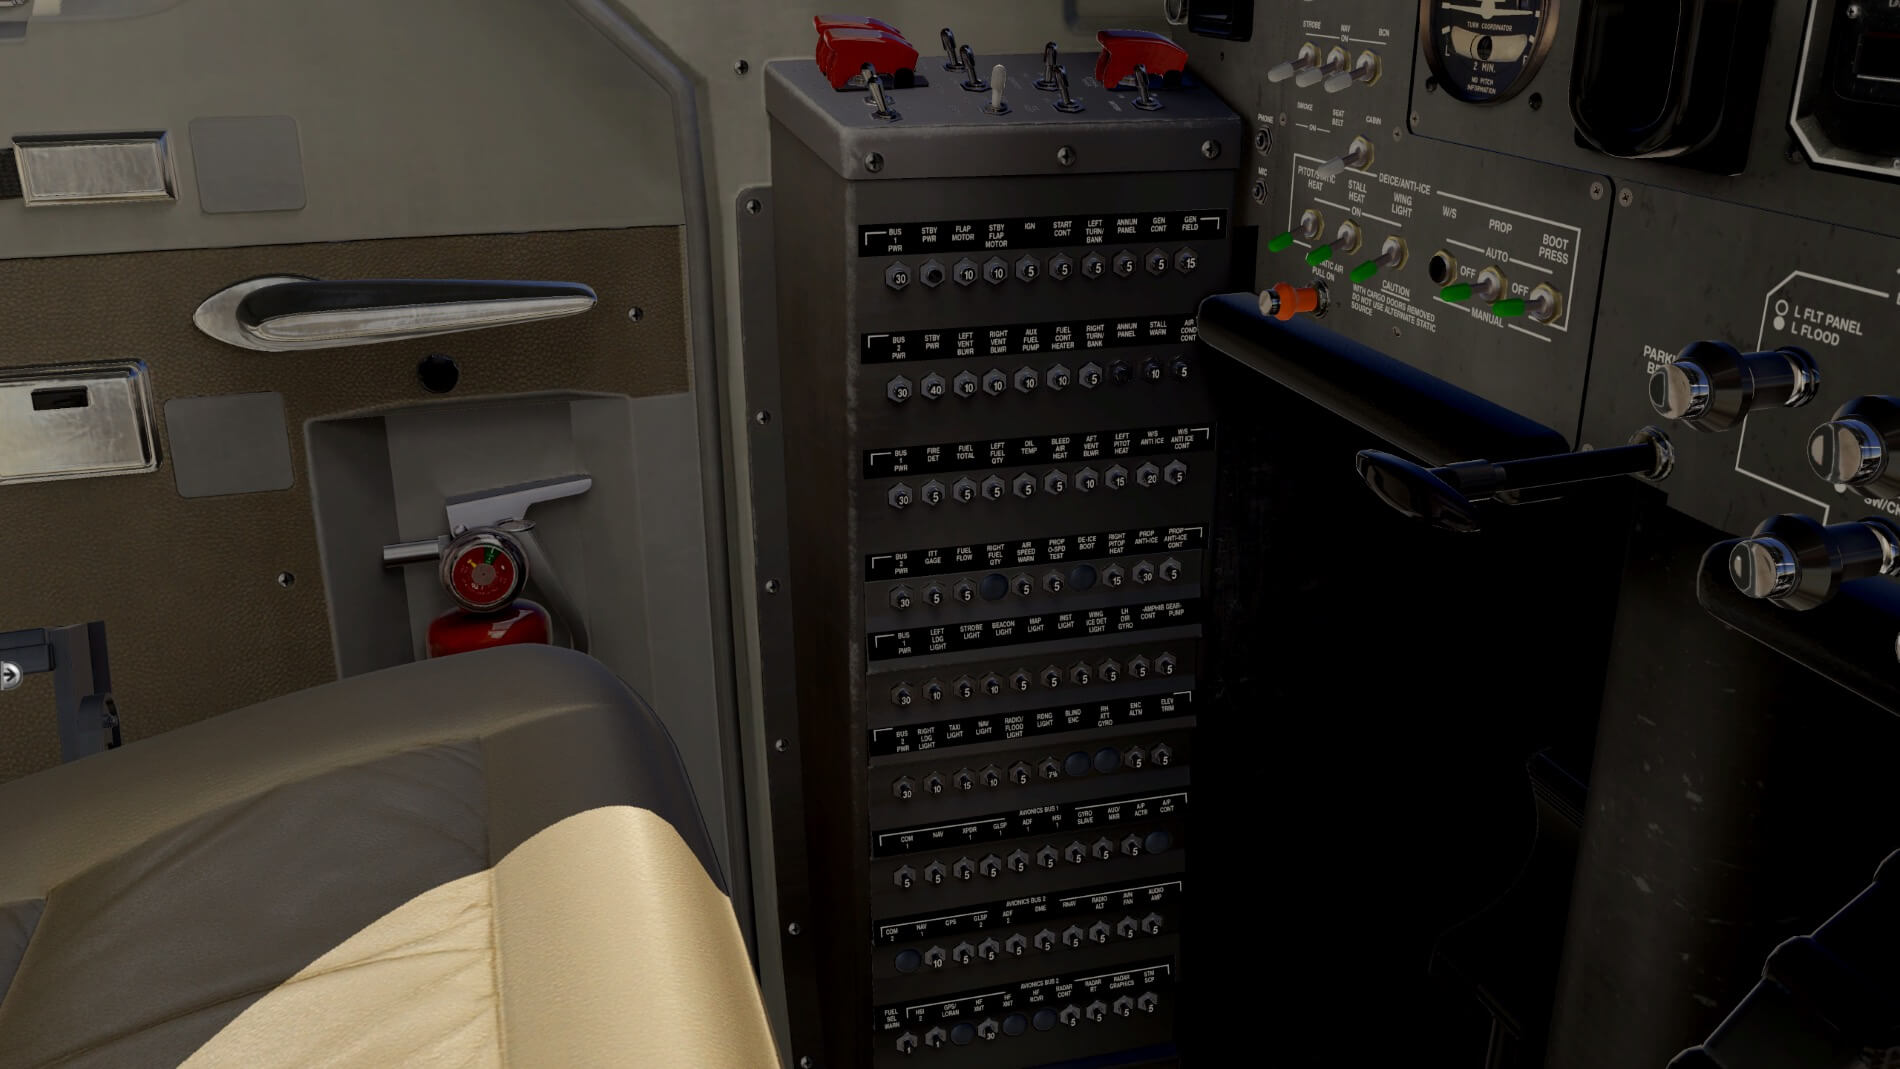
Starting from my left and surveying to the right, I see the electrical panel which includes battery and generator switches and the circuit breaker panel (functionality is not modeled) down along the side. All the electrical systems for the Caravan are operated from this panel including standby systems and external power. True to Thranda’s statement, each type of switch has its own distinctive sound. The modelling continues to maintain the quality we are now used to seeing, and the labelling is letter crisp.
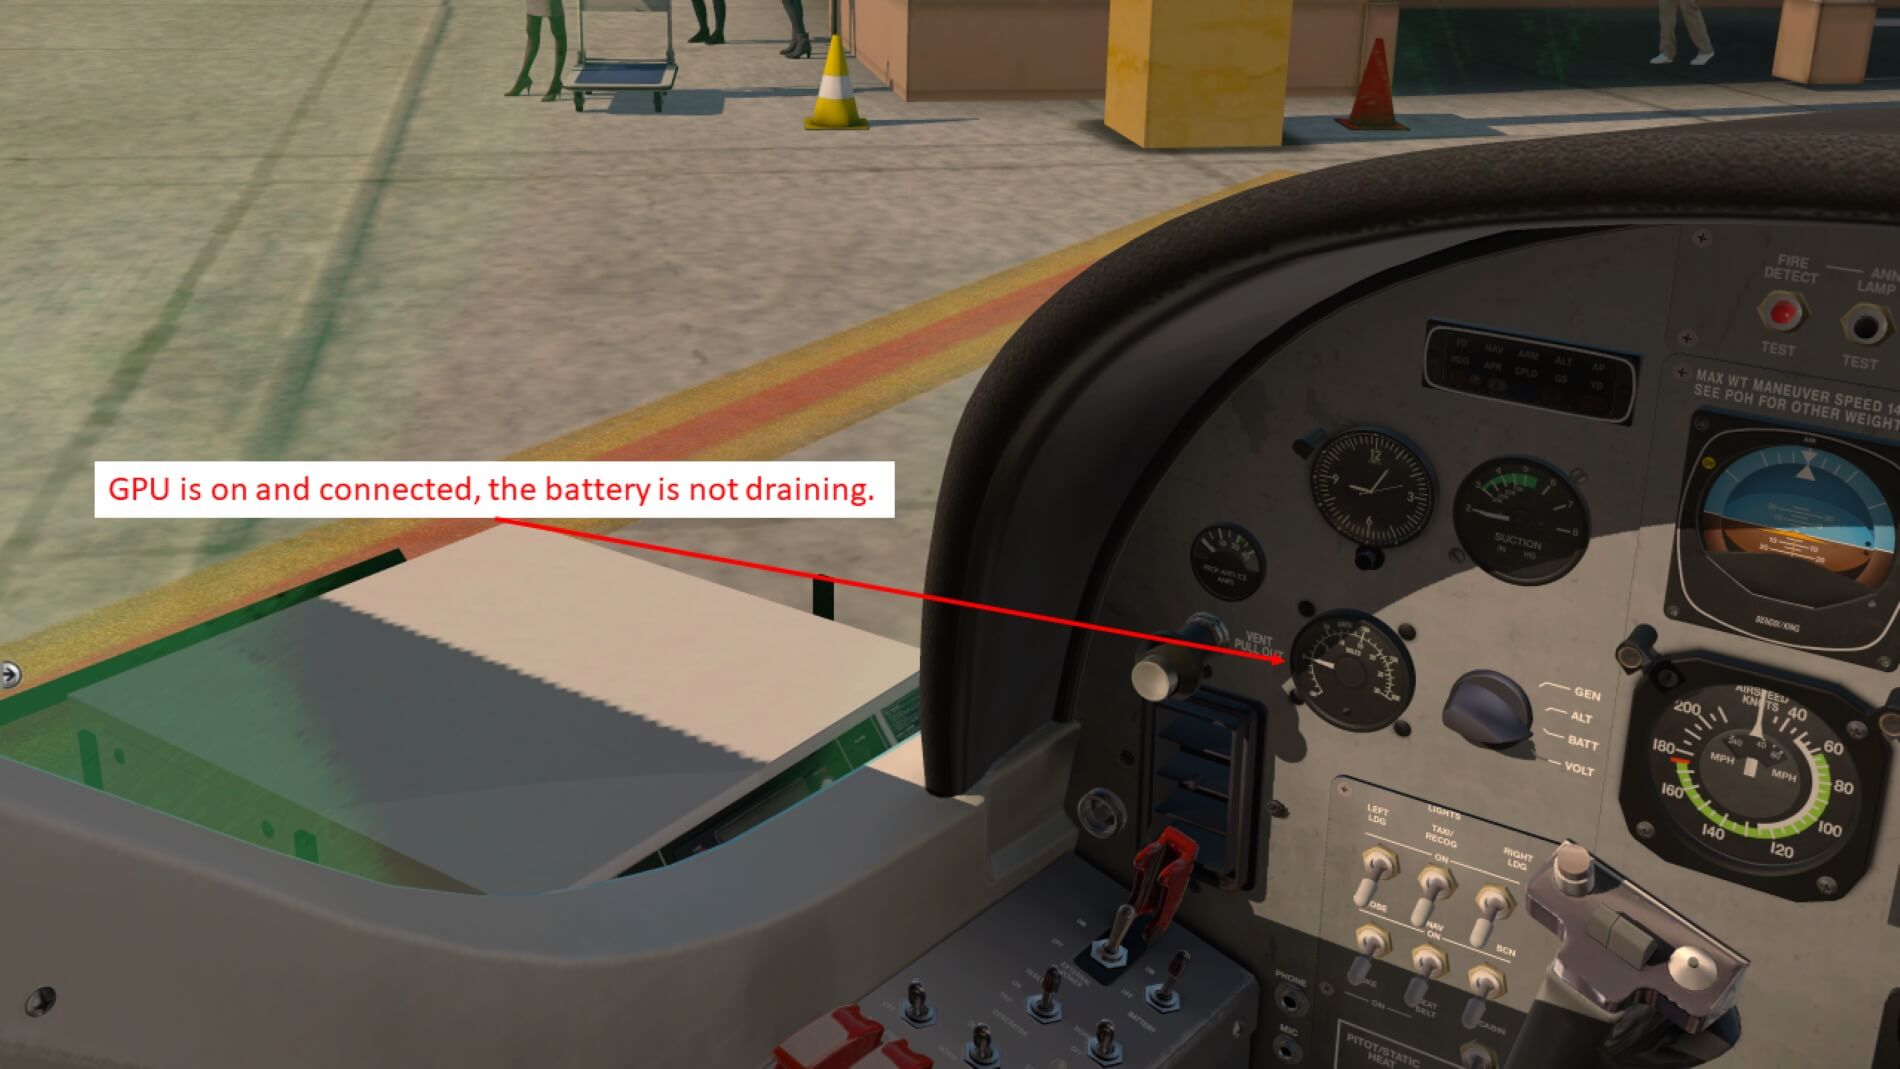
Once the GPU is connected to the Caravan, the external switch guard can be lifted and the external power switch moved to on. This is normally done after testing the battery which is done by powering it on and checking the combination voltmeter / ammeter gauge at the left side of the pilot’s panel. This is part of the functioning electrical system in that the gauge will accurately reflect the demands upon the system. As you go through the battery / external power test, you will see the values change. This is also seen during the standby power test.

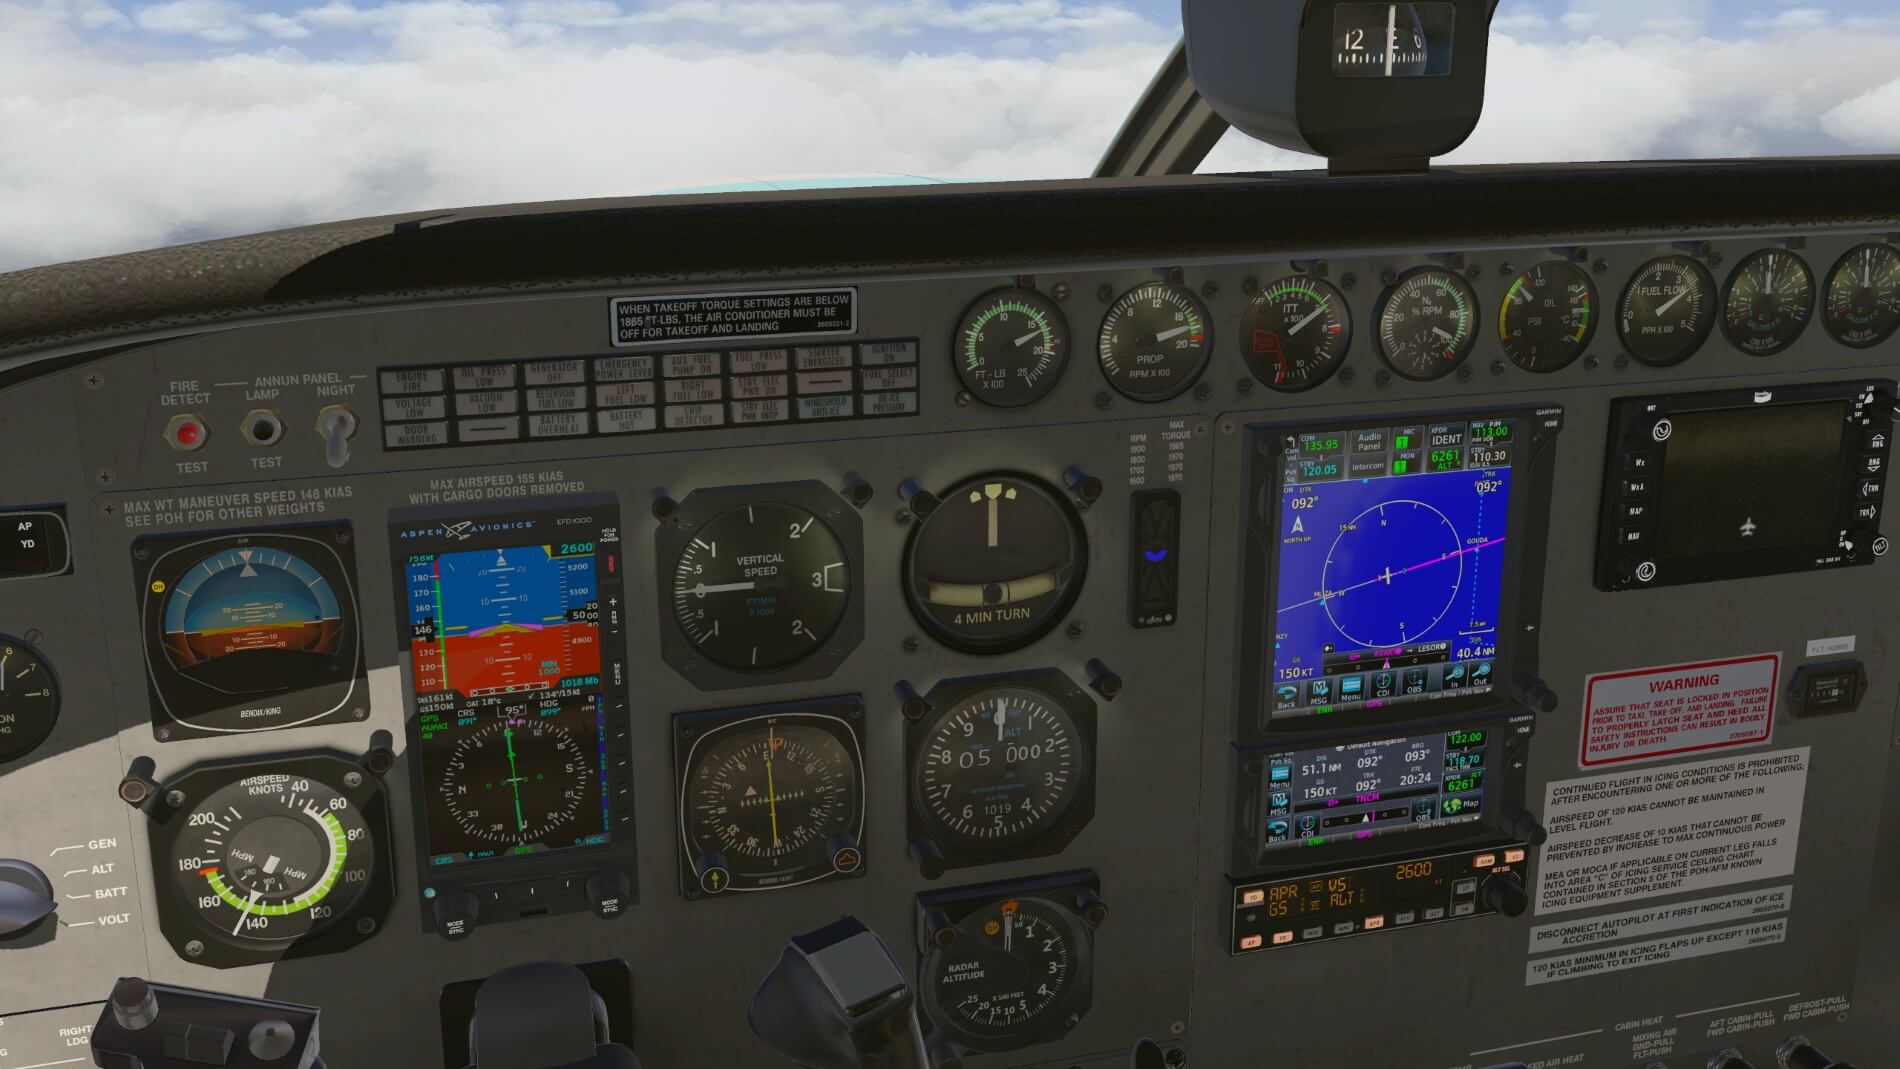
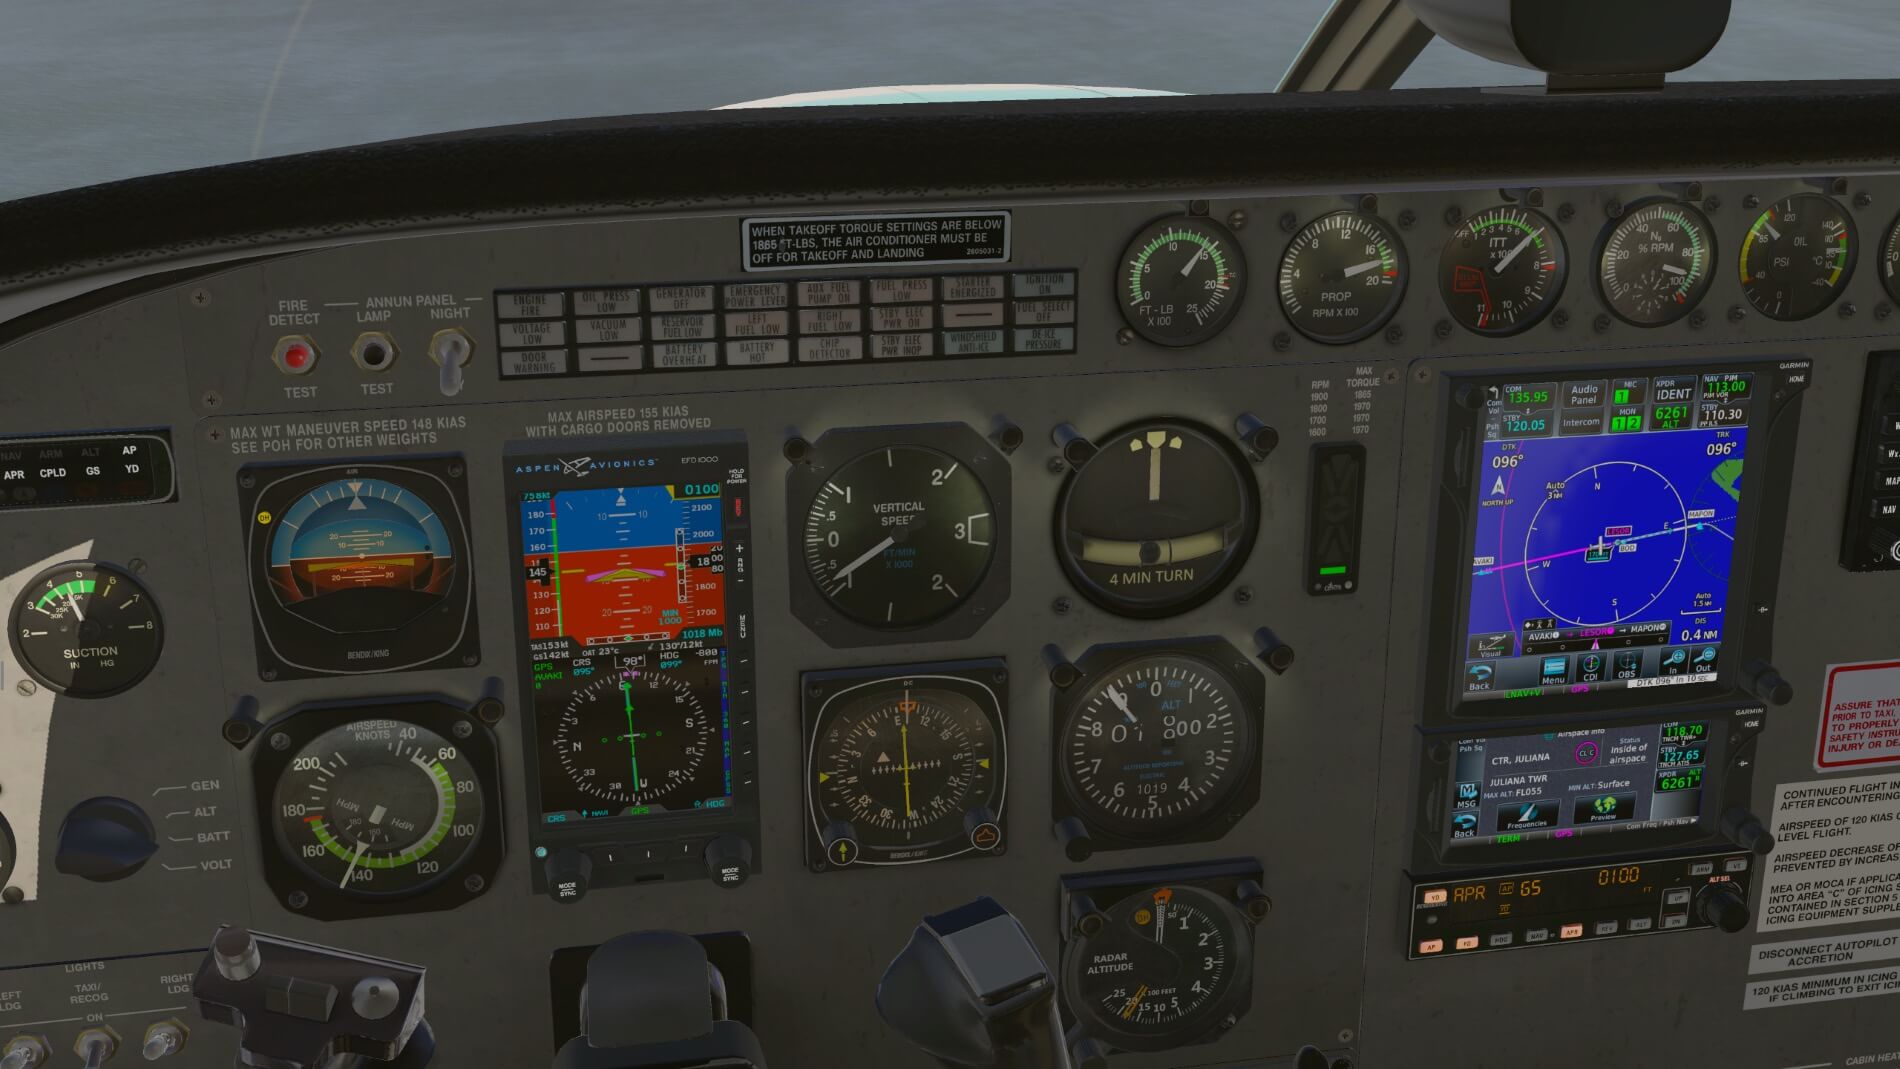
To the right is the Pilot’s panel with a configuration of instruments that, in this case, features the Aspen Evolution which is a nice instrument that can be difficult to get used to and, at times, difficult to read. However, it provides some useful information like the wind speed and direction that can be very useful when operating from unattended airstrips. For anyone who is already flying a Thranda aircraft with modifiable panels, the assortment of gauges, the quality of their modelling, and the legibility of the gauge faces are already known since Thranda has been packaging and reusing these gauges since the Porter came out.
For those of you new to Thranda, these gauges are, simply, fantastic. Above the gauges is the annunciator panel. The day/night switch is functional and dims what are considered non-essential lights in the annunciator panel for night flying. The test button is fully functional and will light every indicator on the panel and fill your cockpit with an ear-splitting siren.
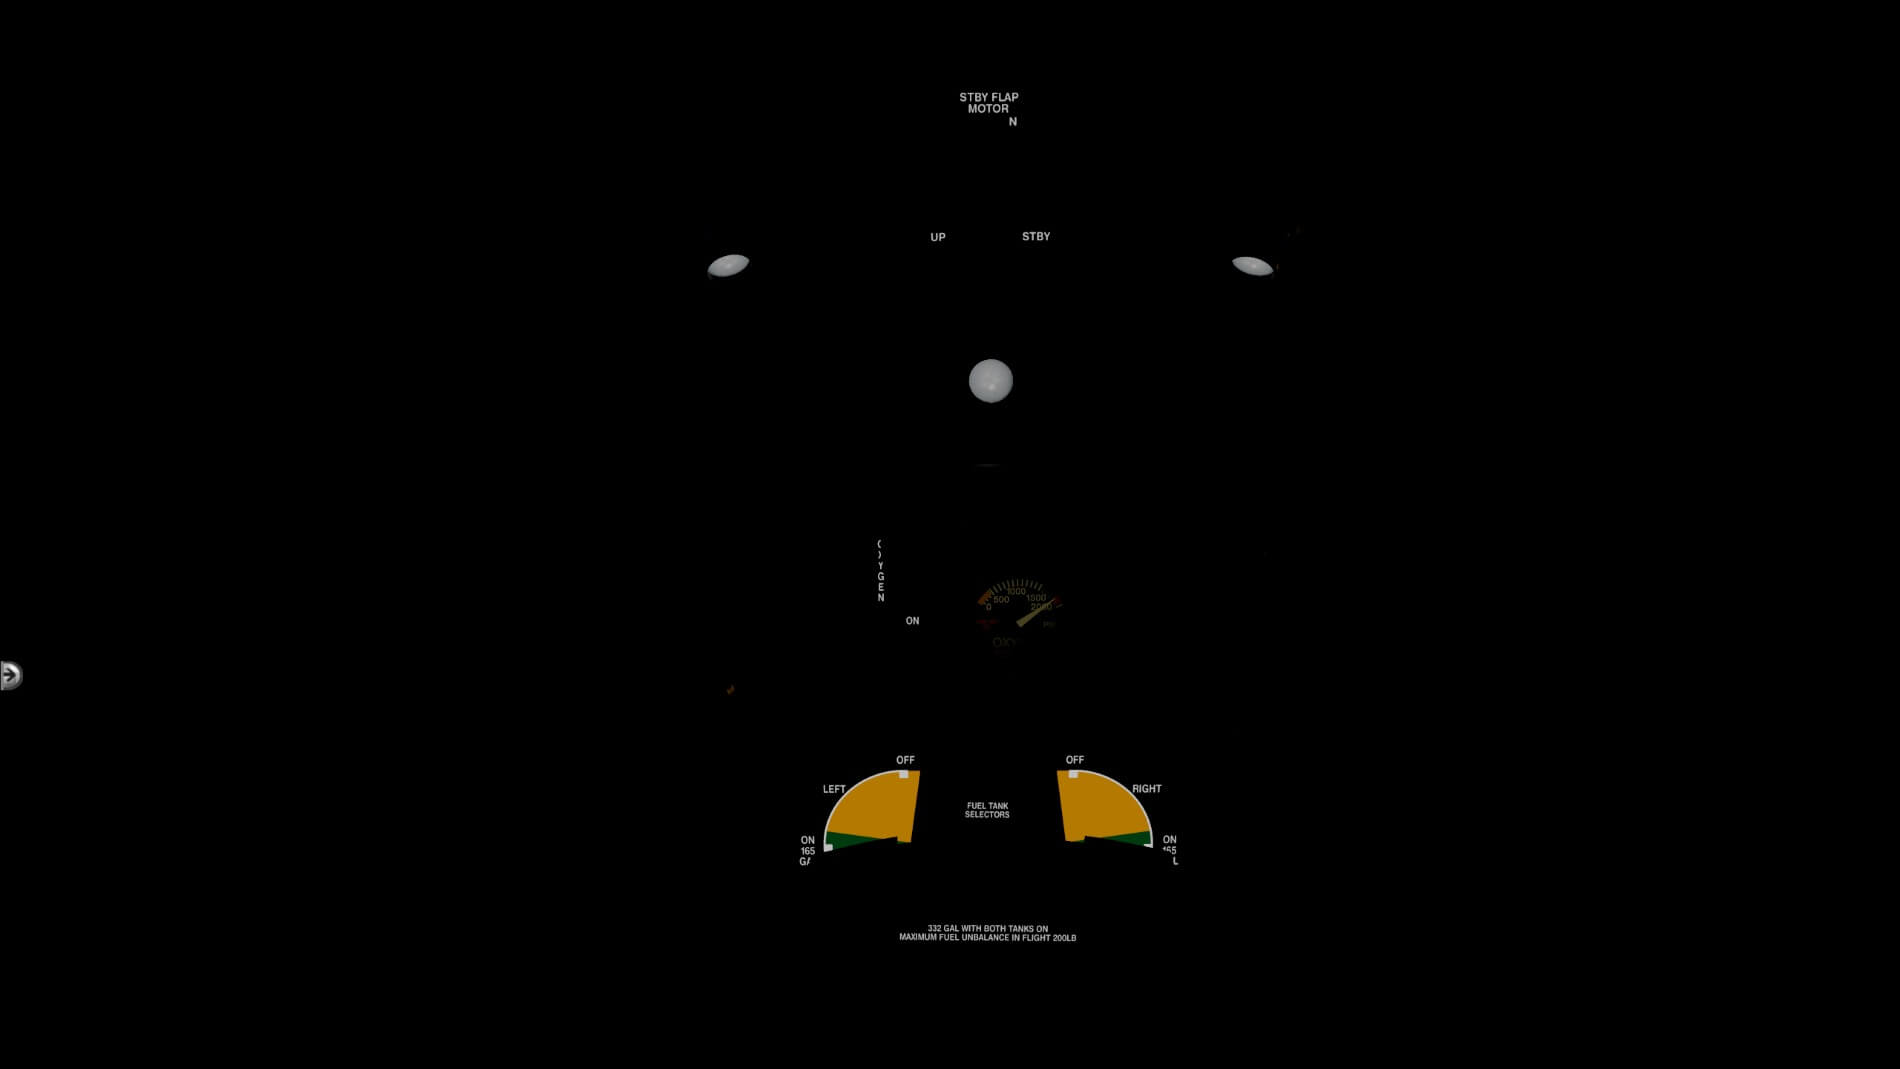
It is on this section of the panel that you will find the unmarked Overspeed Governor Test Switch. The checklist informs you of the need to run this test for the first flight of the day, but the manual does not tell you where to find it. I have gone ahead and attached a screen shot showing you where it is.
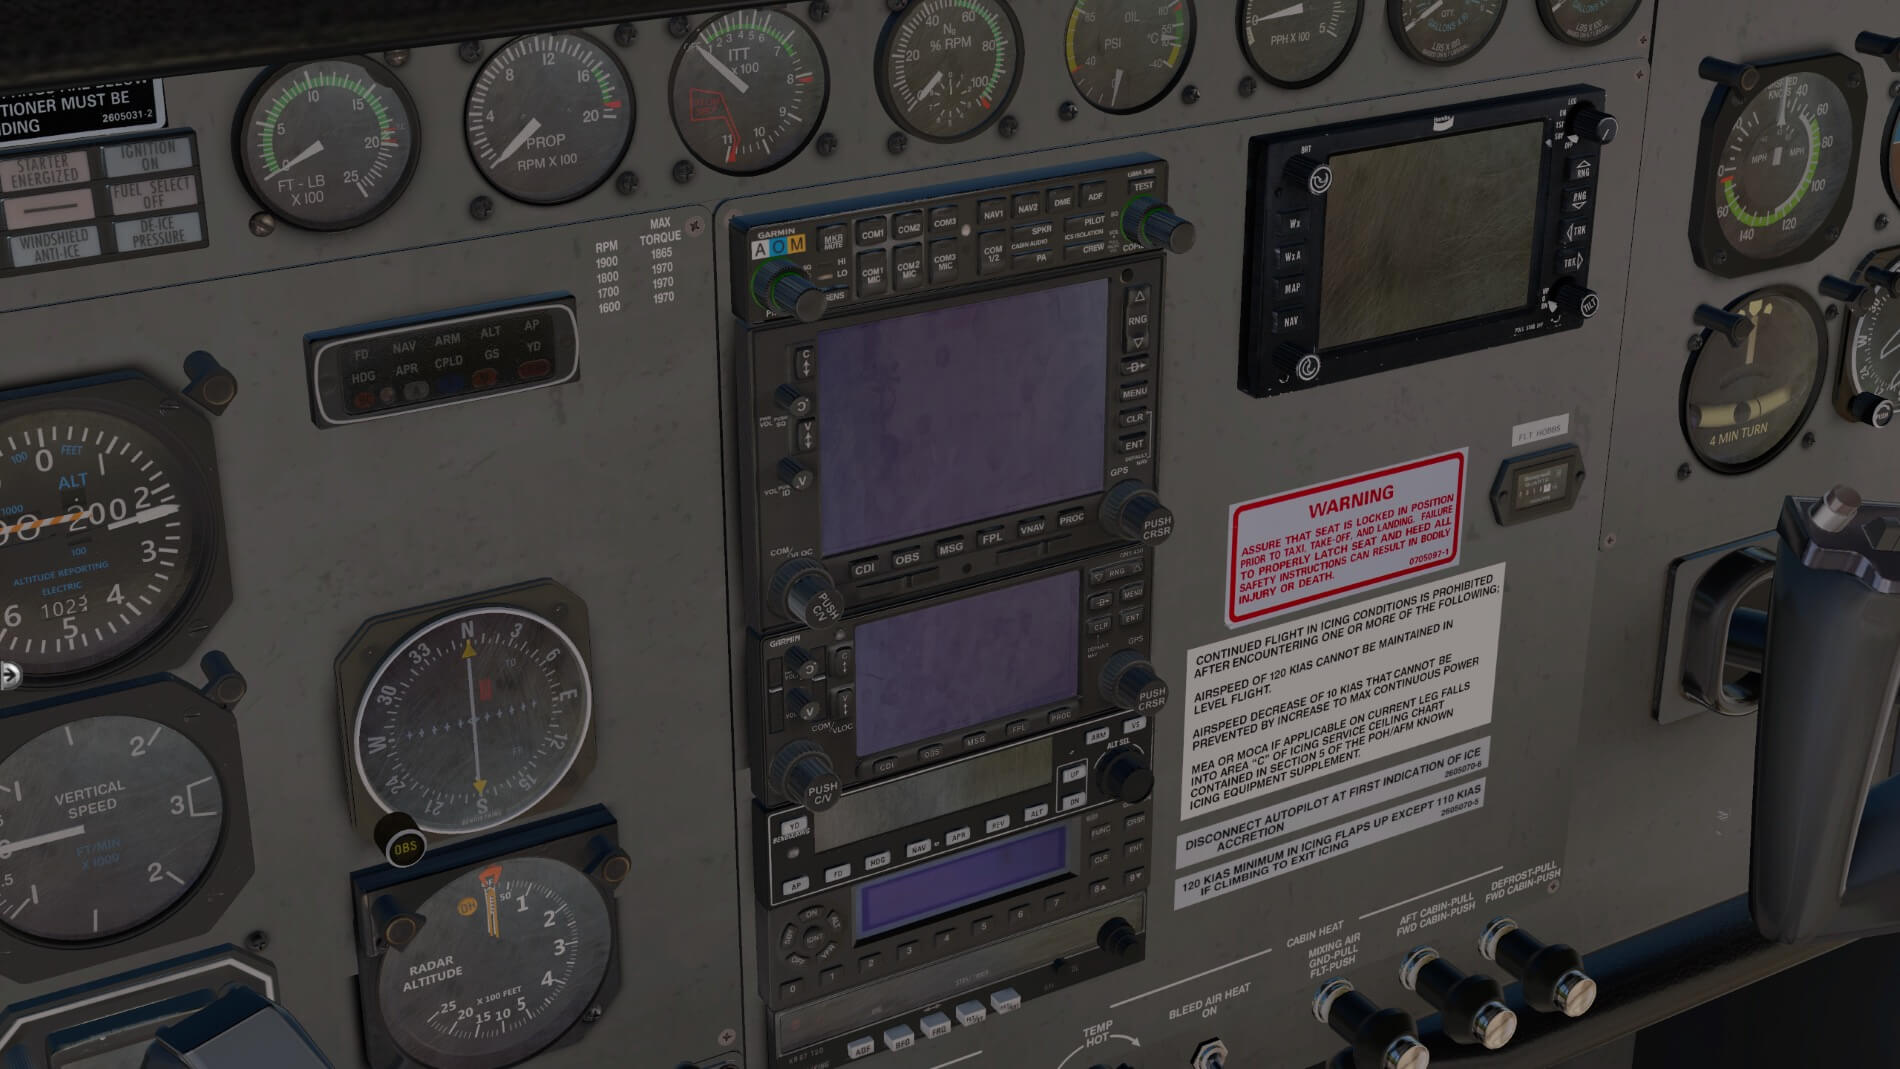
Glancing further right, the engine gauge cluster is located directly under the glareshield which makes a lot of sense. These are instruments you want to be able to look at quickly and not have reflective distortions confusing things. You can turn off instrument reflections on the general menu but that results in a decreased sense of reality. Those fuel gauges are sufficiently legible to be able to pick up on a fuel imbalance with a quick look. No need to set up a special view just for that.
Below this is the radio cluster where I have set up the RealityXP GTN units. These units also function as the Com 1 and Com2, Nav 1 and Nav 2 and the transponder. I have chosen to forgo the ADF as it is being phased out and I’m not currently flying in extreme remote areas where ADF is the only instrument navigation. Beneath the GTN units is the Bendix King KFC-225 autopilot control. One caveat with the KFC-225 is the yaw damper does not disengage automatically when the autopilot is disengaged using the AP button on the panel. It will automatically disconnect if you use the AP disconnect button on the yoke.

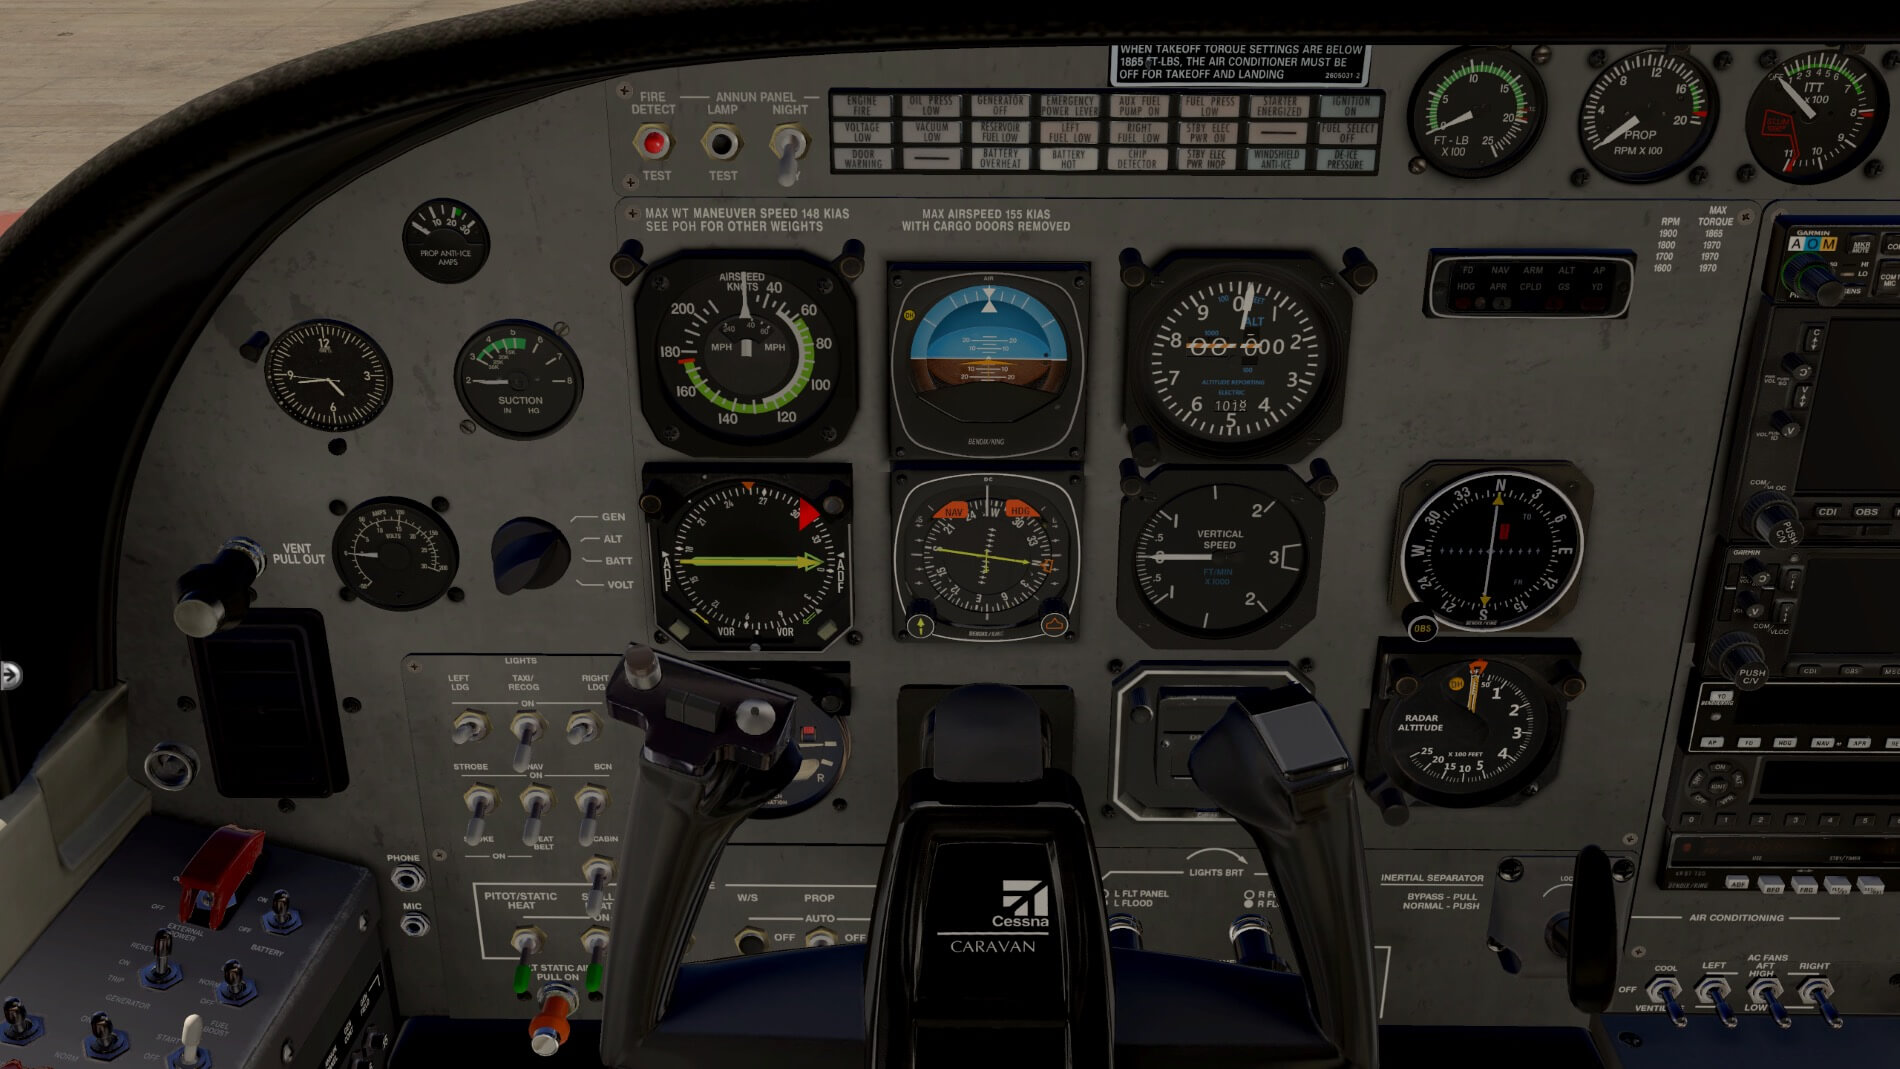
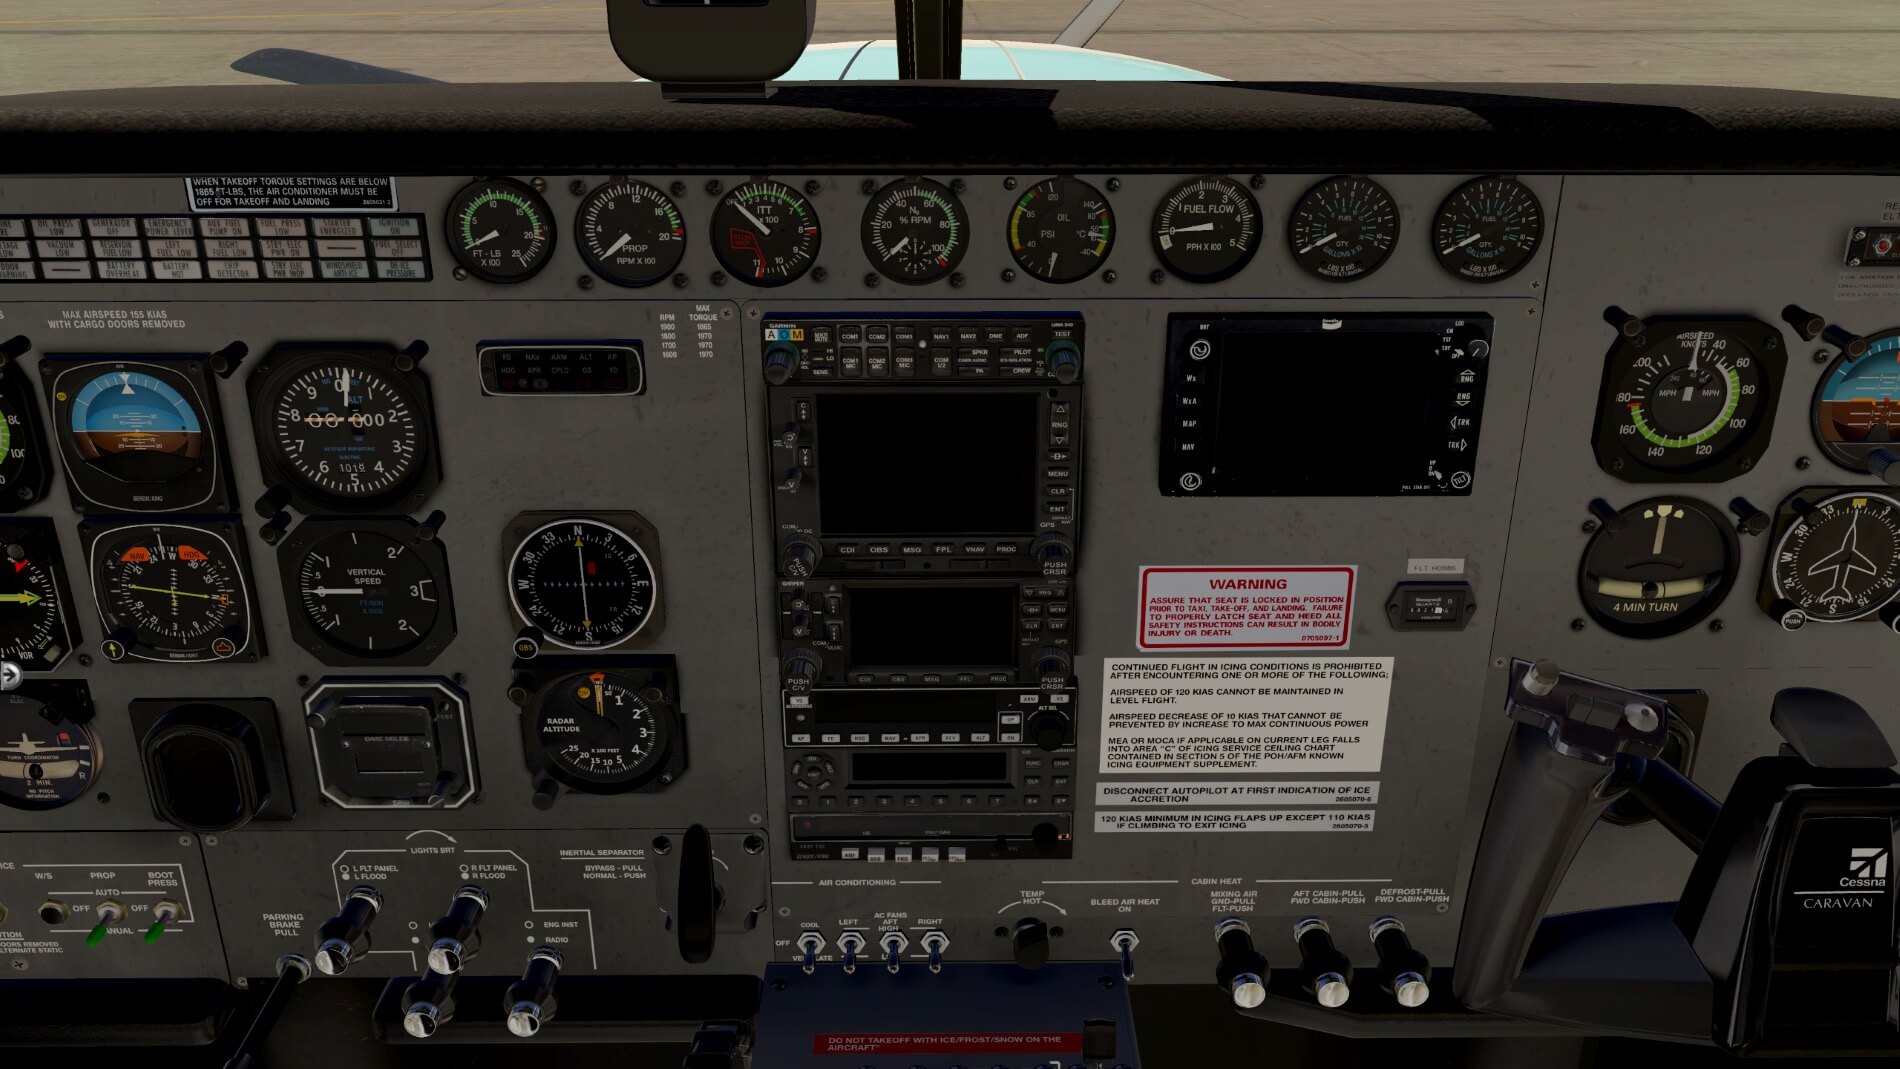

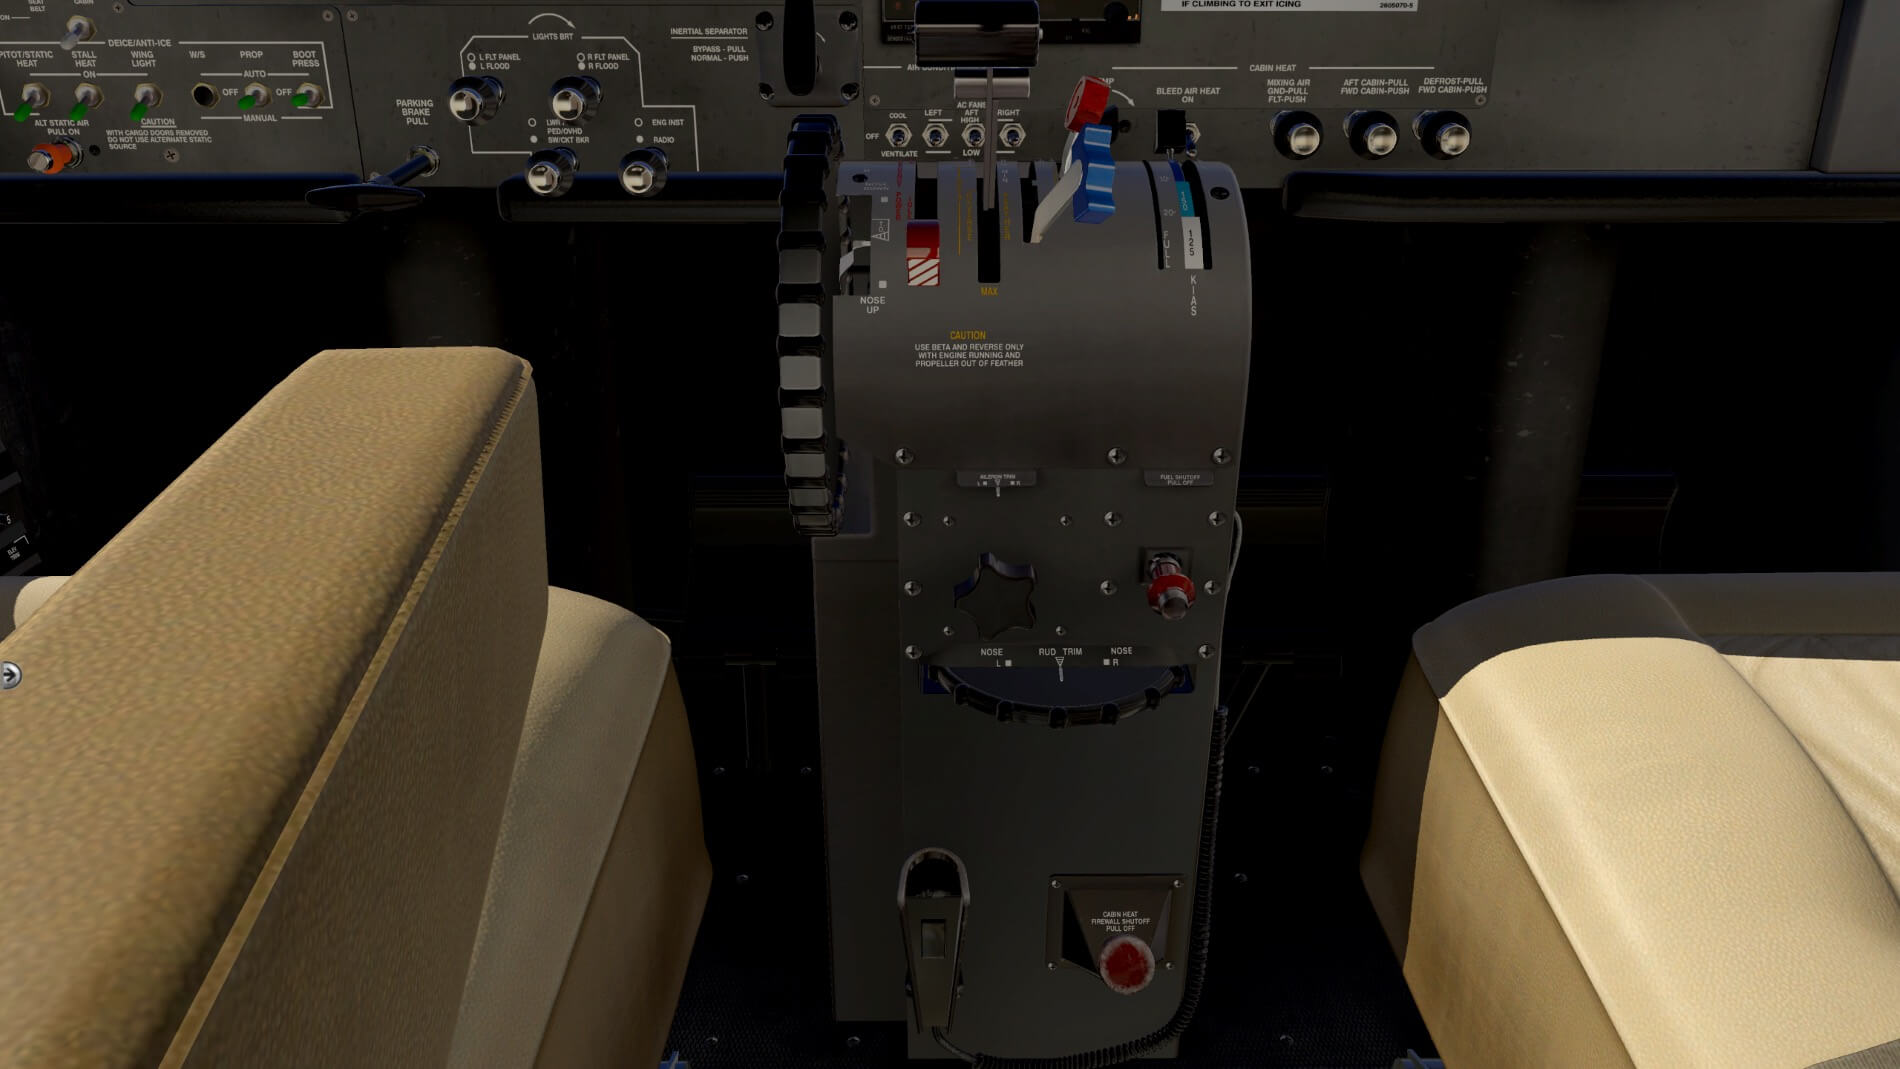
Beneath the radio stack is the skillfully modelled control pedestal where everything related to the manipulation of flight dynamics is found: throttle, propellor, fuel condition, flap lever, and all trims. In this one area of multiple material types, the varying reflective properties are well differentiated from one surface to another. Details abound on the trim wheels, levers, knobs, markings, and even the screwheads have the appropriate depth to the grooves. I’m a little concerned that the firewall shutoff knob is looking so worn!
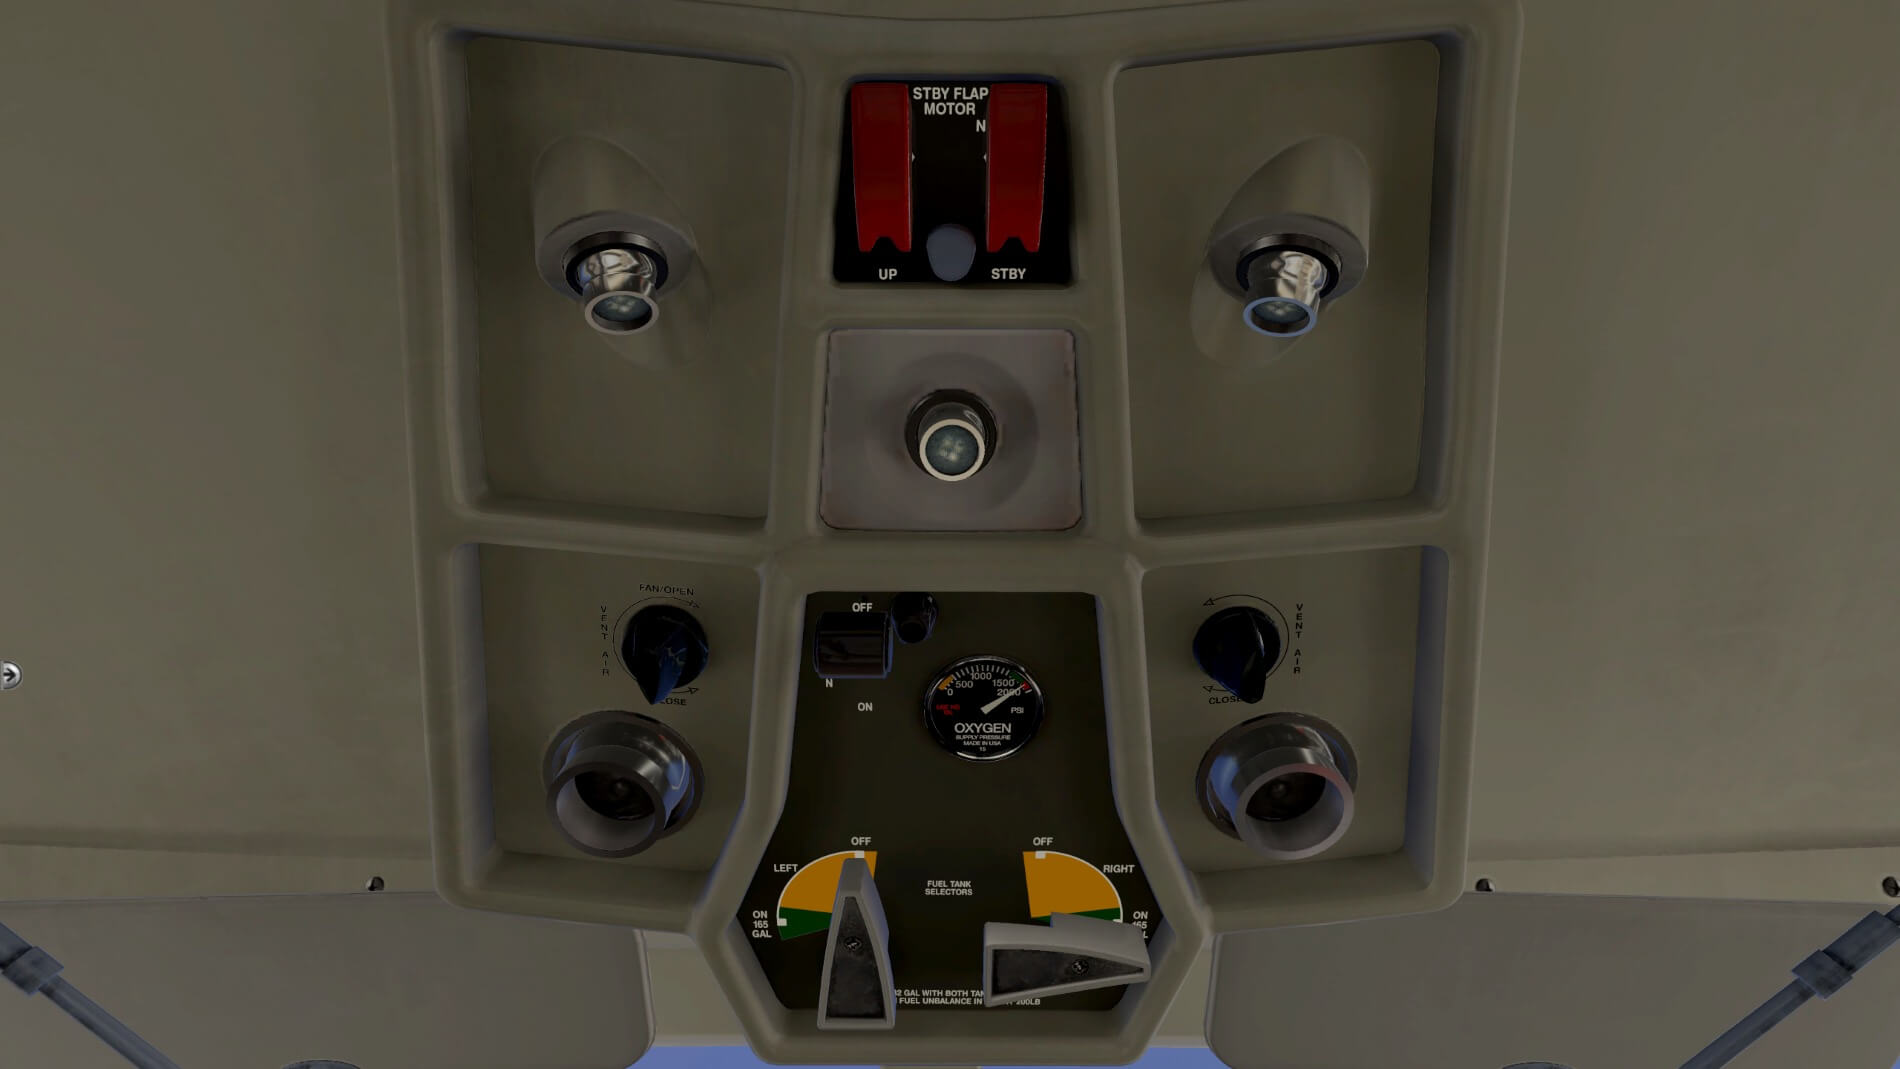
Speaking of well differentiated surfaces, look overhead for the fuel selectors and oxygen system and you find an excellent example of just how much the proper use of shadow can enhance an object. I am almost ready to believe that if I put my hand on my screen I could feel the dividers of this panel. The reality of those dividers makes its presence when it gets in the way of you trying to aim those flood lights at too shallow of an angle.

From Engine Start to Shutdown
Now, for possibly one of the most exciting aspects of this Thranda Caravan: starting the engine. Following the steps on the checklist, you very quickly hear the starter engage and the turbine wind up and fully start with a very satisfying auditory burst of power. The sound work that Thranda has done here is amongst some of the best I’ve heard and doesn’t end with the start up. No sooner does the propellor come up to speed then you can hear the blade slap.
The power of that engine remains throughout the flight experience and may well have you reaching for the audio controls on the Thranda menu or utilizing the headphone jack in the cockpit to engage the sound dampening headset. The drawback to the headset option is it realistically dampens every interior sound, not just the engine.

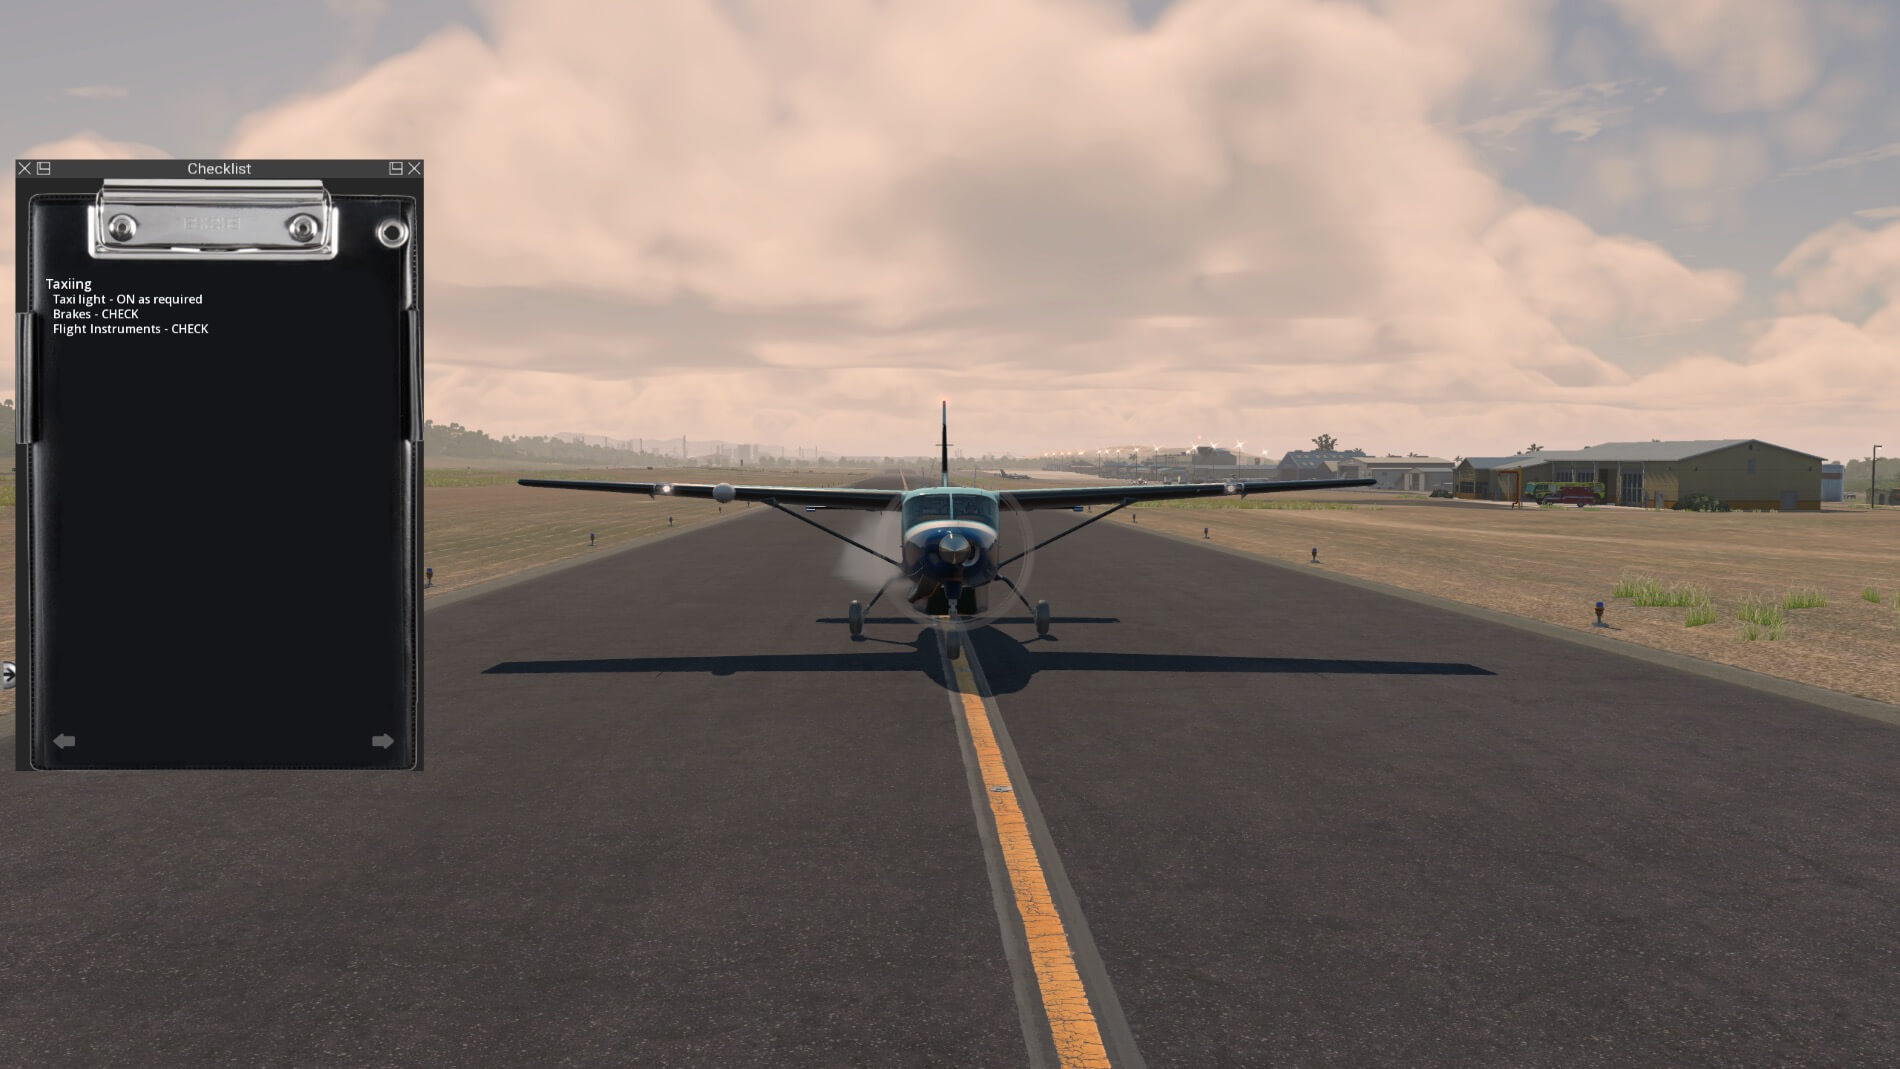
Finish the startup procedure, get clearance for taxiing, release the brake, and the Caravan is finally in motion. Taxiing with the Caravan is not a huge challenge providing you keep the speed under control. That’s a big provision especially if you are travelling light. The idle speed is sufficient to get the big plane moving and keep it moving. It will get away from you in a hurry, so a judicious use of beta is a requirement if you are not going to jar passengers with constant heavy toe brake use. (a word of advice here, if I may. Bind the X-Plane beta and thrust reverse commands to a controller button or keystroke. It will make your life much easier than trying to lift the throttle over the gate every time you need to use beta mode).
Once you get used to it, you should be able to go from gate to take off without using the toe brake unless you need to maneuver in tight quarters. In this case, the use of the toe brake and pedal to turn the aircraft can make it do so with no forward movement. The part of this move that takes a little practice is stopping the turn since you must use the throttle to get the plane turning. If you release the brake without pulling the throttle back or do so before you straighten the wheel, your passengers will advise you of their discomfort.
If you pull back on the throttle too much, you will come to a rapid stop and need to advance the throttle to get the Caravan moving again if you are near to or fully loaded. Once you are moving on the straightaway, it only takes a tiny bit of rudder pedal use to keep it straight. Oversteer and folks in the tower will think you are practicing S turns with tricycle gear since the tendency to overcorrect can come easily. The Caravan does this just as the C-172 does but it feels much heavier (which is what can lead to the overcorrection problem) and is harder to get back under control as one would expect.


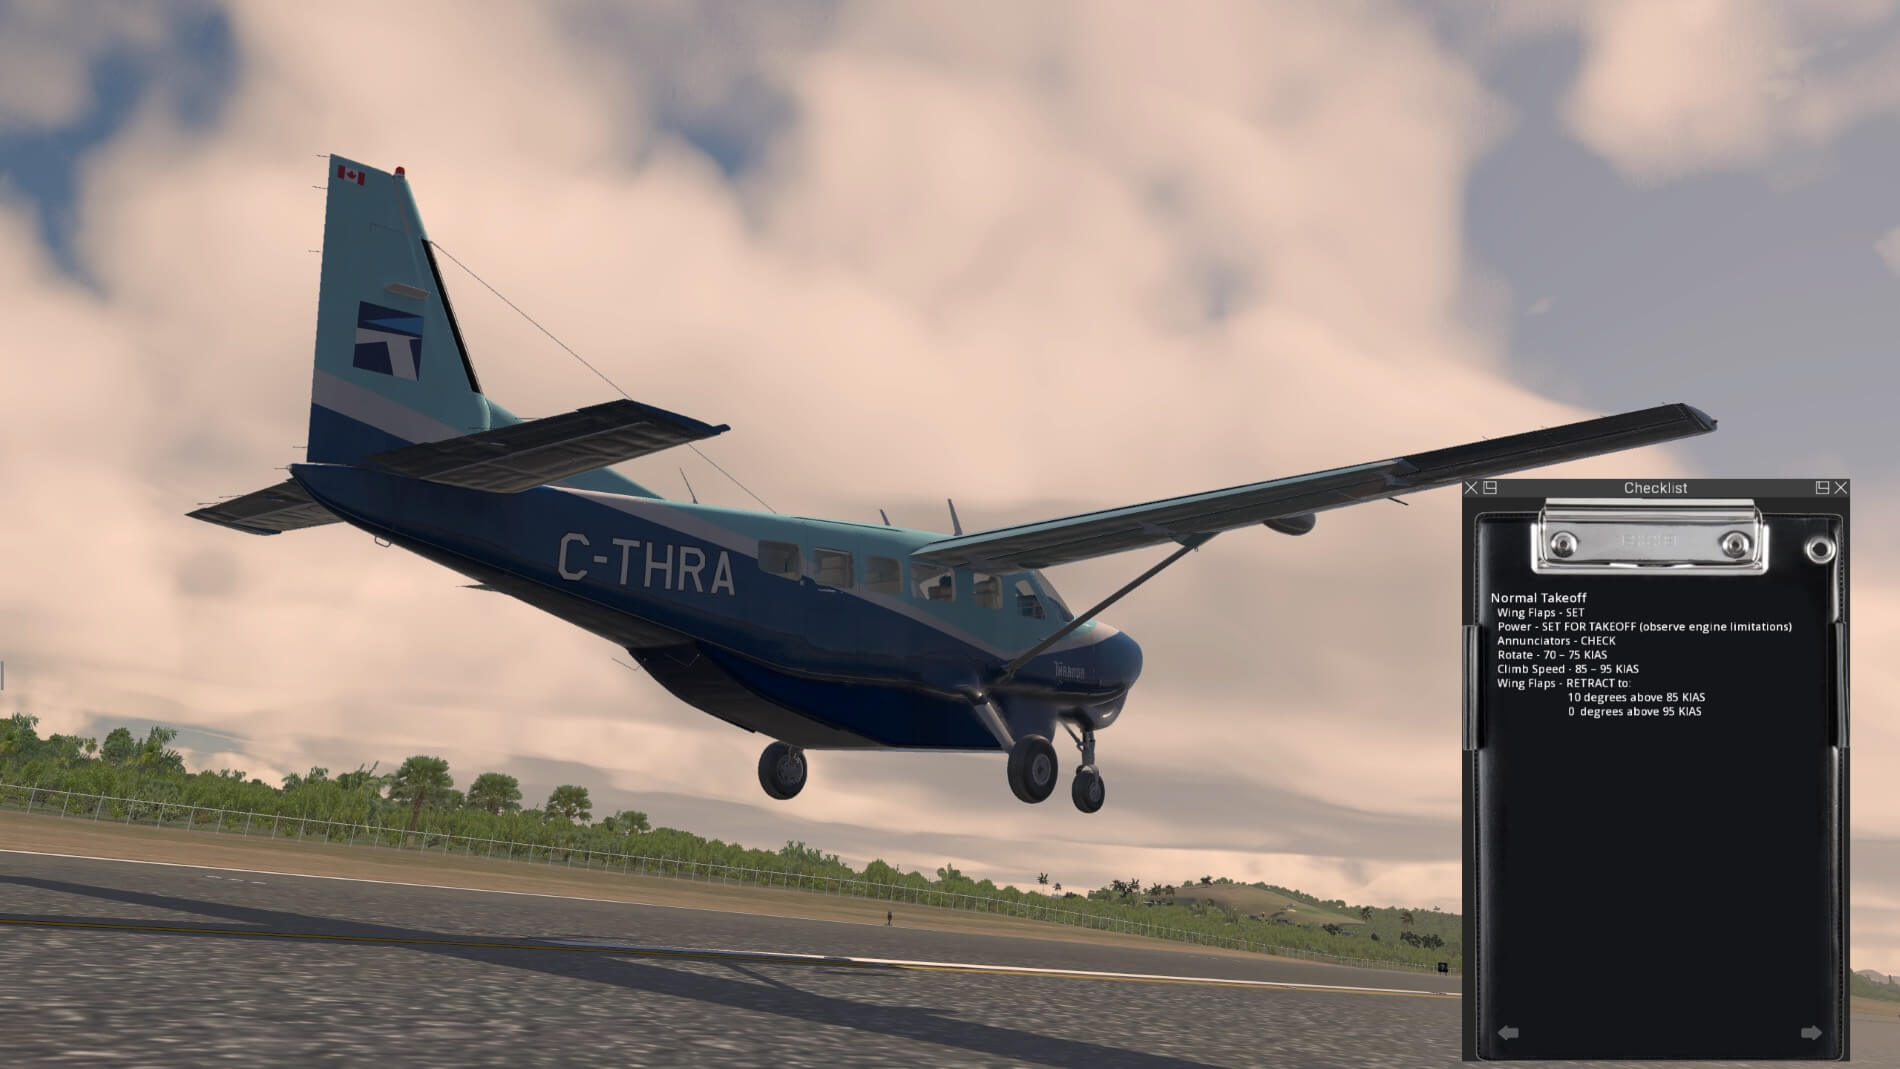
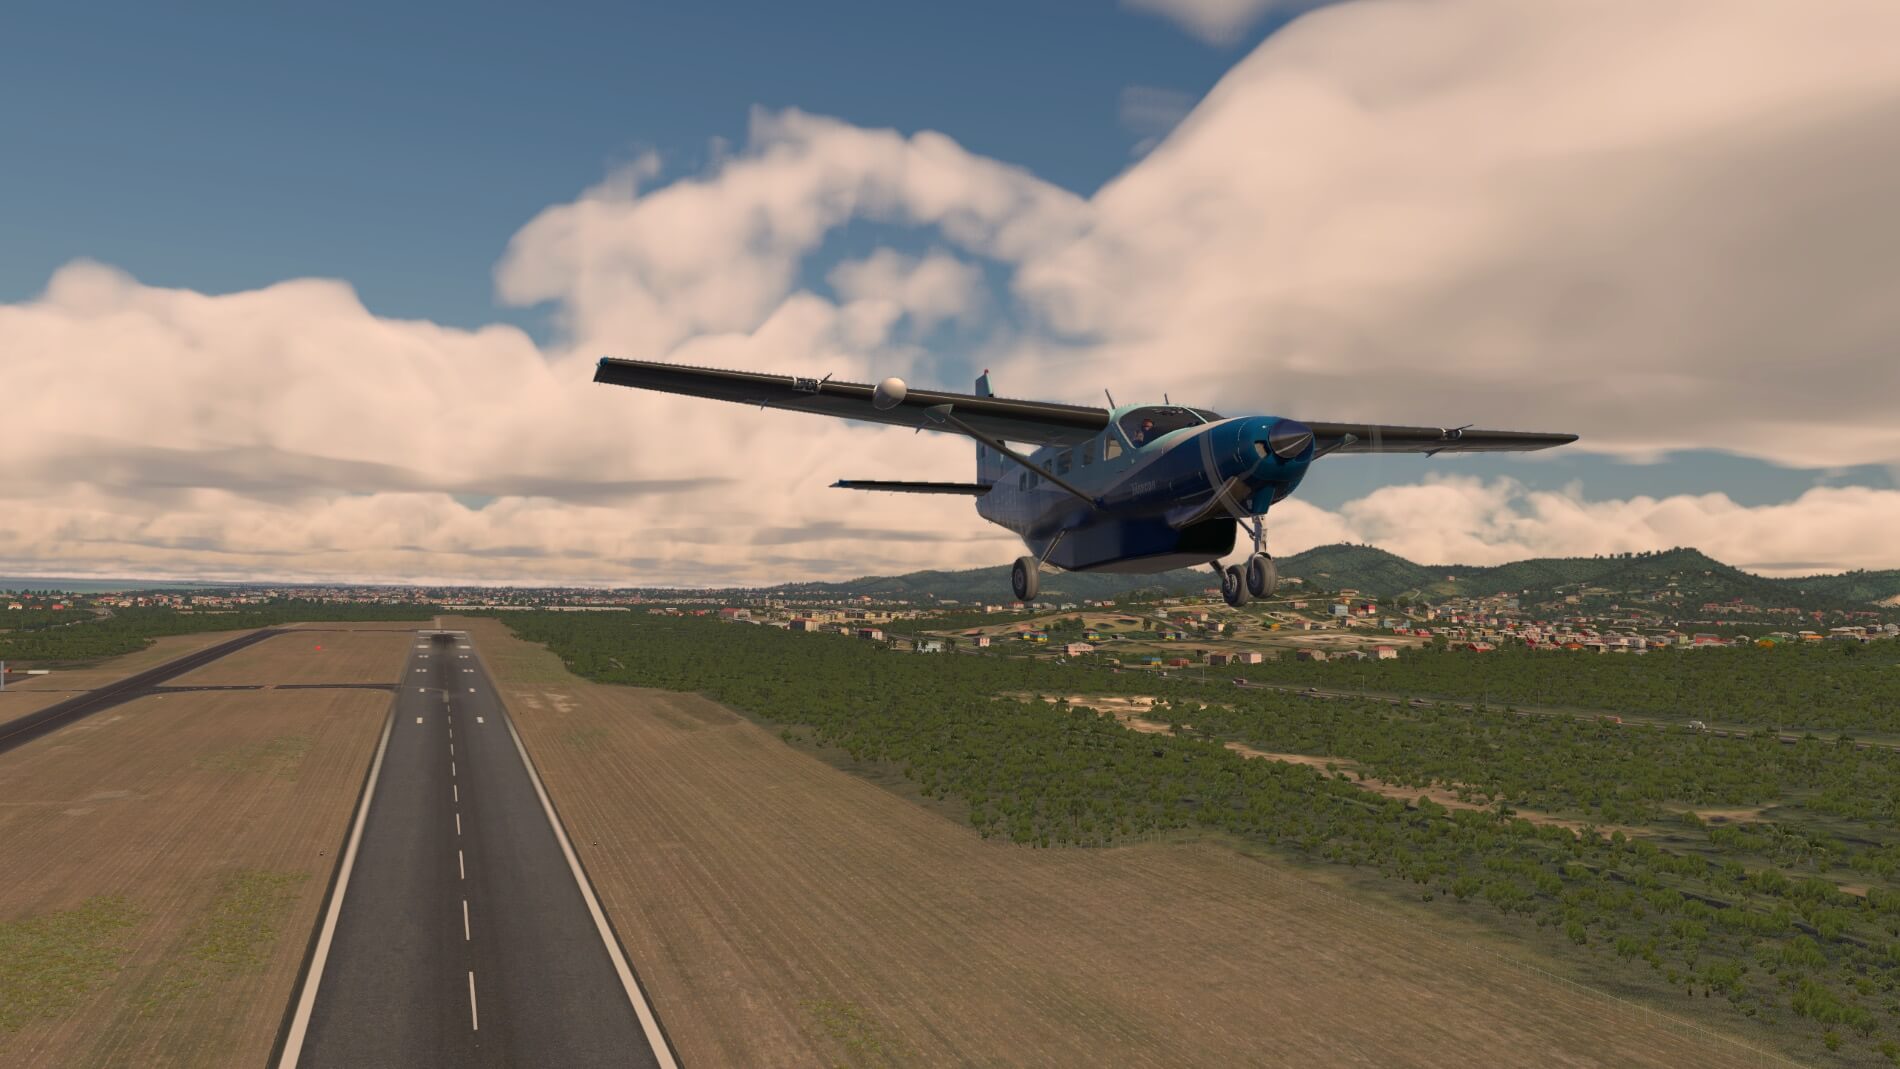
The Caravan leaves the runway at the documented rotate speed. More than once, even at close to MTOW, it seemed to get a little light on the tires starting around 50 kts accompanied by the sound of tires dragging on the pavement. Likely this was the effect of a crosswind presence. Once clear of the ground, it easily reaches the climb speed and I climb out at 700 fpm to keep the passenger’s ears comfortable.
With my take-off weight at 7846 lbs., the Caravan could climb at a faster rate. At 4000 feet, I level out with torque at 1600 lbs. and RPM at 1900. With these settings, I am cruising at a comfortable 145 kts., 157 kts. TAS, and 151 kts. GS. I then climb at 700 fpm to 8000 feet and, at about 6000 feet, I need to increase the torque to maintain the rate of climb. This is completely normal behavior for this aircraft since the pilot must remain aware of the engine settings because there is no governor to manage them automatically.
The Caravan will be torque limited initially and may later be performance limited by the ITT reaching maximum operating temperatures depending on OAT and altitude. At 8000 feet, with an OAT of 9⁰ C, I can maintain the 145 kts. with the ITT limiting my torque to 1700 lbs. and the RPM at 1900. With these settings, and a better headwind component than at 4000 feet, my TAS is 167 and my GS is 163.
The current full weight is 7496 lbs. Later in the flight, as I descend near my destination, I note at 4500 feet that I am maintaining 147 kts. My TAS is 161 and GS is 159. These are the types of performance numbers I was expecting after reading through the performance documentation provided by Thranda.
During the cruise portion of this flight, I decide to test out the DynaFeel feature. In order to do this, I set the sliders all the way to “0” and pull the Caravan into a steep turn to the right and let it nose down to start losing altitude. I then bring it back to straight and level. The moment I touch any control, there is an almost instantaneous response from the plane. It feels almost “twitchy.”
I then set the sliders all the way to 150 and repeat the same maneuver. I did not apply much pressure to my controls because of how the first test went. Big mistake. The Caravan did not respond and, in fact, managed to nose down further and start a little faster descent. I had to really pull back on my controls to get a slow response out of the big aircraft. I set the sliders back to 100% and everything feels to like it should, at least to me. It was nice to see the spoilers functioning as they should.
One thing you will find on the Caravan that can be a bit surprising because it is unusual to have it modelled is the functioning fuel system. Yes, every modelled aircraft requires an operating fuel system but how many of them will allow you to get into an out of balance situation when you have all fuel supplies operating as they should? The Caravan is one that will and that does happen in the real-life Caravan.
Keep your eye on those easy-to-read fuel gauges and watch your turn coordinator for slippage. Going through the maneuvers I did to test the DynaFeel system resulted in a serious out of balance situation that might possibly have caused problems upon landing. While the Caravan may not model an out of balance effect for misloading the cabin, it will let you know if the fuel is off as much as it will let you know if your CG is out of range.


The aircraft is rather demanding on approach and landing. Don’t get me wrong, it is easy to land. You just have to do it right. Proper configuration is required and must be done in a timely manner because the upward pitch response to the use of flaps is both rapid and severe, no matter what degree of flap is set.
Every time I waited too long to set full flaps on landing, I always ended up on a go around due to a botched landing because I am quickly and irreparably out of the glide path and correction results in my descent rate being too fast for landing. Speed needs to be monitored and adjusted to recommended numbers. Attempting to reduce power too much while coming over the threshold results in the Caravan dropping like a rock and bouncing on the runway.
This is an airplane that does not respond well to a sudden loss of lift thereby requiring at least some power for landing. Being a turbine, recovery is not as fast as with a piston engine.
Upon touch down, the Caravan is pretty stable along the center line but be ready on the pedals when you hit the beta mode. It does not like that sudden change in thrust direction. Also be very wary about hitting the toe brakes too soon. As much as I have tried to get the brakes to work evenly, it always seems like one side catches sooner than the other.
At higher landing speeds, you’ll be squiggling from one side of the runway to the other. Once you’ve bled off the speed and raised the flaps, you are back to taxi mode where the big bird becomes mostly docile once again. Taxi to the gate and complete the shut down procedures.


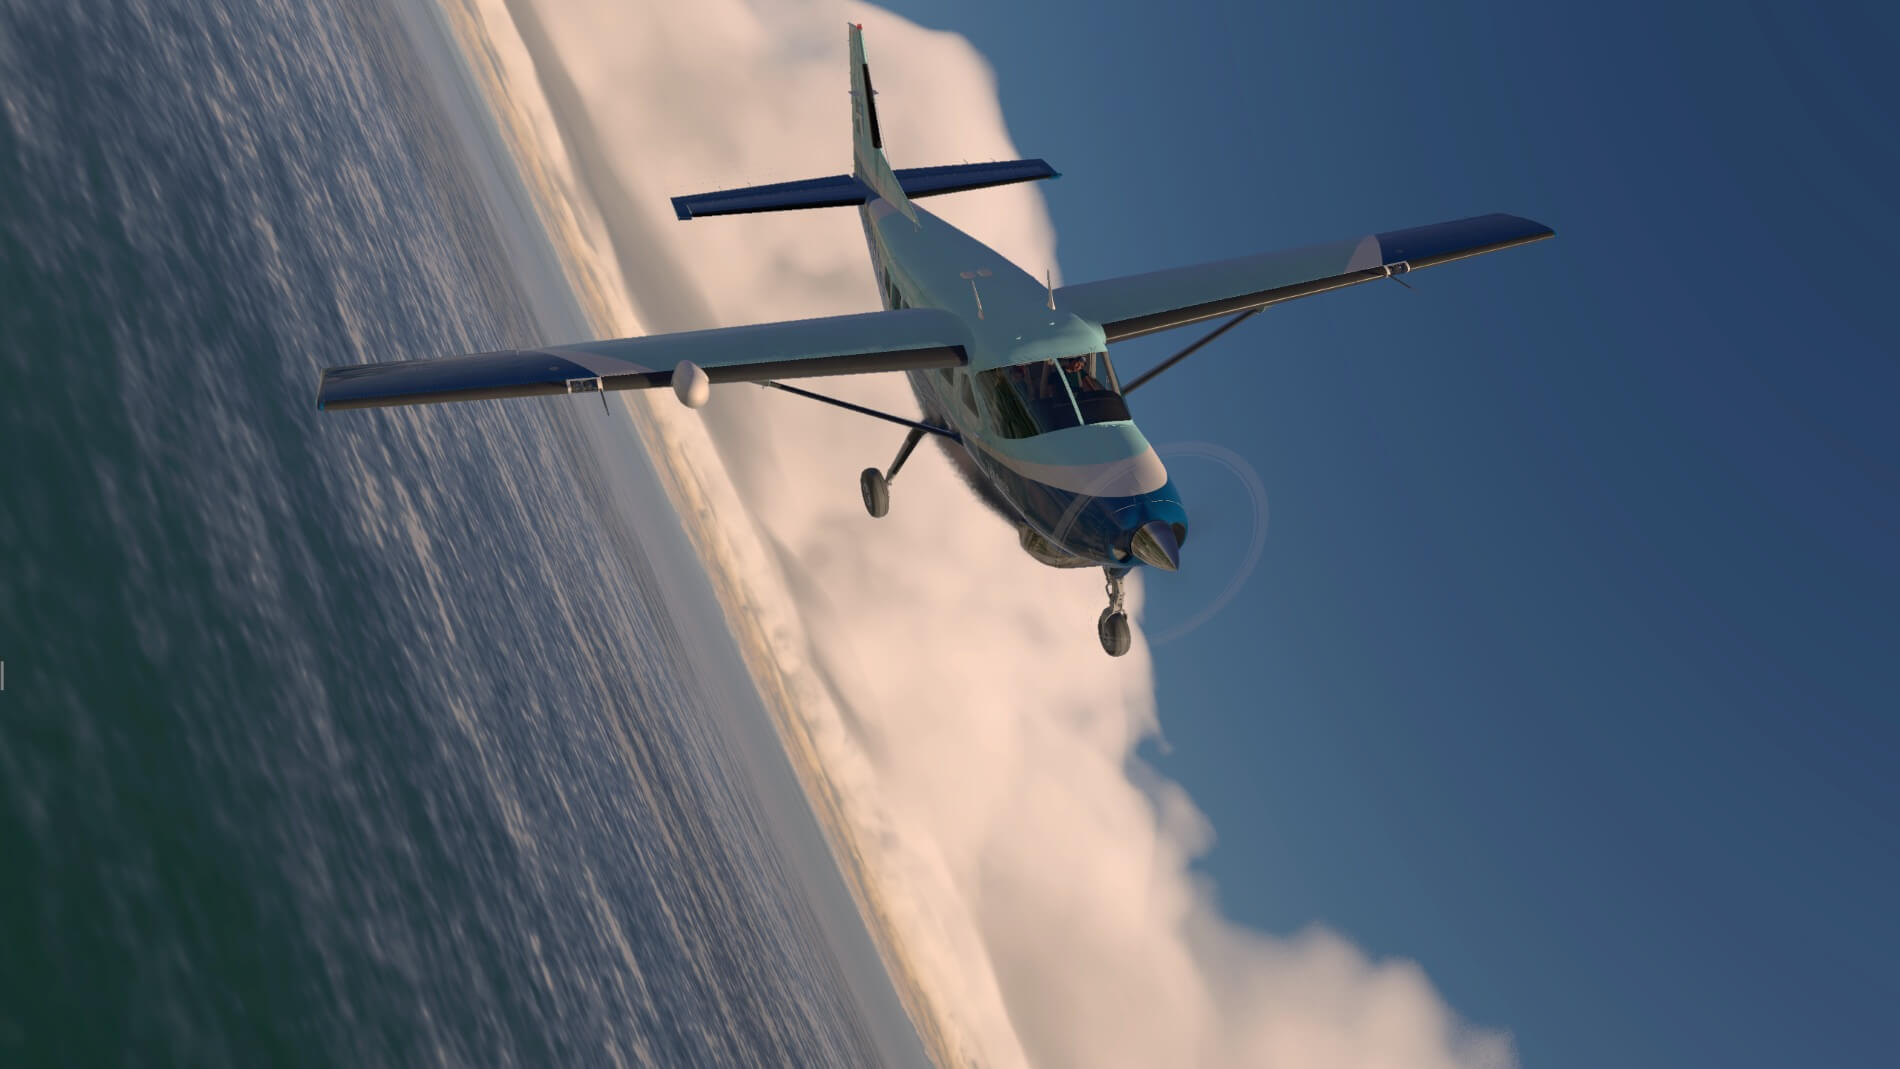
Here is where I’m going to add a couple of observations that I have thus far overlooked and add some screenshots for your perusal. First is to note the excellent visibility from the cockpit. Cessna seems to have a rather unique design in that the pilot is seated forward of the door and it’s window thereby putting the side view looking out of the curved edge of the windscreen. This works quite well in the Caravan especially for ground operations and situational awareness of other aircraft in flight. This arrangement also lets you avoid the “raise the wing to see the airport” maneuver as the wings are behind the point of view.
In the modelling area, my observations are of a few miscellaneous items. First off, the propellor disc. This is done very well with the white stripes at the tip of the blades defining the radius of the rotational circle. The shadow of the blade is visible only from side angles as expected since the view through the propellor should not include the prop itself.
From the exhaust port comes the discharged heat from the turbine. The distortion created by hot air meeting cold is very well depicted with a nebulous somewhat changing area blurring what is behind it.
Lastly is a quick look at the ultimate in filthy airplanes. Dialing up the dirt to maximum displays the texture of the dirt layer in very clear relief. It leaves you with an aircraft that any passenger would likely be apprehensive about flying in. It might even leave question marks in the minds of shippers using your aircraft for freight service! Hopefully, your aircraft never sees this much dirt “decorating” its paint job.


I chose to use the 675 for this section of the review due to its proximal nature to the Kodiak that I am very familiar with. I also chose it because this is the one that is going to have the float option since the modelled Grand Caravan does not have the updated engine that allows it to have the float option. Flying the Grand is very similar to the 675 with the expected performance changes created by higher weight and more drag as a result of its increased size.
RealityXP Flight
Since Thranda chose to integrate the RealityXP package into the Caravan, this flight became necessary because not all integrations have been completely successful. Fortunately, my short flight from St. Croix to St. Maarten demonstrated a completely successful endeavor.
Taking off from St. Croix, once clear of the airport and attaining cruising altitude and speed, I engaged the autopilot NAV feature with the CDI source set for GPS on the Aspen Evolution which simultaneously sets it on the steam gauge HSI. Here is the one very minor issue you can correct yourself and that will be corrected in the next update: The NAV flag does not turn off on the HSI when the CDI source is set to GPS. The fix for this is quite simple. Open the settings menu for the GTN you have set as the master and tick the box for the Connect GPS to VOR option. Problem solved.
With that taken care of, the Bendix King autopilot display accurately depicts the NAV selection and continues to offer the options to change altitude and adjust vertical speeds during the cruise portion of the flight. As I near the entry waypoint for the guided approach, I am required to adjust my altitude to the required level on my own.
At the same time, I begin to reduce my speed in preparation for lowering the flaps to the ten-degree notch. Having reached the proper altitude, I activate the approach and the GPS takes over once it captures the approach at that entry waypoint. The display on the Bendix King changes appropriately to reflect that it has taken over the vertical navigation since this approach supports that operation.
The GPS navigation places me on the appropriate heading and at the proper glideslope for an accurate arrival. While the autopilot is managing the descent, I take the opportunity to complete the descent and landing preparation checklists. This allows me to reduce my speed to the published approach and landing speeds and set the flaps to full while letting the autopilot adjust for the resulting pitch changes.


This lets me focus on the speed adjustments so when I descend below 1000 feet, I can deactivate the autopilot and keep my focus solely on maintaining the set heading and pitch to remain on the glideslope. The landing happens right where it should and is one of my best to date. It doesn’t get any better than this since auto-land is not a feature on this aircraft.
Summary
So, my adventure with the Thranda Caravan comes to a close. That is not exactly true since this airplane has earned its place in my hangar as my go to aircraft and will be hard to displace once the floats are on it. I’m sure you can figure out where this is going to end based on that statement. First, though, let me again state that I have been a supporter and fan of Thranda since the Kodiak release.
But (and this is a big “but”) if for no reason other than my Thranda bias and my desire to provide you with as objective a review as possible, I went digging for things to not like about the Caravan. If you’ve patiently read through this entire review, you already know what those are. For folks who like jump to the end, I will briefly mention what I found.
There are some usability aspects of the menu system that could be a little better. Screens in high-resolution modes present a menu that is difficult to manipulate. Altering the size of the X-Plane interface resolves this but it does create problems including a need to reload the aircraft. When the interface size is put back, the plane requires reloading again. When the menu is displayed on a high-resolution screen, it is easy to click on the wrong spot and produce undesired results. With a model this detailed and thorough, it almost seems like an oversight to not have operation circuit breakers as part of the simulation.
Graphically, there is an extra bolt hole on the front landing gear strut, missing flap hinges, and some necessary sacrifices made in the occasional texture, and other details, for the sake of frame rates. There was an issue with the registration number in the dynamic livery if RealityXP is installed that has been corrected but that registration number tends to “glow in the dark” if you assign it a color other than black. It would be nice if there was some sense of glass left in the windows for folks that choose to turn off the reflections.
There are likely things about gauge operations or technical comparisons to the real-life aircraft that I am unable to comment upon simply because they have not appeared as problems to me. I am aware of some of them through forum posts but, in this writer’s humble opinion, these are items that I would not expect to be covered in a simulated aircraft. Some of these comments seem to be more an issue of a personal preference of those folks who are looking for a simulation model to function exactly as a real-world counterpart would. I believe those simulations cost a bit more money than X-Plane and a Thranda aircraft!
I do not have any complaints about the flight experience or the performance aspects of this aircraft model. There are a few things that took me a bit of practice to transition from my experience with the Kodiak but once done, the Caravan became a joy to fly. It’s somewhat surprising to find spoilers on an airplane of this size and even more surprising to see them actually function in flight. I also find it refreshing to fly an aircraft that almost demands it be flown “by the book”. I only wish there were more consequences to not doing so as there would be in the real world.
The panel varieties and versatility add to the enjoyment factor of the Caravan. This versatility is increased by the support for the RealityXP package. The additional support for the GTN 650 that was added due to customer request adds more possibilities for users of that package. It has been integrated without fault into the autopilot system as was demonstrated in my test flight. The sounds included in this package absolutely add to the realism of the flight experience with the only drawback being, though realistic, that muting the engine noise mutes everything.
A Word on Frame Rates
It is amazing to me at first glance, that a model like the Caravan affects my frame rates at about the same level as something like a heavy aircraft with highly detailed systems. After that first thought, I consider the issue further and realize this makes complete sense when taking into account the high-resolution textures and dazzling detail found in this model. Add to that the exactitude of the engine model, the programming required for the functioning systems, the number of gauges that are being updated even when not visible, the interactivity of the seats, and cargo that appears according to weight.
Other unique Thranda features include the ability to custom build your own panel, paint your own livery, change the metallic and reflective nature of that livery, and now an adjustable “feel” to the aircraft through the DynaFeel feature and the frame rate cost makes sense. With all of that, you can see in the following screen captures that, in the exact same situation, the Caravan has impacted my frame rates by about 10 fps. I have experienced lower rates but that also occurs with other aircraft and is likely the results of cloud density more than anything else.
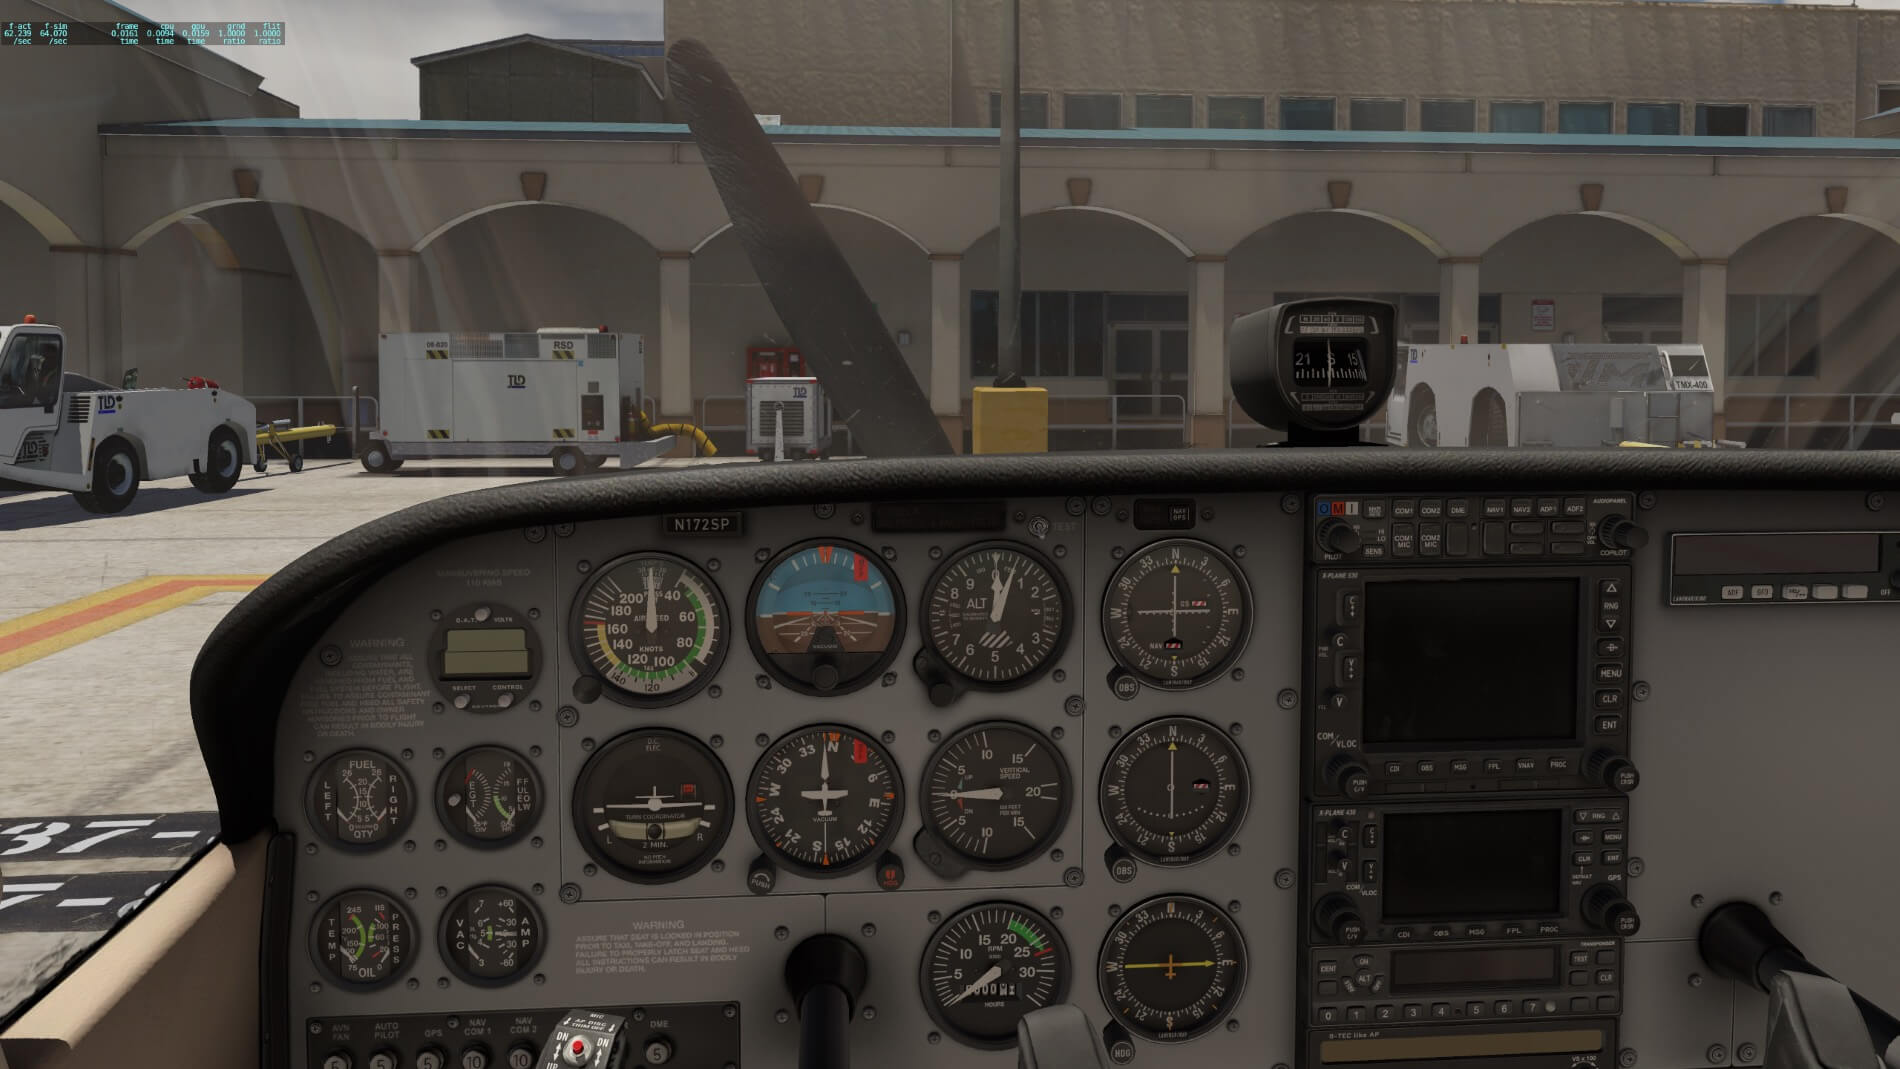

The thing about high resolution textures is you can reduce the texture quality in X-Plane and that will incrementally free up graphic memory and continue to look good. If you start with a high resolution and cut it in half, you still have more than a low-resolution texture and frame rates jump for those who need to use that option. Yes, the Caravan has an impact on frame rates but one has to expect that this level of modelling comes at a cost. It is up to each individual to decide if that tradeoff is worth making.
The Final Note
Okay, so you have plowed through this exceedingly lengthy opus and can probably figure out what my “bottom line” on the Thranda Caravan is. Despite the presence of three other Caravan models, this Caravan package is a must buy if you enjoy flying work horse turboprops. There is none better available for X-Plane 11 and this will likely be the only one that gets optimized for the upcoming X-Plane 12. The systems that Thranda has incorporated in this package bring it to a near “study level” flight experience.
There are two models to operate different missions with and each model has a passenger and freight variant. The possible missions are almost endless and will become even more so when the expansion pack that adds floats to the Caravan 675 is released. In this writer’s opinion, this model is well worth the 44.95 USD price tag and is likely to be around and updated for a long time to come if it follows upon the Kodiak’s six-year life span and that is continuing to grow.
I hope you enjoy your Caravan adventures and I welcome any constructive comments, notifications of any errata, and any questions you may have.
More information about the Thranda Caravan and Grand Caravan can be found at the dedicated Aerosoft store page and at X-Plane.Org.
Until next time, cheers and blue skies!
Feel free to contact me if you’ve got additional questions related to this impression. You can reach me via email Angelique.van.Campen@gmail.com or to Angelique@X-Plained.com.
With Greetings,
Paul Beckwith
| Add-on: | Payware Thranda Caravan 675 / Grand Caravan 208B |
|---|---|
| Publisher | Developer: | X-Plane.Org | Aerosoft | Thranda Design |
| Description: | Realistic rendition of the Cessna Caravan 675 and Grand Caravan 208B |
| Software Source / Size: | Download / Approximately 5.08GB (unzipped) |
| Reviewed by: | Paul Beckwith |
| Published: | June 1st 2022 |
| Hardware specifications: | - Ryzen 9 5950X CPU @ 3.40GHz - Nvidia GeForce RTX 3080 10 GB GDDR6X - 64GB DDR4 3200MHz RAM - Honeycomb Alpha Yoke - Honeycomb Bravo Throttle Quadrant - CH Products Pedals |
| Software specifications: | - Windows 11 - X-Plane 11.55 (64 Bit) |
2 Comments
Submit a Comment
You must be logged in to post a comment.
A most excellent and detailed review. A big thank you Paul for that.
I am still finding my way with the ooh so many features this package offers and reading your review has given me several pointers and answers to questions I didn’t even know I had (yet).
Very well done to both you and Thranda.
Cheers
TinkerNZ
Thank you for the kind words, TinkerNZ. I’m glad you were able to find things in it that were relevant for you. Cheers!