Global Performer … the ToLiss A340-600
Dear readers,
As usual with our reviews, while exploring the product, testing and testing, adding some tutorial look alike sections in it, our reviews grow and grow and before we know, they are very long, but we always try to offer high quality content. Because of our in-depth reviews, we from X-Plained.Com are never the first in releasing reviews. Your personal reporter and ex-Airbus ground engineer and ex-technical trainer Angelique van Campen, started exploring the ToLiss Airbus A340-600 and while writing and writing, the review became longer and longer and more in-depth information was added. Because the review has become much longer then expected, Angelique added a Table of Contents. So lets check that out.
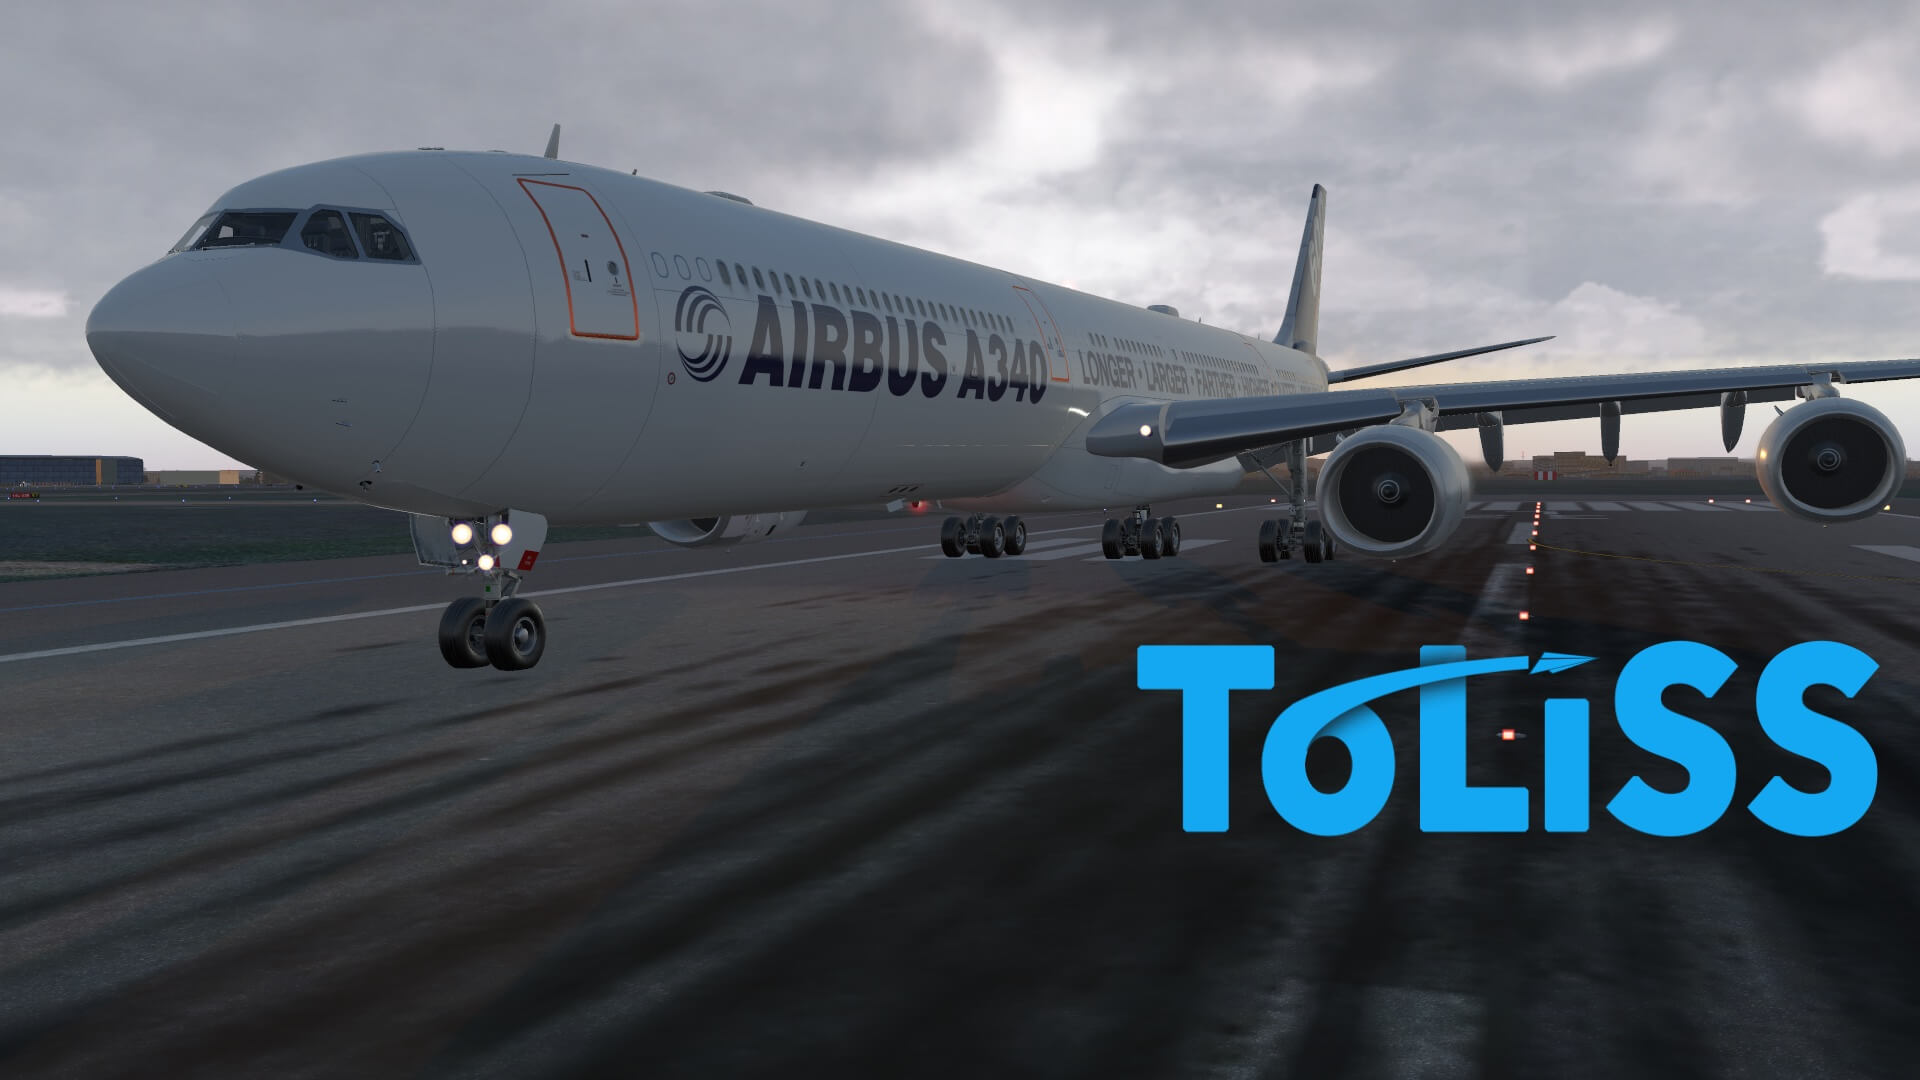
Table of Contents
The Real Introduction
The ToLiss Introduction
Manuals
– The ToLiss_AirbusA340-600_SimulationManual
– The ToLiss_AirbusA340-600_AircraftManual
– The ToLiss_AirbusA340-600_Tutorial
Definitions and Liveries
– High or Standard Definition
– Liveries[/retweet]
It’s the virtual Year 2001, April 20th
– External Inspection
Flight Deck and Virtual Cabin
– Virtual Cabin
– The Flight Deck
Part I – Flight Plan Preparations
– Flight Plan Programs
– Loading the Flight Plan
– Creating/Saving ToLiss Flight Plan
Part II – Hardware Preparations
Part III – Cockpit Preparations
– ISCS Configuration
– Ground Handling Equipment
– Standard Operating Procedures
– Cost Index
– SID and STAR
– AviTab
It’s the virtual Year 2001, April 23rd
Part I – Airbus Test Flight
– Pushback
– Engine start
– Taxi
Part II – Airbus Test Flight
– Take-Off
– Initial Climb
– Climb
– Cruise
Part III – Airbus Test Flight
– Descent, Approach, Final Approach and Landing
Frame Rates
Summary
The Real Introduction
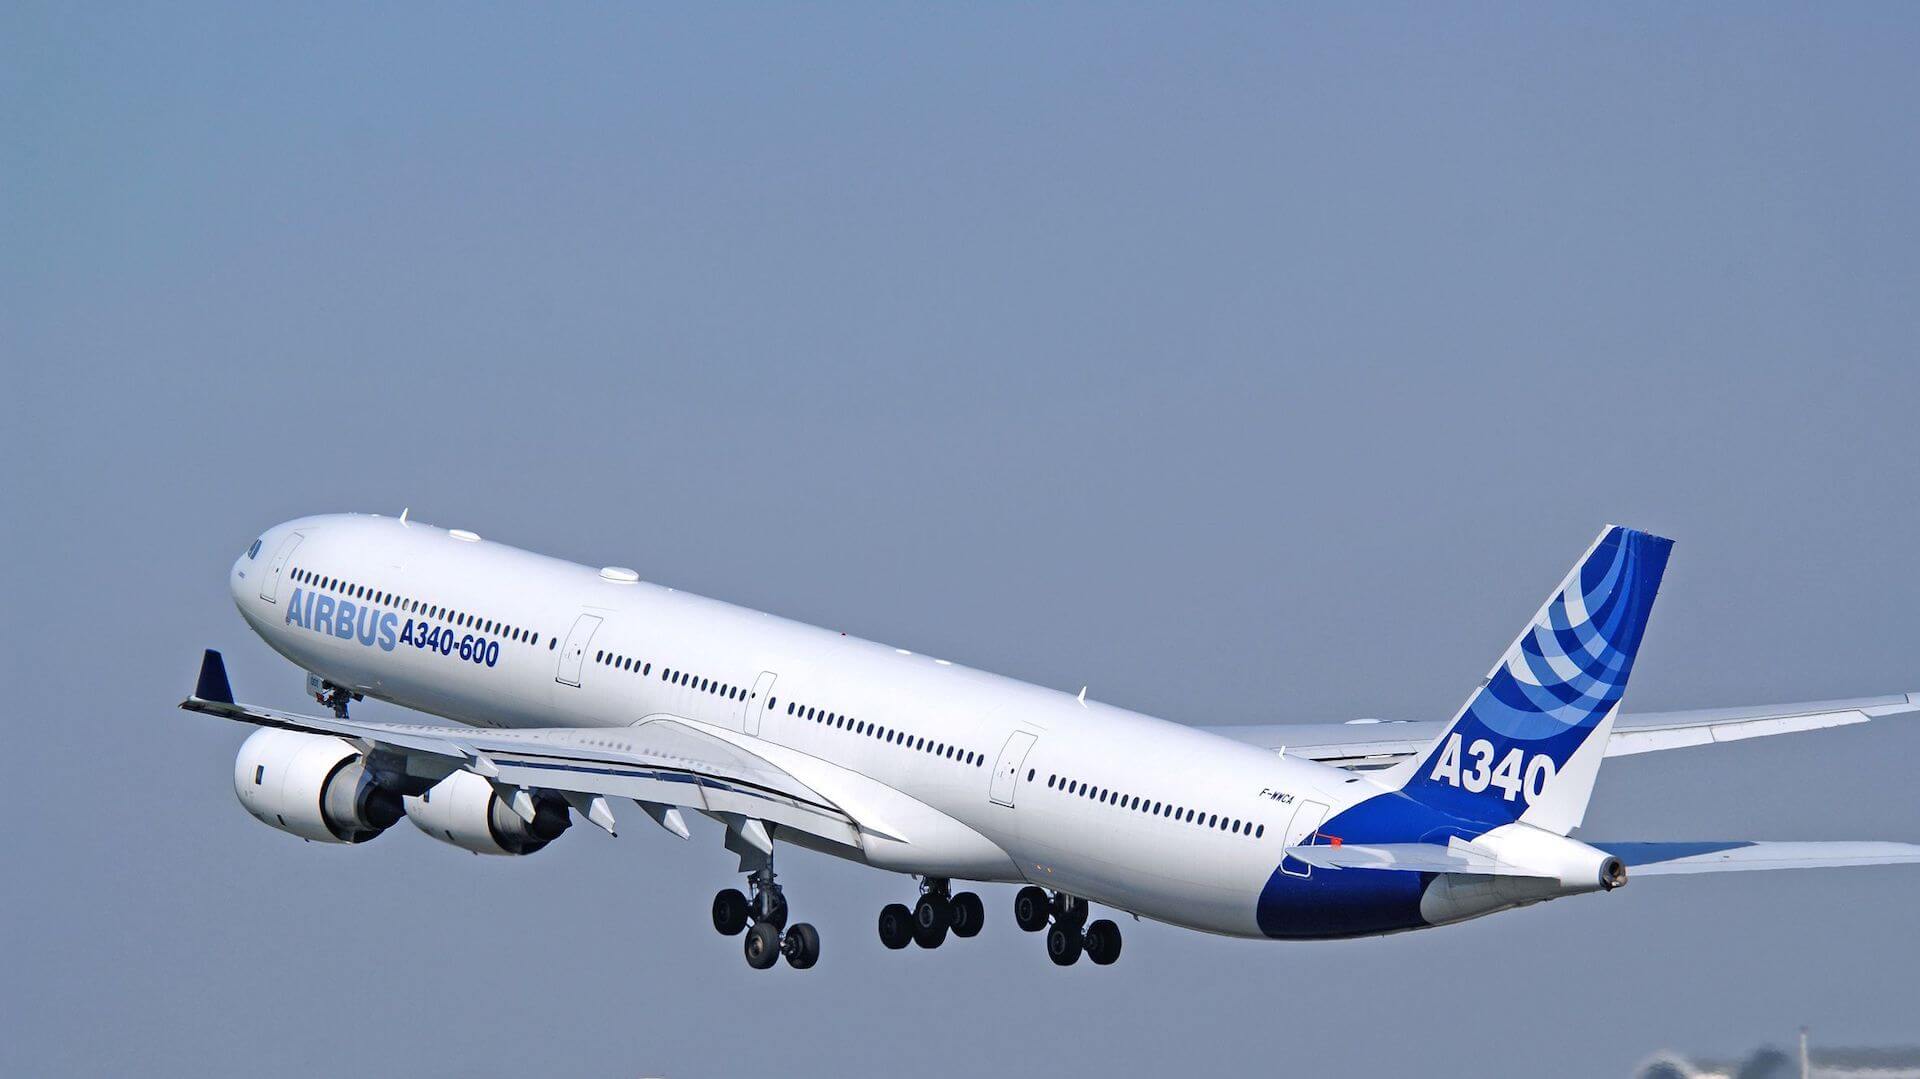
The A340-600 is the largest-capacity member of Airbus A340 Family, with an overall length of 75.36 metres and accommodations for 320 to 370 passengers (or 475 in high-density seating). The aircraft – which can be used effectively in commercial, corporate or government operations – includes state-of-the-art technologies such as weight-saving composite structures and a fuel-saving aerodynamic design, along with pilot-friendly cockpits, flight controls and systems. (Courtesy of Airbus Group)
The Airbus A340-600 is the largest of the Airbus jetliners and is a super-stretched version of the A340 family of aircraft, but you’re already aware of this.
The A340-600 maiden flight took place on 23 April 2001 and the aircraft was awarded type certification in June 2002. The aircraft entered service with Virgin Atlantic Airways which was the launch customer with 20 aircraft on order. In August 2002, the Virgin Atlantic A340-600 took its first commercial flight from London Heathrow to JFK New York.
Other customers include Air Canada (3), Cathay Pacific (3), China Eastern (3), Emirates (18), Etihad Airways of UAE (4), Iberia (11), International Lease Finance (14), Lufthansa (17), Qatar Airways (4), South African Airways (6) and Thai Airways (6).
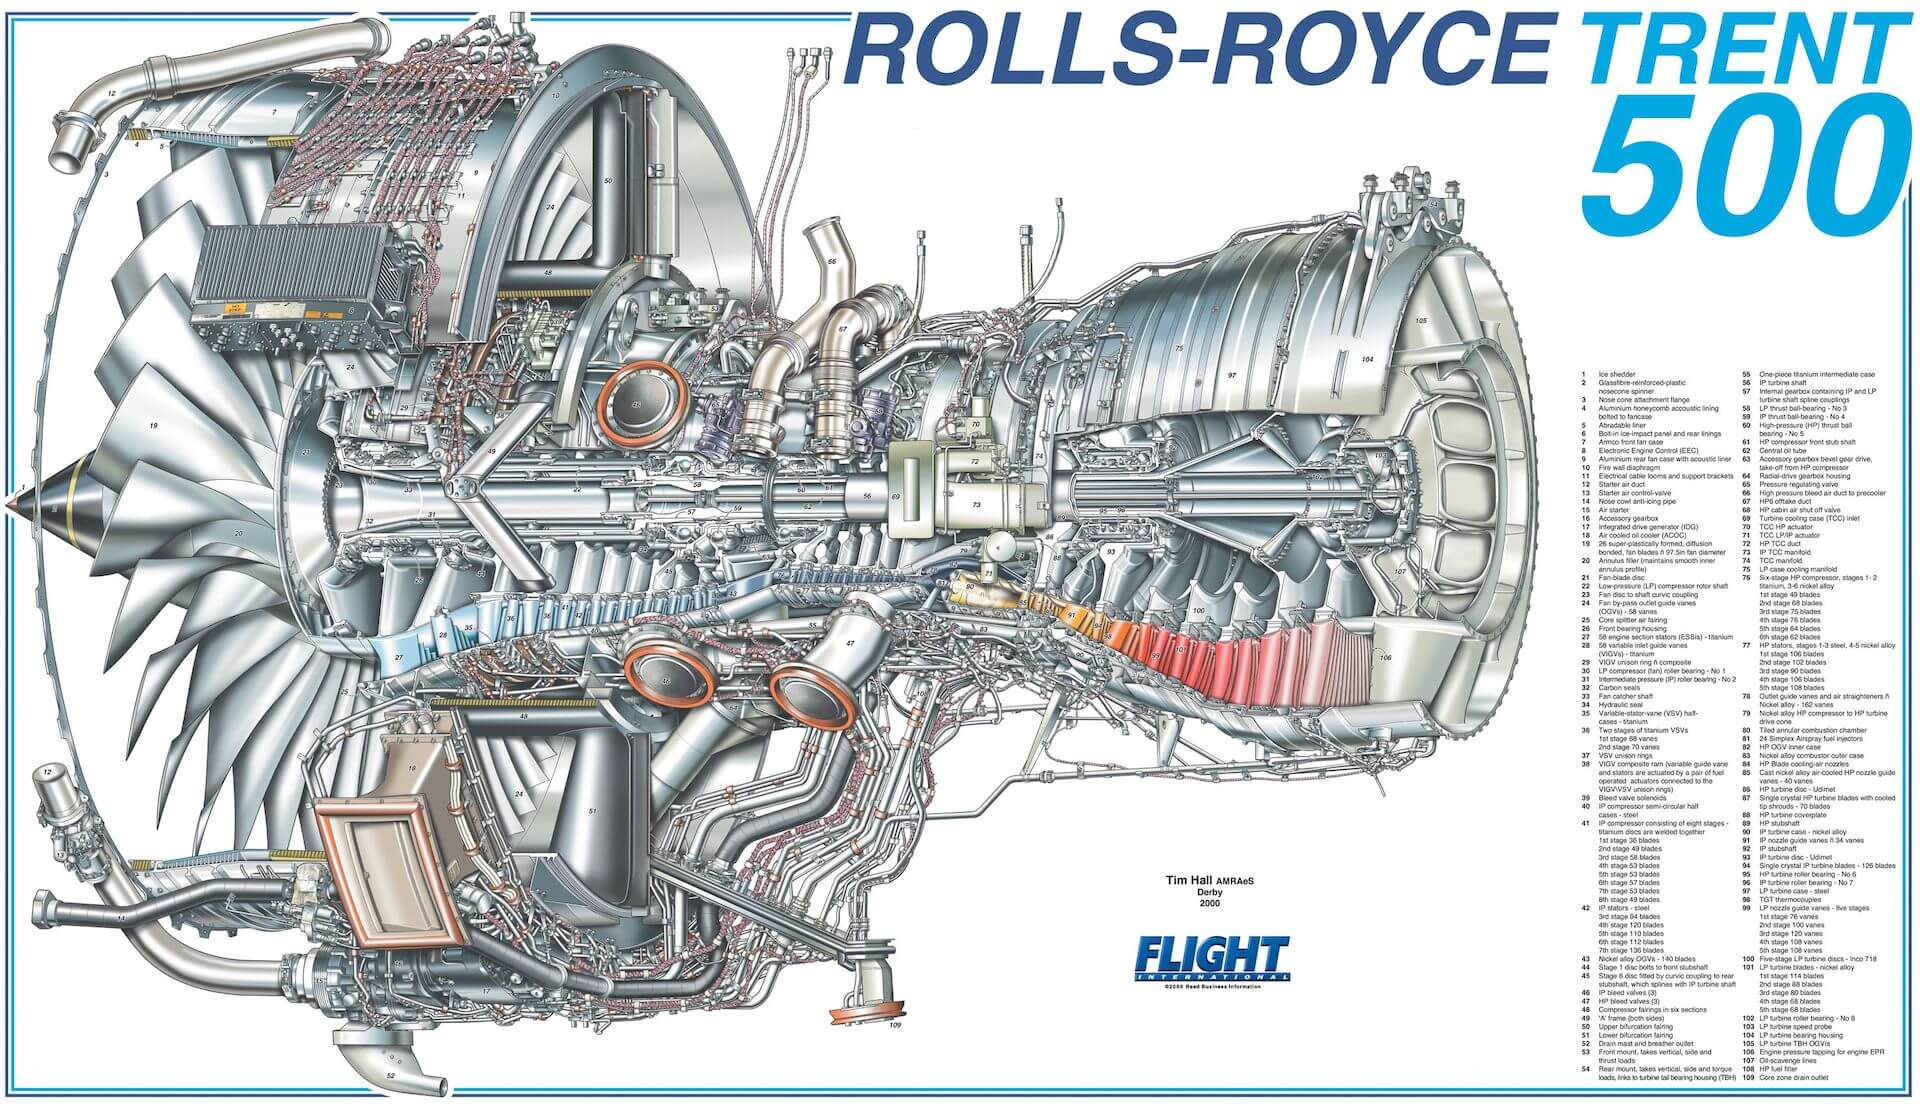
In December 2006, Airbus delivered the first VIP version of the A340-600 to SAAD Air of Saudi Arabia. The VIP version seats about 80 passengers. A new variant of the A340-600 made a maiden flight in November 2005. It was equipped with upgraded Rolls-Royce Trent 500 engines and uses construction techniques developed for the A380 such as laser beam welding. The upgraded aircraft was certified by EASA (European Aviation and Safety Agency) in April 2006 and delivered to launch customer. Qatar Airways shortly after. In February 2008, an A340-600 was successfully tested with a new electric braking system developed by Messier-Bugatti with Airbus. The test included landings with automatic braking and rejected take-offs.
And then, a bit later, Airbus decided to stop the whole A340 program. How sad, but official Airbus certified X-Plane development group ToLiss gave new life to the Airbus A340-600.
One big advantage of a four engine aircraft is that the aircraft is free from ETOPS constraints, the rules that govern the operation of twin-engine aircraft on very long flights. Long-Range Operations (LROPS) rules, that will replace ETOPS, allow the A340-600 aircraft to overfly extreme regions such as the poles or the Himalayas. In an exceptional event of an engine failure, the aircraft can continue to fly safely over these extreme regions to the final destination without diversion.
The ToLiss Introduction
Another massive X-Plane Airbus jet has seen daylight. It’s just a coincidence that both JARDesign and ToLiss modeled the Airbus A340-500/600. JARdesign went for the 340-500 while the ToLiss team went for the Airbus A340-600. The story for both real A340-500/600 is in my humble opinion a sad story. Due to the competition with the twin engine 777, the A340 has a hard time and before we knew, Airbus stopped this extraordinary product. But X-Plane simmers are happy since they have the choice out of two A340 models with the Rolls Royce Trent 500 engines.
And ….. yes and no, this review will tell you as far as possible all about the ToLiss Airbus A340-600 and no, it won’t offer you a comparison between the JARDesign A345 with the ToLiss Airbus A340-600. Besides the price difference, there’s also a big difference in modeled systems and manuals with worth to mention that ToLiss Airbus models are officially Airbus certified.
For those of you who know the ToLiss Airbus A319 and A321, they will see many similarities with the A340-600 besides the fuselage, wings, wingflex, 3D cockpit or flight deck, so, basically the whole aircraft. The A340 Series fuselage is derived from the very old A300B, then the A310, A300-600, A330 and A340. All share the same fuselage except then of course for the length.
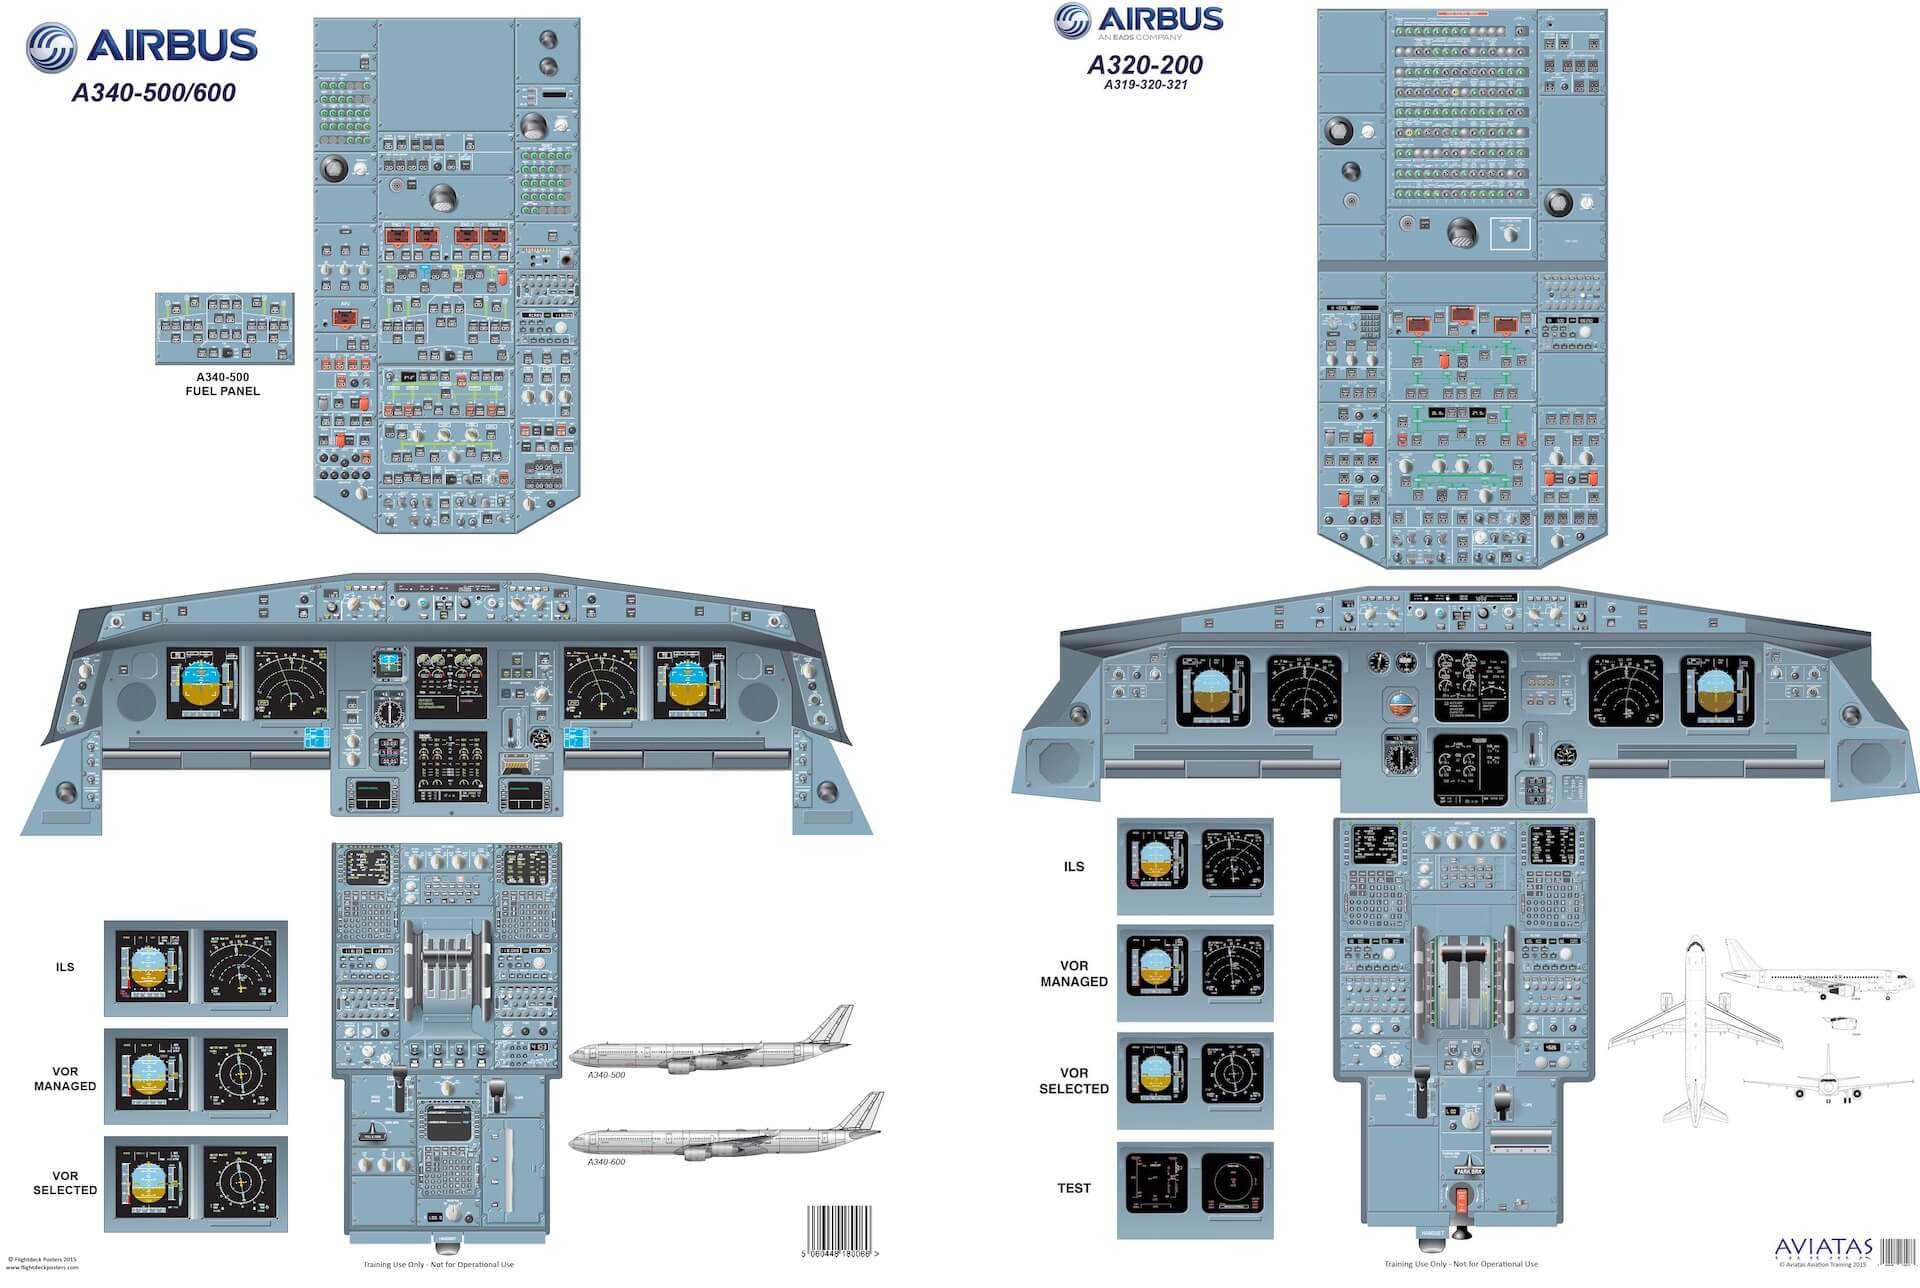
The wings are totally different then the older A310 and A300-600 as well as the cockpit however, the A340 cockpit is very close to the A330. You will notice that the instrument panel, overhead panel and pedestal are in a very similar way modeled, and worth to tell you that even the A320 Family cockpits have lots of similarities with the A330/A340 cockpit. They are of course not the same, but you can clearly see the Airbus philosophy and panel lay-out.
According to ToLiss Aeronautical Simulation Solutions “The ToLiss aircraft feature one of the best fly-by-wire systems in the desktop flight simulation domain providing great fun and high accuracy when hand flying our aircraft. ToLiss aircraft come with a custom FMGS featuring independent MCDUs with all important FMS functions, such as alternate, temporary and secondary flight plans, holdings, pilot item database etc. To round of the experience, we develop accurate 3d models replicating the real dimensions of the aircraft as closely as possible.”
Just to highlight this once more while further on Angelique will use the word ToLiss, but officially it is ToLiss Aeronautical Simulation Solutions. And, ToLiss is as far as my knowledge goes, the only X-Plane developer who is officially licensed by Airbus.
For sure the question pops up “will Angelique also cover the differences between the JARDesign JDA345 and this ToLiss Airbus A340-600? The answer is no. The reason that Angelique doesn’t like these comparisons is because these two X-Plane aircraft are differently priced, and their goal is different as well as the user group. ToLiss tries to create a “as real as it gets” Airbus A340-600 while JARDesign tries to offer a product what can be flown without too much background knowledge and easy to go. Ok, that was the only comparison I’ve made. Now it’s up to review the real ToLiss Airbus A340-600.
Manuals
The following Adobe Acrobat manuals are included:
– ToLiss_AirbusA340-600_SimulationManual (52 pages)
– ToLiss_AirbusA340-600_AircraftManual (59 pages)
– ToLiss_AirbusA340-600_Tutorial (127 pages)
The ToLiss_AirbusA340-600_SimulationManual
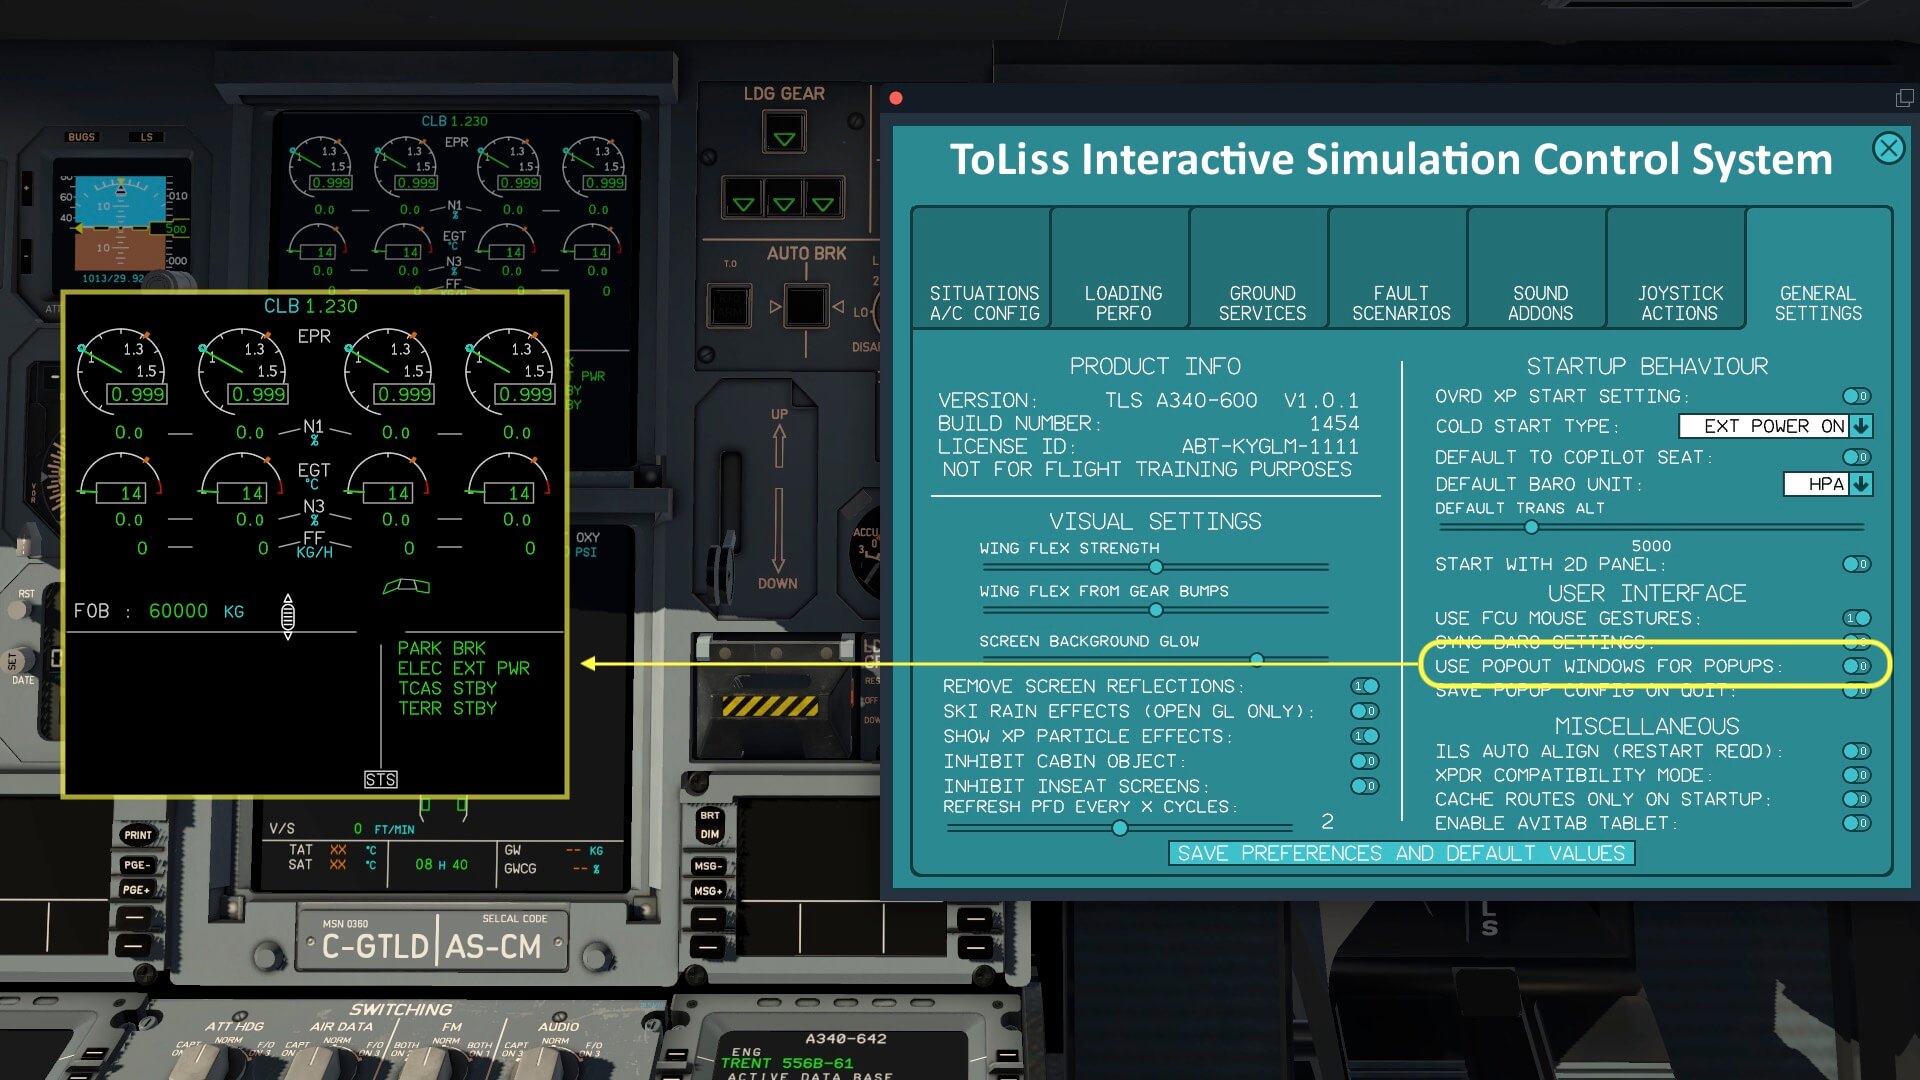
It’s covers all about how to install the aircraft, how to activation it, how to setup the A340-600, and how to deal with the Interactive Simulation Control System (ISCS), but also using ground services, introducing faults and the cockpit orientation as well as trouble shooting.
I say it again, I know, when you own other ToLiss Airbus aircraft you’re familiar with the ISCS panel. This ISCS popup window is the place where you can make all the necessary settings/changes to the A340-600 like:
– Situations A/C config(uration)
– Loading Perfo(rmance)
– Ground Services
– Fault Scenarios
– Sound Addons
– Joystick Actions
– General Settings
Once you’ve downloaded the A340-600 from X-Plane.Org or Aerosoft, there’s no need to re-download the package again when ToLiss releases an update because the package comes with the Skunkcrafts Updater config file that, together with the Skunkcrafts plugin, updates your aircraft as soon as a new update is available.
Further on, the manual goes deeper into the assignment and calibration of your hardware equipment and also how you can use and assign this with the Thrustmaster TCA Airbus Pack. When you use the standard 2 engine TCA pack, don’t forget to select the switch at the front of the TCA throttle quadrant from 1&2 to 3&4. And since the ISCS is the place to make all the changes, it is very well explained in this manual. I’d thought to add something to this, but it’s really in-depth described, so please print it out or read the contents on a second monitor or tablet. It’s not worth it, it’s mandatory stuff to read!
There’s so much more in this Acrobat manual. Chapter 4 for example goes deeper into the cockpit orientation. This means it goes deeper into the view commands, popups, swapping seats to fly from, brightness control and the AutoFlight FCU (Flight Control Unit). Remember, this is a manual that doesn’t go into the functionality of the modeled aircraft systems. No, instead it’s mainly about the ISCS and other related settings and assignments. Although the next manual I will discuss is just as important, this Simulation Manual is your start.
The ToLiss_AirbusA340-600_AircraftManual
This Aircraft Manual covers most of the ATA 100 aircraft systems in detail. Worth the reading I would say, no no, I must say, a must to read since this will be your base knowledge in mastering the A340-600.
For those who aren’t familiar with the ATA 100 system, here’s some background information about the ATA 100. ATA 100 contains the reference to the ATA numbering system which is a common referencing standard for all commercial aircraft documentation. This commonality permits greater ease of learning and understanding for pilots, aircraft maintenance technicians, and engineers alike. The standard numbering system was published by the Air Transport Association on June 1, 1956. While the ATA 100 numbering system has been superseded, it continued to be widely used until it went out of date back in 2015, especially in documentation for general aviation aircraft, on aircraft Fault Messages (for Post Flight Troubleshooting and Repair) and the electronic and printed manuals. (Courtesy of WikiPedia)”
At page 38 the manual continues with Limitations, followed at page 43 with Standard Operating Procedures. As stated in the following paragraph “Note that these procedures are for reference and assume that the user knows the location of the individual switches. Please perform the tutorial flight ones for familiarization”, it is also discussed and explained in the tutorial document. Later more about the tutorial document, but these Standard Operating Procedures are in my humble opinion also important to read and try to follow each step in the modeled aircraft to familiar yourself with the cockpit.
And yes, it’s thru that when you own the ToLiss A319 or A321, you will see and face many similarities with the smaller Airbus aircraft. Although the A340-600 is of a different type then the smaller A320 Family aircraft, the layout of the overhead panel and pedestal including the way EFIS (Electronic Flight Instrument System) and ECAM (Electronic Centralized aircraft Monitoring) works, it very similar.
The ToLiss_AirbusA340-600_Tutorial
I know ToLiss tutorials already for a while and must say, they are awesome. Awesome because this is really a tutorial written in a way that every simmer understands all the steps to do, and to master this highly accurate aircraft. As ex-ground engineer and ex-technical instructor worked for KLM Engineering and Maintenance and LTT (Lufthansa Technical Training), I know the importance of good written tutorials.
As you might know, the ToLiss A319 tutorial covers a flight from Hamburg (EDDH) to Stuttgart (EDDS), with a go-around procedure at EDDS and a diversion to Munich (EDDM), but this is something you can’t do with this A340-600. And even the flight from their A321 is too short although it could be when no other aircraft is available. The A321 tutorial covers namely a complete flight from CYVR (Vancouver, Canada) to PHOG (Kahului, HI, USA) with a go-around in Kahului and subsequent diversion to Honolulu (PHNL).
Whatever you prefer, this A340-600 tutorial covers a much longer flight or actually a flight that belongs to the A340-600. As stated in the tutorial manual “This tutorial describes each step for a complete flight from Hong Kong, China (ICAO code VHHH) to New York JFK Airport, USA (ICAO code KJFK) with a go-around in NewYork and subsequent diversion to Boston (KBOS). This corresponds to the real life flight CPA830 which Cathay Pacific operated with A340-600 aircraft. The route goes almost straight over the north pole, so it is suitable to show long range operation at high latitudes.”
Will I use it for my review? No, I go back to the year April, 2001. Why? You’ll read that later on in this review.
Definitions and Liveries
High or Standard Definition
When you’re familiar with other ToLiss Airbus aircraft, you really don’t need to read this section else stay tuned. The model comes with two kind of definitions namely standard and high, but what does it mean? According to the Simulation Manual “The “Hi Def” version of the aircraft uses higher resolution textures and is the recommended aircraft to load if your hardware supports it. The “Std Def” version allows framerate improvements for weaker hardware, especially if you are low on VRAM.”
Adding to this ….. when you look into the aircraft Objects folder you will find png files that have added to their file names “StdDef” and some not. The “not” are the high definition files which are all 4K texture filers and the once with StdDef are all 2K. That makes the difference. The 2K texture files need less VRAM.
I wanted to know something more about it. Therefore I contacted ToLiss and they came with the following explanation; “The difference is flags that are set in X-Plane plane maker. Perhaps a complex story, but it loads the textures at different resolutions into the VRAM. It effects the external textures as well as cockpit walls, windows etc. The object for the panels itself doesn’t allow this flag.”
When you load the Standard-Def and Hi-Def textures and don’t see any frame rate drop, then most likely your PC or Mac is powerful enough. It’s also worth to tell you that for the external model there’s no difference in supplied textures, but for example for the 3D cockpit there are.
Liveries
The download package comes besides the ToLiss house livery, with two accurate painted Airbus house liveries. One of them is the original old fashioned Airbus livery with the blue, red, orange and yellow stripes on the tail while the other is of the modern blue livery. No worry that your favorite airline isn’t included. As of this writing, November/December 2021, many liveries are painted and are available via this at X-Plane.Org link. You will find a lot of airliners, some of the real A340-600 and some fictional. Those fictional are mostly from airliners who owned the A340-200, -300 or -500.
And now the question … with what shall I start?
There’s so much to see, so much to explore and so many hours to fly. Ok, lets go for an external inspection, then checking the Virtual Cabin followed by the 3D cockpit or flight deck.
It’s the virtual Year 2001, April 20th
External Inspection
Every aircraft larger then a Boeing 737, Douglas DC-9 or an Airbus A320 Family member cost much more time to inspect. Bigger jets like the Airbus A300-600, A310, Boeing 767, Boeing 747 Series, Boeing 777, Douglas DC-10 or MD11 and others, they are already huge and impressive, but the A340-600 is not only huge, not only impressive, but it’s also very long. When a normal ground inspection takes 10-15 minutes, then this A340-600 will take for sure up to 30 minutes to do a thorough ground check.
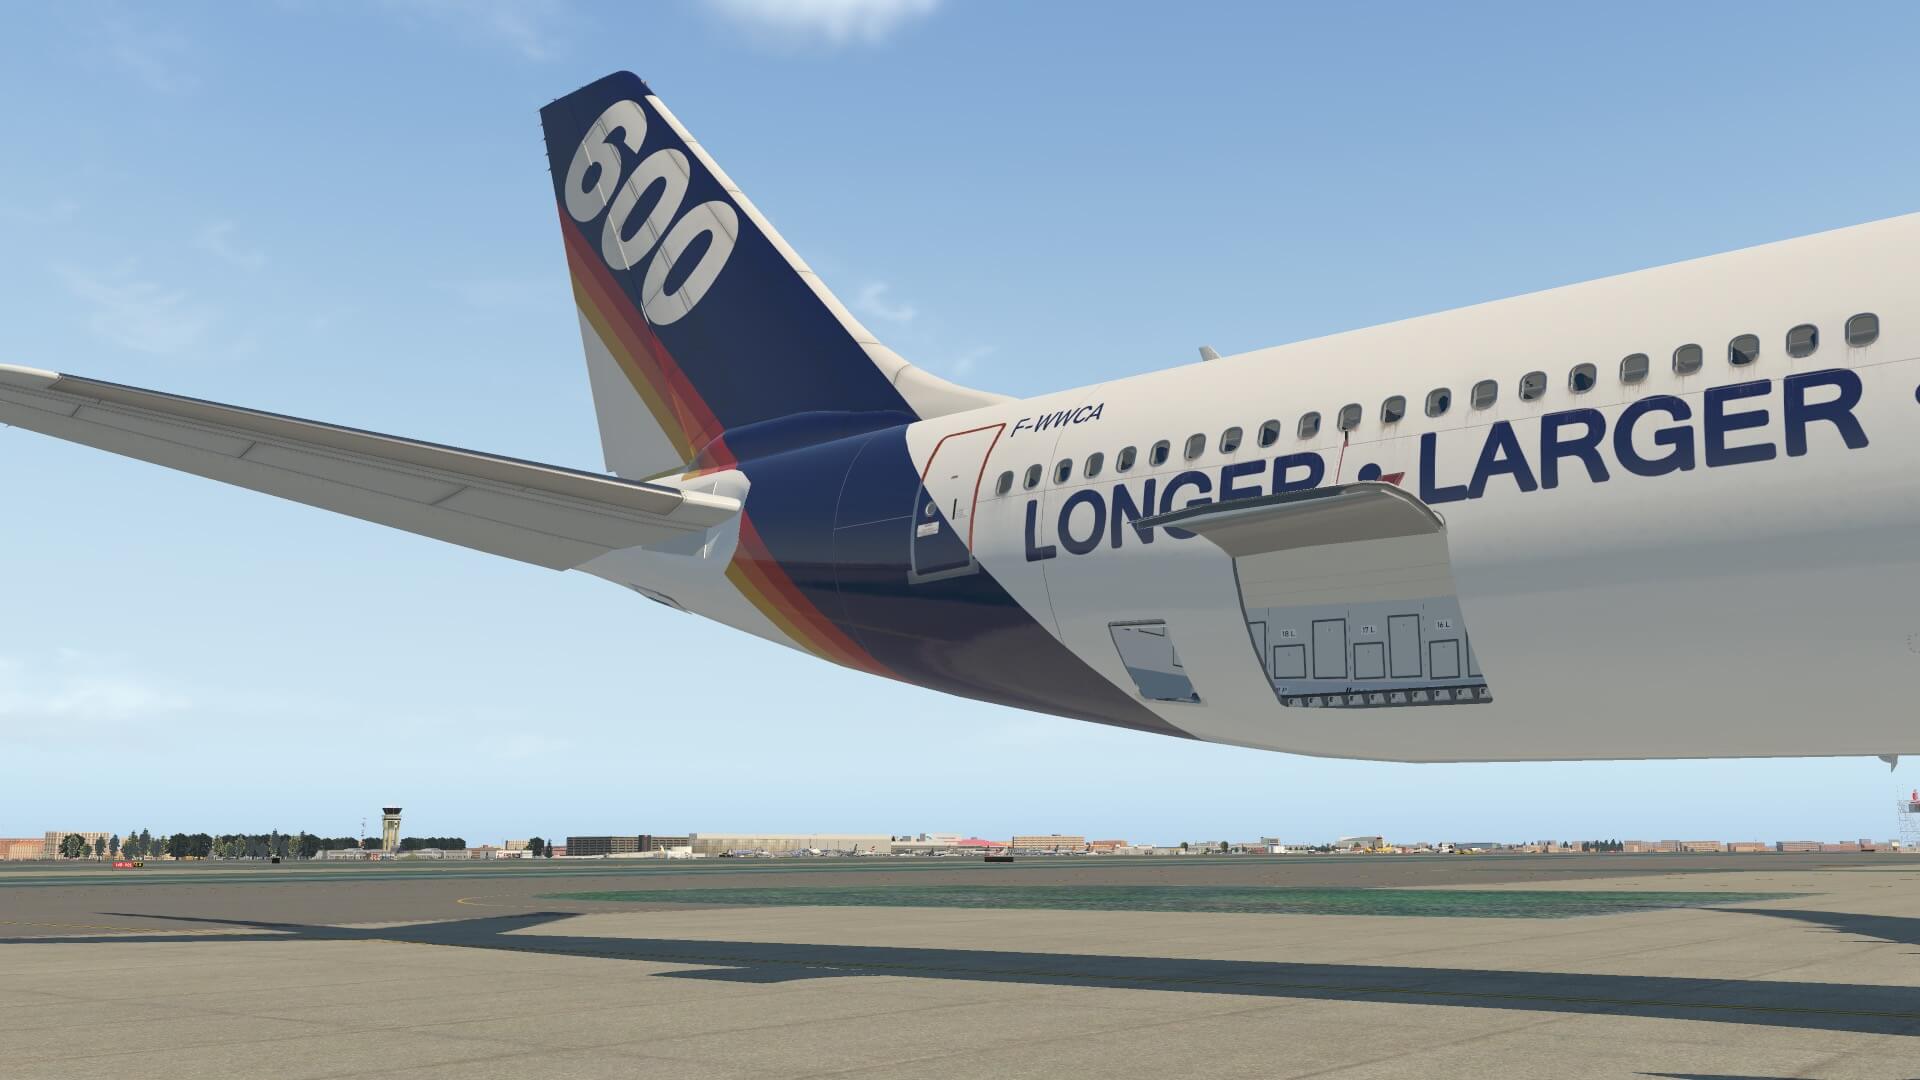
Right on, join me on my A340-600 ground inspection. I’m counting the year 2001, April 20th. This is 3 days before the real A340-600 made it’s maiden (first) flight from runway 32L LFBO. My ToLiss A340-600 is parked at area Ziegler. I chosen on purpose one of the default Airbus house liveries from ToLiss, painted by Christopher Tantow. It’s because it’s for me a moment to look back how it all started, not knowing that the A340-500/600 had such a short production life.
Funny that the overall fuselage, starting from the nose section till the end including the APU (Auxiliary Power Unit) compartment, is the same as the very first Airbus A300B Series, and also the same as my other Airbus baby, the A310. Ok, the A340-600 is a bit longer then the A310 or A300-600 neither less, the fuselage design and diameter are the same. One other thing I would like to highlight before starting with my inspection is if there’s a need to model all kind of tiny details, keeping in mind that every polygon means a possible frame rate drop. With such a long aircraft you need to make certain choices.
I start as always at the nose section by first checking the NLG (Nose Landing Gear). Besides that the NLG and wheel assemblies are a bit clean, assuming that the aircraft just left the hangar, I personally would love to see when the landing gear struts are a bit more dirty and slightly weathered.


Dirt due to the “virtual” grease is something you even see with brand new struts, but OK, that’s also a personal taste. Besides that, the NLG strut, wheel assemblies, the torque links, the NWS (Nose wheel Steering) or doors are all well modeled. Of course, the wheel well area isn’t covered with handmade- or photo-real textures since, I fully agree with this thought, you hardly see this. Not that it cost any frame rates, but on the ground the gear doors are closed. There’s no option to open them as with the real A340-600.
From a distance, but also when you zoom in on the placards, they all are razor sharp which is great news. The real fuselage is build up with Alu skin plates as well as is the modeled ToLiss A340-600 and therefore, this is something you can clearly see over the whole fuselage. Not all tiny details are modeled, but this is also due to the fact that all tiny details cost polygons and each additional polygon cost frame rates, as I mentioned before. Therefore each developer needs to balance between tiny details on the external model and available frame rates.
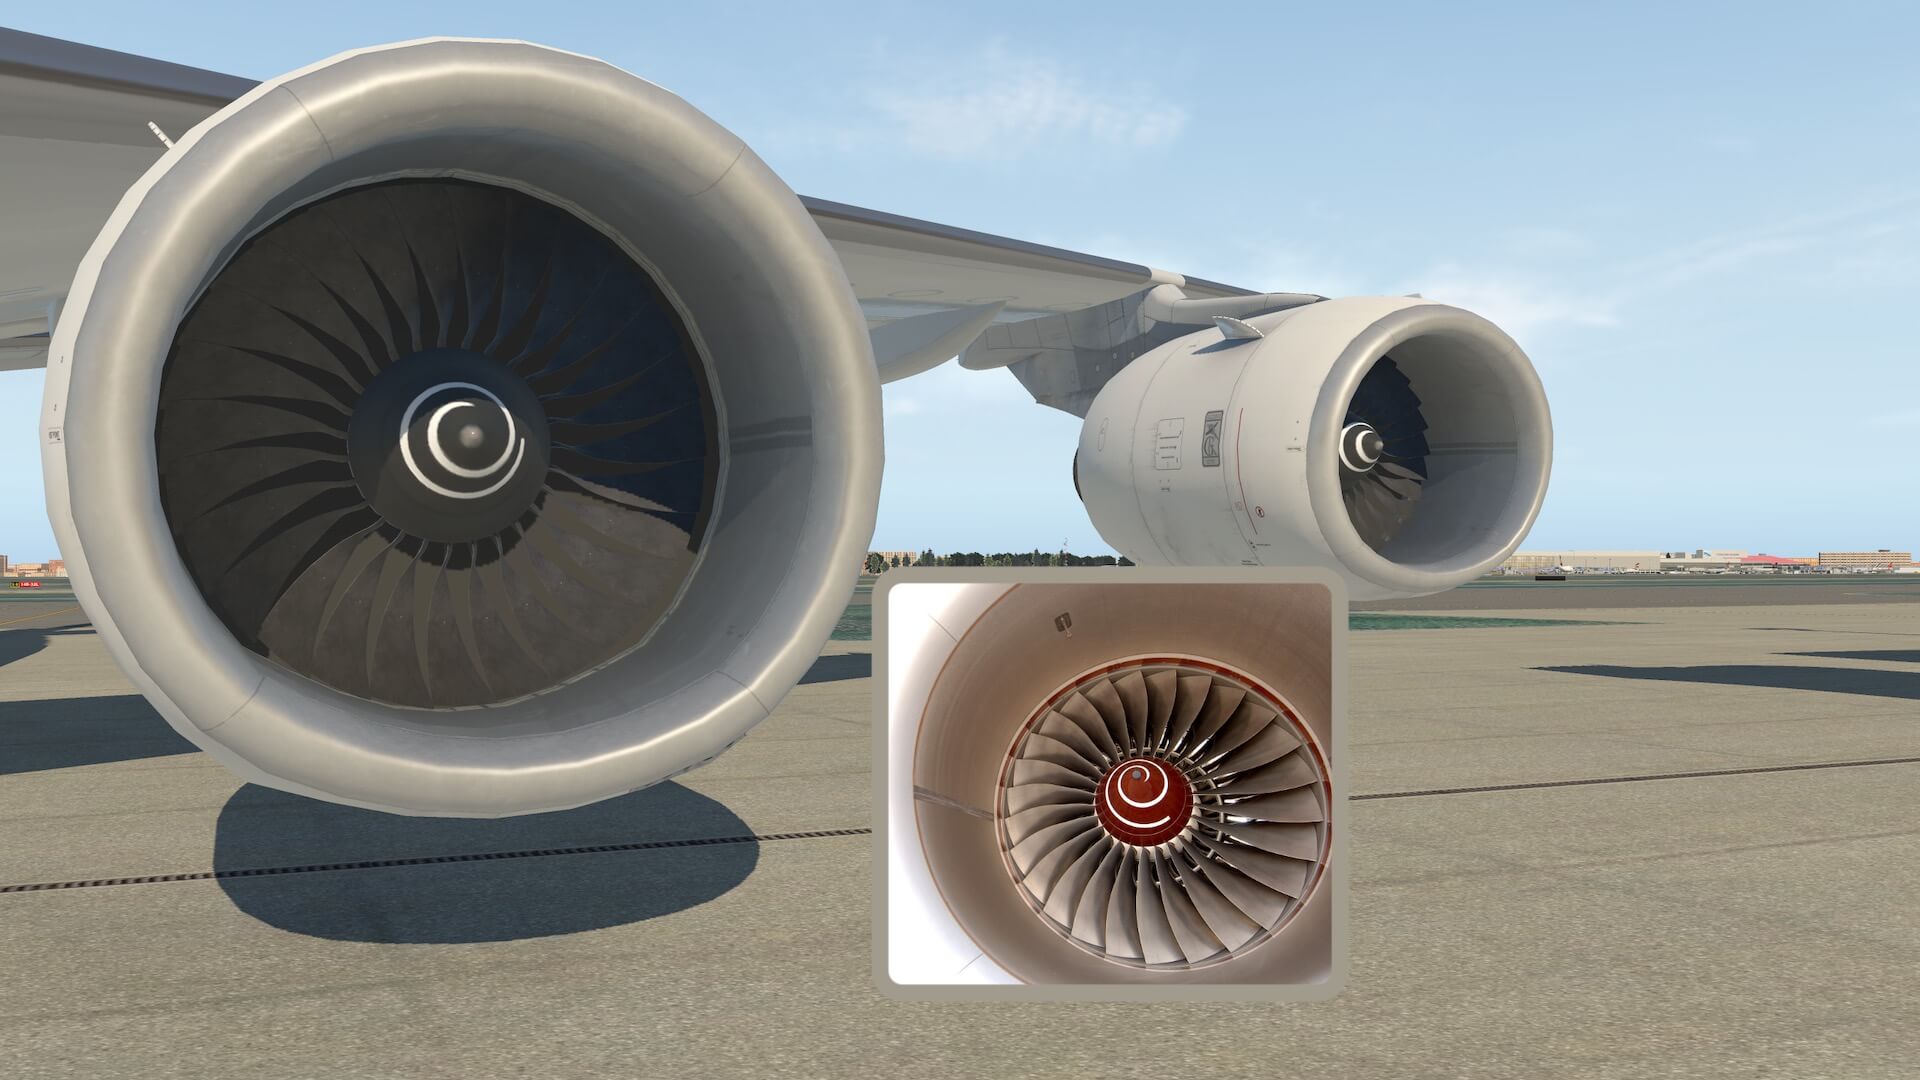
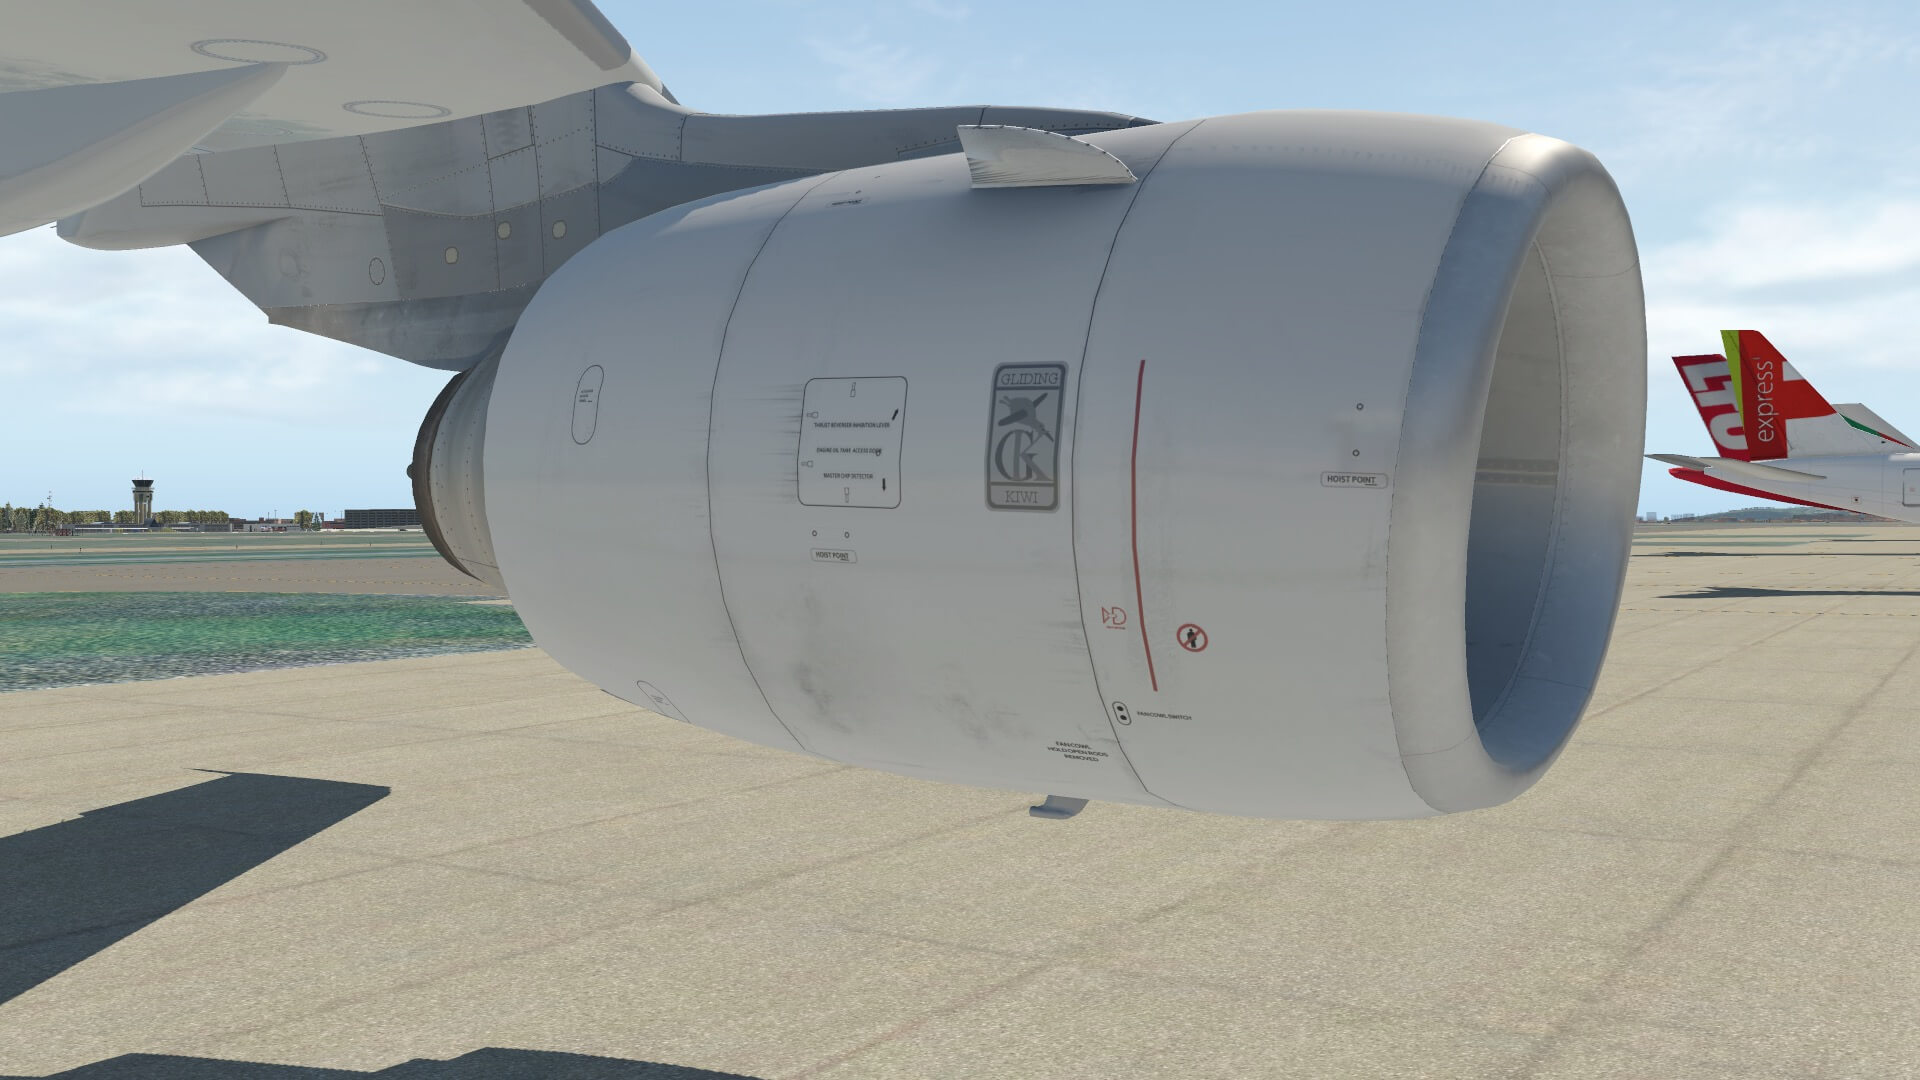
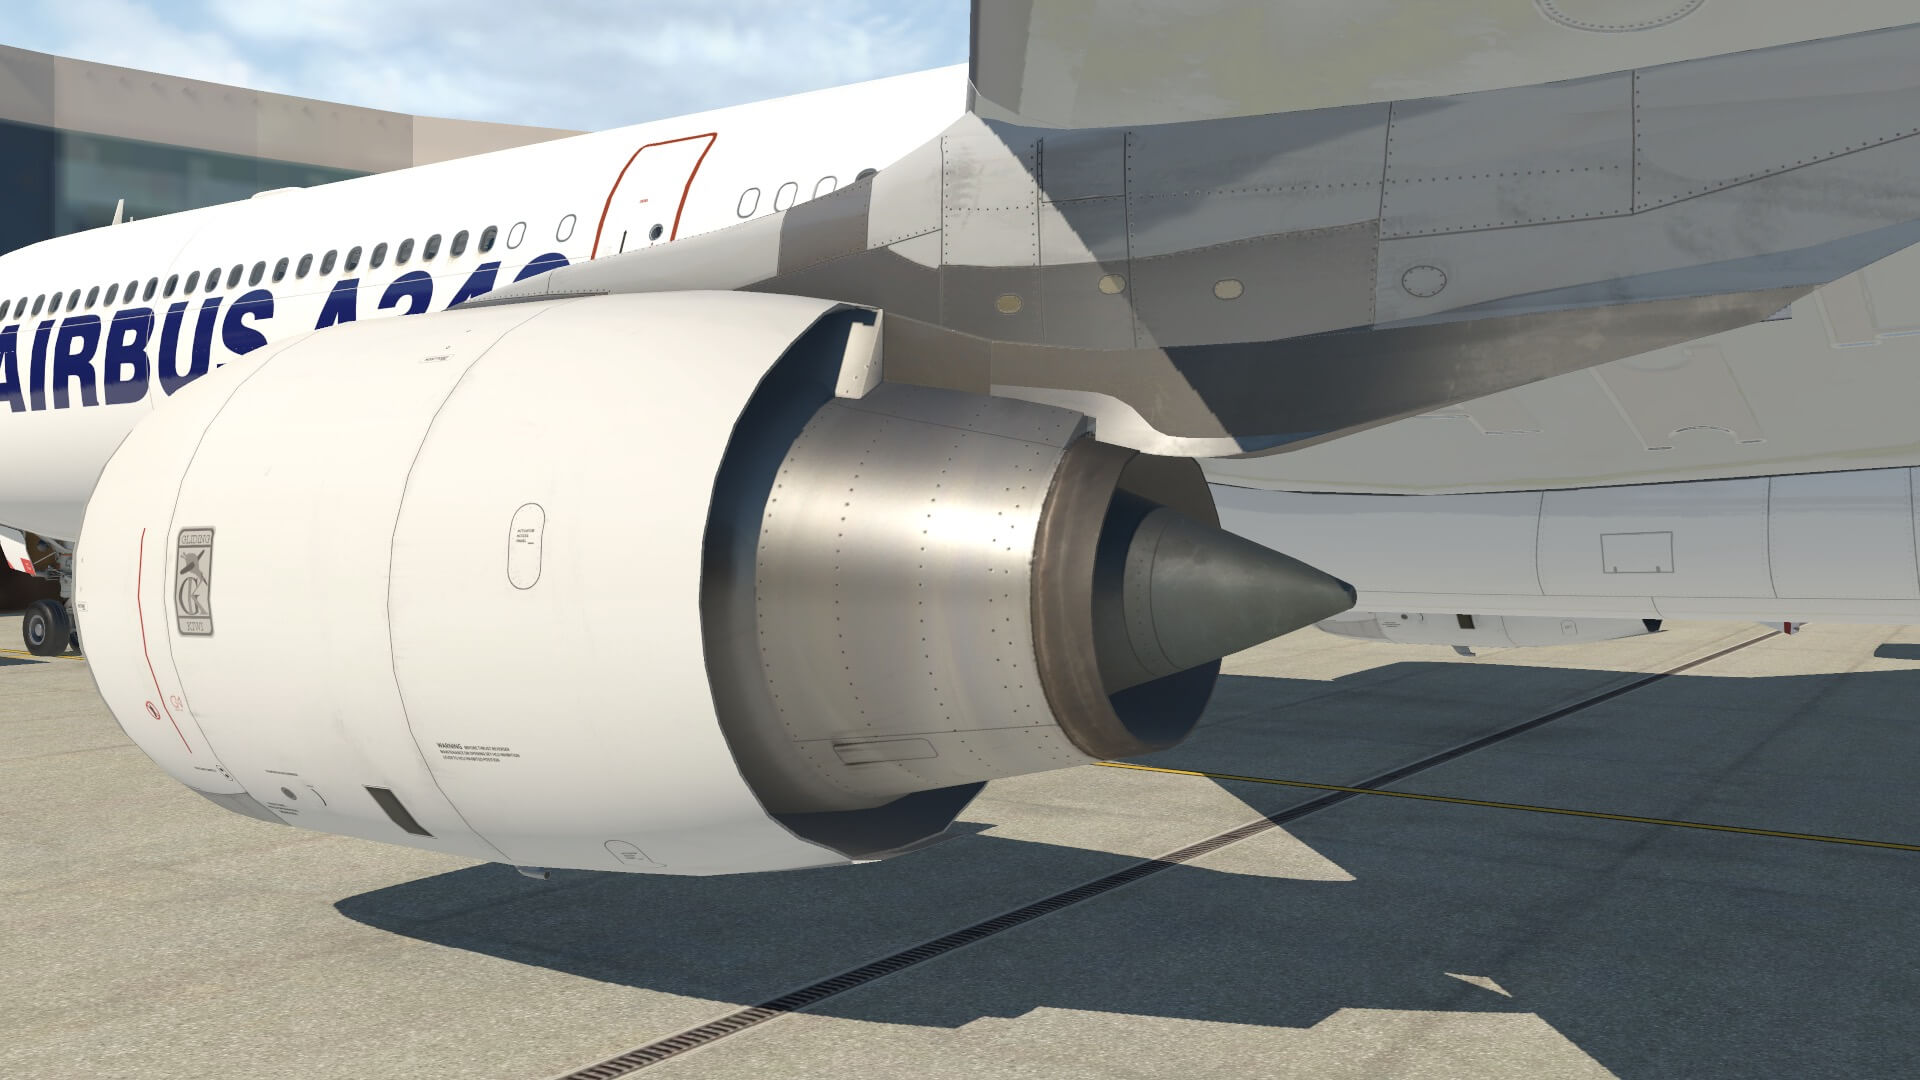
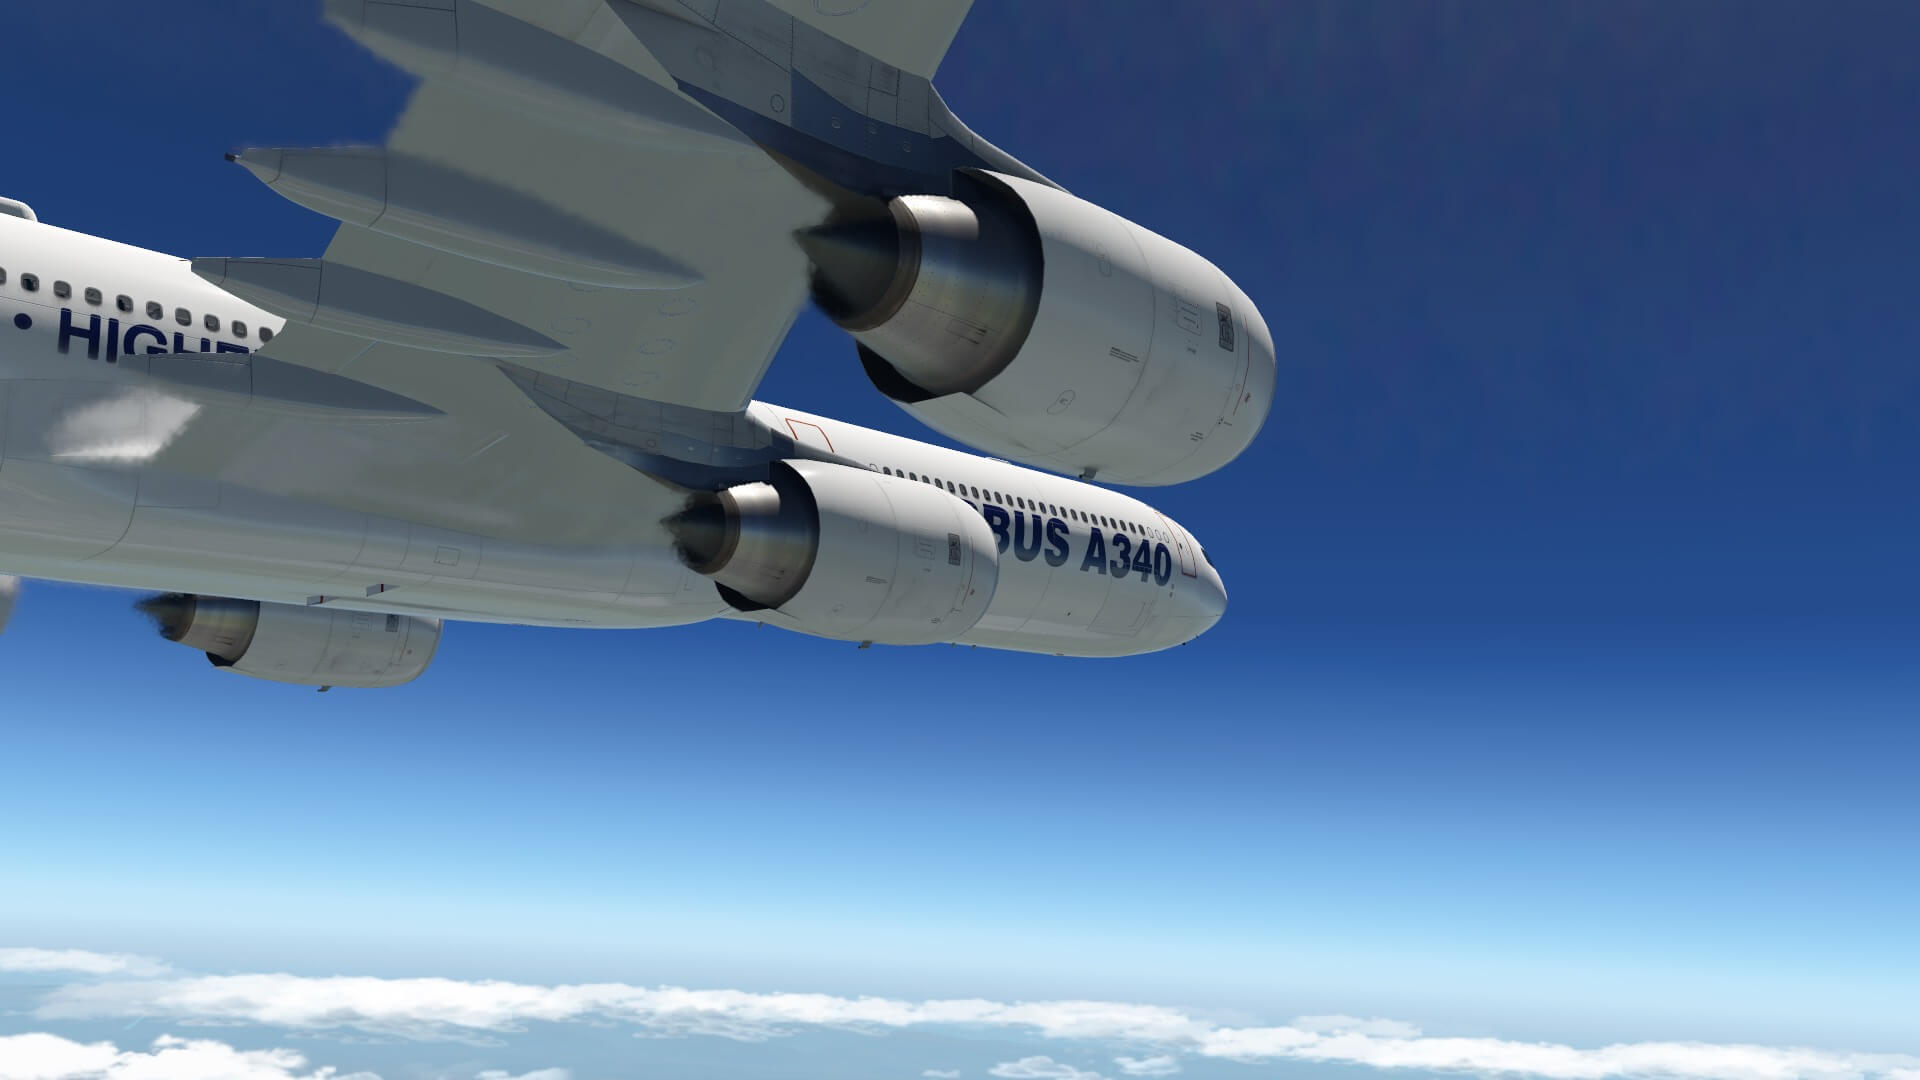
From the nose section I walk towards the Trent engines. The modeled Trent 500 Series engines do look like the real ones. And her too, the placards or decals on the engine cowling and fan casing are all razor sharp. Since everything is sharp, identifying where a panel is for or what’s behind it, is therefore very easy. The inside of the Trent nose cowling is nicely covered with sound reduction textures as it is in real too.
The special shaped real and modeled fan blades of the N1 rotor are looking great including the cone and I got the impression that it’s also a bit weathered. This weathered look is for sure applicable to the fan and engine cowling. Add to this the engine exhaust, the slightly rusted tail pipe and the way the engine pylon is modeled. You can see that the modeler tried to use different textures to create the different materials of which the real pylon consist of. And almost forgotten … I like the alternative of the Rolls Royce logo, the Gliding Kiwi logo. Cool!
I did see already at the X-Plane.Org forum different textures for the fan blades and inlet cone. I didn’t check that yet if these are more accurate then the textures files in the stock package.


Although the wing bottom and top surface is fairly clean, there are always places where things become dirty like at the rear/trailing edge side of the panels or around the fuel entry panels. This has nothing to do with the 3D model, this is more a texture matter. Hopefully with future updates the default wing textures will be updated to have a bit more dirt and weathering. I know from ToLiss that they are busy with updating their paintkit, so hopefully that dirt and weathering will be included or at least to give the painter the option to add this.
Checking the wingtip from the ground is in real already a struggle since it’s all too high, but I still have a good look how the front wingtip lamp unit with strobe and navigation lights are modeled. While looking to the wing bottom, I noticed that there’s a kind of technique used to simulate the Alu wing skin plates. It’s very nice since it reflects how a skin plate looks in real too. With the FLAPS, SLATS and SPOILERS extended I’ve got a good view of the spoiler panel operating system and the slat tracks. To preserve polygons and thus not to influence the frame rates too much, the spoiler actuators, its hydraulic lines at the wing rear/trailing edge spar are kept simplified.
Before moving to the tail lets first stop by the MLG (Main Landing Gear) and CLG (Center Landing Gear). Besides a couple of small issues I noticed which I shared already with ToLiss, the overall landing gears are looking good although a bit more weathering and dirt on the struts would be welcome. This is in my humble opinion also applicable for the large fixed MLG doors. It will just give the overall a bit more realism by adding some of this to the texture sheets.


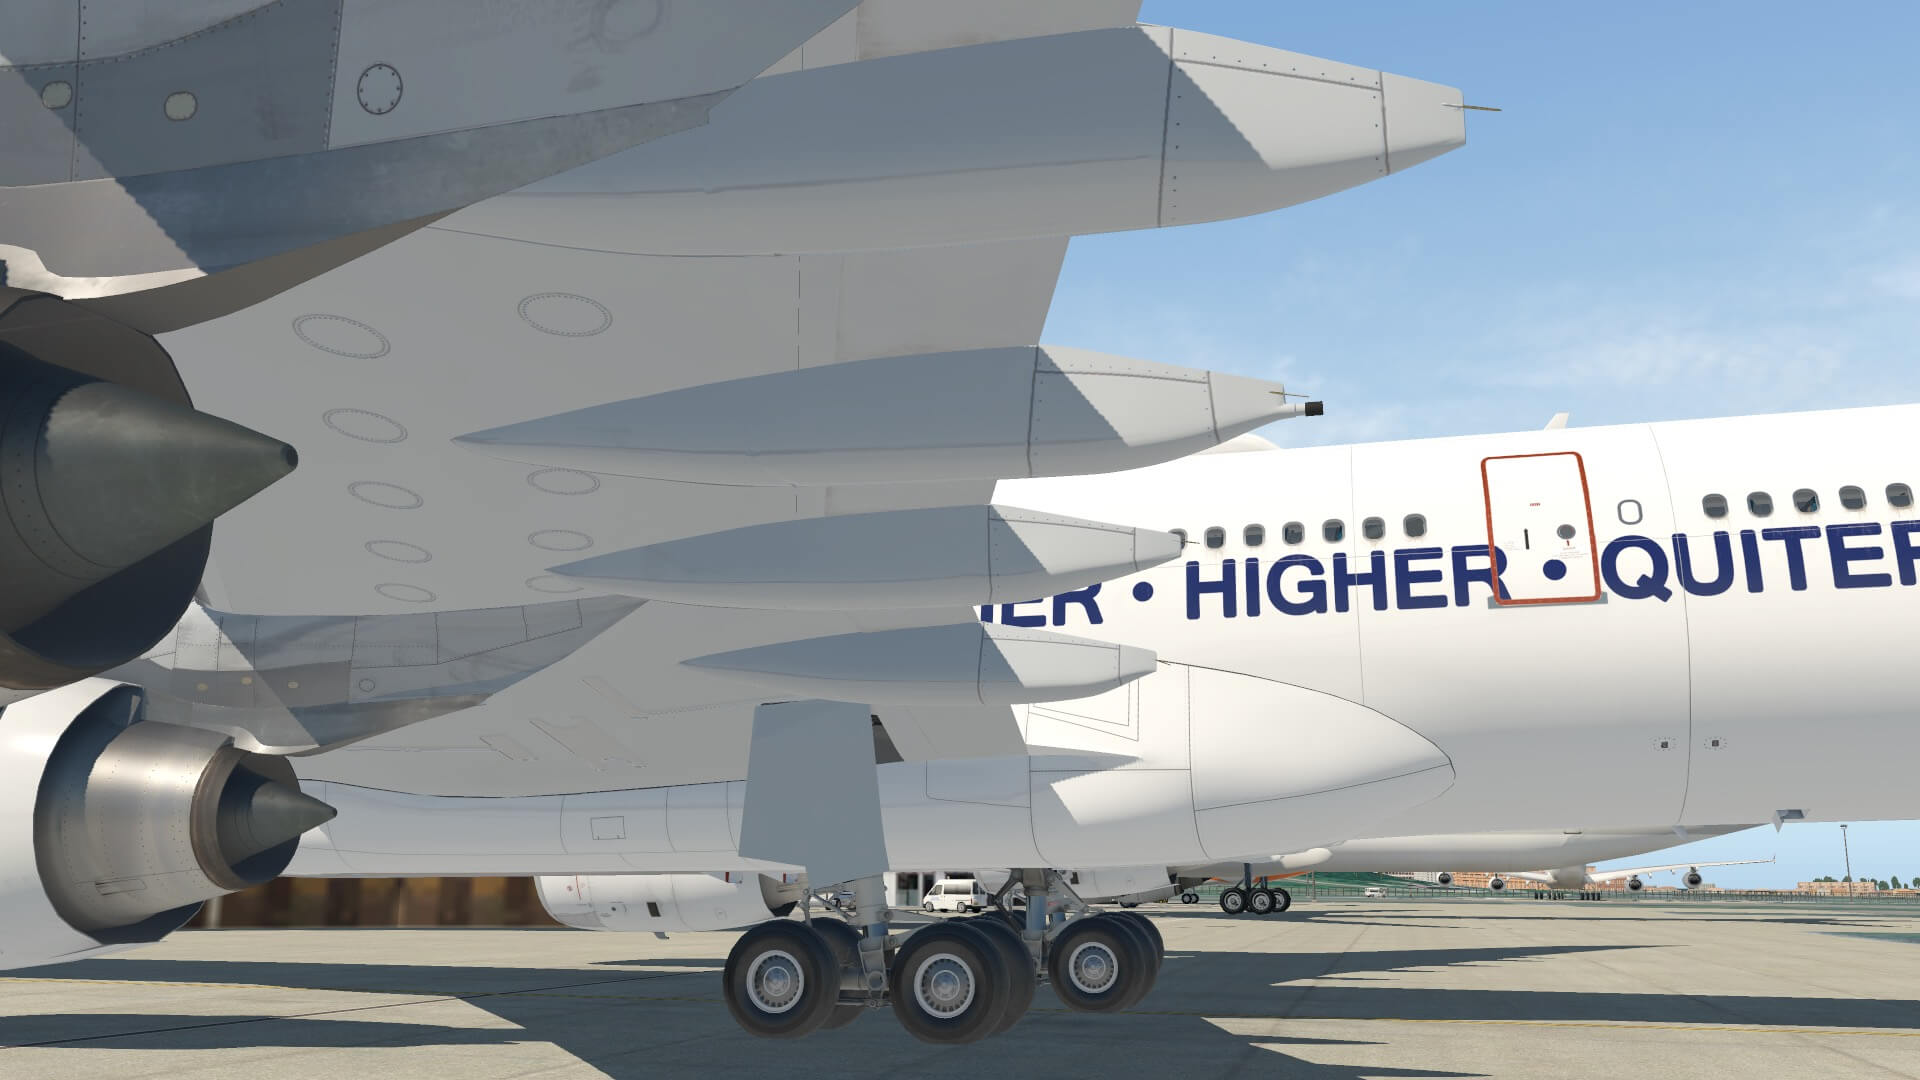


The tail is a typical Airbus wide body construction. I’m happy with the way the THS (Trimmable Horizontal Stabilizer) and vertical fin are modeled and covered with texture material. Some part do have some weathering which is good news. And I do agree when others say that brand new aircraft have no weathering yet, which is of course correct and it’s also a matter of taste. Although I didn’t highlighted this, at the wing trailing edge, the trailing edges of the flaps, ailerons, rudder and elevators, I see many static dischargers which of course, reflects the reality.
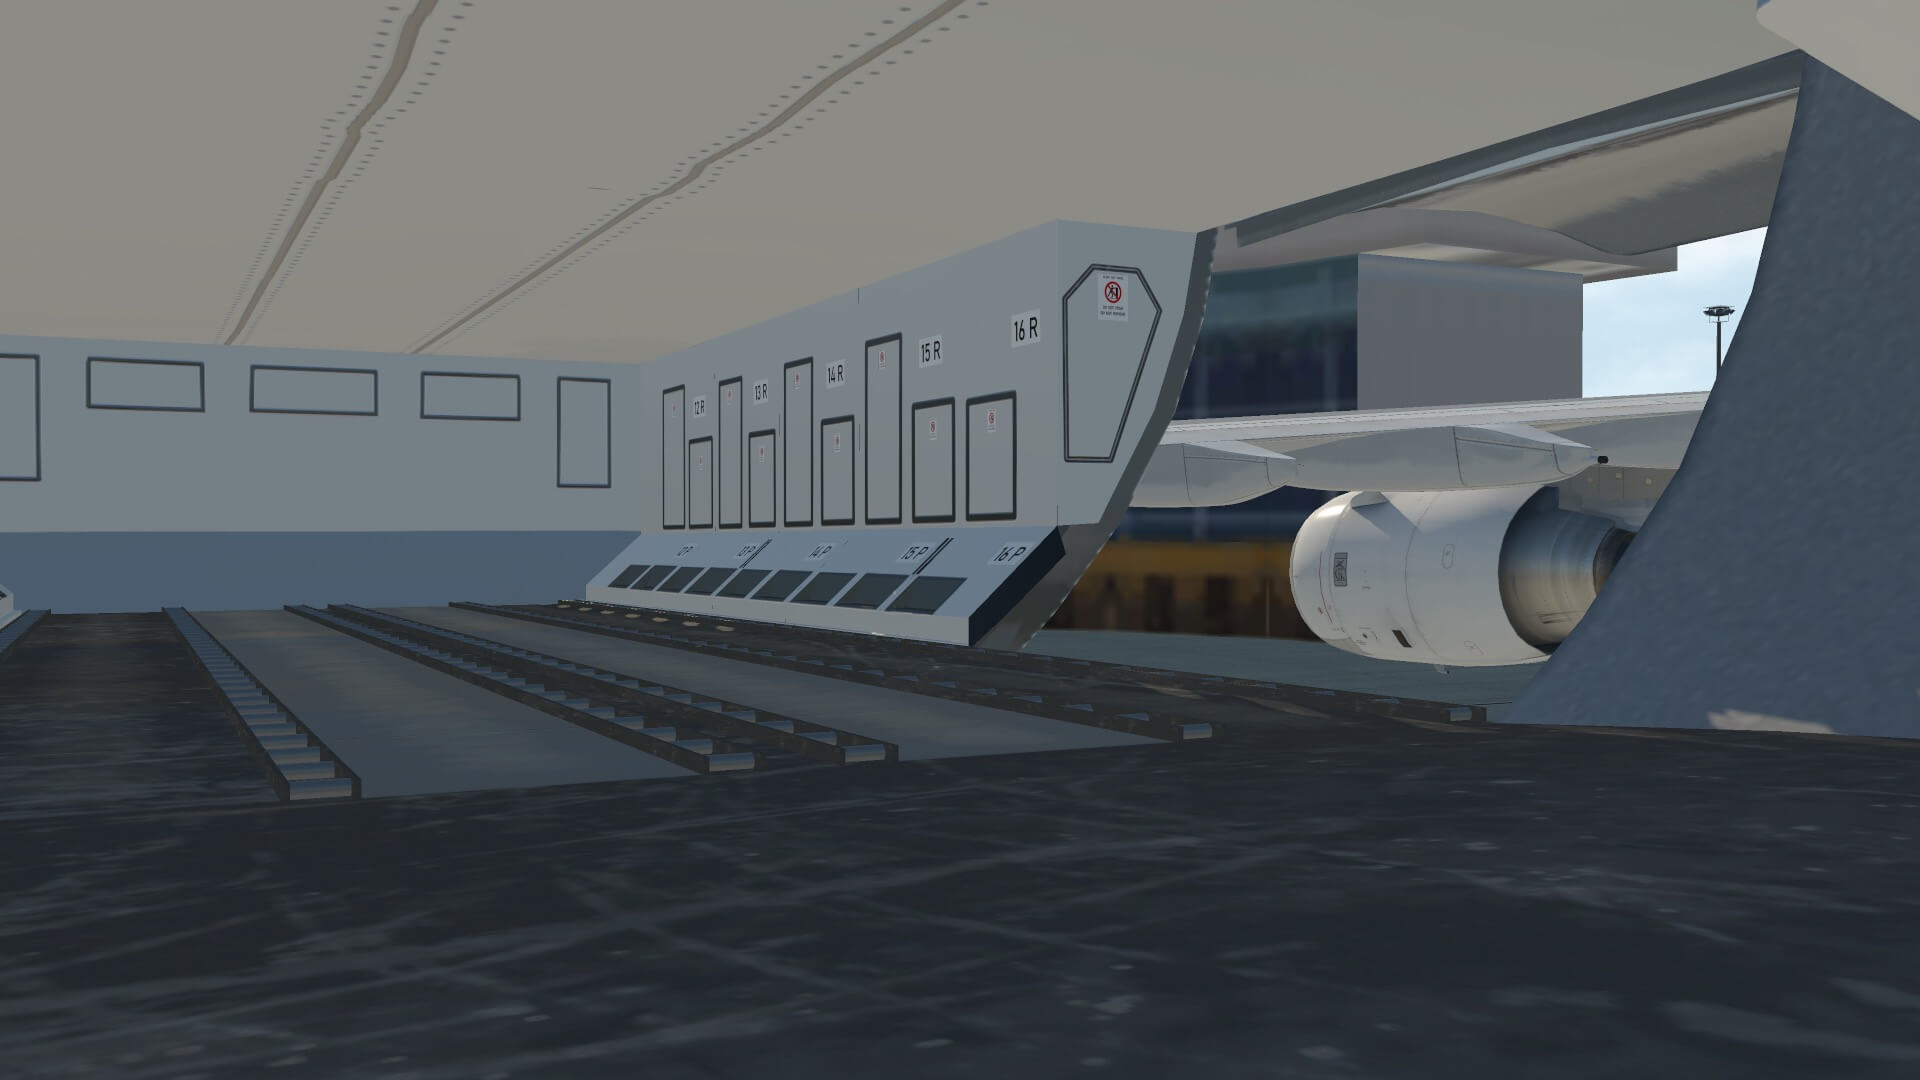
After the tail inspection I return back to the nose of the aircraft, but not before I have a quick look into the cargo compartments. They are basically modeled in a way that I like. Not too many details since you hardly see the interior of these areas, but the cargo area walls are covered with white panels and their identifications which is as real as it gets.


It’s now time to check out the virtual cabin and then into the 3D cockpit or flight deck, whatever you prefer. Come on, lets go.
Flight Deck and Virtual Cabin
Virtual Cabin
A stair is not included with the ToLiss A340-600 so either you need to use the JARDesign GHD (Ground Handling Deluxe) package or you park the A340-600 at the gate and enter the cabin via door 1L. I know that ToLiss priority lies in the overall quality of the 3D cockpit and in particular the simulated aircraft systems as well as the flight characteristics and thus how realistic the modeled A340-600 flies.
So, the virtual cabin. Honestly, it looks good. Lots of tiny objects are included and the overall cabin looks realistic, but don’t expect a virtual cabin as real as it gets. The cabin is one of these examples that makes the difference between loading a Standard Def or HiDef aircraft. Everybody has his/her own thoughts how a virtual cabin should look like or having your own preference, but also for me, I prefer a high quality flight deck with even more important, realistic systems. Although a nicely modeled cabin is always welcome, it has also for me not the highest priority. Oops, I’m aware that this is a personal statement and not objective!
Neither less, I find the modeled cabin OK as it is now since it comes with different classes. Entering the cabin via door 1L allows me to view the FWD galley with all kind of objects I can expect as well as the well modeled and covered door lining with the emergency slide. Even the coffee makers aren’t forgotten. When I step into the adjacent passenger area, I got the idea that this is either first – or business class. It depends from, airliner to airliner.


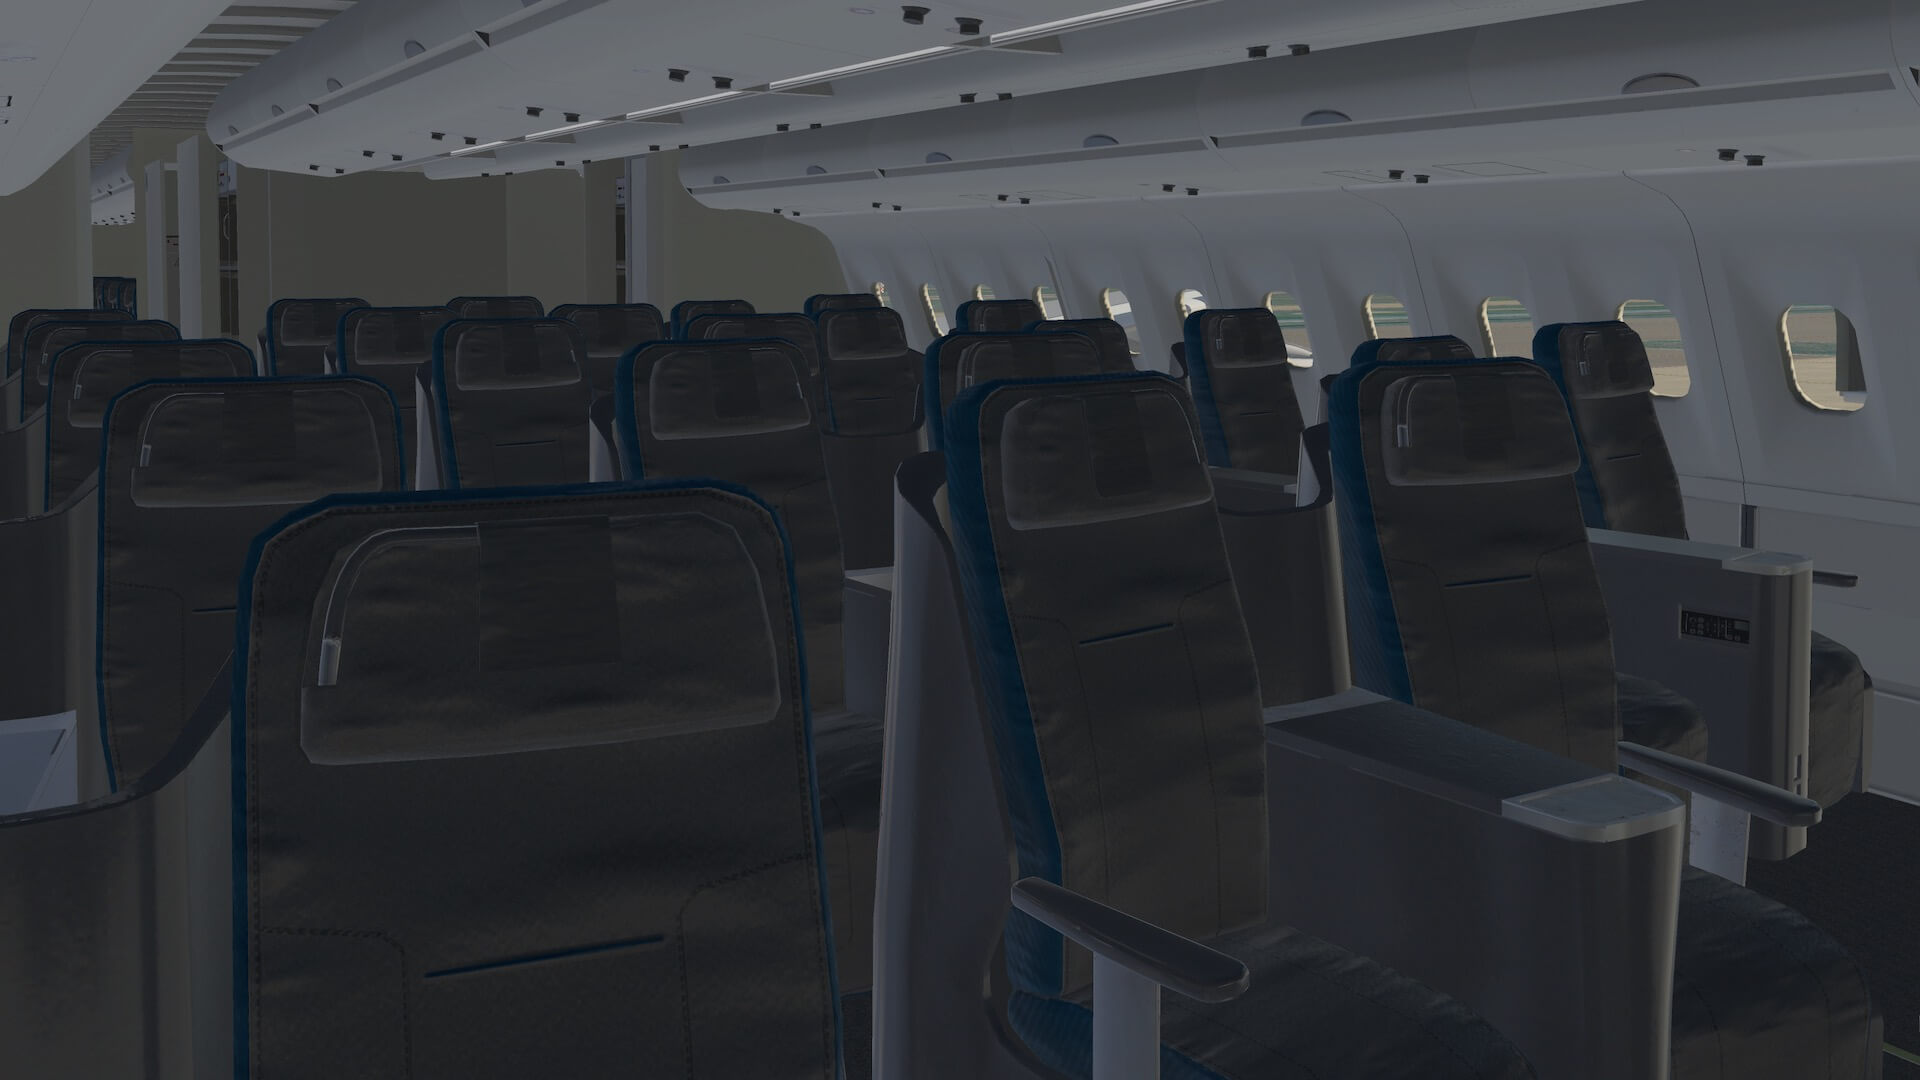
More important is that the seats, the components belonging to these passenger seats as well as the sidewalls and ceiling are all well modeled. The only small remark I can have that it looks all a bit pale, but that could be also me. When I walk further into the virtual cabin it seems that the 3D developer did a great job. Most of what I see and remember from Airbus cabins is that it’s all modeled.
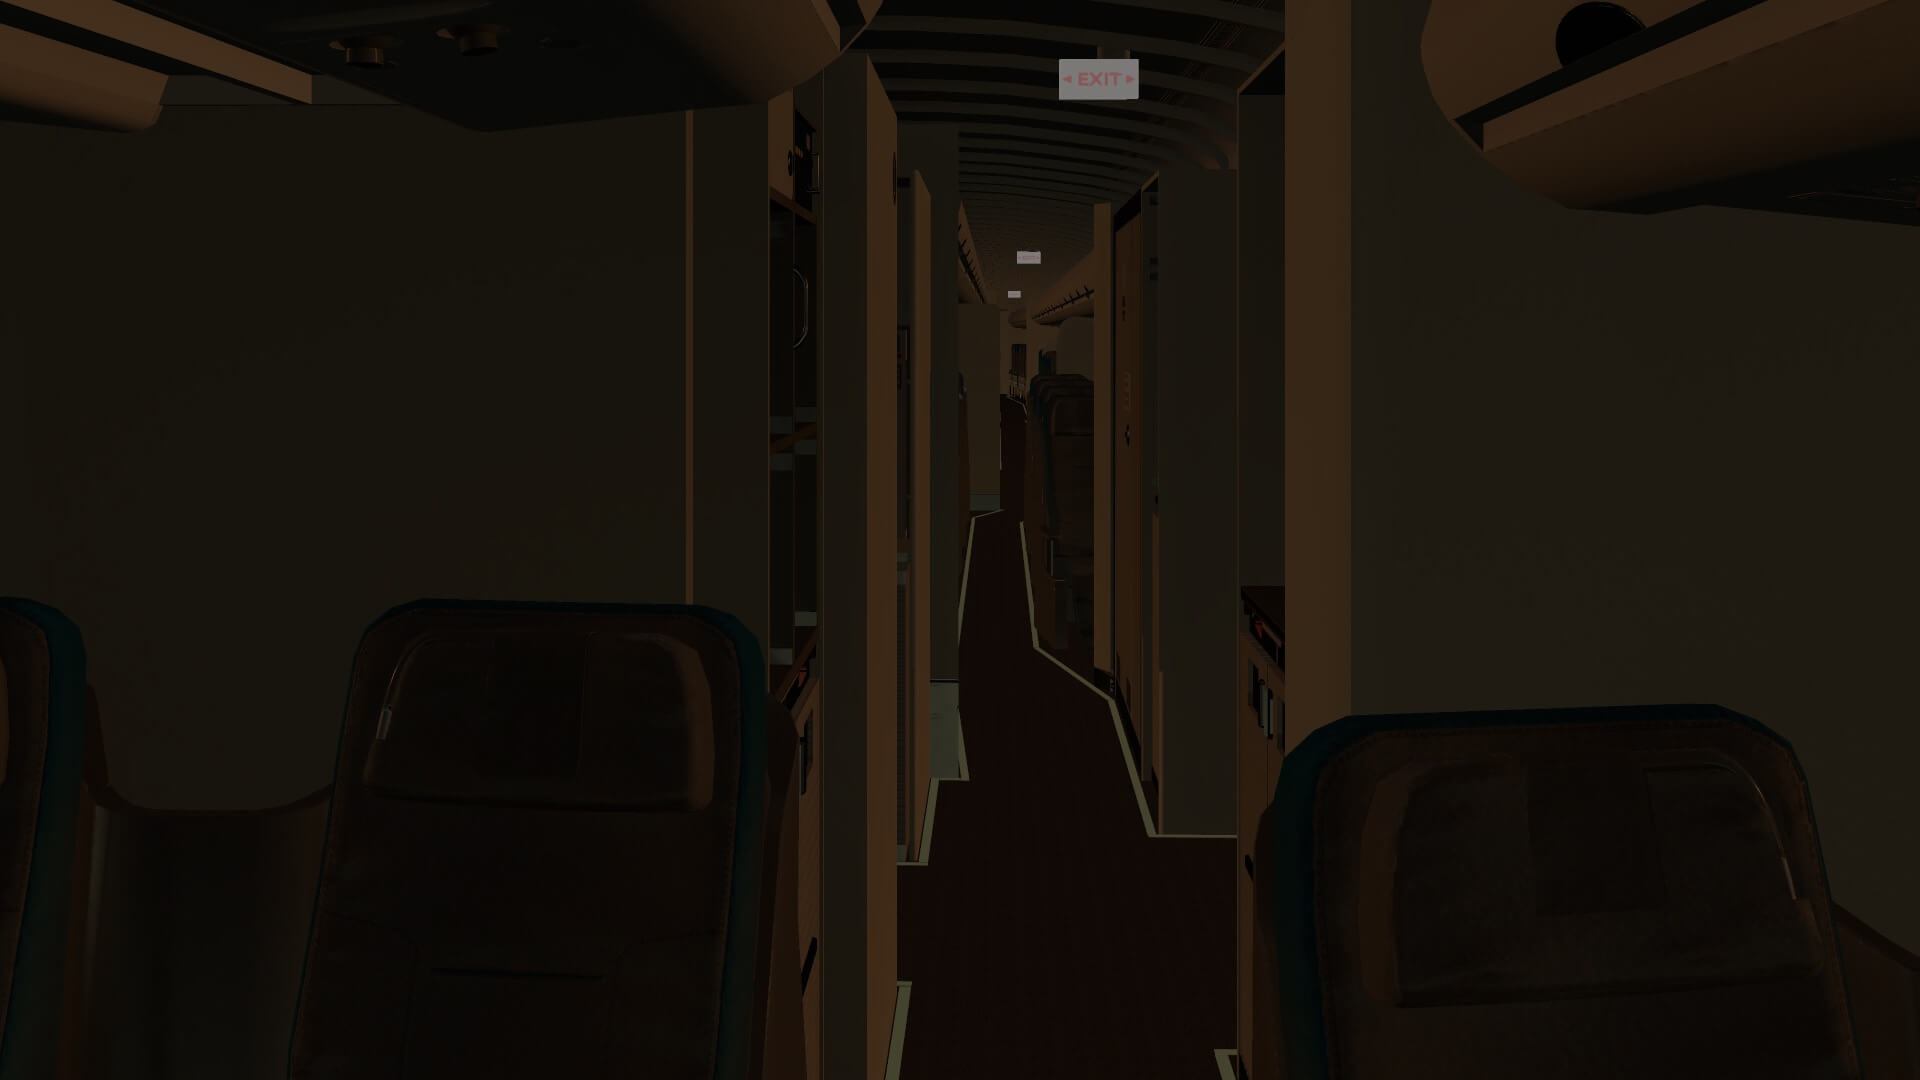
By the way, ToLiss did include the EXIT signs in the aisles and I also saw the FPEEPMS (Floor Proximity Emergency Escape Path Marking System) strip, but not yet sure if this is also simulated to illuminate when the EMER switch is in the ON position, on the OVHD panel in the flight deck. After discussing this and checking out different aircraft systems, it can be either connected to the EMER system or it is an independent non electrically supplied floor strip.
Overall, a nicely modeled virtual cabin, but now it’s time to check out the flight deck. Are you ready?
The Flight Deck
And this is our domain for the remainder of the review, oops, flight and other ground checks. It is without doubt a gorgeous looking and well modeled slightly weathered flight deck. I’m very happy with the overall 3D modeling and with the overall frame rates. And no, to preserve unnecessary animations, you won’t find sliding side windows, movable inner arm rests or movable covers that close off the Quick Donning Oxygen Masks and a couple more. Instead of these non animated features, it does have animated front window blinds including an animated flight deck door, but for me and others perhaps more important, well shaped panels including all the tiny details you may expect as well as razor sharp decals on the panels.
By entering the flight deck via the animated door I noticed that the door itself is well modeled including the many brackets on the door and door frame as well as the locking system. At the entrance of the flight deck I see on my left-hand side the storage compartment with a couple of clothing hangers while on the right-hand side there’s the 3rd seat and 4th folding seat. The captain- and co-pilot seats are nicely done and although they don’t have animated armrests nor that they are movable, this to preserve frame rates, it still looks very nice. But I should not forget those tiny details like the lumbar knobs on the inside of the pilot seats and the levers to control the seat position although not animated.
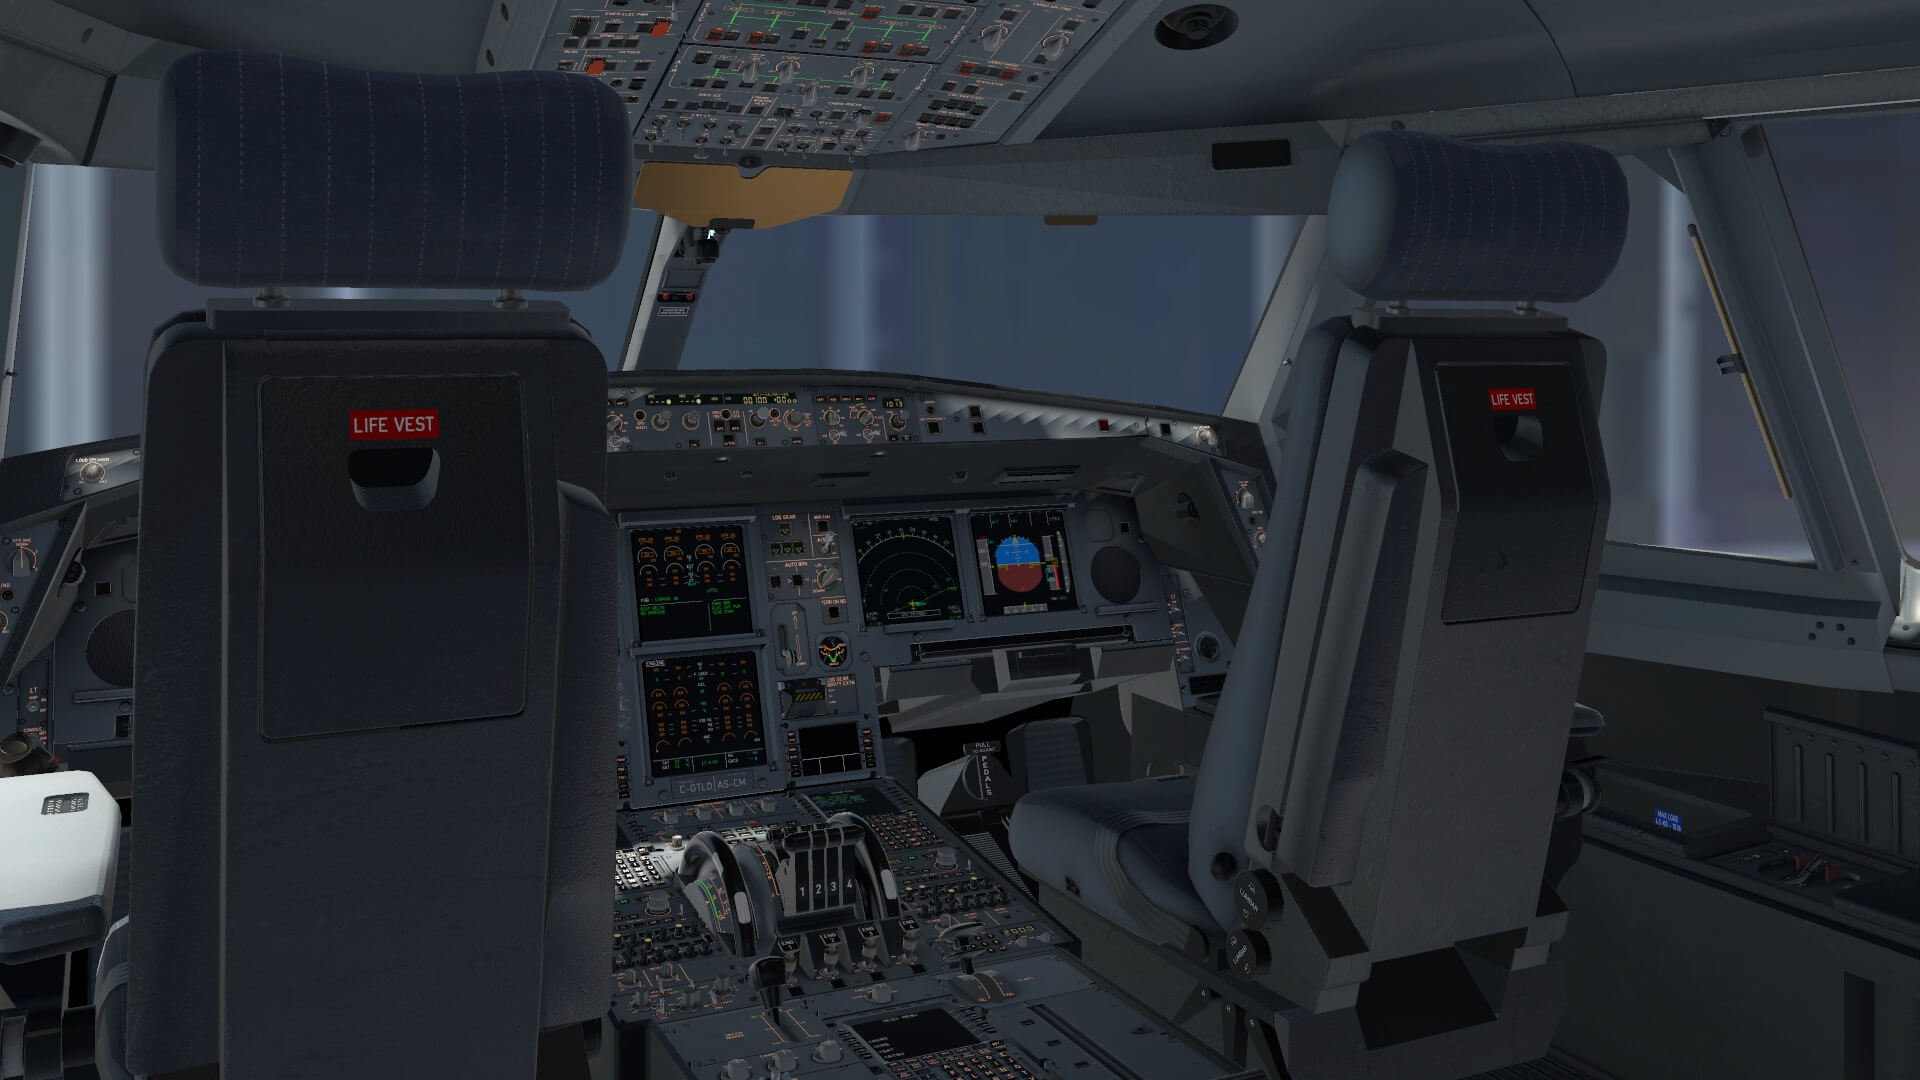

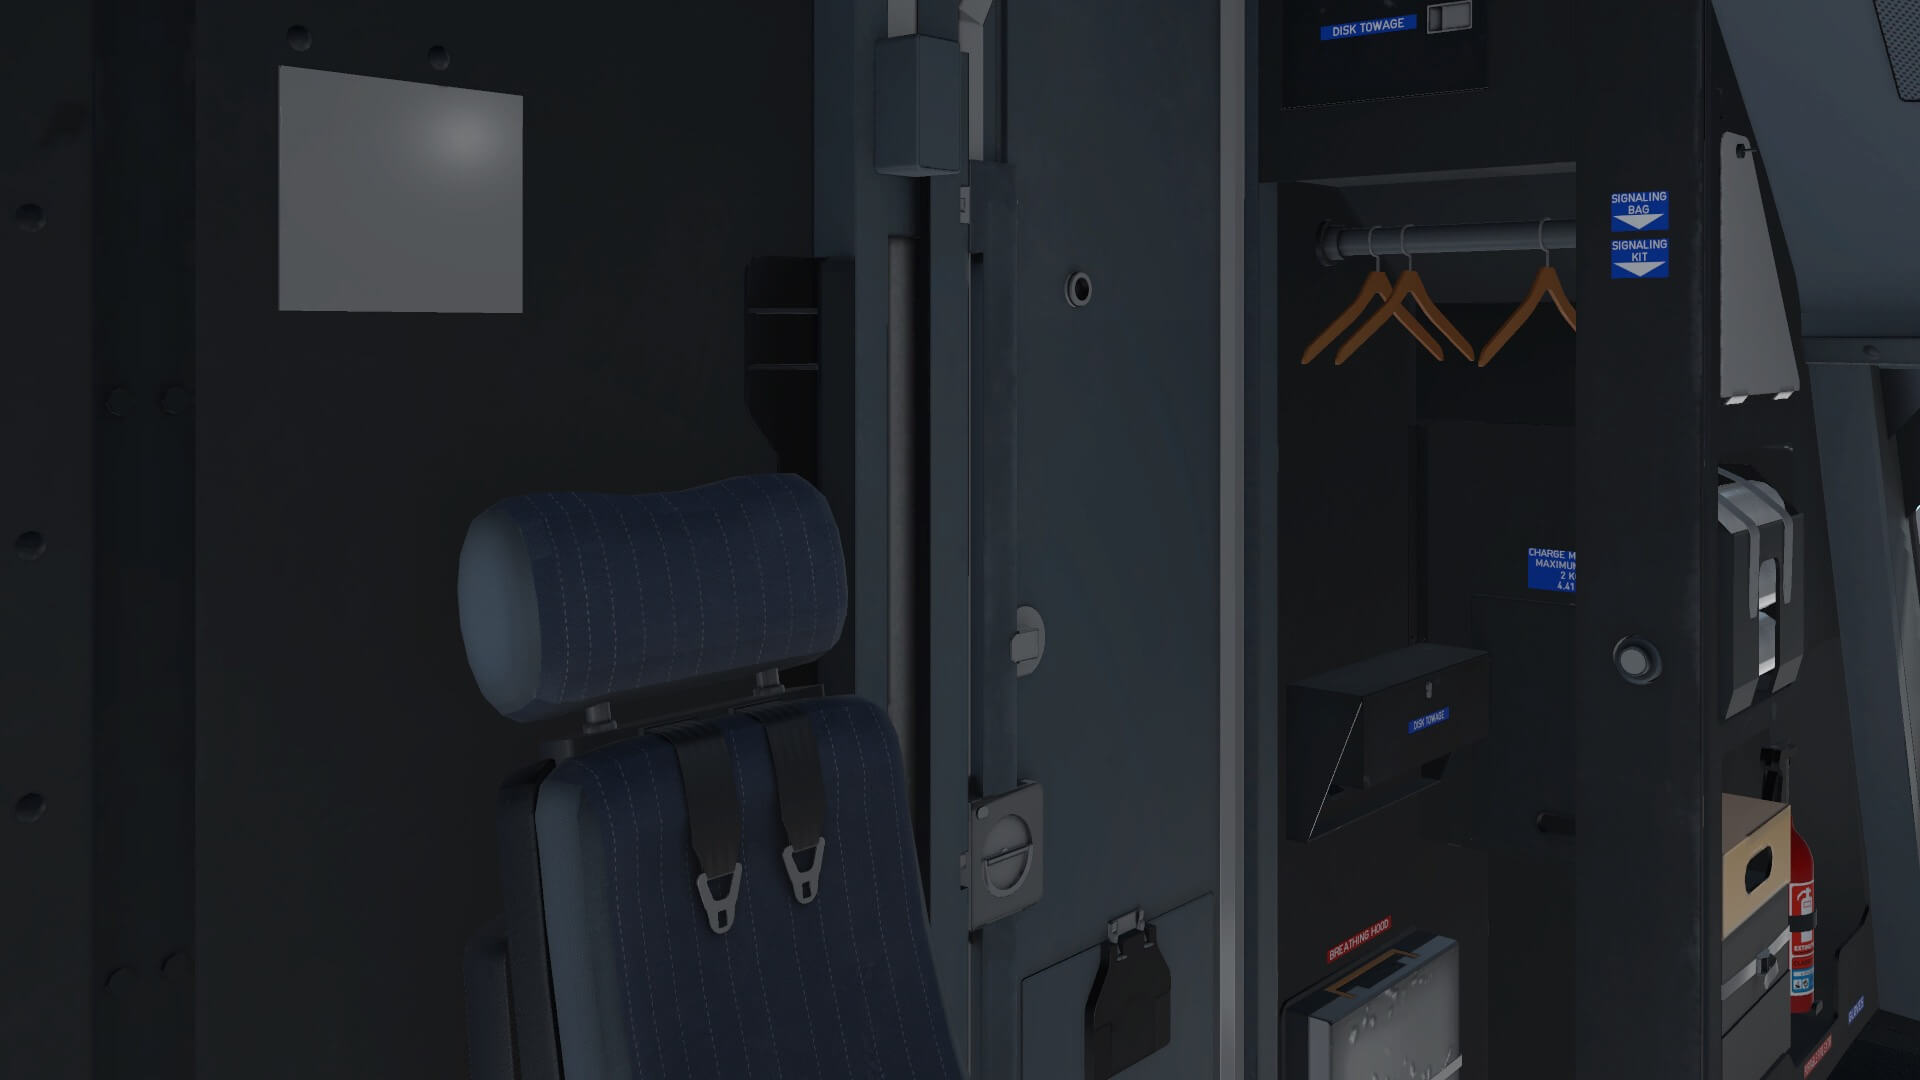


The sidewall panels including the storage compartments are needles integrated in the other side panels and instrument panel. And yes, the main- and center instrument panels are gorgeous. There’s a slight weathering and scratches are added, but not too much, so not over the top. This is the same for the pedestal with sub-panels, and the overhead panel and FCU (Flight Control Unit) at the glareshield. And there’s so much more to explore. I really must say that not only the 3D modeler did a great, also the person who responsible for the textures.
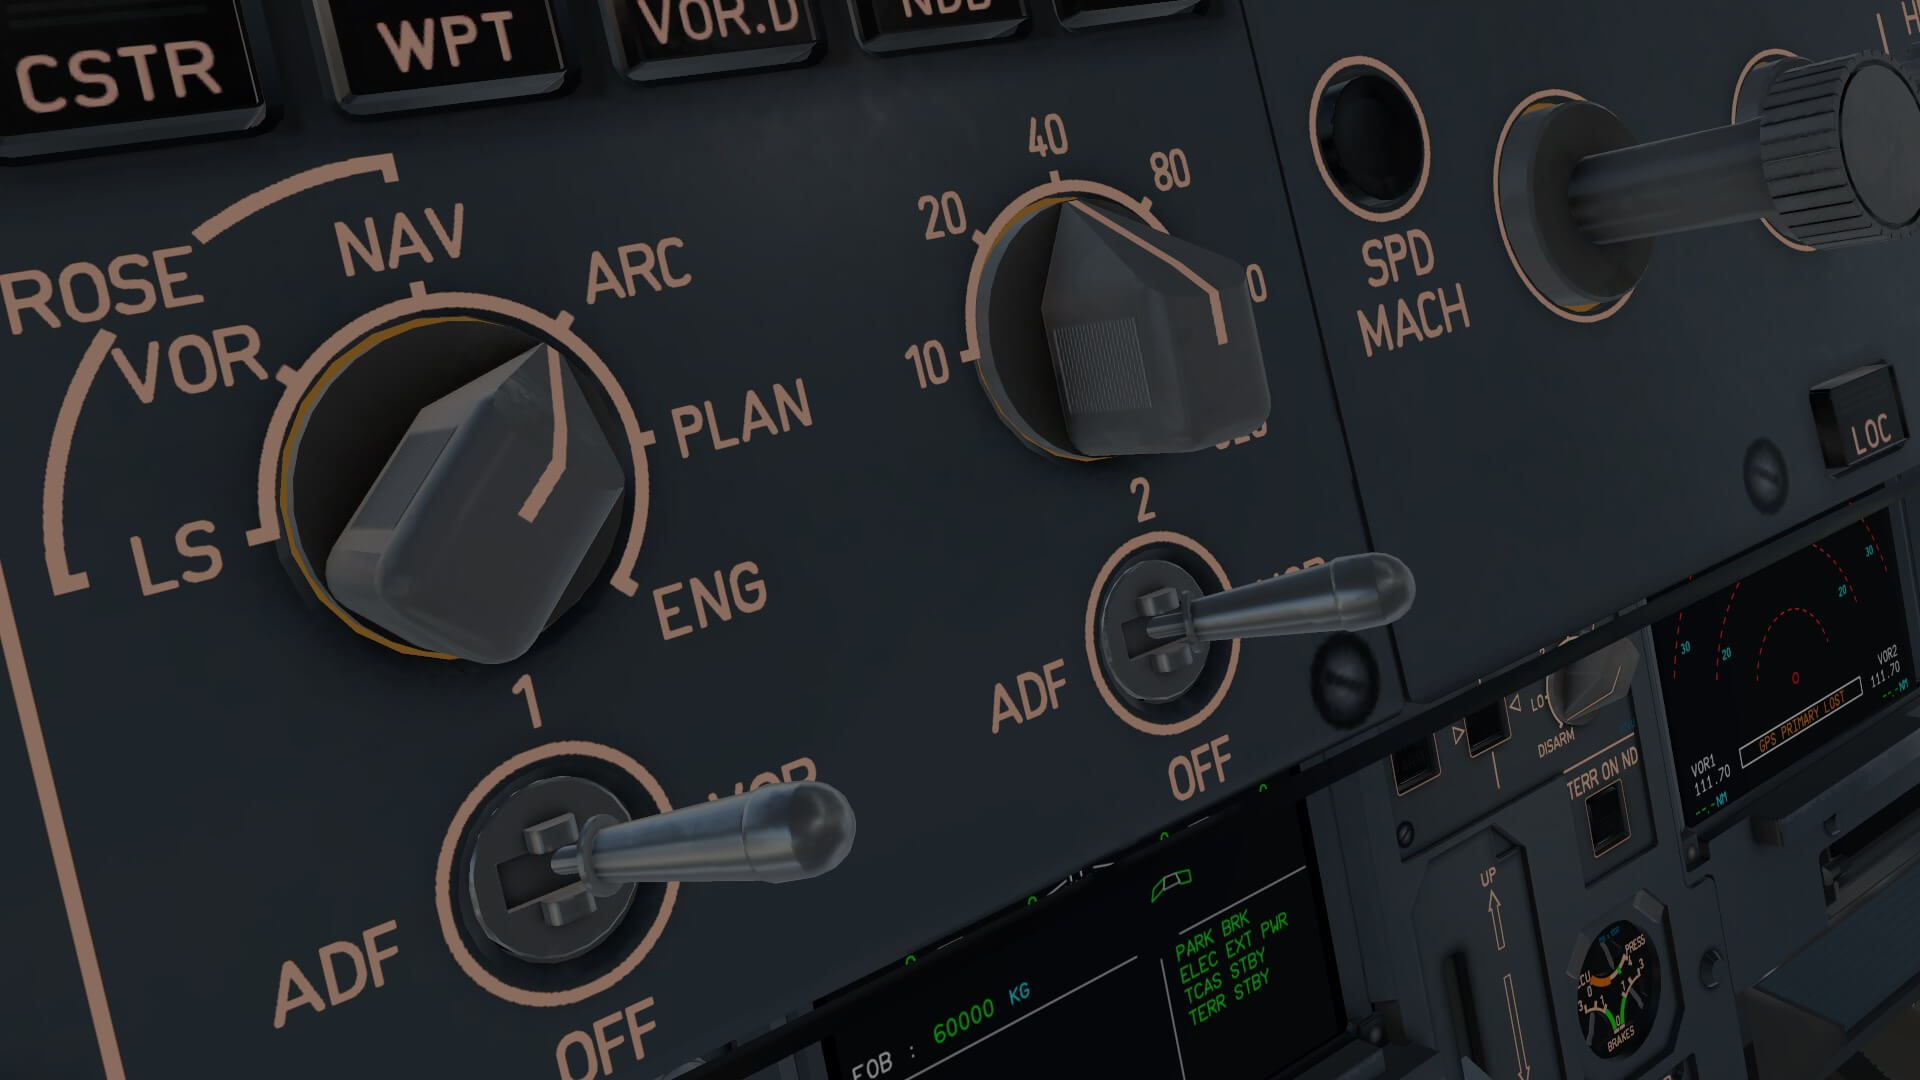
With GND ELEC power connected, everything comes alive and then, yes then it’s gorgeous to see how all the DUs (Display Units), the indication displays on, for example, the FCU are modeled, but also the integral lighting system of all panels is beautiful. Just as important is the text on all the panels which is, again, razor sharp or not only from a reasonable distance, no, even sharp when I’ve put my nose at the panel. And also worth to tell, the selector knobs on the FCU are round, weird isn’t it, and this means that hardly no polygons are visible. How they did it? No idea, but it looks awesome.


Discussing perhaps the most important instruments; the EFIS (Electronic Flight Instrument System) and ECAM (Electronic Centralized Aircraft Monitoring) DUs. They all have 2D popups. And it depends how they are presented. They are either a floating 2D popup within X-Plane that can be increased/decreased with the middle mouse wheel or the 2D popup becomes a floating window that can be moved to another monitor or a tablet. Controlling this is via the ISCS panel. And there’s more when it comes to 2D popup windows. These are the two forward MCDUs and the Electronic Standby Instrument System (ESIS). Check out the following screenshots.
Oops, I completely forgot the overhead panel. Besides the beautiful main- and center instrument panels as well as the pedestal, the overhead panel with ceiling is another beauty in this 3D cockpit. I mentioned before the razor sharp text, the more or less really round knobs and switches, right? When I look to the overhead panel it’s gorgeous. When I zoom in on a sub panel as you can see on the following screenshots, then I’m even more impressed. Everything I love to see, yes yes, this is my personal opinion, is there.
All the sub panels have a slight weathering, some panels have more or less scratches, the typical Airbus switches with their guards, but even the tiny things aren’t forgotten like the panel VU ID numbers or the very small blue “+” on several panels wherever applicable, indicating where the integral light bulb is situated. Check out the following screenshots and judge for yourself.

Overall I’m impressed with the modeled flight deck. Are there any more words needed? I don’t think so. I’ll do some more visual checks while flying, but for now I can’t say anything else. A great job has been accomplished.
Part I – Flight Plan Preparations
Flight Plan Programs
For my flight FROM/TO LFBO I need to make a flight plan. I can do that either by entering all the waypoint in the MCDU or I use an external program and load that flight plan. via the MCDU. Lets see what options there are.
For creating a flight plan you’ve got the choice out on many online and offline programs. Let me highlight a couple of these possibilities. First of all, you can use the online website of Routefinder that offers you the possibility to quickly create a flight plan, but this is not in “X-Plane fms” format and that’s what we need for the ToLiss A340-600 and perhaps for now the most important issue, it doesn’t allow you to add manually waypoints.
Then you’ve got the well known real flight planning program FlightAware, but again, this doesn’t allow you to export it to an fms file format and it’s only based on real flight plans. Another very interesting option is simBrief. Although you need an account to get access which is by the way free to register, it comes with a wealth flight planning information. In case you use SimBrief then this URL is very useful since it’s the A346 profile for correct calculations and flight planning.
A very useful online option, but a Navigraph account is needed to create your flight plans with the latest AIRAC cycle. When you use simBrief in combination with SkyVector, you’ve got a lot of interesting features. SkyVector needs when you use it as a stand-alone flight programming software the online program X-PlaneTools to convert the SkyVector file format to fms, so again a lot of problems on the way, but when you use it in combination with simBrief, then there’s no problem since simBrief can import the SkyVector flight plan and save it as fms format.

Another interesting planning tool that I’m using already fro many years is the offline freeware LittleNavMap and I can tell you that it can do much more then just flight planning. It does basically the same as SkyVector, but offers a bit more flexibility. Perhaps most important is that it’s a program that can be downloaded and installed on your Windows PC, Mac computer or Linux computer. It offers many “save as” options including the fms extension from X-Plane 11. One thing to keep in mind is that Little Navmap needs it’s one AIRAC cycle and take care that the AIRAC cycle is the same as the one used in X-Plane.

Looking to my flight plan I’m aware that Airbus does have their own flight plans where test pilots test new Airbus aircraft near or around the French-Spanish Pyrenees, but these aren’t available to us, so I create my own virtual Airbus flight plan. A flight that is long enough to explore how it feels to fly the A340-600.
Loading the Flight Plan
After I’ve updated the default X-Plane AIRAC to match the same AIRAC with Little Navmap, and copied and paste the flight plan file AI3461.fms (LFBO – TOU – AGN – SAU – BMC – CAA – RILON – MAGEC – MONOX – DONOS – ARVID – PIPOR – ERAKI – RONKO – HUE – LLE – TIRGO – USKAR – BARBO – OLOXO – BERGA – NASGO – BGR – BISBA – MAMES – DIVKO – AVN – MTL – MEN – GAI – LOMRA –LFBO) into the X-Plane Output/FMS plans folder, it’s time to continue.
OK, let me check. Nothing forgotten?
No, except that I could also, as I mentioned before, enter waypoint by waypoint in the left- or right-hand MCDU. Interesting to mention that the ToLiss A340-600 has a master and slave MCDU or actually, the modeled ToLiss aircraft has the same as in the real aircraft a dual FMGS (Flight Management Guidance Envelope System).
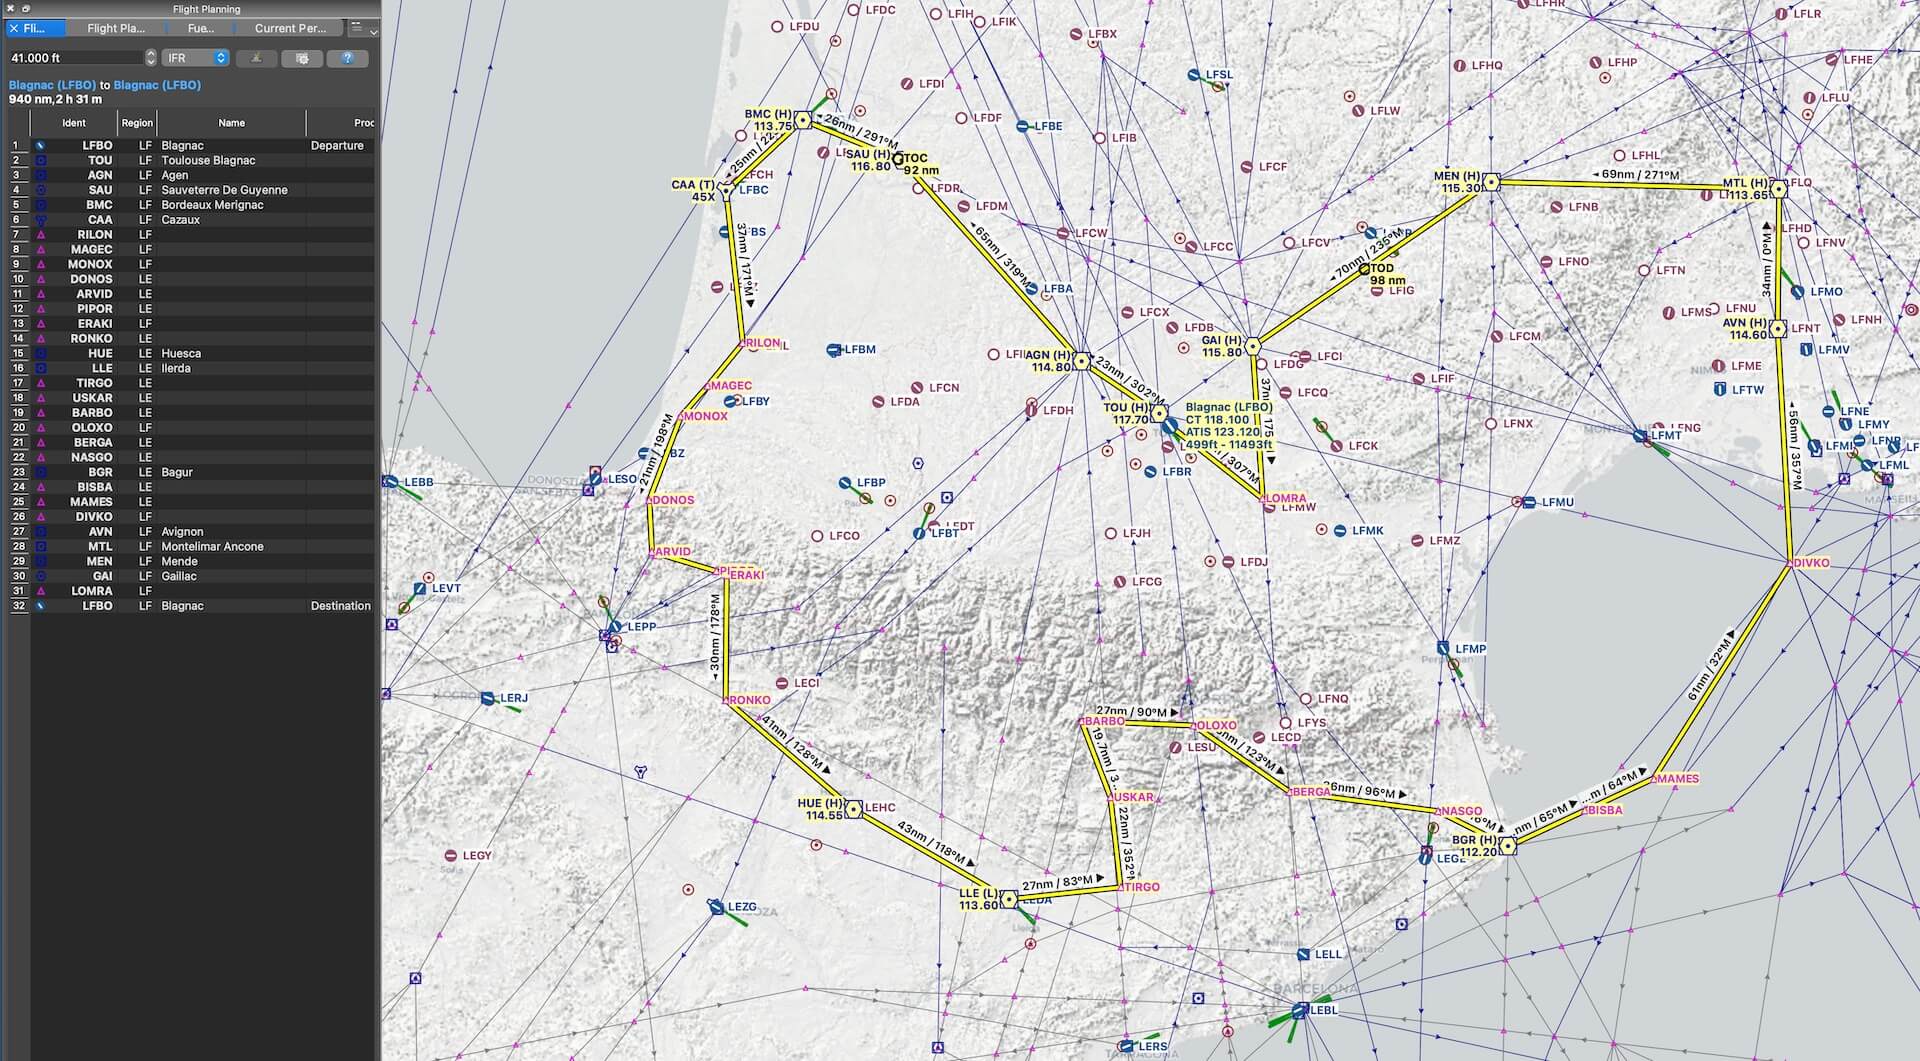

The pedestal has in total three MCDUs, but only the forward two are active and act as master and slave. As you can see on the screenshot map, the flight first goes to the north, then towards Bordeaux, along the coast to the Pyrenees, then crossing France in the direction of the Mediterranean, and finally back to LFBO. Once the A340-600 has finished the CLIMB mode, it will continue its flight at FL322. That depends what is calculated by the MCDU and found at the PROG page. The overall distance without an alternate is 900+ NM. Long enough to do the necessary tests and to explore even more the modeled flight deck.
Creating/Saving ToLiss Flight Plan
For those simmers who don’t prefer to use “ready to load” flight plans as described in the previous paragraph, there’s also another option, enter the flight plan manually into the MCDU. In real it depends what pilots need to do. Large airliners have a database with all possible flight plans where pilots can load these directly into the MCDU. These are the so called “company routes”. Depending on changes, these flight plans can be modified once loaded. Smaller airliners not always have this option of company routes, so they need to load waypoint by waypoint into the MCDU. When the airliner uses company routes, but “this” typical flight of “this” day isn’t in their database, in that case pilots must enter the route manually into the MCDU.
So lets assume that we don’t have the above available route as an Airbus company route. In that case you can use the ToLiss tutorial or the standard normal procedures to enter waypoint by waypoint. To enter the flight plan manually waypoint by waypoint you’ll learn that this is not difficult and perhaps easier then expected, but it is time consuming. After you’ve finished to enter all the waypoints, it needs to be stored, right? To store the basic flight plan you need to follow these steps.
Click the DATA button on the MCDU keypad. Go to page 2 and then click LSK 4R identified as PILOTS ROUTES. Since this is most likely the first time you save a flight plan, the next page will be a NEW ROUTE page. Enter in the scratchpad the name of the flight plan. In my case I enter AI3461, followed by LSK 1L. The name I gave it – AI3461 – is now copied to LSK 1L. Now we need to store it by clicking LSK 2L STORE ACTIVE F-PLN. This action leads to the PILOTS ROUTE page and shows us the just saved flight plan. This is now available as own created pilots route.
Ok, what happened and where is it stored?
First of all, I’ve saved a flight plan without a SID or STAR. The clean flight plan is stored in the X-Plane folder Resources/plugins/ToLissFlightPlans as AI3461.qpc.
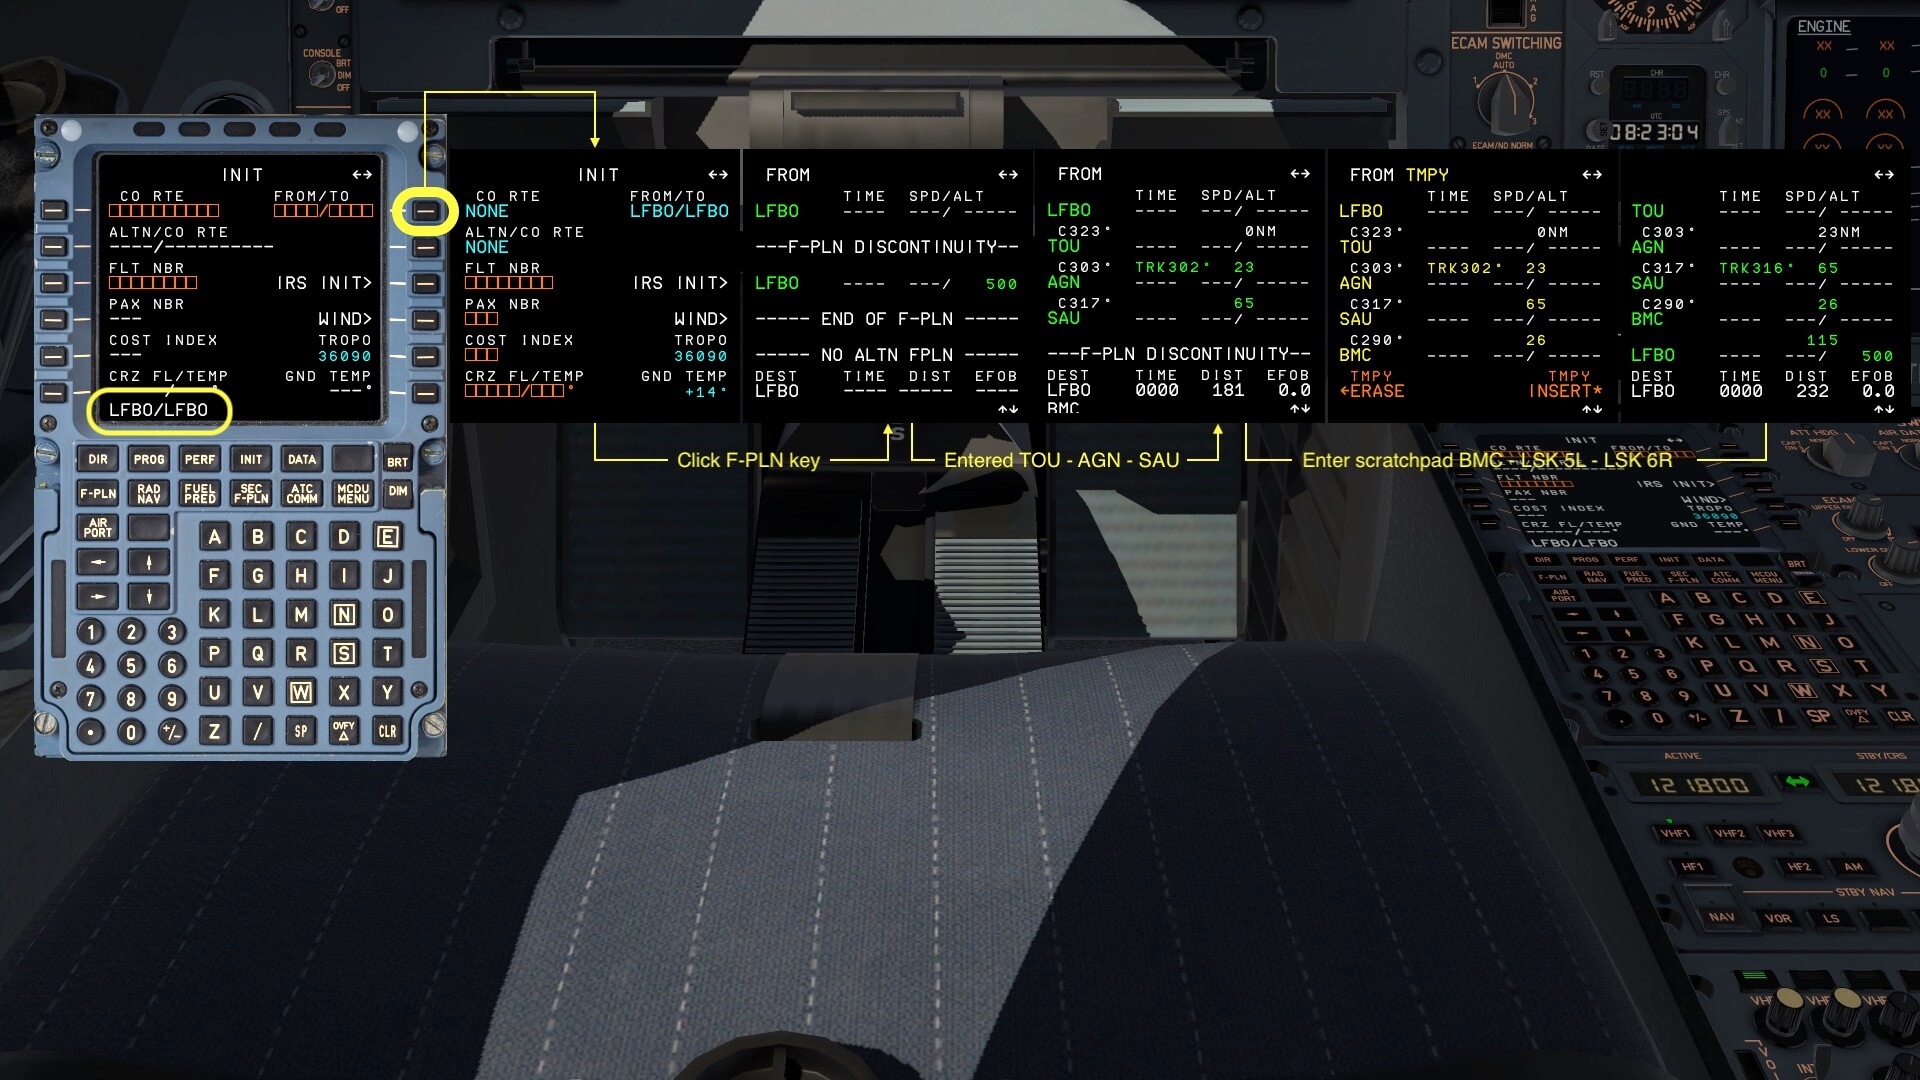

Whenever you want to load this saved flight plan,you can load the saved flight plan via the INIT A page, LSK 1L, but what when you don’t know what’s in the database, right? In that case you first need to find out what flight plans are available. To find this out you click the DATA button on the MCDU keypad, go to page 2, click LSK 4R (PILOTS ROUTES). Now you see all the available CO RTE – FROM/TO flight plans. When you found your CO RTE, you go back to the INIT A page. Enter the CO RTE in the scratchpad, click LSK 1L. On the next page click LSK 6R (INSERT*) which will load the flight plan and you’re done.
One last note regarding Co-Routes thus ready to go “fms flight plan files” in your FMS Plans folder. Lets assume I want to create a new LFBO-LFBO flight plan in the MCDU. The ToLiss MCDU will check if there’s a flight plan in the FMS Plans folder that has the same destination and arrival airports. If it finds one, it will use the waypoints as found in that flight plan. When you didn’t expect this, after you entered LFBO-LFBO and click LSK 1R on the INIT A page, you won’t see an empty flight plan page, no, instead it copied all the waypoints it found in the fms flight plan file. So when you want to create your own LFBO-LFBO flight plan with own waypoints, you need to remove the LFBO-LFBO flight plan out of the FMS Plans folder or rename it in a way that it doesn’t detect it.
Part II – Hardware Preparations
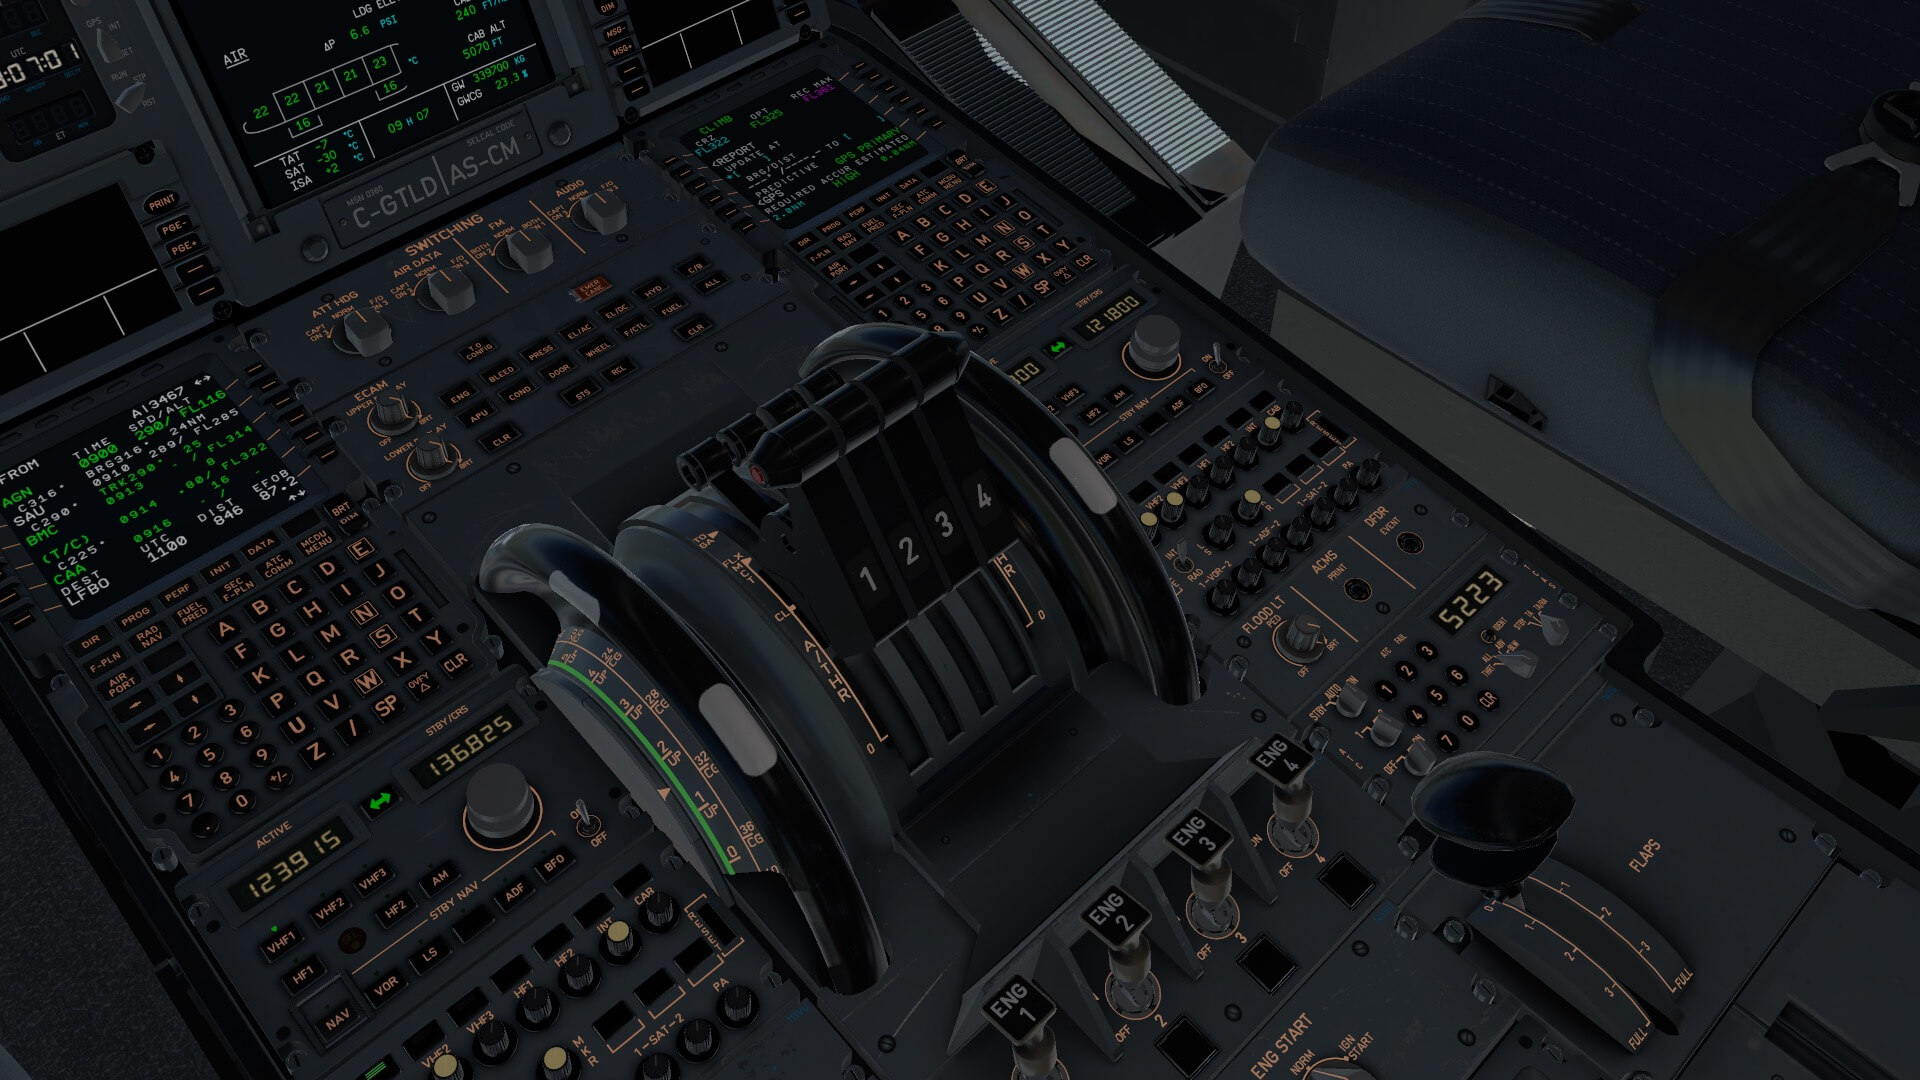
Although hardware setup is discussed in the Simulation manual, I always think it would be useful when I inform you what equipment I’m using for the ToLiss A340-600 and how easy this is. For the joystick you can basically use every type of joystick however, the Thrustmaster TCA Airbus side-stick would be awesome since it’s more or less a replica of the real Airbus side-stick. The simulation manual goes in great depth into the assignments for the joystick starting at page 10 till and including 15. For some reason most developers don’t go into this hardware configuration, but ToLiss put a lot of effort into it and discussed all the possibilities how and what to do including assigning custom commands.
The next hardware component to assign is the throttle quadrant. And also for this, many throttle hardware is available, but ToLiss also discusses the Thrustmaster TCA Airbus Quadrant in their manual. Remember that when you use the TCA Airbus Quadrant for this 4 engine aircraft, that you leave the engine selector at the front at the position 1 and 2 unless you own a 2nd quadrant that is connected with its own USB cable to your PC or Mac. In that case, you slide the switch to 3 and 4.
The Thrustmaster TCA Airbus set comes with typical A320 Family throttle levers. That said, the throttle levers in the Airbus A330 and A340 are of a different design and be honest, the Honeycomb Throttle Quadrant with Airbus Pack comes with the correct lever design as can be found on these large airbus aircraft. Is it really so important? Of course not. It’s a matter what you like or what you own.
When you’re new to the previous mentioned hardware, then it’s perhaps a good idea to check out our in-depth Honeycomb Throttle Quadrant review and our recent finished Thrustmaster TCA Captain Pack Airbus.


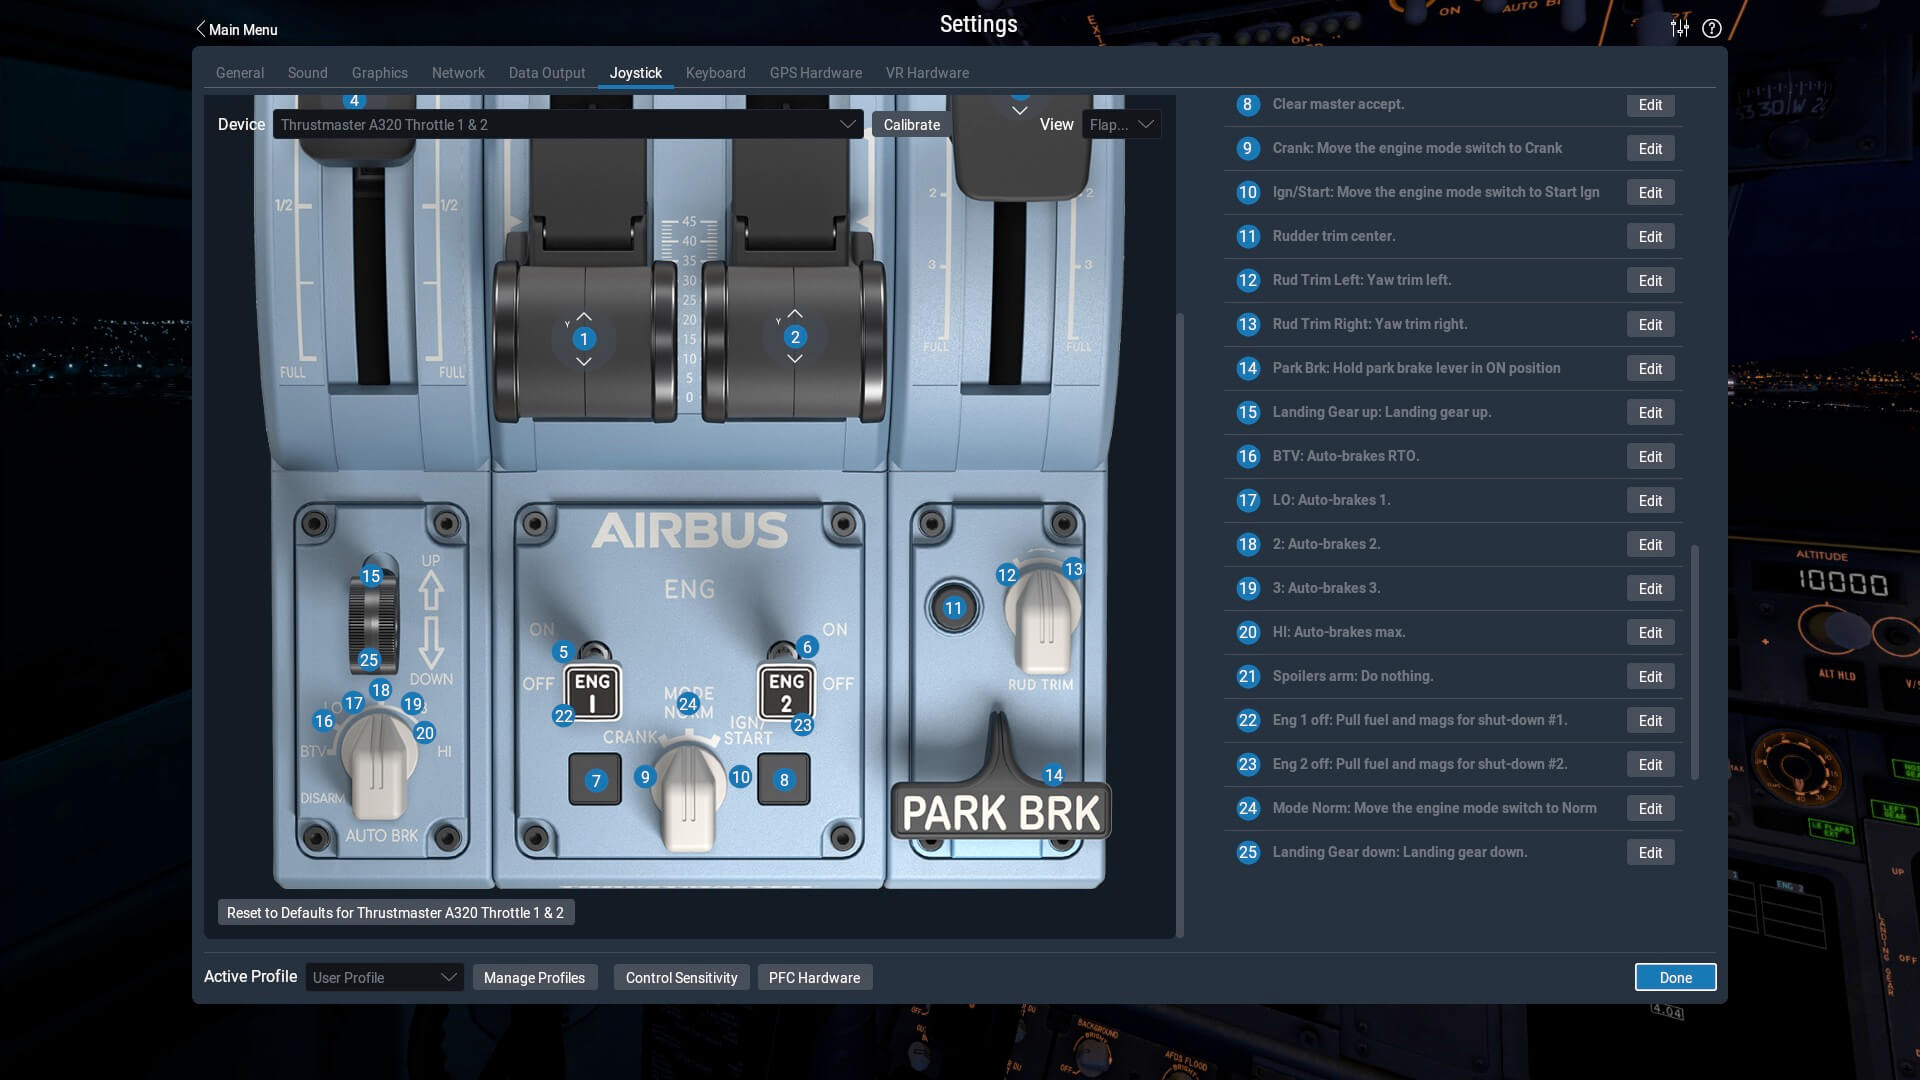
Since ToLiss added a lot of useful information in the Simulation Manual regarding the hardware configuration, I found it interesting to test this with my own Thrustmaster TCA Airbus equipment.
As previously started with, the simulation manual starts with the joystick at page 10, but there’s an interesting note on page 11 which deals with two joysticks. Yes, you’re right, two side-sticks. The real Airbus has two side-sticks, one for each pilot and via a priority logic one of the two can be active. I’ve not seen any other X-Plane Airbus that has this priority logic build in. That said, the ToLiss 340-600 hardware setup supports two side-sticks. I’m not sure if you will use two side-sticks, but in case you prefer to set it up this way, all information is available and integrated in the modeled aircraft. This is something that’s not only well described in the manual, but also how to deal and setup in the ISCS popup window, tab JOYSTICK ACTIONS.
Since I also own the TCA Quadrant with add-on, all the information I need for that starts at page 16. I wrote it before, I only have one TCA throttle quadrant set which means that in the simulated A340-600 the engine throttles 1 + 2 (3 + 4) and reverser levers are connected to each other.
That the throttle levers 1+2 and 3+4 are connected to each other, which is also explained in the simulation manual page 25, but what is slightly different and difficult to simulated on the TCA quadrant are the Eng 3(4) on: Engine starter #3(4) commands. Since there’s no hardware option to show you how to do it (that was only possible when you had a 2nd TCA quadrant), but there’s no note how to deal with this. You can decide to assign some of the switches at the base of the side-stick or just operate them manually in the simulator.
Part III – Cockpit Preparations
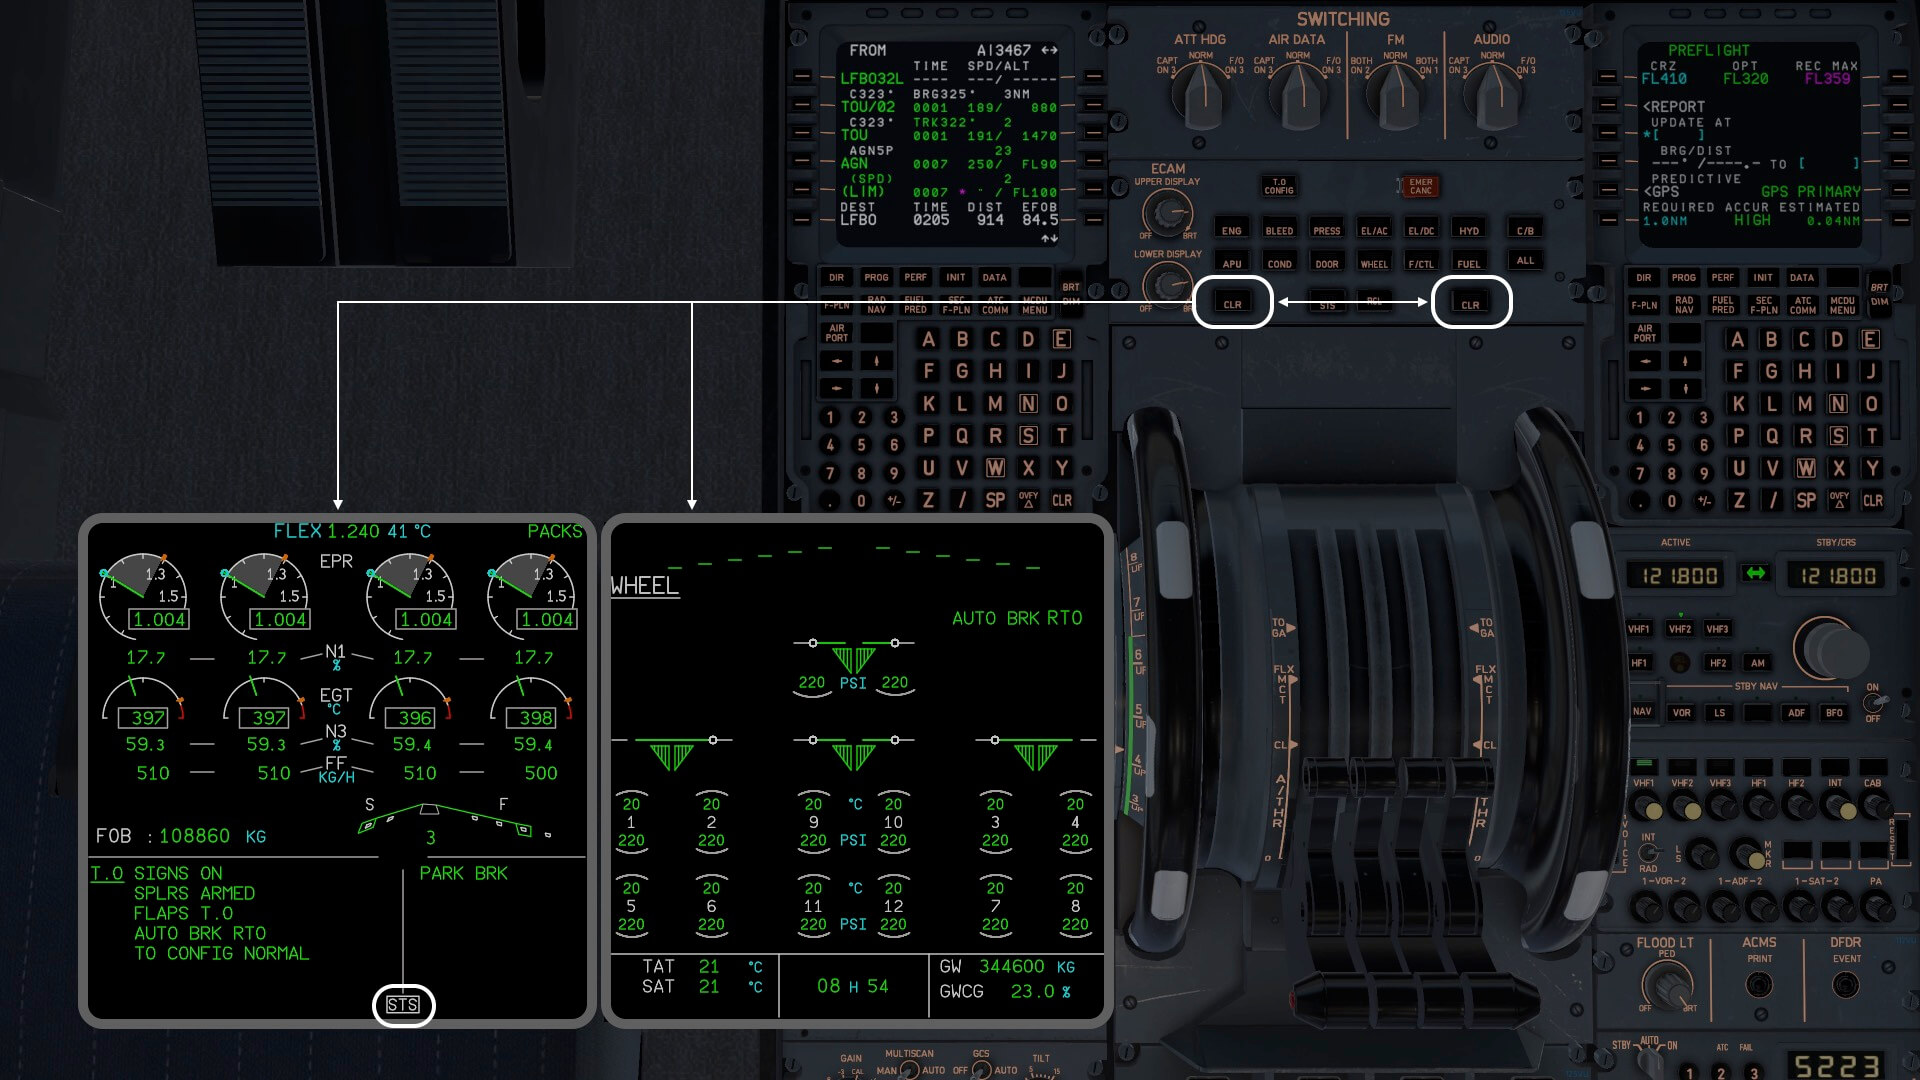
ISCS Configuration
By default, the A340-600 starts up with external power connected to the aircraft, but what when you want a cold and dark configuration? That said, the first thing I want to do is to change this. I want that my parked A340-600 starts up in a “COLD and DARK” condition, and thus overriding the settings. Via the ISCS window tab “General Settings” I select OVRD XP START SETTINGS to a logical “1” and for STARTUP TYPE, I select COLD+DARK. Then save it and restart the aircraft.
Suppose you saved different situations – ISCS page SITUATIONS A/C CONFIG – and found out that you made a mesh of it with too many different ones, then look into the X-Plane 11 folder Resources-plugins-ToLissData-Situations. All situation files are saved here. You can easily delete the situation file or files you don’t need anymore or no clue what they did. When you’ve done these previous steps, reload X-Plane you’ll notice that they are also gone from the ISCS window.

Some notes about the animated cargo- and passenger doors – emergency exits excluded -. They are controlled via the ISCS tab “Ground Services – Aircraft Doors”. The screenshot below shows that all animated doors are set to AUTO. Depending on the aircraft condition doors are open or closed. You can also control these doors manually by clicking the individual dropdown box and select either OPEN or CLOSE. When you leave this in AUTO, then you must keep in mind that “the door(s) opens and closes according to the plugin internal logic to detect if the aircraft is parked at the gate.”

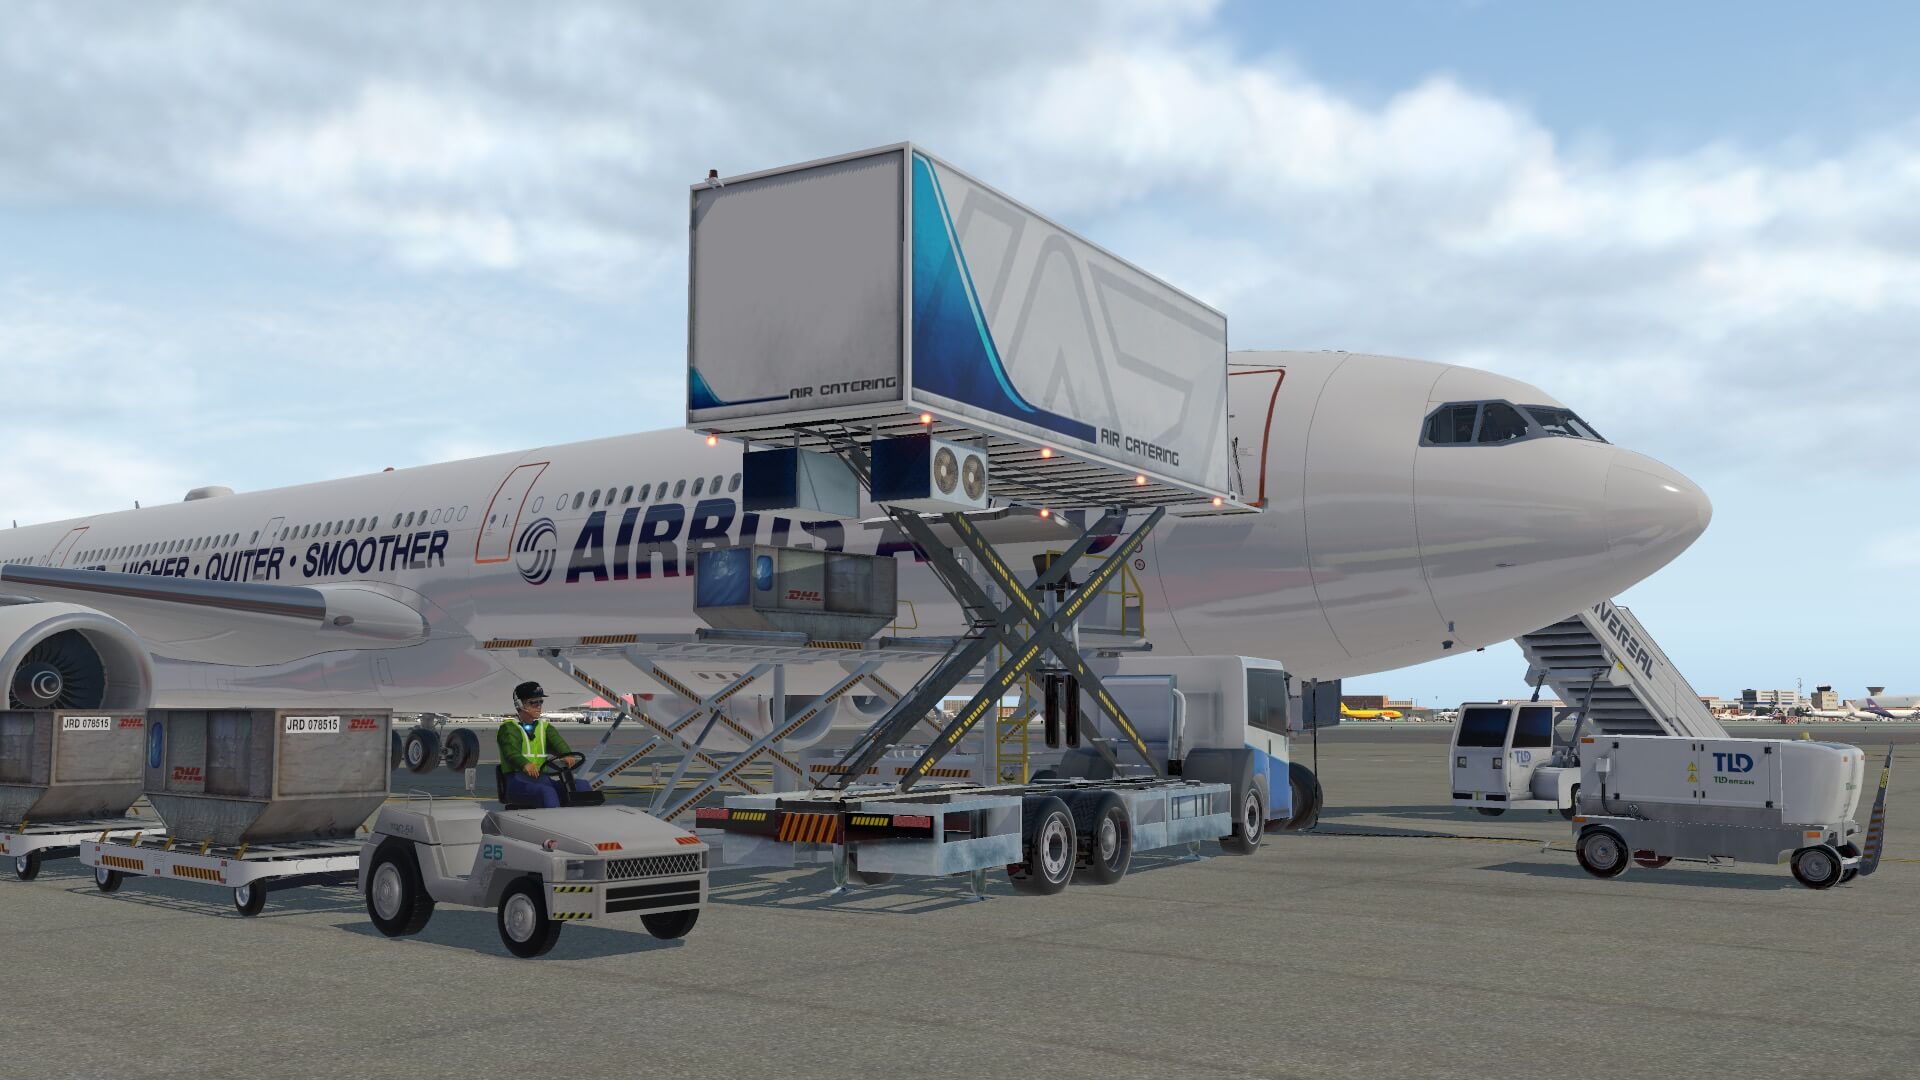
Ground Handling Equipment
As is also applicable to the other ToLiss products, the simulated ToLiss A340-600 doesn’t offer external stairs, fuel trucks, passenger buses, hi-loaders, GPU and so on. It isn’t a problem at all, but when you want ground equipment around the aircraft when you’re parked at the apron, then you need to seek for a solution. One of the possibilities is to go for the JARDesign Ground Handling Deluxe add-on. You can buy this add-on package at the dedicated X-Plane.Org webpage. See some screenshots below, using the dedicated ToLiss GHD A340-600 set in combination with the old fashioned Airbus house livery.


Standard Operating Procedures
As mentioned in the ISCS Configuration section, I’ve decided to go for a COLD and DARK situation/configuration. I don’t use the external power which means I need to start the APU. For this I use the Normal Procedures list, although I could use the tutorial too. The ToLiss A340-600 doesn’t come with an electronic and/or interactive checklist and I haven’t seen yet a clist text file that can be used in combination with the XClecklist plugin.
For now you and I will use the Standard Operating Procedures. It starts at page 43 and ends at page 59. It covers all the flight phases and as I mentioned before, the tutorial does the same however, the tutorial covers an actual flight including all the MCDU entries and for some perhaps important, it comes with screenshots. Whatever you’re going to use, either way is an option and perhaps I mentioned it before, the tutorial can be used of course for every flight except of course for the dedicated entries in the MCDU.
With the Standard Operating Procedures pages presented on my iPad, following each step and finding out that almost all systems are simulated. While following the checklist steps, I found a couple of switches/selector knobs (for example the RAIN RPLNT P/Bs, PURS CALL button, CARGO SMOKE TEST p/b, ELT P/B, APU AUTO EXTING RESET) that aren’t simulated, but that’s not really a big problem.
Reaching a certain point in the procedures, I need to enter the data into the MCDU. Even I need to have a quick look in the tutorial because it explains very well the steps to follow and how to interpret the data from the ISCS window and thus how to enter this in the MCDU. I mentioned this before, the biggest difference and advantage of the tutorial versus the standard operating procedures is that the tutorial has screenshots included which makes it all a bit easier to understand. MCDU programming may take a lot of time, but when you do it several times, you’ll notice that it goes quicker and quicker and you will find the right “flow” to do all the steps.
What is and stays important is how to calculate and enter the ZFW, ZFWCG, block fuel, Slat/Flap TO setting, Stabilizer position and the speeds V1, V2, VR. All this information can be found in the ISCS. Keep in mind that since you need to enter also data in INIT B page that the engines haven’t started yet. INIT page A is always there, but INIT B is only available as long as the engines aren’t running.
I’ve finished all the MCDU steps for this typical flight and used the necessary data from the ISCS, and yes, the IRU’s (Inertial Reference Unit) are also all aligned.
Cost Index
A small note regarding the Cost Index (CI) that needs to be entered on the INIT A page.
In the tutorial page 29 you’ll find the following about the CI “Cost index 10; the cost index determines the trade off between fuel consumption and the time the aircraft takes for the flight. A Cost index of 0 means flight with minimum fuel consumption. 500 or higher is flying as fast as possible. As the flight performed is covers distance at the range limit, a low CI is required in order to have the necessary range.”
Although being an old document, “getting to grips with the cost index”, this Airbus article goes back to May 1998. I’m aware that the manual was written many years ago, it still gives enough and useful background information on the abbreviation CI. For those who are interested, just follow this link.
SID and STAR
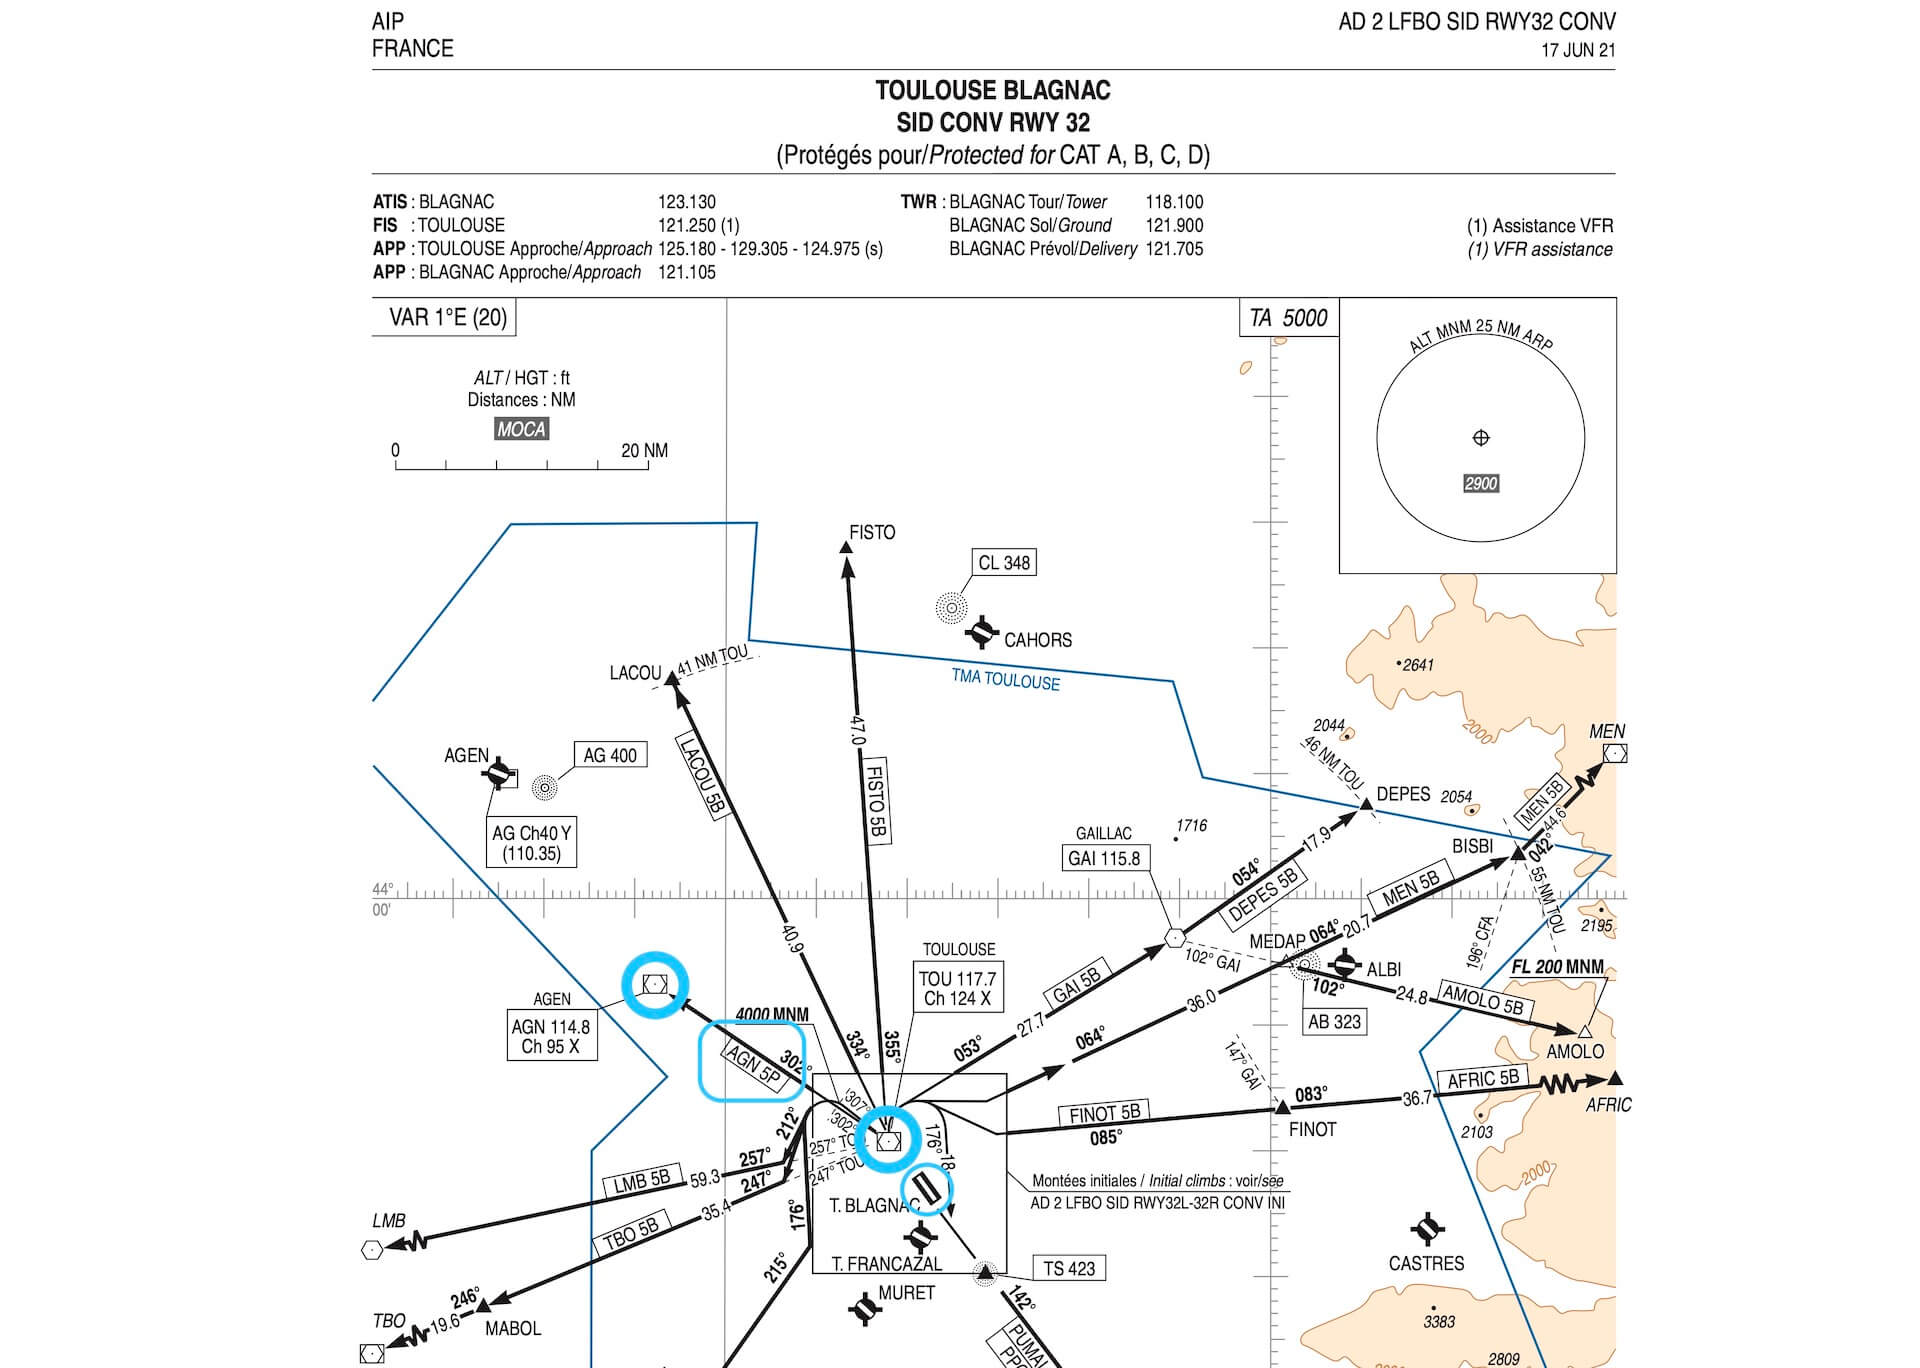
Oops, almost forgotten to mention. Since the LFBO3467 flight plan has no SID (Standard Instrument Departure) and no STAR (Standard Terminal Arrival Route), I still need to enter a SID. Keeping the waypoints in mind, the first one after VOR/DME TOU is AGN, I select SID AGN5P. Since there’s no TRANS(ition), I select LSK 6R to insert this SID. I leave the rest of the flight plan as it is, as well as that I haven’t entered yet a STAR and landing runway. One of the reasons I don’t enter yet a STAR is because it could be that you use a different STAR then intended or the environmental airport conditions change with the result that we need a different runway for our landing.
Needless to say that you can use for this the Standard Normal Procedures pages, but also the awesome tutorial however, everything related to that flight has to be skipped. I can’t express it enough, this included tutorial and not only applicable to this A340-600, but for all ToLiss aircraft, is absolutely professionally put together. As ex-technical trainer I know the importance of an excellent manual or tutorial.
AviTab
I forgot to mention one thing which is for some simmers very important to have and that’s the AviTab (Aviation Tablet). I write on purpose “for some simmers” since the real A340-600 didn’t had the AviTab or am I wrong? A340-500 and -600 pilots did had a tablet to do calculations on, seeking for documents, and so on and they could position or park this at the sliding window frame so …. at the same position where you can find the AviTab.


Since the current AviTab also has a direct link with Navigraph provided you’ve got an account, you can download charts directly on your AviTab and when you have the A340-600 FCOM, you also have access to these documents after you’ve copied them in the designated AviTab folder. All together, not so bad to highlight the AviTab.
It’s the virtual Year 2001, April 23rd
Hold on …. it’s 20+ years later – as of this writing it’s the end of November 2021 – and today I’ll take the ToLiss A340-600 on a virtual maiden flight. For this I’ve chosen for real weather and lucky for me, there’s some wind, but no clouds. The weather conditions can be good these days in Toulouse/Blagnac area. Are you ready to join me?
Part I – Airbus Test Flight
Pushback
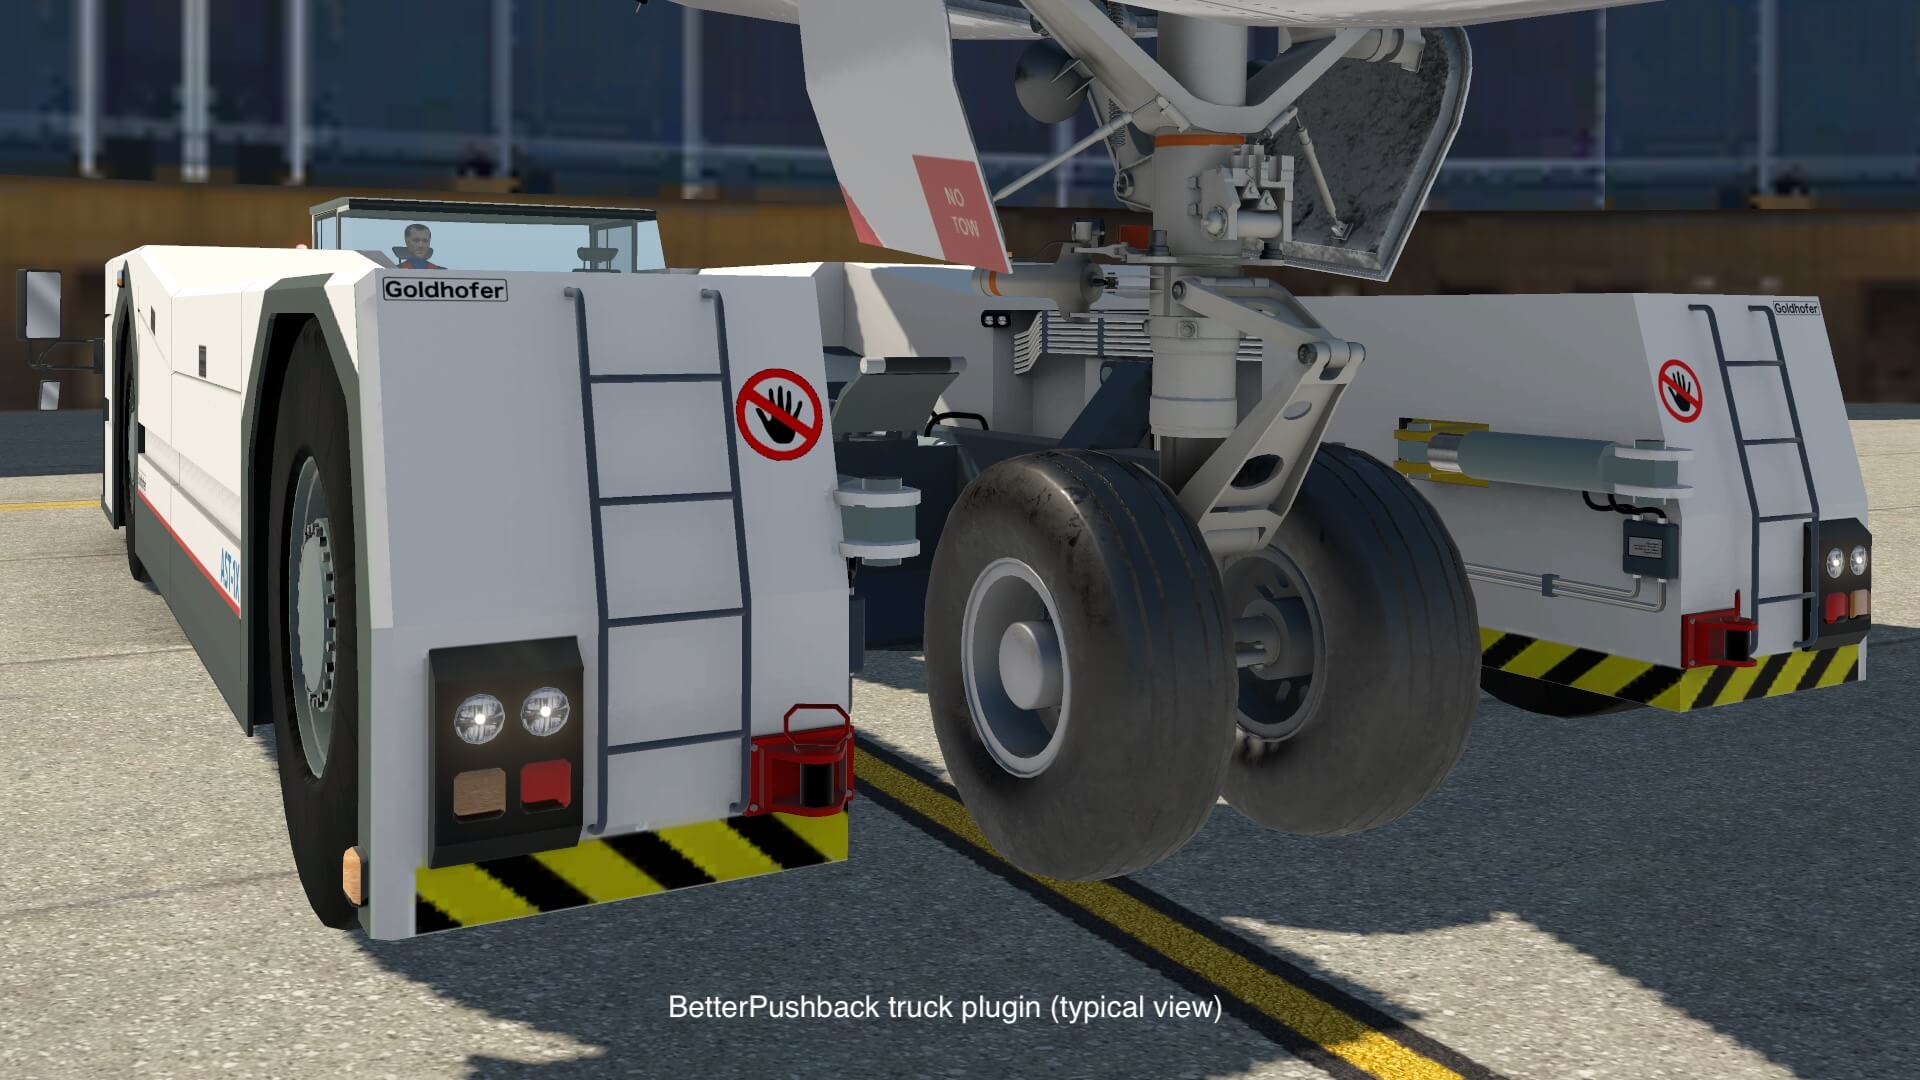
With all the work done so far, it’s time for the pushback preparations. If I decide to ask for a pushback from my parked position, there’s a lot to choose from which or what pushback function to use. First of all, the ToLiss comes with a build-in pushback function. It depends a bit on what you want. When you decide to stay in the flight deck while the aircraft gets the pushback, then it doesn’t make sense nor that it is important to see how the pushback truck is modeled. Right, the included ToLiss pushback truck works, but it’s not the most elegant model.
However, when you find it important that the external pushback truck looks are real as it gets, then you should consider downloading the freeware BetterPushback plugin which is also promoted by ToLiss. Besides that it is a beautiful truck, it comes with a nice controlling tool that allows you to visualizes how and where to pushback too.


Engine Start
As you perhaps know from other modern Airbus aircraft, an engine start is actually very simple. This is because the complete engine start cycle is controlled and monitored by FADEC (Full Authority Digital Engine Control). Ok, you still need to do something and that’s rotate the ENG MODE selector to ING/START and then one after the other, the ENG MASTER switch to ON.
I would say as ex-ground engineer that while the engine is controlled and monitored by FADEC, it’s still useful to monitor yourself the engine parameters on the ECAM E/WD and SD (Electronic Centralized aircraft Monitoring – Engine and Warning Display and System Display). On the other hand, I can tell you that when there’s a problem or malfunction detected, FADEC is much faster in taking the correct actions.
To figure out how real the simulated ToLiss A340-600 engine start cycles are, I searched the Web for A340-500 and A340-600 movies. I came to one conclusion verifying with what I saw …… one word is needed … awesome! Perhaps you would have said to me “ToLiss models always systems as real as it should be”, but I need to see it with my own eyes and I can tell you, it is as real as it gets. That said, the moment the starter valve opens, there’s N3 (HP shaft system) and a bit later slowly N2 (intermediate shaft system). At approximately 24-25 percent N3, ignition is switched ON, FUEL supply provided, EGT goes rapidly up as well as the N2 and N1 (LP shaft system also known as the fan section).
The engines starts in general show a smooth and realistic behavior. Yes, I know, I checked it versus real start Trent 500 procedure. Besides that I’m impressed about the overall procedure, I’m also happy with the sound, but how far is this real. Therefore I decided to contact ToLiss and they told me that “we purchased the engine sounds from TurbineSoundStudios. They are genuine Trent 500 sounds.” No more words needed!
Taxi
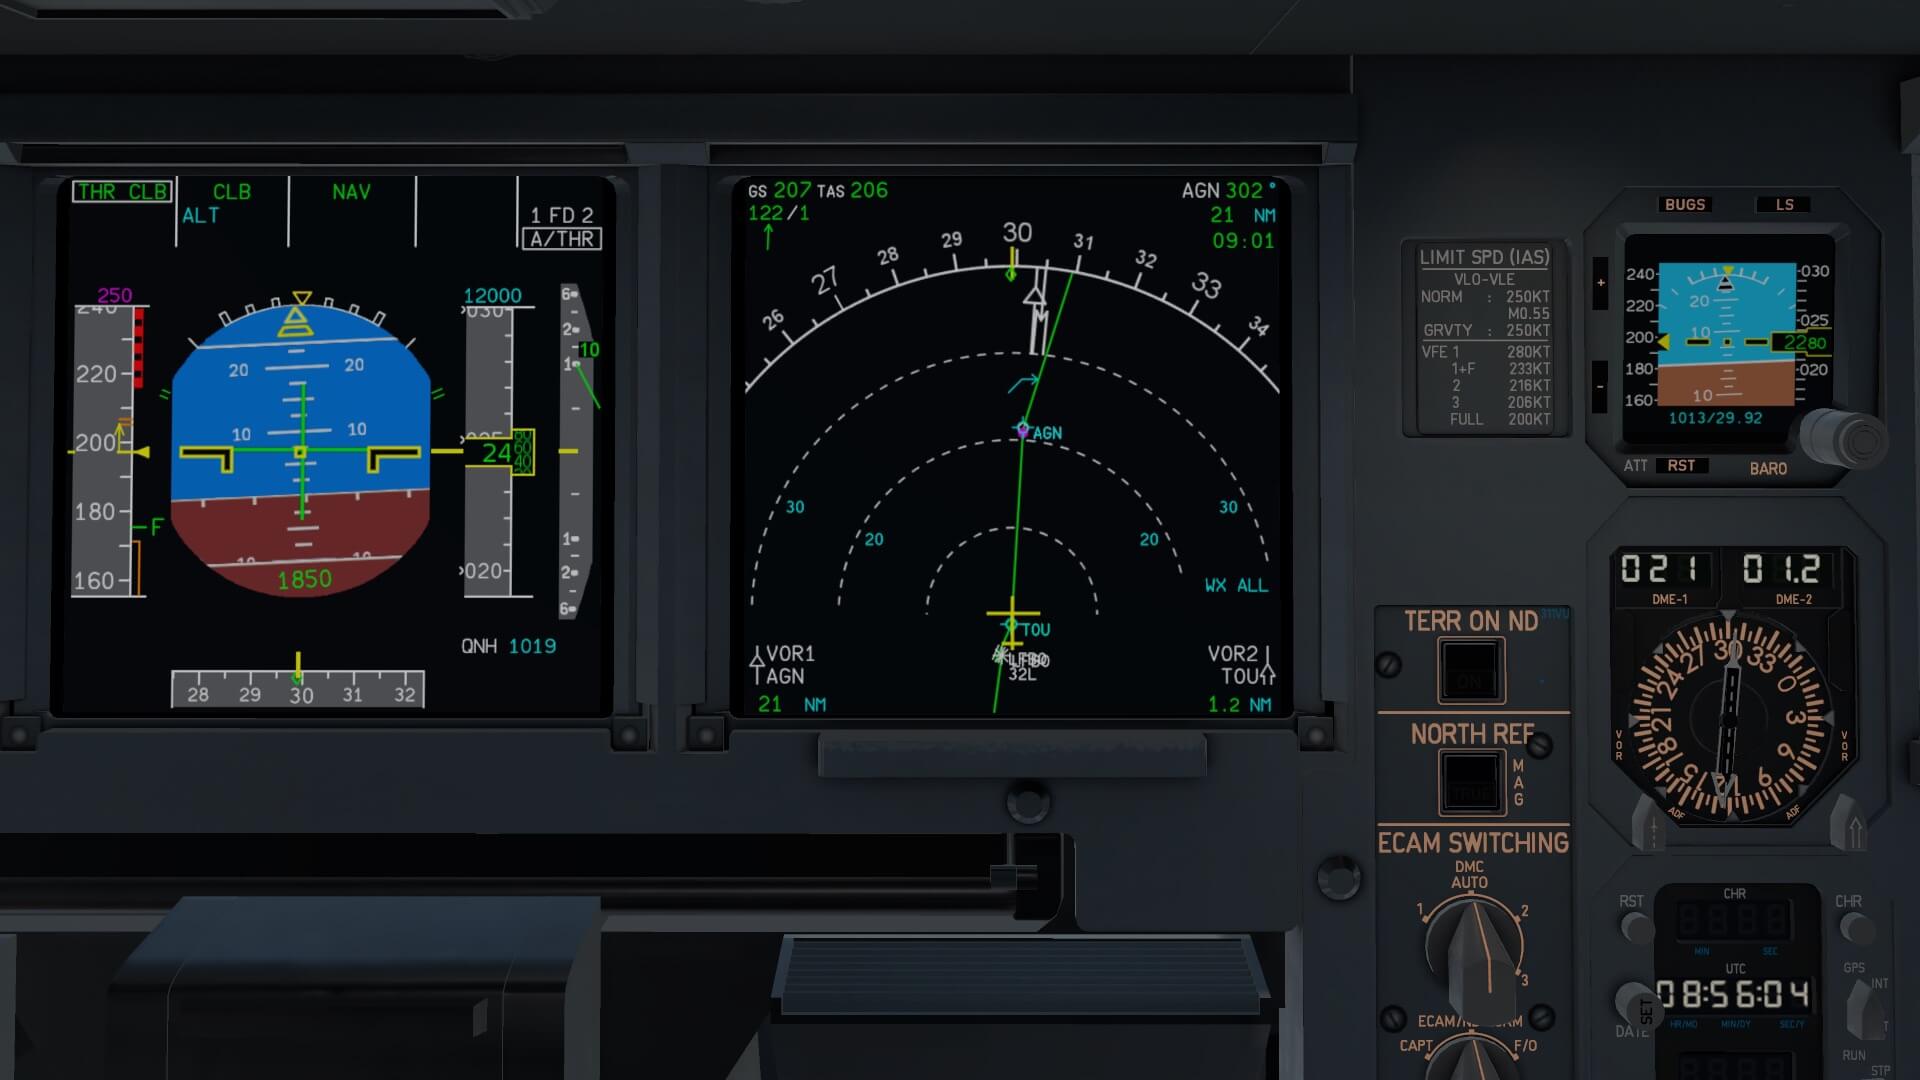
The plan is to take off from runway 32L. I’m at the Ziegler apron and to reach 32L I need to taxi via S90 – W80 – W60 – W50 – W40 – W35 – W30 and holding short at S3, so lets go on.

Due to its overall length, the A340-600 is standard equipped with a Taxi Aid Camera System (TACS) camera system. A camera is mounted on the trailing edge of the vertical fin and one underneath the fuselage pointing to the NLG. Although the name suggests that it is used for taxi only, it can also be used in flight in case there’s a need for.
With that in mind, I switch ON TACS via one of the three selector switches on the pedestal. Via this CAMERA selector panel you can see TACS on either PFD’s or the ECAM SD, but with other selectors you can transfer the CAMERA image to either ND.
The upper part of the TCAS display is from the lower fuselage camera while the lower and bigger screen is from the tail looking forward. The TACS also shows the actual GS (Ground speed). As far as I can remember, the TACS is a default X-Plane feature which means that it perhaps has its limitation like that the shown NWS doesn’t rotate on the upper display when making turns. A note found at the ToLiss X-Plane.Org forum from the ToLiss team “The camera image is X-Plane generated without the aircraft, so we draw the aircraft over it. At the moment, only landing gear extension and retraction are animated there, but this is on my list for updates to include other animations such as flaps extension or nose wheel compression and rotation.”
After selecting a CAMERA selector to ON (CAPT – SD – F/O) you have the CAMERA on a DU, but you will also select on the overhead panel -EXT LIGHTING sub panel – the runway turn off lights ON which also switches ON the two lower lights at the NLG. I tried it, and it works great, but I doubt if the camera lighting is simulated since with a dark environment I didn’t see any lighting in from of the NLG.
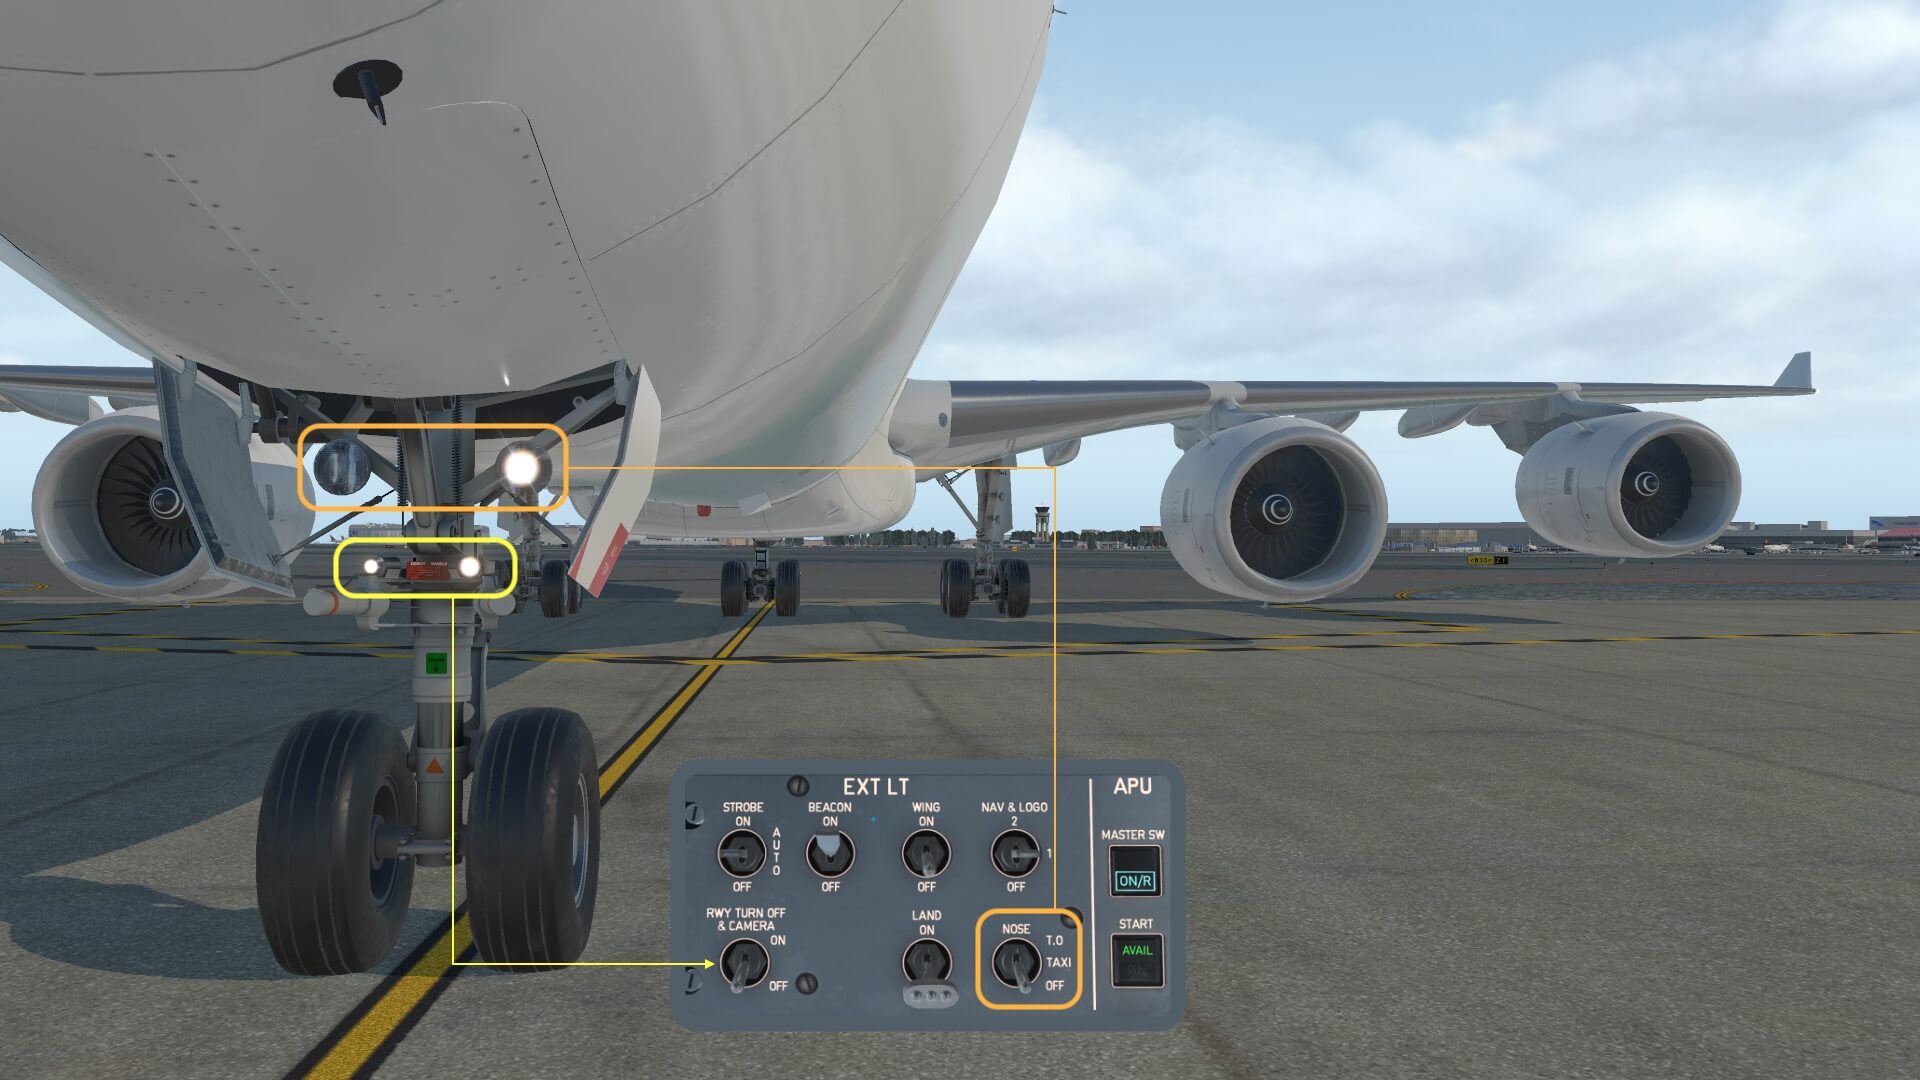
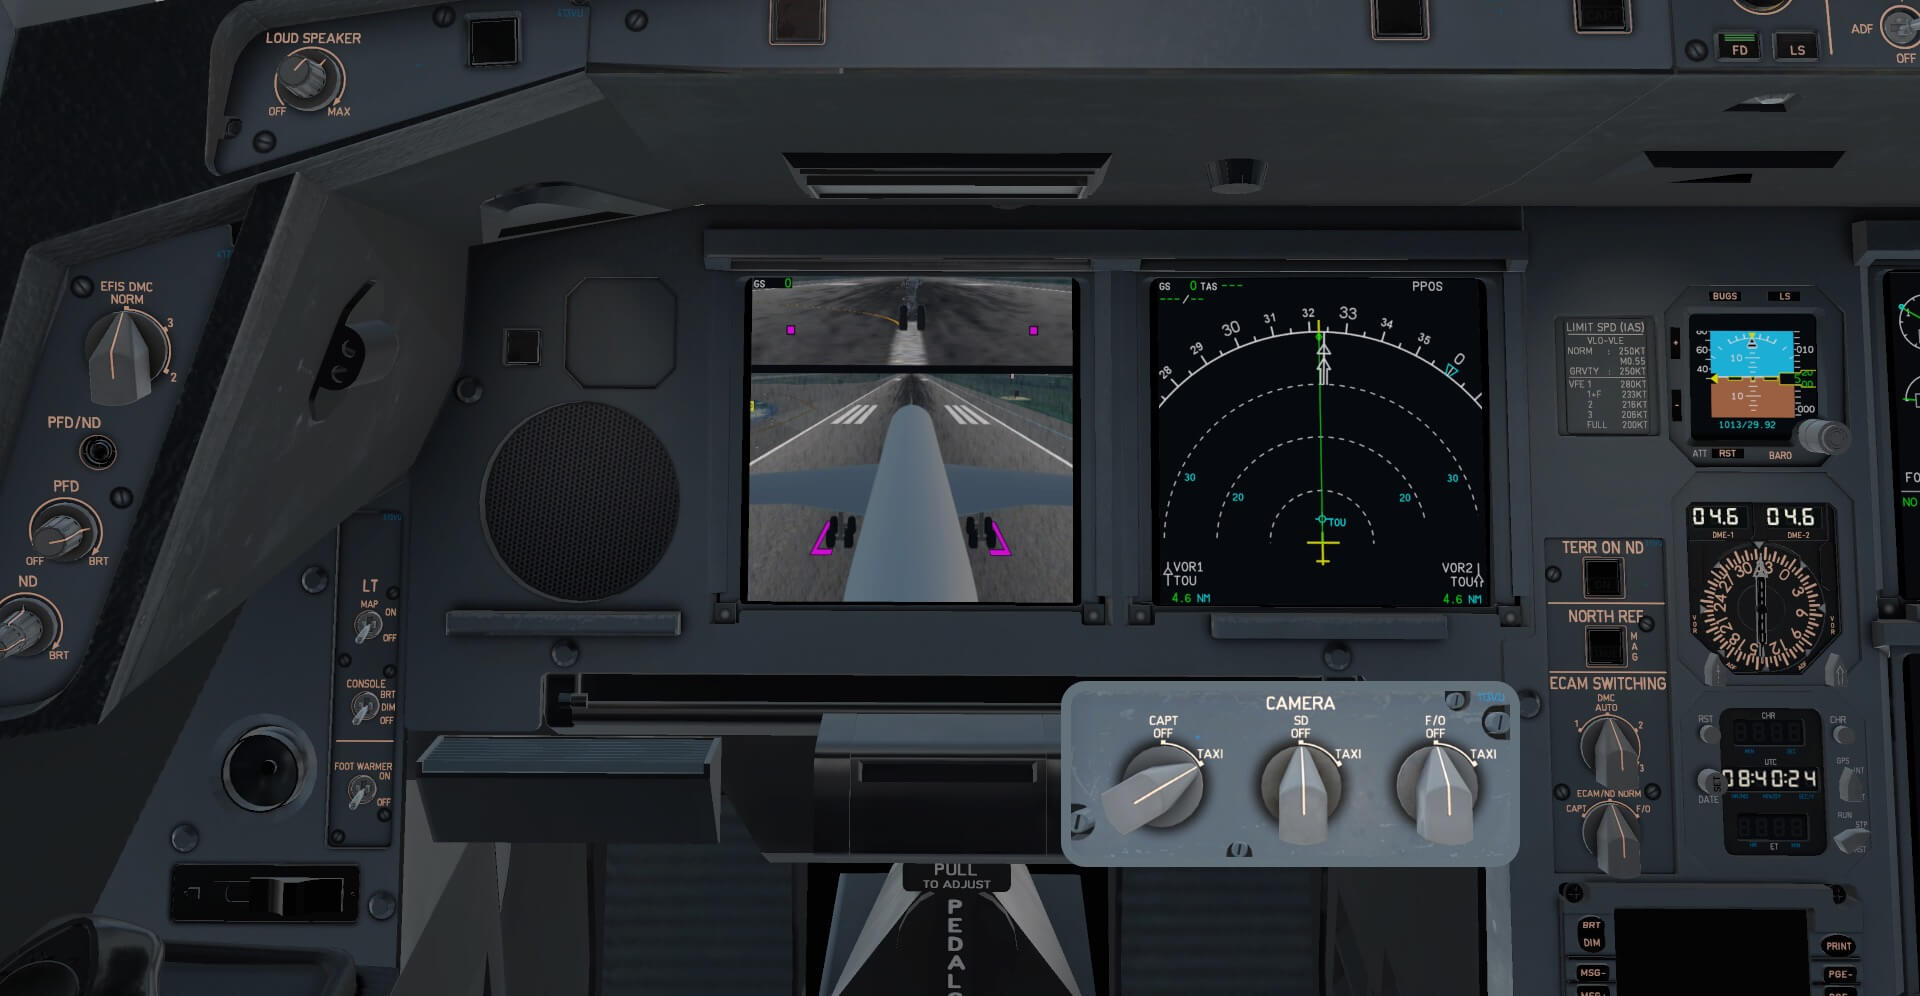

Overall, it makes taxiing this huge bird a lot easier and although it’s standard on the real A340-600 and A380, it will be a great taxi tool when it’s installed on larger X-Plane models. So using the CAMERA view works flawless and it’s even fun to taxi. With this feature you’ve got full control in what you do. Sometimes I did check the outside how and where my centerline was, but this is accurate in what you see on the DU.
Part II – Airbus Test Flight
Take-Off
Since I’m flying offline and thus there’s no ATC to tells me what to do and what not, I can decide when I turn on the runway. Parking brake set at the holding point 32L, I check once more the tutorial if I’ve done all the items. I click the CRONO on the glare shield and then it’s time to apply some thrust to turn the A340-600 on the runway centerline. Besides that, the takeoff phase and initial climb as well as the approach, final approach and landing are the most complex flight phases since many things happen in a short time. That’s not really different in real as in this ToLiss A340-600.
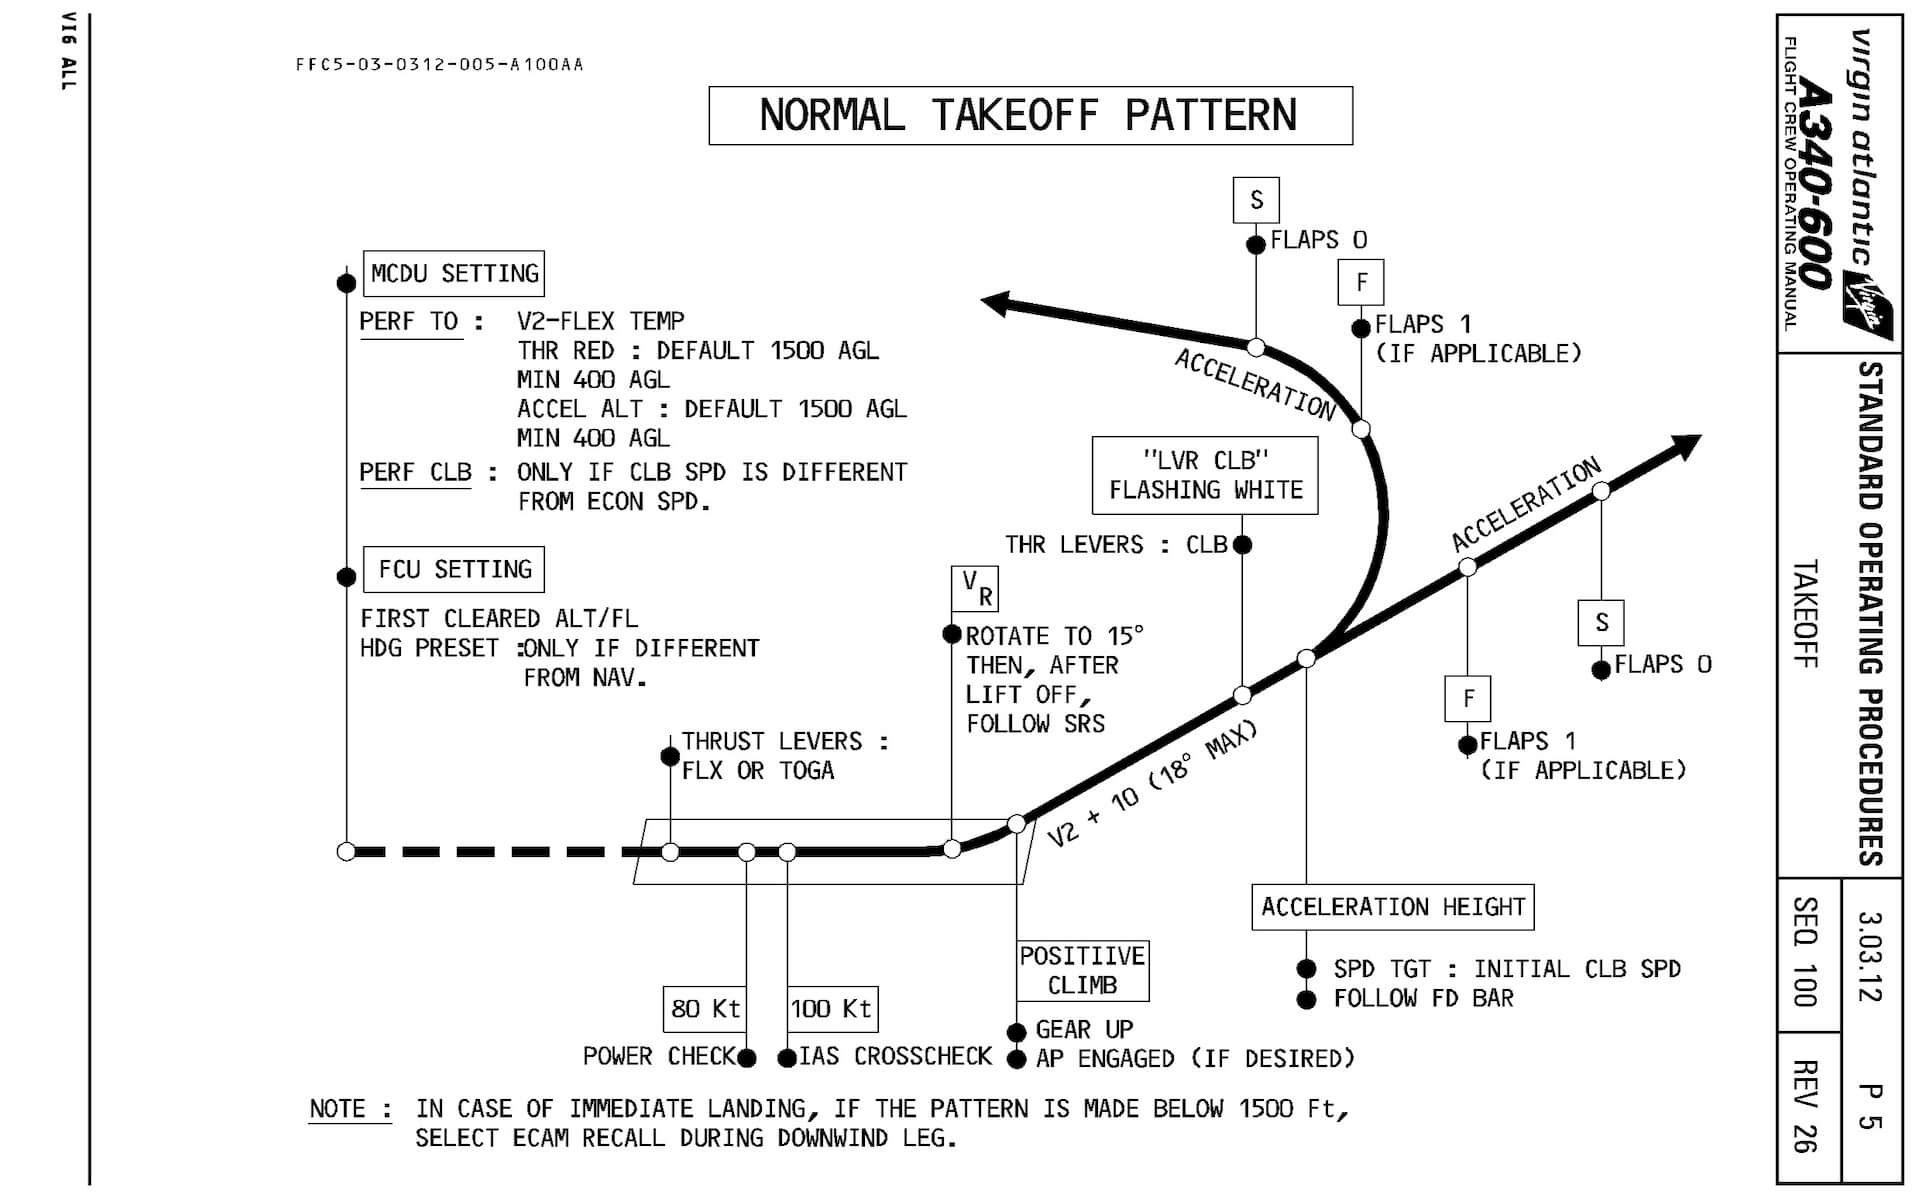
When aligned with the runway centerline, I switch OFF the CAMERA (TACS) selector on the pedestal, slide the Throttle Levers to the FLEX TO detent which also engages A/THR. When I’ve reached the FLEX TO detent, I can confirm this by checking the PFD FMA (Flight Mode Annunciator) where I see MAN FLX +xx where xx stands for the entered MCDU PERF FLEX temperature. Additionally, you and I will also see SRS (Speed Reference System) and RWY (runway) with CLB and NAV being armed in cyan.
By the way, RWY lateral mode provides lateral guidance from the start of the takeoff roll up to 30 feet if a suitable LOC signal is available. SRS vertical mode provides vertical guidance up to the acceleration altitude. As long as slats are extended and V2 is available to the FMS, SRS engages automatically when power is applied for takeoff. It commands a speed of V2+10 during normal operations. If an engine fails, V2 is commanded. SRS also maintains a minimum rate of climb without regard to speed control to provide windshear protection. At acceleration altitude SRS is automatically replaced by CLB mode, which accelerates the aircraft to initial climb speed.
The moment the throttles are in the FLEX TO detent, I notice the presence of the PITCH FD bar as well as the YAW bar on the PFD to keep the aircraft at the centerline of the runway. I write on purpose not both PFDs since that depends if you had selected the FD button on the FCU. Remember, the ToLiss aircraft systems and in this case the FMGS is modeled as split systems, as they are in real. That said, the FD switches on the CAPTAIN and F/O EFIS control panels work independent of each other.
During the takeoff run I hear occasionally a rumbling sound as if you’re passing a runway centerline lamp unit, but that’s it and there’s no cockpit shaking as you may expect while increasing speed on a not 100 percent flat runway which is never the case. Ok, that’s for me not really a big problem, but when you find it an issue or when you want to get the optimum feeling then you can solve this by checking it out XP-Realistic from Roy Kronenfeld.


Since I’ve heavily loaded my A340-600, she’s taking the time to reach V1, and not too much later VR. Since I entered the speeds in the MCDU, I’ll see them on my PFD. I need to remind you and myself that only V1 is announced, not VR. At VR I gently pull the side-stick and the aircraft slowly rotates and a positive climb is initiated.
Initial Climb
As mentioned above, quickly after lift off, RWY is replaced by NAV in green which is then also the active MANAGED mode. All other modes on the FCU are in MANAGED mode, indicated by the dot. Since there’s not yet a JARDesign Co-Pilot LINDA available for the ToLiss A340-600, I need to do all the checklist items myself while climbing out, but I can handle that I think, knowing that I’m still flying the aircraft manually. It’s amazing when you think about “how easy it is to fly the A340-600 manually”.
Controlling for PITCH and ROLL with the side-stick and thereby following the FD (Flight Director) bars is so easy, wondering if this reflects the reality. As curious as I am, I contacted two real A340-600 pilots and asked how they experienced the easiness of flying an Airbus FBW aircraft or in particular the A340-600.
According to both of my real ATPL pilot sources who flew the real A340-600 “the modeled QPAC FBW is perhaps one of the best if not the best Fly-by-Wire simulations out there. It is true that the modeled A340-600, but also applicable to all other ToLiss Airbus models, flies so easy by hand although the real A340-600 has some issue that is not related to the FBW system itself, but more an issue of the aircraft dimensions and fuselage length itself. To simulate this behavior, ToLiss added a kind of slow response that simulates this behavior.” In other words, that the modeled A340-600 flies so realistic is correct and confirmed by real pilots.
At the acceleration altitude – see the MCDU PERF TAKOFF page – SRS is replaced by CLB as the active mode, and underneath MAN FLX flashes LVR CLB which means that I have to slide the throttle levers one detent back to the CLB detent. When the throttles are in the CLB detent, that’s then indicated on the FMA with THR CLB. In the mean time I also need to monitor the green F or S on the PFD speed scale since this indicates when to retract the FLAPS and finally the SLATS. No rocket science, just monitor the F and S on the speed scale when to retract from 3, to 2, to 1+F and FULL RETRACT. Also a note from one of the pilots. It’s not a general rule to only use FLAPS 3 for takeoff. He confirmed that it’s also possible to use FLAPS 2 or even FLAPS 1+F.


For some reason I prefer not to connect AP1 (Auto Pilot) or AP2, but to keep on flying manually. When you move the side-stick according to the FD bars on the PFD, you actually trimming for ROLL or PITCH. When you do this gently, and that’s what I try, you can easily do some other checklist items and when you and I feel not comfortable with this, you can always engage AP1 or AP2, do all the checklist items, and disconnect the AP to continue in MAN mode.
Some additional words about manual trimming by Marcelo Alencar.
Question … is there a need to use manual trimming on modern Airbus aircraft? Do you need to trim for example the ROLL and PITCH channels under normal flight conditions?
To answer this, I could if I want to, find it out myself, but it’s better to ask Marcelo Alencar. Marcelo is an active ATPL pilot or actually, he’s an acting captain with several licenses on modern Airbus aircraft. According to Marcelo “None of the FBW Airbuses has a trim switch on the sidestick. Airbus has what we call “auto trim” and this is directly linked with the flight control laws.
On the A320, A330 and A340 you still have the trim in case you end up using a mechanical backup. There you can see the trim wheels moving, but you can’t interact “command” them. If you degrade to a direct law or mechanical backup, than you can use the trim wheels to control the pitch. This is very difficult to maneuver and as per Airbus, it’s very unlike to happen!
On the A380 and A350 the trim wheels are replaced by a pitch trim switch which has the same functionality as the trim wheels but only a lot smaller. Remember; on the sidestick you only have the PTT p/b (Push To Talk switch for the radio) and the red AP disconnect p/b. On all Airbus the information goes to the computer and then to the surfaces.
After engine start, you set manually the TO C.G. % using the trim units, applicable for the A330-200/-300 and the old A340. On the new A330F (Freighter) and A340-500/-600, this is automatically done by the computer using the information that the pilot inserts via FMS. After take off there is a transition on who’s is controlling the airplane (what laws are working). You do the take off almost on Direct Law and after approximately 10 seconds the system reverts to Normal Law. At this point the computer start trimming the aircraft based on pitch and speed. During the whole flight, the system looks for the best C.G. based on altitude, speed and weight. It uses, if applicable, the stabilizer TRIM tank to change or improve the C.G. by moving the fuel from the other fuel tanks to the trim tank and of course, some conditions are there to comply.”
Climb
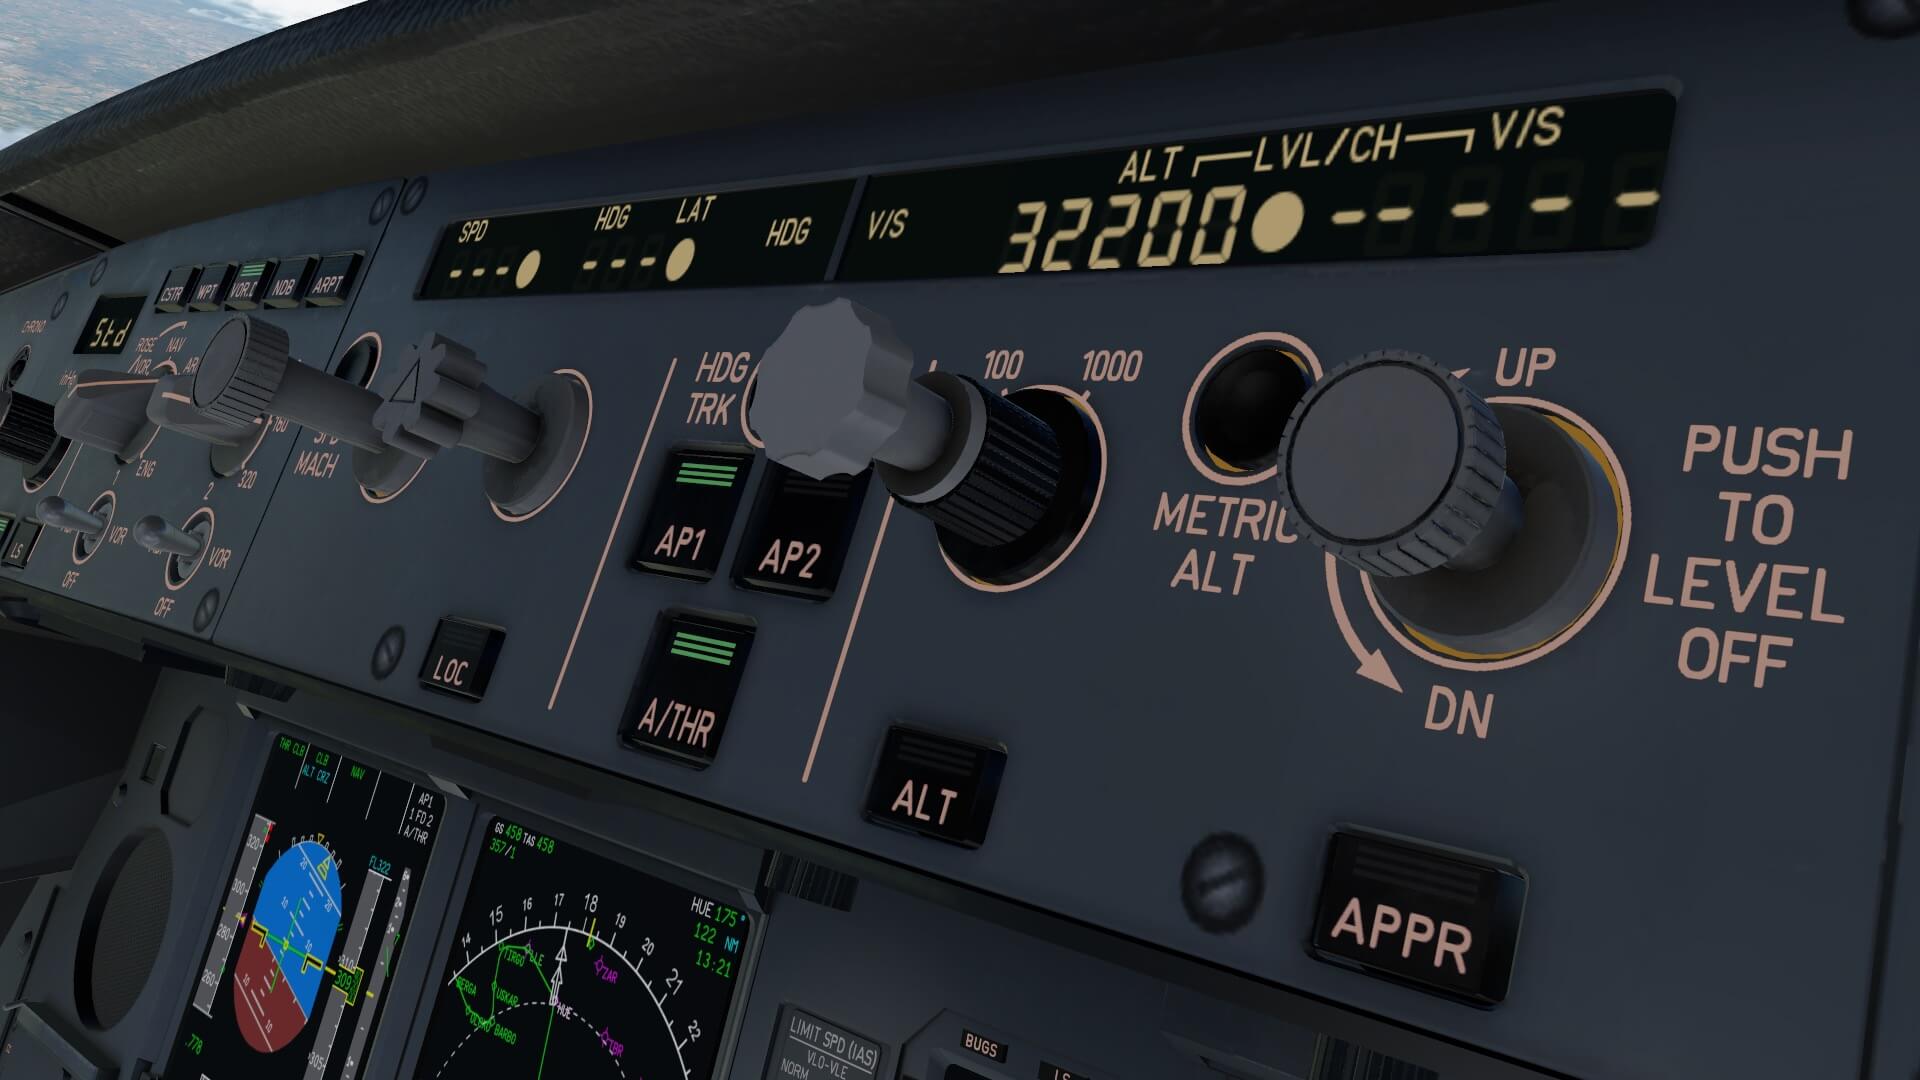
The initial climb hectic is behind me. I’ve reached my first level off altitude and entered my second cruizing level of FL210. I push the knob to stay in the MANAGED mode else, when I pull the knob, I see no dot, I also see that I’m now in OP CLB and the VS (Vertical Speed) window becomes alive on the FCU. From now on it’s all a bit relaxed and it allows me to check out the modeled systems as far as my knowledge goes.
I could do many tests to find out which or what systems are simulated. I could operate all the switches and/or selectors, but perhaps much easier and faster is checking and following the included tutorial. That’s what I did so far, but there’s a bit more. Although I’m not a real Airbus pilot, I can read the FCOM and read how systems should behave, or I can check Youtube videos and see how the modeled A340-600 responds versus what I see in those videos and I can even contact real licensed A340-600 pilots.
But what I know and worth to highlight is that the modeled Auto Flight systems are as far as possible within the X-Plane engine, responding as real as it gets. The three modeled MCDUs of which the two front MCDUs work independent of each other as well as the you can independently get popups of them. Or not to forget the FD buttons on the FCU are split between the CAPT and F/O EFIS. The same is also applicable for the BARO selector.


These are split and ECAM tells you whenever there’s a discrepancy between them. But this is not all, what do you think about the lighting control with rheostats of the EFIS DUs. The lighting of each DU works independent on each side, but also independent from the other side. Or when you select on the CAPT ND a ROSE mode then you don’t see a copy of the same mode and range on the F/O ND. No no, the F/O ND has own controls to select what mode you want and which range you need. And so I can continue …. the modeled systems are really separate systems as they are in real and this means that you and I need to keep that in mind.
Before I’m leveling off at FL210, I’ve entered already my final cruizing altitude. It’s in real much easier to operate with your fingers the knobs on the FCU. Operating the PUSH/PULL knobs on the FCU with your mouse could be challenging however, ToLiss offers a great feature. It can be found in the ISCS – General Settings tab “Use FCU Mouse Gestures” function. And yes, it will be described in the Simulation Manual, but I also know that not everybody takes the time to read that.
The following screenshot is a compilation of this ISCS General Settings tab “Use FCU Mouse Gestures” function and how it looks when you move your mouse over one of the selector knobs. What you see on the screenshots is with “Use FCU Mouse Gestures” selected OFF thus the small slider is moved to “0”.

When this feature is activated the mouse will change to two different hand symbols. As you can see on the screenshot, it can be a hand that pushes the knob or when you move the mouse pointer lower, it will become a hand that simulates that you pull the knob. The “wheel” you see is used to change the value whenever applicable with the middle mouse wheel. In general can be said that for the SPD, HDG, ALT and V/S knobs a PUSH means MANAGED mode or only dashes (V/S). You can if you prefer to select this feature OFF, but give this feature a try. It works great and much easier then the default X-Plane way of changing values or functions (PUSH/PULL).
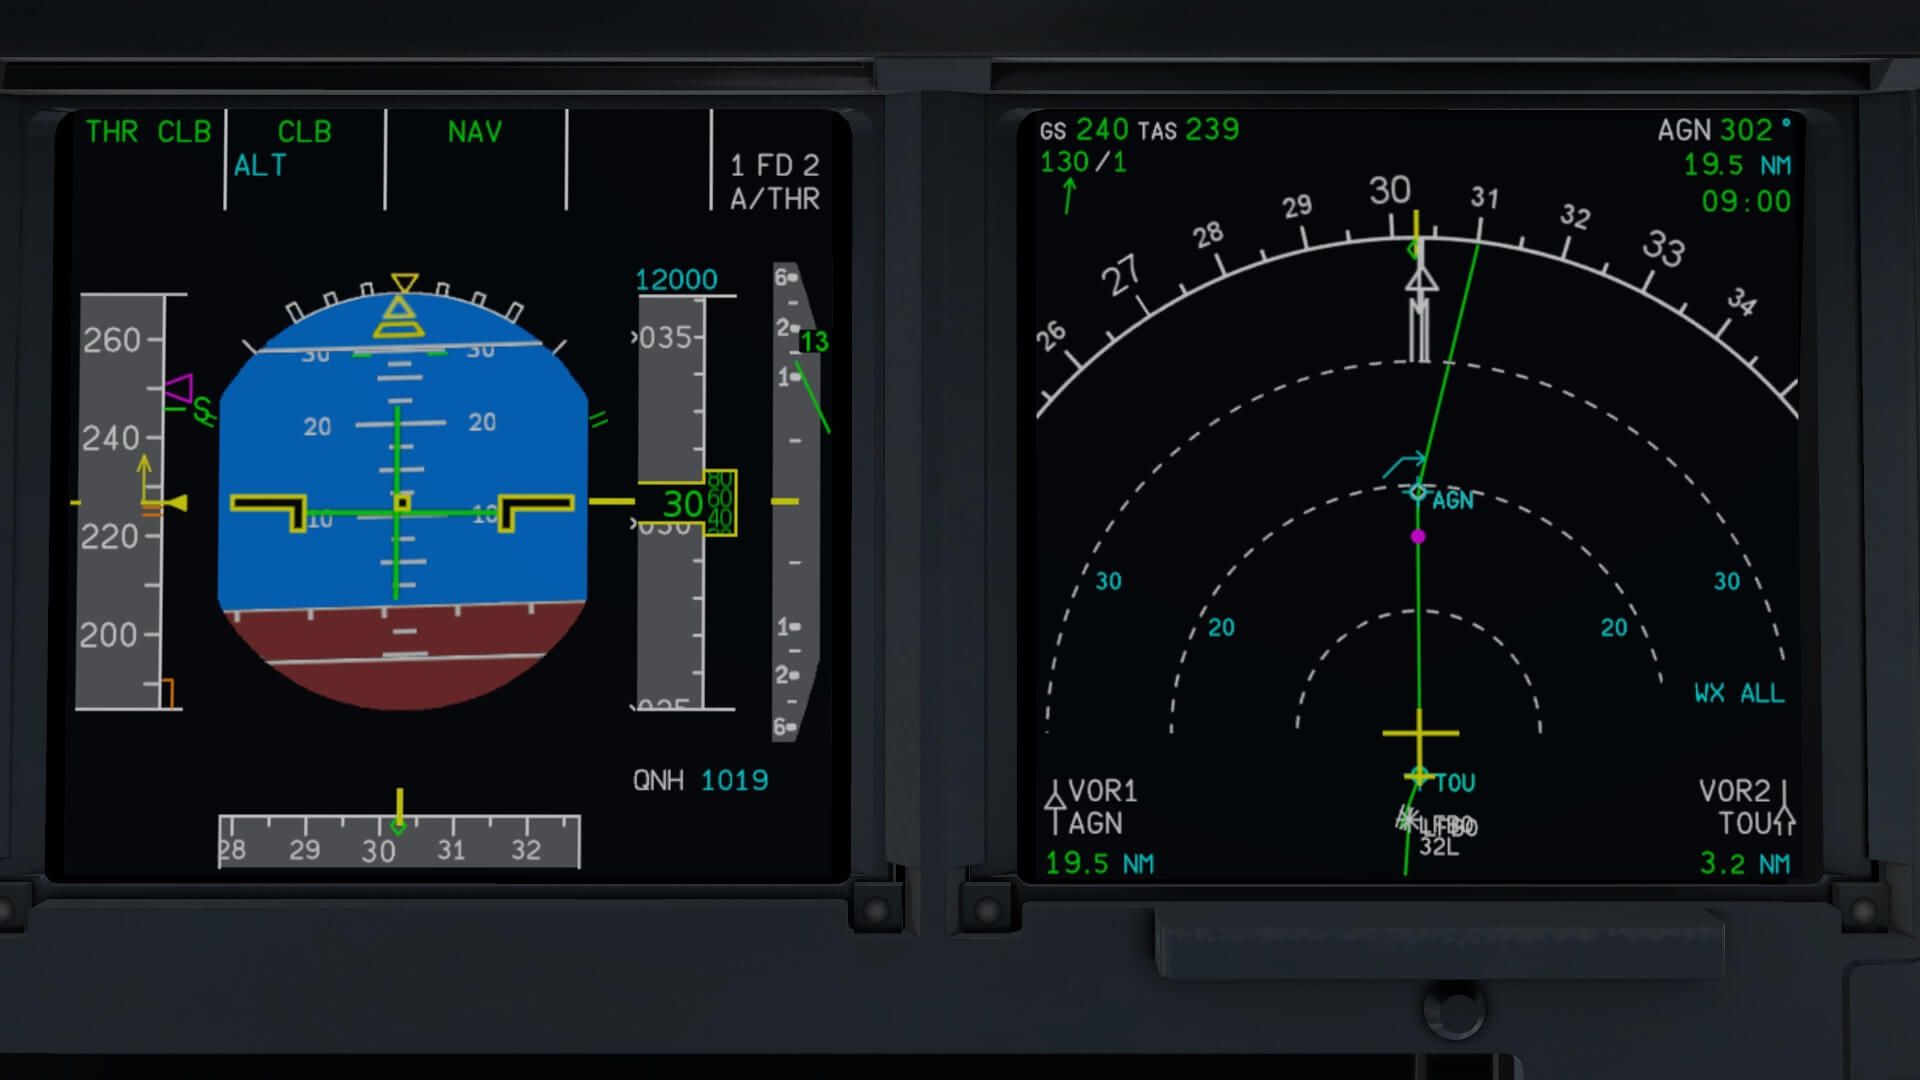
While the climb continues, I want to check out what happens when I change from NAV to HDG mode or when I want to select a certain V/S. Before I start with an example, let me first show you how the FCU and FMA looks like when we’re in MANAGED mode while climbing. The first screenshot shows this situation.
With the previous explanation in mind, I now pull the HDG knob. The HDG window will show the actual HDG as well as that I’m out of the MANAGED mode. No more ashes and dot, just the actual HDG and the indication on the FCU has changed to OP CLB and HDG. OP (open) CLB and later in the flight during the descent, OP DES are non managed lateral modes. Clicking the HDG knob with the hand and finger pointing upwards activates the MANAGED mode and of course, the FMA changes accordingly to CLB and NAV. These actions are basically the same for the SPD knob and the ALT knob with the exception that you’ll always see the selected altitude in the FCU window.
Another example and that’s the Vertical Speed mode selector. I’m not a real Airbus pilot, so I could be wrong, but the V/S is hardly used but handy during the approach when ATC orders you to descent differently then calculated by the FMGCs. In the same way, you can also expect HDG orders instead of following the flight plan to your runway. Anyway, the last screenshot is an example of using the V/S knob.
Again, normally the V/S window shows dashes, but when you move the mouse to the lower portion (mouse hand like a fist) the actual vertical speed is shown in the window. By moving the middle mouse wheel, you can change the value. As you can see on the screenshot, the PFD FMA shows the V/S mode with value, ALT CRZ in cyan being ARMED and the THR CLB is changed in SPD.

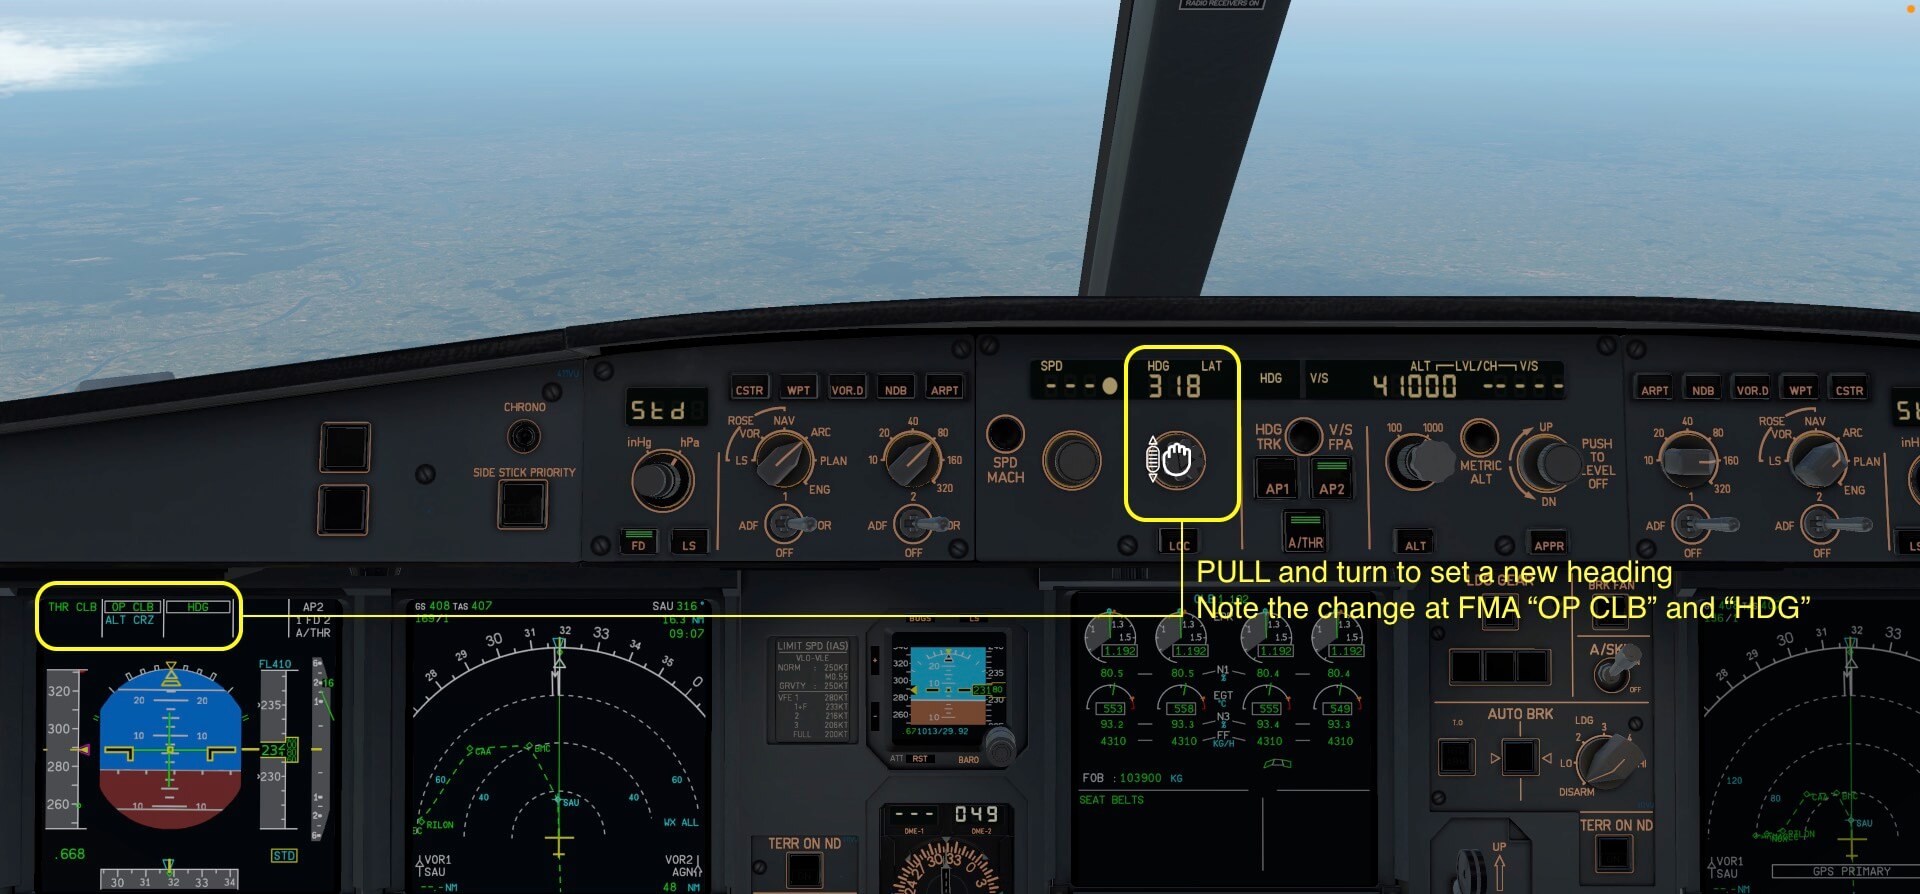

To leave the V/S mode, move the mouse hand to the upper part of the knob till it becomes a hand with pointing finger and click the knob. The V/S window becomes dashes but double check that the altitude window show the dot. If not, click in the same way on the ALT knob. Why all about this for just a couple of knobs? That’s what me makes so happy. It is programmed in a way that it works. You can change and fiddle around with the settings on the FCU, but you can always return without any issues that could popup to the MANAGED mode. This is not always the case with other Airbus aircraft.
Cruise
In the mean time I’ve reached my final cruizing altitude of FL322 – checked it at the PROG page – while the FCU shows all MANAGED modes. What I said before, you can change a mode, see how the aircraft responds and then go back to the MANAGED mode. I started with an example of HDG. I can enter the HDG mode, the original flight plan on the ND becomes a green dotted line with a straight line for the current SEL HDG. When I turn the knob and enter another value, the aircraft will logically follow that HDG.
A reason to do this could be to fly around some clouds or an area you want to avoid without loosing your flight plan. Assume you’ve flown around the area that could be hazardous, you click the HDG button with the mouse being a hand with pointing finder, and the window returns to the MANAGED mode thus dashes and dot. The FMGS picks up the intended flight plan and calculates the shortest route to the first waypoint.


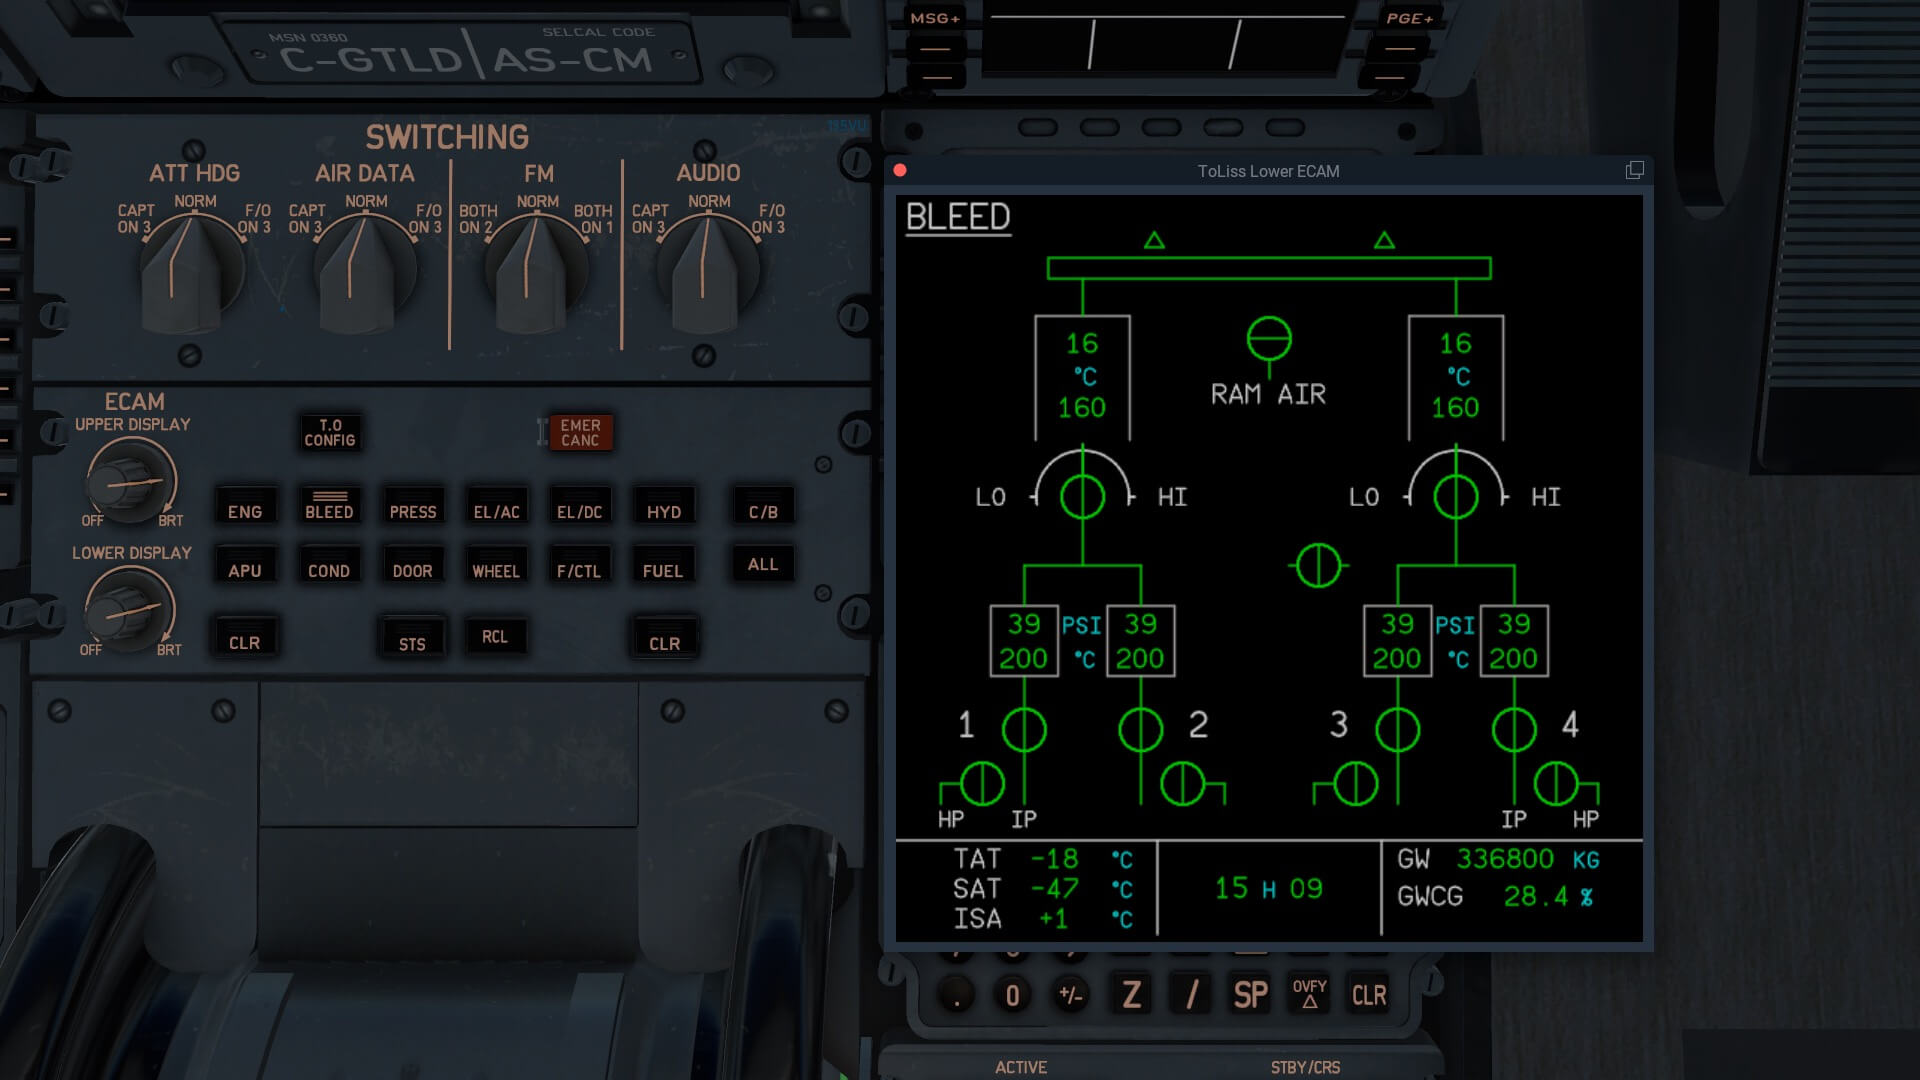
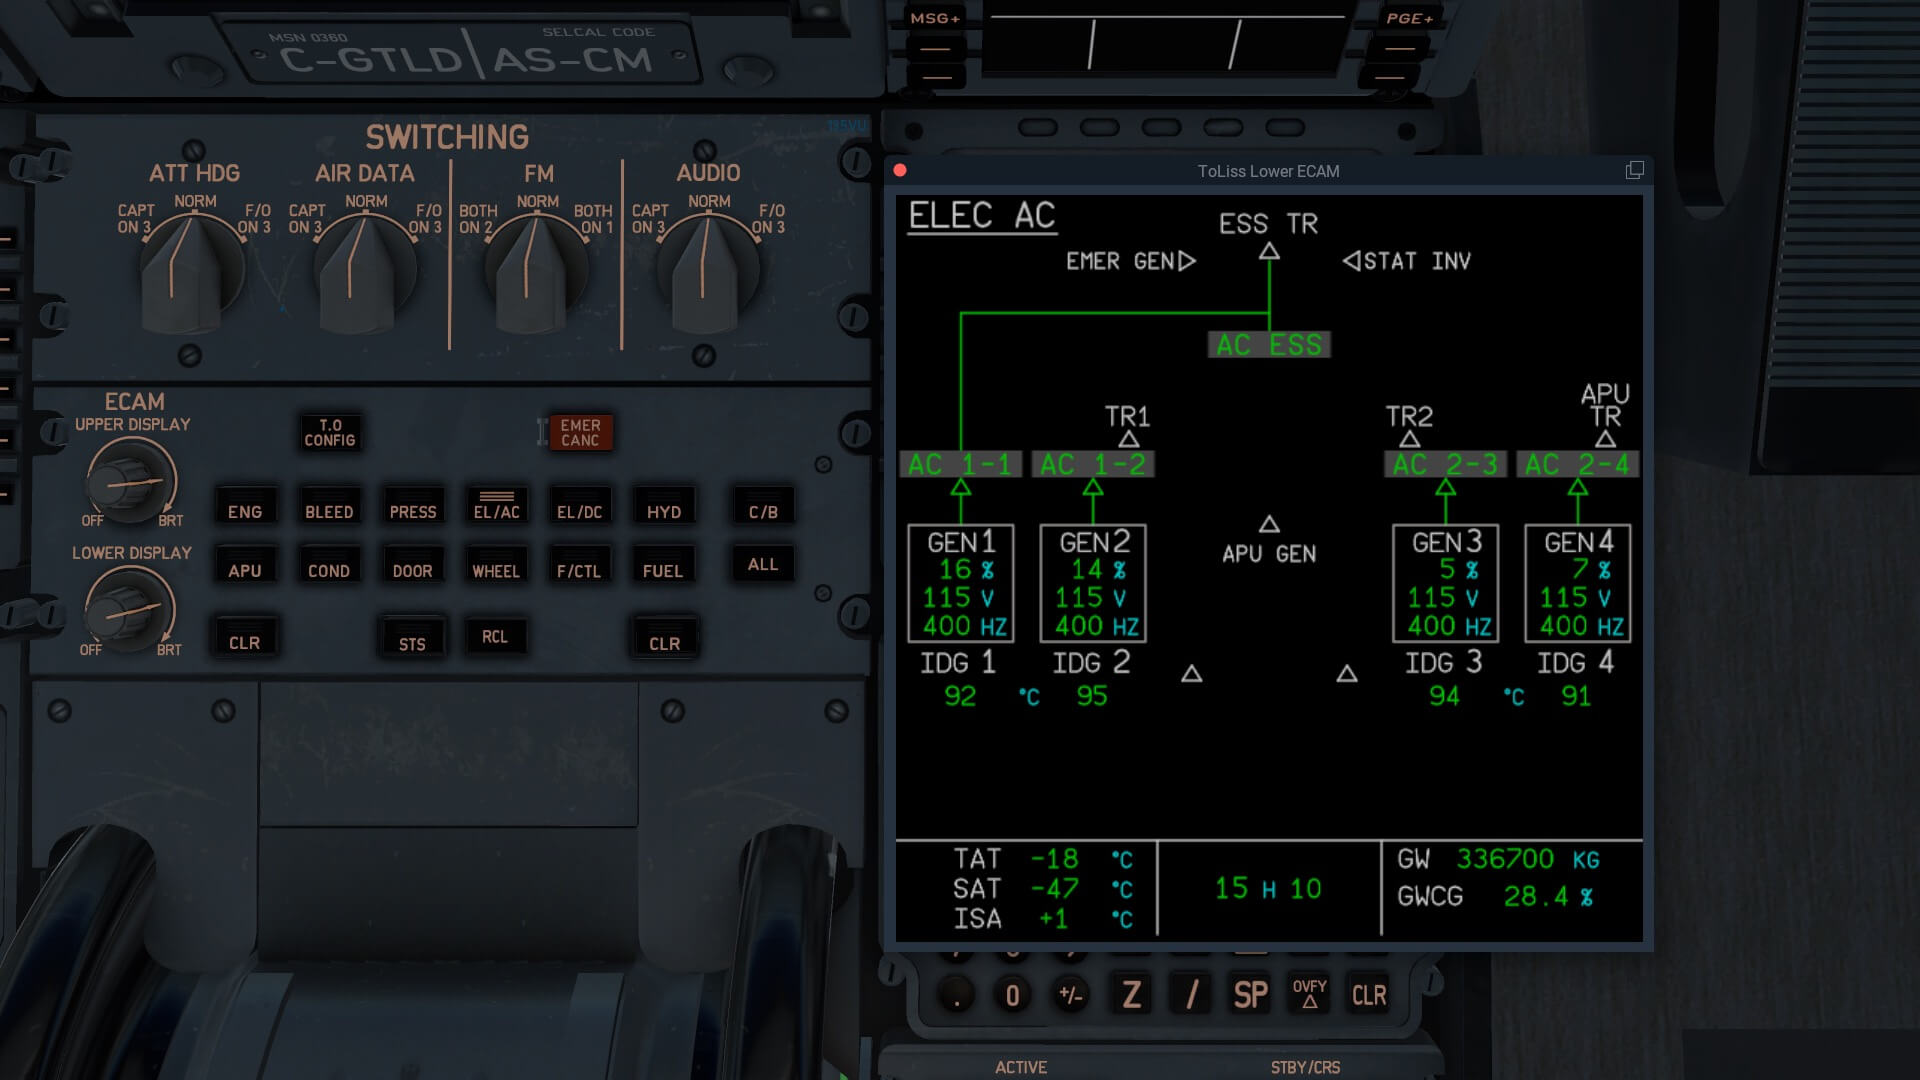


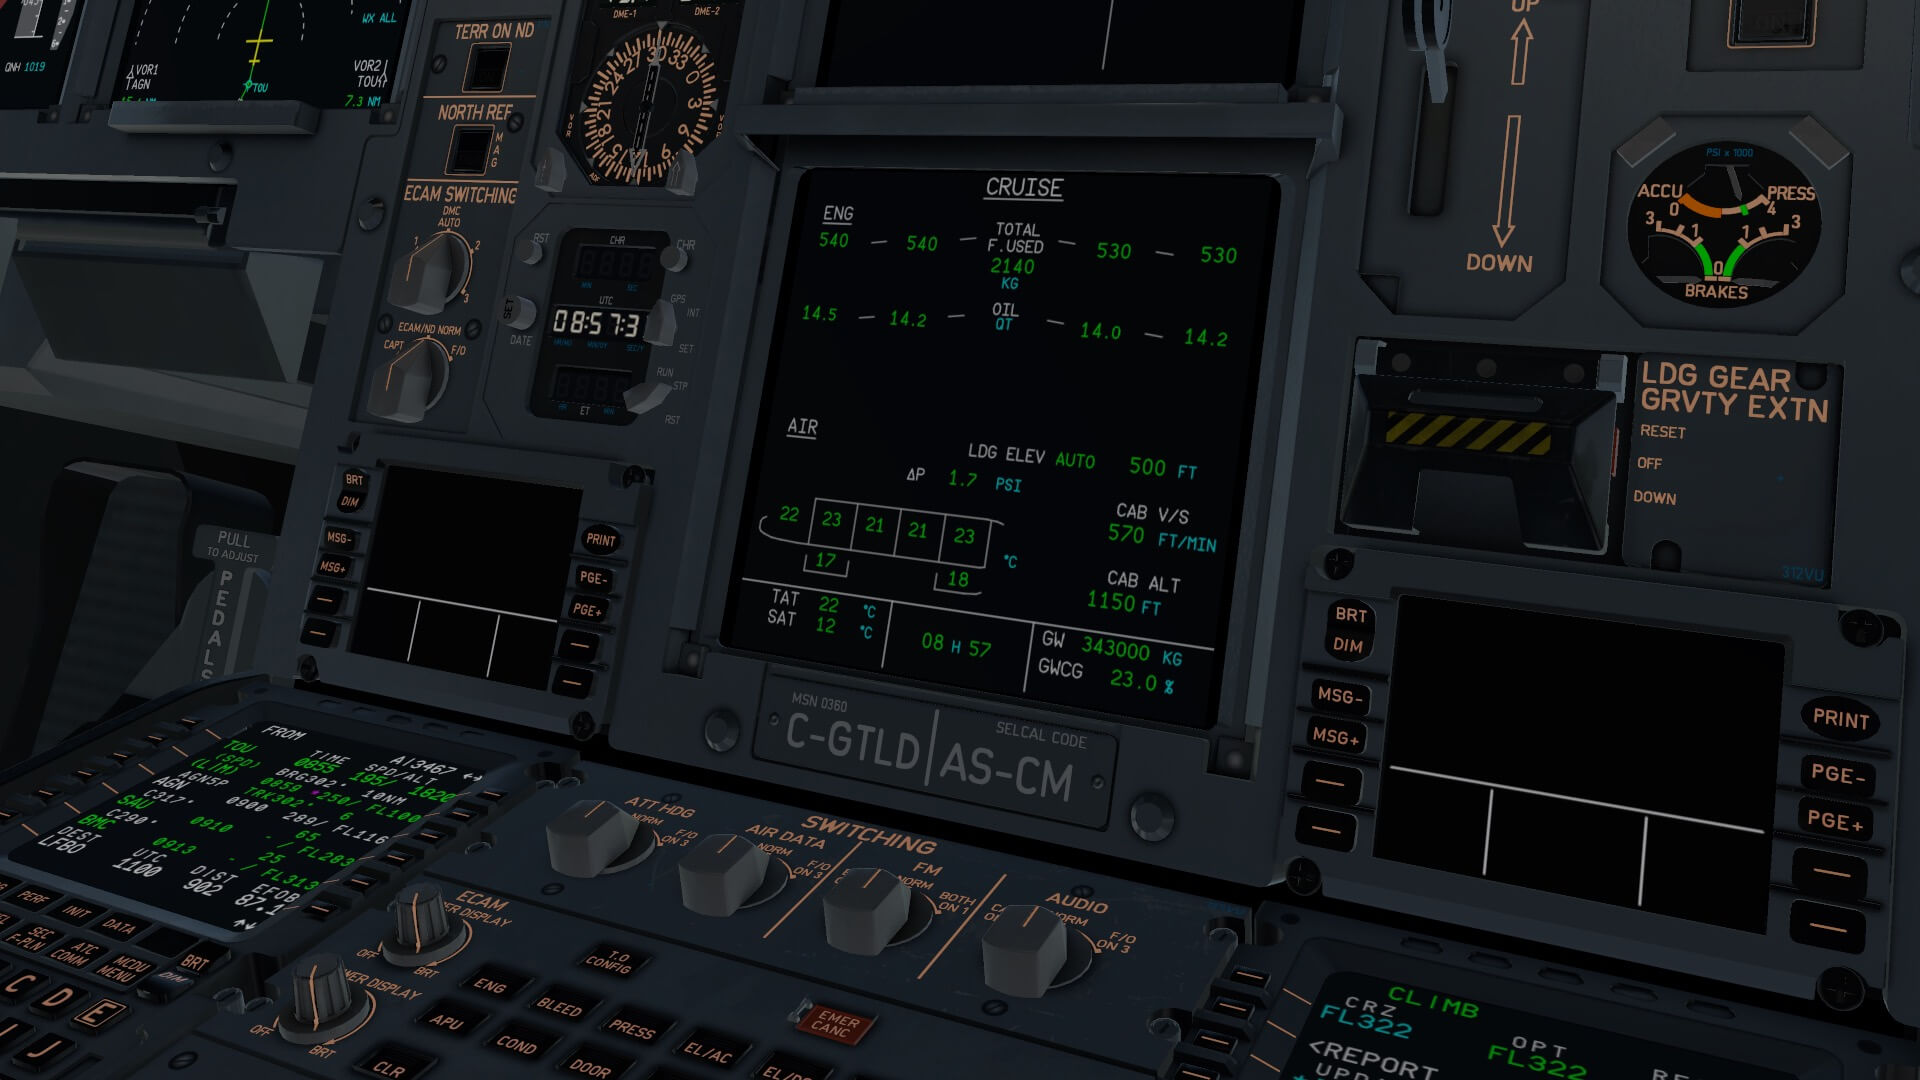
Now that the A340-600 is at cruizing level, it also time to relax a bit. For me as ex-ground engineer with a license for the Airbus A310 it’s fun to check how ECAM is modeled. Since then ECAM has changed a lot. The old fashioned engine indicators in the middle of the center instrument panel are gone and already for a while integrated in the upper ECAM DU or E/WD where as you know, the E stands for Engine. The ECAM philosophy hasn’t changed since then. When a failure pops up, not only the failure is shown on ECAM, but also the action or actions to be taken.
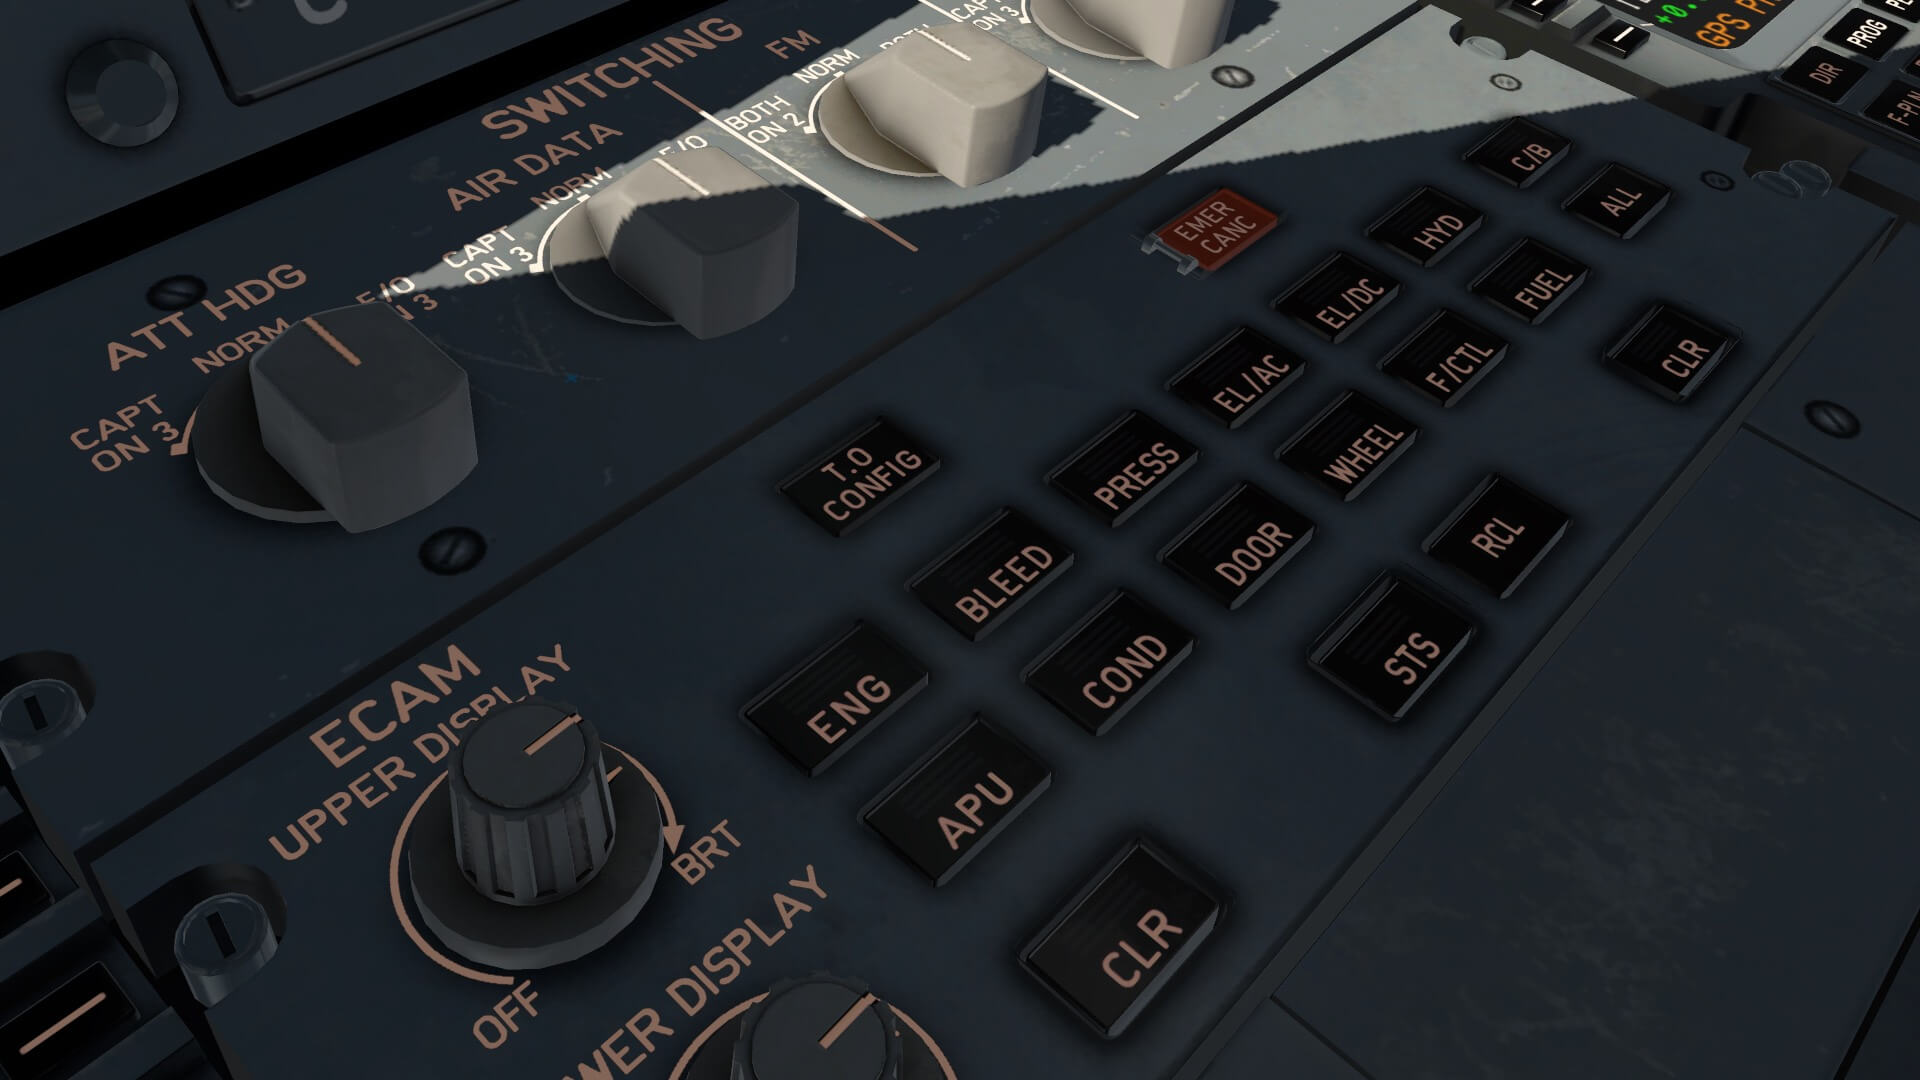
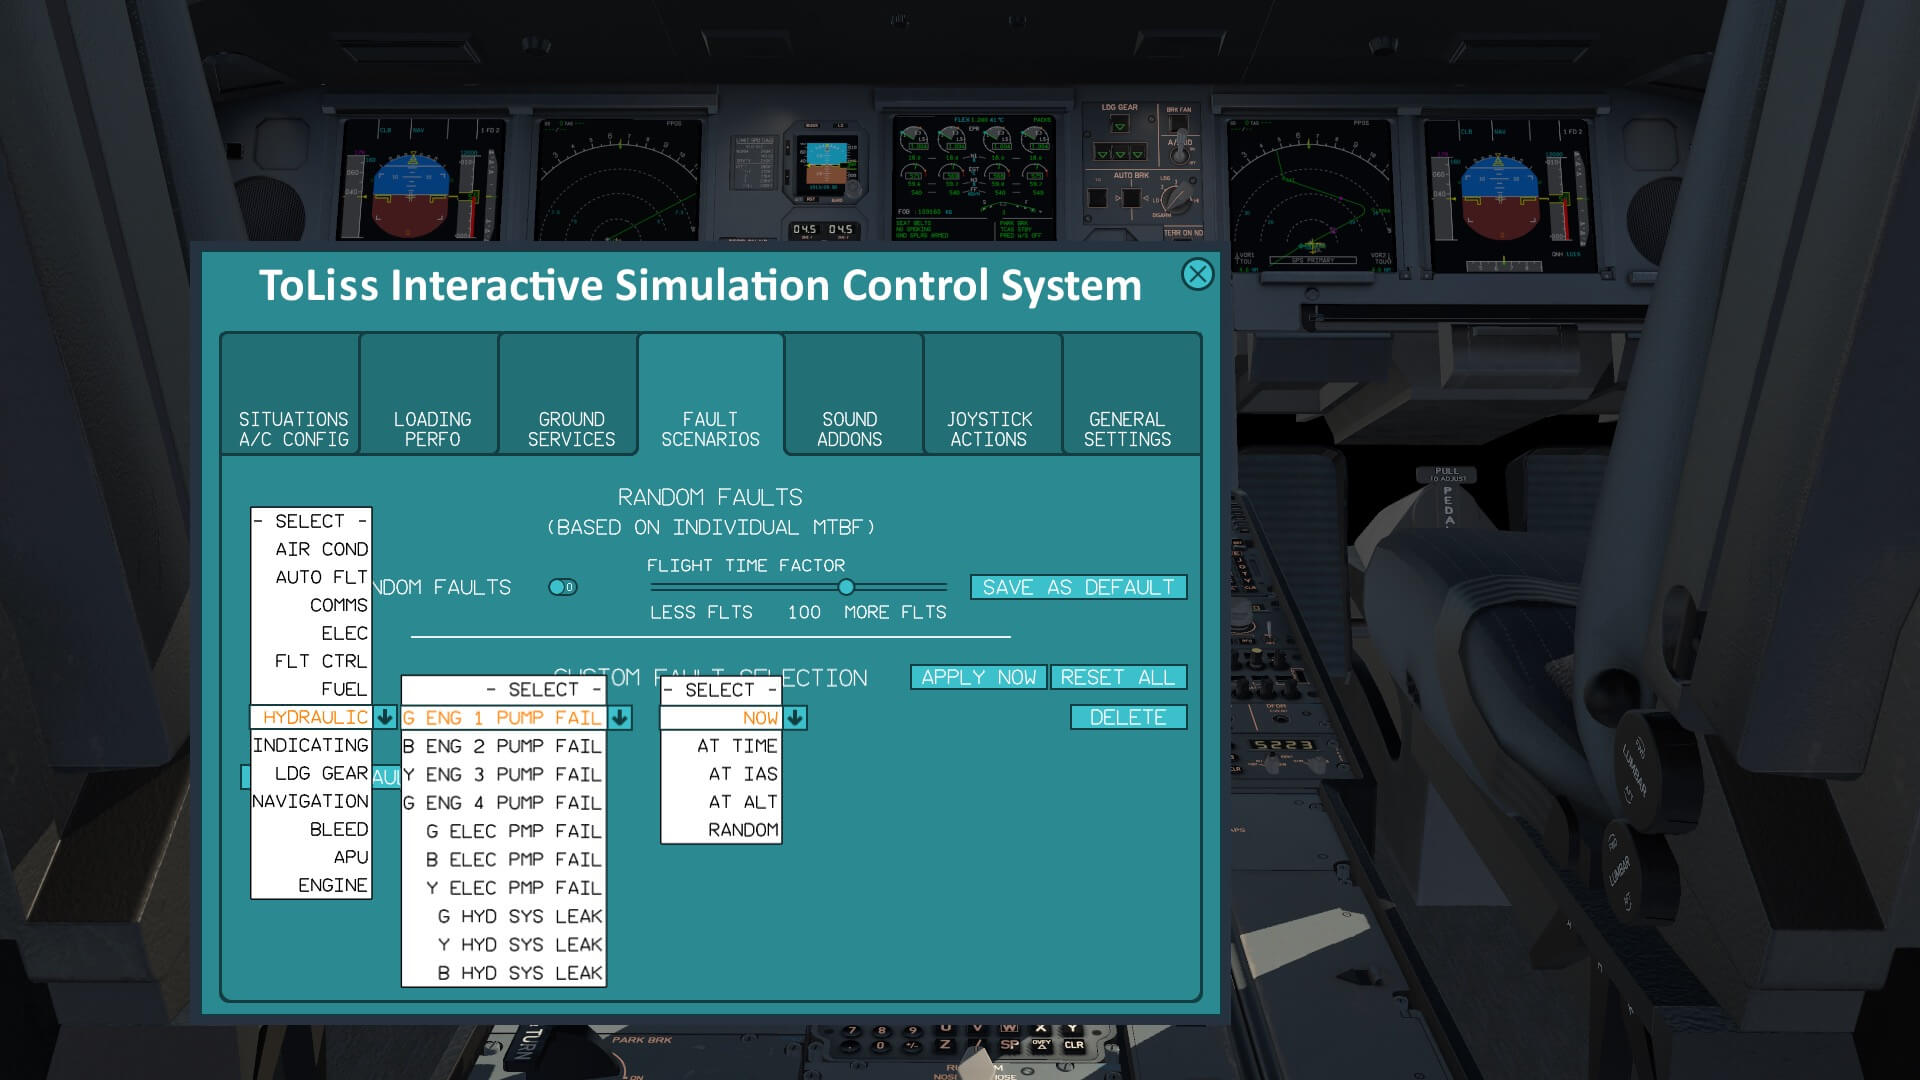
The lower ECAM DU, known as the SD stands for System Display and shows synoptics of the aircraft systems. It’s great to see how each synoptic with so much precision is modeled by ToLiss and also how it responds to system changes or system failures. I’ll give you an example of a typical failure, but let me first highlight the ToLiss fault generating system.
As you can see on the following screenshot where I compiled several images to one, it allows you to select from left to right first a system in which you want to appear the failure (e.g. HYDRAULIC), then you select the component to fail (G ENG 1 PUMP FAIL) and finally when you want this to appear (NOW). The last step to activate this is to click the Apply Now button.
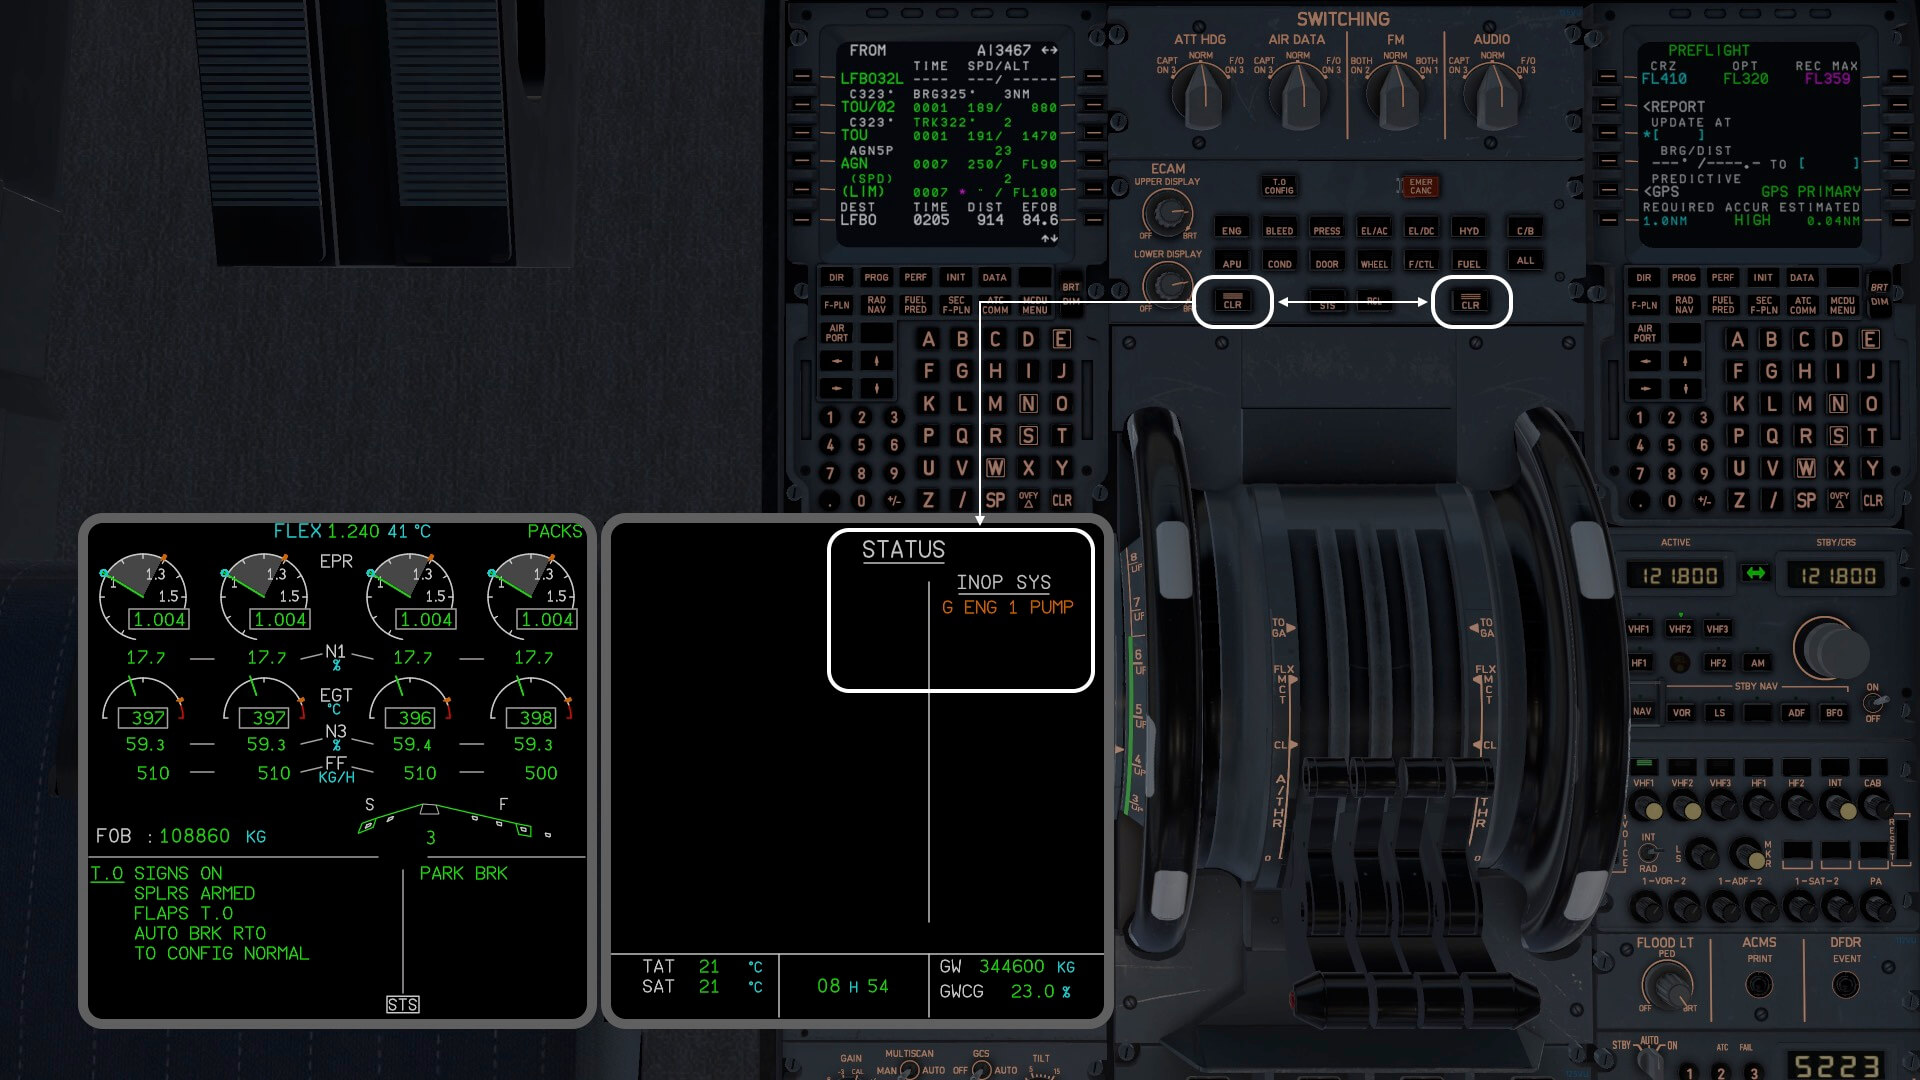
This hydraulic G EDP (Green Engine Driven Pump) failure works completely as expected. When the LO PR is detected, the local FAULT light in the EDP button is illuminated, with a single chime and Master Caution light on the glareshield as well as the fault message on the E/WD – HYD G EDP 1 PUMP LO PR including the action to be taken. In this case GREEN ENG 1 PUMP ….. OFF. Together with this failure message, the related synoptic HYDRAULIC page pops up and shows you there the problem is in amber. The pilot or in this case me follows the instruction. The EDP symbol on the HYD page changes and the message can be cleared via the ECAM control panel CLR pushbutton. Note that a STS (STATUS) message appears on the E/WD lower half.
This means it had consequences for the hydraulic system. What kind of consequence can be seen on the STS page. To find that out, click the STS button on the ECAM control panel. Not every failure results in a sub system failure or limitation or degradation. In this case it was one of the green EDP’s, so the other EDP does all the work, so it has no consequences for the G HYD system. When you’ve pressed the CLR several times, the E/WD goes back to normal, but you’ll always see the STS symbol on the E/WD. And it’s also important to remember that the SD goes back to the flight phase related synoptic provided it was in the automatic mode. Automatic flight phase mode means that no legend is lit in any button on the ECAM control panel.


Although this is just a small and easy example, I hope it gives a bit of an idea what and how ECAM works with failures and how the ECAM system is simulated. For me as technician a great tool to play with!
Although we still haven’t reached the calculated TOD (Top Of Descent), it is I think a good moment to do some descent and approach preparations.
First it’s time to check the charts and then enter what we want in the MCDU. For that we need to check what runway we can expect. We need local weather information before we can add the TRANS (ition) if applicable, the STAR (Standard Terminal Arrival Route) and runway in the MCDU. It turns out that the weather conditions according to ATIS (123.30) haven’t much changed since we left LFBO. That said, I can decide to land on 32L, but we also decide to go for 14R. Since I’m flying offline, I’m free with my planning so I go for 14R. By the way, you can also via the ISCS find the METAR for LFBO.
The first screenshot below is taken within Little Navmap and one of the last waypoints or VOR stations is MEN. From VOR/DME MEN and not GAI, it is a good choice to start the STAR from there and yes, there’s STAR MEN6N. Then, as can be seen on the other screenshots, from MEN STAR MEN6N I fly to NARAK and then to IAF (Initial Approach Fix) NETRO. Then “Via” follows IF (Intermediate Fix) at 3000 feet, and FAF (Final Approach Fix), TOU VOR/DME (117.7) for ILS (TBS 110.7 – 142 degrees) runway 14R. The last screenshot with the ILS approach shows also the missed approach procedure in case we need that.


And how do I add this information in the MCDU? That’s so easy and not only that it is easy, it works flawless and exactly for this example as expected since I know which STAR I need and the gap in-between the runway I’ve chosen. That said, let’s try it out and continue with me by studying the following screenshot.
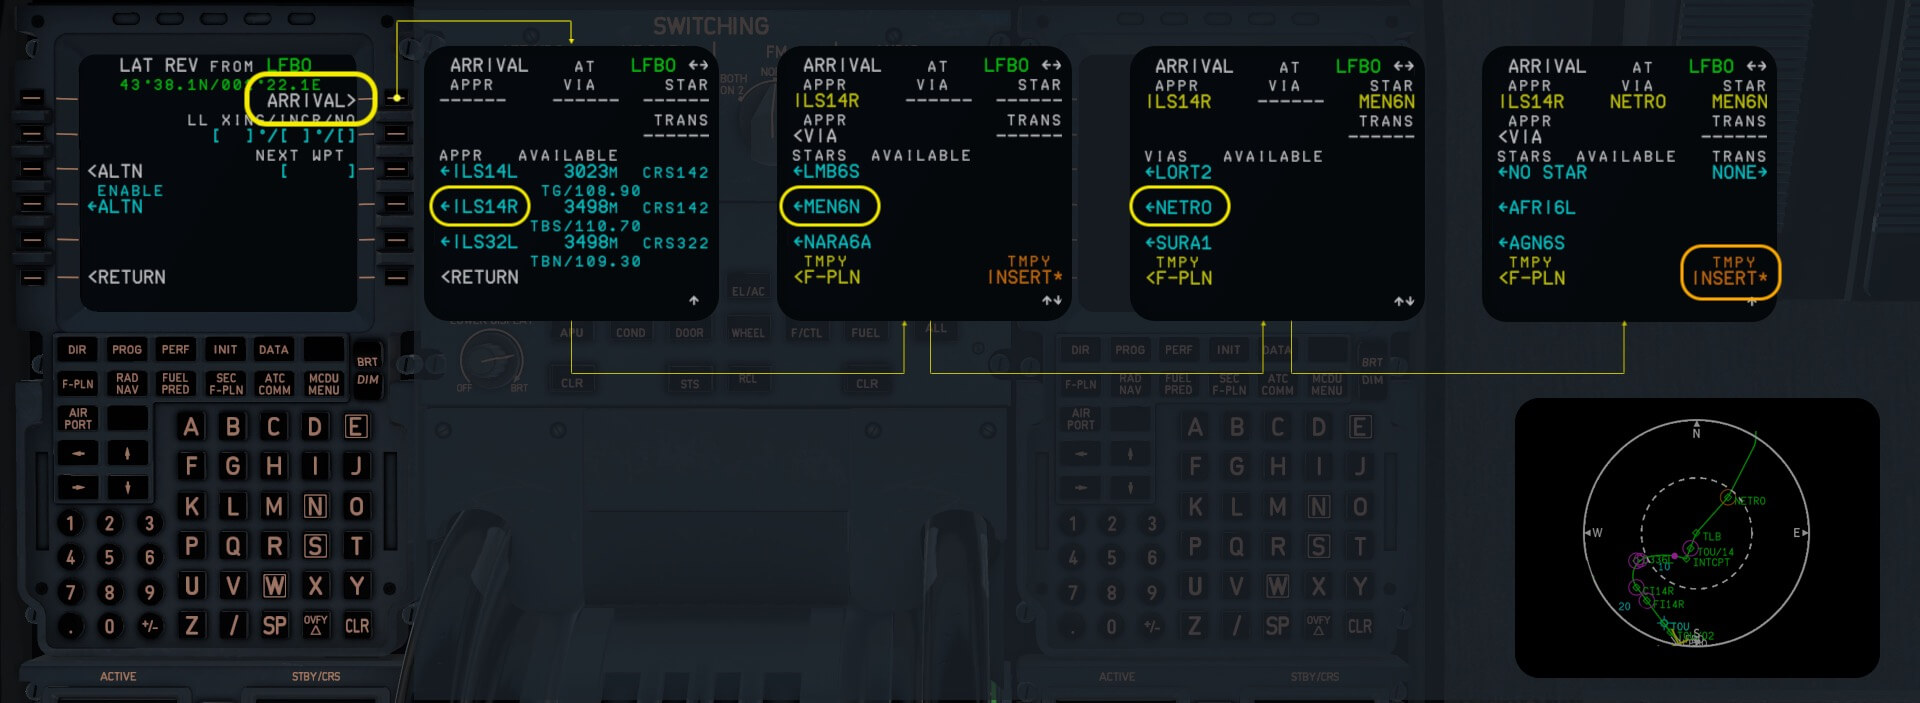
The following two paragraphs belong to the previous screenshot.
If not selected, click the F-PLN button on the MCDU keyboard. Next click LSK 6L (DEST LFBO) that brings you and me to the ARRIVAL page. Search for ILS14R. It is either visible on this page else you need to scroll till you see ILS14R. Click the LSK next of it. On the second page you first notice that I’ve selected ILS14R (in yellow), and now we need to find STAR MEN6N. When I’ve found it by using the UP/DOWN scroll keys, I click the LSK.
Now I’m at the VIA page. This should fill the gap between the end of MEN6N and our ILS14R. I searched for NETRO which was the end of MEN6N what I’ve showed you in the previous screenshots. I’ve found it in the list after using the scroll key and then I’m done. There’s no TRANS(ition), so I can click LSK 6R (TMPY INSERT) and the whole trajectory is added to the flight plan including the ILS frequency. When you select on the EFIS Control Panel the ND mode selector to PLAN and scroll with the UP/DOWN keys on the MCDU thru the flight plan, you can see how it looks and I can only come to one conclusion, it’s exactly the same as on the papers and as expected.
Just a note from the tutorial.
My Airbus flight is roughly 900NM and is therefore a lot shorter then the one in the tutorial, but it’s worth to inform you that you have the possibility to “jump to the next waypoint” with the ToLiss ISCS Joystick Action tab. According the the tutorial “The aircraft will now be put directly before the transition turn at the next waypoint. The corresponding amount of fuel that would have been consumed during this segment is removed from the tanks.” What said, I won’t use it on this flight, but I find it an awesome feature since it also calculates the amount of fuel it had used on that stretch and subtract that from the total.
Instead of using and implementing the “jump to the next waypoint”, I will try to insert a new waypoint and modify the flight plan. Ok, in this case the waypoint is a VOR/DME PPG (Perpignan) station. The principle of adding a waypoint or whatever it is, is the same. To do those steps, I enter in the MCDU scratchpad PPG and while checking out the MAP mode with the right range set, I decide to add it before waypoint BISBA, but I could have chosen any other waypoint in the flight plan.
When I click the LSK of BISBA, the flight plan turns into the temperately mode (yellow) while on the ND I see the change in the flight plan (yellow dotted line). When I agree with it, I click LSK 6R else LSK 6L. Adding or removing waypoints is very easy in this way, but above all, it is programmed as expected. But I’m not yet finished. I want, no I need to skip the rest of the flight plan thus I use the DIR(ect) TO command. And as you can see on the following screenshots, I also need to remove a F-PLN DISCONTINUITY. Just click the CLR button on the MDU keyboard, and then the LSK that shows the F-PLN DISCONTINUITY. The result is that the flight plan is closed again.


Ok, one more example of the DIR (ect to) command. Not really shocking and yes, it’s easy and works well and fast. Since I need to direct to MTL, I click the DIR key on the MCDU keyboard and, if needed, scroll with the UPPER keyboard key thru the flight plan pages till I see MTL (Montélimar). Click the LSK next of MTL. When I’m not sure what I just did, I click LSK 6L (DIR TO ERASE) which cancels me action, but no, I’m sure what I just did and click LSK 6R (DIR TO INSERT).
A handy option when you start doing this, is to select the ND in PLAN mode. When you use the 2D popup MCDU, you can immediately see the action in the flight plan, adjust when needed the range. Keep in mind that once you confirmed the DIR TO action, the rest of the waypoints are gone, but I’m, sure you’re aware of it.

Part III – Airbus Test Flight
Descent, Approach, Final Approach and Landing
I’m approaching the calculated T/D (Top Of Descent), and for those who are new to Airbus aircraft and haven’t seen it before, you find a small cyan arrow on the ND as well as T/D in the flight plan. I turn the ALT knob on the FCU to 3000 feet which is the altitude for the ILS approach. A couple of NMs before my TOD, I push the ALT knob and by pushing it, I stay in the MANAGEd mode. As mentioned several times, this can be seen on the FCU with the dashes and dot, and on the PFD FMA you see DES (cent).
Suppose I had pulled the ALT knob, then I would have seen on the FMA OP DES. By pushing the ALT knob, the FMGS calculates, and keeping in mind constrains along the descent flight path, the V/S, but it also increases or decreases this calculated V/S in case it has to be adjusted.
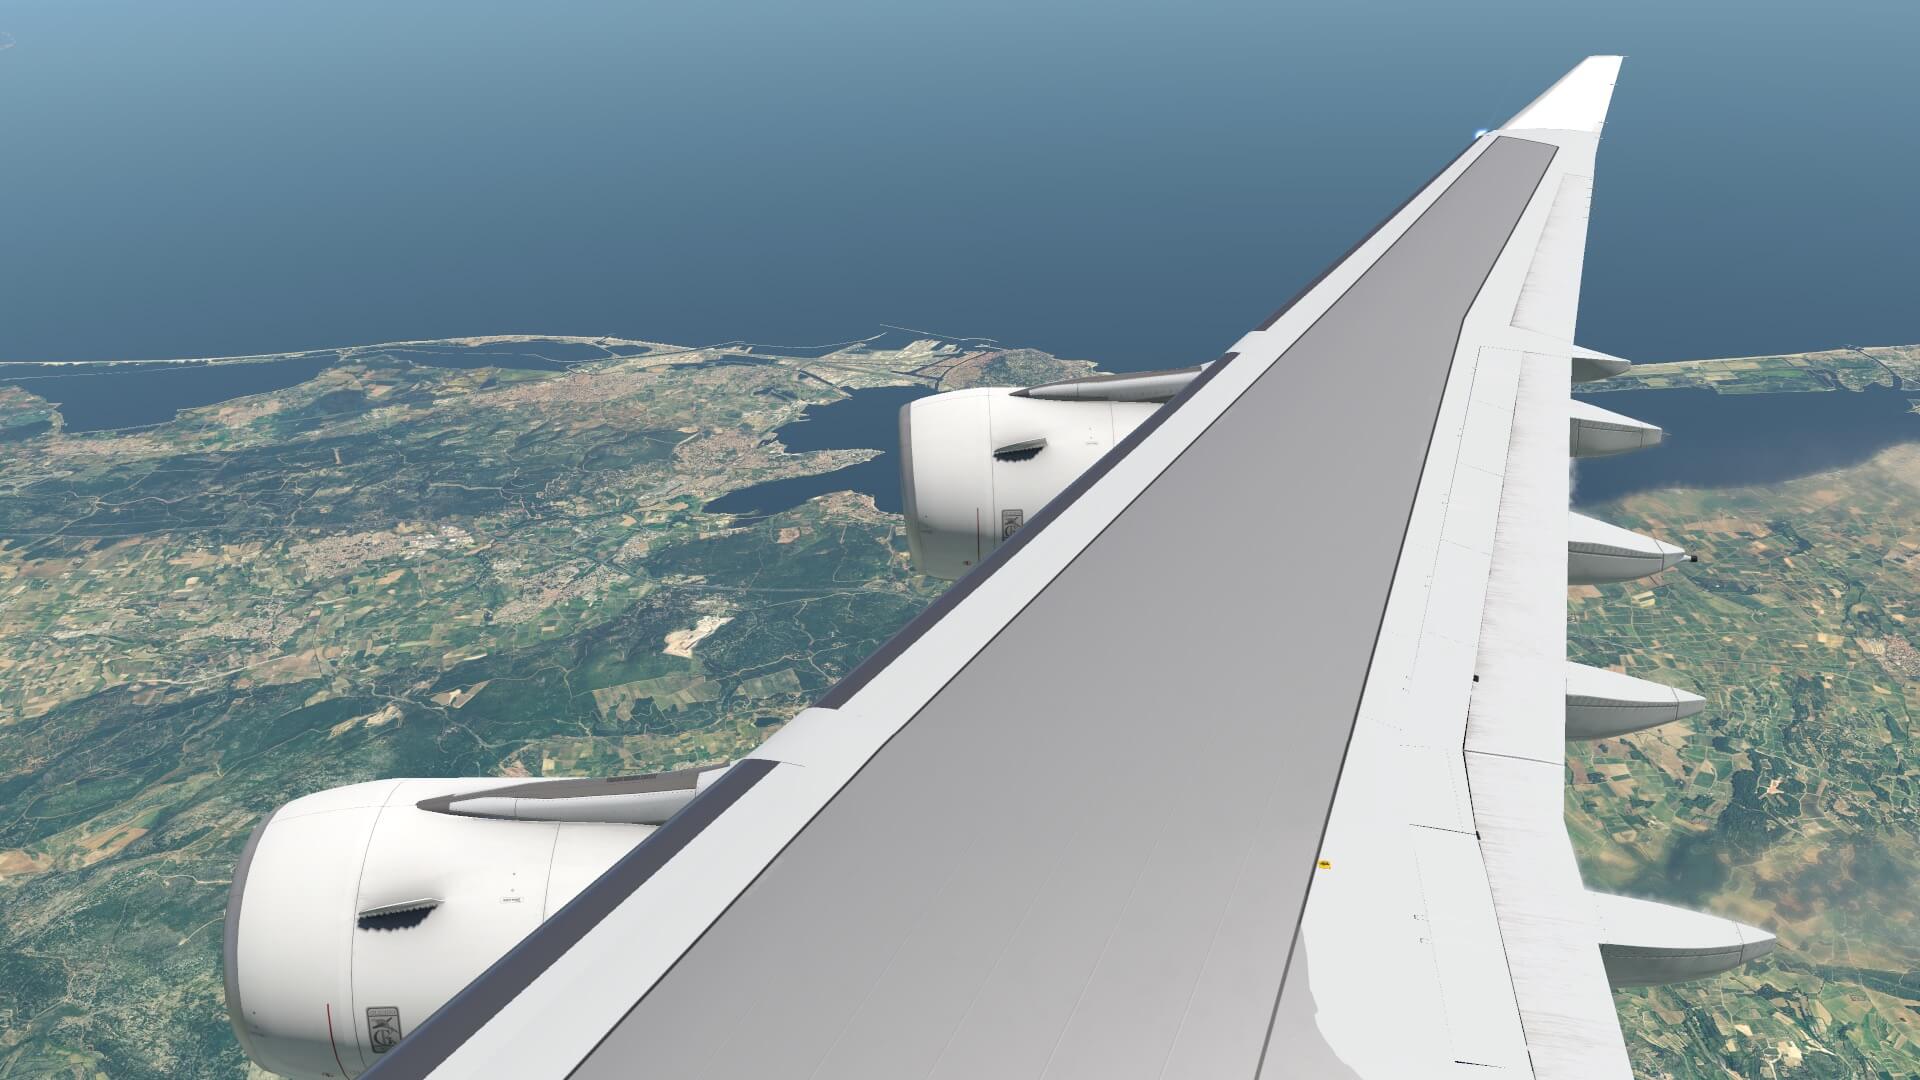
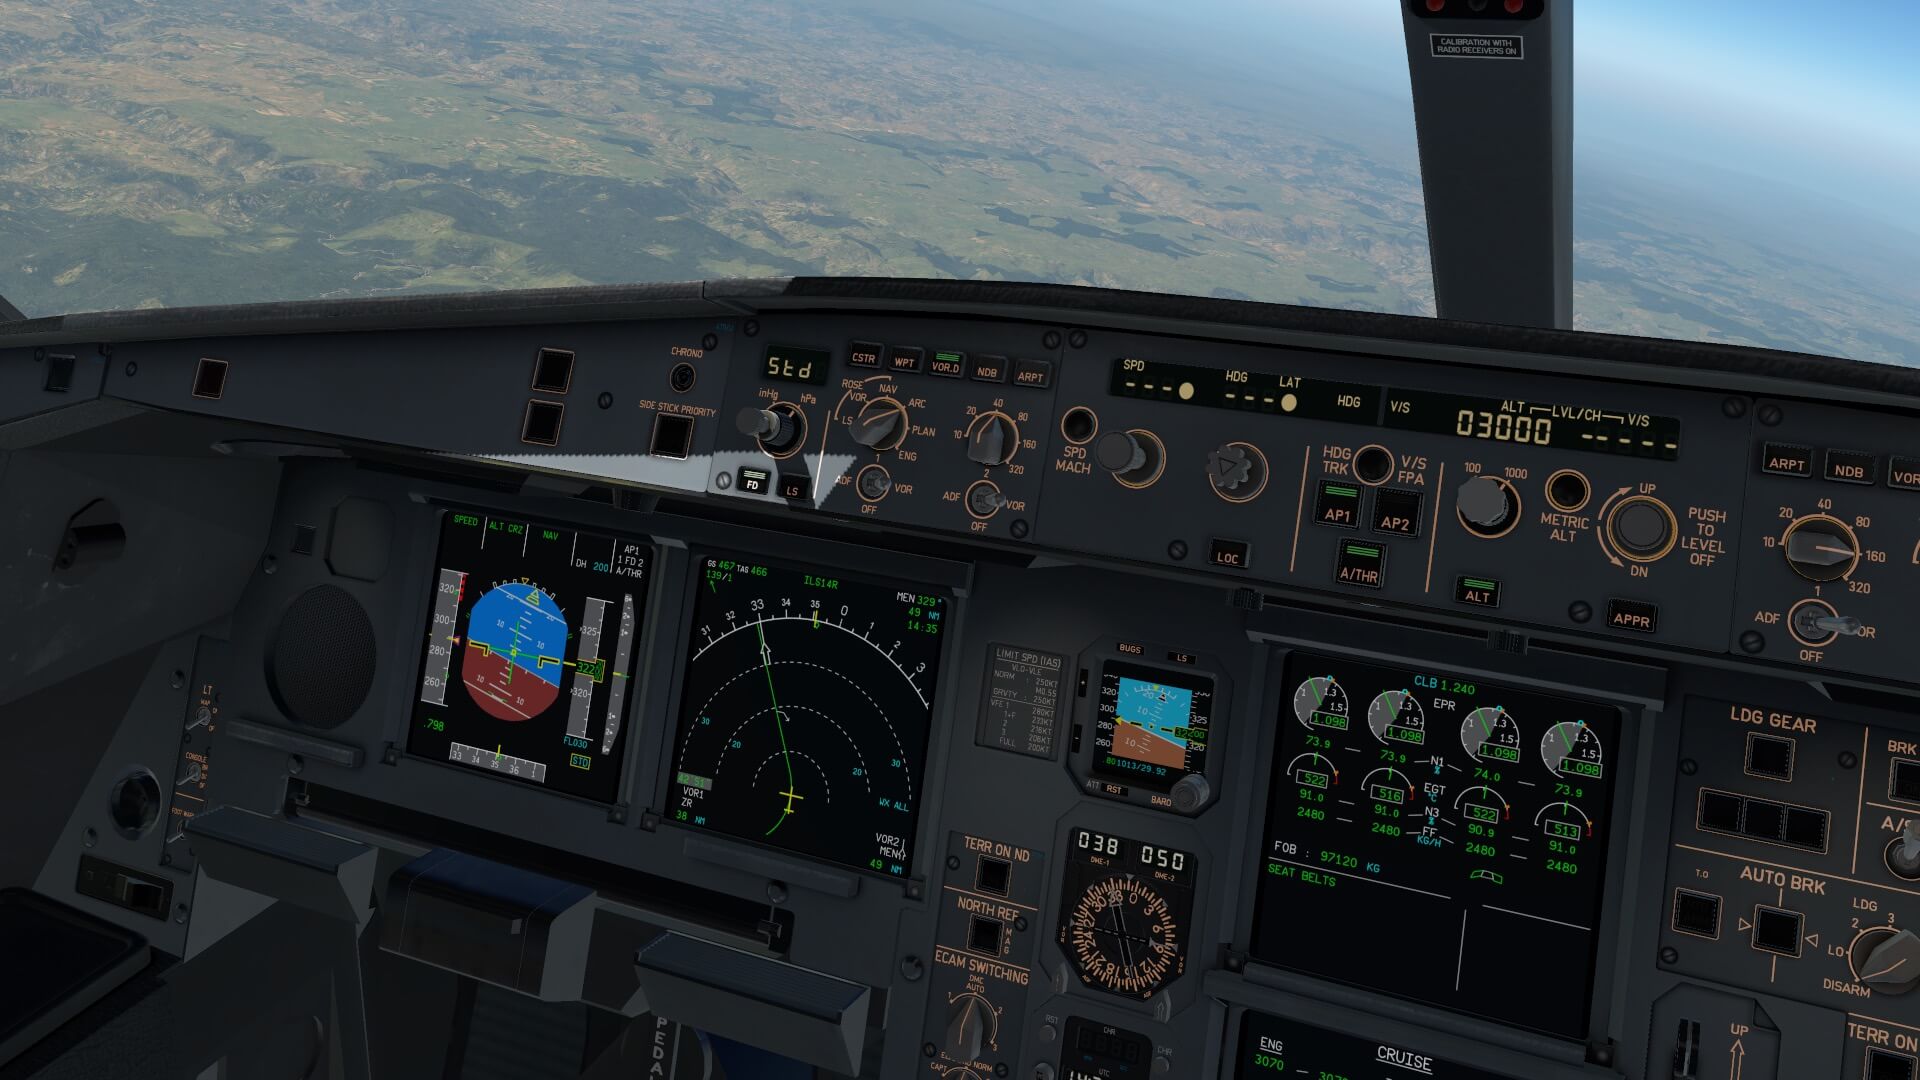

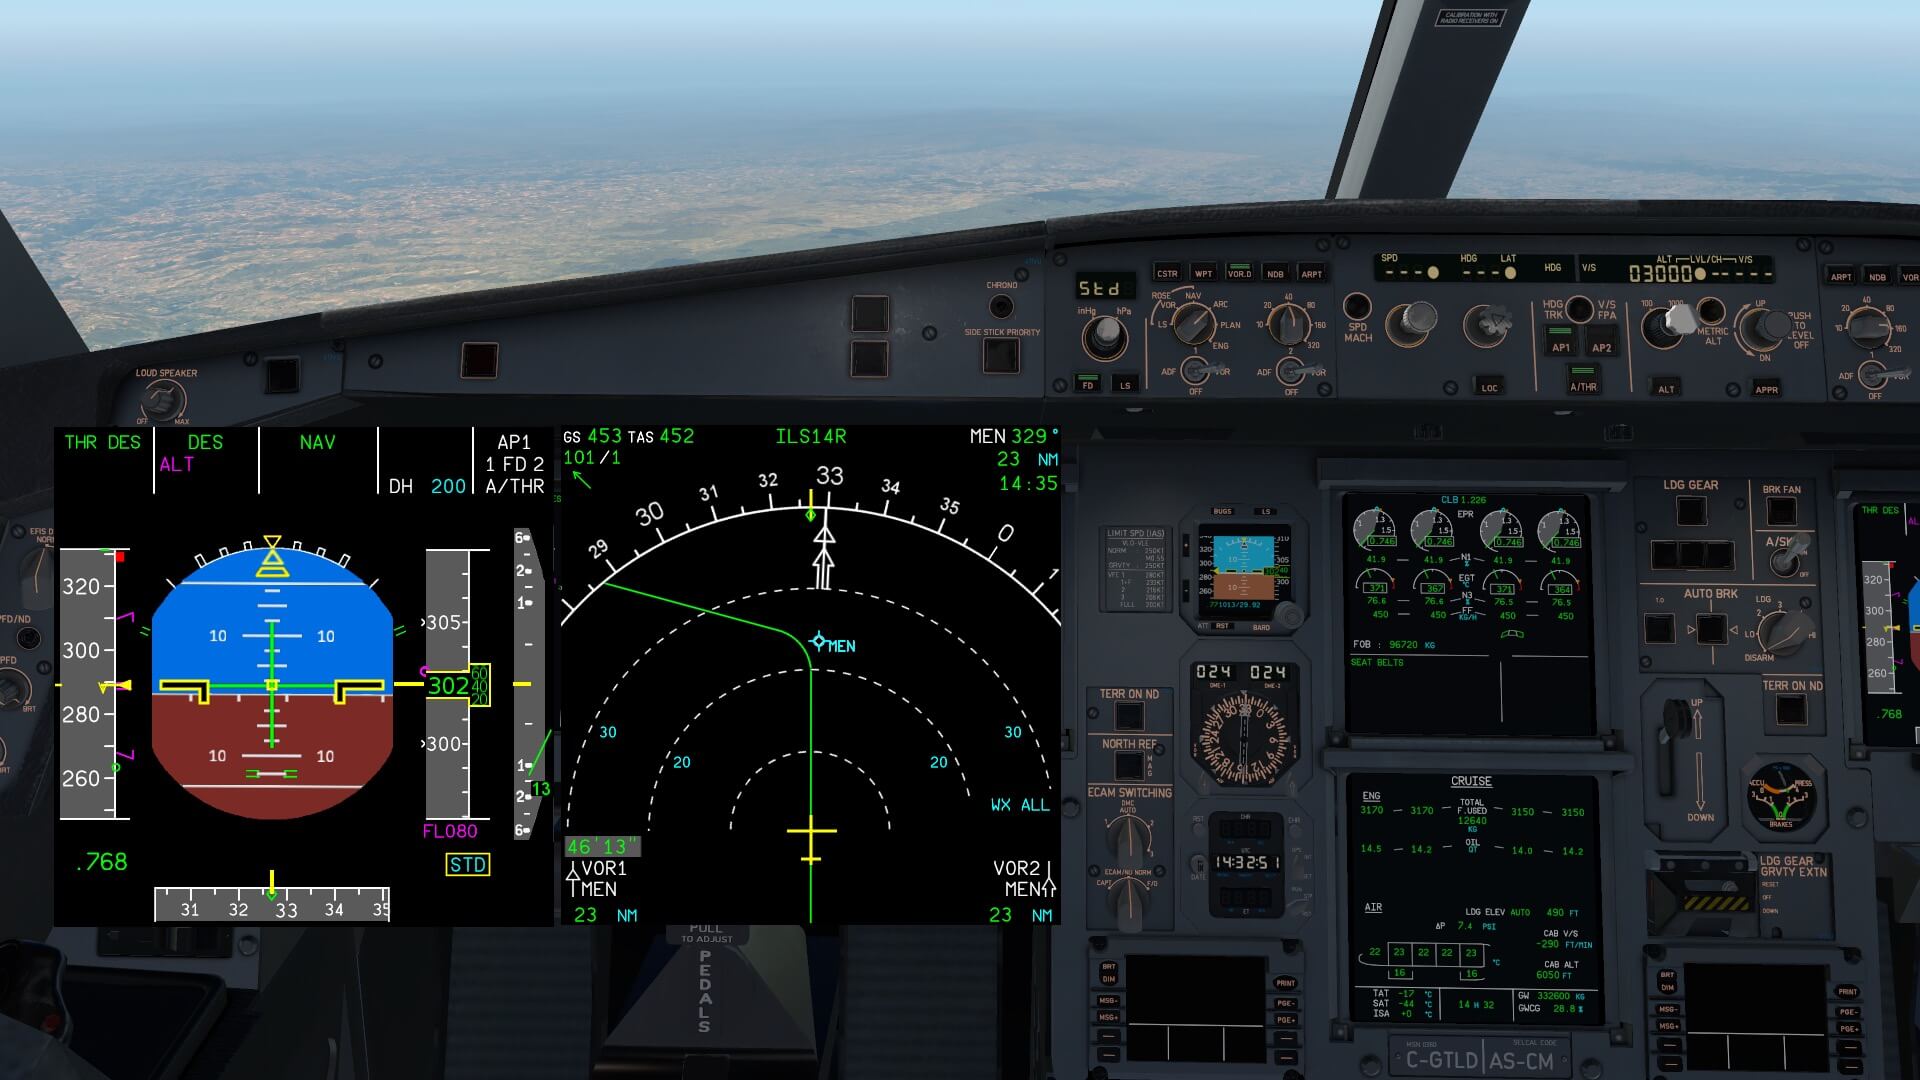
While I’m descending, I double check if the LFBO ATIS information is still the same or if it has changed – most likely it has changed – and if so, I need to modify some data in the MCDU PERF APPR page. Click the PERF button on the MCDU keyboard and click LSK 6R as long as needed till you see the APPR page. I enter for LSK 1L the actual QNH, LSK 2L for the actual airport temperature, LSK 3L for the wind conditions, LSK 3R for the DH (Decision Height) value founds at the ILS charts and finally I land with FULL flaps, but this is already active by default (LSK 5R).
I did fly the A340-600 on my cruise several moments by hand, and I want to do it again during the descent, approach and so on. I know for now that I will connect the AP when I need to do too many things, but when I’ve done that additional work, I continue again by hand. The MCDU shows me at each waypoint what the calculated altitude has to be including that I can see which constraints are along the route. It’s handy to click the CSTR button on the EFIS control panel. During the first part of the descent there’s not yet any panic for this, but the moment I reach the waypoints TOU45 and more or less directly after that NARAK, and now it’s handy to have the constraints information on the ND.
It’s so great to see that all the calculated altitudes for each waypoint are correct. On one of the stretches I had to be at FL114 at NARAK and it was there when I overflew NARAK. You will probably say “logic that it is passing at that altitude”, but this vertical navigation or control is a nightmare for most developers to get it right. What said, I flew this stretch many times and every time the calculated altitudes where correct. When I’ve passed NARAK, there’s a magenta dot on my flight path. It indicates the 250 knots – confirmed with the MCDU – and as expected, the moment I pass this “dot”, the FMGCs reduce the speed to 250 knots. This is the right moment to select FLAPS 1 which means that only the SLATS are half way extended.
Besides that, I’m heading for NETRO and this means I have to be at or above FL080 and again, the V/S is perfectly calculated. For a moment the FMA shows ALT CST*, then ALT CST, but then quickly the FMA reverts to DES when the new altitude is limited to 4000 feet.


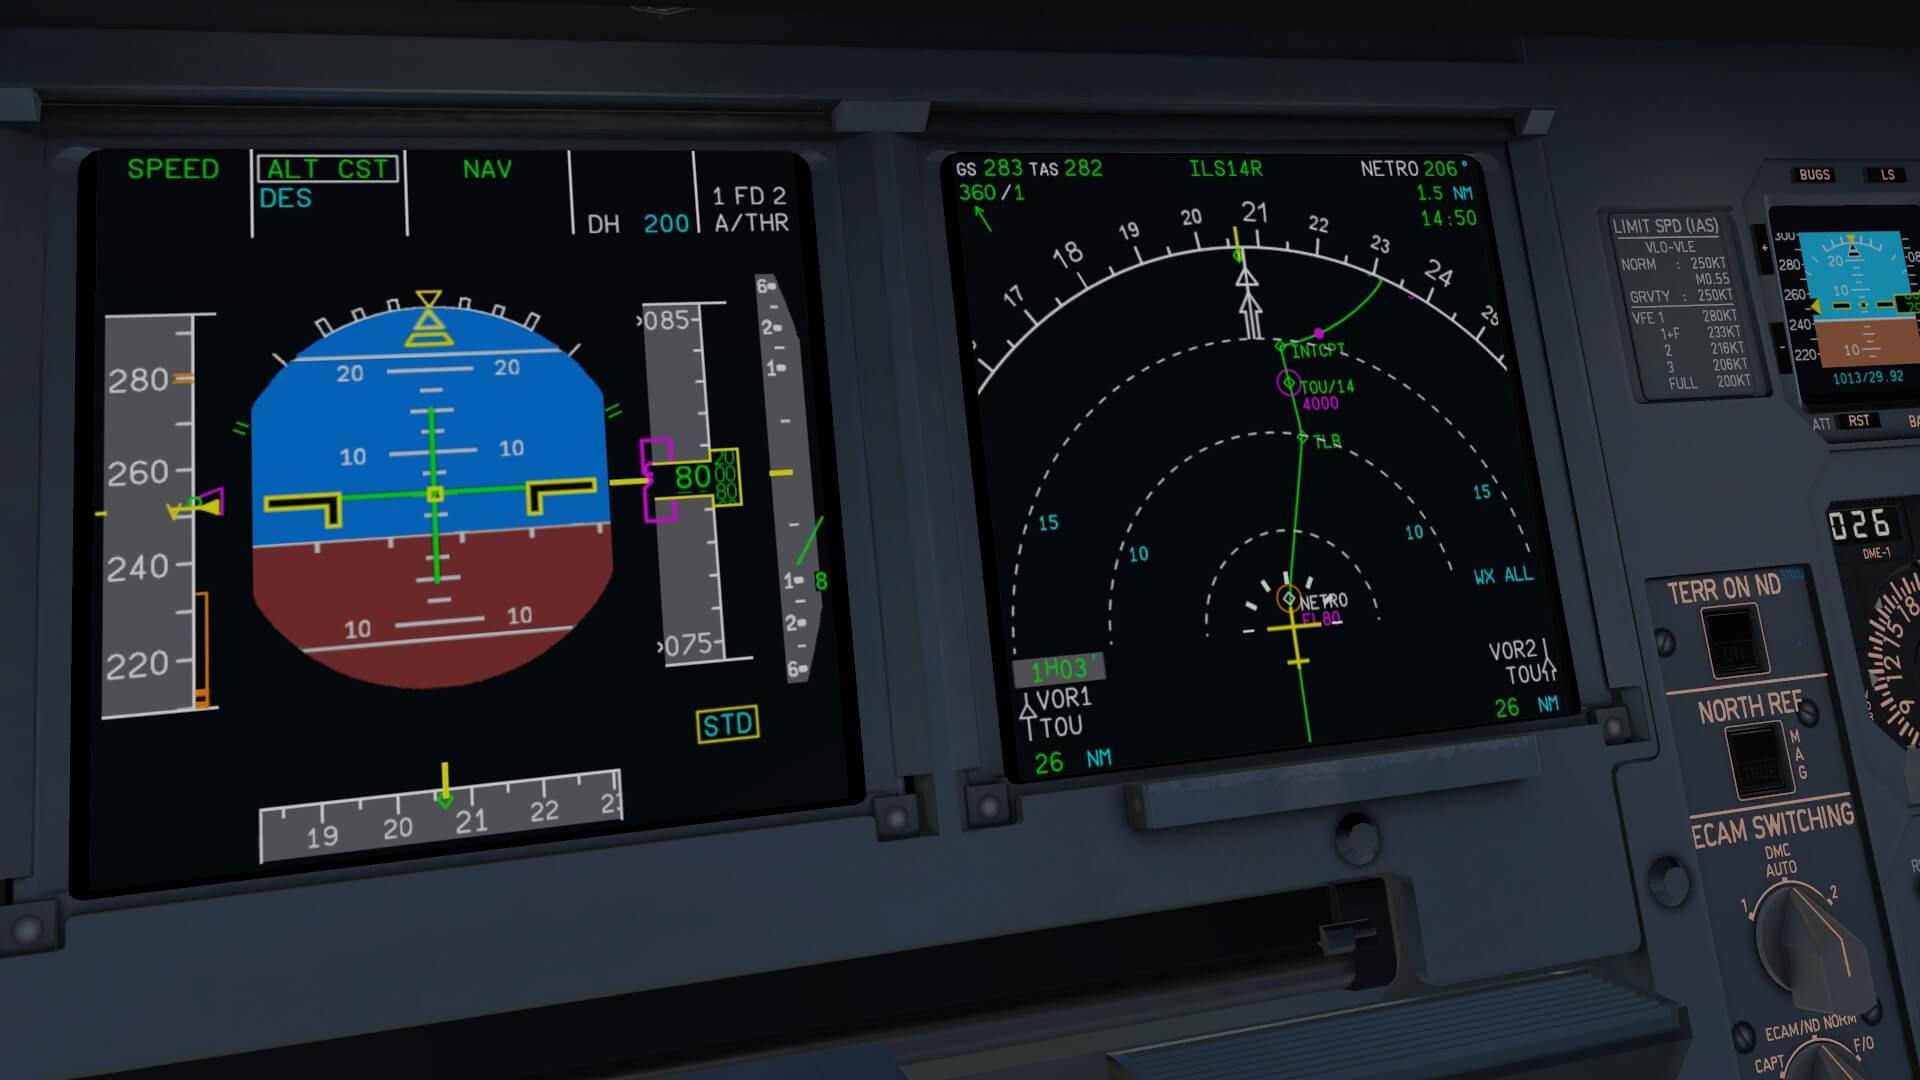
Perhaps you’re wondering why the ALT – second line ARM – on the FMA is magenta. You would expect to be in cyan, but in this case the magenta ALT is because of the constraint along the flight path. And again, during my further descent to 4000 feet, I see again on the FMA the ALT on the second line in magenta. But when the ALT constraint is gone, and we haven’t reached yet 4000 feet, the FMA ALT indication changes back to cyan. On my CAPT PFD the QNH starts flashing meaning I need to switch from STD to the actual QNH. When you fly alone, don’t forget to do the same for the F/O else ECAM will tell you that there’s a discrepancy between the BARO settings.
According to the MCDU F-PLN page I’ve roughly 25NM to go, so it’s time – perhaps I had to do it a bit earlier – to click the APPR button on the FCU. Doing this is essential! Without this, the aircraft will not transition to approach mode and intercept the ILS, so when you do this flight too, you NEED to click the APPR button on the FCU. The moment I click the APPR button, the PFD FMA shows me in cyan G/S and LOC as well as in the right-hand upper corner CAT 1.
Since I’m not yet leveled of at 4000 feet, I also see on the FMA still in cyan ALT. Remember, I’ve set at the FCU ALT window an altitude of 3000 feet for the ILS, but the 4000 feet right now is the altitude constraint. And yes, this is a perfect example on how the modeled FMGS works for this LFBO runway 14R approach, but I know that it works this way for every approach. With accurate precision as we say!


After waypoints TLB, TOU/14, the flight plan makes a sharp turn before further descending to 3000 feet. Then first the A340-600 levels OFF at 3000 feet thus the PFD FMA shows ALT*, then ALT in green. A bit later LOC(alizer) star thus on the FMA LOC*, then LOC CAPTURED. When the PFD shows me F, it’s time to select FLAPS 2. The moment the G/S becomes G/S*, I select the LANDING GEAR DOWN, G/S becomes captured and this is then followed with FLAPS 3 and finally FLAPS FULL.
Although logical, interesting to see in cyan on the ND the MISSED APPROACH procedure. It may be all logic for you that it works according to the book and charts, I’m pleased to see how it is all programmed by ToLiss. Since I have no AP connected, there’s also no reason to make a DUAL AUTO LAND. I challenge You too, to do the same as I did, to fly the modeled A340-600 from the moment the descent starts by hand.
I’ve decided to select the ND selector on the EFIS control panel to LS. This gives me the old fashioned rose mode, but with all the ILS information. It’s a bit late although I can clearly see the runway lights, but I keep on flying on the PFD FDs and the ND ILS ROSE. At 400 feet RH (Radio Height) the G/S and LOC on the FMA are replaced by LAND, and just before touchdown, typical for all modern Airbuses LAND is replaced by FLARE, and then ROLL OUT.
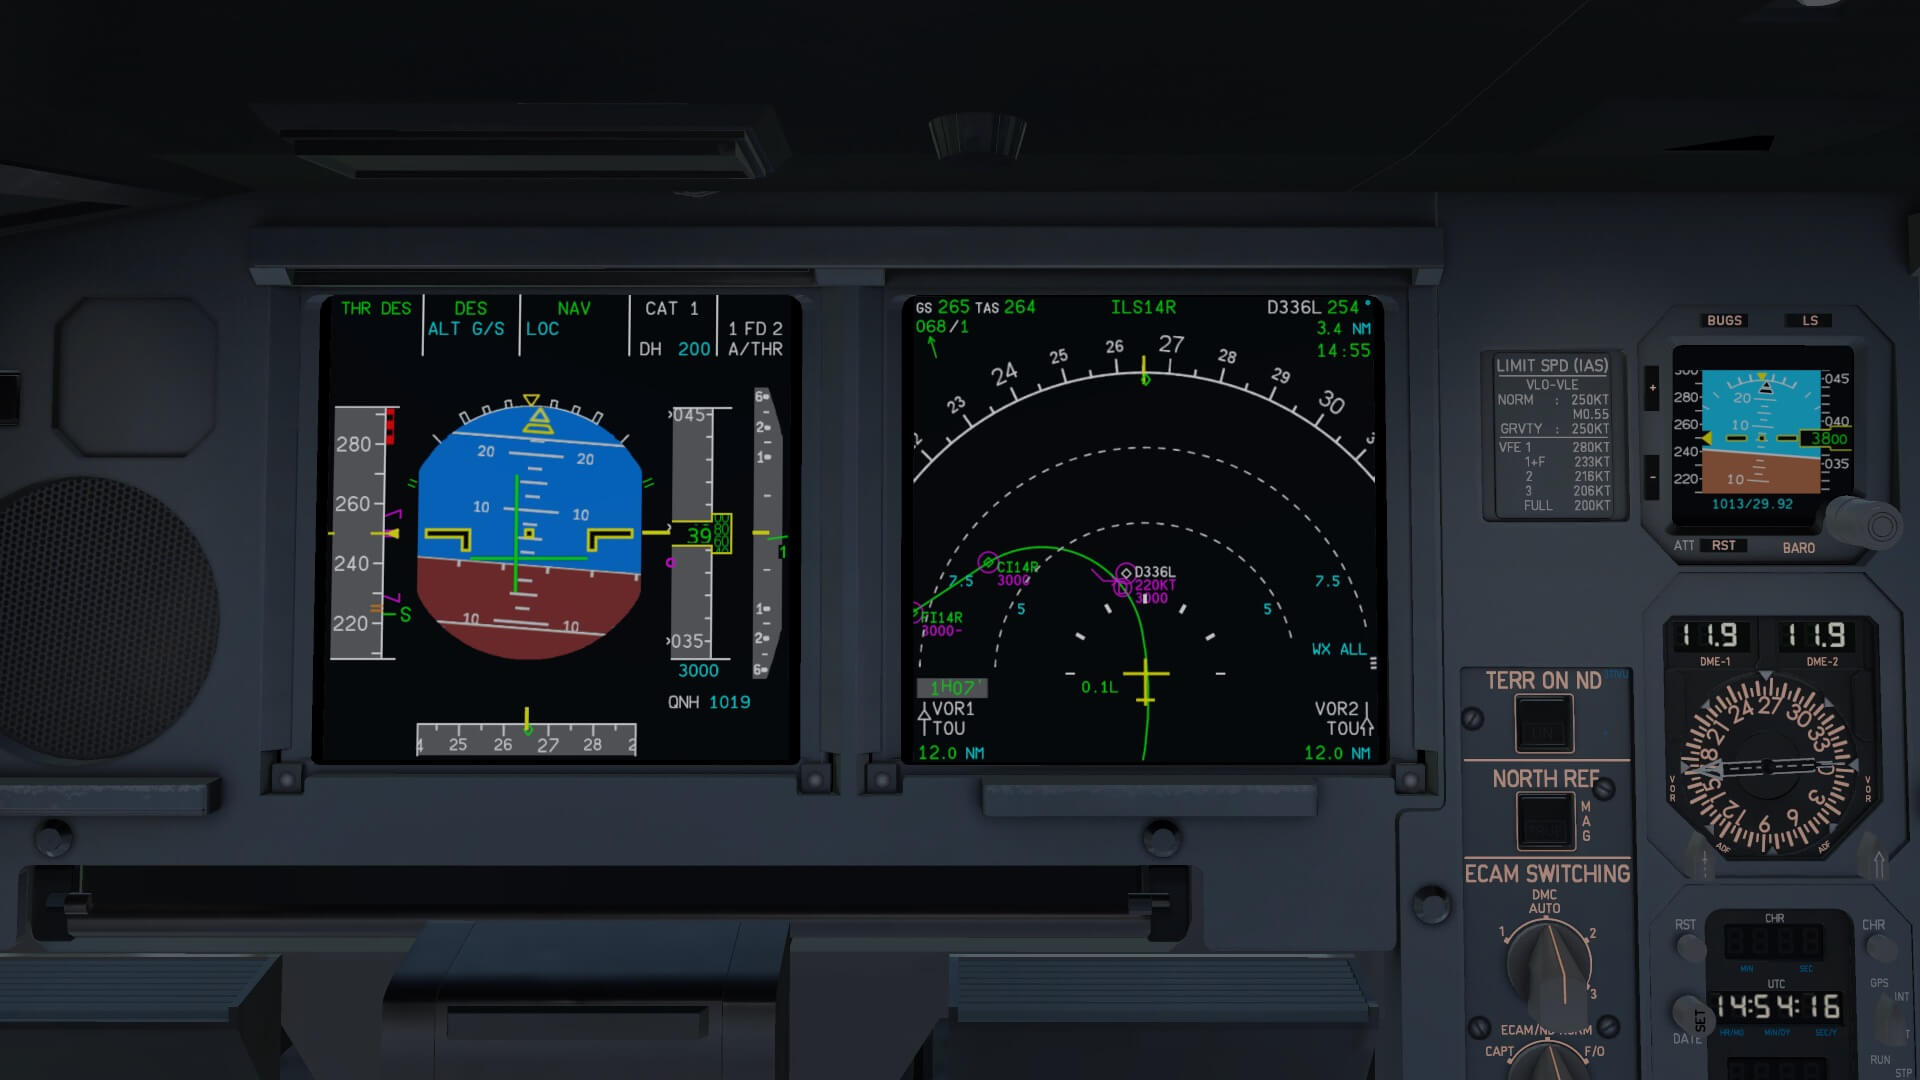
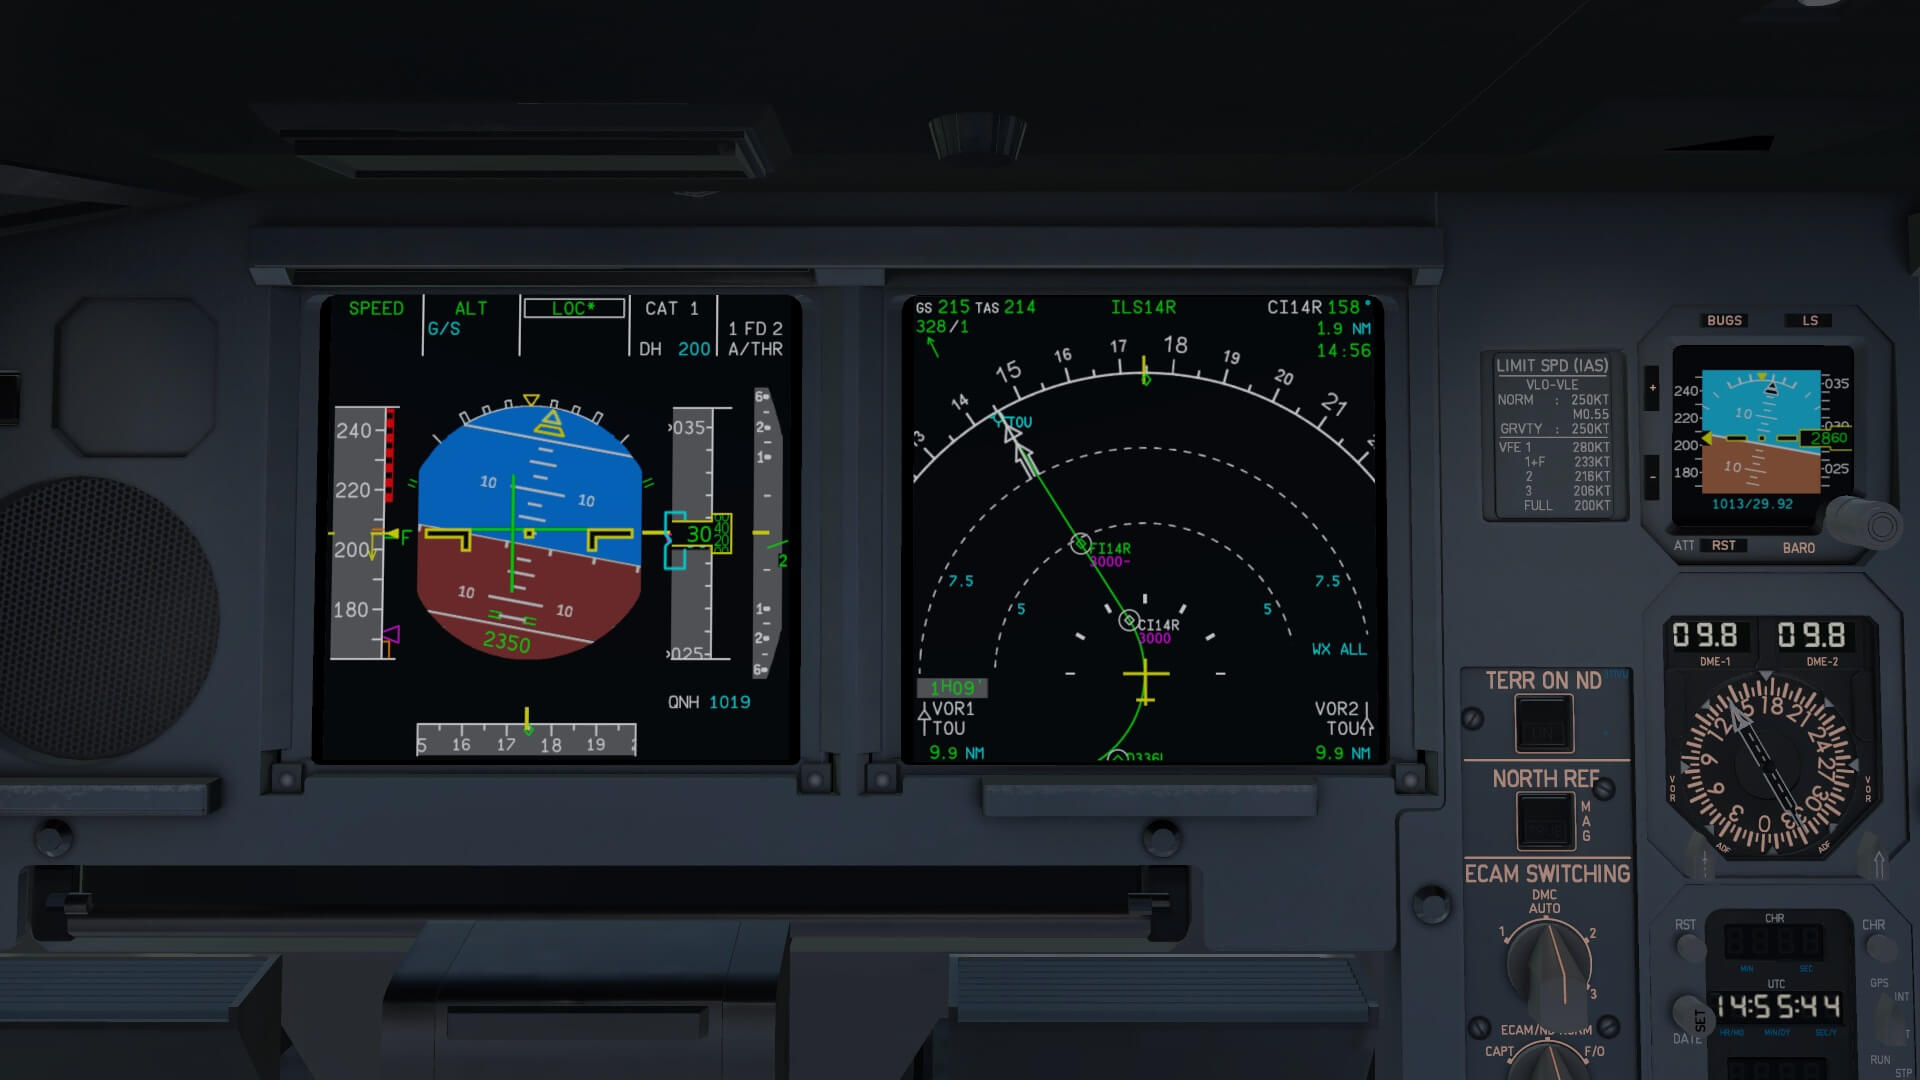

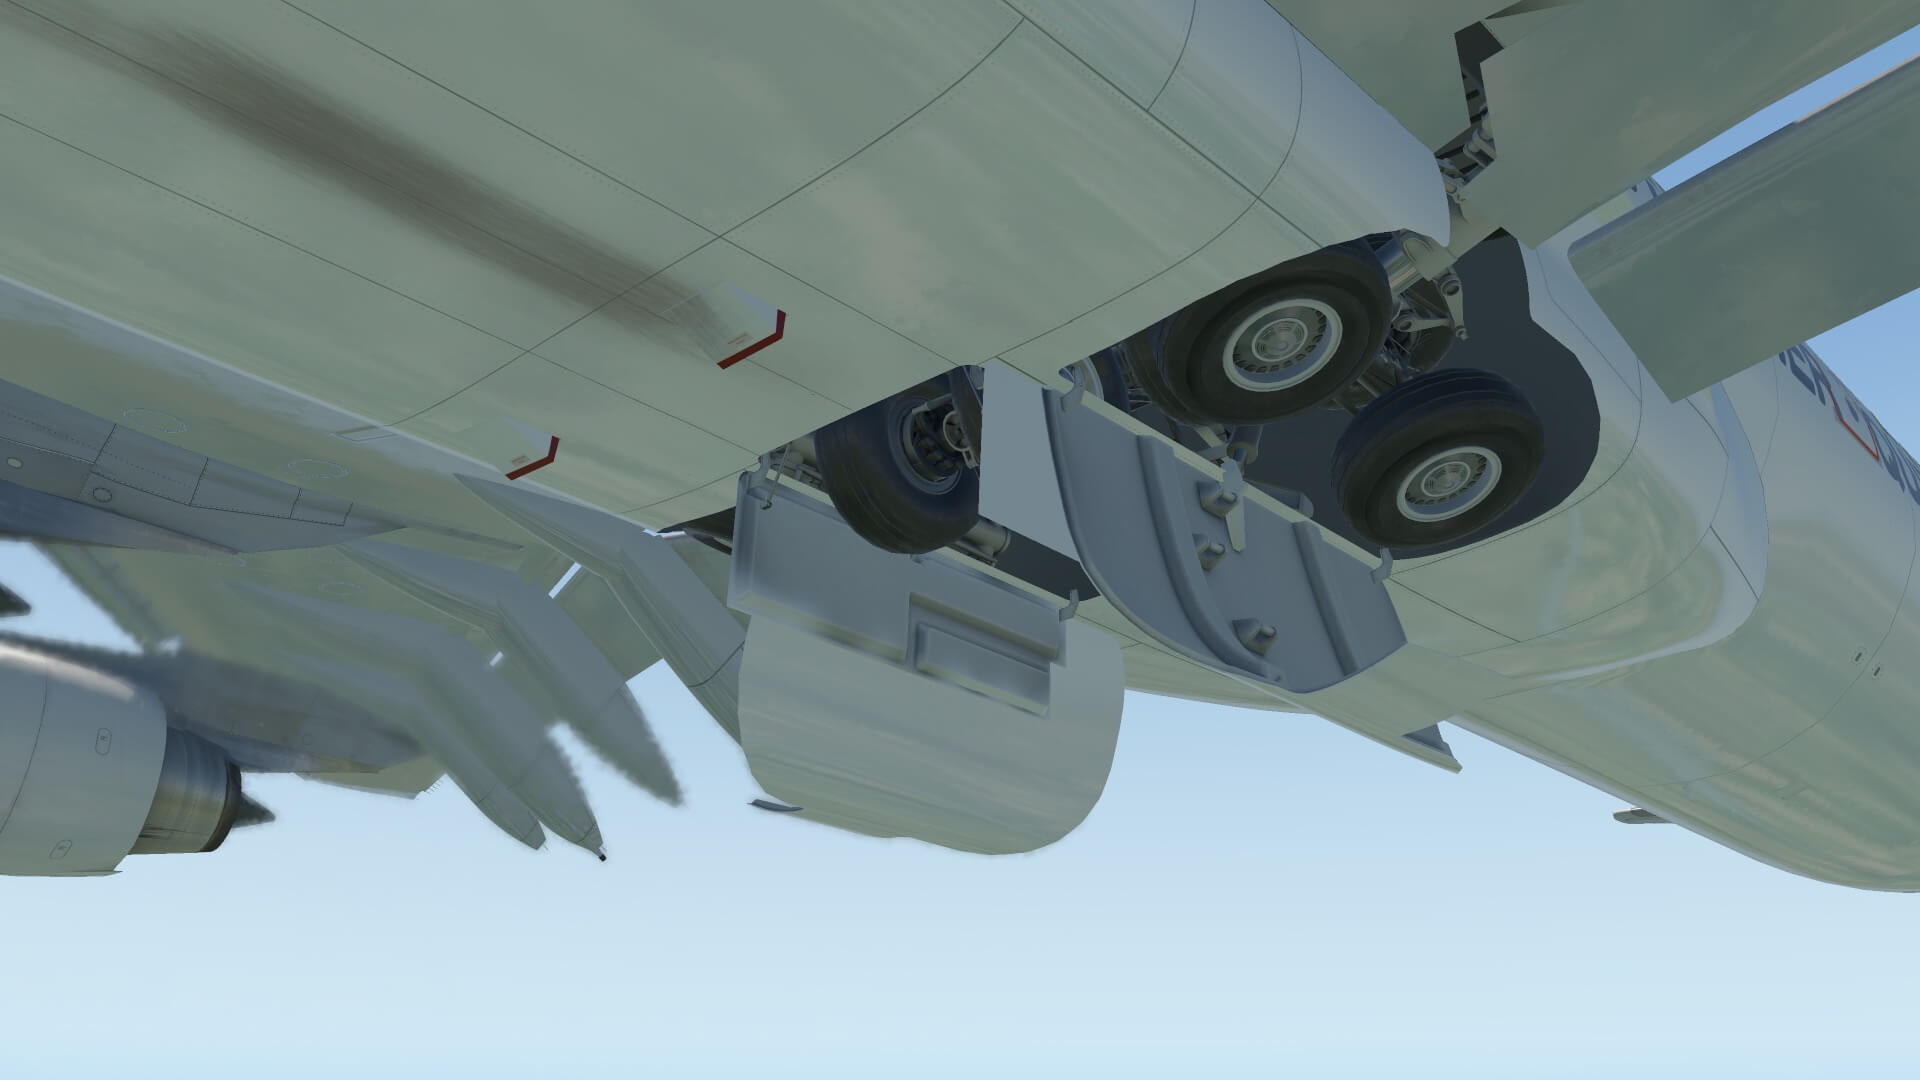
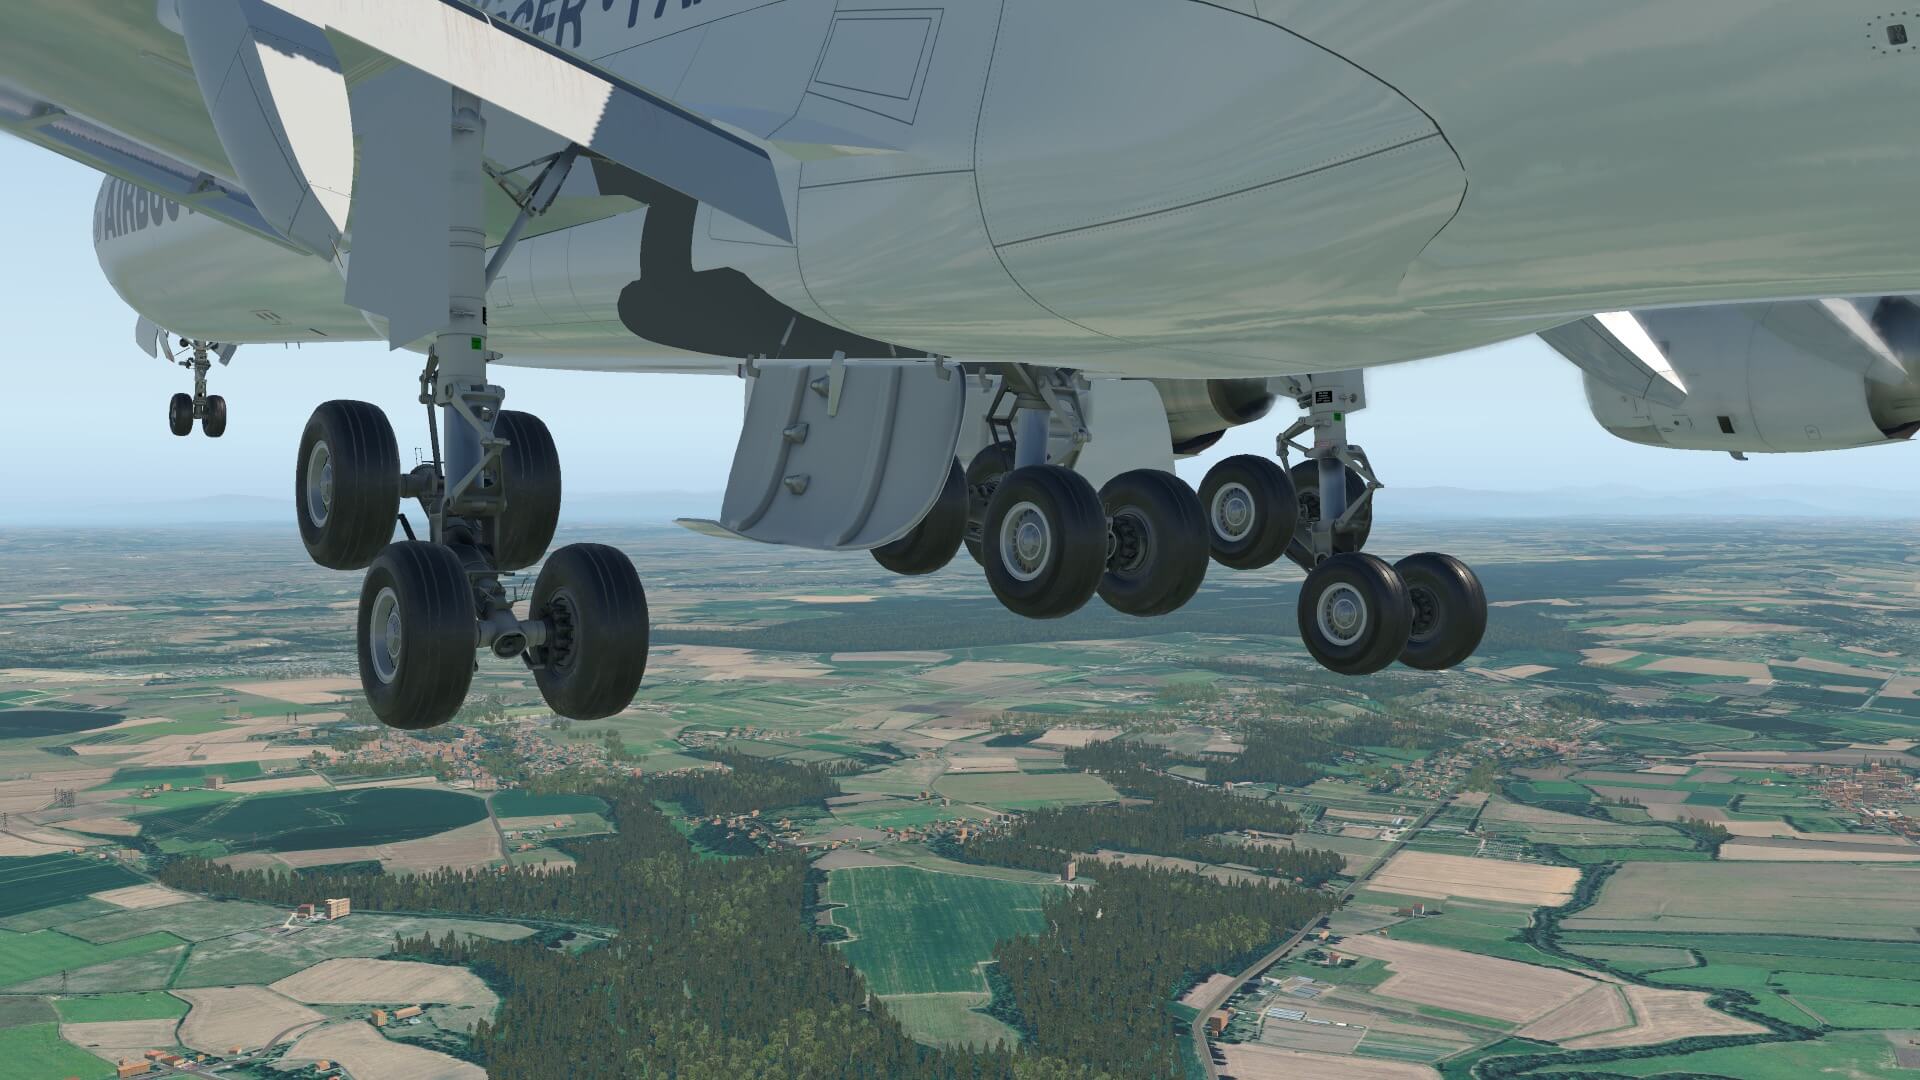


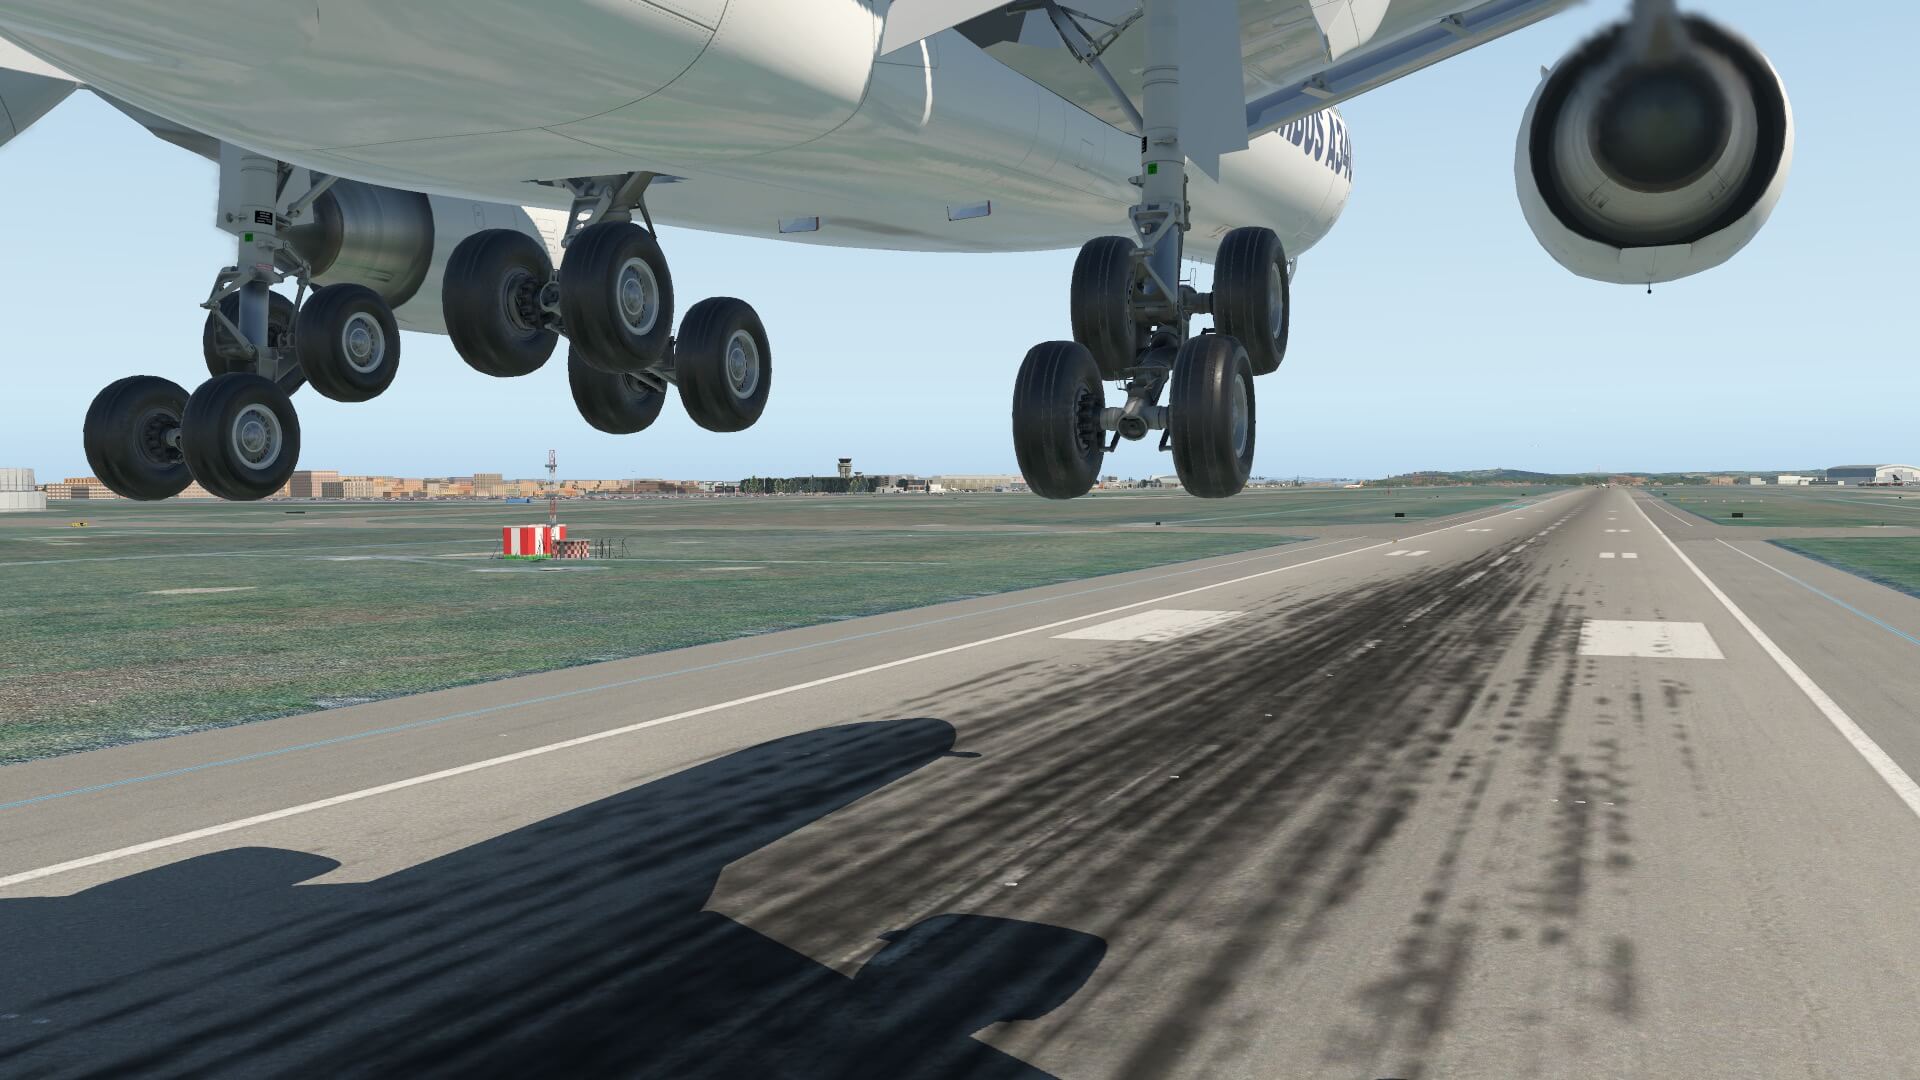

Frame Rates
Normally you expect with such a large aircraft and complex flight deck less frame rates, but for some reason I was impressed by the actual amount of frame rates. I have set the Rendering sliders far to the right, and yes, I have an iMac Pro, and yes, not the best game configuration, but still, very satisfied. And when I say satisfied then it’s for me not difficult to get good frame rates.
It’s not as simple as you think to say that my FPS are between 30-50+ FPS since that depends on if I’m at the ground parked at a complex add-on airport, and do I have CAVOK conditions or lots of complex cloud formations or am I in the air. So for me personally reasonable frame rates means that I can fly without stutters or move around in the 3D cockpit or outside the aircraft without any problems. Neither less to say that Metal is active. This means for me that I can’t use anymore SkyMAXX Pro since for this I need OpenGL. When I untick Metal and therefore back in OpenGL, my frame rates re dramatically dropped, so no option for me.
I know for sure that on a Windows computer it will perform better, but with what I see, it’s very good. Note: I found this interesting link at the X-Plane.Org forum named “A340 Performance differences Mac vs Bootcamp Windows” that highlights as I know when I had myself Windows Bootcamp on my iMac Pro, that in general X-Plane perform a lot better then on Mac. Not sure how this is with the new Mac Boot Pro with M1 Pro and M1 Max CPU-GPU.

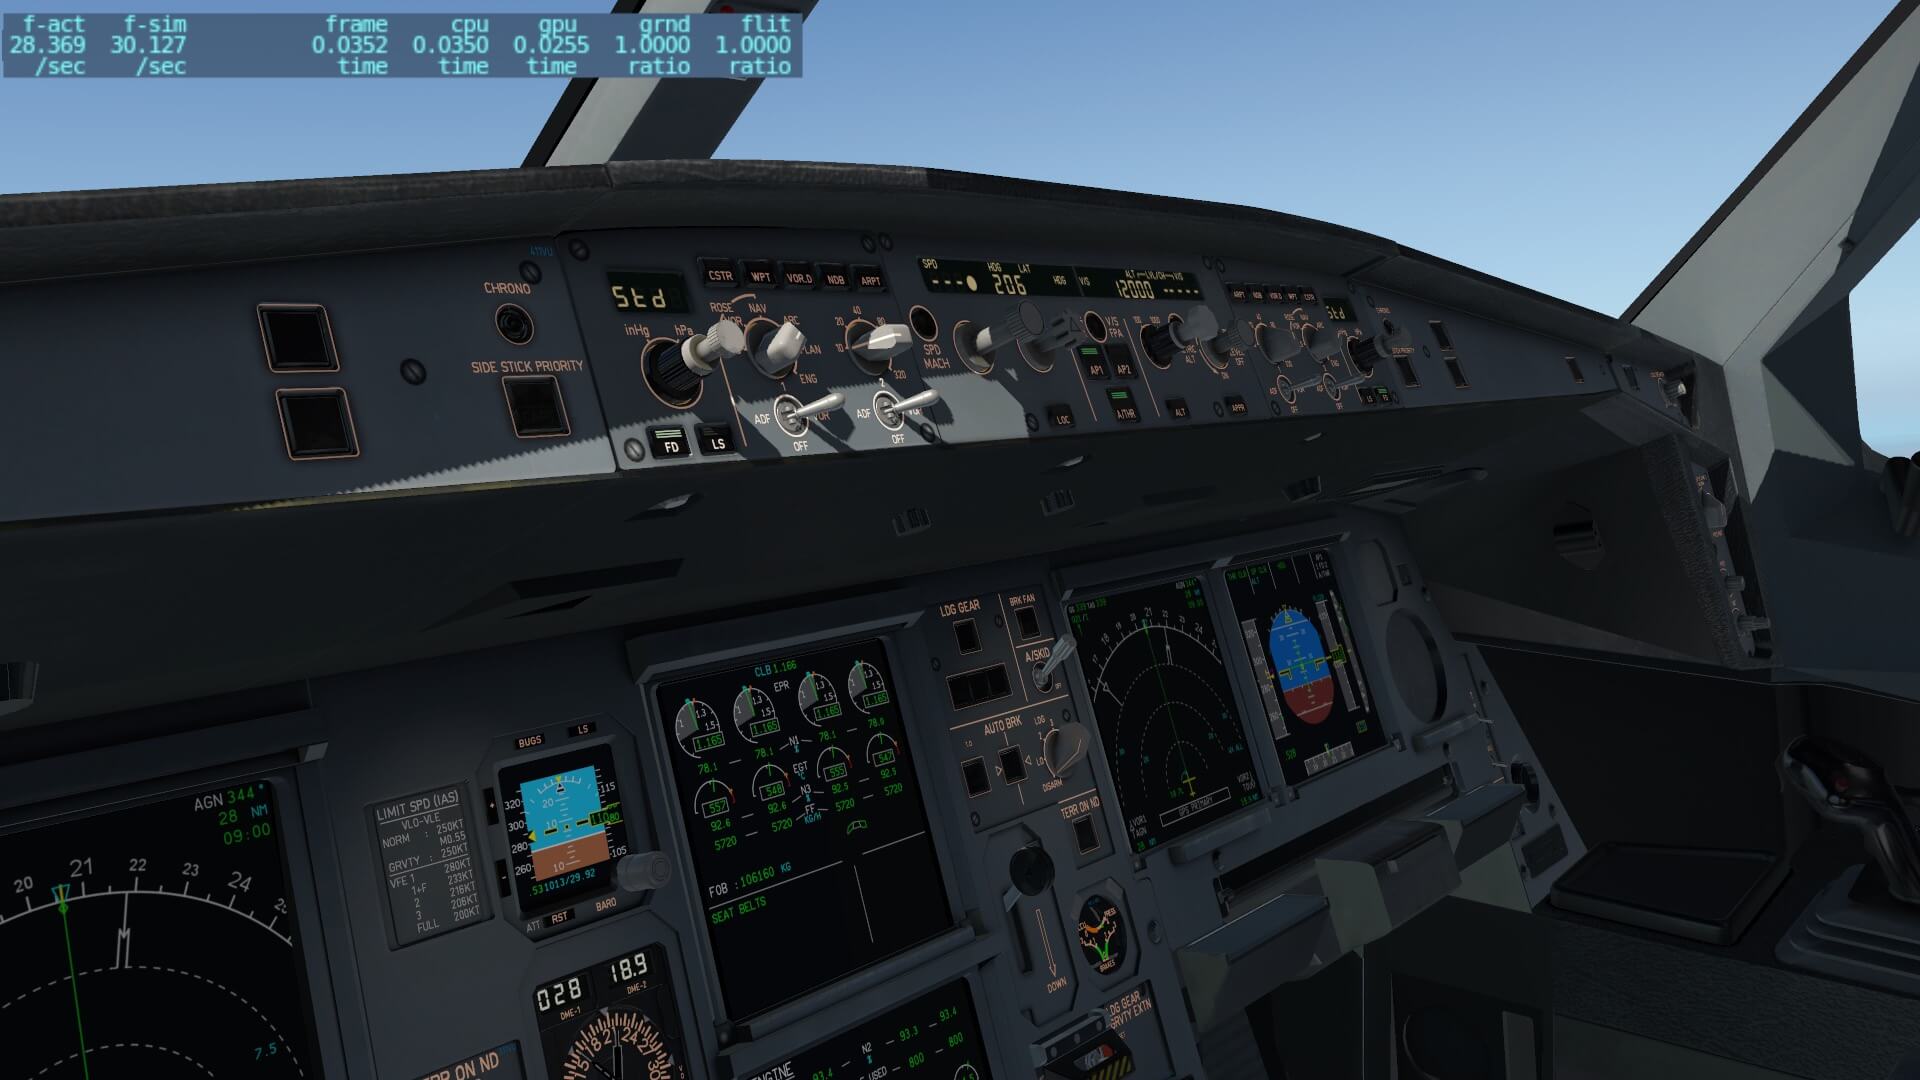


And yes, I’m aware that the actual frame rates are not only depending on the ToLiss A340-600. I mentioned already the Rendering settings, but there’s so much more. It also deals with the monitor resolution, if you’re using complex airports, or real AI traffic, but don’t forget the impact of environmental conditions like clouds, rain effect whenever applicable and so on.
Summary
The moment I approached the Summary section I asked myself immediately the question : did I discussed enough, was there a need for a 2nd test flight with the ToLiss A340-600, did I cover everything and so on. I may have lots of review experience, but it’s every time the same … did I cover enough?
As I thought, the review has become a bit longer then expected. I’ve put a lot of time and enthusiasm in it to find out most of the modeled Airbus A340-600. And I know now already that I didn’t cover everything, but I can tell you that “what” I’ve seen and tested was great. The modeled 3D cockpit or flight deck is gorgeous with lots of weathering as you can and may expect. But weathering is not enough. How are the systems modeled or how does it fly or even better, how realistic does it fly? The answer to that is … awesome! You can use the real standard operating procedures next with it, or you can use the very well written tutorial which is highly professionally put together.
As I mentioned somewhere in this in-depth review, I contacted two real Airbus pilots how this modeled FBW and other systems are programmed and their answer was direct … as real as it gets! One pilot who’s still flying the A340-600 told me that he uses it for his proficiency checks to practice. That said, top notch quality!
What else can I add in this summary?
I’ve got no idea to be honest. I tried to cover most of the features since it’s almost impossible to cover every thing. Therefore the modeled ToLiss A340-600 is too complex to figure out all its systems, but on the other hand it’s not complex in a way that you can’t learn the systems. With the included manuals you’ve got a thorough base to master this Airbus A340-600.
Perhaps one small item that I didn’t discuss since it’s not yet operative. I’m talking about the two Datalink Control and Display Units (DCDU) on the lower center instrument panel. Actually, it is a means of communication between the ATC controller and the pilot using data link for ATC communication. Although this Wikipedia link is not an official source, it does gives you a bit more background information.
The summary is always a good place to inform you about interesting additional features I found from developers who created add-ons with passion for free. One of them is the Speedy Copilot for ToLiss aircraft from XPJavelin.
I dare to write that when you like Airbus aircraft, and large commercial jets, for medium to long distances, then this ToLiss A340-600 is absolutely worth every cent! Also important to mention, when you own already the ToLiss A319 or A321, then it’s only a small step towards the A340-600. And this last sentence is not only applicable to Airbus simmers, it’s the same for real Airbus A320 Family pilots who switched to the large Airbus models including the A350.
Overall I must come to the conclusion that this ultra modern Airbus aircraft has been modeled with love, with passion, typical to ToLiss products.
More information can be found at the ToLiss website, the X-Plane.Org store page or at the Aerosoft dedicated sales page. Before I forget it, at this dedicated X-Plane.Org ToLiss link you can find everything to the A340-600 in case you have any issues or questions.
Last but not least, for this impression I used besides the ToLiss A340-600, the following payware and freeware software:
– Freeware | XPFR Toulouse V2020
– Freeware | FlyWithLua NG 2.7.22
– Freeware | X-Visibility Dynamic Haze Control 1.0.3
– Freeware | Clouds XP11 Environment+ 1.1
– Freeware | Zones Photo ortho scenery textures
Feel free to contact me if you’ve got additional questions related to this impression. You can reach me via email Angelique.van.Campen@gmail.com or to Angelique@X-Plained.com.
With Greetings,
Angelique van Campen
| Add-on: | Payware ToLiss Airbus A340-600 |
|---|---|
| Publisher | Developer: | X-Plane.Org / Aerosoft | ToLiss |
| Description: | Realistic rendition of the Airbus A340-600 |
| Software Source / Size: | Download / Approximately 2.05GB (unzipped) |
| Reviewed by: | Angelique van Campen |
| Published: | November 30rd 2021 |
| Hardware specifications: | - iMac Pro - Intel 3GHz Intel Xeon W / 4.5Ghz - Radeon Pro Vega 64 16368 MB - 64 GB 2666 MHz DDR4 - 1 internal shared 1TB SSD (Monterey 12.x) - 1 external 2TB LaCie Rugged Pro SSD (Bootcamp Windows 10) - Saitek Pro Flight System X-52 Pro and X-56 Rhino - Honeycomb Alpha Flight Controls - Honeycomb Bravo Throttle Quadrant - Thrustmaster TCA Captain Pack Airbus |
| Software specifications: | - macOS Monterey 12.x - X-Plane 11.5x |
0 Comments