My Cherokee
Maybe it isn’t the fastest 140 in the world…but then again it might be
The very nature of Cherokee 140s wouldn’t seem to lend itself to speed. After all, the airplane made its reputation based on a docile stall and some of general aviation’s most benign flying qualities. The littlest Cherokees have always been regarded as among the gentlest of trainers, so universally respected for their predictable manners that some instructors actually criticize them for being too easy to fly.
Keep in mind, any performance increase in a Cherokee 140 would be an improvement. Cherokees were their marquee’s entry-level 2+2 machines, and none were designed as high-performance airplanes. In fact, Piper hoped the original Cherokee 140 would compete as much with the Cessna 150 as the 172.
The company even considered a Cherokee 115, a version with a 115-hp Lycoming O-235A engine to make the airplane more price-competitive with the 150. Performance didn’t meet its expectations, however, that Piper abandoned the idea (Courtesy Plane and Pilot Magazine).
But hold on … I’m confused … is this the Piper PA-28 Cherokee or the Piper Cherokee 140 or both or ….? Actually, the modeled Piper Cherokee 140 is a model version of the PA-28 Series. Ok, I will help you out with this.

The original Cherokees were the Cherokee 150 and Cherokee 160 (PA-28-150 and PA-28-160), which started production in 1961 (unless otherwise mentioned, the model number always refers to horsepower).
In 1962, Piper added the Cherokee 180 (PA-28-180) powered by a 180-horsepower (134-kW) Lycoming O-360 engine. The extra power made it practical to fly with all four seats filled (depending on passenger weight and fuel loading), and the model remains popular on the used-airplane market. In 1968, the cockpit was modified to replace the “push-pull” style engine controls with levers. In addition, a third window was added to each side, giving the fuselage the more modern look seen in current production.
Piper continued to expand the line rapidly. In 1963, the company introduced the even more powerful Cherokee 235 (PA-28-235), which competed favorably with the Cessna 182 for load-carrying capability. The Cherokee 235 featured a Lycoming O-540 engine derated to 235 horsepower (175 kW) and a longer wing which would eventually be used for the Cherokee Six. It included tip tanks of 17-gallon capacity each, bringing the total fuel capacity of the Cherokee 235 to 84 gallons.
And then, finally here she is …… in 1964, the company filled in the bottom end of the line with the Cherokee 140 (PA-28-140), which was designed for training, and initially shipped with only two seats. The PA-28-140 engine was slightly modified shortly after its introduction to produce 150 horsepower (112 kW), but kept the -140 name.

Ok, now that you know a little bit more of its history, by the way, when you want to read all about the PA-28 Series, check out this Wikipedia link, but now it’s time to check out the vFlyteAir 140 Original for X-Plane 11.30+.
The Enthusiastic vFlyteAir Cherokee
Aircraft model
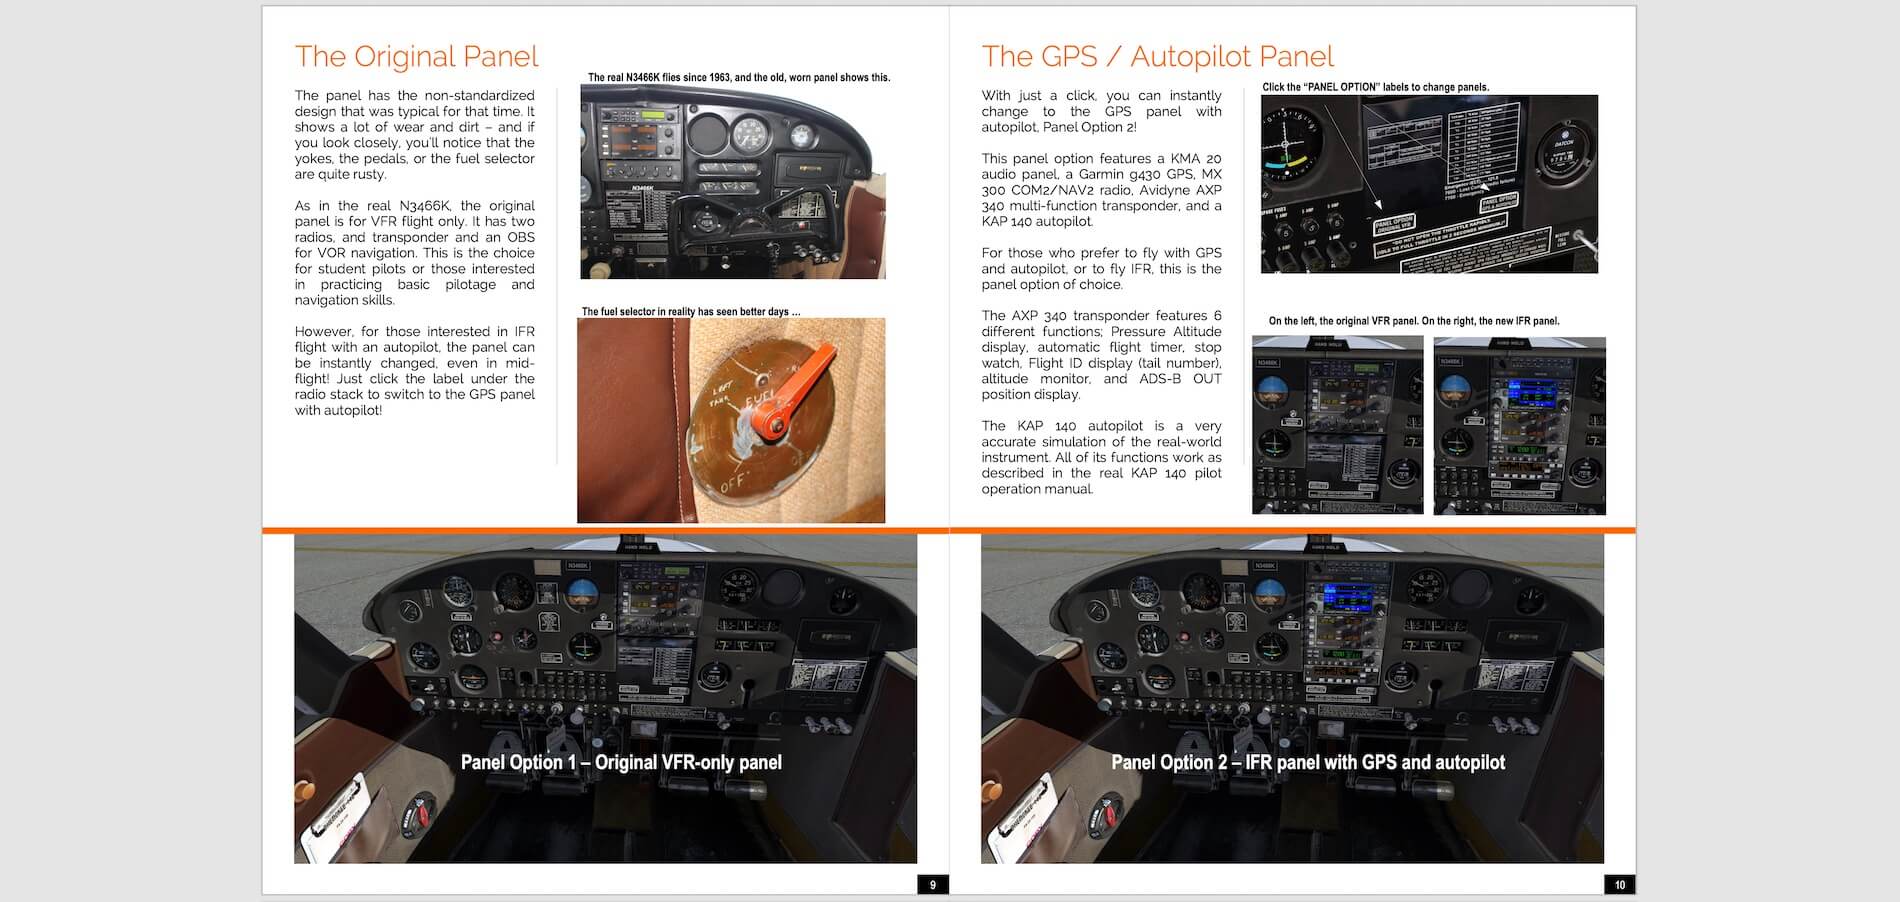
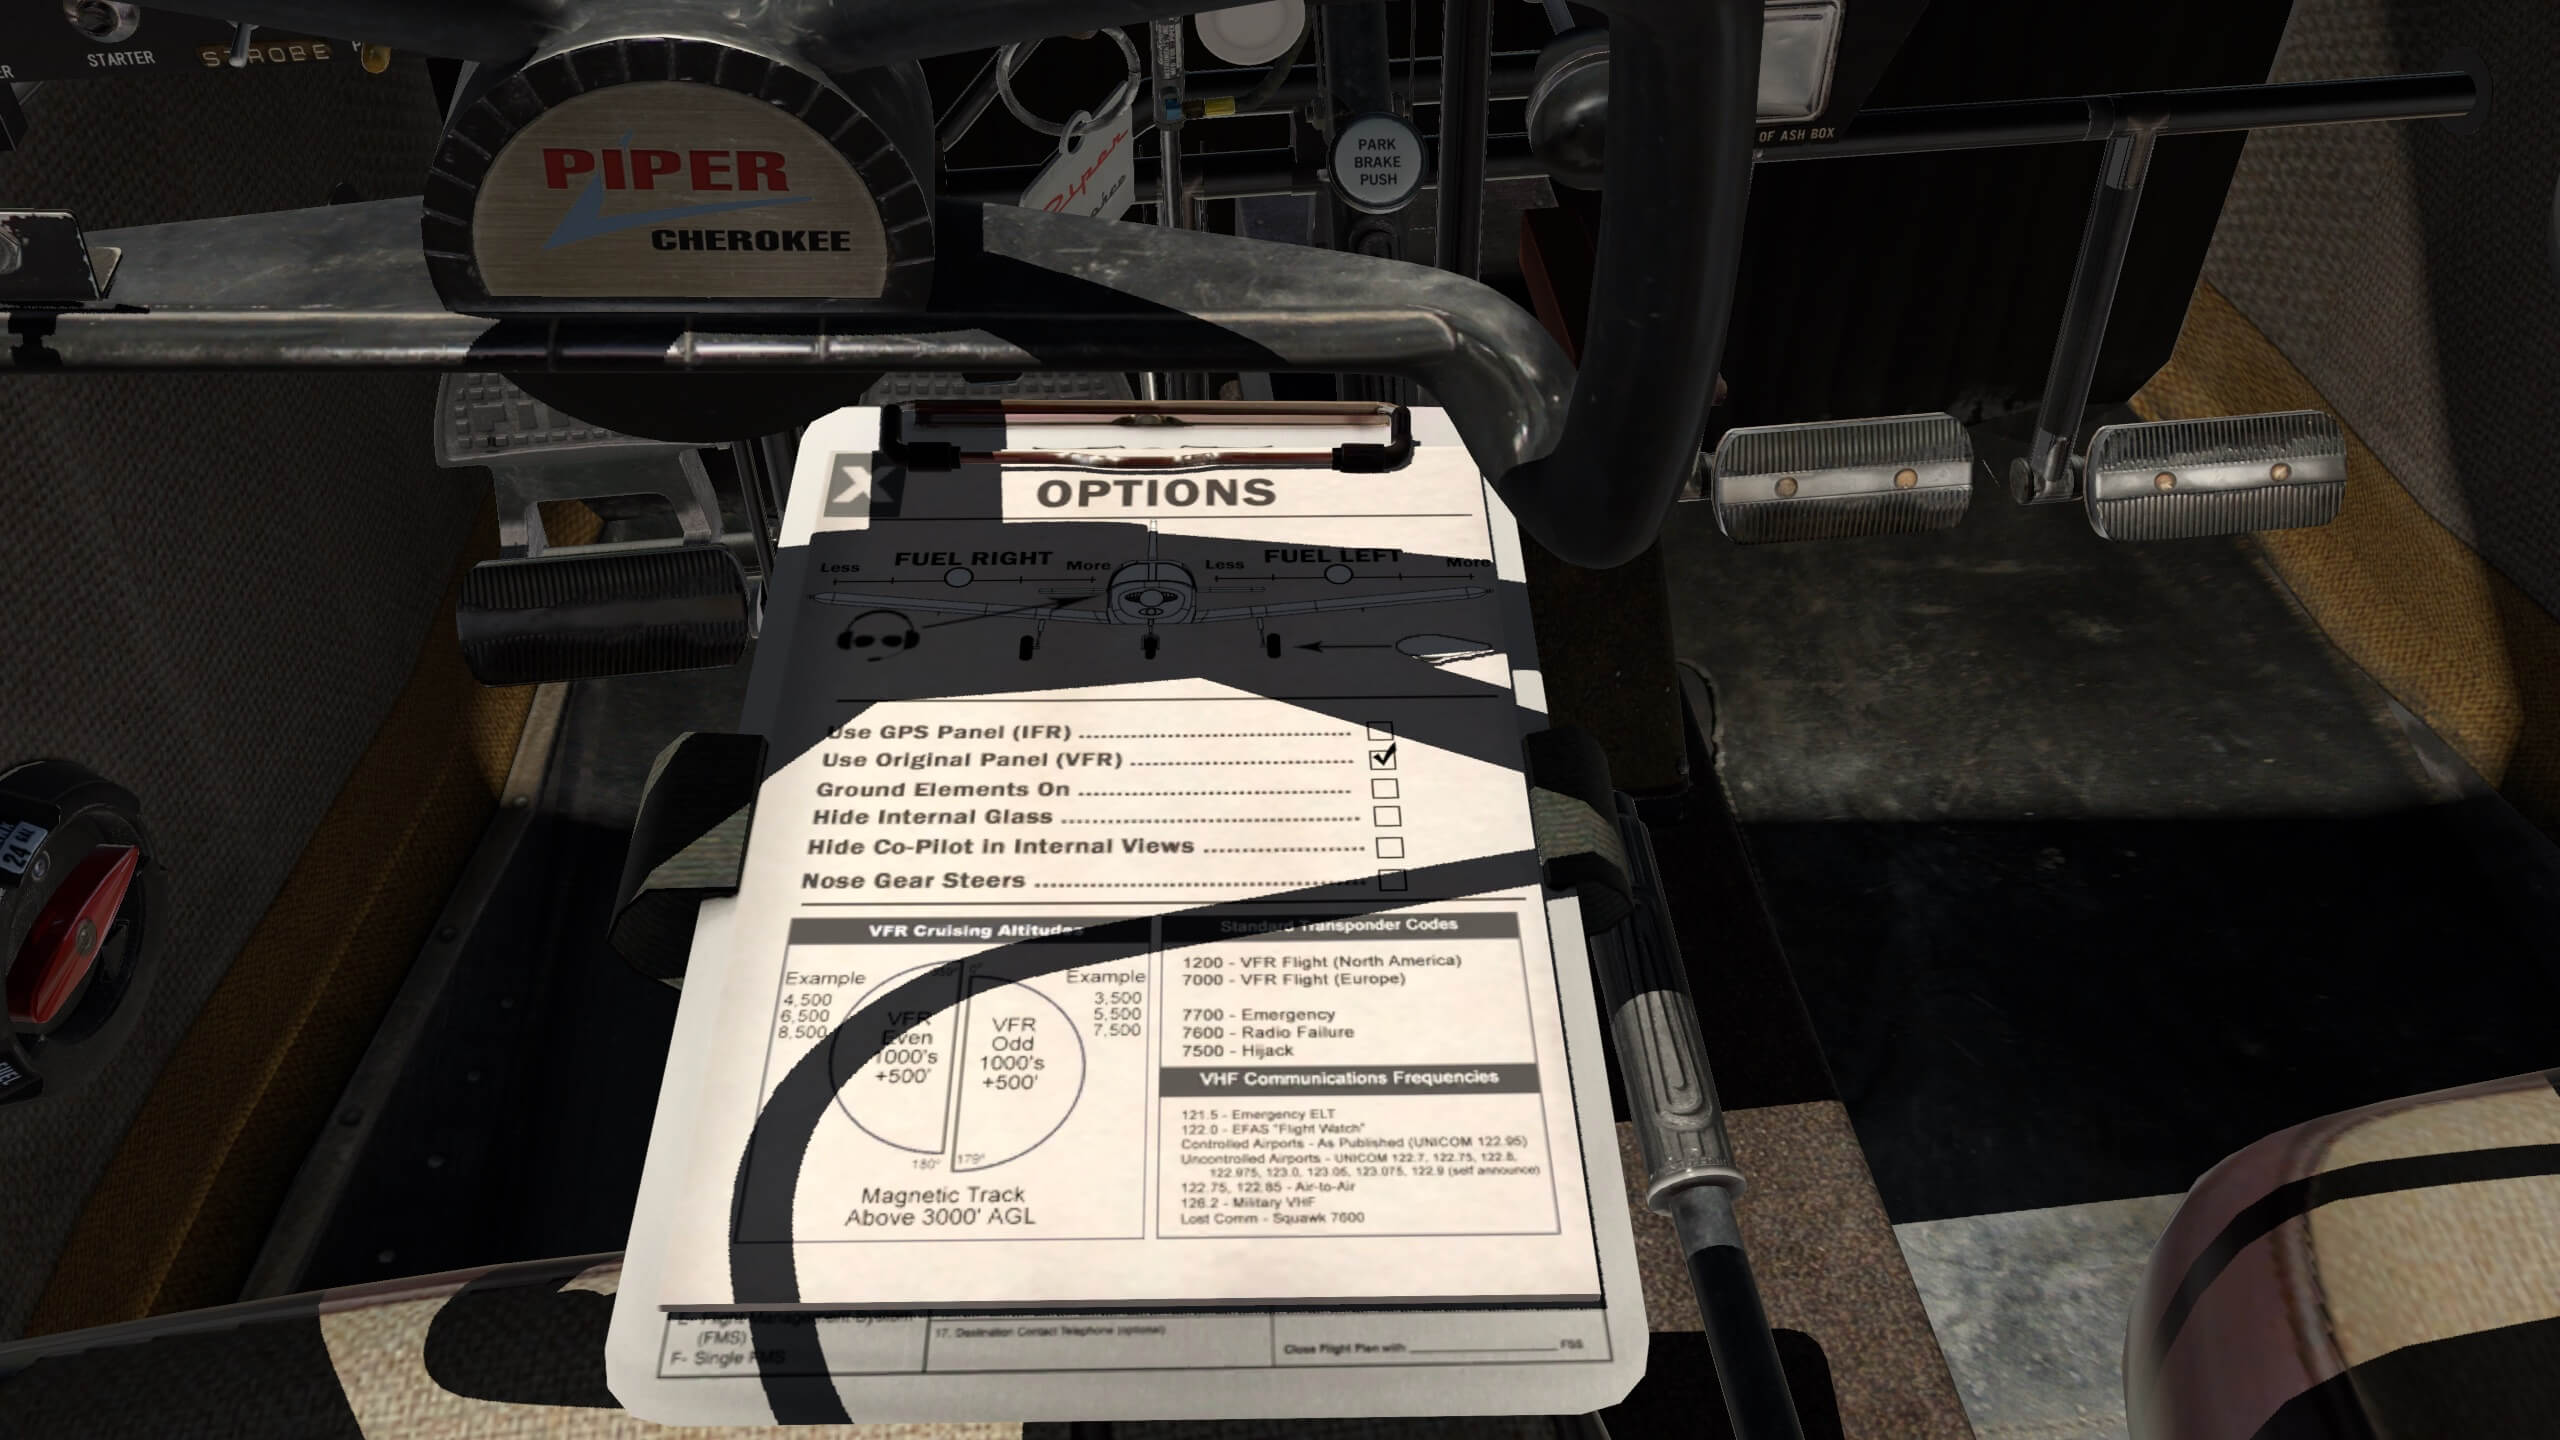
The Original model is completely based on a real Cherokee 140 with aircraft registration N3466K. It comes with, as the name suggest, the original cockpit dated back to 1963 thus this version has a VFR-only panel and can be seen as a “basic trainer”. A perfect aircraft for student pilots and for those who love to fly VFR. Or, as I would say … practice your pilotage and basic navigation with this bird.
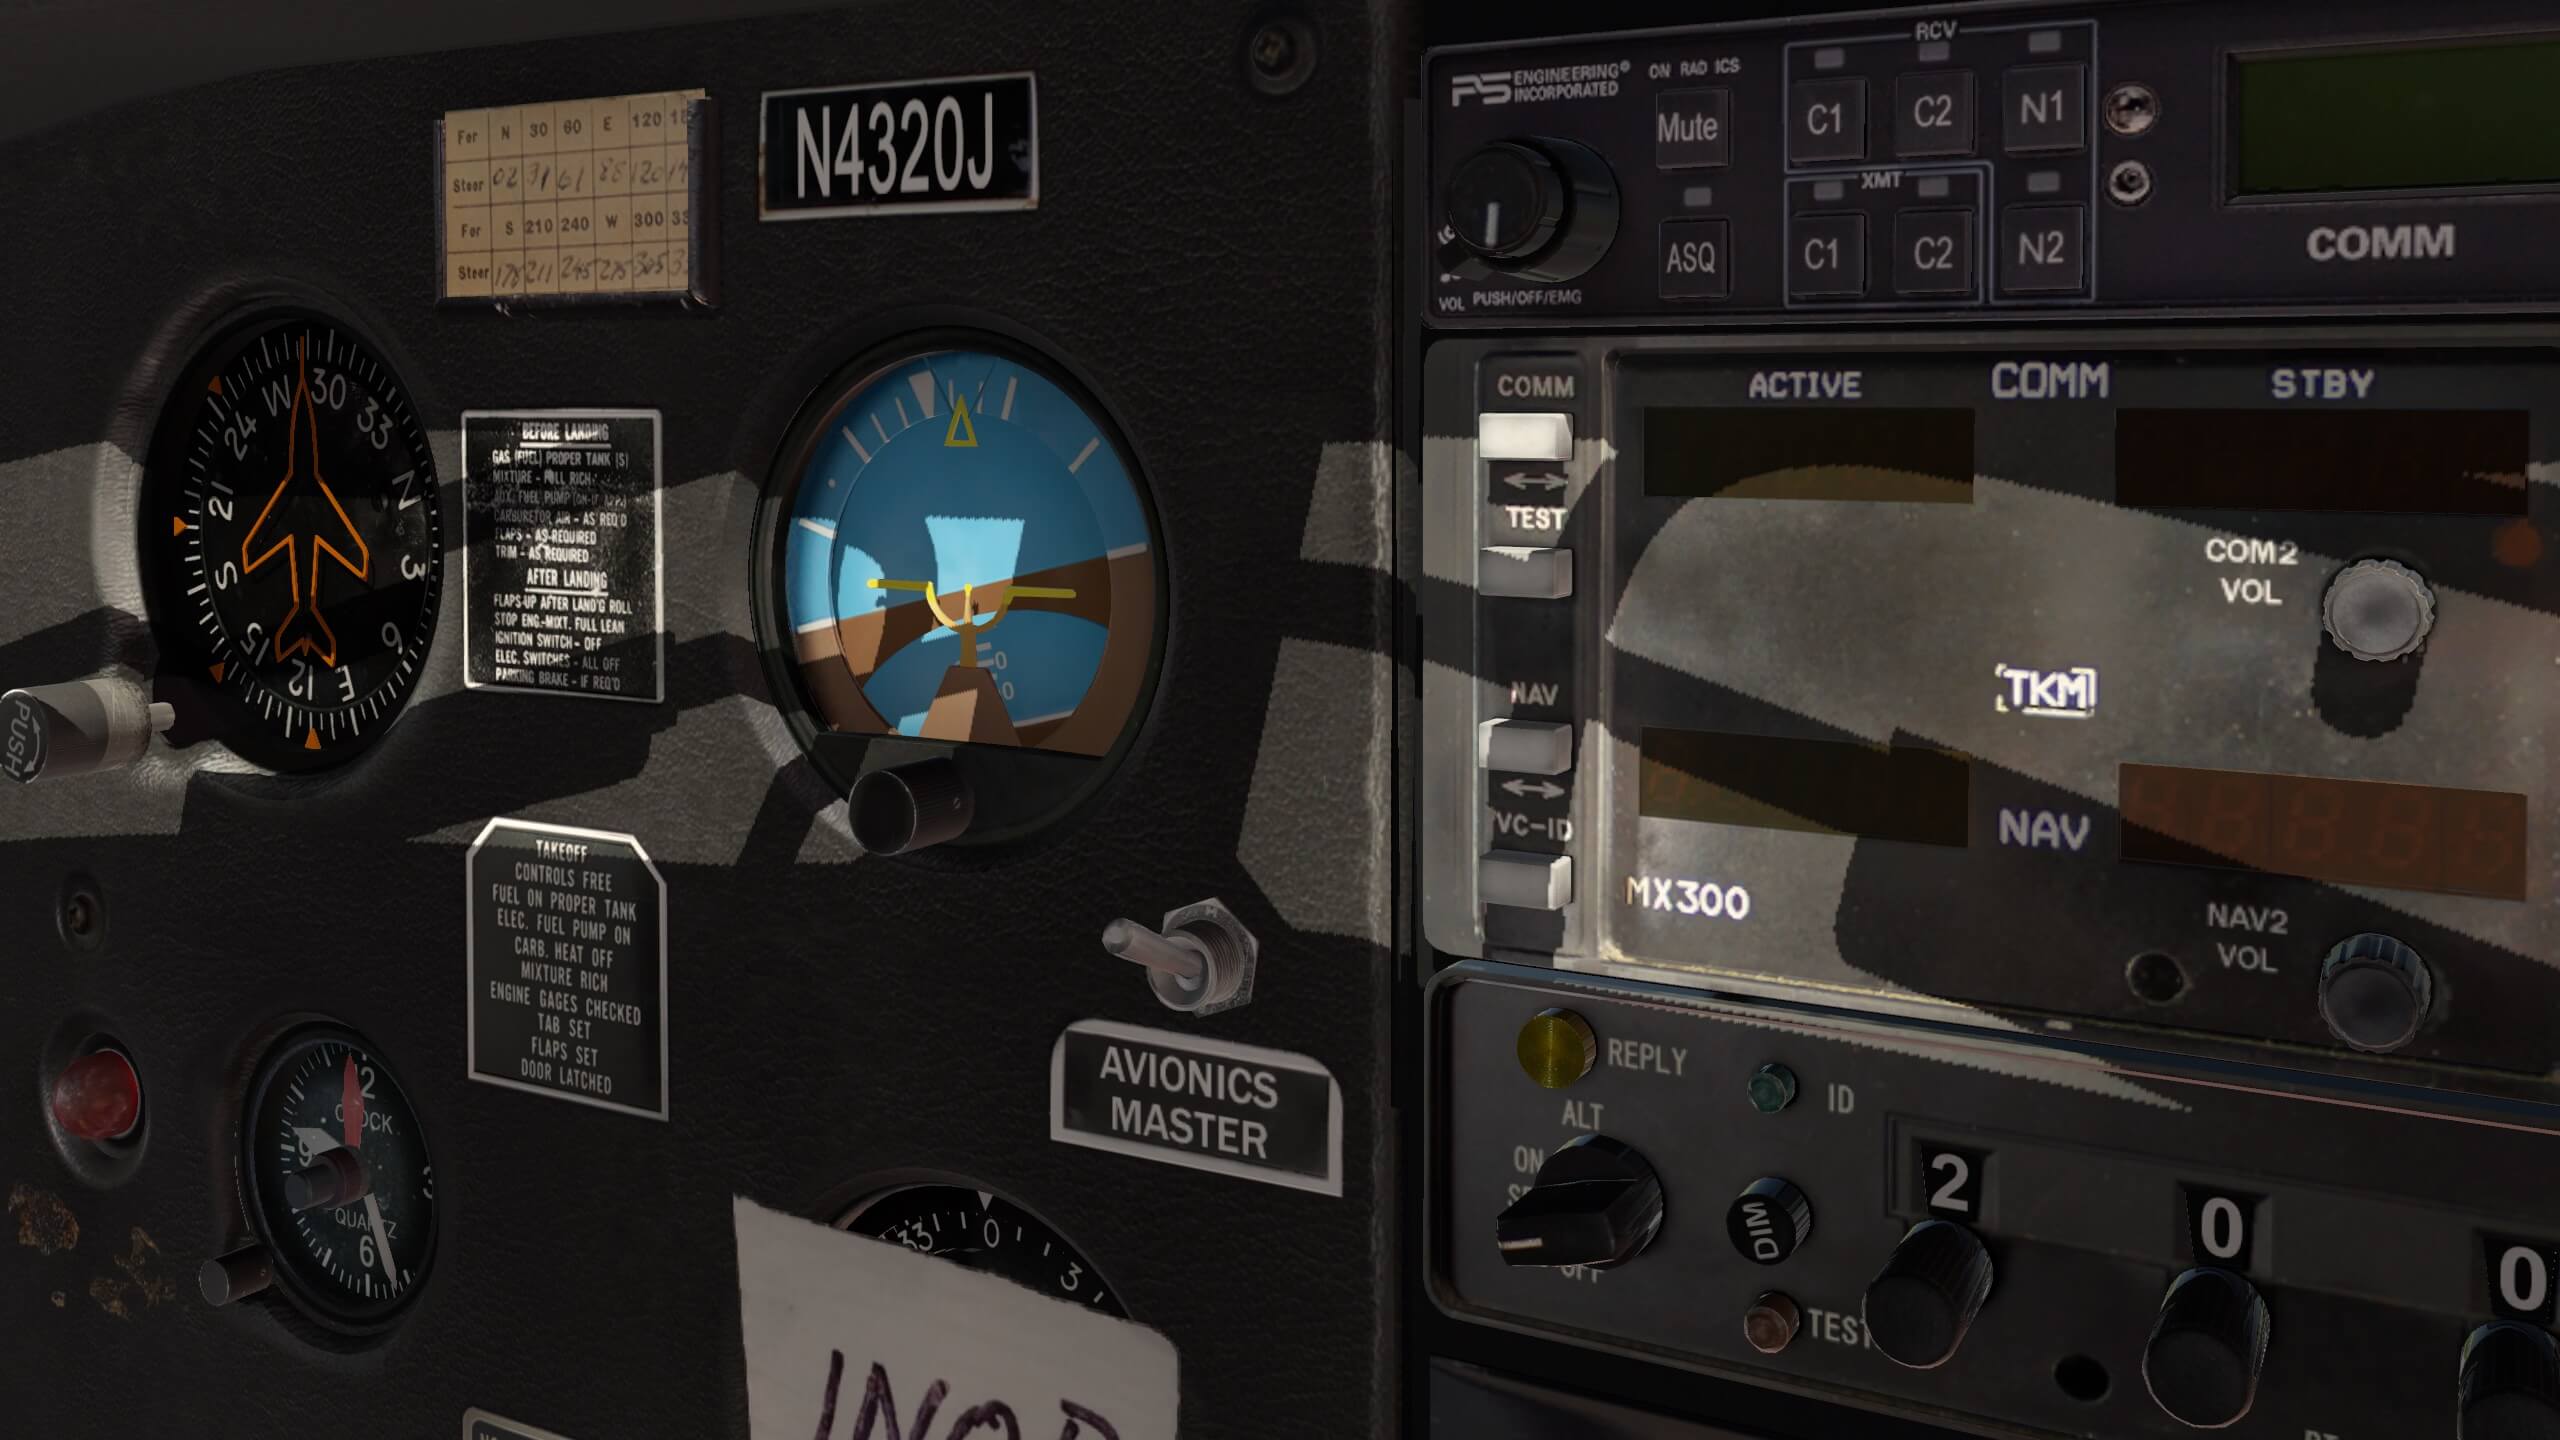
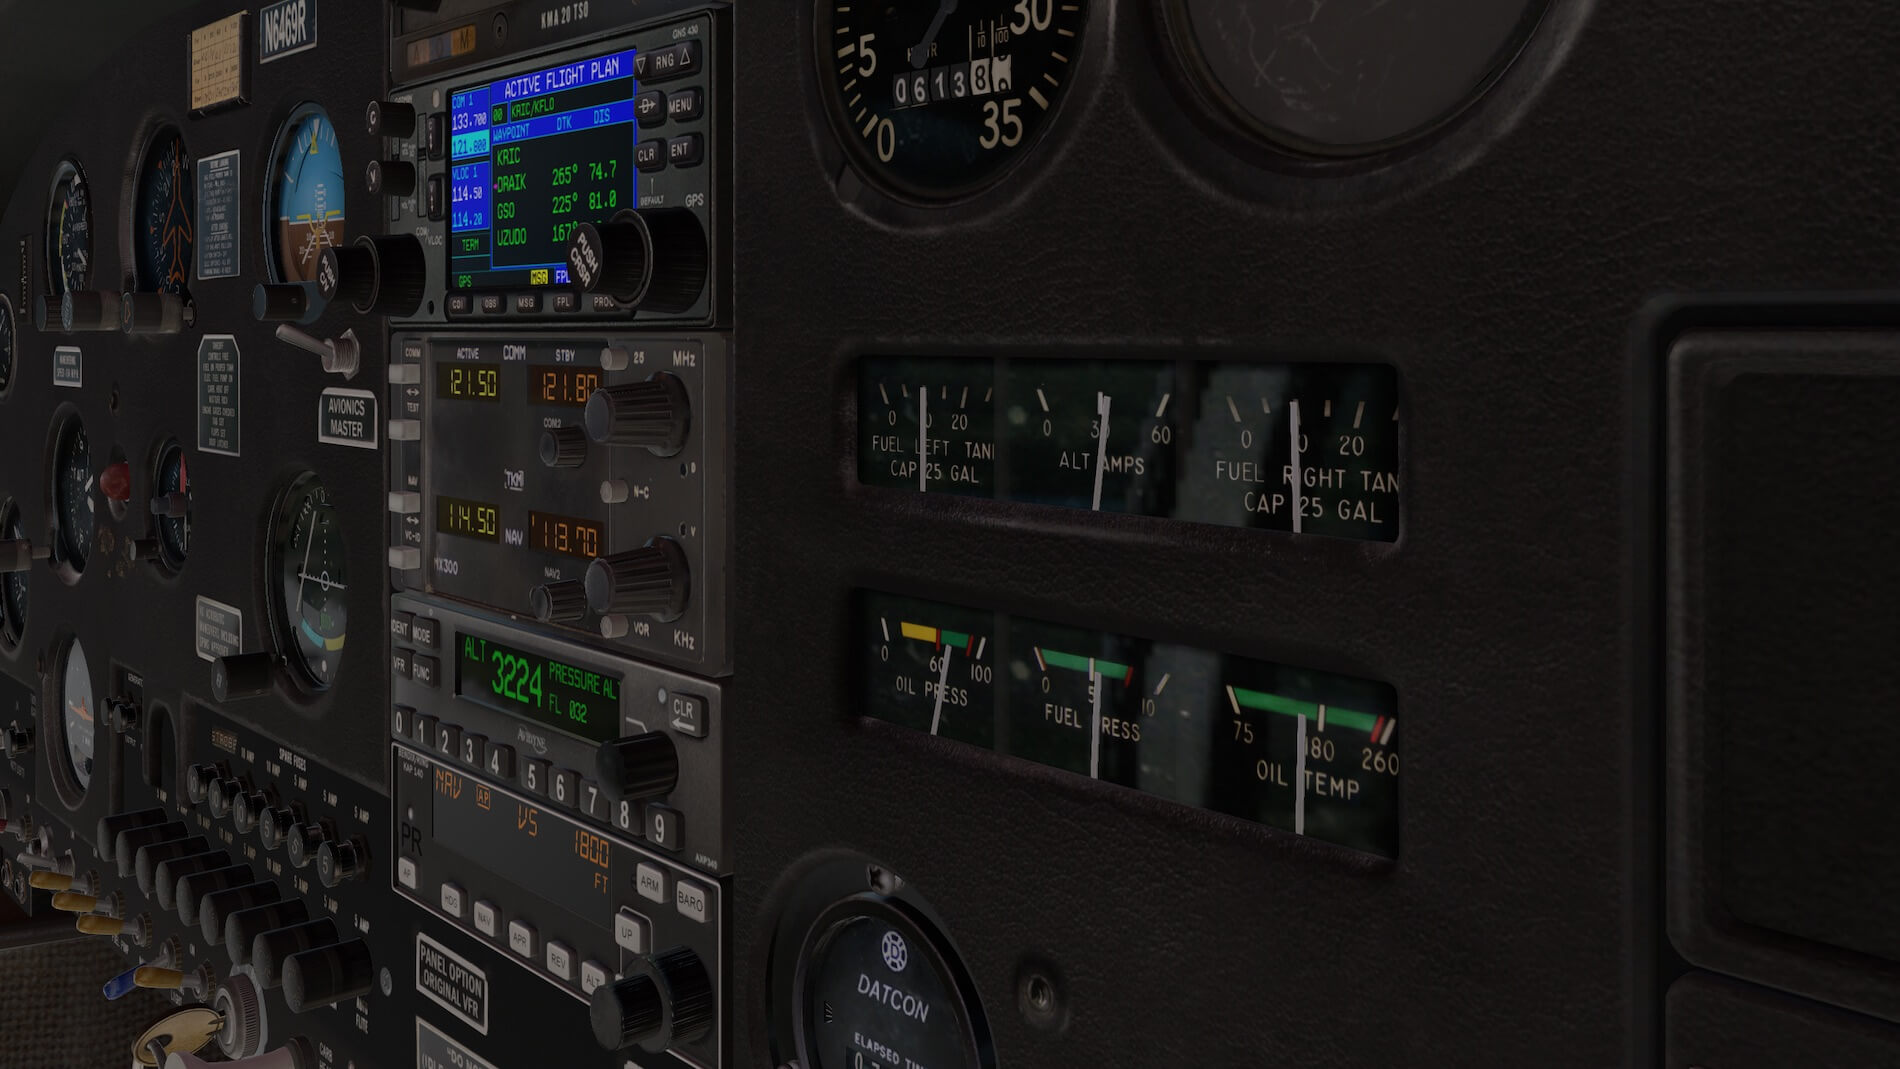
But the same model or package also comes with what may be expected, an IFR rated aircraft instrument panel. Based on the same platform as the Cherokee 140 Original, this airplane has an upgraded instrument panel with the X-Plane 11 Garmin GNS430, a KAP 140 autopilot, ADF receiver, two COM radios, two NAV radios with OBS1 and OBS2 or to be exactly, MX 300 COM2/NAV2 radio and Avidyne AXP 340 multi-function transponder.
Therefore, this airplane is IFR and ILS/RNAV capable and is the choice for those who love to fly with the help of instruments and the use of an autopilot. It can also be seen as those who prefer to practice their single engine IR (Instrument Rating).
Manuals
This Cherokee comes with the comprehensive manual that discusses all the possibilities for those who prefer to fly VFR and those who like IFR flights. Although the basic aircraft modeling isn’t different, the instrument panel is different and that’s then also what’s noticeable in the manuals. That’s it apart of the “vFlyteAir Limited Use Software Agreement” Acrobat file.
I’m only wondering about the following; since the manual is partly from the previous model version, if vFlyteAir has tested if the link and thus the MisterX6 airport package on page 35 to the MisterX6 airport KEYQ – Weiser Air Park is also useable with X-Plane 11.30+. Perhaps it’s an idea to test this. Not much is needed for this airport besides OpenSceneryX. For the continuation of this review, I had a quick check of this originally for X-Plane 10 developer airport is still working with X-Plane 11.30+.
The comprehensive Cherokee comes also with some performance tables which makes the manual complete. My only thought about those tables is always … can everybody interpret them without any help. Then there’s one small thing I found in the original manual and that’s on page 24. It deals with the elevator; “The aircraft uses an anti-servo tab at the tail for elevator trimming”.
Honestly, I’ve got no idea what an anti-servo tab is. I know a trim tab, a balance tab, but that’s it. Time to contact Walker from vFlyteAir. According to Walker “An anti-servo tab is essentially a balance tab, but it works in reverse of a “servo” tab. An “anti-servo” tab is designed to ADD extra pressure on the yoke while pitching up or down to give the pilot more of an indication of pressure on the yoke. In the Piper models, without the “anti-servo” tab, the pilot would feel very little pressure feedback through the yoke while pitching up or down. This is because the “elevator” is actually an all-moving stabilator – the entire horizontal stabilizer fin moves up and down for pitch. The Piper stabilators are balanced fore/aft almost perfectly, so without the anti-servo tab providing some pressure, the pilot would not feel anything at all through the yoke while changing pitch. The anti-servo tab moves automatically in the same direction as the stabilator, thus creating a bit of extra air pressure either downward while pitching up, or upward while pitching down. The anti-servo tabs also help return the stabilator to neutral position when the yoke is released”.

Overall I must conclude that the provided manual is well written with enough information needed to explore either the VFR and/or IFR Cherokee model.
Package installation
The installation can be done in many ways. One thing is for sure, the package aren’t protected by a serial number and you’re free to install it where you want, but logically, each package goes into the Aircraft folder or …. when you own more vFlyteAir models, you can create a sub-folder named “vFlyteAir” and copy and paste the Cherokee 140 folder into this.
With the installation completed, it’s worth to highlight that you’ll find in the manual a preferred X-Plane Rendering and Control settings. For more information check out page 15 of the manual. Keep in mind that as always, settings also depend on your own PC or Mac, when you have a GPU with less memory or less system memory, you need to reduce the settings accordingly.
STMA vFlyteAir Cherokee Updater
At the moment of this writing, there are three kind of product updates possible. Either you need to surf to the developer or publisher where you bought the product, and check for yourself if there’s a new update. Another option is auto updating. Many configurations or programs who can do this, are at the moment available. It is possible that the developer has a build-in auto-installer/updater, or the developer uses such an auto updater from other developers like with vFlyteAir. They use the auto updater from STMA.
Although vFlyteAir doesn’t have there own auto-installer, they sell this aircraft with the STMA Auto Updater included, so actualy, there’s no need to do anything. In other words, the STMA will check for you if a new vFlyteAir Cherokee update is available. Personally I would suggest to leave the Auto Updater (r) ON.
But what do I need to do or how do I see if the STMA Auto Updater is working?
First, assuming you’ve loaded the vFlyteAir Cherokee Original for X-Plane 11.30+ (logically), move your mouse to the left-hand side of the X-Plane window. A small semi transparant window slides out from the left. It can show in yellow “STMA AutoUpdate off” or in green “STMA AutoUpdate on”. When it’s off, and you tick on it, it will become active thus green and a separate window pops up telling you either that your Cherokee is up-to-date or that you need to start the auto updater.
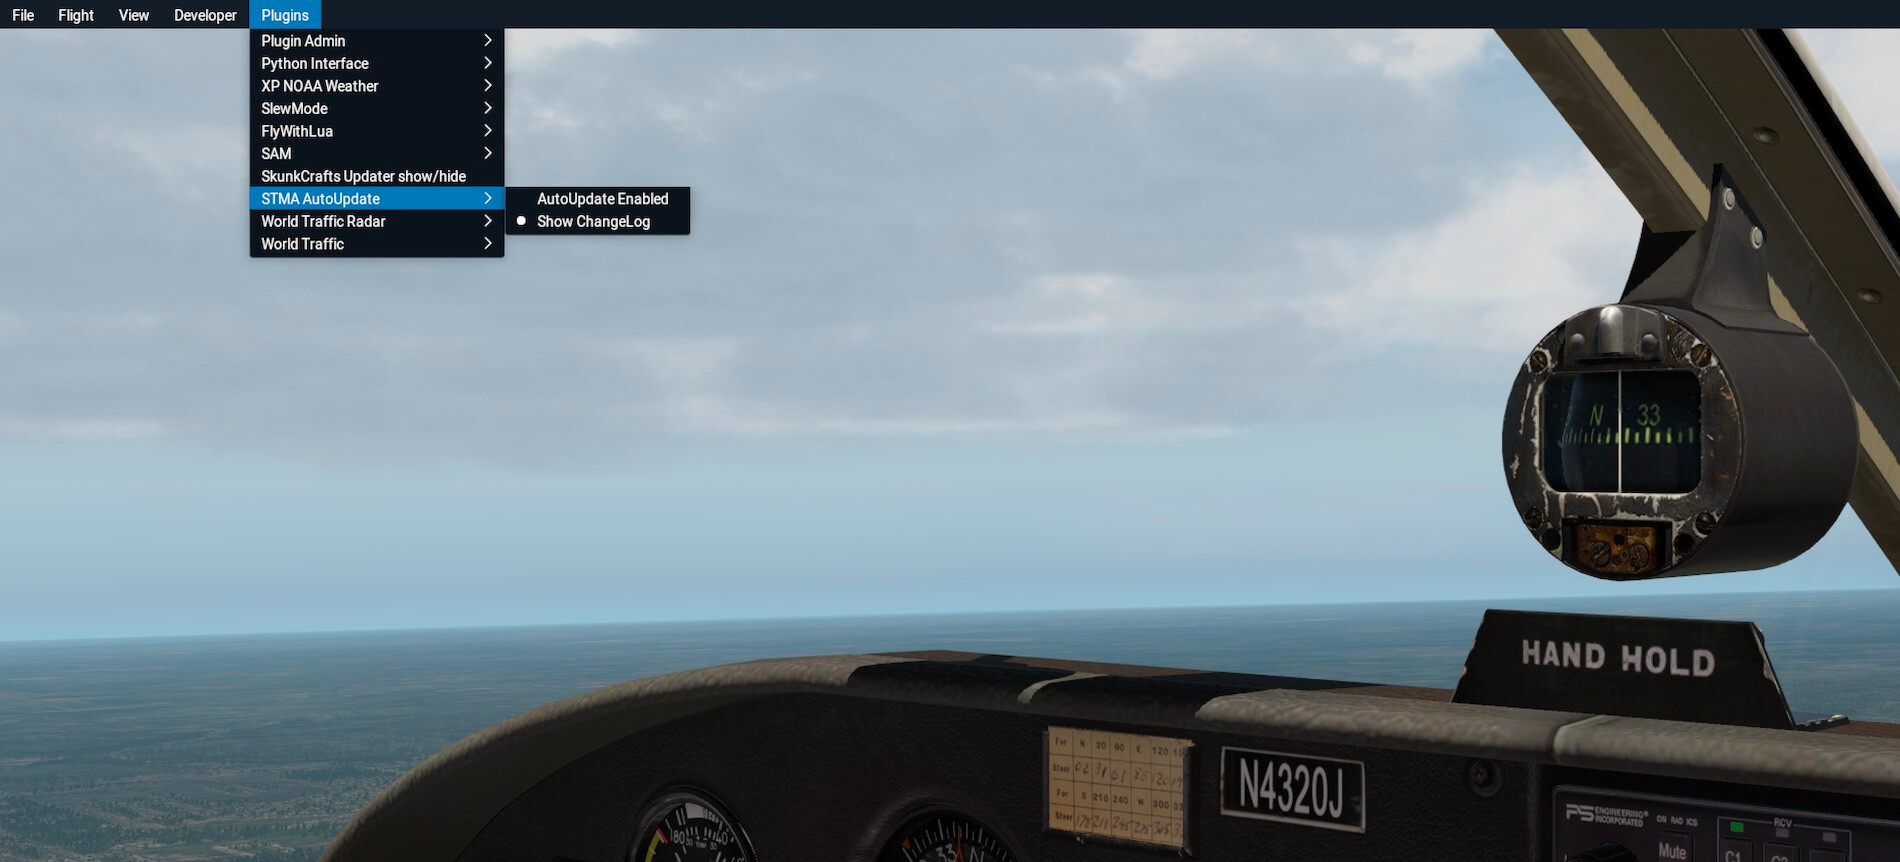
The other option in this left sliding window is View Changelog. While writing this paragraph, I have had no update or whatsoever, so there’s also no changelog to show. If the Cherokee was updated, then clicking on this would show you a changelog list. Another way to check if the STMA AutoUpdater is set to off or on and to view the changelog is via the X-Plane 11 menu “/Plugins/STMA AutoUpdate”.
Time to Explore or time to Fly?
I could do the walk-around check which is normally the way how it goes in real and what I prefer to do and to follow is first, I’m the guest of Walker Guthrie. Walker invited me on this flight so I’m not responsible for the walk-around check, but that doesn’t mean I don’t want to see the modeled aircraft with my own eyes before I jump into the cockpit. With the aircraft parked at KEYQ – Weiser Air Park, I need to take a quick look how the Cherokee 140 is modeled.
First Impressions
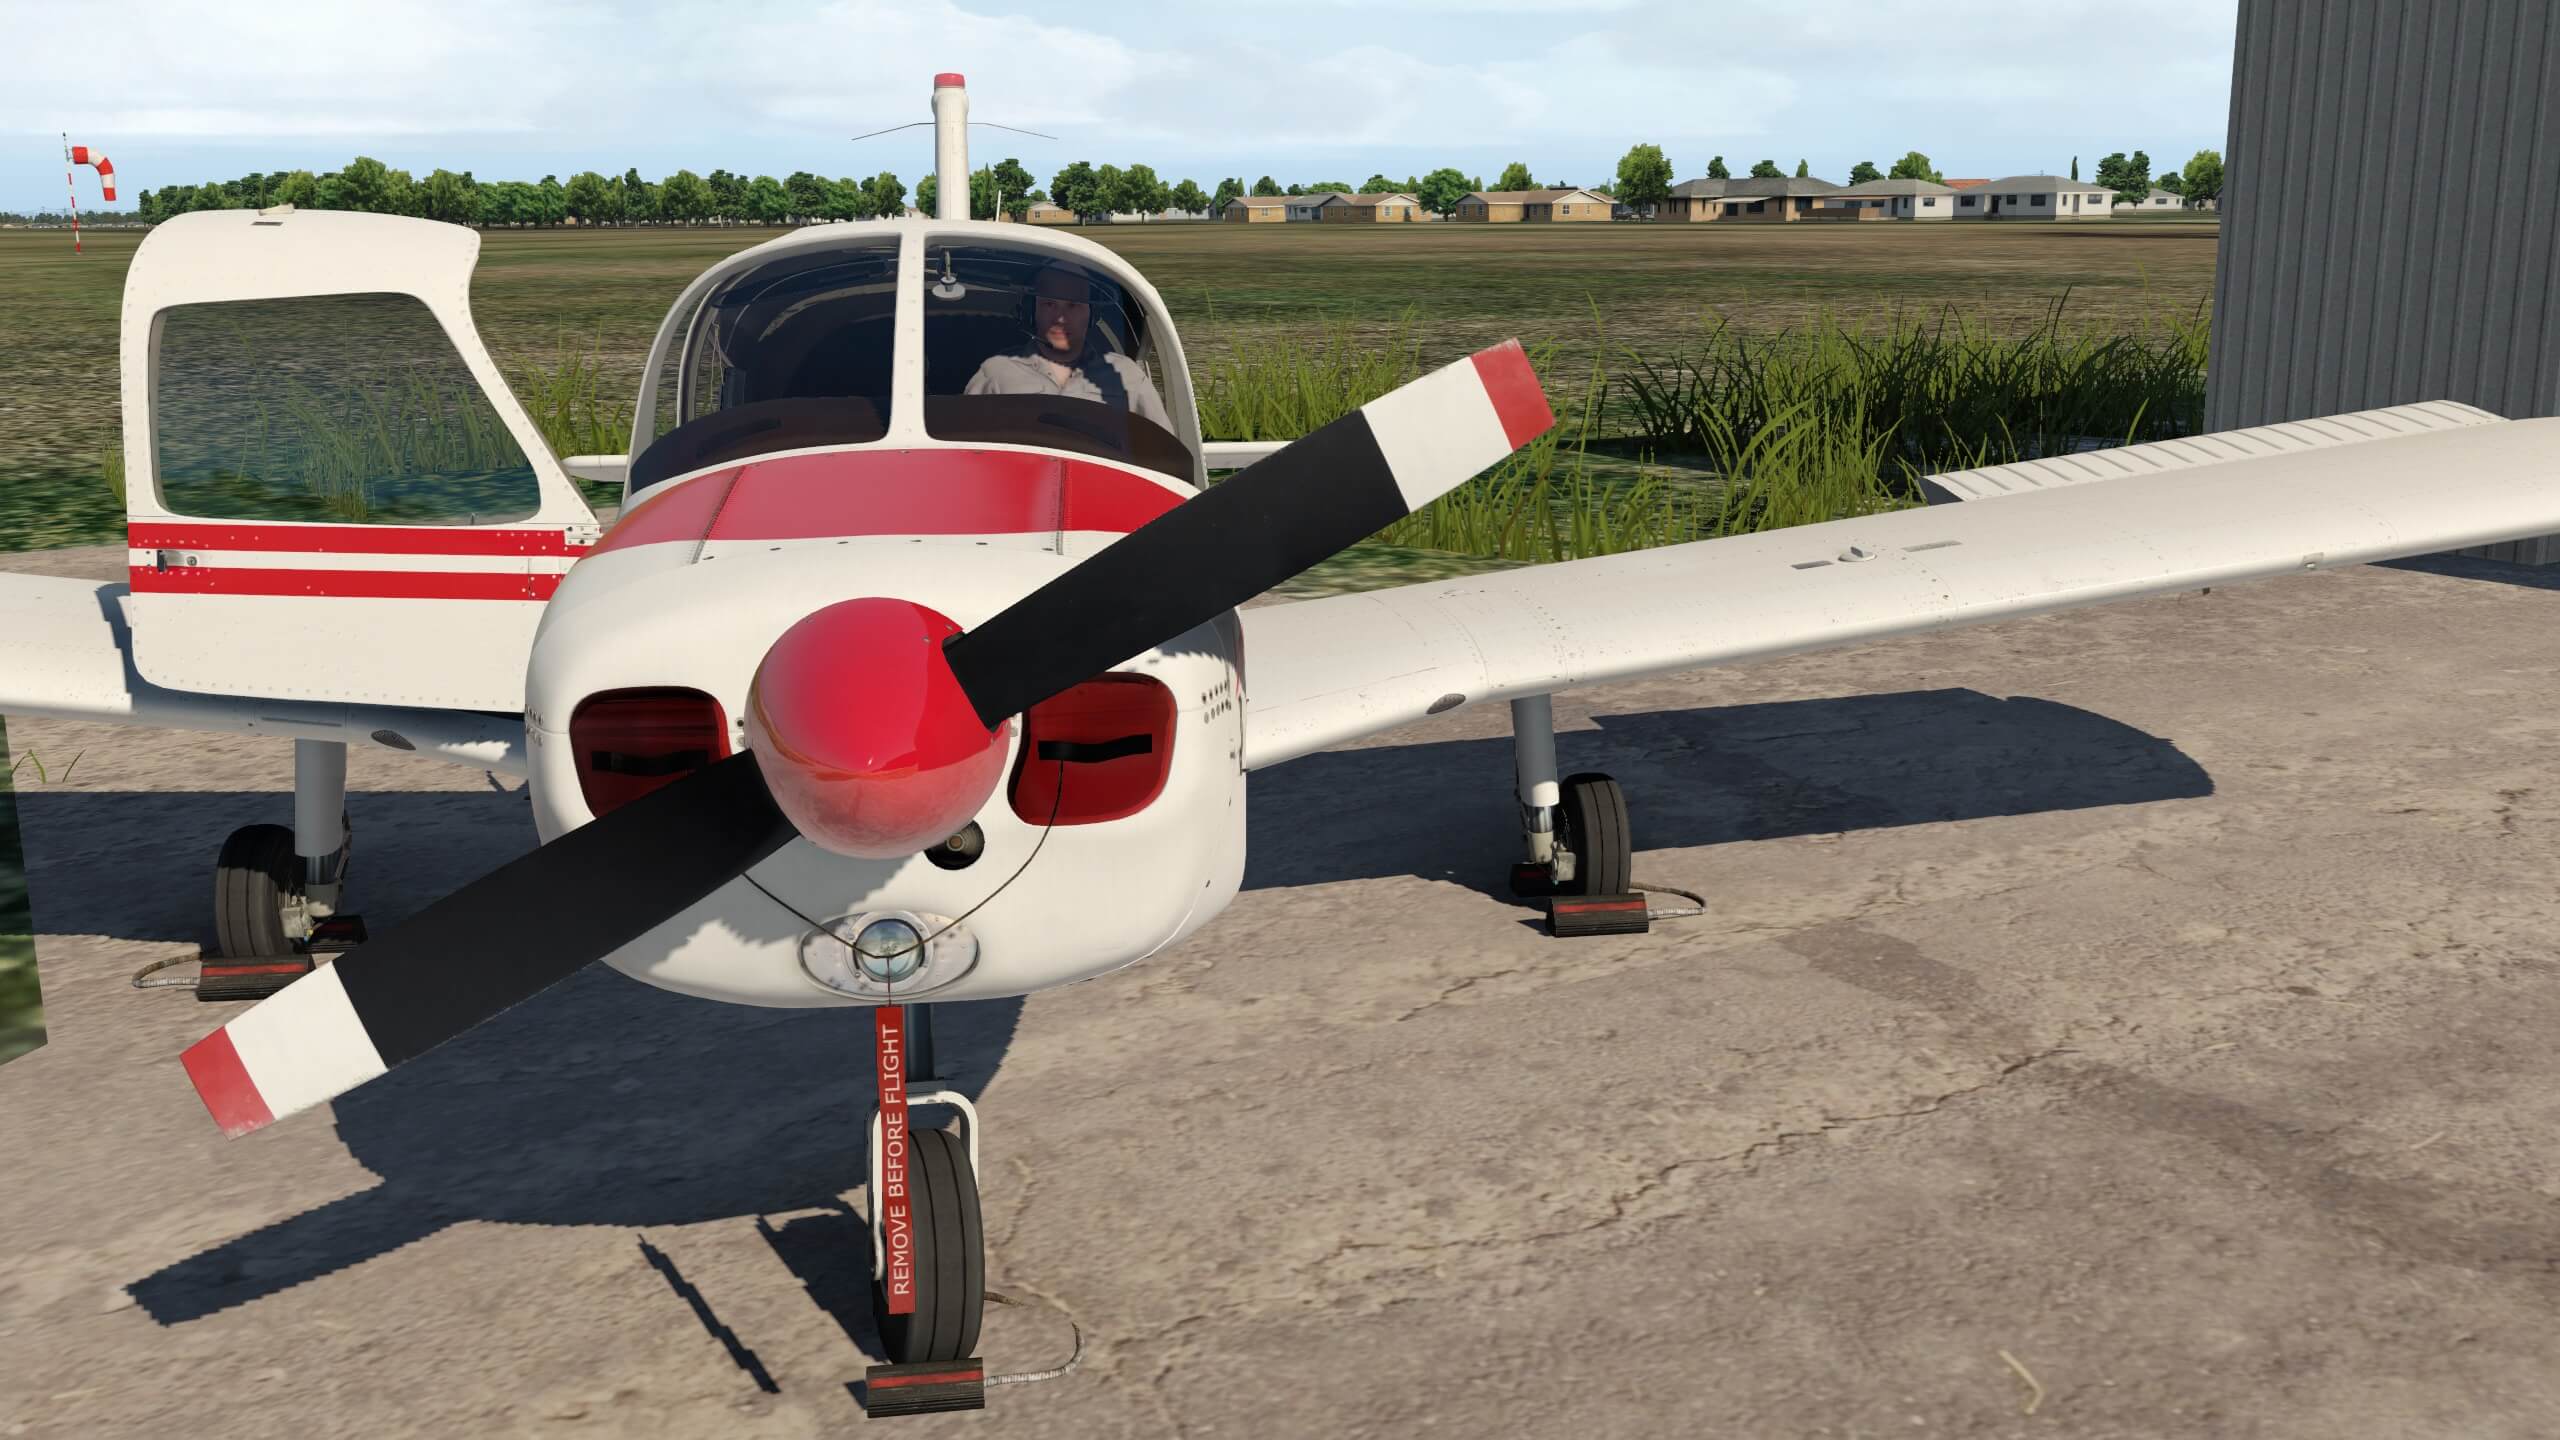
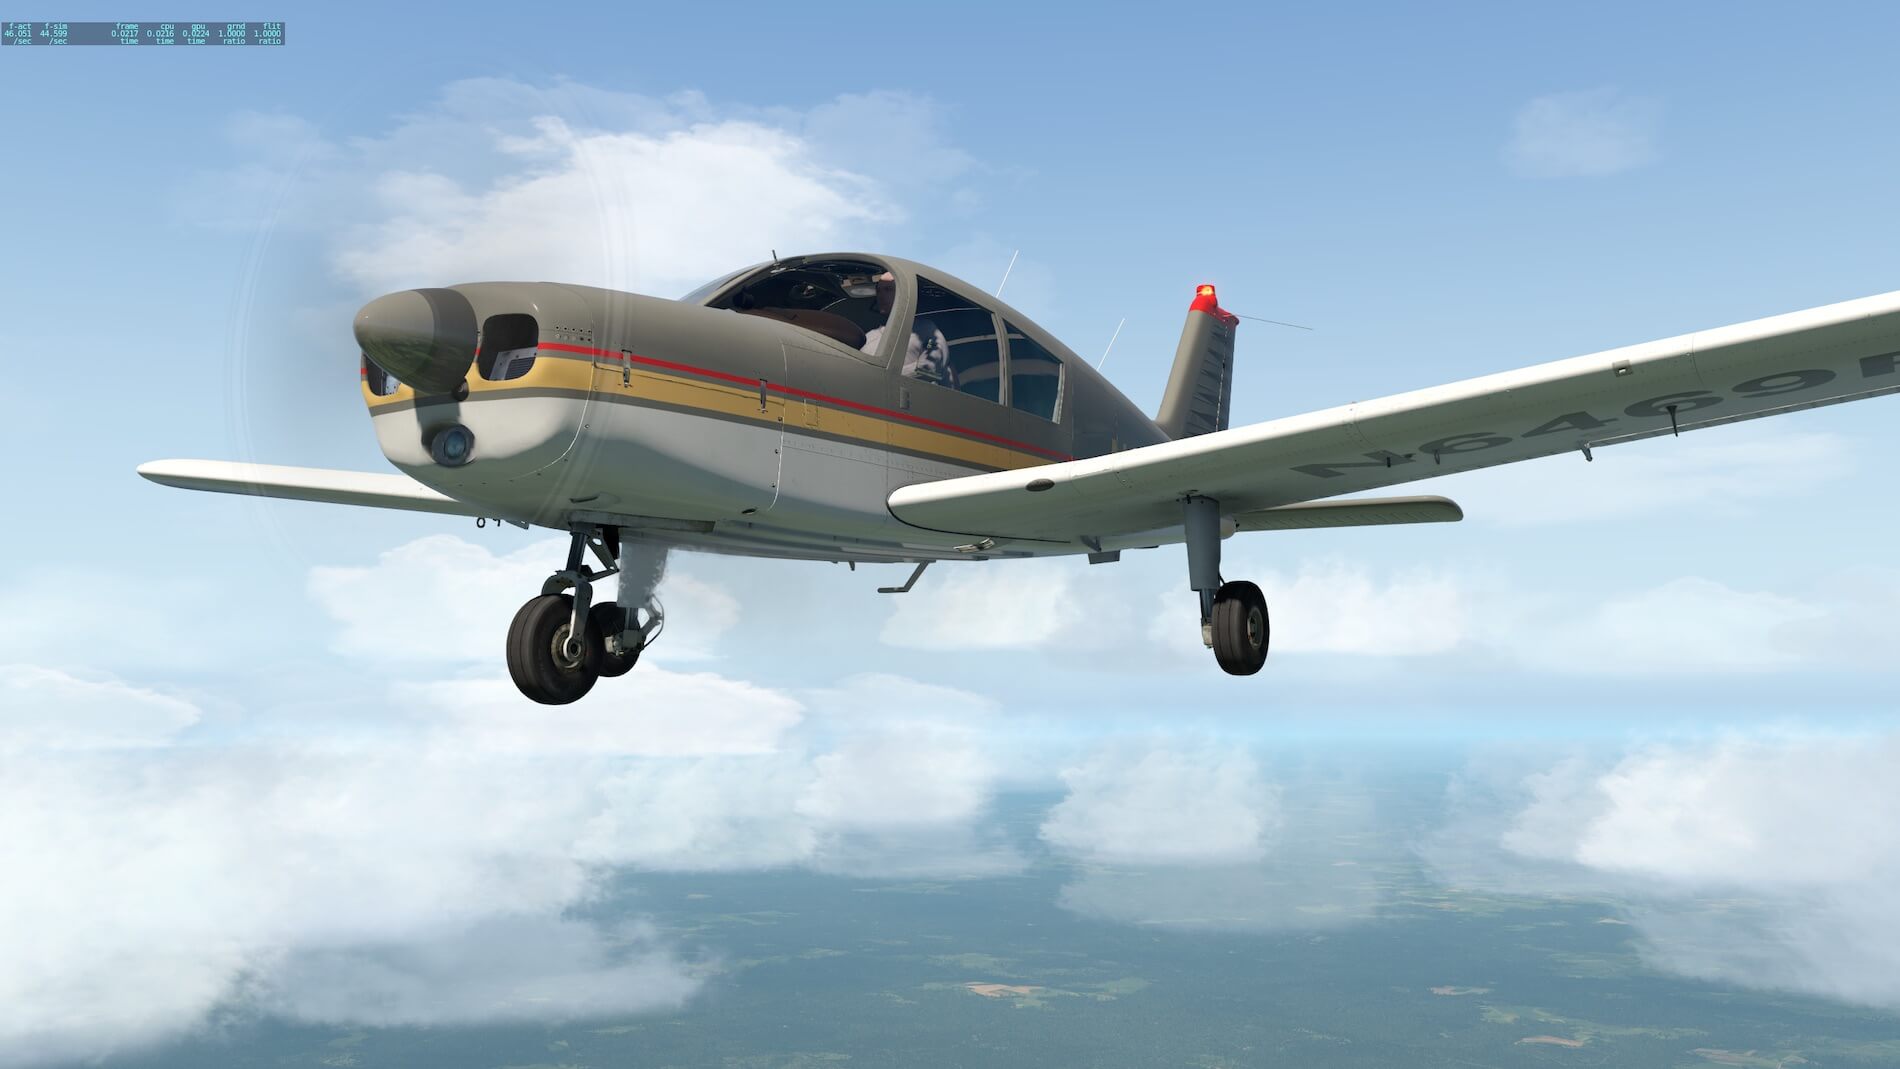
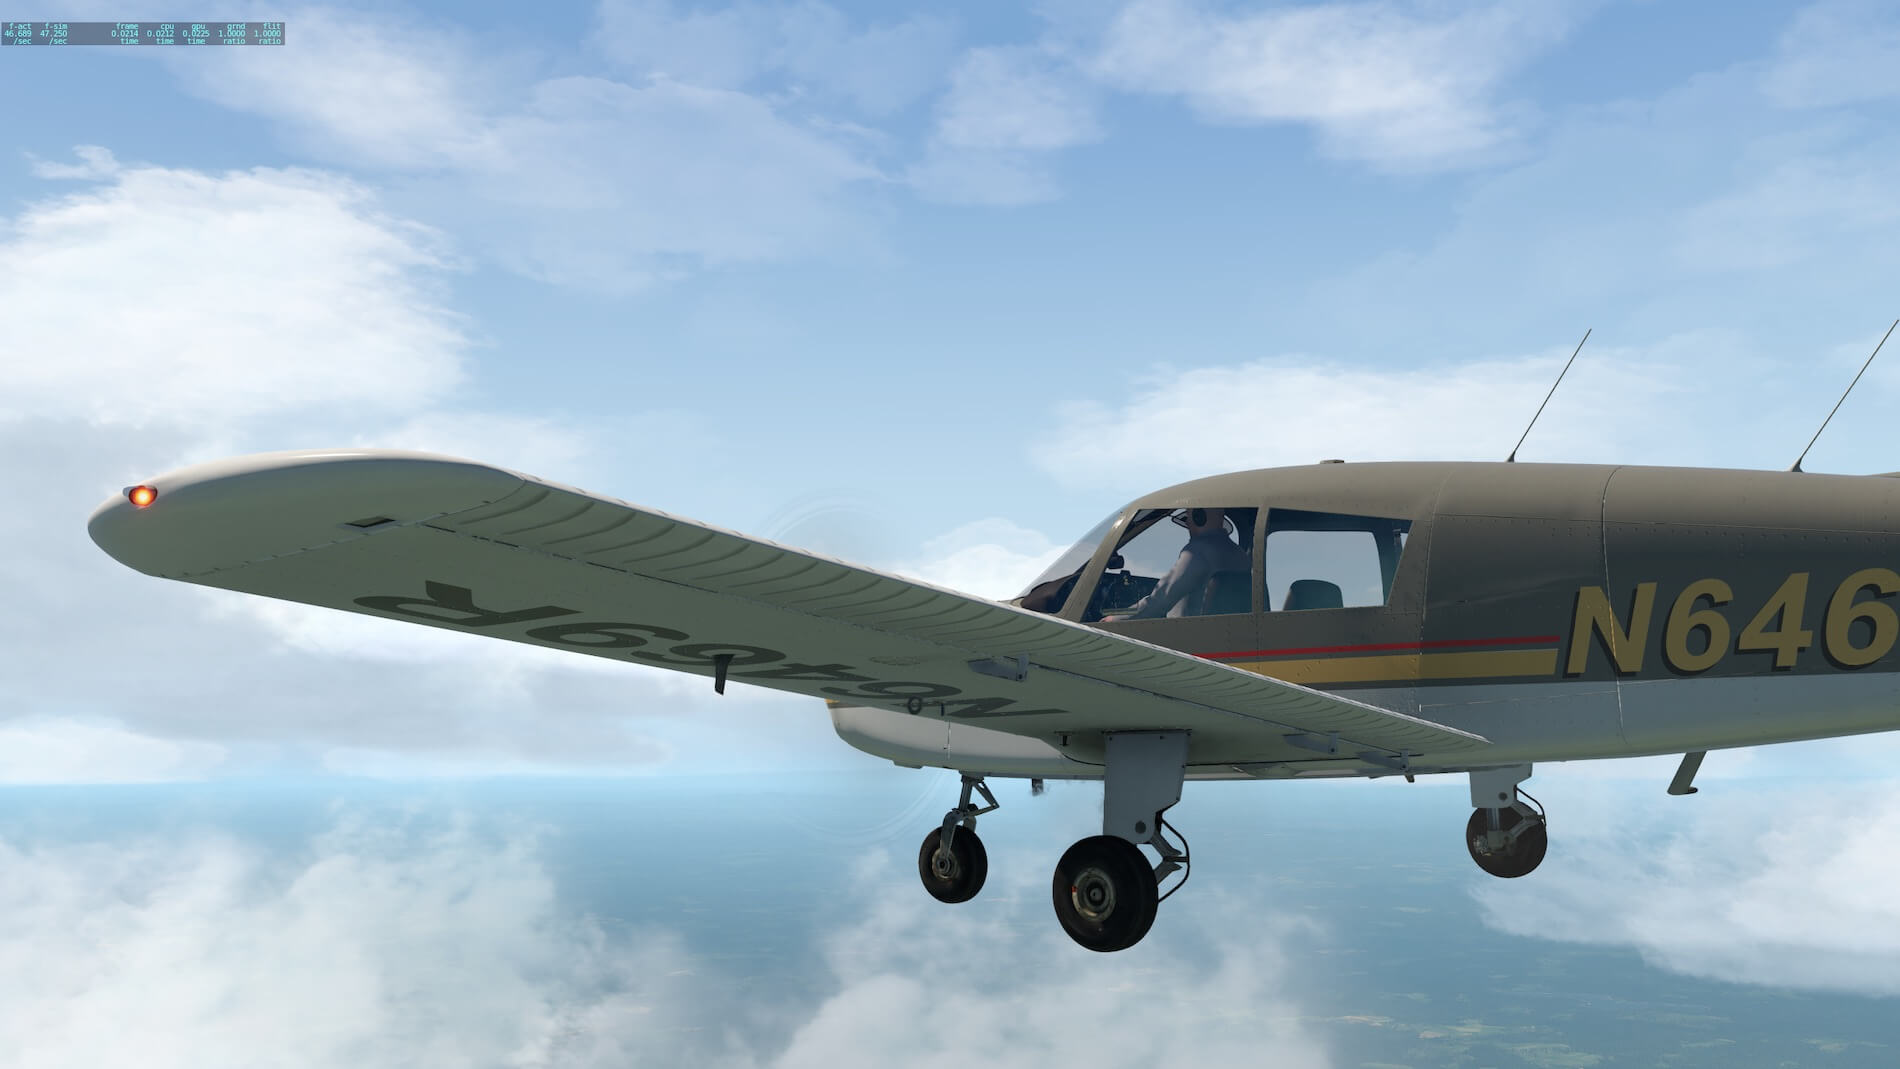
I know vFlyteAir aircraft models quite well. It’s not my first look and feel of a vFlyteAir GA aircraft. That said, my first impression how the Cherokee 140 is build is one of wow, gorgeous, so many details, so sharp etc. Some will say that’s because it’s a GA aircraft and a pretty small one too, and therefore it’s easy to add so many tiny details in the model. I think this is not true.
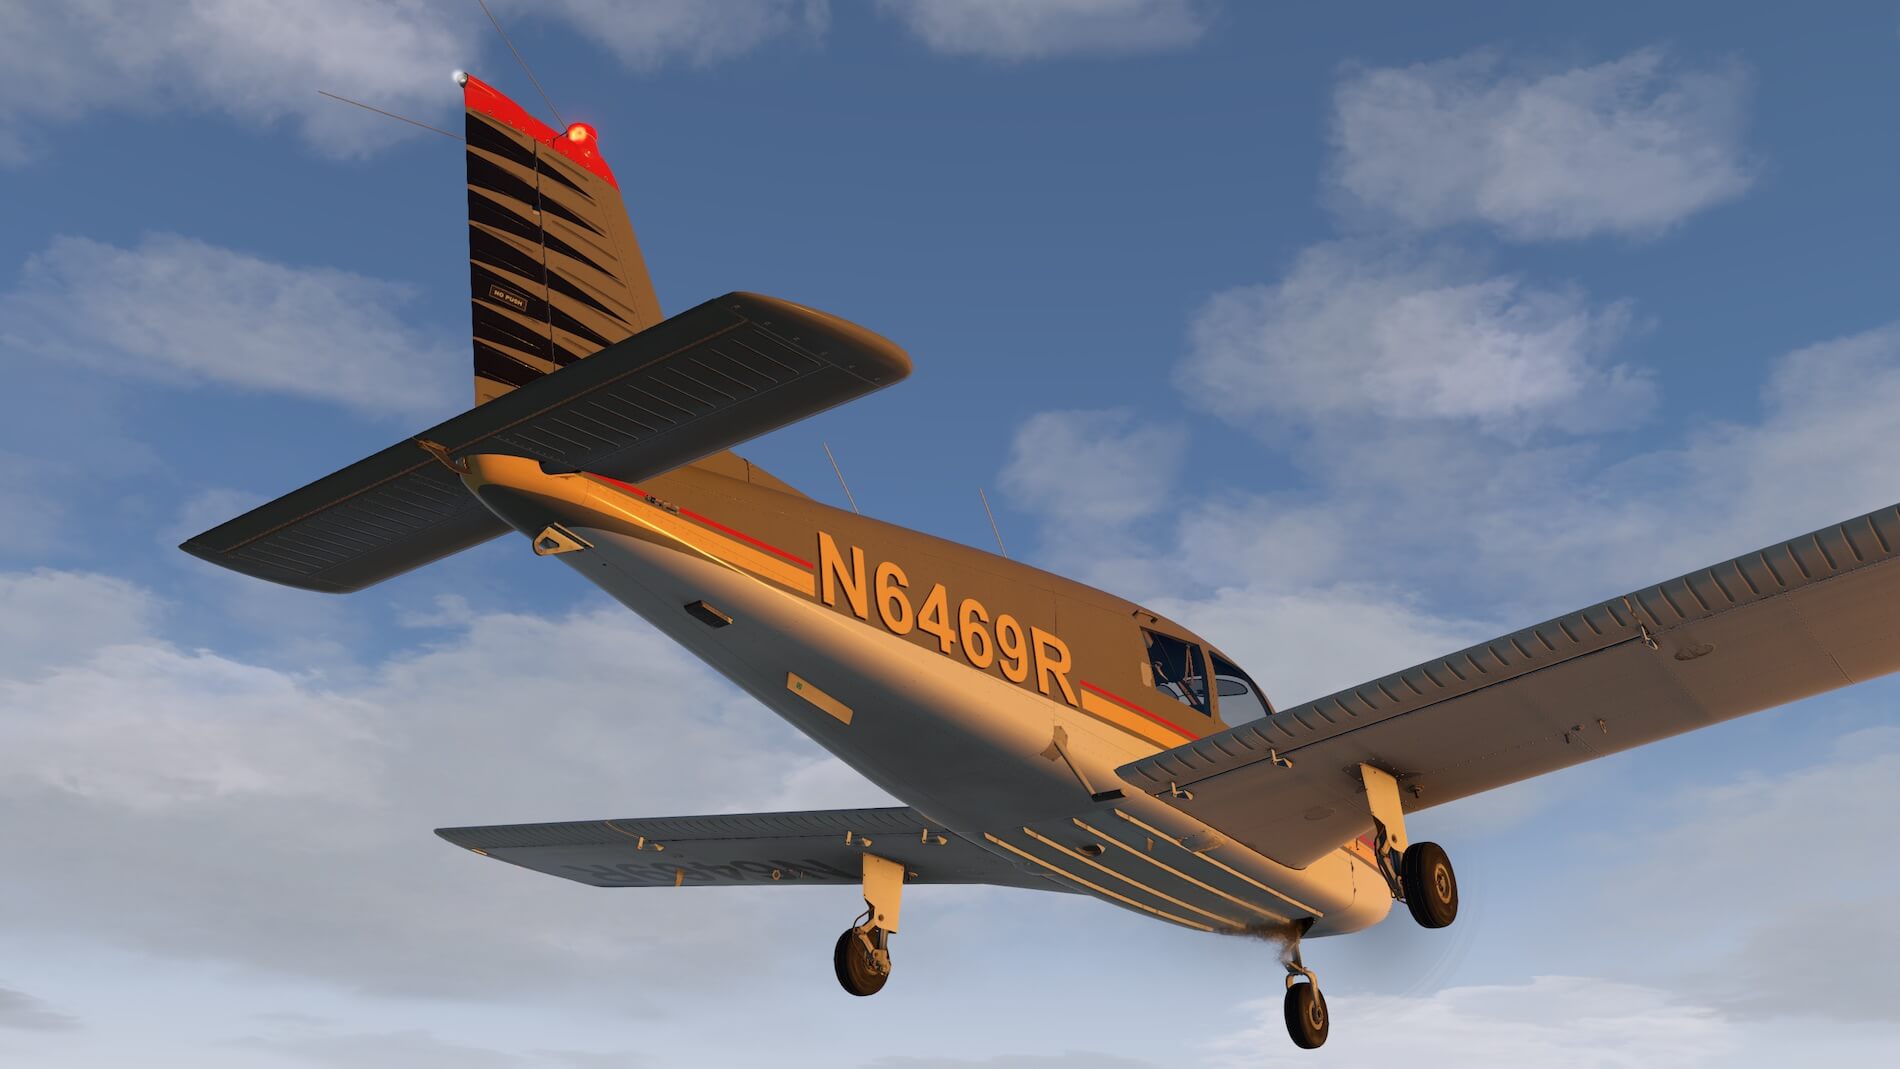
I’ve seen many GA developers and thus many of their GA aircraft, but vFlyteAir has created an own style, of which some of their modeling work can’t be find with others. In that way, VFlyteAir start becoming unique. The modeled Cherokee looks from a distance gorgeous (using Ctrl+4), but even when you scroll outside of the aircraft via the 3D cockpit view (Crtl+9) and move around with the keyboard arrow keys, which means you’re really close to the aircraft skin, it’s even more great to see.
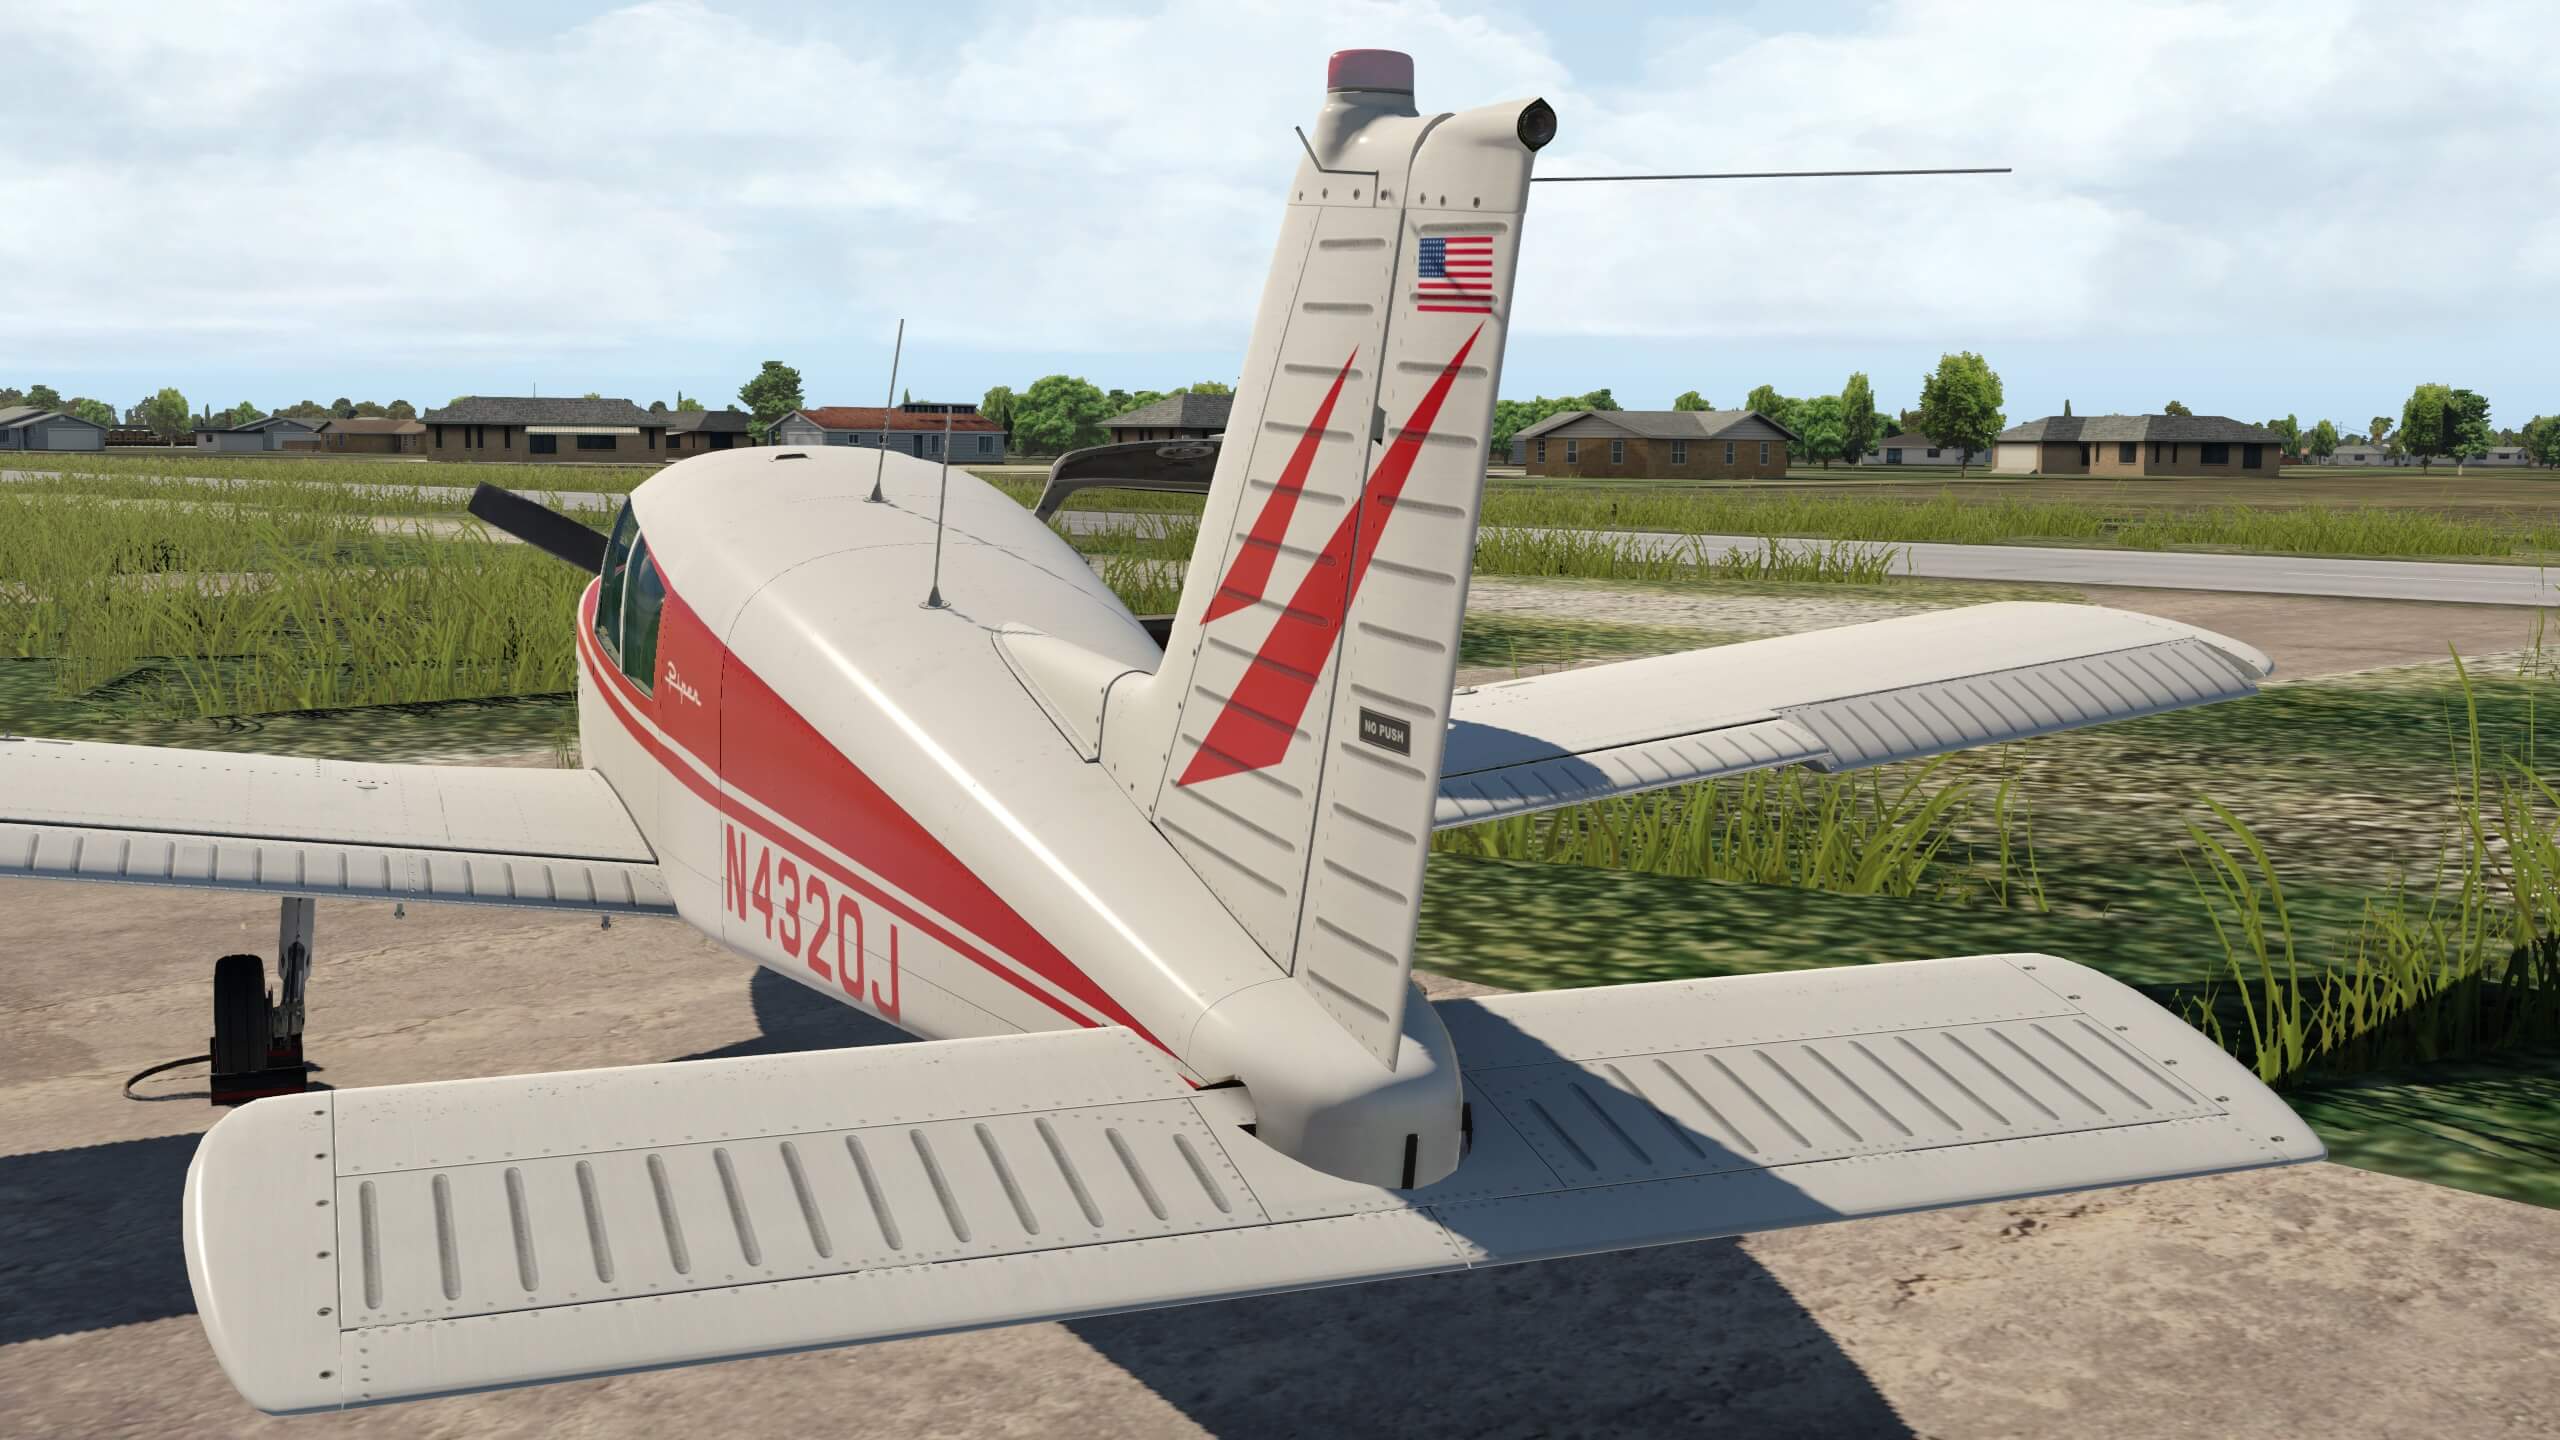
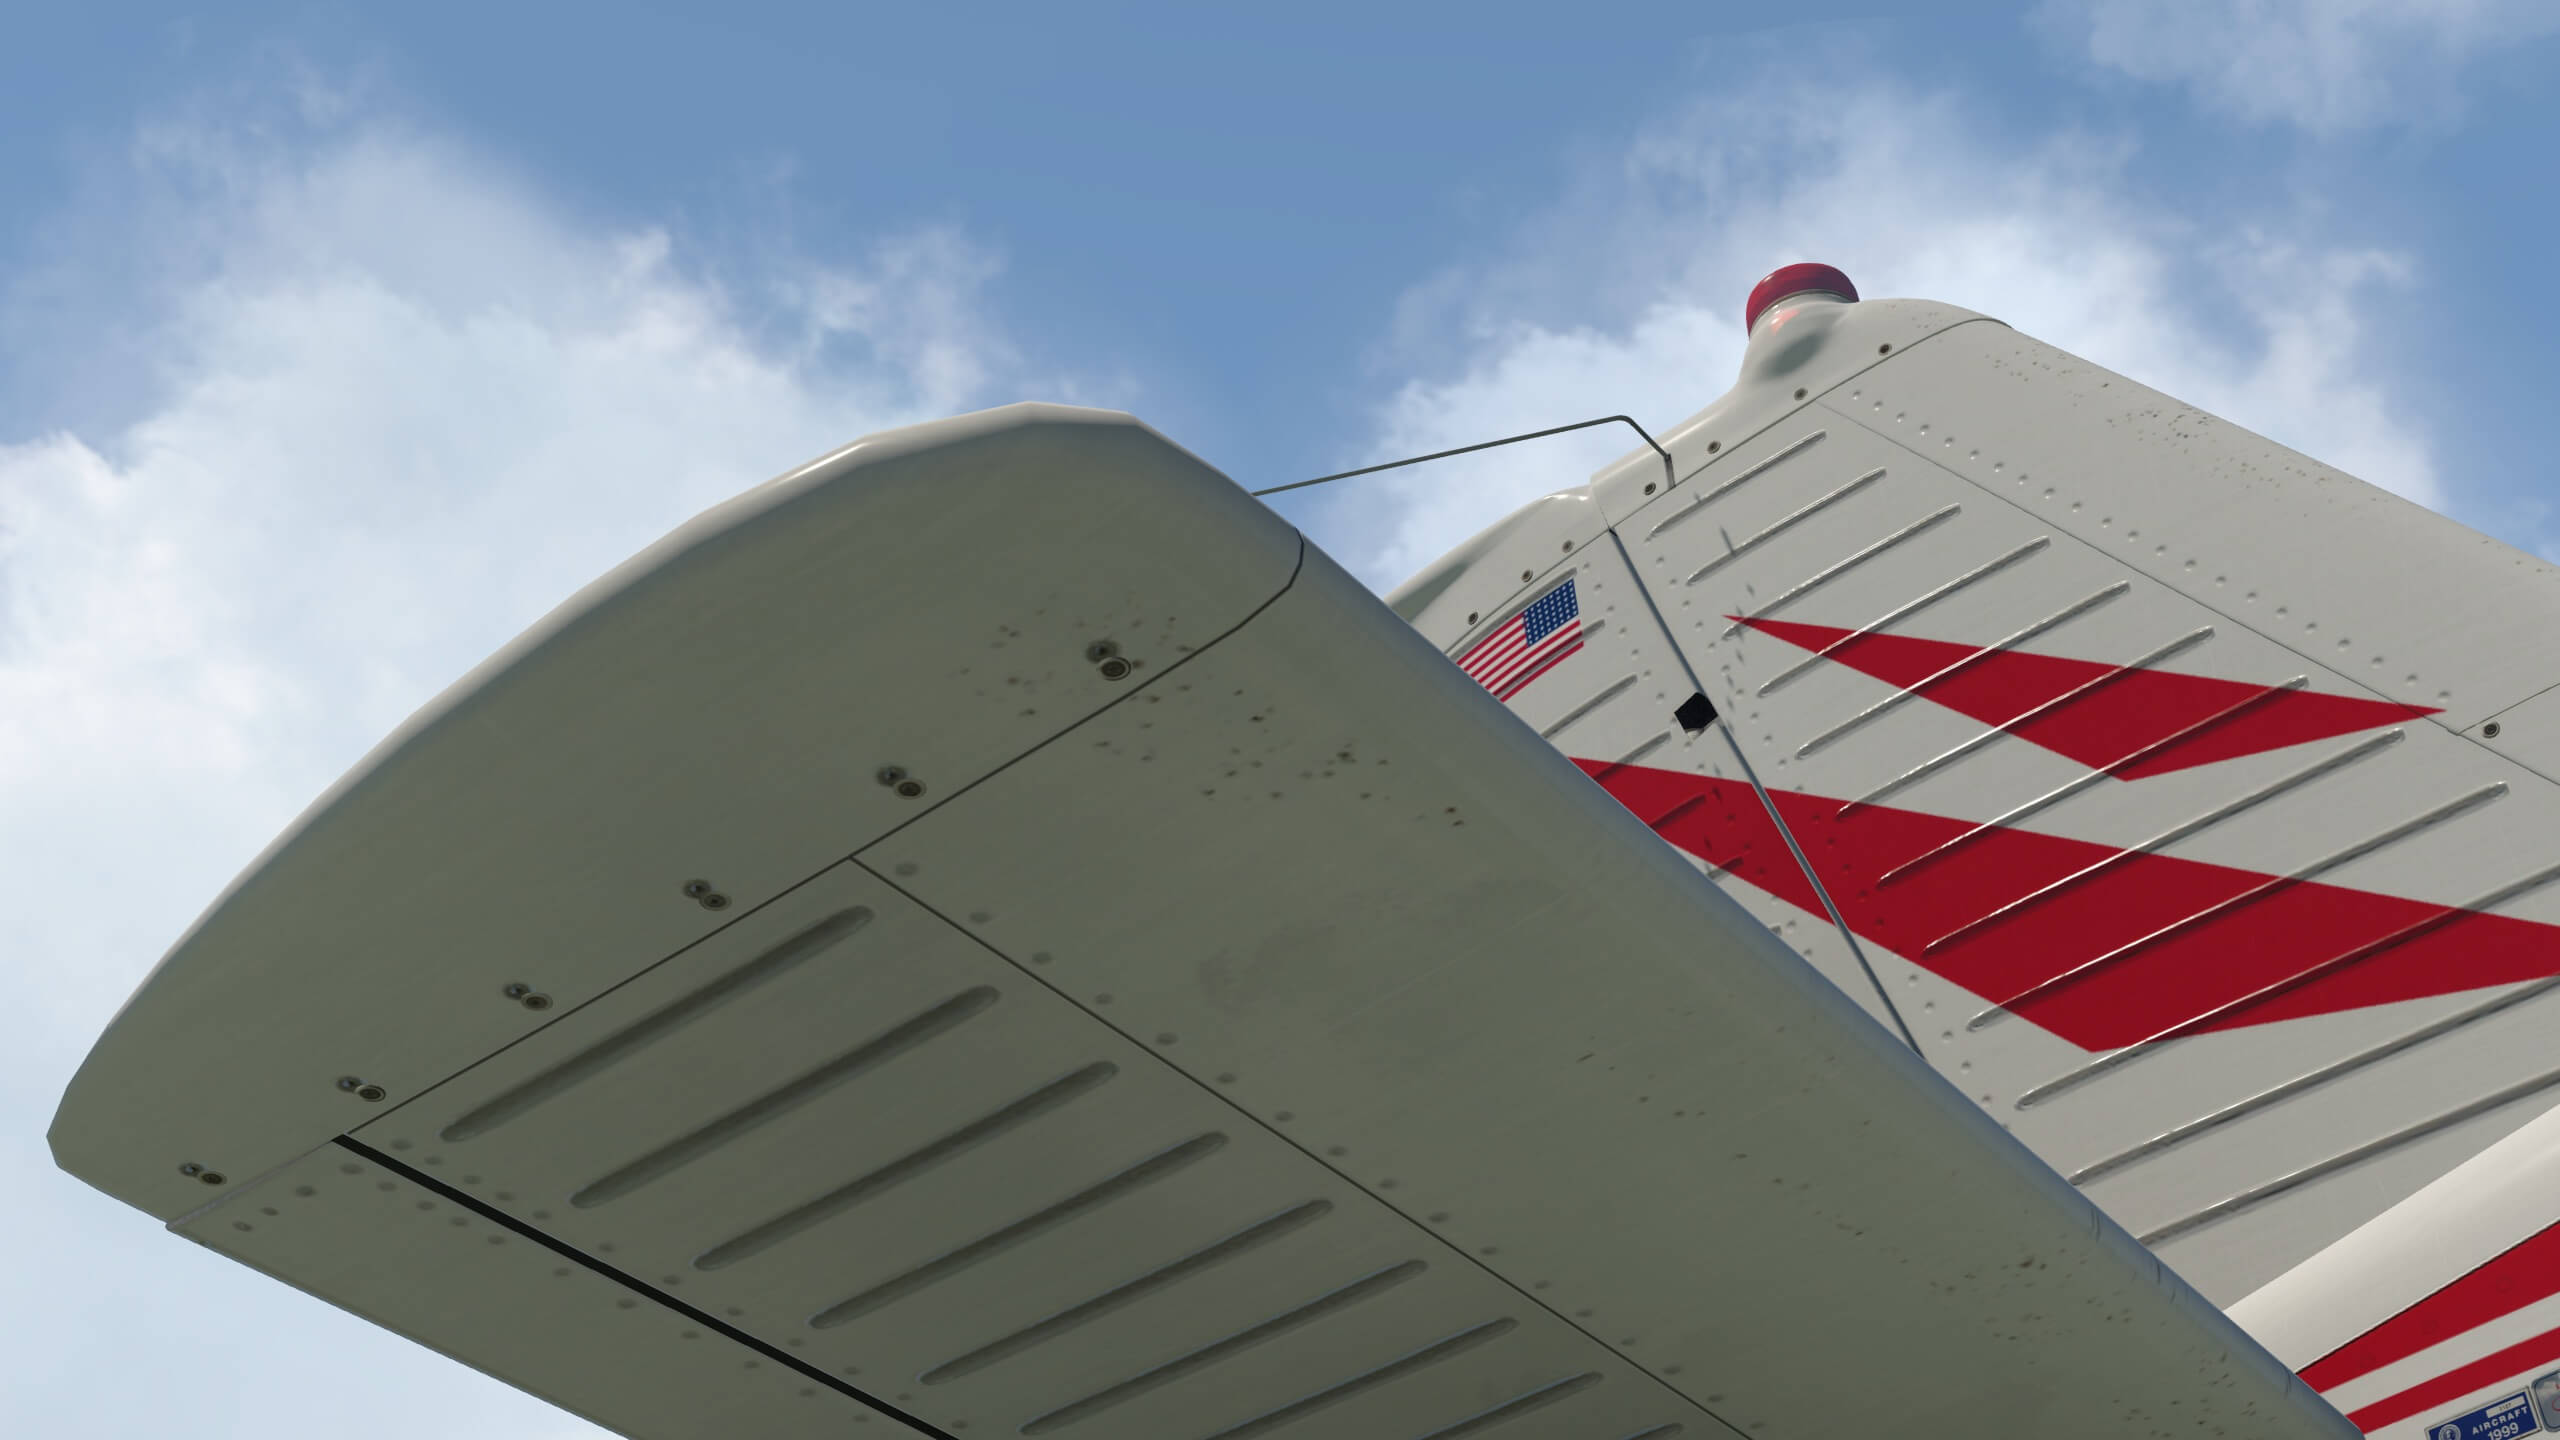
Yes yes, I know … great is an easy word to use, but it is true. Tiny things are unbelievable clear and sharp like the stainless steel aircraft ID plate on the left hand side of the tail near the stabilizer. Or another example; the screws holding the upper and lower engine cowling near the engine inlet. And even the engine inlet air deflector plates are as real as it gets. Oh yes, when Walker and Igor had the opportunity to make 100s or perhaps even 1000s of photos, then you’re in.


But “in” doesn’t mean that you can create or model something that looks as real as it gets. But is there more to discover? Top wing area near the fuel filler cap. Left and right of the cap are two decals. Both are using photo real material and yes, they were lucky to make those photos but what the heck is wrong about that? The end result of Igor’s work is gorgeous.
Besides that, it looks good, the decals are razor sharp as well as the surrounding screws although I personally expected that the wing panel was riveted to the structure and not screwed. Whatever is correct, screws are looking very nice.
Perhaps I’ve got one suggestion for future models. I’ve got the idea that the ribbed structure of the vertical fin, rudder and elevator are only looking like this because of the texture on it, not because of the “real ribs” in the 3D model. Ah, come on … why do I see all those things. It looks great, so why bringing this forward? See this more as a challenge for the next model to implement or perhaps Walker and Igor decide to see if it’s easily possible to add this to the current aircraft.


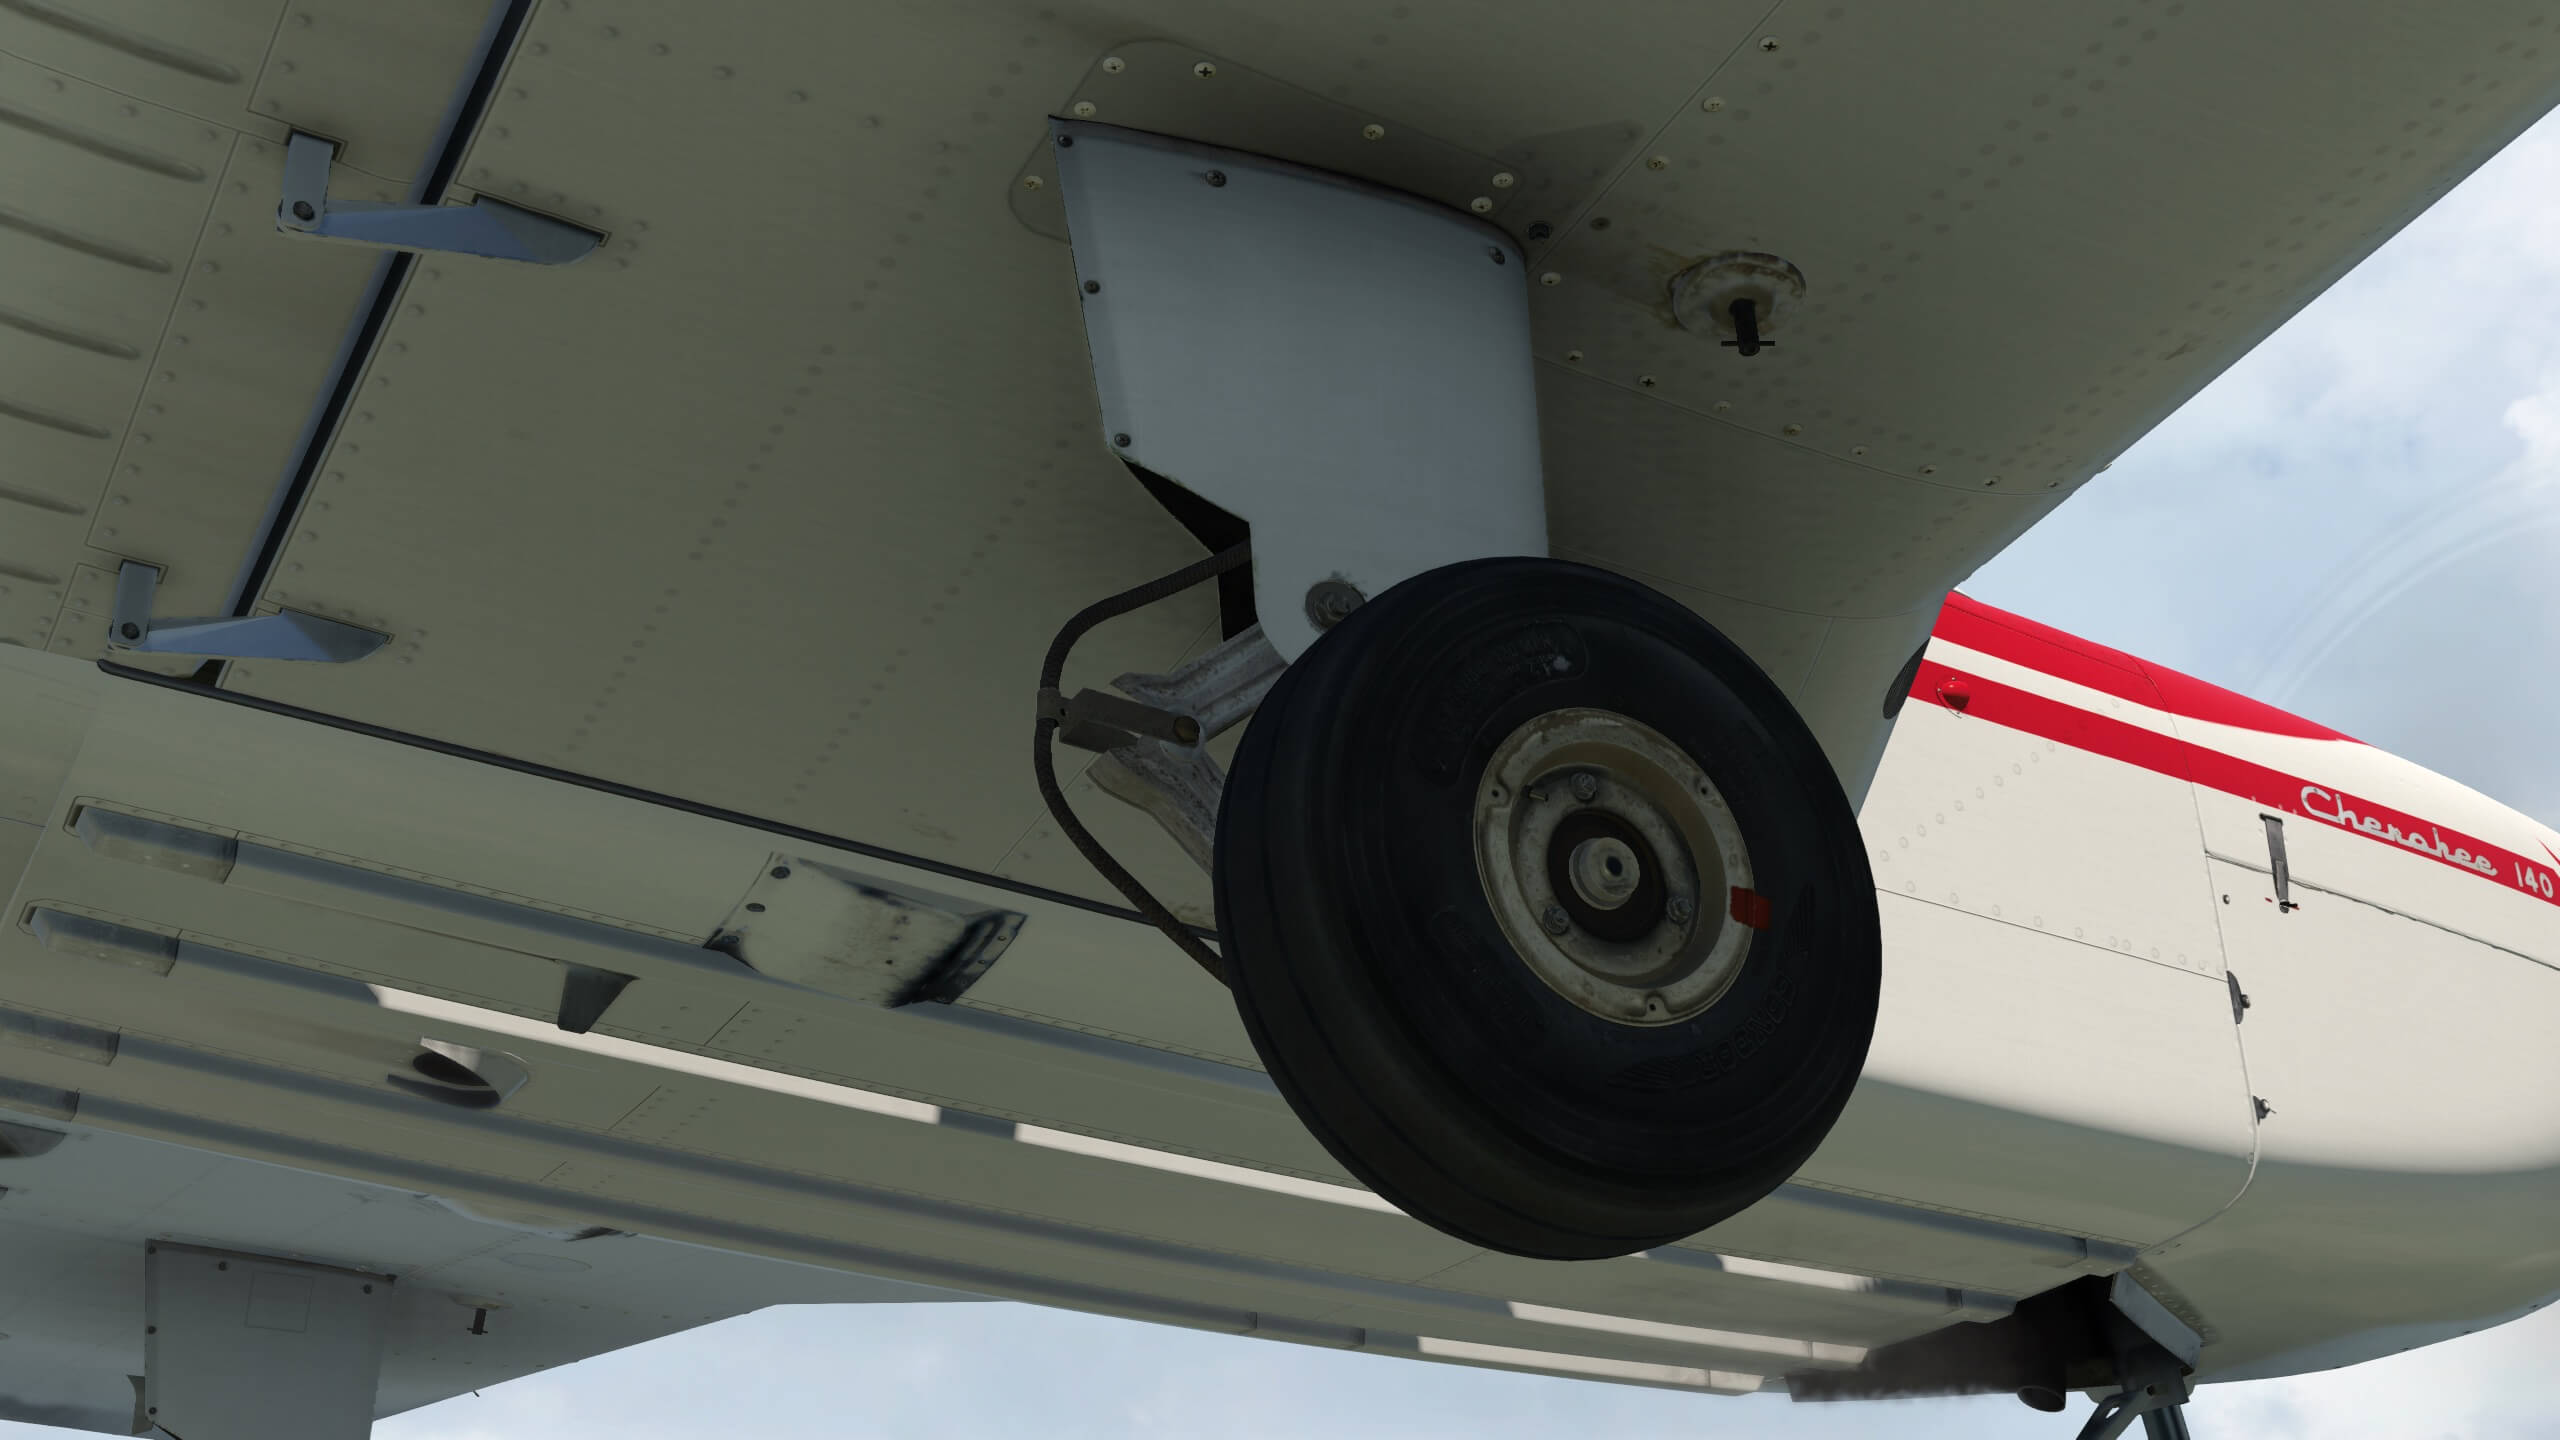
The problem, even for me, is that I don’t know where to look for. When starting at the nose, moving along the left hand wing, inspecting the main landing gear, to the left hand tail and then returning back via the right hand side, each section has tiny details to give you the feeling that this is a real Cherokee 140 and that this could be your PPL aircraft.
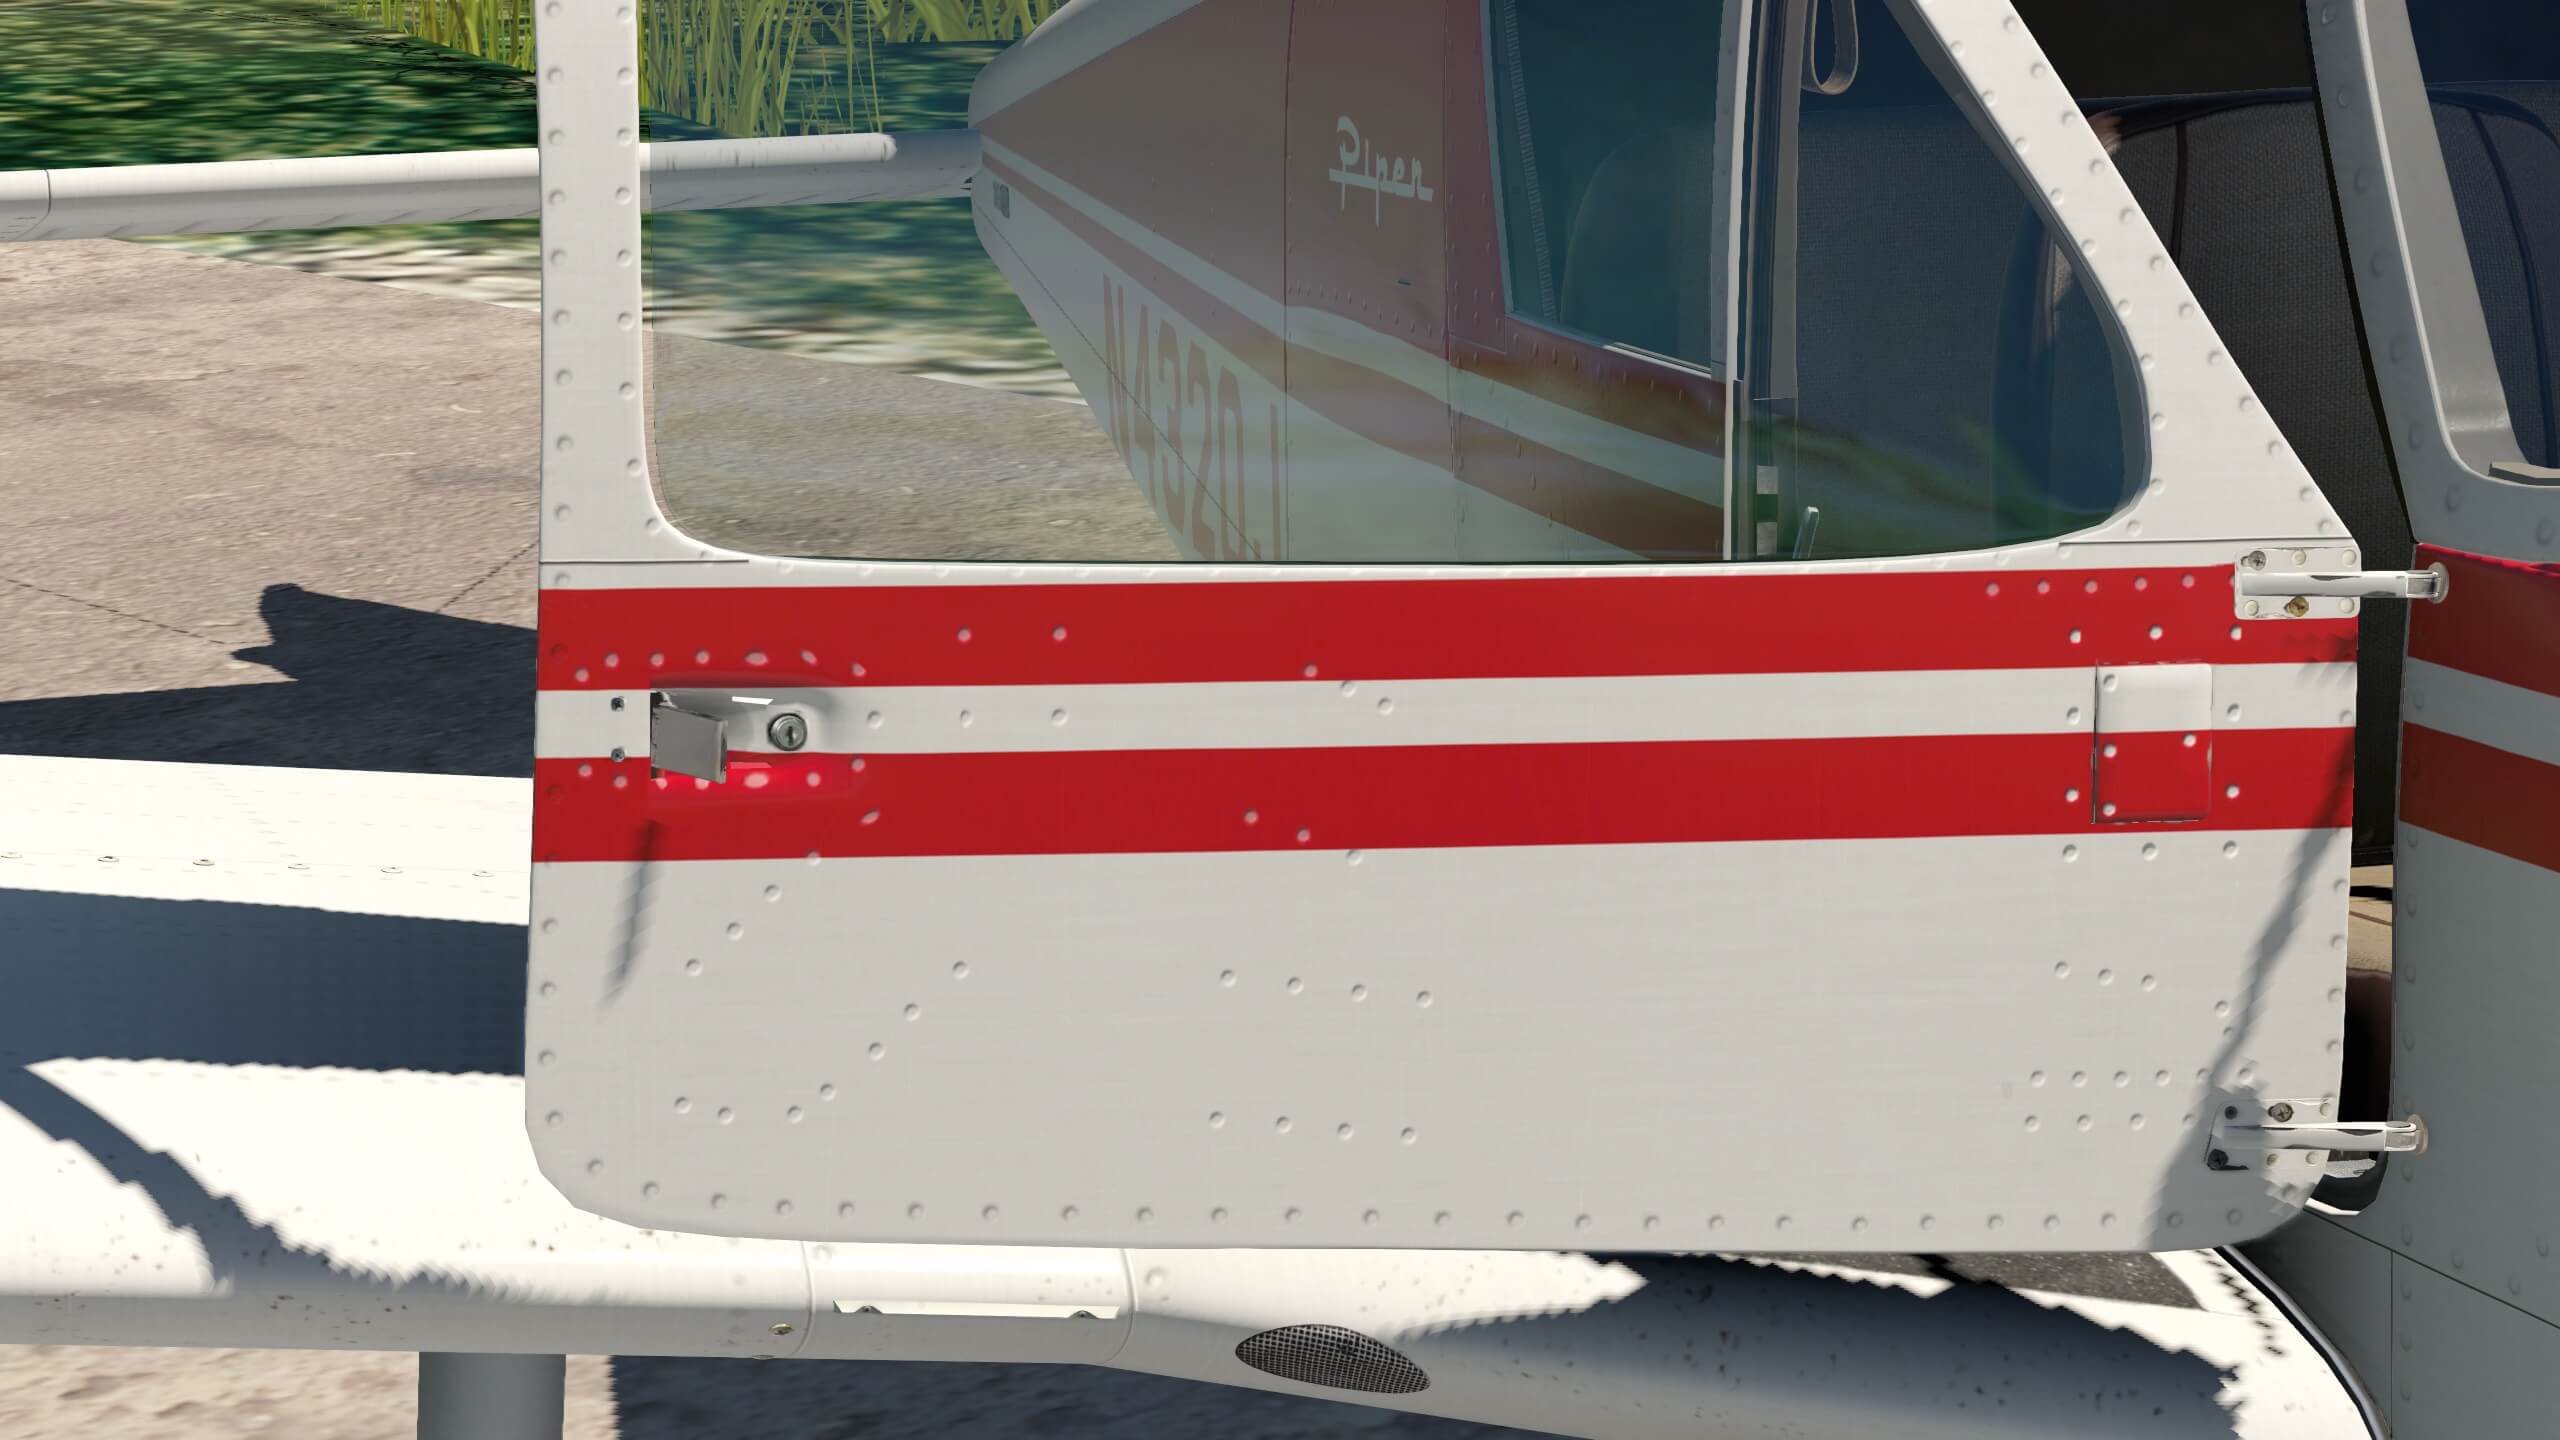
The use of so much photo real texture material and the hi quality modeling make is “as real as it gets.” When you start playing around with open/close the passenger door, you’ll notice that the only door is the passenger door. Oh yes, it’s a huge one, but it’s also for the pilot do go in and out. The left hand side of the Cherokee has namely no door. Another small detail I noticed is the RH seat can fold forward when you want to jump in the cockpit and sit in the back. You can open/close the door via the popup window and click separately on the RH passenger/pilot seat.
You can also fold this seat with the door closed – click on the door external handle – but the only weird thing is that then the door doesn’t open. This is because I forgot to unlock the latch on the top of the door!
Exploring the Cockpit
While Walker takes care for the cockpit preparations, I look around in the cabin as far as you can speak of a cabin and how the 3D cockpit is modeled. At first you think that’s a simple and clean cabin/cockpit with simple seats, but sorry to say, this is how an old-fashioned Cherokee 140 looks like. It’s nothing more than this. It is an old aircraft, simple cabin and cockpit and why should it be more.
It was basically no more then a trainer for PPL pilots. Simple/basic or not, it looks very nice, very realistic and again, with the help of a lot of photo real textures if gives each simmer the right feeling. It’s not only the realistic looking seats, it’s also the way the walls, floor and seat tracks are modeled. It seems that the forward passenger seat needs some repair … you’ll will see it yourself. But there’s more that does get my attention and that’s the area below the instrument panel.
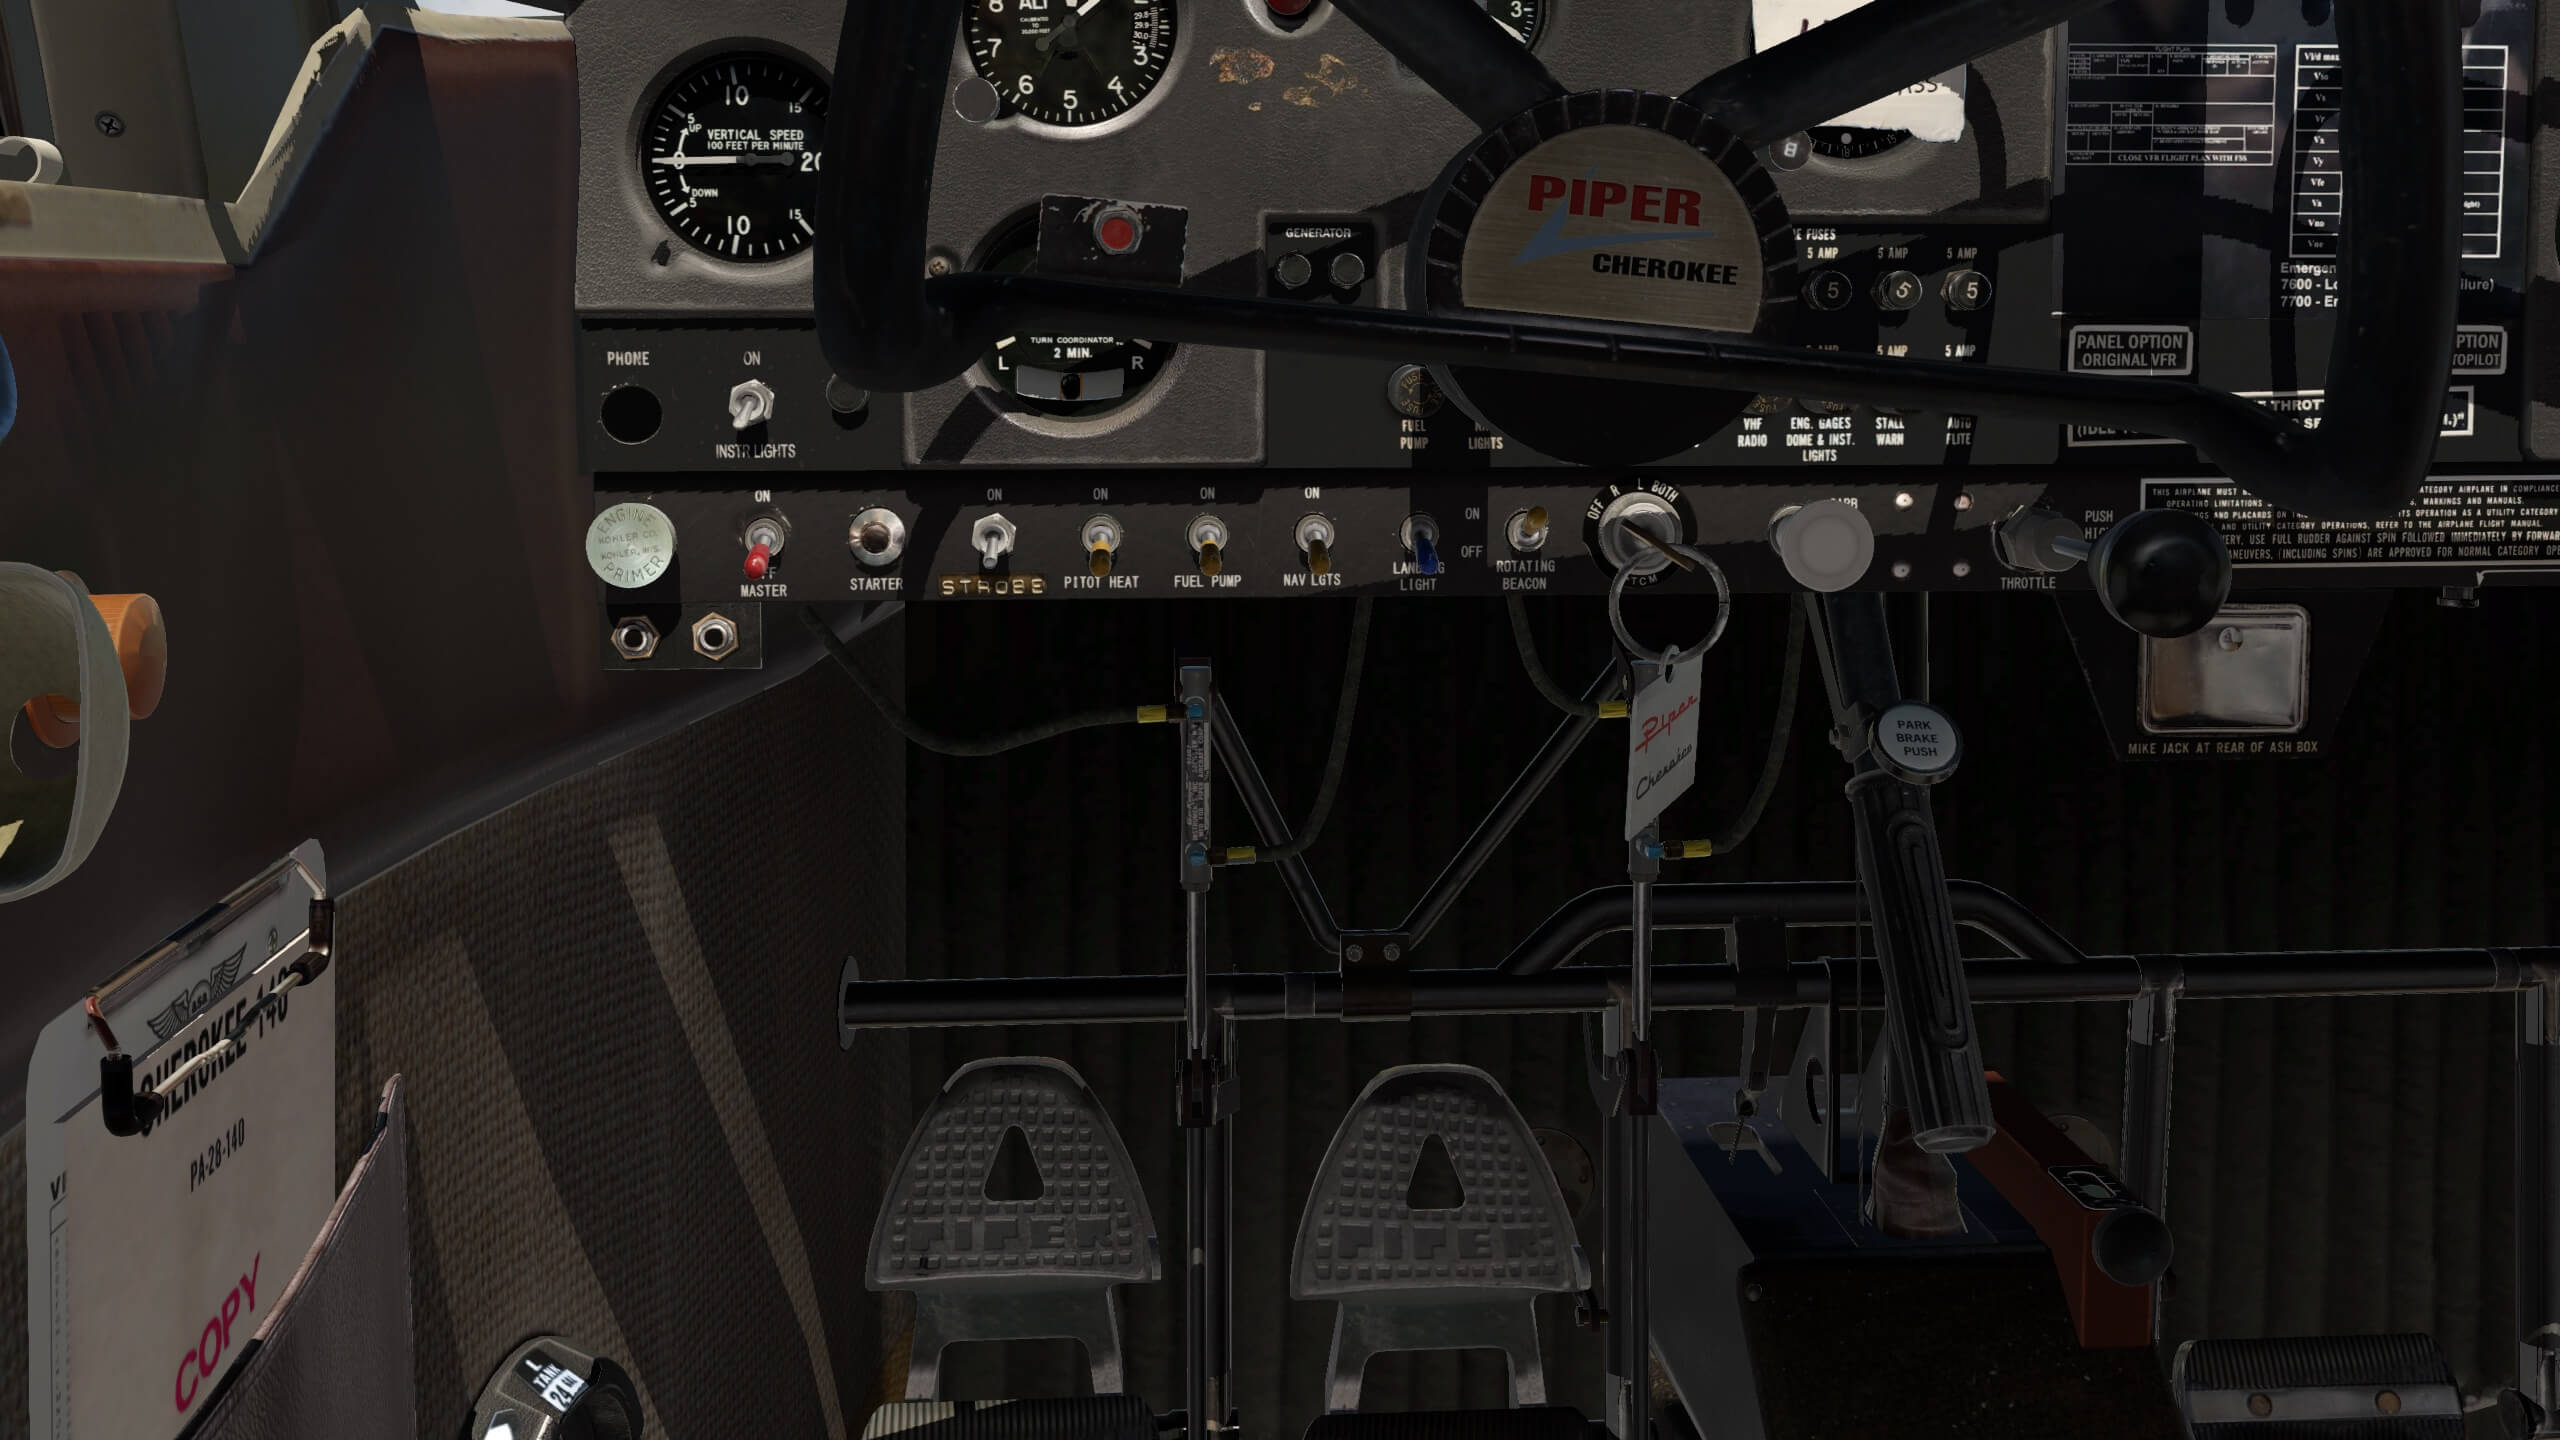
Here you find the rudder/brake pedals, hydraulic lines, rods, the stainless steel floor plates, and what else I’ve forgotten. Some developers will say that they don’t like the use of the photo real material in their models, but is that really the truth or is it because others don’t have the possibility to make real photos or because they aren’t able to model it this way.
Whatever others think of using photo real material, it gives the model “that” additional touch to bring a simulated model alive. But …. I can imagine that when you’re also a PhotoShop artist, that you can make your own look-alike photo real textures, so yes, that’s then also an option. I mentioned on purpose the RH forward passenger seat and not the pilot seat since at the RH side you won’t find any flight instrument thus flying the Cherokee 140 can only be done from the LH seat thus the pilot seat.


As with other vFlyteAir models, you can click away the control wheel to get a better access to instrument panel, in particular needed on the left hand side of the instrument panel. When out of view, you’ve got unlimited access to all the switches and circuit breakers. Speaking about circuit breakers (C/B); all are modeled and that means pulling a C/B will cut of power to a specific system.
In real you won’t pull a C/B for fun unless there’s a very good reason for, but in real a C/B can pop out due to a short circuit. That’s logically the reason of having C/B’s and thus a C/B protect the wiring or components connected to. I’m not yet aware that this “automatic failure” option is included in the vFlyteAir Cherokee.
Walker has finished his “virtual” preparations and the engine is started which means we’ve got power to all systems so we’re ready to go. Actually, Walker is ready to go. I’m just a passenger sitting next of him and enjoying the view and exploring the 3D cockpit. Oops, I didn’t mention this yet; I’ve downloaded and installed as mentioned in the manual, MisterX6 his KEYQ – Weiser Air Park airfield package. Interested in this airport add-on? Check it out at the X-Plane.Org download page.
We decide to takeoff from runway 9 which means from our parked position, we can take the taxi via the taxiway towards runway 9 threshold.
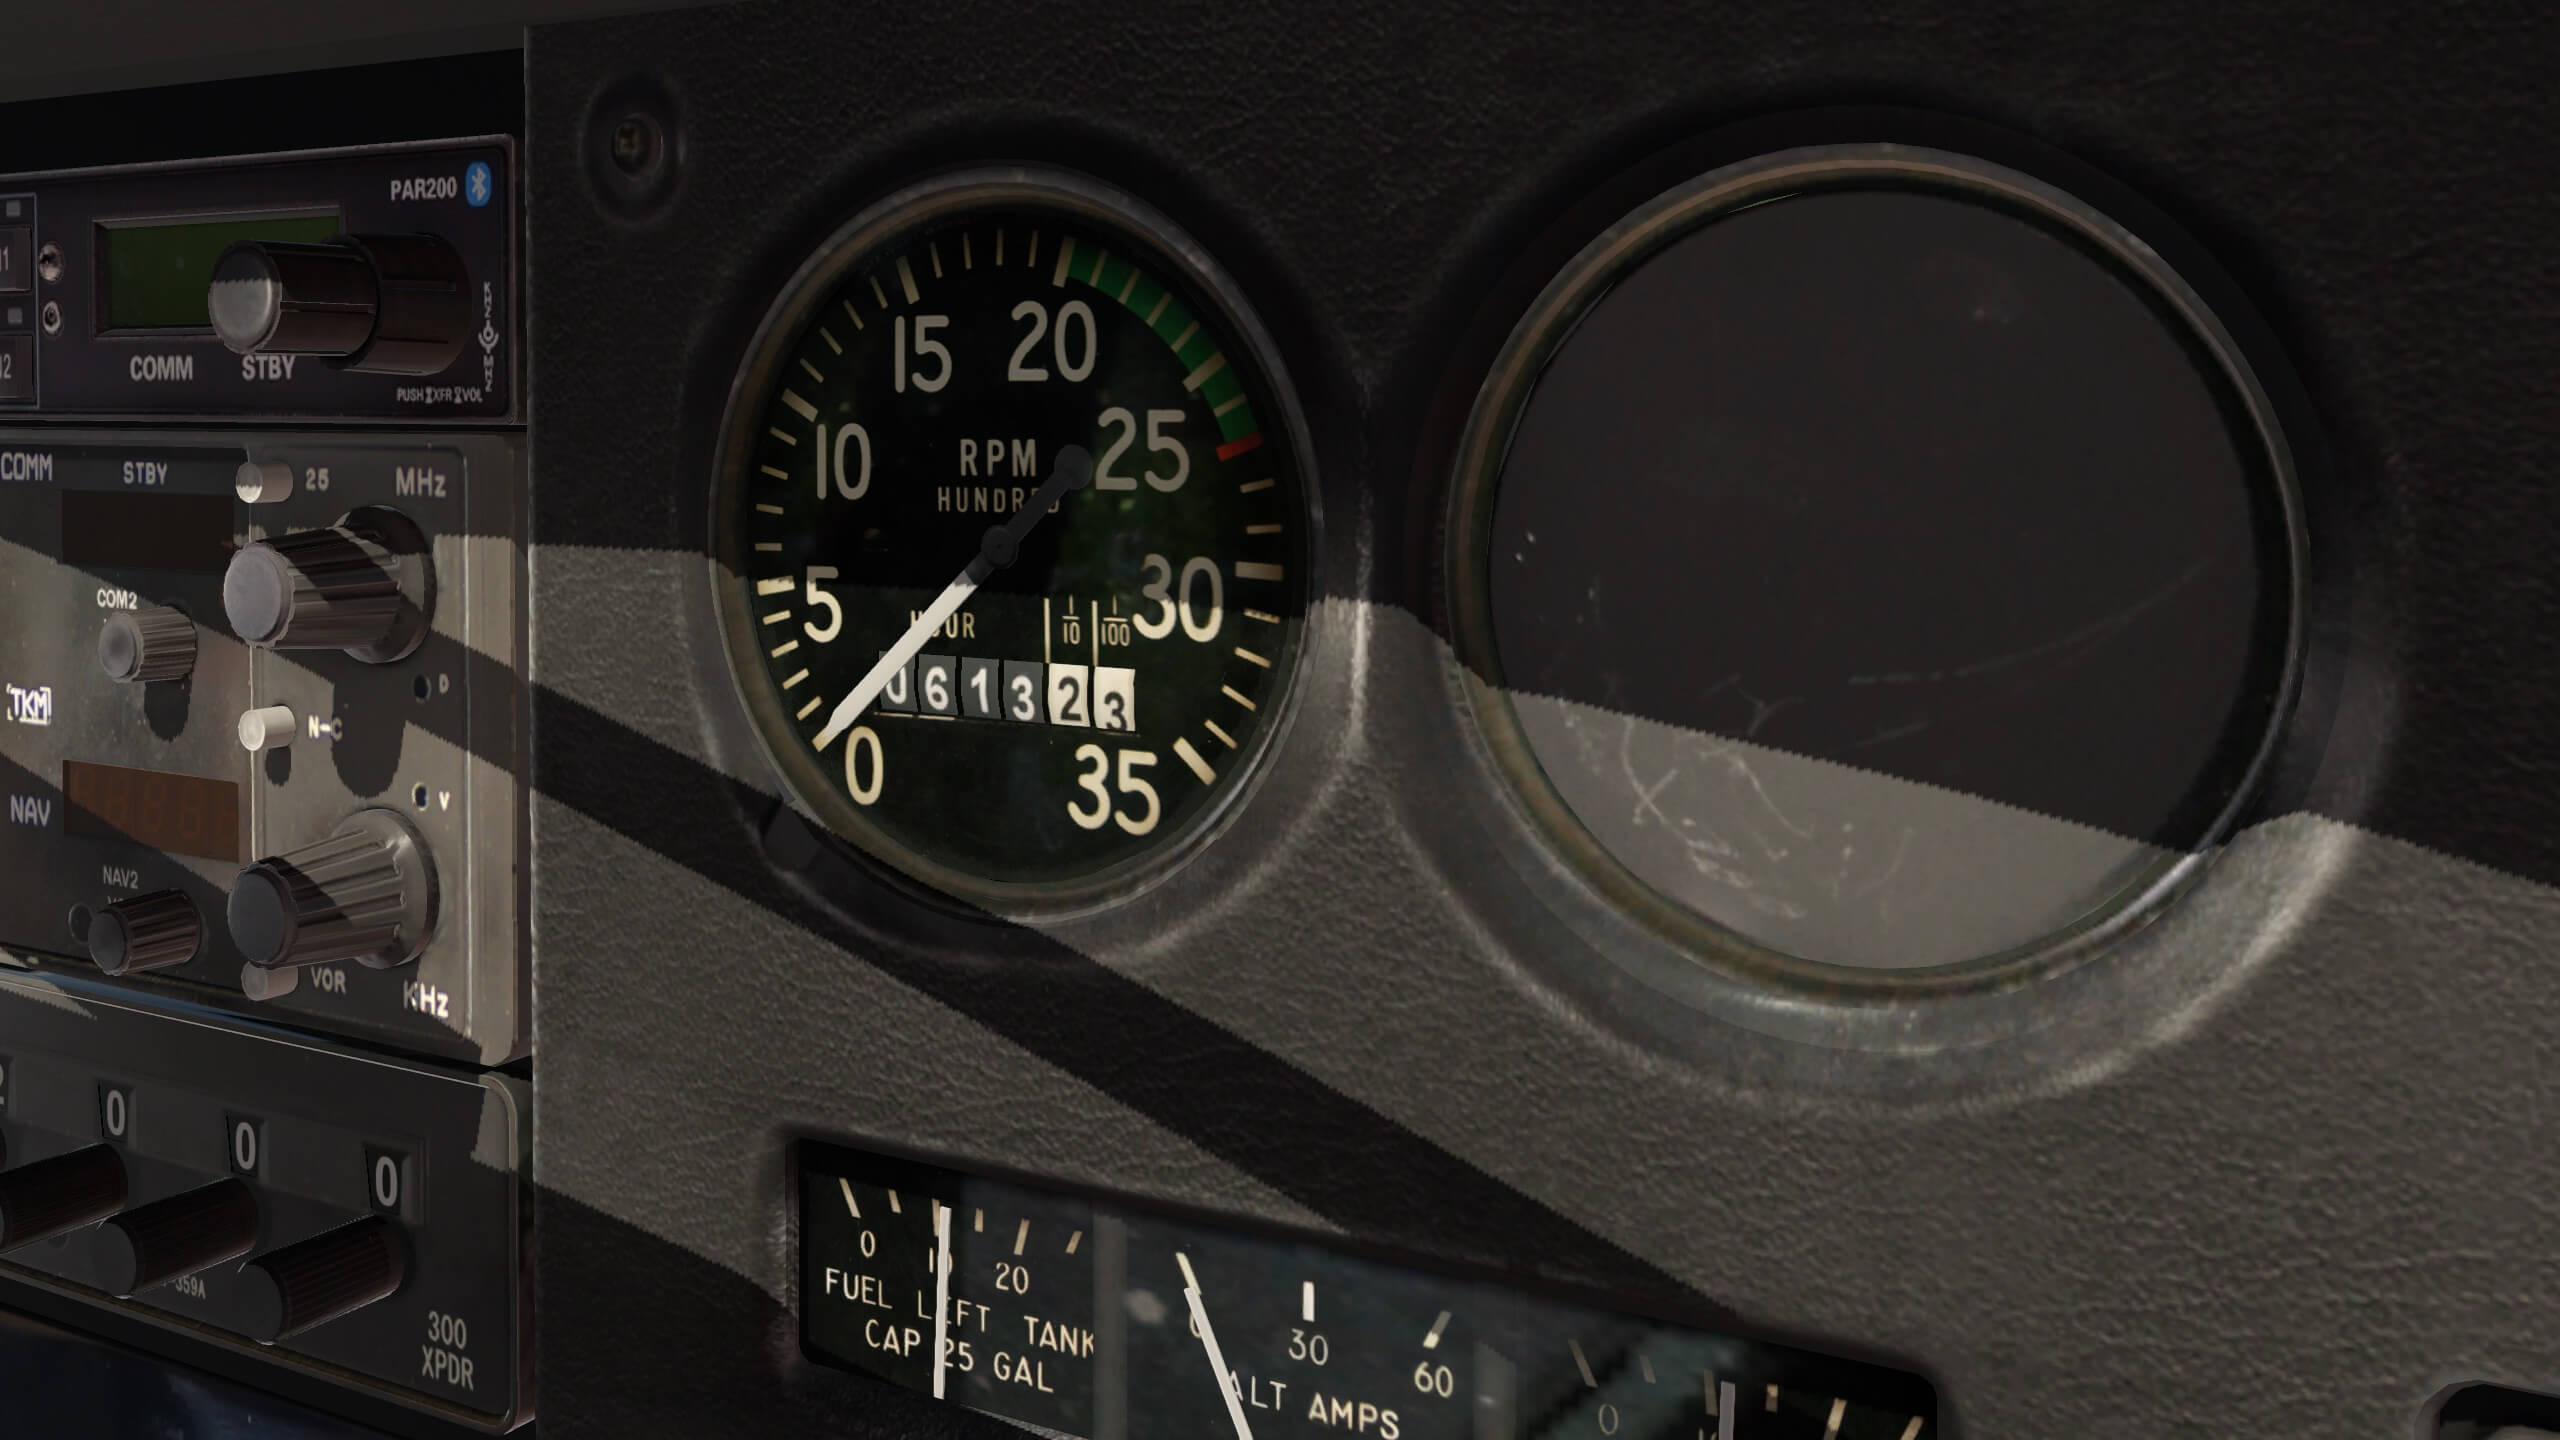
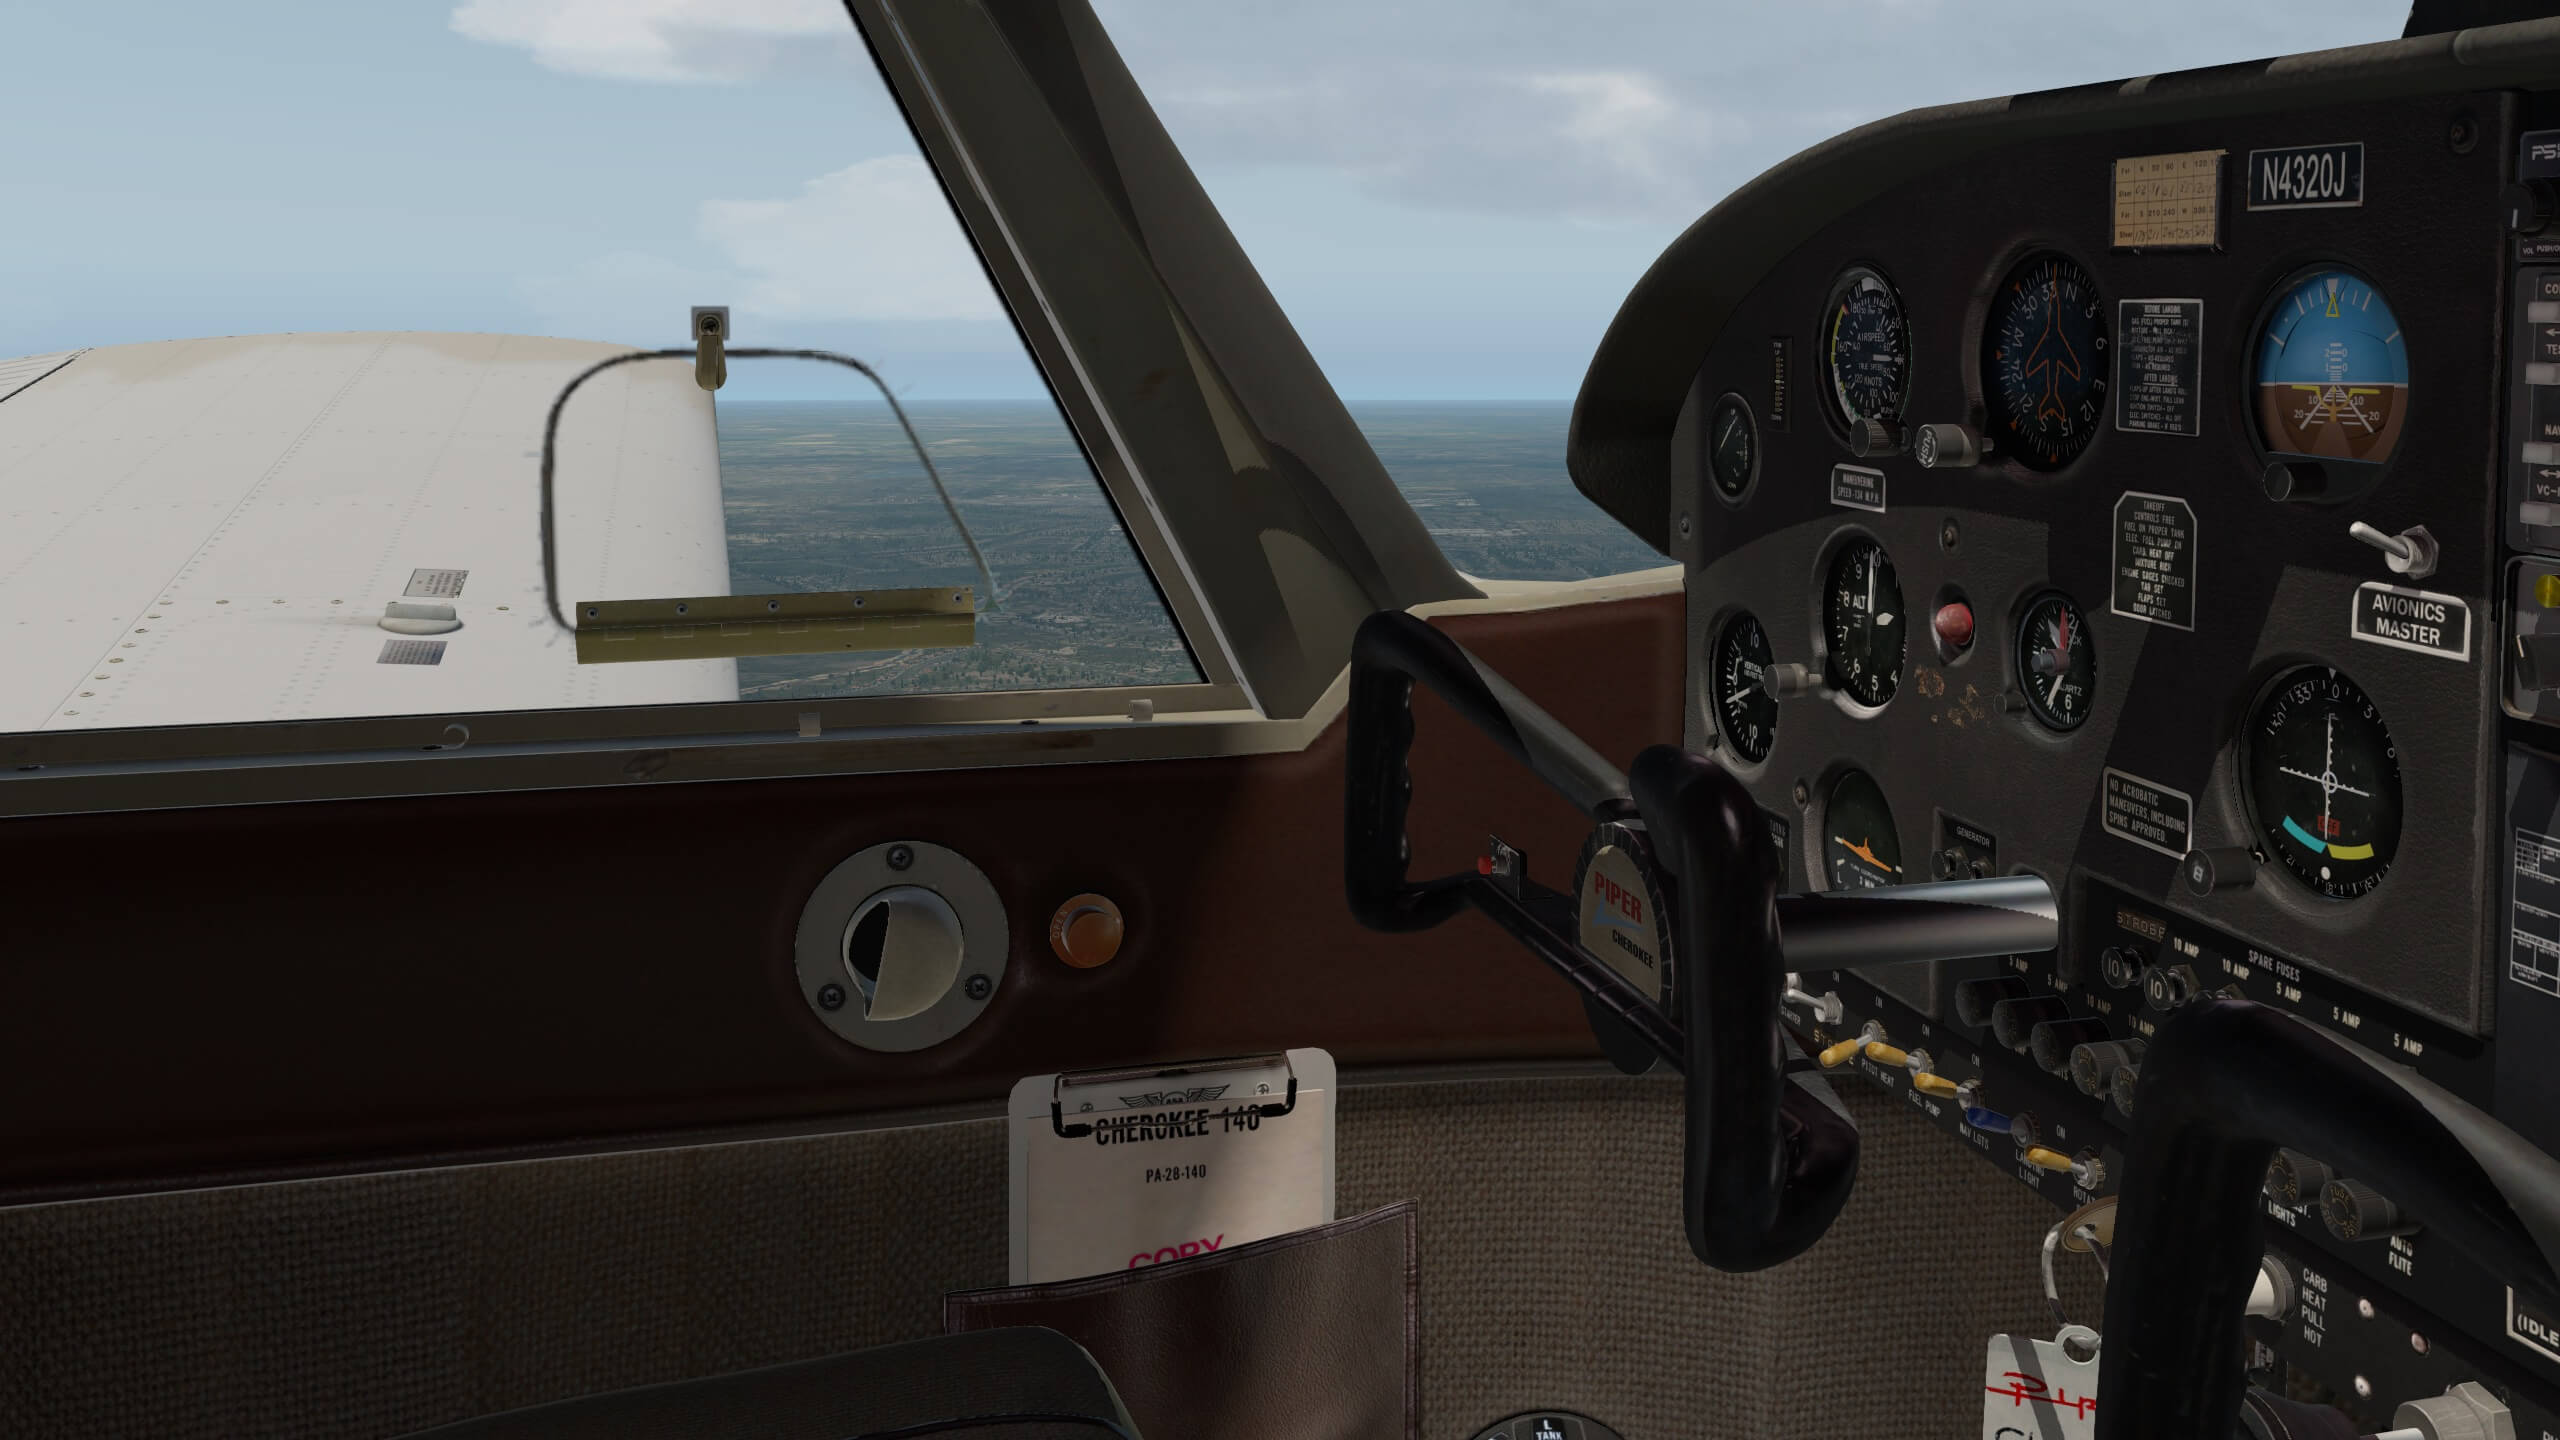
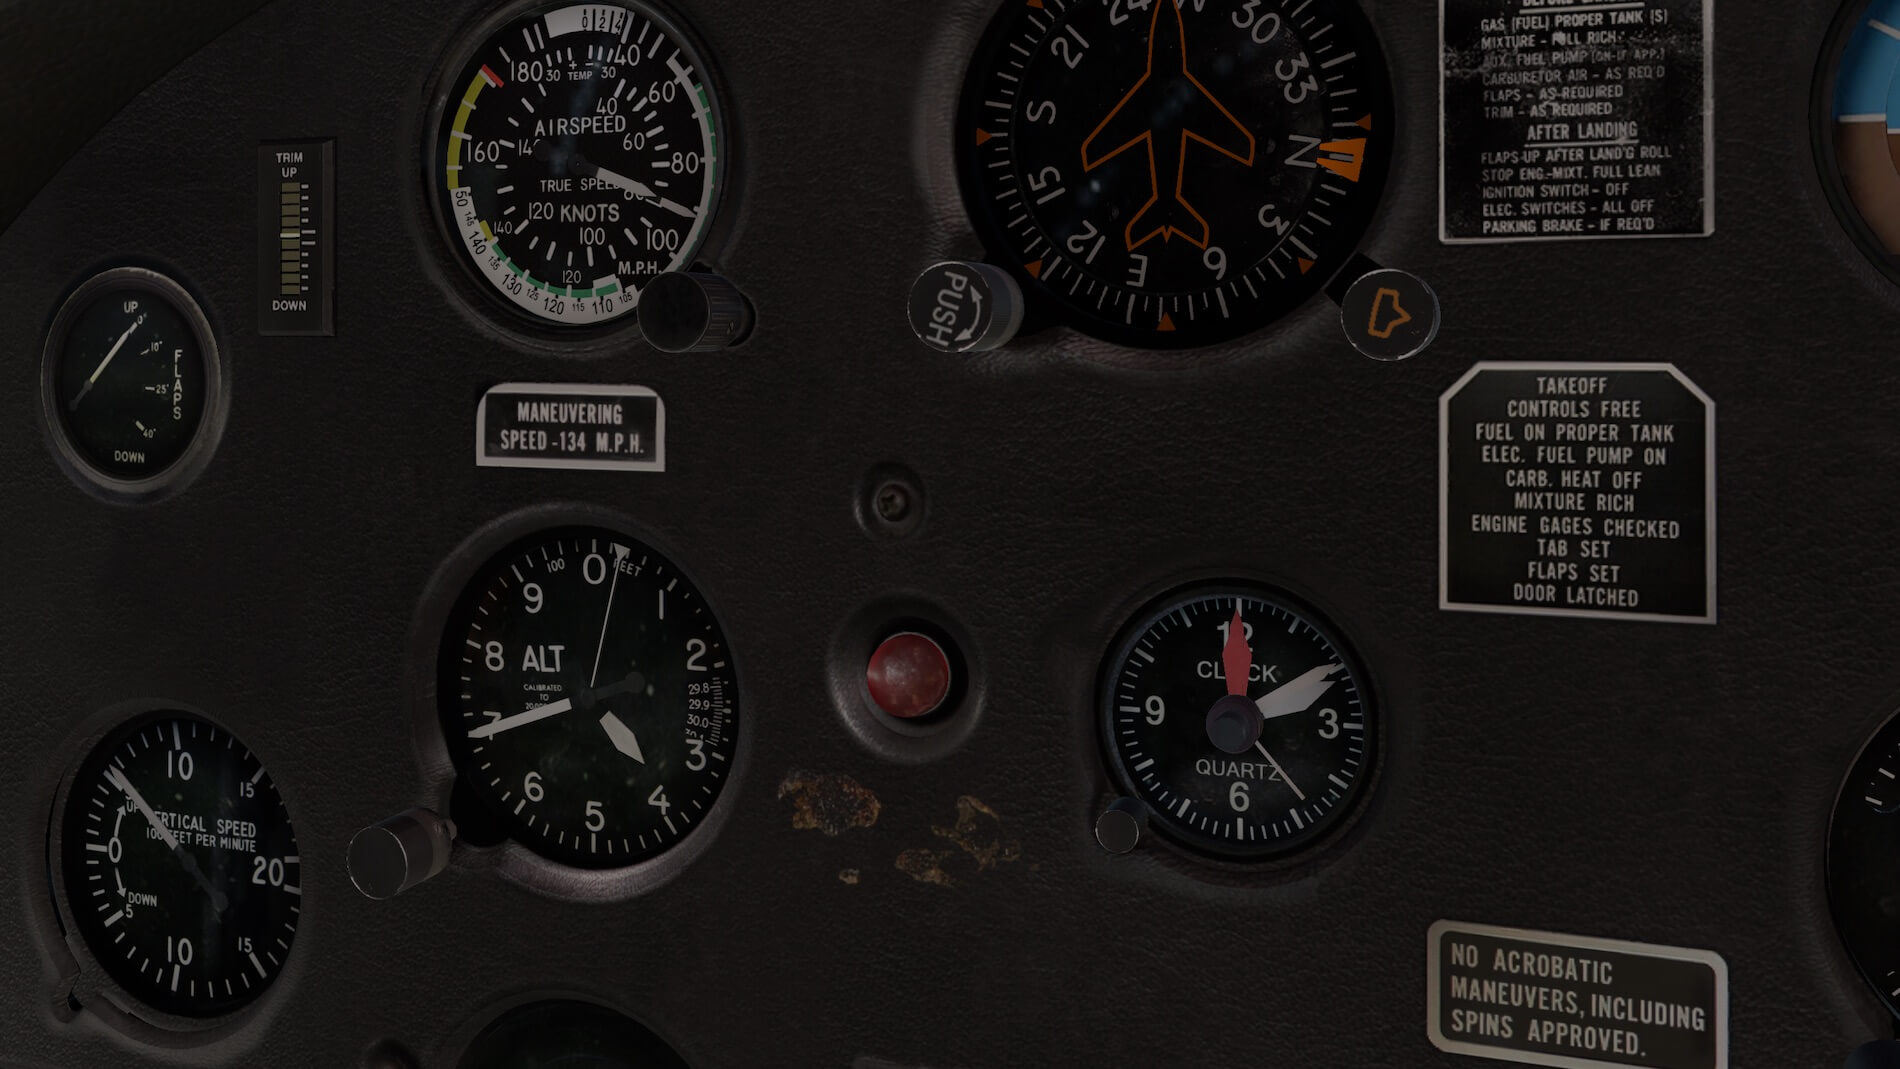
In the mean time I’ve got a moment to inspect and see with my own eyes the instrument panel with indicators. Ok, it’s not an IFR panel, but it still has a NAV1/2 and COM equipment. There’s of course an ATC transponder available with ALT reporting, but that’s it and for a VFR aircraft more than enough.
The rest of the instrument are all essential indicators which are all nicely modeled and above all, they look realistic. It’s interesting to see how the front plastic instrument panel plate is made and placed in position, as it is in real too. You actually have an Aluminum plate that holds all the instruments and in front of that, to give it a nice and elegant look, a plastic plate for the finishing touch is mounted.
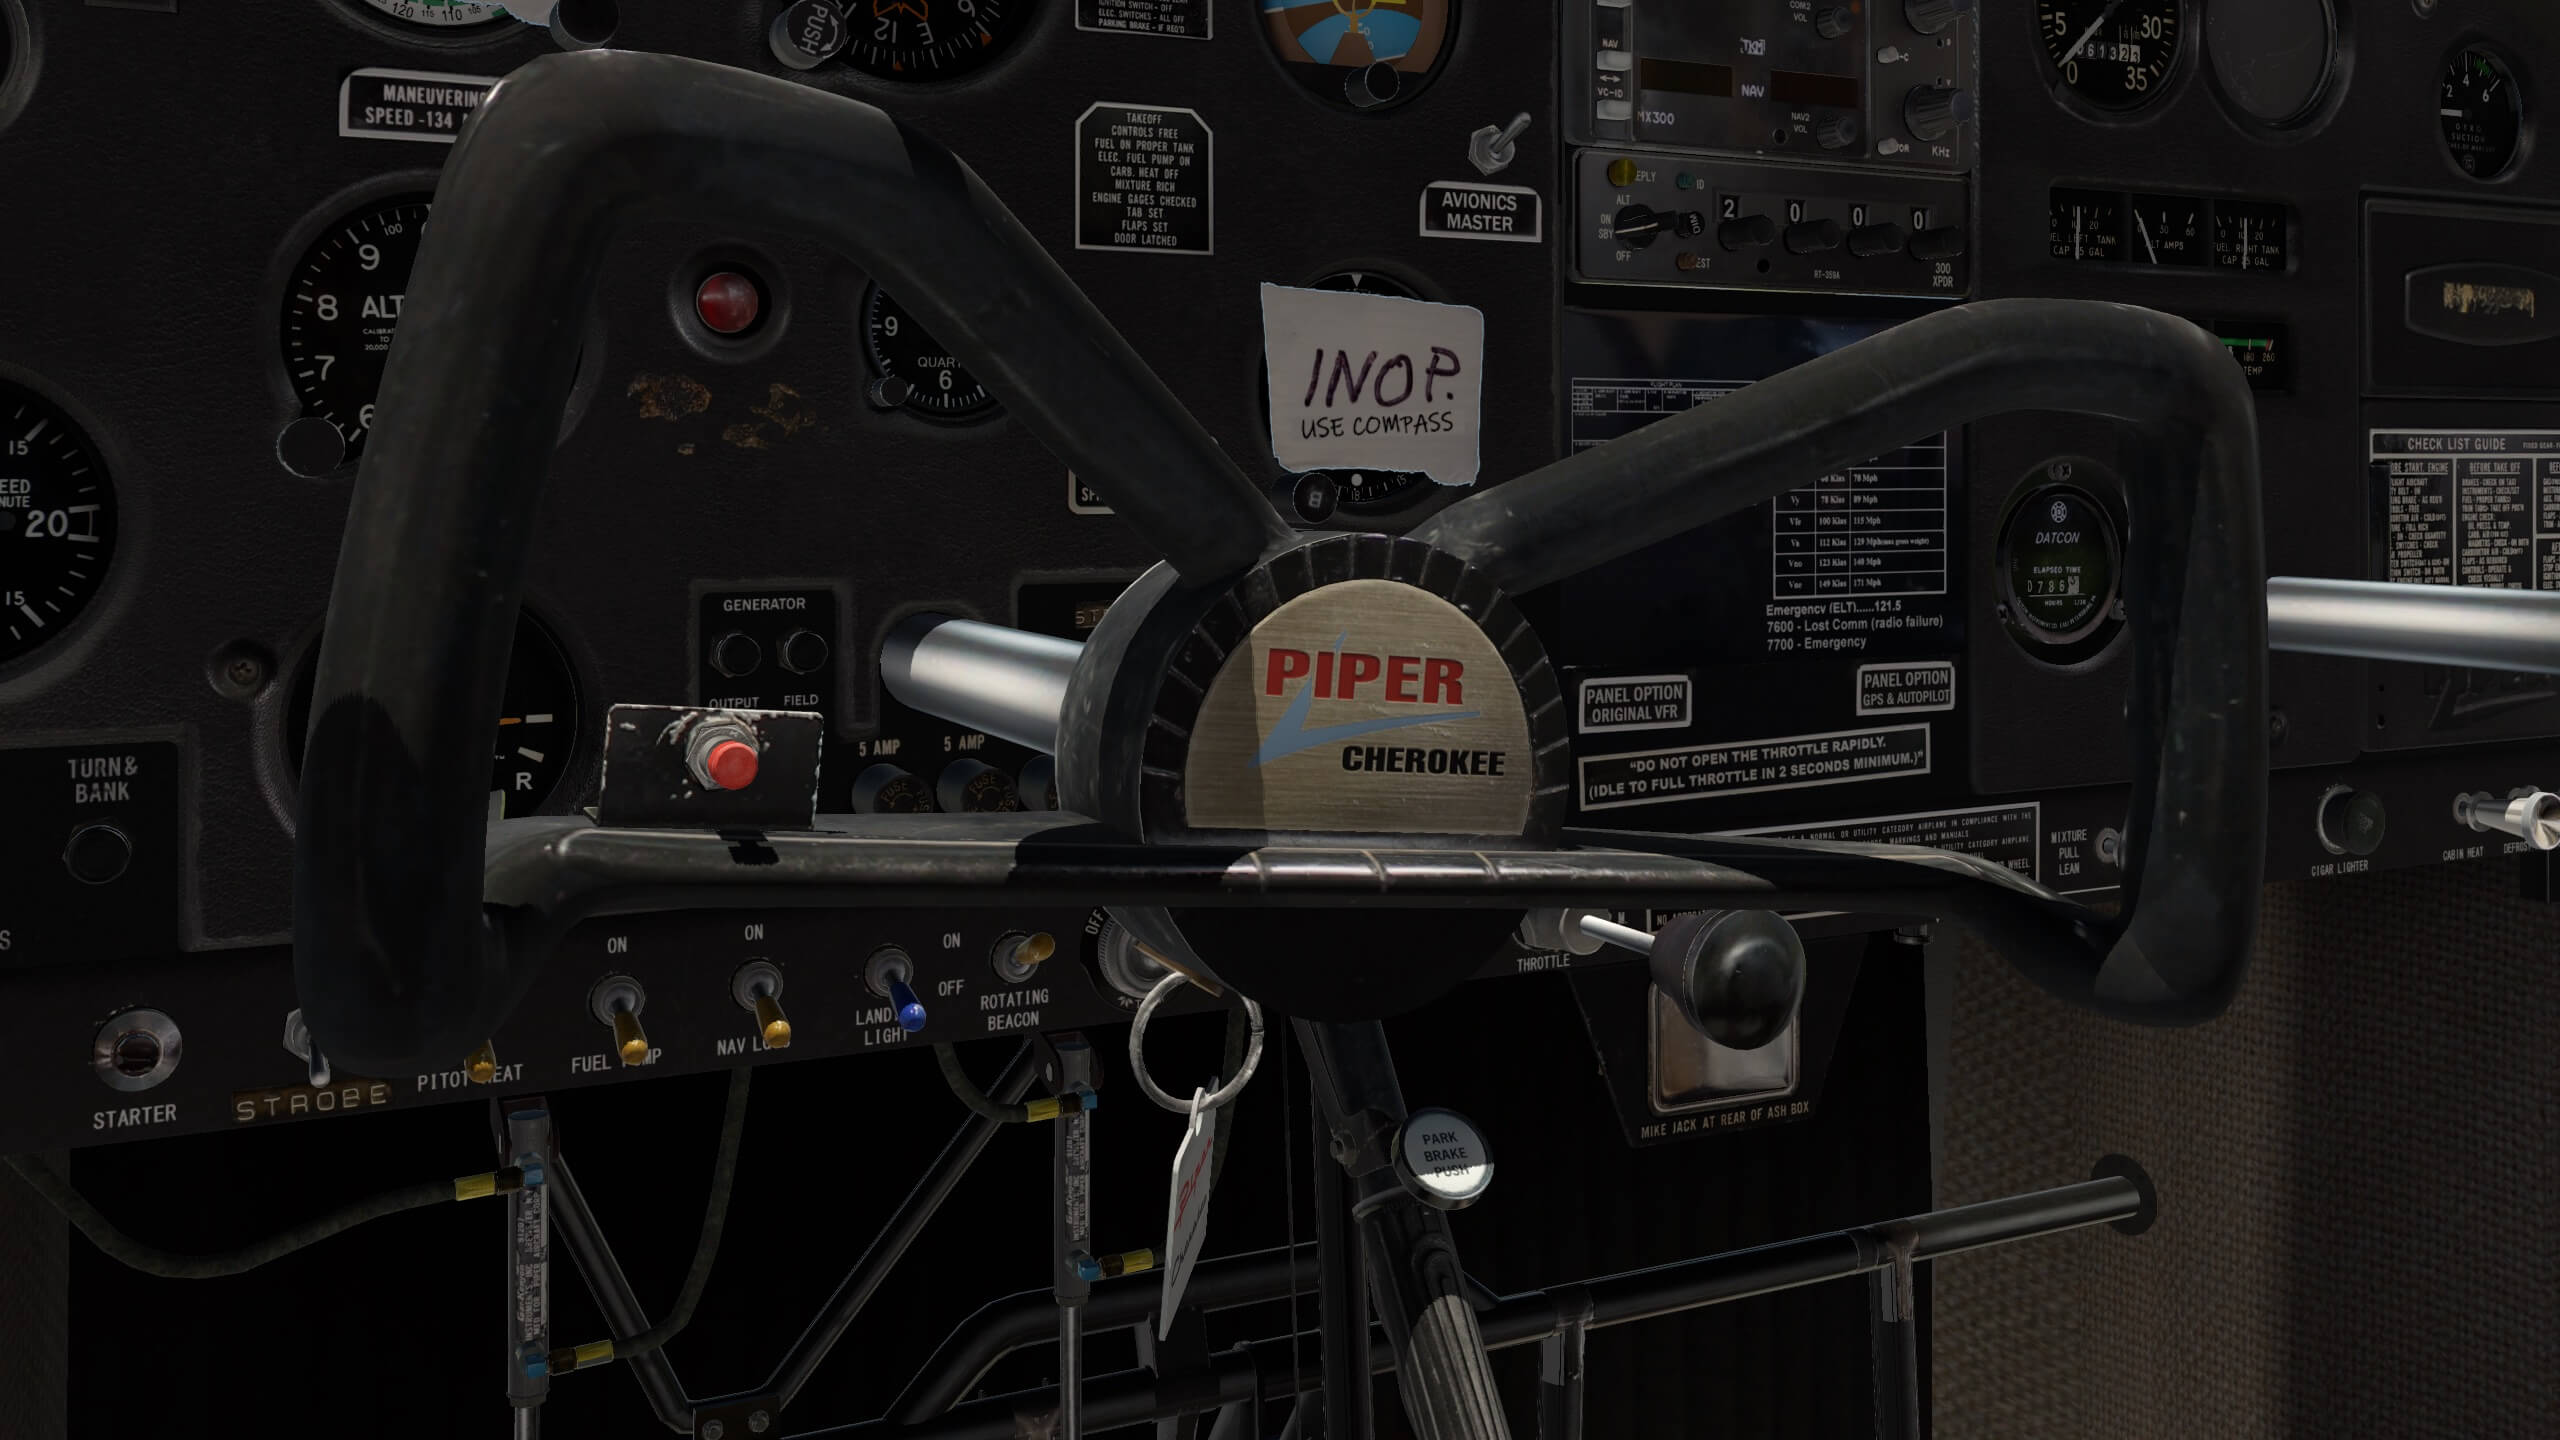


It doesn’t surprise me that the instruments are nicely modeled 3D objects with razor sharp dial plates or decals on the panel. The decals below the ATC panel are really a pleasure to see; razor sharp, useful speed information and other important items to know just in front of you for your flight. Although the 3D cockpit isn’t shaking during taxi or takeoff, the Piper Cherokee key label is doing when in position, it’s really a masterpiece and modeled with great precision but above all, by a team that know what simmers want, even though it’s only a Cherokee 140.
First Flight Impression
My first flight with the Cherokee with Walker on the left, is one of a typical VFR flight. We could use the NAV equipment, but we could also use landmarks and not to forget the Houston sectional aeronautical chart or when you don’t have this chart, you can always look at VFRMap.com. Since the Cherokee doesn’t have ADF, and perhaps this area doesn’t have many VOR beacons either, flying visual is then an absolute need. We will see.
Taxiing feels good although I really have no idea how the Cherokee 140 taxies in real. I know about the C152 and perhaps that’s very similar, but I know one thing, that the Cherokee is easy to keep on the center line although you need to be concentrated to keep it there.
h, that’s not much different then with a C152. One thing will be for sure different and that’s the location of the wing in relation to the aircraft C.G. GA aircraft like these are easy going aircraft to learn flying however the C152 has one huge advantage; the fuselage is below the wing and thus the C.G. is below the wing.
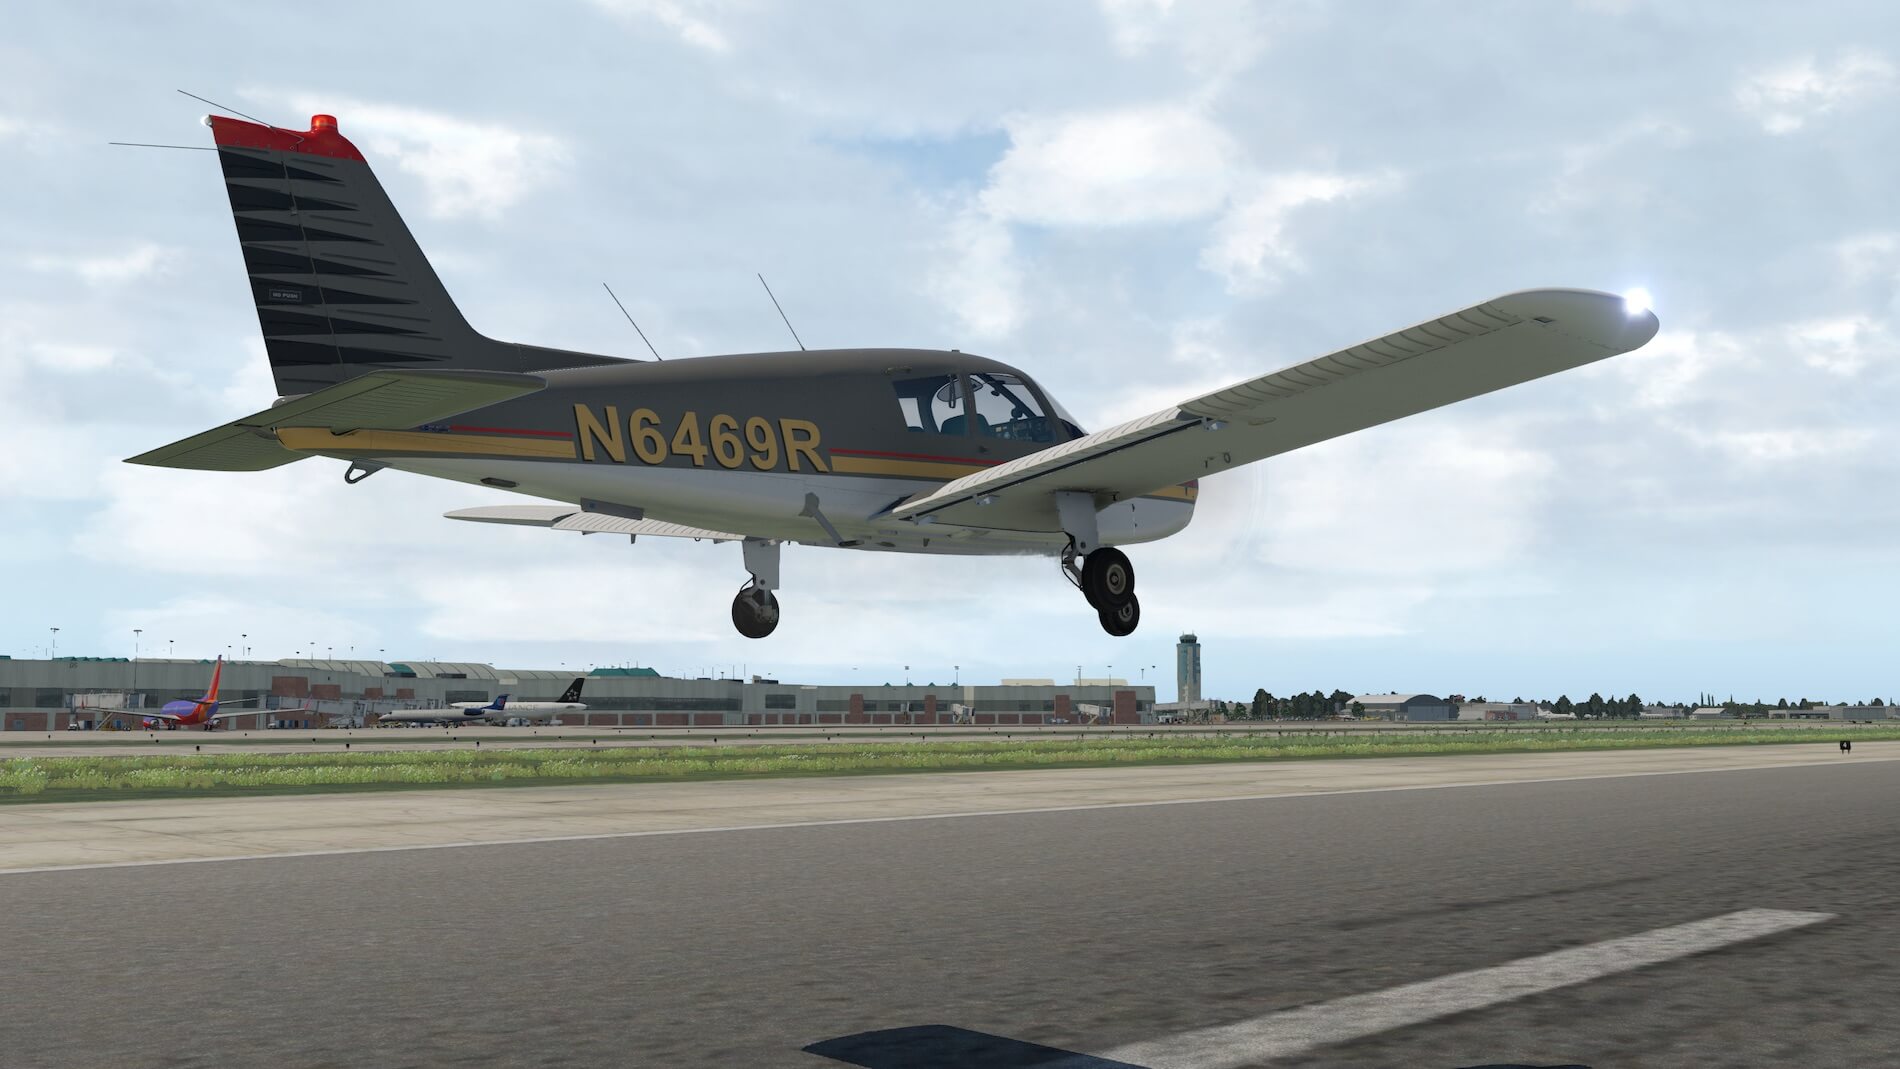
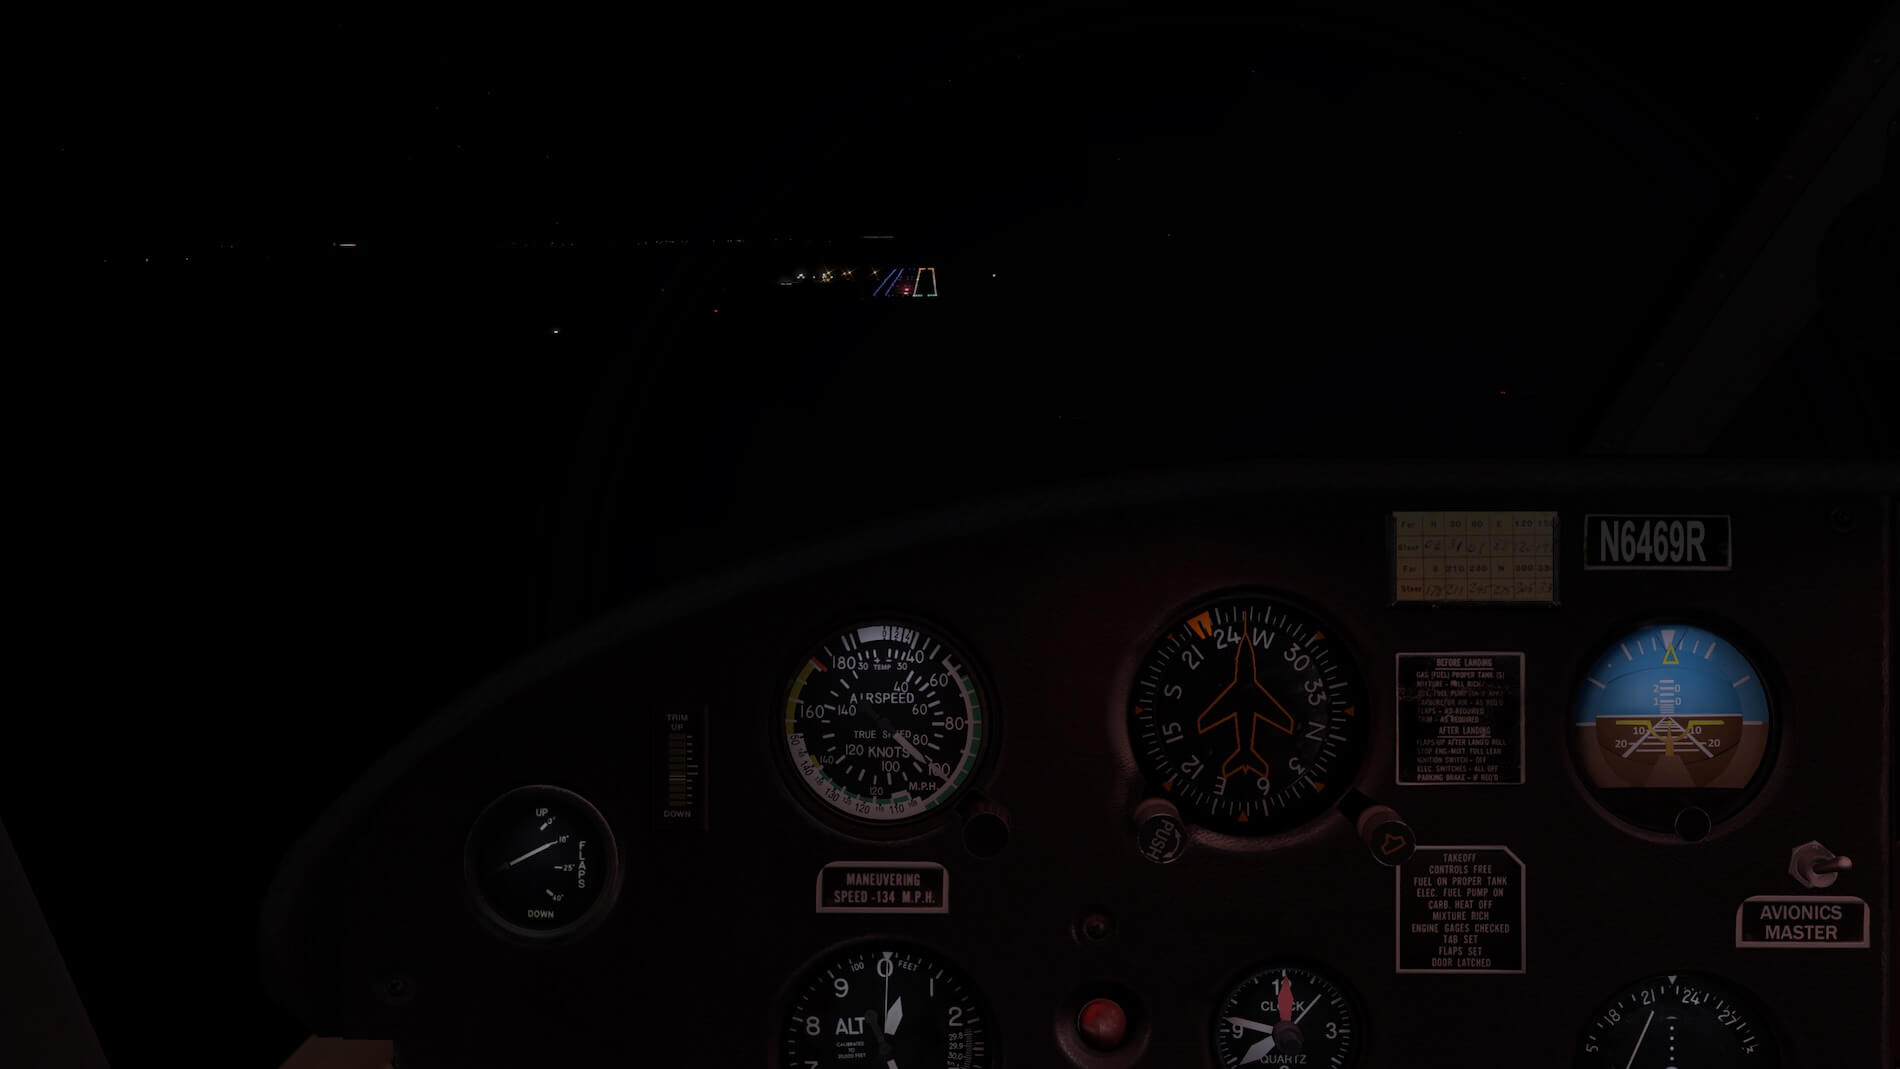
The first thing I noticed and that’s not even related to the Cherokee, is the small runway. Remember, I’ve parked my Cherokee at the MisterX6 KEYQ – Weiser Air Park airfield. My goodness, that’s a small one compared to the runways at KEVB or New Smyrna Beach. Anyway, at takeoff it’s only a matter of keeping the Cherokee at the center line which isn’t easy. Once in the air, you can feel that the Cherokee is made for this ….. being in the air.
What said before, I don’t have real Cherokee 140 experience, but it feels good and that means it’s an easy to handle GA aircraft. Inputs are immediately felt and what I see from the flight instrument, all behaves normal. Of course, to judge correctly, you need to fly hours to be sure that every indicator and system behind it, is working fine. I don’t want to make a mesh of this Walker test flight, so I keep my fingers off from any C/B.
Once we have reach an altitude of 2000 feet, and trimmed the aircraft and having real weather active, I must say that the Cherokee 140 is quite stable. Ok, you need to keep your hands on the control wheel or at the trim handle to maintain your intended altitude. Yes, that’s the disadvantage of not having an Auto Pilot or at least, not using it.
But the Cherokee 140 didn’t have it so you need to fly or perhaps you need to learn to fly. Lucky that it doesn’t fly very fast and that pitch and roll corrections are easy to make. But back to how does it fly when trimmed. Good, very good I must say and not really different then what I can remember during my C152 PPL lessons although I know that this is a different aircraft.
With a trimmed aircraft, Walker is able to tell me a little more about this aircraft while I, in the meantime, tune for a nearby VOR station and via the OBS we steer in the correct direction. When you’re not so familiar with using an OBS, be sure that when you turn the OBS knob, your needle with indicator points either TO or FROM. Most likely you want to fly TO the VOR station, so the indicator should show you the green TO flag. For FROM the flag is yellow.


I did something stupid or is it because I wanted to hear the effect and thus I wanted to check my curiosity? While flying you hear the engine sound which is logic, but the sound level increases when you open the small window on the pilot side. Yeah, you would say … that’s logic and yes, it’s something that you would expect but this is not always the case and therefore, since the sound level increases with an opened window, I’m a very happy person that even this tiny effect is implemented.
I think it has become time to find and airport, preferable my departing airfield, Weiser Air Park. This won’t be easy. When Weiser Air Park airfield has a NDB, it would help however, our Cherokee 140 has no ADF on-board. When Weiser Air Park airfield had a VOR beacon or VORTAC, it would help a lot, but no way that Weiser Air Park airfield has this.
East of our airfield are some VORTAC beacons (KIAH) and even northeast (KDWH), but those are all way to far so the only thing we can do is looking on the sectional map for highways, lakes, rivers, railroads etc. These will help us to find our way back to the airfield. It turns out that there are enough visual spots to guide us back to the airfield, but then one thing is waiting what I mentioned before … the small runway.
I found it already small during the takeoff, but for landing with some crosswind, it feels not good, but at the end, some practice is needed when you have crosswind conditions, it went all well and we’ve landed safely. Was the approach difficult?


Besides the real weather conditions and the crosswind, it was, no, it is an easy aircraft to fly. And just to make it clear since easy could mean also something not real, it feels good, and at some moment the Cherokee 140 feels also not so stable to control, but I think this is a typical behavior of this aircraft.
One of the reasons that I learned to fly the Cessna 152 was that the C152 is just like a play ball in the sky while it’s bigger brother, the C172, is heavier and thus more stable to fly. Since I wanted to learn to fly, I found the C152 a good option. Perhaps this aircraft behaves in the same way. Stable at moments you need it and easy to control, but also a playball when mother Nature has turbulence and clouds waiting for you.
Was it fun? Ready for the next challenge … the IFR Cherokee 140.
Flying IFR with the Cherokee 140
Preparations
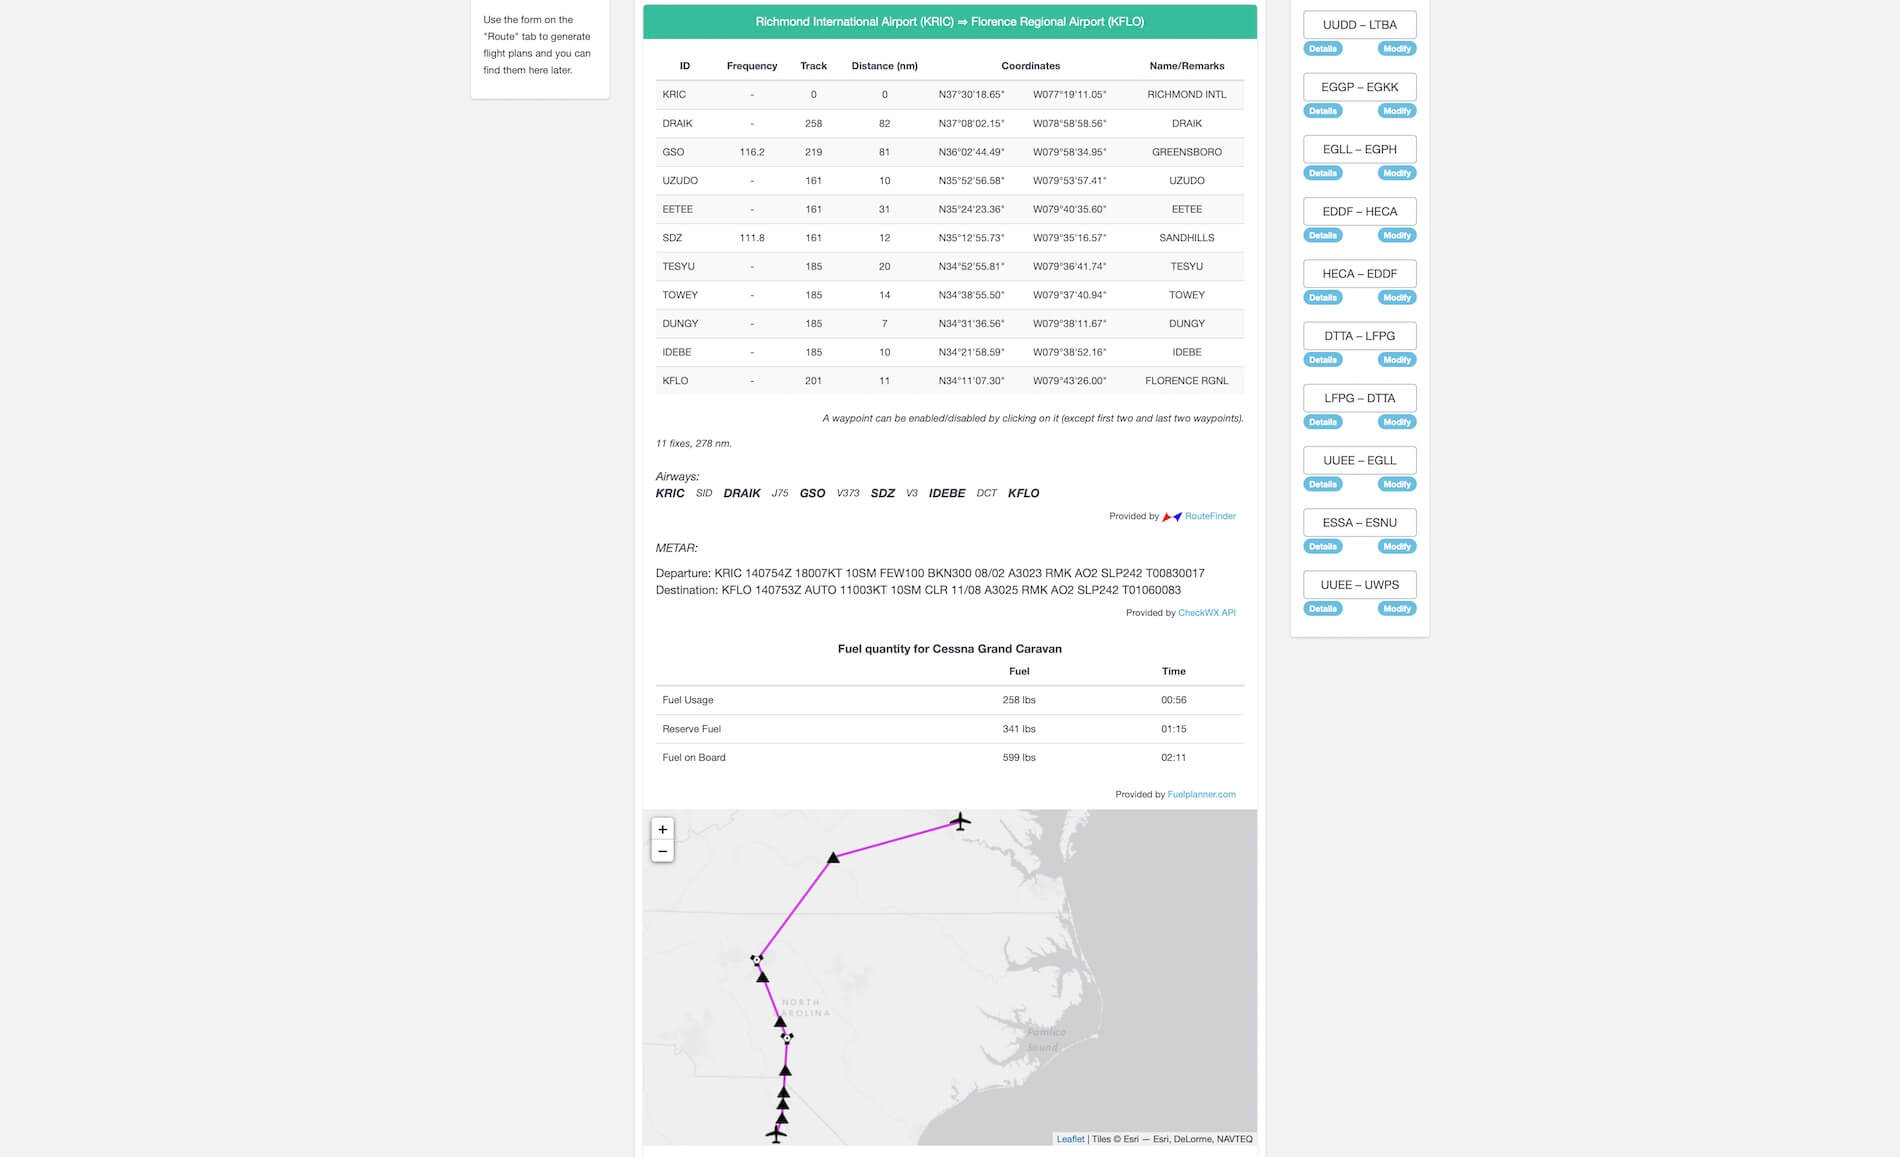
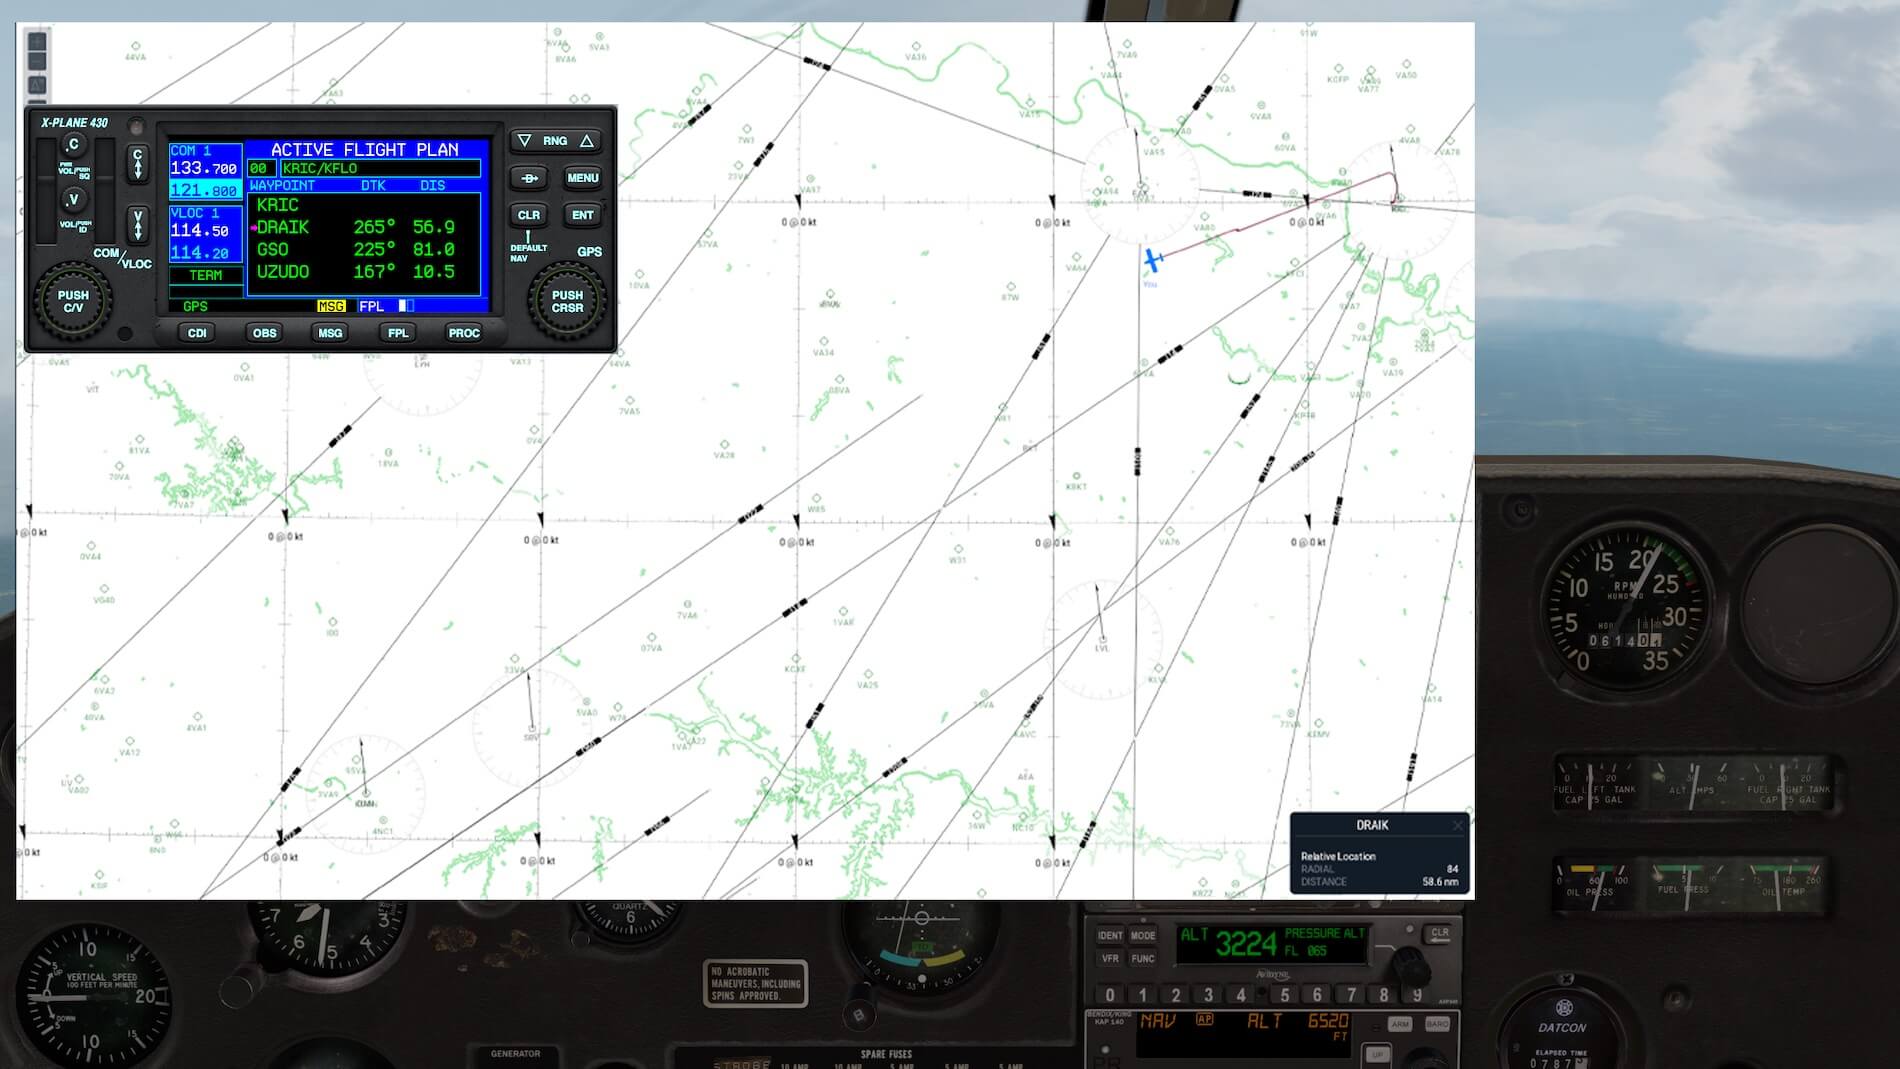
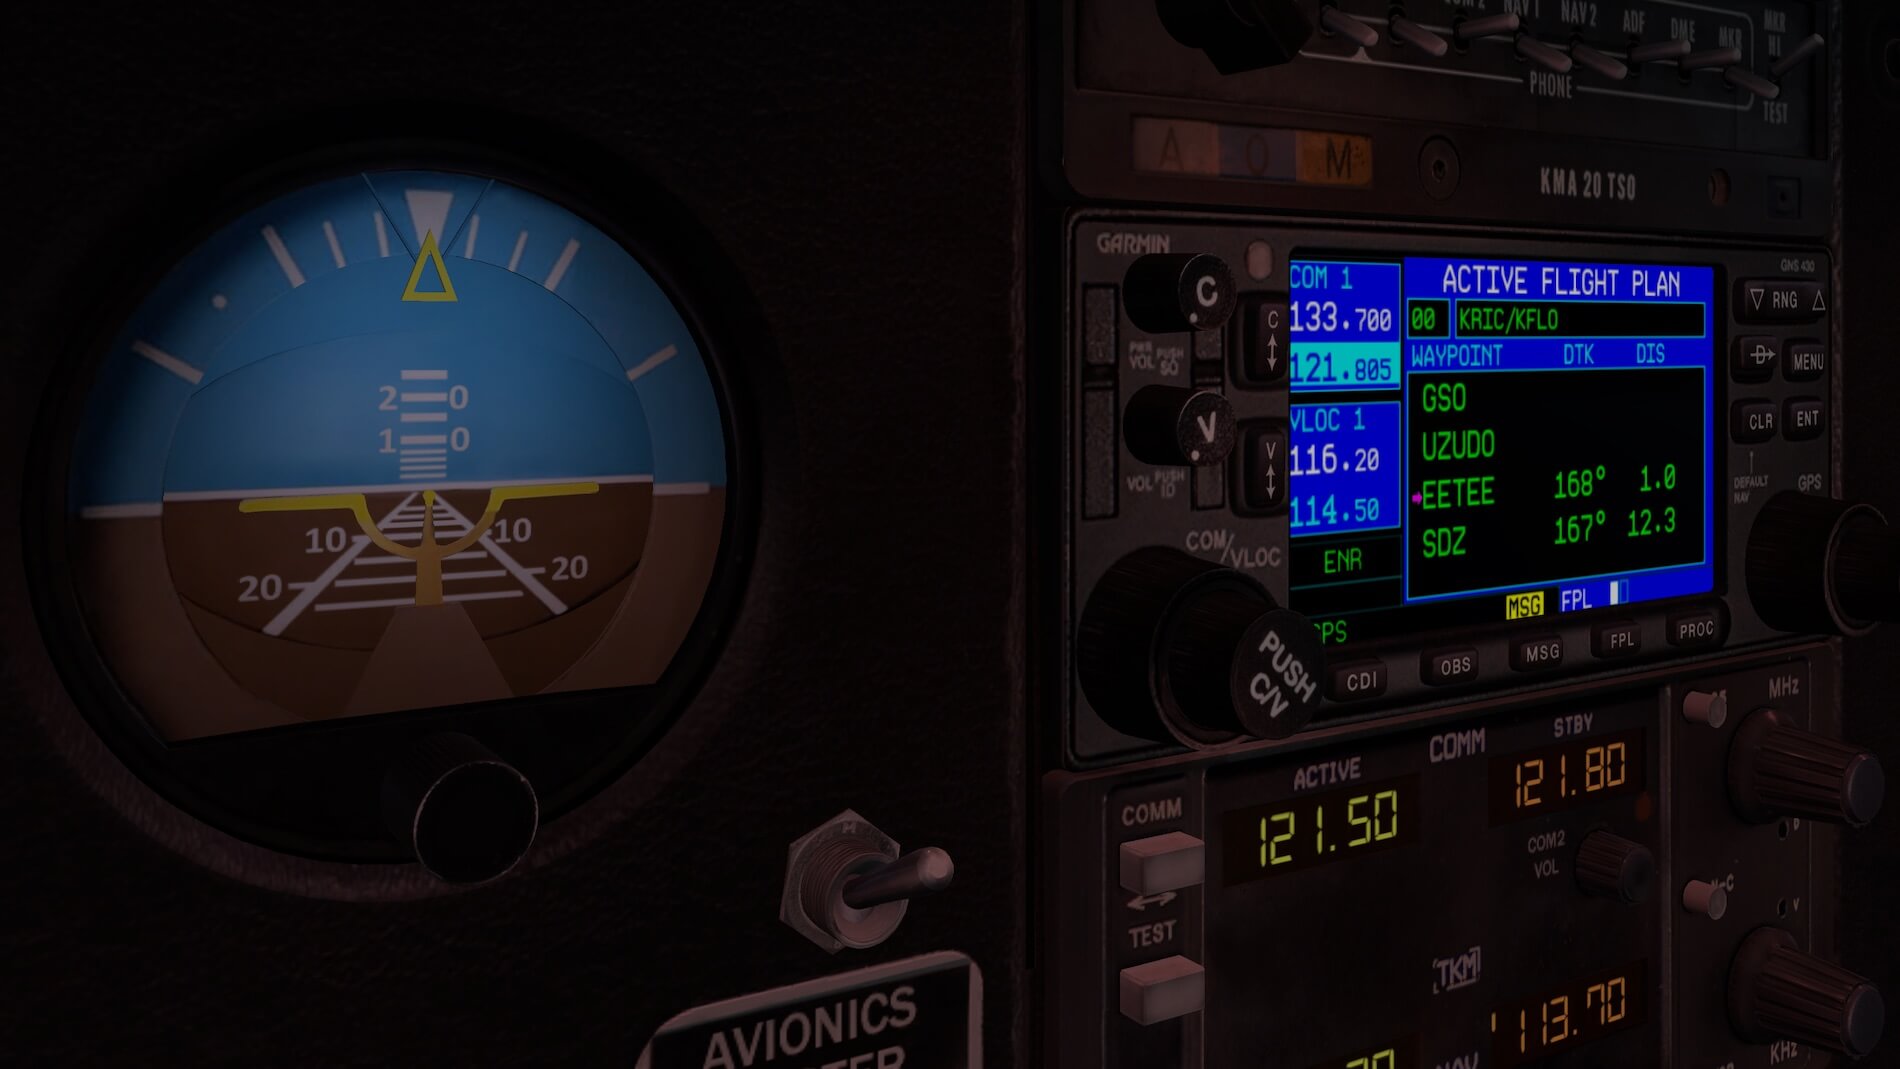
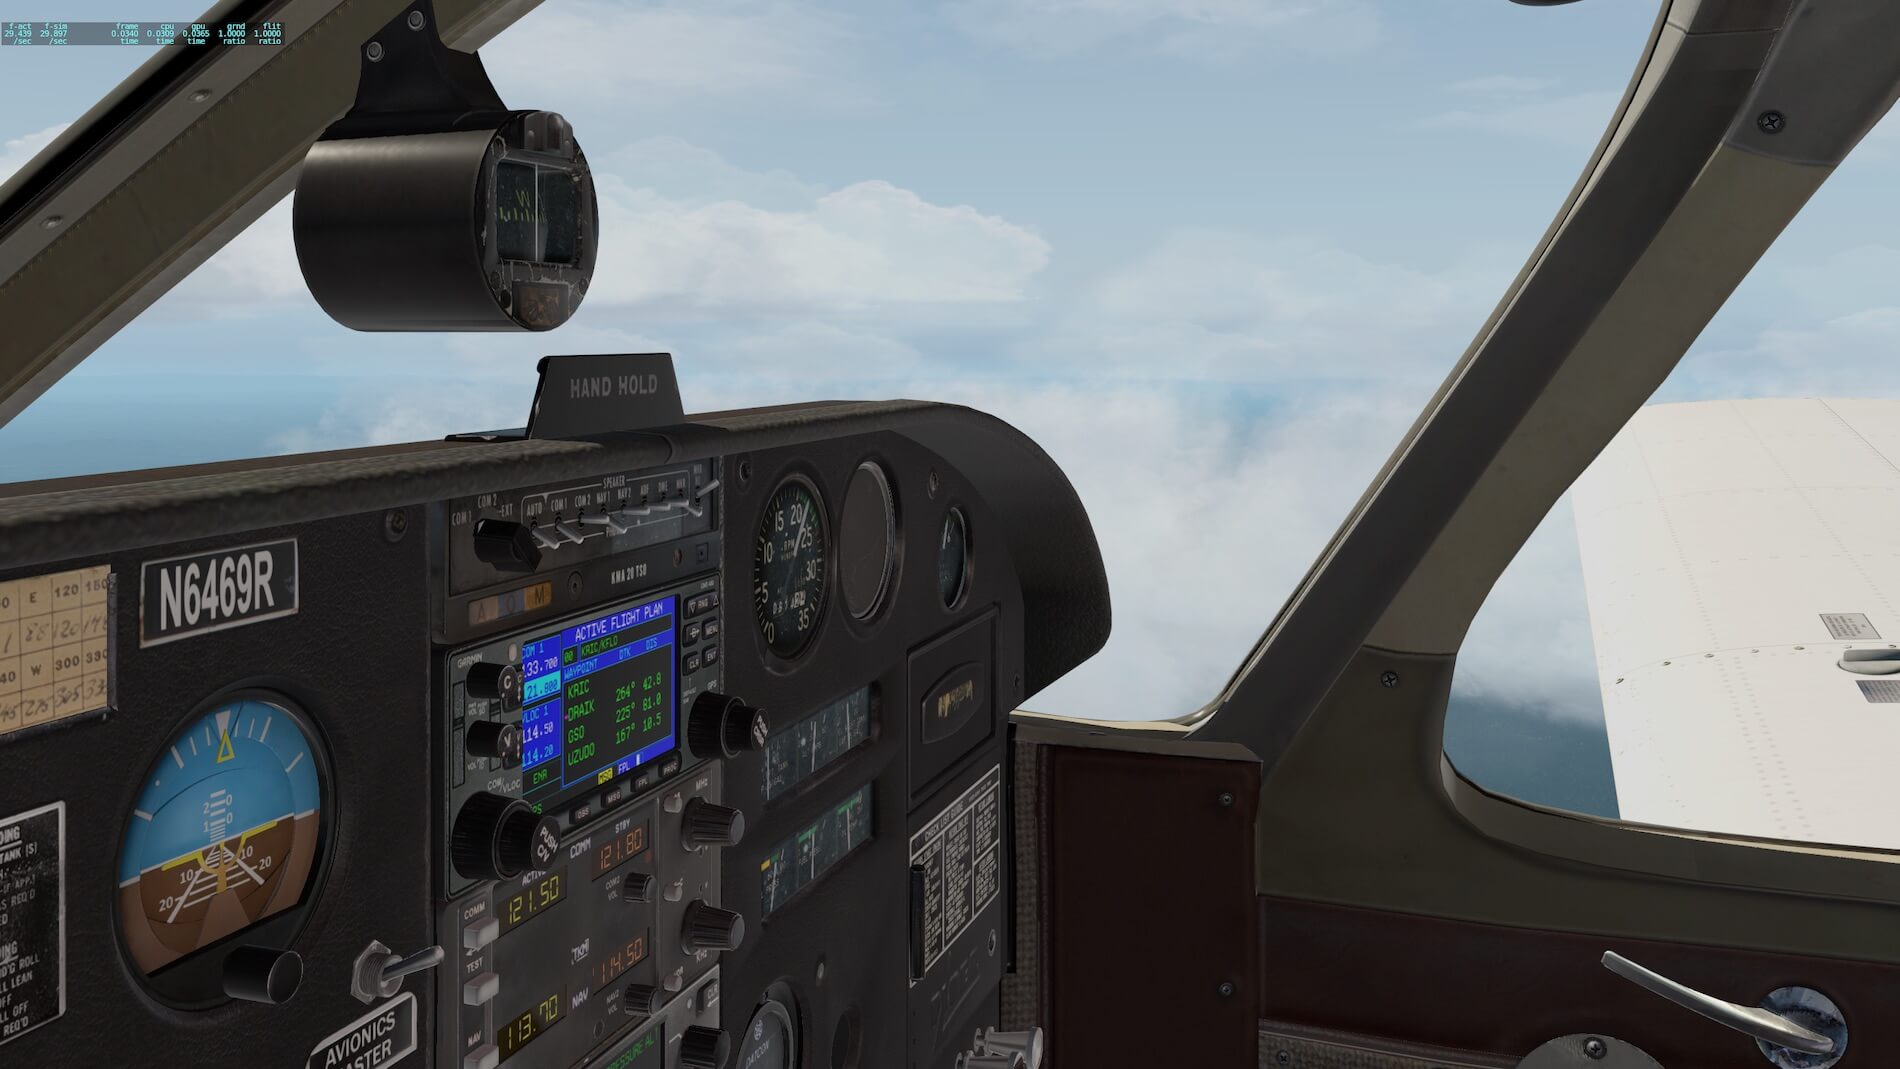
The first thing that comes up in me is where do I want to fly FROM and TO and is it an idea to load a flight plan in the Garmin GNS 430. I decide to fly from KRIC (Richmond International Airport) to KFLO (Florence Regional Airport) which I did before during a test flight with another aircraft. It would be helpful when I’m able to create my own flight plan with an “fms” extension and load it into the GNS 430. Of course, when I know the waypoint to fly to/from, I can enter each waypoint myself in the GNS 430, but I prefer the other method.
Right, let me help you with that in case you’ve not done this before or in case you’re struggling with loading flight plans in the Garmin navigation devices.
Create a Flight Plan
I you want, you can use Online Flight Planner to create a flight plan. This online flight planner uses the same database as RouteFinder, but with several export options, of which one is “X-Plane fms”.


Insert Flight Plan into GNS430
Oh oh, that’s easy said then done and I know that many simmers still struggle with how to insert a flight plan in the GNS430 or GNS 530. For the GNS 530 there’s a wonderful description and operation available from X-Plane.Org user “Ostkamp”. You can get this Acrobat document “XP_10_GPS_530 Unofficial Illustrated Quick Reference 1.2” via this Org link.
IFR Flight KRIC – KFLO
For this test flight, I decided to depart from Richmond Regional Airport. It’s a flight to Florence Regional Airport (KFLO) and although not known unless you live next of Florence Regional, it’s a flight plan that I often use. Besides that, I can enjoy again Richmond airport, developed by Marc Leydecker aka Belga12345. Keep in mind that the airport is originally designed for X-Plane 10 and as far as my knowledge goes, it is/was never updated to work flawless with X-Plane 11.30+.
For KFLO I can say that as of this writing – March 2019 – it is included in X-Plane version 11.30 and even in previous X-Plane 11 versions. It’s a 3D modeled airport from the X-Plane.Com Gateway. Perhaps not the most accurate airport, but better then nothing.
Ok, I’ve parked my Cherokee at the Million Air Ramp of KRIC. Some words about the opening and closing of the passenger door. When for some reason you can’t open it, please check if you have unlocked the door latch on top of the door. When this is still in the locked position, you never get the door open thus first unlock the upper lock, and then you’re able to open the door with the door handle.
Since it is in real like this, it’s also modeled in this way. Just for your own safety I would say! And before I forget it, and yes, I know, it’s all in the manual, on the inside of the passenger door and the fixed sidewall of the pilot, you’ll find a movable air outlet. Use it when you get it too warm, but don’t forget to control the orange knob next of it and turn that one to the OPEN position.
Good, all hidden features discussed? I hope so, but for sure Walker’s team has built in more of these features.
I mentioned this before, but some extra words to explain things or how to assign your trims. The Cherokee comes with two trims; pitch trim and rudder trim, so there’s no roll trim as you have with large commercial jets. That said, when you want to fly the vFlyteAir Cherokee models as real as they are, you should only assign pitch and rudder trim to your hardware versus X-Plane. Rudder is therefore not used for every controlled roll you do since it’s not a aileron trim.
Taxing from Million Air Ramp to runway 2 isn’t long, but long enough to give me an idea about how the Cherokee taxies. It’s relaxed, it stops when I pull back the throttle handle, but I miss something unless one of my settings isn’t correct. I would love to hear implemented a rumbling noise while taxing and some shaking effect.
I hardly believe the KRIC taxiway is so flat that no shaking appears. Now, during taxi, you don’t hear anything and the cockpit is not shaking a little bit which is, when I think back to my C152 PPL lessons, for sure the case with such small and light aircraft. So it’s unbelievable quite inside the cockpit besides then the engine sound. I wonder if it’s not possible to add this additional feature in the Cherokee.
And perhaps it is and I did something wrong, but when it’s not implemented, it would give the Cherokee a huge realistic boost during taxi. But at the moment I start my takeoff run, I do see some shaking and that good news.


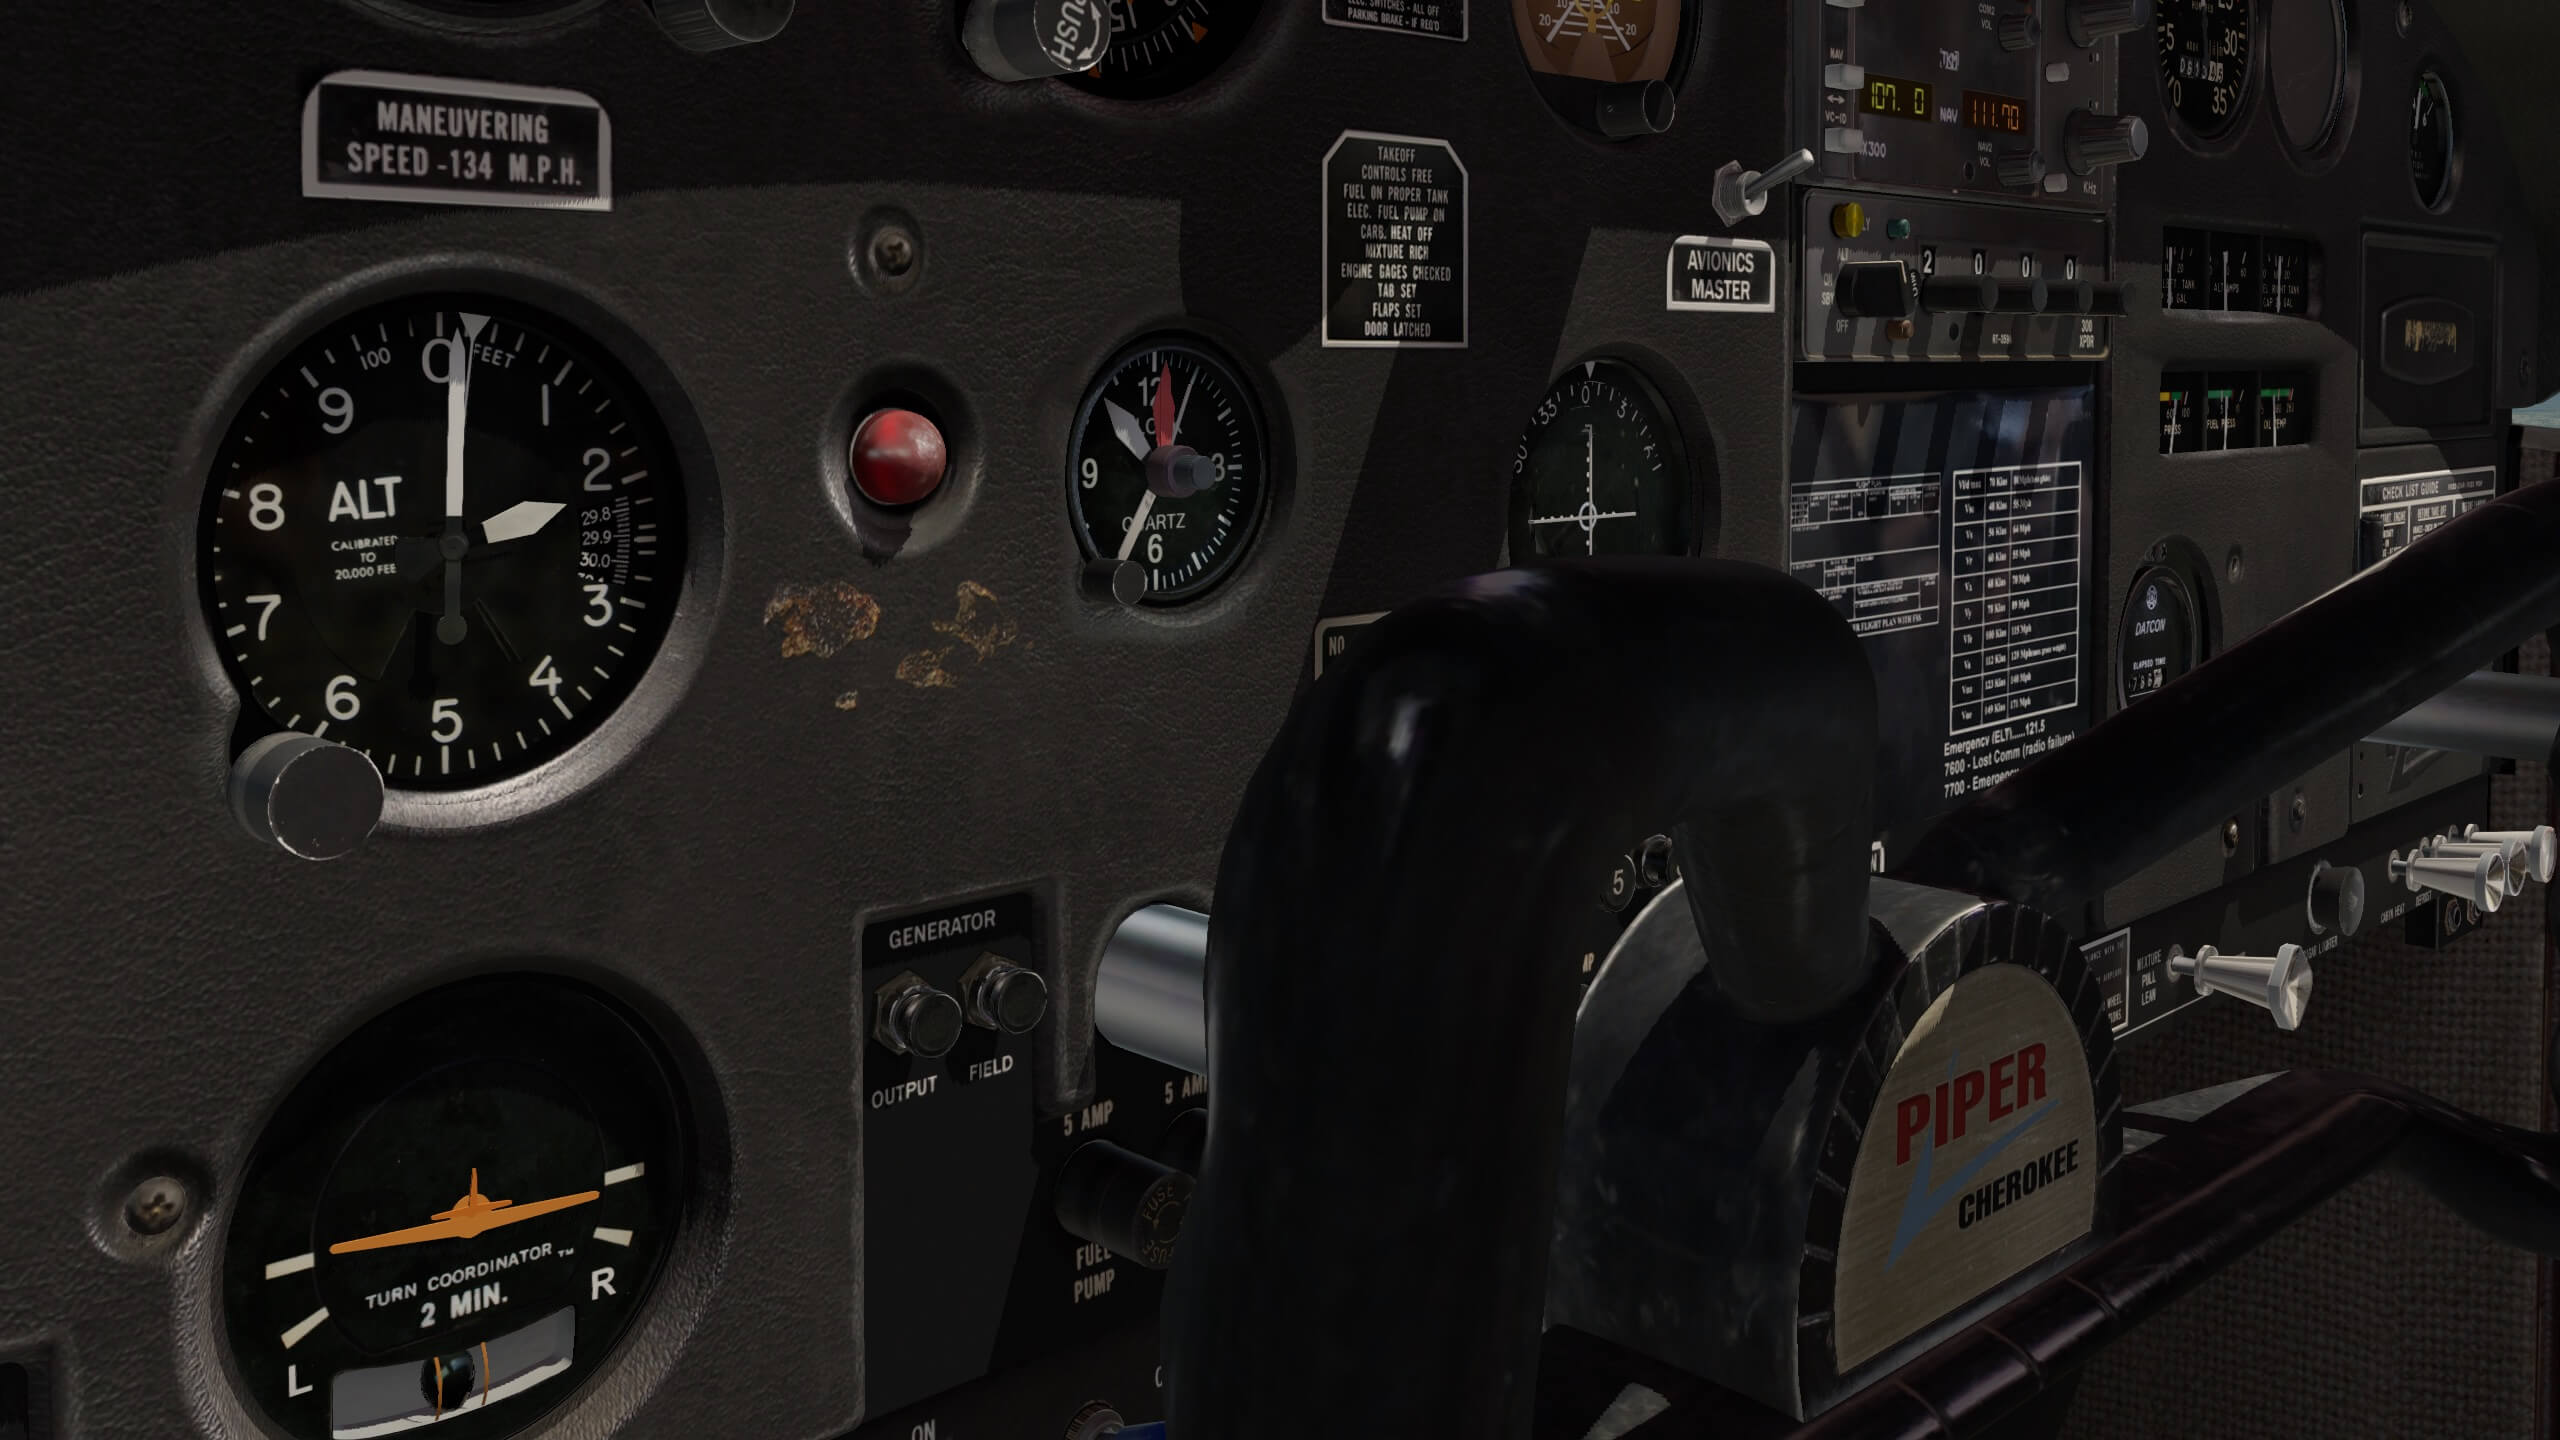
When you decide to use the Auto Pilot, don’t forget to switch ON the FD (Flight Director) switch. It’s by default in the OFF position, and when you switch it to SERVO, the AP S-TEC panel does first perform a self-test and then you can select the AP mode you want.
By the way, you should have selected on the GNS430 the CDI button from the active mode V/LOC to GPS. When you have fulfilled these minimum requirements, you’re able to use the AP and keep your fingers off from the trim. A manual pitch trim will straightaway disconnect the AP, even when you had the AP selected for NAV.
With the AP connected in NAV and ALT with VS modes, you can relax and see how the aircraft is doing. Don’t forget to retract your flaps which can be seen by the vertical mechanical tape on the left hand side of the instrument panel.
Don’t get confused with the mechanical vertical tape next of the GNS430 since that’s the pitch trim indicator. With the Cherokee controlled by the AP, it’s a good habit, at least that’s what I’ve learned, to place the heading bug in line with the lubber line on the gyro compass (the indicator with the large orange aircraft on it). Suppose you switch to HDG AP mode, the aircraft will maintain its current course since the heading bug is at the right position.
You can, when you like to, play a little bit between the AP HDG and NAV mode although not much happens. When you select the HDG button, and you place the HDG bug at a different position, the aircraft will fly towards the HDG bug.
When you select back to the NAV mode, logically, the flight plan course towards the first waypoint is picked up. It’s relaxed like this but it’s more fun flying the Cherokee manually and even though the AP has a APR mode, the Cherokee is so easy to handle, why should you use the approach mode. What you can do is of course, only in the IFR model, use the navigation equipment to plan your flight and cross check positions.
By the way, the model also has ADF equipment on-board. In our case, I tune, just for fun, for NDB Farmville (FVX) with a frequency of 367. And yes, it does exactly what I expected. The ADF pointer shows in the correct direction, verified by the X-Plane local map.


Anyway, the Cherokee flies and flies and I almost forget, when leveled off at 4000 feet, to reduce my mixture. It saves some fuel since it’s quite a long distance to go. With an RPM of approximately 2100, an IAS of 105 knots, the Piper moves ahead. When you don’t have to do anything, you’re seeking for something and in my case that’s testing some circuit breakers.
I decided to disconnect the AP and decided to do some exercises like a slow flight with and without flaps, a steep turn and pre-stall, followed by a stall. I can’t say anything else then that I’m pleased with what I’ve seen. A steep turn is always difficult, at least, I found it also a difficult task during my PPL lessons.
Banking the aircraft 45 degrees for a full turn (360 degrees) and then keeping your altitude as it was. Slow flights as I mentioned before are not difficult but with the Cherokee you reach very quickly the pre-stall busser. Not a problem, but before you know, you’re in a stall and the Cherokee does do this as expected.
Just for those who want to know; yes, I tried both a power off and power on stall. If all behaviors are exactly the same as in real is something I don’t know since, said before, I’ve never flown the Cherokee, but I see a lot of similarities with my C152 even though this is a hi-wing aircraft.
Breaking off your flight plan is not difficult. I’m right now more interested in is it easy to descent and to make a controlled landing. I can tell you, very easy and I’m still using the AP. For a controlled descent I set a particular VS, reduce the throttle to approximately 2000 RPM and check where I would land. When I’ve reach 2000-1500 feet, I press he ALT button on the AP panel.
Perhaps you know, but in case you’ve forgotten it, don’t forget before the descent to set the MIXTURE to full rich and after you’ve leveled off, set again a higher power setting. Preferable that the RPM needle is somewhere in the green band. What already experienced in my first flight, it’s such an easy aircraft and not only because I’ve got the feeling it’s well modeled by vFlyteAir, but in real it’s, what I’ve heard from others, an easy going aircraft.

Overall, I can only say one thing…… I enjoyed every minute with this Cherokee 140.
Performance and Sound
When it comes to real Cherokee sound, I doubt that it is fake. For the simple reason that Walker and Igor have had a lot of opportunities to check the whole aircraft and to record real sound. Normally I’m a little cautions saying this it’s all recorded, but this time I know it’s all as real as it gets. So no more words about sound and the question if it’s real or not.
When it comes to the Cherokee performance with X-Plane 11.30+, it depends of course on all your rendering options, your monitor dimensions thus your X-Plane screen pixels. But the actual frame rates aren’t only based on that. Which add-on packages do you have installed or do you have a complex add-on airport that cost also a lot of frames and so on. Last but not least; Your hardware specifications and then in particular the graphics card memory, system memory and CPU speed. But is it all needed?
The higher your PC specs are, the better of course for X-Plane, but when you don’t own a speedy PC, you can still fly the Cherokee and having fun too. I’ve mentioned this before, each manual comes with a suggested rendering settings screenshot to guide you what’ possible. When you keep that all in mind, the Cherokee is a good flyable aircraft that can produce good frame rates.
Can I compare mine frame rates with that of others? Not that I’m aware of so even my specs are perhaps difficult to compare with yours, but my FPS screenshots should give you a good idea what’s possible.


Summary
With a product impression of this length I could ask myself what to add in this summary. When you tried to read it all, then the summary isn’t of much use unless it was so much information in the impression that a summary with some highlights could be welcome.
Ok, let me see what I can do.
The Cherokee 140 comes with a VFR and IFR instrument panel/model. With the older previous model they called it the Original and Classic model. Basically, the Original with the VFR instrument panel is just a perfect aircraft for PPL lessons or just flying around without the need of using any navigational equipment or you go for the IFR (or old naming Classic) model. Although this is an IFR model, it can still be used for your virtual PPL lessons. It comes with a Garmin GNS 430, an AP, and besides NAV equipment also with an ADF. Perfect for your IFR training.
When you can’t decide, you can buy them both which safes you some money. The vFlyteAir models are very well made, with a lot of tiny details and thus the overall quality is therefore of a high standard. Not only the external model looks great, the interior and then in particular the cockpit is very realistic and absolute an eye catcher.
Not only an eye catcher, it’s also well-modeled, and it’s not difficult to see that the vFlyteAir team created more or less a master piece. And yes, some will say that making GA models is much easier then making medium to large aircraft. I disagree with that. It is true that a smaller aircraft is perhaps easier to make, but on the other hand, simmers expect also a lot of tiny details, and yes, this GA model has it all.
And what does it cost and where can you buy it?
You can buy the Cherokee’s at the dedicated vFlyteAir web pages, and for example at X-Plane.Org. Let me be a little more precise. Here’s the vFlyteAir Cherokee 140 Original X-Plane 11 link or what said, at the dedicated X-Plane.Org store page.
My Cherokee impressions/review article, is based on vFlyteAir model version 3 and tested on an iMac Pro with Mojave 10.14.3 and X-Plane 11.31r1.
For this impression I used besides the Cherokee 140 models, the following payware and freeware software:
Freeware: KEYQ (Weiser Air Park) from Mister6X
Freeware: KRIC (Richmond Regional Airport) for Belga12345
Freeware: FlyAGI FTU (FlyAGI Tweak Utility version 1.10e
Freeware: FlyWithLua NT version 2.7.9 for X-Plane 11
Freeware: Clouds XP11 HD Clouds 1.1
When you would like to have an even more “realistic photo-real factor”, you could decide to install from ForkBoy2 US ortho sceneries. When I look at the map, I think you only need to download the Mid Atlandic (I think it should be Atlantic, but that’s a minor detail) package.
Feel free to contact me if you’ve got additional questions related to this impression. You can reach me via email Angelique.van.Campen@gmail.com or to Angelique@X-Plained.com.
With Greetings,
Angelique van Campen
| Add-on: | Payware vFlyteAir Cherokee 140 Original |
|---|---|
| Publisher | Developer: | X-Plane.Org | vFlyteAir |
| Description: | Realistic rendition of Piper Cherokee 140 |
| Software Source / Size: | Download / Approximately 1.29GB (unzipped) |
| Reviewed by: | Angelique van Campen |
| Published: | March 16th 2019 |
| Hardware specifications: | - iMac Pro - Intel 3GHz Intel Xeon W / 4.5Ghz - Radeon Pro Vega 64 16368 MB - 64 GB 2666 MHz DDR4 - 1 internal shared 1TB SSD (Big Sur 11.x) - 1 internal shared 1TB SSD (Bootcamp Windows 10) - 1 external 2TB LaCie Rugged Pro SSD (Big Sur 11.x) - Saitek Pro Flight System X-52 Pro and X-56 Rhino - Honeycomb Alpha Flight Controls - Honeycomb Bravo Throttle Quadrant |
| Software specifications: | - macOS Big Sur (10.15.x) - X-Plane 11.5x |
0 Comments