FSWidgets iGMapHD for Mac
Innovative Gadgets for Flight Simulators
Introduction
This impression has everything to do with “remote map” visualization. Once and a while I highlighted in my reviews/impressions “X-Mapper Lite” and/or X-Mapper Pro. These “only for iOS” packages offer you on your iPhone or iPad a way “where you fly”. What? ….. a “way where to fly”?
It allows you to connect your X-Plane flight simulator to a Smartphone and/or tablet with a moving map. That said, the moving map is connected via your network with the computer running X-Plane.

One of the disadvantages I faced with X-Mapper, irrespective which version you have, is the lack of an aviation background map, for example not having low- or high enroute overviews or not having a sectional map nor any navaids. The map you see with X-Mapper is an ordinary map without any navigation equipment on it. Ok, it must be said that X-Mapper Lite is free so there’s not much to complain about, while X-Mapper Pro is not free, but still no aviation maps included or at least, no navigation aids like NDB- or VOR/VORTAC beacons, no waypoints, no airports and no aviation aid information. That said, time to look for something else.
This impression deals with FSWidgets iGMapHD for Mac, setup for a dual Mac hardware configuration. When you only own one iMac, MBP or Mac Pro then this configuration also works with iGMapHD. I’ll try to highlight this briefly later on in this impression.
About FSWidgets
For those who aren’t familiar with FSWidgets, the following is an extraction from their website.
The FSWidgets development team are based in Australia (aka Downunder). They specialise in producing add-ons for Microsoft Flight Simulator and Laminar Research X-Plane. Both of its founding members have extensive experience creating award-winning products and have been active in the flight simulation community for well over a decade.
FSWidgets is backed by a two-man team, John Hnidec and Fermin Fernandez. They focus on creating innovative products and bringing cutting-edge technologies to desktop flight simulation. Their 15+ years of experience in the FS industry has resulted in a large body of work, netting them two AVSIM Bravo Zulu Awards plus the much sought-after AVSIM Gold Star Award which recognises state-of-the-art products.
John has brought many firsts to the FS world like Moving Map for FS98, FSFlightMax and FSGarmin for FS2000/FS2002. He also lead the way with the first SimConnect-enabled product called SlewAssist (just three weeks after FSX was released). More recently he produced various Android apps and the terrain awareness app SimTAWS for iPhone.
Fermin is the creator of the TweakFS utilities and ATC Adventures. He joined forces with John in 2004 and produced the first Electronic Flight Bag for FS2004, FSX and X-Plane (plus GMap). Lately he also added more map based apps for iOS and Mac OS X to the product line, as well as Cloud Based aero data for GMap and other supported FSWidgets mapping apps.
The goal at FSWidgets is to enhance the enjoyment of flight simulation enthusiasts by continuing to produce great, innovative products and give first-class support.
And that something else is ….?
Let me first introduce you to FSWidgets iGMapHD for Mac version 4.0. This impression deals with Mac OS X products only, so when you’re a Windows user, then even this impression will be interesting for you too since FSWidgets also offers for Windows GMapHD.
By the way, what’s new in version 4.0:
– Refreshed user interface
– Apple Retina screen support
– Mac Developer ID Signed
Ok, let’s have a look what FSWidgets iGMapHD for Mac is?
According to Fermin Fernandez “iGMapHD for Mac gives you a great moving map for your desktop flight simulator! This app is designed to run on Mac OS X (Snow Leopard or later). You can use it to connect to X-Plane on the same Mac. It can also connect via the network to X-Plane 9 or later (Mac or Windows), FSX and FS2004 (Windows), supporting the three most popular desktop simulators on the market today. It gives you a large moving map display to aid navigation, especially on VFR flights.”
And what does the feature list offer? Check this out in the list below:
– Designed to run on Mac OS X 10.6 (Snow Leopard) or later.
– Connects to X-Plane 9/10 locally on Mac OS X.
– Connects remotely to X-Plane 9/10 for Windows, Mac OS X 10.5 (or later) & Linux.
– Connects remotely to FSX and FS2004 running on Windows 7, Vista or XP.
– Flight Plan Display – supports native FSX, FS2004 & X-Plane flight plan files.
– Flight plan waypoints can be clicked to reveal the related data.
– FSWidgets Network Pack provided to connect to your simulator of choice.
– Powered by Leaflet map rendering API (OpenStreetMap data).
– Connect & disconnect from the flight simulator as required.
– When disconnected can be used as a chart viewer.
– Option to save previously used map type, zoom and position.
– Helicopter icon option for moving map (i.e. instead of fixed wing icon).
– Many base map style options.
– Huge collection of Aero Charts overlays (details below).
– World Nav Data icon display (details below).
– World-wide Metar & TAF data.
– US Nexrad (Next Gen Radar) data layer.
– World-wide Cloud, Rain, Pressure & Wind data overlays.
And …. Very important, included as bonus “Cloud Based Aero Chart and Nav Data:
– US SEC (Sectional Chart) data for entire contiguous US.
– US WAC (World Aeronautical Chart) data for entire contiguous US.
– US TAC (Terminal Area Charts) data.
– US IFR Enroute High data for entire contiguous US.
– US IFR Enroute Low data for entire contiguous US.
– US Helicopter Route Chart data (Major cities)
– Alaska Sectional data.
– Alaska WAC data.
– Cuba and Puerto Rico WAC data.
– New Zealand Aero Chart
– Australia ONC (Operational Navigation Chart)
– South America ONC
– Europe ONC
– Canada ONC
– World-wide Nav Data (airports, ILS, VOR, NDB and Fixes).
What said before, this impression deals with the Mac OS X version in combination with X-Plane 10 on iMac’s running macOS Sierra 10.2.2. I have two iMac – one is way too slow to run X-Plane – but it’s fast enough to be a “slave” Mac for my iGMapHD, connected with the “master” Mac via the dedicated FSWidgets network X-Plane plugin.
Setting Up “iGMapHD for Mac” on 2 Macs
As you can read in the title, I’ll explain you how to setup iGMapHD with the FSWidgets network plugin. Let me make one thing clear although this impression is based on a dual Mac setup; this plugin is always needed, also for a single Mac setup! For me, a good reason to find out how to use this product with another Mac, if you have two Macs of course. When you fly X-Plane in full screen mode, you need to swap between the moving iGMapHD map and X-Plane. Hold on, that’s not entirely correct.
When you have one Mac and want to use this product, you can tick in Settings “Keep iGMapHD Window floating on Top” and that does work fine, but I prefer the dual Mac setup. But for those who have only one Mac, the following screenshots show you a single Mac setup with ticked “Keep iGMapHD Window floating on Top”. A note from Fermin Fernandez, software developer FSWidgets “The plugin is actually required in all instances, even when running iGMapHD on the same Mac as X-Plane. This is because the communication between iGMapHD and X-Plane is conducted over local networking (similar to how FSX/SimConnect does it).”


Ok, what do we need with a dual Mac setup?
– iGMapHD for Mac software pack from dedicated FSWidgets page.
– FSWidgets network pack from dedicated FSWidgets page.
– Mac number I running Snow Leopard or later.
– Mac number I having installed X-Plane 9 (tested with X-Plane 10) or later.
– Mac number I has installed the network pack plugin under Resources/plugins.
– Mac number II will run the actual program iGMapHD for Mac.
Just to clarify this once more: Mac number I (master) has X-Plane installed, Mac number II (slave) has the program iGMapHD installed. Via the network plugin, these two Mac’s can communicate with each other, but when you only have one Mac, then the network plugin isn’t needed!
And …. what do we need for a single Mac setup?
– iGMapHD for Mac software pack from dedicated FSWidgets page.
– FSWidgets network pack from dedicated FSWidgets page.
– A Mac machine running Snow Leopard or later.
– A Mac machine running X-Plane 9 (tested with X-Plane 10) or later,
– On this Mac you’ve installed the network pack plugin under Resources/plugins
– On this Mac you will also run the iGMapHD for Mac app.
Just to clarify: with this setup, you have one Mac (iMac, MBP or Mac Pro) that has X-Plane installed, and the iGMapHD app. Via the network plugin, X-Plane can communicate with the iGMapHD app via the FSWidgets X-Plane network plugin.
Ok, steps to perform for a dual Mac setup
Basically, it’s no more than installing the downloaded packages, configure the IP address / port within the same network and you’re done. But additional information is needed to get the FSWidgets X-Plane network plugin to work correctly with the iGMapHD program.
Step 1 | FSWidgets packages
Download the iGMapHD package and the X-Plane version 1.1 network plugin package (fsw_net_pack_xpl.zip) from the above links and unzip the packages.


Step 2 | Copy and paste the network plugin
Paste folder “FSWidgetsGMap” to your Mac number I “X-Plane folder “Resources/plugins”. You can find this folder within the unzipped directory “fsw_net_pack_xpl”.
Step 3 | Copy/paste iGMapHD for Mac
Copy and paste the unzipped contents of folder “igmphd_mac” to a convenient location on Mac number II (the other Mac thus the slave). A convenient location could be your personal “Documents” or “Downloads” folder, but you can also store it at your Desktop. Whatever your preference is.
Step 4 | IP address/port X-Plane Mac number I (master)
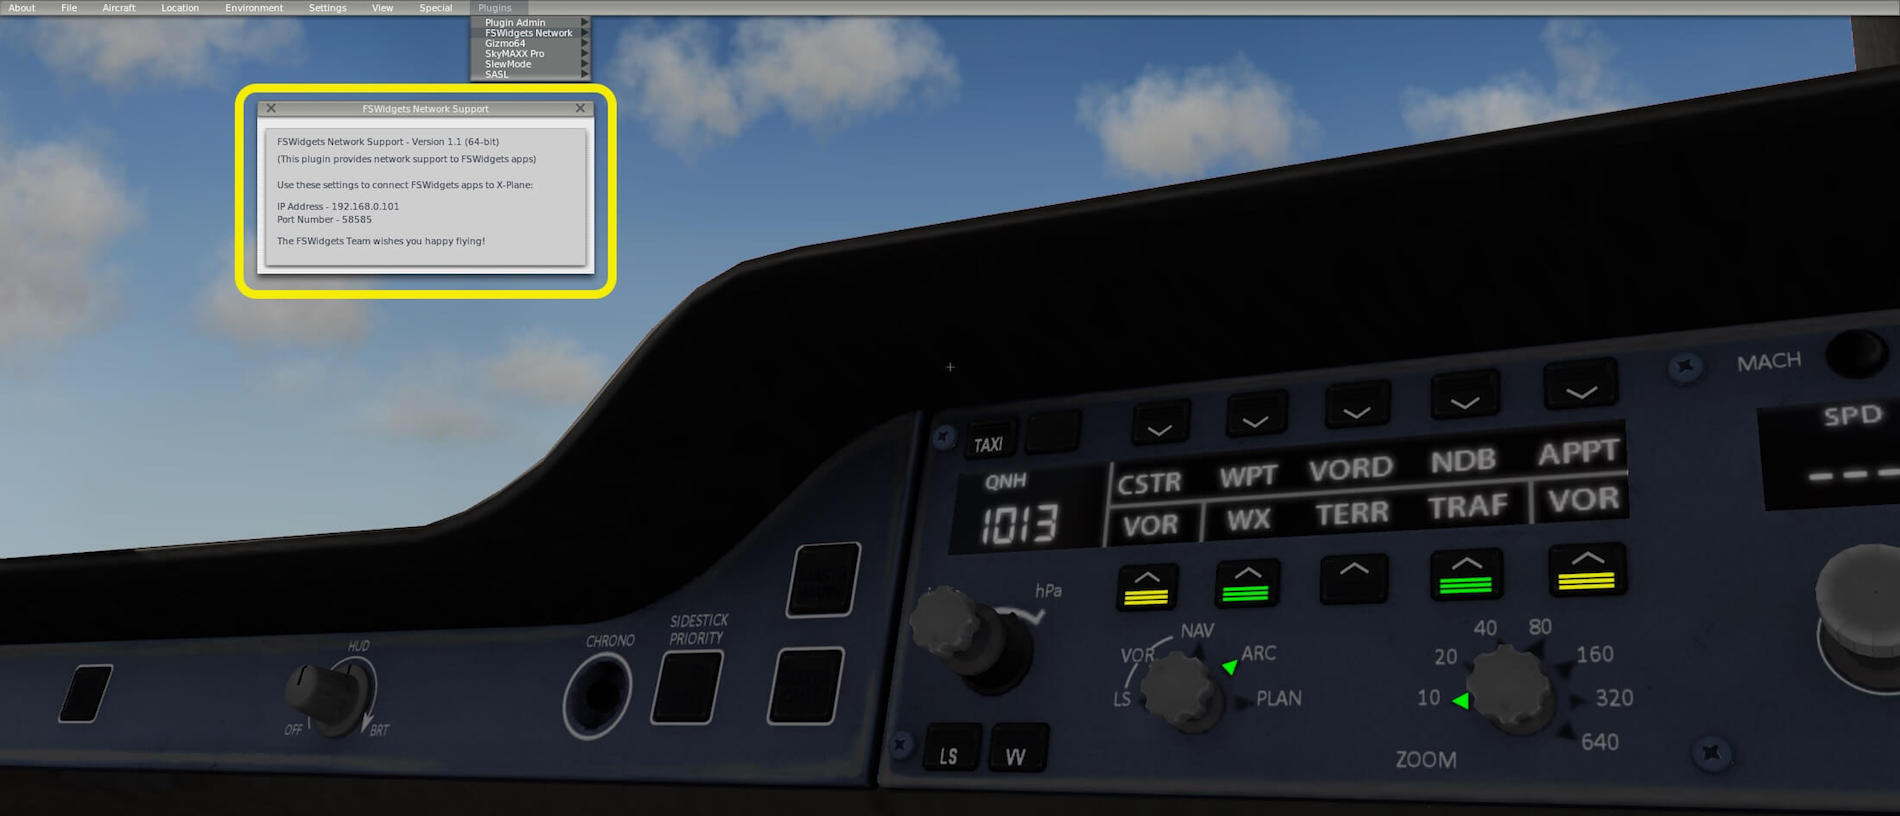
Start on Mac number I “X-Plane” and select from the X-Plane menu “Plugins – FSWidgets Network”. A small popup window appears with Show Info. Click on it. A FSWidgets Network Support window shows you, besides other information, the IP address and port used on Mac number I. Write this information down since you need the IP address and port data for Mac number II.
By the way, when you’ve downloaded the iGMapHD demo, then you must park your aircraft in the San Francisco Bay area else Mac number II (slave) IGMapHGD will tell you that you’re outside the demo area.
Anyway, this impression covers the payware version, so there are no limitations. I’ve finally decided to copy the iGMapHD app to my Desktop. That said, it’s time to explore all the options and menu items of iGMapHD, so let’s move on.

iGMapHD Options/Configure (Mac number II)
The first two things you need to do are, unlock the product, thus to register and to enter the IP address and port. A small note before starting with the menu options and configuration; you can make changes how iGMapHD looks like by adding/removing items from the map, change the map view and so on. You can use for this the Apple “iGMapHD menu bar” or you can make these changes via the product icons bar.
Register and IP address/port
Start iGMapHD, go to the Apple iGMapHD menu bar and select “Registration”. Enter your email and registration key and click “Done”. Restart the program or just reload the map.
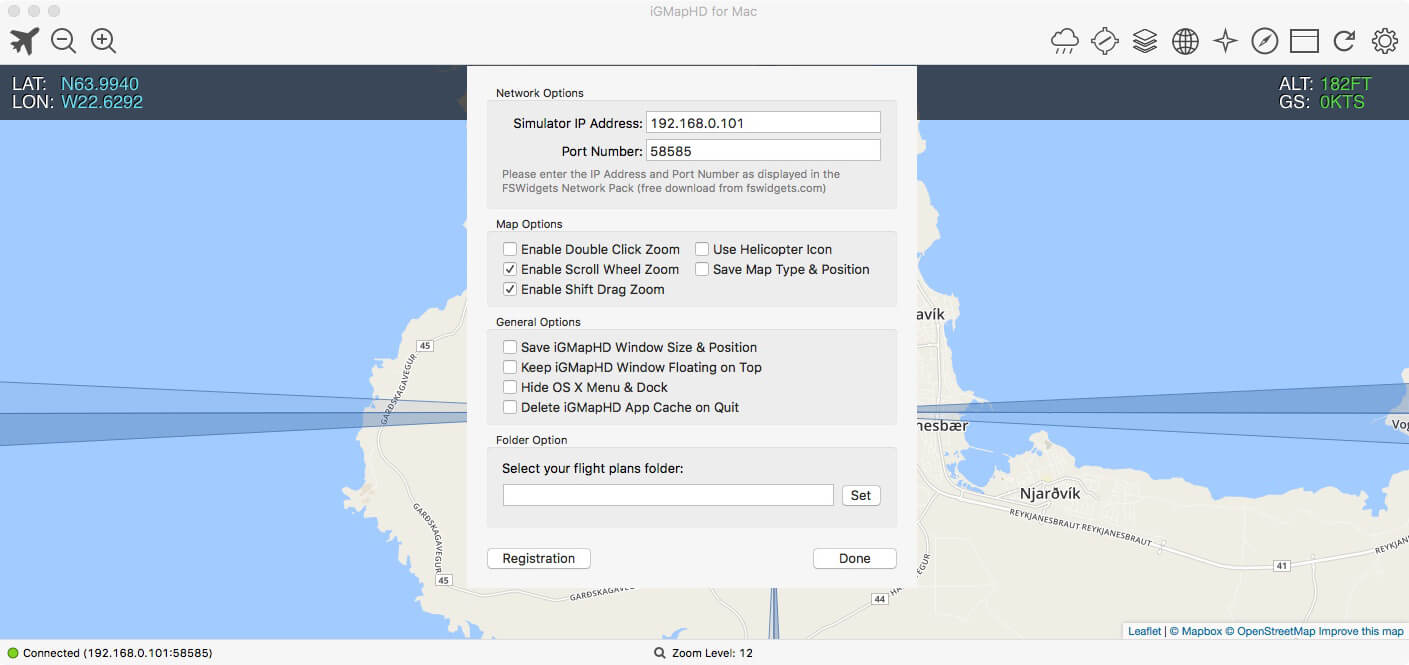
Ok, this was the example using the Apple “iGMapHD menu bar”, but as I mentioned before, you can also register via the “Gear” icon on the apps icons bar. Click the “gear” and a popup window appears. At the bottom, you’ll find the “Registration” button. Click it and you’re able to enter your email and registration key and click “Done”.
In the top section of this popup window enter the IP address and port of your Mac number I. The data you see in the screenshot are, just to make sure, mine data so don’t use this!

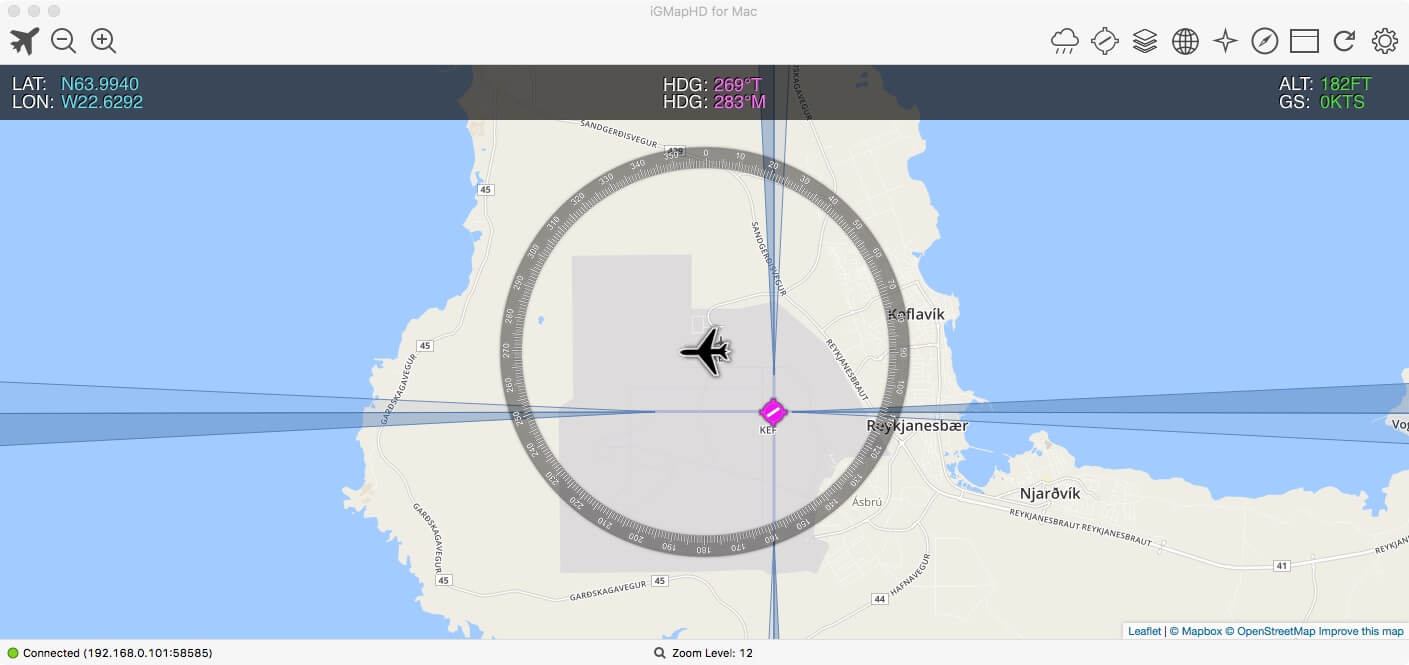
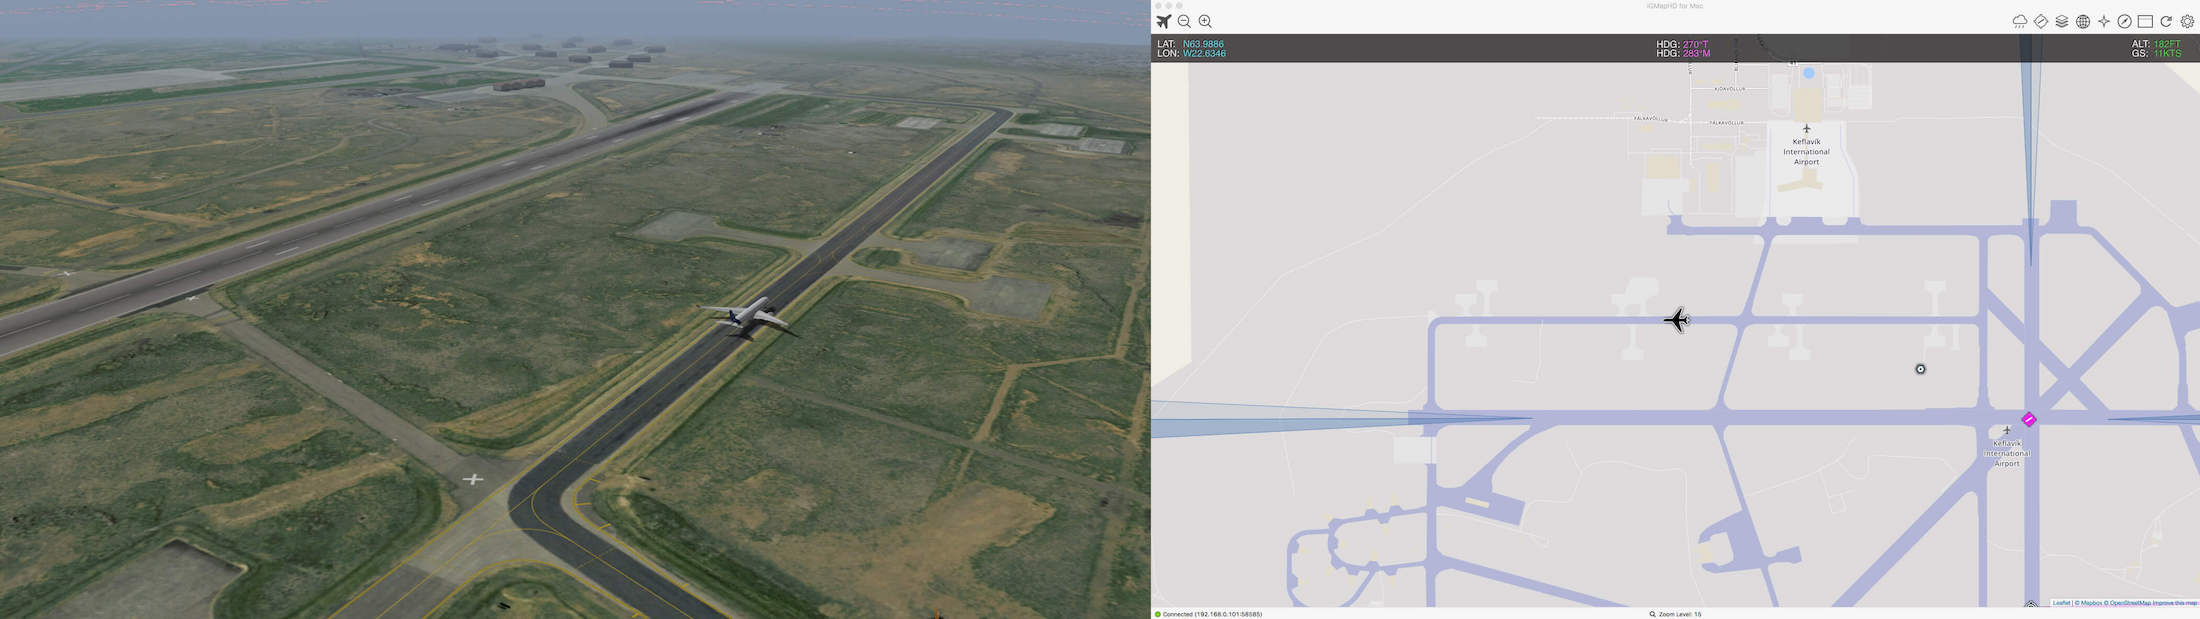
As mentioned before, iGMapHD has its own icons menu bar and below that you’ll find a dark grey semi-transparent HUD panel. This HUD panel shows you the aircraft latitude/longitude (LAT/LON), the headings (HDG TRUE and MAGNETIC) and the altitude (ALT) and ground speed (G/S). You can enable/disable this HUD panel by using the iGMapHD menu View – Toggle HUD Panel or much easier, by clicking the dedicated icon on the icons bar (see below).

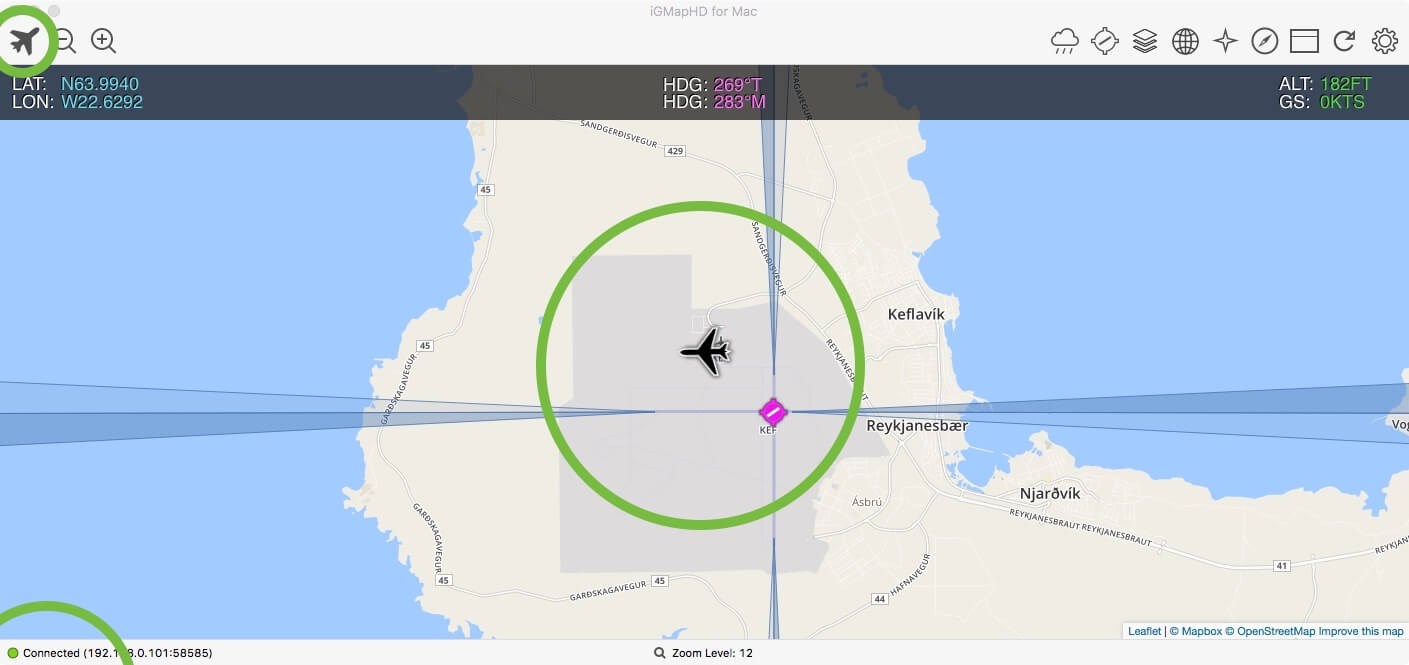
By default, thus at startup of iGMapHD, the product is disconnected from X-Plane, even if on Mac number I (master) X-Plane is up and running. This can be seen on the “not filled in” aircraft symbol on the icons bar. Besides that, you don’t see on the map your aircraft symbol.
To connect iGMapHD (Mac number II) to X-Plane (Mac number I) just click the aircraft symbol which will be, when the connection is successful, turn black. You’ll also see on the map your aircraft location/position at the airport, and in the left-hand bottom corner you see a green circle with your IP/port being connected. By the way, since there’s an active link between iGMapHD and X-Plane, the HUD panel shows now your actual LAT/LOG position, the TRUE/MAGNETIC HDGs, ALT and G/S.

What can be add or change in iGMapHD?
For that, we briefly discuss that with the help of the icons bar – right hand section – from left to right. Down below the summary of their names, and additionally some extra information whenever applicable although some popup windows speak for themselves and are therefore not further explained.
– Weather Data
– Navaid Data
– Cloud Based Charts
– Custom Base Maps
– Supported Flight Plan File Formats
– Toggle Compass Rose
– Toggle HUD Panel
– Clearing cache and reloading map data
– Network Options, Map Options, General Options, Folder Options and Registration
Weather Data Popup
Within this popup window you’re able to select different types of weather information. When you click for example on the “World Cloud Data”, slowly this data is implemented in the map. It is by the way, not downloaded from the simulator (Mac number I), but via the Internet directly on Mac number II. I only find that it’s difficult to see if this option you clicked is active or not. There’s no icon color change or something else that indicates that you activated it. When you click this button again, the function is disabled. When you’re lost in respect to which buttons you’ve clicked, you can always use the “Clear All” option and start all over again.

Navaid Data Popup
The navigation aid, a powerful tool in my humble opinion, allows you to select for instance the NDB and/or VOR/VORTAC beacons as well as waypoints. Handy when you fly a pattern along waypoints on Mac number I. Other navaid data are airports and heliports. Just click and see for yourself the output on the map. By the way, when you click an icon, a small “tick” is added to the icon. That said, here you can clearly see which navaids you’ve activated. Worth to highlight the following; you can only add one navaid per time. That said, you select NDB beacons and automatically these are added, but the navaid popup window disappears. When you want to add VOR beacons too, you need to open the navaid popup, select VOR beacons and automatically the VOR beacons are added, but the popup window is gone again. More navaids? Follow the previous steps again. I find it more friendly when it was possible that you could tick the navaids you want and when done, select a load or done button.

Cloud Based Charts Popup
Together with the iGMapHD payware version, many cloud based maps are included. Basically, everywhere you fly, you’ll have access to maps. Just click them and they are overlaid at the background image which is by default a Google clone map.
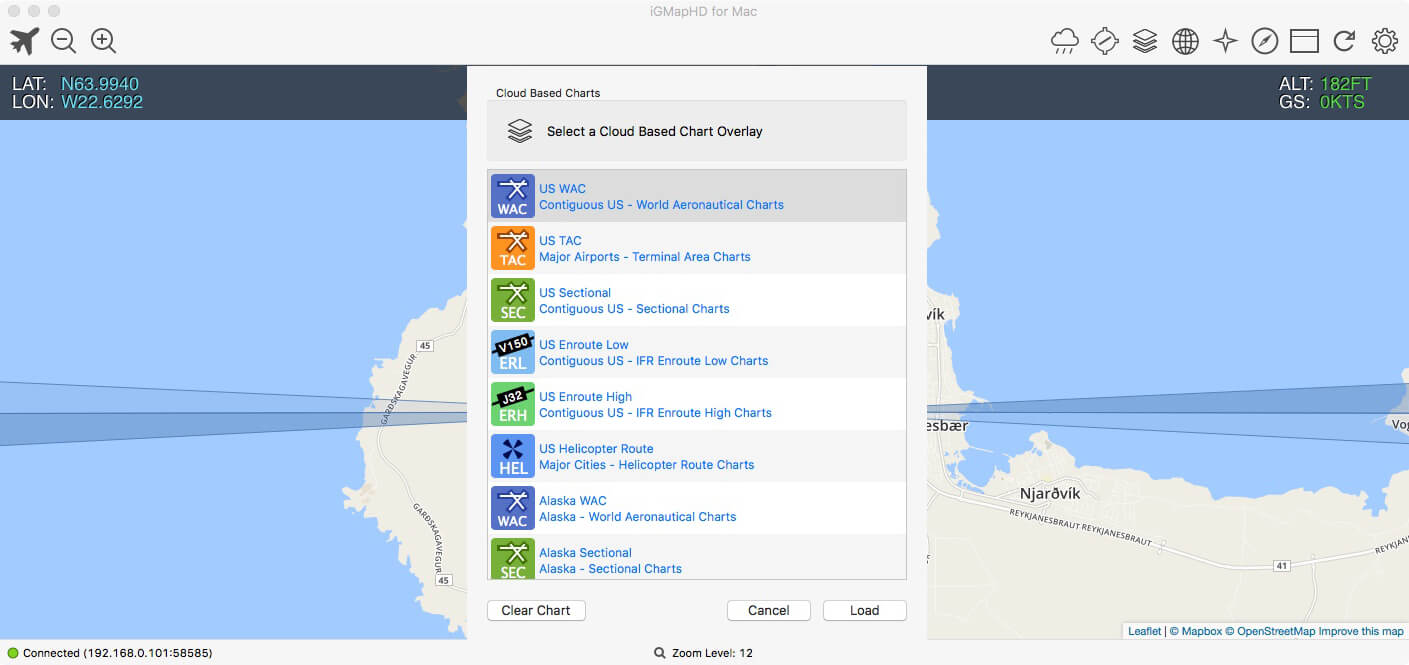
Let me give you an example; I’ve parked my aircraft at KSFO and I select “US Enroute Low”. First, you can clearly see which chart selection you made since it’s highlighted although it must be clear that you can only select one chart at the time. Once selected, click the Load button. The sudden map change is huge. First you looked at the Google clone map of San Francisco area and then you’re looking to a enroute chart, but this is what you wanted, right?
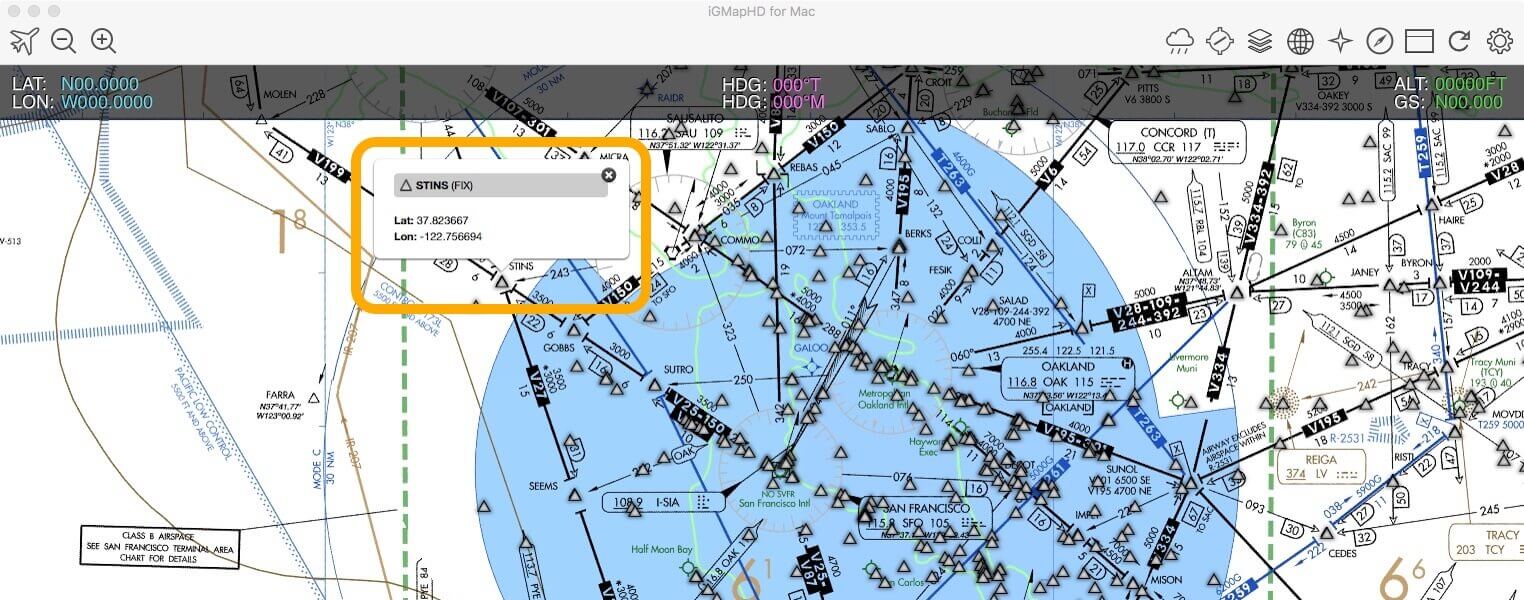
Remember one thing when it comes to fixes or intersections (waypoints). These are drawn on the chart or are a part of the chart layout and have no function, no popup facility. They are just drawn on the map! Although the chart shows me the name of a fix/intersection, I can’t do anything with that. But here’s the trick; select the fix/intersection navaid within the Navaid Data Popup. Now you see that for example with fix/intersection STINS, I can click on it and can read its LAT/LON position. See the following two screenshots.

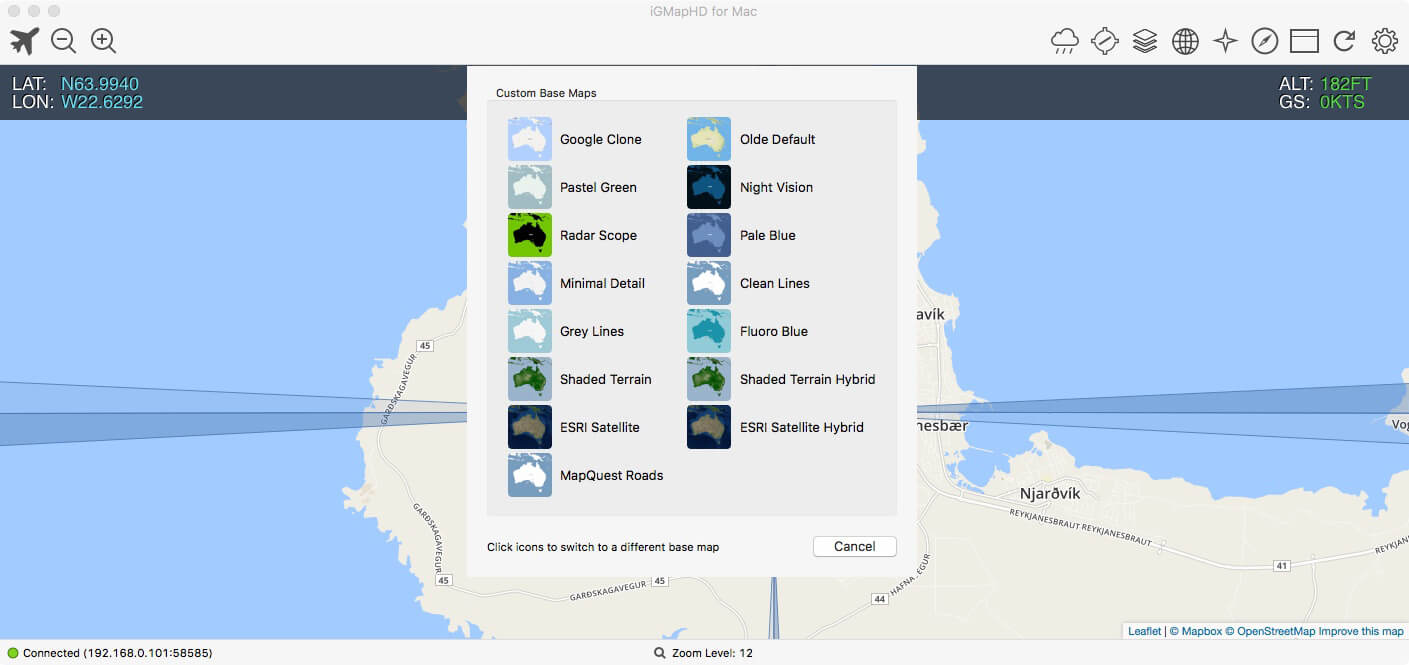
Custom Base Maps Popup (self-explanatory)
Although there’s not much to write about, it allows you select a different background image of your choice, but keep in mind that when you select a chart from the Cloud Base section, it will overlay this background map depending on the used zoom level.
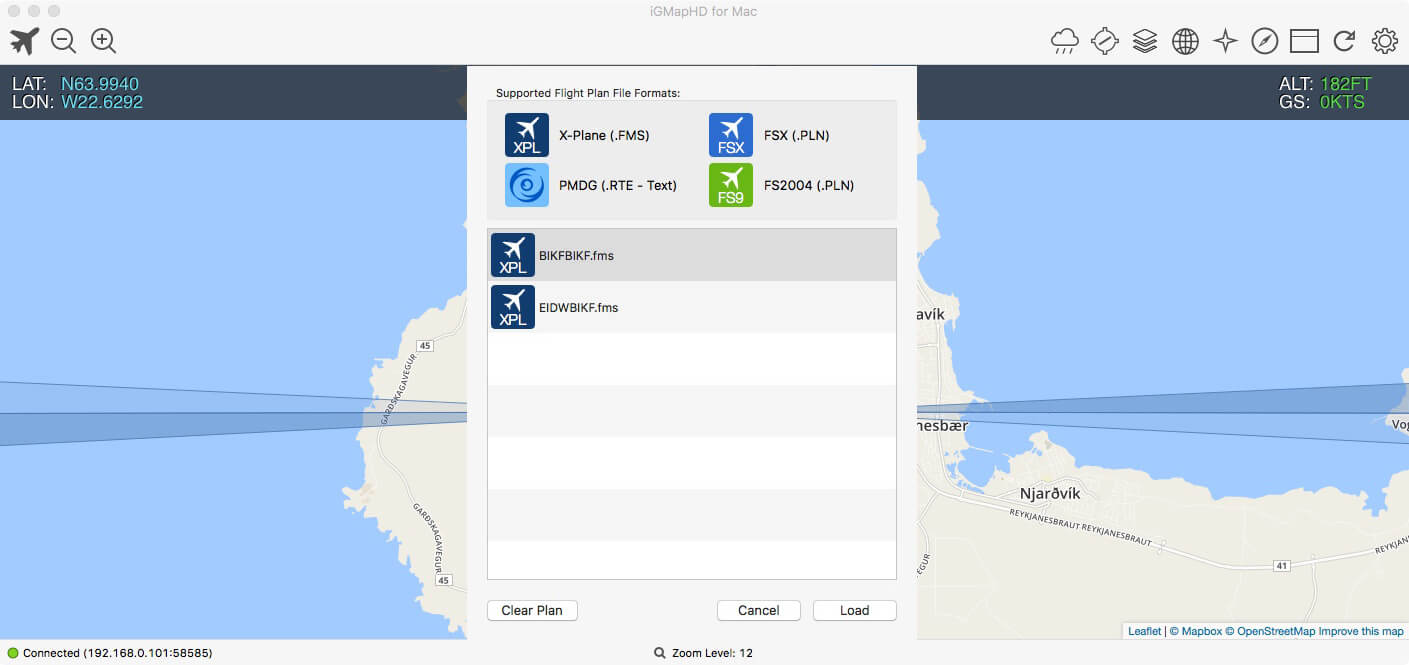
Supported Flight Plan File Formats Popup
What’s supported and what’s not, that’s something you can read yourself on the top section of the popup window. For X-Plane it only supports right now “fms” while in the meantime many other add-on aircraft also support “txt“, ”pln” and “flp” formats. But how to load a flight plan? Good question since on the screenshot below, there’s nothing visible.
According to the FSWidgets online help guide “If you run iGMapHD from the X-Plane.resources/plugins/FSWidgetsGMap folder, any Flight plans added to yourX-Plane/Output/FMS folder will be automatically loaded into the Flight Plans menu. If you do not run iGMapHD from the X-Plane.resources/plugins/FSWidgetsGMap folder, you will need to set the custom flight plans folder on the Preferences panel.”
In the screenshot below you see that I loaded several X-Plane flight plans. In my case with 2 Macs, I created in the users Documents folder a sub-folder “FSWidgets iGMapHD FP”, but you can of course use any other name and you can even make a folder on your Desktop. Whatever you prefer!
Toggle Compass Rose and toggle HUD Panel Popups (self-explanatory)

Clearing cache and reloading map data Popup
If you want to refresh the map for any reason this option allows you to reload the map data from the server. This function will completely refresh the map and return it to the previous saved settings or to the default, depending on what option you have selected under Preferences. Please note that performing this step means any loaded flight plans will also be cleared.

Network Options, Map Options, General Options, Folder Options and Registration Popup
Since the “network- and folder options” as well as the “registration” are already discussed before, I’m left with the map- and general options, but it must be said that these options are self-explanatory.
And how does it ……?
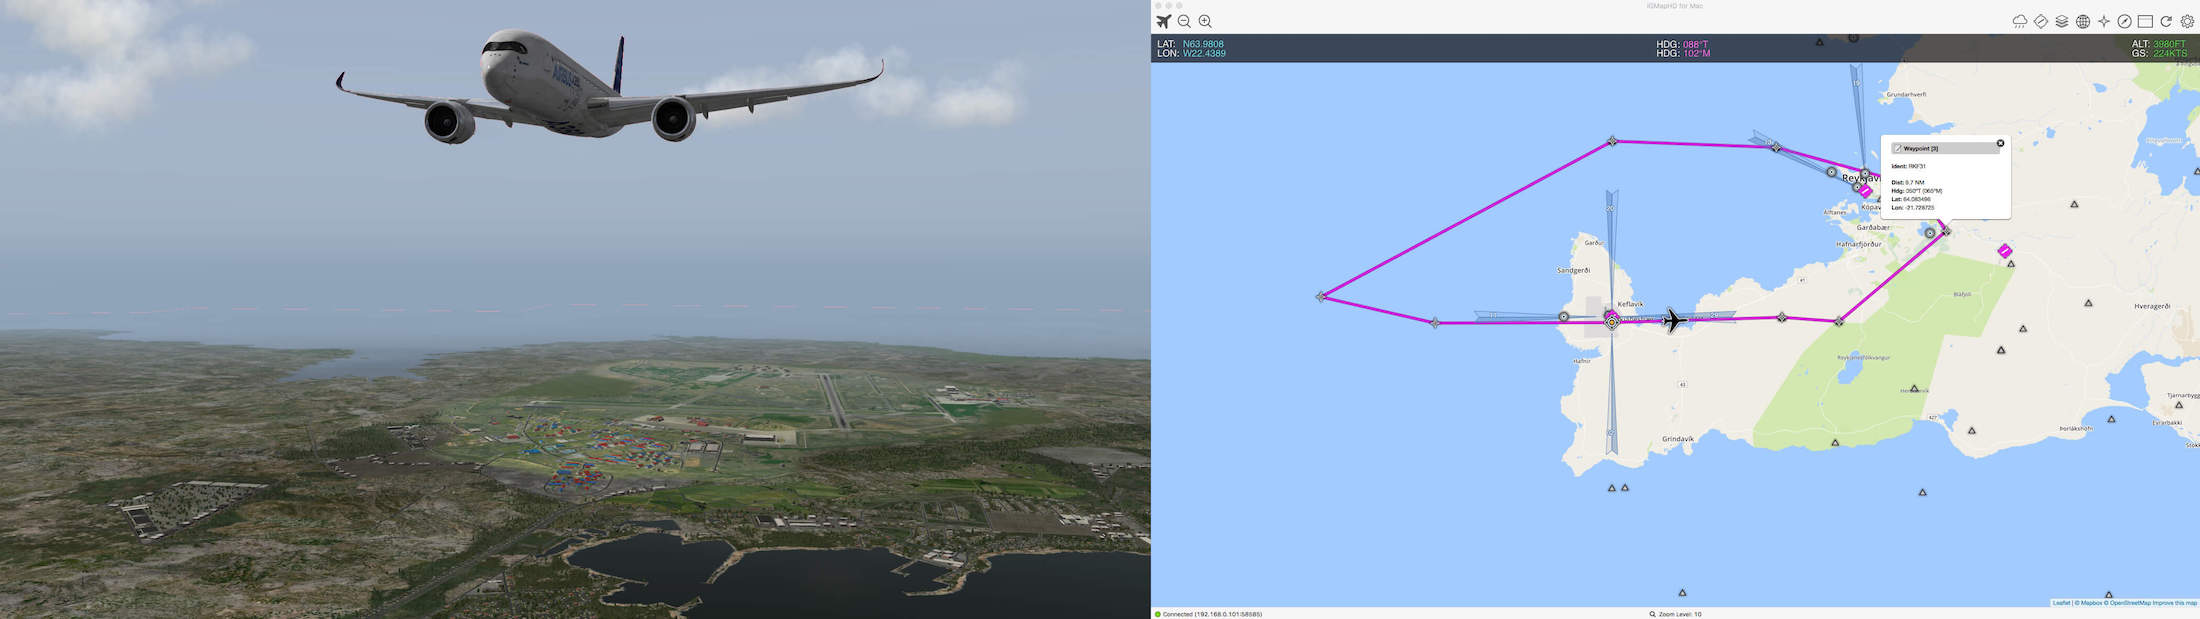
BIKF (Keflavík International Airport) to BIKF
How does it look like and how easy is it to handle?
To answer this I need to setup a flight on Mac number I and use a particular chart on Mac number II, load the flight plan in iGMapHD and see what happens. I decided to make a test flight with the FlightFactor aero/QPAC A350 on Iceland. The flight plan starts at BIKF from the apron, takeoff from runway 11, following a short flight following fixes to 4000 feet. At the end, via an approach over the sea, an ILS landing for runway 11 thus a flight plan that looks like BIKFBIKF.fms. See below the contents of this “fms” file.
A
3 version
1
9
28 +63.978_-22.605 170.000000 63.978180 -22.605436 0.000000
11 KEILA 0.000000 63.984444 -22.158890 0.000000
11 FJALL 0.000000 63.979721 -22.009167 0.000000
11 RKF31 0.000000 64.083496 -21.728725 0.000000
11 MURTA 0.000000 64.135834 -21.811111 0.000000
11 REKTU 0.000000 64.179443 -22.173889 0.000000
11 OTRON 0.000000 64.186943 -22.604721 0.000000
11 KEF29 0.000000 64.008057 -23.369722 0.000000
11 VAKLO 0.000000 63.977779 -23.070000 0.000000
1 BIKF 170.000000 63.978180 -22.605436 0.000000
0 —- 0.000000 0.000000 0.000000
0 —- 0.000000 0.000000 0.000000
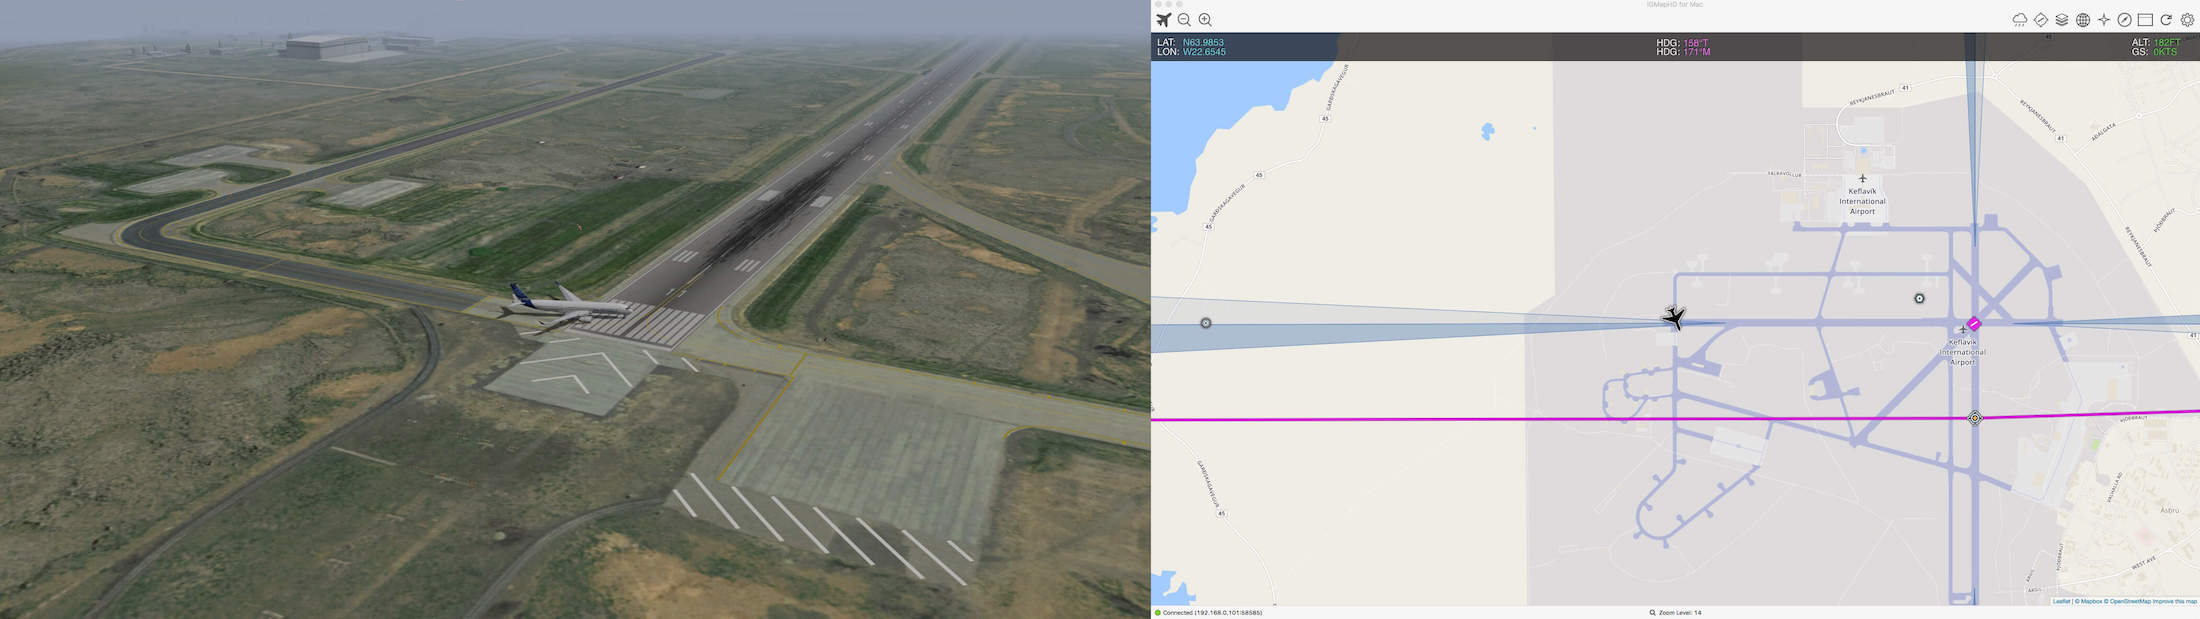
The first thing I noticed is, although Iceland belongs to the European Union, it’s not covered with the “Europe ONC (Operational Navigation Charts) chart nor with any other chart. That’s a pity I would say. Neither less, still worth to see how it looks like.
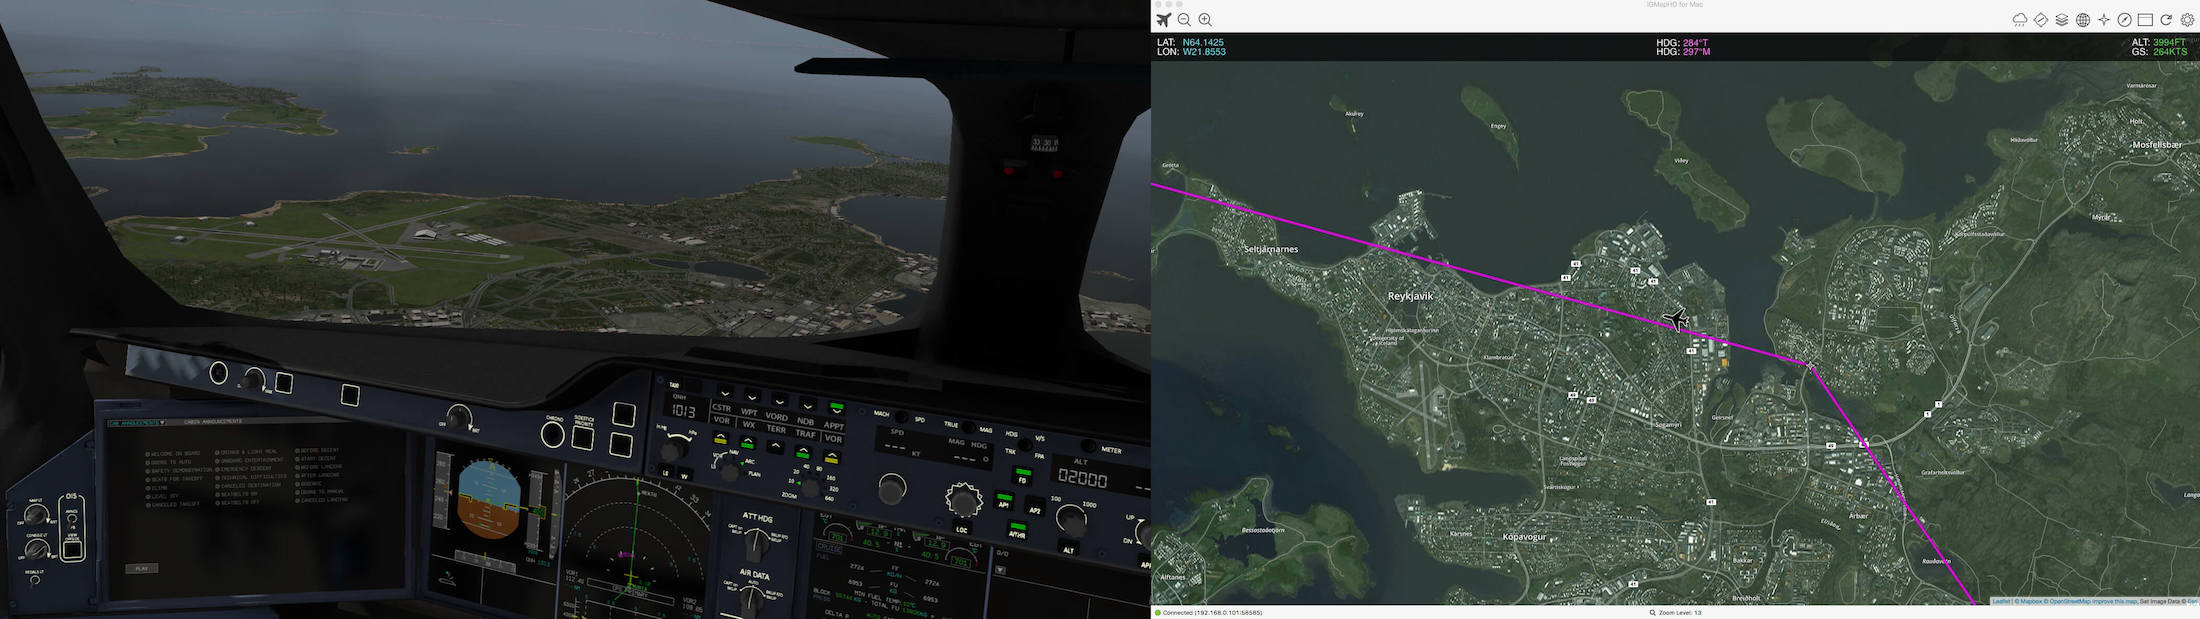
I still have enough base maps to choose from. On the following compiled screenshots, you’ll find on the LH side the image taken from within X-Plane (Mac number I | master) with on the RH side an iGMapHD screenshot (Mac number II | slave). I played a little with some of the available base maps. You can see examples of “Google Clone”, “Olde Default” and “ESRI Satellite”. For some reason, when selecting “Shaded Terrain”, it gave me “Outside Map Coverage”. Perhaps there’s a logical explanation for it, but I had hoped to use it on this test flight. Whenever applicable on the duo screenshots, I’ve marked “landmarks” of what you see in the real sim and how it looks on iGMapHD. Regarding the “shaded terrain” issue, time to contact Fermin. He came up with the following logical explanation “The Shaded Terrain base map is a custom map we generated from SRTM data. Unfortunately, SRTM data is only available between latitudes 60N and 60S. Since Iceland is above 60N we display that message about being outside the coverage area for that particular base map“.
Although this isn’t a movie, which wasn’t a bad idea either, it will give you a good idea what iGMapHD can do for you. For me, it’s exactly doing what I want. Iceland may be then not covered with aviation charts, it offers me the navaids which is important for me when you compare that with this FlightFactor aero/QPAC Airbus A350 ND (Navigation Display) and MCDU flight plan.


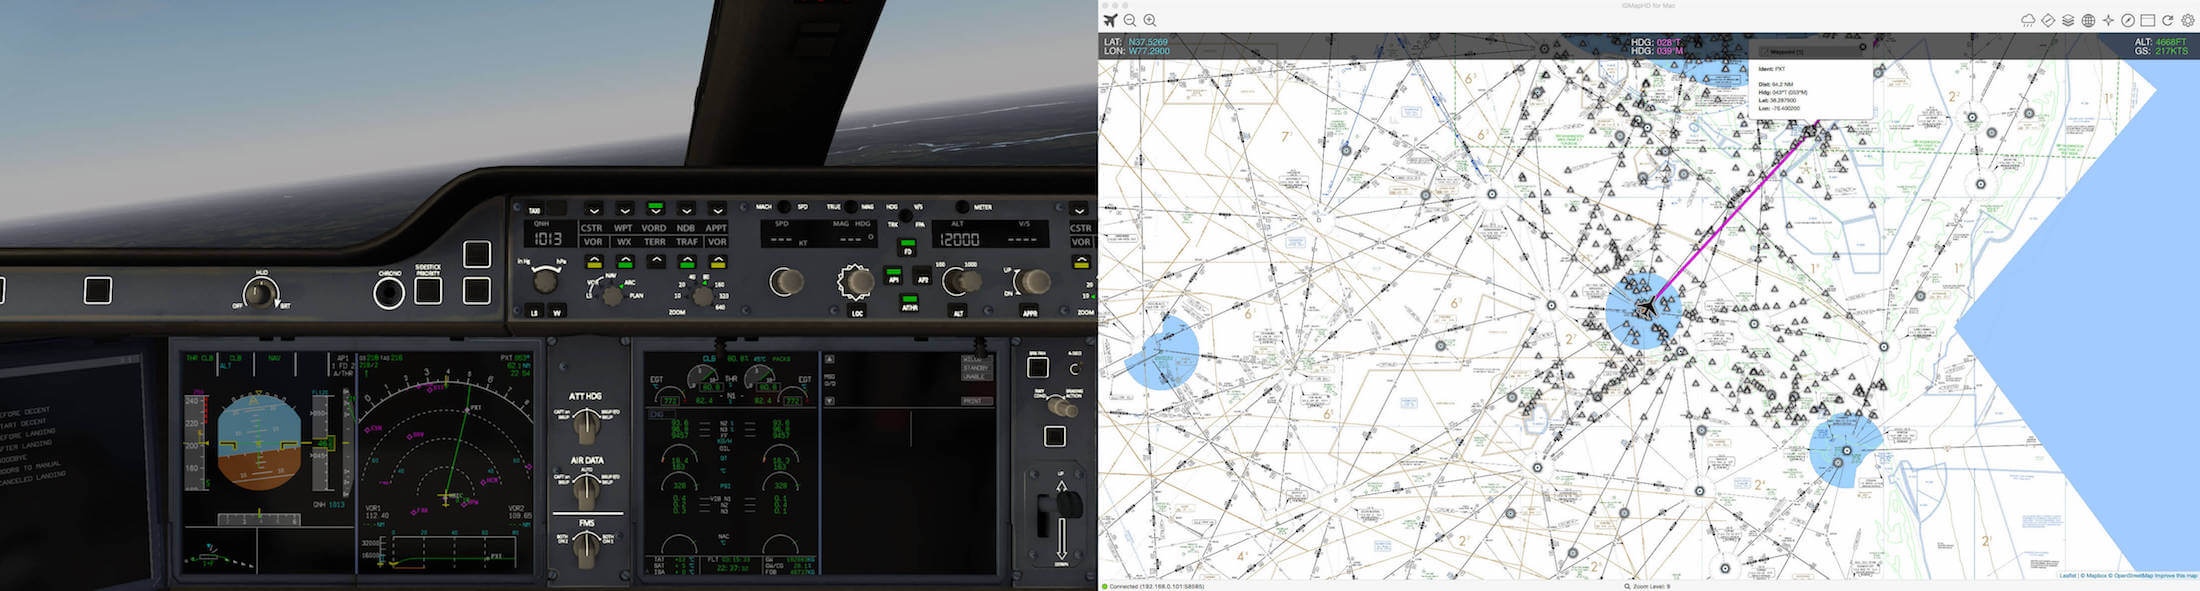
KRIC (Richmond International) to KBOS (Logan International)
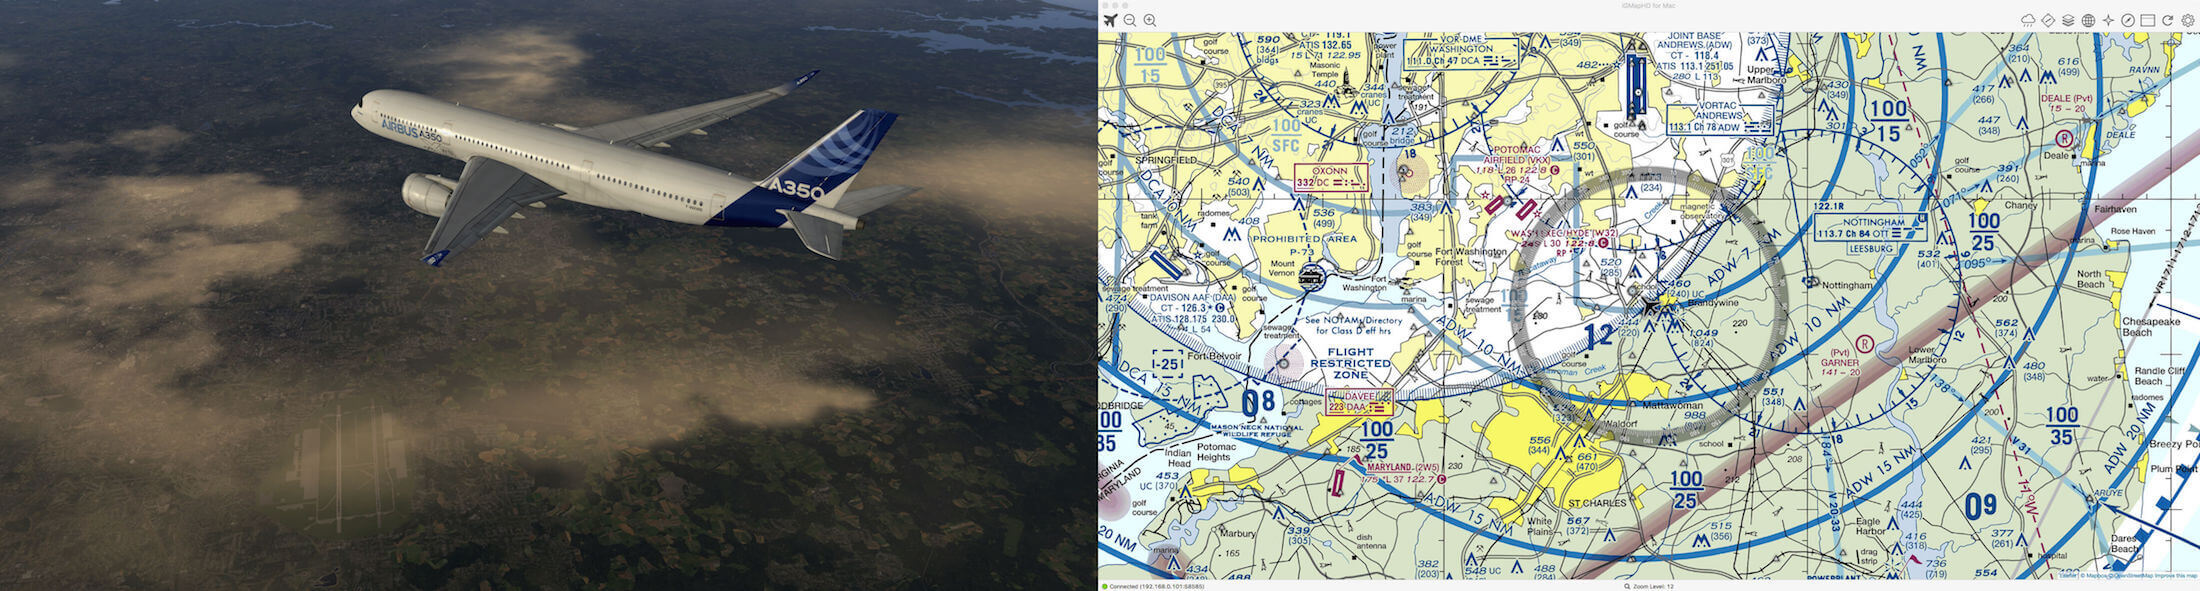
Keep in mind that when using a dual Mac setup (Mac number I (master) and Mac number II (slave)) and using in this configuration for example the US Sectional, US Enroute Low and US Enroute High, changing the zoom level could bring up the famous Apple spinning beach ball. There’s nothing wrong, but the iGMapHD program need to recalculate which could take a little longer then when you use no chart at all. Another item to bring forward is the you can zoom in on the previous charts, but not unlimited.
I noticed that with a zoom level of 11 you still have the selected charts are mentioned about. Zooming in one level more, thus zoom level 12, brings you back to the base map (for example Google Clone, Olde Default, Pastel Green, Grey Lines, Shaded Terrain, etc.). So once ore …. when you’ve selected one of the available Cloud Based Charts, it will overlay the base map. Zoom levels 11 or lower (10, 9, 8, 7 etc.) is no problem, but zooming in too much, zoom levels 12, 13, 14 etc. shows you no longer the chart, but the base map.
Fermin Fernandez from FSWidgets would like to give you some additional background information regarding the zoom levels. Fermin continues “In the case of aero charts, they are only produced by the FAA at a certain resolution which allow for maybe 4 or 5 readable zoom levels. When the aero chart is selected from the menu the map will automatically change to the best zoom level for that chart. If you zoom out or in past the available zoom levels then the underlying base map appears, but you can zoom back to the default best zoom level again manually or by reloading the chart. One word regarding the zoom levels (10, 11, 12, etc.). These are the “Google Maps” format zoom levels and are in reverse where 1 would be the world-wide view and 18 would be a detailed street-level, or taxiway-level zoom.”
Oops, almost forgotten … where to find that zoom level indicator?
In the middle at the bottom of the iGMapHD window, you’ll find the zoom level. Zooming in / out can be done with the magnifier glasses at the left-hand top of the iGMapHD window or with the mouse (double click or scroll wheel). These last two option are activated via the “gear” icon in the menu bar.
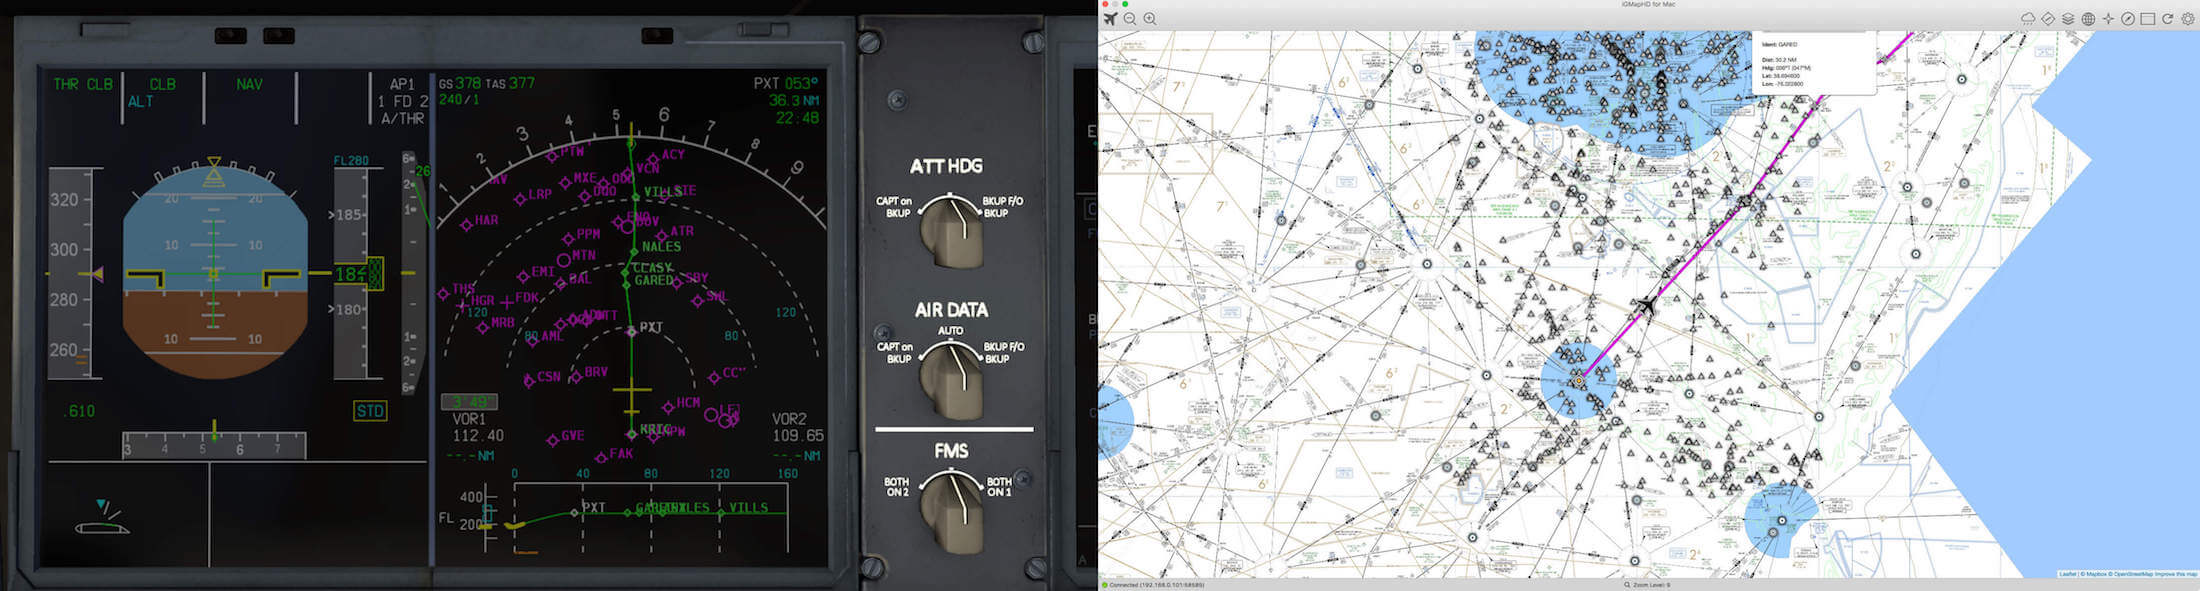
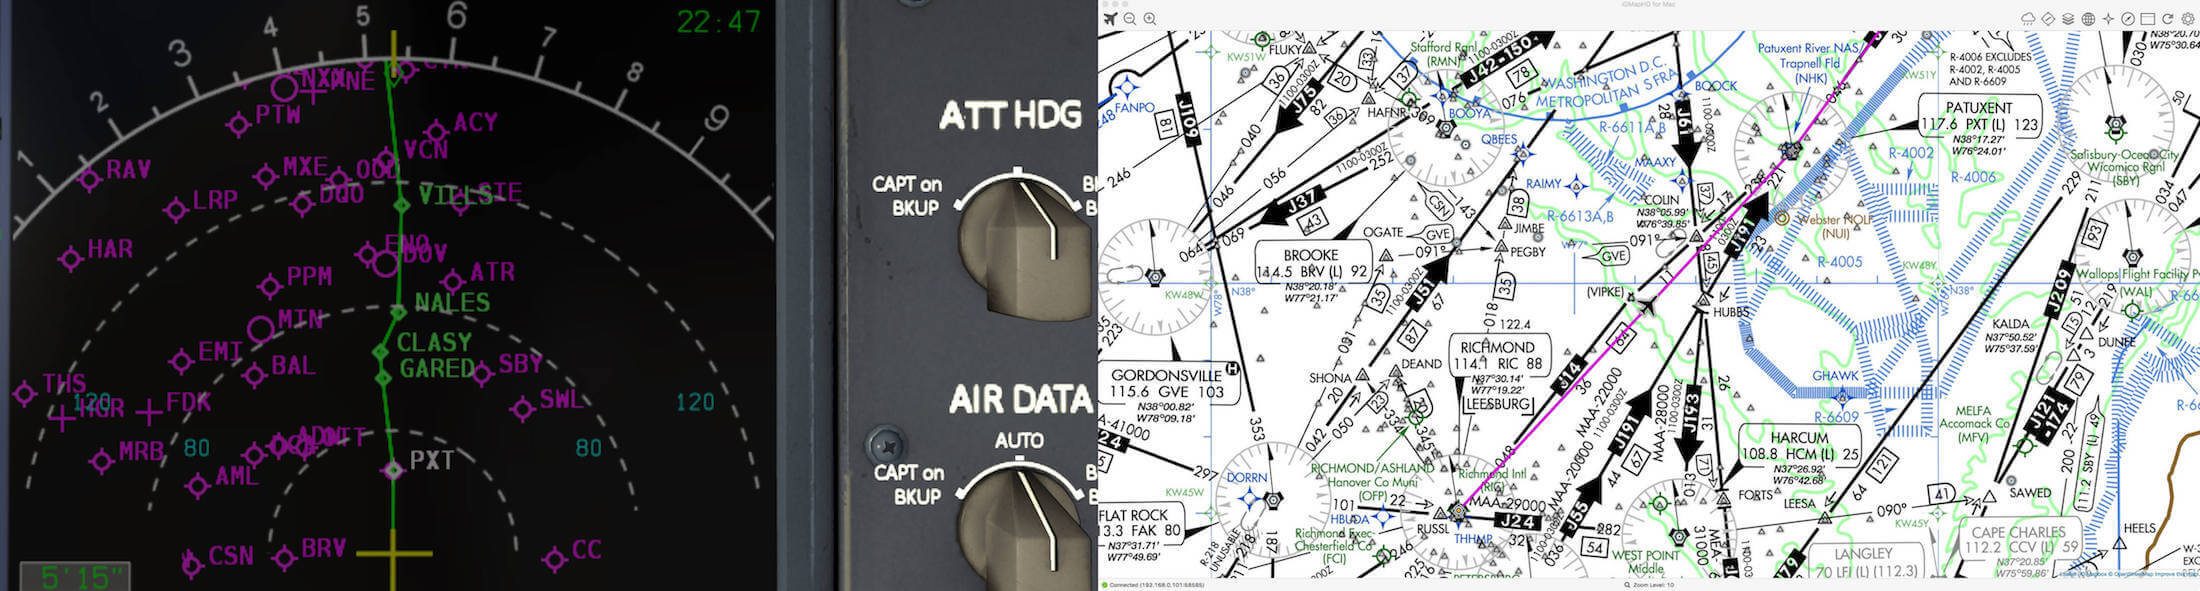
I would like to show you one more example with a flight from KRIC to KBOS. It won’t cover the complete flight, but I would like to show you a couple of US charts and the way it looks like on this regular flight.
The following screenshots give you an idea how it looks when using different US charts. Starting at the top, the 1st two screenshots have the US Enroute Low charts included, the 3rd screenshot is in combination with a US Enroute High chart. The 4th screenshot includes the US Sectional while the 5th fifth and last screenshot has the Washington US TAC (Terminal Area) chart. I’m aware that flying on these altitudes, it’s not logic using the US sectional and US TAC charts, but they are only there to show you what’s possible.

Setting Up “iGMapHD for Mac” on 1 Mac
Basically, it isn’t much different than what was already written in the section “Setting Up “IGMapHD for Mac” on 2 Macs” with the exception that the iGMapHD for Mac app isn’t installed on another Mac, but on the same computer that also has X-Plane installed. I mentioned it already before, when you want to fly full screen, then you can keep iGMapHD floating on top via the option called “Keep iGMapHD Window Floating on Top” on the Settings panel. But, I challenged myself to get it working on a second Mac, but I can imagine that you don’t have a second Mac, but that you have an iPhone, iPad or Smartphone/tablet (Android).
For the iPhone you have iGMap, for the iPad you have iGMapHD, and for Android you have GMapHD and last but not least, you also have the same product I reviewed for Windows.
Summary
It has become a longer review then I expected. Ok, better too long and clear to everybody and helpful, then short and non-informative. To me, iGMapHD for Mac is exactly what I had in mind. I does what I expected, it does where I had hoped for. And yes, as reviewer I’m aware that I haven’t paid for the product, but at the same time, the developer expects a review/impression in return which is logic I think?
All kind of FSWidgets products can be bought via the FSWidgets website and believe me, there’s a huge choice of products to choose from, ranging from Windows, Mac, iOS and Android equipment, and then also for FS2004, FSX and X-Plane although we’re at X-Plained.com are only interested in X-Plane related products.
The reviewed iGMapHD for Mac cost 49.95 USD while the EFB for Mac (Electronic Flight Bag) is slightly cheaper, namely 34.95 USD. On purpose, I decided not to include a review of their “EFB for Mac”. I’ll must likely do that in a separate impression.
As you know now, iGMapHD for Mac was tested on two iMacs. One iMac (master) is a 27-inch Late 2013 model while the other iMac (slave) is a 27-inch Mid 2011 model. Both have macOS Sierra 10.12.2 installed on it while for X-Plane I used version 10.51.
Some words about X-Plane 11 and iGMapHD for Mac.
Although X-Plane 11, per December 31st 2016, is still beta, installing the same FSWidgets network plugin under the same folder as with X-Plane 10 and starting the iGMapHD app on the other Mac or on the same Mac works flawless. Connections … no problem, smooth presentation of the different base maps and cloud based charts. Good news!
Whenever you need more information or having questions related to this review, please feel free to contact me via Angelique.van.Campen@gmail.com or Angelique@X-Plained.com.
With Greetings,
Angelique van Campen
| Add-on: | Payware FSWidgets iGMapHD for Mac |
|---|---|
| Publisher | Developer: | FSWidgets | FSWidgets |
| Description: | Moving map display with many options |
| Software Source / Size: | Download / Approximately 3.5MB (unzipped) |
| Reviewed by: | Angelique van Campen |
| Published: | December 31st 2016 |
| Hardware specifications: | - iMac 27″ 3.5Ghz Late 2013 - Intel i7 3.5Ghz / 3.9Ghz during Boost Mode - NVIDIA GeForce GTX 780M 4096 MB - 32 GB 1600 MHz DDR3 - 1 internal 1TB SSD (Sierra 10.12.2) - 3 external 1TB SSDs - Saitek Pro Flight System |
| Software specifications: | - Sierra (10.12.2) | El Capitan (10.11.6) - Windows 10 Professional - X-Plane 10.51c | X-Plane 10.51m |
0 Comments