QuickPlan for Mac from FSWidgets
Introduction
No no, don’t worry, I don ’t have shares in FSWidgets stocks! It’s just a matter of seeking for flight planning programs and since FSWidgets owns for the Mac OS X (macOS Sierra) platform a flight planning program, I’m in for testing it.

Who is FSWidgets and what is QuickPlan for Mac?
FSWidgets is a software development team based in Australia, specializing in add-ons for Laminar Research X-Plane and, although not applicable for this impression, Microsoft Flight Simulator. Both of its founding members have extensive experience in creating award-winning add-ons for Flight Simulator and have been active in the flight simulation community for well over a decade.
Anyway, what is QuickPlan for Mac version 3.0 (desktop) for kind of program?
According to the dedicated FSWidgets web page “QuickPlan for Mac is a visual point and click flight planner that makes it easy to generate flight plans in native X-Plane formats (and also for, not applicable to us, FSX, FS2004). It makes a great companion for our moving map apps iGMapHD for Mac, iGMapHD for iPad and EFB for iPad.
The entire route is generated visually, by clicking the map to add the departure airport, intermediate waypoints and arrival airport in the same order that you intend flying the plan. During plan creation and after adding the final arrival waypoint you also have the opportunity to remove any of the intermediate waypoints before saving the plan in your preferred format.
Free demo data includes the Cuba/Puerto Rico WAC and San Francisco Bay area Nav Data. Use your Cloud Key to access any FSWidgets Aero Chart and World Nav Data products you already own”.
Firmin Fernandez from FSWidgets would like to highlight the following “Please keep in mind that QuickPlan is not a fully-featured flight planner, packed with all the bells and whistles that sometimes also make these applications complicated to use. Borrowing from our mobile app development experiences we aimed to provide a solution, not a large list of often unused features. The design concept is to provide a quick and easy X-Plane (and yes, also for FSX, FS2004) native flight plan file creator (i.e. .pln and .fms files). Because it uses visual point and click, it perhaps leans towards being more suited to shorter VFR/IFR style usage, rather than long-haul flying.”
QuickPlan for Mac can be used in Freeform Mode, Advanced Mode, or a combination of both, but what is what?
In the Freeform Mode you simply click anywhere on the map and QuickPlan will allow you to add it as a generic waypoint. VFR pilots often use towns, lakes and other unique geographic features and with QuickPlan you can add any geographical location shown on the base map. Plans created this way label the waypoints automatically with generic names (e.g. DEP, WP1, WP2, ARR). If desired, the entire route from departure to arrival can be created without reference to any navigational aids or official airports. This is handy for bush pilots who often use unlicensed airfields and small landing strips (or seaplane landing areas). Helicopter pilots can also quickly create plans that depart from off-airport locations like building rooftops or land on a road.

In the Advanced Mode you own the FSWidgets Cloud Based World Nav Data product. With that, you can create more advanced flight plans by clicking on any of the icons displayed on the map to add them as waypoints – airports, VOR’s, NDB’s and intersections. Plans created this way label the waypoints automatically with airport and navigational aid identifiers taken from the Nav Data (e.g. KSFO, OSI, LV, FABLA). Courtesy of FSWidgets.
Where to Start?
Getting the product
Compared to my previous “only for Mac” impressions, QuickPlan for Mac doesn’t need a network connection with X-Plane although I want to make clear that QuickPlan saves your created flight plan in default X-Plane format which is “fms” and “txt” format. So, where and what is needed to use/run QuickPlan for Mac?
– QuickPlan for Mac software pack from dedicated FSWidgets page.
– Mac running Snow Leopard or later.
– Mac having installed X-Plane 9 (tested with X-Plane 10) or later.
– Internet access required to access the online mapping engine.
Although X-Plane 11 isn’t yet in the above list, the flight plan format (fms) hasn’t changed. That said, flight plans created with QuickPlan can also be used for X-Plane 11.
Where to install QuickPlan?
This is entirely up to you. You can make a shortcut to your Desktop, you can copy the product in your Documents folder or even on a remote Mac. What said before, you don’t need an active/running X-Plane. It works as a standalone product!
Configure QuickPlan
The first thing I need to do is unlocking the product which means registering. As applicable for all other FSWidgets for Mac products; you can make changes how QuickPlan looks like by adding/removing items from the map, change the map view and so on. You can use for this the Apple “QuickPlan menu bar” or you can make these changes via the product icons bar (known as the tool bar) which will be visible from the moment you start QuickPlan.
Registration
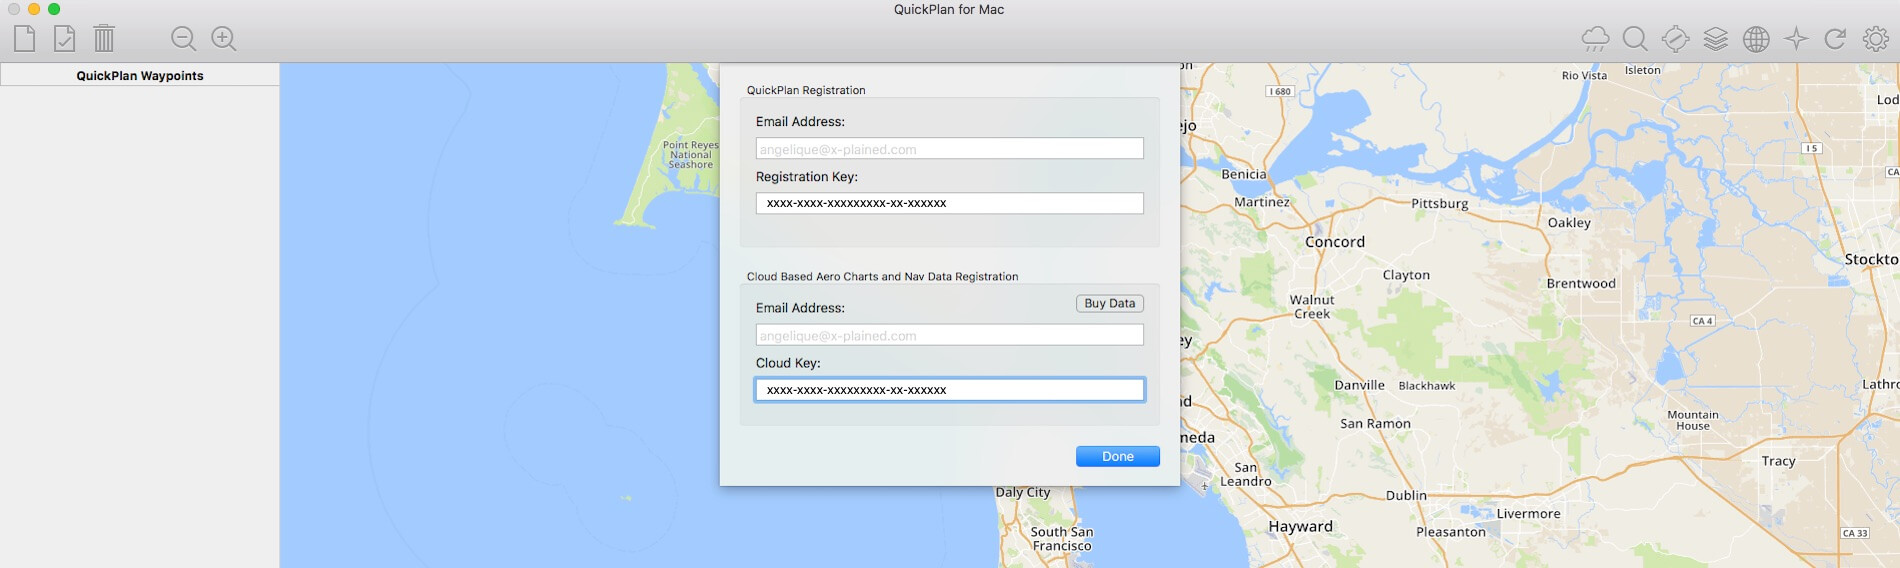
The quickest and easiest way to register QuickPlan is to start QuickPlan, then go to the Apple menu bar and select QuickPlan – Registration. As you can see on the screenshot below, the window consists out of two sections. Registering the product thus QuickPlan, has to be done in the upper section while the lower section is for the Cloud Based Charts and Nav Data. First, enter your email and registration key in the upper section. I’ve tested and reviewed QuickPlan for Mac in the Advanced mode and that means I bought the cloud key to get access to the Cloud Based Charts and Nav Data. After I entered also my email address and the belonging registration key in the lower part of the window, I click the “Done” button. Restart QuickPlan or just reload the map, but how to reload the product?

Reloading QuickPlan can be via the Apple menu QuickPlan – Map – Reload Map or, which we will see in a minute, via the reload icon on the tool bar.
This was the example using the Apple “QuickPlan menu bar”, but as I mentioned before, you can also register via the “Gear” icon on the tool bar. Click the “gear” and a popup window appears. At the bottom, you’ll find the “Registration” button. Click it and you’re able to enter your email and registration keys as described above.

What can be added or changed in the QuickPlan overview?
For that, I discuss each icon you see on the QuickPlan icons bar, starting on the left, moving to the right. This will result in:
– New Plan
– Save Plan
– Clear Plan (self explanatory)
– Map zoom IN/OUT (self explanatory)
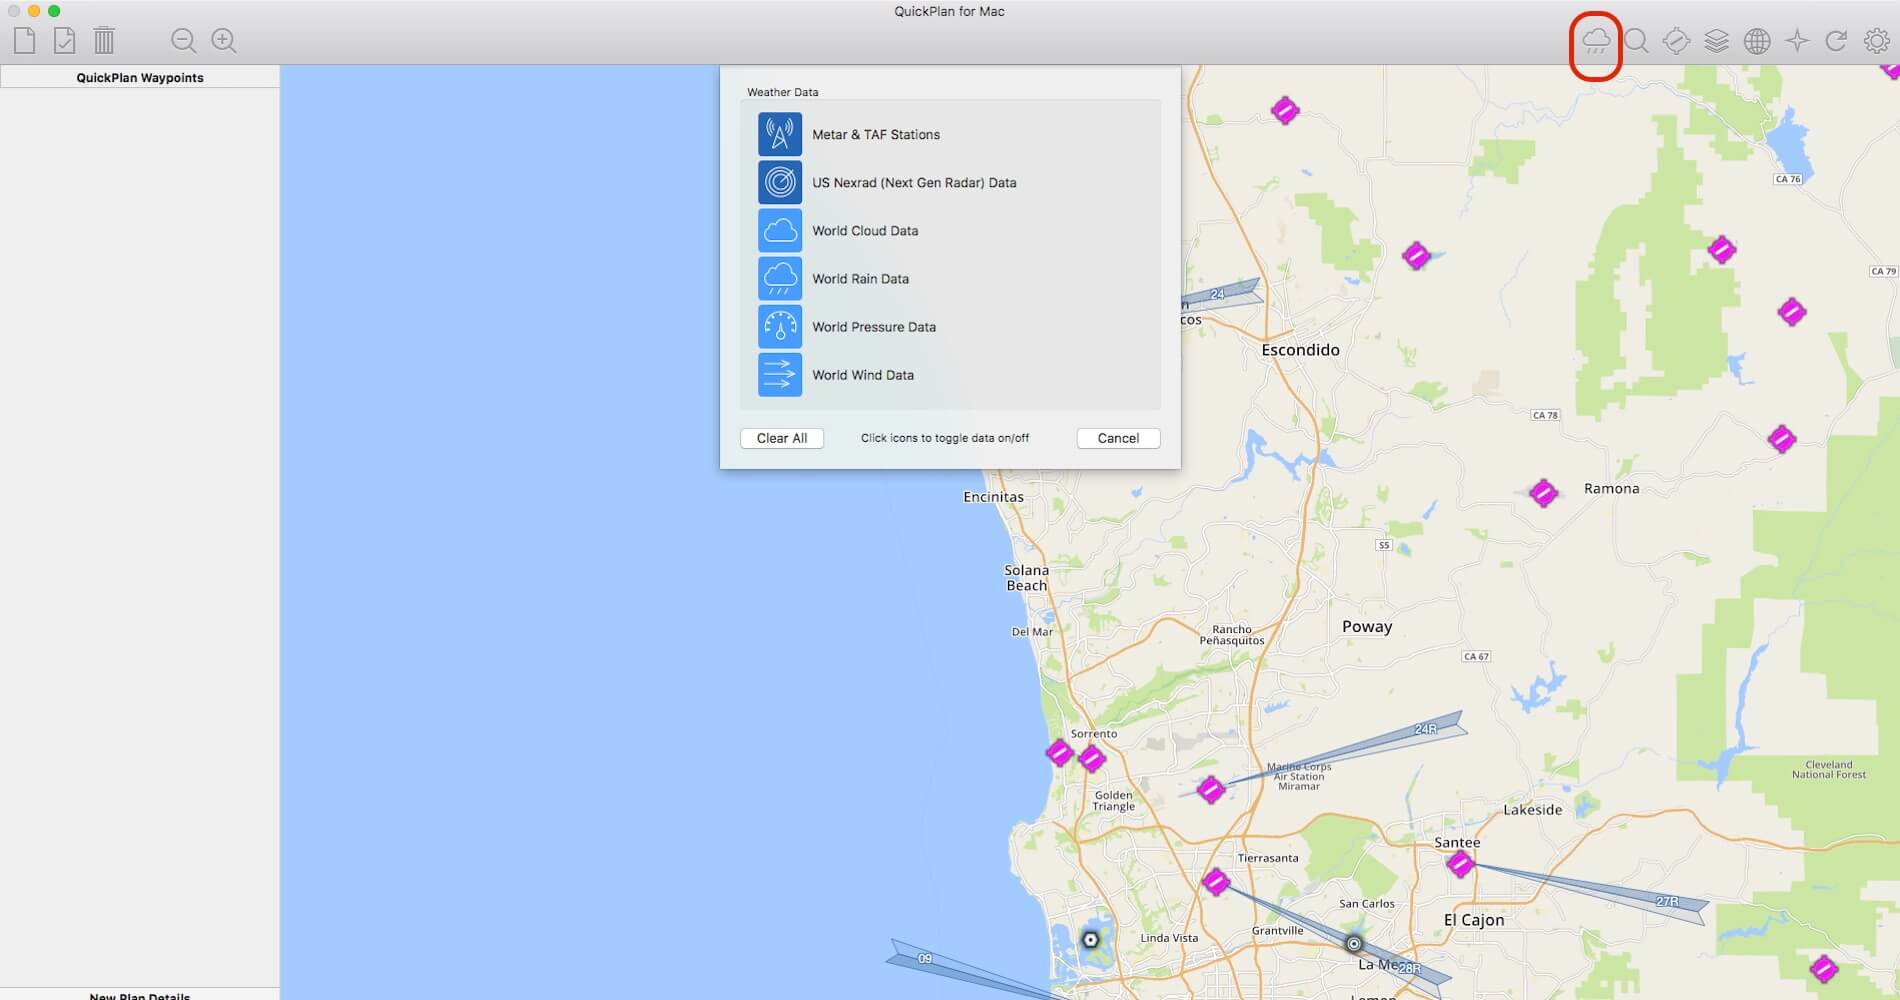
– Weather
– Find
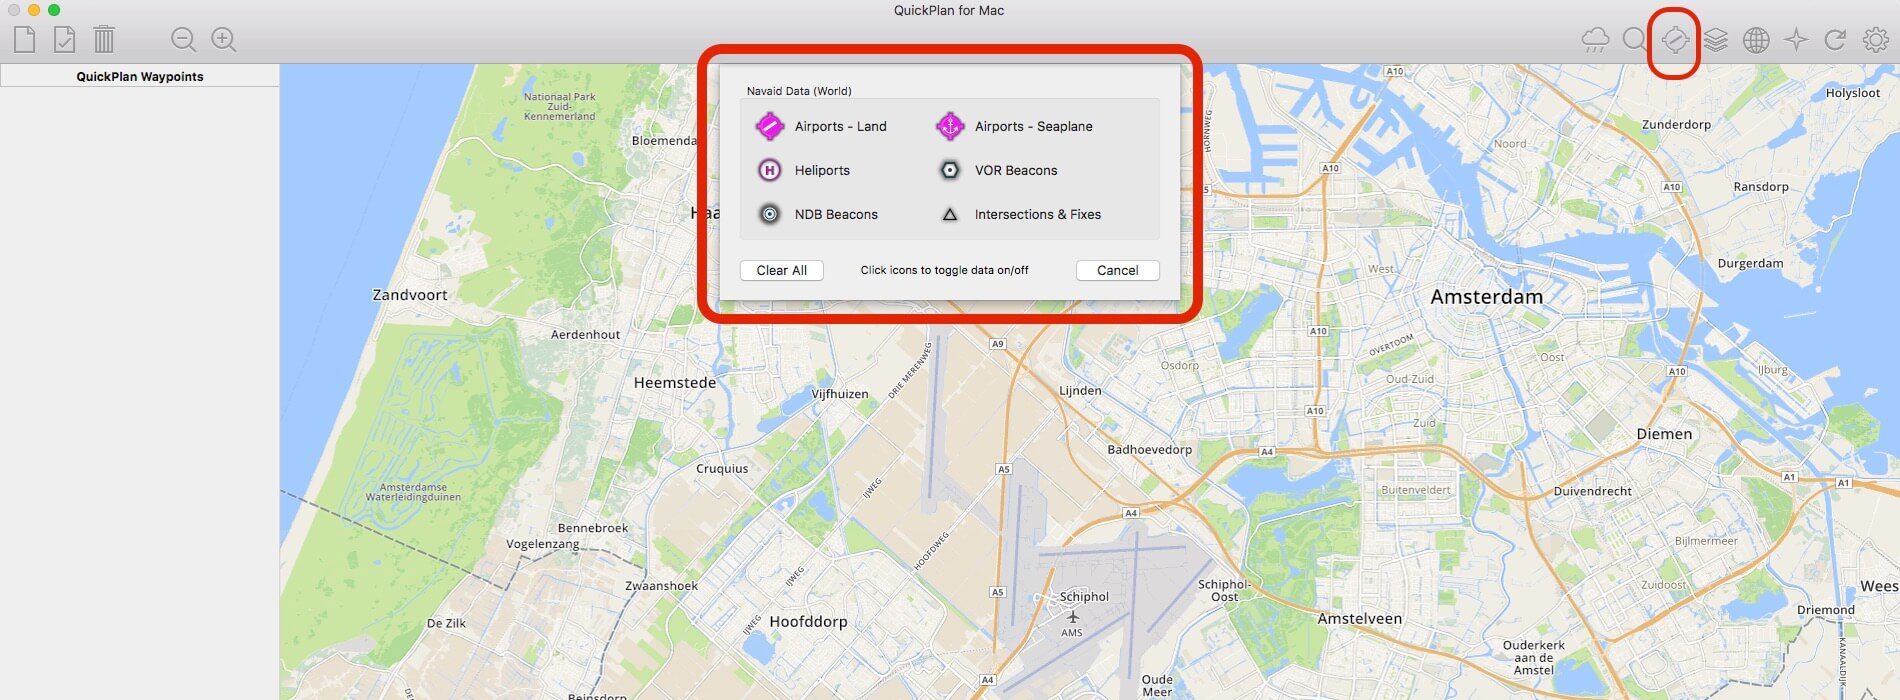
– Navaids
– Aero Charts
– Base Map
– Flight Plans
– Reload Map
– Preferences
New Plan
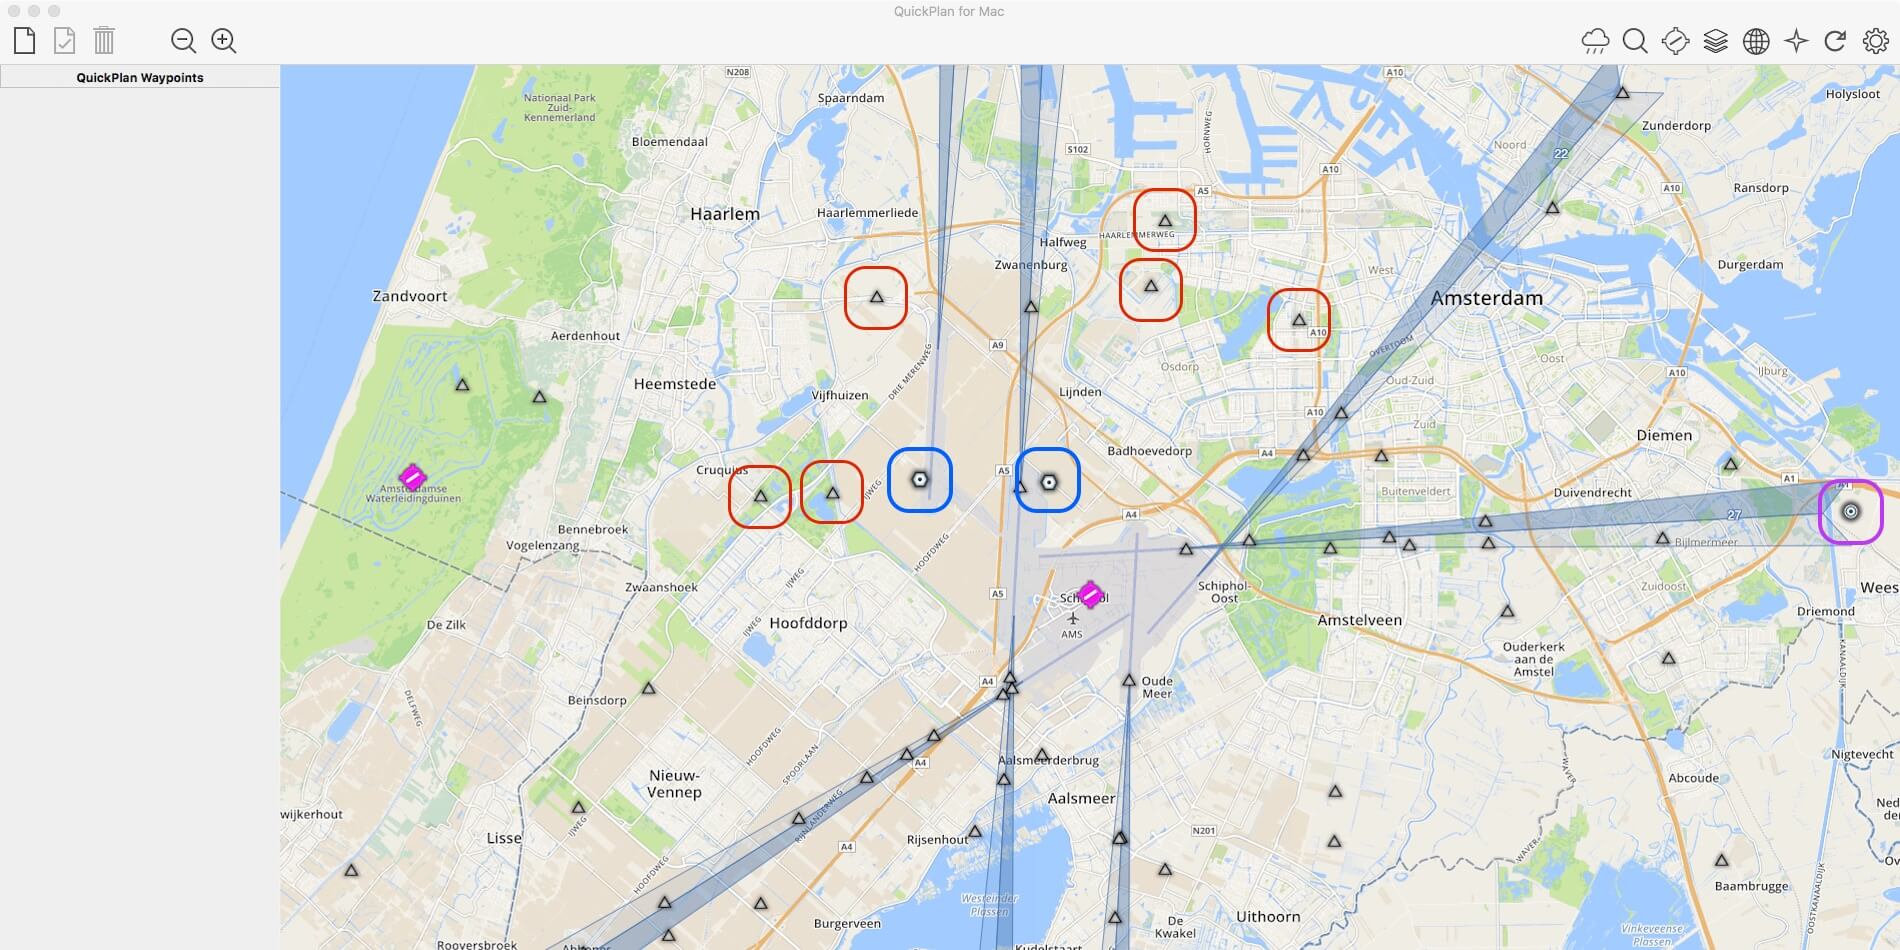
When you click the “New Plan” icon, a bar pops up telling you that “Quick Plan Active – click the map to add waypoints!” So, this means that you can start building your own flight plan, but before you can do that you need at least waypoints to select from. To achieve this you need to click on the tools bar the “Navaids” button and select from the popup window a navaid. More about this later.
The screenshot below shows you a simple flight plan made with the help of a departure- and arrival airport with a couple of VOR/VORTAC beacons as waypoints. Later in this impression I’ll show you step-by-step how to create a flight plan although I can tell you that this isn’t complicated.


Save Plan
Without an active flight plan, this is greyed out. That means, it’s not selectable, but as briefly discussed in the previous section, once you have created a “complete” flight plan, the icon is now active and thus you can save the flight plan. I wrote on purpose “complete” flight plan which means that the flight plan must have at least a departure and arrival airport included, so even waypoints (NDB, VOR/VORTAC or fixes) aren’t needed to save a flight plan. When you’ve fulfilled the above requirements of a flight plan structure, you can click the “Save Plan” icon and you’re asked to verify the proposed flight plan name, where to save it and which format to use. Suppose you use QuickPlan for Mac also on the same computer where you have X-Plane installed, you can also save it under X-Plane folder Output/FMS Plans. This is by default for a lot of aircraft the position for loading flight plans. I say on purpose “the” position since some add-on aircraft these days have own FMS Plans folder where to load the flight plan from.


Weather Data popup
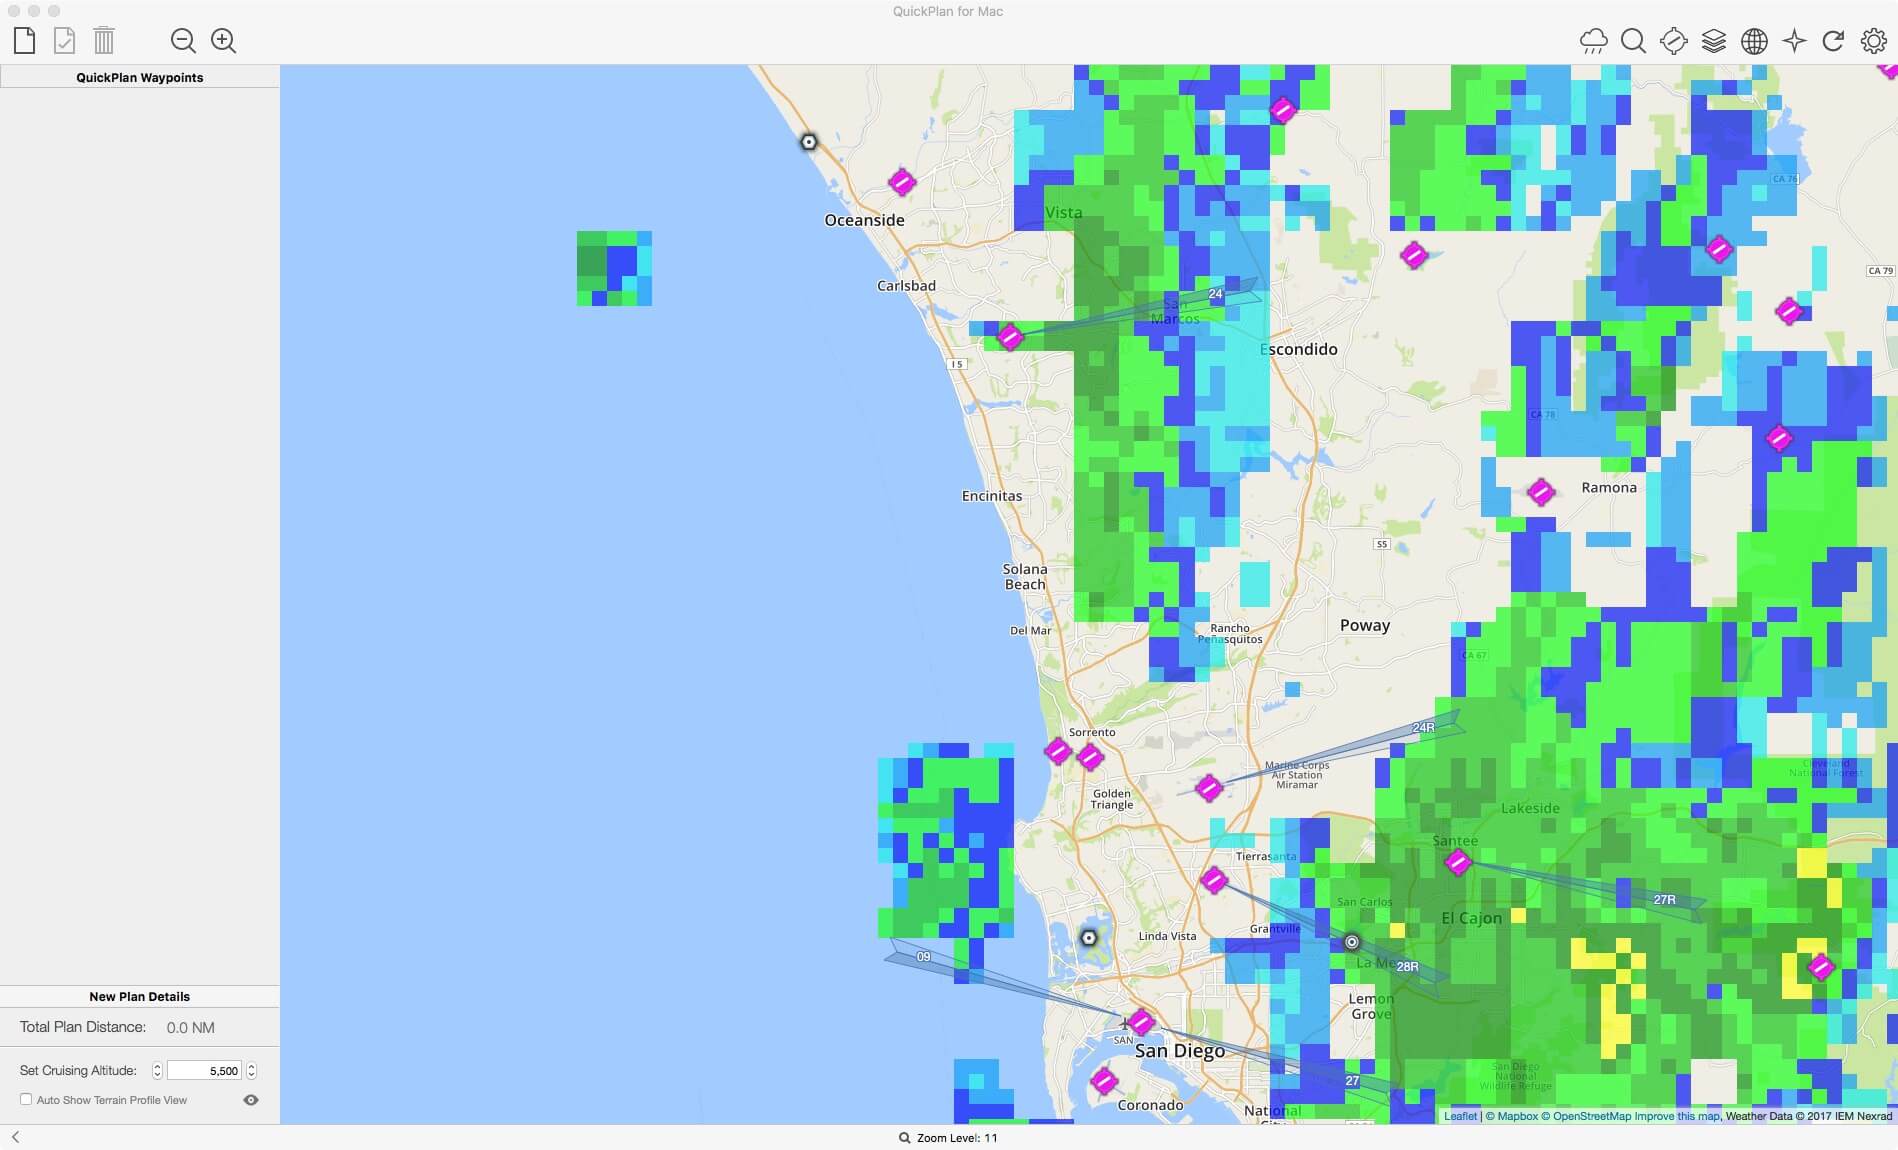
With this weather data window you’re able to select different types of weather information. When you click for example on the “US Nexrad (Next Gen Radar) Data”, slowly this data is implemented in the projected map. The data you see is downloaded directly from the Internet which is the same as with the other FSWidgets products I’ve reviewed before. But I find it difficult to see if this option you clicked is active or not. There’s no icon color change or something else that indicates that you activated a particular weather data. When you click this button again, the function is disabled. When you’re lost in respect to which buttons you’ve clicked, you can always use the “Clear All” option and start all over again.
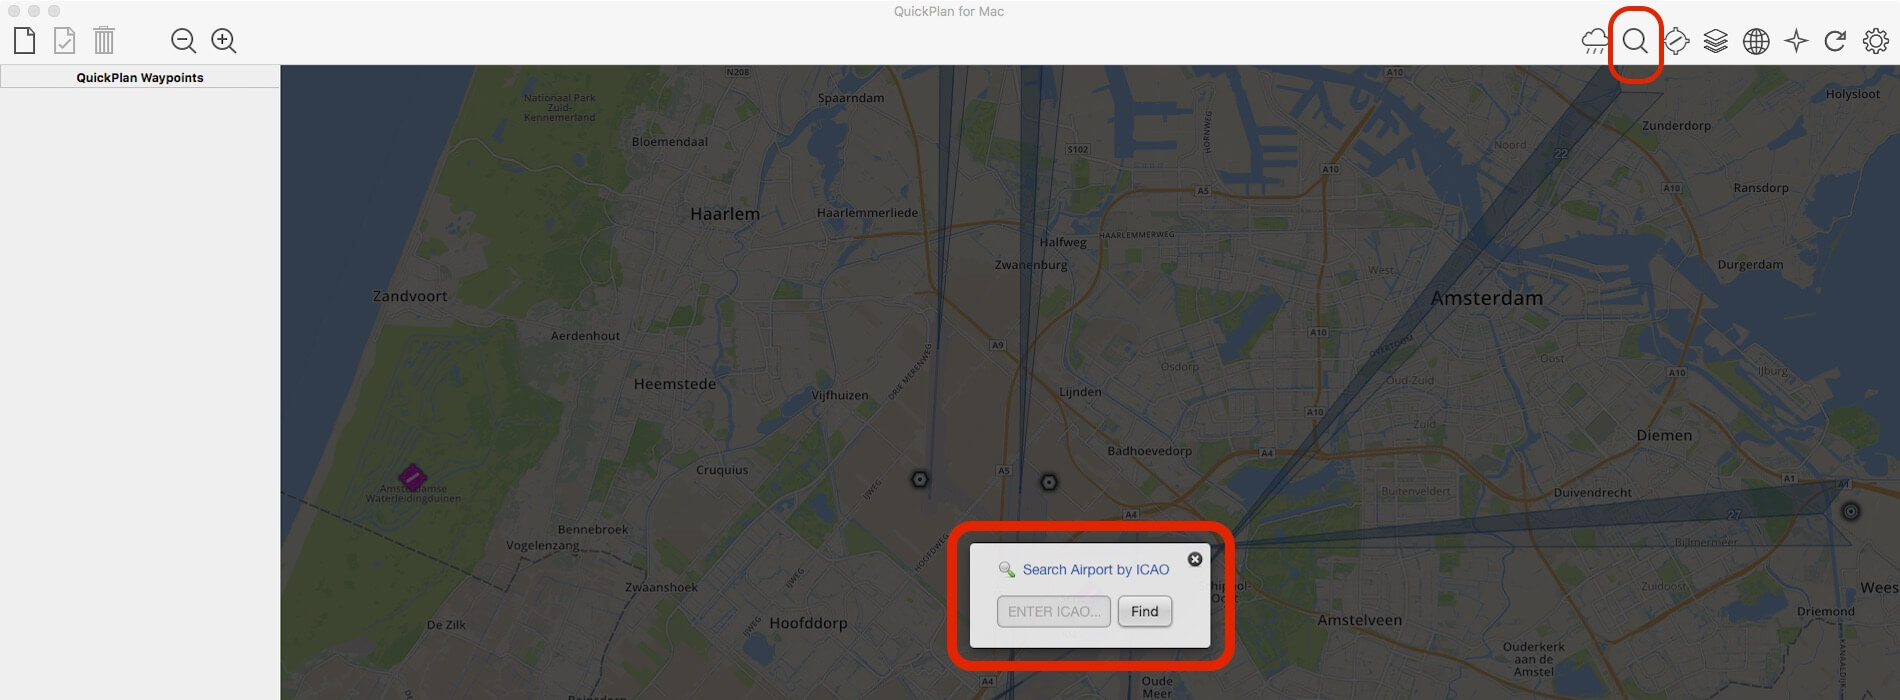
Find Popup (magnifier glass icon)
When you click the Find icon which looks like a magnifier glass without the “-“ or “+”, you’re presented with a popup window. Here you can select the airport of your choice. Irrespective of the map you had in view – in my case KSFO are -, it will move to the location of the airport you entered. That said, I entered EHAM and automatically the map of EHAM is shown with a zoom level of 13.
Navaid Data Popup
The navigation aid, a powerful tool when it comes to making your own flight plan. This allows you to select for instance the NDB and/or VOR/VORTAC beacons as well as intersections and fixes. Other navaid data are airports (land and seaplane) and heliports. Just click and see for yourself the output on the map. By the way, when you click an icon, a small “tick” is added to the icon. Worth to highlight this; you can only add one navaid per time. That said, you select NDB beacons and automatically these are added to the map, but the navaid popup window disappears. When you want to add VOR beacons too, you need to open the navaid popup, select VOR beacons and automatically the VOR beacons are added, but the popup window is gone again. More navaids? Follow the previous steps again. Although I mentioned this before in my previous impressions, I find it more user-friendly when it was possible that you could tick the navaids you want and then click at the end of your selections, the Done button. As with other options too, when you click the “Clear All” button, all selections are gone.
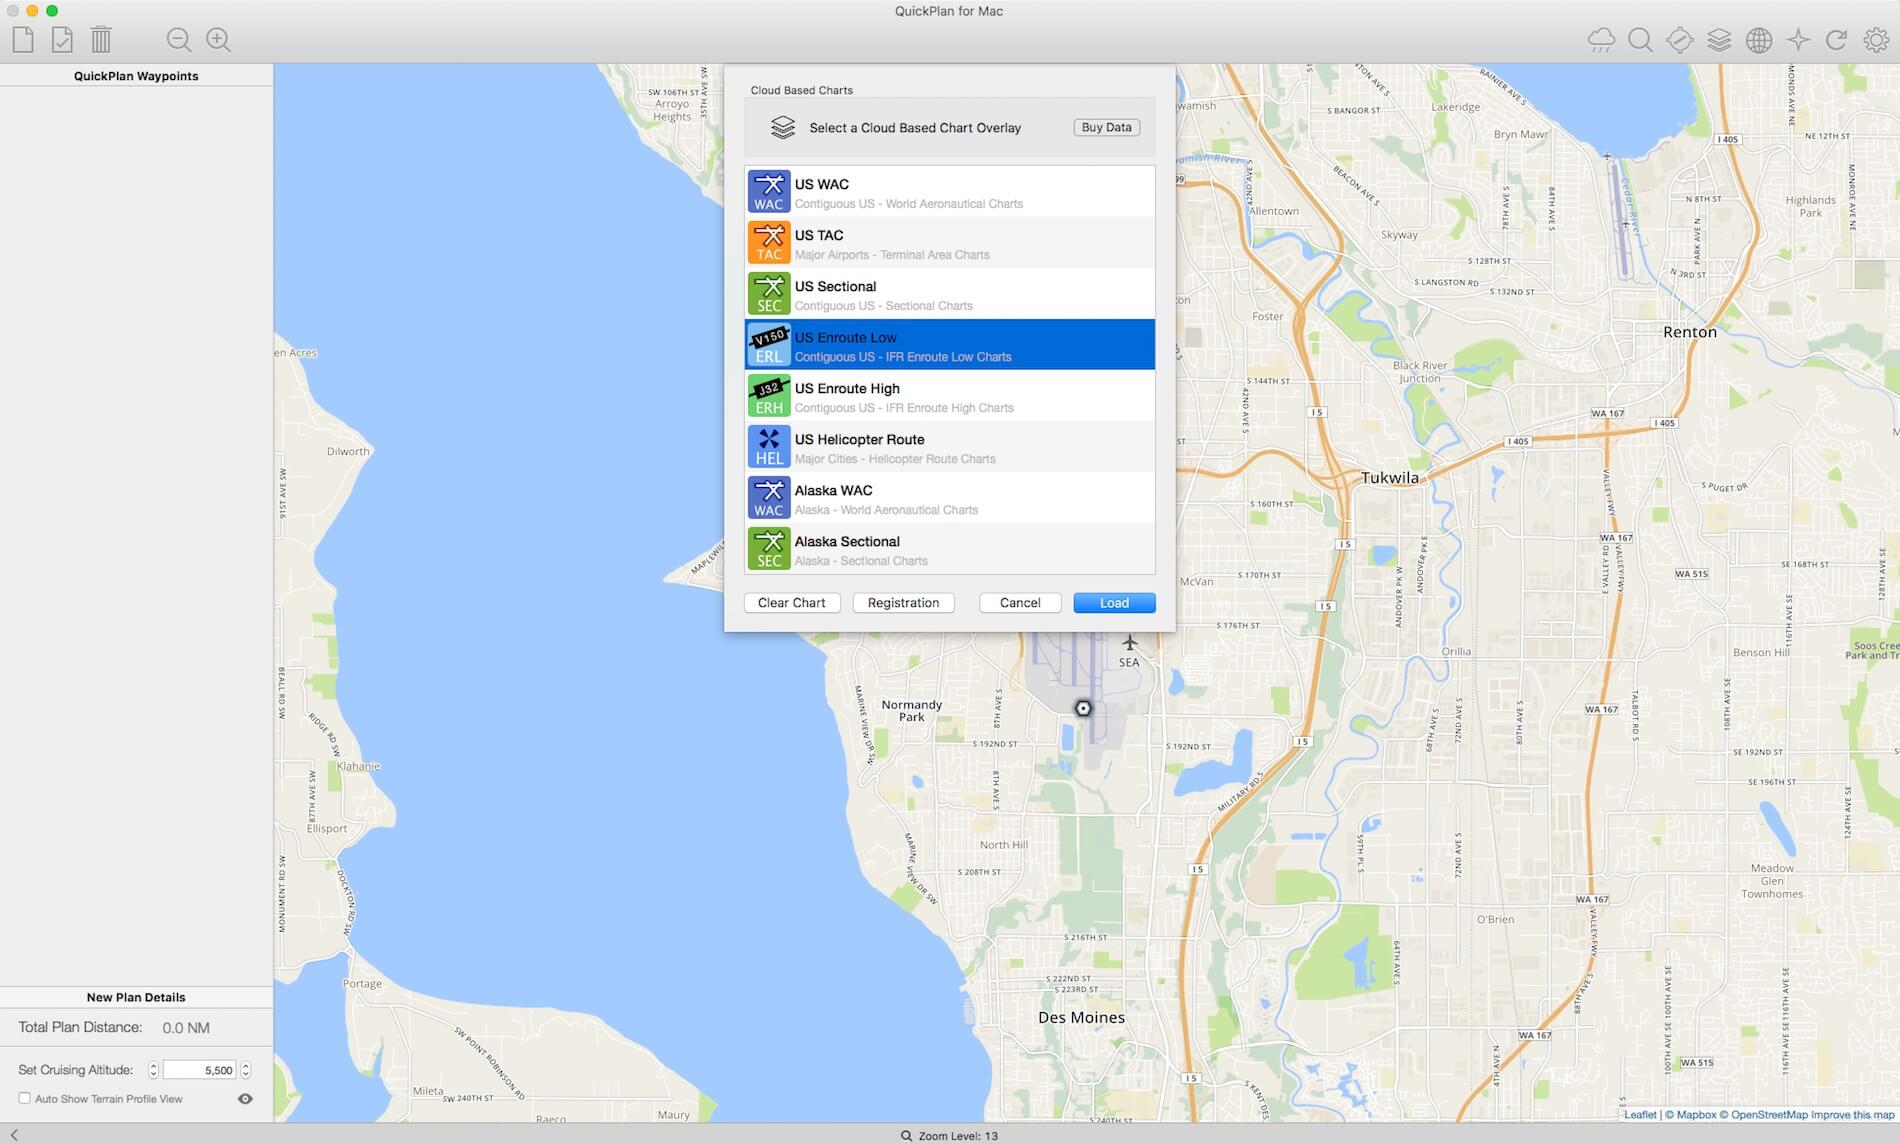
Cloud Based Charts Popup
After registered for the Cloud Based charts and world nav data, this popup shows you all of the, or at least, the charts you’ve bought. The advantage of having these cloud based charts is, that everywhere you fly, you’ll have access to maps and these are important because they are needed to create an IFR flight plan, and not only for VFR flight plans. Just click one of them – in the screenshots below this is the “US Enroute Low” – and the cloud based map is overlaid on the background image which is by default a Google clone map. Depending on the used zoom level, you either see the cloud based chart if selected, or the based map.

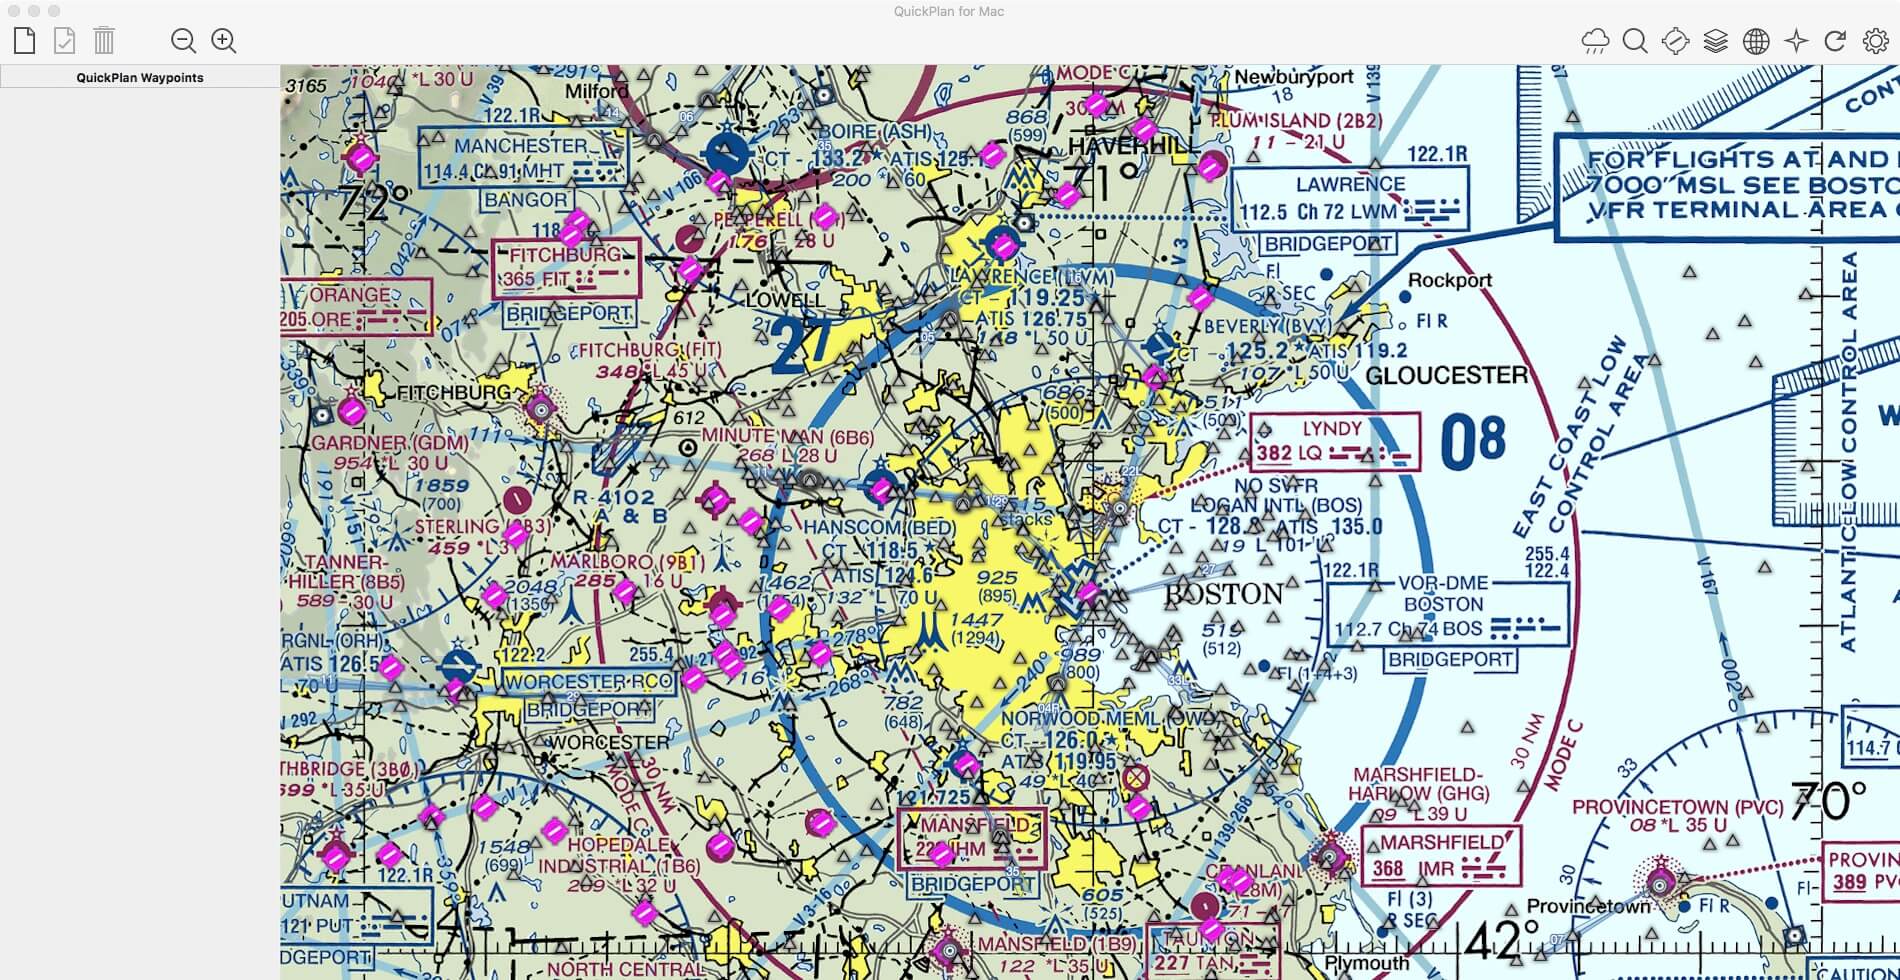
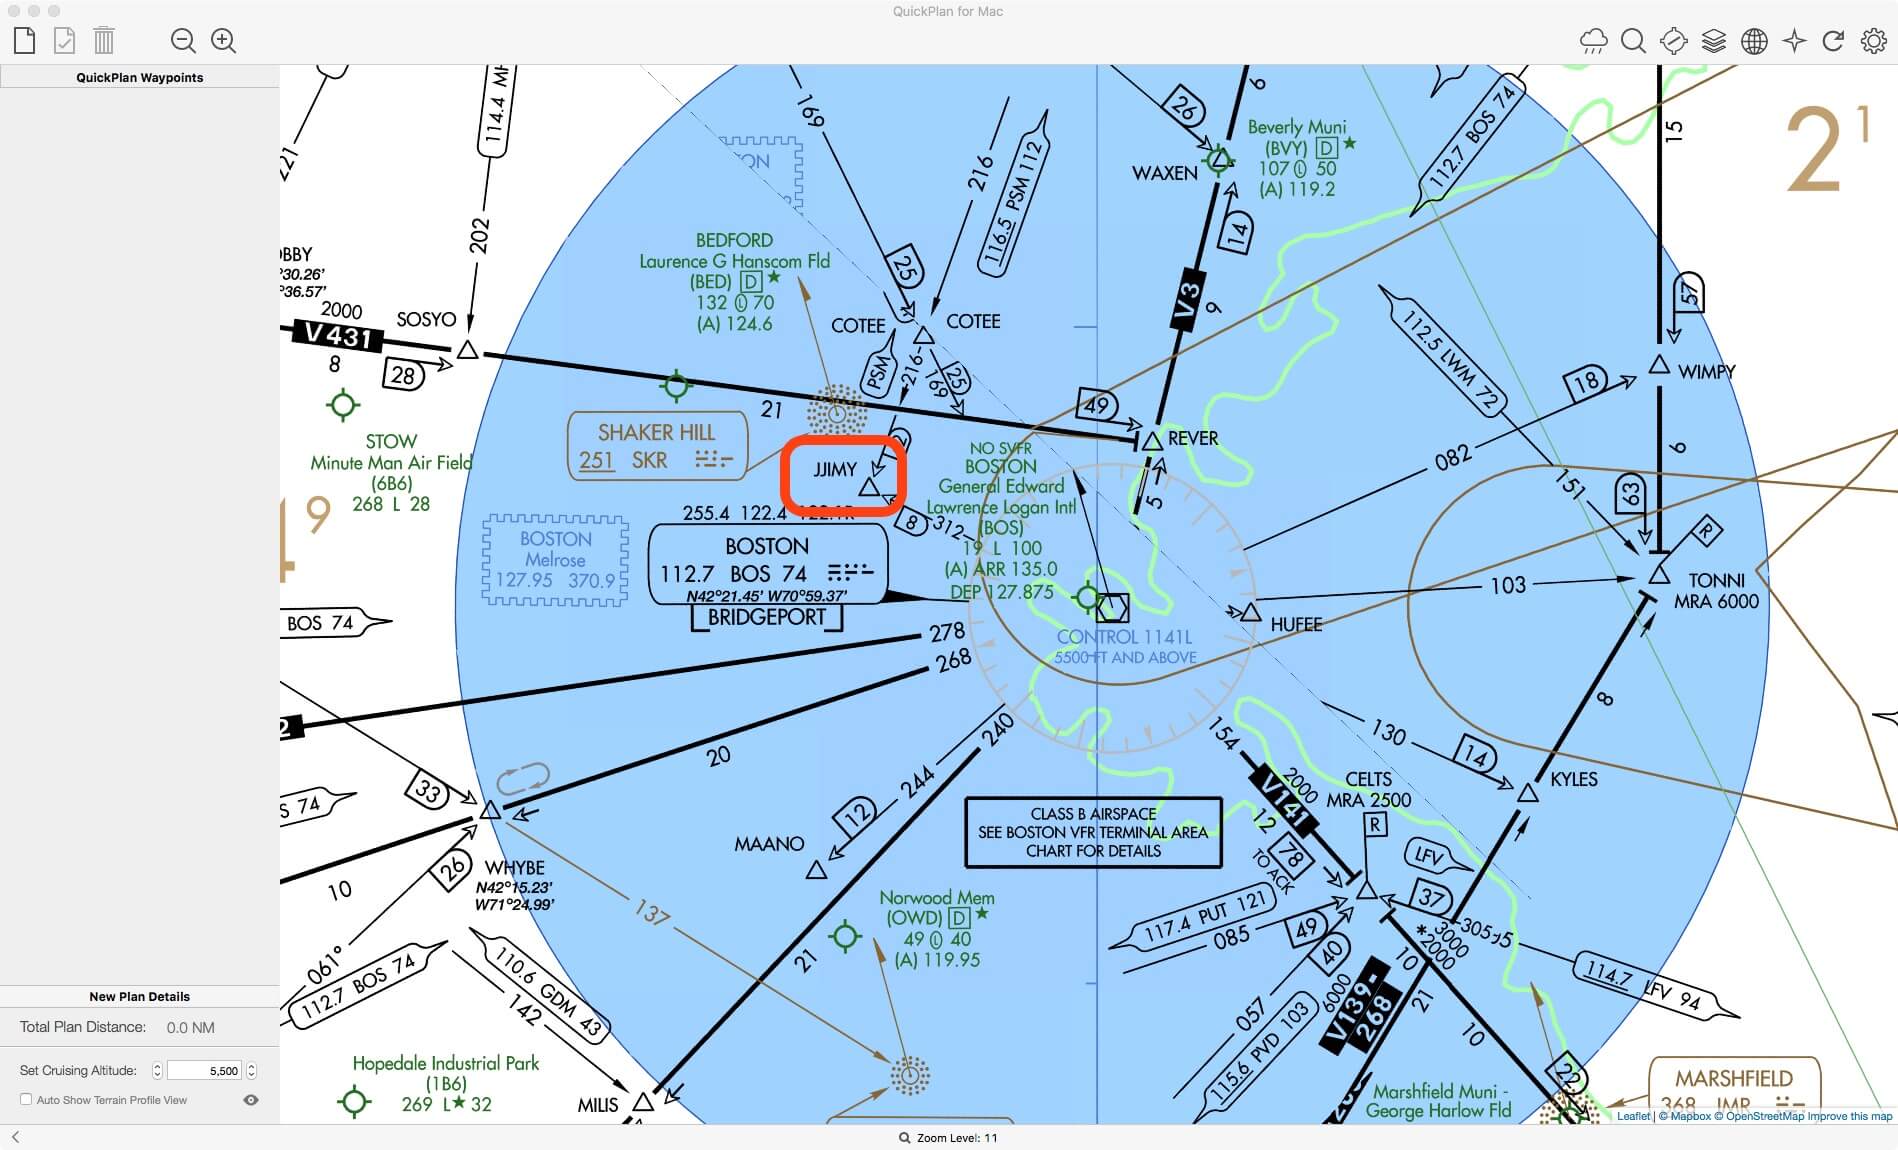
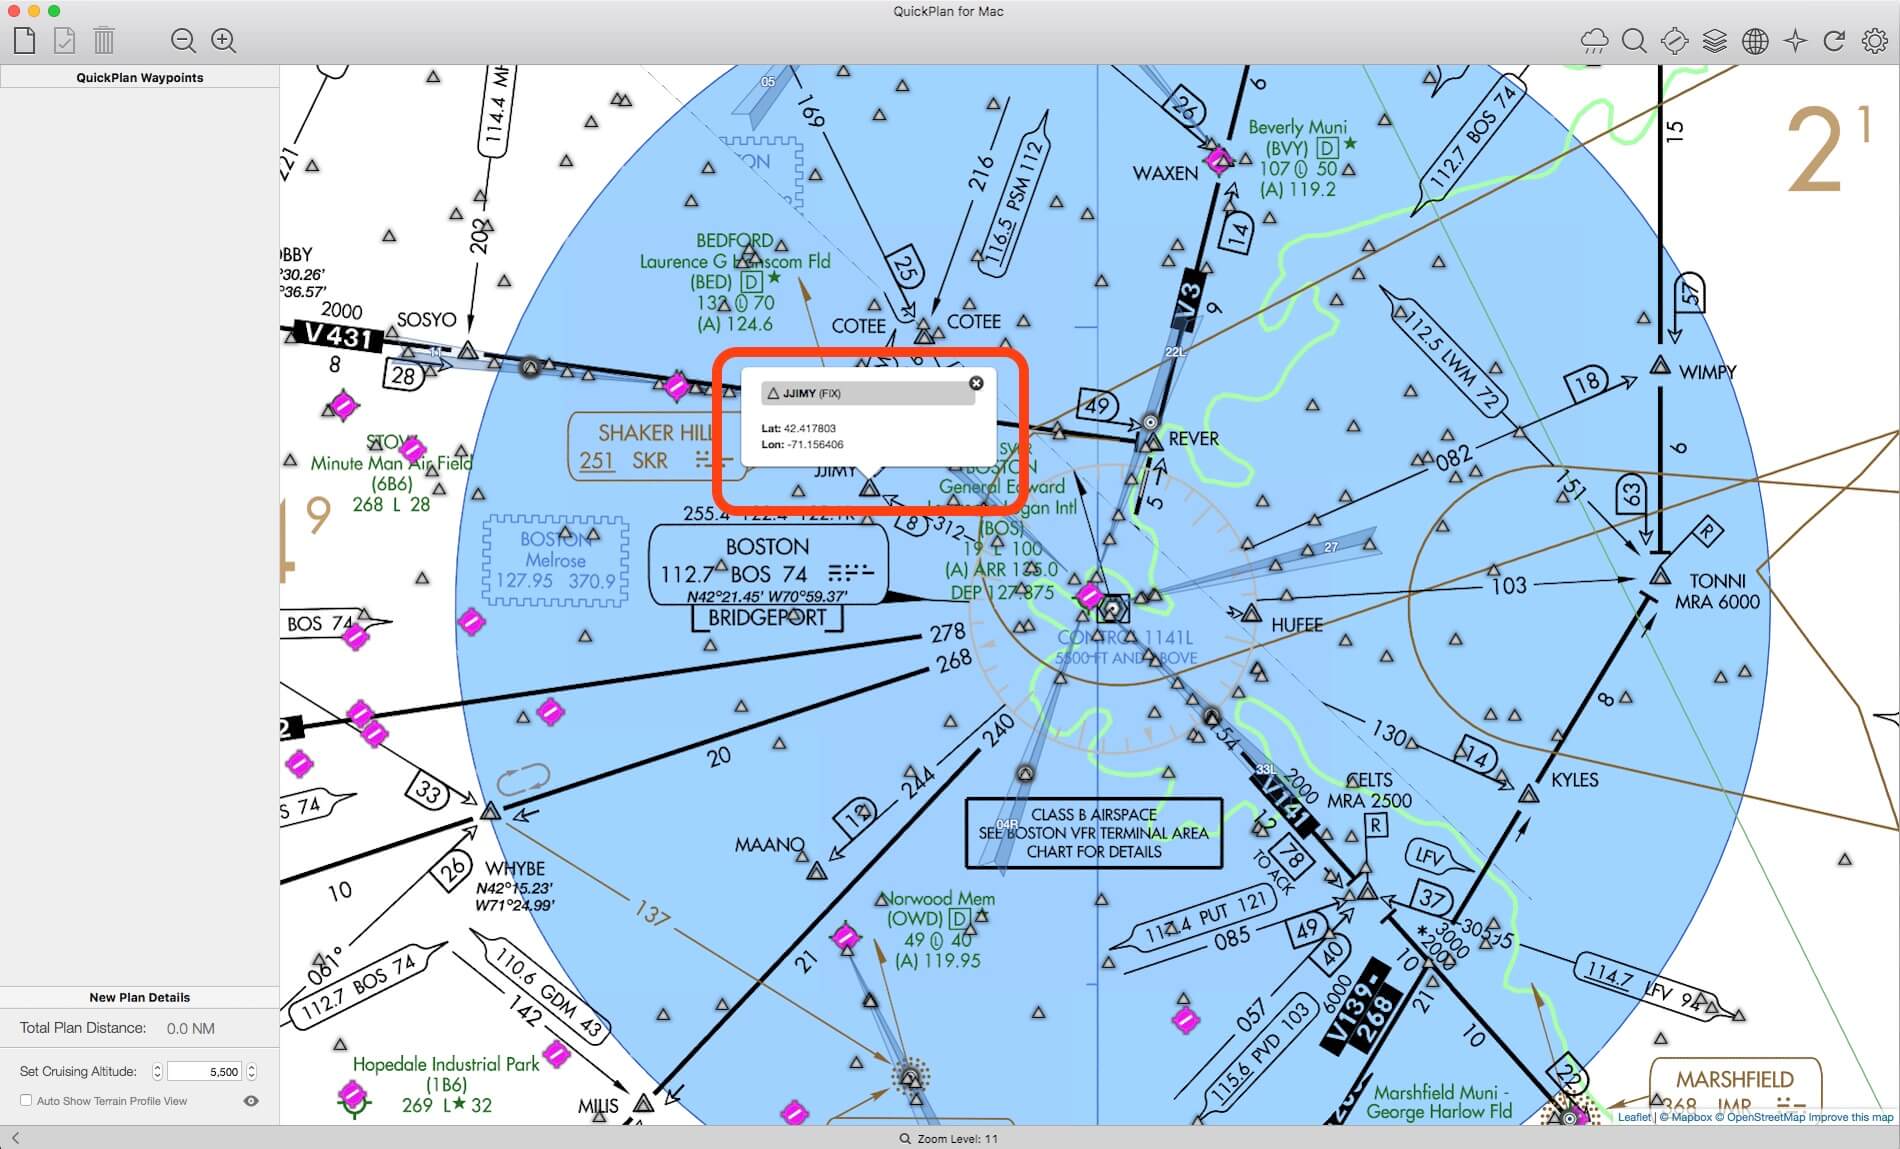
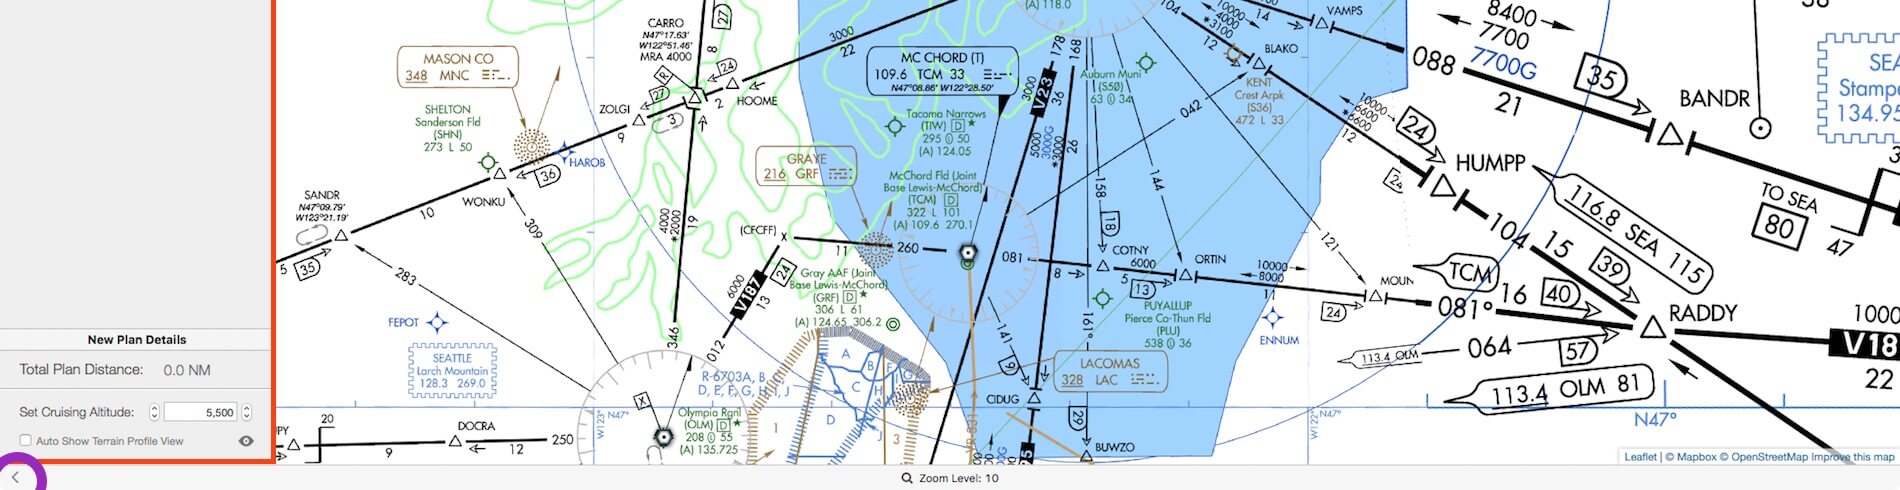
Remember one thing when it comes to fixes or intersections (waypoints). These fixes and intersections are drawn on the chart. Or let’s put it like this …. these waypoints are a part of the chart layout and have no function, no popup facility. They are just drawn on the map! Although the chart shows me the name of a fix/intersection, I can’t do anything with that. This can be solved as follows; select the fix/intersection navaid within the Navaid Data Popup. Now you see that, for example with fix/intersection SEEMS, I can click on it and can read its LAT/LON position. See the following two screenshots. This is of course also applicable for NDB and VOR/VORTAC beacons.
Custom Base Maps Popup
Via this popup window you’re able to select a different background image of your choice, but keep in mind that when you select a chart from the Cloud Base section, it will overlay this background map depending on the used zoom level. The following screenshots show you example maps of Shaded Terrain, Pastel Green and Olde Default.


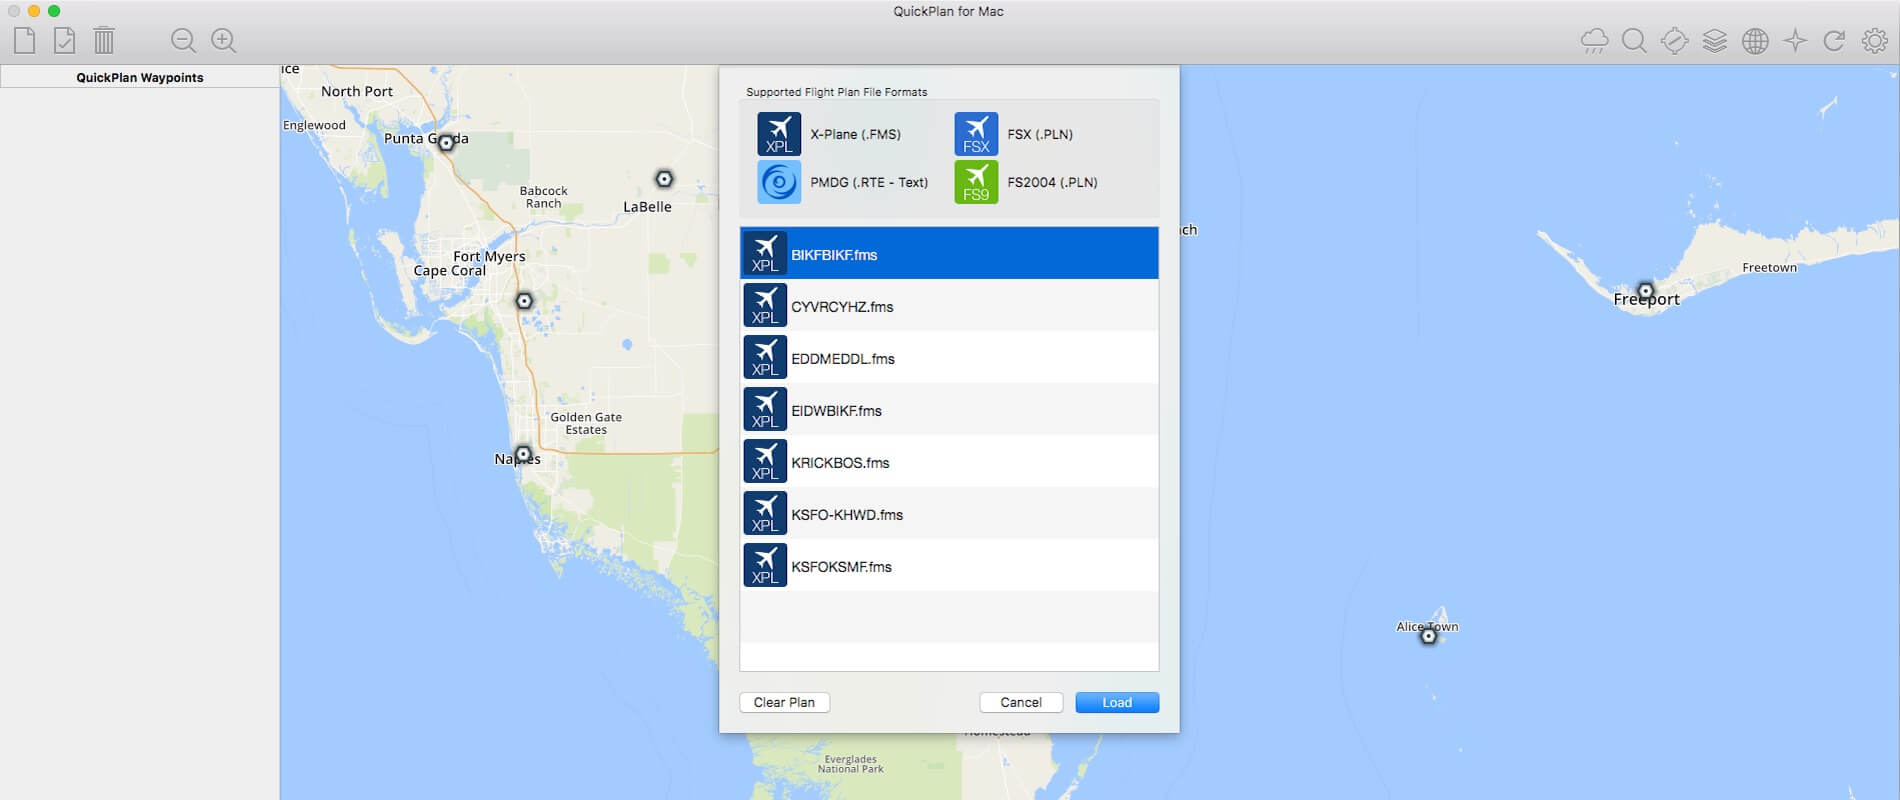
Supported Flight Plan File Formats Popup
For X-Plane, QuickPlan for Mac only supports right now “fms” while in the meantime many other add-on aircraft also support “txt“, ”pln” and “flp” formats. As you can see on the screenshot below, this field is empty. That could have several reasons. First, you haven’t saved any own created flights plans and secondly, you haven’t indicated the right folder where QuickPlan should point to. Let me highlight this. When you’ve created your own flight plan and saved it for example at your Desktop, this flight plan will also be visible in this field. So that’s one thing!

The second addition I would like to made, indicating where QuickPlan should look into for flight plans, is done via the “gear” icon section “Folder Option”. Suppose you run QuickPlan on the same Mac that’s also having X-Plane on it, then it’s the most logical way to point to the X-Plane Output/FMS Plans folder.

But assume you have two Macs, one runs QuickPlan for Mac while on the other Mac you have X-Plane installed. In that case, you can also decide to point the “Folder Option” to the Mac that has X-Plane. This only works when you’ve shared both Macs!
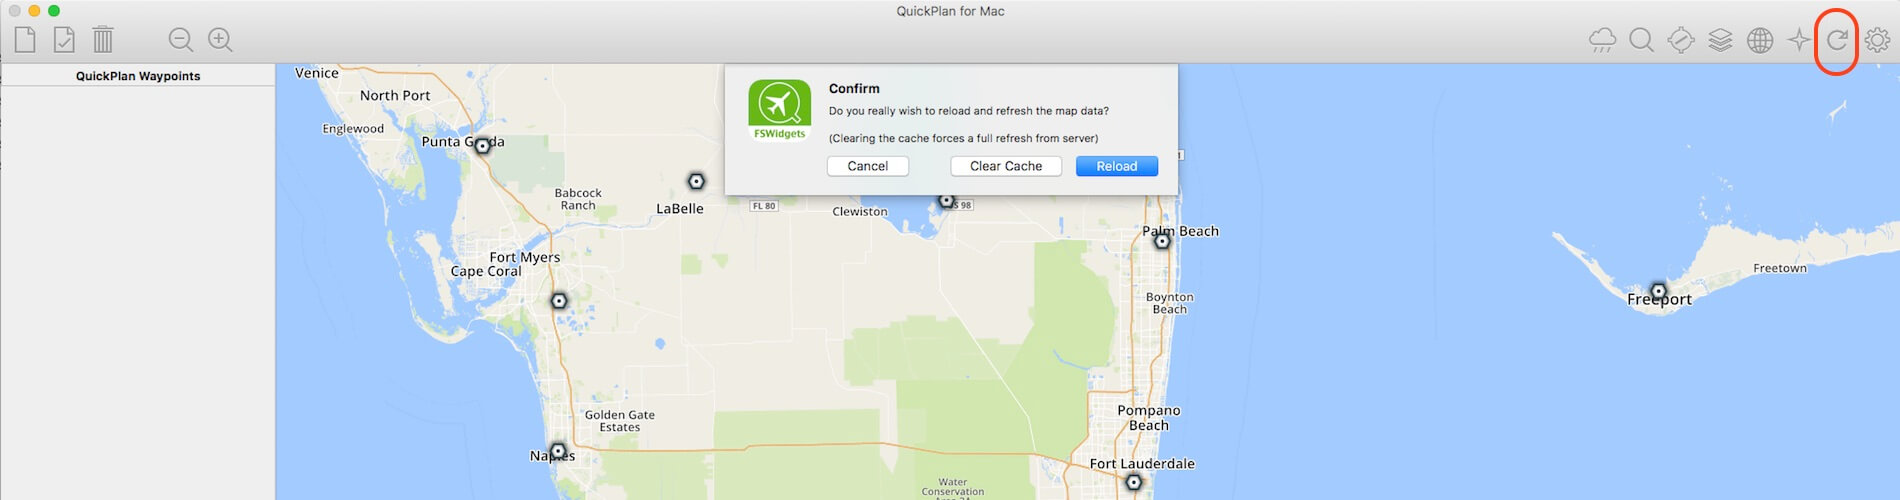
Clearing cache and reloading map data Popup
If you want to refresh the map for any reason, this option allows you to reload the map data from the server. This function will completely refresh the map and return it to the previous saved settings or to the default, depending on what option you have selected under Preferences. Please note that performing this step means any loaded flight plans will also be cleared.
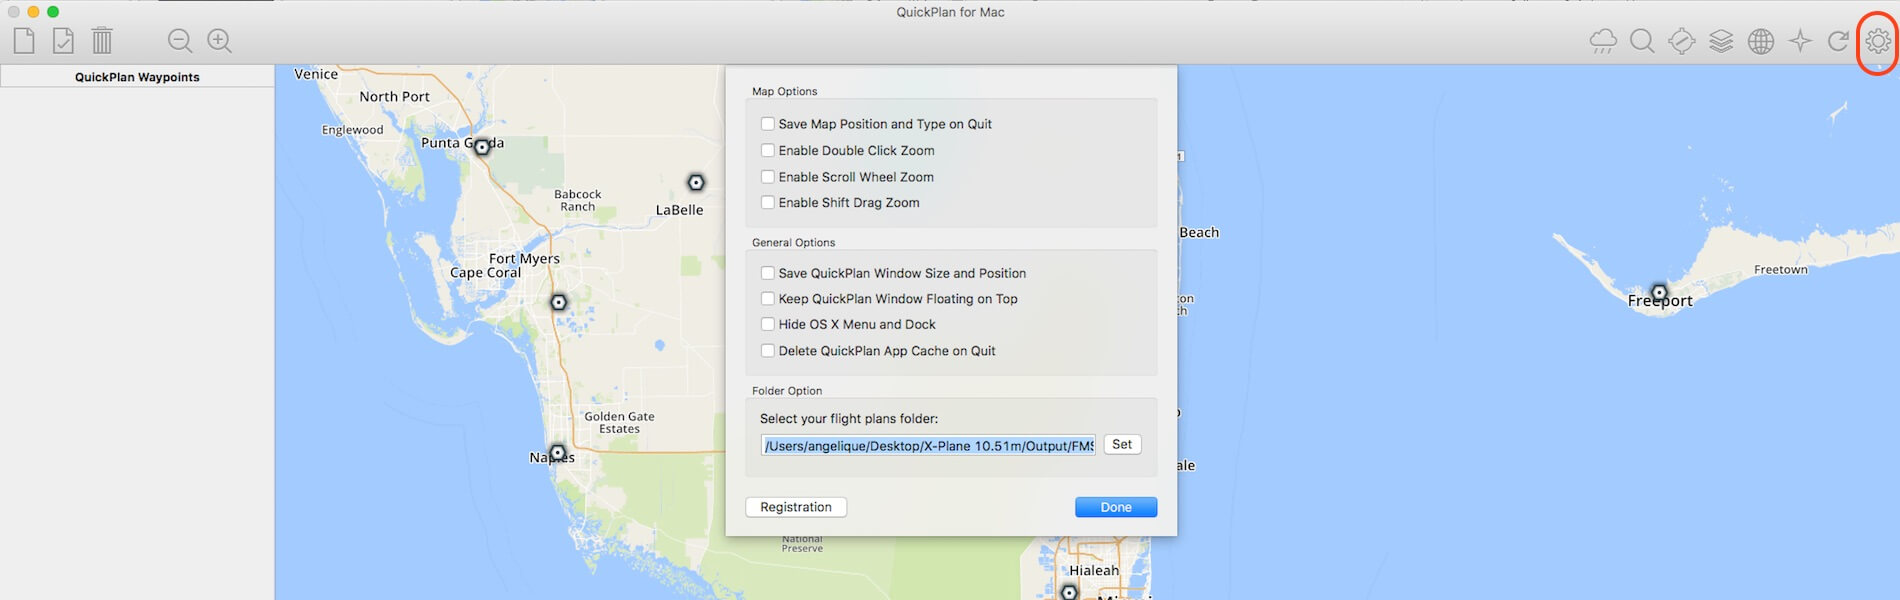
More Options, General Options, Folder Option and Registration Popup
Since the “registration” as well as the “Folder Option” where already discussed before, I’m left with the Map- and General Options, but it must be said that these options are self-explanatory.
Creating an IFR Flight Plan
Although I highlighted already a couple of steps to perform, let me start here with a Step-by-Step procedure. Some parts are based on previous explanations.
Step 1 | From where to go to?
This is not really a step dedicated to QuickPlan for Mac, but more a matter from “where to depart from” and where to arrive”. Let’s assume we intend to fly from KSEA (Seatlle-Tamoca International) to KLAS (McCarran International).
Step 2 | US Enroute Low
Select from the list the US Enroute Low chart and click Load.
Step 3 | Select departure airport
Use the magnifier glass icon (Find) and type KSEA, followed by clicking the find button. That the KSEA area map – not the US Enroute Low map – comes into view is because the zoom level has moved to 13. Therefore, bring the zoom level back to 11 or lower. This will give you back the US Enroute Low map.

Step 4 | Select New Plan
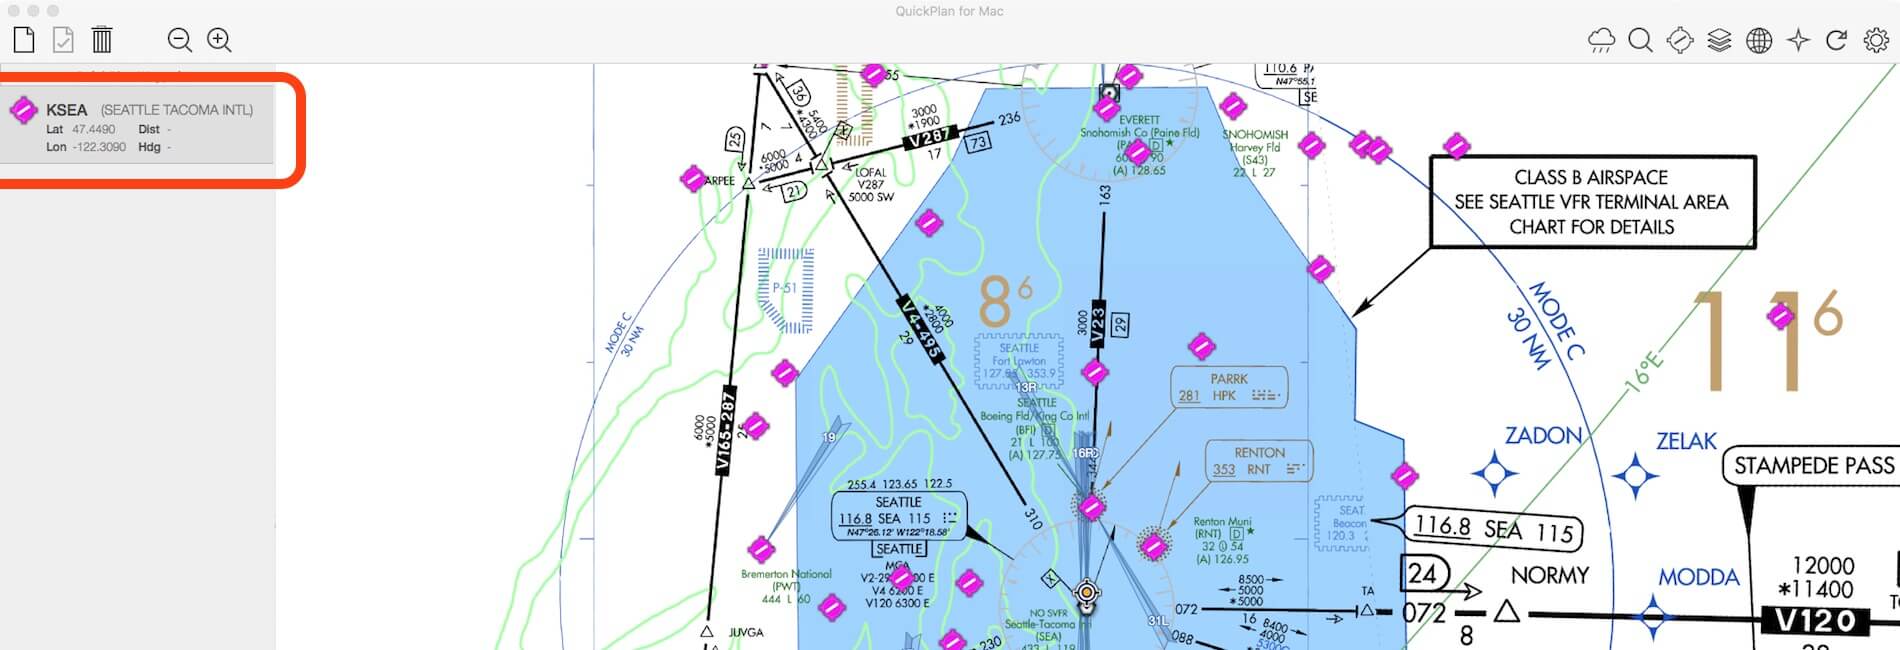
When you click the icon “New Plan”, you’re able to create a flight plan. Don’t forget this step else you’re not able to enter waypoints into the plan section on the left-hand side of the QuickPlan screen, the so called “sidebar”.

Oops, almost forgotten …
What if you don’t see on the left hand side the sidebar? In case you don’t see the sidebar, then seek for the right hand pointed arrow at the far left hand bottom of the QuickPlan for Mac window. Click this arrow, it will turn into a left hand pointed arrow and the sidebar comes back into view. Easy, right?

Step 5 | Found KSEA, and then?
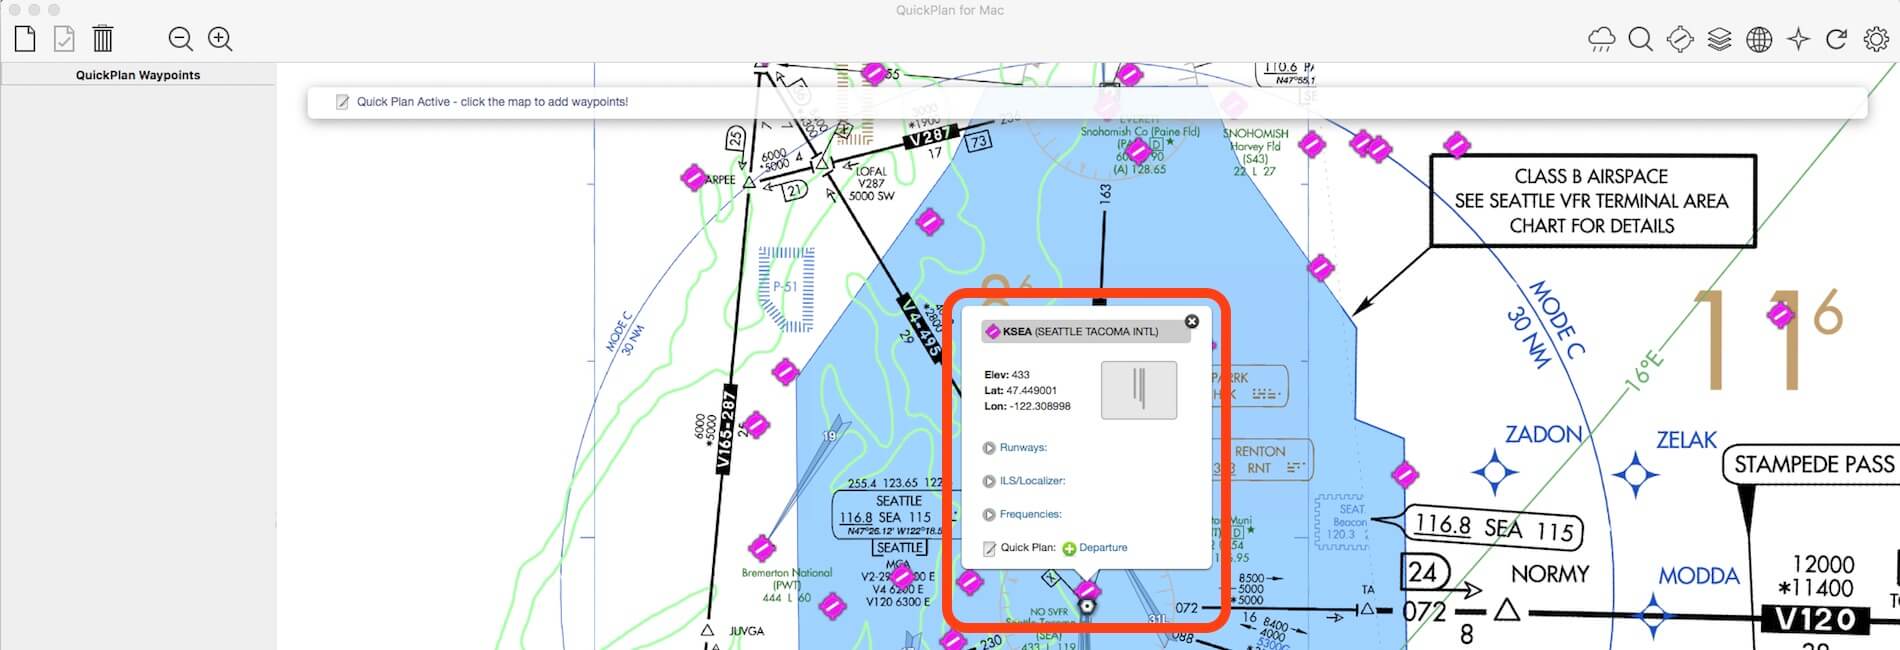
Click the KSEA airport symbol on the map. A popup window shows you the airport name, airport data and a hyper link with a green circle (with white cross) and a hyperlink named Departure. Click departure and automatically KSEA is added to the flight plan list in the sidebar. One item; in the small popup KSEA window you can read runways, ILS/Localizer and Frequencies. All are clickable with additional information, but non have anything do to with the flight plan. That said, you can’t enter runway 16R for example as KSEA starting point!
Step 6 | Finding KLAS, and then?
Use the magnifier glass icon (Find) and type KLAS, followed by clicking the find button. Click on the base map the KLAS airport symbol. The same kind of popup window appears as we saw with KSEA. Below all the KLAS data, you see again the green circle (and a white cross) with two hyperlink options namely “Waypoint” and “Arrival”. It’s our intention to use KLAS as arrival thus we click the Arrival hyperlink.
Oops, this goes wrong!
I could leave this “step” out of the impression, but I leave it in since I didn’t expect that another approach to build my flight plan is needed or didn’t I read the help file before?
What’s the issue and for what reason do I want to warn you?
It turns out that QuickPlan isn’t able to allow you to add waypoints in-between the departure and arrival airports. As it is now on my screen, I’ve got added KSEA (as departure) and KLAS (as arrival). I was hoping that with this, a kind of reference line on my screen (map), I was able to add the necessary waypoints in-between KSEA to KLAS. But this isn’t possible. That said, you can’t already add the arrival airport in the list and add later the waypoints in between!
And perhaps it’s also the right moment to bring something else to your attention. Another thing I had in mind isn’t possible either and that is shifting/changing the order of waypoints in the sidebar. Let’s assume I only have KSEA in the list. I find a couple of waypoints that guide me more or less into the direction of KLAS. With a couple of waypoints in the sidebar, I should be able to zoom in and find the waypoints in-between and add them to the sidebar, preferable waypoints that are airways. When needed, I thought I could change the order in the list, but unfortunately this isn’t possible. Ones you’ve started a list of waypoints, you can’t change their order.
Time to verify with FSWidgets if I’m right with my thoughts knowing the remark Fermin Fernandez made to me that QuickPlan isn’t a full flight planner with all the bells and whistles that can be found with other flight plan programs. According to Fermin; “You are correct in your observation, and thanks for giving me the opportunity to answer your question. In our product description and in our Help file we make the effort to communicate the way QuickPlan is designed to be used which may differ from how other planners work:
The entire route is generated visually, by clicking the map to add the departure airport, intermediate waypoints and arrival airport in the same order that you intend flying the plan.
During plan creation and after adding the final arrival waypoint you also have the opportunity to remove any of the intermediate waypoints before saving the plan in your preferred format.
You can therefore delete intermediate waypoints if you have added one by mistake, and you can also remove the destination, up until the plan is saved. However, at this time QuickPlan does not offer waypoint insertion or rubber banding options.
We realise this point-and-click, plan-in-the-order-you-fly approach is a little different from how it is normally done, but this is the original concept QuickPlan was based on which began on the mobile platform – to be Quick and hopefully easy – to create native flight plan files in record time.”
That said, we need to forget step 6 and move on to step 7.
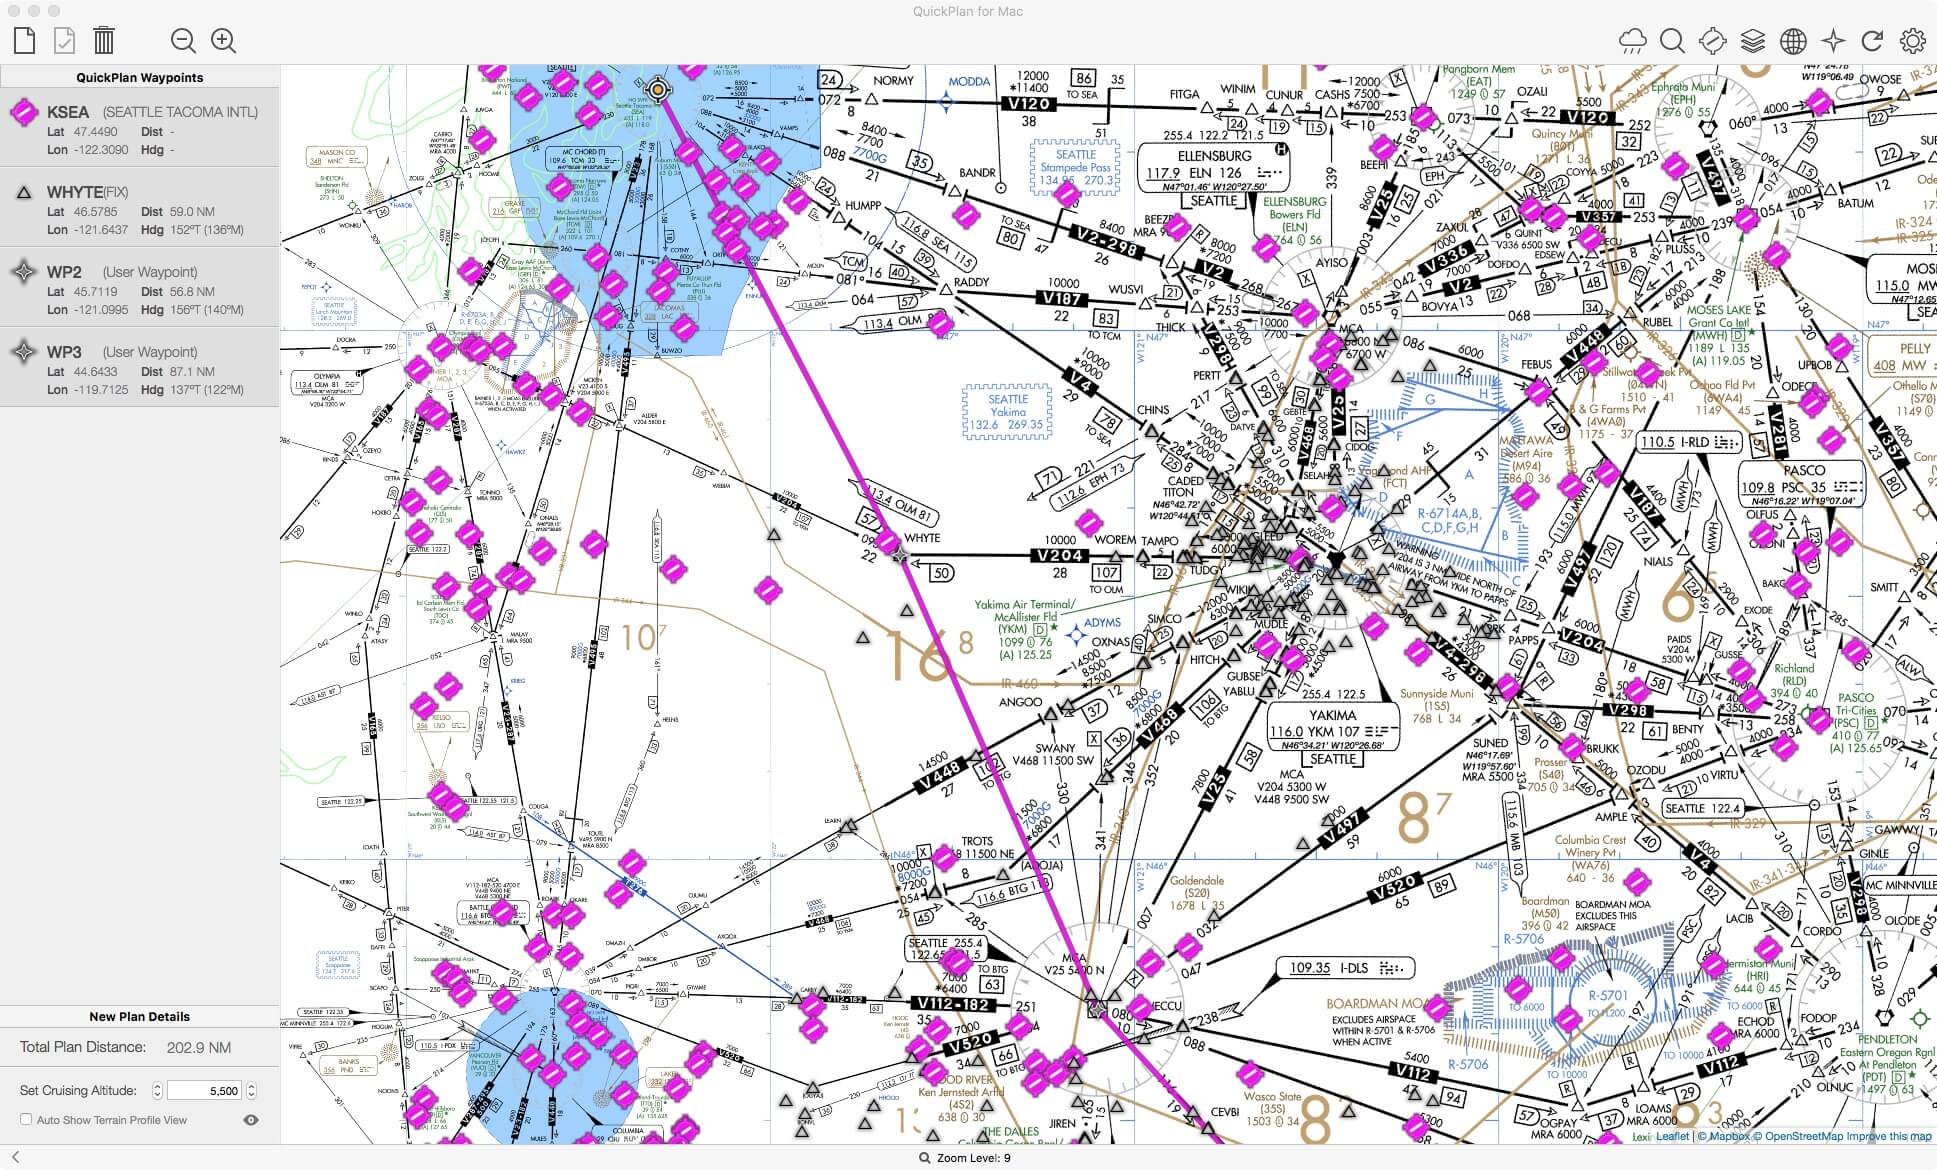
Step 7 | Finding waypoints
Knowing roughly where to find KLAS on the map, you’re free to add any waypoints on your planned flight plan. These waypoints can be NDB, VOR/VORTAC or intersections and fixes. When you’ve found a waypoint, you can add it to the flight plan as described before. Deleting an entered waypoint can be done in two ways; you either click in the sidebar the respective waypoint you want to delete. This turns the waypoint background from grey into white. Then use the backspace key on your keyboard and gone is the waypoint. The other option is clicking the waypoint itself on the map and select in the small popup window “Delete Waypoint”.

Step 8 | Finding KLAS, and then?
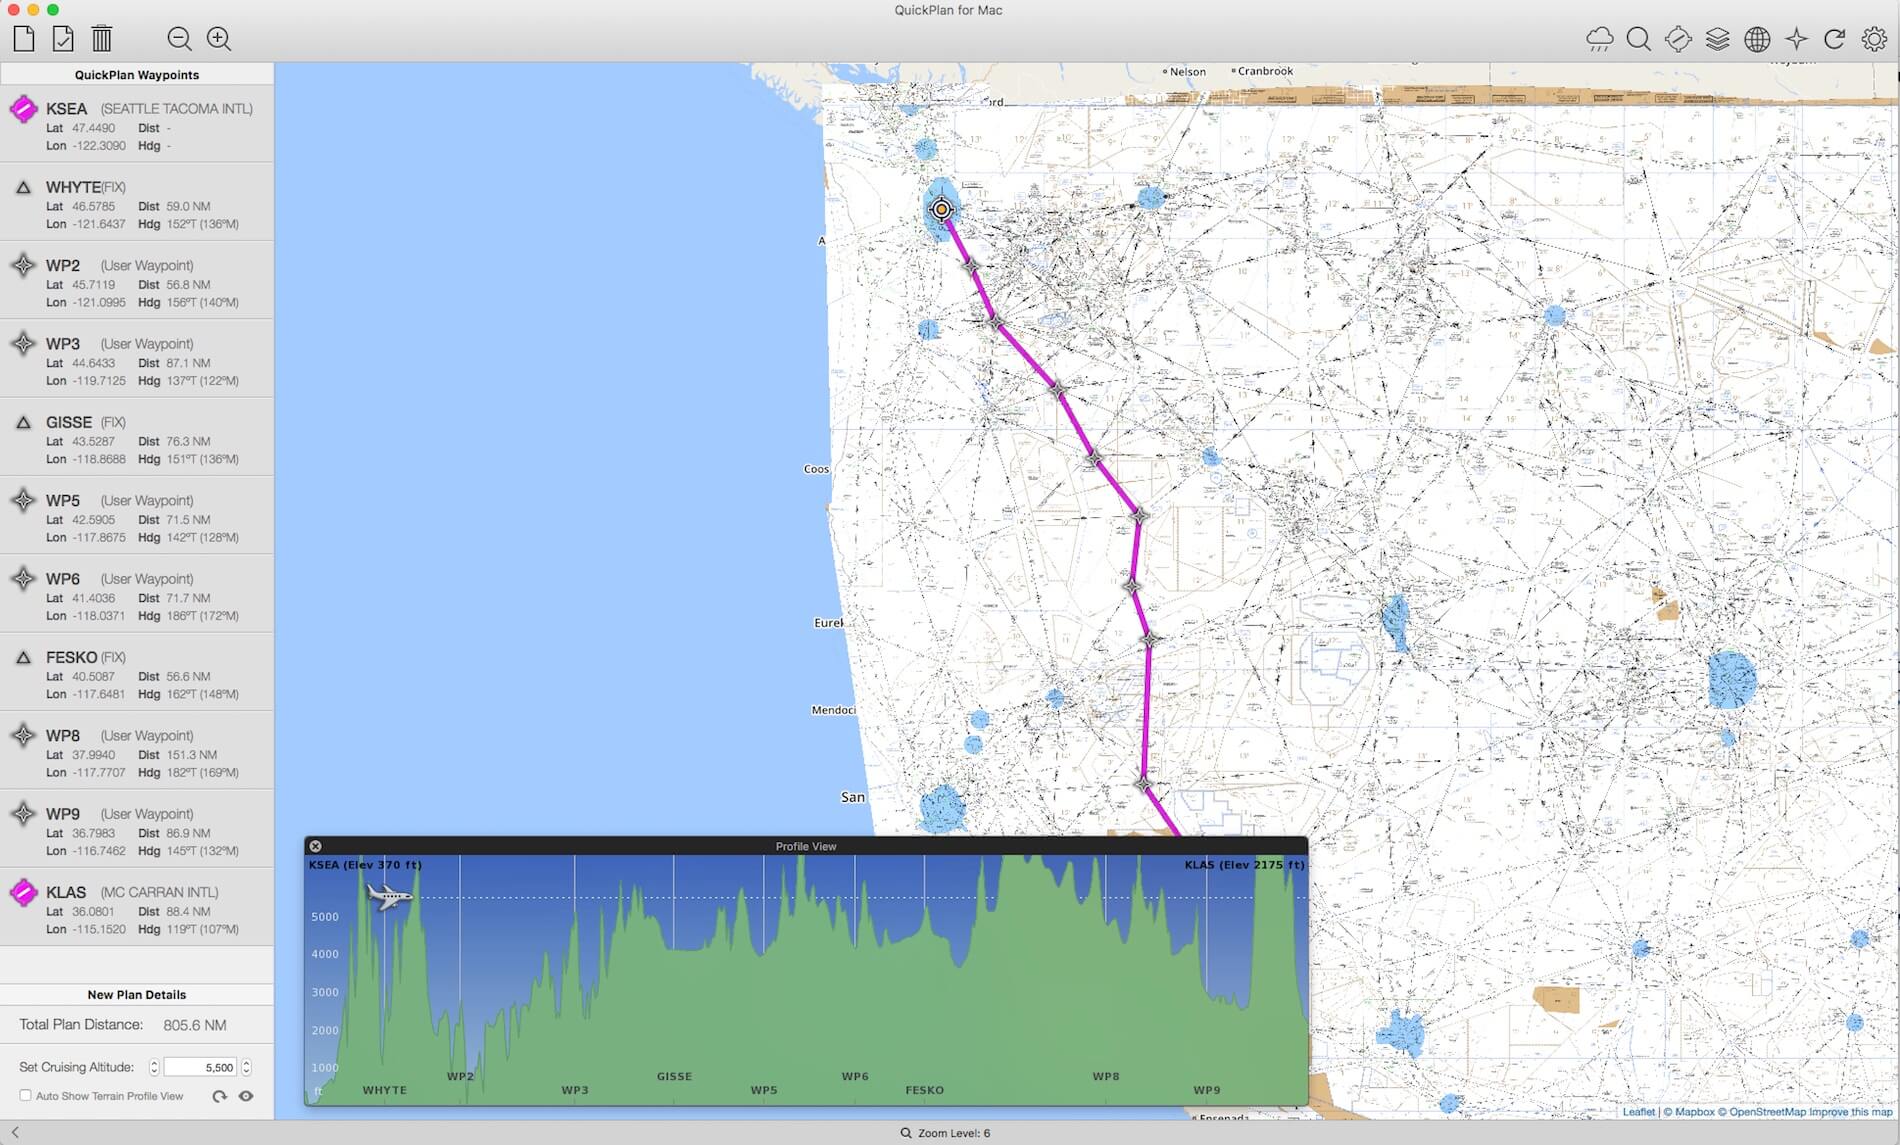
Use the magnifier glass icon (Find) and type KLAS, followed by clicking the find button. Click on the base map the KLAS airport symbol. If cluttered by too many fixes, NDBs, VOR/VORTAC beacons, zoom in and at a certain moment you’re able to click the KLAS airport symbol. The same kind of popup window appears as we saw with KSEA. Below all the KLAS airport data, you see again the green circle (and the white cross) with two options namely “Waypoint” and “Arrival”. It’s our intention to use KLAS as arrival airport thus we click the Arrival hyperlink and the same as we saw with the waypoint, KLAS is added to the flight plan as arriving airport.
In the sidebar, directly underneath KLAS, you see the overall distance from KSEA to KLAS and you’re able to select your intended cruising altitude. Ho ho, hold on … how high do we need to fly? To be sure that we fly high enough due to mountains along the route, you can click the small “eye” symbol. When you click this, a profile view window pops up. It is not a resizable window, just in case you think this. It shows all the relevant information about your flight plan thus the airport altitudes of KSEA and KLAS, cruising altitude, mountains along the way and all the waypoints.
When you’re satisfied with the flight plan you’ve created, it’s time to move to step 9.
Step 9 | Save Plan
We’ve discussed this before. By default, saving your flight plan is guided to your Desktop. Quoted from a previous section “Suppose you use QuickPlan for Mac also on the same computer where you have X-Plane installed, you can also save it under X-Plane folder Output/FMS Plans. This is by default for a lot of aircraft the position for loading flight plans. I say on purpose “the” position since some add-on aircraft have own FMS Plans folder where to load the flight plan from.”

Step 10 | Ready to Fly!
Officially step 10 is the end of creating a flight plan, but perhaps it’s worth to let you know that you can’t enter directly “low-altitude airways” numbers or also known in the US as Victor airways. I had hoped that you could enter a specific airway number like, this example V25, but QuickPlan for Mac doesn’t support such options. When you want to fly via V25, you need to enter at this airway the specific locations of fixes.
Step 11 | No VFR Flight Plan?
On purpose, I didn’t include another way of creating a QuickPlan flight plan. The steps given above are basically applicable for every type of flight plan you intend to create, even for VFR and thus for the US using the sectional charts. But even without these clouds based charts, you’re still able to create a VFR flight plan if, let’s make that clear, you have a registered QuickPlan else you’re stuck to the San Francisco Bay Area.
Summary
As always, the QuickPlan for Mac impression has become much longer then expected. If it is informative for you, I’ve reached my goal. To me, QuickPlan for Mac does what I had expected, when you want to fly VFR and even for IFR. That said, using the QuickPlan flight planner without all the bells and whistles as you can find with other flight planners, is still a useful and easy to handle flight planner.
A couple of words about other X-Plane flight planners.
The biggest problem I’ve faced looking for offline Mac OS flight planners, is that you hardly find them. There are a few that are dedicated for Windows which is not applicable for Mac users unless you use an Apple boot camp partition that allows you to install Windows 7, 8, 8.1 and 10. When you’re not stuck to offline planners, then you’ll find some regular and professional online flight planners like RouteFinder, XPFlightPlanner, xFlightPlanning, SimBrief Flight Planning, Online Flight Planning, XP Flight Planner etc.
At the same time, it must be said that some are freeware while others are payware and those payware planners can become quite expensive when you take for example a yearly subscription. Further on, some planners are nothing more then creating a flight plan based on the given departure- and arrival airports, cruising altitude, AIRAC data to be used etc.. Based on this information a “txt” flight plan is created (which is for example the case with RouteFinder). Another online freeware flight planner offers a little more options, but basically, you never see a VFR, IFR charts of the route to follow and besides that, you can’t create the flight plan by yourself. It’s pre-calculated for you!
Although far from being the ultimate solution, but FlyAware offers real flight plans, which is when you want to go for real, a good option. But again, the flight plan is fixed and nothing can be changed. QuickPlan for Mac, together with the cloud based charts and world nav data has a lot of potential, but I do have my feelings about the following items I faced, also keeping in mind the response from Fermin Fernandez from FSWidgets:
– Possibility to enter airways directly,
– Ability to rearrange waypoints within a created flight plan,
– Being able to add waypoints afterwards when the departure/arrival airports are already entered.
Ok, what’s next?
All kind of FSWidgets products can be bought via the FSWidgets website (https://fswidgets.com/shop/index.php) where you find a huge choice of products to choose from, ranging from Windows, Mac, iOS and Android, and then to be used with FS2004, FSX and X-Plane although we’re at X-Plained.com are only interested in X-Plane related products.
The reviewed QuickPlan for Mac cost 24.95 USD excluding the cloud based charts. Interested in cloud based charts? Then you must check this link and for the world nav data this link.
QuickPlan for Mac was tested on my main iMac. My master iMac is a 27-inch Late 2013 model. It runs macOS Sierra 10.12.2 and has X-Plane 10.51 installed.
When you like the review, you can first give it a try and see if QuickPlan for Mac is something for you. That said, follow this link and download the product and use it in the demo mode, which is limited to the San Francisco Bay area. One cloud based chart of Cuba/PR WAC demo is included.
In case you need detailed product information, you can always click the Help menu item from QuickPlan via the Apple QuickPlan menu or you use this online help link that can be found at the QuickPlan for Mac product page, just below the product download button.
Feel free to contact me if you’ve got additional questions related to this impression. You can reach me via email Angelique.van.Campen@gmail.com or via Angelique@X-Plained.com.
With Greetings,
Angelique van Campen
| Add-on: | Payware FSWidgets QuickPlan for Mac |
|---|---|
| Publisher | Developer: | FSWidgets | FSWidgets |
| Description: | Easy to go flight planning program for Mac |
| Software Source / Size: | Download / Approximately 2.2MB (unzipped) |
| Reviewed by: | Angelique van Campen |
| Published: | January 9th 2016 |
| Hardware specifications: | - iMac Pro - Intel 3GHz Intel Xeon W / 4.5Ghz - Radeon Pro Vega 64 16368 MB - 64 GB 2666 MHz DDR4 - 1 internal shared 1TB SSD (Big Sur 11.x) - 1 internal shared 1TB SSD (Bootcamp Windows 10) - 1 external 2TB LaCie Rugged Pro SSD (Big Sur 11.x) - Saitek Pro Flight System X-52 Pro and X-56 Rhino - Honeycomb Alpha Flight Controls - Honeycomb Bravo Throttle Quadrant |
| Software specifications: | - macOS Big Sur (10.15.x) - X-Plane 11.5x |
1 Comment
Leave a Reply to Bradford Cathey Cancel reply
You must be logged in to post a comment.
I like FSWidgets (I own two of their apps) but for purely X-Plane simmers there is the free option of SkyVector.com and X-Planetools.com to do your flight planning and then get a resulting .fms file.