The All New Honeycomb Bravo Throttle Quadrant
At the beginning
This review has become a bit longer than expected. Since the start I collected a lot of additional information that resulted in a lot of enthusiasm, but also a lengthy review. Due to the length of this review and the chapters/sections about the Honeycomb Bravo Throttle Quadrant, I’ve decided to include a Table of Contents. I hope you’ll enjoy this review that covers my own explorations of this well designed, durable and looking great Honeycomb product.
Table Of Contents
Introduction
The Bravo Throttle Quadrant – Part I
– Box Contents
The Bravo Throttle Quadrant – Part II
– Exploring the Bravo Throttle Quadrant
The Bravo Throttle Quadrant – Part III
– Fixing the Mounting (or 3M Micro-Suction) Plate
– Positioning the Bravo Throttle Quadrant
macOS Drivers
– Bravo Throttle Quadrant with X-Plane 11.51r1 Big Sur
Windows 10 Drivers
– Bravo Throttle Quadrant with X-Plane 11.51r1
Flight Testing
– Introduction
– Testing with LR Beechcraft Baron 58
– Testing with Islander, Duchess 76 or DHC-2 Beaver
– Testing with LR Boeing 737NG
– Using Profile files with Zibo 737-800
– Testing with Zibo 737-800
On Last Note ….. Airbus Models
Summary
Introduction
As I started with my first Honeycomb review a while ago, the following statement stays the same; who hasn’t used or still using Saitek, Logitech, Thrustmaster, CH, VKB Gladiator hardware in combination with flight simulators like X-Plane, FlightGear, Steam FSX, P3D and the latest release Microsoft FS2020?
Our second review deals with Honeycomb Aeronautical hardware which has released an awesome second hardware product namely the Bravo Throttle Quadrant. Some had good experiences with the original Logitech/Saitek flight simulator stuff, while others where not so satisfied with Saitek.
When I wrote about the Honeycomb Alpha Flight Controls I was pleased to hear and to experience that any other throttle unit could work with the Honeycomb device, but everybody agrees with me that it would be much better when Honeycomb would/could bring out an own throttle unit. And that has happend on November 2nd 2020 for X-Plained.Com … the Bravo Throttle Quadrant and believe me, it’s not just a throttle unit like you know perhaps from from Saitek or other manufactures. I haven’t unpacked it yet, but when I check the dedicated Honeycomb Bravo Throttle Quadrant website, wow, this will be fun.

In case you’re new to Flight Simulation hardware or looking around, lets give you some background information about this US based company. According to founder Nicki “Based in San Diego CA, Honeycomb Aeronautical was founded in 2015 with the sole goal of creating and providing affordable flight simulation hardware. We wanted to focus on creating a modern look while staying true to actual cockpit designs. We added functions that are important in a flight sim environment like extra buttons and hat-switches, so more programmable features and assignments are available.”
Nicki continues “We also created a table mounting system that doesn’t require any clamps onto the table and can be used on most table and desk surfaces .The mechanical engineering for the Yoke was handled by Precision Flight Controls who have more than 25 years of experience in creating high-end flight simulators for the professional aviation industry.”
“By using existing components that have been evolutionally developed and tested over many decades, it ensured us that we would have the right feel and mechanical quality. Honeycomb founder, Nicki Repenning has more than 10 years of experience in flight simulation, including 6 years of managing the Saitek Pro Flight Brand in North America.”
And this brings me to this 2nd Honeycomb hardware review. Many years ago I received from Saitek the Pro Flight Throttle, but I can tell you already that although the Honeycomb name is similar, it’s such a massive and impressive device I’d never expected, but more about that later. Regarding the warrantee there’s something different then with the Alpha Flight Controls which has a 5-year warranty on the tension belt, both Honeycomb devices have a 2-year overall limited warranty. And again I say …. is that good? No, that’s excellent!
The Bravo Throttle Quadrant – Part I
Box Contents
This time I got my Bravo Throttle Quadrant sample directly from Honeycomb Aeronautical. Nicky and Ryan, thanks for that. Much appreciated.
Originally my sample took off in the air from Hong Kong, then it went to China, and finally via Belgium, Germany to the Netherlands. It took over 2 weeks to get here. The brown box – so not the actual product casing – has some dents on the corners which shouldn’t happen and this was also visible on the inner Honeycomb casing BUT more important, the Throttle Quadrant itself has nothing. Not surprisingly since the inside is fully packed with foam so under normal conditions nothing can and will happen.
I did notice on the FedEx airway-bill that the overall package weight is 6 kilograms or roughly 13 lbs. And knowing a bit the construction and design of the Alpha Flight Controls, I had already a good feeling about the overall construction, but I didn’t had any idea what to expect and how big it is. I wrote it in the previous section, when you know the Saitek Throttle Quadrant then forget that one and face the massive, no, impressive Honeycomb Bravo Throttle Quadrant. Of course, I could check as you can too, the Honeycomb website and I did that a while ago, but being unbiased is also good to start a review.
It is really that heavy – these 6 kilograms or 13 lbs? To me this means it’s a bit more then only plastic or other material. The only way to find that out was again to open the Honeycomb Bravo Throttle Quadrant box.

It’s time to open, no, to unbox the Honeycomb Bravo Throttle Quadrant blue box. The very first thing I see is foam on one side with two small black boxes on the other side marked with “General Aviation” and “Commercial”. Oh oh, what is that? What does that mean? What to expect? I’m so curious, I want to know what’s inside. I remove the boxes one by one, open them and oh my goodness, this is awesome. This is something I haven’t seen before. And yes, I know, when you checked before the Honeycomb website, you know it, right?
Although I haven’t seen the throttle quadrant itself yet, the two boxes with different levers in it means that you can transform the throttle quadrant for any General Aviation aircraft or for “officially” Boeing look like commercial aircraft. I write on purpose “Boeing” look alike since the throttle levers, FLAP lever handle and speed brake lever are typical for Boeing aircraft, but don’t be disappointed when you’re an Airbus virtual pilot. The Honeycomb Aeronautical team is working on that and can be bought as an add-on for your Bravo Throttle Quadrant to give it an Airbus look like.
All right, back to the black boxes.
The reason that the “Commercial” box is a bit higher has to do with the overall length of the throttle levers and the FLAP lever. I’m aware that the “General Aviation” and “Commercial” levers are all from plastic, but components made of plastic aren’t the same. Some plastic parts really feel like cheap plastic and that’s absolutely not the case with these add-on parts for the Bravo Throttle Quadrant. These parts are not only nice to see, they look realistic, they feel solid and worth to highlight, the “Commercial” throttle levers do have a functional arm/lever for operating the thrust reversers.


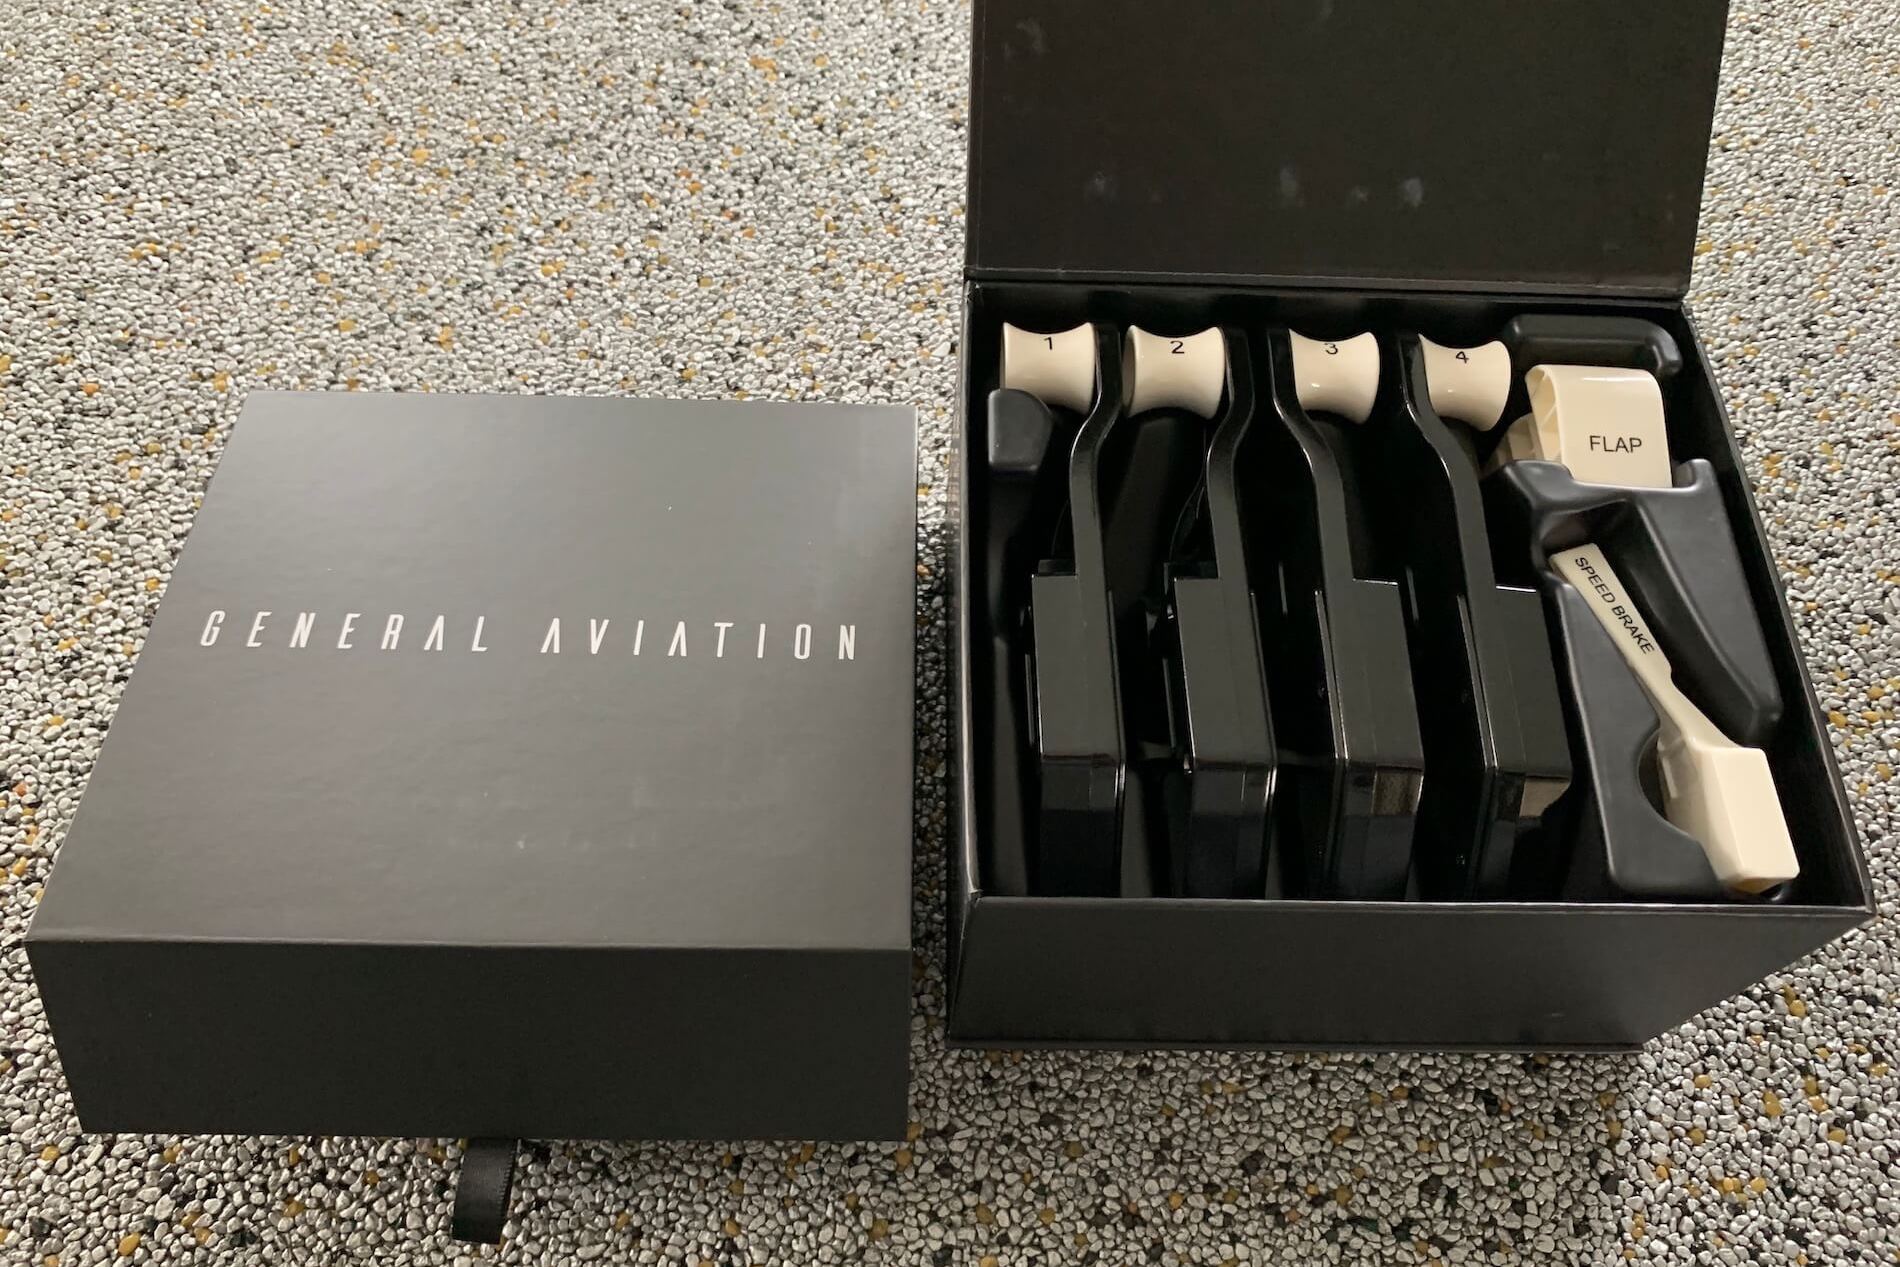


And before I forget it, only applicable for the “Commercial” throttle levers which have at the bottom of each lever 3 electrical contacts. Most likely this is for the thrust reverser lever and perhaps also for the red dot button. I’ll explain later more about the electrical contact on the Throttle Quadrant unit itself.
Time to continue with the unboxing and see what’s next. I first remove the upper foam part which covered the box that holds the previous mentioned boxes with levers. And, at the bottom of the box – still completely covered by foam lies the Throttle Quadrant itself. That’s a big unit. Oops, that’s not of the same size and for sure also a different construction of the Saitek Throttle unit. Wow, it’s not only a big unit, it’s also heavy. Time to unpack and yeah, I could have expected this, the overall model is very similar to the Alpha Flight Controls, at least, the housing except for the front part and the mounting plate.


As you can see on the last two photos, that base unit is the same as I’ve seen with the Alpha unit. Anyway, we still need to unpack other components. Once I’ve removed the Throttle Quadrant unit, I spot the “suction/mounting” plate – same as with the Alpha Flight Controls – an Aerosoft flyer, the Honeycomb manual and a flyer with Honeycomb partners.
Due to the same design and construction I’ve seen with the Flight Controls unit, the Honeycomb Bravo Throttle Quadrant has the same dual mounting plate solution. You either connect the mounting plate with two clamps to the table or you use the 3M Micro Suction pad which means you don’t need the clamps.
Clearly noted in the English (and for sure in the German and French too) manual is that when you follow the cleaning instructions of the 3M Micro-Suction, you can be use on and on. In other words, there’s no need to keep, once you’ve placed the mounting plate with the 3M Micro-Suction to the table, it mounted on the table. When you don’t need the mounting plate for a while, then follow the instructions in the manual, reapply the plastic covering to preserve quality and condition of the 3M Micro-Suction.
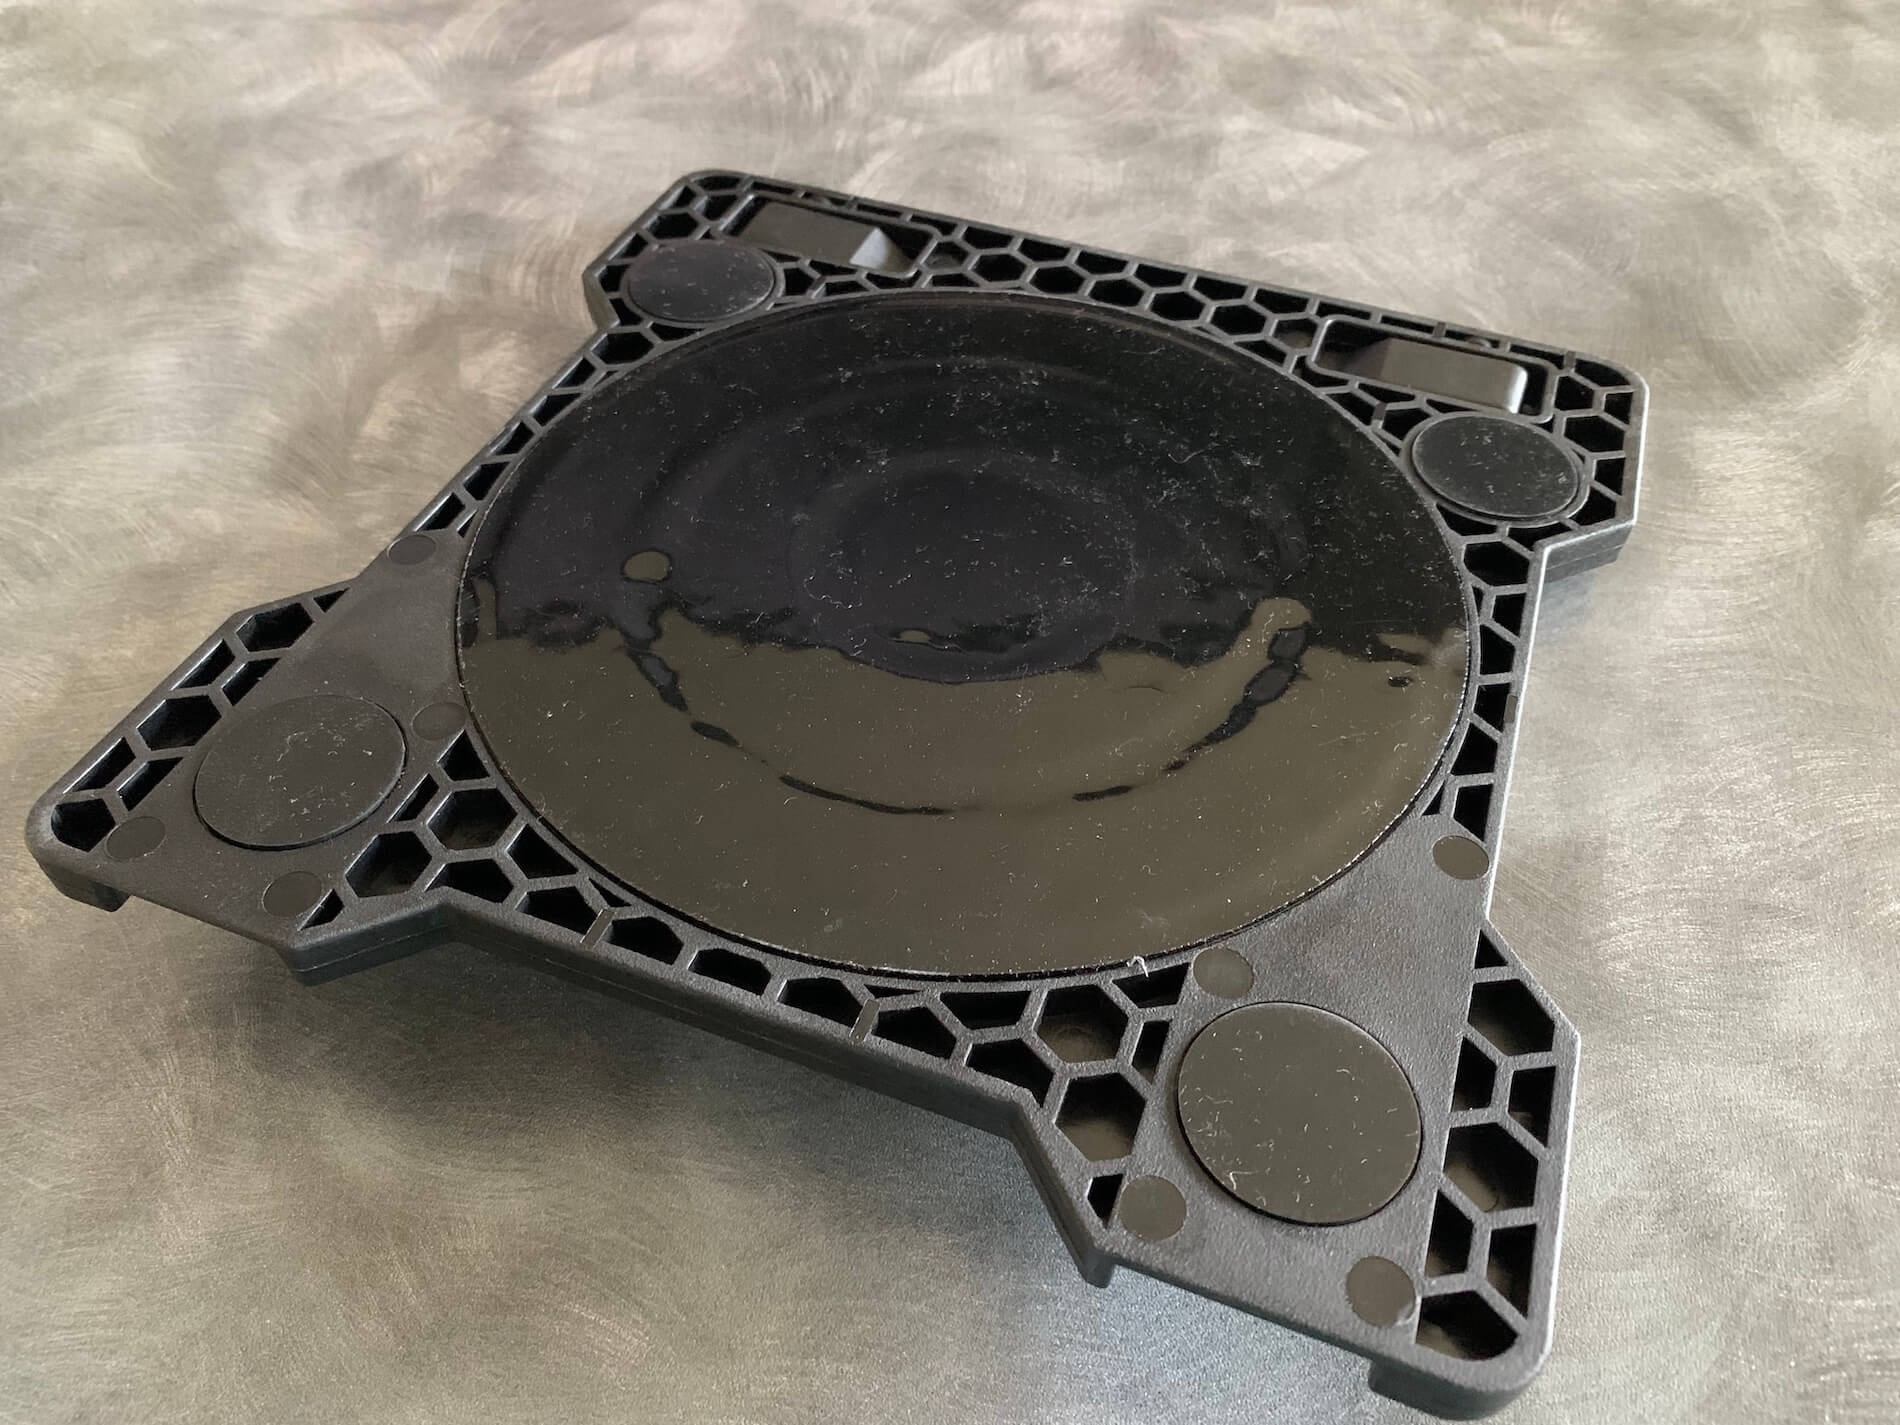
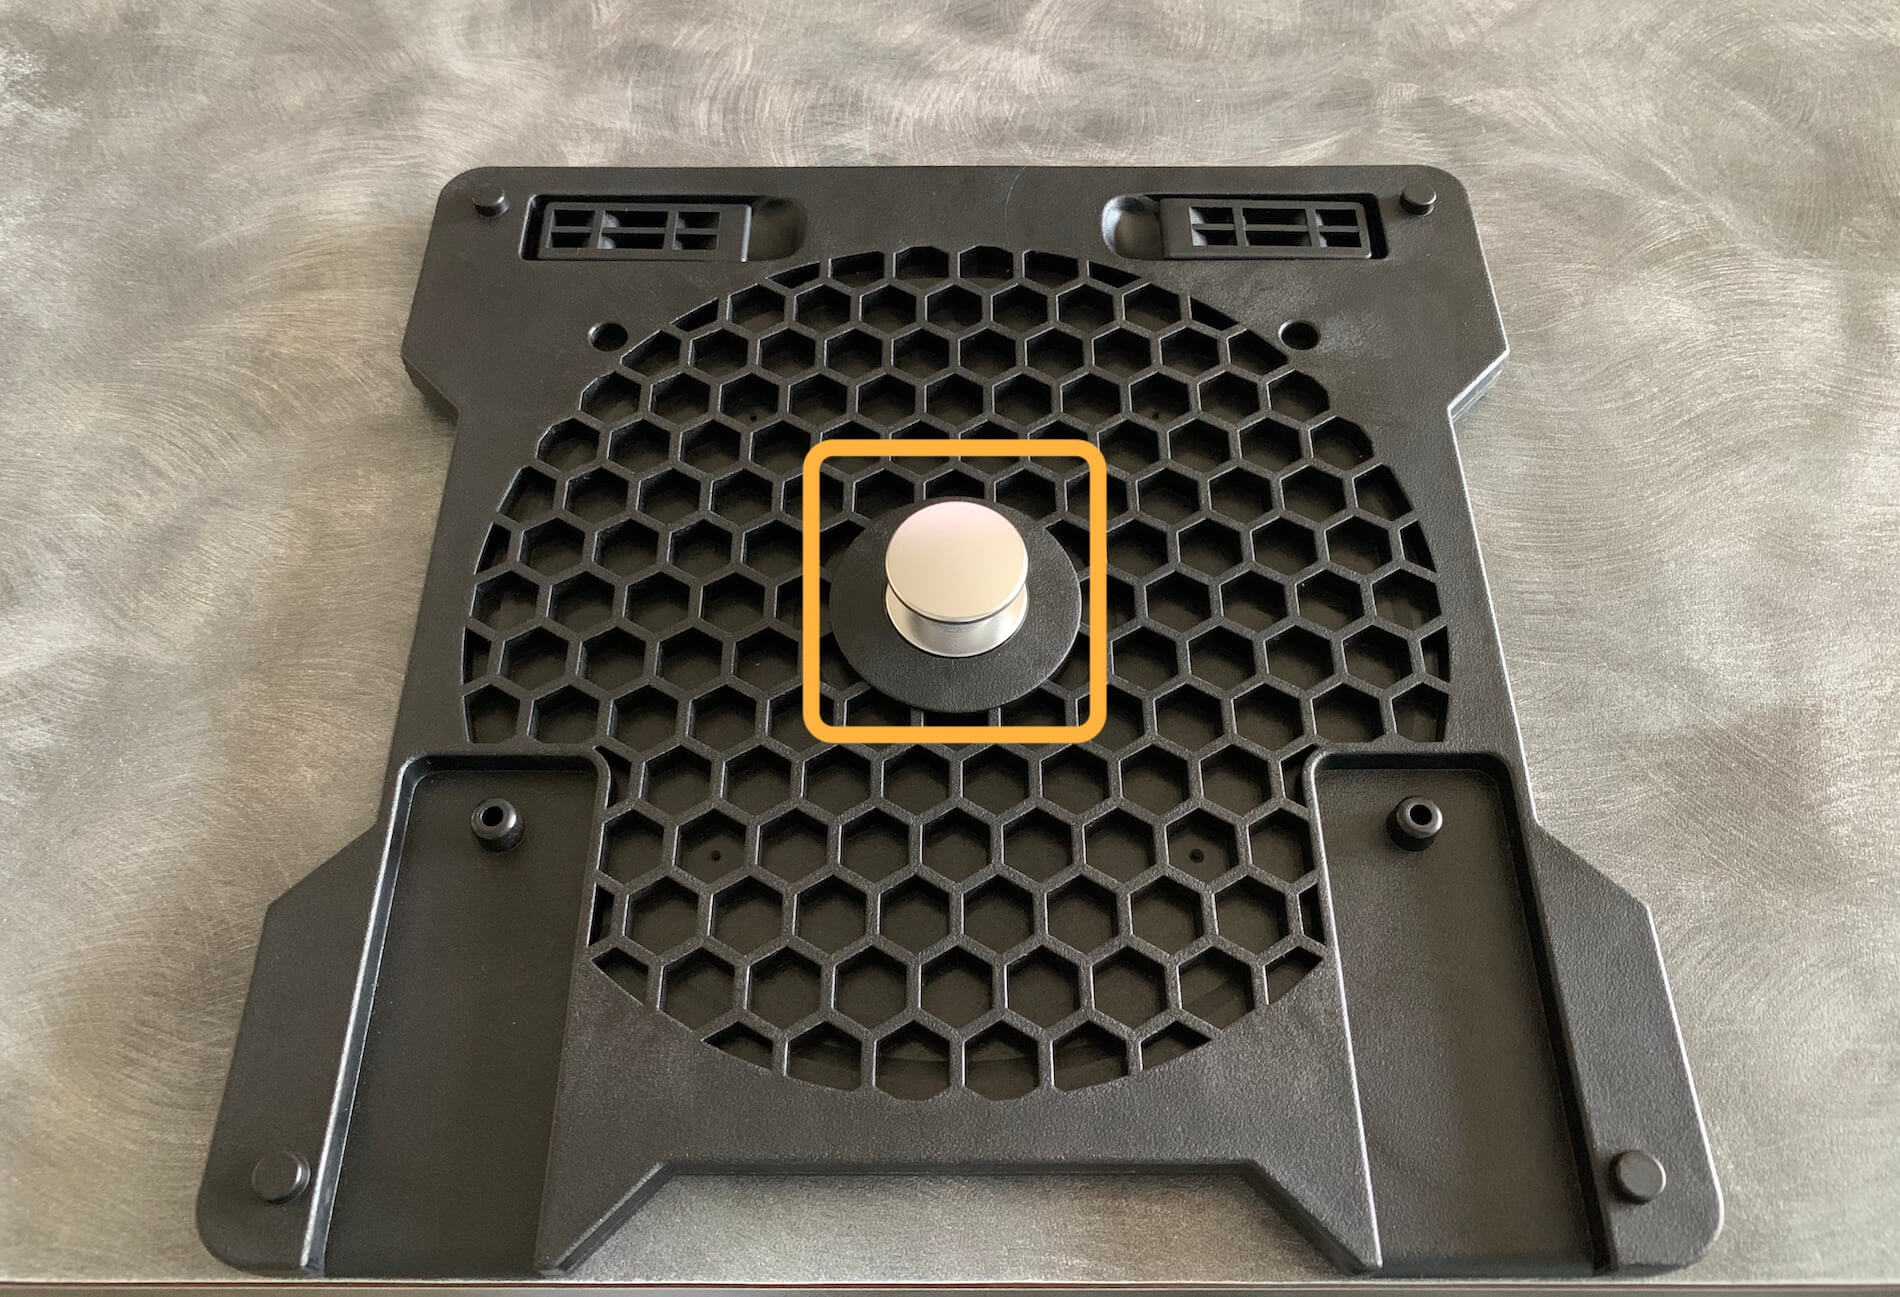
One last word about the mounting plate. It’s not just a plate. It’s relatively heavy for the size and what it does. It’s stiff and looks professional and made of durable material. In the middle is a metal connecting pin for the yoke housing to slide in a fixation slot in the unit while on the front side you find openings for the clamps. On the other side two lifting levers in case you use the 3M Micro-Suction to lift the plate from the table.


Back to the unboxing.
Besides the flyers, the Honeycomb manual is available in three different languages; English, German and French. Below the suction or mounting plate is another piece of foam and below that, you will find the stainless steel lock screws and USB cable (USB Type A to USB-C). The cable is 1.5 meters (4 feet, 11 inches), and has on one side a regular USB connector for in your USB hub or PC/Mac, with on the other side a USB-C connector that fits in the back of the Honeycomb Throttle Quadrant.
That’s it. You normally would expect a DVD with software, but that’s old fashioned, that’s history. On page 10 of the English manual you find a Honeycomb link where you can download the latests Honeycomb software and drivers, but hold on, there’s nothing needed when using the Honeycomb Bravo Throttle Quadrant in combination with X-Plane 11 except then for the joy file and belonging photos, in case it’s not yet included in X-Plane itself. When you search for this Honeycomb page you’ll see yourself, unless you use the hardware with Prepar3D, FSX Steam Edition or MSFS2020.
Some words about the Honeycomb Bravo Throttle Quadrant. It’s heavy and feel durable and professional although it’s from plastic, but I said that before, you’ve got plastic and plastic however, they can feel as rubbish material or as professional components which is the case with the Honeycomb hardware.
Ok, back to the unit. Just to give you an idea of the used materials and thus their weight; the mounting plate is stiff and counts 400 grams (14 ounce), both clamps together 700 grams (approximately 1.5 lbs), the Bravo Throttle Quadrant a whopping 2.4 kilograms (almost 6 lbs).
The Bravo Throttle Quadrant – Part II
Exploring the Bravo Throttle Quadrant
An how does it feel? How does it look?
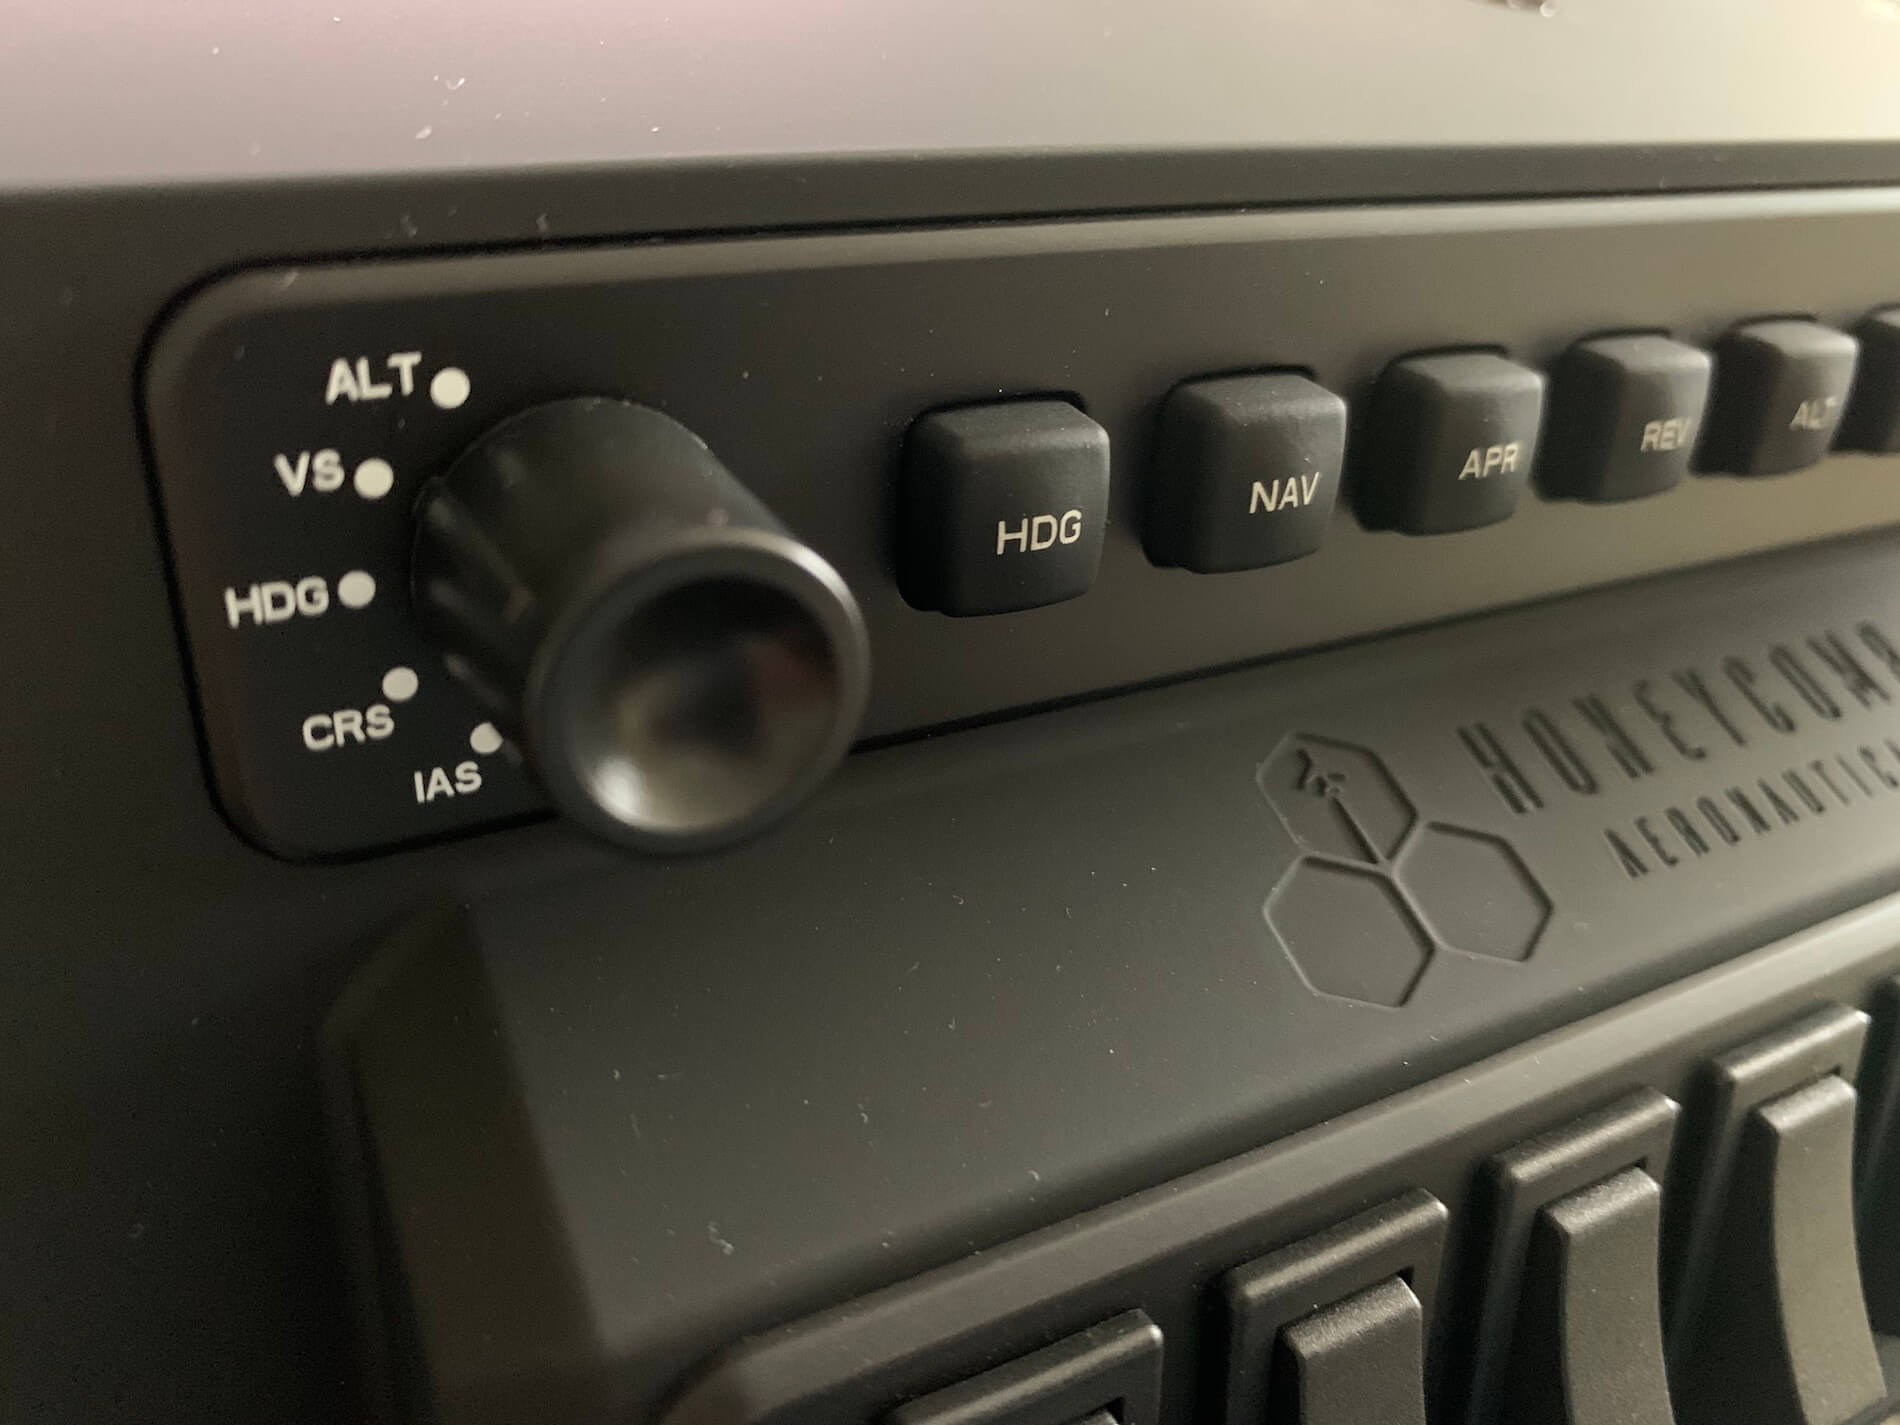
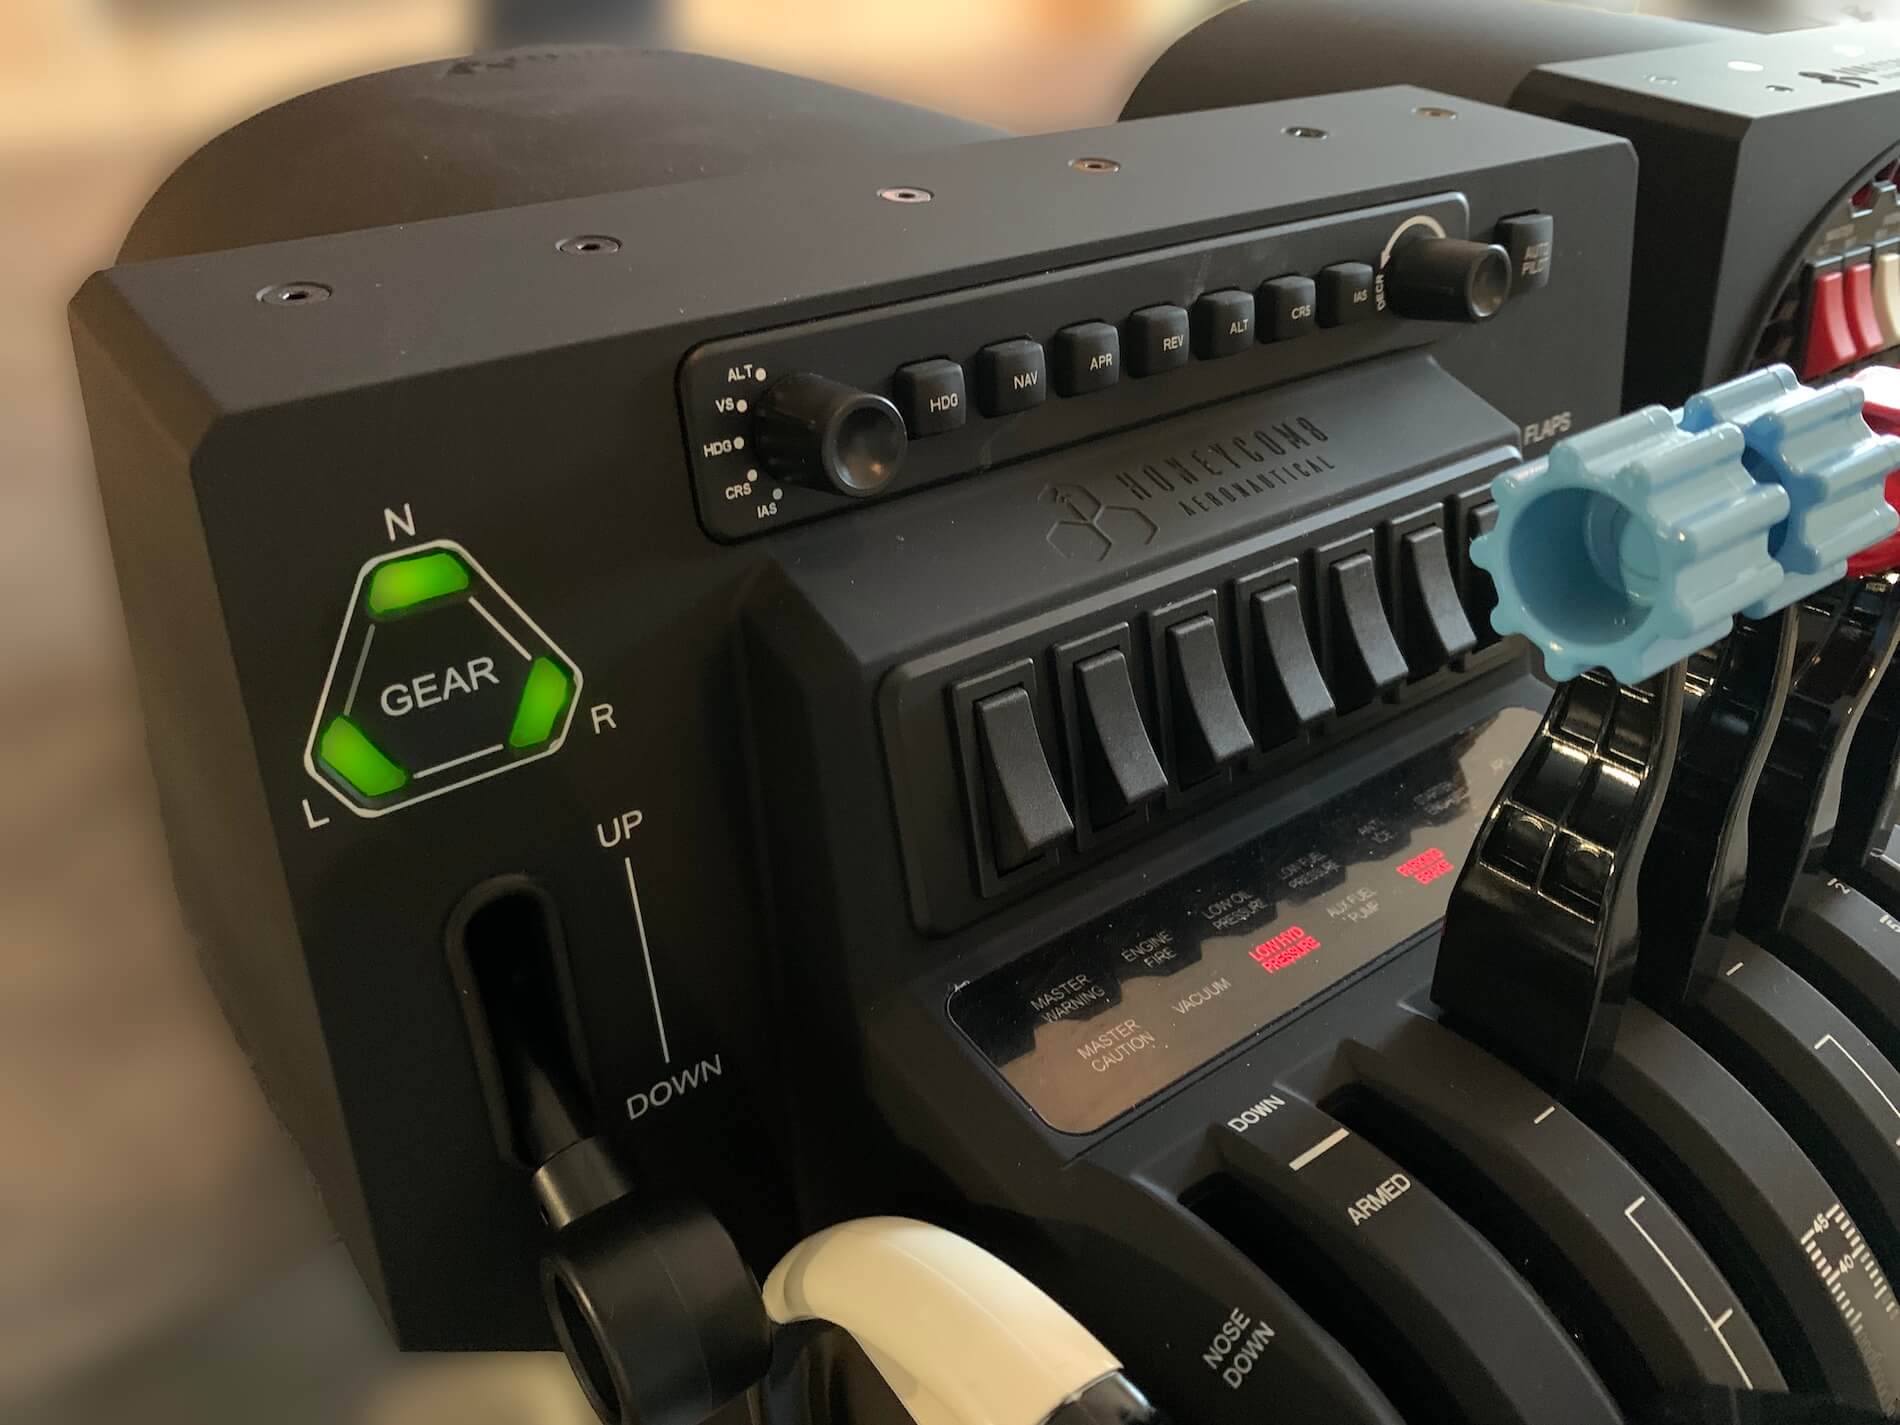
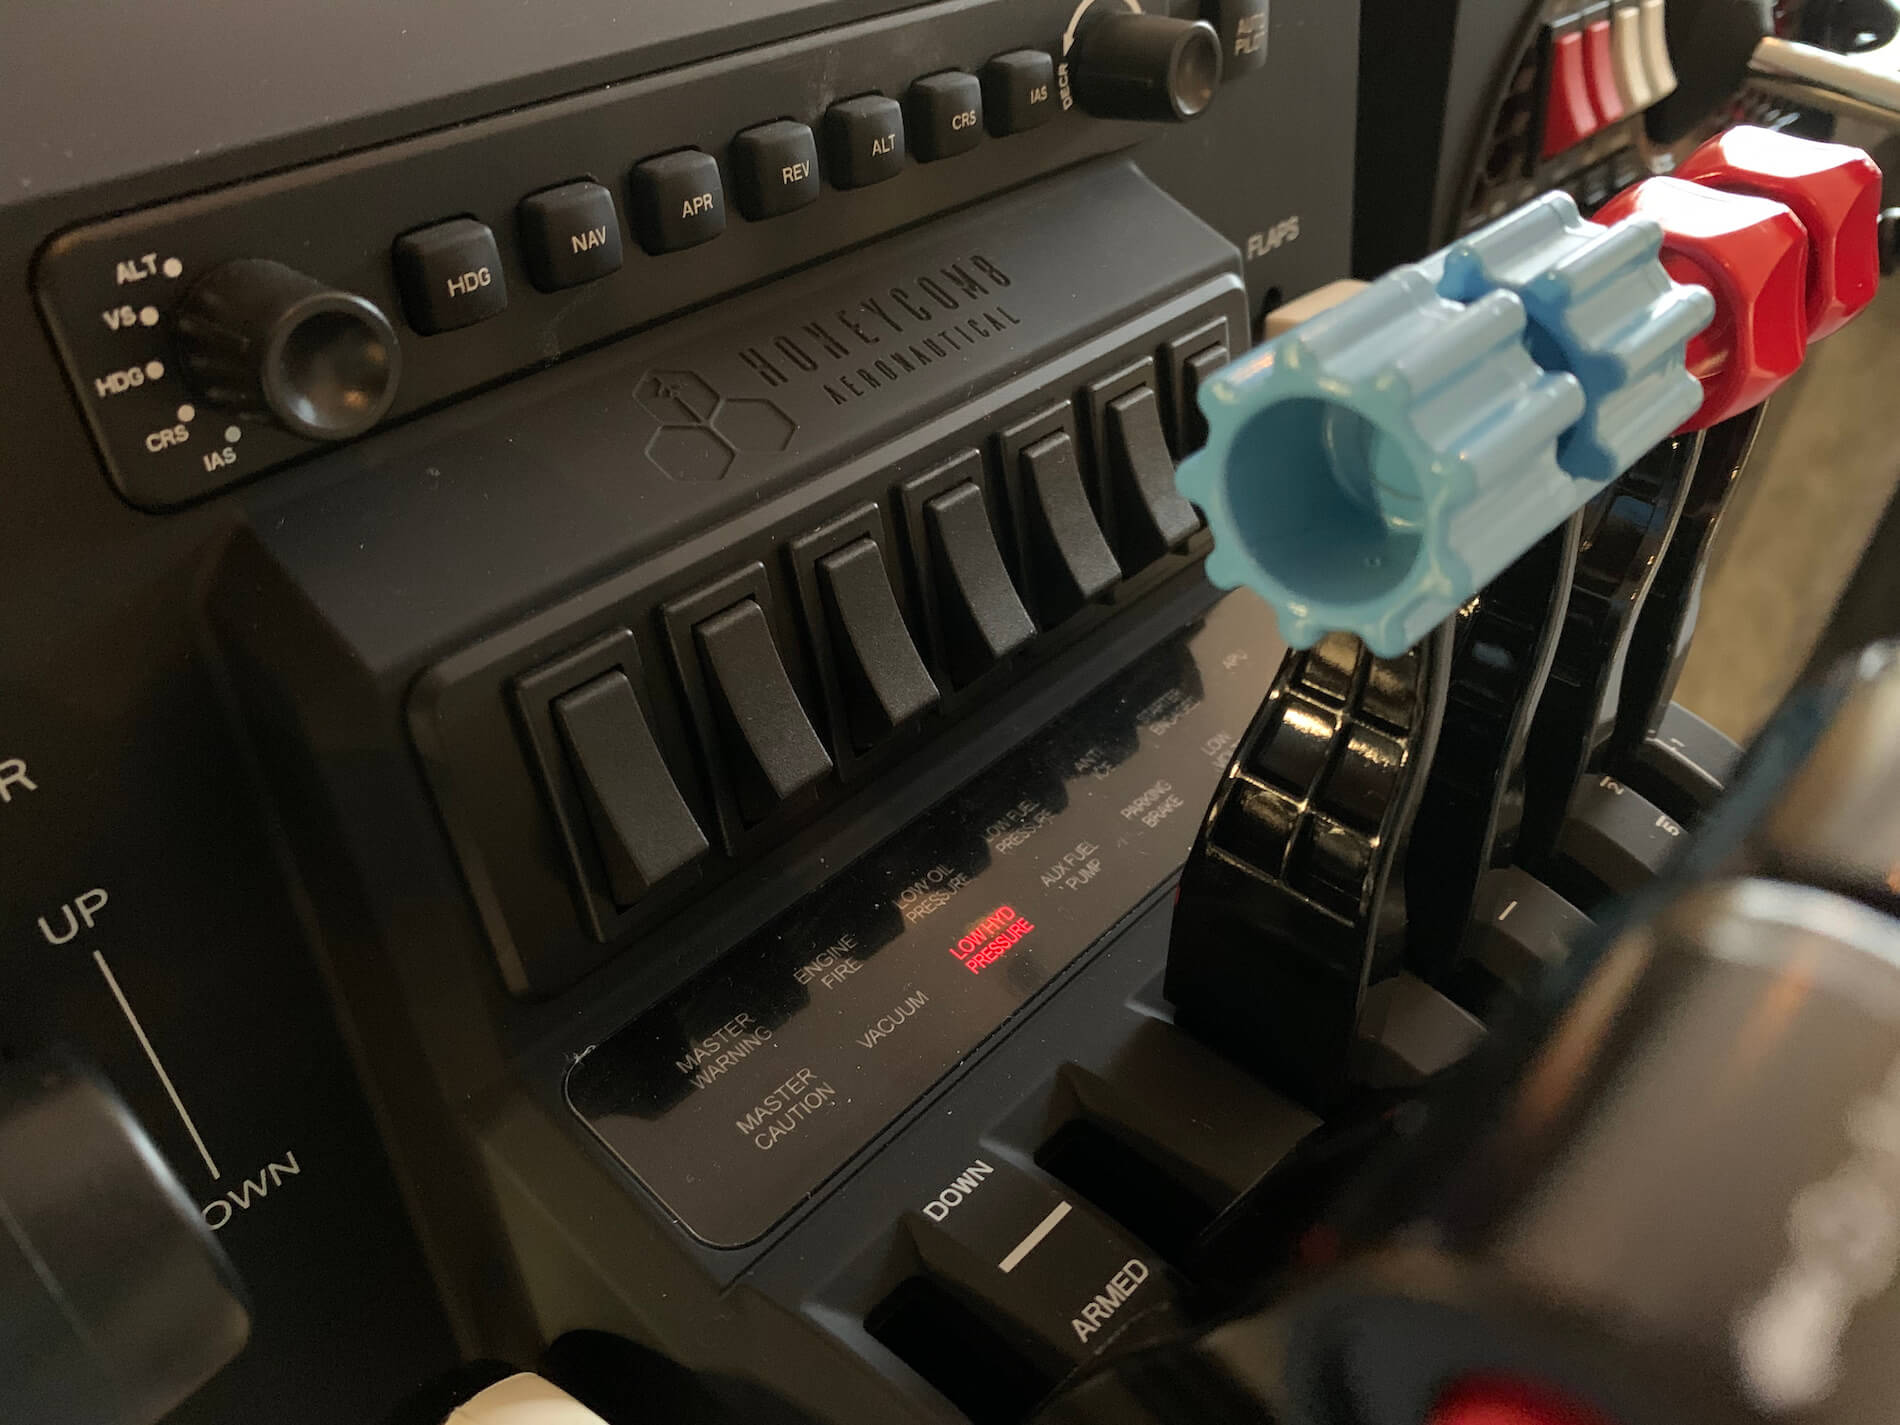
Simple questions, and such simple answers. It feels great and much heavier then expected and besides that, the front of the throttle device looks awesome. But it offers a bit more than only throttle controls or whatever you can think of. At the front pat of the housing you’ll find a basic AP (Auto Pilot) panel. I write on purpose basic AP panel since it’s not a replacement for the Boeing MCP or Airbus FCU. That said, the AP panel comes with HDG, NAV, APR, REV, ALT, CRS (VS) and IAS buttons and on the left-hand side of the AP panel a selector knob to set the required mode you want to use in combination with the on the right-hand side located increase/decrease knob.
Still with me?
Suppose you turn the selector knob on the left-hand side to VS (Vertical Speed) you can increase/decrease the VS value with the right-hand knob and of course, the X-Plane aircraft will correspond in accordance what you select. And last but not least, there’s an AP button on the far right to engage/disengage the AP.
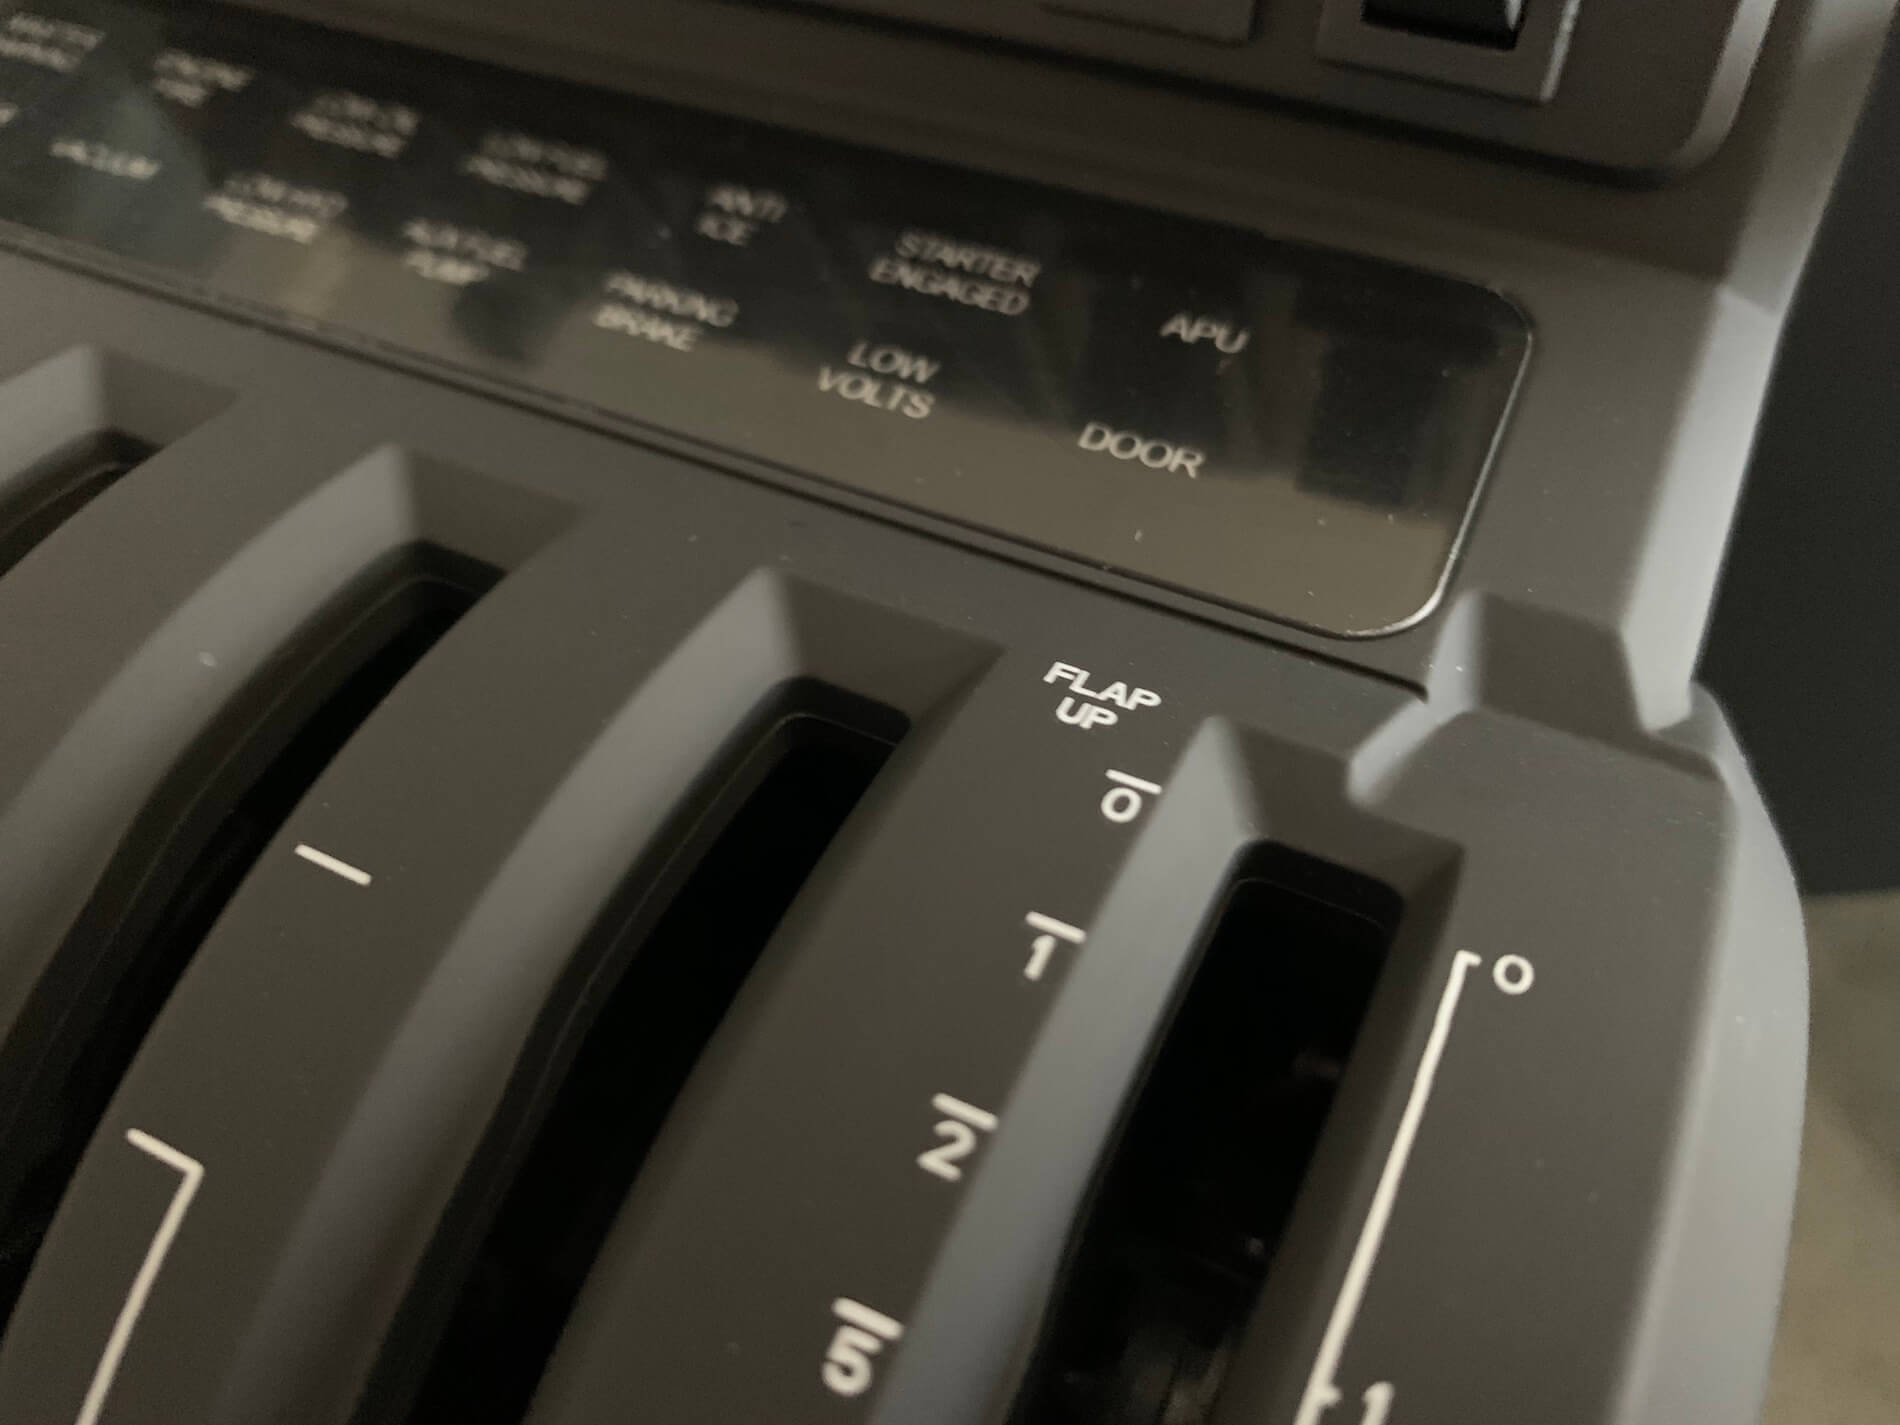
On the left of the housing you’ll find a landing gear knob while on the right-hand side you see the FLAP handle. The FLAP handle on the housing is a typical GA look alike handle. The gear handle isn’t since this “look and feel” can be in any type of aircraft. That I mention this, has a reason, but no worry, I’ll come back to this later. Then directly below the AP section, you find several switches and below that an annunciator light panel.


And then, the actual throttle unit or perhaps I can better write a Boeing look alike housing can be configured as you want. That said, it can be configured for a single engine GA aircraft, for a twin engine GA aircraft or for a Boeing twin or 4 engine aircraft. Wow, that’s a complete new design that I’ve haven’t seen before. When you take the Bravo Throttle Quadrant out of the box, all openings in the housing are covered by rubber fillings. Perhaps you’re confused, but hold on. You can peel out the rubber fillings but please, please, don’t throw them away. You need them later for filling up the openings (and thus a levers) you’re not using. Let’s first have a look to the following photos I made.


Now that we know what’s all possible, keep in mind that some levers in the “General Aviation” and “Commercial” boxes have an electrical contact. That said, when you look into the back of the lever, you see some contacts and the same you will see on the throttle lever arms. Some throttle lever arms have 2 while others have 3 electrical contacts. As you can see on the previous photos, when you’re not using some of the throttle lever arms, you can use the rubber caps to close the opening off and to keep the dust outside.
And last but not least, the PITCH TRIM wheel. Although the trim wheel can be used with every aircraft, it is typical a Boeing look alike trim wheel. It’s nicely modeled, feels good when you turn on it, and it looks as real as it gets. When turning the wheel during one of my flights, I didn’t feel any slack.
A few tips and tricks and things you need to know.
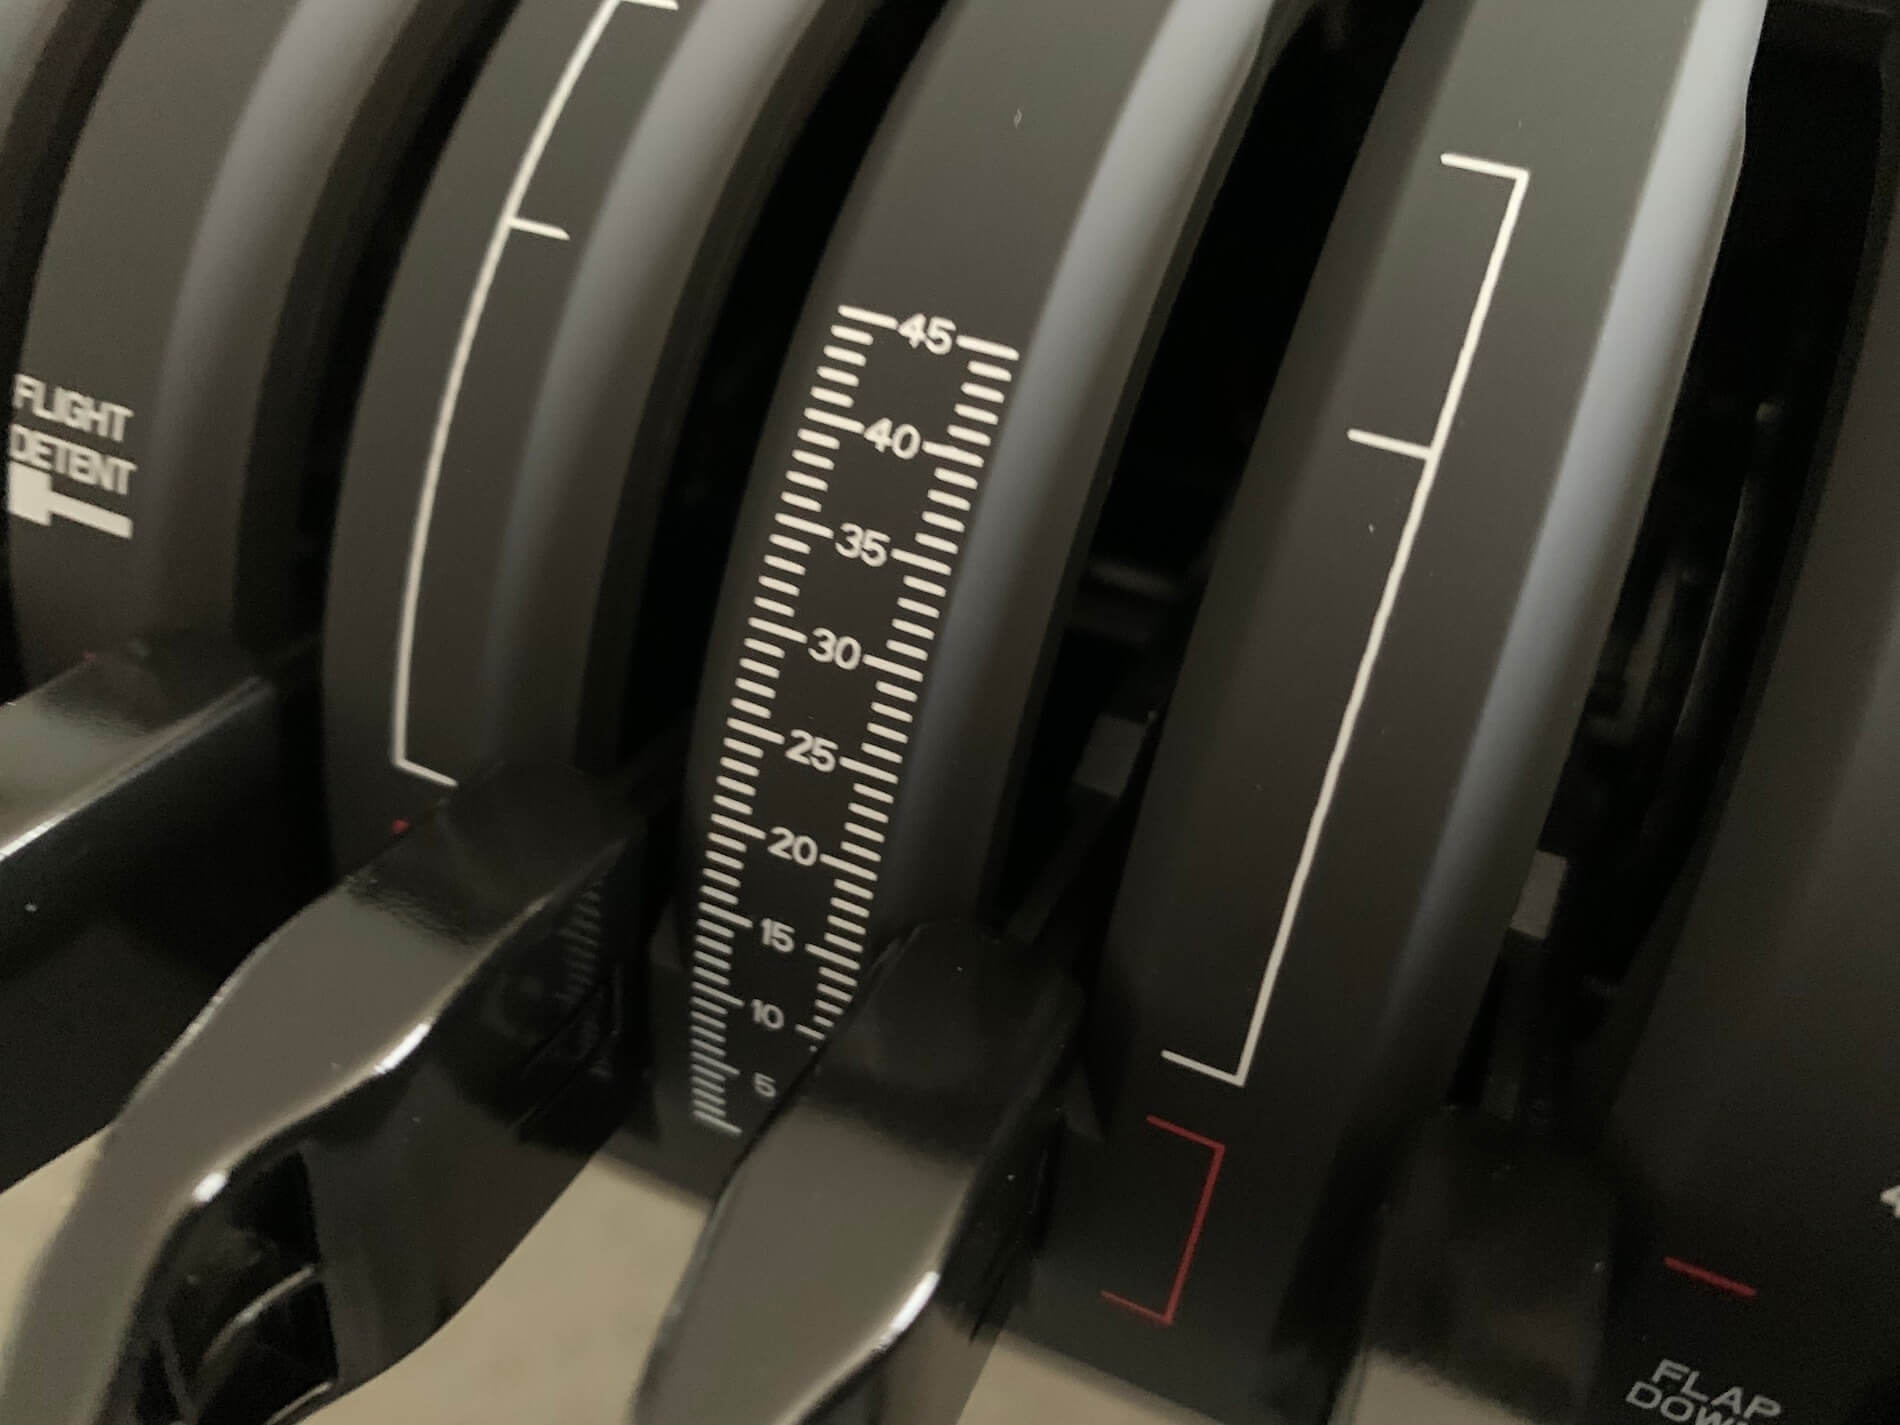
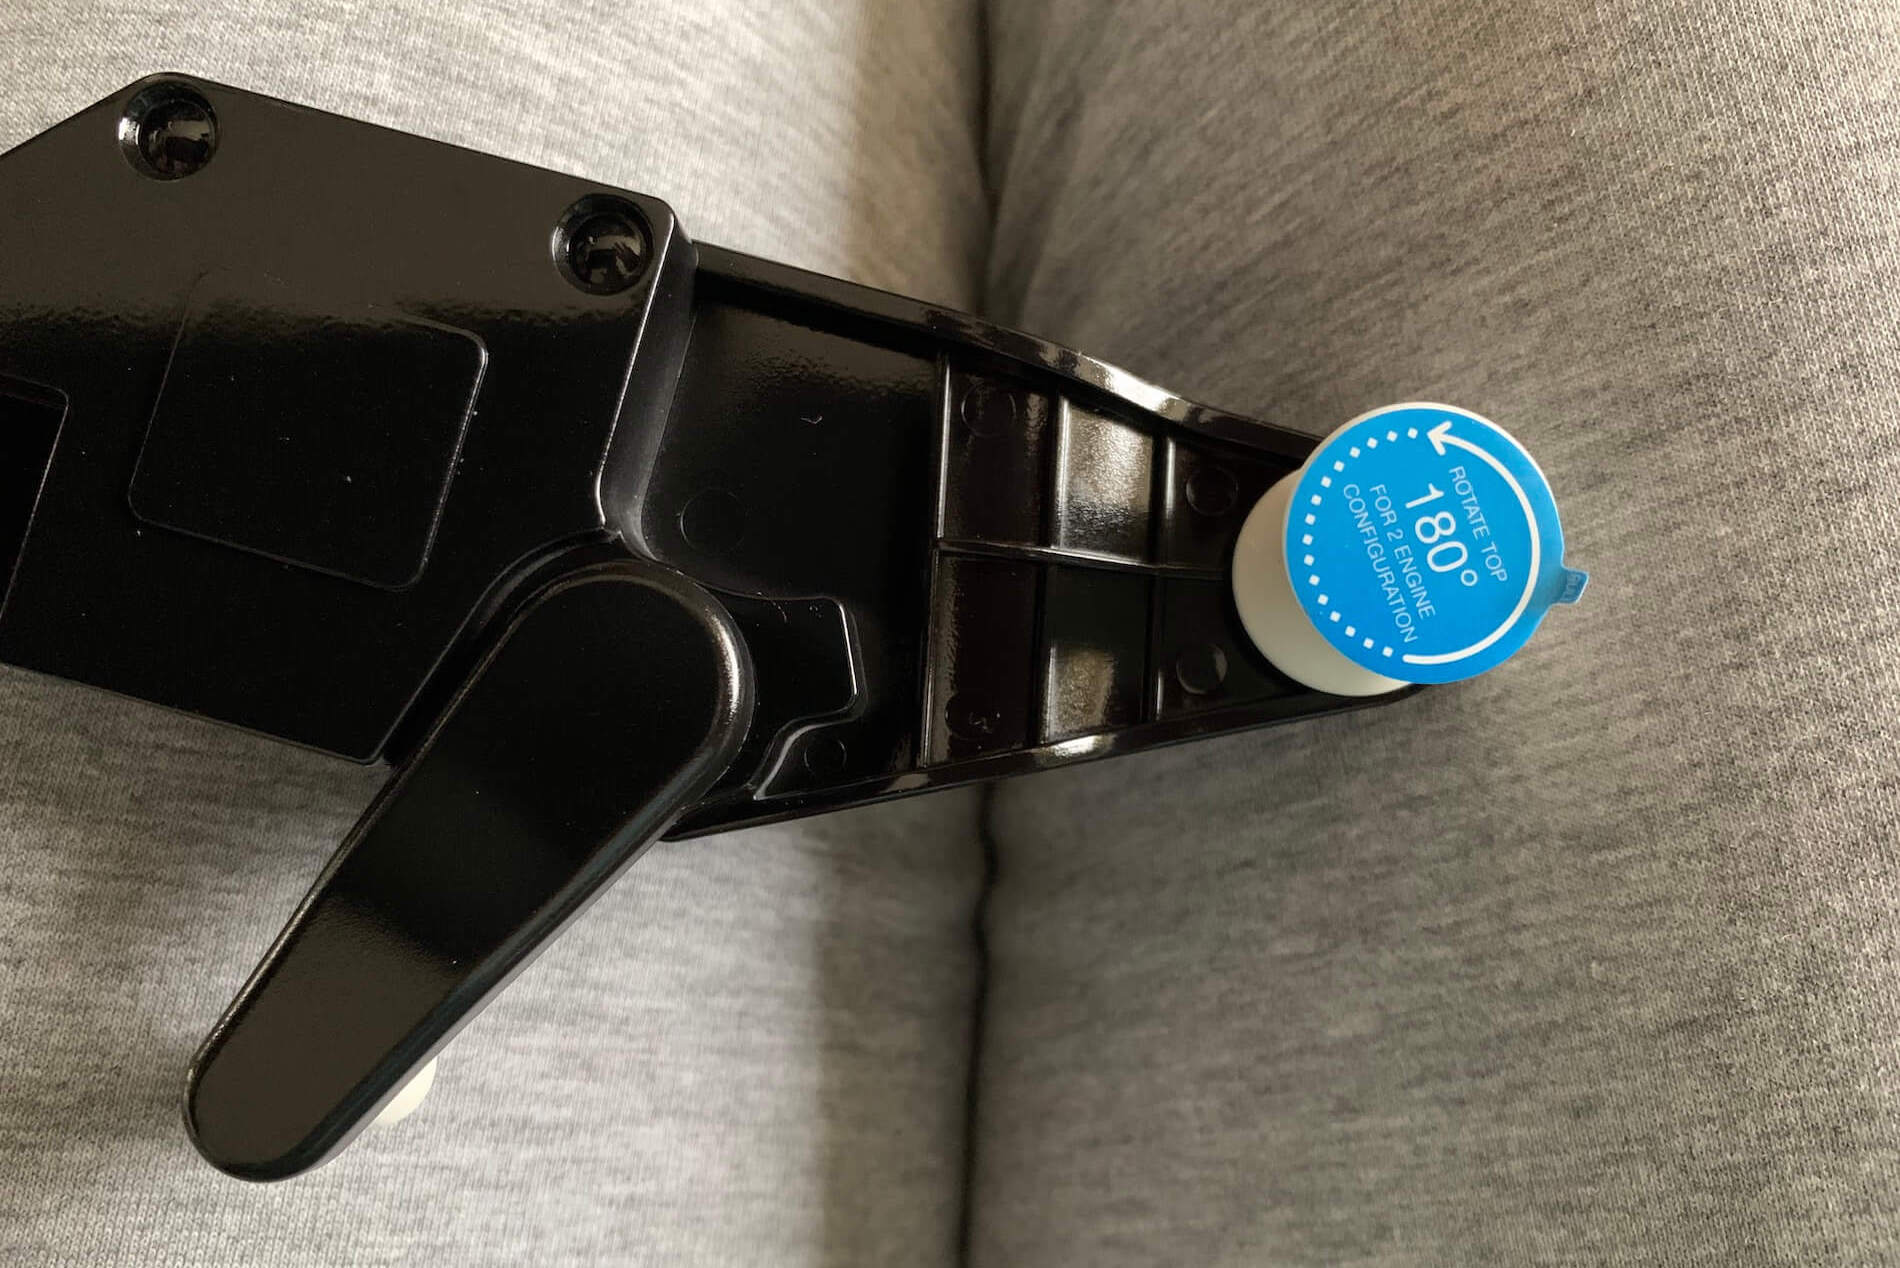
First: you can only install the handles in one way. You’ll notice that immediately. When the handle is in the right position, it slides easily on the arm. When you’d turned the handle 180 degrees, you’ll feel some resistance which means the handle not in the correct position. For the Boeing look alike throttle handles is makes sense since each throttle handle has an integrated reverser handle which should be on the back. The Boeing SPEEDBRAKE handle always points outwards so that makes sense too and the same applies for the Boeing FLAP handle. When you turned the FLAP handle 180 degrees, the FLAP symbol on top points in the wrong direction as well as that you can’t read the word FLAP.
So far, all as expected, but when it comes to the GA look alike handles you could easily put the PROP and MIXTURE handles in the wrong position which would lead to interference of handles. Because of that, you can only install it in one way.
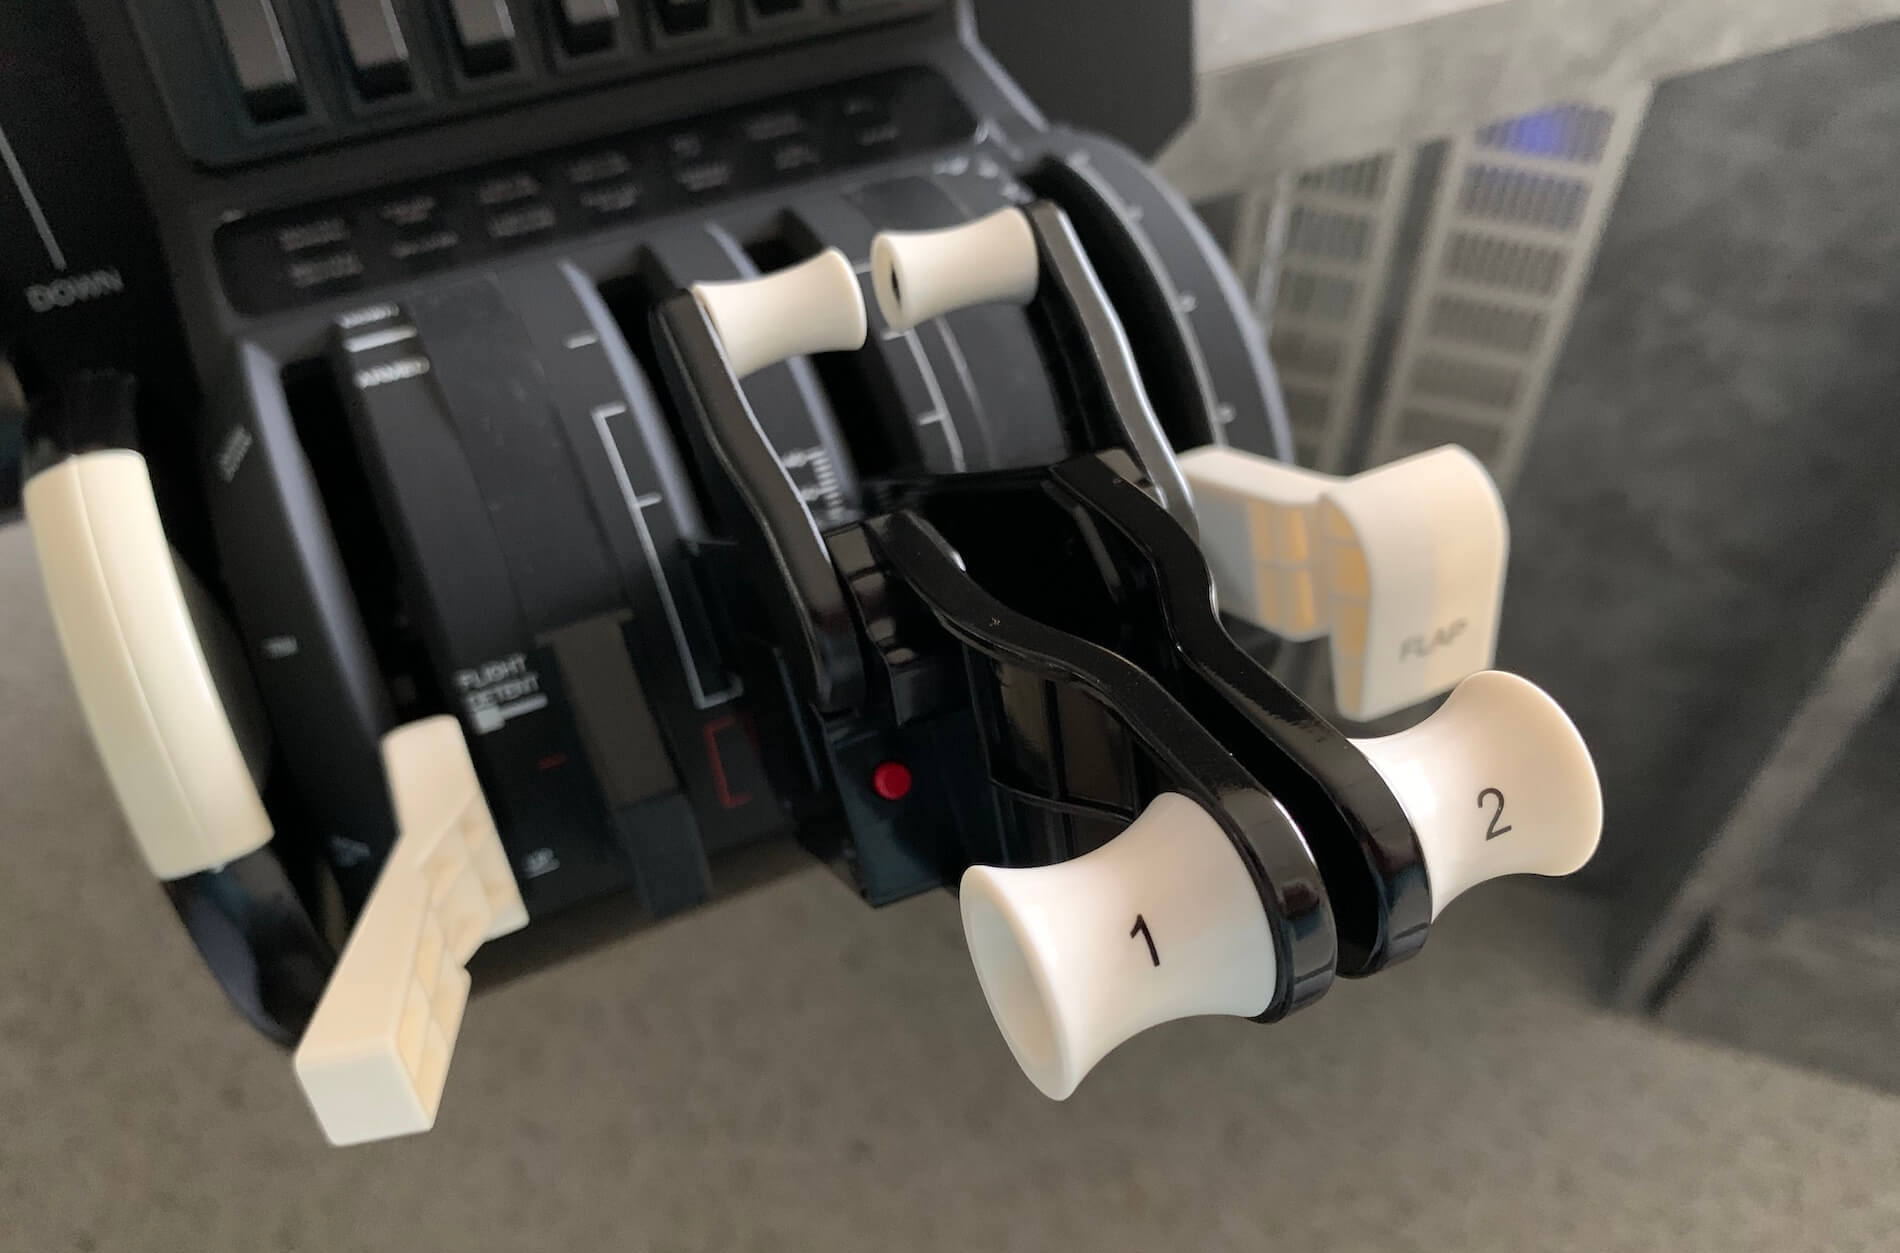
Second: when you want to use it as a Boeing throttle panel, but only need two throttle handles like for the 737, 757, 767 and 777, you need to install throttle handles numbered 1 and numbered 3 (2). Oops, that’s confusing 3 (2) right? Out of the box throttle handle 3 has an additional number on it namely 2. This throttle handle is used as number 2 (RH engine) or number 3 (4 engine aircraft like the 747). On the sticker on the side of this throttle handle you’ll read it.
Third: some arms on the Bravo Throttle Quadrant have two and other three electrical contacts. And as you can expect, some of the levers have internally (see photo) no contacts, two contacts or three contacts. The contacts are needed for additional functions like GO AROUND, A/T DISCONNECT or REVERSE ACTIVATION. That said, see the photos where to install certain handles.
For the Boeing look alike 4 engine aircraft it’s easy and straightforward. For the Boeing look alike 2 engine aircraft use only the middle two throttle arms. When you go for GA or commuter aircraft, it doesn’t make much difference since the PROP (blue) and MIXTURE (red) have no contact. The only contact is then the throttle lever with the GO AROUND red button. That can be put in position one or two, looking from the left side of the throttle unit.


The whole Bravo Throttle Quadrant feels heavy, no, better to say feels solid and made of durable components. I mentioned this before that the main housing is similar to the Alpha Flight Controls except for the front part. The plastic throttle, prop, mixture, thrust, flap and speedbrake levers are all made of plastic, but look and feel solid and realistic.
Personally I find the Boeing look alike thrust levers with integrated reverse levers beautiful. On the right-hand side of the throttle housing you’ll find a friction knob. Perhaps you know that or seen it with other throttle manufactures, it allows you to increase or decrease the force needed to move one of the six handles. What I understood from Nicki is that most internal components are made of metal and that means, it’s of high quality and durability. Neither less, use the friction knob with care.
When you’ve connected the Bravo Throttle Quadrant to an USB receptacle, you won’t see any LED lights in the front as we know from the Alpha Flight Controls. The only integrated lights I’ve seen are those from the landing gear, the annunciator light unit and the AP related buttons.
I hope I can find the right words for this, it looks like that the top layer of the base unit – same as with the Alpha Flight Controls – is covered with a rubber coating which gives a kind of anti-slip look. Perhaps it’s not rubber, but to me it looks gorgeous. Also applicable for the Alpha unit and the same for the Bravo unit, the model or size of the throttle quadrant feels OK as well as the durable switches and knobs.
The Bravo Throttle Quadrant – Part III
Fixing the Mounting (or 3M Micro-Suction) Plate
After my thorough check of the Bravo Throttle Quadrant, it’s time to move on. It’s time to connect the Bravo to my flight desk table. Ready to join me in the next section.
As we know from part II, you can use the clamps to connect the mounting plate to your flight desk table, although there are also other options. That the clamps will do a great job and hold the mounting plate to the table, I’m sure about that, but I’m more curious how the 3M Micro-Suction works and if it stays on the flight sim desk when you grab it.
As explained before and written in the manual, I remove the protective plastic and after I cleaned the table, I press it firmly in position and rubb it around to fixate the mounting plate. Said before, when you want to remove it, lift the two clips on the front end and before you know, you can slowly pull the mounting plate from the table. Want to store it? Don’t forget to put the plastic back on it.
Attention .. Attention …. Important
In noticed one thing and would like to bring this to your attention and that is placing back the plastic sheet on the 3M Micro-Suction plate.
For this, see the last two photos.
It’s important that you place the plastic sheet correctly back on the suction plate which means that the red extension is on the outside. The photo shows you clearly what I mean including a green square or red square. I noticed this by accident and didn’t expect that when you put the plastic sheet back up side down it’s very difficult to peel it off. In case, it can happen to everybody, you have put the plastic sheet back up side down (see the photo with the red square), don’t worry too much. Gentle peel off the plastic sheet from the suction plate. I will go but do it gentle! I did inform Honeycomb about this since I’m not 100 percent sure if this is a real issue or that it is just me. When feedback follows I let you know their answer.


Positioning the Bravo Throttle Quadrant
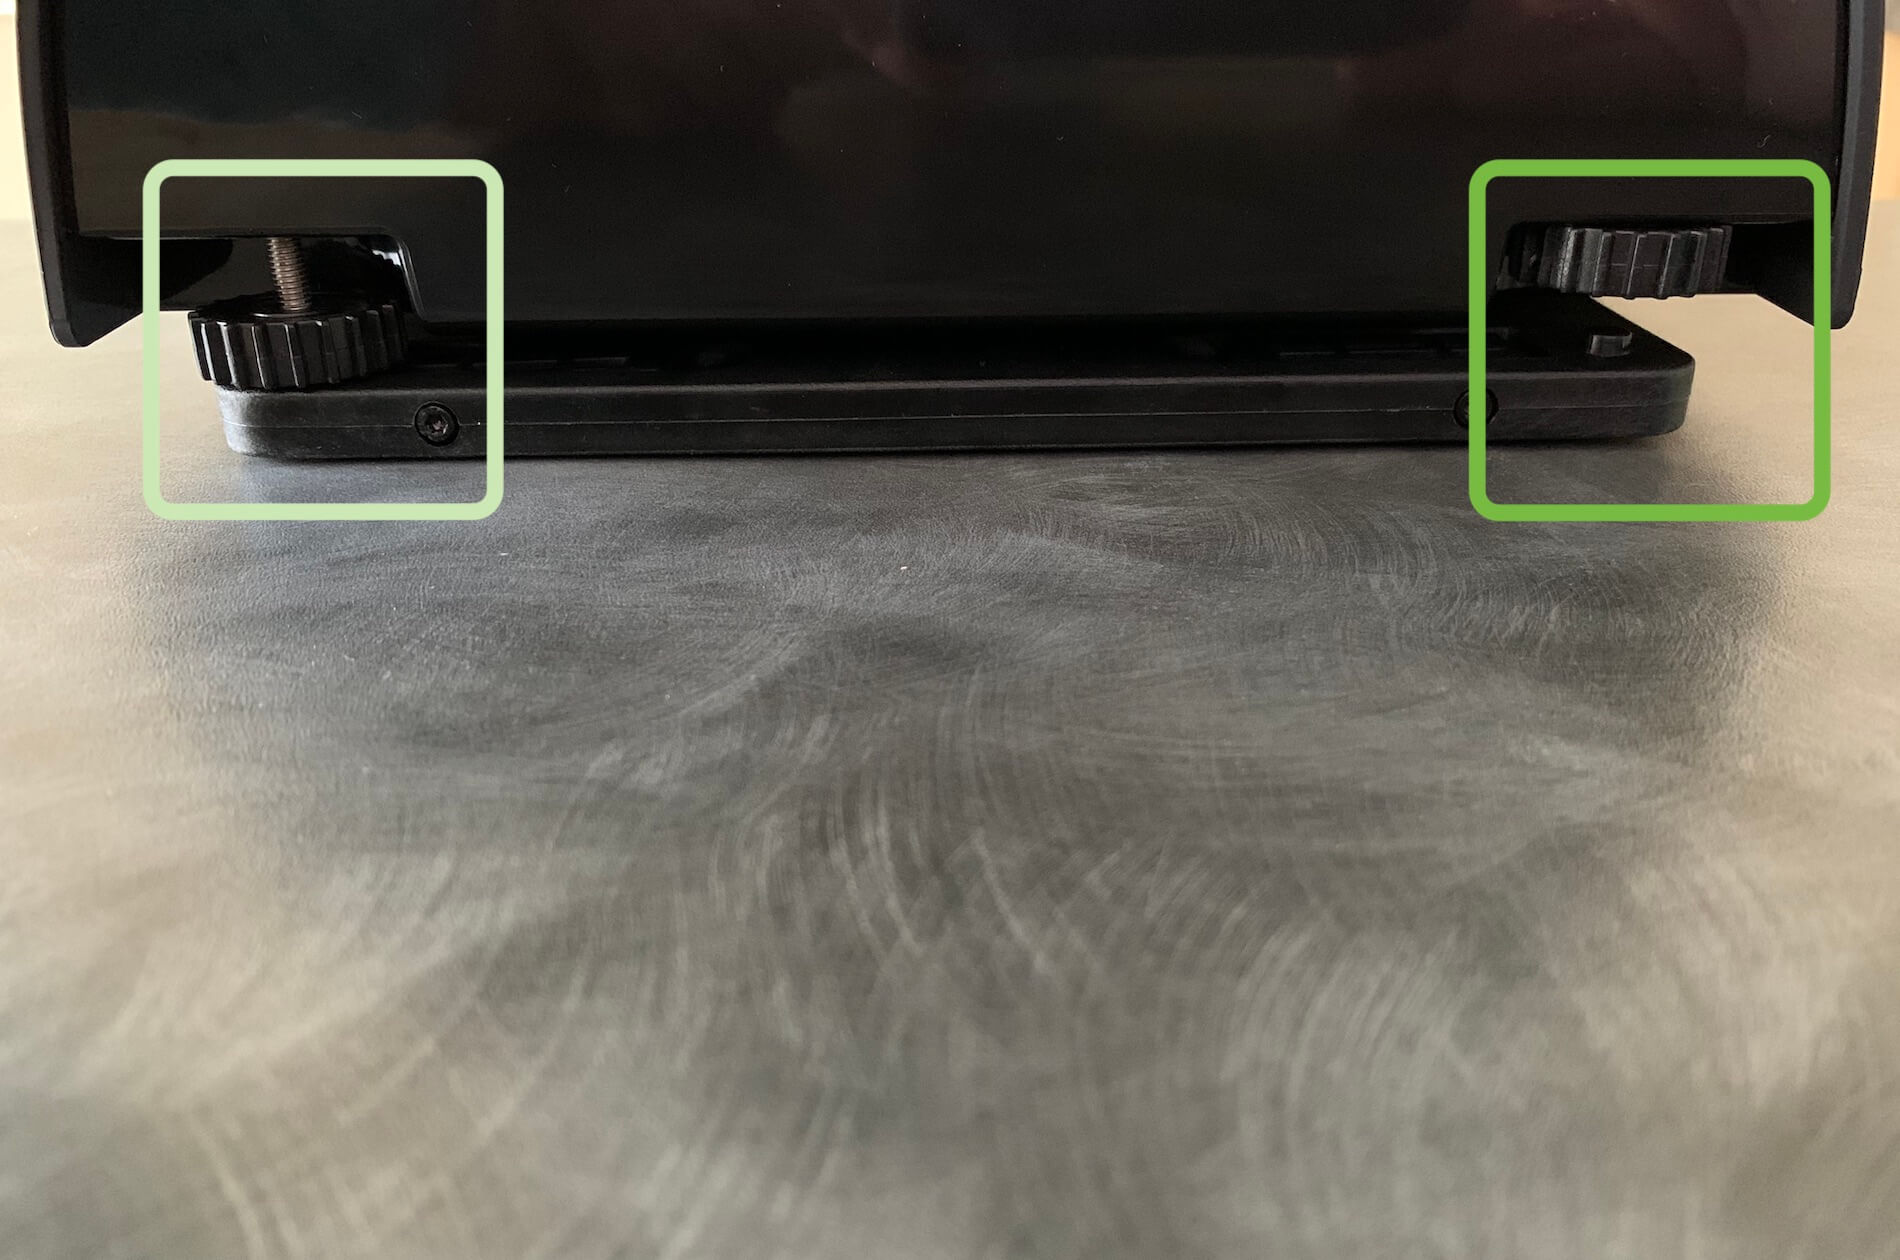
Next we need to place the Bravo Throttle Quadrant to the mounting plate or actually, we need to slide it backwards. On the bottom of the Bravo Throttle Quadrant you see a hole. As taken from the manual “center the yoke above the mounting plate and adjust placement until the yoke is fixed on the mounting plate.” Actually, it’s a slotted hole “so slide the throttle unit backwards – away from you – to lock into place” and thus lock it in the slotted hole. As it is now, the Flight Controls unit is in the correct position, but not yet tightened to the mounting plate. So we continue “On the rear of the yoke you will find two screws locks (locking knobs). Begin to tighten until the screws are embedded within the mounting plate to complete installation.”


When you tighten the screws and this means right-hand rotation of the screw knobs, the slack the Bravo throttle unit had will be reduced till at least one knob/screw is fixed to the mounting plate. No need to over tighten the screw knobs.
Loosening the screw knobs means a left hand rotation of the screw knobs is needed. When the screws knobs are fully in, slide the yoke unit a bit to you and lift it up. It sounds so logic and believe me, it is so easy! Next I connect the USB cable to the Bravo Throttle Quadrant where the USB-C connector goes into the back of the Bravo Throttle Quadrant while the other end – USB Type A – goes either directly into the PC or iMac or in an USB hub. Worth to highlight that whenever you face interface/connecting problems when using an USB hub, I advice you to reconnect the USB Type A connector directly into your PC or iMac.

I think it’s time to move on to the next section. and that deals with how difficult, no, how easy it is to configure the unit under macOS and Windows 10. Since I have Parallels for Desktop and VMWare installed, I’m also able to test the Honeycomb Bravo unit with Windows X-Plane as well as that I have a separate drive with Apple’s Bootcamp. That’s even better since that Windows runs natively on my iMac without macOS as hosting OS.
macOS Drivers
Bravo Throttle Quadrant with X-Plane 11.51r1 Big Sur
As we know from the previous section, no software drivers are needed for X-Plane. Actually, this is not completely correct since you need the so called “joy” files for the Honeycomb Bravo Throttle Quadrant dedicated for Windows, Mac and Linux as was also applicable for the Honeycomb Alpha Flight Controls. It could be that these files are already in the X-Plane Resources/joystick configs folder, but as of this writing with X-Plane 11.51r1, they are not yet in this folder. That said, added to this joy file are a couple of pictures of the unit. When you have that, you’re done although you can or must change certain assignments and/or create one of more user profiles. More about this later.
As per January 2021, the Honeycomb Aeronautical website offers dedicated zip packages for Windows and Mac. You can grab your copy from this Honeycomb URL.
The Mac package – AS_HONEYCOMB_XP11_MAC_V2.zip – not only contains the Mac joy file, it also offers the Bravo Throttle Quadrant photos and the Windows joy file. Oops, I’m going a bit too fast. When you’ve unzipped the Mac package, you end up with a folder named Resources and the following sub-folders:
– joystick configs
– plugins/AFC_Bridge
That said, simple copy and paste the contents of the joystick configs folder into the X-Plane directory Resources/joystick configs. As you’ve understood right now, although the name suggests that this is only for Mac, it does contain the Windows joy file too, but what about the “plugins/AFC_Bridge” folder?
The contents of this AFC_Bridge” folder has to be copied to the X-Plane plugins folder. It contains a Windows exe file as well as a macOS app file. What does is actually do? It offers a separate program that can be started without having X-Plane running, but you need to have the Honeycomb Alpha or Bravo device connected. to your PC or Mac. As of this writing – January 2021 – after several attempts I finally got Aerosoft AFC_Bridge program working with macOS Big Sur, but what said, only after several attempts.
It turned out that at first it didn’t work, but when, on advice from an X-Plane.Org user, I re-downloaded the package from Aerosoft and only, I repeat only copied and paste the honeycomb-configurator.app file in the Resources/plugins/AFC_Bridge folder. So once more, don’t delete the AFC_Bridge folder and paste the complete new AFC_Bridge, no, only the honeycomb-configurator.app!
Why it this way worked, no idea, but lucky it worked. According to other Org users it seems that the Aerosoft AFC_Bridge software only works with macOS Big Sur and Catalina. No guarantee is given that it works with Mojave or older. I can only tell that it works for me with Mojave and older macOS I don’t have anymore. Added to this previous story, I also tested the Aerosoft AFC_Bridge exe file with Windows 10 and can confirm that it works with that platform.
Back to Aerosoft. According to the Aerosoft manual ; “Why do I need a config tool and why am I not able to assign the settings in the simulator? This is a legitimate question. Our current simulators are not able to natively support all of the hardware. This is dependent on the various simulators. Home cockpit builders are surely aware of this situation where they tend to tinker around a lot more than actually fly. To make sure you don ́t waste too much time in setting up we have created a config tool allowing to be as flexible as possible but also to make sure that beginners also find it easy to handle.”
Because of this, Aerosoft developed with Honeycomb this Honeycomb/Aerosoft configuration tool. The AFC_Bridge” folder includes an English and German manual, but the manual is in my opinion very basic. It explains briefly what you can do, what the several options are while several examples on how you can configure is missing. But it’s also fair to add to this that a couple of Youtube movies are available that explain in English how to create your own json file for your favourite aircraft. Although this good news, I had hoped that before the initial release of the Bravo Throttle Quadrant many json (aircraft add-on configuration) files where available via the Honeycomb and Aerosoft websites. Anyway, those movies can be found via this URL
It is correct that X-Plane 11 uses for specific hardware only 1 joy file. However, with this basic joy file you can create several user profiles and assign them to different aircraft. I’ll give you an example about this in the coming paragraphs. The problem is that the Bravo Throttle Quadrant has many switches, levers, knobs of which most can be configured within X-Plane but when it comes to the annunciator lights, the integral AP lights, the GEAR lights, for hose you need the Aerosoft AFC_Bridge configurator.
But to the Mac joy file.
When you connect the Bravo Throttle Quadrant while X-Plane is already up and running, a popup window appears that tells you that new hardware is detected. Not just new hardware, no, it tells you that the Honeycomb Bravo Throttle Quadrant is connected and needs to be calibrated as is needed with all connected hardware. Once you’ve calibrated the six levers by moving them over their full travel, the calibration process finishes.
As you can see on the following screenshots, via the View pulldown menu you can select different lever configurations as well as the switching and Auto Pilot part of the Bravo Throttle Quadrant. You will notice that the joy file is for a 4-engine jet commercial aircraft being the far most left handle is the SPEEDBRAKE, then from left to right throttles 1 till and including 4 and the last handle is for the FLAPS. This means for any other aircraft configuration not being 4 jet engine aircraft, you must manually re-assign the levers.


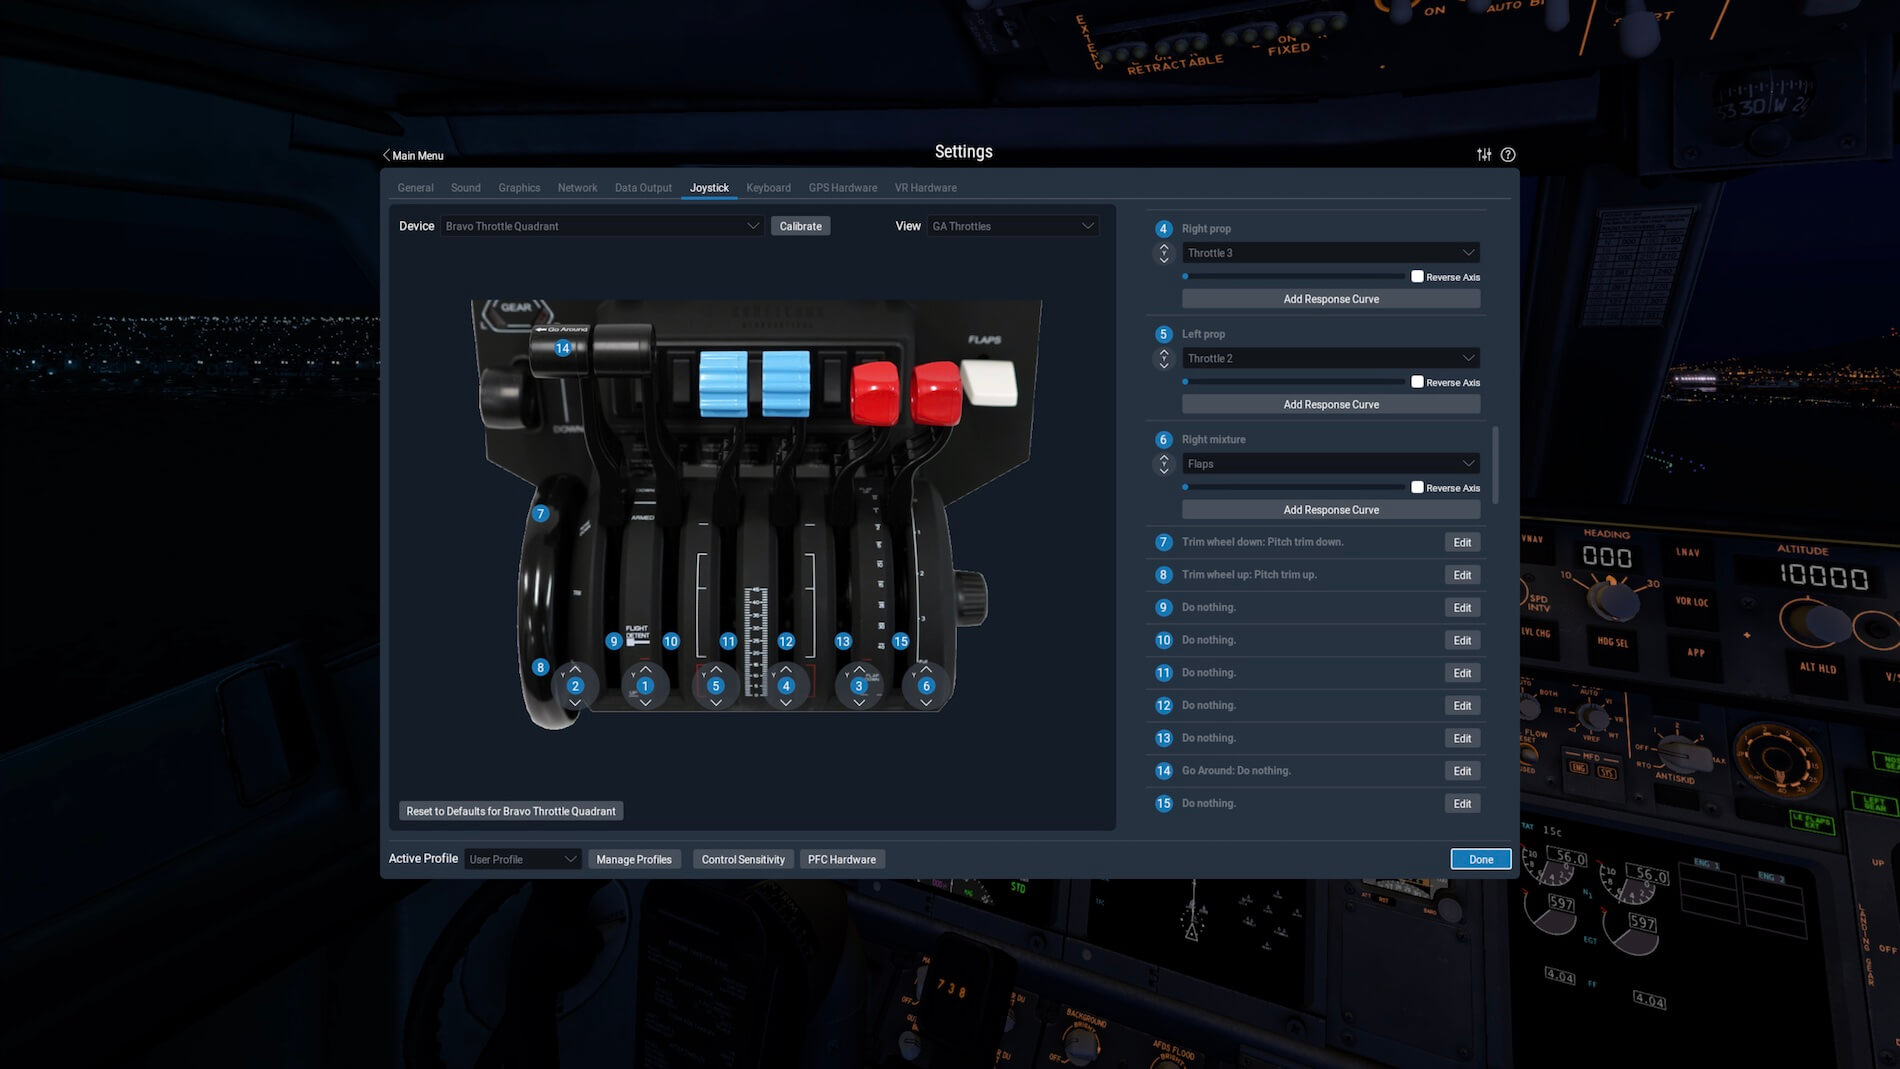
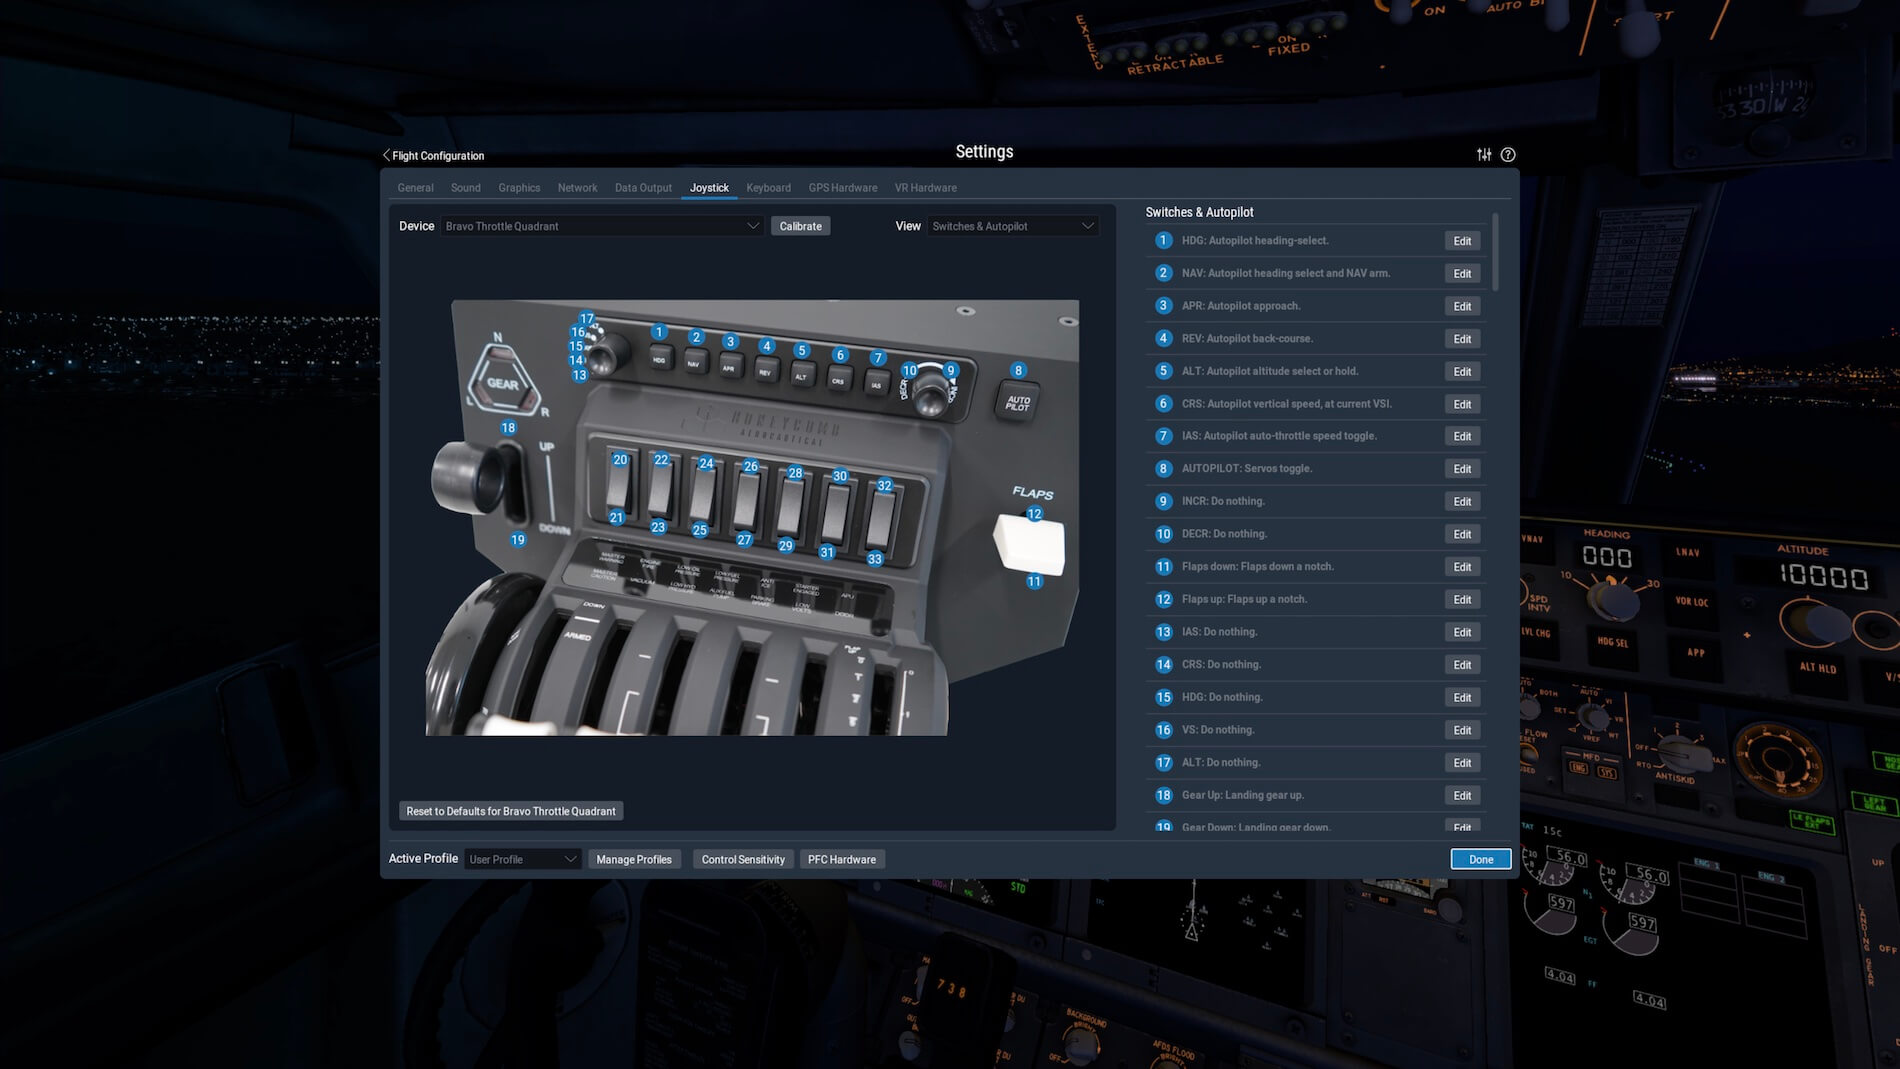
What’s most important and something you and I would expect, is that all the AP related switches and levers (remember, only for a 4 engine jet aircraft) are correctly assigned. There’s an additional row of switches in front of the levers. These switches are not yet assigned to anything, so you’re free to use them for your own. Of course, you’re always free to change other already assigned switches, or knobs to what you prefer, but basically it should be left assigned to the most logical switch, knob or lever. When you select for example the commercial four engine configuration, then all levers belonging to this are correctly assigned.
There’s one more thing I would like to bring to your attention and that is using User Profiles and linking these user profiles to a certain aircraft. Lets go for an example; as you can see on the above GA related screenshot, it’s now all assigned to the “User Profile”. A better idea is to save it under a different name like GA Twin Engine.
Next assign this newly created profile to the right aircraft. Click the “Manage Profiles” button and connect or assign this dedicated GA Twin Engine profile to the Beechcraft Model 76 Duchess. See for this the screenshot below. The biggest advantage of this is that you leave the User Profile untouched and create for a collection of aircraft a dedicated profile which can have different assignments to the switches and knobs on the switching and Auto Pilot section of the Bravo Throttle Quadrant.

When you have the Honeycomb Alpha Flight Controls you know that this works the same. Last but not least for this section; not all hardware that can be used with X-Plane is so well pre-configured as the Honeycomb equipment! Perhaps it’s good to bring the following to your attention. I did inform the Honeycomb team about this and I must also remark that it works, although I don’t understand it and this deals with the AP related selector knob on the left and the INCR/DECR knob on the right. When you check the assignments in X-Plane it says for example for the It shows e.g. HDG : Do Nothing. Weird because when I use this AP function in flight, it works, so no idea why it says Do Nothing while it works. When the Honeycomb team replies with an answer, I let you know.
Windows 10 Drivers
Bravo Throttle Quadrant with X-Plane 11.51r1
As mentioned in the previous Mac Driver section, I highlighted the presence of zip files available at the Honeycomb website. I told you that you’ve got two packages:
– AS_HONEYCOMB_XP11_MAC_V2.zip
– AS_HONEYCOMB_XP11_WIN_V2.zip
I explained already the contents of the the Mac zip file. Then the question arises; what is the purpose of the Windows file? When unzipped you’ll find besides many other files, a setup.exe file. When you start this, you will install the previous mentioned standalone Honeycomb/Aerosoft configuration program. Just to make one thing clear; the program will be installed in X-Plane, but can be started and used to create profiles without running X-Plane. Check out the following example screenshots that shows you the additional Honeycomb program where you can assign functions and create profiles to the Honeycomb Alpha and Bravo units. As I mentioned before, as of this writing January 20th 2021 – this Aerosoft utility only works with Windows, not with macOS.


After the installation is completed, there’s a Honeycomb Configurator shortcut on the desktop. When you seek for the original file, you’re guided to the X-Plane/Resources/plugins/AFC_Bridge folder. He, that’s interesting since that’s the same folder I highlighted in the previous Mac Driver section. In other words, the Honeycomb Mac zip package offers not only the Windows joy file and Bravo photos, but also the ready to use Windows external Honeycomb/Aerosoft configuration program while the Honeycomb Windows zip package offers the same, but now as an installer.
It seems that when using Windows 10 and X-Plane 10.51r x, there’s not much difference then what I’ve seen on the Mac. That said, the moment I start Windows X-Plane, and connect the Bravo Throttle Quadrant for the first time to my iMac, you need in the same way as with macOS X-Plane, calibrate the six levers by moving them over their full travel. After that’s finished, the different Honeycomb pictures can be found with their switches, buttons and the levers. Since I only have macOS and Windows X-Plane, I wasn’t able to test the Honeycomb Bravo Quadrant with Linux.
There’s however a small difference in the joy file related to the pre assignments of the 6 levers. These levers are with Windows X-Plane also assigned for a 4 engine jet aircraft, but all are assigned in the correct order which means from left to right SPEEDBRAKE, throttle 1, 2, 3, 4 and FLAPS. This is not the case with the Mac joy file.
Flight Testing
Introduction
The fun can start. I’m ready to start up X-Plane and test the Bravo Throttle Quadrant. This section is applicable to both Windows and macOS.
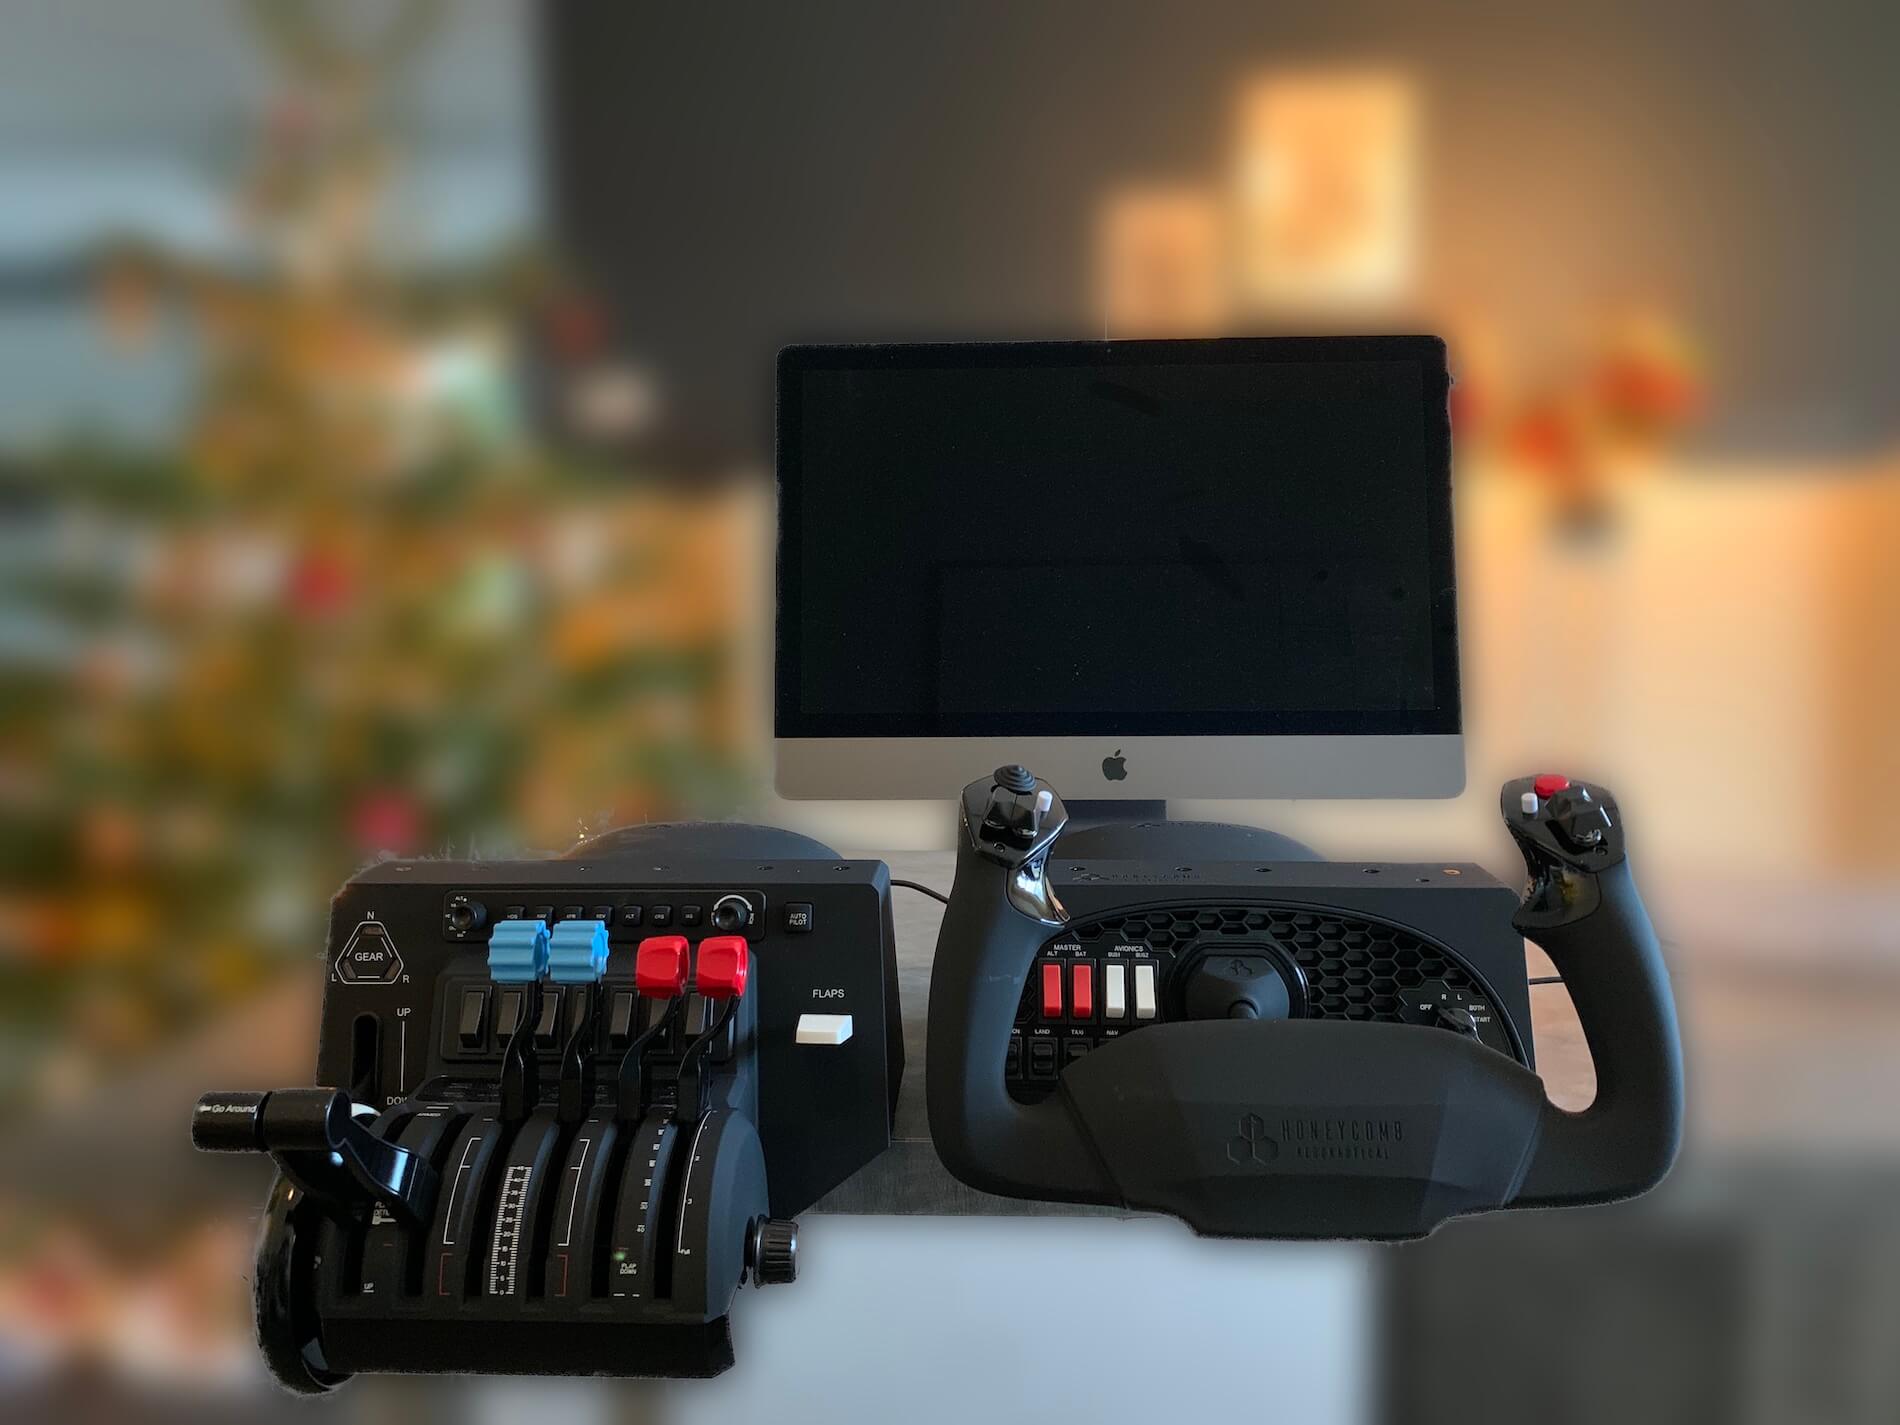
I did all the checks before. I did double check the assignments so ready to go. There’s for me not directly a reason to show you different flight configurations with a single engine GA aircraft, or a twin engine model like the King Air or with a 4 engine Boeing 747. It’s for now more a matter how the Throttle Quadrant feels and how it works for you and me. What I do in this section although this review deals with the Honeycomb Bravo Throttle Quadrant is using the Bravo in combination with the Honeycomb Alpha Flight Controls, just to see how much space you need on your table. Most logical solution, right?
Testing with LR Beechcraft Baron 58
As you can see on the photos below, my flight desktop is filled due to the positioned Alpha and Bravo devices. I decided to install the Bravo unit on the left-hand side which is easier for me to check out all the levers, knobs, and buttons. While writing this, I must admit that, using the Bravo for a twin engine GA aircraft and sitting in the left-hand pilot seat, I wonder if my setup – Bravo on the left, Alpha on the right – is logical. No, it isn’t since when I’m sitting in the left-hand pilot seat. Then it would be more logical to position the Bravo on the right as it is in real, right? But lets be honest, it’s not a big deal. It’s also what You prefer!
Another thing that’s perhaps missing in this configuration are rudder and brake pedals. I’m aware of that, but for some reason I can deal without it for the moment.

I parked my twin engine Beechcraft Baron 58 at the GA apron KFAT (Fresno Yosemite International Airport), and from that spot I taxi to the runway, make the takeoff, climb out to 6000 feet, level of for a short cruise. Ho ho, hold on. How does the Bravo equipment feels so far? Yes, yes, I’m aware of that.
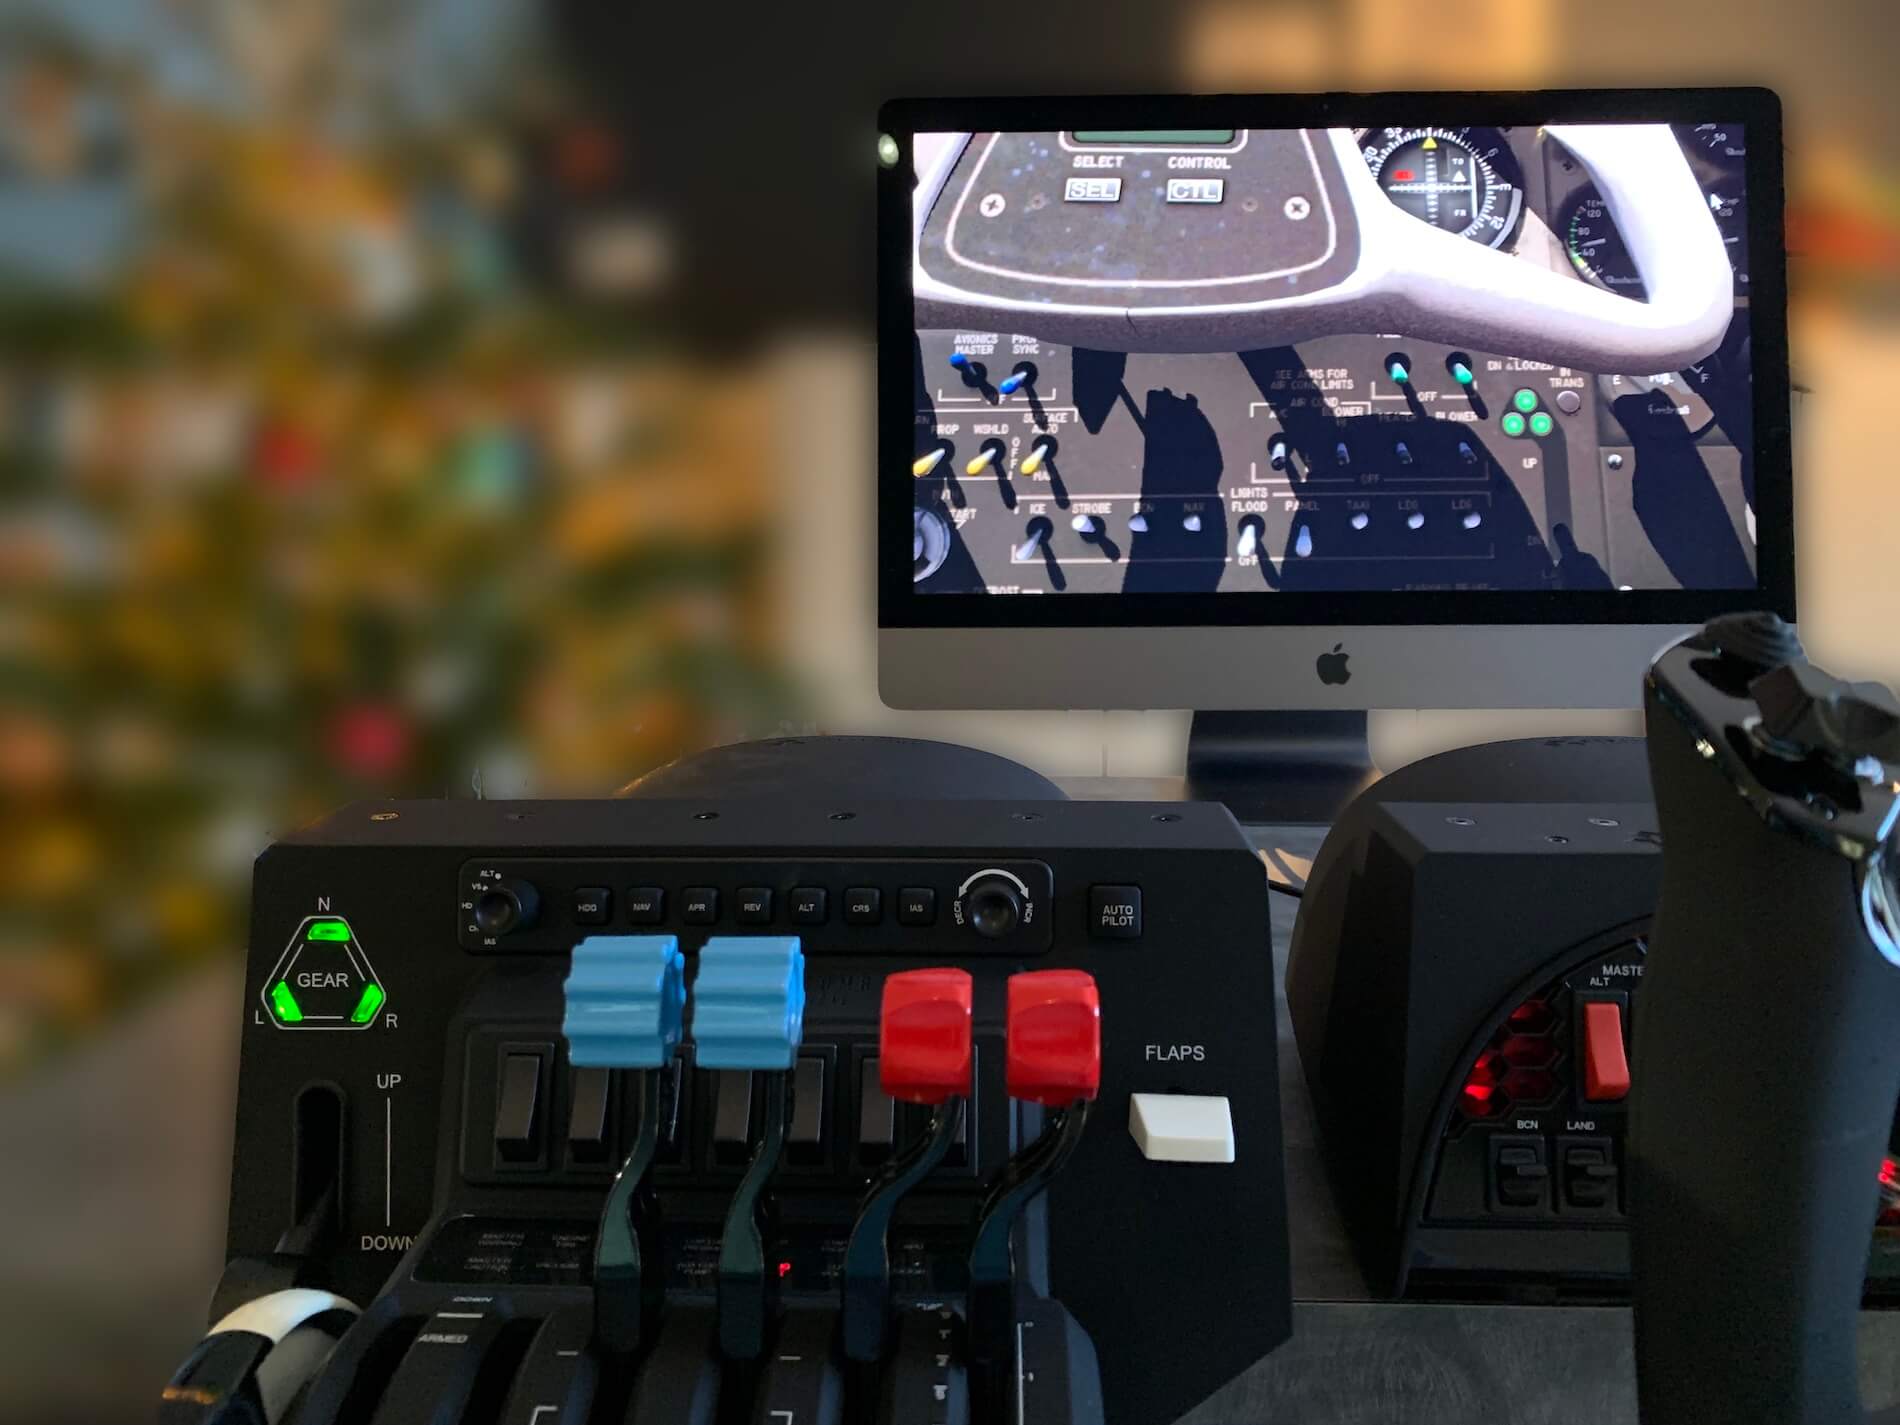
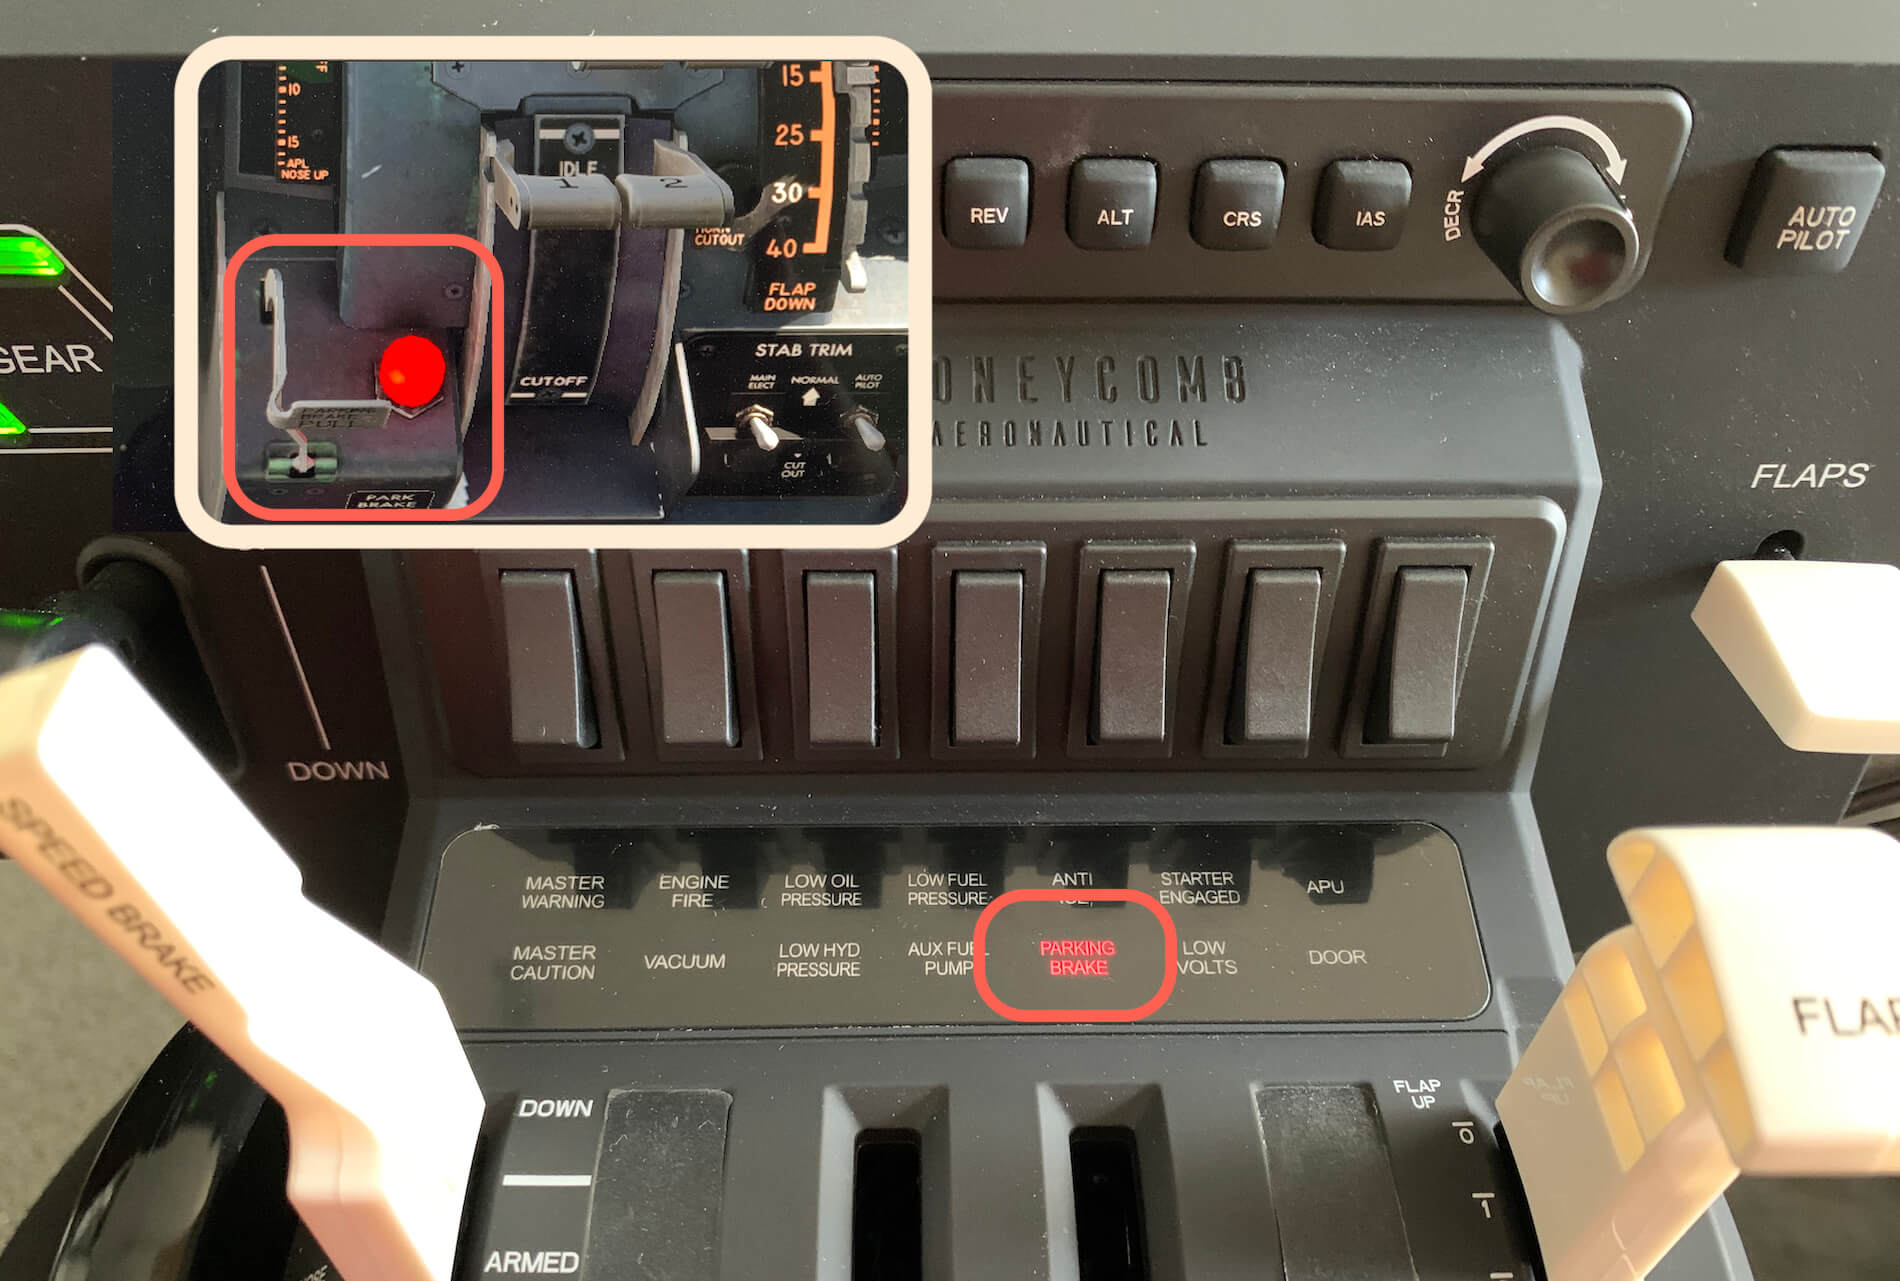
I depends a bit on how you start up your aircraft, but I assume you did it the same way as I thus with a cold and dark situation. Then you can see one of more annunciator lights illuminated on the light panel in front of the levers. How many and which lights are ON, that depends on the aircraft type you chose. When you’ve applied electrical power to the aircraft, you’ll also see the green LANDING GEAR down lights. Some words about the lights at the annunciator panel. You can’t assign these yourself, so you have to accept what’s illuminated and hope that this is correct for the aircraft you’ve loaded.
What I noticed while taxiing and using the throttle levers is the smooth way you move these levers. There’s no slack, it offers immediate response and there’s a nice detent at the begin of travel. I didn’t assign that detent yet, but you can do that easily yourself. Perhaps when the joy file becomes updated, it is already assigned with something for you. While climbing out, there’s another awesome experience, the PITCH TRIM wheel on the left side of the Bravo unit. I have or had assigned on my left-hand horn of the Alpha Flight Control one of the toggle switches to the PITCH trim. No need anymore for this assignment since the PITCH TRIM wheel on the Bravo feels so good, so realistic, so smooth and direct and again, I felt no slack at all.
Once I’ve leveled off at a certain altitude, it’s time to adjust the PROP and MIXTURE levers and as I previously mentioned, the travel and movement of these levers is smooth, and direct. Don’t believe me? When you close your eyes, grab the right handle – you know that because of their shape in case you have a GA aircraft configuration – and move them a bit forward and back, you will know what I felt and what I mean. When there’s a need to have a bit more friction on the levers, you can adjust the friction knob on the right-hand side of the Bravo. Just turn the black knob and feel directly what friction is good for you and oops, don’t test this while flying!
Besides the additional switches in front of all the levers that can be assigned with what you like, you can use out of the box the switches and selectors on the Auto Pilot (AP) panel. The idea of this panel is as follows; in the middle you find the different AP mode or engaged buttons – HDG – NAV – APR – REV – ALT – VS – IAS – with on the left of these buttons a selector knob that allows you to select a mode. Then, assuming you have set the left-hand selector knob to VS, you can with the right-hand selector – INCR/DECR knob – know increase/decrease the aircraft vertical speed.

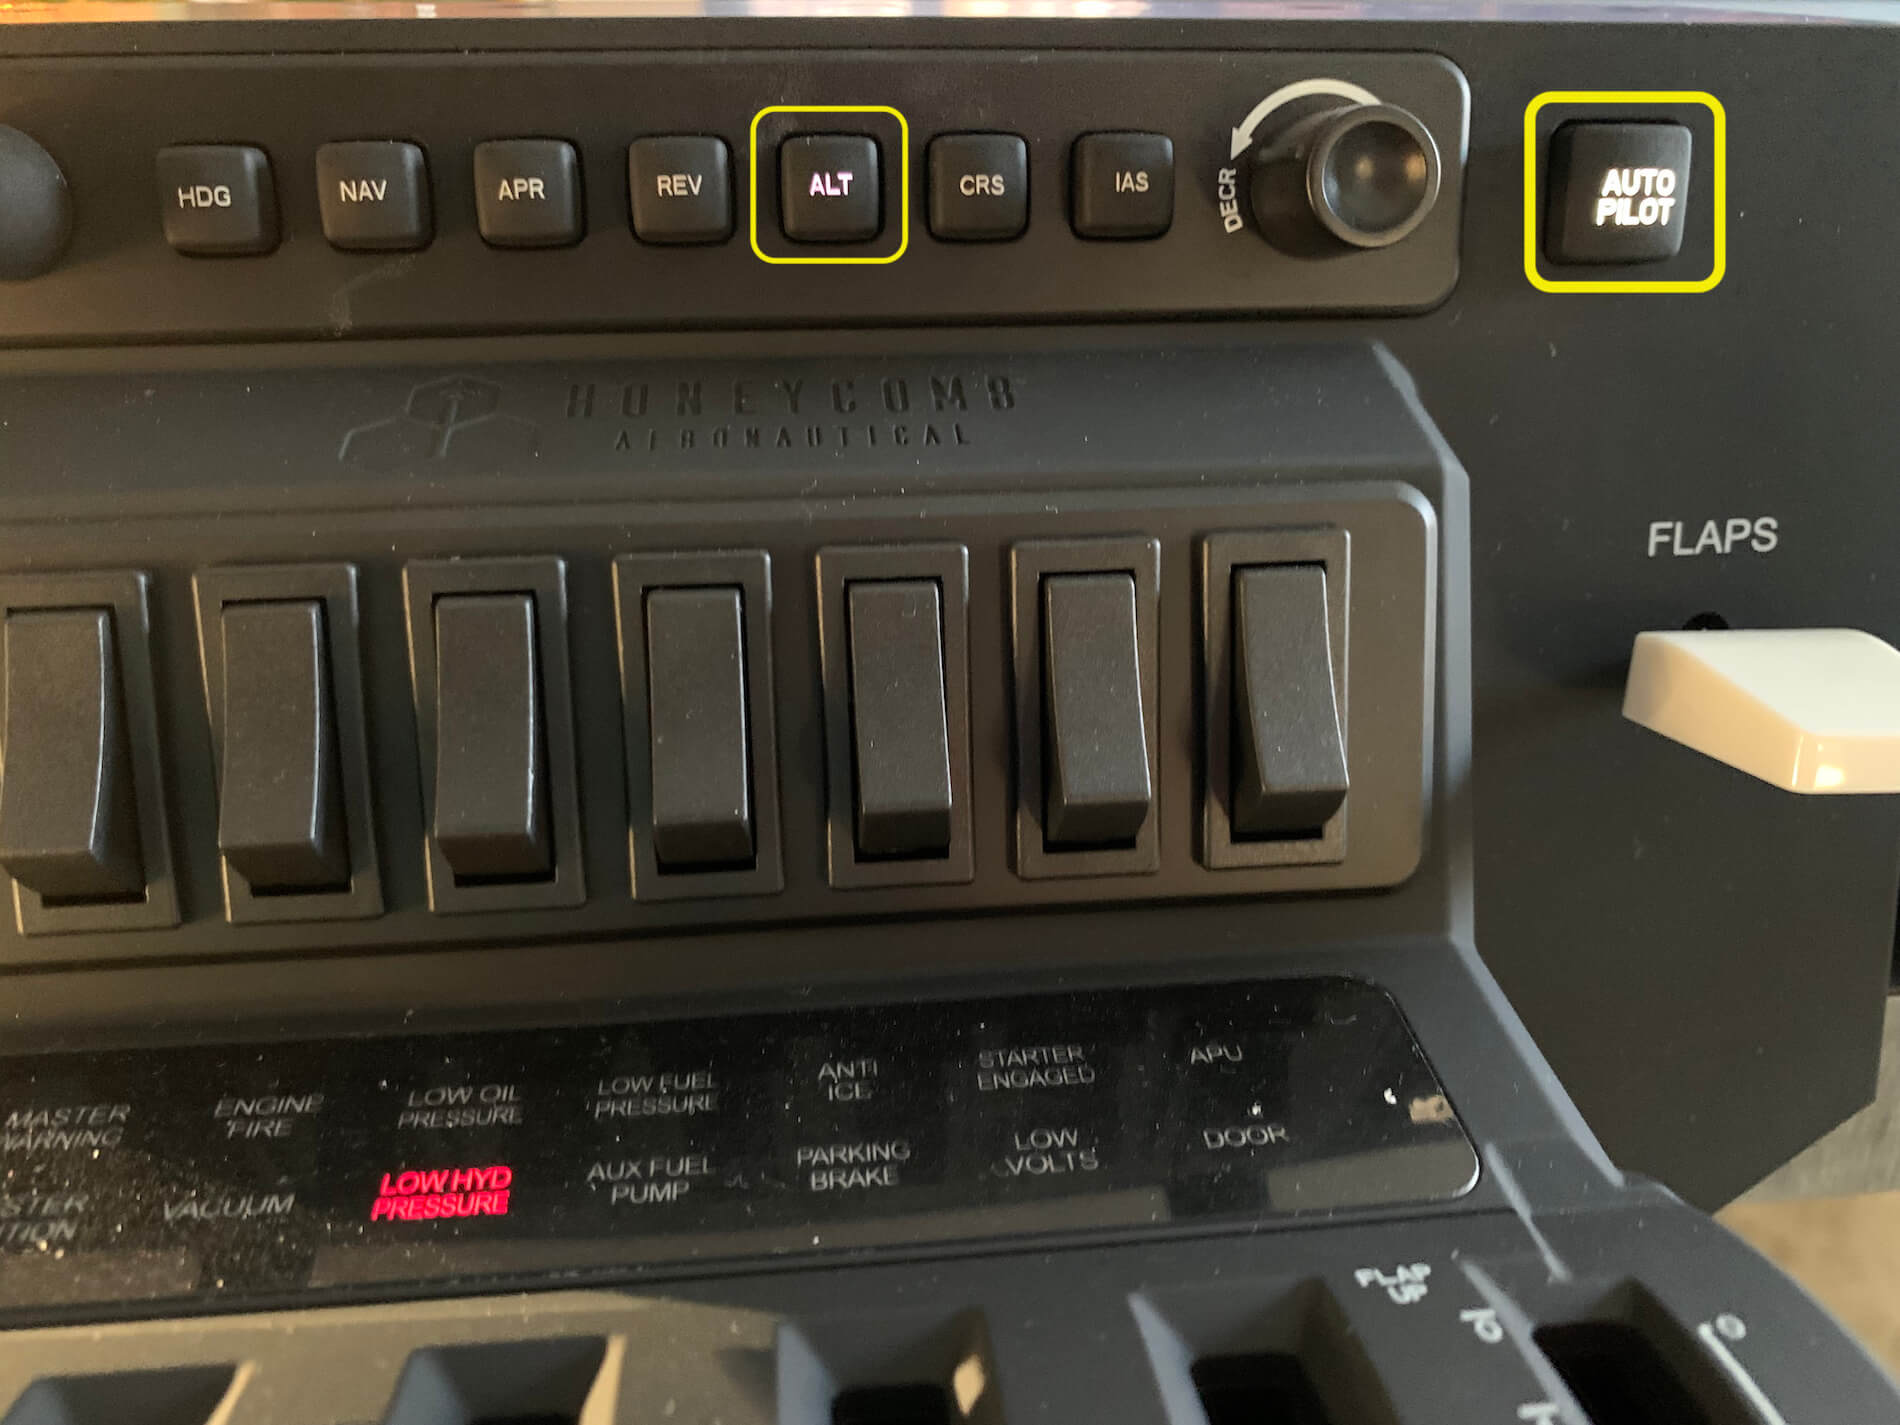
Then on the far right of the AP panel you find the AP engage button. The advantage of this AP panel is that it’s a bit more then just a panel. A lot of AP assignments are involved with this panel which means that no other switches or buttons are needed to be assigned to have a working AP. Of course, this is not the whole list of possible AP assignments, but it will do.
While at CRUISE, I try to test several AP modes. Lets first start with the easiest ones; HDG and VS. Click the HDG button on the Bravo, followed by the AP button. Besides that you can see on the annunciator panel that the AP confirms this with the integral lights in the buttons. Next I press the VS button on the Honeycomb Bravo. It locks the current aircraft VS, but this can be changed with first the left-hand selector knob which is placed to VS and by rotating the right-hand knob in a clockwise-(INCR) or counter clockwise (DECR) direction. Depending on the direction I rotate, the B58 starts descending or increasing altitude.
Suppose I want to change the current HDG – so lets say this is HDG HOLD – I turn the left-hand selector knob to HDG, and turn the right-hand knob in a left/right direction. The HDG bug will change which can be seen on the B58 HSI. This is then actually the HDG SEL mode/function of the AP. Although this is just a HDG and VS example, it works for all other AP buttons/modes the same way. And how does it feel or how do the selector knob feel when you rotate them? It feels all solid. When you press the buttons to engage or disengage that particular mode, you feel what you’re doing and it also feels as decent quality.
I noticed with macOS and the Honeycomb Bravo that the NAV button and integral light didn’t gave an action in the X-Plane aircraft, but when I selected the NAV AP button at the X-Plane Baron, I got the NAV light at the Honeycomb Bravo. So it does report back to the Honeycomb Bravo, but I wasn’t able to do the same via the Honeycomb Bravo by selecting the NAV button. The solution was easy; I reassigned the NAV button to another function and now it works as expected. That said, when I press the NAV button on the Honeycomb, the Baron or most likely other aircraft will engage the NAV mode.
There’s a small remark and that is when you fly as particular aircraft type, it’s not easy to see all the annunciator lights, positioned behind the PROP and MIXTURE levers or to operate all these free available switches. Actually, the space between the levers when in a fully FWD direction is a bit tight.
Testing with for example the Islander, Duchess 76 or DHC-2 Beaver
Next, what when I use another add-on twin engine GA aircraft like the Nimbus Islander or perhaps the Just Flight/Thranda Duchess 76 or the Thranda Beaver? Keep in mind that when it comes to the AP assignments that this could make a difference if the AP is dedicated modeled by the developer. That said, I did first a flight short test with the Nimbus Islander. It seems that all assigned AP functions work with this aircraft, but when I tried to do the same during another flight with the Just Flight/Thranda Duchess 76, the basic functions like FLAPS UP/DOWN lever and GEAR UP/DOWN handle worked, but the AP didn’t respond do what I expected. This is probably due to different assigned X-Plane AP commands versus the default AP commands.
So what’s the lessons I’ve learned so far with some GA aircraft?
If an add-on aircraft has a dedicated developed AP, it could be that the assignments for AP commands are different then the ones assigned by the joy file. That said, when this happens you should go in my humble opinion for User Profiles.
Testing with LR Boeing 737NG
So now it’s time to check the default joy file with 2 engine jet aircraft. Let’s start with the default Boeing 737NG. I know, you probably don’t use the default 737NG, but it works so nice in combination with the Bravo. Out of the box with the latest joy driver and the Bravo functions, it works flawless.
Ok, that’s great news, but what is even better is the smooth way you can use the controls on the Bravo and see the 737NG responding. And yes, the throttle levers move so fluently from idle to TO. Keep in mind, when you set the FLAPS to 5, 10, 15 or any other position, the slots you have in the simulated X-Plane 737NG, you don’t have these on the Bravo FLAP scale. The same is also applicable for the SPEEDBRAKE handle. And what I miss with both handles is a marking on it. A mark that identifies the current position.
The green/red GEAR lights work fine as well as the AP MODE buttons, the AP ENGAGE button, selector knob (ALT-VS-HDG-CRS-IAS) and rotary knob (INCR/DECR). And not to forget the integral lights of these buttons. And yes, even the annunciator lights work, so I’m a happy person and satisfied with what I see. What I didn’t say yet is that when you turn the left-hand selector knob to for example, ALT (PRESET ALTITUDE), VS, HDG (HDG SEL), IAS, you actually change these values on the MCP (Mode Control Panel). Cool. No need for a separate hardware driven MCP!


While testing the Bravo as I’m flying the 737NG above Seattle area, I’ve got another tip for you and for the Honeycomb team. OK, first this; every knob is black and everything means the selector-, and rotary knob. Each knob has a “mark”, indicating its neutral point. And that’s also the problem. Because the mark on each knob is also black, it’s difficult to see where each knob is in relation to the scale. Ok, perhaps this is less important for the INCR/DECR knob, but important for the left-hand selector knob. When the virtual cockpit lighting, read your room lighting, is average, it’s difficult to find out where the left-hand knob is and therefore difficult to figure out if you need to turn clockwise/counter-clockwise to make your new selection. But besides these issues, it’s a cool device!
Using Profile files with Zibo 737-800
What when you prefer to fly the Zibo 738?
In that case you can run into problems. I’d had look at the X-Plane.Org website and found a good explanation and solution from X-Plane.Org user flyillin06. According to flyillin06 “The Configurator software for the Bravo is required to assign LED lights and to use the autopilot INCR/DECR knob. Normal switches and throttle axes can be assigned within XP11 as usual, once you’ve download the joystick config file. The software is apparently developed by Aerosoft where updates and discussion can be found here.”
Added to this, X-Plane.Org user carlbear95 came up with a lot of good ideas and then also tips and tricks for the json file in relation to the Zibo 738. You can follow the discussion via this URL. I started this Zibo 738 section because I ran into problems and just to make this clear, not into problems when it comes to the basic X-Plane assignments like for the throttle, flap and landing gear levers, but more for the lights and some AP functions.
Although I was surprised that the out-of-the-box Bravo joy driver did a reasonable job with the Zibo 738, I did see a couple of things that where not correct. For instance, I had the ANTI ICE caution light illuminated, but there was no sign of no problem in the aircraft. I could use most Auto Pilot functions and knobs, but nothing happened on the MCP. That said, perhaps it’s a good idea to test this with the json file from flyillin06.
Adding to these paragraphs, you can find additional json profile files thus other aircraft types, at this dedicated Aerosoft Bravo Throttle Quadrant forum page. In case you’re also looking for the Honeycomb Alpha Flight Controls profile files, then check out this URL.
After having a chat with X-Plane.Org user Madhex, I was able with his help to use the AFC_Bridge program with macOS Big Sur and therefore able to load new profile files and select the one I want, but perhaps you don’t have luck that on your macOS the Honeycomb configurator doesn’t work and you would love to fly the Zibo 738. In that case there are as far as I understood, two options.
You either load the Zibo profile file into your X-Plane aircraft folder with the help of this Youtube video named Honeycomb Configurator – Local Load Function
https://www.youtube.com/watch?v=gzgCkRJk2G0&list=PL-CM2J7huv9GsJLInEaXS71CKKU_5g3Sl&index=3&t=236s
Or you can use – remember, only for the Zibo 738 – the BravoPlugin_Mac.v0.6.1.xpl file, written by Madhex. According to Madhex “The AFC Bridge app doesn’t work in Mojave at all so I gave up. I actually wrote a plugin myself to make Bravo Throttle work in Mojave. You do need to configure it on XP’s joystick page and map rotary knob and selector to plugin’s custom commands, but at least on my iMac I am able to get LED and landing gear LED and all selector-rotary knob to work. I don’t know how the plugin would work in Catalina and Big Sur since I haven’t tested it in any newer macOS yet. The installation is simple and straightforward; simply unzip it and place it in Resources/plugins folder.”
Testing with Zibo 737-800
As written in the previous section, I managed to have a functional Honeycomb configuration app with Big Sur and followed the steps to make it the default profile as well as loading it in X-Plane. I noticed that with the Zibo loaded in a cold and dark situation, that I didn’t see the annunciator lights as expected, but it turned out that once I selected from the X-Plane Plugins – Honeycomb – BFC_Throttle menu “Reload Bindings”, the Zibo.json file was loaded and now, I have most of the light on the Bravo Throttle Quadrant illuminated. And of course, not only that, but also all the functions related to the Auto Pilot.
Yes, of course, the Auto Pilot section on the Bravo Throttle Quadrant is different then the MCP in the modeled 738, but it’s right now more important that you can enter via the Bravo your IAS, HDG and ALT. That said, with the loaded Zibo.json file you can set the left-hand knob to ALT, HDG or IAS and with the right-hand rotary knob you increase or decrease the value which is visible on the MCP in the sim. During climb and initial cruise level, I was able to control the aircraft Auto Pilot with the help of the Bravo dedicated Zibo.json plugin and I can tell you, that it works to my satisfaction.
On Last Note ….. Airbus Models
I feel that it’s time to finish this review. I went already much further than initially planned, but I would like to add the following regarding those who want to fly Airbus aircraft.
The only problem is, of this writing – January 2021 – I hardly could find at the X-Plane.Org or at the Aerosoft forum, dedicated Airbus json files. The only json file I found was for the ToLiss A319/A321, but no sign “yet” for the FlightFactor A320 Ultimate, the JARDesign A320Neo or their A330, the RW Designs A330, but for sure, the will come.
During a quick test with the ToLiss A319 and the “ToLiss_A319_A321_V1_5_1.json” (https://forum.aerosoft.com/index.php?/files/file/6013-toliss-a319a321-profile/) file, I can confirm that it worked as expected although I had the idea that not all the system lights at the annunciator panel are working correctly. I noticed a constant APU amber light while the APU was up and running providing AC and BLEED AIR, so no idea why this light was illuminated at the Bravo annunciator panel. I also noticed that when I do a light test in the cockpit, the light test thus the illumination of all the caution and warning lights wasn’t copied to the Bravo, but I believe that this was also mentioned by Aerosoft forum member kavster who created this json file.
Perhaps this will be modified by kavster as soon as he has time. But the good news is that the Auto Pilot left-hand and right hand selectors on the Bravo are copying information to the ToLiss Auto Flight FCU (Flight Control Unit). That said, when I enter a speed, altitude or heading, it can be seen on the FCU. You and I need to keep in mind that for example the Zibo 738 and other add-on aircraft aircraft have complex Auto Flight systems. With these Auto Flight systems and the belonging MCP or FCU, it’s not always possible to cover every caution light on the Bravo or the Bravo Auto Pilot section.
Summary
What can I add to this Summary with such an in-depth review of the Honeycomb Bravo Throttle Quadrant? Honestly, I don’t know. I sincerely hope you enjoyed this review. I can tell you that it was an honer that X-Plained.Com was able to review this piece of Honeycomb flight simulation hardware. It tried to cover every part, section or whatever was needed to write an unbiased in-depth impression.
It isn’t a long term tested review of the Honeycomb Bravo Throttle Quadrant, but I can tell you right now that it’s a solid, modern and unique piece of hardware not seen before. The same what was applicable to the Alpha Flight Control is also applicable for the Bravo Throttle Quadrant. It is a heavy duty device, with a stiff mounting plate that can also be connected to the table with the 3M Micro-Suction pad. When you use the clamps, you could use it also in combination with the 3M Micro-Suction, but there’s actually no need for. You can leave the plastic on the mounting plate and connect it only with the clamps. Either way works and my personal preference was using only the 3M Micro-Suction since when I don’t fly, I would like to have a clean desk.
But that’s easy to do; remove the Bravo from the mounting plate, leave the mounting plate with the 3M Micro-Suction plate on the desk, slide your keyboard in front of it, and continue with the job you want to do.
I didn’t mention this before, but I think it’s worth to tell you how I felt this; cleaning the 3M Micro-Suction pad. On page, oops, there’s no page number, but it’s on the English page that says “Dual Mounting Solution Installation“. The last paragraph “Cleaning” explains how to clean with soap and water using your hands the Micro-Suction pad. Since I prefer to use the pad without the clamps, I’m curious how this works so off I go, cleaning with soap and water the 3M plate.
Important and mentioned in the manual, use only your hands and no cloth or whatsoever. clean/move with soap and a bit of warm water your hands over the Micro-Suction pad. This won’t take any longer than 1 minute. Turn over, let the water drops drip off and let it dry. I tried to use a dishcloth and softly moved it over the pad which worked fine. Leave the pad for a while on the table, in the mean time clean with the same dishcloth the plastic and when the pad is dry, put the plastic back on the Micro-Suction pad. Done!


What I personally like about this throttle quadrant is that you can configure it for single/twin GA propellor aircraft having throttle(s)-, mixture(s)- and prop(s)- levers. But when you’re more a virtual commercial pilot you can configure it as a twin or four engine jet aircraft. All typical GA or commercial jet levers are included as you have seen in the beginning of this review.
I was hoping for such a design and feature, but the hope has become reality and OK, it may look when transforming your Bravo device into a commercial aircraft a bit more Boeing then Airbus, it’s still an awesome solution/option. And for those who like Airbus models, check out the following or check out the dedicated Honeycomb Aeronautical “Throttle Pack for Airbus” web page.
The Throttle Pack for Airbus will have the following features:
– Two and four-engine setup with magnetically swappable A/T disconnect cone.
– Functional Thrust Reversers with a mechanical lock at idle position
– Flap lever with lift to unlock function
– Speed Brake lever.
– MSRP $69.99/€79.99/£69.99 (pricing is close to identical when taxes/VAT are removed)
– Available 2021
Back to the Honeycomb Bravo Throttle Quadrant; only one word fits it all; awesome piece of hardware! Although the name suggest that we’re dealing with a throttle device for flight simulators, it actually offers much more then only a throttle unit. Besides throttles for GA single and multi aircraft, it also comes with a set for commercial aircraft and it also offers an annunciator light panel and AP panel.
And here’s the Million dollar question; where can you buy it?
You can buy the Honeycomb Bravo Throttle Quadrant at the Aerosoft store, and soon also via X-Plane.Org. The Honeycomb Bravo Throttle Quadrant cost approximately 249,99 Euros including VAT.
Last but not least, I would like to thank Nicki, Jeremy and Ryan from Honeycomb Aeronautical who made it possible for me to write this review.
Feel free to contact me if you’ve got additional questions related to this impression. You can reach me via email Angelique.van.Campen@gmail.com or to Angelique@X-Plained.com.
With Greetings,
Angelique van Campen
| Add-on: | Hardware Honeycomb Bravo Throttle Quadrant |
|---|---|
| Publisher | Developer: | X-Plane.Org | Aerosoft | Honeycomb Aeronautical |
| Description: | Realistic Multi Purpose Throttle Hardware |
| Software Source / Size: | Not Applicable |
| Reviewed by: | Angelique van Campen |
| Published: | January 26th 2021 |
| Hardware specifications: | - iMac Pro - Intel 3GHz Intel Xeon W / 4.5Ghz - Radeon Pro Vega 64 16368 MB - 64 GB 2666 MHz DDR4 - 1 internal shared 1TB SSD (Big Sur 11.x) - 1 internal shared 1TB SSD (Bootcamp Windows 10) - 1 external 2TB LaCie Rugged Pro SSD (Big Sur 11.x) - Saitek Pro Flight System X-52 Pro and X-56 Rhino - Honeycomb Alpha Flight Controls - Honeycomb Bravo Throttle Quadrant |
| Software specifications: | - macOS Big Sur (10.15.x) - X-Plane 11.5x |
0 Comments