The Ultimate Helicopter Equipment | Part II
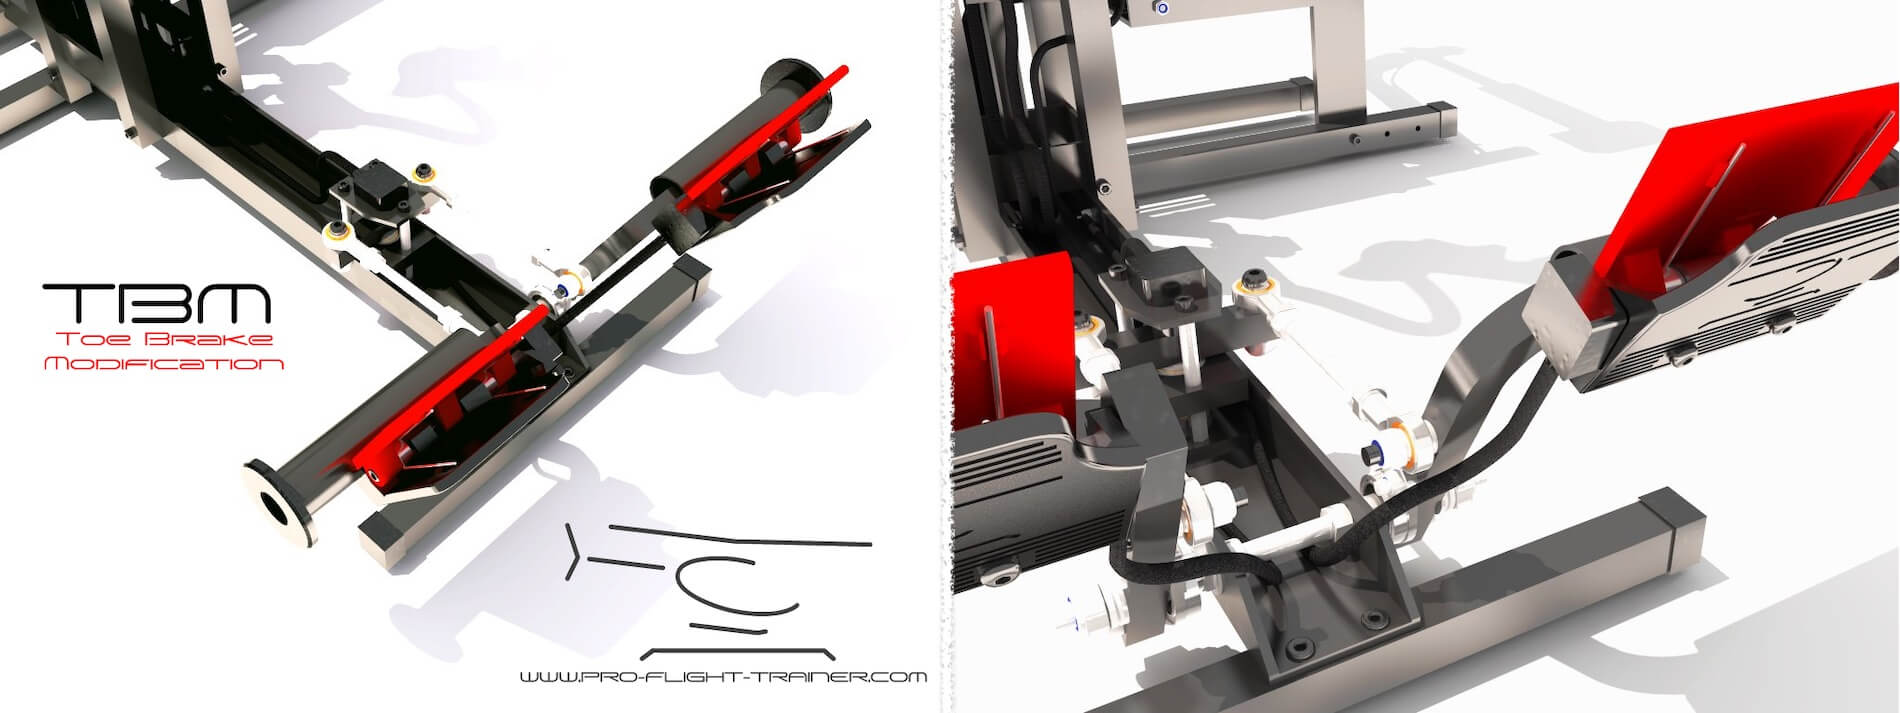
Introduction Toe Brake Modification Kit
This Part II of the Pro Flight Trainer PUMA review explains all about the Toe Brake Modification (TBM) kit for the Pro Flight Trainer PUMA which I reviewed before in combination with Laminar Research X-Plane 11 on both Windows and macOS.
As explained to me in one of the email conversations I had with a Pro Flight Trainer team member, most helicopters have no wheels and therefore no brakes. When the helicopter has no wheels, then the Toe Brake Modification package is not needed. But when you fly occasionally helicopters with wheels like the Sikorsky S-92, S-76, SH-3 Sea King, UH-60 Blackhawk, K-1200 K-MAX, Cowan Simulation 222B, X-Rotors AW139 and many other models I haven’t mentioned or just forgotten, then it is convenient to have the Toe Brake Modification package mounted/installed on your Pro Flight Trainer PUMA.
But how did it all start?
A while ago I started to explore a helicopter on request of X-Plane.Org which was the VSKYLABS Robinson R44 and this resulted in a comprehensive review. This review not only covered the modeled VSKYLABS R44, but the review also included lot of tips and tricks. Although I struggled using the Saitek/Logitech X-56 HOTAS, I managed to fly and hover the R44, but I learned my lesson; you and I need special helicopter hardware equipment to fly a helicopter.
Advised by JetManHuss from VSKYLABS, I started looking around for special helicopter hardware and ended up with the Pro Flight Trainer PUMA. While checking this right now, I believe they are the only one in the simulator world that offers such special hardware. After I got a press copy from Aerosoft for the duration of this review, I explored the hardware and came to the conclusion that this kind of hardware is a must for every serious helicopter simmer.
While the review – The Ultimate Helicopter Equipment | Part I – was progressing, my enthusiasm increased and this resulted in an in-depth review of the Pro Flight trainer model PUMA.
And now, I’m up to review the Toe Brake Modification kit from Pro Flight Trainer. There’s no need for me to assemble the whole PUMA together since I did that already. I only need to assemble the toe-brakes to the pedals, connect the left- and right-hand wires to the PCB (Printed Circuit Board), install the software and calibrate. When that’s done, I need to assign the toe-brake functions in X-Plane and I’m off to go into the sky.
The TBM Kit or Toe Brake Modification
According to the dedicated Pro Flight Trainer web page: “The TBM is a 3D PETG and PLA+ printed kit that can be installed effortlessly on any Puma. The kit includes all you need to add spring loaded toe brakes to the push-pedals, featuring individual axis for Left and Right brakes. The kit can be ordered as a standalone order for post modification, or can be ordered with any new Puma PAS or RTF.”
General Features:
– Independent left and right spring loaded Toe Brakes
– Variable brake signal (not just on/off operation)
– Compatible with all Puma units
– Plug & Play as with any Pro Flight Trainer products
– Custom down-loadable .joy file for easy X-Plane 11 setup
Toe Brake Modification Kit includes:
– Left and right 3D PLA+ printed Toe Brakes
– Mounting hardware and wiring
– New pedal tube end caps
– Installation instructions
The kit costs, as of this writing December 2020, 99.00 USD and just to make this clear; you need to own the Pro Flight Trainer PUMA, but I think that makes sense. You can however buy the PUMA with or without the TBM. It saves you some money when you decide to buy the PUMA and include this modification kit.
The TBM Contents
The TBM kit was directly send to me by Pro Flight Trainer. I would like to thank them for this and now, time to explore the contents of this small brown box. The contents offers:
– a piece of paper with the PCB (Printed Circuit Board),
– a YouTube link to a TBM installation guide,
– a small plastic bag with an Allen key, Velcro bands and 4 “replacement” bolts,
– two toe brake units.
One note what’s mentioned on the webpage regarding the TBM kit components. The kit doesn’t include new pedal tubes with caps. These are already part of the Pro Flight Trainer PUMA kit.
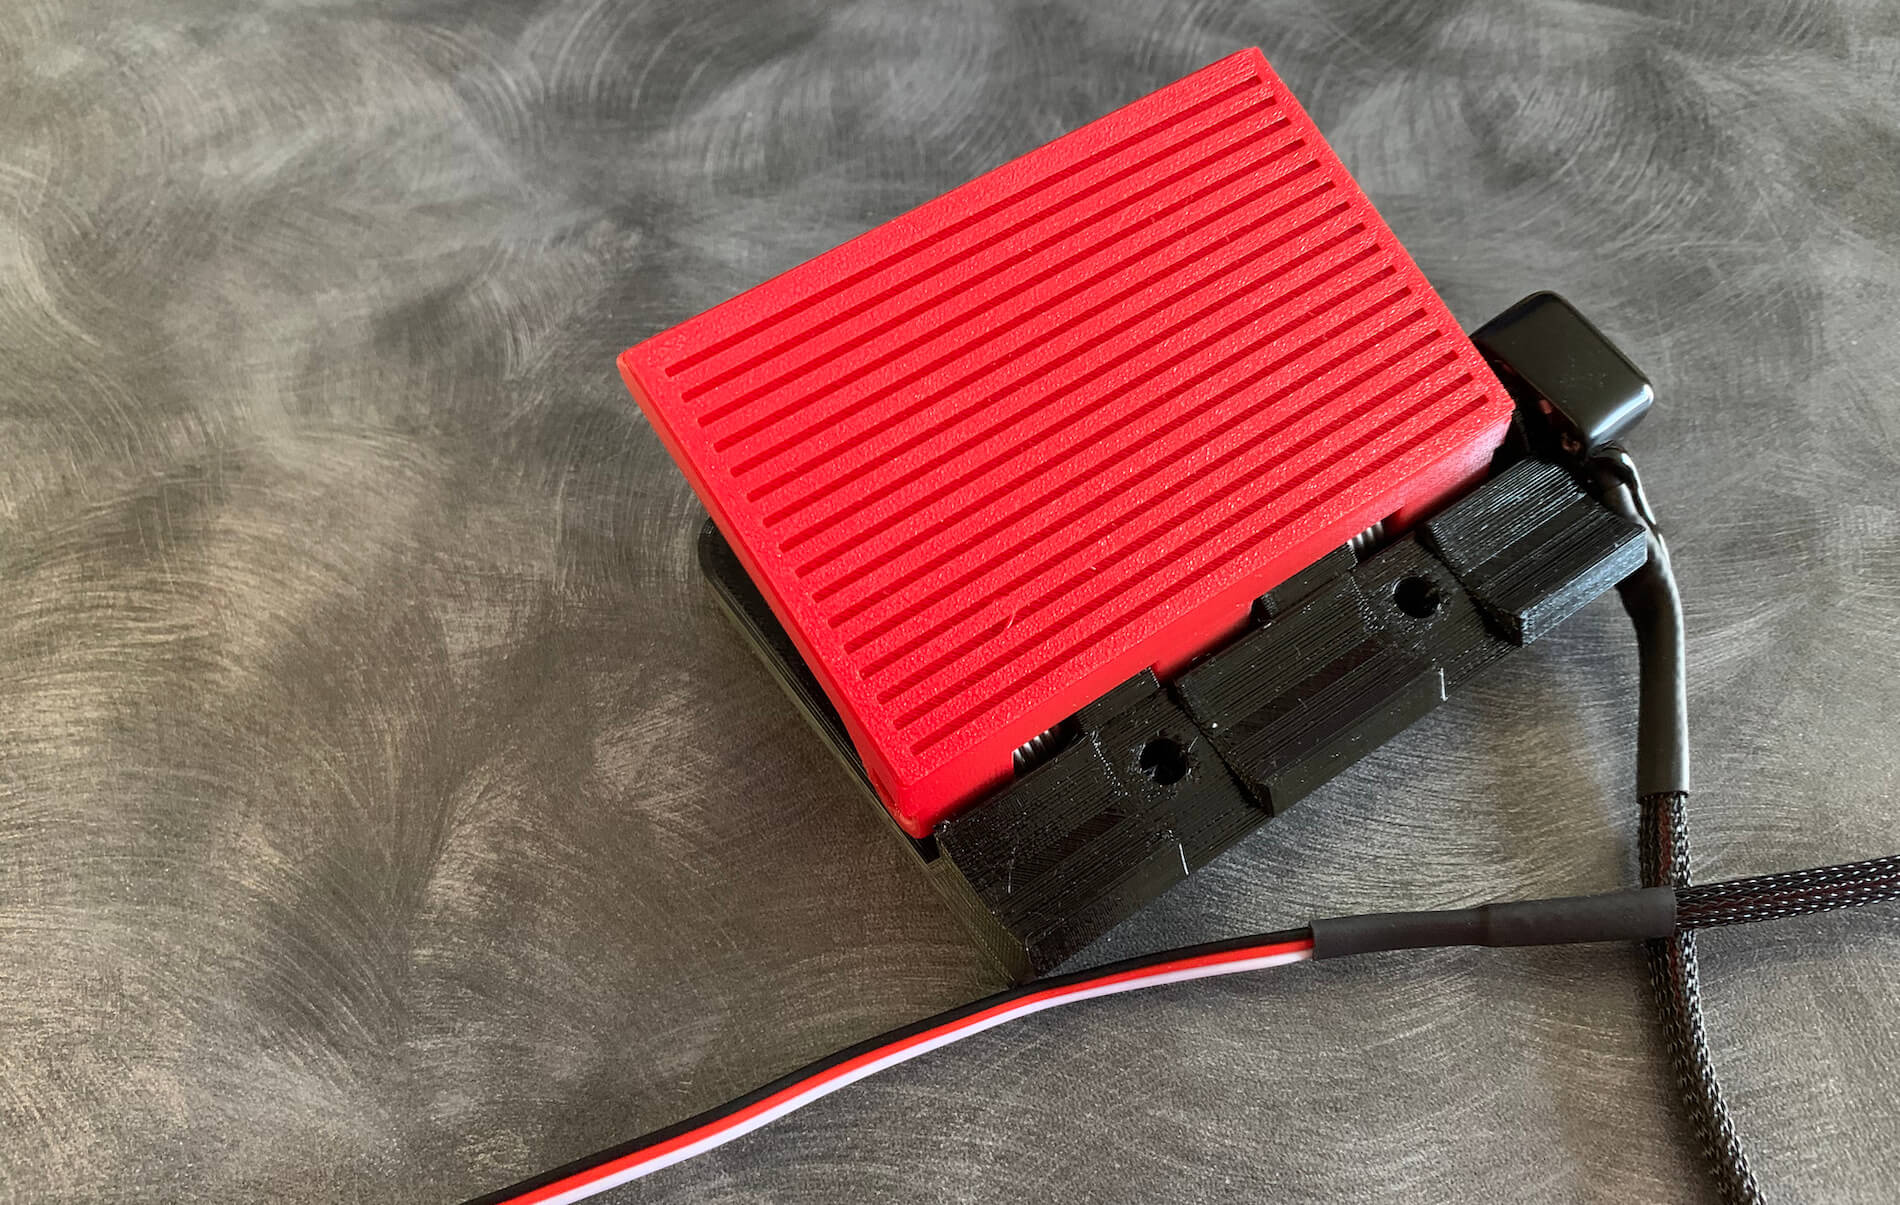
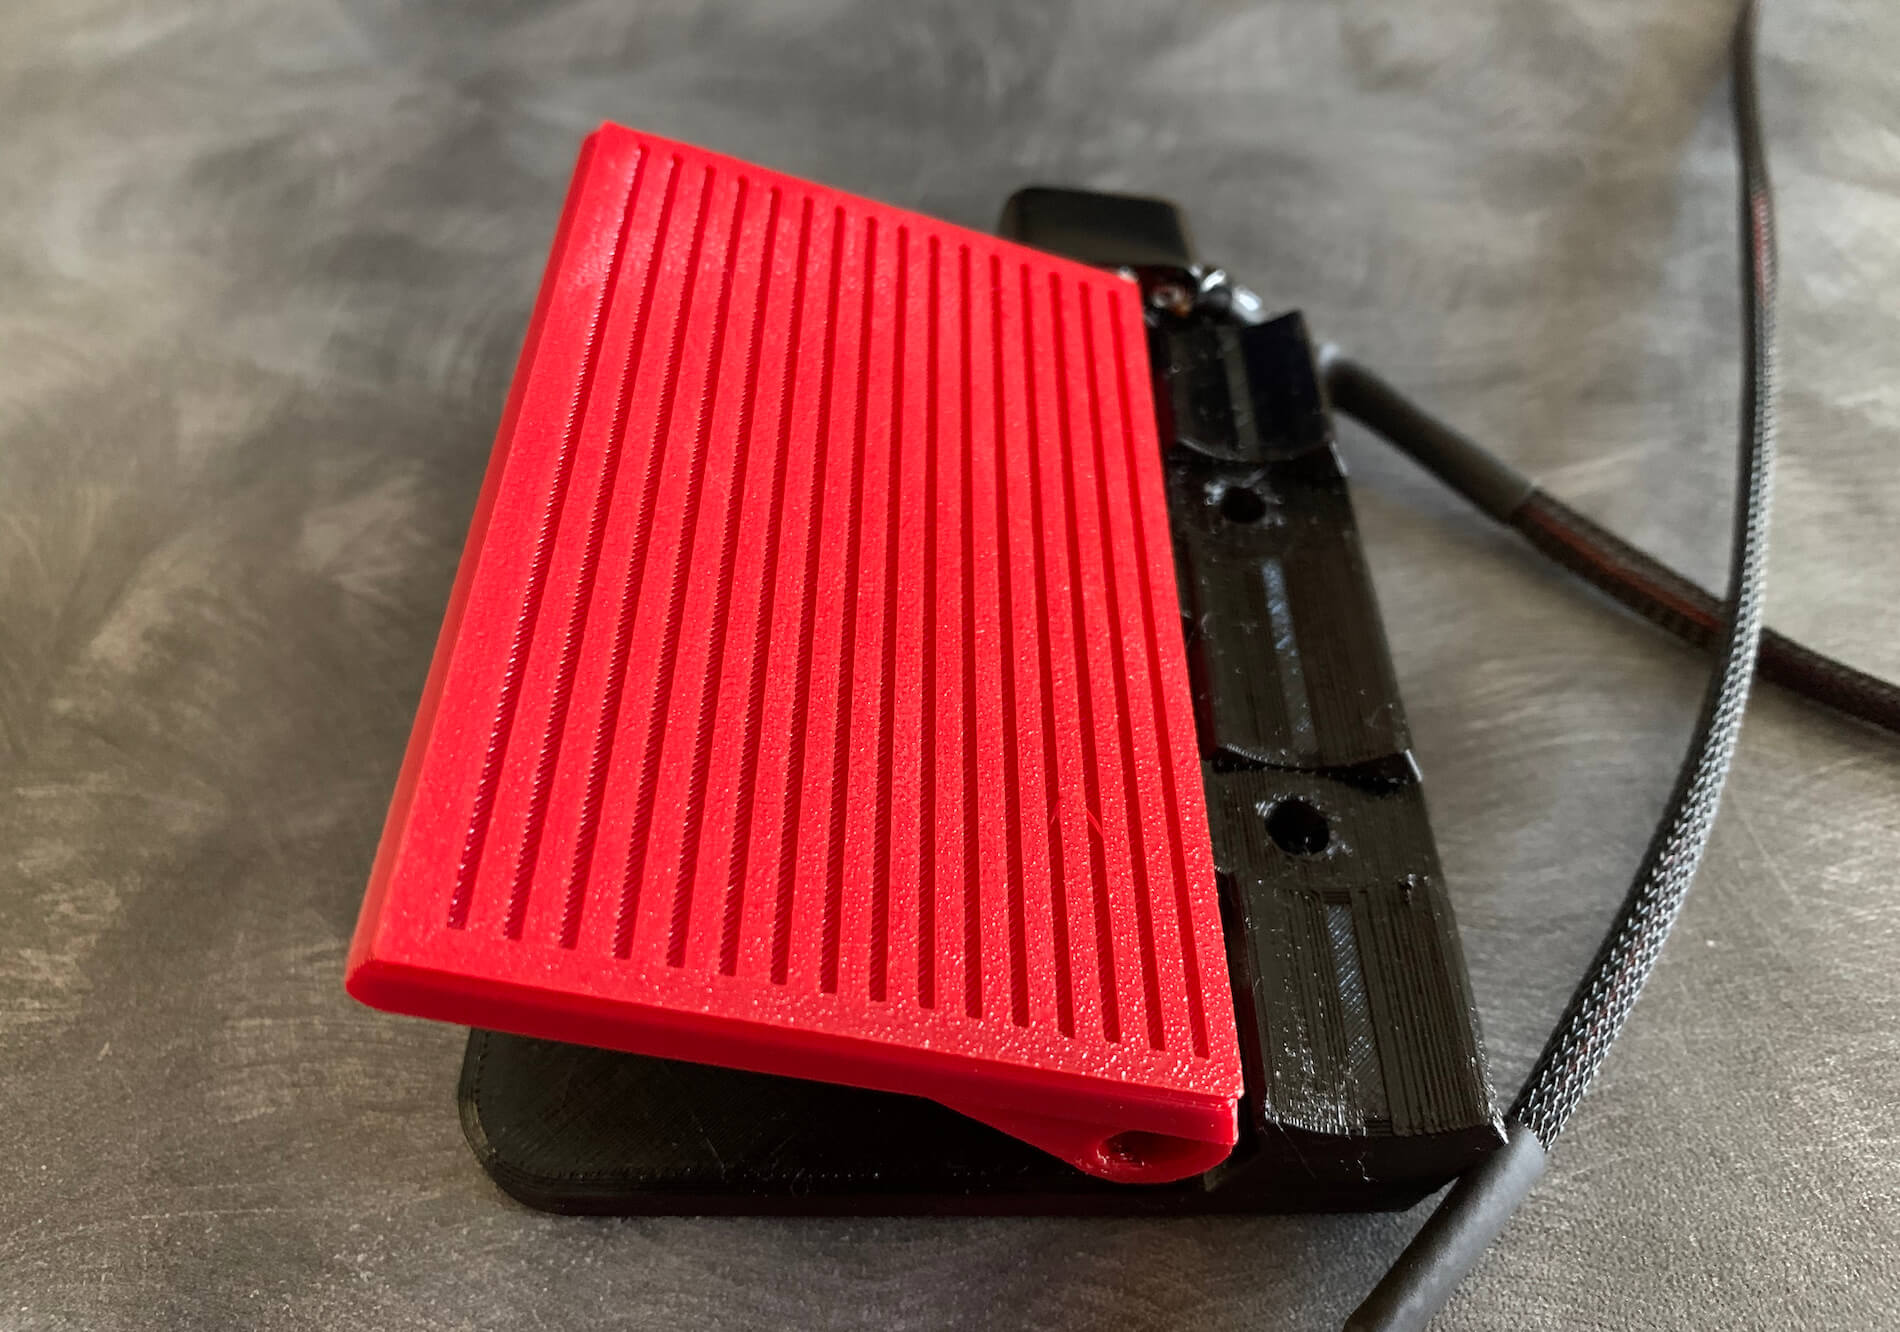
The individual toe-brake devices are made of plastic, made with a 3D printer. That sounds perhaps to you not very good, but believe me, it’s not just plastic. As I’ve seen with the individual PUMA components, I see the same with the toe-brakes parts. They are made of durable thick and solid plastic that doesn’t look cheap at all.
Just to make the following clear; the black bottom part and the red “toe-brake” as well as the metal shaft that functions as a hinge and the metal spring are all made of solid material. Plastic yes, but then again made of high quality!
Mounting and Software Configuration
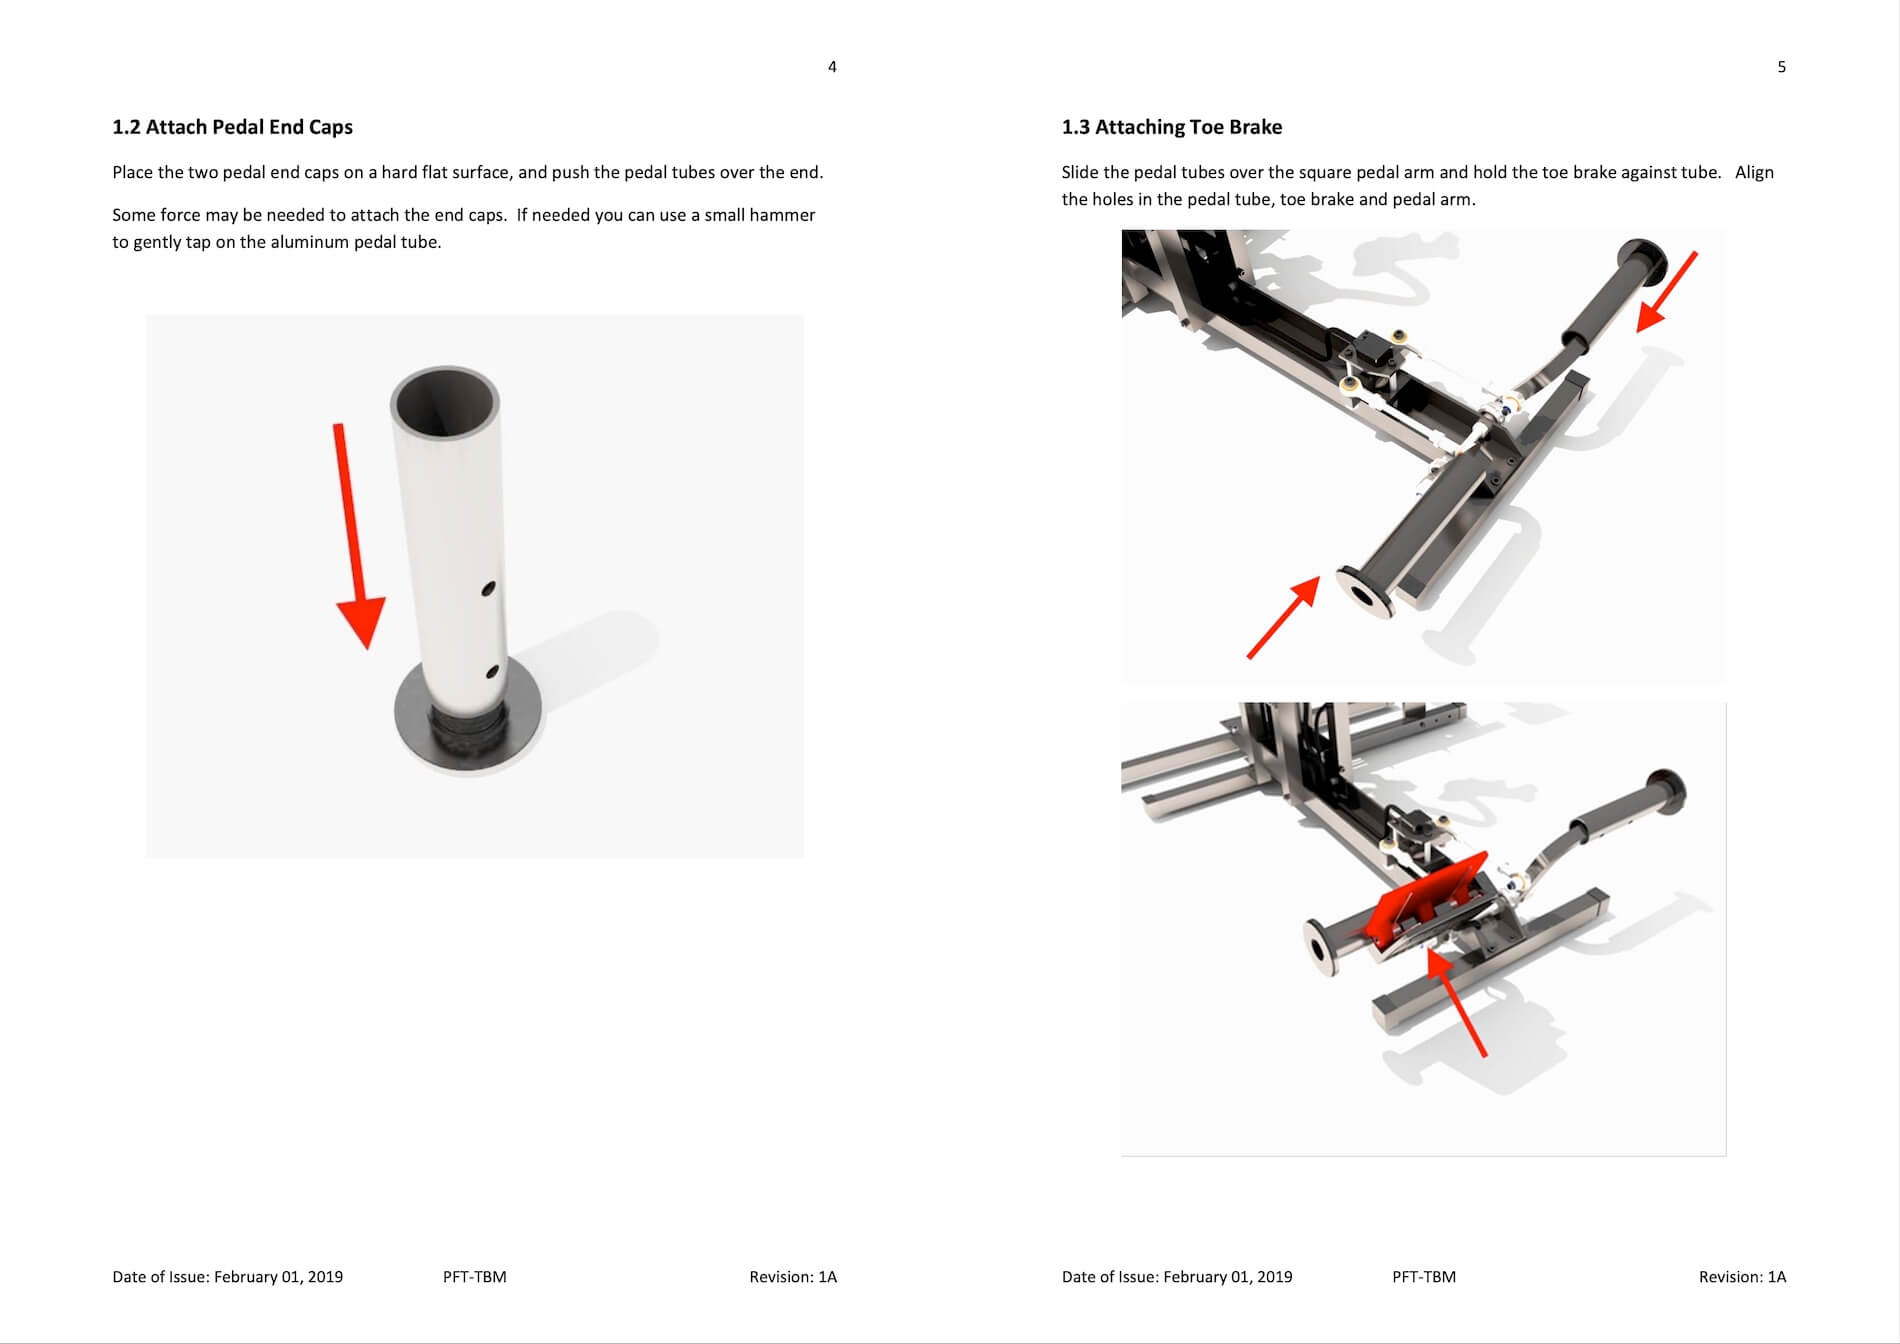
Installation toe brakes
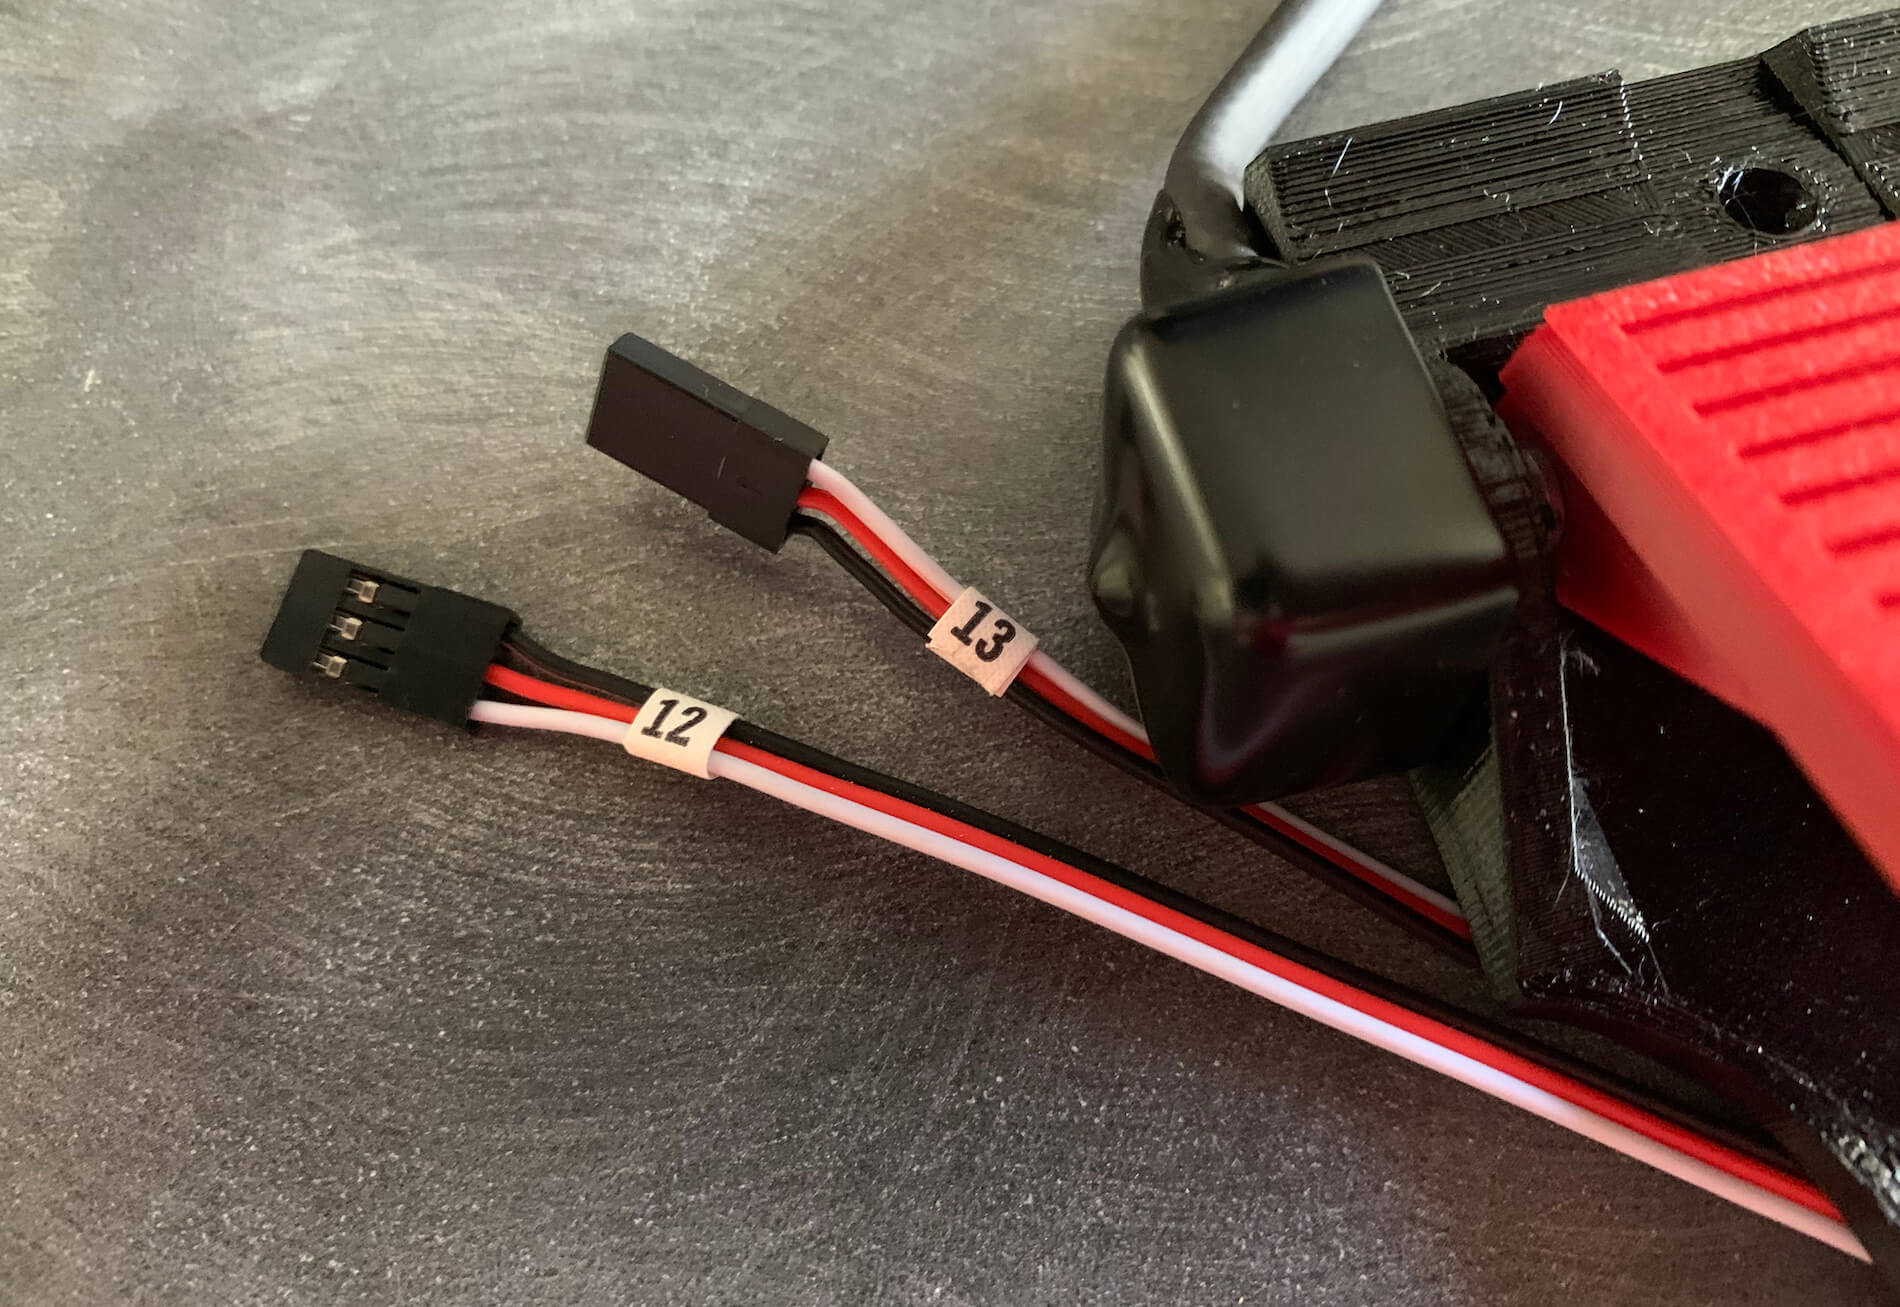
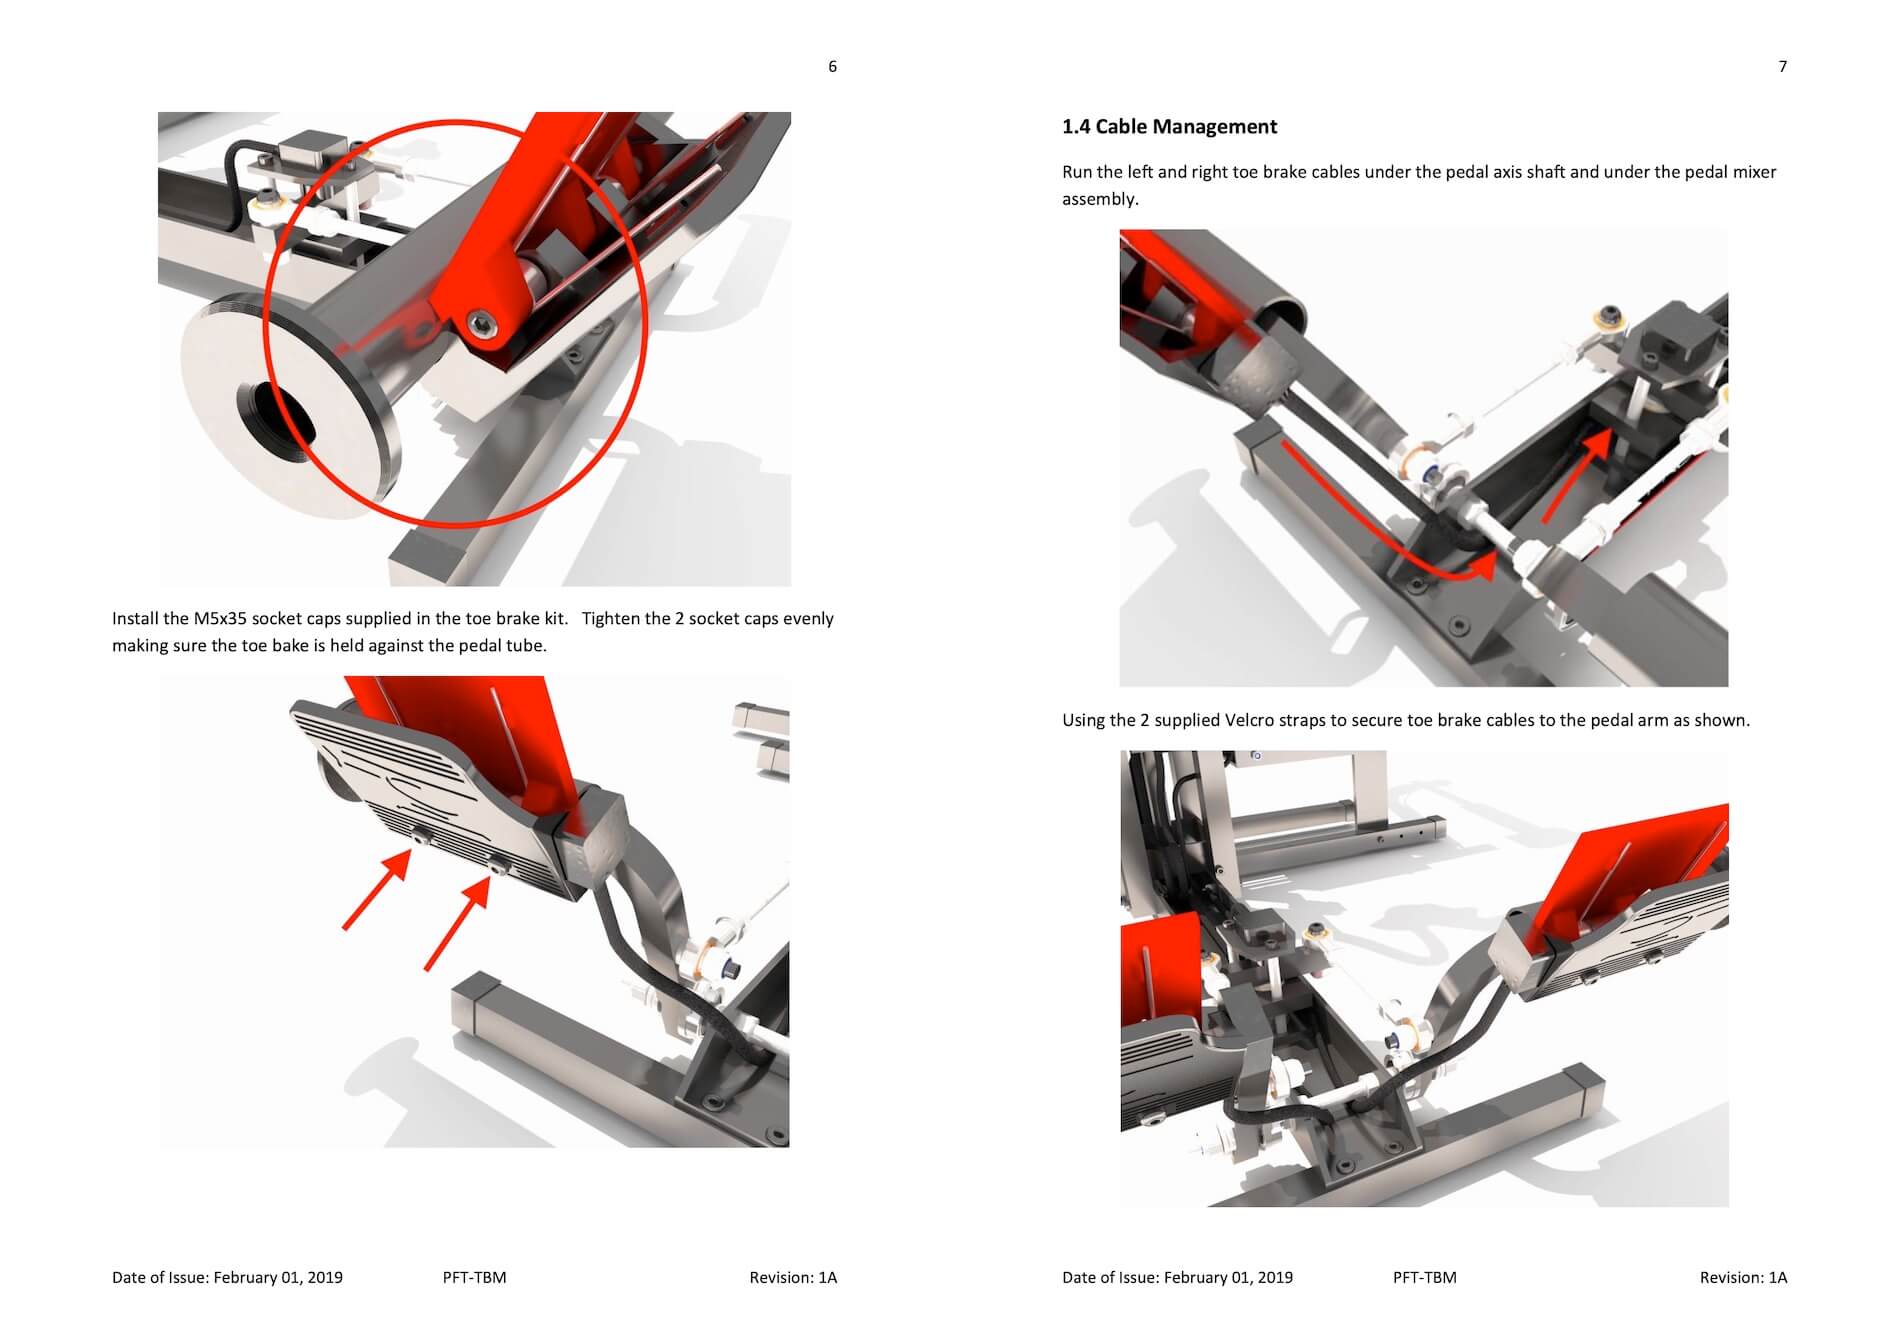
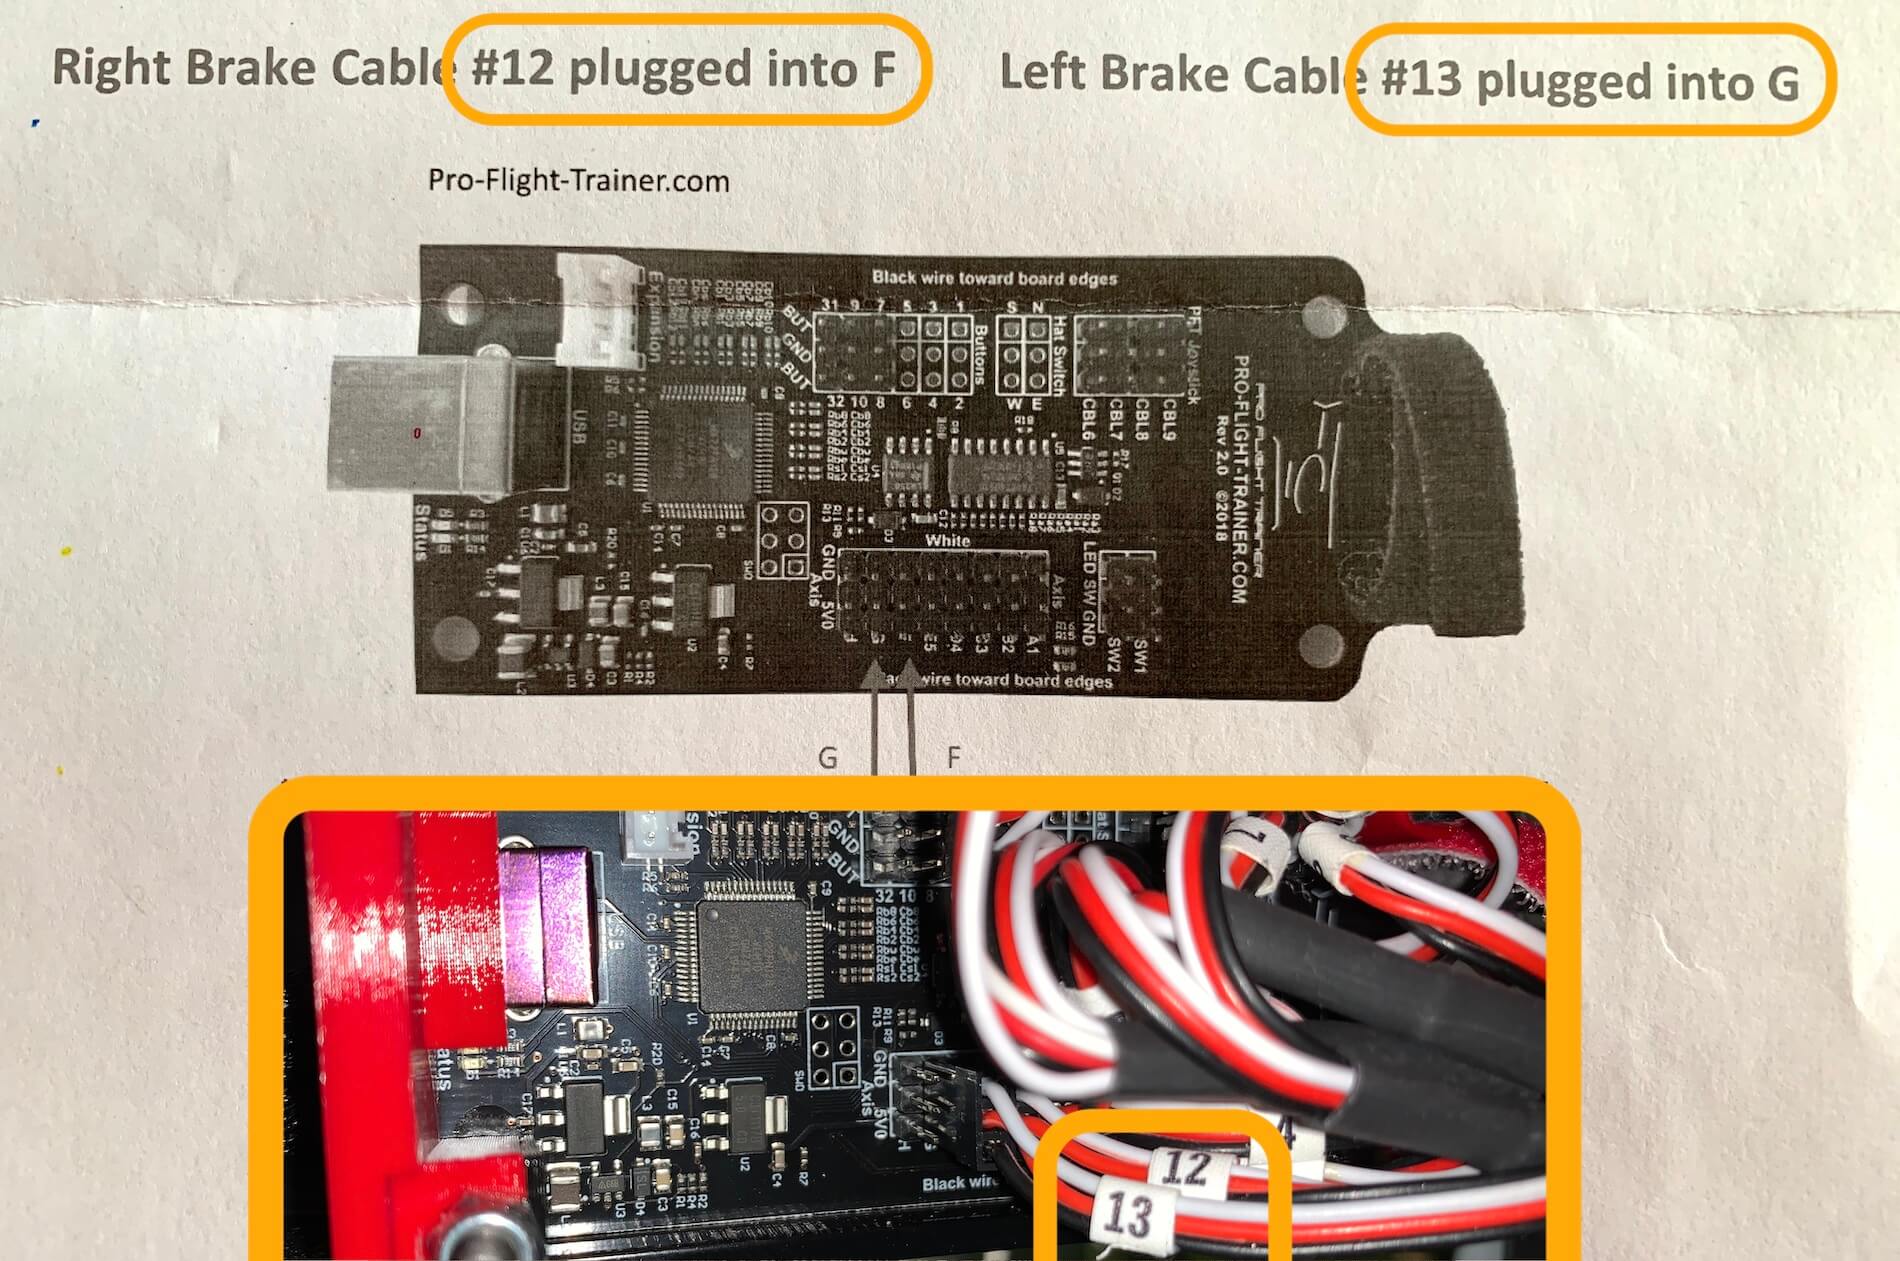
Each toe brake has its own wires, bundled together with a nice wrapping and the same kind of connector at the end as we’ve seen with the Pro Flight Trainer PUMA sensors. The individual left- and right-hand toe brakes are identified with connectors 12 and 13. Each cable is long enough, actually, each cable/wire is 1 meter long. In other words, the overall length of each cable is more than enough to lay it nicely in the mid frame and passing it underneath the cyclic unit. Then routing the cable behind the PCB as I did with the other cables and then plugged into the PCB.


I mentioned in the previous paragraph that the package comes with “replacement” bolts. I need to go a bit more in depth what I mean with that. The pedals or plastic tubs/bushes that are currently mounted stay where they are. Remember, each bushing/tube is mounted with two black bolts. Each toe-brake device is mounted on top of these pedal tubs. Check out the following photos.
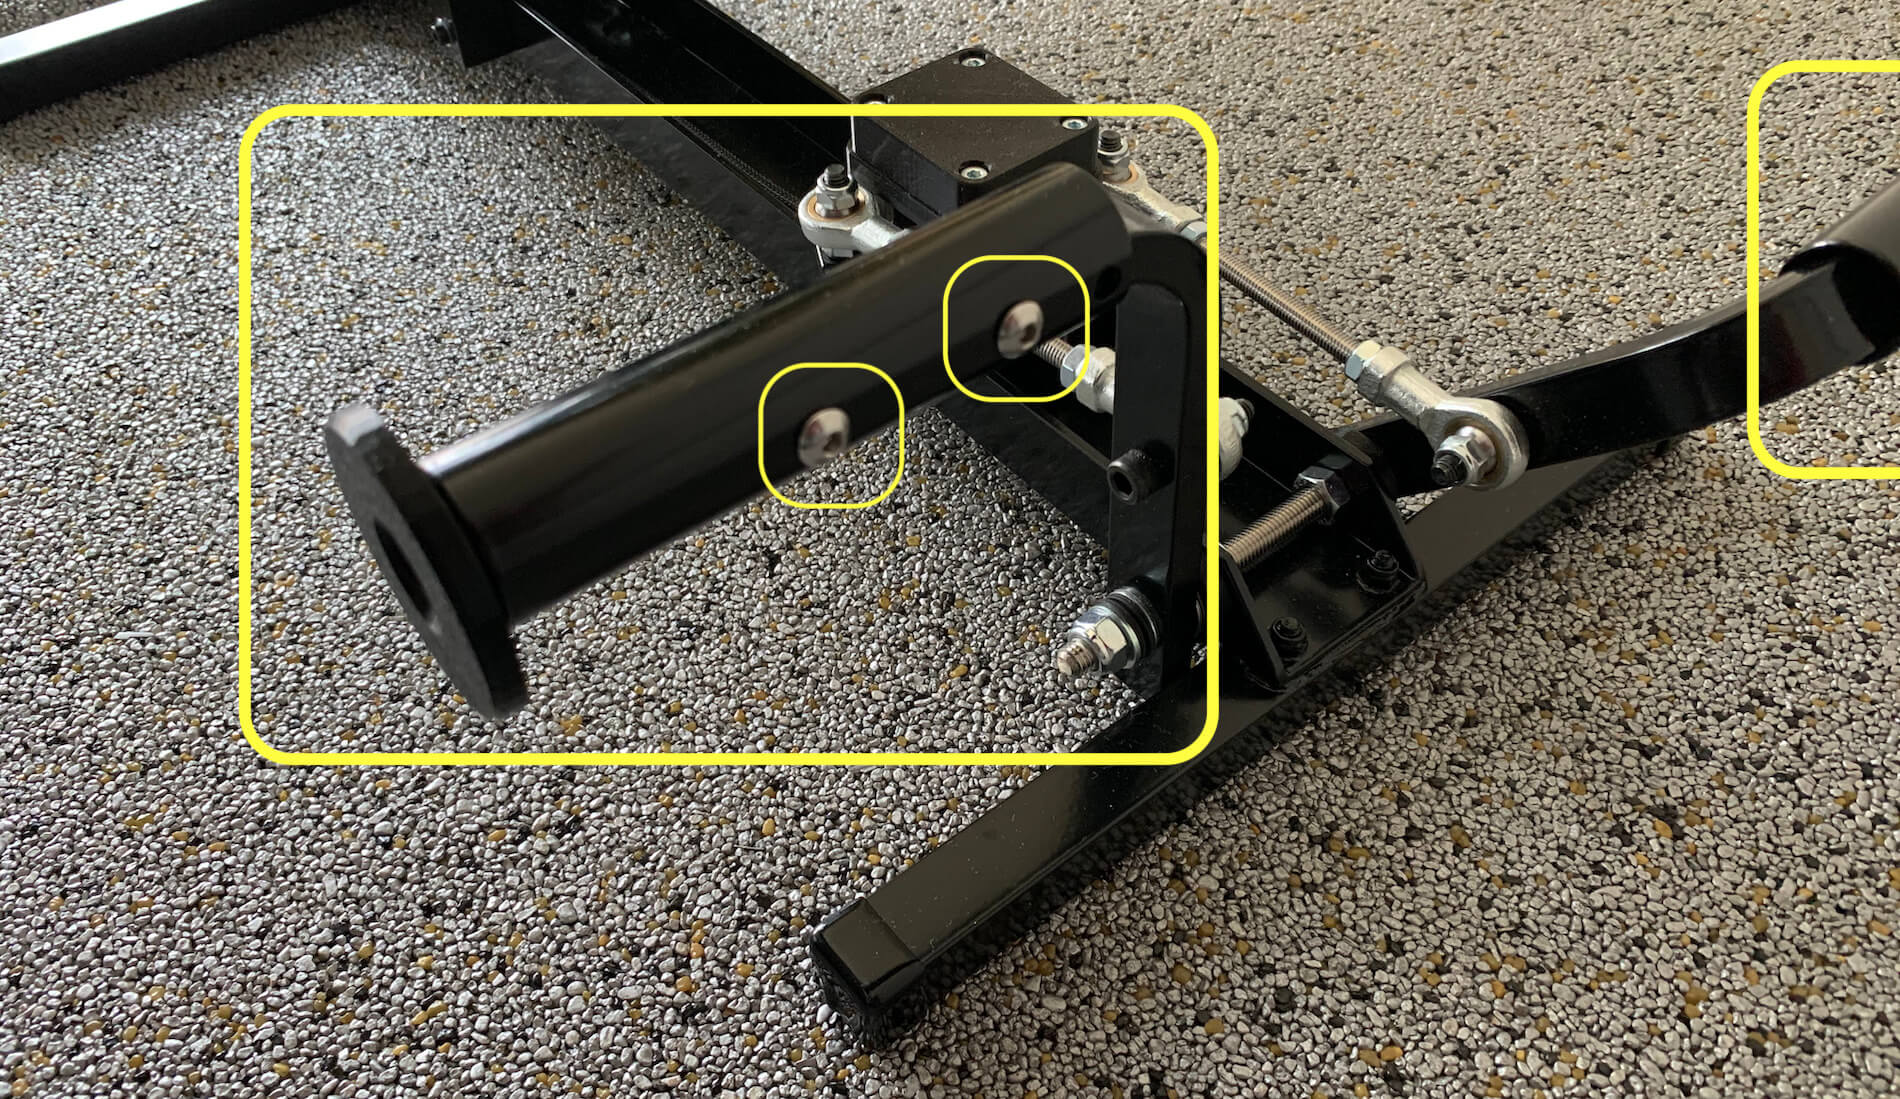
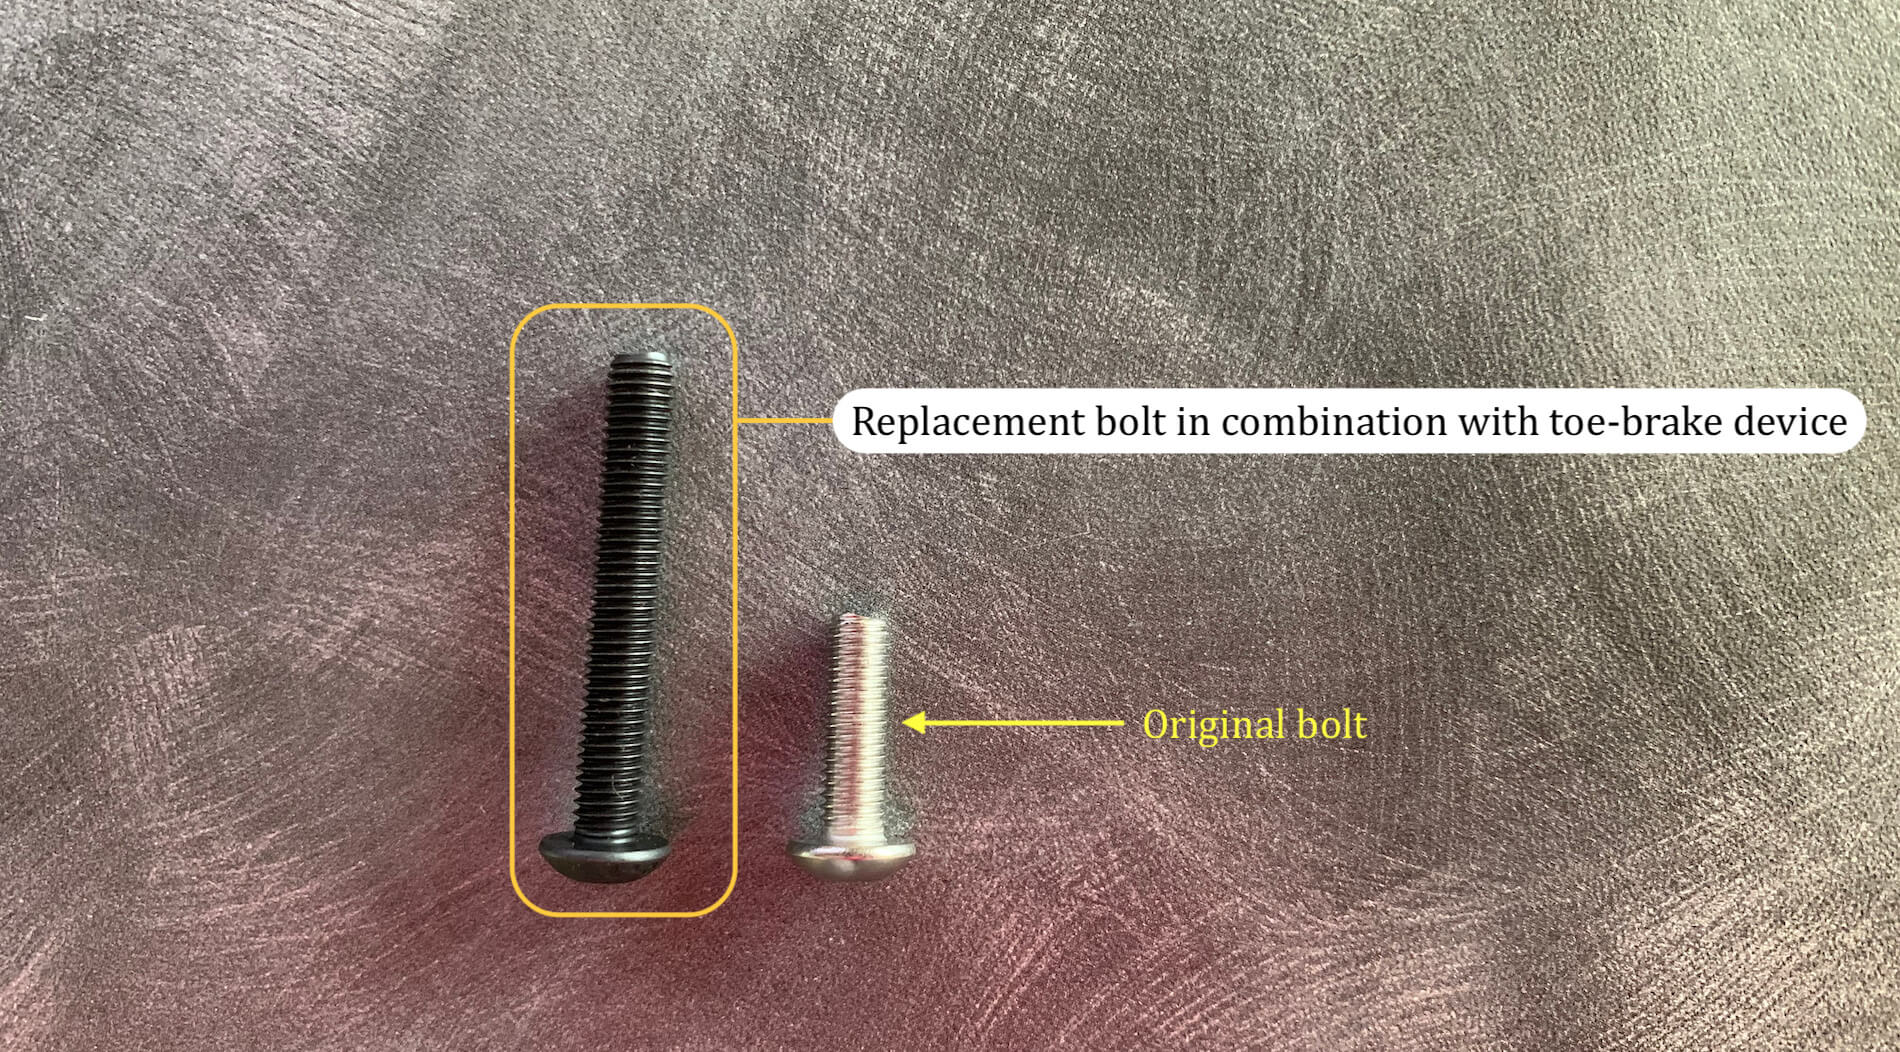
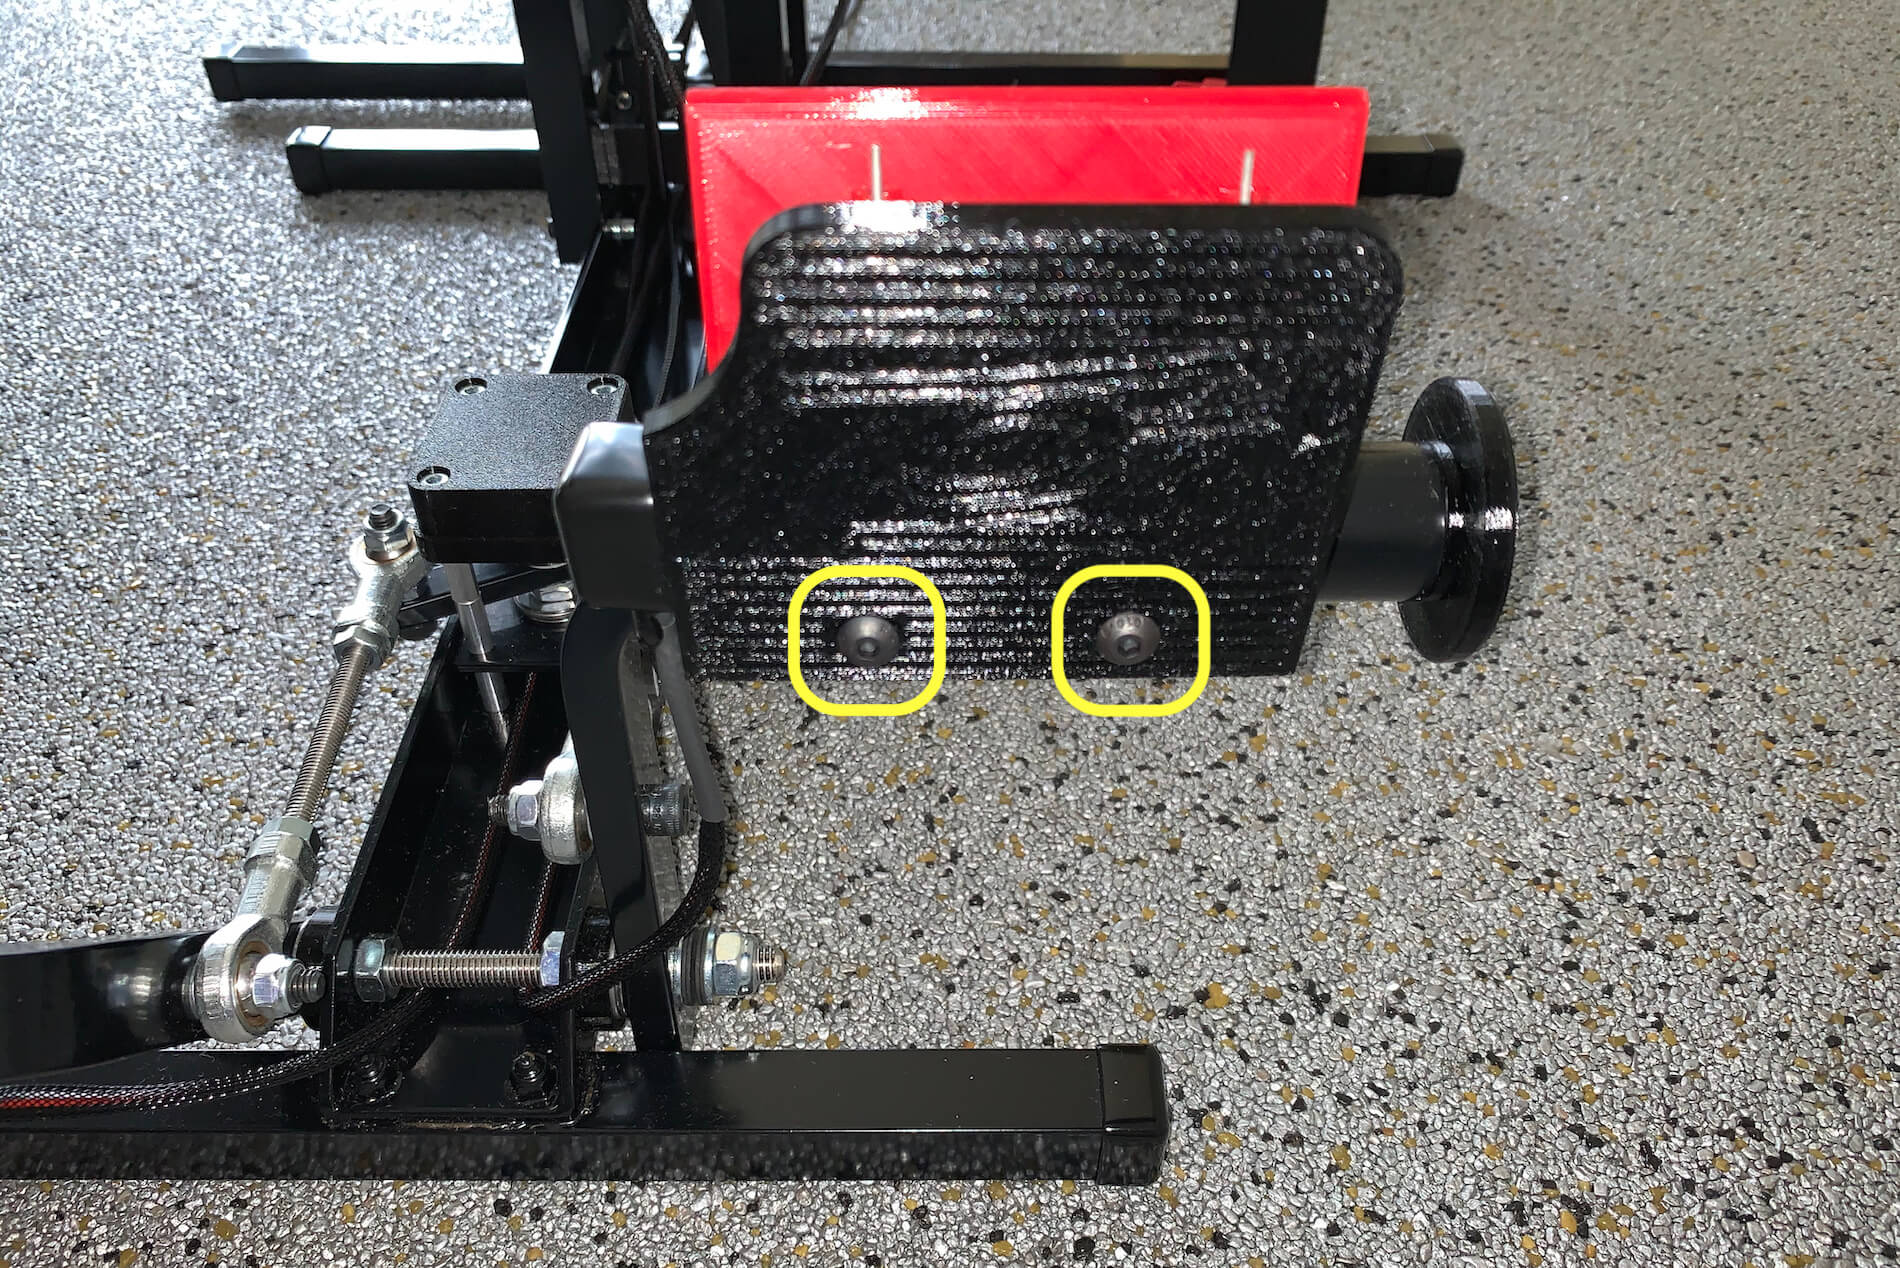


As you can see on the photos, it’s an easy job. The only thing that could be a bit difficult is that you need to align the new longer bolt thru the plastic (pedal) bushing/tube and then find the hole in the metal part to tighten it. Then you need to fiddle a bit to get the wires nicely underneath the connecting bolt that interconnect both pedals. Then the wires go underneath the sensor section and finally under the cyclic.
I said the same when I built the PUMA together: take your time! Don’t hurry and be gently, particular when you connect the electrical connectors. When you don’t do it gently you can easily break the pins on the PBM. So do it carefully and when you can’t see it, take a flash light.
When you find this all a bit too much, you can always check out the following Pro Flight Trainer TBM YouTube movie. It explains very well how to mount the toe brakes to the PUMA and you can also download the following Pro Flight Trainer TBM Acrobat document that offers the same information.
Calibration and Driver(s)
The calibration process seems to me very easy. Looking at page 10 of the Pro Flight Trainer TBM Acrobat document it’s no more than “placing the two supplied washers in-between the brake and the pedal tube as show in the picture below. This creates a small “No signal zone” if you accidentally place a small amount of force on the pedals during operation.”
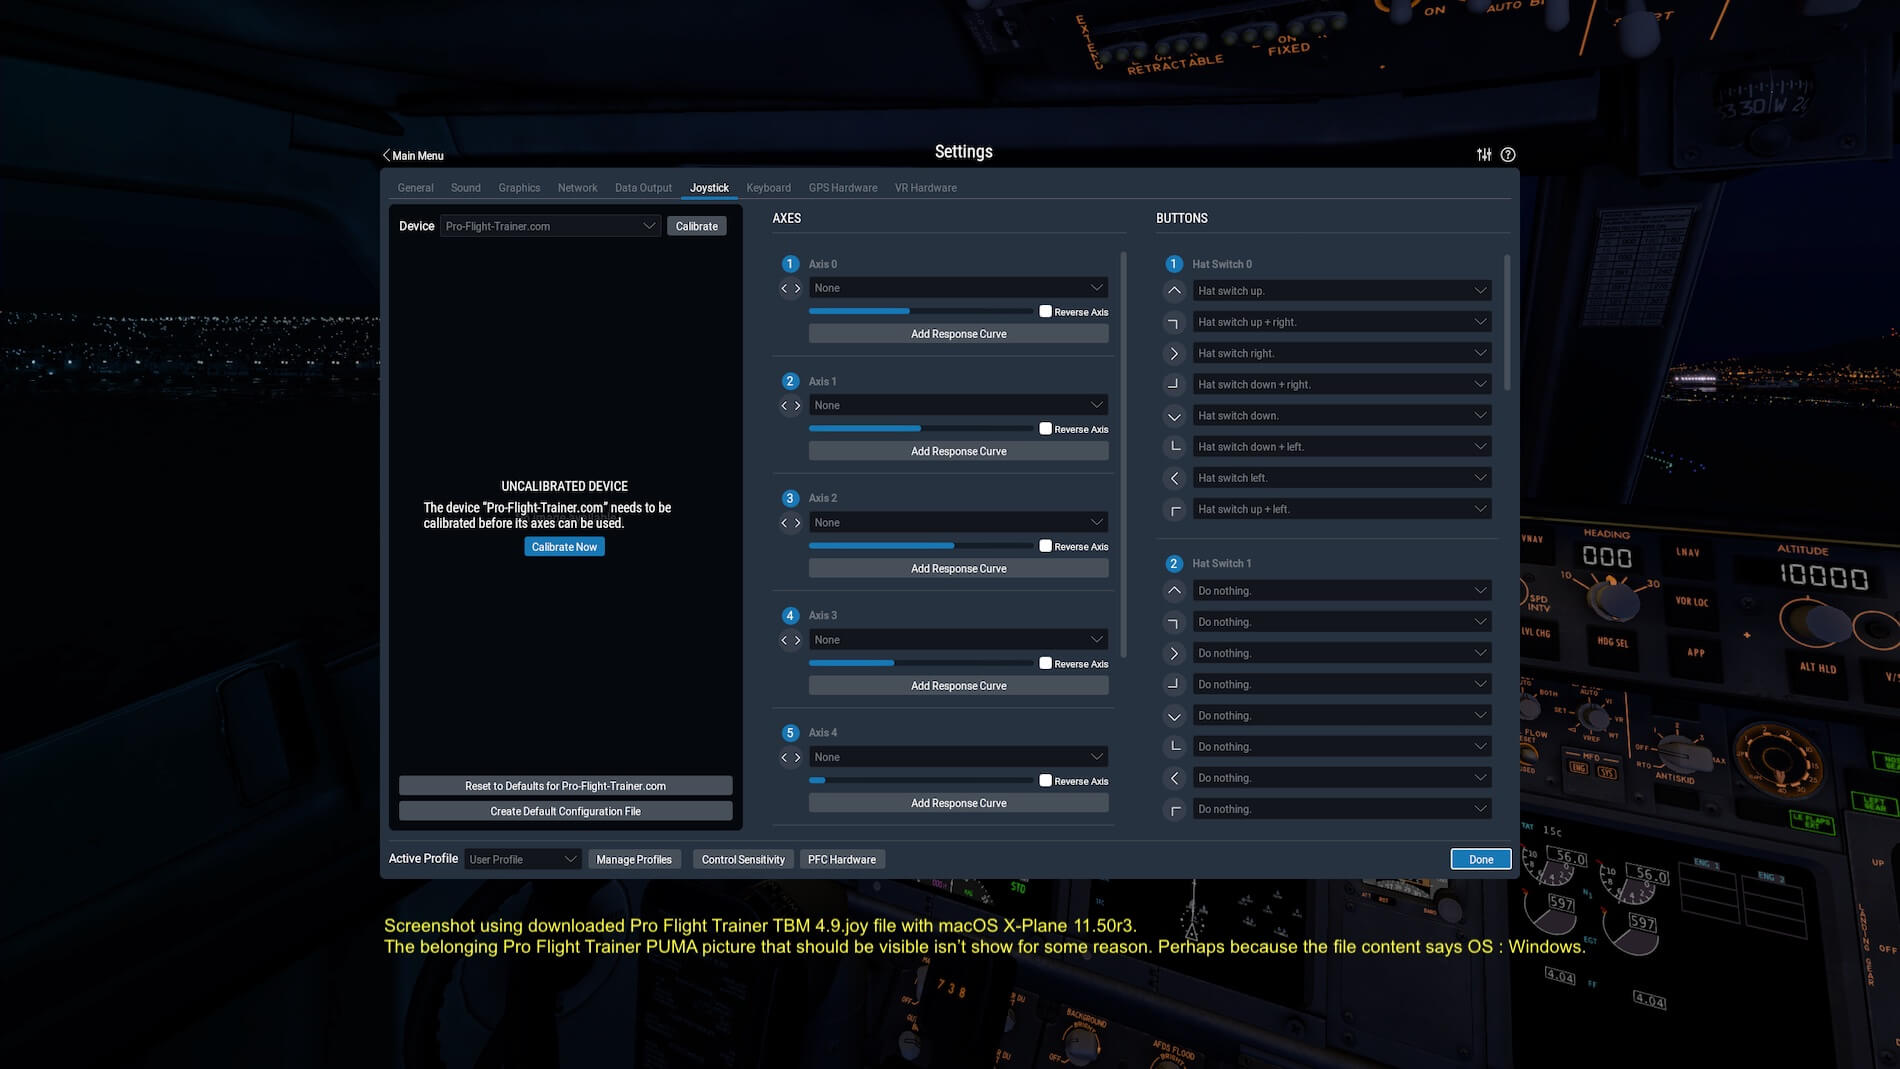
Next I need to download the TBM driver package. Actually, it seems once you’ve unzipped the package that this is an updated Pro Flight Trainer PUMA package with the TBM joy commands included as well as the respective photo png file. But the same as what I explained in the Part I review, the current macOS and Windows X-Plane versions – 11.50r3 / 11.51r1 – have all the picture (png) files and joy files already installed.
That said, the X-Plane joystick configs folder comes with two joy files of which the Pro-Flight-Trainer-com 4.9.joy file is the one we need however, this file is only for Windows and there’s no file for Mac or Linux. I know that the included file is only for Windows since when opening the joy file with a text editor, there’s a command line that tells me that this file is exclusively for Windows.
I don’t have Linux, but I do have a Mac thus I do the same and modify the Pro-Flight-Trainer-com 4.9.joy and rename is to Pro-Flight-Trainer-com TBM 5.0 – Mac.joy. It’s basically the same file as the file I mentioned and modified in the Part I review however, this joy file includes codes for the TBM. Just to make one thing clear: when you have the Pro Flight Trainer PUMA without the TBM, then you need joy file Pro-Flight-Trainer-com 5.0 – Mac.joy else you need the Pro-Flight-Trainer-com TBM 5.0 – Mac.joy. I’ve sent the modified Mac joy file to the Pro Flight Trainer team, but for your convenience you can also find the download link here at X-Plained.Com.
Next copy and paste the updated joy file to the Resources/joystick configs folder and delete any other Pro Flight Trainer joy file in this folder. Attention please: I do this for Mac only since that’s the OS I’m testing on. When you have Windows, you don’t need to do anything.
But a modified joy file isn’t enough. You still need to make the necessary travels with the cyclic, collective, throttle, pedals and toe-brakes, but all assignments are straightforward as you can see in the screenshots, which are made within X-Plane 11.50r3 macOS Big Sur.

Worth to highlight once more is the calibration or centering procedure of the axis. Suppose you start with the calibration of the whole Pro Flight Trainer PUMA with the TBM kit, then keep the following in mind when you set everything in the centered position. For the cyclic you use the red calibration tool as explained in our review Part I. For the throttle, just turn it in the full counter clockwise direction and place the collective in the full down position.
Next, position the pedals visually in a centered position. For me as an aviation ground engineer this sounds a bit weird. It sounds weird since I could imagine that the Pro Flight Trainer development team could have design a rig pin hole that allows you to lock the pedals in a centered position, which is of course only needed for the duration of the calibration. Therefore, since there’s no such option, try to bring the pedals visually in a centered or middle position. For the toe brakes you don’t need to do anything. The toe brakes are spring loaded to the no brake position so that’s OK.
Now it’s time to see how it goes. Ready for another helicopter experience this time using the Pro Flight Trainer PUMA in conjunction with the added toe brakes. Basically it’s not much different then what I tested already in the Part I review, except that I added the toe brakes.
Heel Support
Perhaps not directly a paragraph you would expect, but I needed to bring this to your attention. Before I started with my flight impressions using the TBM kit, I sat in my chair and tried out how it feels to use the pedals in conjunction with the toe brakes. I don’t have small feet neither are they long, but I didn’t know exactly where to place my heel in such a way that I had full control over my pedals and toe brakes.
What I personally miss although you can create anything yourself, is a kind of adjustable heel support. Adjustable in a way that it offers place for short/long feet and that the “fit” on the pedals and in particular the toe brakes is good. Perhaps this is a suggestion for the Pro Flight Trainer team to add such a plastic adjustable construction that can be mounted to the back of the black part of the toe brakes. Again, as of this writing there’s no such solution, so you and I need to find something else that gives heel support.
Flight Impressions | Helicopters with wheels
Before jumping into a helicopter with wheel and brakes, I first do something you probably won’t expect, but I can tell you, it works. At least, it worked for me and that is “learning how to use the Pro Flight Trainer PUMA toe brakes and how much effort is needed to see and feel when an aircraft is braked.”
Although it may sound odd, I felt it’s a good idea to become familiar with these toe brake modifications by using a fixed wing aircraft. It doesn’t matter which or what aircraft model you choose, but with the Pro Flight Trainer PUMA you have all the necessary controls gathered around you. This way you’re able to learn to taxi and brake a fixed wing aircraft.
Yes, I know, it sounds weird using a fixed-wing instead of a helicopter, but in this way you can experience yourself how the toe brakes respond. Looking to myself: mastering a helicopter what I wrote already before, is not easy even though this hardware will help a lot, but when toe brakes are added, then there’s another control you have to take care for. When you have practiced with a fixed-wing before, you will get the right feeling how the toe brakes respond. When you’ve never flown a fixed-wing aircraft then probably you can skip the previous paragraphs.
And there’s one more thing I would like to share with you: you can’t adjust the toe brake spring force! That’s not really a problem, but just to let you know. The spring force is just OK. It didn’t take too much effort to press either toe brake but it’s not too low that you’ve got no artificial feel. While these toe brakes are mounted at the pedal shafts, you are able to adjust the pedal shaft friction. It is also a good idea when testing the equipment with a fixed-wing aircraft to check if you need to adjust the pedal friction and what feels comfortable for you. Although the pedals do unofficially the same namely controlling yaw, there’s a huge difference between the yaw channel for a fixed-wing and a helicopter.
Just to conclude the previous paragraphs: there’s no need to fly with a fixed-wing aircraft although the Pro Flight Trainer PUMA equipment allows you to do. It was more my idea of bringing this up just to learn to taxi and to brake and thus to feel the reaction of the Pro Flight Trainer PUMA with TBM. That’s it! And now it’s time to taxi and use the brakes with a helicopter.
I start with the DMO Design Sikorsky S-92 at EDDF. I’m not sure if this is a well modeled helicopter, and if the flight dynamics are as real as they should be, but for now, taxiing and braking when needed is enough. And I can tell you, oh oh, that’s not so easy as with a fixed-wing. Don’t worry, I was able to do it, so you will too. A fixed-wing aircraft is relatively stable when taxiing unless you taxi with 40+ knots or more and try to make a turn, but in general, a fixed-wing aircraft is stable.
Taxiing with the Sikorsky S-92 was OK, but you have to monitor everything and don’t think of losing attention. And don’t touch while taxiing the cyclic to simulate a roll input. Ok, nothing happens, but when you’ve positioned yourself outside the helicopter you’ll notice immediately that when you apply a small ROLL cyclic input, the helicopter starts moving as if it would roll. It can’t since it’s on the ground, but you see the immediate the roll effect of the cyclic.
So how did it work out?
I released the brakes, I lifted the collective slightly and monitored what the Sikorsky was doing. When I noticed it started moving, I pressed the left-hand pedal which means the nose wheel starts moving to the left and while applying a bit more collective, the S-92 starts taxiing faster. When it goes too fast, reduce a bit of collective. When you sit in the cockpit or move outside, you can see that the fuselage starts wobbling a bit to the left. This can be corrected with the cyclic. But just as I wrote in Part I: do it all with small adjustments. Do it gently!
I also noticed with this add-on helicopter that when you make sharp turns while taxiing it goes out of control and flips. I’m sure this is not the reality. Whatever is true, take the time when you do something and see how the helicopter responds. So after all, taxiing is not so difficult with the Pro Flight Trainer PUMA and TBM. You and I still need to practice a bit more, but overall I’m satisfied with the electrical response of the TBM sensors in combination with the add-on helicopter.
After taxiing around at EDDF, it’s time to takeoff at a dedicated spot. First I try to hover at the spot and then I slowly fly away and oops, don’t forget to retract the wheels. I won’t say landing gear, but perhaps that’s correct too. After I retracted the wheels, it’s time to have fun and see the ground below in a different way then you have ever seen with a fixed-wing.
I decide to switch to the X-Rotors AW139. A beautiful helicopter and it surprises me how easy it is to handle the modeled AW139. Not only taxiing goes well and of course, using the brakes too, but also hovering and flying out along the Swiss mountains. Because of this I decided to move with the X-Plained circus to Zermatt-Tasch Airfield, Switzerland. One of the European countries where flying between the mountains is as we say “offering an awesome experience”.
Flying in these areas, not only Switzerland, but also nearby Austria, the French and Italian Alps is something you can forget with a GA fixed-wing aircraft. When you want to see something of the beautiful mountains, flying close to them, see and fly over glaciers, than this is the ultimate helicopter experience: a nicely modeled helicopter in conjunction with the Pro Flight Trainer PUMA and TBM kit.
Anyway, I was or supposed to test the TBM kit for the Pro Flight Trainer PUMA. How real this X-Rotors helicopter is, again, I have no idea. But it surprises me how easy things go or is it perhaps me that together with my enthusiasm for helicopters everything goes smoother than expected? Who knowns.
That said, I parked the AW139 at a spot at Zermatt-Tasch Airfield (LIZER), but of course at the wrong spot, so a taxi is needed and that goes well. After releasing the brakes, I apply some collective, move the cyclic a bit forward and there the AW139 goes. While we’re still on the ground, following the runway grass centerline goes easy with the pedals who function as YAW or in this case the nose wheel steering. Oops, I go a bit too fast. Pressing the toe brakes works perfect and while applying brakes, the reply is immediately seen although I could also use the collective, but the collective is no brake. Fiddling a bit around with this helicopter I decide to hover and fly away. This may not be a part of this review, but that goes so easy. Before I know I’ve picked up 25-30 knots and, as you can remember, as long as the speed is above 25-35 knots, you’re in a safe area to control the helicopter.
I could continue with other wheels equipped helicopters, but I think you got the picture and I was able to share that experience and feeling with you.
My overall TBM (Toe Brake Modification) hardware impression with these wheels equipped helicopters is great. Although I only tested and used it with macOS Big Sur X-Plane 11.50r3, it can be used with many other flight simulators. It is true that not many helicopters have wheels and brakes, but keeping the overall price in mind of the TBM kit, it’s worth to invest in this add-on part. And there’s another advantage when you have the toe brake modification installed and that is you can use the Pro Flight Trainer PUMA with TBM kit also for fixed-wing aircraft, in particular when using it in combination with historical fighters that had a stick in between the pilot’s legs. Ok, the modeled collective with throttle is typical for helicopters, but even then, you can still use it with these historical fighters.
Summary
Was it worth my additional time to check out the Pro Flight Trainer with the TBM kit?
Can I say it in one word or do I need more?
Ok, this time more than one word is needed to specify the importance of the Pro Flight Trainer TBM kit is needed. It makes sense that when you add the TBM to the Pro Flight Trainer PUMA, you have toe brakes which can be handy when you prefer to fly the larger helicopters that have wheels and brakes. But there’s another advantage that I mentioned before: you can also use it due to the presence of the toe brakes for fixed wing aircraft and although I said it would perfectly fit with historical fighters, it will work fine with any other aircraft type.
That said, the whole PUMA with TBM kit is now a bit more multi functional and not only dedicated to helicopters. Real helicopter pilots will say to me “she’s crazy, this is dedicated high quality helicopter hardware that you don’t use for fixed-wing aircraft” and in a sense they are right. But “simmers who want to fly helicopters and fixed-wing aircraft, they will have awesome equipment to fly both types”.
I’m still impressed how it looks although it’s just a brake assembly, but I’m still impressed how it’s manufactured. The cables that connect all the individual sensors to the PCB (Printed Circuit Board) are of high quality with a nice and protective shielding around it, same as we saw in the Part I review for all the other wires.

I mentioned in the previous paragraph that I tested the Pro Flight trainer PUMA with TBM kit only with X-Plane macOS. That said, I had to modify the included joy file since it didn’t do what I expected. Not a big problem since I did the same when I reviewed only the Pro Flight Trainer PUMA. After I modified the joy file for use with macOS X-Plane 11, it works as it should.
I never believed I would fall in love with helicopters. On the other hand, with the help from Sergio Costa from Helisimmer.Com and JetManHuss from VSKYLABS, I managed “so so” how to fly the Robinson R44 with fixed-wing hardware, and after that, still with their advices, I continued with the Pro Flight Trainer PUMA and now added to this the TBM kit. It was such an extraordinary experience and I sincerely hope I can continue reviewing helicopters. And finally, I would like to thank Nicolas from X-Plane.Org who offered me the DMO Design S-92 Sikorsky package.
I hope I covered everything regarding the Pro Flight Trainer TBM (Toe Brake Modification) kit that was needed to write in-depth reviews of the Pro Flight Trainer PUMA Part I and Part II. I would like to thank Winfried Diekmann, Aerosoft CEO who offered me the Pro Flight Trainer PUMA for the duration of this review, and not to forget Christophe Niederhauser, Development Manager at Pro Flight Trainer for his help, advices and offering me the TBM kit.
I sincerely hope that for those simmers who want to explore helicopters and fly them in a professional way, that both my Pro Flight Trainer PUMA reviews will help them in making the right decision and at the end GO for the Pro Flight Trainer PUMA!
As always in the summary of a review: is it worth the 99,00 USD for the TBM kit?
Absolutely.
You can buy the TBM kit at several outlets, but for now, find detailed- and buying information at the dedicated Pro Flight Trainer webpage URL. For me there’s no doubt if this is expensive or not. It’s again something made of high quality and durable plastic, and it feels good and is worth the price.
Other information can be found at the Pro Flight Trainer.com website. Just in case you missed our comprehensive Pro Flight Trainer PUMA Part I review, here’s for your convenience the direct link to that review.
Feel free to contact me if you’ve got additional questions related to this impression. You can reach me via email Angelique.van.Campen@gmail.com or to Angelique@X-Plained.com.
With Greetings,
Angelique van Campen
| Add-on: | Hardware Pro Flight Trainer |
|---|---|
| Publisher | Developer: | X-Plane.Org | Pro Flight Trainer.Com |
| Description: | Toe Brake Mod kit for the pro Flight Trainer PUMA |
| Software Source / Size: | Download / N.A. |
| Reviewed by: | Angelique van Campen |
| Published: | January 2nd 2021 |
| Hardware specifications: | - iMac Pro - Intel 3GHz Intel Xeon W / 4.5Ghz - Radeon Pro Vega 64 16368 MB - 64 GB 2666 MHz DDR4 - 1 internal shared 1TB SSD (Big Sur 11.x) - 1 internal shared 1TB SSD (Bootcamp Windows 10) - 1 external 2TB LaCie Rugged Pro SSD (Big Sur 11.x) - Saitek Pro Flight System X-52 Pro and X-56 Rhino - Honeycomb Alpha Flight Controls - Honeycomb Bravo Throttle Quadrant |
| Software specifications: | - macOS Big Sur (10.15.x) - X-Plane 11.5x |
0 Comments