Thrustmaster Ultimate Rudder Pedals
Introduction
Actually, the title isn’t completely correct. The hardware devices I’m going to review are not only intended to control the rudder(s), but also the wheel brakes as well as steering the nose wheel, whenever applicable. I hope with this review to cover all the ins and outs of two Thrustmaster rudder devices; the T.Flight Rudder Pedals and the TPR.Pendular Rudder. I am aware that although these two rudder pedals/controls are of a total different order and price, it is worth to discuss them in one review. Being honest and based on my own real aviation experience as ground engineer and PPL holder, the pendular rudder is an awesome replica of what can be found in many aircraft types, ranging from the small GA aircraft till and including the modern commercial jets.
As you’ve seen, but hopefully also read, this will be our third Thrustmaster hardware review. For every flight simmer rudder pedals are a requirement although most of the flight simulator software allows you to use the flight stick YAW axis to control the rudder and or NWS (Nose Wheel Steering), but that’s far from realistic, right?
I will turn for you these hardware devices up and down, check every screw, rod and construction and test them with Laminar Research X-Planed 11 and even with X-Plane 12 on macOS and Windows 10.
And yes, you might say “Thrustmaster equipment isn’t compatible with macOS since on their website they only talk about Windows. Yes and no. “Yes” because they only provide TARGET software for Windows and “no” because X-Plane 11 and X-Plane 12 Early Access have their own set of calibration software build in. For macOS you only use X-Plane hardware support while for Windows you can install the Thrustmaster TARGET software, but it’s not really needed when you fly with X-Plane. This statement is based on my previous Thrustmaster hardware reviews.
Who or what is Thrustmaster?
Thrustmaster: a distinguished video gaming tradition
For over thirty years, Thrustmaster has been developing high-tech video game accessories designed to satisfy and entertain all types of gamers. Drawing on its know-how and technological expertise, Thrustmaster develops products – flight simulation peripherals, headsets, and controllers – designed to offer extremely accurate gameplay, providing a completely immersive experience with optimal realism across numerous platforms.

Thrustmaster takes pride in its core values, “Passion, Quality and Innovation”, and constantly strives to improve the realism and immersiveness in legendary game worlds by offering thrilling and truly exceptional experiences. From video game enthusiasts to casual gamers, Thrustmaster accessories for PC and gaming consoles bring everyone’s dreams to life.
Hold on, this is not the complete story. It actually starts with …….
Hercules Thrustmaster: Two strong brands with passion
A designer and manufacturer of interactive entertainment equipment and accessories, listed on the stock market since 1998 and a major player in the market since 1984, Hercules Thrustmaster focuses its activities on its two flagship brands: Hercules for the digital hardware and peripherals segment and Thrustmaster for PC and console gaming accessories.
The Group is currently present in eleven countries, including France, Germany, Great Britain, Spain, the United States, Canada, Italy, Belgium, China, Hong Kong and Romania, and distributes its products in more than one hundred countries worldwide, with the aim of offering high-performance and user-friendly products to maximize user satisfaction with interactive digital entertainment. (Courtesy Hercules Thrustmaster)
Want to know more about what they all achieved? Then you must check out their History. It’s quite an impressive hardware list.
Are you ready to explore these Thrustmaster Rudder Pedal devices?
TPR. Thrustmaster Pendular Rudder
Just Revolutionary
According to Thrustmaster “In a nutshell; The rudder system with realistic dimensions and perfect precision, for total immersion in all types of flight simulation. The TPR features Thrustmaster’s exclusive PENDUL_R technology: a unique, suspended mechanism ensuring smooth and fluid movements. In conjunction with the magnetic sensors, this guarantees perfect precision, even for minor adjustments. H.E.A.R.T. Hall Effect AccuRate Technology: Unrivaled precision.”
“In order to guarantee performance with unrivaled precision, the TPR also features H.E.A.R.T. HallEffect AccuRate Technology (U.S. patent US08471815) with 3D Hall effect magnetic sensors, providing 16-bit resolution (16,000 x 16,000 values) on 3 axes: rudder, left differential brake, and right differential brake (65,536 values on each axis, 0.005 degrees of precision). What’s more, the magnets ensure ultra-precise, frictionless action that won’t change over time. Thrustmaster Advanced pRogramming Graphical EdiTor software: combine the TPR with other Thrustmaster devices so that they’re recognized as a single USB device, and load or create specific profiles for each game. Please visit to discover T.A.R.G.E.T. profiles for the TPR, and load them in your favorite flight simulation games!”
“The positions of the TPR’s springs can be adjusted, allowing users to adjust the resistance according to their preferences (two springs are included). The pedals can also be adjusted into five positions, at angles between 35 degrees and 75 degrees. The TPR can be used underneath a desk or in a flight simulation cockpit. It is compatible with all types of flight simulation games: military or civil flight, for solo flight or formation flight.”
TPR: Realistic Look and Feel
It’s not difficult for me to show you how real this TPR is. Check out the following screenshot. At the screenshot you see two examples of commercial aircraft, the Airbus A330 and the Boeing 757.

You might think “my favorite aircraft isn’t included?” which could be right, but I don’t have from all major aircraft AMMs (Aircraft Maintenance Manuals) to show you how the real rudder pedal construction looks like. Anyway, this screenshot show you with in the middle the Thrustmaster TPR and although you see that the TPR is constructed upside down versus these commercial jets, the basic idea is the same. Both are/have a pendular system. We’ll see later when I highlight the T.Flight Rudder Pedals that this design is different and more similar with other vendors. So that was the “look” part, but to “feel” the unit, I need to un-wrap the box and feel and touch it.
Unwrapping
I can tell you, the box is heavy although the Thrustmaster dedicated webpage says it’s only 2473 gram or roughly 2.5 kilograms or 5.5 Lbs. This is not correct. The overall weight of the TPR is roughly 7.3 kilograms or 16 Lbs. As stated on their website, it’s 100 percent made of metal, most likely Aluminum and perhaps parts of steel too, but my goodness, it’s huge, it looks so professional. No, it is to me a professional pendular rudder device. Period!
Because it’s so expensive and delicate, it is very well packed. The carton box it made of a solid construction and the TPR itself is held in place by solid high compressed styrofoam. The device is ready to go out of the box except that you need to install the pedals yourself. Since the TPR has several “to fit for you holes”, it comes with two different sizes of Allen keys and two basic wedge keys that can be used to loosen/tighten bolts and/or nuts. What else can be found in the box? A 2 meter heavy duty USB Type-A (to be connected to your USB hub or computer) to USB Type -B (to be connected in the TPR).
Worth highlighting that the TPR is officially only compatible with a PC thus with Windows. Thrustmaster doesn’t support macOS or Linux. I can’t talk about Linux, but with macOS in combination with X-Plane, I assure you that the tested and reviewed Thrustmaster flight equipment is compatible with macOS. This is mainly because Laminar Research takes responsibility for the “joy” files with belonging photos.


Connecting the pedals and fixing them is easy, but first you need to remove the T-wraps that holds each pedal linkage for transport. Don’t worry, you won’t miss this step!
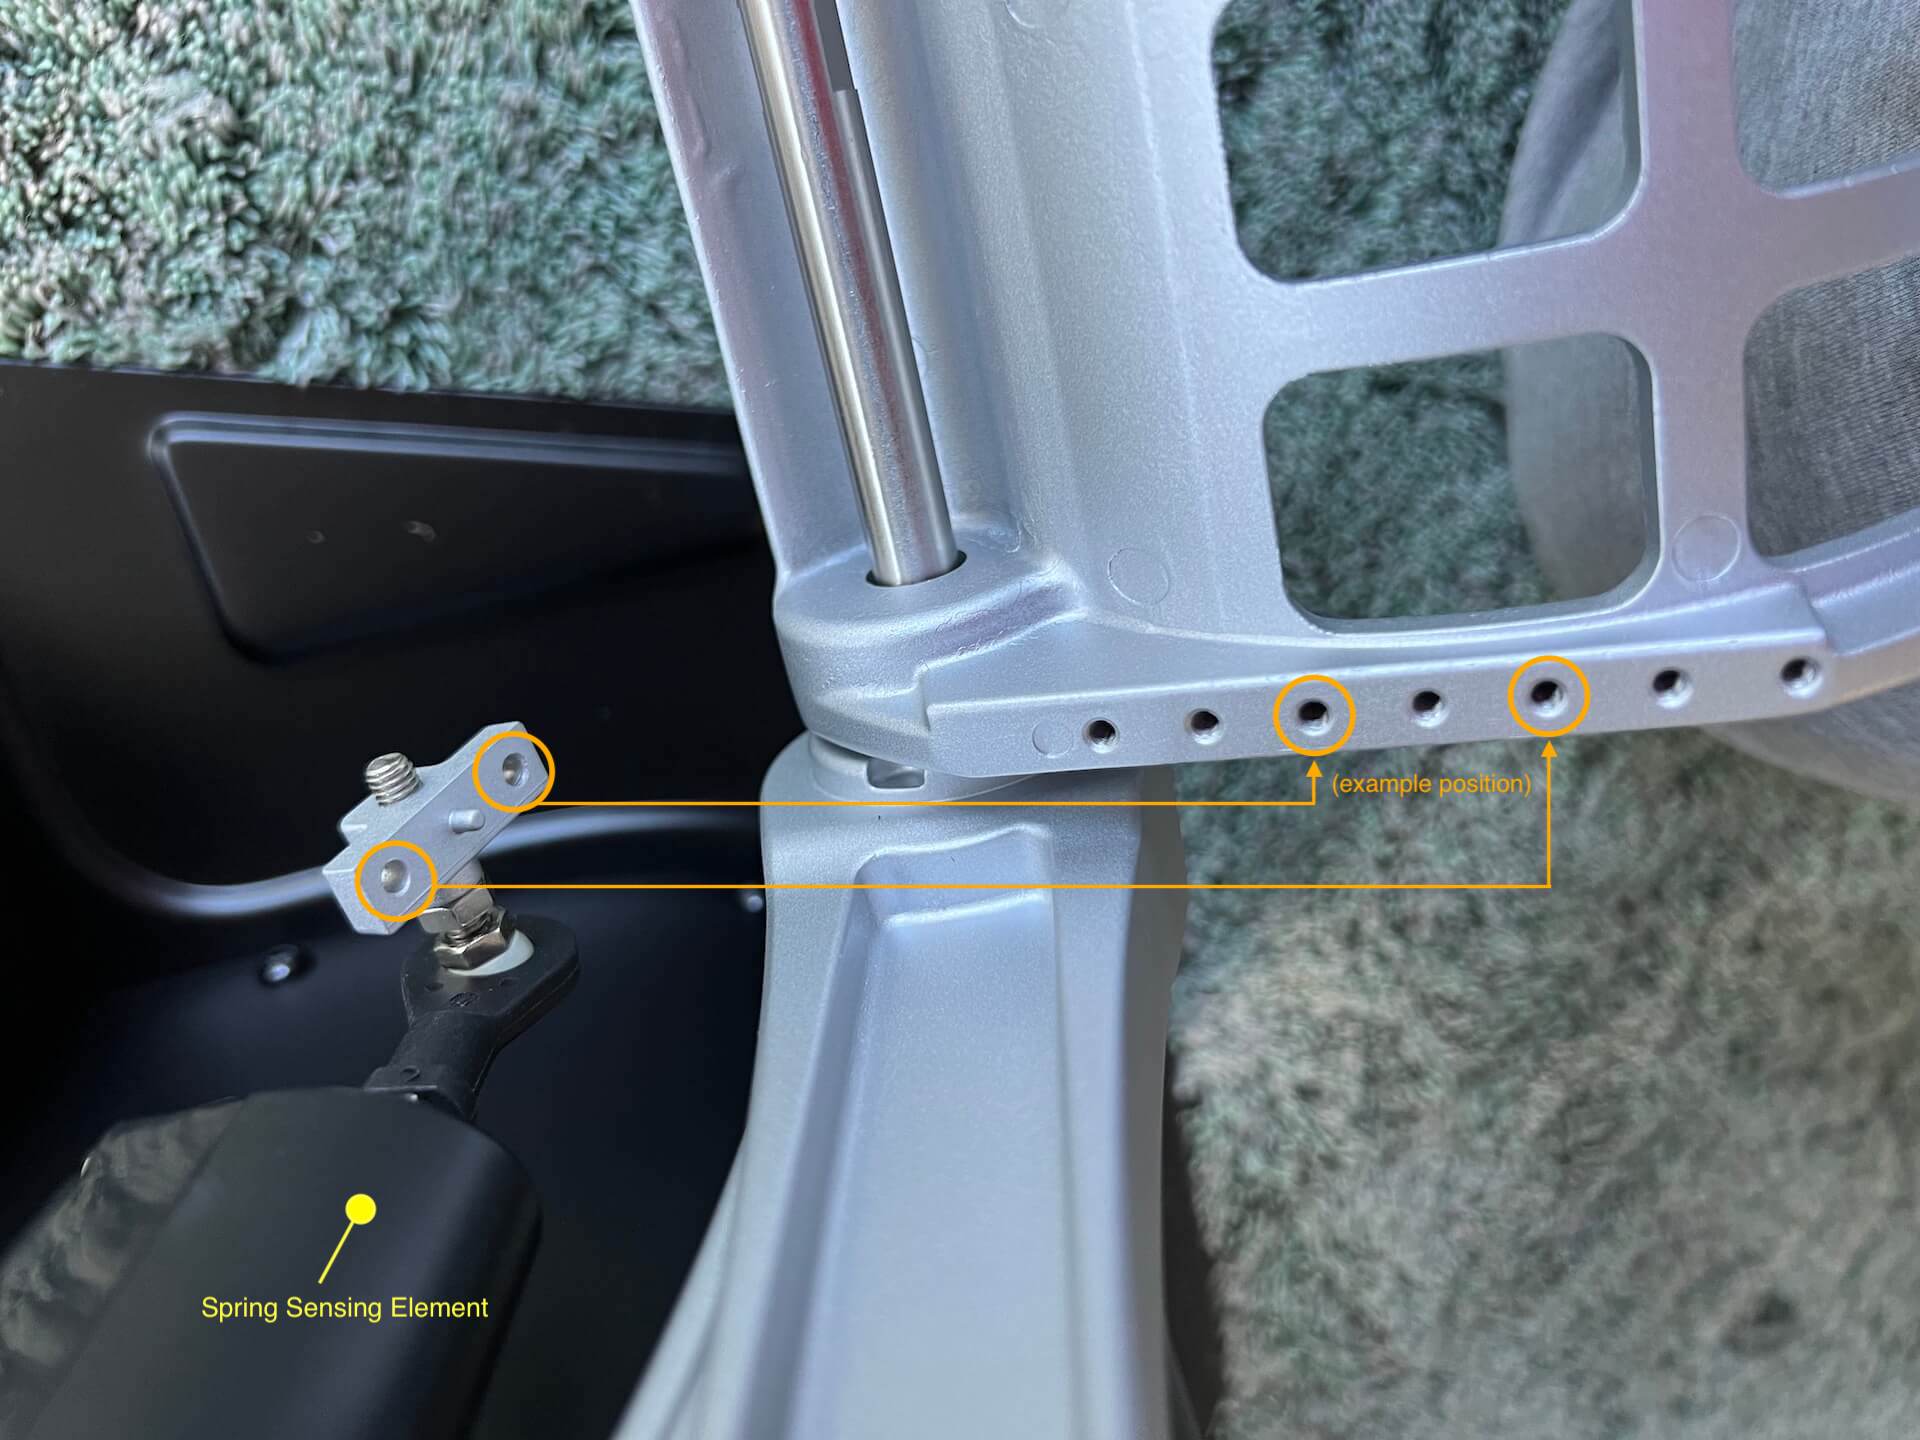
Keep in mind that some parts are made of Aluminum, others from steel. In most if not all cases all bolts are made of steel which are tightened in Aluminum, if applicable. Not a problem however, but don’t over tighten them. Tighten it gentle which is enough else you could get problems with the Aluminum thread in the housing. Ok, lets move on. Each pedal comes with a build in steel shaft, a washer and non self locking nut. To connect the pedal on the back to the sensing element and spring unit, you find two tiny screws on the back of the pedal. I mounted the bracket at first in the middle as can be seen on the photos. If needed, I can always change that later whenever needed.

And finally, it comes with a multi language manual. Normally I would say that it’s better to download the manual from the vendors website, but in this case I think it’s OK to use the paperback. The first language is English and starts with placing the pedals in position as well as how to make some adjustments like the tension of the rudder axis and the inclination of the pedals.
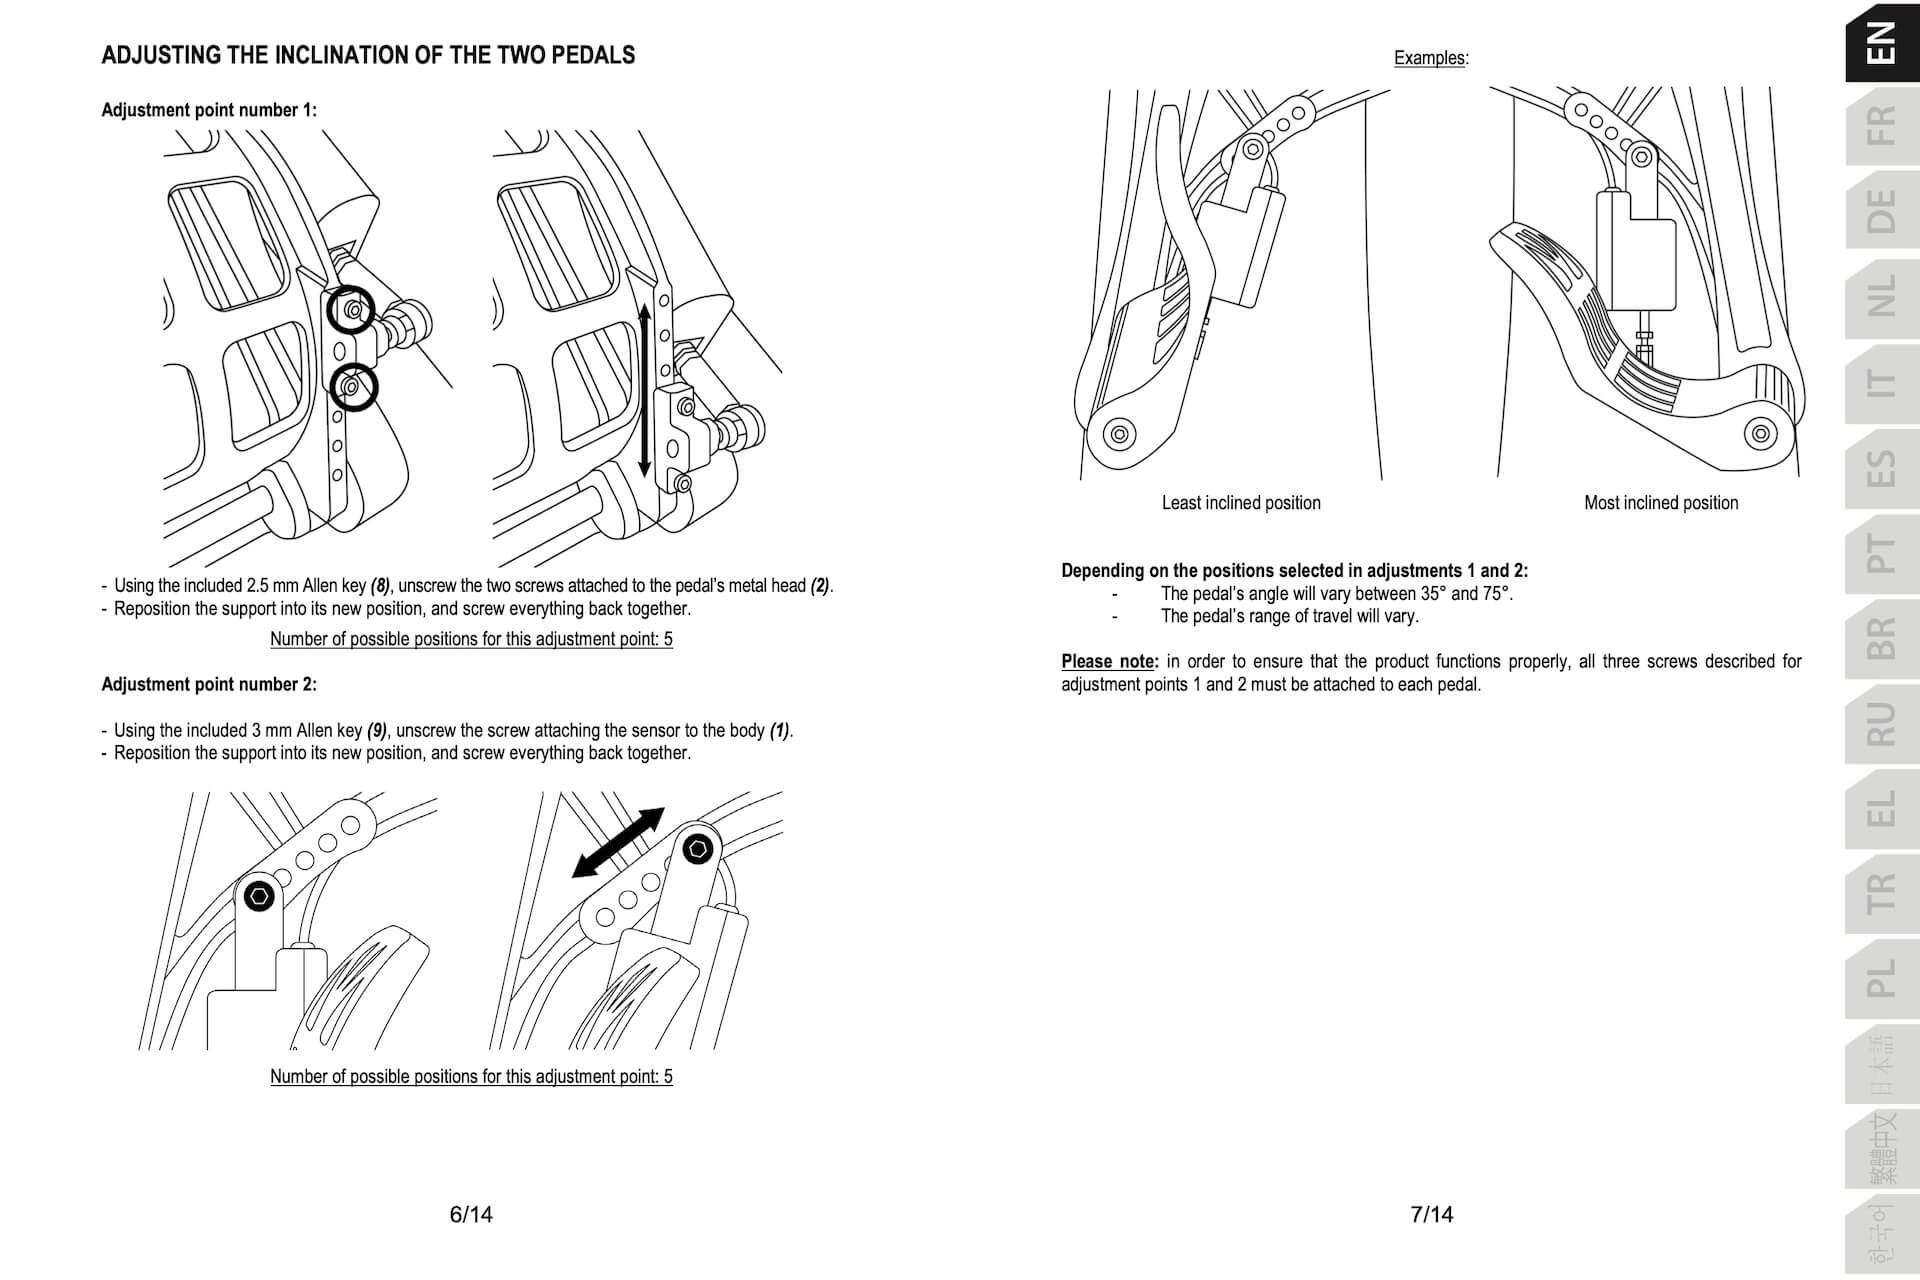
There’s no golden rule how or where you need to fix the pedals for the inclination. At first, mount it as you can see on the photos how I did it and once in position, you try and see if you need to adjust the inclination and/or spring tension. You could ask yourself why the pedals aren’t mounted to the base unit, but that would make the box even bigger. Because you have to do it yourself – very easy and well explained with drawings – you can immediately adjust the pedals to your need.
Inspecting the TPR
When I place the TPR on my desk, in front of my iMac I’m impressed how big it is. It’s almost the height of my iMac and it’s heavy – said that already before – and massive. I have to admit that it doesn’t look as impressive on the photo as it is in real. Sorry, I’m not able to offer you a AR look and feel of the TPR.

Boom, it’s there! Also because it’s heavy, it stays without slipping over the ground when using it and if you don’t want to screw it to the floor, the base has several anti slip points. Looking to the pedals and then in particular their size, I’m wondering if they aren’t too short. When you put your heel in the recess, then I had personally hoped that the pedal was a bit higher or if you wish longer. On the other hand, when you rest your foot on the bottom, then it’s long enough. After double checking my AMM (Aircraft Maintenance Manual) I came to the conclusion that the current size of the pedals are almost the real dimensions so what you see on the TPR is as real as it gets.
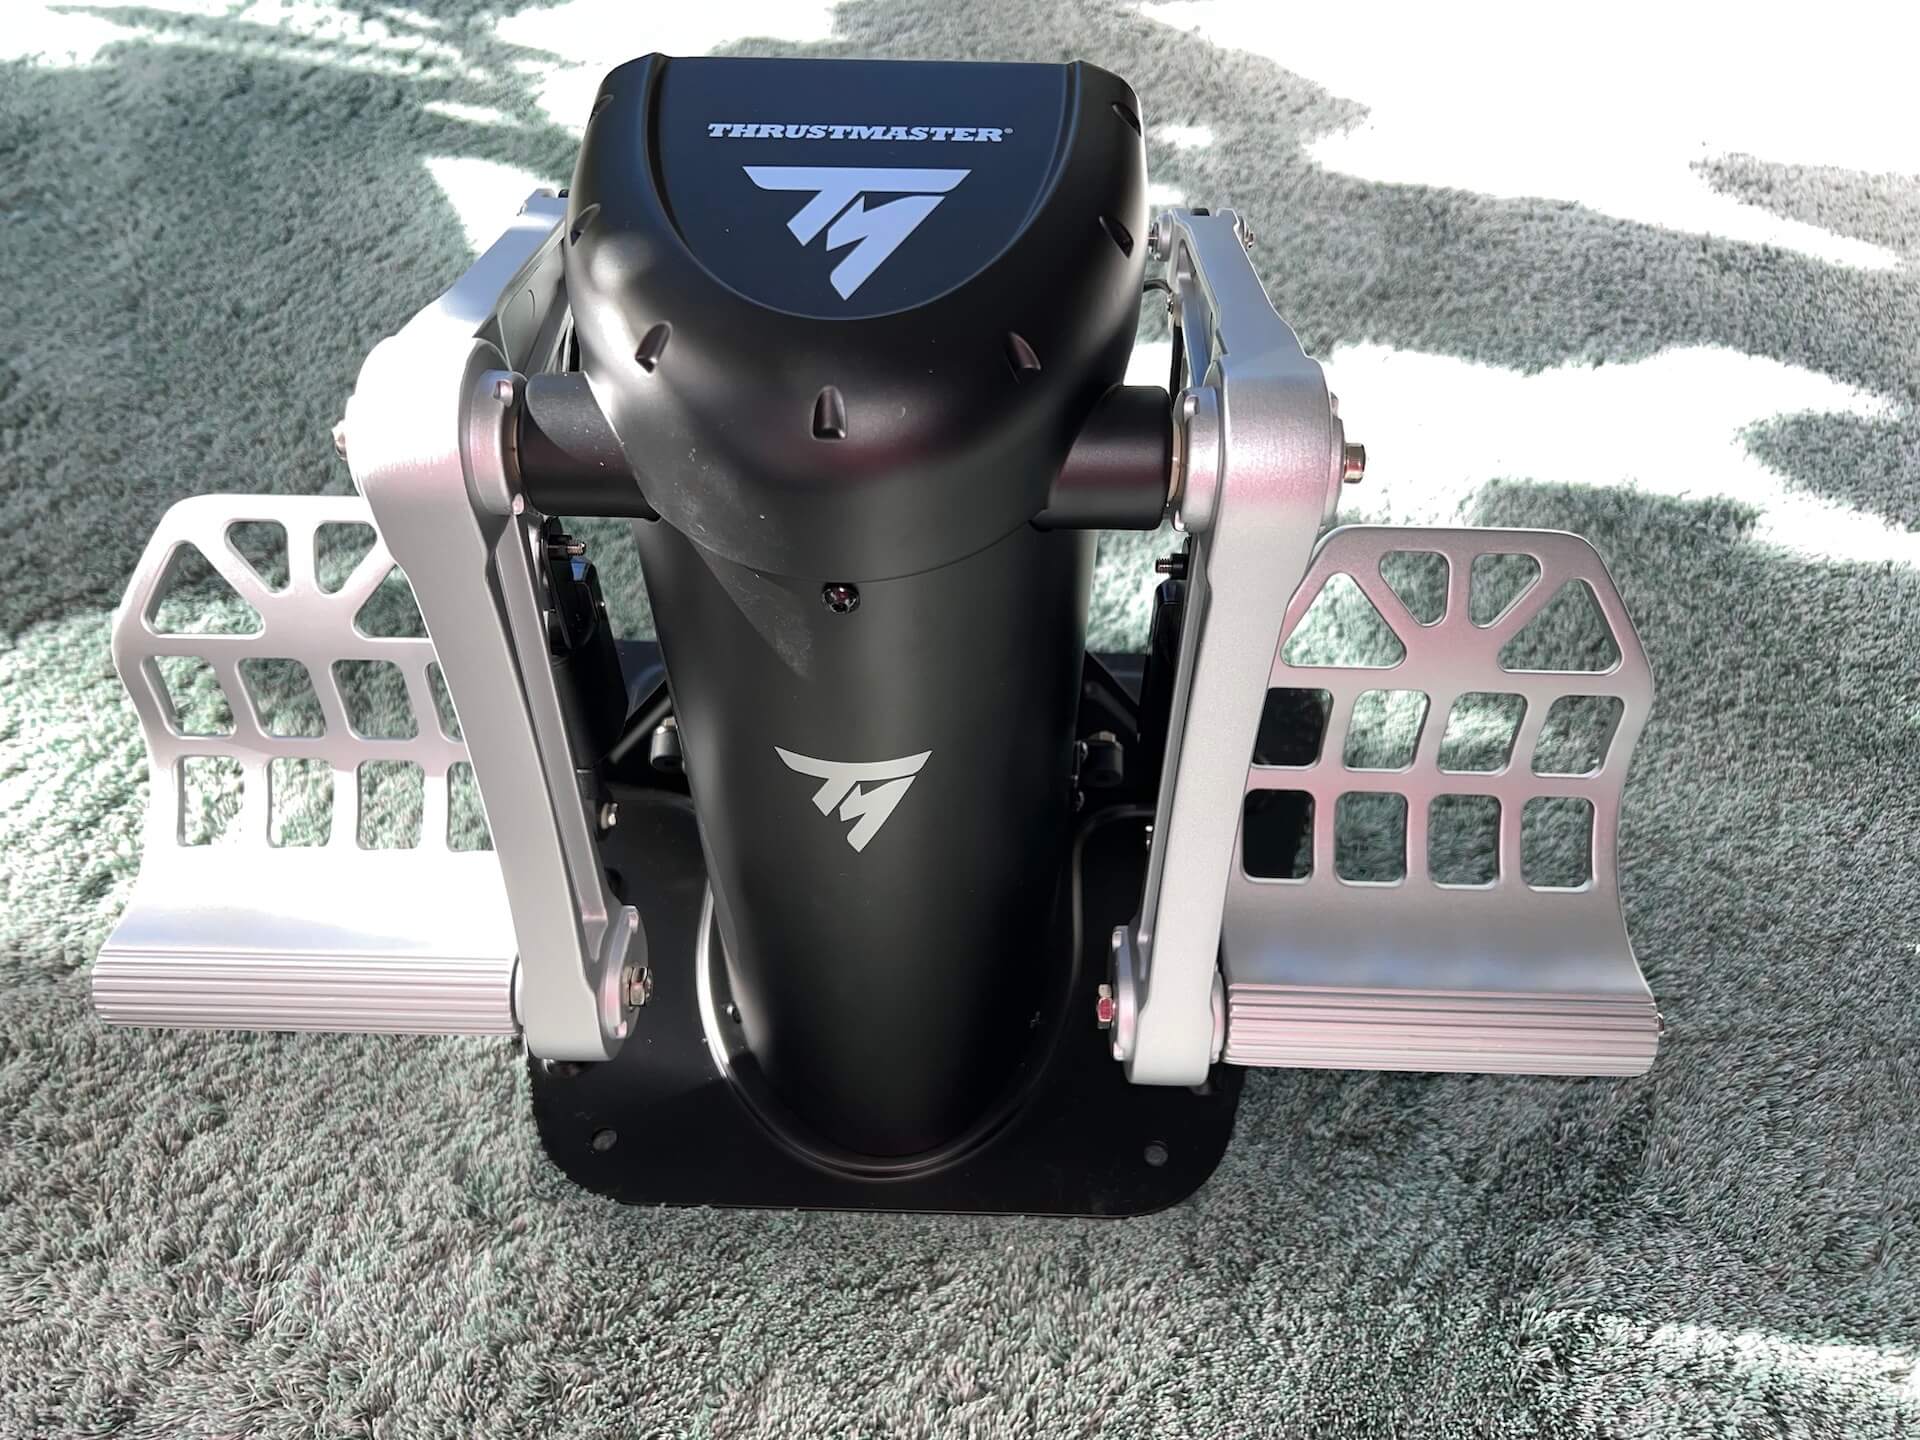

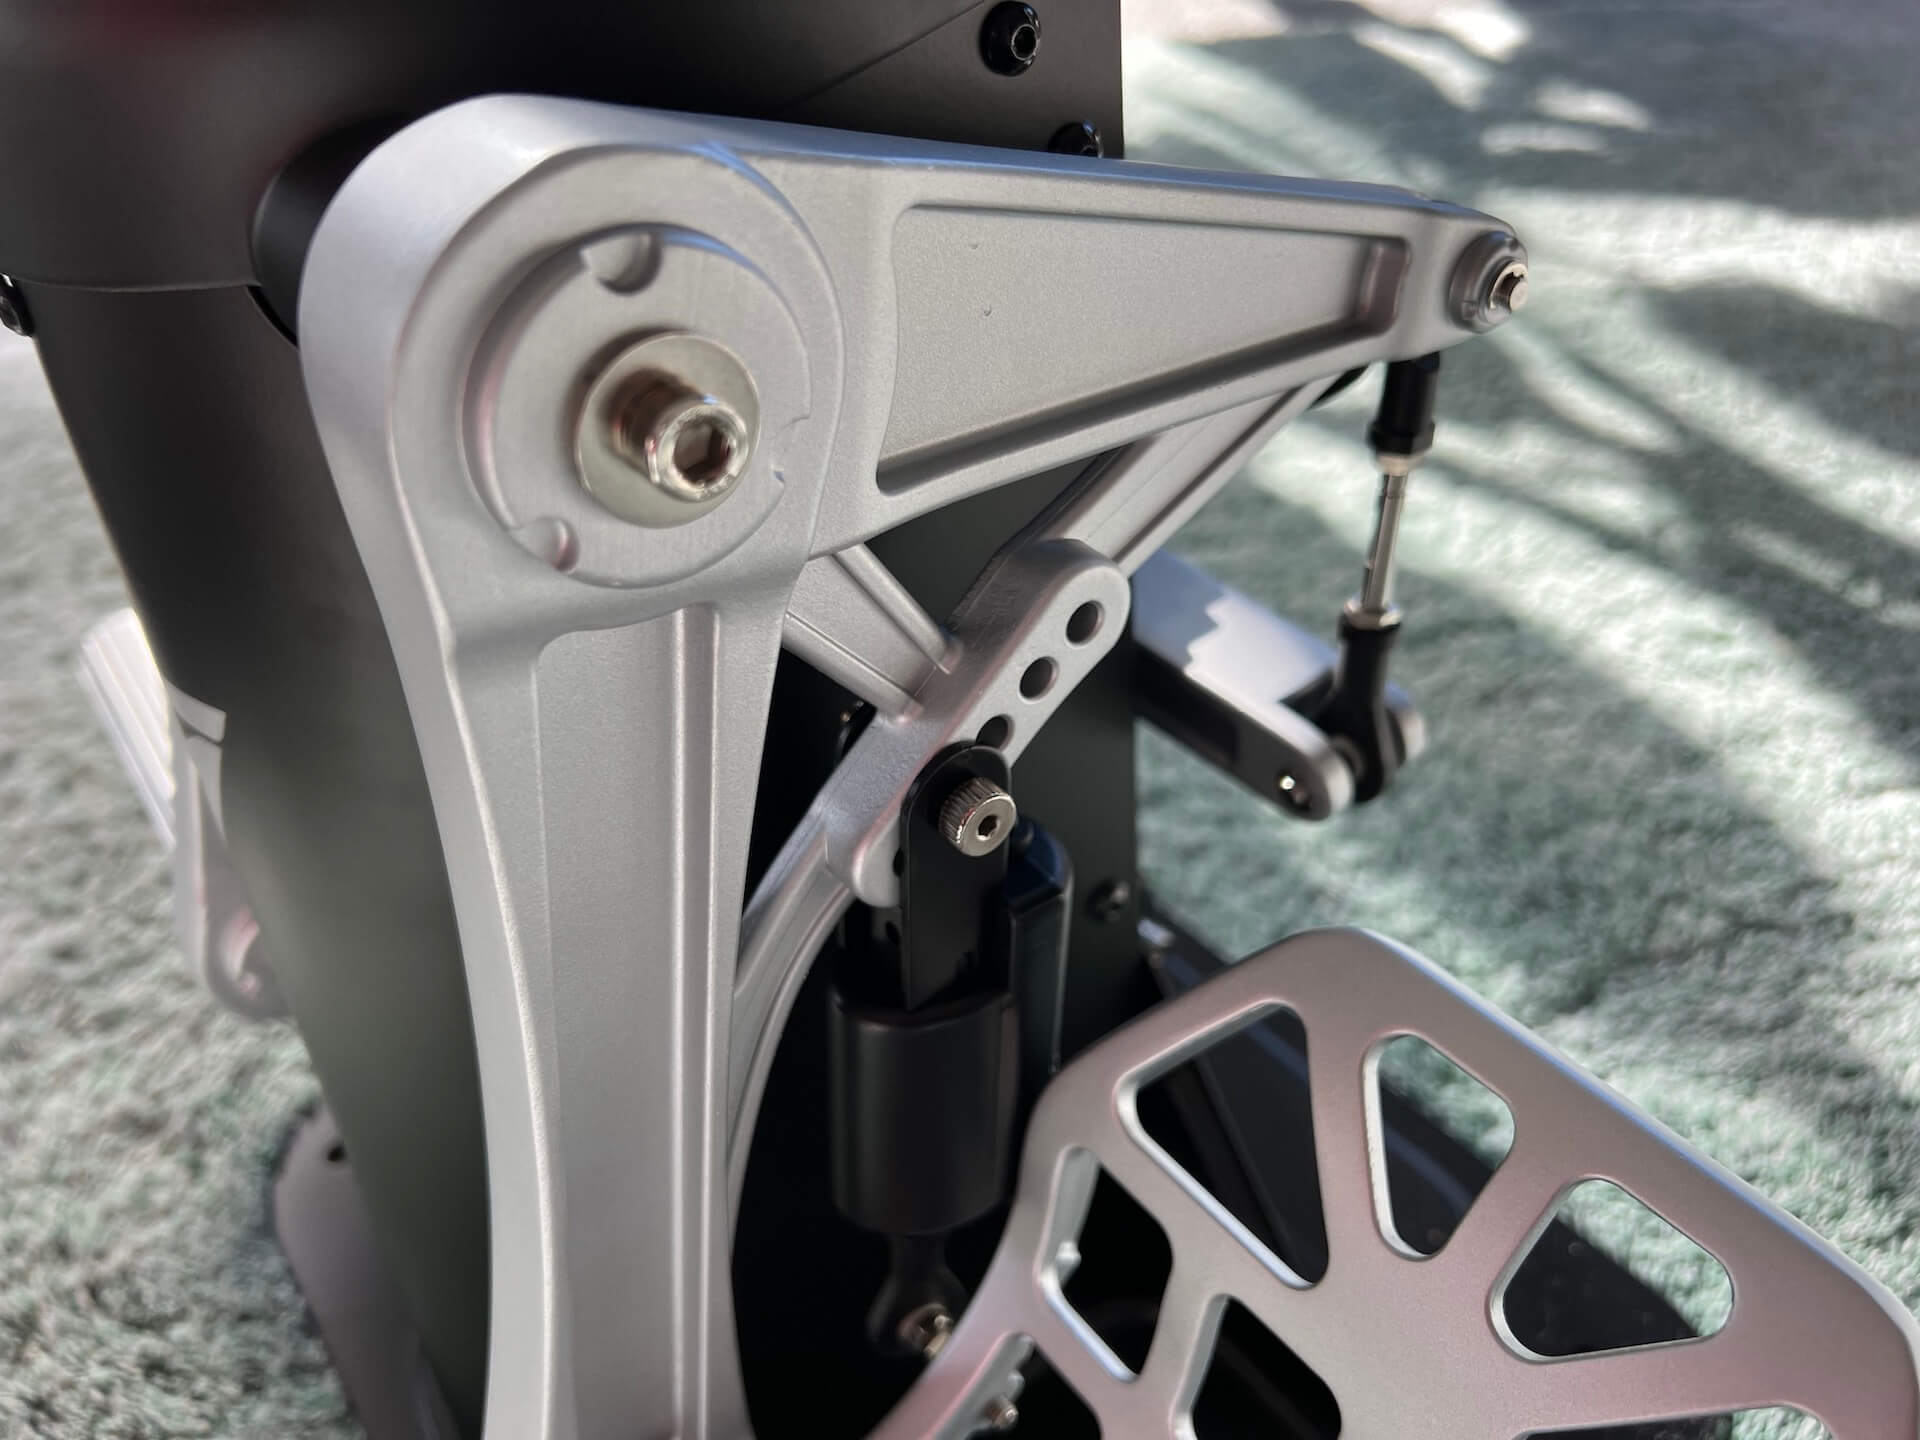
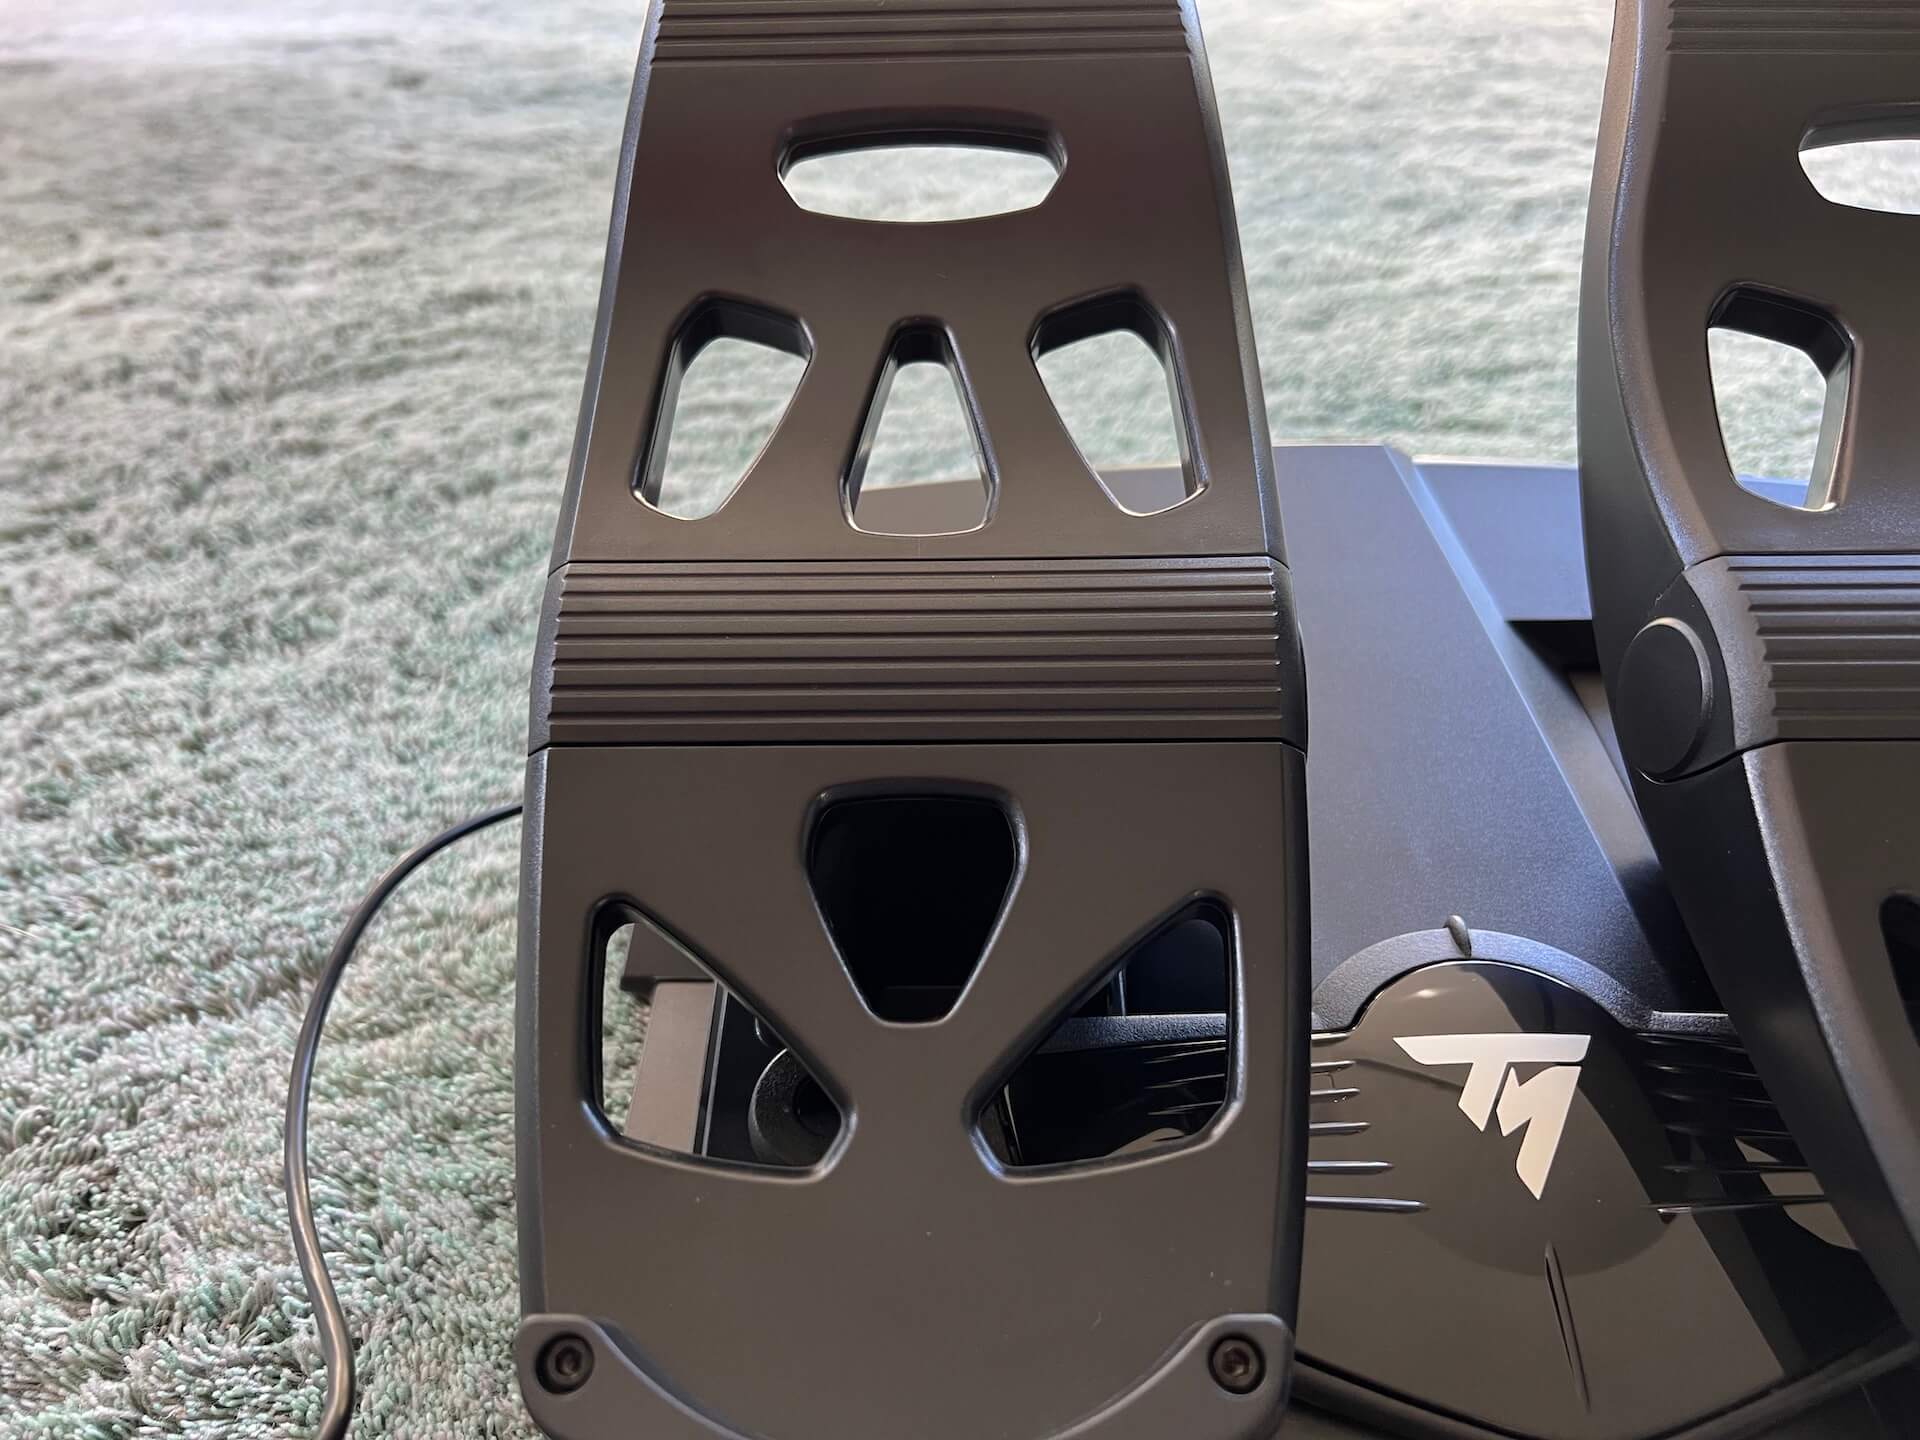
I take the time to inspect every part, and thus exploring every tiny detail. As you can see, the arms (linkages) and pedals are silver painted while the base, medium size control column, dampers and rear linkages are all black. The huge pedal linkages are for sure casted Aluminum, but very well and smooth sanded and finalized with a silver paint. Looking to the sensing spring unit that is between the pedal and the silver pedal linkage; it’s really a pleasure to see how it’s made and how much effort is put in the development to make something unique like this. Honestly, I’ve never seen such a beautiful piece of pedal hardware.

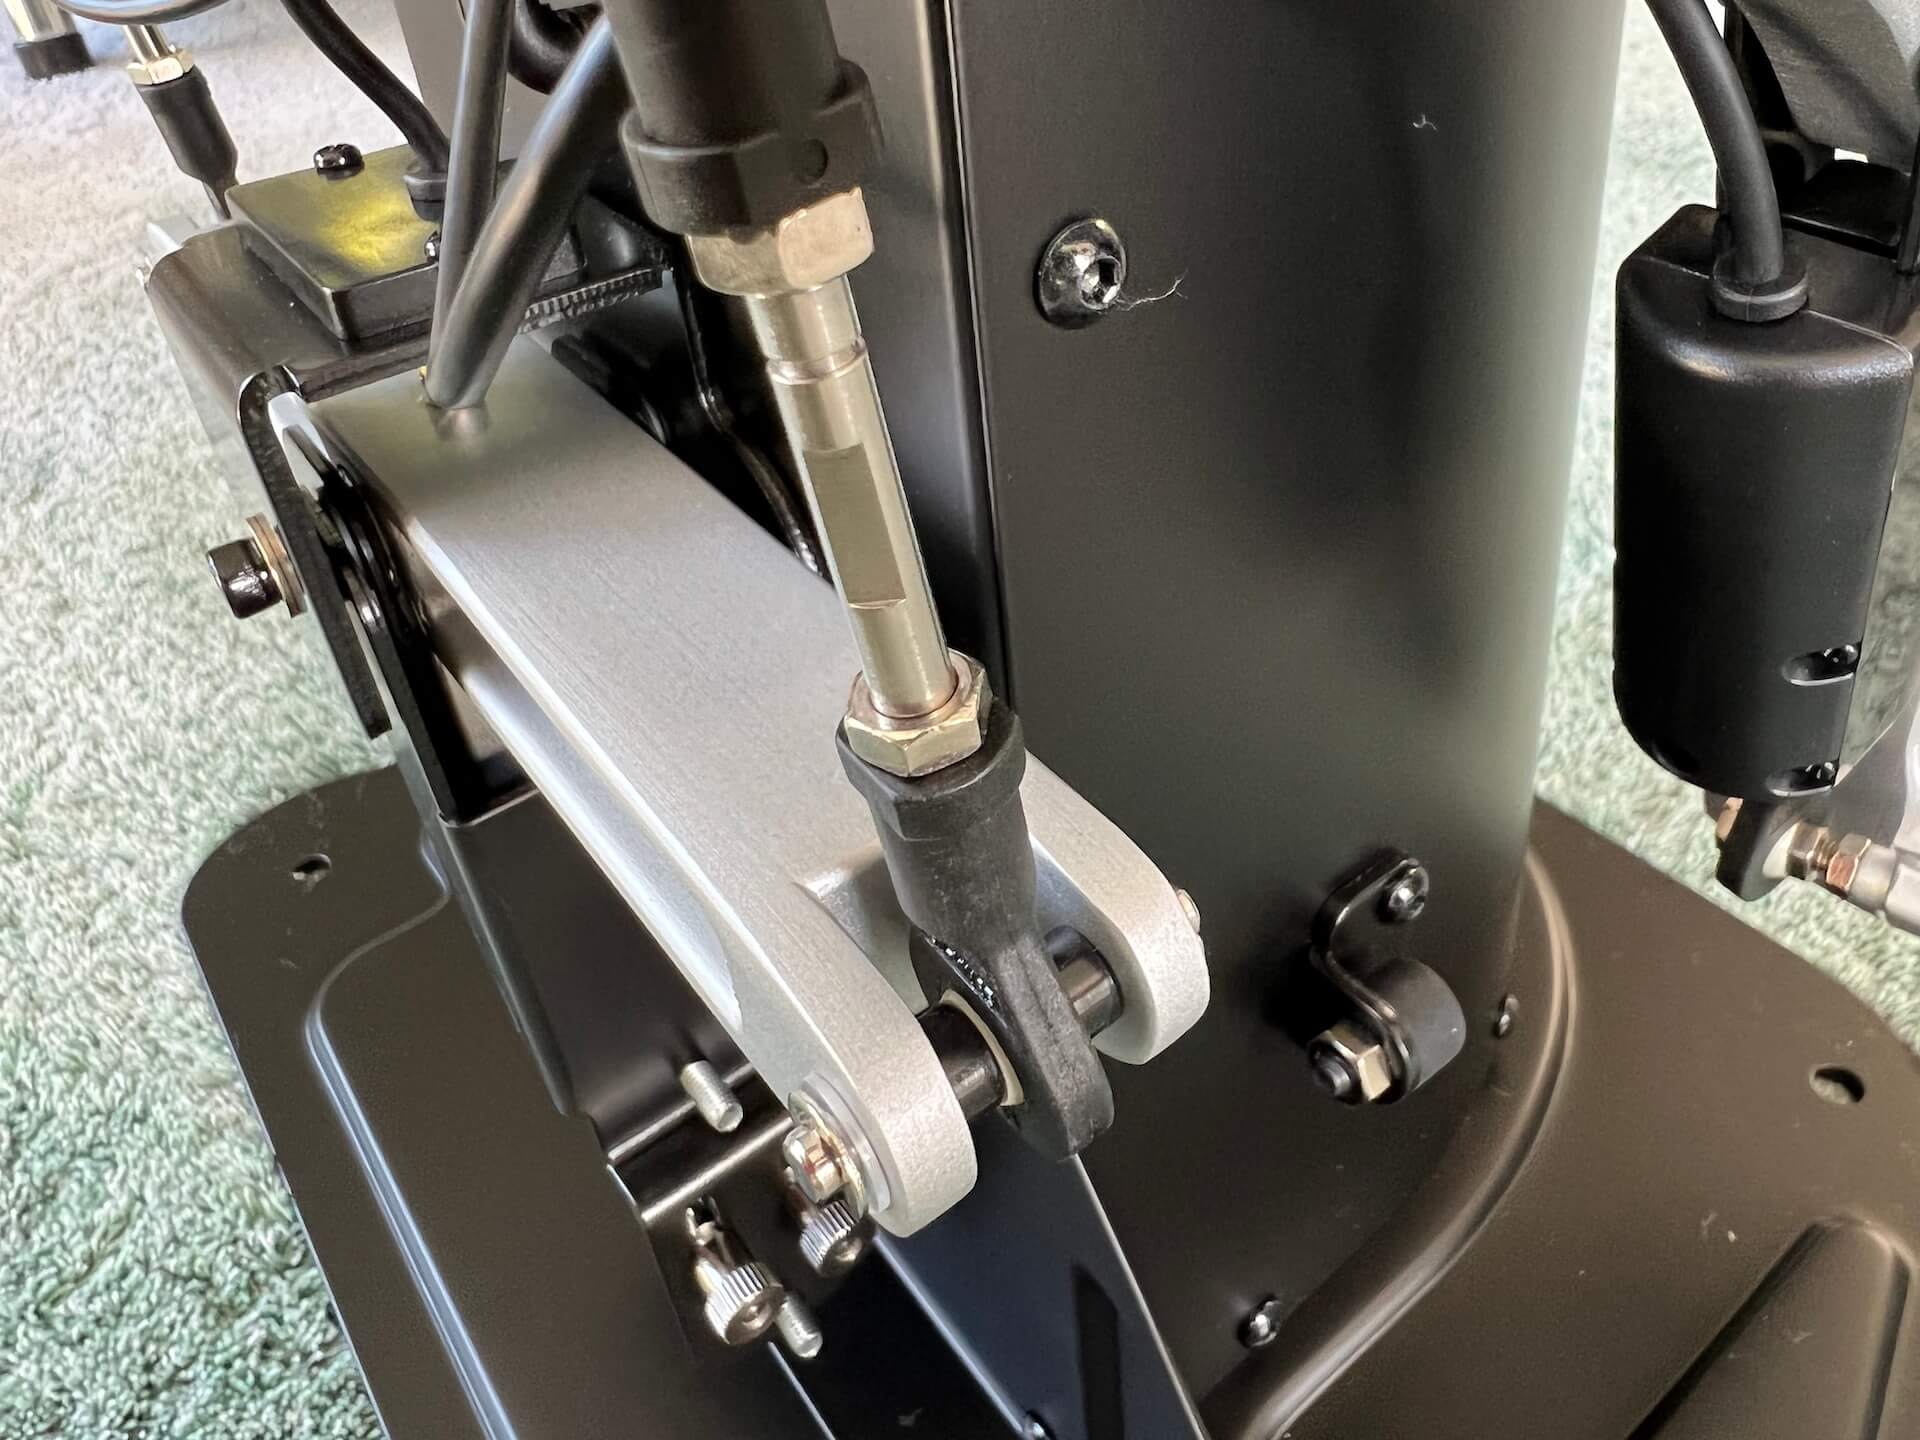
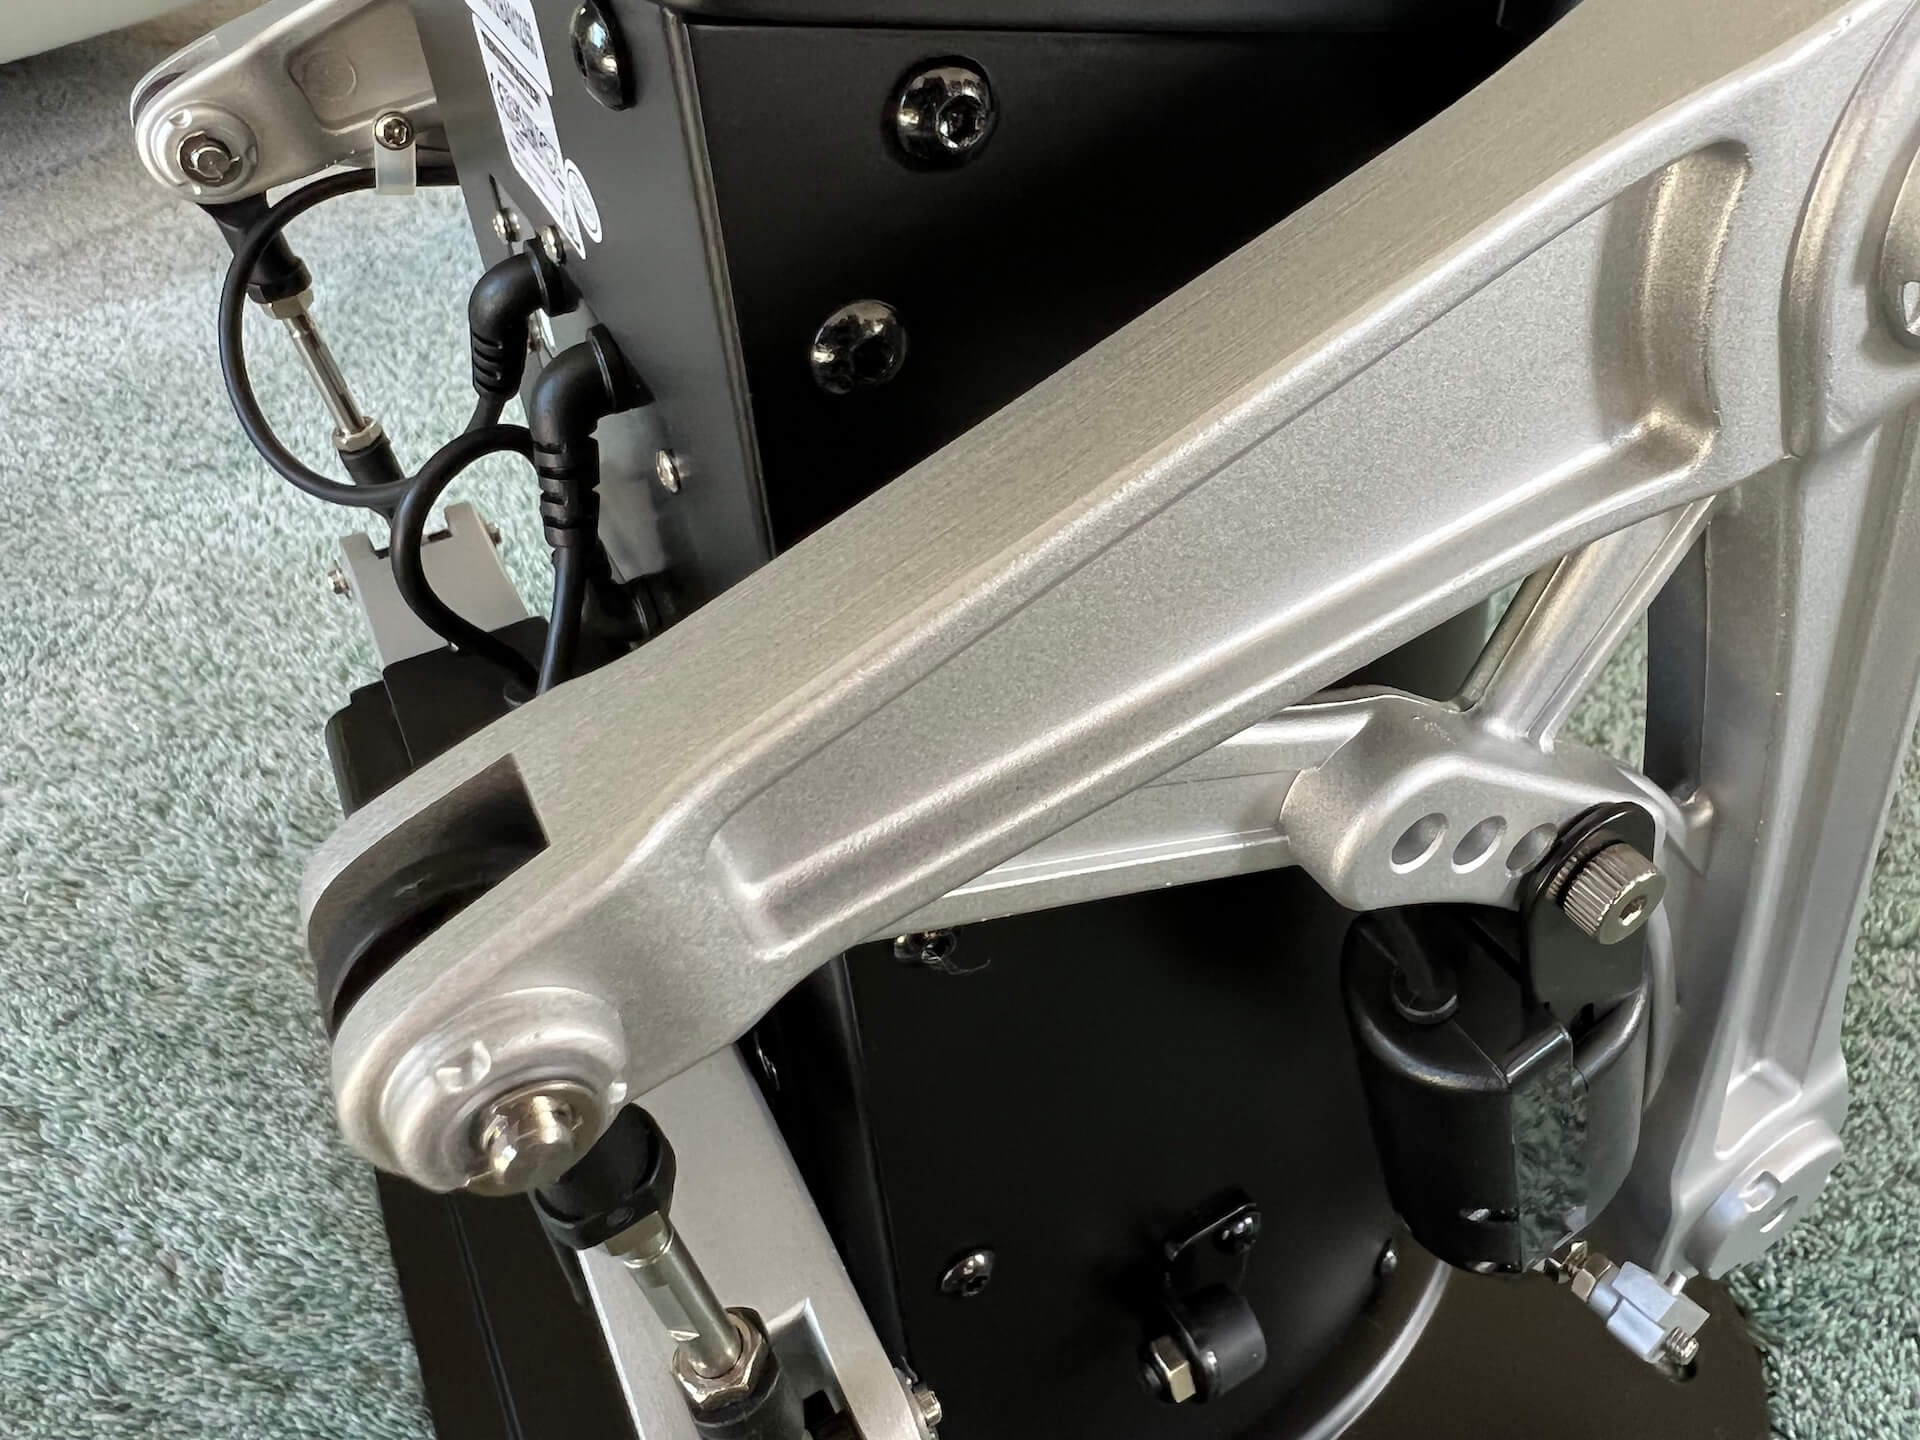
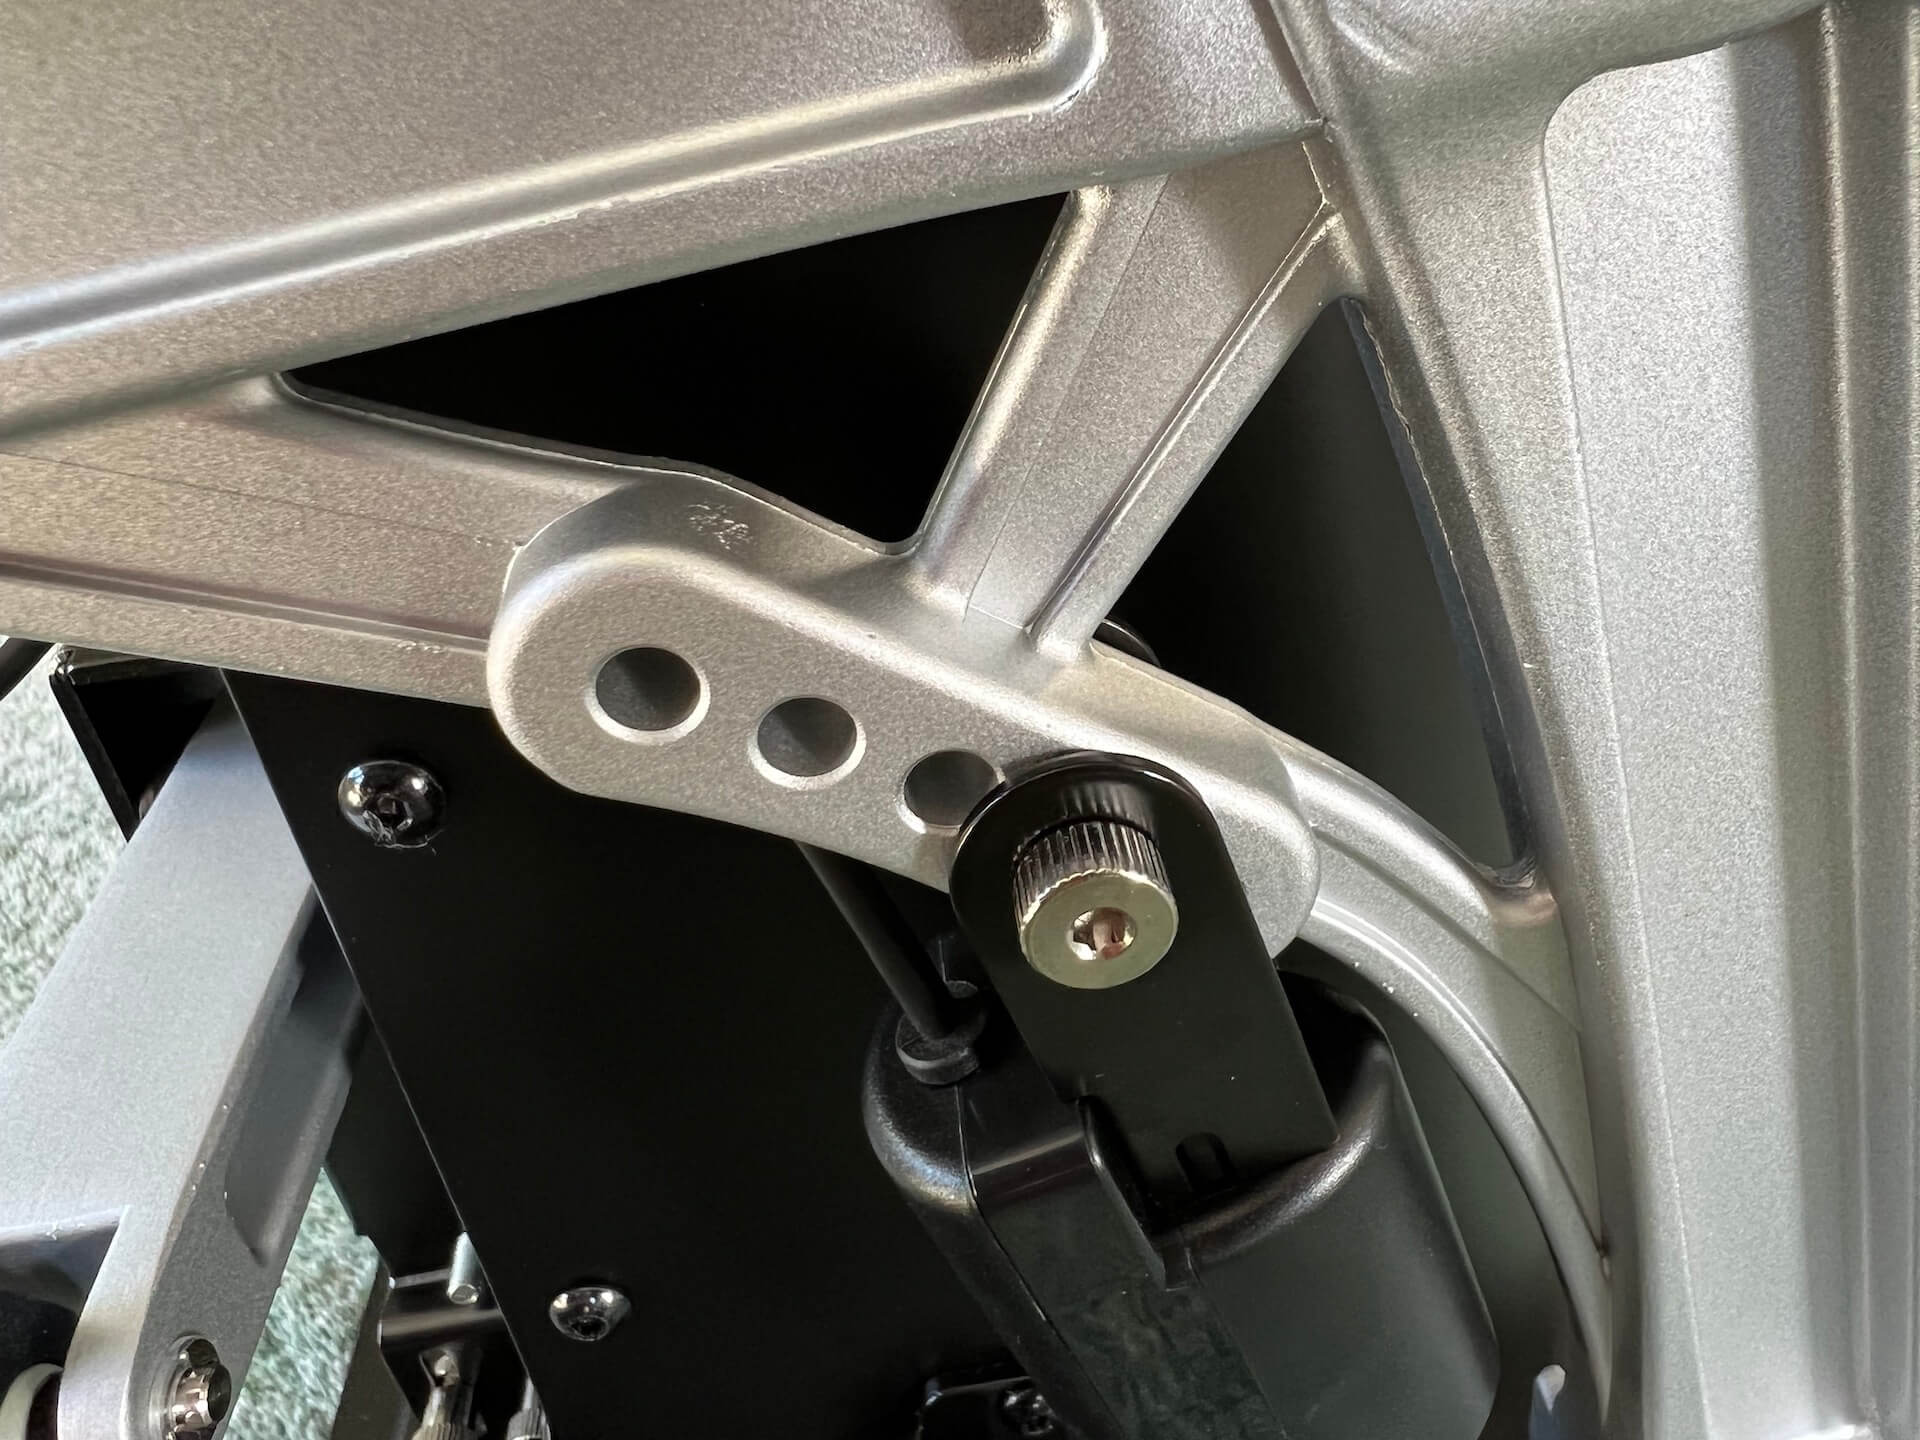
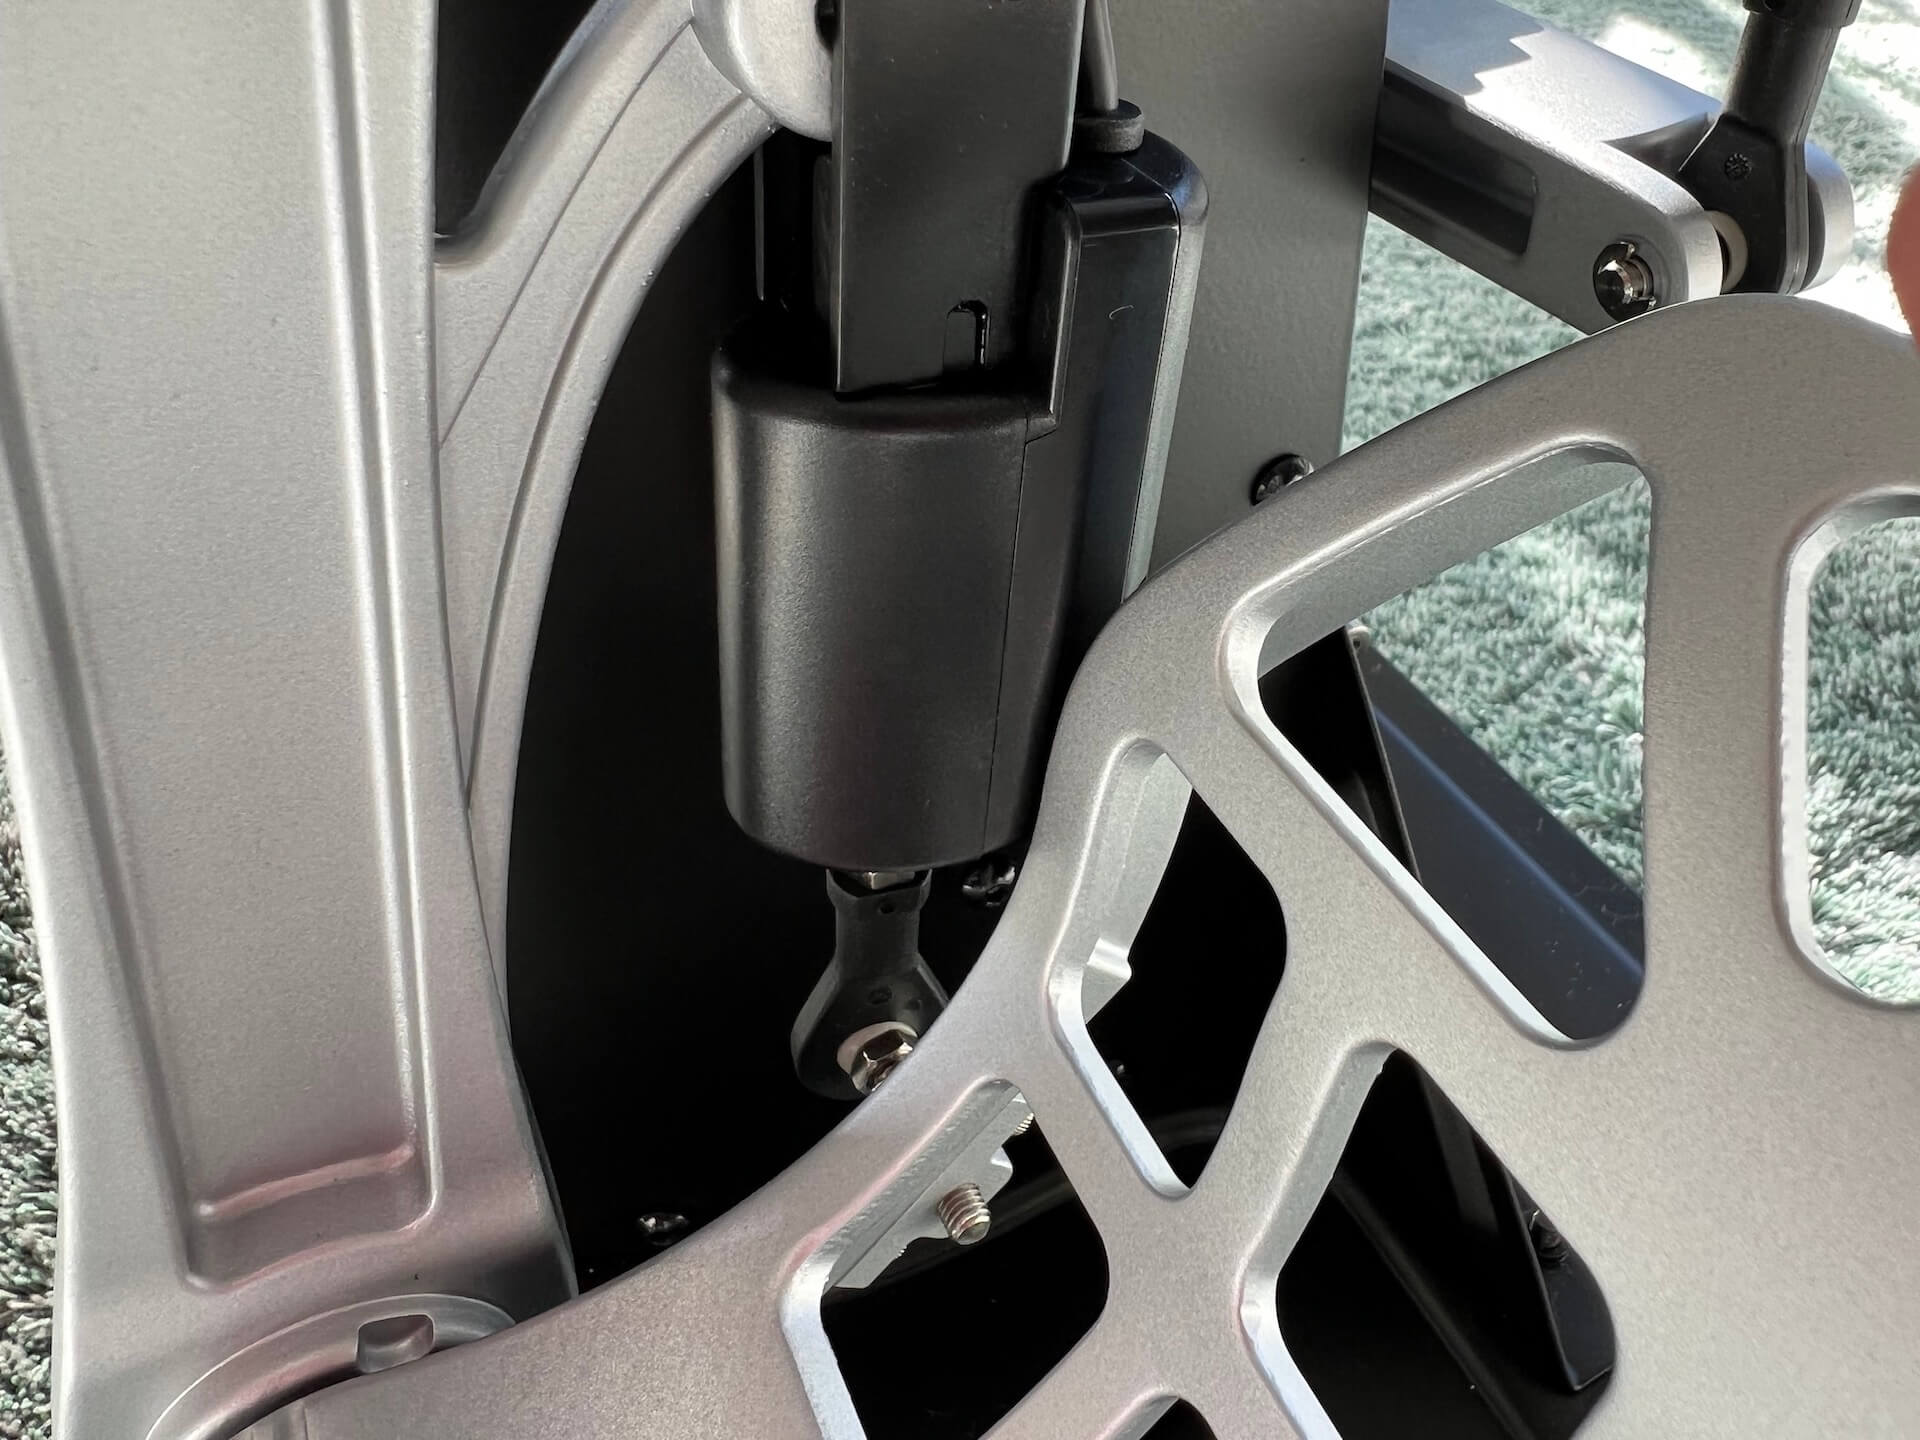
The other part related to the pedals is the rudder or yaw input. Via the top on the pedal linkage and a control rod or turnbuckles at the back, the yaw input is transmitted to a bar with springs – which are adjustable – and sensing element. At the back of the base you find all the electrical inputs and the only one connector, an USB Type-B. Especially seen in the close-up photos is the quality of the paint work. Near the bottom of the rear side control column where you find the linkages for the yaw channel, you find two spring and all other components that hold these springs in position. When you see the springs and when you extend them, it explains why it is all made of metal. These two springs are also used for the yaw centering while the spring inside the previous mentioned sensing spring units are to return the pedals to there neutral position.


On each side of the base there’s a stop that is protected on one side with rubber, so what the heck is that? It’s one of those tiny details I didn’t expect, but the designers didn’t forget this. Ok, what is it then? When you use the pedals for yaw thus for a rudder input, you reach this end-of-travel stop. To prevent damaging the components, the stop is covered with rubber. On the other side you have the adjustment. Loosed the nut, screw in the bolt which is by the way on the other side also covered with rubber, and adjust the bolt length for the right total travel. Out-of-the-box these stops are turned in. Anyway, awesome detail!
Before I move on to the software and how to use it with X-Plane, let me first highlight the other Thrustmaster rudder hardware, the Thrustmaster Flight Rudder Pedal.
TFRP: T.Flight Rudder Pedals
According to Thrustmaster “Versatile ergonomic design suitable for all types of flight (aerial combat, space adventure, civil flight, etc.). First rudder ever to feature the S.M.A.R.T (Sliding Motion Advanced Rail Track) slide rails system!”
“Capitalizes on the brand’s 25 years of expertise and leadership. Is the device most highly requested by members of the flight sim community. 4 slide rails crafted of industrial-grade aluminum for perfectly smooth sliding motion.”
“Self-centering rudder axis: The perfect balance between smoothness and resistance for re-centering, for the most accurate maneuvers (1024 values on rudder). Long range of travel on rudder axis for precise maneuvers. Versatile ergonomic design suitable for all types of flight (aerial combat, space adventure, civil flight, etc.). With the heel-rest removed, you can control the rudder using the ball of your foot, with your heel on the floor. With the heel-rest in place, you can rest 100 percent of your foot on the pedal.”
First one important thing; the TFRP is not a competitor of the previous highlighted TPR or pendular rudder device. It’s more a matter what you like and how much money you can spend. Keep in mind that the TFRP cost roughly 100,00 Euro while the TPR is just over the 500,00 Euro. The big difference lies in their quality, and the used materials and for sure the production process and how many are made. More about that later in this review.
TFRP: Realistic Look and Feel
What said before, this is a totally different design, different quality and therefore a much lower price. You could ask yourself the question; is it then worth to buy the cheaper TFRP or the more expensive TPR? The TFPR has several competitors in the flight sim market although some don’t exist anymore like Saitek – ok, it has become Logitech – or new products are introduced, but believe me, the new products that come on the market are more expensive. A good example is the Honeycomb Charlie Rudder Pedals. The US market price is 350.00 USD which isn’t cheap either.
Ok, back to the TFRP. Keeping in mind the price, and the way it looks like, then without testing anything, I think it’s price versus quality a good and decent piece of hardware, but it’s better to unwrap the box and see how it looks like and how it feels.
Unwrapping the TFRP box
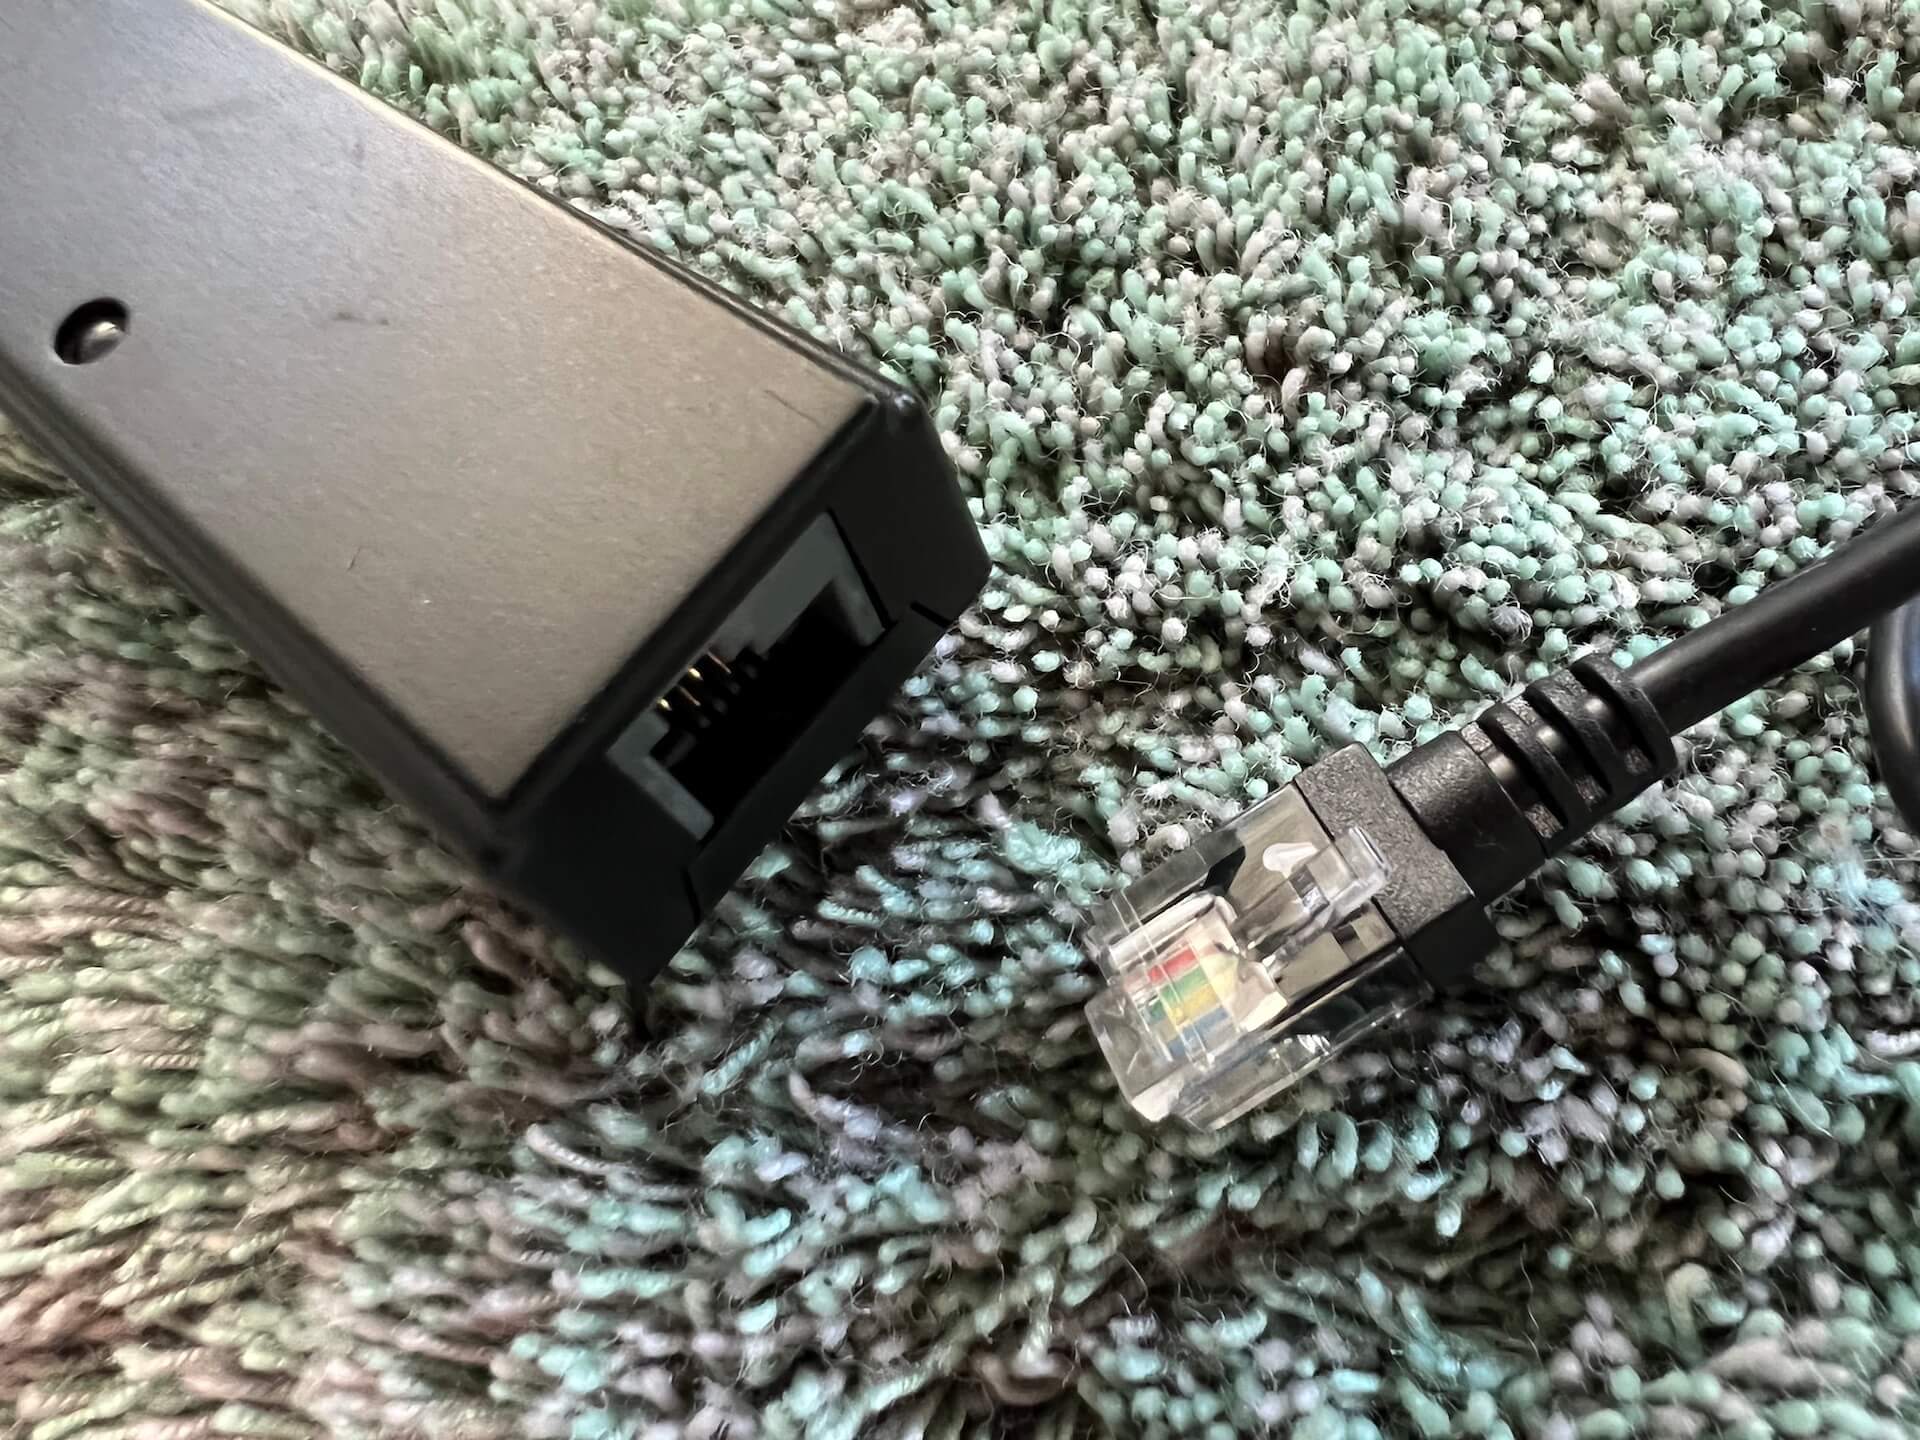
It’s without doubt a smaller box, it weights less then the TPR, but neither less, it still looks nice and comes with a Thrustmaster retail price of 99,99 Euro or 129.99 USD. The box is OK, offers enough protection, the TFRP is packed in plastic, but has no styrofoam. Since the overall size is smaller, there’s also no need to ship it with disconnected pedals. You can say that the TFRP comes out-of-the-box ready to use. Different then with the pendular pedals, this device has a fixed cable with a RJ12 connector. What is that … a RJ12 connector? The answer is easy. This piece of hardware can be used with a PC, XBox or PS4. I’m not familiar with XBox and PS4 but I guess that these consoles have a RJ12 receptacle. That said, one of the additional components included in the box is an adapter from RJ12 to USB Type-A connector.
Important: when you use the RJ12 to USB Type-A wire, please don’t forget that on the side there’s a switch that indicates either an aircraft symbol or a car symbol. That said, this pedal device can also be used for racing cars.

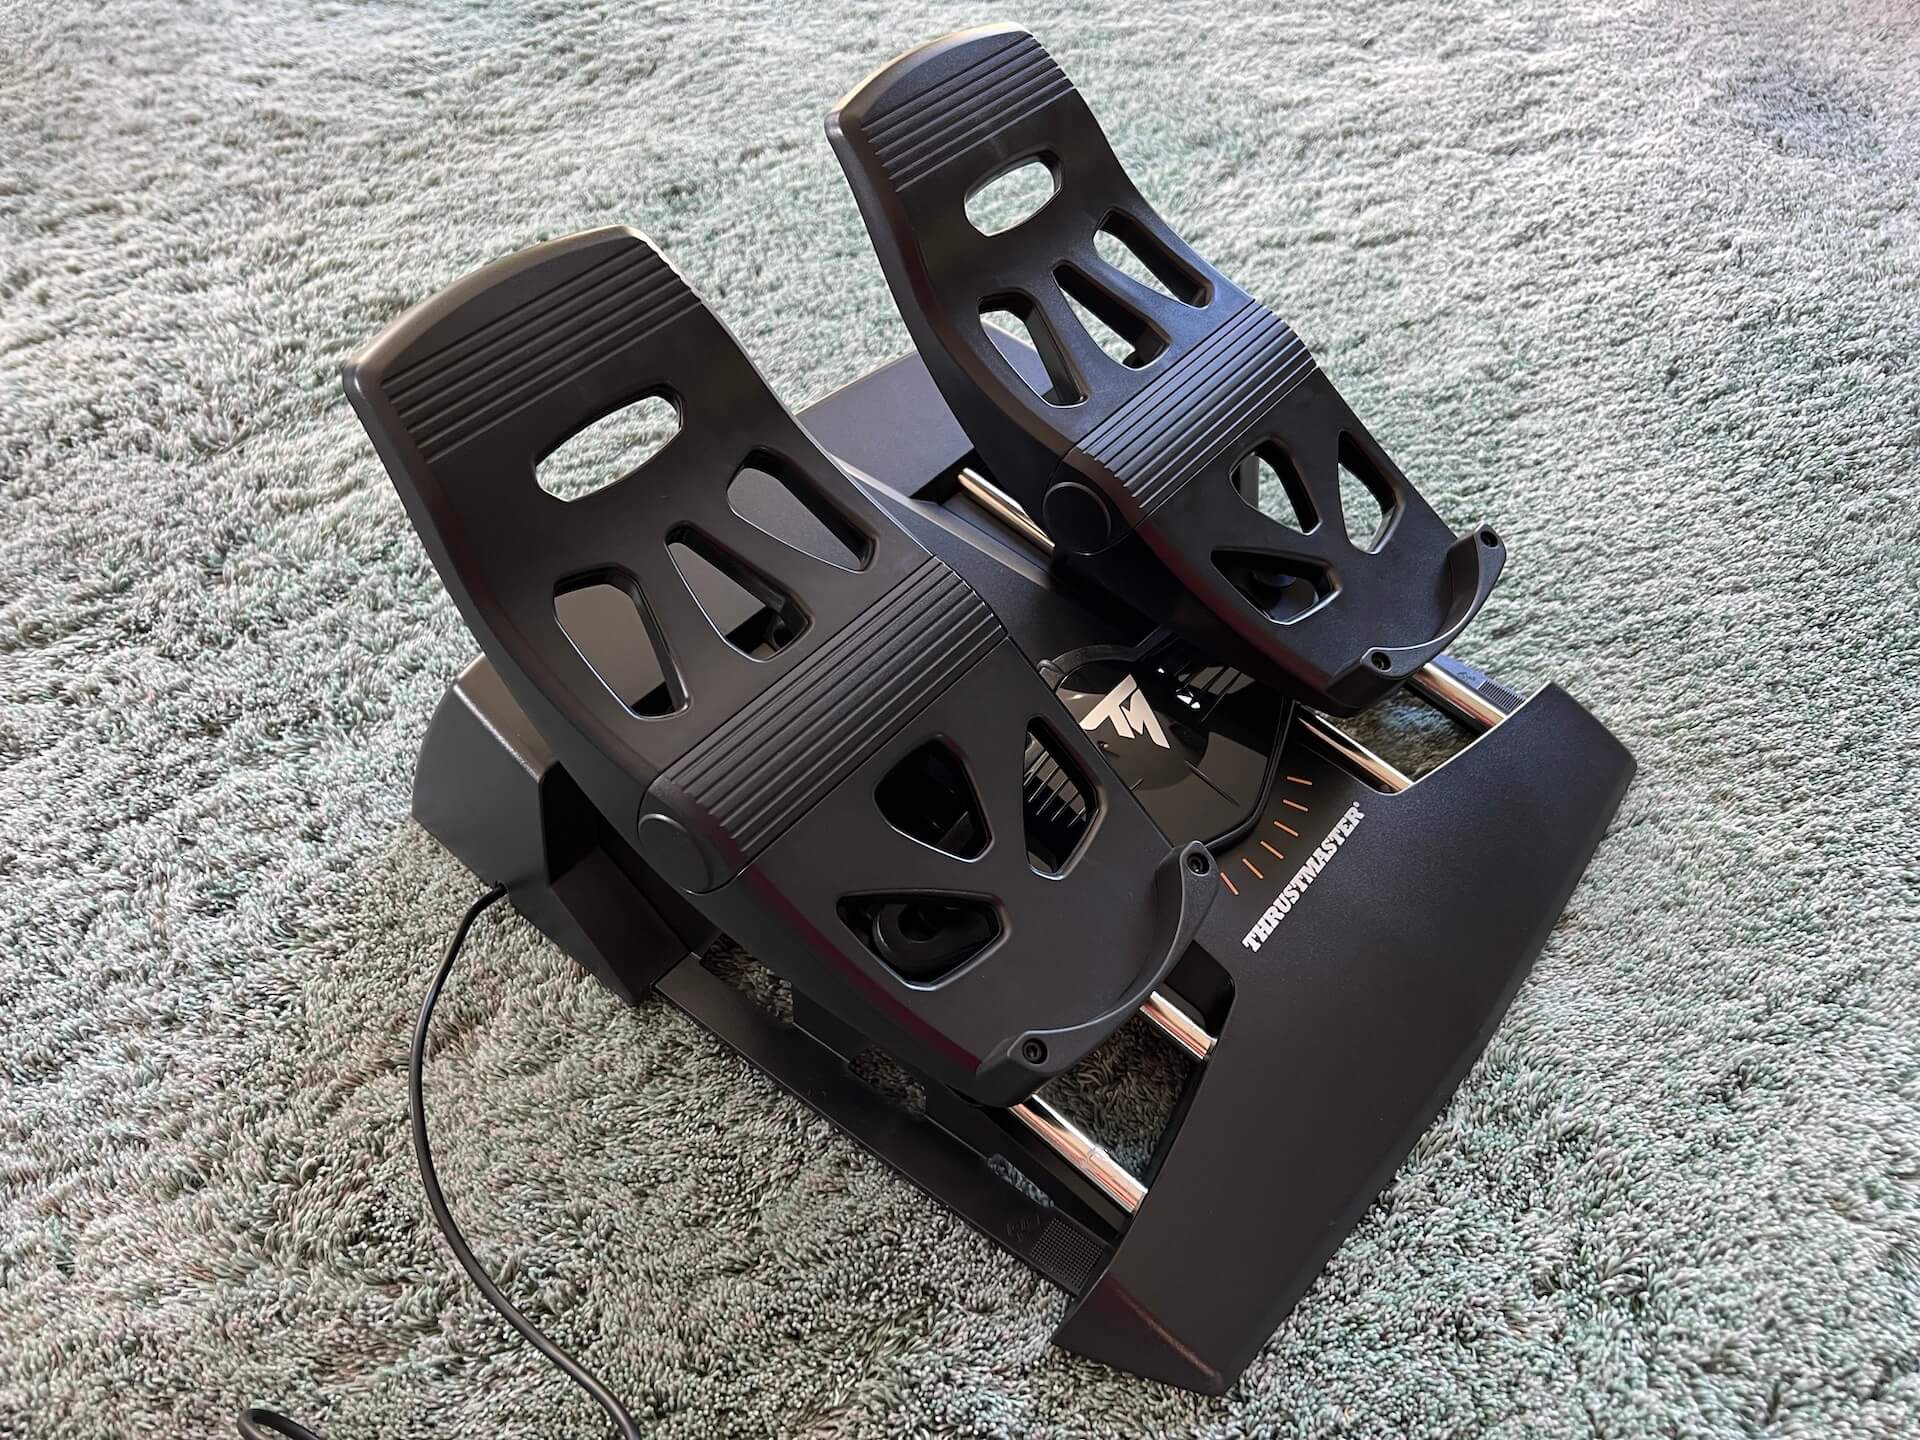
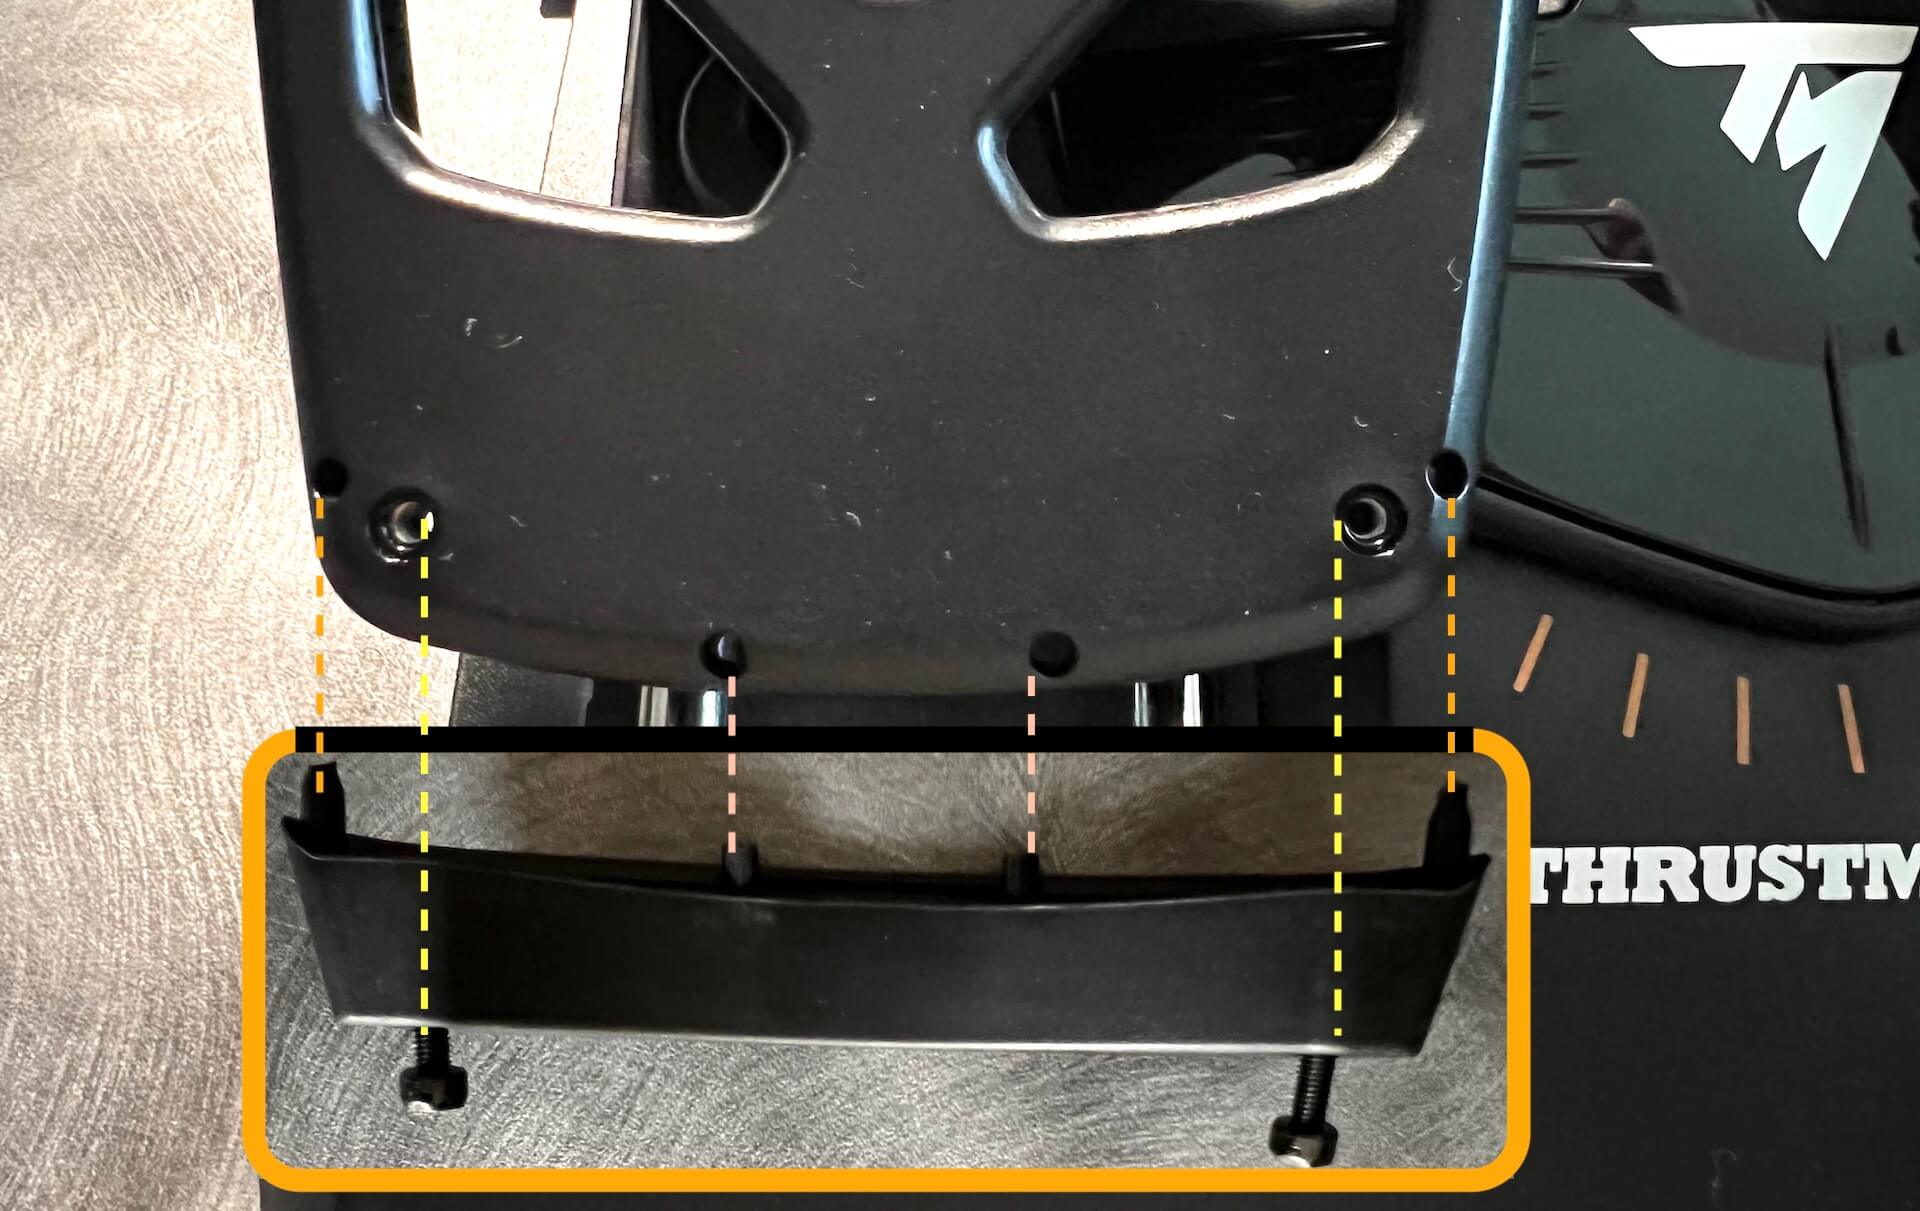
The TFRP device is made of plastic as well are other parts like the pedals itself. The shafts on which the pedals slide are made of metal and perhaps other metal parts are included on the inside. Plastic sounds like a “cheap” product but that’s absolutely not the case. The plastic components seems to be made from durable plastic, and it is nicely finished and it even has a look of professionalism. As you can see on the photos, the pedals itself are much larger/longer and in case it’s not large/long enough, you can remove with the included Allen key the pedal stops on the bottom. Only remark I have is where do you store that pedal stop and the screws?
Between the pedals you find some marks indicating the pedals (yaw) angle. It’s nice, but has no further function. What I actually miss is a “stiffness” control with what you can control the force needed to move the pedals during yaw inputs. Lets go quickly to the bottom of the unit. Although it’s an open structure, it looks to me that it is solid piece and the same as I saw with the TPR, nicely crafted and well mounted together. The bottom has several anti-slip pads and if you want – not directly visible – two holes to connect the unit with two screws or bolts to the ground or another construction. The included wire with USB Type-A connector has an overall length of 2 meters or approximately 6 feet and 7 inches.


Overall I must say that for 99,99 Euro it looks pretty good, but what does that mean .. pretty good? Yes yes, I know, you can and may not compare it with the TPR. That’s out of the question with a fifth of the price. And that was never my intention. For every bodies wallet there should be something. So, this unit is from plastic with sliders from metal but the plastic doesn’t look cheap at all.
Every part of the FTRP is nicely made, nicely crafted and made of durable plastic, and even the pedals are solid and stiff although these are also from plastic. The bottom of the device may be not that interesting, but the anti-slip pads do their work as expected. And it’s a multi purpose device not only for PC games, but also for XBox and PS4 including the right connector for whatever is needed.
And now it’s time for the software section? Any questions?
Software and X-Plane
OK, with what shall I start. The software ….
Lets start with Thrustmaster macOS software?
This will be a short and easy section since there’s no Thrustmaster software for macOS however, X-Plane simmers don’t need that since it’s almost plug and play with X-Plane and then it doesn’t make a difference if it’s XP11 or even the new upcoming X-Plane 12. As mentioned before, X-Plane does use the so called “joy” files for Windows, Mac and Linux including photos of the hardware involved.
Since I started with macOS, lets see how it is with Thrustmaster Windows software.
Although Thrustmaster offers TARGET software, but all of these basic and advanced adjustments are build into X-Plane. Therefore, the TARGET_v3.0.21.910_rev1.exe software (applicable for the TPR and the TFRP) should normally be downloaded to configure, however with X-Plane there’s not really a need for. Now we’ve decided that we not really need the TARGET_v3.0.21.910_rev1.exe software, what do we need then in combination with X-Plane? The answer is simple; calibrating the rudder devices in X-Plane 11 or 12, weather it is for Windows, macOS or Linux.
One thing you will miss as macOS simmer is the possibility to update the firmware of the TPR and TFRP since updating the firmware is a part of the TARGET software. This can be bypassed by installing under macOS a VM (Virtual Machine) program like VMWare or Parallels, install as VM Windows and once you Windows up and running via the VM, you can insert the TPR or TFRP, connect it to the Windows VM, and after you’ve installed the Windows TARGET software, you can check for a firmware update. If available, it will update it, and you benefit from it when you use the TPR or TFRP under macOS.
X-Plane Calibration
Intro
This section was initially planned for both Windows and macOS, but after I tested the connectivity of the TPR and the TFRP with Windows 10, I noticed that the way I need to connect and configure the rudder pedals was the same. Therefore this section is now dedicated to both macOS Monterey/Ventura and Windows 10/11. And since I’m a Mac simmer, I do this on my iMac Pro, and, I mix X-Plane 11.55r2 and X-Plane 12 Early Access thru each other. These windows aren’t different. It’s more a matter if the TPR and TFRP are recognized in both X-Plane versions.
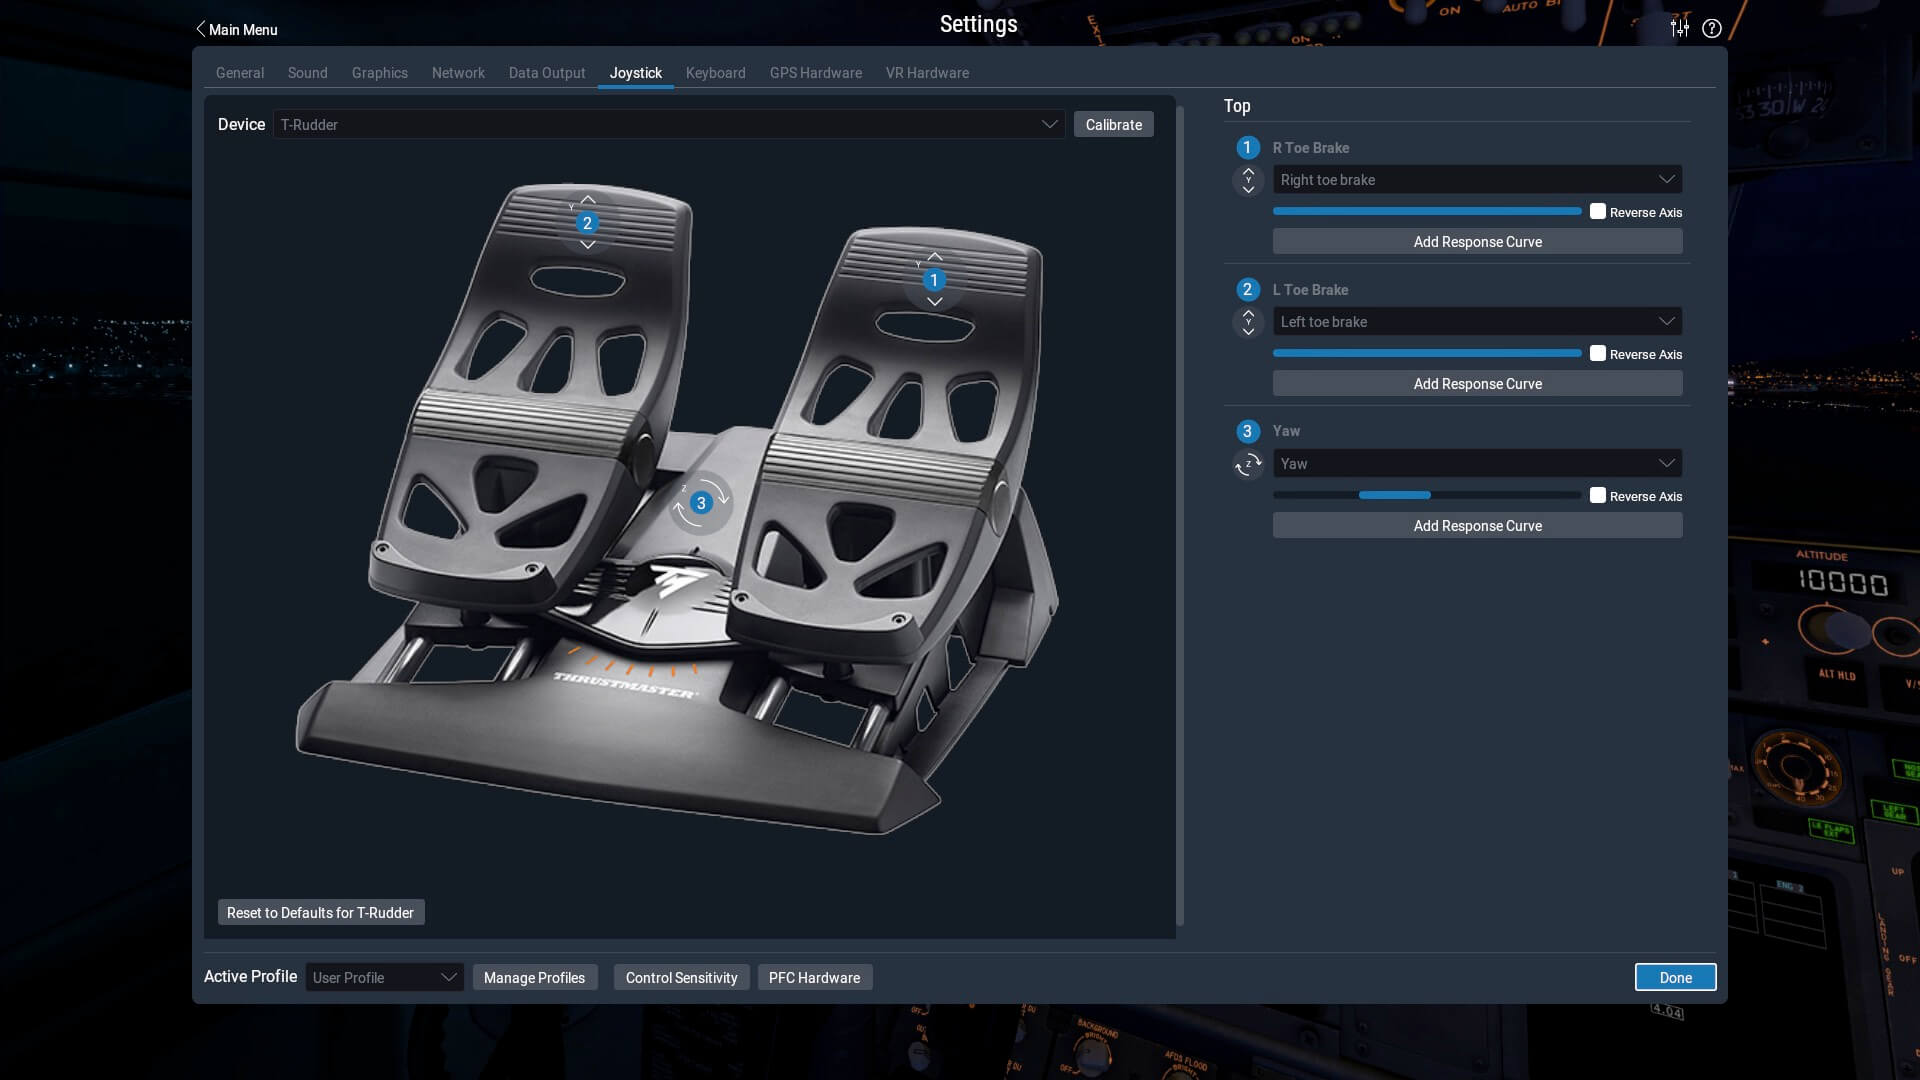
TFRP (T. Flight Rudder Pedal)
It depends how your X-Plane starts up, but in my case I first see the startup window. But before we continue, you connect the extension lead to the RJ12 connector and the other end with the USB Type -A in your PC, Mac or USB hub. Note that a green LED should lid up on the extension lead and be sure that the tiny switch on the side is in the position “Aircraft” and not shifted to “Cars”.
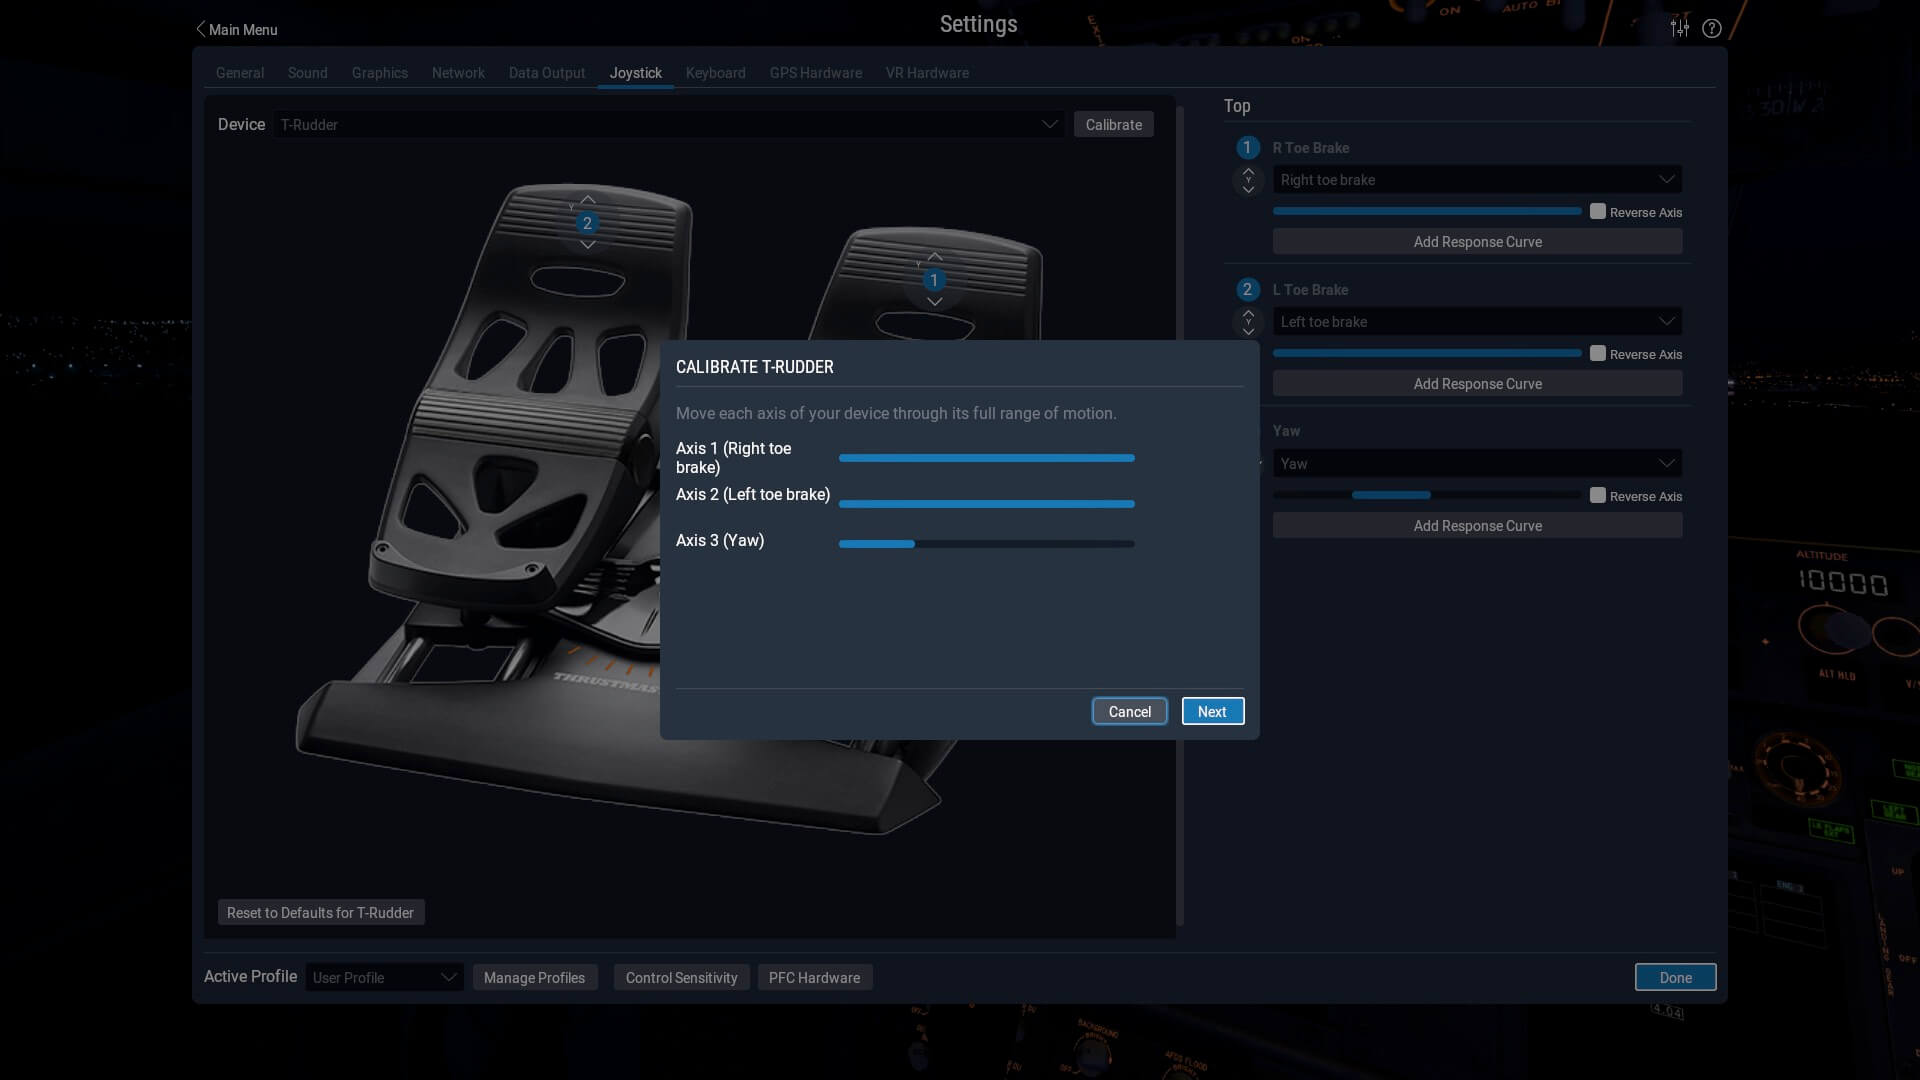
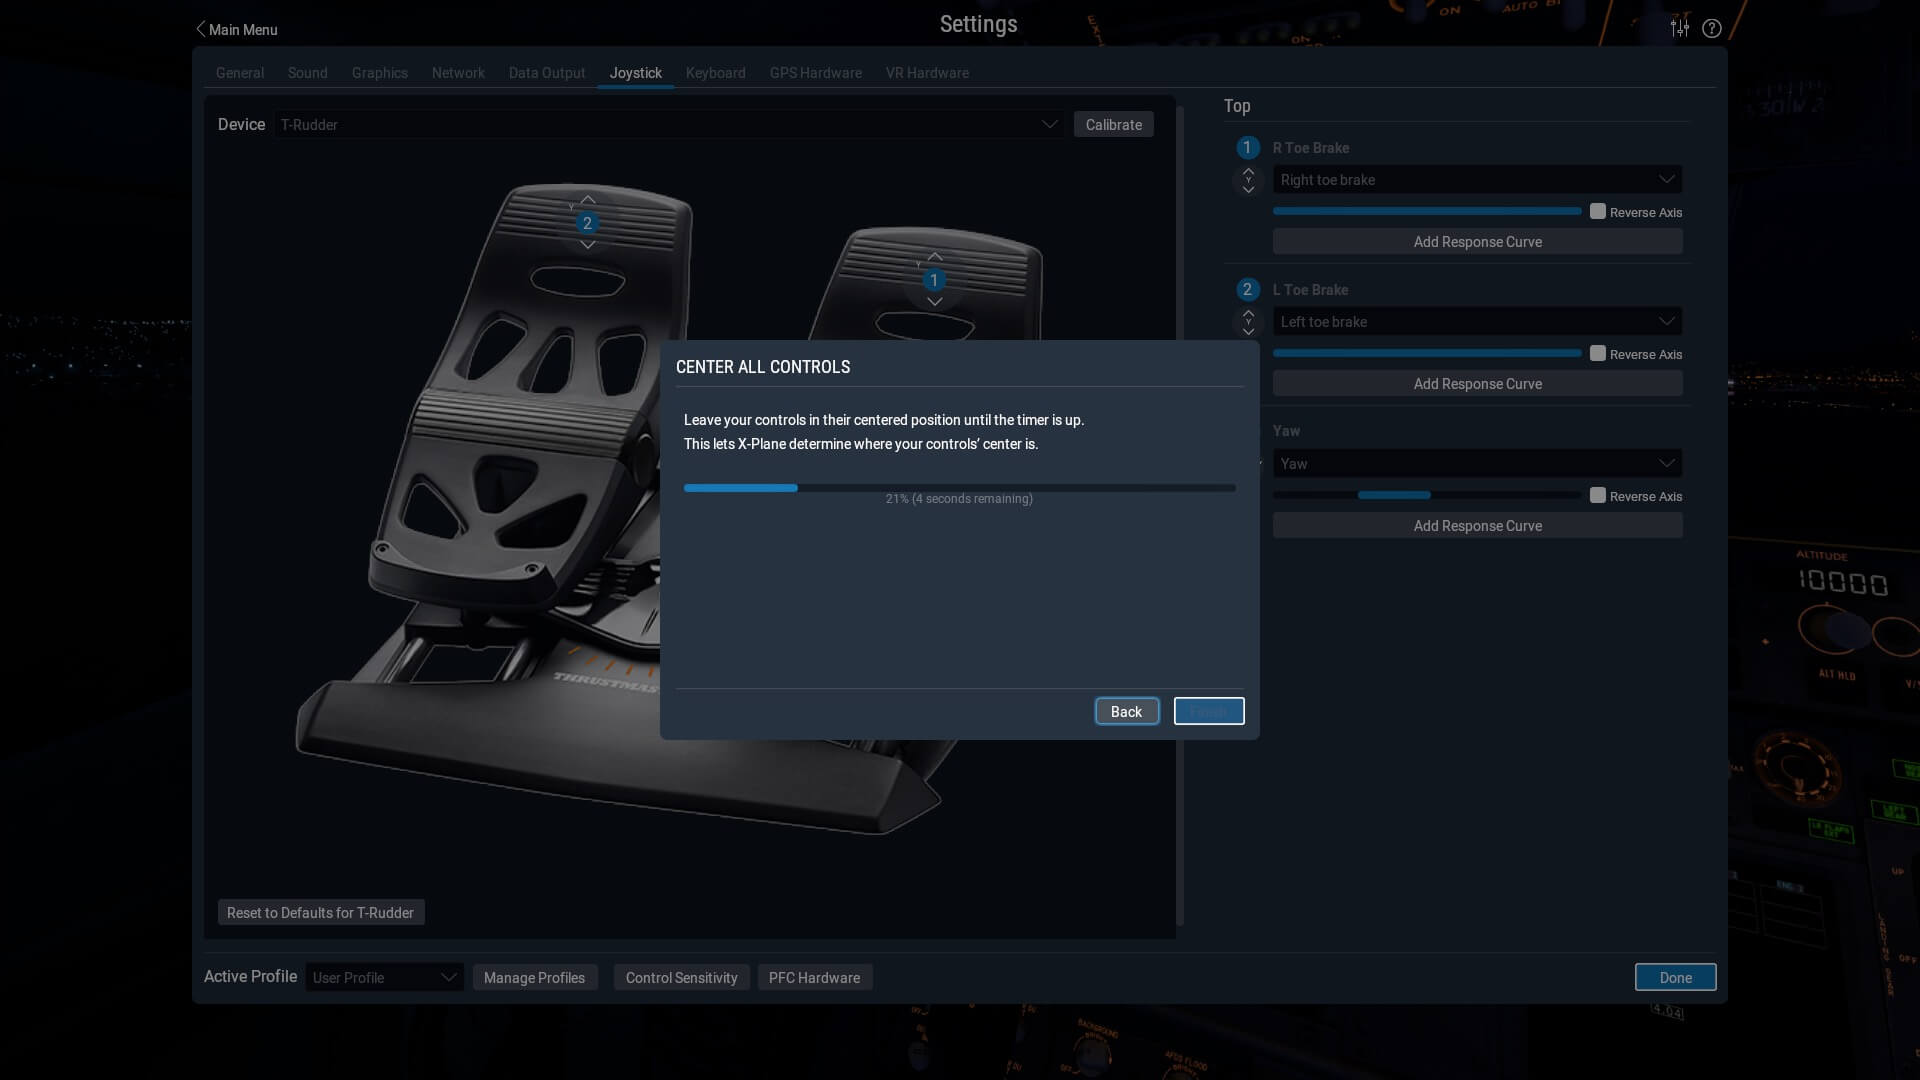
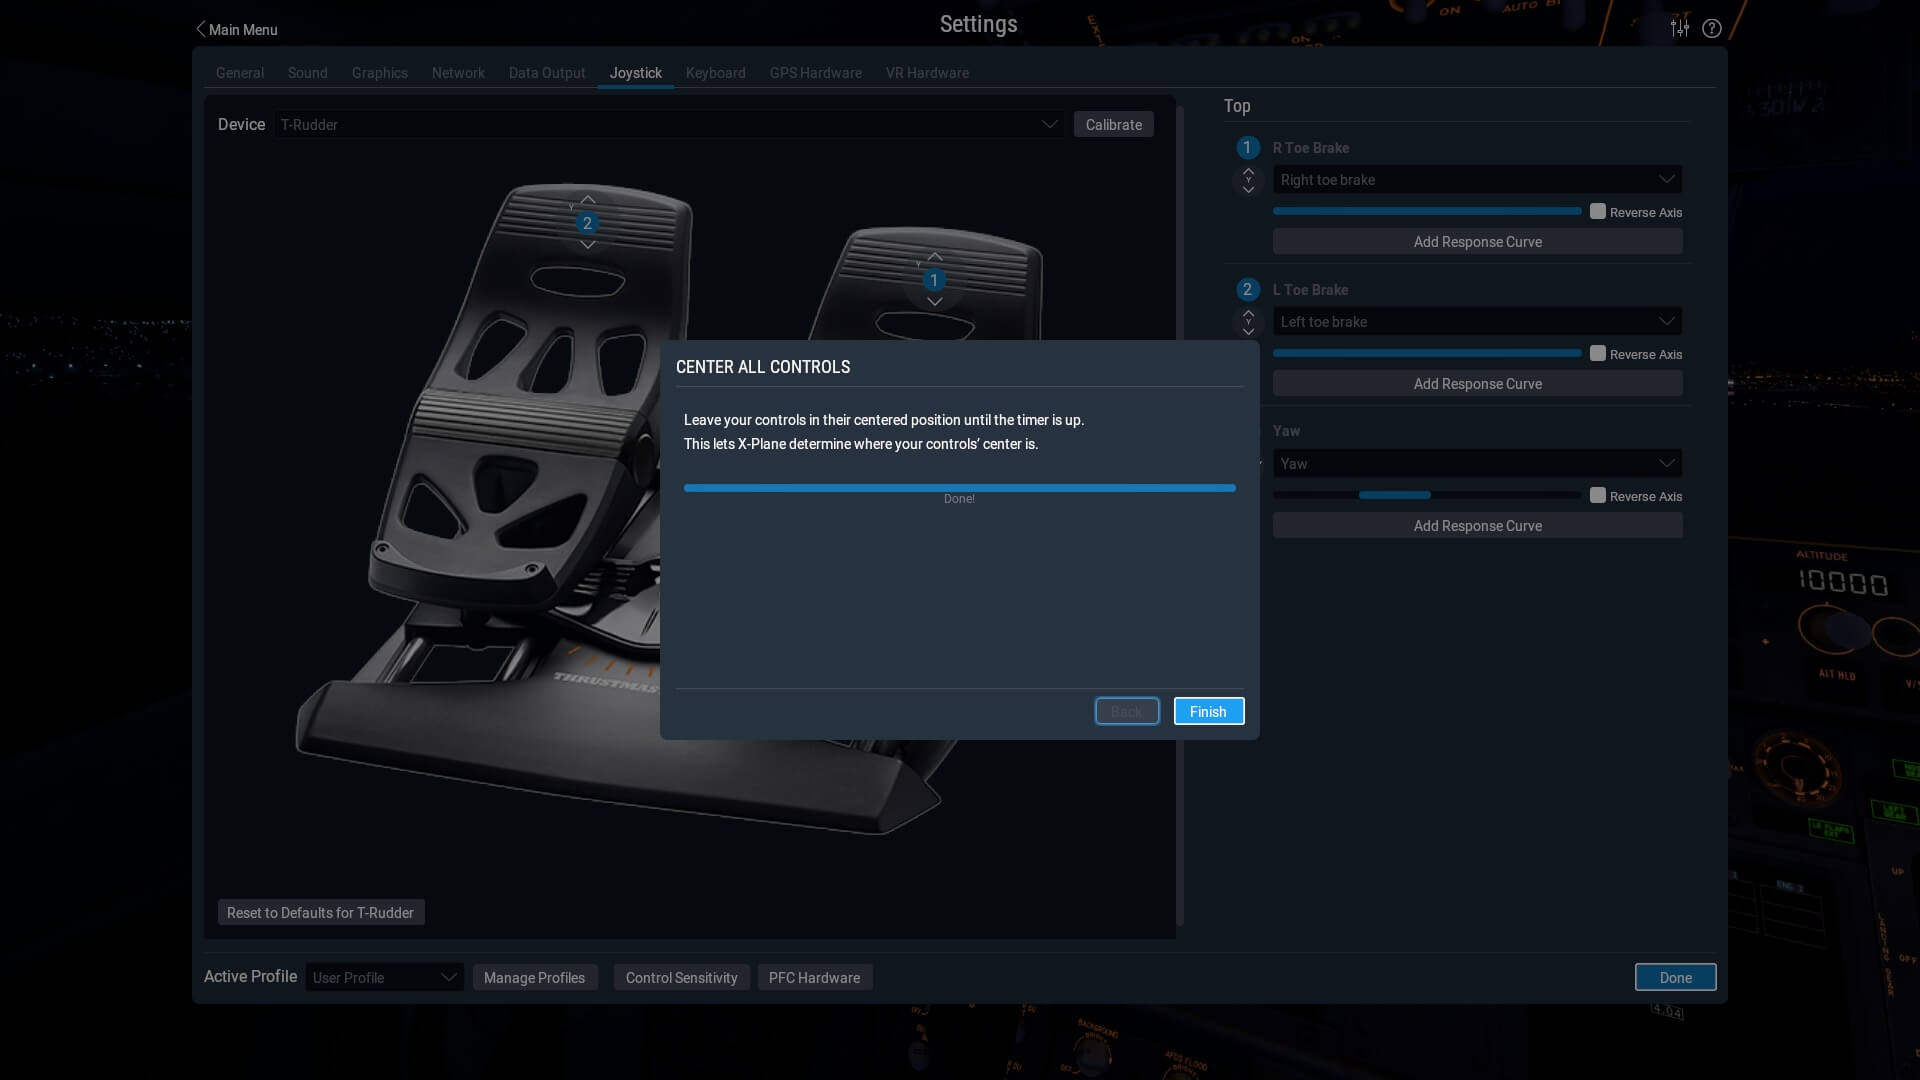
Ok, next you and I click the Settings button and then click the Joystick menu. When everything goes according to my plan, you should see the image of the Thrustmaster TFRP and telling that the Thrustmaster hardware is uncalibrated. Click the Calibrate Now button. By the way, on the right you see the uncalibrated channels namely for the L and R toe brake and for the YAW channel. The YAW is normally only for the rudder but it depends on the aircraft type if a NWS (Nose Wheel Steering) is included or not.
Most likely you’ve done this more, but in case you haven’t done, press each pedal to check the toe brake function as well as introduce a yaw movement. When all sliders are light blue, click the Next button. Read the text in the popup window and continue. And we are back at the first screenshot however, you no longer see the uncalibrated message. And that’s it. No complicated buttons to assign, or switches, or HAT switches or whatsoever, this is it! The screenshots below are taken with X-Plane 11. You can always change within X-Plane the response curve if you feel the necessity.


Knowing that the above screenshots are made with X-Plane 11, I want to know if it is different in X-Plane 12. Come on, lets check that out. This will be very short. No difference. The only difference is the Airbus background and the slightly semi transparent grey windows.


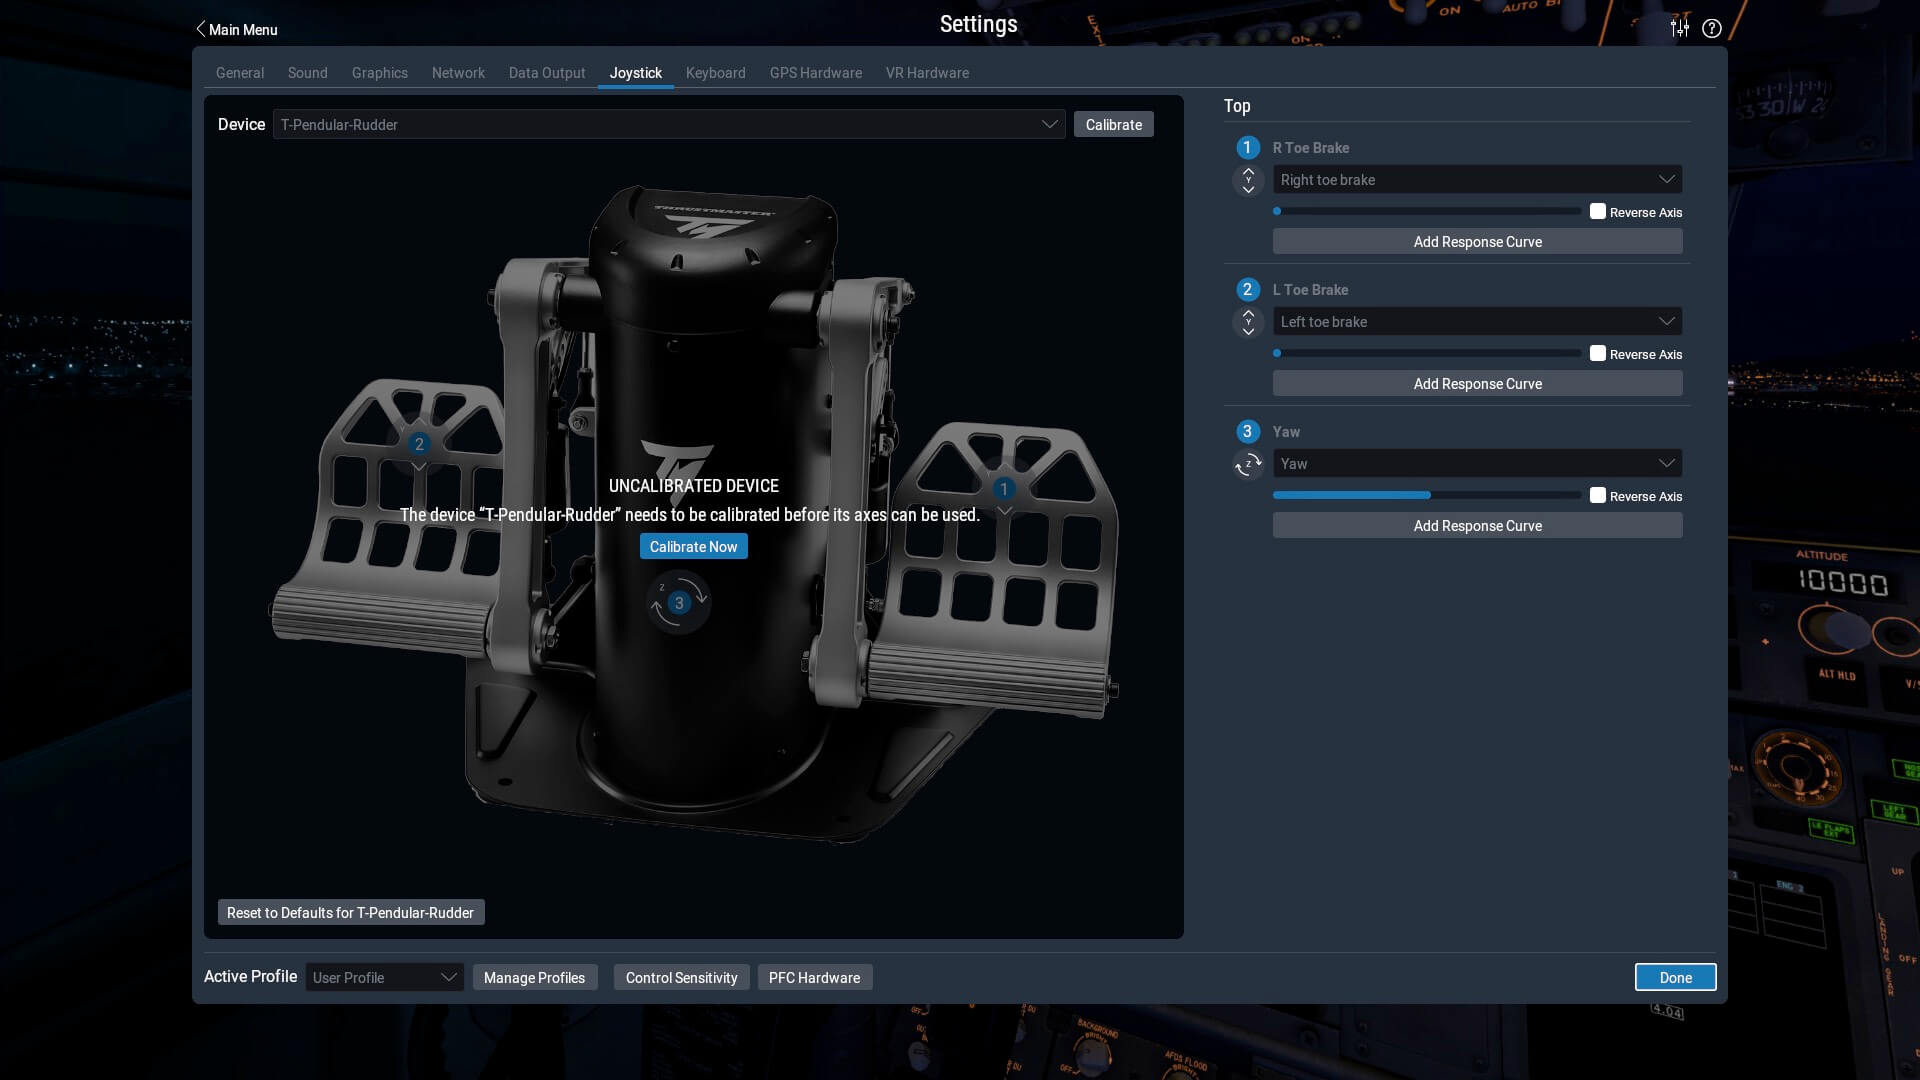
TPR (T. Pendular Rudder)
What can or will we expect? Will it be again easy as we saw in the previous paragraph with X-Plane 11 or X-Plane 12? Will this device we recognized just as easy as the TFRP? Lets check that out. No fiddling around with cables since the TPR has one cable with on one side the USB Type-B connector for the TPR and the other end is the regular USB Type-A. I start first X-Plane 11 (or X-Plane 12 Early Access), once up and running I click the Settings button and then click the Joystick menu. Now I connect the TPR with my iMac or perhaps in your case your PC or USB hub and when everything goes well, you should see the image of the Thrustmaster TPR and telling that it is uncalibrated. And yes, I can confirm that it is working. The image is different, but the steps to follow and the actions to be taken with the pedal for toe brake and yaw are all the same. That said, click the Calibrate Now button.
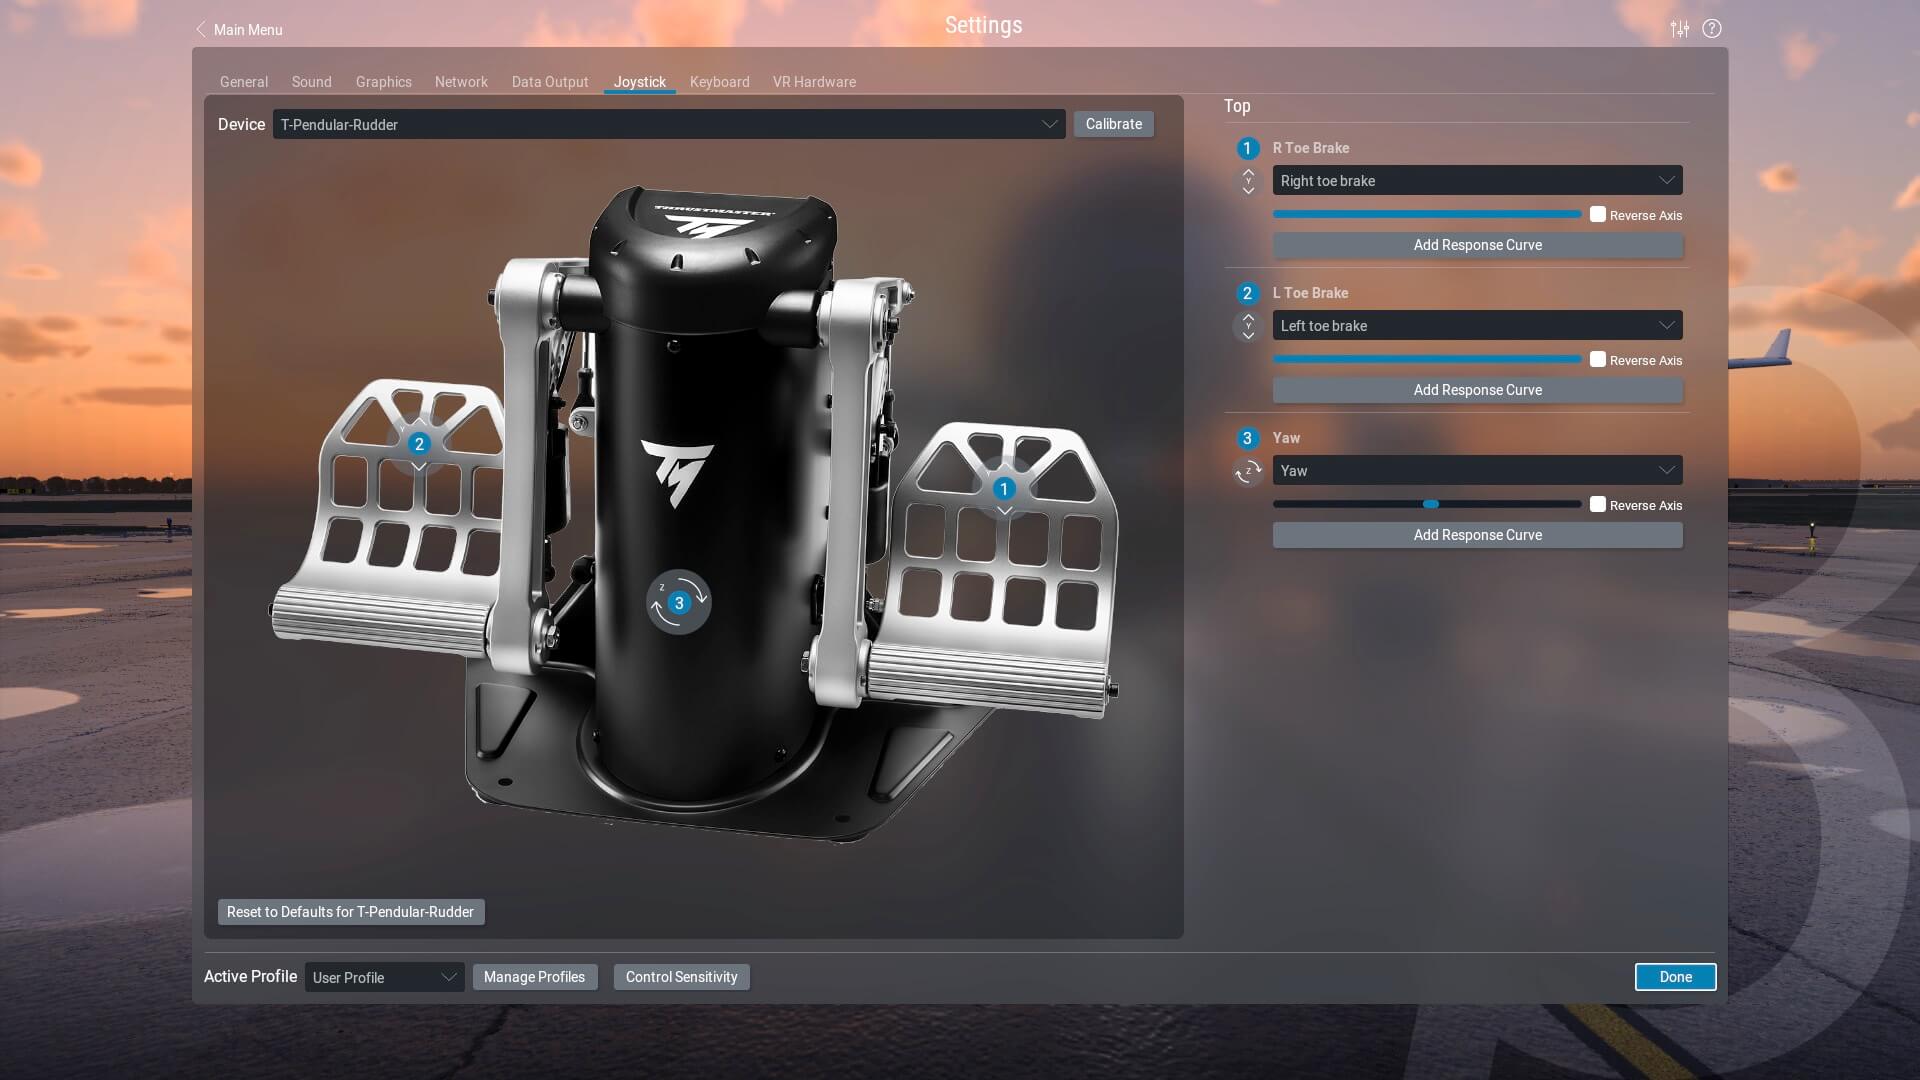
Next I depress each pedal to check the toe brake function as well as introduce a yaw movement. When all sliders are light blue, click the Next button. Read the text in the popup window and continue. And we are back at the first screenshot however, you no longer see the uncalibrated message. And again, that’s it. I combined this time the different X-Plane version together since the steps to follow and what you see in the Settings – Joystick windows is exactly the same.
It’s not a very large section discussing how to calibrate and assign within X-Plane, but I can’t make more of it. This is it. This is how easy it goes. No more programs are needed for this. As I mentioned in the beginning of this section, if it is macOS, Windows or Linux, the steps I showed you are applicable for all OS. And now it’s hands on training thus to test it during taxi, and landing and see how the TPR and TFRP feel.
Ground/Flight Testing TFRP (T. Flight Rudder Pedal)
For many reasons I decided start testing the TFRP with X-Plane 11 and 12 Early Access. Since I didn’t notice any different in behavior, all my tests are for any X-Plane. The same is for the behavior with Windows 10 and/or macOS. Again, same calibration, same assignments and same feeling.
When you think about what you all need and what to assign, then throttle quadrants, joysticks and control wheels are much more complex then rudder pedals. What said before, rudder pedals and it doesn’t make any difference if such a hardware device is from vendor A, B, C or D, they all have the same basic assignments; YAW for rudder and NWS (Nose Wheel Steering) and the left-hand and right-hand brakes, also know as toe brakes. With some add-on aircraft you need to make some additional assignments within the aircraft itself, but in general, it’s only YAW, and brakes.
What you need to keep in mind, in particular for the toe brakes, is that sometimes you need to tick the REVERSE box in X-Plane. This is something you see easily. When you haven’t depressed either brake pedal and the blue slider is visible, then this is not good. That said, when you tick “REVERSE” the blue slider will only appear when you start depressing the pedal. For the YAW channel I haven’t noticed any issues.
Once X-Plane is up and running, selected an aircraft of my choice, engines running and parking brake released, the aircraft starts moving. My first test is slowly depressing either brake panel, then both pedals. The brake signal(s) is/are nicely implemented by the aircraft. It feels good to see that I can with some precision control the brake pressure. This is very good to see when you have selected an aircraft with a brake pressure indicator or something visible via EICAS or ECAM. I noticed the same smoothness with using the pedals for YAW. It is good to know, at least that’s how I felt it, leave your feet resting on the pedals, but don’t add too much force. I mentioned this before; the more weight/pressure you add to the pedals, the more difficult it becomes to make small brake pedal movements or it will be more difficult to feel the center of the YAW signal. This paragraph has actually nothing to do with the T.FRP. It is applicable to all rudder pedal devices. I just wanted to mention this.
So back to my experience and how it felt to brake or to add yaw (rudder). When you’re not used to rudder pedal devices and only assigned for example the joystick twist to the YAW channel, it needs some time to get used to the YAW channel of the TFRP, but once you’ve got the right feeling, the TFRP responds immediately and that can be seen in X-Plane. Same as with your flight controls, at higher speeds like at takeoff or landing, you need to move the pedals gently. In that way you can control the NWS during the begin of your takeoff run, later it’s with the rudder and for landing basically the same. The sensitivity of the YAW channel sensors is highly realistic and thus accurate control is possible.
The length of each pedal should by OK for short and long feet. As previously mentioned you’ll find at the lower side of each pedal a bracket which you can remove in case you prefer this, but perhaps I’ve got a suggestion for Thrustmaster. When I place my feet on the pedals, my heel rests on these plastic brackets and that feels not pleasant since it’s made of plastic and it doesn’t forms to my heel. I could remove it, but I don’t want. If Thrustmaster could make this bracket from a softer material or that you can place a rubber cap over the bracket, that would help.
Anyway, all together a great experience, but now it’s time to test the TPR. Are you ready?
Ground/Flight Testing TPR (Thrustmaster Pendular Rudder)
Besides the total different structure of the pendular rudder, it feels totally different. The moment you place your feet on the pedals it feels cold – logically, it is made of metal – but it feels solid, massive, and it looks so beautiful. But that’s not all. It’s also the size of the pedals. When you’ve read me previous sections including the photos, you’ve noticed that these pedals are much shorter. The width is the same, but a lot shorter. Wow, is that correct and does it reflect the pedals as fitted in the real aircraft? The answer is yes, in real aircraft at least the commercial jets, these pedals are also short. In that respect, these Thrustmaster TPR pedals seems to be a replica of the real pedals.
I’ll try to explain what I feel when I place my feet on half of the pedal or completely on it. When I let my feet rest on the pedal, I can control with my heel and muscles in my tibia the YAW or NWS whatever is applicable for that aircraft. Doing it this way, I don’t move the pedal for braking, but when you move your feet, you can depress the pedal. It sounds weird and compared to the T.FRP it is indeed weird.
No, it’s different.
That’s the right word. Not only that, you need to play with this and to learn it. The other option you can do is leave your heel on the floor, and with the middle of your inner feet you can gently press or release the pedals for YAW. Due to the unbelievable high sensitivity of the pedal YAW sensors, it’s works this way too, but the disadvantage is that you can’t brake since you feet are not in the right position to press the pedals.
I hope the above makes a bit sense, but how does either way works when taxing an aircraft. I can tell you that this is a different sensation compared to the T.FRP. I’m not 100 percent why this “control” of YAW and brake is so much different, although it could be because of the design of the two devices. With the T.FRP and competitors, you slide the pedals FWD/AFT for YAW. With the TPR you don’t slide anything.
With the pendular rudder device the pedals are connected to a linkage and that turns around a shaft and when pressure is applied to the bottom of the pedals, a YAW input is given. What does this all mean? It means to me a much more realistic input system. Add to that the stability of the device, with the extreme sensitive sensors and you’ve got the ultimate rudder control and brake system.
Hold on, how does it feel then and how does it go during the takeoff run or landing?
I don’t know why when using the TPR during taxi it feels so different, so accurate, so sensitive? Or is it something that’s between my ears? No, that can’t be. I think it has to do with the natural feeling and natural control of the pendular system. It’s more natural then sliding pedals. Is this pendular design then easy to offer the braking function when using the pedals for YAW? That’s not easy, but what said, when you control the taxi speed with your throttles, you can also decide to lower your heels to the ground and then with your mid foot you control with minimum movements for YAW. I felt both ways working fine.
I tested the TPR with several GA, business jets and commercial aircraft and in all cases it turned out that it does have my preference above any other rudder/brake control system. Although the following is something you may expect from a piece of hardware like the TPR; there’s no slack, a perfect strong return to neutral or centerings, but also not too strong. I highlighted this already before, the TPR has a couple of adjustment options to fit your needs.
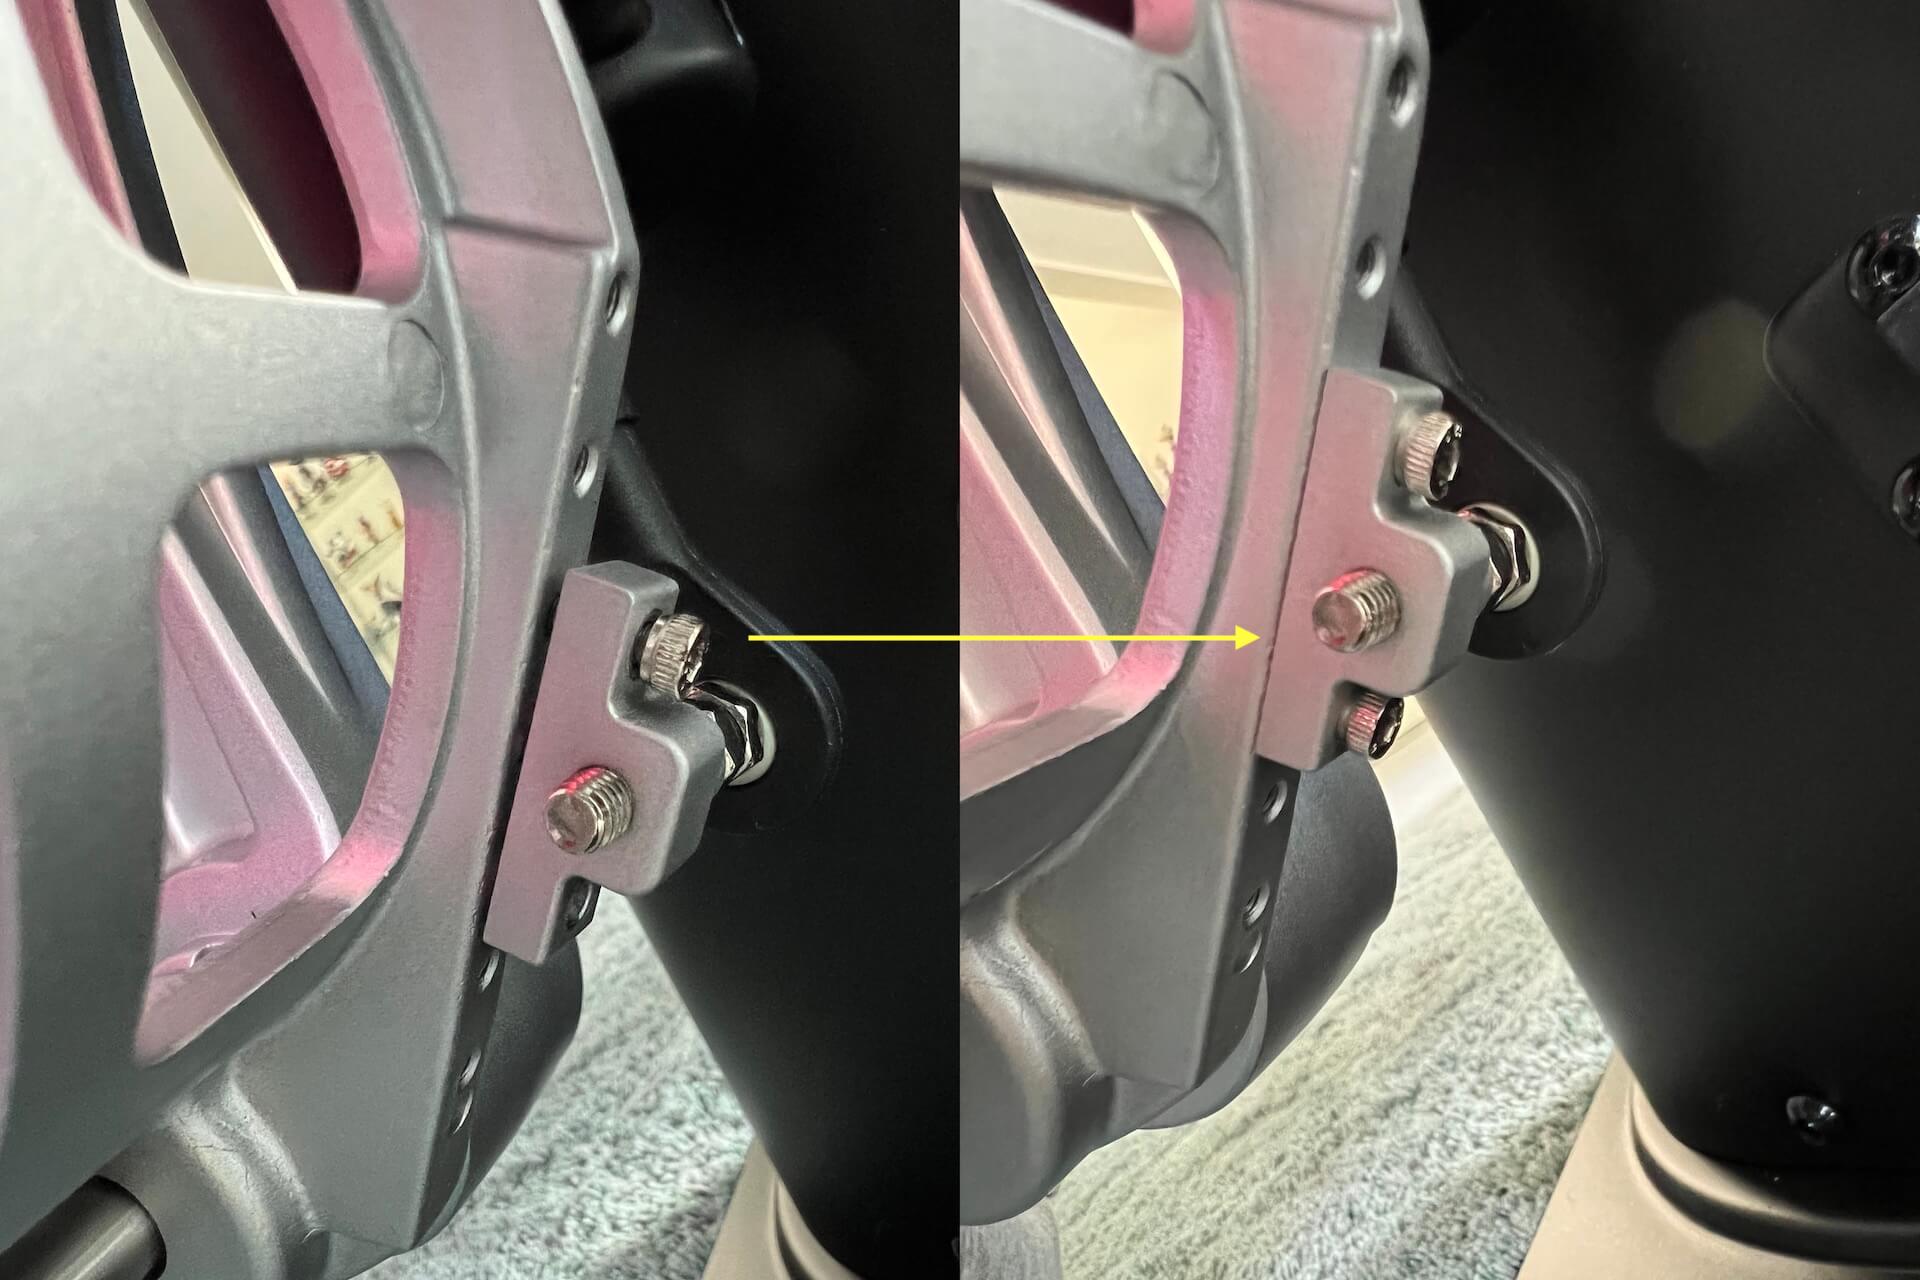
You can, when you find it too strong, reduce the rudder centering force. First, you can move both springs on the back of the device from the low position to the up position. See also the manual how that looks like. If that’s still too much for you, you can remove one spring and move the other spring to the low position. If still too much, position the spring to the up position. But keep in mind that a rudder centering or YAW centering should be firmly available.
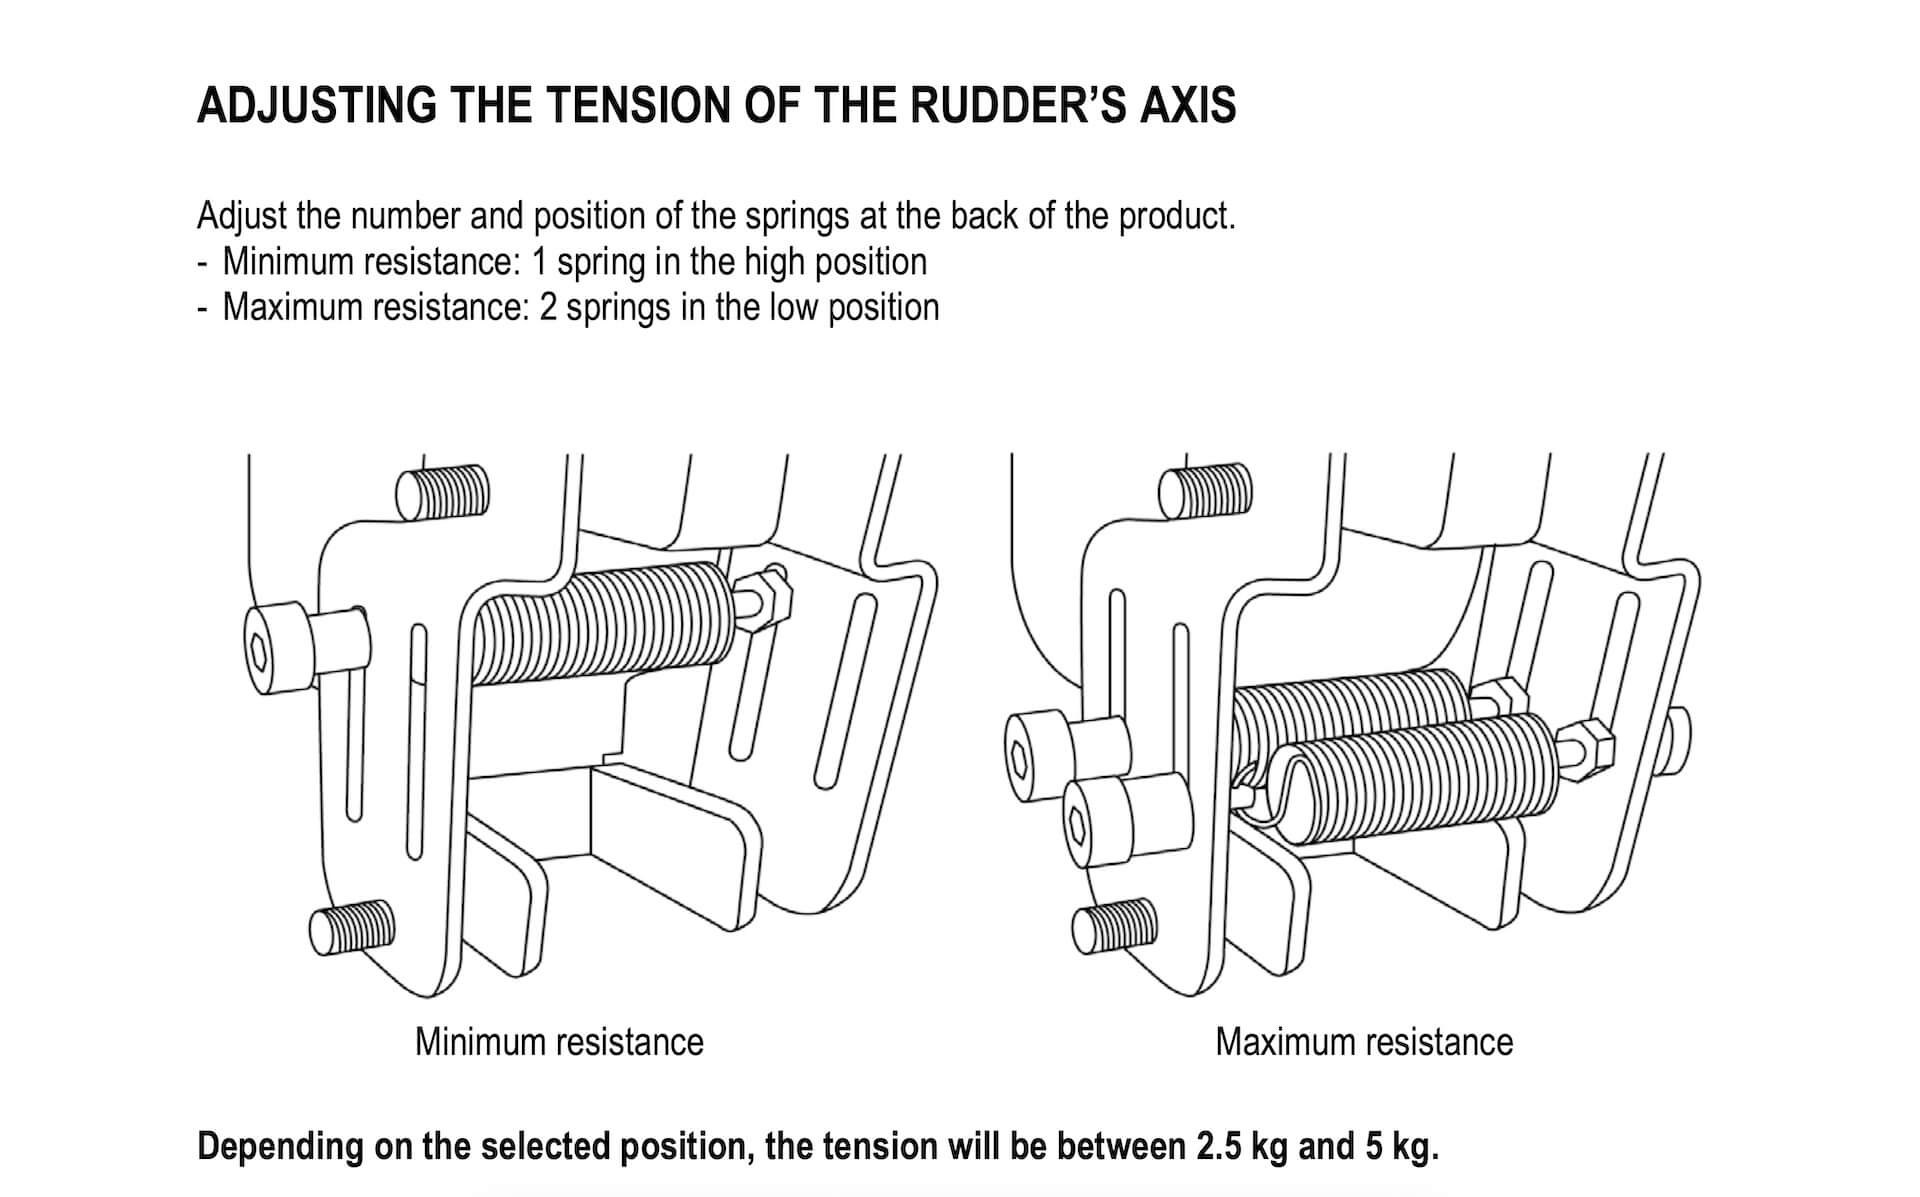
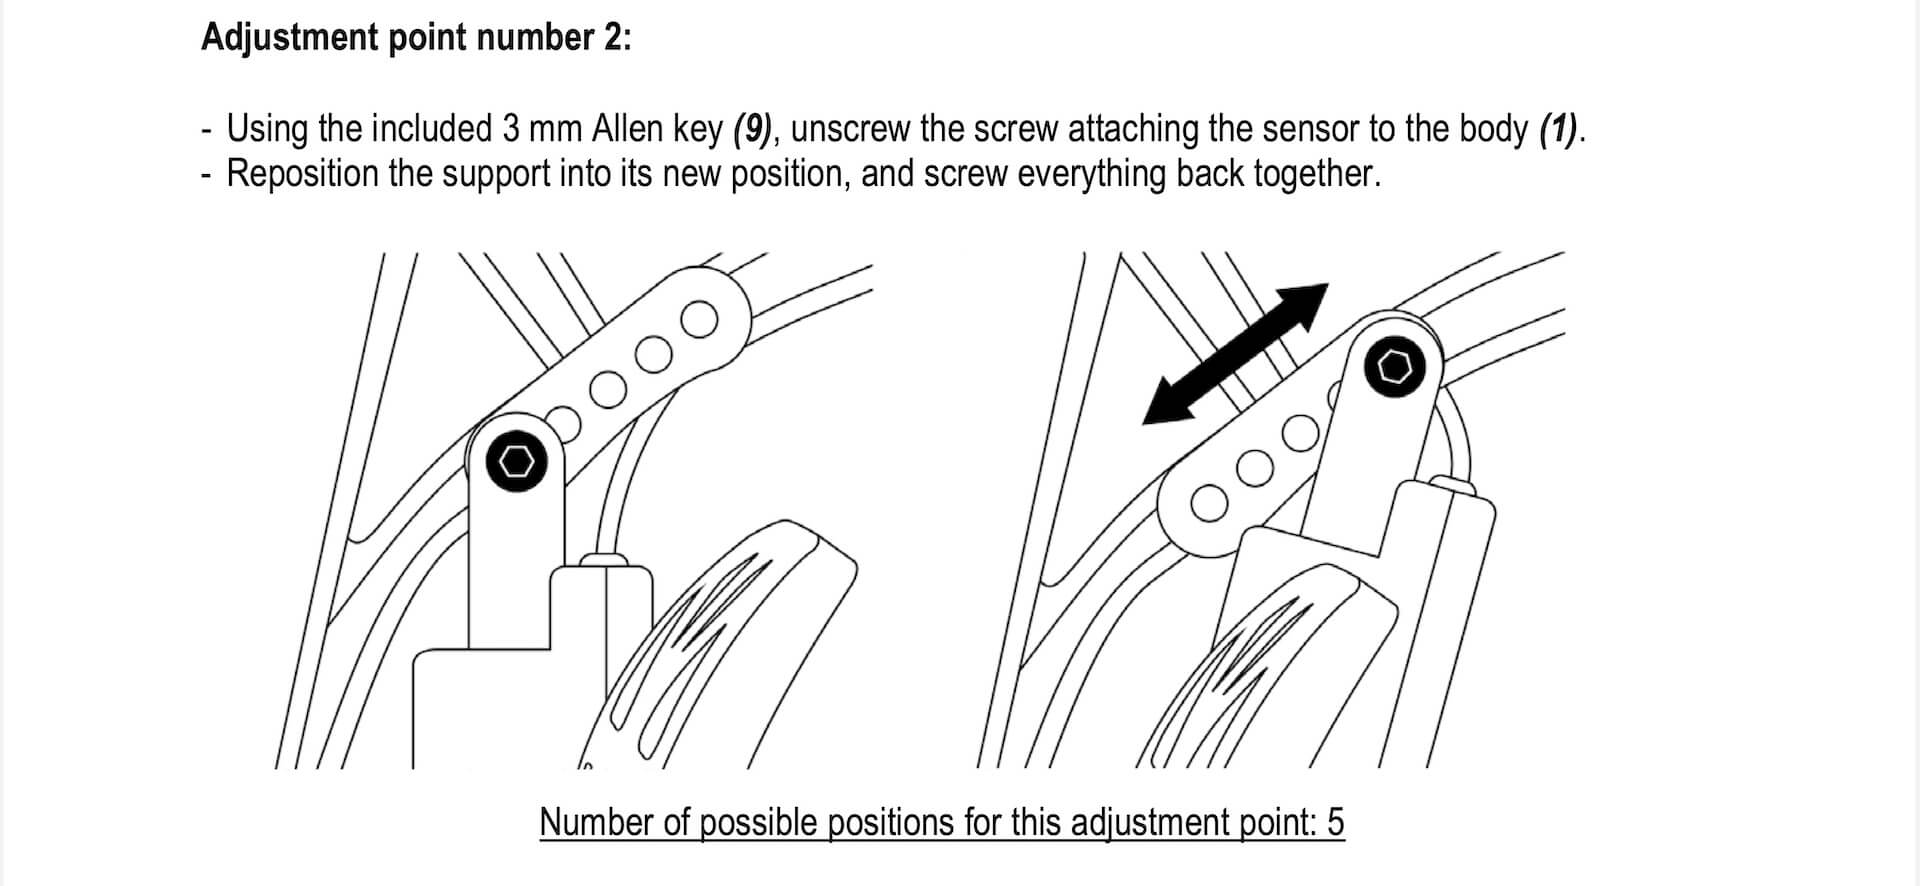
The other possibility is to change the inclination of the pedals. I write on purpose pedals since you adjust the pedals individually and logically, when you change from one pedal the inclination, you also need to do that with the other pedal. According to the Thrustmaster manual; depending on the positions selected in adjustments 1 and 2, the pedal’s angle will vary between 35° and 75° and the pedal’s range of travel will vary.

Which position fits your needs is a matter of trail and error. I personally preferred the settings as seen on all the photos but that’s what I feel and like. Perhaps much more important for me and you is the fact that you’ve got a lot of “adjustment” possibilities and that makes me happy. Ok, you could say then “the more adjustments, the more things can break”, but this won’t break. It’s all made of metal in a way that you can’t break it. When plastic was included, I could have different thoughts, but that’s not the case.
What can I say?
That I was already impressed when I opened the box hasn’t changed. I’ve becoming even more impressed by the overall design, the quality, the durability and the way you can adjust the pedals inclination and yaw spring force to your needs. In now word awesome!
Summary
I enjoyed every minute reviewing these two Thrustmaster rudder devices. Each of them has their own specific specifications and pricing. I could have looked to competitors but found hardly anything.
The T.FRP (Thrustmaster Flight Rudder Pedals)
Let me start with the roughly 100 Euro T.FRP. The only look alike competitors I found is the CH Products Pro Pedal or the Logitech Pro Flight Rudder Pedals. The CH is almost double the price of the T.FRP while the Logitech is also much more expensive the the Thrustmaster but difficult to find. It’s a matter of taste, but the CH Pro Pedals looks as being a very old fashioned design. Not something from today!
That said, the T.FRP which is sold for around 100 Euro at different shops in the EU and abroad, is for what it offers a great device. It comes with a standard 1 year warranty although in the EU that should be 2 years. Modern sensing elements – safely protected in a box beneath the pedals – are used for the measuring of the YAW and toe brake displacements. The centering of the YAW is strong, but not annoying in terms that it’s difficult to apply a YAW input. Individual pedal movement for the toe brake has also a strong return spring, but the same for this, not too much force is needed to add a brake input.
For those with bigger feet – I can hardly image that since the pedals are already of a large size – or for those who don’t want the installed stops at the bottom of each pedal, it can be easily removed, but remember, it can’t be stored somewhere else. The whole hardware except for the rods is made of durable plastic and the overall component weights a bit more then 2 kilos or roughly 5 pounds. Together with the anti friction pads on the bottom of the base, I noticed that under all conditions the device stays in position and yes, it depends of course on the flooring. In case you face problems that it doesn’t stay in position while using it, you have the option to screw it to a wooden plate or directly to the ground. Keep in mind that the two holes intended for this, are not directly visible, except from the bottom view. Overall, a great rudder pedal device for a competitive price.
The TPR (Thrustmaster Pendular Rudder)
Let me start with …. is/are there similar competitive device(s) on the simulation market? As of this writing, October 2022, the answer will be short; NO!
There’s nothing that uses a pendular system, and I doubt if others so called competitors use liquid fluid damping. I’ve found other rudder pedals devices which are also made and build from 100 percent metal, but these are mostly 1000 Euro/USD or more, so not something to think about. Then I found the Honeycomb Aeronautical Charlie Rudder Pedals which looks basically the same as the T.FRP however, the pedals of the Honeycomb are made of metal, probably Aluminum. The housing of the Honeycomb Charlie I don’t know, but I guess it is made of durable plastic.
Anyway, the Honeycomb Charlie has an expected retail price of 350.00 USD while the TPR has a retail price at the US Thrustmaster shop of 599.99 USD. I’m aware that this price difference is a lot, but honestly, the TPR is 100 percent metal, extremely durable, without doubt a professional look and feel, excellent control and super sensitivity of the YAW and toe brakes channels. The centering springs for the YAW input as well as the return springs of the toe brakes is great, not too strong, but strong enough to return it to the neutral position without any slack. and last but not least, add to that the several adjustment options.
The look alike black “control column” is not for fun that big and solid. It offers the necessary stability for all the mounted external components. It offers solidity for the bearings and sensors. And it’s completely closed which means no dust or other debry can enter the sensitive inside. It’s extremely heavy and therefore solid. It stays as a rock and in combination with the rubber pads, it won’t slip when using it. But if you want, the base has 4 holes to mount it to a wooden plate or directly to the ground if needed.
Although Thrustmaster and other distributors are advertising that both reviewed products are only compatible with a PC and Windows, this isn’t 100 percent correct when it is used in combination with Laminar Research X-Plane. When these Thrustmaster rudder pedal devices are used with X-Plane, they function the same with Windows and macOS. Since I’m not able to test the hardware with X-Plane Linux, I’m not sure about that although my feeling says they will also work with Linux.
Was it ever my idea to compare these two Thrustmaster rudder and brake devices?
No, that was never my intention. I tried to be open minded, not being influenced by one device that looks almost a professional piece of hardware.
Ok, where can you buy it?
I’m aware that I live in Europe, but you can buy these Thrustmaster rudder and brake devices at the Aerosoft website or you look at the dedicated Thrustmaster store page, but it’s also available via other online stores. Last but not least, did I cover everything? I hope I did, but I know myself, afterwards I always think .. oops, I’ve forgotten this or that. But this review should give you a good idea how I experienced the TFRP and TPR.
Feel free to contact me if you’ve got additional questions related to this impression. You can reach me via email Angelique.van.Campen@gmail.com or to Angelique@X-Plained.com.
With Greetings,
Angelique van Campen
| Add-on: | Hardware Thrustmaster TPR / TFRP |
|---|---|
| Publisher | Developer: | Thrustmaster | Aerosoft | Thrustmaster |
| Description: | Realistic rudder/brake hardware |
| Software Source / Size: | Download / Approximately N.A. (unzipped) |
| Reviewed by: | Angelique van Campen |
| Published: | October 12th 2022 |
| Hardware specifications: | - iMac Pro - Intel 3GHz Intel Xeon W / 4.5Ghz - Radeon Pro Vega 64 16368 MB - 64 GB 2666 MHz DDR4 - 1 internal shared 1TB SSD (Big Sur 11.x) - 1 internal shared 1TB SSD (Bootcamp Windows 10) - 1 external 2TB LaCie Rugged Pro SSD (Big Sur 11.x) - Saitek Pro Flight System X-52 Pro and X-56 Rhino - Honeycomb Alpha Flight Controls - Honeycomb Bravo Throttle Quadrant - Thrustmaster TCA Airbus and Boeing - Thrustmaster TPR and TFRP |
| Software specifications: | - macOS Ventura - X-Plane 11.5x / 12 Early Access |
0 Comments