Ryan Navion?
Ryan Navion, uhhhhh, never heard of it, you perhaps?
After some digging on the Internet which could be me best friend, I found the Ryan Navion, a typical American historical aircraft which is by the way, still used for flight lessons. Although the first Navions did have as every other GA aircraft ordinary steam driven instruments, the vFlyteAir is not just another GA aircraft with old-fashioned instrument. No no, this vFlyteAir GA aircraft comes with nicely modeled Display Units so yes, worth to read this review.
Anything else before flying?
But First …
You could jump in the Navion, but I think it’s better to read the manual first.
Ok, the installation is quite simple and I may assume you’ve figured that out already. In case you didn’t figure it out, just copy and paste the downloaded package, after you unzipped it of course. Paste the package into the Aircraft/General Aviation folder, but feel free if you own more vFlyteAir aircraft, to create a subfolder “vFlyteAir”.
The package comes with a bunch of real paintings which should make you and me happy. The default livery is the vFlyteAir house livery, but hold on, there’s much more. Besides the 11 real life liveries, the package also includes a paint kit so hopefully painters are willing to create your favorite Ryan Navion painting. Curious which others real liveries are possible? Check it out at this dedicated Airliners.Net link.
Ok, back to the included manuals. In the Ryan Navion folder you’ll find a subfolder named Documents. For first orientation, you check the NavionB_UserManual Acrobat file. Although it’s only 17 pages, it covers in my opinion everything. From Ryan Navion background info till and including thorough explanation of the instruments and Display Units.
Next you’ll find the original Ryan Navion POH (L17_Handbook), but keep in mind that the handbook shows you old-fashioned instruments which aren’t applicable anymore for the modeled vFlyteAir model. On the other hand, there’s still a lot more interesting information about the aircraft systems and how to perform an external walk-around check. Is it worth it? Yes, it is when you love to fly the Ryan Navion.
And finally, this Documents folder offers a performance chart for the Navion Super 260. I suggest that you print this JPEG file and keep it next of you when planning a flight.
Ready?
I’ve parked the Ryan Navion at the Canterbury Flying Club apron of NZCH. For those who aren’t familiar with the ICAO code; we’re dealing here with Christchurch International Airport situated in New Zealand. While walking to the Navion, it seems everything is closed and no wheel chocks are in position. This is the result of not having the “CRTL MENU” available via, for example, the plugins menu. Why do I write that? The “CRTL MENU” is a popup window that’s only accessible via the cockpit and allows you for example to open the cargo door and place the wheel chocks in position. Further more, but that’s a personal thought, I would love to see that there’s a possibility that you can open/close the canopy from the outside which is a realistic thought. Now you can only open/close the canopy from the inside of the cockpit. What said before, perhaps this could be integrated in a plugin which is accessible via the Plugins menu. Just a thought, nothing more!
After I’ve opened the canopy, cargo door and placed the wheel chocks in position, I’ll have a quick external inspection before jumping in. Join me?
External Walk-around
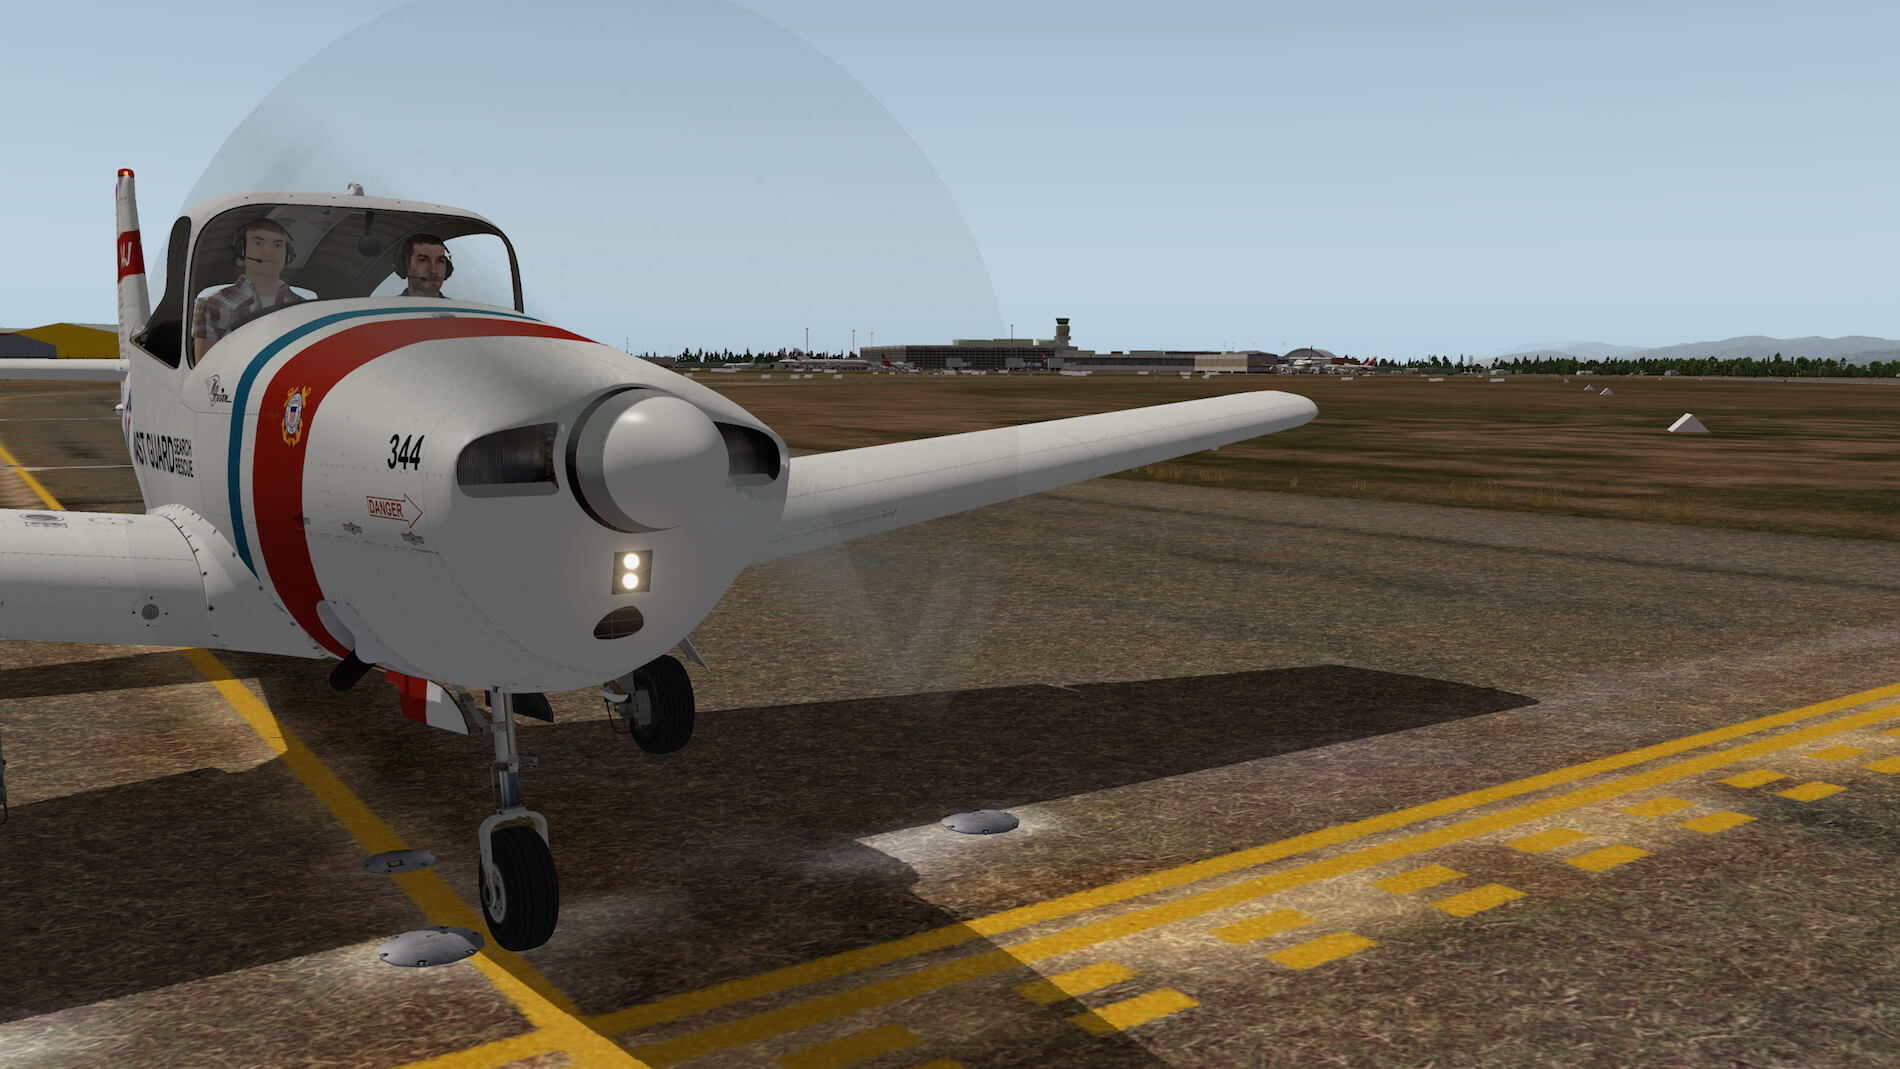
With the Navion canopy opened, I’m impressed about the way the canopy shape is modeled and, because the canopy is mounted under an angle with the fuselage, it looks a little weird with the rear side in an upwards direction. All of this is because of the canopy rail which is mounted under an angle with the fuselage. Anyway, I’m aware that GA aircraft in general can be modeled with high precision and many polygons can be used to create the almost perfect aircraft shape and still keeping acceptable amount of frame rates in mind. This is applicable for many X-Plane GA aircraft developers, and also for vFlyteAir. This Navion is again an example of an almost perfect modeling and realistic screws, rivets, latches, dirty spots, weathered look, oil spots and many more of these things that make the modeled aircraft as real as it gets. In other words, this Navion looks gorgeous!


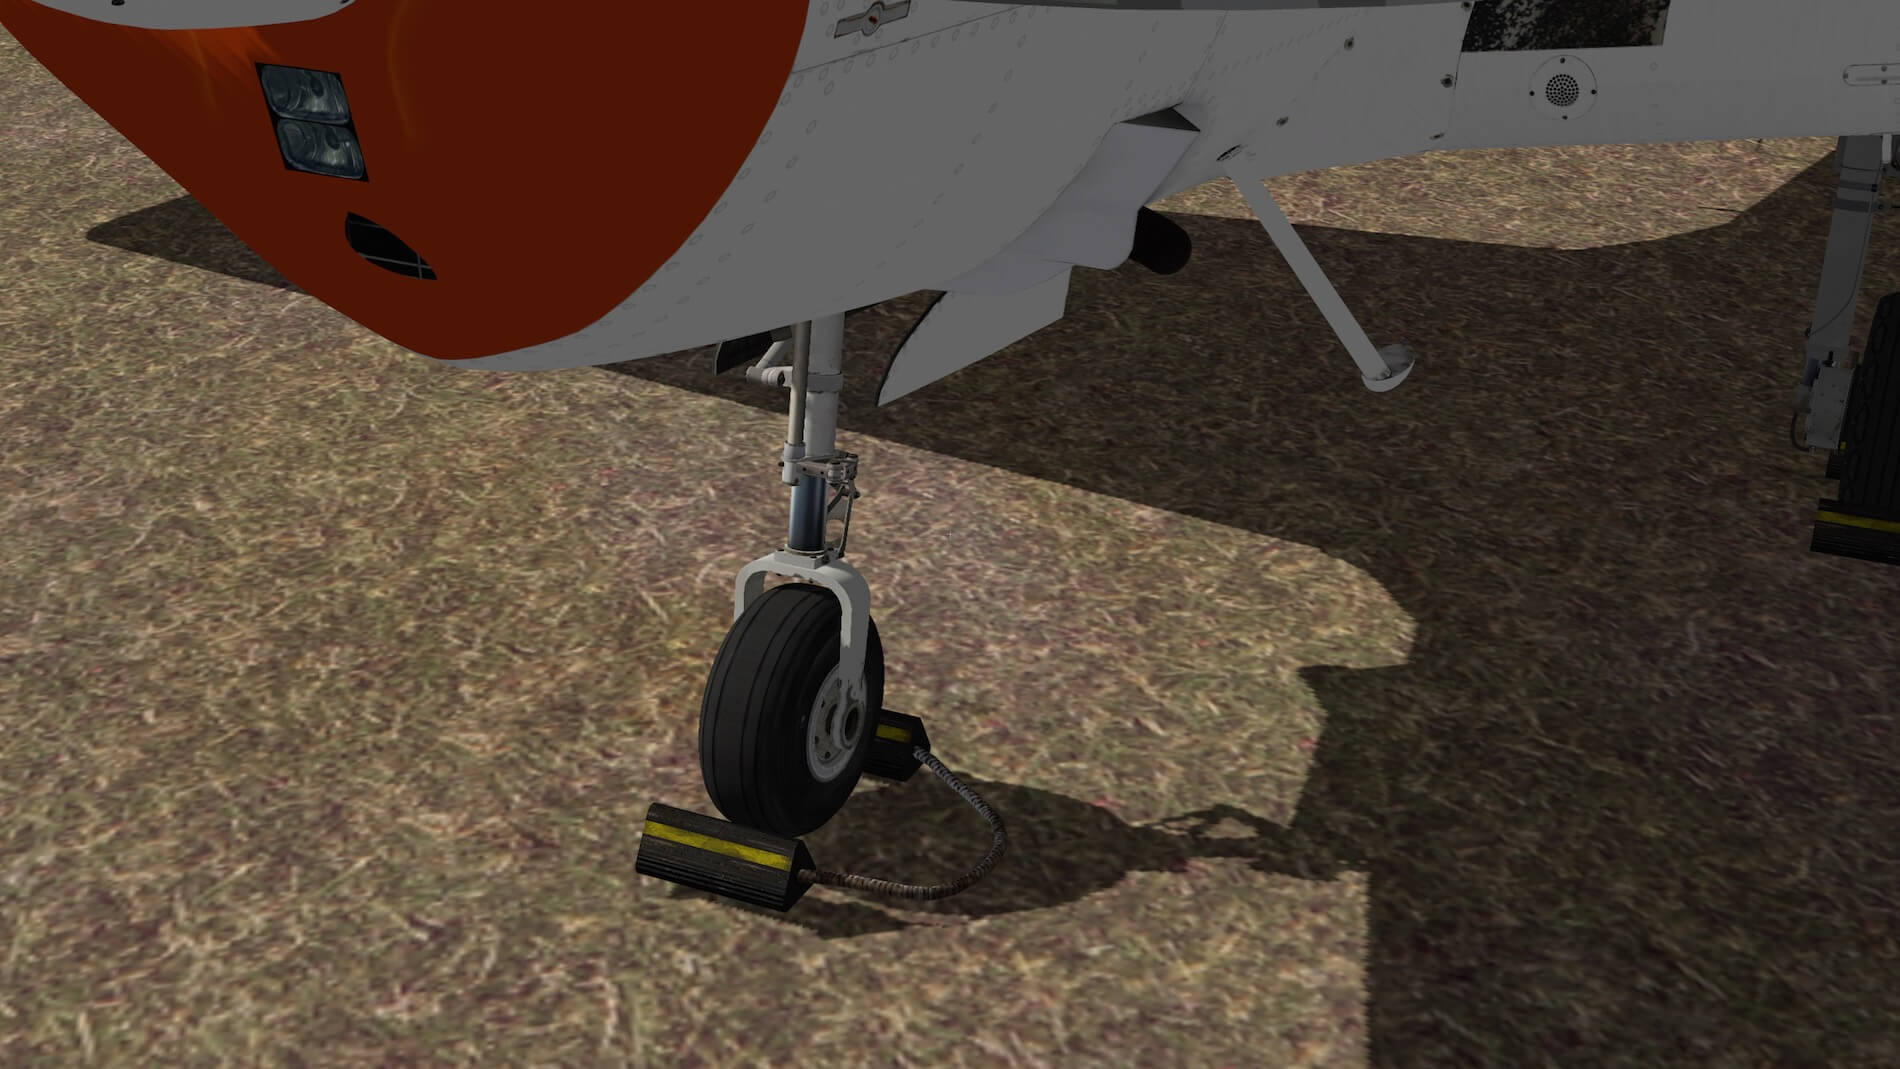

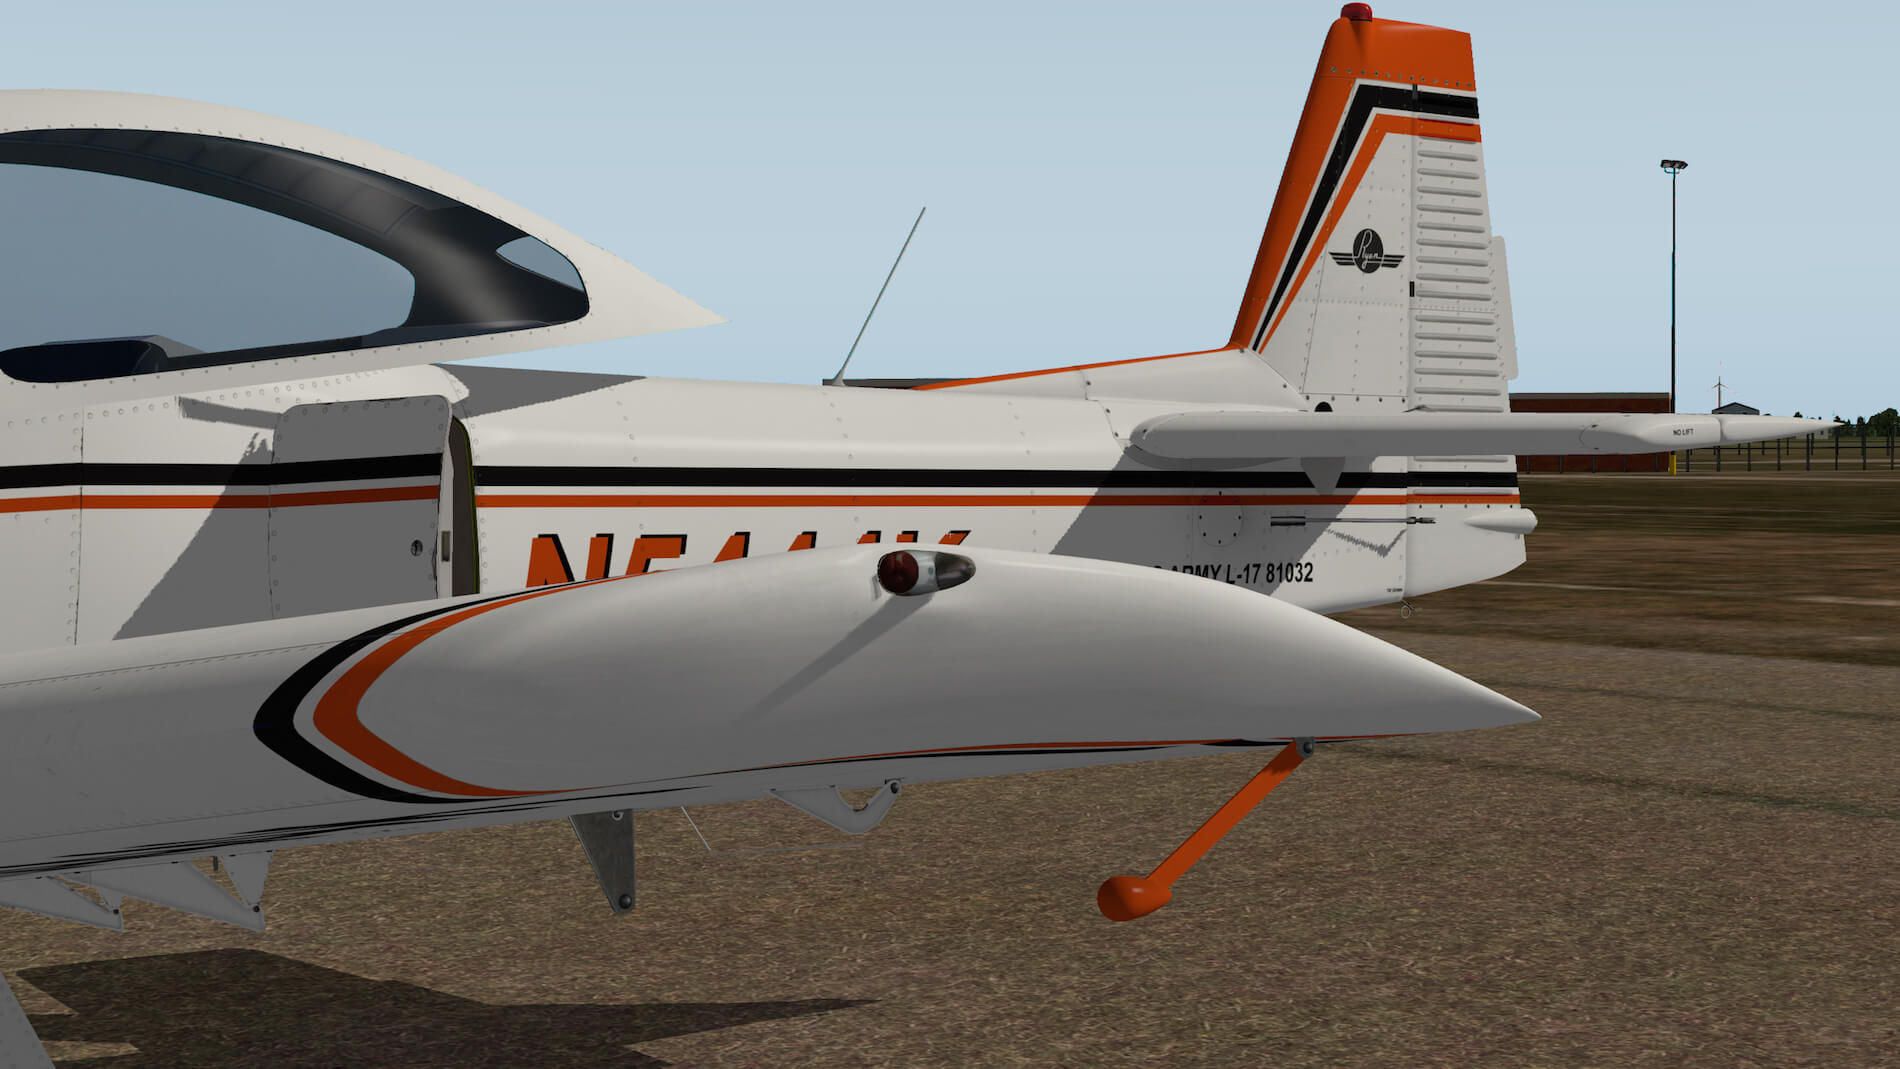
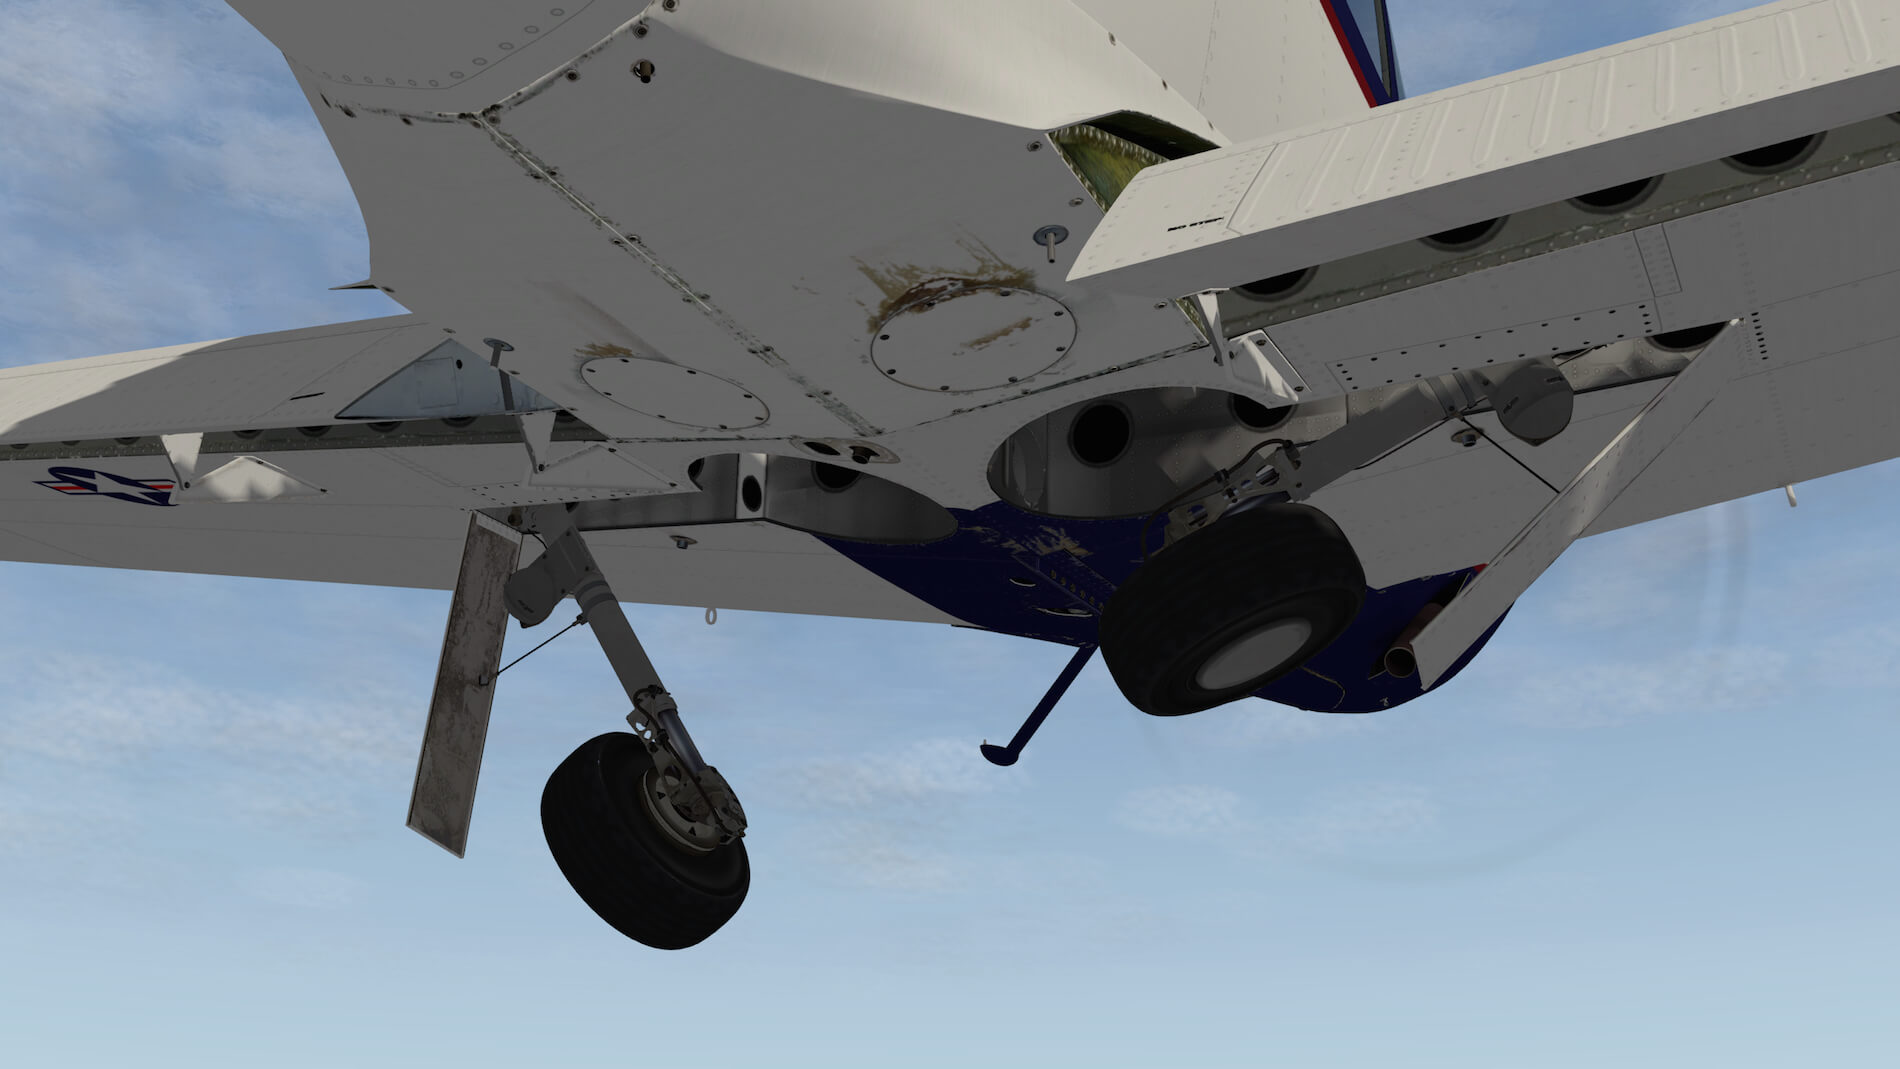
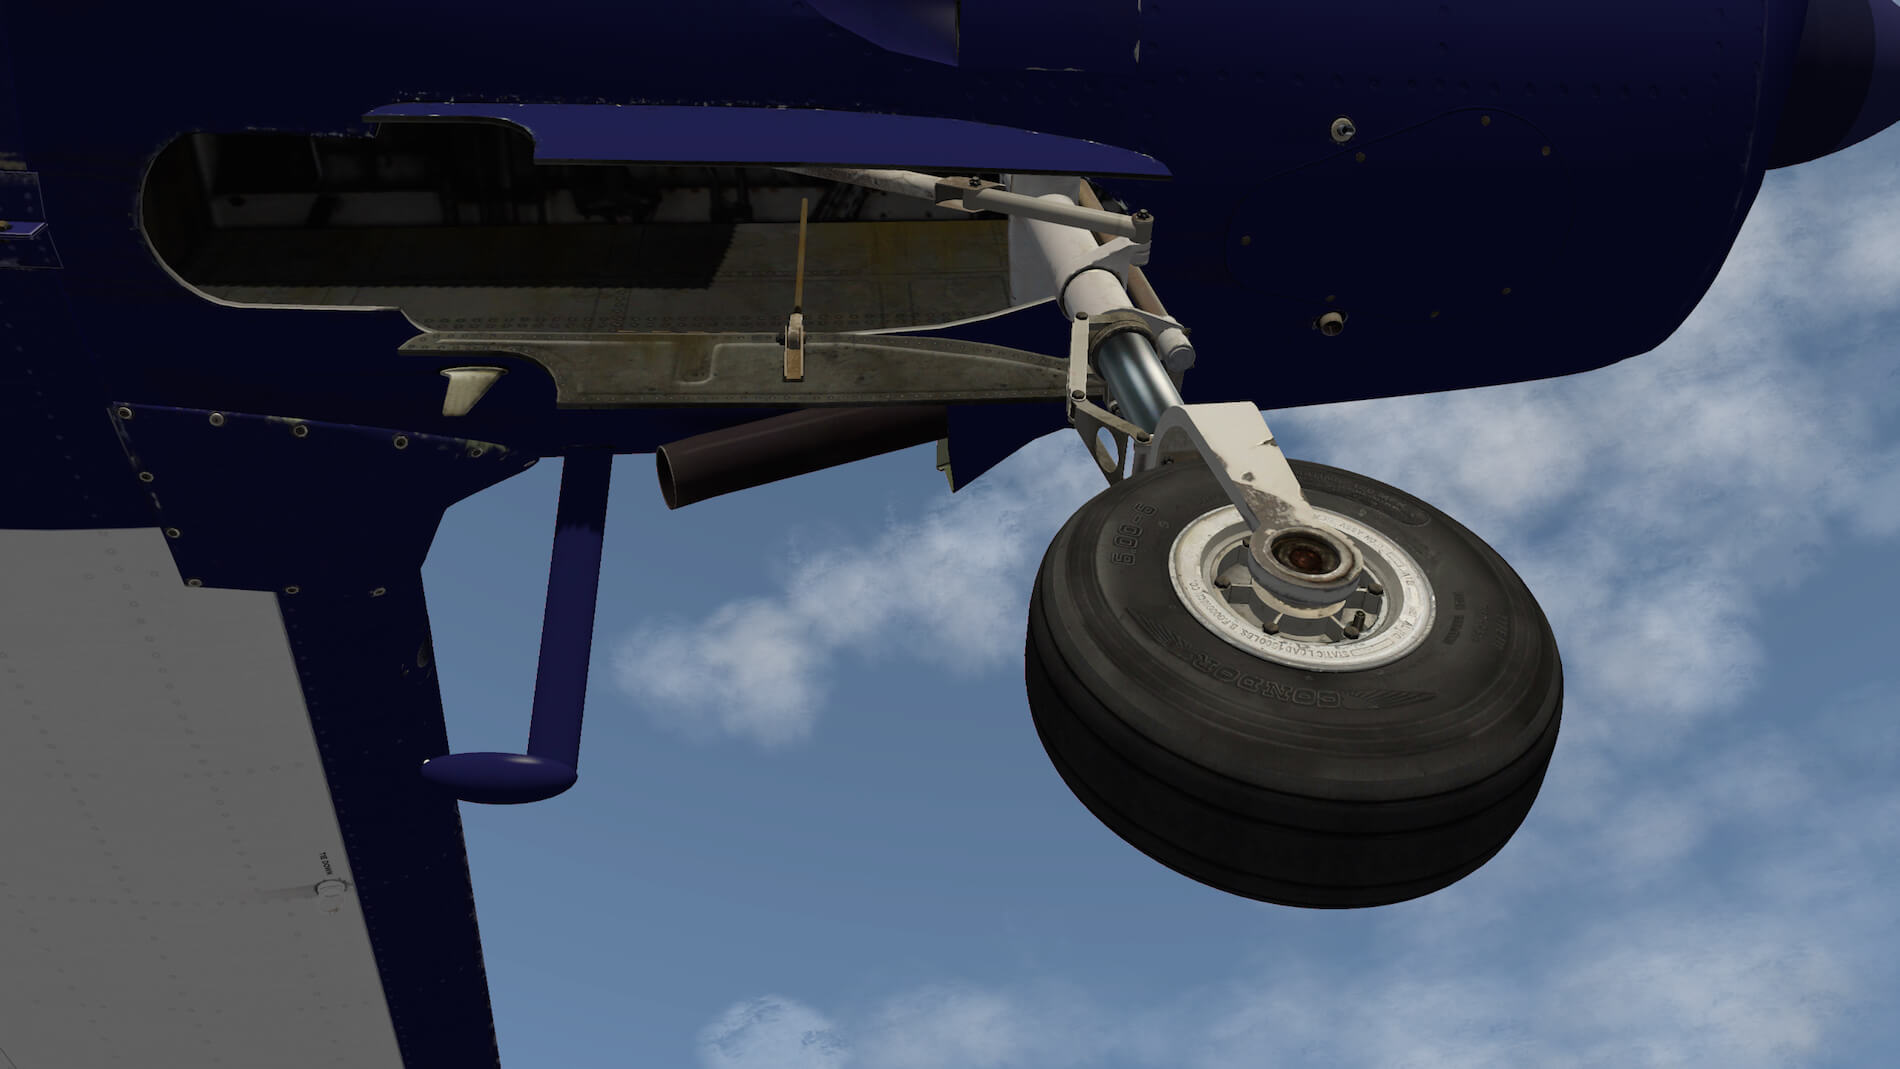
The Ryan Navion is a relatively short aircraft, small vertical fin, large nose cowling and a huge canopy that gives the pilots lots of external viewing. Besides that, the NLG (Nose Landing Gear) and MLGs (Main Landing Gears) are modeled with great precision and most of the parts are covered with photo real material. Not just photo real textures, no, as real as it gets. That sounds over the top, but believe me, it looks very nice and realistic. Where applicable and/or needed, you can see scratches, weathered look and more of that. What I can remember from my real GA aircraft maintenance experience is that the lack of some paint on for example the NLG fork, as it is modeled on this Navion, wasn’t acceptable and needed to be treated to prevent corrosion. Ah, what the heck .. this is a virtual aircraft and corrosion won’t appear!
I have no problem finding out that I’m dealing with a Hartzell propeller blade since these decals are of a high resolution and thus a good quality which is very good news. And this is not the only decal that is very sharp. Near the top wing root, you’ll find the fuel cap and clearly can be read that you need AVGAS ONLY with GRADE 100 GRADE 100LL and the wing has a CAPACITY of 39.5 US GAL. Well-done guys!


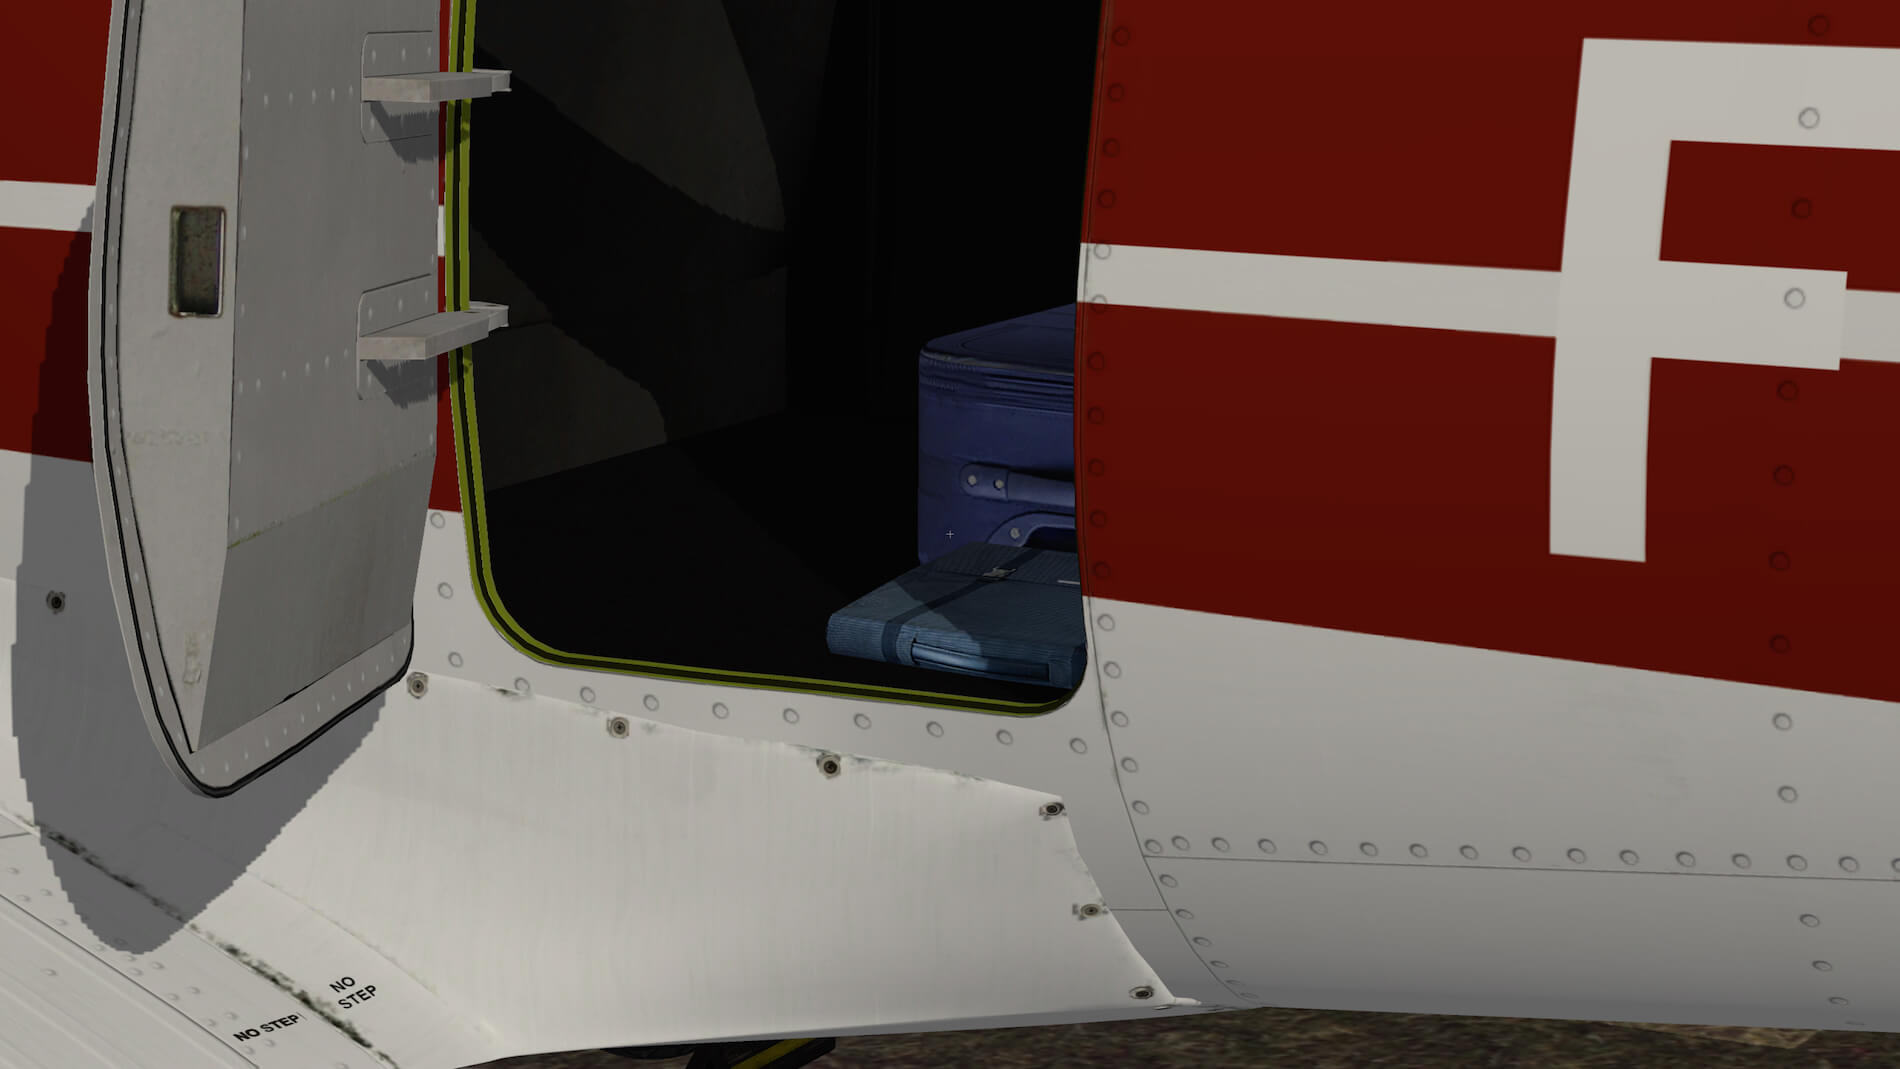

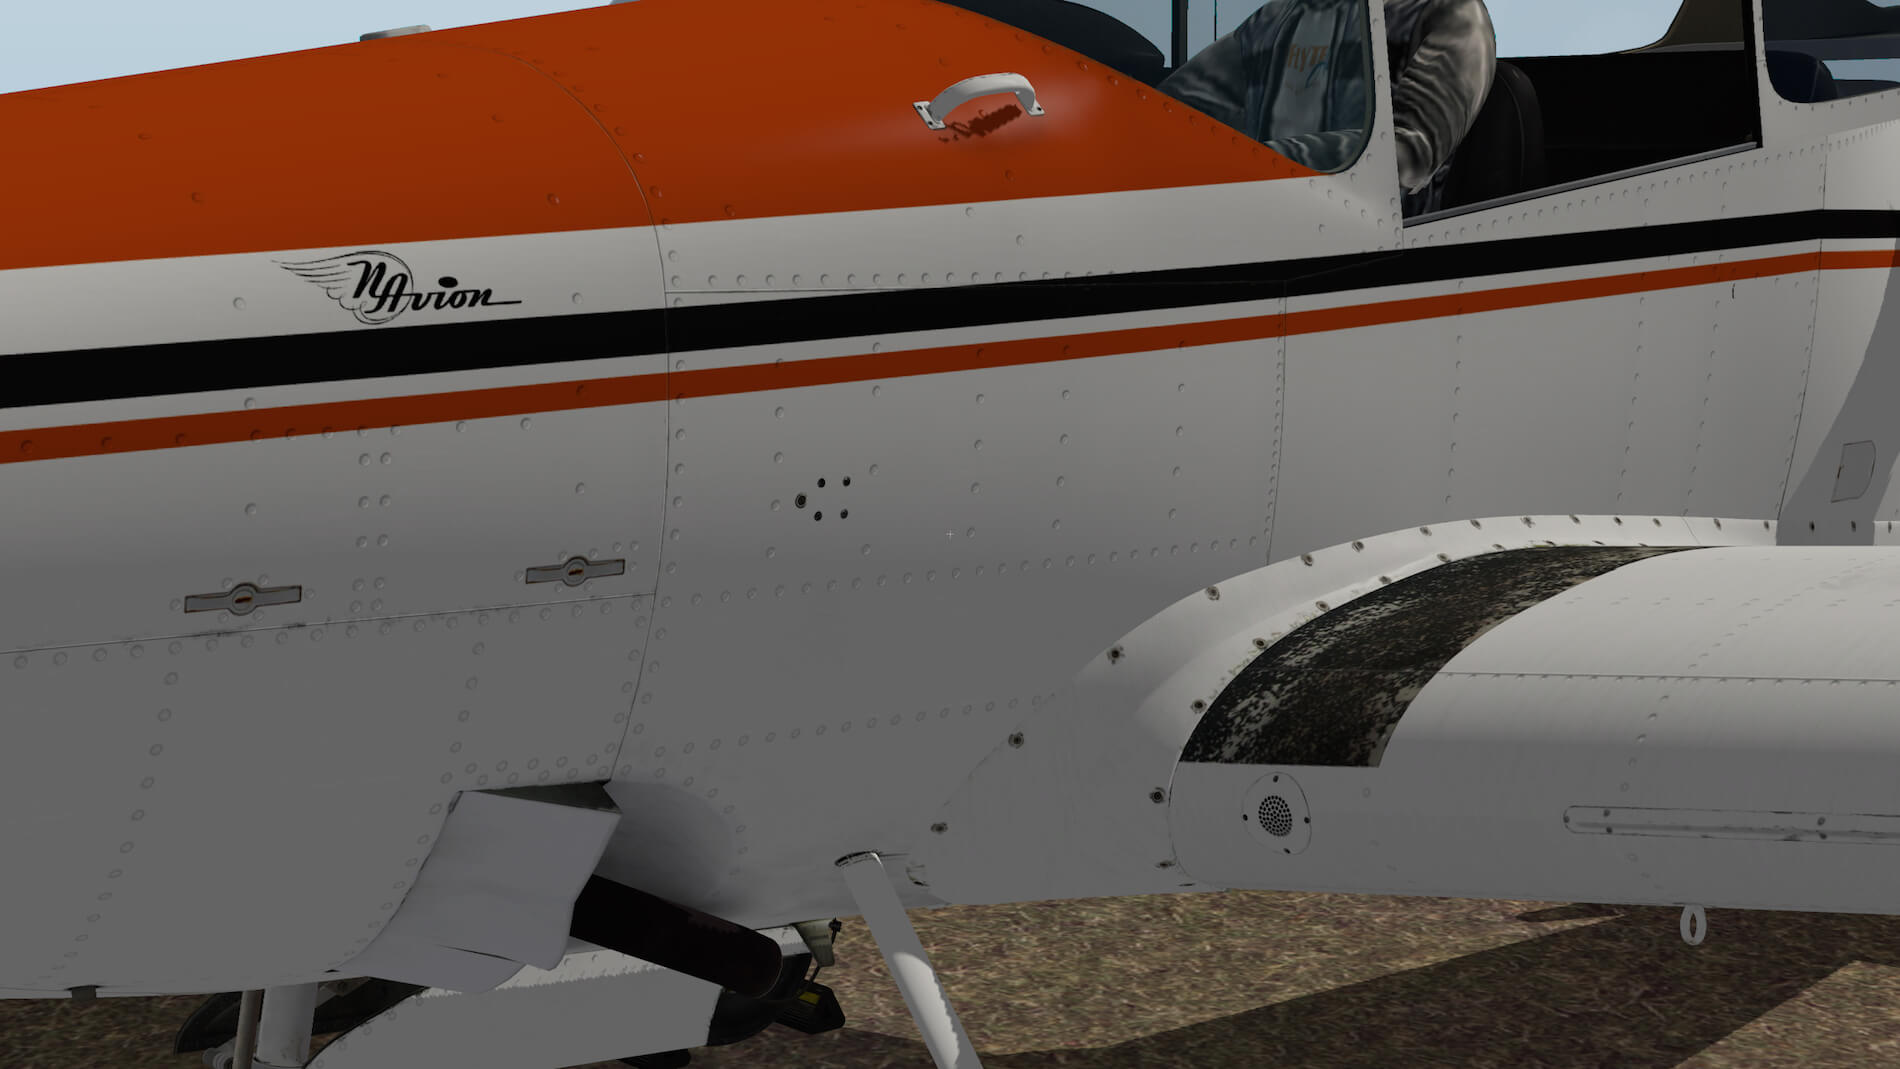
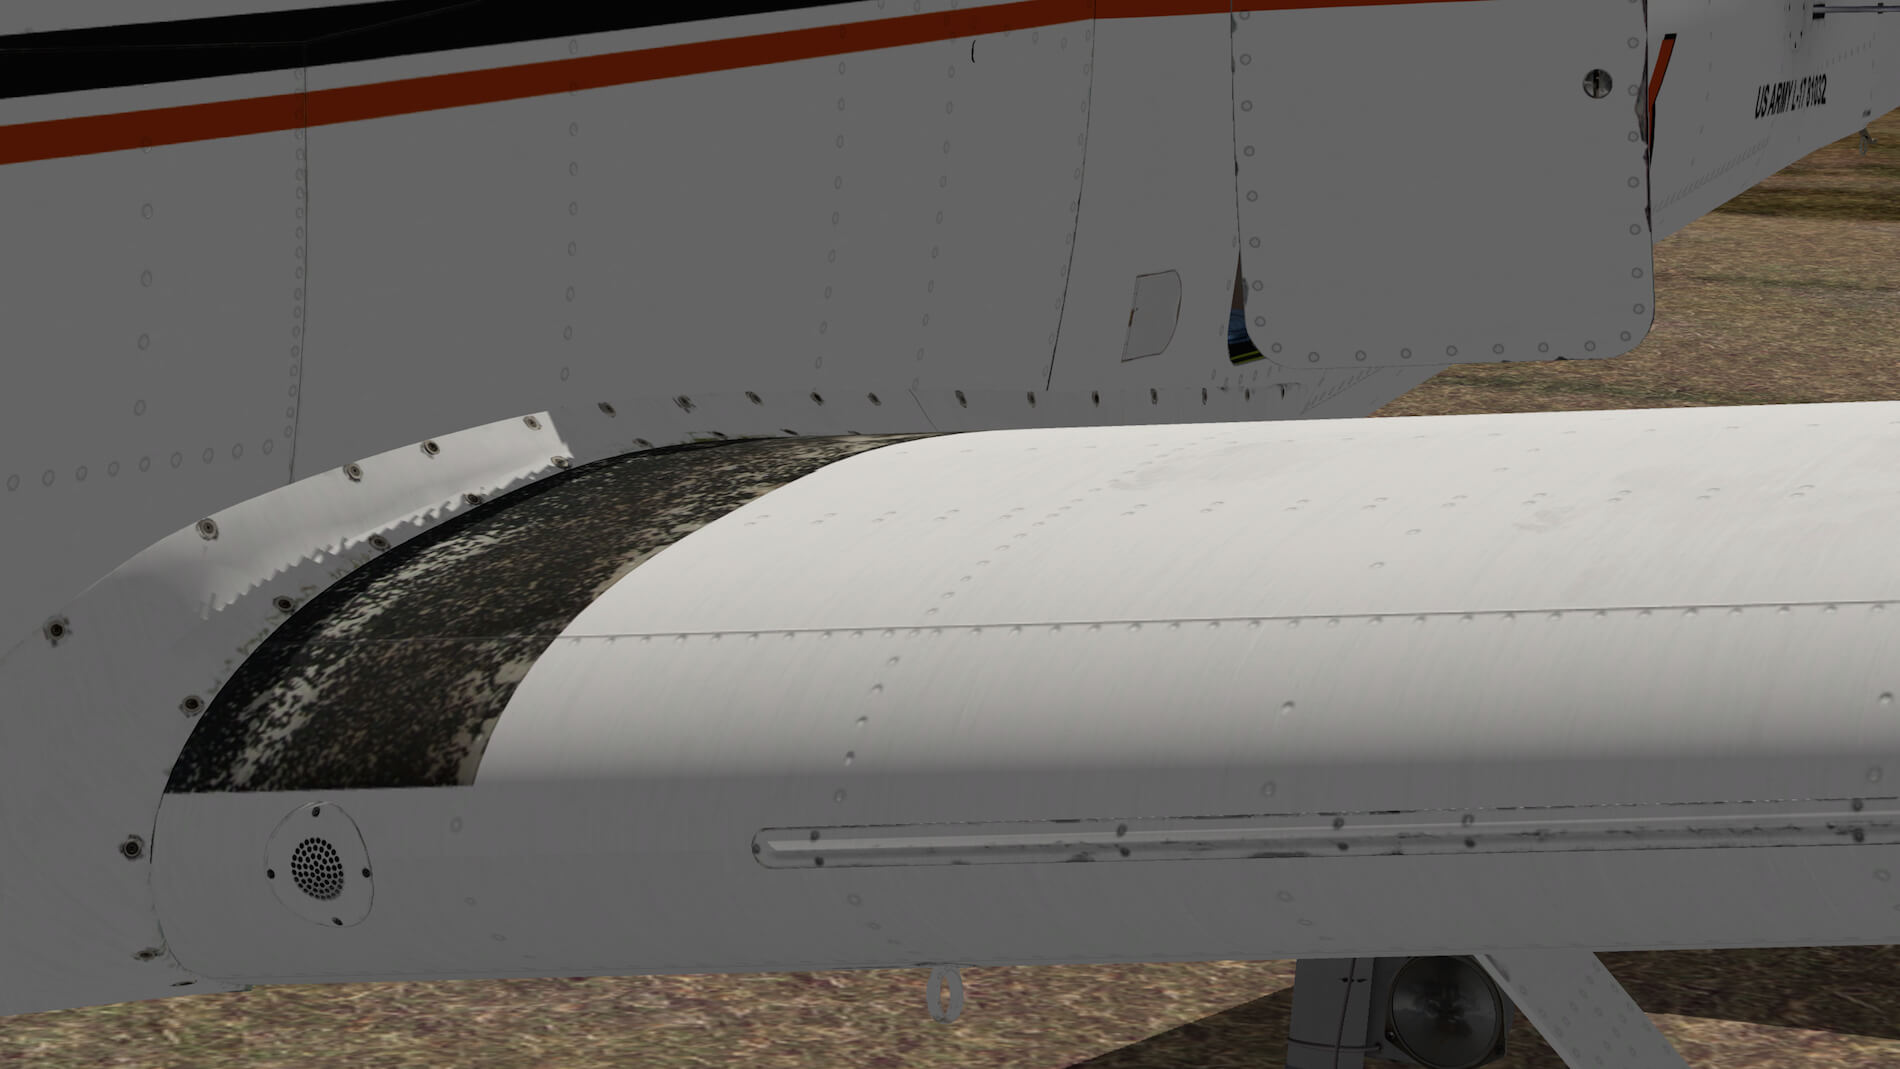
Walking along the engine cowling with perfectly modeled latches, I’ll walk along the wing leading edge to the wing tip. Not so spectacular, but it’s all made with great precision and eyes for details. The aileron balance weight underneath the wing, the aileron and flap hinges underneath the wing, all looks gorgeous. Approaching the aft wing root left hand side, I spot a small panel and directly behind that the cargo door. Not just a door, but completely modeled on both the outside and inside. Outside is logical, but the way it is modeled on the inside is very nice. Although the cargo compartment may be dark, I can see that the walls, ceiling and floor are textured. The area is completed with the presence of a large and small bag. I wanted to write down that it looks odd to me that the white divider line on the fuselage from the front to the tail runs thru the aircraft registration. Normally you expect that a line that runs from the front to the rear of the fuselage stops at the point where the aircraft registration is placed. But after a double check on the Internet, it turned out that Navion F-BAVZ has a white line that runs thru the registration.
Although odd, it’s as real as it should be.
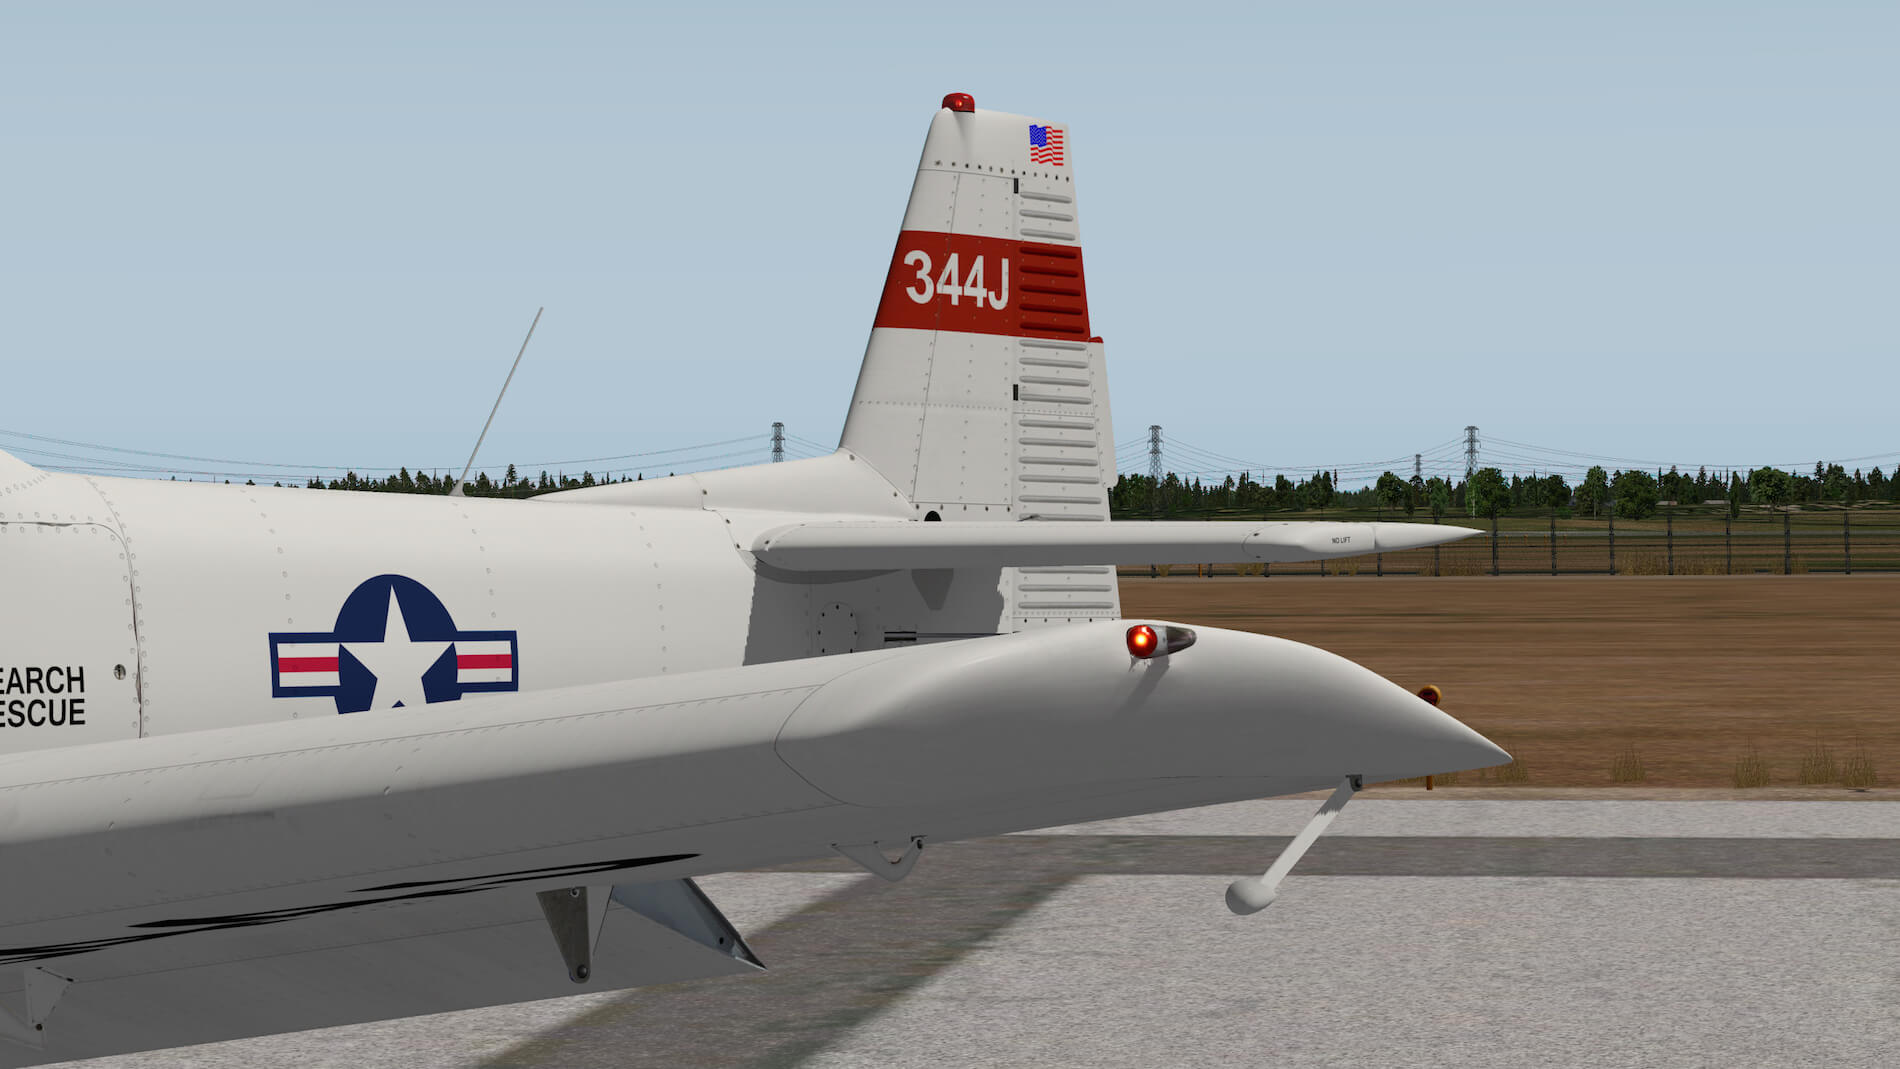
Can I expect a different quality at the tail or ….?
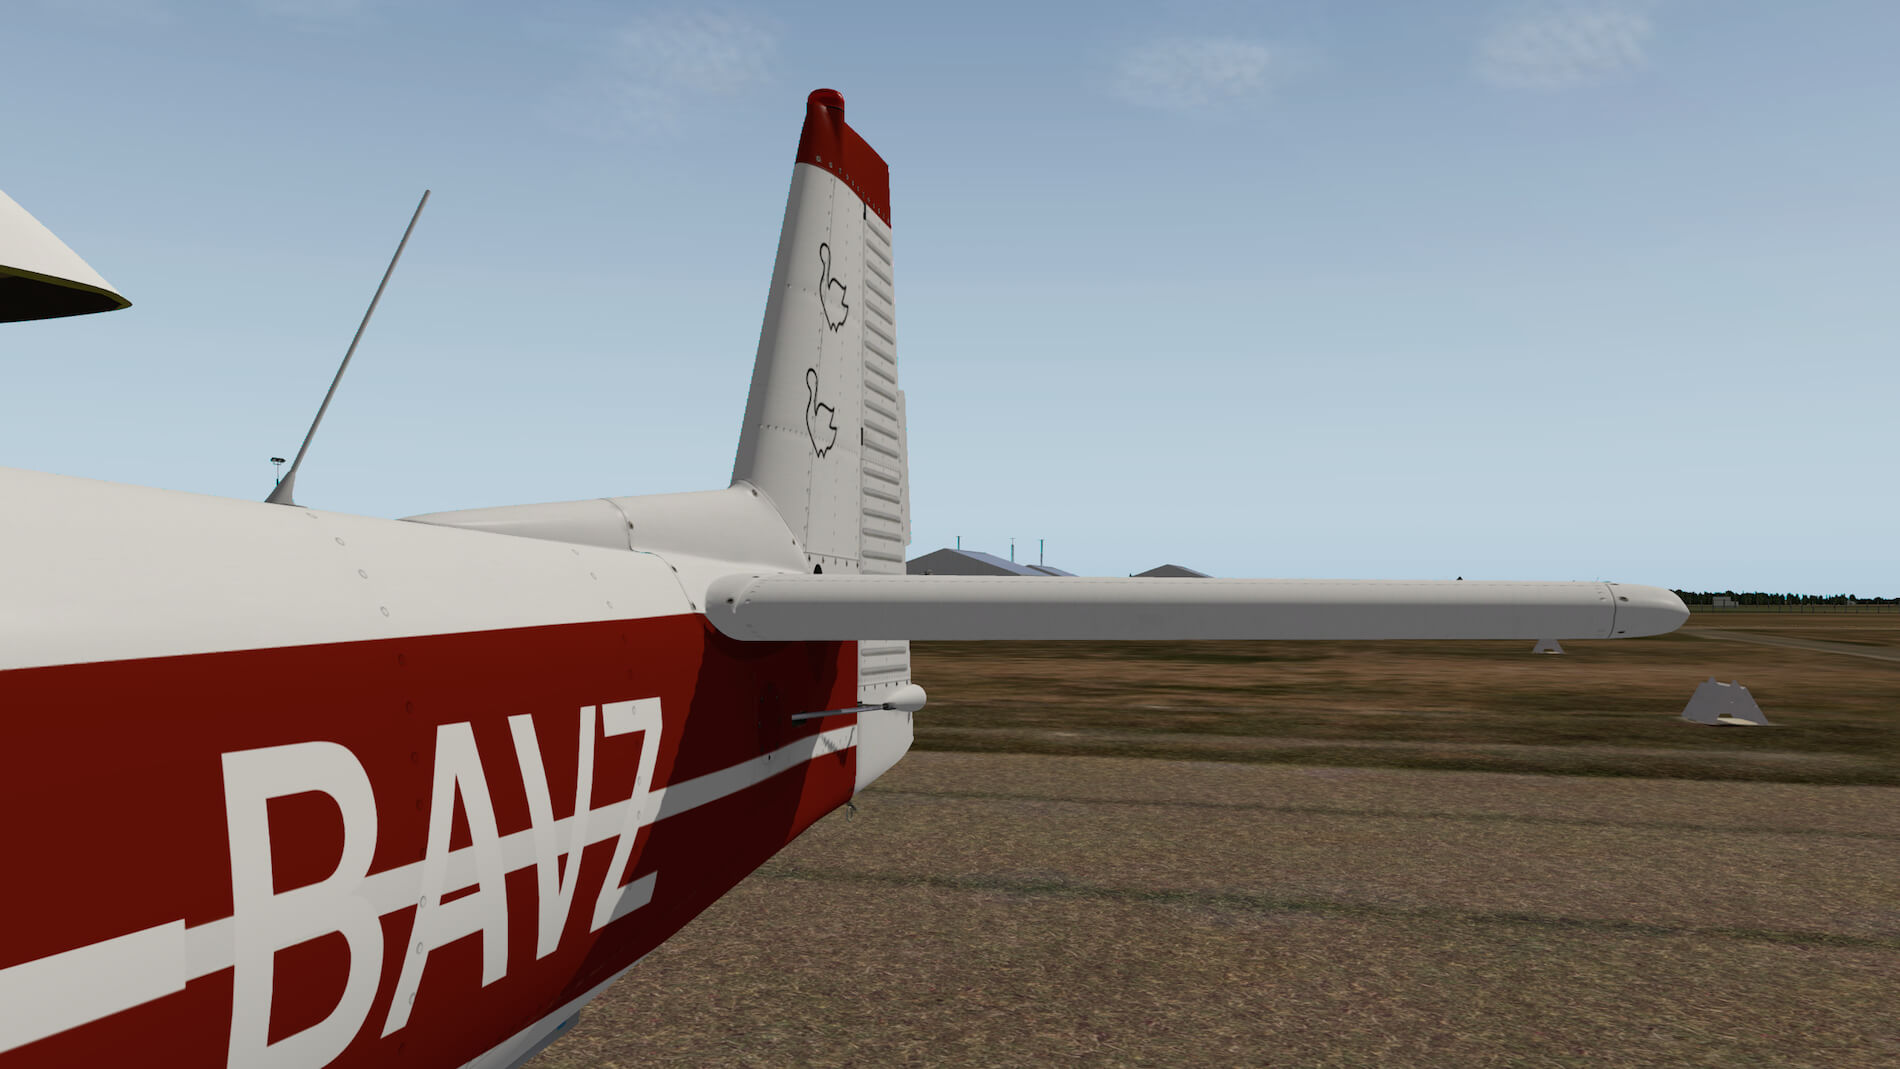
No, the tail is modeled with the same high quality, precision and eyes for details as the rest of the aircraft. Decals, wherever applicable, are razor sharp. The same implies for the rivets, screws, rudder and elevator hinges. It all looks as real as it gets. And not to forget the rudder control rod, the mooring hook at the aft bottom fuselage and what do you think about the white navigation taillight and red anti-collision light on top of the vertical fin. But there’s one thing I may not forget since it’s so tiny and so unbelievable sharp. That’s, I think, a small light brown/yellow stainless steel plate with the aircraft data on it. It indicates “North American 1946 Navion S/N NAV-4-295”.


What is the overall conclusion?
A gorgeous modeled vFlyteAir Ryan Navion! Time for the test flight?
NZCH VFR Flight
Some things first
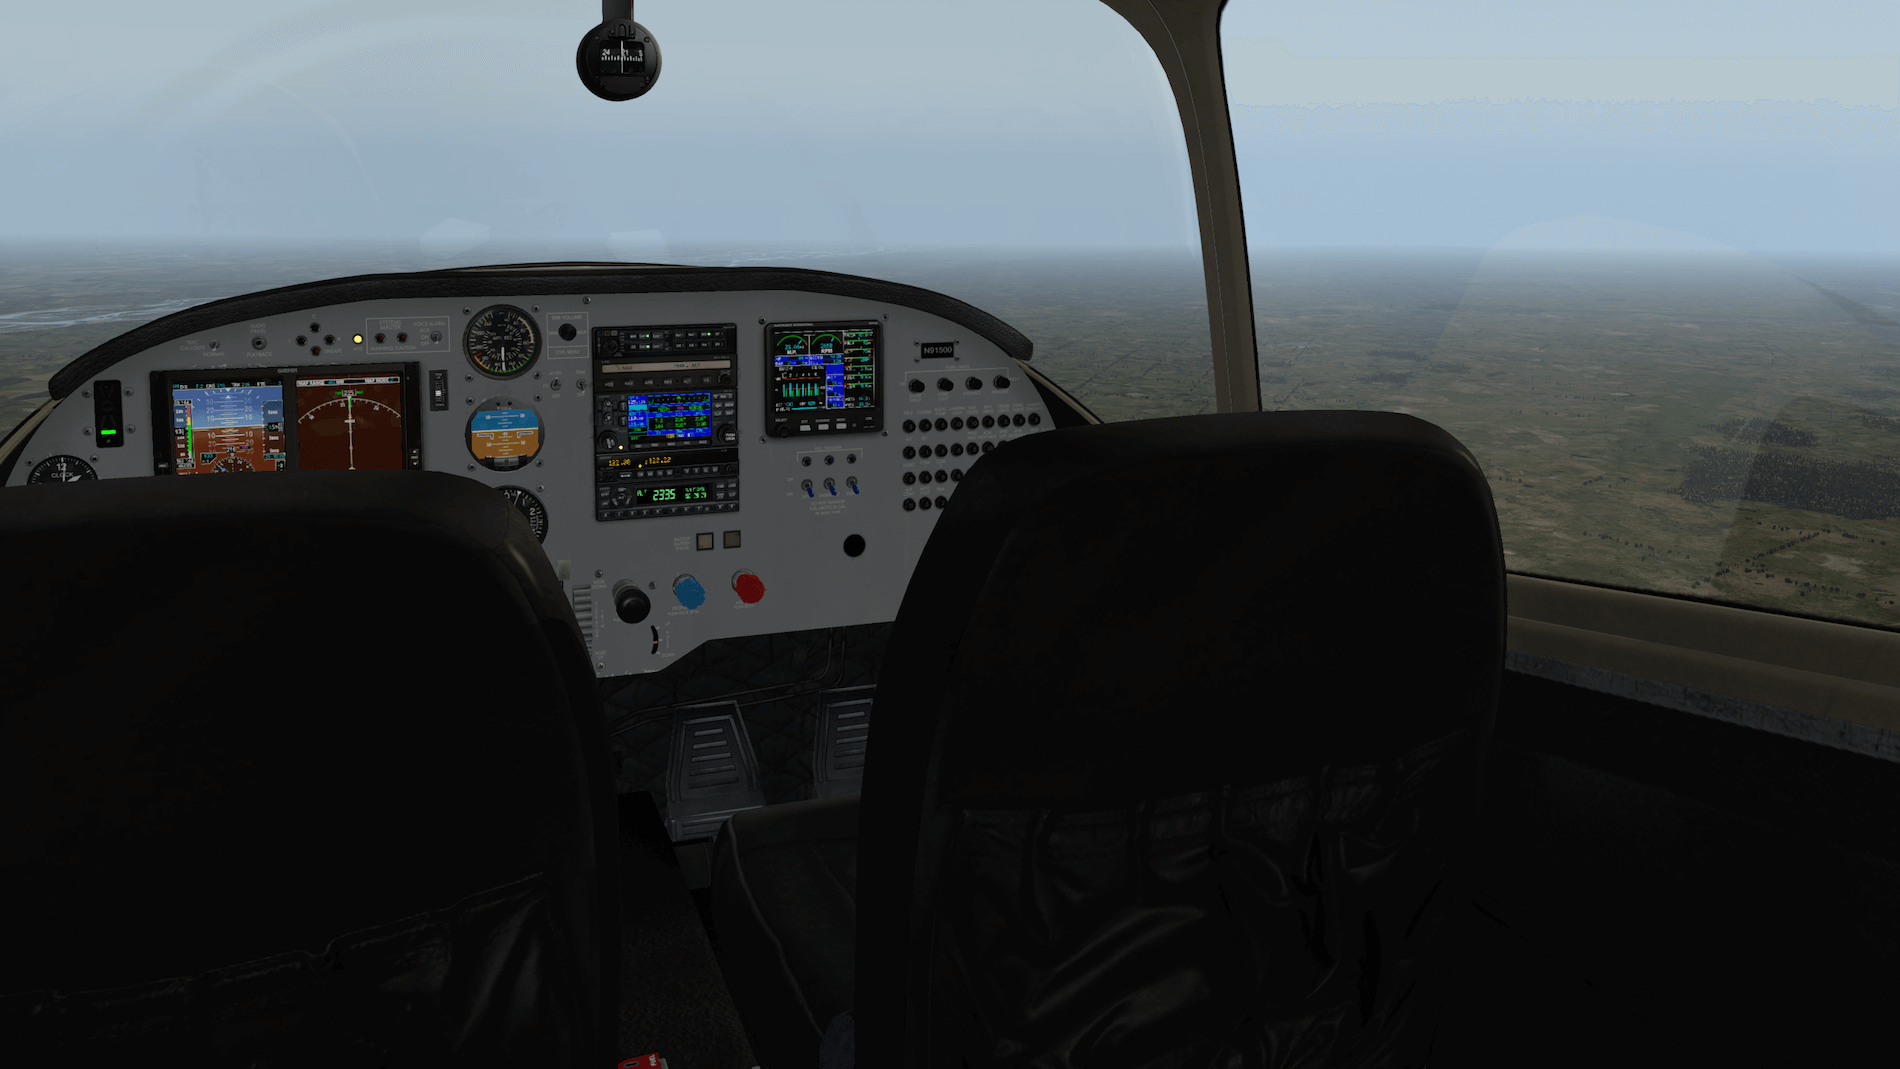
You can jump into the 2D cockpit (keyboard command W), but go for the 3D cockpit (keyboard command Shift+9). Digital instruments or Display Units like the Garmin GDU 620 PFD/MFD and MVP-50 Engine Monitor will cost some additional frame rates then ordinary old-fashioned instruments, but the frame rates impact is not high so therefore go for the 3D cockpit.
There’s no need for me to explain every instrument or Display Unit, switch, button or selector since all of that is explained in the NavionB_UserManual Acrobat file. But that doesn’t mean I can highlight a couple of other things.
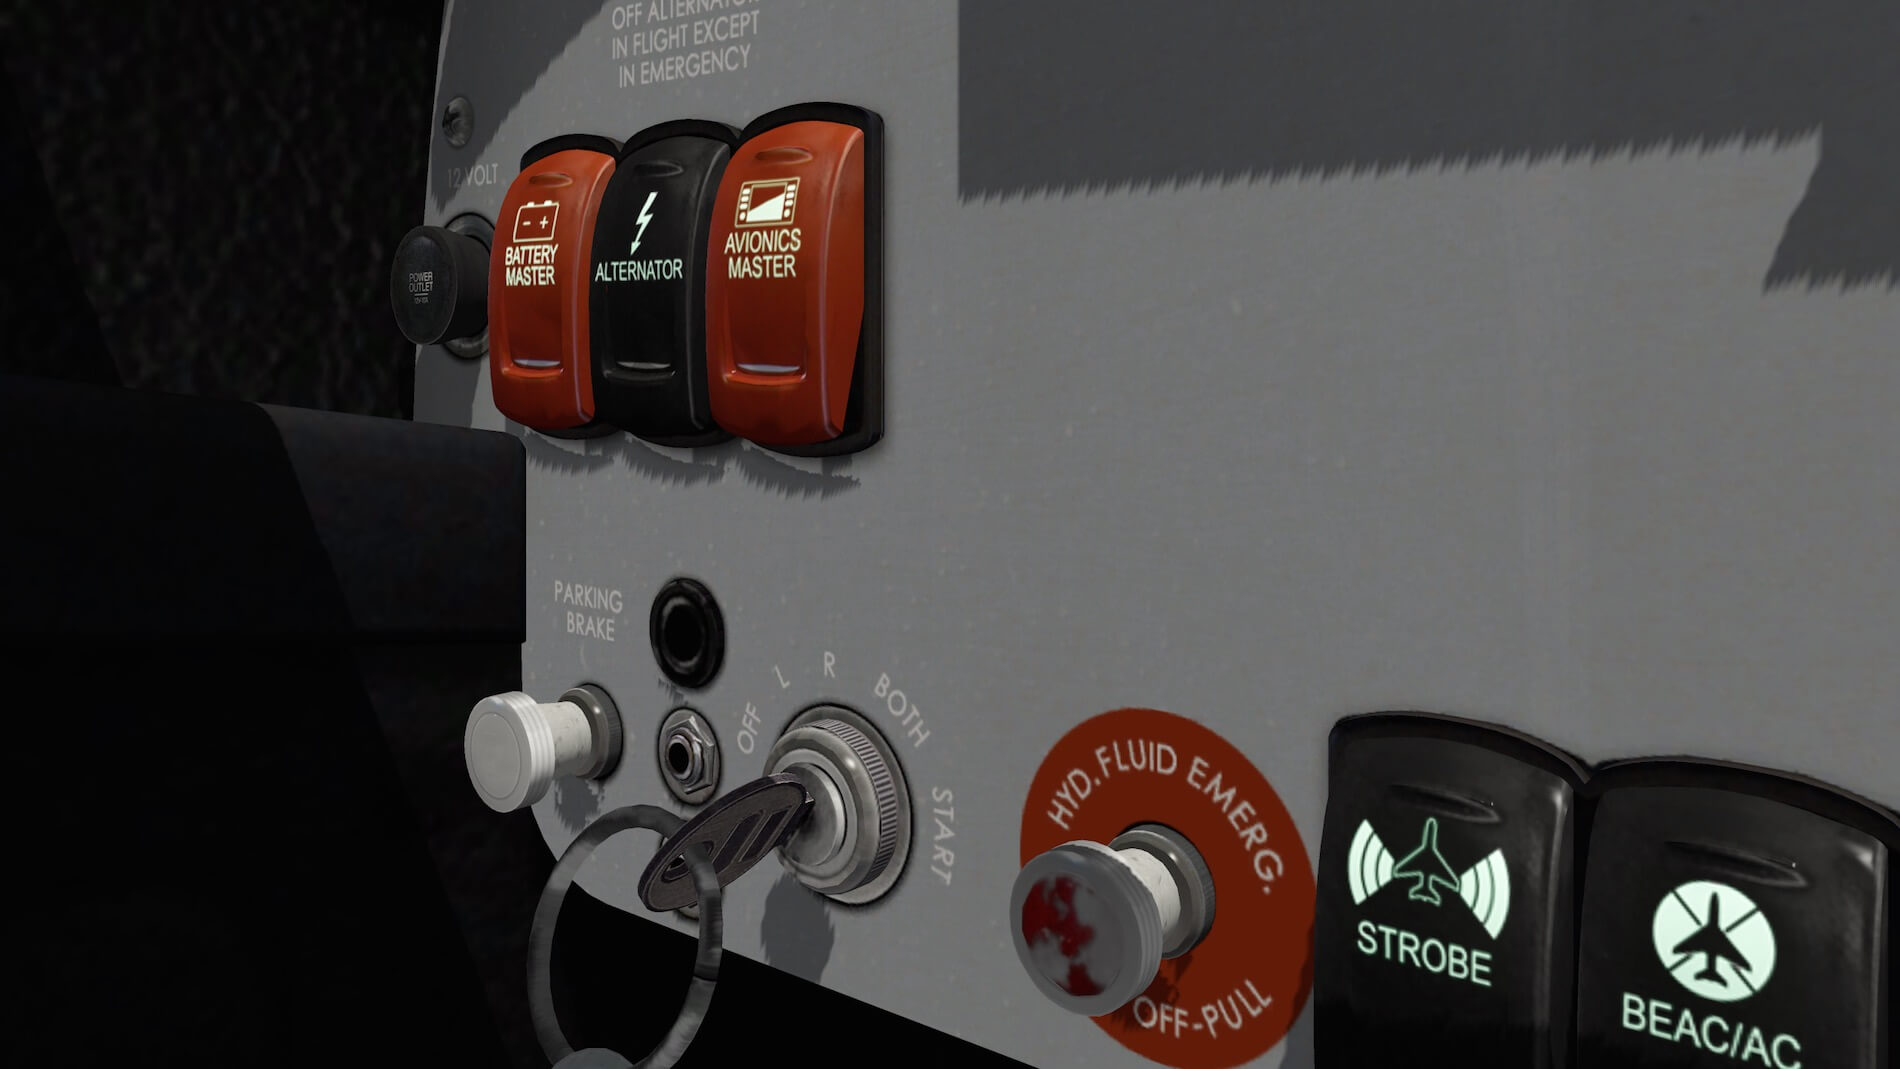
You can let the flight yokes disappear and reappear by clicking the yoke rod. In particular the left hand yoke is easy to get it out of view because if covers a large amount of switches. By the way, these red and black switches situated at the lower left side of the instrument panel are very nice and well made. Not only that, the green integral lighting gives the switch, when switches ON, a mysterious look. When you look for the first time to the light grey “Aluminum” instrument panel, you could get the impression that it’s not really great modeling, but keep in mind that this isn’t a modern aircraft. In those days cockpits weren’t fancy, but just basic and that’s what this vFlyteAir is trying to offer. Just a basic, as close as possible realistic, light grey Aluminum panel with some old fashioned instruments mounted in it. They are mounted in a way we’ll never do that these days with modern instruments or DU’s. For now, this is enough. When in the air, I’ll try to highlight a couple of more things about the Garmin 620 PFD/MFD and the other digital instruments.
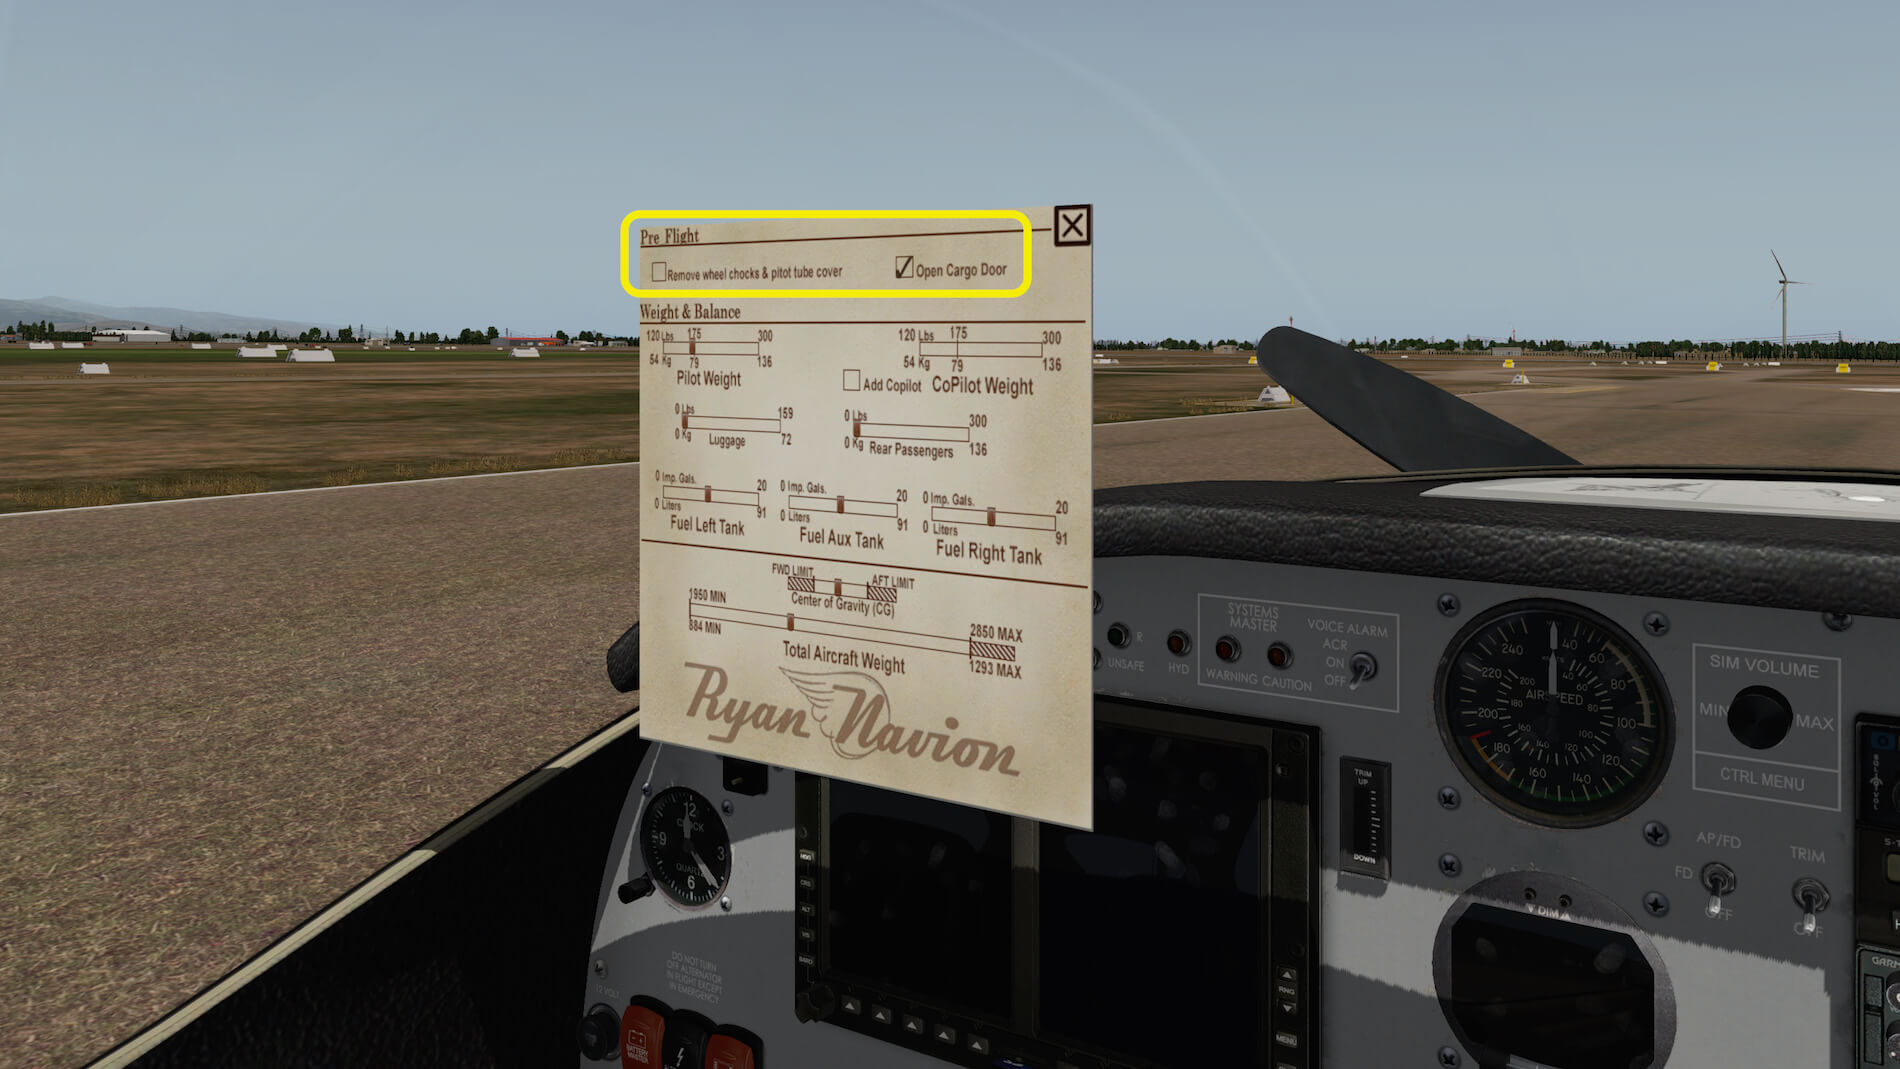
One more thing before powering up the systems and start the engine; the CRTL MENU hot spot on the instrument panel right of the AIRSPEED indicator. This popup window is basically divided into two parts:
– Pre Flight
– Weight and Balance
The Pre Flight section allows you to control the cargo door and control the presence of the wheel chocks and pitot tube covers. The Weight and Balance section offers weight control for the pilot, co-pilot and rear passengers via a sliding bar. The sliding bar principle is also used for the amount of fuel in the left, right and auxiliary tanks. Below the line everything comes together in a C.G. graph and total aircraft weight. Although the popup window looks straight forward, it’s neat, clean and works well. The “NavionB_UserManual” Acrobat file offers on the pages 5 and 6 a checklist, but with version 1.1 you’ll find a “clist.txt” file. This means the vFlyteAir Navion does have the electronic checklist framework on-board.

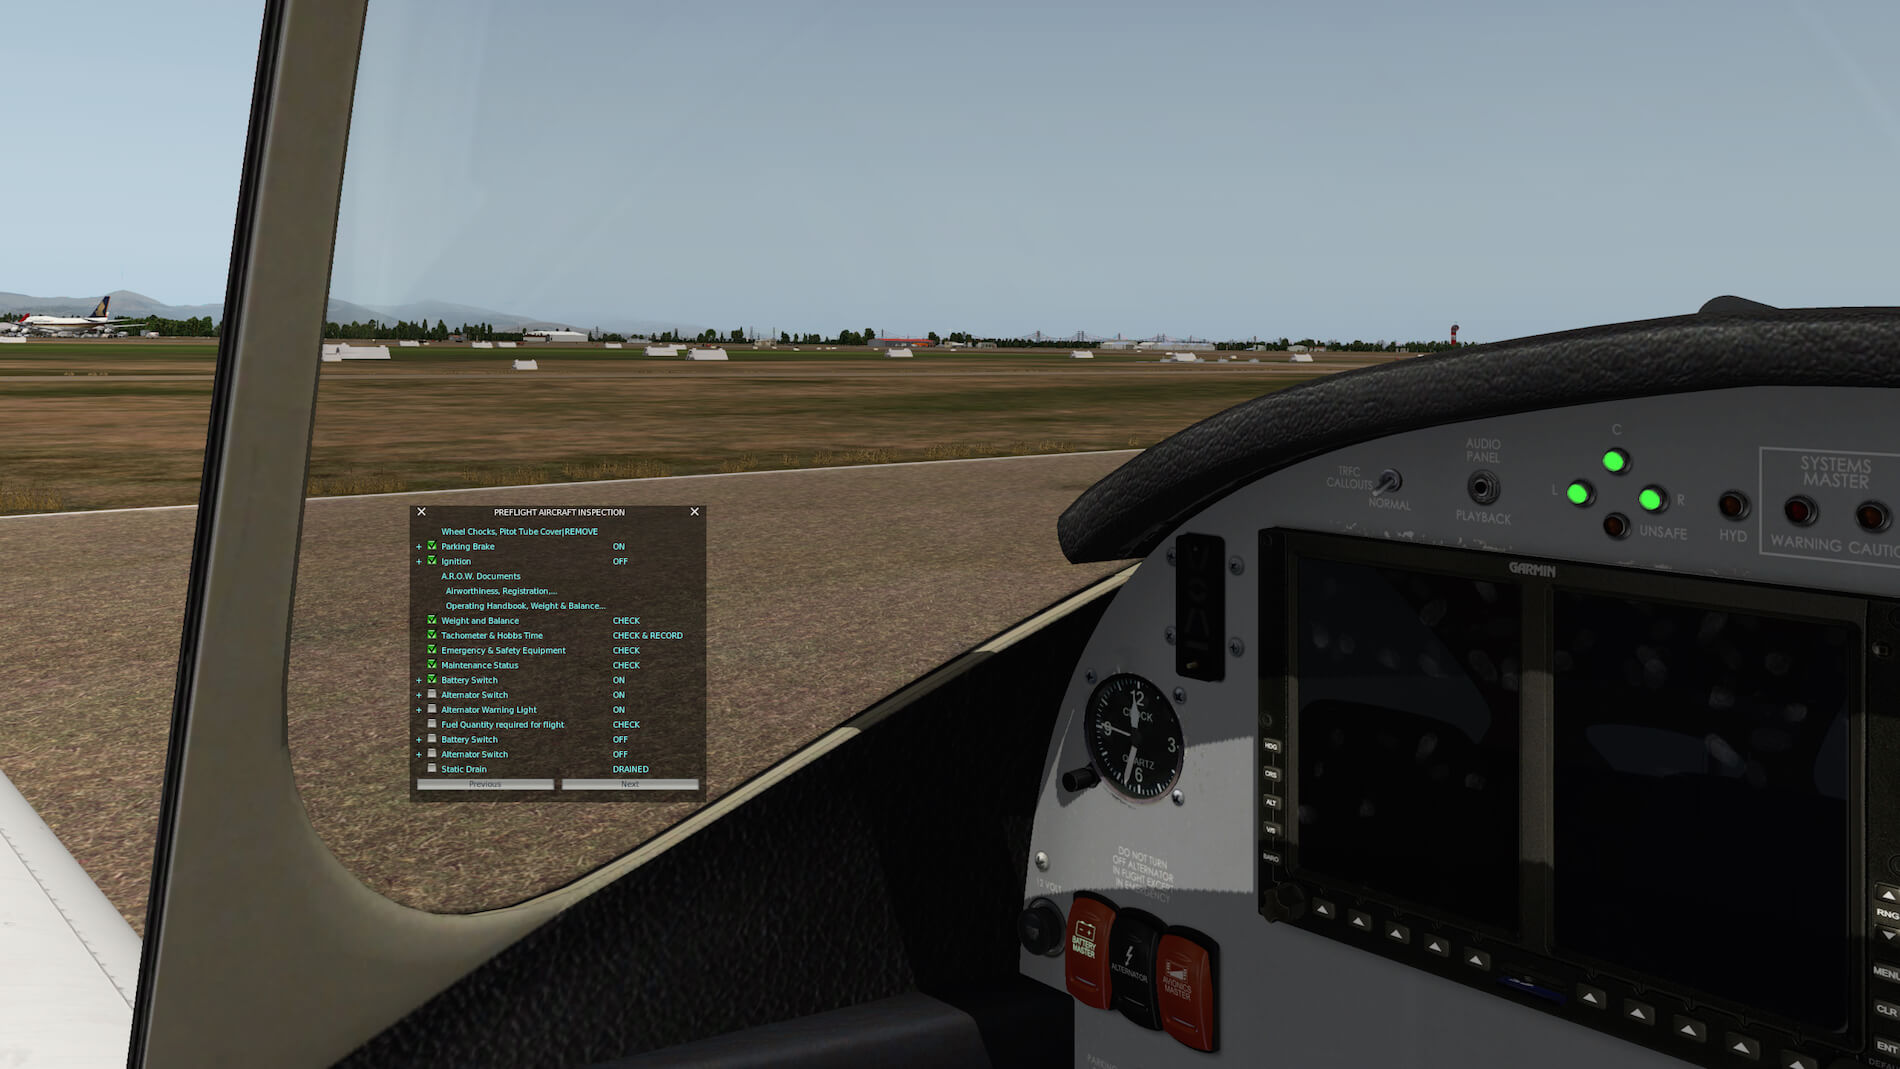
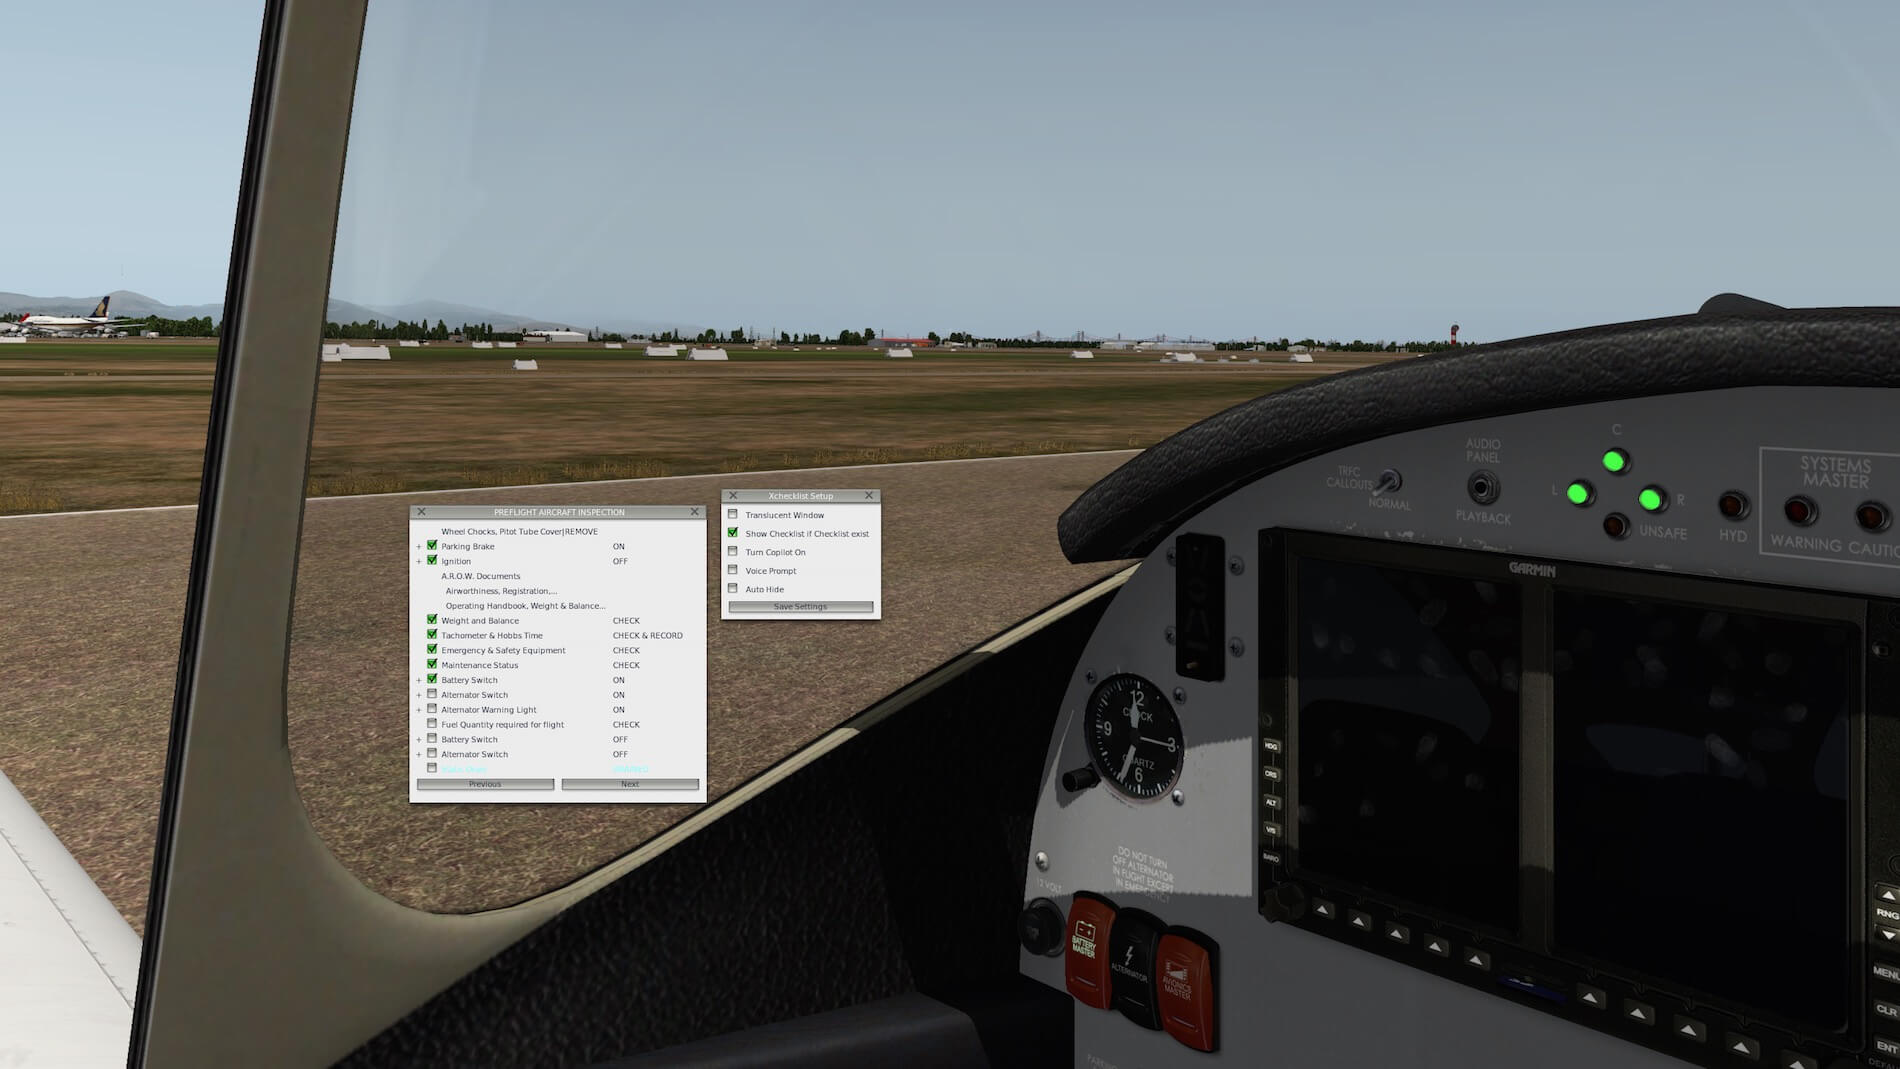
The vFlyteAir Navion popup window is basically divided in three sections as decribed before. Here identified with three colored squares. The Xchecklist plugin allows you to make several changes. One of those changes is a transparent checklist window or not.
The only thing to do to make it functional is that you download the clist plugin. The on-screen Xchecklist plugin from Michal & Bill’s is available at X-Plane.Org via this link.
Preparations
After I’ve closed the canopy, fasten my seat belts, it’s time to load your flight plan, if you want of course. I create with Online Flight Planner a short flight from NZCH to NZQN (Queenstown). It’s approximately 200NM and good to check out the Ryan Navion for the first time. This online flight planner uses the same database as RouteFinder, but with several export options, of which one is “X-Plane fms”. Unfortunately the Ryan Navion is not in the list so just choose one of the smallest aircraft from the list.

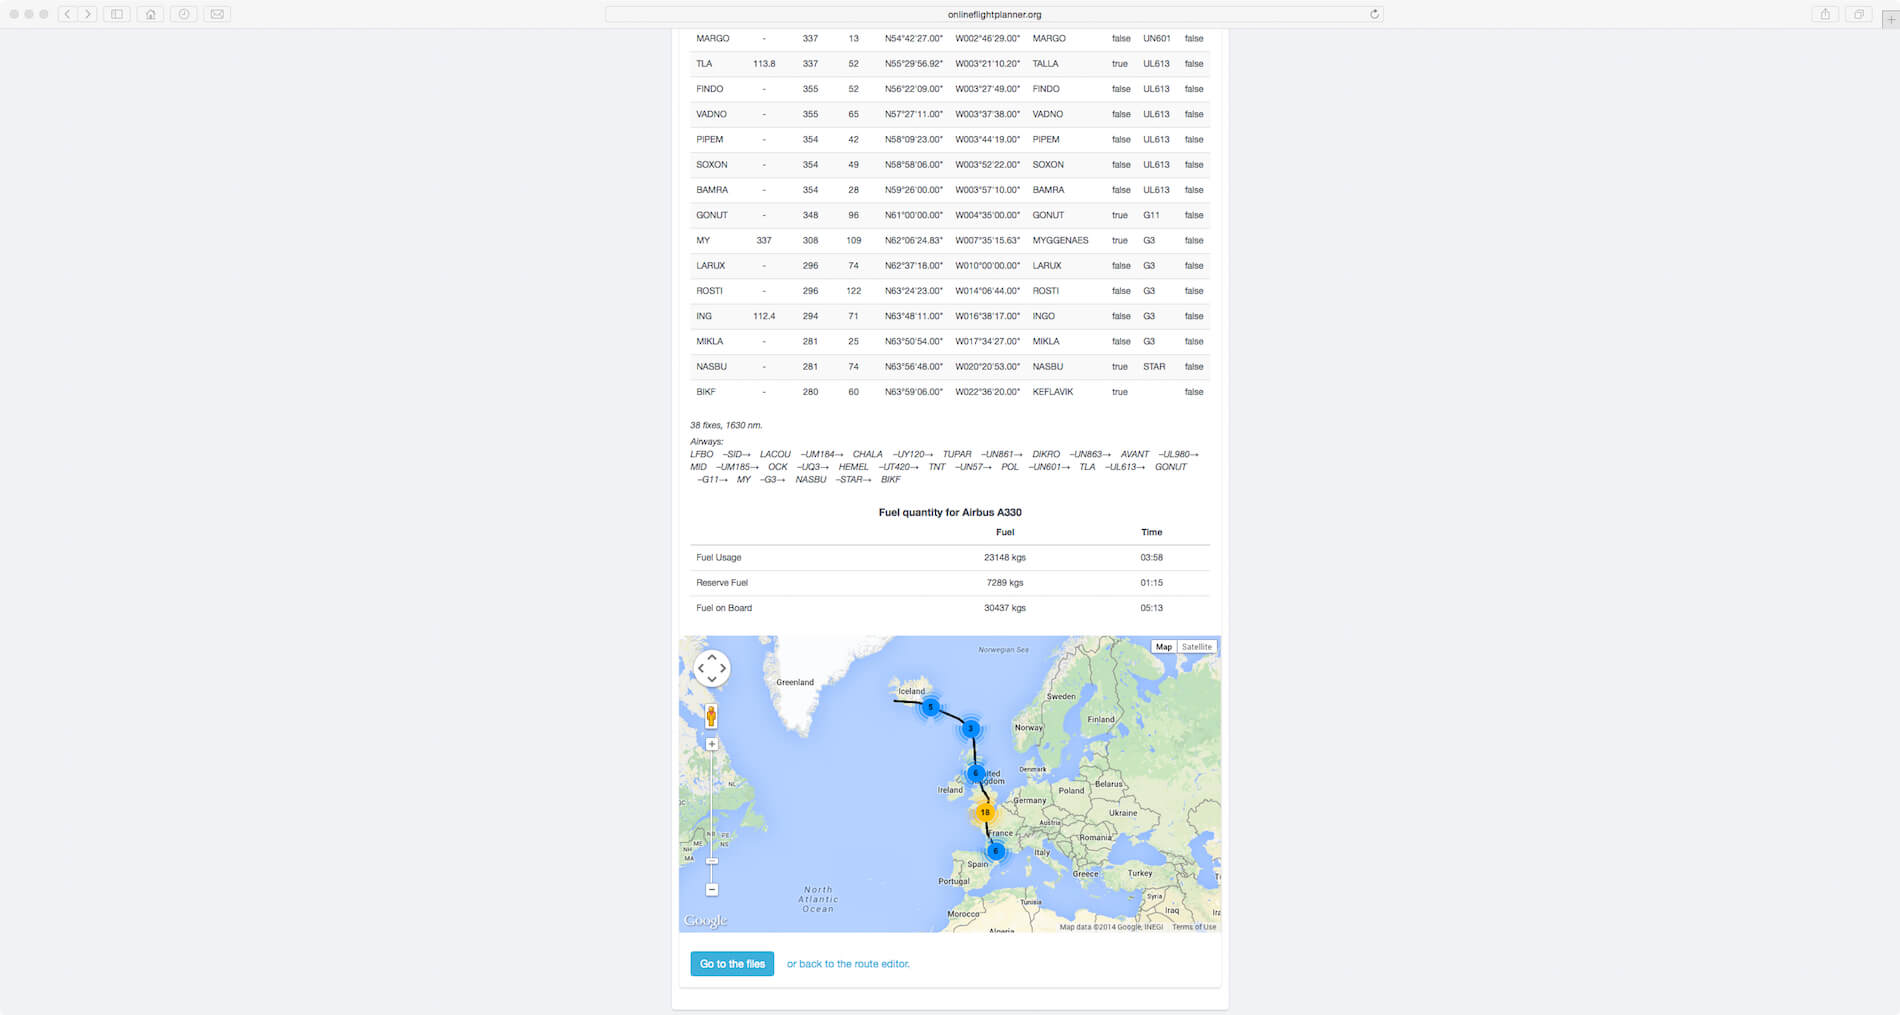
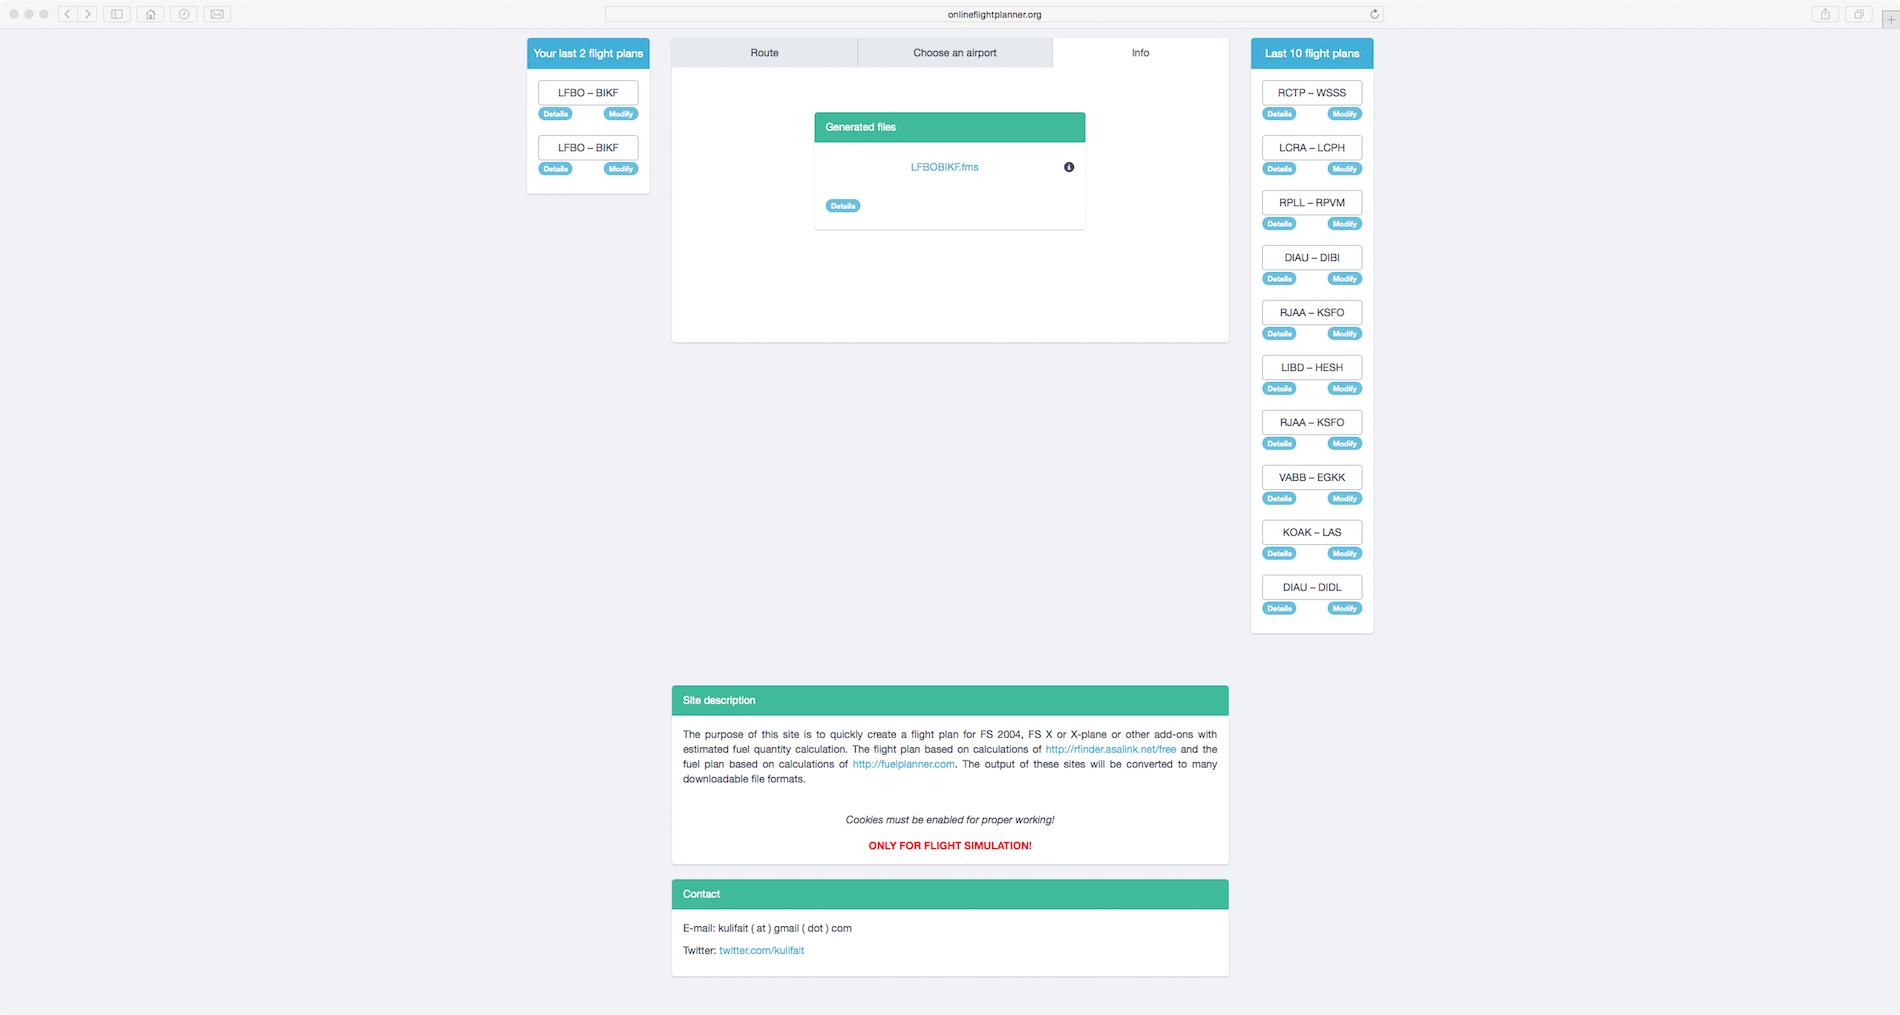
An example of creating a flight plan with OnlineFlightPlanner. It uses the database from RouteFinder. The screenshots don’t represent the flight from NZCH to NZQN.
Anyway, copy the created fms file into the X-Plane root folder Output/FMS plans. With the fms file in this folder, you’re able to load the flight plan into the Garmin GNS G430. Oops, that is easier said than done. Let me help you out with loading a ready to use flight plan. Once you loaded the aircraft and powered it up, click the flight plan button till you got the empty “ACTIVE FLIGHT PLAN” page. Next click once on the right hand inner knob. In case you have the “mouse scroll” active, place the mouse symbol at the right hand side of the inner knob and rotate the middle mouse wheel one click. In both cases, the previous page is replaced by a “FLIGHT PLAN CATALOG”. Nice, but still no “fms” file has been highlighted or activated. So, click next on the right hand knob. This will highlight the top listed “fms” flight plan. When the page only shows one flight plan, then this is most likely yours. When you have more flight plans installed, then click as many times as needed on the right hand outer ring of the knob. Once your flight plan for this NZ flight is highlighted, click the ENT (enter) pushbutton. Your GNS G430 goes back to the overview page and shows a loaded flight plan.
The Flight
Ground Maneuvers
After the flight plan is loaded, I continue with the paper checklist, check the aircraft weight and balance. When all of this is done, it’s time to taxi to runway 11. When you don’t feel comfortable with the AoA 9050 Angle Of Attack indicator, you can always decide to switch it OFF with the AOA switch right of the PITOT HEAT switch, but personally I suggest to leave it ON and try to use the indicator first and you’ll notice quickly how handy this small indicator is. Select for take off the first FLAP position and off we go to runway 11. From the parking location it’s only a short taxi to our runway, but long enough to get the right taxi feeling.
Taxiing the Ryan Navion feels good. Good means that it feels very similar during my PPL Cessna 152 lessons. Ok, the Cessna is a different aircraft type (hi-wing), but the constant available yaw with the pedals to control the nose wheel steering to keep on the centerline, feels similar.
Before turning onto the runway, I check once more the checklist if everything is done and if so, full throttle and there I go.


Takeoff and Climb
It seems that the Ryan Navion is quite sensitive for yaw so I need to concentrate myself to keep it on the centerline or at least, close to it and although it sounds strange, it feels realistic. At the rotation speed you’ll see what your AoA is with the help of the AoA indicator. Not that the AoA indicator gives you degrees of AoA, but is visualizes a degree with symbols. Very handy I must say. When you’ve forgotten what the different symbols and colors mean, double-check the AoA indicator in the user manual page 11.
While climbing out you need to keep attention to the pitch and roll. Before you know, the Navion is doing other things then you want like rolling too far to the left or right. But no worries, you can use pitch and roll trim although the ROLL TRIM switch on the horn seems not to be modeled. It is there, but when you try to click on it, nothing happens. Once the Navion is trimmed, it flies like an Eagle, but small corrections are always needed of course, depending on actual environmental conditions. If you want, you can always decide to connect the Auto Pilot. You can connect the AP with the AP/FD switch on the instrument panel, mounted left of the S-Tec Fifty Five X AP control panel or you press on the Fifty Five X panel the NAV, HDG, ALT or VS button, whatever you prefer.


The ALT switch levels the aircraft off to maintain a certain altitude without the possibility to enter a preselected altitude. For the V/S (Vertical Speed) you can enter a UP or DOWN V/S on the same panel or you enter the V/S via the GDU 620 rotary knob. With the AP connected either in HDG mode or, as I started with, NAV mode, you can sit, relax and enjoy the internal and external view. Keep in mind that you need to monitor the airspeed yourself on the GDU 620 or the airspeed indicator since the Fifty Five X has no IAS (Indicated air Speed) option.
Instrument Panel Impression
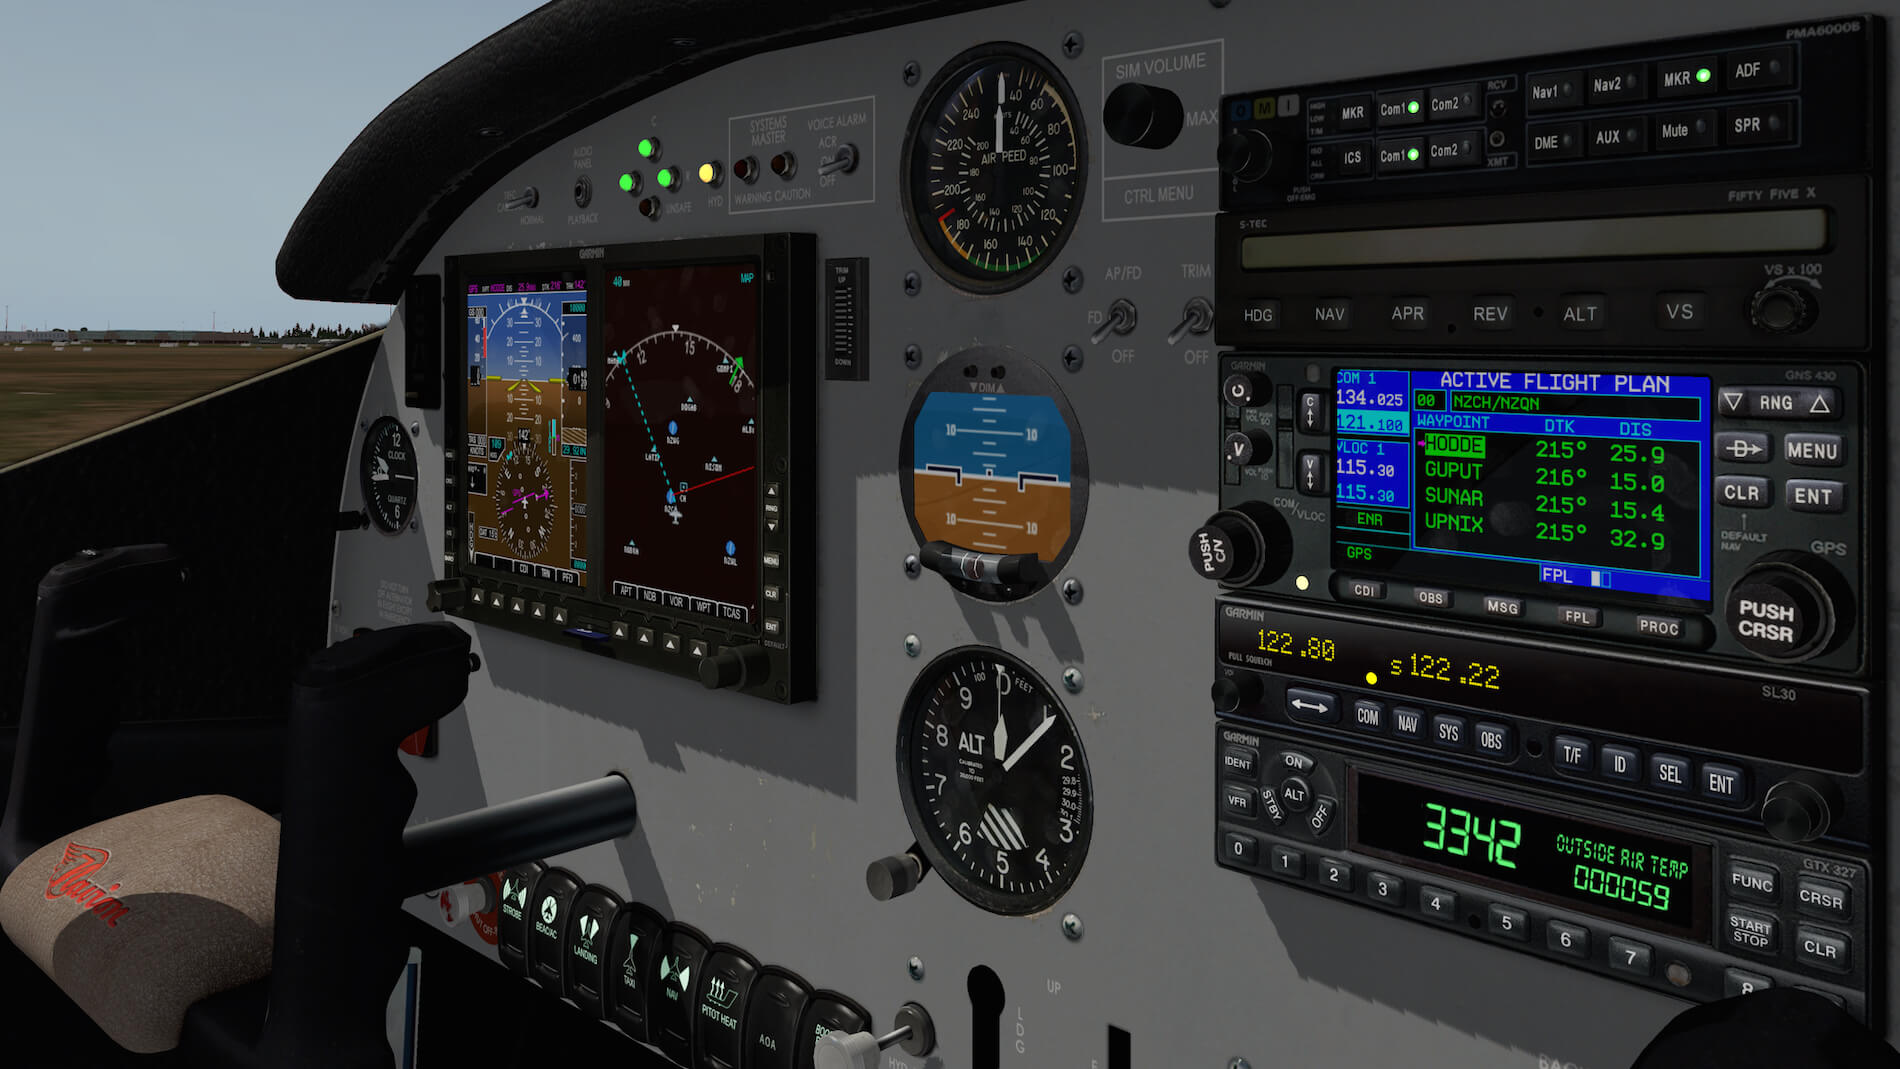
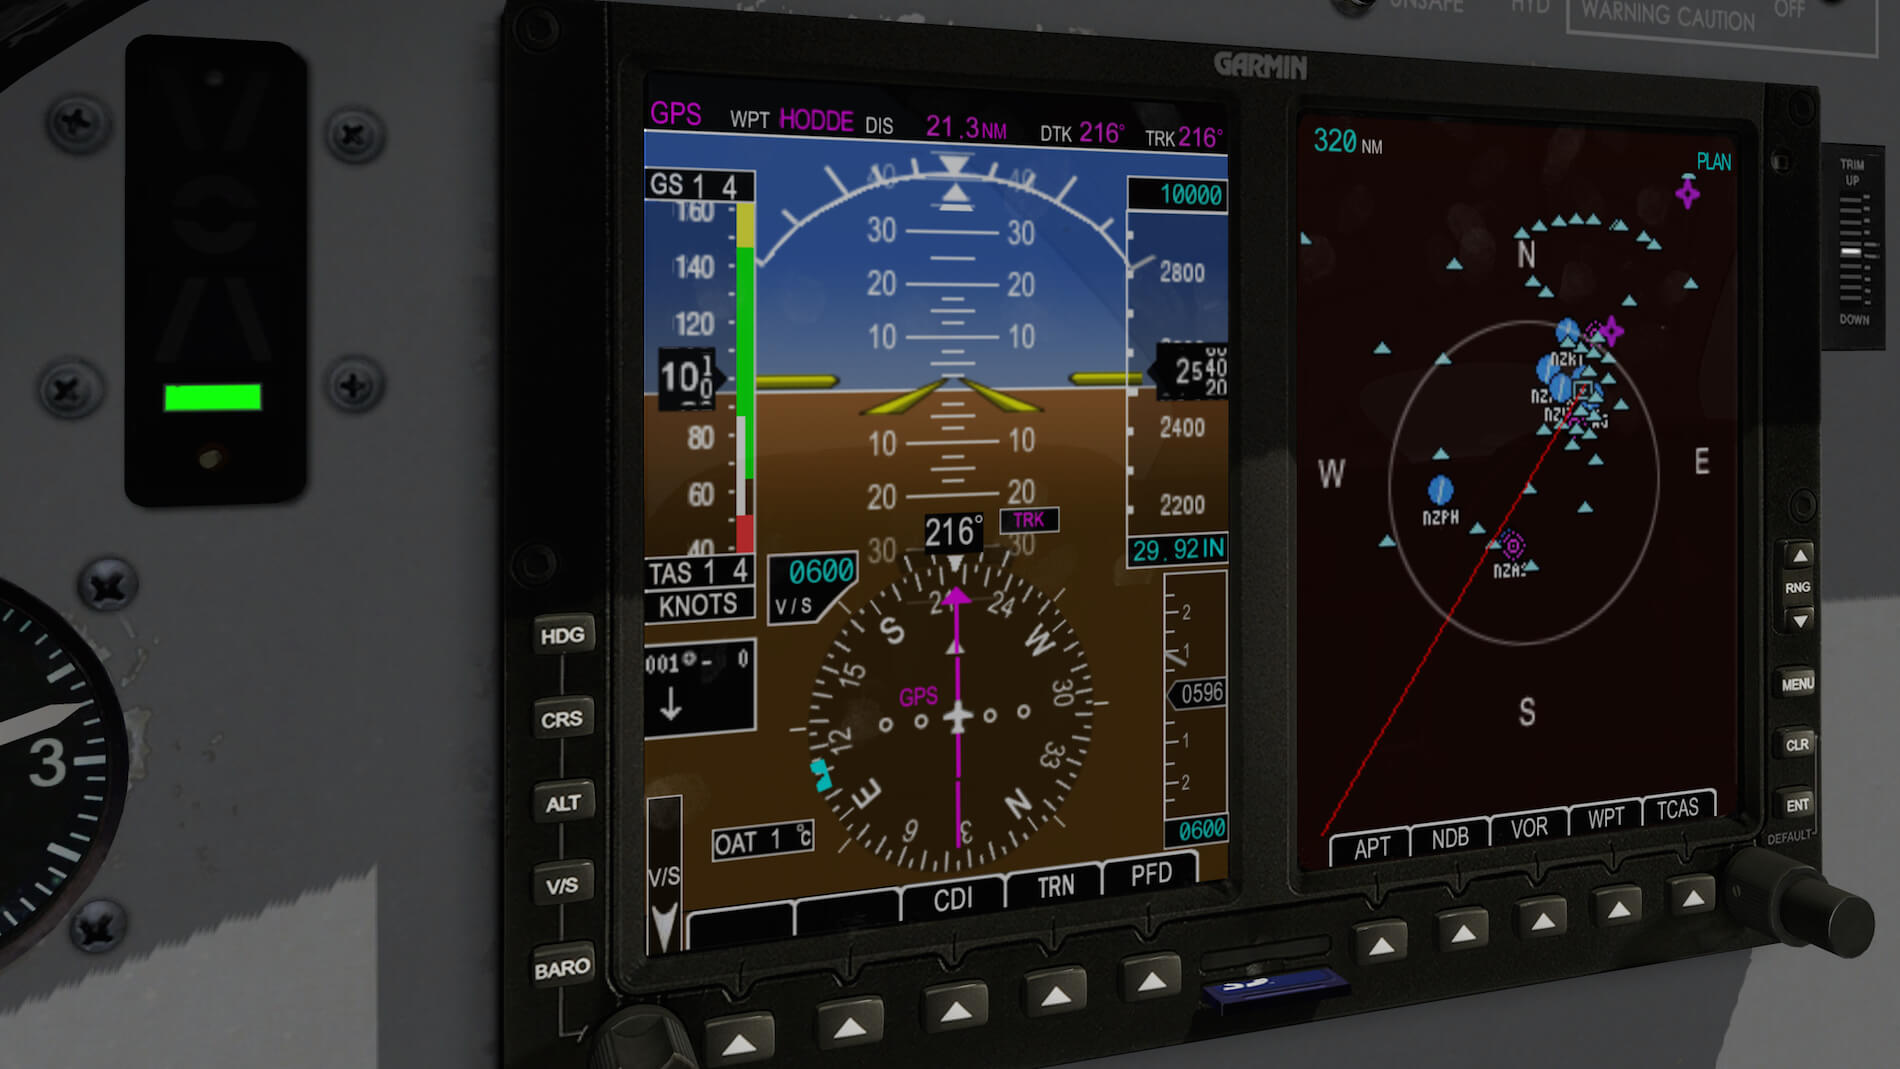
The Garmin G430 gives you basically everything, but instead you can also look at the Garmin GDU 620 PFD/MFD. As the name suggests, the left hand half show you the PFD (Primary Flight Display) while the right hand half shows you the MFD (Multi Function Display).
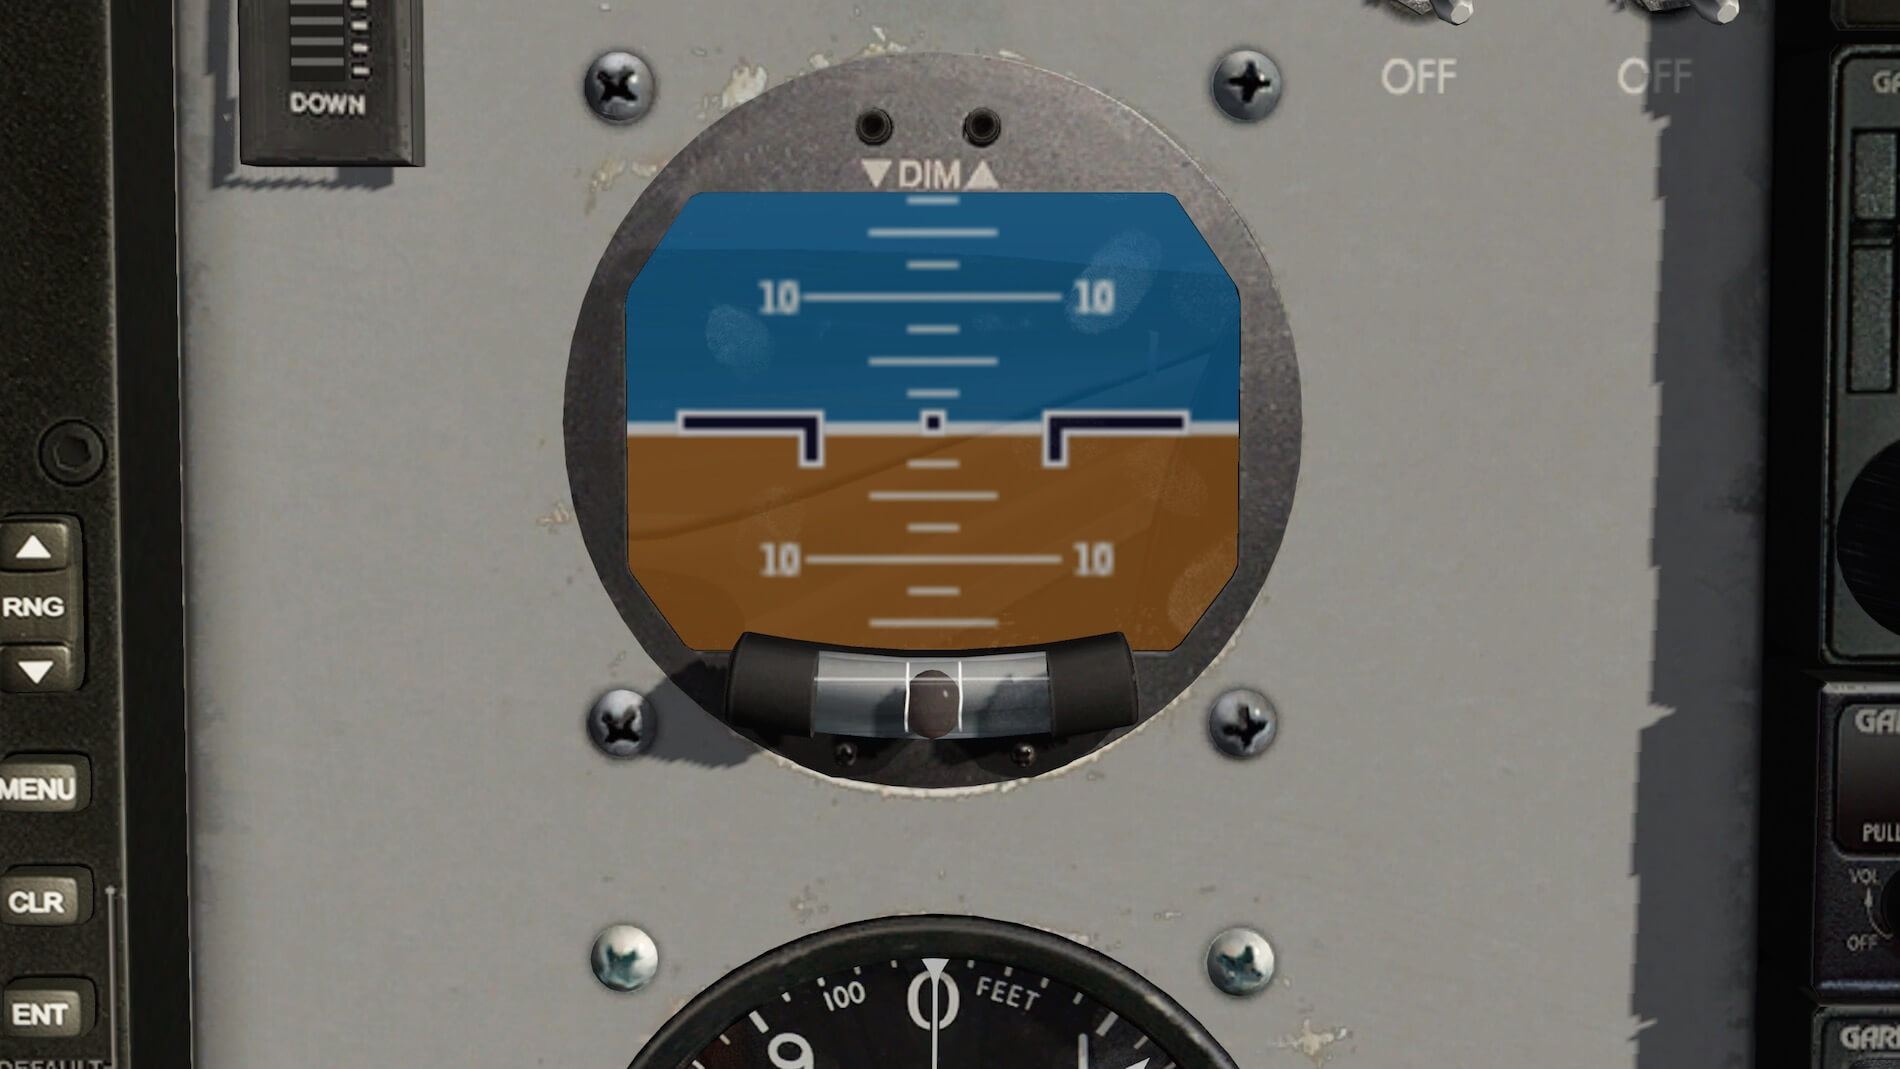
Besides that the PFD shows you the horizon or an electronic ADI, you’ll also find a speed tape, a V/S tape, an altitude tape, and a NAV rose. On the top of the PFD you’ll see some parameters while at the lower left side of the DU and the bottom left there are adjustments for HDG, CRS, V/S and BARO. At the right hand bottom side three buttons are situated of which one is really should check out. The button is called TRN and when pressed, it will show you behind the transparent PFD, a synthetic vision of the ground or the sky … at least, external forward view. It is like it is filmed with a camera mounted in the front of the nose. When you press the button again, the brown/blue PFD background is back. I’ve seen this feature before in the vFlyteAir Renegade Falcon.


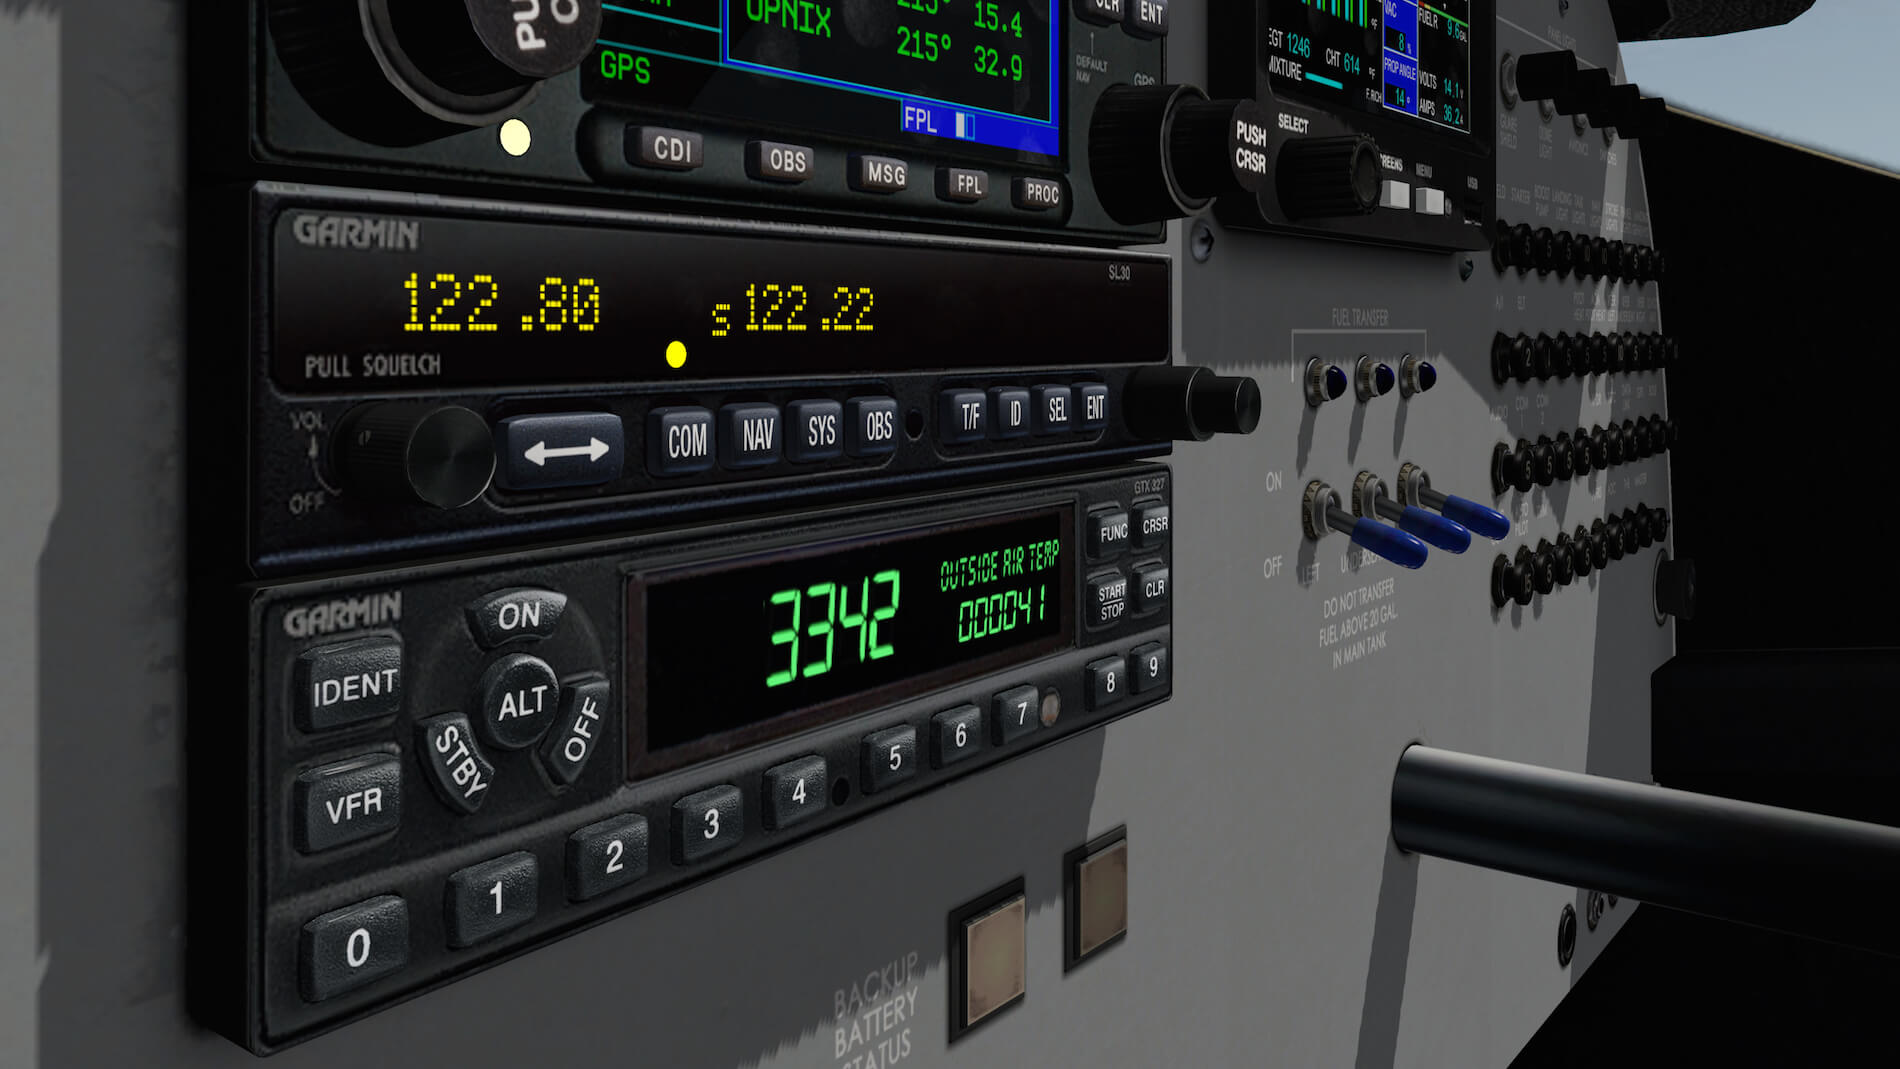
On the right hand side of the instrument panel you’ll find the electronic engine display unit although it also shows fuel qualities, fuel pressure and fuel flow. The indications speak for themselves, but remember and where applicable, it only shows one engine cylinder indications at the time. To see the engine parameters of the other 5 cylinders, I need use the rotary knob. Positioned in-between the Garmin GDU 620 and the electronic engine unit, you’ll find basic navigation equipment like the PMA6000B Audio Selector Panel, a S-Tec Fifty Five X AP control panel and the default X-Plane Garmin GNS 430 with popup function. Further on, I spot the Garmin NAV/COM transceiver SL30 and at the bottom the Garmin digital transponder GTX 327.


Although these components aren’t hard to understand, wouldn’t it be great when you have a link to the official user guides? I think so and therefore I’ve added the links for you right below here:
– Garmin GTX 327 Pilot’s Guide
– Garmin SL30 Pilot’s Guide
– Cobham S-Tec Fifty Five X
– Garmin GNS 430 Pilot’s Guide
– PS Engineering PMA6000B
– Garmin GDU 620 PFD/MFD
– Electronic International MVP-50
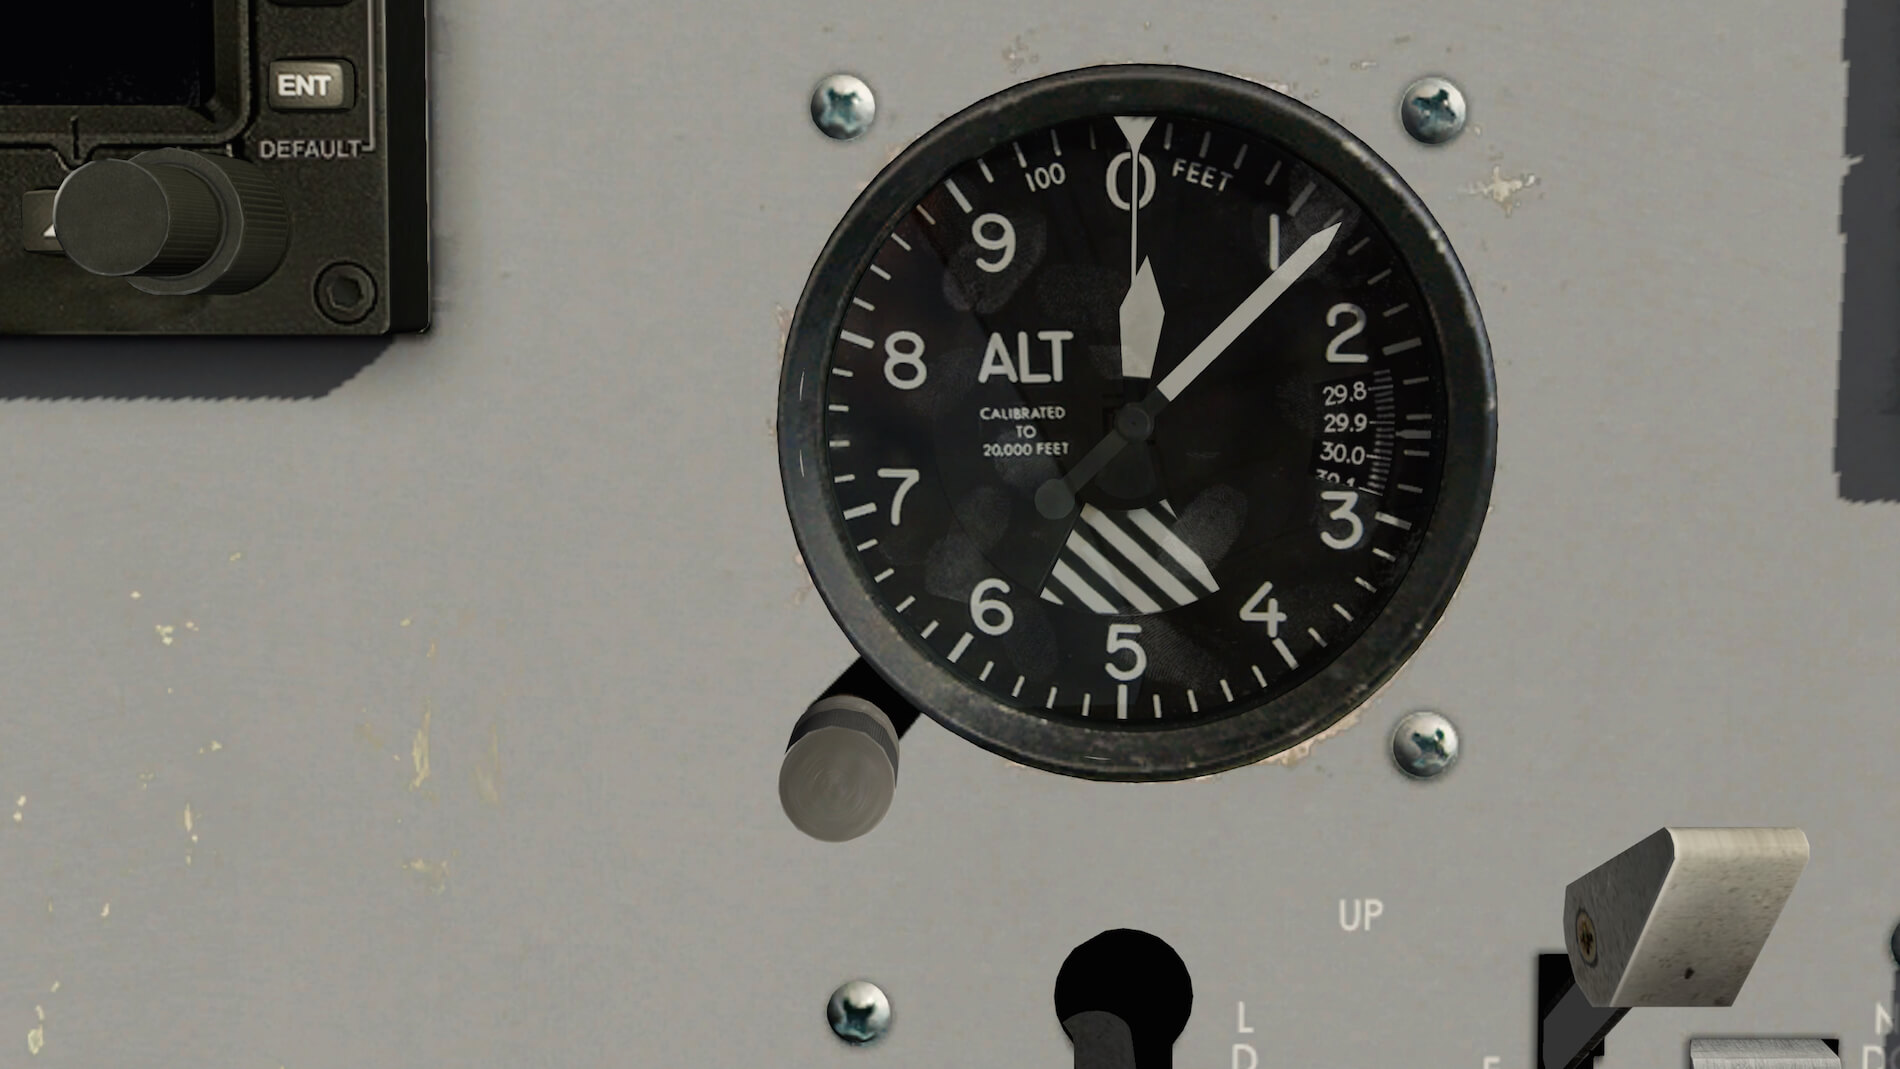
And finally, packed in-between the GDU 620 and the audio/navigation equipment, three ordinary flight instruments; airspeed, attitude (horizon) and altimeter. When you look closely to each individual instrument and then in particular how it’s mounted to the panel, you can clearly that this is very old fashioned and at the same time as real as it should be. The instrument was in those days mounted from the back to the panel with screws in the front. That said, the drilled round opening in the panel for the instrument was never as perfect as the round instrument. These days this kind of instruments are slided from the front of the panel thru the drilled opening and cover automatically the drilled opening. But my goodness, these old-fashioned instruments, when zoomed in, are so real. So real that you hardly believe you’re looking to a virtual indicator!

And last but not least, some words about the overall 3D cockpit modeling. I’m very pleased with the 3D cockpit. That said, not only the instrument panel itself looks used and weathered and therefore realistic, but this is also applicable for the sidewalls, ceiling, passenger area, the floor, rudder/brake pedals and pilot seats including frame and tracks.
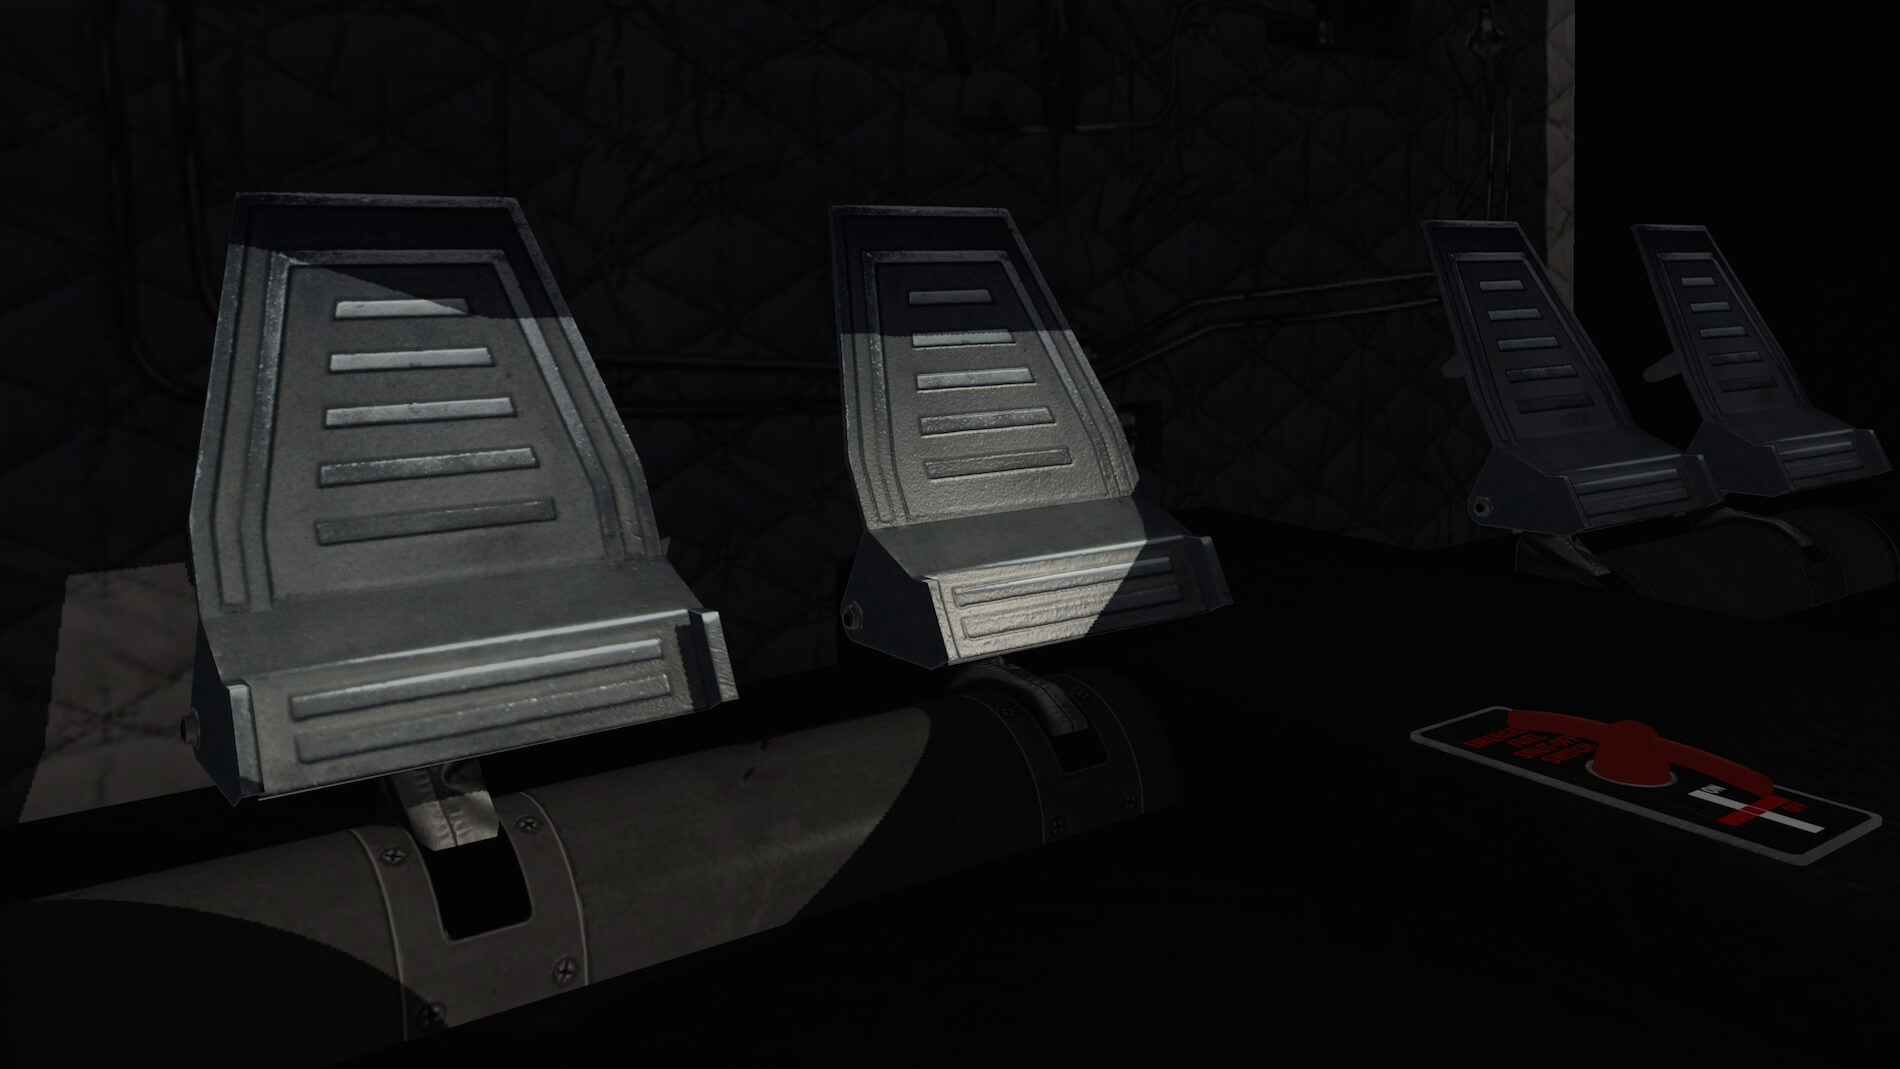

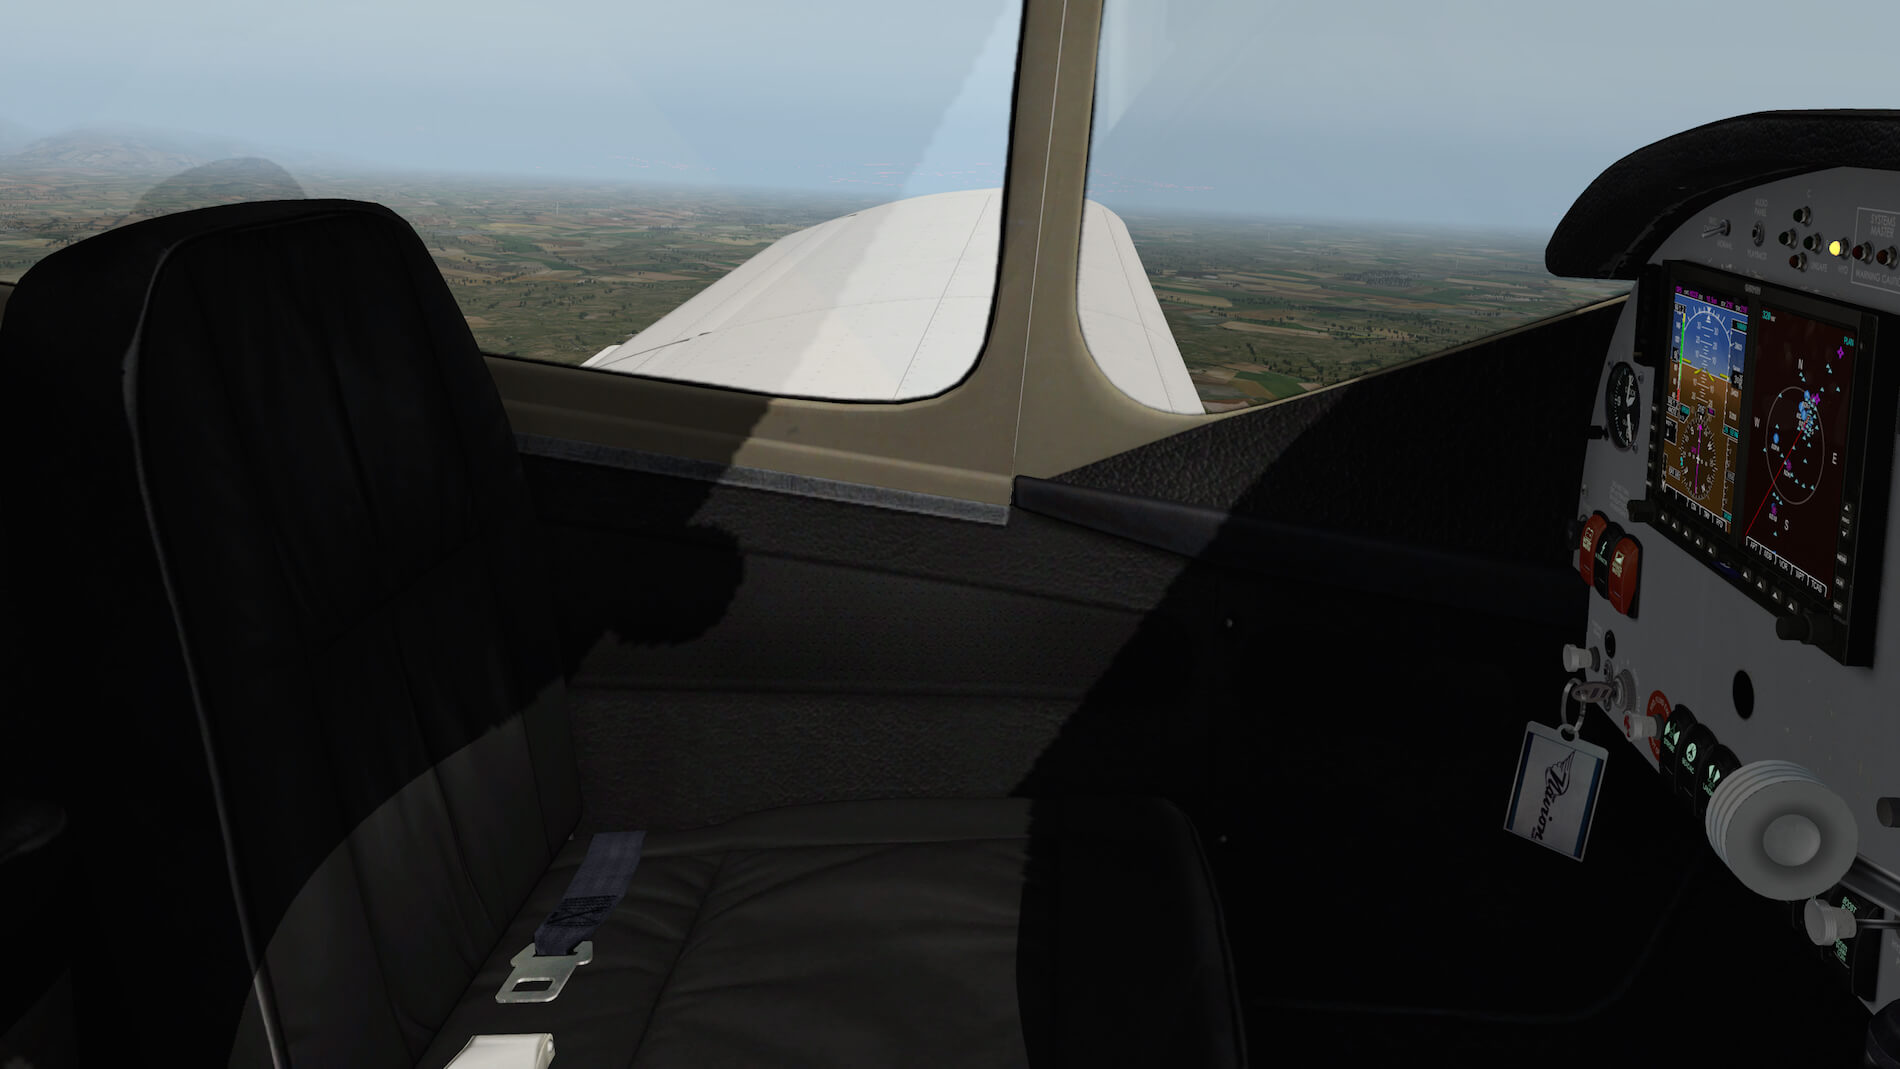


The whole 3D cockpit is made with eye for details and, even the tiny parts, aren’t forgotten like the fire wall photo real cover with hydraulic lines on it. I’m aware you won’t look the whole flight to all these tiny details, but it is such a pleasure to fly in a gorgeous modeled 3D cockpit.
Cruise Above New Zealand
With the AP connected it gives me time to check and play with the different display units. The GDU 620 PFD/MFD offers a lot more then you think and therefore, I’ll go ahead and test all the different functions. Not all functions are simulated on the GDU 620 compared to the real GDU 620, but there’s still a lot to discover.


And, as curious as I am, I decide to disconnect the AP and fly the Navion for a while myself. With pitch and roll trim and the pitch trim indicator and not to forget the AoA indicator, it’s a good way to learn to fly the Ryan Navion.
Descent, Approach and Landing
Queenstown doesn’t has a runway that supports ILS instead runway 23/05 supports RNAV approaches, but I prefer to fly an ordinary VFR approach and that means approaching the airport via the south, flying over Lake Wakatipu. On the other hand, you can also fly-in via the East and tune for VOR/DME Queenstown (113.6). It’s great to have an AP with APR option and having a GNS 430 on board, but why not approaching the airport under VFR rules.
In the case you decide to use the QUEENSTOWN RNAV RWY 05 approach, it means that you should enter IAF IBABU at 10.000 feet and for that you need oxygen. The same entry RNAV IAF ATKIL (or UGPED) also applies for runway 23. And since I haven’t found any oxygen onboard of my Ryan Navion, my maximum altitude is limited to 8000 feet. I can live with that and not using a RNAV approach!
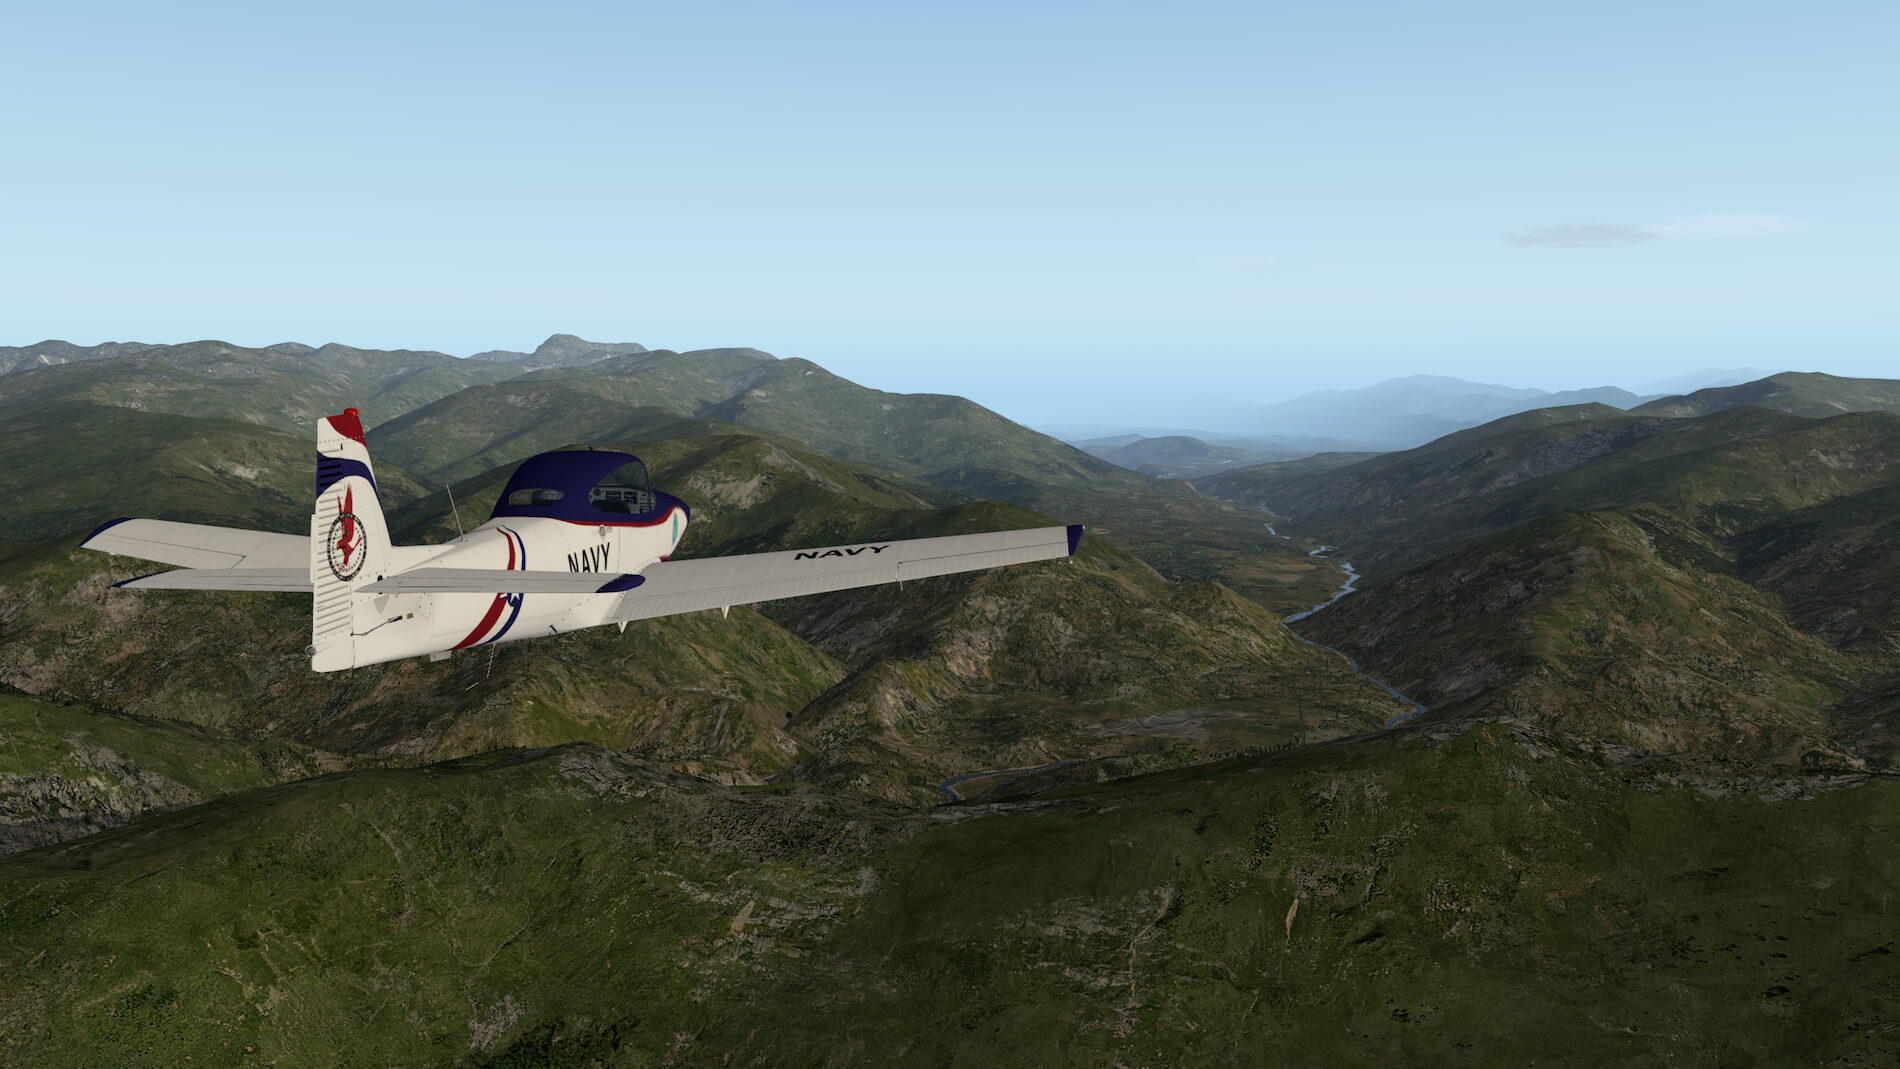
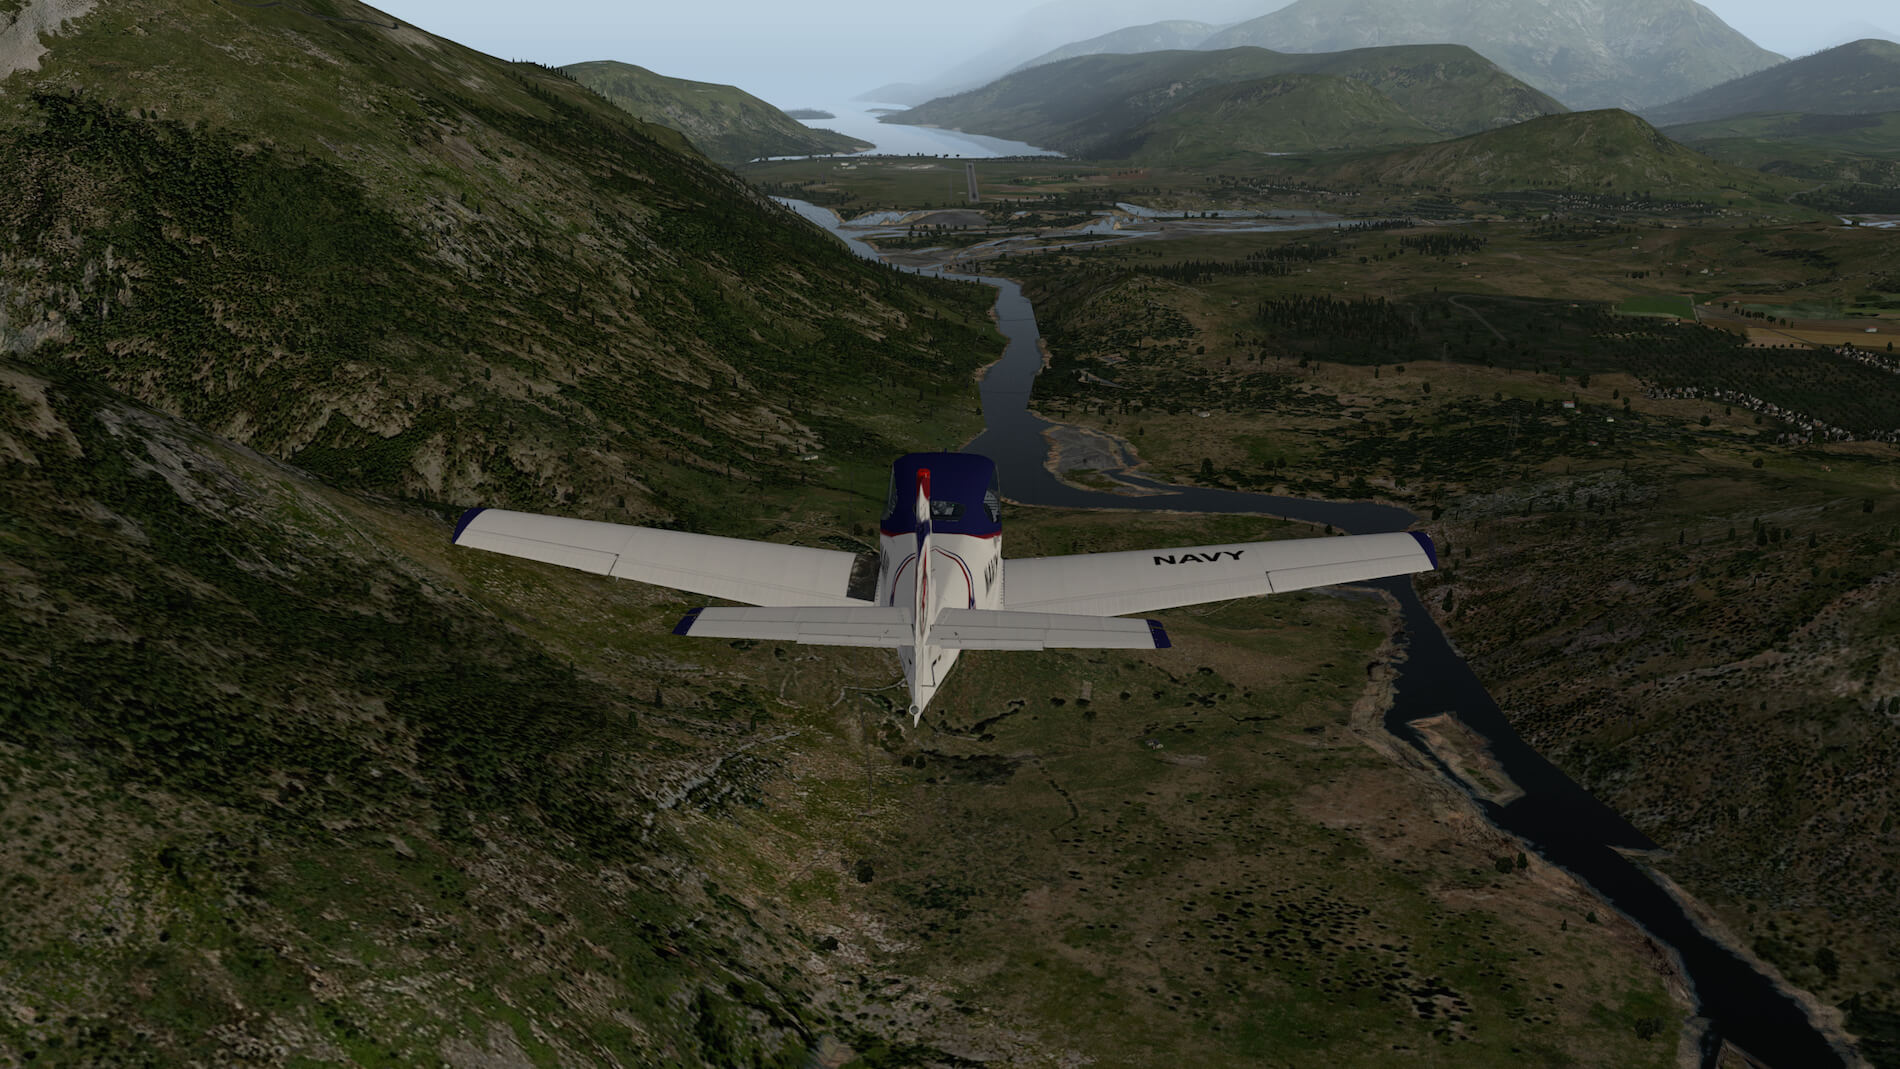
Besides the above paragraph which is applicable for my approach, I fly the whole trip under IFR rules with the help of my flight plan. I can enter some additional waypoints when approaching NZQN, but at a certain moment I switch to VFR rules. On my way to Queenstown I decide to fly in via the East by following the Kawarau River. Flying-in at 6000 feet keeps me far above the mountains and still having a good idea where I am. It’s not that complicated. There’s no complex FMS, it’s just logical thinking. As long as I monitor my airspeed and keep the IAS at roughly 70 knots, I can handle it. With the river below me, I start descending far ahead. Queenstown is situated at an altitude of approximately 1100+ feet, so my new level off altitude will be 3000 feet. Flying thru the valley and with the river below me, it’s easy to see the runway from a far distance.


Taking the checklist in my hand, lowering the flaps, extending the landing gear and I’m ready for my landing. And, is the Ryan Navion easy to handle during the final approach? No problem at all!
Flight Summary
A very easy aircraft for ground maneuvers, easy to fly under different flight conditions. It’s fully up to you if you want to make an IFR or VFR flight. All what you need is onboard the aircraft. Keep in mind that once you’ve reached your cruising altitude, to reduce the throttle and lean the engine. When you don’t do, the EGT will be too high and problems arise with your engine.
And what about Frame Rates?
I mentioned this issue briefly before. I’m impressed with the available frames. Of course, it all depends on your Windows, Linux or Mac hardware specifications, your monitor resolution, your X-Plane Rendering settings and the installed airport scenery and/or if you have SkyMAXX Pro. Perhaps I’ve forgotten something, but these things basically decide the actual frame rates. Although I don’t have SkyMAXX Pro, it’s not difficult to get with hi Rendering Settings 30-35 FPS (Frames Per Second) Even when the frame drop to 25, it’s still OK.
Summary
Oh sorry, again a longer review then planned. By the way, the review is based on model version 1.1. Just to highlight a couple of new features and/or improvements for those who owned version 1.0. Version 1.1 comes with:
A new Garmin GDU 620 PFD/MFD with greatly improved graphics, accuracy and functionality. Produced by Mario Donick of Germany for vFlyteAir, the new GDU 620 functions include:
The HSI soft button now toggles between NAV1, NAV2 and GPS sources (added NAV2). On the new PFD upper bar display added for NAV2. Further on ALT function now works. Use ALT mode & PFD knob to pre-select autopilot altitude. (S-TEC 55x autopilot updated to use ALT pre-select). New ALT display added to left of HSI.
And the CRS button function updated to allow adjustment of new NAV2 OBS indicator. When GPS HSI mode is active, the CDI indicator automatically points toward the active GPS waypoint, and the CDI shows the airplane’s deviation from the course.
The Slip/Skid Indicator added to artificial horizon. Start-up screen moved to right side of unit. Press ENT key to dismiss or wait 5 seconds. And all on-screen graphics improved for accuracy and readability.
Regarding the S-TEC 55x Autopilot changes include ALT mode changed—now allows altitude pre-select for autopilot. Press ALT key to arm the altitude hold mode, then use the knob to select a target altitude. VS mode may be used to climb to selected altitude. When selected altitude is reached, ALT mode and VS mode will return to ready state, and autopilot will hold selected altitude.
The Garmin SL30 COM2/NAV2 Radio changes include new Distance and Ground Speed indicators added to show DME distance and ground speed to selected NAVAID. With OBS mode active, press SEL key to toggle between CDI indicator and DME indicators and COM and NAV illuminated lamps now stay lit when OBS mode is active
And finally, some Flight Model Improvements like a new reduction gear was added to the model to provide the proper propeller gear ratio for the Continental GO-435 260HP engine. The model is now accurate in cruise flight with the Navion Super 60 Flight Performance Chart. Not to forget the yaw control made less sensitive.
Other Improvements are the on-screen Checklist (clist.txt) added for the XChecklister plug-in. Michal & Bill’s Xchecklist plugin is available at X-Plane.Org.
I wrote this Ryan Navion review with a lot of pleasure simple because it’s a gorgeous model and easy to handle. It is fair to say that the overall external and internal 3D modeling is gorgeous. It implies for the instrumentation and Display Units. I can say, no, I must conclude that the vFlyteAir Ryan Navion has reached the level of details and functionality of the Carenado/Alabeo models and in some cases, it even passes their quality. Yes, I know what I’m writing down, but it’s the truth and of course, it’s my personal opinion. Ok, The vFlyteAir doesn’t have the well-known Carenado/Alabeo “C”, “O” and “A” plugin which is handy and functional. But on the other hand, the vFlyteAir Ryan Navion has functional circuit breakers. Functional circuit breakers offer an even more realistic operation of the aircraft.
And did I cover everything?
I think I covered most of the vFlyteAir Ryan Navion, but as you know, it’s always possible I’ve forgotten something. In case you’ve a different experience or want to share issues or thoughts with me, feel free to contact me or write a comment on ASN X-Plane. You can reach me via email address Angelique.van.Campen@gmail.com.
More information about the vFlyteAir as well as buying details can be found at the dedicated vFlyteAir sales page. or check out their screenshot gallery.
For this review I used several add-on freeware add-ons, besides of course the Ryan Navion. The used add-ons are:
– Freeware | Alpilotx.net New Zealand Pro
– Freeware | ISDG Christchurch International Airport (NZCH)
– Freeware | NZQN Queenstown version 1.1
– Charts AIP New Zealand | NZCH / NZAA
Feel free to contact me if you’ve got additional questions related to this impression. You can reach me via email Angelique.van.Campen@gmail.com.
With Greetings,
Angelique van Campen
| Add-on: | Payware vFlyteAir Ryan Navion |
|---|---|
| Publisher | Developer: | X-Plane.Org | vFlyteAir |
| Description: | Realistic presentation of the Ryan Navion version 1.11 |
| Software Source / Size: | Download / Approximately 642MB (unzipped) |
| Reviewed by: | Angelique van Campen |
| Published: | February 16th 2015 |
| Hardware specifications: | - iMac 27″ 3.5Ghz Late 2013 - Intel i7 3.5Ghz / 3.9Ghz during Boost Mode - NVIDIA GeForce GTX 780M 4096 MB - 32 GB 1600 MHz DDR3 - 1 internal 1TB SSD (El Capitan 10.11.4) - 3 external 1TB SSDs - Saitek Pro Flight System |
| Software specifications: | - El Capitan (10.11.4) | Yosemite (10.10.5) | Mavericks (10.9.5) - Windows 10 Professional - X-Plane 10.45c | X-Plane 10.45m |
0 Comments