The Beechcraft Baron
Introduction
Although being an old aircraft which was a long time ago developed, after being updated to version 3.2, still a worthy airplane to test and therefore, I decided to do a quick but in-depth review.
According to Carenado “Version is compatible with X-Plane 10.51 64-bit, on Windows, Mac, and Linux platforms. Overhauled plugin-enhanced sound and lighting, X-Plane 10 optimizations, and many further improvements. These packages run only with X-Plane 10, as it looks now, not for X-Plane 11. It could be that when you test it with X-Plane 11 is seems to work fine, but no guarantee is given.”
This and much more can be found in the “Carenado B58 Baron Version History” document, located in the DOCUMENTATION folder.
The Baron comes with one white livery (default paint) and four additional liveries which are “Gold Green (N2822D)”, “KLM (PH-BYL)” and “Metal Blue (VH-HMU)” and “Red Classic (N209K)”.
The Real Beechcraft Baron 58
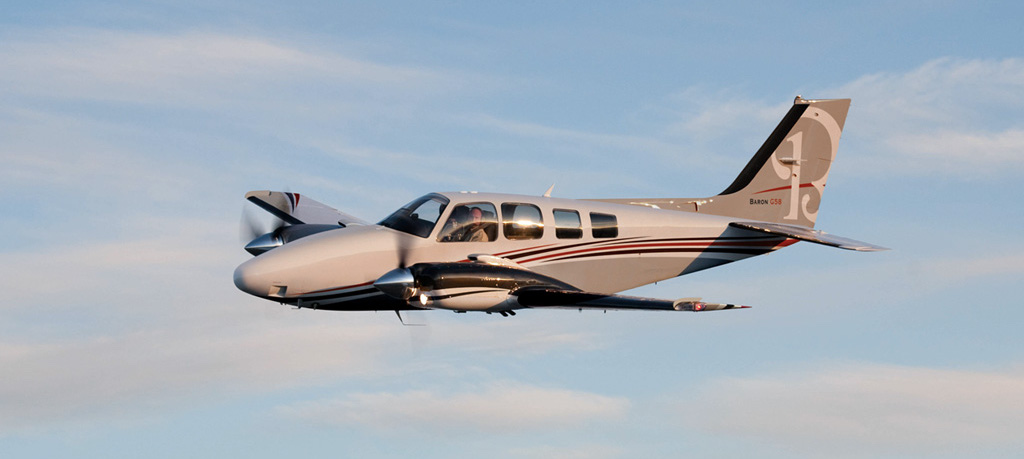
The Beechcraft Baron is a light, twin-engined piston aircraft originally developed by Beech Aircraft Corporation and currently manufactured by the Hawker Beechcraft Corporation.
The Baron is a variant of the Beechcraft Bonanza, more specifically the Travel Air, and was introduced in 1961. Beech also offered a Twin Bonanza line; they featured some design commonality with the Bonanzas, but in all respects, were entirely different airplanes and could not be considered to be true “Twin Bonanzas”.

The direct predecessor of the Baron was the Beechcraft 95 Travel Air, which incorporated the fuselage of the Bonanza and the tail control surfaces of the T-34 Mentor military trainer. To create the new airplane, the Travel Air’s tail was replaced with that of the Beechcraft Debonair, the engine nacelles were streamlined, six-cylinder engines were added, and the aircraft’s name was changed.
Since its inception, the Baron has always been near the top of the light airplane hierarchy. In 2008, a new Baron costs roughly $1,040,000 US. As expensive to operate as it is to buy, the ‘next step up’ from a Baron is a very big one. Faster aircraft, with greater range and more load-carrying capability are generally turbine-powered and far more expensive. The older Baron variants, mainly the 55 series, have dropped little in value, with their fair market prices numerically equal to that of their original pricing, in today’s dollars.
The Baron 58 model was introduced for the model year 1969, the larger, more powerful Baron 58 was developed from the Baron 55, introducing club seating, double aft baggage doors, and new gross weight of 5,400lbs. Depending on the variant, the Baron 58 is fitted with either the Continental IO-520 or IO-550 300-hp engine. The Baron 58 can cruise at 200 knots (370 km/h) at 7000 feet (2100 m). The lengthening of the fuselage increased rear baggage space, as well as providing more comfortable six-place seating over the Baron 55 and 56TC.
More information can be found at the dedicated Wikipedia web page or check out the official Beechcraft Baron 58 web page.
Installation and Documentation
The installation of the Baron 58 package version 3.2 is quite simple. Just copy and paste the complete contents to the Aircraft – General Aviation folder. In the Baron 58 folder, you’ll find a folder labeled Documentation. It comes with 8 Acrobat files of which a few are basic information and a text history document. Let me highlight those which are important to you.
The Autopilot KFC225 Acrobat manual is based on the fitted Auto Pilot control panel and helps you out how to control the AP during your cross-country flights. The B58 Normal and Emergency Procedures Acrobat document tells you all about the Baron 58. There’s also a section included about how to do the walk-around inspection, but there’s so much more when it comes to normal and abnormal procedures.
The B58 Reference Acrobat is a one-page document that gives you certain max speeds of the Baron 58. The General Information is worth reading since it explains in depth, a little more the XP10 features. And finally, the Recommended Settings X-Plane 10 Acrobat manual. Especially for those who are new to Carenado XP models, this an interesting page with minimum XP rendering options.
The Carenado Baron 58
The Model
We’re all aware of the high quality that Carenado offers, but sometimes I’ve got the idea the “simulation quality” is placed again at a higher level. This Baron 58 isn’t just an update from version 1.0 to version 2.0.
No, it’s gorgeous!
While doing my walk-around check, I’m really impressed by Carenado how they do it. And yes, there’s a TV program “How Do They Do It” and that’s the same feeling I have with this Baron 58.
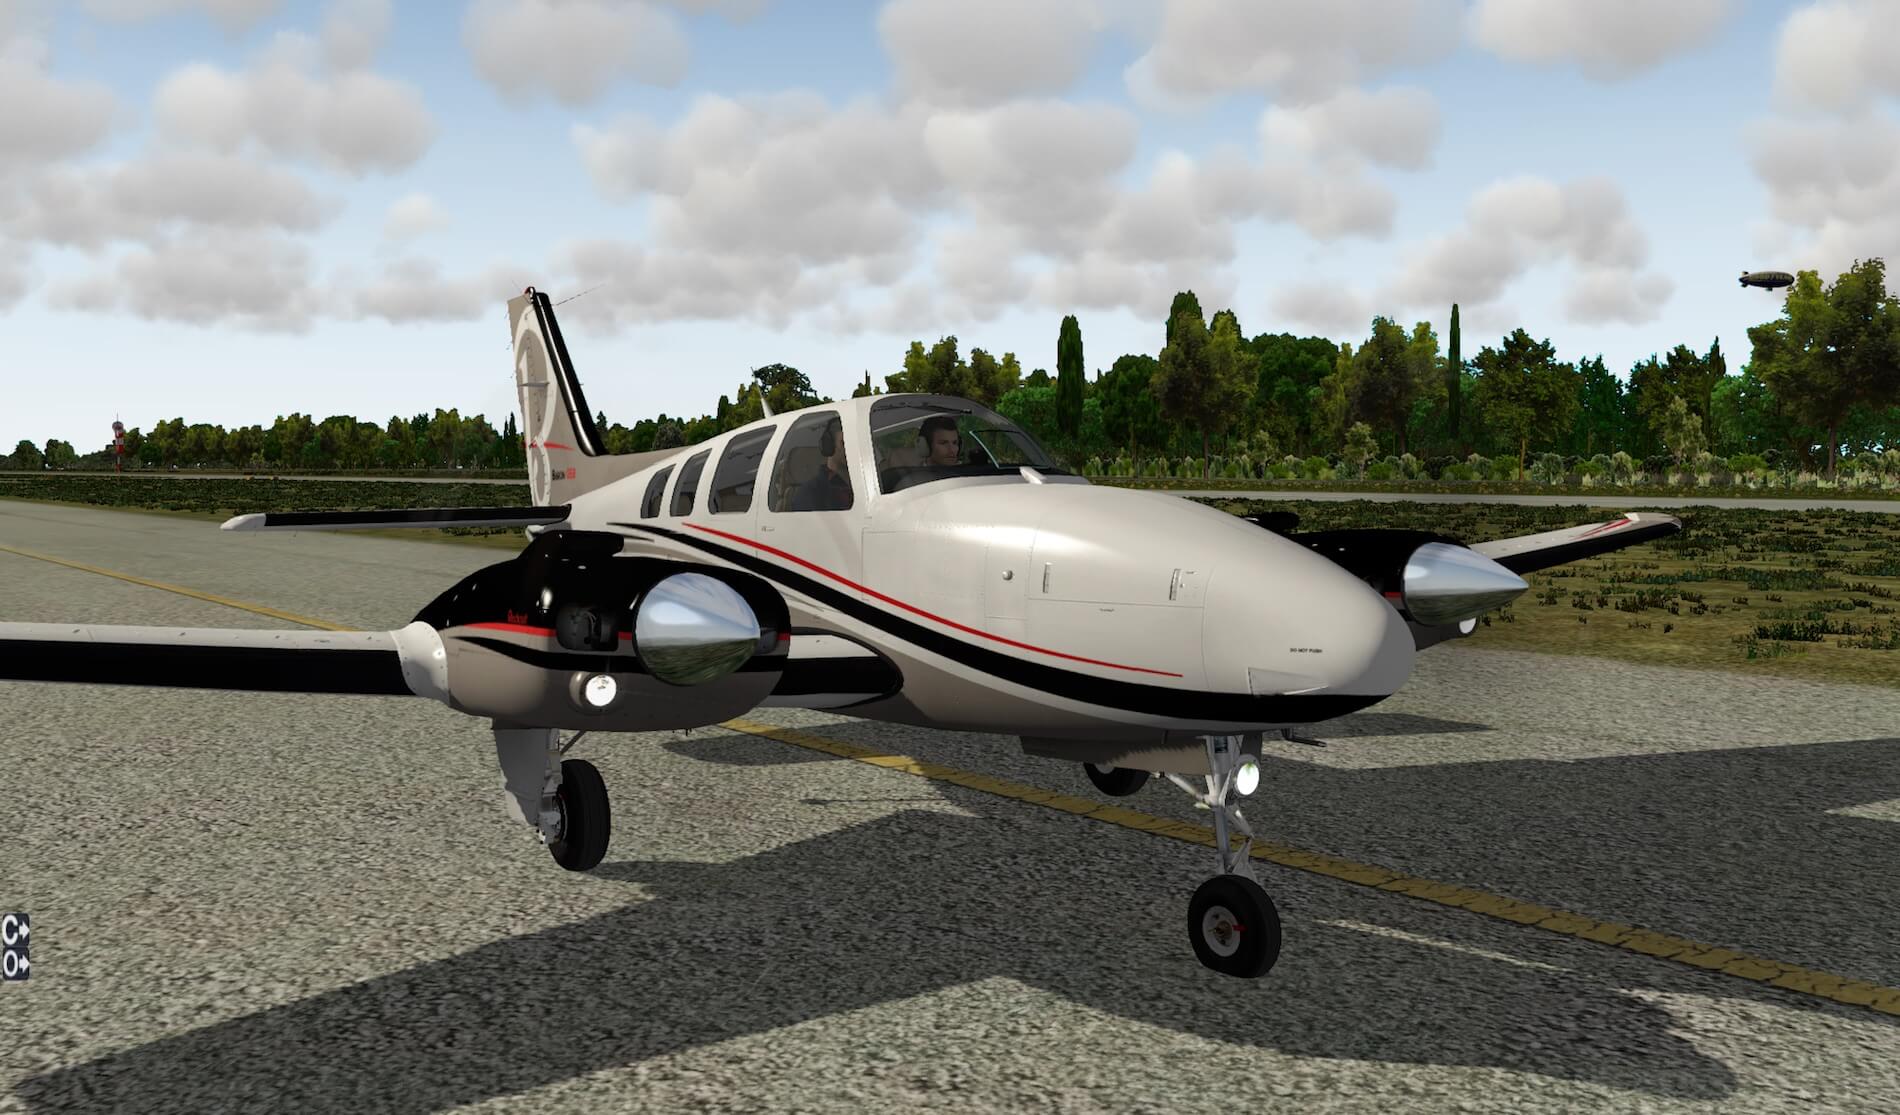
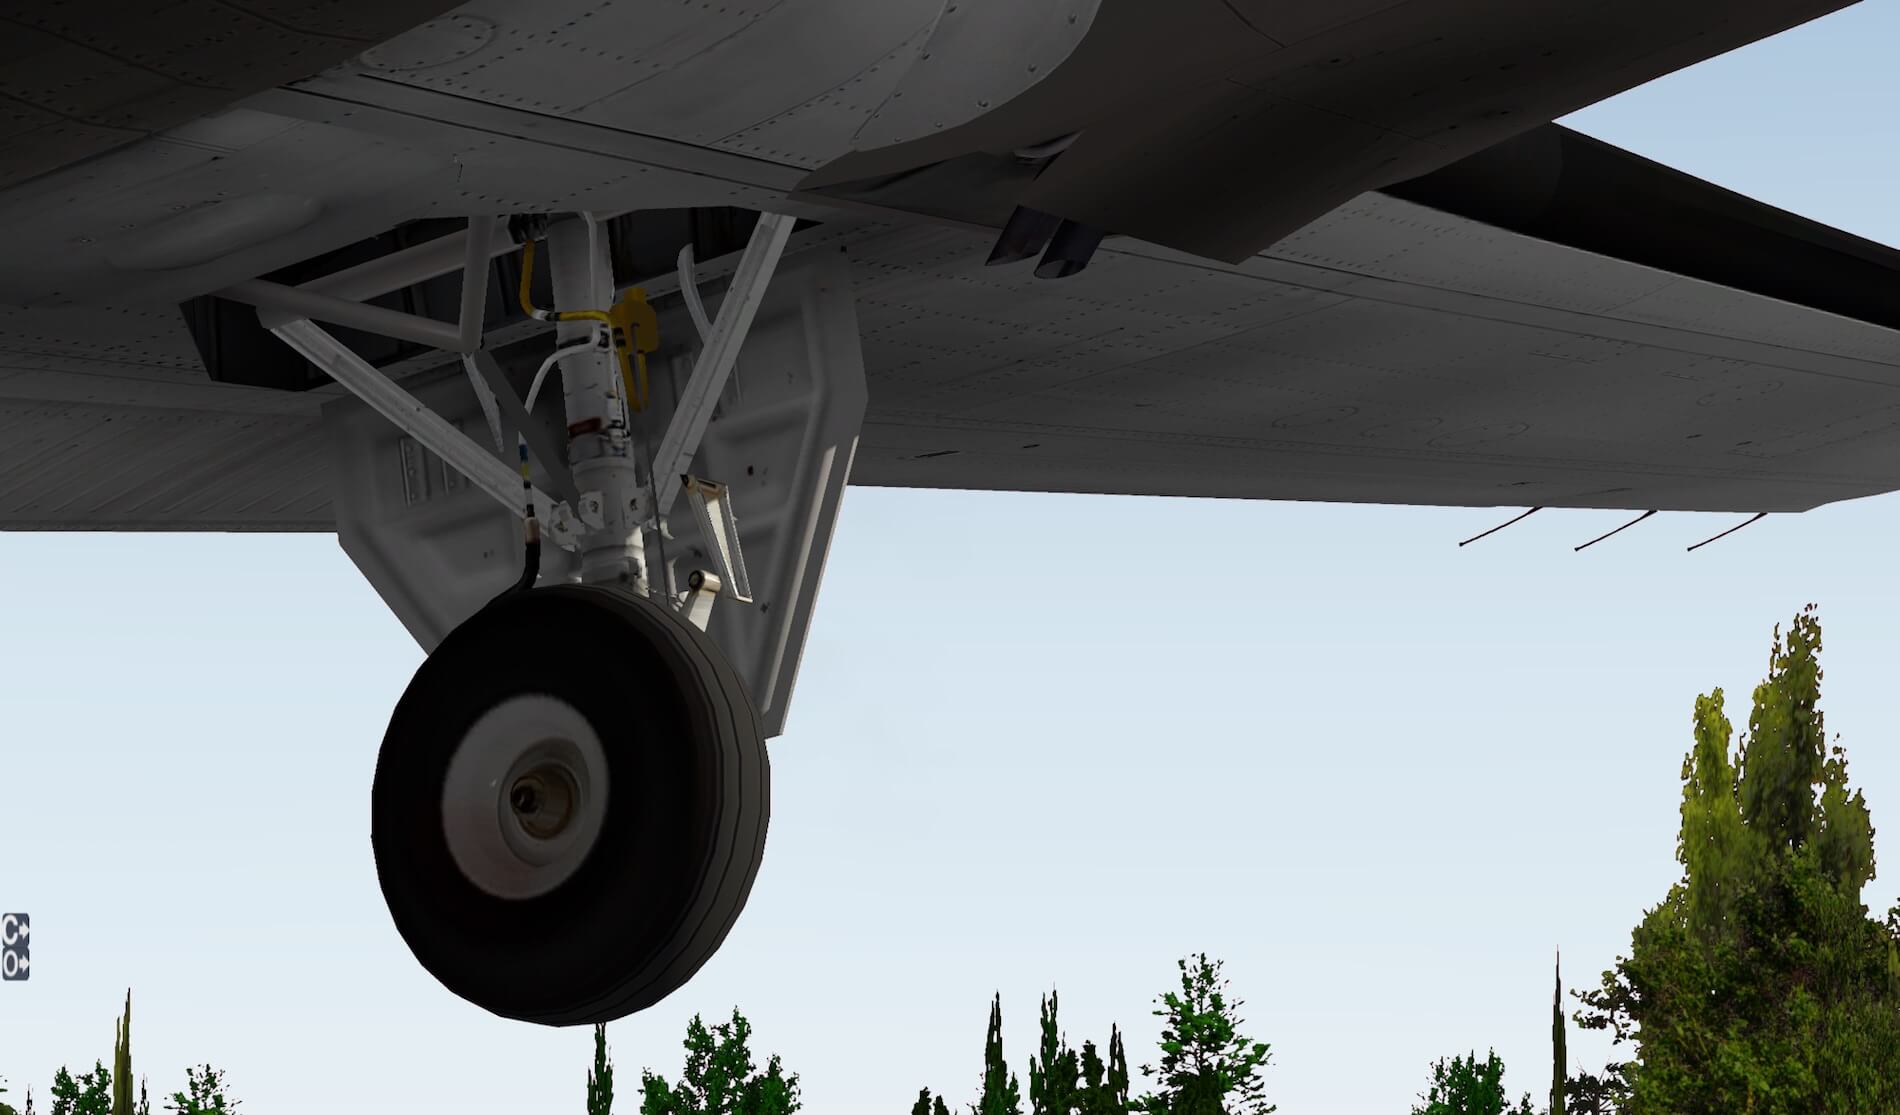
The Nose Landing Gear (NLG) is so realistic that you hardly believe you’re looking to an XP model. The dirt and weathered look finishes it all. With different daylight conditions, many tiny details become visible. Even the special taxi light surface is as real as it should be.
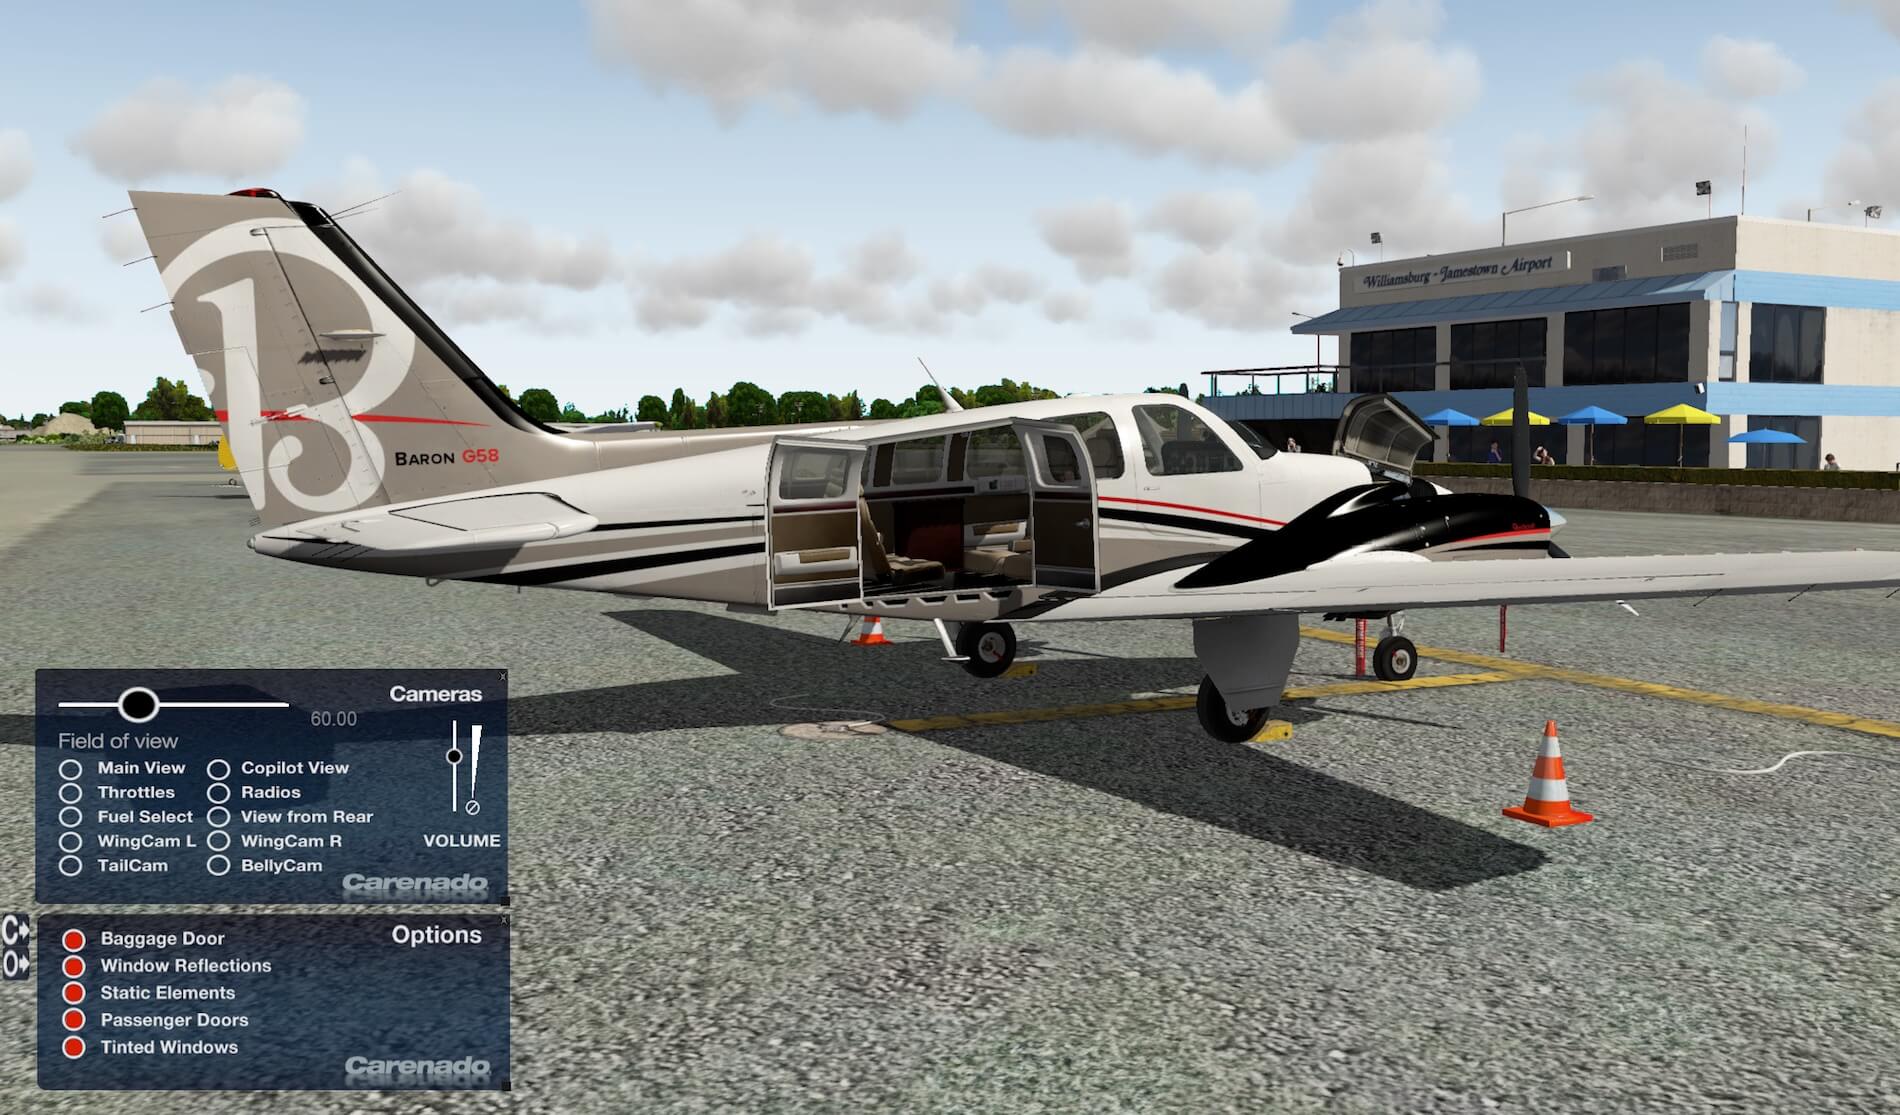

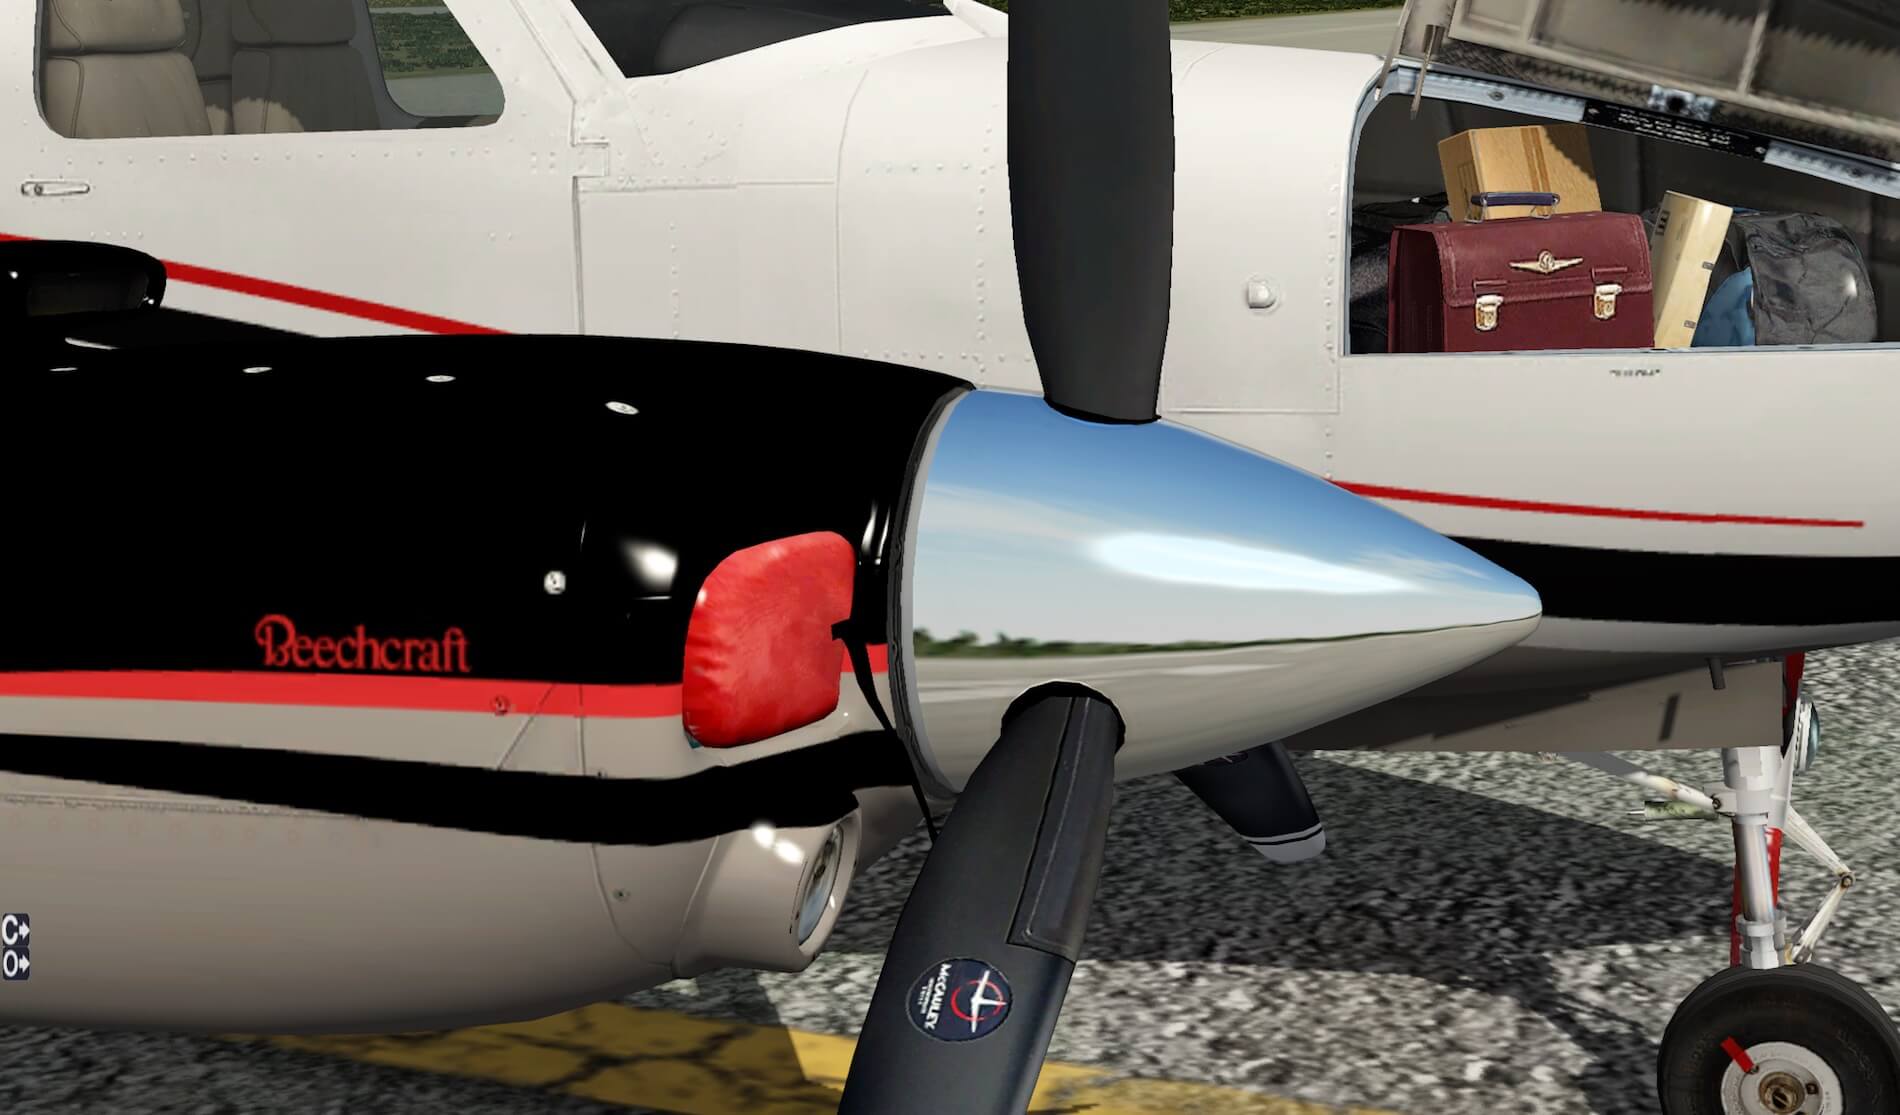

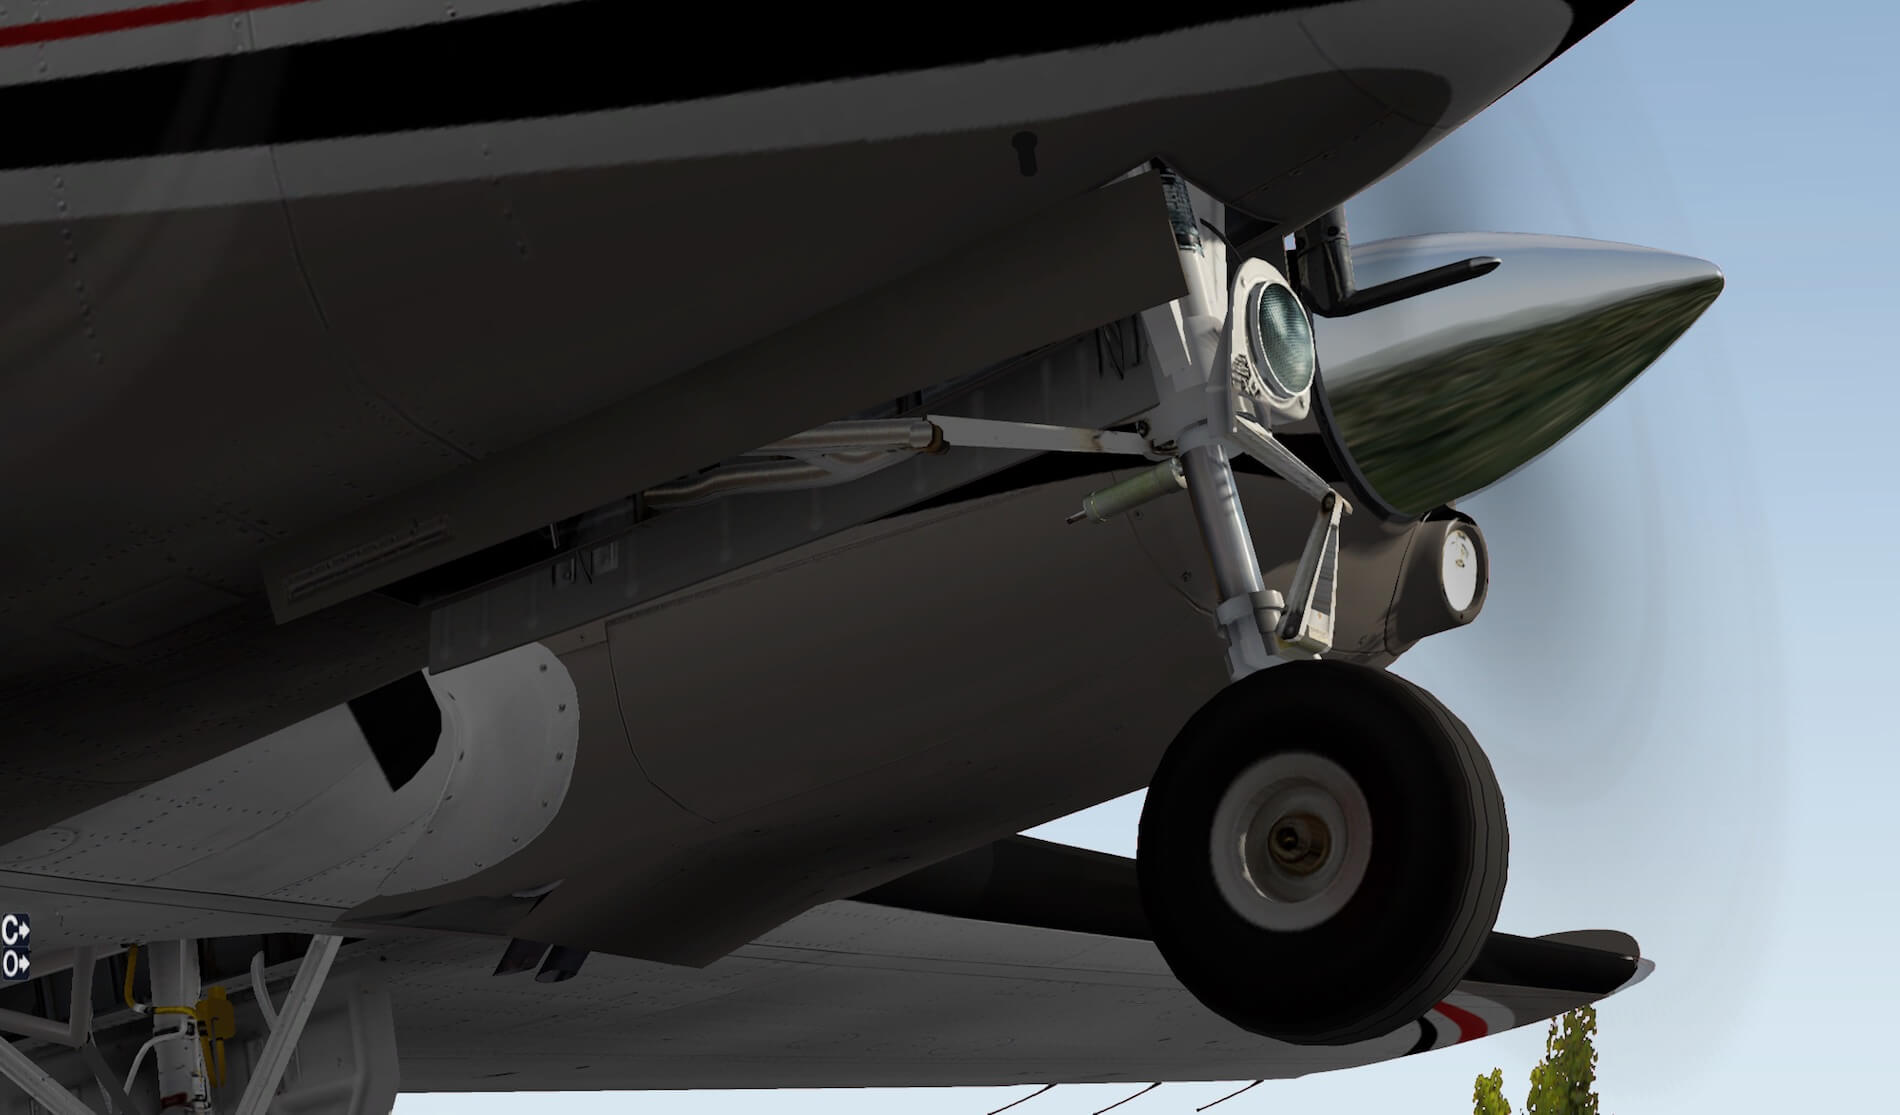
Next to it you’ll find the pitot probe and although just a probe, the combination of photorealistic material, makes it look like a real probe. The same is more or less applicable for the engine nacelle. NORM mapping is of course used which gives the overall look a slightly 3D effect, but what do you think of a tiny “Baron” sign on the outside of each nacelle. And, it’s unbelievable sharp too! From this I have a quick look to the Main Landing Gear (MLG) which is worth to check for a moment. Don’t forget to check the tire pressure!
Along the wing leading edge, I reach the wing tips with strobe and navigation units. I’m aware it’s only a small part of the wing and for some perhaps not interesting to look for, but it’s a great mix of 3D modeling and photo-real material. The reflection of the plastic cover is so realistic that you would say … better then this isn’t possible. The red/green navigation bulb is very nice as well as the white strobe unit. At the back of the wing tip you’ll find, as on most aircraft, several static dischargers.
Walking from the tip to the tail tells me what I know already … an awesome modeled replica of the Baron 58. On the elevator and rudder, you can clearly see the trim tabs, rivets, screws, antennas and panels. Depending on the external lighting conditions, you see more or less almost hidden skin features. I almost forgot … have a look to the red anti-collision light unit on top of the vertical fin … gorgeous, isn’t it?

For sure I have forgotten several items but the overall impression is again …. awesome! But how’s the cockpit?
Oops, by pressing the Options menu icon “O” on the left-hand side of your screen, you’re able to open several doors like the one for the passengers and baggage. Furthermore, static elements can be placed in position (engine inlet cover, pitot probe cover, wheel chocks etc.). You’re also able to activate/ deactivate tinted windows. Tinted windows are only applicable for the passenger windows.
The cockpit
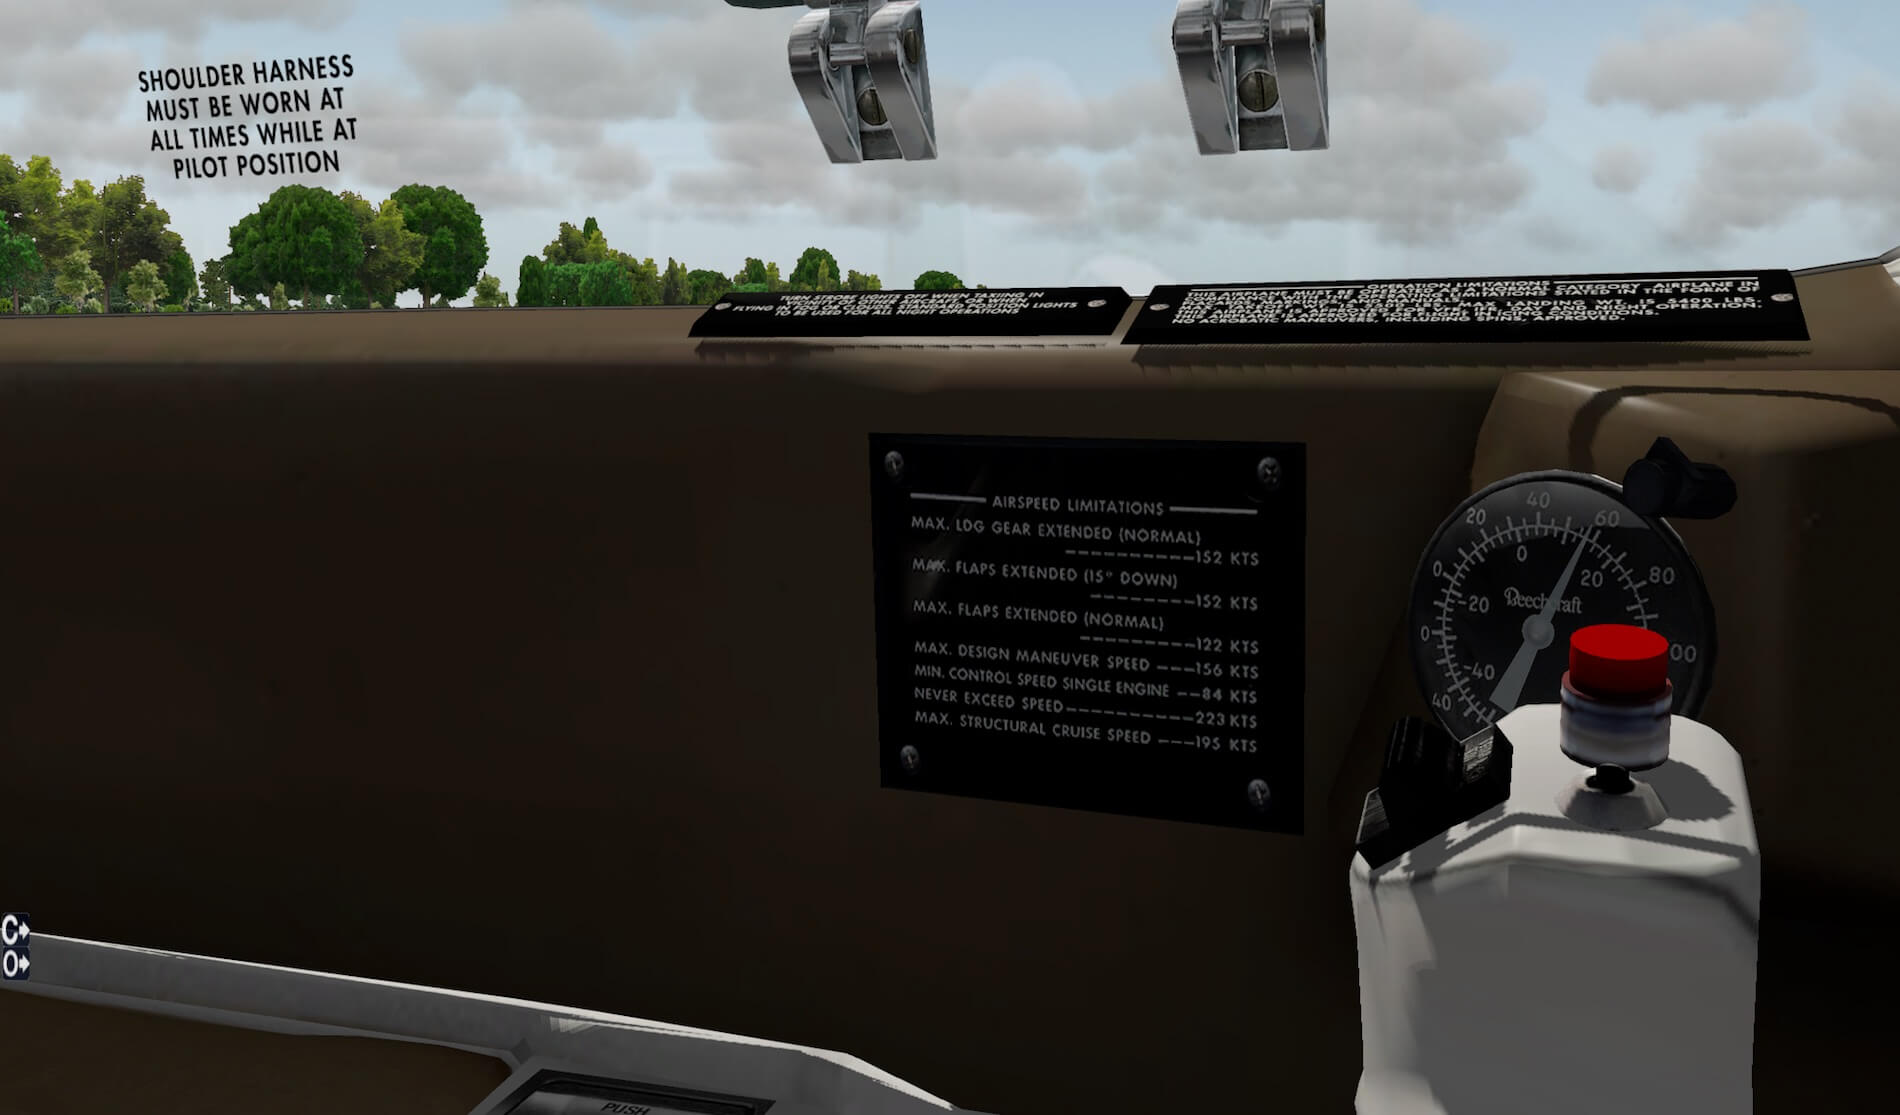
Together with HDR rendering ON and a nice and comfortable anti-aliasing and anisotropic filter setting, you get the best out of your Baron 58 cockpit, but it’s also applicable for the external look. Which HDR settings you take, I can tell you that the overall 3D cockpit looks great and panels, instruments, placards etc. are sharp from a distance as well as when you zoom in. That the text “SHOULDER HARNESS etc.” on the left-hand side window is sharp makes sense, but even the placards with text near the small window, are sharp too.
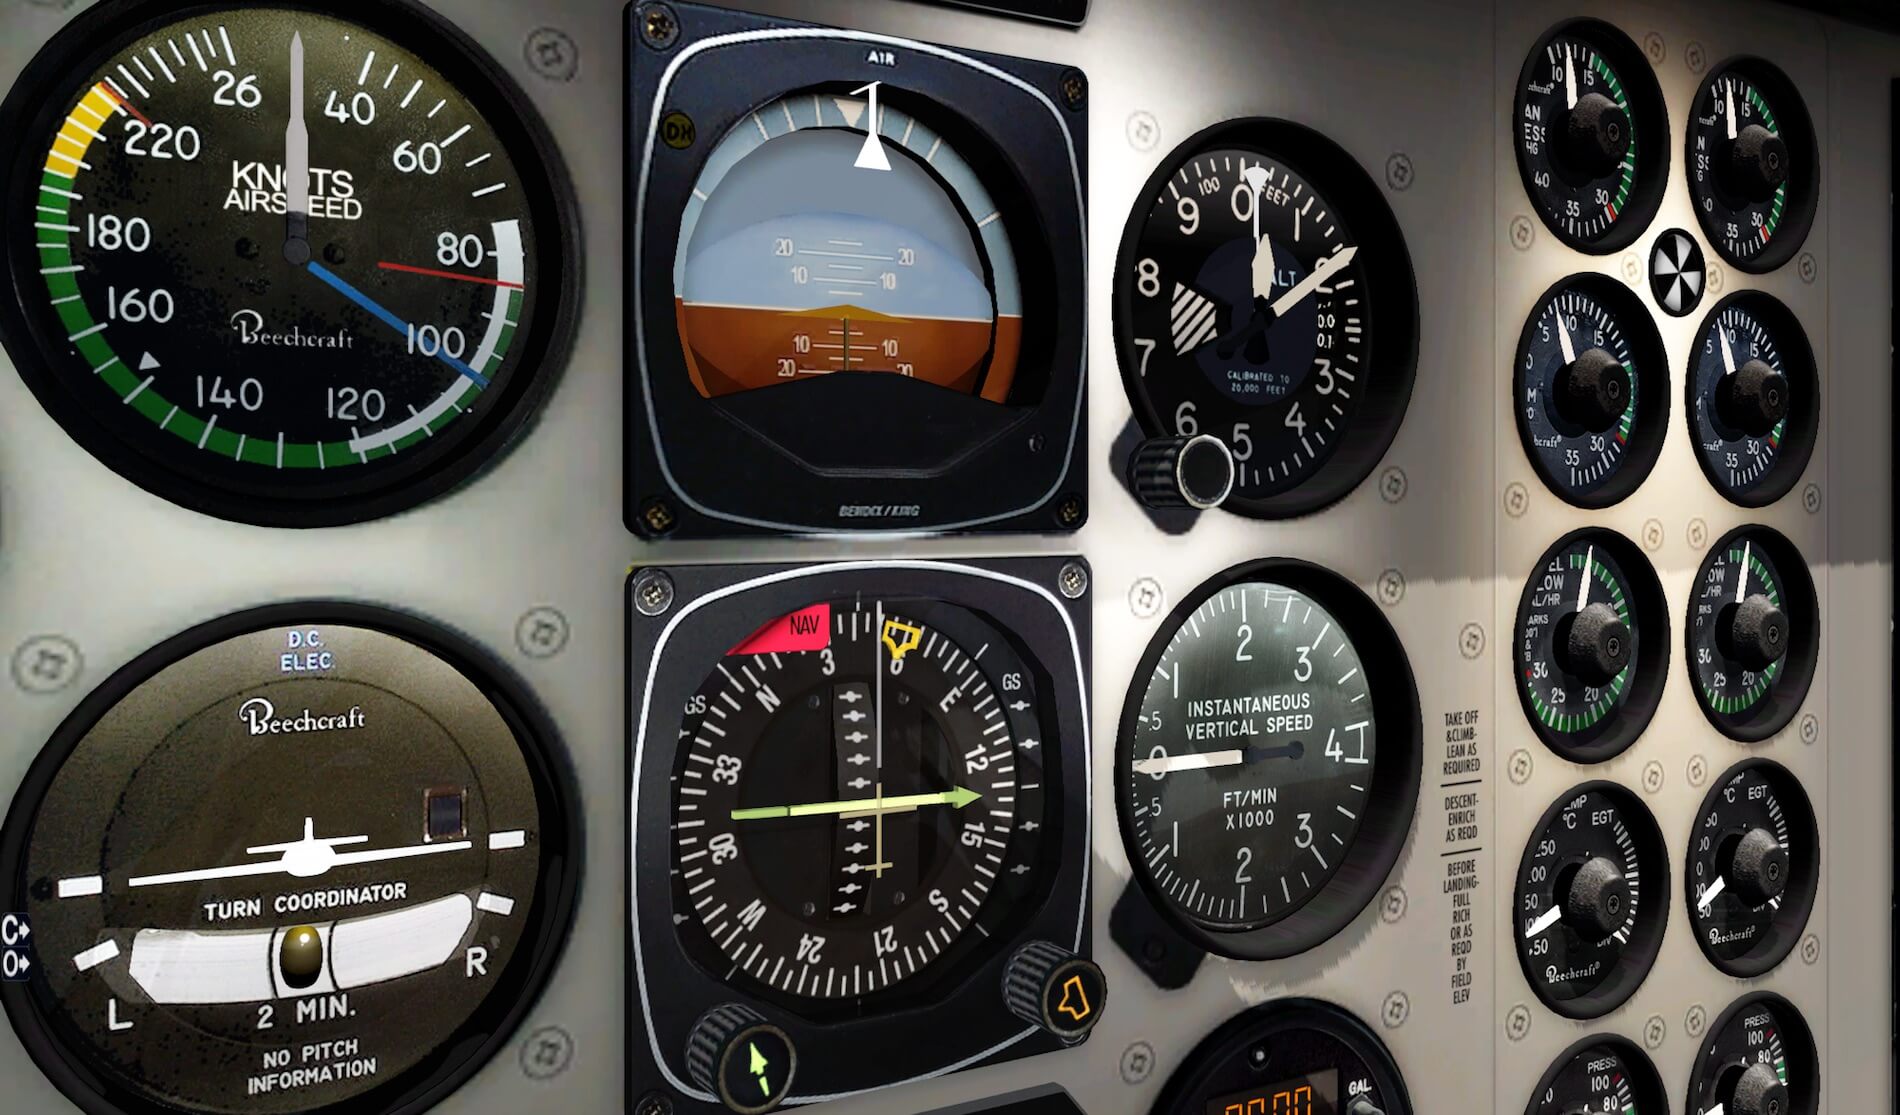
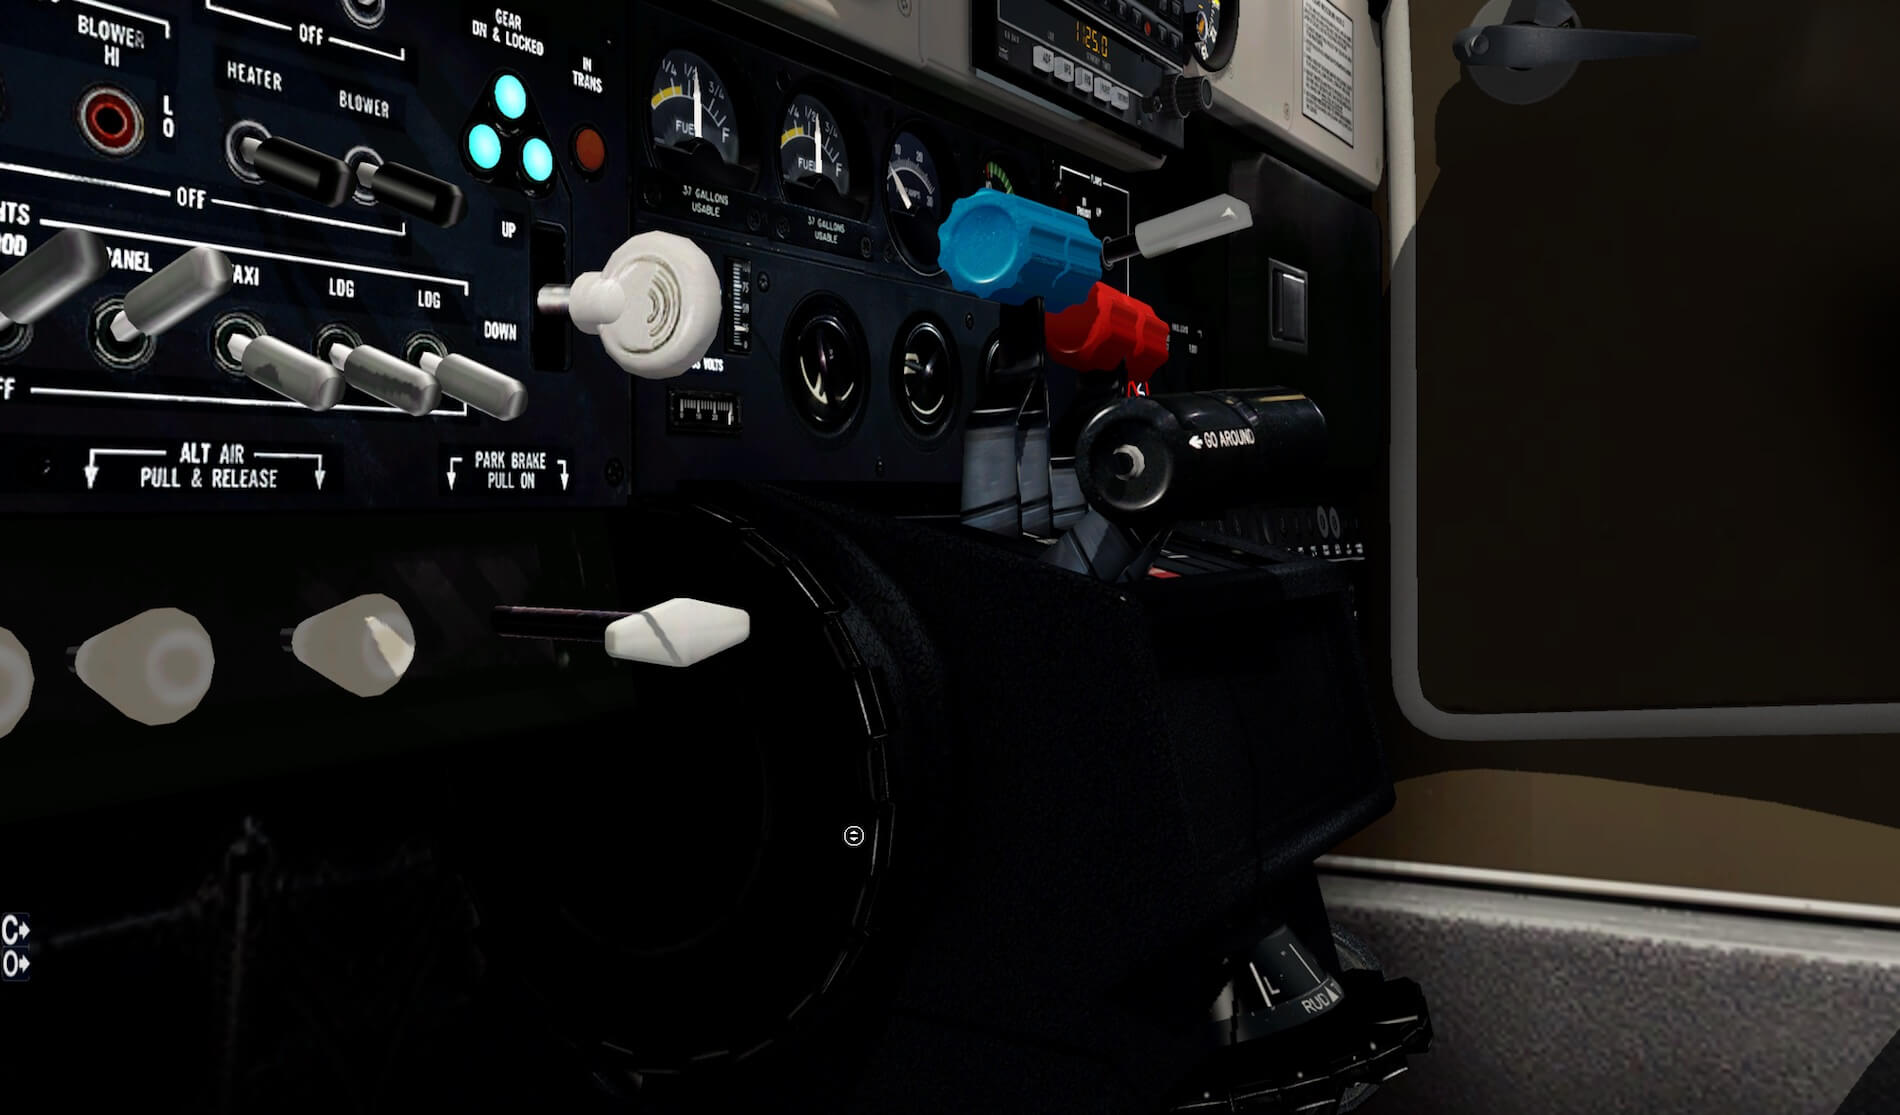
Click on the yoke rod and the yoke will disappear for more instrument panel clarity. When zooming in on the switch panel underneath the left-hand yoke, you will be amazed about the overall quality of the text, witches and selectors. Moving upwards to the main flight and navigation instruments, result in an even more quality spectacle.
The gauges are unbelievable sharp as well as the instrument pointers, red flags, knobs etc. Just to give you one tiny example: the text on the instrument panel right of the vertical speed indicator is extremely sharp. Even with my eyes almost zoomed in on the panel, the text stays readable and sharp!

More or less in the middle of the instrument panel you’ll find some Garmin equipment. Each Garmin panel looks better the in previous models. The buttons, knobs, selectors and text are now readable and there’s no blurry text. The displays however could be sharper but not sure if this is default XP equipment or modeled by Carenado themselves.
I’m already happy that the Garmin panels are now lifted to a higher level and no longer having blurry knobs, switches etc. Just to make one thing clear; the Garmin GTX 327 doesn’t has a blurry display. That’s sharp! Right of these Garmin instruments you’ll find a digital engine indicator, the EDM 760. Very nice!
Well-done guys!
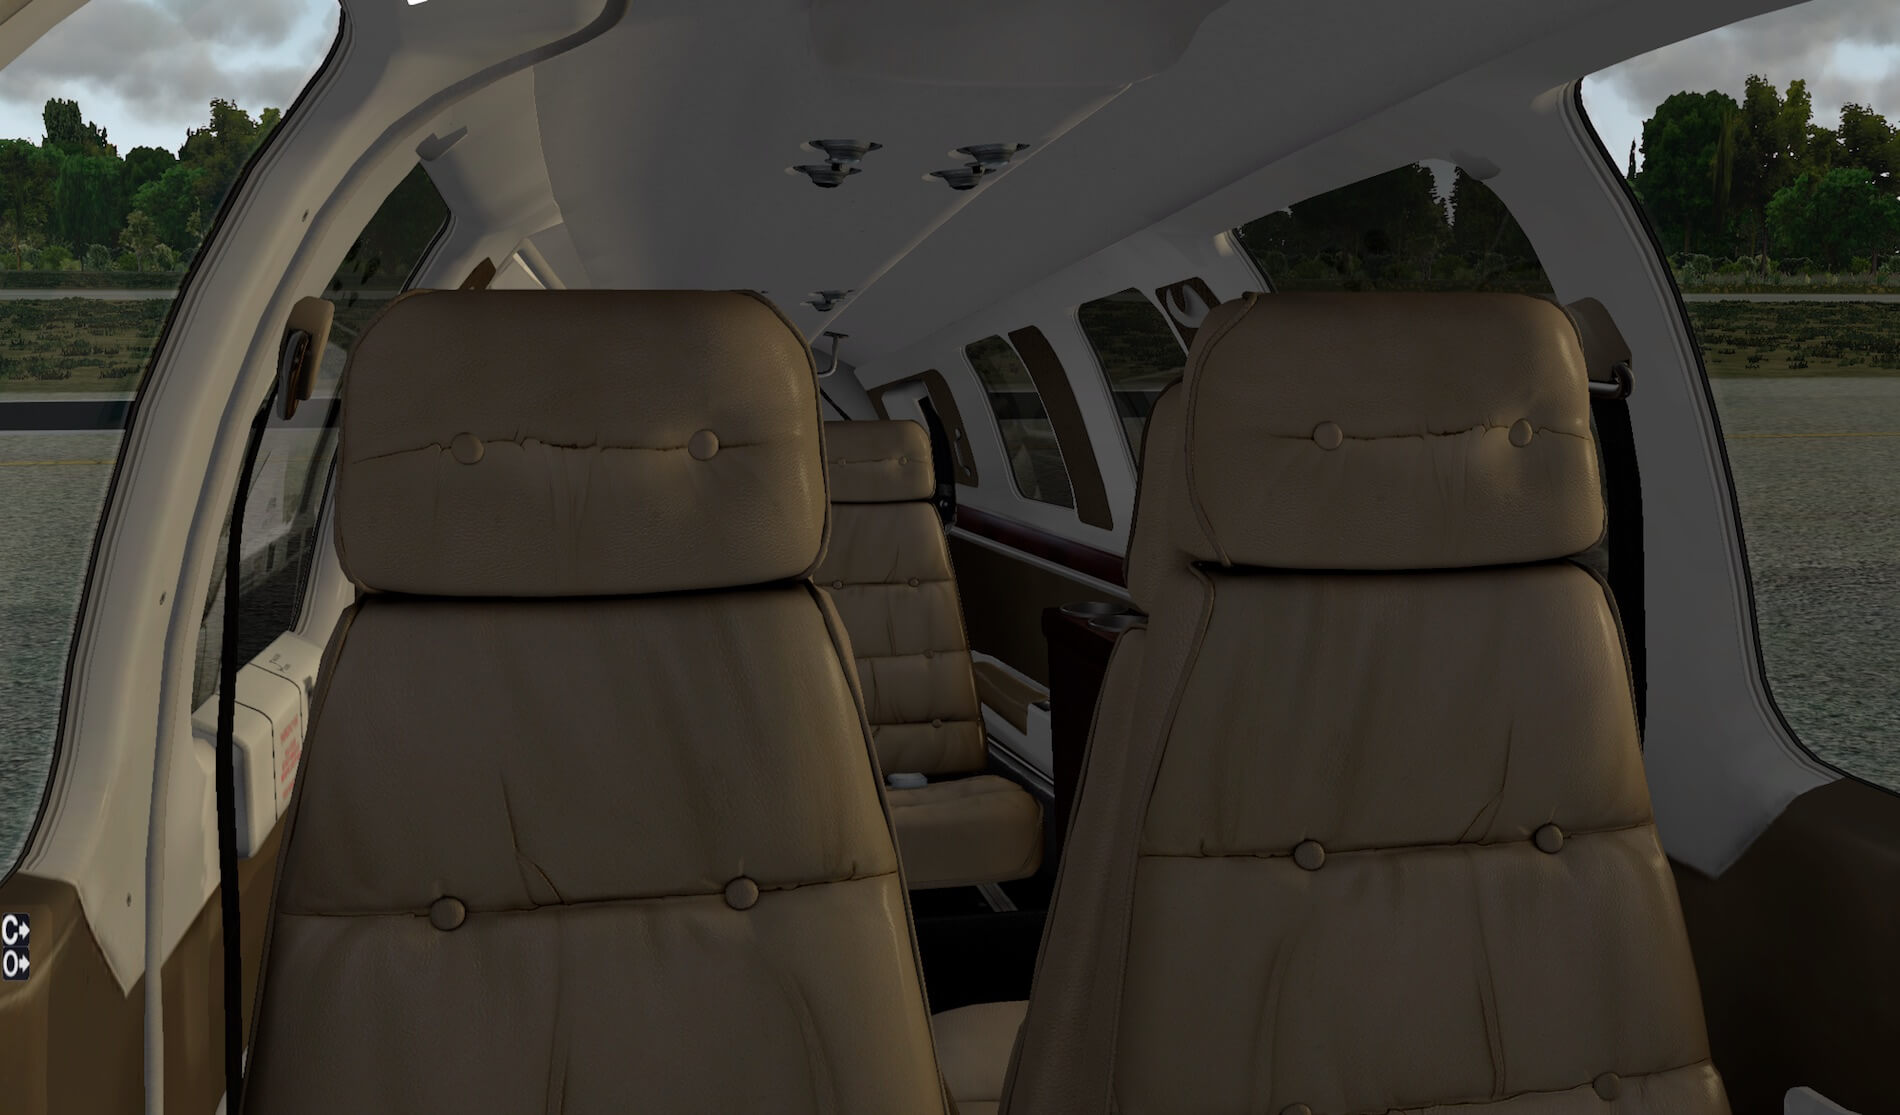
But I’m not yet finished; although this is only an impression, have a look to the forward seats. They look awesome! The only thing that’s missing is the smell of leather! Zooming in on the leather gives you not only a realistic look of the seats, but it also shows you the master piece of using photo real material with the 3D modeling. And this is of course also applicable for the passenger seats in the back.


And finally, there’s the Cameras screen icon “C” that allows you to control the Field of View (FOV) and to select different internal and external camera views. Overall a great cockpit and because it doesn’t need too many frame rates, you need to fly this with the 3D cockpit.
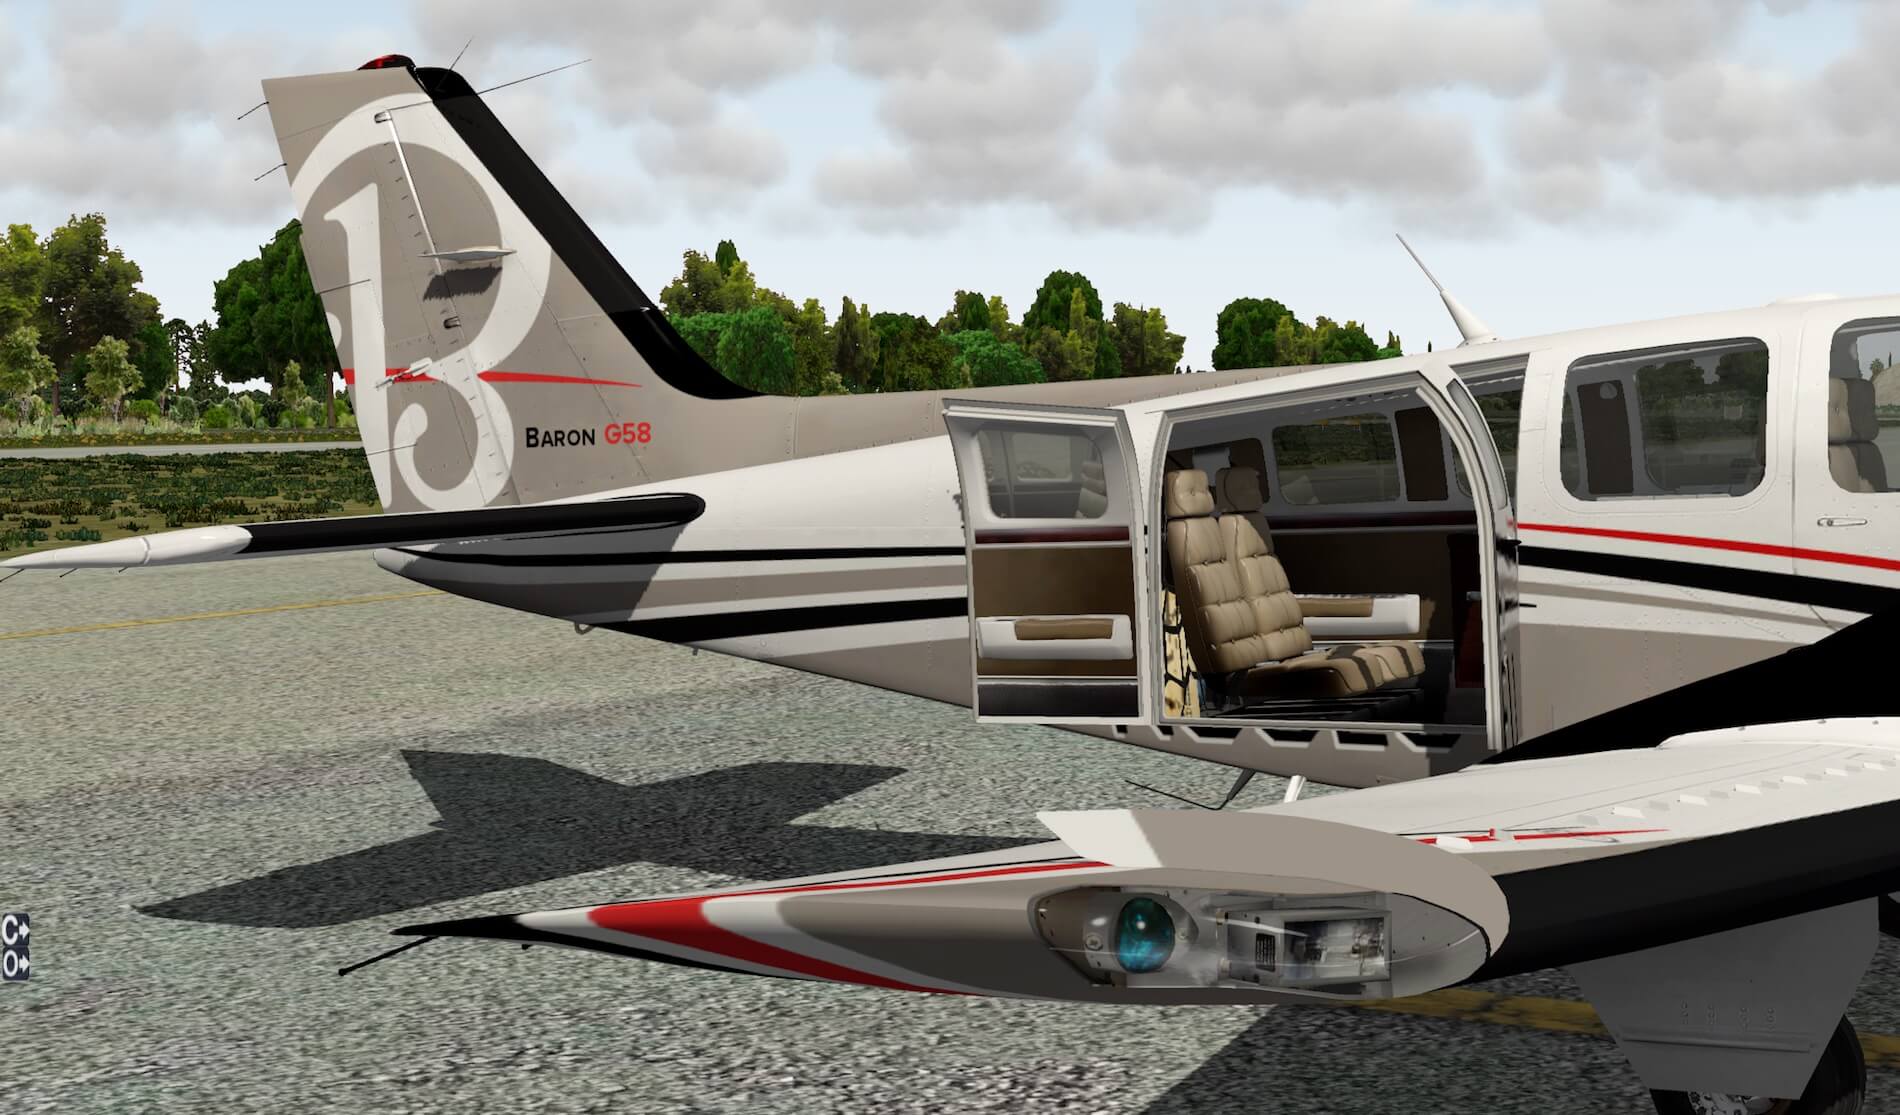
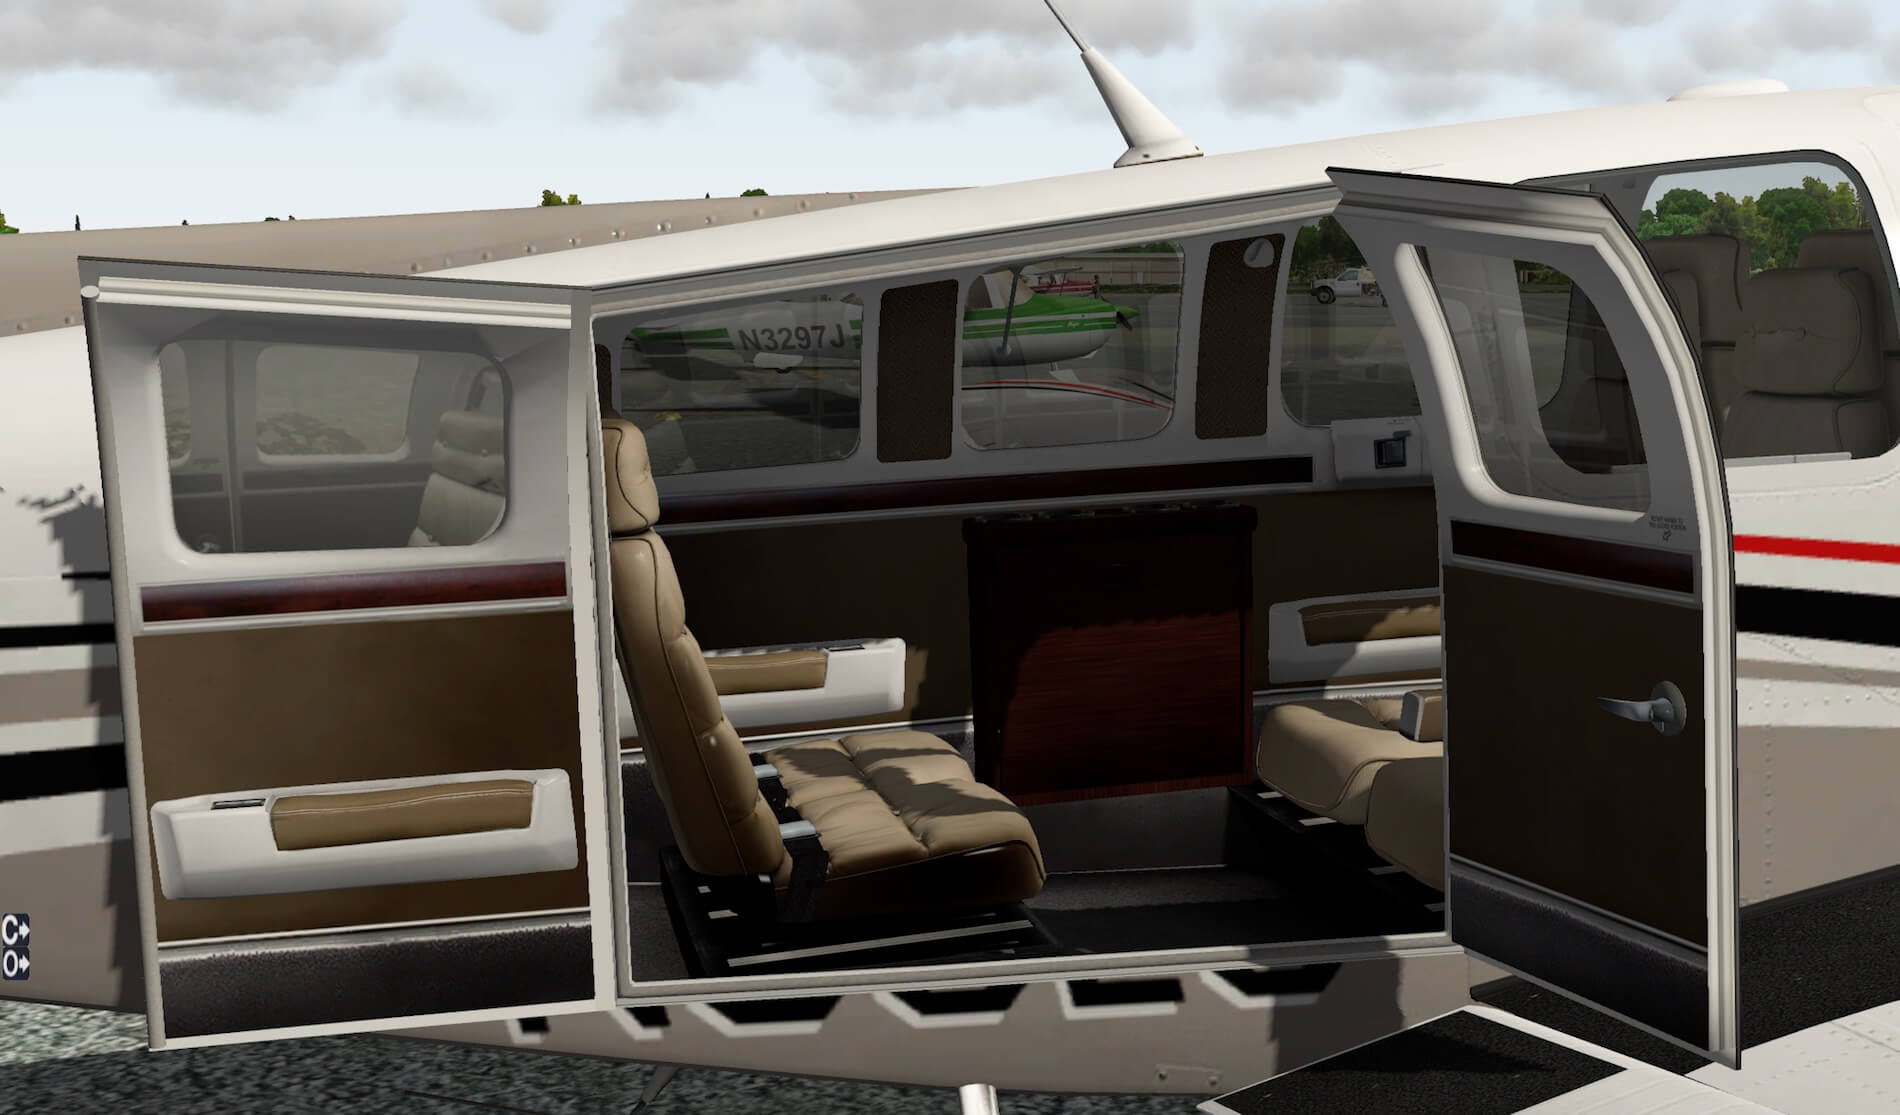
The virtual cabin, not more then an extension of the cockpit, is well modeled with eye for details. I’m pleased with what I see. The leather look alike seats are nicely modeled but also covered with textures that simulate leather. But there’s more; the carpet, sidewalls, ceiling, seat belts, lighting and what else I’ve forgotten. The passenger door is another example of great modeling and eyes for tiny details. Don’t believe me, check out the following screenshots.

First Baron 58 Flight Impression
In real life flying twin-engine props is much more complicated then just a single prop GA aircraft. I think that makes sense. On the other hand, flying the Baron 58 in combination with my Saitek X52 Pro set, makes life much easier since I haven’t two throttle, two mixture and two prop levers. In other words, I fly this Baron 58 with only one X52 throttle unit and thus for me flying this aircraft is like a single prop configuration.
Keeping this in mind, the Baron 58 flies great. If it flies realistic, that’s something that’s difficult to judge for me, even though I own a FAA PPL (Private Pilot License). But knowing Carenado for a while, I’m confident that this Carenado offers flight dynamics close to the real Baron. With that knowledge, I made some test flights from one of my favorite freeware add-on airports … KJGG from Marc Leydecker aka Belga12345.
When taxiing the Baron 58, you need to keep in mind that you keep the taxi speed low. For straight taxiing, you could use higher speeds but in particular when it comes to turns, the Baron needs enough space to make this turn. When your taxi speed is too high, you can’t make a nice turn and could end up in the grass, so reduce your taxi speeds when making turns.
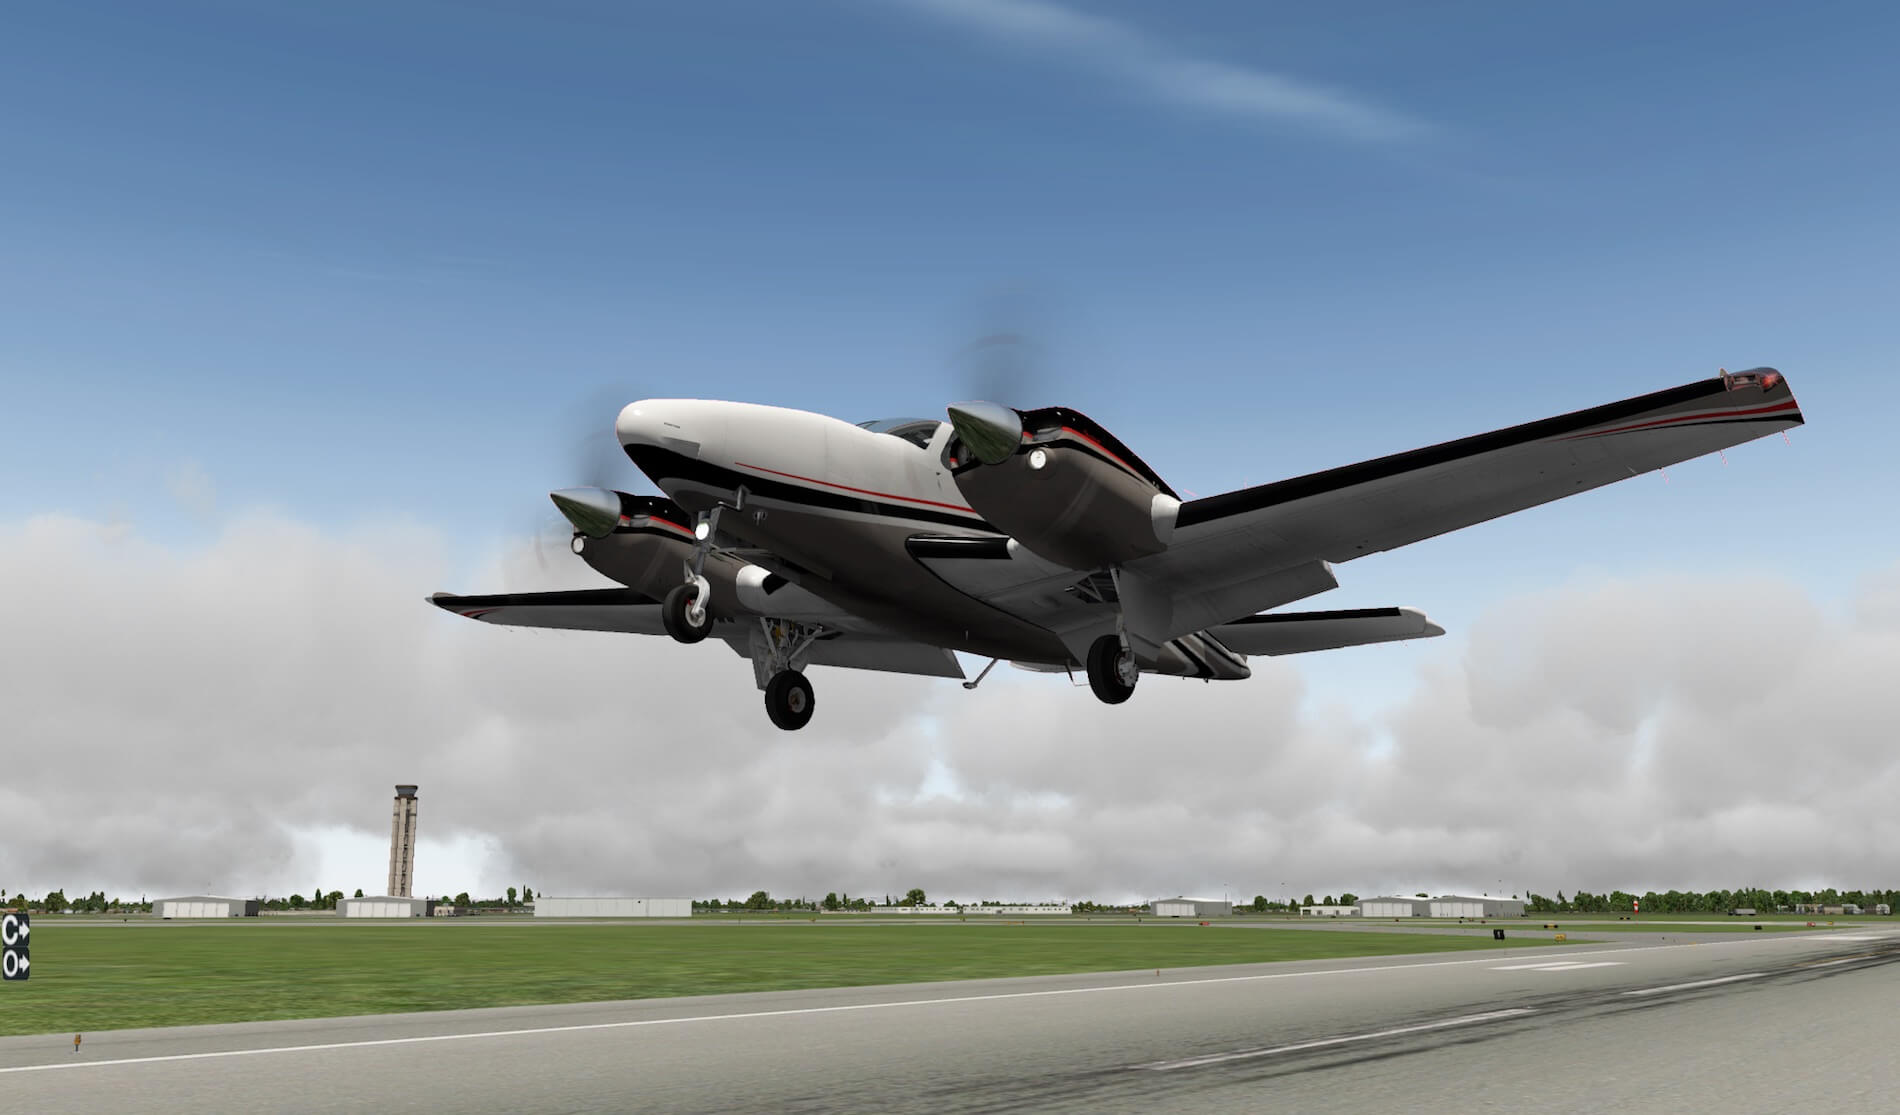
Taking off is, with the single Saitek X52 Pro throttle unit, easy and before you know, you’re off the ground. Once airborne, gears and flap retracted, it’s a pleasure to fly this model. When you’ve also assigned trim functions to your hardware yoke or flight stick, it becomes a pleasure to fly during any type of cross-country flight. Just trim the aircraft, sit back and once and a while add some trim to keep it straight.
Of course, you could use the Auto Pilot if you want. On the other hand, the stability of the Baron 58 is quite good and no Auto Pilot is really needed. Together with the Garmin navigation equipment, you should find your way.
The Baron 58 can be used for your VFR and IFR flights, whatever you prefer. When you prefer IFR flights, then all what you need to fulfill this is installed in the gorgeous looking cockpit. With HDR ON (Settings – Rendering Options), not only evening lighting conditions are wonderful, but also the daylight sunlight reflection is great. While looking to the instrument panel from either a forward seat of a 2nd row (passenger) seat, it’s also worth to look via the windows to the wing and engine cowling. Due to the NORM mapping and the presence of all the screws and rivets on the Aluminum skin, it gives it all a realistic look.
Although the Baron 58 isn’t a small GA aircraft, you’re still able to perform steep turns with it or pre-stalls, slow flights etc. I’m impressed by the overall look of not only the 3D cockpit, but also the 3D cabin with seats, the external model and all those tiny details, know from Carenado. It’s again a masterpiece!
But hold on, I still need to check out an approach.
You could do it all without a checklist, but I encourage you to use a checklist. The aircraft is as real as it gets and very close to the real Baron 58, so as in real life, you should use a checklist. Following the checklist for your approach, final approach and landing helps you doing the right steps without forgetting anything. I must admit that making a visual approach with the Baron 58 is easy and when you keep your IAS in the safe range while selecting the flaps and finally the landing gear, you should be able to make a successful landing.
This flight impression is just off and go. That said, VFR! But the aircraft is perfectly equipped with the necessary Garmin equipment, so I think it’s a good idea to make a IFR flight too. VFR is no problem. VFR is fun, at least, that’s how I think about it, but IFR is also fun, but a bit more preparations are needed. You’re ready for it?
IFR Flight Impressions KJGG – KRIC
Preparations
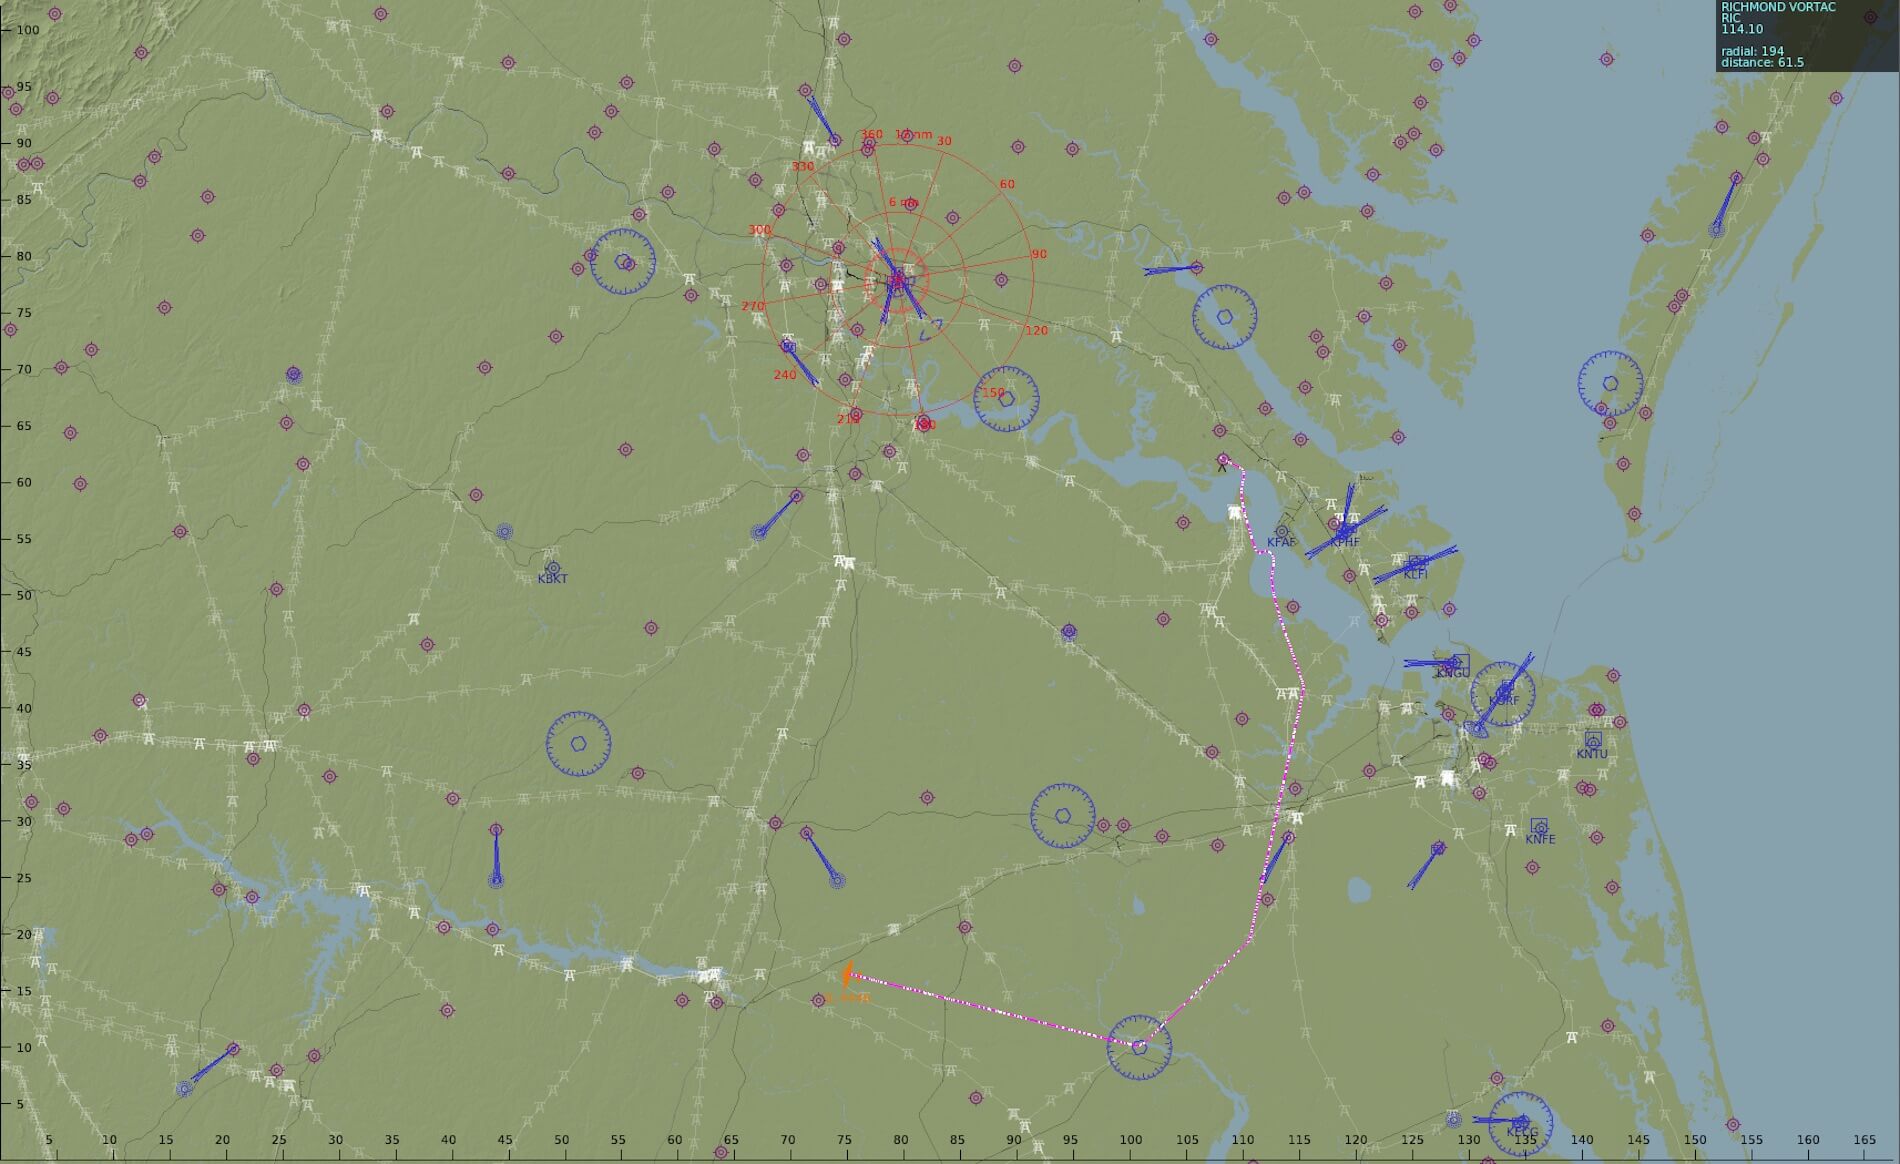
The planned test flight will depart from KJGG (Williamsburg-Jamestown Airport) and our landing will be at KRIC (Richmond International Airport). Normally, this shouldn’t be a problem using one of the online flight planning programs, but we can also make our own flight plan and add waypoints of our wish. It depends a bit on what we want … a flight plan created via the Online Flight Planner or one with the help of SkyVector. Do you want a sight-seeing flight around the area or straight to KRIC?
Before I forget it, find via this link a package with different flight plans, charts and other stuff that could be interesting in case you decide to fly this too. Ok, when you create the flight plan via the Online Flight planner, then the outcome is boring. No waypoints in-between KJGG to KRIC, so you may use and fly it, but that’s not fun, right?
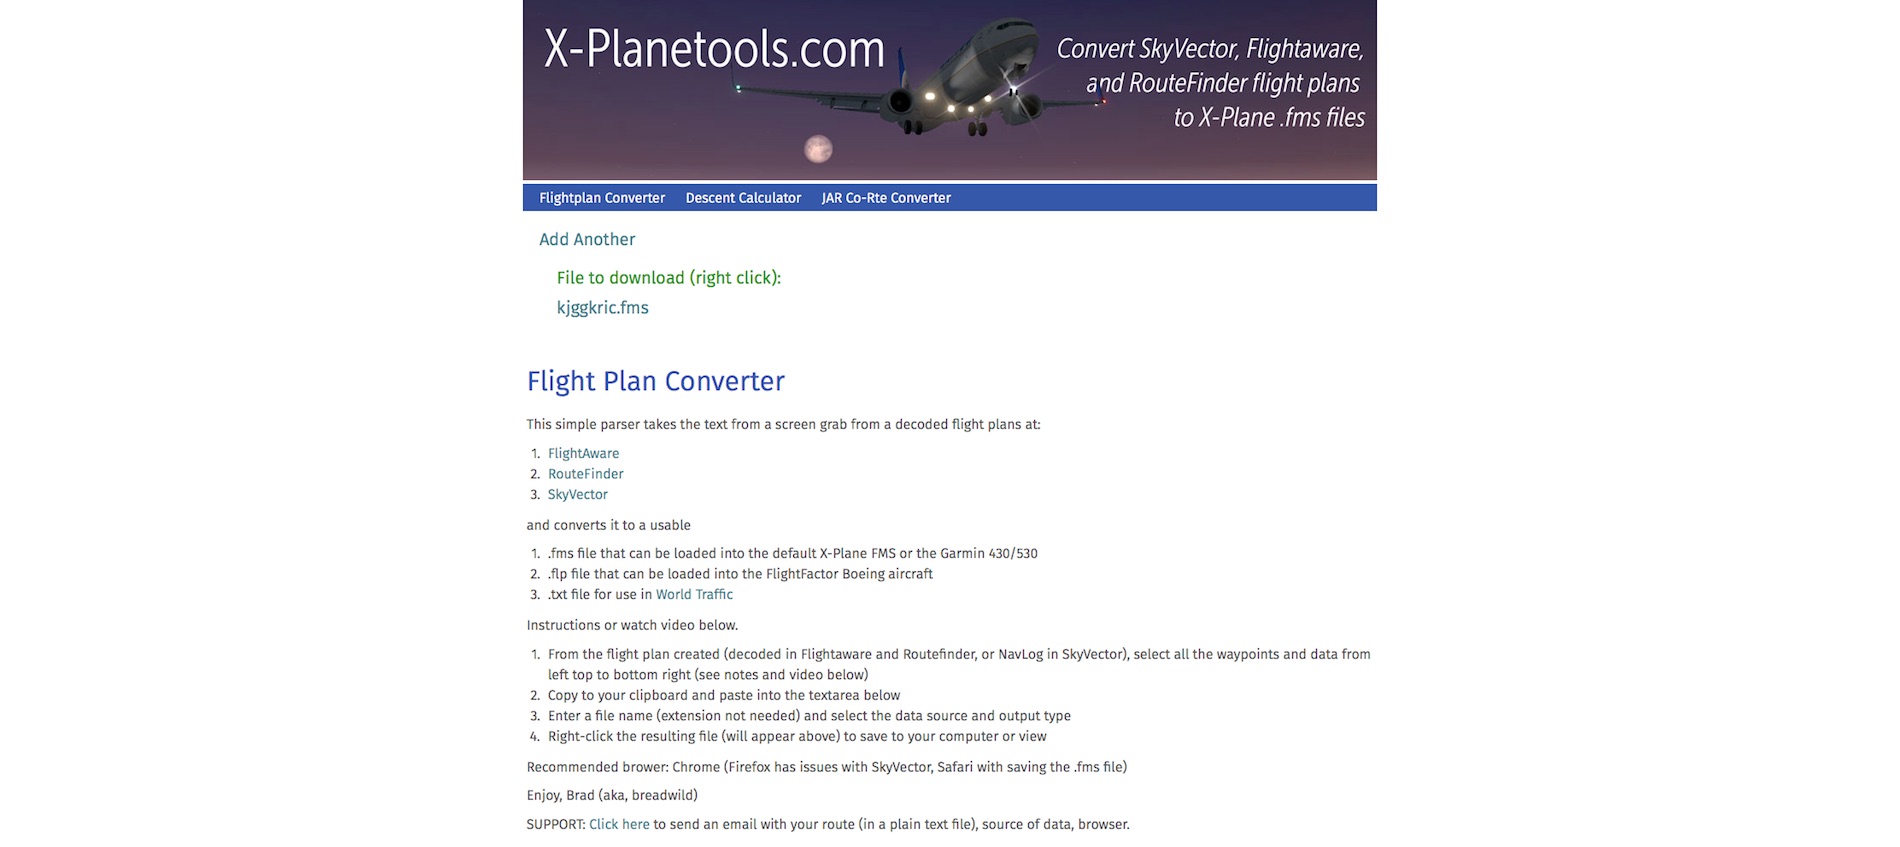
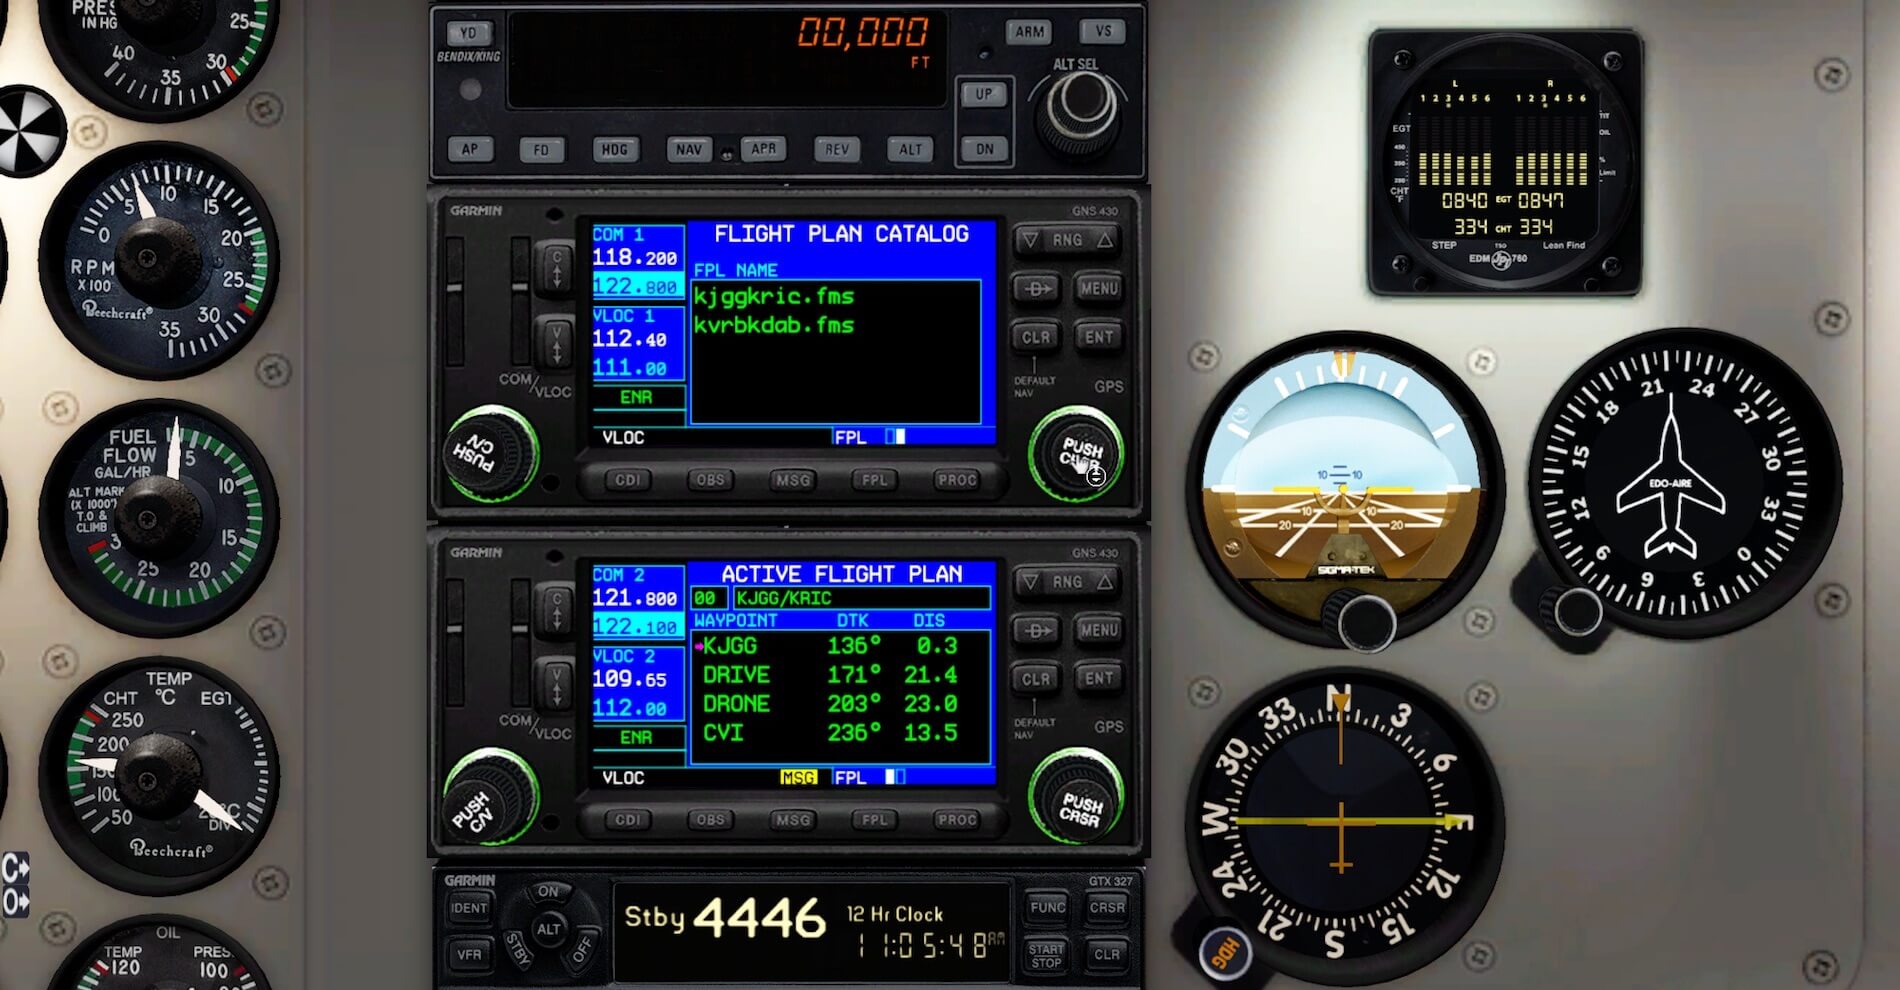
When you use SkyVector and thus the created flight plan I made for you, you’ll find the following waypoints: KJGG – DRIVE – DRONE – CVI (114.6) – GUMBE – LVL (112.9) – NUTTS – ARVON – EMMIE – EPICS – KRIC. I leave out any runway, and leave that up to you. Keep in mind that the generated flight plan does have the “fms” extension, but hold on, that’s not the case with SkyVector. A SkyVector flight plan has the extension “fpl”, so we can’t use that however, X-PlaneTools allows you to to convert this “fpl” into a “fms” extension. For you convenience, I’ve included both the KJGGKRIC.fpl and the converted “kjggkric.fms (with SkyVector and X-PlaneTools).fms” file in this package. Remember when using this file to remove all between the brackets!
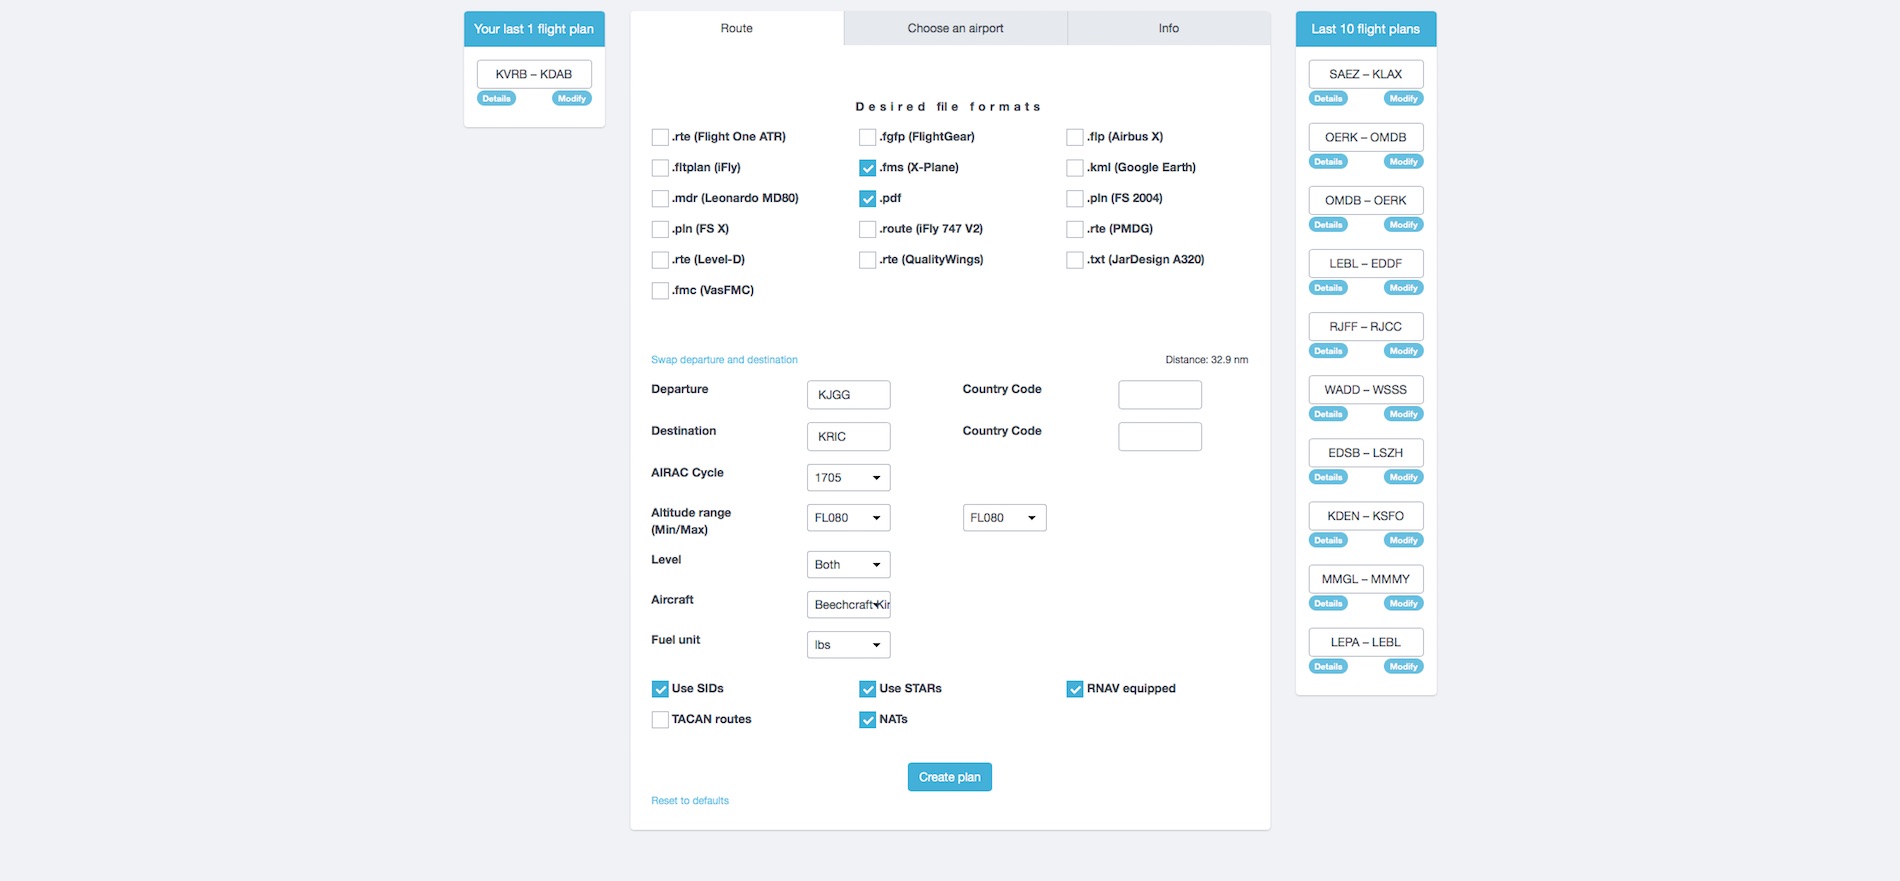


The SkyVector created flight plan contains mostly waypoints and only two VOR/VORTAC stations. For the build in Baron 58 Garmin GNS 430 it doesn’t make any different. As you know, the advantage of VOR or VORTAC stations is that they have a frequency, thus you can tune to them, but a waypoint has only longitude and latitude information.
Once more in case you missed it …… I’ve packed a couple of things together like two different flight plans as discussed in the section. Feel free to download in case you’re interested. Here’s the direct X-Plained.Com link.
Step-by-Step GNS 430 FP insertion
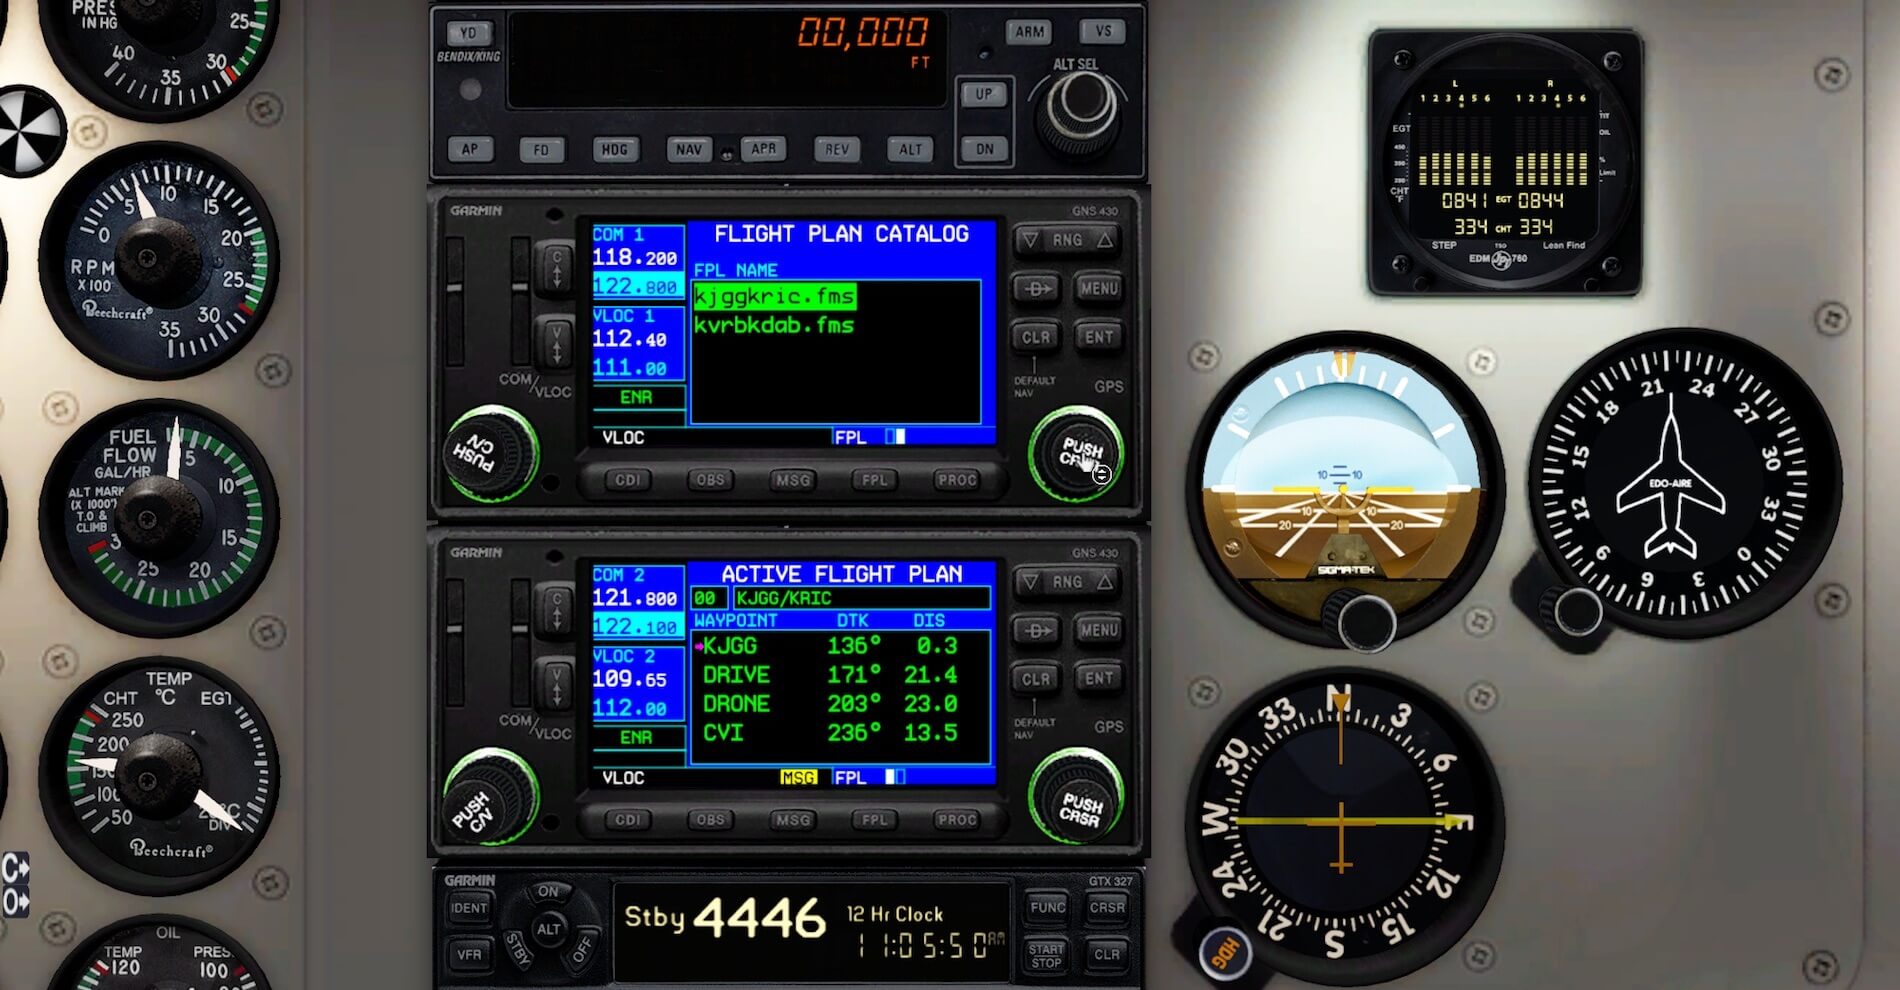
Copy the created fms file into the X-Plane root folder Output/FMS plans. With the fms file in this folder, you’re able to load the flight plan into the Garmin GNS 430.
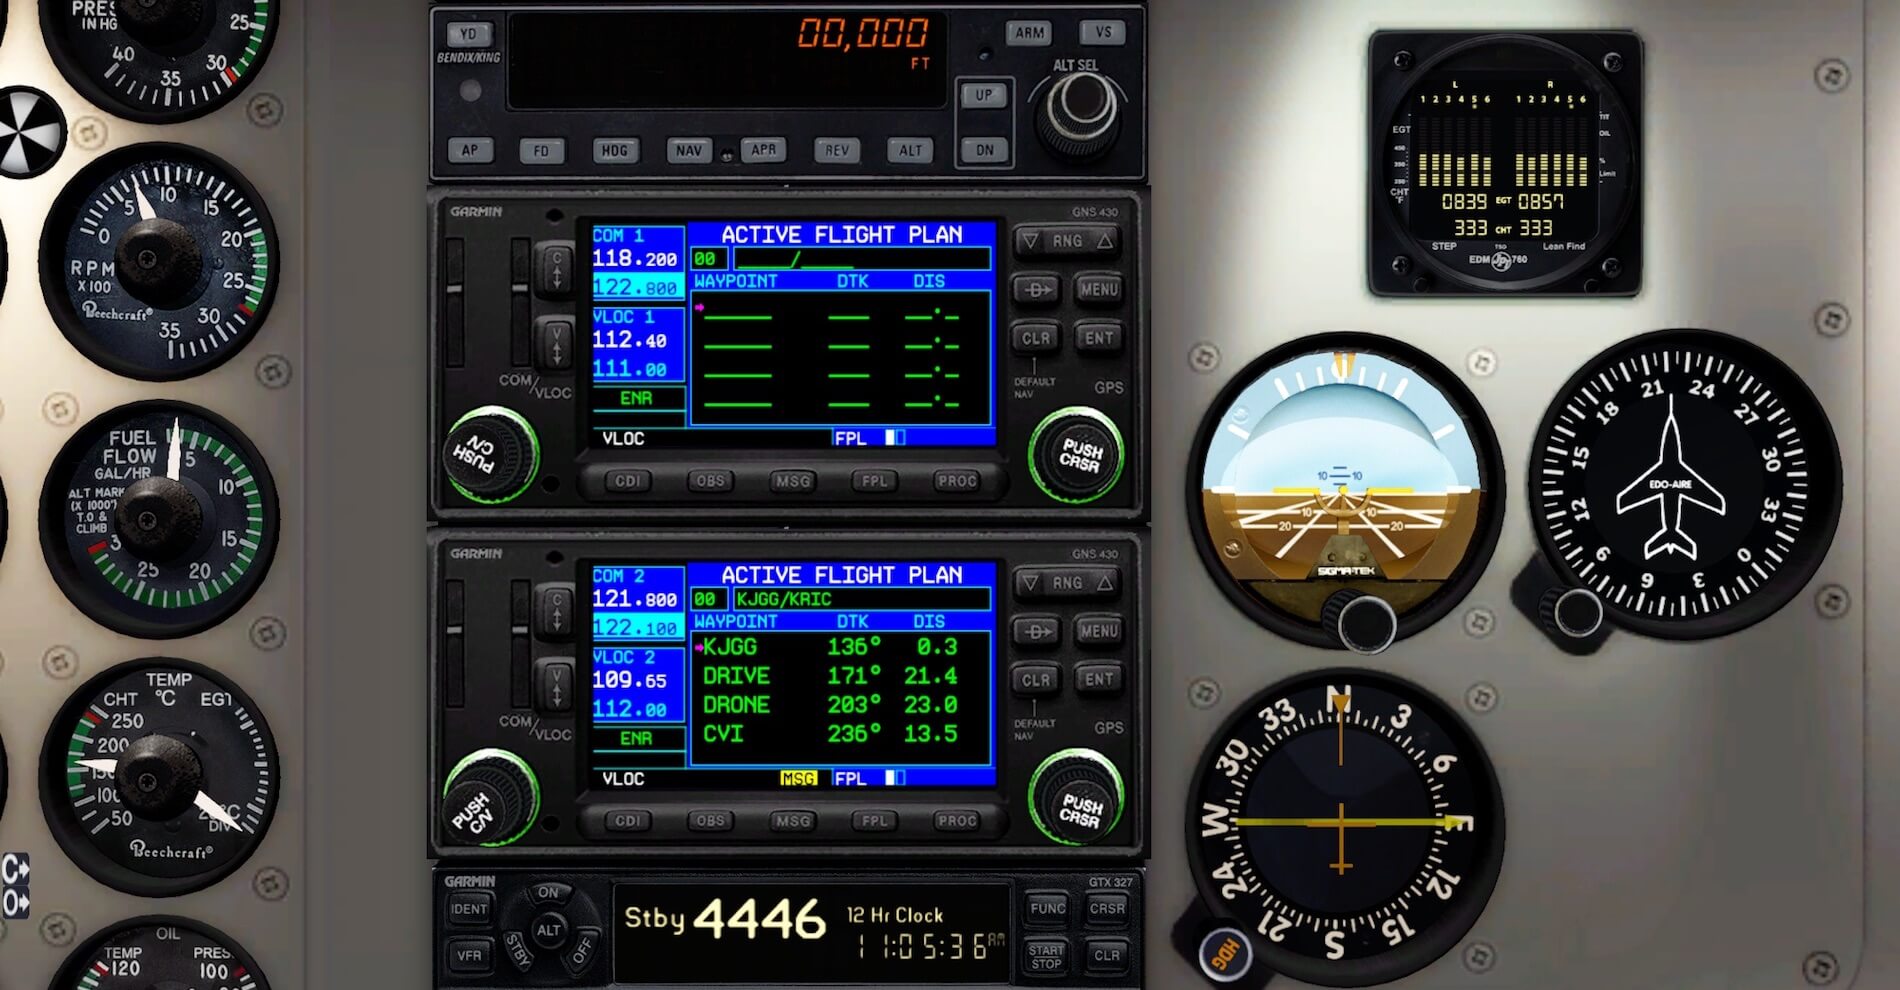

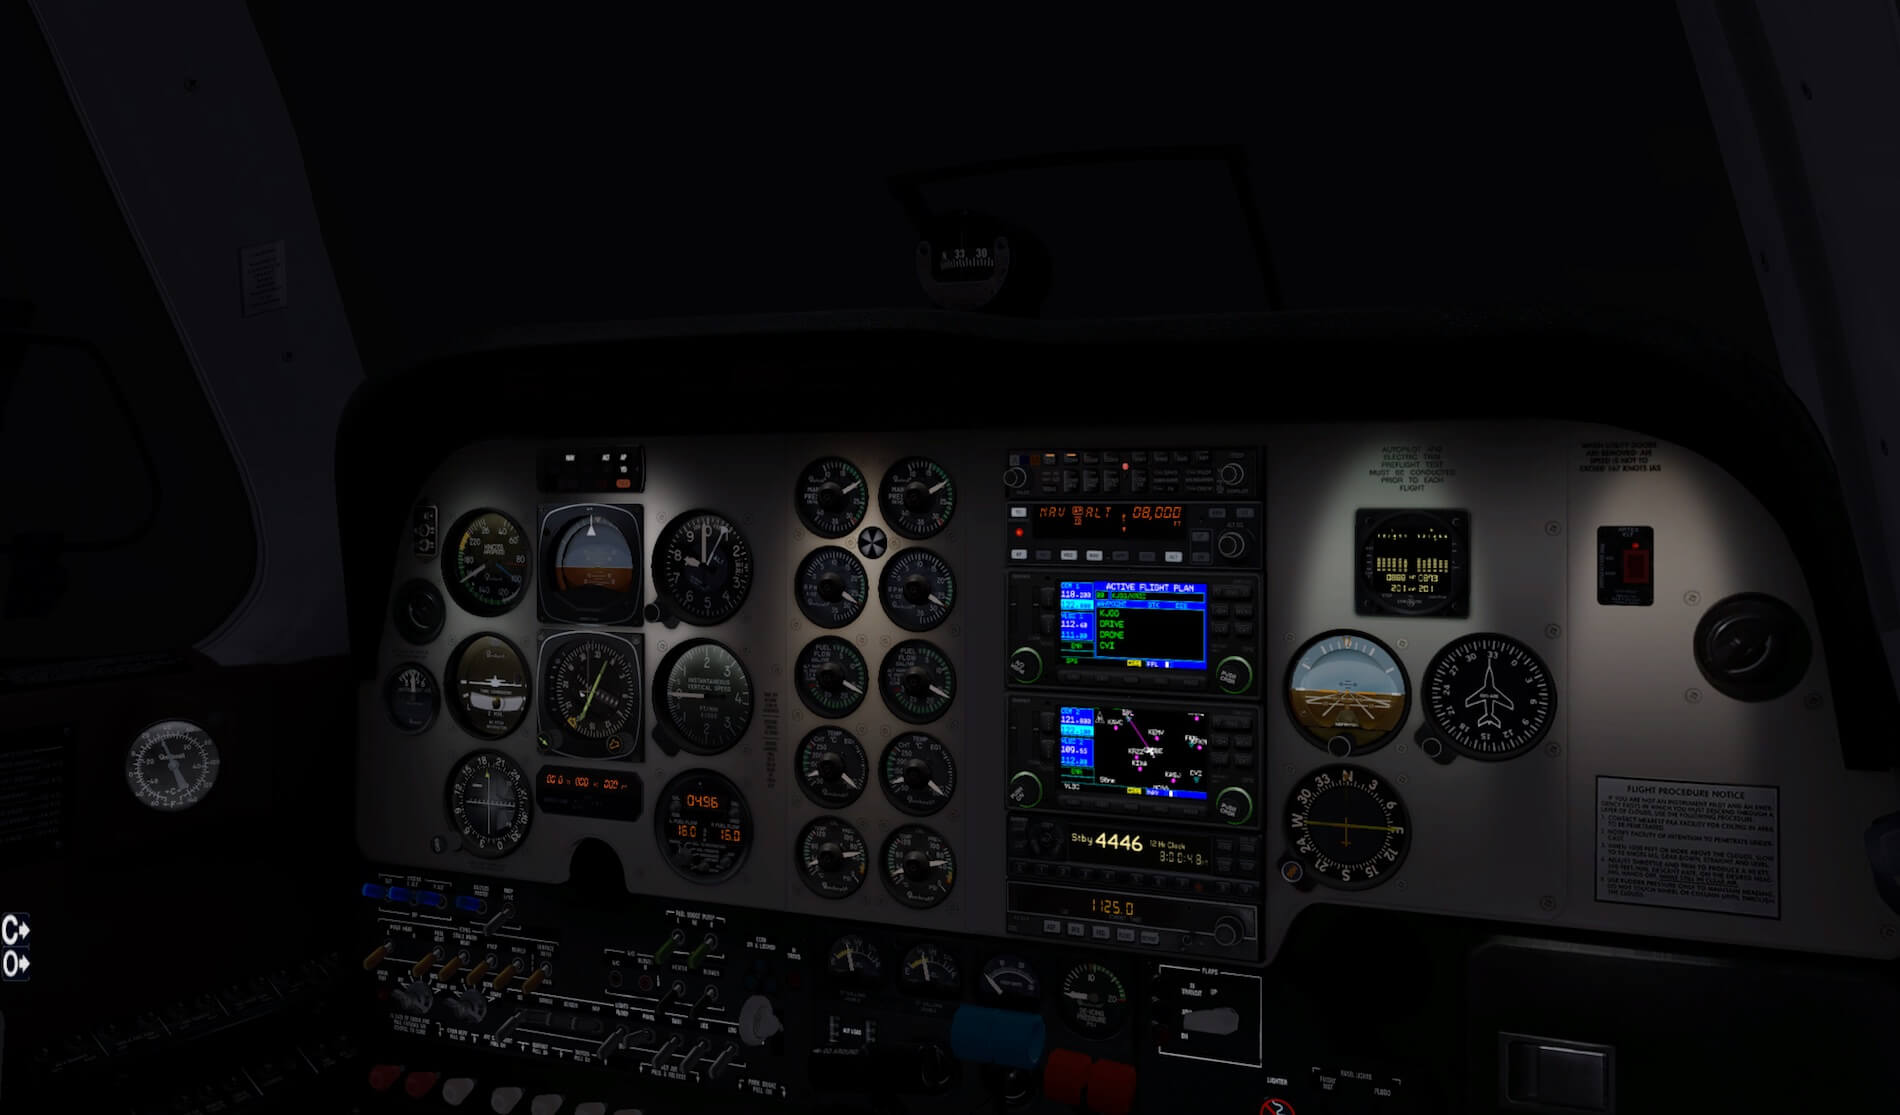
Taxing from the apron to runway 13 is not long. The Baron is easy to control, easy to taxi, so there’s nothing new about this part. What said before, the upper GNS 430 offers the flight plan waypoints, while the lower GNS 430 shows me the flight plan. If needed, I hope you’re aware of this, you can always get the 2D popup GNS 430, but the build in is easy to read and even from a distance it stays like that. While taxiing you clearly hear the sound of synchro’s. Most of the installed instruments or indicators have synchro’s.
Don’t forget to set the runway heading at the HSI. When you switch on the AP, you can continue first flying a runway heading, which is most likely the case. When the HDG bug is set for runway heading, no strange or uncontrolled roll movement appear. Further on, I’ve set at the Bendix/King AP panel an altitude of 8000 feet which is also our cruising level. I think this is it, flaps extended, checklist double checked so, I’m ready!


The moment you select AP, I also selected YD (yam damper), AP HDG mode is activated too. That’s why it’s good set the HDG bug before! I adjust the vertical speed a bit to normal values like 1500 to 1800 feet per minute. But there’s something more important ….. we want to follow our flight plan. Ok, on the AP panel I select NAV, deselect HDG, but nothing happens. That’s because the the CDI (Course Deviation Indicator) button on either Garmin GNS 430 is still at VLOC (illuminated white) while it has to be in GPS (illuminated green). When I’ve set either GNS 430 to GPS, it will follow the flight plan. Keep in mind that when you’ve programmed only one GNS 430, then you should only set on this GNS unit GPS with the CDI button.

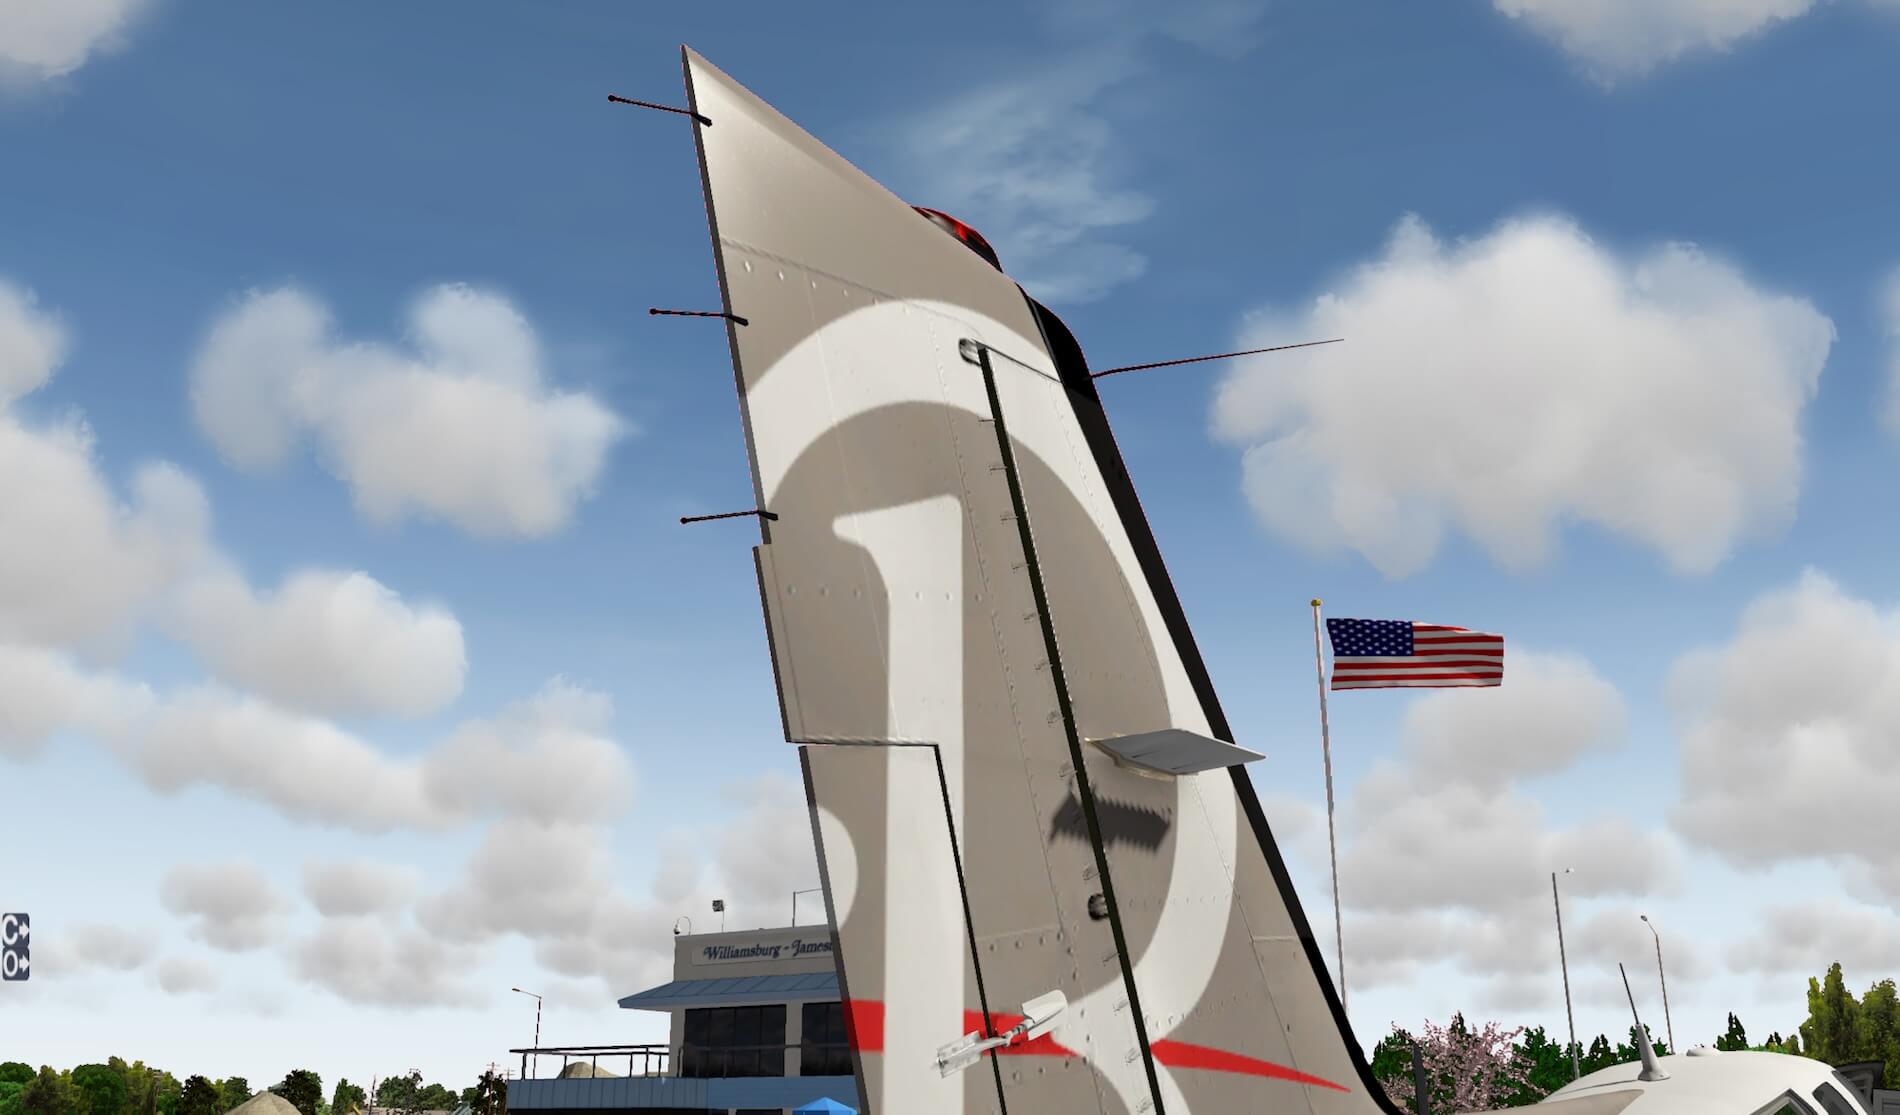
Small vanes on the top wing surface?
For sure you’ve seen these small vanes, pointing in every direction on the top of the wing leading edge?

These small vanes or whatever you want to call them, are vortex generators and you see them often on different types of aircraft. Ok, vortex generators are small components deployed on the wings and stabilizers surfaces. They modify the flow around this/these surface(s) affecting the boundary layer. Properly arranged, improve the performance and controllability of the aircraft, particularly at low flight speeds, climb, and high angles of attack. There’s of course much more to say about these vortex generators, but that goes beyond this review. For those who want to read more about it, check out this dedicated Wikipedia page or this Aero Service site.
Oops, back to our flight.
My Baron has levelled off at 8000 feet, approaching nearly waypoint DRIVE, and is following the flight plan. I’ve adjusted the IAS (Indicated Air Speed) which gives me the time to look once more around in the cockpit and the passenger area. Although at some places the text on the panels is blurry, these aren’t often used. The instrument panel text and the dial plates in the indicators is razor sharp. Ok, another blurry item are the decals in the baggage area, but who looks there and who is interested in sharp decals down there?


I’m also playing around with the instrument panel or integral lighting and the flood lighting. I’m not sure if this is all OK. Situated right of the FLAP handle, I’ll see panel light rheostats. One for FLIGHT INST and one for FLOOD. I can click on the FLIGHT INST which switches it to the fully 100 percent lighting or I can use the mouse wheel to adjust the lighting. This is clearly visible at day time as well as darker hours, but this is not applicable for the FLOOD light switch/rheostat. It needs to be dark else you don’t see the flood light – cockpit ceiling – at all.

The weather has changed a little bit. From a clear sky with a couple of clouds, it’s now overcast. I don’t see anything expect the cloud formation which is also not bad. What said, it’s a IFR flight so Instrument Flight Rules apply. It’s nice to fly under IFR conditions since the only thing you need to reply on, are your instrument. There’s no reference with the horizon, except for the HSI.


After a couple of hours being in the air, it’s time to descent for our landing at KRIC. I’ve decided to land on runway 16, which has an ILS CAT I (IRGJ | 110.70). If I use the ILS, is another story. Flying the Baron by hand is easy. It’s an easy aircraft to trim and thus to control under, as far as I’ve seen, many flight attitudes.
Anyway, when you’ve entered in either, or to be sure both GNS430 the ILS frequency, set the CDI on the GNS 430 to VLOC, you’ll see that the HSI shows the LOC (Localizer) signal while the OBS shows you with two needles the LOC and GS (Glide Slope). When you visually see the runway, and also PAPI, then it’s a nice to have that all, with bad weather conditions, it’s an absolute need to follow the needles in the HSI and OBS.
I’ve started my approach, making final adjustments and since the weather has cleared up, a visual is possible. With the help of PAPI (Precision Approach Path Indicators) which is always there, it’s easy and an ILS is in those cases not needed. All together a nice and great flight. Perhaps a bit too long, but on the other hand, it gives you a lot of time to play around, to test everything, to explore new things and to learn flying the Baron 58.

Summary
Was it all worth my time and effort?
Yes, it was. Although the Carenado Beechcraft Baron 58 isn’t the newest model, it’s still worth to fly it and it’s kept up to date. Are current Carenado or Alabeo models better then this one? I don’t think so, but perhaps that current models offers different techniques and knowledge that can’t be implemented anymore in older models. That said, is the Baron then old-fashioned? No, it’s not old-fashioned. Ok, is has no modern EFIS instruments or whatever is possible these days, but it’s not an old-fashioned aircraft to fly with.
Attention … attention …. some words about X-Plane 11.
As stated in the introduction of this review, the aircraft is only for X-Plane 10.51, but that doesn’t mean you can’t fly it with X-Plane 11. Oh yes, you can and as far as I’ve seen, most of the things in the cockpit work (excuse me when I’ve missed a couple of things) as well as the aircraft behavior. However, all the special features X-Plane 11 offers like for example the glossy external look, that’s something you can forget. So, even this favorite Carenado Baron can be flown with X-Plane 11.
Does it need updates?
Yes, it does, but it also gets updates. The Baron 58 is, as with many older models, upgrade to version 3.2. Good, I’m happy with this review, but where can you get it? Most likely via the dedicated Carenado web page. (https://www.carenado.com/CarSite/Portal/index.php)
Besides the Carenado Baron 58, I used for this review the following freeware and payware add-on products:
– Freeware | KJGG (Williamsburg-Jamestown) from Marc Leydecker
– Freeware | KRIC (Richmond International) from Marc Leydecker
– Payware | SkyMAXX Pro 4.0.1
Feel free to contact me if you’ve got additional questions related to this impression. You can reach me via email Angelique.van.Campen@gmail.com or to Angelique@X-Plained.com.
With Greetings,
Angelique van Campen
| Add-on: | Payware Carenado Beechcraft Baron 58 |
|---|---|
| Publisher | Developer: | X-Plane.Org | Aerosoft | Carenado |
| Description: | Realistic rendition of the Beechcraft Baron 58 |
| Software Source / Size: | Download / Approximately 468MB (unzipped) |
| Reviewed by: | Angelique van Campen |
| Published: | May 5th 2017 |
| Hardware specifications: | - iMac 27″ 4.2Ghz Late 2015 | iMac 27″ 3.9Ghz Late 2013 - Intel i7 4.0Ghz / 4.2Ghz during Boost Mode | Intel i7 3.5Ghz / 3.9Ghz - AMD Radeon R9 M395X 4GB GDDR5 | NVIDIA GeForce GTX 780M 4GB - OWC 64GB 1867MHz DDR3 | 32GB 1600MHz DDR3 - 1 internal 1TB SSD (Sierra 10.12.4) | 1 internal 1TB SSD (Windows 10 Pro) - 1 external 1TB SSD | 1 external 1TB SSD - Saitek Pro Flight System X-52 Pro and X-56 Rhino |
| Software specifications: | - Sierra (10.12.4) | El Capitan (10.11.6) - Windows 10 Professional - X-Plane 10.51c | X-Plane 10.51m | X-Plane 11.00r1 |
6 Comments
Submit a Comment
You must be logged in to post a comment.
Hi,
very nice job.
May we talk about XP11 and your FIP (Belga12345)?
Maybe 2 years ago I bought your FIP and I had fun with B58 and XP10
Now I have XP11.30, Carenado B58 (rev 3.2) with latest REX, and I can not use your FIP (screens are black). I have followed all the info you provided in your manual.
Moreover Carenado B58 with REX does not match real CH temperature with Saitek FIP (always indicating Max Temperature even if I have just tuned on the engines)
May you refresh your FIP to let them work under XP11.30?
Thanks,
Hi, if Belga12345 has the time, is something he can only answer.
Excellent review!! By any change, can you share with us the livery used for this pictures? I such an amazing livery!!!!
Also send you an email via Dropbox , but just in case … here’s he link too -> https://www.dropbox.com/s/c20al8koj2nmrzp/N58EU.zip?dl=0
thanks for another great review. btw simcoders.com have done a reality expansion pack for this model. simcoders.com
Hi Dean,
Thanks for bringing up SimCoders. Perhaps worth a review.