The Ultimate Aircraft with the Ultimate Carenado Perspective
Introduction
Who can that be and when did this success story start?
That can only be Carenado and/or Alabeo and when it started … oh, that’s not so important. More important is the recent release of the Carenado SR22 Turbo with the ultra modern and highly realistic simulation of the Cirrus Perspective by Garmin Cockpit. Oh sorry, you’ve never heard of the Cirrus Perspective?
Then you should take a look at this link and feel free to download the Cirrus Perspective brochure too. It is also worth the time to have a look at the dedicated Cirrus Aircraft SR22 Turbo link. And when you want to go even deeper, then perhaps it’s an idea to download the official Cirrus iFOM or interactive Flight Operations Manual. But wait … although it’s a great option, it isn’t for free. You can get more information at the dedicated iTunes iBook section link. And last but not least and I’m not sure how long this link stays active …. via thus URL you a grab your free copy of the official Cirrus SR20, SR22 and the SR22T FOM.

Ok, but what’s so special about this Carenado release since, if I remember rightly, vFlyteAir released also a Cirrus aircraft, namely the SR20 which also has Cirrus Perspective instrumentation which seems to me the same or is that a wrong conclusion? I know one thing for sure, this Carenado SR22 Turbo review won’t be a comparison with the vFlyteAir SR20.
Perhaps I will highlight a couple of differences during my SR22 Turbo adventure, but you won’t hear from me what’s good and what’s bad. Therefore, this impression focuses on the Carenado SR22T. Some will think differently, but keep in mind that although Carenado and Alabeo use the FSX/P3D model as starting point, there’s a lot to do before a FSX/P3D aircraft becomes an X-Plane aircraft. That said, it’s not just porting a FSX/P3D to X-Plane.
Just to give you an idea … external textures are adapted for X-Plane use, although a lot of work has to be done to make it suitable for X-Plane. When it comes to the instrumentation, all of the instruments are re-animated for X-Plane, as animation data is not the same format for X-plane as for FSX. And, in particular for the Garmin G1000, the Garmin G1000 needs to be reprogrammed from scratch to make it suitable for X-Plane.
When you read the previous paragraph once more, you’ll find out that there’s a lot to reprogram and recreate before the original FSX/P3D aircraft functions well within X-Plane.
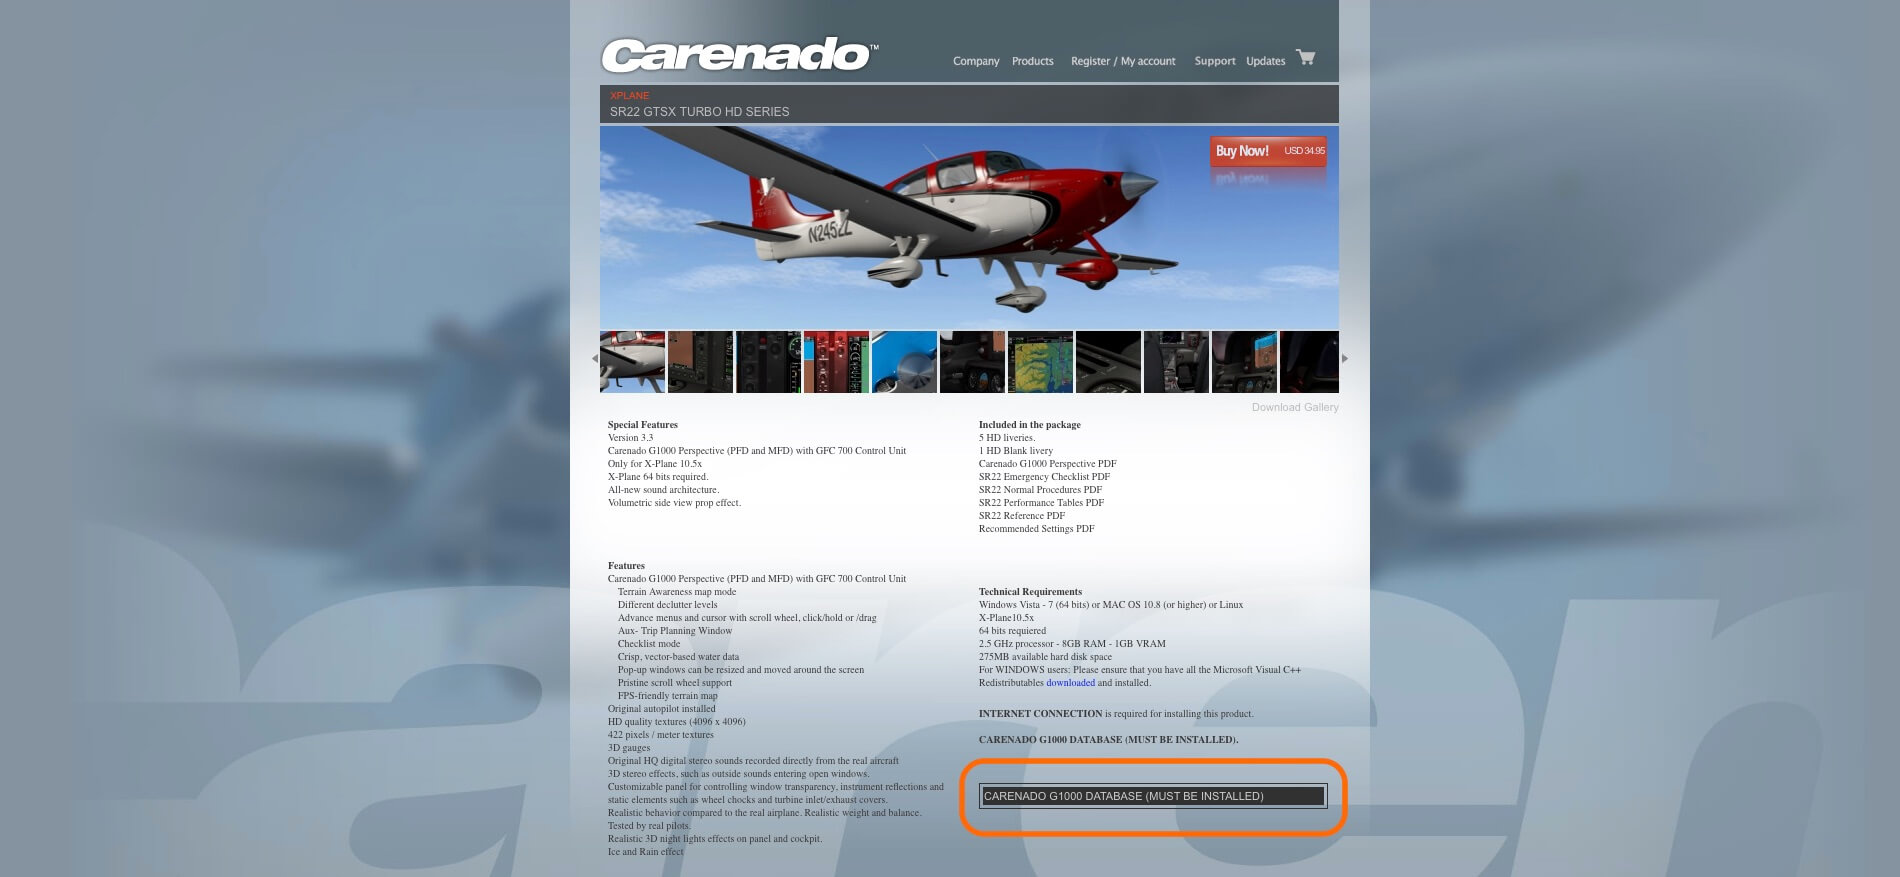
Besides the SR22T aircraft package, you also need the Garmin G1000 DB which is free to download from the dedicated Carenado SR22T website via this link or perhaps even easier, you can use this Carenado DB URL directly. Keep in mind the note on the Carenado webite “This database MUST be installed in order to use Carenado G1000 in any aircraft. Download the file, unzip it and put the “carenado” folder inside the X-Plane root folder. It is only needed once (in case you have several aircraft with Carenado G1000).”
What do you get for your money?
It’s always the same question and that is …. Is it worth it, do I get enough updates, what’s included in the download, how do I install it, any manuals included and so on.
I’ve downloaded and tested this Carenado aircraft on a Mac OSX, but as you might know, it’s also available for Windows and Linux. It will help, just in case, that you have a virtual memory available of at least 1GB, preferably more. The requirements I’ve seen on the Aerosoft and Carenado pages are always the minimums thus I would suggest to go for a slightly more powerful PC or Mac.
Downloading the package via the dedicated Carenado SR22T web page is easy and quickly since the aircraft package, version 3.3 of this writing May 2017, is no more then 264Mb. Unzip the package and copy and paste the contents into the General Aviation sub-folder. The only thing that’s important to know is that the provided serial number which you received by email is needed later to activate the aircraft and link it to the Carenado database.
Once you’ve installed the aircraft package, you need to install manually the Carenado G1000 Perspective database. And then, it’s time to read or at least to have a look to the provided Carenado SR22T documents. You’ll find them in the “DOCUMENTATION” folder, inside the aircraft package. Let me highlight them briefly:
– Carenado G1000 SR22T
– Credits
– Recommended Settings X-Plane10
– SR22T Emergency Procedures
– SR22T Normal Procedures
– SR22T Performance tables
– SR22T Reference
– SR22 Version History
All are Adobe Acrobat documents except for the “SR22 Version History” file which has a rtf (rich text format) format. The G1000 SR22T document offers you all the information you need to understand and how to interact with the Cirrus Perspective G1000 DUs (Display Units) and controls.
Although the SR22T Reference is only one page, it offers several aircraft limitation- and operating speeds. The SR22T Performance tables document is 2 pages thick and offers you the cruise performance tables. The procedures manuals are, I may assume, self-explanatory, but it’s worth to highlight that the SR22T Normal Procedures document can also be used as a checklist. The credits document speaks for itself and although this is also the case with the Recommended Settings X-Plane 10, it’s still worth to check what X-Plane Rendering Settings are needed for the Carenado SR22T.
And finally, the SR22 Version History page is a change log page that offers the changes in this release versus previous releases. Before closing this section, let me check the included liveries. It comes with 5 liveries; one with a German registration, 3 with a US N registration and finally an Australian registration. As always, I’m curious if painters had uploaded their SR22T creation, but I tried to find – May 2017 – other paintings, but didn’t find anything.
First SR22T Impressions
And … is it nicely modeled or ….?
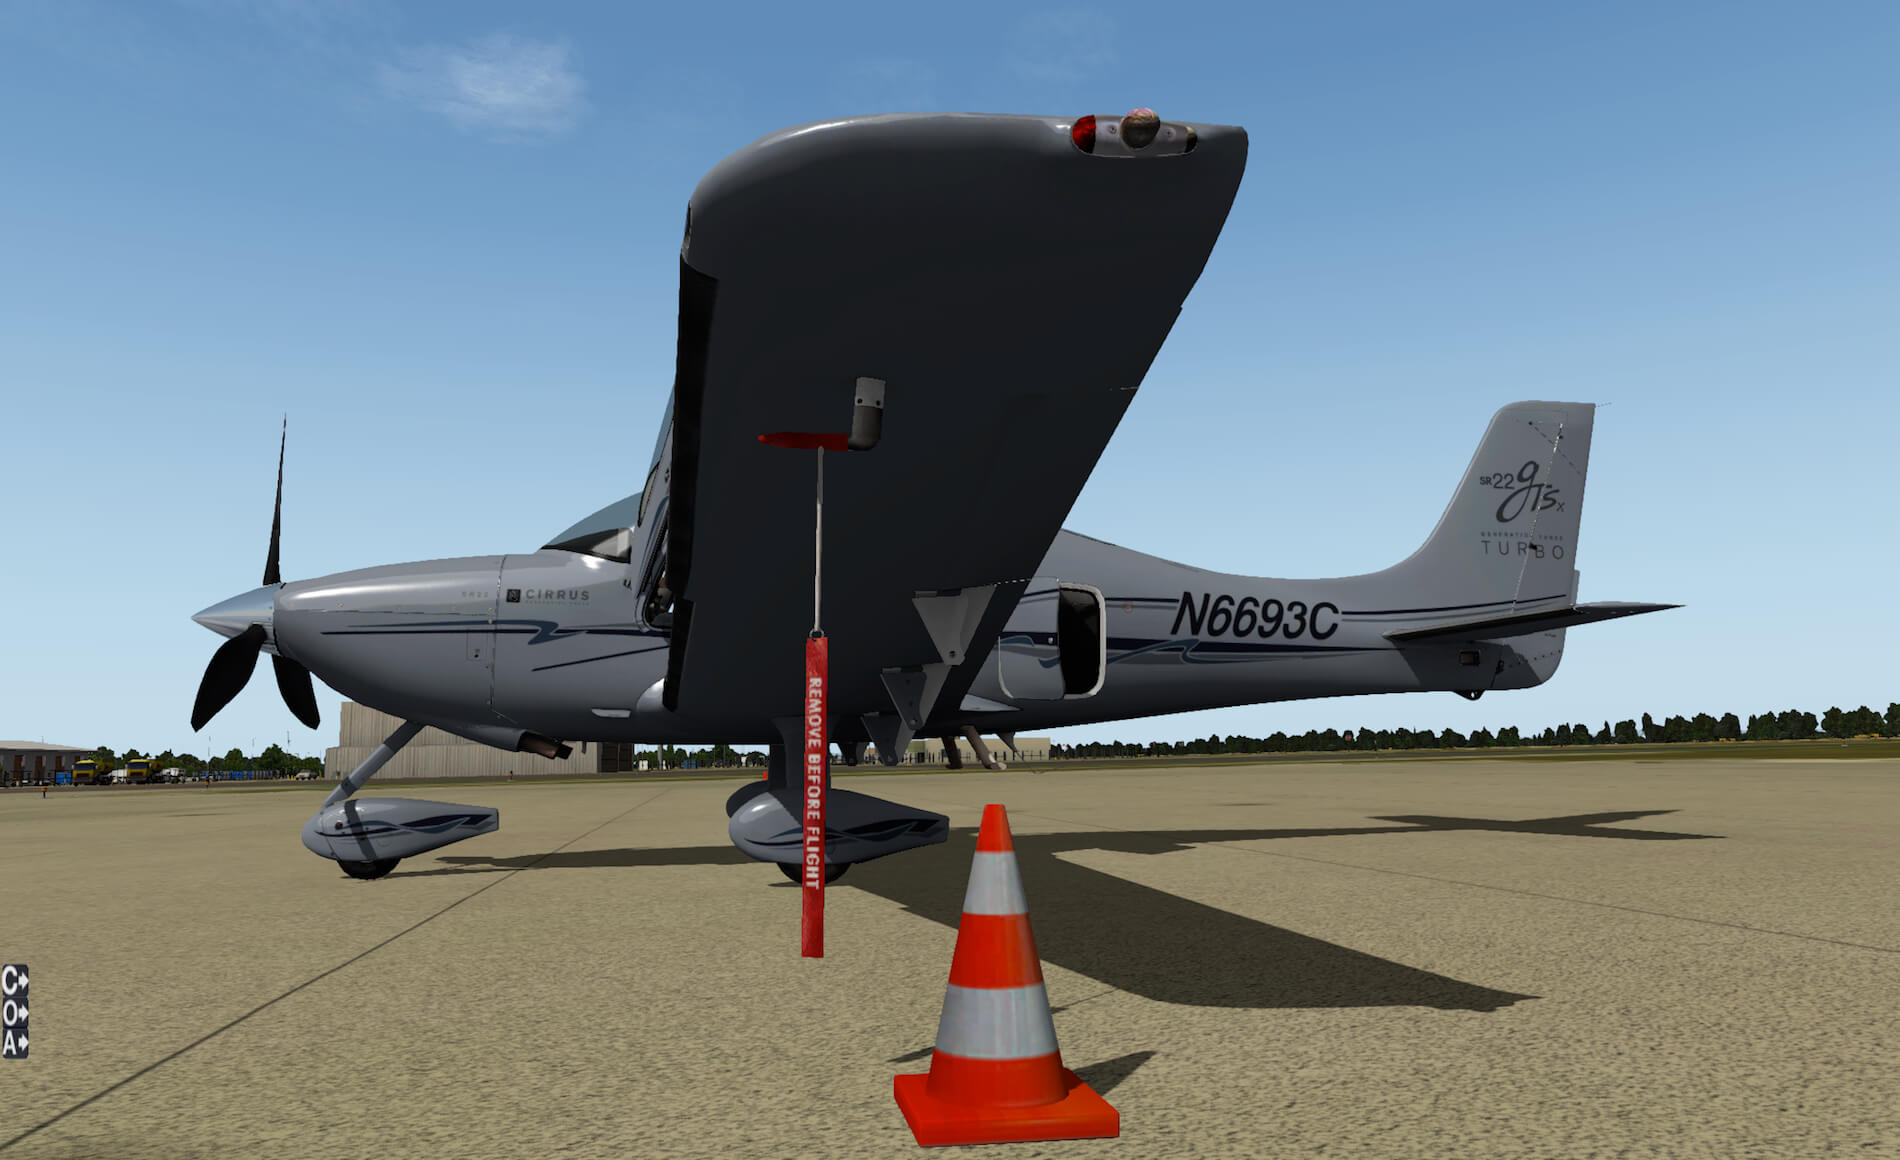
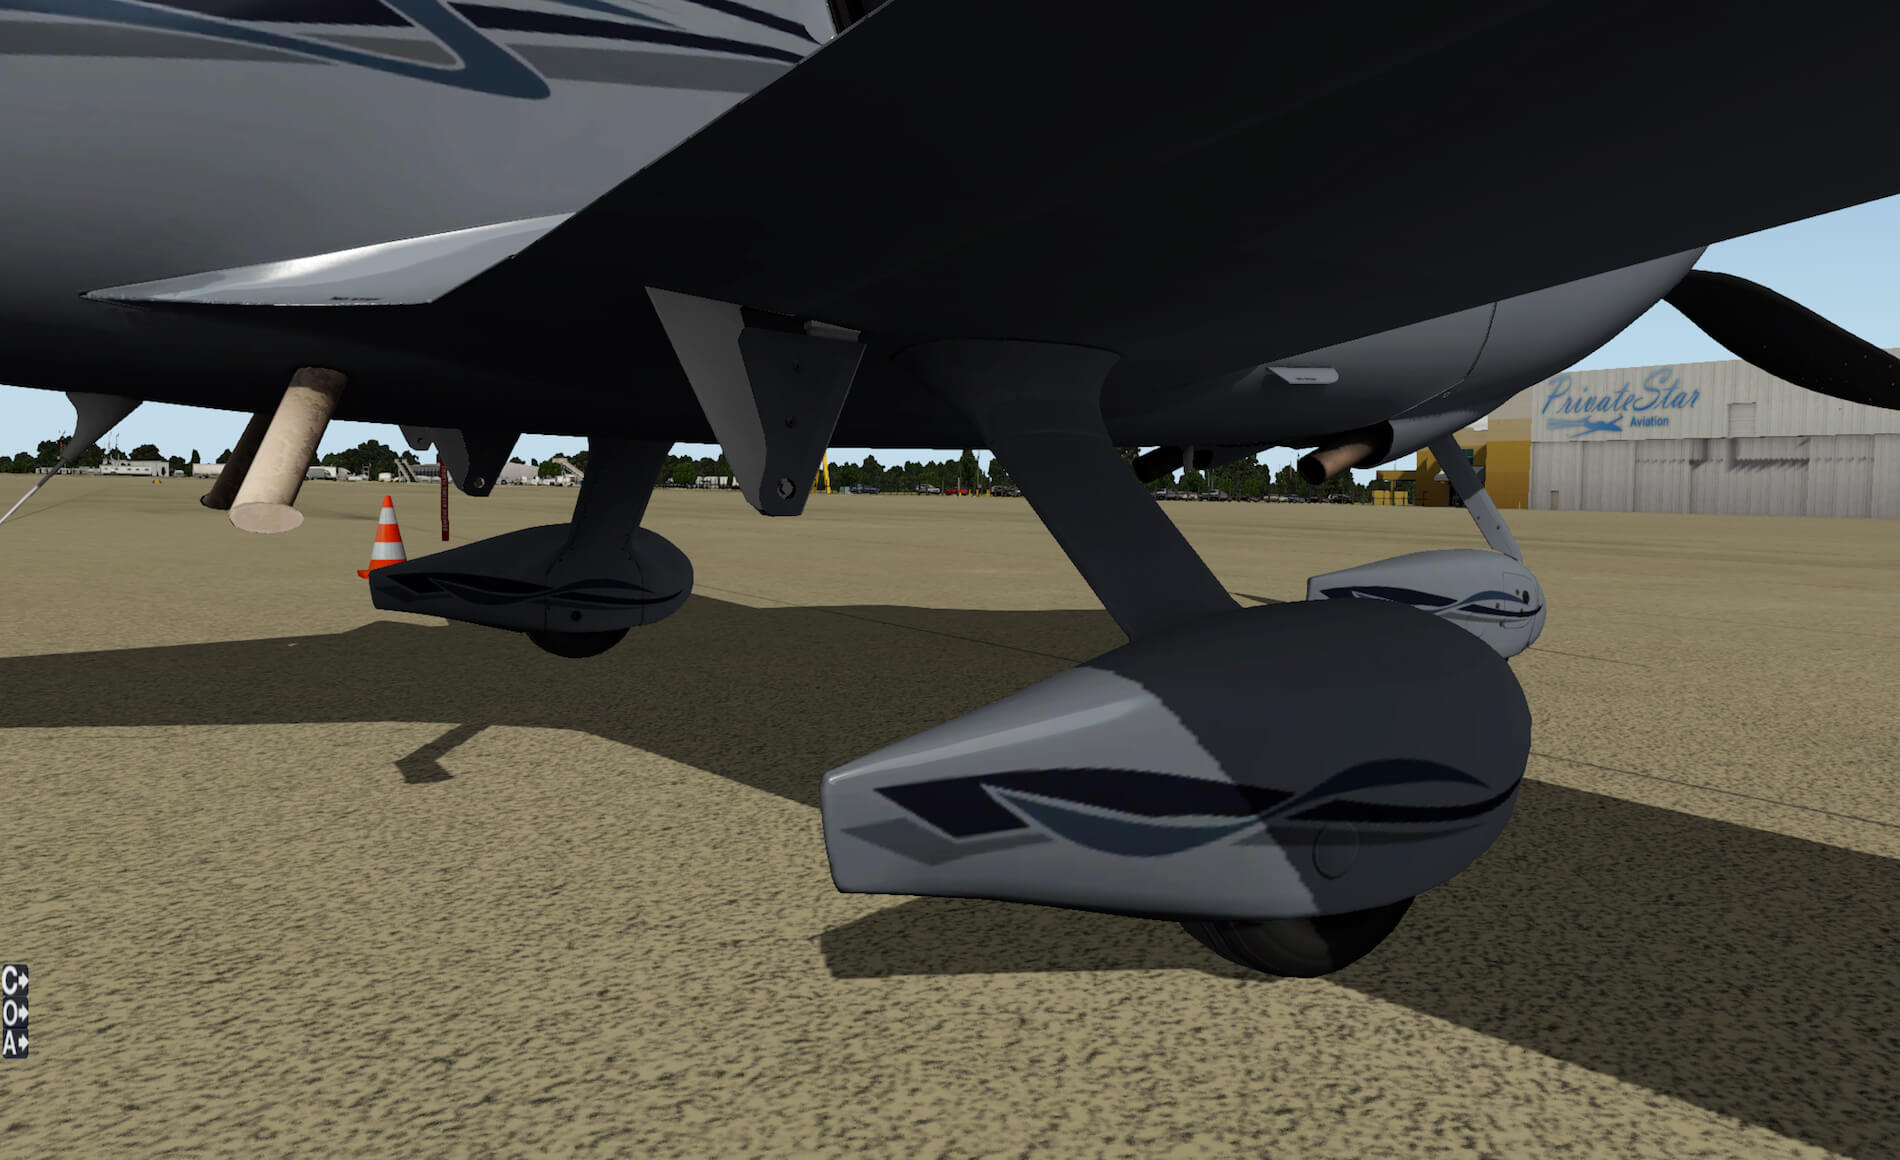
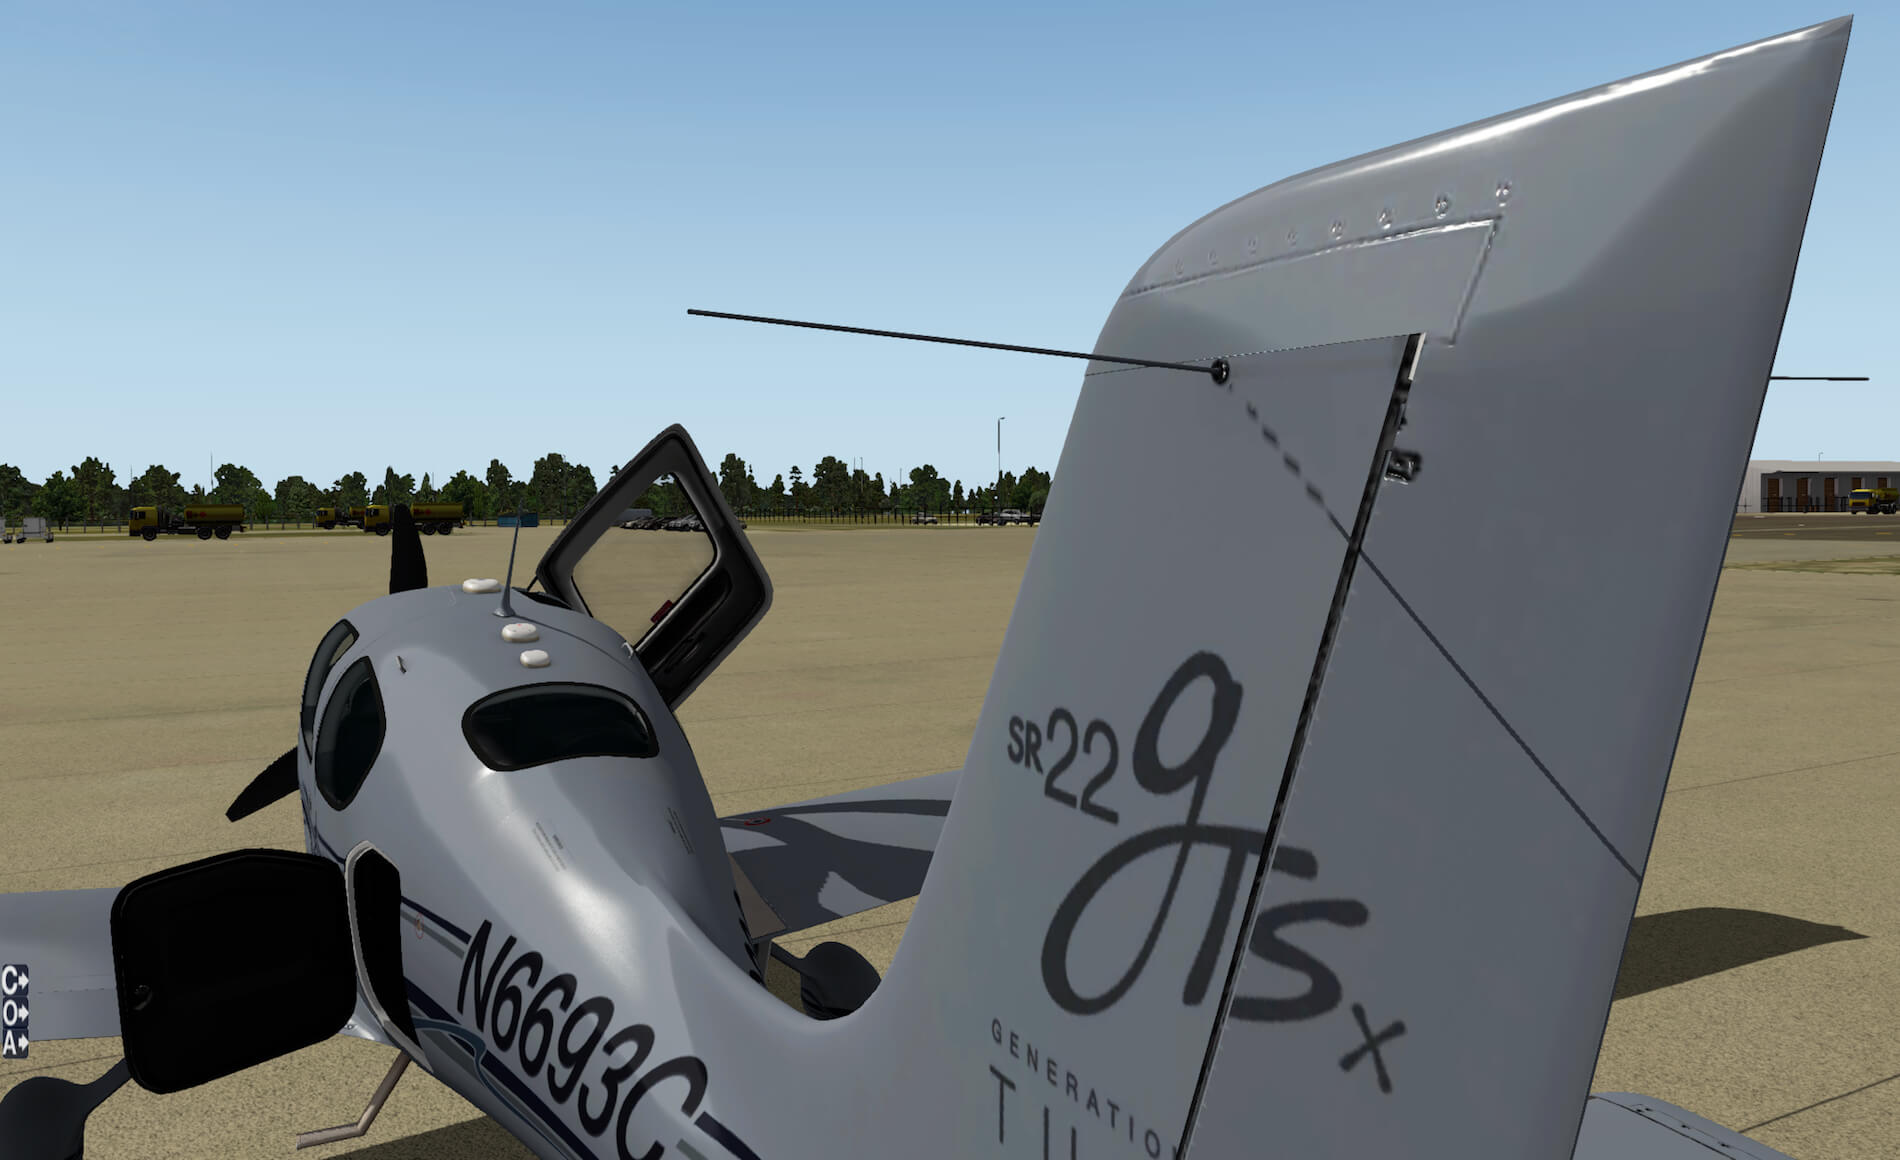
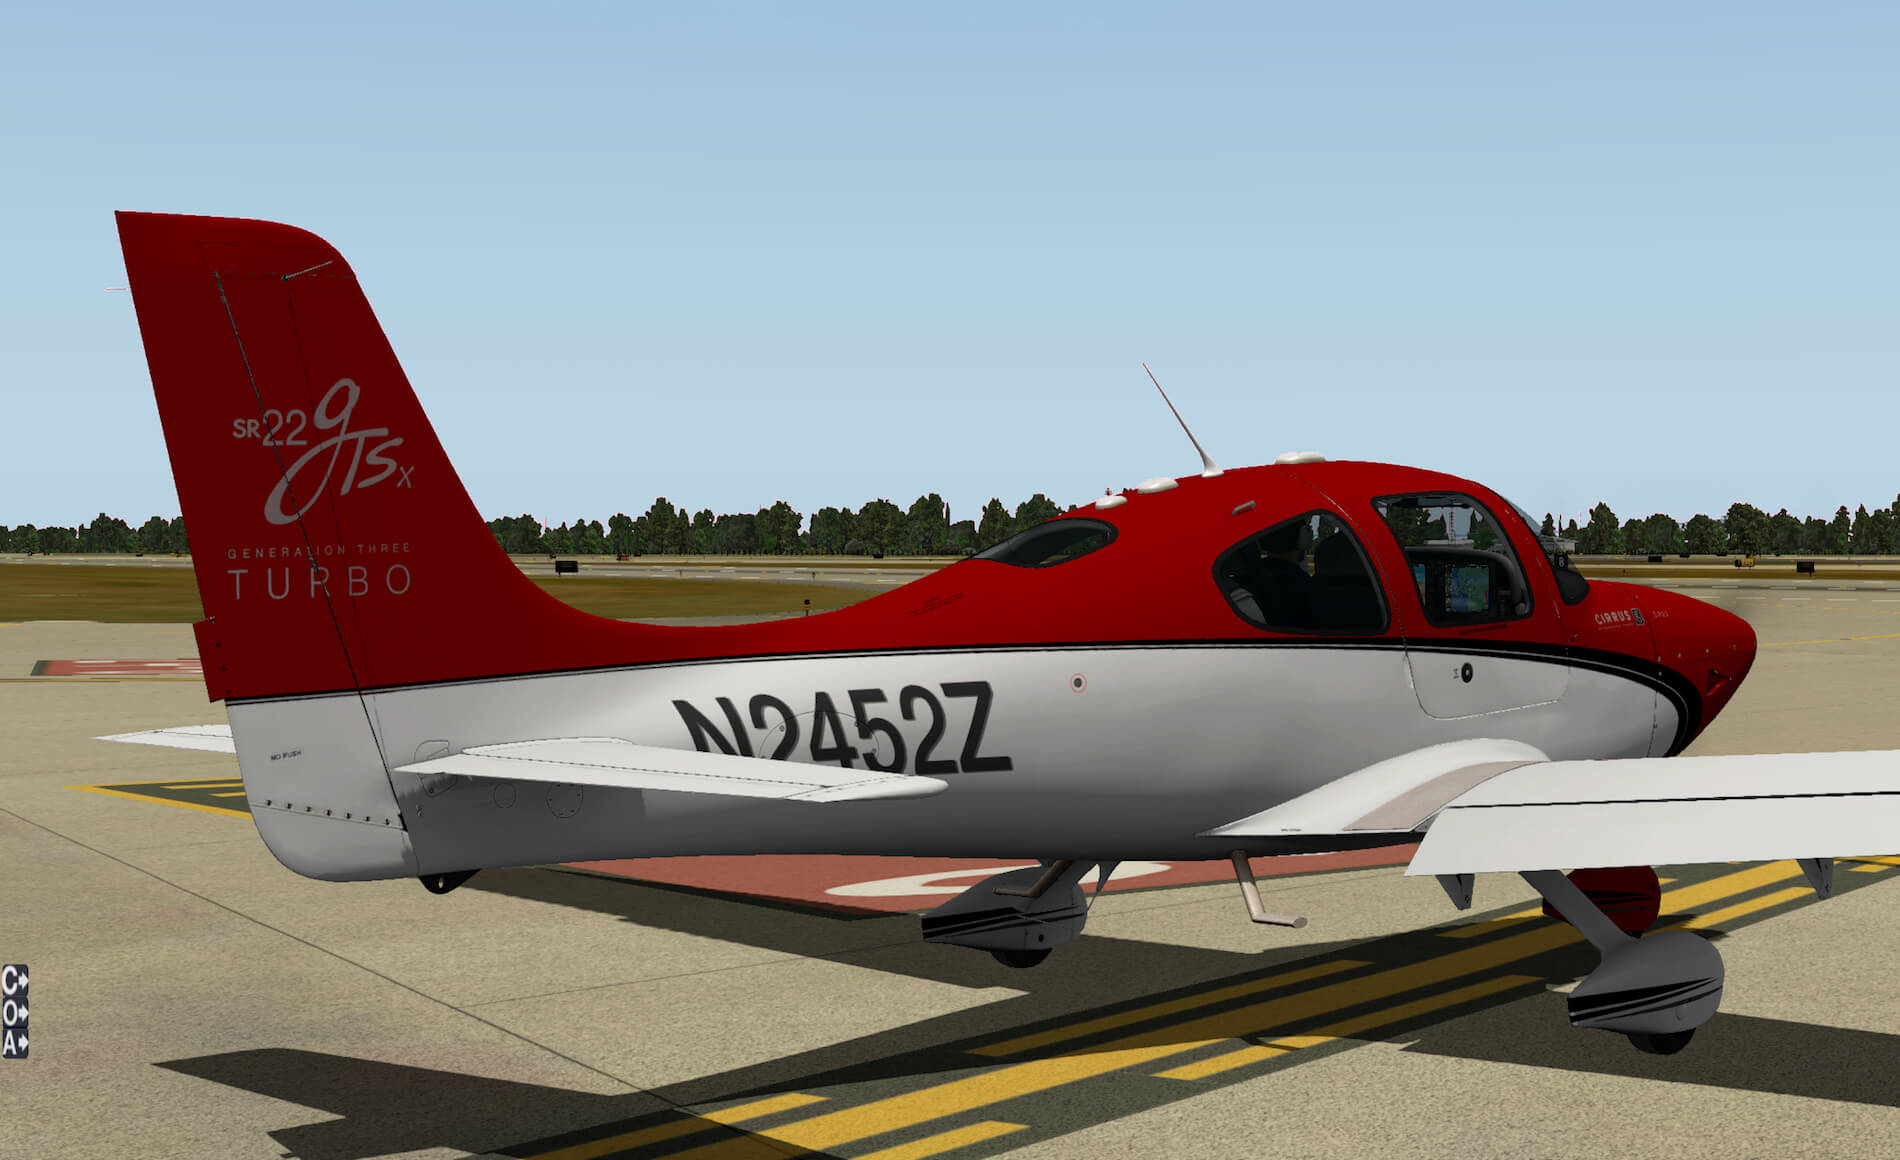
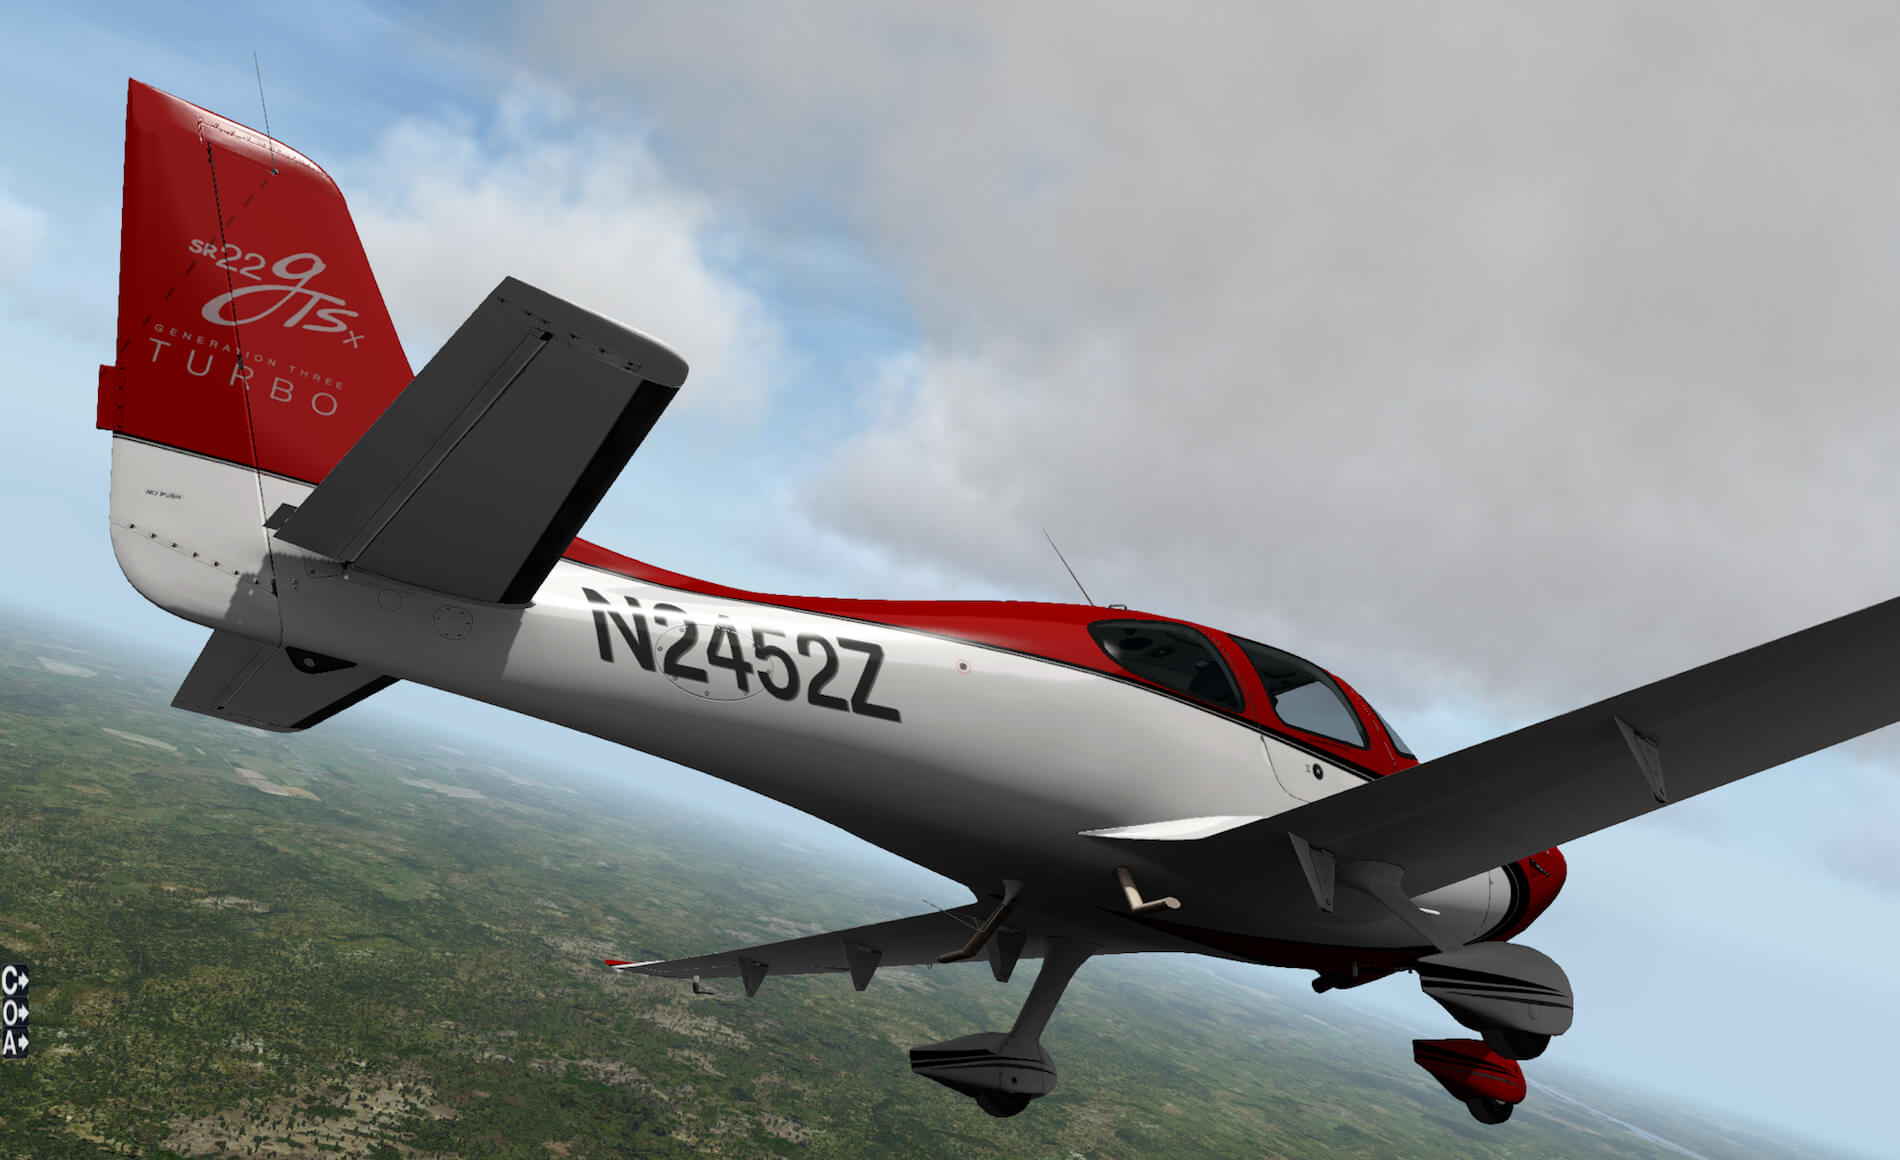
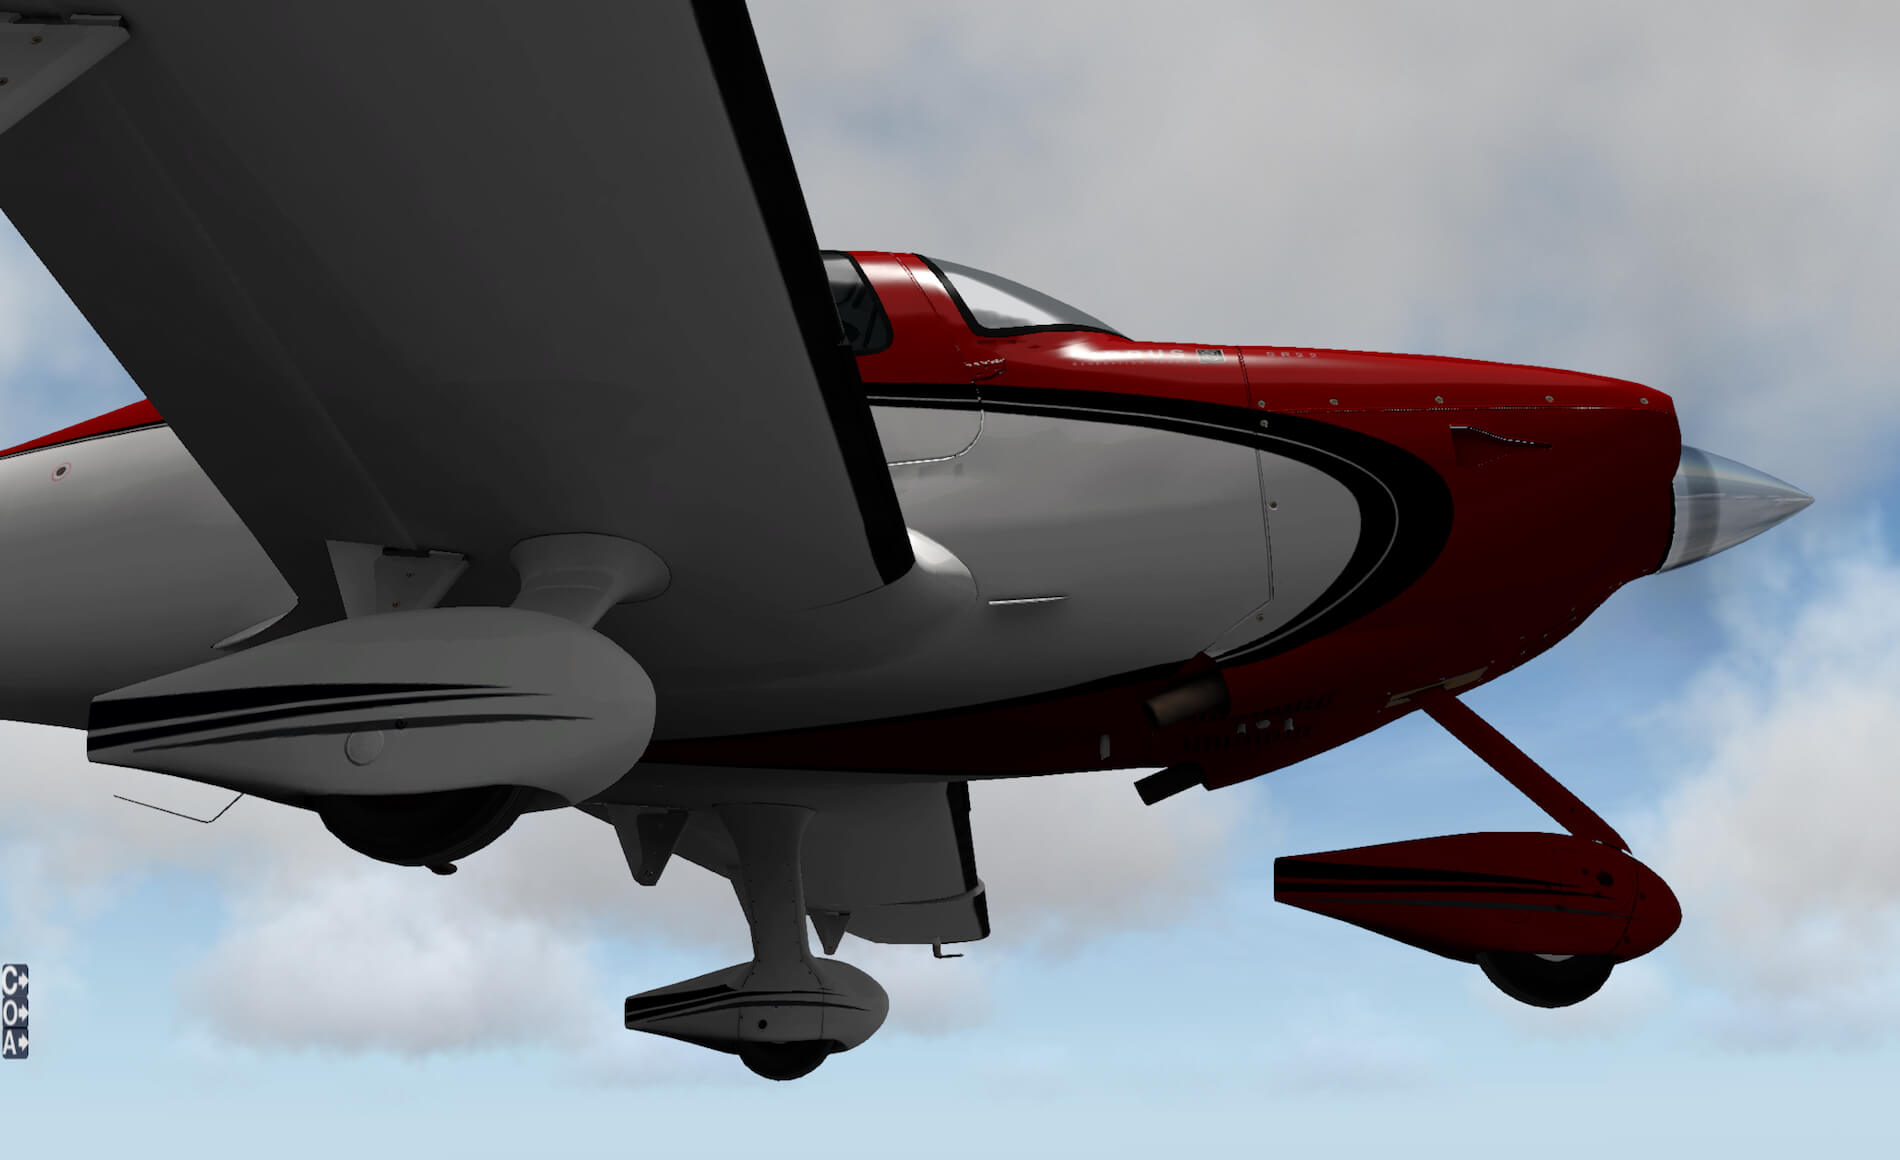
No doubt about the exact replica of the original aircraft. When zoomed in on specific aircraft parts, I’m impressed with certain decals like the stainless steel ID place underneath the left hand fixed stabilizer. Also, the propeller manufacture decal is nicely readable and more of these tiny details, but it’s also fair to say that some decals or just text on the wing or fuselage, aren’t sharp at all, irrespective of how you check them out.
Let me give you a small example of what I mean …. at the fuselage nose section, you’ll find on both sides “SR22 and Cirrus Aircraft” which are both not really sharp. I know from other GA aircraft developers that this could be better. This is also applicable for the red text on each pilot/passenger door, just underneath the glass pane and for the button with the text PUSH TO OPEN. Very difficult to read. But it’s also fair to highlight that other decals on the aircraft are razor like for example the OPEN FUEL CAP identification or a NO STEP plate just in front of the wing leading edges. Besides these good and less sharp decals I’m happy with the overall modeling.
You can open/close several animated doors via the “C”, “O” and “A” icons on the left hand side of the X-Plane screen. Although I’ve mentioned and highlighted this before, when you’re new to Carenado and Alabeo aircraft, I think it’s a good idea to quickly highlight these C, O and A once more.


The “C”, “O” and “A” icons
This paragraph won’t be difficult so here we go. The “A” is from Auto Pilot, the “C” from Cameras and volume and finally, the “O” from Options. The original 3D Auto Pilot control panel can be found at the pedestal. Nothing wrong with that, but having a 2D AP popup window is great since it’s easy to control the aircraft while in 3D cockpit view.
The “C” from Cameras and volume popup window allows you to change the FOV (Field Of View), the sound volume and several internal and external previews.
The “O” for the Options popup window allows users with less powerful computers to remove the window- and instrument reflections which do cost frame rates. As said before, the SR22 Turbo is modeled with several animated doors and yes, The model comes with the following animated doors:
– L baggage door
– Pilot door
– Passenger doors

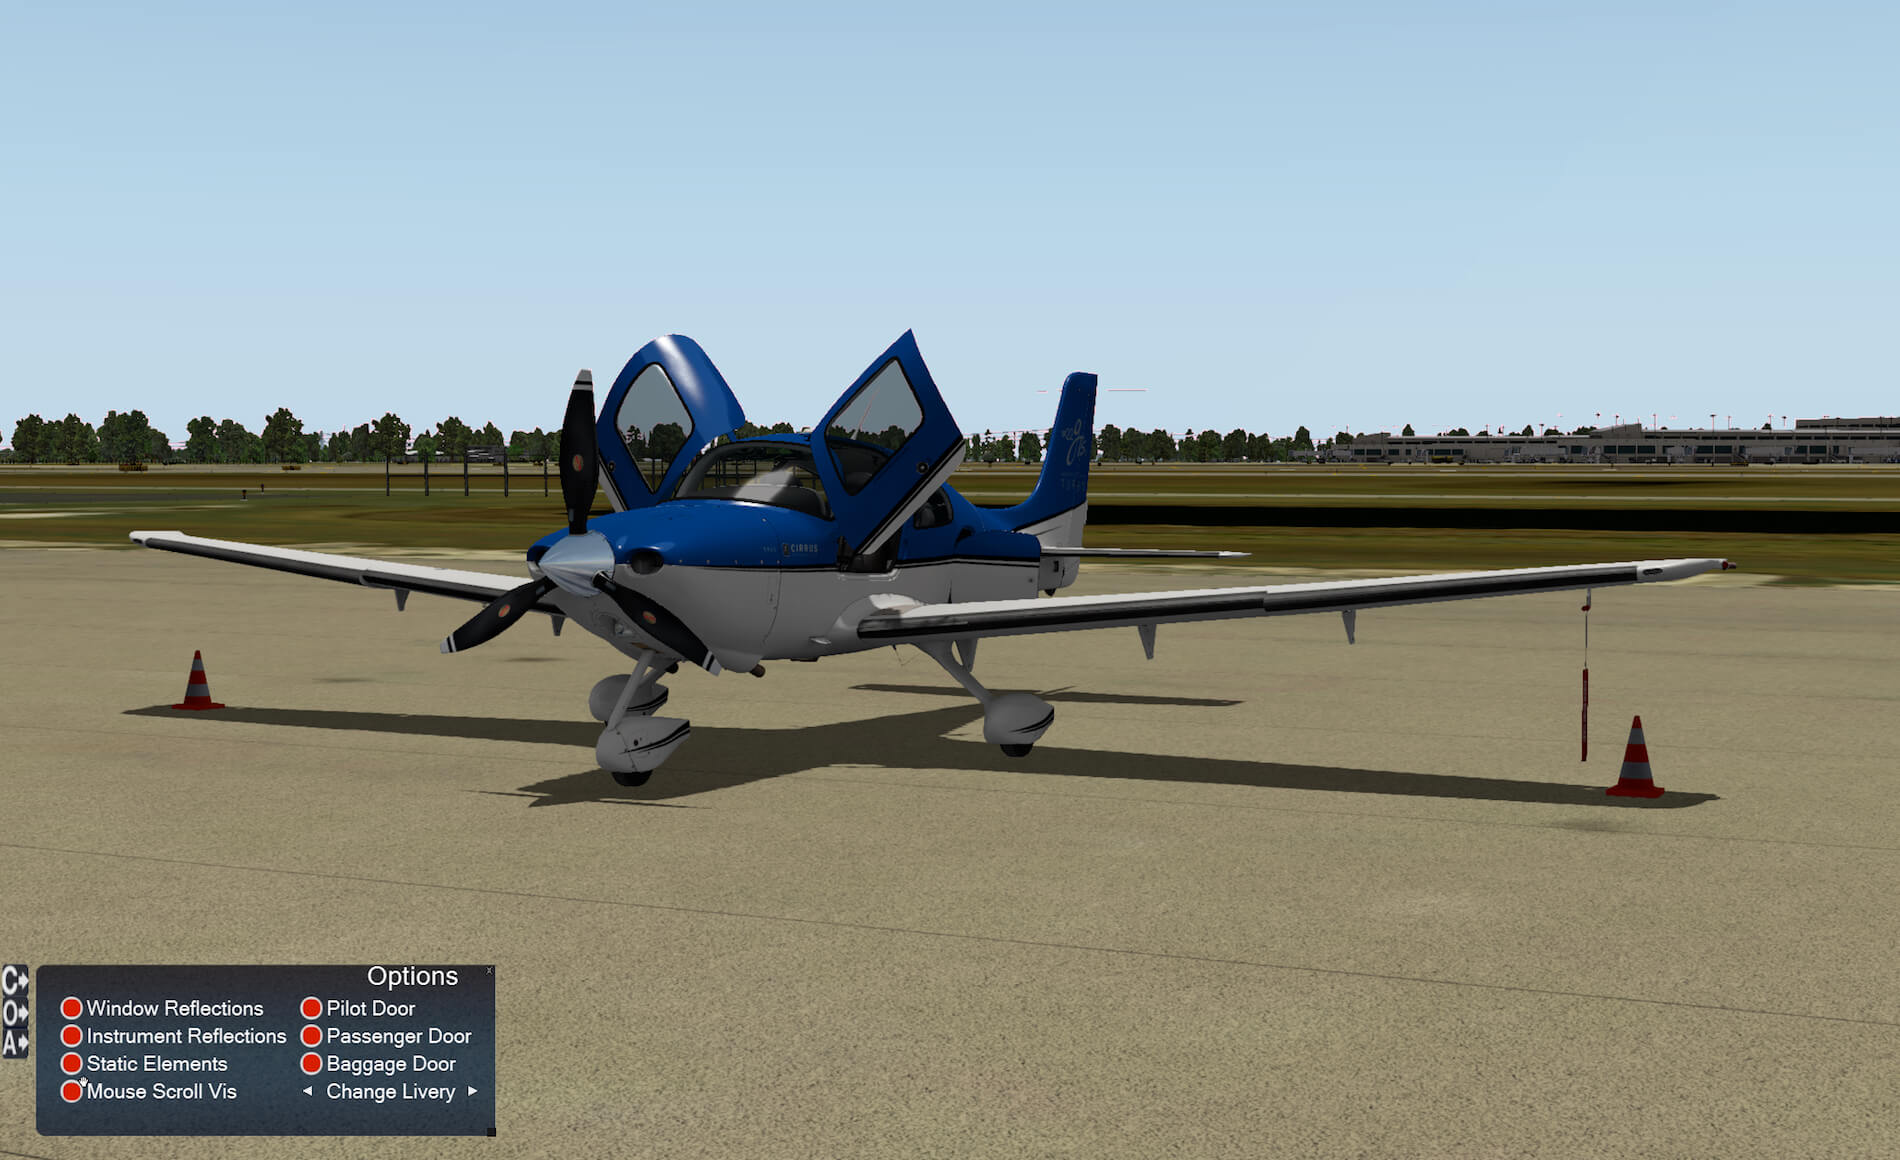
And finally, you can change on-the-fly the aircraft livery. A handy and useful option although everything above is already for a while implemented by Alabeo and Carenado. I’m pleased with the professional way Alabeo/Carenado has made this, but again, the company has implemented this already a while ago.
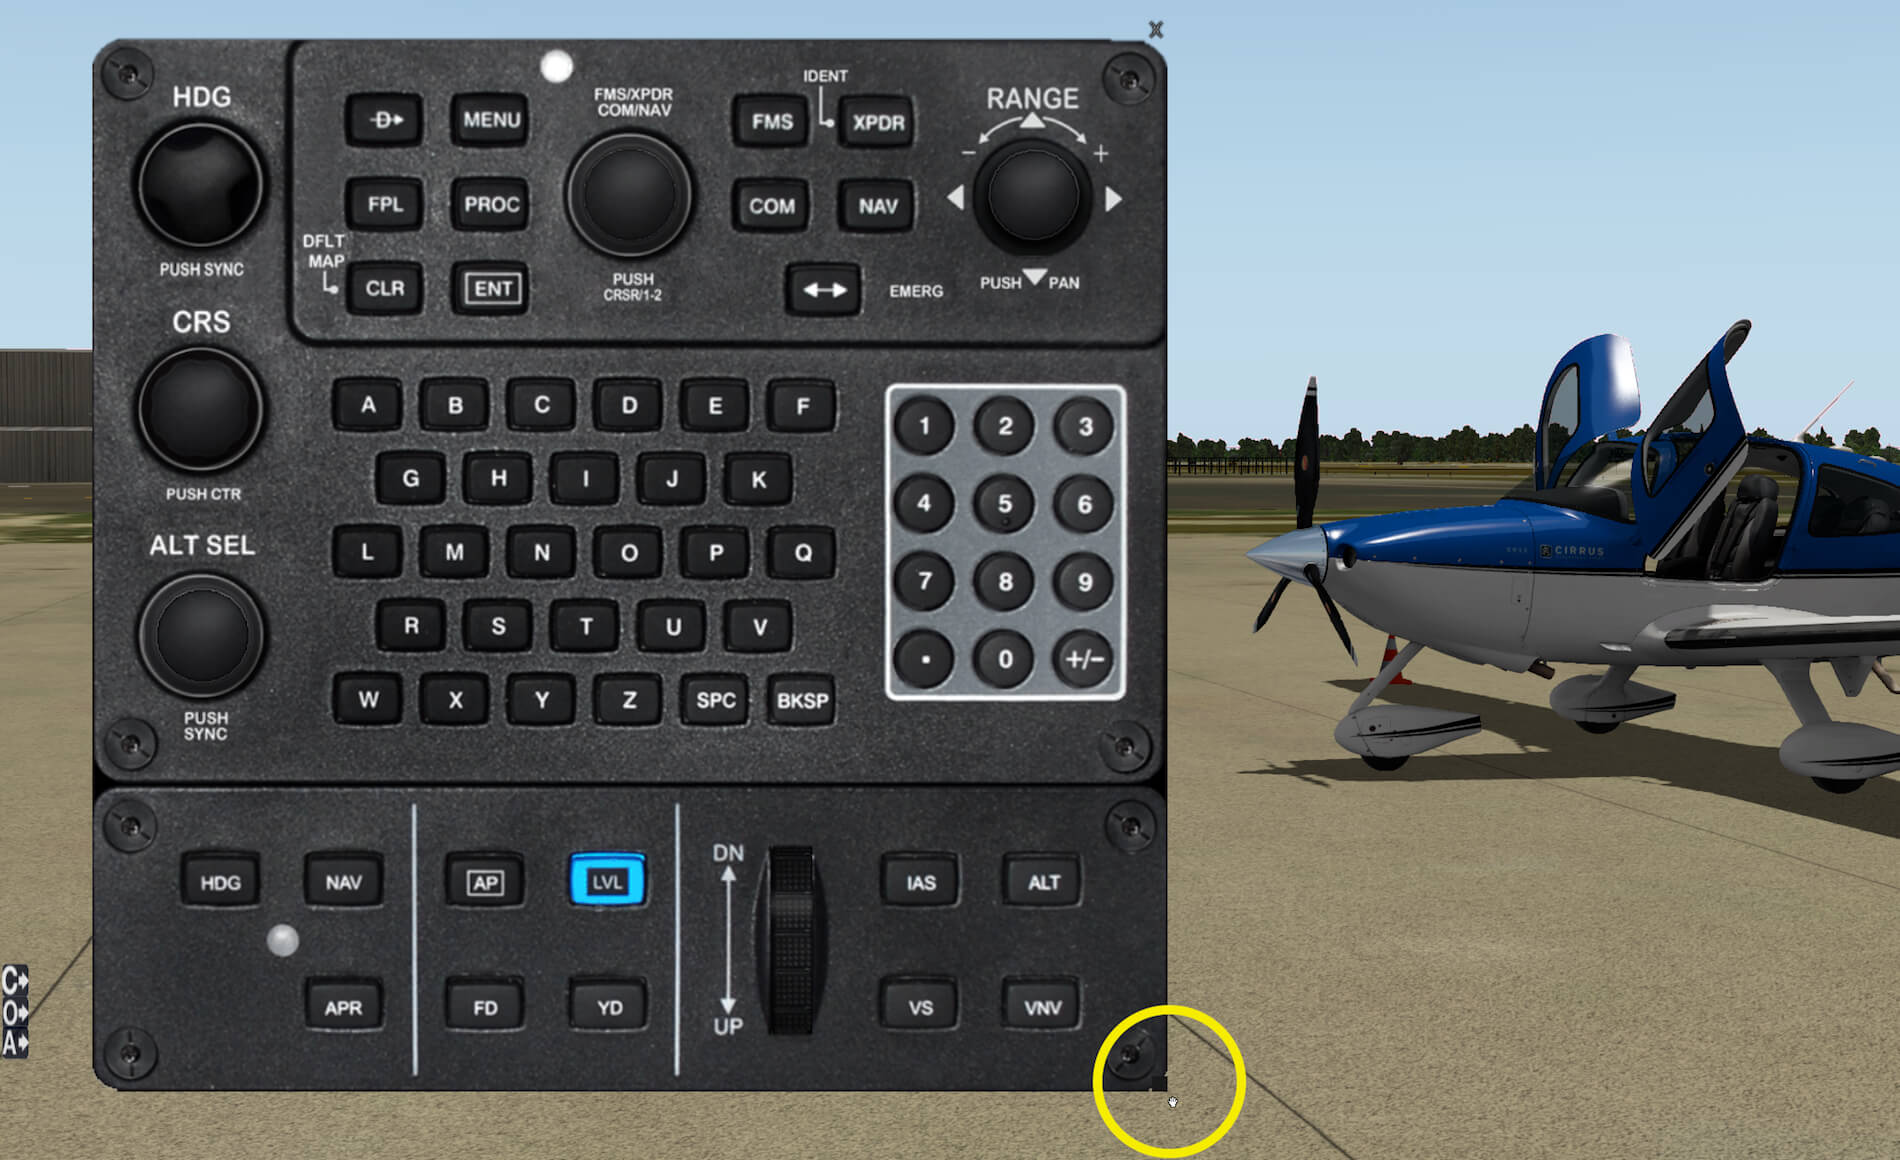
In addition to these popup screens I would like to inform you that you can resize these popup screens too, if needed. When you look closely to each popup screen, you’ll see a small black square at the right hand lower corner. Place your mouse here, and the added to the mouse pointer you’ll see a small hand too. Hold the left hand mouse button and move the mouse in a right hand or lower direction. You are now resizing these C, O and A popup screens.
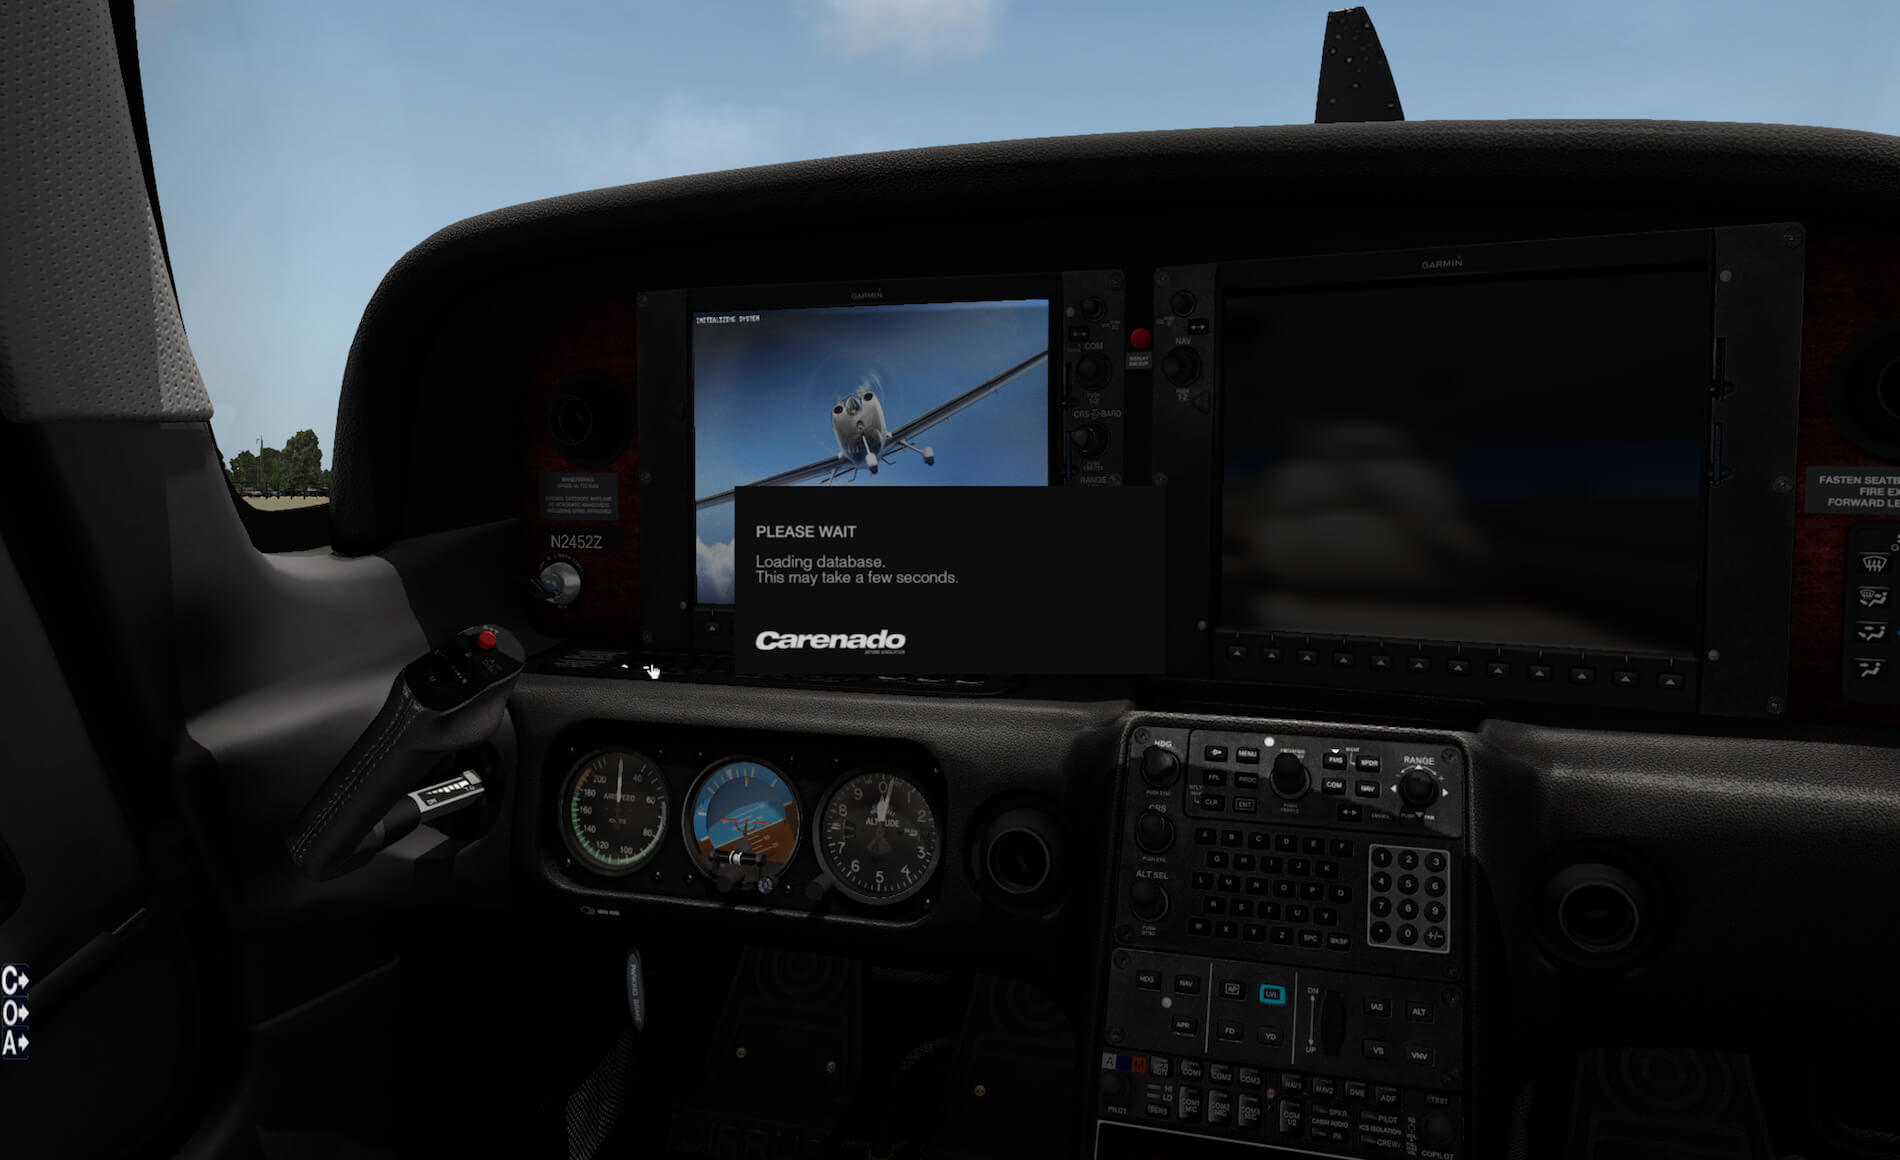
Oops, almost forgotten to explain this. During the loading of the aircraft in X-Plane, an authentication is needed to make it possible to link the aircraft to the Carenado DB.
Ok, back to the 3D modeling.
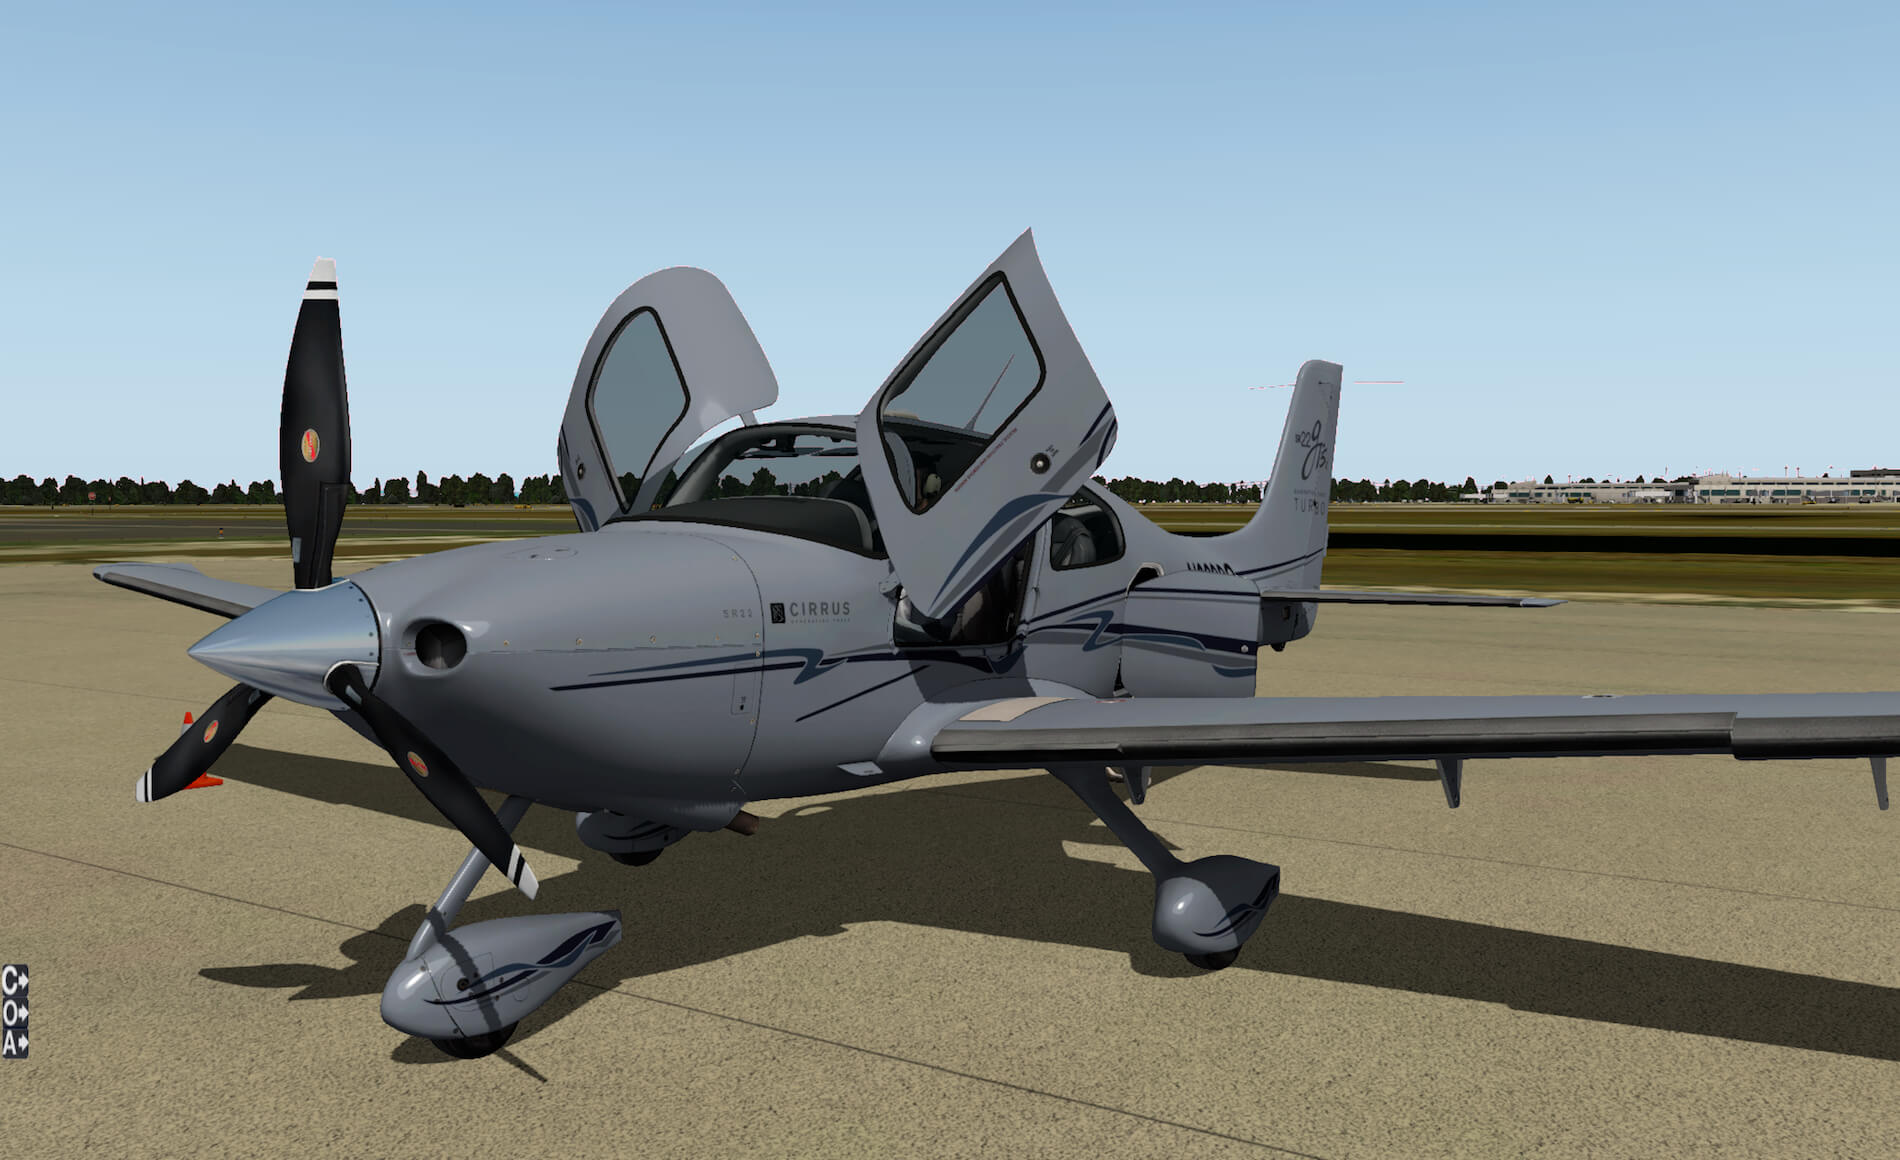
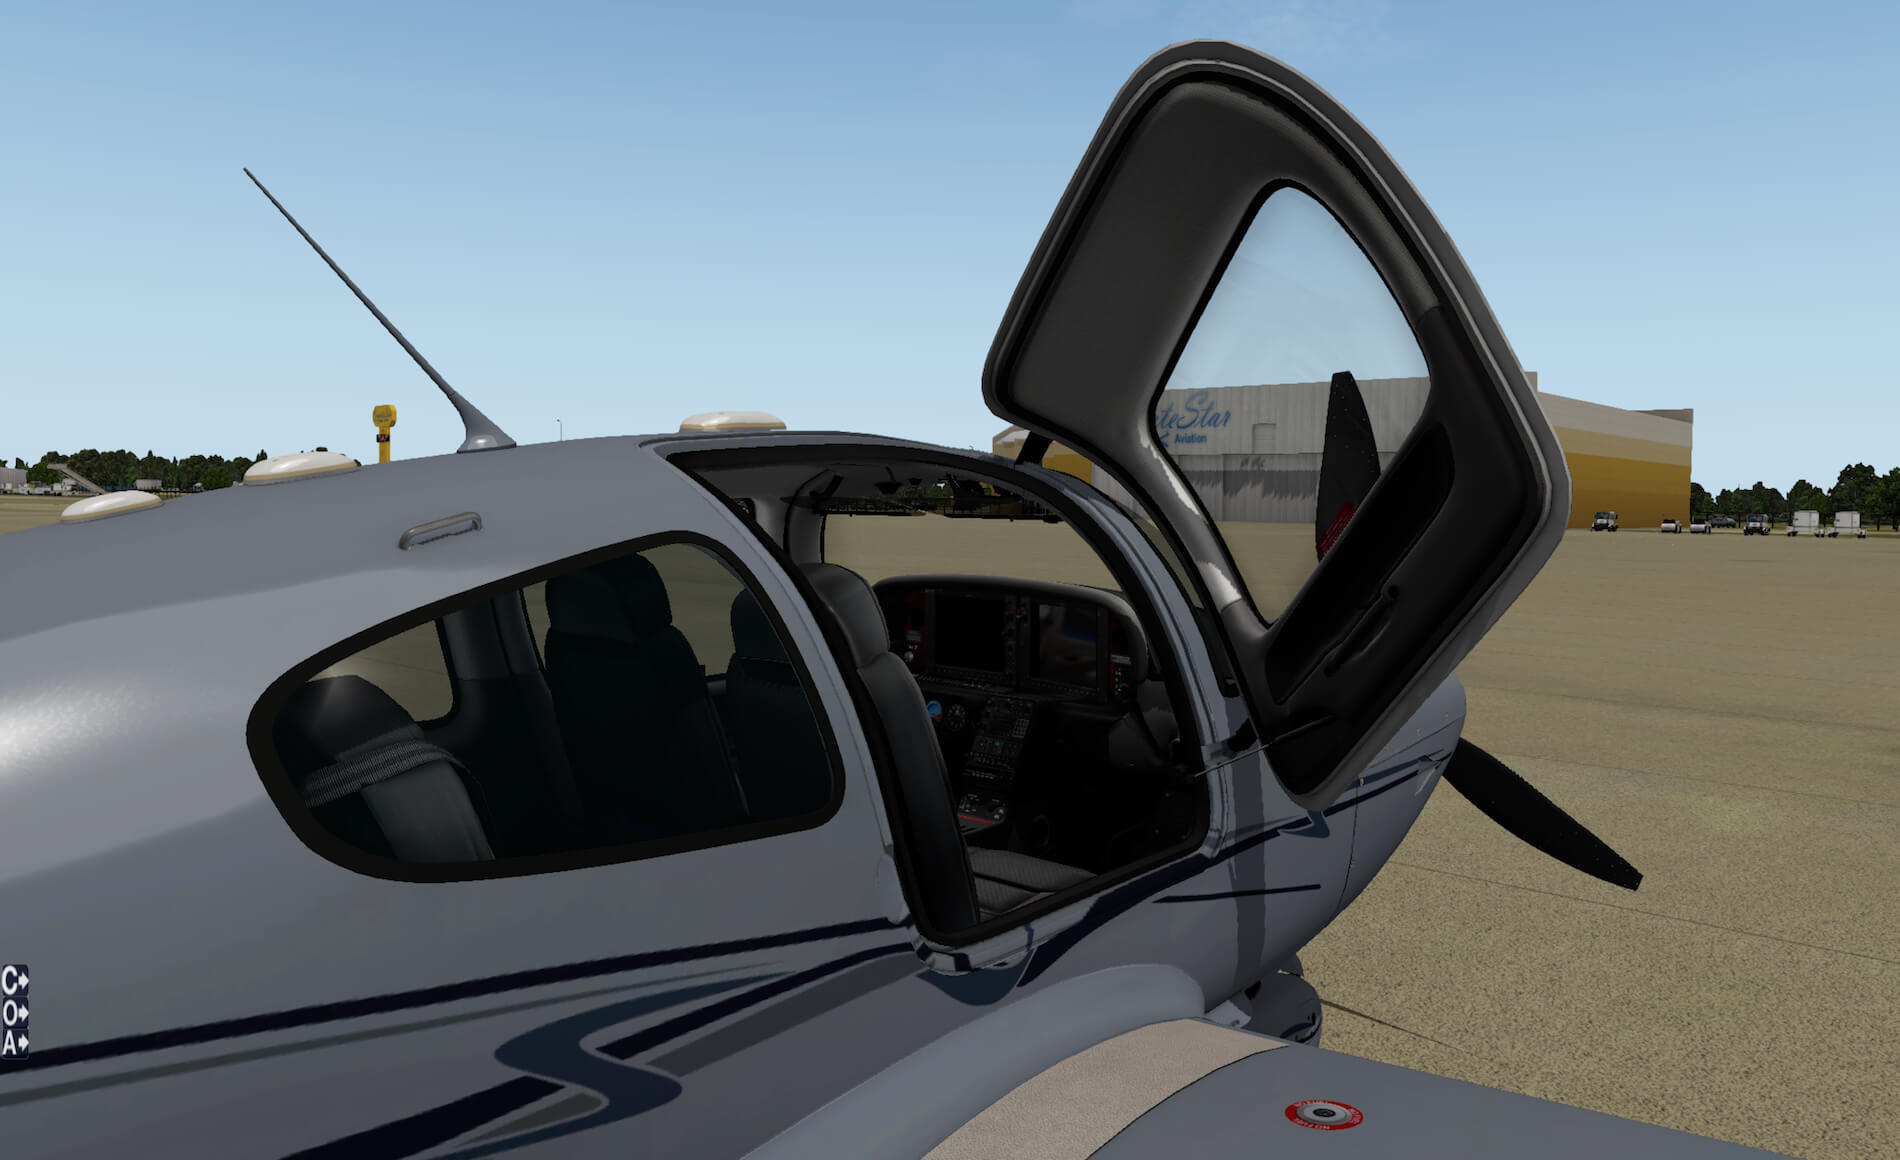
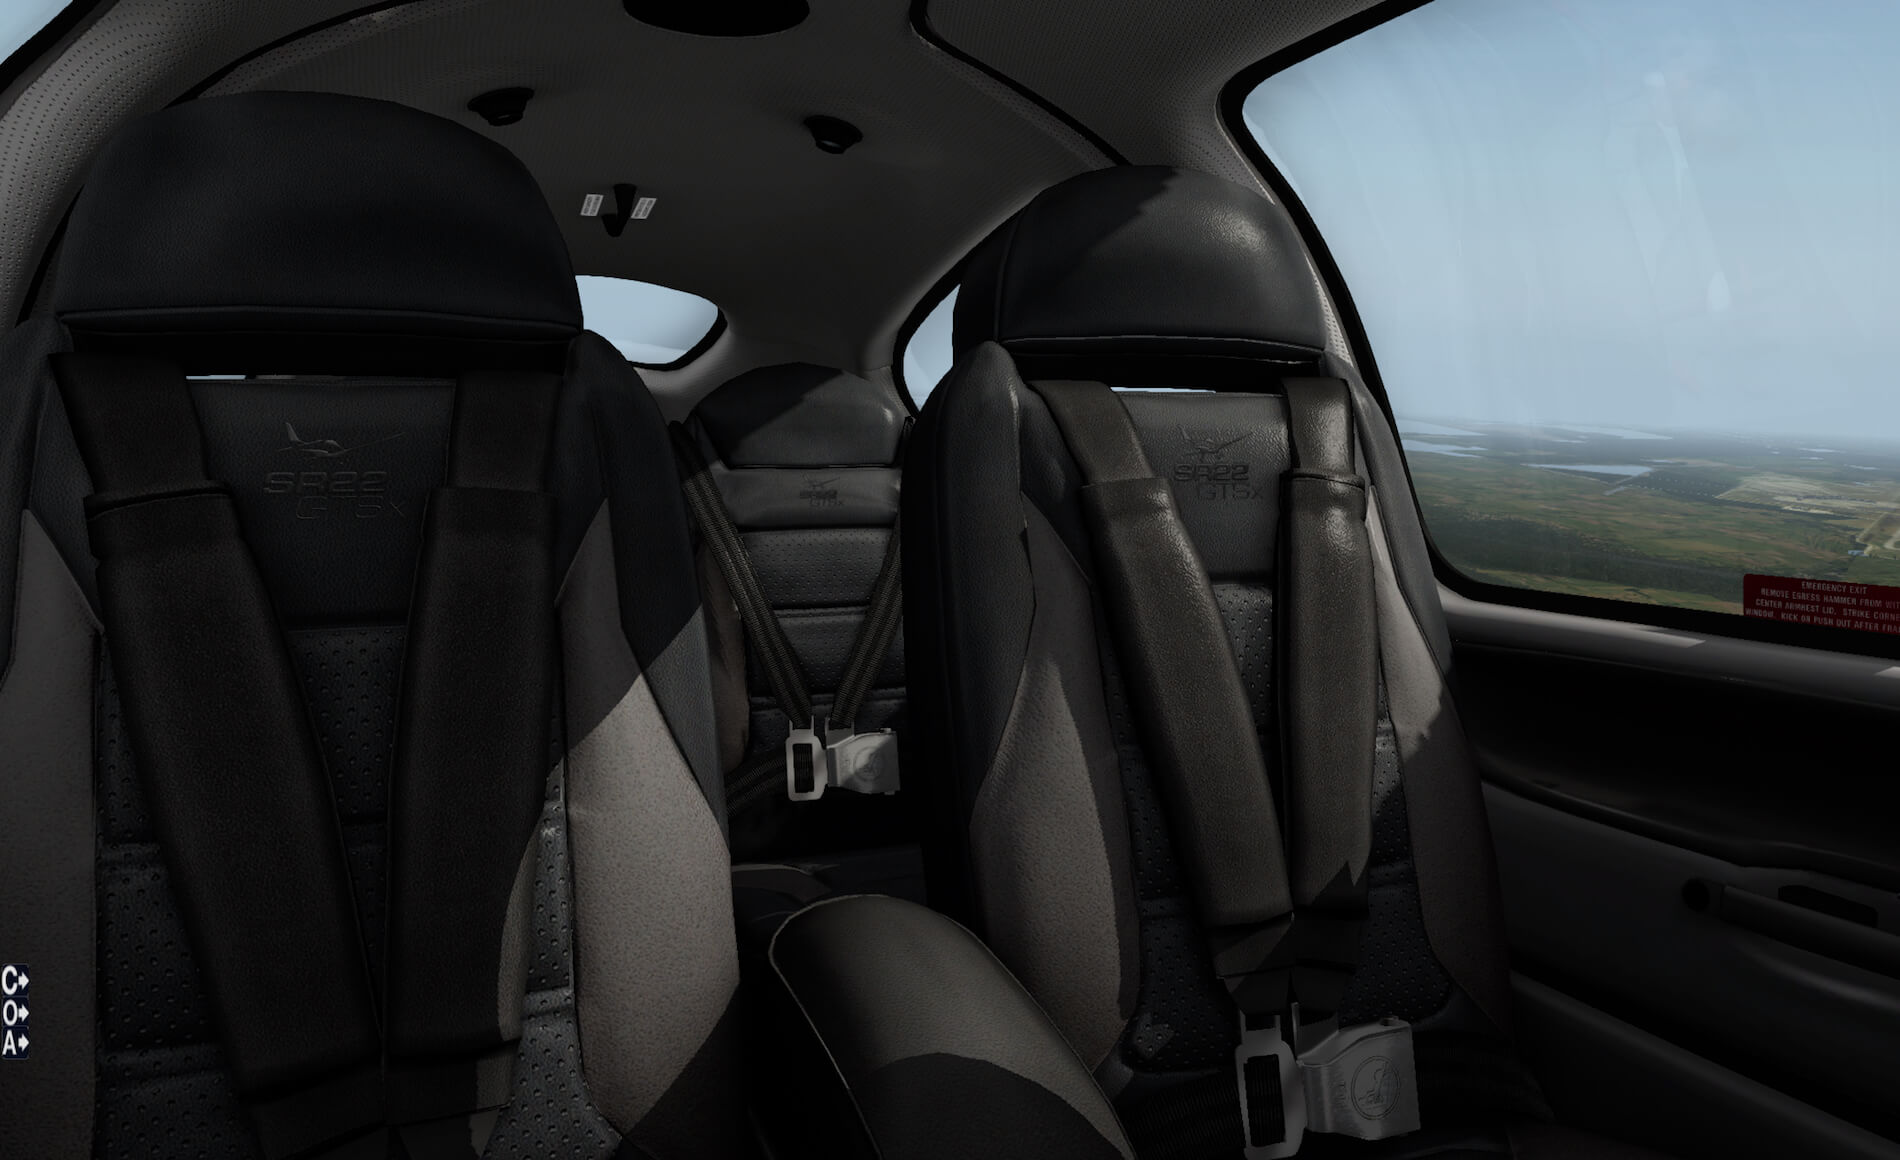
With the passenger and pilot doors opened, I have a nice look into the 3D modeled cockpit and I must admit that this gives me a “Wow” effect. The black/grey leather seats are gorgeous although I don’t smell the leather … just joking! The mid console (pedestal) construction goes smoothly over into the forward pedestal which is perfectly integrated with the main instrument panel. The used panel structure is very realistic as well as the included panels in the mid console. The text, wherever applicable on the pedestal (aft. mid and forward) is sharp and easy to read. I’m pleased to see how the sidewall and covers on each door is modeled. The textures at these locations is absolutely without doubt realistic. Very well done!
I haven’t put any electrical power on the aircraft yet, but that will change in a minute. One more time a thorough look to the Cirrus Perspective Garmin cockpit and then of course the DU’s. When I around with the external lighting conditions, I swear it’s all made of plastic. Yes, that’s right. In real the G1000 DU circumference is most likely made of a durable plastic, but here in the modeled X-Plane SR22T, it seems also plastic which is of course ridiculous since it isn’t possible, but it looks so real … wow!
The same as with the default Garmin GNS navigation devices, these G1000 are also clickable and offer you a popup 2D model. That sounds interesting. More about this – resizing the G1000 GDUs – later in this impression.
The impression so far
What’s that for weird title …… the impression so far versus what?
I won’t write down which model till so far – vFlyteAir SR20 versus Carenado SR22 Turbo – is better. Oh yes, there are differences between the vFlyteAir SR20 and the Carenado SR22 Turbo till so far, but where one model has “this and that” better, the same model has also issues that I as reviewer dislike, not necessary not my taste. And so it is also with the other model. Overall, I can say that the 3D modeling of both aircraft developers can compete with each other. Carenado and Alabeo uses the “C”, “O” and “A” icons on the left hand side of the X-Plane screen while vFlyteAir uses the “gear” icon on their SR22 Turbo which is also nice and useful.
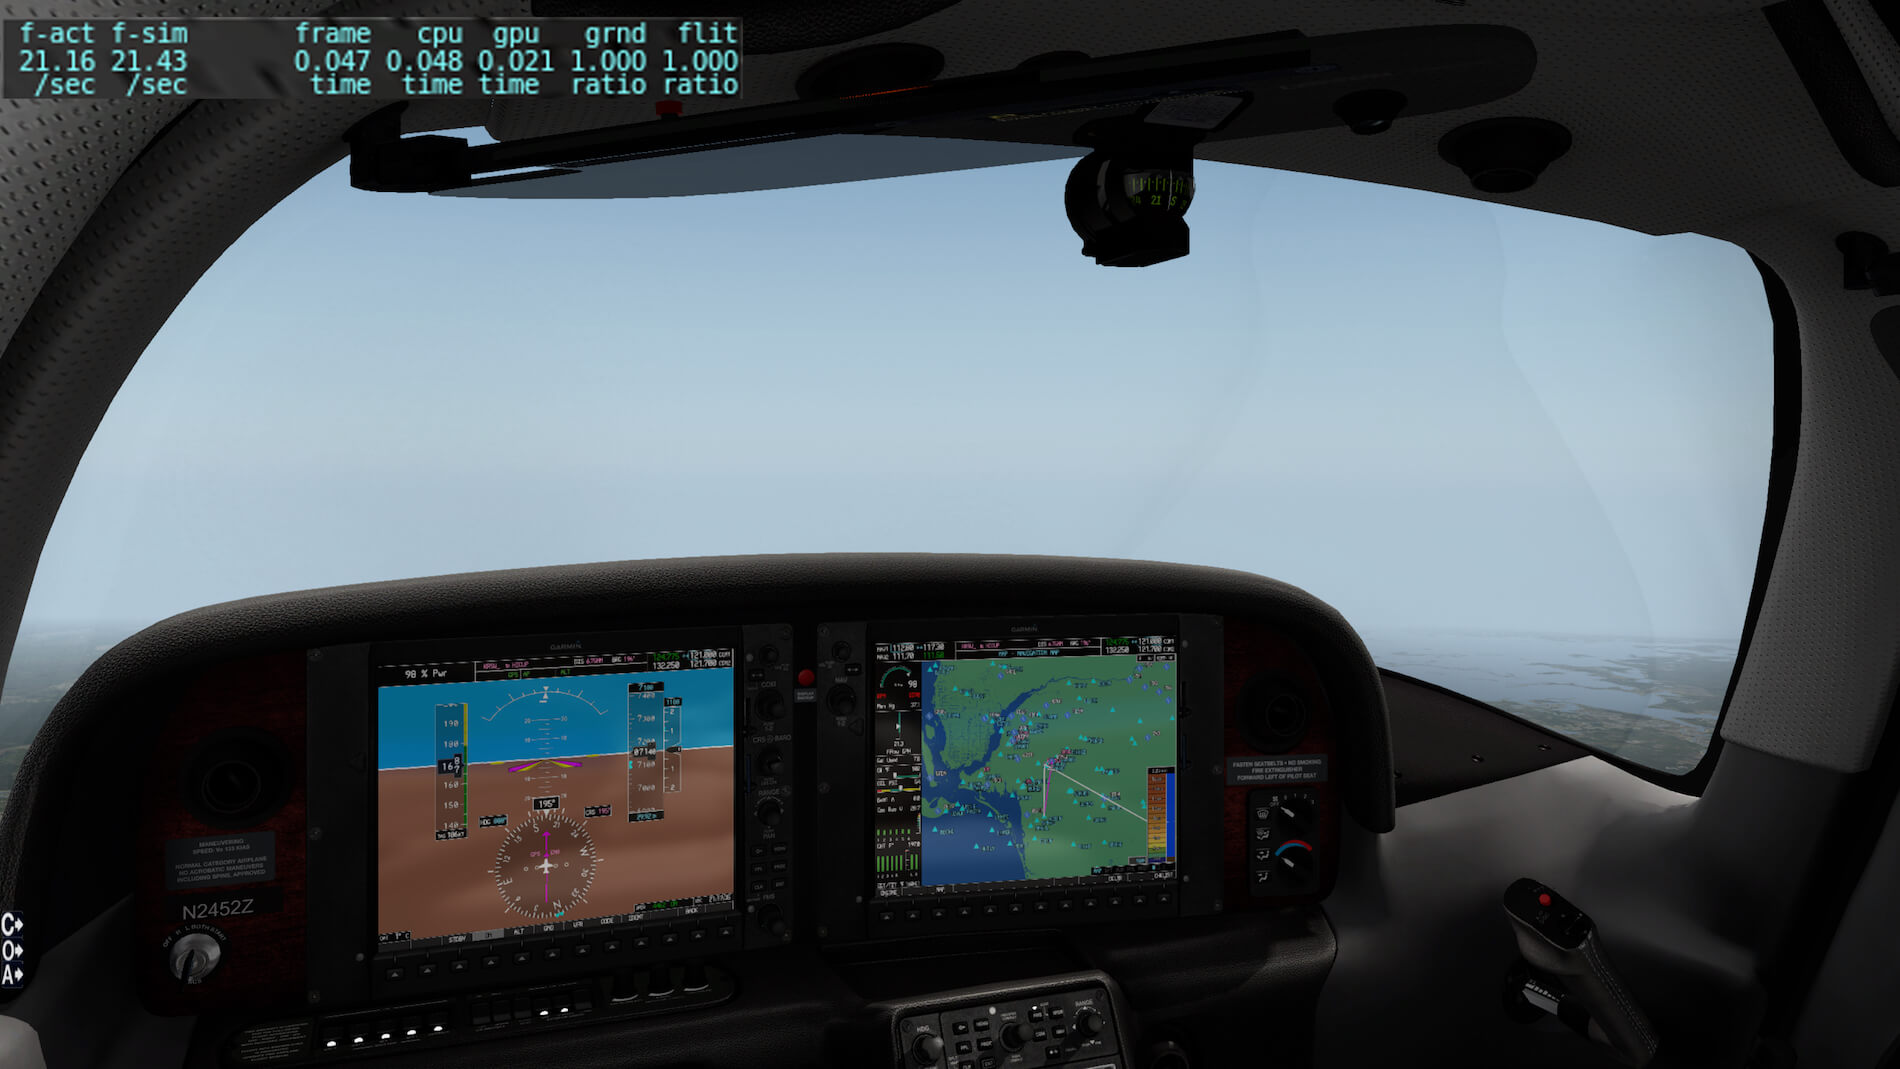
But the secret of this aircraft model lies of course in the modeled Cirrus Perspective Garmin displays, representing a PFD (Primary Flight Display) and MFD (Multi Function Display. Not that the Carenado Cirrus SR22 Turbo is the first Carenado aircraft of its kind with these extreme highly realistic G1000 displays. And no, I haven’t looked into these displays yet, but that’s coming next.
The Carenado Perspective Garmin Cockpit
Introduction
This time not the Cirrus Perspective cockpit, but the one created/modeled by Carenado. When you switch on BAT 1, you also switch on BAT 2. Sounds logical, but in reality I assume you can switch on these batteries individually. Not sure if this has to do with the X-Plane programming or the way it’s designed. This is not really a problem to me, as long as you are aware of it. When you’ve switched ON the batteries, they will power both DUs thus the PFD (Primary Flight Display) and the MFD (Multi Function Display).
By the way, I advise you to read the provided G1000 manual or even better, print it. It’s also fair to inform you that the provided Garmin G1000 manual is basically the one from the FSX/P3D adapted for X-Plane. That said, a couple of things aren’t applicable for the X-Plane version or aren’t yet implemented or work different then expected in the SR22 Turbo.
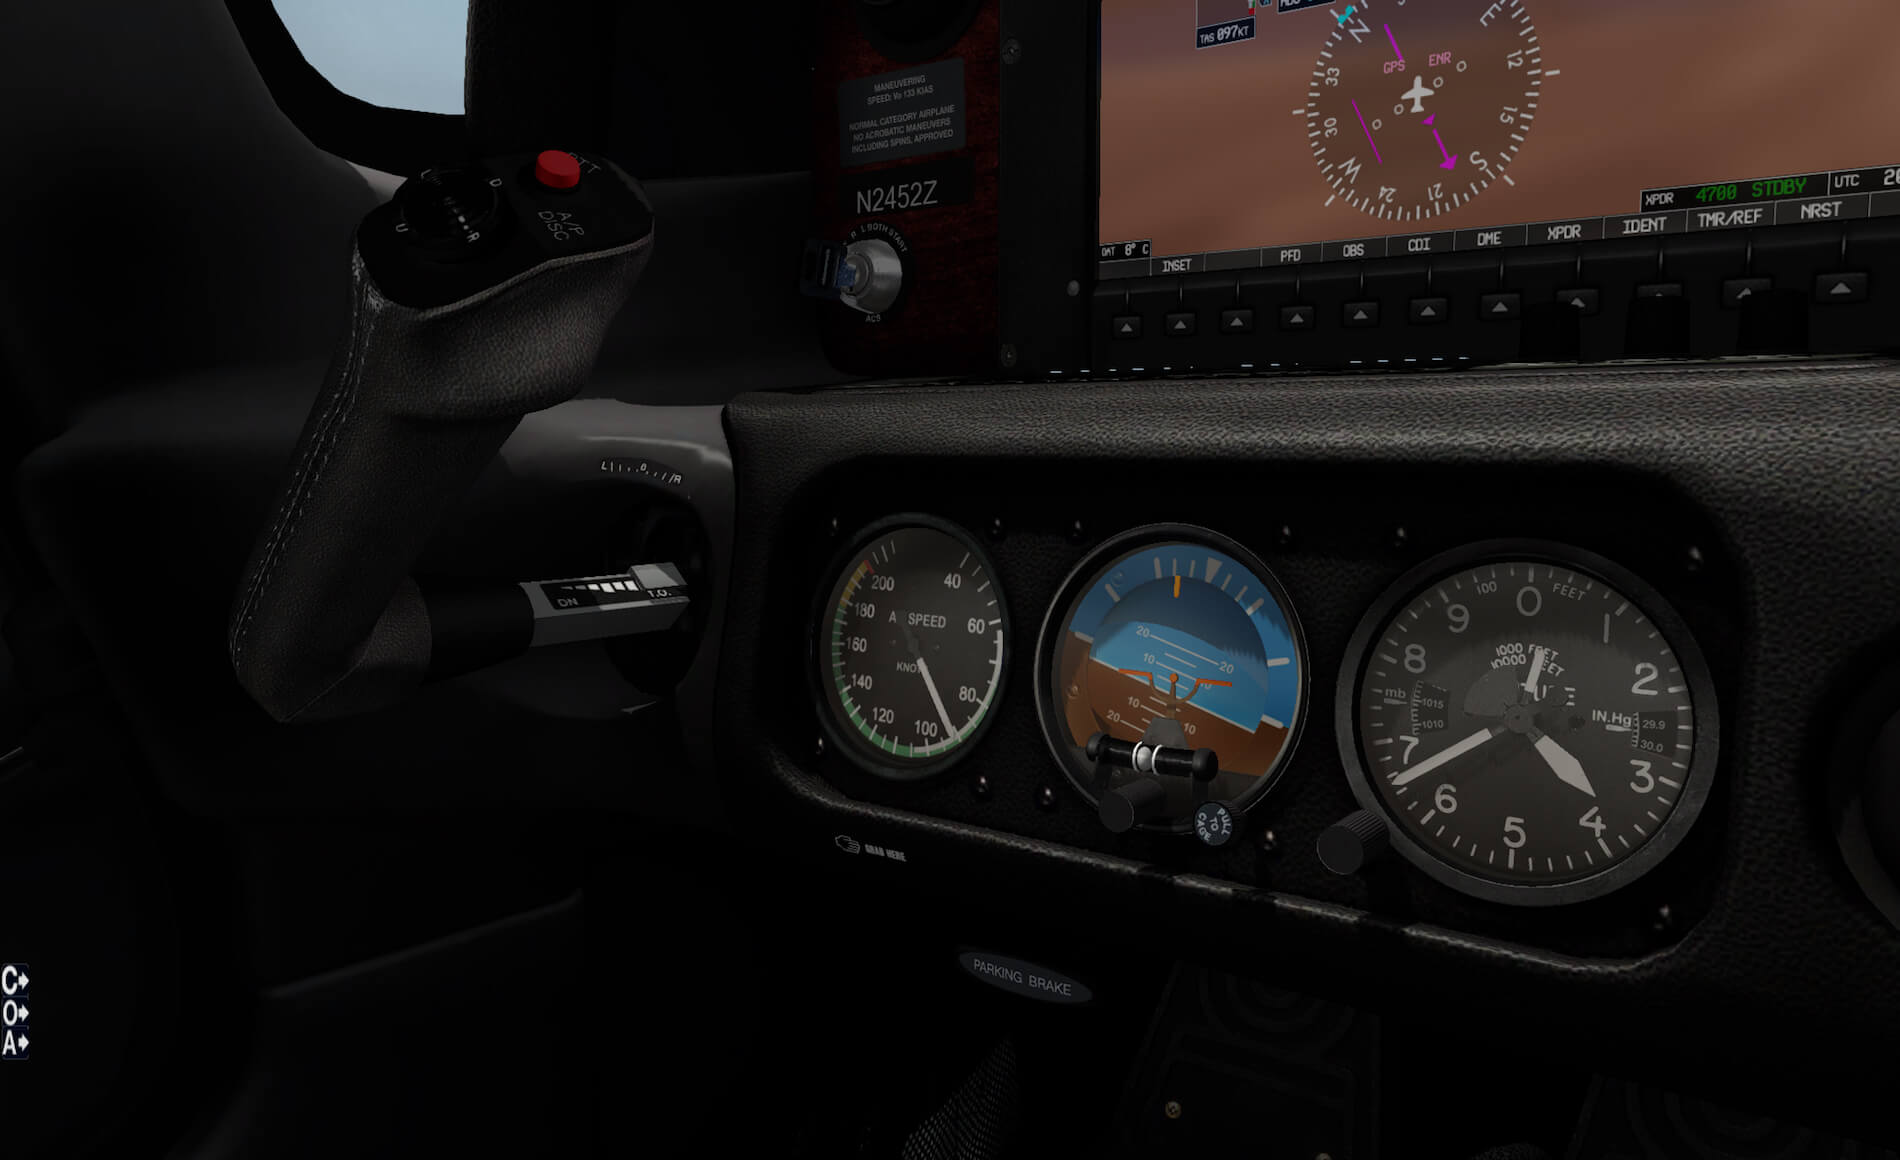
Since there’s no other instrument left in the Cirrus Perspective cockpit besides the ordinary analog IAS, altimeter and horizon, you must understand and know how to handle the large DU’s or better to read the GDU (Graphical Display Unit).
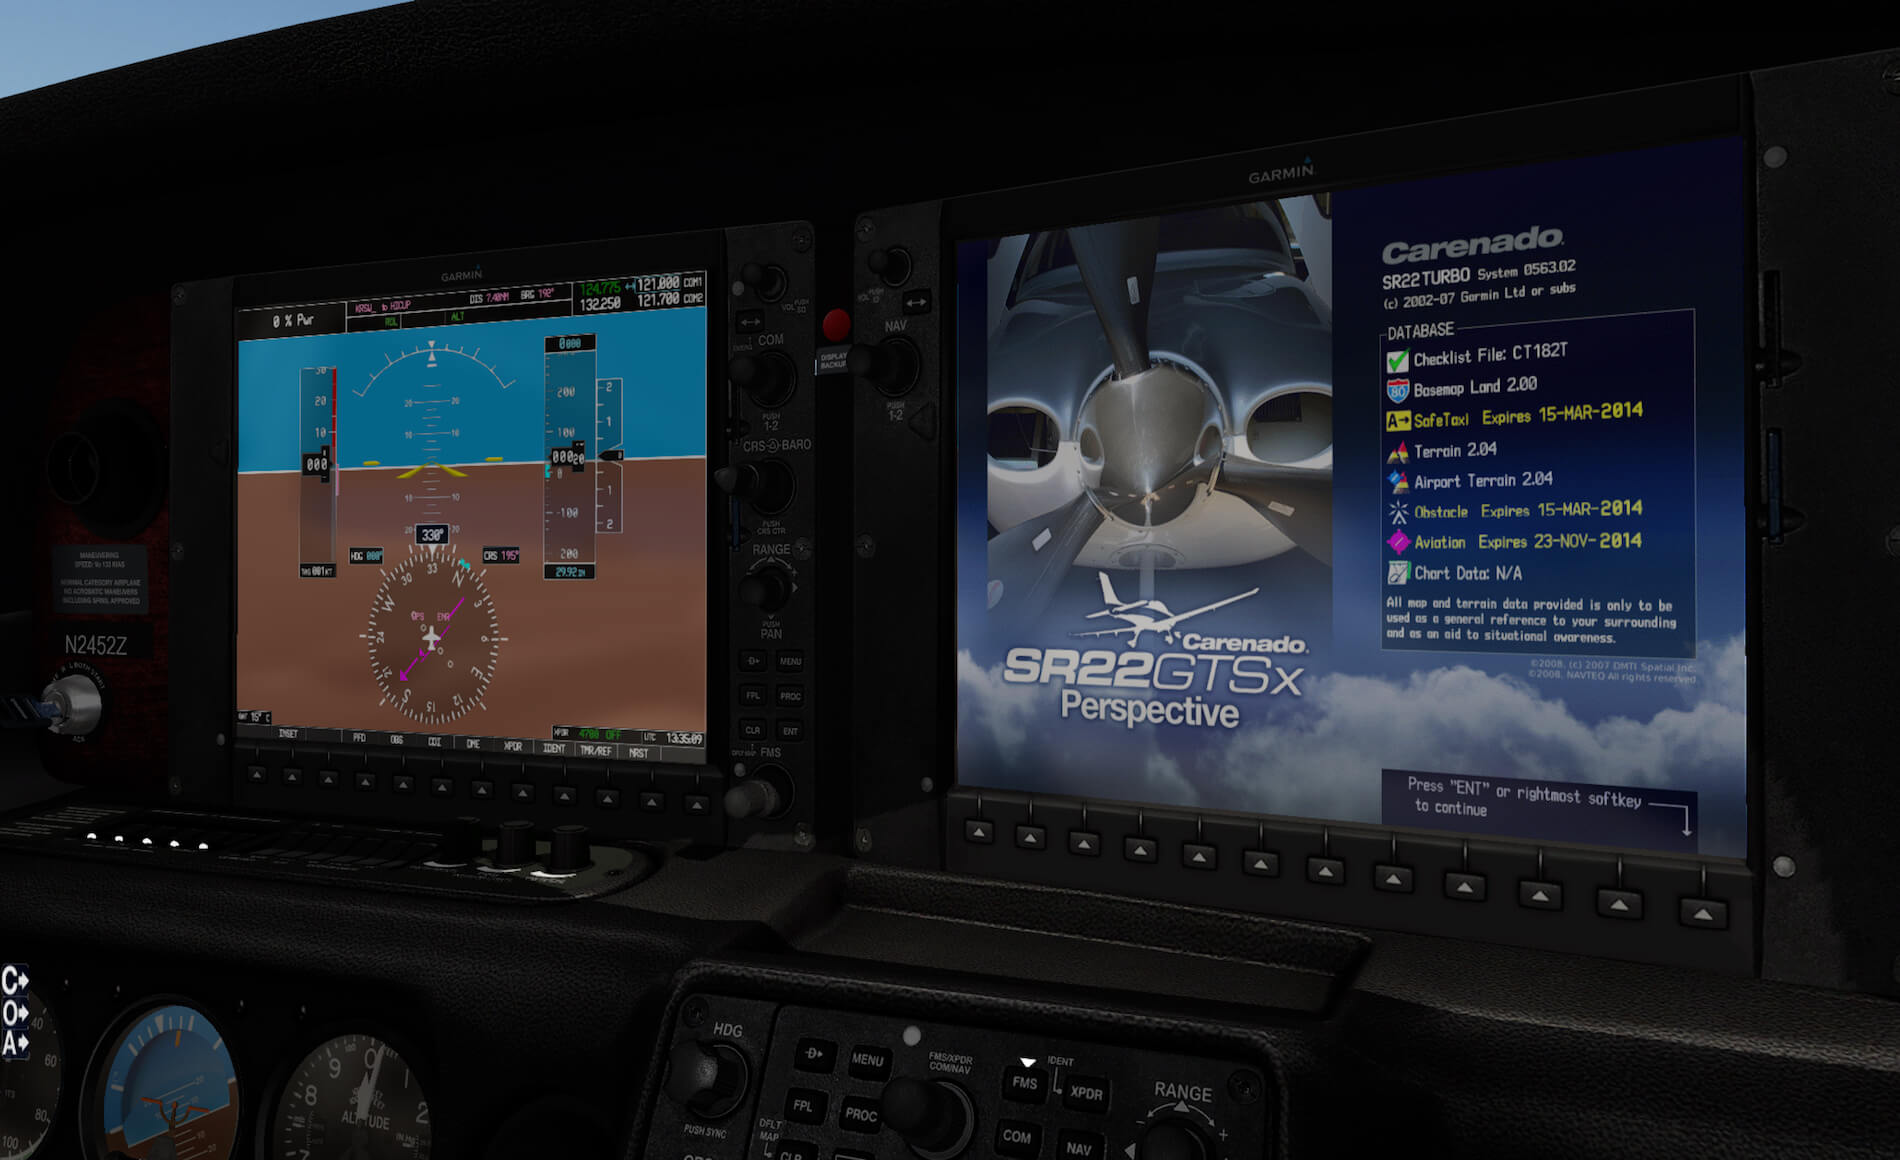
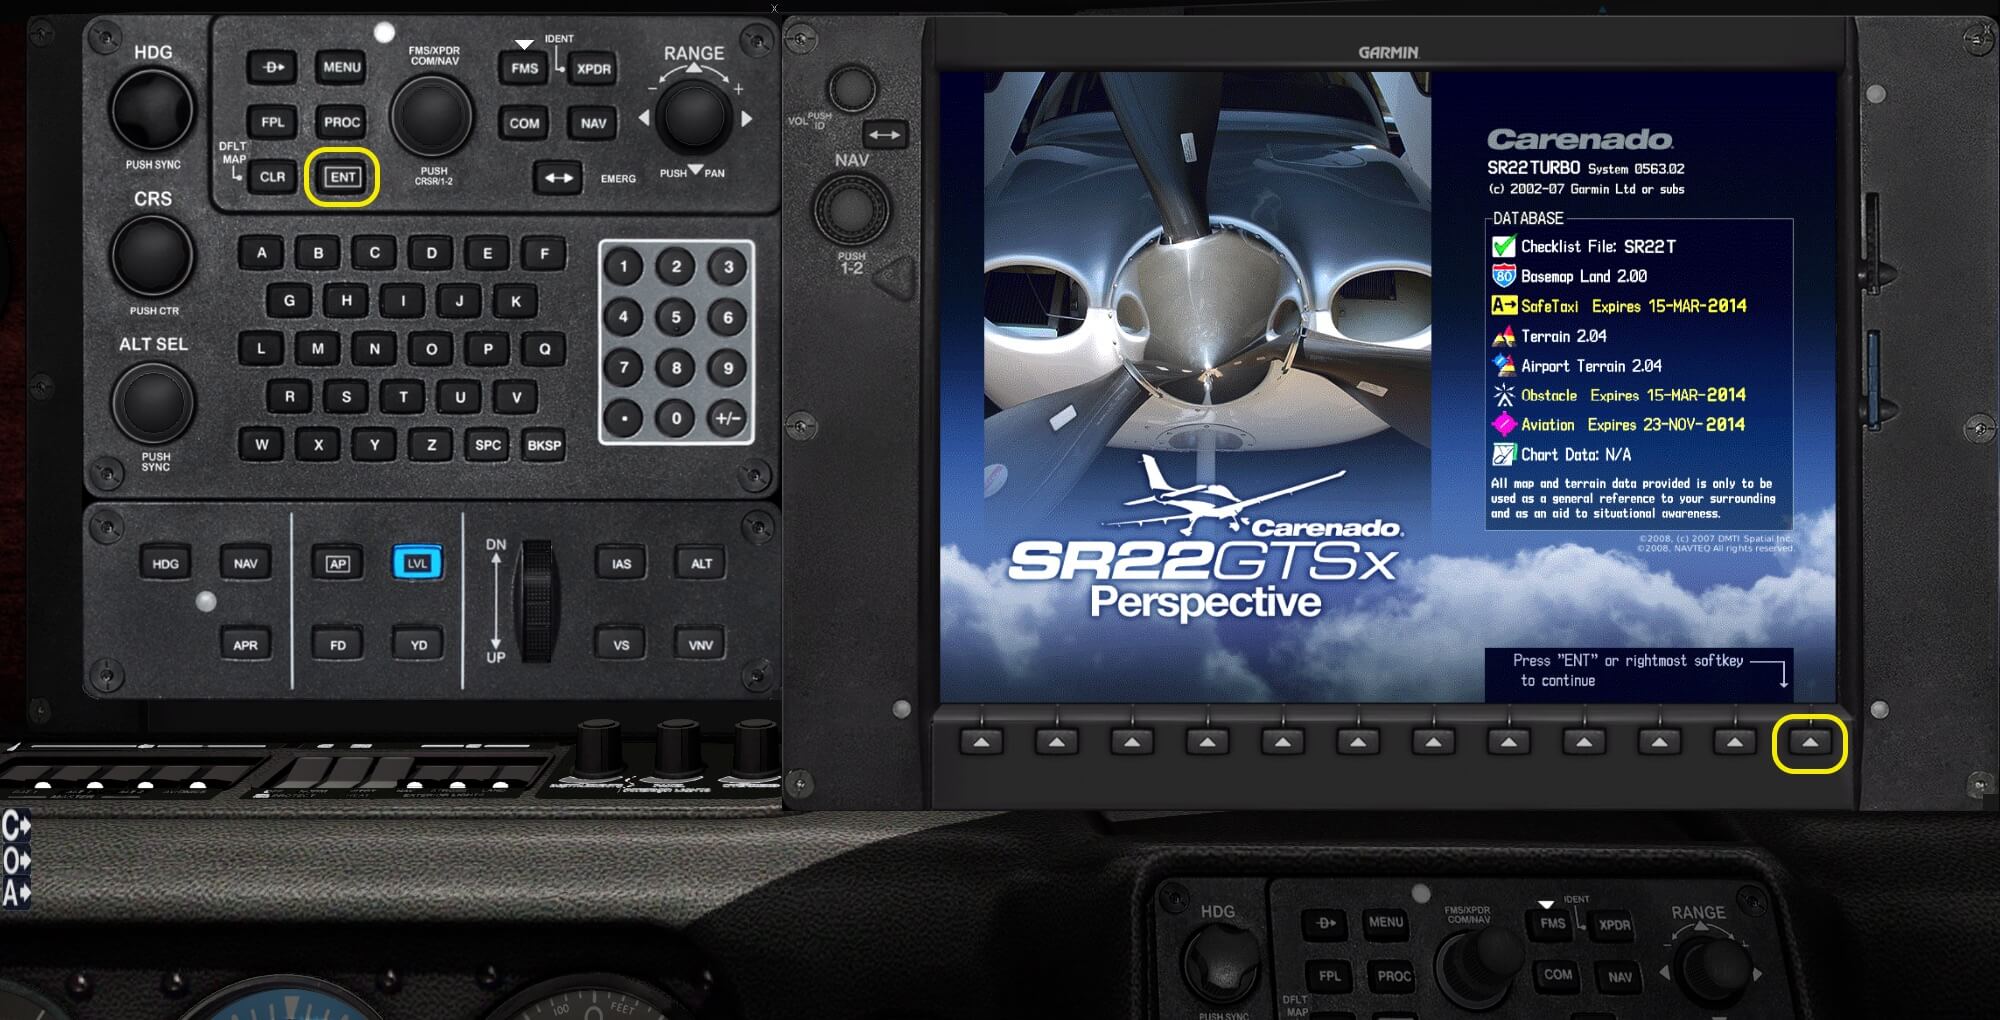
Anyway, at startup of the DUs, you’ll see on each DU a startup image. On the PFD it will quickly be replaced, after initialization, by the PFD itself. The MFD image file stays in view till you select the ENT softkey which is the far right softkey on the MFD. Once you’ve clicked the ENT softkey, the MFD comes alive and the image file disappears. By the way, when you look closely to the MFD image, you’ll notice that the checklist file is identified as CT182T. According to Carenado this is just an PNG file, I may assume that the actual checklist in use is updated for the Cirrus SR22T.


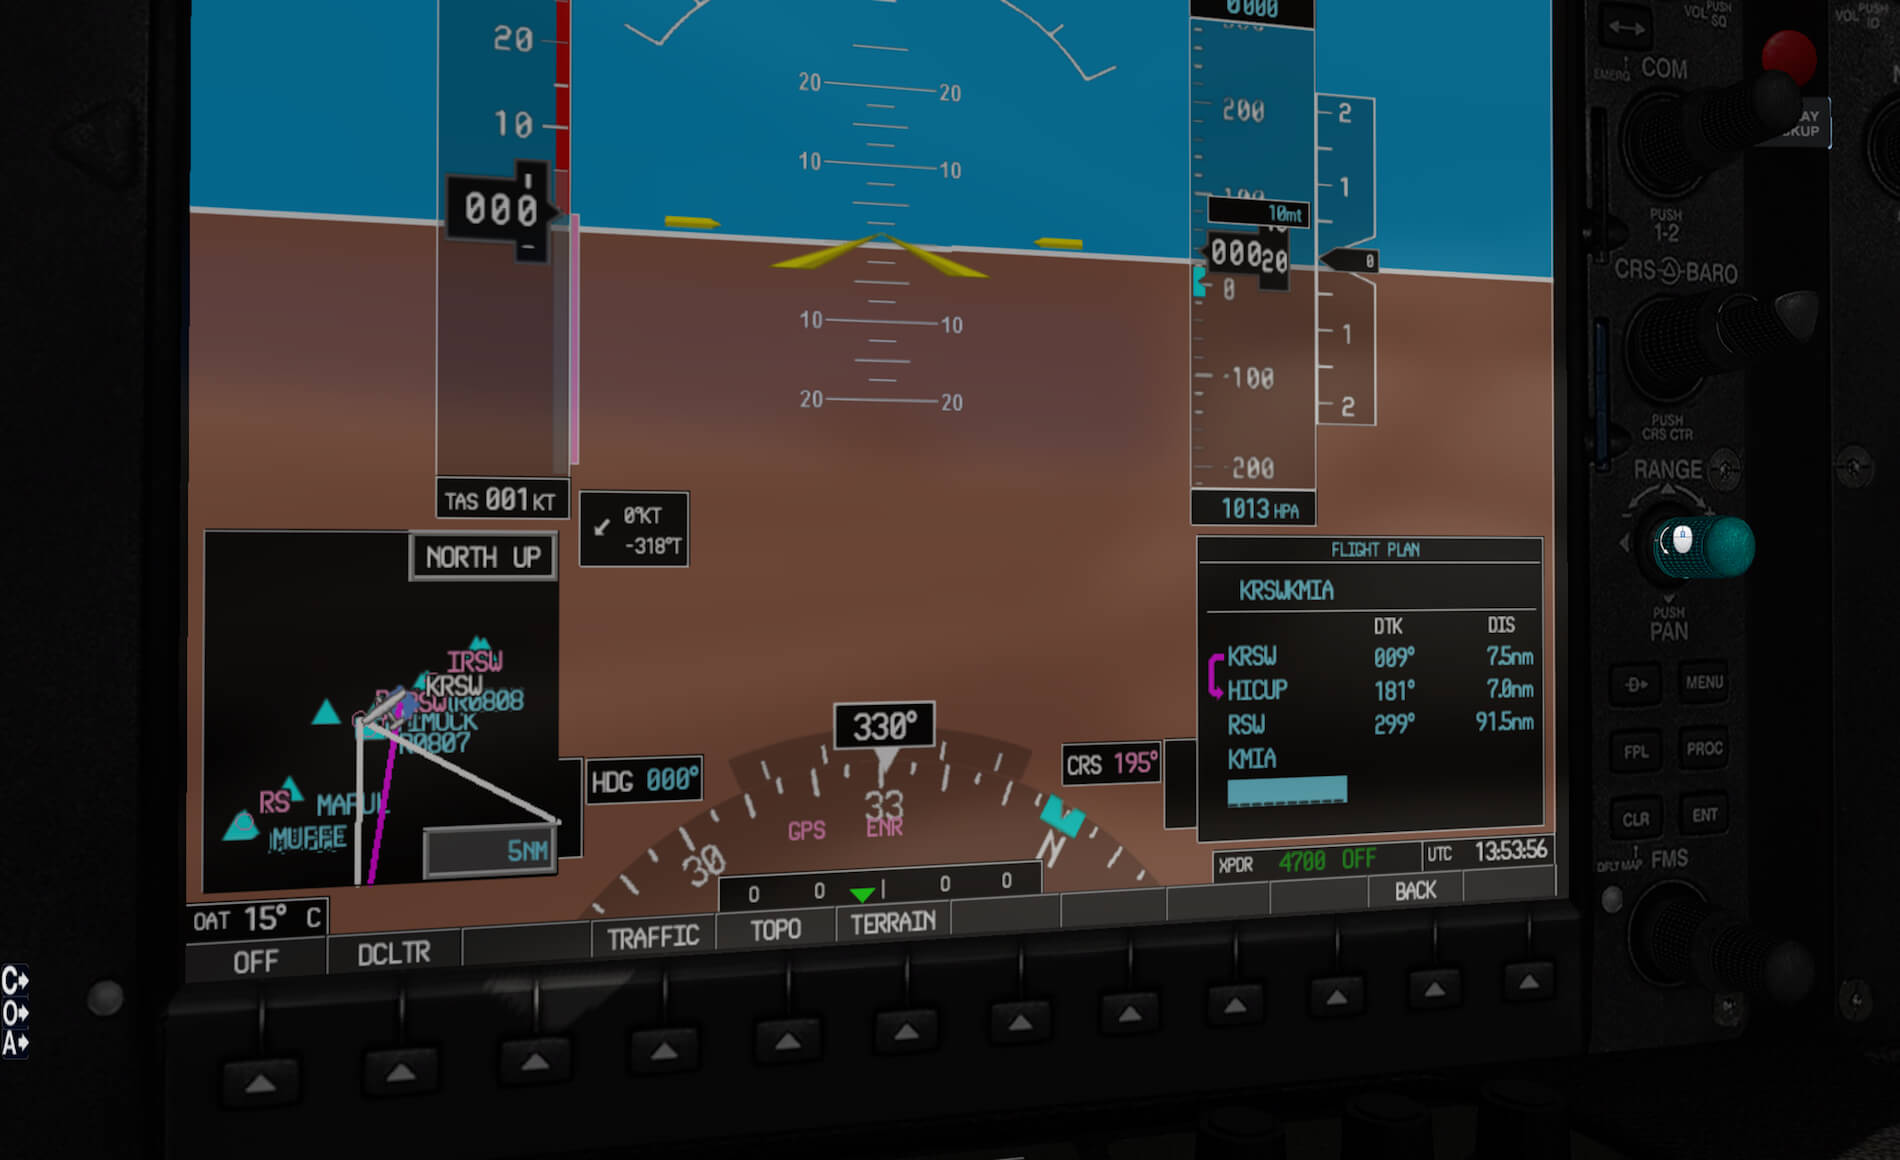
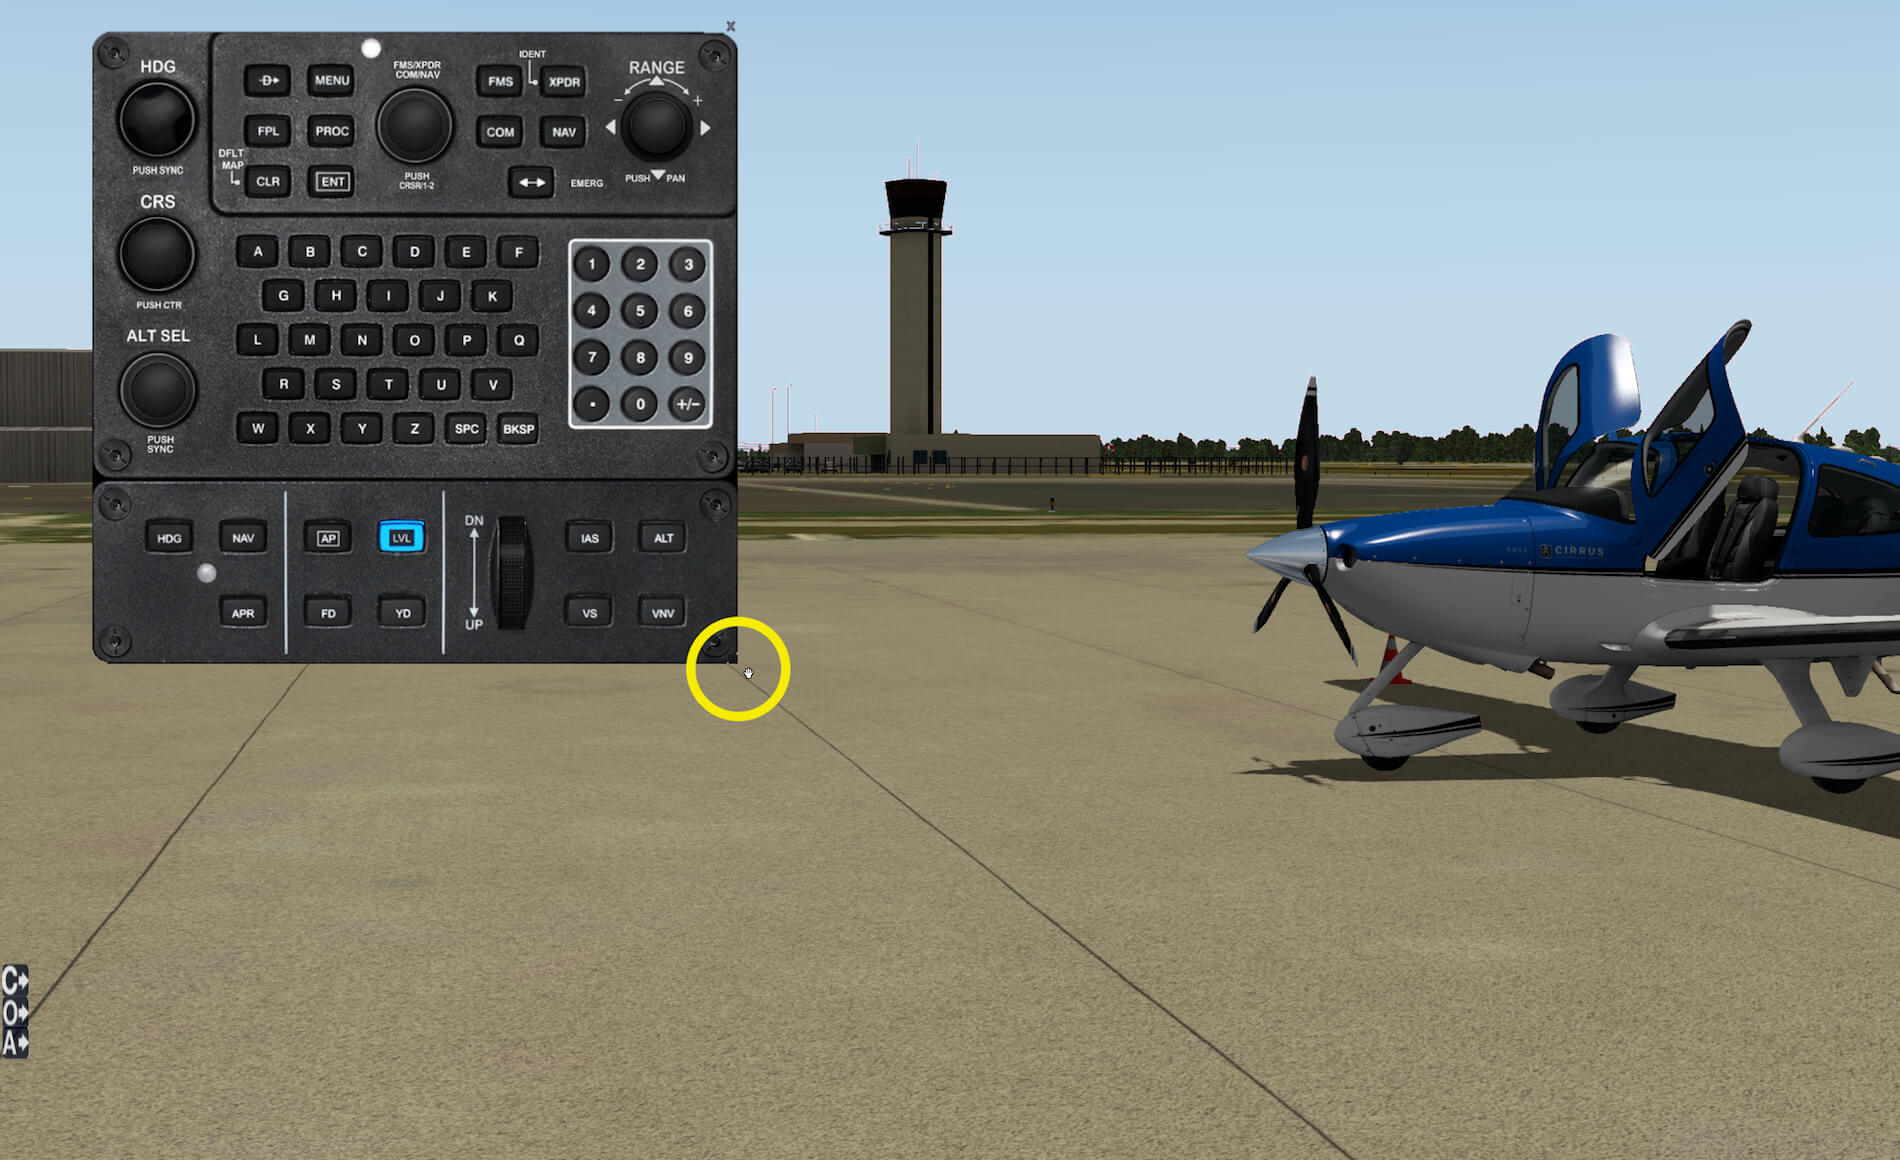
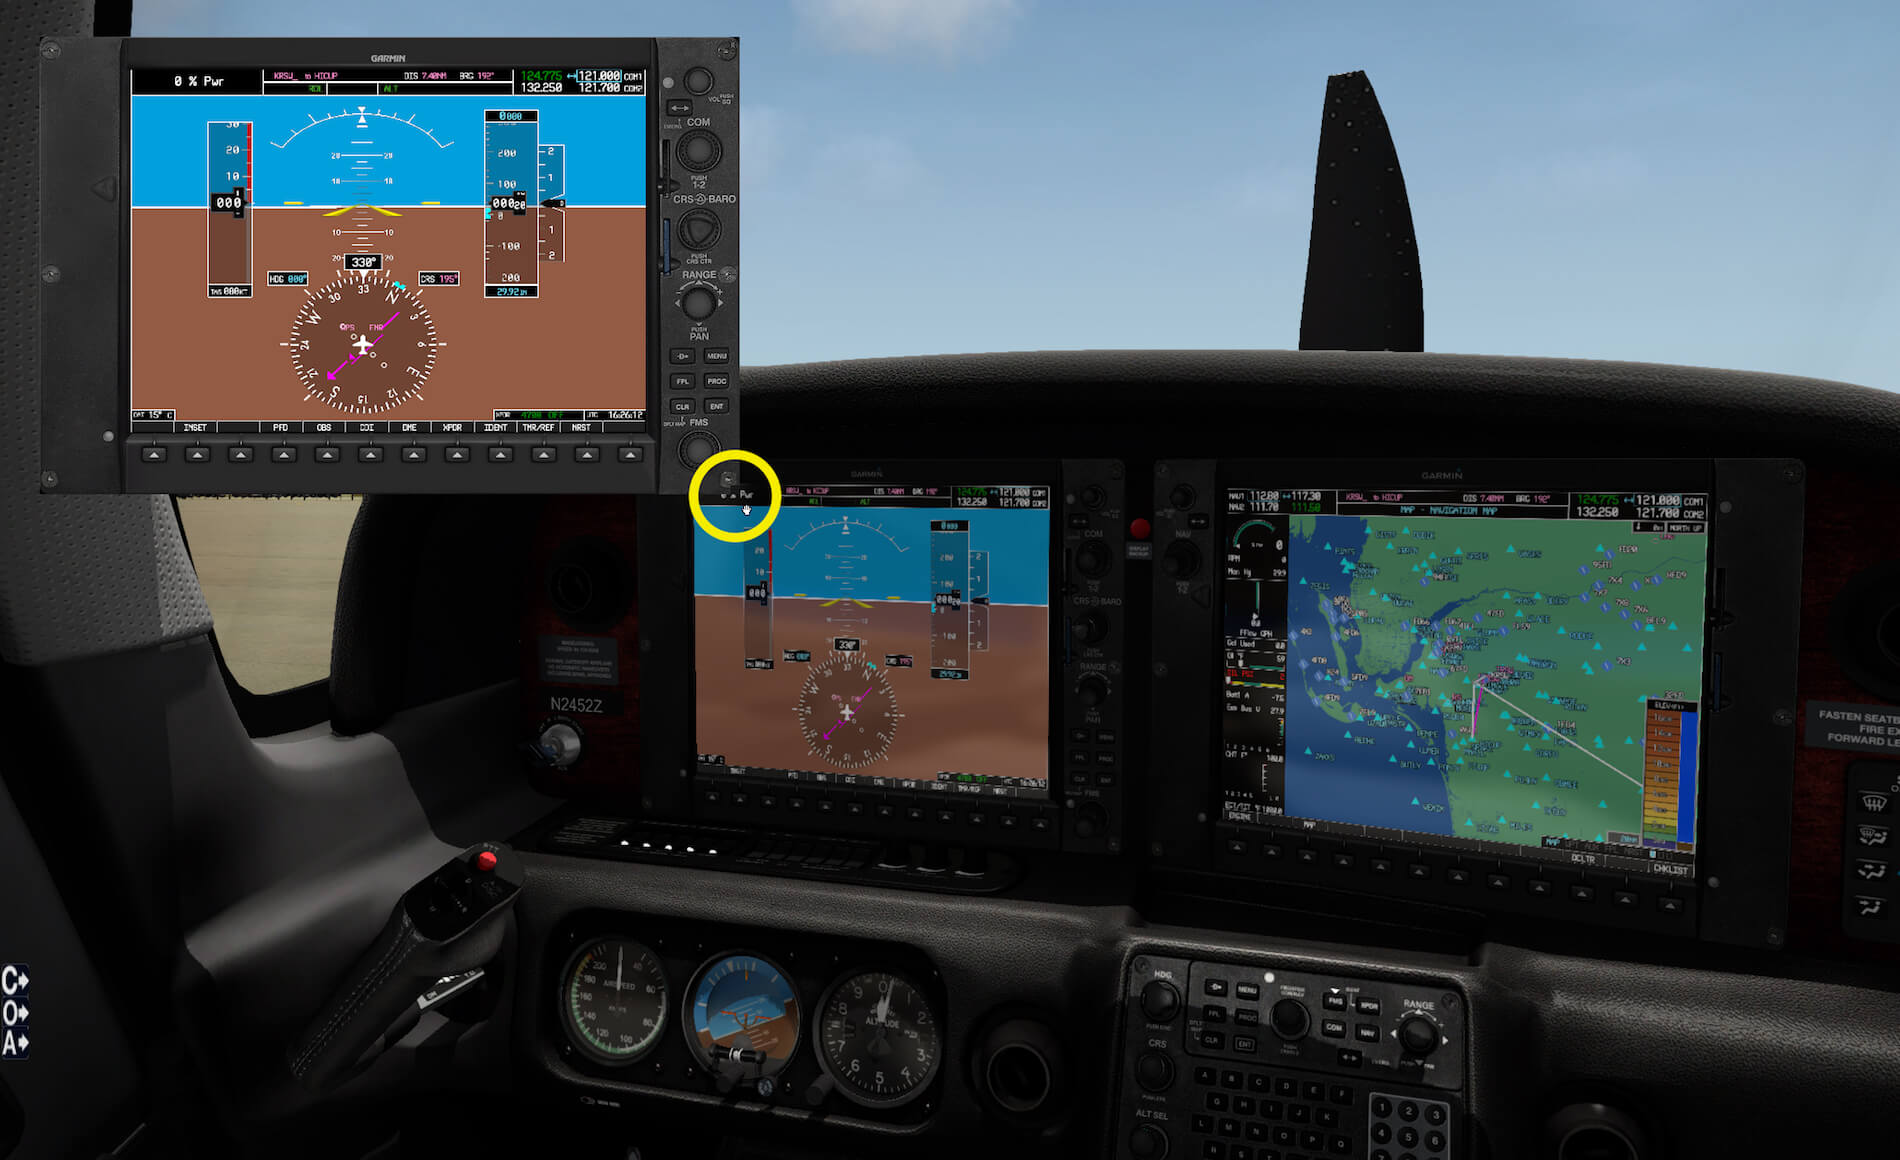
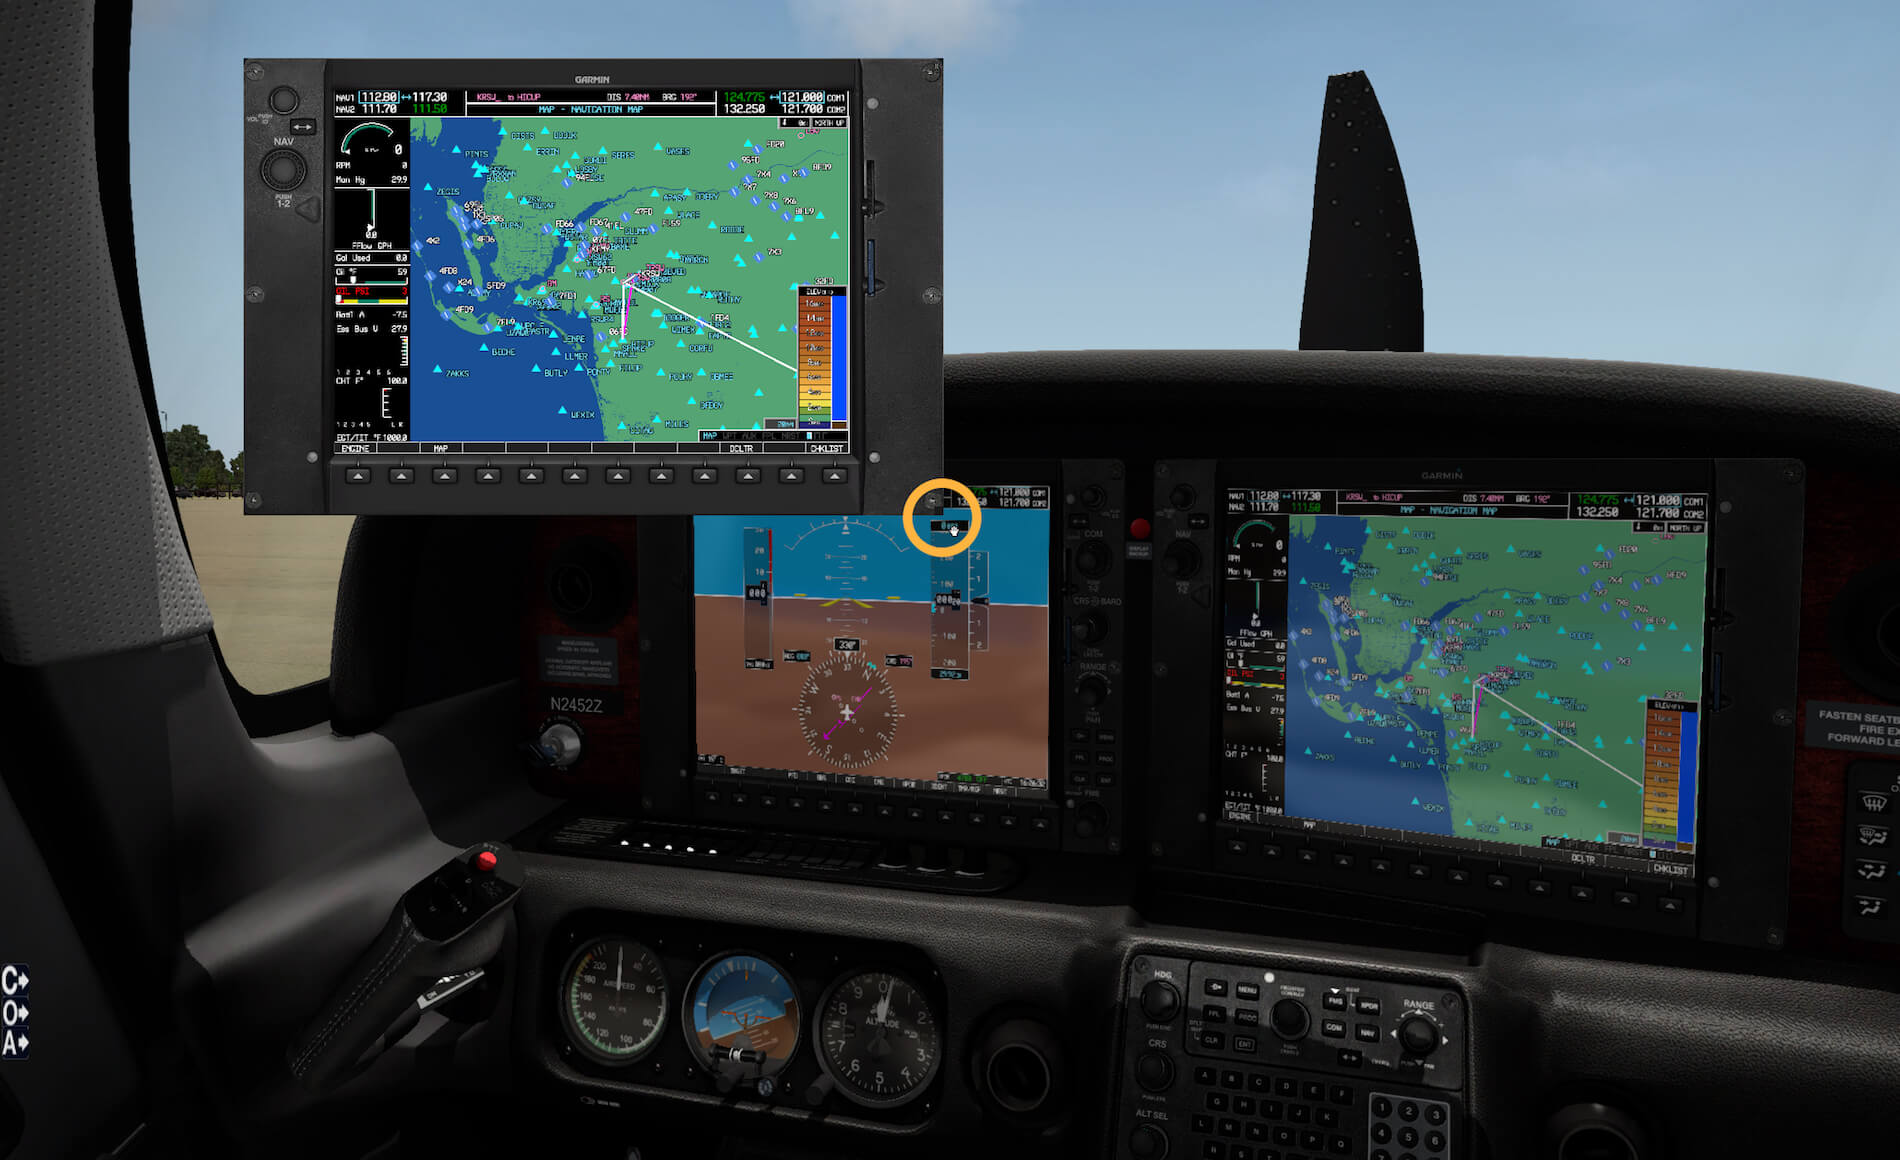
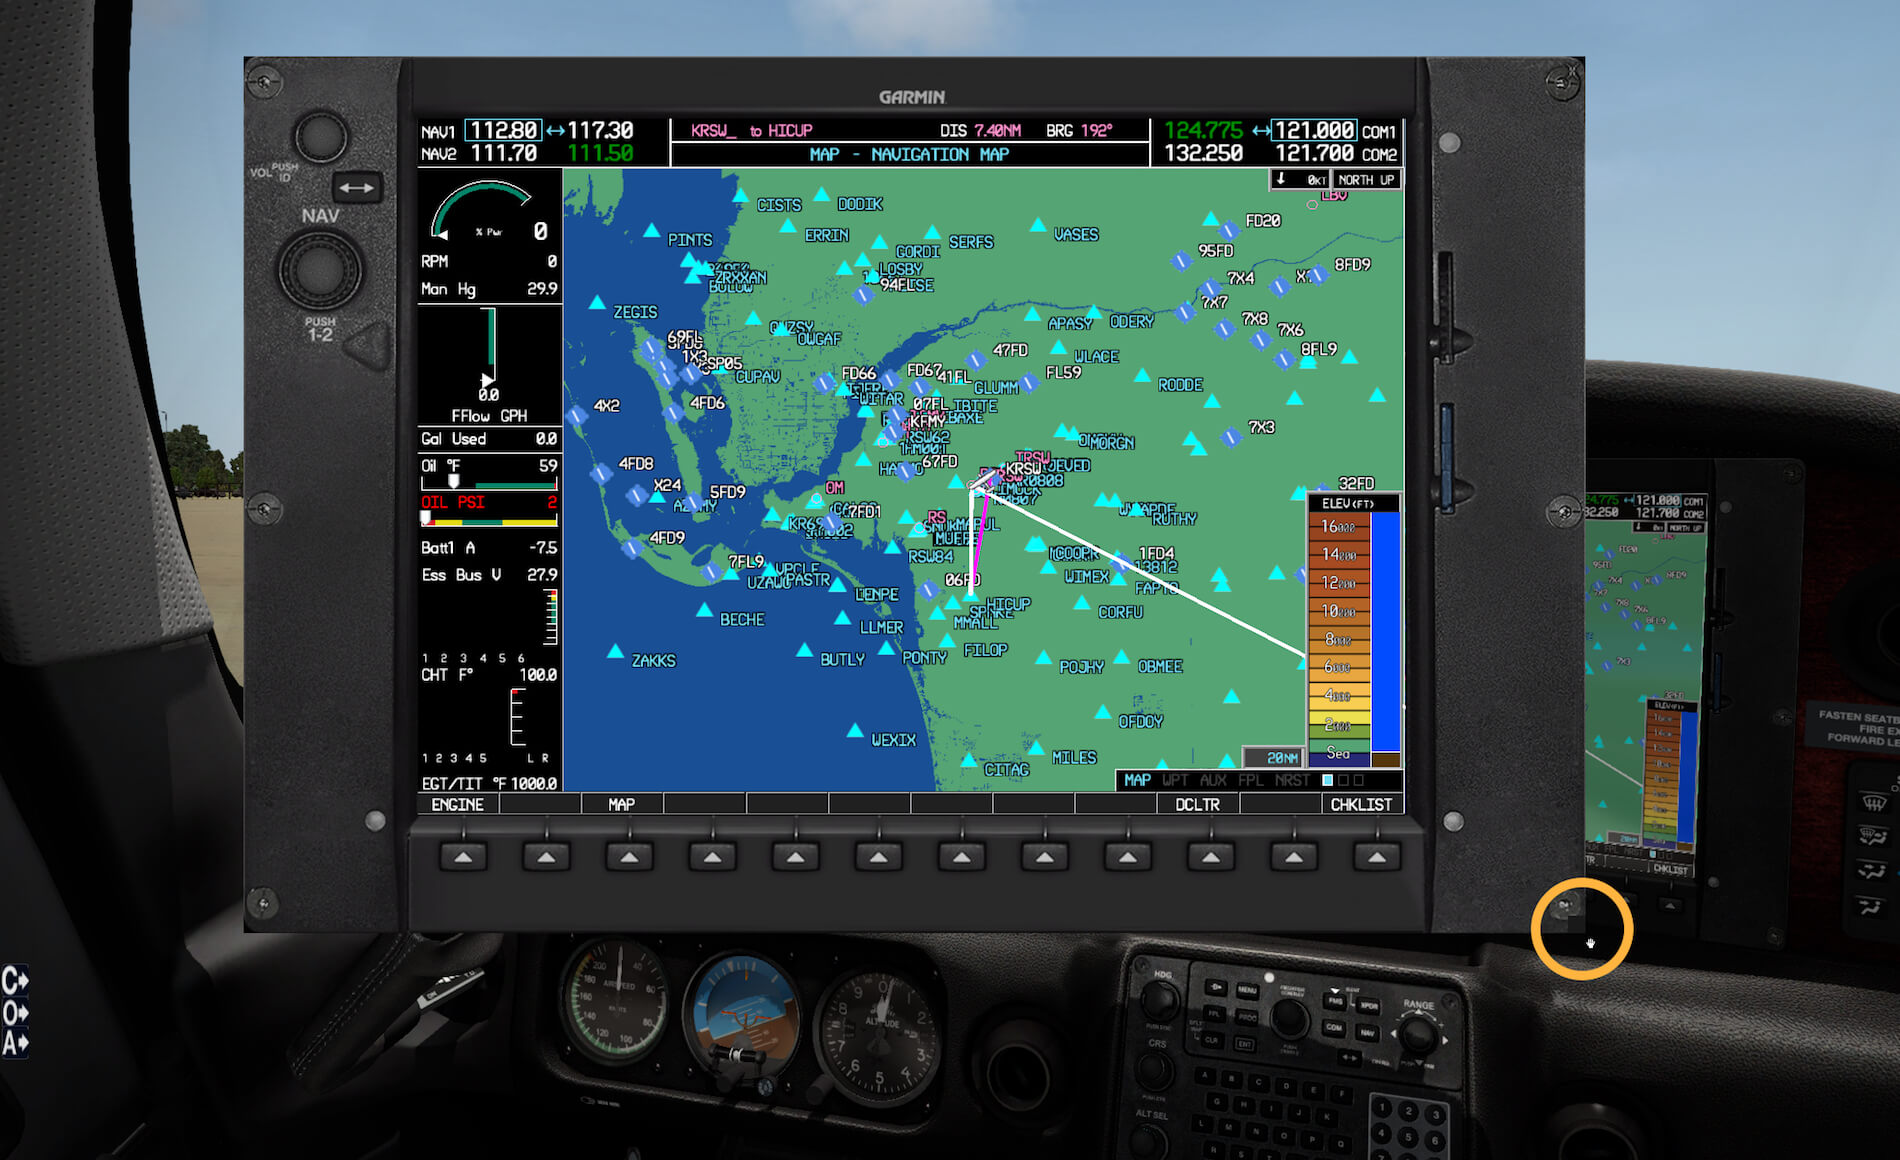
Each DU can produce a popup window by clicking somewhere on the PFD/MFD screen, the same as you know from the default Garmin GNS 430/530 devices. And before I forget it, the popup DU is functional in both the 2D and 3D cockpit. When you’ve chosen a PFD or MFD popup window, and you find it difficult to read because it’s all too small, you can resize this GDUs as well as the control panel with GFC 700.
When you look closely to these popup windows/screens, you’ll see a small black square at the right hand lower corner. Place your mouse here, and the added to the mouse pointer you’ll see a small hand too. Hold the left hand mouse button and move the mouse in a right hand or lower direction. You are now resizing the GDU or control unit/GFC 700. And the great part is … the overall quality of the resized window/screen is gorgeous.

In case you’re looking for this, you won’t find any DU brightness control although the popup DUs are significantly brighter then the in-situ DUs. According to Carenado I was informed that “the G1000 displays have not been programmed with dimmers”. The “A” icon which I discussed before was or is intended for the Auto Pilot control panel although in this case it must be said that it’s for the Garmin GFC 700 control which is the AP panel and for the control unit which allows you to control the different pages on the MFD. The GFC 700 is an easy to handle AP control panel, but when you want to read more about it, you can always check out this Garmin link that covers the GFC 700 AFM for the Cessna NAV III. The panel may look different, but the operation and control are basically the same.
Back to the MFD control unit.
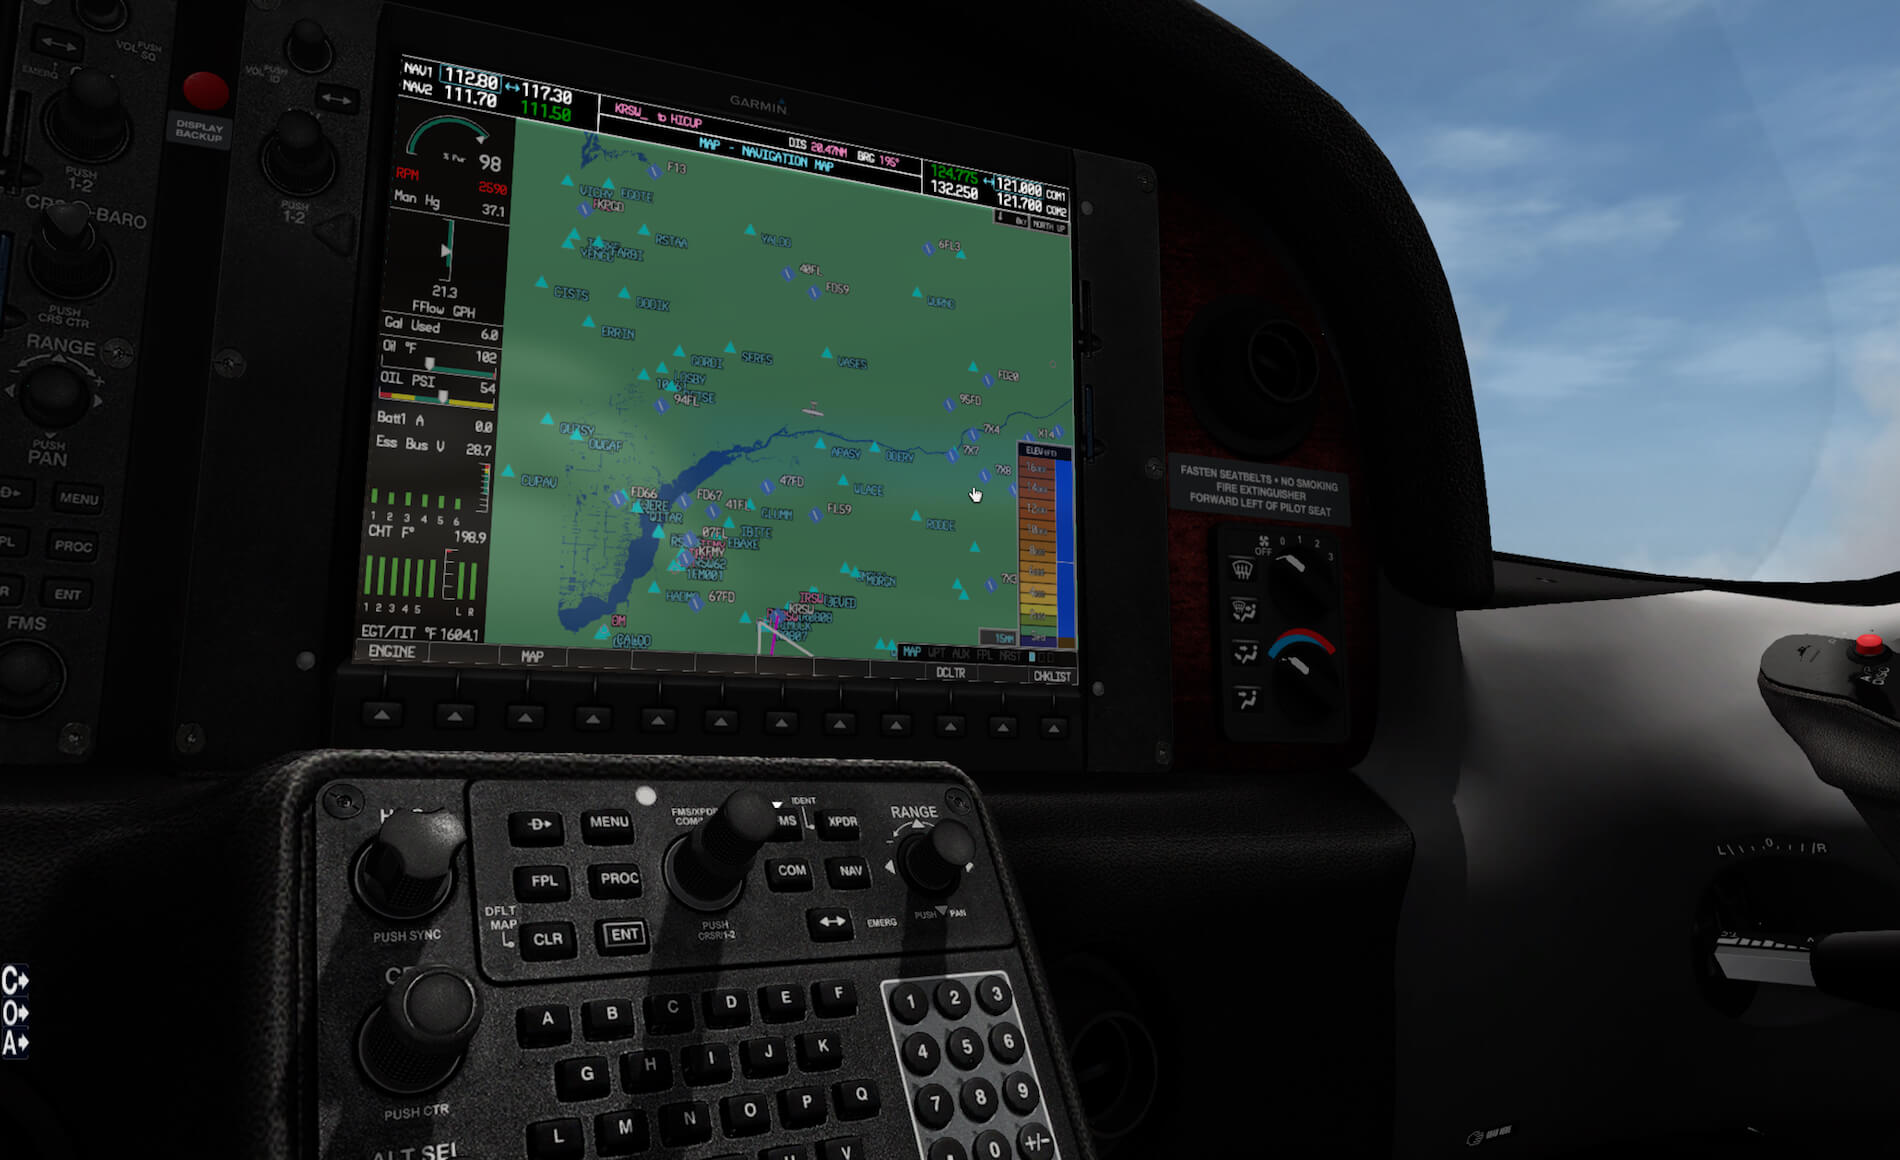
As I already stated in the previous paragraph besides the MFD softkeys, the control unit is used to select different pages on the MFD in the sections MAP, WPT, AUX, FPL and NRST (nearest). It’s also used to scroll through the interactive checklist. Personally I had hoped that Carenado had included a small tutorial on how to interact with the control unit and the MFD pages. It took me some additional time to figure how to go through the pages and how to get them via the control unit.
Once you get the idea, it’s easy to use and impressive, I must say. Besides impressive, the overall quality of the PFD and MFD are of an extreme high texturing. I briefly explained it before, but want to go a little deeper into this issue. The Carenado G1000 manual and then in particular the section related to the MFD, isn’t always showing you what is presented at the G1000 MFD. This means that some MFD pages or the way a page looks like, could be slightly different then the one you find in the aircraft.
Creating or loading a Flight Plan?
The Carenado G1000 manual offers a short tutorial how to create a flight plan. You can find this step-by-step procedure starting on page 25 till and including page 28. It is of course a possibility to do it this way, why not? You’ve got everything in your cockpit to practice, however, you could also decide to create a flight plan with a separate program and load that into your G1000. Isn’t that perhaps an idea?
Yeah, that’s a good idea. Let’s go for it and see what the possibilities are. For example, lets fly from KRSW (Southwest Florida International Airport) to KMIA (Miami International Airport). It would be great when I’m able to create my own flight plan with an “fms” extension and load it into the G1000 since an FP “fms” extension is needed for the Garmin G1000. Let me help you with this in case you’ve not done this before or in case you’re struggling with loading flight plans in the Garmin G1000.
I use most often Online Flight Planner, but there are other programs/websites that can help you in creating an “fms” flight plan. There are also very good standalone programs like FSWidgets or Goodway 5. Anyway, this online flight planner uses the same database as RouteFinder, but with several export options, of which one is “X-Plane fms”.
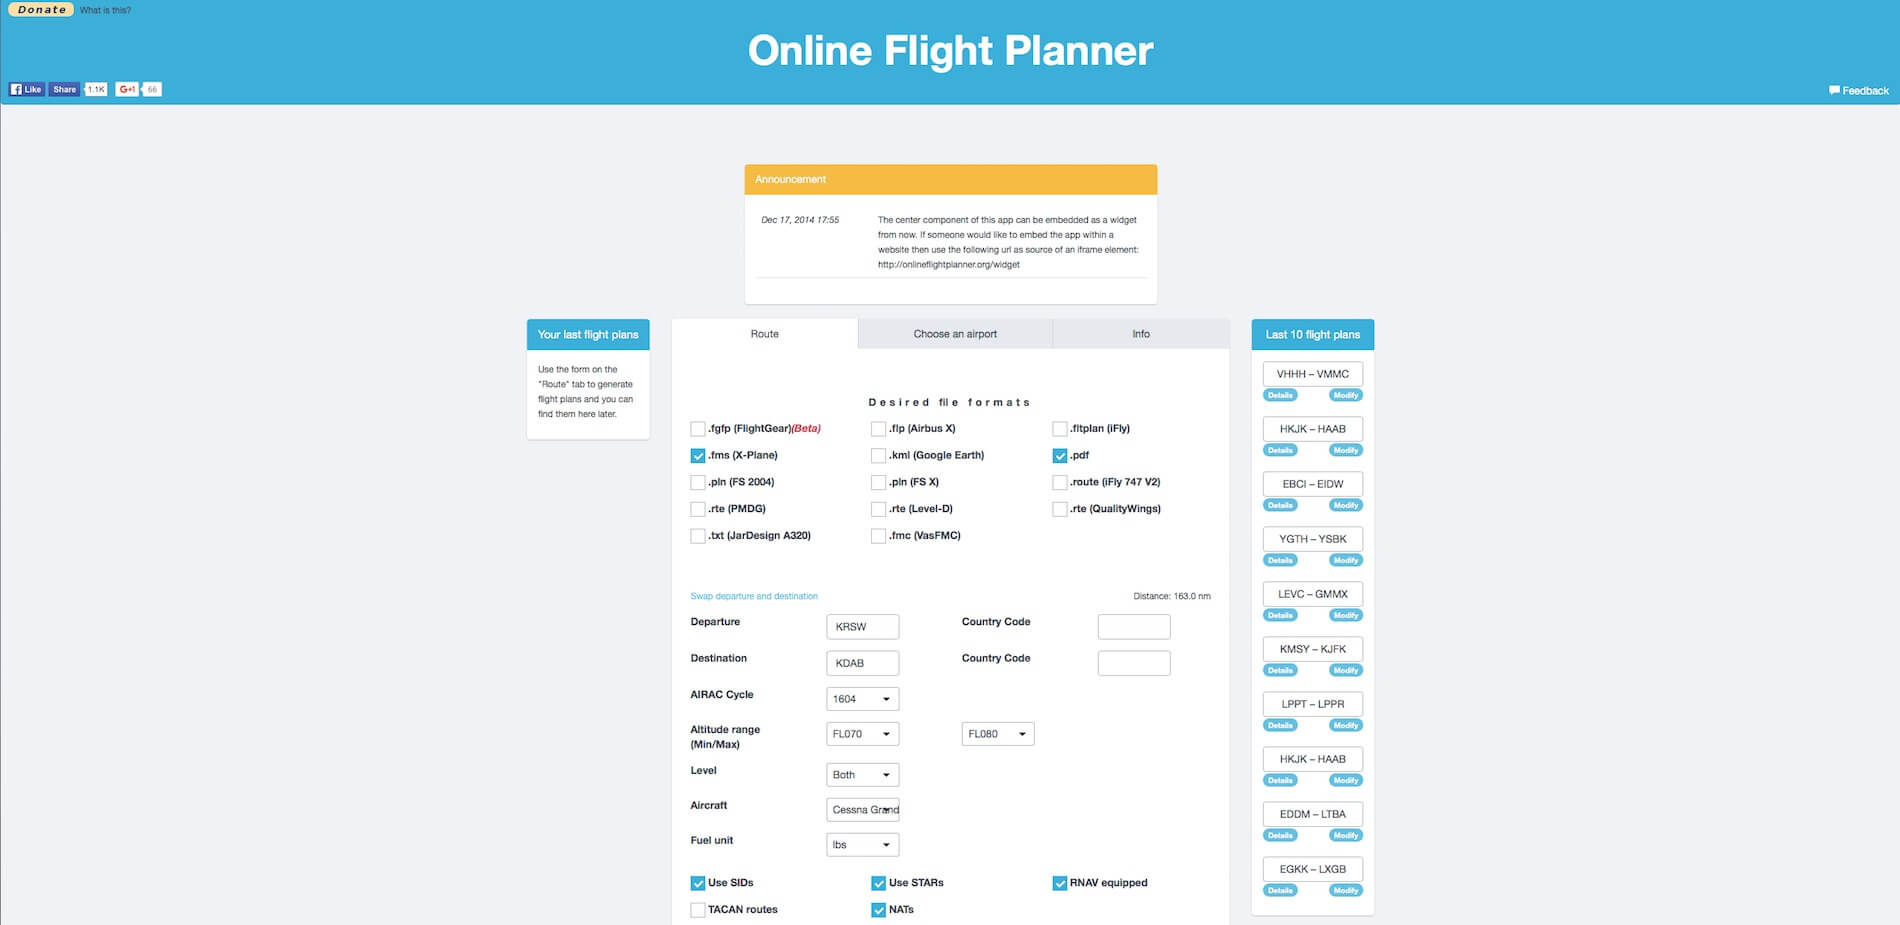


Copy the created fms file into the X-Plane root folder “Output/FMS plans”. With the fms file in this folder, you’re able to load the flight plan into the Garmin G1000. Oops, that is easier said than done. Let me help you out with loading a ready to use flight plan.
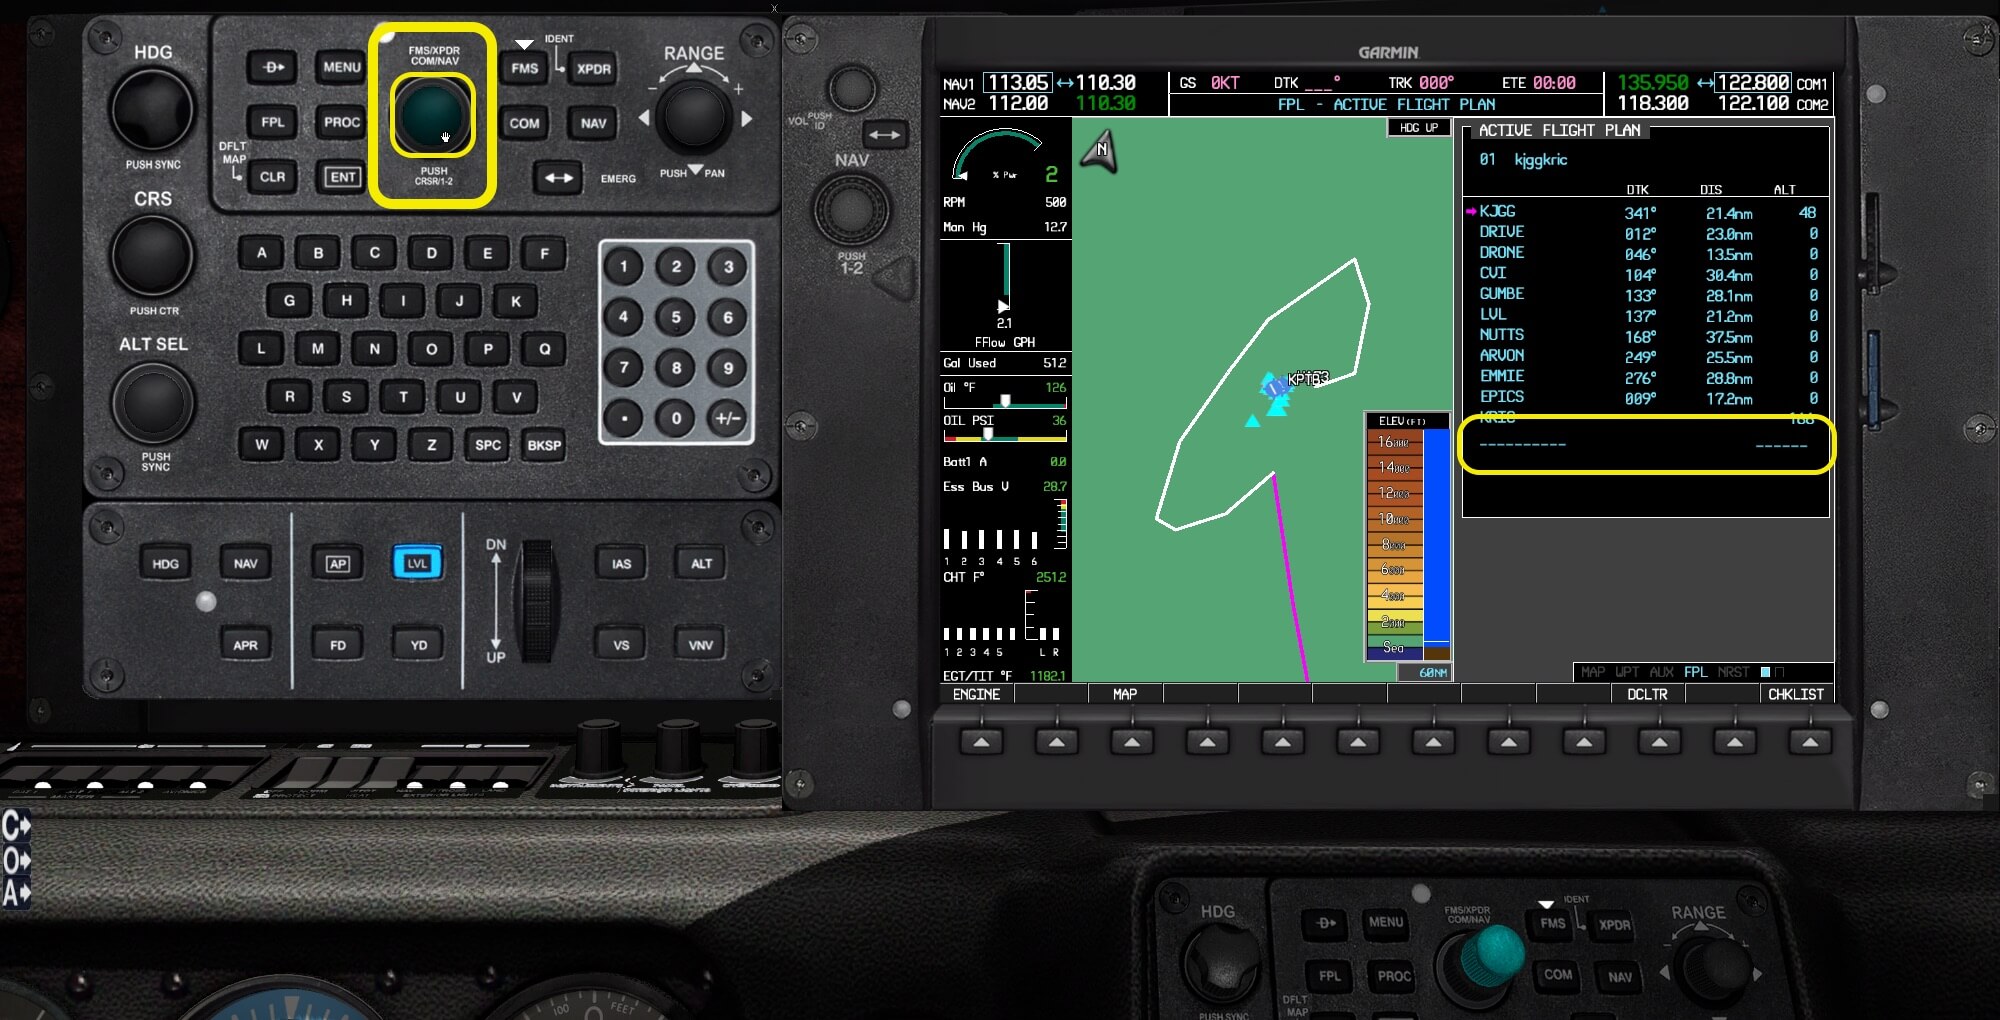
Once you’ve loaded the aircraft and powered it up, click the Flight Plan (FP) button on the control unit or use the in-situ mid console control unit. Originally and taken from the default X-Plane Garmin GNS 430/530 loading process, I’ve learned that this procedure or at least the workflow also works for the Carenado MFD. That said, follow me …..


Time for a flight?
I think I’ve written it before, additional information about the PFD and MFD can be found in the provided G1000 manual. Although this Carenado G1000 manual offers a lot of information, it’s not a flight tutorial and I think that adding a flight tutorial to the SR22 Turbo package would be a good idea due to the complexity and programming possibilities of the G1000, at least, that’s how I feel about it. I also hope that the current X-Plane G1000 manual will be rechecked for what is really applicable for the X-Plane G1000. Now the manual shows still a couple of things not implemented yet which could lead to unnecessary confusion.
I will use for my flight impression the KRSWKMIA flight plan although I will return to KRSW after a flight of approximately 60 minutes. Lets first get the SR22 Turbo feeling and see how the modeled aircraft behaves.
A Flight Impression KRSW-KRSW
I decided to load my previous discussed flight plan although I now know already that I won’t fly to KMIA, but back to KRSW. After I’ve done all the necessary preparations with the help of the onboard interactive checklist, it’s time to taxi. Taxiing the SR22 is rather different than expected and, since I have no real SR22 experience, it’s also difficult to say if the modeled SR22 taxi behavior is close to the real aircraft. The SR22 feels very sensitive on the nose wheel so small corrections must be made to prevent over steering to the left or right.
Further on, it also feels that the nose gear strut is very sensitive. I’ve got the idea that when you keep your taxi speed low, everything goes normal, but when the taxi becomes too high, what is too high? The SR22 starts producing a wobbling effect during the taxi, it feels like becoming seasick. Just to be sure, I tested its taxi behavior with different X-Plane configurations (a clean XP install and one with lots of add-ons and plugins), but I also decided to check it on Yosemite. There’s nothing wrong with this although I don’t know if it’s a real SR22 behavior, but just that you are aware of it.
Lining up the runway, preparing for takeoff, but before that I need to perform some final checks and then, off I go. It’s not difficult to keep the SR22 on the middle line although the P-factor effect is clearly noticeable. Once in the air, it’s an easy to fly aircraft. How real these flight characteristics are versus the real Cirrus SR22 Turbo, no idea, but I’ve written that before. The SR22 T may come with an advanced AP (Auto Pilot), but flying the aircraft by hand isn’t difficult either.
Trimming goes well, a little too sensitive in my humble opinion, and since you have every necessary information directly in front of you, it’s not difficult to control the aircraft during the climb to 4000 feet. But I also want to check in flight the different options on the PFDD and MFD and thus I need to connect the AP. Even without reading this manual section, no no, you should do it before, the AP control panel is an easy to control device. On the Control Unit (select it via the “A” icon on your screen) you select the Y/D (Yaw Damper) and FD (Flight Director) pushbuttons first.
Next, but that’s just my opinion, you click once on the HDG knob. This aligns the HDG bug with the current heading you’re flying. Then select the HDG button, followed by the AP button. Which AP mode are right now active, that can be seen on the white arrows on the AP control unit and at the top middle section of the PFD. Next we need to select a pitch channel. Clicking the ALT knob isn’t during our climb not a good idea since the AP will immediately LEVEL OFF the PITCH, so we select the V/S button and with the thumbwheel we select a vertical speed we want. This selected V/S can be seen in cyan at the top of the ALT vertical tape.


Suppose you prefer to navigate with the help of VOR or VORTAC beacons, whatever is applicable, you enter that VOR or VORTAC frequency via the MFD or via the AP Control unit upper part. Just in case you lost track … when you decide to do it via the AP control unit, you first click the NAV button on the upper section of the control unit before using the FMS/XPDR COM/NAV knob/button. In other words, this knob in the top middle section can be used for 4 different systems; COM, NAV, XPDR or FMS.
As you hopefully understand, this is indeed different then when changing a frequency on the MFD since this NAV knob/button is only for NAV frequencies and nothing else. Ok, when done, don’t forget to select on the PFD the CDI (Course Deviation Indicator) to VOR1 or VOR2. When you want to see the DME too, click on the PFD the PFD soft key, followed by the BRG1 (VOR1) or BRG2 (VOR2) soft key. And suppose you don’t want to use any VOR or VORTAC beacon at all, but just using the FMS, then the CDI soft key on the PFD must be in the GPS mode and of course on the AP control unit you need to select the NAV button. You can imagine how many options are possible and then I haven’t even discussed the ADF mode.
When you and I decide to use the loaded flight plan although knowing that I will return to KRSW, I can also enter a new waypoint or fix. I can also decide to go DIRECT TO a fix, but when you to this, remember that the rest of the flight plan is immediately lost. Whether this is normal or not, I honestly don’t know, but I just wanted to let you know. The MFD may look complex and fancy, basically you can handle it as the old fashioned Garmin GNS430/530, but then, even I, must admit that the modeled G1000 offers much more then the other Garmin navigation units.
While approaching my intended flight level for the moment, approximately 4000 feet, you simple click the ALT button on the AP control unit and the aircraft levels off nicely at the altitude at the moment you pressed the ALT button. Although not mentioned yet by me, I find the modeled AP doing its work very well, perhaps I should write, almost as in reality or what you may expect from Garmin. Being leveled off at approximately 4000 feet I reduce the throttle a little bit or decide to click the IAS button on the AP control unit.
And since the aircraft is now following the flight plan, and my virtual companion is monitoring everything inside and outside, I have some more time to play around with the soft keys on the PFD and MFD. Just a small reminder to you and it sounds so normal, but several times I got this wrong …….. it was misleading I found; when you click for example of the PFD softkey CDI, don’t think you can click with your mouse on the “text” CDI. No, you need to click on the button below this text. Yes, I know, sounds so logical, but a mistake is easily made and suppose you do it wrong and click with your mouse on the text “CDI”, then the PFD popup window appears.
Anyway, with a connected AP and no worries with beacons or whatsoever, you’ll quickly understand how to see all the pages on the PFD and MFD although I have also a comment …. I still find it worth that Carenado offers a tutorial for these G1000 GDUs, in particular for the MFD. The G1000 handbook section MFD covers all of that, but it is in my humble opinion not user friendly arranged and it must be noted that some screenshots don’t apply for the X-Plane model which can make it even more confusing for simmers.


After I’ve checked, as far as possible, all the possibilities on the PFD and MFD, I think it’s time to disconnect the AP and fly the SR22 by hand while trying to follow the flight plan. Following the flight plan is thus not looking to the MFD, but looking and following the FD V-bar. It’s so much easier to follow the FD and see if PITCH or ROLL input is needed then thinking that you could follow the FP line on the MFD. That said, trimming the aircraft and following the movements of the FD is easy and before you know it, you’re a skilled manual flying pilot.
But I think it’s time to return to KRSW and you could do that using the AP for an automatic approach (APR) or just by hand. Either way is OK, but if landing by hand, and I must say that it’s such an easy aircraft to control, even under these slow speed conditions, and with flaps fully extended. Anyway, to have a successful ILS landing, you need to enter, logically, the correct ILS frequency, preferable the CRS of the runway and select on the PFD CDI VOR2 of you have tuned VOR2 for the ILS. Next, when the SR22 is in a position of being able to intercept the LOC beam, you press on the GFC 700 the APR button.
On the PFD you should see now an armed white VAPP. It turns green when the ILS is intercepted. I double checked this behavior, just for myself, with the official GCF 700 manual, but I honestly expected to see in the PFD information section LOC and GS, but it seems in the modeled SR22 it’s VAPP.


Whatever is in the game I would say, right?
As the title of this section says ….. a flight impression KRSW – KRSW while in fact I’ve flown many hours to master this Carenado SR22 Turbo. Did I see and tested everything or did I perhaps forgotten something? Oh, for sure that I’ve forgotten things since there’s so much to see and to explore. Although the following doesn’t has to do much with my flight experience, it is worth to tell you. While flying from KRSW in an eastern direction, I selected the PFD and MFD popup GDU’s and enlarged them. Nothing special you would say, however, it hardly had any FPS drop and that surprised me. Oh yes, I do believe this is perfect and yes, I think it’s great, but I’m surprised that it hardly influenced my flight experience. Good programming work I would say!
What said before, I see so much that so complex and needs any assistance, and that said, I would like to write a tutorial about several flight options and PFD/MFD views, but that will be too much work I’m afraid. It’s a shame that there’s really no tutorial since the modeled Carenado G1000 GDUs offers so much interesting information that probably will be missed during your flights unless you take the time to play around.
And, what about FPS?
Although this flight impression is more or less finished, how were the FPS (Frames Per Second)?
When I say to you … no problem, high frame rates, ranging from 30 to 50, then I would lie. The only problem is, as usual, what is acceptable and what isn’t. Some are happy with 30, other with 25 and some say that their frame rates must be 40 else they stutter. It’s all between our ears, oops, they don’t have anything to do with our eyes!
As you all know, the actual frame rates depend on so many other factors then only X-Plane and besides that, X-Plane settings are crucial too. Your hardware – PC / Mac with MB (Mother Board) CPU and graphics adapter, are crucial as well as the amount of memory and the speed of the memory. Then you have the choice of having an ordinary hard disk or, much more expensive, a SSD although this has not much to do with the FPS.
The SSD only offers a much faster loading time of scenery textures. Anyway, the actual frame rates depend also on your monitor screen size. Do you run the simulator in full screen or a smaller windowed mode? And finally, you’ve got the Rendering Options settings in X-Plane itself. They can make or break the actual performance and therefore, it is always handy when a developer tells you on which systems a scenery or aircraft has been developed. It is and remains a difficult issue …. what should I do, what is acceptable … do I need to buy another CPU and/or MB, a new generation GPU or just another PC or Mac?
Back to the SR22T performance.
Are you happy when I tell you that the aircraft can perform 20, 25, 30 or even higher frame rates? All is possible, but it depends on where you are, your settings and yes, we all know that. Are you at a complex airport, then probably you get 19.90 FPS. In the air, depending on real weather or a large amount of clouds, it can drop again to 20, but with lesser clouds it’s no problem to get 30 FPS.
What I did to see how far I could go, is I first selected in Rendering Options “Set to Medium” and before I forget it, I am parked the SR22 at the add-on airport KRSW FBO 3. Further on, X-Plane in full screen mode (2560×1440 pixels), selected CAVOK conditions and reduced the visibility to 10.0 SM. With these starting conditions, I think it’s the best way to offer you some realistic values instead of using real weather since that can change from hour to hour.
Standing in front of the Private Star Aviation hangar with running engine thus all systems powered, I have approximately 22-24 FPS. Standing outside, 25-27 FPS, but perhaps it’s a good idea to make a couple of modifications to the “Set to Medium” rendering options. Having birds all around me isn’t a good idea and seeing balloons far away, I’m not interested in that either. So in the rendering options I un-ticked “dim under high G-load”, “draw hi-res planet”, “draw forest fires and balloons”, “draw birds and deer” and finally, “draw aircraft carriers and frigates”.
Note that the frame rates changed much due to these rendering options modifications. Changing my SR22T location to Cargo 2 didn’t change the frame rates much. Even when I move the aircraft to one of the gates, in this case B1, the FPS hardly go down which is good news. I even noticed that when switching to a windowed XP screen (approximately 2000×1260), the frame rate increase is perhaps 1 to 1.5 FPS which is also good news.
The screenshots below are taken during one of my flight with the following conditions and rendering options and aircraft and situations.
– 10.0 SM visibility, CAVOK conditions thus no clouds
– Alpilot.net Mesh installed
– Full screen mode 2560×1440 pixels
– macOS Sierra 10.12.4

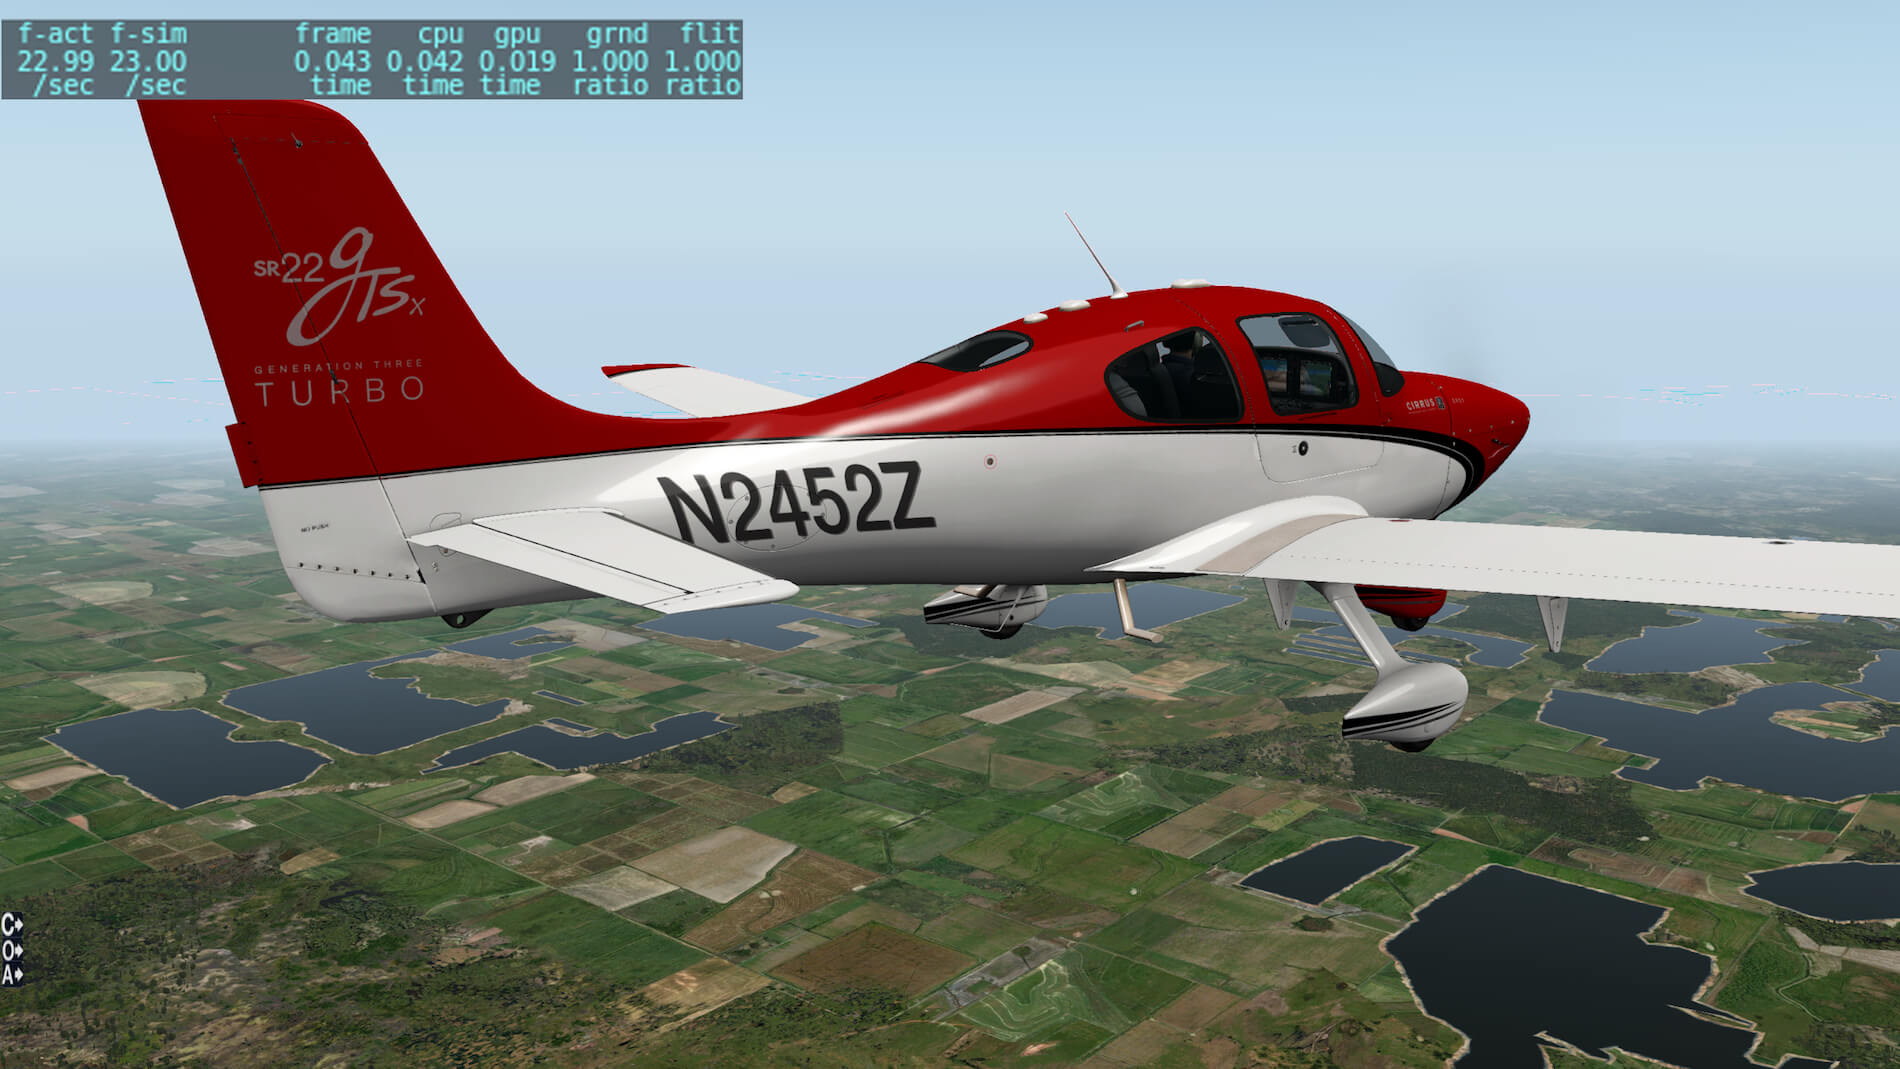
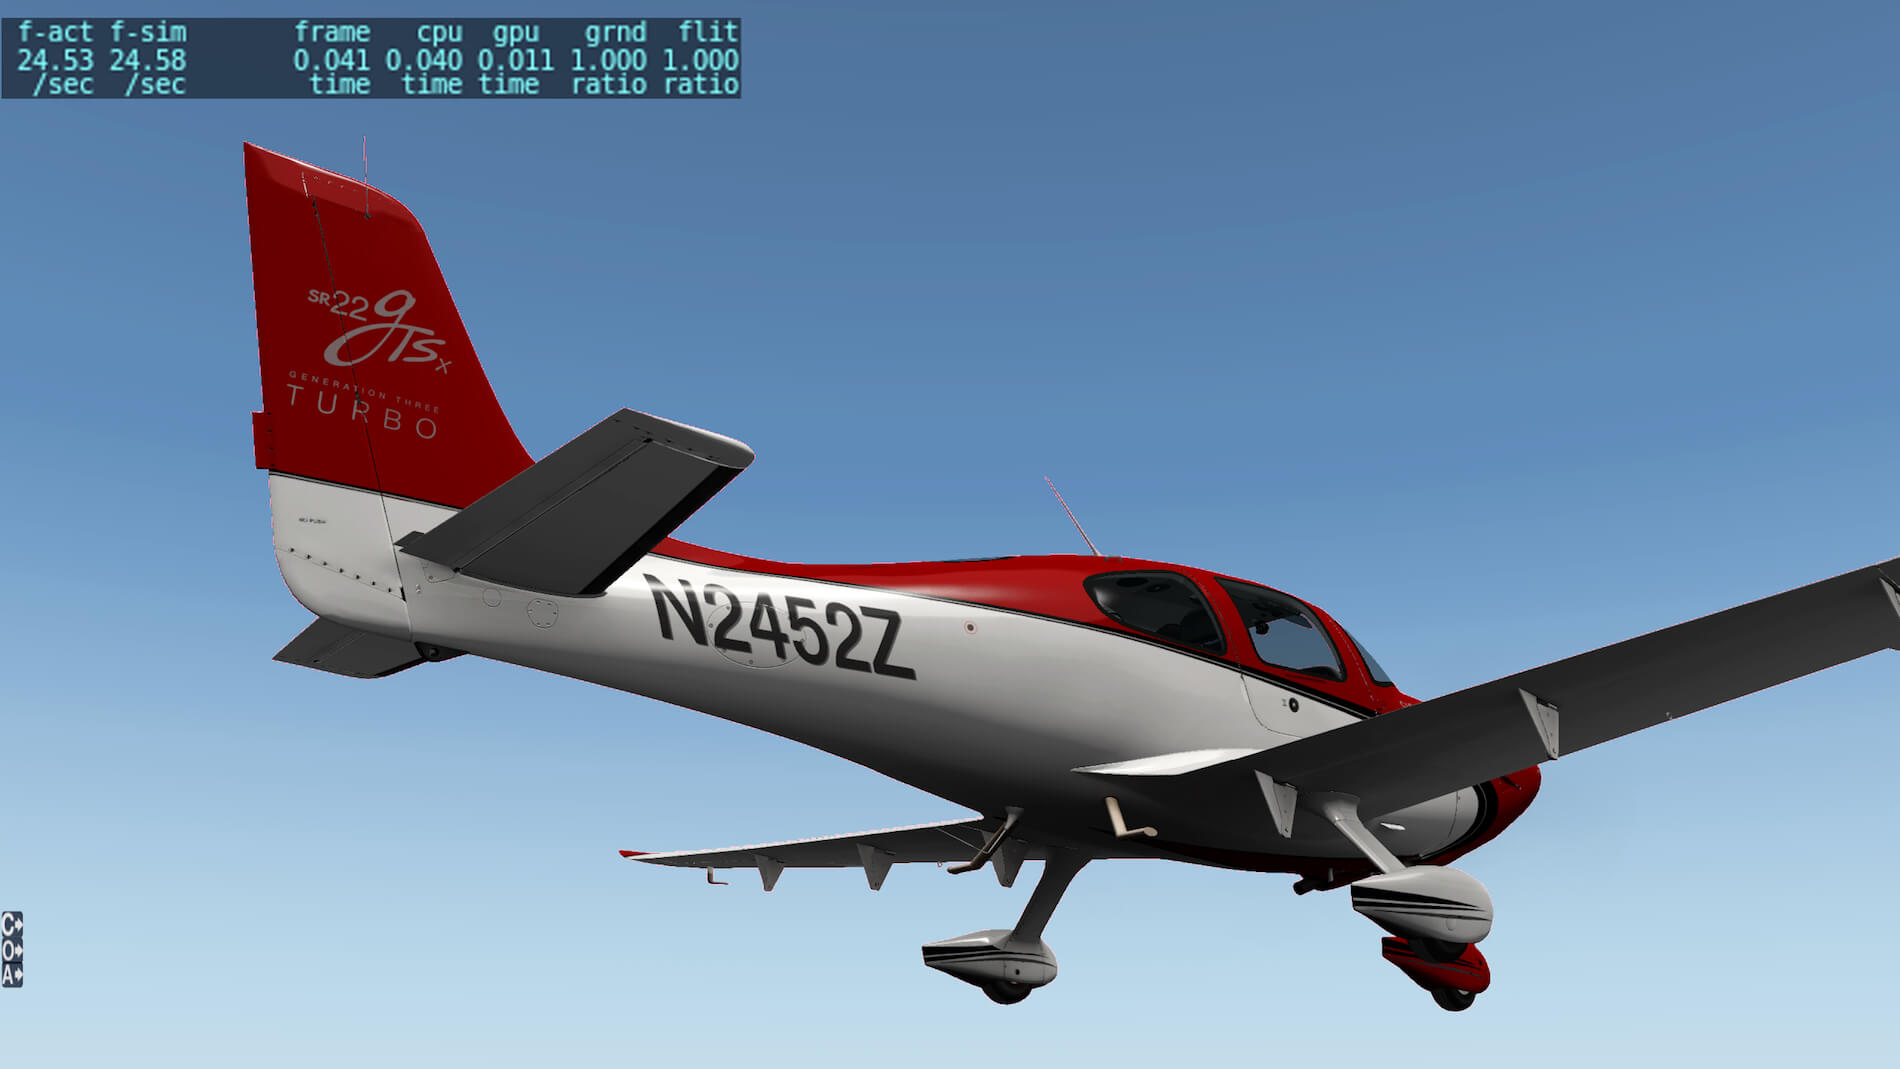
When in the air, the FPS go up, but not so that I suddenly have 30 to 40 FPS. Remember, or at least that’s my opinion, it may be a small GA aircraft, but the complexity and calculations that are needed to drive the PFD and MFD and not to forget the popup versions of each GDU, cost frame rates too.
What I want to say is that perhaps with a lower screen resolution frame rates go up, oh yes, for sure, and perhaps the aircraft performs better on Windows than on Mac.
Summary
With such a long and hopefully in-depth impression, I must conclude that the SR22 Turbo was a nice model to test although the issues I found with the MFD versus the G1000 manual need to be solved in my opinion. A tutorial is missing although the G1000 manual offers all the insides of what can be done with the PFD and MFD however, the manual not always reflects what is modeled. For me, and perhaps for others too, it would be good when the G1000 manual reflects all the possibilities on the PFD and MFD that are as they are now on the GDUs. Reading things in the G1000 manual that aren’t implemented, makes simmers unnecessarily confused.
Some words regarding the retail price; it’s not a cheap aircraft compared to other non equipped G1000 instruments, but you do get a lot back when you like flying with G1000 GDUs. If you prefer the old-fashioned instruments like in my previous Titan 404 Ambassador impression, then you probably won’t like this aircraft since it only has 3 standby old-fashioned instruments installed.
The overall quality, as you may expect from Carenado, of the 3D SR22 Turbo modeling of the aircraft body itself and the 3D cockpit/cabin are of a high level. The same can be said of the G1000 PFD and MFD as well as the belonging AP and control unit for the MFD. Even the popup displays look very nice. The only thing I couldn’t find and perhaps it’s not available, is the rheostats to adjust the fixed mounted PFD/MFD. I find the intensity sometimes a little too low. This is by the way not a problem with the popup PFD/MFD. Their brightness is OK.
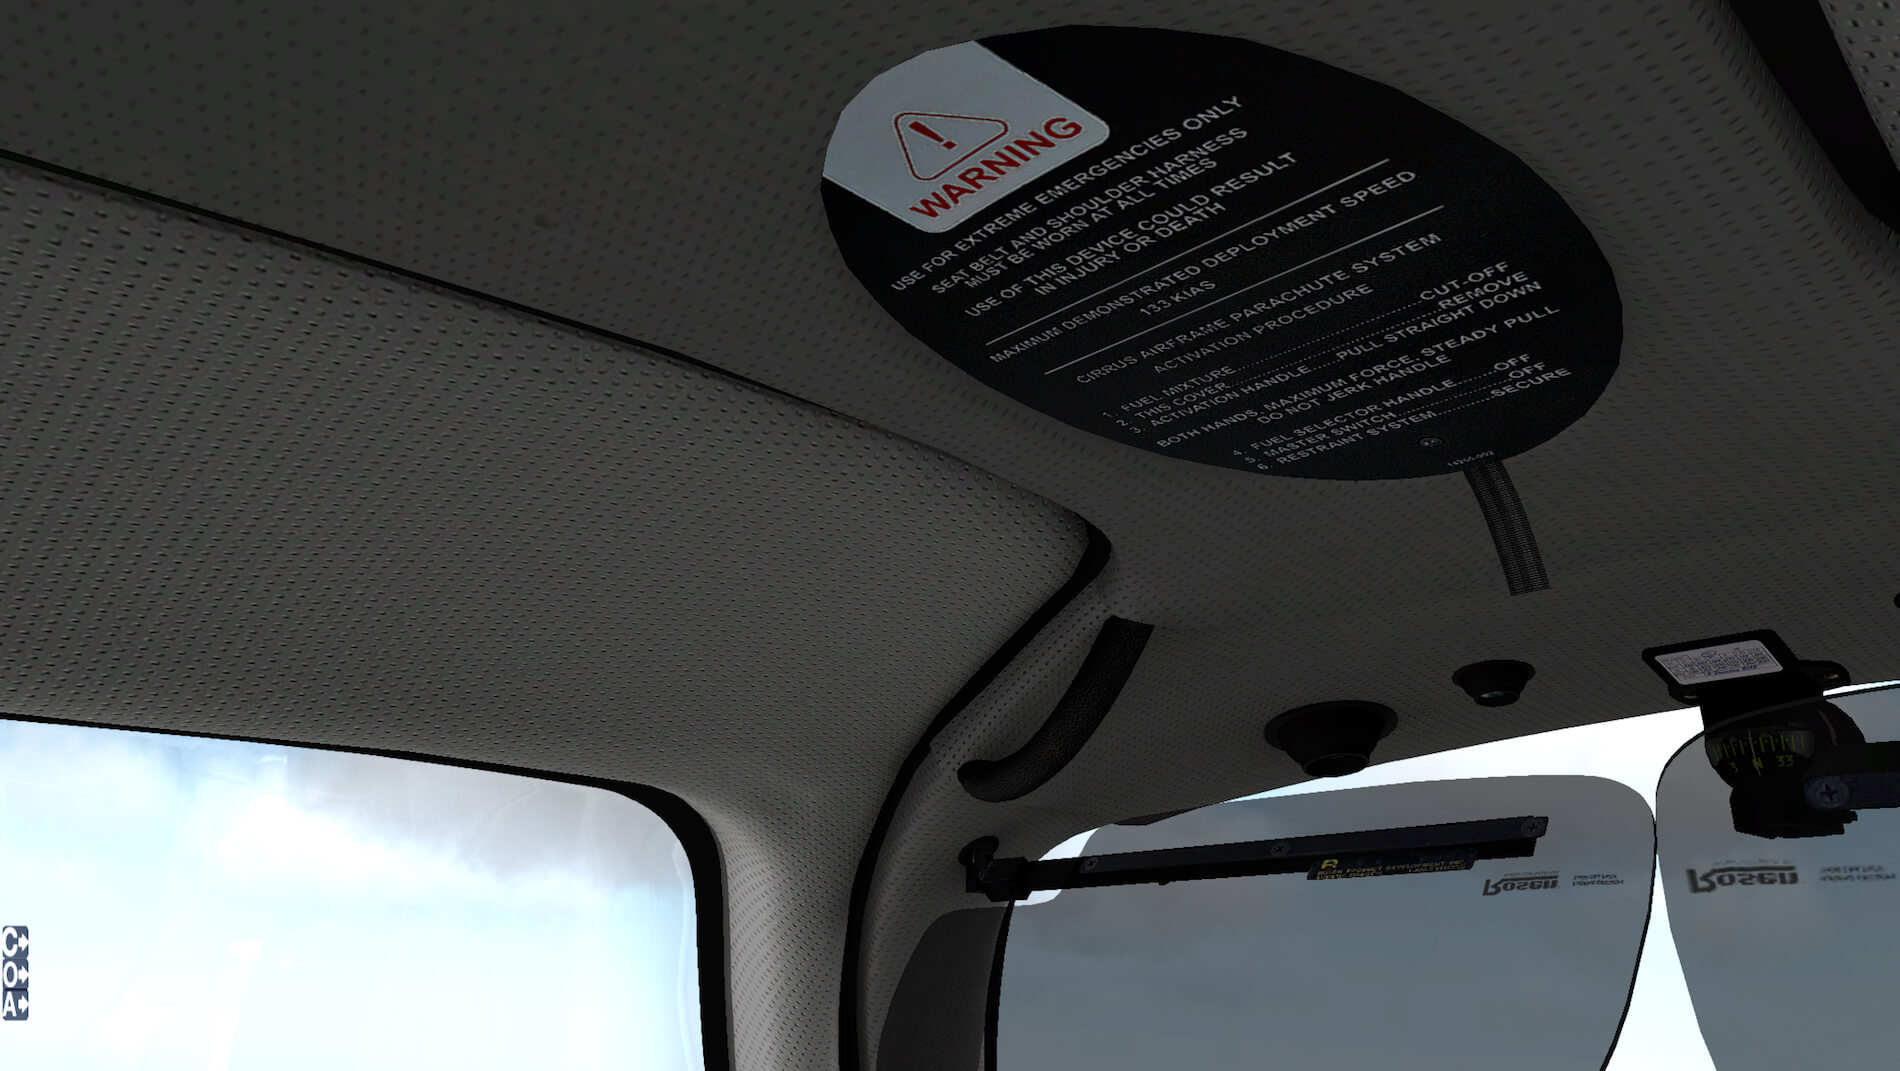
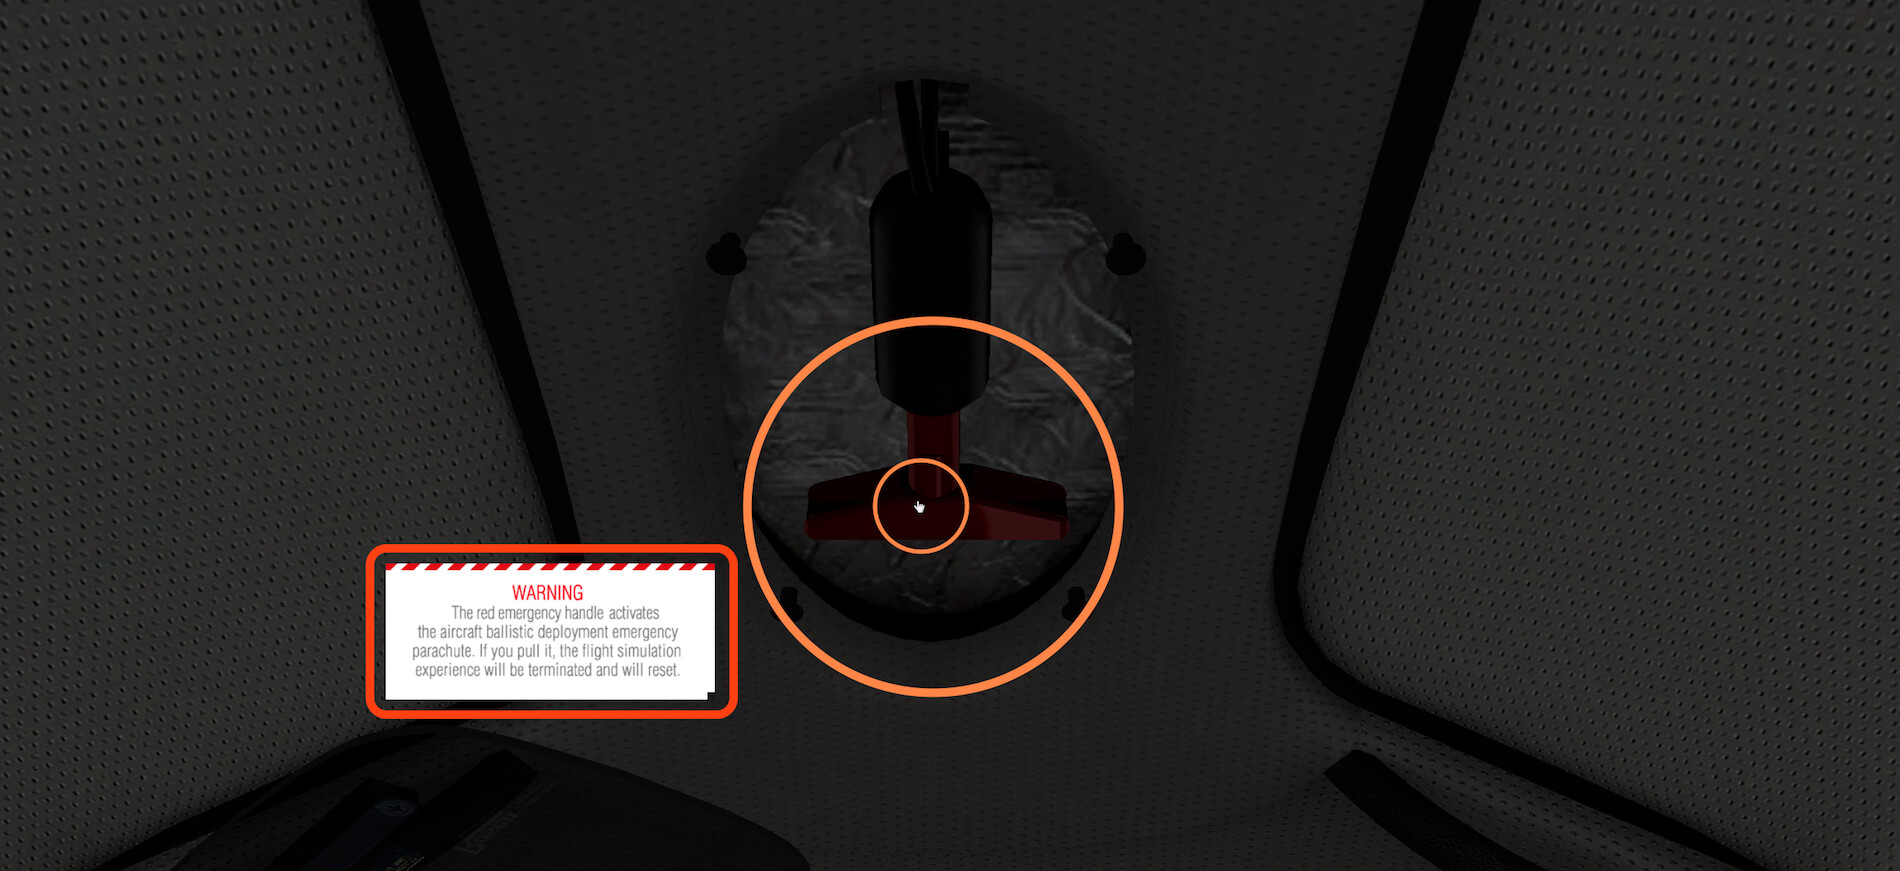
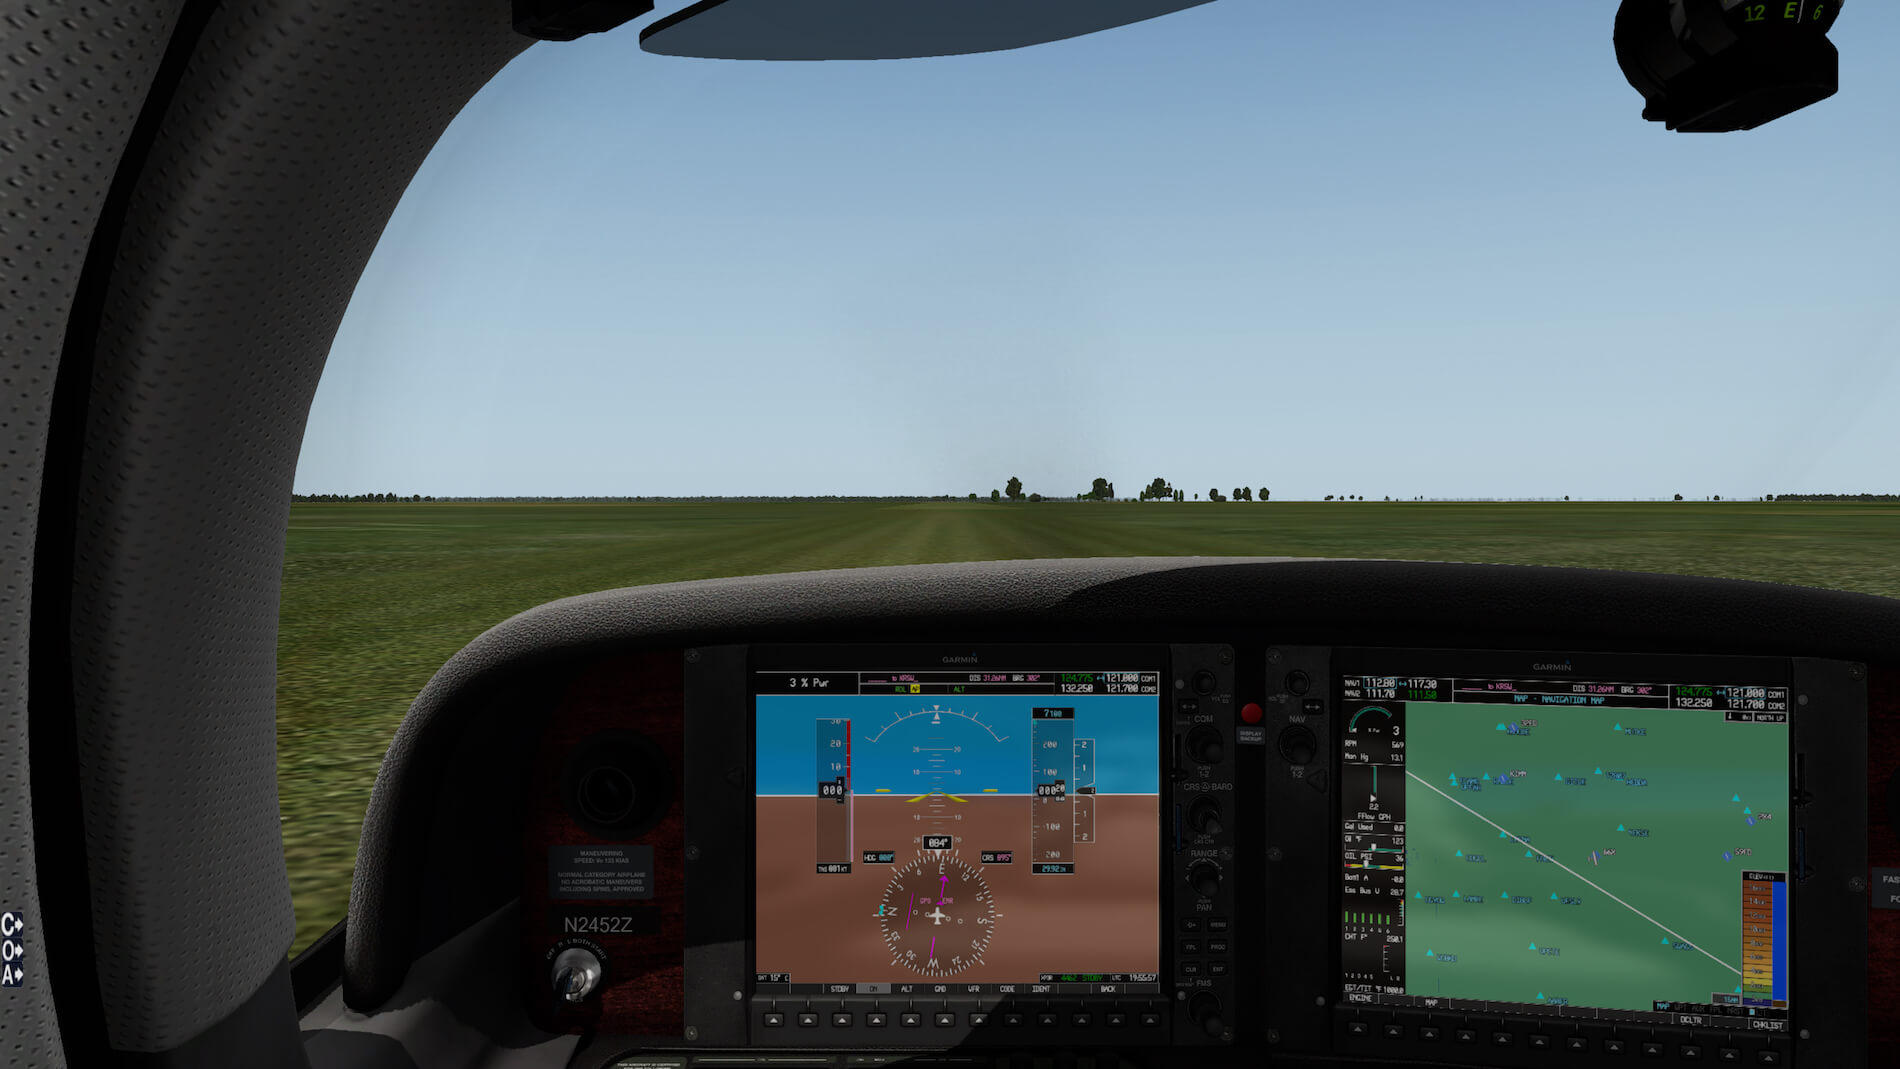
And then, at the end of this impression I suddenly think … oh my goodness, the life saving Cirrus SR Series parachute I’ve completely forgotten to explain and to give it a try and to see finally the result. Ok, I follow the instruction of which one of them is placing the engine mixer in CUTOFF, pull the cover that reveals the red handle, but a separate WARNING popup window will tell you the following “The red emergency handle activates the aircraft ballistic deployment emergency parachute. If you pull it, the flight simulator experience will be terminated and will reset.” The last sentence means that you’ll never see the parachute and after a couple of seconds you’re back on the ground and thus the simulator flight experience has terminated.
The following 3 screenshots shows you the steps to activate the parachute and, once the handle is pulled, the automatic return to the ground and thus the termination of the flight.
Anything else, wishes or thoughts?
You can grab your copy of the Carenado SR22 Turbo via the dedicated Carenado web page, but it’s also available via X-Plane.Org or Aerosoft.
For this impression I used besides the SR22 Turbo, the following payware and freeware software:
Payware | KRSW Southwest Florida International Airport
Freeware | Carenado SR22 GTXs xChecklist 1.0.1
Freeware | Xchecklist (lin+win+mac+32/64) 1.22
Feel free to contact me if you’ve got additional questions related to this impression. You can reach me via email Angelique.van.Campen@gmail.com or to Angelique@X-Plained.com.
With Greetings,
Angelique van Campen
| Add-on: | Payware Carenado SR22 Turbo |
|---|---|
| Publisher | Developer: | X-Plane.Org | Aerosoft | Carenado |
| Description: | Realistic rendition of SR22 GTSX Turbo |
| Software Source / Size: | Download / Approximately 264MB (unzipped) |
| Reviewed by: | Angelique van Campen |
| Published: | May 11th 2017 |
| Hardware specifications: | - iMac 27″ 4.2Ghz Late 2015 | iMac 27″ 3.9Ghz Late 2013 - Intel i7 4.0Ghz / 4.2Ghz during Boost Mode | Intel i7 3.5Ghz / 3.9Ghz - AMD Radeon R9 M395X 4GB GDDR5 | NVIDIA GeForce GTX 780M 4GB - OWC 64GB 1867MHz DDR3 | 32GB 1600MHz DDR3 - 1 internal 1TB SSD (Sierra 10.12.4) | 1 internal 1TB SSD (Windows 10 Pro) - 1 external 1TB SSD | 1 external 1TB SSD - Saitek Pro Flight System X-52 Pro and X-56 Rhino |
| Software specifications: | - Sierra (10.12.4) | El Capitan (10.11.6) - Windows 10 Professional - X-Plane 10.51c | X-Plane 10.51m | X-Plane 11.00r1 |
3 Comments
Submit a Comment
You must be logged in to post a comment.
Use the sr22 GTS for X-Plane 11.05r2 (build 110501 64-bit) with full performance?
Angelique, it seems to me the best way to model authentic CR22 flight controls would be a joystick for the left hand. Would you agree?
That’s a bit up to you, depending if you’re left- or right-handed.
That the real model has two controls means that the aircraft can be flown in real from the LH or RH seat although I can imagine that when flying the SR22 from the left-hand seat, you’ve got the main flight information in front of you while this isn’t the case when sitting on the right side. BTW Kevin, I’ll send you an email with a separate question.