Carenado’s Piper PA-46-350P Malibu Mirage
Malibu Introduction
The Piper PA-46 Malibu and Matrix are a family of American light aircraft manufactured by Piper Aircraft of Vero Beach, Florida. The aircraft is powered by a single engine and has the capacity for one pilot and five passengers. Early Malibu’s were all piston-engined, but now, a turboprop version, the Malibu Meridian, is available.
The PA-46 is the third single-engined piston aircraft with a pressurized cabin to ever reach the market, after the Mooney M22 and Cessna P210 Centurion. It’s sold mainly to civilian customers.

Work on the PA-46 began in the late 1970s, with a prototype (the PA-46-300T) first flying on November 30, 1979. Various models exist in real life, but Carenado decided to go for the 350P.
Production of the PA-46 350P Malibu Mirage commenced in October 1988. New features included a more powerful Textron Lycoming TIO-540-AE2A 350 HP (260kW) engine and a new wing. This model remains in production as of 2011. Various changes have occurred over the model years. Earlier models had an all-King panel and later this became largely Garmin.
The Avidyne Entegra glass cockpit is now standard in the Mirage with the Garmin G1000 optional. In 1995, the pilot’s windshield became a glass assembly (earlier it had been acrylic glass with a heat strip overlay). In 1996, numerous switches were moved to an overhead console. In 1999, the Mirage gained the strengthened wing designed for the turboprop Meridian. The base price for a 2013 Malibu Mirage is $1,078,875 US.


Remember that the modeled Carenado model doesn’t come with the Avidyne Entegra glass cockpit. The above is only a small collection of text, taken from WikipediA. You could also have a look at the dedicated Piper Mirage web page.
What does the Carenado PA-46 offer?
As of this writing, April, 2017, Malibu version 3.2 is intended for only X-Plane 10.5x and up. The package comes with the following features:
– HD quality textures and 3D gauges
– Volumetric side view prop effect
– 505 pixels/meter textures
– Original HQ digital 3D recorded stereo sounds
– Volumetric side view prop effect
– Advanced exterior HDR lighting system
– High quality animated pilots
– Customizable panel for windows transparency, instrument etc.
– Real behavior compared to the real airplane
– Real weight and balance
– Realistic night lights effects on panel and cockpit
And what else does the package offer?
– A collection of Acrobat manuals
I tried to figure out if the supplied registrations are real or fake. That’s not really a problem if they don’t exist, but some simmers like things to be realistic. Registration N322DF is an official registered registration, but not for a Piper Malibu. It must have been before the year 2007, because since September 14th, 2007 it’s registered for a Schempp-Hirth Discus-2CT. The other “N” registered aircraft do not exist. At least, I couldn’t find them. I found a PR-TRX linked to a Malibu Matrix, but no registration PR-TRZ for a Piper Malibu Mirage.
First, we’ll take a look at the manuals and then check out the Malibu Mirage.
The installation of each Carenado and Alabeo model is easy. Unzip the package if it hasn’t unzipped automatically and install the complete package under “Aircraft/General Aviation” or any other sub folder of your preference. Next, check the “DOCUMENTS” folder in the Carenado PA46 Malibu Mirage root. You’ll find the following documents:
– Autopilot & AVSS Mirage (pdf)
– EMIS (pdf)
– PA46 Malibu Mirage Emergency Procedures (pdf)
– PA46 Malibu Mirage Normal Procedures (pdf)
– PA46 Malibu Mirage Performance Tables (pdf)
– Recommended Settings X-Plane 10 (pdf)
– Carenado Joystick settings (jpg)
– Credits (pdf)
– Copyright (pdf)
– Scroll Manipulator (pdf)
– Version History (text document)
If you’re familiar with Carenado and Alabeo models, then you’re also familiar with the normal and emergency procedures and the performance tables. If you’re new to Carenado and Alabeo, you’ll find that these three manuals are the minimum basic manuals belonging to these aircraft models. What I really miss is a manual that explains in more detail, the function and operation of the installed indicators exempting the instruments that are already explained in separate manuals. Hopefully, Carenado will notice this advice and add this to future models.
Although the “Autopilot & AVSS (Altitude and Vertical Speed Selector) Mirage” manual is only two pages, it still offers some interesting background information about how to control and operate the Auto Pilot control panel.
The EMIS (Electronic Module Instrument System) manual covers the Transicoil EMIS which is a precision microprocessor based instrument with displays for engine related instruments. In three pages, it shows you what different modes the instrument can display with the aircraft on the ground or in the air.
The recommended X-Plane 10 settings are important, particularly if your PC or Mac isn’t powerful enough. Another interesting document, shown as a picture file, is the joystick settings. Very easy to follow and even more easy to implement.
Finally, my rented Malibu Mirage is waiting for me at the Piper factory, situated at Vero Beach, Florida, USA. Renting the PA-46-350P wasn’t difficult since this location also contains the Piper Aircraft main offices and with some nice friends working here, it’s easy to rent a brand-new Malibu Mirage. So, let’s go!
Visiting Vero Beach, Piper’s HQ
Piper Carenado CEO Fernando Herrera and chief modeler Daniel Klaue, make me most welcome at the Piper Carenado HQ. After some discussion and some coffee, it’s time to start my Malibu Mirage adventure.
Walk-around inspection
Although my rented Malibu Mirage already had a flight delivery inspection, I still need to do my own external walk-around check. Using the well-known “O” icon from “Options”, you’re able to control windows reflections, instrument reflections, static elements and the passenger and baggage doors. Some of them you won’t see while doing a walk-around check, some you see directly. A nice detail is the push-pull device linked to the nose wheel, although it’s not modeled. If modeled, that feature would allow you to move the PA-46 to another position or into a hangar.
There’s still more and more competition in the GA (General Aviation) XP aircraft market, but I continue to be impressed with what Carenado and Alabeo are producing for X-Plane. I like more competition since it will result in more high quality X-Plane aircraft. Now, let’s do the walk-around check.
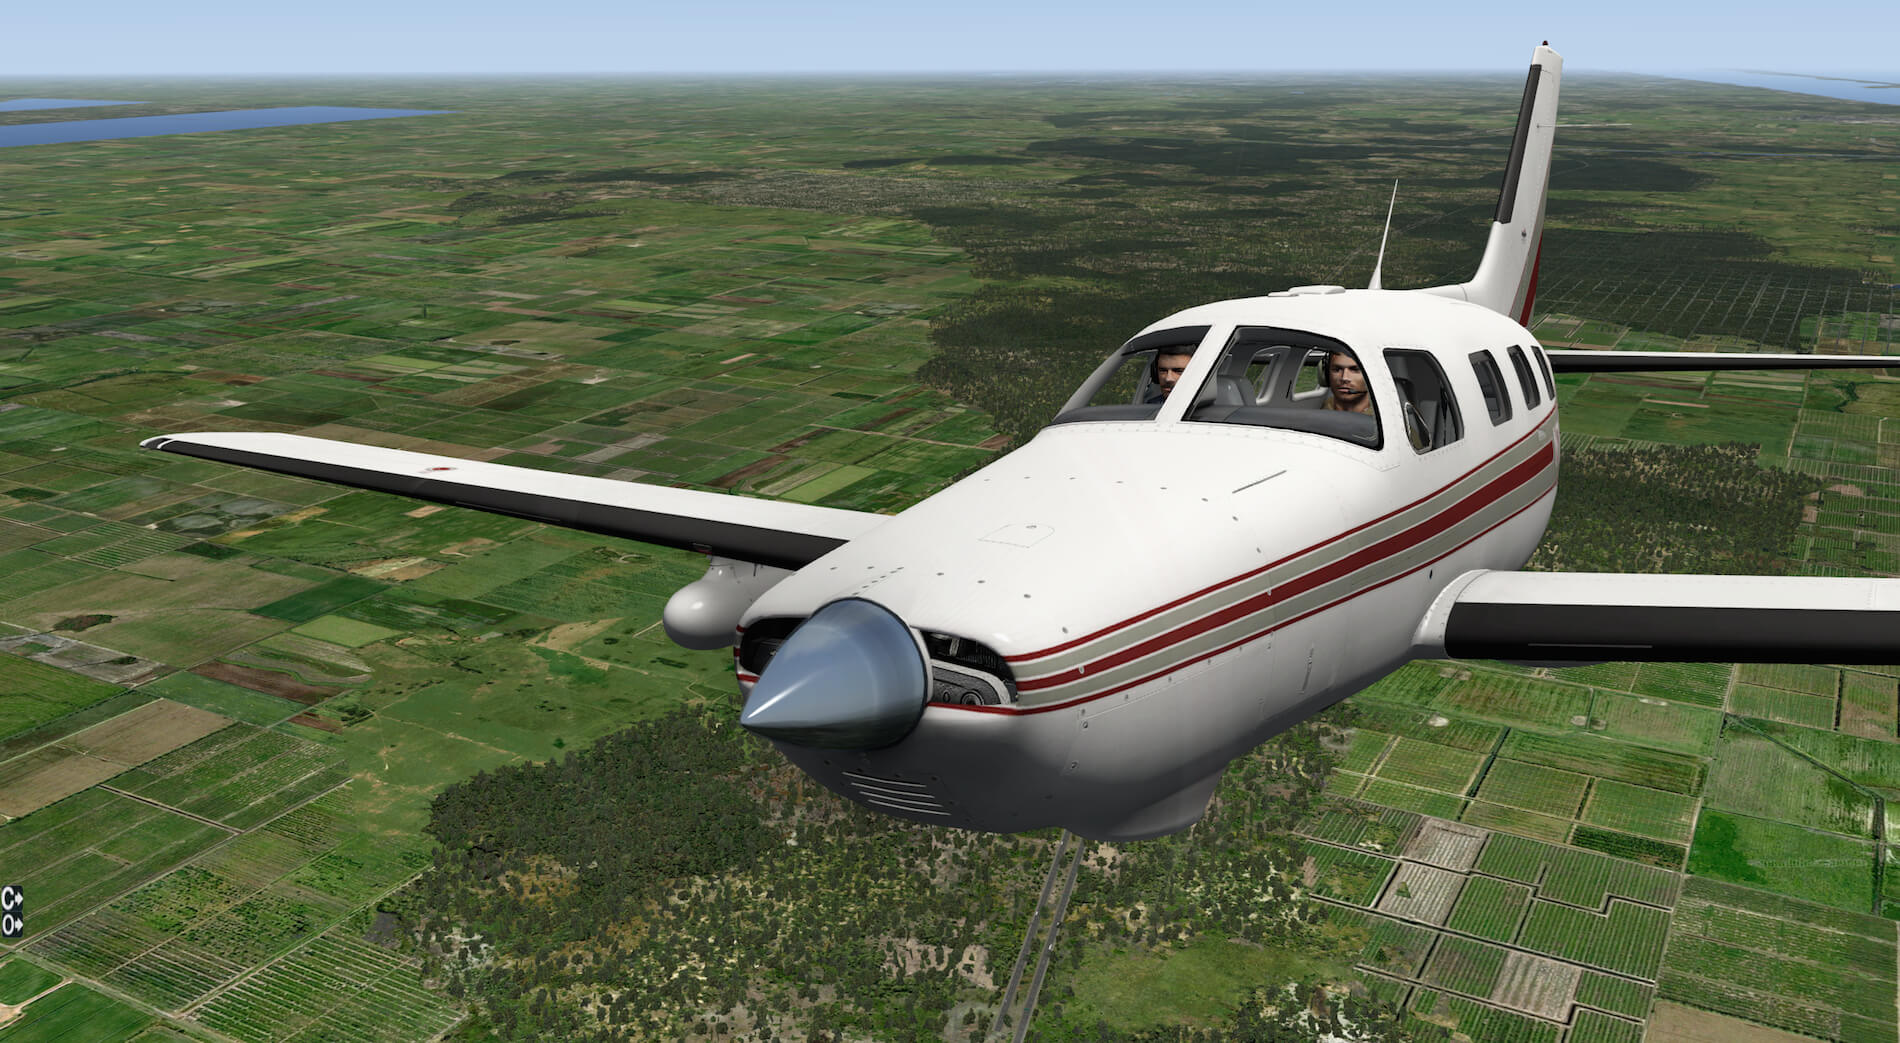
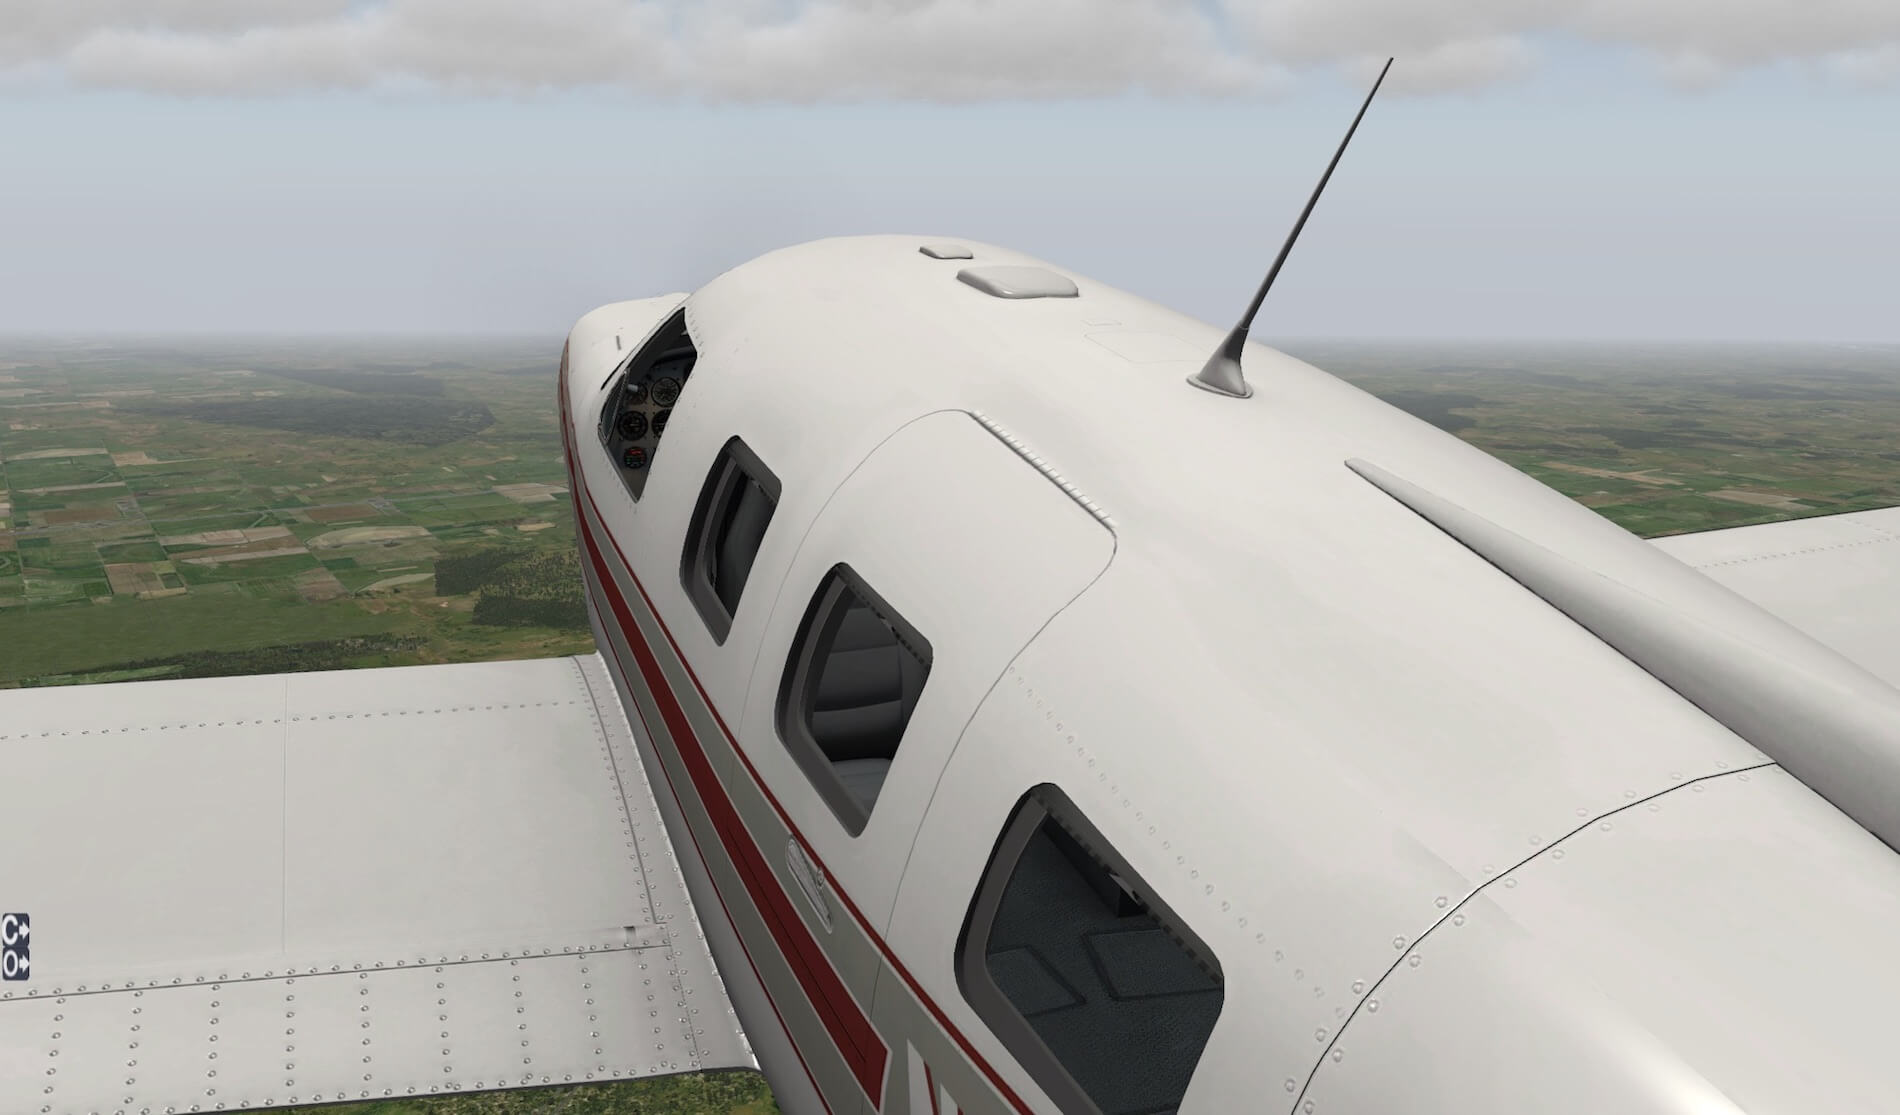
One of the reasons that the Piper Malibu Mirage has a characteristic look is the long fuselage nose which houses the powerful Textron Lycoming TIO 540-AE2A turbo charged 6-cylinder engine and there’s also a huge baggage compartment. It turns out that the rented N706AZ looks quite new on the outside. I hardly see any scratches, dents or weathered parts. Is this real or not? That depends what you like and what the painter likes. Besides that, these models are most likely privately owned aircraft and in that case they are kept in a superior condition. Come to think of it, I rented this model directly from the HQ, so I should have expected a brand-new model.
Unfortunately, I can’t open the engine cowling to have a look inside. I’d love an option like this, but if it was modeled, that would mean that the engine must be modeled too and that means even more polygons and less frame rates. So, I’ve given myself the answer as to why the engine hasn’t been modeled. The propeller spinner looks wonderful and so do the three propeller blades.
When I zoom in on a propeller blade I can even see the logo of the manufacturer, which is by the way, Hartzell Propellor Inc. With this information, I even found out about the real Hartzell mounted PA-46-350P propeller blades: “The Hartzell ASC-II consists of a unique monocoque structure of advanced composite materials. The structure consists of carbon fiber laminates integrated into a co-molded stainless steel shank. The outboard half of the leading edge is protected with a co-molded electroformed nickel erosion shield.”
Find out more at this link.
I’m very pleased about how the aluminum skin is made. An aluminum skin is never 100% flat. You’ll always see some kind of distortion on it and this is the case with this Carenado model, but also with previous models. Under the right external lighting conditions, you can clearly see the NML (Normal Mapping) effect. A very good example of this is the nose landing gear doors. Together with the rivets and the spotted weathered parts around he rivets, I’m more than satisfied.
From the nose I walk towards the right hand wing root and find a spot on the fuselage skin. At first, I thought this was a static port, but it turned out that it looks like a virtual repair. It seems odd to write that we’re dealing with a “virtual repair”. It looks like a dent, but when I zoomed in, it looked to me as if it was just a rivet. Whatever the modeler had in mind, it gives the smooth skin something real.
Not surprising to me, the wing to fuselage fairing is very nice. It’s filled with rivets and some skin contours can be spotted which gives a very realistic look overall. To see all of this, you need to zoom in quite deeply, but it tells me something about the overall quality and why the cost of this aircraft is what it is.


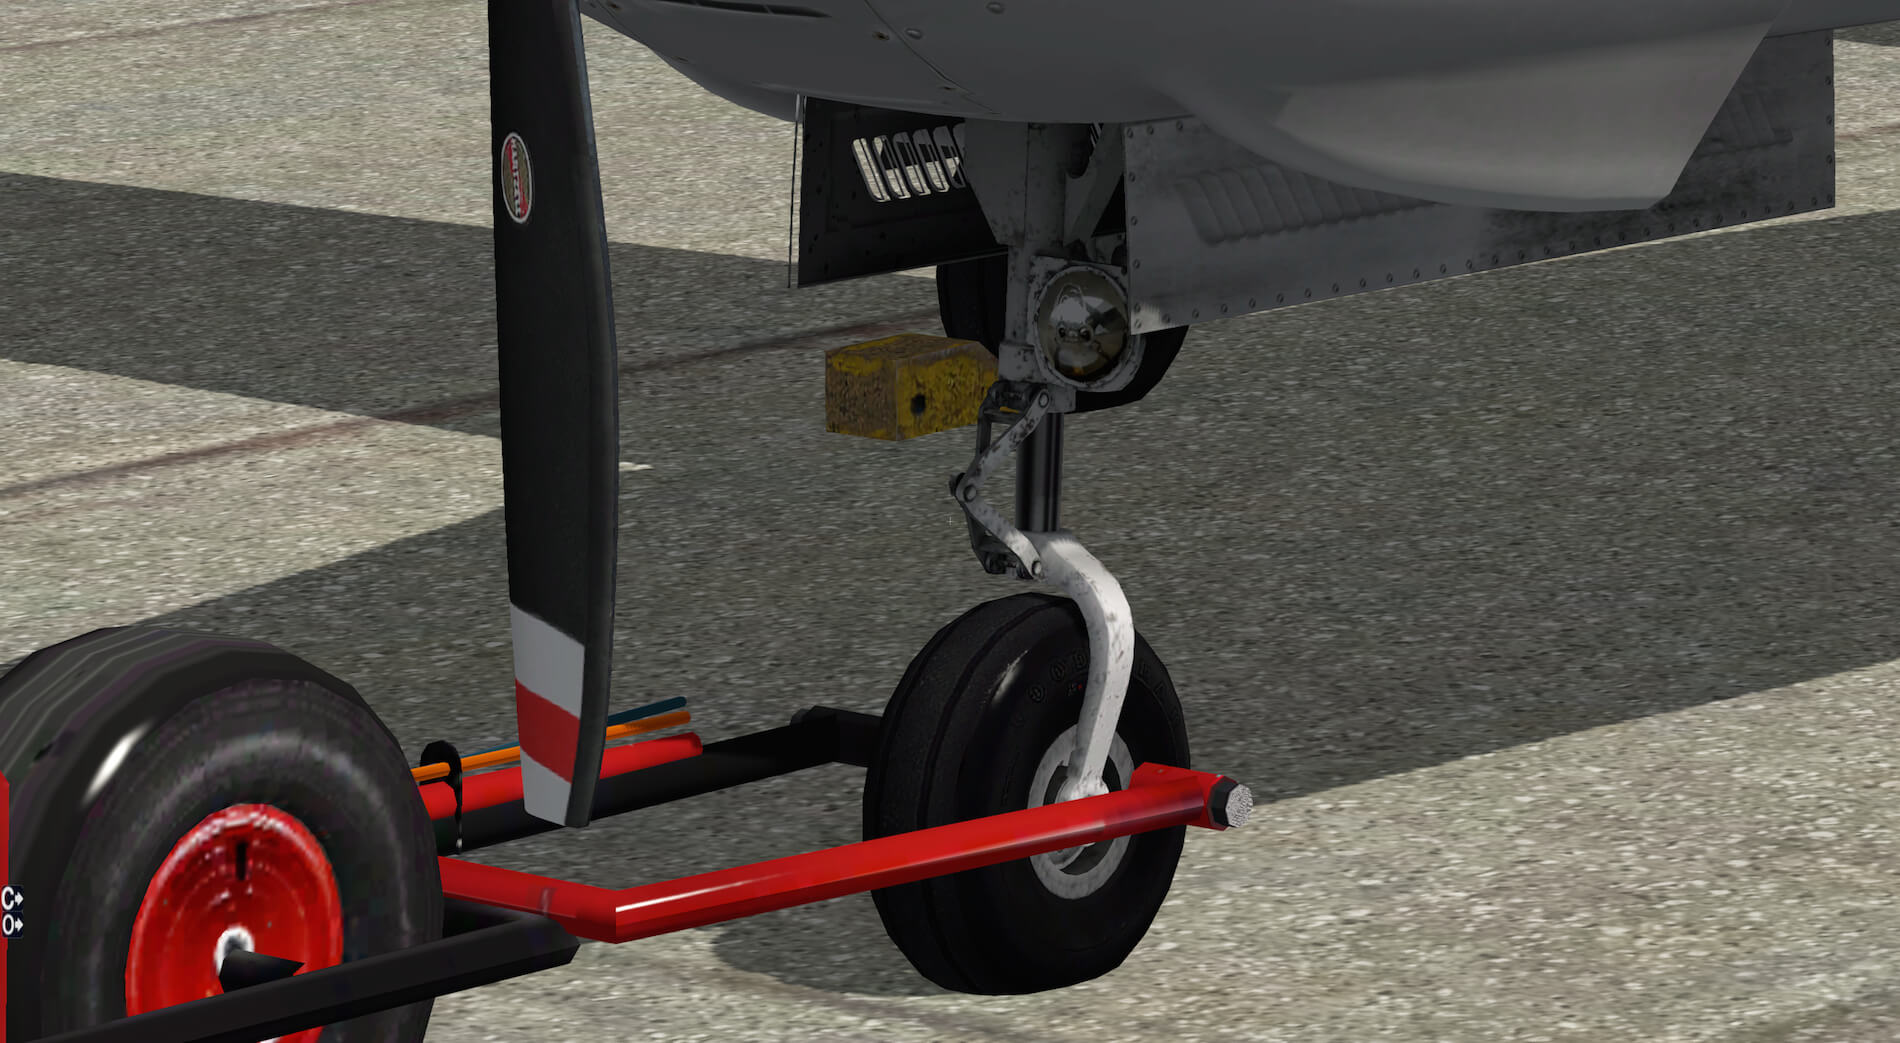

The black wing boot on the leading edge doesn’t give me much of a chance to see anything except for the leading edge mounted STALL warning lever with the DANGER placard indicating to keep your fingers from activating it unless you want to do an actual ground PRE STALL test. Down on my knees, I can spot the main landing gear which is very well modeled including all tiny details as well as the bottom wing mounted inspection panels. By the way, the main landing gear strut shows more detail than you’d think.
I can spot wires, hydraulic lines and the landing gear strut itself is full of weathered spots and dirt. That shows the highly realistic look of this landing gear. The same is applicable for the wheel brake assembly. With the gear in this position, it’s not difficult to see that nothing has been forgotten. The wheel well area is modeled in great detail as well as the main landing gear retraction actuator.
I continue my inspection by way of the wingtip and wing trailing edge to the fuselage rear section. A quick look on top of the wing shows me that there are some weathered spots which gives an overall realistic look and feel. The fuel caps with placards are nicely done. In the future, it would be a nice idea to add a popup window to these fuel caps that would allow you to refuel.


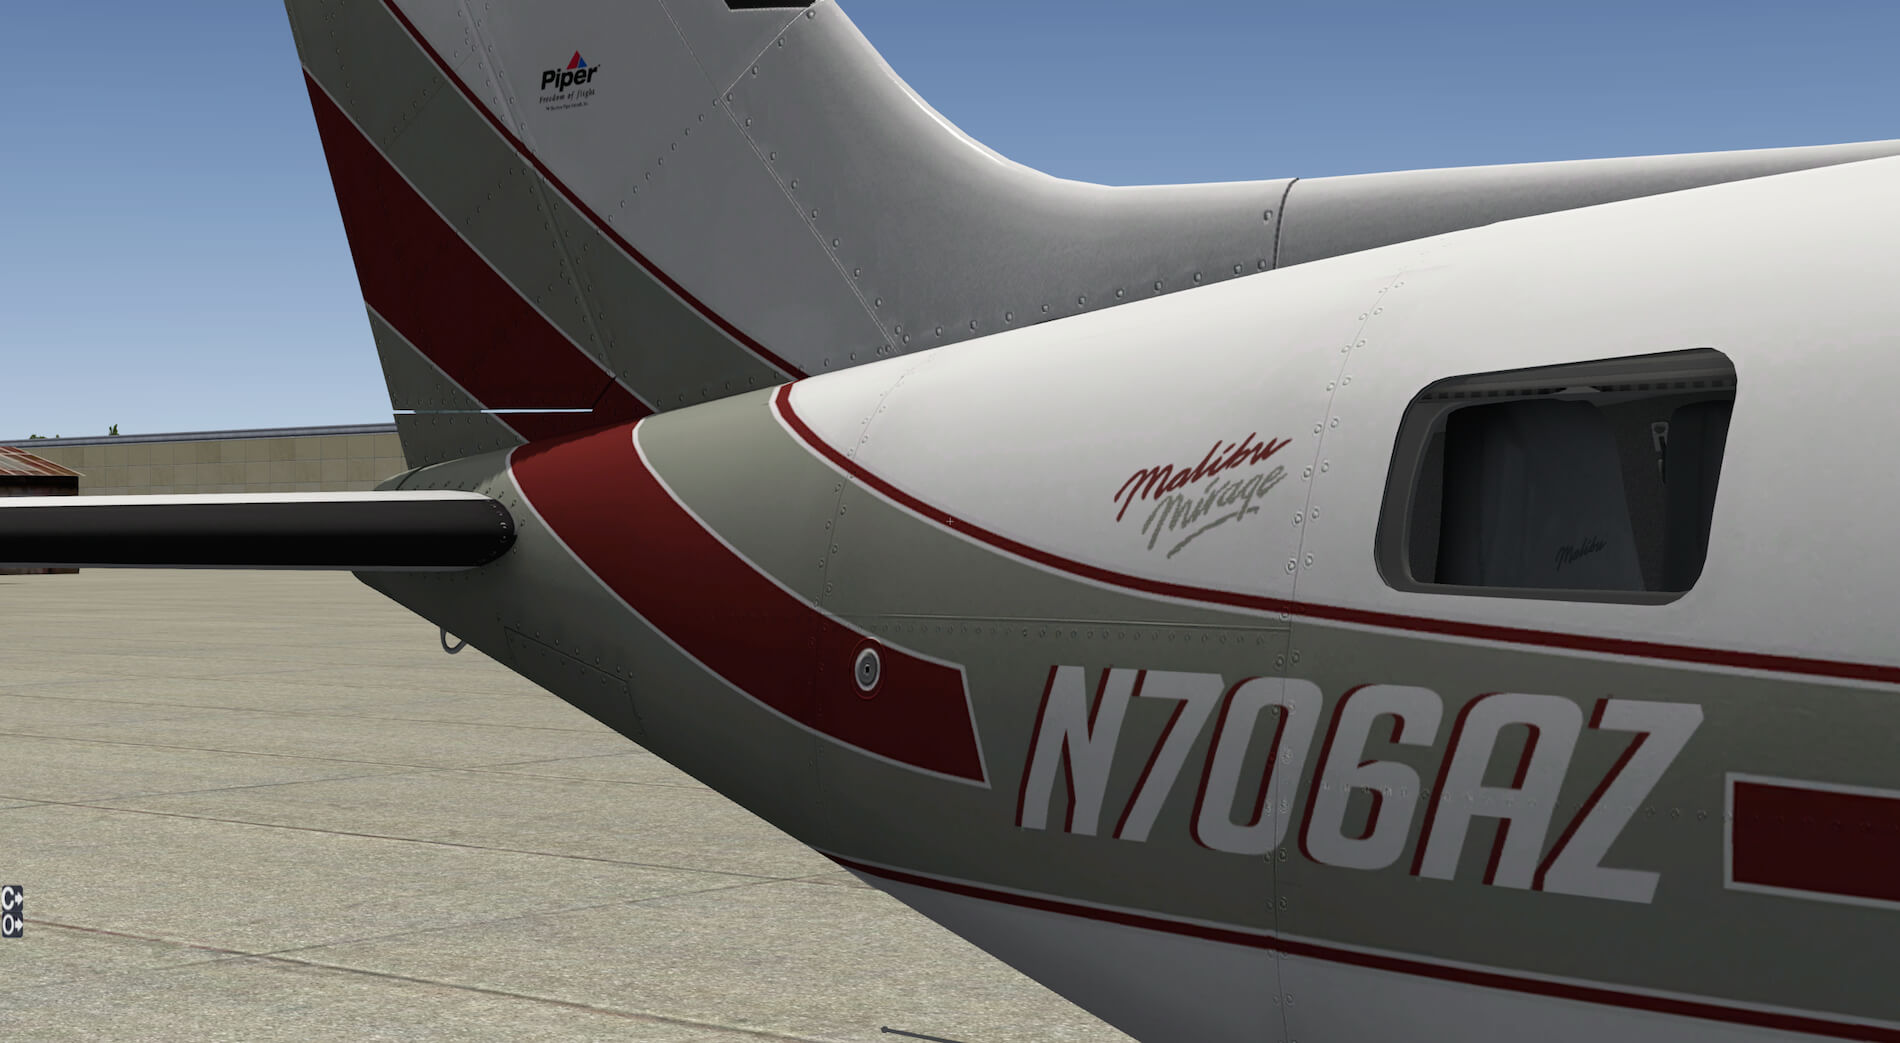
Normally you have to watch out that you’re not zooming in too close on the wings, fuselage or what item you want to check. This time I’ve zoomed in further than normal and for some reason the fuselage textures stay quite sharp. Wow, I’m impressed! I can clearly see the striping, the N aircraft registration which stays sharp, the rivets, the static port and many other tiny details you only see if you’re able to zoom in that close.
What’s applicable for the aft fuselage is also for the empennage. The skins of the horizontal and vertical stabilizers looks realistic in the way the texture surface is simulated. The same for the rivets and, just to give you an idea, also the same for the elevator control rods at the far end of the fuselage tail cone. From this aft fuselage tail cone position, you have a clear look on the aft fuselage mounted antennas, exhaust exits and skin plates.
The only thing I haven’t found yet are static dischargers, which are normally mounted at the far ends of the wingtip, ailerons, elevators and rudder. I’ll check that out later. I know this is a just a small detail, but worth pointing out the Piper decal mounted on the vertical fin: “Piper, Freedom of Flight”. The second line of text – “Freedom of Flight” – has tiny letters, but when zooming in, you can read it easily. Good work!


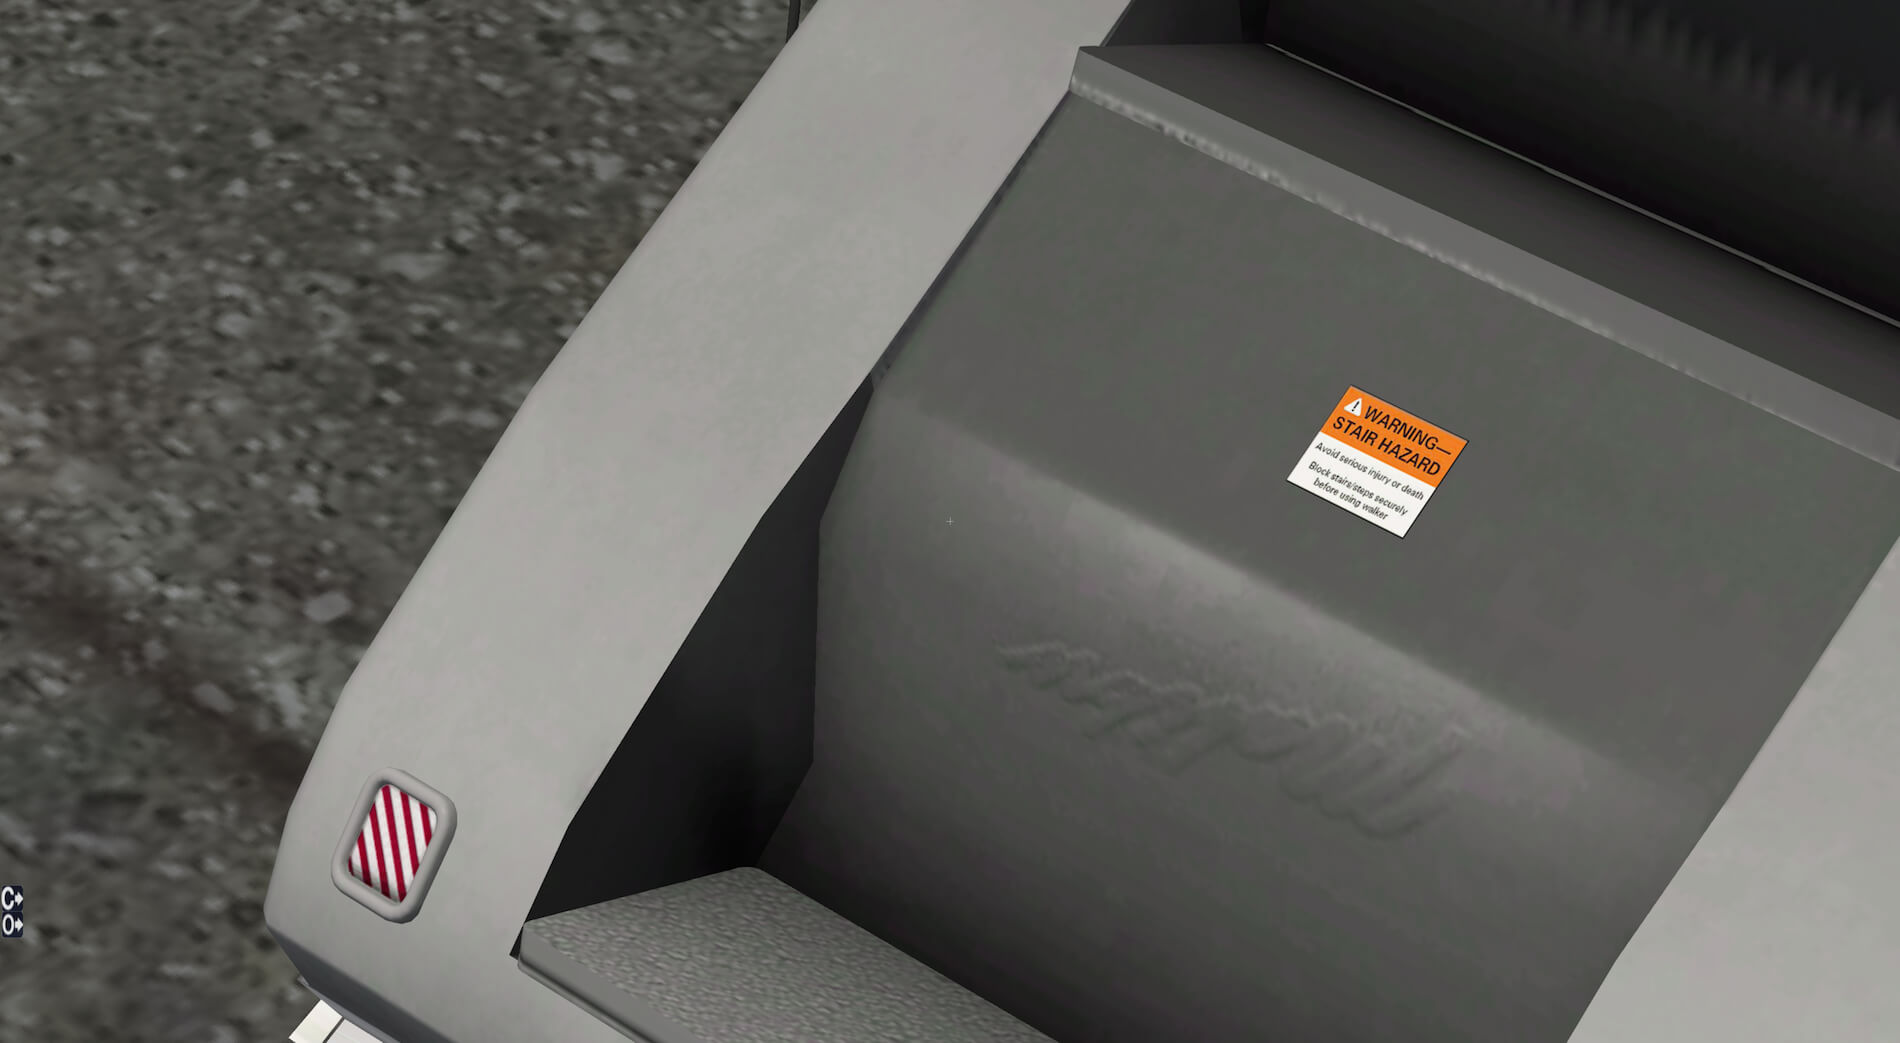
With the passenger door opened, you not only have a close look into the well modeled virtual cabin, as well as the door internal covers, but also, how accurate the passenger itself is modeled. And again, a tiny detail, but it’s really impressive that you are able to read, on the inside of the passenger door cover between the stairs, a small white/orange decal that says “WARNING | STAIR HAZARD | Avoid serious injury or death. Block stairs/steps securely before using walker”. Believe me, this is a small decal and I can even read the small text.
Perhaps those of you who own this aircraft, have never noticed this high quality decal and you could ask your self the question “what’s needed to make those tiny decals readable?” For me it means that Daniel and his XP team, who has converted this model, did a great job! While standing at the door entrance, I have a quick look into the virtual cabin and must say, nothing seems to have been forgotten.
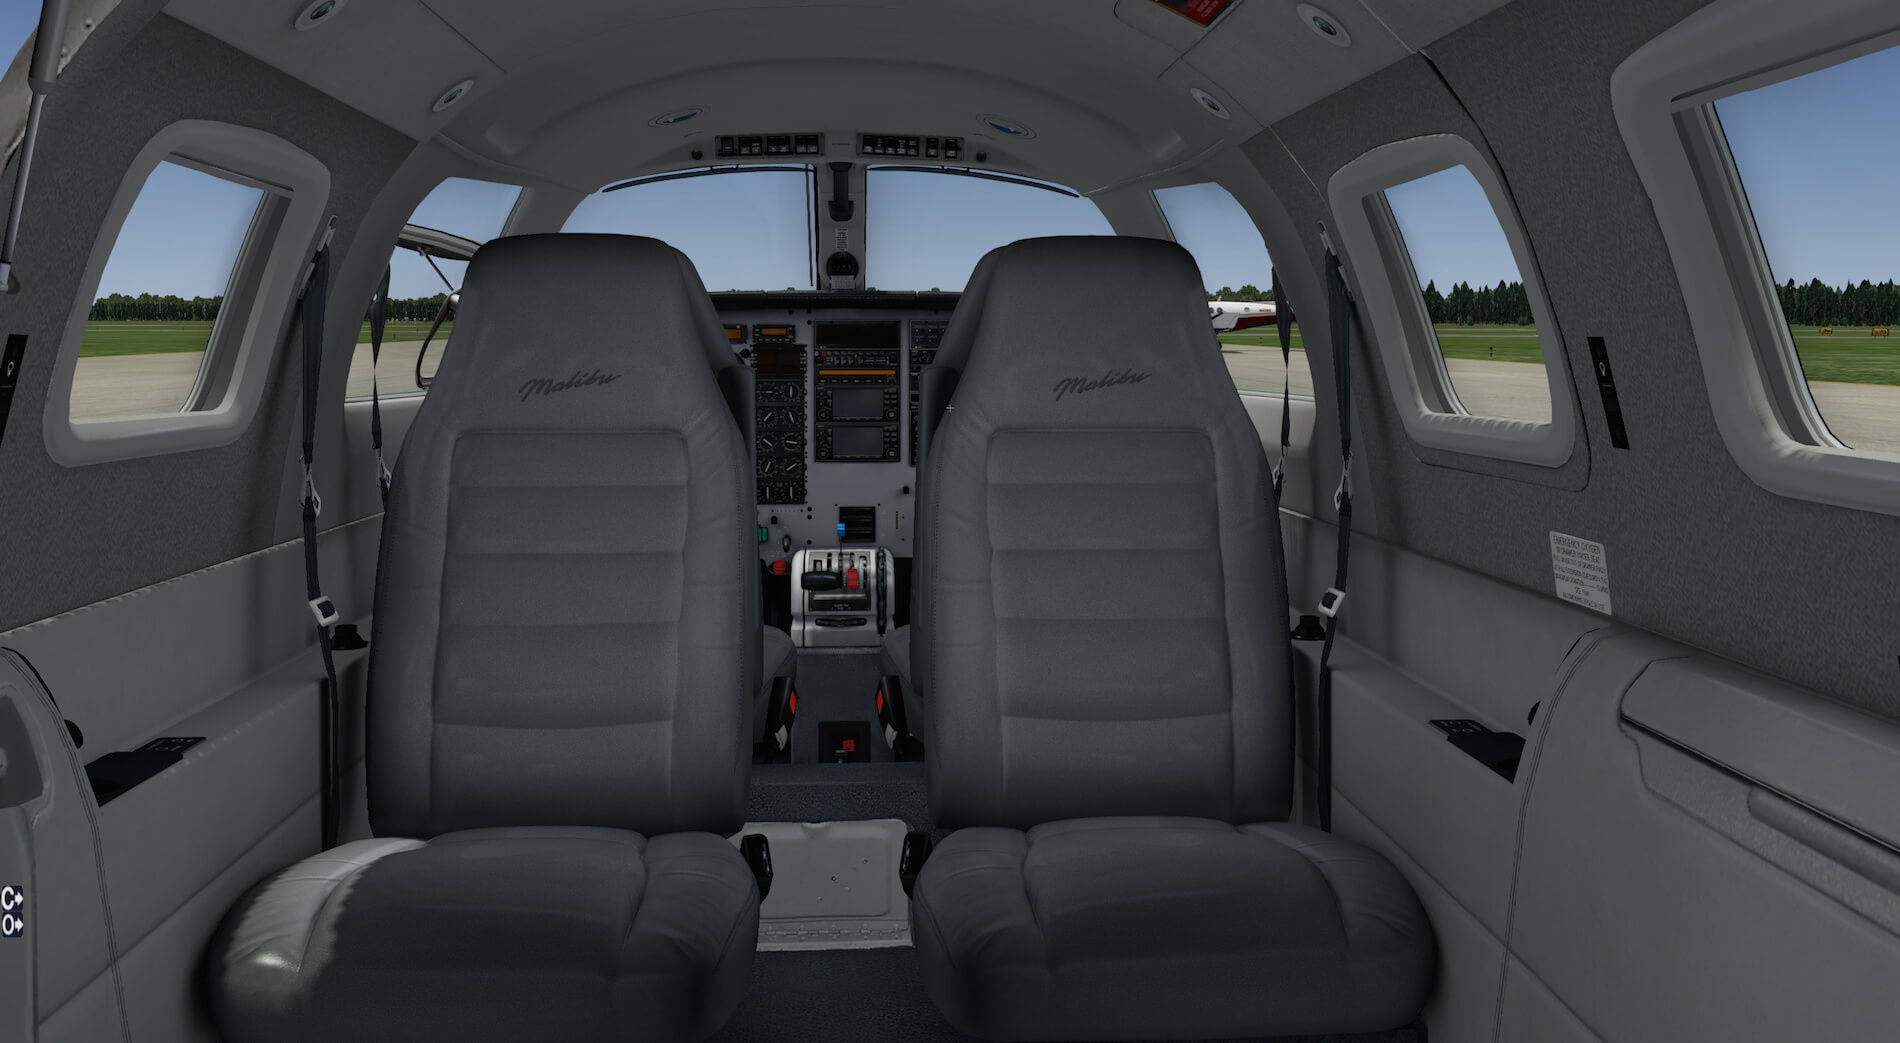
The leather look of the seats are gorgeous, the sidewall and ceiling panels reflect the real look of the inside interior and let’s not forget the door entrance lining and fuselage construction. Here’s something else that hasn’t been forgotten! At the left hand wing, I have a look into the baggage compartment. The baggage door with the hold open actuator is very nice and has a realistic look, but the baggage interior is also very realistic.


Well now, that was an impressive walk-around check I must say. For years, I’ve known about the overall Carenado quality and they constantly improve the quality of X-Plane converted models, but it looks as if there’s something new added to every new model.
Virtual Cabin and 3D cockpit
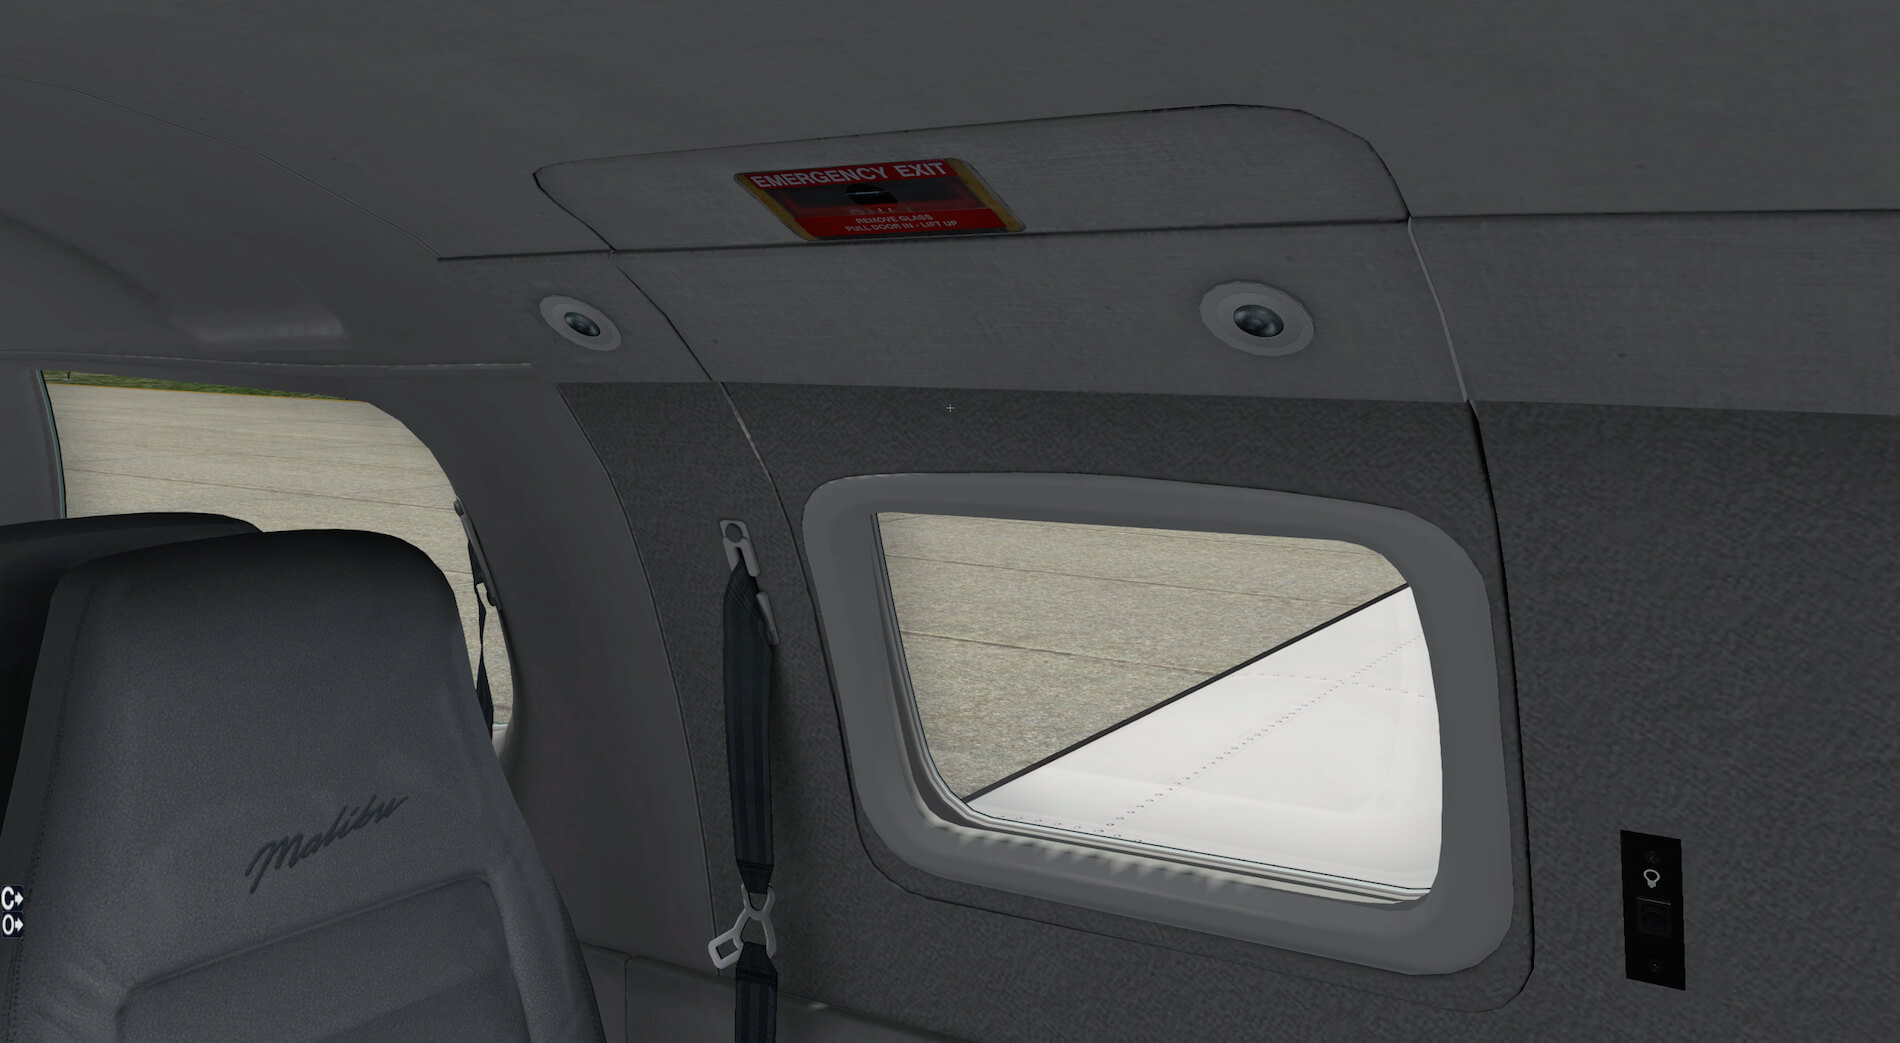
At the opened passenger door, I’ll take a moment for myself by sitting in one of the passenger seats. I’m looking around while relaxing, and notice the presence of the many small decals on the sidewalls, near the arm rests and the realistic looking carpet, leather seat textures, seat belts and all other tiny things I’m sure I’ve forgotten.
At the AFT interior cabin pressure wall, I spot two decals which aren’t really readable, but does it really make any difference if they’re not readable? Not really. So don’t pay too much attention to this, but I think that the lower decal is placed upside-down. It could be that I’m wrong, since it’s not quite clear what the text indicates. Anyway, I need to move forward to reach the 3D cockpit. This is the only way to get into the cockpit.


Before you enter the cockpit, scrunch down and look for the FIRE EXTINGISHER on your right hand side, behind the right hand forward passenger seat. Check the red decal and the normal and emergency equipment chart. It helps you to check if all the equipment is on board. You need to check this before flying out. As you can see, the Piper PA-46-350P could be equipped with different instrumentation.
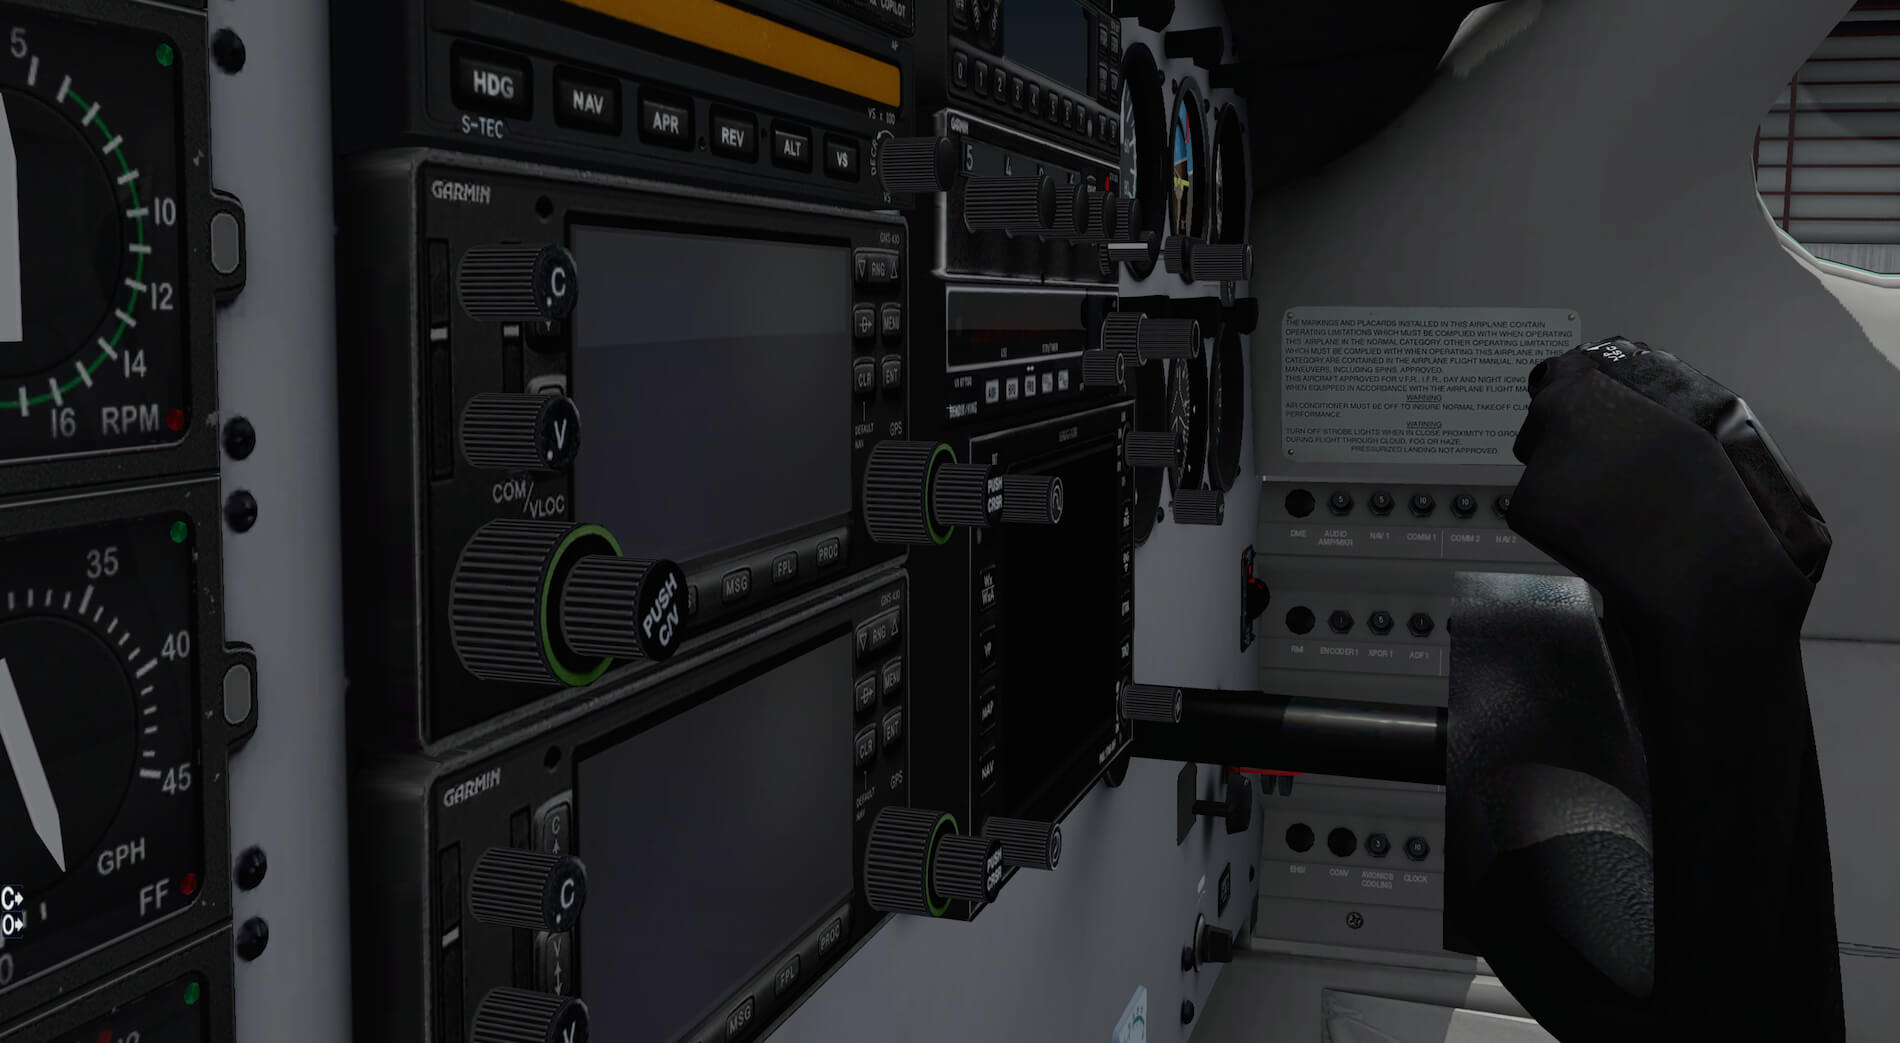
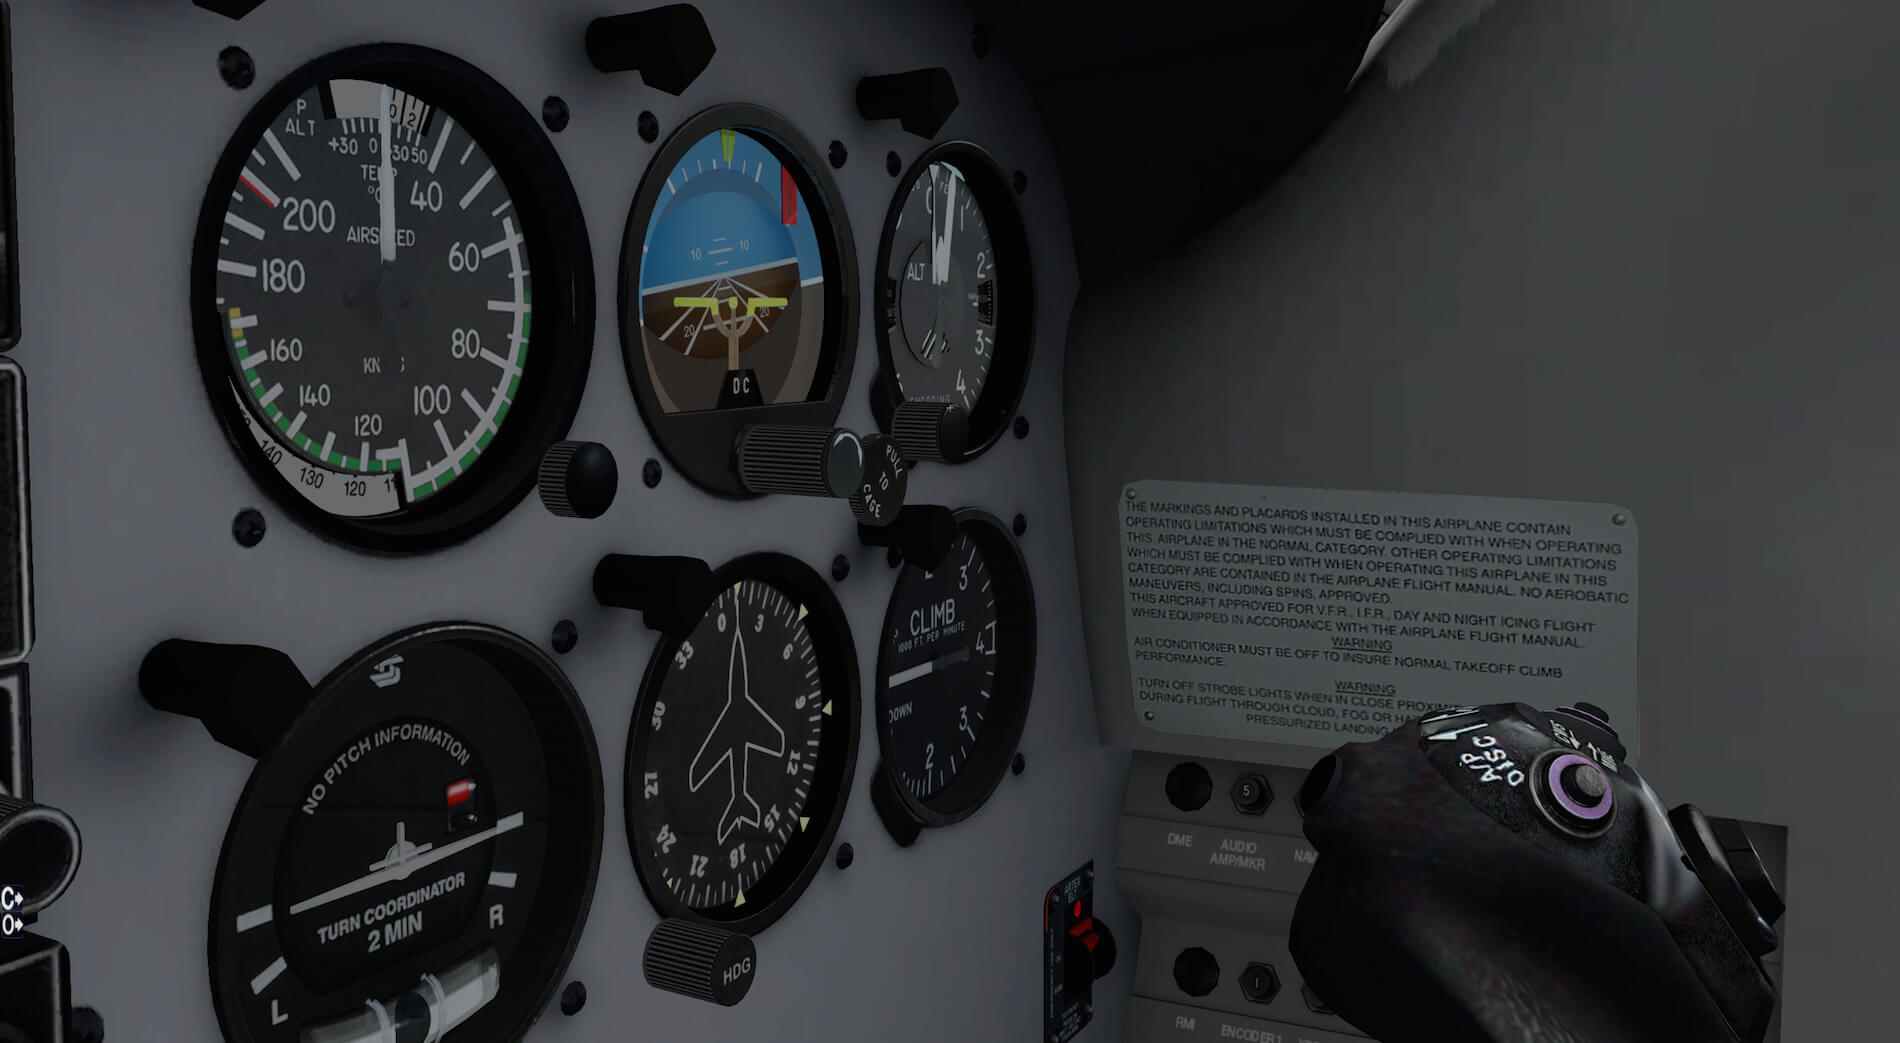
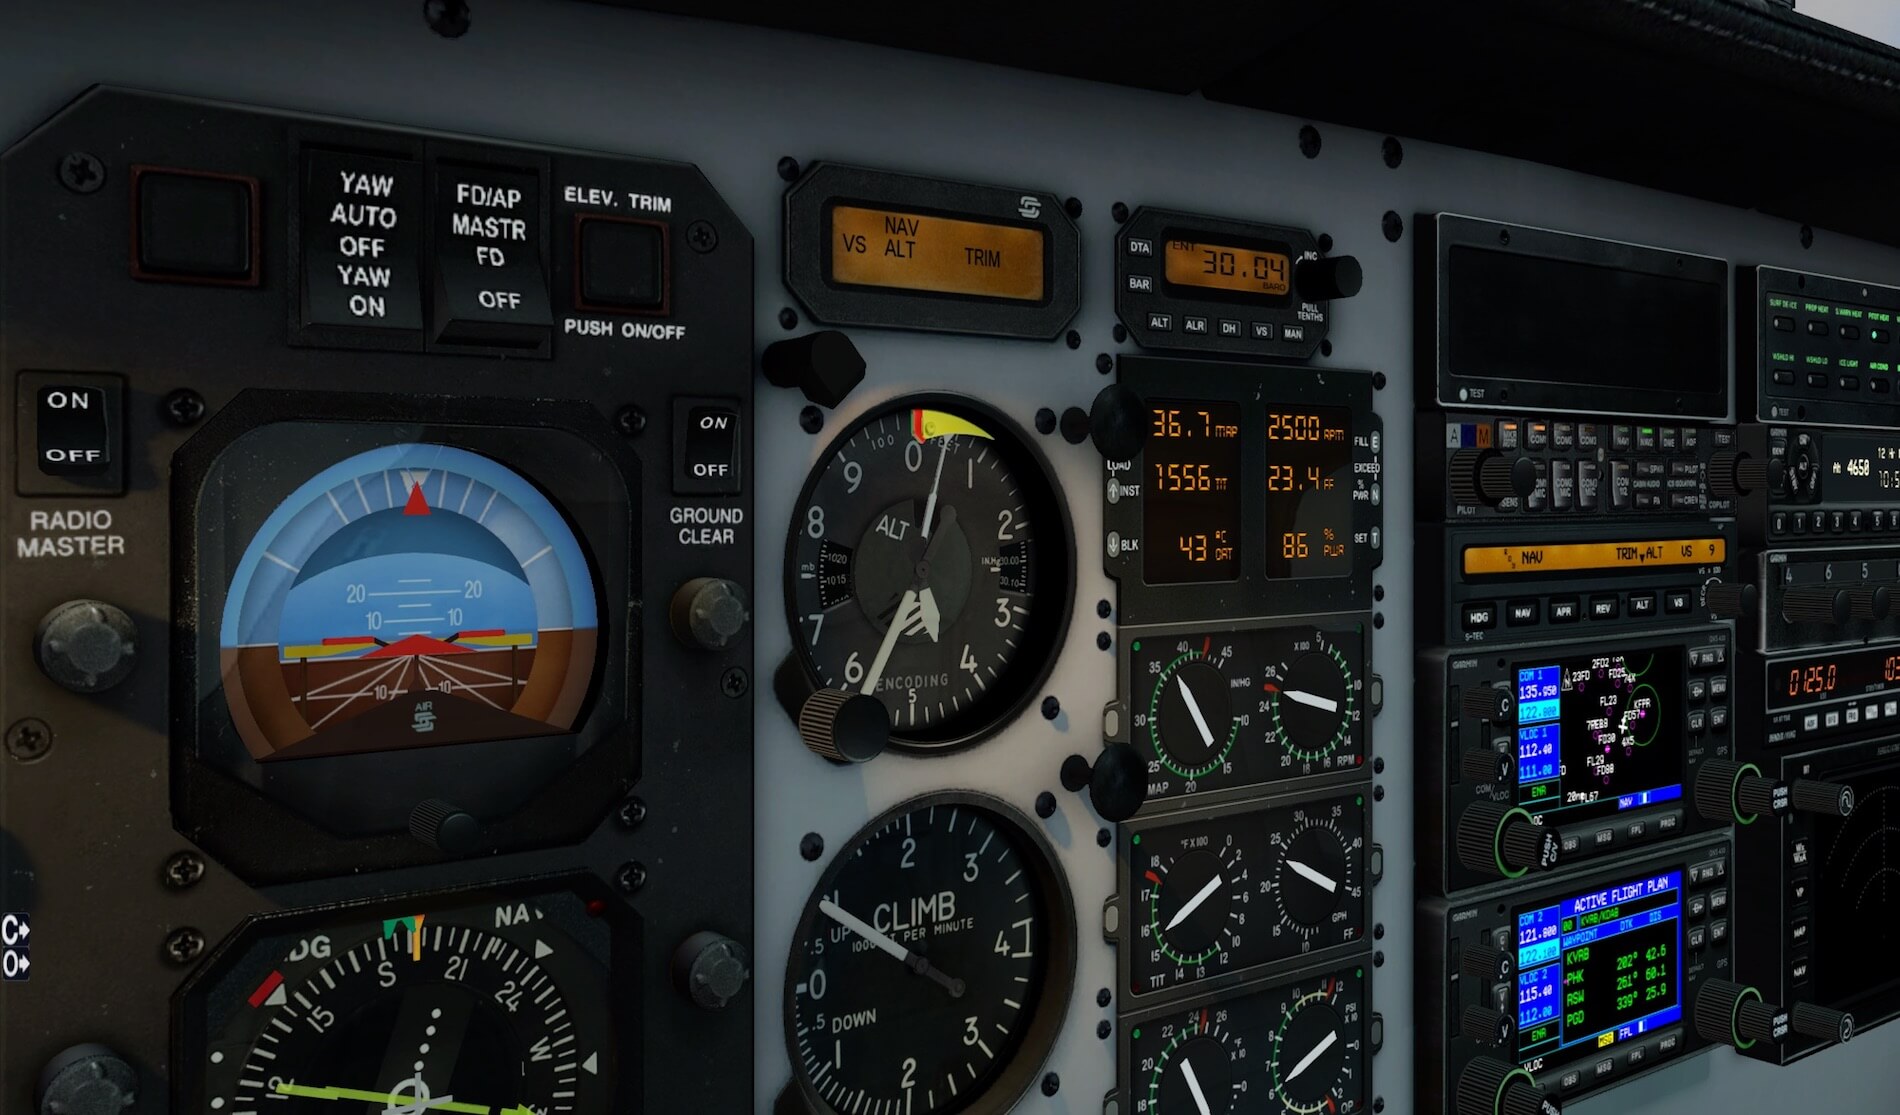
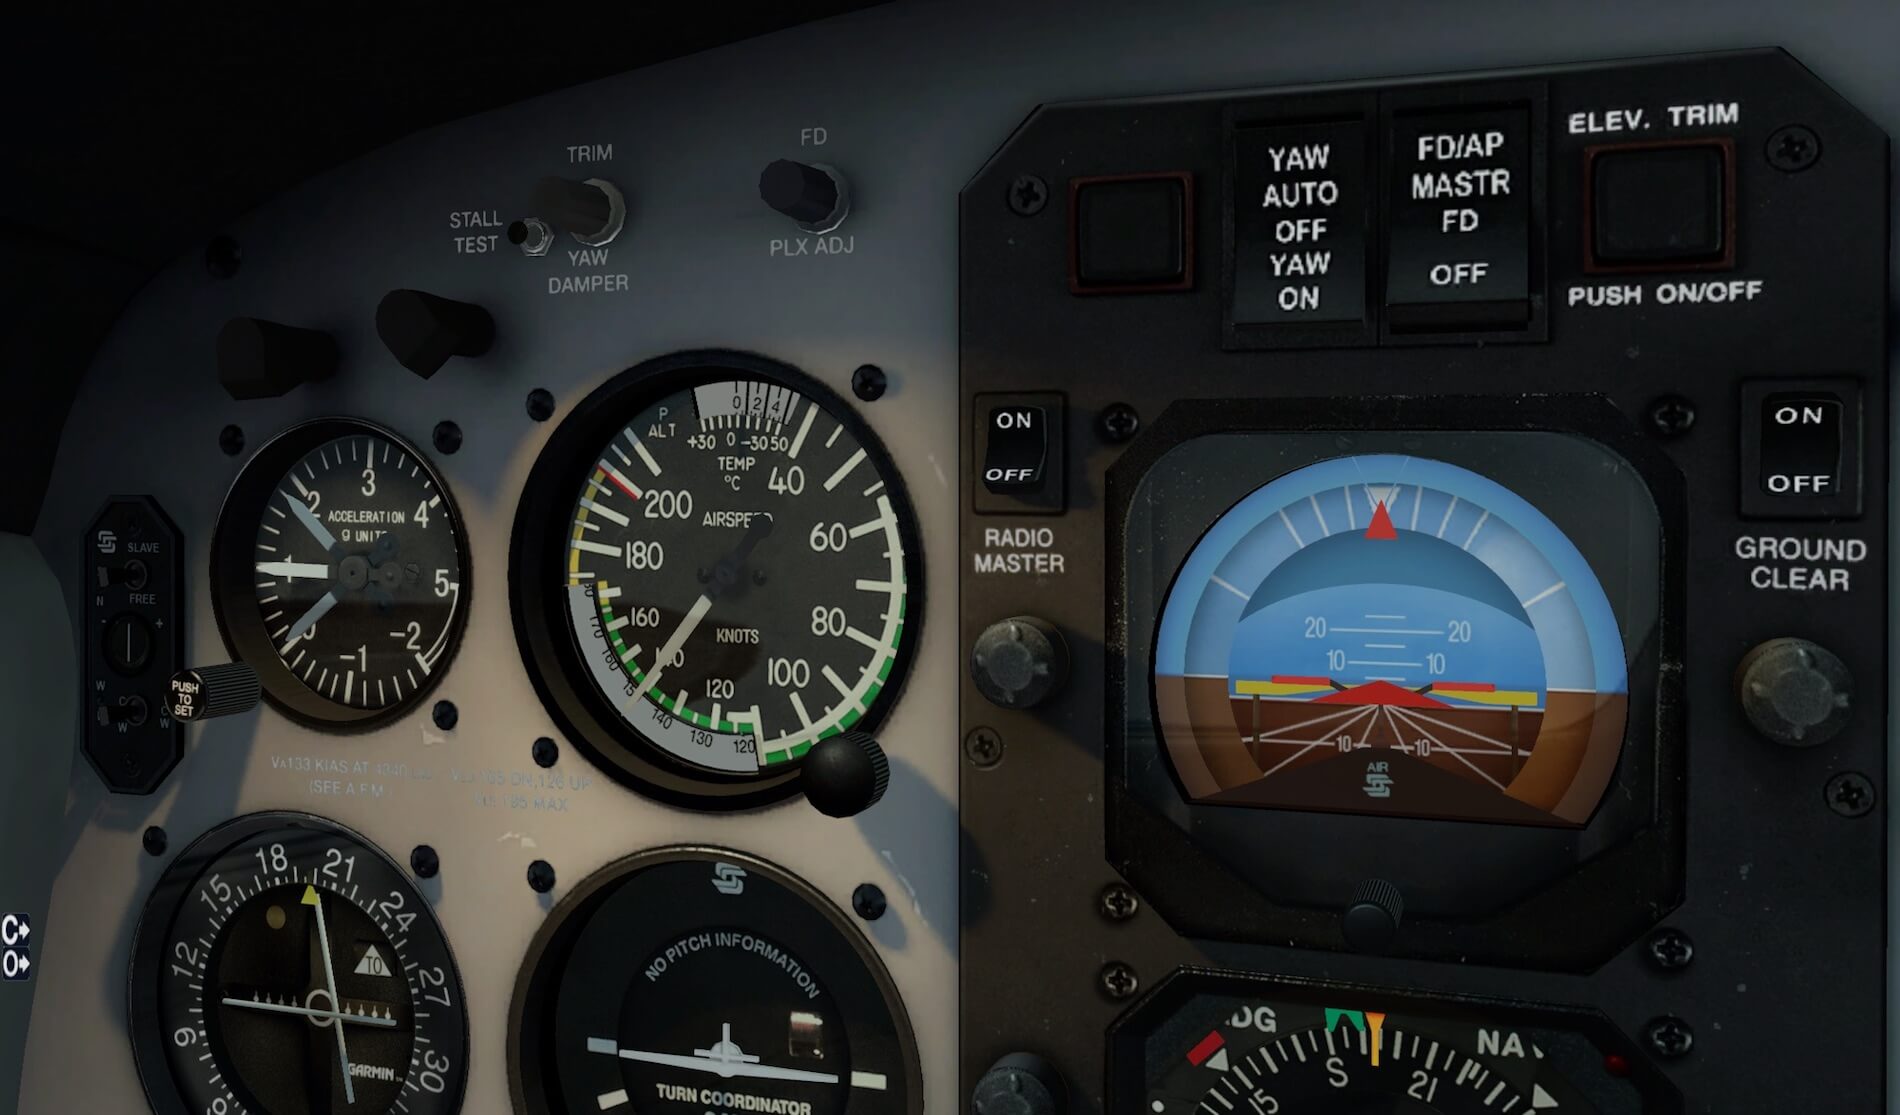
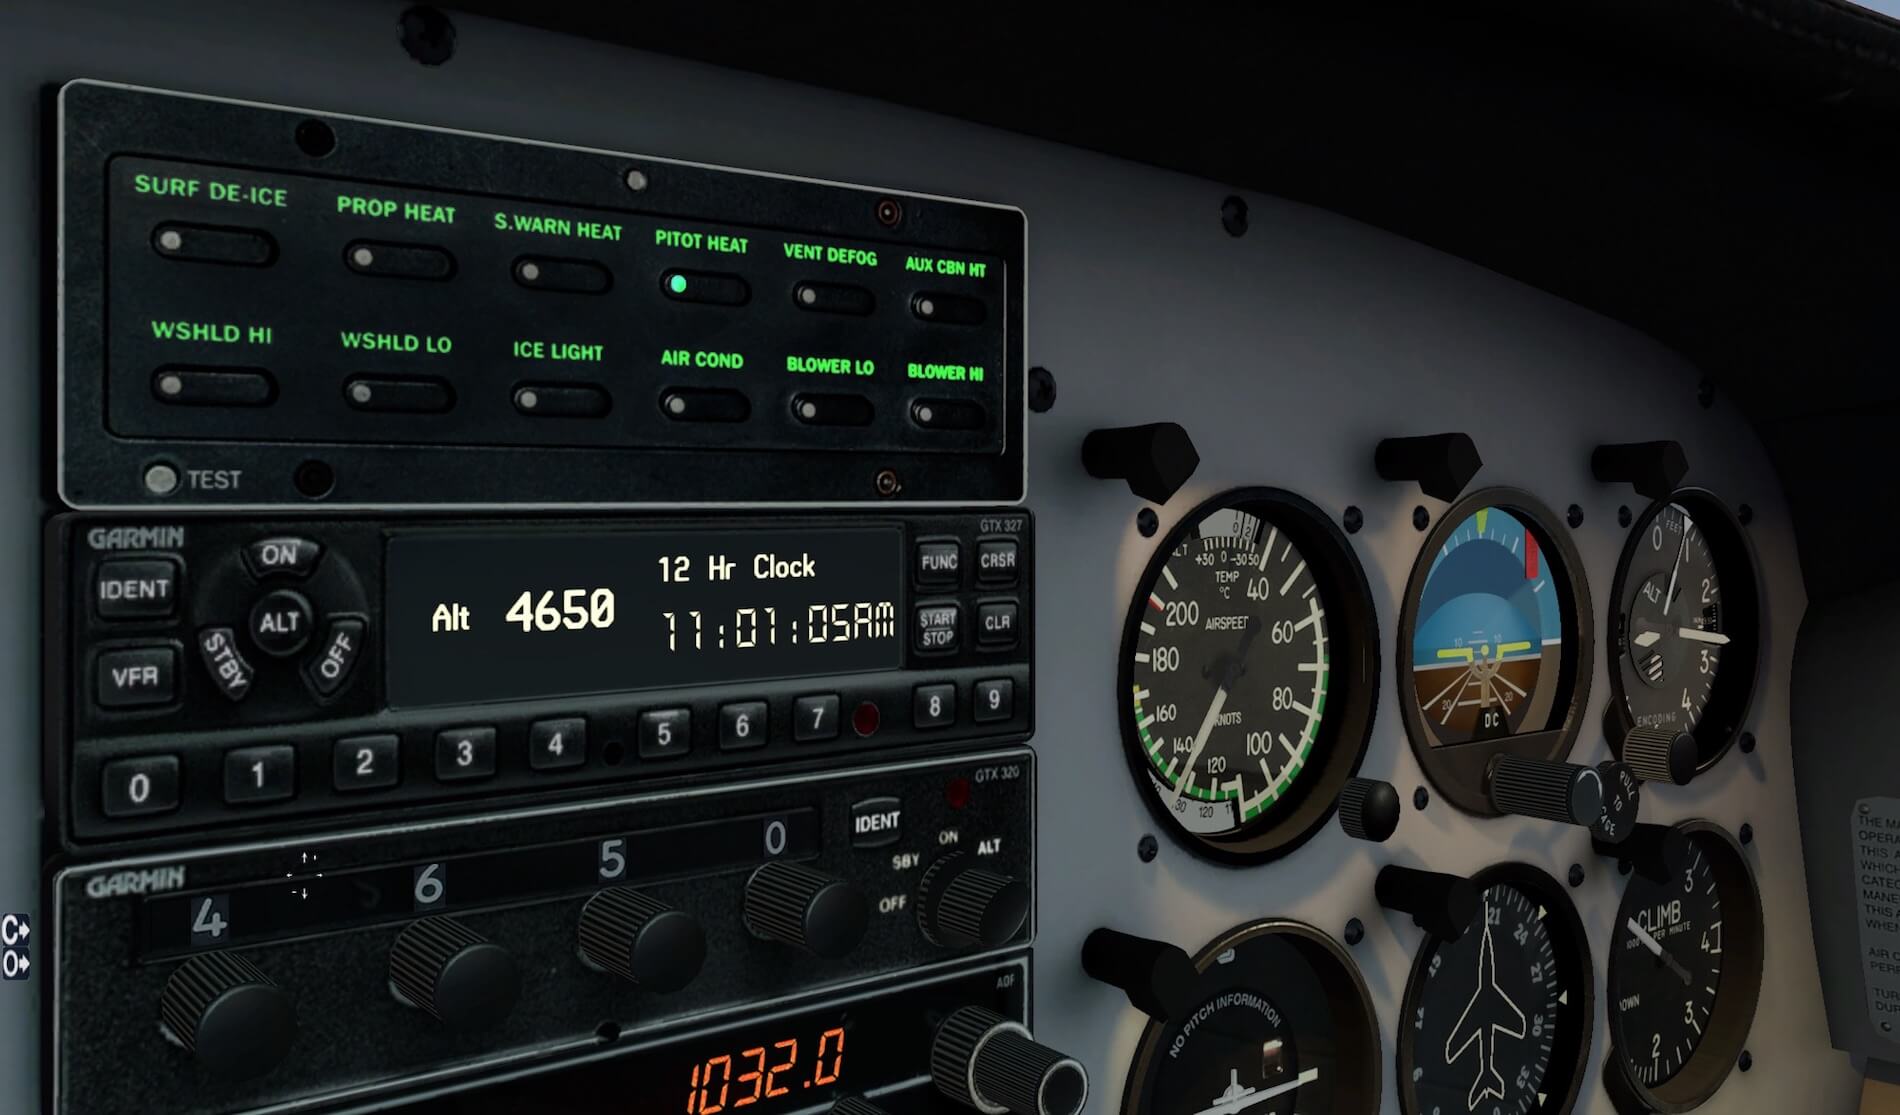
The modeled PA-46-350P is the standard version with the old-fashioned instruments except for the Garmin GNS430, GTX 320, GTX 327, EMIS, an S-TEC AP unit and a Bendix/King radar unit. Other modern equipment hasn’t been modeled. Perhaps, in the future, Carenado will decide to add to the Malibu Mirage, the Garmin G1000 or even the more interesting Avidyne glass cockpit. For now, we have to deal with the Horizontal Situation Indicator and the Attitude Indicator with flight director function and many other analog instruments, situated on the left hand side of the instrument panel.
If you’re interested in this aircraft, you can see for yourself what instruments this aircraft offers at the Carenado website, at Aerosoft or at X-Plane.Org. As always, it’s your choice. One advantage of not having a G1000 or Avidyne glass cockpit configuration is the impact on frame rates. Believe me, that will be a lot compared to old-fashioned instruments.
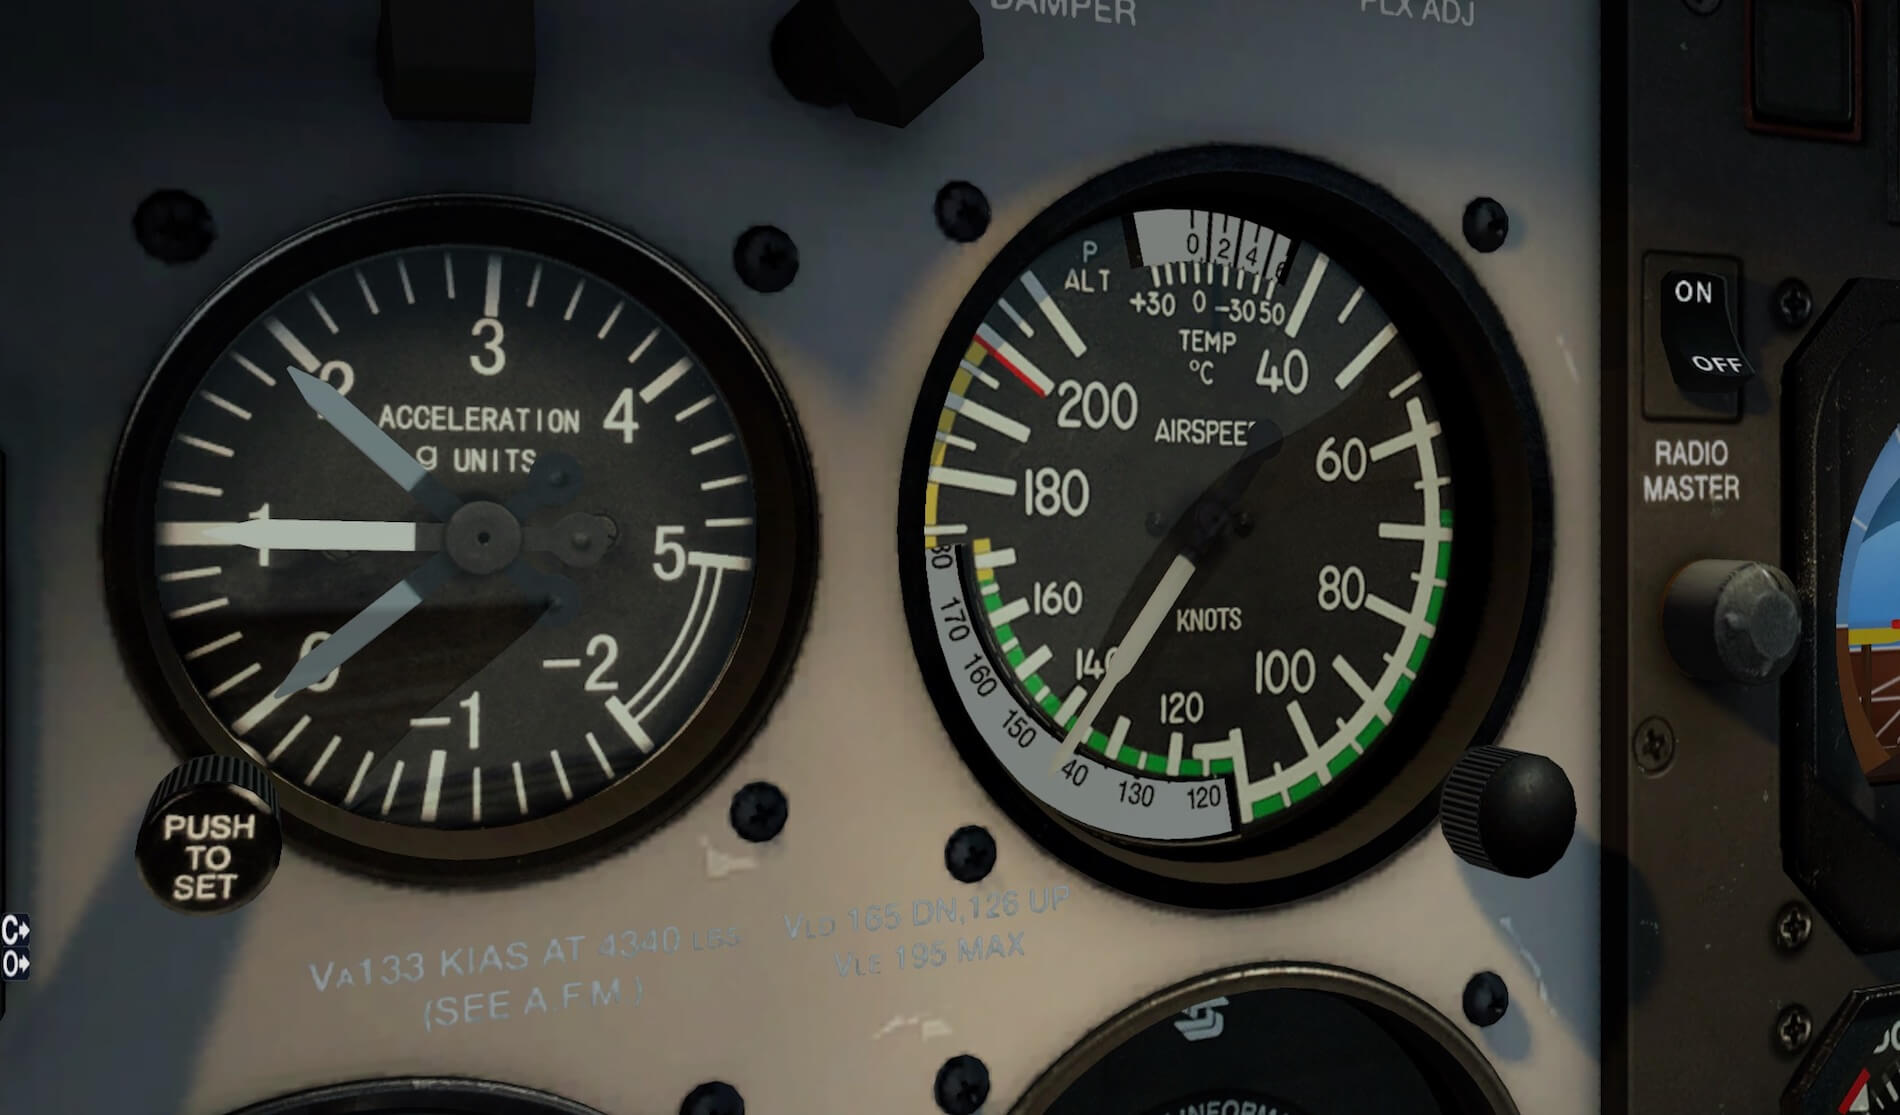
If your PC or Mac is able to handle this, I would suggest that you leave the “Window Reflections” and “Instrument Reflections” ON.” As said before, you can find these settings in the “O” icon on the left-hand side of your screen. In particular, the instrument reflection gives the instruments a great look with the right external lighting conditions. Besides that, the sharpness of the instruments is really superb. An unlimited zoom-in on these instruments won’t work, but you can zoom in much further than with some other GA modelers.
When you’ve zoomed in, you can also notice some scratches and weathered spots on the instrument panel itself. It’s not only the instruments that are razor sharp, so are the rotary knobs, switches and panel text. It must be said that the overall panel look is dazzling. I talked previously about the EMIS (Electronic Module Instrument System) with the digital information on top and analog instruments below. I assume it’s all modeled by hand and that makes this EMIS so great. Zoom in and see for yourself the way these analog indicators are made.
Sharp, clear reading and some small scratches on each housing. It’s interesting that these EMIS instrument frames may all be the same, but the scratches are all at different locations. By the way, if you want to get rid of the yokes, just click on the rod that comes out of the panel and it’s gone. You might say that this isn’t realistic, but on the other hand, you’ll get a much better view of the panel behind the yokes.

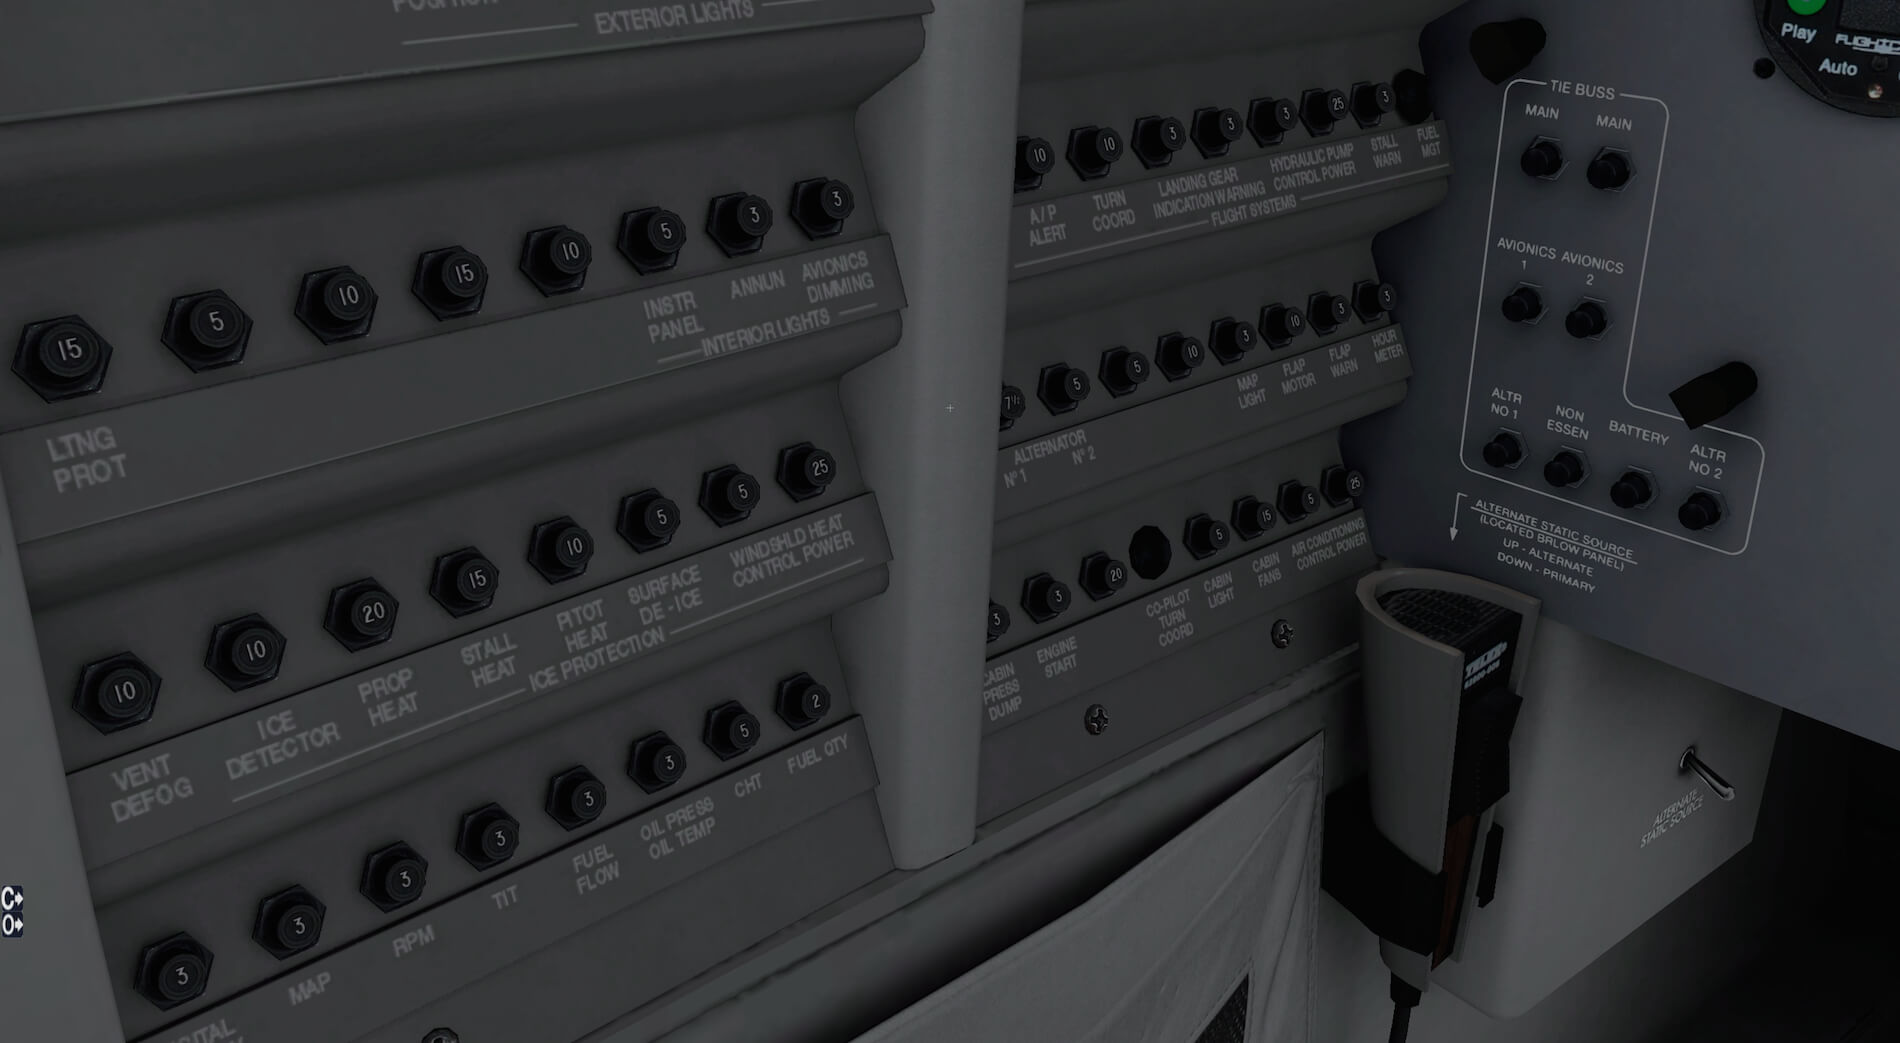

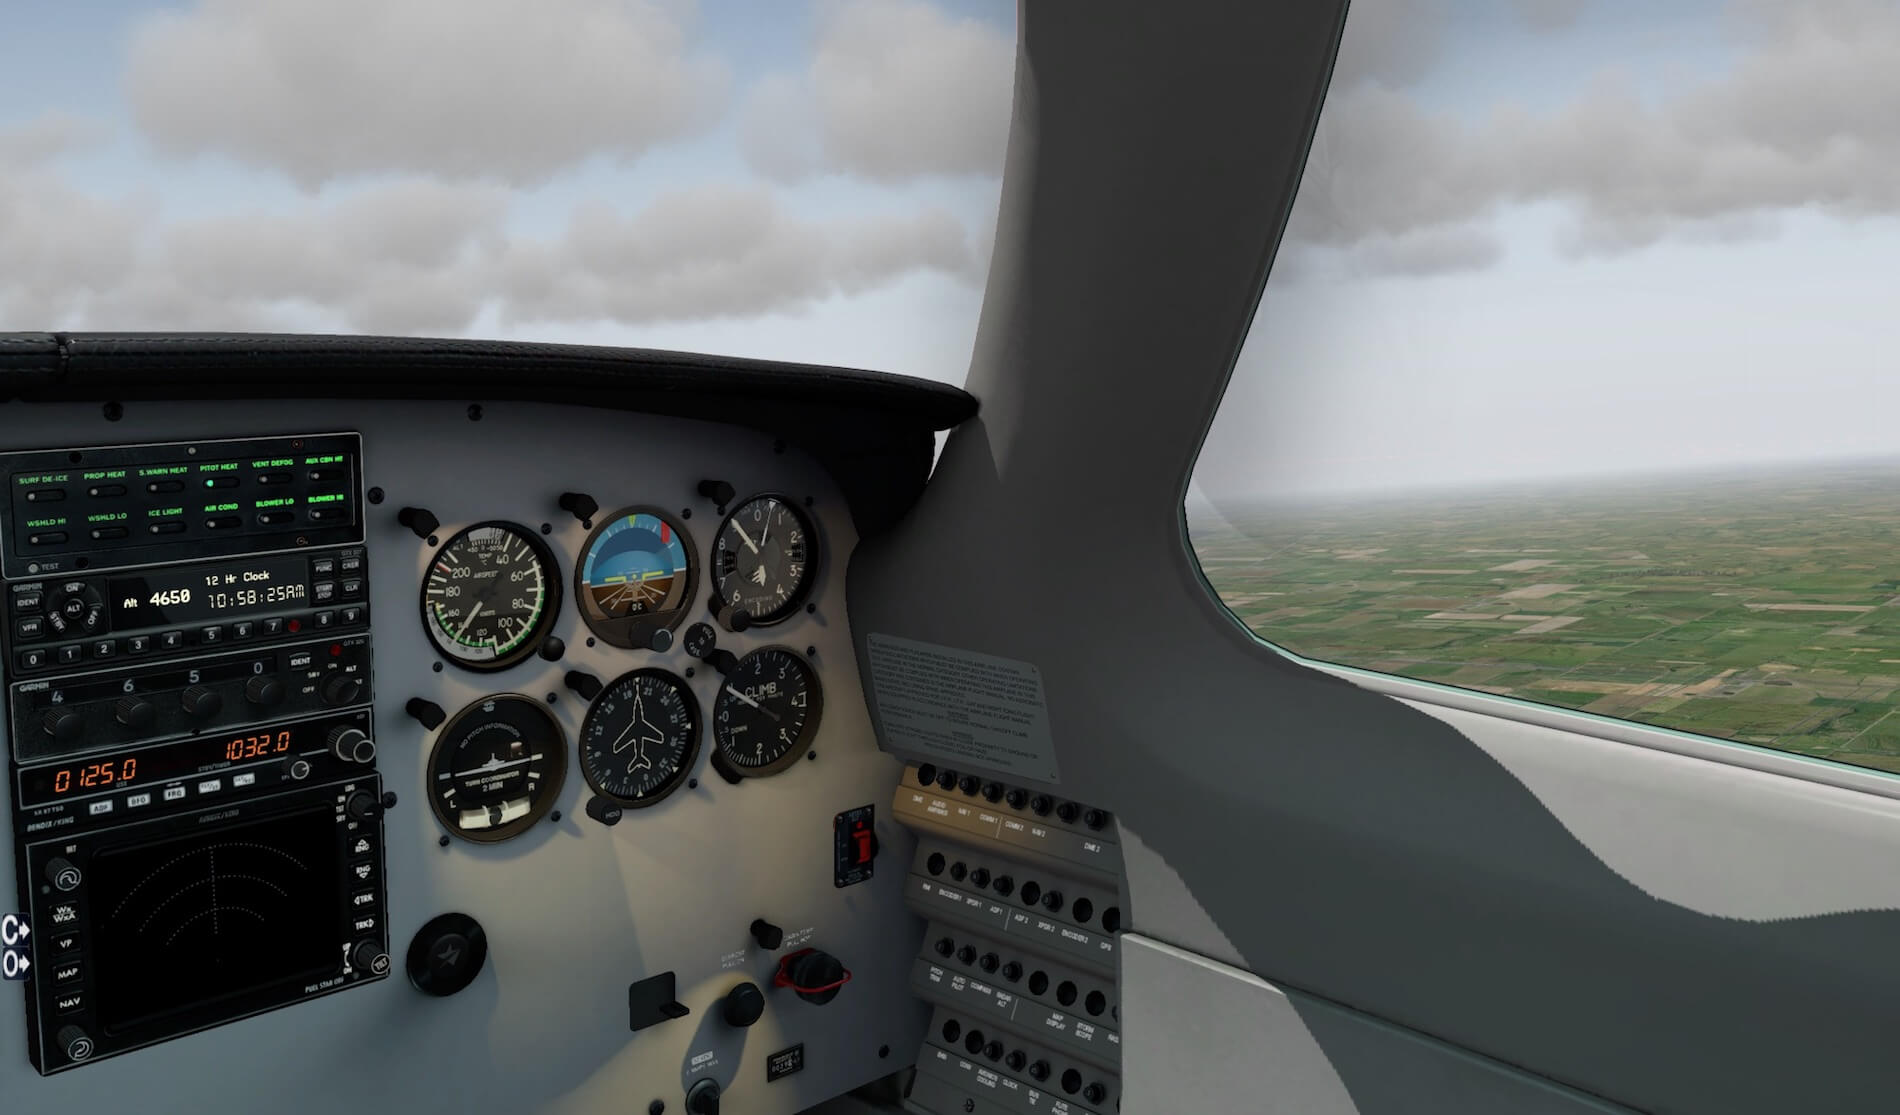
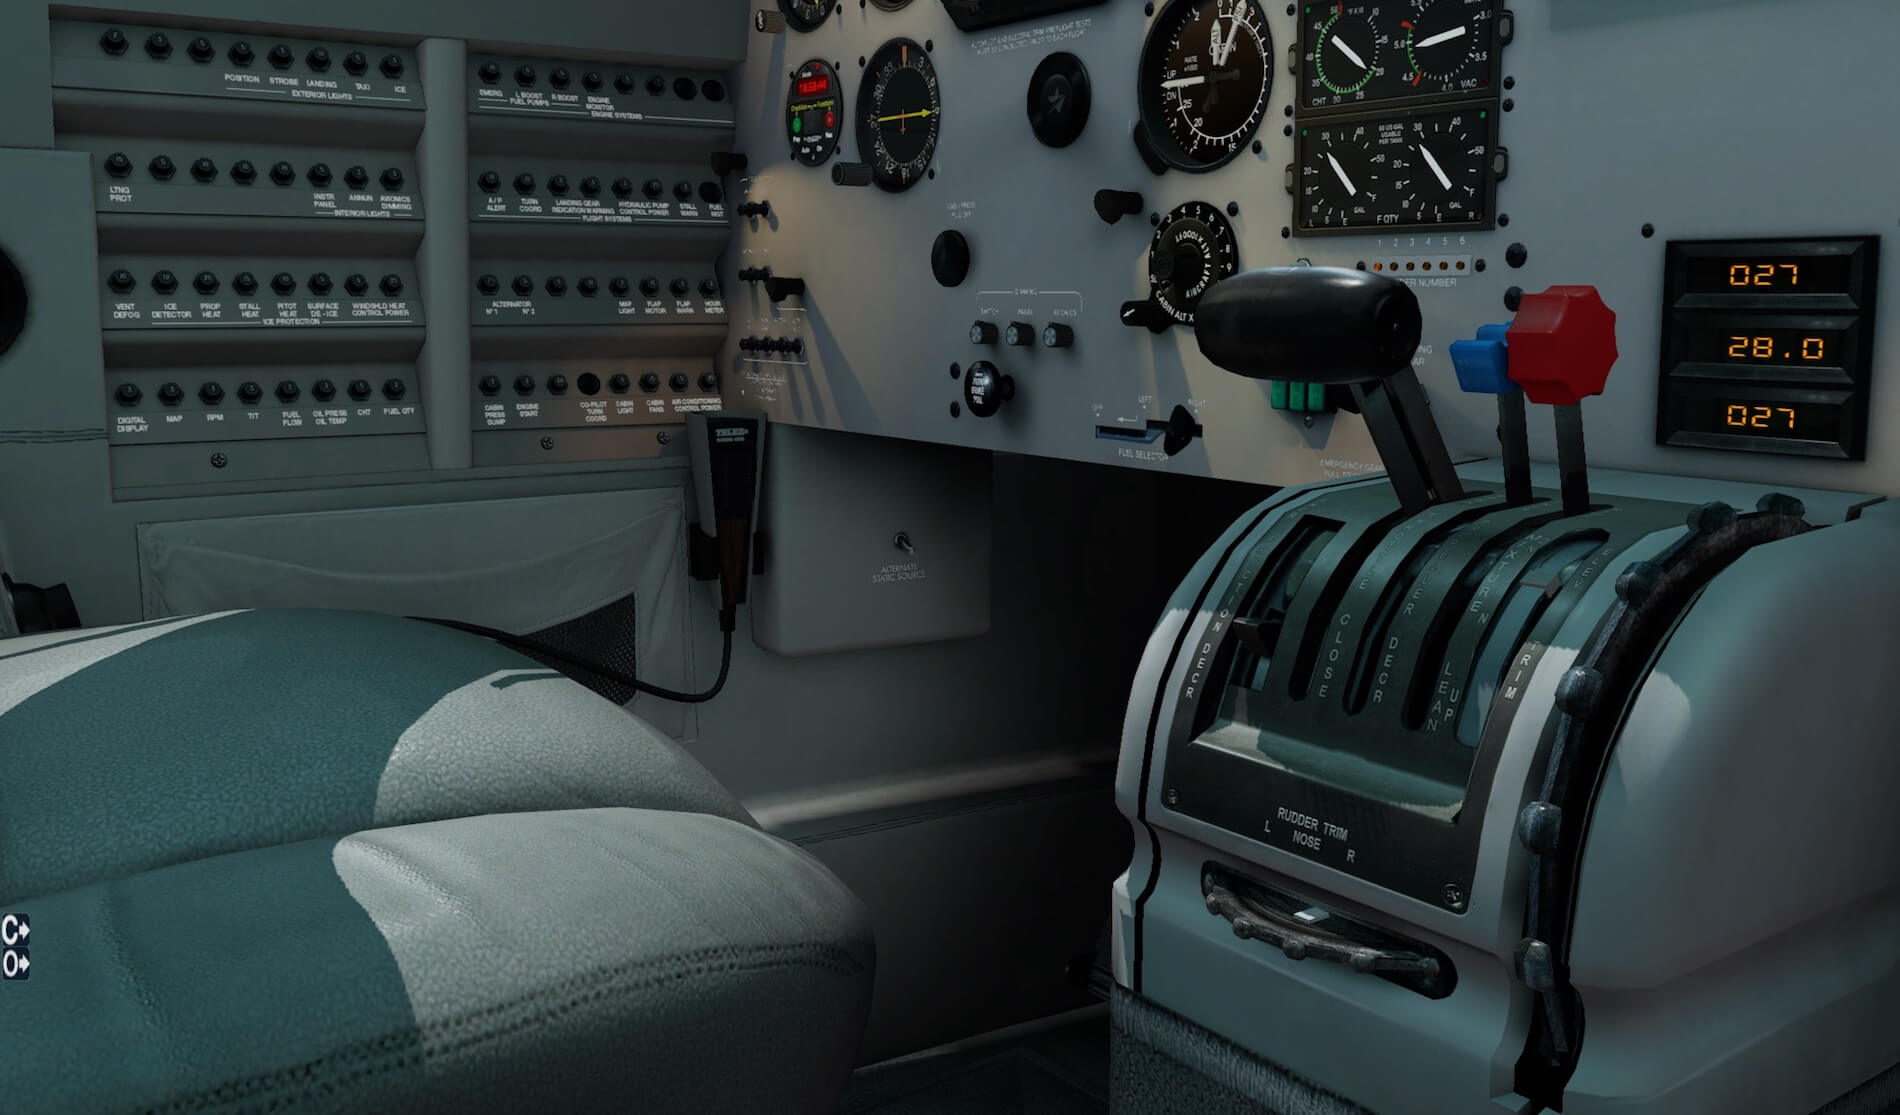
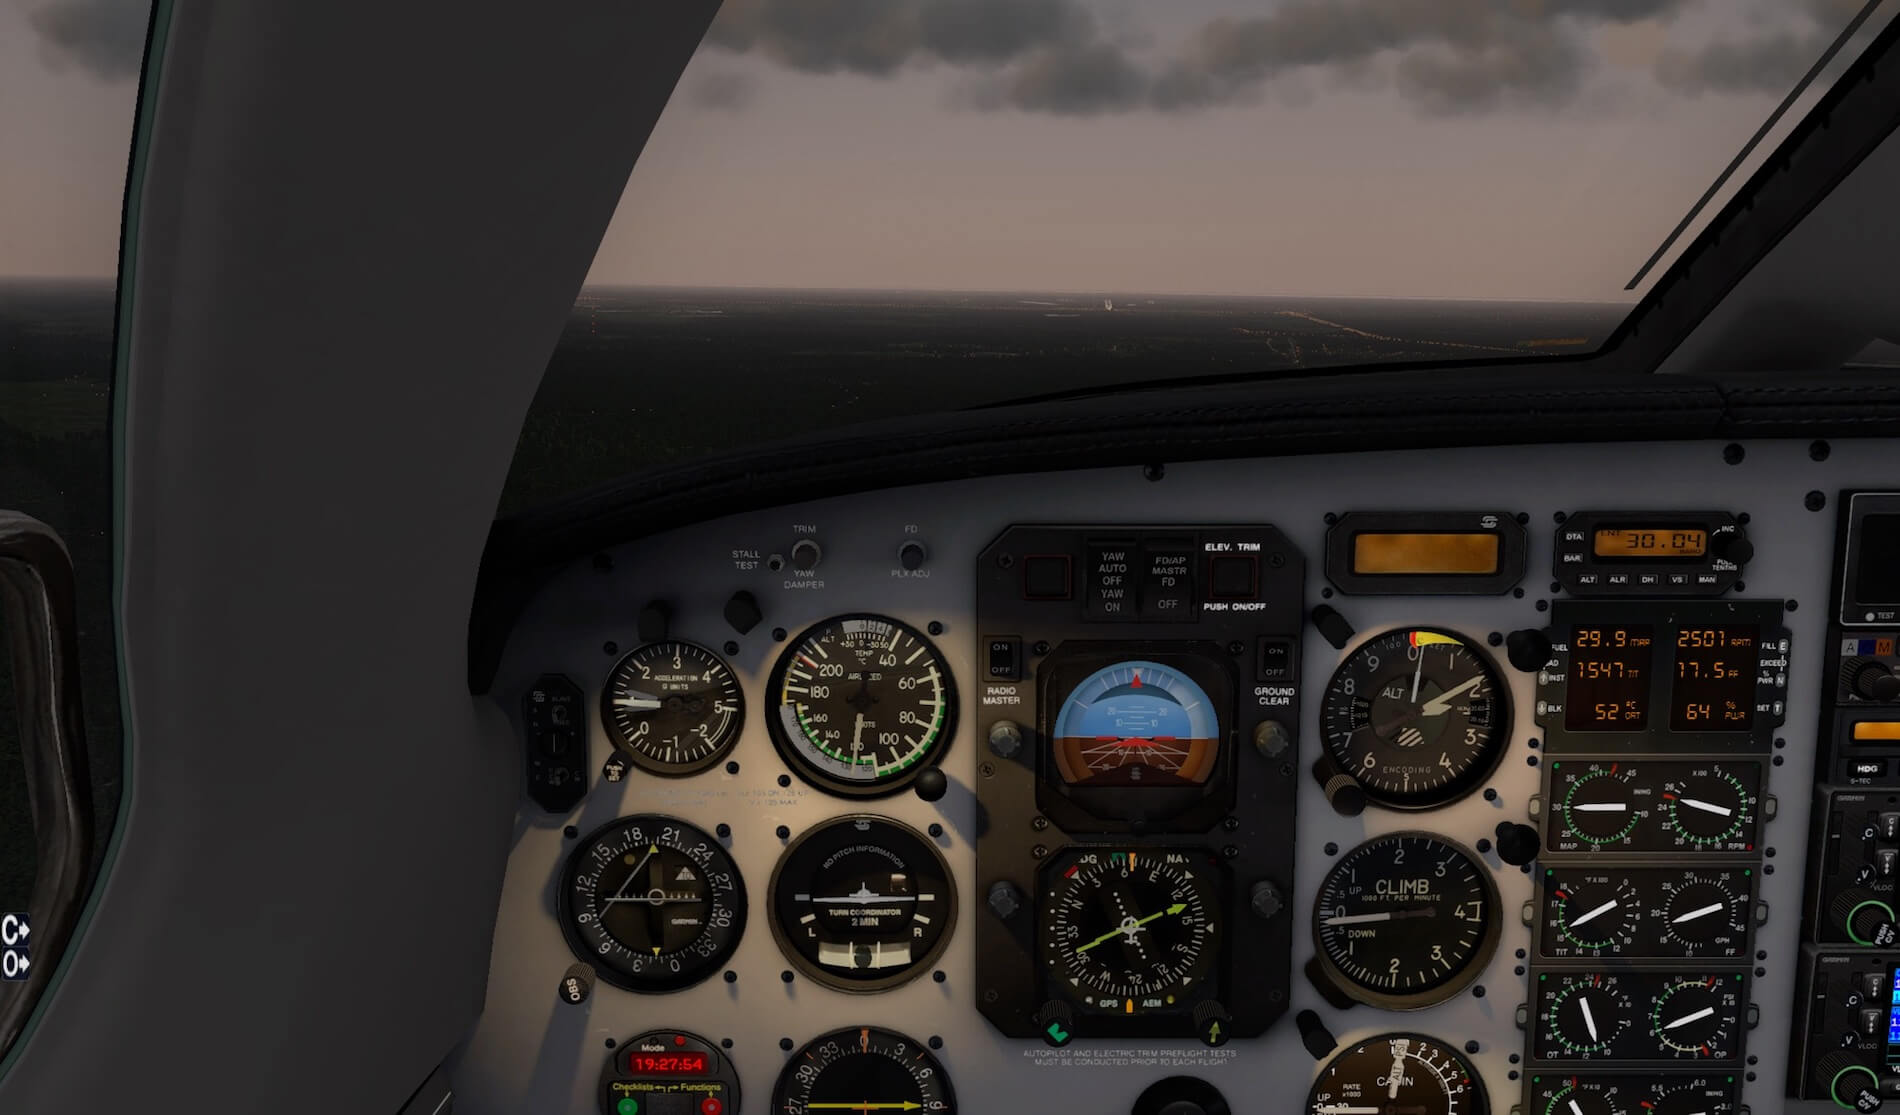
Although the left-hand instrumentation offers a variety of instruments, you’re also able to fly the Malibu Mirage from the right-hand side with fewer comprehensive flight instruments. The instruments to fly this aircraft from the right-hand side are the heading indicator, the attitude indicator, IAS indicator, roll and bank indicator, IVSI (Inertial Vertical Speed Indicator) and an altitude indicator. A little further to the right, along the sidewall, you’ll find a circuit breaker panel which can also be found on the left-hand side, at the same spot.
There’s a reason to bring these circuit breakers to your attention. There’s now one GA aircraft developer who has implemented the functionality of circuit breakers. In other words, you can push-pull the C/B including the influence a C/B has. As an example, if you pull the CLOCK circuit breaker, the power supply to the CLOCK stops. Although this may be a simple example, it adds even more to the reality of an aircraft.


What’s left?
In the middle of the instrument panel, situated in-between the pilot seats, is the pedestal. Although there’s nothing special about it, it’s been modeled with great precision. The pedestal only contains the engine related handles and trim wheels to control the aircraft PITCH and RUDDER (the aircraft YAW). Looking up, you’ll see the overhead panel. It’s not really an overhead panel but it has switch panels and DOME light rheostat control switches.
Finally, there’s the sidewall and ceiling panels. They all complete the gorgeous look of this 3D cockpit. At some locations, it has some weathered issues and some scratches, but overall things looks clean and not too much used. Possibly it’s reflecting reality but maybe it’s due to the privately-owned models whose owners try to keep their “babies” are new as possible? Overall, beautiful!
Before I actually can make my flight, I should check the paperwork one more time looking at the fuel level and other official issues that have to be completed. I’ll see you in a minute. Take a seat in the passenger compartment and relax.
Planned flight | KVRB to KDAB
Preparations and flight planning
The PA-46-350P can fly at cruising speeds (TAS) up to almost 220 knots, depending on OAT (Outside Air Temperature) and your cruising altitude. But a more normal or even economical cruising speed is approximately 180-190 knots at an altitude of roughly 18,000 to 20,000 feet. And don’t forget that the IAS has a clean, never exceed, speed of 198 knots.
All these figures are “approximate” since the values are taken from different manuals. I found that it’s possible, during an economical flight, to have a range somewhere between 350-380 NM. This is from one of the official older manuals.
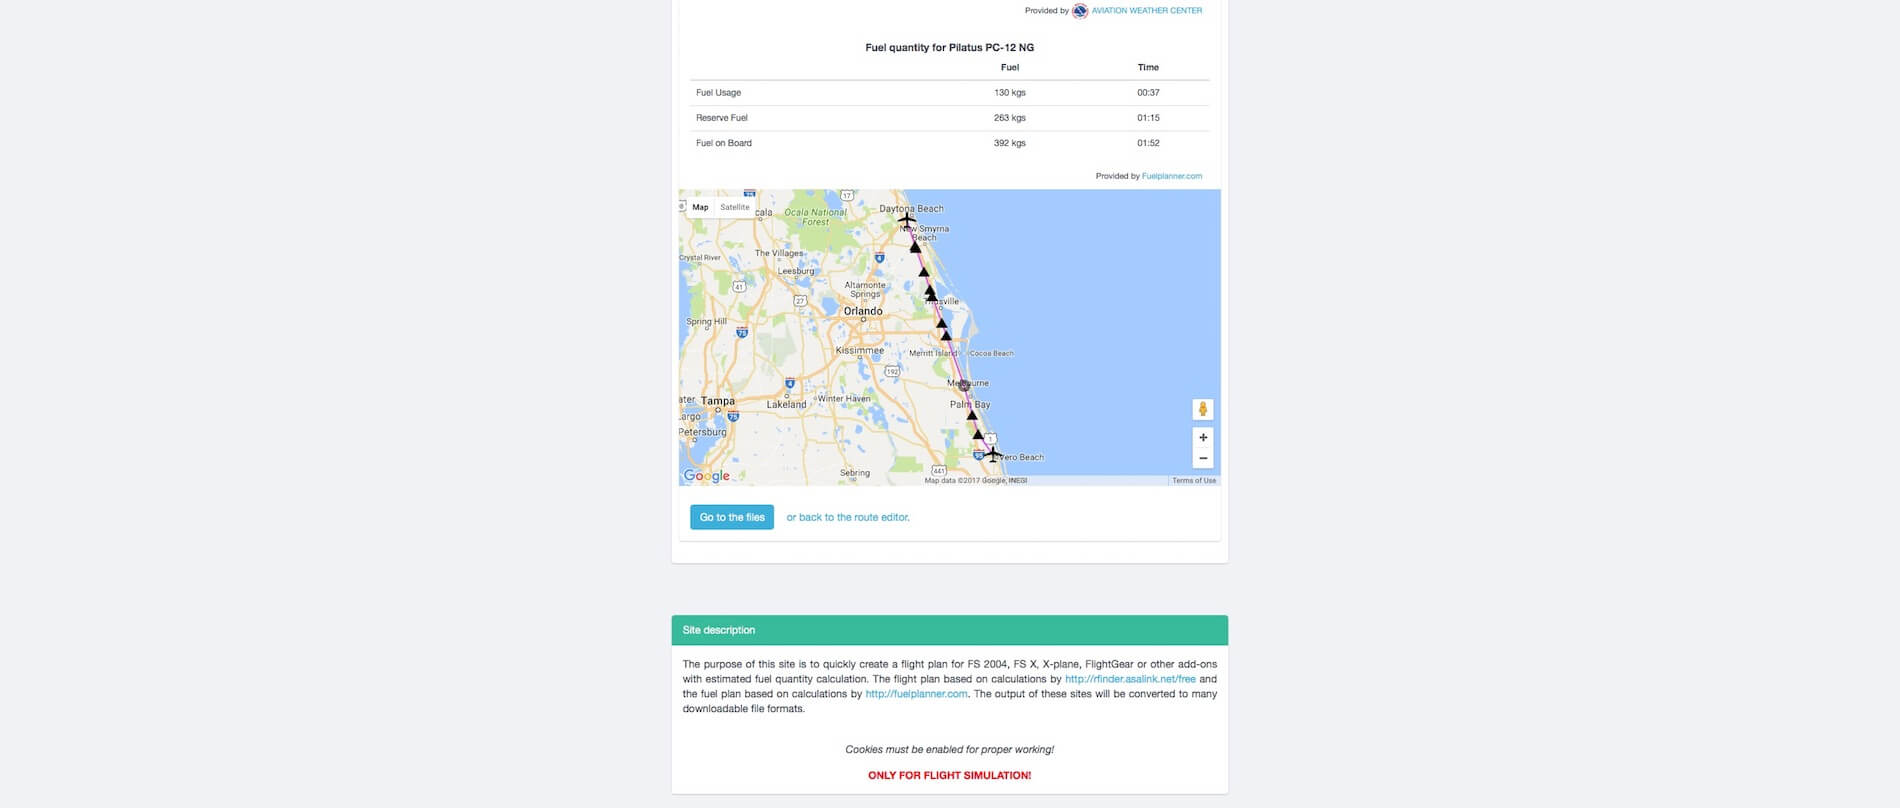
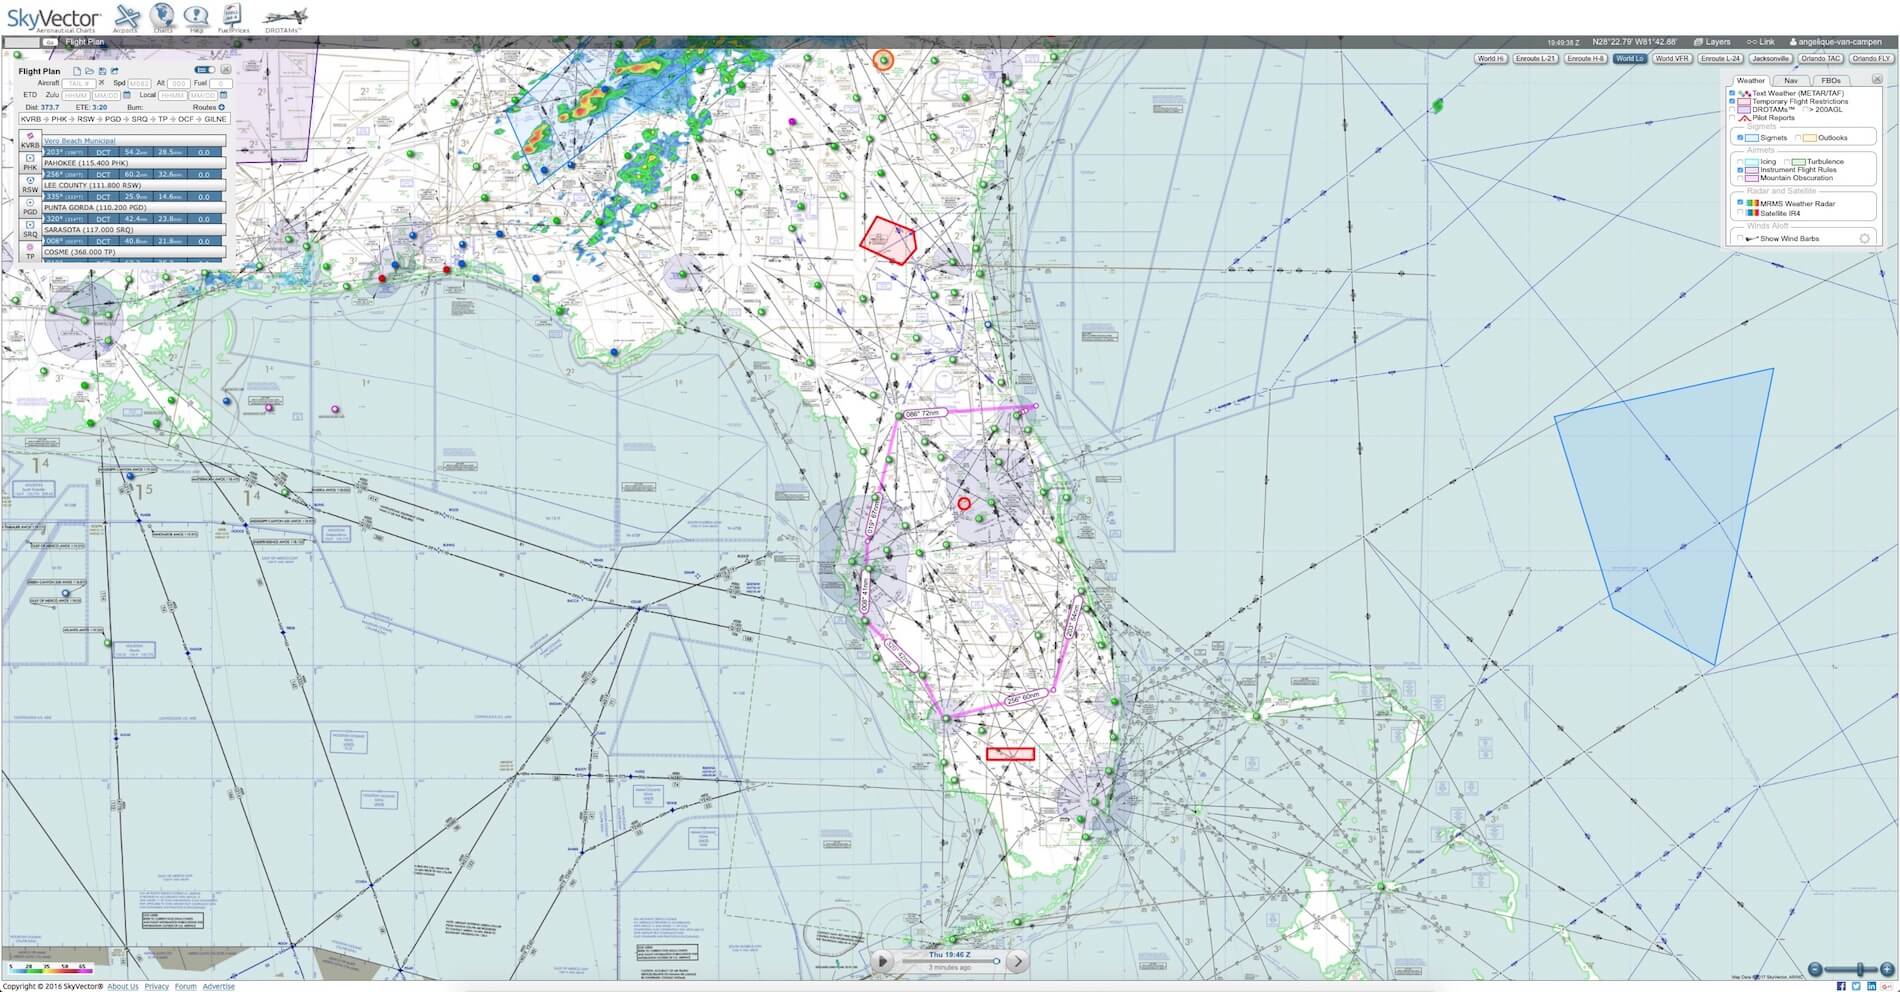
I’m not sure if I will succeed, but the planned test flight will start in KVRB (Vero Beach Municipal) and will end in KDAB (Daytona Beach International). Normally, this shouldn’t be a problem, but in this case, I make a circle across Florida, USA. I planned the following way points: VRB (117.30) – PHK (115.40) – RSW (111.80) – PGD (110.20) – SRQ (115.20) – TP (3.68) – OCF (113.70) – GILNE – DIYAK – BANNR – KAPDE – MULLR – IDAB (ILS CAT I KDAB runway 07L) but I can also decide to make a flight plan via Online Flight Planner, SkyVector, SimBrief and many others. More important to keep in mind that the flight plan does have the “fms” extension.
Good, For this flight plan I used the online, free available X-Plane Online Flight Planner. Do you know a better online flight planner? If you do, please let me and others know. Just to highlight; the created flight plan with the help of Online Flight Planner finds a totally different route then the one created with SkyVector since within SkyVector you can add waypoints in order to create your custom tailor made flight plan. For this flight I will use the flight plan that goes to KDAB via the West of Florida.


The above stations and waypoints are a mix between VOR-DME, VORTAC, NDB and ordinary waypoints. The advantage of VOR, VORTAC and NDB stations is that they have a frequency, thus you can tune to them, but a waypoint has only longitude and latitude information. If you have on-board equipment that can use waypoints and can load the complete flight plan, then you’re lucky. And we’re lucky. The Carenado PA-46-350P can handle and load a complete flight plan, but that’s not new for you.
With the checklist printed out, I go through all the steps. That brings me to another suggestion for Carenado and Alabeo. Could it be possible for future models to integrate an electronic checklist that can be called up instead of using a paper version?
For your convenience, I’ve packed a couple of things together like two different flight plans as discussed in the section, the Mirage (Malibu) POH, an engine PowerPoint file and some charts. Feel free to download in case you’re interested to fly this plan too. Here’s the direct X-Plained.Com link.
Insert the Flight Plan into GNS430
Oh oh, that’s easy said then done and I know that many simmers still struggle with how to insert a flight plan in the GNS430 or GNS 530. For the GNS 530 there’s a wonderful description and operation available from X-Plane.Org user “Ostkamp”. You can get this Acrobat document “XP_10_GPS_530 Unofficial Illustrated Quick Reference 1.2” via this Org link.
So, how and what shall I do? Let’s create a step-by-step procedure how to add a flight plan into your GNS 430. Once you know it, it’s so easy else you struggle and struggle and ask yourself why Garmin made it in this way.
Step-by-Step GNS 430 FP insertion
Copy the created fms file into the X-Plane root folder Output/FMS plans. With the fms file in this folder, you’re able to load the flight plan into the Garmin GNS 430.

Once you’ve copied and paste the aircraft into the FMS Plans folder, powered X-Plane 10 and the Malibu, click the flight plan button till you got the empty “ACTIVE FLIGHT PLAN” page. In case you see for some reason an illuminated green bar underneath WAYPOINT, first click once on the in the middle of the PUSH CRS knob. This will extinguish the illumination of the selected WAYPOINT line.
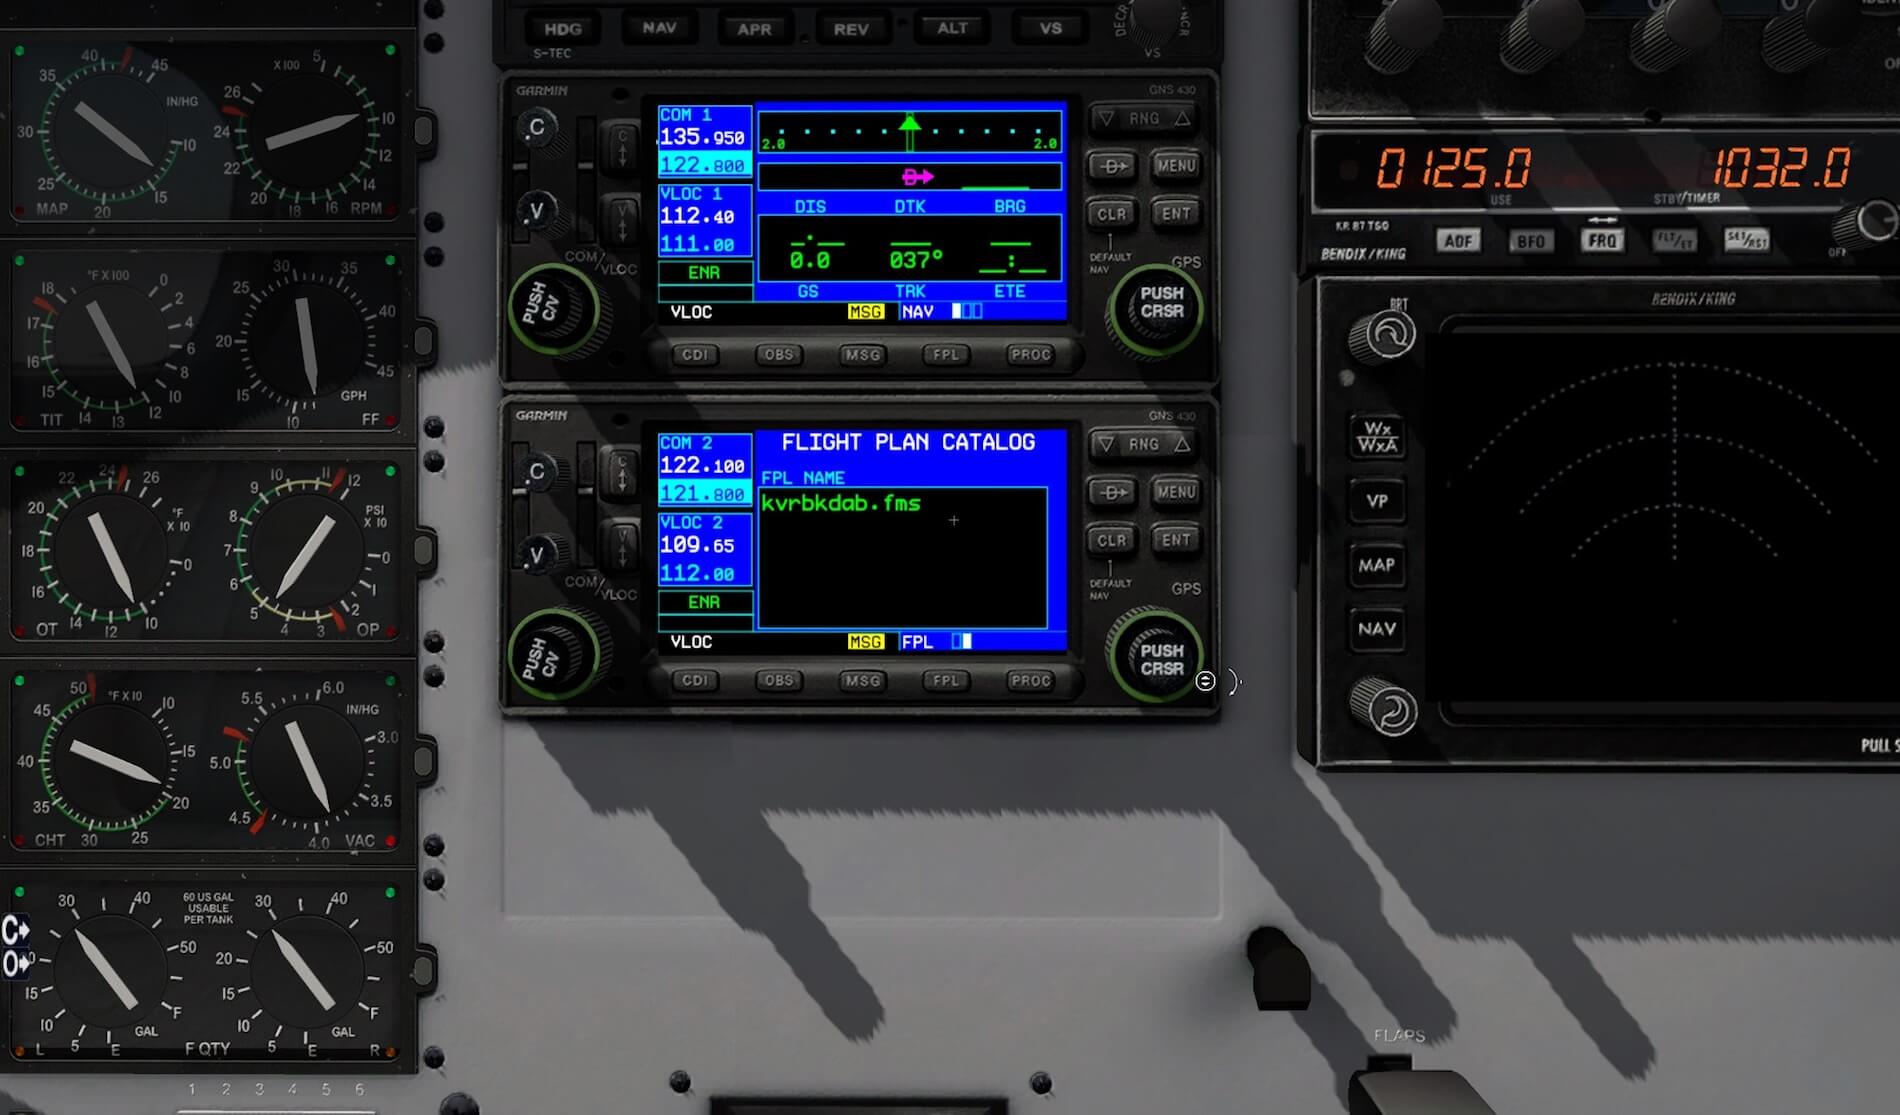
Next click once the knob right hand inner ring. The previous page (ACTIVE FLIGHT PLAN) is replaced by a “FLIGHT PLAN CATALOG”. Further on, in the field you see our flight plan file kvrbkdab.fms.
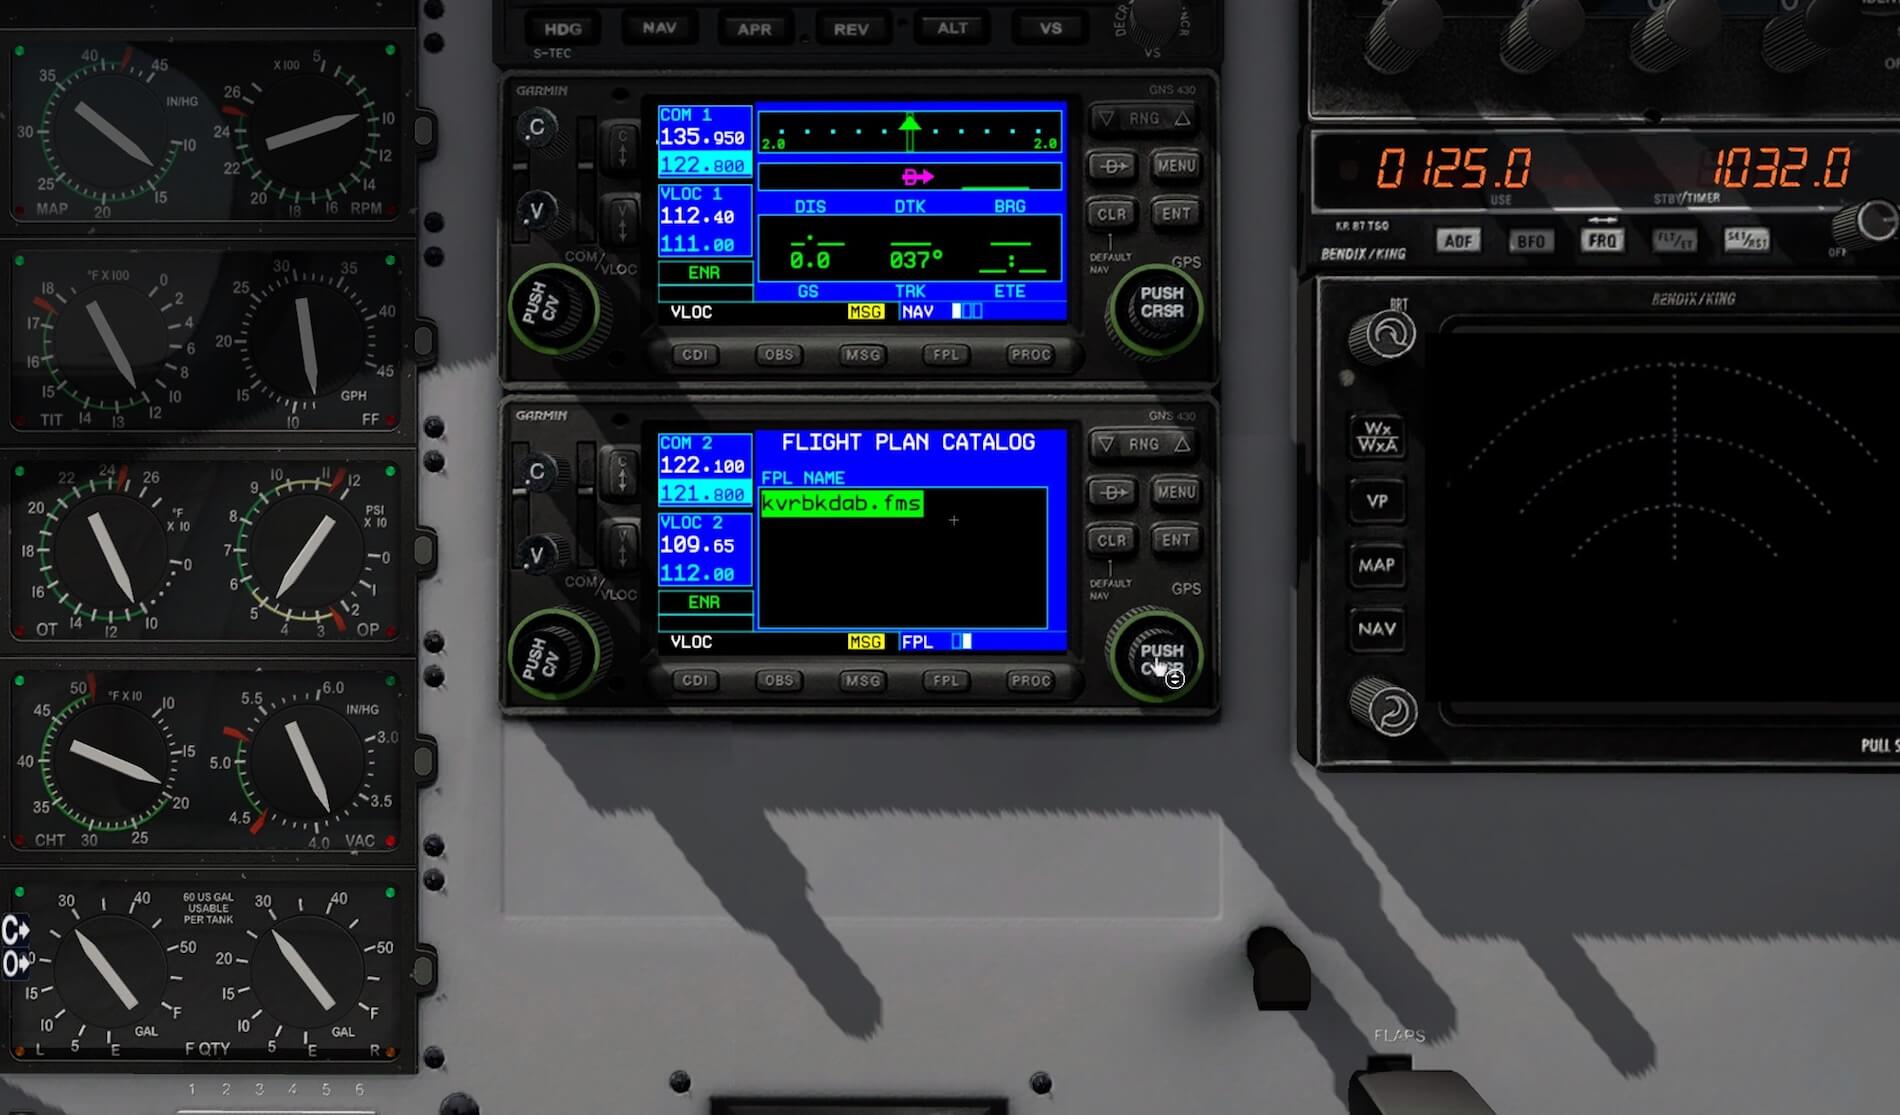
Next click once on the middle of the right hand inner knob (PUSH CRS). The selected flight plan, in our case kvrbkdab.fms will be highlighted green.

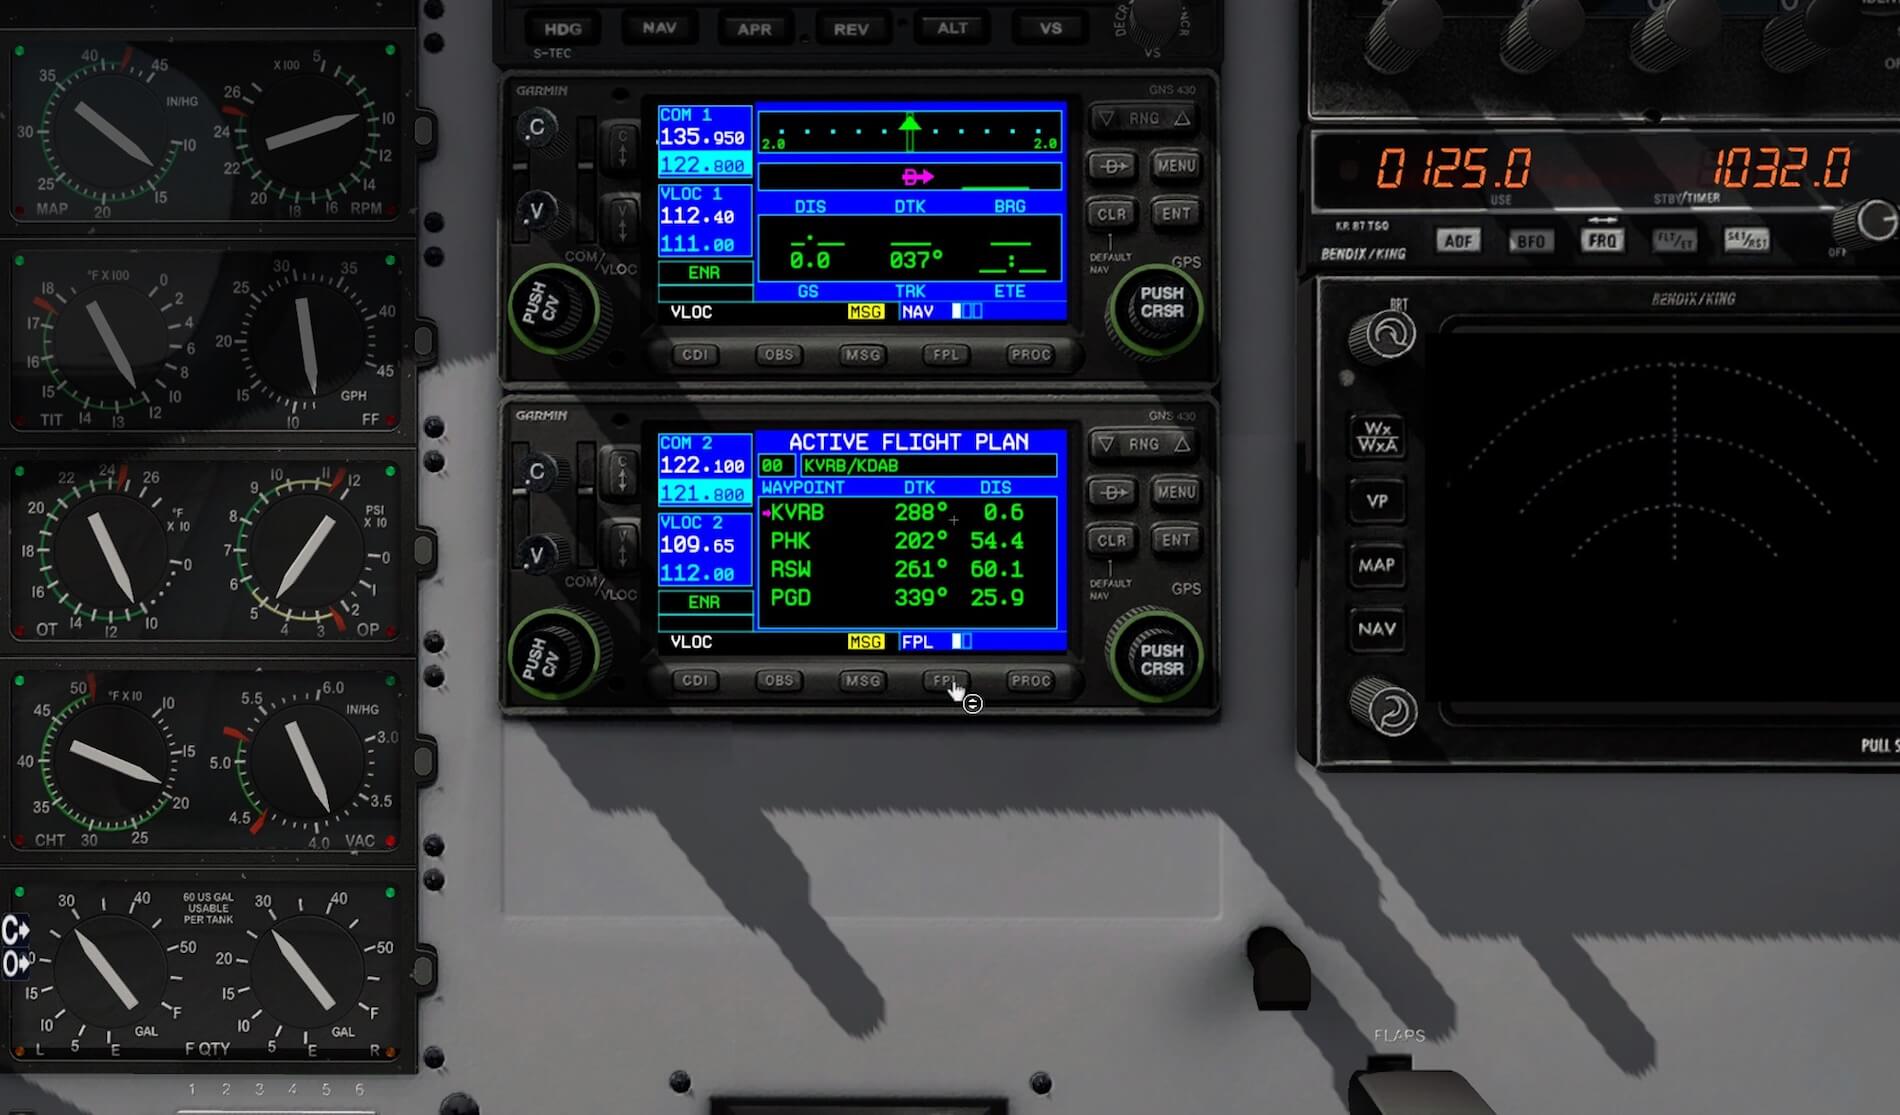
Once your flight plan is highlighted, click the ENT (enter) pushbutton. Your GNS 430 goes back to the overview page and shows a loaded flight plan. The see the waypoints, click the FPL button.
Ready to go!
I’m cleared for a departure using runway 11R. That means I’ve got to taxi a long way from my Piper HQ position to runway 11R. By the way, for this review, I’m using the free Vero Beach Municipal airport scenery version 1.2 from X-Plane.Org user “Drankum”, available at this dedicated X-Plane.Org link. Feel free to download the official ground movement map from AirNav. Here’s the direct link that brings you directly to AirNav KVRB.
From my parking position, in front of the Piper hangar, I taxi towards taxiway C2. At the crossing with taxiway C, I move left along taxiway C all the way to the beginning of runway 11R. For this, I need to cross 22/04 and thus, need a clearance. Since there’s no real ATC, I’m free to do what I want.
Taxiing with the Malibu is easy. You’ve got a good external view due to the large windows and that results in a good view so you can follow the taxiway centerline with minimal problems. Before commencing the takeoff, I’ll check the checklist again. It seems all is set, so I’m ready to go. There’s a need to correct for yaw during the takeoff, but other than that, this is an easy aircraft to control.
Slowly pull the yoke or joystick (whichever you have) and bring the PA-46 to an initial climb rate of 1,000 feet per minute. I decided to leave the Auto Pilot OFF and fly the Malibu by hand. By using the available trim functions, it’s no problem to fly the Malibu by hand.
On the far-left hand side of the instrument panel you’ll find an OBS indicator. Any VOR or VORTAC tuned station is always shown here, but it could be that you can’t receive the station signal yet. In most cases this is due to your distance versus the station (slant distance) or your altitude is too low.


The climb to 10,000 feet is an easy one and when I’ve reached my intended cruising altitude of a little above FL100, I keep the speed at around 120 knots. Lean the fuel a little and off I go. When you enter the waypoint or station you’re flying to on the upper GNS 430, you’ll have even more information. Welcome information for the flight during that stretch is the distance to the station, the track you’re flying, the GS (Ground speed) and the ETA (Estimated time of Arrival).
It’s worth highlighting the fact that the upper Garmin GNS 430 is linked to the Captain’s HSI while the lower Garmin GNS 430 is linked to the OBS indicator. With these linkages, you can enter the second VOR frequency in the lower GNS 430. If you don’t have a VOR or VORTAC station, but only an NDB, then you enter the NDB frequency in the panel mounted above the Bendix/King radar. The proof is shown on the ADF indicator mounted right of the digital clock.
After a bit, I think there’s been enough hand flying and decide to connect the AP. Since I’m at my intended altitude, I lock the ALT (HOLD) and initially use the HDG HOLD mode. Remember, although it’s a nice AP, it doesn’t offer many preset functions. You can preset a certain V/S, but the AP control panel doesn’t offer modes other than HDG, NAV, APR, REV, ALT and VS.
But although the AP offers basic functions, there’s an LCD indicator just above the pilot’s altimeter. It’s also nice to see that when the AP controls the aircraft and the aircraft trim, that the AP panel shows the ALT TRIM with arrows UP and DOWN. In other words, you can always see what the AP is doing. And, although not visible with arrows, the AP indicator above the pilot’s altimeter shows YAW TRIM. This means YAW TRIM is engaged.


Sometimes when you’ve entered a VOR or VORTAC frequency in the Garmin GNS 430 window, there’s no reception and consequently the HSI or OBS indicator doesn’t show you anything. But when you’ve entered in the Garmin GNS 430 the VOR or VORTAC name (DIRECT TO | ENT), it gives you all the information you need and which track you need to fly directly to the station.
Just repeating once more, the DTK on the Garmin GNS 430 shows you the direct track to the station while the TRK shows you the aircraft current track. They should be the same. If they’re the same, you’re flying the shortest way to the tuned station.


It’s becoming dark outside and this means that you’re more and more in the hands of the navigation. A visual external view is gone, so tuning the correct radio stations is essential now. Before it’s too dark, I disconnect the AP and do some unusual flight attitudes like steep turns, slow flights with and without flaps and pre-stall practices.
It seems that this works fine although I’ve got no idea whether the flight characteristics of the modeled PA-46-350P Malibu Mirage are close to realistic. I’m approaching my last VOR station (OCF -113.70), Ocala and then we’re heading, more or less, to the east coast. As we approach the east coast, I really need the Garmin GNS 430, since I need to enter waypoints.
Remember that I said that waypoints have no frequency, they only have a longitude and latitude position. I tune to the ILS runway 07L frequency and keep on flying the Malibu by hand. There’s’ really no need to use the AP for making landing, even when it’s dark. Together with the trim, I can control for the aircraft for a correct path. The HSI gives me the localizer information and PAPI lights gives me a visual path for the correct glide slope. So, before I know it, I’ve made a successful landing at Daytona Beach.


After that workout with the Malibu, what more can I tell you?
I’ve felt it’s an easy aircraft to fly, but to be honest, if it flies realistically, compared to a real Malibu Mirage, is something I can’t answer. What I could check were the performances and those I checked seemed quite realistic. The 3D cockpit looks lavish, no doubt about that. The same is applicable to the virtual cabin. Zooming in on the instruments shows me that the team did a great job and the 3D effect of each individual instrument, Garmin or Bendix/King unit is impressive also.
I can’t complain at all when it comes to frame rates, but while writing this review, I’m aware that my old iMac Late 2013 with an Intel i7 Quad core 3.5Ghz, 1TB SSD, 4GB nVidia graphics adapter and 32GB 1600 Mhz memory is far above the normal standard. Although the Carenado P-46-350P doesn’t come with frame rate consuming glass instruments, it still needs a powerful PC or Mac. Of course, you can compensate this by reducing your Rendering Settings.
The recorded sounds, at least those I’ve heard, are indeed clear, and realistic.
Am I ready to conclude this review? No, not quite. As you can see in the last screen shots of my flight, as evening approaches, the cockpit becomes very well illuminated. The floodlights over the instrument panel are imposing as are the two tropical sea blue ceiling lights. They give the cockpit a mysterious look.
Summary
With such a long review, I’m wondering what else I need to write down in this last section. Let’s start with a hope that with future updates Carenado adds a comprehensive manual that goes deeper into the instruments. If you’re not really familiar with all types of unusual instruments, it would very helpful for those folks. Adding an electronic checklist is also something on my wish list and as a challenge for Carenado/Alabeo, try implementing functional circuit breakers.
I’ve read, on several forums, that some people are disappointed that the cockpit doesn’t come with a glass cockpit, either the Garmin G1000 or the even more advanced Avidyne glass panels. Still the PA-46-350P Malibu Mirage is worth the cost. It’s an easy aircraft to handle either by hand or using the Auto Pilot. The modeled instruments are of an extreme high quality as are the external textures. The overall quality of the 3D model, external skin textures and interior are suburb. As we all know from Carenado and Alabeo, they all come with the screen icons “O” and “C”. Known from previous models are the C (Camera) and O (Options) screen icons.
Clicking the “C” gives you access to different virtual cockpit viewing angles as well as the ability to adjust the FOV (Field Of View). The “O” from “Options” allows you to control window reflections, instrument reflections, static elements, along with the passenger and baggage doors.
Overall, it’s another great Carenado product. However, remember that it needs a little more resources then with smaller models. It’s absolutely a model that belongs in your hangar for medium distance flights.
You can buy the Malibu Mirage at the Carenado store, at Aerosoft and at X-Plane .Org.
Highlighting the minimum requirements needed for this aircraft according to Carenado:
– X-Plane 10.51 (64 bit compatible)
– Windows 7, 8, 8.1 or 10 (32 or 64 bits) or Mac OS 10.6 (or higher) or Linux
– 3 GHz Processor (Dual Core or equivalent system recommended)
– 4 GB RAM System Ram
– Graphics card with at least 1024 MB
Besides the Carenado PA-46-350P Malibu Mirage, in this review I used the following add-on products:
– Freeware | Org user “Drankum” Vero Beach Municipal
And finally, did I cover every tiny detail of this Carenado model?
I hope so, but I know that there’s so much to see, that there’s a chance that I may have missed something. But as I go back over what I’ve written, I feel that the review covers more than enough to get a thorough idea of this aircraft.
Feel free to contact me if you’ve got additional questions related to this impression. You can reach me via email Angelique.van.Campen@gmail.com or to Angelique@X-Plained.com.
With Greetings,
Angelique van Campen
| Add-on: | Payware Carenado Malibu version 3.2 |
|---|---|
| Publisher | Developer: | X-Plane.Org | Aerosoft | Carenado |
| Description: | Realistic rendition of Piper PA-46-350P Malibu Mirage |
| Software Source / Size: | Download / Approximately 313MB (unzipped) |
| Reviewed by: | Angelique van Campen |
| Published: | April 30rd 2017 |
| Hardware specifications: | - iMac 27″ 4.2Ghz Late 2015 | iMac 27″ 3.9Ghz Late 2013 - Intel i7 4.0Ghz / 4.2Ghz during Boost Mode | Intel i7 3.5Ghz / 3.9Ghz - AMD Radeon R9 M395X 4GB GDDR5 | NVIDIA GeForce GTX 780M 4GB - OWC 64GB 1867MHz DDR3 | 32GB 1600MHz DDR3 - 1 internal 1TB SSD (Sierra 10.12.4) | 1 internal 1TB SSD (Windows 10 Pro) - 1 external 1TB SSD | 1 external 1TB SSD - Saitek Pro Flight System X-52 Pro and X-56 Rhino |
| Software specifications: | - Sierra (10.12.4) | El Capitan (10.11.6) - Windows 10 Professional - X-Plane 10.51c | X-Plane 10.51m | X-Plane 11.00r1 |
0 Comments