Embraer EMB 110 … nickname Bandeirante
Introduction
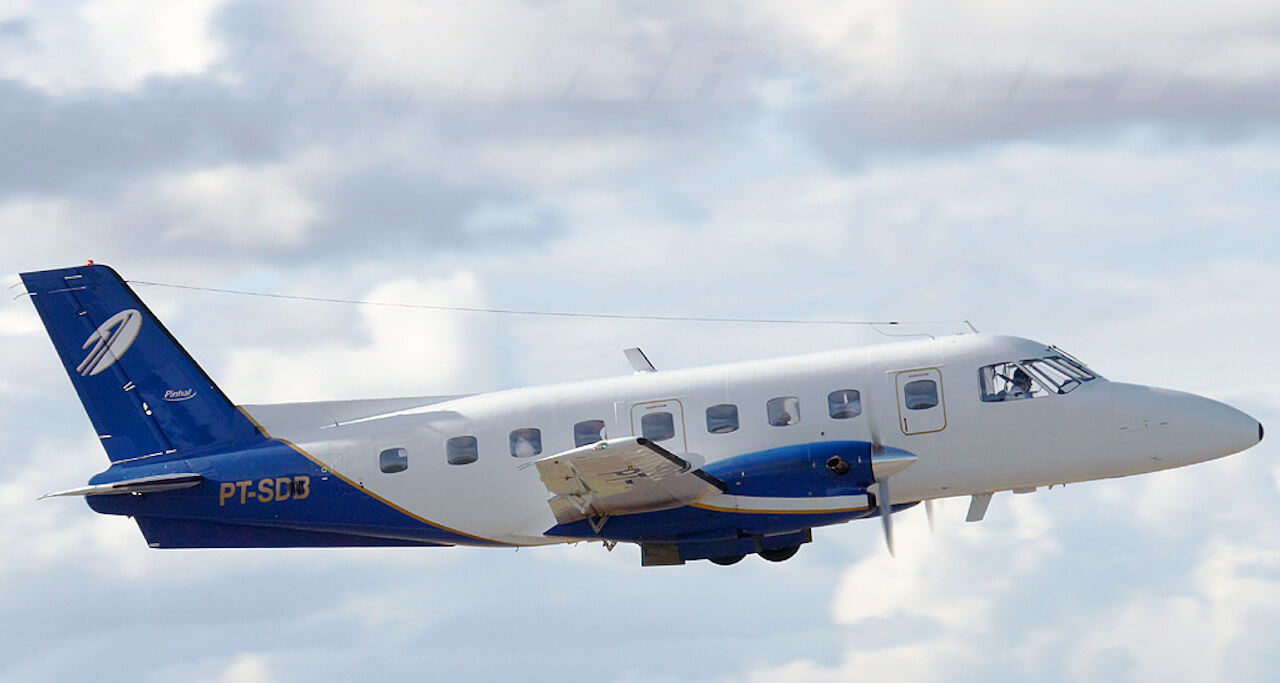
I think you will agree that ‘bandit’ isn’t worthy of this very nice aircraft, although her nickname is Bandeirante, or officially the Embraer EMB-110. According to WikipediA ‘The Embraer EMB 110 Bandeirante is a general purpose 15-21 passenger twin-turboprop light transport aircraft suitable for military and civil duties. It was manufactured by the Brazilian corporation, Embraer.’
‘Bandeirante or English for pioneer was the name given to the Portuguese settlers and pioneers who expanded the limits of the Portuguese Empire, language and culture in Brazil by progressively moving in and then settling from the early coastal settlements towards the inner, then unknown and uncharted zones of the vast continent. Actually, yes, it becomes even weird, The EMB 110 was designed by the French engineer Max Holste. The goal was to create a general-purpose aircraft, suitable for both civilian and military roles with a low operational cost and high reliability. On this measure, the EMB 110 has succeeded.’

Although this background information is interesting, it really is time to turn our attention to the modelled aircraft. Actually, it’s designed and modeled by Lidimar Santos of DreamFoil. The plugins, the smartMenu and DreamEngine by Conex of DreamFoil. Well, time to move on to the next section. Lets find out what you get!
What do you get?
When you buy the aircraft at X-Plane.Org, you get a non-serial numbered/non-registered package. That said, unzip the package and install it, as usual, in the X-Plane 11 Aircraft folder. You can, as I do, make first a sub-folder named DreamFoil and copy and paste the package in there. As of this writing, the review is based on model version 3.1.
The basic package comes with a couple of liveries, but if you look for liveries on X-Plane.Org you will find a few more. There’s also a DOCUMENTATION folder that offers the following manuals:
– Emergency procedures;
– Normal procedures;
– Manual EMB 110.
I would like to discuss in more depth the manual EMB 110 and the normal procedures Acrobat files. The EMB 110 manual consists of only 23 pages and offers the following sub-chapters:
– Installation
– Garmin 430/530 units from Laminar Research
– Instrument identification with short description
– Autopilot identification with description and how to use it
– The Aircraft;
– SmartMenu, SmartChecklist and SmartLivery
– External clickable areas
– Refueling
It’s a quite colorful manual, but it can’t say anything is missing. There’s unfortunately no tutorial included. By the way, I deliberately wrote ‘instrument identification’ because it doesn’t offer more than where to find various handles, switches, knobs and indicators.
The normal procedures manual offers the necessary speeds to know during normal operation, a normal checklist, the engine start steps to follow and an automatic feathering check. Further on, taken from the real manual, how to perform a walk-around check and several diagrams how to fly a normal take-off, and several landing procedures.
Worth to highlight is that although this manual offers a normal checklist, the model also has a SmartChecklist which is not an interactive one. Most likely soon a clist will popup which allows you to have an interactive checklist. One more note to this SmartMenu, SmartChecklist and SmartLivery feature. It looks like these are three individual features, but actually, it’s all controlled from the same device.

The package comes with a couple of liveries – 4 in total (default, Euroair, FAB and Imperial) – including a white paint livery. Not much but while writing this, August 6th, I’ve seen already many user paintings passing by at X-Plane.Org.
Preparations
Hot Spots
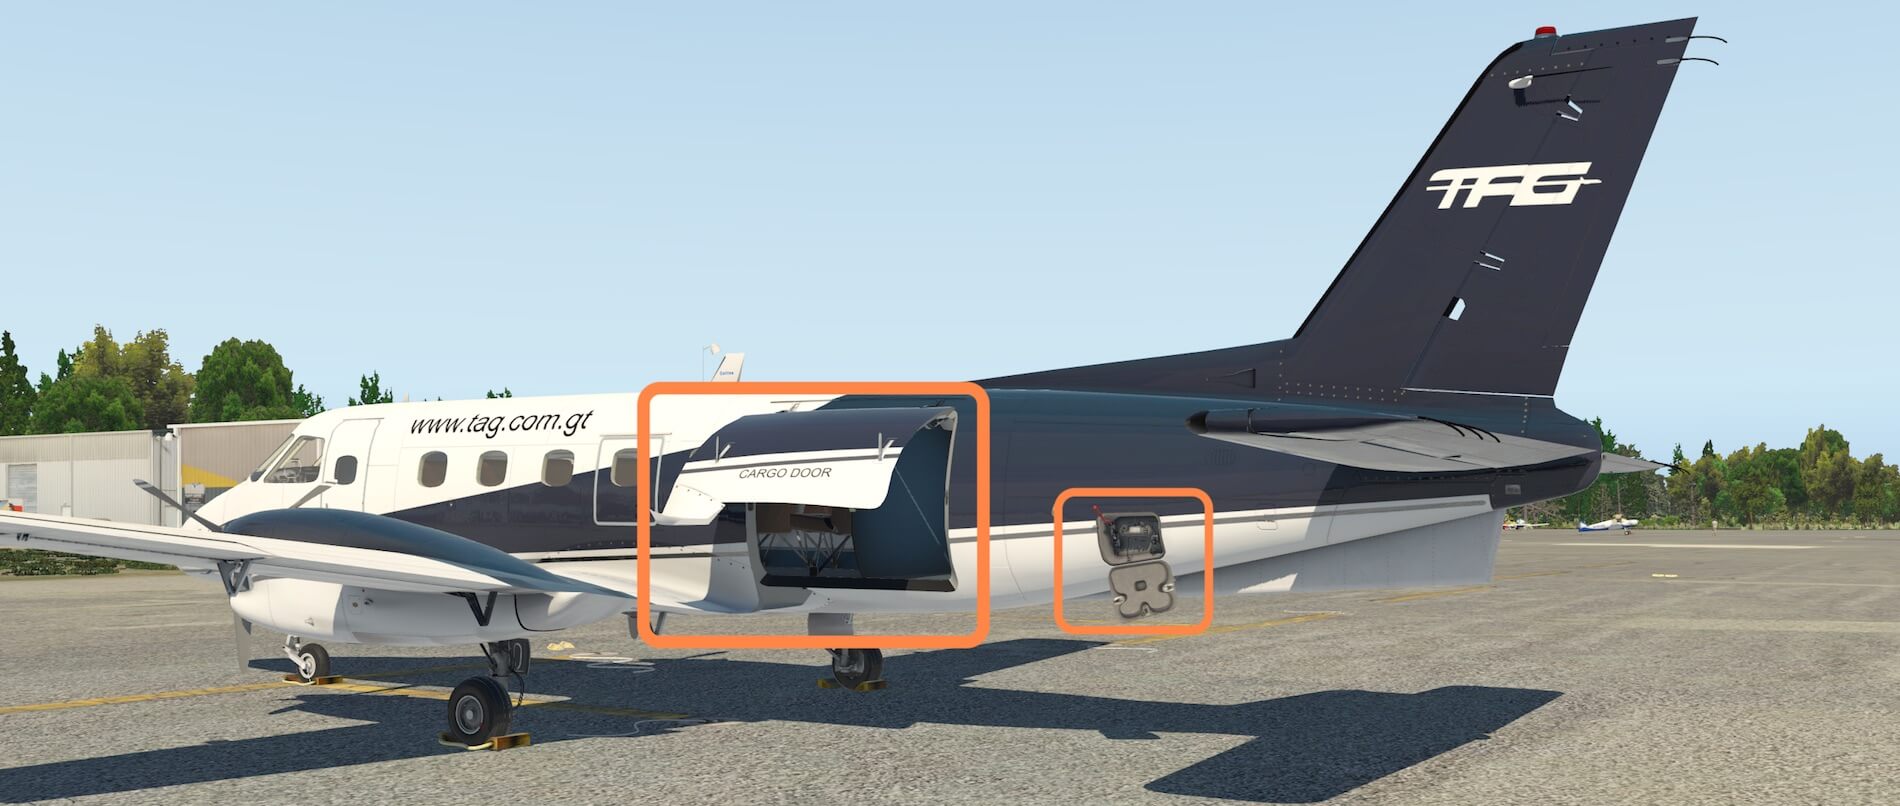
I’ve parked the EMB-110 at one of my favourite airports (KJGG Williamsburg-Jamestown Airport), modeled by Marc Leydecker. Walking towards my EMB 110, I first open the passenger and cargo doors. When you move your mouse towards the passenger door, you’ll see two white arrows above each other that indicate the ‘hot spot’ to control the opening/closing of the door.
By the way, it surprises me that the door opens and closes very quickly. Perhaps this could be slowed down a little and implemented in the next update or Service Pack. Opening and closing the hydraulically controlled cargo/baggage door is carried out in the same way as the passenger entrance. This cargo/baggage door is controlled via a small panel right behind it. Again, this small panel door opens like Speedy Gonzales, but closes at a much smoother rate. The moment you’ve accessed the small panel door, the large door in front of it opens/closes at a smooth rate.

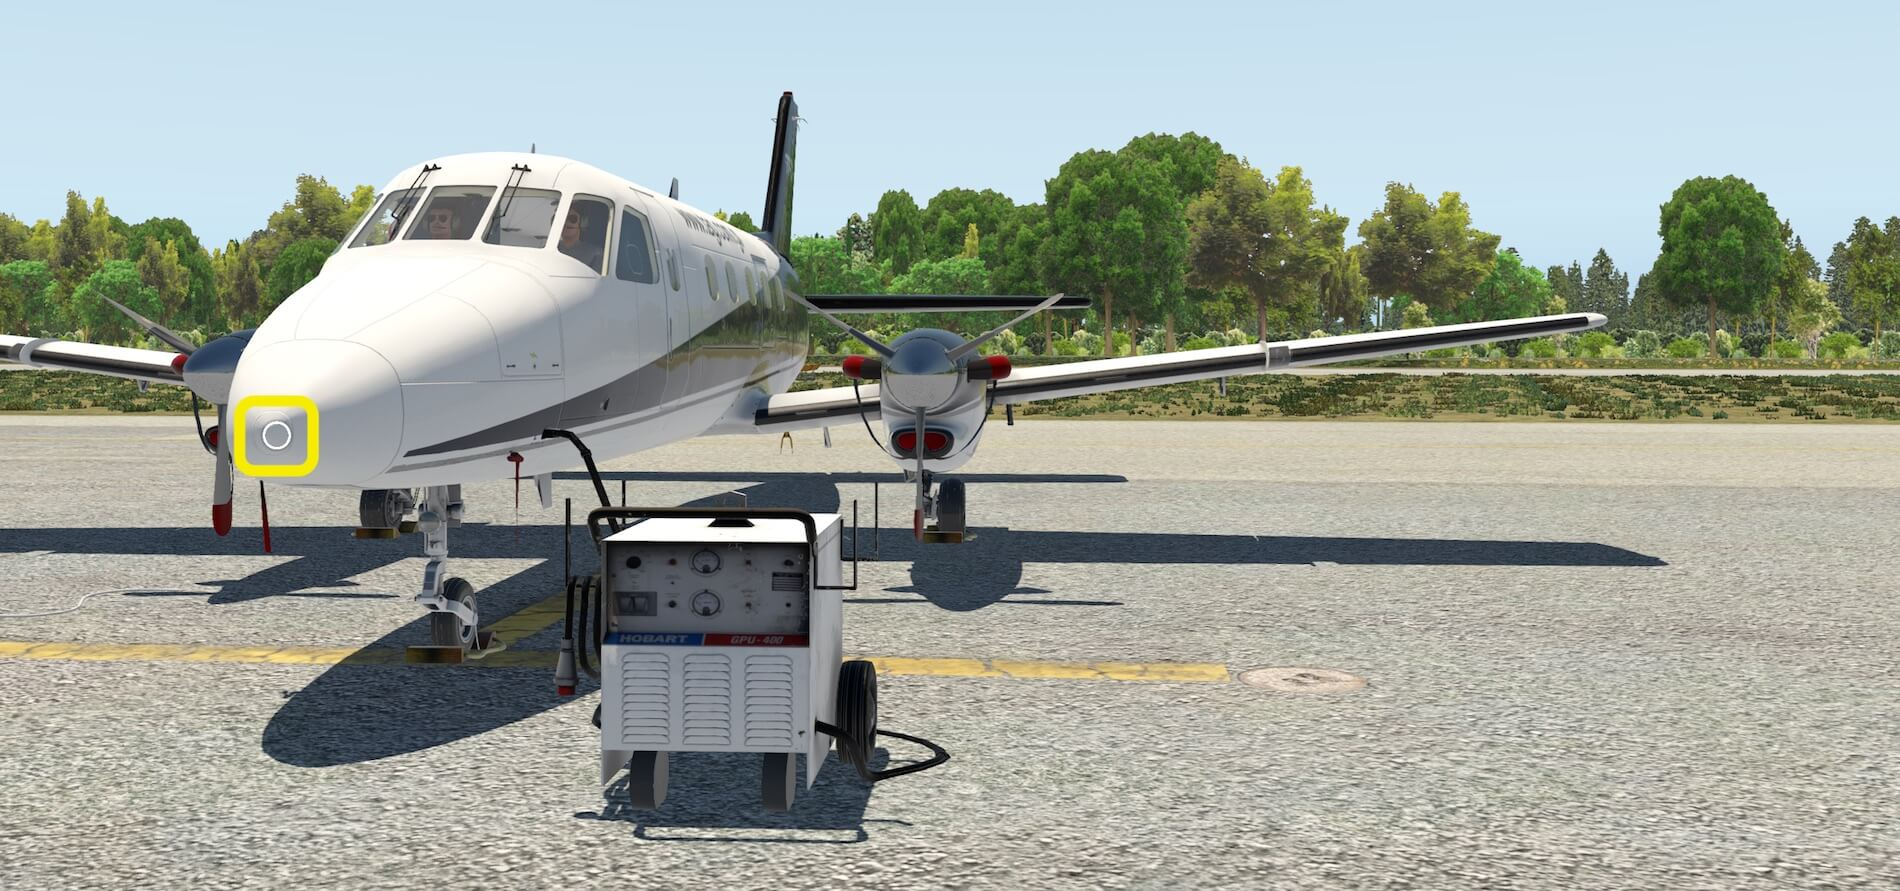
However, the EMB-110 comes with more interesting hot spots. With a circle you can install/remove all the individual ‘DO NOT BEFORE FLIGHT’ red labels or engine inlet covers and much more. This is quite realistic as you have to do this for every item, exactly same as you would do in real life. Hold on, there’s a much easier way to locate these hot spots, and the answer can be found at the radome nose. Click on the radome nose and you’ll see a popup window that allows you to control all these ground safety covers individually or using just one click.

And finally, refuelling.
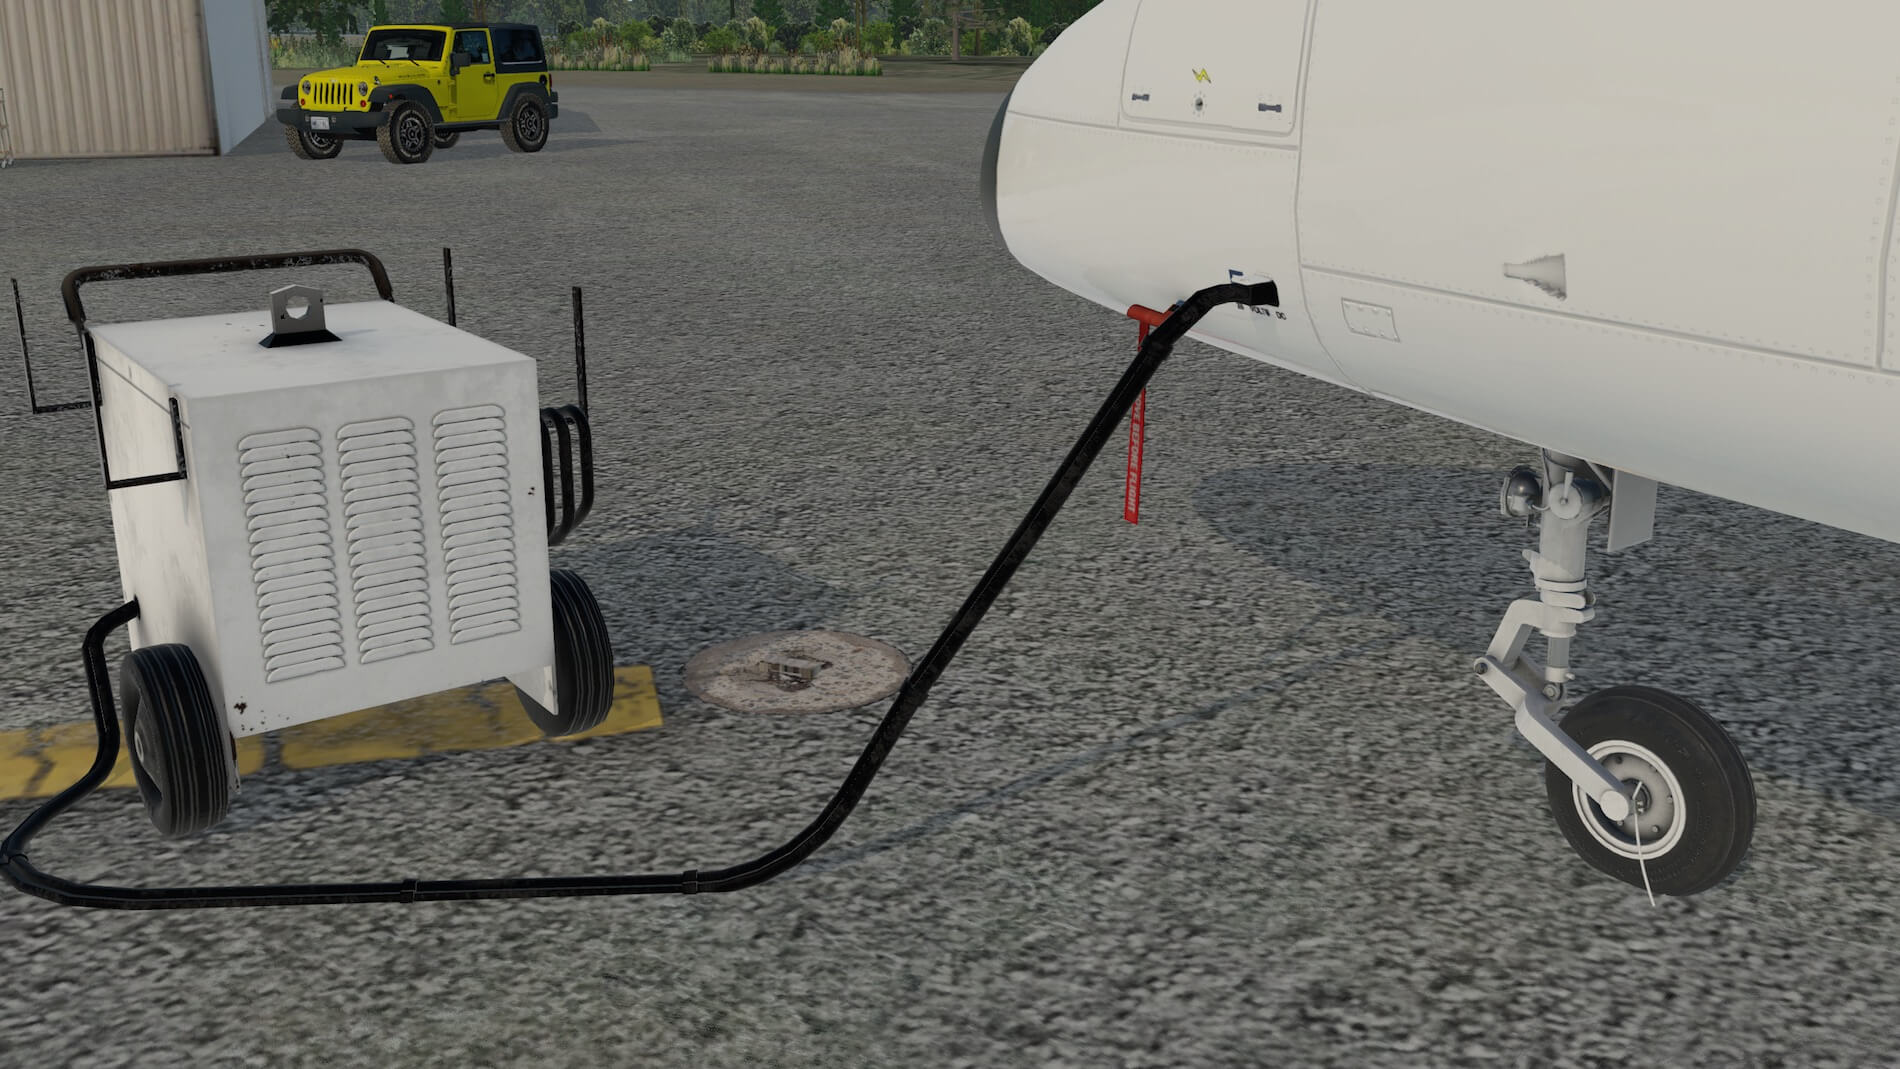
When you walk towards the middle of the wing leading or trailing edge, you’ll notice that a white fuel nozzle appears. By clicking the fuel nozzle, a quantity indicator pops up. Clicking on the fuel quantity scale allows you to increase or decrease the amount of fuel per wing. An interesting detail is that, when you increase the amount of fuel, the resulting larger fuel load will lead to the compressing of the main gear strut.
In case you’re lost, the ‘hot spots’ locations can also be found in the EMB 110 manual.
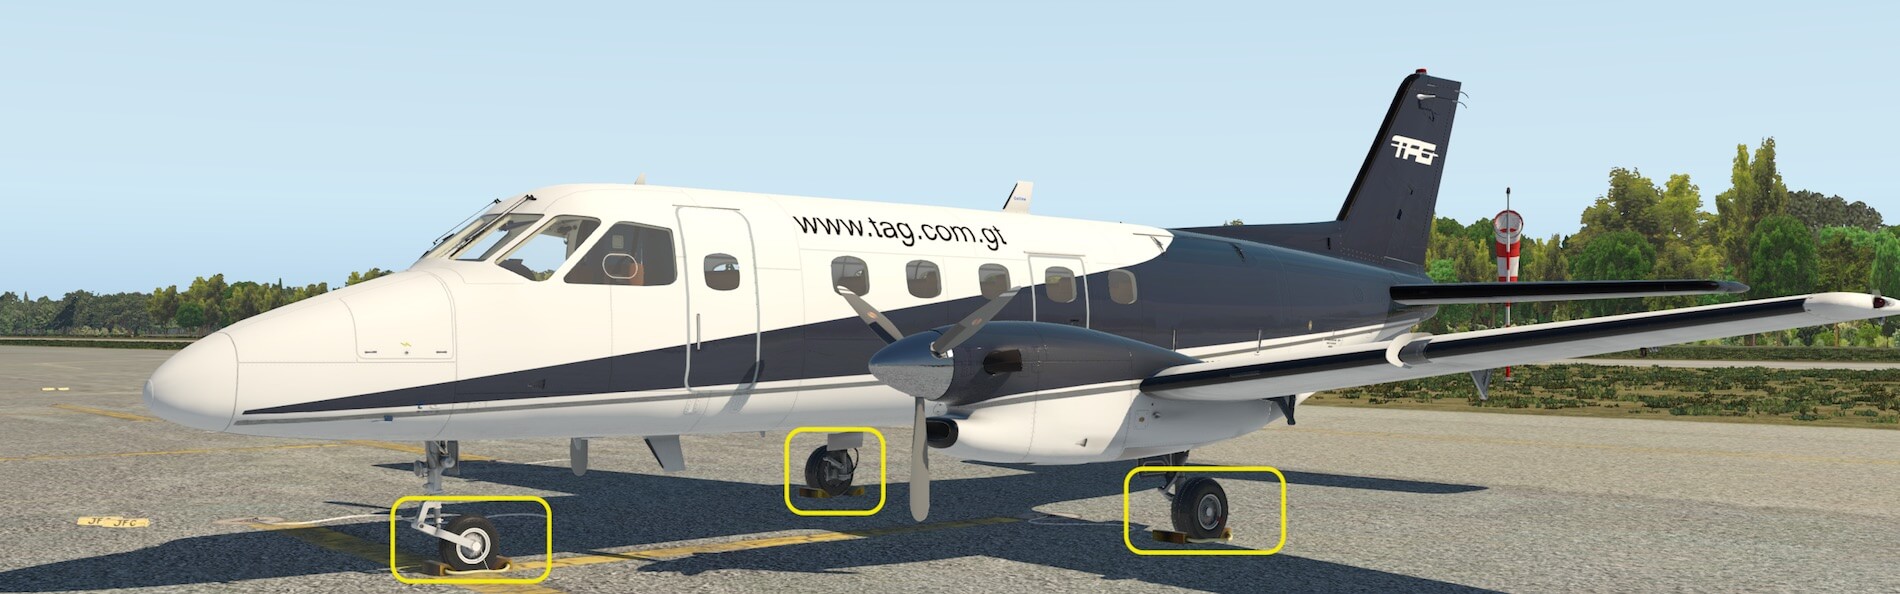
Quick Check
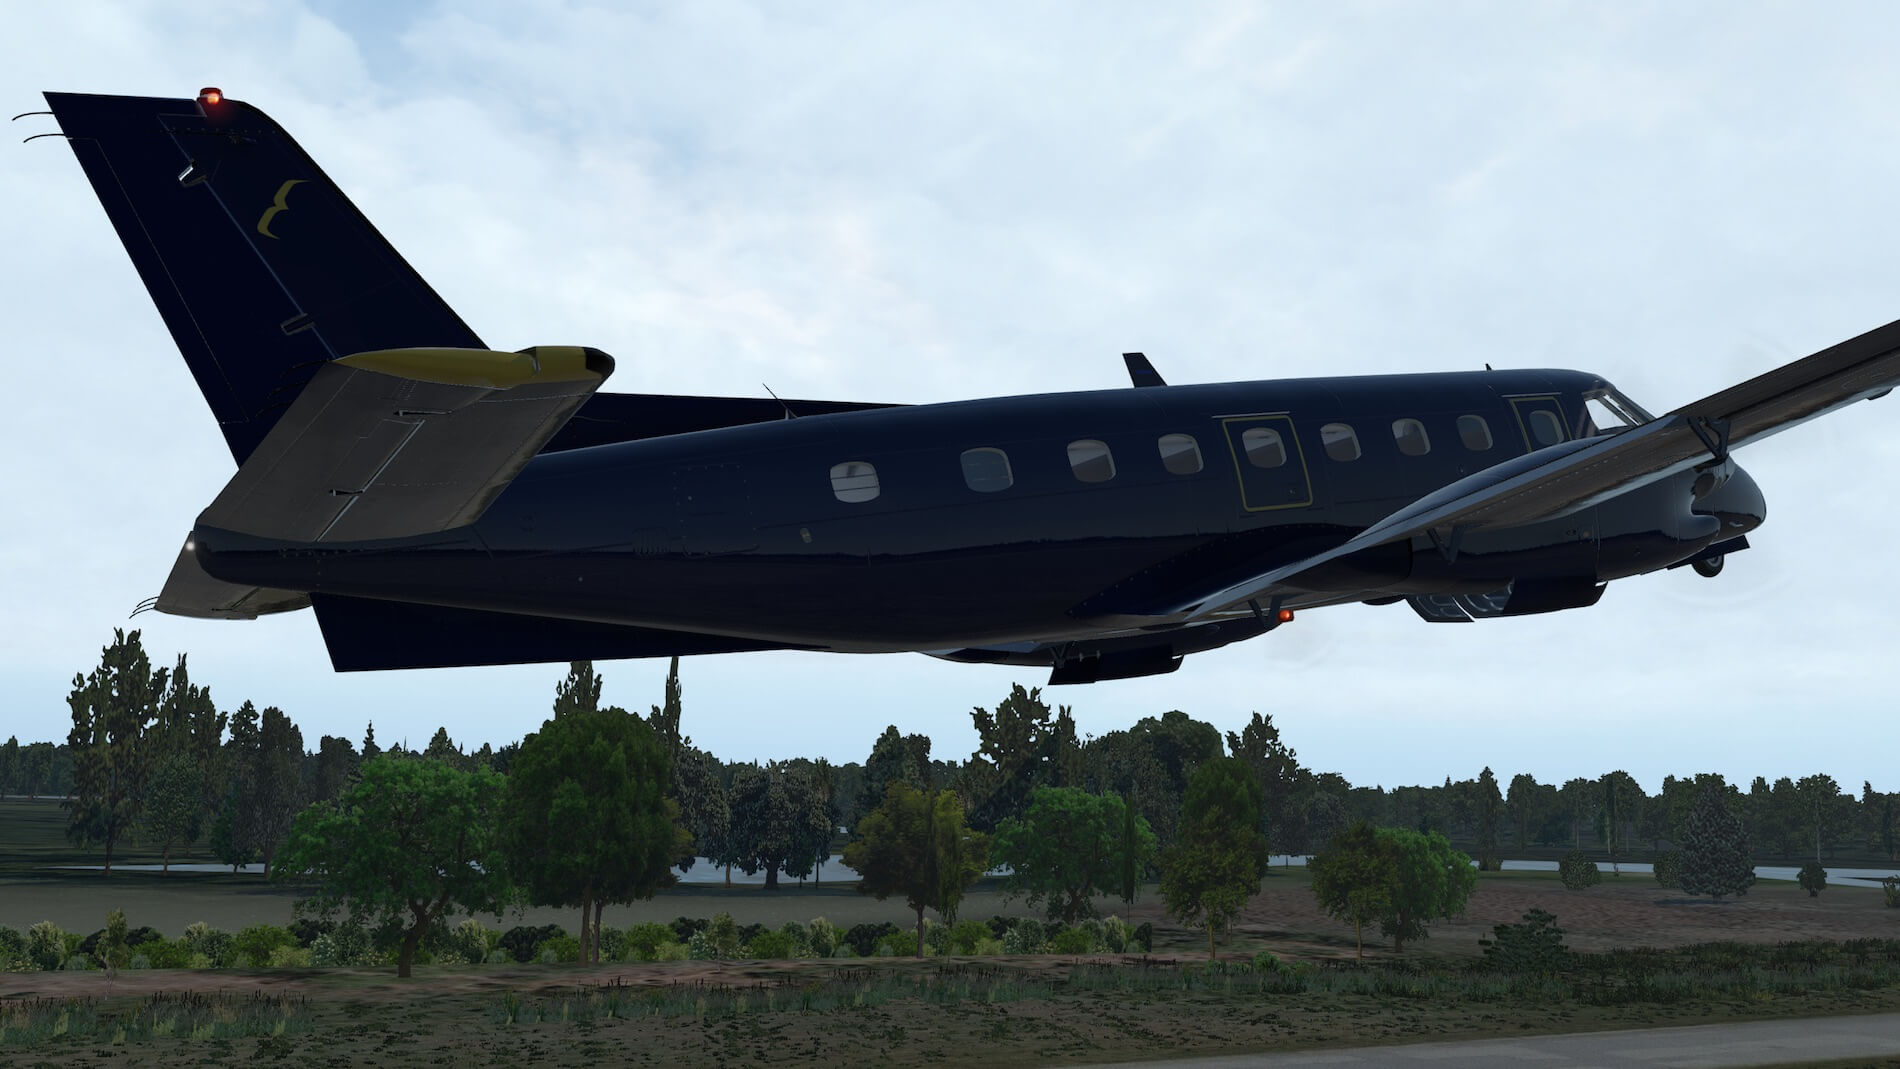
When I carried out the preparations, I was already happy with what I saw: a very detailed EMB-110! The landing gear struts are all modelled with great detail, although it looks like all the liveries are brand new or repainted. Besides the missing scratches and weathered spots, I also miss oil leaks or dirty stripes on the engine cowling. Yes, I know, it is just possible that all models have had their annual inspection including a fresh coat of paint on their skin, but I think it would be more realistic if a more used look was depicted.
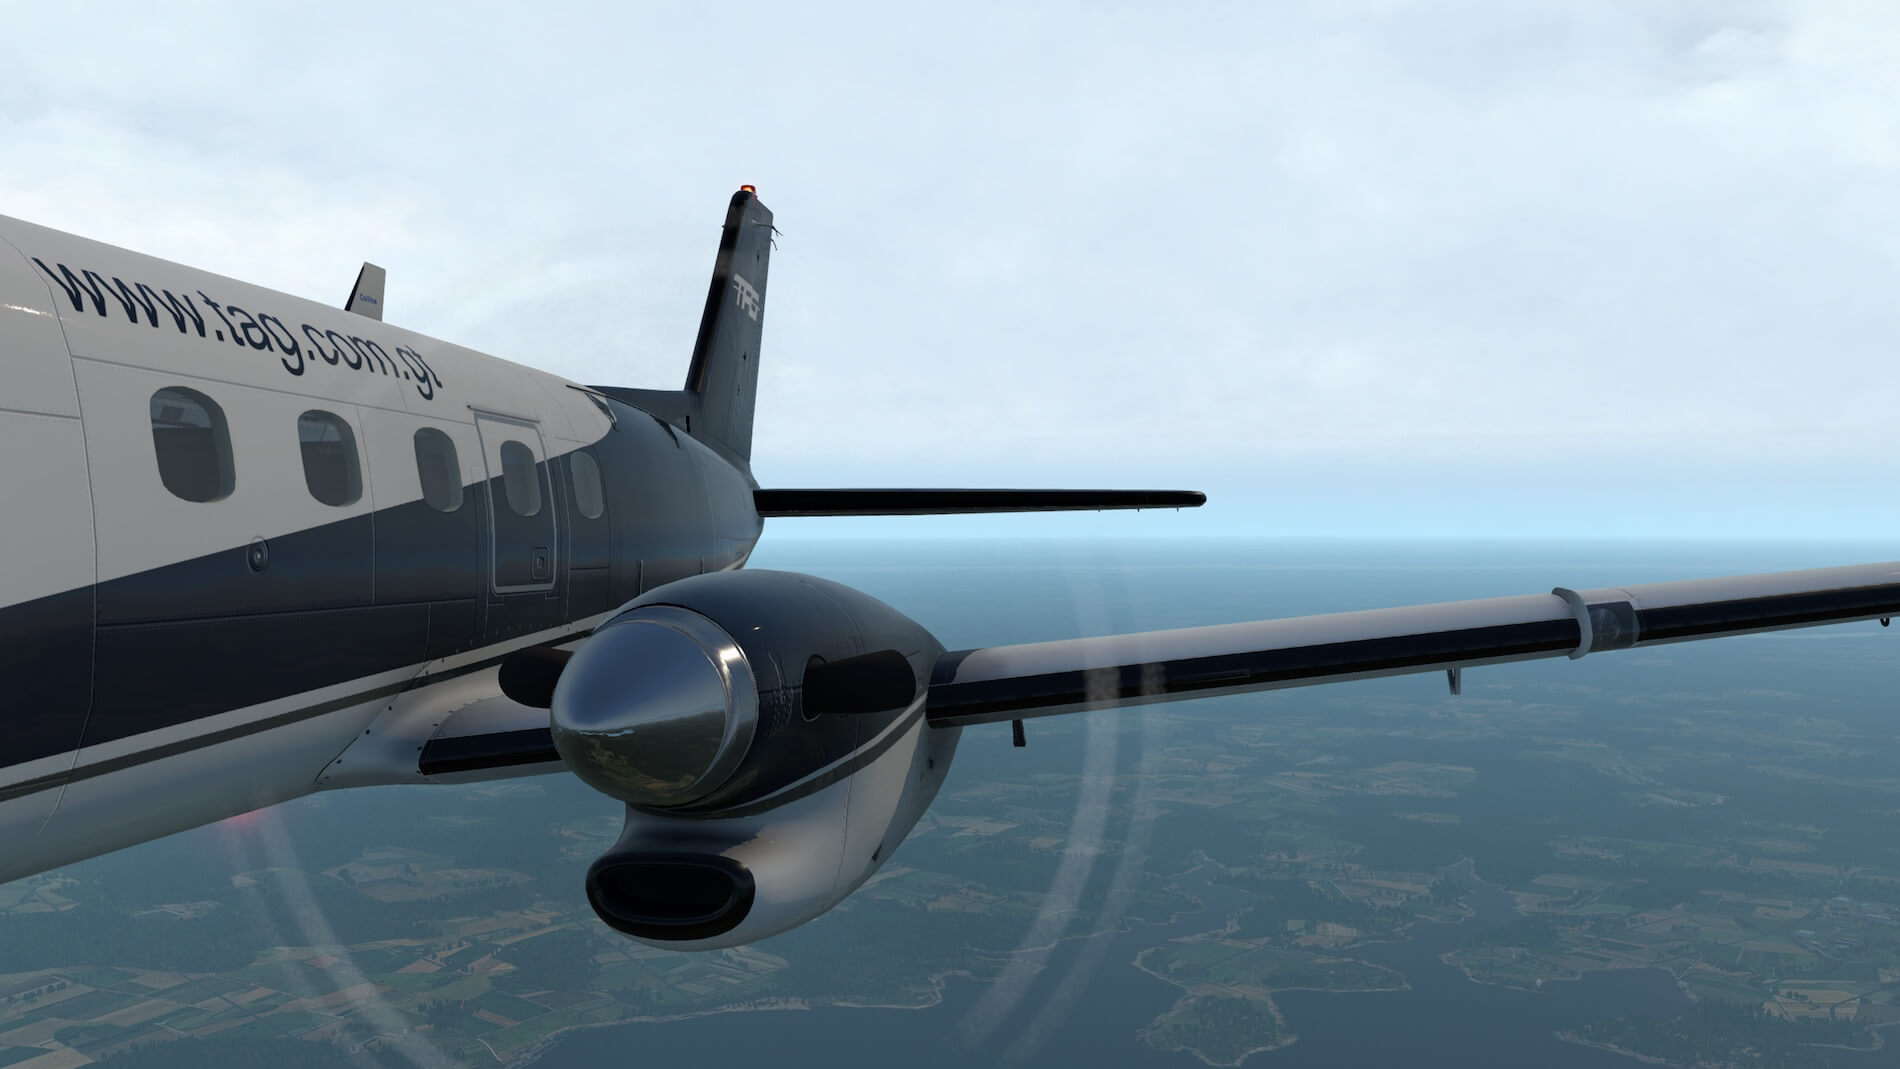
Besides this, many tiny details aren’t forgotten and these contribute towards giving the modelled EMB-110 a realistic look. Zooming in on the fuselage skin decals I should point out that every piece of lettering is readable. This is a great news. Taking a closer look at the engine cowling and propeller blades in particular, the Hartzell decal is readable as well as every decal near the cargo door. I’m also aware that some simmers aren’t really interested in such detail, but it’s my aim to highlight such things anyway.

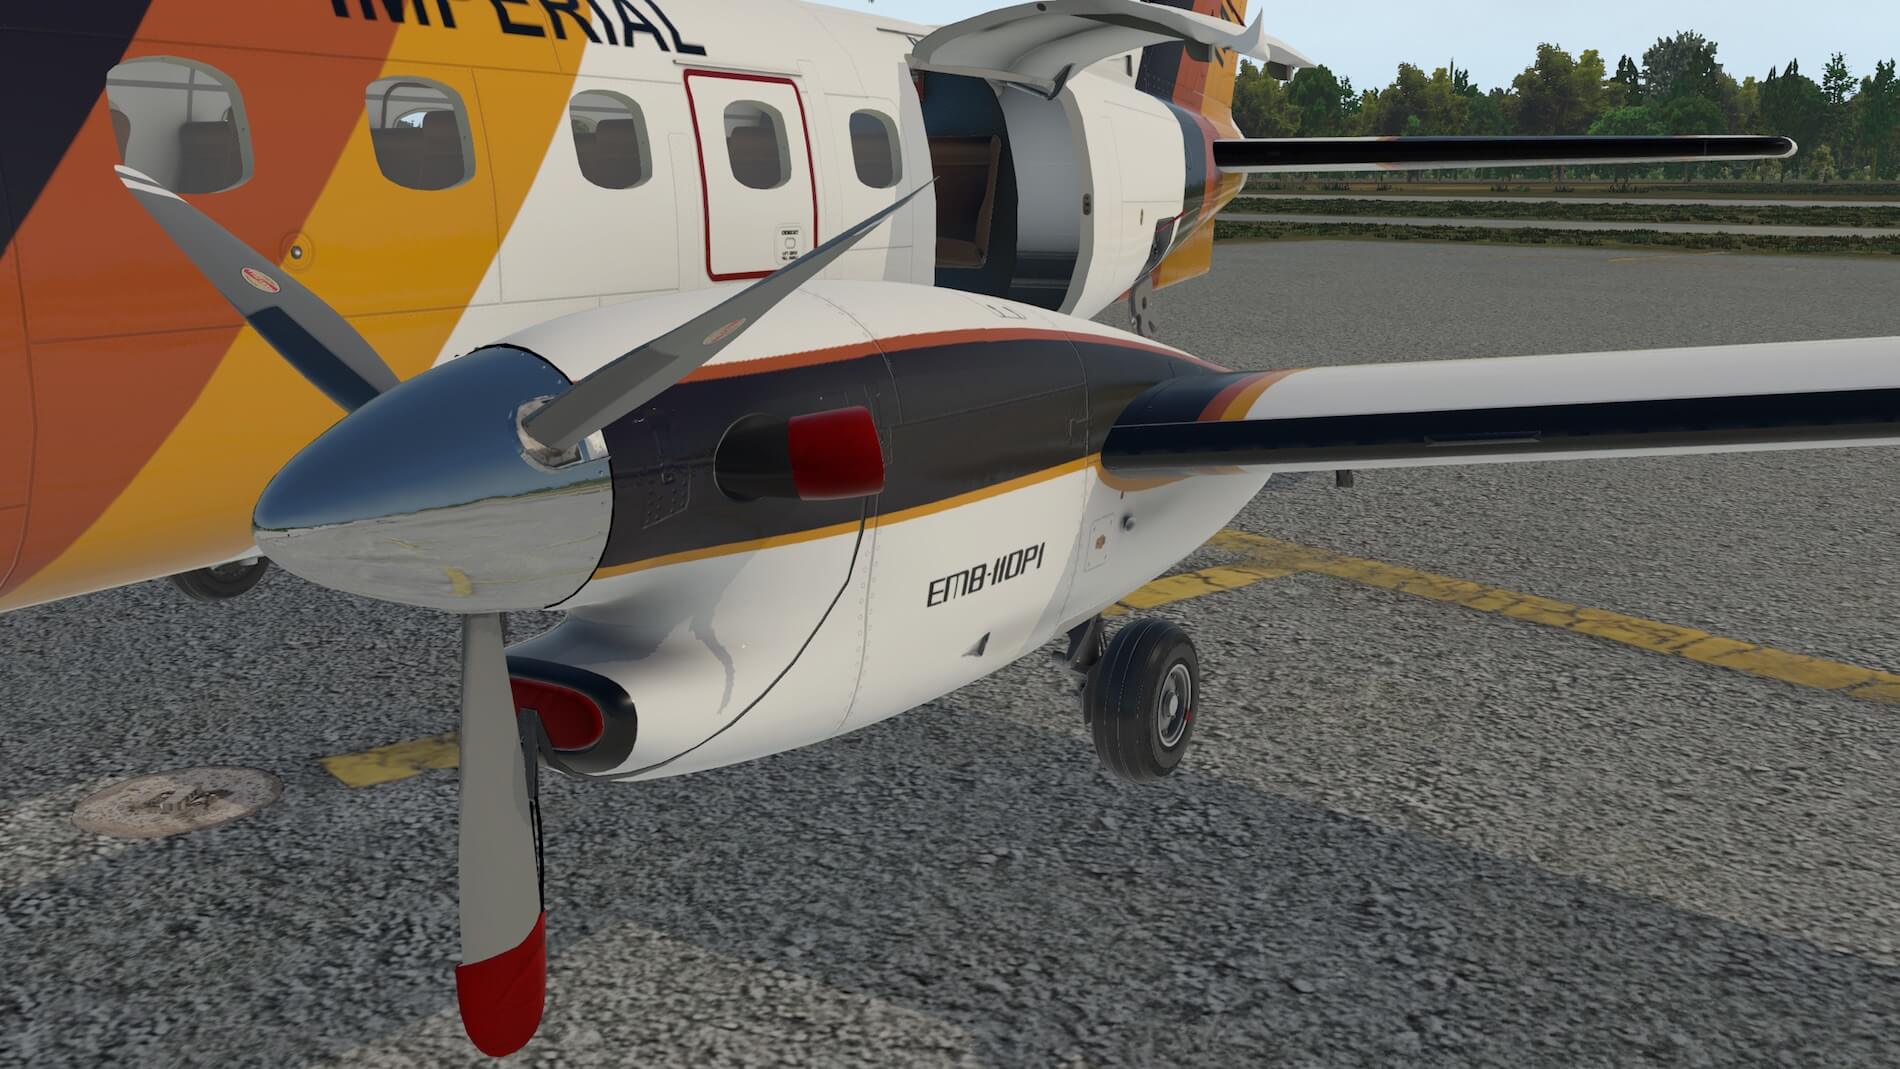


Although the wing tips look straightforward, I am impressed by them and in particular I like the modelled plastic glass on top of the red/green navigation lamp unit. From the wing tip towards the fuselage I also notice the way the flap supporting struts are modelled. Further on, on the left hand side of the fuselage, just behind the cargo/baggage door, we’ve got the small panel door with perfectly modelled hydraulic hand pump, hydraulic lines, selector valve, cylinder and red hand pump handle. Very nice work!


As expected, the tail is well depicted, although I’m wondering if the white navigation tail light or perhaps strobe light is modelled. Looking from the end of the tail to the top of the vertical fin, I have to say that every static discharger is modelled (same as on the wing trailing edge) as well as some antennas. Overall a good replica of the real Embraer EMB-110!
Powering Up but first …
Introduction
Via the passenger entrance door I get access to the right-hand cockpit seat, but first I need to cover a special popup window from DreamFoil which I briefly highlighted in one of the previous sections. This popup window is activated right above the airspeed indicator or left of the AP control panel. It allows you to control:
– SmartLivery
– Quick Views (cockpit, passenger area, baggage area and tail camcorder)
– Volume (exterior, interior and wind or master)
– FOV (Field Of View, default set at 60)
– Checklist (a new popup booklet of the checklist appears)
– Stability (adjust pitch, roll and yaw stability)
– Customize (HF antenna, tail plane and failures)
– Exterior (wheel chocks, caps, tail support etc)
– EXIT (the light grey word EXIT or white dot in the middle)

OK, time to move on and first print out the normal procedures manual. The reason is that you get a better appreciation of how to fly the EMB-110, but in addition it offers the checklist and how to start the engines.
Starting with a cold and dark Embraer EMB-110, if you follow the checklist to power up and start the engines, it all works perfectly. The checklist is a good guide, but when you’re not familiar with the Garmin equipment GNS 430/530, you can download a good and informative manual from Laminar Research. Compared to the previous model for X-Plane 10, the implementation of the Garmin units is welcome hardware.


Back to the intended flight plan. I’ve created a short flight plan from KJGG to KBOS. There are many ways to create an ‘fms’ flight plan but, since I’m on a Mac, I used Online Flight Planner.Org (http://onlineflightplanner.org). The route in total is just over 400NM which gives you enough time to check out the aircraft systems, how the EMB-110 flies and how to use the Auto Pilot, although I need to point out that the EMB-110 is equipped with a so-called ‘basic AP’. This means there’s no glareshield where you’re able to make the necessary pre-selections.
The Making of a Flight Plan
I mentioned in the previous section already the online flight planner option, but let me highlight a couple of others.
Let me start with Routefinder which offers you quickly a flight plan, but this is not in “X-Plane fms” format. If you don’t like Routefinder, you could check out FlightAware, but again, this doesn’t allow you to export it to an fms file format; however, it offers real flight plans.
Another very interesting website is simBrief. Register for free and a wealth of flight planning information becomes available. It should be noted that simBrief prefers that you have a Navigraph account else it will use the data from RouteFinder.
Then there’s the previous mentioned browser-based Online Flight Planner which seems to be a good one although I’m not 100 percent sure if the generated flight plans are as real as they should be. The good news is that it seems to do the same as RouteFinder, but with several export options, of which one is “X-Plane fms”.
One more option but that requires two steps is using SkyVector and X-PlaneTools. We all know SkyVector, but SkyVector saves your flight plan in fpl format which in turn can be converted to fms with X-PlaneTools.
By the way, when you insist on using RouteFinder or FlightAware, you can use the same X-PlaneTools website also for converting these flight plan extension to a “fms” extension. Anyway, copy the created fms file into the X-Plane root folder Output/FMS plans.
With the fms file in this folder, you’re able to load the flight plan into the Garmin GNS 530. Oops, that is easier said than done. Let me help you out with loading a ready to use flight plan.
Insert Flight Plan into GNS530
Copy the KJGGKBOS.fms file into the X-Plane root folder Output/FMS plans. With the fms file in this folder, you’re able to load the flight plan into the Garmin GNS 530. Next, follow the steps in the screenshots below with additional information what to do.
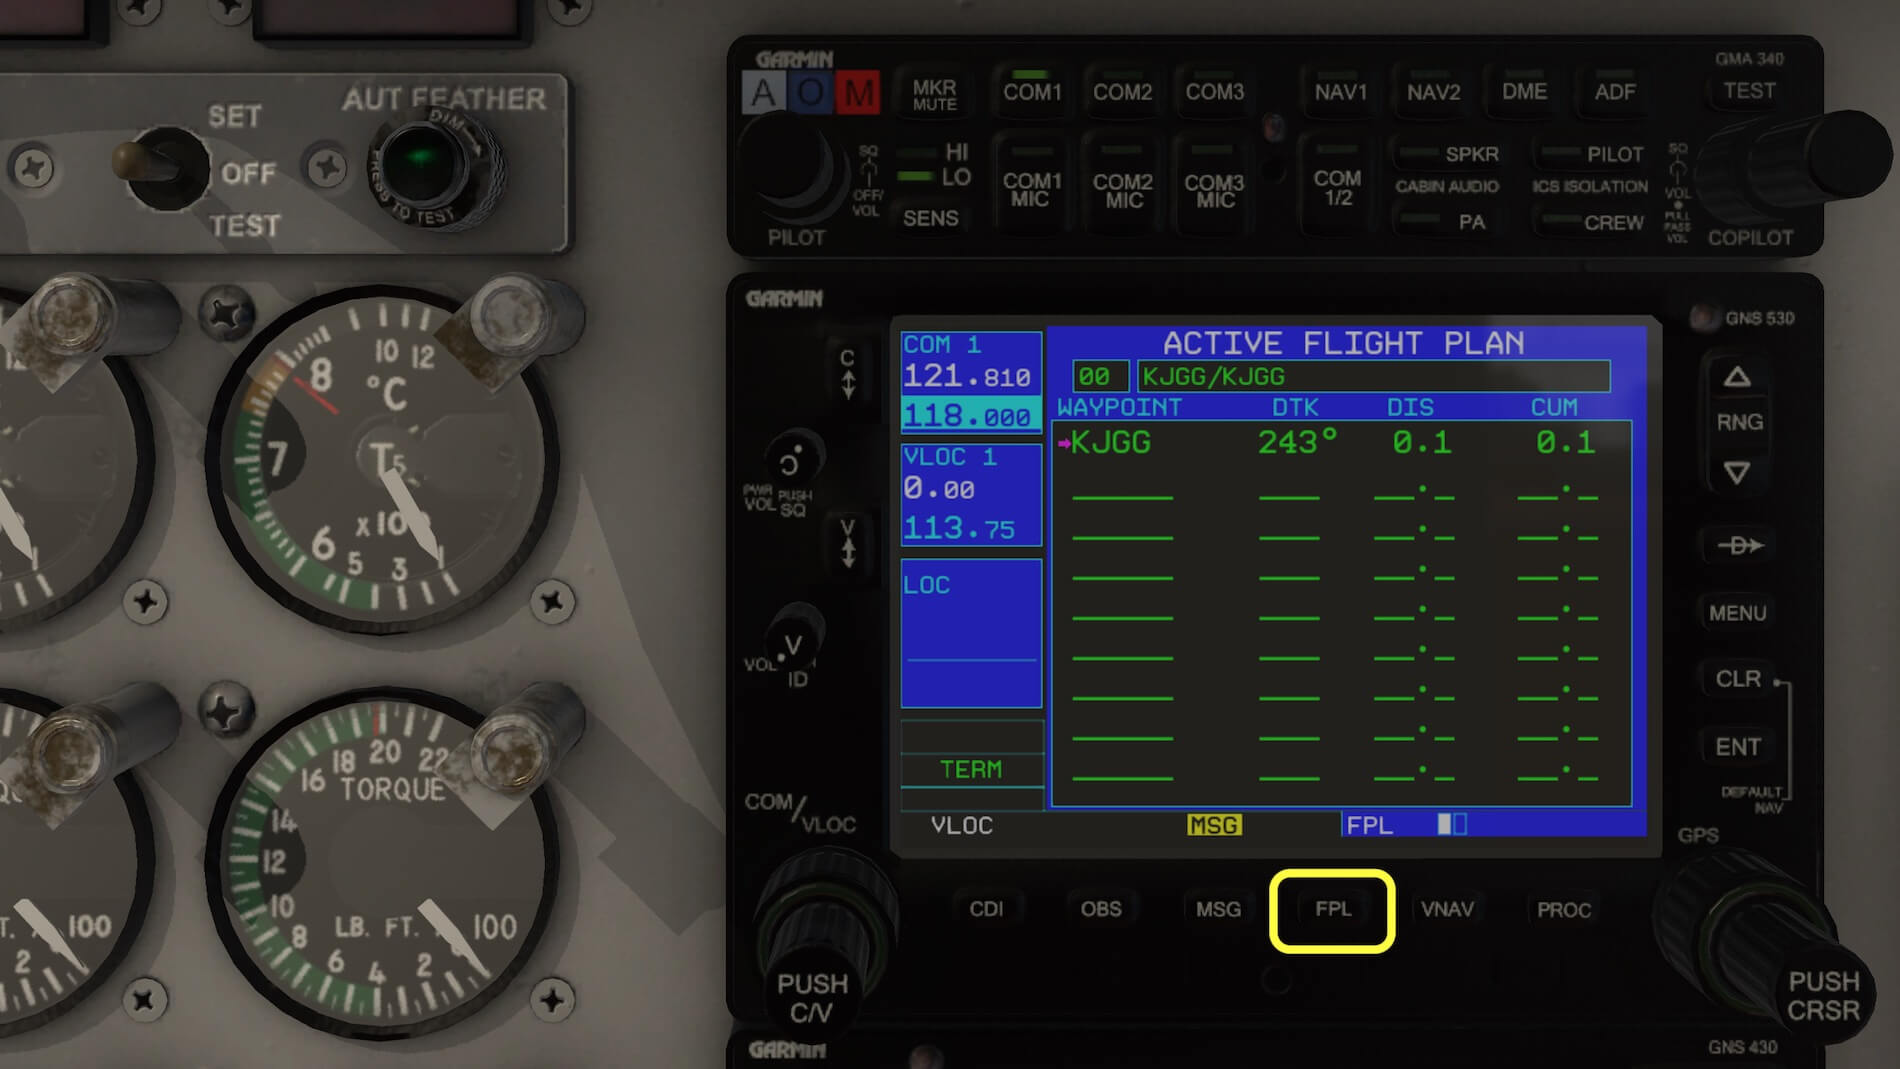


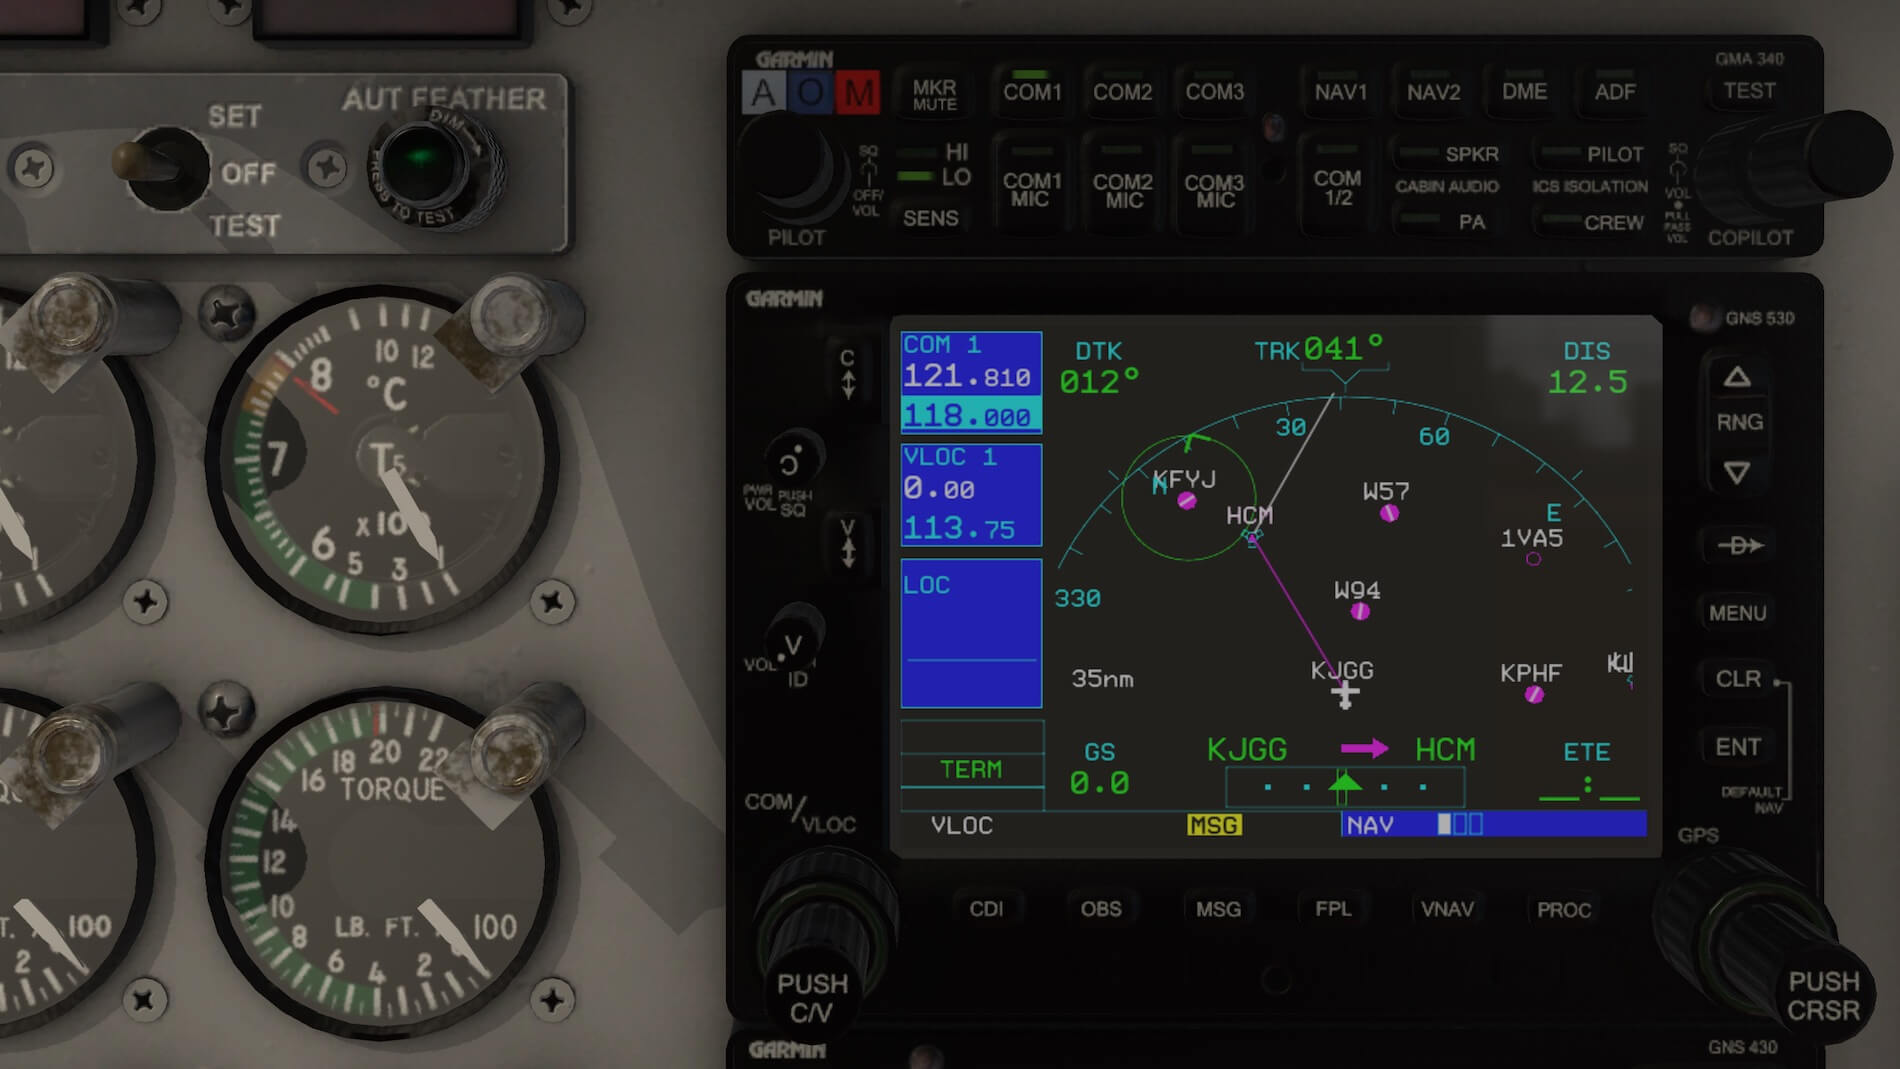
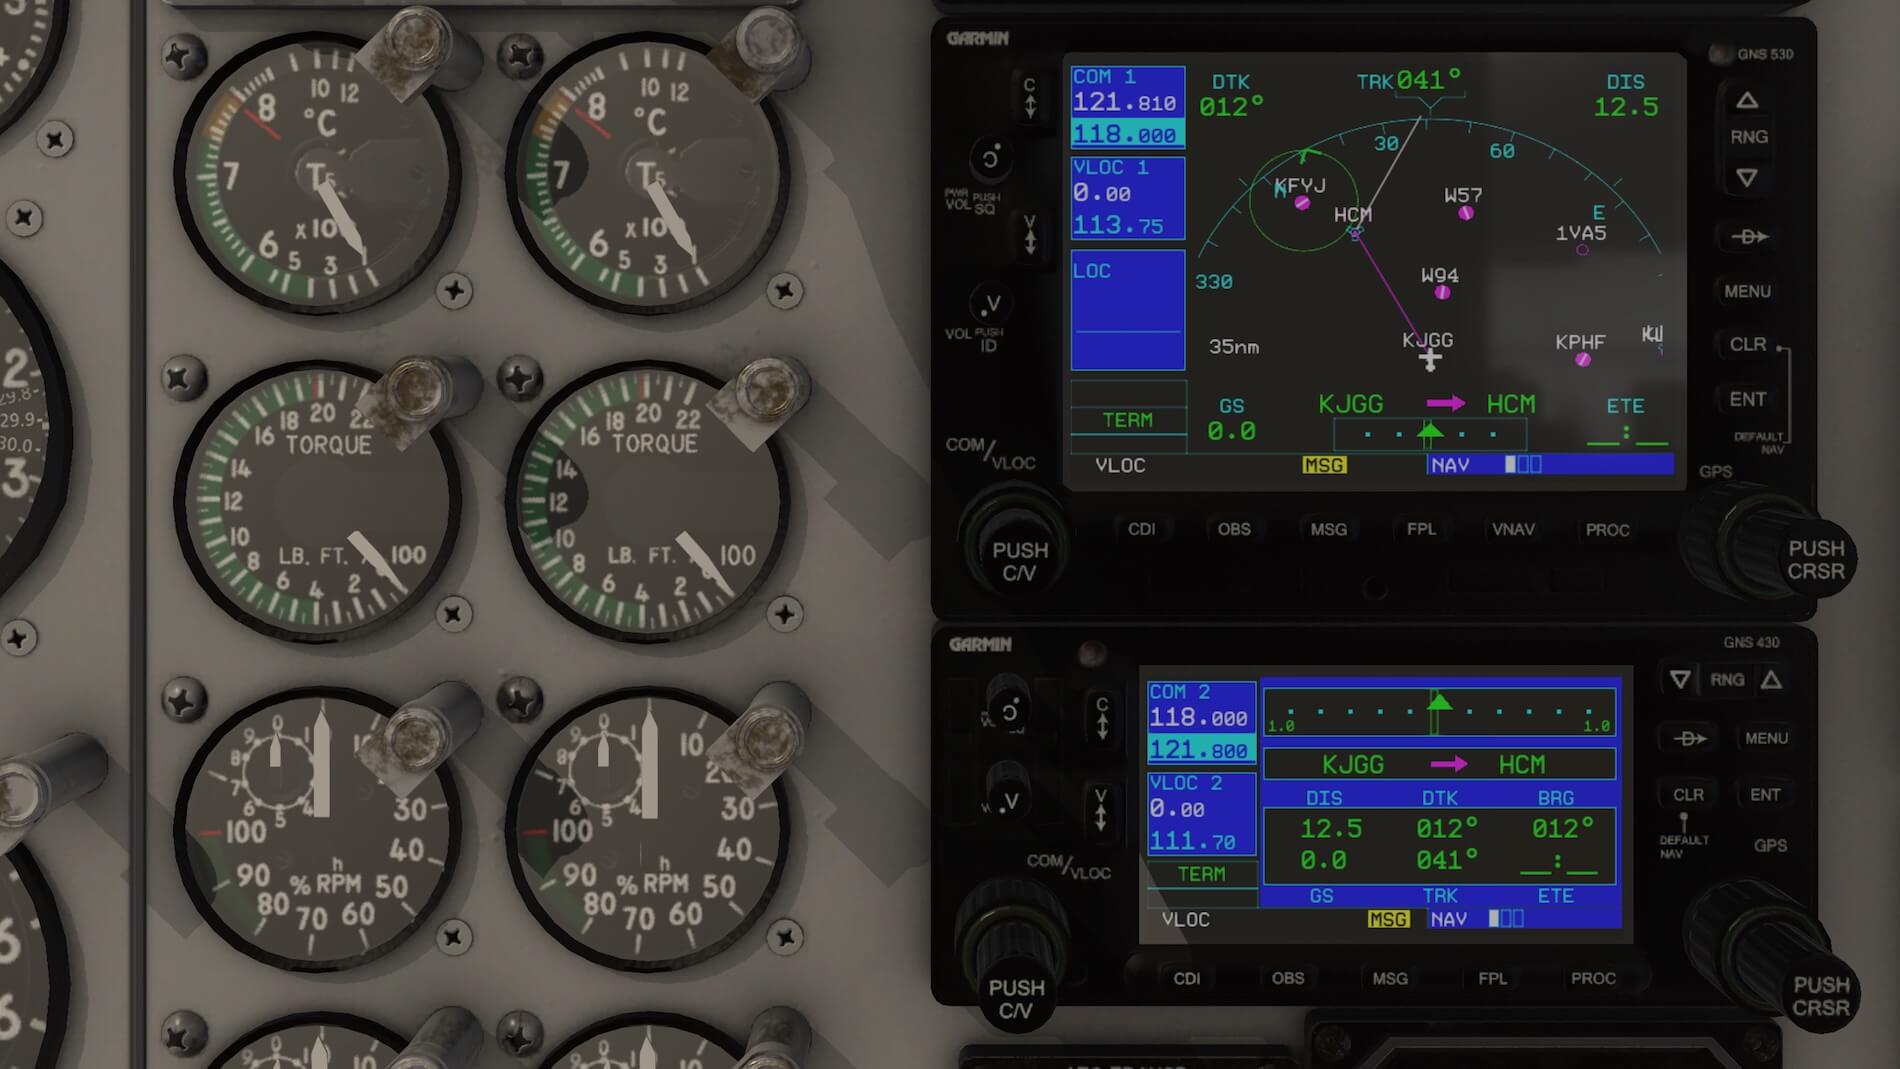
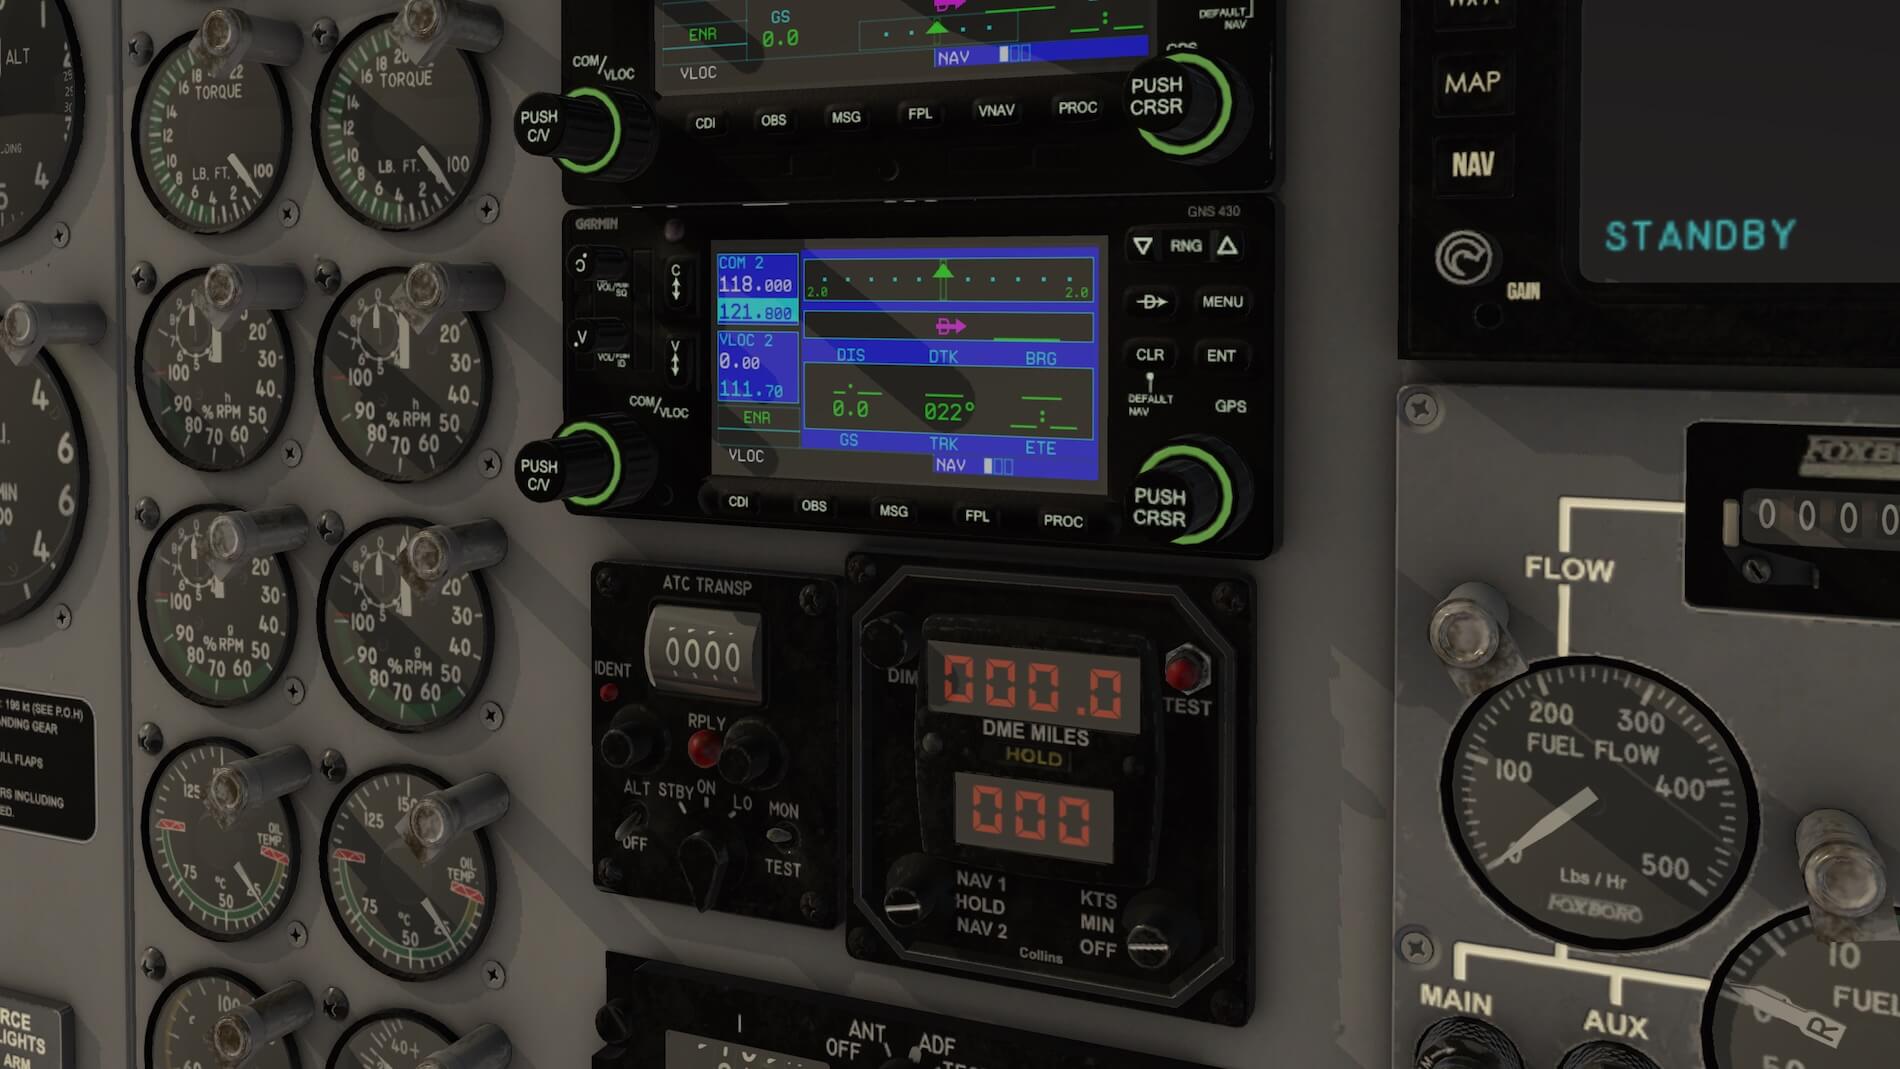
As you can see for yourself, it would be helpful when you’re able to create your own flight plan and load it into the GNS 530. Additionally, I decided to load the flight plan ones more into the GNS 430. The advantage of this is, that’s at least how I feel about it, that the GNS 530 (upper Garmin) shows the plan while the GNS 430 (lower Garmin) shows stretches.
Time to Fly
Taxiing with the EMB-110 is nice, although no rumbling sound during taxi can be heard, at least, I didn’t hear anything. Before the takeoff I went over the checklist again and when all the items were completed, it was time to fly. Doing the takeoff isn’t a problem, the same for the climb. If needed, you can trim to reduce your workload.


When at 4000 feet, and using the ALT button on the AP, I noticed that the AP had some problems levelling off the aircraft. It took longer than expected before the IVSI needle stopped moving. Right now, I’m flying in HDG, ALT and AP mode. OK, AP is not a mode. It simply means that the AP is connected in heading and altitude hold mode. The active mode can be seen, of course, via the ON lights on the AP control panel and the flight mode annunciator above the horizon.
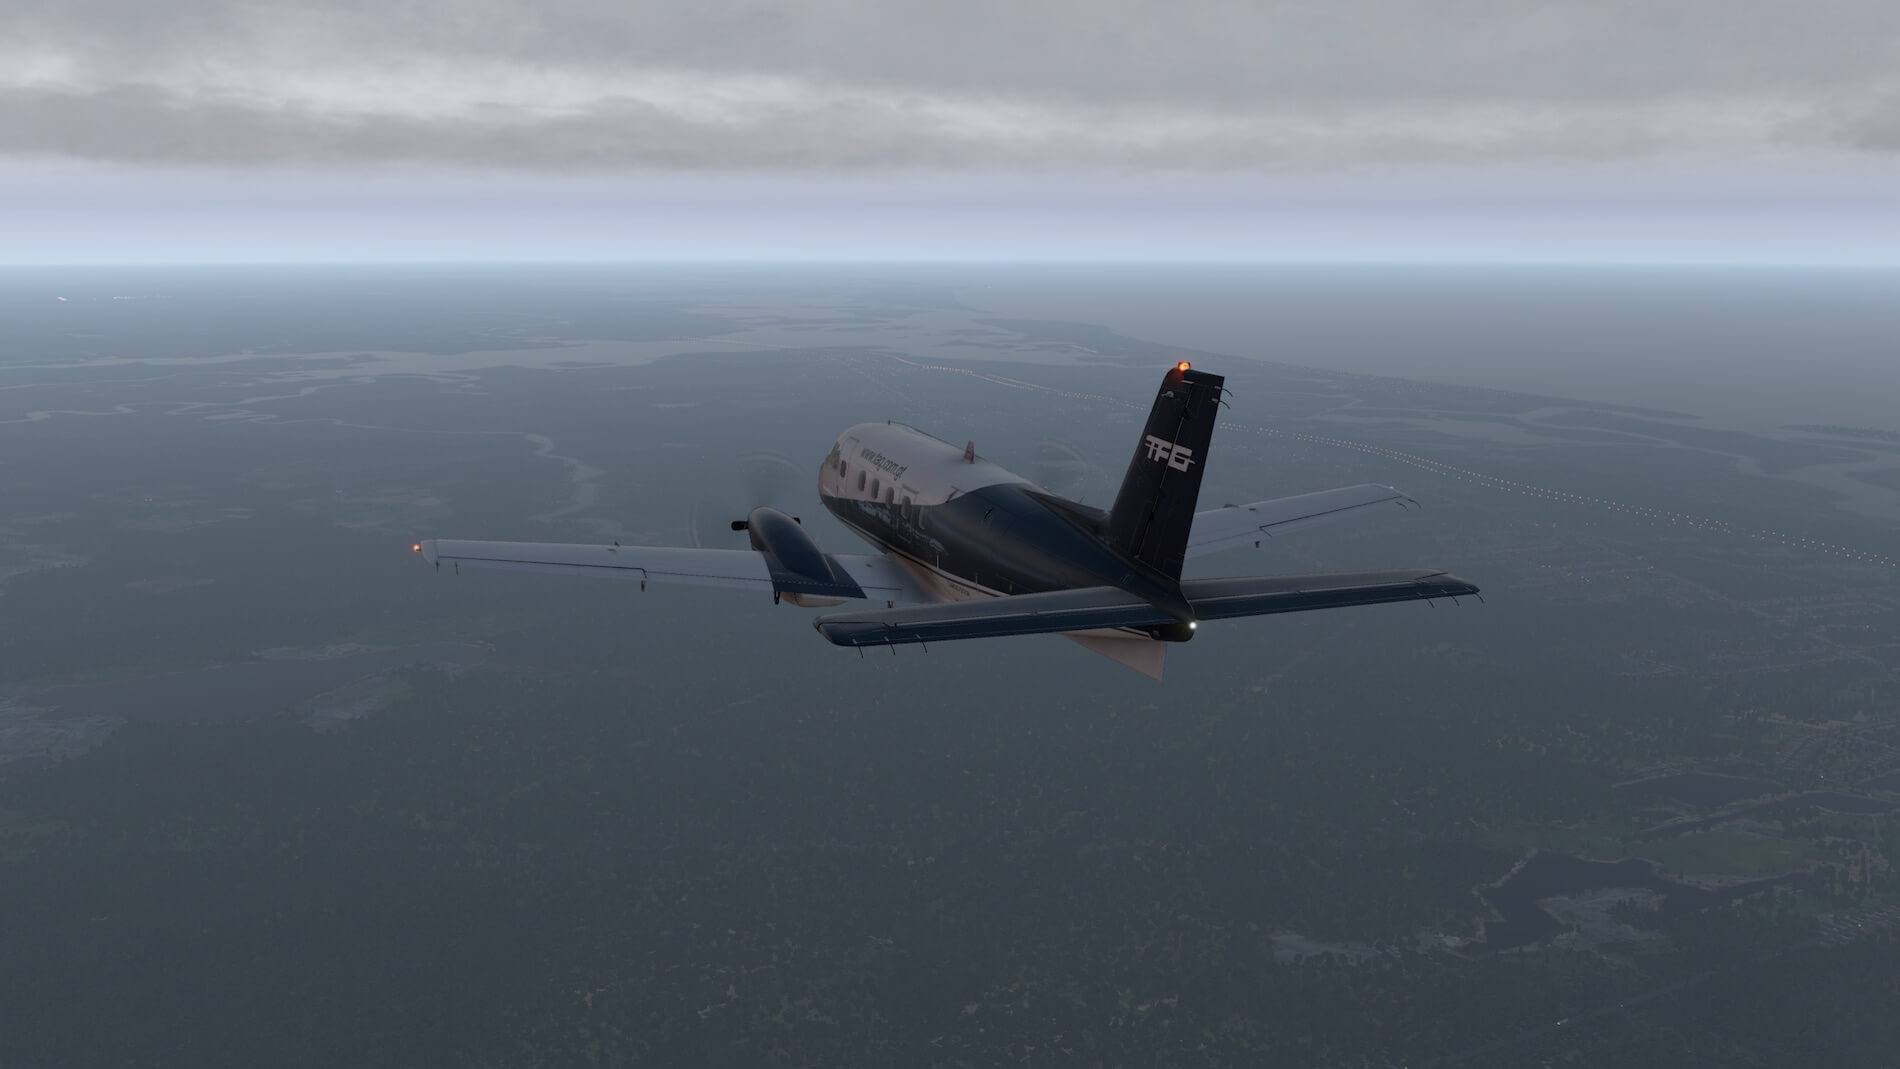
At a certain moment I decide to climb to FL060 and turn the ALT button on the AP panel off, use the trim thumbwheel on the AP panel to adjust a certain vertical speed. Don’t use the trim switch assigned on your connected hardware. When all the AP modes are disconnected as well as the AP itself. The only mode that stays connected is the YAW channel. By the way … that I decided to go to 4000 feet, and a bit later to 6000 feet, that’s entirely up to you when you decide to fly this stretch too. I used real weather and although it’s an IFR (Instrument Flight Rules) flight and no need to see the ground, I prefer to see between the clouds what’s below me. When you go to a higher altitude and you’ve got scattered or overcast, then you don’t see anything, but perhaps you don’t want too. What said, up to you!
While following the flight plan with the passing of the different waypoints, I must say that the EMB-110 Auto Pilot does it’s work well. Smooth movements are made and no over steering. I’m not 100 percent sure, but I think the EMB-110 is using the default Laminar Research AP. As long as the simulated AP in the add-on aircraft is “basic”, I must admit that the constantly updated default Laminar Research AP is becoming better and better. The AP in this EMB-110 is what I call a ”basic AP”. Nothing wrong with that, but there’s no glareshield panel like with Boeing (MCP) or Airbus (AFS) aircraft. Settings are made on the fly.
I think it was a good idea that DreamFoil did decide to implement the default X-Plane Garmin GNS 530 and GNS 430 units. I’m not sure about the real EMB 110, but I can imagine that they could have been equipped with these Garmin units. Garmin equipment like the GNS 530 and/or GNS 430 are nowadays standard fitted within the aircraft.
And … how is the modelled 3D cockpit?
That’s an interesting question, but an easy answer.
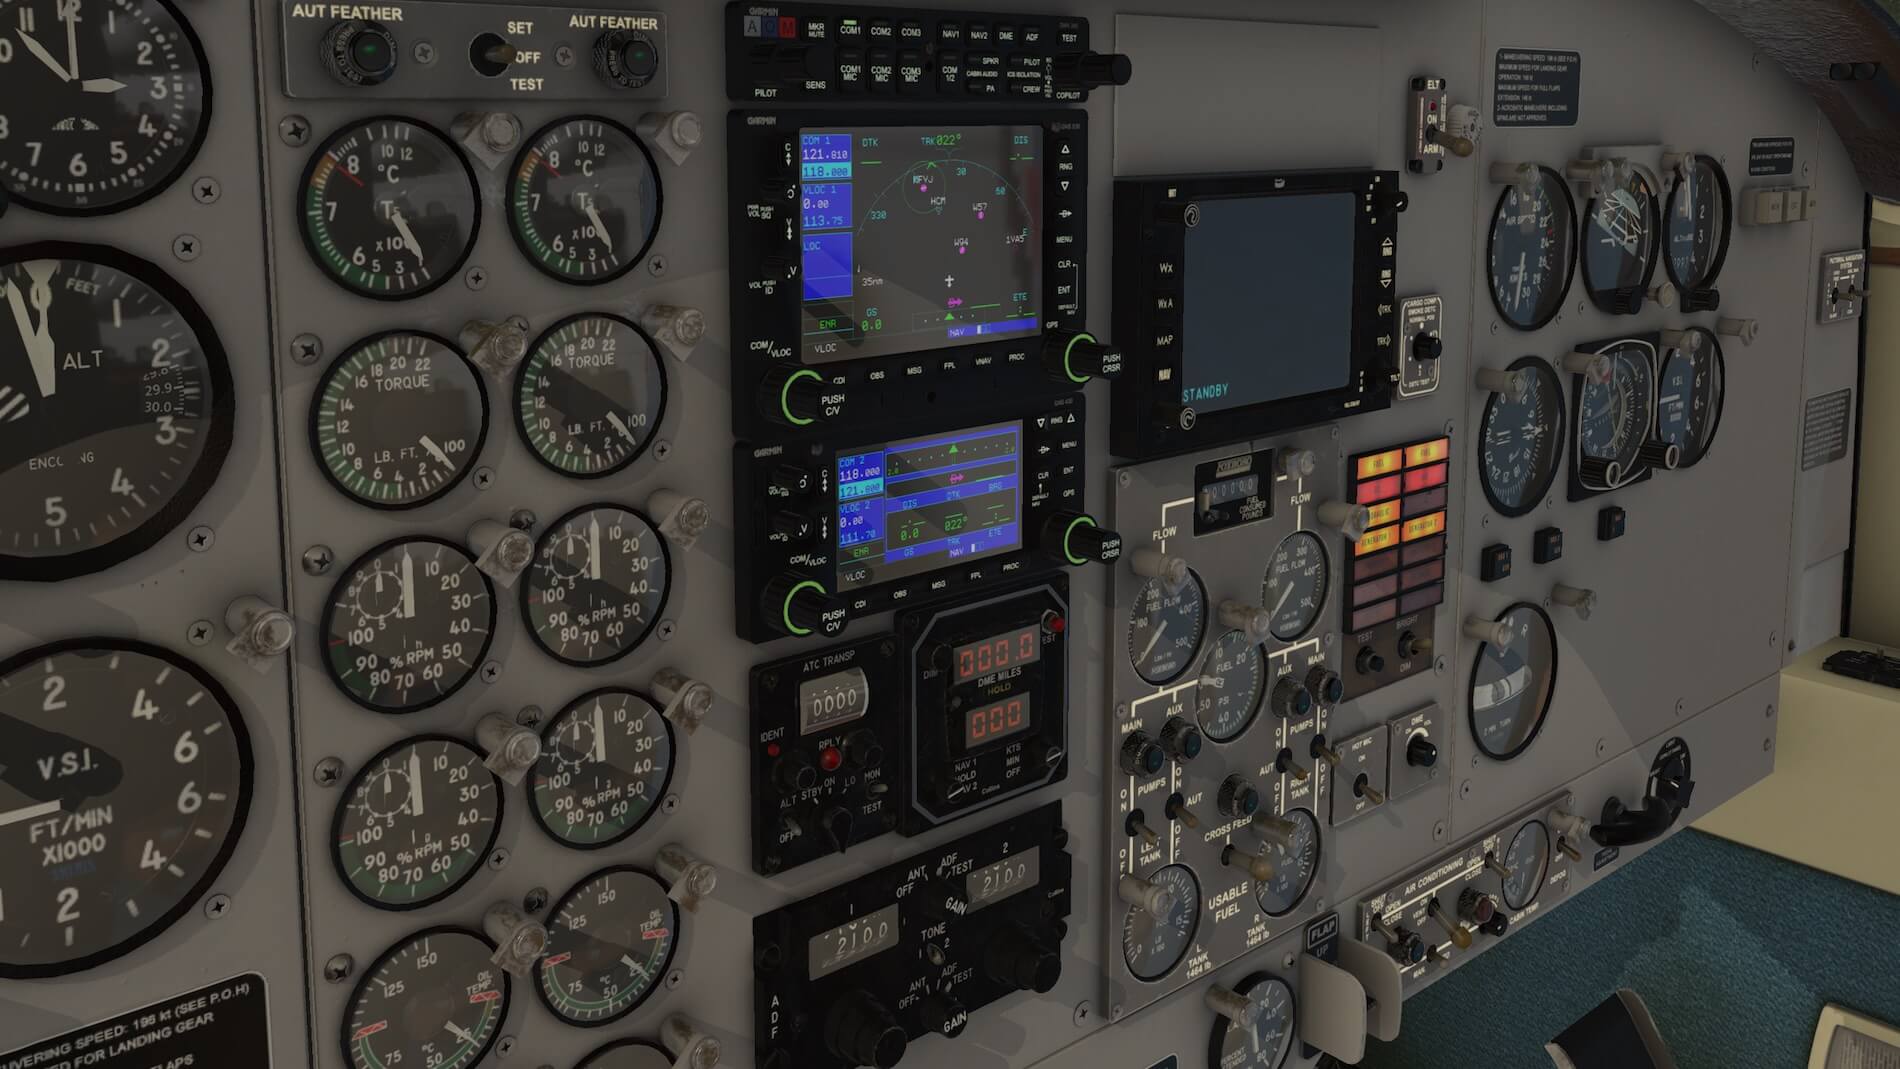
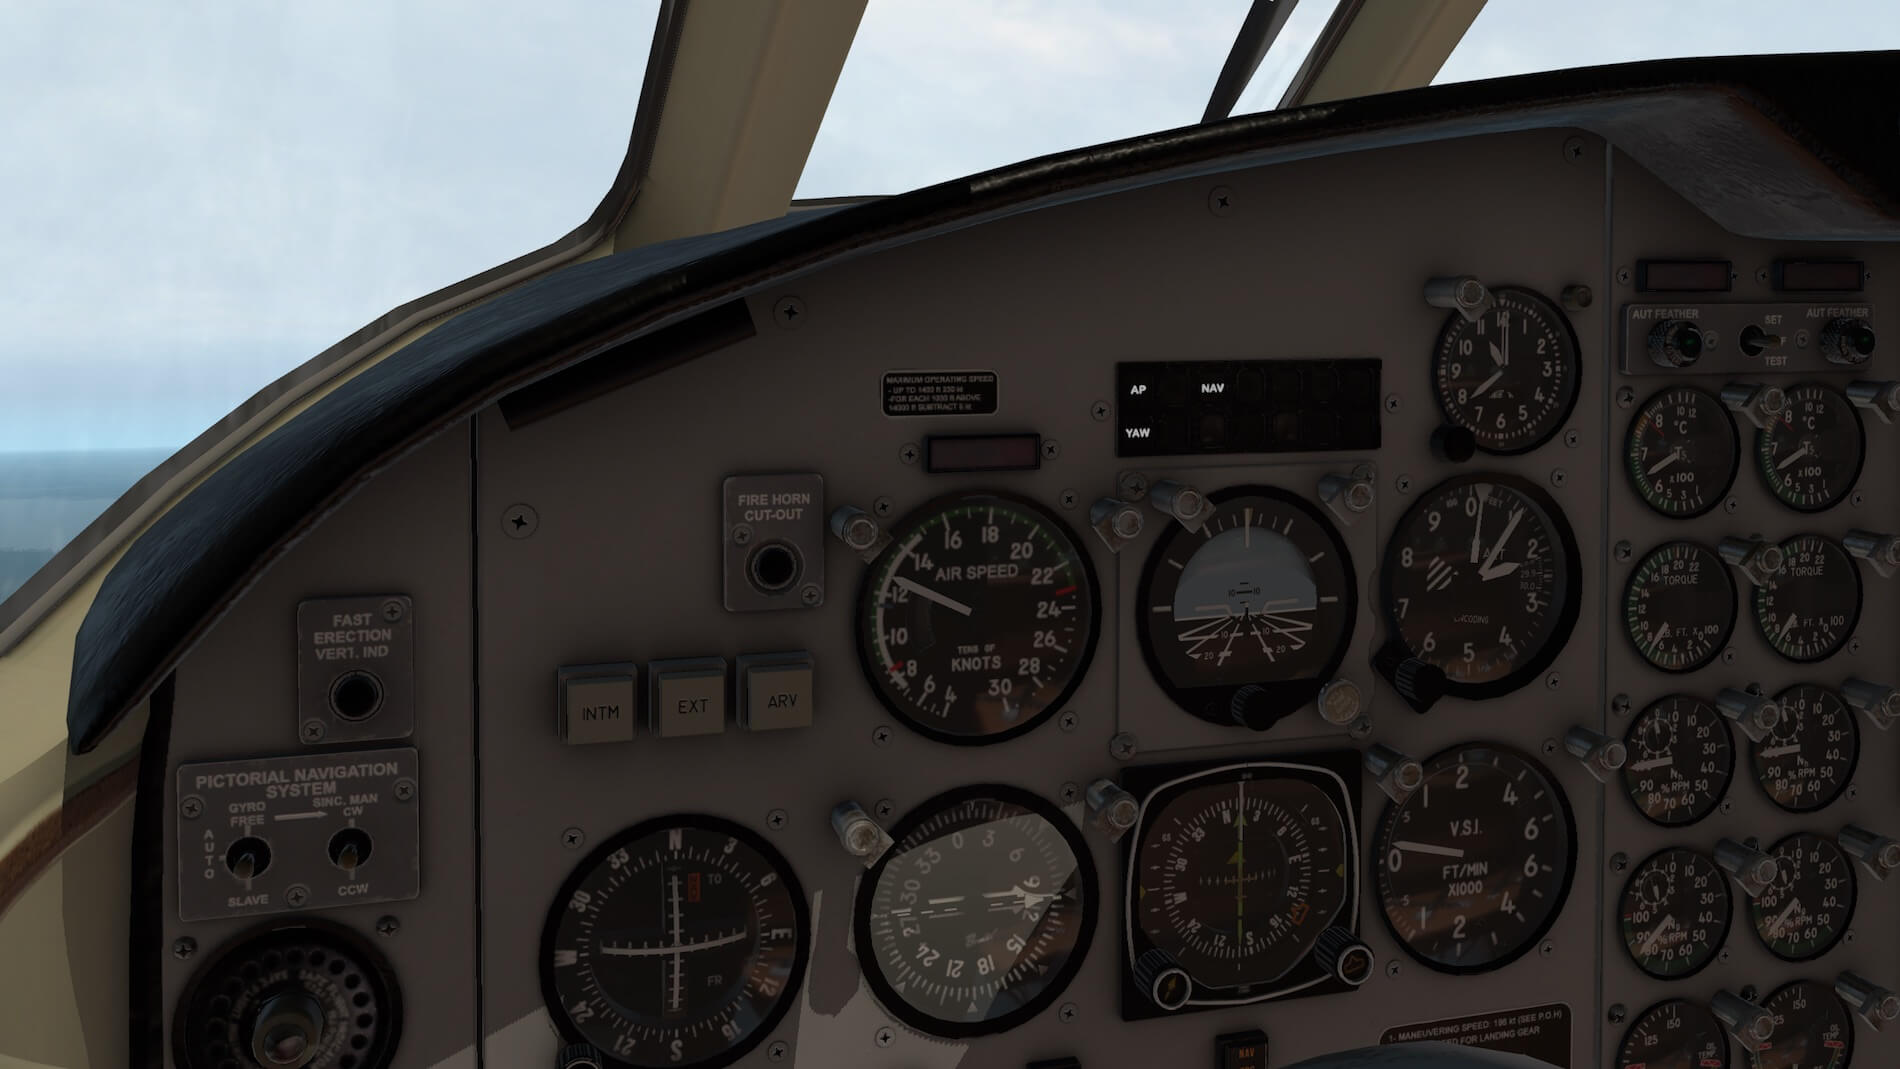
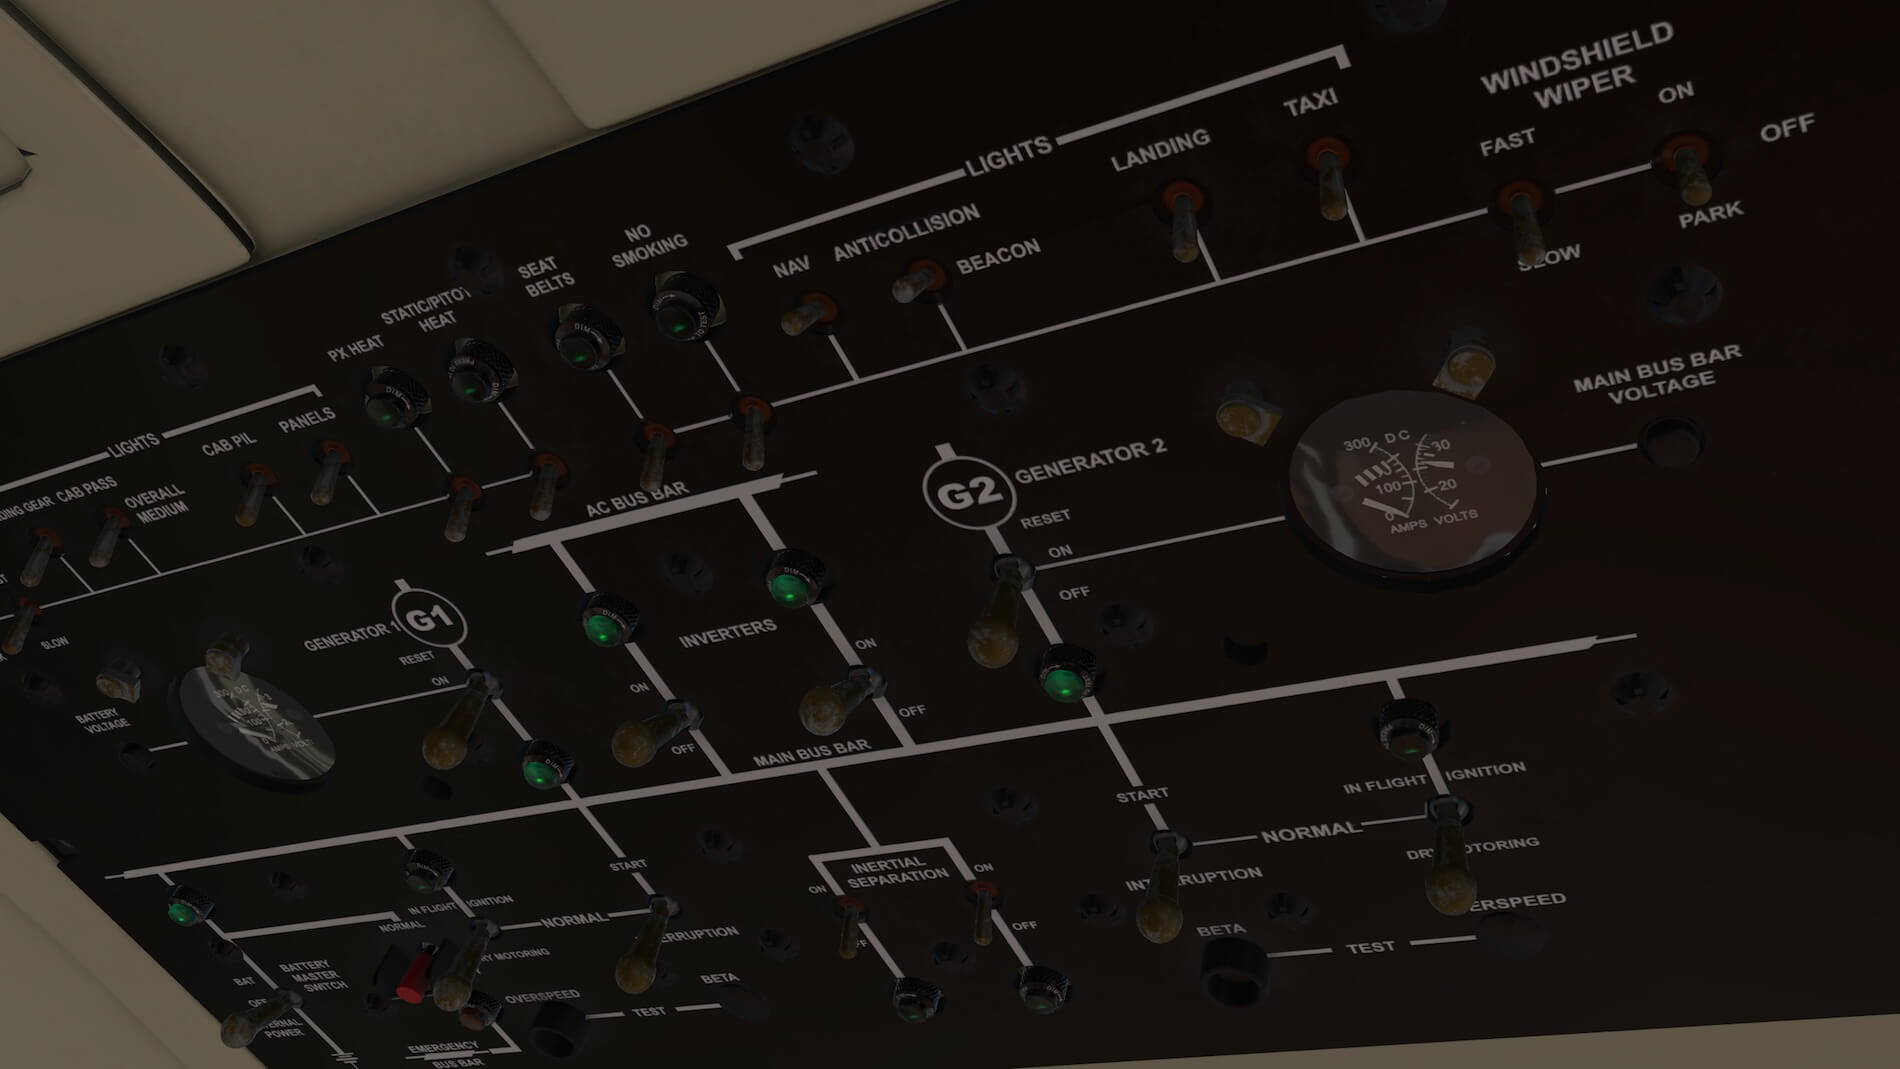
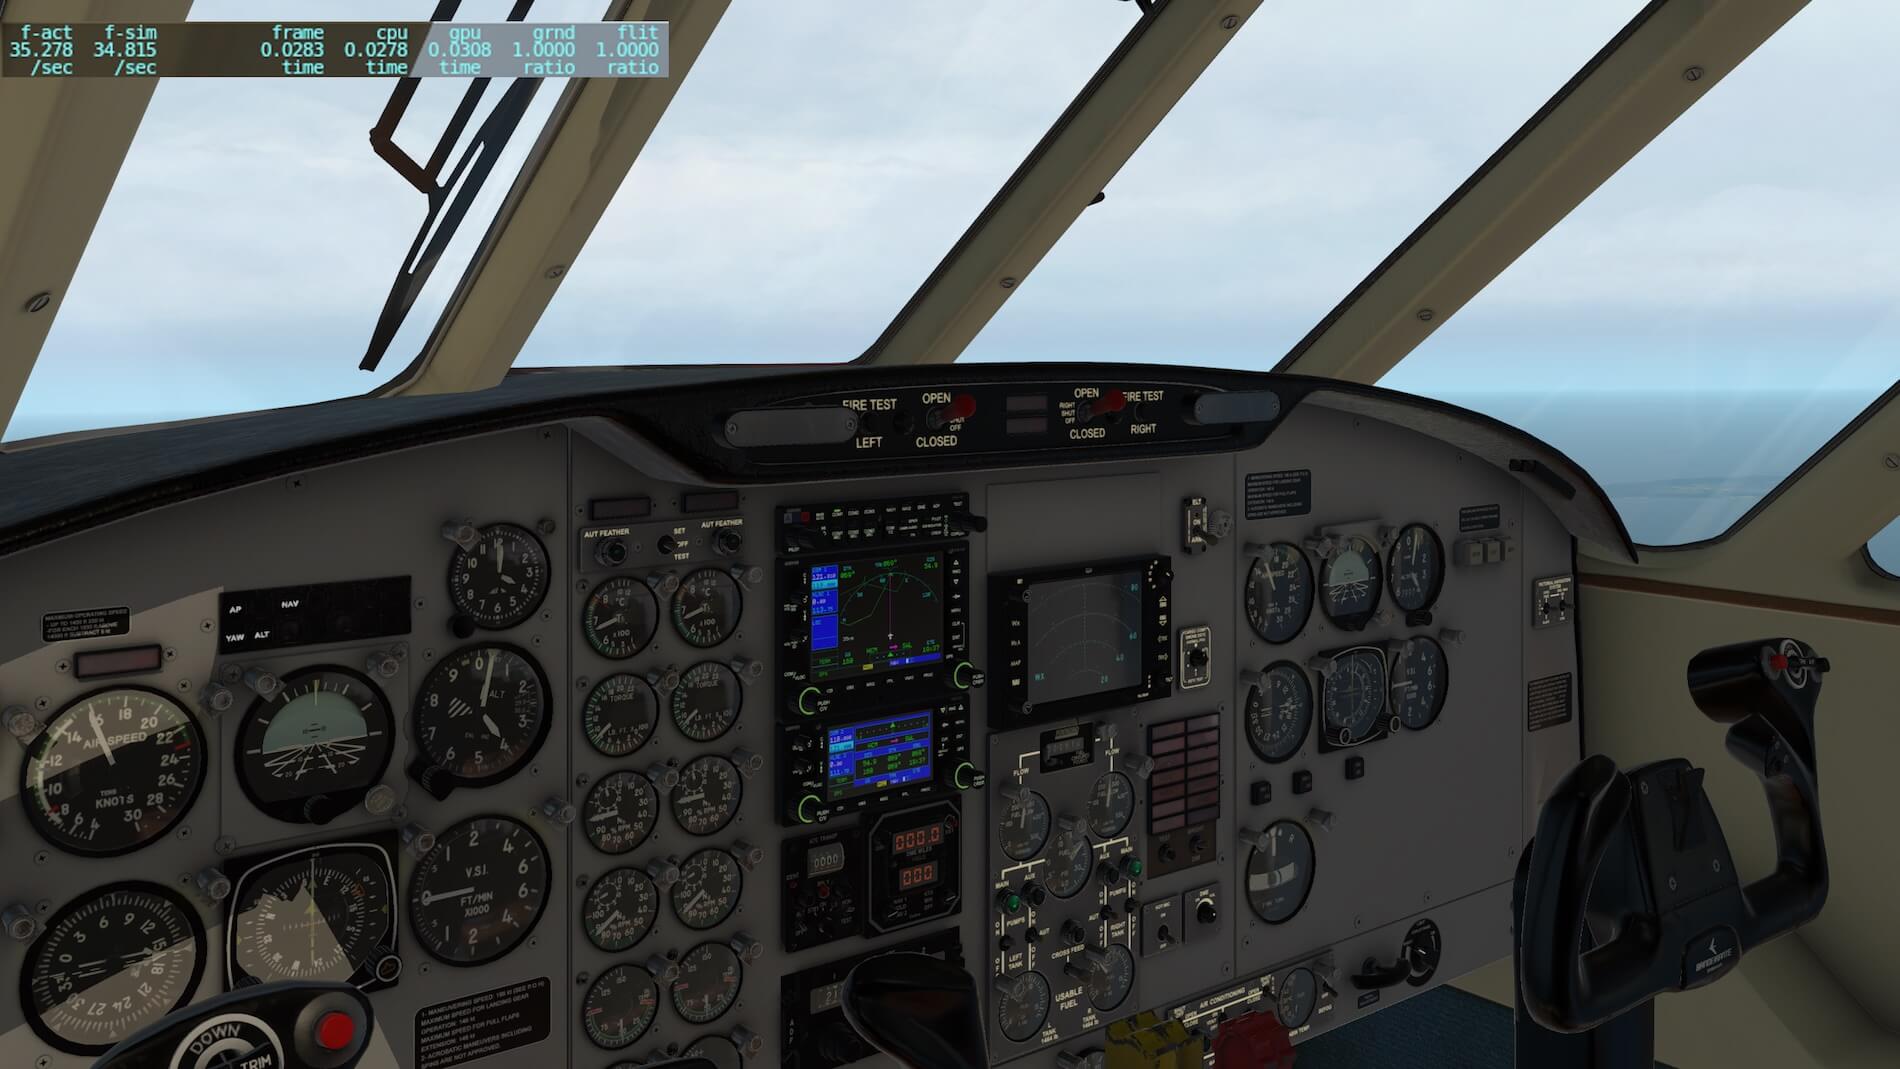
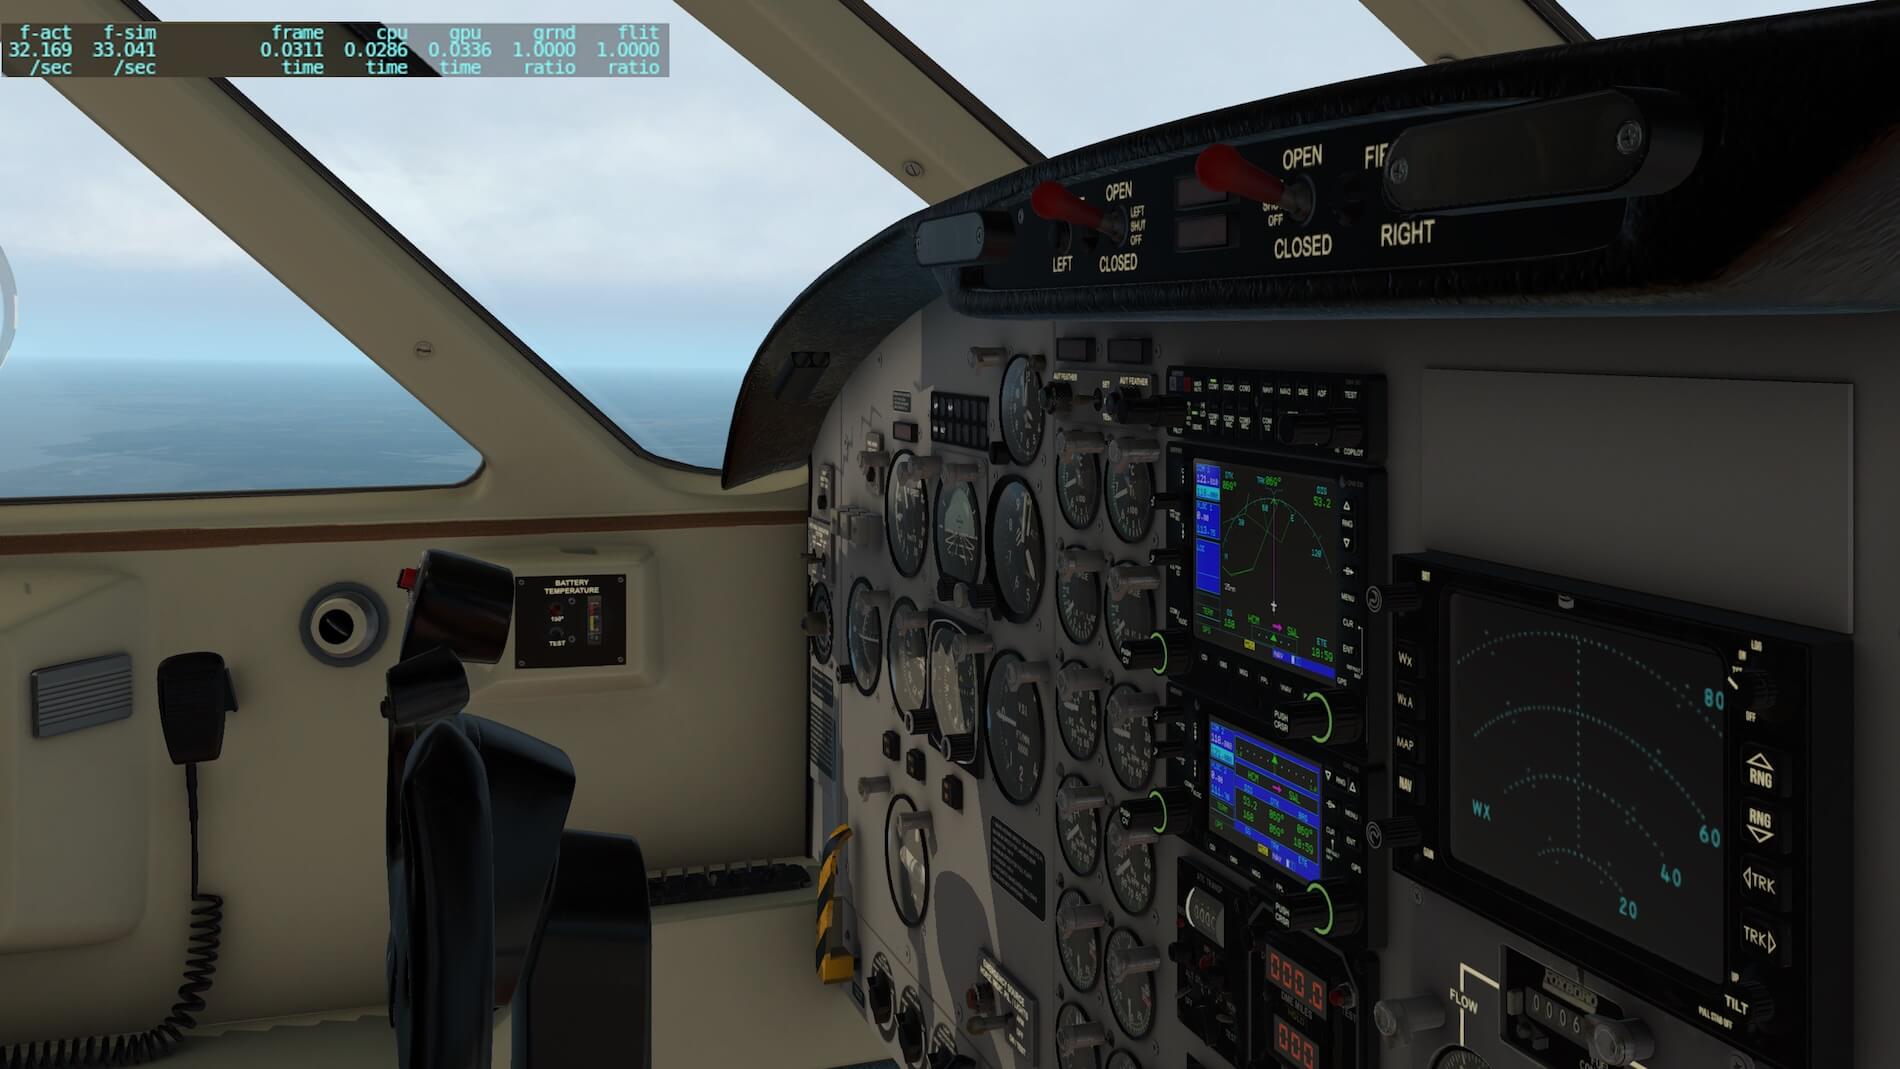
I’m pleased with the 3D cockpit modelling including all the switches, knobs, indicators, panels etc. The other panels look gorgeous as does the overhead panel. The integral lighting of the overhead and center instrument panels is very nice and can be controlled via a switch or simulated rheostats, located on the left-hand lower switch panel.
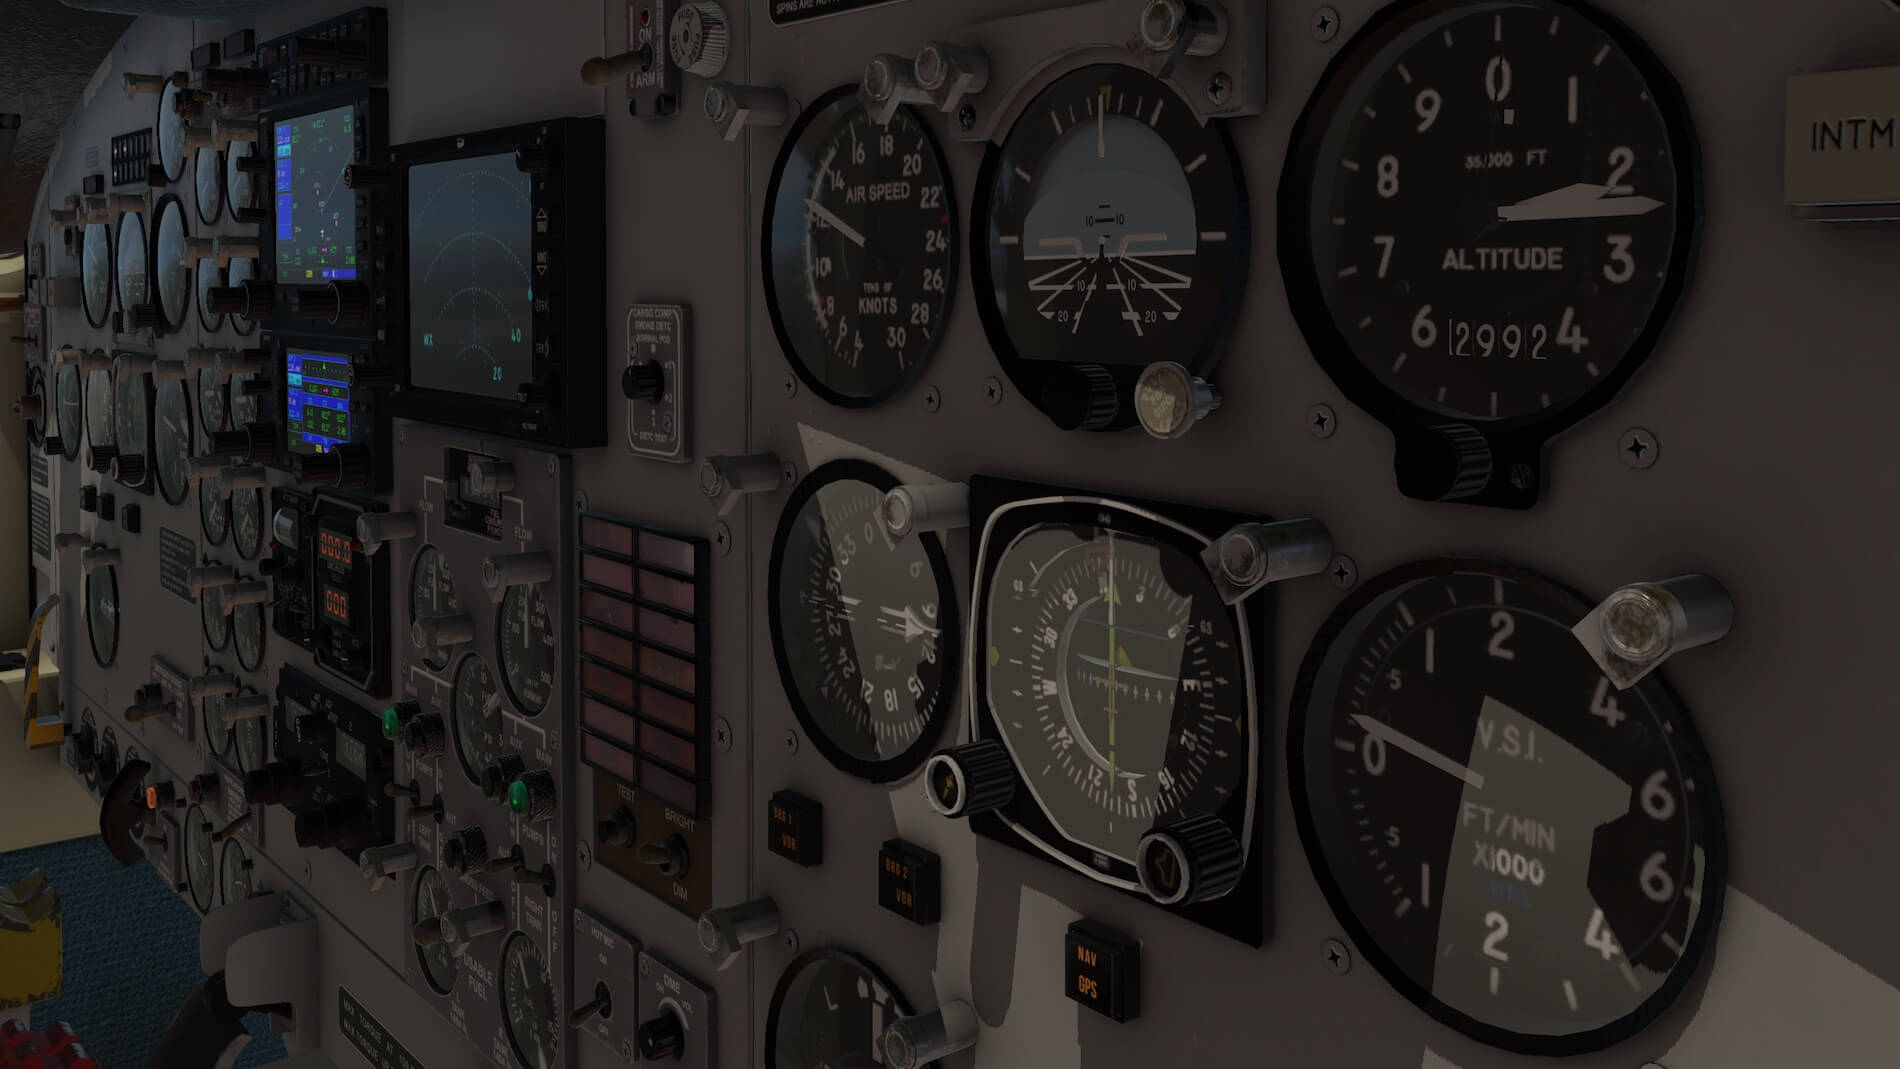
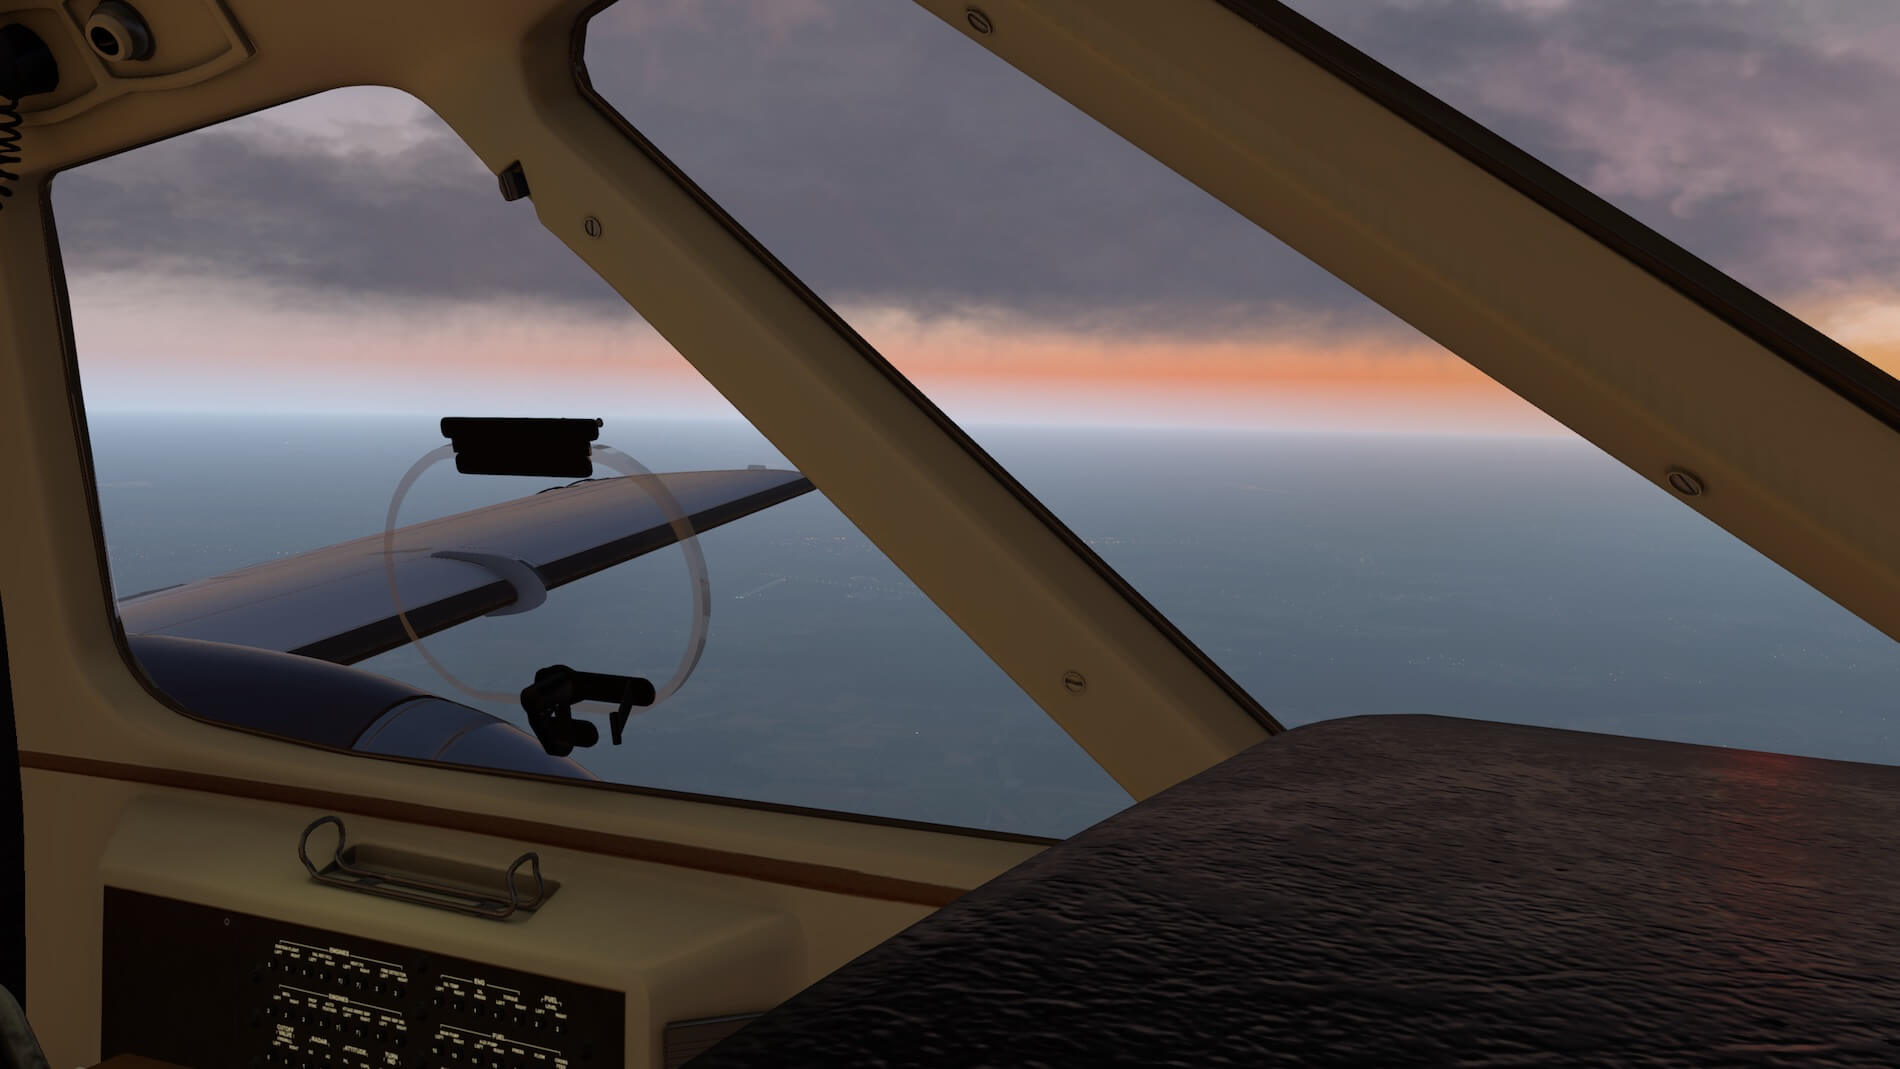
Zooming in on the panel will make you happy since all the instruments stay sharp including the needles, indicator plates, panel text etc. On the side windows you’ll find small window panels that can be opened for ground operation and it must be said that these are very well done.


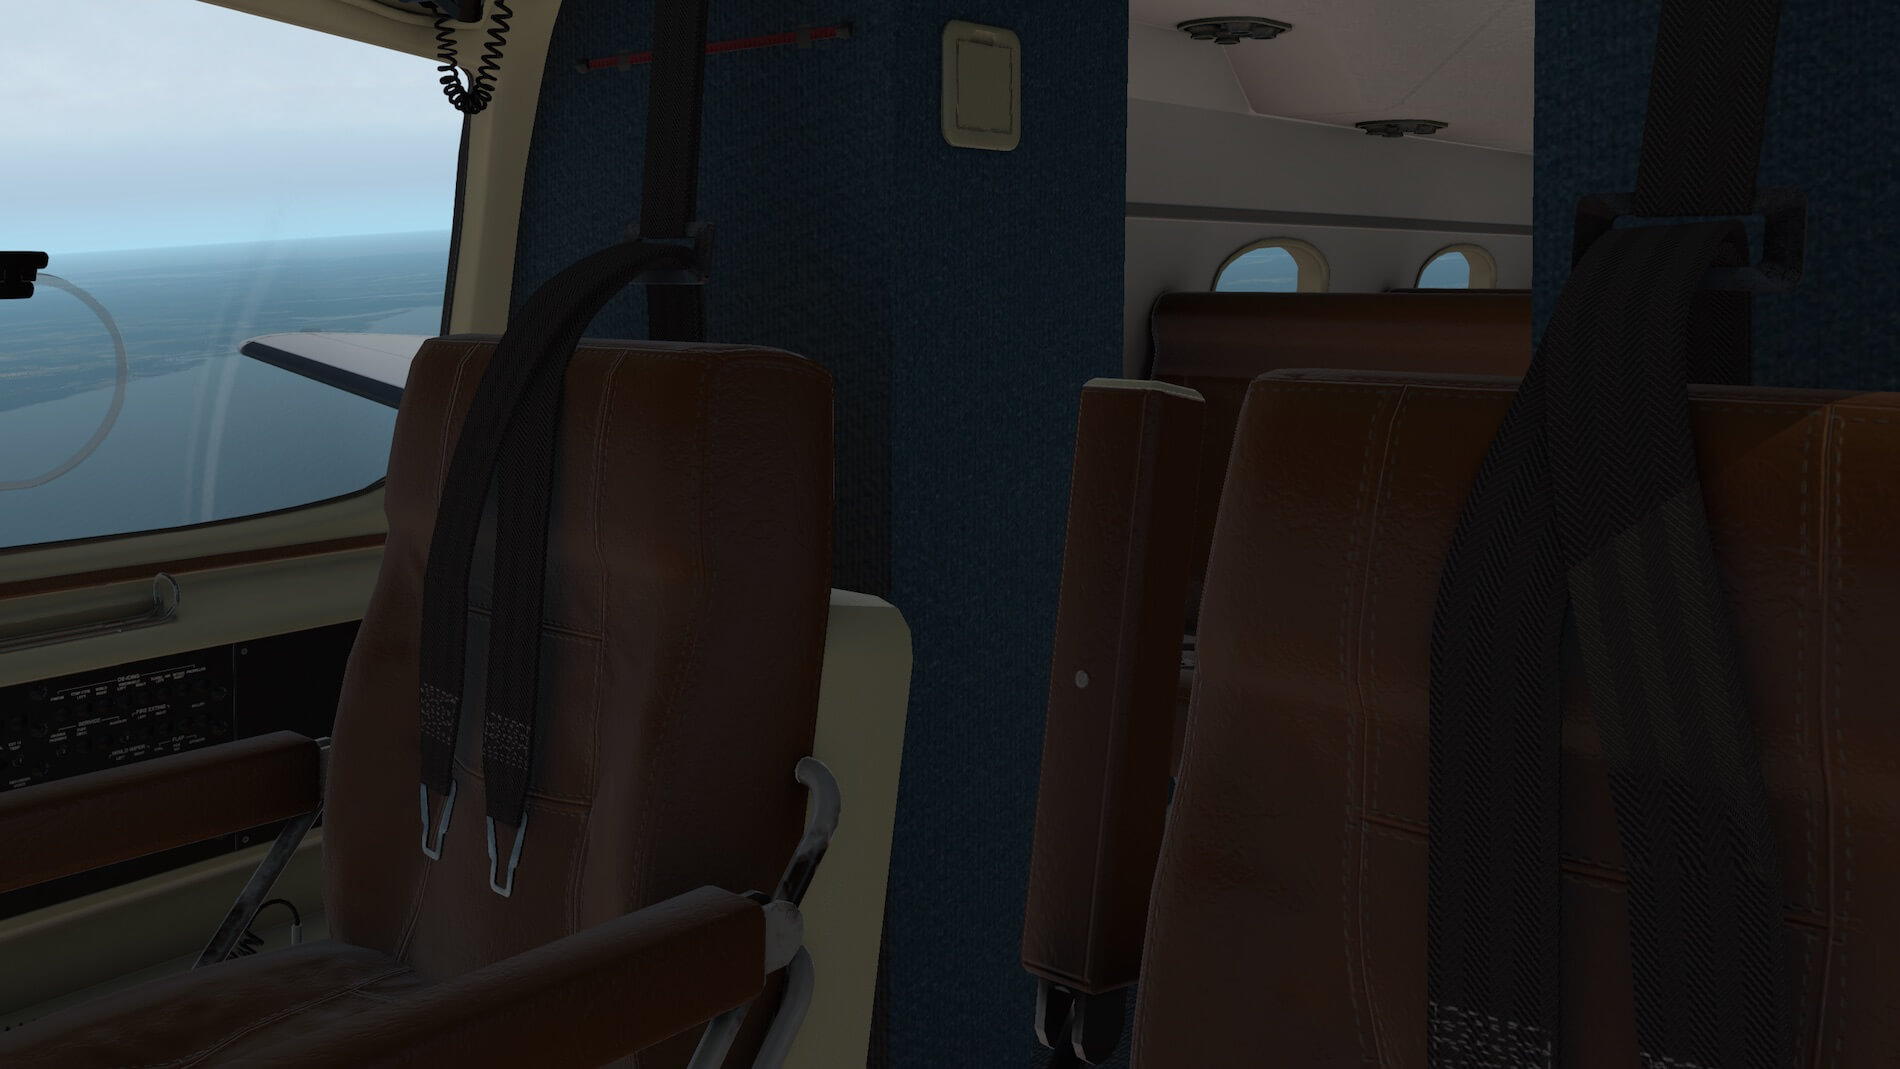


Since there’s no door in-between the cockpit and virtual cabin, I thought it would be a good idea to have a quick look in the cabin too. I can see a lot of work has been put into the cabin with seats, carpet, seat tracks, sidewall panels and ceiling. Although for some the virtual cabin isn’t so important, it is worth just mentioning that a lot of time and effort is put into it. Some like this virtual cabin, other prefer a good-looking 3D cockpit. Then we’re both happy since this DreamFoil updated and improved aircraft has got both worlds well modeled.

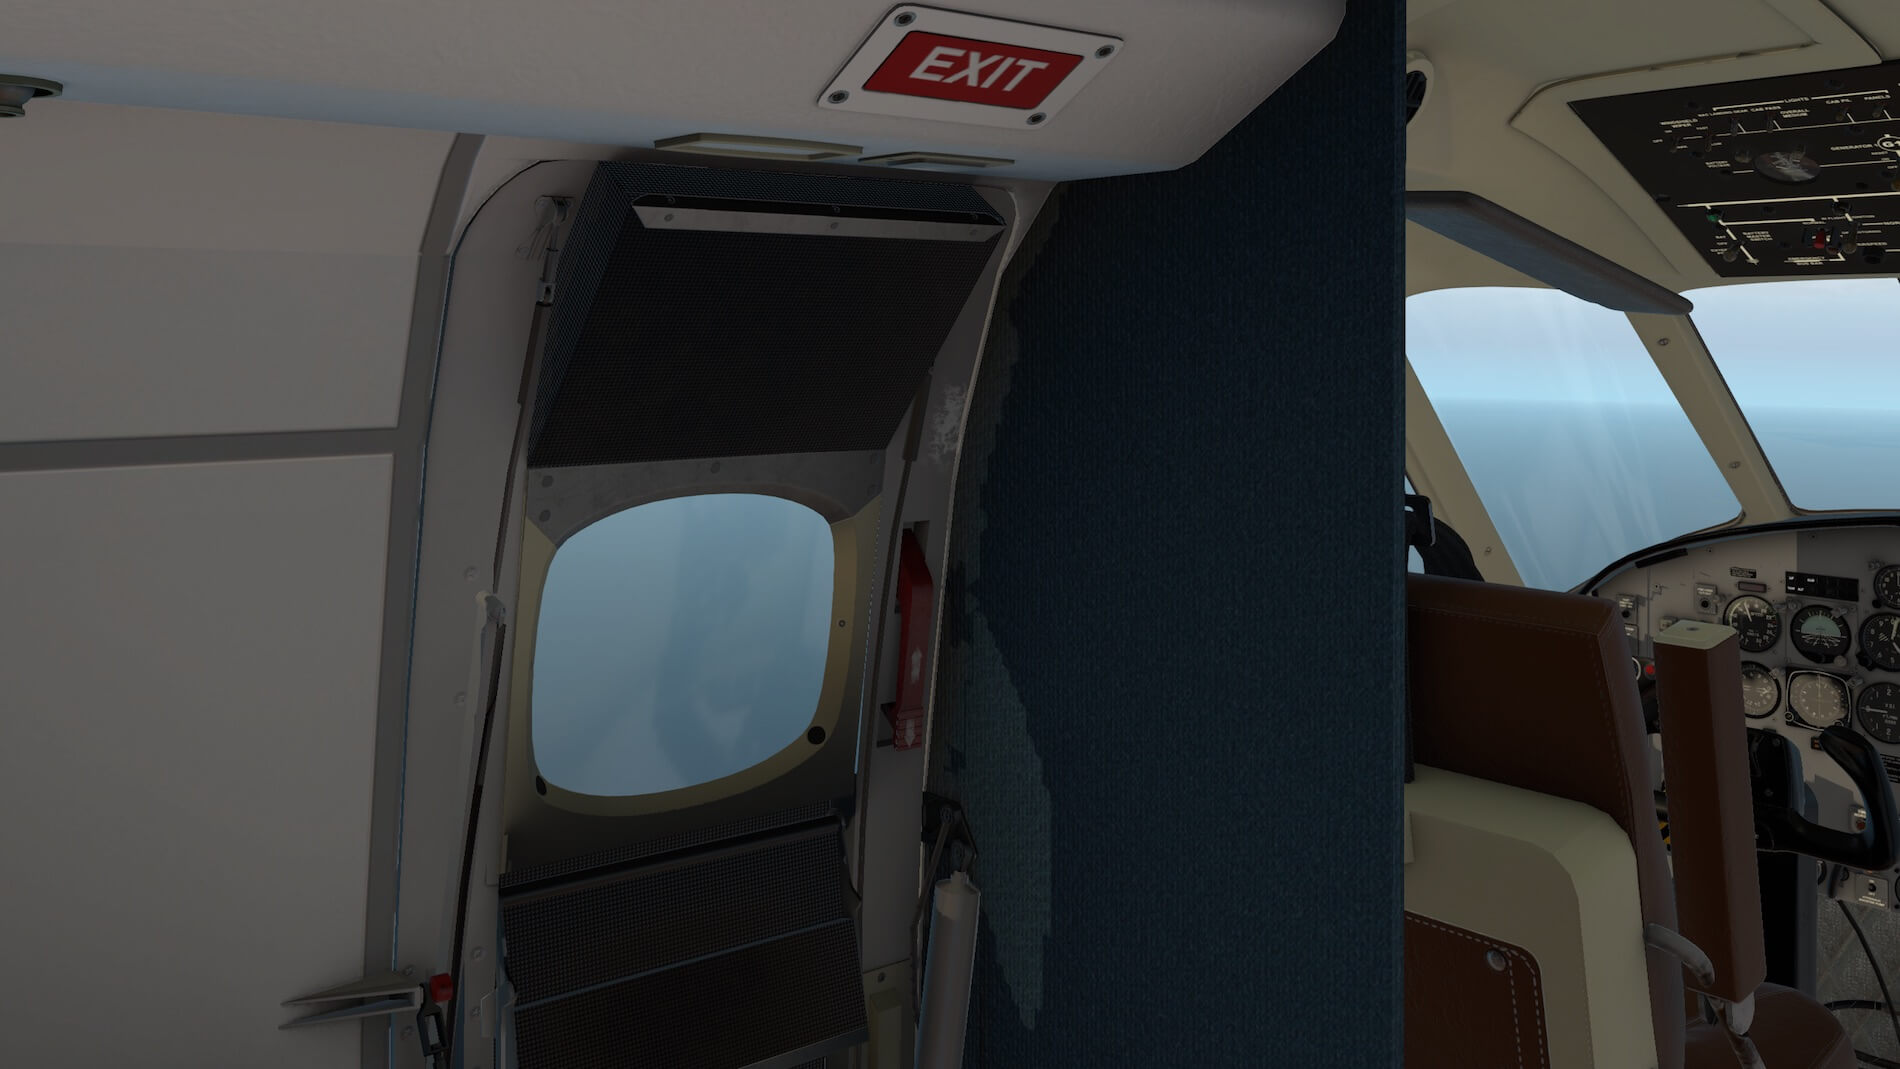

At the end of the cabin, you’ll find the cargo/baggage area. Although the modelling is basic, it completes the whole virtual cabin. Oops, I almost forgot to mention the interior of the passenger entrance door. I appreciate that I have already seen it during my quick external check but, with the door closed, it looks totally different than when unfolded. This is partly because everything is folded together to give the interior door a slim look. Nicely done.
Back to the flight
As with many other aircraft, the EMB-110 can be easily flown manually using the trims or via the AP. The EMB-110 comes with 3 trims; pitch, roll (aileron) and yaw (rudder). For normal trimming during flight, you will not need rudder trim, only roll and pitch unless one engine completely fails. Then the rudder trim is absolutely needed to correct. For the yaw effect of one engine.
Not that you would fly the EMB-110 for hours by hand, but it is possible. The aircraft responds well, the trim functions as expected although real weather could lead to constant trim corrections, but on the other hand, that’s as real as it gets.


As highlighted in the previous paragraph, flying the EMB-110 manually is possible but you need constant attention to keep it on your vertical and lateral track. In particular, if you decide to fly the aircraft by hand with the help of the trims, please bear in mind that the aircraft responds slowly, so before you realize it you’ve given too much trim.
I found the aircraft stability – all set by default at 50 percent – a little too sensitive. Some adjustments are welcome to prevent over steering. With the AP connected, you’ve got enough time to fiddle around with the COMM/NAV control panels and see their NAV 1 and NAV 2 output. These COMM/NAV panels may look authentic, but not all the text is clearly visible and sometimes I felt I was guessing what was what.


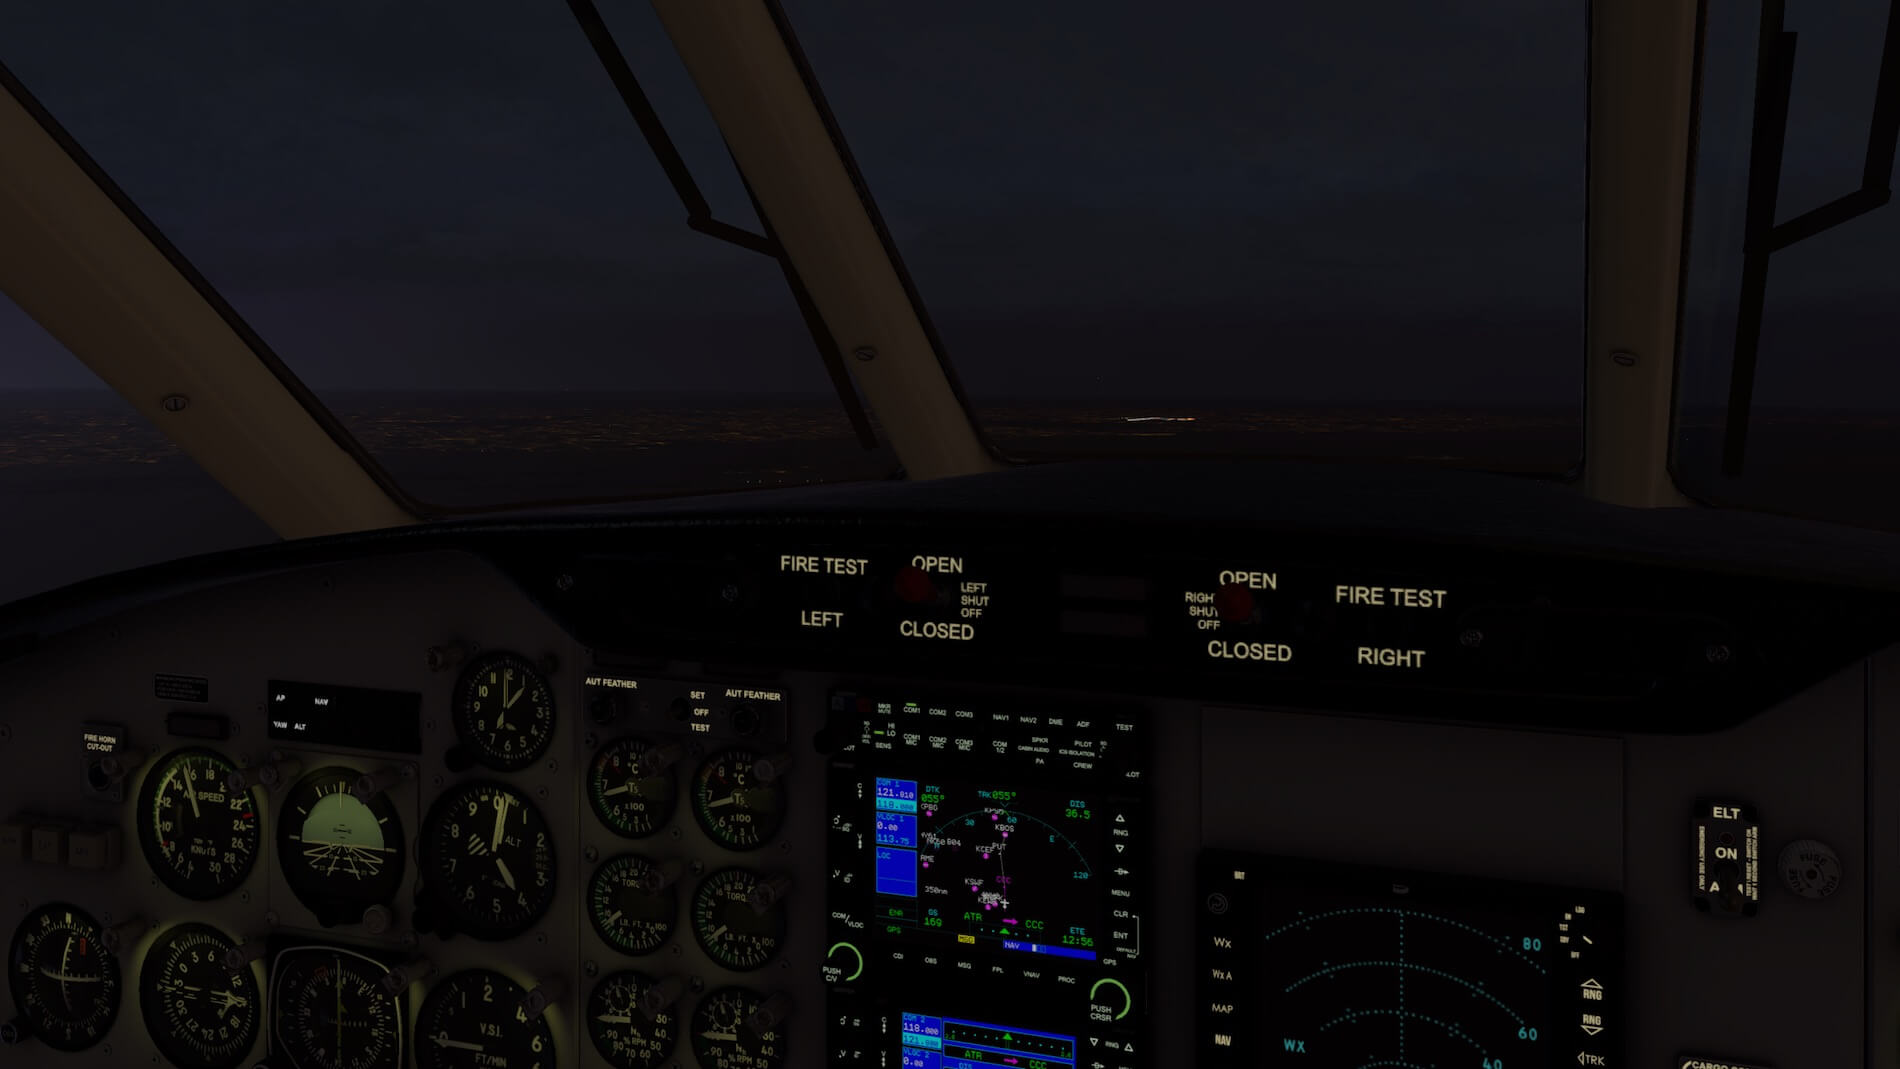


Descending, initial approach and landing can be done visually with the help of an airport VOR/VORTAC, using the AP or making a guided landing. I personally like to land the aircraft myself. Difficult? No, not at all, but close attention is required to keep the aircraft in the air!
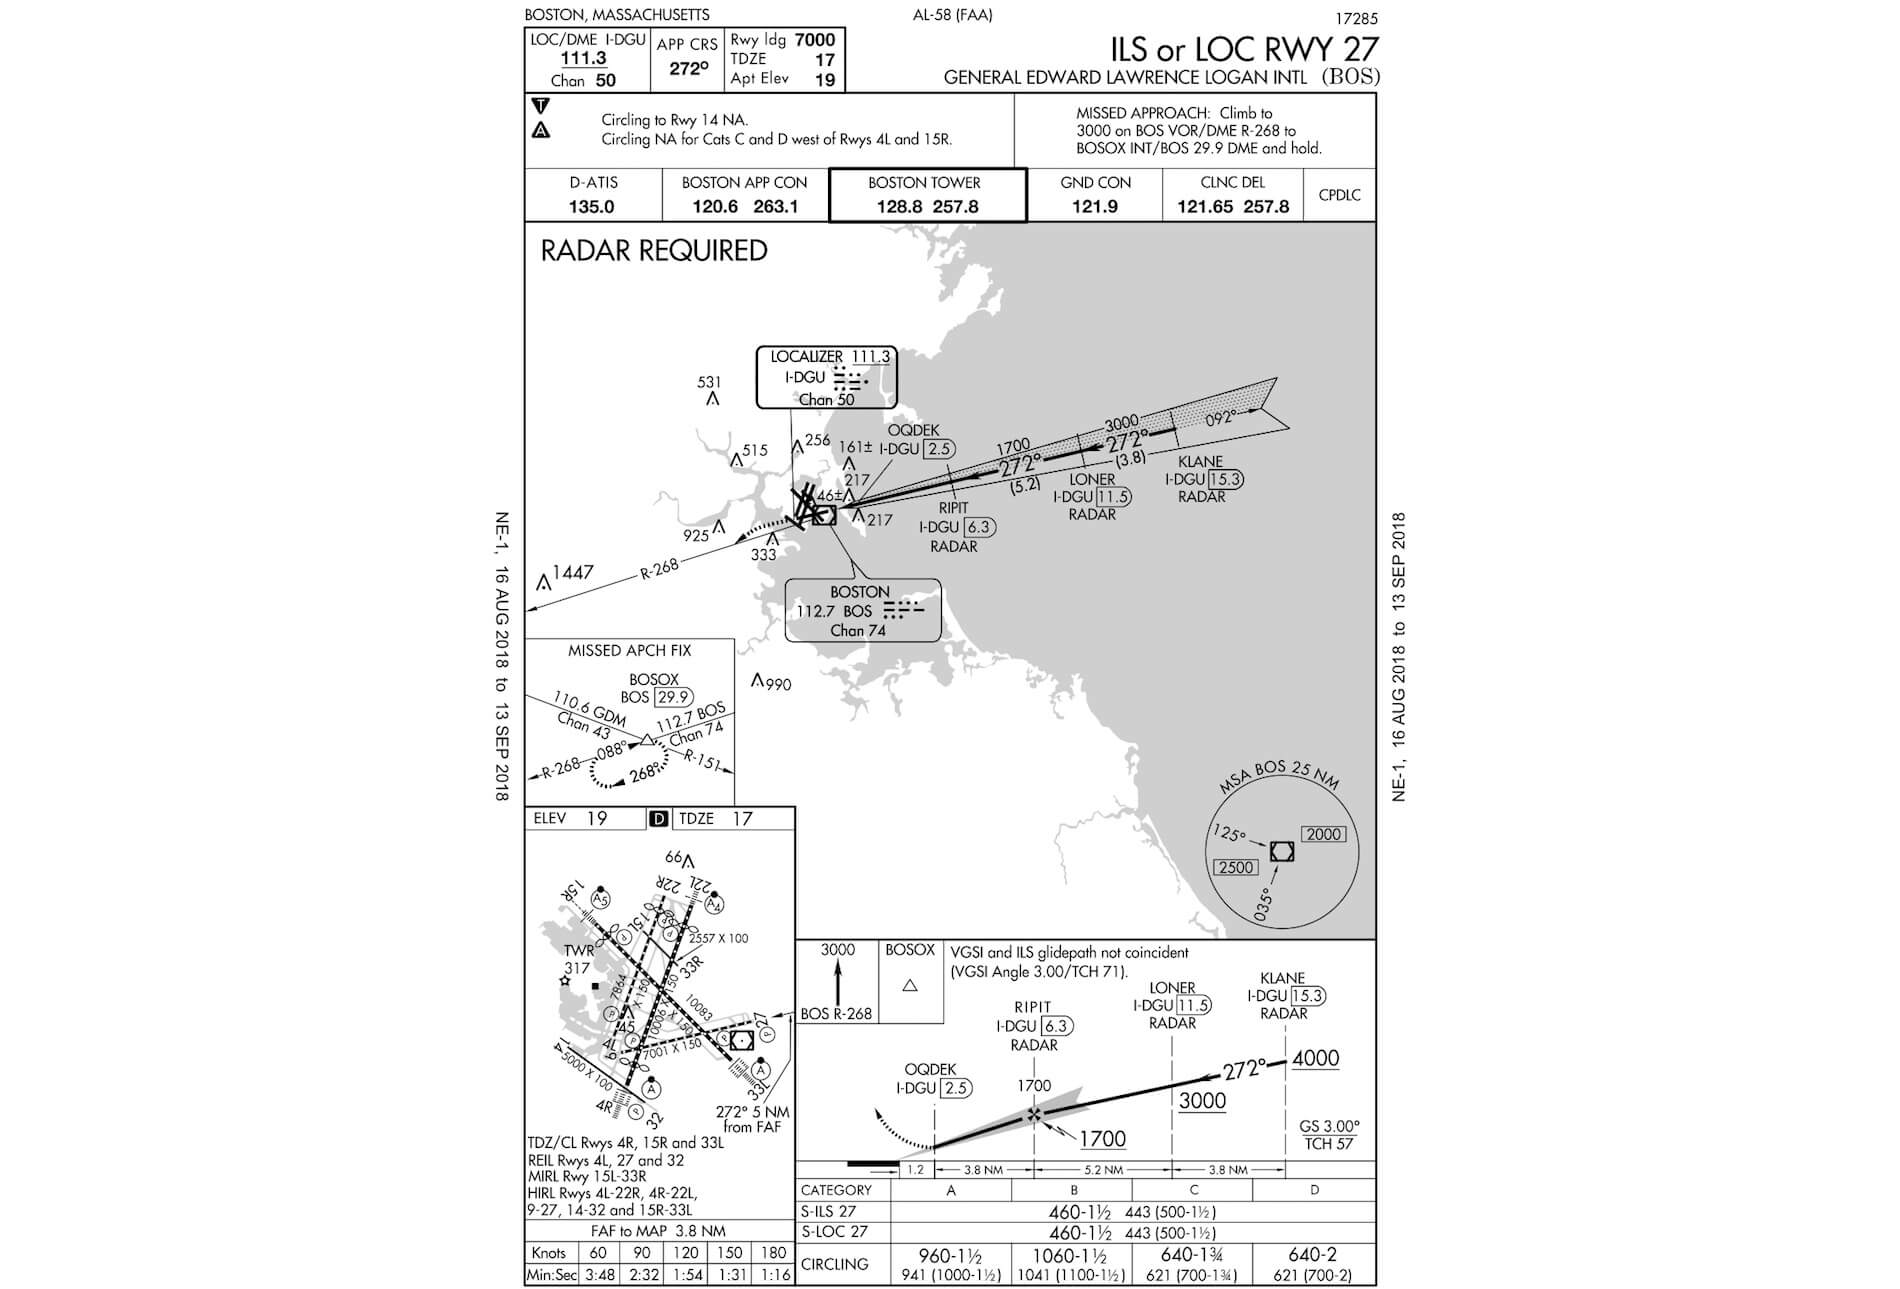
While approaching KBOS, it’s time to think about which runway to take. Since I’m not flying “online”, I can pick any runway I want. Flying in from a southwest direction, I’ve decided to take runway 27 which has, when needed, an ILS (frequency to set 111.3, a course of 272 and identity I-DGU). It’s time to disconnect the AP, and thus flying the EMB-110 by hand and trim, but it’s always a good idea to set the ILS frequency which give me at least localizer and glideslope guidance for my landing. The weather is a bit bumpy – real weather loaded – and that makes the approach more challenging. The further I descent, the more challenging that becomes.

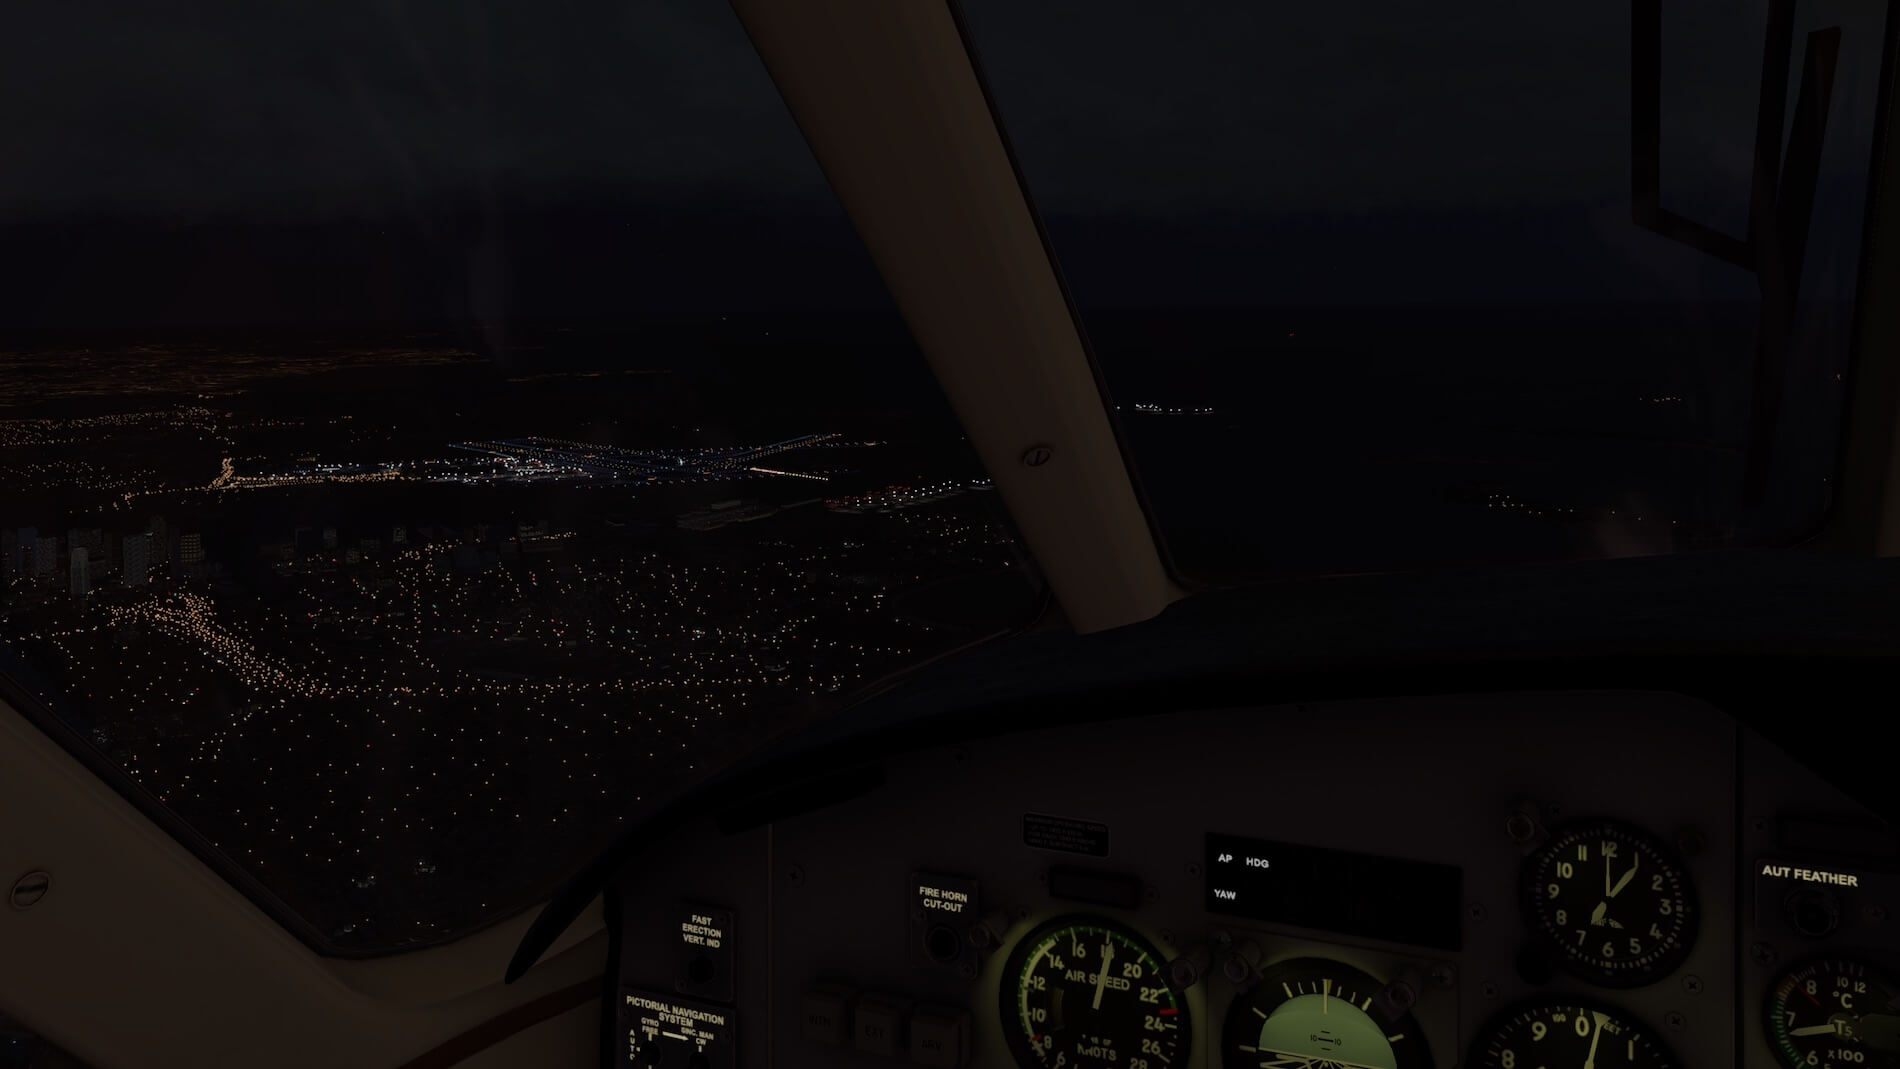

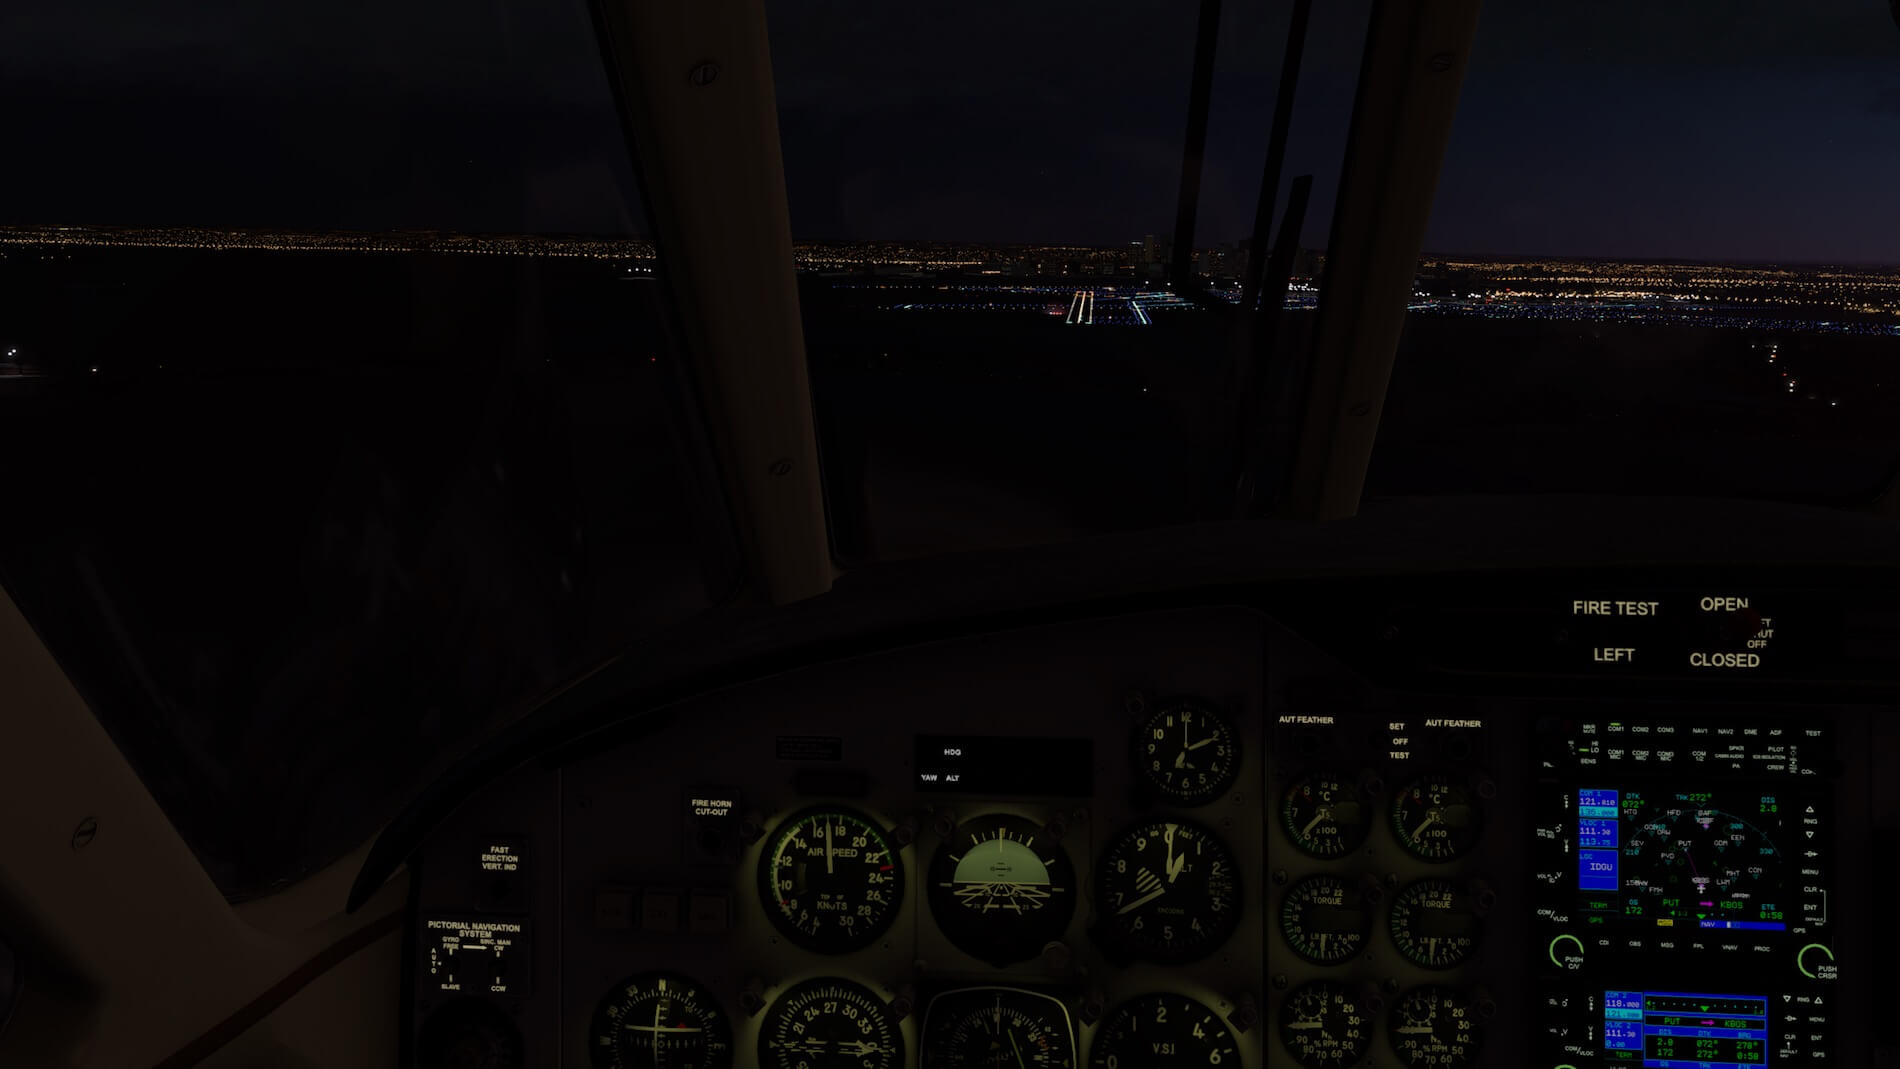

It was a bit expected to be honest. It’s not a big aircraft, it doesn’t fly fast so it’s not that difficult to follow everything during your approach and final approach. Maintaining the IL:S guidance is possible, but not always that easy. Since the EMB-110 has no Auto Throttle or Auto Thrust, I need to monitor the aircraft speed too else everything goes wrong. No no, no worries. You can do it too although some practice is needed.
Additional Touch and Go’s
For some reason I found it worth after I landed at KBOS, to do some additional touch and go’s at KBOS. I found out during my KJGG to KBOS approach that the aircraft is easy to control, but at the same time it’s also a bit nervous while trying to follow the localizer and G/S. Remember, that nervous behavior isn’t from the AP but the moment you’ve got the controls in your hand.
That said, I parked my EMB-110 somewhere at the GA apron, taxi to runway 27 …. oops, that’s a long distance, but anyway, I’ve got the time and enough fuel. After lining up with 27, I set my HDG bug already that after takeoff, and selecting the AP, I can go straight in HDG mode. The plan is to fly and climb on a heading of 270, left-hand pattern thus 180, then downwind 90, then base for 360 and on final back to 270. That’s easy to do, right?
I climb out to 2500 feet on a HDG of 270. I connect the AP – don’t forget to engage the AP on the pedestal – in HDG and trim with the trim switch on the AP panel for roughly 500-700 feet/min. When I’ve reached 2500 feet, I select ALT and it’s then also time to turn 90 left. Since I’m in HDG mode, the AP follows the new HDG bug setting. In the meantime, I set on the Garmin GNS 530 my ILS frequency of runway 27 (111.3).
While the aircraft follows the path, I spot the APPR and GS buttons on the AP panel. When I’ve turned to base and leveled off from the roll, it’s time to hit the APPR button which responds with an ON legend, the NAV ON legend comes on and the GS button will show ARM. Keep in mind, and what I mentioned before, there’s no Auto Throttle that maintains your selected speed. Speeds is something you need to do yourself. You need to monitor this and takes corresponding action to decrease or increase it.
Among many other solutions, using the Garmin GNS 530 to check for the waypoints along localizer runway 27, is not easy. It’s a mesh of waypoints and I can’t pinpoint those (RIPIT, LONER and KLANE) so perhaps it’s a better idea to use the X-Plane “Show Map” or “Show IOS” and don’t forget to select as mode “IFR low enroute”. When you have either map mode at VFR Sectional, you won’t see any waypoints. Since I’m flying at 2500 feet, I can turn for base when I see in the map waypoint LONER which normally should have an entry altitude of 3000 feet.


Ok, back to base and leveled OFF from roll. All is set on the AP panel and when everything goes well, it will pick up the localizer signal and yes, it is doing so. This means, the aircraft has picked up the localizer signal, and later it will pick up the glide slope too. I noticed – after I did several touch and go’s – that the moment the localizer signal is detected that the APPR button ON goes off and that the aircraft makes a huge overshoot along the localizer. No idea where this problem lies although it will always detect the glideslope. Thus .. keep in mind that the localiser can make large overshoots which could be a normal behavior when you are too close to the runway which could be the problem while testing this ILS behavior.
Anything else?
No, I think I covered what I wanted or what I feel you might need to know about this aircraft before you decide to buy it. Perhaps I will finish off with some words about the frame rates and the aircraft sound folder.
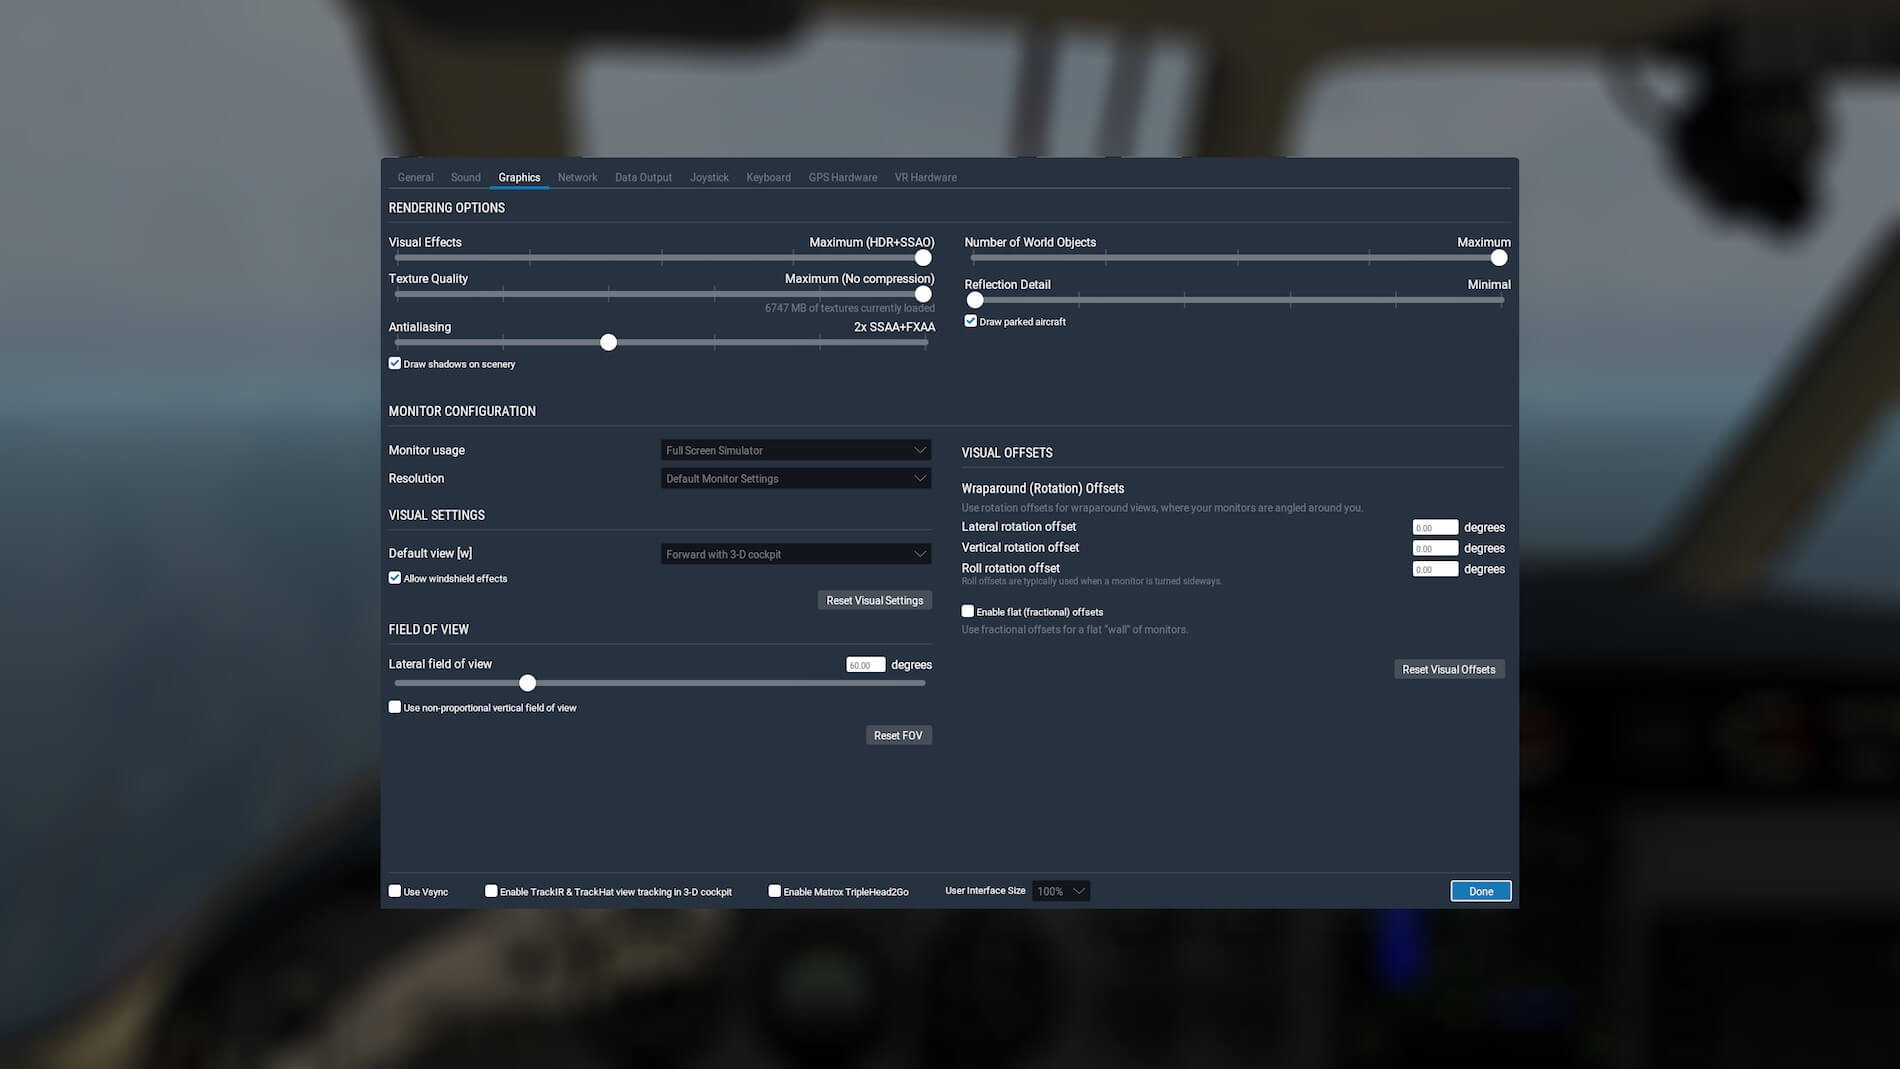
During my EMB-110 test flights of course I noticed frame rate drops logically. Keeping in mind the aircraft systems, environmental conditions, airport complexity. When we keep that all in mind, it’s logically that I see slight frame rate drops. That said, being a high-quality model like the EMB-110, it’s still possible to fly it with reasonable to good frame rates and by reasonable, I mean at least with 25 to 30 FPS or more.
The modelled EMB-110 doesn’t come with complex EFIS, EICAS, ECAM or FMS equipment and this most likely results in good frame rates. X-Plane rendering options could be of a major factor, plus your X-Plane screen size, your PC or Mac hardware specifications and so on.


I cannot confirm that the aircraft has authentic EMB-110 sound files included. I have never seen this aircraft in reality, even looking at YouTube doesn’t provide me with a good comparison.
Summary
This is another interesting addition to the X-Plane aircraft fleet. I’m aware that it becomes a bit crowded with all kind of these twin engines GA aircraft on the X-Plane 11 market. Carenado has got a few, vFlytAir has got one, Alabeo has got one, and so on. Neither less, I was impressed with the DreamFoil model for X-Plane 10, so it is logical that I like it still while being updated for X-Plane 11 with a couple of new features and a couple of nice implemented modifications.
The operations manual is – in my view – very colorful but the majority of things you need to know are there. The EMB-110 is nicely modelled externally and internally which was already the same for the X-Plane 10 model. The exterior has many tiny details, as well as the virtual cabin and 3D cockpit. I sincerely hope painters will take the time and effort to provide some more liveries. The current default liveries are nice, but the model deserves more.
Is it worth checking out the DreamFoil Embraer EMB-110 model version 3.2 yourself?
I think so and I encourage you to have a look at the dedicated X-Plane.Org web shop EMB-110 X-Plane 11 page (http://store.x-plane.org/Embraer-110 Bandeirante-XP11_p_850.html).
For this review, I used the following payware and freeware add-on products:
Freeware: KJGG Williamsburg-Jamestown Airport v 1.0 from Marc Leydecker aka Belga12345. You will need to sign in first.
Freeware: FlyWithLua for X-Plane 11 v2.6.7
Freeware: Environment+ v1.1
Freeware: AlpilotX.Net HD Mesh v4
Freeware: AlpilotX.Net UHD Mesh v4
Freeware: MisterX6 Boston Logan Airport v1.0
Freeware: MisterX Library v1.61
Feel free to contact me if you’ve got additional questions related to this impression. You can reach me via email Angelique.van.Campen@gmail.com or to Angelique@X-Plained.com.
With Greetings,
Angelique van Campen
| Add-on: | Payware DreamFoil EMB-110 |
|---|---|
| Publisher | Developer: | X-Plane.Org | DreamFoil |
| Description: | Realistic rendition of Embraer EMB-110 Model version 3.2 |
| Software Source / Size: | Download / Approximately 3.3GB (unzipped) |
| Reviewed by: | Angelique van Campen |
| Published: | August 20th 2018 |
| Hardware specifications: | - iMac Pro - Intel 3GHz Intel Xeon W / 4.5Ghz - Radeon Pro Vega 64 16368 MB - 64 GB 2666 MHz DDR4 - 1 internal shared 1TB SSD (Big Sur 11.x) - 1 internal shared 1TB SSD (Bootcamp Windows 10) - 1 external 2TB LaCie Rugged Pro SSD (Big Sur 11.x) - Saitek Pro Flight System X-52 Pro and X-56 Rhino - Honeycomb Alpha Flight Controls - Honeycomb Bravo Throttle Quadrant |
| Software specifications: | - macOS Big Sur (10.15.x) - X-Plane 11.5x |
0 Comments