The FJS 732 Tin Mouse
Introduction
It turned out that this FJS 732 TwinJet v3 review is a bit longer then expected and because of that, I’ve decided to include a Table of Contents. That said, before I continue, first the table.
Table of Contents
Introduction
Some 737 Classic Background
What’s the Plan?
FlyJSim 732 Inspection
Virtual Cabin
The Cockpit Impression
The Flight Plan
Flight Plan Creation
Cockpit Preparations
A Regular Test Flight
What if you use FMS or INS?
Installation, Contents and Documentation
– Installation and Contents
– Documentation
Additional Features
A gift … meet the Old Fashioned CIVA INS
– The INS
– Basic Construction
– Simplified Operation
– The xCIVA INS Add-On
– Package and User Guide
– Installation
– INS Videos
– Using xCIVA INS
Summary
Introduction
Nick names for the Boeing 737 Classic are for example Tin mouse, Maggot, Pocket Rocket Socket, FLUF (Fat Little Ugly F**cker), Light Twin, Baby Boeing, Fat Freddy, Guppy, Thunder Guppy, Yuppy Guppy and so on. Writing a review of the refreshing product is fun, a lot of fun.

Back to what I had in mind, writing a review of this product is fun, especially when the product that has to be reviewed is an old-fashioned aircraft. Not that I don’t like to fly and/or review modern aircraft, but once and a while it’s fun seeing how old aircraft can become alive in the flight simulation world. The review deals with the brand new FlyJSim 737 Classic, or at least, that’s how I call it. Jack from FlyJSim prefers to call it the “732 TwinJet” version 3.
Jack is known for his Dash 8 and his well modeled Boeing 727 Series which is officially not yet 100 percent compatible with X-Plane 11, but I’m quite sure that will come too in the near future. The Boeing 727 cockpit is, other than the aircraft having three engines, of the same fuselage and cockpit. No, you’re right, the cockpits are not the same, but there’s a lot similar
But what has FlyJSim and Org to say about the 732 TwinJet?
According to Org “FlyJSim continues their commitment to delivering high quality aircraft for the X-Plane platform! It’s time to ‘Experience the Jet Age’ with the 732 TwinJet which is modeled off the 737-200 Advanced, with JT8D-15A engines, and a SP-77 Autopilot. The plane offers an experience like nothing before and some for every type of pilot.”
“v3 Brings a visual and auditory experience like nothing before…”
- For the ears: From the roar of the JT8D turbojets on take-off to the individually recorded cockpit switch sounds, to the seat belt signs overhead seat 26A, the FMOD sound pack provides a fully 3D positioned immersive experience. Put on your headphones and crank up the volume!
- For the eyes: Fully utilizes X-Plane 11.10’s Physics Based Rendering capabilities with a complete retexturing of the cockpit, liveries, and a fully rendered 3D cabin! Admire the sunlight reflecting off the painstakingly hand-textured wings and fuselage as you climb the 3D animated modeled airstairs and cabin plug-door. Was that you that left the coffee stain on the galley counter?
The 732 TwinJet v3 is the perfect airliner for any pilot…
- For the beginner. Get acquainted with this easy to fly aircraft! The FlyJSim 732 TwinJet comes packaged with easy-to-use checklists and the X-Plane 11 FMC to accurately fly full RNAV procedures with ease. Flight-planning and navigation is easy, so sit back in economy class and enjoy the sights and sounds of our newly modelled cabin!
- For the advanced. Navigate just like the real pilots who originally flew this plane. Using ground based navigation, VOR-to-VOR, gauging DME distances, chasing ADF needles and the glide slope beam.
- For the veteran. Control wheel steering (CWS) and unique aspects of the SP-77 autopilot are modeled with engaging fidelity. From departure to cruise and descent to touchdown, challenge yourself to fly the plane according to real procedures. Couple custom failures, generated when the custom maintenance system is enabled, with faithful systems modeling and your flight will be one to never stop talking about. Once you are back safely parked on the ground.
FlyJSim Custom Replay System in v3
Take the visual experience and learning to the next level during replays. The FlyJSim custom replay system records far more parameters, allowing you to enjoy all those exterior surfaces in accurate motion, even after you have shut the plane down at the gate. Learn from your performance in replay while reviewing more instrument needles, switches, guards, and levers in the cockpit not previously provided by X-Plane’s native replay.
True-to-Life Exterior
- Incredible textures in v3. Rivets, reflections, and surface bumps all add up to give you that extra bit of realism. A completely accurate replica of the 737-200 Adv, down to the last hand placed rivet.
- Detailed animations in v3. All exterior control surfaces animated accurately to real world behavior and smoothly driven even in replay using the custom replay system.
- Exterior sounds in v3. JT8Ds have a roar like no other.
- Detailed lighting. Lighting is based off real 737 data. Landing, taxi, taxi turnoff, strobe, beacon, navigation lights, wing and even logo lights have been faithfully modeled using the real angles and widths of the real 737 lights. And the lighting looks better than ever as they light up these new v3 liveries.
- Wing flex. Of course. You wouldn’t want them to snap.
Immersive Interior
- Fully interactive and dynamically lit cabin in v3. Detailed seats, adjustable lighting and interactive doors and air-stairs, movable window blinds, and baggage compartments you could stow away in!
- Unprecedented cockpit lighting in v3. All cockpit lights are controllable. These include all indirect lighting on the panels, storm lights under the glare-shield, center console light to shine onto the throttles, dome light to illuminate the entire cockpit at night, and two map lights. Light spills realistically from annunciators onto nearby switches. Flying at night doesn’t get more fun. Each of the over 300 lights fades in and out like authentic incandescent bulbs.
- Best in class cockpit manipulators are even better in v3. The dedication to Intuitive cockpit manipulation that you would expect from a FlyJSim product continues in v3 with mouse wheel support added for the knobs you want it on. Great care has been taken in setting up just how you interact with the switches, knobs, and levers in the cockpit. Dial in your headings, course, altitude, and radios with ease, even while flying online.
- Animations everywhere. Each switch, lever, knob, and handle is animated. Press to test functionality on annunciators. Standby compass stowable. Both map lights adjustable. (You do have that approach plate on board, correct?)
- Precisely dimensioned 3D cockpit. Modeled using real dimensions down to the size of the switches.
- 3D modeled circuit breakers in v3. As you go to check out the cabin, be sure to notice these beautiful breakers. You might spot a couple of surprising system breakers.
Study Level Systems And Dynamics in v3
Designed with input and testing by former 737-200 pilots and mechanics.
- Advanced flight model utilizing the absolute latest XP11.10 vector based flight dynamics, including refined down-wash and ground effect.
- SP-77 autopilot modeled including Control Wheel Steering (CWS) modes
- JT8D-15A engine performance tuned across the full flight envelope
- Control surfaces driven using fully custom coding, simulating hydraulic pressures, blow-down effects and standby control surface modes in the event of failures.
- Autobrake system modeled to match real world data
- Every annunciator light is push to test. Spot the burnt out bulbs during pre-flight!
- Bleed systems and performance physically modeled, and respond to temperature, altitude, wear, and humidity. Look in the FCOM to find the N2 requirements for a cross-bleed start.
- Pressurization and environmental cabin control systems faithfully modeled. Open the doors to let a breeze in, get AC on before loading passengers on a hot day, and watch the cabin temp cool as the sun sets. Auto, Standby, AC and DC manual modes all faithfully modeled. Cabin doors are pressure locked.
- FMC and CIVA units realistically coupled to pilot HSI for improved situational awareness.
- Fully custom hydraulic systems and electrical busses.
- Instrument Comparator.
- GPWS including test functionality.
- Warning systems.
- Fire protection systems.
- Weather radar.
And believe me, this is not the complete list of features. For the whole list, I would invite you to visit the dedicated X-Plane.Org FJS 732 TwinJet v3 web page.
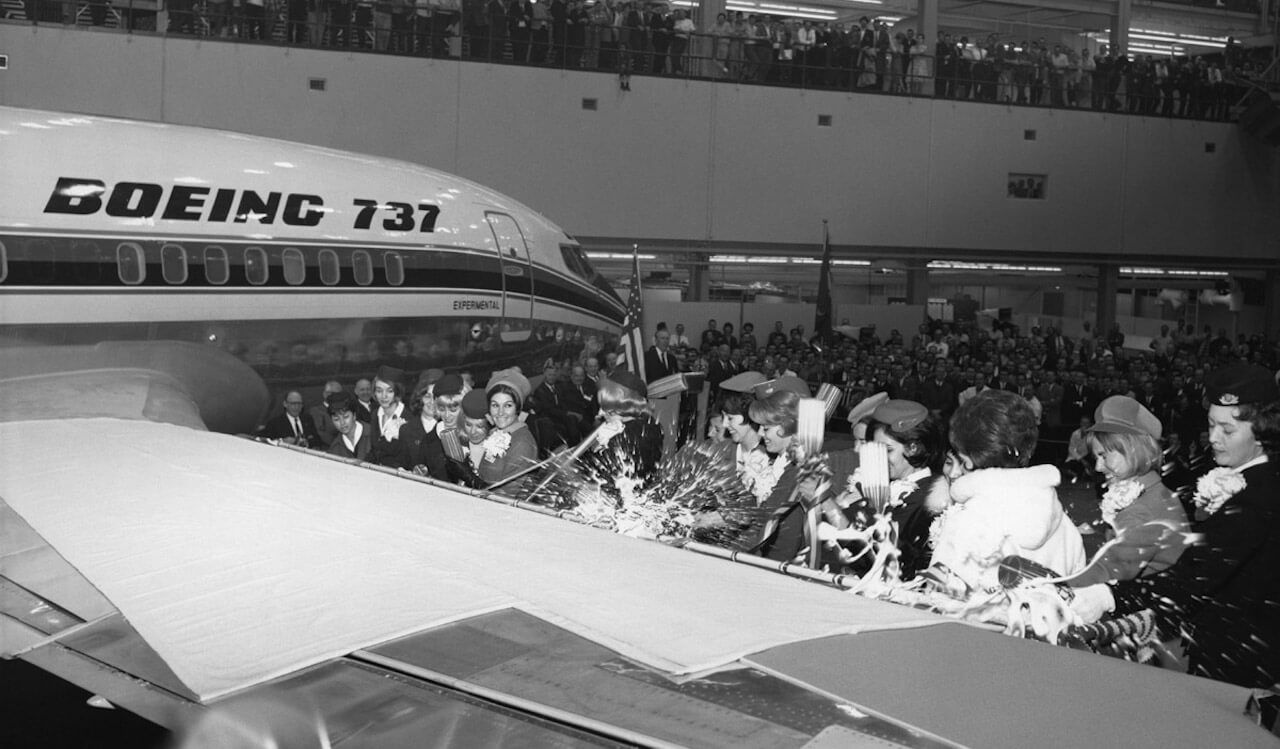
Some 737 Classic Background
The Boeing 737 is a short- to medium-range twinjet narrow-body airliner. Originally developed as a shorter, lower-cost twin-engined airliner derived from Boeing’s 707 and 727, the 737 has developed into a family of nine passenger models with a capacity of 85 to 215 passengers. The 737 is Boeing’s only narrow-body airliner in production, with the -600, -700, -800 and -900ER variants currently being built. A re-engined and redesigned version, the 737 MAX, is set to debut in 2017.
The 737 series is the best-selling jet airliner in the history of aviation. The 737 has been continuously manufactured by Boeing since 1967 with 8,104 aircraft delivered and 3,931 orders yet to be fulfilled as of June 2014. 737 assembly is centered at the Boeing Renton Factory in Renton, Washington.
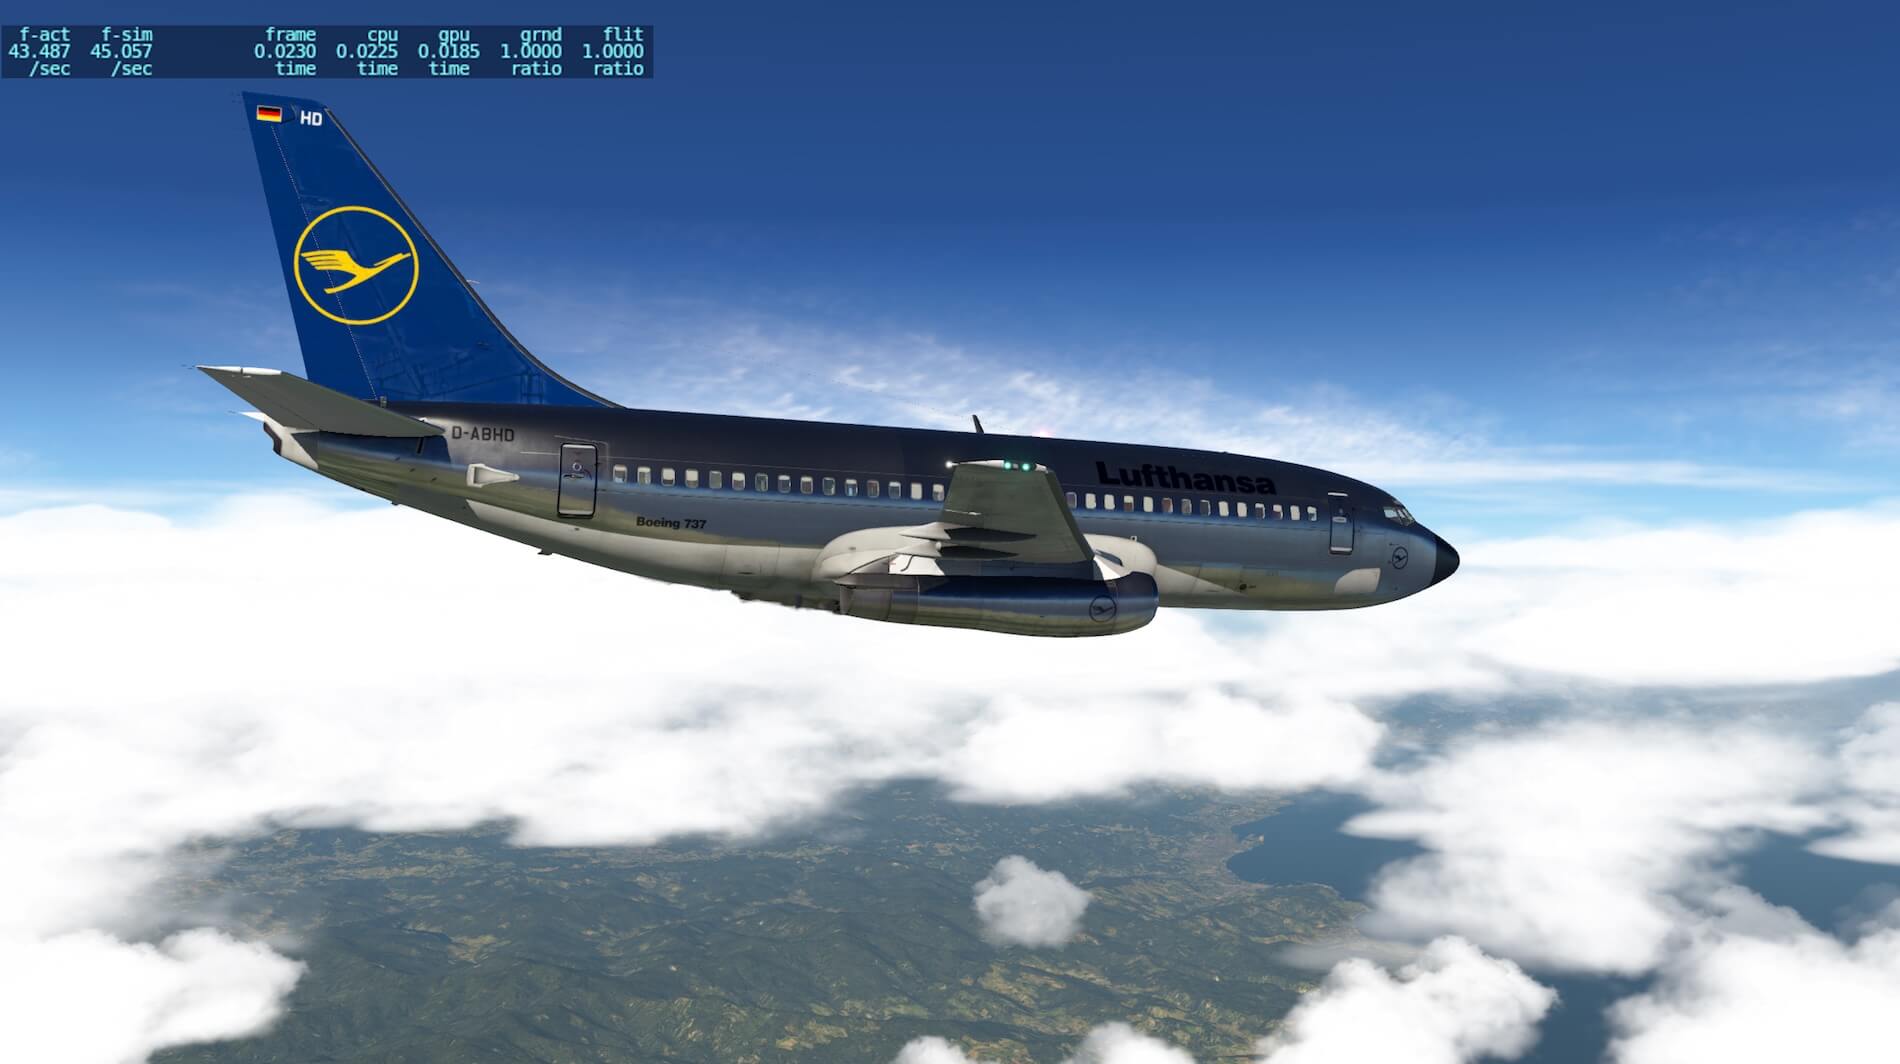
Boeing had been studying short-haul jet aircraft designs and wanted to produce another aircraft to supplement the 727 on short and thin routes. Preliminary design work began on May 11, 1964, and Boeing’s intense market research yielded plans for a 50- to 60-passenger airliner for routes 50 to 1,000 mi (80 to 1,609 km) long. Lufthansa became the launch customer on February 19, 1965, with an order for 21 aircraft, worth $67 million (1965, $190.28 million in 2008), after the airline received assurances from Boeing that the 737 project would not be canceled. Consultation with Lufthansa over the previous winter resulted in an increase in capacity to 100 seats.
On April 5, 1965, Boeing announced an order by United Airlines for 40 737s. United wanted a slightly larger airplane than the 737-100. Boeing stretched the fuselage 91 centimeters (36 in) ahead of, and 102 cm (40 in) behind the wing. The longer version was designated 737-200, with the original short-body aircraft becoming the 737-100.

Detailed design work continued on both variants at the same time. Boeing was far behind its competitors when the 737 was launched, as rival aircraft BAC-111, Douglas DC-9, and Fokker F28 were already into flight certification. To expedite development, Boeing used 60% of the structure and systems of the existing 727, the most notable being the fuselage cross-section. This fuselage permitted six-abreast seating compared to the rival BAC-111 and DC-9’s five-abreast layout.
Design engineers decided to mount the nacelles directly to the underside of the wings to reduce the landing gear length and kept the engines low to the ground for easy ramp inspection and servicing. Many thickness variations for the engine attachment strut were tested in the wind tunnel and the most desirable shape for high speed was found to be one which was relatively thick, filling the narrow channels formed between the wing and the top of the nacelle, particularly on the outboard side.

Originally, the span arrangement of the airfoil sections of the 737 wing was planned to be very similar to that of the 707 and 727, although somewhat thicker. However, a substantial improvement in drag at high Mach numbers was achieved by altering these sections near the nacelle. The engine chosen was the Pratt & Whitney JT8D-1 low-bypass ratio turbofan engine. With the wing-mounted engines, Boeing decided to mount the horizontal stabilizer on the fuselage rather than the T-tail style of the Boeing 727.
What’s the Plan?
Ok, here’s my plan for this version 3 FJS 732.
I first do my daily inspection as I did often in the past. Then via the AFT entrance door I’ll do a Virtual Cabin and last but not least, a “first flight of the day 3D Cockpit check including some tests and finally, you and I are invited on a regular flight to see, feel and hear the FlyJSim 732 TwinJet.
FlyJSim 732 Inspection
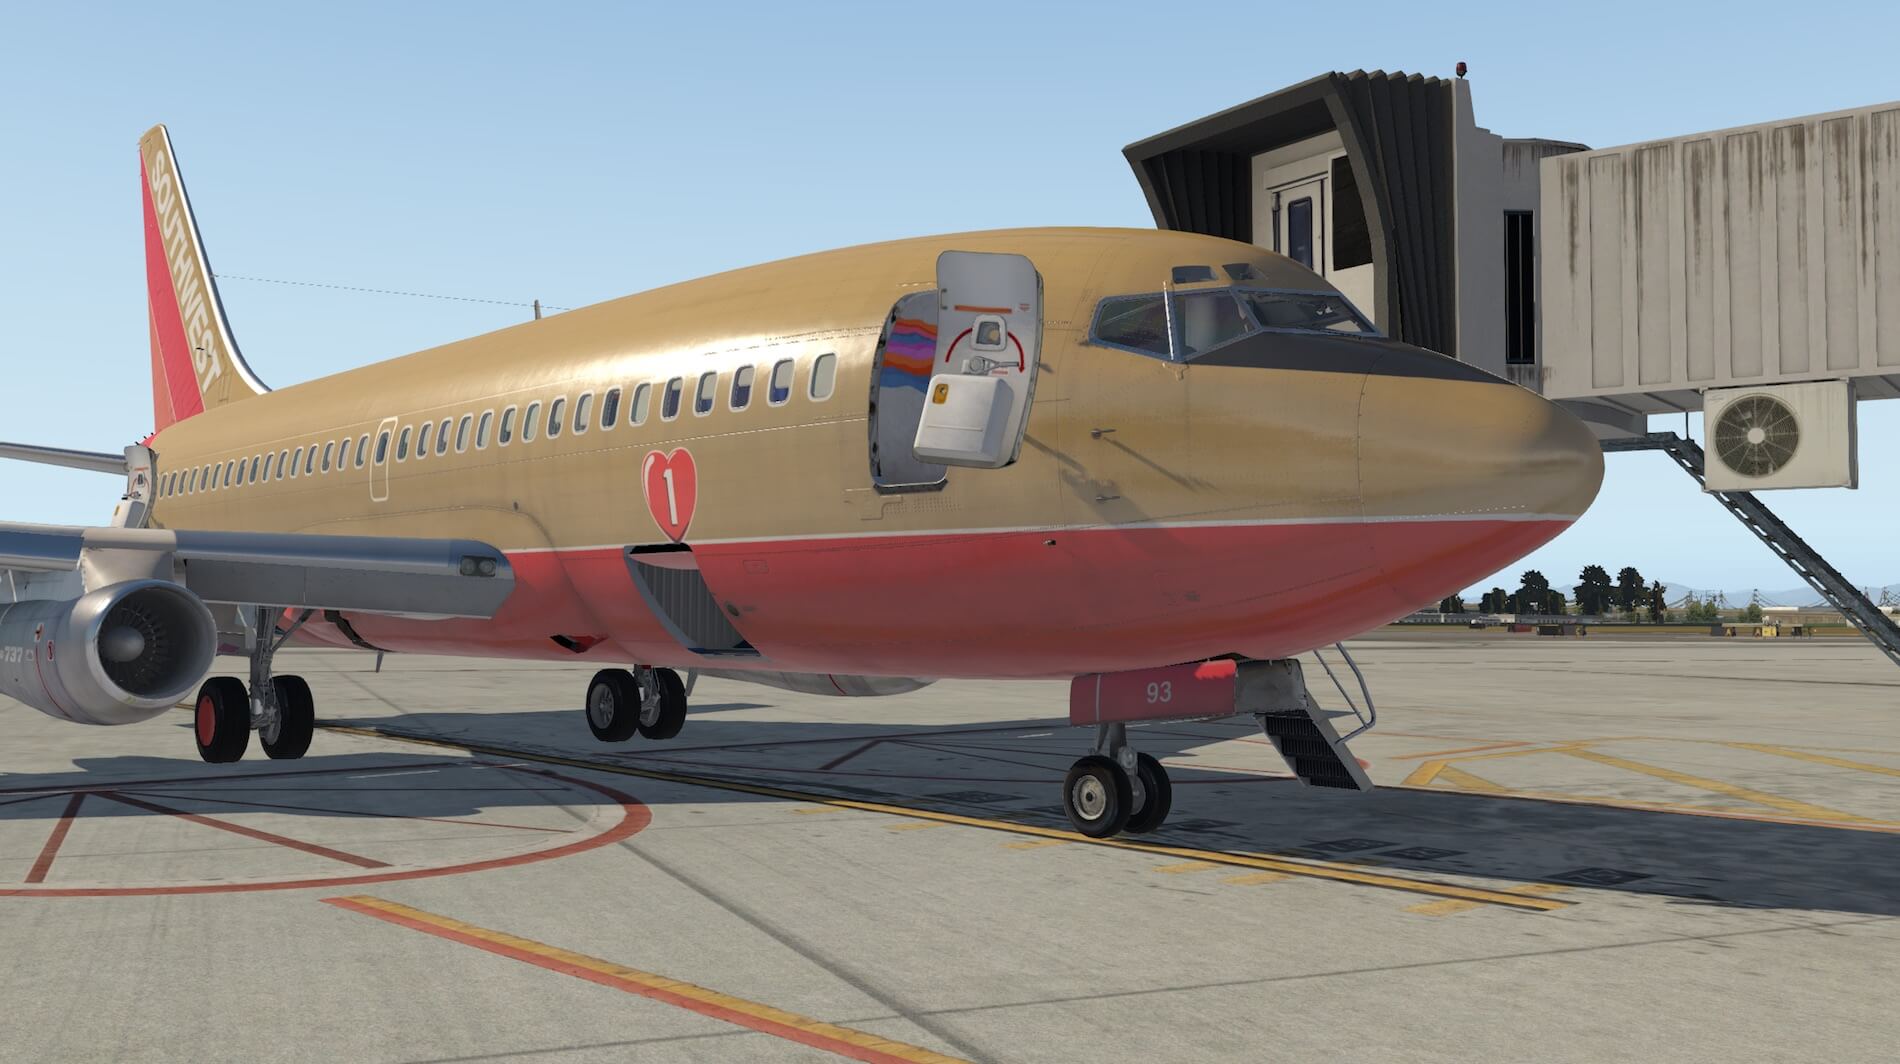
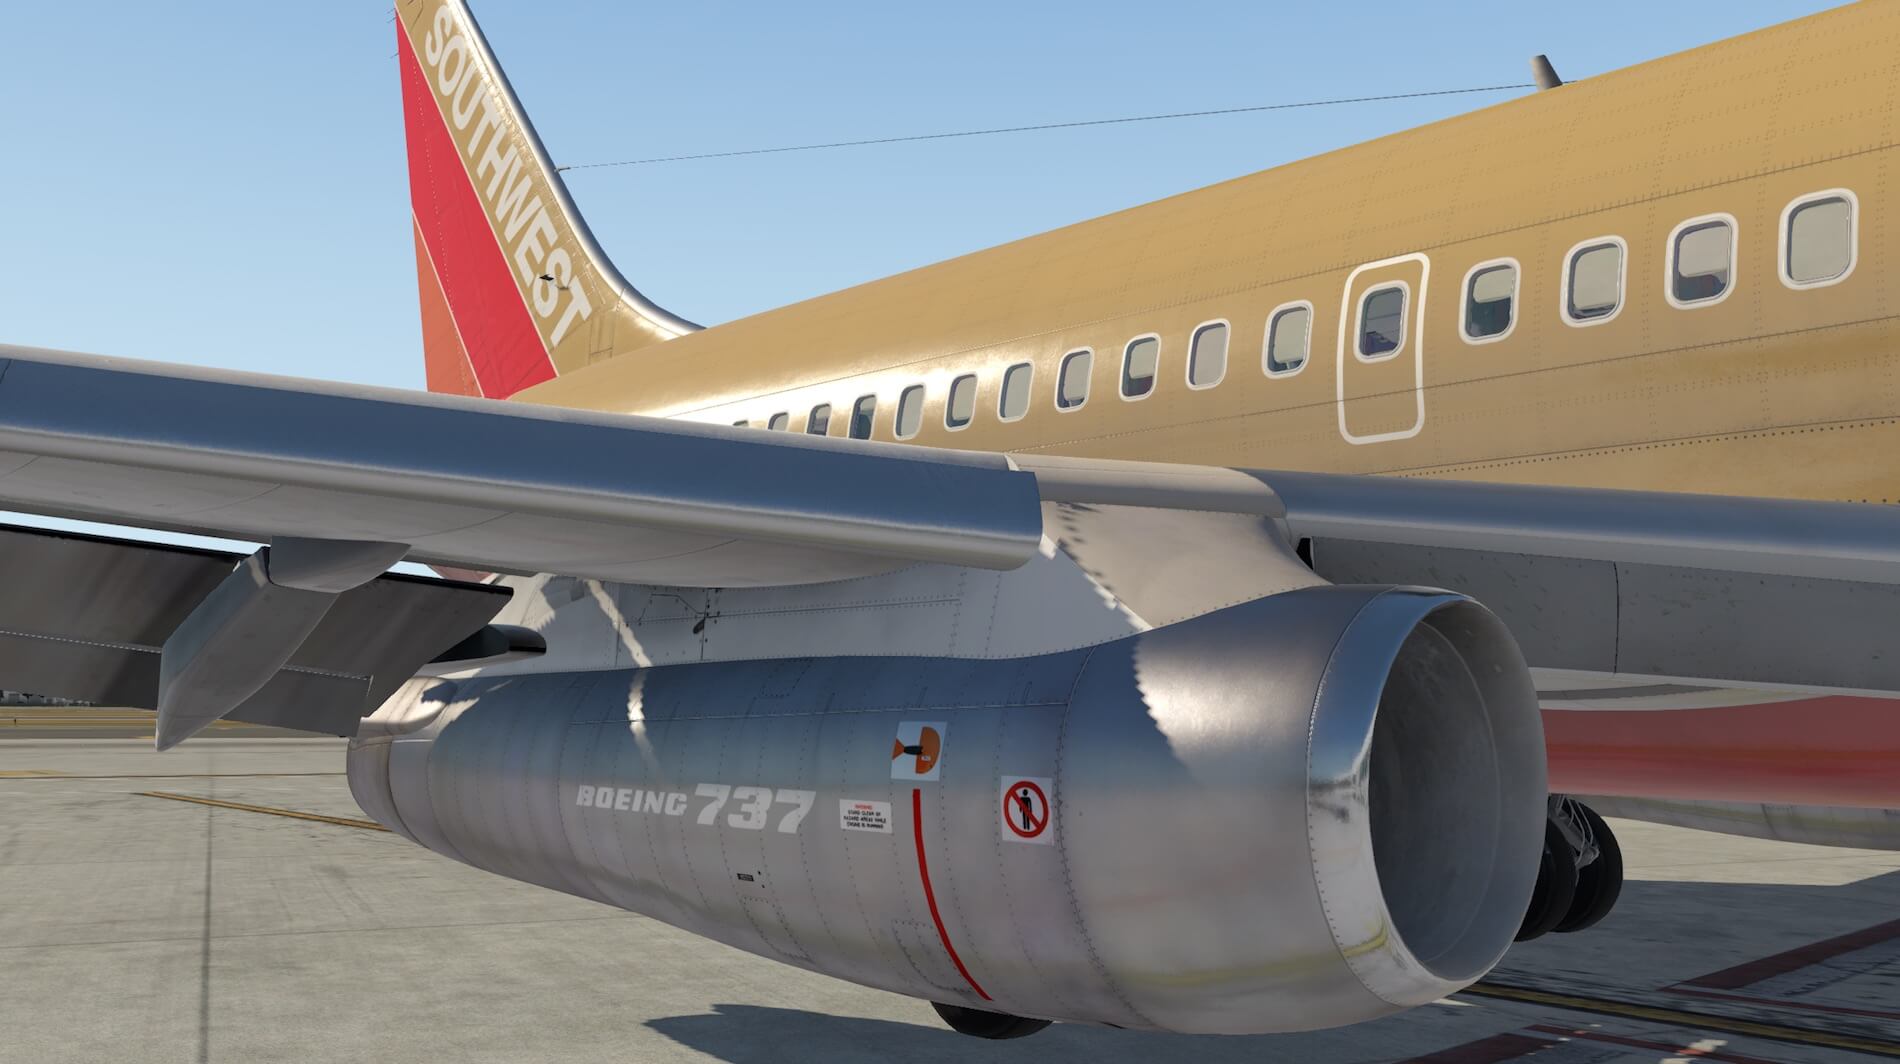
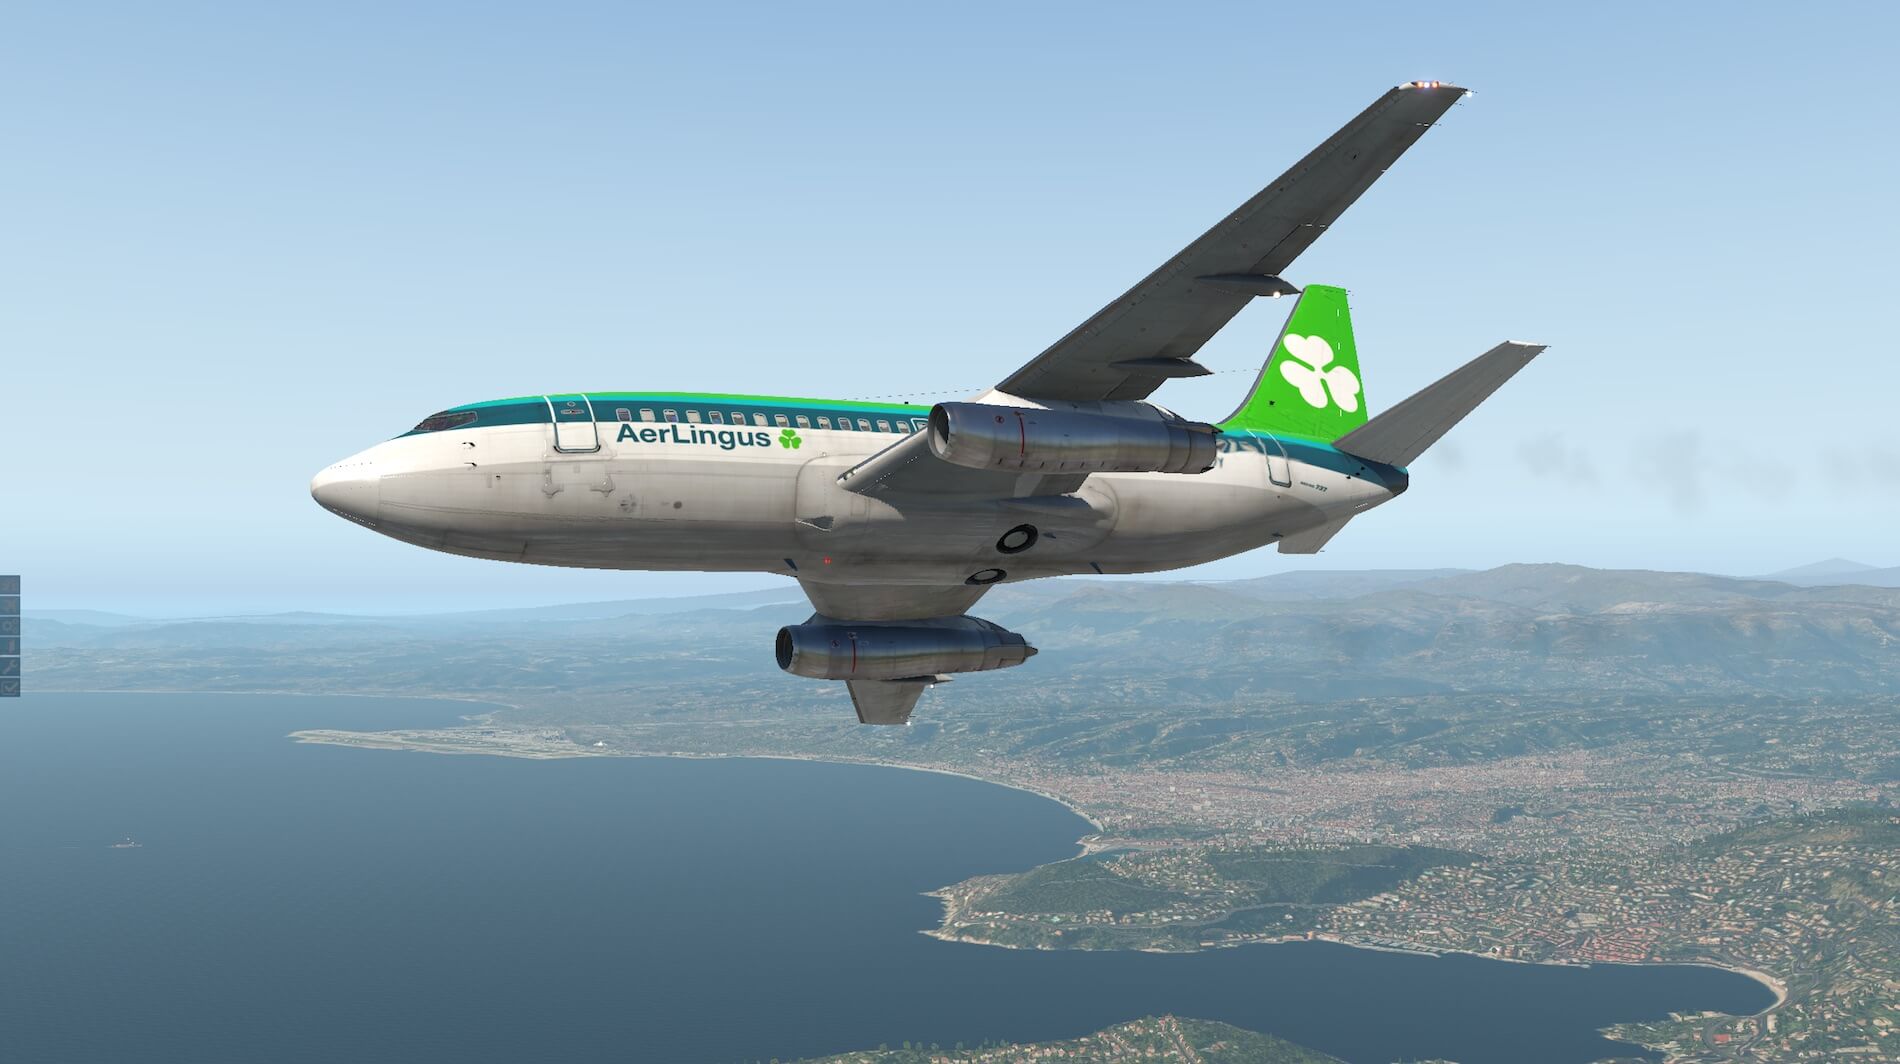
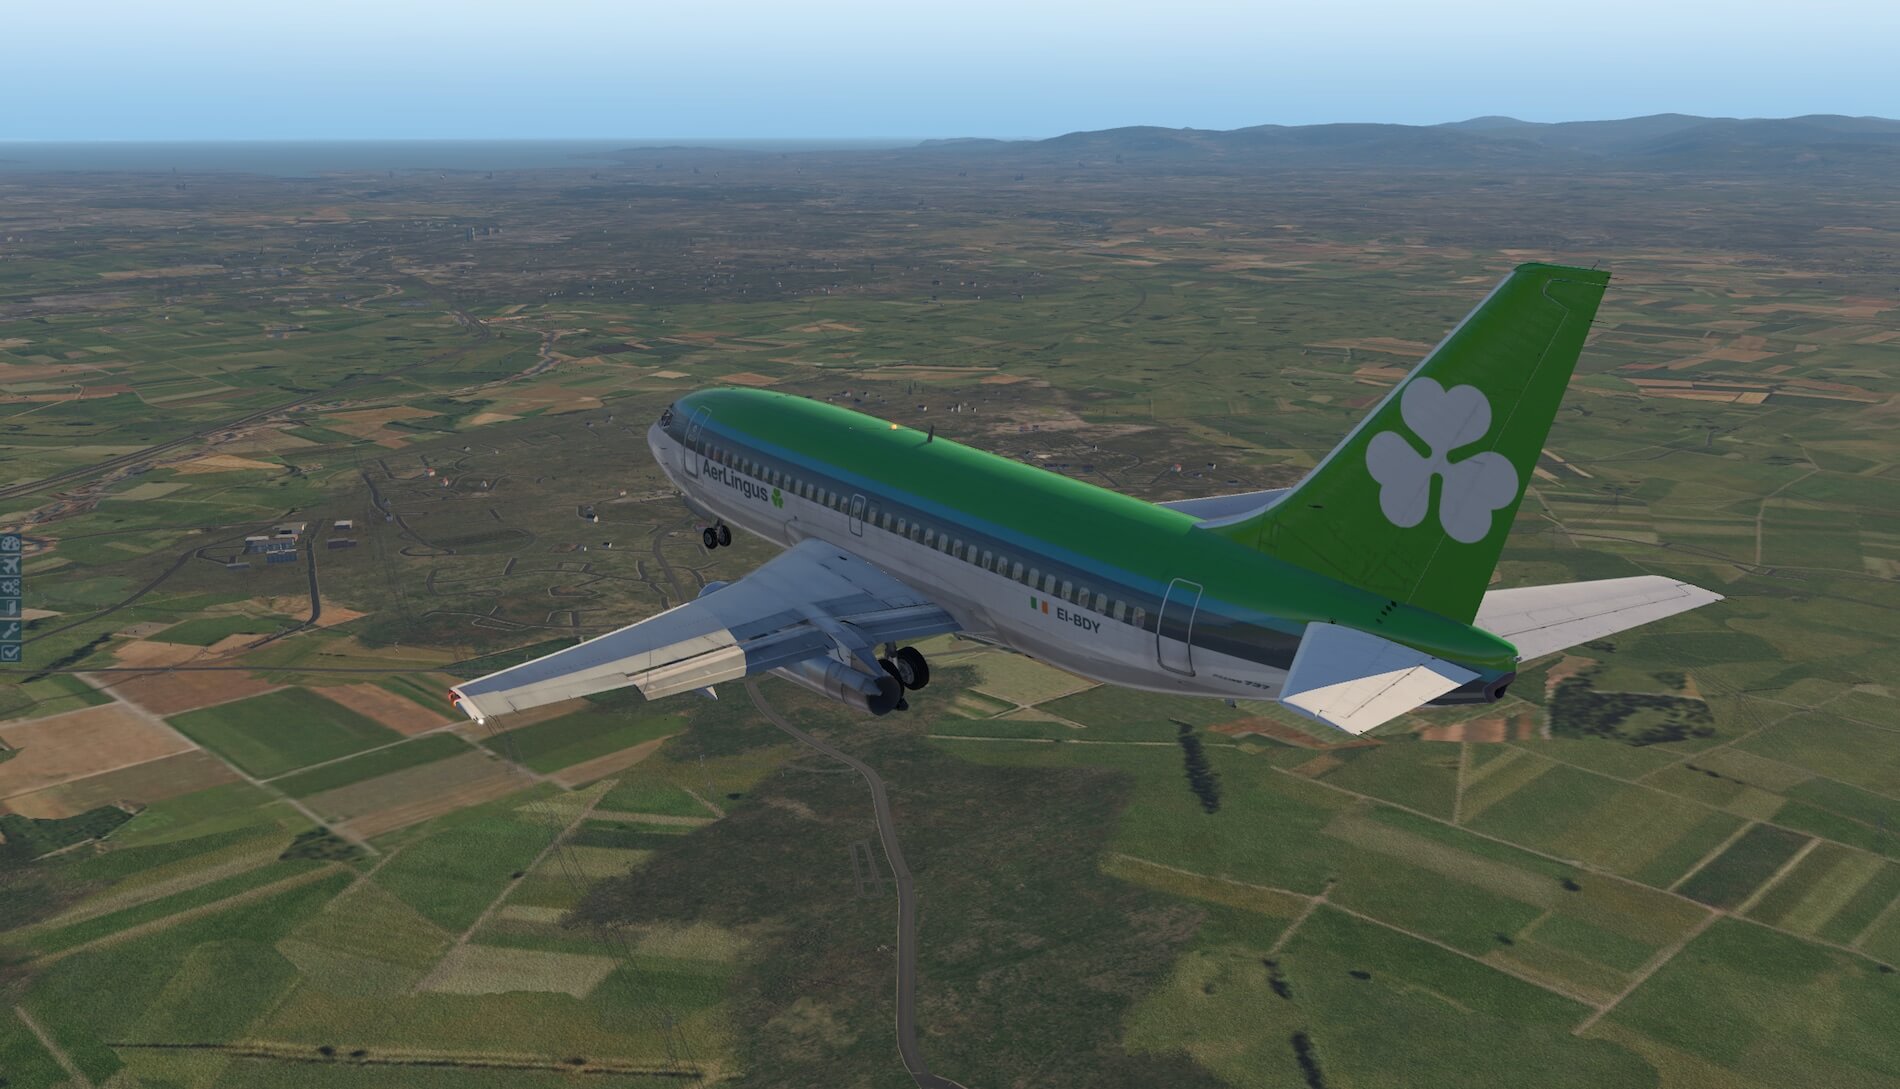
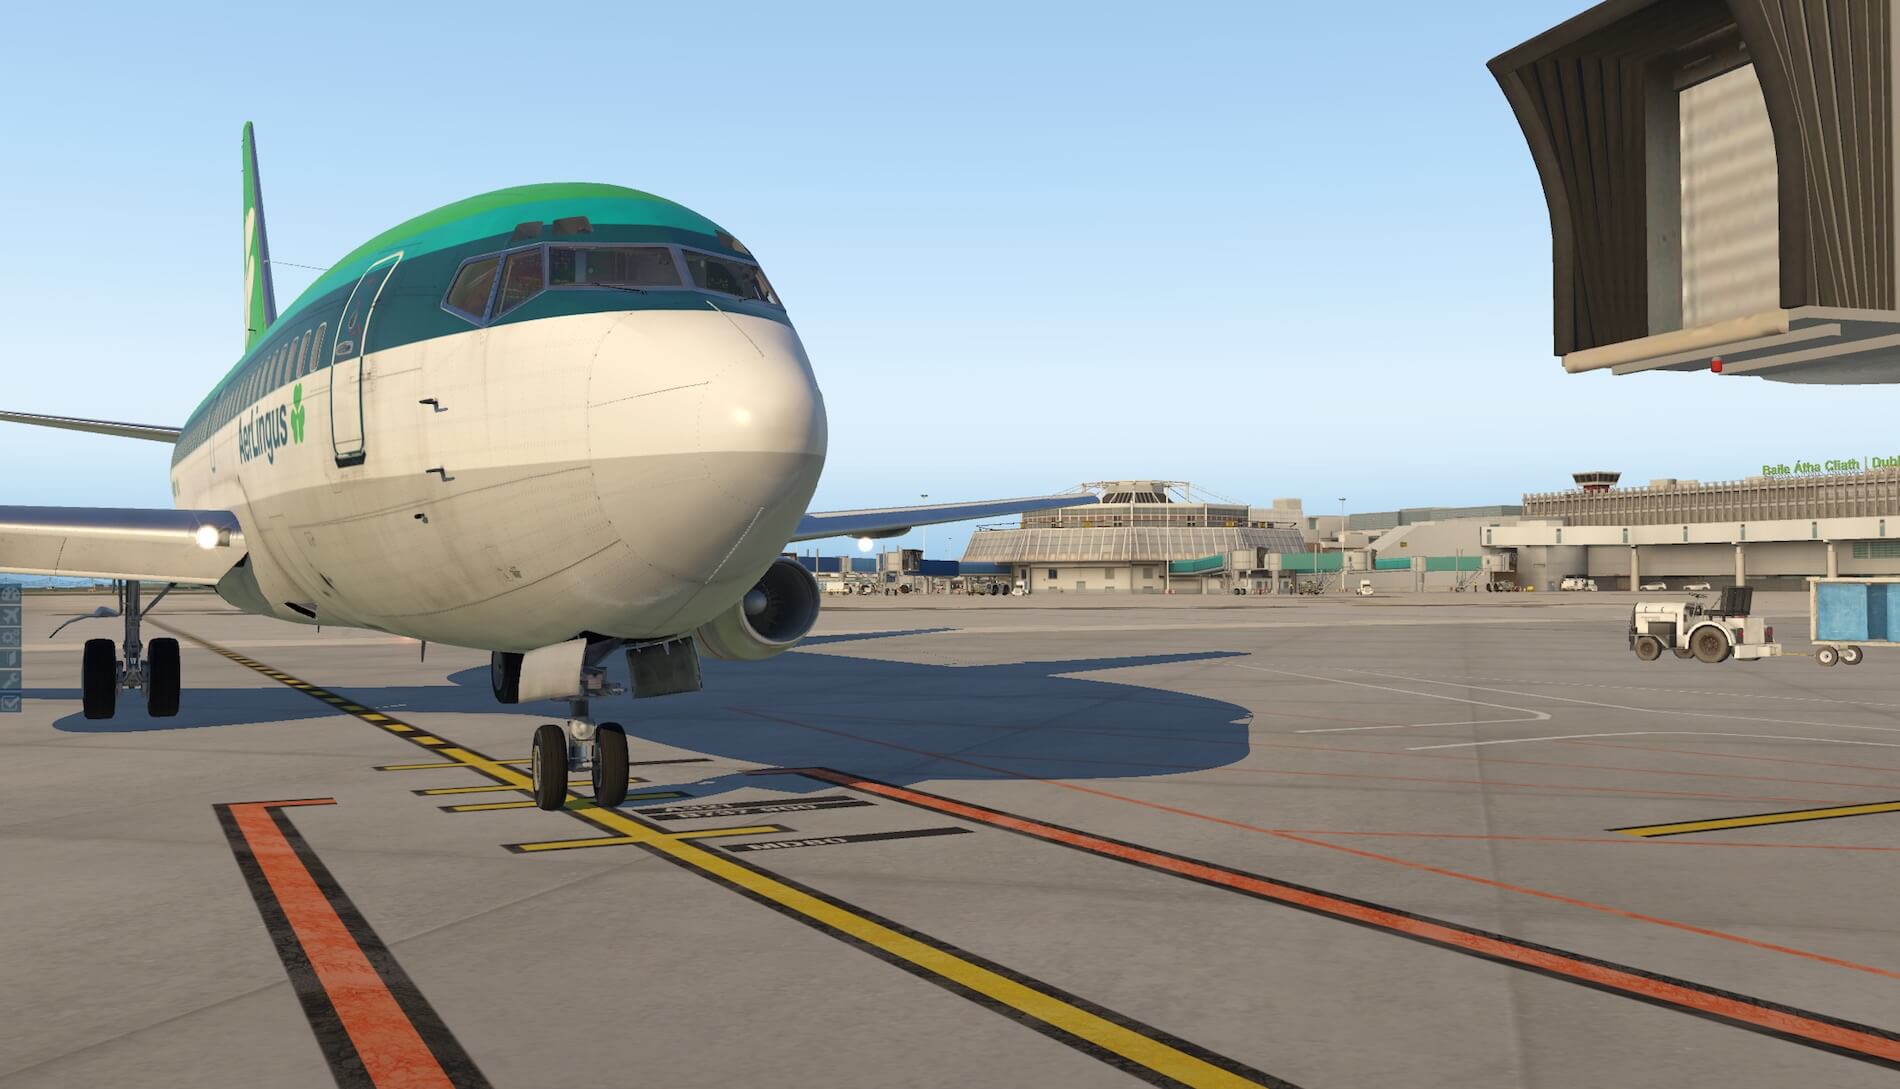
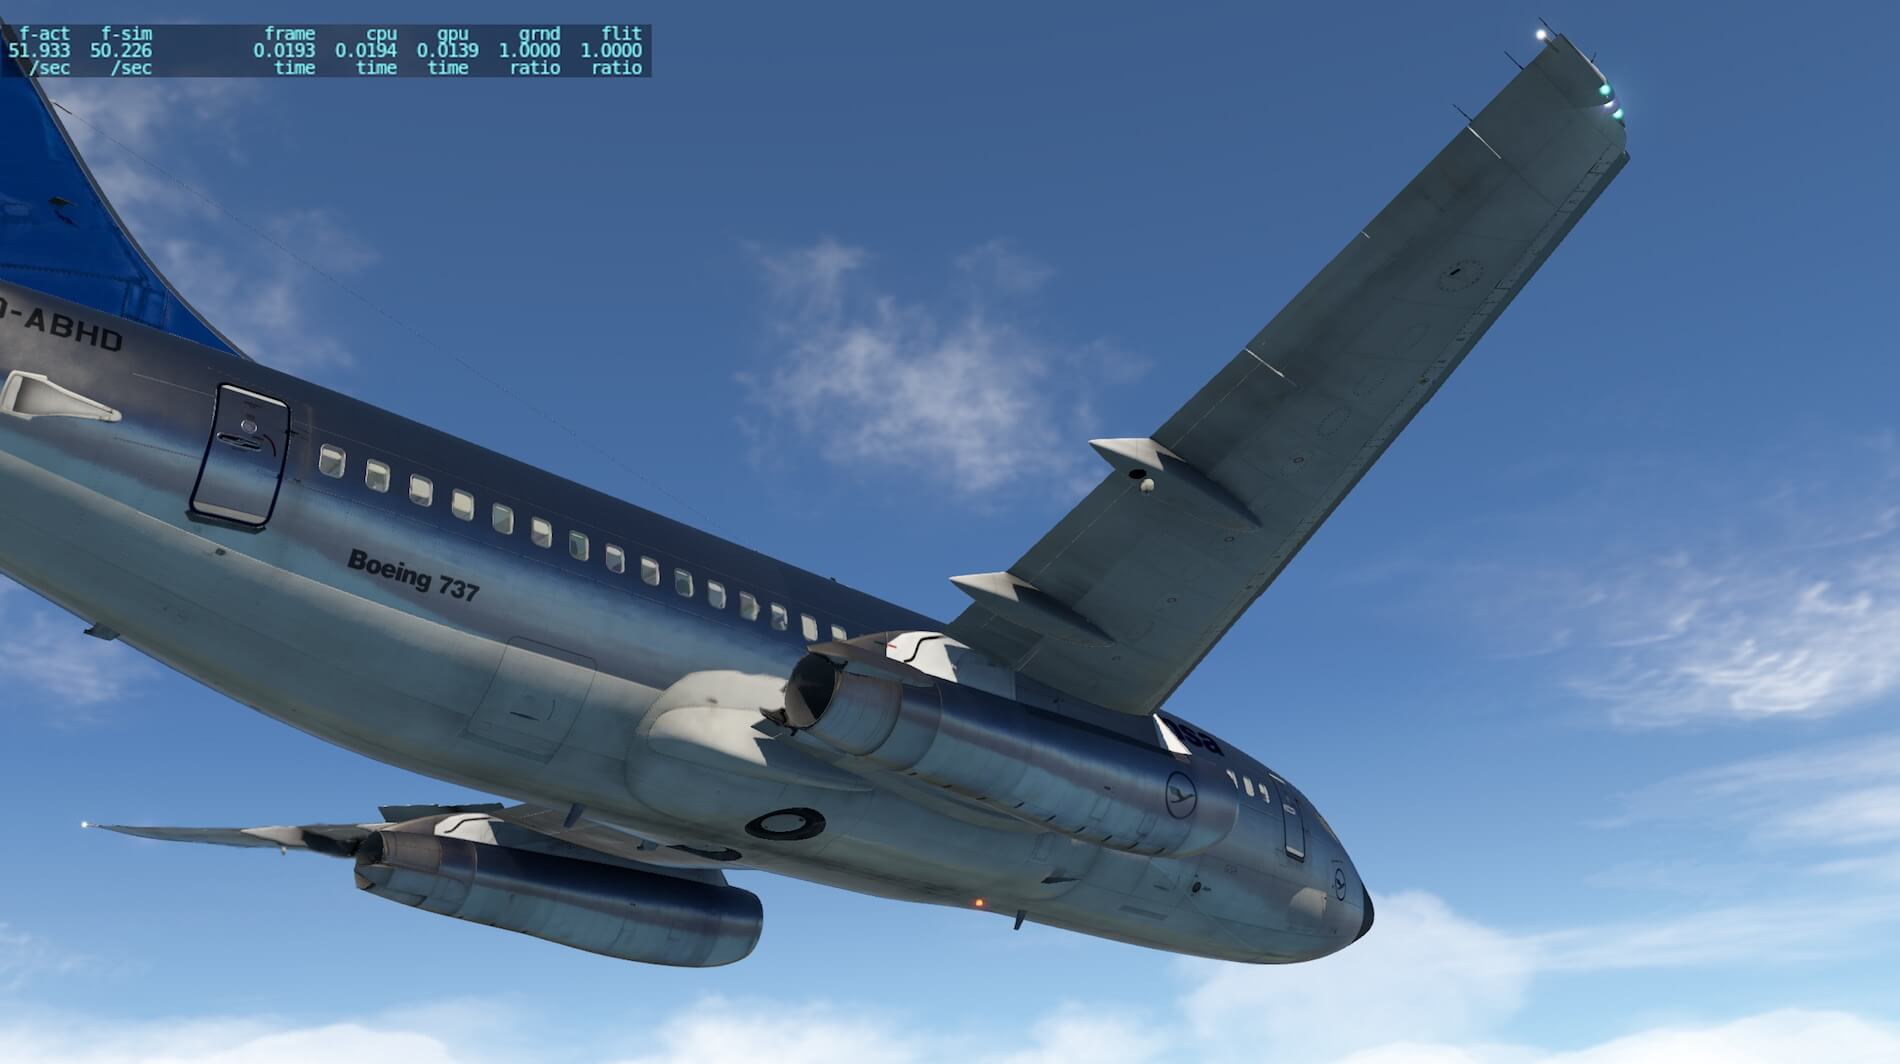
From a distance, I can say nothing else other than a wonderful and accurate 3D modeled Boeing 737 Classic. This is the way “how” a typical 737-200 looks and many similarities are visible between the 737 Classic and the 727 Series. Starting my inspection at the nose, I can clearly see the metal strips placed on the radome nose as well as the Aluminum skin plates. Further on, I can’t miss the pitot static tubes and the RAM AIR temp sensor. But it’s not only that that makes me happy. It’s also the way the textures look like. Jack has decided to go for 4K textures and many animations are included like the FWD passenger door stair and the LH AFT entrance door with integrated stair.
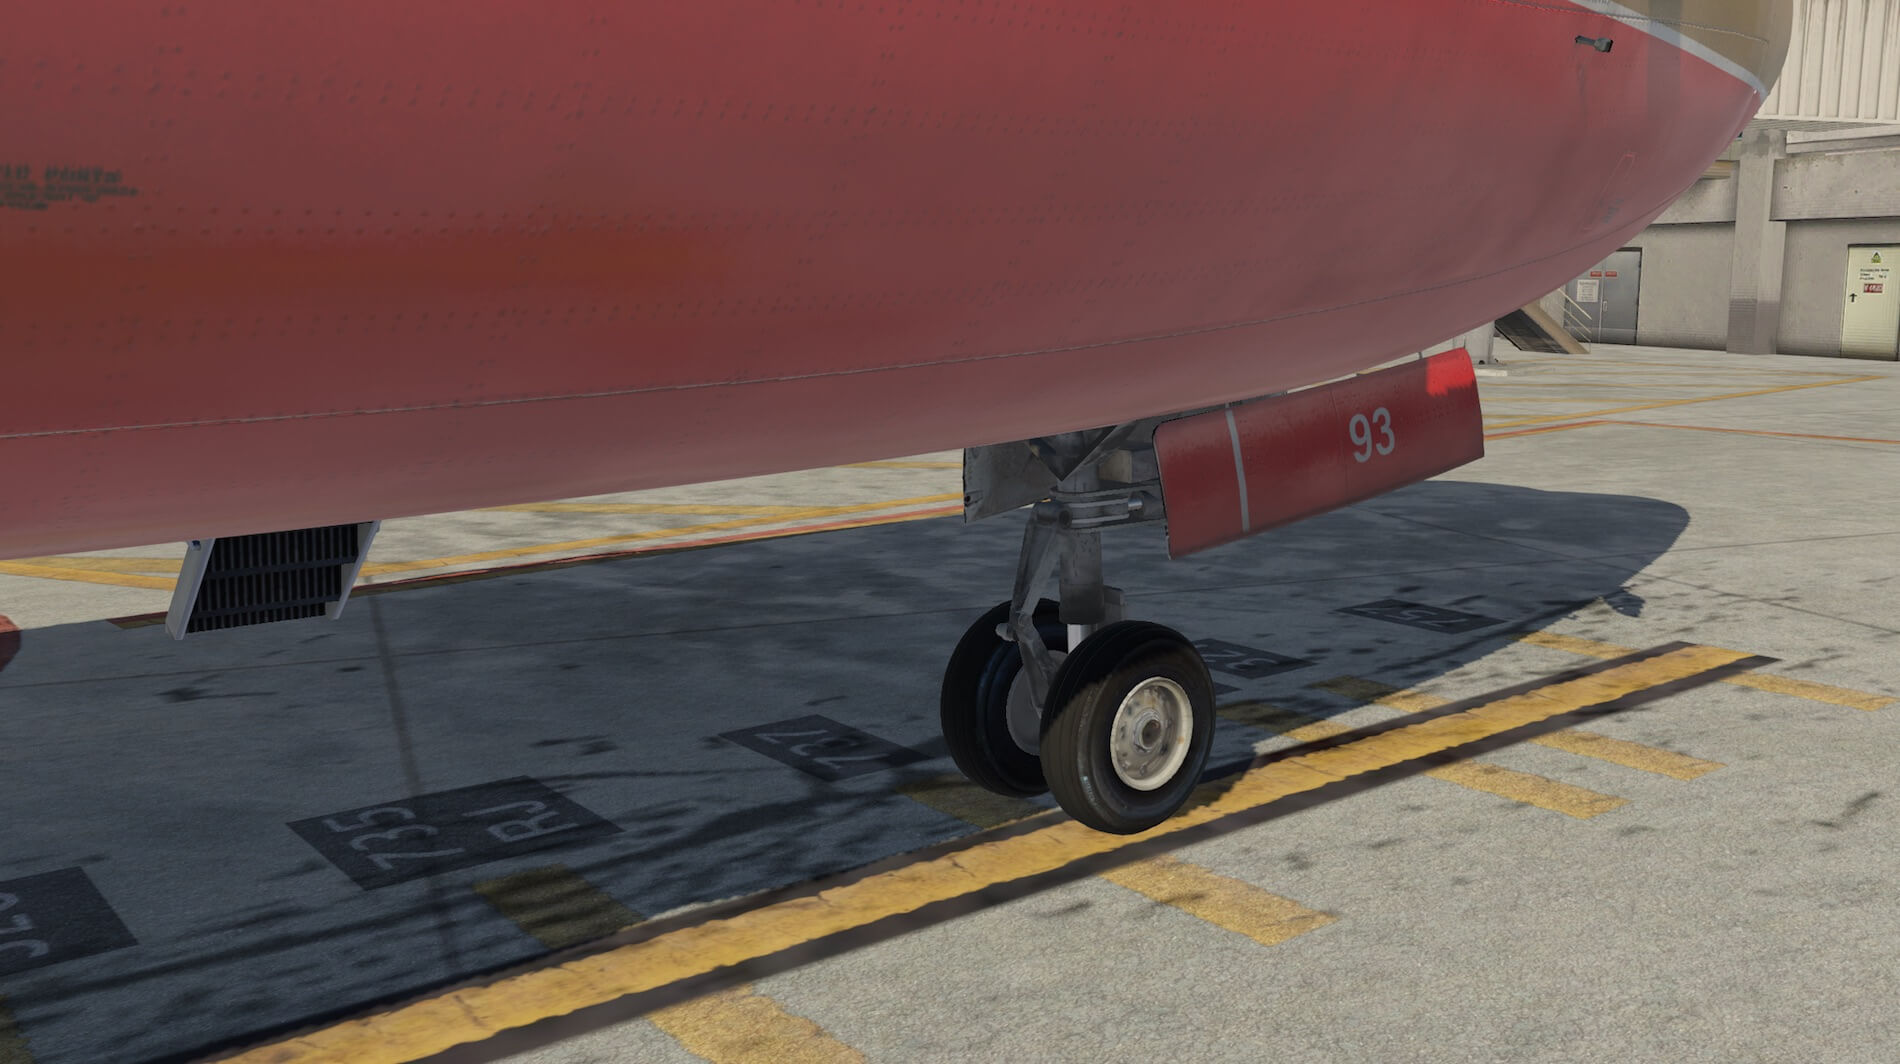
Anyway, the first thing you can’t miss is the well/accurate modeled Nose Landing Gear (NLG), with the torque links at the back and the gorgeous looking nose wheels, and, not to forget, the take-off light in front of the NLG with its mounting bracket. Using photo real material is great, as long as it’s of a high quality and that’s for sure the case with the tires and the wheel rim. They give the nose wheel assembly a realistic look from a distance and also during a close-up inspection.
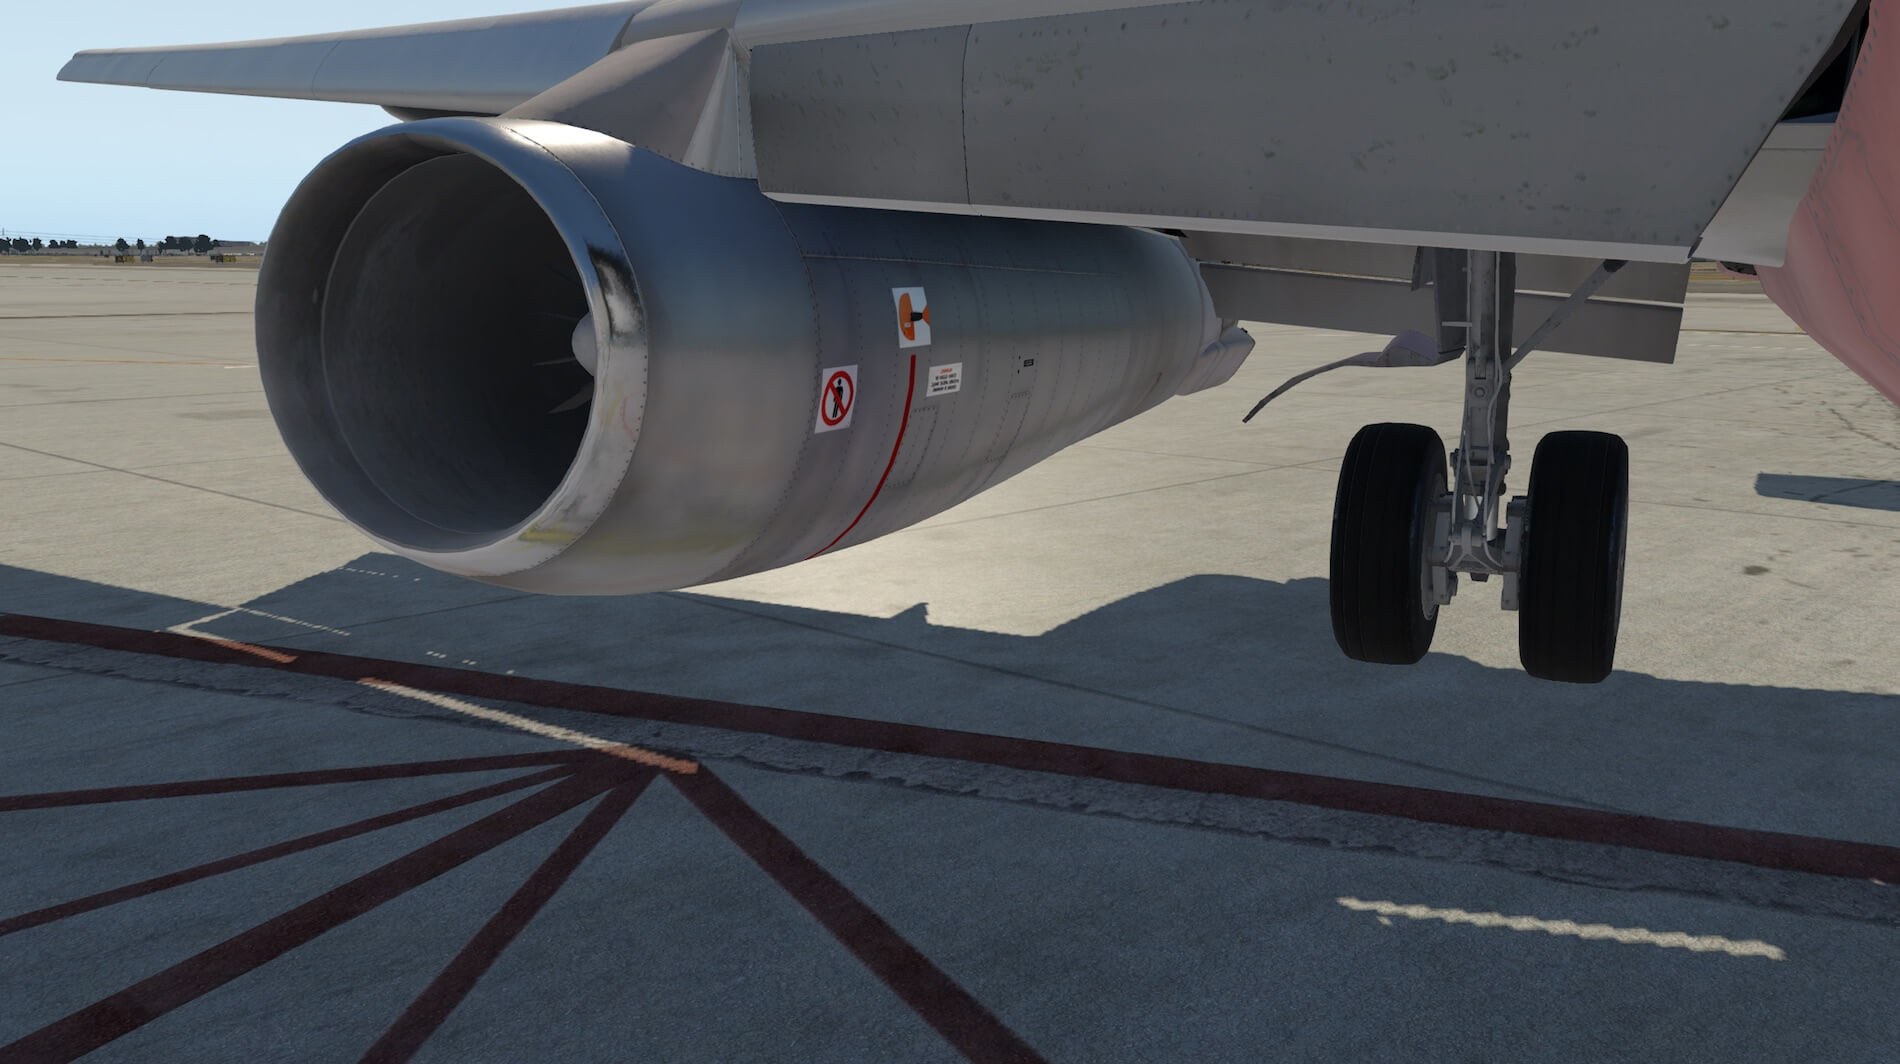
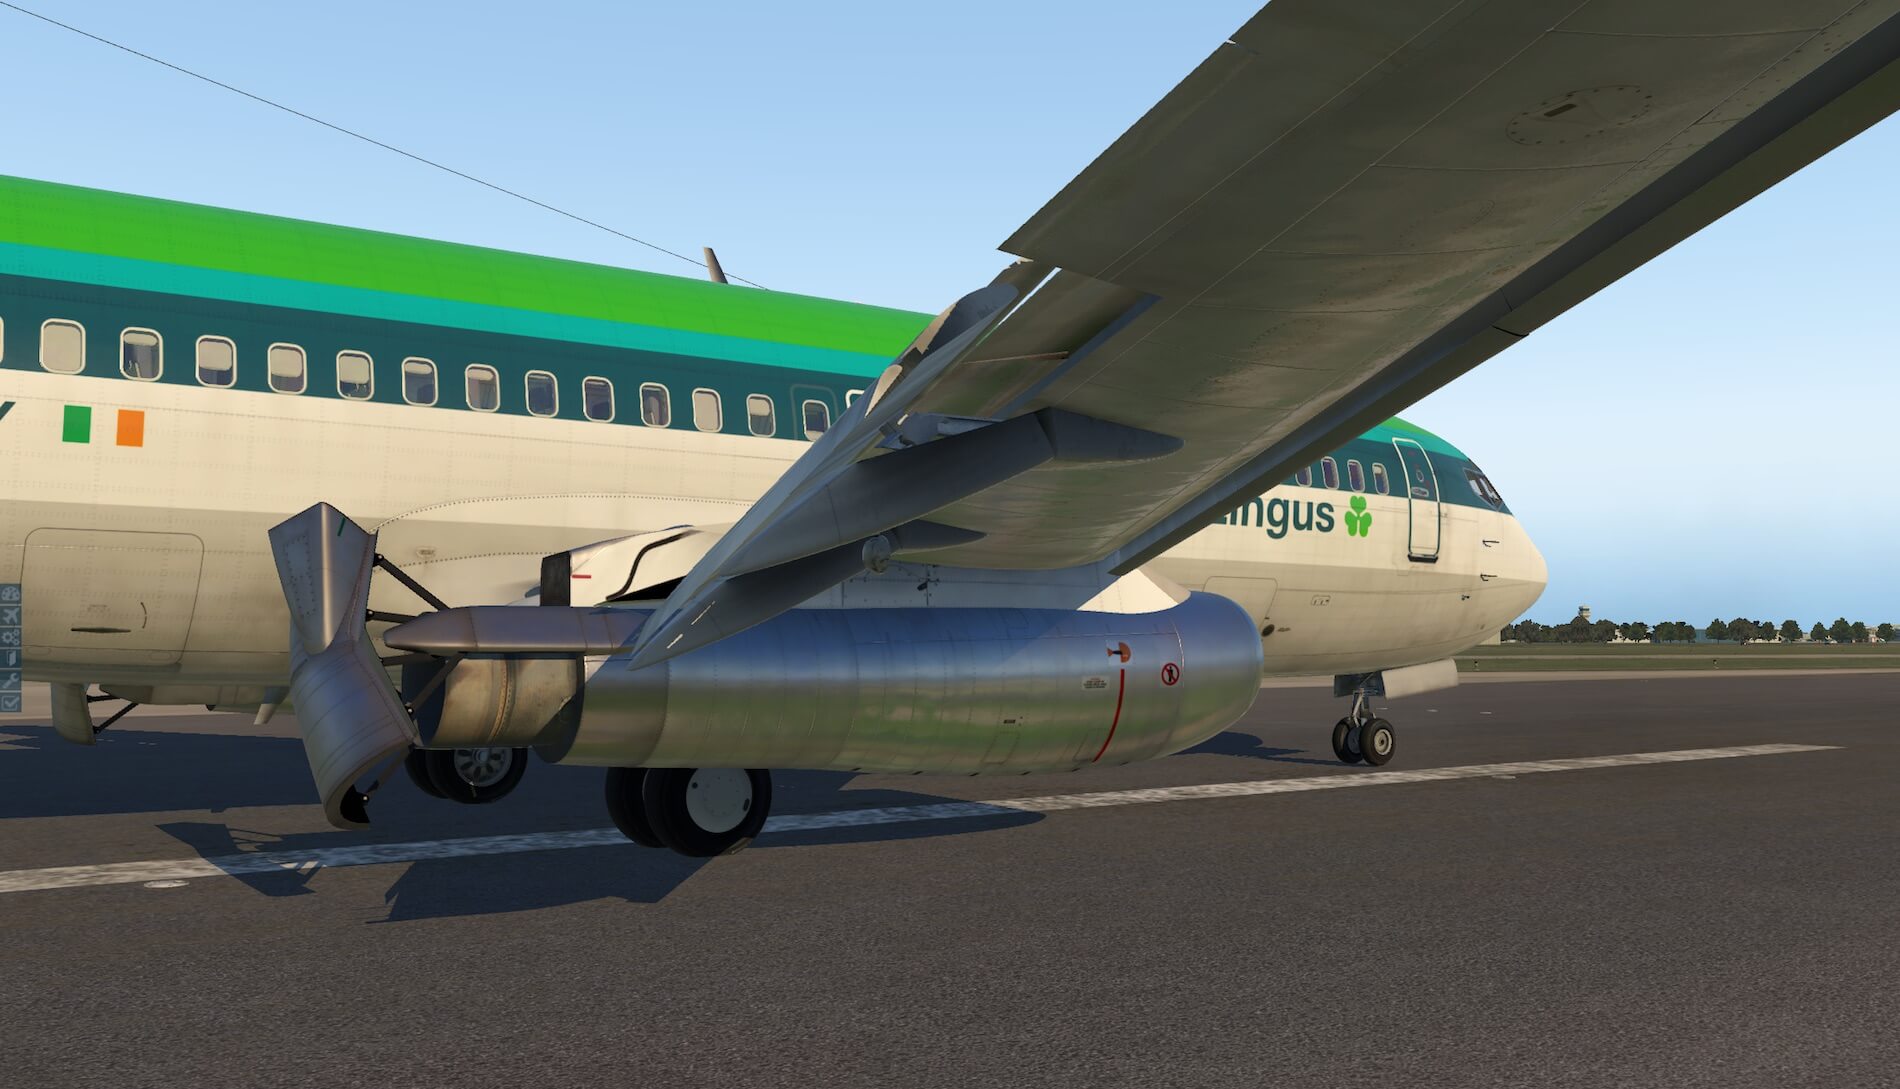
Looking from this fuselage position, near the NLG to the left-hand wing, and the dropped down Kreuger flaps and engines, I’m impressed by the way this 737 is made. The modeled 737-200 comes “lucky” with weathered textures. This makes me very happy since these flying 737 Classics aircraft are far from new. You could argue about the clean look of the engine thrust reverser bucket doors. Under normal conditions these are black, black of the carbon exhaust outlet gases. Ok, when the aircraft has been delivered from the factory or when the aircraft have had a heavy maintenance inspection, then those bucket doors are clean and perhaps even polished, as I’ve seen often with Lufthansa aircraft.
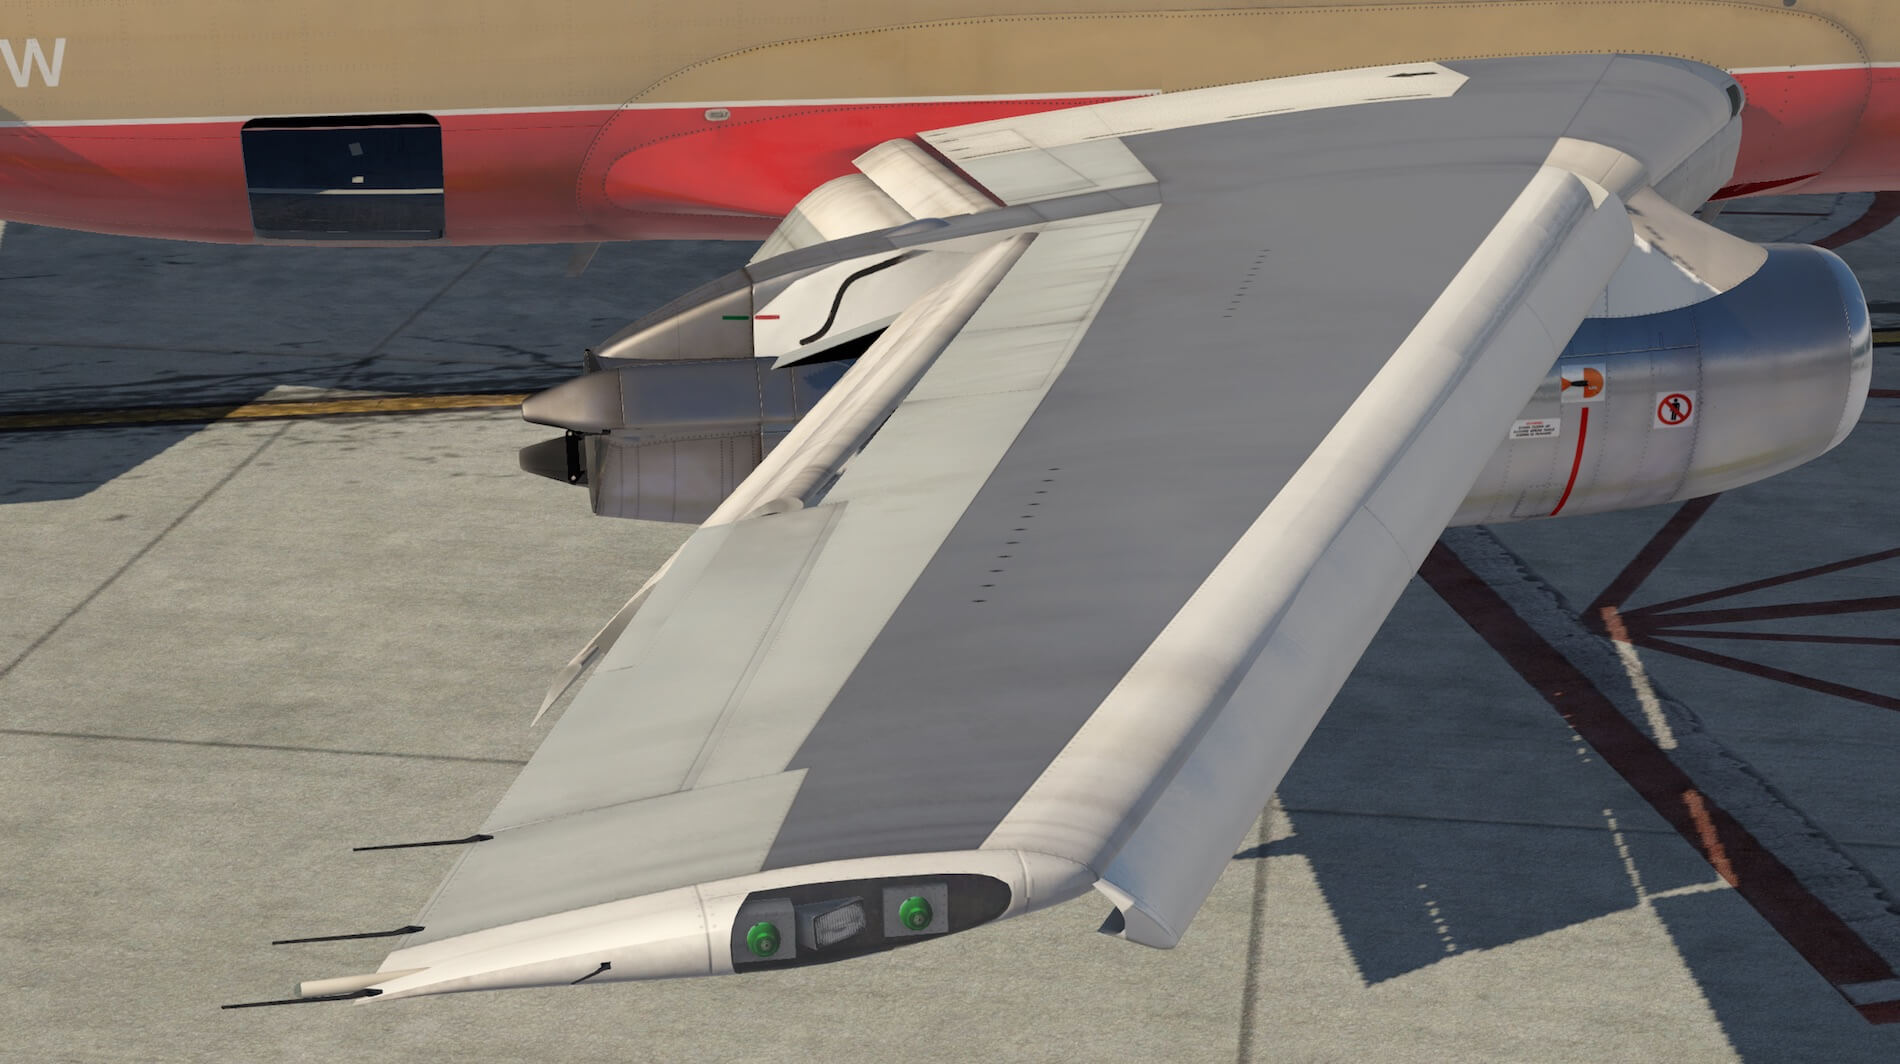
Walking along the wing leading edge, I spot the very nice and accurately modeled wing tip. I like the way the wing tip glass cover is made. You really get the idea that there’s something behind it. In this case, you’ll see the colored navigation light units and a strobe light unit. And, almost forgotten, at the wing tip trailing edge, the white navigation light and some static dischargers. Via the trailing edge with the flaps being extended, I spot the Fowler flap system, the landing light. Belonging to a Fowler flap system, the visible flap track in the rear engine pylon. Before having a quick look to the Main Landing Gear (MLG), I’m able to check the engine exhaust for any “possible” virtual oil leaks!
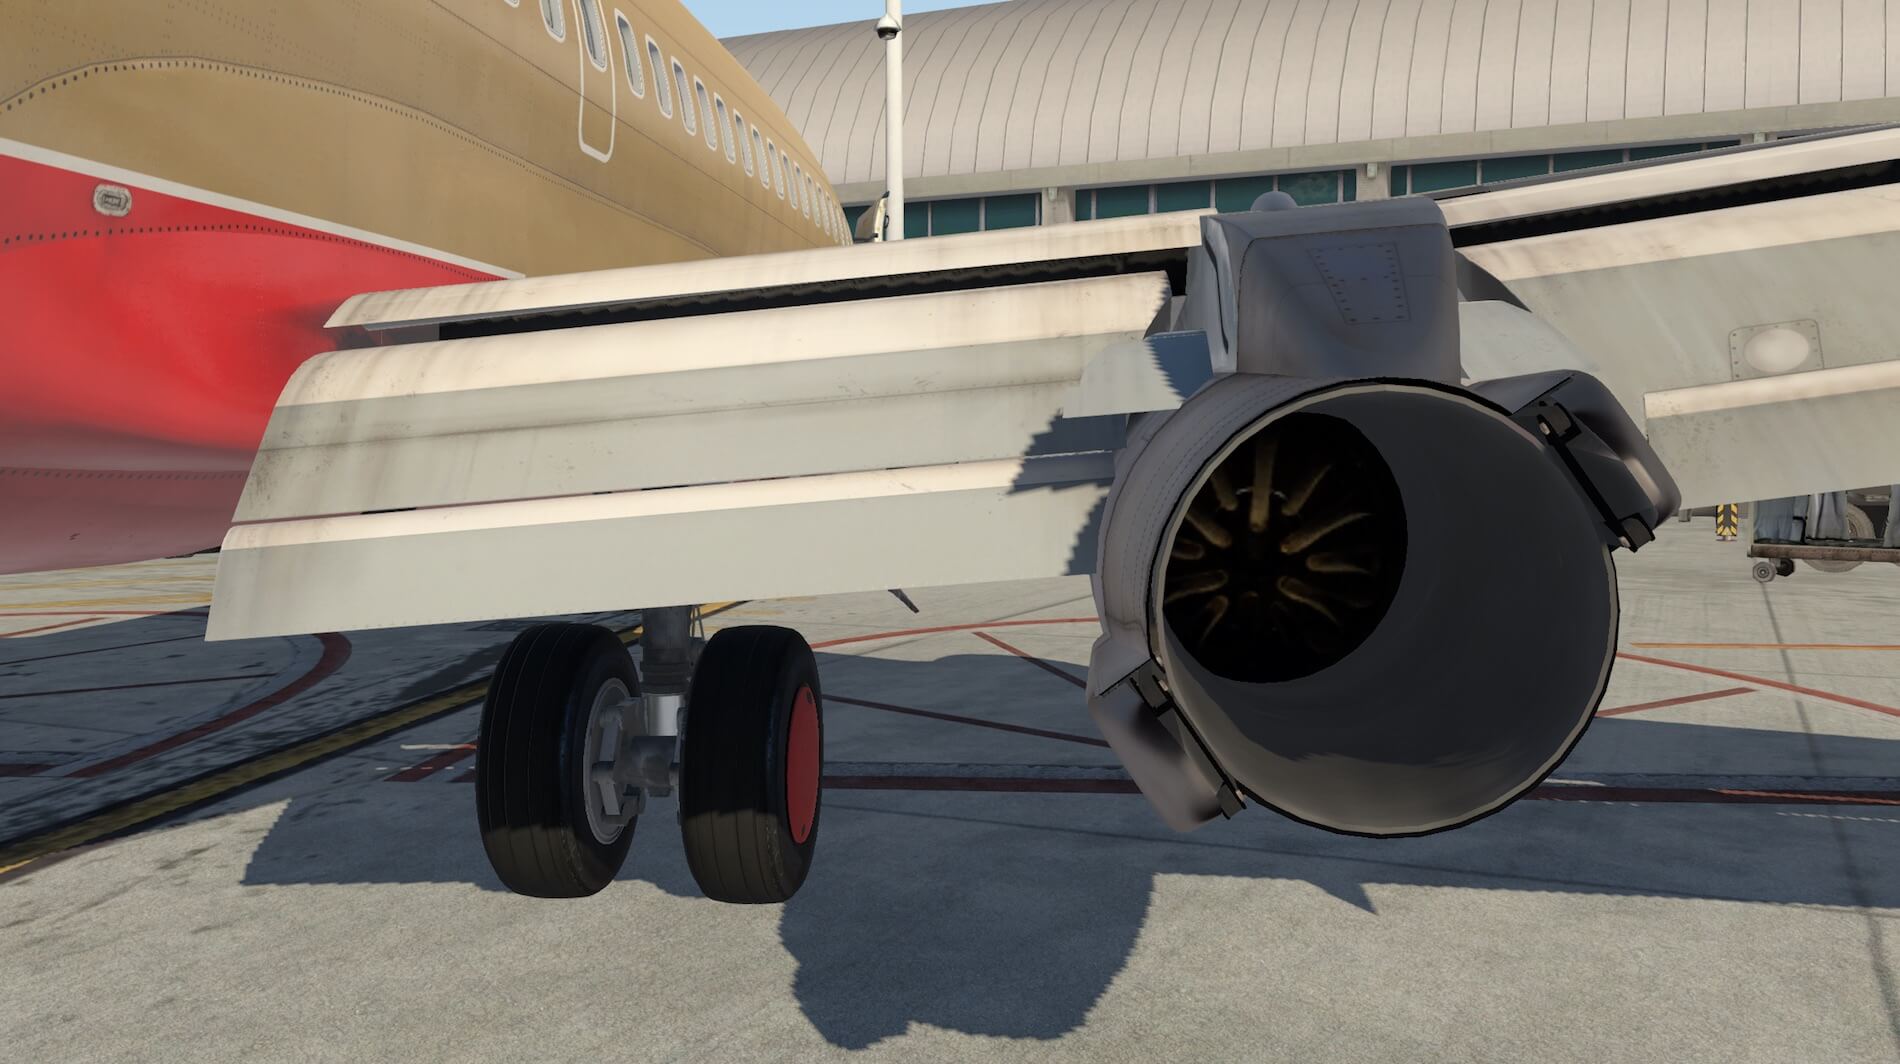
The MLG and wheels are, same as I’ve seen at the NLG, of the same quality. The tires are well modeled, covers are installed on the outboard main wheels to close off the gap when the gears are retracted and, not to forget, the aircraft comes with a nice, but above all, accurate modeled MLG gear structure with fixed gear door.
When you’re not familiar with the 737 MLG doors; the 737 and even the latest 737NG, don’t have a movable gear door that closes off the MLG after it’s retracted. The only gear doors fitted on the 737 are the fixed doors on the outboard side of the landing gear strut. When the gear is fully retracted, the fixed strut door closes off everything except the main wheel tire. The wheel hub is covered by a cover and finally there’s a minimum of turbulence around the main gear strut and wheel assembly.


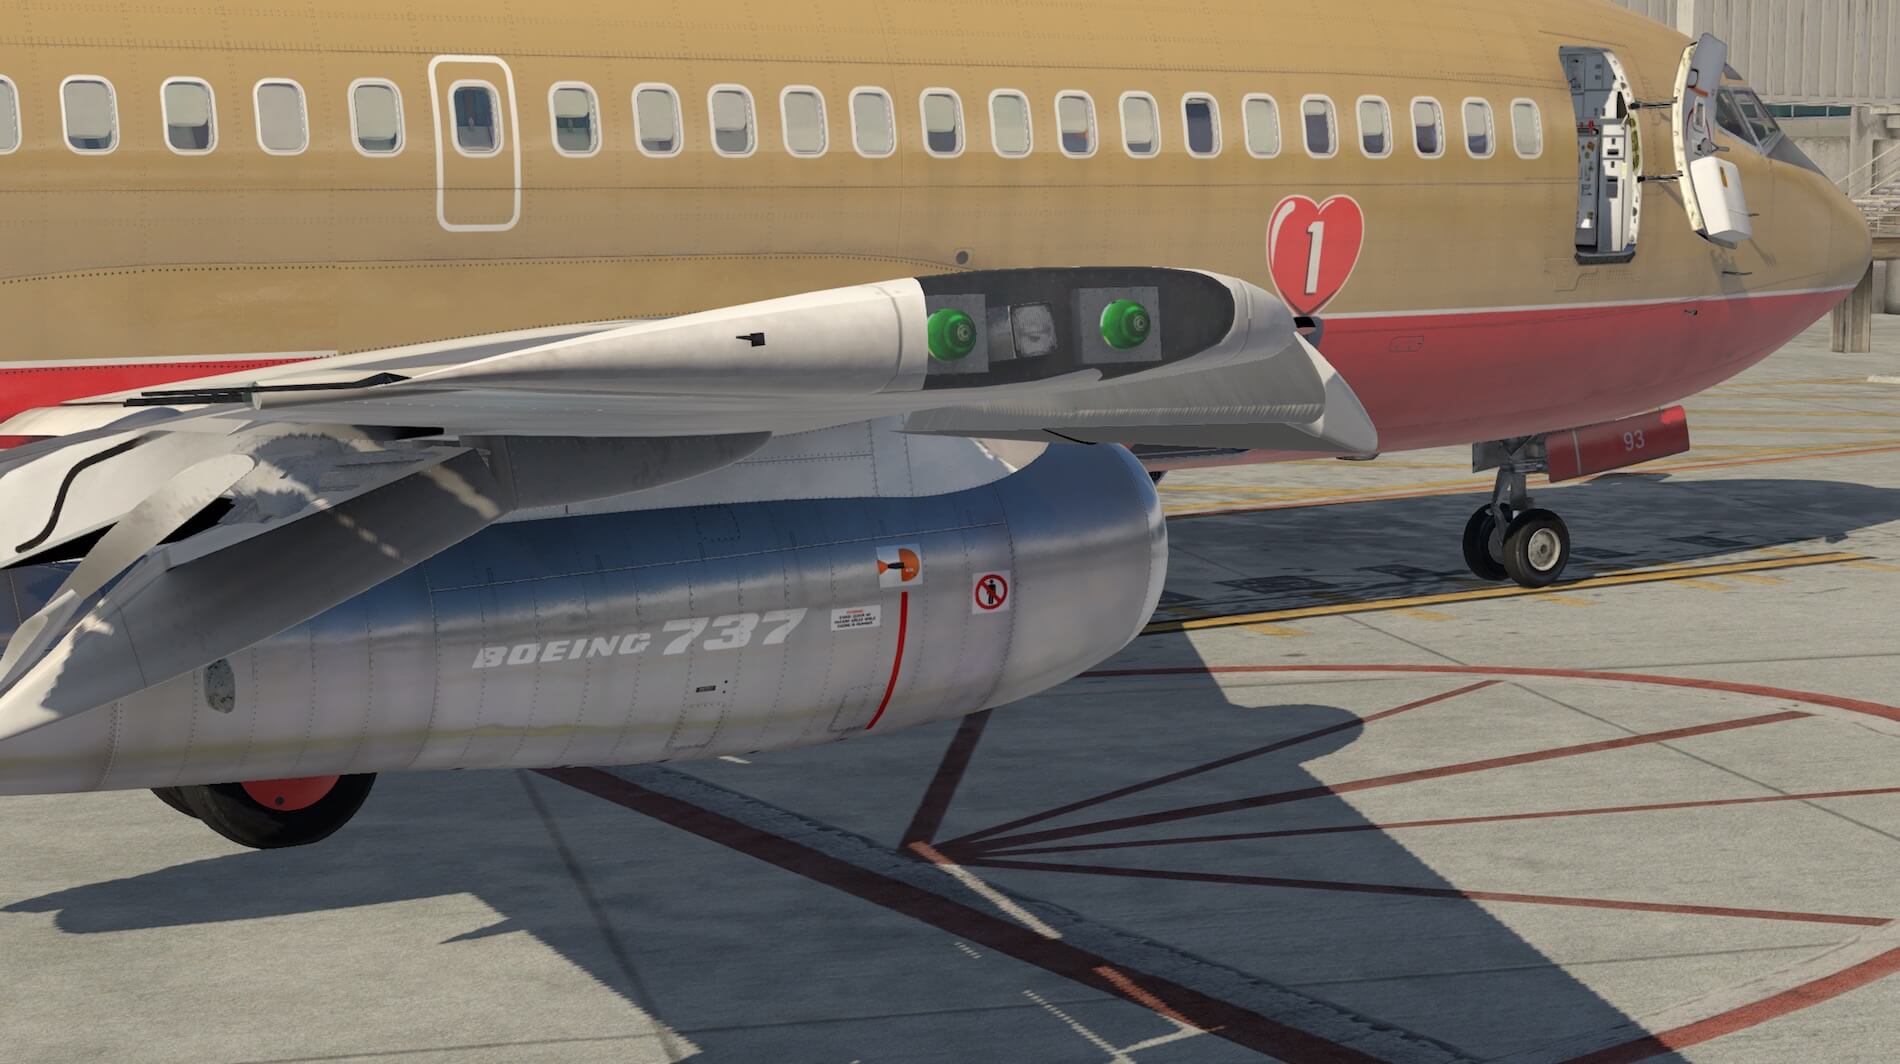

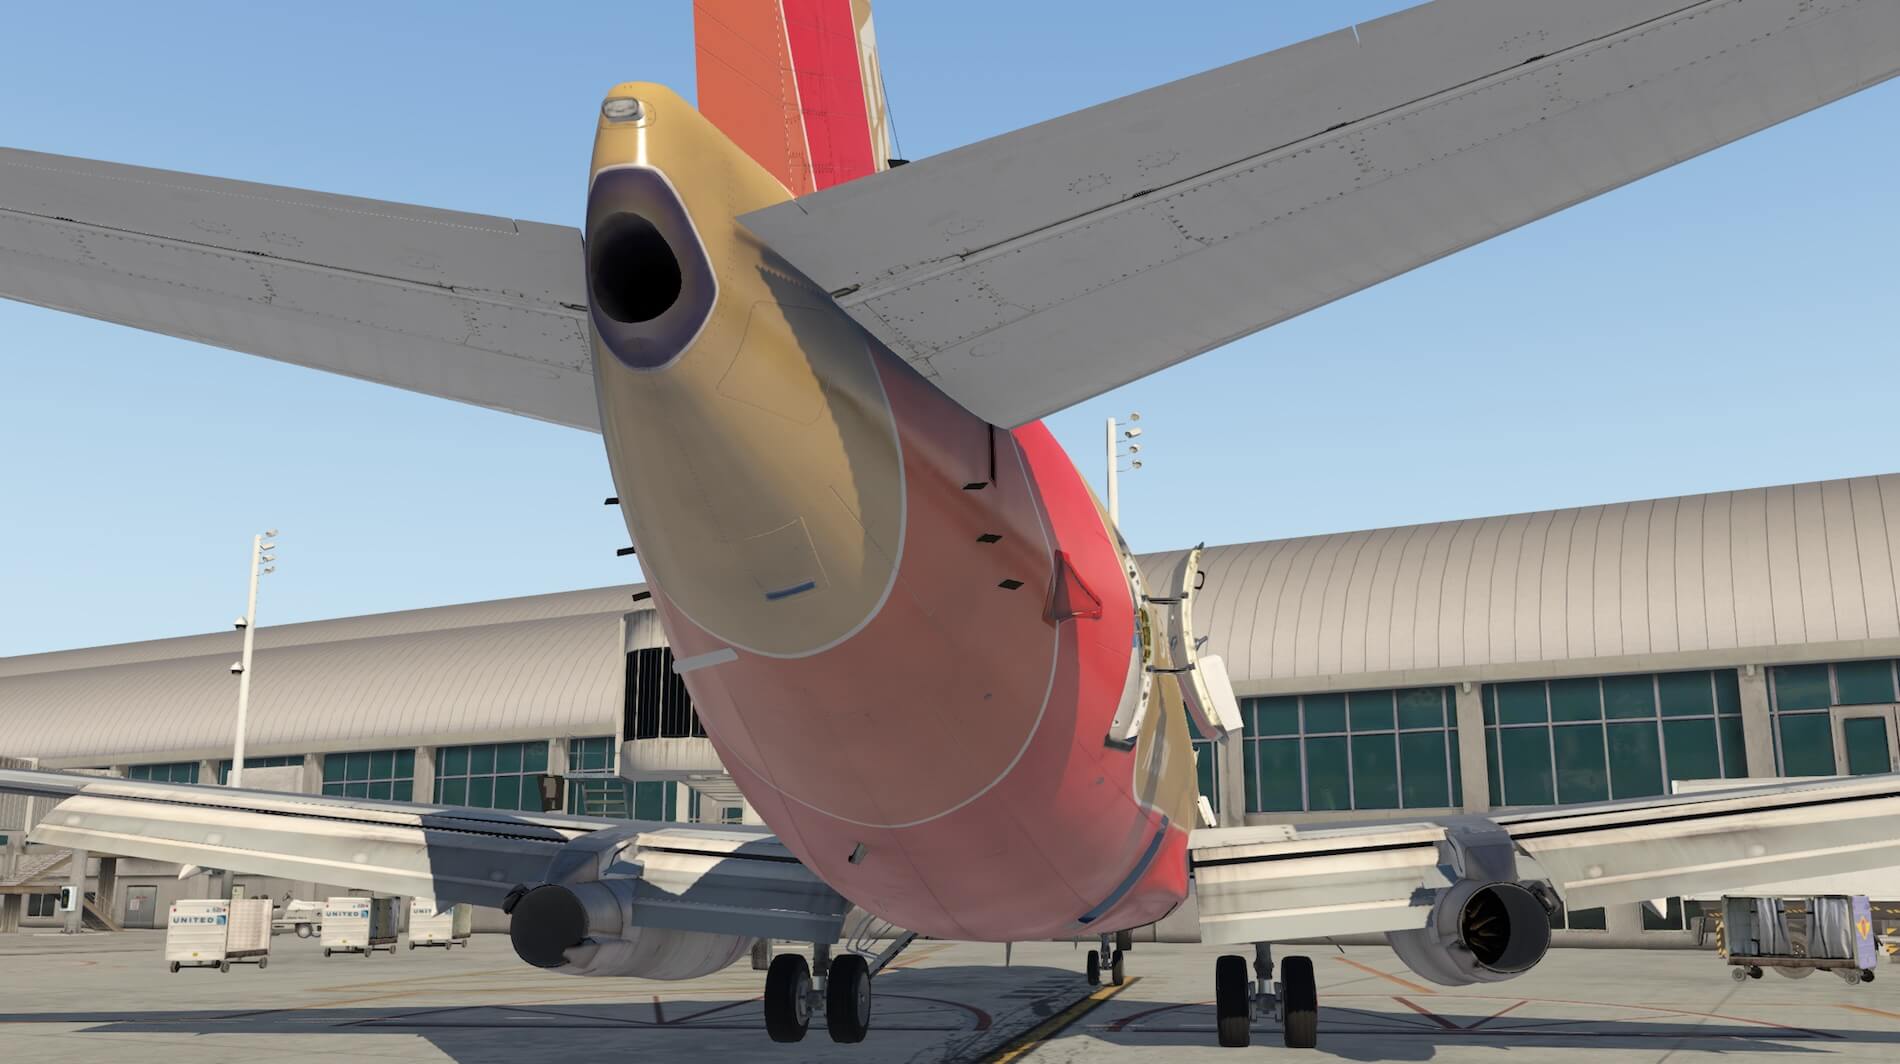
While walking towards the aircraft tail, I’m very happy with the overall look of the modeled tail construction. It’s gorgeous and it seems that nothing has forgotten. All tiny parts are modeled as well as the panels, wherever applicable, with screws. I mentioned already before that several doors are now simulated which wasn’t the case with the previous models.
With FJS 732 version 3 I must say that all the passenger and/or service doors are very well simulated and modeled with eye for details as well as the cargo door holds. Besides these doors, the FWD stair is included and the LH AFT passenger door does come with the foldable stair too. Keep in mind that the FWD stair works already without AC power connected to the aircraft since it’s connected to the BAT HOT bus. This is not the case with the AFT PAX door with in integrated stair. To open this door and to extend the stair, you need to connect AC electrical power, for example via the external power unit (GPU- Ground Power Unit) or via the APU (Auxiliary Power Unit).
Back to the tail; what I personally like the most is the fuselage tail section with the horizontal and vertical stabilizers. All static dischargers are in place, the APU (Auxiliary Power Unit), with mounted above on the tail cone, the AFT white navigation light. When you’ve bought it or decide to buy it after reading this review, you should take a look to the vertical stabilizer too. You will be surprised by the amount of tiny details that are included on the rudder and vertical stabilizer itself including the antenna.


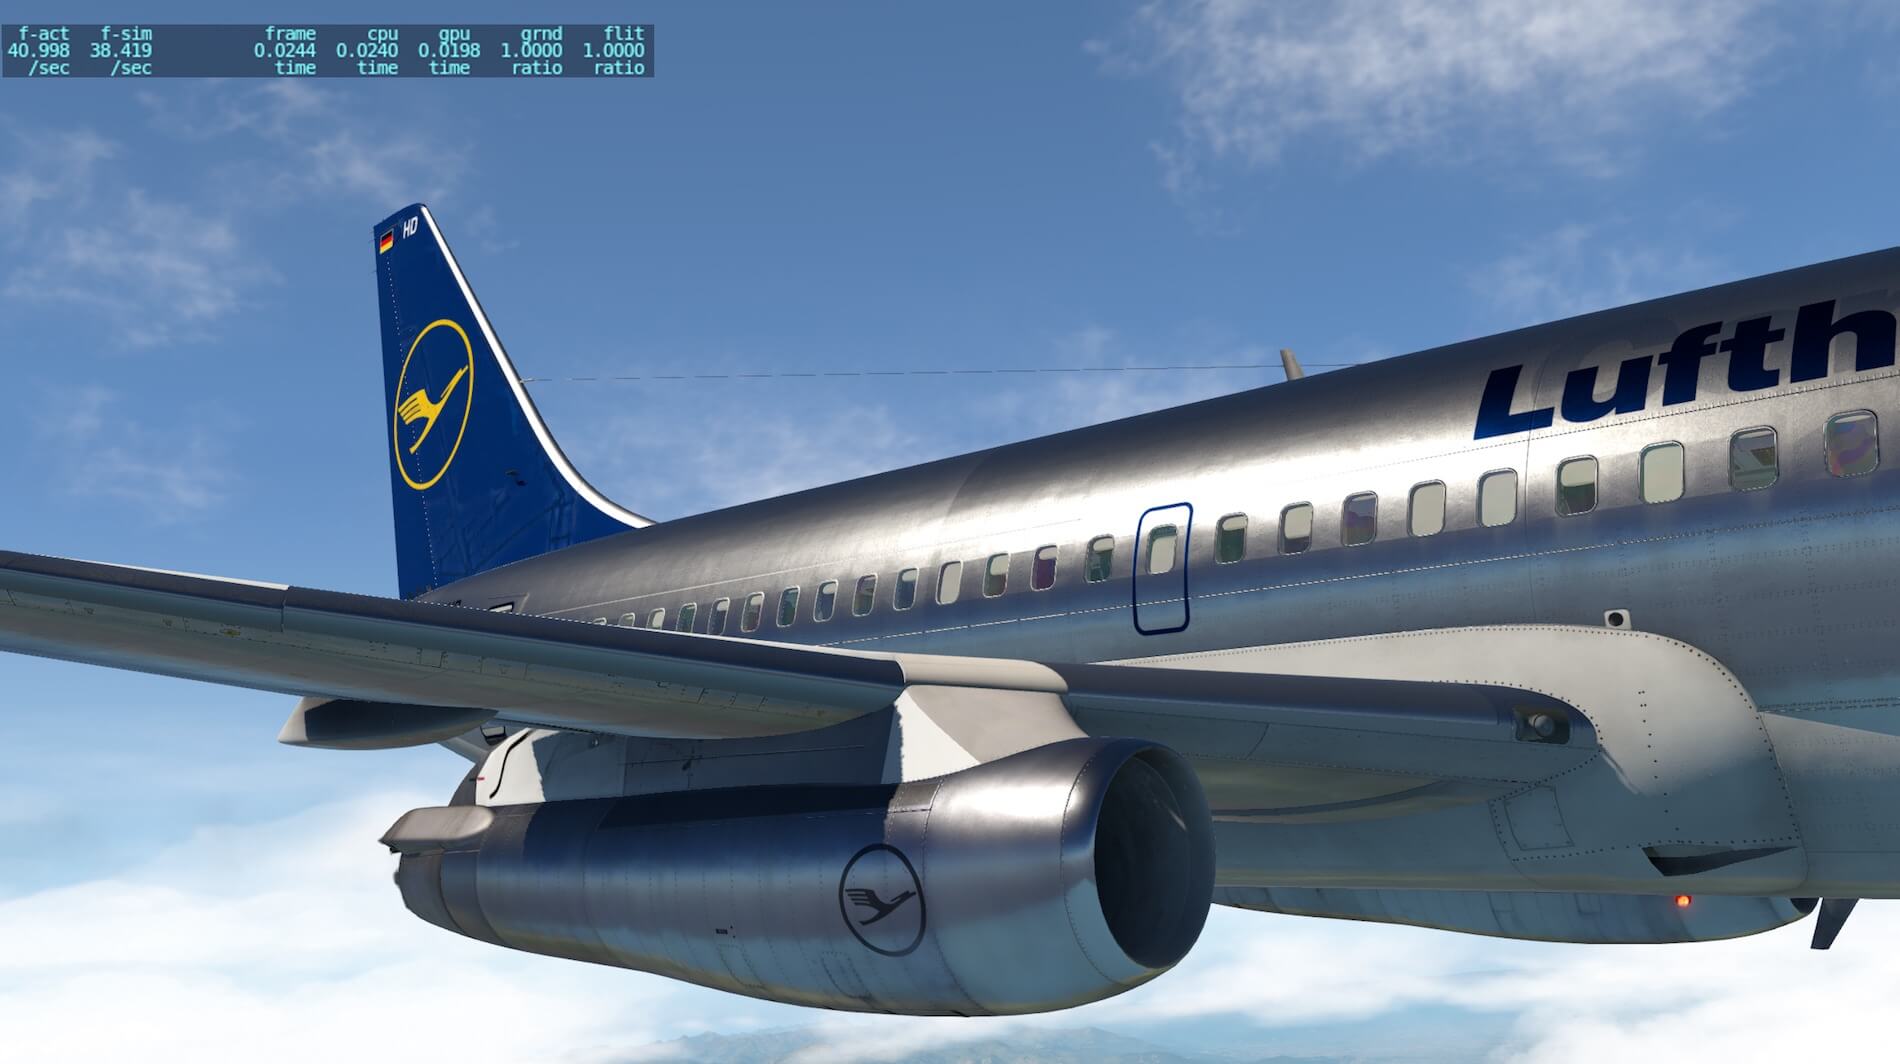
And finally, some technical details about the used textures.
The fuselage texture file is split into two parts besides a texture sheet for the engines and vertical fin, and one for the wing. Each texture sheet is 4K. That said, a huge difference with the previous FJDS model which had 2K textures. Not only that, the overall quality and eye for details is great with this v3 model. And this also means that when you zoom in on the aircraft, it looks great.
Wherever applicable, NML (Normal Mapping) files are included. For those who aren’t familiar with NML files; they give the fuselage, wings, tail etc. under the right external lighting conditions a nice 3D effect when it comes to the rivets, screws and skin plates. Consequently, due to this the longerons and ribs become realistically visible.


Since the model release, somewhere mid of January 2018, I’m impressed how many liveries are already offered by simmers/painters at X-Plane.Org. Great news I would say! So far I’m impressed by what I see, and now, let’s enter the Virtual Cabin via the left-hand AFT passenger door.
Virtual Cabin
For those who know the FJS 732 already for year, they know that the aircraft never had a Virtual Cabin, but that is changed with the release of this FJS v3 model package. A Virtual Cabin is something that simmers like and some say “I don’t care when it’s not there”. That’s something I don’t believe to be honest, but what it was, nothing, didn’t had my preference too. The current included Virtual Cabin looks very nice with lots of details but it must be said, your frame rates will drop the moment you enter the cabin and not a couple of FPS, but a lot.
On the other hand, it seems nothing has bene forgotten … a detailed galley or pantry if you like. No blurry textures, well modeled sidewalls, ceiling, even the passenger control parts for lighting, air outlet etc. are sharp. And not only sharp, they are modeled with a 3D look. The individual lighting buttons or the attendant call don’t work, but there’s no need for and I also didn’t expect it. No reason for all of that. Having a very nicely modeled without blurry panels is already great.


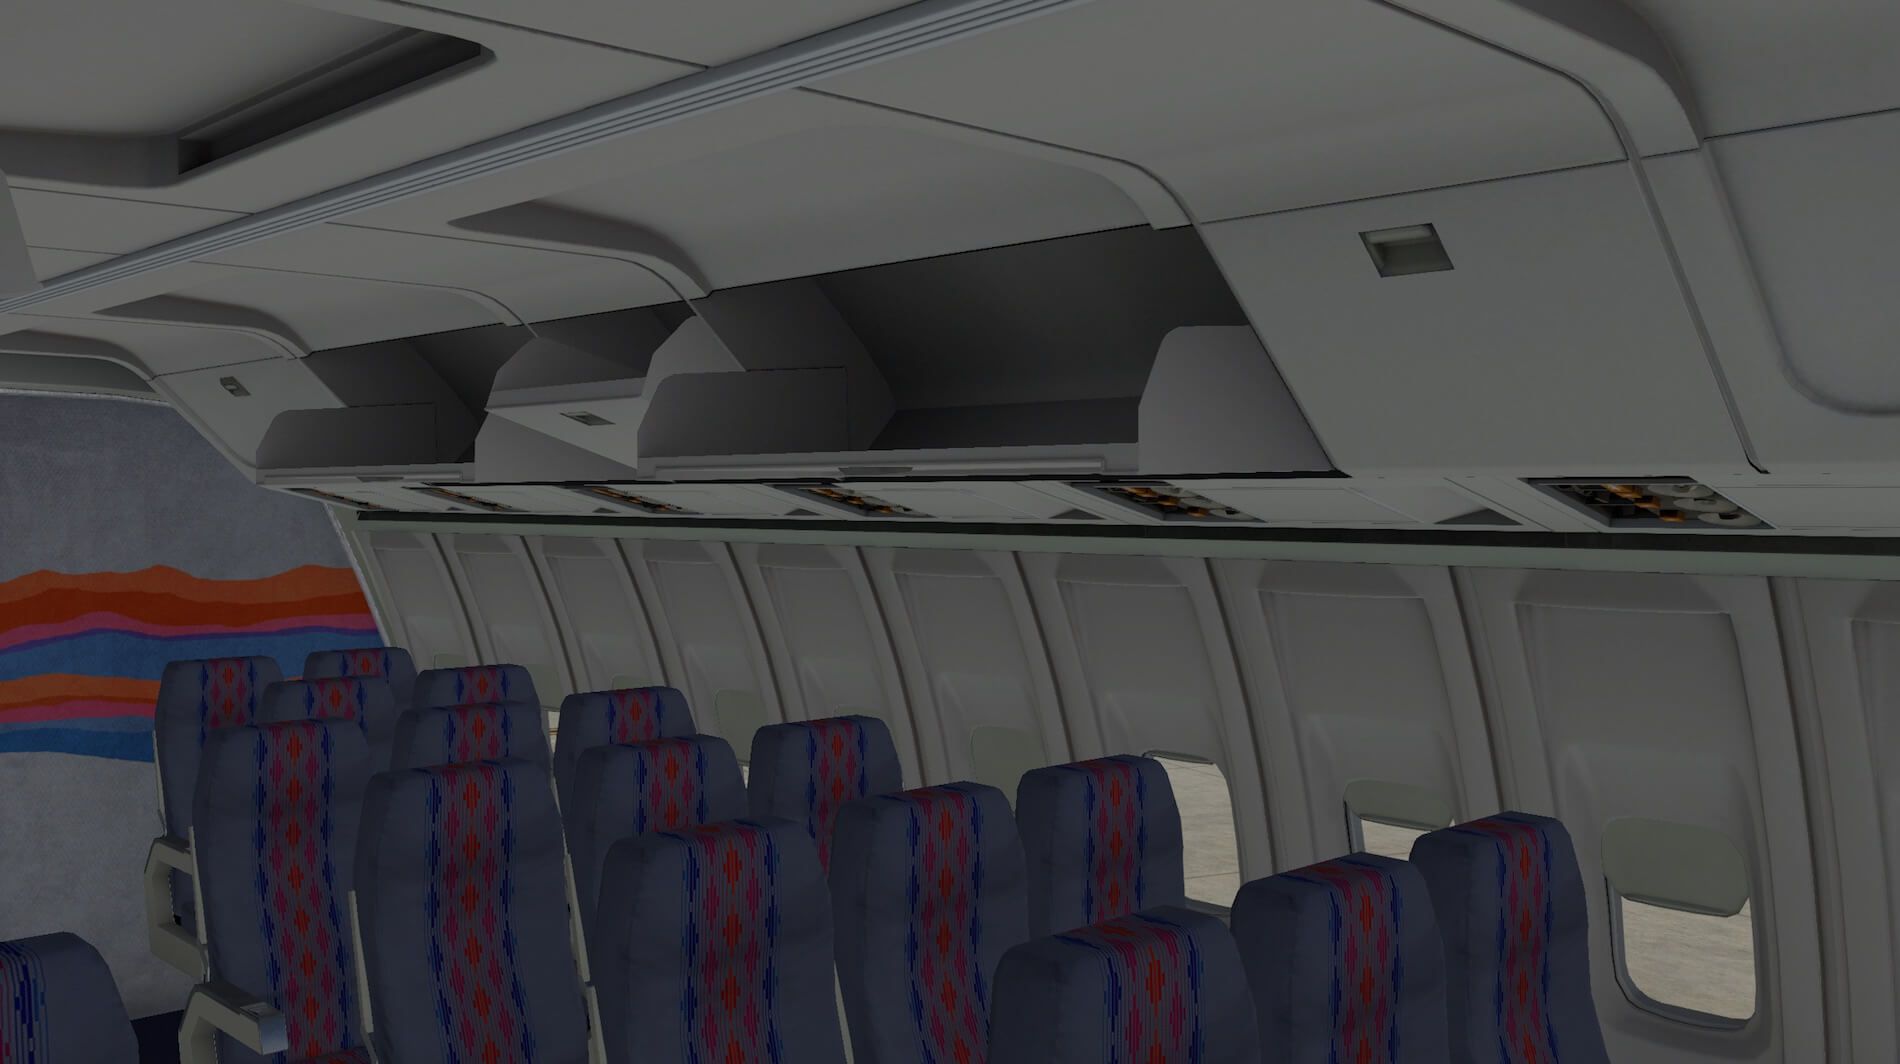

I should not forget, that’s something I didn’t expect, to highlight the animated window blinds. Your mouse turns into a hand and you’re able to slide the window blind up or down. The 737-200 series is equipped with in total 2 emergency exits, one on each side of the fuselage mid-section. Just to be clear, the window blind in the window works, but you can’t open the emergency exit. But hold on, fun just started. The overhead bins are animated too.
Enough about these animations. Turn in into a well illuminated evening cabin and you’ll be surprised what you see. Ok, it cost you some frame rates, but it’s worth the evening lighting. And a funny but highly realistic add-on is the presence of slightly different or older fluorescent lamp in the sidewalls. How do you see this … look to the evening panel color? It’s slightly more pinky then the others. Realistic? What I just said, as real as it gets!
Ok, are you ready for a cockpit impression?
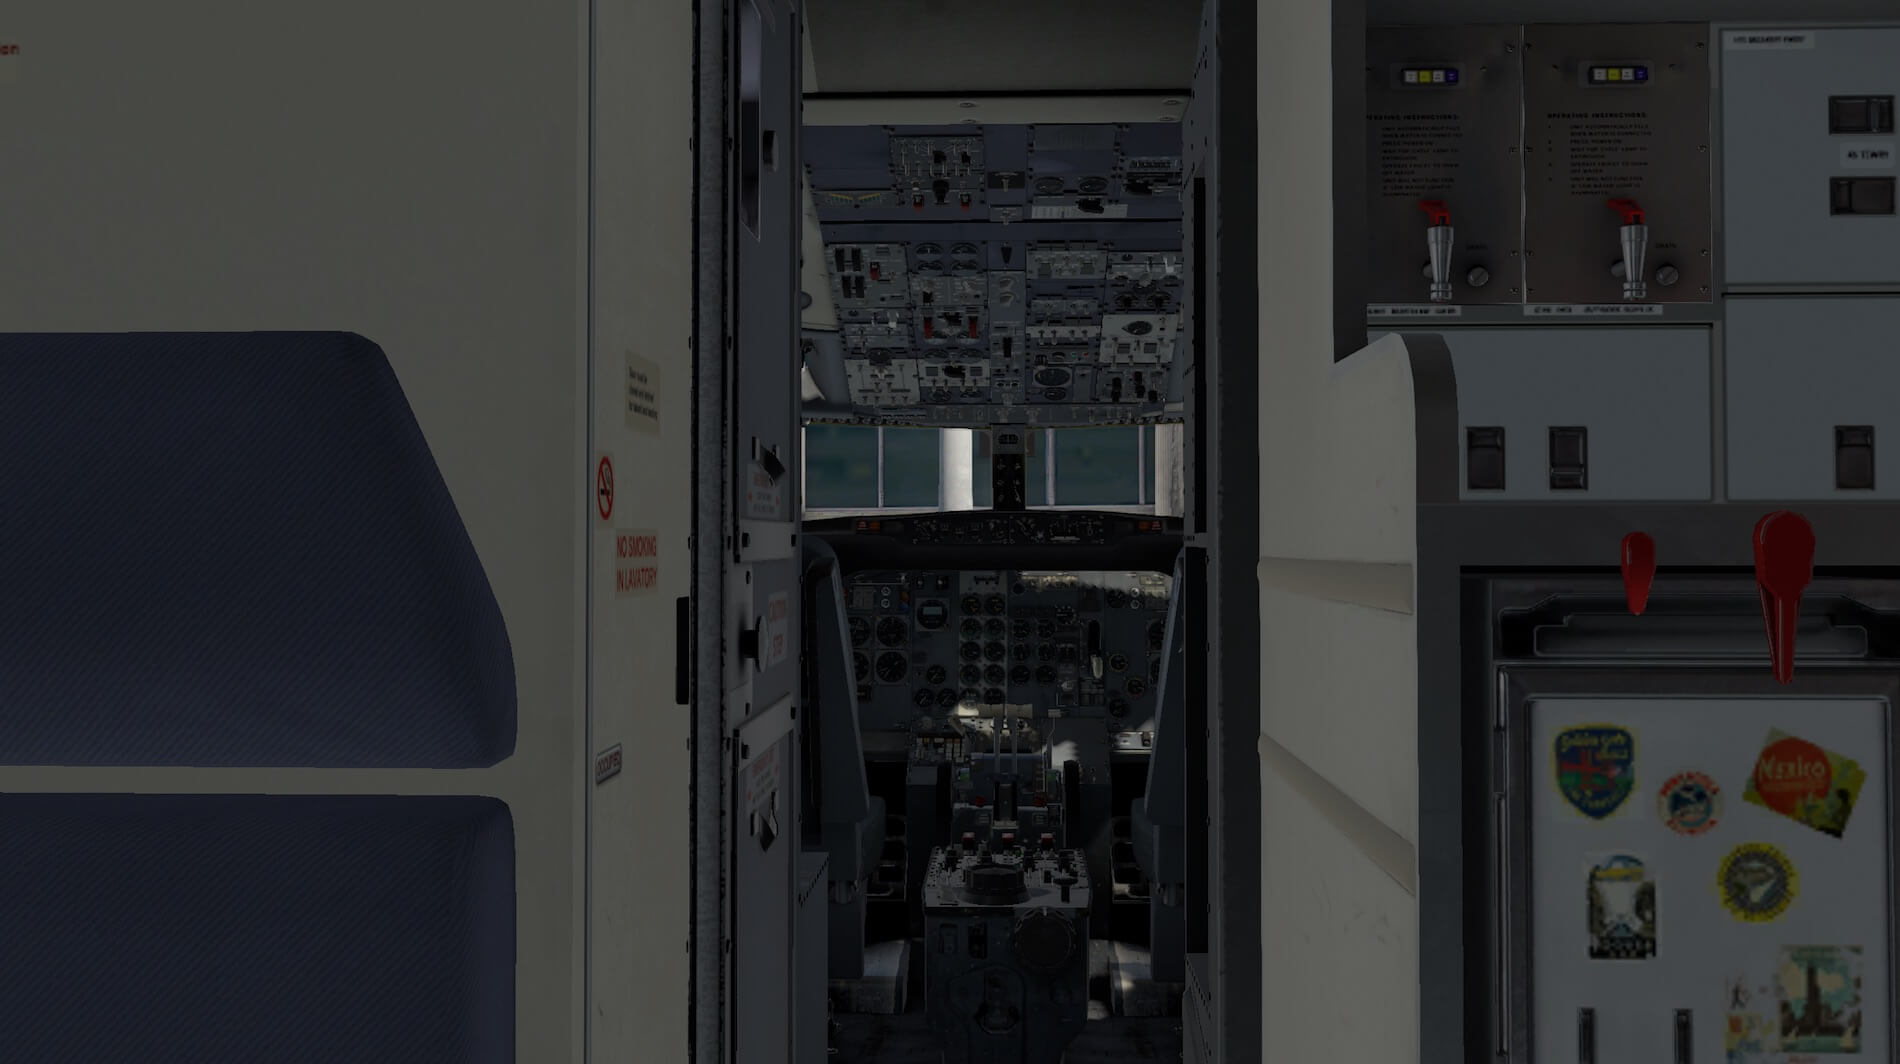
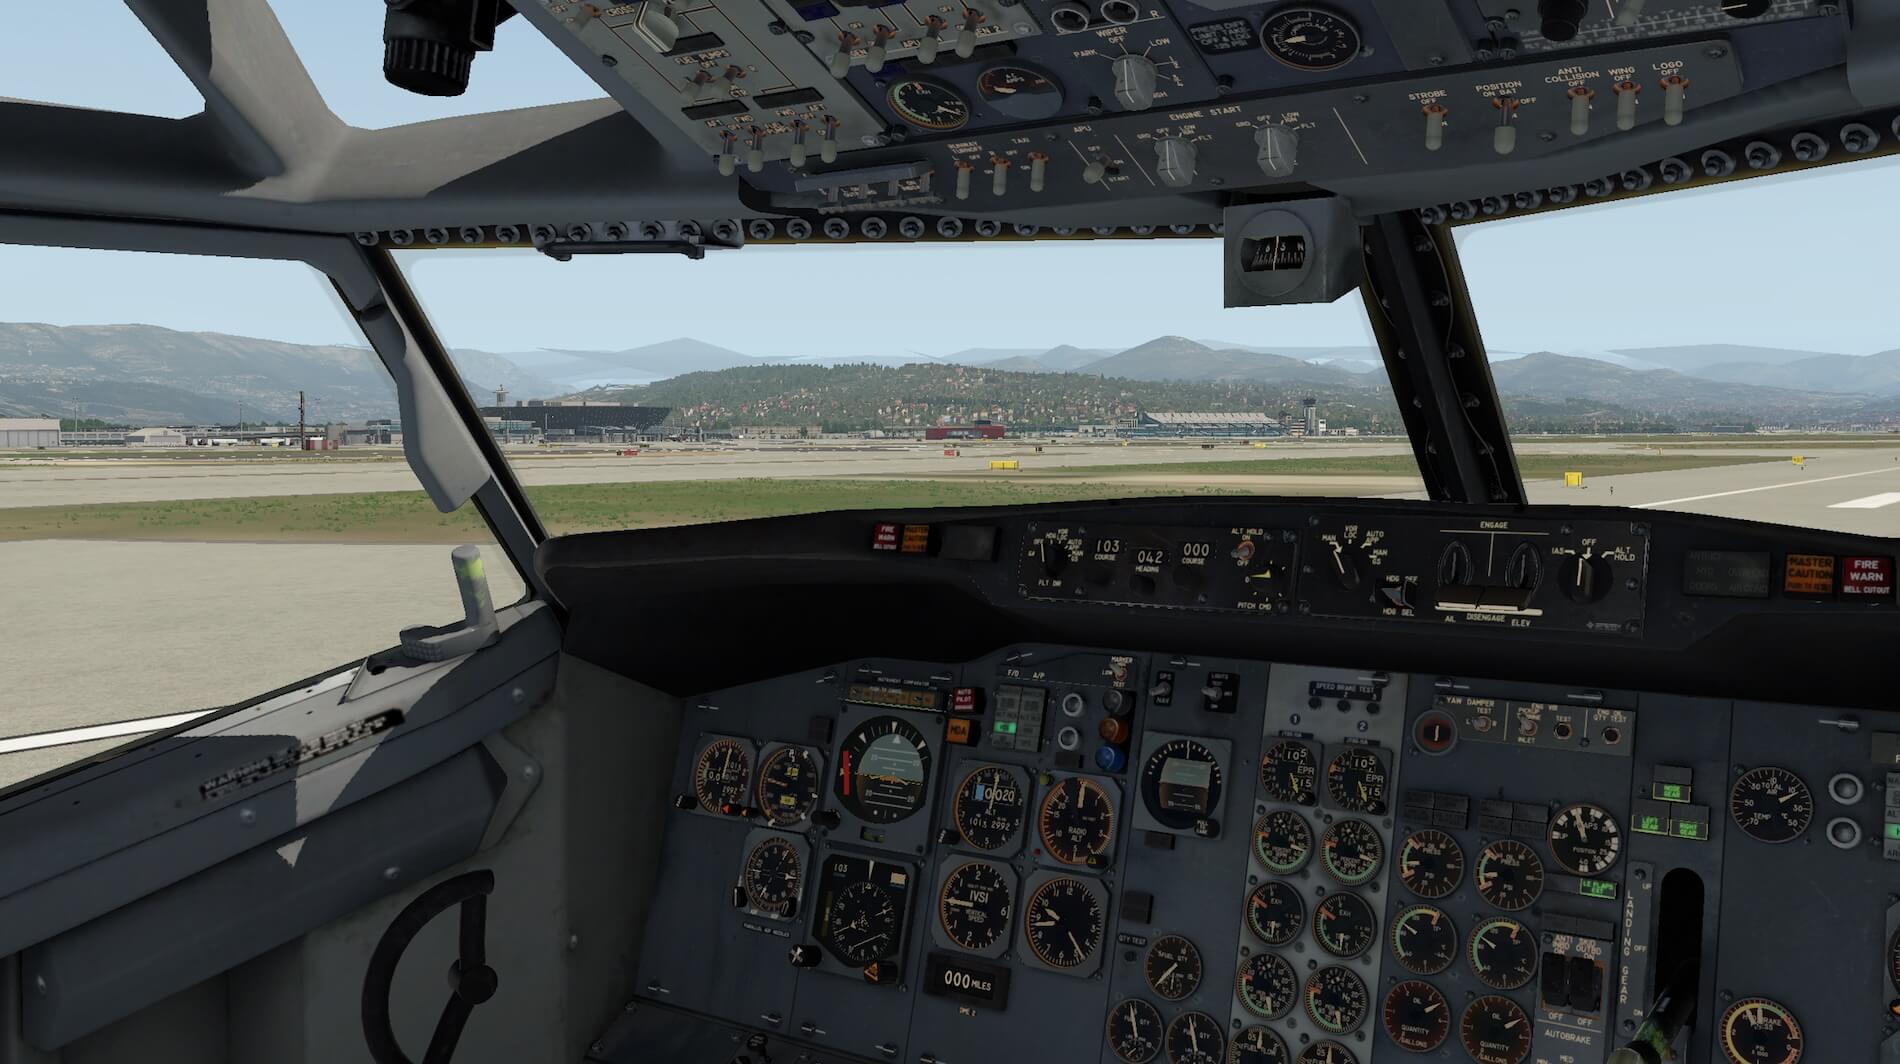
The Cockpit Impression
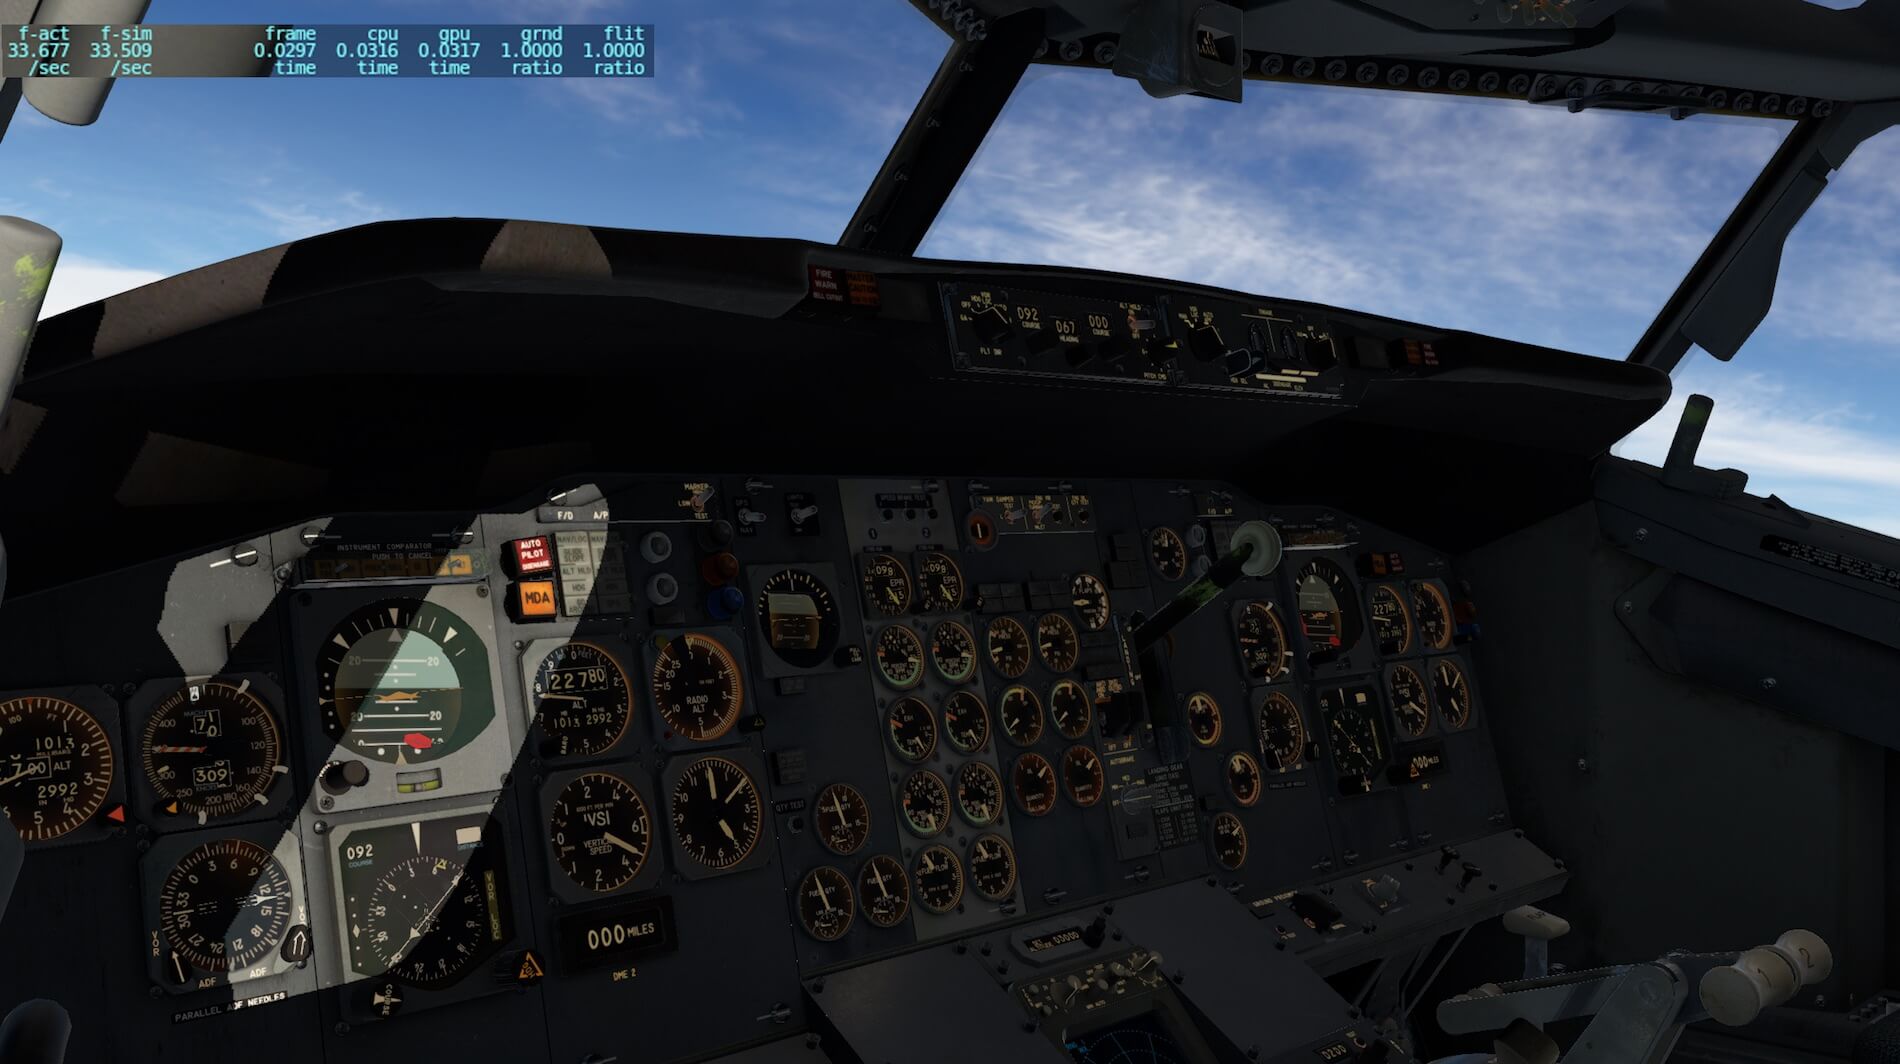
Enjoy together with me the gorgeous modeled 3D cockpit. It’s worth it! Ok, perhaps there’s one note ….. the sliding windows aren’t animated nor are the pilot seat armrests. But instead you get ……… oh oh, I said it before … an unbelievable realistic and authentic modeled 737-200 cockpit.
I think that the instrument panels, sidewalls, ceiling and floor texture structure, are a mix between hand painted and photo real texture material. But there are two things that are photo real material and that’s the black WARNING placard on the sliding windows base and on the side overhead panel, the left/right red EMERGENCY ESCAPE ROPE text. And there’s a reason I highlight this since it was also wrong with the previous version. The black right hand sliding WARNING decal is placed mirror image as is the left hand red EMERGENCY ESCAPE ROPE text.
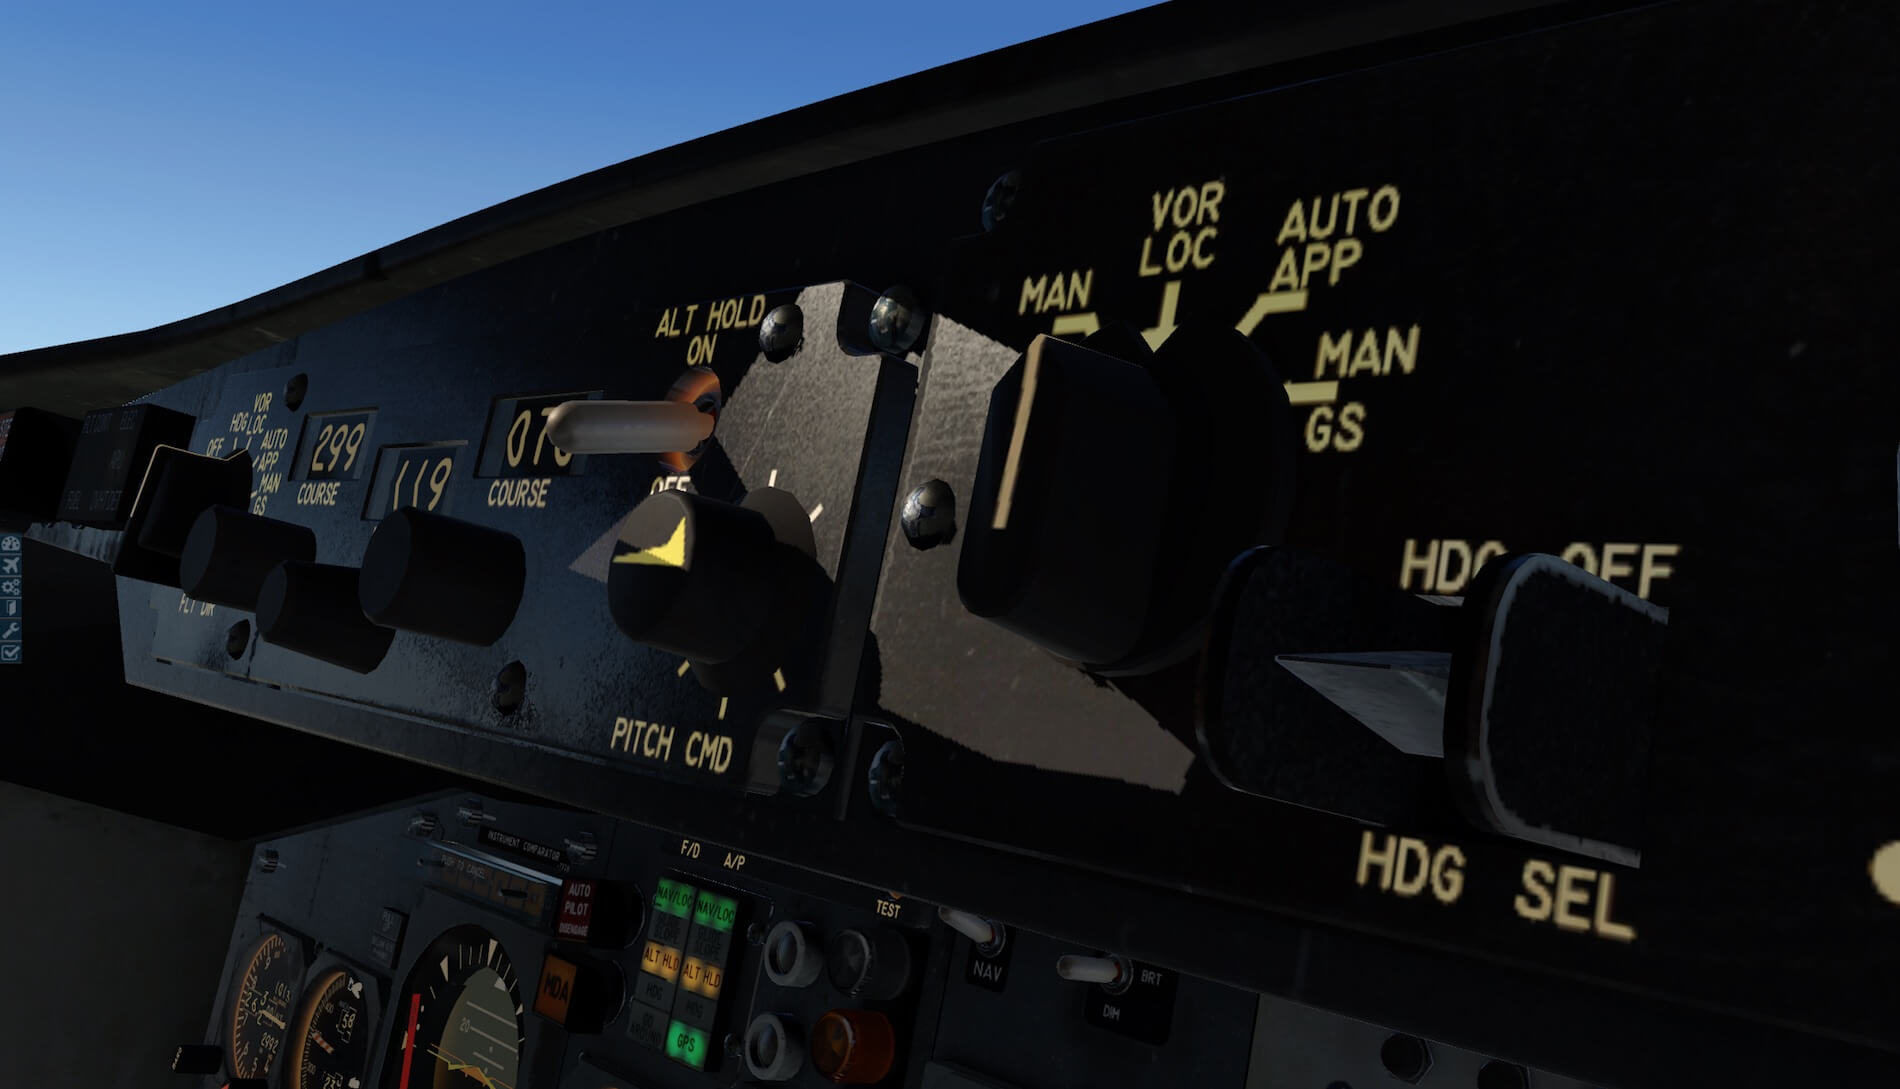
The modeled FJS 732 TwinJet is an old-fashioned cockpit that had no EFIS, ECAM, EICAS or FMS installed. The Auto Pilot is what I know from my younger years, a BASIC AP. Don’t expect a fancy MCP (Mode Control Panel). Instead, you get a simple, but efficient Auto Pilot, at least, for those days. When it comes to navigation or flying a route from A to B, you have to do that with the help of NDB beacons (ADF instrument) or better of course with a VOR/DME or VORTAC beacon.
I need to correct me regarding the FMS. Although the real 727-200 didn’t had an CDU or MCDU, this FJS v3 model has by default the X-Plane 11 MCDU mounted in the pedestal. Realistic or not? I think it’s a good that Jack has decided to add this by default in the aircraft. Not every simmer is familiar with using and flying (read navigating) an aircraft with the help of old-fashioned navigation equipment like VOR or ADF.
What said, the MCDU is professionally placed in position as it looks as real as it gets, but when you don’t want to use this FMS MCDU, then you fly the 737-200 just as it was done in those days … flying from VOR (or VORTAC) to VOR (or VORTAC).


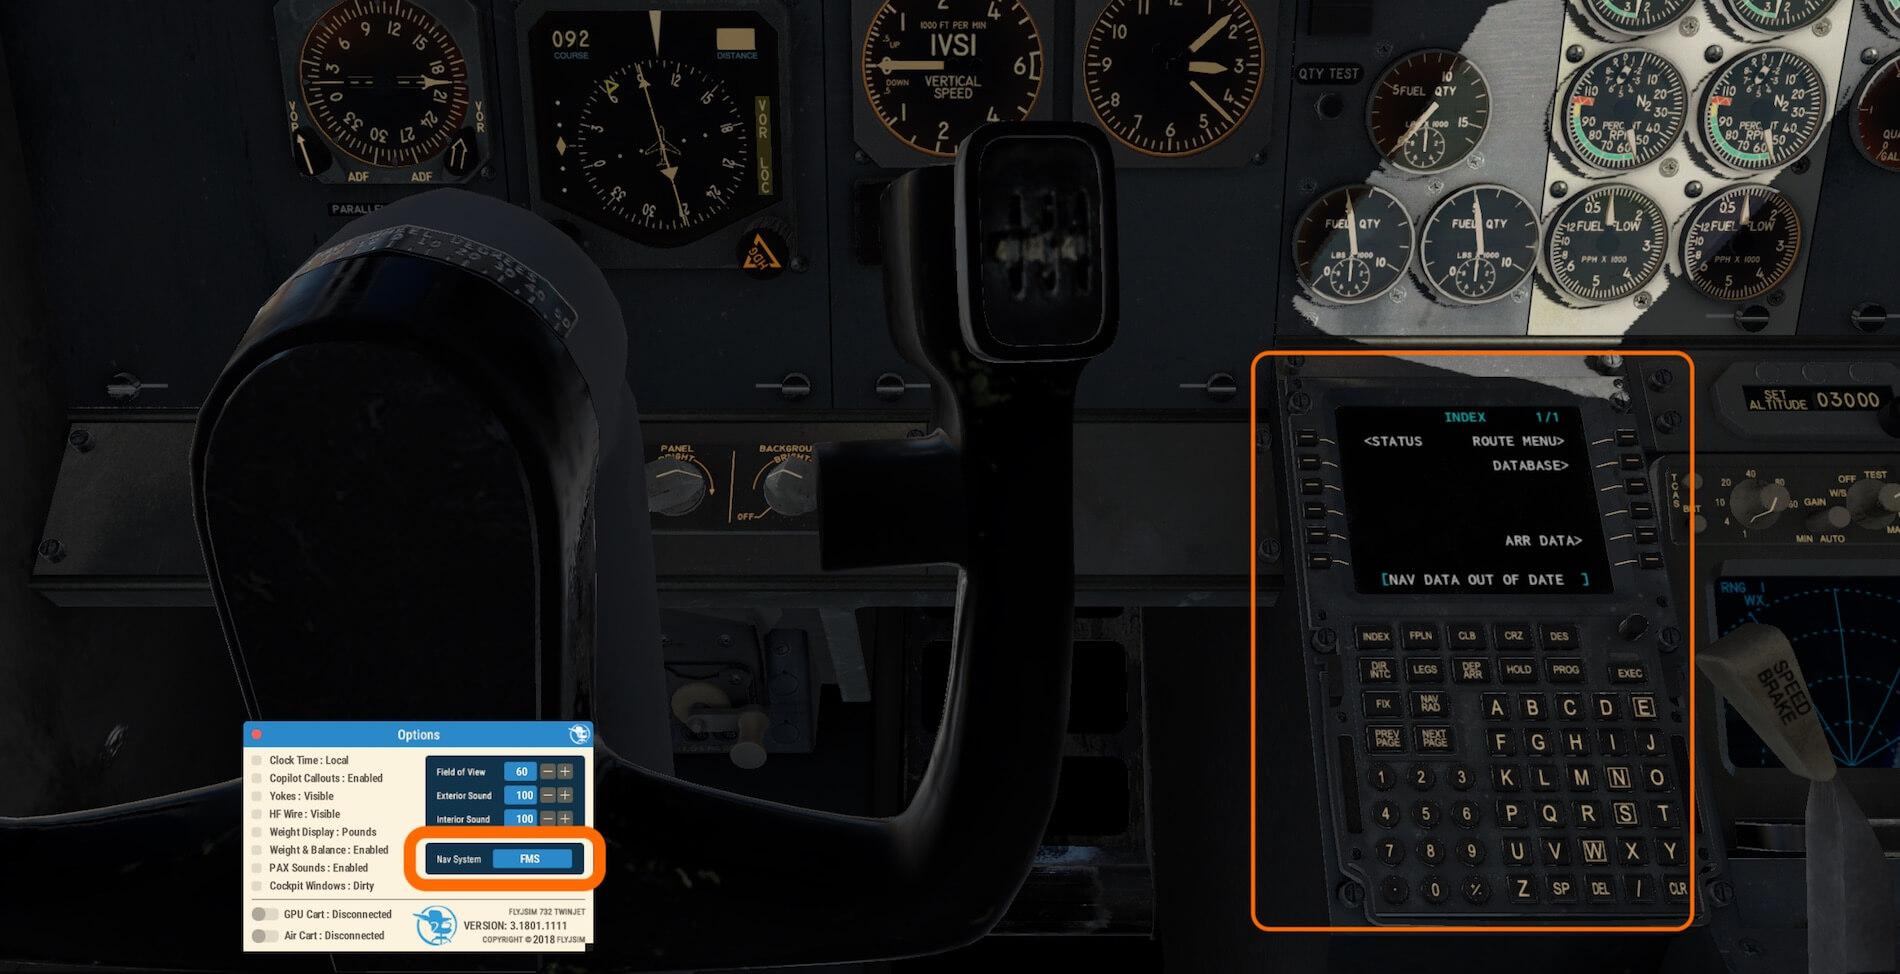
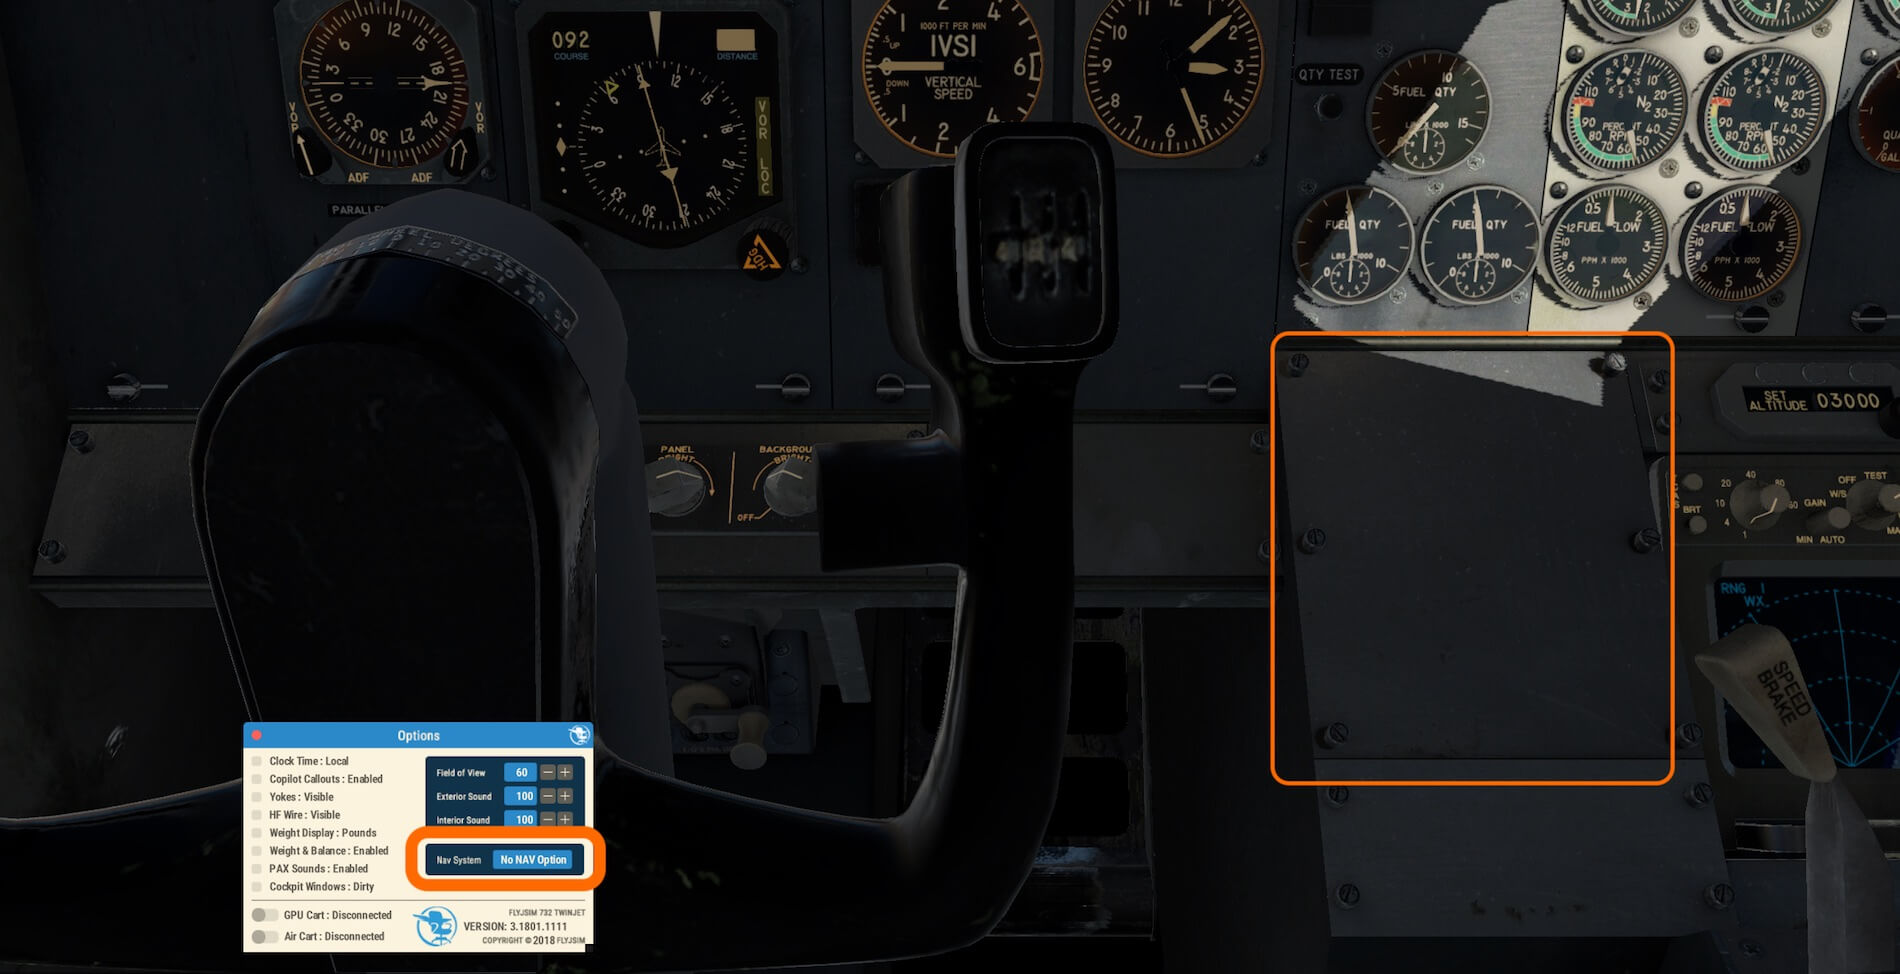
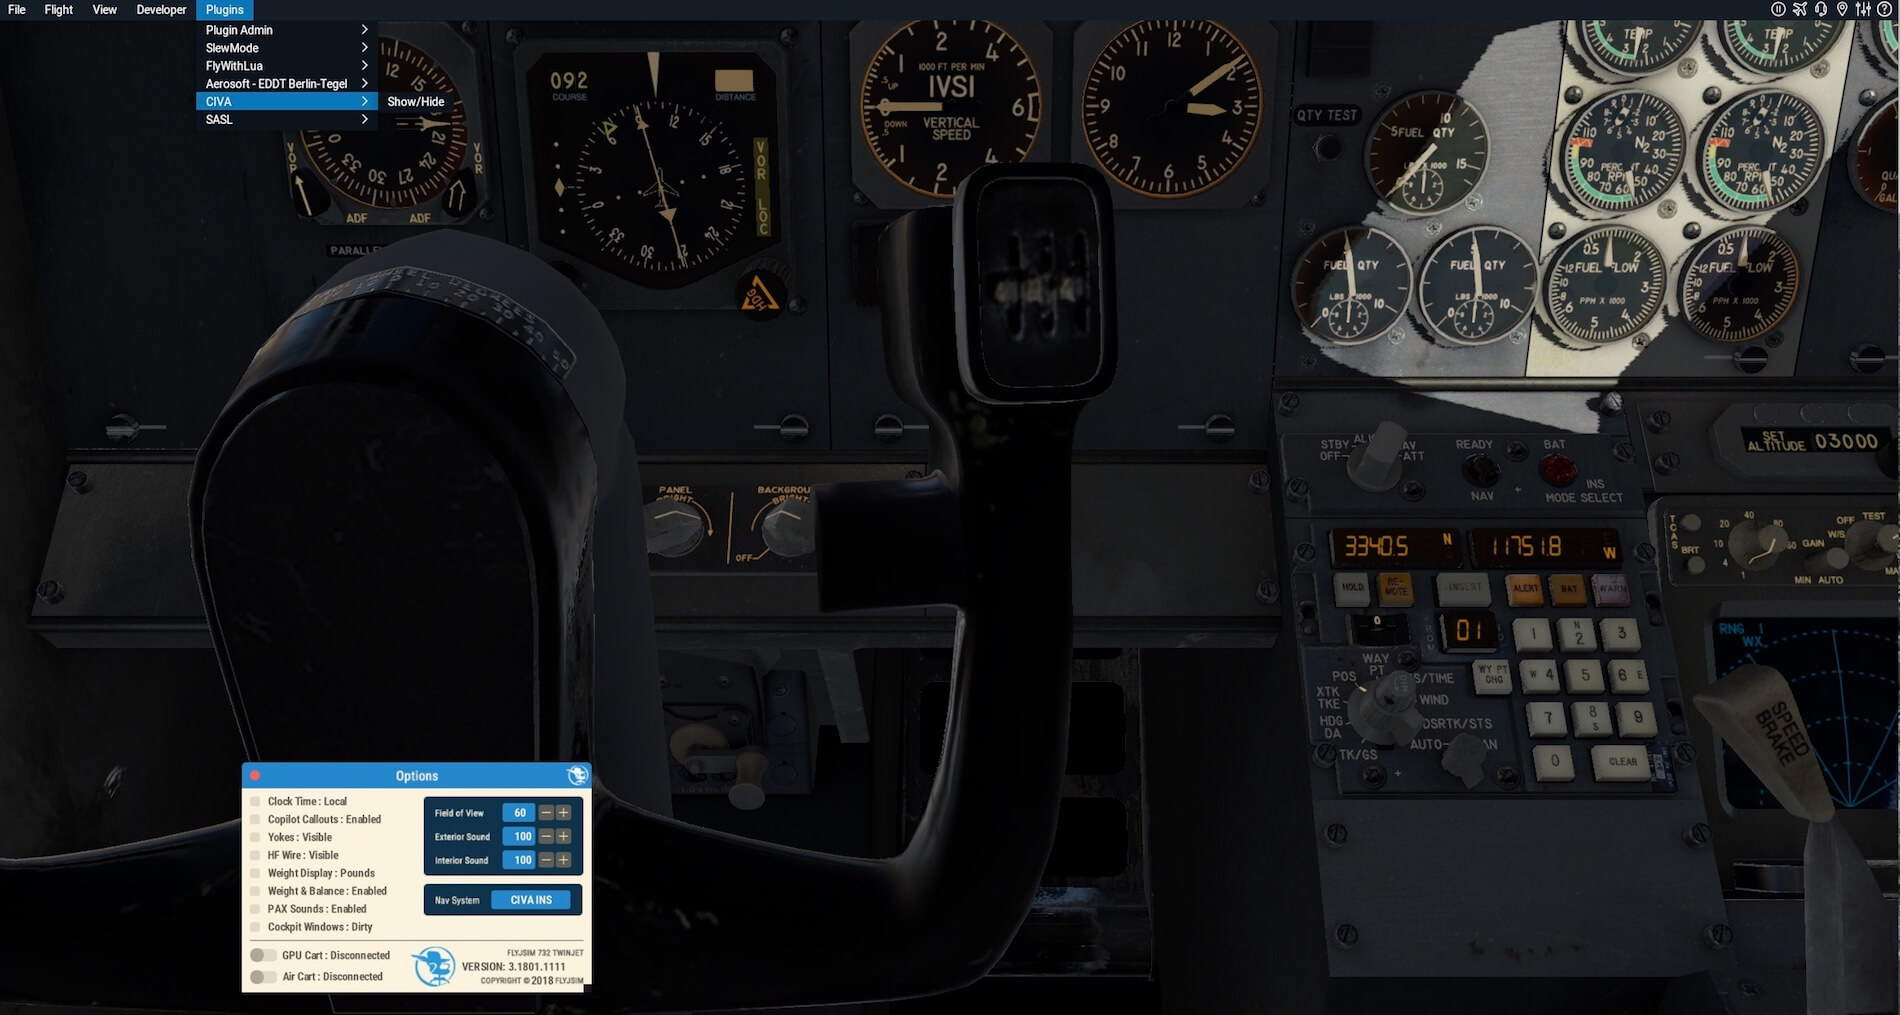
Optionally you’ve got the possibility to link, install and use Phillip Ringler xCIVA INS (Inertial Navigation System) with the FlyJSim 732 Twinjet. Once you’ve installed the xCIVA package in the FJS 732 aircraft/plugins folder, you can call-up the xCIVA INS CDU via the X-Plane Plugins menu. A note to this is that the 3D cockpit can show you either the FMS MCDU, nothing or the xCIVA CDU.
Ok, let me highlight this a bit more. Via the FJS icons – move your mouse to the mid left-hand side of the X-Plane screen. The third FJS icon from the top, the Option menu, allows you to select which navigation system you want to use.
By default, the nav system is FMS thus you’ll see a FMS MCDU on the pedestal FWD left-hand side. When you click once the FMS blue button, it shows “No NAV Option” and consequently, the FMS MCDU is gone. When you don’t have the xCIVA INS, then you won’t see any other option when you click once more the blue button. But when you have the xCIVA plugin, and installed it in place, then when you click the blue button it will show on the pedestal the xCIVA INS CDU.

Back to the modeled 3D cockpit.
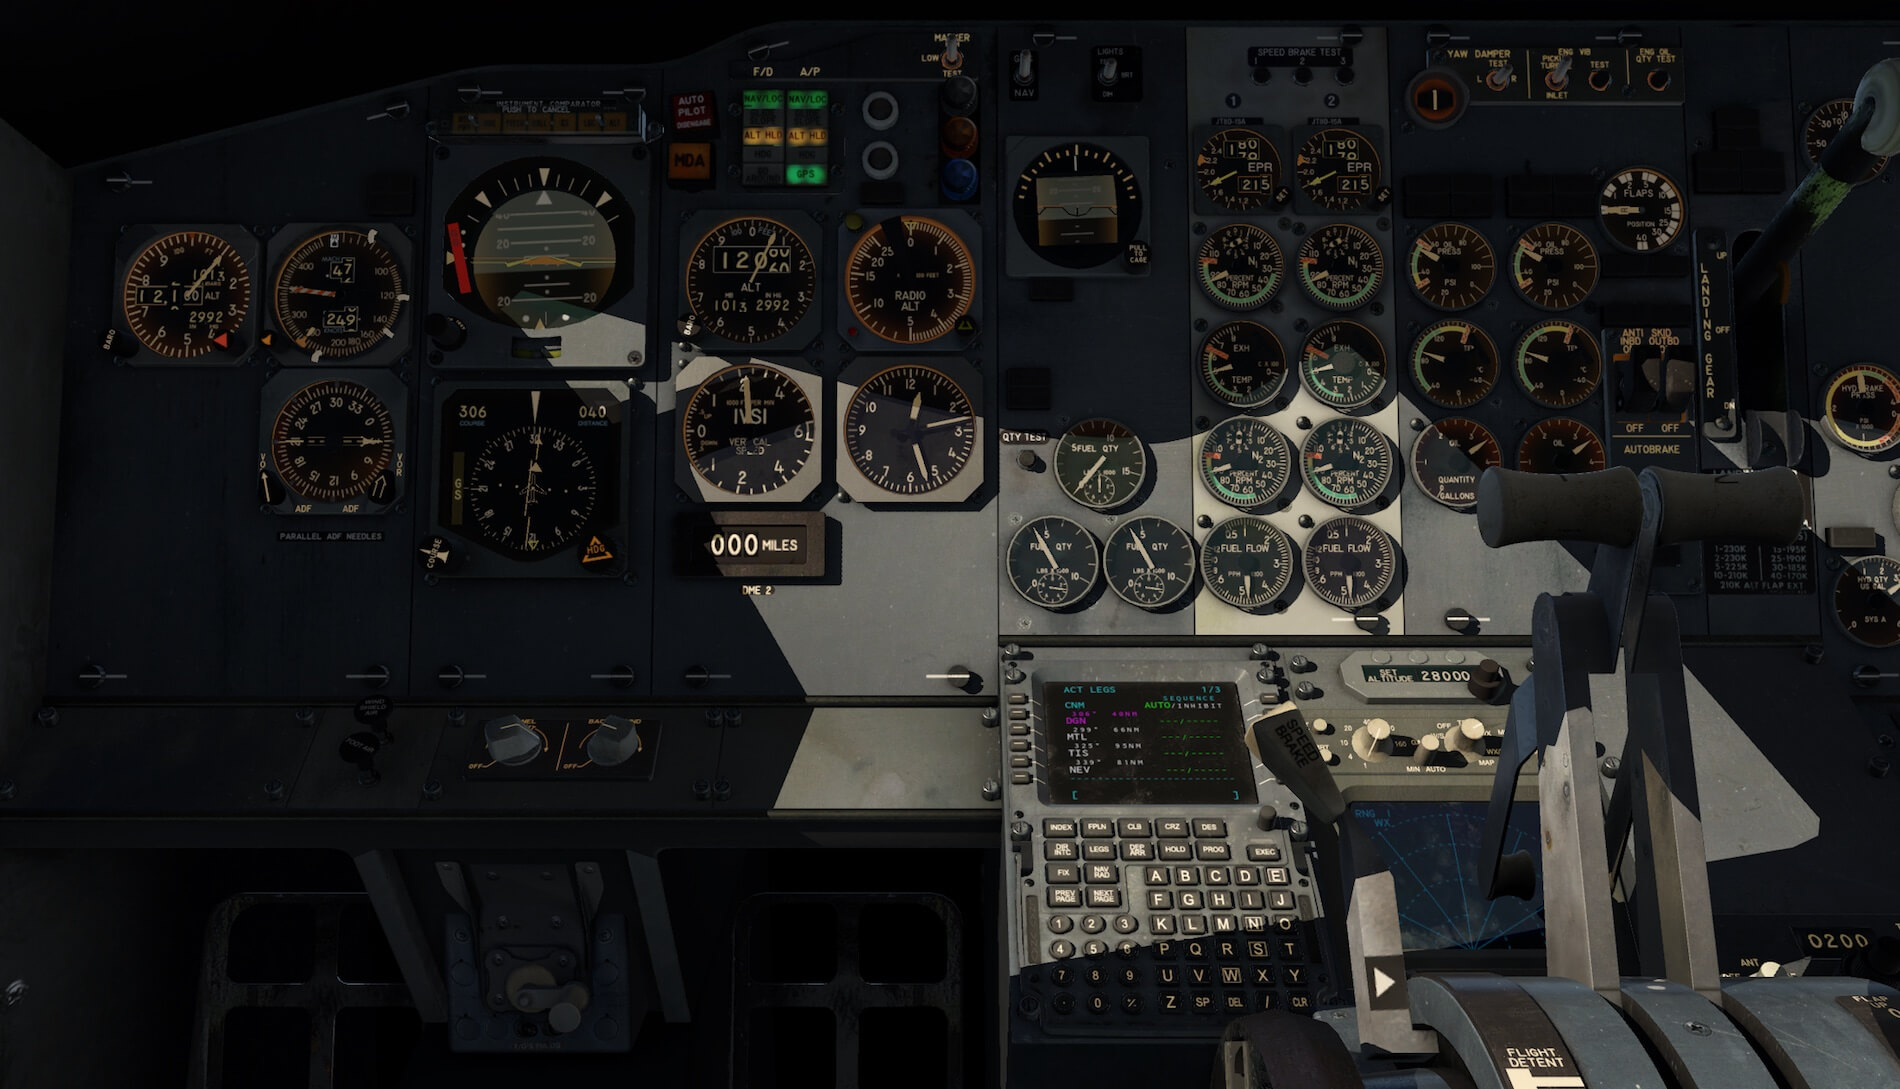
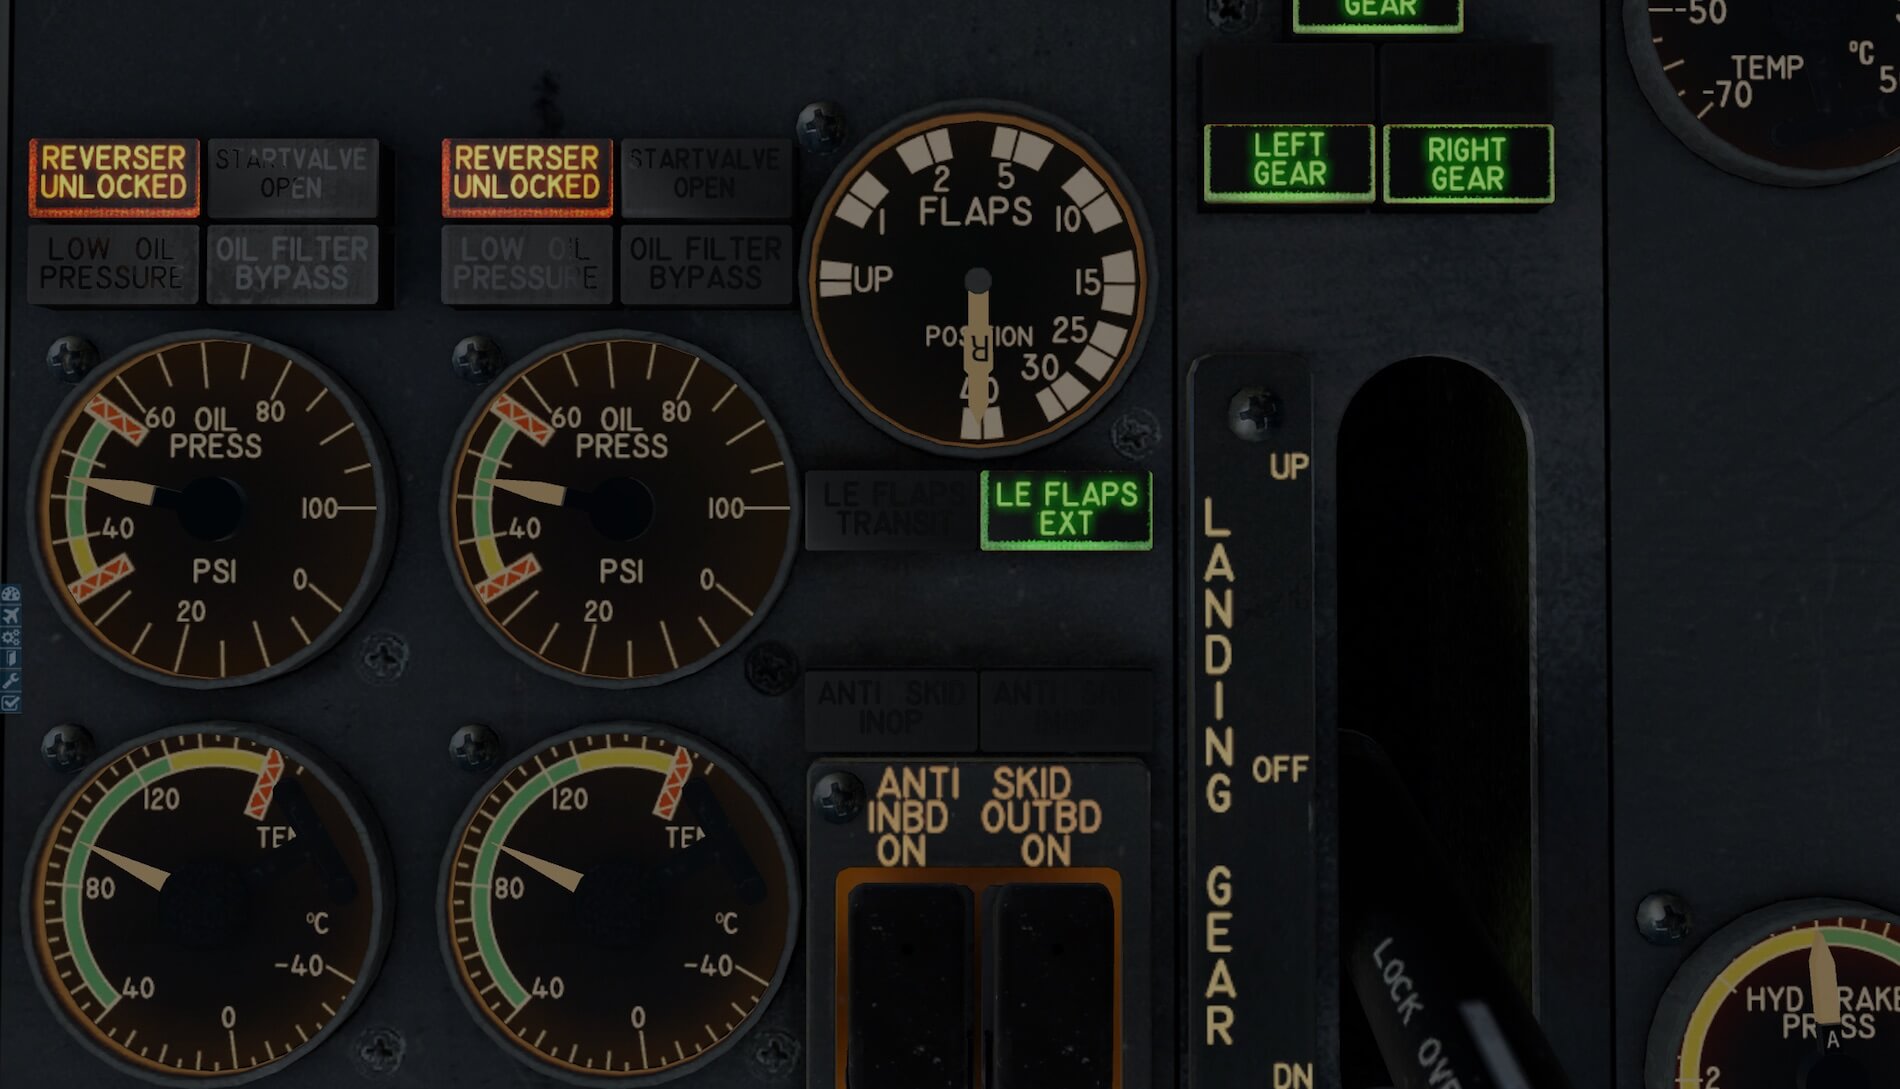
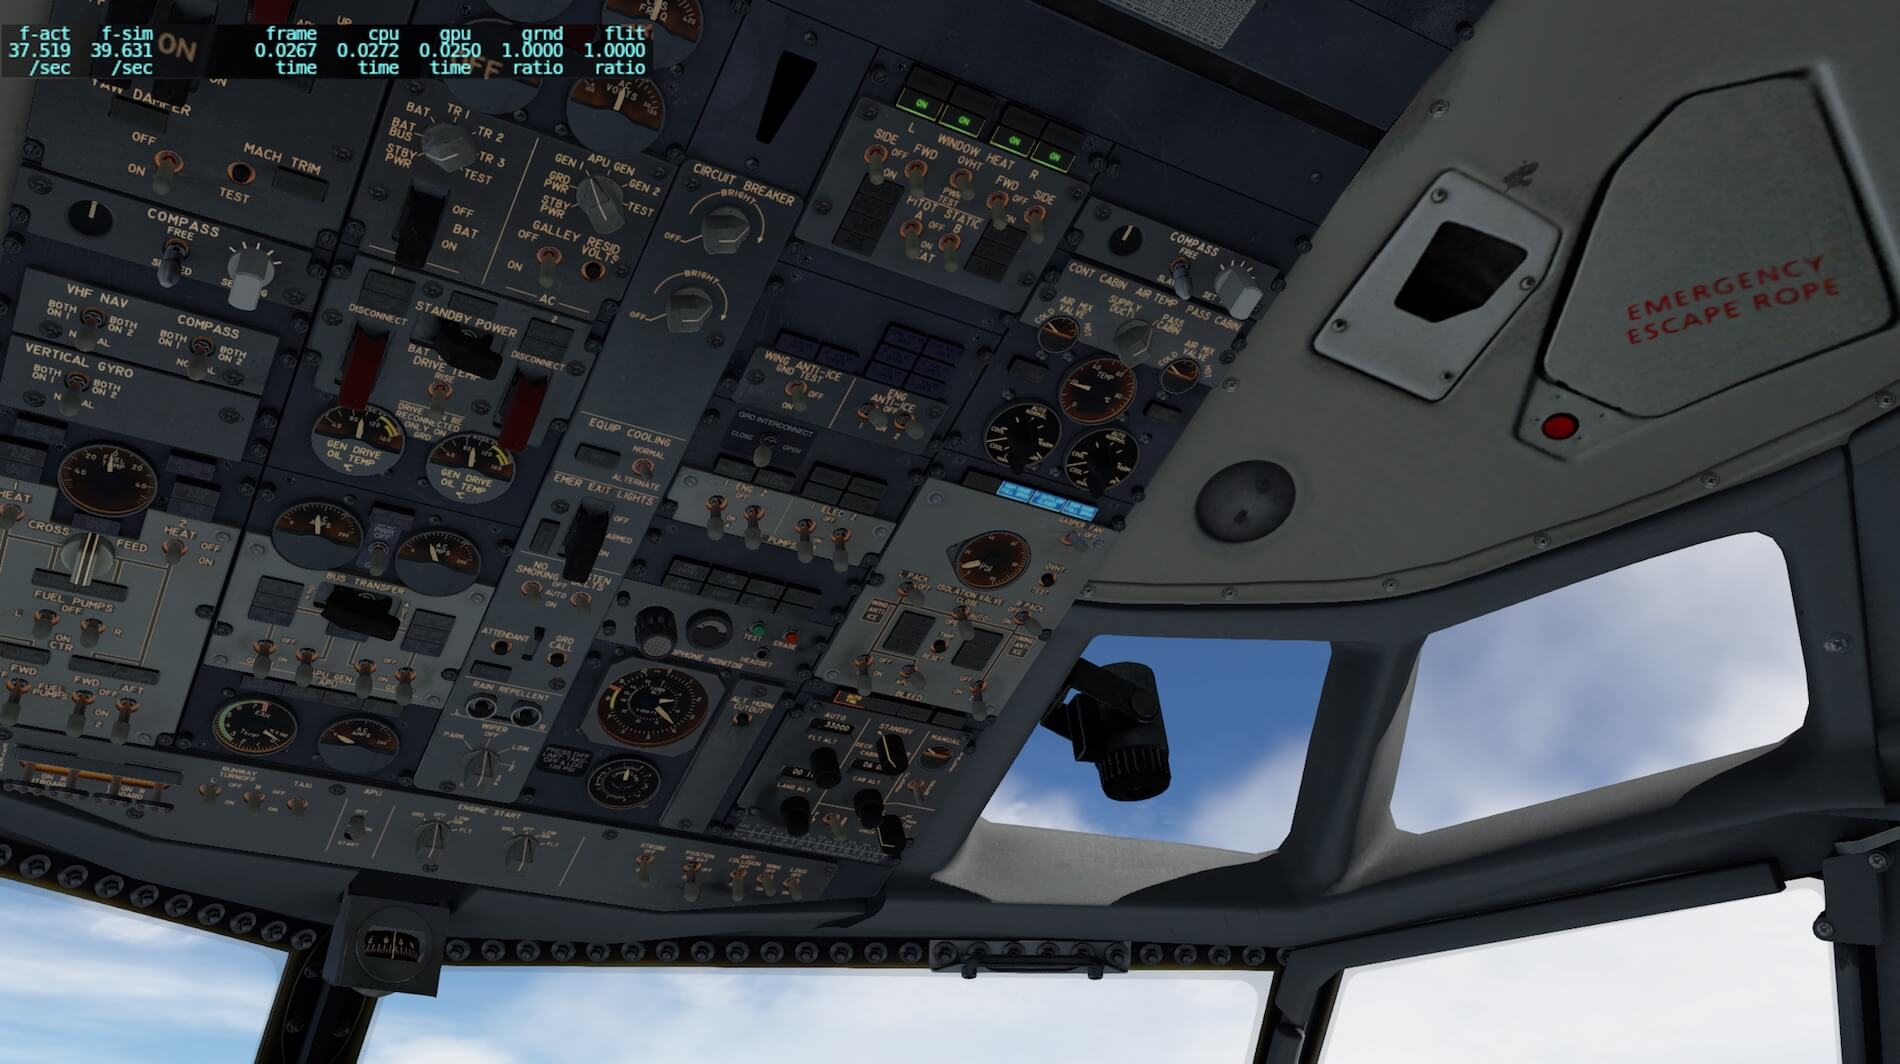
I’m impressed by the 3D modeling and the way the pedestal, sidewalls, ceiling, main instruments panel, overhead panel, seats, the circuit breaker panels and others are made. Although not directly related to this review, in the previous model the circuit breaker where blurry. Now they are gorgeous! My compliments Jack for this! Almost every cockpit/instrument panel has a weathered look and bits of paints are missing and dents and scratches are visible.
Zooming-in on switches, indicators, knobs, windows, light bulbs etc. are making me happy. Each of the previously mentioned components are sharp from a distance, but they stay sharp when zooming-in on each individually. Ok, here some screenshots of my first impressions of the 3D cockpit.


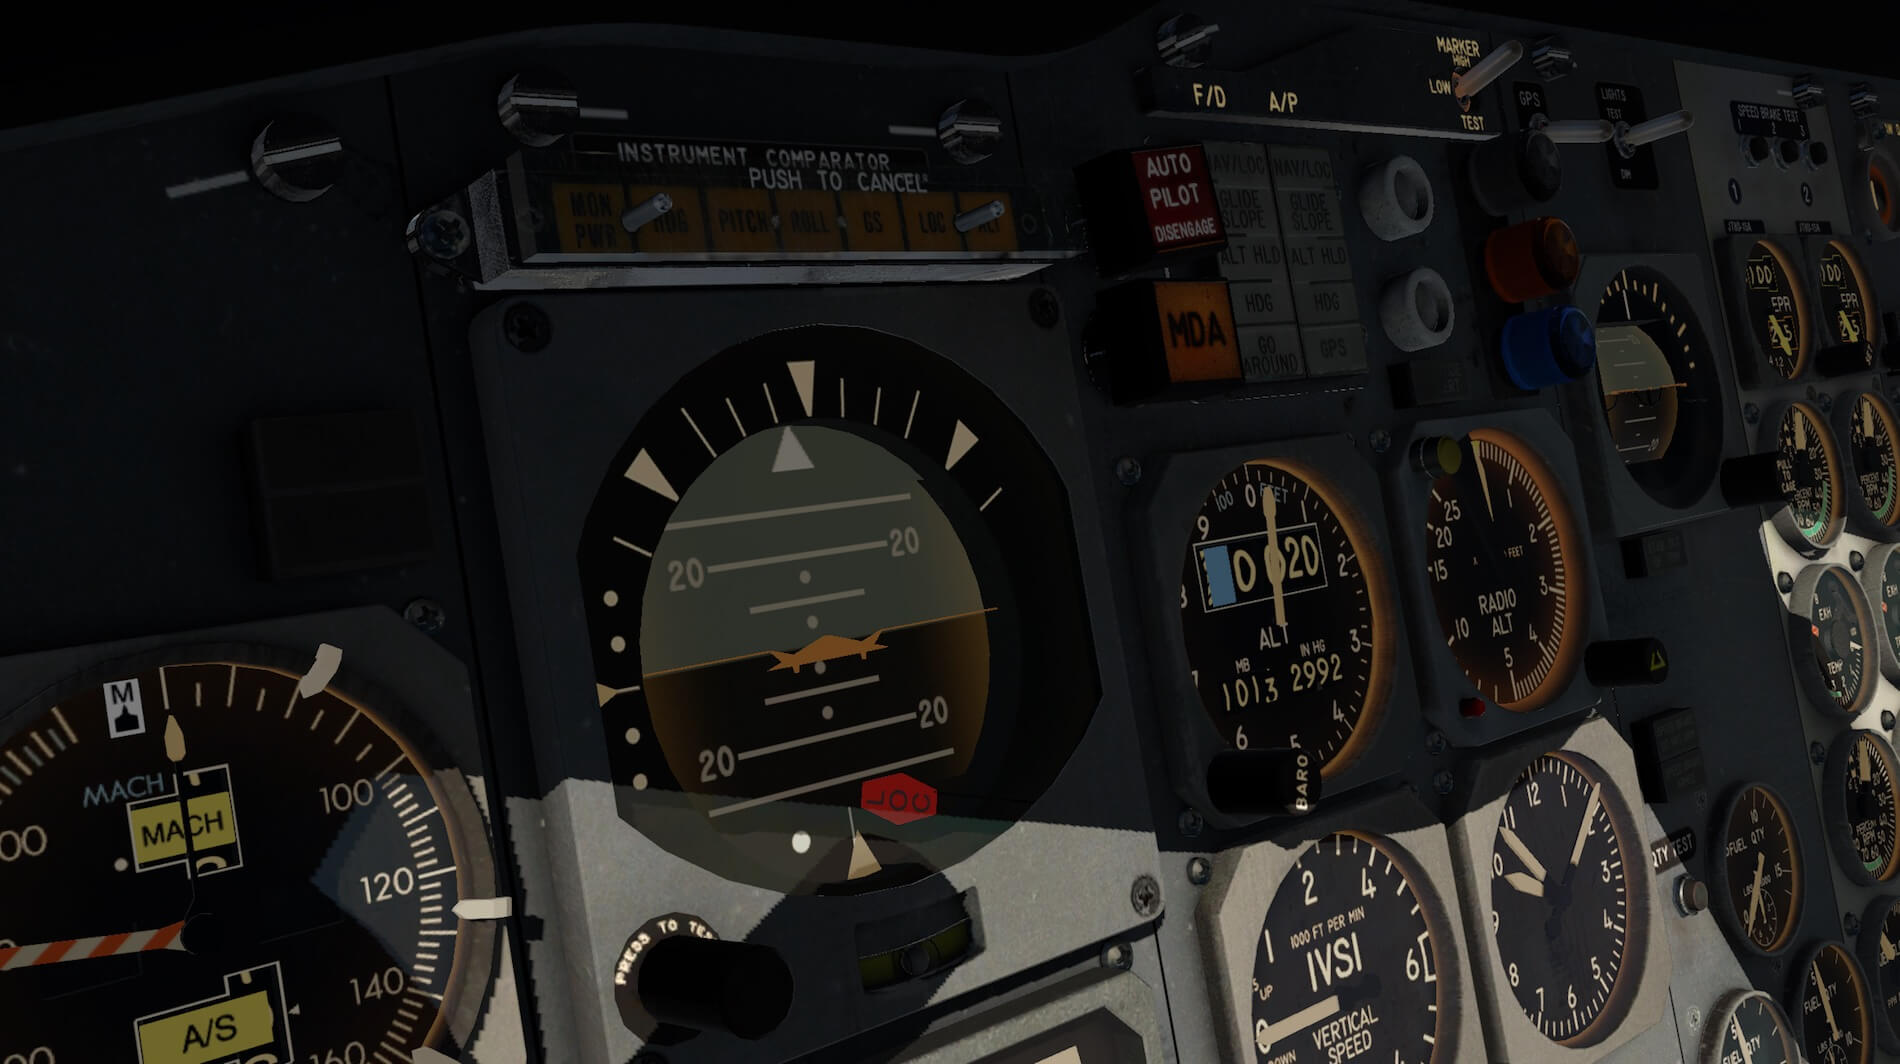
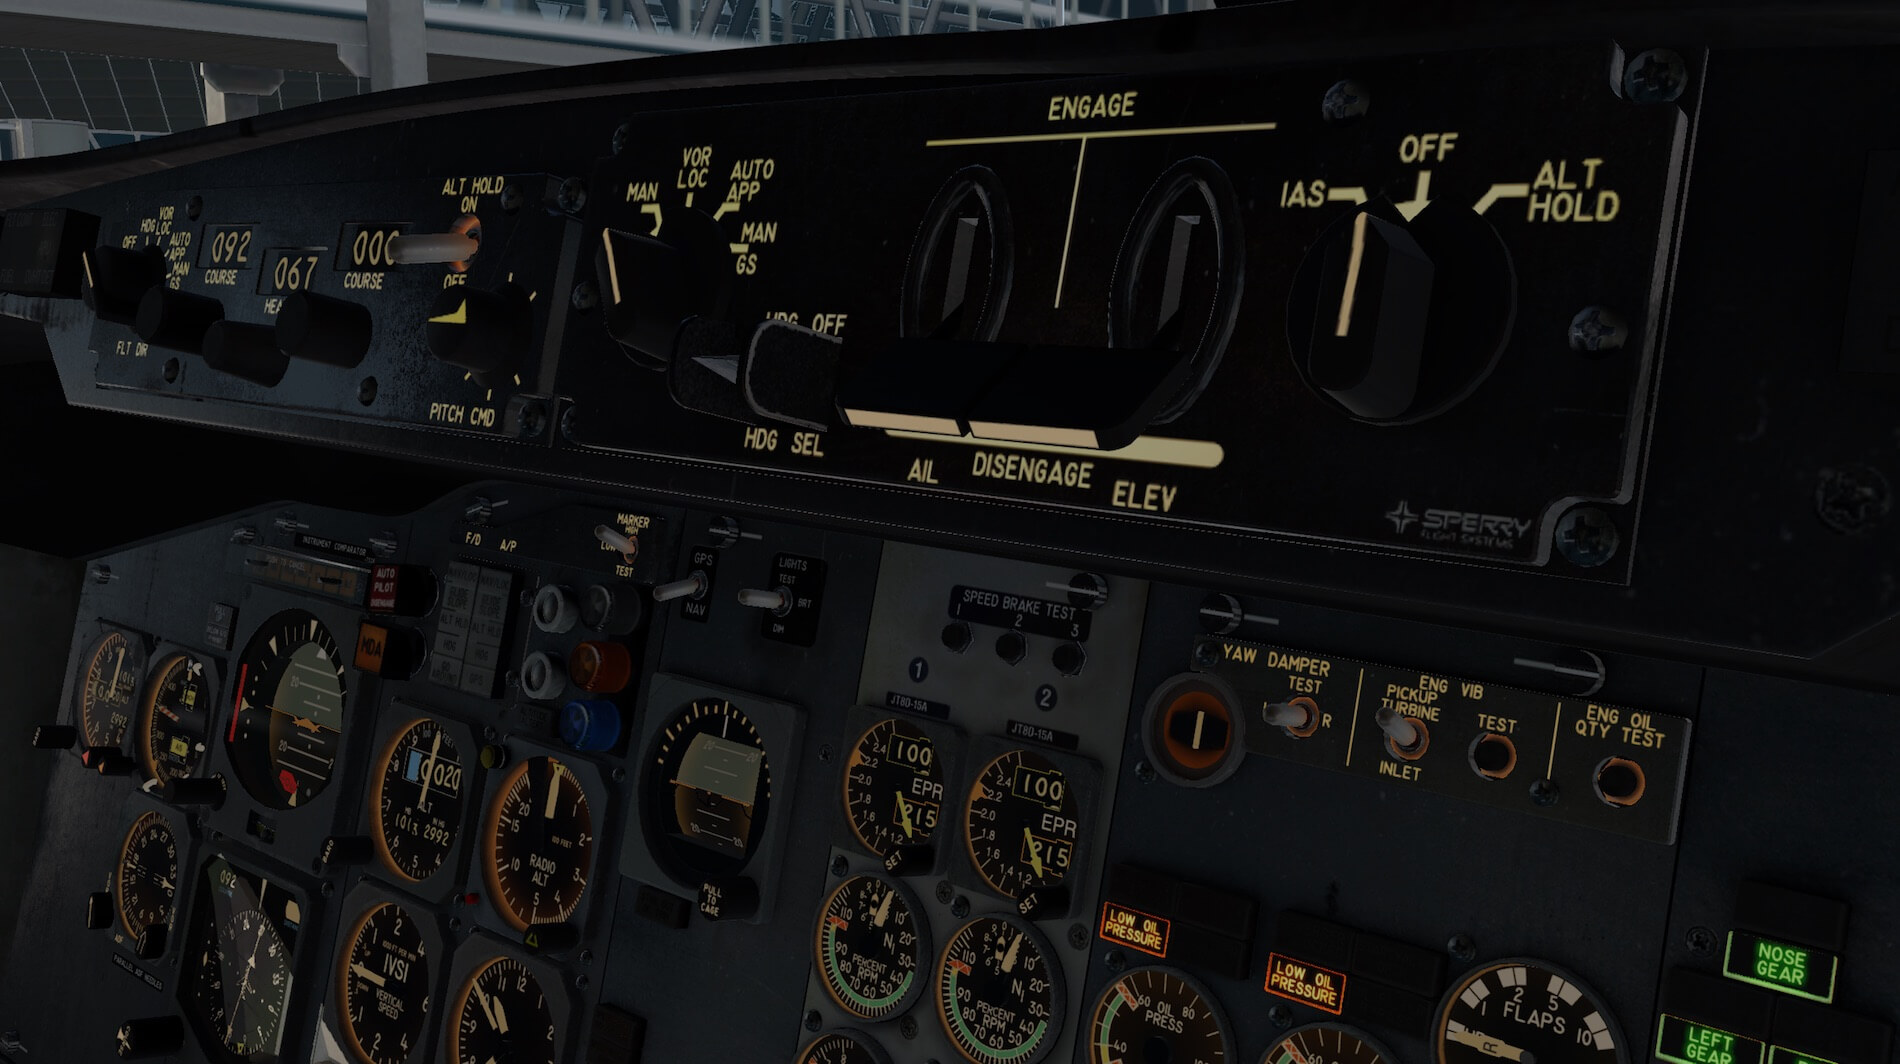


As you can see for yourself, this FlyJSim 737-200 has the old-fashioned ADI (Attitude Directional Indicator) and HSI (Horizontal Situation Indicator) while the newer 737-300 and up offer the EADI and EHSI whereas the “E” stands for an electronic instrument instead of the old-fashioned “electrical driven synchro” with gyros which are modeled in the FlyJSim.
To me there’s nothing changed. I was impressed and the longer I look at these panels, the more impressed I become. The following screenshots represent the pedestal. Zooming-in on the Stabilizer scales, next of the FLAP scale and SPEEDBRAKE control, I find a gorgeous modeled scale and, not to forget, the text in the green band “TAKEOFF CG%MAC” which stays sharp.
And what do you think if zooming-in on the rear of the throttle section with the FUEL CUTOFF levers and the three fire handles with the plastic tape on it.

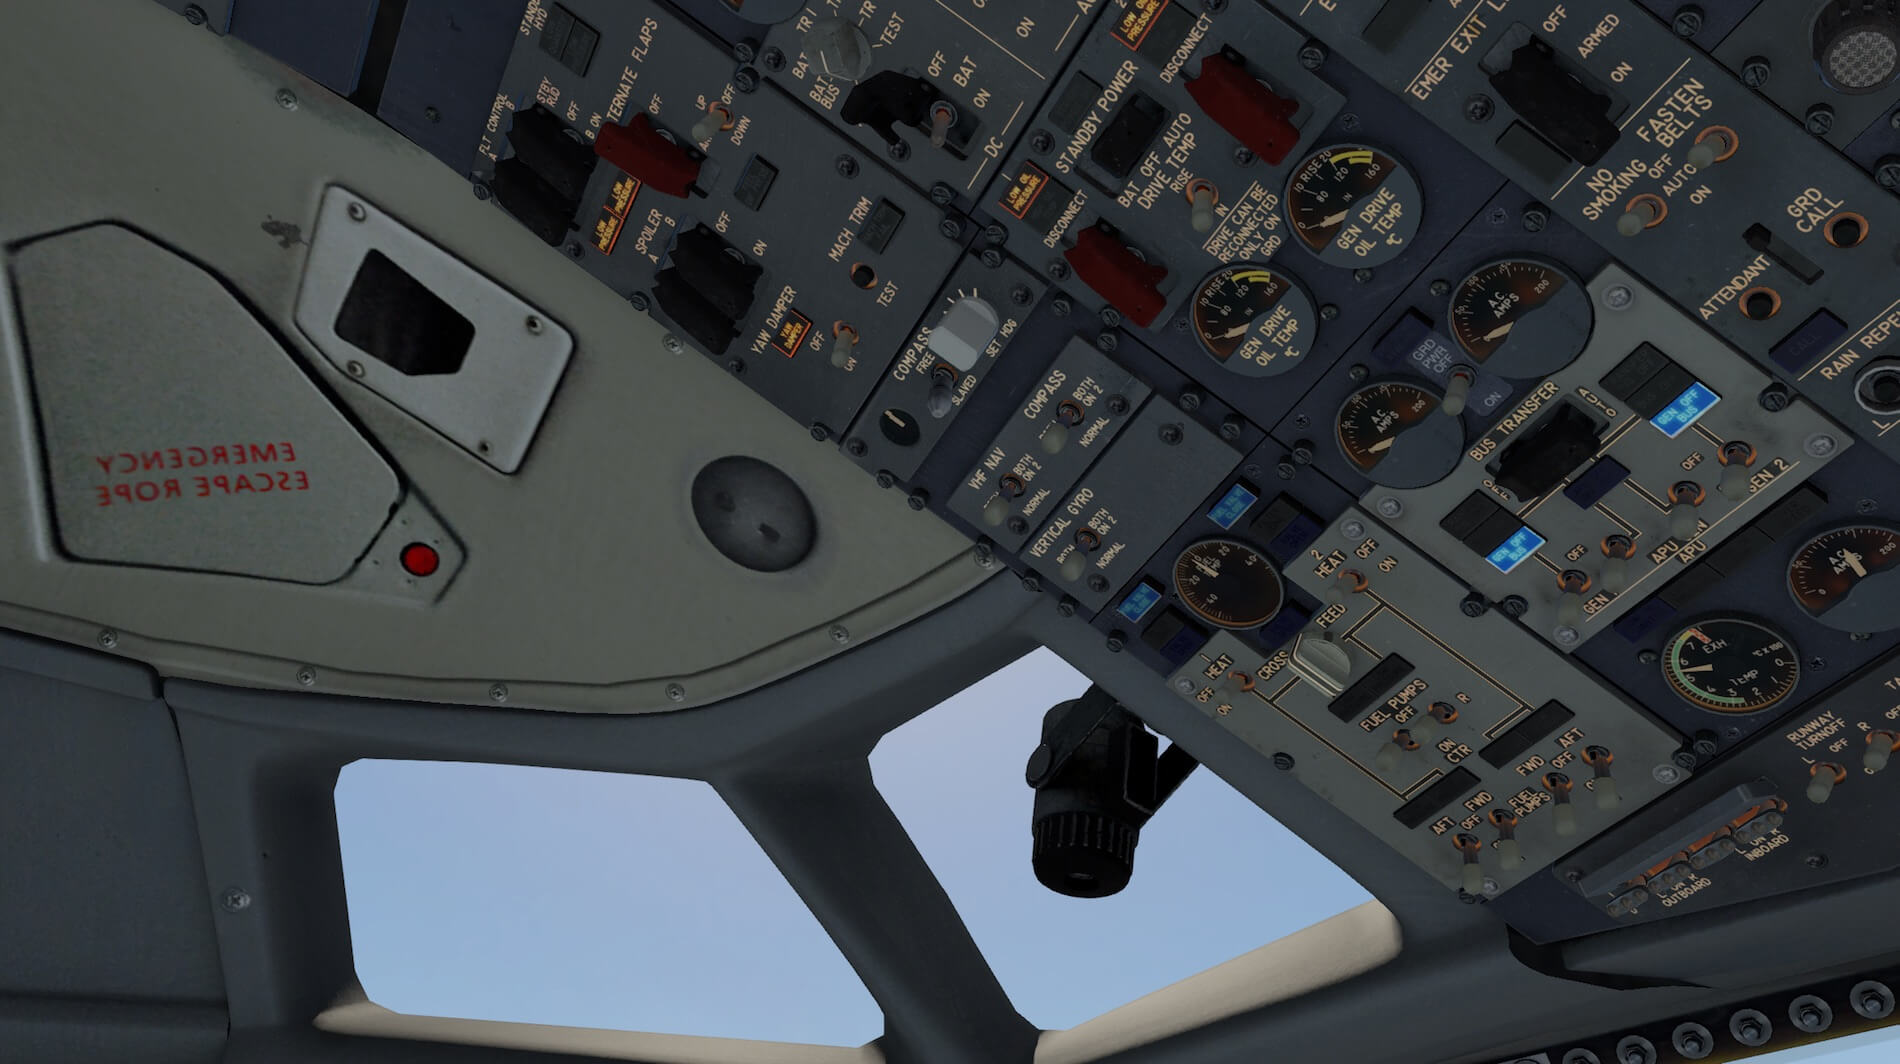
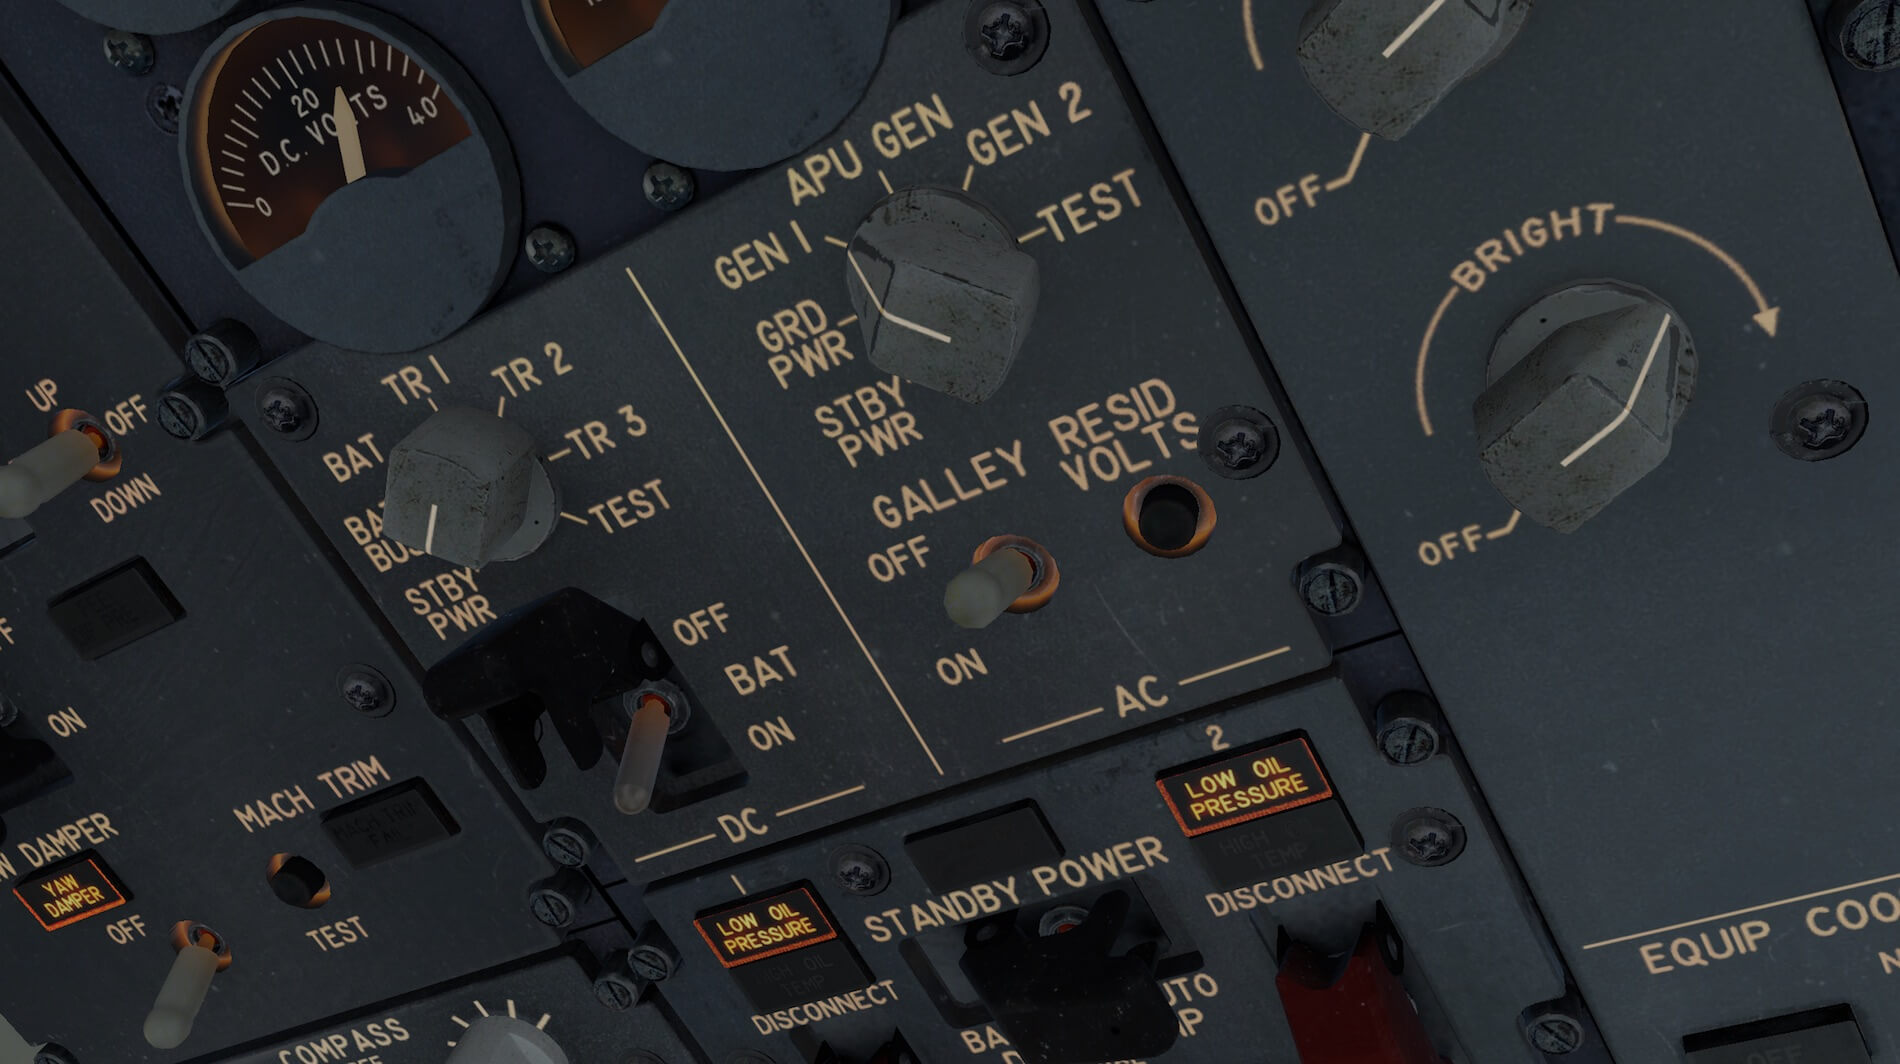

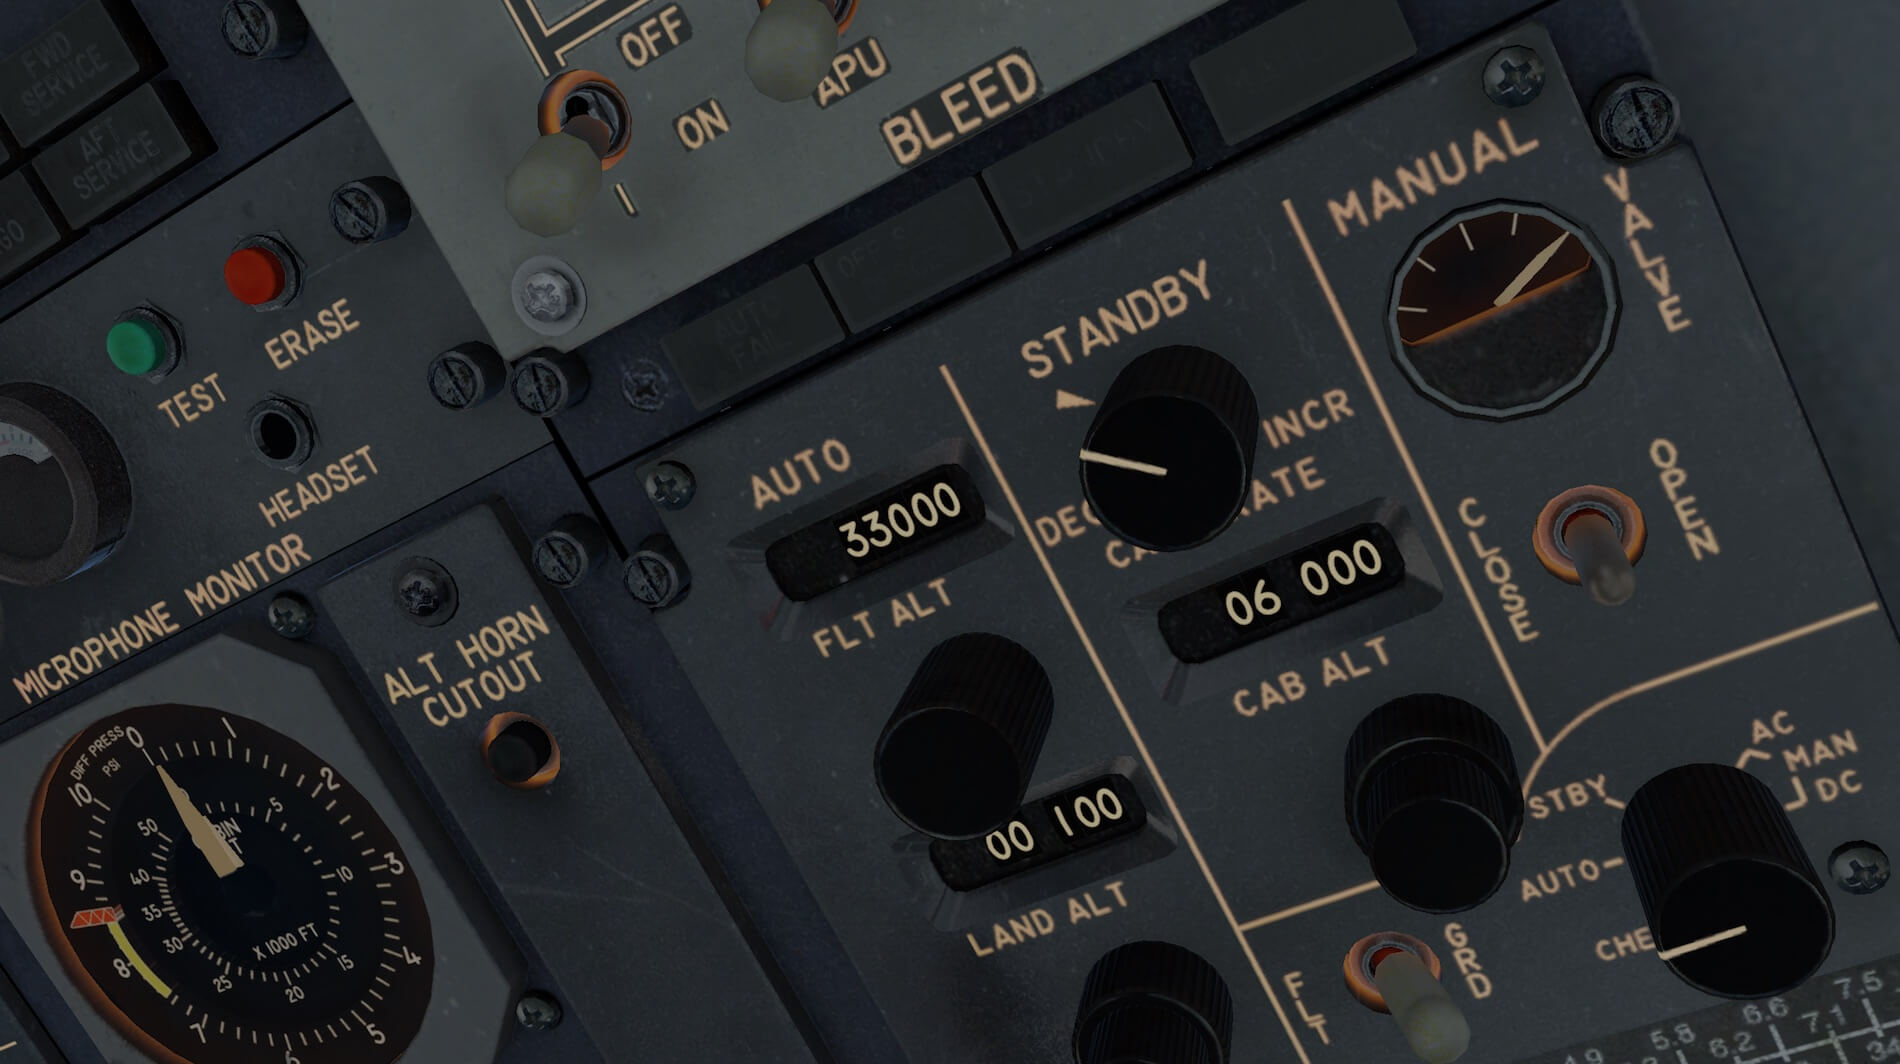

The same is applicable for the FWD and AFT overhead panel. It offers great modeling, sharp indicators, switches, knobs etc. and there’s also a lot of high quality photo real material used. I tested most of the switches and knobs and it seems to me that all are operative. For this I also checked the system description manual, but couldn’t find a switch or knob function that doesn’t have an output, but that’s for later during our cockpit preparations.
One last note regarding the 3D cockpit and that are the frame rates. For some reason, the frame rates are with and without electrical power applied extremely high. For such a complex aircraft, you could expect lower frame rates, but even with my older iMac and having the Rendering settings high, it performs great and yes, this means very good news!
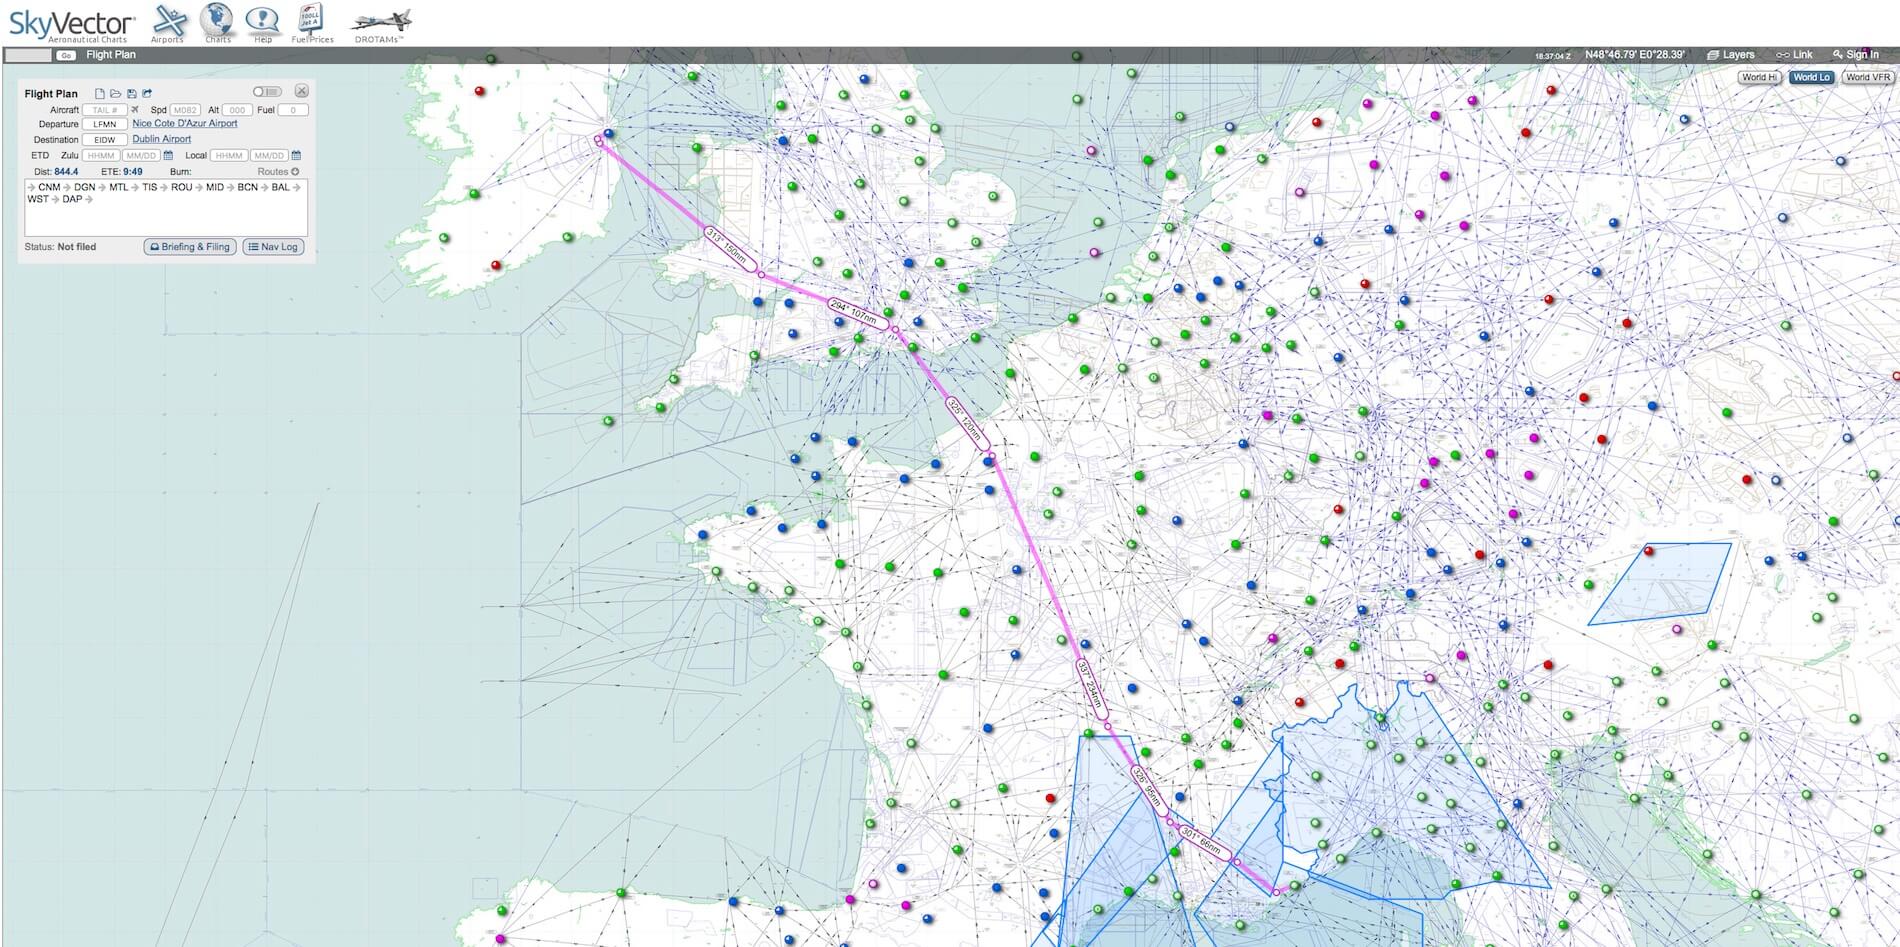
The Flight Plan
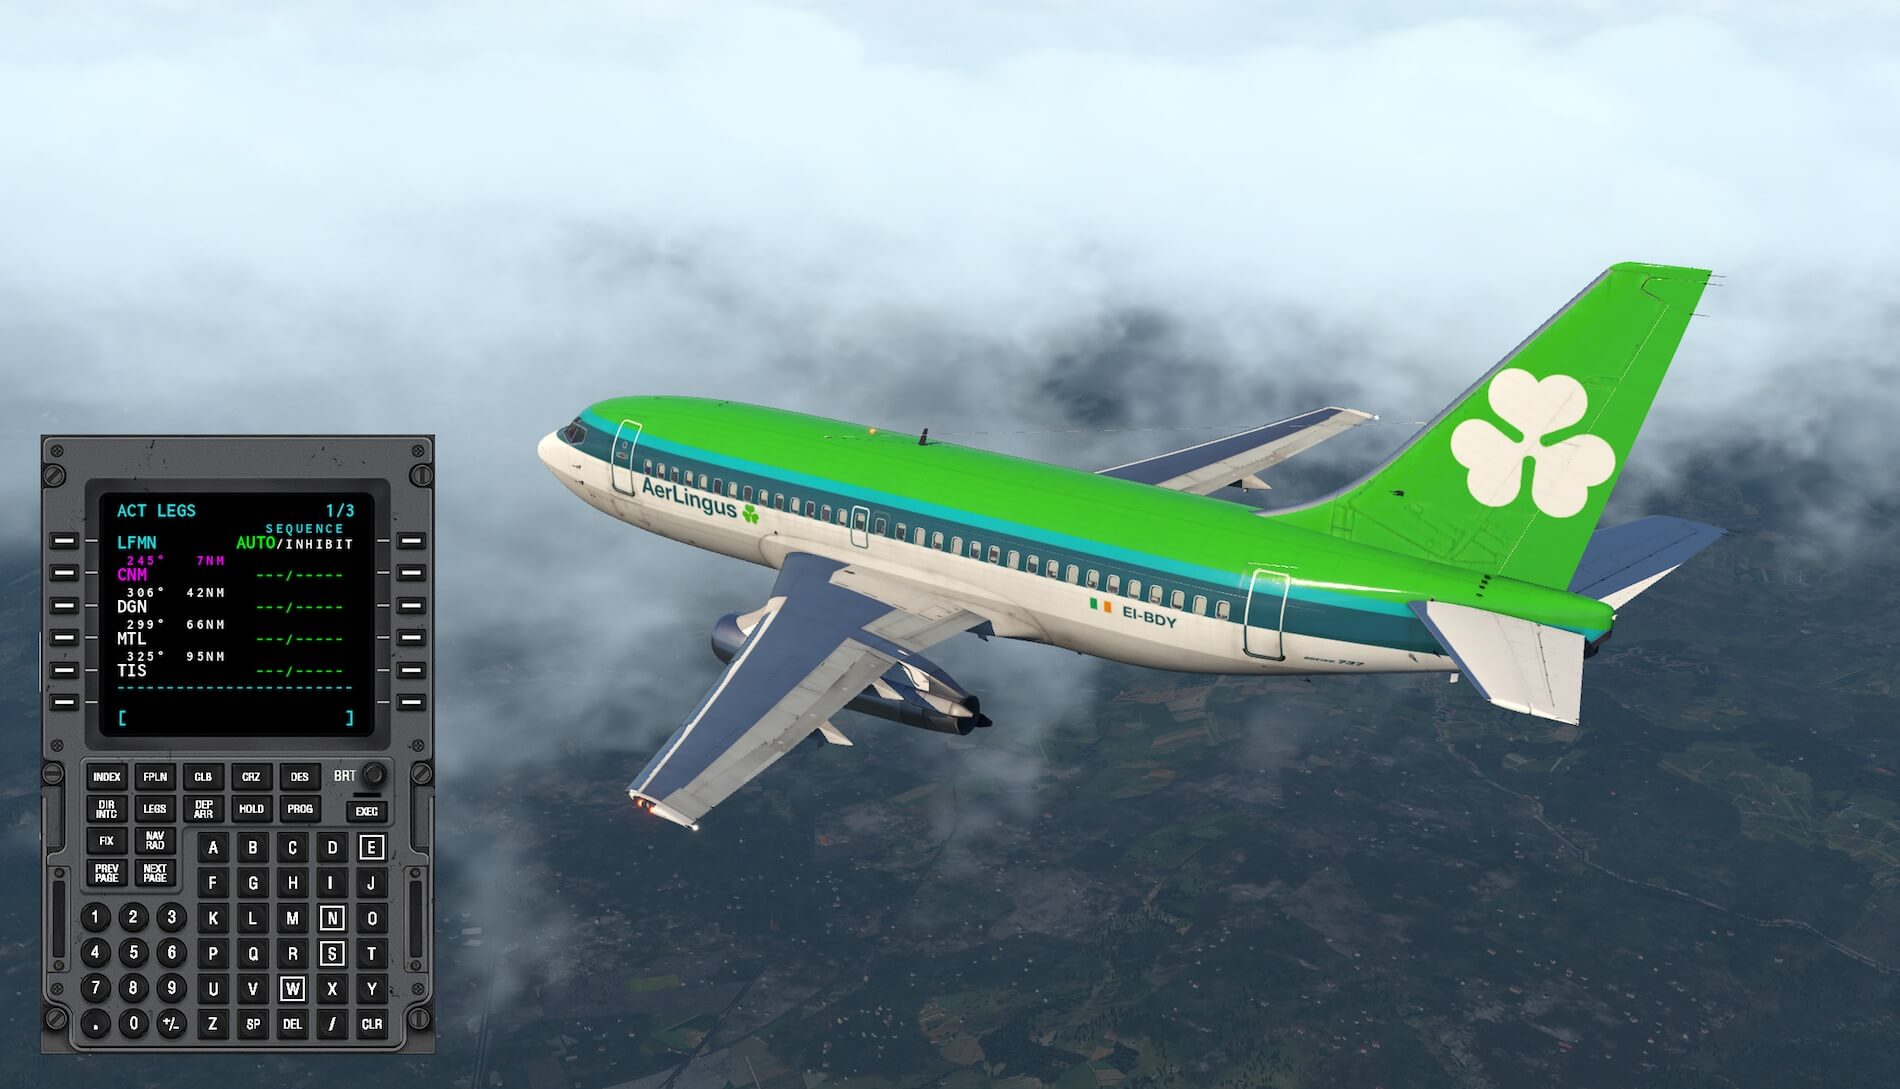
I’ve decided to take one of the old FJS 732 flight plans to test fly this baby. Because I live in Europe, I’ve decided to pick from the many 732 flight plans I have, a European flight plan. The flight plan is not based on a collection of own derived VOR/DME beacons. The test flight departs from Nice Côte d’Azur Airport (LFMN) and arrives at Dublin Airport (EIDW). As long as I create a flight plan that has the “fms extension”, both the default X-Plane 11 FMS MCDU and the xCIVA INS can use it.
The overall flight plan looks like this:
LFMN – CNM (Cannes-Tanneron | 111.40) – DGN (Digne | 113.85) – MTL (Montelimar Ancone | 113.65) – TIS (Thiers | 117.50) – NEV (Nevers | 113.40) – ROU (Rouen Vallee de Seine | 116.80) – MID (Midhurst | 114.00) – BCN (Brecon | 117.45) – BAL (Baldonnel | 115.80) –WST (Weston | 114.70) – DAP (Dublin Collingstown | 111.20) – EIDW.
The necessary charts for these airports can be found via Fly-Sea.com. Easier is of course, the direct links to these airports:
LFMN (https://www.fly-sea.com/charts/LFMN.pdf)
EIDW (https://www.fly-sea.com/charts/EIDW.pdf)
All of the included beacons are VOR/DME and no VORTAC beacons are used/applicable. For those who are only familiar with VOR/DME beacons, a VORTAC is a navigational aid for aircraft pilots consisting of a co-located VHF omnidirectional range (VOR) beacon and a tactical air navigation system (TACAN) beacon.
As far as my knowledge goes, VORTAC beacons are only available in the USA. Both types of beacons provide pilots azimuth information, but the VOR system is generally used by civil aircraft and the TACAN system by military aircraft. However, the TACAN distance measuring equipment is also used for civil purposes because it is built to civil specifications. (Source WikipediA)
Flight Plan Creation
To create a flight plan you could use many programs like Routefinder which offers you quickly a flight plan, but this is not in “X-Plane fms” format. Or you could go for FlightAware, but again, this doesn’t allow you to export it to an fms file format. Another option simBrief. You need to register but it’s for free and a wealth of flight planning information becomes available.
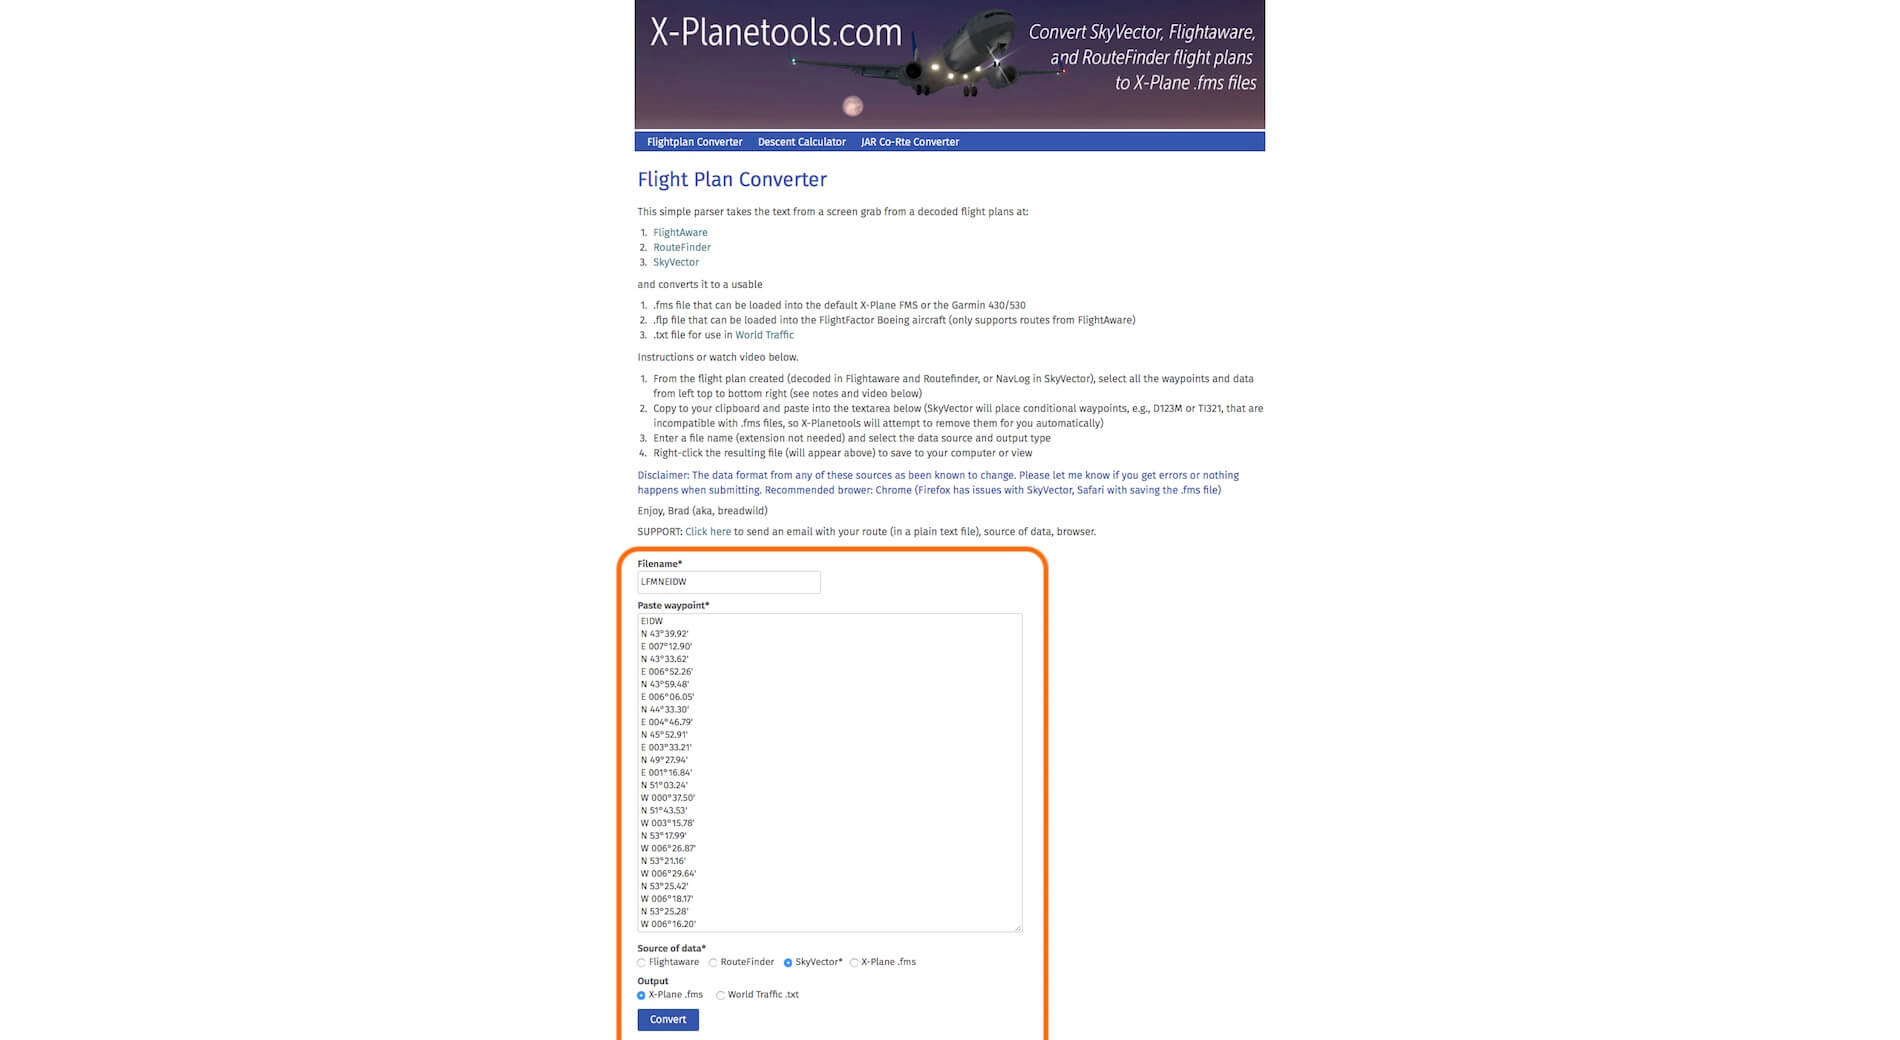
Then there’s also the browser-based Online Flight Planner, but I go for SkyVector, but I need for this X-PlaneTools. You and I all know SkyVector, but SkyVector saves your flight plan in fpl format which in turn can be converted to fms with X-PlaneTools. I prefer to create a sightseeing IFR flight, so I use SkyVector above all the other options since it allows me to add waypoints on my scenic IFR route. One of the reasons to use SkyVector is that you’re free in the waypoints you want to use.


After I’ve updated the default X-Plane AIRAC and placed the fjs-737.fms flight plan file into the X-Plane Output/FMS plans folder, it’s time to start with the cockpit preparations.
Cockpit Preparations
Although the package does come with a short on-screen checklist, instead I suggest that you either use the “FJS_Dash_8_Q400_Manual” manual, starting at page 14 “Amplified Procedures” or that you go for the “FJS_732_TwinJet_Procedures_Simplified”. Yes yes, you’ve probably seen already that the complete procedures manual is titled wrong. It’s titled for the Dash 8 aircraft, but believe me, the contents are of the 732. I’ve decided to use for my cockpit preparations the simplified manual since, as it starts with, shows you and me all the steps from a “Cold and Dark” till a complete power down situation.
Personally, I would suggest printing these pages since it’s easier than reading it from a screen un less you’ve got a second iMac, or a second PC with screen or even a tablet would work. A smartphone display, even the large ones, are in my humble opinion too small.
Follow the simplified procedures and it turned out that it all works perfect. And perfect means that all that’s in the procedure list can be carried out on the modeled 732. Ok, a few items aren’t applicable, for example the circuit breakers on the panels P6 and P18. As I mentioned before, these circuit breakers look awesome, but they aren’t functional. Some simmers will be disappointed, but believe me, linking all individual circuit breakers to simulated systems is perhaps not even possible for such complex aircraft systems. And perhaps X-Plane 11 isn’t itself designed to model this.
But overall, I worked out all the procedure items and also had a look in the amplified procedures. With the amplified procedure, I went up “before taxi procedure”. But at the same time, I must say that when you’re new to this type of old-fashioned complex simulated aircraft, please try to read the system descriptions beforehand, since a lot is simulated. That said, just switching ON and OFF certain systems doesn’t work. System description and operation can be found in the “FJS_732_TwinJet__Systems_v3” Acrobat document.
As I mentioned before, the FlyJSim team has created complex and highly realistic aircraft systems behavior. Hold on, before you start with the amplified procedures, you first need to go to page 74 (Electrical Power Up) and apply electrical power to the aircraft. After this supplementary procedure, you can return to page 14.
A Regular Test Flight
A regular VOR test flight or perhaps a mix between VOR to VOR and FMS MCDU?
As you might know, you can fly the FJS 732 v3 with the default FMS MCDU, or by using the xCIVA INS or just flying by using VOR (or VORTAC) beacons and thus tune for them, preferable VOR beacons that also offer DME information. That said, this test flight will be based on using regular VOR/DME beacons along the route.
I’ve parked my 737 at the apron, location 11, but I already know that I have to taxi to runway 04R. By the way, here’s the flight plan once more.
– LFMN
– CNM (Cannes-Tanneron | 111.40)
– DGN (Digne | 113.85)
– MTL (Montelimar Ancone | 113.65)
– TIS (Thiers | 117.50) – NEV (Nevers | 113.40)
– ROU (Rouen Vallee de Seine | 116.80)
– MID (Midhurst | 114.00)
– BCN (Brecon | 117.45)
– BAL (Baldonnel | 115.80)
– WST (Weston | 114.70)
– DAP (Dublin Collingstown | 111.20)
– EIDW
You can tune at least two VOR/DME beacons and if you wish, you can also add to this NDB beacons although I didn’t include these in the flight plan. After that, it’s time to start the engines and, by the way, as where I’m parked I don’t need a pushback, so that makes it all a bit easier. If you need a pushback you can look for example for the freeware add-on BetterPushback. For those who aren’t familiar with the freeware add-on, check this out “This is a pushback plugin for the X-Plane 10 and X-Plane 11 flight simulators.
It provides an overhead view to plan a pushback route and accomplishes a fully automated “hands-off” pushback, letting the user focus on aircraft startup and other pilot duties during pushback. It can of course also tow you forward, or perform any arbitrarily complicated pushback operation. To increase immersion, it speaks to you in a variety of languages and accents, simulating ground staff at various places around the world.” More details can be found at the BetterPushback website.
To have a bit more view on my left-hand main instrument panel, I decide to get the yokes out of view. As you can remember from a previous section, this is done via the “Option” popup window.
I taxied via taxiways S, T, D, U to A1. When 04L is clear, I cross 04L and then via V to A33 to runway 04R. I mentioned this before, while outside of the aircraft with keyboard combination “Shift + 4”, I’m happy with the realistic sound that comes from the modeled JT8Ds. And not only that, to me the different cockpit sounds are also authentic, in particular that of the instrument “synchro’s”.
I turn onto 04R, set the parking brakes for a moment, apply approximately 1.70 EPR (Engine Pressure ration) and then release the parking brake. According to the Vcard, I have a calculated max EPR of 215 and, with my current aircraft weights, a V1 of 139, Vr of 139 and a V2 of 143. There’s not really a need to check the IAS constantly since there’s also an aural warning that tells you the V1, Vr and V2 speeds. At Vr, I gentle pull on the stick and the aircraft lifts off and climbs gradually to my initial altitude of 6000 feet. One note for you; keep on monitoring your IAS … before you know, the IAS is way too high!


The initial climb follows the runway heading, but a sharp right-hand turn must be made soon. After that, I set for the right HDG so the bug on the HSI points in the right direction. Since there’s no active ATC, I decide to switch on the Auto Pilot in VOR/LOC. Although I had already entered the next VOR/DME station, it seems that this is too far away in relation to my current altitude.
It was better having some additional navigation means nearby, but that isn’t the case. And yes, the FlyJSim 732 doesn’t have the possibility to use waypoints or fixes in the configuration I’m flying right now. Remember, when you had selected the default FMS MCDU to be your primary navigation equipment, then you had the possibility to add waypoints/fixes in the flight plan. The same with my flight.
Till approximately FL160 picking up beacons further away than normal is really a problem, but at my cruising altitude of FL280 it isn’t a problem anymore. Actually, the problem of not receiving a beacon was already gone at approximately FL180-FL200. Just to make this clear. It has nothing to do with the FJS modeling. It’s just the reality!


It would be handy to have a chart of the route in front of me or in case you have a tablet or other PC/Mac, you could use an online X-Plane Flight planner and in that case you have a chart near you or you can use for example from FSWidgets iGMapHD for Mac, Windows, Smartphones or tablets.
Anyway, while the AP brings the 737 to an initial cruising altitude of FL280, you’ll need to monitor your IAS. I’ve said before, the aircraft doesn’t come with an Auto Throttle and/or Auto Thrust system. And yes, on the right-hand side of the AP panel, you’ll find a Pitch Mode Selector. One position is identified as IAS, but this is only for the AP to maintain the captains IAS for climbing or descending.
When you feel after a while comfortable with the AP connected in ALT HOLD, and flying from VOR to VOR, you can also try to switch to HDG mode. But before doing this, first set the HDG bug on the HSI at the heading you’re flying. When you switch then from VOR/LOC mode to HDG, the current heading will be maintained and no strange aircraft rolls appear during the switching. This switching from VOR to HDG and back to VOR is only to practice. Nothing more!
The rest of the flight isn’t spectacular. It’s just flying from VOR to the next VOR. Since sunset is coming along, it’s time to make some additional screenshots from an integrated cockpit lighting. That said, I need to switch on all lighting rheostats on the pedestal, main instrument panels, side panels and the overhead panel. The overall cockpit lighting including the background instrument lighting is gorgeous!
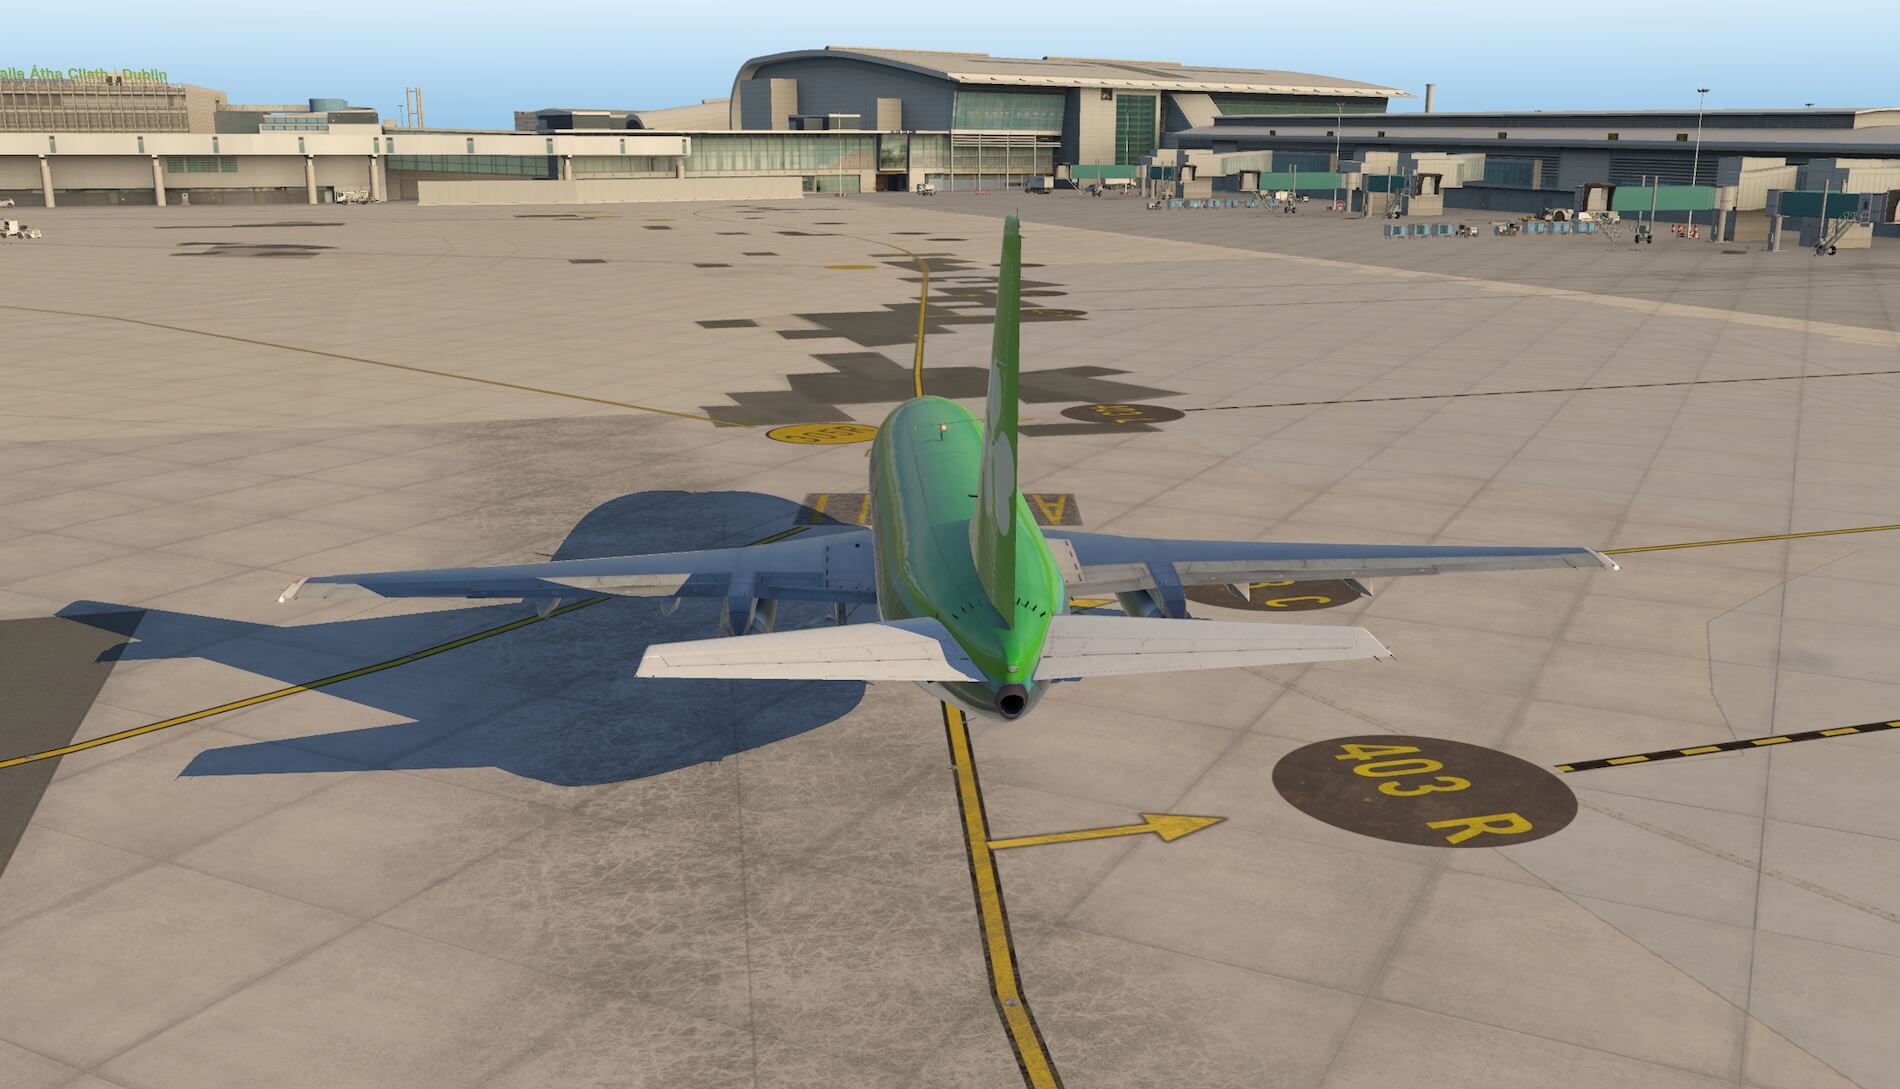
I can’t find any other words for this! Just a quick look at the external model and then I think it’s time to make the necessary preparations for the approach and landing at EIDW runway 16.
Since there’s no FMS that calculates for me the TOD (Top Of Descent), I have to do it myself. Many websites offer you “rules of thumb” for calculating the TOC (Top Of Climb) and TOD. I also printed STAR (Standard Terminal Arrival Route) BOSSS ONE ARRIVAL, but this works great when you have a FMS which we have on board, but we decided not to use it for now.
Since I made an ILS landing during this flight impression, I now tried to make a manual landing, of course with the help of the ILS 16 frequency. And honestly, it wasn’t easy. Although it was dark outside, I needed to concentrate myself completely on runway 16. Since there’s a lot to do during a final approach, like keeping in mind the glide path, staying aligned with the runway localizer, maintaining the right IAS, and not forgetting to extend the FLAPS and of course the landing gear, there’s still a lot to think about.


That said, the final approach was a new challenge mainly because of all the things you need to control and monitor. With an old-fashioned cockpit like this, you should have somebody next of you. But I finally made it and had a good landing.
By the way, talking about frame rates.
Yes, I’m also aware that the frame rates depend on so many “other” things than only XP11. Your PC or Mac specifications, your screen resolution and of course your XP11 rendering options. In addition, do you have frame rate consuming airports installed, and what about your clouds etc.? For clouds – within Mac environment – I used for example the Balanced_Clouds.lua script in combination with FlyWithLua for X-Plane 11.
I find, but I’m aware that this is a personal taste, that the clouds in X-Plane 11 aren’t bad at all. Till now, you and I must wait the xEnviro is also available for Mac. I’m not a favorite of using SkyMAXX Pro. It is frame rates consuming add-on, and X-Aviation support is far from professional when it comes to service.
Long story short; with my old iMac specifications, I’m pleased with the overall frame rates in conjunction with the FlyJSim TwinJet. I had fairly good frame rates although they differ a lot between being on the ground and in flight. For my departure airport, I used the LFMN from JustSim while for my arrival at EIDW, I used Aerosoft’s payware airport. In both cases there was a frame rate impact, in particular for LFMN, but not too much that flying isn’t possible anymore. In flight, the frame rates are higher except when I approached clouds.
Let’s put it like this; frame rates vary between 25-45 in flight and around 20-25 on the ground. Again, that’s with my XP11 Rendering settings.


This concludes the flight impression. Did I cover entirely everything about this aircraft during this flight? For sure I missed a couple of things, but my overall impression is a gorgeous looking 3D cockpit that sounds and flies as real as it gets.
What if you use FMS or INS?
I can imagine that you prefer to use the implemented default X-Plane 11 FMS MCDU. It’s a lot easier, it works faster and there’s no need to monitor and wait for the flying-to VOR stations. But the moment you decide to go for this option, don’t forget to select the GPS-NAV switch on the Main Instrument Panel (MIP) to GPS. This GPS switch position is also the right setting when you decide to use the xCIVA INS.
When you look back to the LFMN – EIDW flight, what’s then different when I decide to use the default FMS MCDU. Besides the previous mentioned GPS-NAV switch, you need to load the flight plan into the MCDU.


Once you done that, it’s just doing the same cockpit preparations, but after the initial climb you set the AP Mode Selector switch to VOR/LOC and that together with the GPS-NAV switch in GPS, will follow the flight plan. The only thing you need to take care for is that you monitor and/or control the pitch of the aircraft thus your climb and cruising level. Keep in mind that this is an old-fashioned Auto Pilot without a VS (Vertical Speed) option. Basically, it’s the same kind of flight as previously discussed except for the longitudinal channel.
But what when you own the xCIVA INS and want to use this navigation device for navigating along the route? In that case, follow the few screenshot steps below to activate the xCIVA INS CDU and load the same “fms” flight plan. For the rest, there’s nothing else then the previous FMS story however, keep in mind that the xCIVA INS can only hold at the maximum 9 waypoints. In this case it won’t show you all the waypoint since there are more than 9 of them.


You’ve noticed that I used on our flight from LFMN to EIDW also the implemented FMS MCDU from Laminar Research. I must admit that it is much easier then constantly changing VOR or VORTAC frequencies. Ok, I’m also aware that the 737 Classic never had an FMS MCDU, perhaps after a retrofit package, but I’m not sure about that. That I used the FMS MCDU too, gives me more time to explore the wonderful and highly accurate modeled Boeing aircraft. During my review years I’ve seen, tested many commercial aircraft but this is one of those aircraft that has realism at an unbelievable high level.
So, worth all your pennies!
Installation, Contents and Documentation
Installation and Contents
The installation – as of this writing I’m reviewing version 3.1801.1111 – is simple and straightforward. Unzip the package and install the complete contents under Aircraft or like I did, creating a sub-folder FlyJSim under Aircraft. Once you start X-Plane and load the aircraft, you’ve got the option to do an “online” or offline” product activation. I went for the online activation procedure and after I entered the serial number, reloaded the aircraft, the product was activated. Easier isn’t possible!
The FlyJSim 732 TwinJet v3 package comes with the following brand new X-Plane 11 liveries. These are:
– Aer Lingus,
– Air France from 1975,
– Aloha Airlines N73711,
– FlyJSim v3
– KLM,
– Lufthansa
– Southwest,
– United
– Westjet.
Documentation
In the 732 folder (the official extracted name of this package is _FJS_732_TwinJet_Pro_V3) you’ll find a sub folder “_Manuals”. This folder contains the following Acrobat files:
– FJS_732_TwinJet__Manual_v3
– FJS_732_TwinJet__Procedures_Simplified
– FJS_732_TwinJet__Procedures_v3
– FJS_732_TwinJet__Systems_v3
The FJS_732_TwinJet__Manual_v3 manual is a kind of overall manual that covers general parts of the aircraft like the installation, support, updates, views, menu’s, options, cockpit manipulations and more.
The FJS_732_TwinJet__Procedures_v3 manual is one of the complex manuals that are a “must” to read. This manual deals with everything that has to do with operational limits, normal procedures, supplementary procedures and adverse weather. Worth to highlight is the starting on page 14 of the “Amplified procedures”. See these pages as an extended checklist with actions to be taken and expected aircraft responses. A more simplified and straight forward manual is the FJS_732_TwinJet__Procedures_Simplified. I won’t say that this simplified manual is a kind of tutorial how to follow each flight section, but it works fine although it must be said that this simplified man ual doesn’t replace the normal procedures manual nor the systems manual.
And finally, you’ve got the FJS_732_TwinJet__Systems_v3 manual. This manual covers the aircraft systems in full detail. There’s for each aircraft system a panel description and a system overview of how it works or how it should work. And yes, you should take some time to check this out, especially when you’re not familiar with old-fashioned aircraft systems.
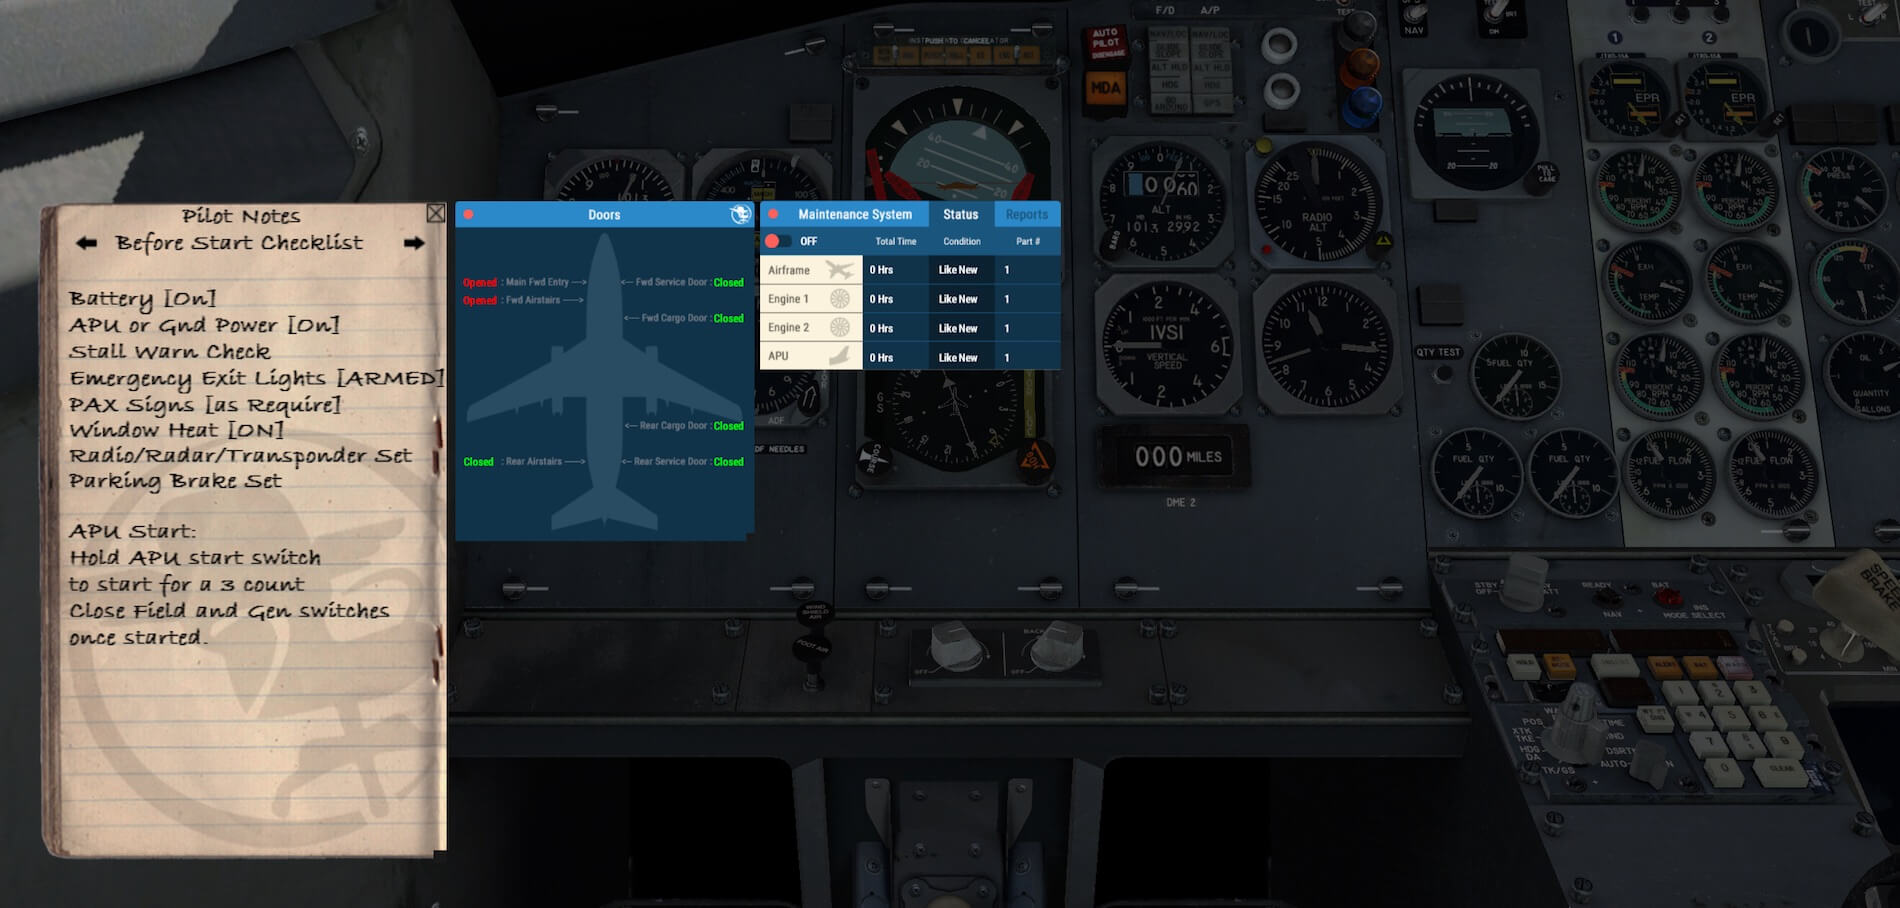
Additional Features
When moving your mouse to the mid left-hand side of the X-Plane screen, some grey you FlyJSim 732 boxes appear. From the top to the bottom you’ll have the following popup windows:
– V (speeds) card for takeoff and landing
– Weight and Balance
– Options
– Doors
– Maintenance System (Status and Reports)
– Checklist

It’s not my intention to explain all of these icons in great detail since the FJS_732_TwinJet__Manual_v3 manual offers a thorough description. The V (speeds) card pop window automatically calculates for you the required speeds, EPR (Engine Pressure Ratio), N1 and other data needed for the takeoff and landing depending on the aircraft weight like ZFW and payload and environmental conditions.
The Weight and Balance popup window allows you to control the aircraft weight by changing the passenger and cargo load as well as the amount of fuel. With these weight changes, automatically the aircraft CG (Center of Gravity) in percent MAC (Mean Aerodynamic Chord) is calculated and presented to you.
The Options pop up window allows you to modify aircraft situations like introducing a (by default) cold and dark configuration, or an aircraft configuration with the engines already running, hiding the yokes, weight not in Pounds, but in Kilograms etc.
With the Doors popup window, you’re able as mentioned earlier, the control the passenger, service and cargo doors. For the left-hand passenger door, you’re also able to control the FWD stair.
The Maintenance system popup window allows you add realism into the FJS 732 simulator. By default this feature is OFF, but once switched ON, a popup window shows you at the bottom of the X-Plane screen that the failure system is switch ON and consequently, it starts counting hours and failures for the airframe, engines and APU (Auxiliary Power Unit).
Last but not least is the checklist popup window. It’s not an interactive checklist, but it shows you the steps to be taken and what’s needed.

A gift …. meet the Old Fashioned CIVA INS
The INS
The simulated INS (Inertial Navigation System) is a perfect companion for old-fashioned aircraft since, without this piece of hardware, navigation must be done with the help of VOR (VHF Omnidirectional Range) or NDB (Non-Directional Beacon) stations. In case you’re not familiar with VOR and/or NDB stations/beacons, I’ve added also the Wikipedia pages. Of course, many other websites are available that offer you thorough background information about these navigation aids.
Delco Carousel was a popular INS-based navigation automation system for aircraft developed by Delco Electronics. Before the advent of sophisticated flight management systems, the Carousel allowed pilots to automate navigation of an aircraft along a series of waypoints that they entered via a control console in the cockpit. The Carousel used an INS as its position reference for navigation. Many aircraft were equipped with dual or triple Carousels for redundancy. The Delco Carousel derives its name from the fact that the inertial reference platform is in constant rotation as a technique to reduce drift and increase accuracy.
Basic Construction
Consider an accelerometer as an instrument that measures acceleration along a single axis.
Integrate the output once, and you have velocity. Integrate again, and you have position – or rather, change of position – along the accelerometer’s axis. If you know the direction of travel, you can deduce current position.
Inertial Navigation is simply a form of dead reckoning. You need to know the starting point. An Inertial Navigation device/system can’t find its initial position on the earth (it can find latitude, with difficulty, but not longitude).
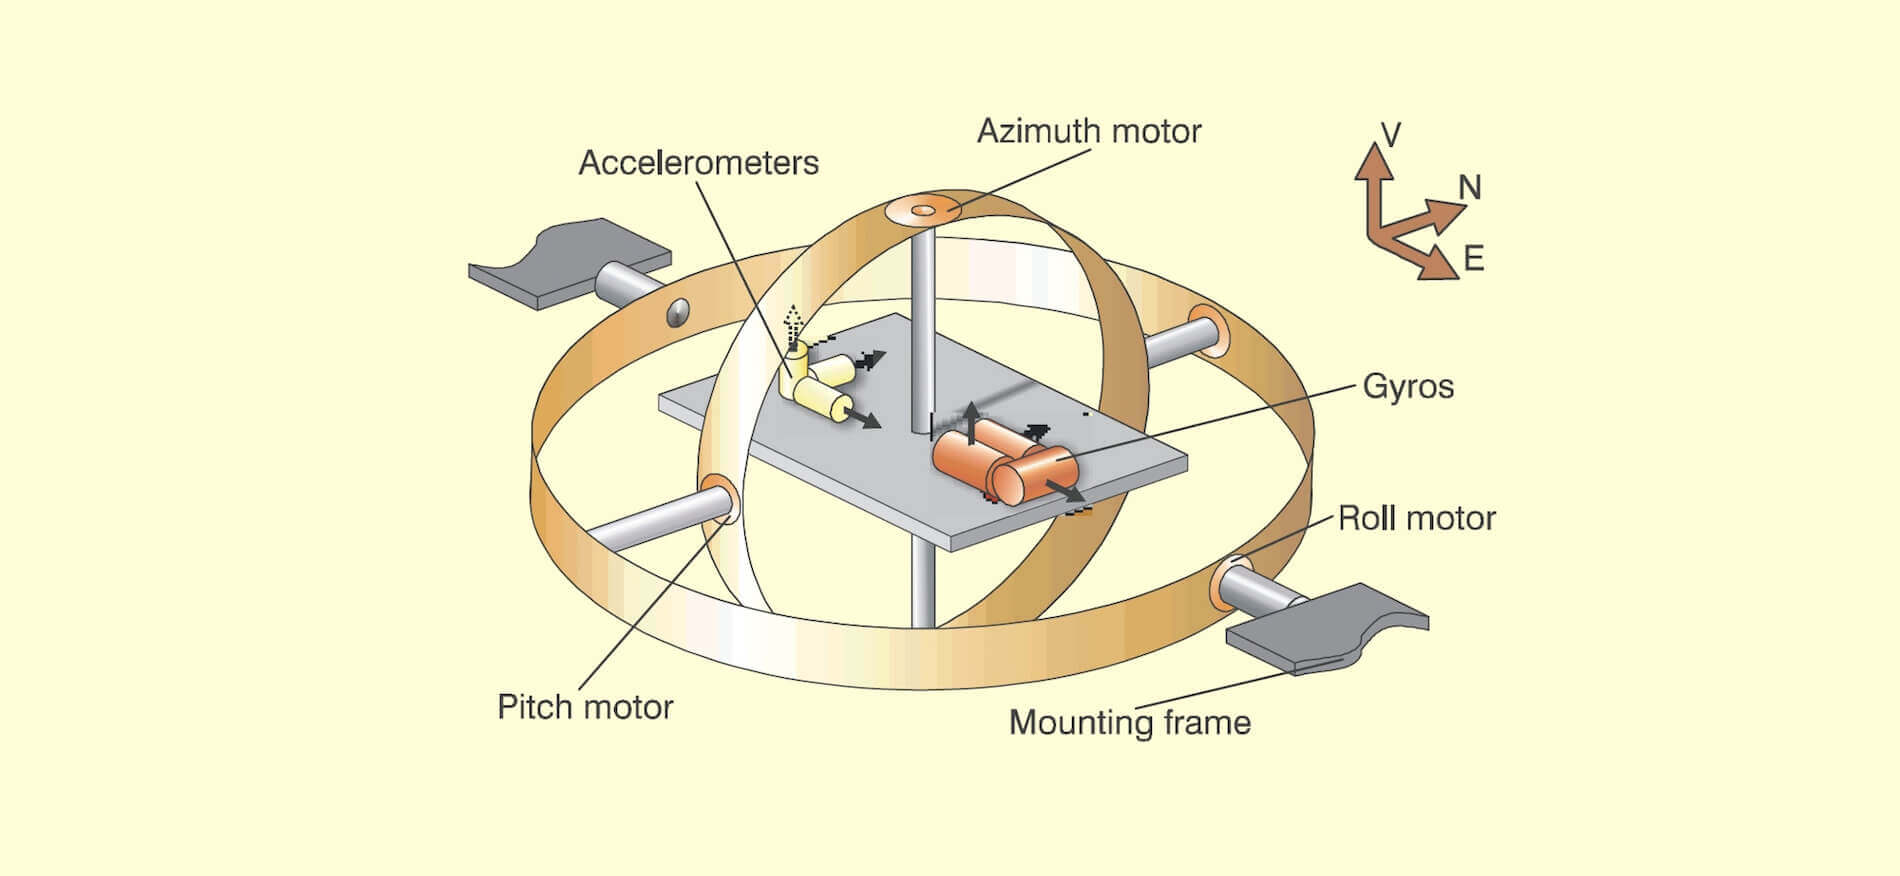
Take three accelerometers, with their sensing axes orthogonal. Arrange them so that their axes are aligned north south, east west, and vertical. To maintain this orientation when the vehicle maneuvers, the accelerometers are suspended in a set of three gimbals that are gyrostabilized to maintain the direction. Later we will be describing strapdown arrangements, but it always seems easier to explain the principles by starting with the gimbal model.
The gyros, similarly, are single axis devices, of a type known as integrating gyros – that is, they give an output proportional to the angle through which they have been rotated (about their input axes). The gyros are used as the sensing elements in null seeking servos, with the output of each gyro connected to a servomotor driving the appropriate gimbals, thus keeping the gimbal in a constant orientation in inertial space.
Integrating gyros also have what is called a `torquer’, a means of processing the input axis at a rate proportional to input current.

This combination forms a convenient means of cancelling out any drift errors in the gyro. The gimbals, as shown in the figure, (well, they may be there but they are not identified) have a bearing at each end. Each has a motor, built around one of the bearings, and at the other end a synchro.
No matter how the aircraft maneuvers, the innermost gimbal maintains its orientation in inertial space. The synchro on the innermost gimbal thus measures azimuth (or heading), the synchro on the middle gimbal measures pitch, and the outer gimbal measures roll.
The innermost gimbal can be thought of as a stable platform on which are mounted the gyros and accelerometers although, in practice, it looks like anything but a platform, being a miracle of mechanical packaging.

The whole arrangement is generally called a gimballed platform. Find on your left an example of an Inertial Measuring Unit (IMU), which houses not only the gyros, motors, gimbals but also the accelerometers.
Simplified Operation
As said before; the IMU is an electro-mechanical device consisting of accelerometers and gyroscopes. The accelerometers are mounted on a gimballed platform in a way that the axes of the devices sensitive to acceleration were mutually perpendicular.
At the beginning of the flight, an IMU is aligned although some say too quickly that the INS is aligned. Just to make sure; INS is a system, comprising all the components together like the IMU(s), Mode Selector Panel(s), CDUs (Control Display Unit) etc. The pilots provide the CDU with the current position of the aircraft. The system stores this information and aligns the gimballed platform to a set attitude with reference to the Earth.
The gyroscopes were set up to measure the rotational displacement and velocity of the aircraft about the longitudinal, vertical and lateral axis of the aircraft. Basically, what happens is that the gyroscope signals are used to mechanically rotate the gimbaled platform in a direction opposite to what the aircraft is doing.

This maintains the accelerometers in the same attitude relative to the Earth that they were established in during the alignment process. Thus, if one accelerometer was aligned East-West, and one North-South, this alignment would be maintained no matter the attitude of the aircraft.
The accelerometers would generate signals proportional to the accelerations in the E-W and N-S directions. This acceleration data can be directly integrated once to get velocities in the E-W and N-S directions, and integrated once more to get displacements or navigation data in the E-W and N-S directions.
The xCIVA INS Add-On
Although I’ve mentioned it before, highlighting it once more can’t be a problem. The X-Plane developed CIVA INS can be found at the dedicated X-Plane.Org web page (https://store.x-plane.org/CIVA-Navigation-System_p_196.html). According to X-Plane.Org, “The original CIVA INS could be found on the Boeings 707, 727, some 737-100s and -200s, the DC-10, the L-1011 Tristar, and on the early 747-100, -200 and -300 variants.”
The CIVA INS package comes with the following features:
– Fully compatible with the FJS 727 Series by FlyJSim
– Realistic warm-up, initialization and alignment procedures
– Optional Quick-Align to get you flying instantly
– All display modes modeled, including HOLD modes:
– Automatic navigation of up to 9 waypoints
– XP flight plans can be loaded instead of manual WP entry
– Single-DME updating incorporating DME elevation
– Realistic position drift and smooth updating
– Built-in 30-minute backup battery in case of emergency
Package and User Guide
Ok, suppose that after reading this review you’ve also become enthusiastic about the CIVA INS add-on, and decided to buy your personal CIVA INS copy for only 10.00 USD, it’s time to see what you get. So, you’ve downloaded (xciva.zip | 4.7MB) and unzipped it. You end up with a folder “xciva” that contains:
– the actual plugin xciva
– CIVA-User-Guide.pfd
The CIVA User Guide comes among a few other chapters with:
– Inertial Navigation – An Introduction
– Installation
– The CIVA Popup window (via XP menu)
– Keyboard entry, basic modes and navigating
– The Hard mode (Cold & Dark situation)
– Display modes
– Leg change and DME updating
Although the manual seems to offer all the information what is needed to understand CIVA INS, it’s in my opinion not in a user-friendly way written. This is for example with chapter 8, which is far too much text and hardly any pictures to highlight certain process changes or visualize the steps to be taken.
Installation
Next step; where to install it?
Install the “xciva” folder in the X-Plane “Aircraft/ _FJS_732_TwinJet_Pro_V3/plugins”.
When you prefer to use the popup xCIVA INS, then go to the X-Plane Plugins menu and select CIVA. A sub popup window appears with only two options; Show/Hide. When there’s no CDU in view, you (logically) click Show. And here you are, the floating CIVA INS add-on. But it should be noted that once you’ve installed the xCIVA package plugin, the pedestal mounted INS CDU becomes operational and functional. This gives it a realistic look and feel and the popup INS CDU is then more for your convenience since there’s no need to look down on the pedestal to see the CDU.

INS Videos
Searching YouTube for the CIVA INS operation, I found four movies that could be of interest. These videos show you a different INS CDU, not the one developed for X-Plane, but it should give you a better understanding how to handle this INS CDU and the Mode Selector Unit.
– CIVA INS tutorial I
– CIVA INS tutorial II
– CIVA INS tutorial III
– CIVA INS tutorial IV
Using xCIVA INS
When using the xCIVA INS add-on on your flights, you’ll notice that the way you use this navigation device isn’t different then using the default FMS MCDU. Connecting the INS to the aircraft AP is the same as when you use the FMS.
That said, with a connected AP, the AP will follow the flight plan loaded in the INS by clicking the LOC button on the right-hand panel on top of the glareshield. The popup xCIVA INS consist out of two components; the INS MODE SELECTOR panel and the INS CDU. Both are functional and work according to what is written in the CIVA manual. And, as said before, the pedestal mounted Wilson INS CDU is also functional, but this is not the case for the overhead panel mounted INS MODE SELECTOR panel.
That’s it!
Summary
When you want to know all about the 737-200 series with the help of the AMM (Aircraft Maintenance Manual), then I suggest that you use this link which gives you direct access to the official and complete AMM from Aerolineas Argentinas. Perhaps it’s also an idea to check out this link although the provided FlyJSim 732 TwinJet manuals are already in my humble opinion complete.
The link offers you the complete AMM of the Boeing 737-200. An AMM is not a FCOM. The AMM offers much more details on how systems work or how systems can be tested. It’s a matter what you like, but it’ always worth to check that link too.
After testing the FlyJSim 732 for many hours with X-Plane 11, I can only conclude that I’m a happy simmer. Some simmers would say why this review doesn’t compare or highlight the differences with the IXEG 737 Classic. First of all, the IXEG is not a -200 but a -300 series which is a more modern version of the 737. Further on, since I don’t own the IXEG 737 Classic, it is difficult for me to compare.
Additional paintings for this v3 version are, as said before, available at X-Plane.Org.
Did I cover everything?
I think I covered most of the FlyJSim 732 TwinJet v3, but for sure not all. On the other hand, I can recommend this dedicated Boeing 737-200 for X-Plane 11, made by FlyJSim for 200 percent. As far as I can judge, the modeled 3D cockpit and the Virtual Cabin are really a pleasure to sit in and to fly with. I’m not a real 737-200 pilot, but what I see and how the aircraft responds in flight, it feels very good. During my flight to Dublin I had more then enough time to test the aircraft behaviour and oh man, that was really great!
You can grab your personal copy at the dedicated X-Plane.Org store page and when you’ve decided to go for it, a look at the FlyJSim website is always worth a quick look. At this FlyJSim dedicated liveries page you can find some liveries for model version 3 as well as the official Photoshop paintkit.
Feel free to contact me if you’ve got additional questions related to this impression. You can reach me via email Angelique.van.Campen@gmail.com or to Angelique@X-Plained.com.
With Greetings,
Angelique van Campen
| Add-on: | Payware FlyJSim 732 TwinJet v3 |
|---|---|
| Publisher | Developer: | X-Plane.Org | FJS |
| Description: | Realistic rendition of Boeing 737 Classic |
| Software Source / Size: | Download / Approximately 970MB (unzipped) |
| Reviewed by: | Angelique van Campen |
| Published: | February 2nd 2018 |
| Hardware specifications: | - iMac 27″ Late 2013 - Intel i7 3.5Ghz / 3.9Ghz - NVIDIA GeForce GTX 780M 4GB - 32GB 1600MHz DDR3 - 1 internal 1TB SSD - Saitek Pro Flight System X-52 Pro and X-56 Rhino |
| Software specifications: | - High Sierra (10.13.3) - X-Plane 11.11r2 |
1 Comment
Submit a Comment
You must be logged in to post a comment.
What an absolutely fantastic review and well worded. I watched Jack in his many Twitch streams while he was coding this new version and I have to add that a lot of love has gone into this plane. Jack is a stickler for perfection. Also like to mention ‘Valdudes’ on Twitch as well who did a lot of the texturing in the cockpit and cabin. I had the previous version and as soon as this came out I bought it. It is an absolute beauty to hand fly and the 4k textures are fantastic. I have a pretty good PC and flightsim on a 50″ Samsung 4K TV and get reasonable framerate with this plane, not very often under 25 fps maybe a bit less when it is cloudy. Once again great review Angelique, groetjes Glenn.