Your Own Approaches
Introduction
Welcome to FS Instant Approach 2019 for X-Plane 11!
FS Instant Approach 2019 for X-Plane 11 adds a whole new level of fun to your flights with X-Plane 11. You can put yourself “On Approach” to any runway in the world in seconds! Set yourself up “on final” or ready to intersect a final approach for a more challenging flight. For a tougher assignment, set up to fly the traffic pattern approach to any runway, beginning at the start of the ‘downwind’ leg of the pattern.
The above paragraph is a part of the FS Instant approach introduction, brought to you by FSInventions. Perhaps not quite clear, but it’s my job to find out how this flight approach add-on for X-Plane 11 and exclusively for macOS, works, feels and acts. Although I don’t have the Windows version of FS Instant Approach 2019, I’m quite sure that this works and feels not much different then the macOS version.
How did it all start!
How and with what reason did the developers start development FS Instant Approach?
Time to check this out with John Jones from FSFlyingSchool; X-Plane itself has a number of options for placing the aircraft on straight in final approach to any airport. We thought it would be interesting to offer a greater number of choices to pilots wishing to practice approaches and to give them a means to set them up in seconds. Thus FS Instant Approach for FSX was born, and more recently FS Instant Approach 2019 for X-Plane 11.
Our aim was for pilots to be able to practice multiple challenging approaches during a lunch break, and spend no time at all calculating distances, angles or altitudes. X-Plane allows for 3 or 10 mile straight in final approaches.
FS Instant Approach 2019 allows the pilot to start final approach from over a dozen distances and automatically computes the appropriate altitude to be on the glideslope.
In order to add a challenging variation we added the option to start the approach from an intersecting angle and distance which the pilot chooses, from either left or right of the final leg. We also heard from pilots who wanted to start on the downwind leg of a left or right traffic pattern and so added this too.
Finally, for added interest, we incorporated an additional function so that the pilot will be placed at a random airport and runway. This has proven to be very popular, challenging and entertaining. Filters were provided so that the pilot can limit the random selection by (partial) ICAO code, surface type, elevation and length.
How to start?
Or perhaps it’s better to say … how to install and what are the requirements for FS Instant Approach for Mac to work?
The installation is simple and straightforward. After you’ve unzipped it, you simple run the FS Instant Approach 2019 application. This means that this X-Plane add-on program works outside X-Plane. That said, for the app there’s no need to have X-Plane up and running.
Ok, one thing I would like to highlight. In the manual is written; “If the Mac is struggling to run X-Plane 11, then FS Instant Approach 2019 for X-Plane 11 will be unable to give its best performance”, then it’s not a good idea to use the add-on, but what means when your Mac is struggling with X-Plane 11? What is mend with what and how do you know? When X-Plane 11 is too heavy for your Mac, then probably you’ve got already other problems with X-Plane and then there’s no need to worry if this add-on and other add-ons works yes or no!
The other issue to check, if there’s a need to install “Sandy Barbour’s excellent ‘Position Aircraft‘ plugin”. It’s a free plugin and a must to have it install, but as stated in the manual “If you already have Position Aircraft version 1.20 or above installed on your Mac, you do not need to install it again.”
Assuming you go for the registered version, you need to enter the received license key in the Credits tab before you can do anything else. When you don’t have a registration key “yet”, you use the add-on in demo mode which is then limited for KORD and KGRB approaches.
FS Instant Approach App
App Intro
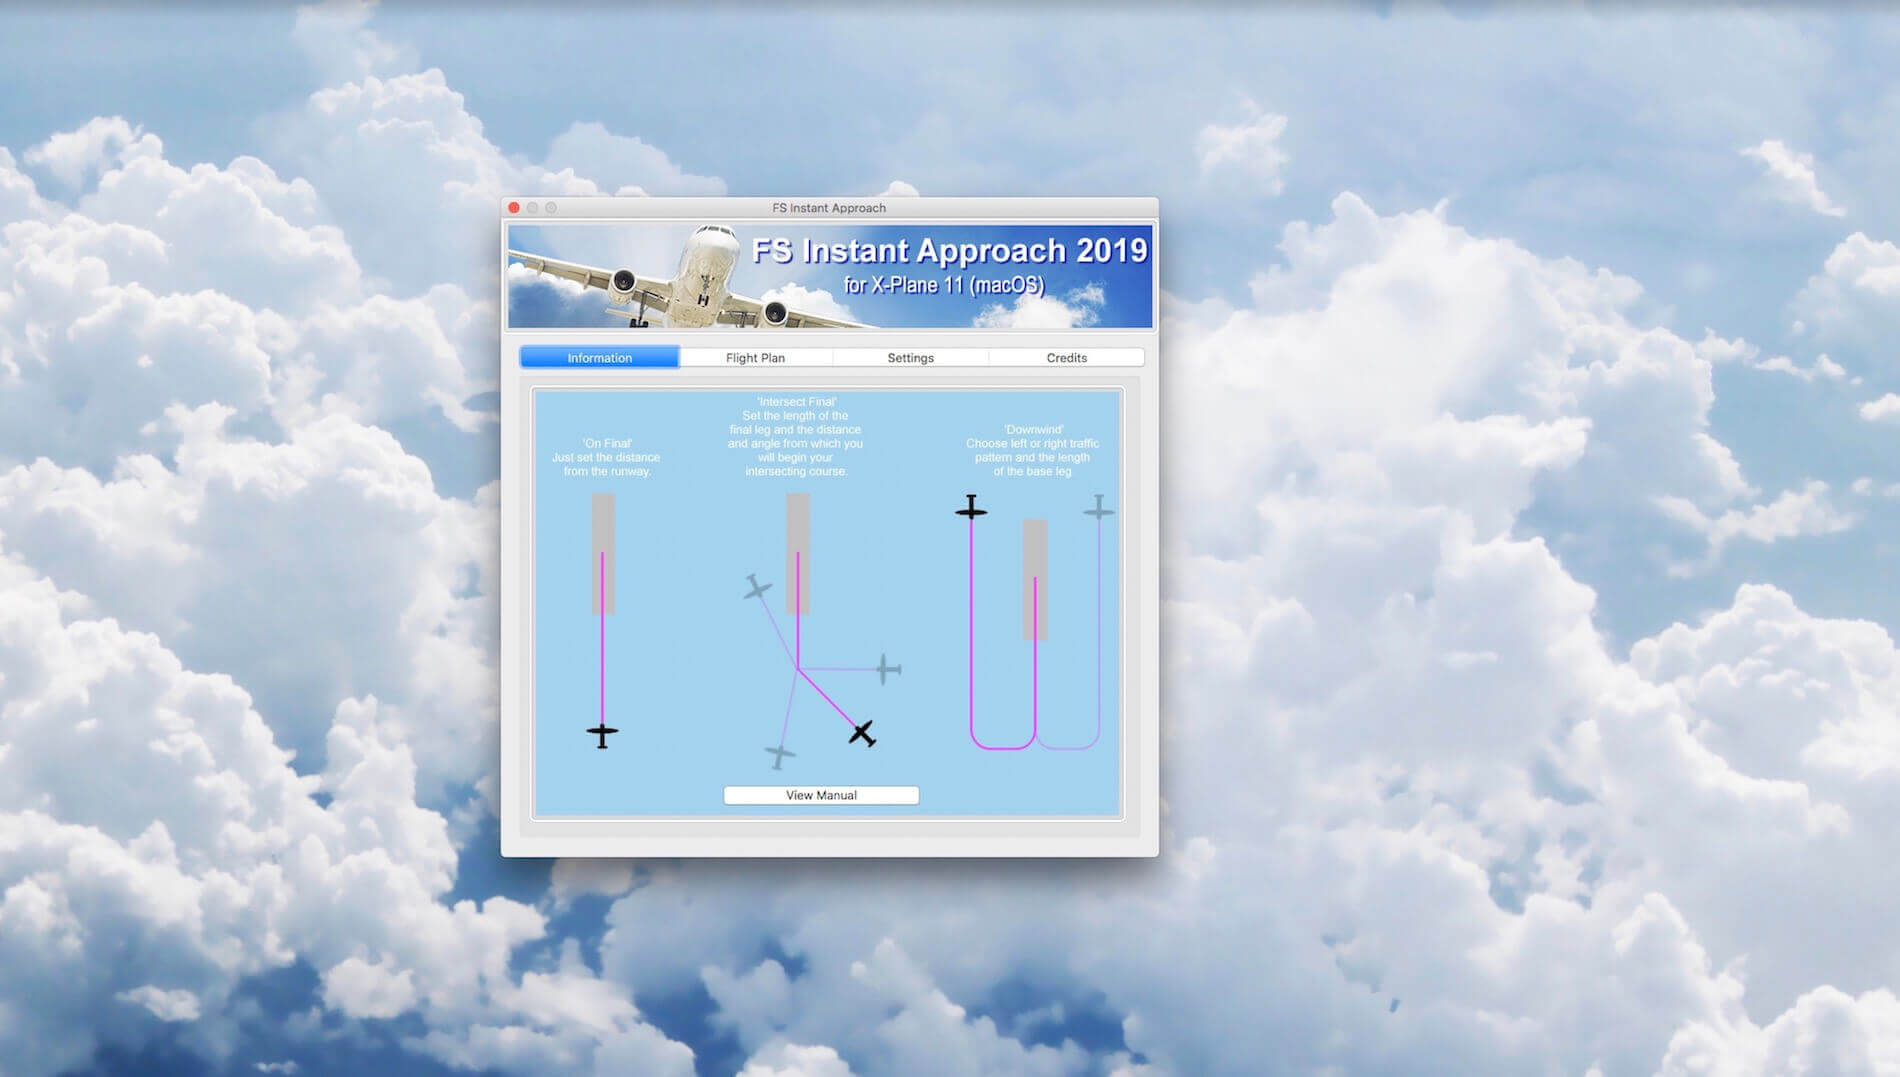
So, once you’ve started the FS Instant Approach 2019 app, you see a popup window with 4 tabs; Information, Flight Plan, Settings and Credits. The popup window comes up by default with the Information page however you first need to enter your license key at the Credits page, followed by clicking the Register Program button.

Next click the Settings tab. Point to the X-Plane folder, followed by the Generate Runway Data and, something I highlighted before, it shows you if the Position Aircraft plugin is installed or not. If the button is still active, you need to install the Position Aircraft plugin first. for this, see the manual page 3.

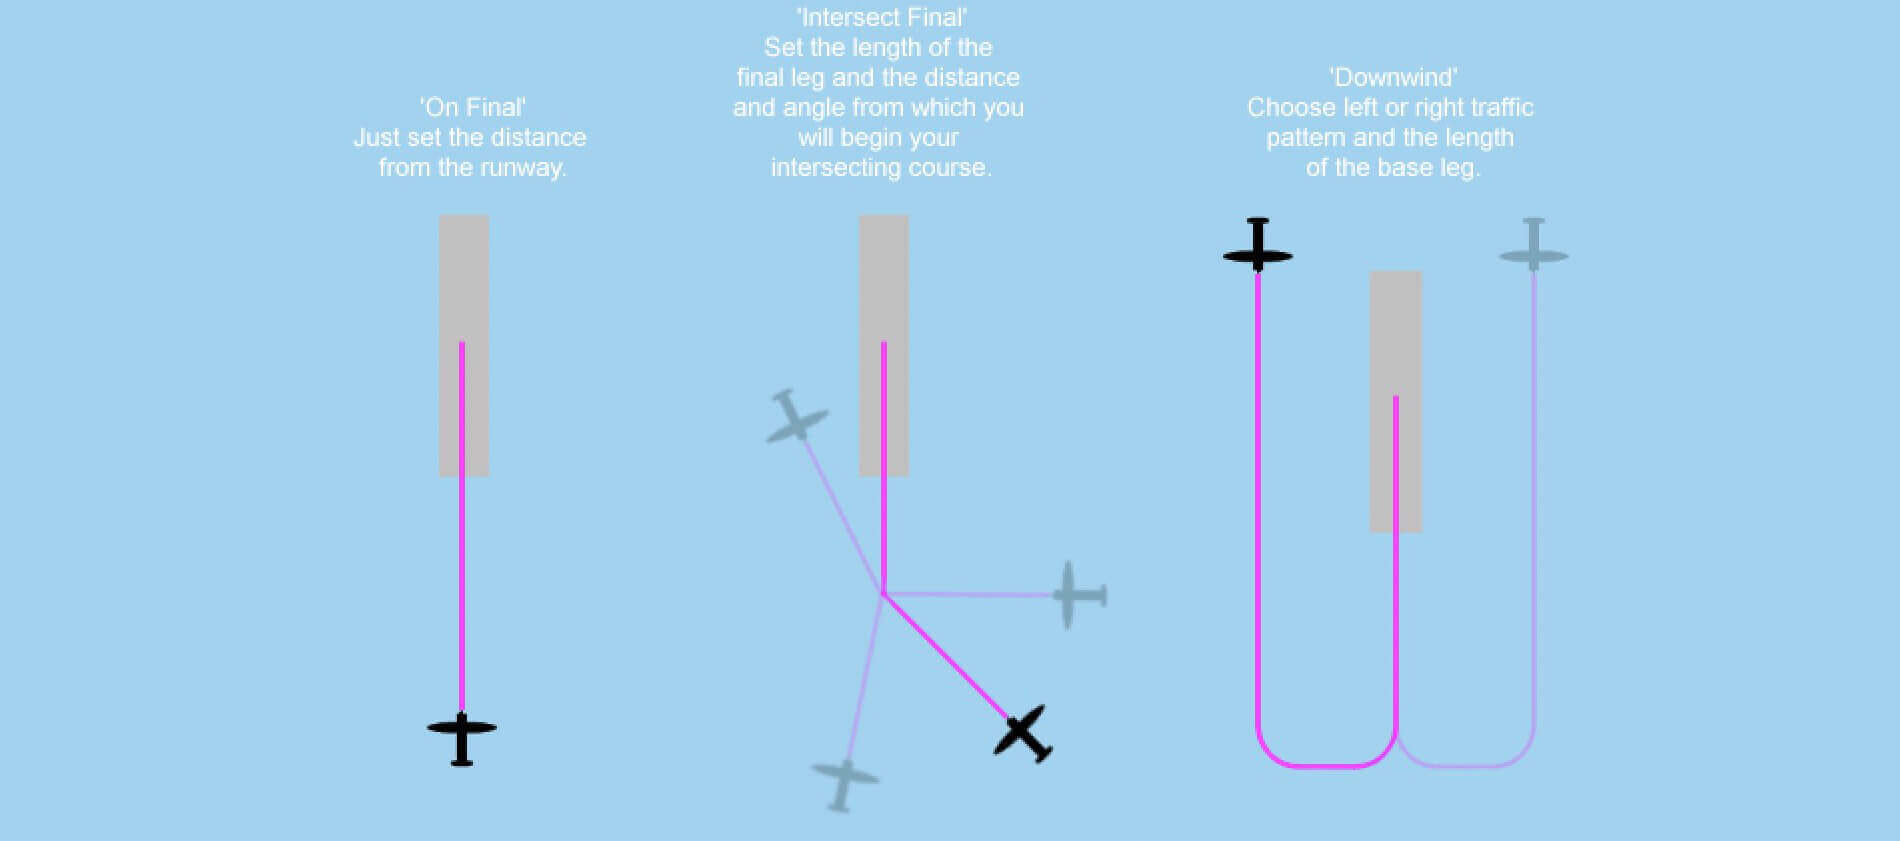
Before moving to the Flight plan tab, lets have a quick look to the Information tab. It offers you 3 different kind of possible approaches – it’s just a picture – that can be performed with the help of FS Instant Approach 2019.
Just to clarify although you probably knows this unless you’re new to X-Plane, X-Plane offers only the “On Final” approach with a 3NM or 10NM out of the runway and then without other options, compared to the many possibilities to modify this approach with Instant Approach 2019. In other words, FS Instant Approach allows you to control much more then just the default X-Plane “On Final” approach settings.
This means, when you want to learn to fly all kind of approaches, this is the right add-on program to learn it all! More about all of that later. At the same Information tab, you also have a URL button that offers the online manual. In case you don’t have an online Internet connection active, then you can use the same manual that is included as Acrobat file with the package.
Just a thought; perhaps it’s an idea when the developer could modify this “View Manual” text button into an Online Manual” button and, not sure if the following belongs to the possibilities, adding a second button to the Information tab that links to the locally installed Acrobat manual.
User Manual and Position Aircraft plugin
A couple of words about the user manual or the online version of it. The add-on needs Sandy Barbour’s ‘Position Aircraft’ plugin which is of course free as with all other Sandy’s add-ons. More about this plugin later.
The manual doesn’t come with a Table of Contents (TOC). It’s fair to say that a manual of 13 pages doesn’t really need a TOC, but I would like to highlight which chapters you can expect:
– Introduction and system requirements
– Position Aircraft plugin
– Configure X-Plane 11
– Demo and registered versions of FS Instant Approach 2019
– Quick Start
– The app interface (Information, Flight Plan, Settings and Credits)
– Troubleshooting
-EULA
You’ll notice later on in this review that the most important part of the app is the Flight Plan tab. This tab offers all kind of approaches that can be made, which airport you want, where you want to land, which other settings you need for the approach and so on. The pages 7 till and including 9 offer you enough background info, but it is without any example step-by-step examples for a specific approach. My idea is that I offer a bit more how to configure certain approaches and how it will look in X-Plane.
Although Sandy’s ‘Position Aircraft’ plugin isn’t a part of this add-on, it relies on it and FS Instant Approach 2019 won’t work without it. That said, I’m a bit surprised that the provided manual doesn’t offer a bit more information. After re-reading the user manual, I think that the developers don’t want you to disturb with all kind of ‘Position Aircraft’ plugin settings and so on. On page 5 (Quick Start) of the user manual you’ll find 2 shortcuts to load the approach file (Ctrl Shift Q) and to position the aircraft ready in the air to fly the approach (Ctrl Shift P). Honestly, that’s enough, but for those who want to know a bit more, check out the following paragraph.
Sandy’s ‘Position Aircraft’ plugin
According to Sandy “This plugin allows you to save the current position of the aircraft in a text file. It is dynamic so that when you load the file and apply it the aircraft will be flying just as it was when you saved it. It also remembers things like AP settings when the file was saved.” You can download his manual for more information (if you want to) via this link.
The Flight Plan tab
Perhaps the most important tab is the Flight Plan tab although the name “flight plan” confuses me a bit since it suggests that we’re dealing with a flight plan which is, as you might know now, not really the case. That an approach could be a part of the flight plan, yes, that is possible. But the moment I use FS Instant Approach 2019 for VFR flights and having the intention to practice “Downwinds”, then this is not necessarily in combination with a flight plan. We’re dealing with approaches! Anyway, not a hot item, just my thought!
Ok, the screenshot below shows you the middle section of the Flight Plan tab and, as you can see for yourself, it offers a lot of “approach” possibilities. This section offers the three possible approaches you can chose from (straight in on final, intersect for final and downwind). As you can see, several adjustments are possible whereas for on final literally every distance for that type of approach is possible from the dropdown NM selector while the default X-Plane only allows you a 3NM or 10 NM out of the runway.
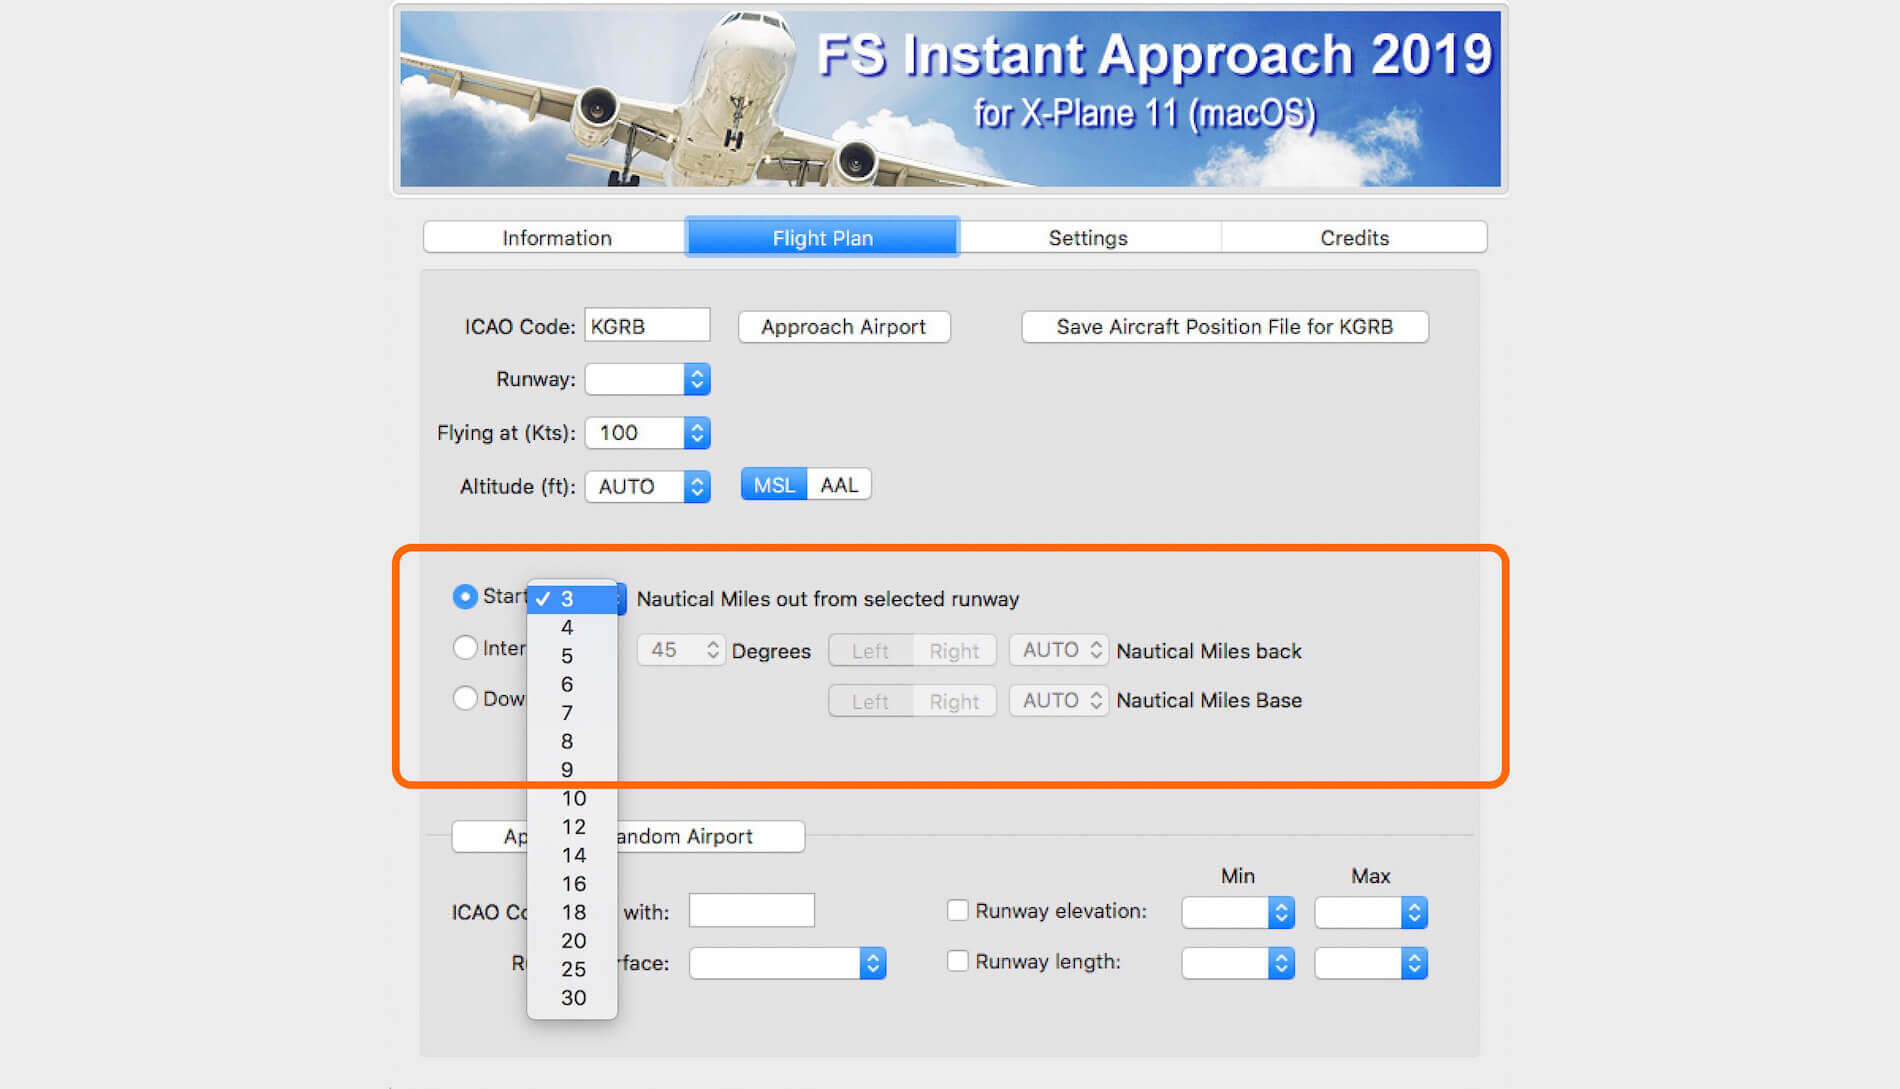
When you decide to test your “intersect or downwind” approach skills, then you select “Intersect from” or “Downwind”. Each of these options allows you do add, if it will be, a LEFT or RIGHT intersect in relation to the runway or, if it is a LEFT or RIGHT downwind, including options for the distance and angle in case of the intersect.

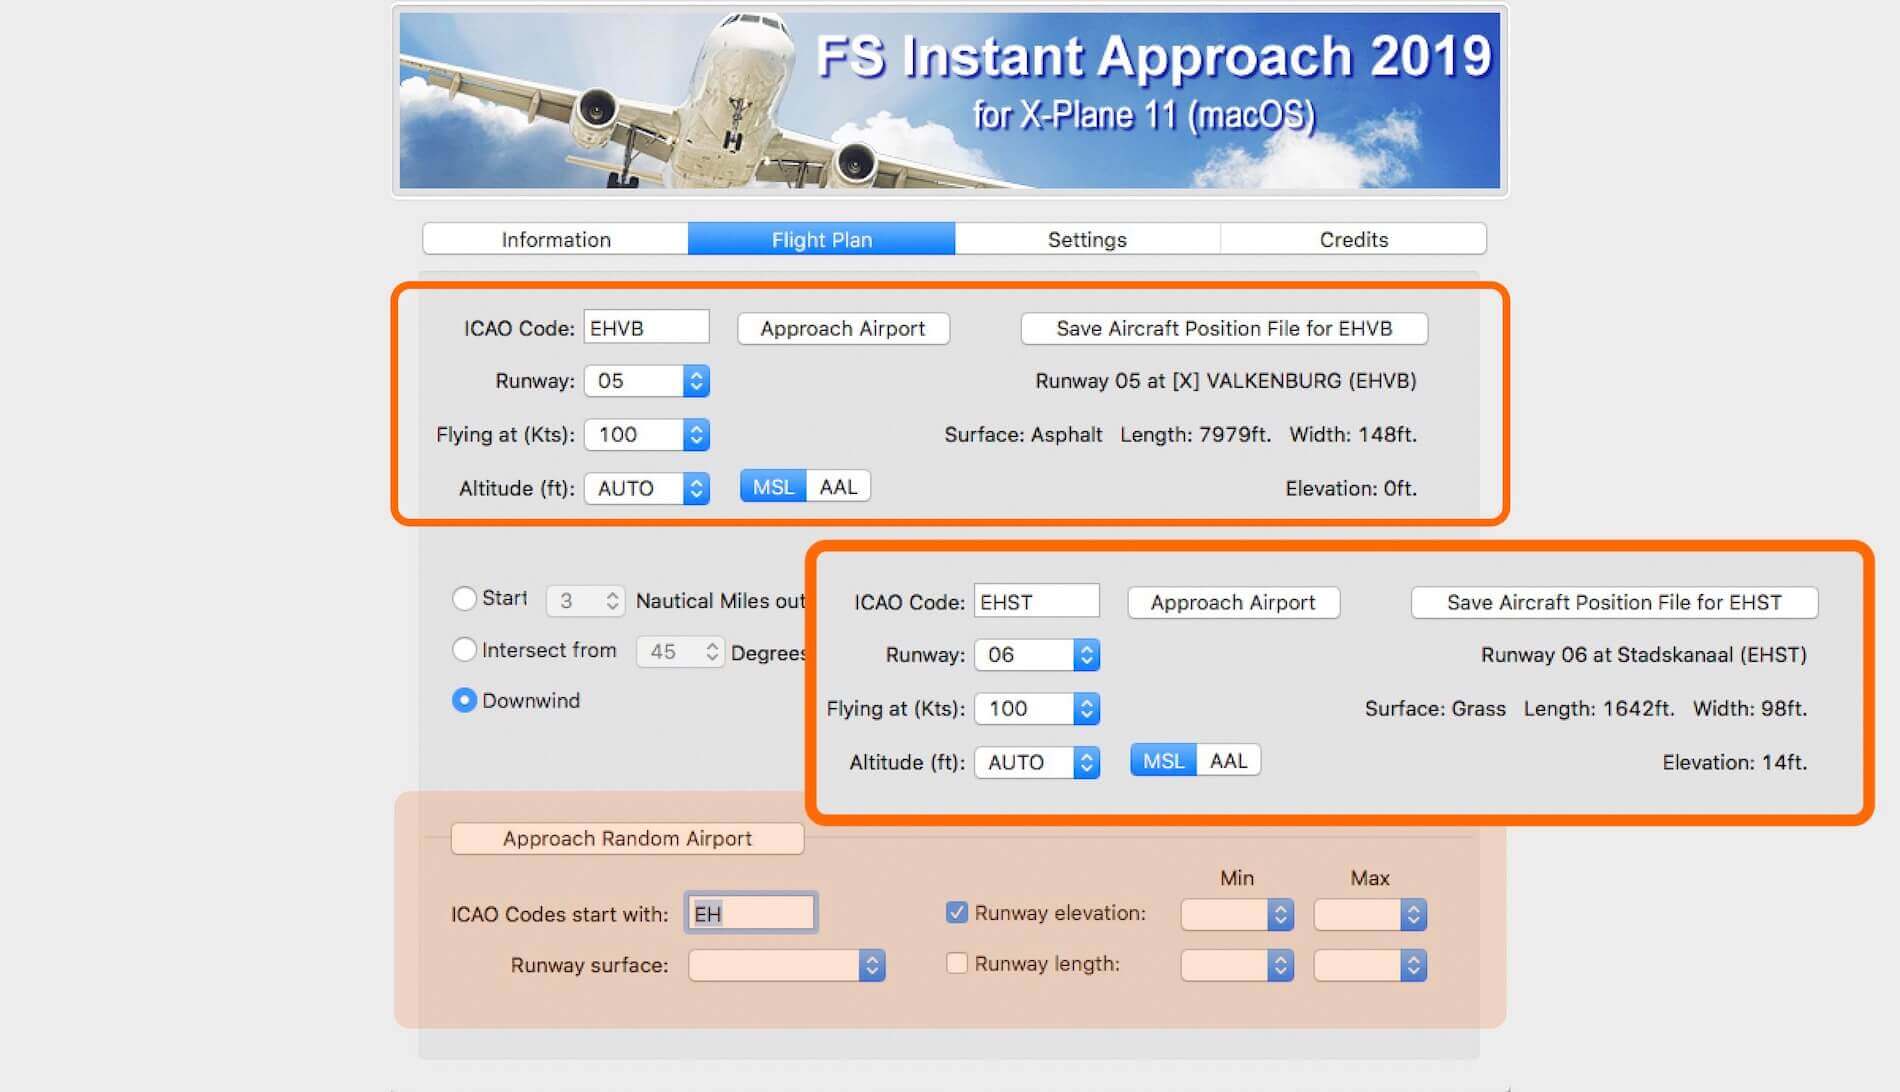
The lower section of the Flight Plan tab allows you to randomly select an airport for your approaches in a way “where you are”, include all kind of random preselections. These preselection’s are for example – see the screenshot below – all airports that start with “EH”. EH are airports situated in the Netherlands. With this “preselection search”, the first airport that appears in the upper section of this tab for me is EHVB, but when I click another time the “Approach Random Airport” button, the random airport is now EHST.
Although this was just an example, many other preselection’s or search inputs can be given like a preference for the kind of runway surface, or the runway length or runway elevation including a minimum/maximum value. In one word, just awesome!
And then finally, the upper section of the Flight Plan tab.
Let me rehearse what I’ve done … first I’ve made a choice for what kind of approach I go (on final, intersect or downwind), and not unimportant which airport I will use to test my approach skills. When all of these steps are fulfilled, I need to add to this the following selections:
– the runway
– the speed I’m flying
– the altitude I would like to do my approach
– If I use MSL or AAL
And at the end, I save these settings via the “Save Aircraft Position File for ”. A note goes to the selected altitude and if you go for MSL (Mean Sea Level) or AAL (Above Aerodrome Level). I prefer to leave the altitude at AUTO since that sets/keeps all other parameters in accordance with each other.
I want to make one thing clear in case you missed this. You can use the lower section to randomly select an airport, but when you know already where you want to practice, e.g. KEVB (New Smyrna Beach Airport, FL), then you type KEVB in the upper section ICAO code field, followed by the Save Aircraft Position File button. Depending on your Mac, this saving process can take up to 5 – 10 seconds. Once saved, it will write this in blue (Aircraft Position File Saved) above the button.
I hope you got this, right?
You can leave the FS Instant Approach 2019 app open or you close it.
FS Instant Approach 2019 for Mac in Action
Downwind runway 02 KEVB
My first attempt will be practicing VFR patterns thus I go for the downwind option. That said, I’ve made the following settings in the FS Instant Approach 2019 Flight Plan page (see screenshot below).

I’ve chosen for runway 02 KEVB which means, according to SkyVector data, that I need to select a LH pattern. I reduced the IAS to 80 knots, altitude AUTO so I may assume that this is automatically calculated by FS Instant thus that it positions the aircraft at VFR pattern altitude which should be around 1000 feet unless a different altitude is indicated to follow. More information on airport traffic patterns can be found in this faa.gov article.
Next, I startup X-Plane and see where I end. Oops, what does that mean? For the moment it’s not so important at which airport you end up. Aircraft type should be in correspondence with what I have in mind, so I select the Cessna 152 II. OK, I’m settled at the wrong airport. For sure I’m not at KEVB New Smyrna Beach, but what said, that’s not a problem.
So, here we go ….
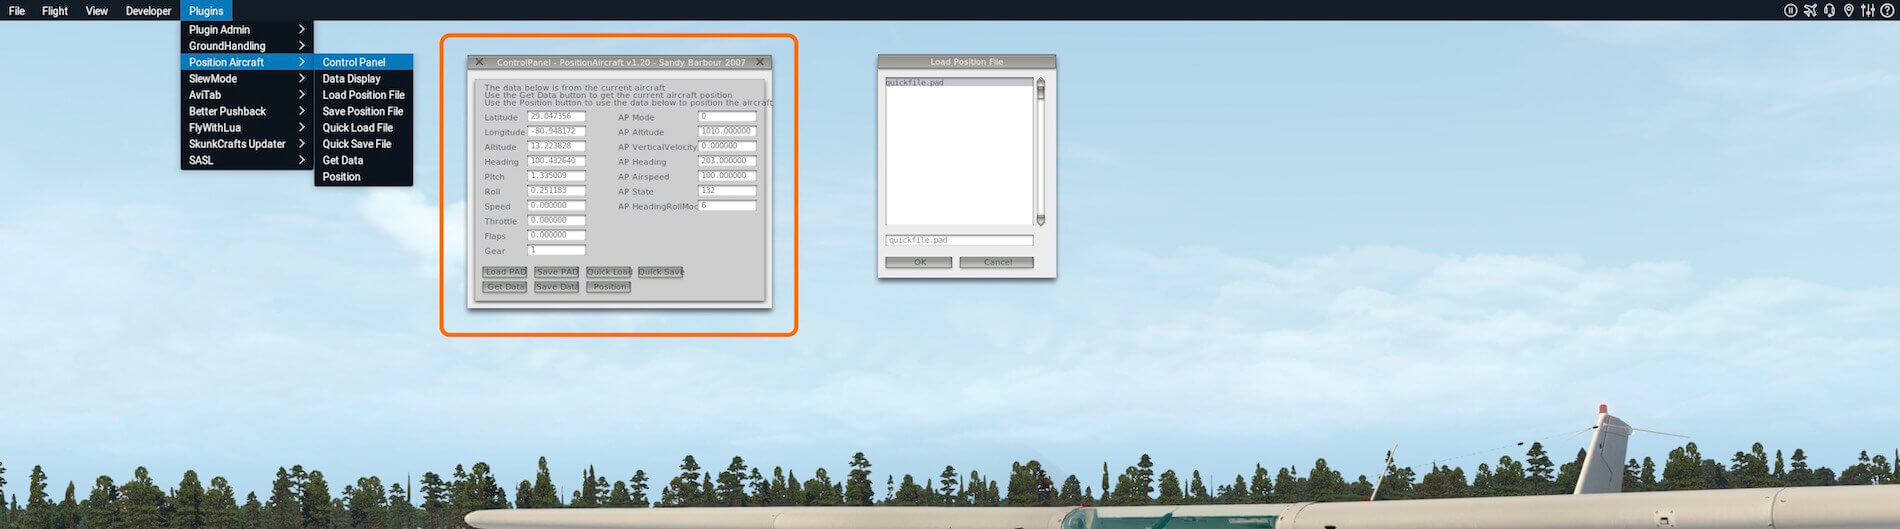
From the X-Plane menu I select Plugins – Position Aircraft (that’s the additional plugin) – Load Position File. When the popup window appears (see screenshot below), you click the OK button. Next you select from the X-Plane Plugins – Position Aircraft menu the Position option. This is a way to do it, but what previously written and written in the user manual, you can also use the following shortcuts; to load the approach file (Ctrl Shift Q) and to position the aircraft ready in the air to fly the approach (Ctrl Shift P).
After this, my Cessna C152 II is positioned in the air, on a VFR pattern downwind KEVB for a planned approach/landing at runway 02. Perhaps you ask yourself the question; what’s the advantage of having this downwind preposition versus making a takeoff, and then crosswind, ending up in downwind.
See this FS Instant Approach 2019 feature as practicing approaches and not practicing complete patterns. Out of personal experience, the takeoff and crosswind legs aren’t so complex. The complexity starts when at downwind, calculating when to start descending, keeping in mind the wind, when to turn for base and final. Much more complex and much more attention to do it right!
One more note. You can control the distance for your downwind position in relation to BASE. You do this by setting a xNM value from the dropdown box. Any value as indicated on the dropdown between 3 and 30NM is possible.


Different Intersects
The next example is to try out the intersect option, not necessarily into a VFR pattern. It could be also an IFR intersect, but it doesn’t make much difference.
Let me give you some examples related to this intersect from option.
Example 1:
For me, during my PPL lessons at KEVB, practicing intersects was quite common. I had to intersect the VFR pattern, for example for runway 29 while coming from the west. I had to intersect in a left-hand pattern downwind. This means, planning a landing on runway 29, I had to intersect under an angle of 155 degrees. I’ll show you later with some screenshots.
Example 2:
The default FS Instant Approach 2019 intersect angle is set for 45 degrees. Assume that you intersect left-hand, then this means that you intersect for runway 29 KEVB at a heading indication of roughly 335 degrees. This is what the Whiskey compass will show you.
Calculating the right intersect angle during a real flight or in the simulator isn’t easy as long as you keep your fingers from the pause button. OK, what was my idea to give you those two examples. FS Instant Approach 2019 allows you to change the intersect angle and it is also visible on the Information tab although only a few examples. There you see intersect angles of approximately 20, 45, 90 and 120 degrees.
Let me visualize these examples.
On the FS Instant Approach 2019 Flight Plan I leave the entry into the pattern at 45 degrees as well as a left-hand entry with auto altitude calculation. Click the “Save Aircraft Position File for KEVB” and you and I are ready for X-Plane.
With X-Plane up and running, I go for another possible approach to load the FS Instant Approach file.
From X-Plane menu Plugins – Position Aircraft, I now go for the Control Panel option. I click the Quick Load button, click the OK button on the new window and next, I click on the Position button, in the right-hand lower corner. It all does the same as previously explained.
A small note is welcome; when you click the Position button, the aircraft is positioned from the ground (and whenever you parked) in the air, but to prevent any off-track movements, you can click the P (from pause) immediately or you simple first pause the simulator before you click the Position button!
The following screenshot shows you the saved file configuration; this is left-hand intersect from 45 degrees. For clarity I combined the KEVB airport diagram with where you are in X-Plane. Runway 29 is indicated with the black arrow. The X-Plane MAP airport is the blue circle with a tiny black dotted line on a heading of 290, and a line that goes straight to the aircraft. As you can see for yourself, that angle is 45 degrees.

And suppose I go for the other example that I gave in the previous paragraph; flying in from the West, an entry with the downwind leg of left-hand VFR pattern runway 29, I need to enter for intersect angle 155 degrees however, when I leave the other parameter at AUTO (Nautical Miles back) I’m way too far for my VFR pattern unless you want that. So, what can you do … set the Nautical Miles back dropdown to 5NM or if you like more. That’s just a matter of trying. And one other thing; I said I would like to intersect with 155 degrees however, the dropdown only allows me to select either 150 or 160. Don’t make it more complex then it is; go for 150 or after a glass of wine or beer, 160 degrees. It doesn’t make much difference. This is how it will look like when you check it with the X-Plane MAP view.
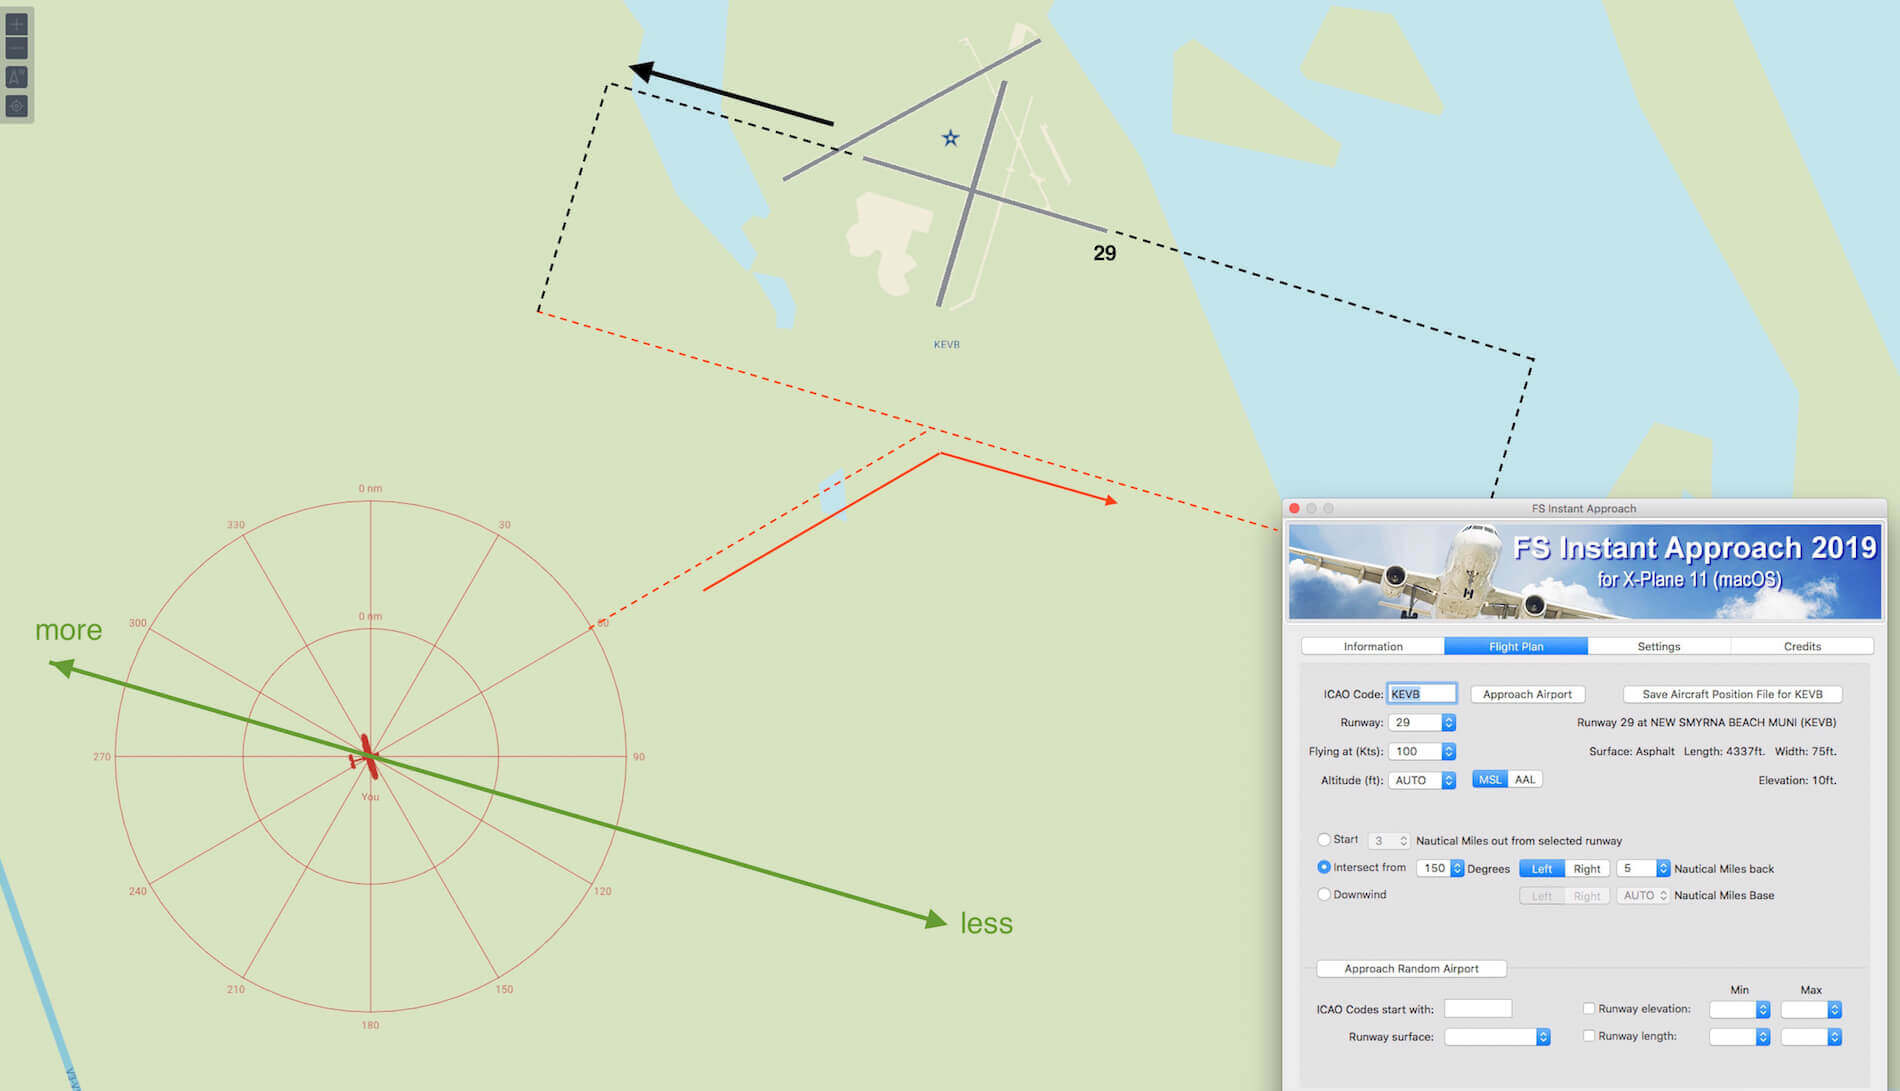
You’re perhaps wondering what that green line is doing in the drawing …. On the left side is written more, on the right is less. When I increase the Nautical Miles back from the shown 5NM to e.g. 7, 10NM, the aircraft moves along the green line to the left thus the aircraft will entre the pattern earlier. A lower value of Nautical Miles back will move the aircraft to the right along the green line which means I enter the pattern further at downwind.
In the first paragraph of this section I said that it doesn’t make a difference if you use this for your VFR or IFR flight. The principle is the same, but most likely the pattern to fly for “a” runway is larger. Easy isn’t it?
On Final
The last possible approach option is “On Final” (as indicated on the Information tab) or as “Start” on the Flight Plan tab. I kept this type of approach as last possible approach option. It’s perhaps the easiest kind of approach and although the distance to set is much more flexible then its default X-Plane counterpart, it’s still worth to highlight it.
The distance to set in NM from the runway can be between 3 and 30 NM via the dropdown box. You’re not able to set other values then what’s visible in the dropdown, but I don’t see the need for that. The way it is, is perfect.
Summary
And, did I miss something or …?
Perhaps I did, but I think I covered most of it. I used the Cessna 152II for explaining all my approaches, but you can imagine that any aircraft will do the same. Perhaps their speeds are higher, perhaps you need to adjust the approach altitude, but the principle is overall the same.
You’re most likely interested in one question; is it worth the product?
I can tell you that it took me some time to figure out how to test it. How to write down what I’ve seen and how it works. Once I had that feeling, the writing and explaining was no longer an issue. And at the end I say, yes, this was fun testing your approach skills with all kind of aircraft models.
Once and a while I faced the problem that when using the “Position Aircraft” plugin for loading the saved file and positioning the aircraft at the right approach, no response was detected thus the aircraft stayed at the same ground spot.
After some additional tests, I concluded that the “Position Aircraft” plugin could conflict with other plugins. Not a big issue, but just to keep it in mind. As you might know, conflicting plugins is something that can appear. Comparison tests where done on a X-Plane demo version with no additional plugins loaded versus a completely configured X-Plane with several plugins installed including the FlyWithLua.
After I contacted John Jones from FSInventions, and additional testing, we would like to add the following regarding the previous paragraph. According to John Jones “This problem has occurred for some macOS users. It doesn’t seem to happen on Windows!
Using several X-Plane plugins can cause problems with shortcut keys. However, everyone who experienced the issue has worked around it by:
- Opening the Position Aircraft’s “Control Panel” window,
- Some users then find Ctrl+Shift+Q and Ctrl+Shift+P then work,
- If not then the user’s can using the “Control Panel” window’s “Quick Load” and “Position” buttons.”
For this review I used FS Instant Approach for X-Plane 11 (OSX) version 2.01, in combination with X-Plane 11.26r2 and running on macOS 1013.6 High Sierra.
More information can be found at the dedicated FSInventions website or you have a look at the dedicated X-Plane.Org store page. As of this writing, FS Instant Approach 2019 for Mac cost you 14.95 USD which is also the same price for the Windows version. What previously said, I doubt if they are different. Only the OS is different! In other words, you can use this Mac review also when you’re Windows X-Plane simmer.
Feel free to contact me if you’ve got additional questions related to this impression. You can reach me via email Angelique.van.Campen@gmail.com or to Angelique@X-Plained.com.
With Greetings,
Angelique van Campen
| Add-on: | Payware FSInventions FS Instant Approach 2019 |
|---|---|
| Publisher | Developer: | X-Plane.Org | FSInventions |
| Description: | Optional approaches |
| Software Source / Size: | Download / Approximately 29MB (unzipped) |
| Reviewed by: | Angelique van Campen |
| Published: | October 17th 2018 |
| Hardware specifications: | - iMac Pro - Intel 3GHz Intel Xeon W / 4.5Ghz - Radeon Pro Vega 64 16368 MB - 64 GB 2666 MHz DDR4 - 1 internal shared 1TB SSD (Big Sur 11.x) - 1 internal shared 1TB SSD (Bootcamp Windows 10) - 1 external 2TB LaCie Rugged Pro SSD (Big Sur 11.x) - Saitek Pro Flight System X-52 Pro and X-56 Rhino - Honeycomb Alpha Flight Controls - Honeycomb Bravo Throttle Quadrant |
| Software specifications: | - macOS Big Sur (10.15.x) - X-Plane 11.5x |
0 Comments