A Piper Arrow III or Piper PA-28 Cherokee
Introduction
Actually, both are correct, but I need to add some information to this. It all began in 1960 with the Piper PA-28 Cherokee. After many years, and I really mean many, PA-28 versions were made. Current models are the Arrow, Archer TX and Archer LX. The real and modeled PA-28 series competes with the Cessna 172, the Grumman American AA-5 series, and the Beechcraft Musketeer.
Ok, back to the current Arrow model.

vFlyteAir modeled the Arrow III, which is actually the Piper PA-28R-200 series. It’s a four-place GA aircraft with a retractable landing gear, a Lycoming IO-360-C1C6 engine of 200 HP (149 kW), and a gross weight of 2,750 pounds (1,247 kg). And very interesting to know, the first Arrow III was certified on 2 November 1976.
Although quickly highlighted, don’t forget that the original Cherokees were the Cherokee 150 and Cherokee 160 (PA-28-150 and PA-28-160), which started production in 1961. At the dedicated WikipediA web page you will find a lot more information, but let me go quickly to the very well-modeled vFlyteAir.
Who and What is the vFlyteAir Arrow III v4.0?
According to Walker from vFlyteAir “The Arrow III PA28R-200 version 4.0 is compatible with X-Plane 10.50. It features the new hi-resolution Garmin G430 GPS which is added into the cockpit as a portable hand-held unit mounted on the instrument panel. The PA28R-200 has a retractable-gear, 200HP airplane with constant-speed propeller. The Piper comes with the base airplane package, and an “Extra Liveries” that provides you with 6 extra liveries. In other words, you get in total 15 liveries.”
Oops, how to install this?
Oh, that’s very easy. I installed the Arrow III in a separate sub folder of Aircraft named “vFlyteAir”, but this is entirely up to you. You can also decide to install it in the default sub folder ‘General Aviation’.
To get a better understanding of the Piper Arrow III, vFlyteAir has included two Adobe Acrobat manuals and a changelog text file that informs you about all the changes since version 3.0 :
– vflyteair_ArrowIII__manual_v4.0
– POH-PA28R-200
– ArrowIII_ChangeLog_v4 (text file)
The vFlyteAir user manual (vflyteair_ArrowIII__manual_v4.0) is more then just a manual. It’s basically divided into the following sect6ions:
– About the Arrow III
– Overview
– Model Description
– Operational Notes
– Familiarization Task
– Charts, Procedures
It offers a lot of useful information like how to perform a quick start, a brief description of where and what to find in the cockpit, some specifications and different procedures. The Familiarization Task isn’t really a tutorial, but it does offer a VFR pattern flight so a couple of items are discussed how to fly the Arrow III.
I’ve pleased to see that vFlyteAir included an original copy of the POH-PA28R-200. This offers those simmers who want to get everything out of the aircraft, the right papers.
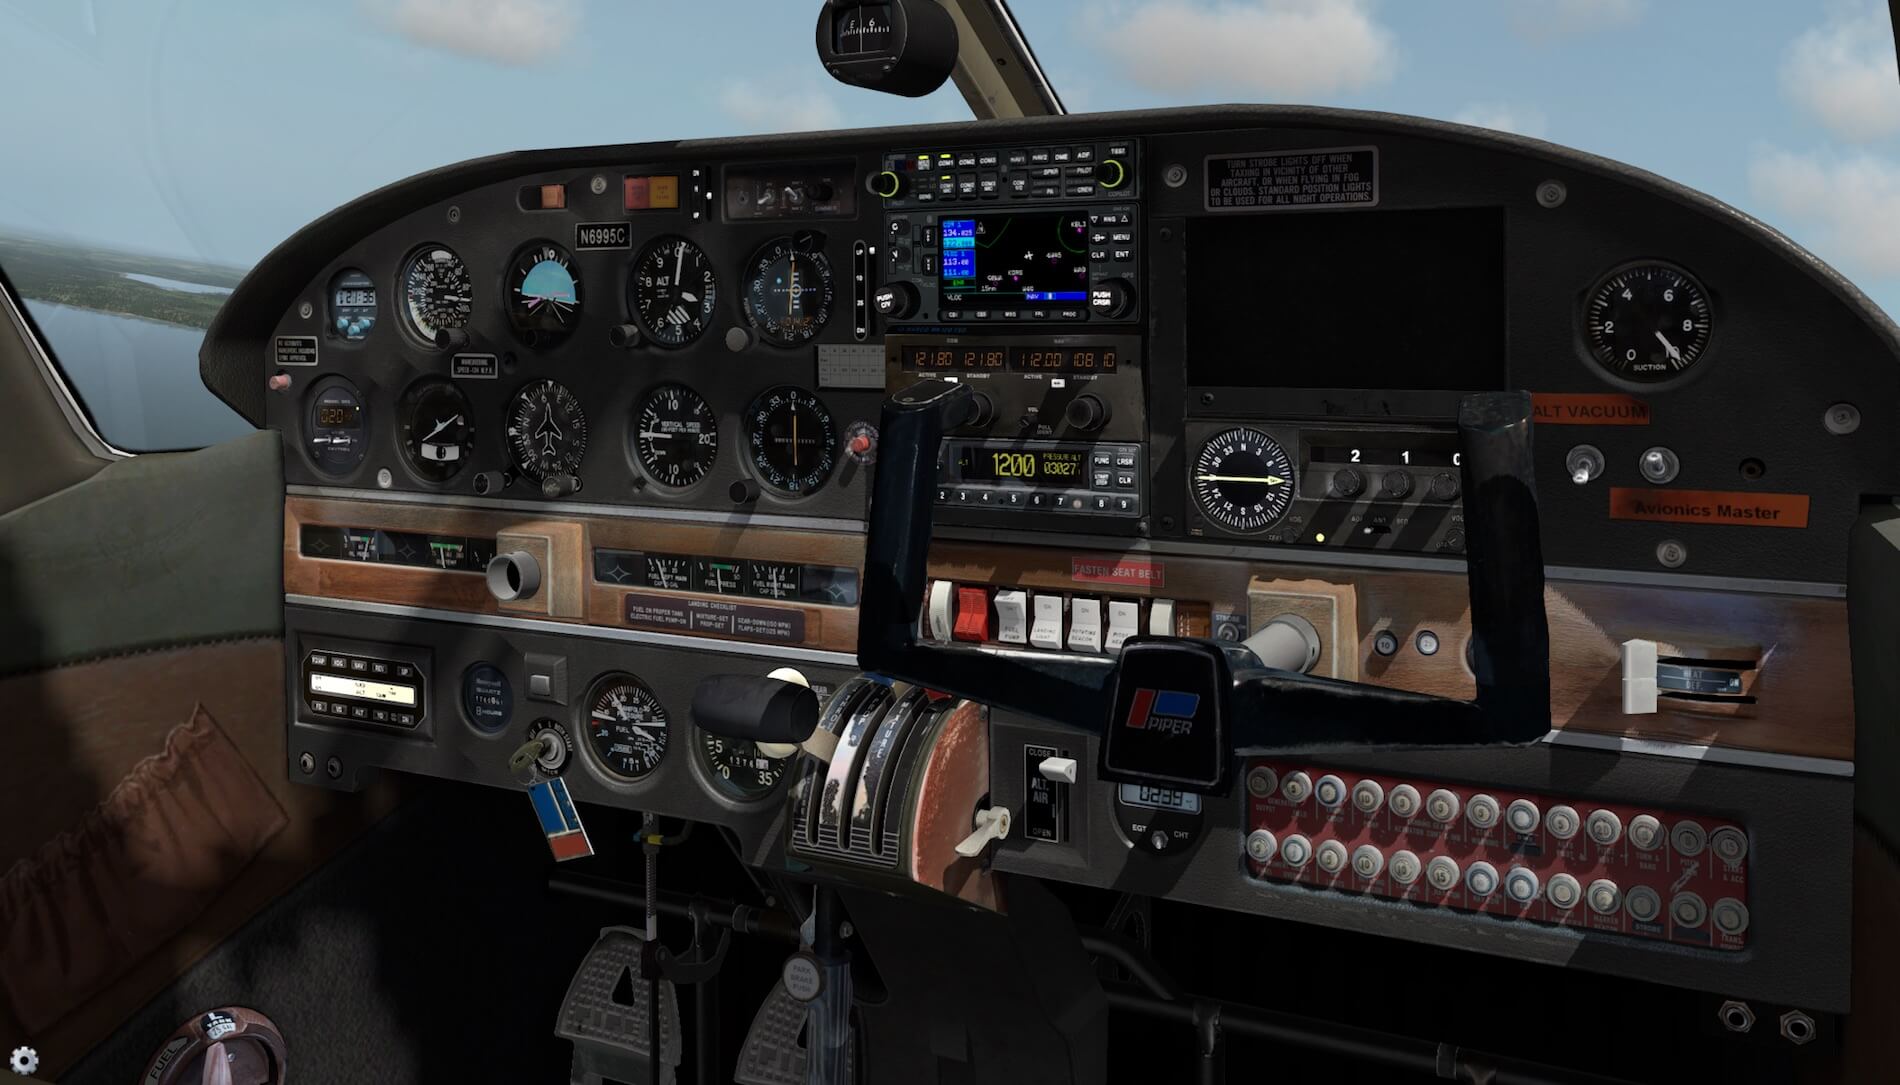
The modeled cockpit with the installed instruments and the panel lay-out are only one of the many available panel options. I found on the Internet the Piper Cherokee has many different panels and instrument configurations.
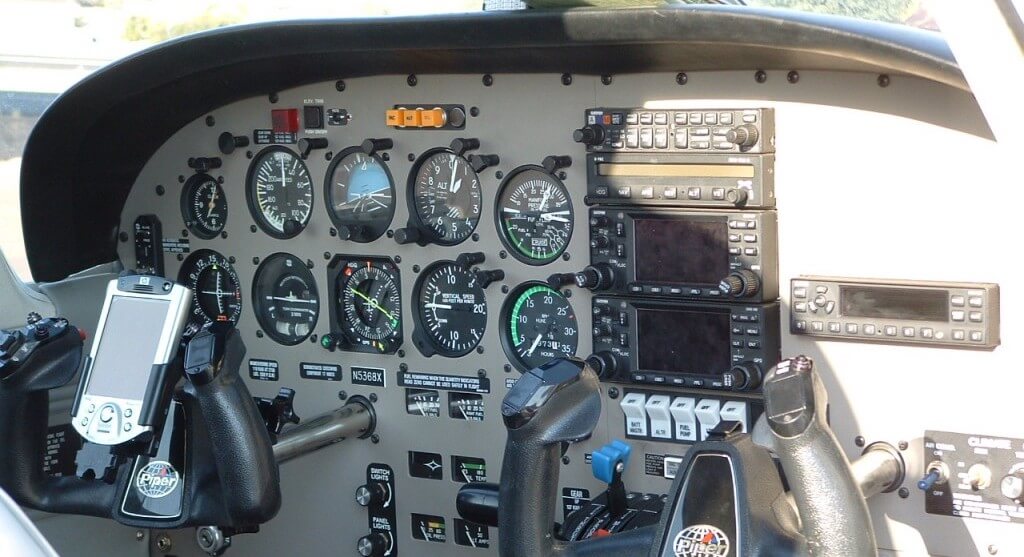
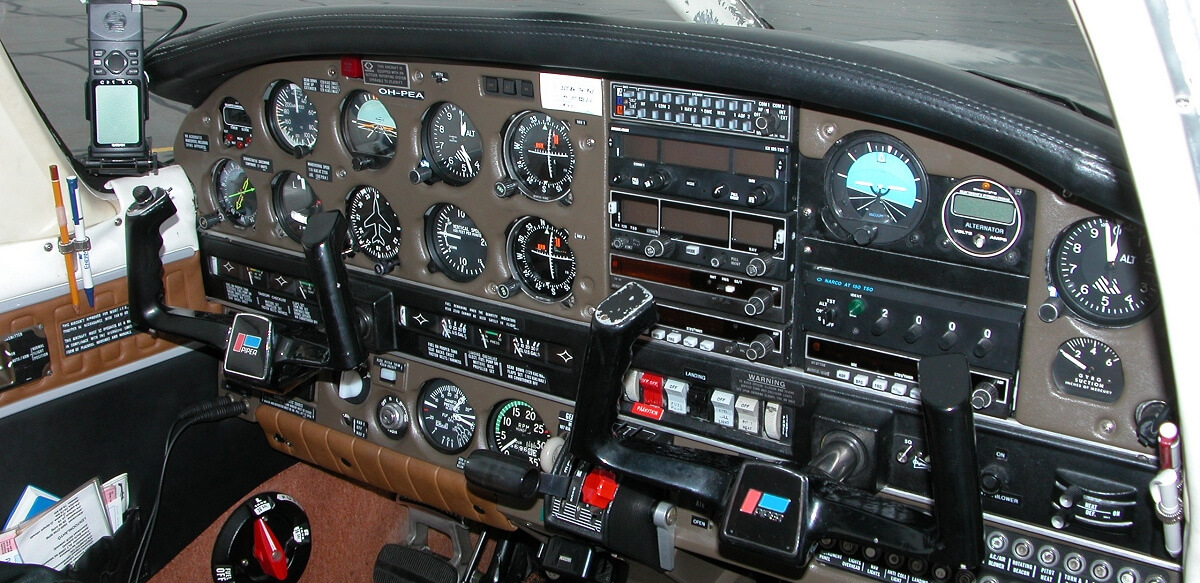

The one by vFlyteAir is, but one possible panel/instrument panel configuration. Nevertheless, what is modeled is very nice and as realistic as possible. That said, don’t expect a fancy brand new cockpit, but an old-fashioned collection of instruments but for the modern and remodeled default X-Plane Garmin GNS 430. And this is quite common in today’s GA aircraft.
Many real GA pilots have their own Garmin GNS unit that can be fitted into the cockpit at an appropriate place. But when you’re not familiar with this Garmin GNS 430, you could have a problem. Therefore, I personally miss an included Garmin GNS430 manual. Since it’s not included in the package, it’s perhaps wise to check this out at the dedicated Garmin web page. It covers the complete operation of the GNS 430 and how to handle it. Therefore, worth taking a look!
Enough I would say. I think it’s time to assist Walker and his team with a quick walk-around check before we go into the air to see and feel how this modeled Arrow III smells and flies.
Quick Look
Me writing down a quick look of the vFlyteAir Arrow III?
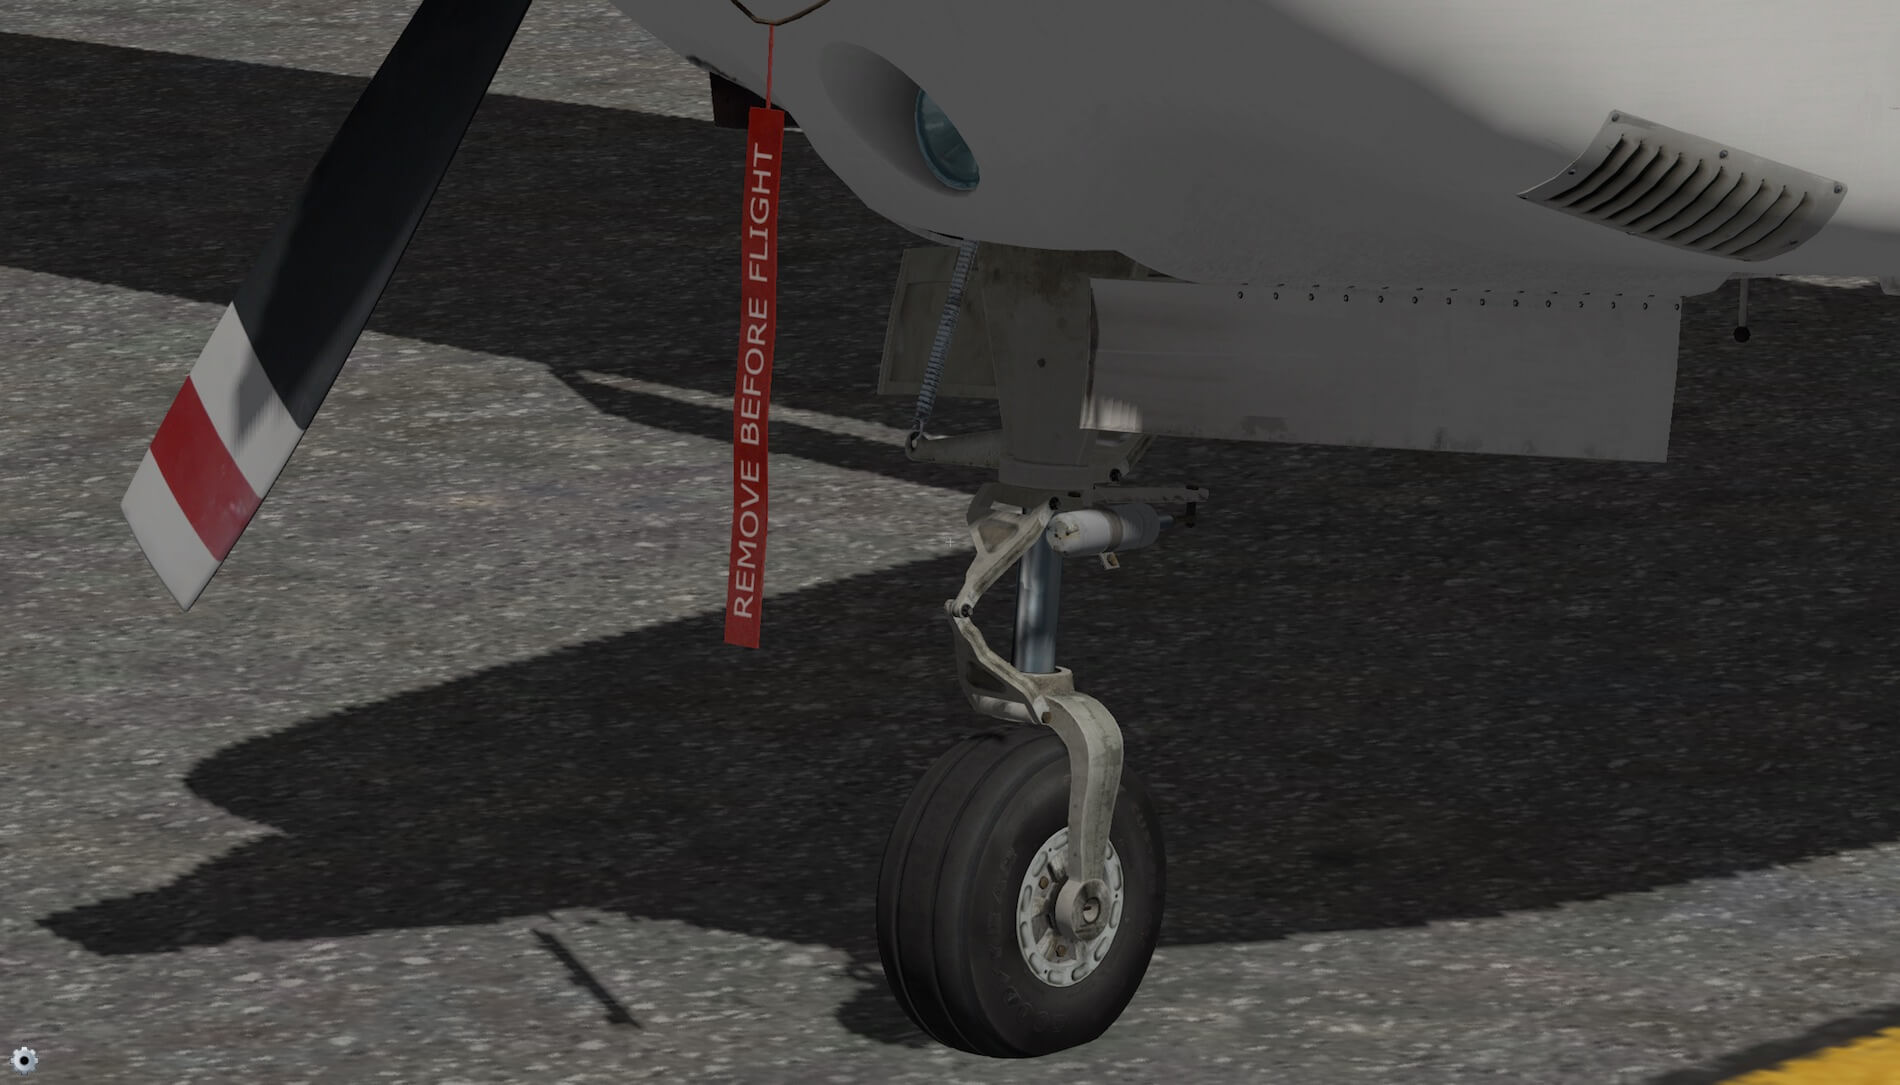
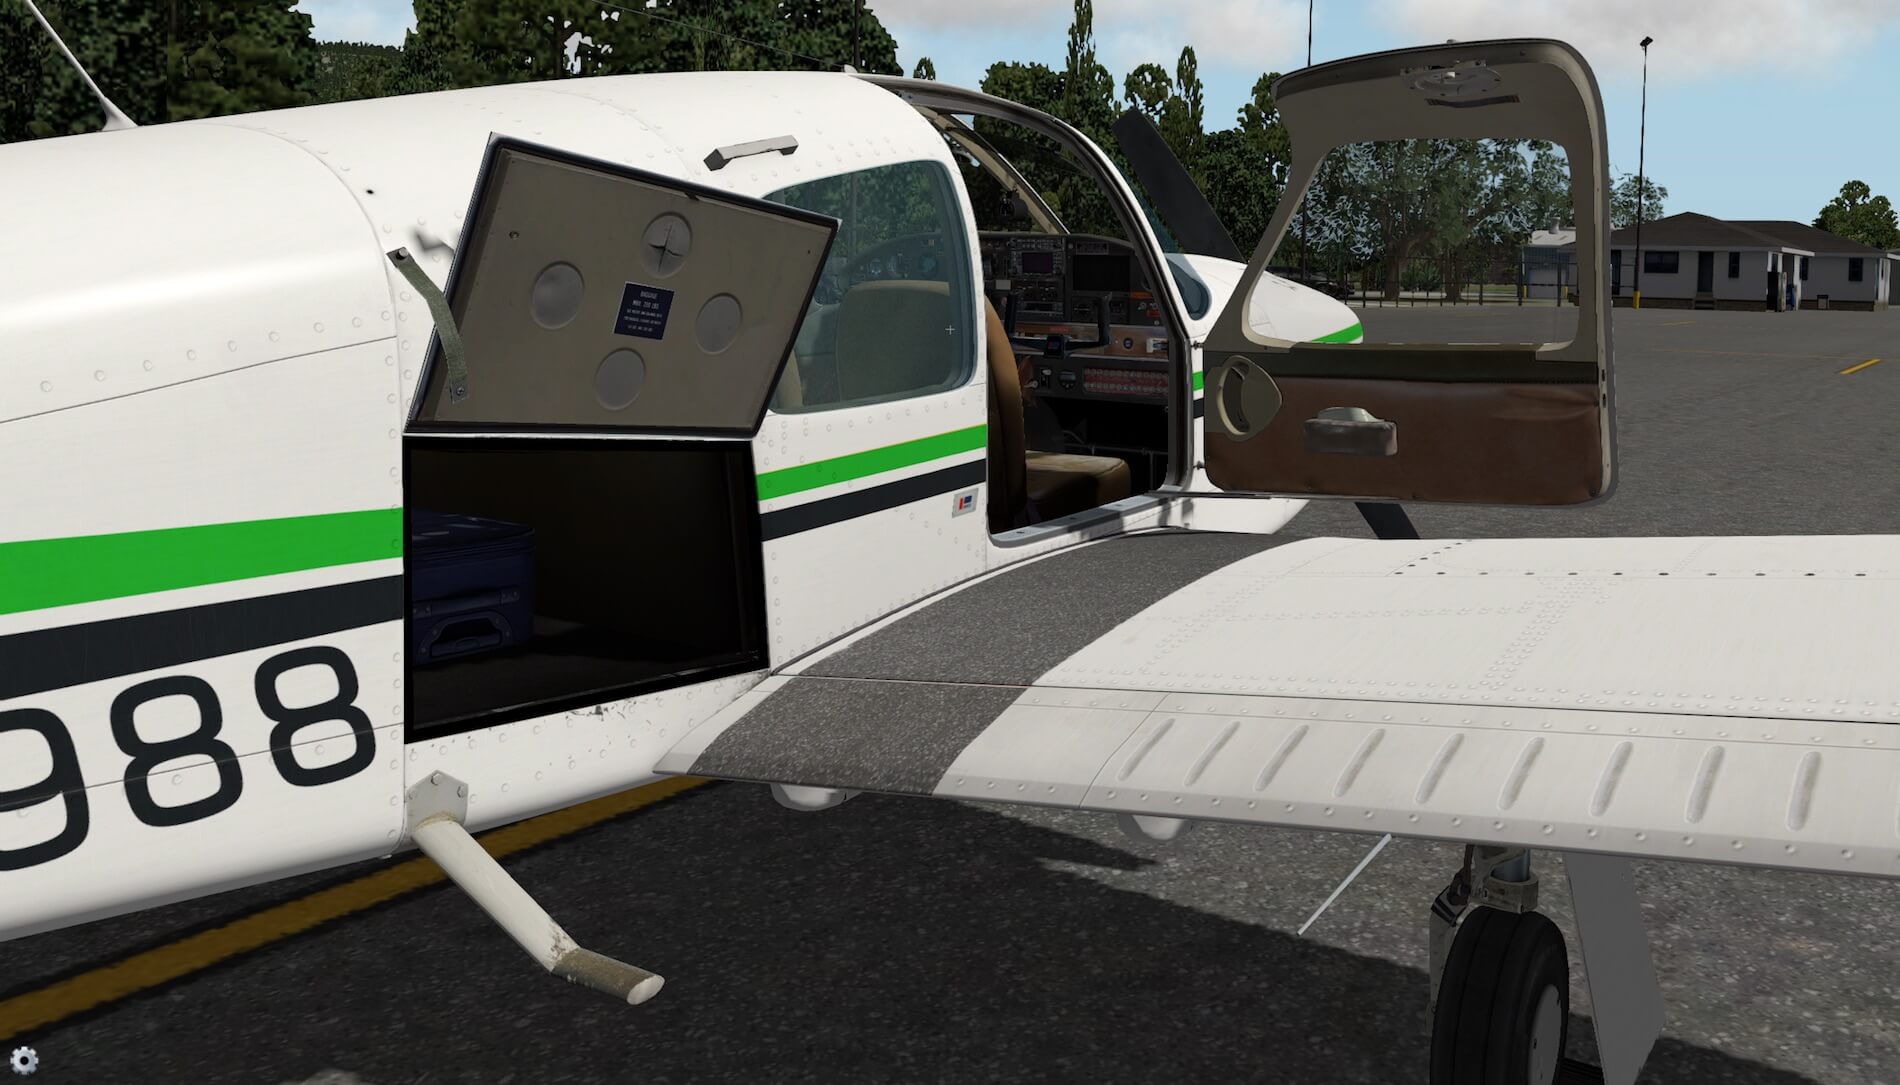
No, we know I can’t write short stories of what I see. With the Arrow III parked at the apron of add-on airport scenery KORS from Org user Aerospace, you’ll notice immediately the presence of the “do not remove before flight” flag, engine cowling inlet covers and around the main wheels, the wheel chocks. While looking around, I was wondering why there’s no popup window that allows me to control these ground equipment items and/or to control the passenger door as well as the baggage door.
That said, the right hand passenger door can be opened anytime, even when you’re sitting in the cockpit or when you’re standing outside via the vFlyteAir “gear”. The same Feature popup window “gear” applies for the baggage door. I’ll try to explain that in the following section since the “gear” icon offers a little more than only opening/closing doors.
The vFlyteAir Gear
What’s that … the gear?
To quick thought … watch for the “gear” on the lower left-hand corner of the X-Plane screen. Via this gear you’re able to change certain aircraft conditions of which some are to increase your frame rates in case there’s a need for. Check for example the option “Hide Glass”. When you slide this option from ON to OFF, the cockpit windows seems to have disappeared, at least, they don’t have the semitransparent green look.
When you want to fly the Arrow III as real as it gets, you can slide ON-OFF the “On-Screen Warnings”, but on the other hand, it’s also a nice feature to learn the aircraft what you do wrong or what you forget. Sliding option are all situated on the left while the internal and external previews can be found on the right-hand side of the semi-transparent popup window. When no preview is selected, you’re sitting in the cockpit. For clarity, I’ve enlarged in the first screenshot the gear icon.


Thorough Inspection
I’m very pleased with the way the 3D modeling is done and yes, I’m also aware that for a small GA aircraft like the Arrow III, the 3D modeler has the freedom to use many polygons to make it as accurate and realistic as possible, as compared to large commercial jets. Anyway, the propeller spinner is gorgeous which is also applicable to the propeller blades. However, I can’t spot any weathering on the leading edge of the black painted blades.
On the other hand, the McCauley placard is unbelievablely sharp and therefore perfectly readable. Another interesting detail is the well modeled engine cowling with quick fasteners that hold the upper and lower engine cowling together. And you won’t believe this …. On the lower side of the left hand engine cowling lower half, I can spot and read the FUEL SUMP DRAIN. Crispy and realistic. Very well done! While zoomed in on this tiny fuel sump drain detail, I see an air inlet with parts of paint missing thus giving a weathered appearance.


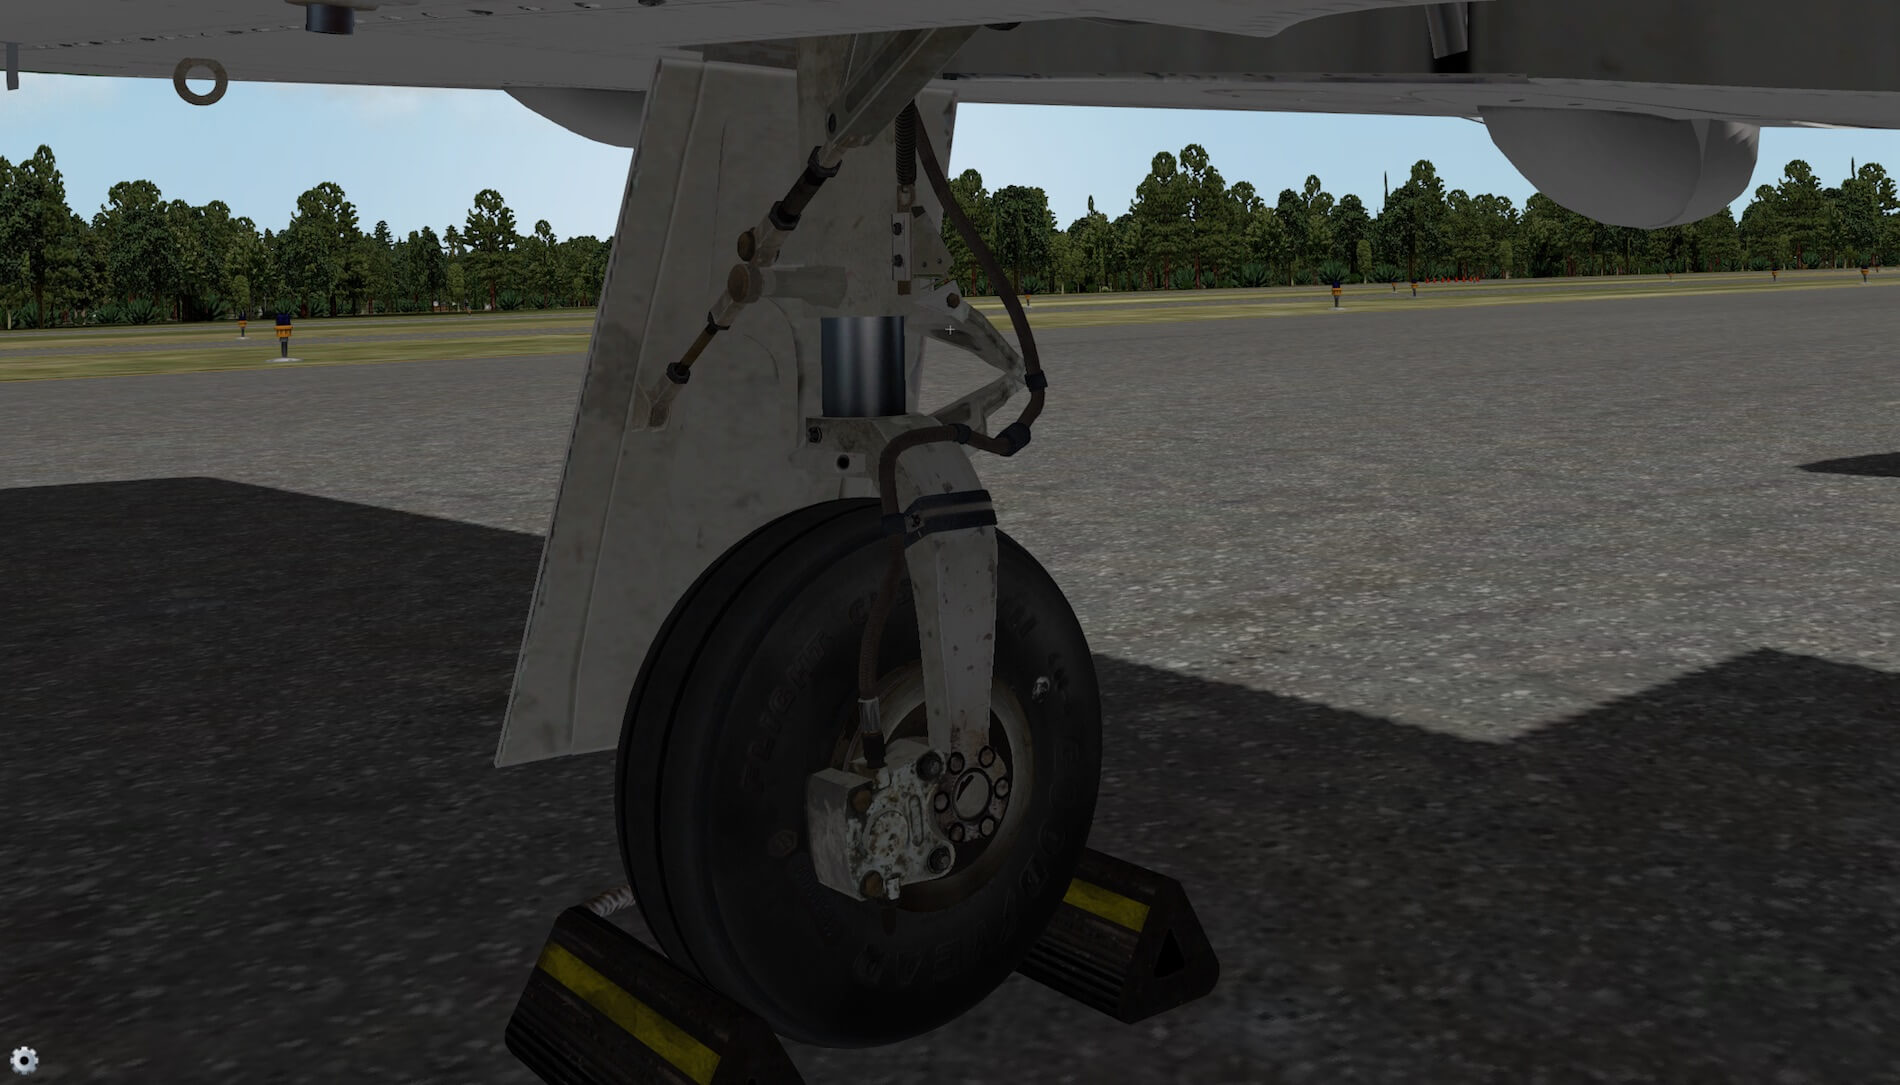
A quick look down at the retractable NLG (Nose Landing Gear) tells me that Igor, yes, I believe it’s Igor, did a great job. A very highly detailed NLG and wheel, covered wherever appropriate with photo real material. Overall it is a gorgeous looking landing gear, which is also true for the MLG’s (Main Landing Gears). The wing leading edges with the stall detectors are nicely modeled and painted, but as said before, a little more weathering at the leading edges would be welcome. When you look closely at the last 1 to 2 meters from the wing tip, you will see some weathering on the leading edge, but I personally prefer more.


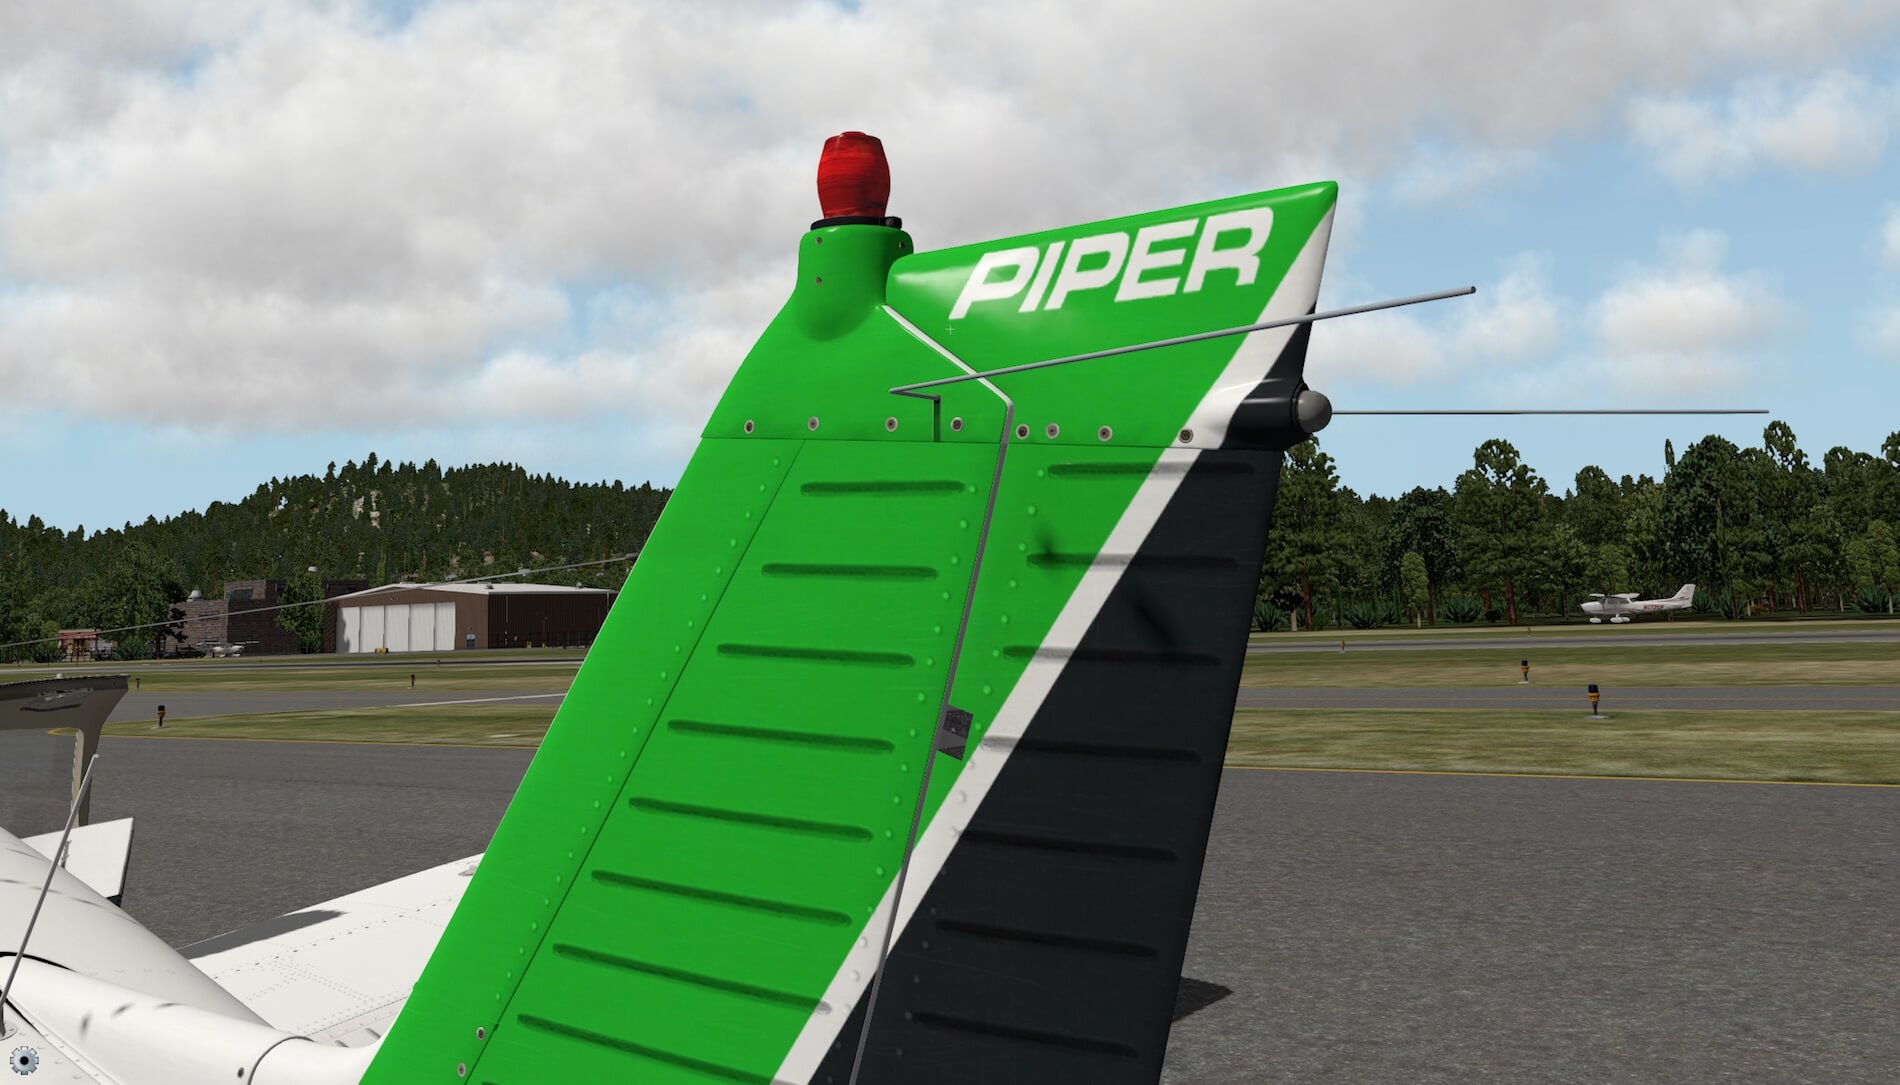
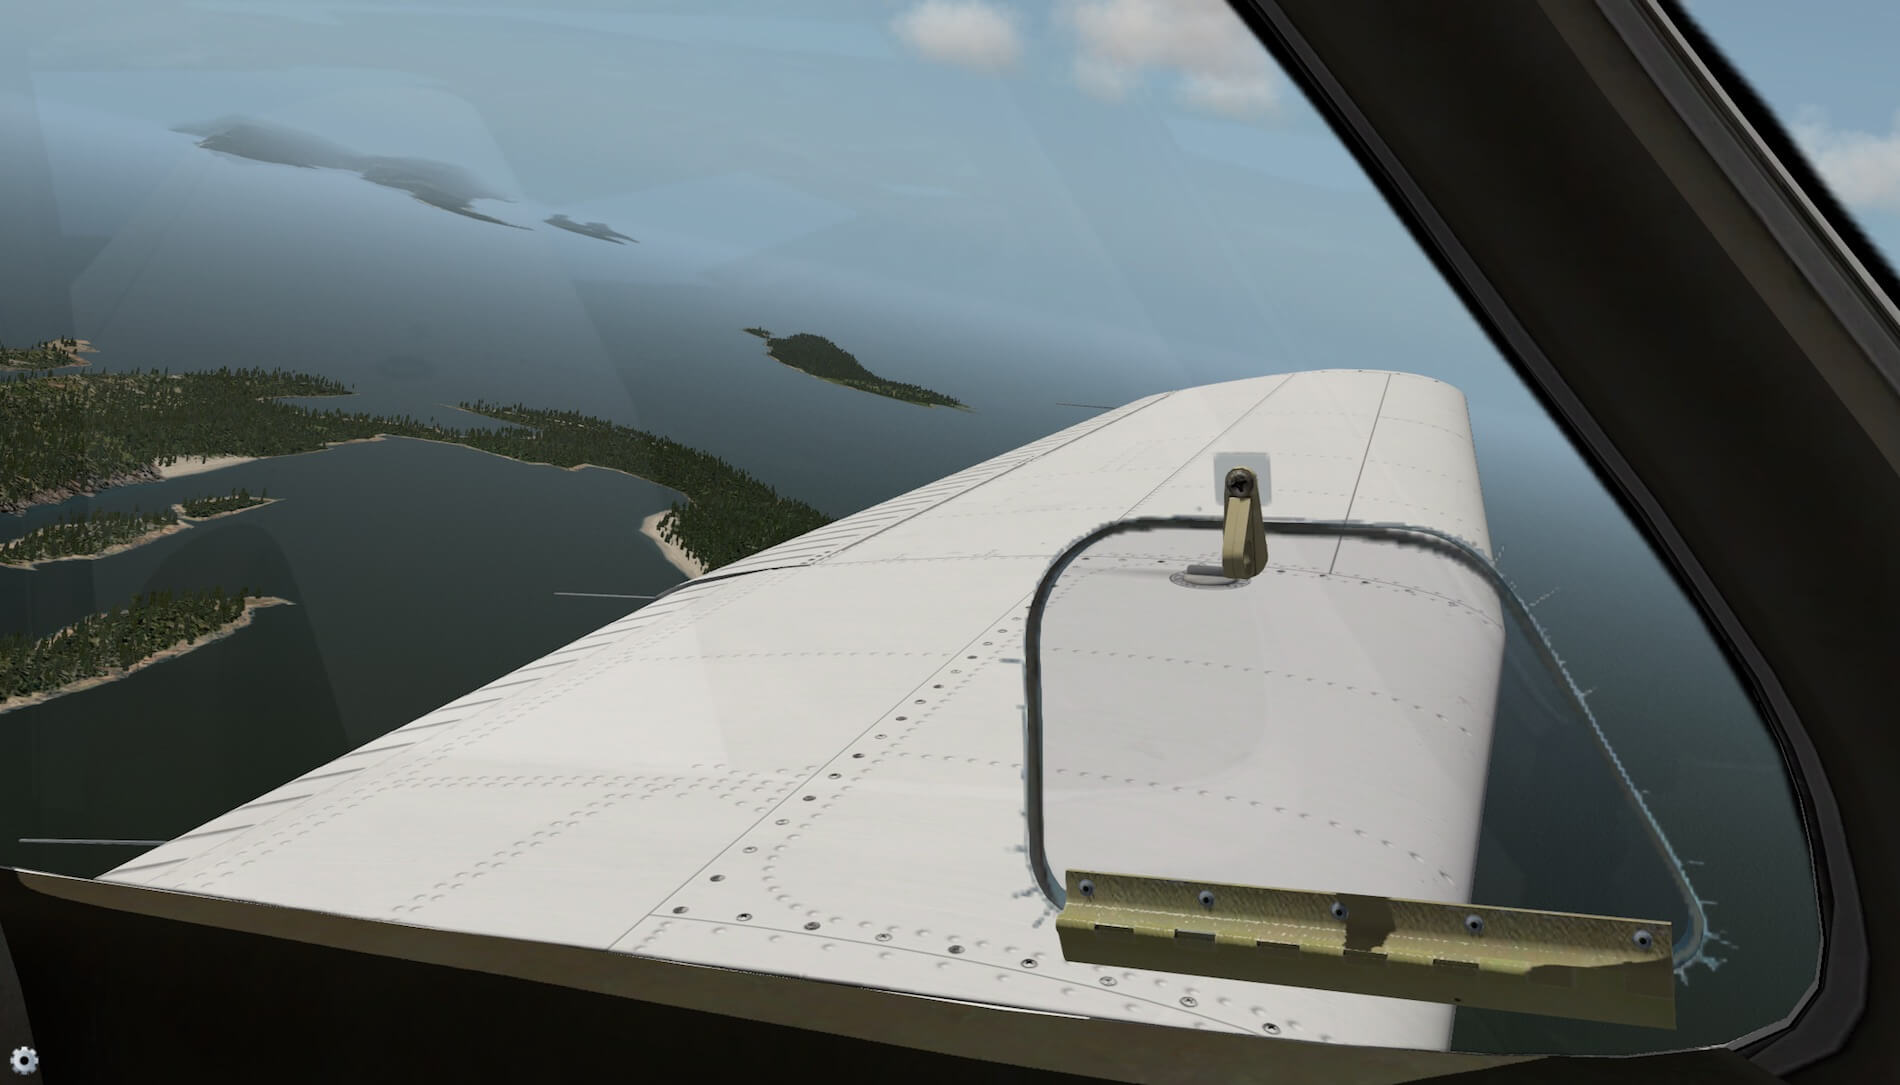
While arriving at the wing tip, you can’t miss the combined navigation and strobe light unit. At the trailing edge of the wing you will find some static dischargers and a realistic looking aileron with the hinge mechanism mounted at the underside of the aileron to the wing construction. On top of the left hand wing, and of course also for the right hand wing, you can see the presence of NML files (Normal Mapping) for a kind of 3D effect.
In this case the NML files offer under the right external lighting conditions a 3D effect of the aluminum skin plates and, less dominant, a 3D effect of the rivets. And, not clearly visible on the ground, the package also includes NML files for the wing bottom, fuselage and cockpit panels.
Yes, the cockpit panels also have their own NML file. Since the instrument panel is divided into two sections, each with a texture resolution of 2K, you can expect a high-resolution look. I also noticed the presence of three window files in the Objects folder of the Arrow III. Actually, there’s a window texture file for clear weather conditions, one for rain and one for icing conditions. I need to keep that in mind when I make my test flights.
Via the fuselage I turn into the direction of the aircraft’s tail which is, without using too many words, gorgeous. It’s well-detailed, with great 3D modeling, but some weathered look would be welcome, or at least a couple of liveries that have more weathered textures.

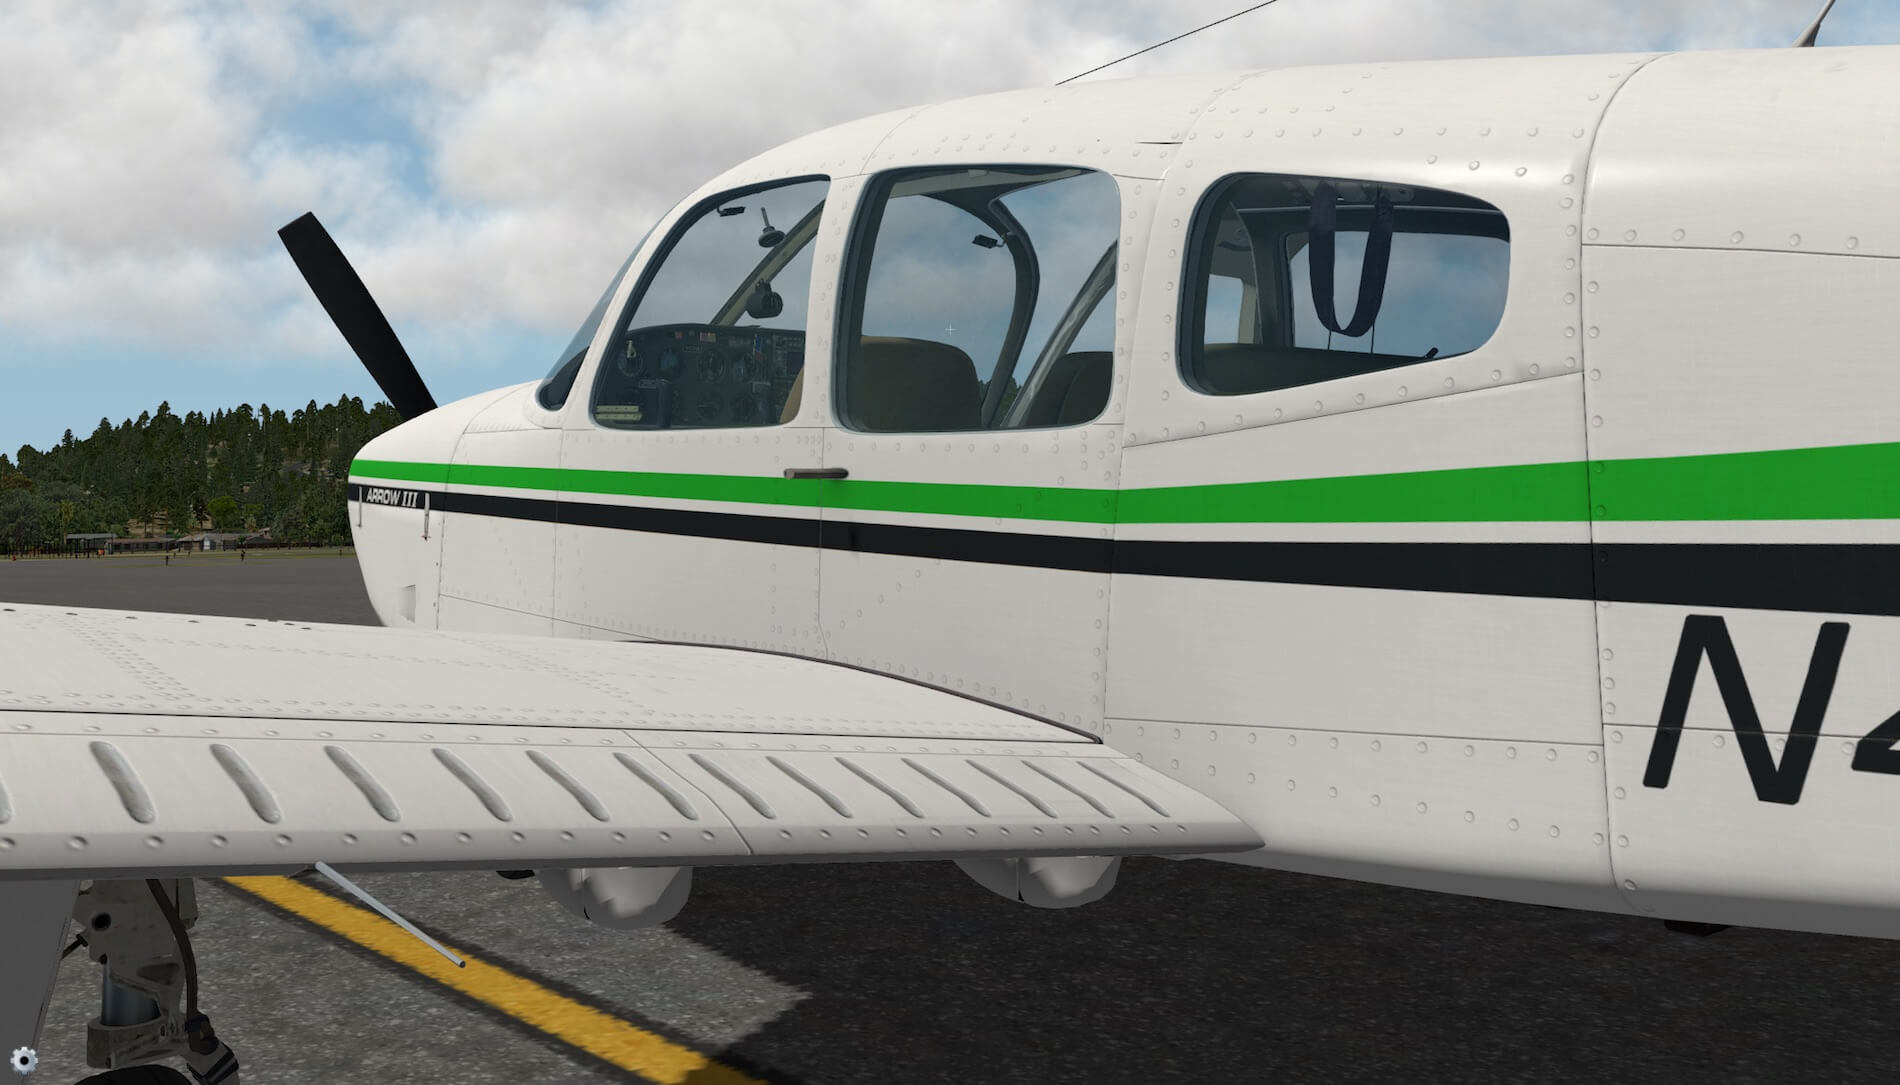


Via the opened right hand passenger door, I crawl into the cockpit and take place in the left hand seat. I immediate spot the small Plexiglas window next of me. Keep one thing in mind that when you have selected “Hide Glass” (thus it’s OFF), you won’t see the small window except the handle to open it. With “Hide Glass” ONM, you see the green glass and thus you’ve got a good impression of the small window.
I move a little forward to the instrument panel, turn myself and try to get a glimpse at the modeled seats and in particular the old-fashioned and weathered brown leather. Awesome! I don’t smell the leather anymore since it’s too old, but the real photo textures have given the seat the “as real as it gets” look.
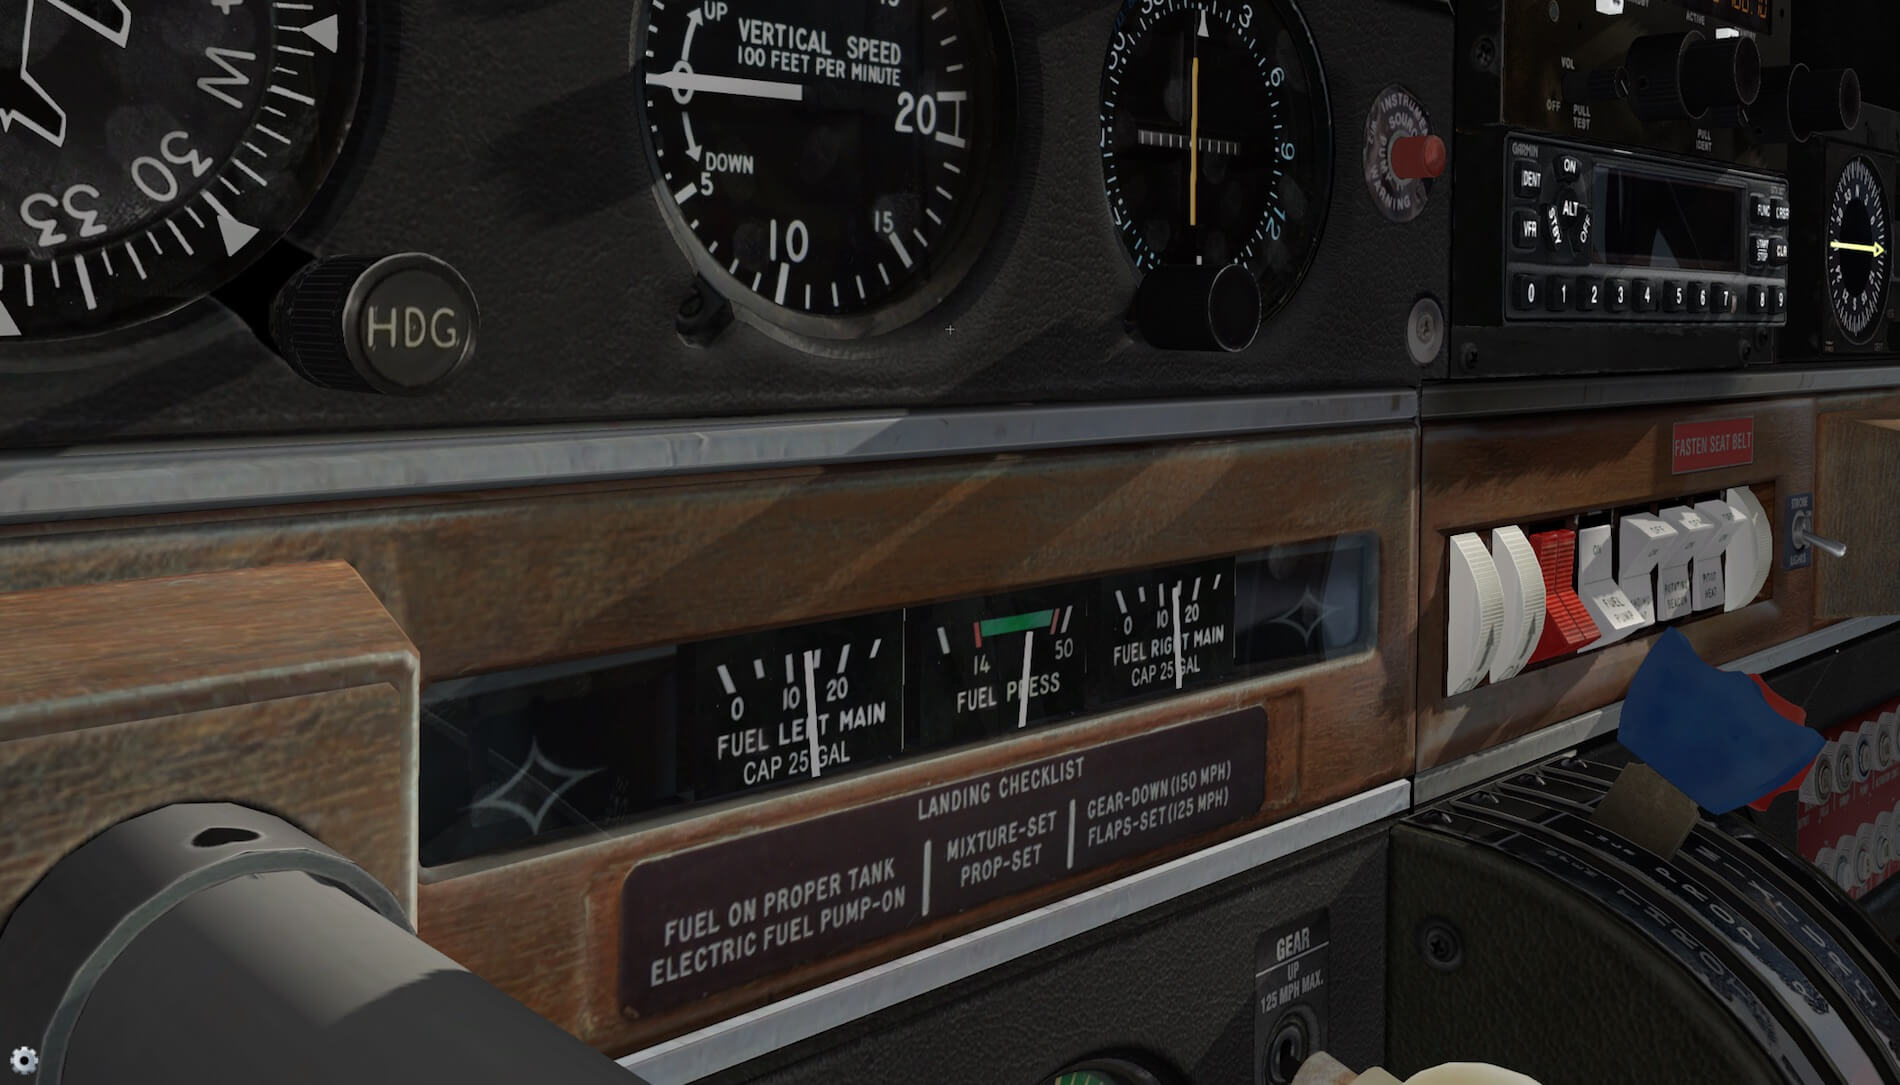
Remember what I wrote before …. it’s an old-fashioned aircraft with most likely an old instrument panel. Don’t expect a fancy panel with modern instruments or Display Units. No, you get a really old fashioned and ugly looking panel. He he, hold on …. don’t’ get me wrong …. it’s real just as it is!


It could be that you don’t like the way the panel looks like with the plastic looking wooden mid section and the old heavily used and weathered control wheel. This is how it really is and what is to be expected. In this respect I must say that I’m impressed by the old and realistic look of this instrument panel. It’s basically completely covered with high quality photo real material and you can see the result.
Everywhere you look, it looks used, but that gives it the look I was hoping for. I think, but not 100 percent sure, the side panels are not covered with photo real material, but for the rest, it seems to me it is.
Even the brake / rudder pedals as well as the linkages are covered with photo real material. And is this it? No, the pilot and passenger seat as well as the couch seat frames are as real as you would expect. The seat belts are not forgotten, and even the pedestal (although pedestal is a little too much to say), is covered with photo real textures.
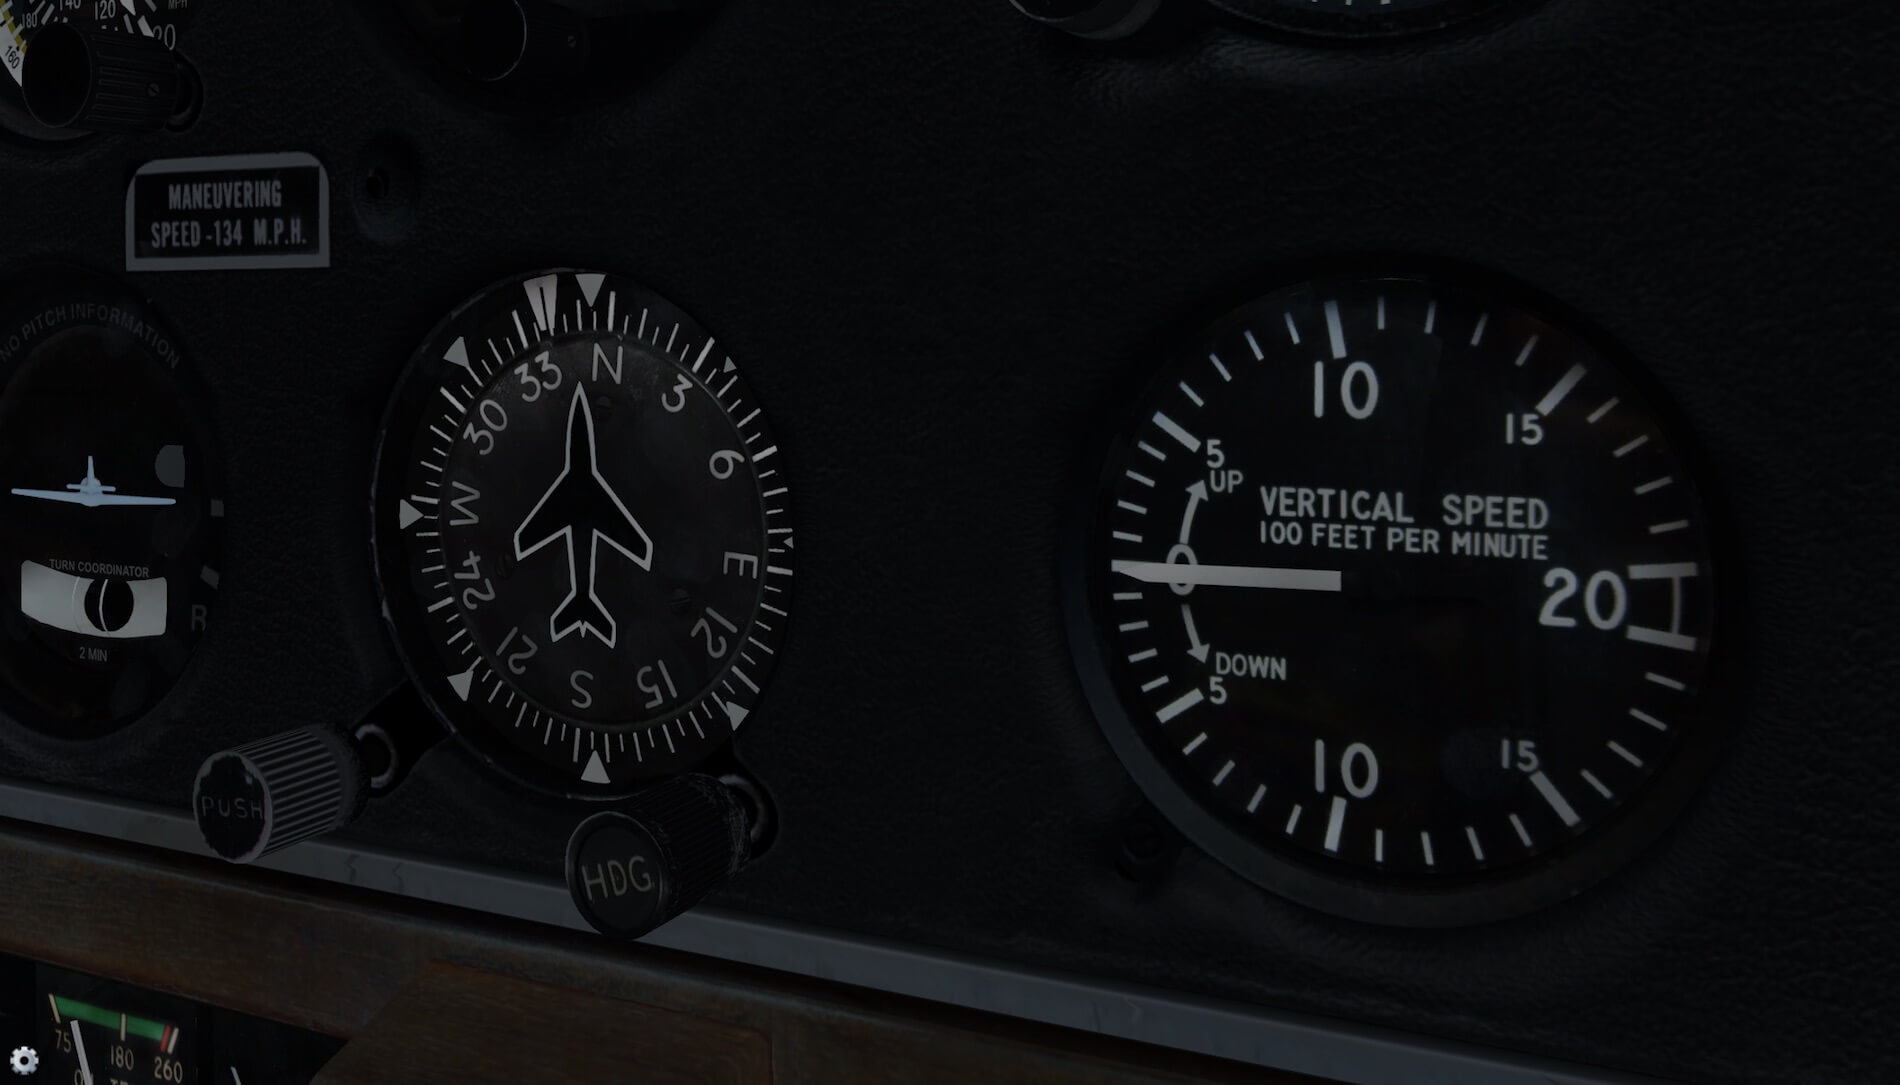
I’m very pleased with the way this old-fashioned and realistic panel and cockpit looks. Every switch, even the circuit breakers, indicators, knobs, handles and whatever else I’ve forgotten works, but above all, it looks old, weathered and dirty. Ok, perhaps not filthy dirty, but it’s gorgeous and as I said before, you may like it or not.


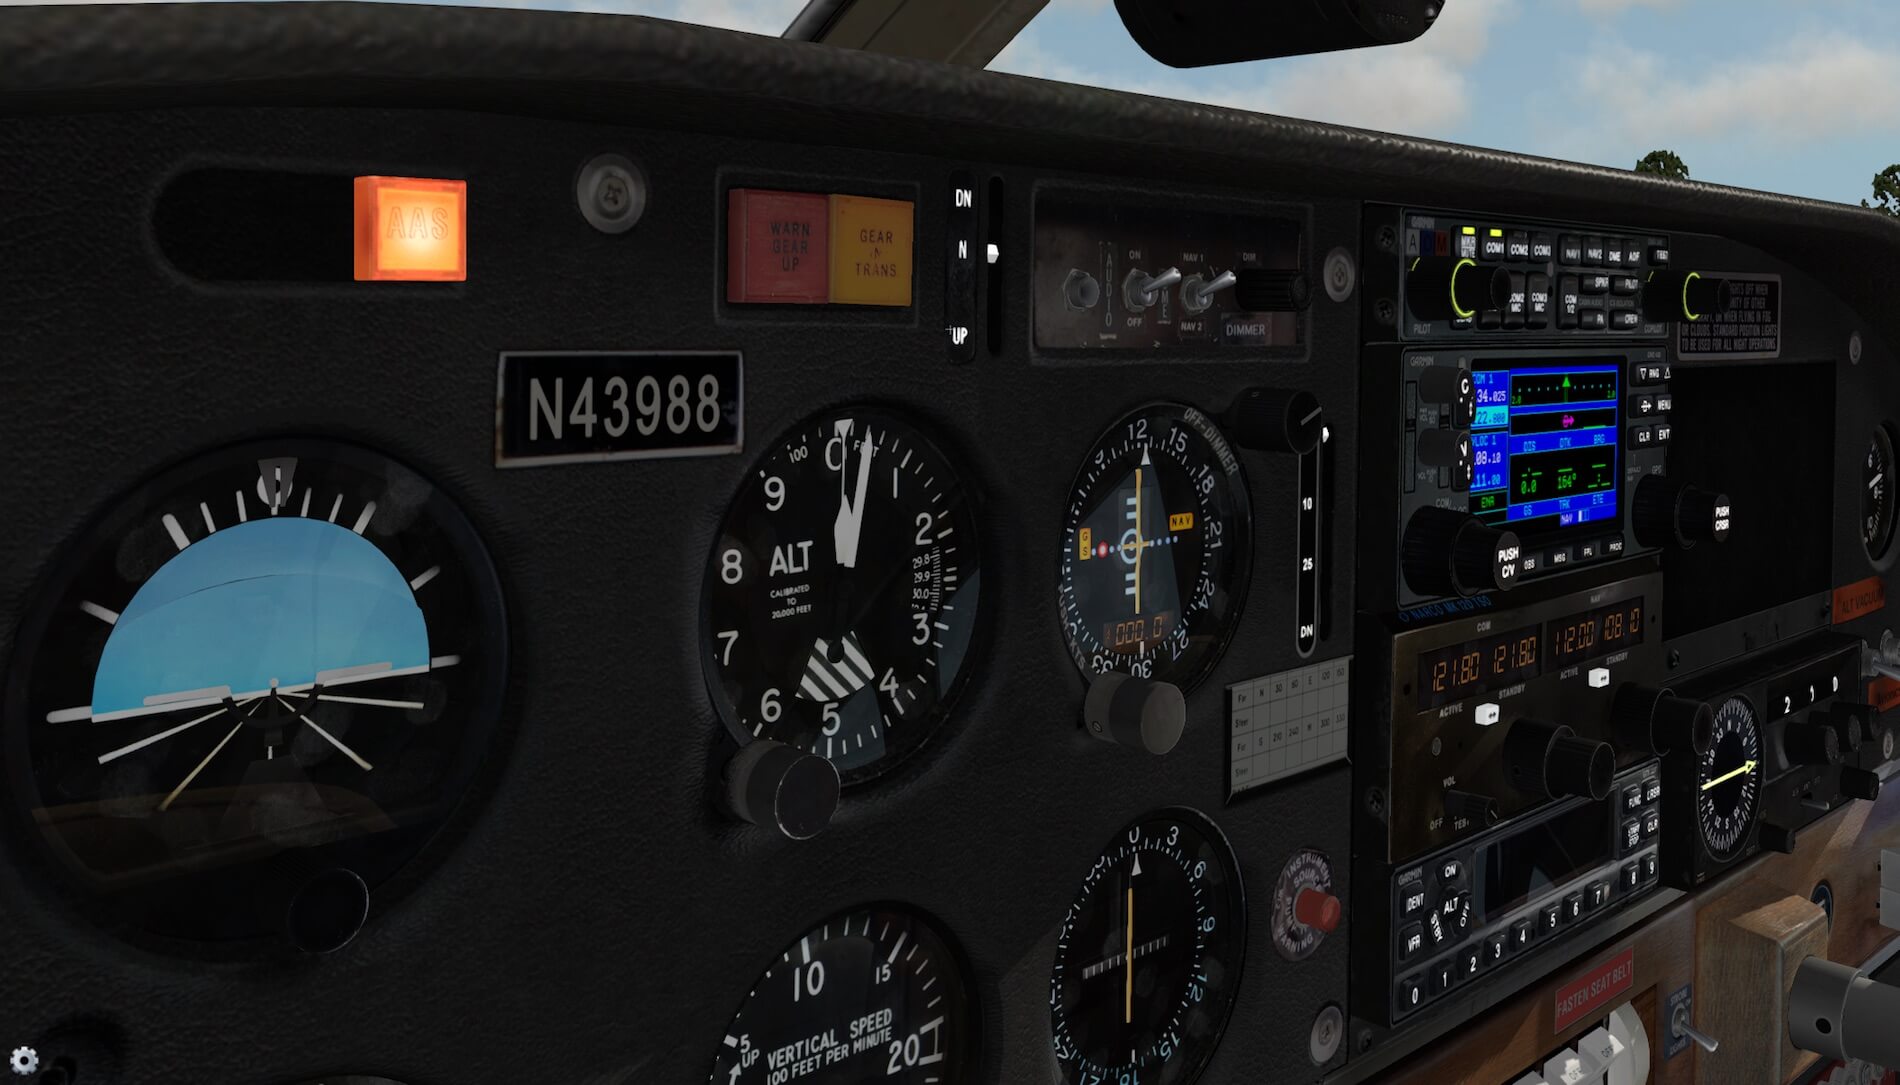
The only instrument that’s new,. Needed to follow international aviation regulations, it the instrument panel mounted Garmin 430 GPS. Although it’s the default X-Plane GNS 430, it’s nicely build in. What said before, old aircraft like this Arrow III don’t have a standard Garmin navigation unit on-board and therefore, it’s common that either a pilot takes his own Garmin unit with him and mounts it temporarily in the cockpit as was with model version 2.0, or when the aircraft is privately owned or a flying club, it’s mounted in the panel itself.


Not the way it’s mounted in the Arrow III, but with another solution. The idea is OK!
Time to Fly
When you load the Arrow III with no engine running, which is for me the most common way, the Arrow III will load with the external ground equipment components and in the cockpit the “CONTROL LOCK ” hooked into the left hand control stick. When you click on the CONTROL LOCK flag, it disappears. And, not unimportant, touch with your mouse the key that lies on the glareshield. When you click it, it moves by itself into the starter switch.
One last item before I start with the preparations, the disappear option for the control wheels. Click on its shaft near the instrument panel. Click the empty place on the instrument panel and it reappears. Next is switching of the red BAT switch, but normally you also select the ALTN (alternator) red switch ON.
And by doing this, next in row is the AVIONCS switch, located on the right hand side of the instrument panel. I would suggest to leave this one in OFF as it is, start the engine first so the aircraft alternator can electrically supply the electrical network, and then switch on the AVIONICS switch.
Don’t wait too long and don’t climb out of the cockpit with the BAT Switch left in the ‘ON’ position else you drain your battery completely!
When you’re done with the previous steps, just turn the Start key and start the engine. Leave the engine running for a couple of minutes while you check the instrument panel for abnormal indications and wonder what that amber AAS light above the horizon is all about. Good, AAS stands for Audio Advisory System. The following is an extraction of a vendors website.
This site explains everything about AAS. According to P2 Aviation Technology “The system provides the pilot with AUDIO (it actually communicates with the pilot through the headset and/or speaker) and VISUAL (through an illuminated annunciator) advisories. It functions by continuously monitoring airspeed and other inputs and converts them into the appropriate audio messages. Whether you are busy studying an instrument approach plate, looking outside, or just conversing with your passengers, the system is watching over you.”
It’s time to tune for some beacons with or without the help of the modern Garmin GNSPlus which is by the way a simulated version of the default X-Plane Garmin GNS 430. After this, it’s time to taxi and figure out how it flies. Taxiing a small GA aircraft like the Arrow III isn’t difficult.
The only thing you have to keep in mind is that the aircraft tends to move to the left, but with some rudder you can easily correct this provided the rudder is effective enough. Don’t forget to set the flaps before takeoff, apply power and try to keep the Arrow III on the centerline while accelerating. At 80 knots I pulled slightly on the stick and with a nice vertical speed the Arrow III climbed out to my initial altitude of 2000 feet.
After retracting the landing gear and flaps, I still felt no need to connect the Auto Pilot (AP). Yes, even this small and old-fashioned aircraft has an Auto Pilot.
By the way, this model version 4.0 comes with a new STEC 65 Autopilot that replaces the old Piper AutoFlite III. You can now fly ILS and RNAV approaches, and the STEC 65 supports flight-plan following using the Garmin GNS 430 GPS.


The user manual offers the following STEC 65 user information thus how to use the STEC 65:
- Press the “FD” key to turn on the Flight Director.
- Press the “FD/AP” key to engage the autopilot servos.
- Select HDG or NAV mode to have the autopilot follow the selected VOR Radial or GPS flight plan leg destination. Be sure to select GPS mode on the Garmin 430 GPS to use the GPS as the NAV source.
- Press ALT to capture and hold the current altitude.
- Press VS to have the autopilot fly the selected Vertical Speed. You can adjust the VS rate up or down in 150′ increments by pressing UP or DN keys.
- Press YD key to engage the “soft ride” function
NOTE:
Approach Mode (APPR) is automatic on the STEC 65. If the unit detects a valid Localizer signal on the selected NAV1 Frequency, APPR mode will automatically engage, and “APPR” will appear on the STEC screen. You can press the REV key to select APPR mode back-course.
Before, the installed Arrow III Auto Pilot was very basic AP and not really needed in my opinion since the Arrow III is easy to trim and to maintain in a trimmed balanced flight. But when you want to look around or sit back, then it’s handy to connect the AP for a while. With the new and upgraded Auto Pilot, much more is possible although I still think it’s an easy aircraft to fly by hand.
After I reached my initial altitude of 2000 feet, I climbed further to 4000. At that altitude I’m able to perform some unusual flight attitudes like steep turns, stall and slow flights. It also gives me the time to re-check the cockpit although I have to admit that I’ve already seen a lot.
Remember one thing when you’ve connected the AP, it will automatically disconnected when you use a trim function which is confirmed by an aural warning. On the other hand, and illogical to me, when you move the control wheel or in my case the joystick with the AP connected, there is no AP disconnect.


During this test flight I also had the time to monitor the frame rates. It is no surprise the frame rates stay high even with my rendering settings set quite high. After I’ve approached my cruising altitude of 4000 feet, I reduce my speed to test the extension and retraction of the landing gear.
Extending or retracting is not something special, but the way it’s modeled including the main gear fixed landing gear doors is a really nice demonstration of an eye for those tiny details. When I say tiny details I talk not only about the landing gear itself, I’m also talking about the landing gear bay although the word ‘bay’ is perhaps a little too much.
It seems nothing is forgotten including the hydraulic lines, rivets, ribs and stringers. It’s also nice to see that when you extend / retract the landing gear not all gears retract extend at or with the same speed. The hydraulic system reduces the main gear in order to give preference to the nose landing gear.
After the nose gear is almost retracted / extended, the main gear follows. As far as I can remember using other GA aircraft, this is familiar behavior. Not mentioned yet, but worth writing it down. It has to do with the real implementation of functional circuit breakers (CB). I’m aware that it’s a GA aircraft with not too many CB’s, but what isn’t more realistic than having real functional CB’s.
For example …. when I pull the STROBE light CB, the strobe lights extinguish with the switch in ON. When I press the CB back in, the strobe light functions again. Although this is a simple example, it’s really great to see this in, as far as I can remember, many vFlyteAir aircraft.
One of my first tests to perform is a pre-stall. I expected to be honest to hear a busser, but instead I was aurally informed that I’m in a stall. Real or not, I have no idea, but it worked. Doing a steep turn wasn’t really a problem either, but it’s not easy to keep the same altitude which has nothing to do with the aircraft, but with my flying skills. I remember that from my real PPL lessons.
Anyway, in case you reach a difficult flight attitude, it shouldn’t be a problem to keep control over the Arrow III. Also a slow flight with flaps and without flaps is easy to do, but it’s also easy to get into a stall. When you wait too long with a stall or let’s say pre-stall, the Arrow III will go positively into a stall which is also what I had hoped for.
There’s so much more to see, but it’s getting dark outside so it’s time to go back to KORS, if I can find it! No, that’s no longer an excuse with the Garmin GNS430. Just click the 3D modeled Garmin and a 2D popup Garmin GNS 430 comes into view.


In the situation that it’s becoming dark outside and some instrument or area lighting is needed, the Arrow III offers you enough. On the instrument panel you’ll find an instrument integral lighting dimmer. It dims every indicator, the Garmin and radio equipment.
There’s also on the switching panel right hand side, a red area rheostat. It gives, when active, a very nice soft red cockpit lighting. Perhaps it’s better to say that the red lighting is mainly projected on the instrument panel itself.
For sure it doesn’t offer an integral lighting. It’s like a panel red flood light. My flight reaches slowly the end and with KORS in sight, it’s not difficult to make a successful landing.
I think I can conclude that it was fun testing the vFlyteAir Arrow III. I liked the old-fashioned interior and the well-modeled cockpit and not to forget the high quality 3D external model with a bunch of high-resolution liveries. Frame rates are perfect, at least, on my iMac. I’ve heard many sounds which are for sure not default X-Plane sounds and in particular the ppropeller sound that gives a irregular noise and feels realistic.
Summary
Was it worth a review and is it worth it to have the vFlyteAir Arrow III version 4.0 in your hangar? For both questions the answer is YES. Reviewing a GA aircraft is for me always fun. They are small, easy to handle and most of the time you can expect high quality models.
This Arrow III is a rather old aircraft type with consequently an old-fashioned instrument panel, never the less, it is modeled with great precision with an eye for details. And this is not only applicable for the cockpit, but also for the external model. Decals on the fuselage and wings are razor sharp and a pleasure to see how it’s made.
The only thing I missed was a description of the installed AAS (Audio Advisory System). A thorough description and operation of the Garmin GNS 430 can be found either via Garmin or via X-pLane.Org. Other than this, it’s worth your 24.95 USD.
And did I cover everything?
I think I covered most of it but as you know, it’s always possible I’ve forgotten things. In case you’ve a different experience or want to share issues or thoughts with us, feel free to contact us. You can reach me via email address Angelique.van.Campen@gmail.com or via Info@X-Plained.com.
More information about the vFlyteAir Arrow III as well as buying details can be found at the dedicated vFlyteAir web page.
For this review I used one freeware add-on, besides the vFlyteAir Piper PA-28-200 Series Arrow III. The used add-on is:
– Freeware | Org user “Aerospace” KORS – Ortho – Orcas Island Airport
Feel free to contact me if you’ve got additional questions related to this impression. You can reach me via email Angelique.van.Campen@gmail.com or to Angelique@X-Plained.com.
With Greetings,
Angelique van Campen
| Add-on: | Payware vFlyteAir Piper Arrow III |
|---|---|
| Publisher | Developer: | X-Plane.Org | vFlyteAir |
| Description: | Realistic rendition of the Piper Arrow III |
| Software Source / Size: | Download / Approximately 836.5MB (unzipped) |
| Reviewed by: | Angelique van Campen |
| Published: | February 17th 2017 |
| Hardware specifications: | - iMac 27″ 3.5Ghz Late 2013 - Intel i7 3.5Ghz / 3.9Ghz during Boost Mode - NVIDIA GeForce GTX 780M 4096 MB - 32 GB 1600 MHz DDR3 - 1 internal 1TB SSD (Sierra 10.12.3) - 3 external 1TB SSDs - Saitek Pro Flight System |
| Software specifications: | - Sierra (10.12.3) | El Capitan (10.11.4) - Windows 10 Professional - X-Plane 10.51c | X-Plane 10.51m | X-Plane 11.00pb11 |
0 Comments