Le bellissime Dolomiti by Frank and Fabio
Wow
This time not a regular introduction title but Wow!
The Dolomites or also known as the Dolomite Mountains, Dolomite Alps or Dolomitec Alps, are a mountain range in northeastern Italy. They form part of the Southern Limestone Alps and extend from the& River Adige in the west to the Piave Valley (Pieve di Cadore) in the east. The northern and southern borders are defined by the Puster Valley and the Sugana Valley (Italian: Valsugana). The Dolomites are in the regions of Veneto,& Trentino-Alto Adige/Südtirol and Friuli Venezia Giulia, covering an area shared between the provinces of Belluno, Vicenza, Verona, Trentino, South Tyrol, dine and Pordenone. (Courtesy of Wikipedia)

Although this was a short extraction from Wikipedia but when I read it the first time, I thought “My goodness, should I know or remember all of this during my geographic lessons”? Yes I am a wholeheartedly European, but I’ve never been really in the Dolomites, so it’s also new to me. In other words, there’s a lot to explore for me and perhaps for you too.
According to Frank and Fabio, the developers of this area; “The Dolomites for X-Plane 12 covers an area of over 11000 sq. km. It includes all Dolomite groups, which means over 64 mountain groups that are all reconstructed with detailed 3D models and photographic textures. Besides that, Frank and Fabio reproduced main cities such as Bolzano, Trento, Belluno and all Dolomites villages with the placement of thousands of custom buildings such as churches, monuments, public buildings, stations and houses with characteristic typology of the place also as integration of the autogen.”
Further on “Frank and Fabio reproduced major airports like LIPB, LIDT, LIDB, LIDA, LIDI, LIVD, LOKL and numerous airfields. All the terrain in this area has been reproduced with the use of polygons/textures that reproduce the area according to terrain characteristics. The territory includes much of Trentino Alto Adige with the cities of Bolzano, Trento and their airports, heliports and airfields such as Loker, Sterzing, Termon, Vervò and Corvara. The whole province and city of Belluno with airport, heliports also near Dolomites Refuges and airfields such as S.Giustina, S.Felice, Casera- Razzo (Friuli) and Siusi Alpes and Val Fiemme, Agnedo, Rolle Pass, Monte Casale (for ultra-light aircraft).”

They continue “Compared to Dolomites scenery packages for X-Plane 11 – only applicable to those who have had this – many details have been improved and many areas added such as LIENZ airport (Austria), Val di Fleres with Tribulaun in 3D, the whole area between Trento and Bolzano city, Sappada and Sauris area, Asiago plateau with airport for a total of over 11000 sq. km.”
Wrapping it al together, that’s a lot of additional features and objects that are included. So far the introduction, lets move on to the installation and documentation and what else is needed.
Installation, documentation and need to know
I’ll first start with the installation.
Unzip the downloaded package and install all the folders into the X-Plane Custom Scenery folder. When I say “all” the unzipped folders I mean all and believe me, that are a lot of folders. In total the unzipped Dolomites package is divided into 51 folders. Unzipped also means 9,65 GB! My goodness, this means HUGE!
Ones you’ve dropped all the folders into the X-Plane Custom Scenery folder, I suggest that you delete or rename the scenery_pack.ini file. X-Plane will make a new ini file at startup and will place all the folders thus the entries in the ini file in the right order. It’s important that you keep all the folders grouped together which means that the MESH_Dolomite1 is placed directly below all other Dolomites folders. And that’s it!
A comprehensive document is not really needed with a scenery package like this one. The contents of the package speaks for itself. It covers the previous mentioned 11.000 sq. km. area although it must be said that the document – DOLOMITES XP12 Acrobat file – also includes a listing of all the airports, airfields and heliports. Just to give you an idea; it comes with 7 airports, 15 airfield and 47 heliports. What or which airport, airfield or heliport “you” will use, depends on which aircraft or helicopter you will use to explore the Dolomites. Perhaps also good to know that I have never had their Dolomite packages for X-Plane 11, so for me this is my first and only experience with this Italian region.
One last note although not directly related to the contents of the document; I quickly checked a couple of airports like Bolzano (LIPB), Trento (LIDT) and Belluno (LIBD) and it’s amazing with how many details this is modeled and not only the airport, but also the nearby cities or surrounding area. That will be fun!
The last part of this section discusses the need to know. I planned to add this since I faced an issue something myself. Nothing to worry about but just to share with you. The provided document offers a list of known problems and hardware requirements. Although ground textures won’t influence frame rates, all other objects, trees or actually the forests that can be found every where, do influence your performance. The known problems list is just something to keep in mind and is more a list related to your PC hardware versus settings and mixing other sceneries with the Frank and Fabio Dolomites.
My own experience on my iMac Pro I had, had to do with loading X-Plane at an airport and rather flying to a location, I actually “scrolled” myself to that particular location I want to see. The problem that can appear, and it also depends on your PC or Mac, is that not everything is loaded and in my case that “everything” could be trees, many many trees. I ended up with a nice green grass beneath me without trees or forests. This is a known problem with X-Plane that not every thing is loaded immediately or won’t load with the result that the “view” is wrong. I learned from this after I contacted Frank, that you just fly to a location you want to see or you hopefully, when you’ve scrolled to location, that X-Plane takes time to load everything bit and piece of that particular area.
Flight Impression LIDI – LIDB – LIPB – LIDT
Introduction
I can tell you already that it is almost impossible to check every sq. km. The same problem as I faced with my previous Frank and Fabio ALPS UHD XP12 review … where to start and what to cover. The ALPS UHD XP12 covered also a huge area, but luckily there I could pinpoint myself on some specific well-known or famous mountains. With the Dolomites it is different. Although the Dolomites also have their specific and interesting mountain groups, it is much more spread over a large area. To get an idea of all those major peaks, check out the following screenshot taken from Wikipedia.

As you can see, it offers much more major and well-known peaks then you’ll find in the Alps. Besides that, the Dolomite peaks are almost at every location in this area and are relatively small groups of peaks but that makes the Dolomites unique.
By the way, did you know where the name Dolomites comes from?
According to Wikipedia “The Dolomites, also known as the “Pale Mountains”, take their name from the carbonate rock dolomite. This was named after the 18th-century French mineralogist Déodat Gratet de Dolomieu (1750–1801), who was the first to describe the mineral.”
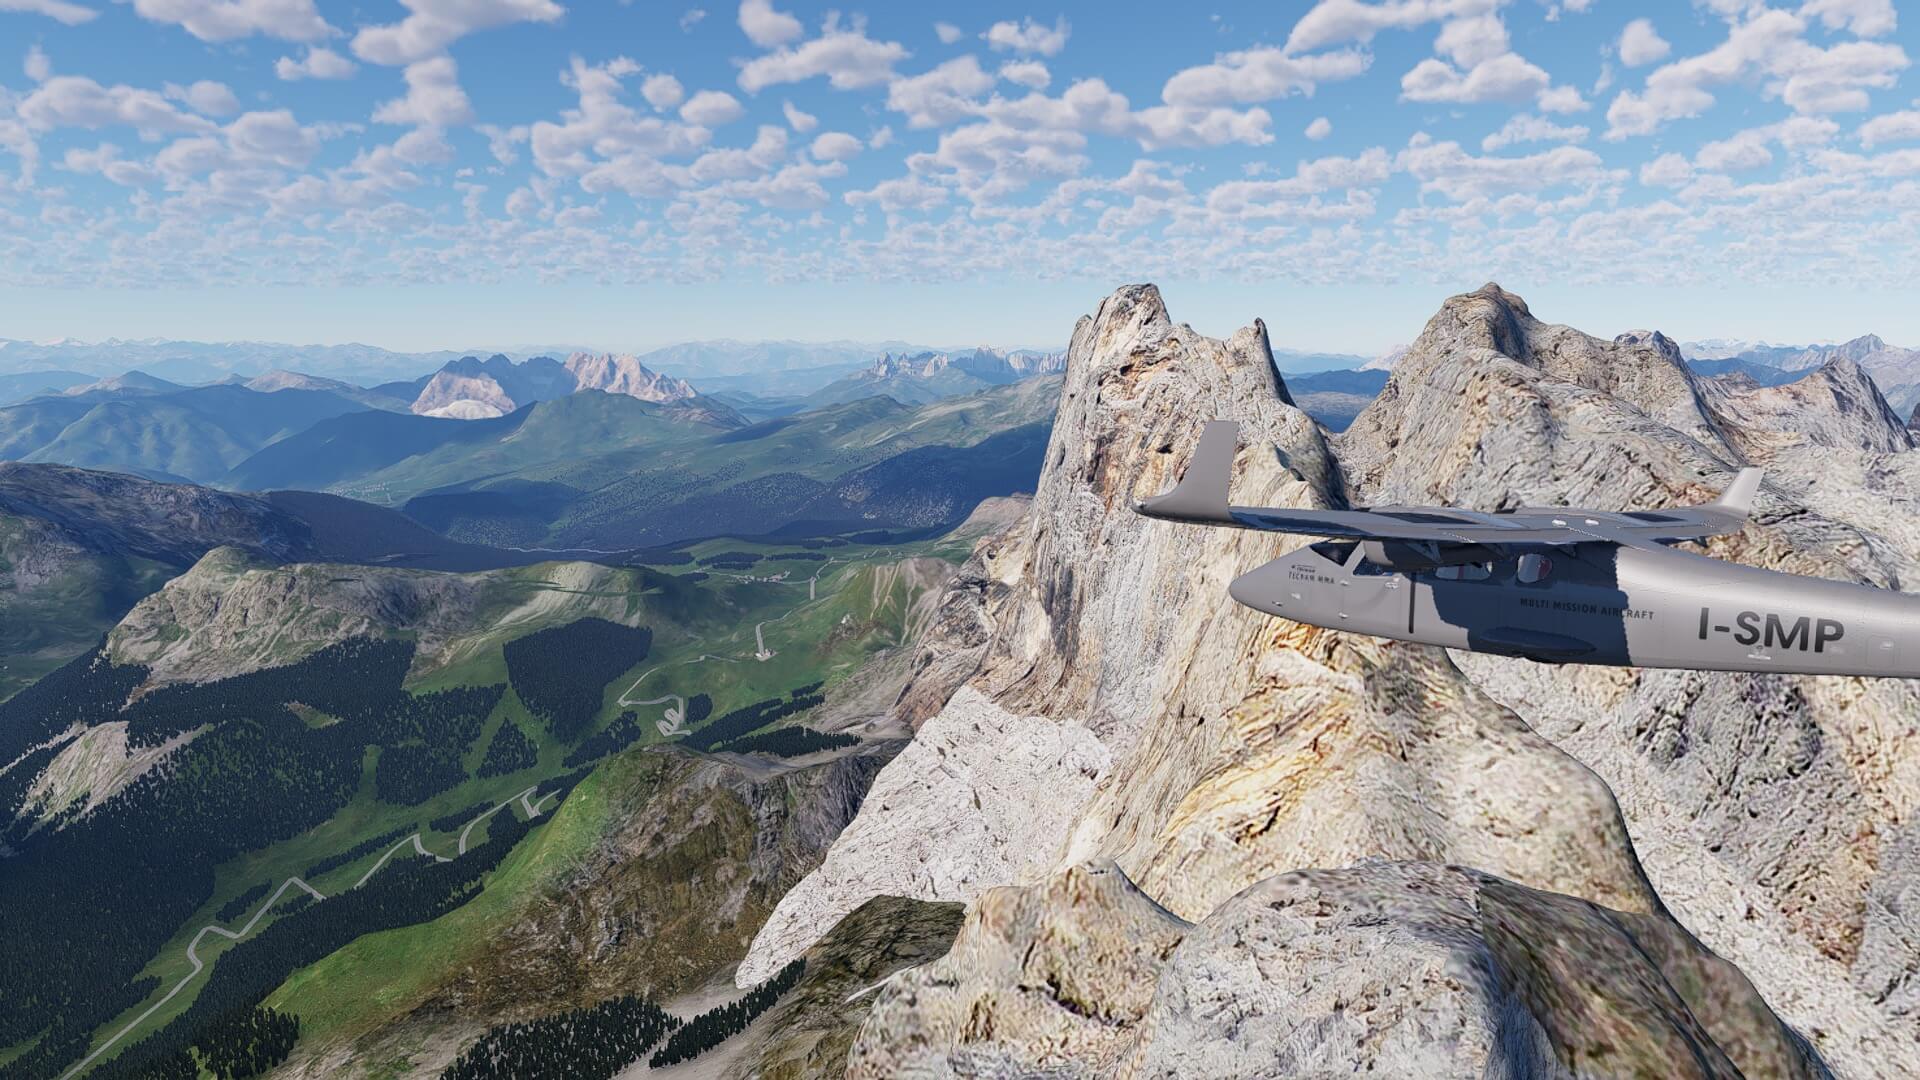
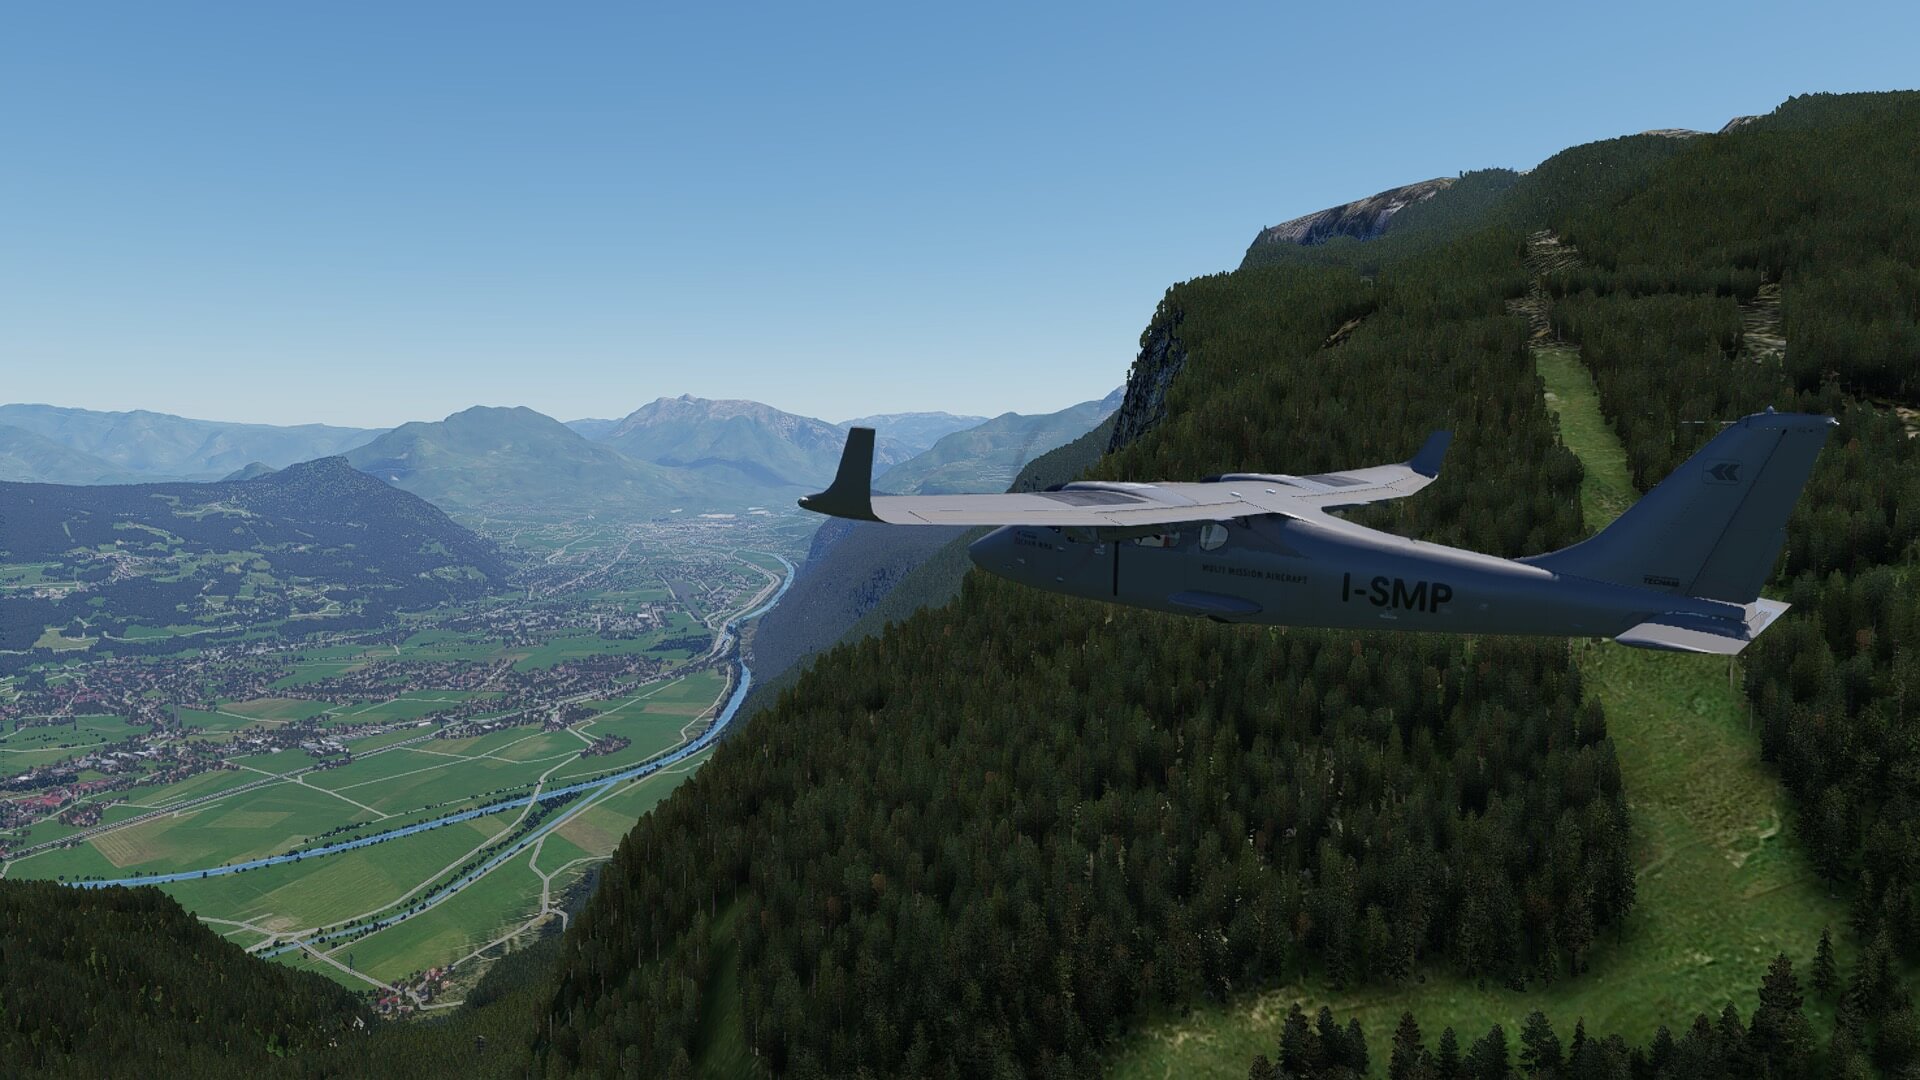
What I wrote before, I can’t cover everything, but I can offer you a nice scenic flight and add to this my own visual experience. For that I came up with the following idea, I plan to use the VSkyLabs Tecnam P2006T model version 9.0 for X-Plane and use the I-SMP livery. Not strange since the Tecnam P2006T is an Italian aircraft manufacture and the registration I-SMP means actually Special Missions Platform.
Anyway, it should be possible to use this aircraft for the planned airports since the takeoff/landing distance is certified for 349 meters or roughly 1200-1300 feet.
For my flight impression I use Little NavMap. A great program that allows you and me to create a flight plan with lots of options. For me right now, I only need a FMS flight plan to guide me in what direction I need to fly. See it as a guidance to fly from airport to airport irrespective what and how I fly between these points. That depends on the mountains along my route and the detours I want to make to see the specific Dolomites from nearby.

Depending on where I fly or what I want to see, I climb to a certain altitude. One thing you and I need to know is that the practical ceiling level of the Tecnam P2006T is 14.000 feet which I can tell you is high enough to fly over the Dolomites since the highest Dolomite peak – the Marmolada – is roughly 11.000 feet, besides if that’s on my route.
Detailed Flight Information
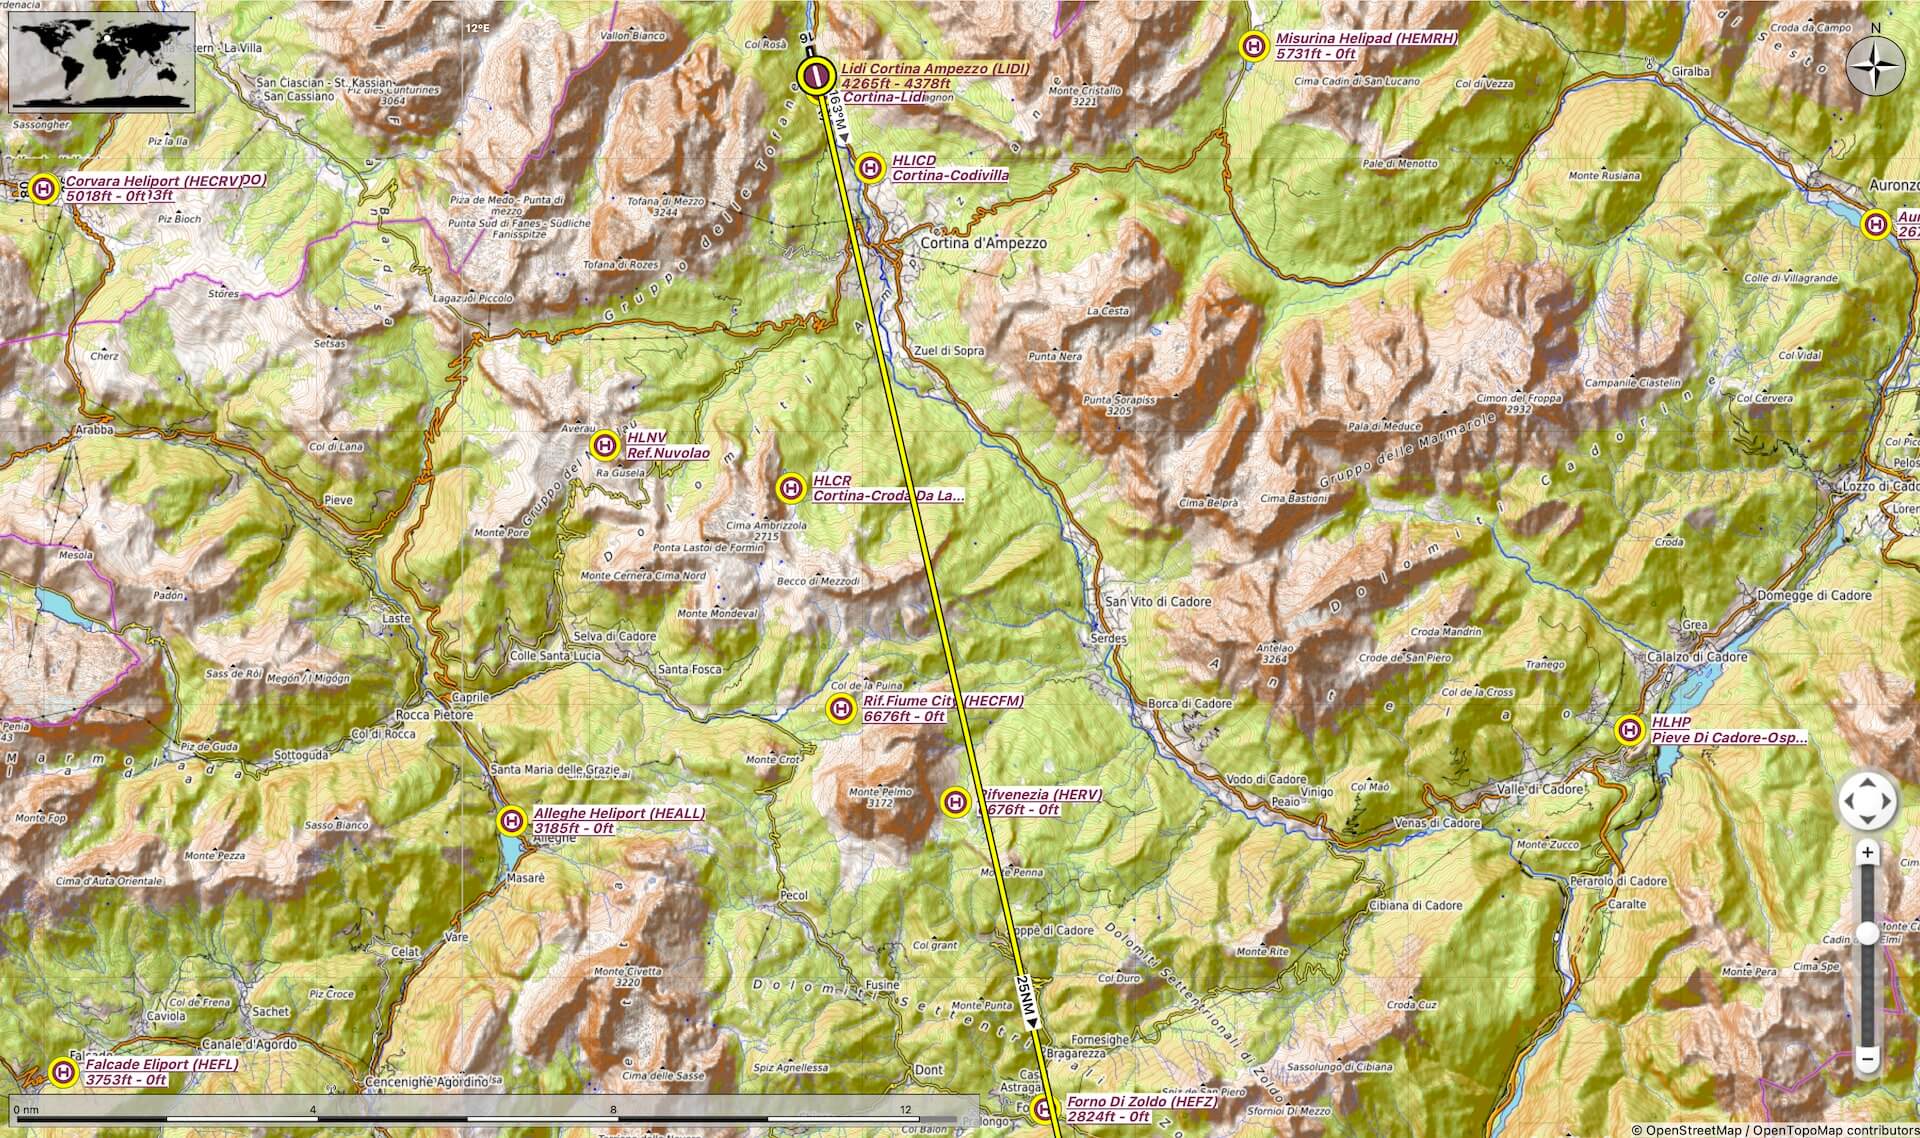
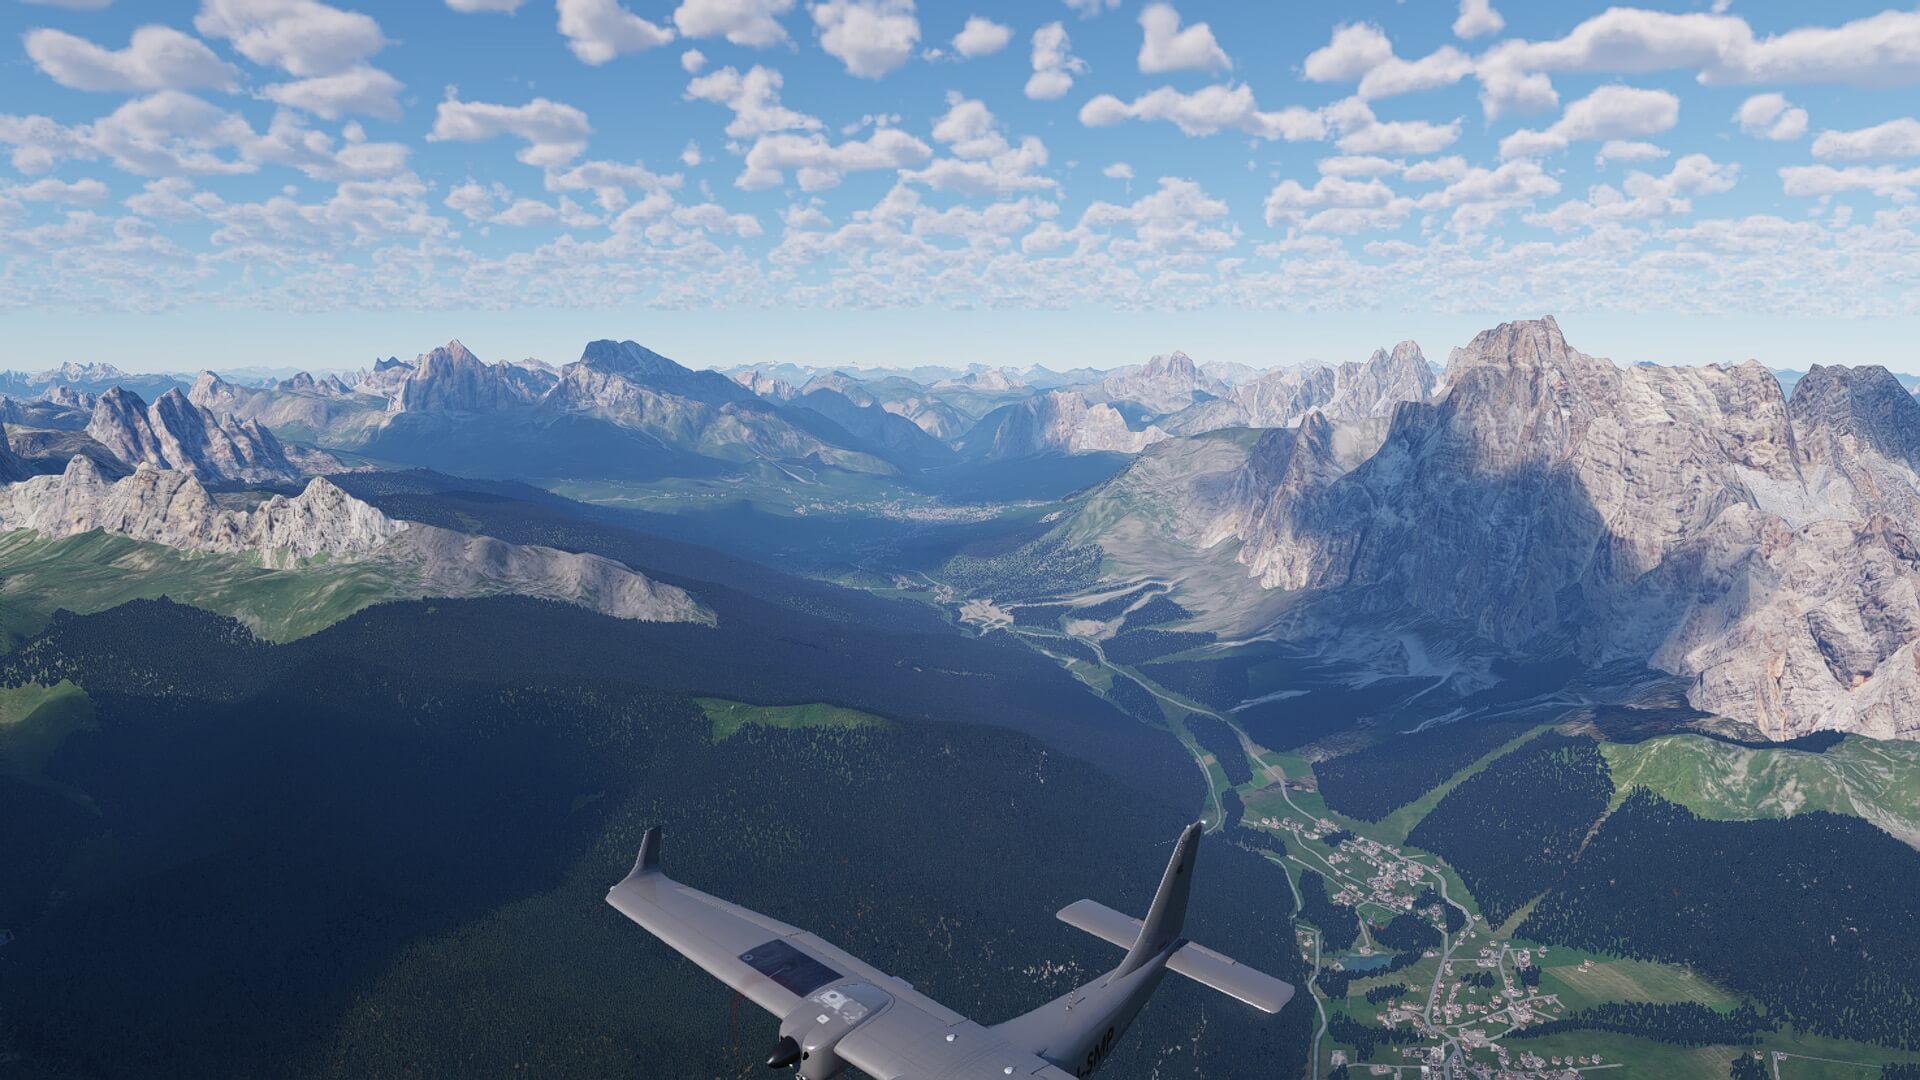
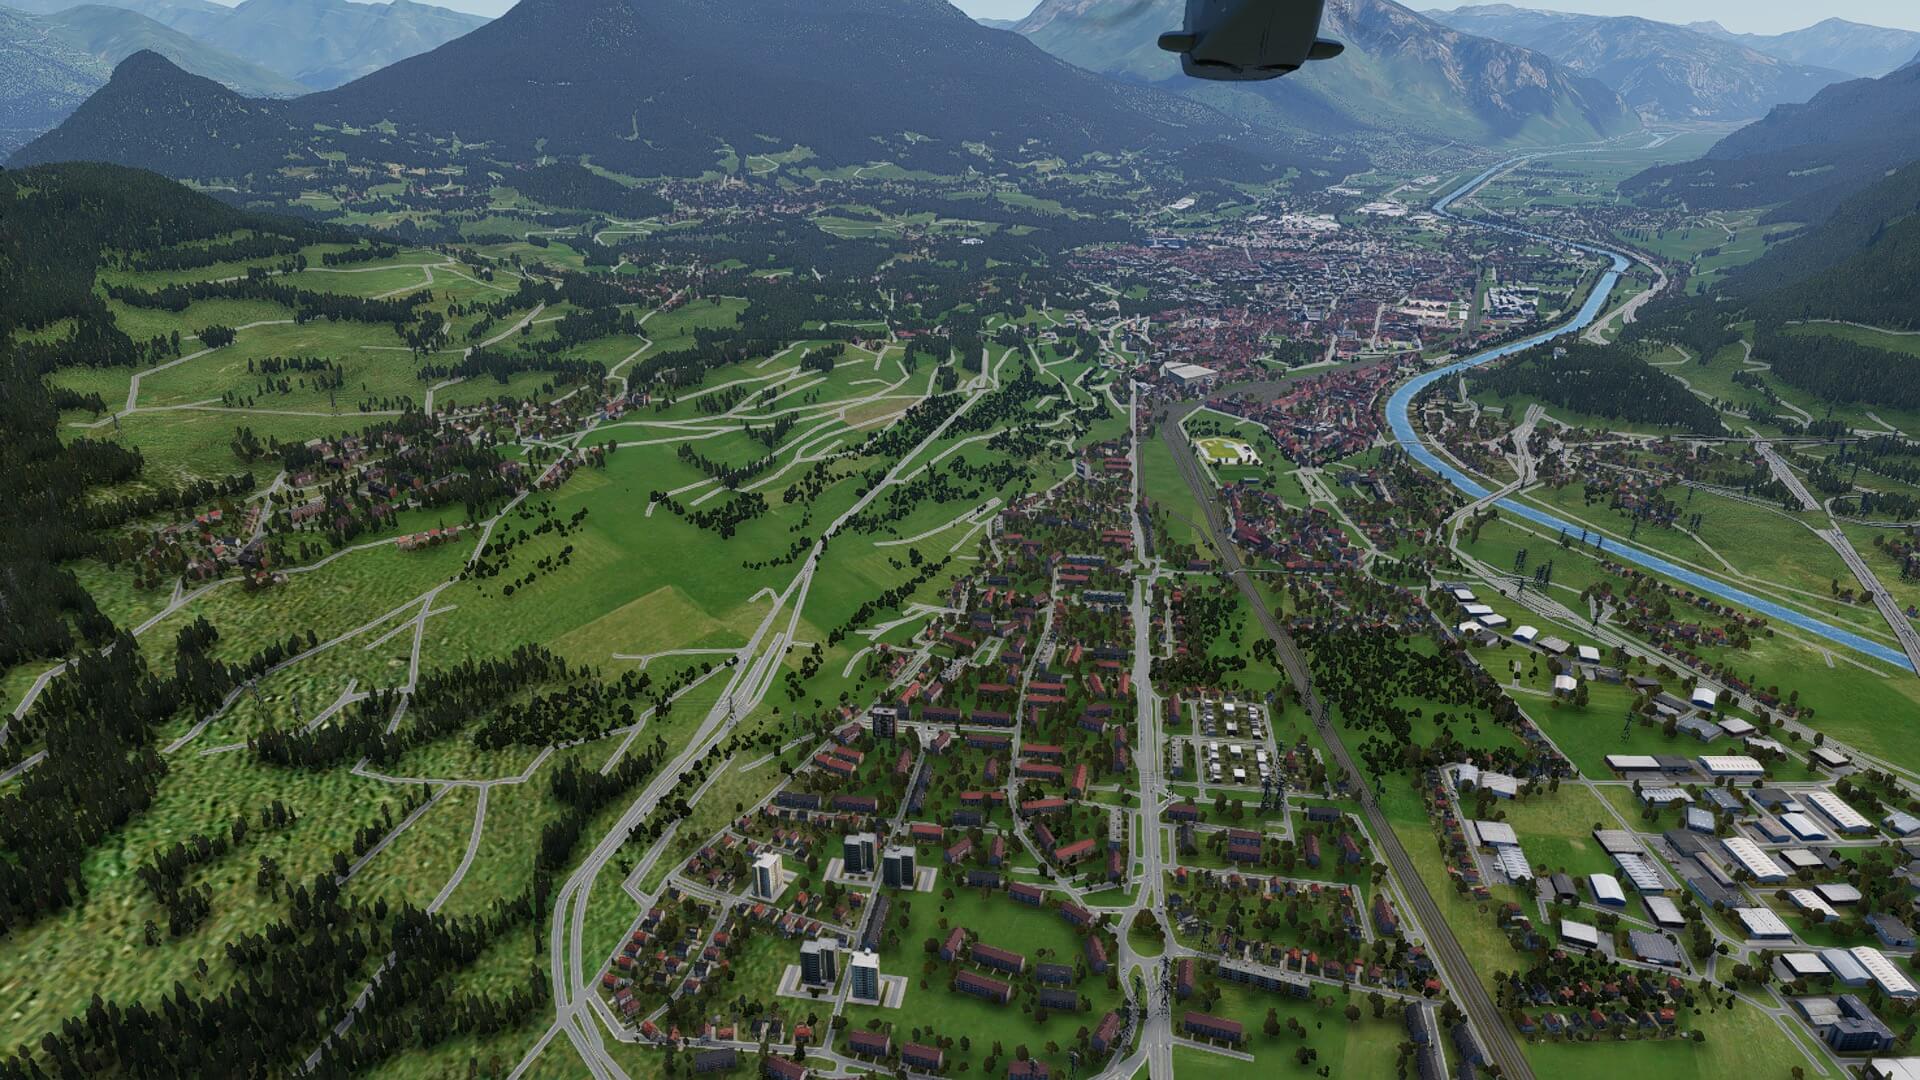
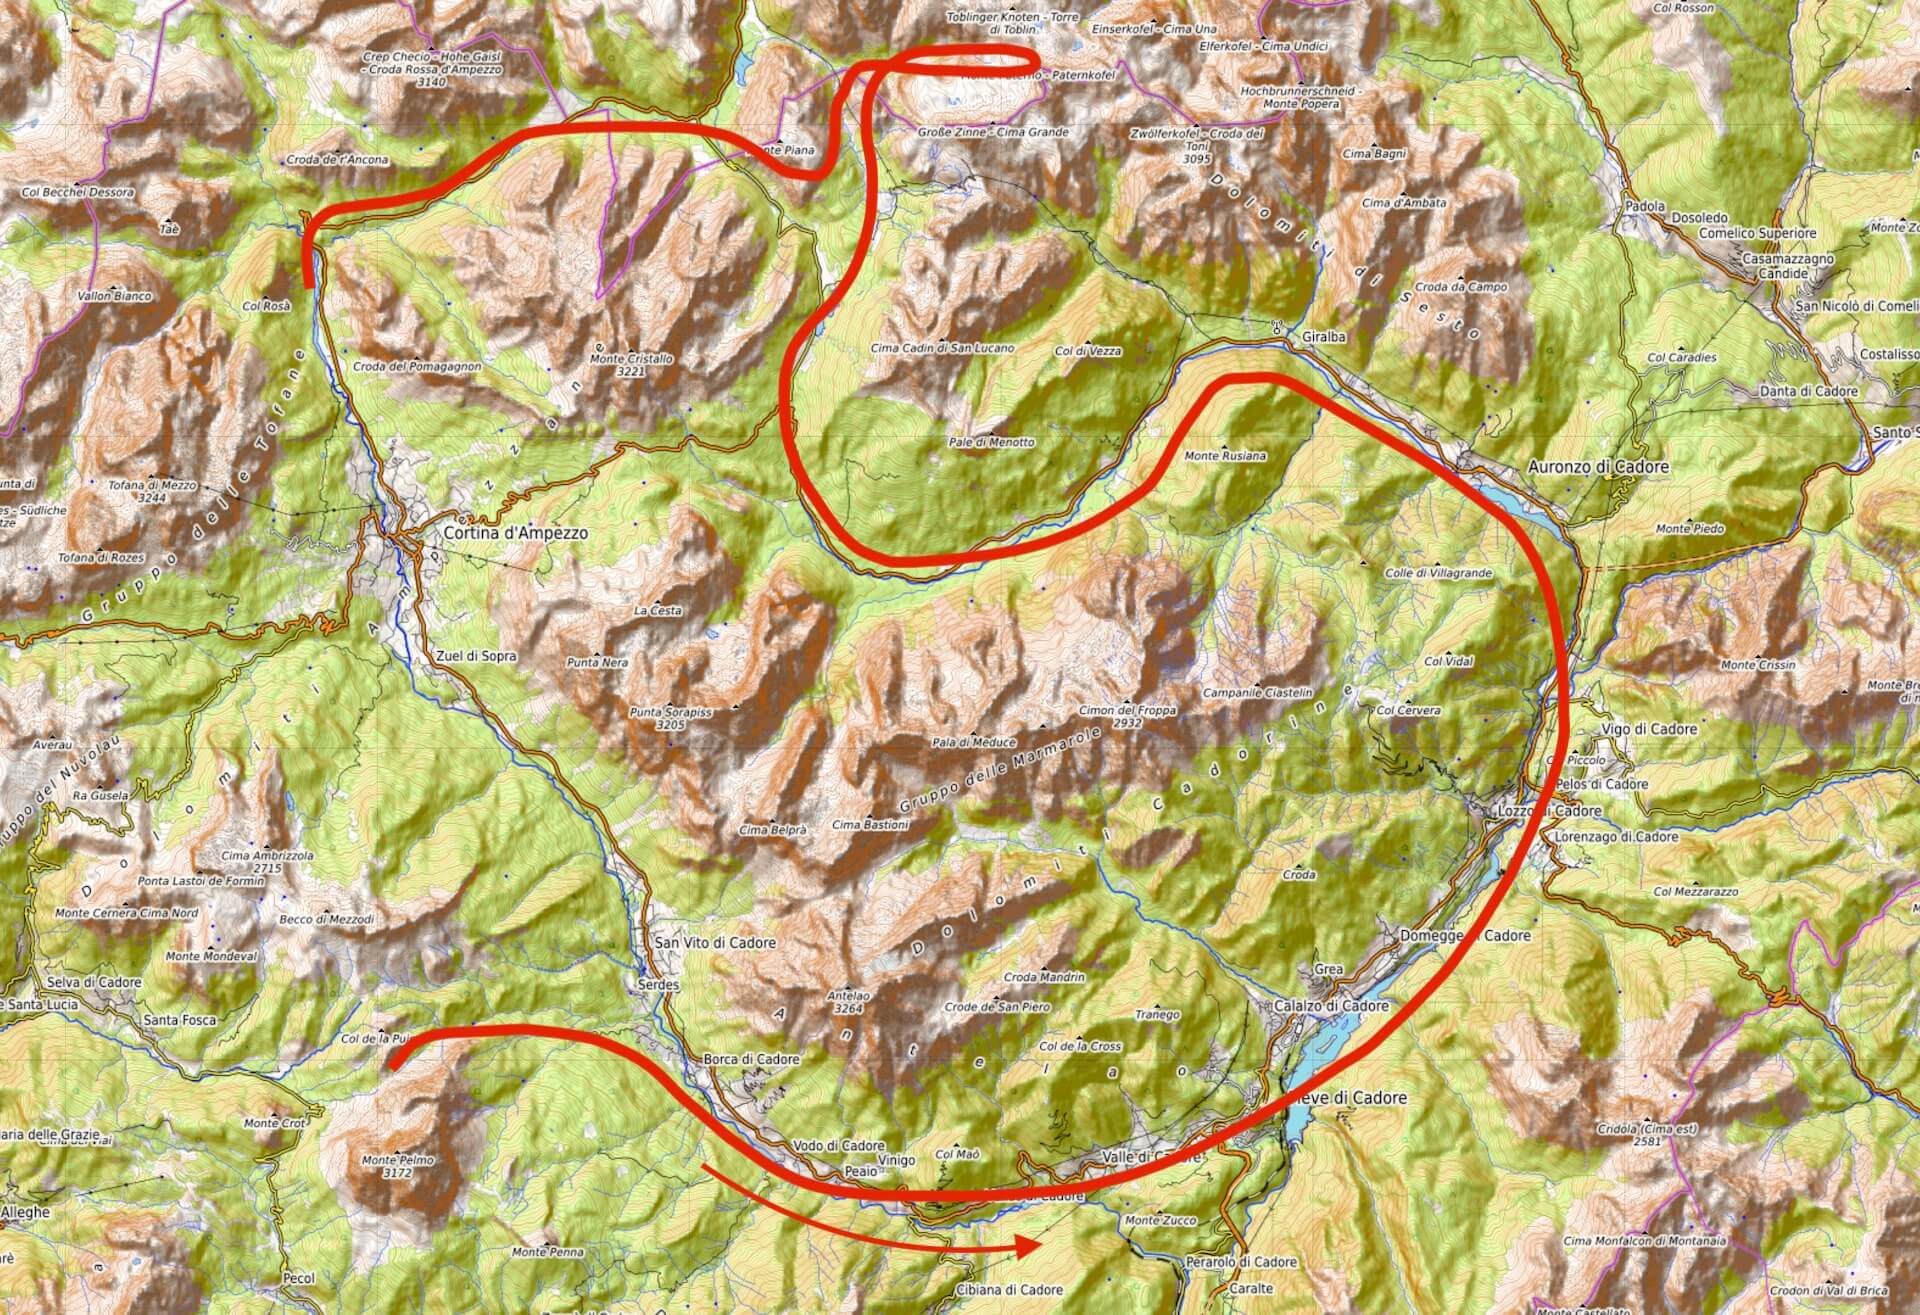
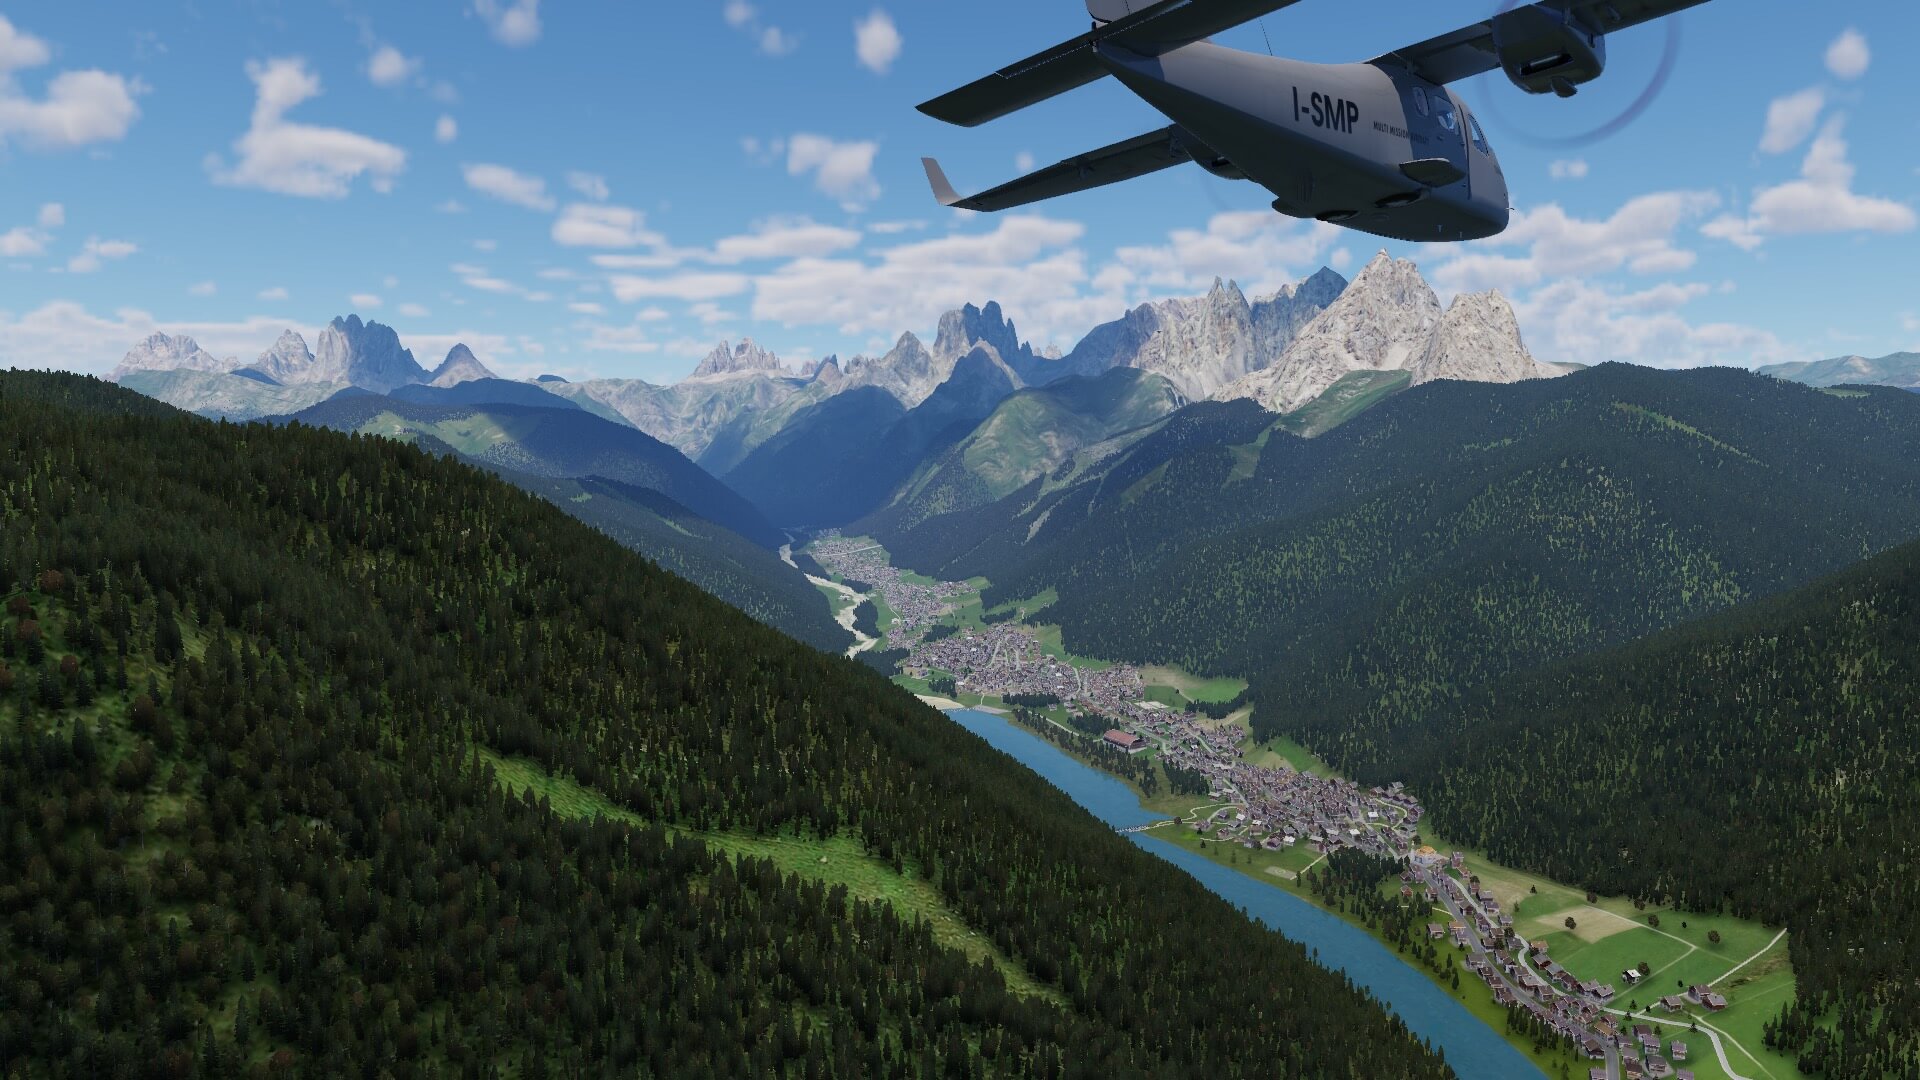
The first Dolomite stretch will be from LIDI (Cortina d’Ampezzo) to LIBD (Belluno).
While departing from LIDI in a southern direction, I should spot on the left side the Gruppo del Pomagagnon, while right are the Gruppo delle Tofane. A little further, almost opposite of the city of San Vito di Cadore, I should see the Gruppo Croda da Lago with just behind this the Monte Pelmo and Monte Pelmetto. The area I’ve just flown above is also known as the Dolomite Ampezzane.
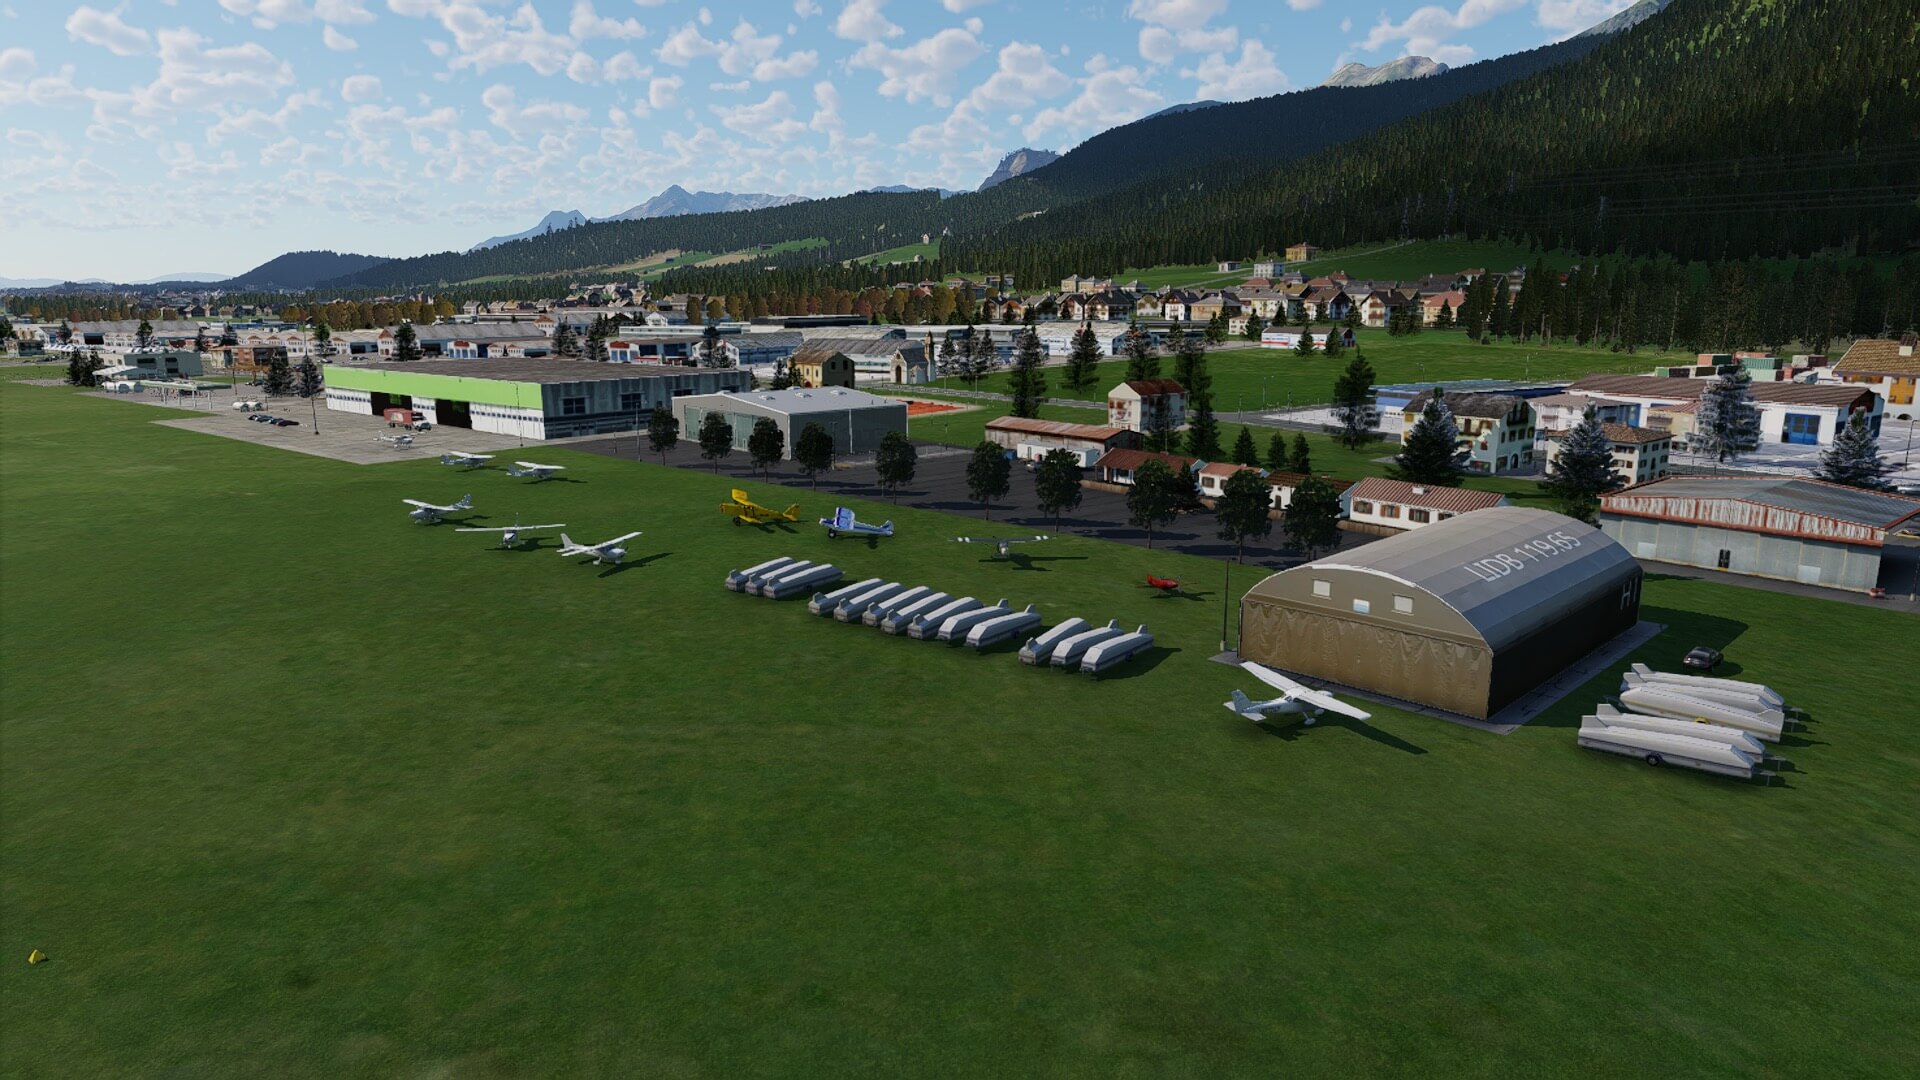
After I’ve left behind me the Monte Pelmo and Monte Pelmetto, I reach the Dolomite Settentrionali di Zoldo, with before I forget it, on my right the large mountain area known as the Civetta. Next on our trip it will be followed by the Dolomite Meridionali di Zoldo before reaching the city of Belluno with airport LIDB. The following Little Navmap screenshots show you in more detail the route to fly.
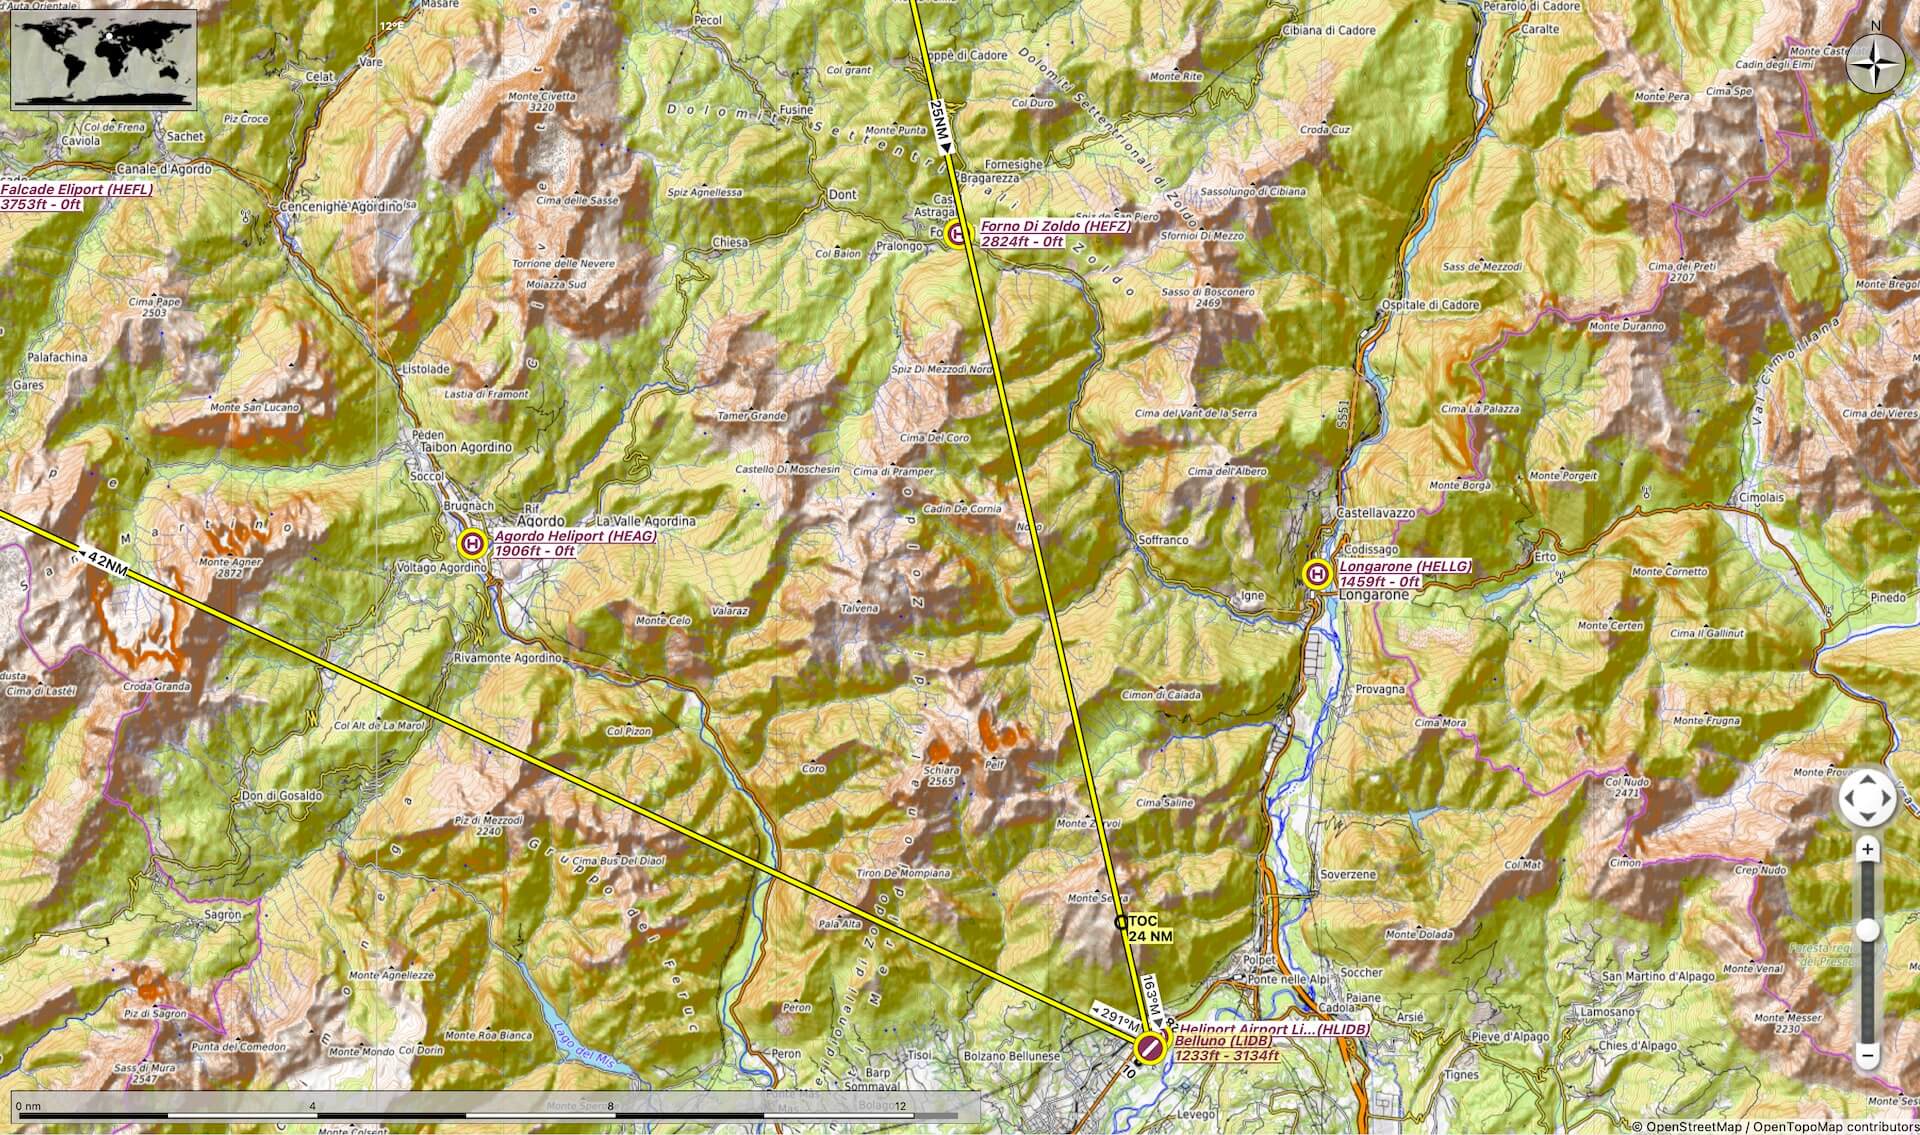
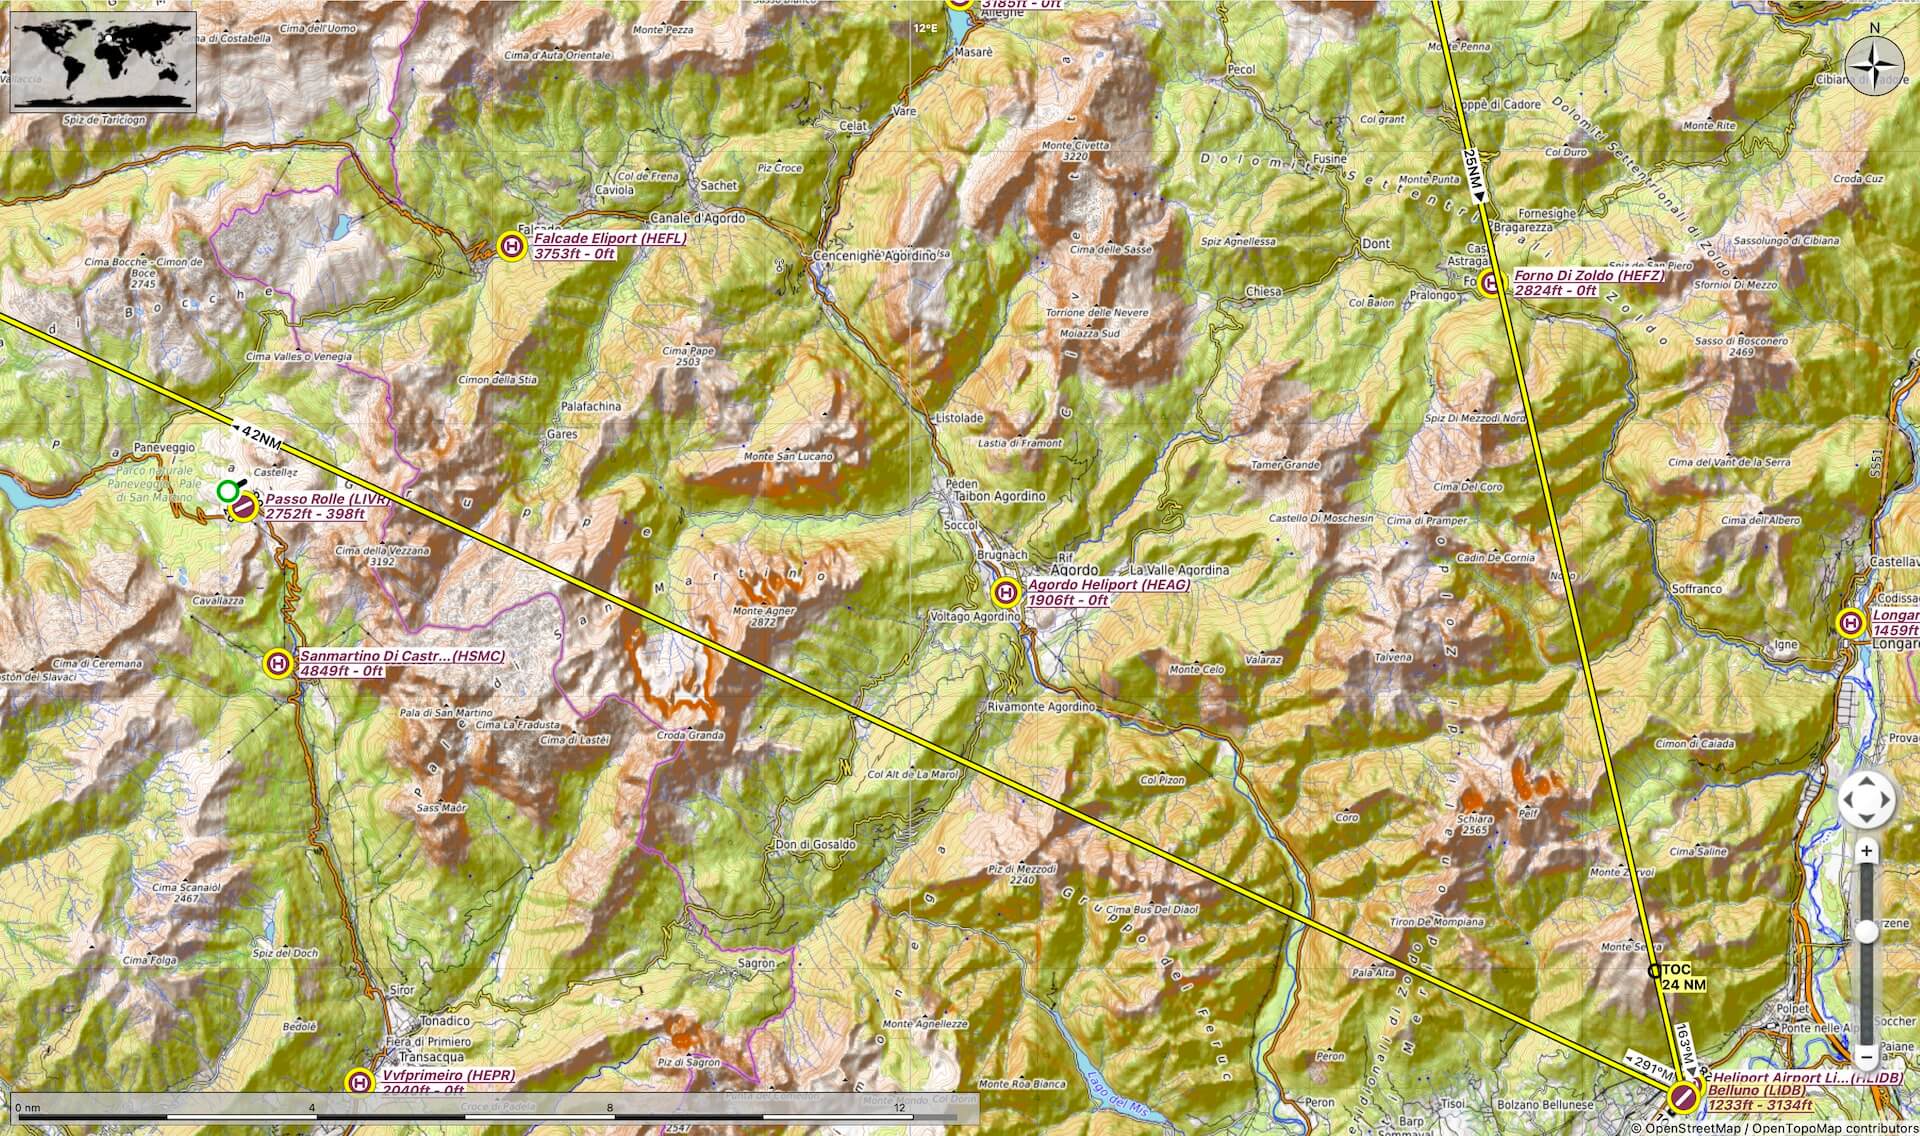
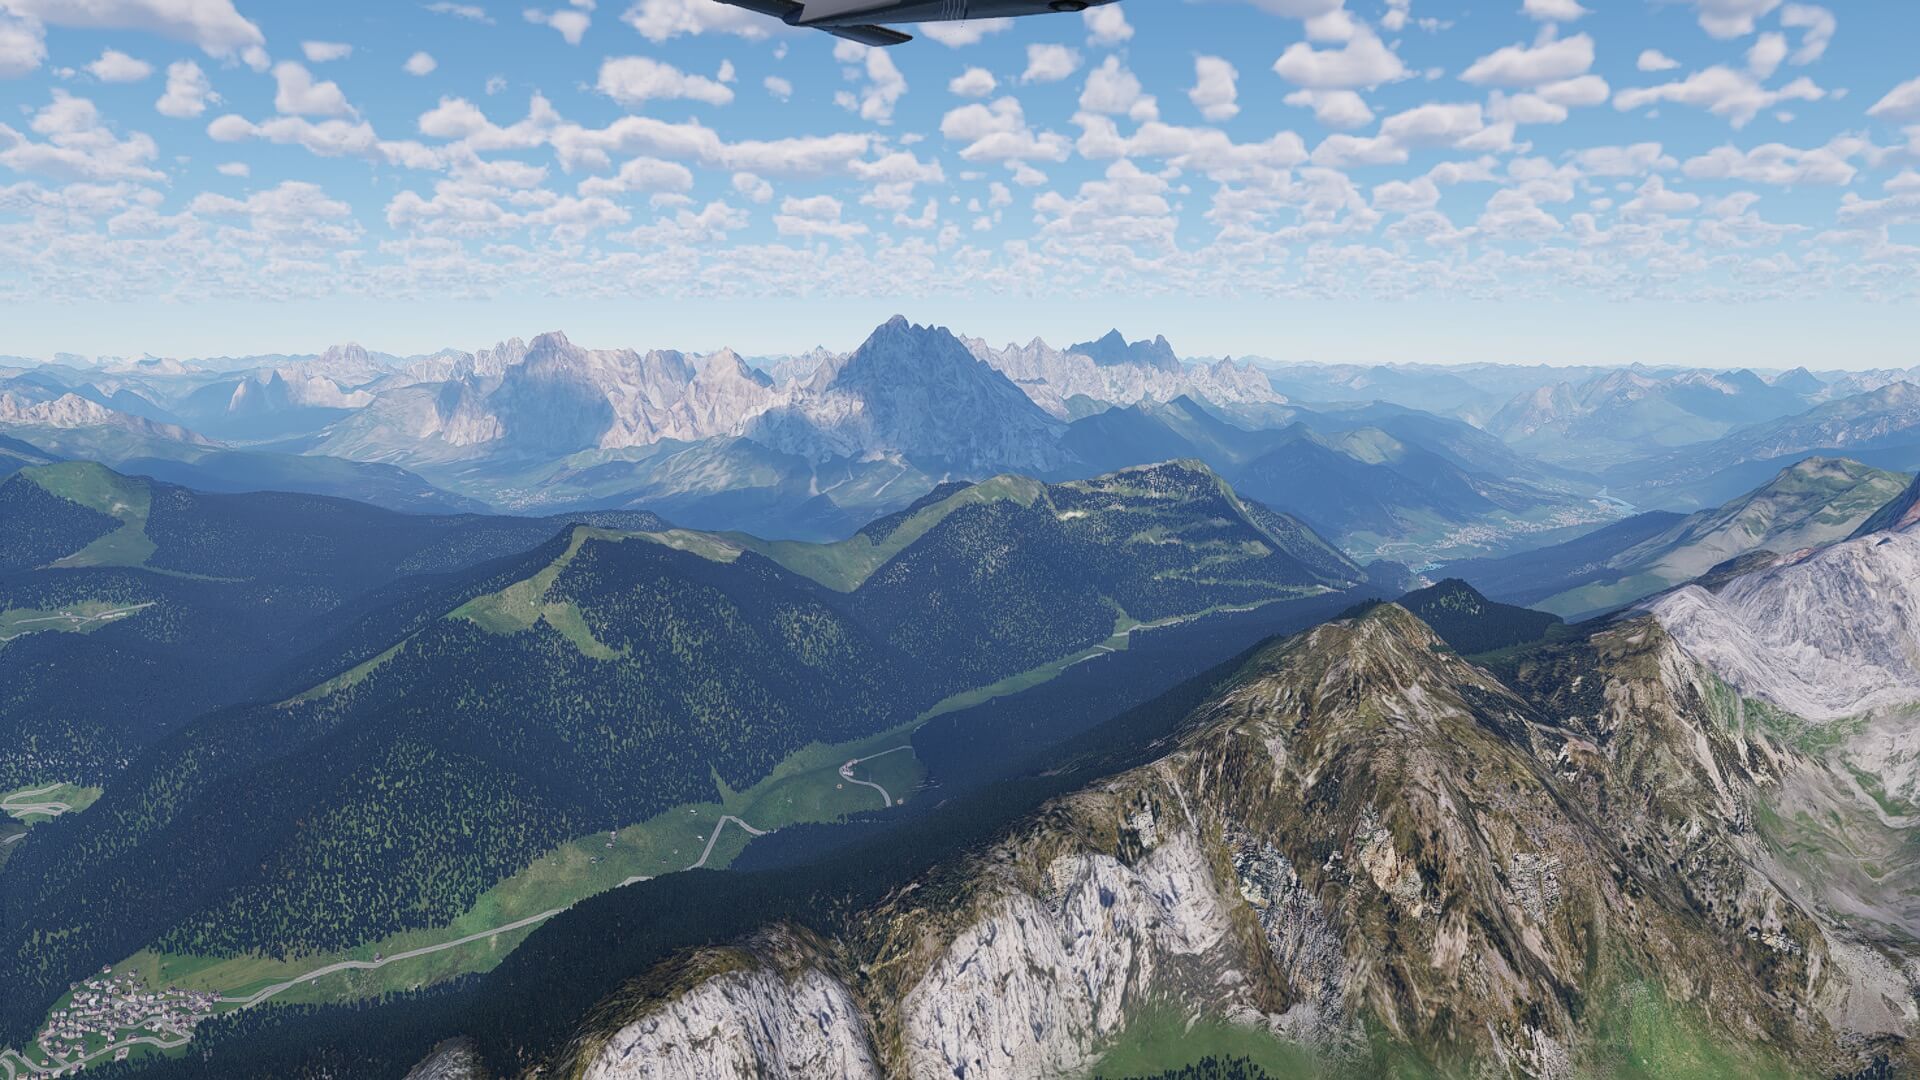
The next stretch is from LIDB to LIPB (Belzano). We had seen the Dolomite Settentrionali di Zoldo from the right while flying in a southern direction. Now we see these Dolomite from the left while flying in a western direction. Via Lago del Mis we reach, I can’t miss it, the Gruppe Pale di San Martino. Not sure if I will see it, but behind these massive Dolomite is the heliport Sanmartino Di Castrozza. Having on our left side Lago di Paneveggio, I should spot on the right side Catena di Bocche with immediately behind these mountains Gruppo della Marmolada with the highest point, the Punta Penia at 3343 meters. Before approaching Bolzano (LIPB) we fly over the Cimon del Latemar-Diamantiditurm (Latemar). I could create a detour in the direction of Gruppo del Catinaccio. It is easy to reach the valley following the cities Moena, Pozza di Fassa and Mazzin. What I decide to do is not so important right now since I always end up in the Belzano valley.

The last stretch to explore the Dolomite goes from LIPB to LIDT (Trento). I could make it myself easy by flying via the valley and follow autoroute A22 or the river Etsch Adige, but that’s no fun and besides that, I want to see the Dolomite. Before reaching our final destination LIDT Trento, you and I can’t miss on the right-hand side the Dolomite di Brenta with in front of them the Gruppo della Paganella and south of these the Gruppo Bondone-Stivo. I’m not sure if the following is also included in the Dolomite package, but behind the Dolomite di Brenta lies the Italian Alpi dell’Adamello e della Presanella. No, I guess this lies outside the Dolomites package.
Hold on, I forgot something.
While flying to Trento, I spot on the left-hand side the Dolomite Settentrionali di Fiemme, and a little south of them the Dolomite Meridionali di Fiemme, and the Fleimstaler Alpen – Dolomite Fiemme. And then while approaching Trento-Mattarello Airport (LIDT), this flight impression comes to an end.

Although I haven’t yet flown these three stretches, there’s always that same question; did I see with these flight impressions all the modeled major and minor Dolomites from Frank and Fabio? I guess that the answer is no, but what I do know is that I did see a lot and therefore I’m sure that this review gives you a good idea what to expect when you want to fly yourself thru the Italian Dolomites.
Stretch 1 – LIDI (Cortina d’Ampezzo) to LIBD (Belluno)
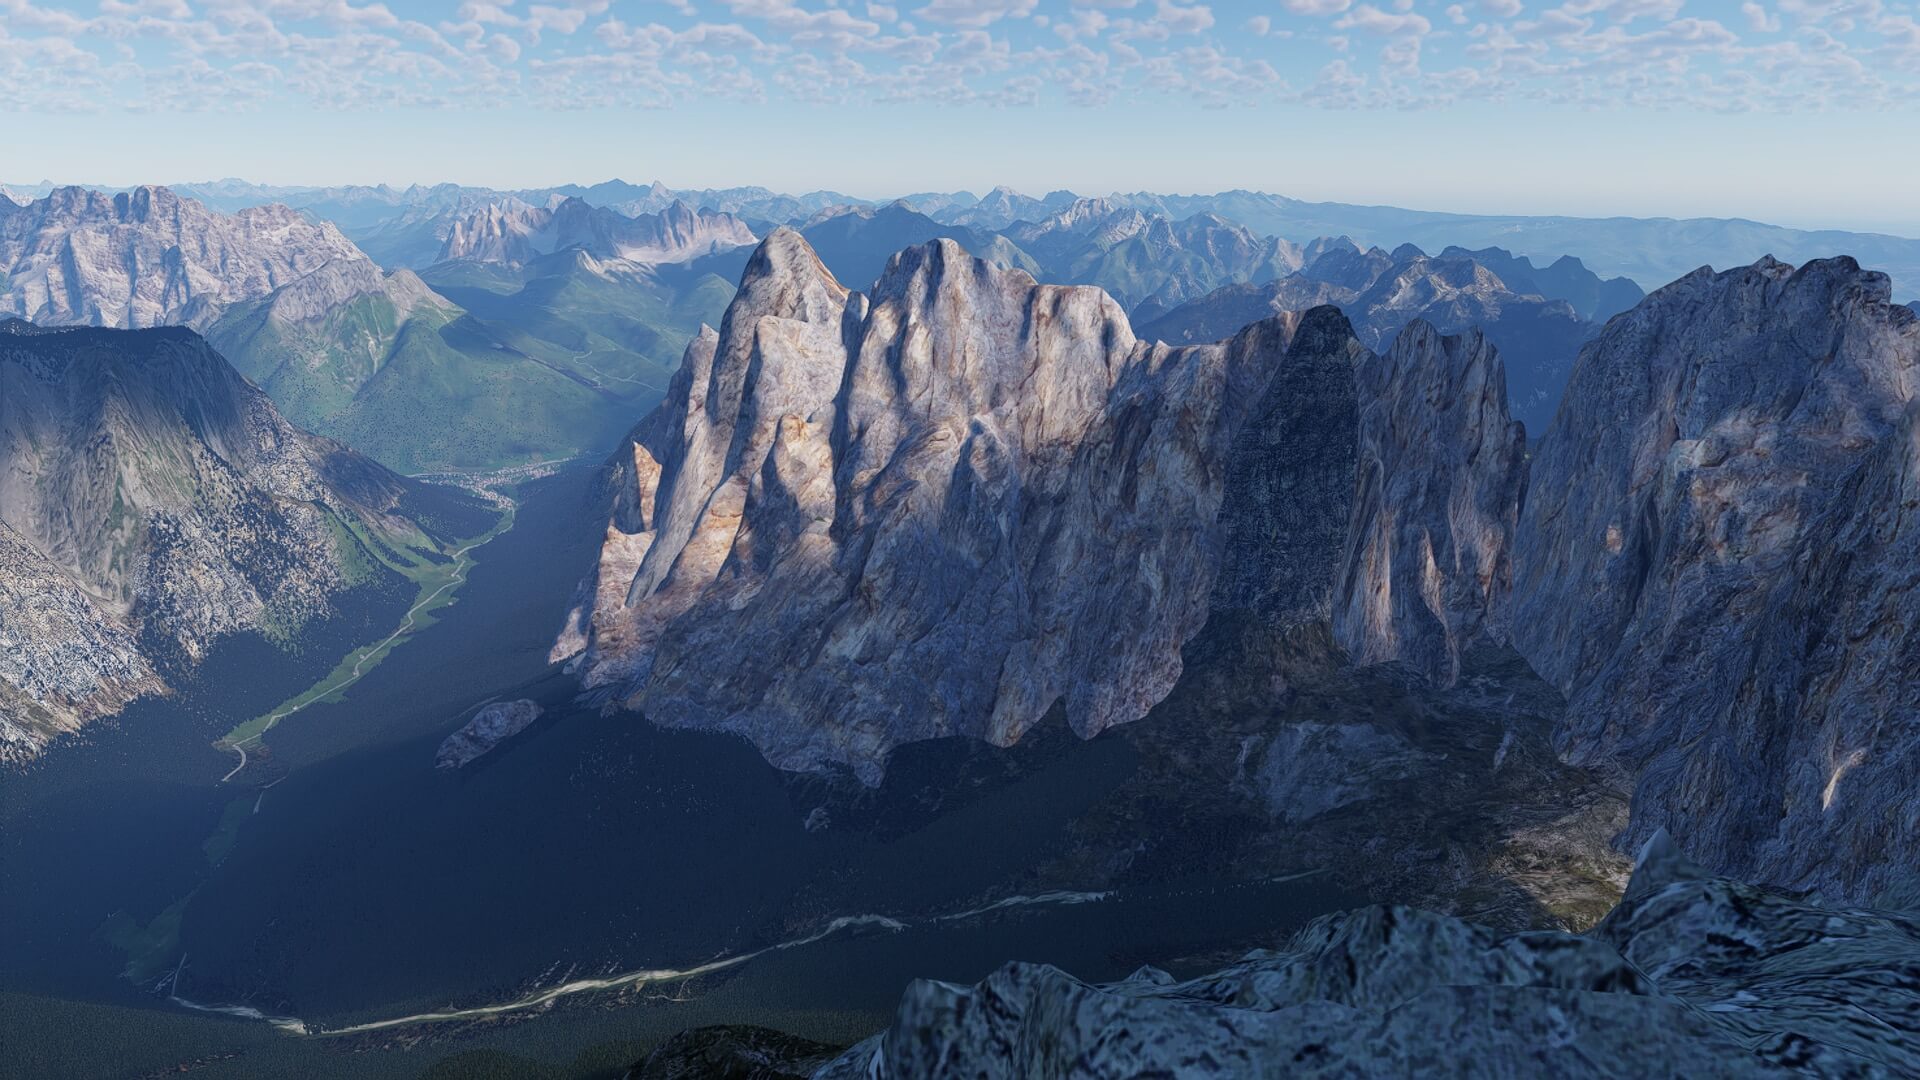
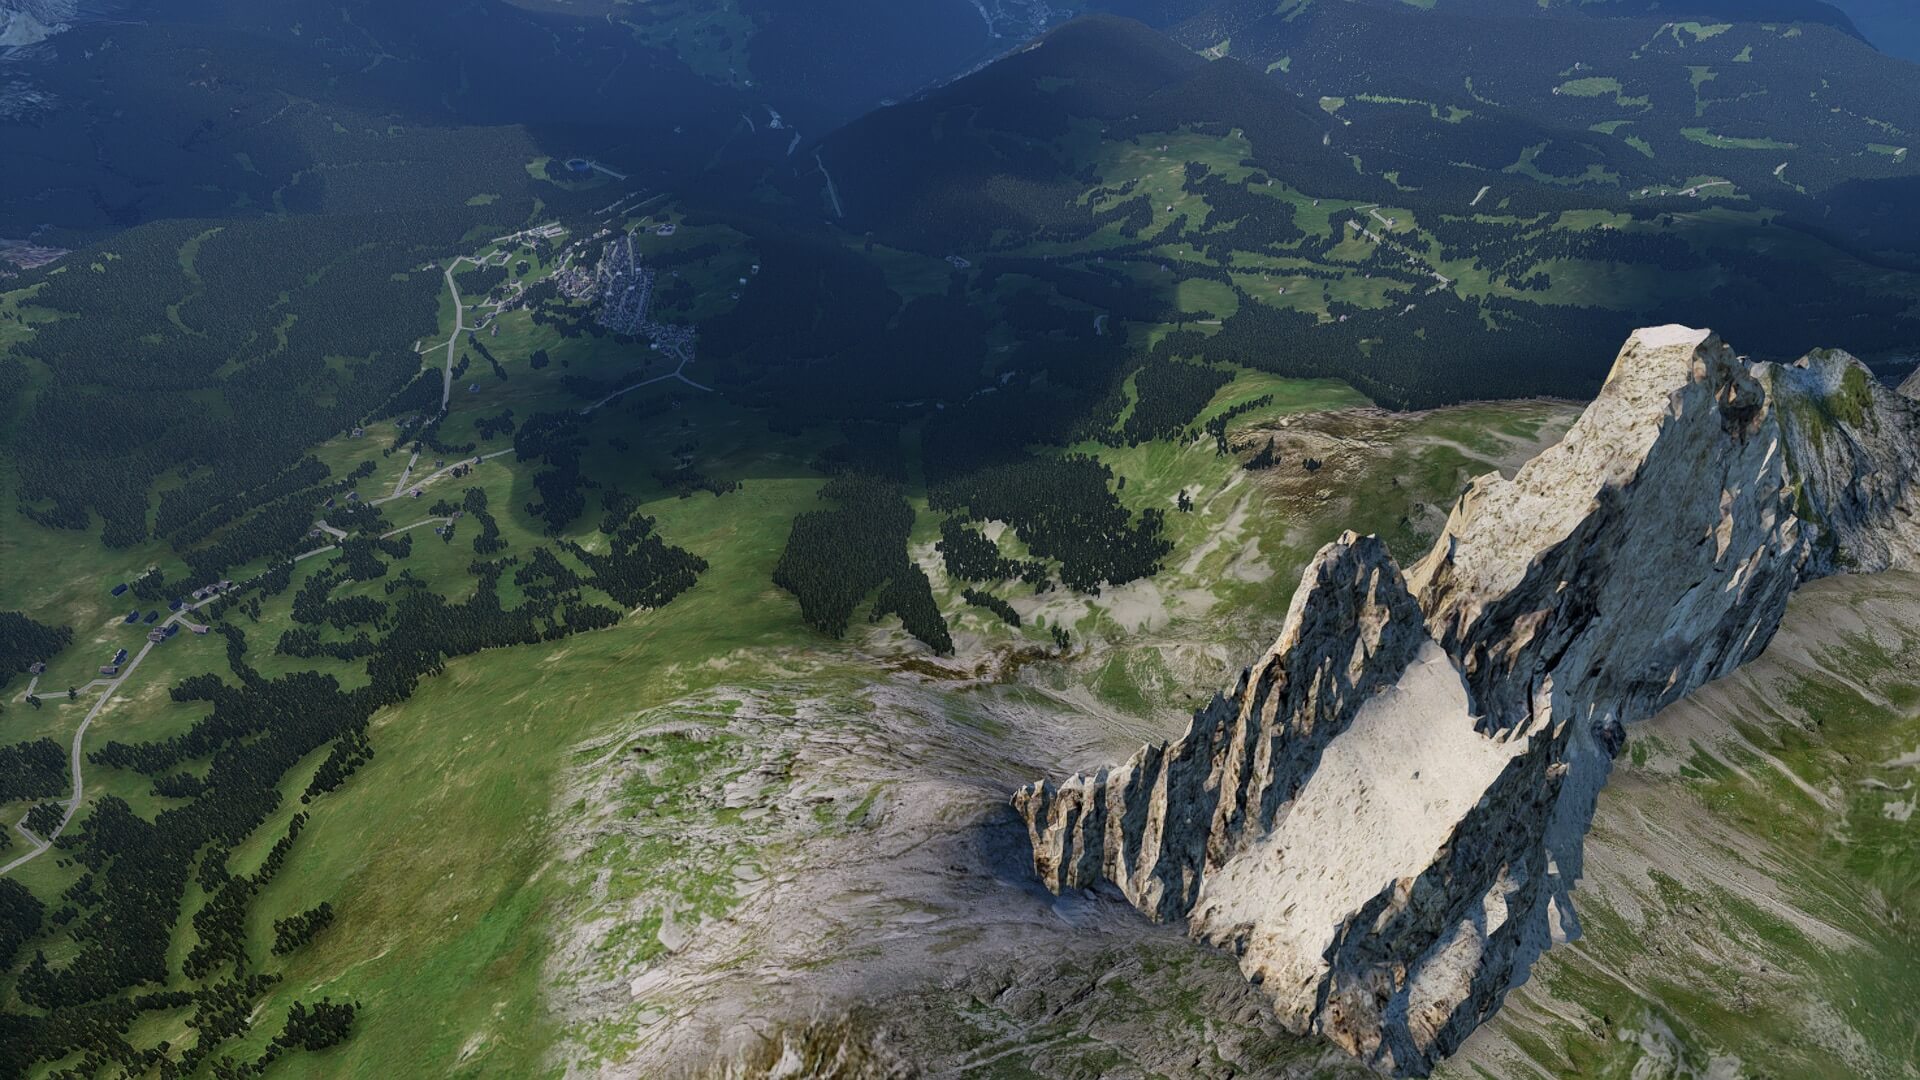
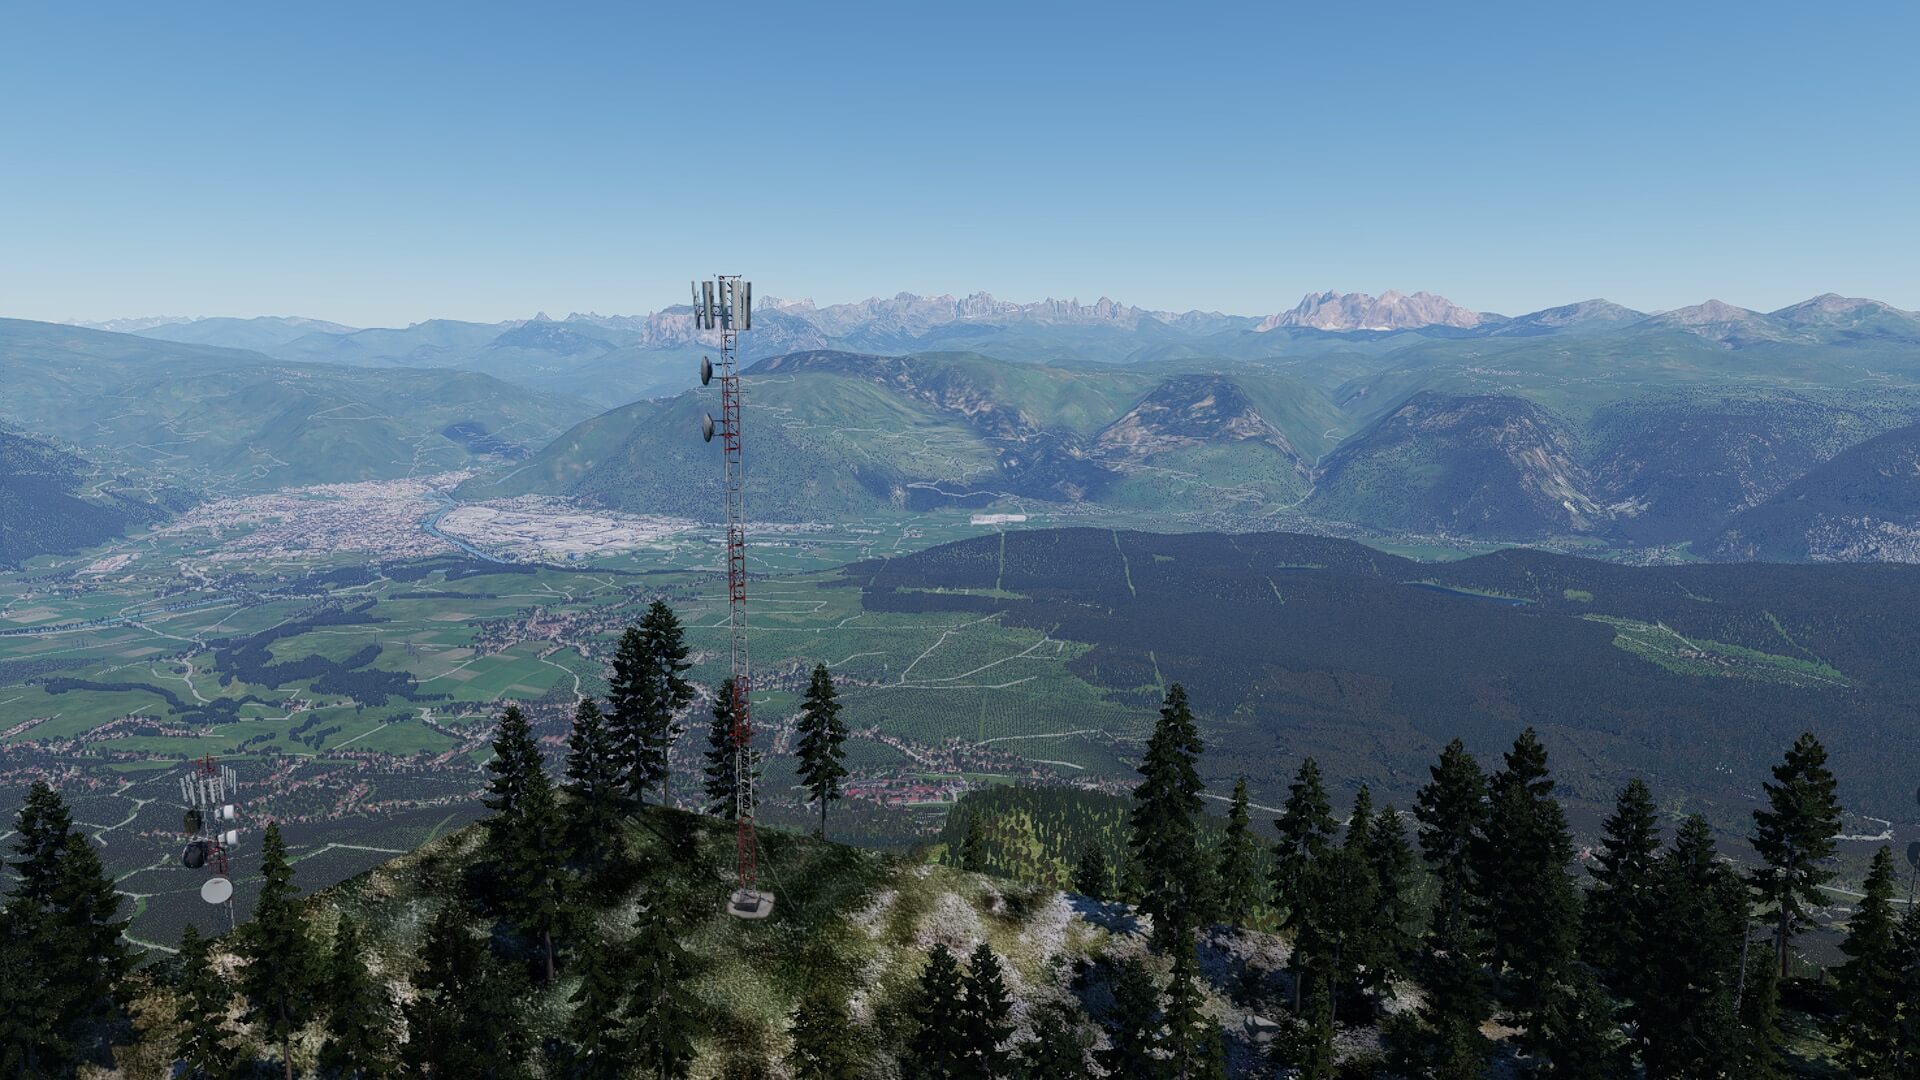
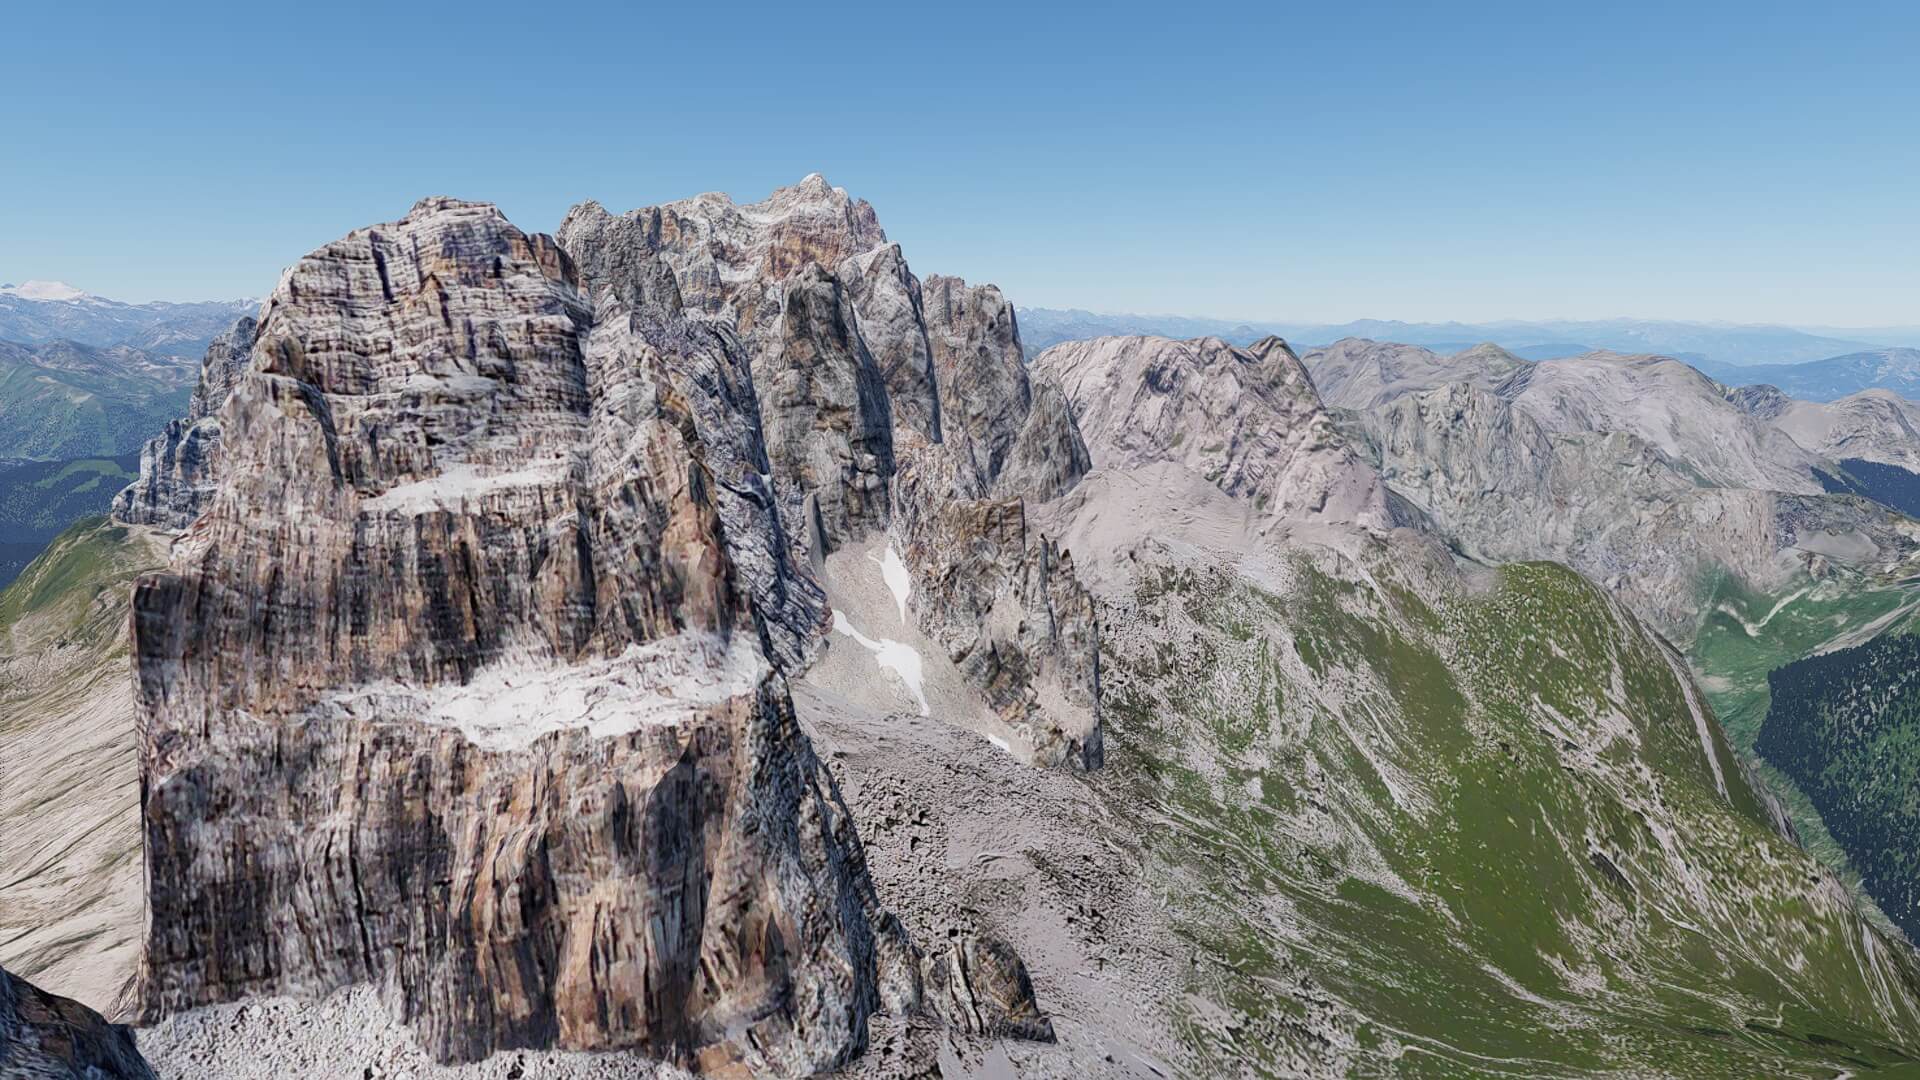
Believe it or not, but I planned to fly each stretch of my Dolomite exploration only once, but it turned out that I flew each stretch several times. Why you would ask? The answer is very simple … there’s so much to see on each stretch that you don’t know where to look for. All what I see on this first stretch is almost overwhelming me. I see this, and then that, and oops, there’s also something I would like to see and so this first stretch ended up in a massive WOW of what I’ve seen.
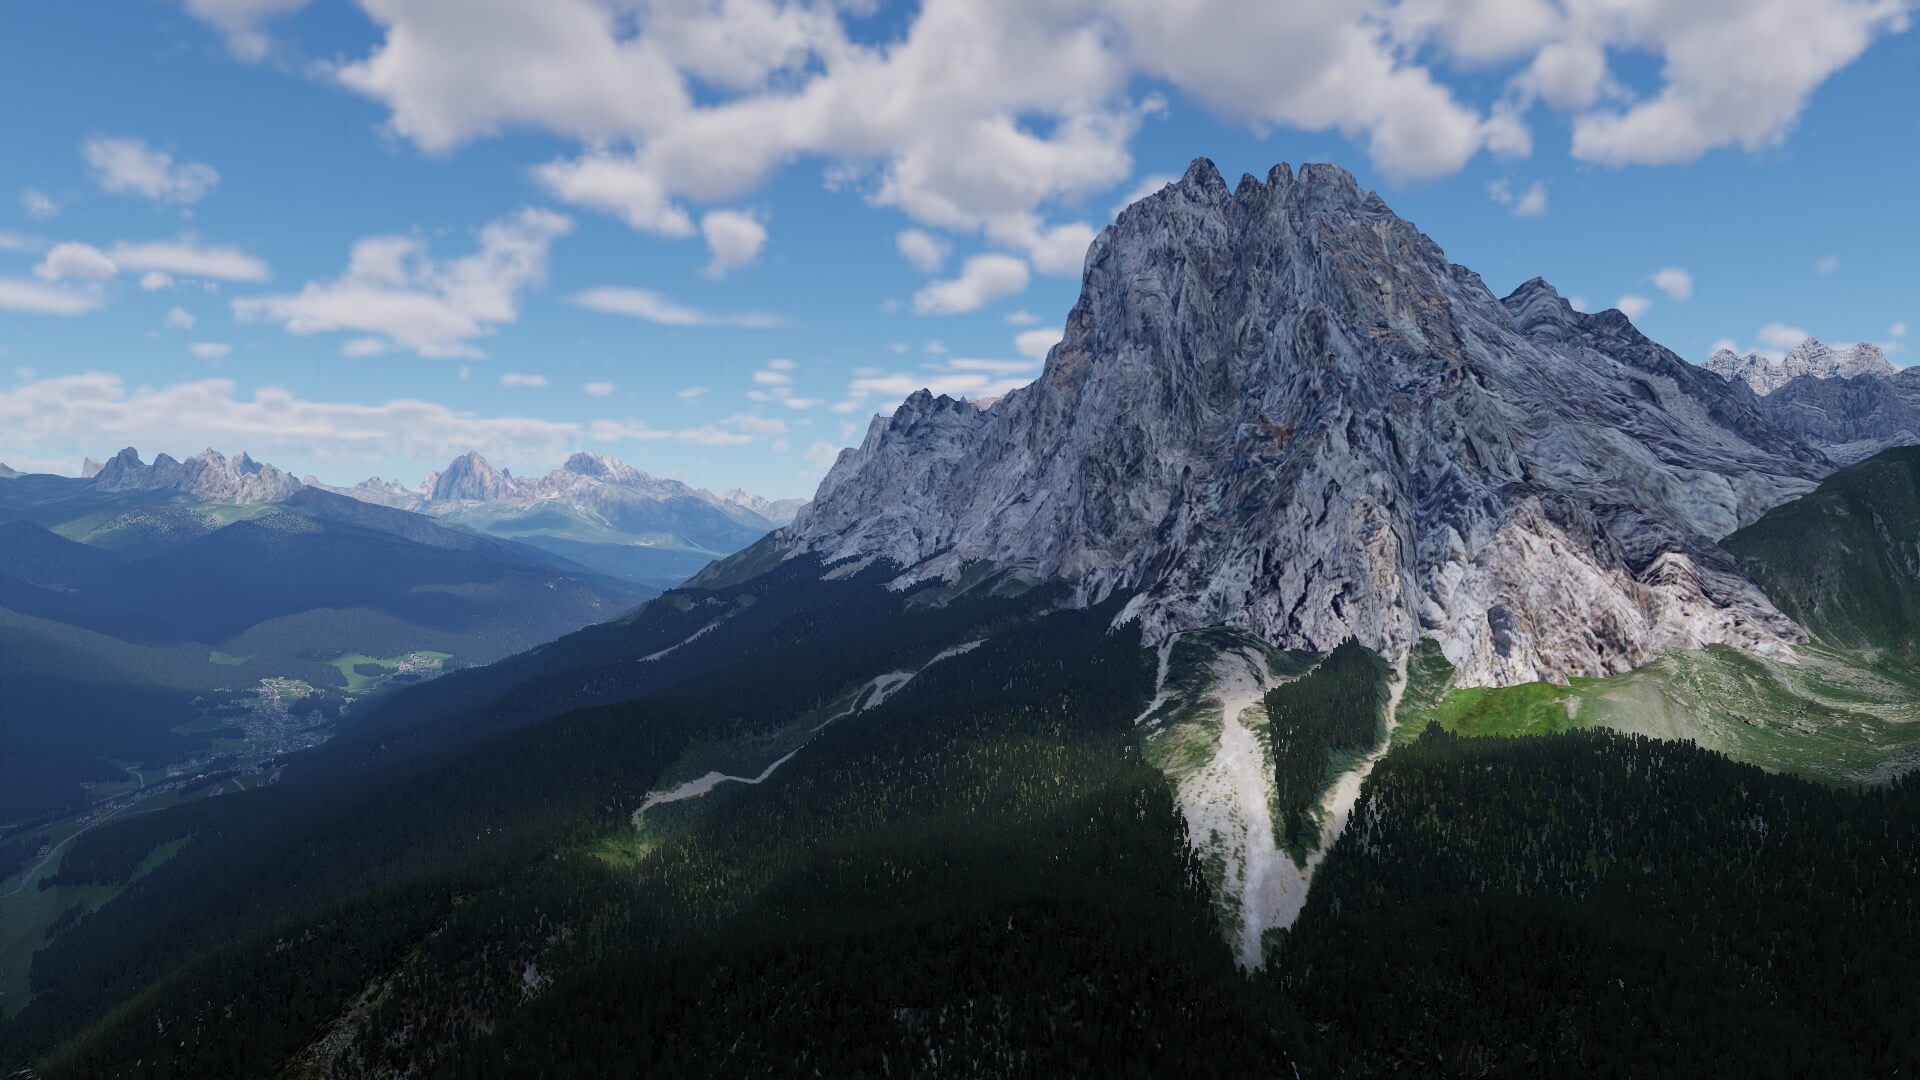
It begins already when taking off from LIDI. On my right-hand side I spot the massive Gruppo delle Tofane, but this is only one group of mountains that has stolen my hearth. I climb quickly out to roughly 8000 feet and that leads to another WOW. With a slight haze in the sky, the overview over the Dolomites looks gorgeous. And with that the real and modeled Dolomites show you the beauty of this area. The overall area is full with mountains, but different then for example the French and Swiss Alps.


The Alps is a large area of mountains covered with snow, more or less connected to each other while the Dolomites is an area with minor Dolomites and major Dolomites, as Frank explained me. The typical small young mountain groups are awesomely modeled and look almost as real as it gets. I and most likely you too when you have read this review and bought it, didn’t expect this to be honest. From the ground it all look great but the moment you’re in the sky and having that Dolomites overview, you’re lost. Lost because you don’t know where to look for. Everything looks great and I want to see everything, but I can tell you that this is almost impossible. Back to my flight.
I tried to get an idea “what is what” and with that I mean “can I recognize the groups as planned to see on each stretch” but that seems for most mountains groups very difficult to find out. On the other hand, having a guide via my FMS in which direction I need to fly, it is easy to see some Dolomites that are not close to my route. Since I fly without an Auto Pilot, it’s is easy to maneuver to see the groups close-by, and then return to my initial route.


So, on my first stretch I can recognize some of the planned Dolomites like the previous mentioned Gruppo delle Tofane, Gruppo Croda da Lago with just behind this the Monte Pelmo and Monte Pelmetto. Just to make it clear to you and even myself, the area I just flown is known as the Dolomites Ampezzane. I could continue by mentioning all the other Dolomites seen on my stretch, but I’ve lost them all.
I lost them all because it looks stunning, and as you can see on the previous screenshots, I kept the Summer season active and didn’t switch to Winter and adding snow in this region. I did it for a moment to see how it looks like, and honestly, I like the Summer look and feel much more then when the Dolomites are fully covered with snow, knowing that this is a personal feeling, but why do I like flying thru the Dolomites in Summer?
When you’re exploring the Dolomites during the Summer, Spring or Autumn, you can see the beauty how these Dolomites are made, the beauty of the photo real textures with what the Dolomites are covered. When you have a snowy landscape you don’t see that, right?
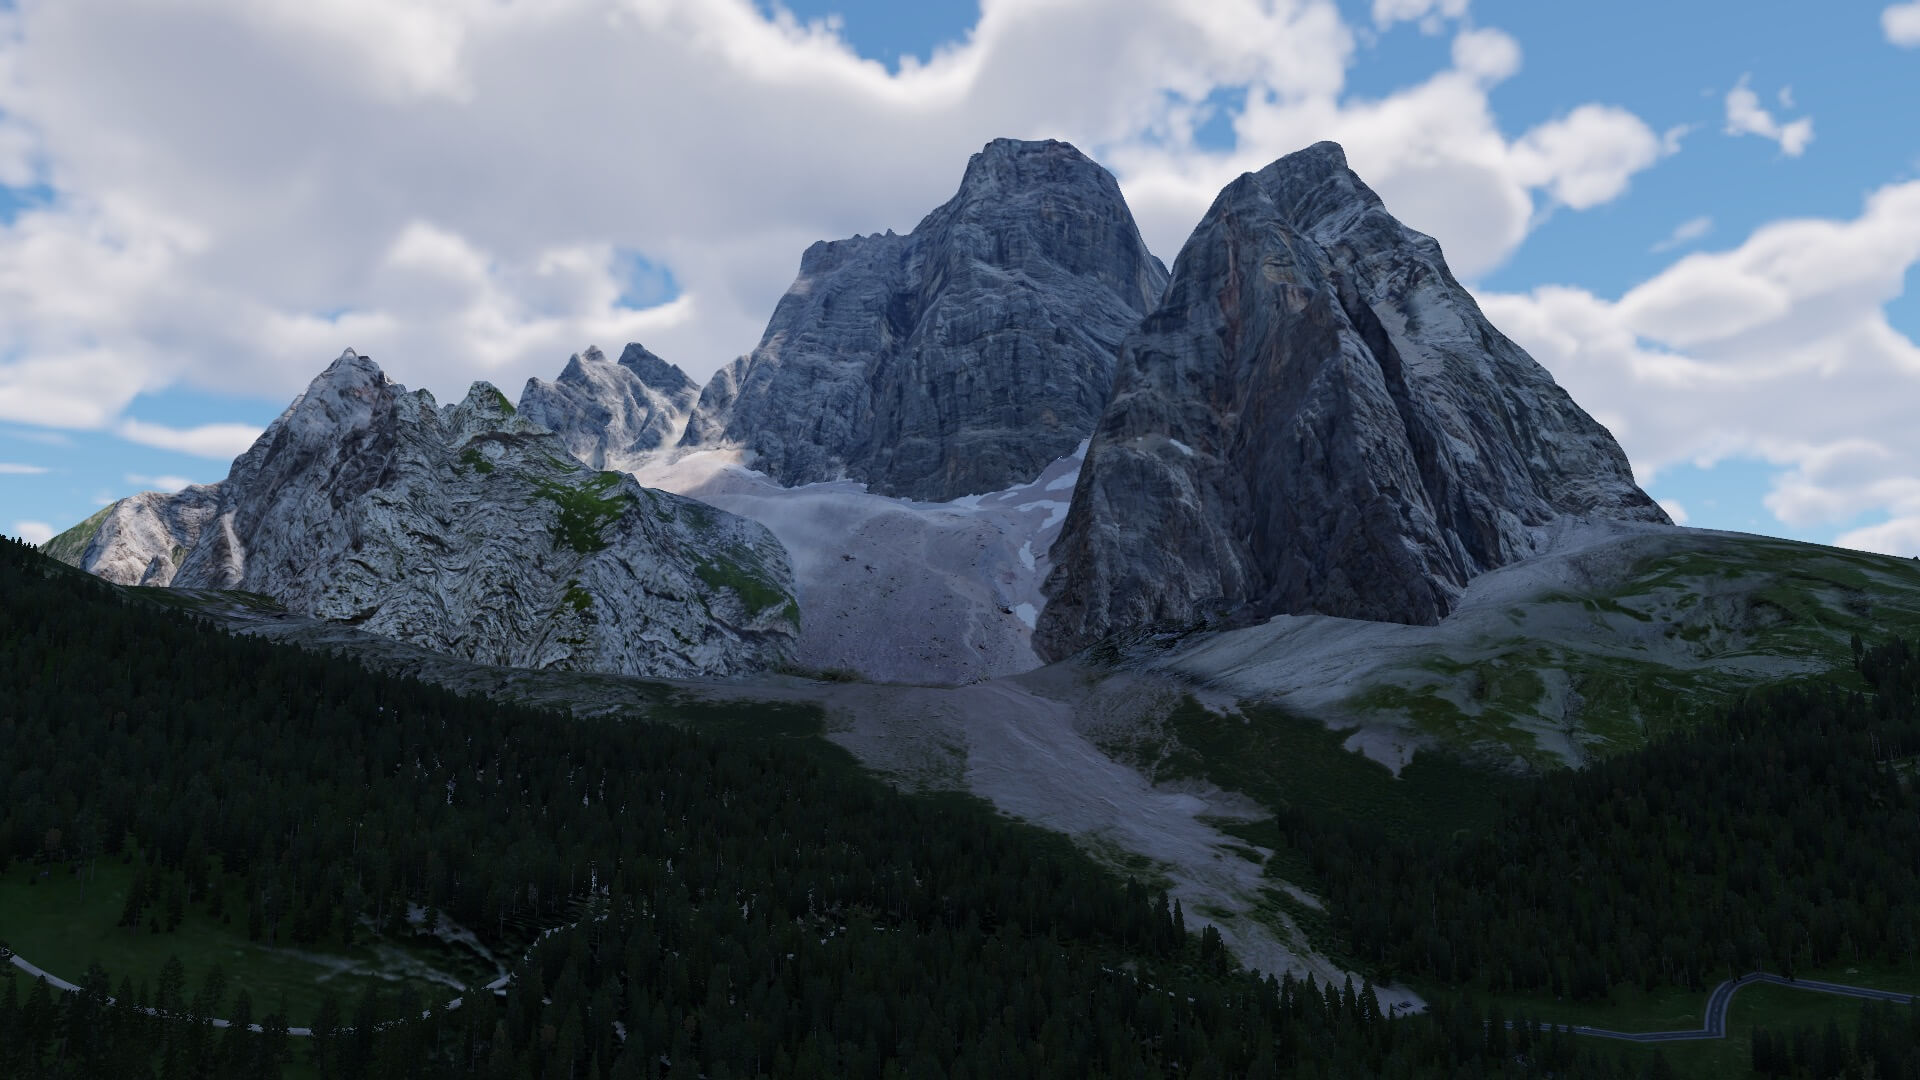
Before starting my descent to Belluno, I can spot on my right-hand side the peaks of the Schiara and Pelf that belong to the Dolmites Meridionali di Zoldo. With the approach to Belluno I end my first stretch and I’m impressed by what I’ve seen so far. I’m looking forward to see the next Dolomites on my next stretch.
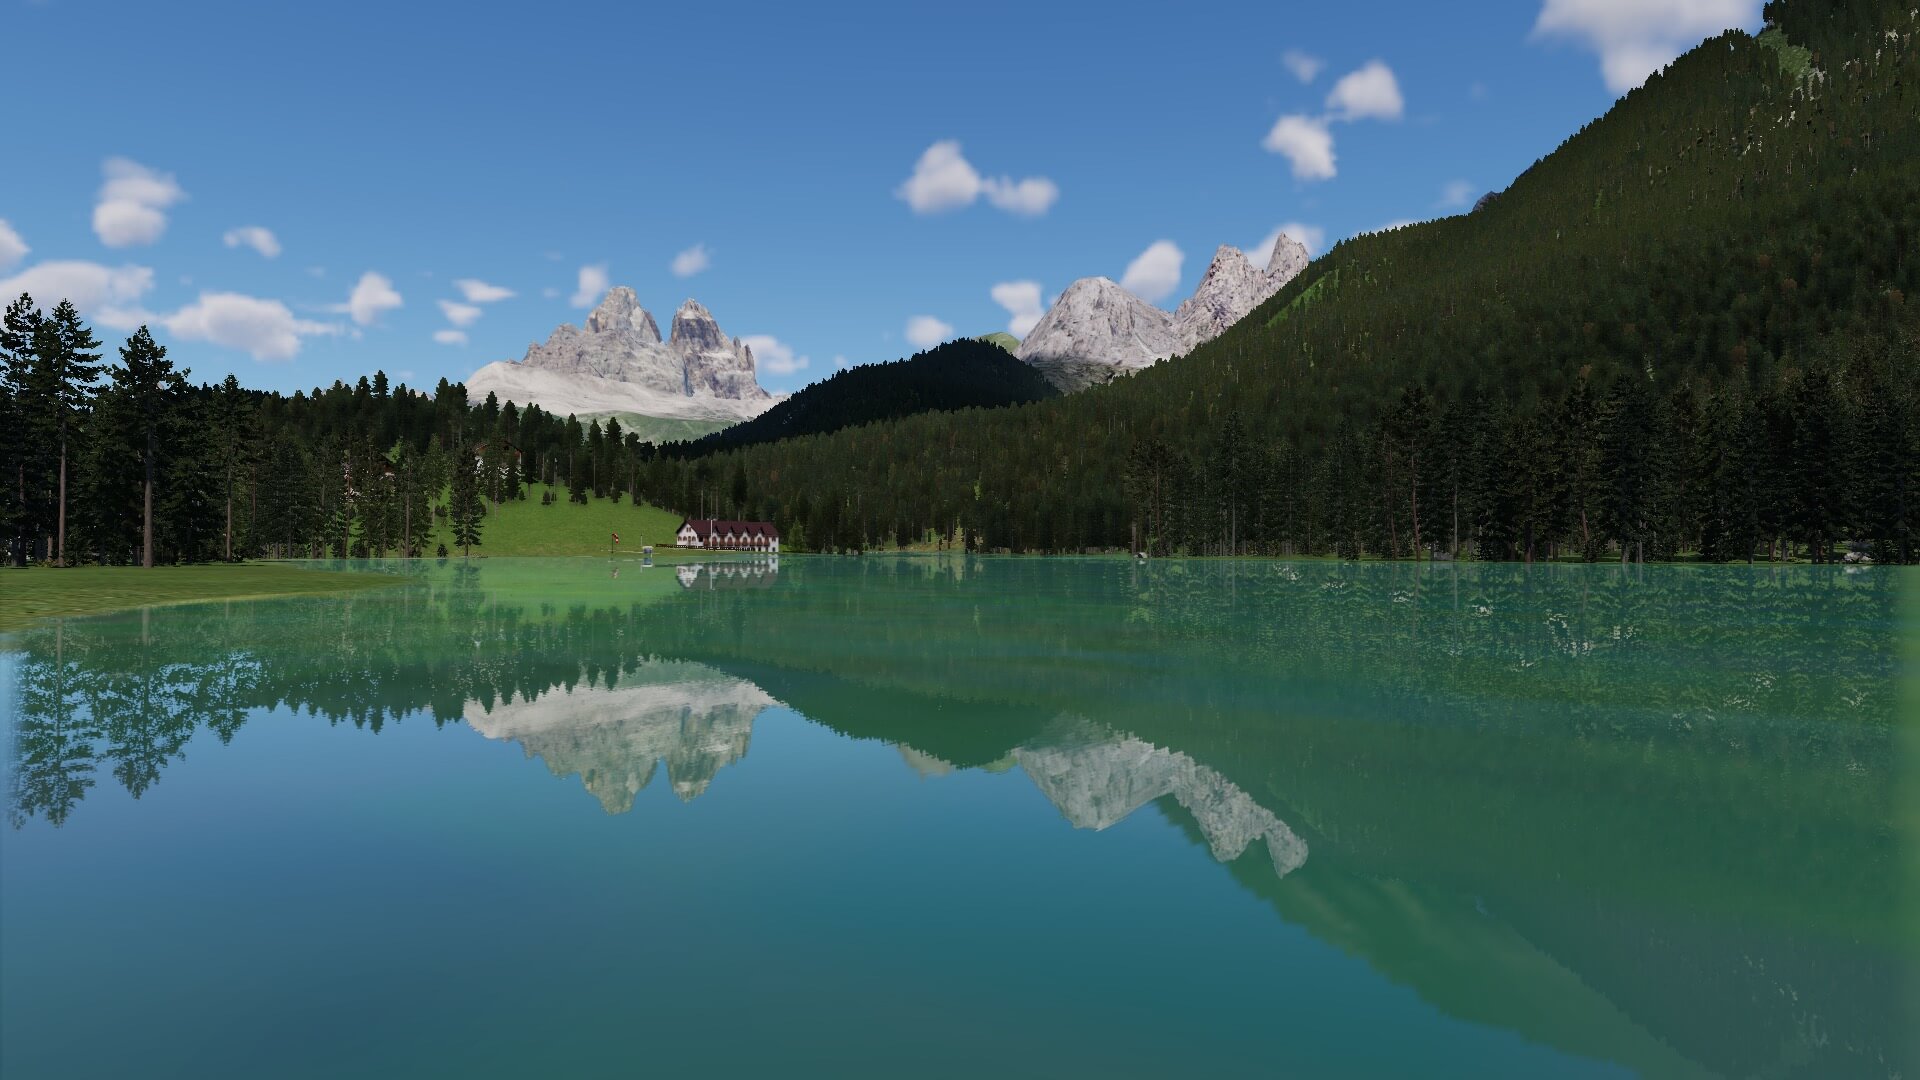
Before starting my approach and landing, I have a quick detour to the Lago di Santa Croce and not only this lake is interesting to see, it’s also the nature around it and the way the default scenery received an immense boost. A boost that makes flying in this region a pleasure. No, it will give you so much satisfaction and above all, fun!


Stretch 2 – LIBD (Belluno) to LIPB (Bolzano)
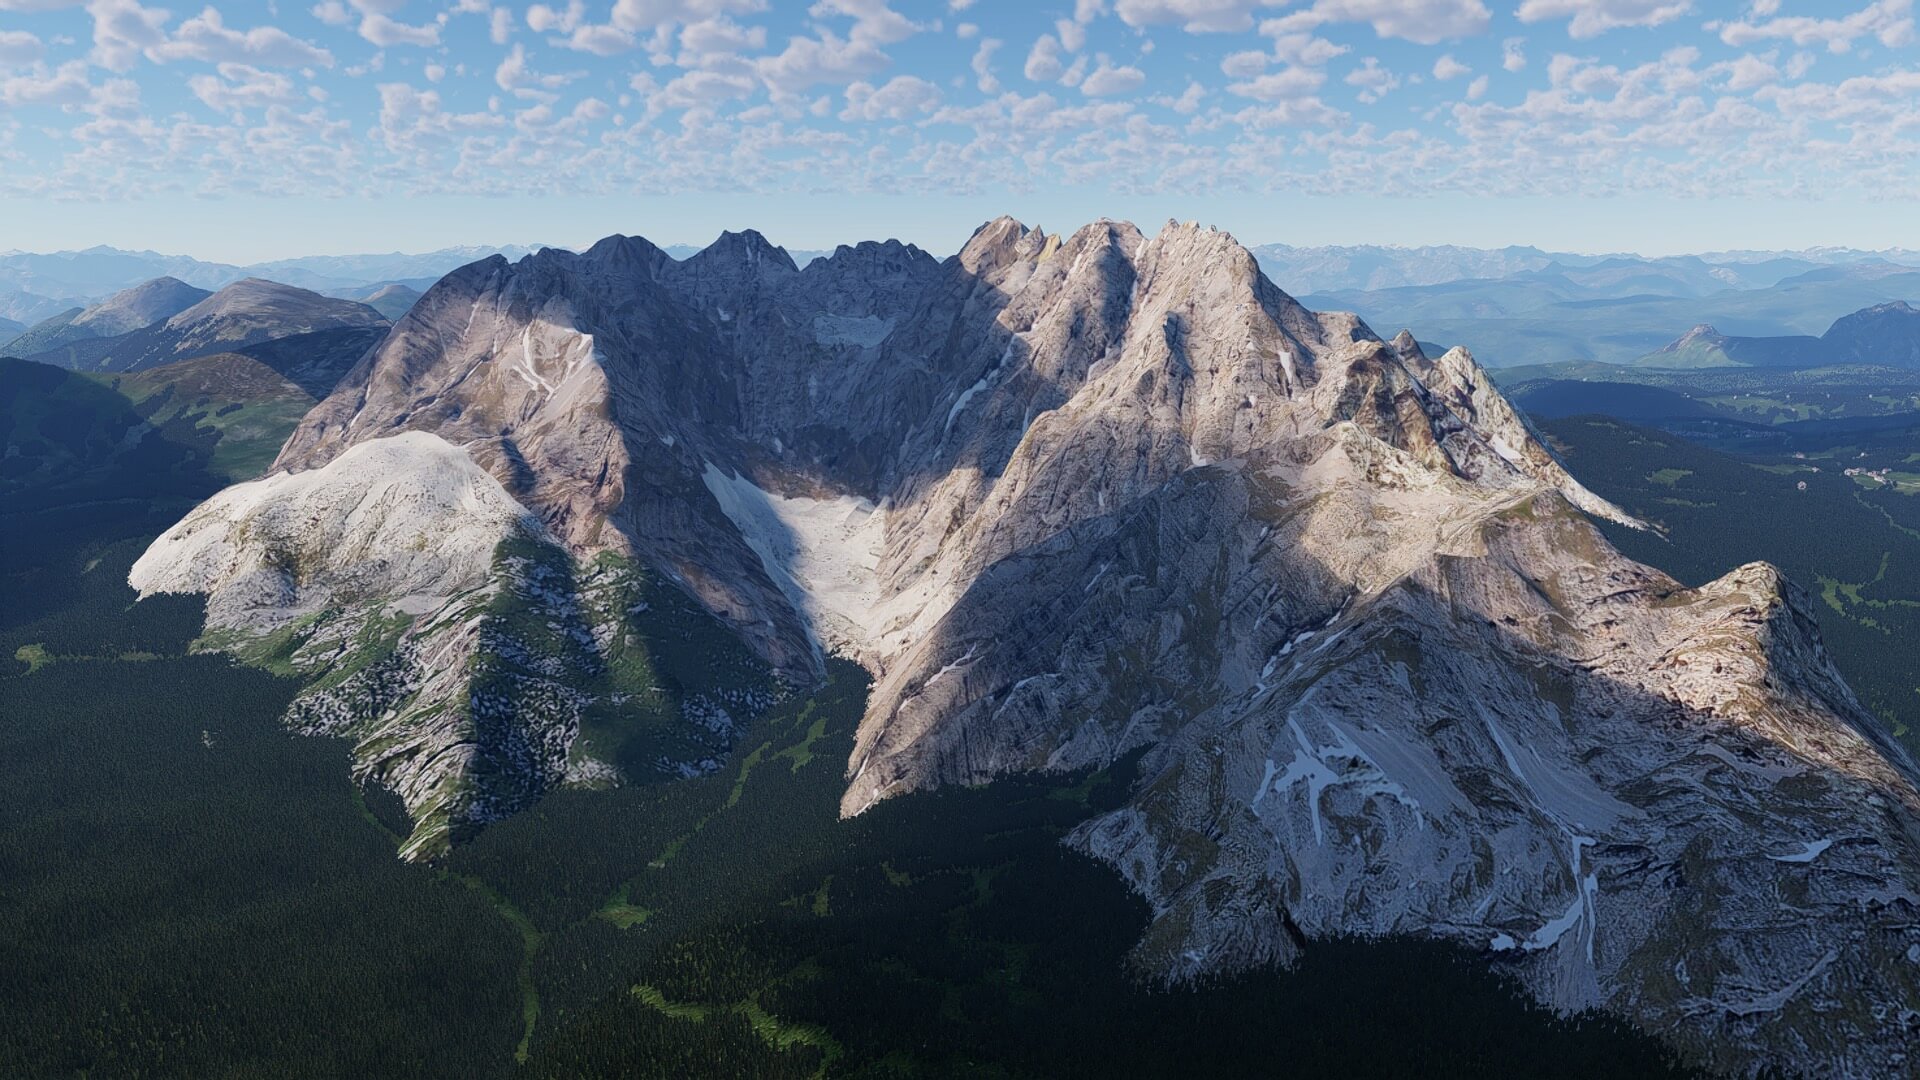
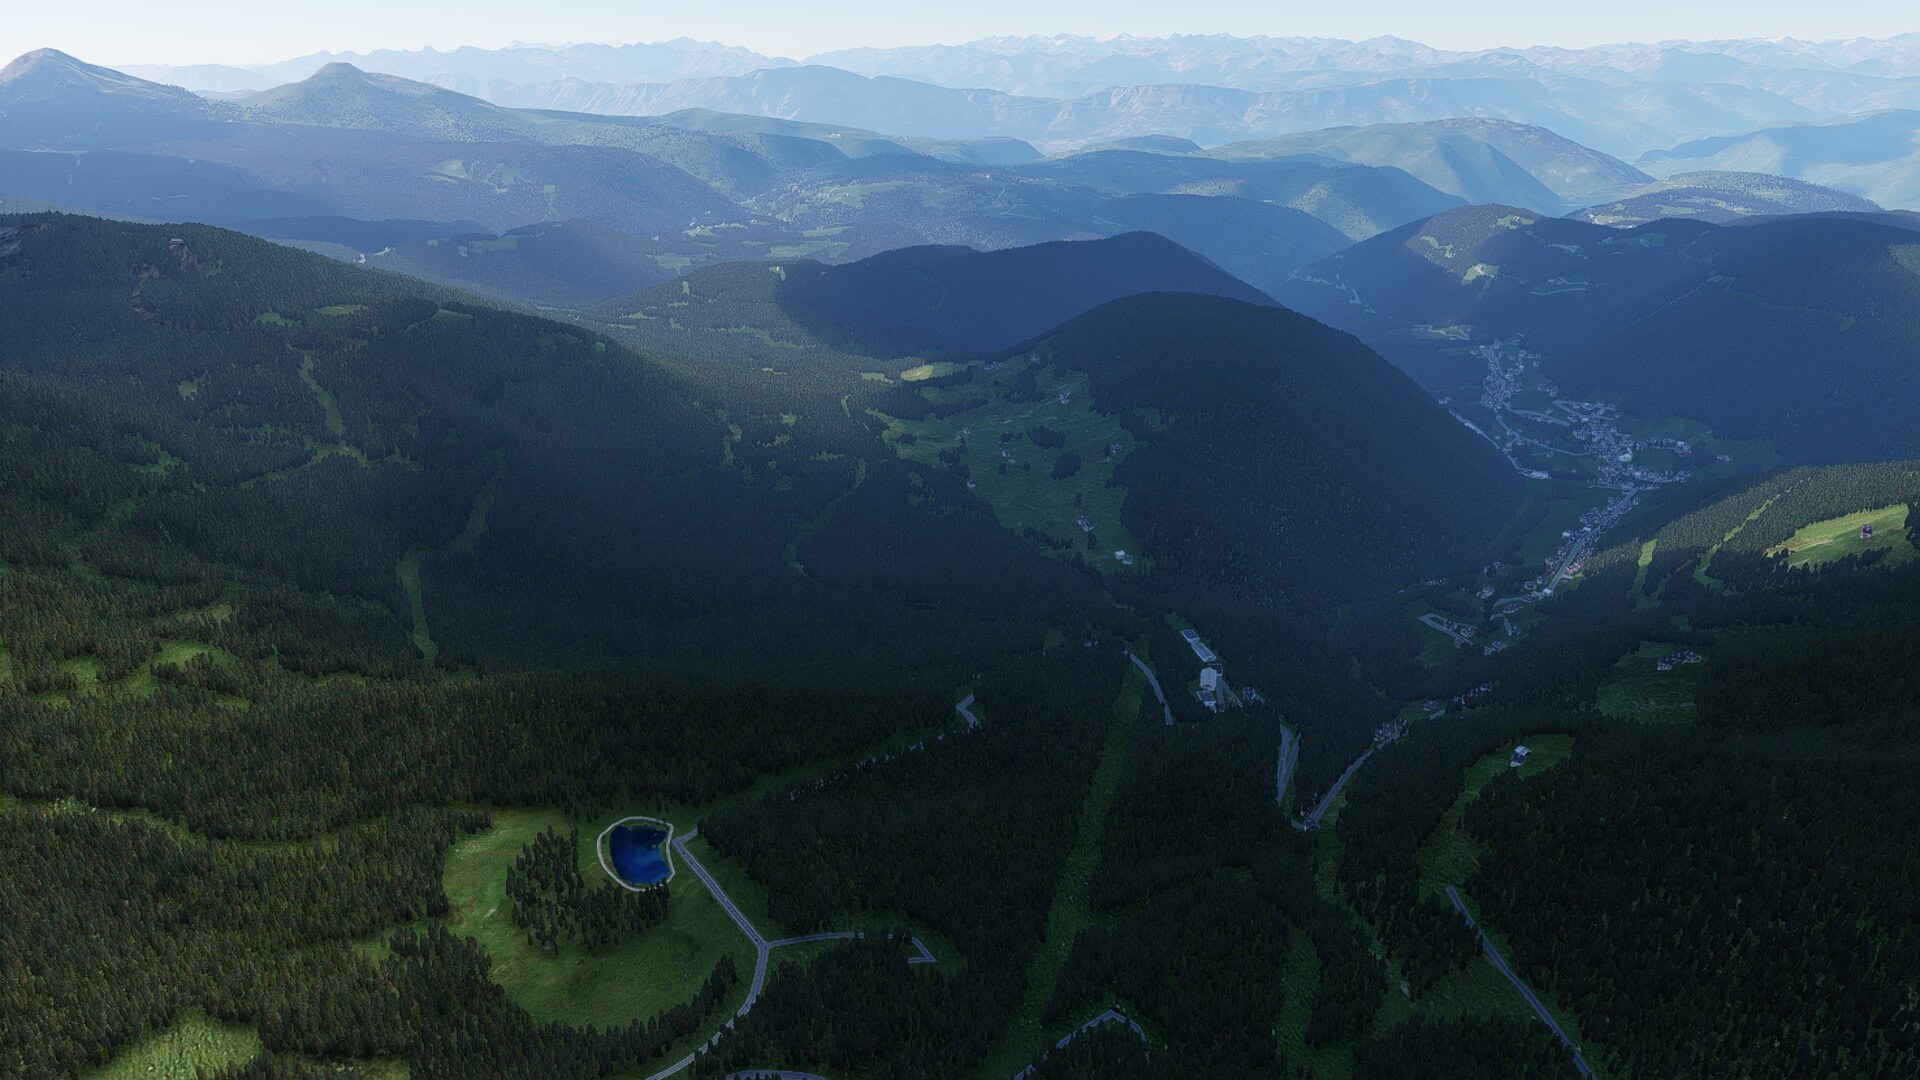
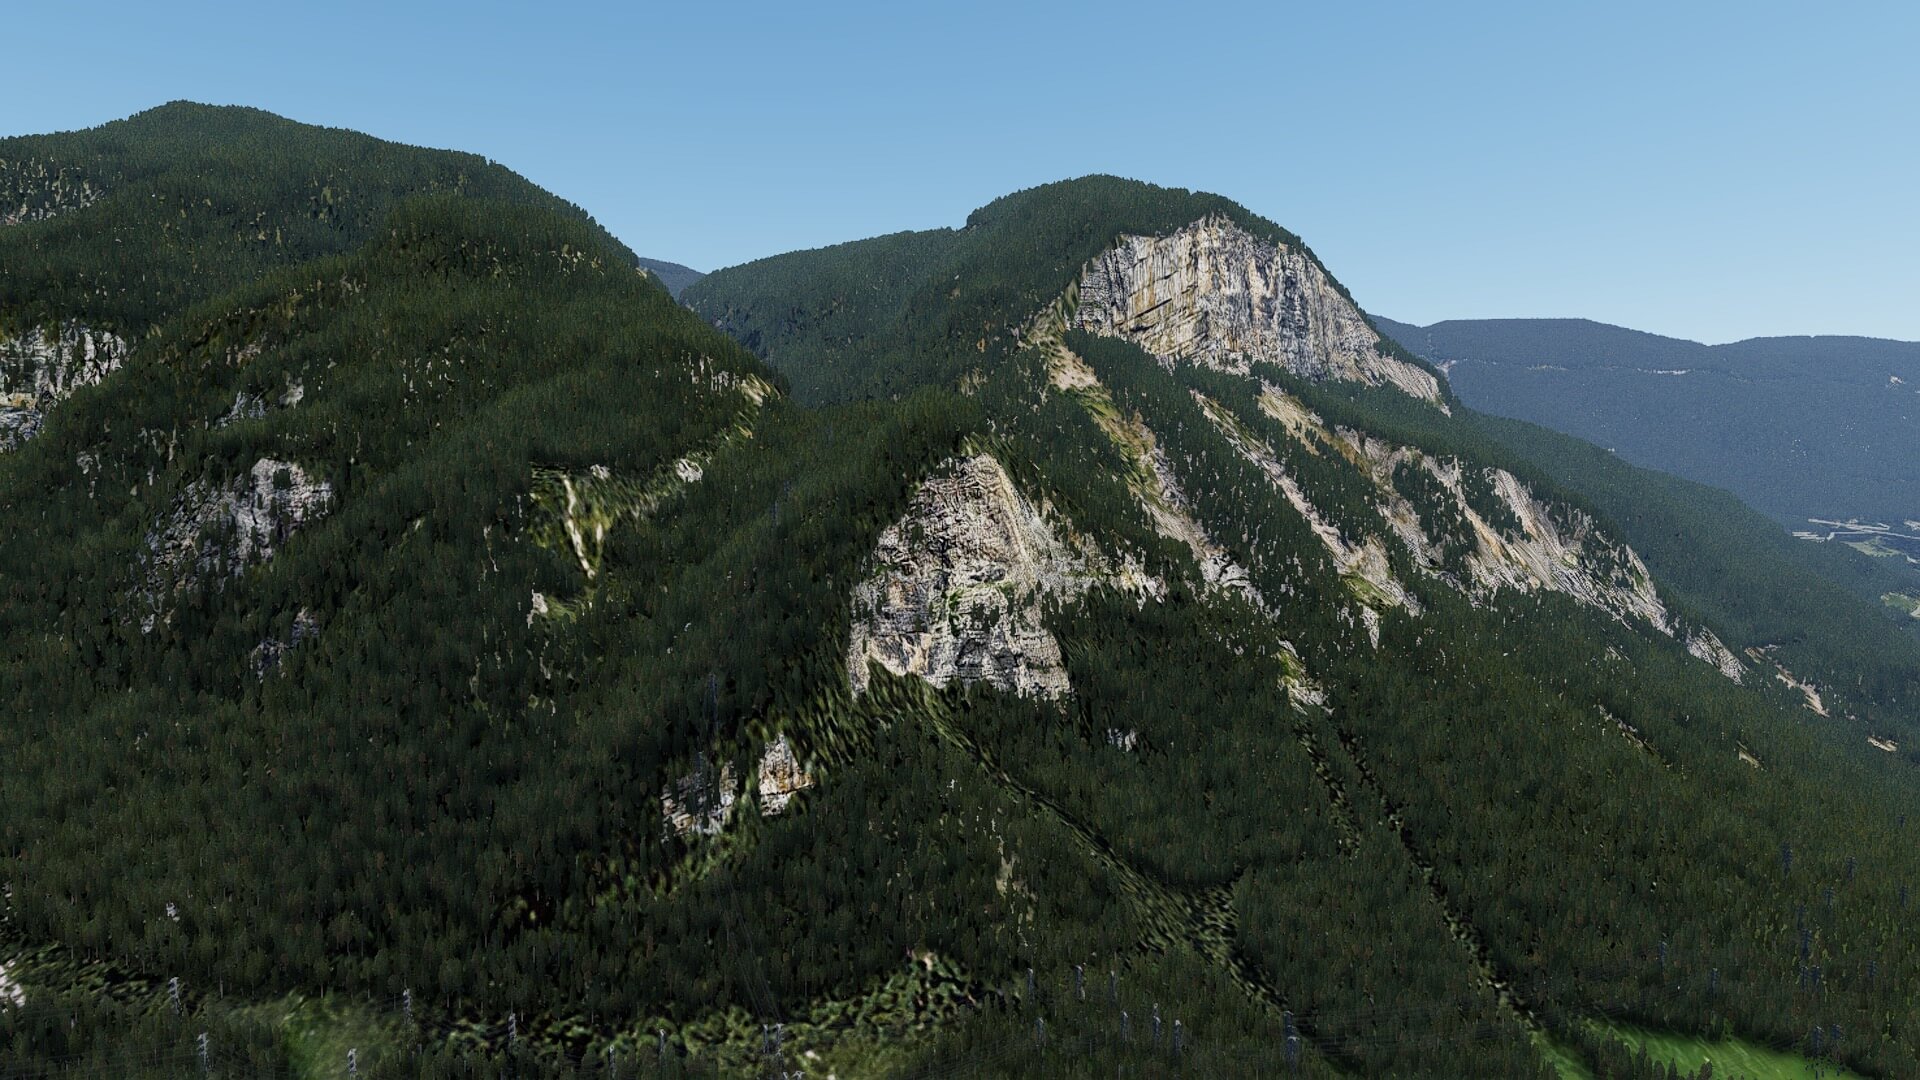
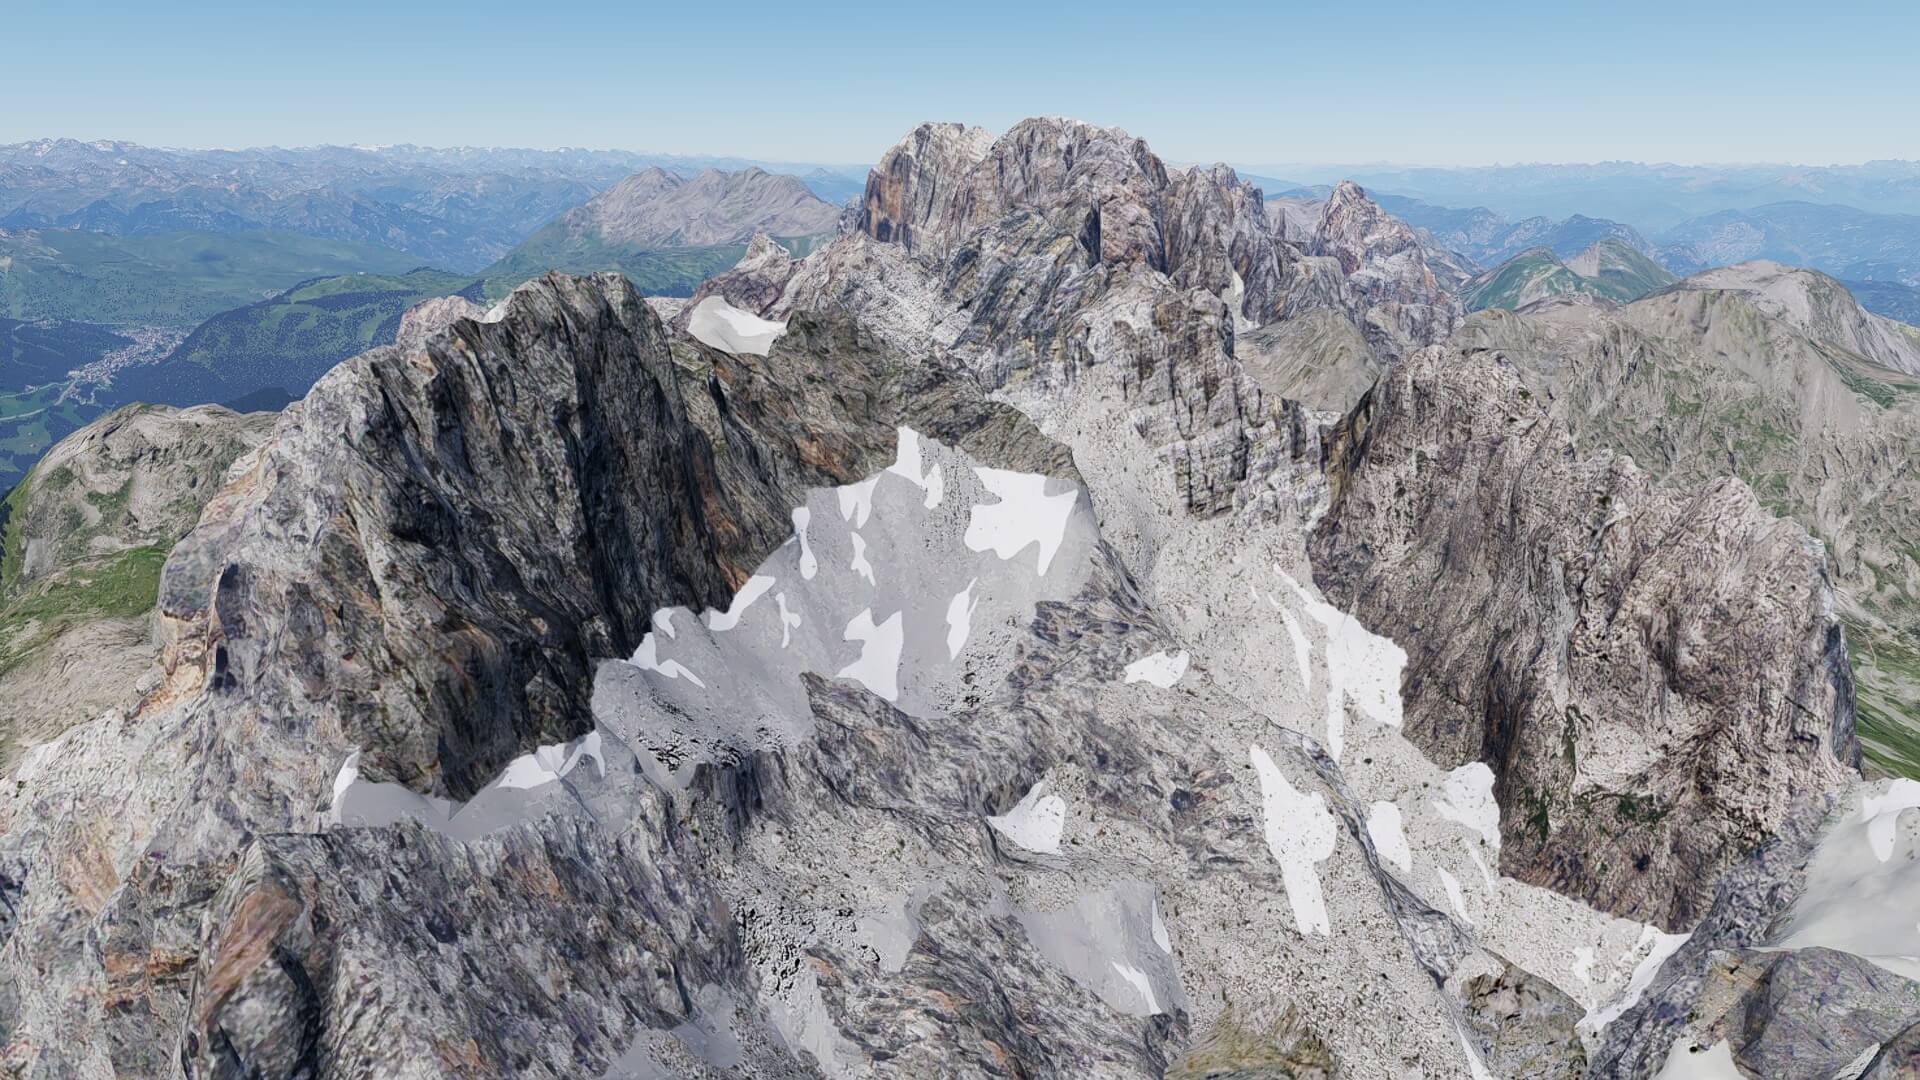
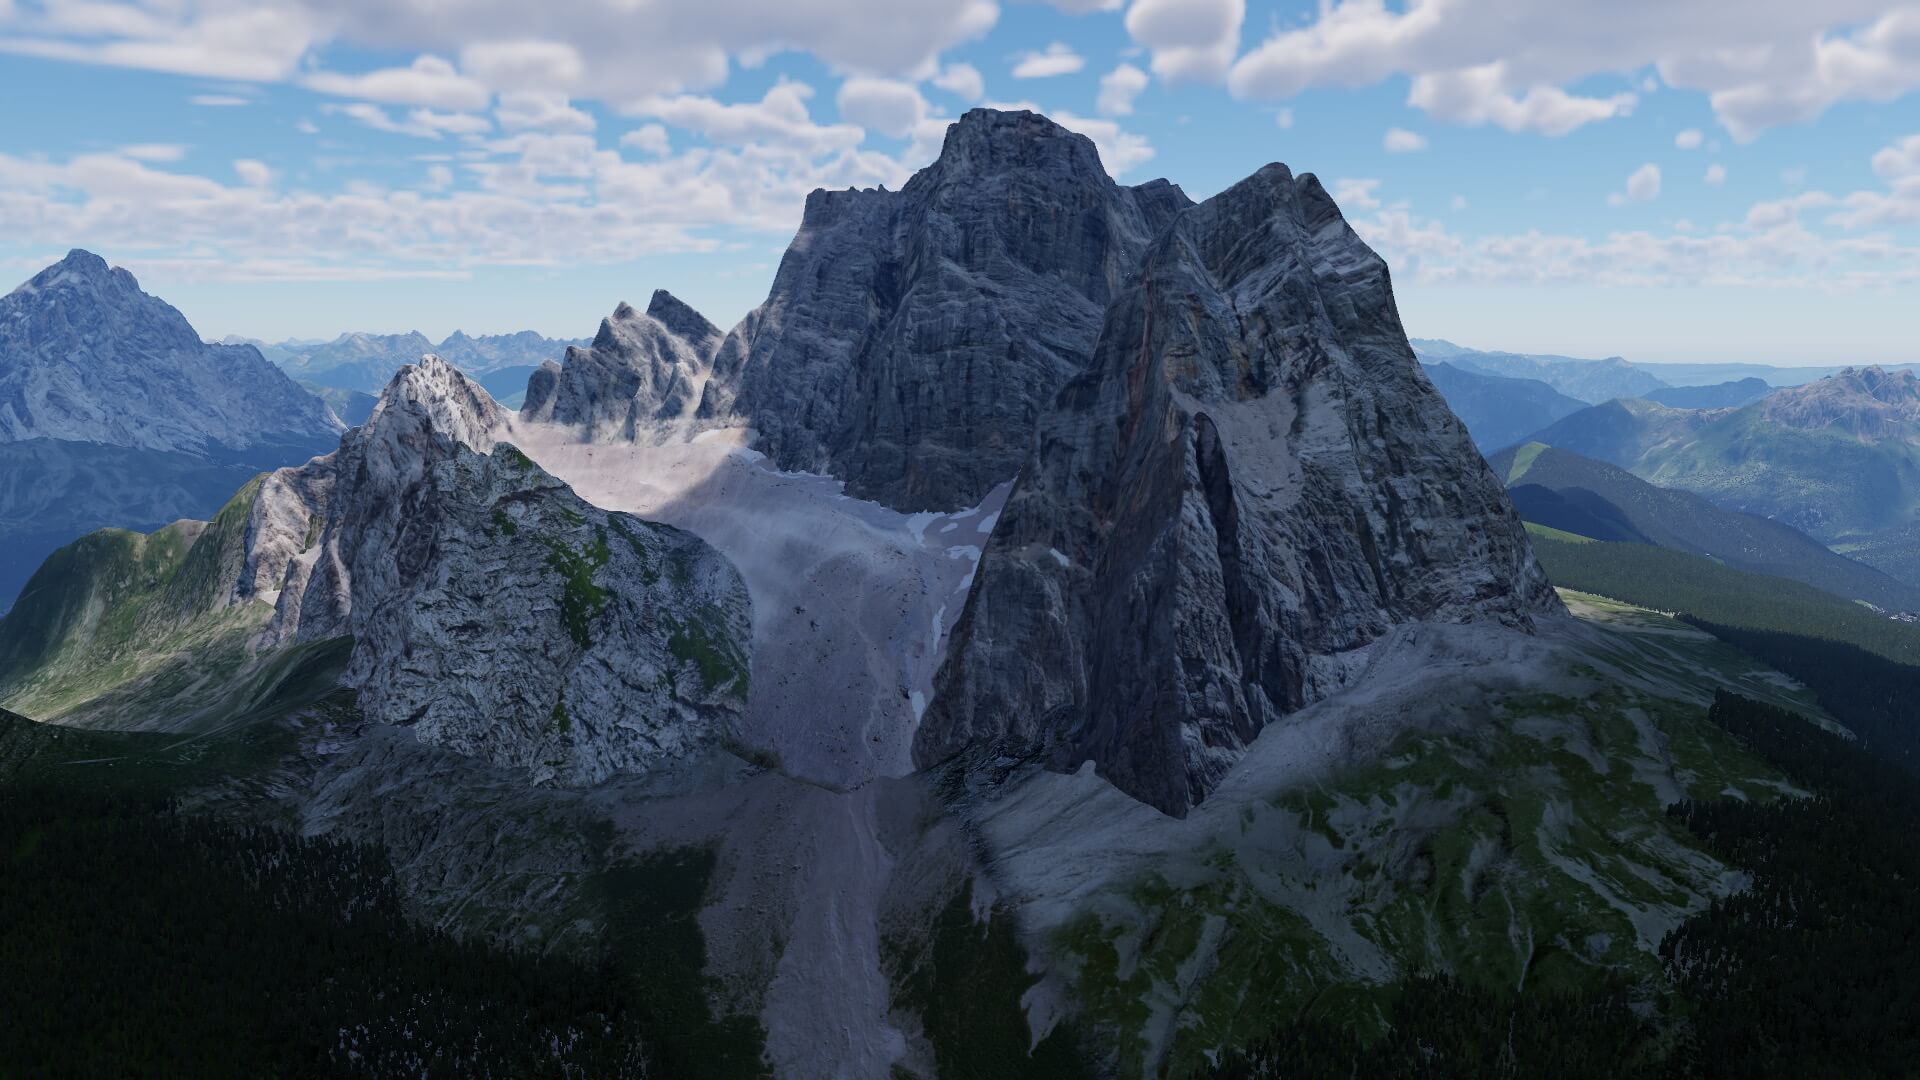
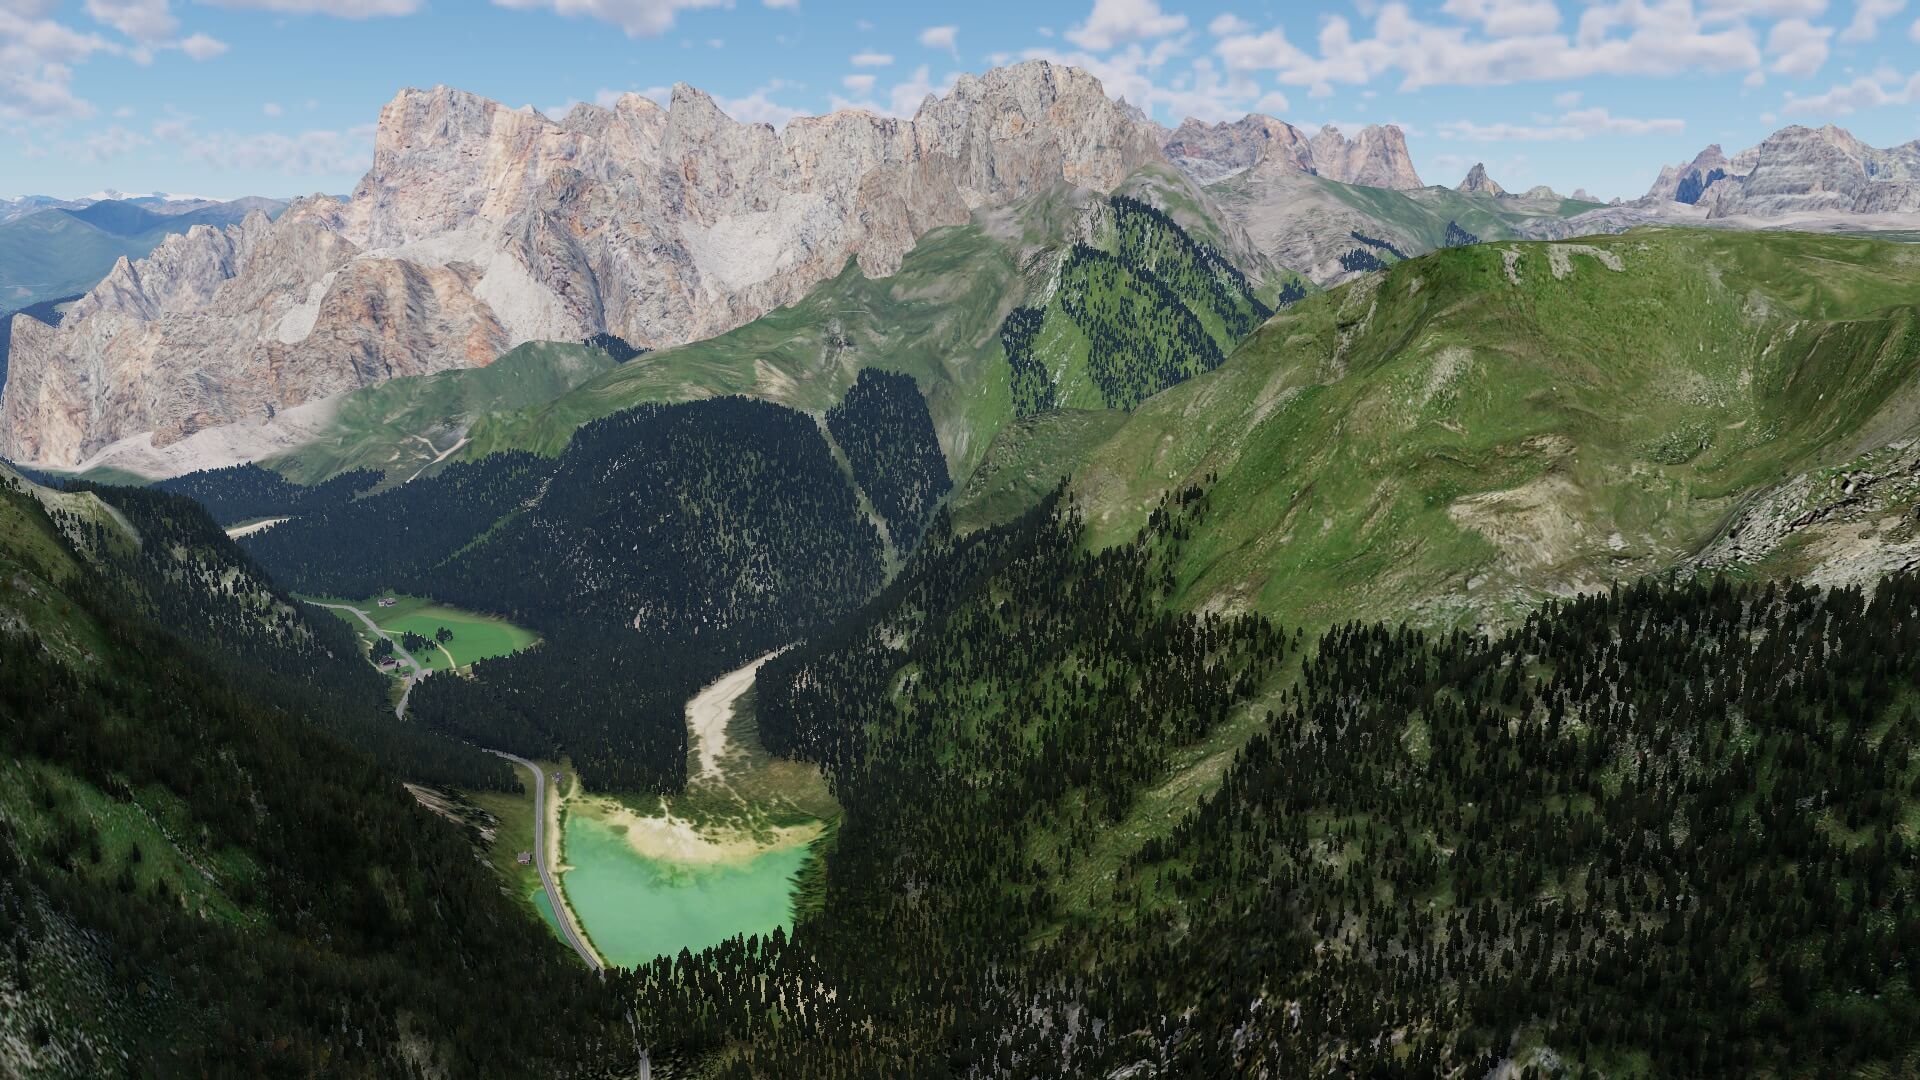
On my next stretch I take off from LIBD (Belluno) in a Western direction thus I’m using runway 28. By following the river Fiume Piave and thus flying south of Beluno I turn to Lago de Mis , just before reaching the city Sedico. Since I want to see the Dolomites peaks I climb out again to 8000 feet or if needed, a bit higher. Because I fly via the narrow area in which the Lago del Mis lies, I end up by flying straight to the Gruppo Pale di San Martino. This is huge. This is impressive. I fly straight on to the Croda Granda, the Cima de la Beta, and Lastei d’Agner peaks, just to mention a couple of them since there are much more peaks. This looks awesome since it’s a large area of peaks, and partly covered with snow on the north side. While approaching these Dolomites, I can decide to bypass these mountains via the left or right. When you do the same flight as I did, then keep in mind that you need to climb to at least 12.000 feet when you take the right-hand sightseeing tour.
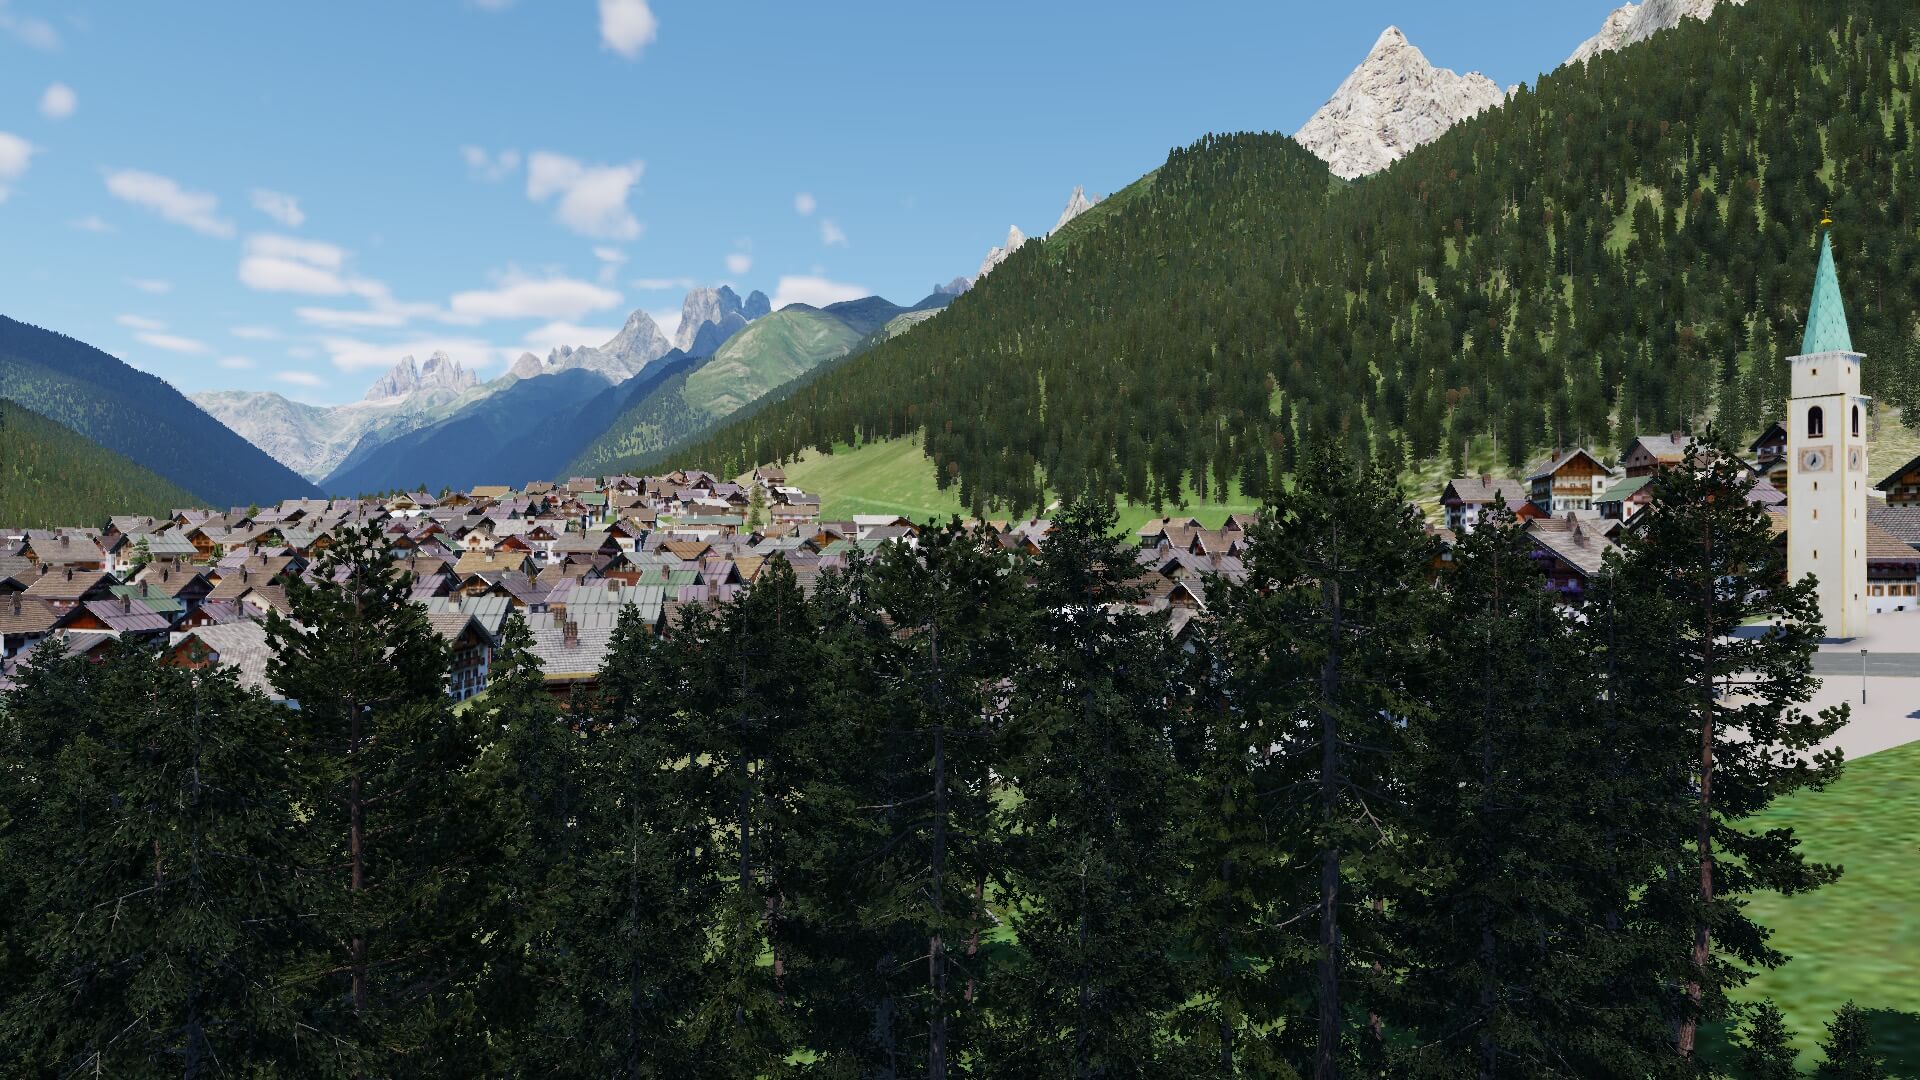
Hold on, I constantly talk about the beauty of how the Dolomites are modeled, but there’s so much more that belongs to this Dolomites X-Plane 12 package. Things you easily forget but it took Frank and Fabio many many hours if not months to model all the lower valley landscapes, the small and larger villages, the roads, the local characteristic houses and many other objects. Again, this almost hidden craftsmanship can be seen perfectly from the sky.
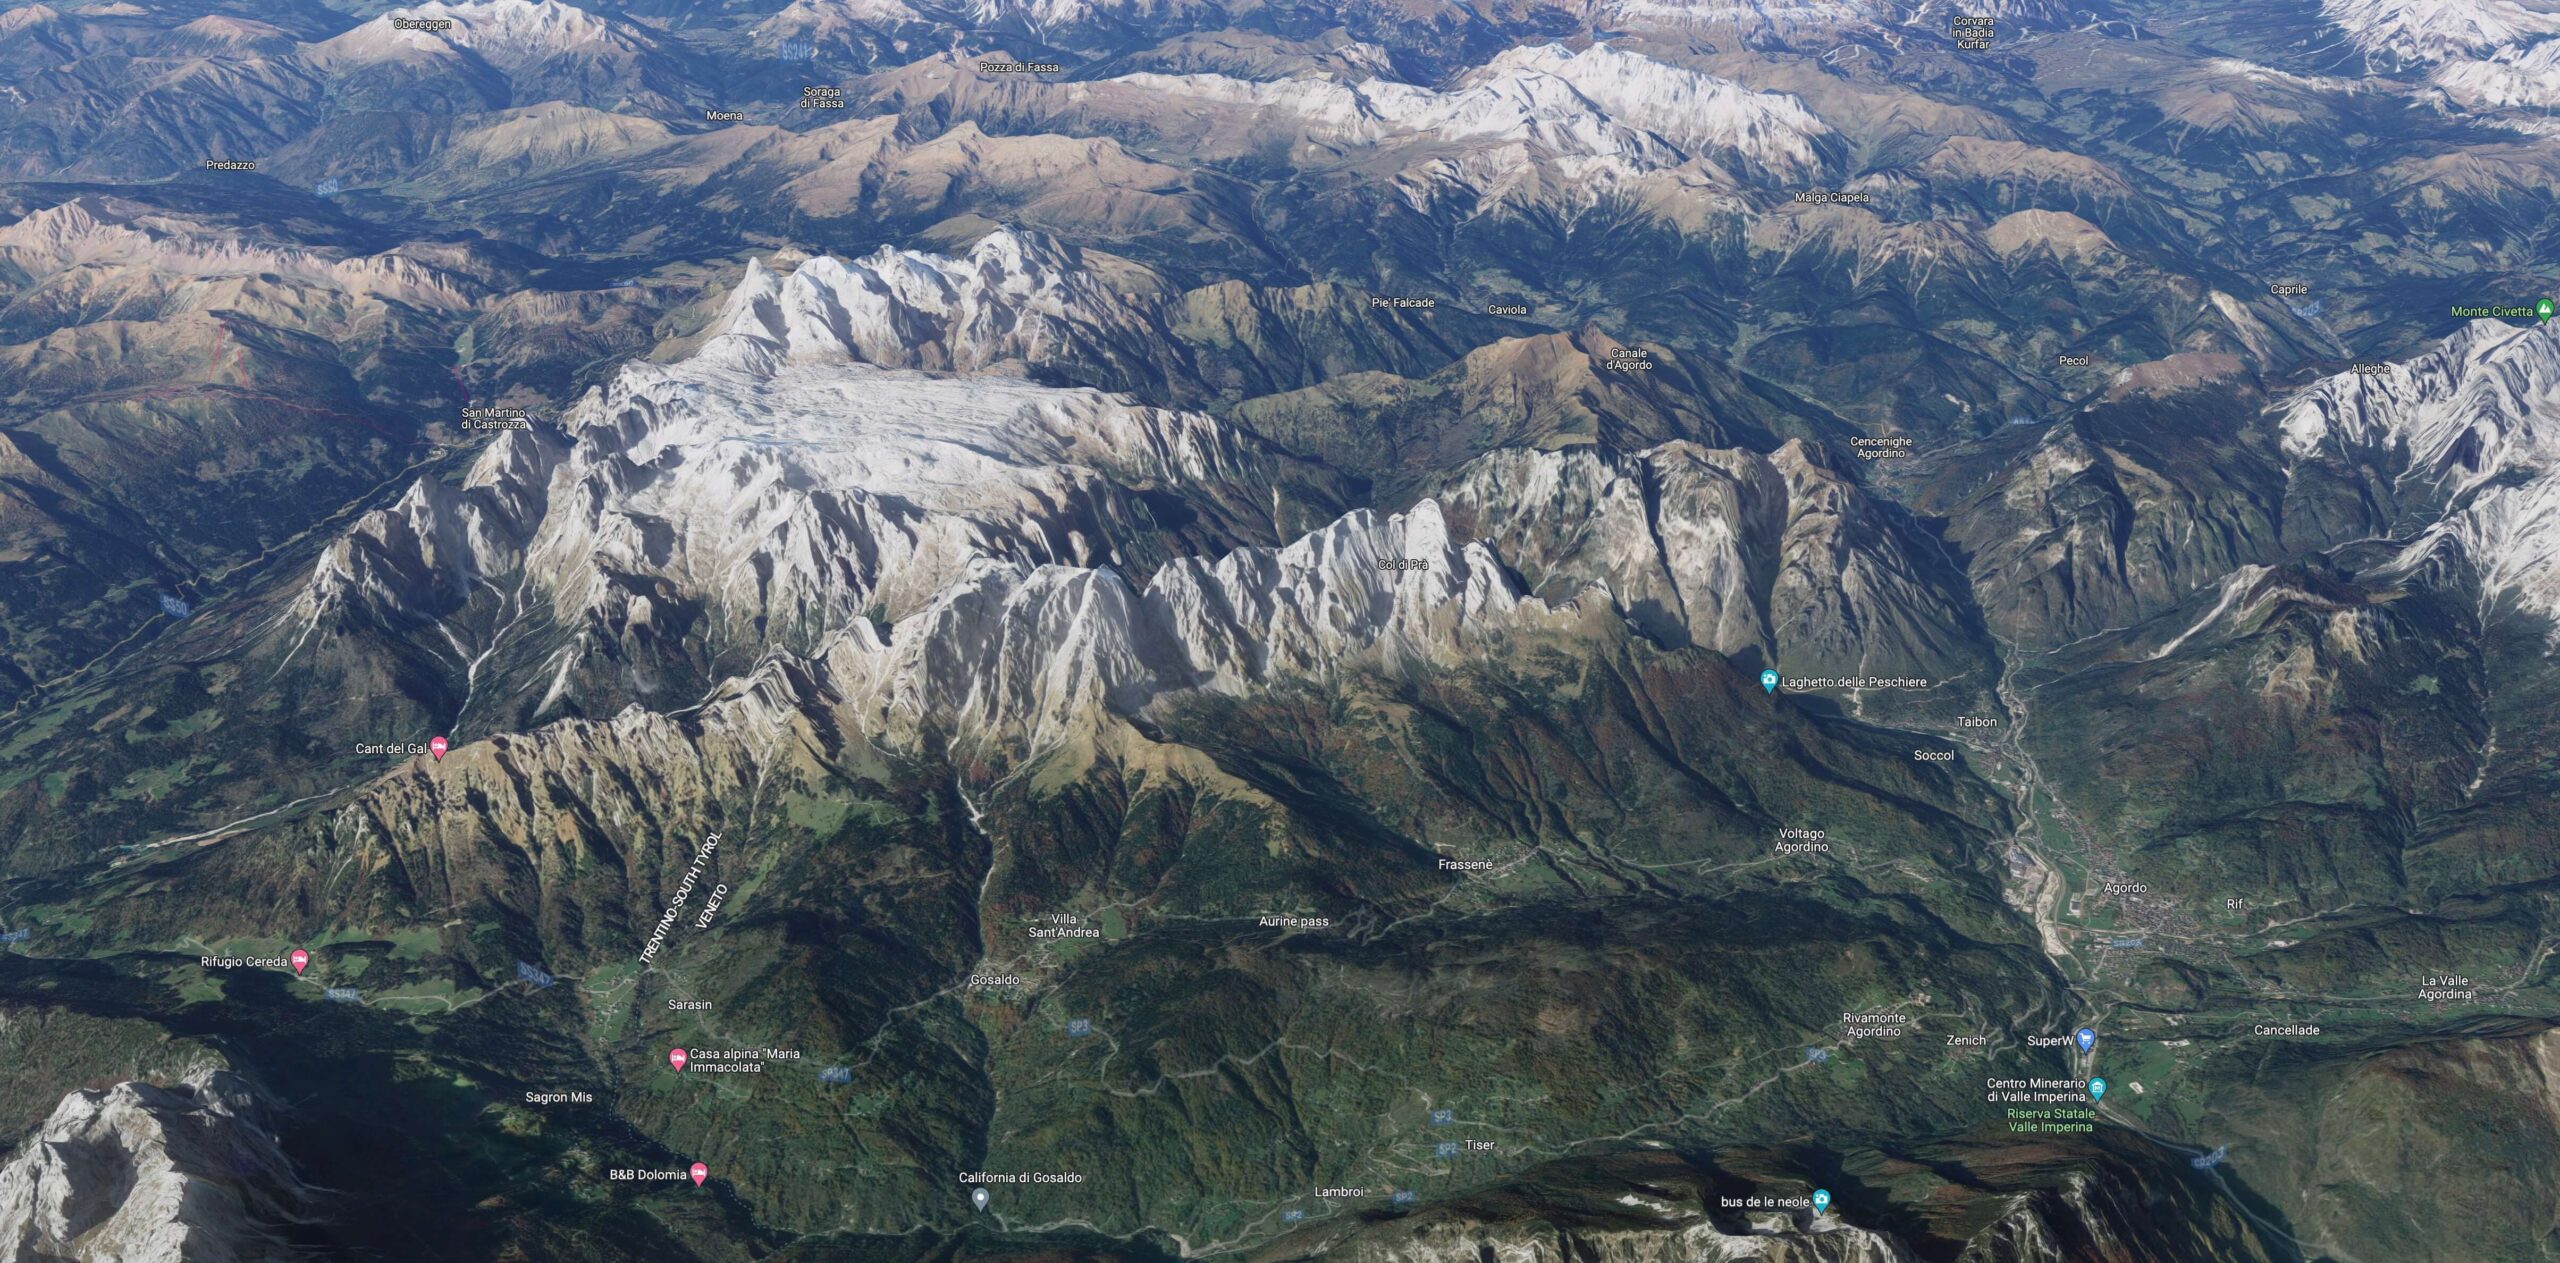
Just an advice to you all who read this review, look also down and see all the modeled villages, and cities. The following Google Maps 3D screenshots shows that to expect of the Gruppo Pale di San Martino.
That said, when you fly left to the Gruppo Pale di San Martino, and being at an altitude of 8000 feet, check out on your right-hand side the city of Agordo, but also the smaller villages Voltago Agordino, Taibon Agordino or more straight in front of you the village Don di Gosaldo. They are all there and with much more detail and precision then you can imagine.


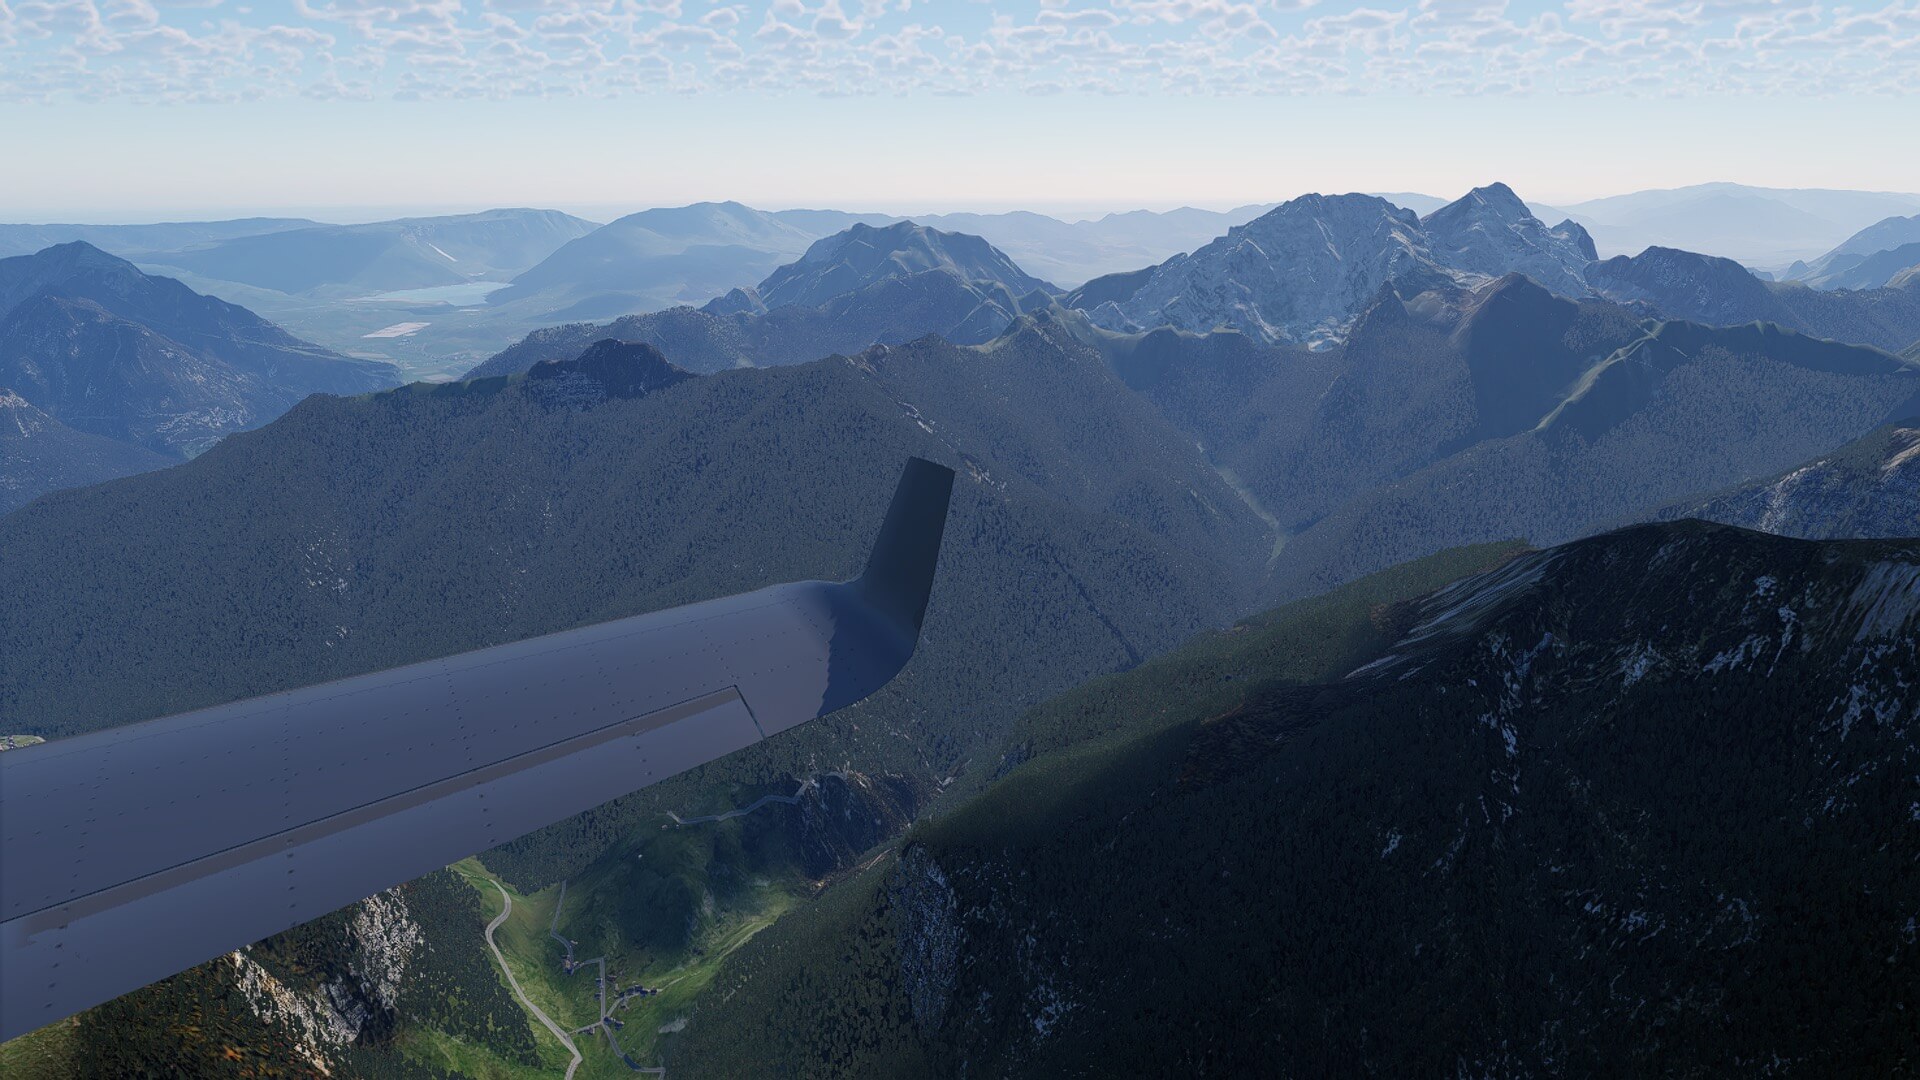
Flying over one and then another valley I see Lago di Paneveggio, the villages San Martino Di Castrozza, Bellamonte, Predazzo and so on. All are from this altitude well modeled although I can’t see everything in detail, but that makes sense from an altitude of roughly 8000 feet. Then I fly more or less straight to the peaks of the Corno d’Ega and Cimon del Latemar and wow, these are as real as it gets. The photo-real textures offer an great view of these mountains.
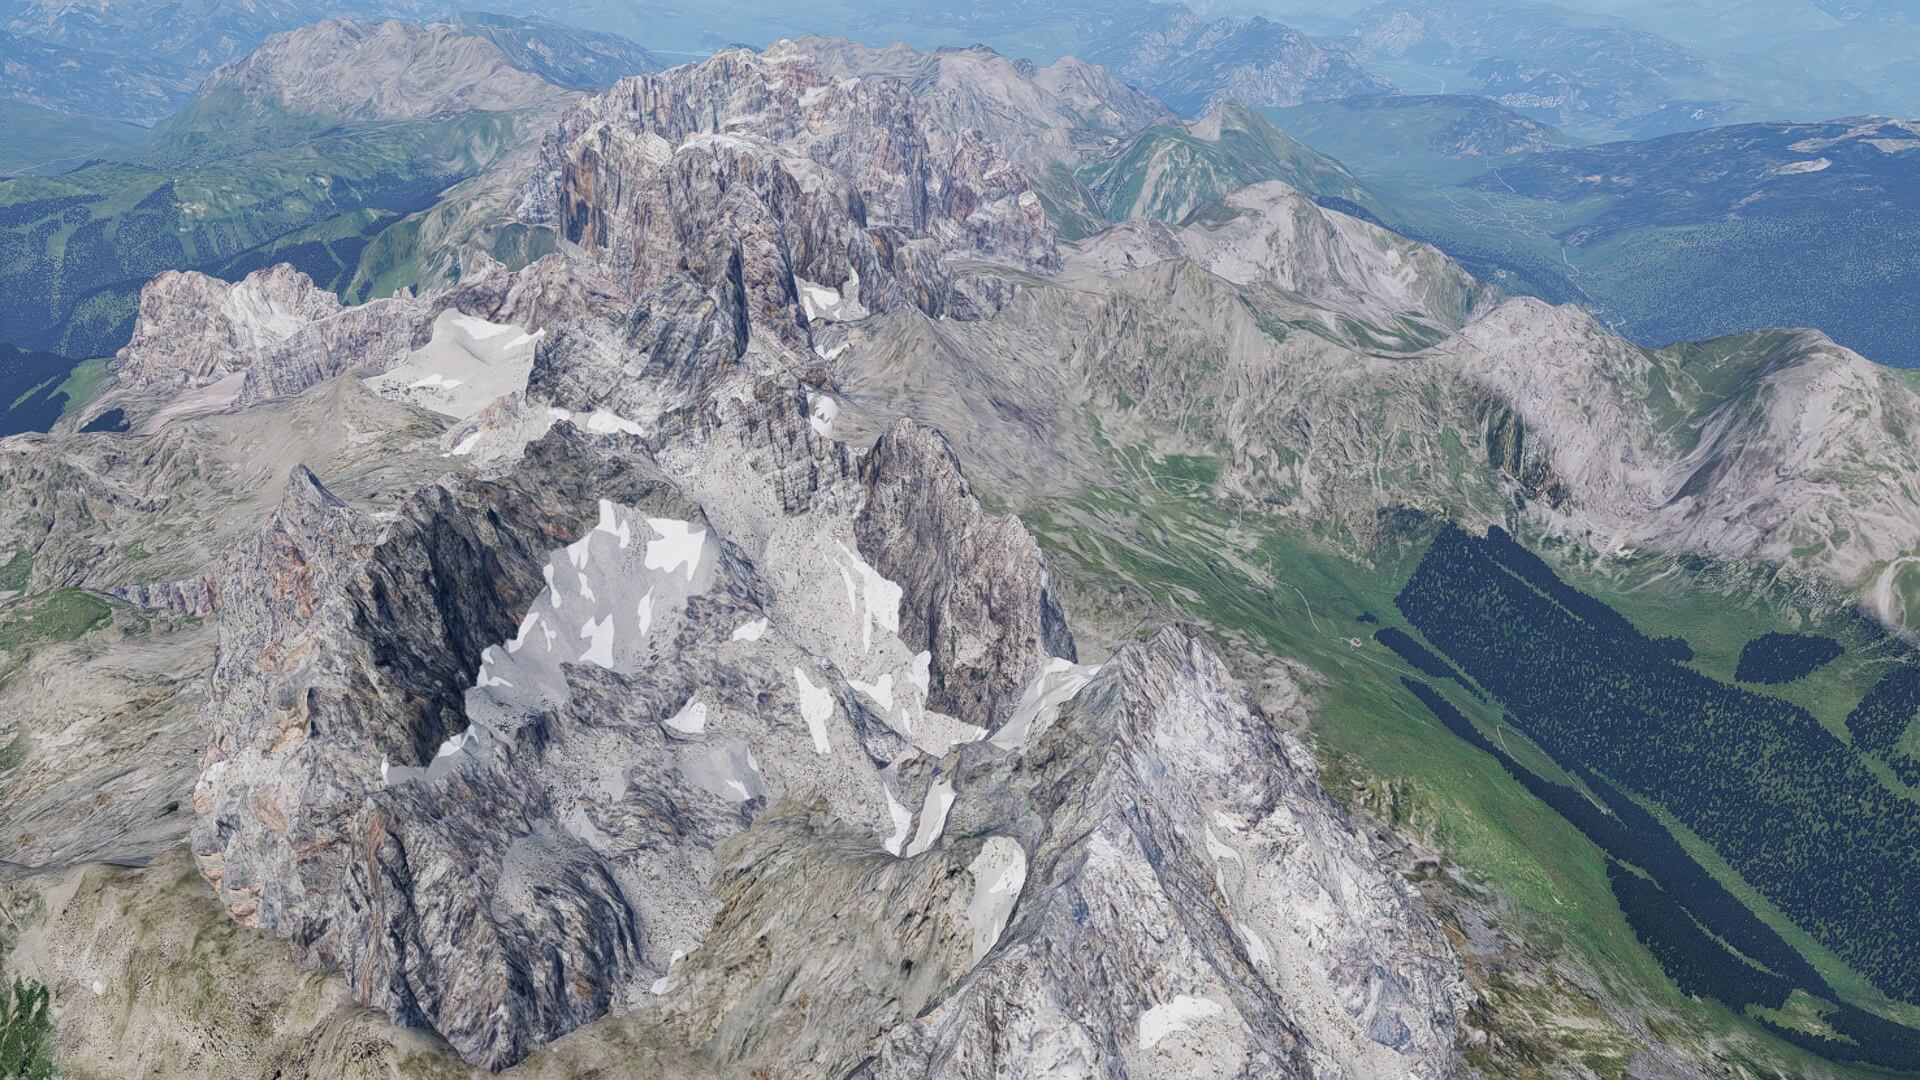
Although I’m not using a helicopter for my flight, I can still maneuver in such a way that I can enjoy every corner of these mountain groups and then, before heading to the last part of this stretch, I see on the right side something that could be very interesting namely the Gruppo del Catinaccio. Since I’m so curious how this looks from nearby, I decide to turn towards these mountains and I can tell you, it is worth the detour. As I said in the beginning, there’s so much to see, that you don’t know where to look for or what to skip.
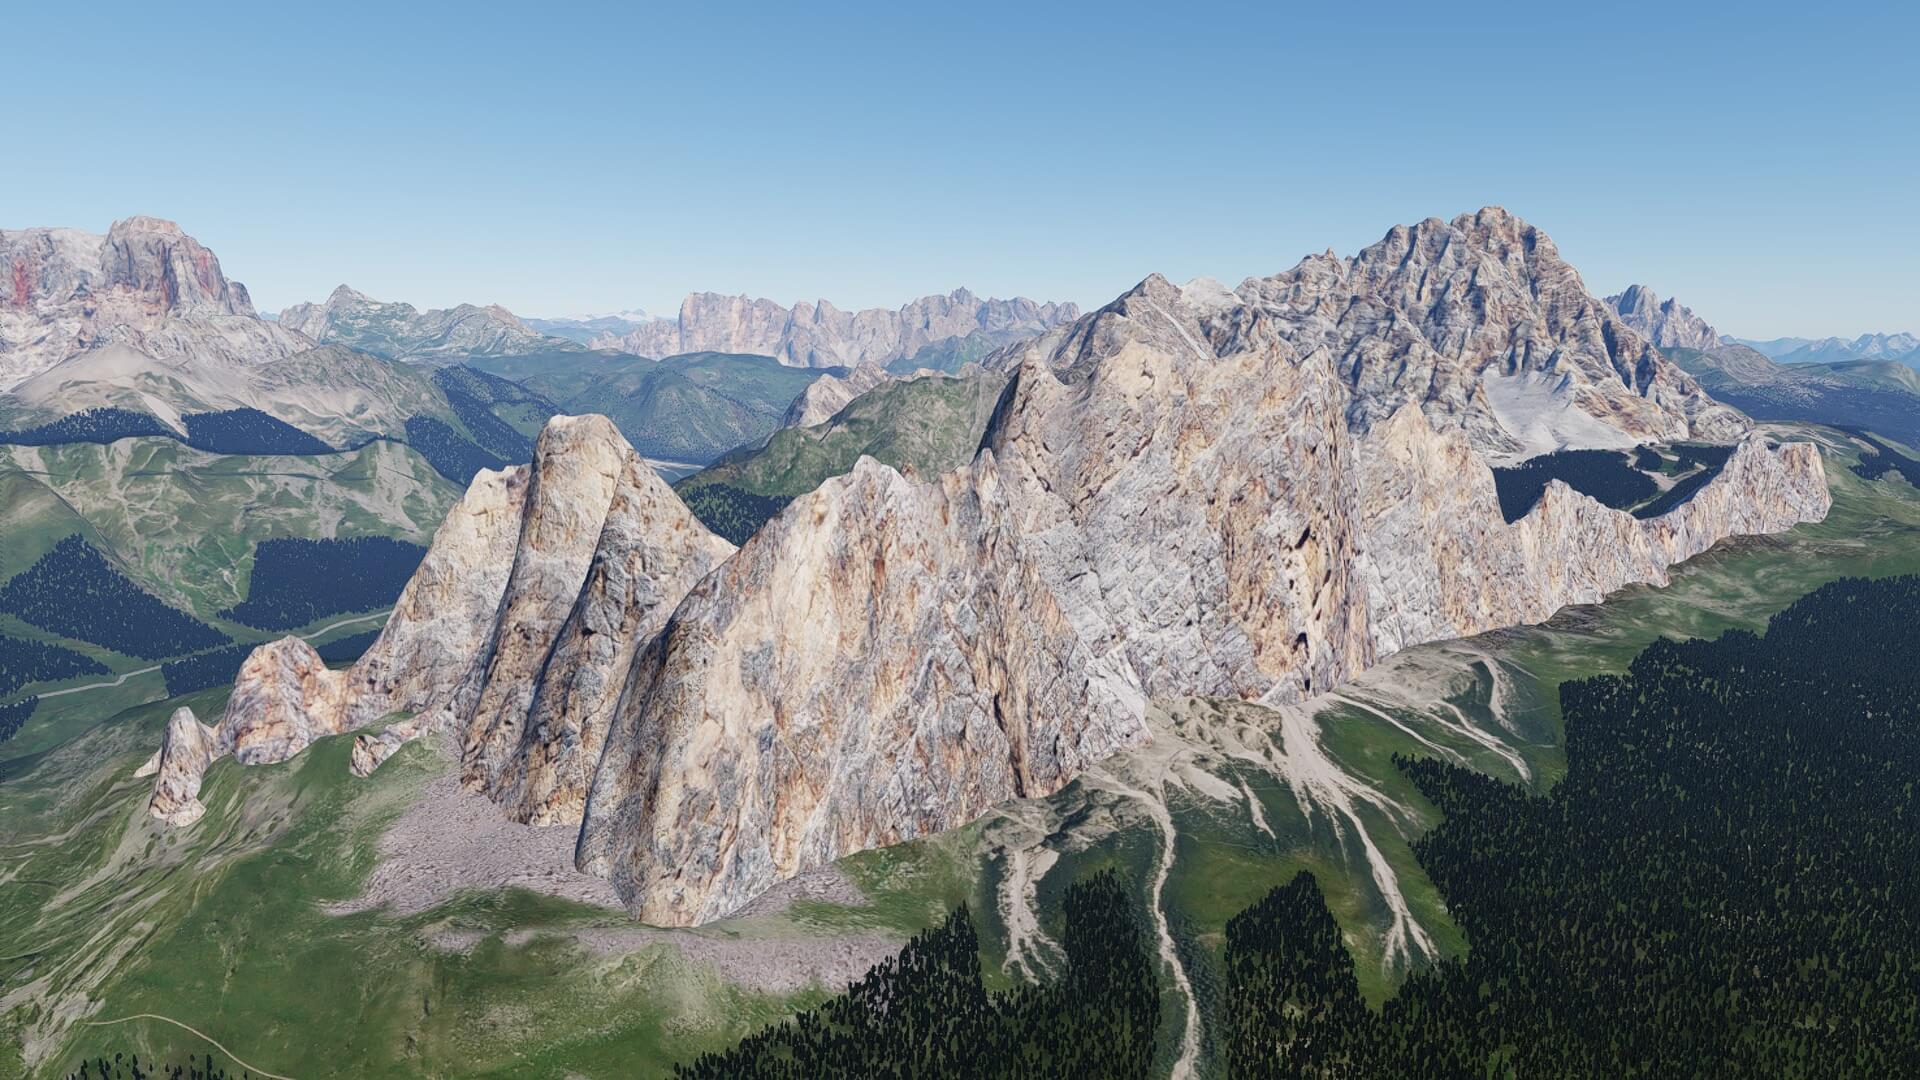
While approaching the Gruppo del Catinaccio it becomes clear to me that Frank and Fabio have created the Dolomites in such an impressive and realistic way that you didn’t expect. The result is stunning.
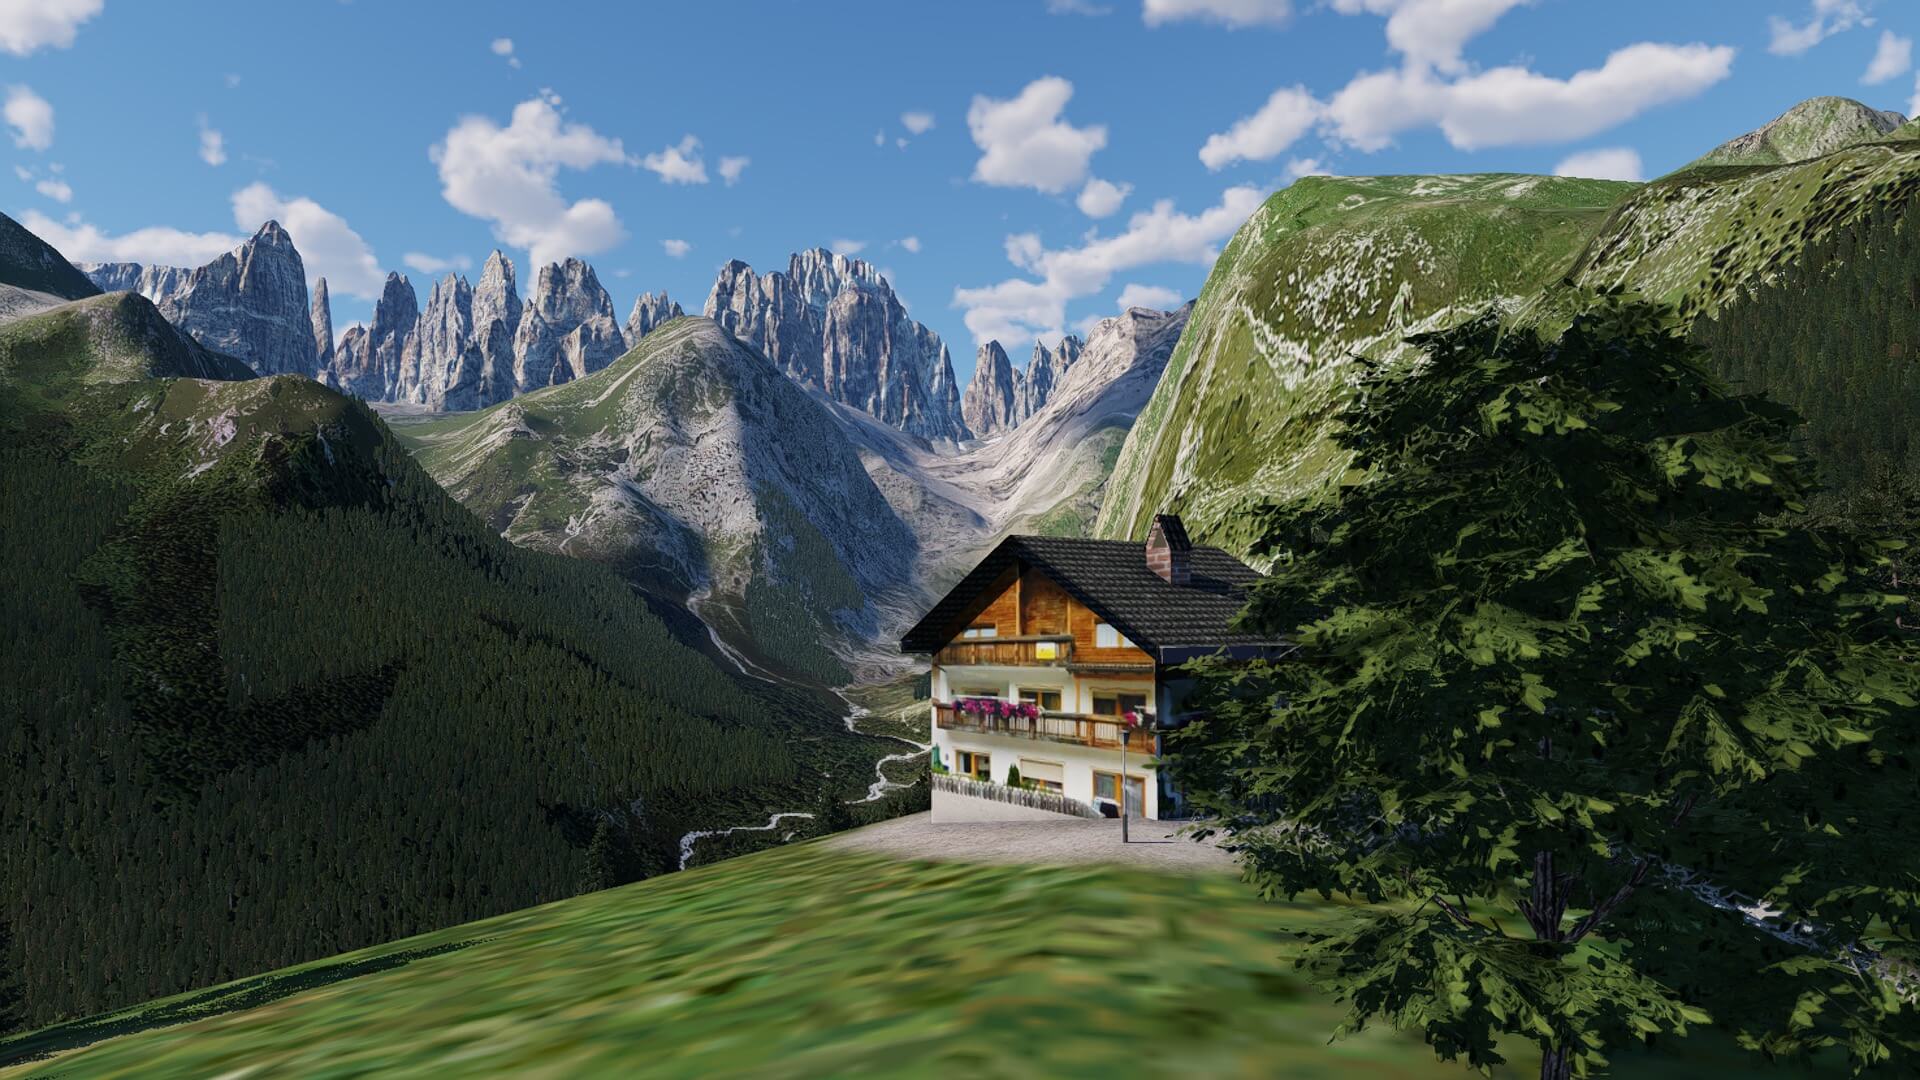
The Gruppo del Catinaccio highest peak is the Catinaccio d’Antermoia and that’s what I want to show you, the Cima La Sforcella and Cima Catinaccio Ciadenac. These are a couple of rock formations south of the Gruppo del Catinaccio and oh my god, they are also covered with photo-real textures and they look gorgeous. Yes, I know, I’ve used this word more then once, but it is smashing.


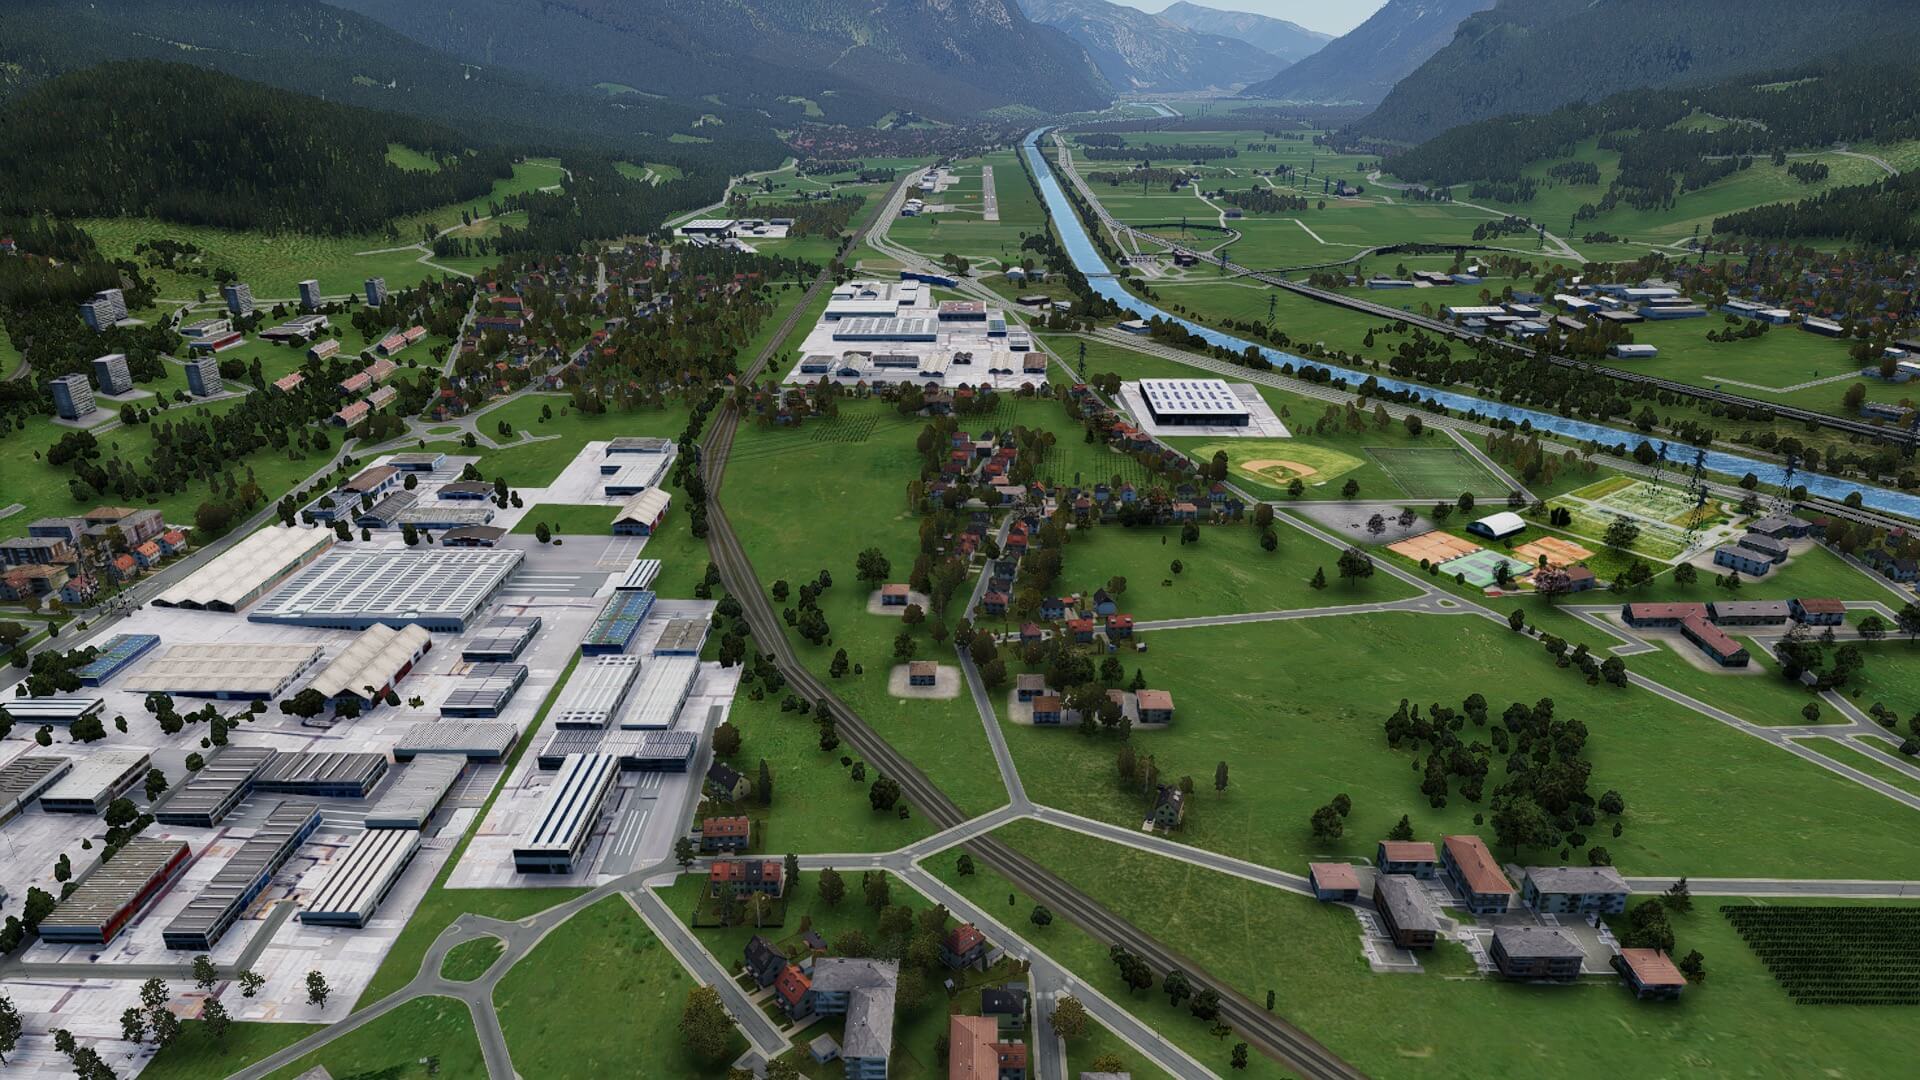
I could circle and circle many times in this area or fly even further north, but Bolzano that lies in the valley is now nearby. Even this area is something you and I should not quickly forget. It’s modeled with great detail. The small, and larger villages or the city of Bolzano including the airport itself is well modeled. And when I say well modeled, then I’m not only talking about this airport, but the many others too.
Some are more basic, but at least they are now available like the many heliports or airfields while some airports are made with great detail like LIPB (Bolzano) or LIDT (Trento). Besides this, and mentioned before, so many other things that are included in this massive scenery package. So many things that even I can not cover all of them.
With the airport of Bolzano down below me, I need to find a way to drop altitude and to land on runway 01. Doing it this way, I prevent losing altitude above the city itself but use instead the valley. After landing, I take the first exit I turn to the apron and park at an available spot. On purpose I write “an available spot” since you’ll find several static aircraft.
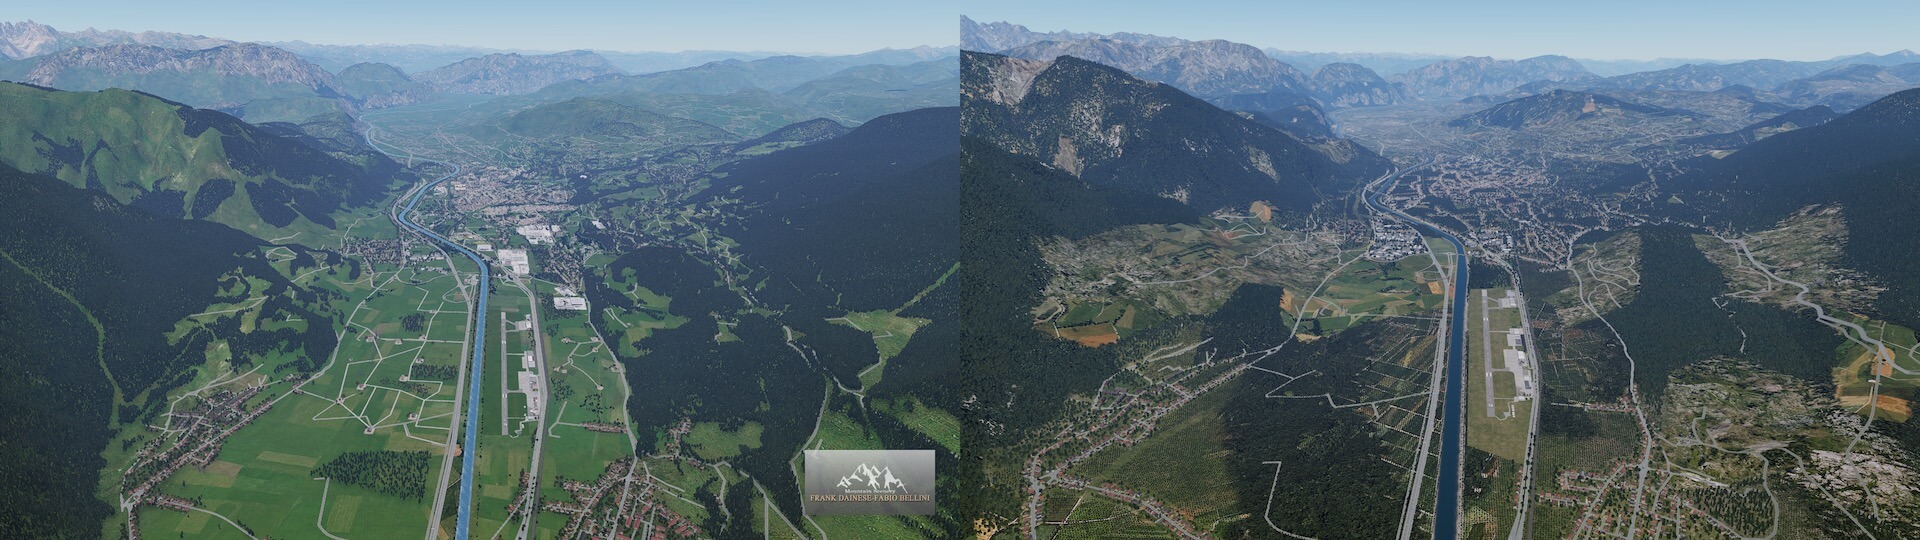
When you look to the way Bolzano is modeled you could ask yourself the question if this is so much better then the default Bolzano or is the modeled Frank and Fabio airport scenery and surrounding area is as real as it gets. First of all I would like to emphasize that airports, airfields and heliports are “a” part of the Frank and Fabio Dolomites for X-Plane 12. It is not fair to expect that the major airports are being modeled in the same way like the individual add-on airports that cost you 20+ USD, Euro, GBP or any other currency. That said, the included airports are well modeled and in the case of Bolzano, also a well modeled and realistically created Bolzano city.
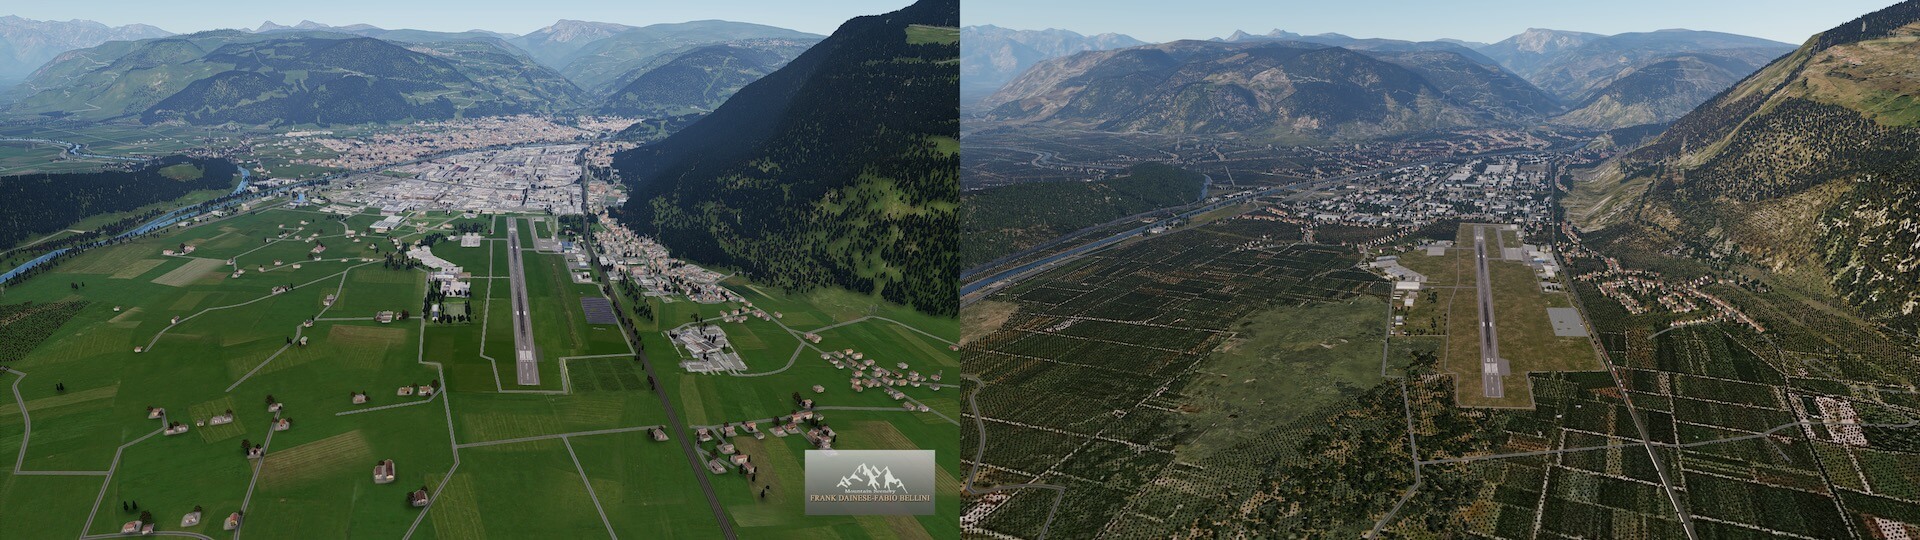
The following compiled screenshot shows you what you’re missing when you don’t have Frank and Fabio Dolomites for X-Plane 12. As you can see and I’ll give you some other examples, the difference is huge. Not only Bolzano village and industrial area, the surrounding landscape, the airport itself, but also the ground textures, the massive amount of trees that can be found in this valley and of course the mesh. It is, when you have installed the Dolomites for X-Plane 12, that you’re suddenly in a total different world, but one world that is as real as it is!
Stretch 3 – LIPB (Bolzano) to LIDT (Trento)
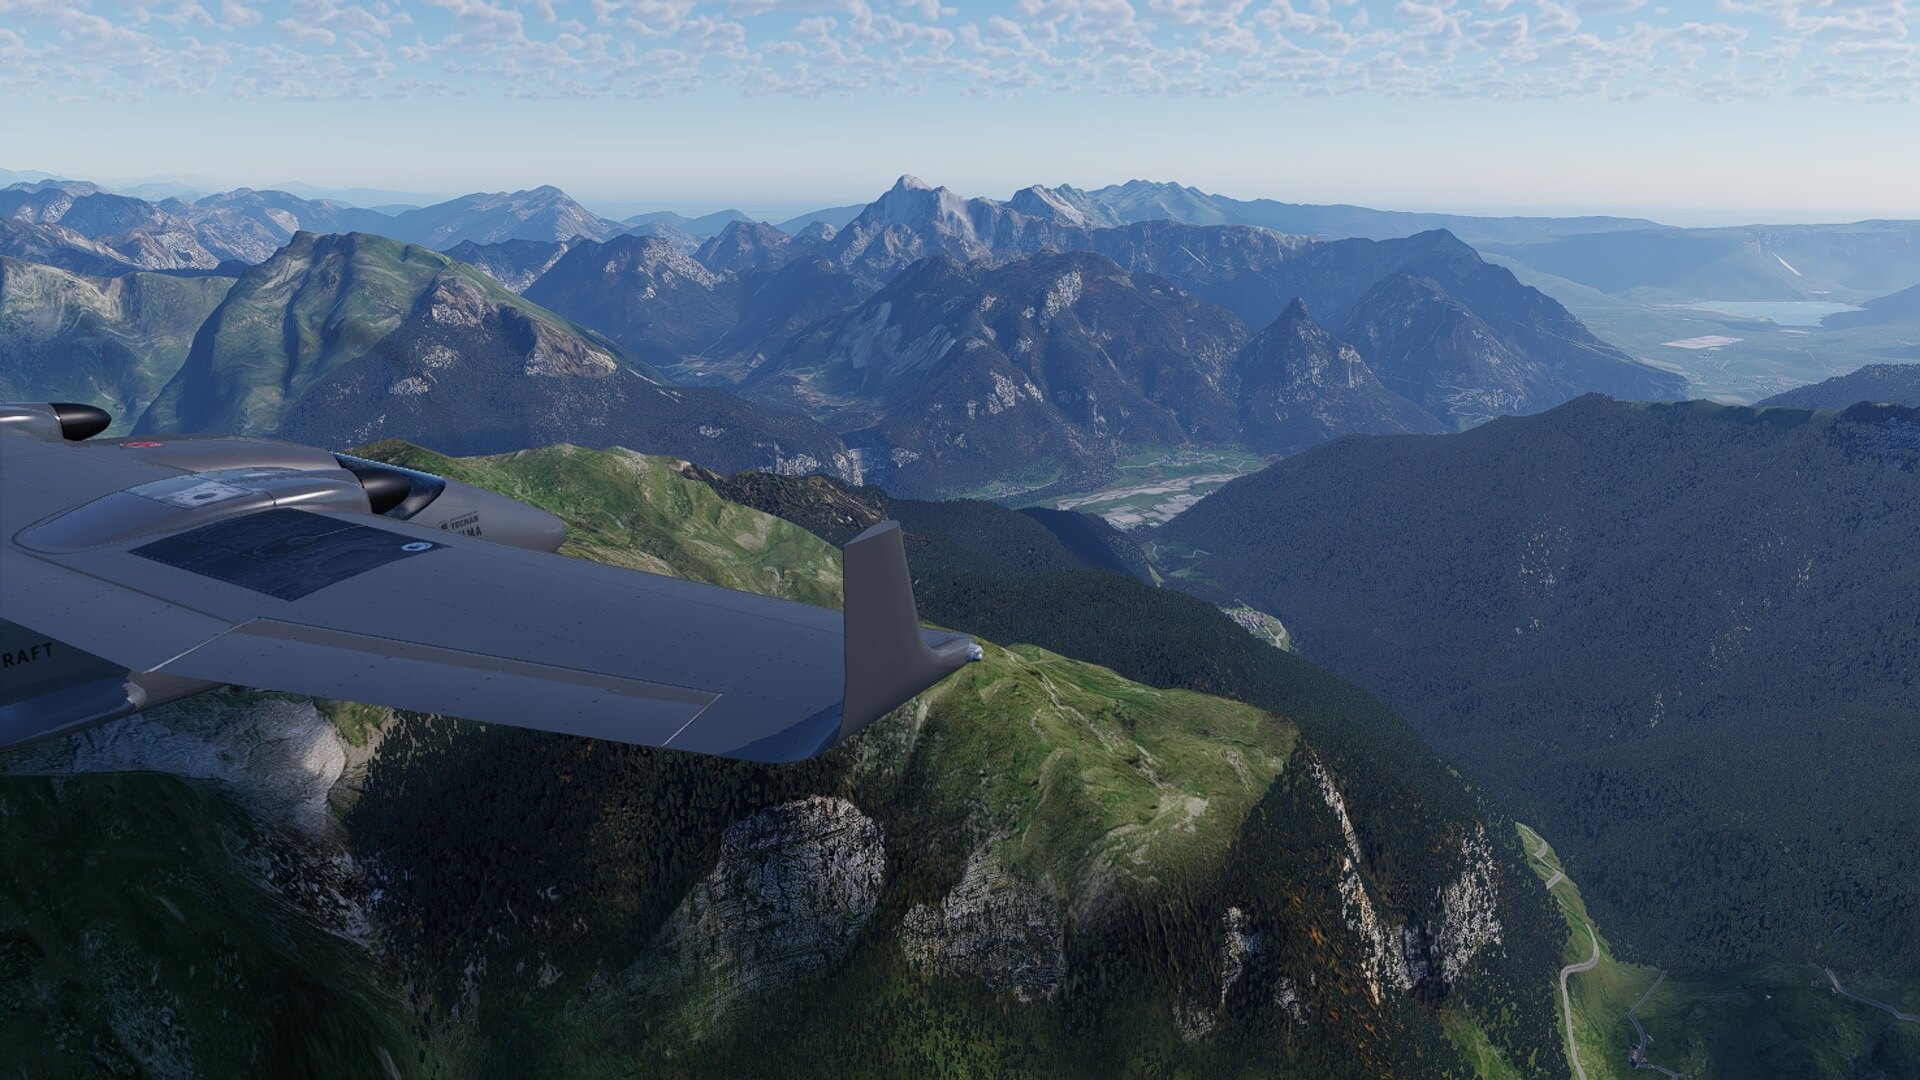
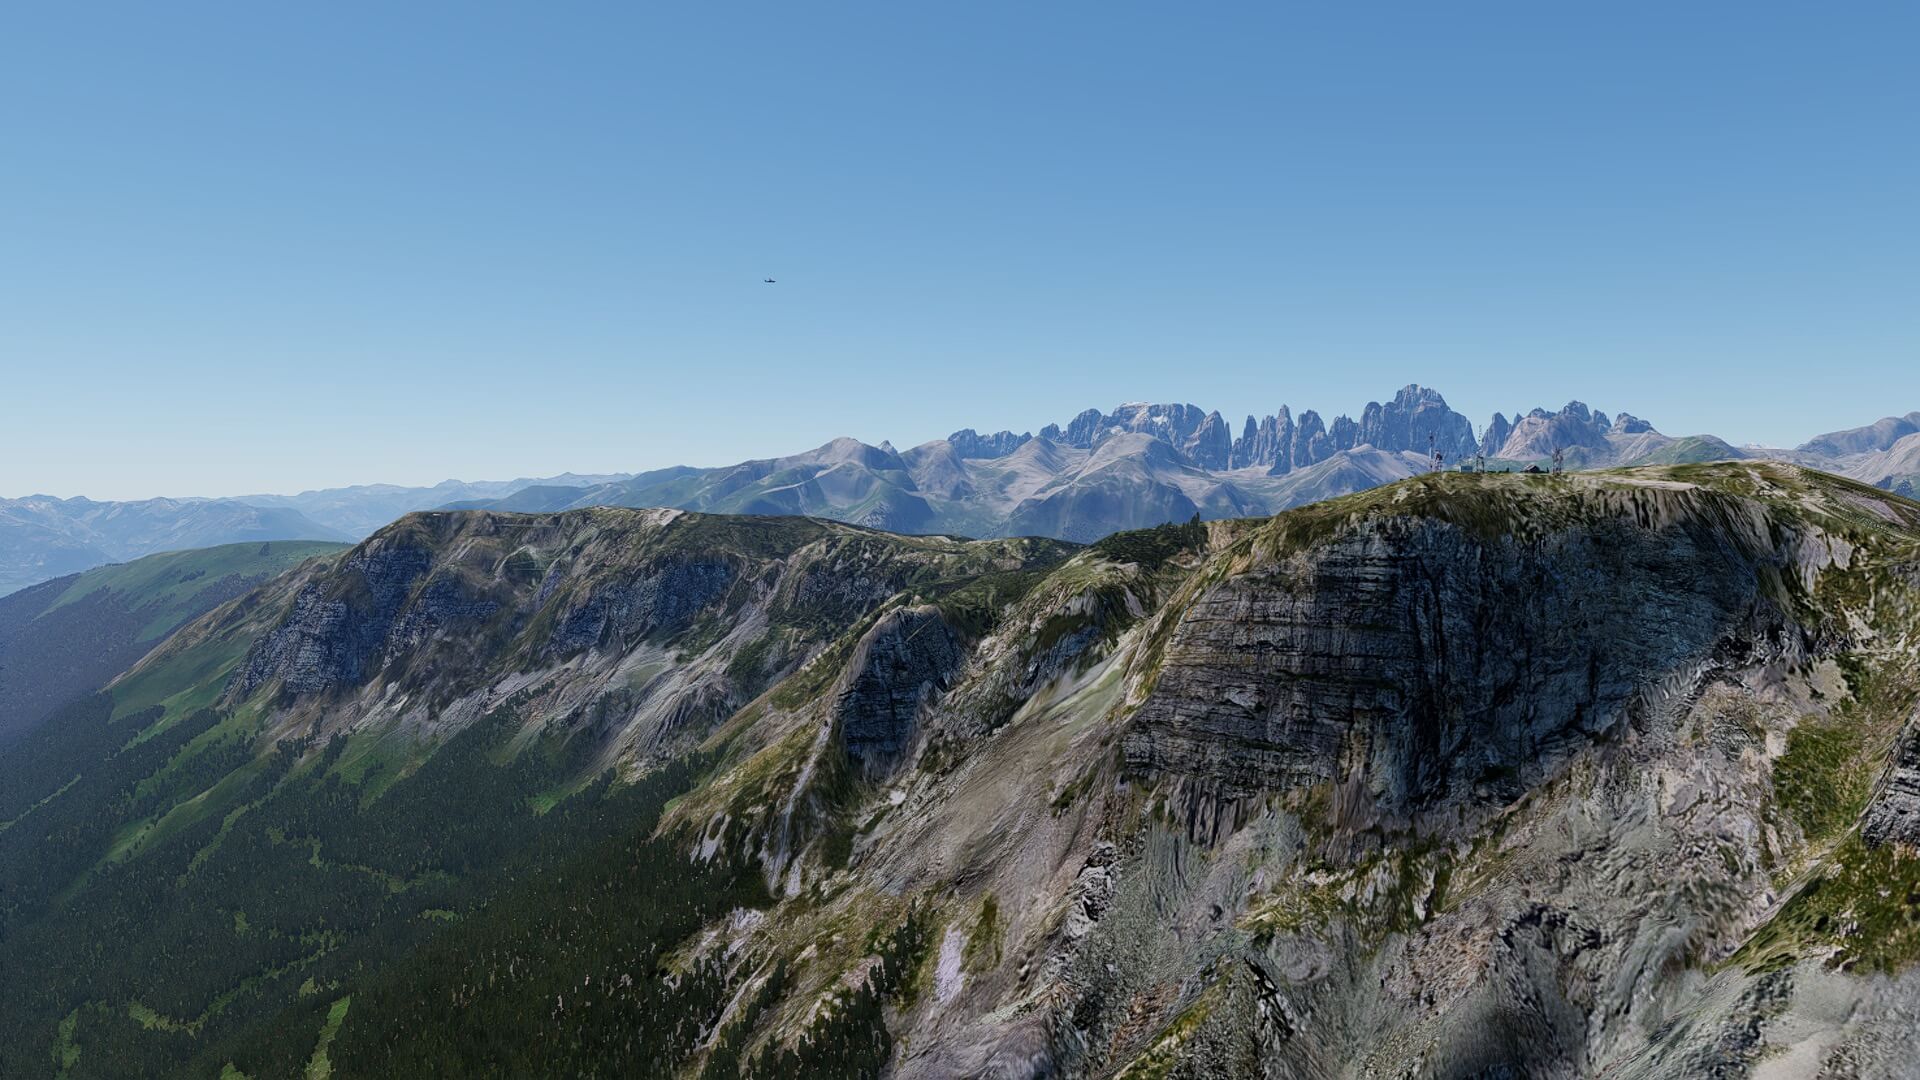
It’s already my last stretch via the valley to Trento. When I rewind this flight I thought it would be a relaxed flight without impressive Dolomites on my route, but I was totally wrong. Besides that, I discovered also some remote weather stations – I guess – and the magnificent Gruppo della Paganella, but the absolute highlight are the Dolomite di Brenta. OK, that’s for later.
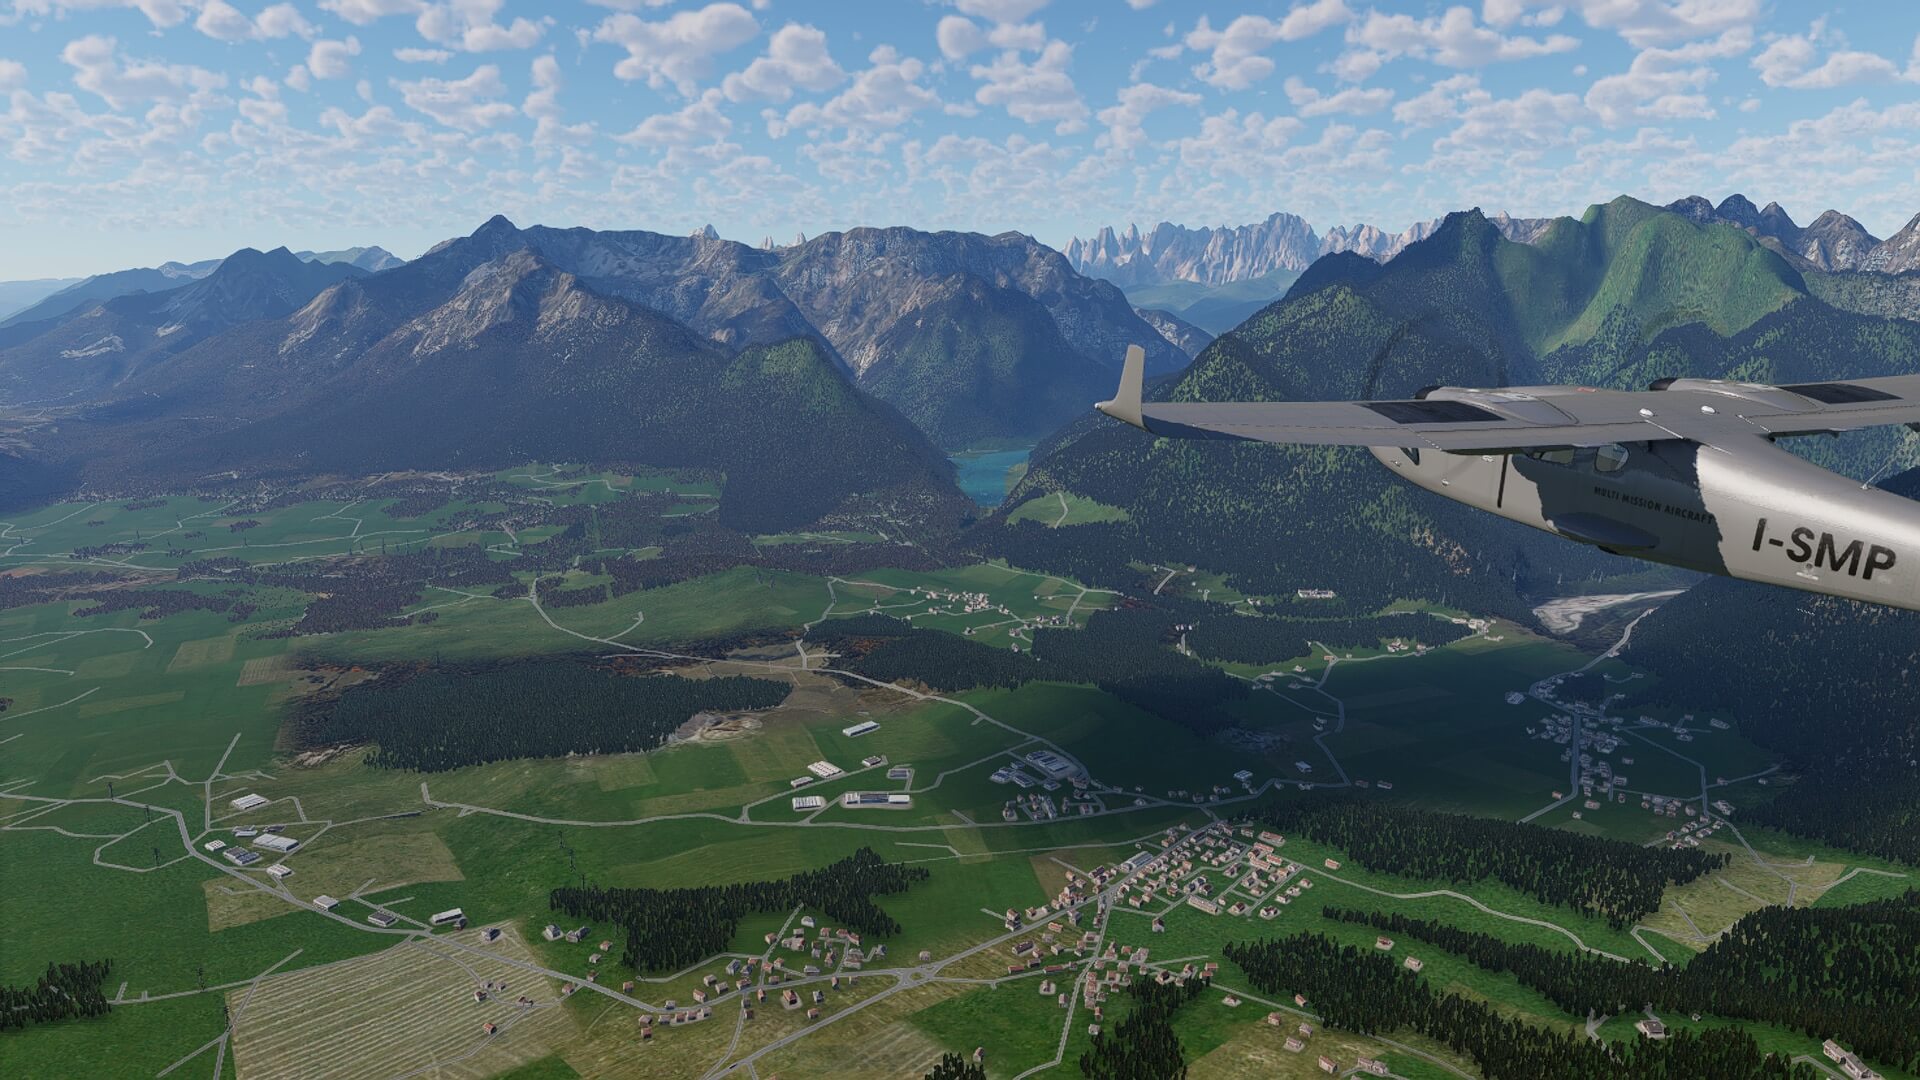
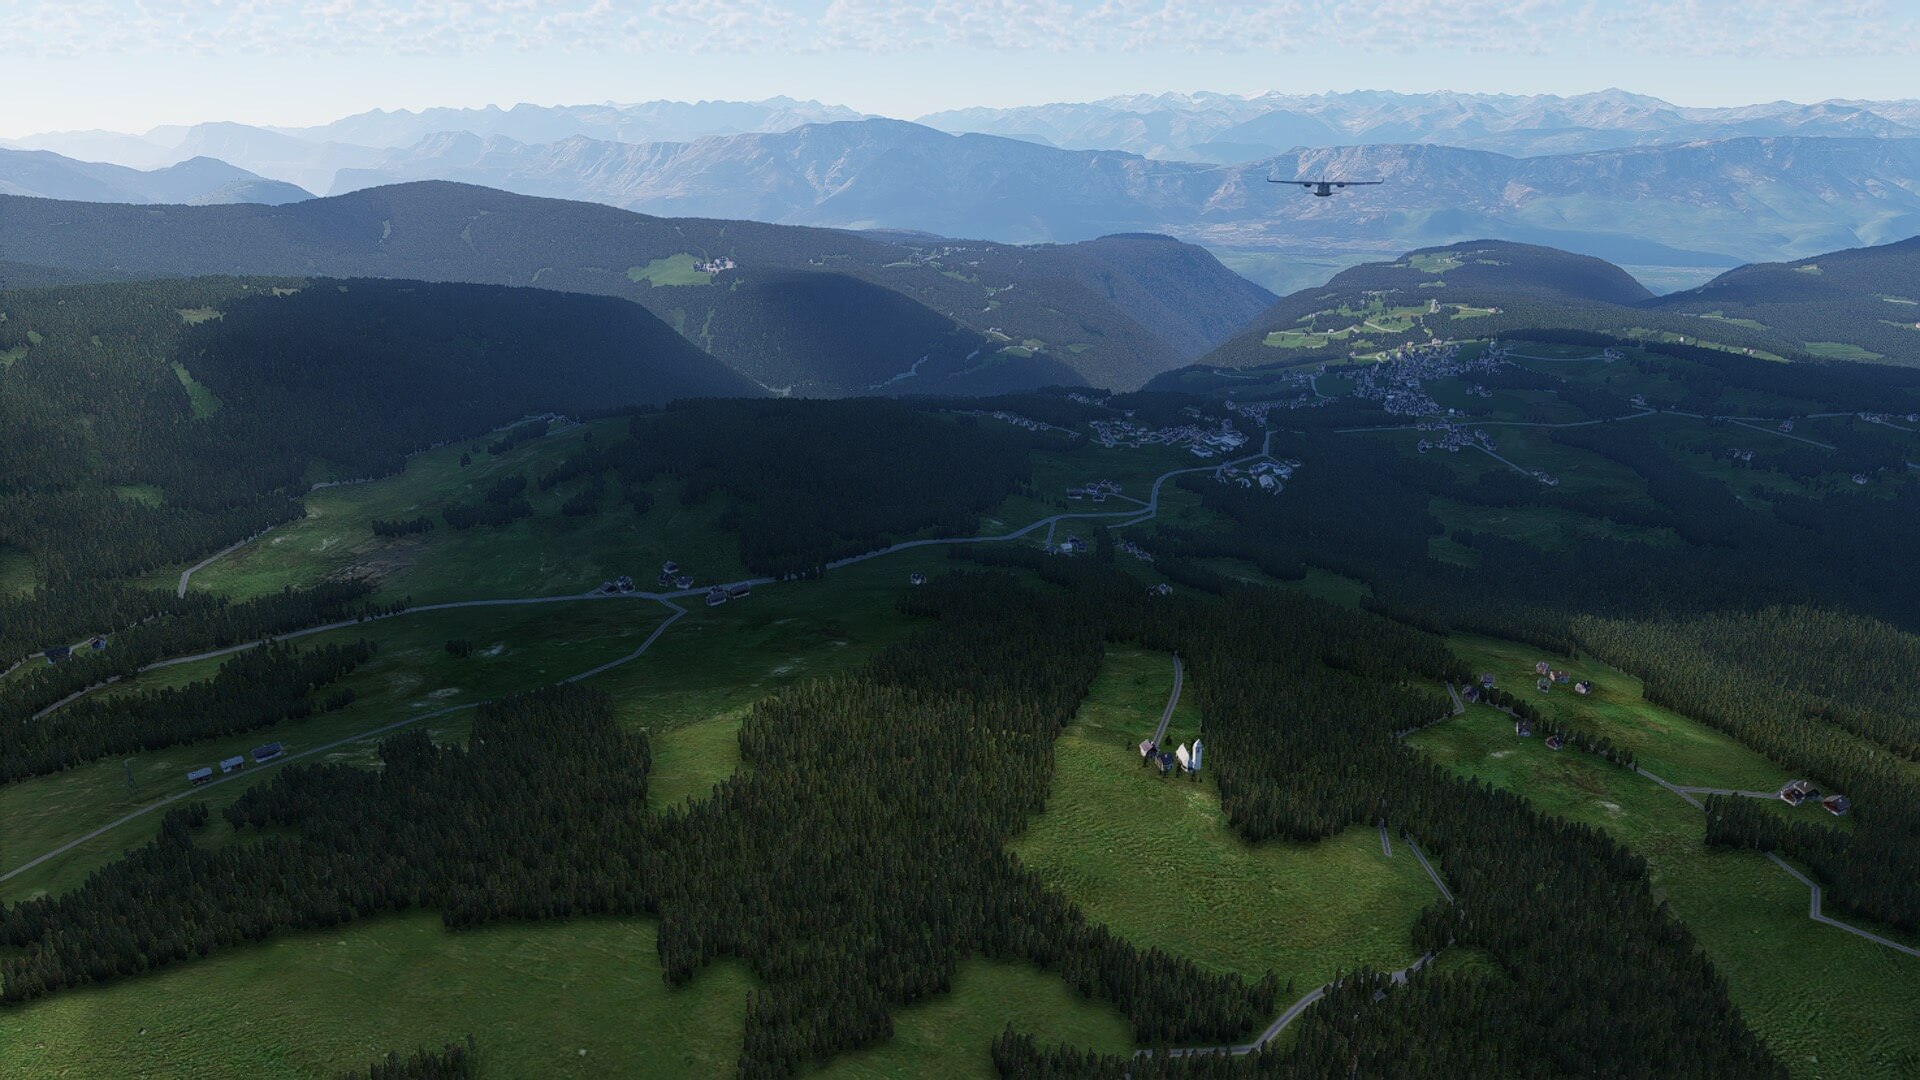
The moment you take off from Bolzano in a southern direction and climbing out, I’ll decide to circle around Bolzano valley to gain altitude. Once I’m at approximately 7000 feet, it’s time to follow the valley to Trento. Although I use the Laminar Research build in Garmin G1000, I actually don’t need for this stretch a navigation device and flight plan since I can either follow road A22 to Trento, the river Adige or the railroad.
That said, I’ll follow either river, road or railway. It’s still fun to fly this stretch since it is well modeled with lots of realistic minor mountains along each side of the valley, and of course the villages I see below and when you look close-by, you can see the typical houses known for this area.


The moment I’m approaching the city of Zambana, I am nearby the Gruppo della Paganella with behind the Dolomite di Brenta, worth for a detour. Come on, join me on this detour.
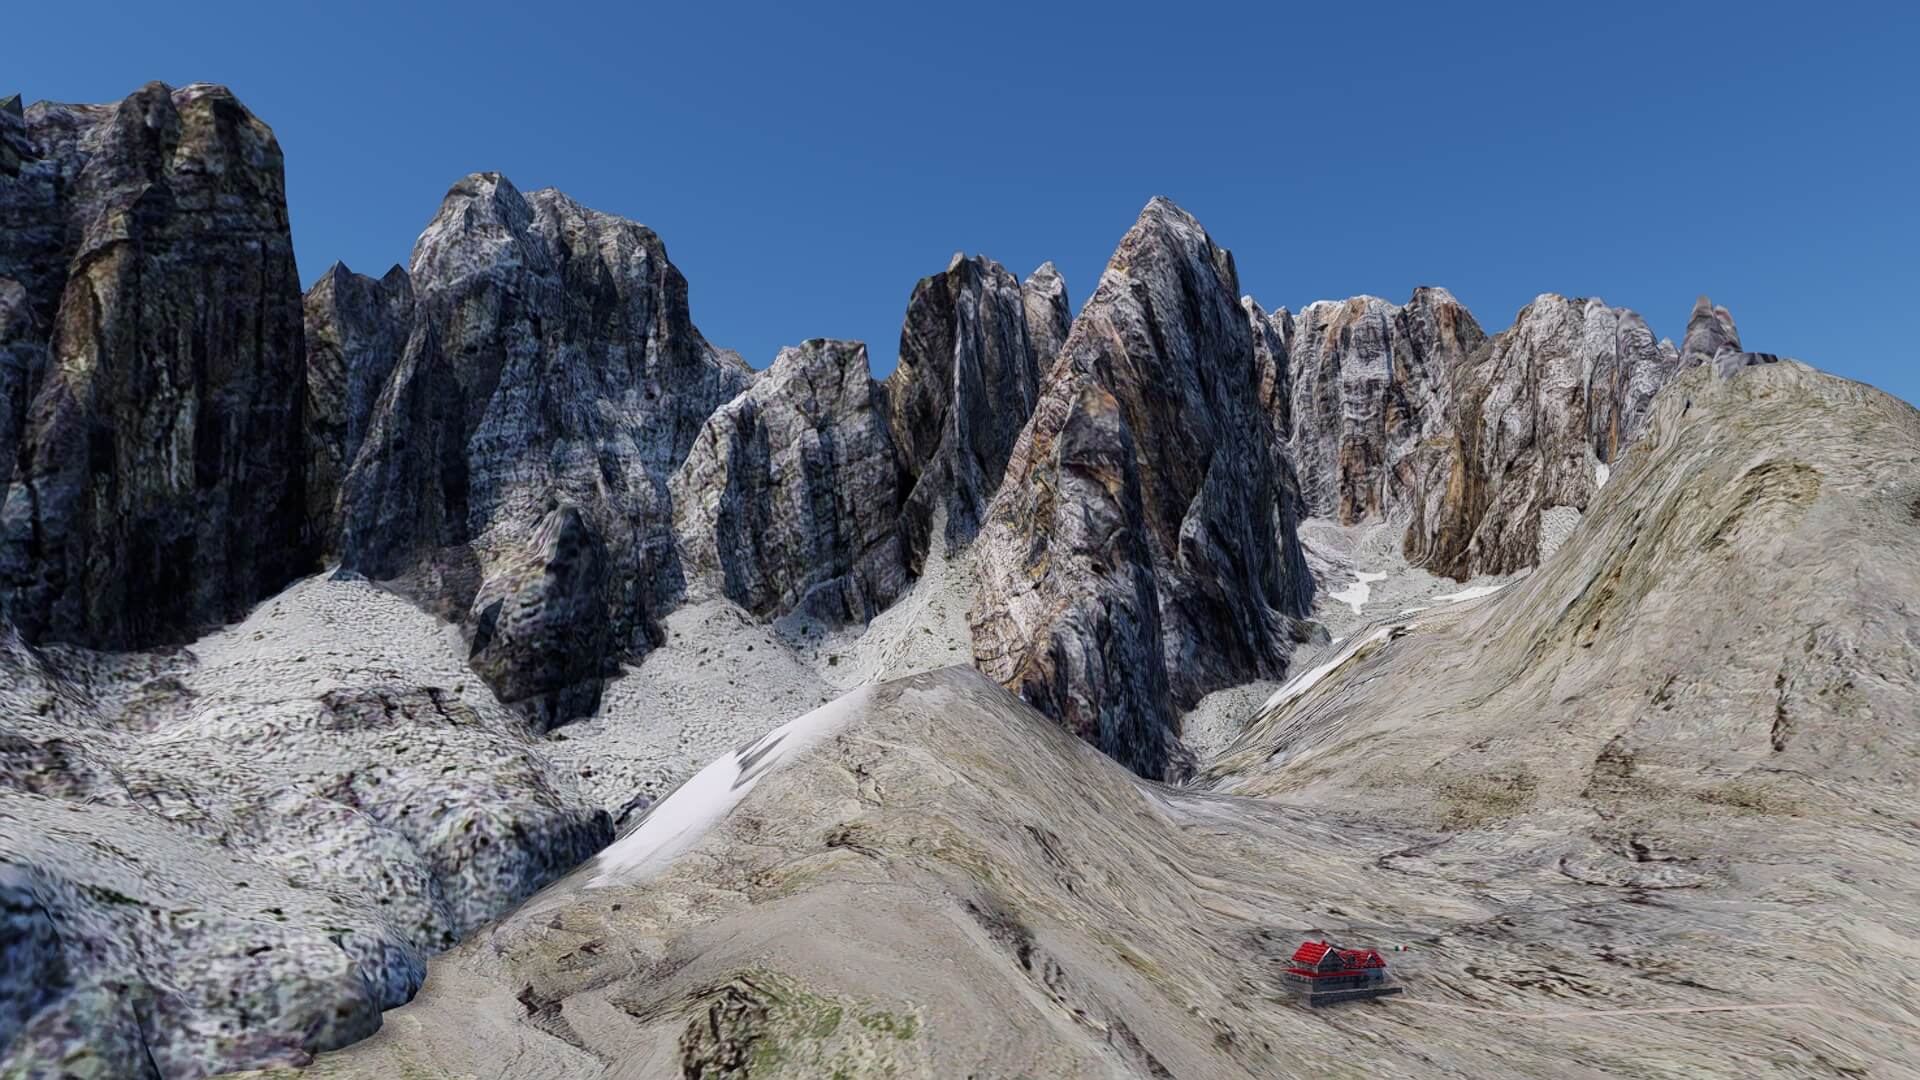
At one of the tops on the Gruppo della Paganella I spot a weather station and although I don’t see Frank or Fabio standing on one of the tops, I see well crafted objects. Worth to make a photo. Passing the rim brings me to the Dolomite di Brenta. Oh oh, this is also a master piece. First of all because the Dolomite di Brenta are beautiful, but also the way they are modeled. Nicely covered with photo-real textures as with all Dolomites I’ve seen on my stretches, and a perfect balance between the lower ground textures, the hills up and the blending between all these different textures.
When flying in a southern direction along the Dolomite di Brenta, I spot down below the village of Molveno with its lake, Lago di Molveno. That must be my next fly over before heading for Trento. Honestly, before starting this last stretch I didn’t expect to find some other impressive mountains or groups like the Dolomite di Brenta. The reason I mention this is since along the valley the mountains look great too but not like the typical Dolomites I’ve seen before.
What said, flying along the Dolomite di Brenta tells me that Frank and Fabio did an awesome job. It’s difficult to describe what I feel when flying there. It really feels as if you’re flying along the real Dolomite di Brenta. Ok, that was easy, right?


And believe me, it’s not only the way the Dolomite di Brenta are made, it’s the time and effort they have put into all of these mountain sceneries since it’s not only the Dolomite di Brenta or other Dolomites that look great. It is all with belongs to this package, thus all what is included. It is like that one scenery is included in the other scenery. Oops, let me explain that. You get all the Italian Dolomites, but you also get the minor Dolomites, ground textures, uncountable objects for regular and characteristics houses for the Dolomites region, offices, hangars, shopping malls, churches, roads, remodeled landscape, airports, airfield, heliports and so many other things.


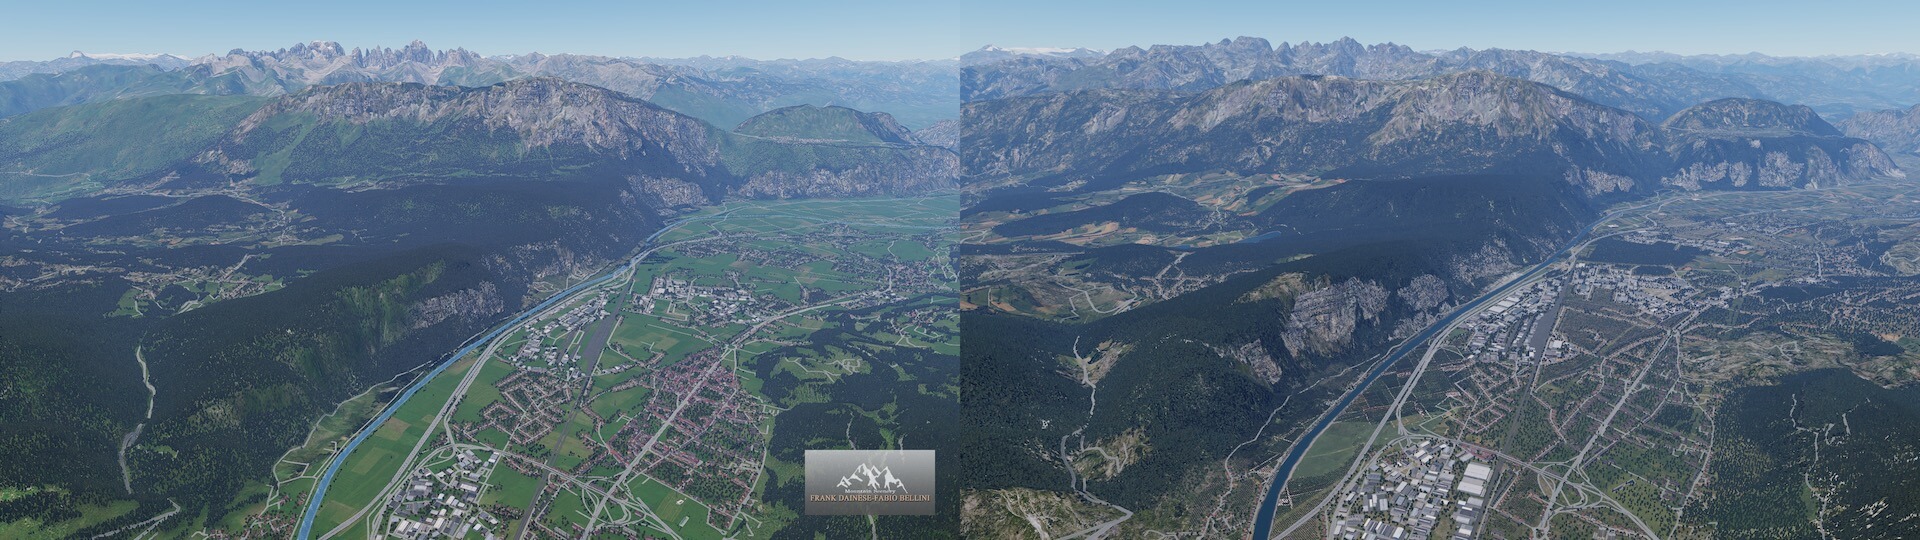
Related to this last stretch I can say that the ground textures in the valley are as real as it gets (checked versus Google Earth and Bing), the grass, the forest that are positioned at places where they belong, and not to forget the villages, the cities and airports, airfields and heliports. Even on this short last stretch I was and still I am impressed how this was all put together. Some will probably say “but the default X-Plane 12 scenery in this area I flew from Bolzano to Trento isn’t that bad too”.
Oops, that’s an understatement!
Let me show you with one simple screenshot with on the left Frank and Fabio Dolomites X-Plane 12 and on the right the default X-Plane 12 scenery. No further words are needed, right?
Right on. Let me continue with my flight.
After I passed the impressive modeled Dolomite di Brenta, I turn near the village San Lorenzo in Banale to the very small village of Molveno. This tiny village is modeled as it is, of course not in 100 percent full detail and perhaps not a full replica of the real Molveno, but it isn’t forgotten at all and immediately I need to add to this that some remote located traditional houses have a magnificent view on the Dolomite di Brenta. This is awesome, isn’t it?


But as always, I have to descent and make my entrance at Trento – Mattarello G. Caproni airport. What I wrote before, all airports are modeled with great detail but keep in mind that for example the textures aren’t of the quality of payware add-on airport packages. And that is not mend to be negative, let me clearly highlight this. The included massive amount of airports, airfield and heliports are a part of the massive Dolomites package and let’s not forget that the default X-Plane 12 scenery doesn’t have all these airfields, heliports and even airports included.
I wanted to highlight this before, just to clarify things.
Everything you see in Frank and Fabio Trento – Mattarello G. Caproni airport is as it is in real. Every building, office, hangar, sign, ground texture and so on, can be found on real photos. Just to give you that realistic look and feeling when you’ve flown thru the Dolomites and want to relax after this. That can be done at one of the many modeled airports. Honestly, I’m impressed what is all included. It is actually too much to mention them all. And finally, don’t worry when you land on Trento – Mattarello G. Caproni airport; you’re not alone. There’s lots of activity with static aircraft, ground handling and so on.
One last stretch …..
I couldn’t leave my aircraft parked at Trento. I felt I had to fly back to Belluno. No no, not to my start point, but Belluno. When flying to Belluno I could close the lower range of the Italian Dolomites too. That said, off we go again into the sky and while on route I trey to fly in a straight line to Belluno what doesn’t work. As you can expect, I see many things on my route and divert from that to see what is this or what is that. The first scenic point I see is the Lago di Caldonazzo with immediately behind Lago di Levico.


I did mention that the Dolomites packages come with lots of heliports, but since I don’t use a helicopter for this review, it’s not something I’m looking for till now, check out the following. I continue my flight and spot on my left-hand side a nice mountain that looks nice from a distance. That said, I divert to the left and fly straight to … yes, it’s the Cima d’Asta, a mountain with a height of 2847 meters and Lago di Cima d’Asta. Oh, this is awesome. I didn’t expect this and the way the mountains are covered with photo-real textures. Anyway, asa indicated on the Little NavMap the helipad Rif, Cima d’Asta (HERCA) at an altitude of 8135 feet.


After this unexpected surprise, I return to my intended track and end up near Belluno to make a final landing and to rest. Mission accomplished.
How could I miss …..
Introduction
Yeah, that’s really a big issue, but that’s partly because of the huge amount of scenic views that are offered with this Dolomites package for X-Plane 12. After I safely landed at Belluno, checked in at my hotel and tried to relax in the hotel bar, I looked once more on my flight map and double check if I had covered all the areas I’ve seen. As I said before, it’s almost impossible to cover everything.
Anyway, while relaxing I got some companion from other virtual pilots and then, after discussing about the scenic areas near and around Cortina d’Ampezzo, it turned out that I totally missed some great views. Oh my goodness, how can I correct that.
Relax Angelique, tomorrow is another day.
Scenic view Monte Pelmo
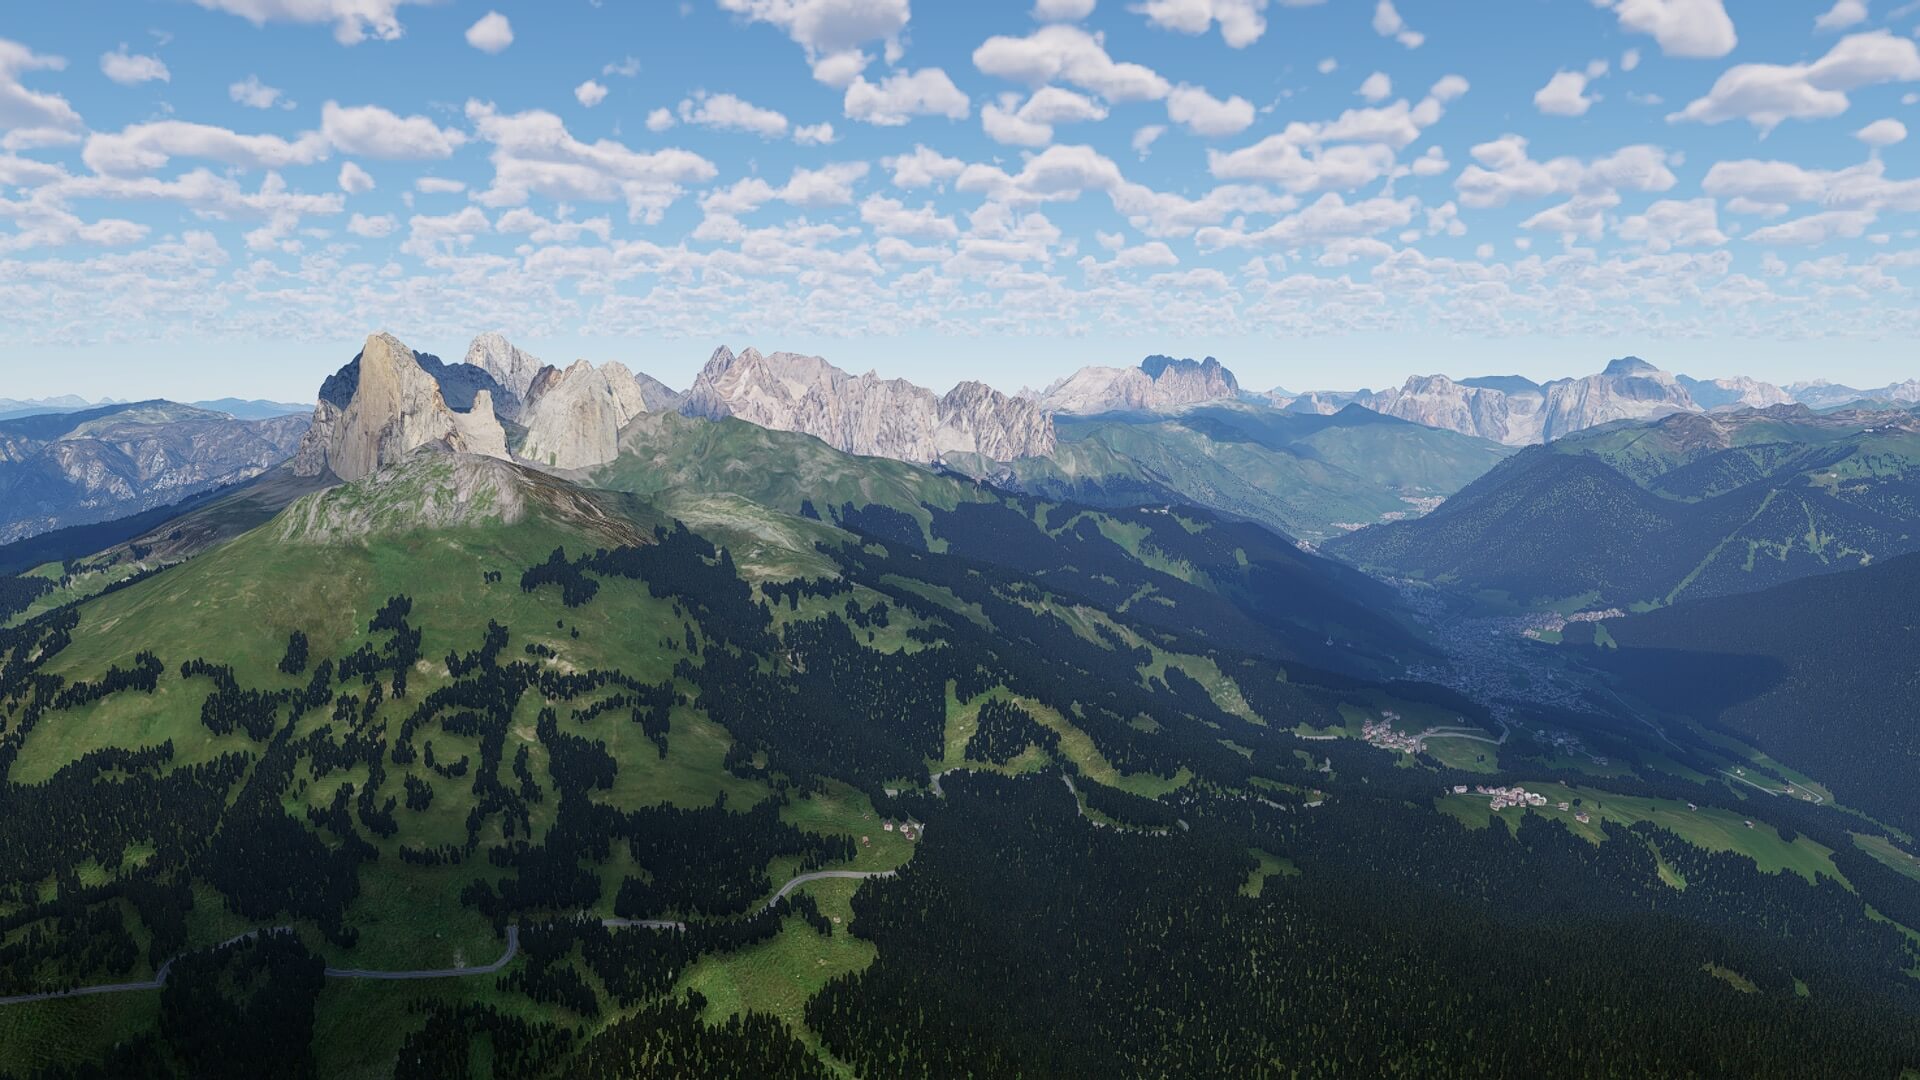
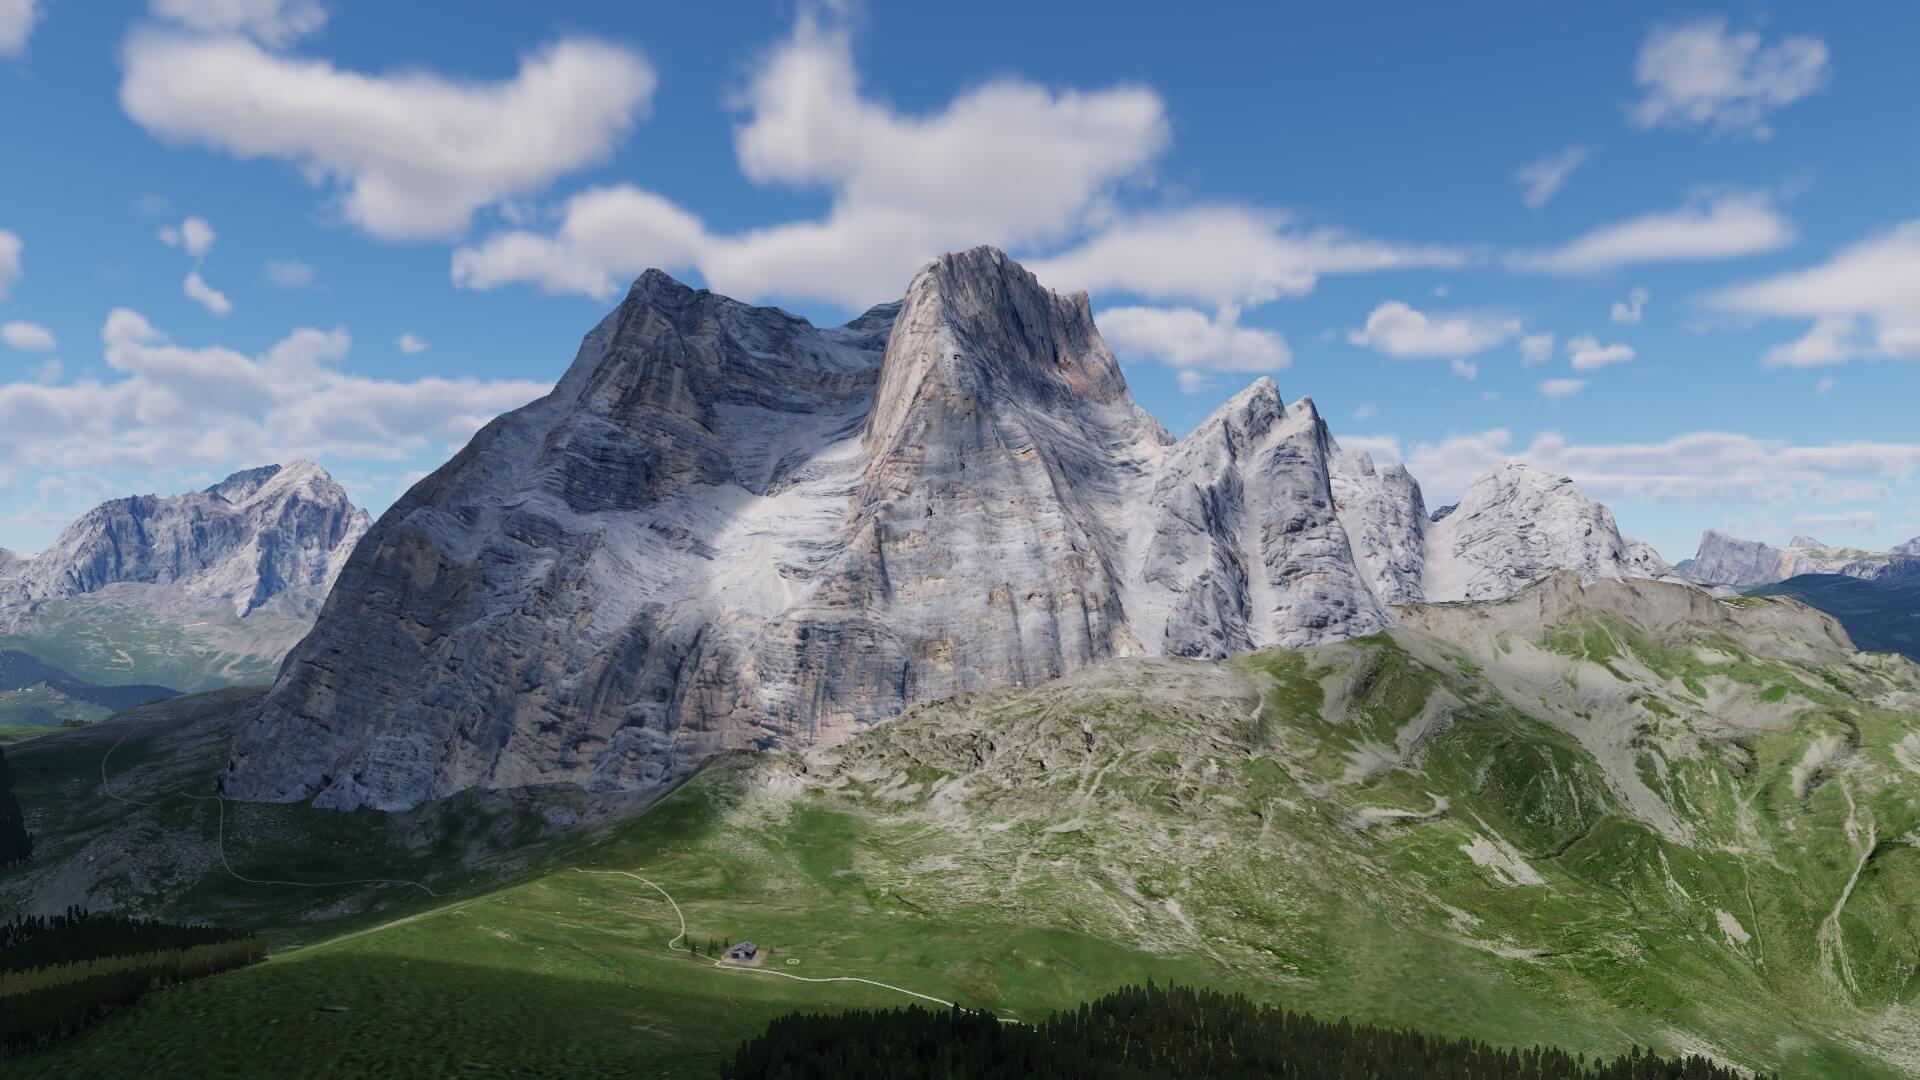
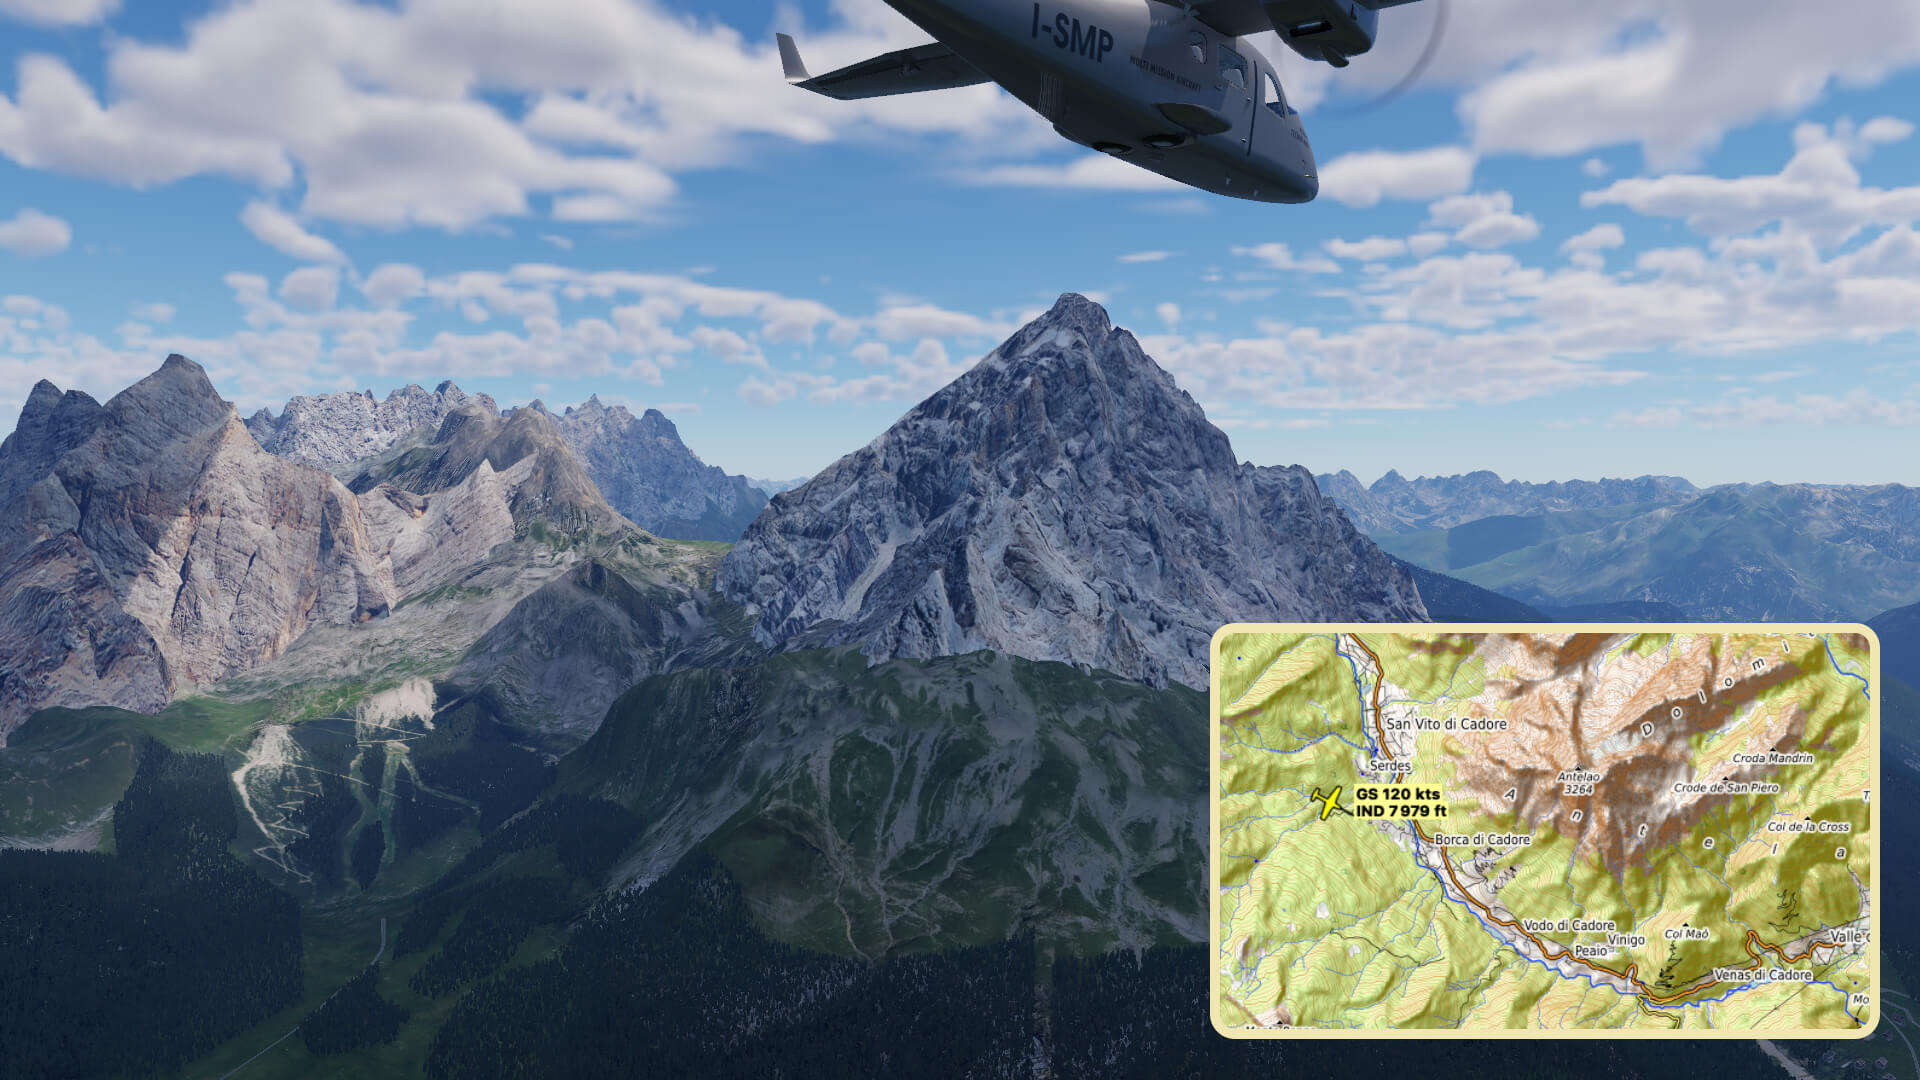
That said, the next day I jump into my VSkyLabs Tecnam P2006T and fly first to LIDI (Cortina d’Ampezzo). While passed halfway between the two airports, I must have seen on my very first stretch the Monte Pelmo on my right-hand side, but I’m afraid I’ve been flying too low in the valley, so I totally missed it. This time on my way back to LIDI, I can give it another try and YES, this time I recognize it although it’s not easy from the east side. It is roughly 8 – 10 NM from LIDI when I spot the massive area of mountains of which the Monte Pelmo is the highest one.
The Monte Pelmo is surrounded by the Monte Pelmotto, Spalla Sud, Spalla Est and some more. The look and feel is not much different then with all the other major Dolomites I’ve seen before. The Ponte Pelmo is highly realistically modeled, an almost perfect shaped with photo-real textures and down below a heliport, an hotel with restaurant and other objects as can be found here. The following screenshot confirms the realistic look and feel of the Monte Pelmo.
In case you’re flying this too, you can also use the helicopter and land at FIUME CITY. You can take a drink in the local hotel and restaurant or you start enjoying the awesome view. Since I’m not flying with a helicopter, I decide to fly around the Monte Pelmo and sister mountains before heading to LIDI, but before I move on, first some views of the trip to Monte Pelmo with the beautiful Monte Pelmo itself.


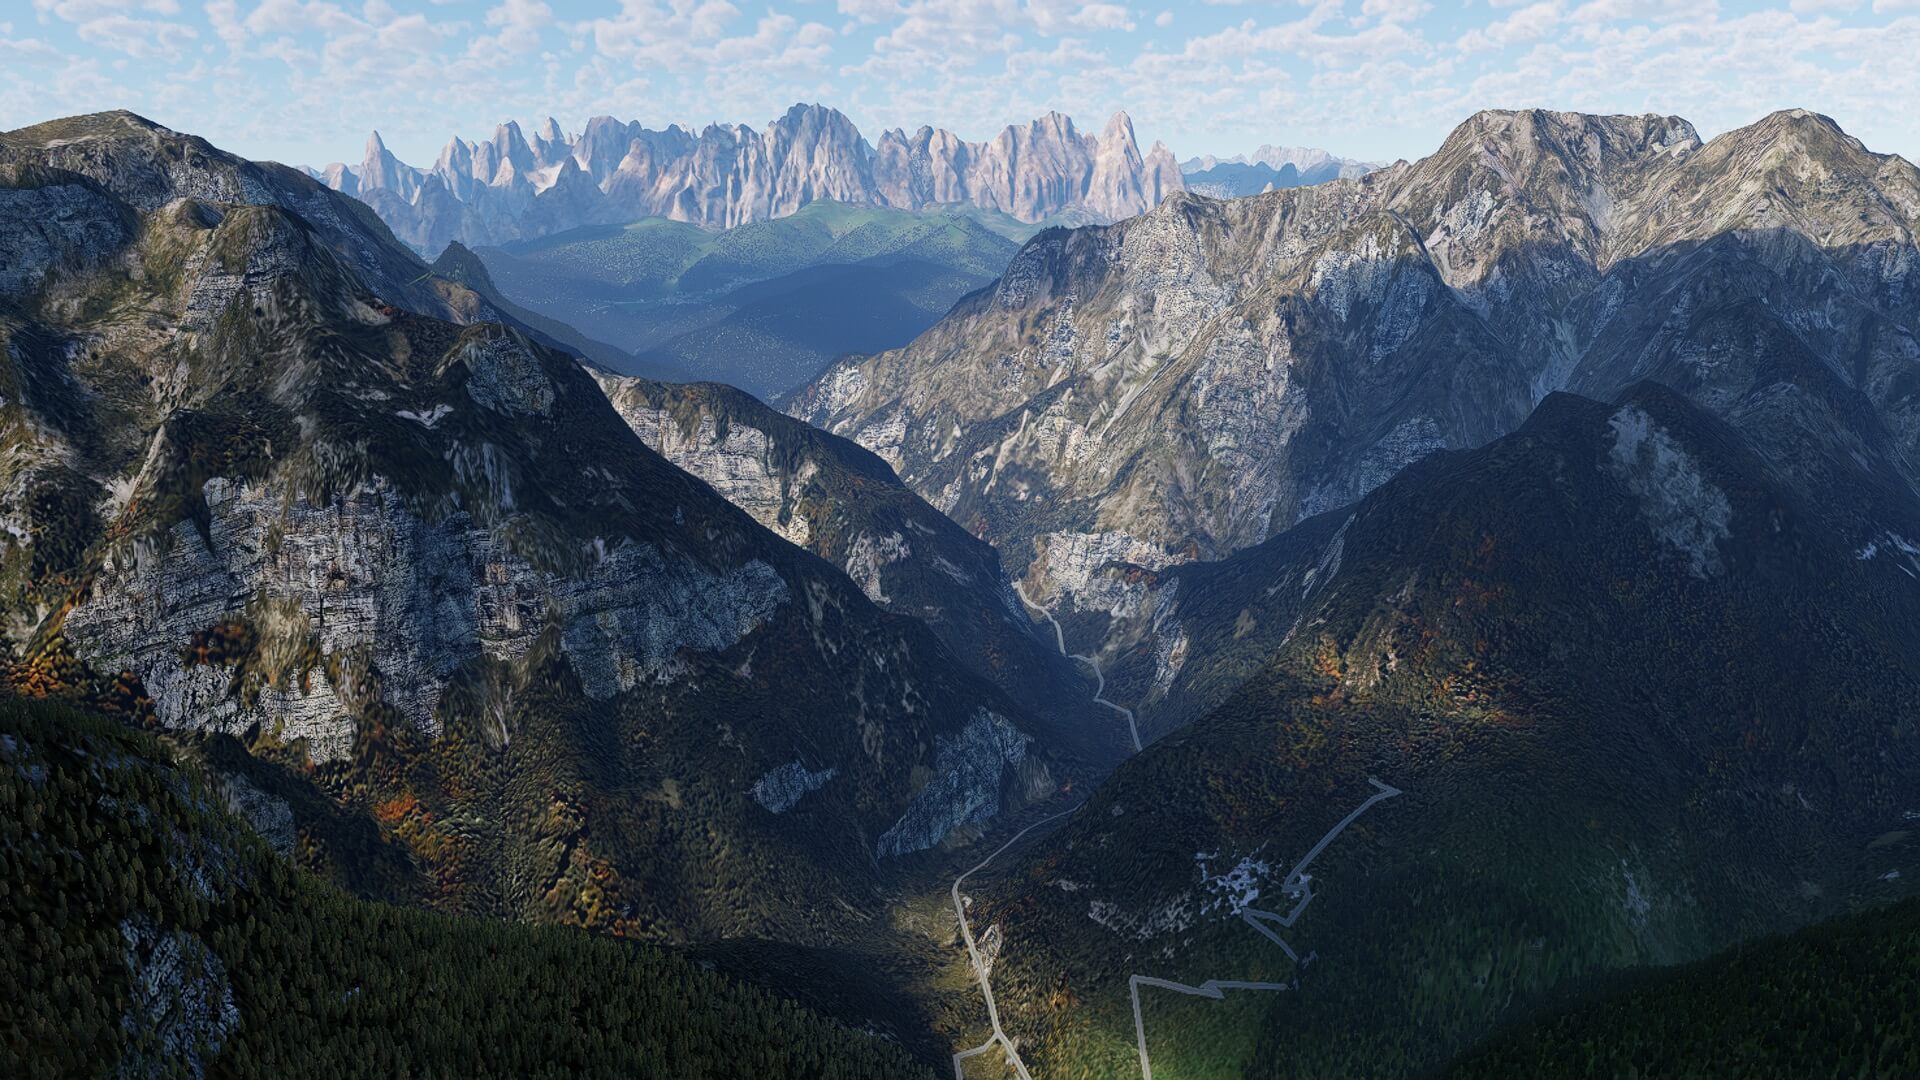
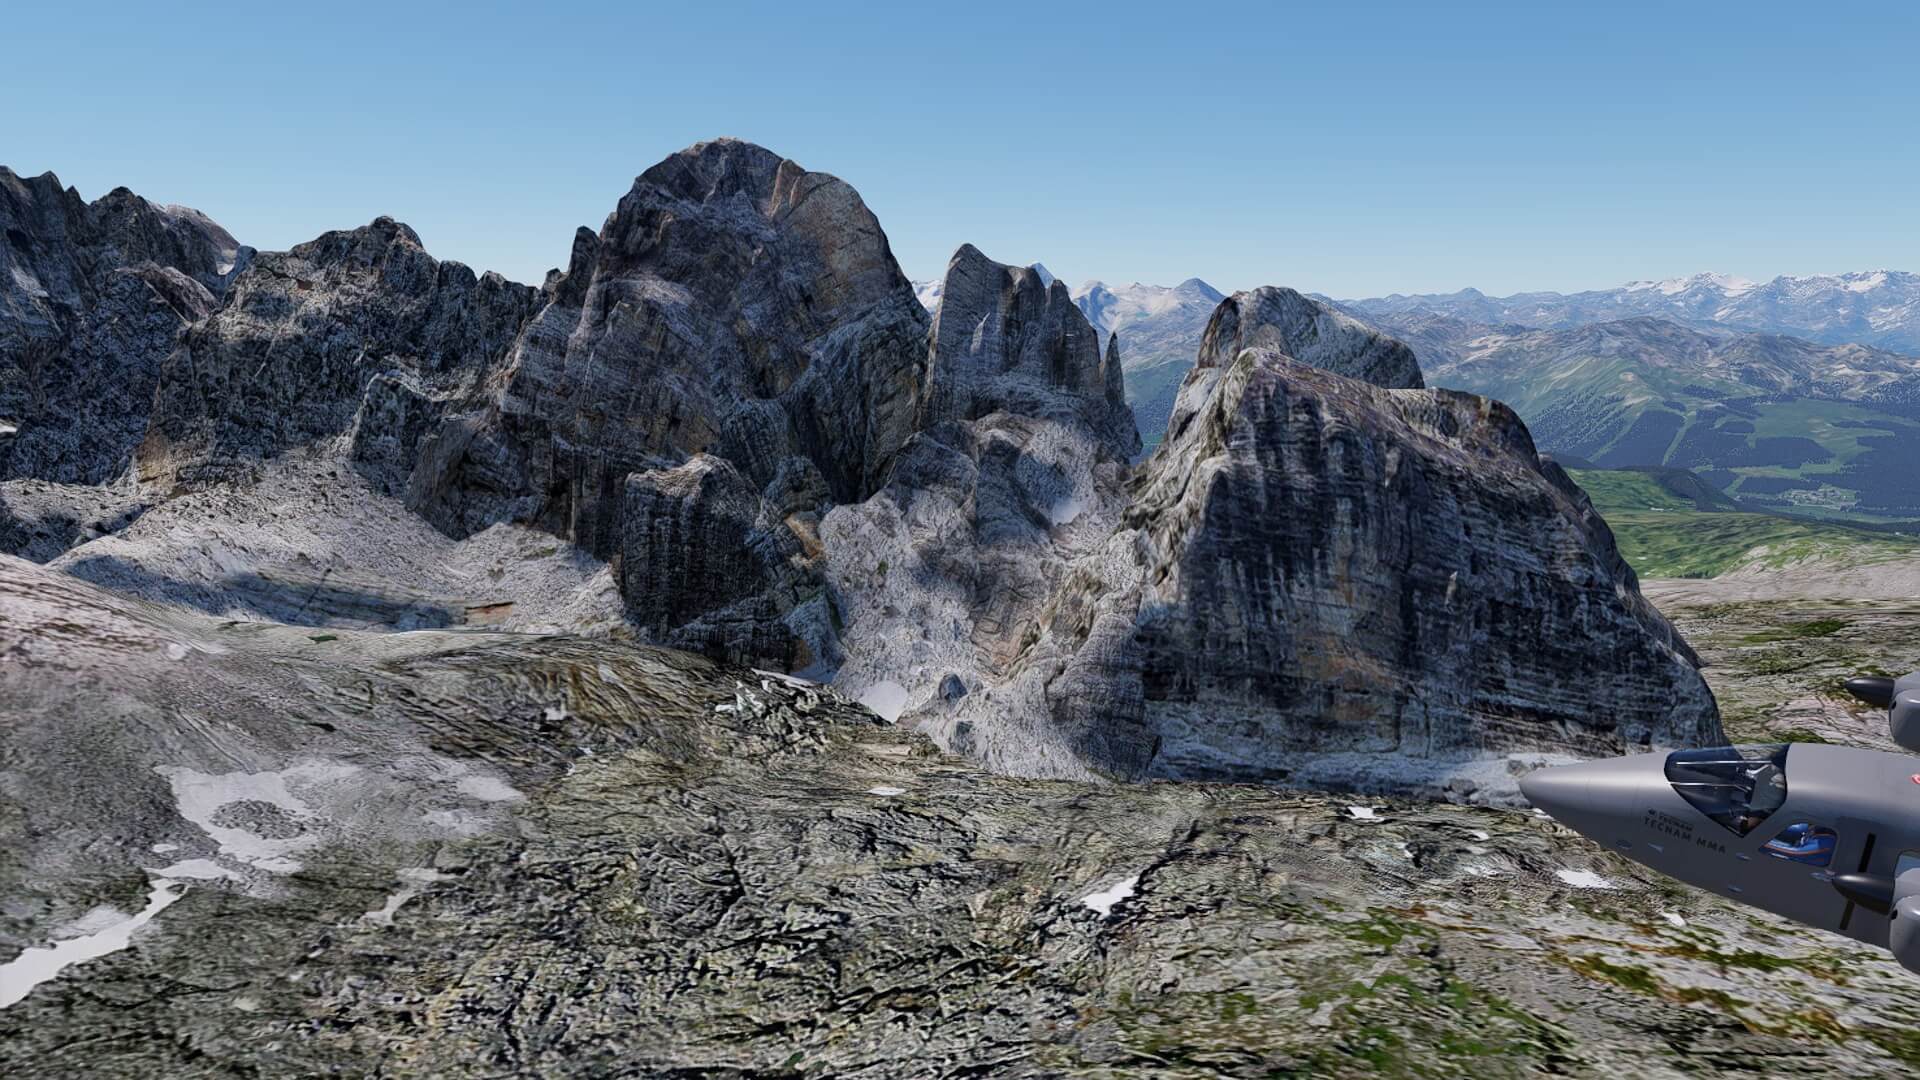
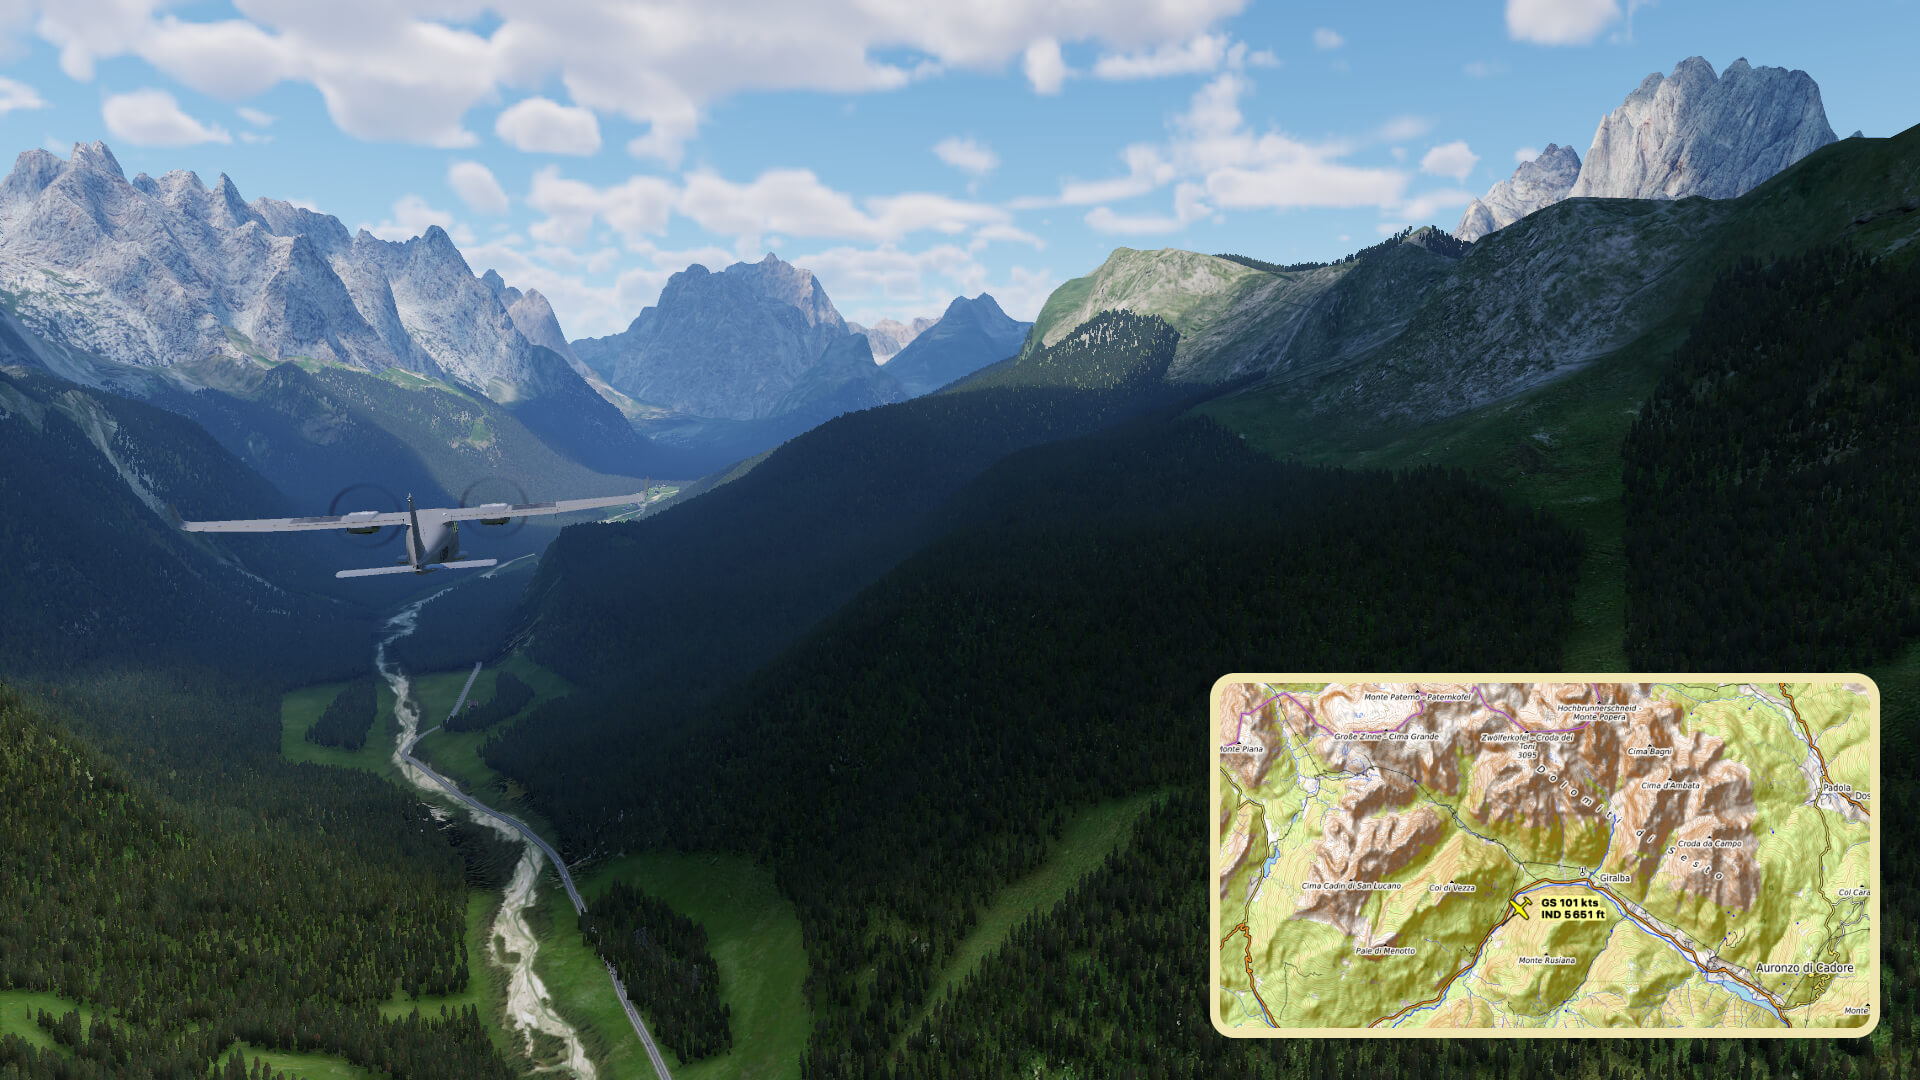
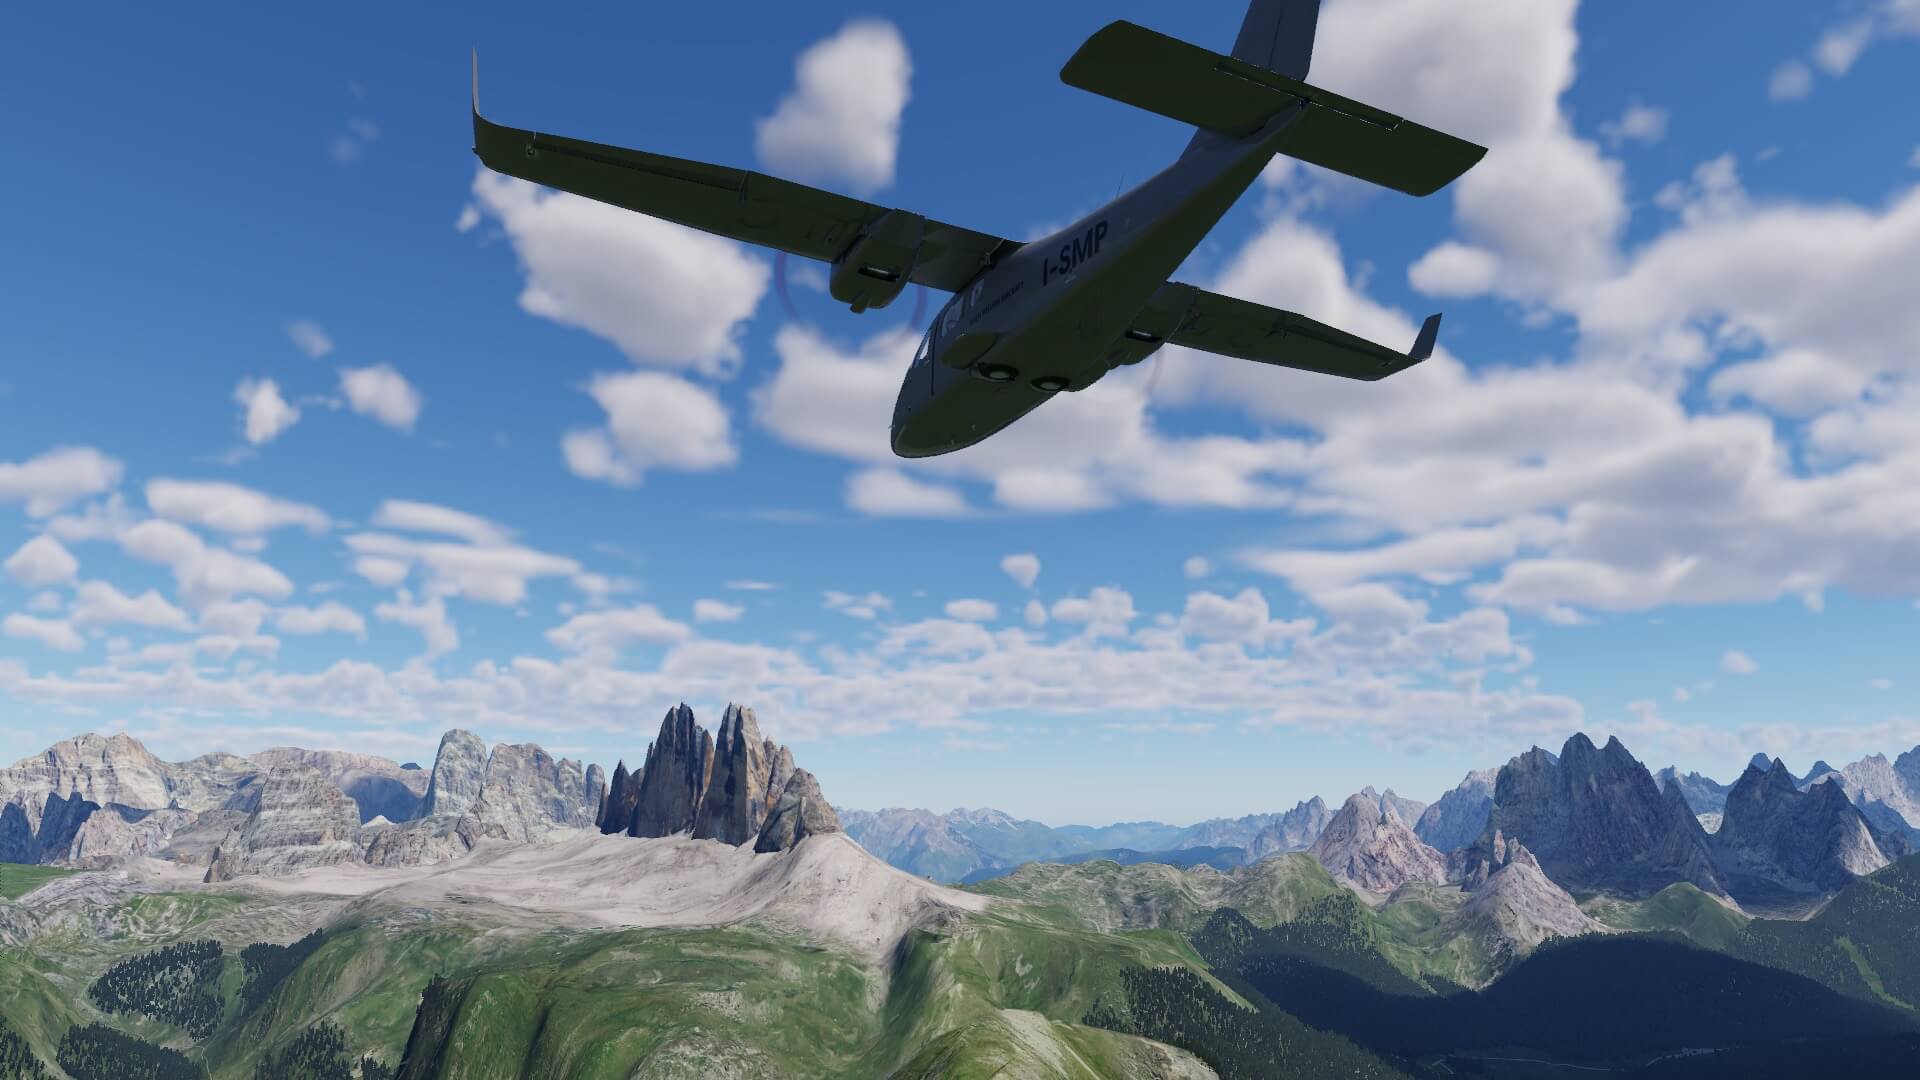
What said before, it’s now time to check some other scenic areas that I totally missed when departing from LIDI heading south. From my current location I first fly back to the valley and continue in an eastern direction to Pieve di Cadore. Via Lozzo di Caldore to Auronzo di Cadore that lies on the Lago di Santa Catarina. On this stretch I see lots of rivers, lakes and gorgeous traditional villages with authentic houses. From here I have two options; either I go straight to the Three Peaks of Lavaredo or I fly by following the river Ansiei or road SR48 to another gorgeous lake namely Lago di Misurina. Once arrived at this last lake, it is now time to see the famous Three Peaks of Lavaredo.
And yes, another option was of course to fly straight to LIDI and from there to the Three Peaks of Lavaredo, but then I would miss a lot from the following paragraphs. Good, check out the following screenshot to see what to expect.
Scenic views Tre Cime di Lavaredo (Three Peaks of Lavaredo)
I described already in the previous paragraph the way to fly and what to expect. Screenshots speak for themselves so no words are needed to explain those, but what I can explain or tell you is the sensation I felt during my flight trip thru the valley to the Tre Cime di Lavaredo. I’ve mentioned it many times; Frank and Fabio modeled major and minor mountains. While flying to Pieve di Cadore, you and I will spot mainly minor mountains with some peaks that are unique like the Antelao that belongs to the Dolomiti Cadorine. Neither less, while continue my flight to Lozzo di Cadore and Auronzo di Cadore, I’m constantly impressed by the amount of work this all have cost.
It’s not only the correct and realistic ground textures, but also all the villages and characteristic houses in those small villages. A good example is Auronzo di Cadore. When I would stay at roughly 6000-7000 feet, I won’t see much of all the work done by Frank and Fabio. Since I descended to a lower altitude you will be impressed what can be found on the ground. The village is completely rebuild including bridges, churches, ski resort objects and so much more. Add to this the correct ground textures, the green landscape, the forests or single trees and you are in the right atmosphere. So actually I’ve hundreds, no, thousands or handmade dedicated objects!

As seen on the previous overview Little NavMap screenshot, I continue my flight thru the valley, heading for the Three Peaks of Lavaredo, but first another interesting place to stop over. Ok, actually, I can’t stop or park any where since I fly an aircraft and not a helicopter. Ok, in X-Plane we’re a bit flexible.
I’m heading now towards Lago di Misurina. While approaching it must be an exclusive area. The lake is gorgeous but that’s not it. Although the small village Misurina is situated on the south, the lake and all what’s modeled around it looks to me more an exclusive resort rather then a village. I’m interested in the way it is all modeled. It has as far as I can judge two large hotels on either side of the lake. The hotel on the south side with lake side view rooms offer another awesome view oh, yes yes … the south side of the Three Peaks of Lavaredo. Oh oh, this is becoming interesting.


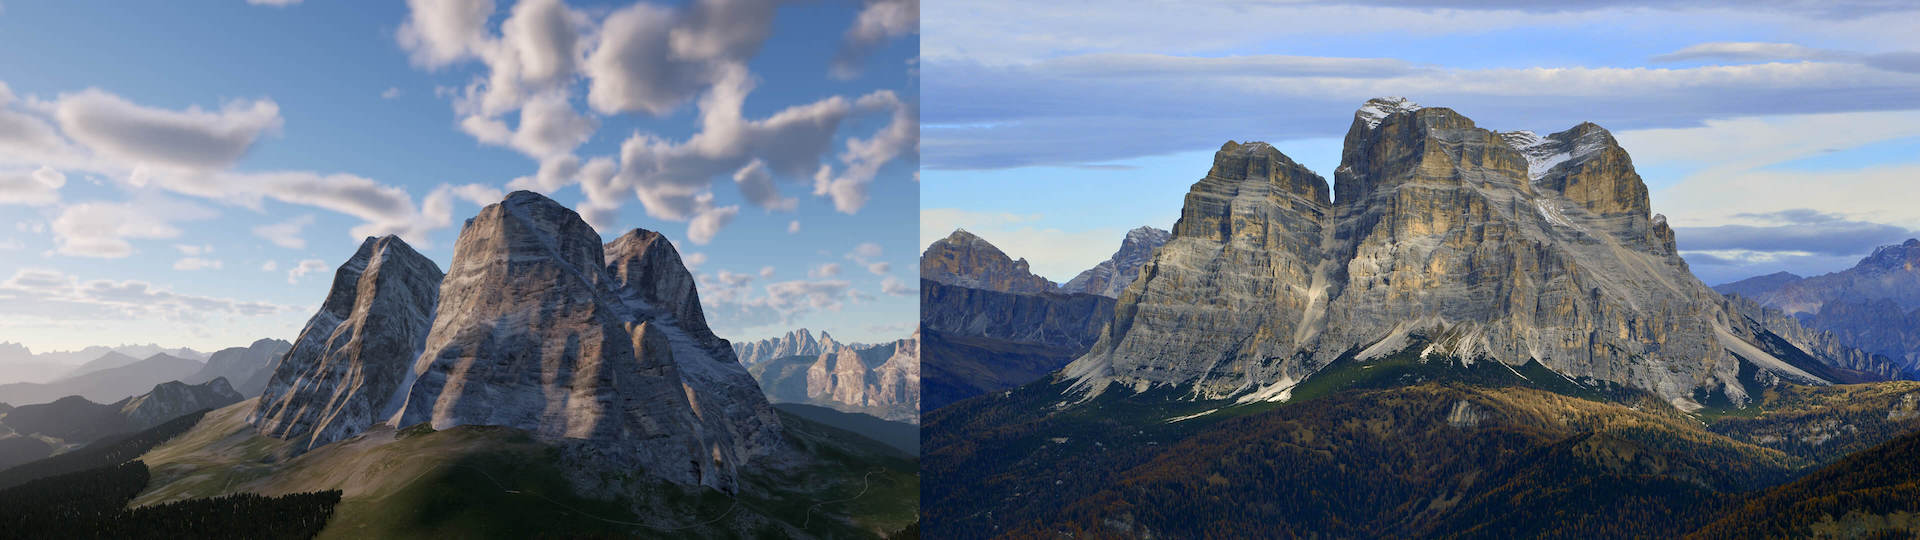
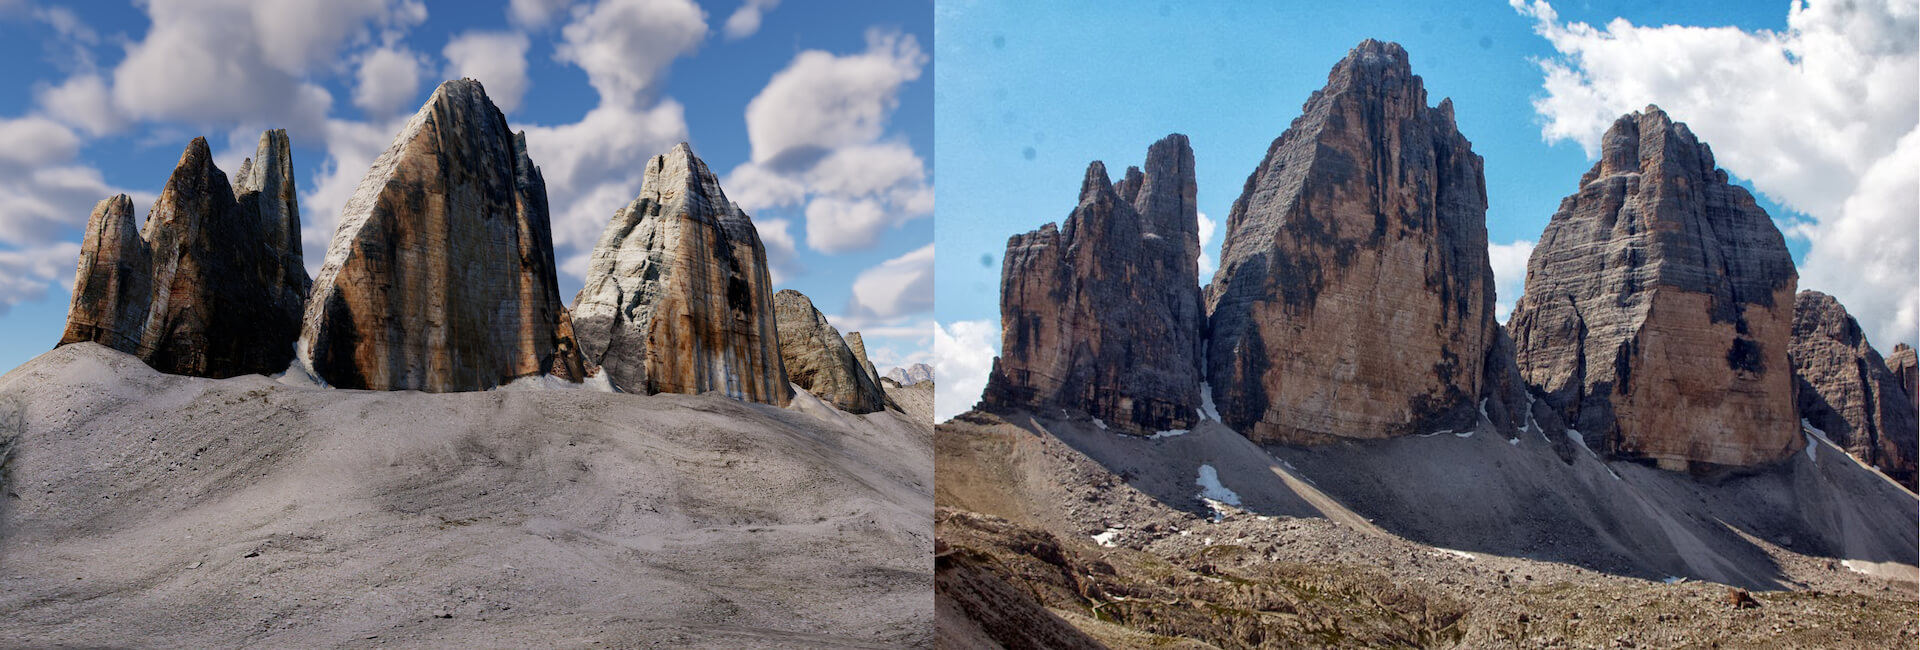
Initially I did plan to fly straight towards the Three Peaks of Lavaredo, but decided to turn left via another valley, heading over the small village of Carbonin, passing the small but gorgeuos Lago di Landro and then right to the massive mountains which are all a part of the Parc Naturale Tre Cime, but of course straight to the Three Peak of Lavaredo. Actually – thanks Frank for the clarification – the three peaks or Tre Cime are named from left to right: La Piccola di lavaredo, La Grande di lavaredo, La Ovest. I can tell you; they look gorgeous. Don’t believe me, check out the following screenshots and worth to check., the comparison screenshot of the real Tre Cime and the modeled once!


That was an awesome experience, and I still know, while I fly back via the valley to Cortina d’Ampezzo Airport that I couldn’t check all other interesting scenic views. I know for sure that you are heavenly interested in buying this Dolomites Package for X-Plane 12. By the weay, I while ago I saw a message on the X-Plane.Org forum from somebody who said that the Dolomites for X-Plane 12 are even more impressive then Frank and Fabio ALPS UHD XP12.
I do not agree with him. I think that both packages show the areas they cover as real as they are, with each of the areas having their own charm. The real and modeled French and Swiss Alps are unique in “their” way and are like a ribbon of mountains while the Dolomites are peaks everywhere in this 11.000 square kilometers area. I’ve learned with this second Frank and Fabio review that they have also an unique charm.
Summary
I start this summary section immediately with the following question; did I see everything Frank and Fabio modeled? No, sorry about that. It’s almost if not completely impossible to cover all what they have modeled. The area is namely too big to do this which is of course great news. In the start of this impression I mentioned that the covered area is 11.000 square kilometers.
This is way tooooooo much to cover, but what I did see during my three stretches flying thru and around the modeled area offers me awesome realistic looking major and minor Dolomites, many airports, airfields and heliports. Many of them not even included in the default X-Plane 12 scenery. But thousands if not more objects representing every thing you can imagine. It’s all there. It is all included. Actually, I can’t find any other words then impressive, gorgeous, awesome, wow! Oh yes, I’m aware that there are always places which I haven’t seen that need some corrections, but the overall is more then 200 percent worth your investment.
A big thumb up for Frank and Fabio with this Italian Dolomites master piece.
Could I use one word or do I need more words to tell you how I experienced the Frank and Fabio Dolomites for X-Plane 12? I need more then one word ….. a awesome realistic experience, the “wow” effect can be found behind every mountain, a stunning masterpiece as if you’re flying in-between the real Dolomites!
Before finishing my Frank and Fabio Dolomites impression I would like to share with you this great real Dolomites movie, filmed, edited and compiled by Bashir Abu Shakra. According to Bashir “I decided to make one of the biggest films i’ve ever made alone. This was the hardest challenge i’ve made in my life, since i decided to cover most of the Dolomites, known and unknown. Hundreds of hours i’ve hiked and climbed to get to these views and with all my camera equipment. Most of the time I had to camp there, just to be alone in the shot, or to get the sunrise. In this film I want to deliver a message, what a single person can achieve alone, if he believes in himself and keep going after his goals.”
Wow, this is impressive what Bashir has done. Yes, I know, the following movie shows you the real Dolomites, but the only reason to add this in the summary is to show you real beauty of the Italian Dolomites. Enjoy!
And finally, where can you find additional information and buying the product?
For the dedicated forum from Frank and Fabio sceneries you surf to this URL. At the X-Plane.Org dedicated store page you can buy the product. As of this writing, March 2023, the package cost you 59,95 USD and as you can imagine after reading this review, it is worth every Dolomiti!
Feel free to contact me if you’ve got additional questions related to this impression. You can reach me via email Angelique.van.Campen@gmail.com or to Angelique@X-Plained.com.
With Greetings,
Angelique van Campen
| Add-on: | Payware Frank Dainese and Fabio Bellini Mountain Scenery |
|---|---|
| Publisher | Developer: | X-Plane.Org | Frank Dainese and Fabio Bellini |
| Description: | Highly Realistic rendition of the Italian Dolmites |
| Software Source / Size: | Download / Approximately 9,65GB (unzipped) |
| Reviewed by: | Angelique van Campen |
| Published: | March 22nd 2023 |
| Hardware specifications: | - iMac Pro - Intel 3GHz Intel Xeon W / 4.5Ghz - Radeon Pro Vega 64 16368 MB - 64 GB 2666 MHz DDR4 - 1 internal shared 1TB SSD (Ventura 13.x) - 1 external 2TB LaCie Rugged Pro SSD (Bootcamp Windows 10) - Saitek Pro Flight System X-52 Pro and X-56 Rhino - Honeycomb Alpha Flight Controls - Honeycomb Bravo Throttle Quadrant |
| Software specifications: | - macOS Ventura (13.x) - X-Plane 11.5x - X-Plane 12.04 |
0 Comments