Orbx TrueEarth Britain North or just “Scotland”
Introduction
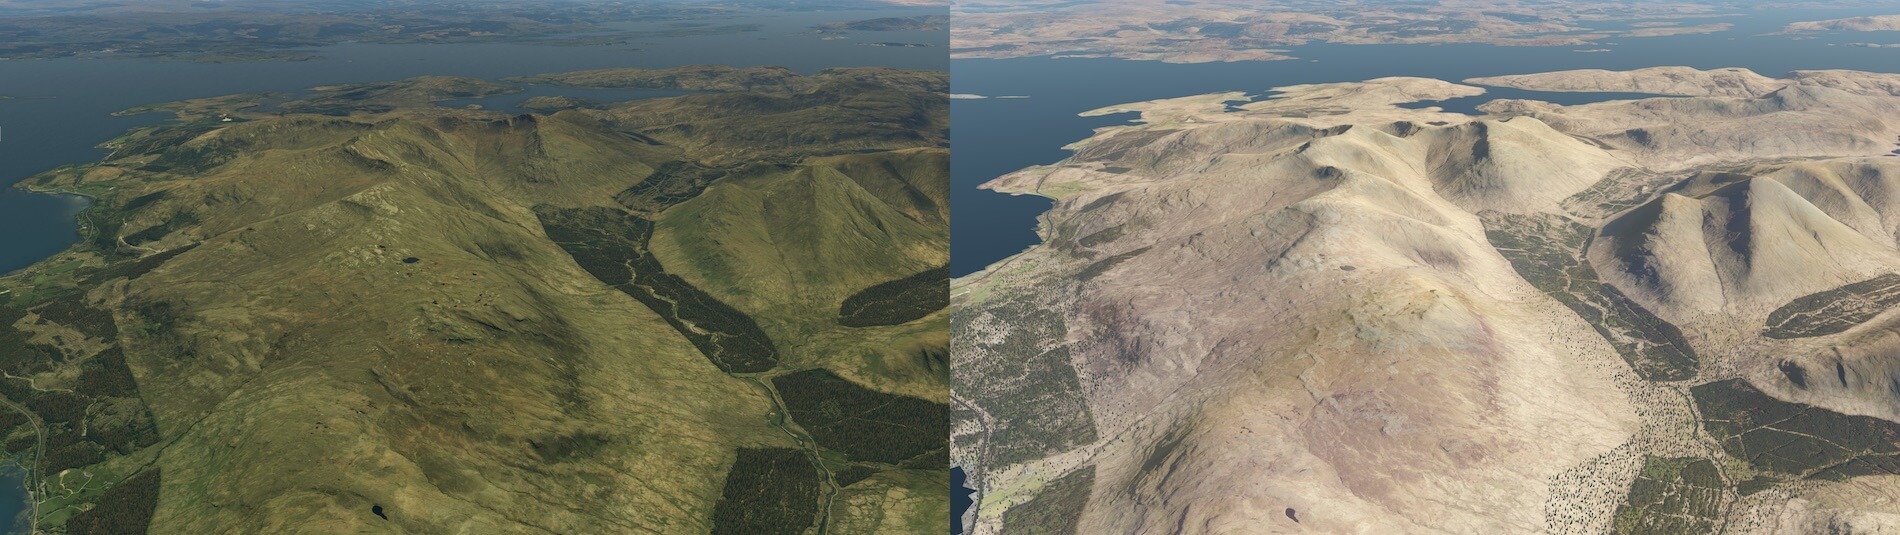
Who doesn’t want that … simulator flying over true Scotland, and true means then really true? Before Orbx Simulation Systems introduced TrueEarth Britain North (and Central and South) it was with its limits possible with the ortho textures from Zones Photo, and before that, I had the photo textures from SimHeaven. the ortho texture from SimHeaven had as far as I can remember a Zoom level of 17 while those from Zones Photo which are still available, have a ZL of 16.
Since only Zones Photo offers ortho textures from, in this case, Scotland, I’ll try to keep focused on that versus Orbx TrueEarth Britain North. You could ask yourself and perhaps you will ask yourself, why should I buy TrueEarth Britain North while Zones Photo offers me also those ortho textures tiles, right?
In this review I will try to explain why the Orbx TrueEarth Britain North is a better choice when you love to fly over Scotland since it’s not just the quality of the ortho tiles, it’s a bit more that is else missing although I’ll be aware that with the current X-Europe it’s even for me not easy to compare, but I will succeed, believe me. Just to highlight in case you’ve never heard of X-Europe; X-Europe is not a ortho scenery package like the ortho packages that can be downloaded from Zones Photo.
X-Europe is actually “is a scenery using XP11 objects like the standard scenery, but the objects are not set by an auto-gen rule, they are set following OSM data, which leads to a more realistic look and feel. It is bringing localized objects for countries and regions, now including the Alps region, Norway/Scandinavia and Greece, so you will recognize where you fly if you simply look outside the window.”
That said, TrueEarth Britain is doing that too, but a bit more then only good ortho textures, realistic Scottish objects but above all, a beautiful blending of the Scottish coastline. Hold on, let me show you what Orbx says about this product.
According to Orbx “TrueEarth Great Britain North covers a massive area of 40,415 sq mi of hand corrected imagery covering the entire central region as shown below in the coverage map. Of particular note are metropolitan areas such as Edinburgh and Glasgow.”
“We have also faithfully recreated areas such as the Scottish Highland, the beautiful Lochs, the Outer Hebrides and the Shetland Islands. There are many notable castles, ancient bridges, monuments and ruins included in the wonderful landscape. Also included is a fantastic rendition of the Isle of Man with over 50 custom 3D models, which will further by enhanced by a separate scenery including the airport from Orbx later in the year.”
And although Orbx offers also a list of all the features, the above paragraphs do say enough like hand corrected imagery textures, ancient bridges and castles and much more. In particular and that’s where it is all about, the hand corrected imagery textures. I can tell you already that on ly this makes the difference. Not that the Zones Photo textures are bad, but at many places you feel that something is wrong with the textures. I’ve been testing Orbx TrueEarth Britain North for a while and I couldn’t find a place where textures tiles weren’t well blended.
I think it’s time to move on and see how easy it is to install and to use it, right?
Installation, What to do and Enjoy!
The installation is very easy, but it will cost you a lot of time, and a lot of SSD/HDD space, whatever is applicable to you. The following paragraphs are applicable for macOS Catalina (10.15.3), X-Plane 11.41r1 and as of this writing, Orbx Central version 4.0.39.
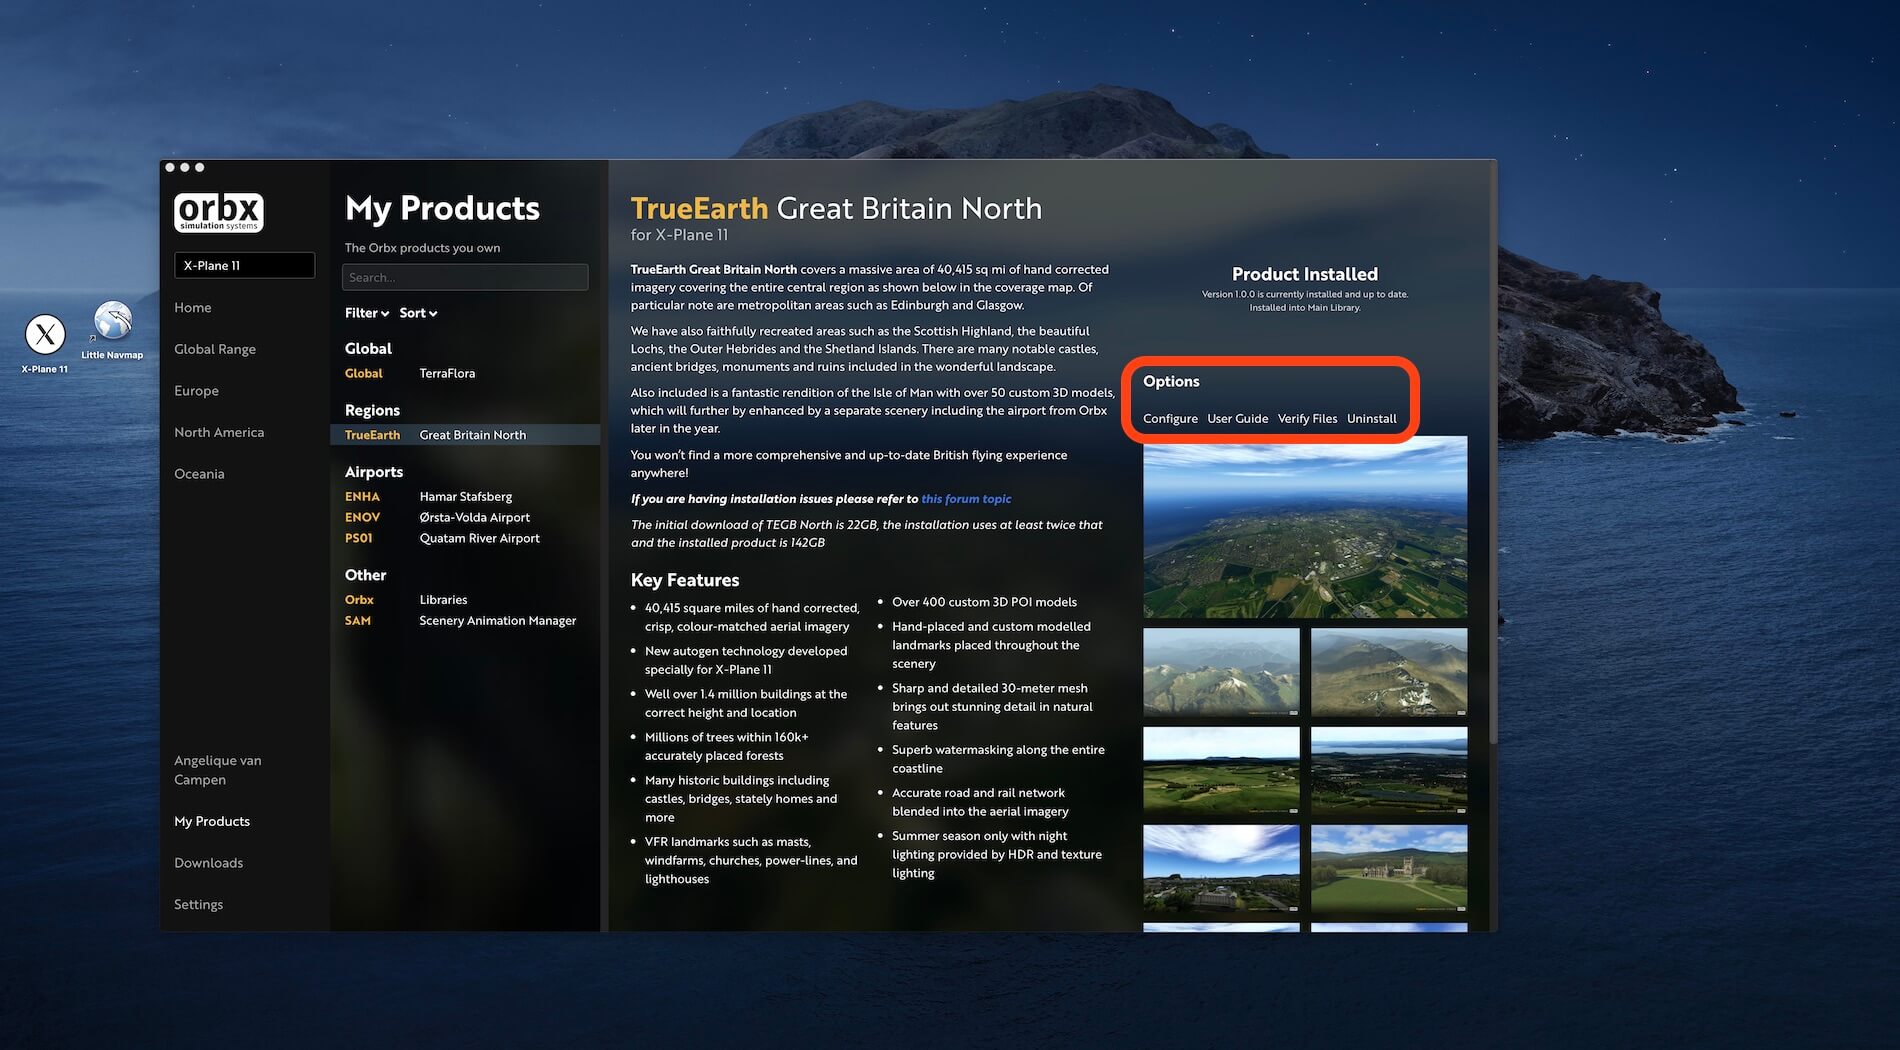
To start downloading and configuring Orbx products, you need Orbx Central (https://orbxdirect.com/central). It’s a kind of portal to all your Orbx products. It’s not only a portal that allows you to buy and install your Orbx products. No, it also tracks any updates and if ao, it install them. Further on, Orbx Central allows you to control where to install your Orbx products.
By the way, all products are stored under a folder named “libraries”. Ok, at frist I was a bit confused about this since libraries mean in X-Plane something different. For sure libraries are not airports which is in this case with Orbx different. In other words, the Orbx folder is “the” place where you store airports, but also the Orbx libraries and SAM. You’re still with me?
In the beginning when I started using Orbx product for reviews, I had a lot of problems understanding this different logic, but now I’m used to it and it’s only for my stored Orbx products, so it had not much to do how it is copied and pasted in the X-Plane 11 “Custom Scenery” folder.
In particular important for the TrueEarth packages, you’re able to point the installation. and extraction to another disk then your X-Plane SSD or HDD or perhaps your Fusion drive. With the installed product at another place then your X-Plane 11 drive, it saves you a lot of space and the only thing that it added in thew Custom Scenery folder is a shortcut or alias to the actual installed drive.
When you’re new to X-Plane 11, you probably don’t see the difference why to install sceneries on an external drive instead at the internal drive. In most cases, the internal drive of your PC or in my case my iMac Pro, is not 4, not 10, or even more GBs. It’s in most cases the internal SSD of 1GB or 2GB and then installing all sceneries and aircraft on that internal drive … that won’t work. Before you know, it’s FULL! That’s why it’s logic to install all Orbx TrueEarth packages on an external HDD or a RAID HDD unit. As a side note, with the latest Mac computers who are have Thunderbolt 3, you can also decide to install X-Plane 11 with all additional stuff on it on that external SSD Thunderbolt drive.
Back to TrueEarth Britain North. It is downloaded just over 22GB while extracted it is approximately 142GB. Yeah yeah, you read it correctly … 142GB! My goodness, and that’s only north Britain. After the installation process and being extracted, a short cut or alias is placed in the X-Plane 11 Custom Scenery folder as well as that the scenery_pack.ini file is updated or modified and an old original copy is stored too. Reading this is down in 5 minutes however, downloading, extracting will cost a lot more time. How much time? That depends on your Internet connection and your PC or Mac.
What to do?
There’s no manual how to follow the steps in Orbx Central, but it more or less straightforward. The same is applicable for the configuration after you’ve downloaded and extracted TrueEarth Britain North. Assume you’ve also decided to install the package at an external disk or at least another drive then your X-Plane drive, Orbx intalls an alias/shortcut and modifies the scenery_pack.ini file, but you can do a bit more. You can read the Orbx TrueEarth Britain North manual, but I think it’s a bit outdated and then in particular the section that deals with the way roads are shows in the scenery.
The manual release date is from January 2019 so a year ago. Not really a big problem, but at page 5 is written “At time of publishing, FTX Central is not compatible with MacOS and Linux systems”, so this is no longer valid. Orbx Central is 100 percent compatible with at least macOS and for sure also with Linux.
This is not what I wanted to highlight since that’s on page 8 section “The TE Great Britain North Control Panel”. Before paragraph Compatibility Notes you can read the following:
MacOs And Linux Users – manual roads toggle
In the Custom Scenery folder, inside the Orbx_B_GB_North_TrueEarth_Overlay folder, there are two folders “roads” and “roads_x”. The “roads” folder is the textured roads that are inside X-Plane and are now enabled by default. The “roads_x” folder are the transparent roads. To use transparent roads, rename “roads” to “roads_t” and rename “roads_x” to “roads”
You can do it the way as it is described in the above paragraph, but since the Orbx Central works flawless with macOS, you can also do it within the control panel. See the screenshots below. Click “Configure” and within the new window you can set the way you want to see the roads. Default road textures is selected, but I found out that transparent road textures are much nicer then the default X-Plane roads.

So, as you can see, the previous paragraph is actually no longer needed although the steps as described are still valid. This is all what is needed to configure. As previously mentioned, no other packages or X-Plane libraries are needed. In case you’re a bit familiar with X-Plane library packages, no OpenSceneryX is needed, no tree package is needed, also no X-Europe from SinHeaven is needed since all objects are repositioned according to the OpenStreet information and a lot of unique and dedicated objects are created by Orbx.
Hold on, perhaps what you need in case you don’t like the default X-Plane water structure red waves or that you hate the default X-Plane clouds or the environmental haze is adding either lua scripts controlled via FlyWithLua or you need to install cloud and/oir water textures. No need to say anything more about the manual since I did that already, so we’re ready to go, right?
While completing the above sections, I still have some questions and for sure you too. Therefore I contacted Tony Wroblewski who’s the project manager of this product. Let me highlight my questions and Tony’s answers.
[table “” not found /]Ok, that’s then done and I thank Tony for these replies and clarifications.
Exploring Scotland
Remarks … Summer … Altitude … haze (fog) or nothing
Isn’t that a weird sub title or isn’t it?
Perhaps it’s a good idea to bring the following to your attention unless you have enough ortho texture experience and the altitude you’re flying at.
First, the provided ortho textures are only representing Summer textures which is also mentioned in the feature list, so nothing new, right? There are a couple of programs of which SimTiles is for me the best know that can modify Summer textures to Winter textures, but that’s it. For the other seasons I’m not aware that Summer textures can be modified.
Next item to discuss is the best view or altitude to fly above the Scottish Orbx ortho textures. You need to fly at a certain altitude where the slightly blurry look of ortho textures in general diminish. That said, when you fly at 1000 feet, ortho textures aren’t sharp, but from somewhere between 2000 and 3000 feet and higher, it’s a pleasure to look down to see how Mother Earth has changed due to the Orbx TrueEarth Britain North package.
The last item I would like to highlight is the default X-Plane atmospheric look and feel. This could be the clouds, but also the haze. When you don’t like the cloud textures, many others can be found at the Internet, mainly at X-Plane.Org. Sometimes these replacement cloud bitmaps can with a lua file. If so, you also need FlyWithLua which you can get at e.g. X-Planed.Com. When you don’t like the haze or fog you can do the same and that’s seeking for other options. One is the FlyWithLua based package from FlyAGI Tweak Utility which is also available and free to download from X-Plained.Com.
For those who are familiar with X-Plane datarefs, they could also install the datarefs plugin and from Art Controls you seek for “fog” or more precise for “fog_be_gone”. When you change the value to 0.0, the fog is gone. Do you like it or not, that’s up to you, but you will immediately notice that the ground textures will show there fresh vivid colours. Personally I like this more then the slight haze which is visible with value 0.800000, but again, a matter of taste and reality. Lets make this clear … 0.0 is not as real as it is while 0.5 and up is more realistic.
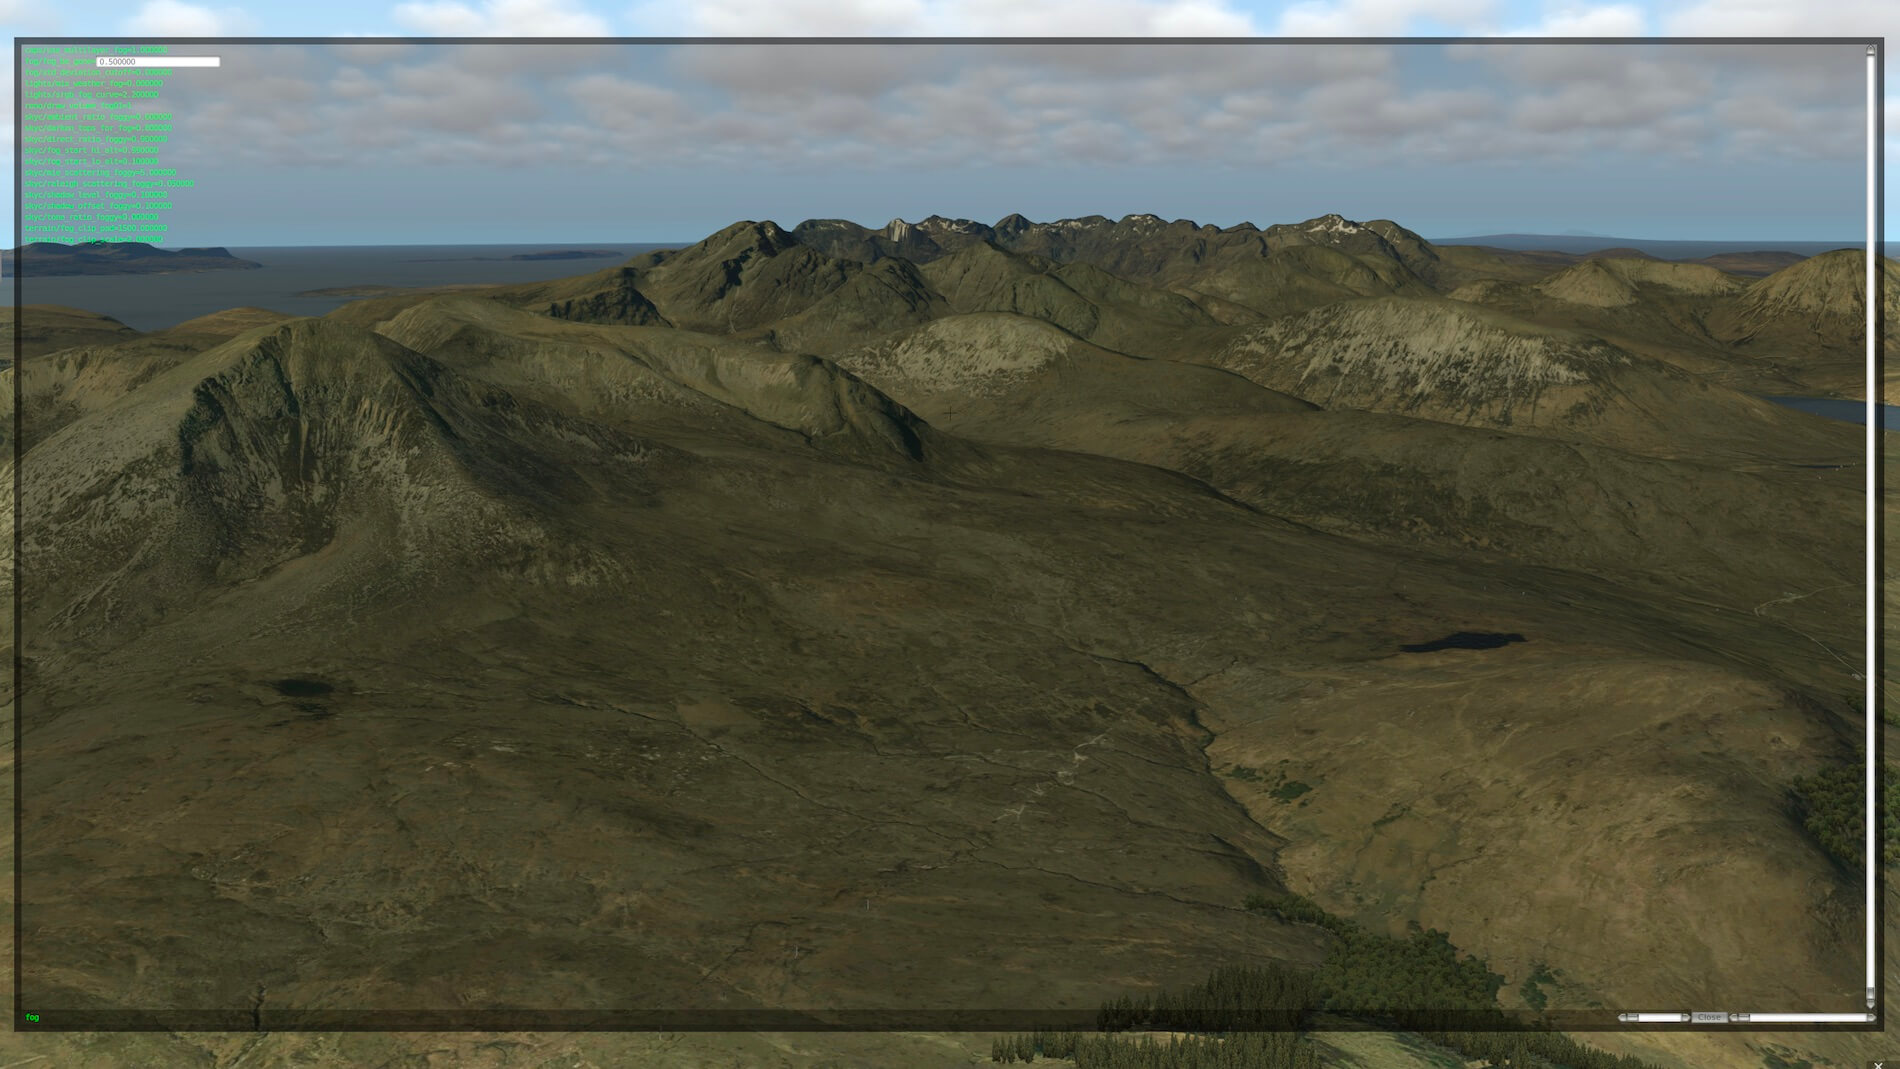


One last word about the “fog_be_gone” value. Keep in mind that at lower altitude you could set the value to 0.0 or 0.2 while at higher altitudes, lets say FL060 and up, you need to increase the value to give it a realistic look from higher altitudes. That’s not really working, right? So much better is using a lua script that does change the “fog_be_gone” value depending on the altitude you’re flying. Just an idea!
Screenshots or videos
That’s another challenge I have to say. Of course, I could make 50, 70, 100 or even more screenshots showing you how the landscape looks like when you’ve installed Orbx Britain North, but that’s boring so I’ve decided to show you with a couple of short movies places in Scotland that are worth it. Ready to go?
Flying over Orbx Britain North
Scotland belongs in my/our real life to one of my/our favorite destinations even though Brexit is reality and nobody knows how difficult it will be to visit England in the future. With our caravan we take the ferry to Newcastle or Hull and via Edinburgh or from Hull directly to Glasgow we move in a northwest direction with our first stop in Fort William. Then it depends on the real weather if we go to the Isle of Skye, or via Ullapool to Durness, Polla, Tongue and finally we arrive in Thurso. For those who are a bit familiar, you could also go to Thurso via Perth, Inverness and then up to the north-coast of Scotland. But this is just one example. Scotland is a bit bigger then many people think unless you live there.


As you can see in the previous three screenshots, I’ve given Scotland areas to visit different colours. To be exactly:
– Isle of Mull will have an amber line
– Isle of Skye will have a red line
– Isles of Lewis-Harris, Benbecula and North and South Uist will have a blue line
– Northwest-coast of the Highlands, Eriboll, Kyle of Tongue, Thurso and Inverness will have a pink line
– Inverness, Cairngorms National Park, Aberdeen, Dundee and Edinburgh will have a green line
You find those colours back in the videos. But there’s so much to see and although we know that, we’ve hardly visited in real the West part of Scotland. Why … no idea, therefore Fort William is always on our list because of Ben Nevis, the highest mountain in Scotland and I believe even in the United Kingdom.
With the videos I would like to highlight these areas to visit. Does it mean that I’ve then visited all Scotland areas covered by Orbx TrueEarth Britain North scenery? Absolutely not, but I know for sure, for me and all our readers that I’ve given a detailed impression of what this package can do for you. When you like Scotland, when you like ortho textures, when you like dedicated developed objects, then this is absolutely worth it.
Exploring Isle of Mull
For my first cross country trip I depart with my Carenado Grand Caravan EX G1000 from Glenforsa Airfield, situated on the mid north side of the island. The island is a mix of hills or should I call it mountains, flat land with beautiful coast lines. This is in particular the case at Iona, Kintra, Fionnphort, Fidden, but also the inland is worth a visit. Loch Scridain is also a gorgeous place to fly over and from here via the A849 at and altitude of 2500 to 3000 feet I reach the East side of the island. At some places I tried to fly a bit lower, but as suggested by Orbx, for ortho textures to look good or sharp, the minimum altitude is 2000-3000 feet of higher.
Anyway, it’s not only the ortho textures that give it the wow factor. It’s also the objects that are modeled. Some objects are basic but some objects are typical for this or that area. You’ll see them when we’re approaching for example Inverness, Aberdeen, Dundee, Edinburgh, Glasgow and so on.
For now, enjoy my first cross country trip over the isle of Mull.
No, this is not the end. There’s much more coming. I hope you liked the different approach of not using 30, 40 or 50 screenshots, but instead a movie. It’s basically the same as separate screenshots, but looking to 60 screenshots like this way via a video is more convenient, in combination with Celtic music. Ready for the isle of Skye visit?
Exploring Isle of Skye
For my next cross country flight I’ve decided not to takeoff from Broadford Aerodrome at the Isle of Skye, but I’ve decided to depart from Plockton Airfield. This airfield lies north of Loch Alsh and that brings me then to Eilean Donan Castle. I could skip it from my isle of Skye cross country flight, but the castle is, as with many other castles I’ve seen during my Scottish Orbx adventure, well modeled and worth a quick overfly. And that’s then the plan. Via the southern situated hills along Loch Duich I fly towards the castle and then to Kyle of Lochalsh.
Before I know I’ve passed the famous Skye Bridge and then it’s heading for Harrapool. The landscape looks beautiful and it must be said that the different ortho tiles are for 99,9 percent perfectly blended with each other. Once and a while I see a slight discolouring but what said, that’s then for 0,1 percent. A great job I would say!
Via the west coast we fly in a northern direction and pass one of the famous Scottish malt whiskey distillery Talisker. Many Scottish malt whiskeys are great, but the Talisker is a bit salty, so you like it or not. Again, a matter of taste!
Our goal is at the end to fly towards Uig, the place where ferries connect the Isle of Skye with Tarbert, situated at Lewis-Harris. There’s no need that you don’t know what to do during this Grand Caravan EX G1000 flight. There’s so much to see down there while flying at an altitude of approximately 2500 feet. Medium size villages, small size or remote houses are all modeled and because I had disabled the default Laminar Research roads, all roads I see are realistic in relation to the landscape textures.
What is surprising is the amount of modern windmills. Lots of them I see, even on the isle of Skye. And lets not forget the trees or forests. Although I have the sliders on my iMac Pro quite high, the frame rate impact is not much. Ok, ortho textures tiles versus default tiles shouldn’t give a frame rate issue since the ortho tiles only replace the default tiles. Trees, forests, objects, many objects together, that could lead to a reduced frame rate.
Back to my flight. After passing Uig, I pass the villages Kilmuir and Duntulm before moving south along the coastline to Scalpay. A great trip I can say with lots of dedicated objects like The Storr or the modeled city of Portree. It was all worth the time.
Exploring Lewis-Harris, Benbecula and Uist
The outer Hebrides are worth the visit. Not only virtually, but also in real. It is said that the west-coast has beautiful white beaches, so time to explore.
At the local Stornoway flight training center I rent a DHC-6 Twin Otter from RWDesigns and takeoff from Stornoway and fly along the coast to the far northern tip of Lewis; Butt of Lewis Lighthouse. The landscape is basically flat, neither less, it’s gorgeous and that in combination with all the added objects like houses, bridges whatever applicable, the lighthouse and so on. As a guide for myself I fly in a southern direction by following or keeping an eye on road A857 and A858. Besides the many modeled villages, I spot once and a while a beautiful beach. The textures are from this altitude, roughly 2500-3000 feet sharp and worth to make a photo from it.
From the city of Carloway I decide to fly on a heading of approximately 200 degrees further south. The landscape changes and more and more hills appear. And where I was hoping for, nice beaches popup. It’s surprising to see that in these remote areas you still find villages or communities.
I didn’t mention that, but we’ve left Lewis behind me and I’m now in Harris. Although I tried to find a border line between Lewis and Harris, I couldn’t find it. But I think that Lewis is the biggest part of the Lewis-Harris island while Harris is a bit smaller. Smaller or not, it has a bit more dynamic landcape. Till now, Lewis and Harris is one piece which means there’s no bridge or other tide road that connects these islands together. To reach by car North Uist you need a ferry, but for me flying a plane, it’s so easy to move further south to North Uist and South Uist.
After I’ve left the Sound of Harris behind me – the area between the southern part of Harris and North Uist – I see a scattered landscape with as they said before, beautiful beaches on the west coast. They are not only beautiful in real, they are also gorgeous with the Orbx Britain North package. I don’t plan to go to the full southern part of South Uist since I need to keep an eye on my fuel quantity that I have enough fuel onboard to go back to Stornoway, but I want to pass the isle of Benbecula and see something of southern Uist. Is it all worth it? Oh yes, the outer Hebrides are so beautiful.
Exploring Eriboll, Thurso and Inverness
Time to go back to the Scottish Highlands or should I just say .. the Scottish mainland? Time to visit the northern Scottish west coast and from there via Eriboll to Thurso and finally, back to Inverness. In one way or the other, I have to return to Edinburgh, but that will take a while.
For now, departing with a Fokker 50 from Carenado from Stornoway which by the way, also has a ferry to Ullapool. I fly in a straight line to the west coast. To be exactly, I fly towards Eddrachillis Bay and from there on a heading of approximately 45 degrees to Eriboll.
With a gorgeous landscape below me, it’s a pleasure to fly this. There’s actually for now not much to see then only hills or mountains. Once and a while I spot a small village and when I look closely, the main road that comes from Ullapool can be followed. In real this starts with the A835, then the A837, followed by the A894, then the A838 which goes up to Eriboll and Tongue. Then the road name changes once more to A836 that goes all the way to Thurso.
Good, nice to know, but we’re flying so we have it much easier. Either I use landmarks or waypoints to fly from A to B and so on. The northern coastline is great to see. Great in real, but also gorgeous in X-Plane. The different loch textures are so beautiful – yes yes, I know, I use the word often, but it is really great to see how the ortho textures are – combining this with other objects like houses, specific objects, treres, forests, windmills, makes it all complete. And yes, sometimes I see a tree placed at a location I think of .. that’s not correct, but overall, it worth to explore.
After leaving Thurso behind me, I can fly in many ways down to Inverness. I could follow one of the roads which is not logic when flying, so I fly in a more or less straight line down to the south coastline and from there to Inverness. It is not something you do in 30 minutes, even with this Fokker 50. It is and stays a long trip. Once I’ve reached Helmsdale I decide to follow the coast which gives me great spots to see like the coast and tide area of Brora, Golspie, Littleferry with river Fleet and belonging water tide textures.
Before approaching Inverness which I pass at an altitude of approximately 4500 feet, I spot Nigg Bay and all what’s in real there, is also modeled and this means a lot of dedicated Orbx objects. The bay itself with the tide textures is gorgeous, but this is also for all the other objects I can spot; houses, villages, energy park, windmills and what else I’ve forgotten. Passing the last hill brings me to Inverness. Finally, we’re almost there and before landing at Inverness Airport, the gateway to the Scottish Highlands, I have a good look at Loch Ness. Enough for today!
Exploring Aberdeen, Dundee and Edinburgh
Actually, when departing from Inverness I should, no, I must pass the Cairngorms National Park. I could of course bypass the National Park, but that would mean a lot of miles extra to fly, so we don’t do that. That said, from Inverness I climb out to an altitude of almost 5000 feet and heading for the National Park. Via Aviemore and Feshiebridge I follow the mountain valley that would bring me at the end in the right direction of Aberdeen.
What I see are a lot of forests, well blended ortho textures, villages and much more. And just to repeat this once more; every where I’ve flown, villages are almost covered with objects. That, said, in these remote areas all ortho house textures are covered with objects. Then at least it looks like as it is in real. I’m pleased with all of this and although I do like the coastline from the outer Hebrides, this landscape looks great too.
While leaving the mountains from the National Park behind me and still impressed by what I’ve seen, I’m curious how Aberdeen, Dundee and Edinburgh are. Yes, I know that the Orbx ortho ground textures are great, but while approaching the big cities, I’m curious how they look like and what dedicated objects are modeled for these cities. I was already surprised when approaching Inverness, so lets see and wait what to expect with Aberdeen and others.
While flying more or less in the direction of Aberdeen Airport I see so many things. Perhaps too many to write them all down. What seen before too, lots of villages are modeled, even industrial areas are modeled and when coming closer to the airport, the whole industrial estate around the southern part of the airport is done. The airport isn’t done, but that was know and mentioned in the manual. But near the coast I see windmills in the sea, again, windmills!
Never knew that Scotland had so many windmills.
Anyway, I can tell you that Aberdeen is well modeled. Of course, not all houses I see are dedicated for this area, but the city is filled with many objects to give it that look you may expect from a large city.
But there’s more. Near the coast I spot many dedicated objects like the Aberdeen Conference Centre, a football stadium, a sports complex, downtown several churches and so on. I knew that it was included, but with trips like these you find out what it is really about.
From Aberdeen we fly further to Dundee and Edinburgh. A quick look tells me that Orbx didn’t forgot Dundee. Bridges and houses along the shore are all there. The perfectly blended tides water textures complete it, as usual with Orbx products. I’m almost at the end of my virtual Scottish trip. Last item to check is Edinburgh and for that I first fly towards Loch Ness and then I turn via Forth towards the bridges to downtown Edinburgh. The bridges are as far as I know not a part of the default Laminar bridges, but dedicated developed and made by Orbx. Gorgeous in one word.
And I wrote this before, I know, Edinburgh itself has also a lot of dedicated objects. I’m sure you’ve seen them in the movie of my last cross country trip.
Summary
What can or shall I write in the summary?
Not much I can add to this comprehensive review. The review is already long enough and although this review included several movies that cost me more time then expected, it was worth every minute of testing, flying, editing, and creating this review. That the review cost me more time was also due to the making of these videos. Making a video with in my case Final Cut Pro X, was not an easy job, but at the end once you understand how FCP X works, it’s a lot easier then initially thought. Anyway, I hope that the included videos gives you as reader another dimension to a review and about the product.
At the end I was very happy to see how and what this ortho package could change for me and for you. The package is not just a ortho texture pack, but I think you’re already aware of it. It’s much more then that. I highlighted already that the package comes with a lot of dedicated objects, trees and forests and what else I’ve forgotten. Although this package – TrueEarth Britain North – is only a third from Britain that’s covered, I find it worth the price. Ok, you do need a fast Internet connection for downloading the initial package, but you also need a lot of diskspace to store the unzipped and ready to go folders.
More information about this Orbx TrueEarth Britain North can be found at the dedicated Orbx store page. As of this writing, February 2020, the sales price of this package is roughly 36 Euro’s.
And finally, did I cover everything or did I see everything of TrueEarth Britain North?
The answer is no!
For sure I’ve forgotten places to visit. I didn’t check downtown Glasgow, I didn’t check my favorite city Fort Willam, and I didn’t had the time to climb Ben Nevis, but what I’ve seen during these five cross country flights tell me more then enough. For sure you’ll have a good and detailed look and feel of this review and when you like Scotland, then this package is worth every penny!
Feel free to contact me if you’ve got additional questions related to this impression. You can reach me via email Angelique.van.Campen@gmail.com or to Angelique@X-Plained.com.
With Greetings,
Angelique van Campen
| Add-on: | Payware Orbx TrueEarth Britain North |
|---|---|
| Publisher | Developer: | Orbx | Orbx |
| Description: | Realistic rendition of Scotland |
| Software Source / Size: | Download / Approximately 142GB (unzipped) |
| Reviewed by: | Angelique van Campen |
| Published: | February 11th 2020 |
| Hardware specifications: | - iMac Pro - Intel 3GHz Intel Xeon W / 4.5Ghz - Radeon Pro Vega 64 16368 MB - 64 GB 2666 MHz DDR4 - 1 internal shared 1TB SSD (Big Sur 11.x) - 1 internal shared 1TB SSD (Bootcamp Windows 10) - 1 external 2TB LaCie Rugged Pro SSD (Big Sur 11.x) - Saitek Pro Flight System X-52 Pro and X-56 Rhino - Honeycomb Alpha Flight Controls - Honeycomb Bravo Throttle Quadrant |
| Software specifications: | - macOS Big Sur (10.15.x) - X-Plane 11.5x |
0 Comments