Haversine “Remote” AirEFB
Introduction
With the ultimate EFB (Electronic flight Bag) you’ve got all your important data with you and yes, some add-on aircraft developers have modeled an EFB or something that looks like an EFB. One thing is for sure … one EFB isn’t the other. That said, there’s a big difference what the EFB should offer or what it can offer.
I remember during the good old days as ground engineer that aircraft didn’t had an EFB. Actually, those aircraft didn’t had EFIS, ECAM, EICAS or they had a simplified FMS. But an EFB …. future thoughts! This means that for every flight, flight bags where brought onboard, full with airport data. As far as I can remember, for a McDonnell Douglas DC-9-80, it where in total 4 bags. Imagine the weight, and the work to keep those books with charts up-to-date.

Today we would say … that’s impossible to keep it up-to-date, but for those days, there was no other way to do it. Anyway, at a certain moment the electronic flight bag was introduced, in most cases together with the introduction of electronic flight instruments. Initially as standalone units, but these days with the constant enlarged DU (Display Units), fully integrated in the EFIS system.
The Real EFB
According to Wikipedia “An electronic flight bag (EFB) is an electronic information management device that helps flight crews perform flight management tasks more easily and efficiently with less paper. It is a general purpose computing platform intended to reduce, or replace, paper-based reference material often found in the pilot’s carry-on flight bag, including the aircraft operating manual, flight-crew operating manual, and navigational charts (including moving map for air and ground operations).
In addition, the EFB can host purpose-built software applications to automate other functions normally conducted by hand, such as performance take-off calculations.
The EFB gets its name from the traditional pilot’s flight bag, which is typically a heavy (up to 40lb/18kg or more) documents bag that pilots carry to the cockpit. The electronic flight bag is the replacement of those documents in a digital format.
EFB weights are typically 1 to 5 pounds (0.5 to 2.2 kg), about the same as a laptop computer, and a fraction of the weight and volume of the paper publications. There are numerous benefits for using an EFB but specific benefits vary depending on the size of the operation, type of applications used, the existing content management and distribution system, the type of applications deployed.
Some common benefits include: weight savings by replacing the traditional flight bag, reduced medical claims from handling traditional flight bags, reduced cost, and increased efficiency by reducing or eliminating paper processes. There are also claims of increased safety and reducing pilot workload.” (Courtesy of Wikipedia)
More information can be found at the dedicated Wikipedia web page.
In case you want to know a bit more about for example the Boeing EFB, I encourage you to check out this Boeing EFB article. It’s worth it. And perhaps this article from Airbus is interesting too. And in case you really think .. I want to know more … then you must check this Airbus URL too.
The Haversine AirEFB
You can imagine already, worth to review the AirEFB from Haversine. Let me first highlight what Haversine says about this Apple iPad iOS app.
Whether you want to keep all your charts and technical manuals in one single place, have a concise way of performing flight checklists or want to know your way around the airport while on the ground and taxiing, AirEFB allows you to do just that in one single iPad app.
Designed to integrate with the X-Plane flight simulator, AirEFB provides an interface layer to all the documents you need to carry onboard and an absolute must have to find your way to holding point X or runway Y while on the ground. Using our next generation communications protocol you can connect AirEFB to X-Plane seamlessly and effortlessly. Install a simple plugin and it all happens automatically, on the fly and over the Air; no need to configure anything.
Due to its need for screen space and its aim to replicate a real Electronic Flight Bag, AirEFB is only available for iPad and requires iOS version 9.0 or above. Simulator wise, AirEFB is compatible with X-Plane versions 11, 10 and 9 and it can also be used standalone with the device’s internal GPS or location services.
How to Start?
Intro
Besides you need to have the AirEFB app which is by the way only available for the iPad, you also need the free Haversine X-Plane Air plugin. This free Air plugin is basically the same as in my previous review that explained everything about the AirFMC.
So … what’s needed
For the optimal AirEFB and X-Plane sensation, you first need the Haversine X-Plane Air plugin. According to Haversine “In order to use AirEFB with X-Plane you need to install a small piece of software in X-Plane called a plugin.
This addon interacts with X-Plane, its different planes and FMC systems by putting all relevant information on the network and by receiving specific commands from apps and feeding them back to X-Plane. Just download the plugin (plugin for X-Plane and all its 3 platforms, Mac, Windows and Linux in 32 and 64 bit formats) and copy the HaversineAir folder to your “X-Plane/Resources/plugins” folder.
If you have any problems see the INSTALL.txt file for details. That’s all, you don’t need to configure anything else, just launch X-Plane and your flight should show up in AirFMC, AirEFB and AirTrack and AirEFB if you have them.
That’s all, you don’t need to configure anything else, just launch X-Plane and your flight should show up in AirEFB, AirFMC and AirTrack.
In order to run it you will need a computer with a valid copy of X-Plane 11, 10 or 9 and a wireless LAN network which connects your computer to the iPhone/iPad/iPod device(s) on the same subnet / segment.”
Although many features on the AirEFB app thus on your iPad, work independent from X-Plane, there’s one feature that is great and for that you need the Air plugin. More about this feature later in the section LSK 5L: Airport Data and Map.
After this Air plugin installation, search on your iPad at the App Store for Haversine and/or AirEFB. After you’ve paid, you’re ready to go.
Familiarize Yourself
Your Haversine Air Account
Before I continue with the AirEFB app, it’s a good idea to create a free Air Account at the Haversine website. For this, follow this link and click “If you don’t have an Air account yet but would like to, you can register here”. When you click the “register here”, you can enter as you can see in the following screenshot your desired name, your real name, your email address and the country of origin. When all data is entered, click the Register button. Upon this, you’ll receive an email with your preferred user name and password details. Just in case you think; the entered values you see in the screenshots are fake .. sorry!


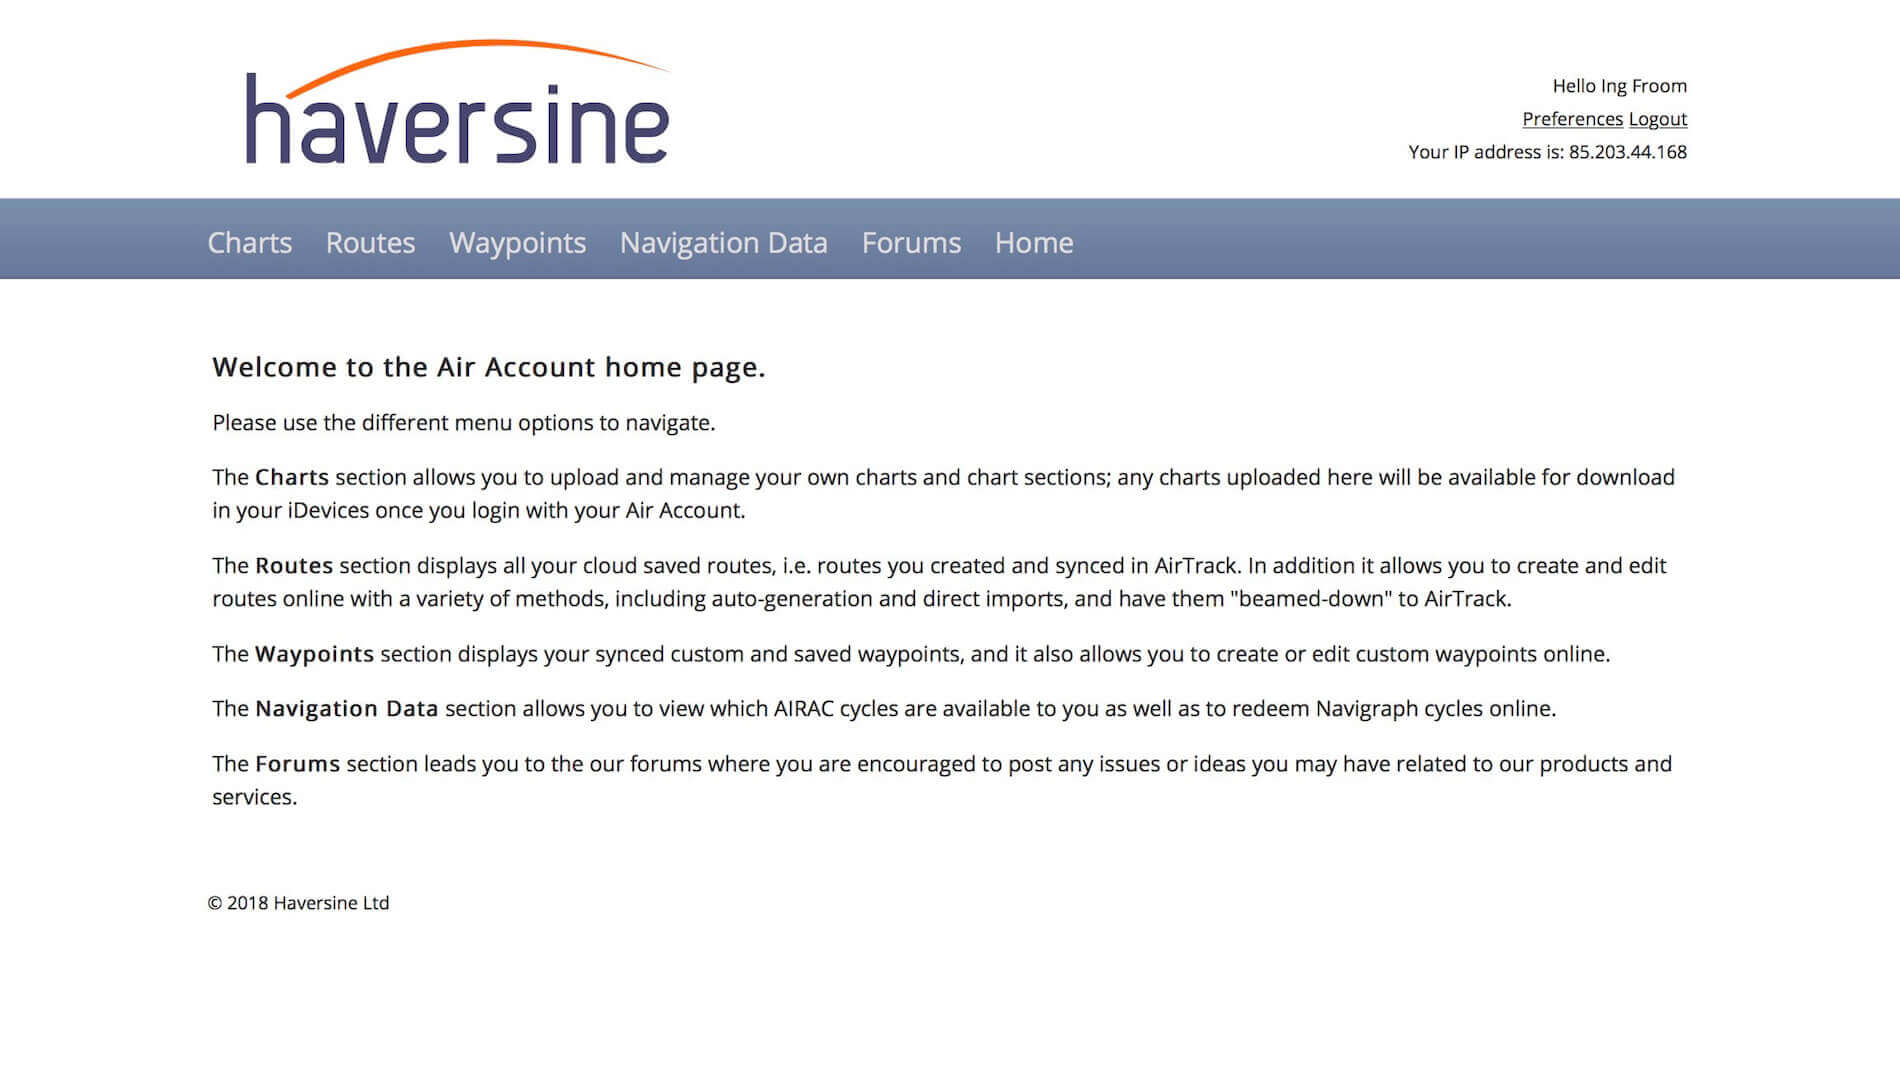
Use the user ID and password data from the email you received and logon into your personal Haversine Air page. As you can see on the screenshot below, your personal page has the following menu items:
– Charts
– Routes
– Waypoints
– Navigation Data
– Forums (what the name says ….. brings you to the Haversine forum)
– Home (brings you to the Haversine home page)
Let me start with menu item Charts, and just in case, I’m talking about my (your) Air account Charts menu at the Haversine website!
Before I start with my step-by-step tutorial, first this; to add charts you can use the Cloud space offered by Haversine, but keep in mind that Haversine offers only a limited amount of Cloud space for you. Another option is loading your charts into the iPad via iTunes or via any other iOS sync program. I’ll discuss that later in this review. I tested both options and although you can’t upload unlimited amount of data to the Haversine Cloud, you still have 100000000 bytes which is approximately 100MB.
Ok, let’s continue. When you select Charts you see the following:

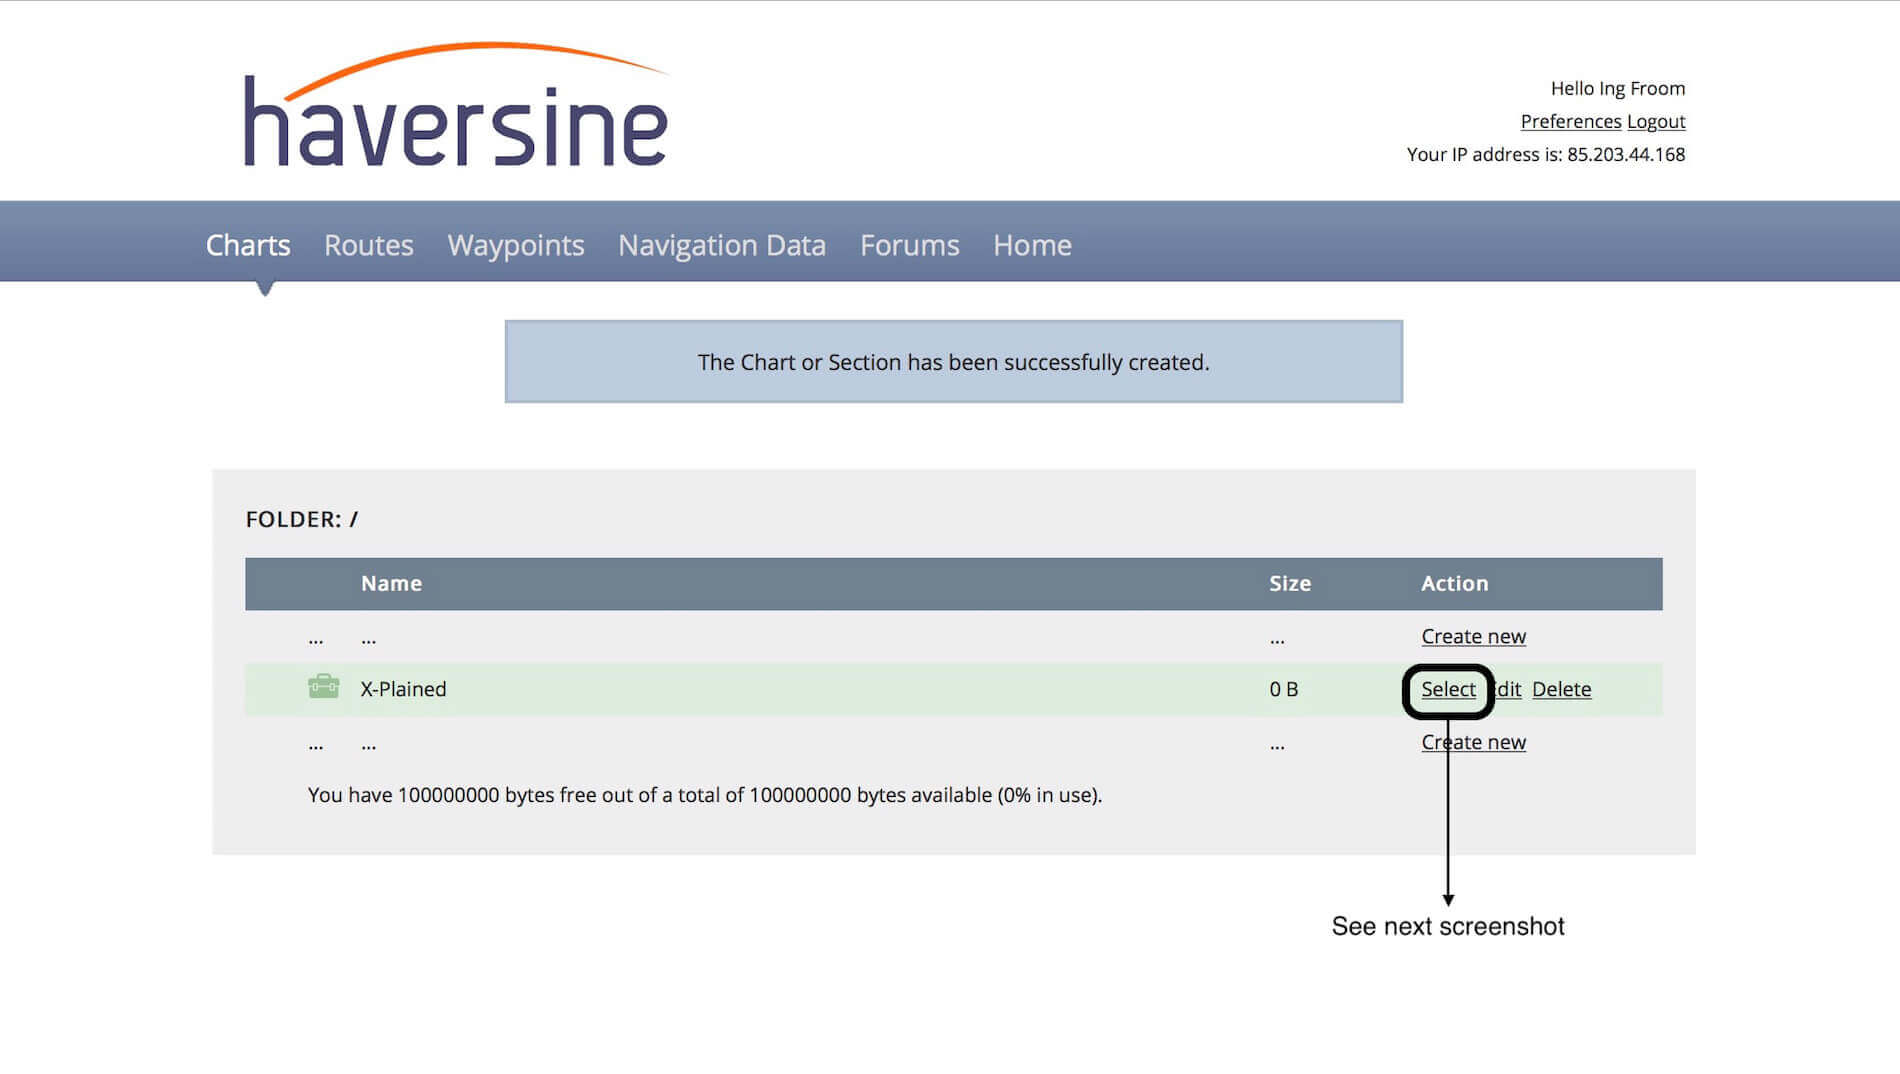
The first thing you and I need to do is to create a folder, at least, I think this is handy. Why, continue reading.
I named it X-Plained. That said, click the “Create New” button on the right, enter in the field X-Plained (or any name of your choice). Why I created a folder is something we’ll see later on the AirEFB app. Using a folder instead, allows us to upload all our charts, so they are organized under folder X-Plained or whatever you’ve choosen.
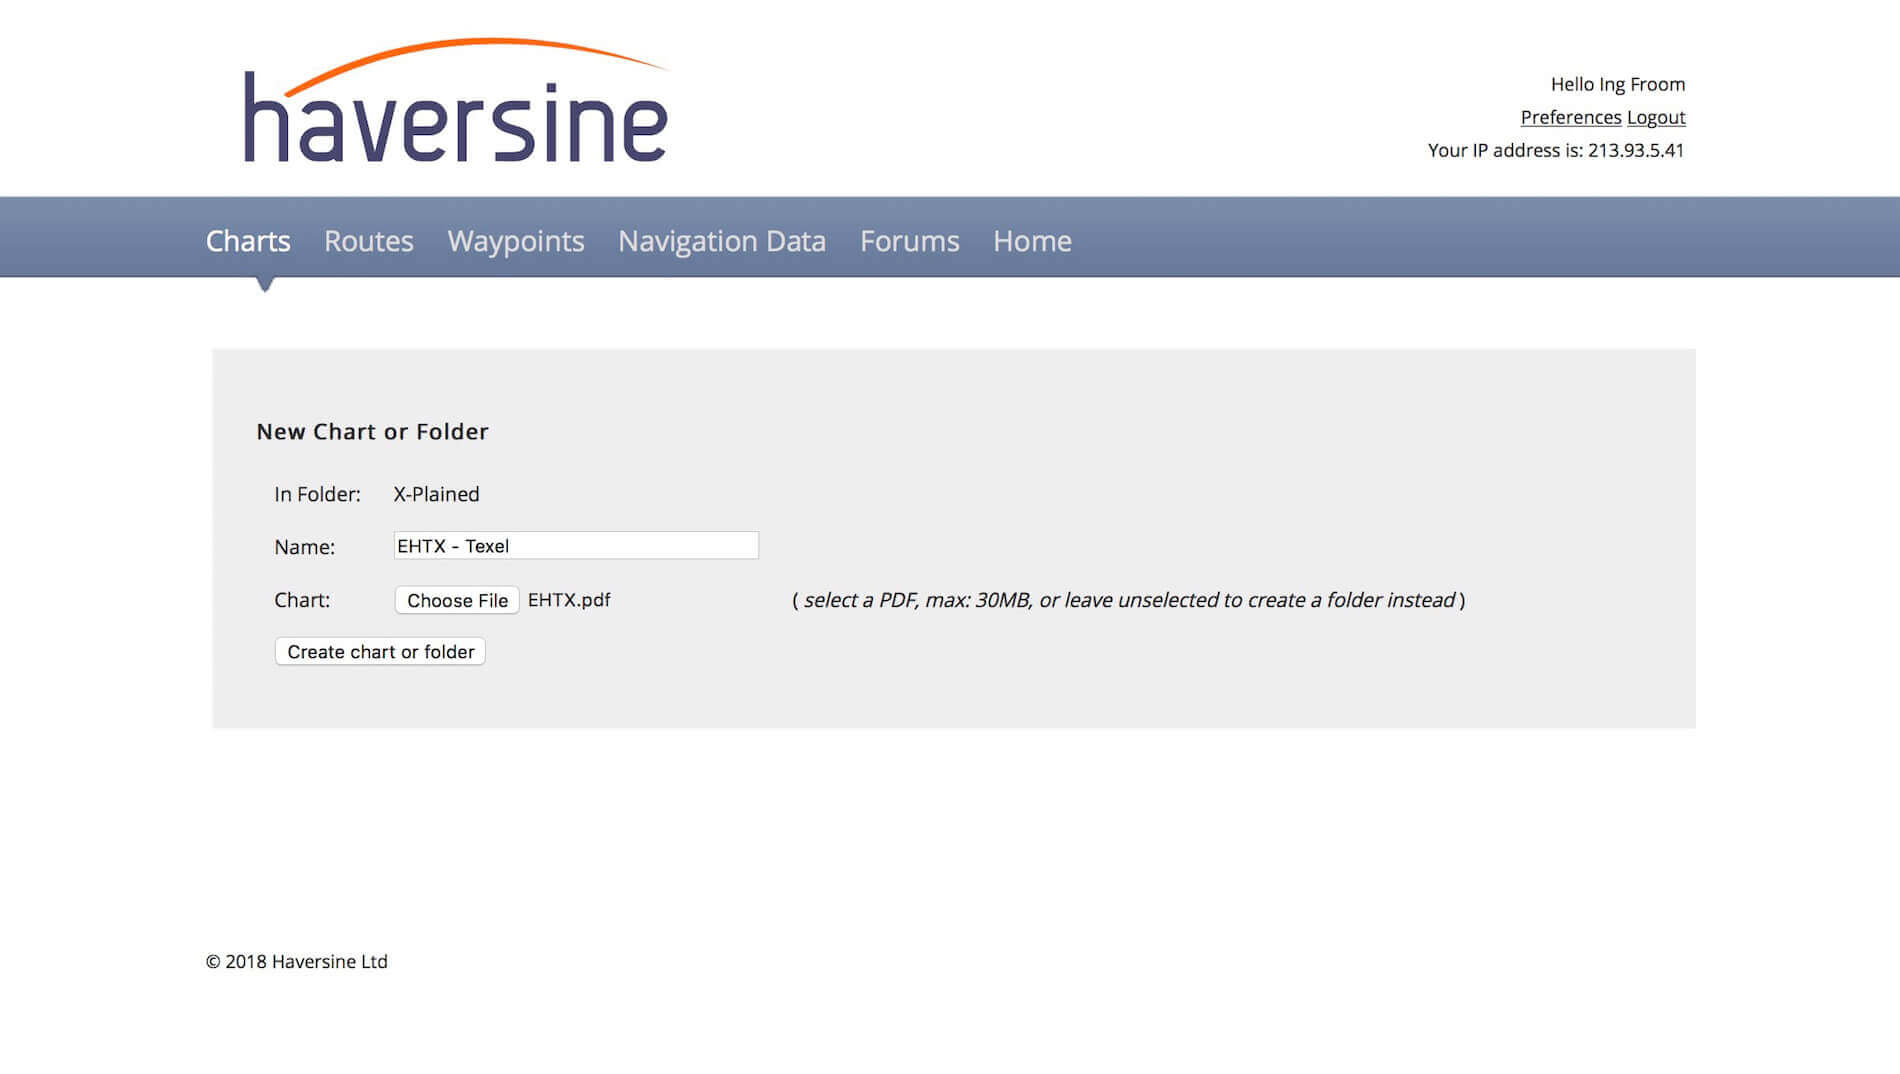
That said, I enter X-Plained and click the “Create chart or folder”. The output should look like the following screenshots. As you can see on the screenshot, you can always select, edit or delete the folder name. But one step to do before moving on to the next paragraph; make the new created X-Plained folder the active folder. For that, click the “Select” link at the right-hand side (marked with green square). This will bring you and I in the X-Plained folder. Every chart that will be uploaded, will be placed in this folder. Why, that’s for later when we check the AirEFB CHARTS.

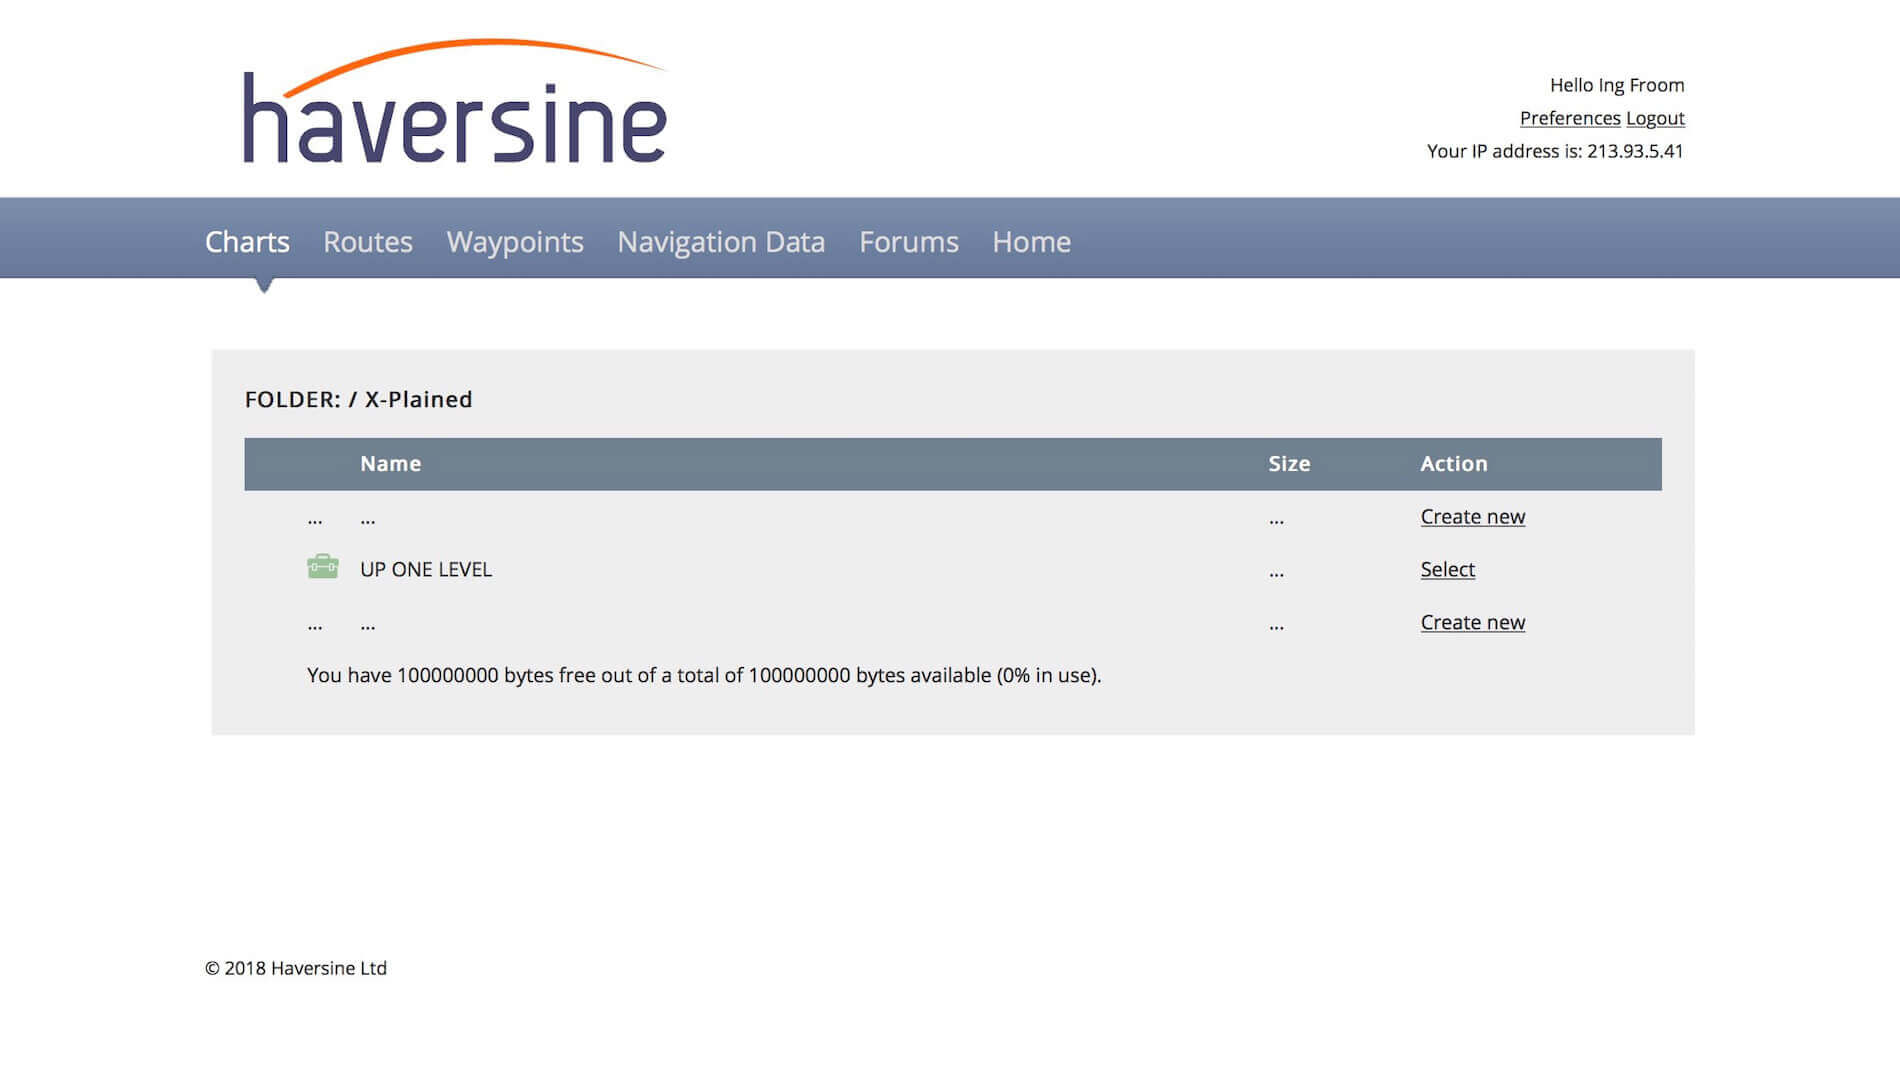
Next step to go; I could create a sub folder under X-Plained (for example to identify countries) or just uploading charts. I don’t need a subfolder, so although I click again the “Create New” link, I will now upload a file (chart) and give it a name.
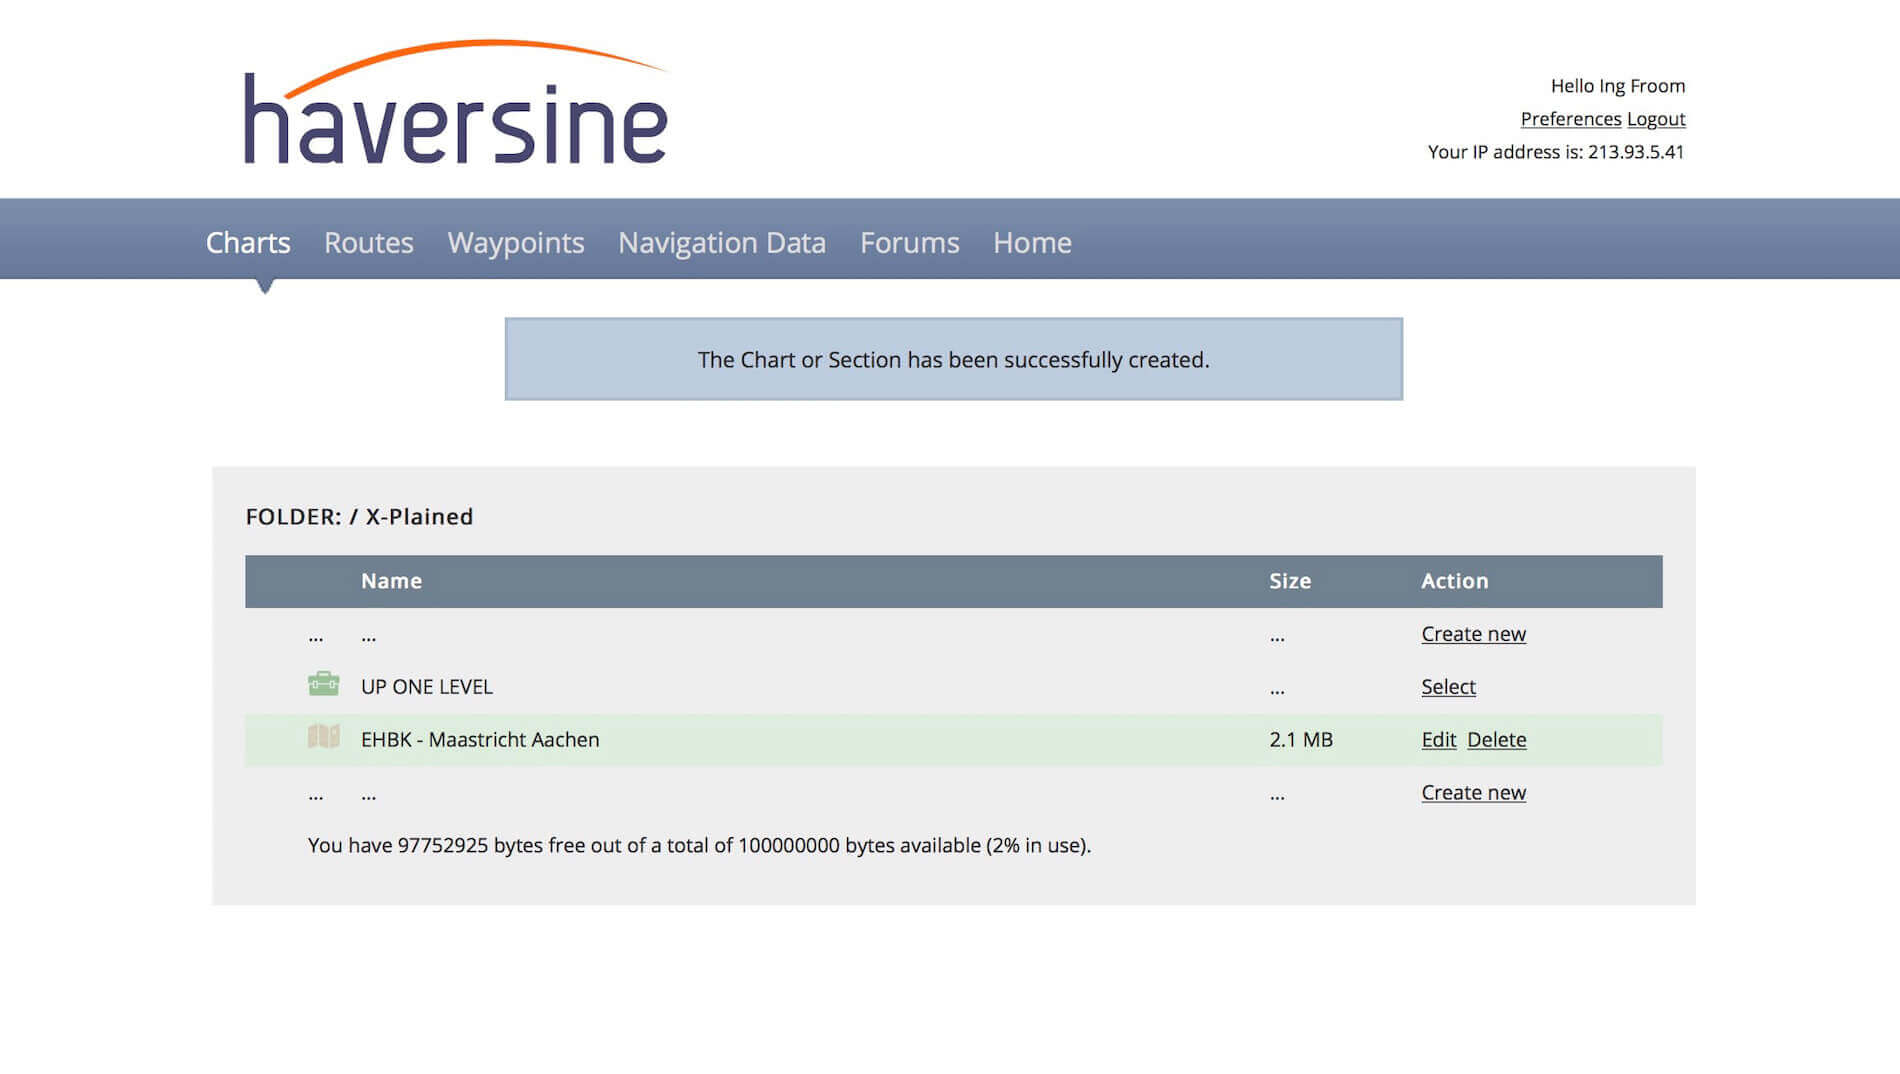
What did I do for preparations before I started this?
I copied all the charts I needed from a specific airport in the Netherlands; EHBK Maastricht Aachen. I gave it the Adobe Acrobat file name EHBK.
Ok with that?
Time to continue.
I enter in the field the name of the airport as it will appear later on the AirEFB app and choose the file via the “Choose File” button. Finally, you click the “Create chart or folder” button. See the screenshots below of what I just described. And to finish it, I’ll decide to upload one more Dutch airport, EHTX Texel. I add the name of the airport in the field (EHTX – Texel), followed by uploading the EHTX Acrobat file. And, as with the previous steps, click at the end the “Create chart or folder” button.


Before continuing with the other menu items, I was wondering if the website Air Account menu items “Routes” and “Waypoints” have anything to do with the AirEFB app? When I read for each menu the need, it all reverts to the AirTrack app and that’s not related to this review or did I miss something?
Time to contact Joao Cabral from Haversine and see if he can help me out with this question. According to Joao “No, they are all related to AirTrack. They were created before for AirTrack cloud services. The waypoints page is basically a storage of custom waypoints for AirTrack’s Navigation Display. So you can either create them online and they will appear in AirTrack, or you can save a location in AirTrack and it will be uploaded to the cloud and then propagated to all your other devices.”
“The routes are similar for routes (flight plans). You can create one in AirTrack and it will be uploaded automatically, or you can create one online and it will be downloaded automatically so you can load it in AirTrack. The online route / flight planner is actually a bit clever and you can choose from a variety of ways to create a route between airports A and B, either using NavAids, real Airways, or common routes used in VATSIM and IVAO. But again these are only for AirTrack as AirEFB doesn’t have such concept, at least not yet.”
With that back-ground information, I think it’s a good idea to move on to the AirEFB app, right?
Intro AirEFB App
Let’s assume you have been running X-Plane. That doesn’t mean you can’t use the AirEFB on your iPad. Oh yes, you can since you and I need to familiarize with the AirEFB but hold on, we first need to set up a couple of things within the AirEFB app. Suppose you can’t wait and want to start immediately with the AirEFB app, you end up with a grey EFB frame when the app is started.
As with the AirFMC app, you’re not able to change the colour of the EFB frame as is possible with AirFMC. It could be also that the AirEFB is powered OFF. When this is the case, click the round PWR button in the right-hand top corner.
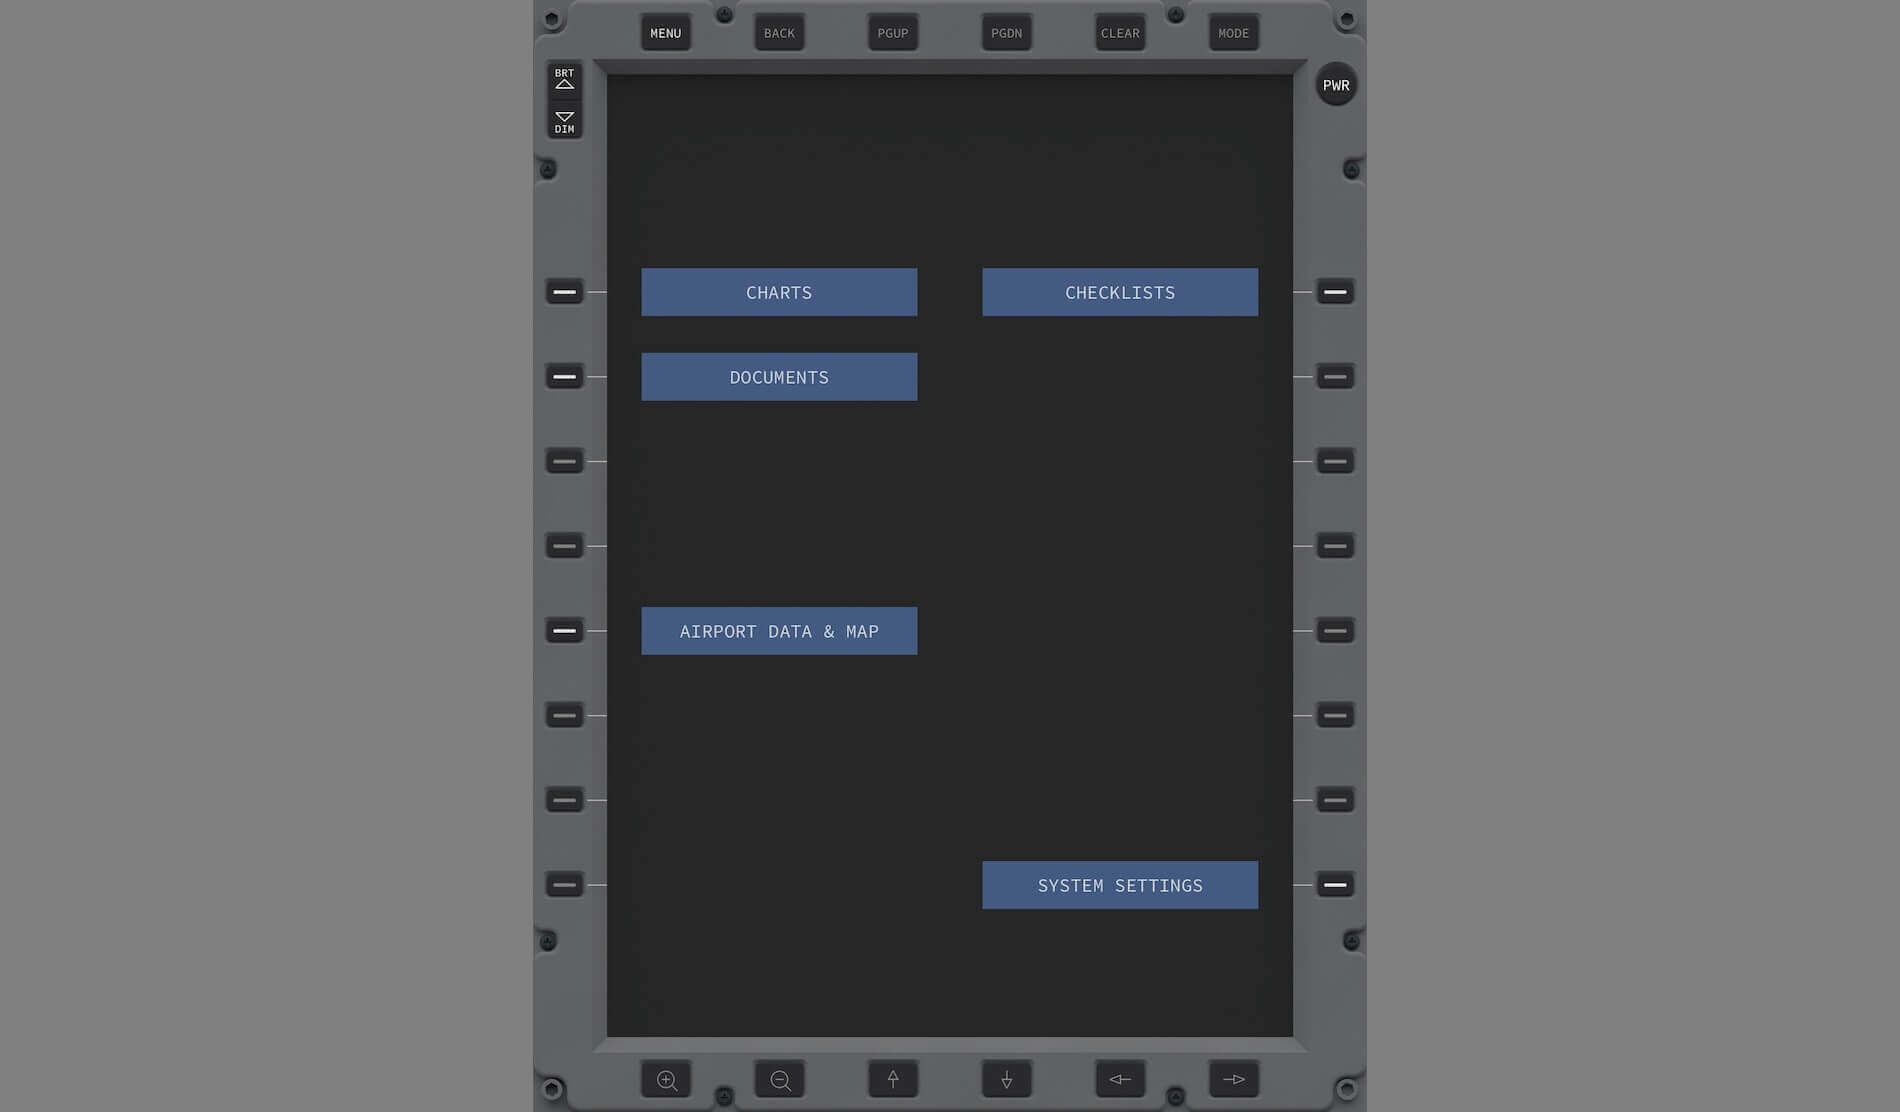
Ok, the startup AirEFB page comes with the following active LSK (Line Select Keys):
– LSK 1L: Charts
– LSK 2L: Documents
– LSK 5L: Airport Data and Map
– LSK 1R: Checklists
– LSK 8R: System Settings
I could make it myself very easy to direct you to the Haversine website where you can find all the AirEFB app documentation, but that’s not me. Oh yes, you can always have a look at the dedicated Haversine AirEFB page (https://haversine.com/airefb), but I follow my own way and try to give you some tips and tricks what I faced and how I did it.
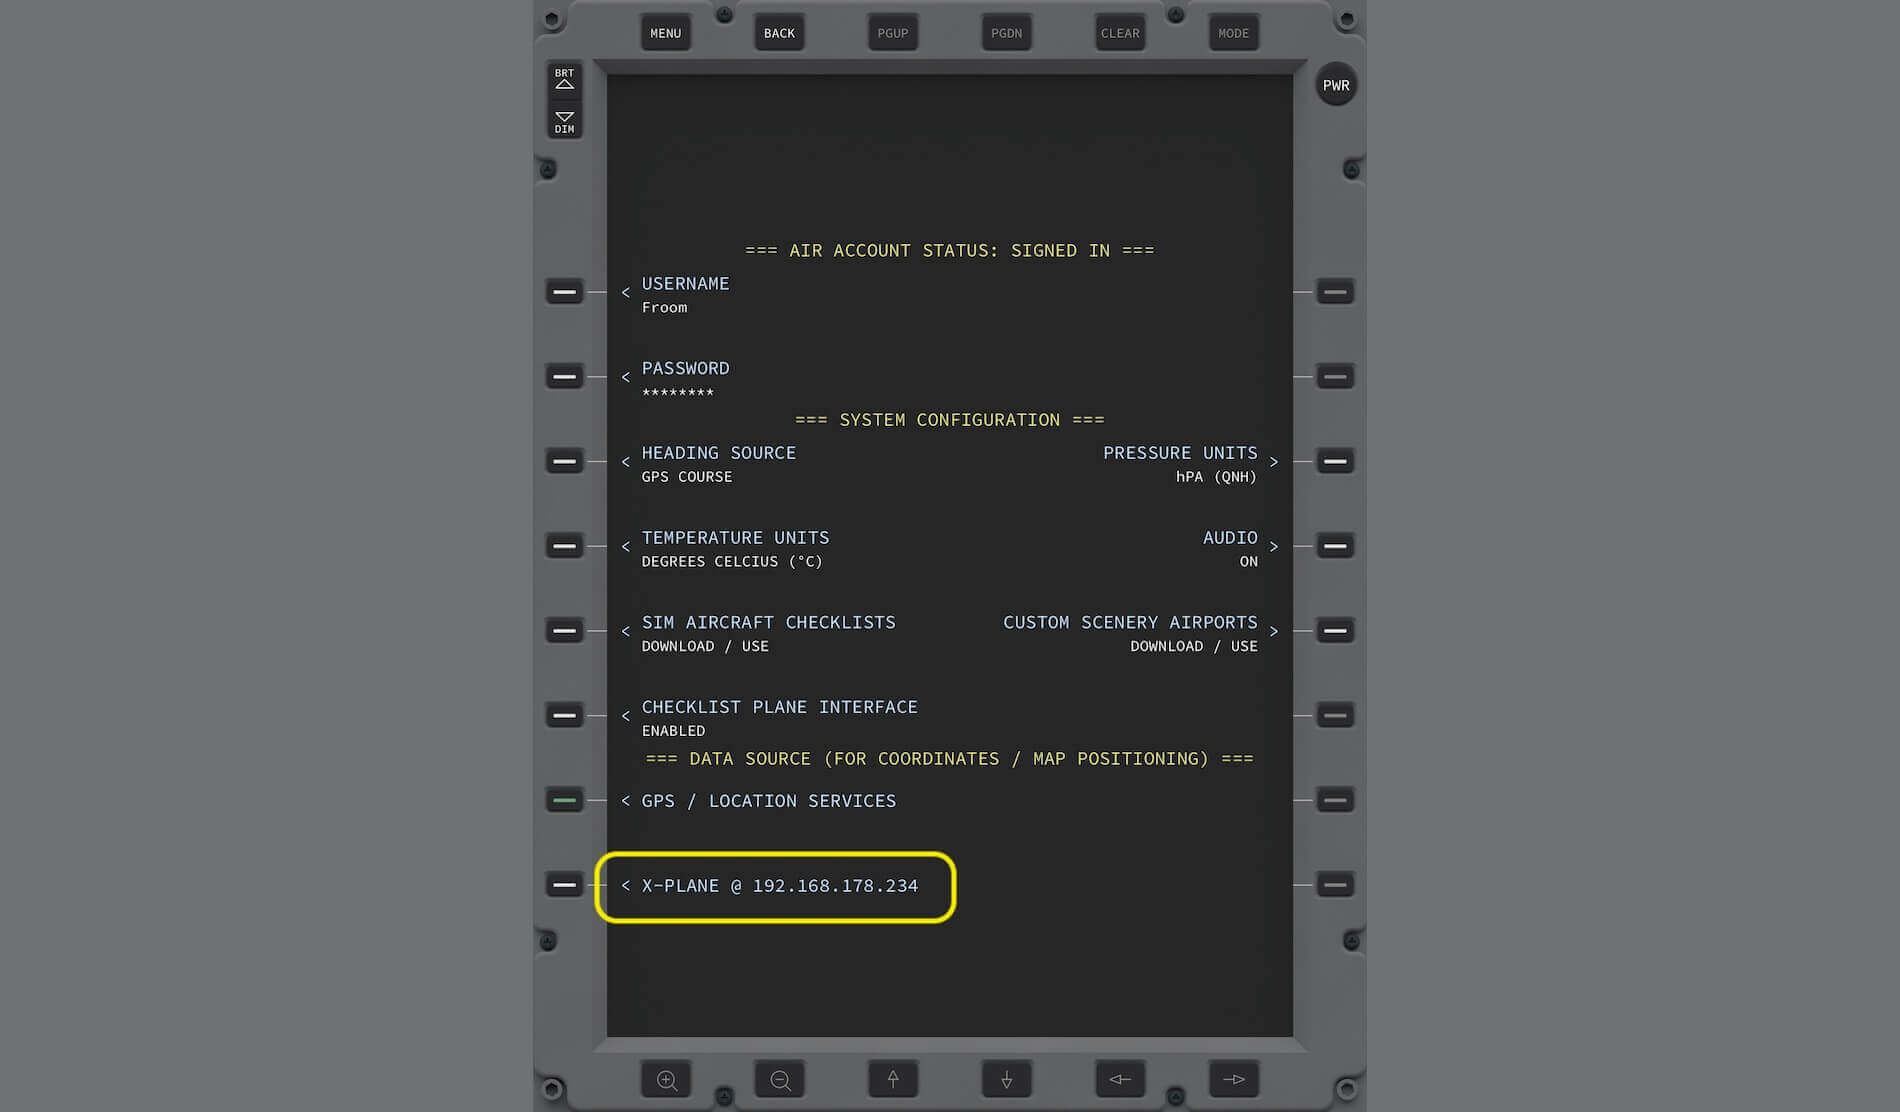
LSK 8R: System Settings
Remember, we’ve just made an account via the Haversine website. Check LSK1L and LSK2L which are identified – my example account – as User Name (my example …. Froom) and Password (xxxxxx). The created account has a capital and lower-case letters (Froom). That said, this has to be in the same way entered on the AirEFB app thus it’s case sensitive! To get lower case letters on the AirEFB app, you click the DOWN arrow on the white keyboard.
When you’ve done, the keyboard capital letters changes to lower case. Now you can continue to enter your name with small letters like “Froom”. When finished, click LSK 1L. This stores the entered user name. Next you enter the password according to what was given in the email you received and when entered, click LSK 2L. When everything is entered correctly, you will see on screen in yellow “=== AIR ACCOUNT STATUS: SIGNED IN ===”


The same AirEFB page is actually divided into three sections:
– === AIR ACCOUNT STATUS: SIGNED IN ===
– === SYSTEM CONFIGURATION ===
– === DATA SOURCE (FOR COORDINATES / MAP POSITIONING) ===
You can leave all the settings in these sections as they are unless you want to change the following:
– Switching between Fahrenheit instead of Celsius via LSK 4L.
– Switching between hPA (QNH) or inHG (ALTIMETERS) via LSK 3R.
– Switching between heading source DEVICE COMPASS or GPS COURSE via LSK 3L.
LSK1L/2L: Charts (or Documents)
Switch on your iPad, click the AirEFB app and – just mentioned this too – suppose the AirEFB app doesn’t power up by itself, you can try to click the round PWR (power) button in the right-hand upper corner. When powered up, click on the blue CHARTS text block on the display or click LSK 1L. This will open “Charts page 1/1” or 1/2 etc. (right-hand upper corner)
On the screenshot below, you see that I have in total 3 chart sections (DEMO CHARTS, FAA CHARTS and X-Plained). The demo and FAA are available by default, but the X-Plained charts at LSK 3L is the one we created before. When I click LSK 2L I see my own uploaded chart packages from EHBK and EHTX including their overall size. Pretty cool isn’t it?
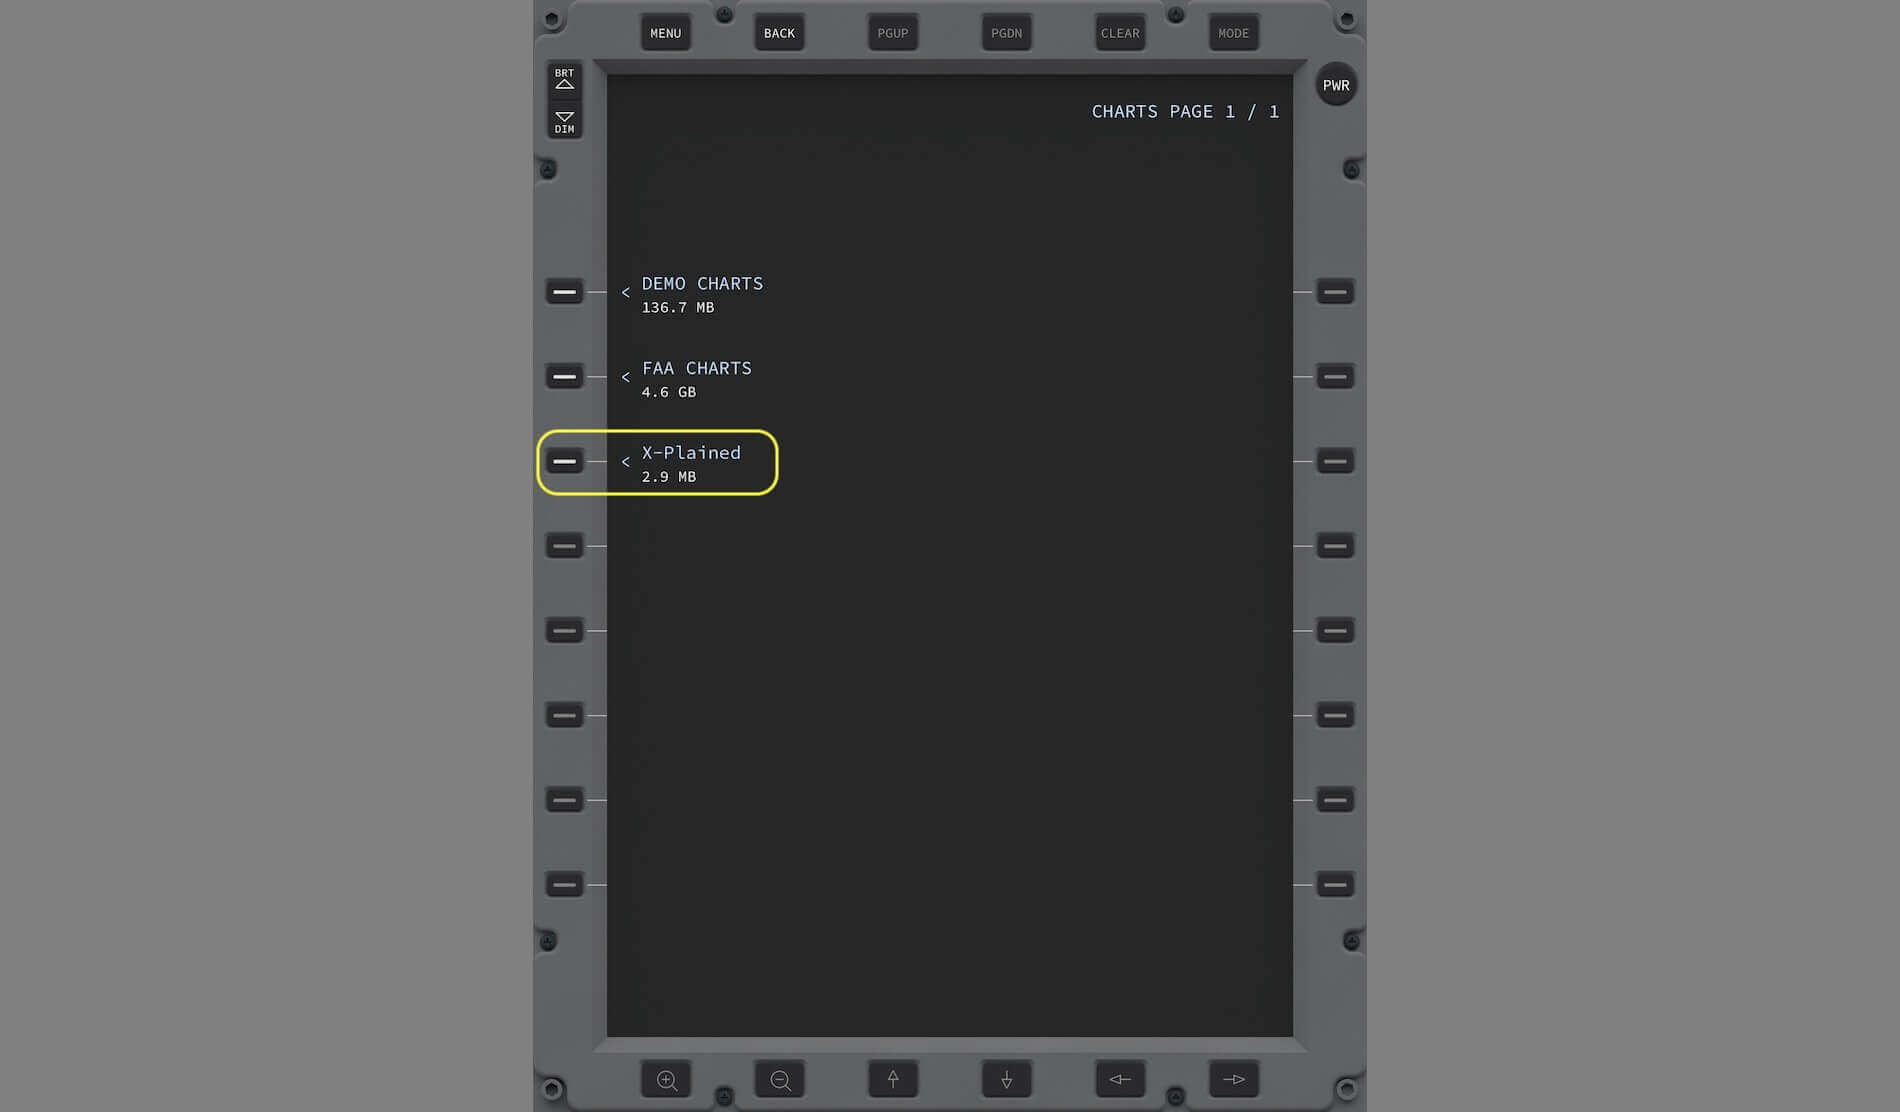

Let’s go one step further. Let’s click LSK 2L thus let select EHTX – Texel.
Since this Acrobat file is downloaded from the Haversine Cloud, you’ll notice at the top of the AirEFB screen that it is downloading and depending on the size and wifi connection, it’s either visible or not.
Once my EHTX is downloaded, it is opened. With the PGUP and/or PGDN AirEFB button on the top, you can scroll thru the pages. Depending on your wifi connection, it can take a couple of seconds or even a bit longer before the new page of the EHTX package is loaded. And you can use both fingers to zoom in or out.


AirEFB Charts Loading via iTunes
I mentioned this before and would like to offer a step-by-step tutorial how to load charts directly into your iPad. Advantage of doing it this way; you don’t have the 100MB limit via Haversine and since the charts are stored on your iPad, you don’t need any Internet connection to load them.
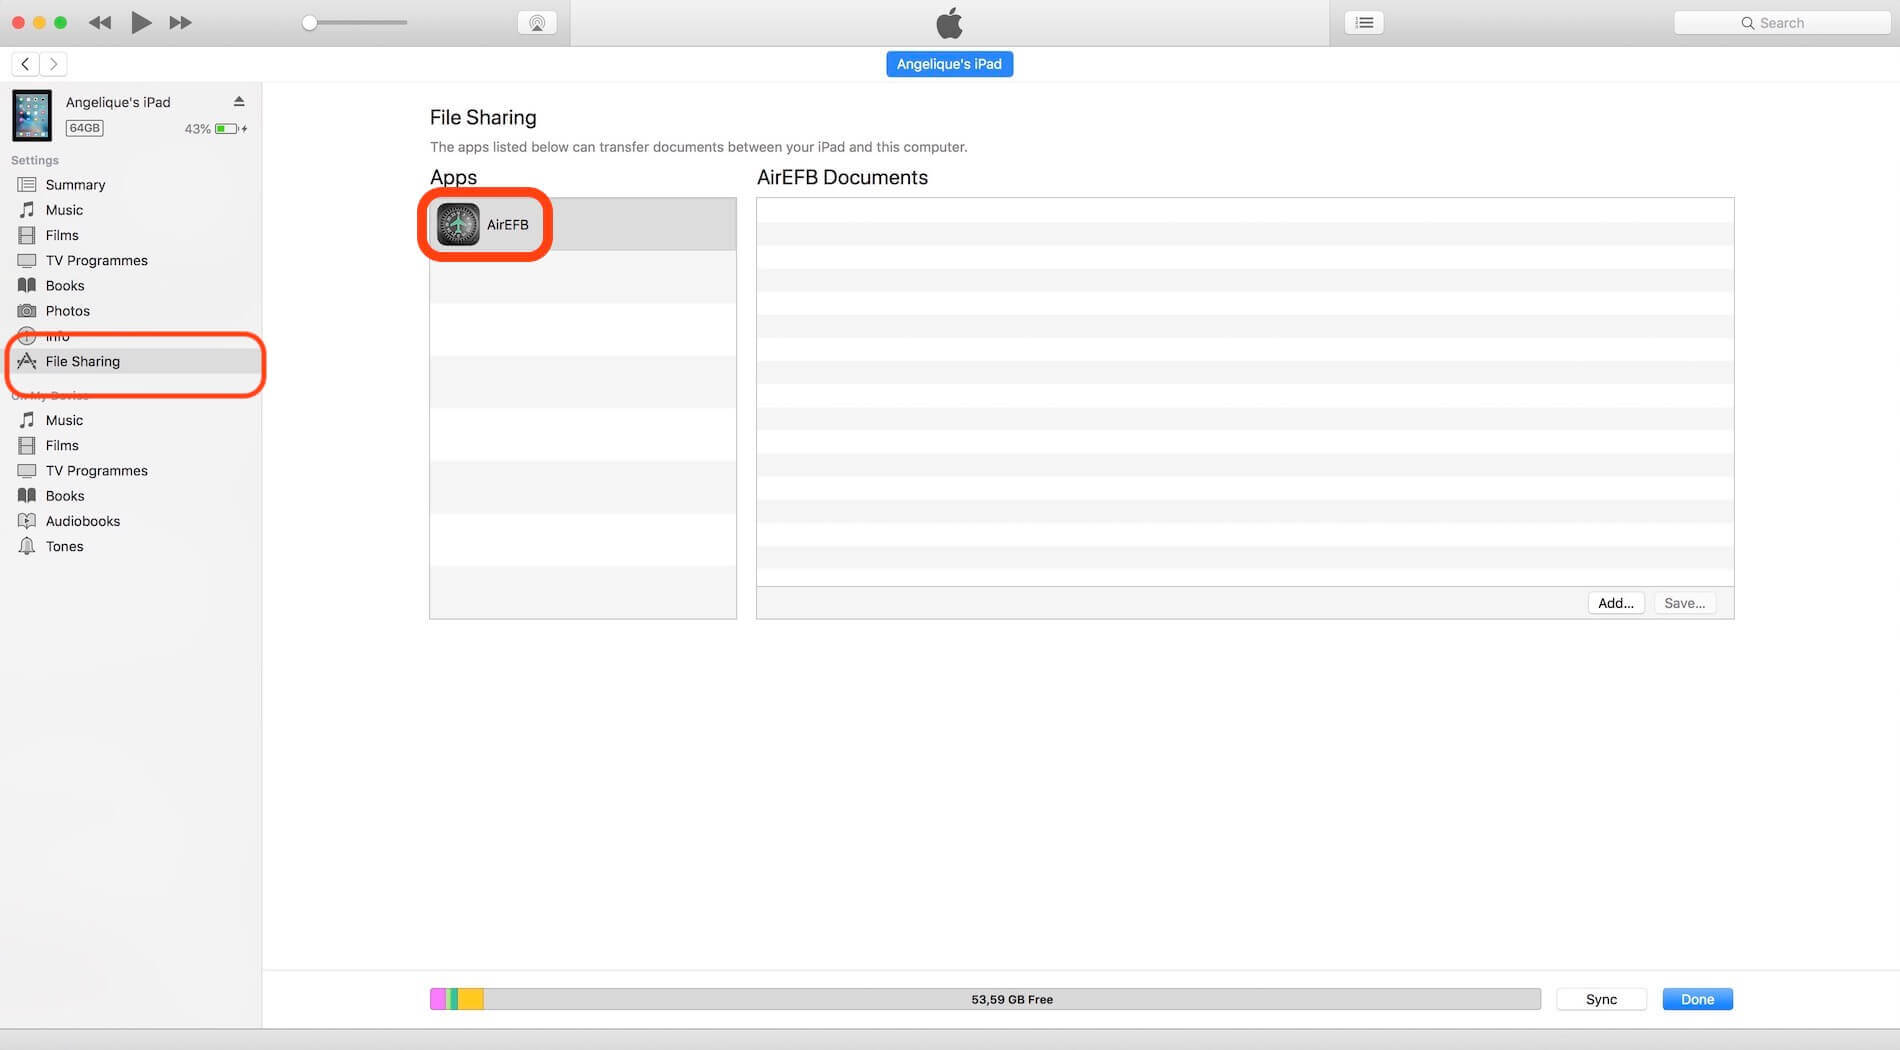
Before I start with this, first a couple of things you need to know. Create on your Mac, Linux or Windows computer, preferable at the desktop, three folders named – in capital characters only – CHECKLISTS, DOCUMENTS and CHARTS. And, important too, you can’t create any subfolder(s) in one of these main folders.
- Create a folder named CHARTS (or CHECKLISTS or DOCUMENTS) in your desktop or any other place you prefer and copy your preferred PDF files in it.
- Open iTunes.
- Connect the iPad with your computer with the sync cable.
- Click on the iPad symbol on top of iTunes to select it.
- Select File Sharing in the left-hand side of the iTunes pulldown menu.
- Select AirEFB from the list of Apps.
- Drag and drop the folder(s) CHARTS (or CHECKLISTS or DOCUMENTS) to the iTunes window, identified by AirEFB Documents or use the Add button in the lower right-hand corner.
The screenshots below show you the step-by-step procedure as previously described including how it looks on the iPad. Since it’s not possible at this moment to make sub folders in this way – via your Mac – uploaded documents, charts or checklist are ordered in alphabetic order on the related AirEFB pages. That said, try to find a logical naming convention that the overall stays a bit organized.
With, in this example, an EHTX chart in view, you can with your two fingers zoom in or zoom out as is standard on iPads.


Although this description is for CHARTS, for DOCUMENTS you follow the same procedure, but when it comes to CHECKLISTS, then we need to follow a different approach to be able to read the checklist files. That said, let’s move on to the next section … AirEFB Checklists.
LSK 1R: Checklists
According to Joao from Haversine “The format of the CHECKLISTS folder is different. You should rename the original clist.txt file into something like xxxxx.clist. This has to be done for each checklist and logically, each checklist has its own unique file name. Sub folders within CHECKLISTS isn’t allowed.
So for instance, both xxxx.clist files are stored in the CHECKLISTS folder:
– JAR A330.clist
– FlightFactor 777.clist”
Just to clarify the following:
Normally you use the clist.txt file what is used with the Xchecklist plugin from sparker. Example; for the JARDesign A330 you could download this clist.txt file. Once downloaded, I rename the file to, for example, JAR A330.clist or JARDesign A330.clist.
The same we do with the clist for the FlightFactor 777. Here’s the link for this clist.txt and once downloaded, I rename this file to FlightFactor 777.clist or FF B777.clist.
Note: Important to remember that the file no longer has the “txt” extension. The file extension is now “clist”!
As said before, store these clist files in the CHECKLISTS folder and copy the complete folder following the same iTunes procedure as above described to your iPad. When copied, the iPad contents of the AirEFB app should look like this:


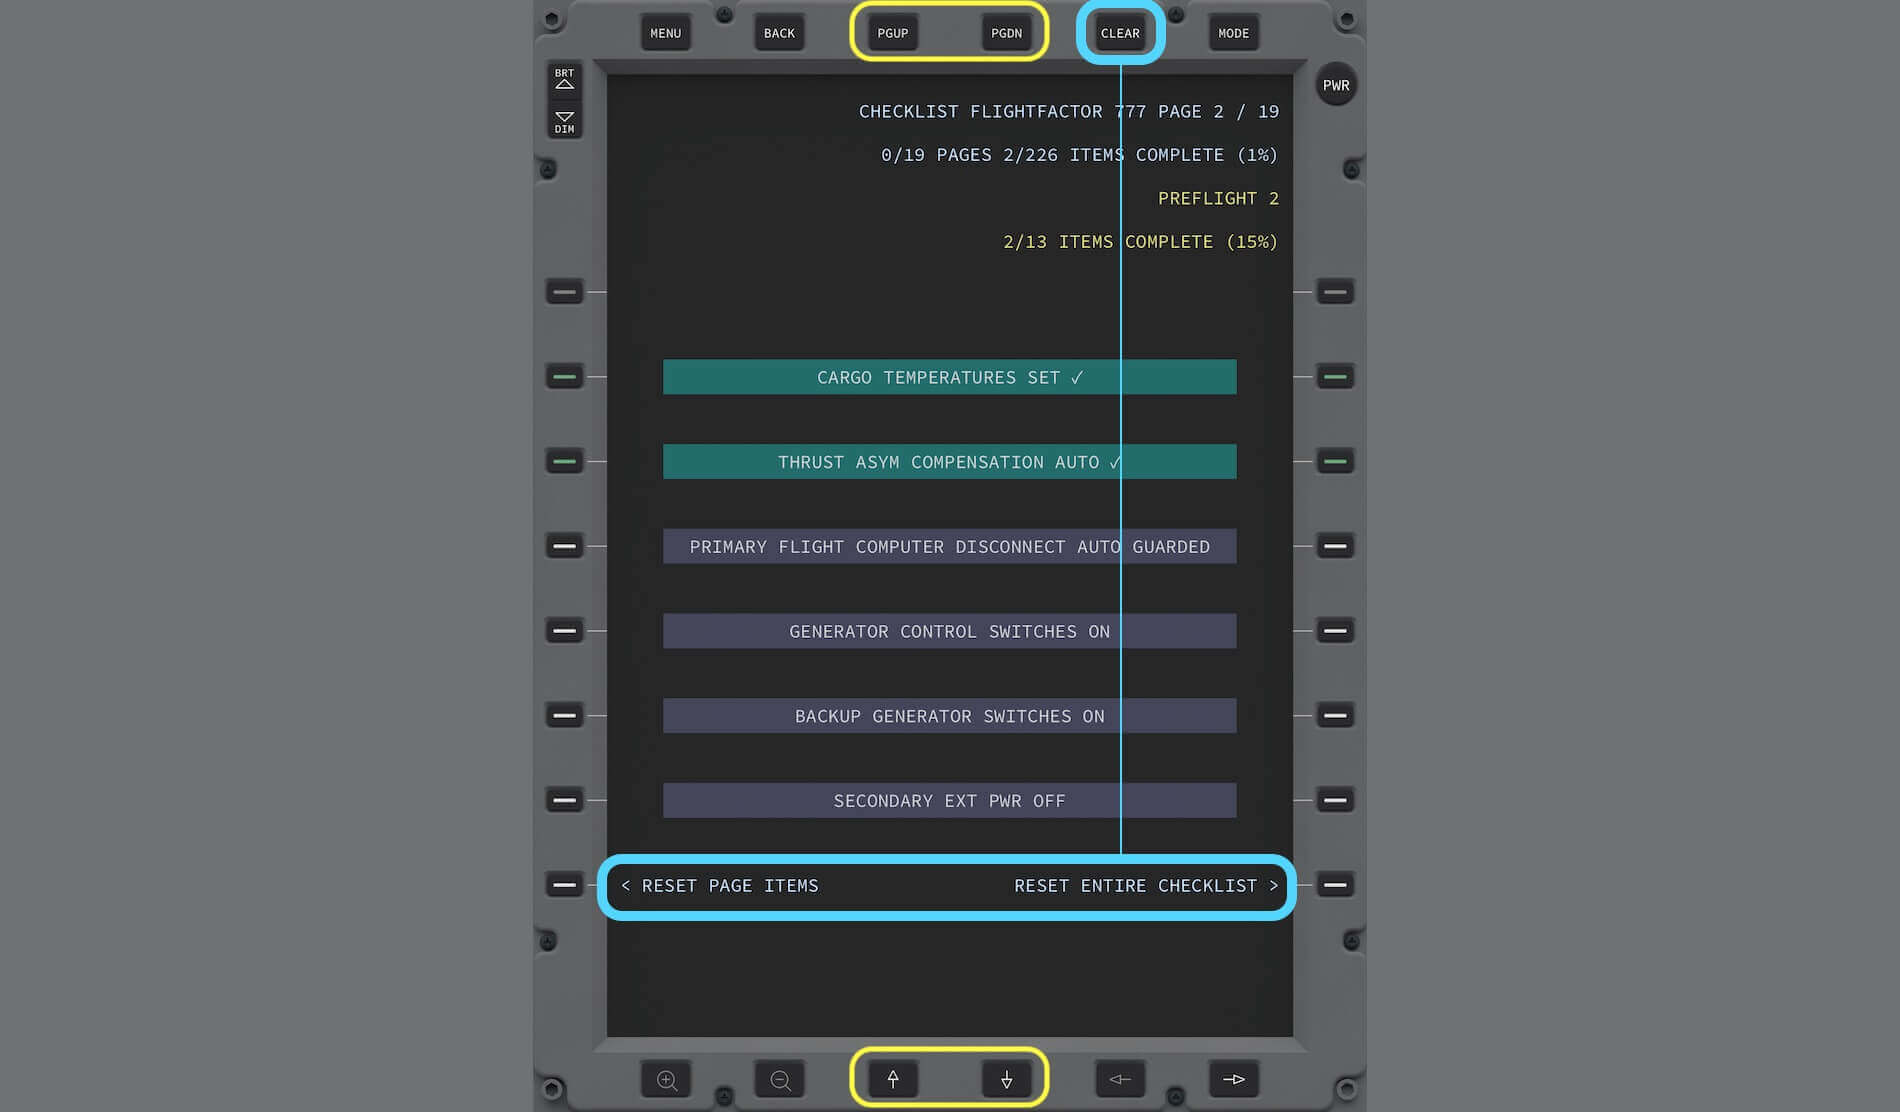
I want to make clear that when you’ve selected from the AirEFB front page LSK 1R (CHECKLISTS), you see the checklists you’ve just loaded. Straight forward, right? When I click the Flight Factor 777, I see the first checklist page which is actually number one out of 19 pages (see right-hand corner AirEFB app). In the last screenshot I checked a couple of checklist items versus the cockpit.
When you click the checklist line or the related left-hand or right-hand LSK, the checklist line turns green, but it’s not interactive done in the modeled aircraft cockpit. Basically, it works the same way as you had used the Xchecklist plugin.
Perhaps you’ve noticed it already, the top yellow line tells you which checklist it is. In this screenshot example it’s PREFLIGHT 1. With the arrows at the bottom of the AirEFB, you can scroll to the other checklist sections. While scrolling to the different checklist sections, you can see that you’re on PAGE x / 19. Scrolling can also be done with the PGUP/PGDN buttons on the top of the AirEFB (marked with yellow squares next screenshot).
Resetting checklist items
Suppose you’ve ticked on the AirEFB some checklist items and think “I want to start all over again”, you got a couple of options to reset the ticked checklist items. You first click the CLEAR AirEFB button on the top of the AirEFB. By doing this, you’ll see at the bottom left and right respectively RESET PAGE ITEMS (LSK 8L) and RESET ENTIRE CHECKLIST (LSK 8R). When you click LSK 8L only those checklist items on this page as reset while using LSK 8R resets the whole checklist (marked with light blue squares).
Creating your own checklist
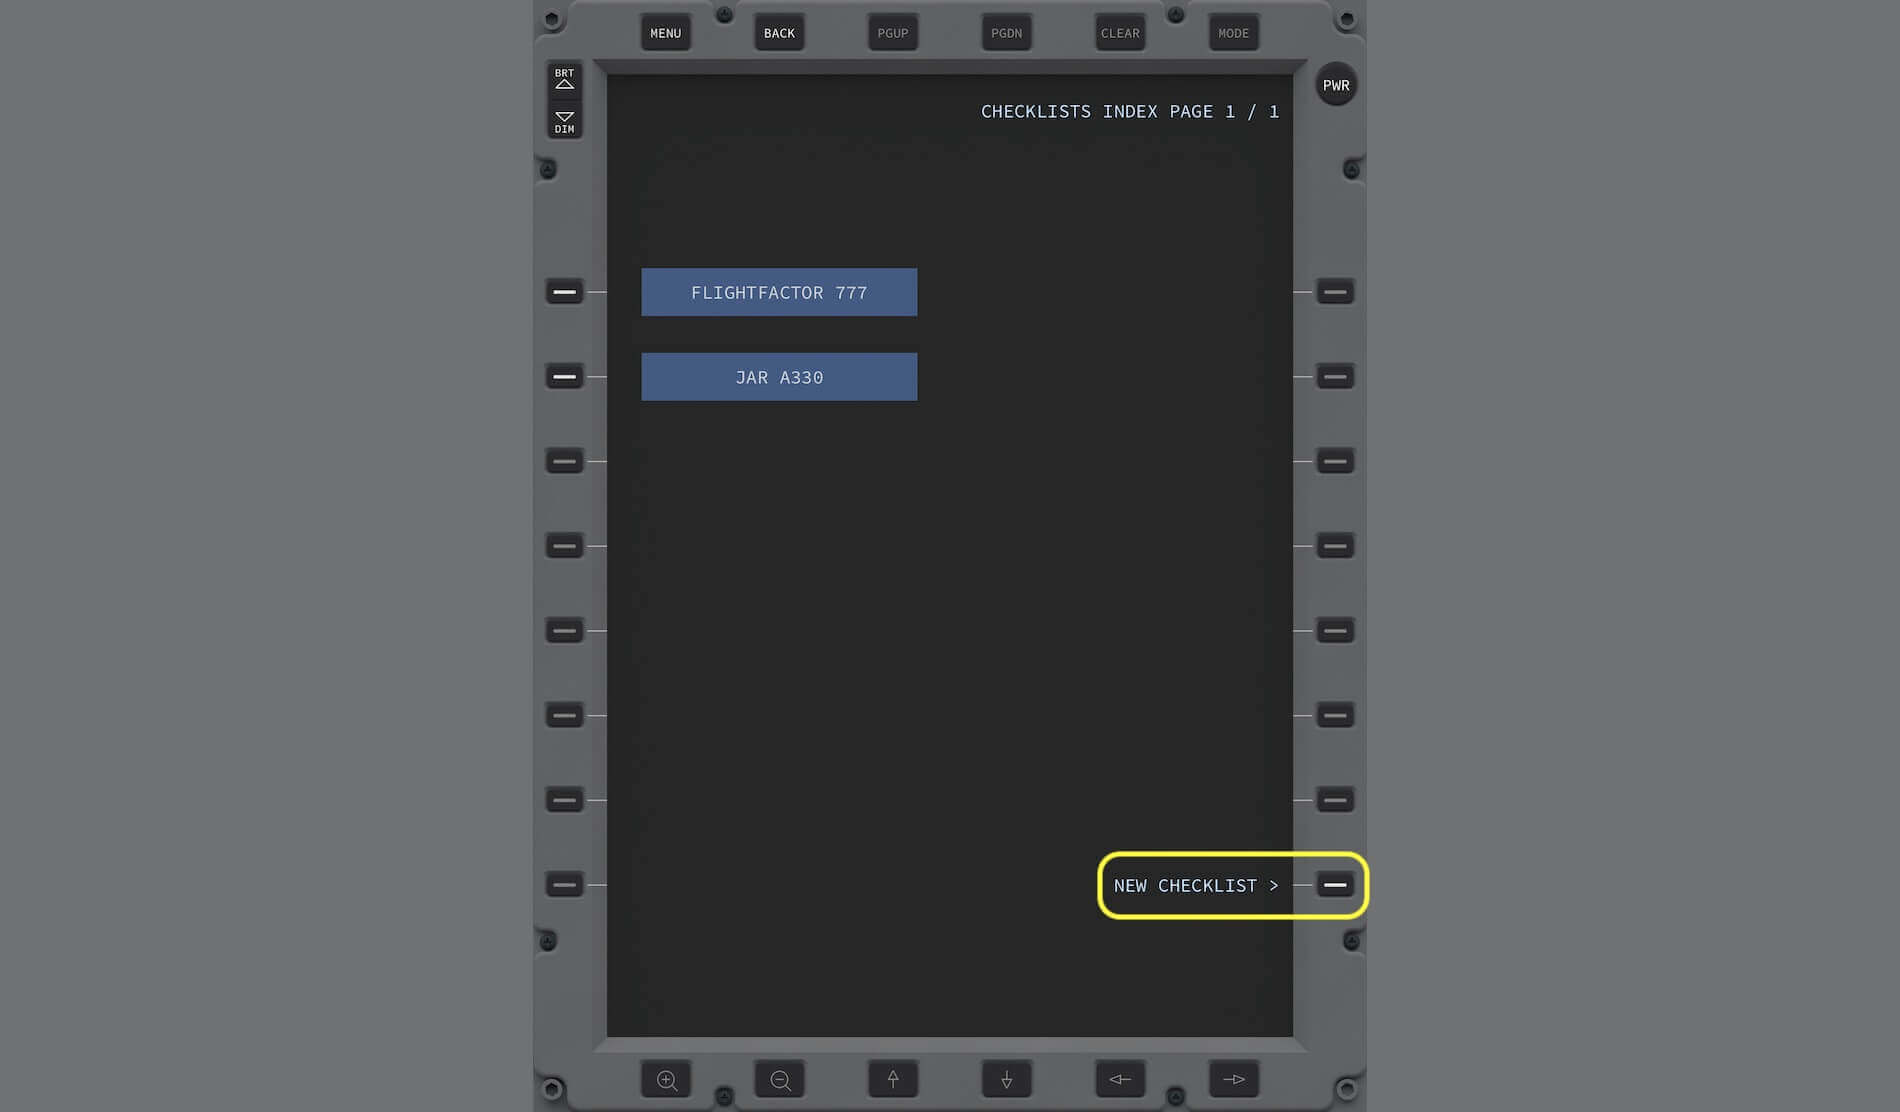
Suppose you can’t find a clist checklist of your preferred aircraft, then you can always decide to make a checklist yourself. I tried it on the AirEFB and although it works great, it’s a lot of work. But let me give it a try in case you want to create your own checklist.
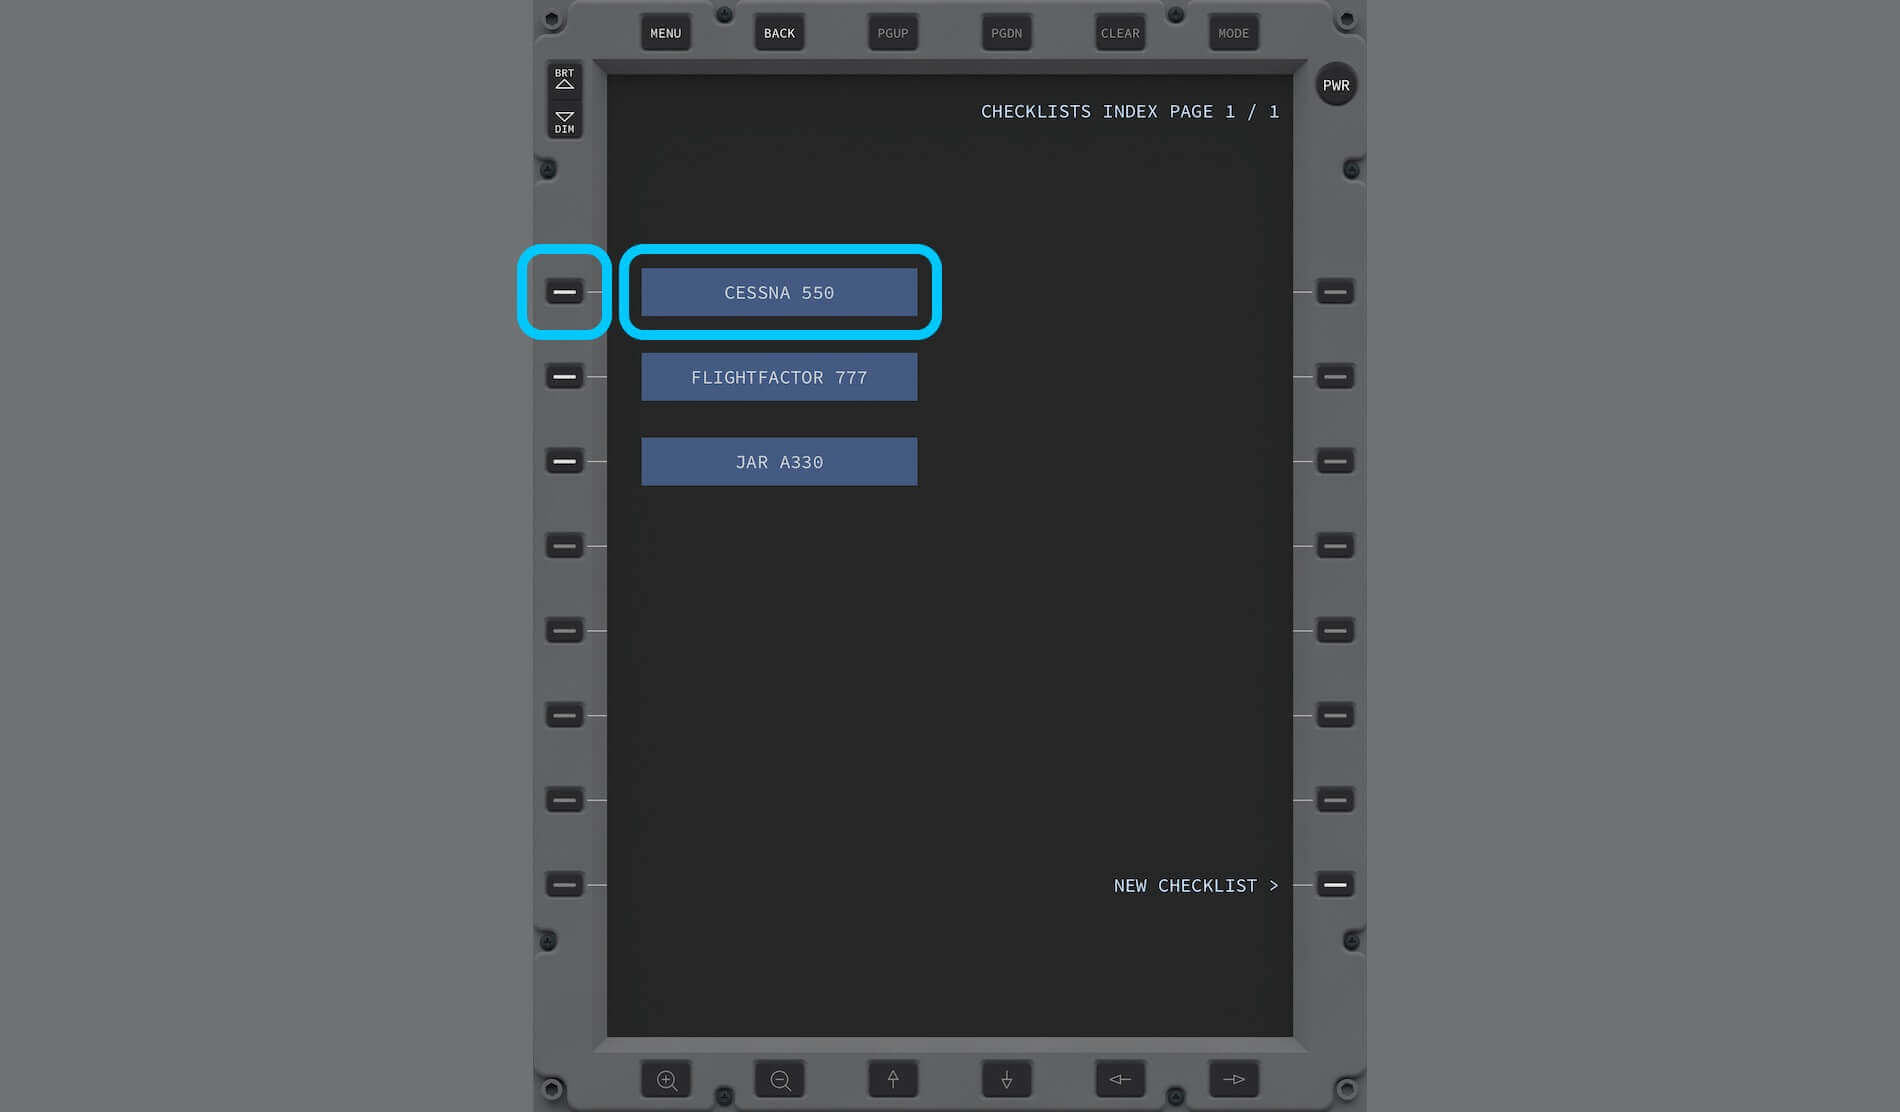
- Select from the AirEFB CHECKLIST page LSK 8R (NEW CHECKLIST > )
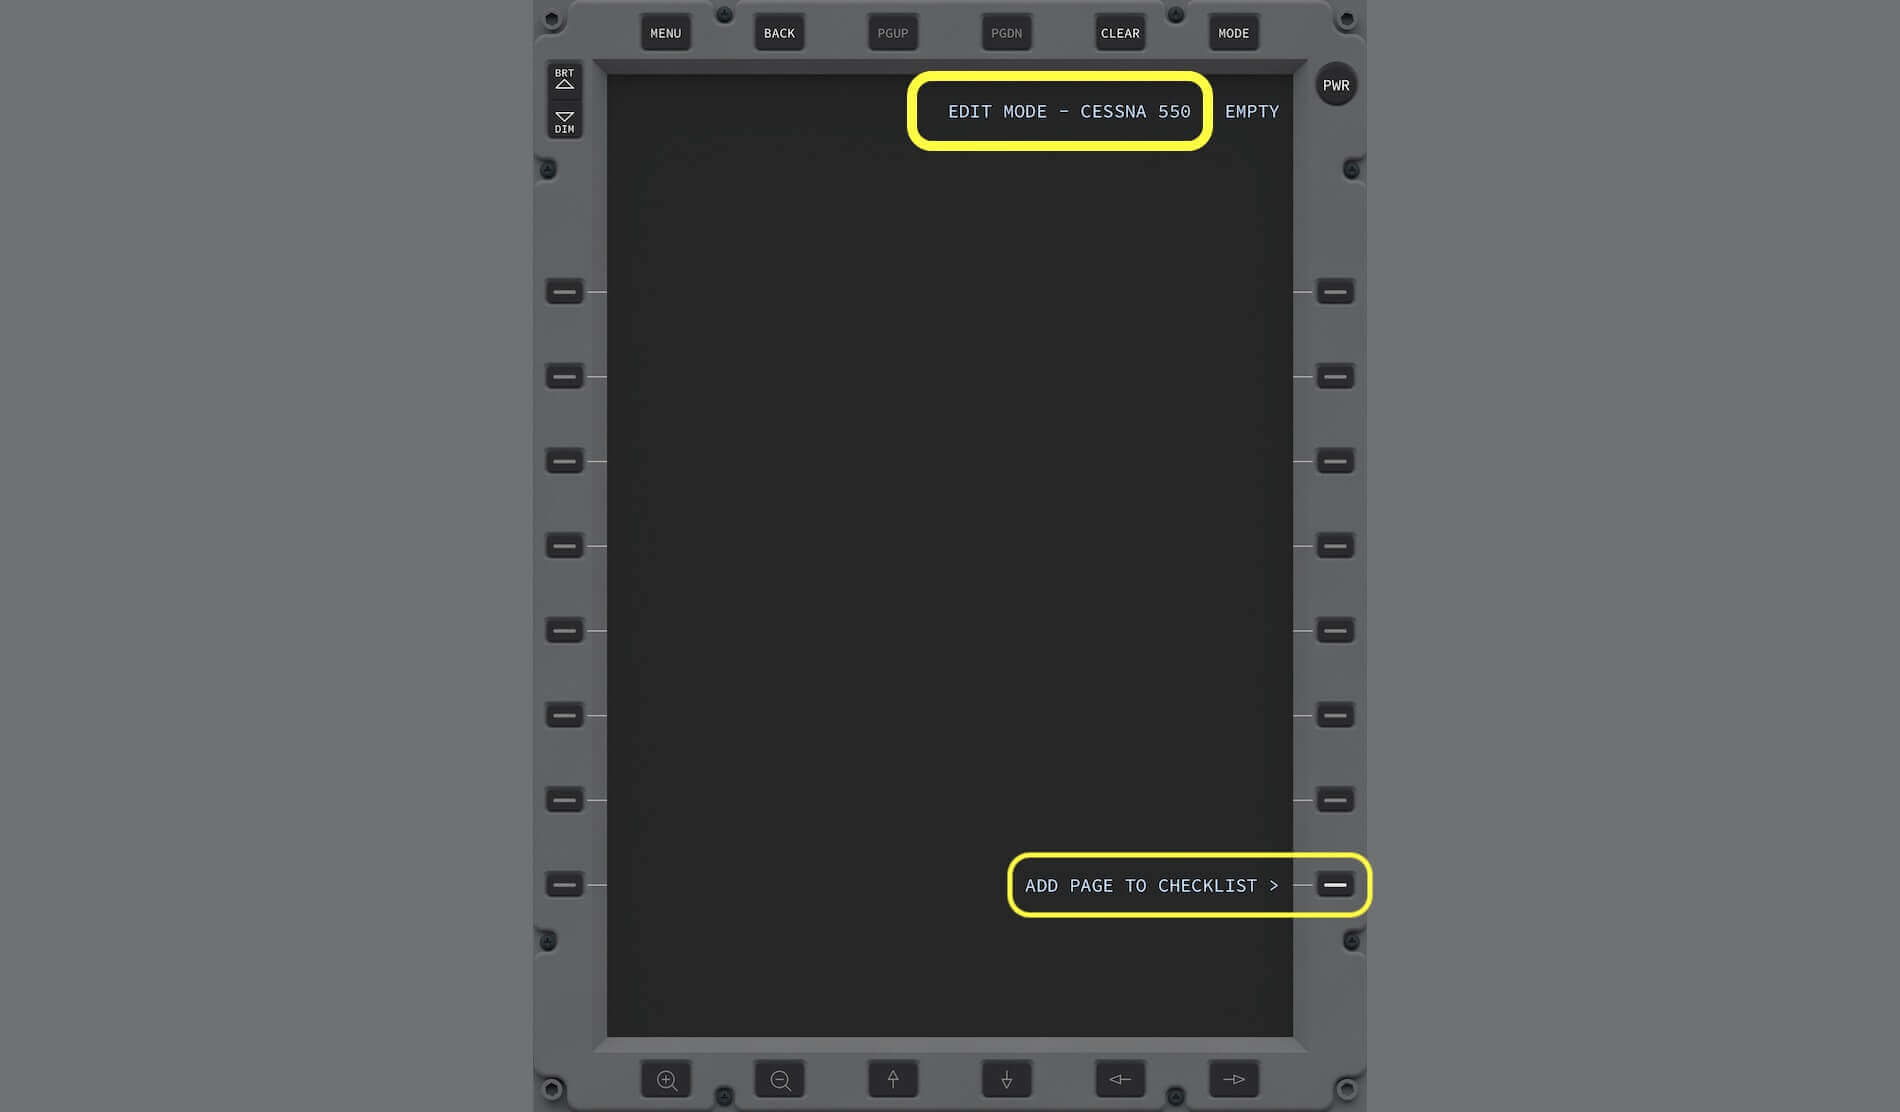
- Used the AirEFB keyboard to enter a name e.g. Cessna 550
- Click the AirEFB return key. This saves your Cessna 550 name
- Select from the AirEFB CESSNA 550 page LSK 8R (ADD PAGE TO CHECKLIST > )
- Used the AirEFB keyboard to enter a name of the first checklist Preflight
- Click the AirEFB return key. This saves the preflight page

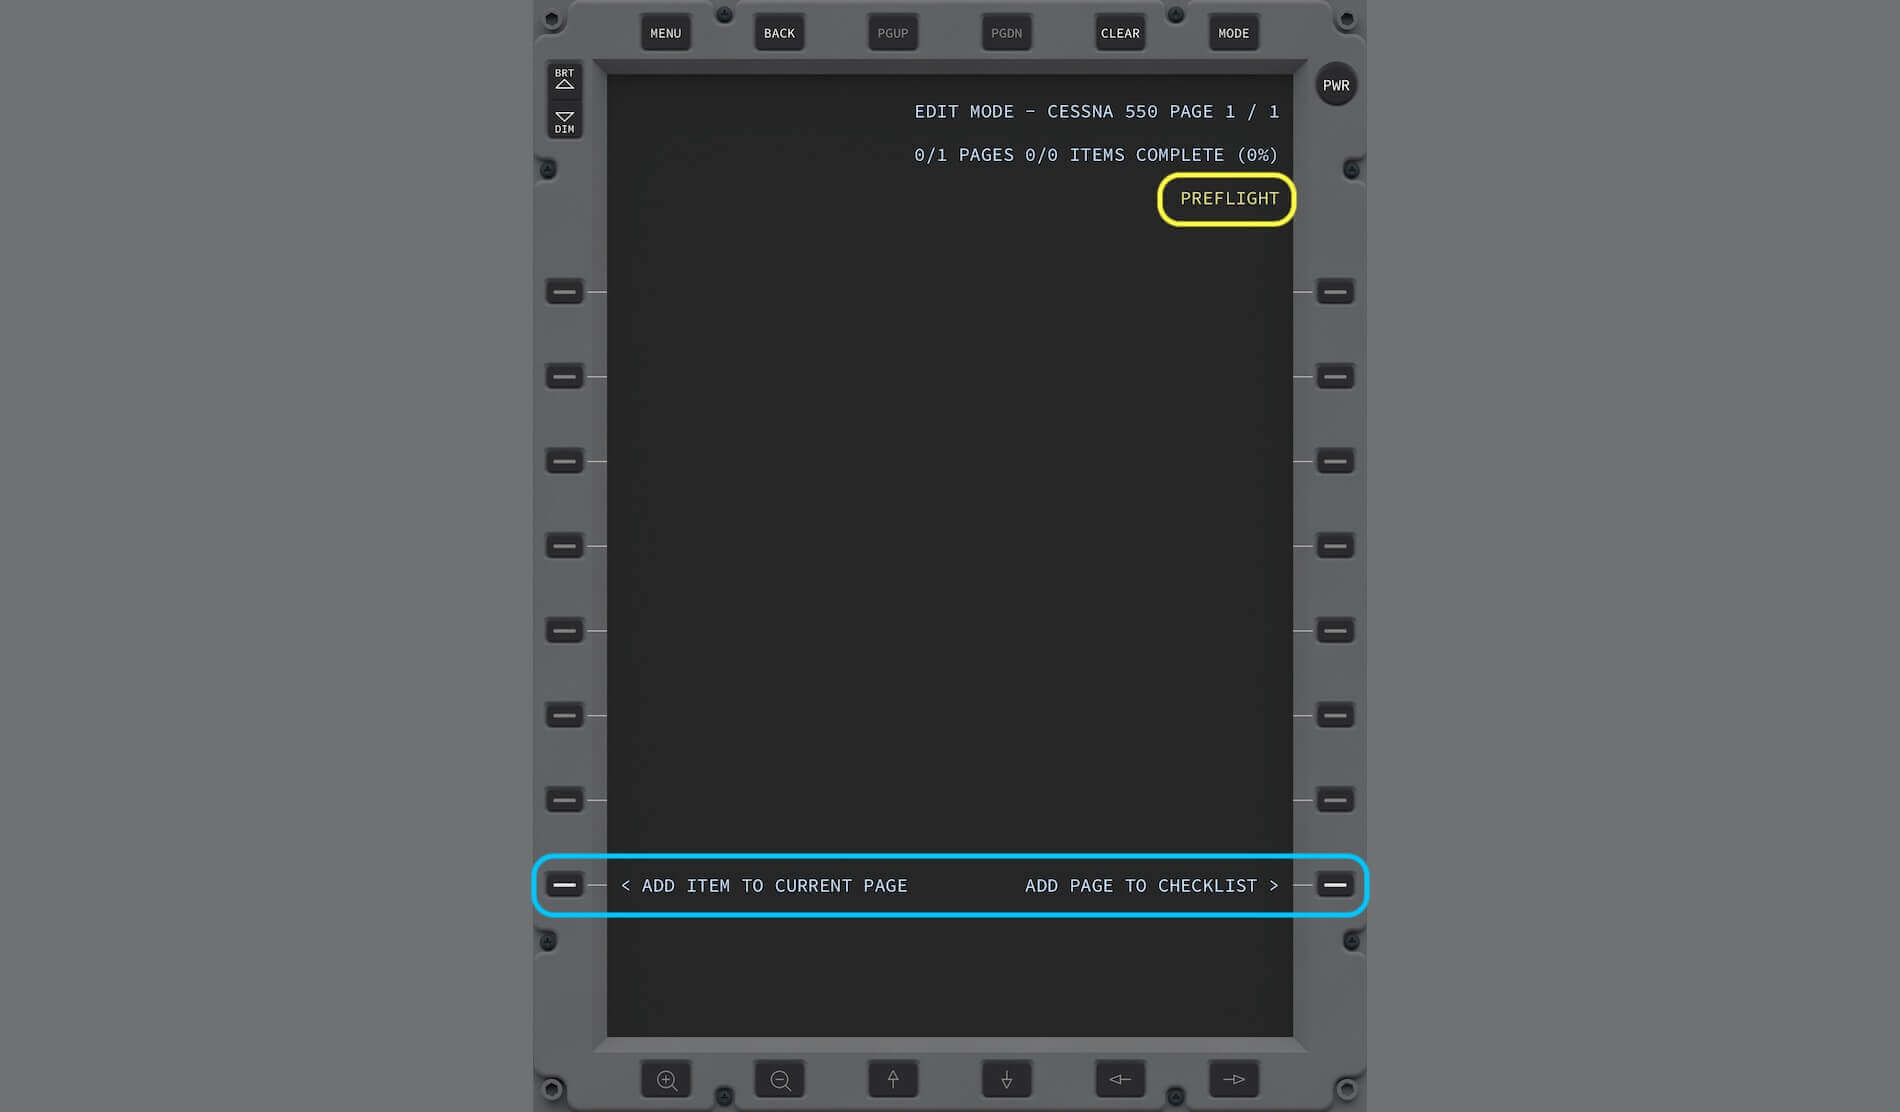
You’ve got two choices. You either first fill the Preflight checklist we’ve just made with checklist items (LSK 8L) or you create already another checklist e.g. Preparations (LSK 8R). I continue with filling the current Preflight checklist thus I select LSK 8L.
- Select LSK 8L (ADD ITEM TO CURRENT PAGE)
- Used the AirEFB keyboard to enter the first item e.g. Battery ON
- Click the AirEFB return key. This saves your battery ON checklist entry
- And so on with every next item
- When you’re finished, don’t forget to select the MODE button on the right-hand top of the AirEFB. This will bring you out of the checklist EDIT MODE
Now you can select the MENU button on the top left of the AirEFB, then select LSK 1R (CHECKLISTS) and you’ll notice that we’ve got a new checklist in the list. One that was not uploaded via iTunes, but created by yourself.


LSK 5L: Airport Data and Map
With the Air plugin installed in the X-Plane Resources/plugins/Haversine Air folder and the AirEFB iPad active, it’s time to check out the interaction between the airport data and map function on the AirEFB and a running X-Plane. For this example, I use the airport of Texel (EHTX). Let me show you in a step-by-step procedure how to get this done.
- Assuming I have the HaversineAir plugin installed
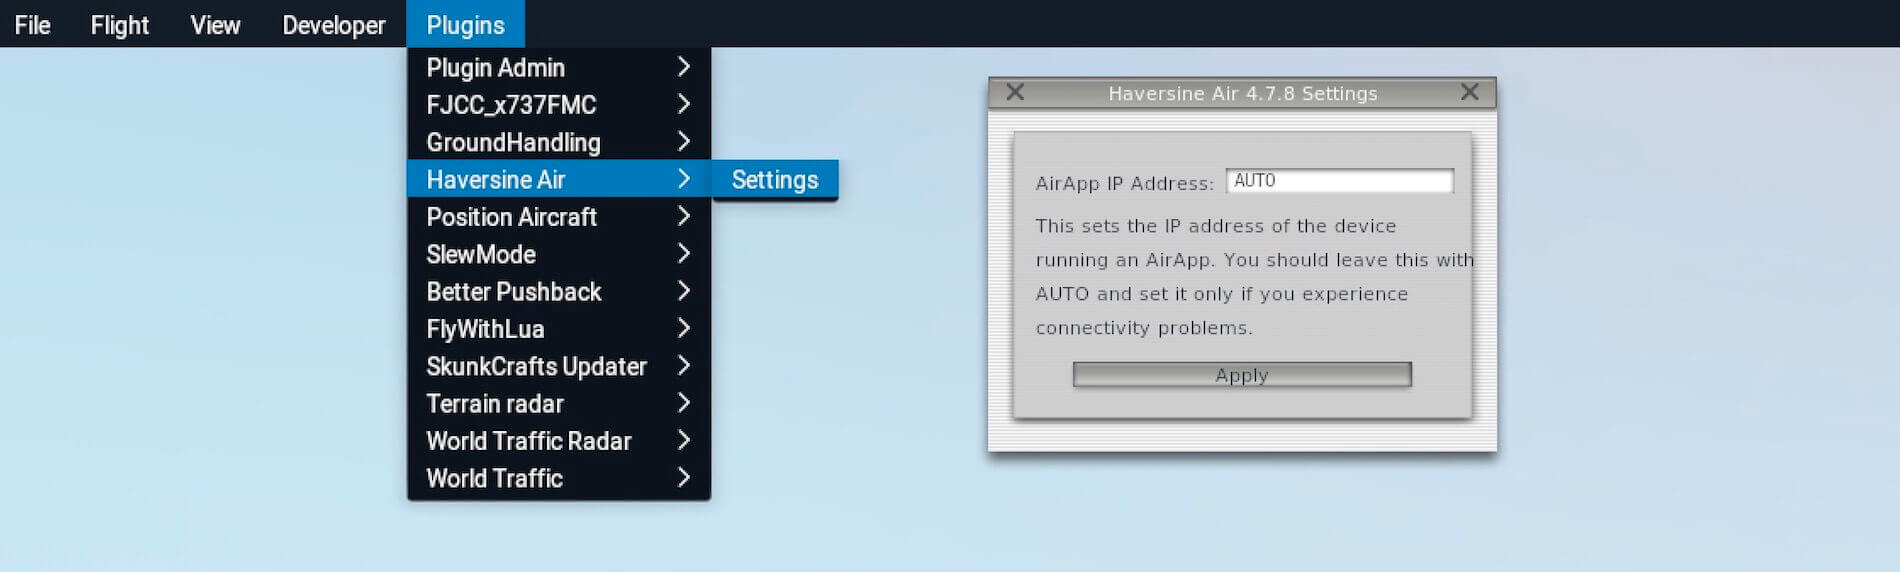
- I select a Cessna 172 and park it at the apron of EHTX
- I verify that the Haversine Air plugin (X-Plane menu Plugins) show that the Airapp IP Address is set to AUTO which is it normally by default.
- I start the AirEFB app on my iPad and select from the screen LSK 5L (AIRPORT DATA & MAP). Note: suppose that the AirEFB stays blank, click the round PWR button on the right-hand top of the AirEFB. This will power up the AirEFB.
- From the list I select EHTX which is in my case LSK 6L.
- The page that pops up show the runway(s), taxiways, platforms and so on as well as the necessary data. Note: I’m aware it’s a simple airport, but the principle is the same for more complex airport.
- When the connection with X-Plane is successfully established, I see on the AirEFB my aircraft. Wow, that’s fun!
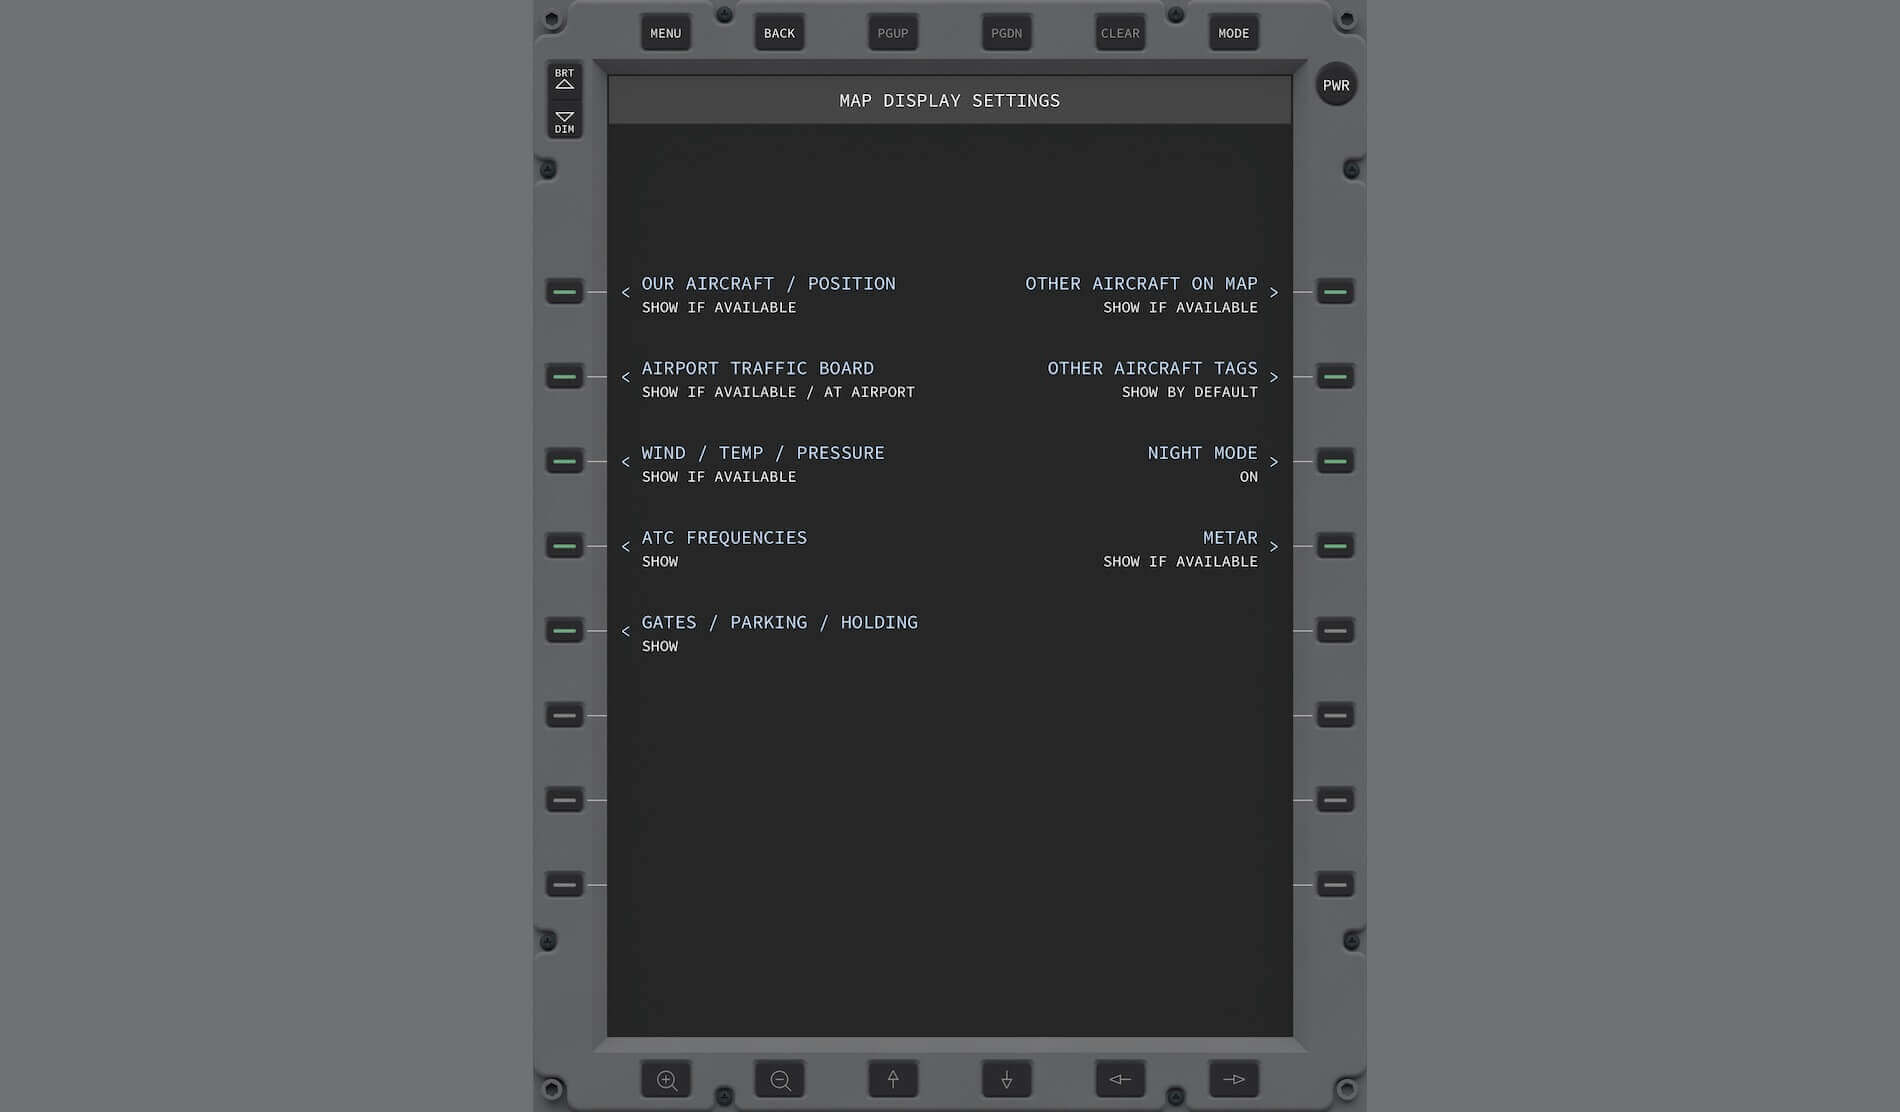
- The way the AirEFB AIRPORT DATA & MAP page looks like, depends on the settings. You can change the settings by clicking the MODE button on the top right-hand of the AirEFB. As the name suggests (MAP DISPLAY SETTINGS) you can hide or show specific information on the map. Play a bit around with it. Click the MODE button to make some changes to the MAP display which are immediately visible, so you can see if this is what you want.


I’m aware it’s just a small airport with only one runway and a simple taxi system, but imagine you’ve parked your aircraft at Schiphol Amsterdam international Airport and parked somewhere, and you need to taxi a lot and oops, it’s a bit foggy outside. Then you can use the AirEFB MAP function to guide you during your taxi to your runway. A very nice feature I would say.
Two things I need to highlight.
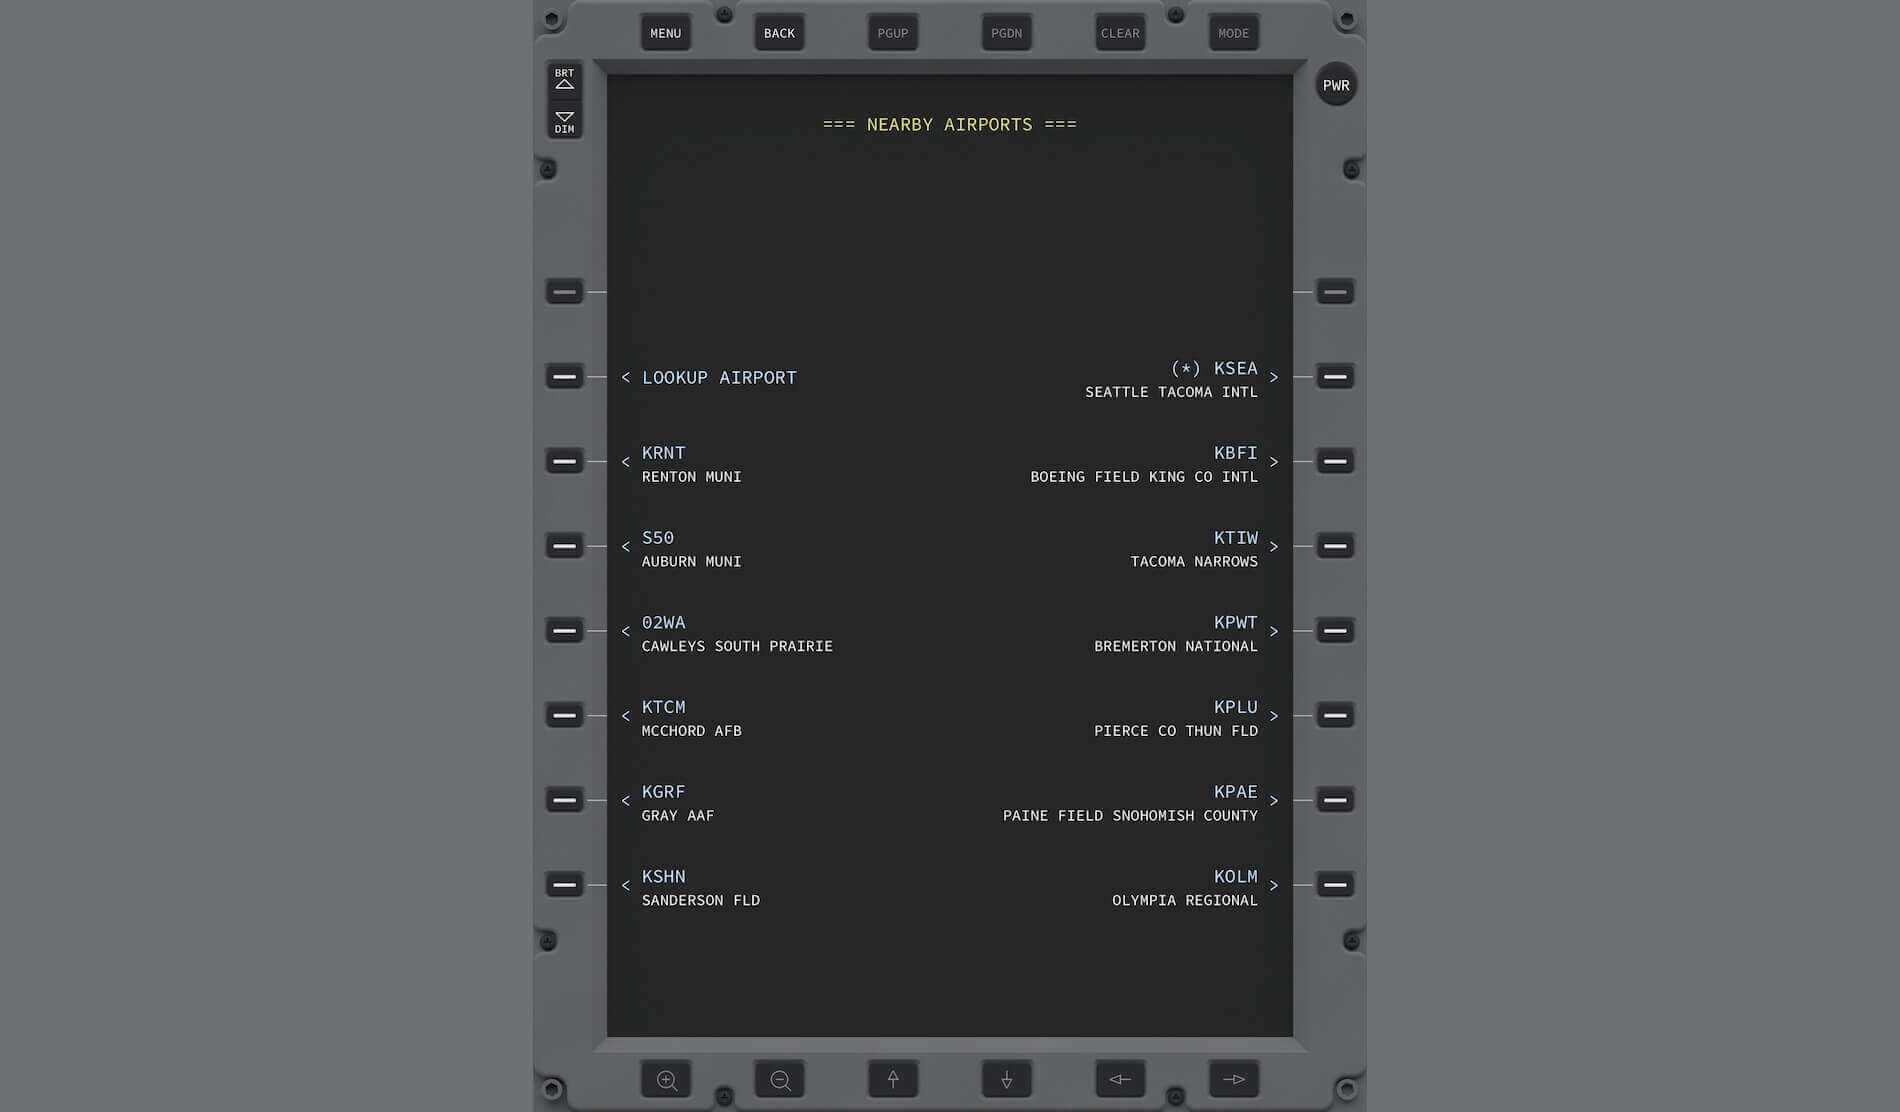
When you’ve selected AIRPORT DATA & MAP, I’ve noticed that I get a list of nearby airports. Nearby means in this case all airports nearby EHBK. Since I had selected EHBK, it grabs via GPS the nearby airports. When you move the aircraft to e.g. KSEA (Seattle Tacoma International Airport), and X-Plane has been up and running, you’ll notice that the nearby airport list is now different. In the following screenshots I would like to show you this.
So once more; I had parked my Cessna at EHBK (Beek Aachen Airport), and moved my aircraft to KSEA. Once X-Plane has finished loading, the AIRPORT DATA & MAP should show now all the nearby airports around KSEA. If this is not the case, you can try to shutdown the EFB and restart is again. You should know now that shutdown and restart of AirEFB is done with the PWR button.
I faced the following and would like to highlight that.
After X-Plane had finished loading KSEA, I expected that the AIRPORT DATA & MAP page would show you the nearby airports including KSEA, but it didn’t. Instead, it showed my an almost empty page as you can see on the screenshot below (=== AIRPORT SELECTION ===). What I did to solve this is shutting down via the PWR button, and restart the AirEFB again with the same PWR button. Then select AIRPORT DATA & MAP page again, and now it should show you now all the nearby airports of KSEA.
A remark from Joao regarding this “If you have and are flying a custom detailed version of an airport in X-Plane, and the built in (or imported) database has another, when you lookup (or if you’re nearby) you will see both airports for choice with different LSKs. The one with the (*) symbol is your custom one but you can still choose between one or the other.”


I would like to share with you the following information I got from Joao regarding the reasons why nearby airports around might not appear. According to Joao; “1) If your X-Plane datasource gets lost and AirEFB disconnects; you may then need to reselect X-Plane as the data source under settings (which gets done if you restart the App with the PWR button I think). You get messages saying “NEW DATASOURCE SELECTED” and “DATASOURCE LOST”. You can always select a datasource in the settings. There is always GPS plus any number of X-Plane instances (you can run multiple in multiple computers too).
2) If you are in the AIRPORT SELECTION page instead of the NEARBY AIRPORTS page; note that they are two pages:
a) When you enter the Airports page from the main menu, you go to NEARBY AIRPORTS where you see those around you and you can press LK2 to go to Lookup mode
b) Once you have performed a lookup (for a text string) you get the list of matches found in the AIRPORT SELECTION. So at this point it’s no longer the nearby page but it’s the results page. In order to go to the nearby page press BACK once.”
Another thing that I want to highlight has to do with the SYSTEM SETTINGS page. When you don’t have it in front of you, you’ll probably never notice it. Assuming you’re checking something on this page, you’ll notice that when X-Plane is up and running and the Haversine Air plugin is installed, that it will show at LSK 8L the IP address. You can’t do anything with that LSK. Just see it as a confirmation that both devices are linked to each other.
Some additional tips and tricks from Joao; “You can enter for example for Schiphol EHAM, right? But you also can enter a portion of the name of the airport and it will show all matches like for example “EHAM” or “AMST” or “SCHIP”. The airports, taxi map is my favourite part of AirEFB. Why …. you can look up any airport and see what it looks, including its frequencies, weather, and so on.”
Summary
What can I say … a great multi-platform utility tool!
I think I’ve covered most of it. There’s always a chance I missed something, but most of it is discussed I think. As reviewer I had constant email contact with Haversine in the person of Joao Cabral and can’t say anything else then very helpful and always willing to find a solution or to improve the product. I didn’t got the feeling it’s only because I was writing this review!
With this review I tried to show you as far as possible all the ins and outs of this iOS app. Yes, perhaps that’s the only remark; AirEFB is only available for iOS hardware and then in particular for the iPad. I tested it with an iPad 3, so not the newest iPad, but it still works great and, my iPad is still using iOS 9.3.5.
I hope that this review adds a bit more background to the Haversine AirEFB add-on. It’s a very nice tool, Haversine offers you to a maximum 100MB cloud space to upload your charts and/or documents but perhaps it’s easier to upload documents directly to the internal iPad memory with, for example, iTunes, but I’m also aware that there are many other add-on products that will copy the folders/files too.
Although I used for this my iMac and connected it via the Haversine Air plugin to my Mac X-Plane 11, remember that the latest Haversine Air plugin works with all its 3 platforms, Mac, Windows and Linux in 32 and 64 bit formats. In other words, when you own an iPad, but you’re a Windows or Linux simmer, then this review is also applicable for you!
At the moment of this writing, November 2018, the Haversine AirEFB add-on is only available via the App Store, but perhaps in the near future, it will be also available via X-Plane shops. The current price is 21.99 Euro’s.
Feel free to contact me if you’ve got additional questions related to this impression. You can reach me via email Angelique.van.Campen@gmail.com or to Angelique@X-Plained.com.
With Greetings,
Angelique van Campen
| Add-on: | Payware Haversine AirEFB |
|---|---|
| Publisher | Developer: | Haversine | Haversine |
| Description: | Realistic rendition of an EFB (Electronic flight Bag) |
| Software Source / Size: | Download via App Store |
| Reviewed by: | Angelique van Campen |
| Published: | November 22nd 2018 |
| Hardware specifications: | - iMac Pro - Intel 3GHz Intel Xeon W / 4.5Ghz - Radeon Pro Vega 64 16368 MB - 64 GB 2666 MHz DDR4 - 1 internal shared 1TB SSD (Big Sur 11.x) - 1 internal shared 1TB SSD (Bootcamp Windows 10) - 1 external 2TB LaCie Rugged Pro SSD (Big Sur 11.x) - Saitek Pro Flight System X-52 Pro and X-56 Rhino - Honeycomb Alpha Flight Controls - Honeycomb Bravo Throttle Quadrant |
| Software specifications: | - macOS Big Sur (10.15.x) - X-Plane 11.5x |
0 Comments