Laminar’s X-Plane Control Pad
Introduction
When you own an Apple iPhone or iPad, and using X-Plane 11 on your Mac, Windows or Linux, then this article could be very interesting to you. Oh yes, I’m aware that this free Apple Store app is already for a long time available, but I get the impression that it’s a bit “a forgotten Laminar Research app”. But first, let me introduce you to the Laminar Research X-Plane Control Pad.
According to Laminar Research “When the Pros (professionals) fly their flight simulators for currency-checks, an instructor is hiding behind the scenes, setting location, weather, and inducing simulated aircraft failures during the flight test.”
“The goal is to survive the flight… despite the impossible weather, aircraft weight and balance, and equipment failures that are being triggered by the devilish instructor cowering behind the pilot.”
“Now, you can get this experience in X-Plane for Macintosh, Windows, and Linux personal computers by running this App on your iPad or iPhone (…with, of course, a willing tormentor to set all the various failures at the worst-possible time! Or just set them yourself.. the interface is clean and fast.”

Keep in mind that the Control Pad app is only for iOS hardware and, from September 2019 and on, also iPadOS and for X-Plane Mac/Windows/Linux 11.00 and later. That said, you can load the app for free on your iPhone or iPad. Personally I prefer the iPad due to its screen dimensions. As Laminar Research said already, the app allows you to control many parameters within X-Plane. Time to find out how to install, activate and use it.
Installation, Manual(s) and Configuration
Since it’s an iOS or iPadOS app, the installation goes via the Apple app store. On your iPhone, iPad or iPod touch open the App Store and search for “x-plane control pad”. The following screenshots are taken on my iPad Pro model 2015, but basically they look the same on the iPhone and I’m quite sure the same on an iPod touch (but I don’t own the iPod so I guess it looks the same). Further on, on the second screenshot you see that this product review/impression is based on Control Pad version 1.14.


Perhaps worth to highlight right now; the app requires iOS 7.0 or later and it is compatible with iPhone, iPad and iPod touch. As of this writing, I’m using for the Control Pad app either my (very) old iPad 3 and the iPad Pro 2015. The iPad 3 has iOS 9.3.6 while the iPad Pro has – of this writing October/November 2019 – the new iPadOS. Then I use an iMac Pro with X-Plane 11 and macOS Mojave and Catalina, but this could be also a Windows or Linux computer. As long as the iOS hardware can make a connection with your X-Plane 11.
I tested the Control Pad app with both the iPad 3 and iPad Pro, but it must be said that the iPad 3 is a bit slow in responding and thus also sending data to the X-Plane computer. In that respect the iPad Pro is much faster and better to work with neither less, the iPad 3 with iOS 9 can do the work too.
To connect your Control Pad app to your X-Plane computer, you use your wifi network. When you use wifi, be sure that your iOS equipment and your X-Plane computer are on the same network.
Manual(s)
There’s not really a manual, but at the dedicated Apple Store page you can find the following instructions; “Simply fire up X-Plane on your Macintosh, Windows, or Linux personal computer and Control Pad on your iPhone or iPad. As long as they are all logged into the same WIFI network, they will see each other, and: Viola! You now have an Instructor Operator Station for X-Plane on your iPhone or iPad!”
“Now, on your iPad, you can load aircraft, set location, set the weight and balance of the airplane you are flying, set the weather in X-Plane, see a map complete with plan and profile views to see how well you are flying your approaches, and even induce any of the aircraft equipment failures possible in X-Plane (currently, about 1,000 possible failures!)”
Configuration
As you can read from the above, there’s no special configuration needed except that you are on the same network. Note that iPad app only works with the iPad in a vertical position.
Control Pad not Connected
Before starting with the Control Pad app, it’s a good idea to highlight what can be found at the start page – within the app also known as the SET page – before you connect the app to X-Plane. After the Laminar Research startup logo, you’re presented with the startup page in the UI (User Interface) mode. The app comes with three different UI modes; dark, medium and light layout. Further on, you can adjust the screen/app brightness and the app volume level.
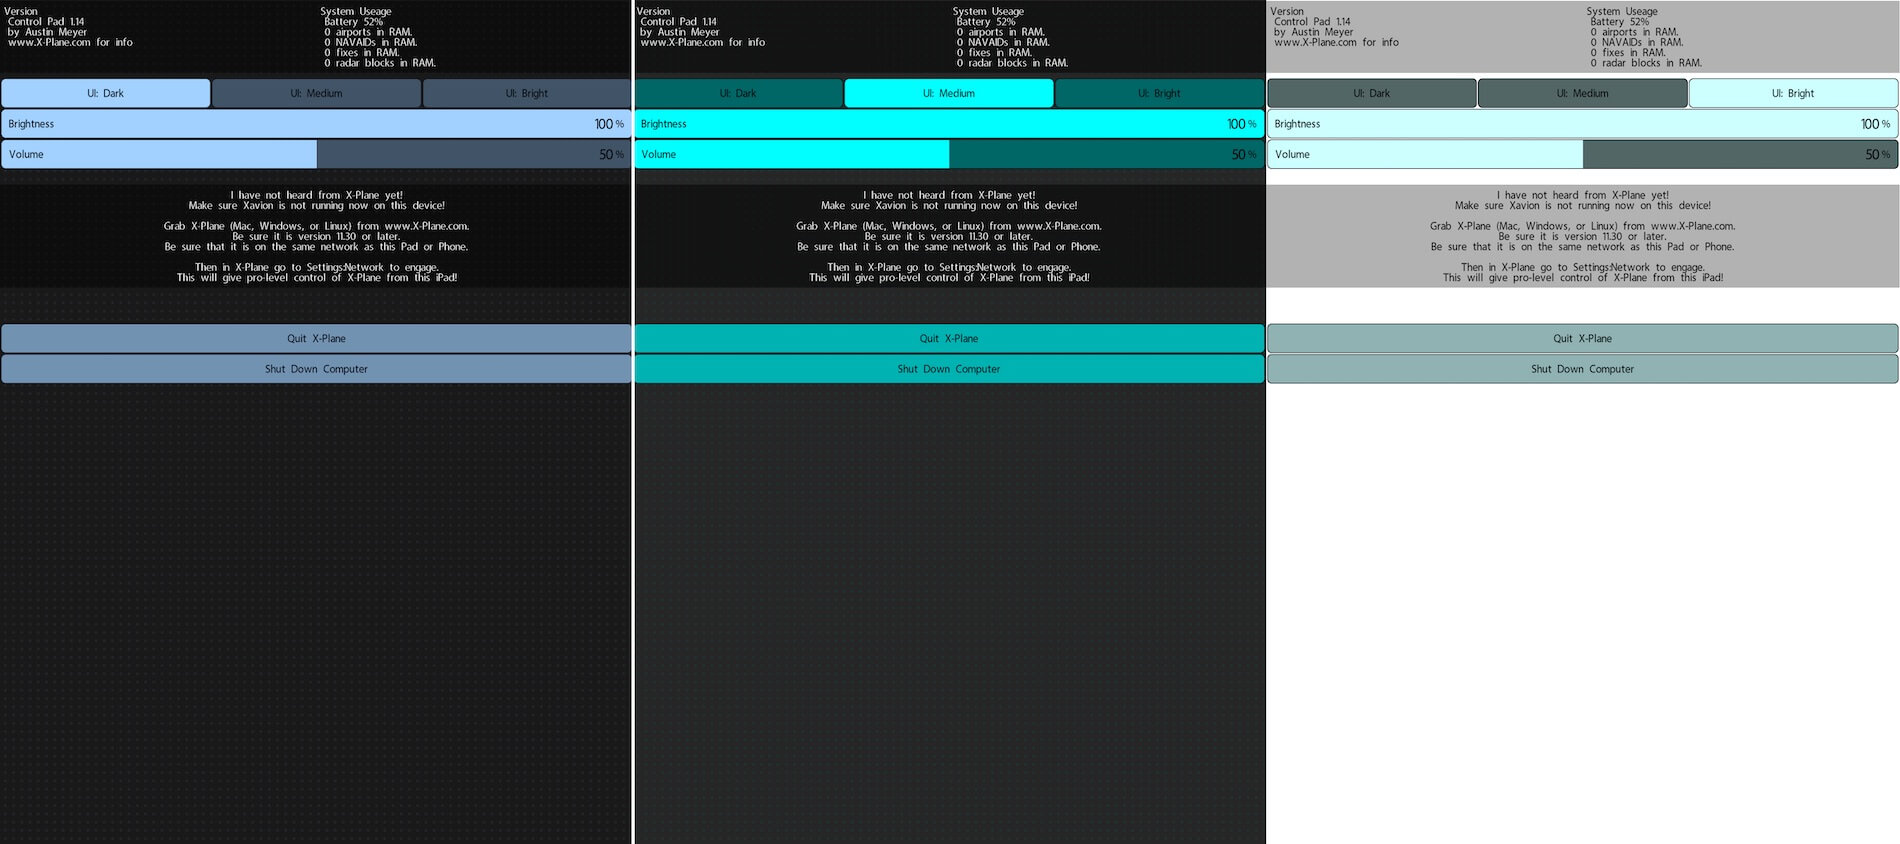
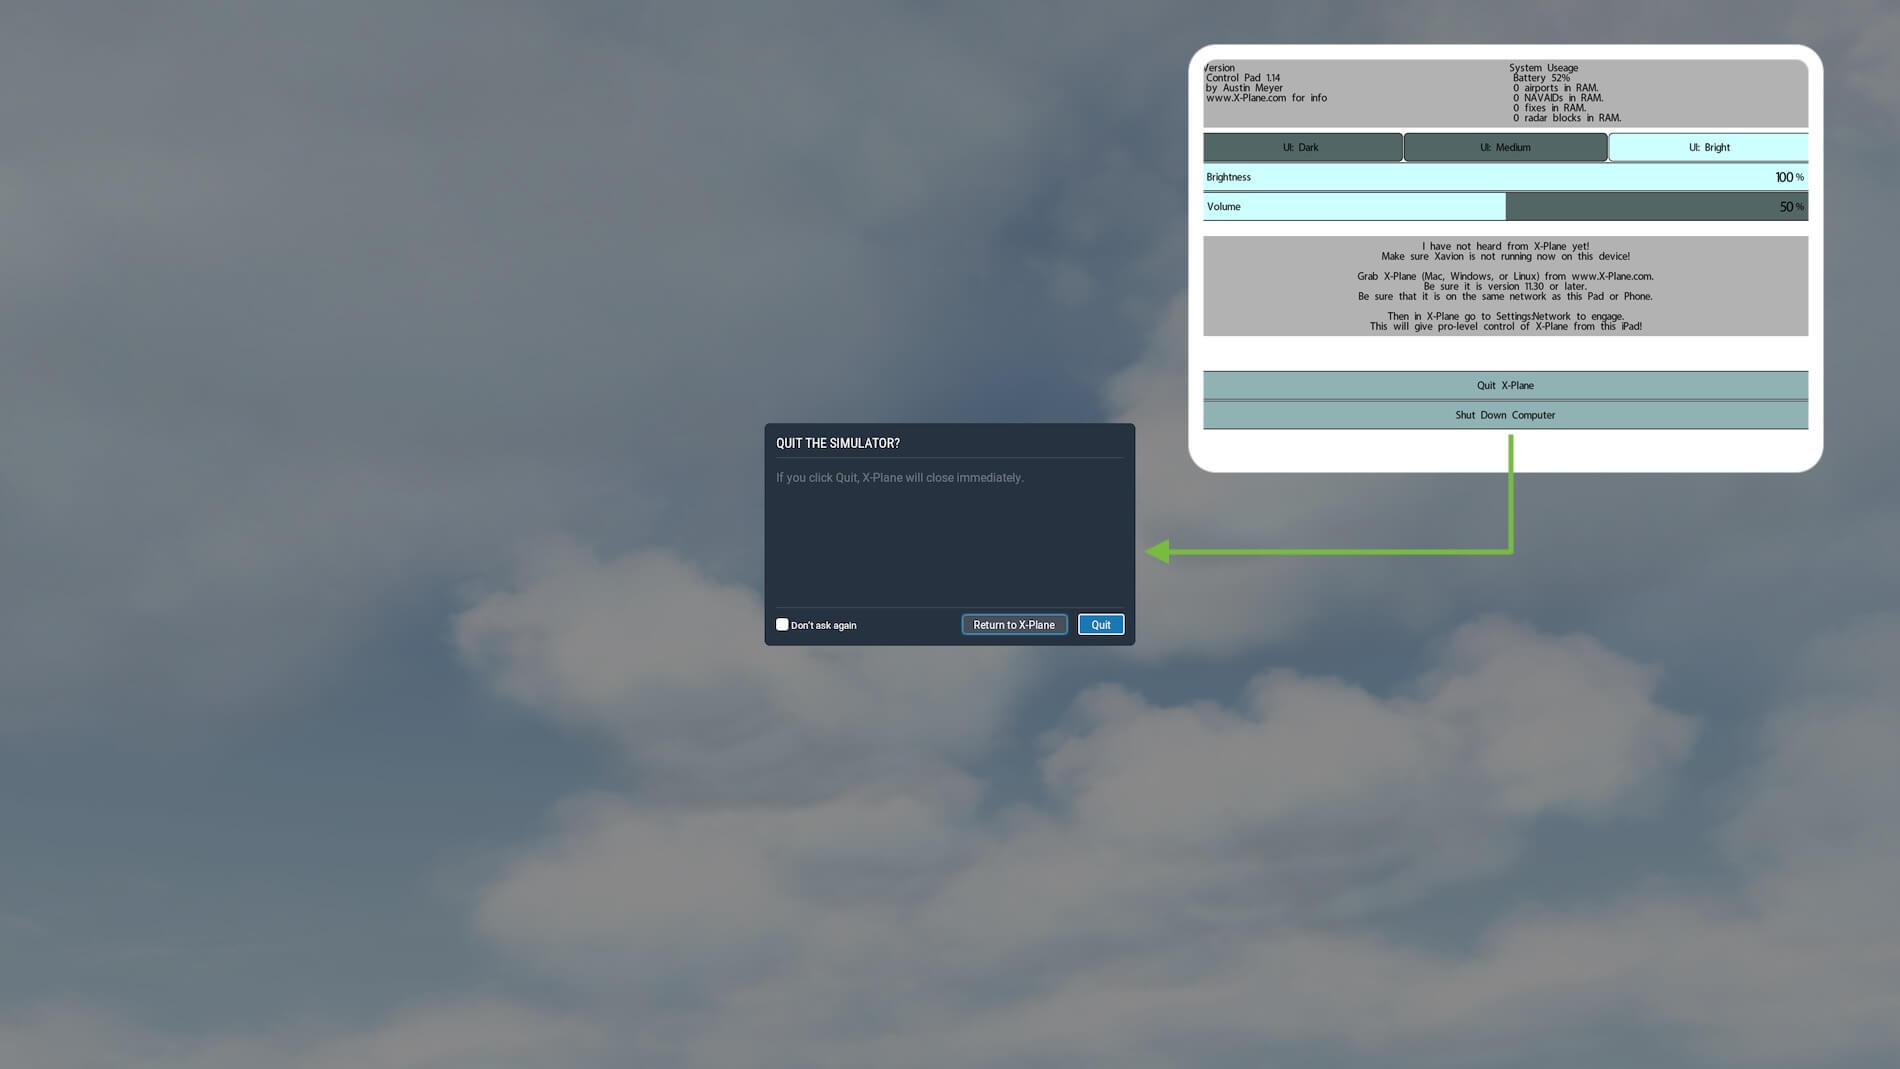
Below that you find the “Quit X-Plane” and “Shut Down Computer” buttons. The “Quit X-Plane” makes sense. When X-Plane is up and running on your computer, and the Control Pad app is connected to X-Plane, you can quit X-Plane directly from the app button.
The “Shut Down Computer” button does the same, but with an intermediate step namely, X-Plane will ask you if you want to quit X-Plane or that you want to return to X-Plane. The X-Plane popup – on your computer – allows you to select either “Return to X-Plane” or you select the “Quit” button.
Since I found the button name – Shut Down Computer – as bit confusing, I decided to contact Austin Meyer from Laminar Research and ask his opinion about this since Austin is responsible for this app. According to Austin “hm indeed it does or it should shut down the computer in the cases i have tested.. though I might not have tested all cases… it is used to shut down a network of many computers at the end of training to save time…”
Hopefully Austin comes back to me after he has tested it once more. I can only say that I tested this on an iMac with Mojave 10.14.6, Catalina 10.15.1 and X-Plane 11.36 and X-Plane 11.40r2. Not sure if this “Shut Down Computer” button behaviour on a Windows or Linux PC is different.
And last but not least, the information on the top of the start (SET) page. It shows you the version number and the system usage. Besides the battery power level which is just a function of the iPad/iPhone out iPod, all other data is directly taken from X-Plane, BUT on the above screenshot the app isn’t yet connected to the X-Plane computer thus all the information you see is “0”. This will change or being updated the moment the app is connected to X-Plane. I’ll cover that in a later section.
Control Pad Connected
Connecting
It’s time to do some tests and see how smooth and easy everything goes. Although it all happens by itself, in X-Plane 11 under Settings – Network you can check the X-Plane’s computer IP address used (see screenshot below). When you fire up the Control Pad app on your iPad, and assuming X-Plane 11 is up and running since that’s a requirement, you see above the “Quit X-Plane” line two additional lines with the used IP addresses from the active X-Plane 11.

These are the IP addresses you can also find in X-Plane settings. Click one of them and your Control Pad app is connected to X-Plane.
The moment the Control Pad app is connected/linked to X-Plane, you’ll see at the bottom of the app the following tabs; CRAFT – START – WGT – WXR – FAIL – MAP – CMD – SITS – SET. The SET button is highlighted which means it’s active, but I’ve already explained this before. Let’s find out what each tab does, right?
Hold on …. VPN (Virtual Private Network) Active
Worth highlighting when you’re using a VPN (Virtual Private Network) connection. I’m using ExpressVPN and not sure if it’s only with ExpressVPN, but I noticed that when VPN takes care for my IP address, it blocks the Control Pad app to make a connection with the X-Plane computer. No idea why, but it’s worth to bring this to your attention in case you also have a VPN license. Disable the VPN connection and you should be able to connect to the X-Plane computer and the same network.
Control Pad tab | CRAFT
Craft stands for – logically – aircraft types. The app gets from your X-Plane 11 configuration all the data of installed aircraft. In the screenshot below you see aircrafts made by Carenado, FlyJSim and Laminar Research.
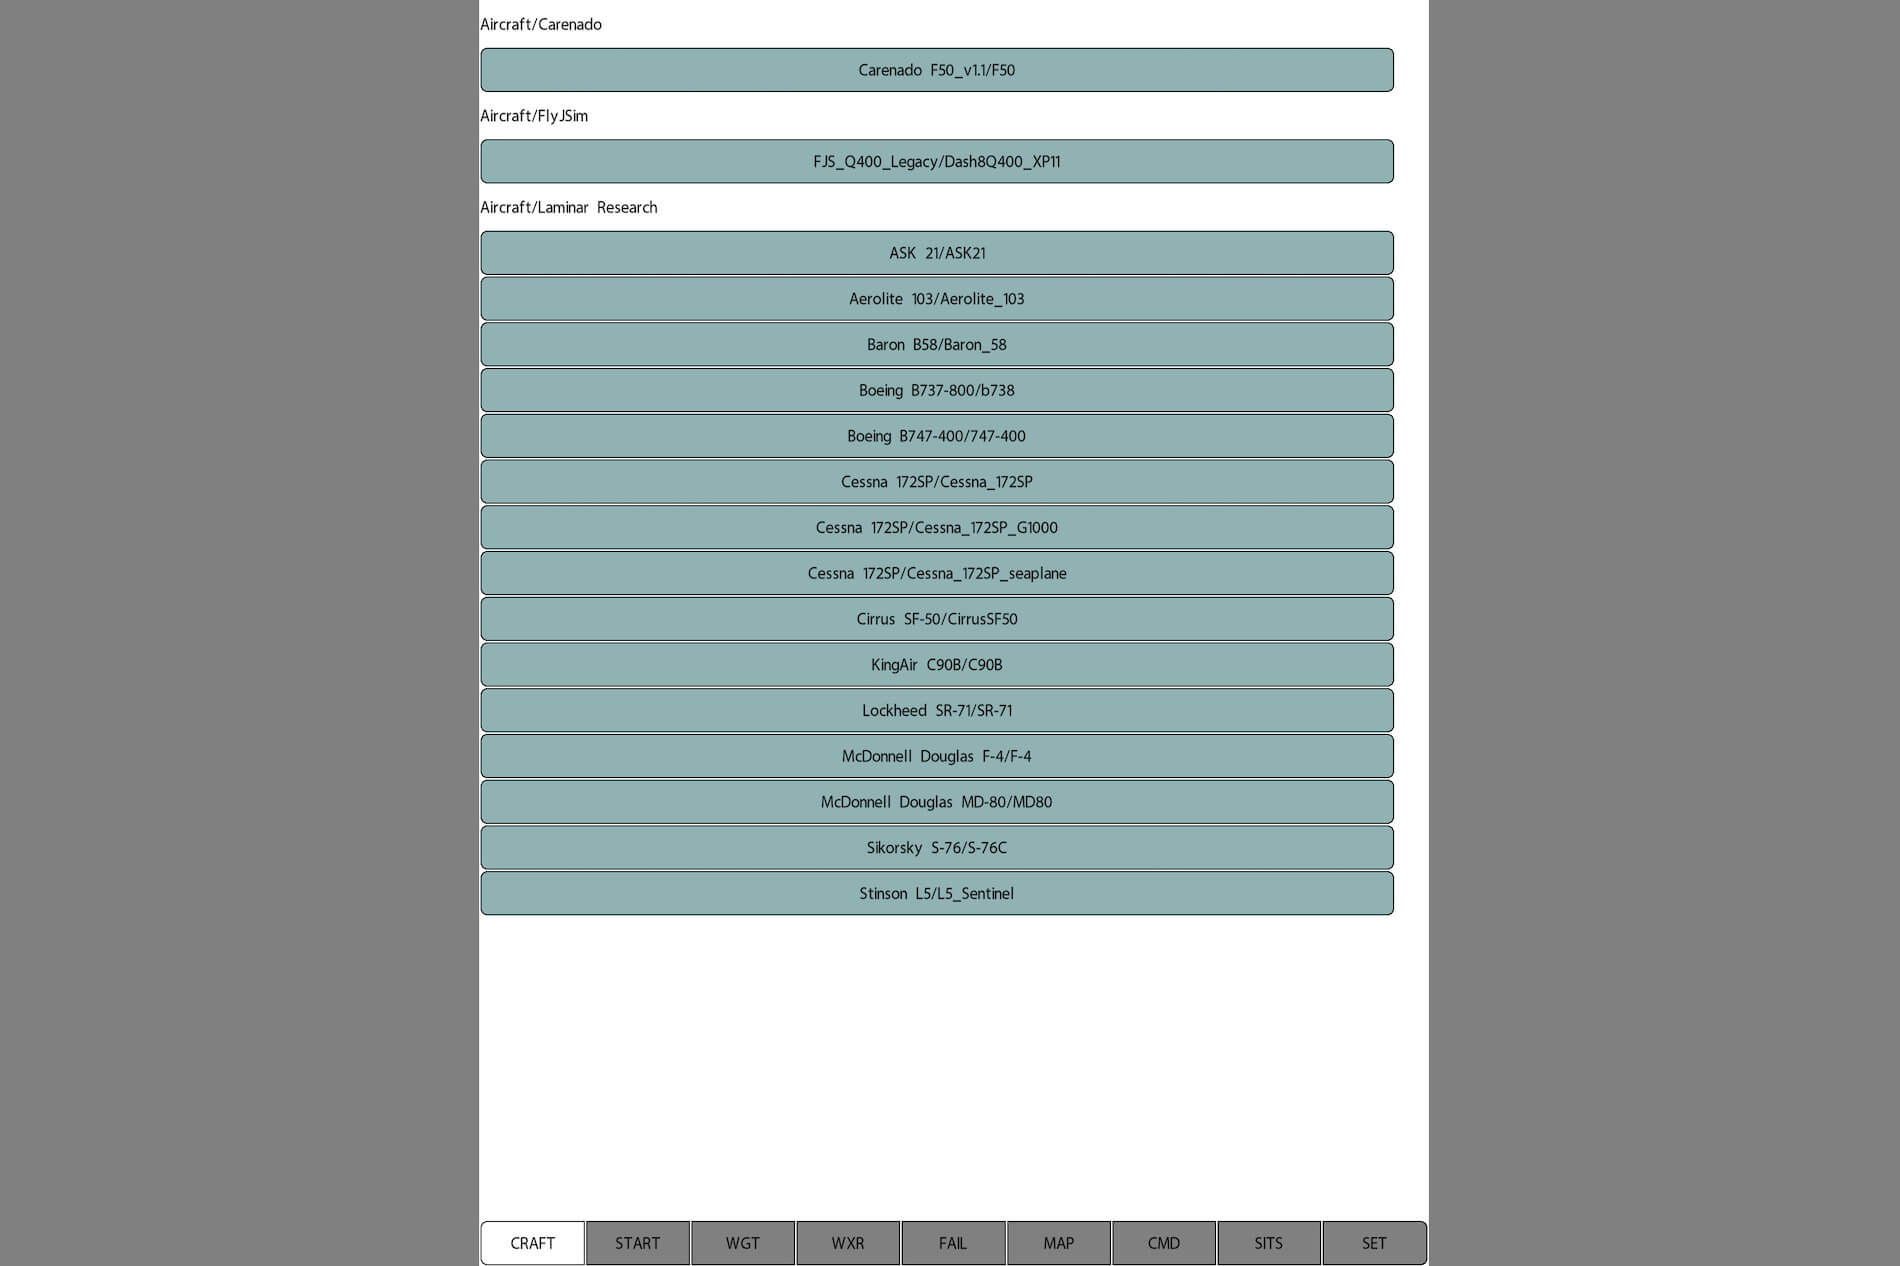
When you click/touch one of the add-on models or one of the stock Laminar Research aircraft within the app – the respective button will highlight for a moment – and the selected aircraft will change in X-Plane. With my iPad Pro 2015 this happens more or less instantaneously although it must be said that it depends on the type and complexity of the aircraft you select.
Thus, when I select a Laminar Research aircraft, within seconds X-Plane has switched to the other aircraft, but when I select the Carenado Fokker F50, then it takes a bit longer.
Control Pad tab | START
Start stands for which airport you chose from including the preconditions. Further on, the START tab has also two additional tabs namely Airport and Special. When the airport tab is active – highlighted – you will see above the keypad “start at
START – AIRPORT
Ok, let choose a different airport.
I decide to enter EHBK which is the Dutch airport of Maastricht Aachen. With the DEL keypad button I clean the line till there’s written “start at -“ with a flashing cursor. When I start typing the “E”, it shows me a list of all airports that have an “E” in their ICAO code. Then I type the “H” and the list changes till I’ve entered EHBK. At the top of the app screen I see Maastricht Aachen. That’s good news. That’s the one I need!
To change from the current airport in X-Plane to EHBK, I click the top Maastricht Aachen button and are presented with what my intension are. Do I want to be at the runway or at 3NM/10NM out of either runway? For now I lose “runway 21 takeoff”. and with a certain time delay I’m no longer parked at my initial airport but moved to EHBK. I mentioned “a certain time delay” but keep in mind that this “change” depends on many things like your wifi connection, your PC or Mac performance and if the selected is the default airport or a complex add-on airport.

One final note to the above. When you click a runway or being at 3NM/10NM final, you got the impression that nothing happens at the Control Pad app, but this isn’t true. It’s right, you hardly see anything on the app, but X-Plane will start moving you to the newly selected airport and this cost time!
START – SPECIAL
The special page shows you “special” flight or ground conditions like taking off from a gravel, dirt, grass, water way or a helipad. Or it allows you to do special approaches like approaching a frigate, oil rig, oil platform, forest fire and even for the space shuttle. Besides these special takeoffs or approaches you can also test your flying skills by flying in a formation, or trying to catch a refuel boom, or an airdrop from a B-52, or being on top of the 747 in the space shuttle. Once in a while you see these special flying skills at the start-up of X-Plane. Want to do a bit more, then try one of these special starting configurations.

It works in the same way as the selecting an airport including the preconditions. Just click one of the special buttons and with a slight time delay, your aircraft or helicopter are repositioned and ready to test you special skills.
Control Pad tab | WGT (Weight and Balance)
The weight and balance page allows you to change the C.G. (Center of Gravity), the payload and the amount of fuel in the tanks. Although it may sounds logical, the CG graph and the amount of fuel tanks fitted are depending on which aircraft you select.
The following upper screenshot shows you on the left the WGT page of the Laminar Research Boeing 747 while on the right it’s the default Cessna 172.
The lower screenshot shows you that it doesn’t make any difference when you select payware add-on aircraft. On the left you find the WGT page of the Carenado Fokker F50 while on the right-hand side of the same screenshot you see the same WGT page from the FlyJSim Q400 Legacy.
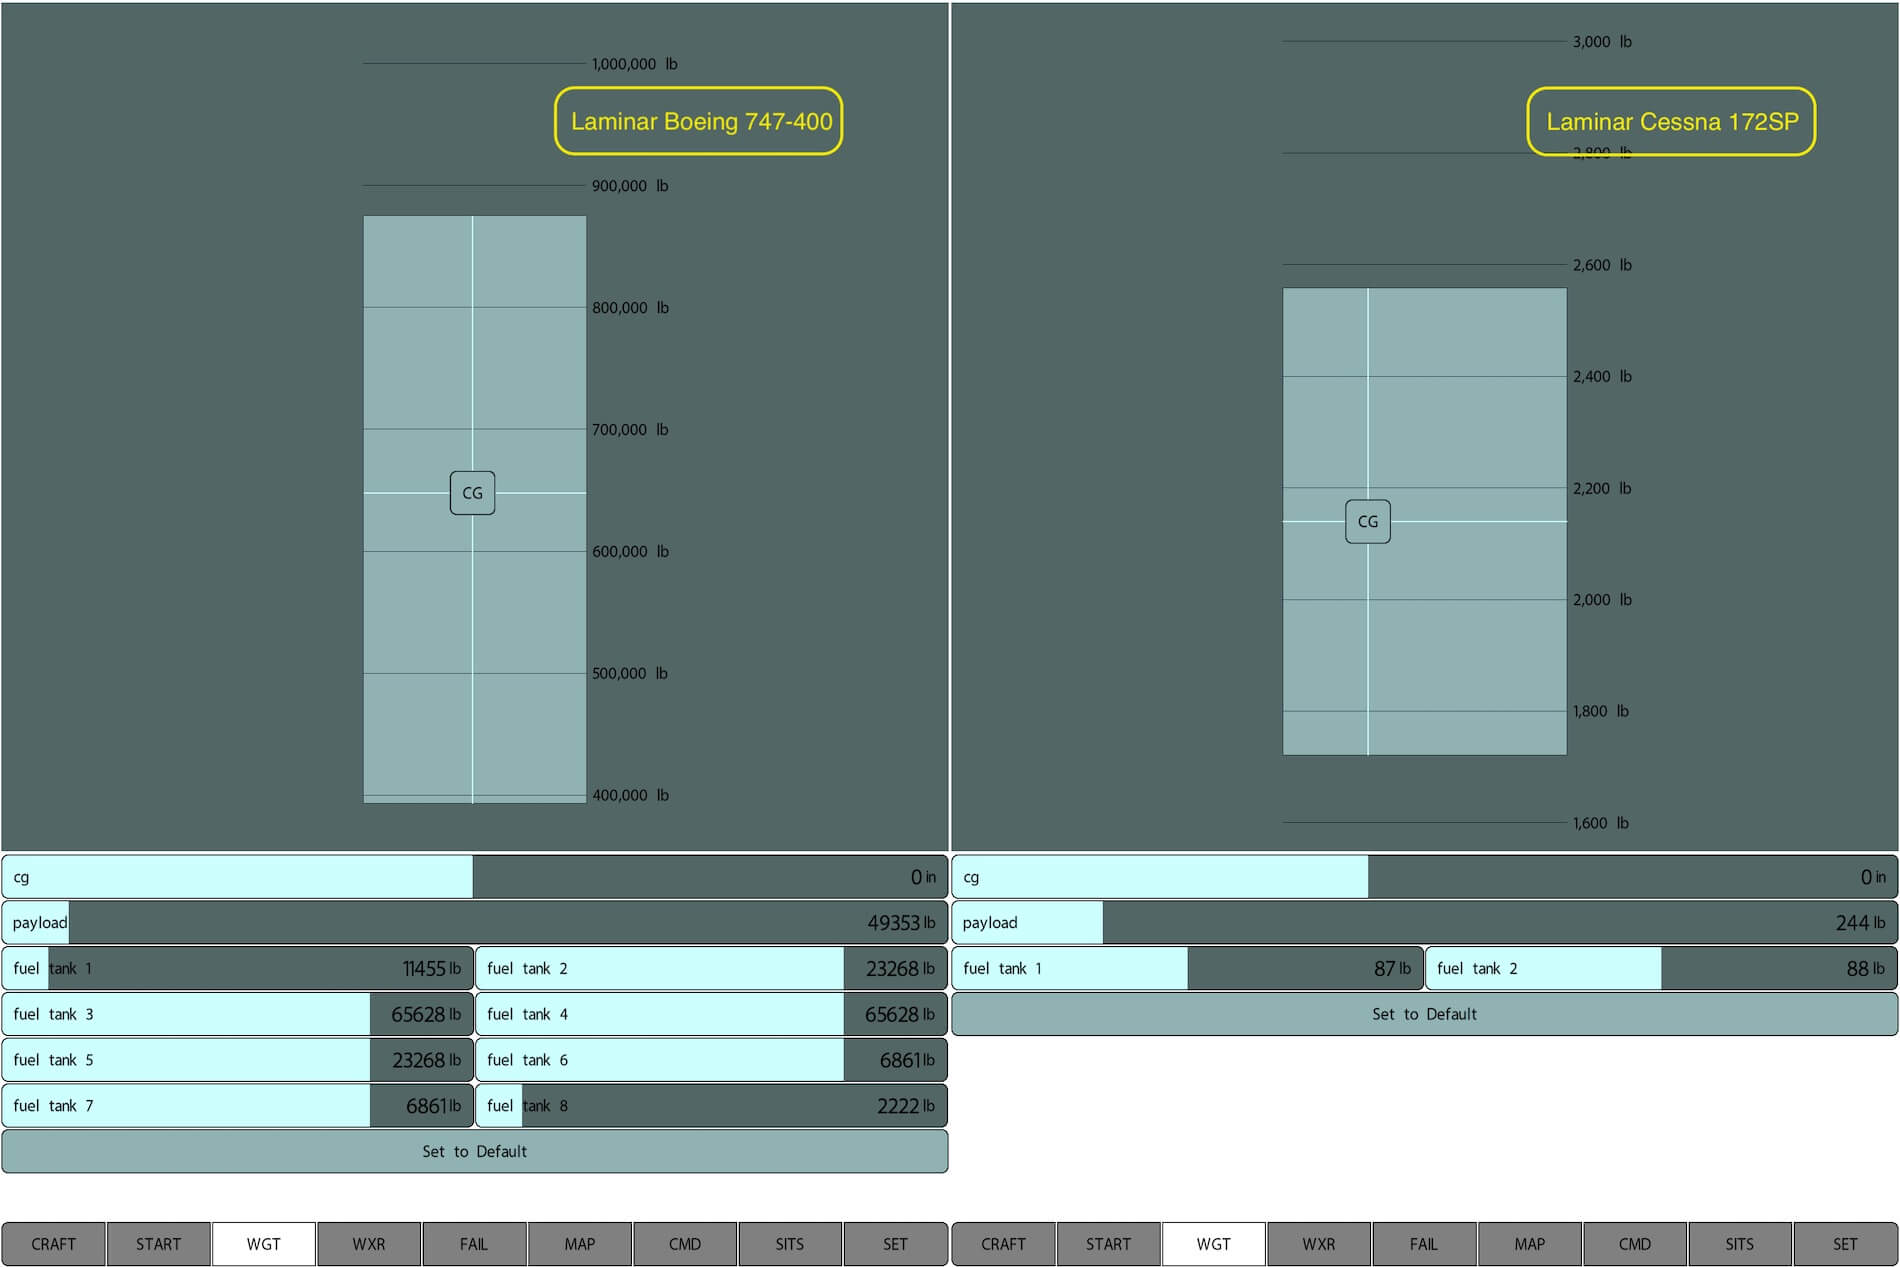

Suppose you made a mesh of it and your aircraft CG is far outside the limitations, you can always return the settings to default with the “Set to Default” button. Just click it and it return and brings the CG within limit range.
Control Pad tab | WXR (Weather)
Actually, weather as I indicated, isn’t the right name for this button. It’s more related to the environmental conditions that can be modified. The WXR tab has additional tabs; TIME – ATMOSPHERE – CLOUDS – WND. Let me start with the easiest one, TIME.
WXR – TIME
This app page allows you to change instantaneously the time of the day and the date. Just put your finger on the slider and slide it to the right or left. When you monitor X-Plane on your computer/Mac, you see the time of the day or the date changing at the same time. It’s so easy!
Yes, that’s right. I didn’t mention this before, but by using the Control Pad app it goes all so much easier and as Austin said himself “the pros do it also this way in the level -D FFS (Full Flight Simulator). The only option that’s missing is that you can’t select “track real-world data and time”, as is possible within X-Plane.
WXR – ATMOSPHERE
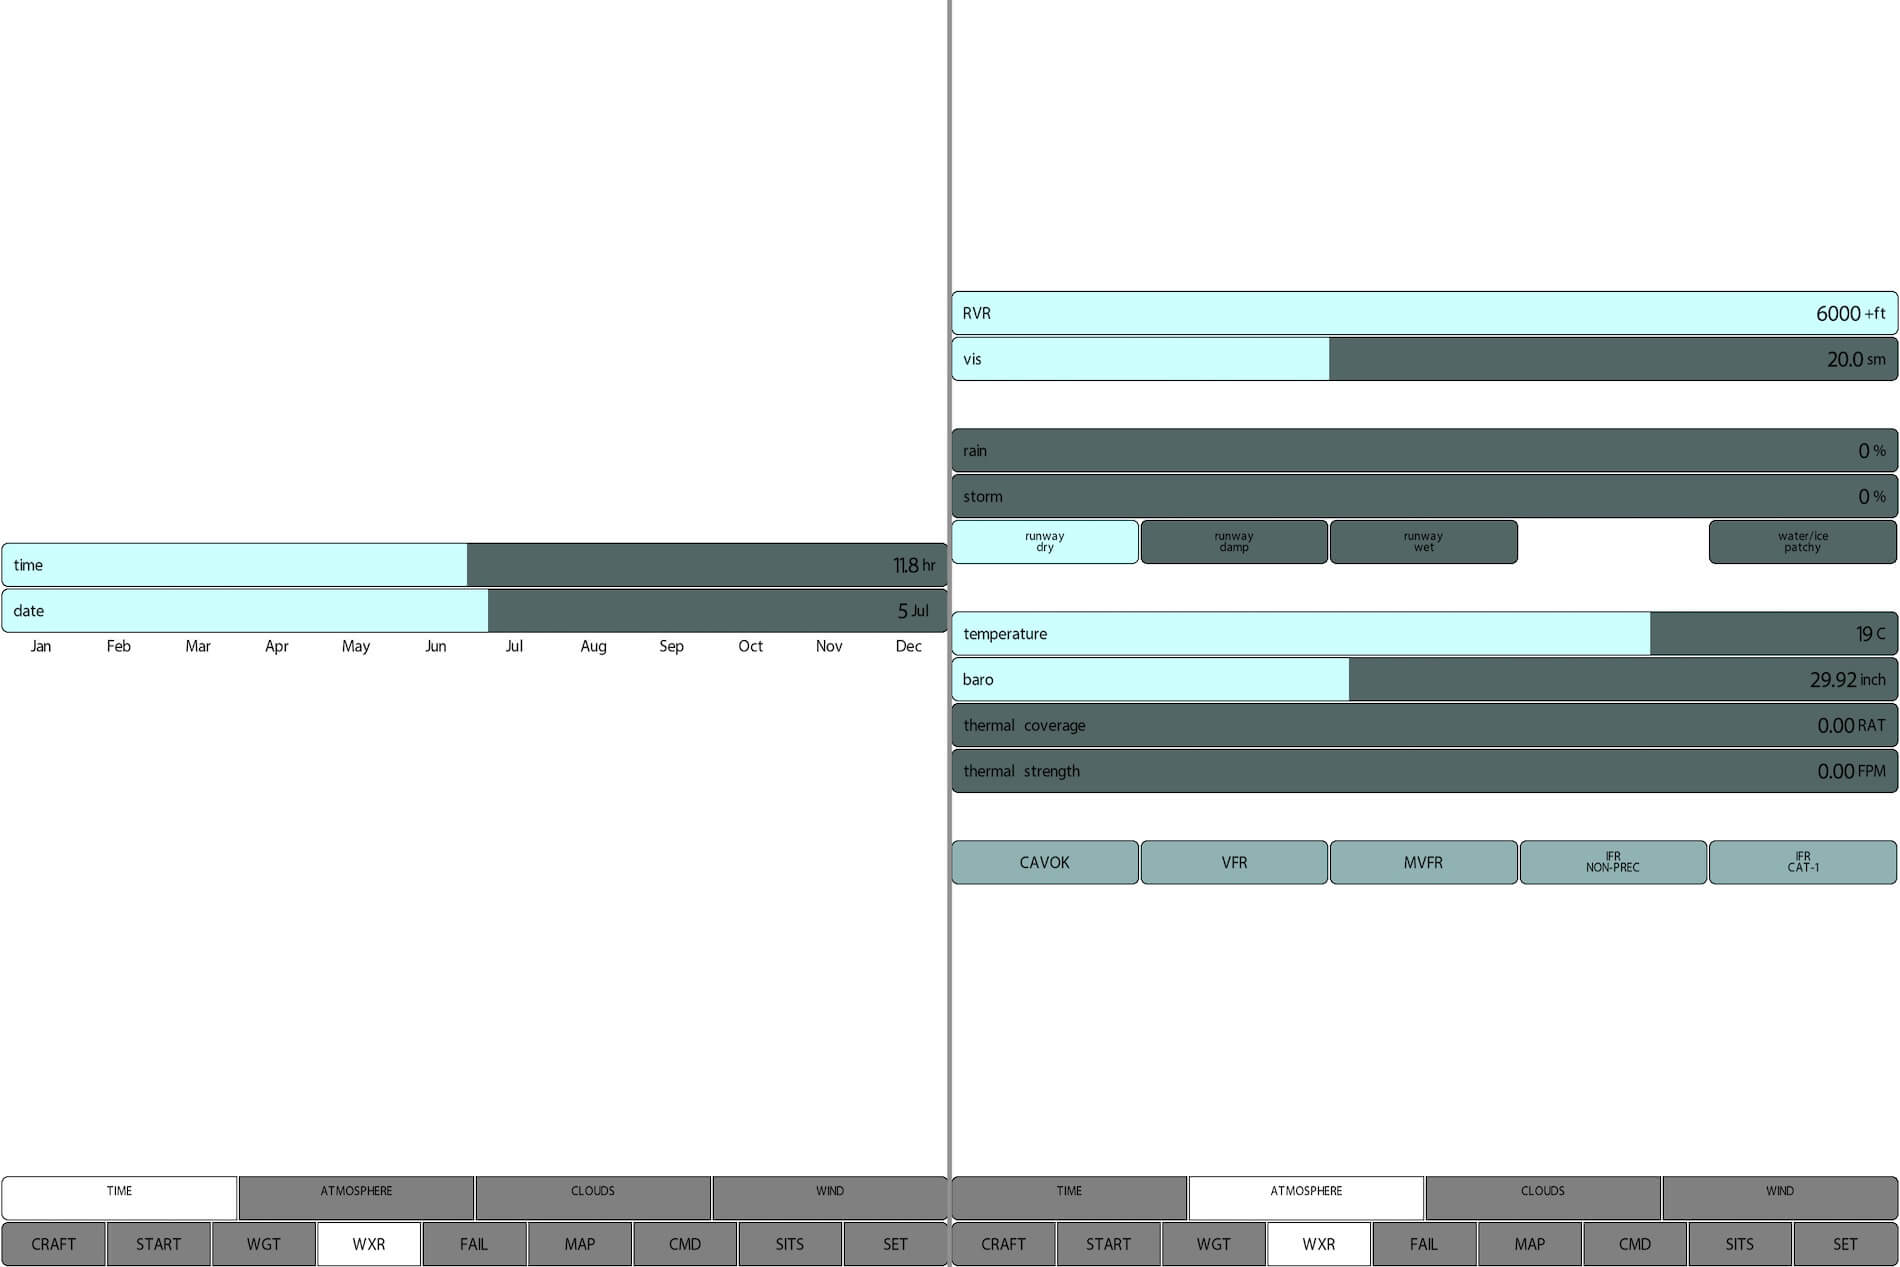
Everything that has to do with the environment conditions, runway visibility, runway conditions or preselected conditions, are gathered together on this page. Either you slide with your finger for example the RVR (Runway Visual Range) to the left or right to decrease the RVR or increase the RVR. And the same as in the previous section, instantaneously the RVR changes in X-Plane.
The same happens when you change the vis (visibility), rain, storm, temperature, baro (barometric value), thermal coverage and thermal strength although it must be said that thermal changes aren;’t visible. Other options on this page are changing the runway tarmac conditions.
You’re also able to make preselected environmental conditions like CAVOK (Cloud and Visibility OK), VFR (Visual Flight Rules | ceiling greater than 3000 feet and visibility greater than 5 miles, includes sky clear), MVFR (Minimum Visual Flight Rules | ceiling 1000 to 3000 feet and/or visibility 3 to 5 miles inclusive), IFR NON-PREC (Instrumental Flight Rules Non Precision Approach) and finally, IFR CAT-1 (Category I operation” means a precision instrument approach and landing with a decision height not lower than 200 feet (60 meters) and with either a visibility of not less than 800 meters or a RVR of not less than 550 meters).
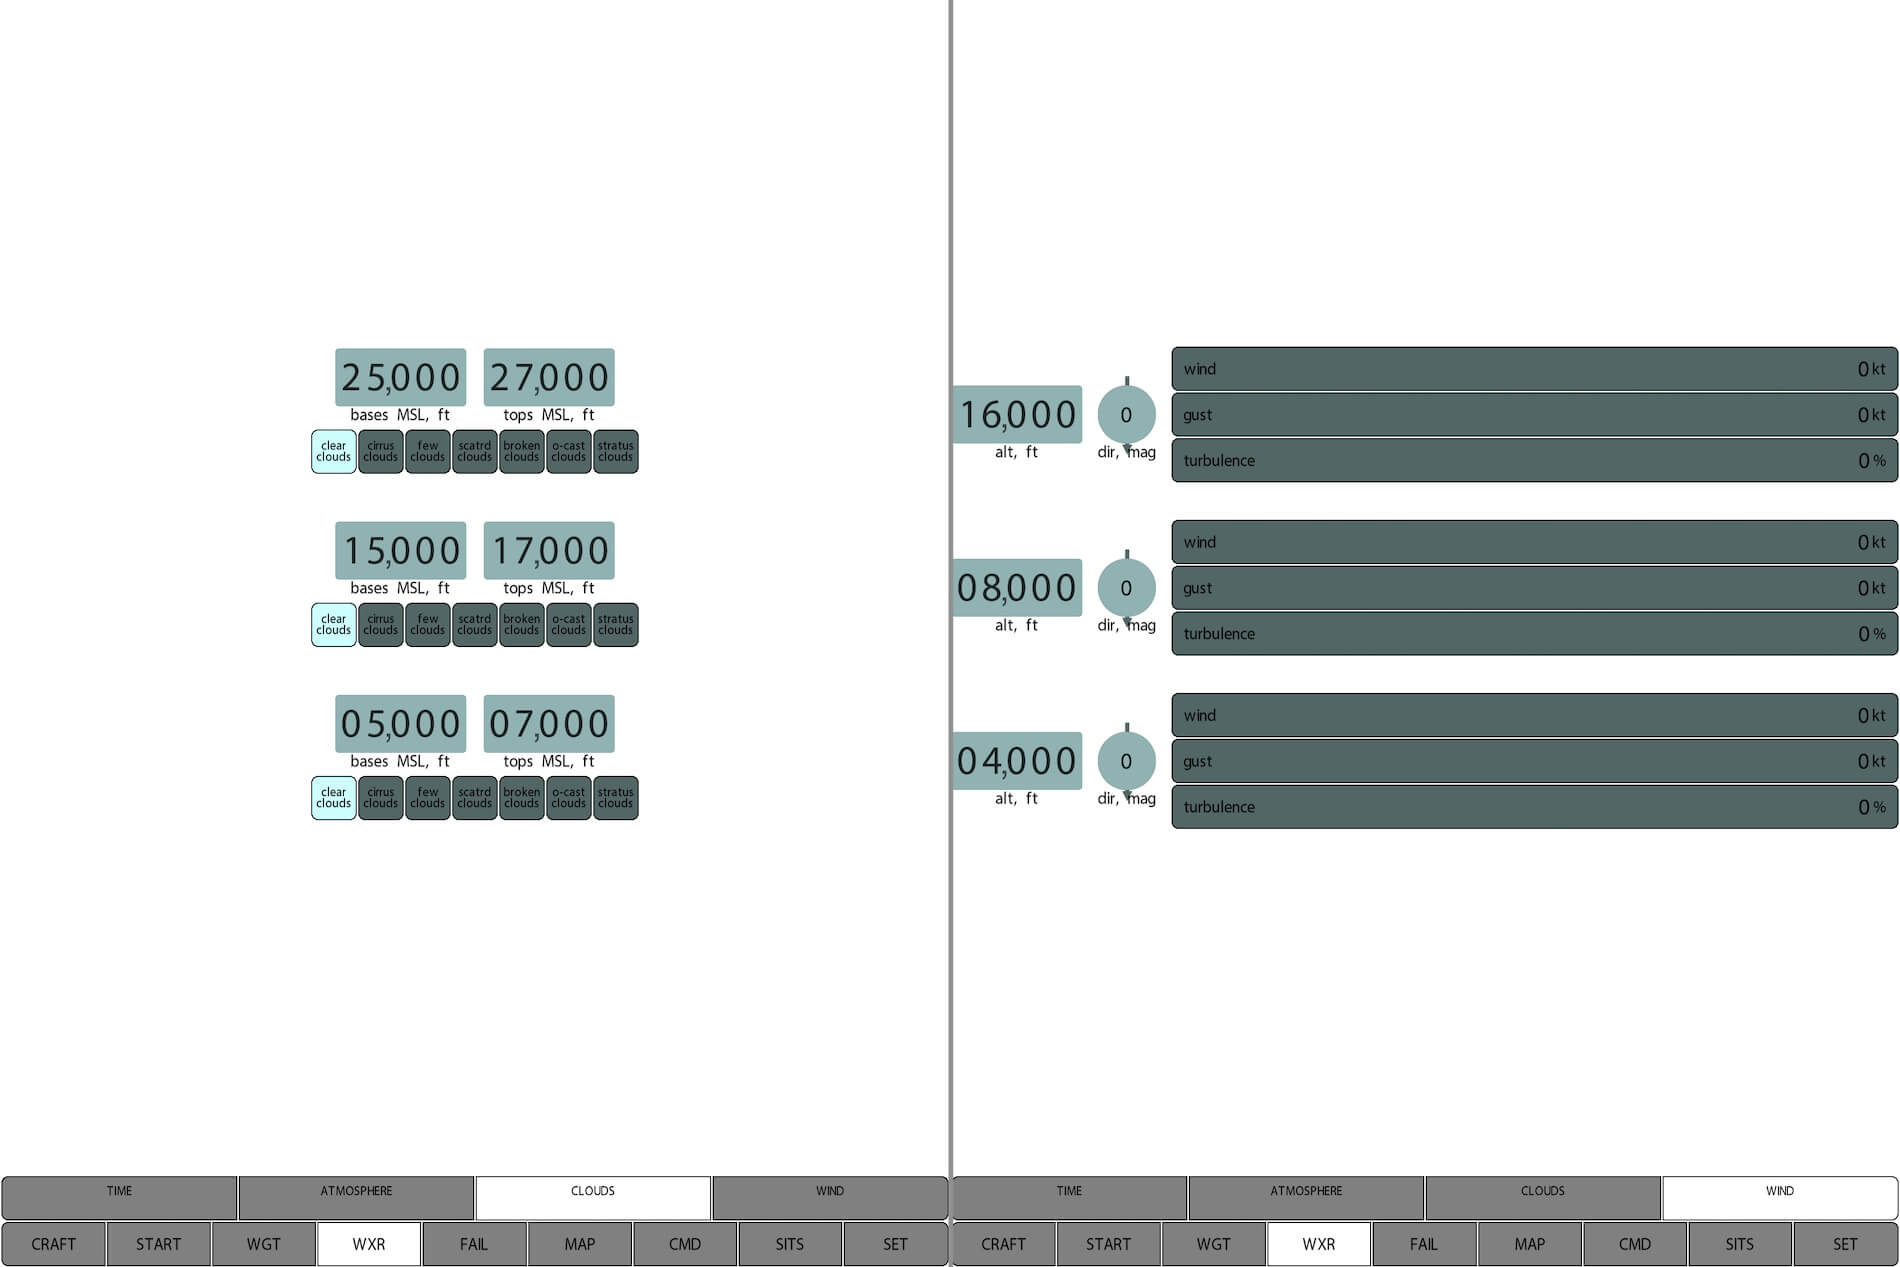
WXR – CLOUDS
The clouds page allows you, within three altitude levels, to select an altitude range within predefined clouds. In other words, the lower level allows you to select which cloud you want to see in this lower altitude level. Suppose you’ve ticked the “few clouds” button which will then be highlighted, then set the base/top MSL (Mean Sea Level) altitude belonging by the few clouds.
As far as I can see, there’s no option to select real weather clouds which is available in X-Plane itself. Not really a problems as long as you know, but it’s not a good idea to select within the lower cloud level as previously discussed to select cirrus clouds since cirrus clouds are only appearing at an AGL (Above Ground Level) above 20.000 feet.
So before setting the clouds in the lower, mid and top range on this page, it’s perhaps an idea to check out this FAA link and scroll to page 12-15 that starts with Clouds unless you know all about it. When you take the time to read this, you get a better understanding when you select manually clouds, that you set the right clouds for the right altitude range. Got it?
WXR – WIND
What was more or less applicable to the previous cloud page, is basically the same for this wind page. It allows you to set manually for three different altitudes the wind speed in knots, wind gusts in knots and the amount of turbulence as a percentage. Besides that, you can set for each of the three altitudes the magnetic wind direction. Unlike with clouds, when adding wind to one of more altitudes, isn’t something you see, only when you fly you will feel it or drifting from your course if you’re not correcting for it.
Control Pad tab | FAIL
With the FAIL button on the iPad you can introduce all kind of aircraft system failures, but also external issues. The FAIL has many sub buttons like World, Systems, Instruments, Engines, Wings and Octo-Rotors. But this is not all. When you click for example at the Systems sub fail button, a complete list of additional system related failures popup.
This is the same for Instruments and Engines. The following screenshot is a compilation of what happens when you click the FAIL button, followed by the Systems button and all the Systems sub fail buttons. The examples you see are the FAIL – Systems – Electrical output on the left with on the right a screenshot of the FAIL – Systems – Landing gear.
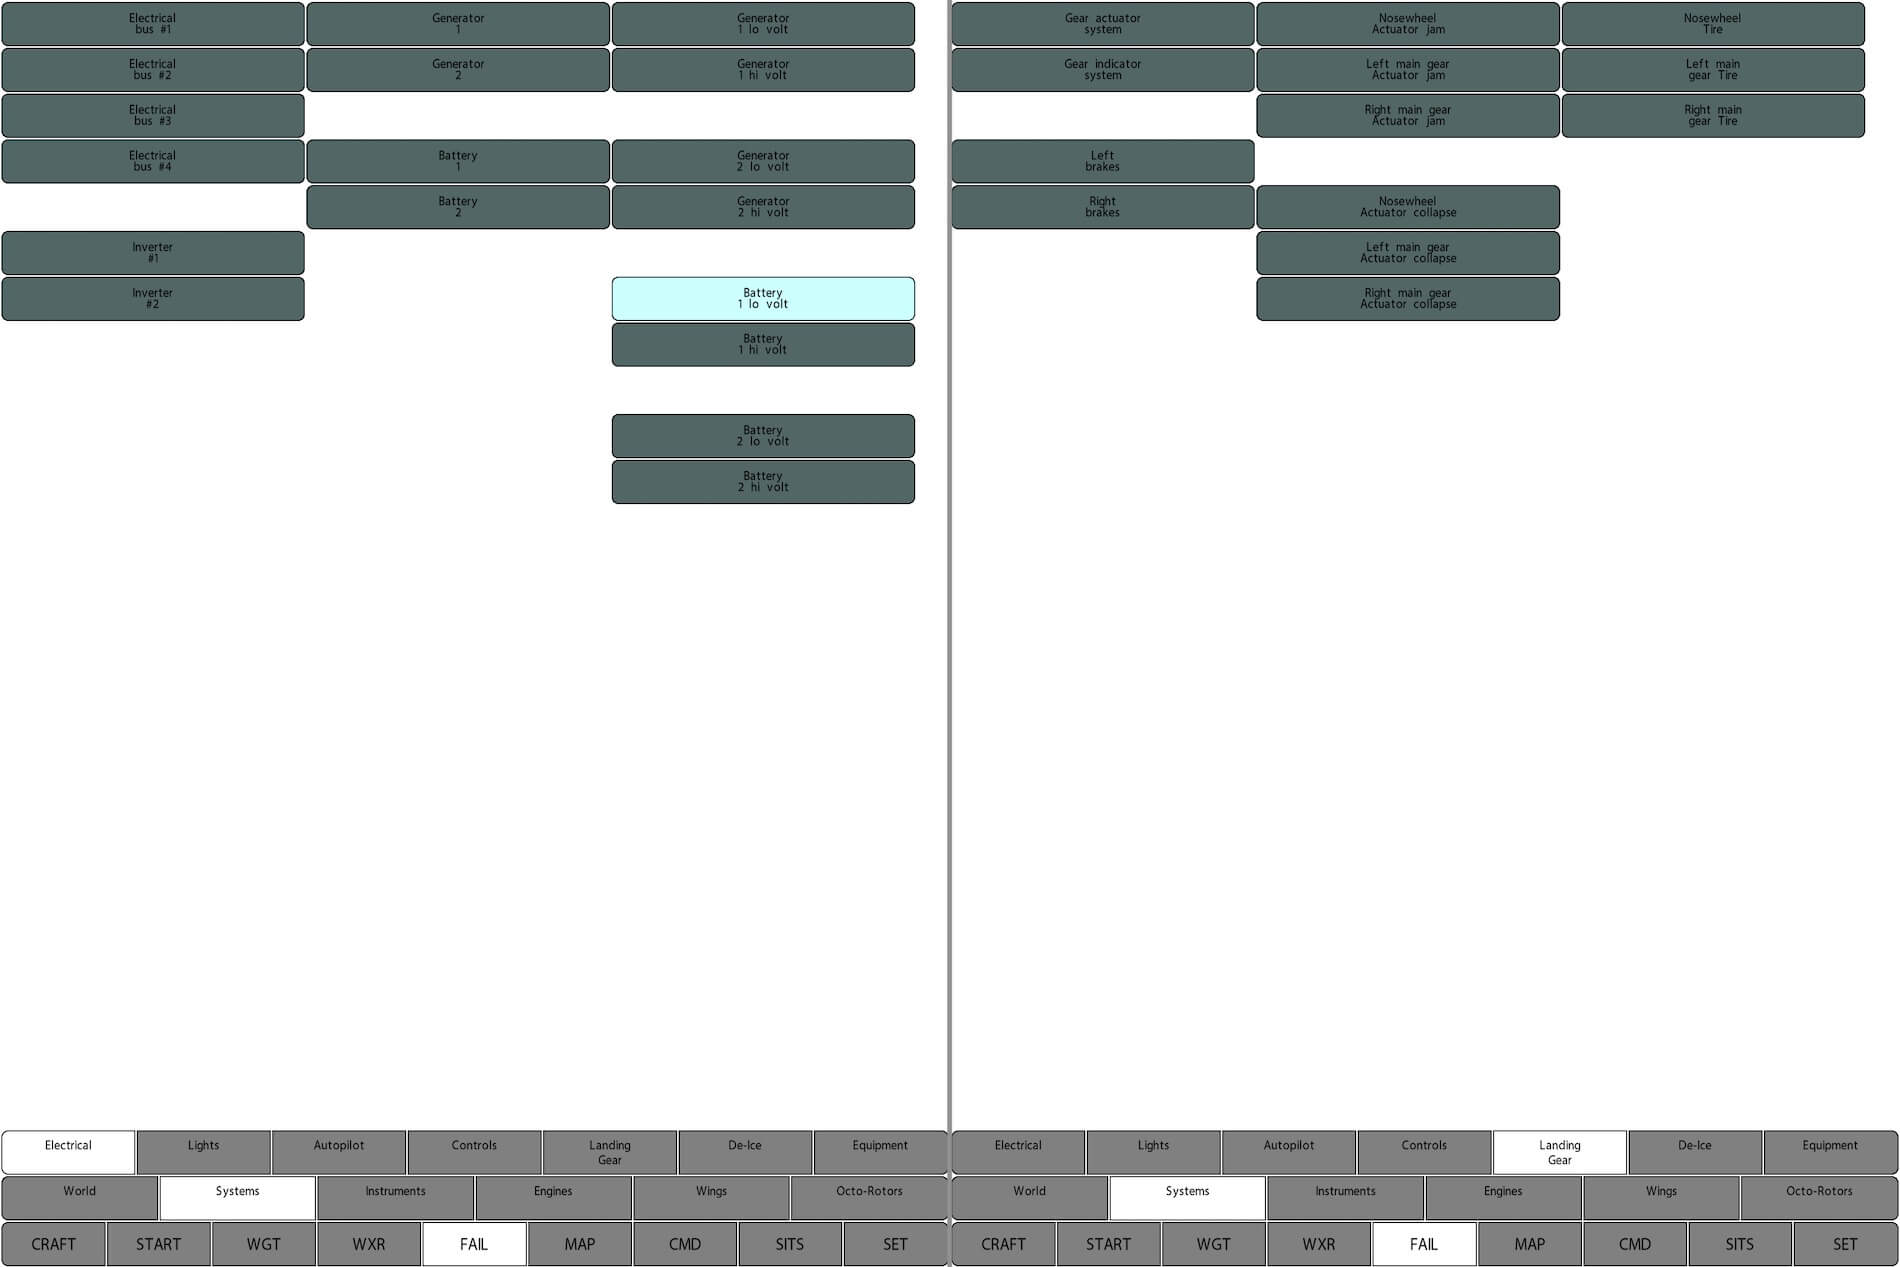
In the above screenshot you see that I clicked the Battery 1 lo volt. When the aircraft has a battery 1 as identified in that way, you will get a cockpit warning telling you that the battery voltage is low. Unfortunately, there’s no checklist included so you need to check in relation to the aircraft you’re using to see what actions has to be taken.
This FAIL button and all its sub options is great since it helps you understanding the aircraft much more then just flying without any failures. And yes, out of real experience, it can happen that in a real aircraft nothing goes wrong, but in many cases aircraft systems do produce minor or more complex failures. That said, try it. You won’t fall out of the sky!
Control Pad tab | MAP
The MAP iPad button and its sub buttons is very interesting since it gives you an overview of the outside world. Let me first start with the sub MAP buttons on your iPad. When you’ve clicked the MAP button, you see above it on the iPad four additional sun buttons namely; PFD (Primary Flight Display), NEXRAD (Next Generation Radar), SET and GLS (GBAS Landing System) More about GLS later in this section.
In the following screenshot I’ve selected these buttons and their iPad screen, but first this. When you have only the MAP button active and see on the iPad screen all kind of airports, beacons, ILS supported runways as well las your aircraft and its position, you can with your fingers on the iPad screen zoom in or out as is common on iPads.
Second item to highlight is that you can add to the MAP view one after the other the additional buttons. That said, you can select only PFD or GLS or all.
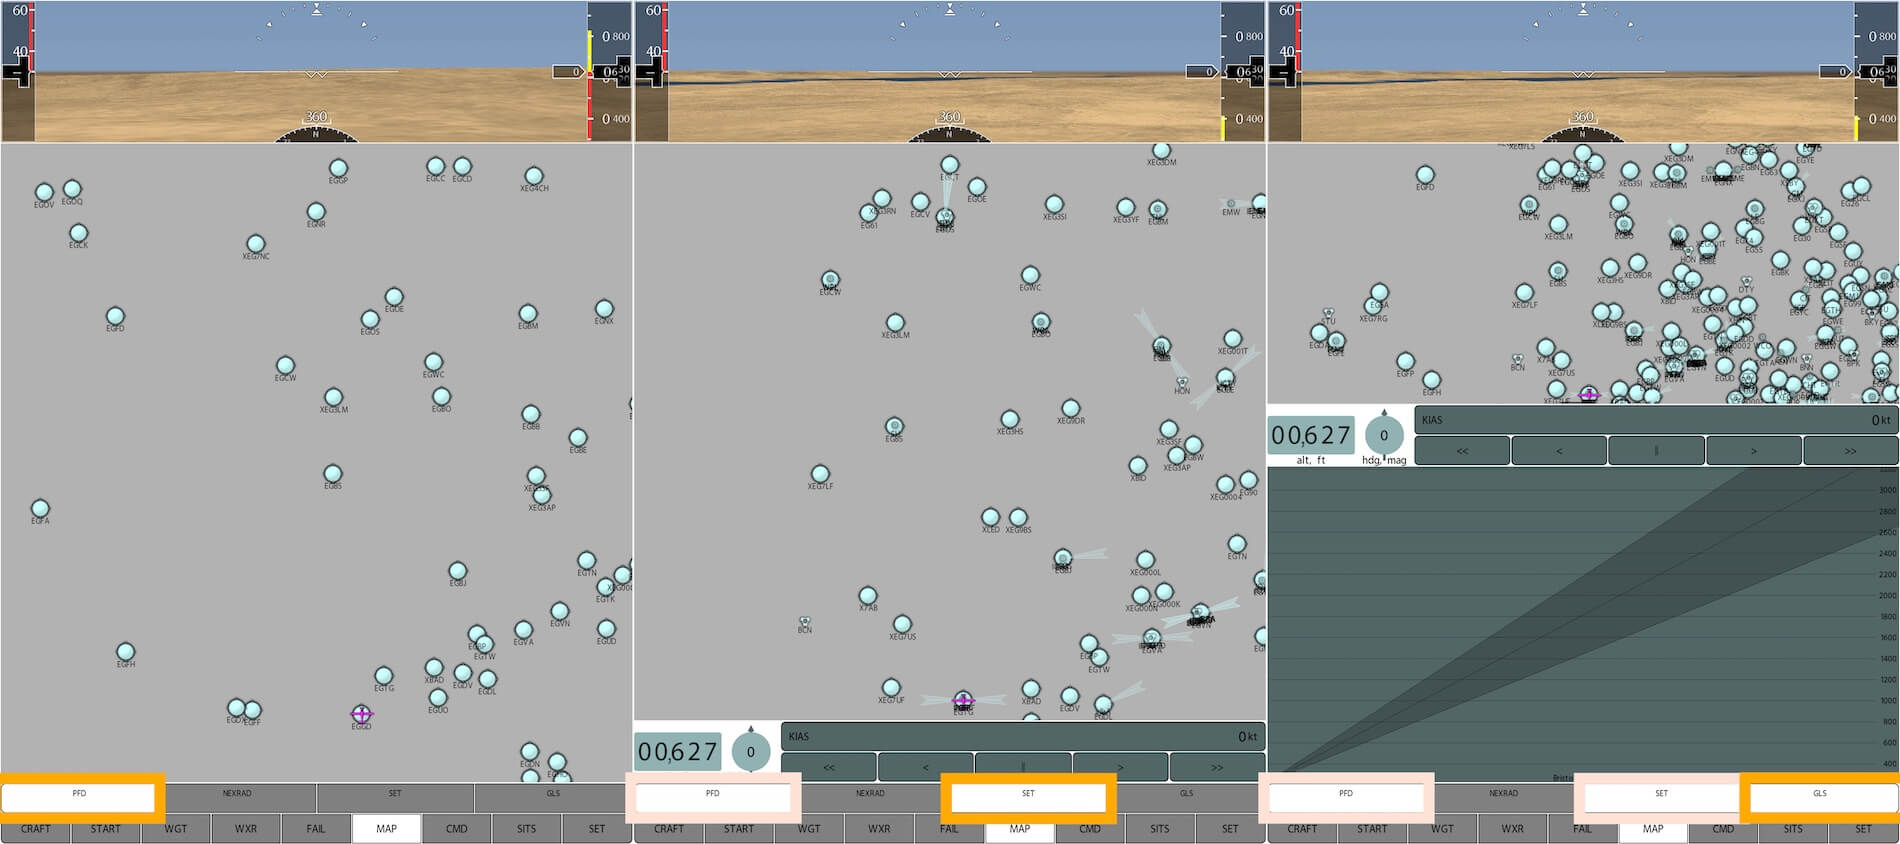
But there’s so much more to tell. I hope I can manage it all, but you must definitively try it out yourself. Keep also in mind that when you have selected the MAP – SET button, that you’re able to change the aircraft altitude, the heading, the aircraft speed and below this line you can activate the REPLSY function and scroll forward/backward. I almost forget this … since X-Plane is up and running – check out the beginning of this review since that’s a requirement – the aircraft will real time move to whatever you select.
Example; I entered on the iPad several MAP related settings and as a result, my Beechcraft is now positioned at an altitude of 1900 feet, and set at a heading of 356 degrees. This can be seen on the iPad assuming you’ve also ticked the PFD button and it can be seen on the X-Plane computer screen. Lucky with all of this, the simulator on your computer goes in PAUSE mode.
Changing the altitude, heading and speed is just by sliding your finger up or down for the altitude, circling with your finger to change the heading (HDG) or moving your finger from left to right to change the speed (KIAS). And finally, activating the REPLAY is with the “||” button and with the arrows you can select backwards or forwards as requested.
In case you’re not familiar with the MAP sub button GLS, then check out this “A GLS or GBAS Landing System is a Global Navigation Satellite System-dependent alternative to Instrument Landing System (ILS) which uses a single GBAS airport ground station to transmit corrected GNSS data to suitably-equipped aircraft to enable them to fly a precision approach with much greater flexibility.” Want to know more about GLS? Then you could check out this URL.
Control Pad tab | CMD
When you click the CMD (command) button on the iPad screen, you end up with a QWERTY look alike keyboard and the numbers 0 till and including 9. The rest of the screen is empty (white) – see the following screenshot left-hand side) however, when you click e.g. the “A” button on the iPad, you’ll notice that in the grey command line the “A” appears but more important, the white field is replaced by sim(ulator) commands. This is on the screenshot below visible and indicated on the right-hand side.
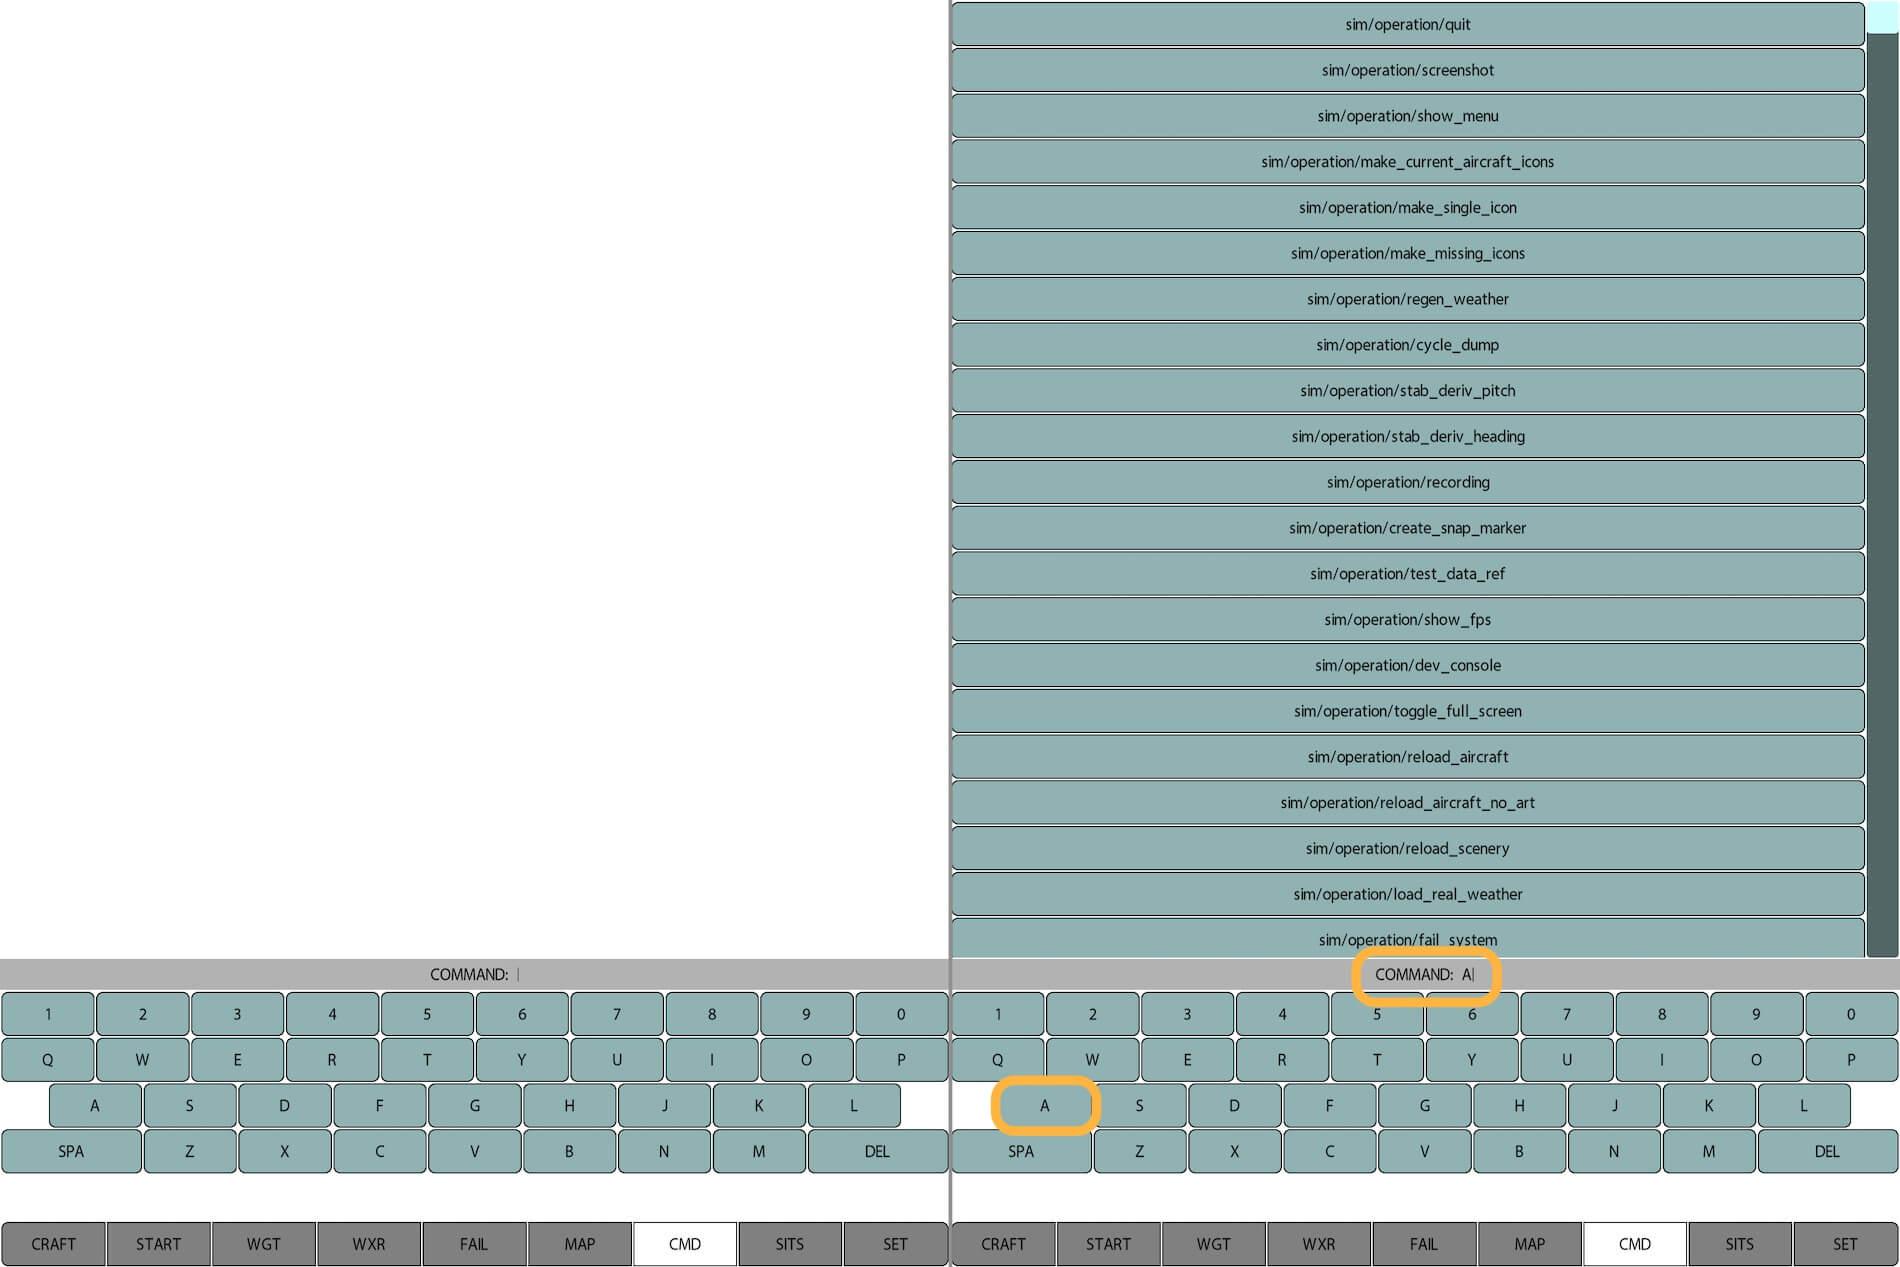
Got the idea? No …. let me help you a bit.
When I click on the QWERTY keyboard of the iPad screen the “A”, followed by the sim command “sim/operation/screenshot”, I make a screenshot of the current X-Plane view. You can see that in the screenshot below. I know, it’s a simple example, but it’s the easiest way to understand what you’re doing. Another try; show_menu. With the iPad “A” command page still visible, click the sim/operation/show_menu. The upper screenshot below shows you that you’ve activated the X-Plane menu from the iPad. The same I tried for sim/operation/show_fps. When you click this button on the iPad, the frame rates become visible in X-Plane.


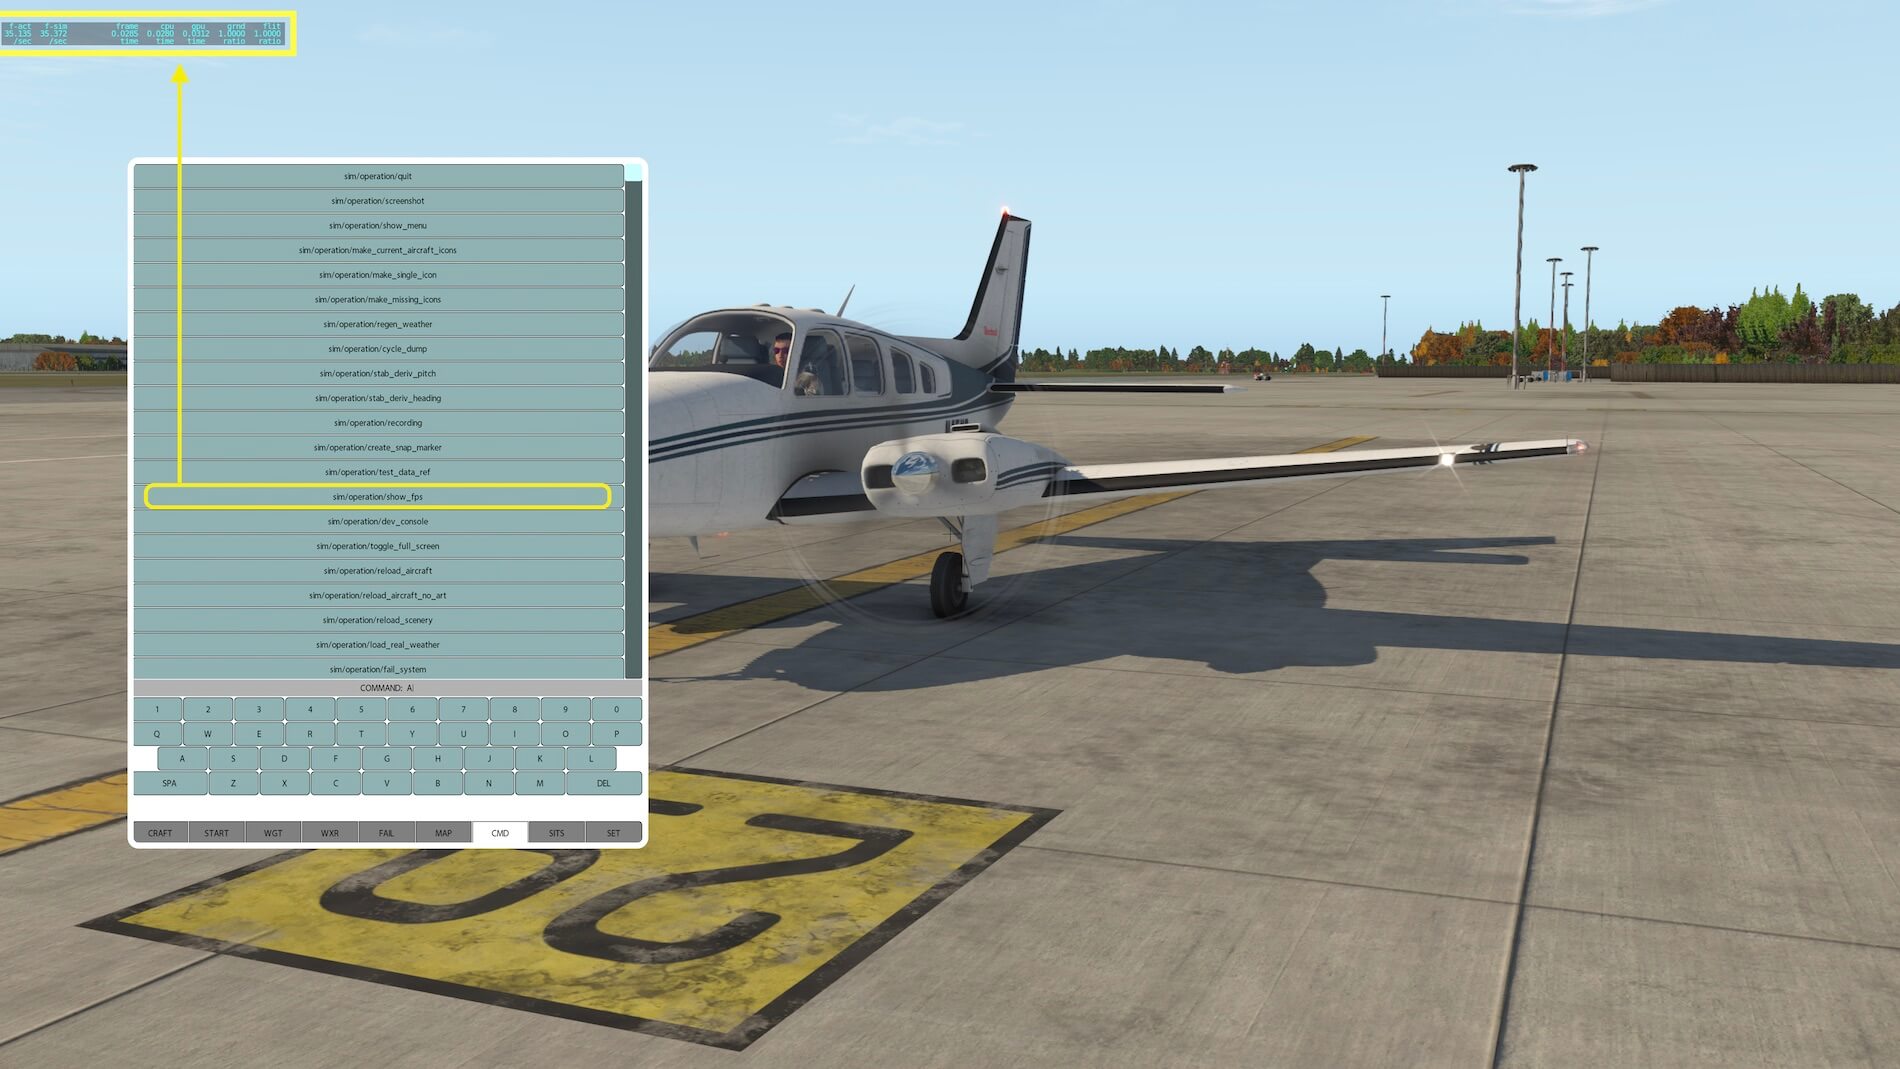
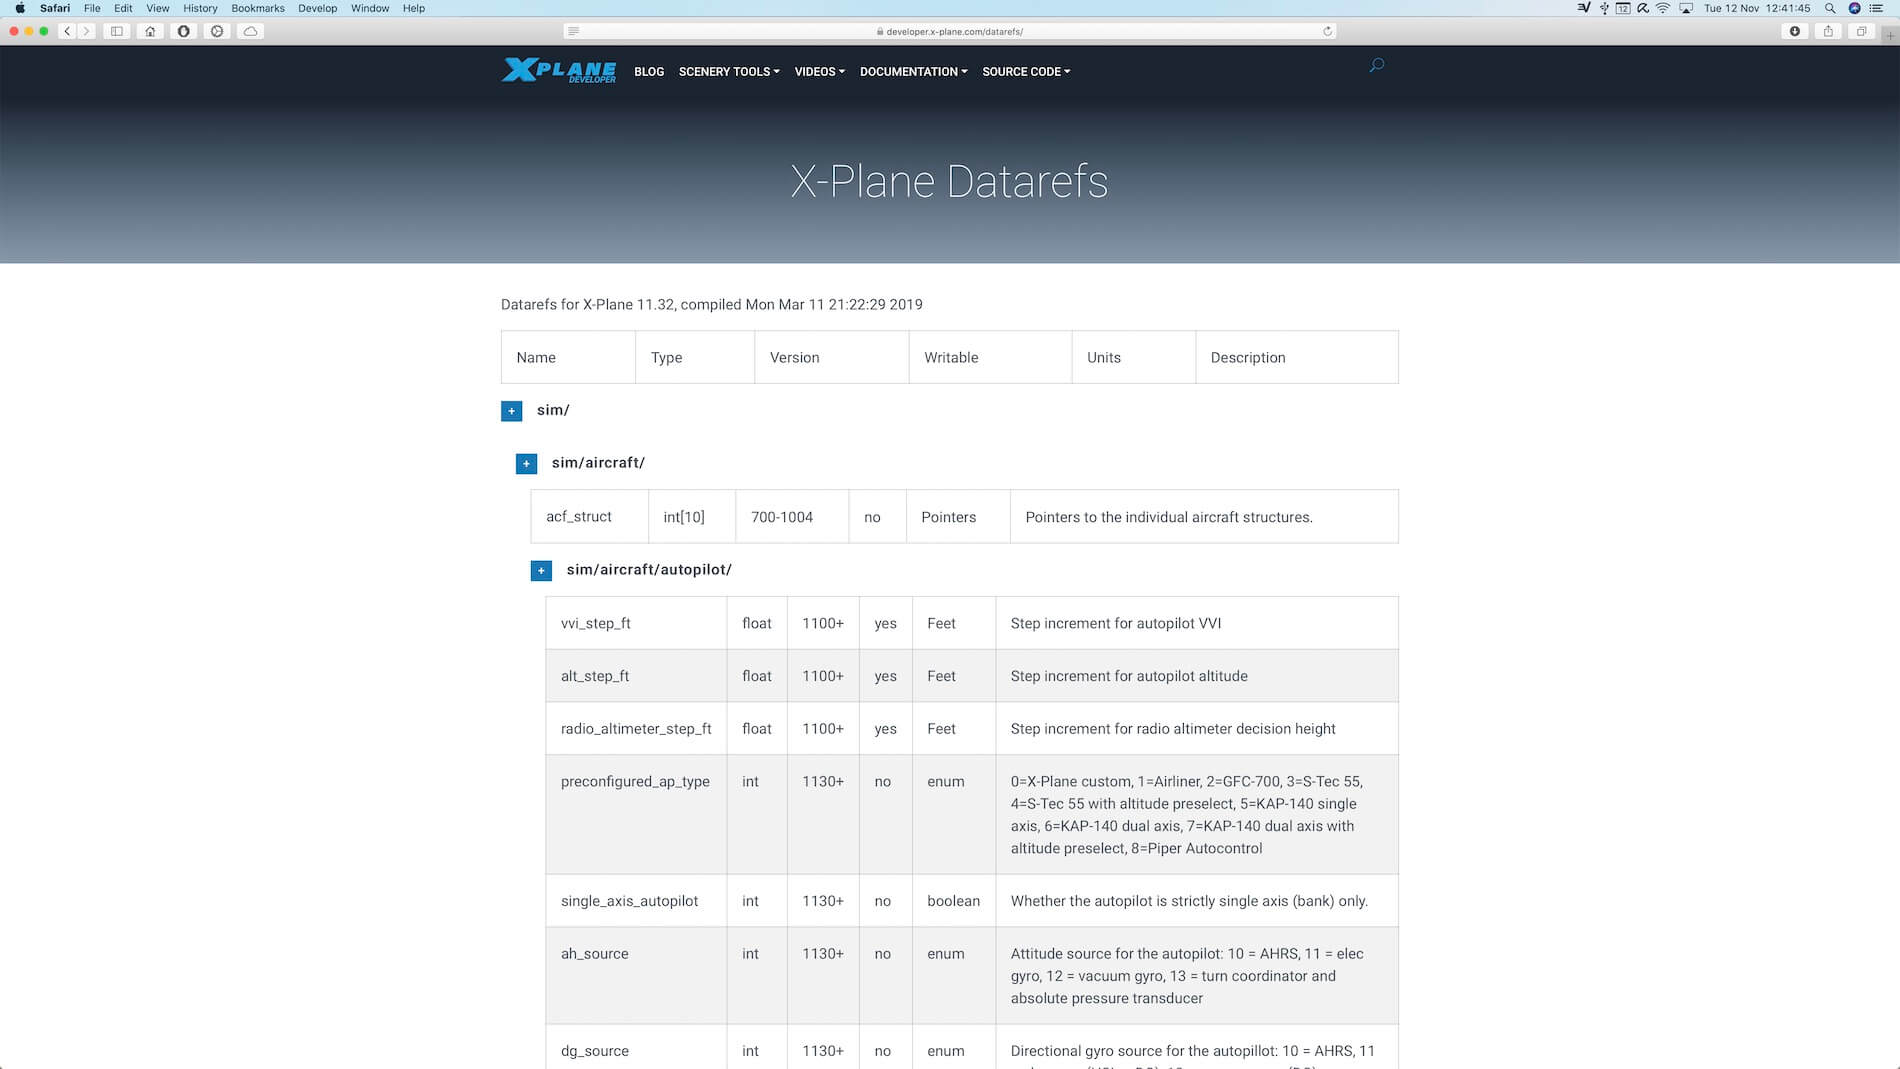
What you actually do/change from the iPad is showing/activating the X-Plane data refs. When you want to know more about all the X-Plane datarefs, you must check the following official X-Plane data ref page. This online list gives you all the available datarefs for X-Plane 11. The list not only shows you the data ref name, but also what type it is, the version, if it’s writable, the units is it indicating and a short description of the dataref.
This is by the way not the only way to play with the datarefs. There are plugins that allow you to change within X-Plane the data ref. Basically it does the same as via the iPad.
Control Pad tab | SITS
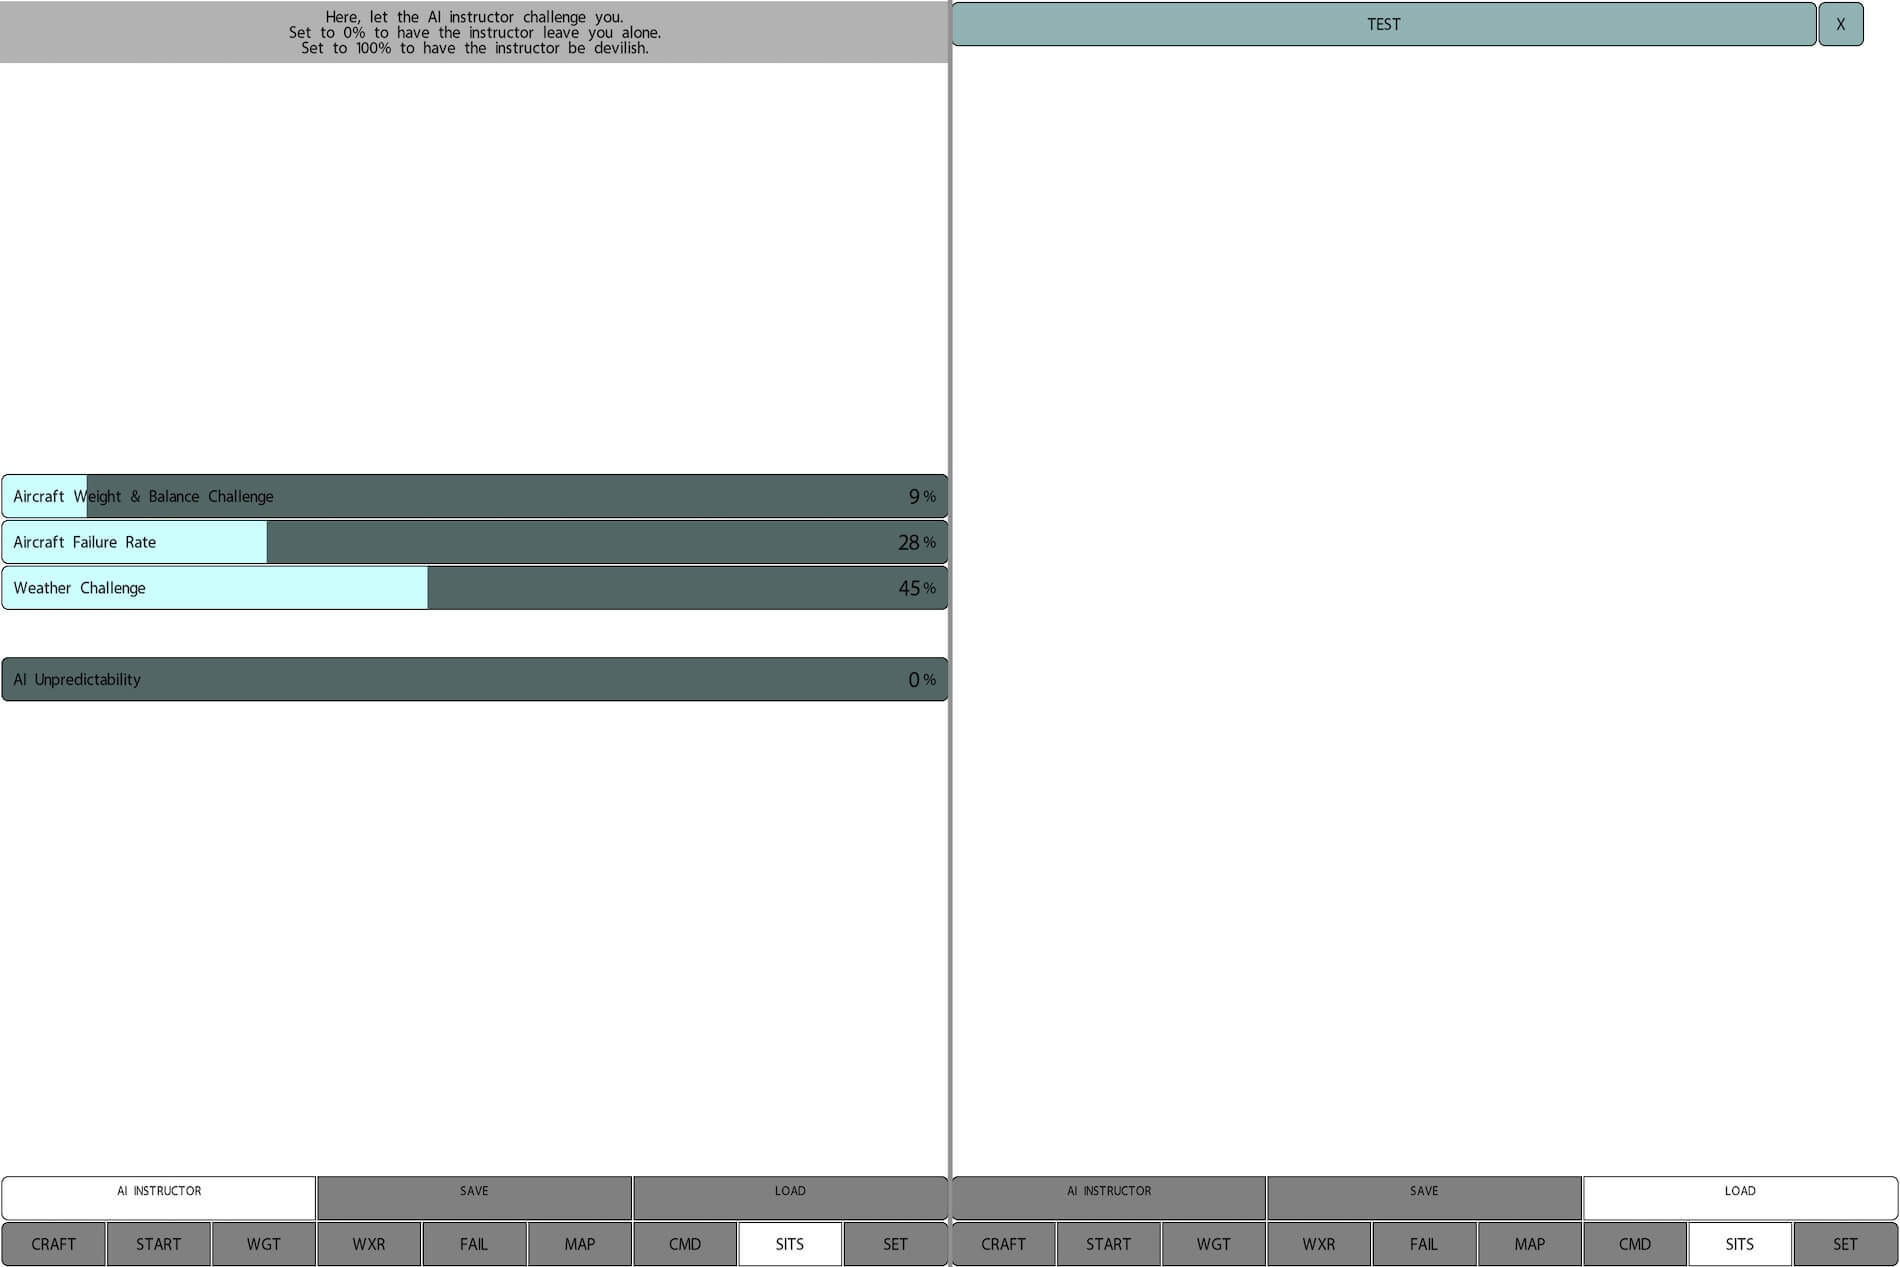
When you click the SITS button – I assume that SITS stands for situations – on the iPad, your AI instructor can change the look and feel of the simulator “on the fly”. With the SITS – AI INSTRUCTOR button active, the AI instructor or just you, can change the aircraft weight and balance, the rate that failures appear and adding a weather challenge as well las unpredictable situations. The same as other buttons, it’s a matter if trying hat happens.
One note for the slider “Aircraft Failure Rate” is that you NEED to have failures selected under the FAIL buttons with sub buttons as previously discussed. When you have under FAIL no failures selected, then nothing happens with the “Aircraft Failure Rate” sliders at a percentage.
The SITS has besides this AI INSTRUCTOR two other buttons which speak for themselves namely that you can SAVE a specific setting/situation or LOAD a situation. Example; select the SITS – SAVE button, enter a name of the settings/situations you made under the AIU INSTRUCTOR button, and use the Save button. When you click the LOAD button, you see the saved situation. In this example that’s saved under the name TEST.
Control Pad tab | SET
This page was already discussed in the beginning of the review/impression. It’s actually the start-up page of the app the moment the Control Pad app is connected to X-Plane. The moment it’s connected, all the previous tabs are visible.
Summary
This was fun.
I know this Laminar Research app already for a while, but I’m not always using my iPad in combination with X-Plane on my Mac. Strange isn’t it and at the same time also a shame since many other developers make also great add-ons to project for example the FMS MCDU on the iPad and/or iPhone or maps, charts and so on. That said, this Laminar Research app is free of charge. It doesn’t cost anything and you can change settings, change the aircraft, change the airport and so much more on the fly. Worth trying it out I would say and that was also the idea of writing this review/impression; try it!
Perhaps some will say that it’s a shame it’s not available for Android, but that’s something I can’t change. That’s up to Austin who designed and programmed it and constantly modify and update the app.
Feel free to contact me if you’ve got additional questions related to this impression. You can reach me via email Angelique.van.Campen@gmail.com or to Angelique@X-Plained.com.
With Greetings,
Angelique van Campen
| Add-on: | Freeware iOS Laminar Research app |
|---|---|
| Publisher | Developer: | X-Plane.Org | Aerosoft | xxxxxxxxx |
| Description: | iOS or iPad OS app for X-Plane |
| Software Source / Size: | Download Apple app for iOS or iPad OS |
| Reviewed by: | Angelique van Campen |
| Published: | November 12th 2019 |
| Hardware specifications: | - iMac Pro - Intel 3GHz Intel Xeon W / 4.5Ghz - Radeon Pro Vega 64 16368 MB - 64 GB 2666 MHz DDR4 - 1 internal shared 1TB SSD (Big Sur 11.x) - 1 internal shared 1TB SSD (Bootcamp Windows 10) - 1 external 2TB LaCie Rugged Pro SSD (Big Sur 11.x) - Saitek Pro Flight System X-52 Pro and X-56 Rhino - Honeycomb Alpha Flight Controls - Honeycomb Bravo Throttle Quadrant |
| Software specifications: | - macOS Big Sur (10.15.x) - X-Plane 11.5x |
0 Comments