SkyScout … the Ultimate X-Plane Extension
Introduction
For those who have more than one X-Plane monitor, it’s a bit easier to share panels, indicators, DUs (Display Units) or maps with the other monitor. For those who have only one X-Plane monitor, the sharing has to be in another way. As we know from several applications, you can use the IP address of for instance a SmartPhone or tablet and port the data you want to the SmartPhone or table. It doesn’t make much difference if that SmartPhone and tablet are Android or iOS/iPad related.
Since I only own Apple equipment, I will continue with my story of transferring these X-Plane (M)CDUs, MAPS, EFIS DU’s or whatever is possible to iPhones and iPads. What said, you’ll find already a couple of products that can do this. Some use the Apple App Store while others need browsers and some use other software needed to connect data or retrieving data from X-Plane and transport that data on an iPhone or iPad.

And this brings me to SkyScout from XPlane Aviator. A brand new way of retrieving or extracting (if you want to call it that way) X-Plane data and present it on an iPhone or iPad but just to clarify this, also to Android SmartPhones and other tablets. SkyScout does a lot and when I had a first look into it, I was impressed what was all possible and for sure, more things are possible and as we speak – November 2020 – XPlane Aviator, the programmer behind SkyScout is adding more features and improving sections of SkyScout. Anyway, what is SkyScout and what does the name say, right?
According to XPlane Aviator and X-Plane.Org “SkyScout is a web based EFIS (PFD/MFD/EICAS) system specially designed to provide an enhanced experience in the X-Plane environment. X-Plane pilots will easily emulate a glass-cockpit-style at home just using additional monitor, laptop computer, iPad, iPhone, Android tablet or phone: all you need is one or more devices with a compatible web browser.”
“Specifically designed for virtual pilots willing to take advantage of all the simulator features in real time, without pausing the sim. X-Plane pilots will enjoy this software maximizing their potential when flying online or offline and increasing their skills by learning how to get the full power available in X-Plane simulator.”
“Scale your home cockpit by using one or more devices to display the PFD, MFD, moving map, switch panels, weather control, route manager and much more by using SkyScout, the most flexible, easy and cheap way to build your home cockpit. Available for Windows, Mac and Linux.”
So, what brought XPlane Aviator to develop/name it SkyScout. I think it’s a good idea to contact XPlane Aviator and ask him. According to XPlane Aviator “I did Aviator Pro product to cover some needs I was experiencing when using X-Plane, so when Aviator Pro was finished and I was using it, then I wanted to go to the next step: Aviator was helping a lot, but was not really an EFIS.”
“That said, along with Aviator Pro I was trying myself several options:
- Pop-out X-Plane G1000 in external monitor: this works only for additional monitors in the same PC and does not work for tablets and iPads, additionally, takes a lot of PFS out and not all options are functional in the external view of the G1000. This option is only available in planes with pop-able G1000 and ….
- I tried several free EFIS (like X-HSI)… most of them don’t work on tablets or iPad and are limited to specific planes. Also, very reduced in features. Honestly, I didn’t like it,
- So I tried also payware EFIS for tablets and iPad… not very good ones, limited to very simple G1000 PFD and not compatible with most of the planes.”
XPlane Aviator continues; “given the points above, the natural next step for users willing to use something more than Aviator Pro was a full EFIS, but I wanted to do something that pilots can use in tablets, iPad, laptops and additional screens. Something for all the planes, something that takes full power of X-Plane… that was the main reason to develop SkyScout.”
Now that we know this, it’s perhaps a good idea to check out the following YouTube video to get an idea what SkyScout can do for you.
Although the Youtube video highlights a lot, the program can do much more than that and keep in mind, this is a video that shows you SkyScout version 1.0 and as previously explained, XPlane Aviator is already busy with an updated version 1.1. With our X-Plained impression I’ll try to cover a lot of things but knowing the X-Plane add-on program has an in-depth manual included, I won’t explain all the aspects of the product.
Then it will be a massive review and that’s not good for the reader and potential interesting flight simmer. But don’t worry. The review will cover a lot of thing that I wanted to know in advance and which or what steps to take.
The Manual(s)
Normally I always start first with the installation process and then I have a look into the included manual(s), but this time with a very good reason I’ll start first with the manuals.
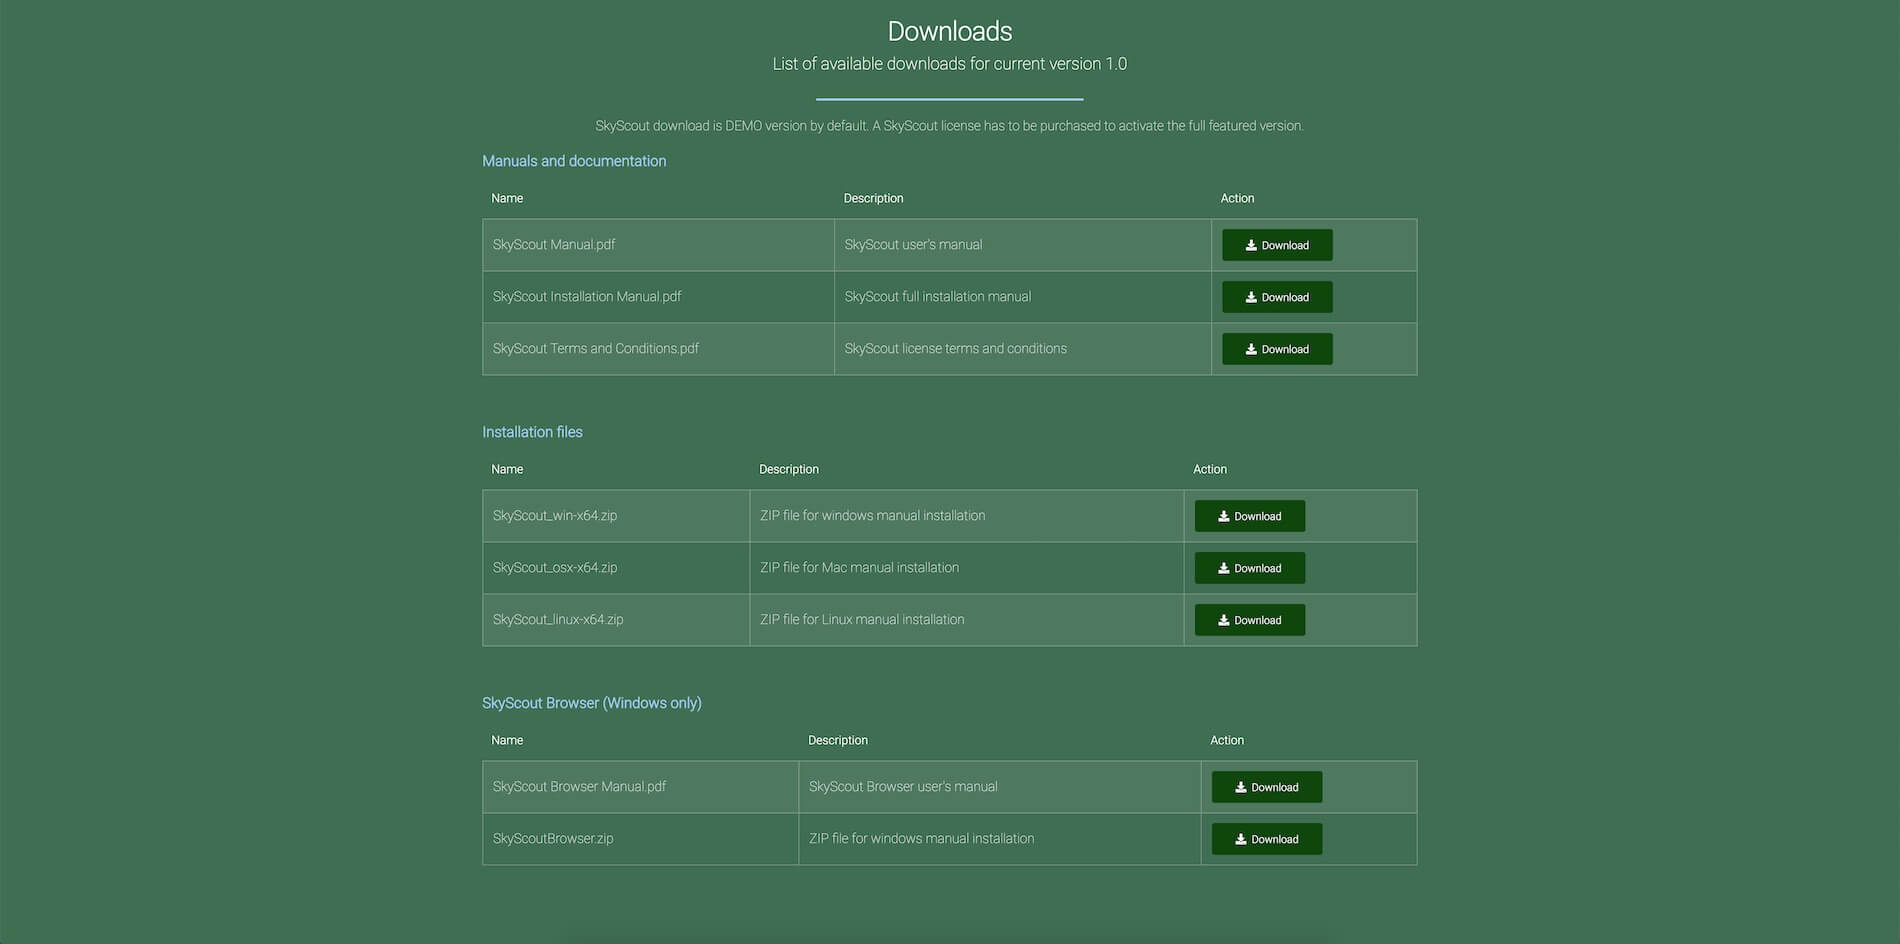
Each SkyScout Windows, macOS or LinuxZIP package comes with 3 Acrobat files:
– SkyScout Manual (56 pages)
– SkyScout Installation Manual (6 pages)
– SkyScout Terms and Conditions (2 pages)
Let me start with the last manual from the above list, the SkyScout Terms and Conditions. That’s the easiest one. The name suggests that this has to do with the terms and conditions of the product. So, it deals with the disclaimer, compatibility, and approach of SkyScout with on the second page – very important to read – third party dependencies.
Next from the list is the SkyScout Installation Manual. This manual as the name already suggest has everything to do with the three OS installation processes. Since I’m not a Linux not a Windows user, I stick to the macOS part, but I can add to this that while reading this manual, the installation procedure is basically very similar to the other OS. First, and please read this …… first and most important are the minimum requirements and yes, you’ll also find them in the dedicated X-Plane.Org store page, but reading these and understanding these prevents disappointments later.
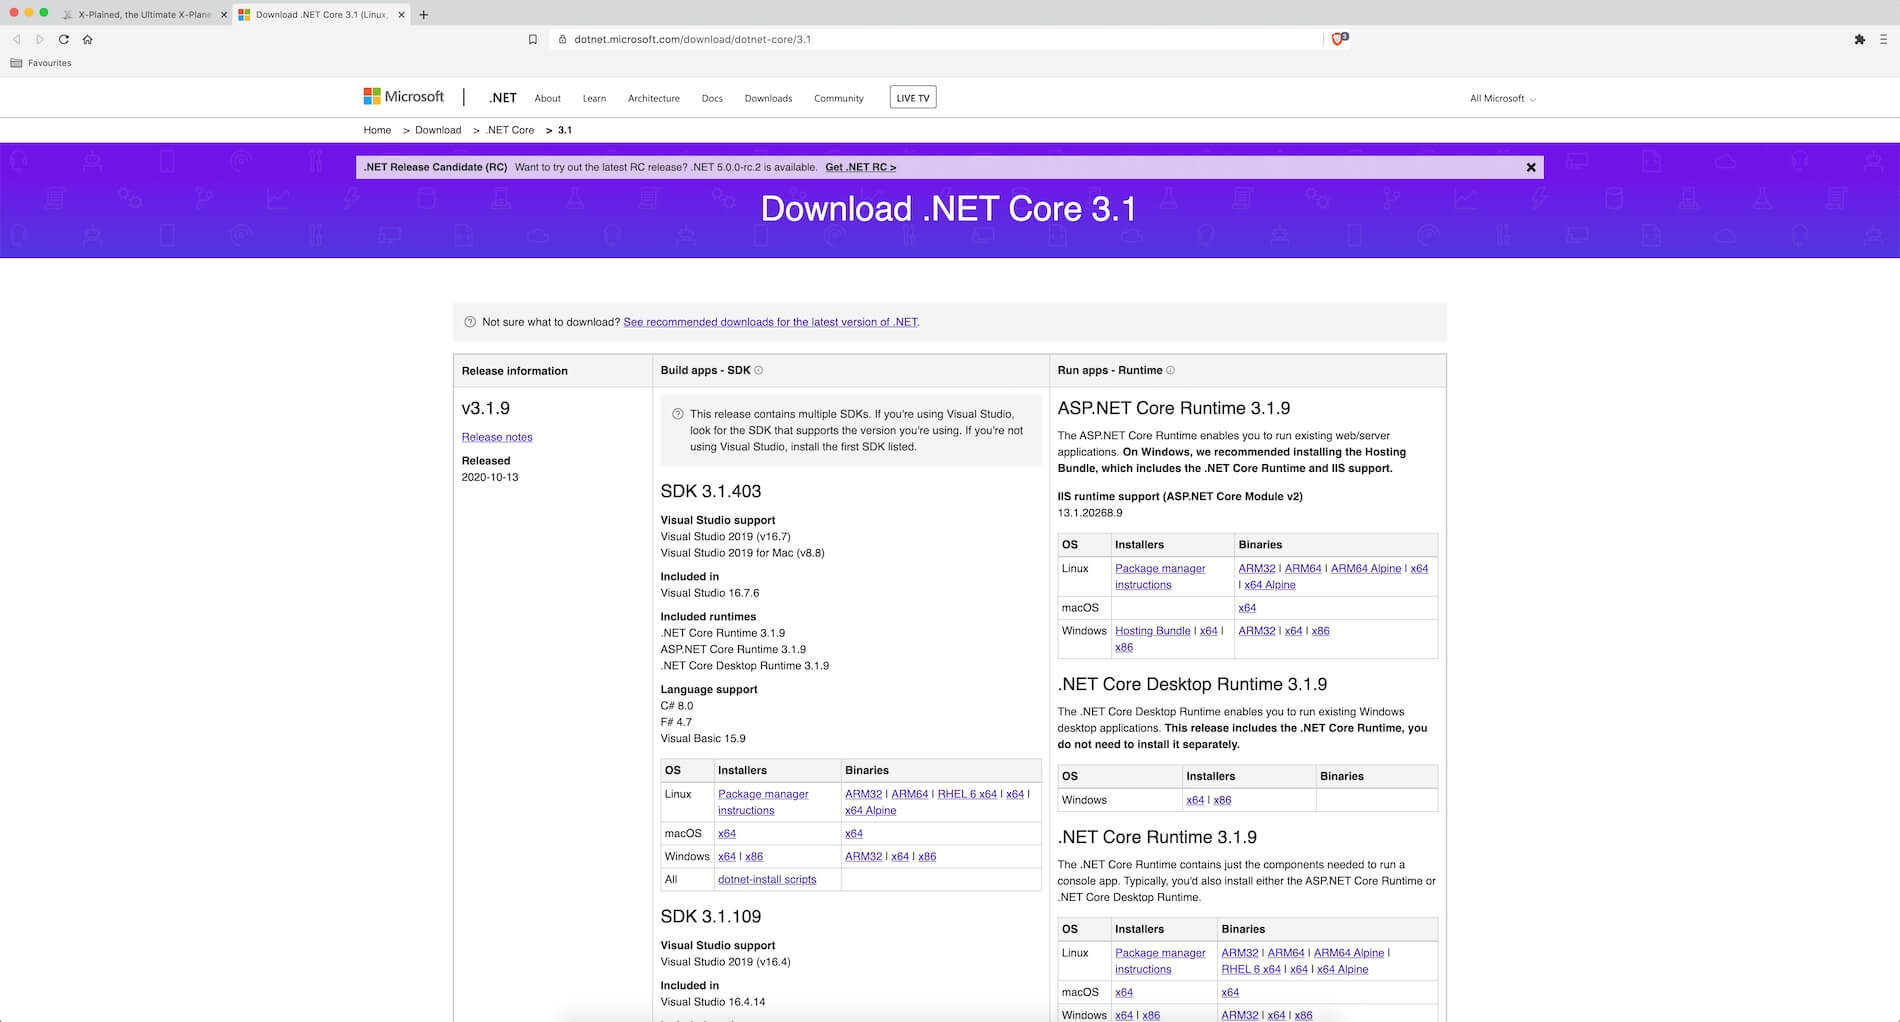
On the same page you first download and install Microsoft .Net Core 3.1 Runtime. The manual provides a link to the dedicated Microsoft page, but keep in mind that .Net Core 3.1 is perhaps not just 3.1 but an updated version like .Net Core 3.1.9.
One of the important things you need is a fast tablet or iPad. When these are too old, then it doesn’t work, when they are old but compatible the reaction or response on your iPad is slow, so fast tablets or iPad are needed. The other pages explain step-by-step the whole installation for each OS and how to run SkyScout.
Please take attention to the following sentence, taken from the manual “SkyScout will be accessible from your web browser using http://localhost:9889 in the same computer you have SkyScout installed in or in external devices using the IP address of your host computer instead localhost and always adding :9889 after the IP address. Example: http://192.198.1.10:9889.”
The reason I bring this specific sentence to your attention that I did this wrong while trying to get SkyScout on my iPad, only because I forgot the Mac (or PC) X-Plane IP address. Although you might know this I want to clarify one more thing; the given IP address in the manual – http://192.168.1.10 – is just an example. Check the IP address within X-Plane to check which IP address the computer running X-Plane has.
And finally, some words about the SkyScout Manual. This manual is the heart of SkyScout. It explains everything. It’s well written, all possible windows that can be found are described. I know from own experience as technical trainer and also from simulator friends that not always everybody takes a moment, takes the time to read a book or in this case the in-depth written manual. I understand that although I strongly suggest that you either take the time and read it from your tablet or iPad or else you print it. Believe me, it’s worth the time XPlane Aviator has put into this manual!
But suppose you think “No no, I want to start immediately and see how far I come” then I must conclude that this is also an option but only when you’re an experienced X-Plane simmer/user. The way SkyScout is build up is logic and although you have tons of information, when fiddling around for 30 minutes you’ll got an idea where and what can be found. What I want to say is that when you’ve fiddled around and see what ‘s possible, it’s easier to check the manual and pinpoint straight to the corresponding page in case there’s a need for.
When XPlane Aviator asked me to do some testing, it was that way I followed. First connecting my iPad Pro 12.9 inch model 2015 to my X-Plane iMac and then, once I had SkyScout running on my iPad Pro, looking around and see what info it can show on the iPad.
Hold on, there’s another manual available which is not included in the Windows package but see this as an optional browser, made exclusively for SkyScout. This “Windows only” browser package and the included manual are available via the following URL under section SkyScout Browser (Windows Only). In case you missed this; the provided URL gives you for each OS the DEMO version which runs for 15 minutes and during this DEMO time you can try everything with SkyScout.
Ok, back to the manual.
According to XPlane Aviator “SkyScout Browser is a light-weight web browser based on Chromium Engine Framework that connects and opens SkyScout interface directly in full screen mode and improves performance if several browser windows are opened. This browser is free and provided to be used with SkyScout for Windows only, without any commercial responsibility, liability or support.”
A Typical SkyScout Installation
Mac Installation
There’s for me no need to describe all the steps needed to run SkyScout on a Mac computer, running Catalina or Big Sur. The reason that I don’t explain all the steps to perform is because the manual is written from the user’s perspective and that’s good news. You clearly see that the XPlane Aviator developed this app with the idea and needs from a simmers point of view. But a couple of things are needed to highlight else you could run into problems. Once you’ve installed SkyScout as explained in the installation manual, you could run/use on macOS any web browser with http://localhost:9889, but that’s not really convenient. When you run on an iMac while X-Plane is also up-and-running additionally a web browser with SkyScout you need to swap between the web browser and X-Plane. That’s not handy, right?
So, you either connect another monitor to your iMac which I would say none of iMac simmers have connected another monitor to their iMac or will not do that, so the only option left is either an iOS-, iPad OS- or Android device. iOS means an iPhone. That said, an iPhone works, but it’s too small and not handy so it’s better to stick to an iPad or Android tablet. I only own iPads, so let me stick to this. You can’t use any iPad. It needs to be one of the later models and preferable fast. Which models or which iPad OS is needed is therefore important.
Time to contact XPlane Aviator. According to him “Technically is iOS 6 and a 5th generation iPad or higher. Browsers supporting WebSockets RFC 6455 standard are mandatory. For tablets same browser requirement, but there are no standards to define an Android tablet hardware, so the newer and faster the better. That said, the best definition for requirements is “the newer and faster the better”. Because even if it is compatible with a 5th generation iPad with iOS 6+… it could result slow in that environment. Due to the difficulty establishing a rule of what is good or bad I decided to publish the DEMO version fully functional for 10 minutes. Best way to help users to know if SkyScout will work in their environment.”
During my email communication with XPlane Aviator, we came to the following conclusion in respect to which iPad – regular model, the Pro, Air and Mini – is compatible to run fluently SkyScout. What was said before, the newer the iPad, the better it is. But we’re also aware that not every simmer can afford himself/herself a new iPad so two things are important to keep in mind. First, double check that the iPad is running iOS 6+ but preferable iOS 12+. Next the web browser you’re using on the iPad should be compatible with Web Socket. To know that, you can check out this URL. Open your preferred iPad web browser, enter the URL and when the web browser is compatible, it will tell you “This browser supports WebSocket.”
As a side note I would like to highlight this; not that this is always a guarantee when both requirements are fulfilled, that SkyScout works on the iPad and because it’s not easy to say in advance which or what iPads can be used, you have always the possibility to check this out with the free 10 minute SkyScout DEMO version.

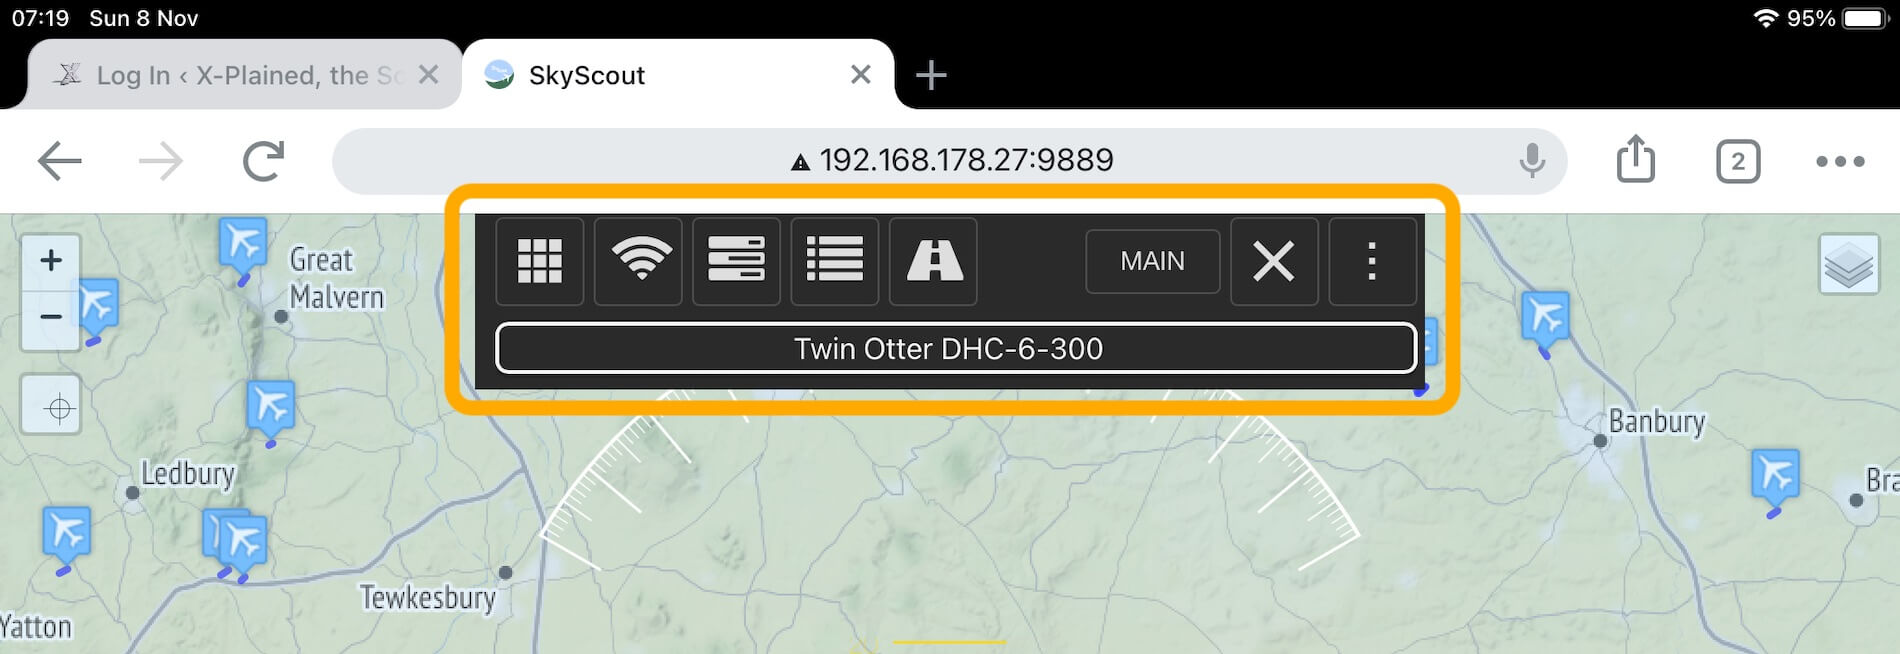
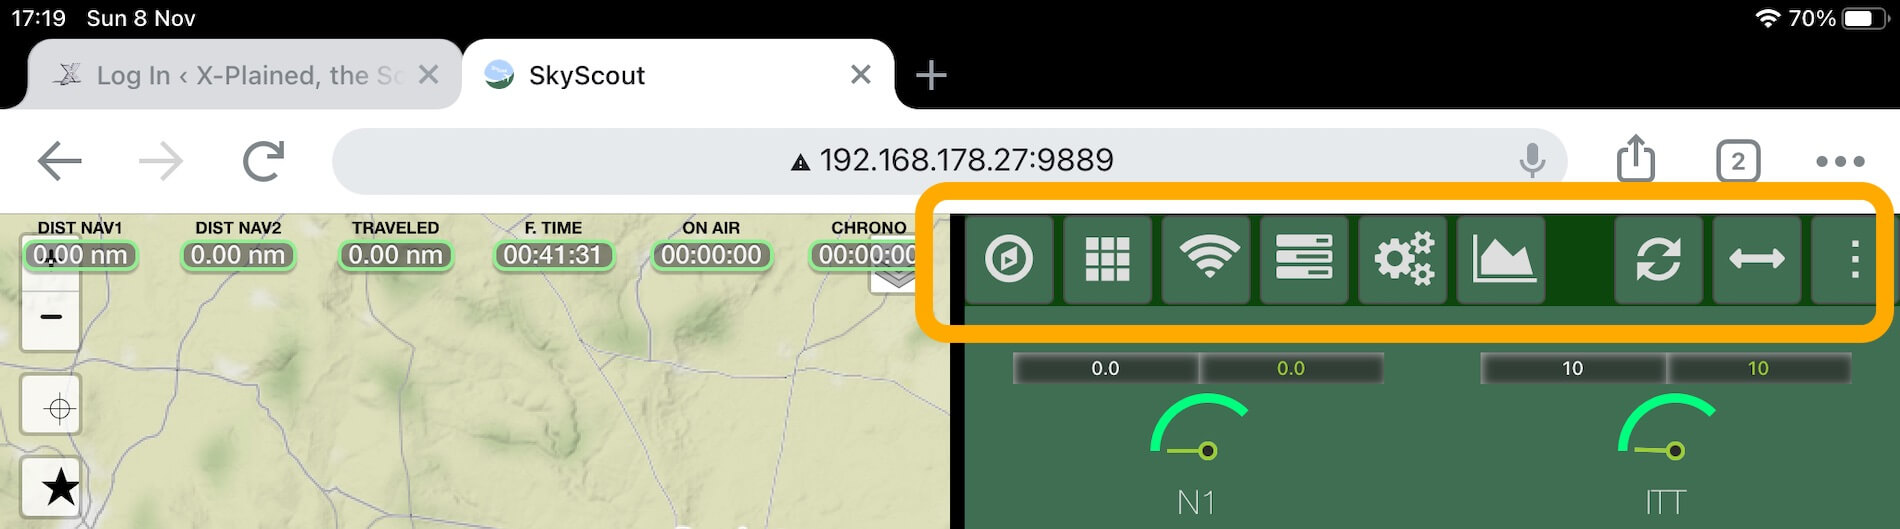
Looking to my hardware setup; using an iMac Pro and the previous mentioned iPad Pro, this is a good combination although a faster iPad is always welcome. The faster the iPad (or Android tablet), the faster SkyScout will refresh X-Plane data. I know it’s in the installation manual on page 5, but I want to highlight it else it won’t work when running SkyScout from your iPad or tablet. When I run SkyScout on my iPad, I either use Safari or Google Chrome. I enter in the iPad web browser the URL or actually the IP address of my iMac running X-Plane IP and adding at the end of the URL (IP address) “:9889”.
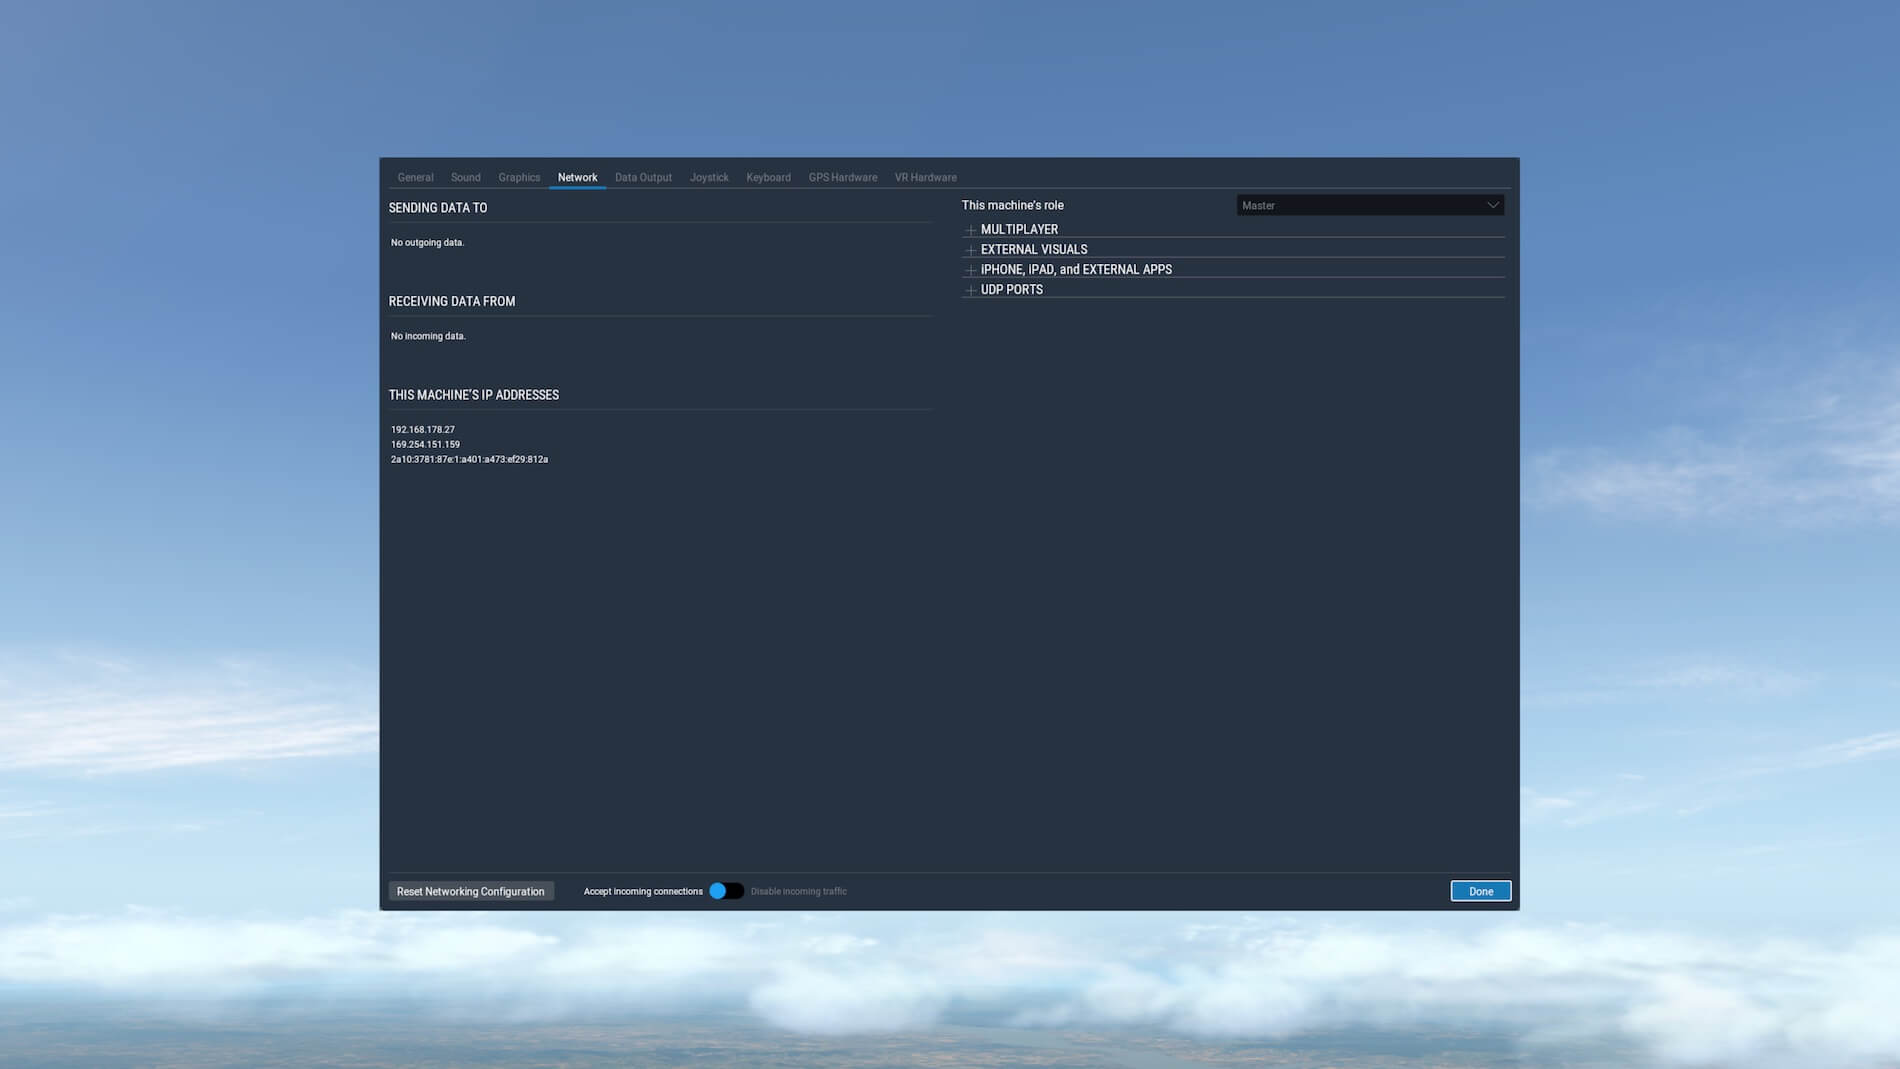

As you can see in the screenshot, my iMac IP address is either 192.168.178.27 or 169.254.151.159. That said, you enter in the iPad (Android tablet) web browser 192.168.178.27:9889 or 169.254.151.159:9889. Which IP address you use depends on which one works thus which one shows you SkyScout on the iPad (tablet). Attention .. attention: remember that this IP address is just an example. Yours is most likely different!
On the following screenshot you see a successfully started SkyScout. You can see that this is – by default – the demo version unless you’ve entered your license information. So just to make this clear, only the first time you start SkyScout it’s in demo. Once you’ve entered your license information it will never start anymore in the demo version. SkyScout also shows me the X-plane version that I’m using.
This is taken from the X-Plane directory where SkyScout is installed in. Most important, at the bottom you read “START X-PLANE”. Click the button (touch it), on the top of the SkyScout screen you see “Waiting for X-Plane to connect” and on my iMac X-Plane is started. In case you have more than one X-Plane folder on your Desktop, then only that X-Plane is started that has the SkyScout_osx-x64 folder in it.
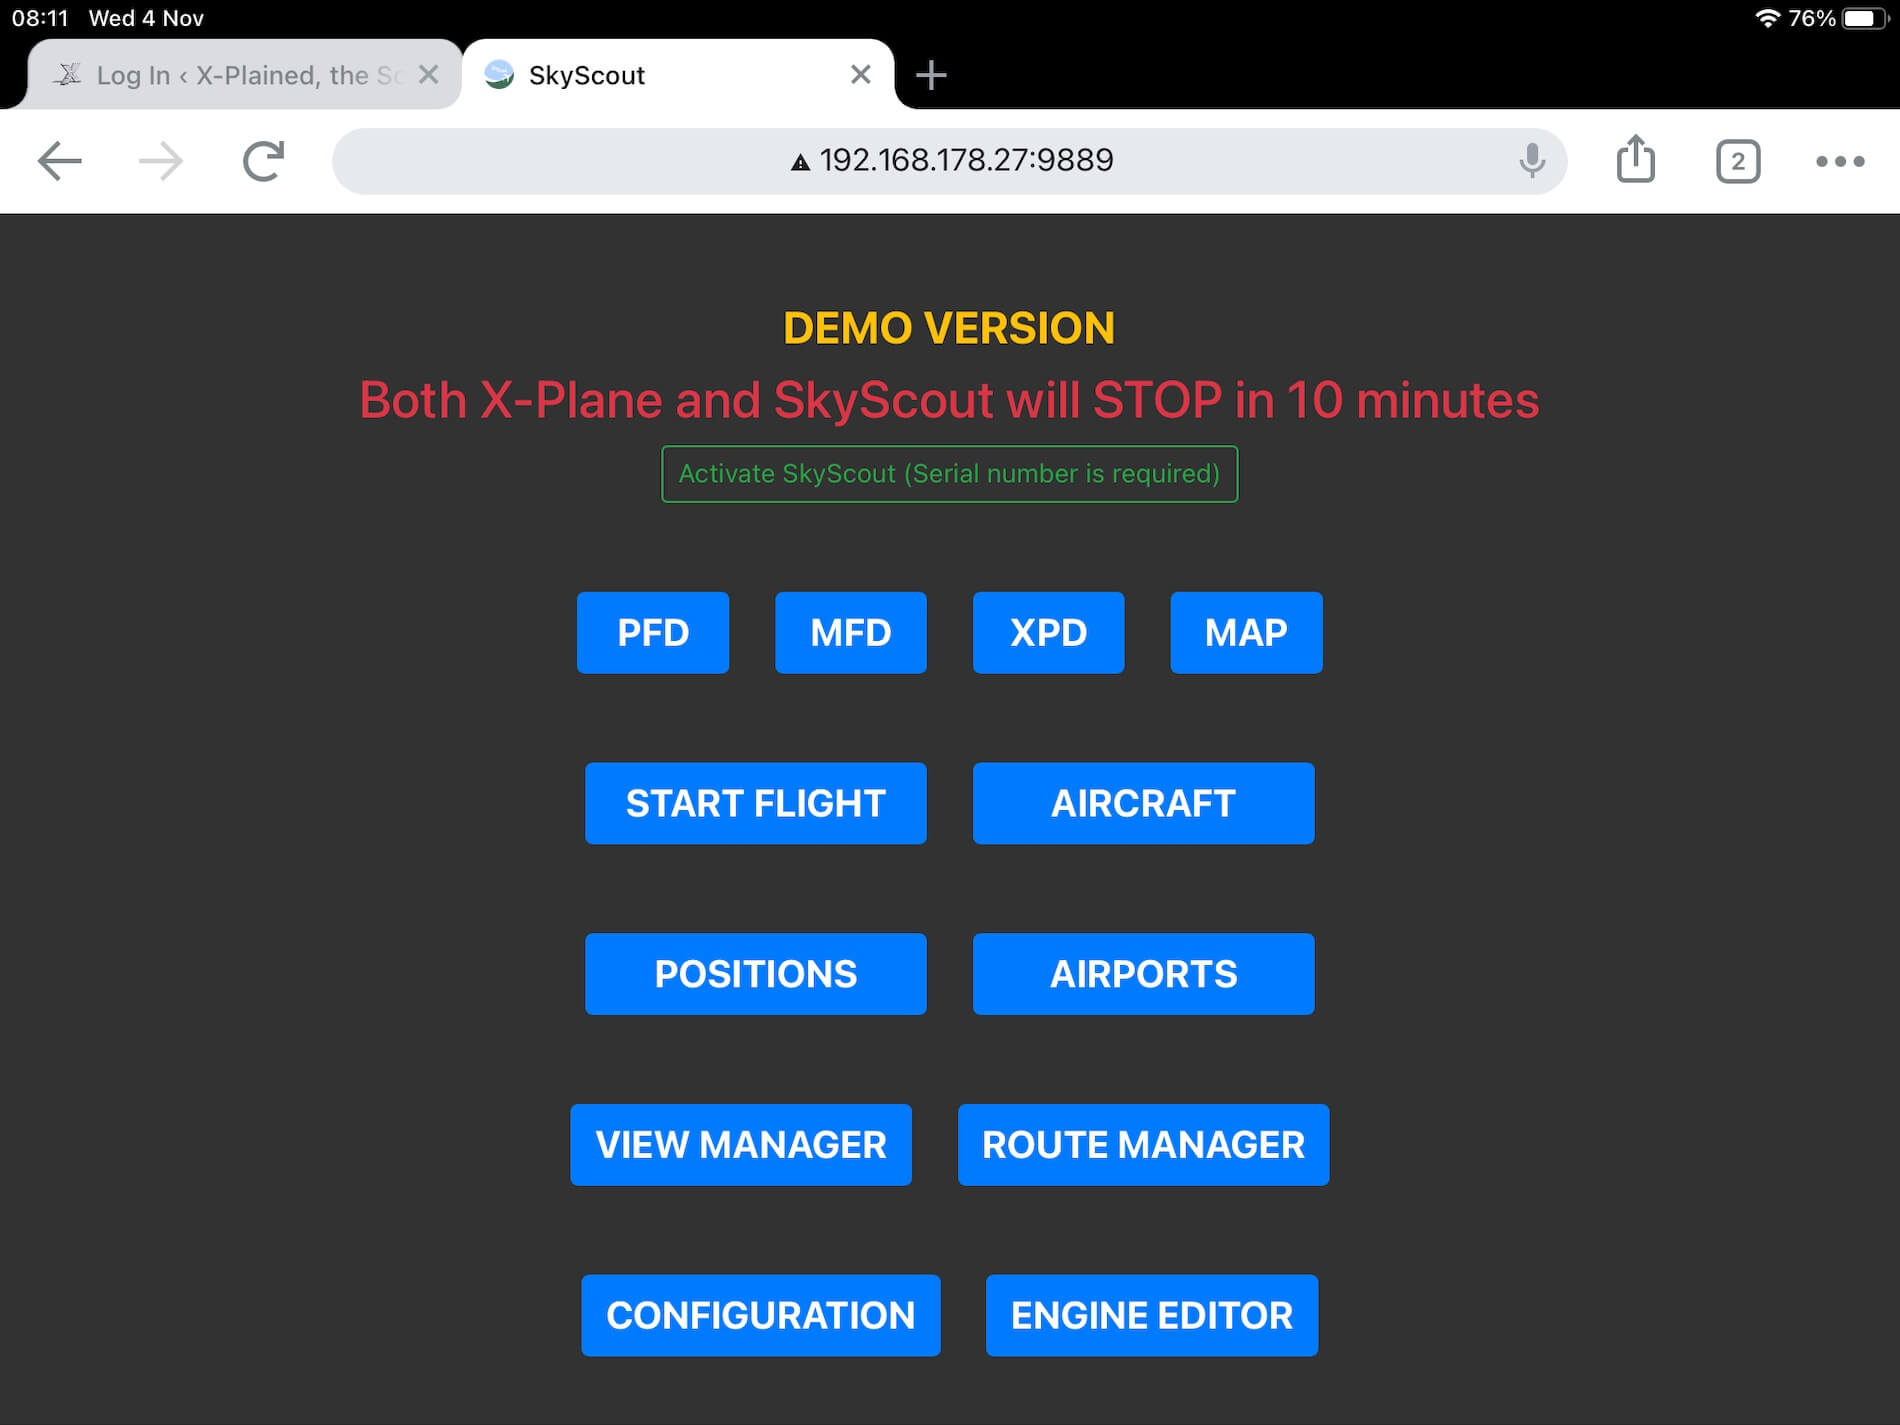
The moment X-Plane is up-and-running with a certain aircraft at a certain location, the SkyScout screen on the iPad changes to what you see on the following screenshots. As we saw on the previous screenshot, SkyScout is still in the DEMO mode and that X-Plane and SkyScout will stop after 10 minutes and that’s not what you and I want, we want a fully operational SkyScout. Click the green “Activate SkyScout (serial number is required)” button you on the next web page enter your serial number you received with the email, your full name and your email address. After that, click the “Request License” button.
When you correctly entered all the data, SkyScout confirms this with a green page (see below) that you’ve activated SkyScout and to continue with the Pro version which also activates your license, you and I need to restart SkyScout. So, I go to the X-Plane SkyScout_osx-x64/Server folder and double click SkyScoutServer. On the iPad I enter the IP address as mentioned before ending with “:9889” and SkyScout start in the Pro version.


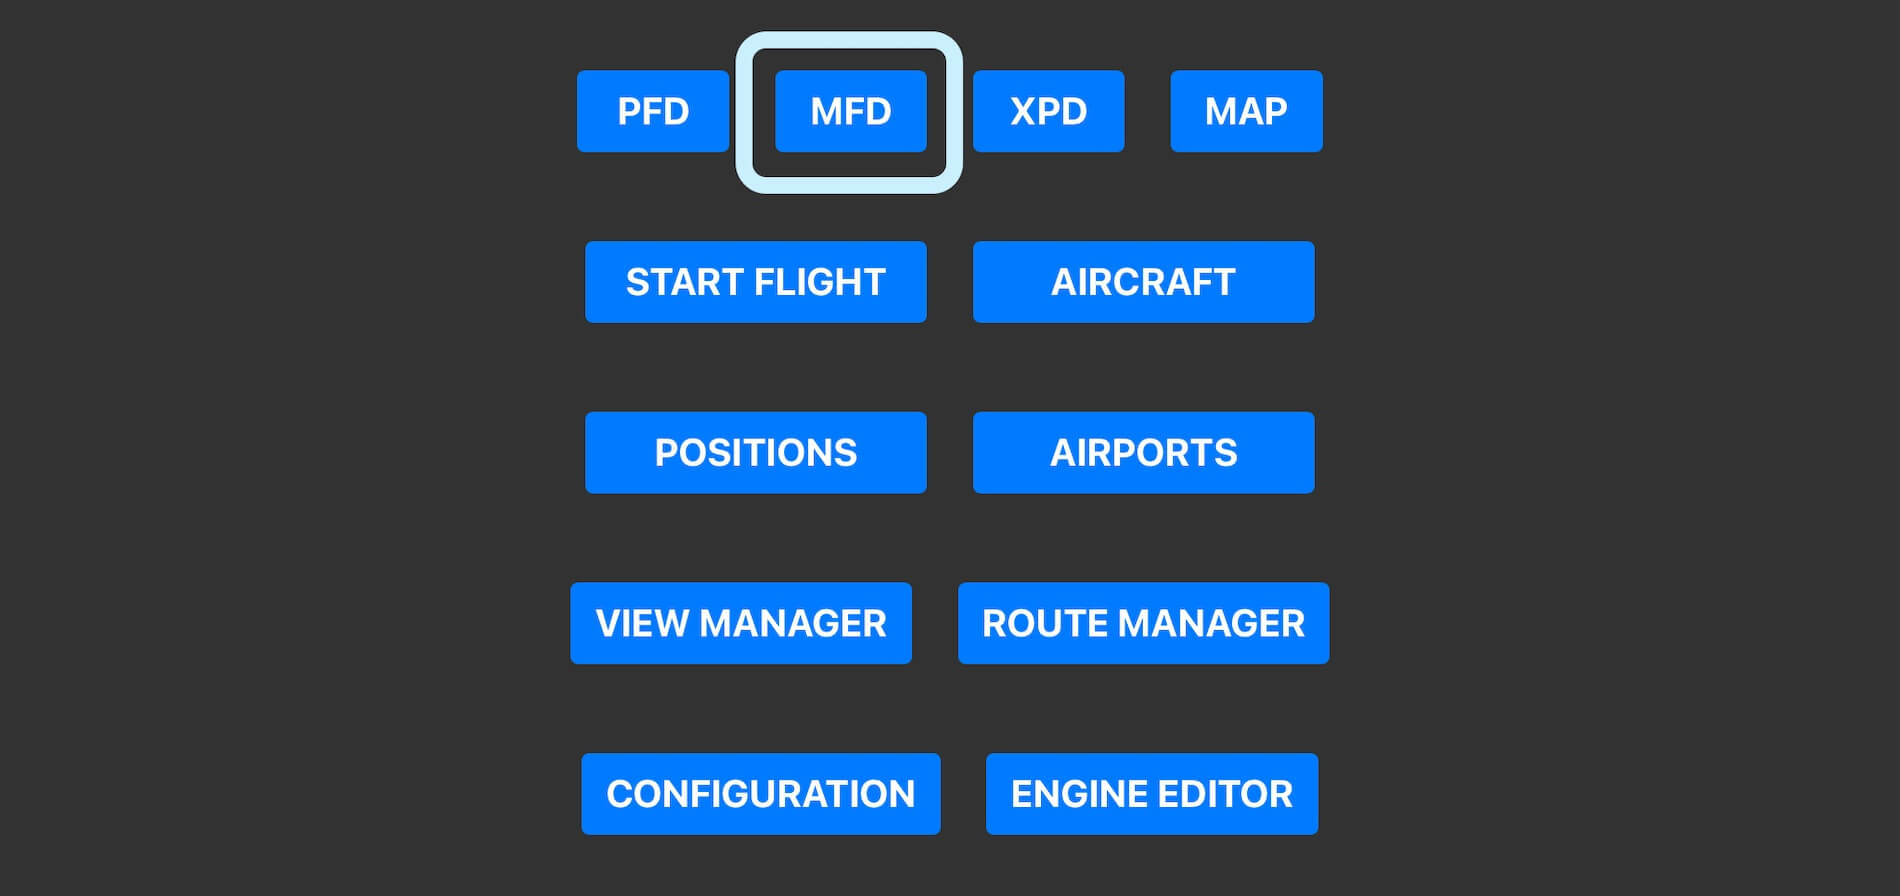
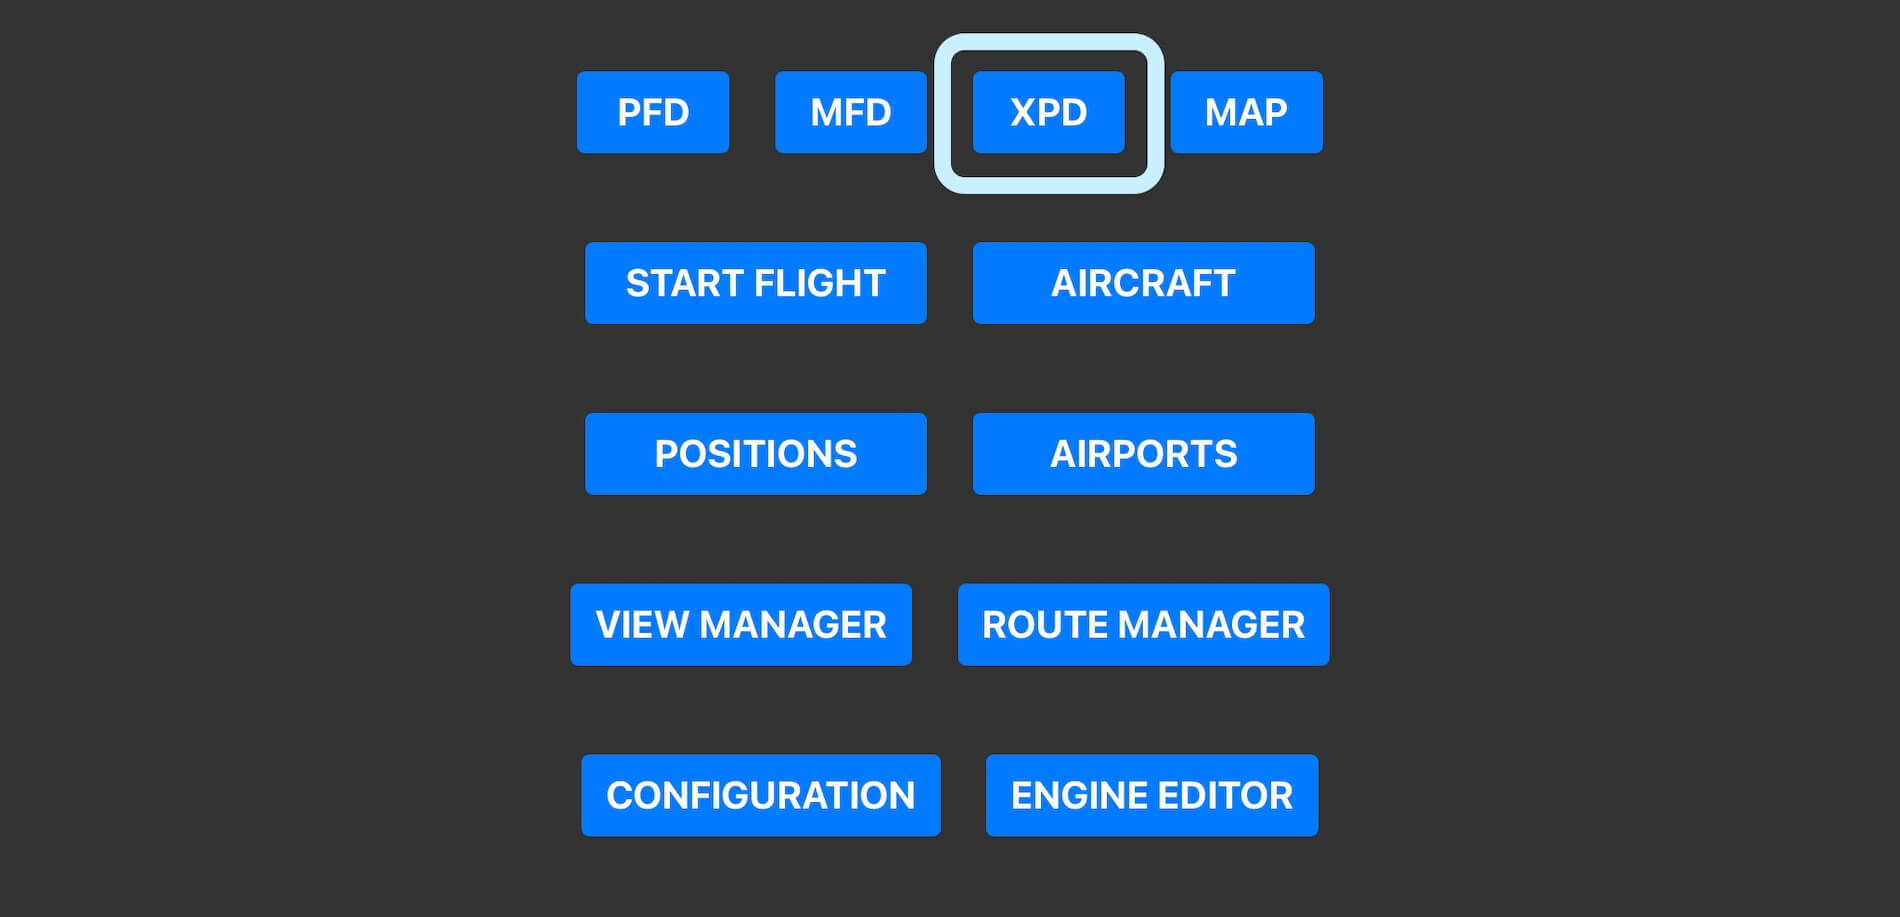
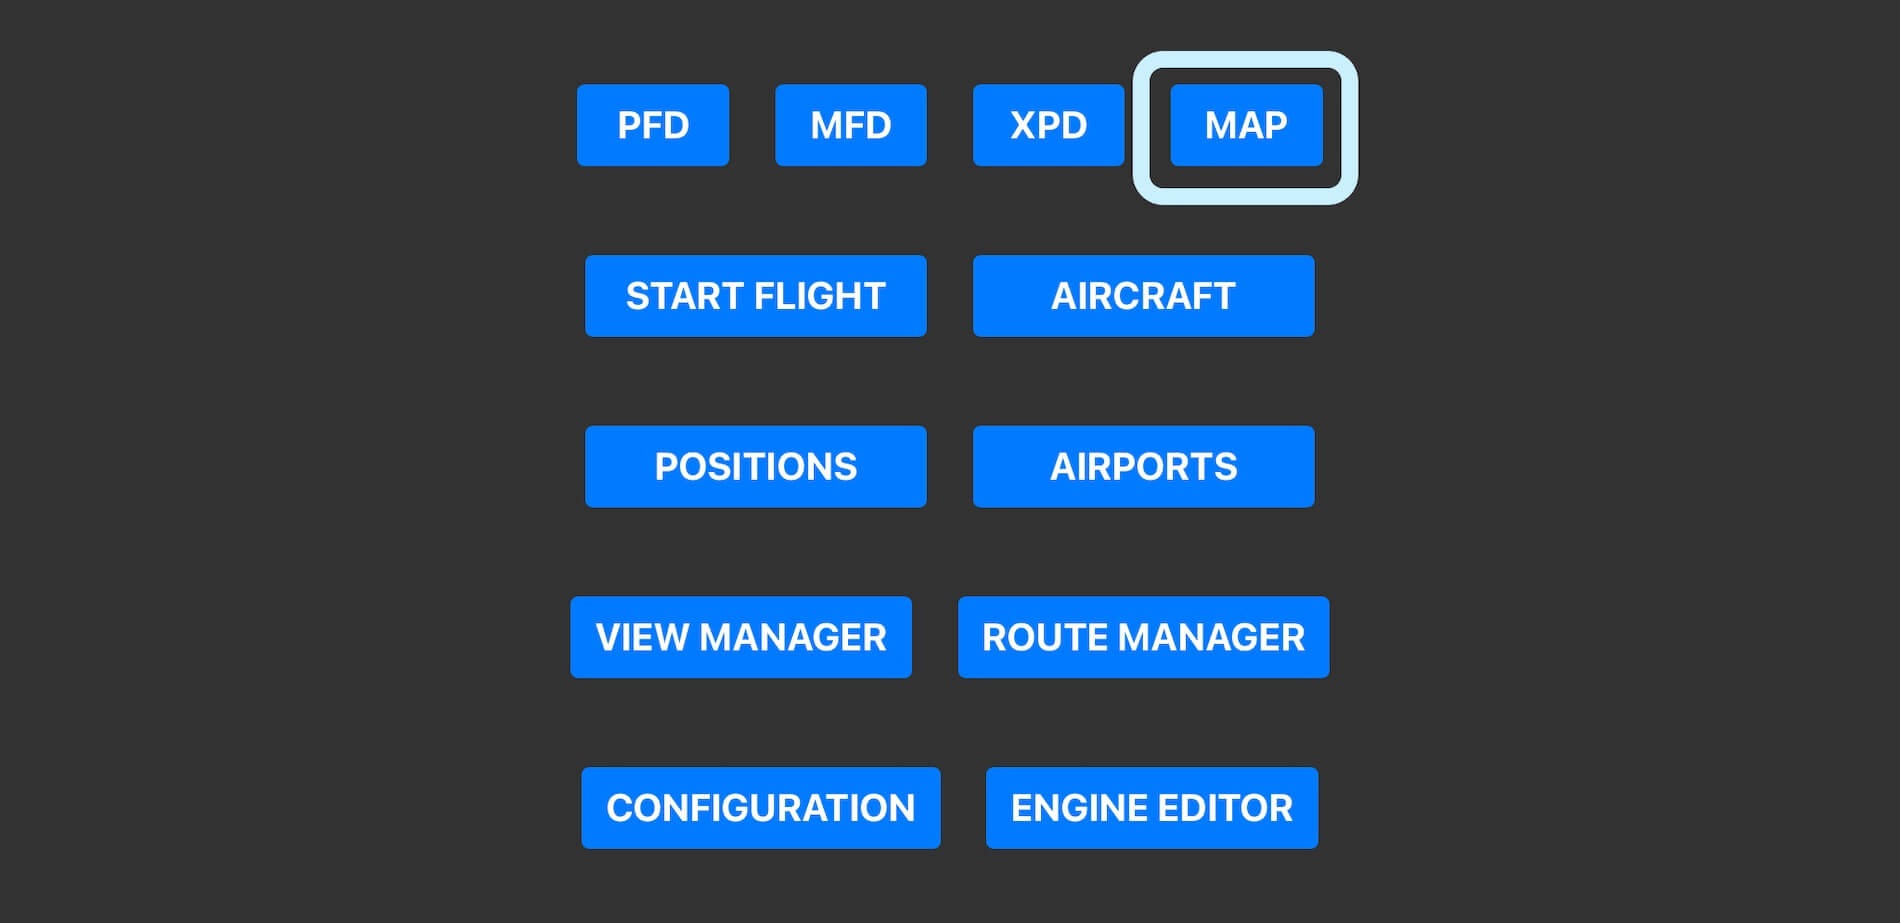
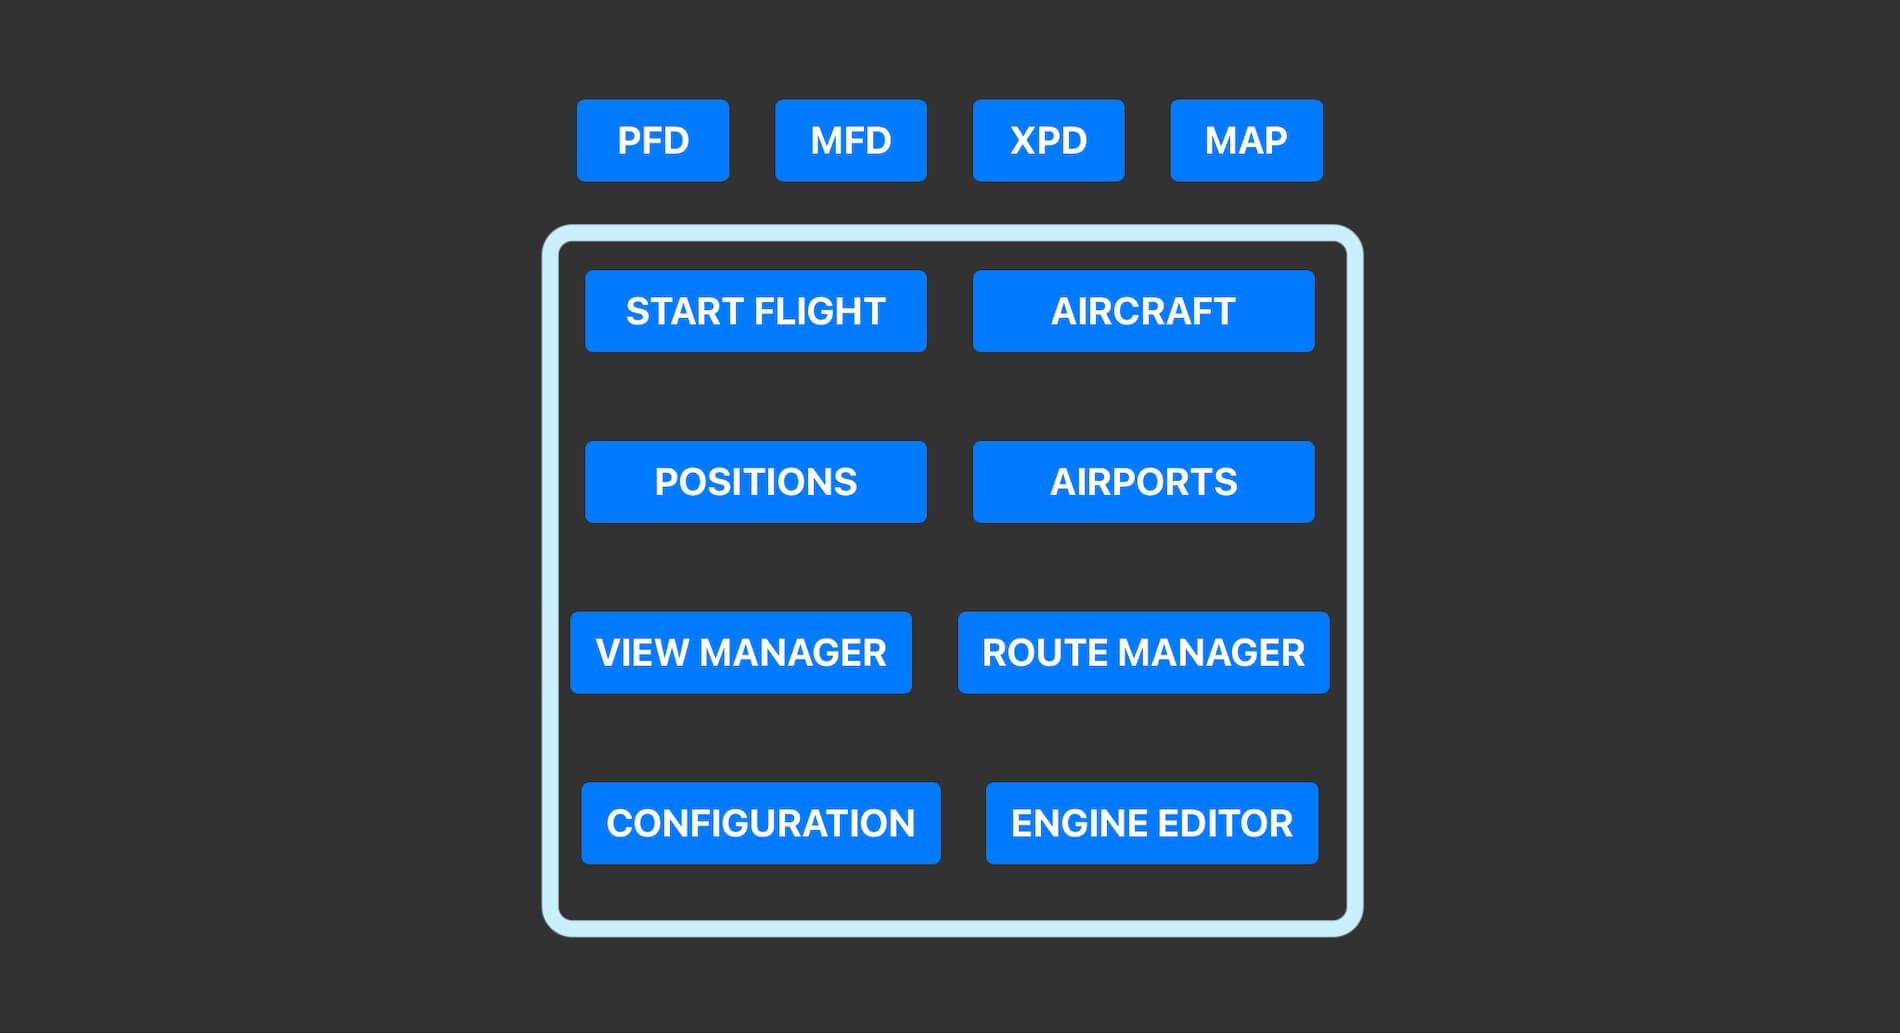
Click again the “START X-PLANE” button, and X-Plane will startup on my iMac (Mac). When X-Plane has been started, SkyScout continues and you’ll be presented with the SkyScout START screen. A screen that shows you all the available functions like PFD, MFD, XPD, MAP and much more.
Windows Installation
Although I’ve installed Windows 10 via a VM (Virtual Machine) on my iMac I’d a quick look, but it turns out that I can’t get a connection from Windows SkyScout to my iPad, but normally a Mac simmer will never use Windows X-Plane on an iMac. What I can check is if the whole SkyScout process works different then on a Mac and that can be answered quickly; NO!
The windows SkyScout process and the look and feel you’ve seen on the previous macOS screenshots is the same. Only exception is that SkyScout for windows is started via an exe file while with Mac this is via a Terminal command “SkyScoutServer”.
Running SkyScout – Introduction
Although the previous sections where a bit “static”, it’s time to explore SkyScout. As you can remember from one of the previous sections, I won’t explain every SkyScout web browser page in full depth which you can see on the iPad, tablet or on your computer since this is very well documented by XPlane Aviator. Besides that, XPlane Aviator also offers full support via the X-Plane.Org forum. That said, lets start SkyScout on my iMac or iPad and see what’s possible, see how easy things go, and see with your own eyes the endless possibilities.
After I’ve started the SkyScoutServer file located in my X-Plane folder (X-Plane /SkyScout_osx-x64/Server) – a so called Terminal window opens, but you can ignore this. When you know the IP address of the iMac that runs X-Plane, I enter in my Chrome web browser on my iPad the IP address with :9889 at the end. See for more details the above explained installation section. Once the SkyScout start page is up and running, I click the blue text button at the bottom “Starting X-Plane”.
Finally, my SkyScout page is up and running as you can see on the following screenshot.

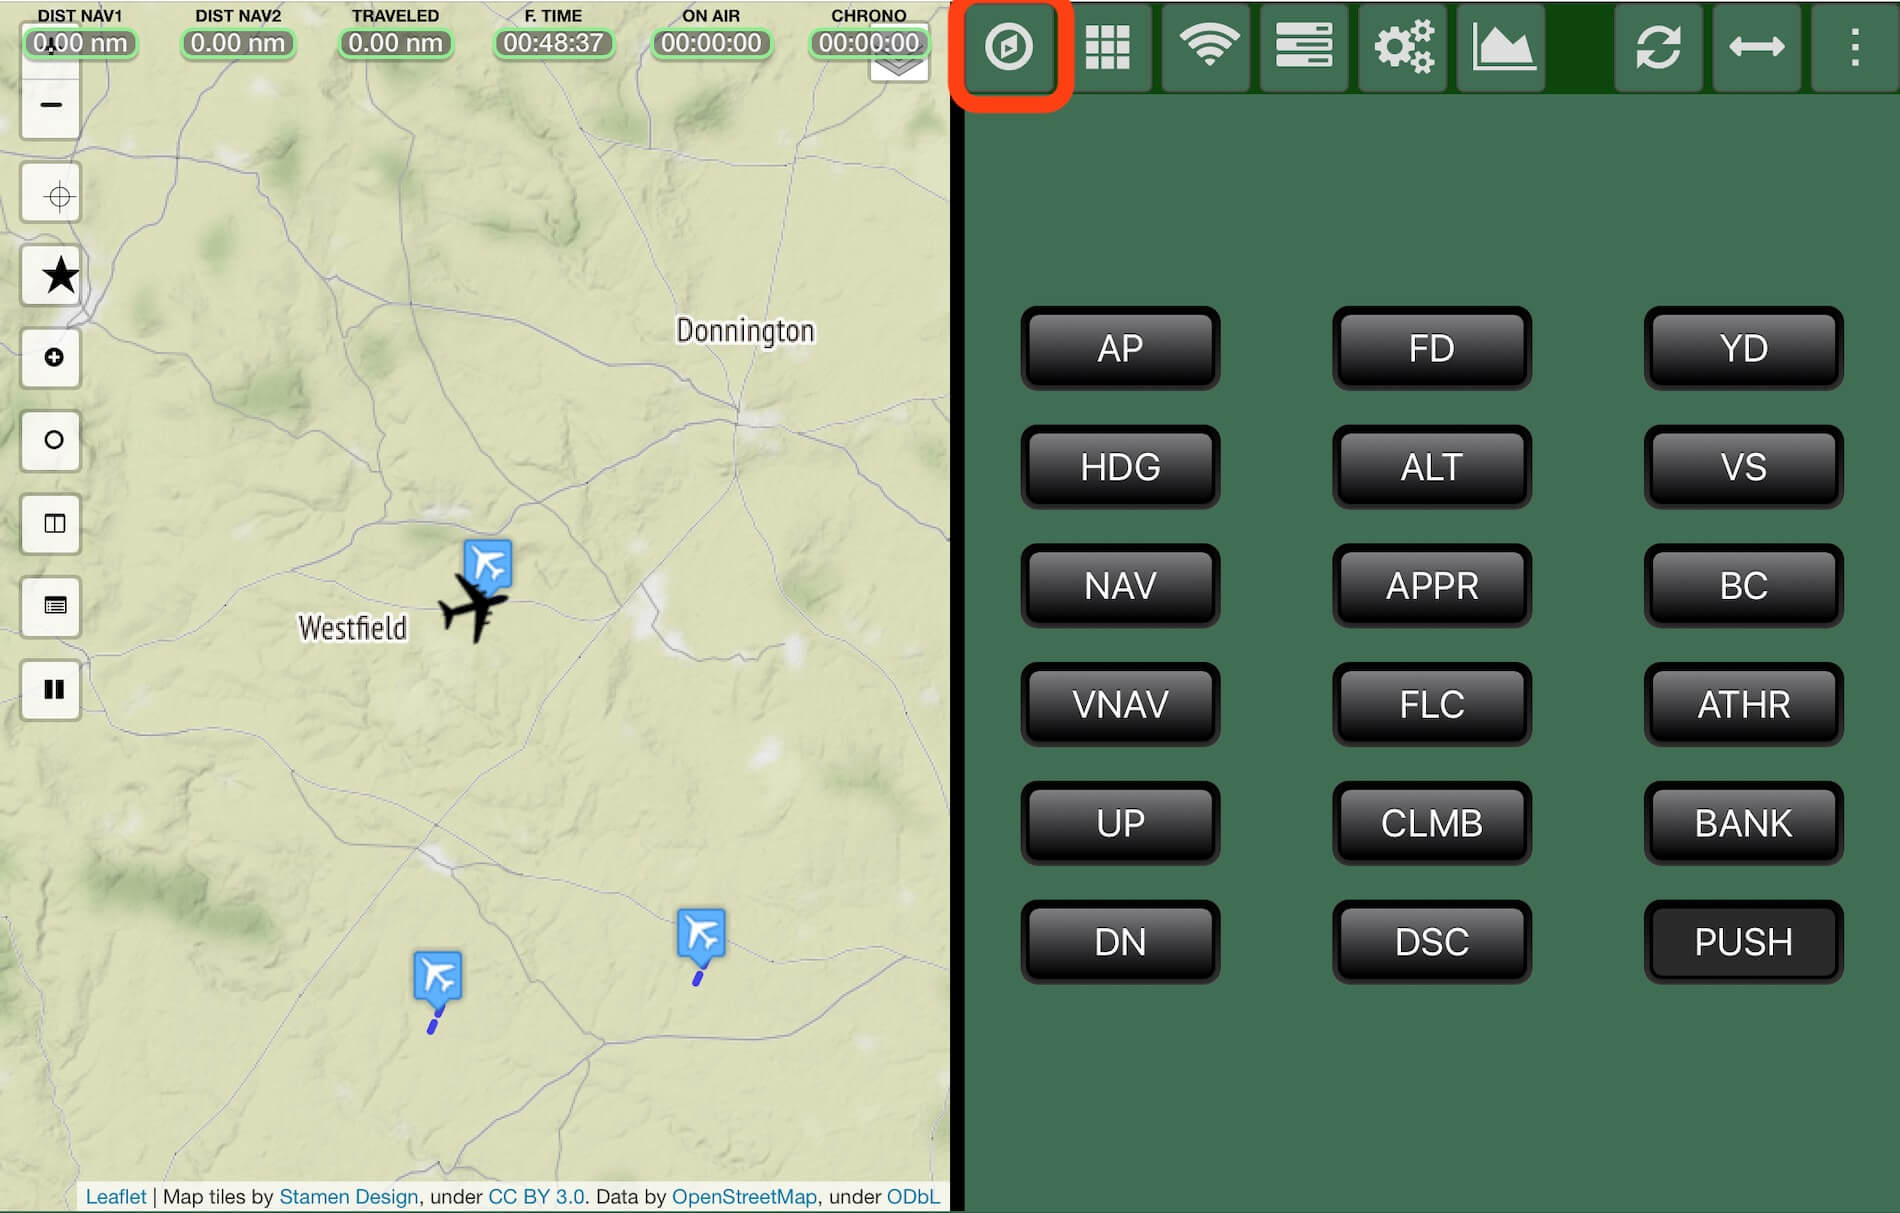
In my humble opinion, the heart of SkyScout are the upper row buttons : PFD (Primary Flight Display), MFD (Multi Function Display), XPD (Switch Panel Display) and MAP. The buttons below these are X-Plane system settings or configuration buttons. Let me check out the upper buttons one by one, what they do and what they offer you.
Running SkyScout – PFD

Overview
At first the SkyScout PFD (Primary Flight Display) looks a bit overwhelming, isn’t it? And yes, when you know the regular commercial aircraft fitted PFDs, yes, then it shows a bit more than expected, but no worries. The presented SkyScout PFD as you see on the following screenshots pops up by default with all additional sub functions. For example, in the left-hand upper corner Auto Pilot functions, in the lower left-hand corner ENGINE parameters, in the right-hand upper corner RADIO / NAVIGATION frequencies and so on.
So first I can clean up all these sub functions. Tick with your finger somewhere on the screen. When you do want to run SkyScout PFD from your iMac, then put your mouse pointer somewhere on the screen, click the LH mouse button and a “mouse hand” appears. A square appears around each of these sub functions. This can be seen on the second screenshot. When you click for example on the small AUTOPILOT box, the whole AP box shifts upwards and cleans the area. This action represents the third screenshot.
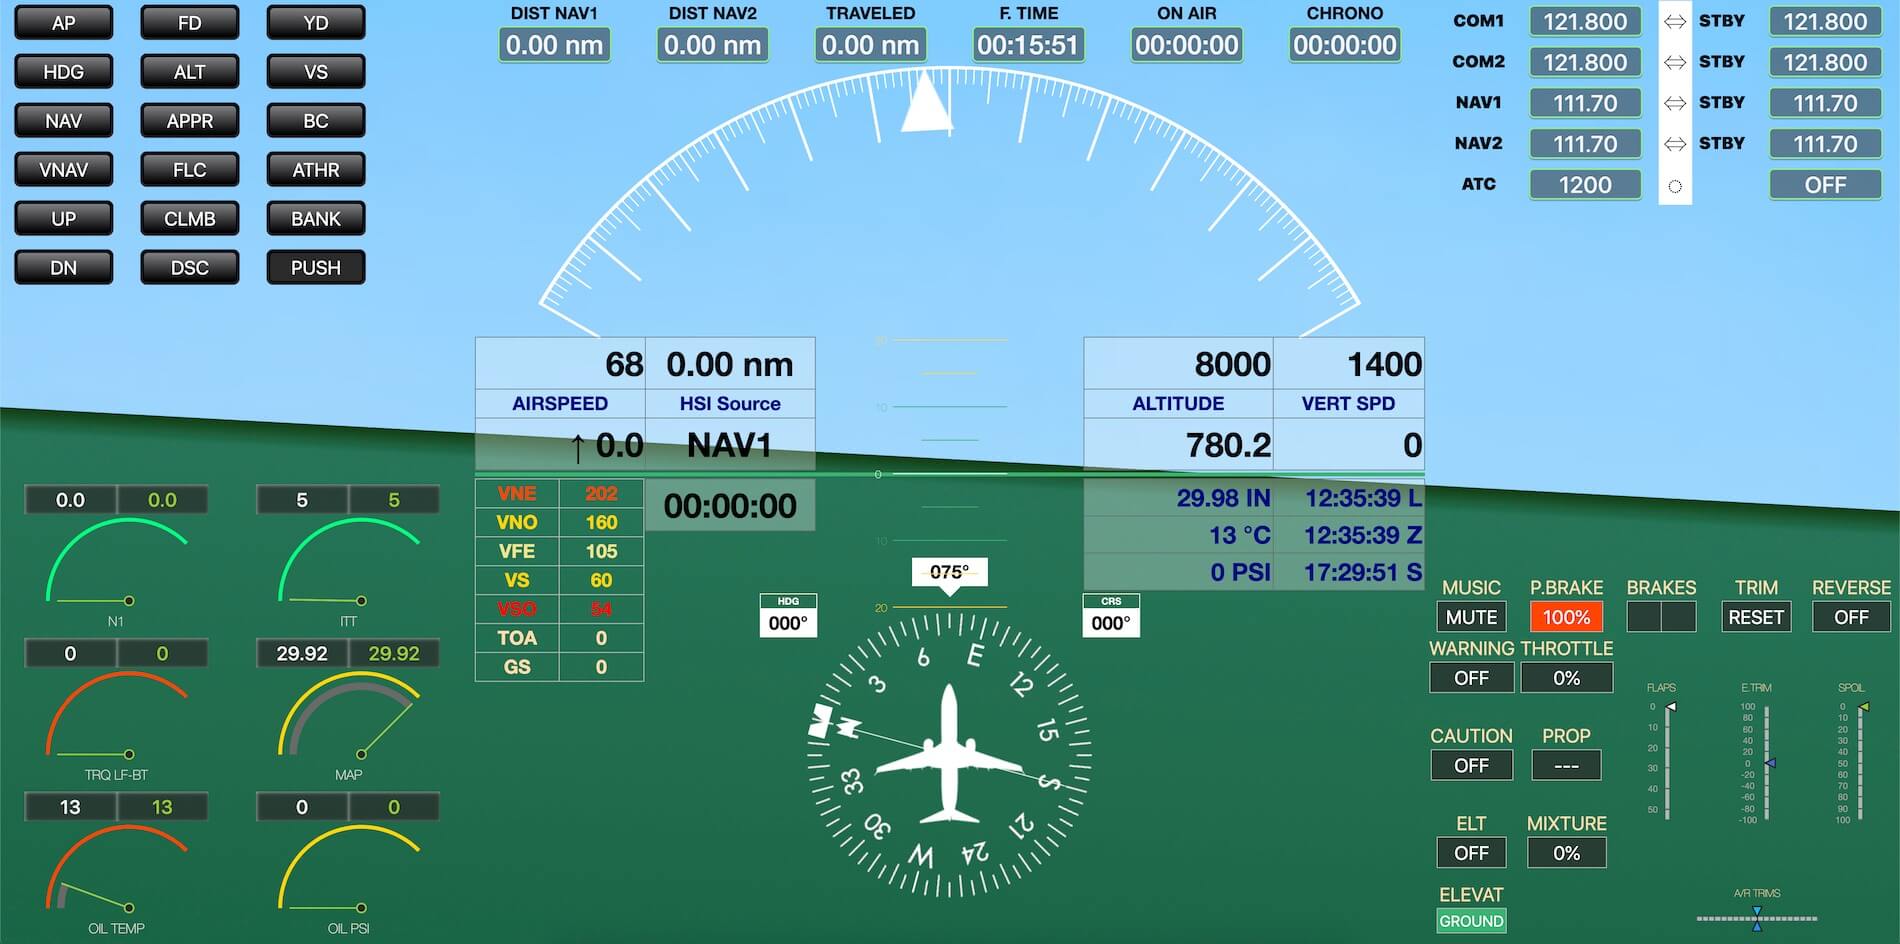

In this way you can clean up or create your own preferred PFD screen. Cool isn’t it?
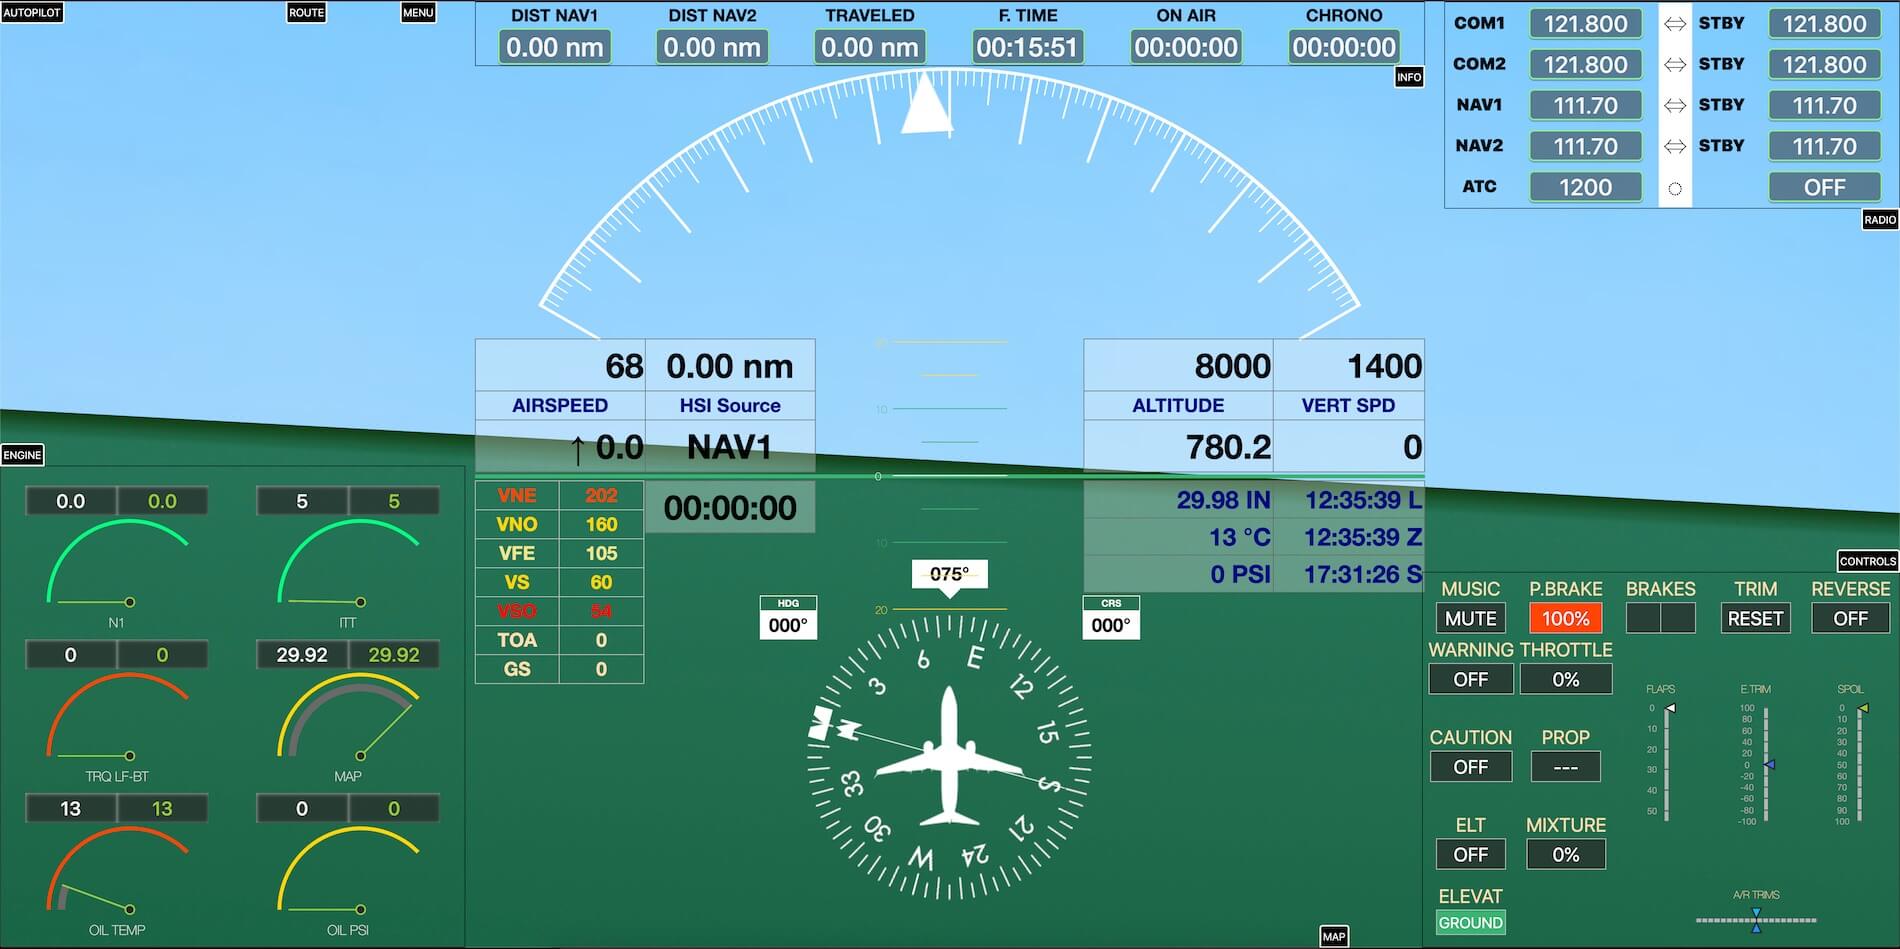
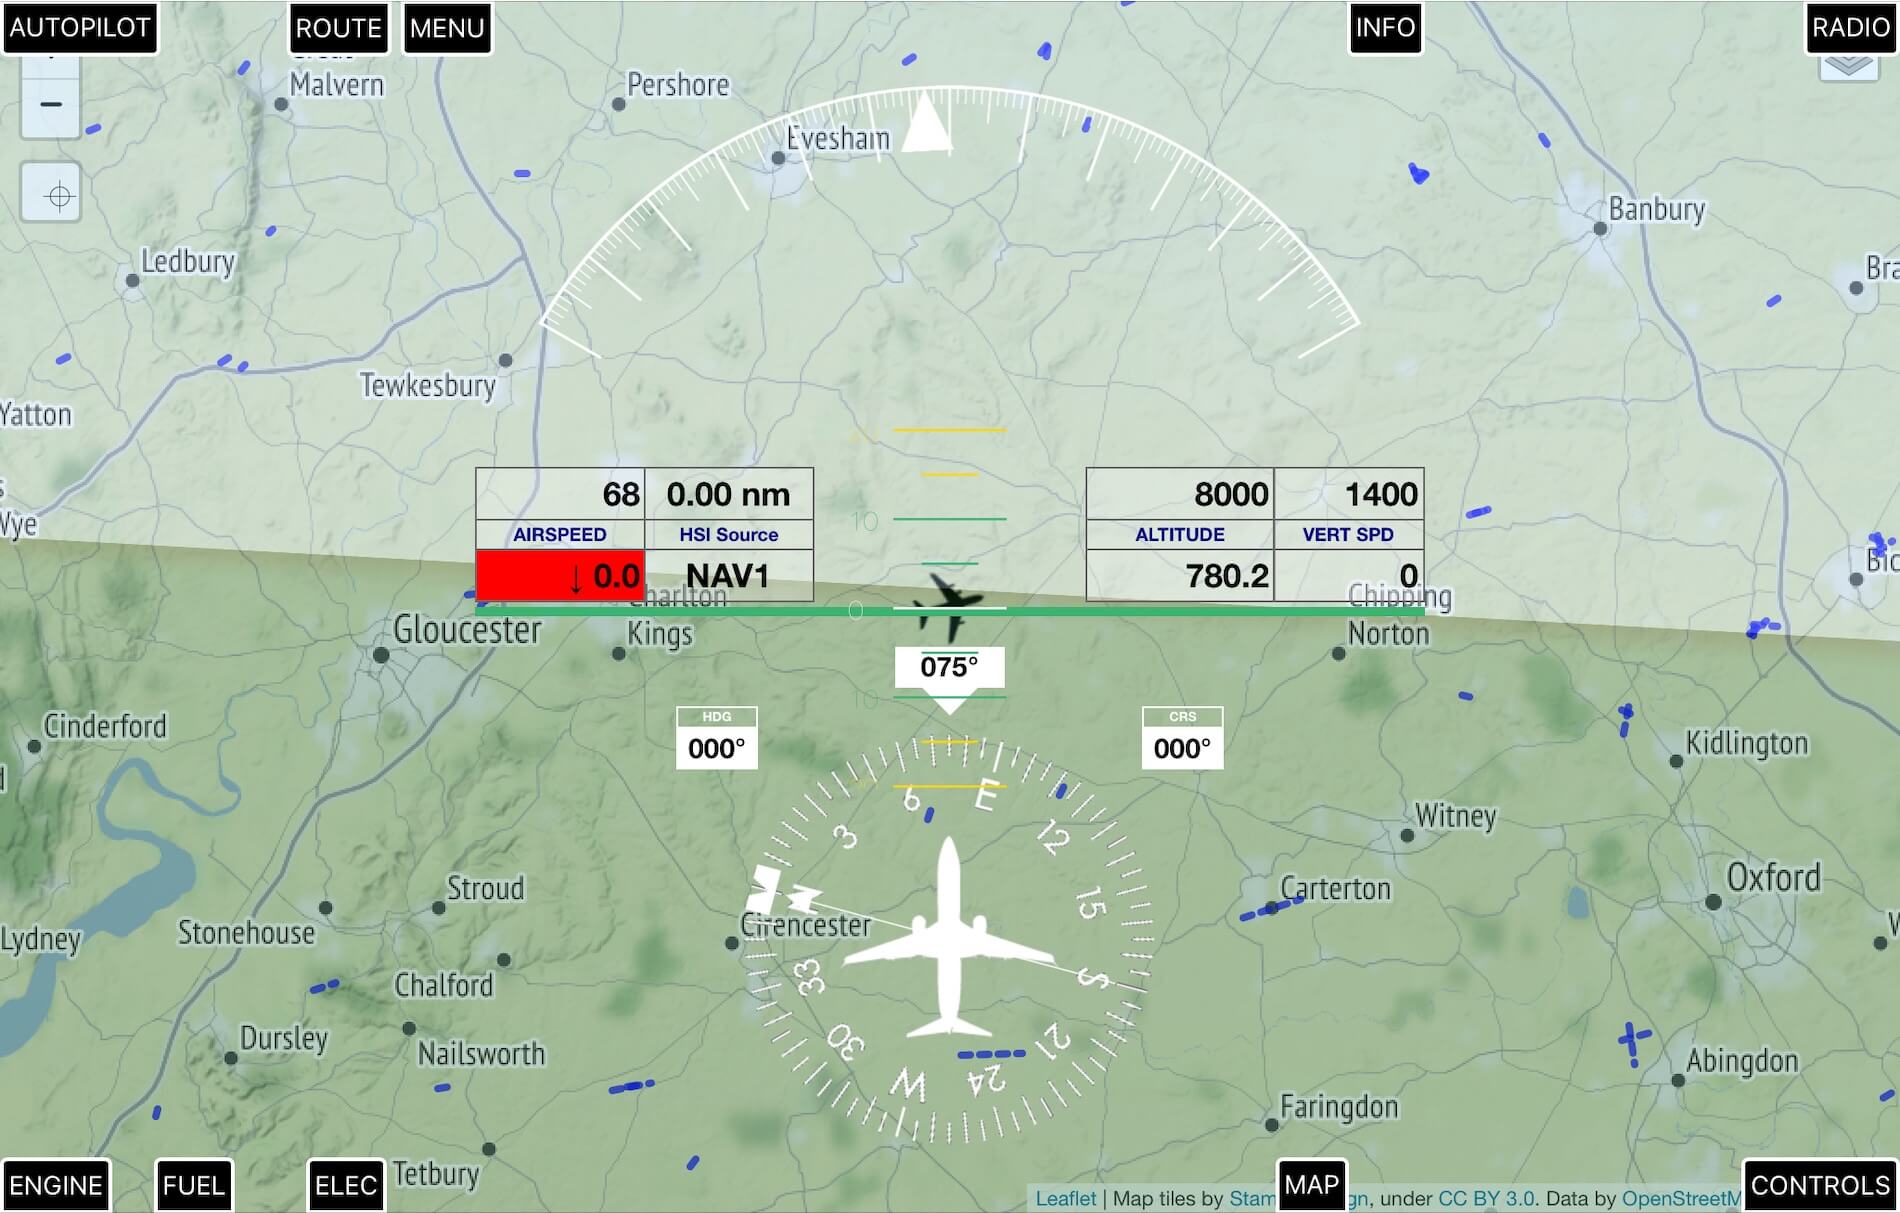
When I’ve cleaned up all the sub functions – AUTOPILOT, ENGINE, RADIO, INFO and CONTROLS, my PFD looks as can be seen on the next set of screenshots. Besides the ARC and ROSE including belonging flight parameters you noticed the green and light blue sections, representing ground and sky, but I would like to add something semi-transparent to this green/blue background, namely my MAP. Lets find that out!
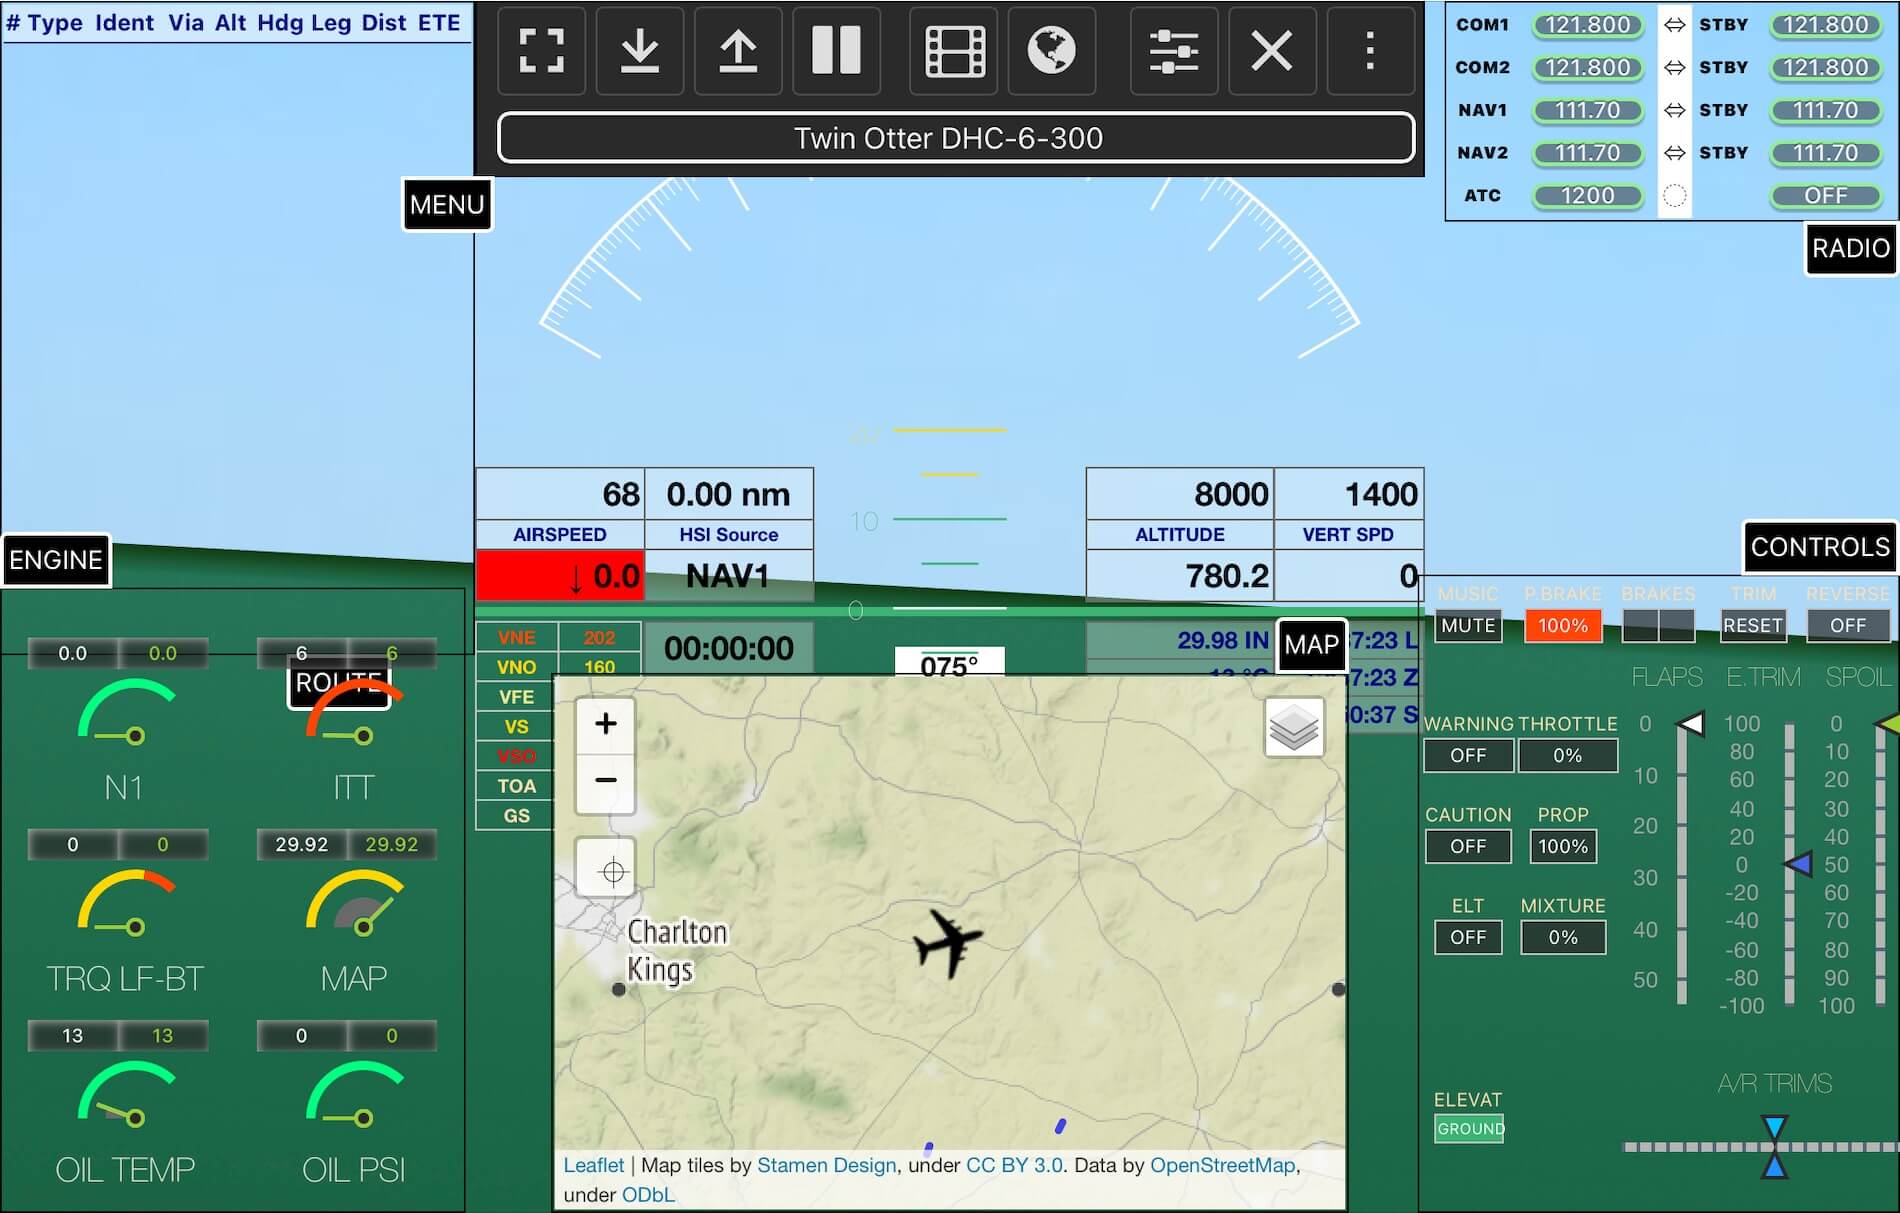
On my clean PFD I click once with my mouse left-hand button somewhere on the PFD screen (applicable for iMac browsers) or tick with my finger somewhere on the iPad screen. In the middle lower part of the screen I click the MAP text box. This brings up a MAP which can be by the way be modified, but more about that later. The inset MAP is small and not semi-transparent, so this is nice, but not what I want. Note : it can be semitransparent too, both maps admit transparency. See both <a href=”https://forums.x-plane.org/index.php?/forums/forum/592-skyscout-video-tutorials/” rel=”noopener” target=”_blank”>videos.
What I do next, I click near the upper part of the screen the text box MENU and then the “Earth Globe” icon. Wow, the result is awesome. This is where I was looking for. In full screen mode I have a MAP overlay image being semitransparent (opacity level) underneath my PFD. This is not it, no, you can change the transparency (opacity level slider) of the MAP. Again, in the text box MAP you select the “sliders” icon. When you click that, a small window pops up where you can adjust the upper slider and change the transparency on-the-fly.
Attention: the following screenshots are a reflection what I explained in the above paragraph.


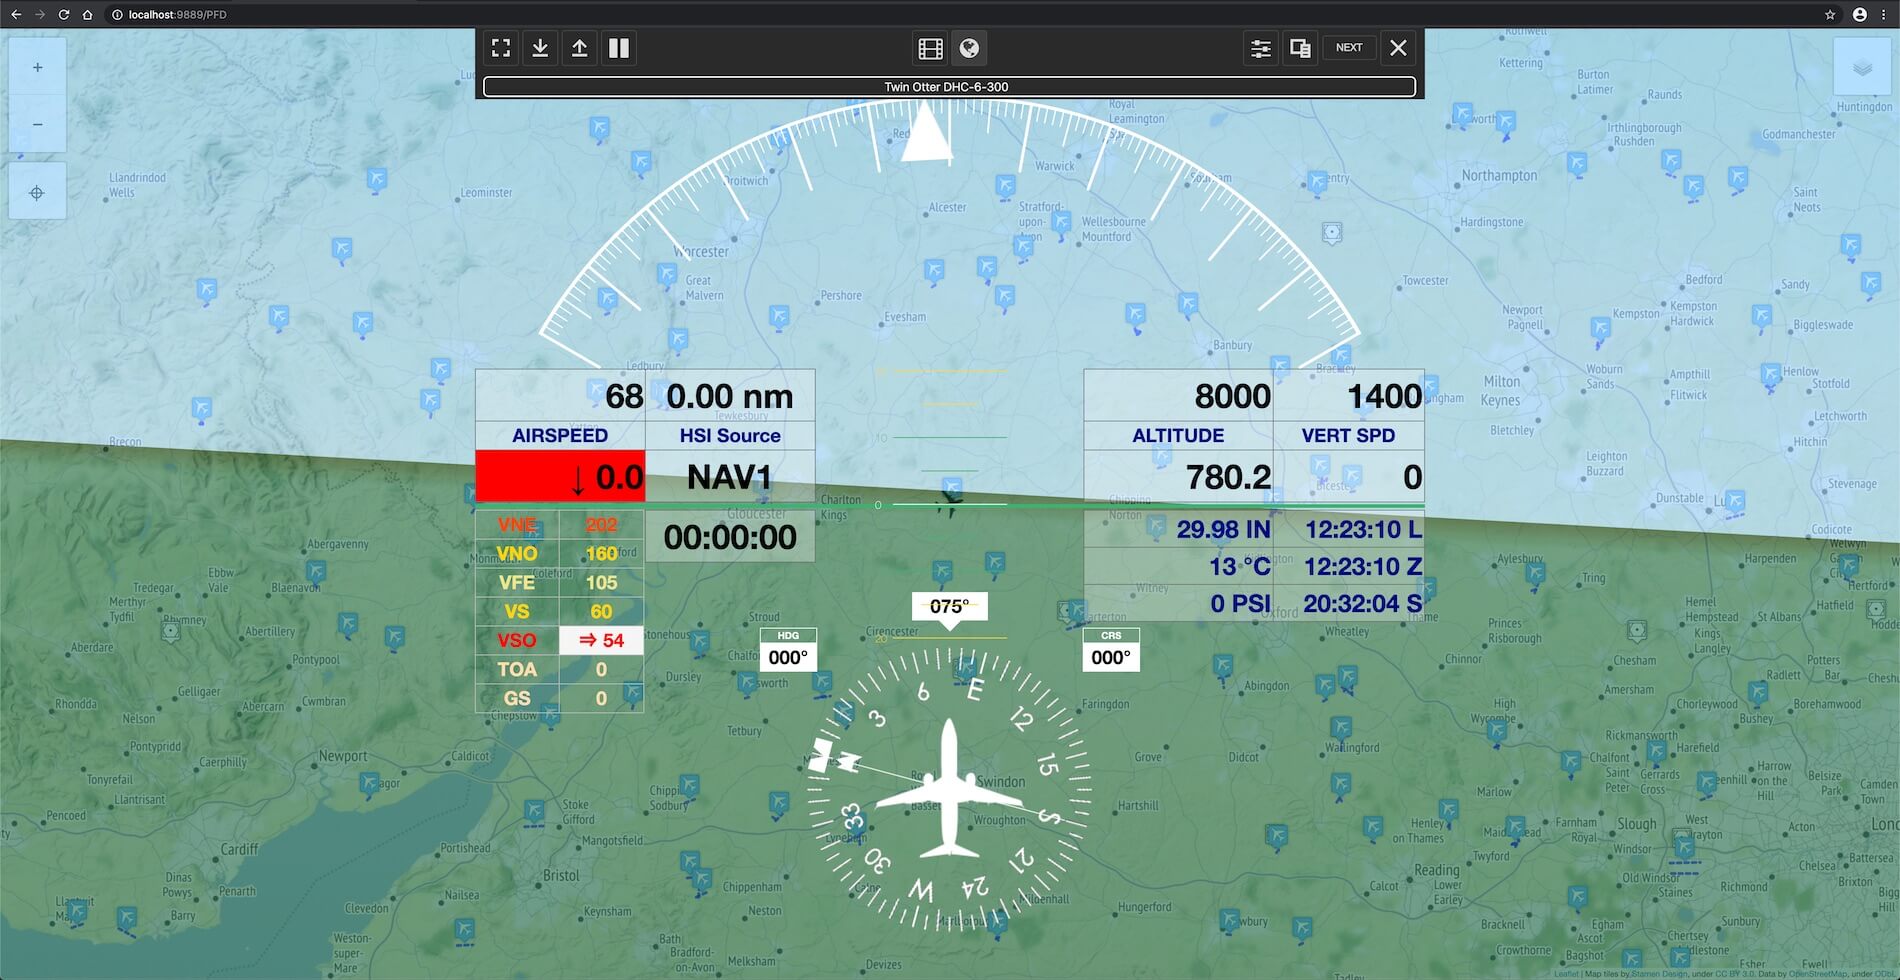


Besides the previous description, you also notice that the popup window allows you to change the local time at the airport by simple dragging the slider, or changing the date as well as the FOV (Field Of View). The blue FULL SCREEN button extends the web browser to full screen mode, if applicable. I write on purpose “if applicable” since when you do this on a second monitor, the browser will go to full screen mode, but on an iPad, the browser won’t go to full screen.
Two other things to highlight.
When you restart the same web browser on the same computer, you’ll notice that your previous settings are automatically saved. The SkyScout screenshots you’ve seen are made on my iMac with the Chrome browser. I’m not sure if this will also be when you’ve started SkyScout on an iPad. A quick check on my iPad learns me that your last PFD “look” is saved too. So the next time you start-up SkyScout PFD, you have the same lay out as you had, before you had closed SkyScout. The other thing I would like to bring to your attention is your actual airport position. When you look closely to the PFD SkyScout screen you see in the middle of the screen a tiny aircraft symbol … that’s You!
Next thing to highlight are/is the other sub function(s).
I first click the AUTO PILOT text box to clean up my screen. Because of this, I have in the upper and lower section of the browser all the available black text boxes. In the lower left-hand corner we had the ENGINE display, but it turns out that you can also select the FUEL or ELEC AC/DC information. When you have selected a sub function, it stays there unless you click once again on the text box. And so you can check out the other text boxes with reference information found in the manual.
MENU Text Box – Part I
Now it’s time to go a bit deeper into the MENU text box. Click it – we’ve seen this function box before – and let me explain a bit more about the icons.

From left to right you can activate – if applicable – web browser full screen mode. Then you see an arrow DOWN and UP. The DOWN arrow shows you almost every other sub functions popups namely ENGINE, MAP (small mode), CONTROLS and RADIO. If you don’t like this, you click the UP arrow and SkyScout PFD goes back to what it was.
Then you see a PAUSE button which paused X-Plane. Besides that it pauses X-Plane, you’ll see it also in the line below. Then you see a movie icon. Click it and the MAP is instantly removed leaving a clean PFD behind. To get the MAP back, click the Earth Globe button. So easy, right?


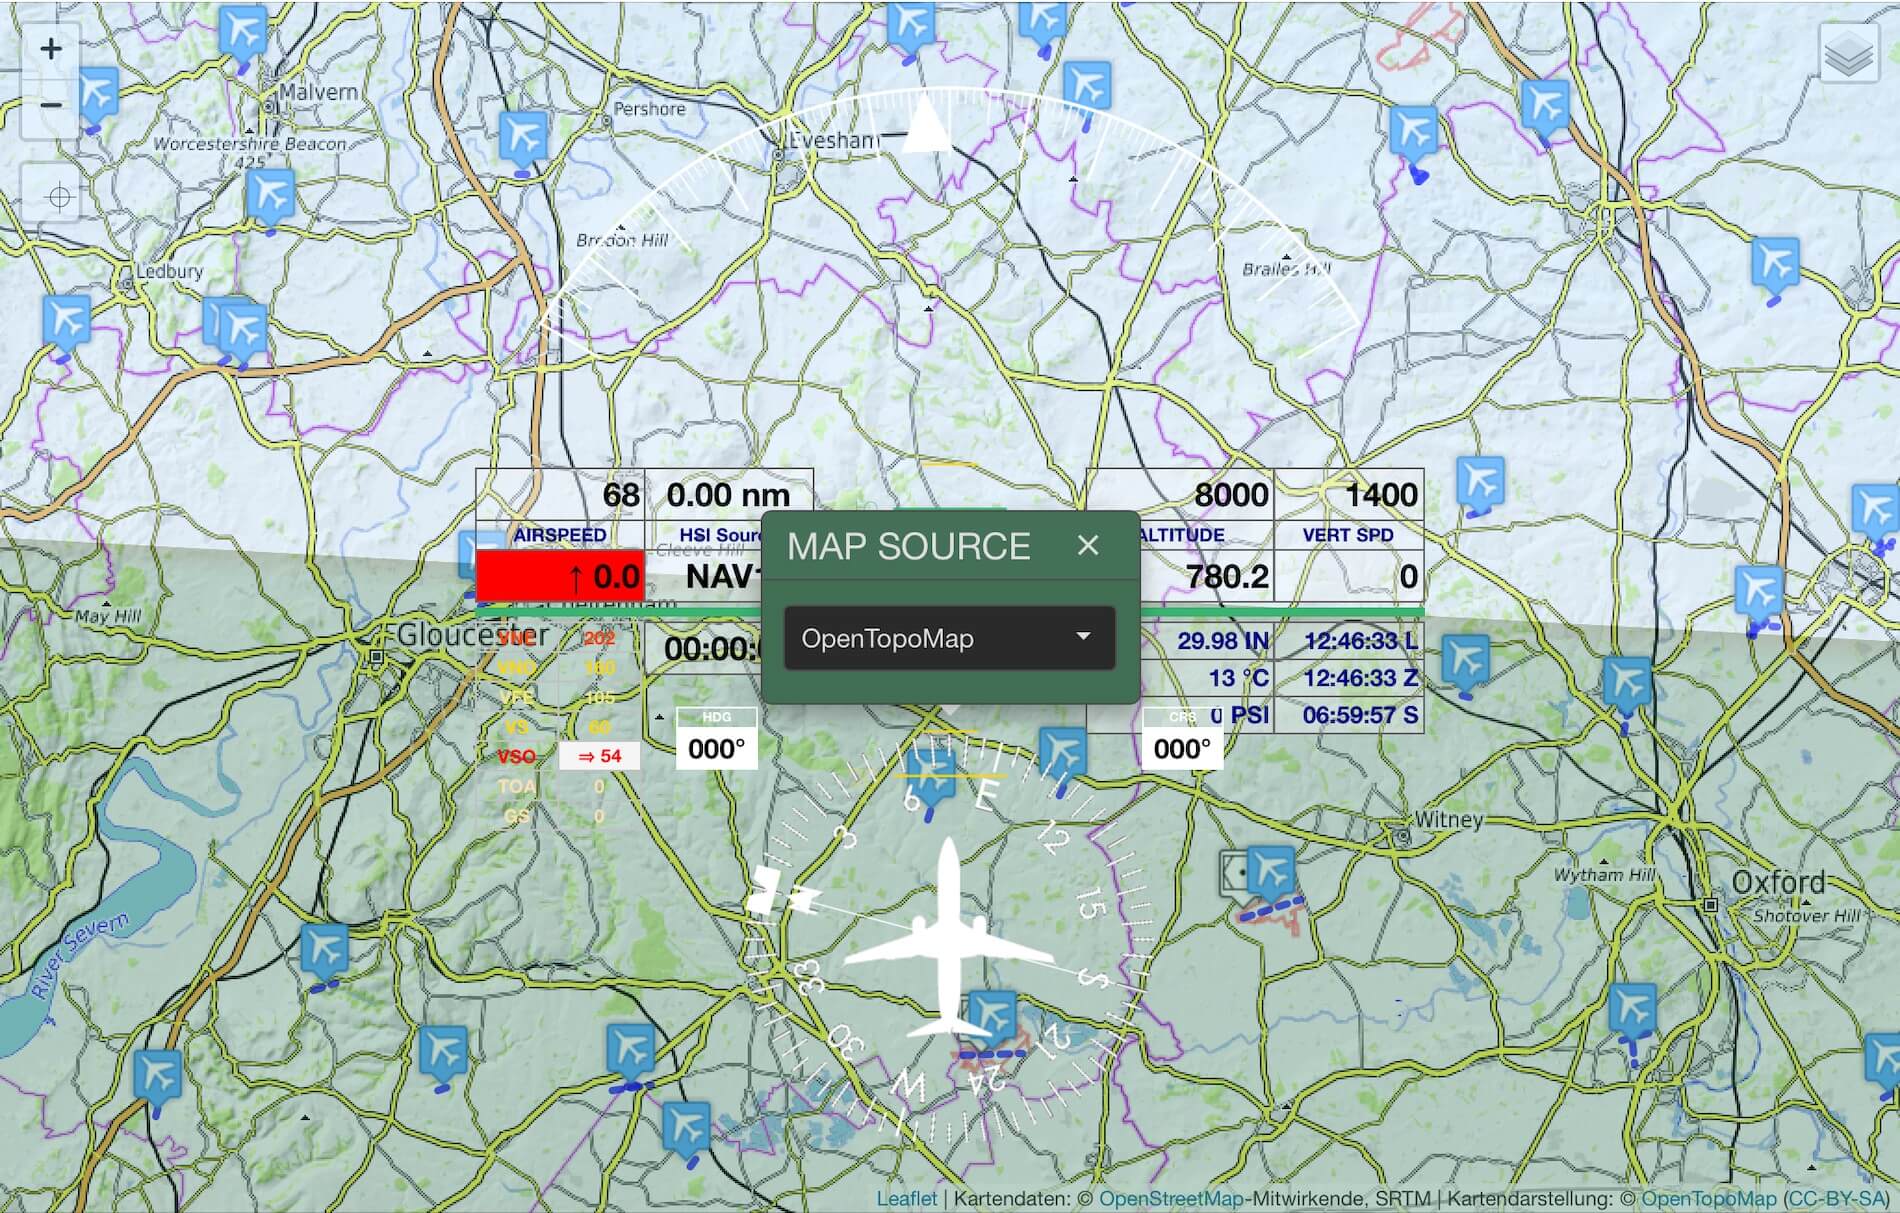
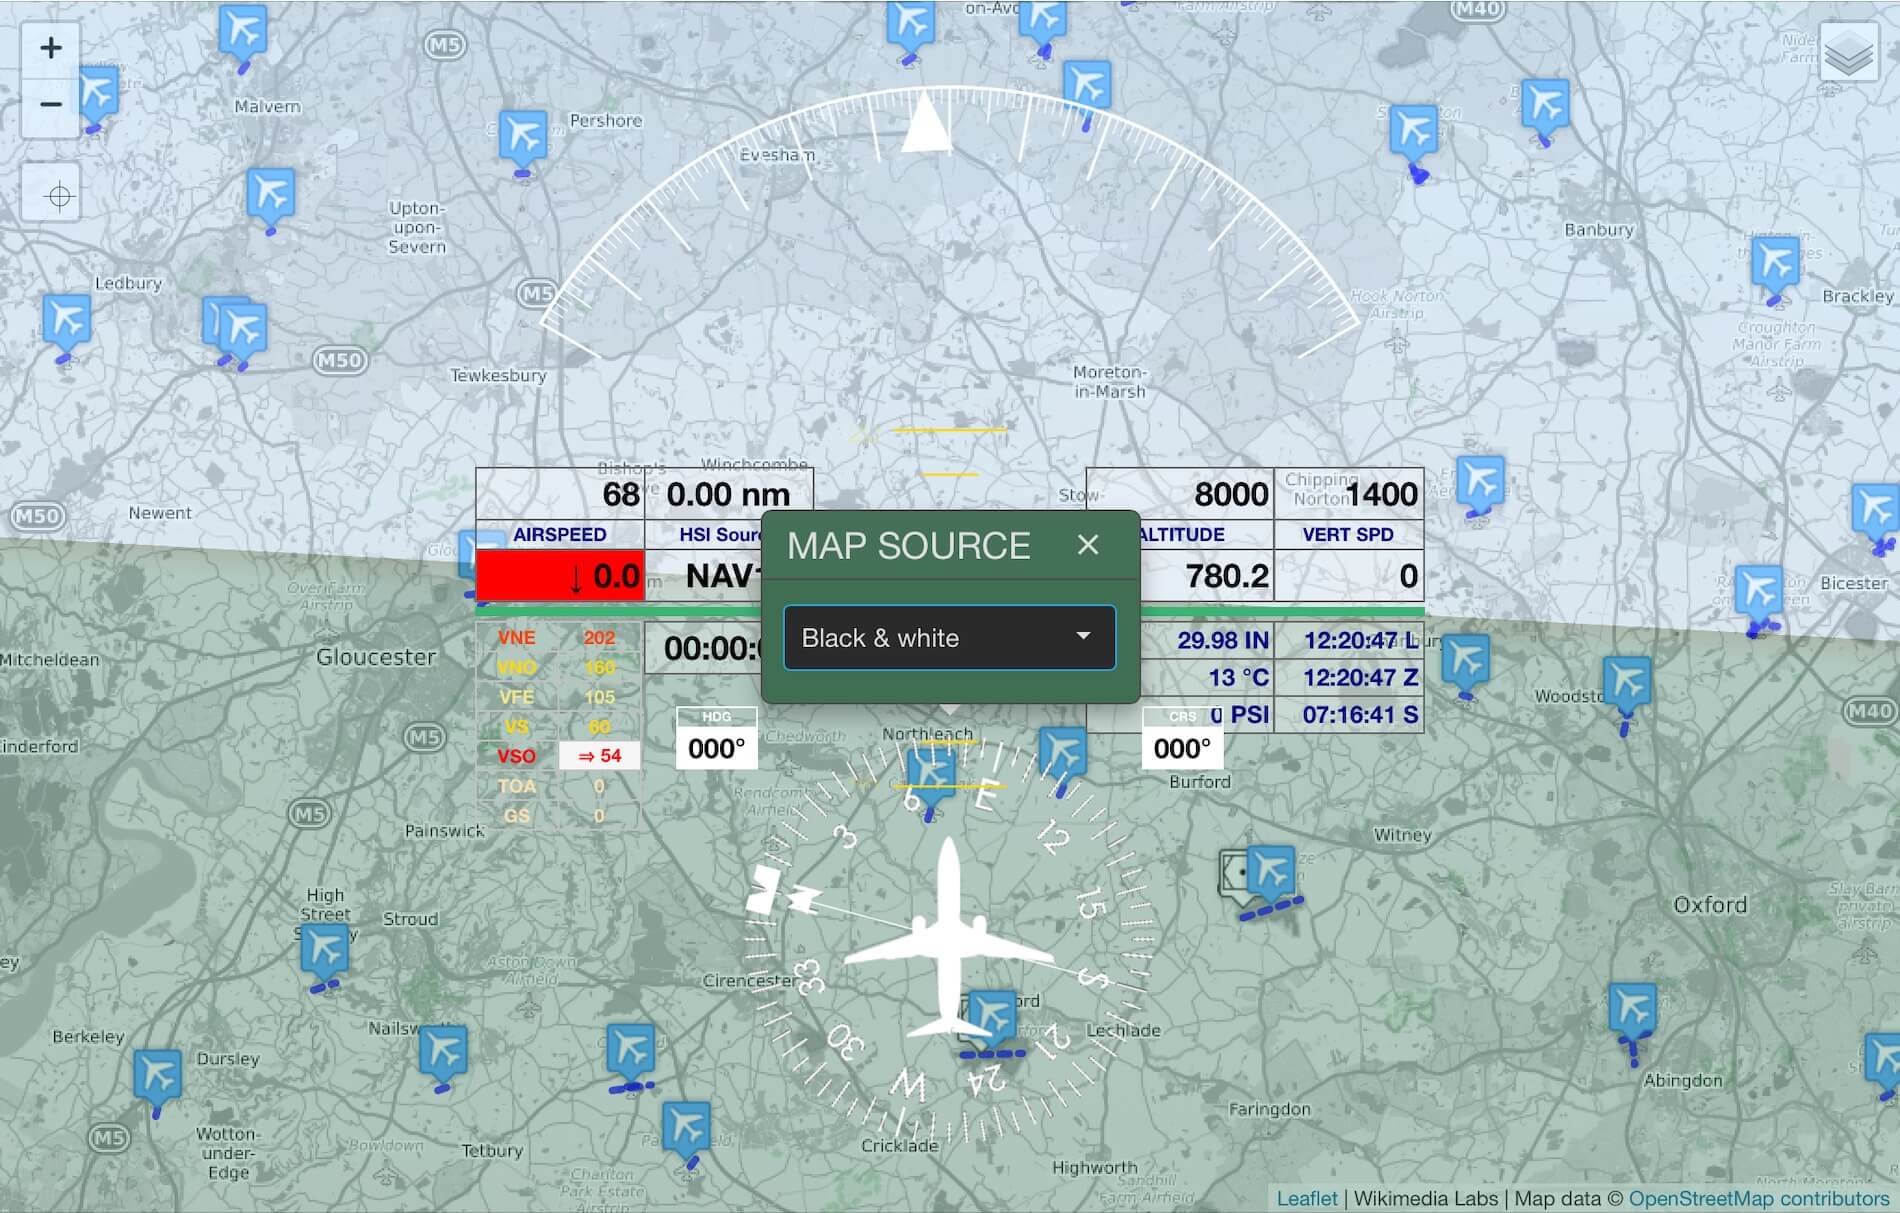
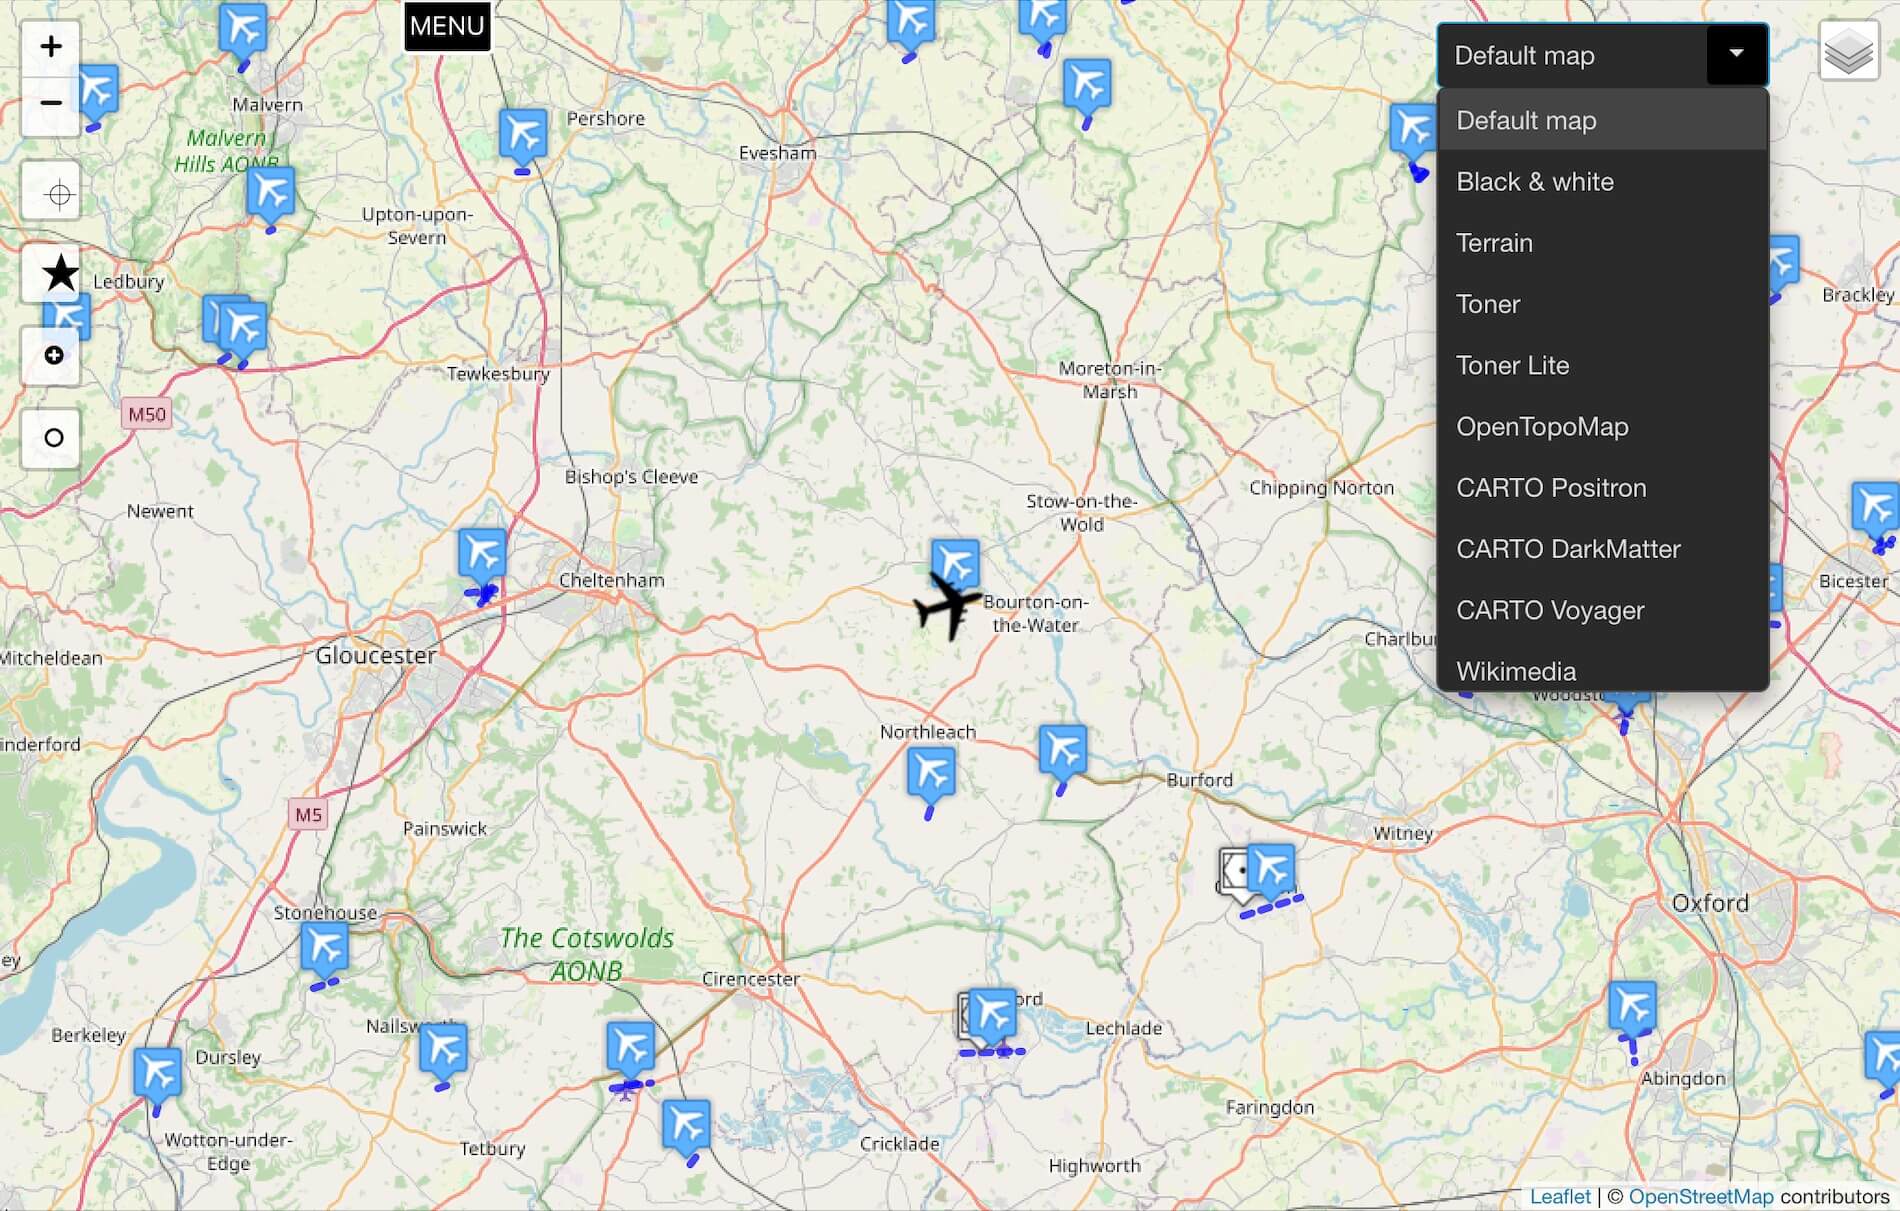
The Settings button I’ve discussed before. The X button, oops, I didn’t want to do that, but OK, I did it. This button brings you back to the startup screen with the blue function buttons. And then finally, the last button with the 3 dots gives a small popup window. When you click the upper icon, it brings up another small MAP SOURCE pulldown window. He, that’s interesting. Via the pulldown options you can select what kind of map you want to see. I give it a try and select OpenTopoMap, then Black and White and finally I try Toner. Awesome options when you don’t like the TERRAIN map which I had from the start. Curious how the selected maps look like? Check out the following screenshots.


And now, one final step to the NEXT page. Yes, that’s the last function from this page.
MENU Text Box – Part II
In the second MENU text box which looks like the screenshot below, we have different options. All of these options I’ll discuss in a minute, can also be reached via the SkyScout start page or via the other sub functions on the PFD in MENU Text Box – Part I, with some of them in a limited configuration.
From the left to the right these 5 buttons offer you first the switching panels for the aircraft lights, aircraft electrical systems, the engine(s) and panels. Closing this popup is done via the “X” located in the right-hand upper corner. Attention: don’t use the browser arrow!
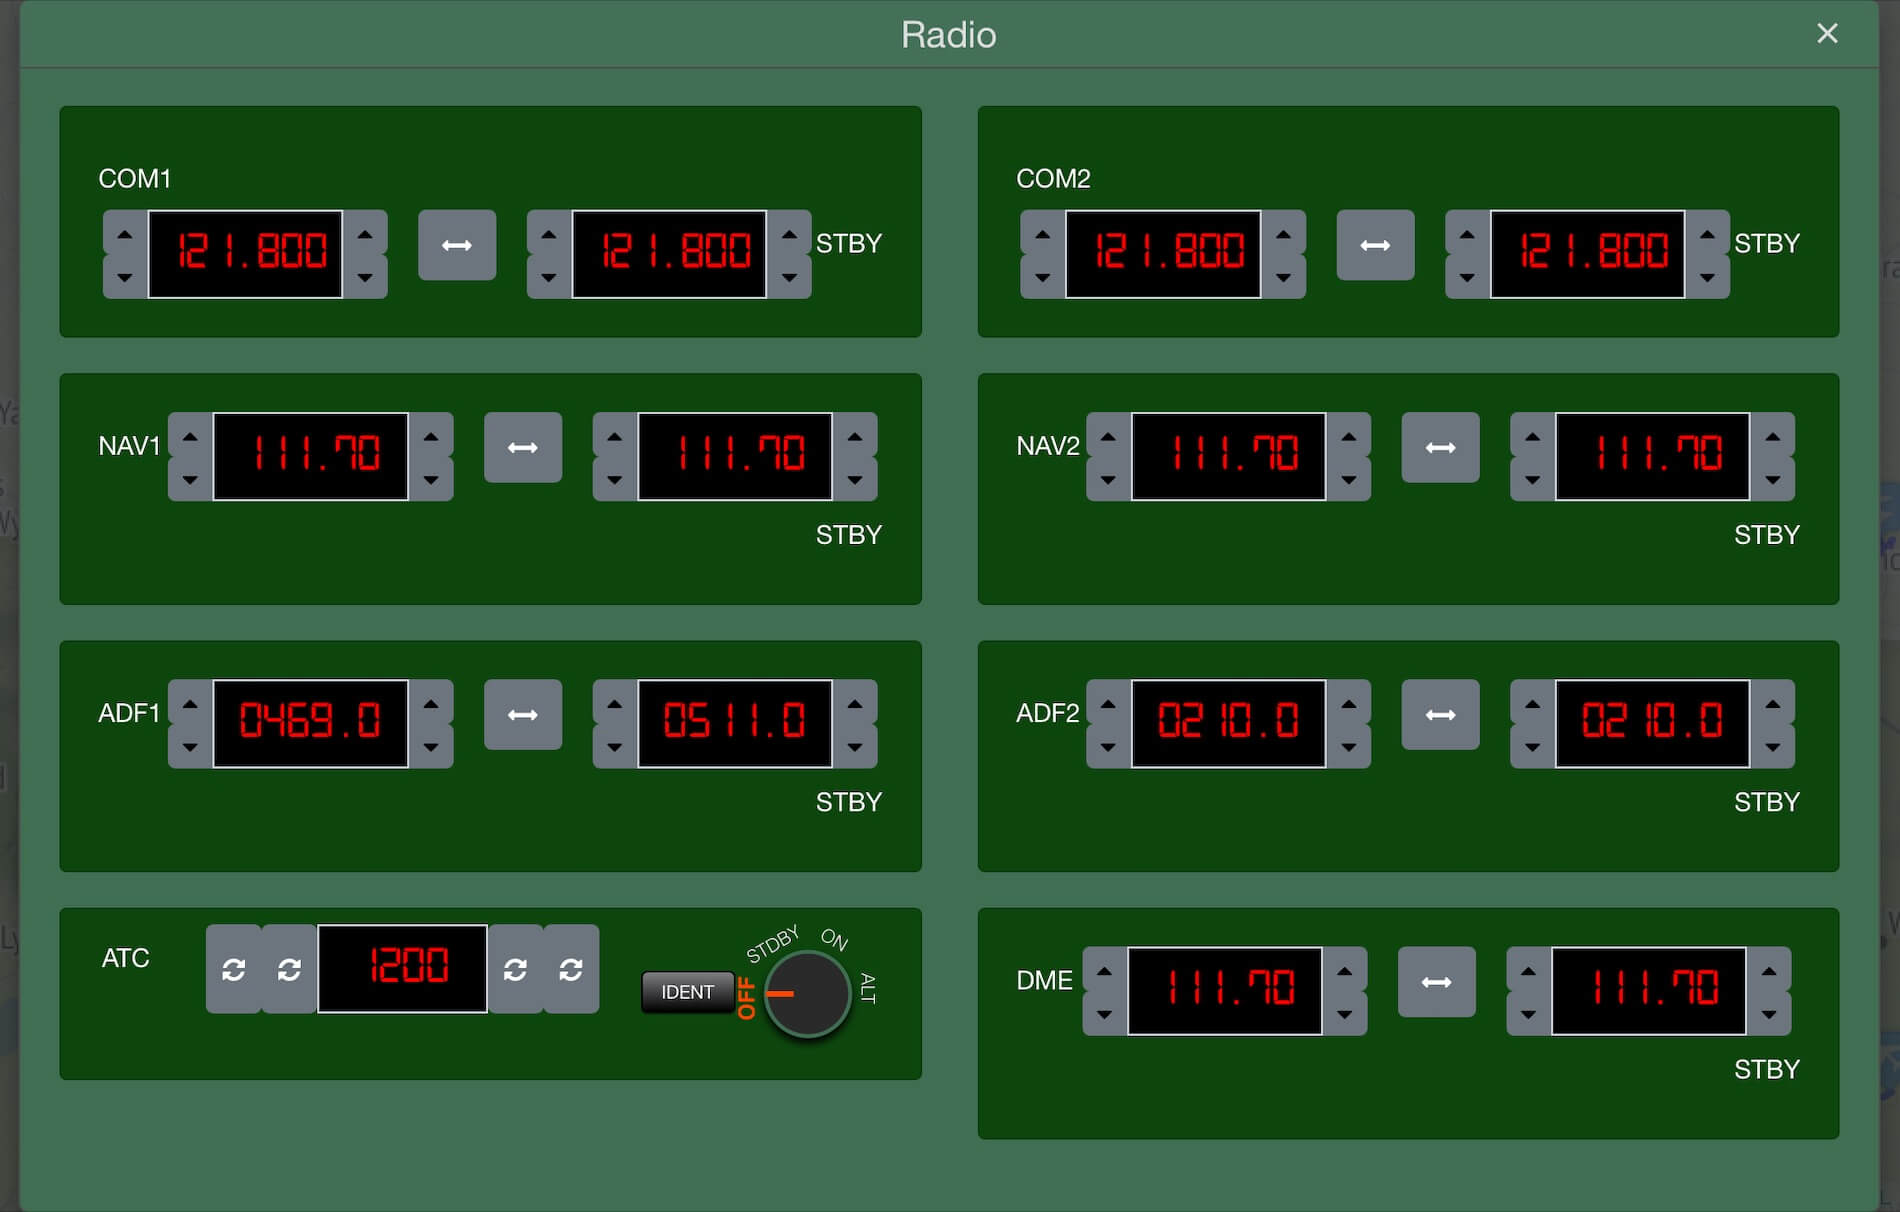
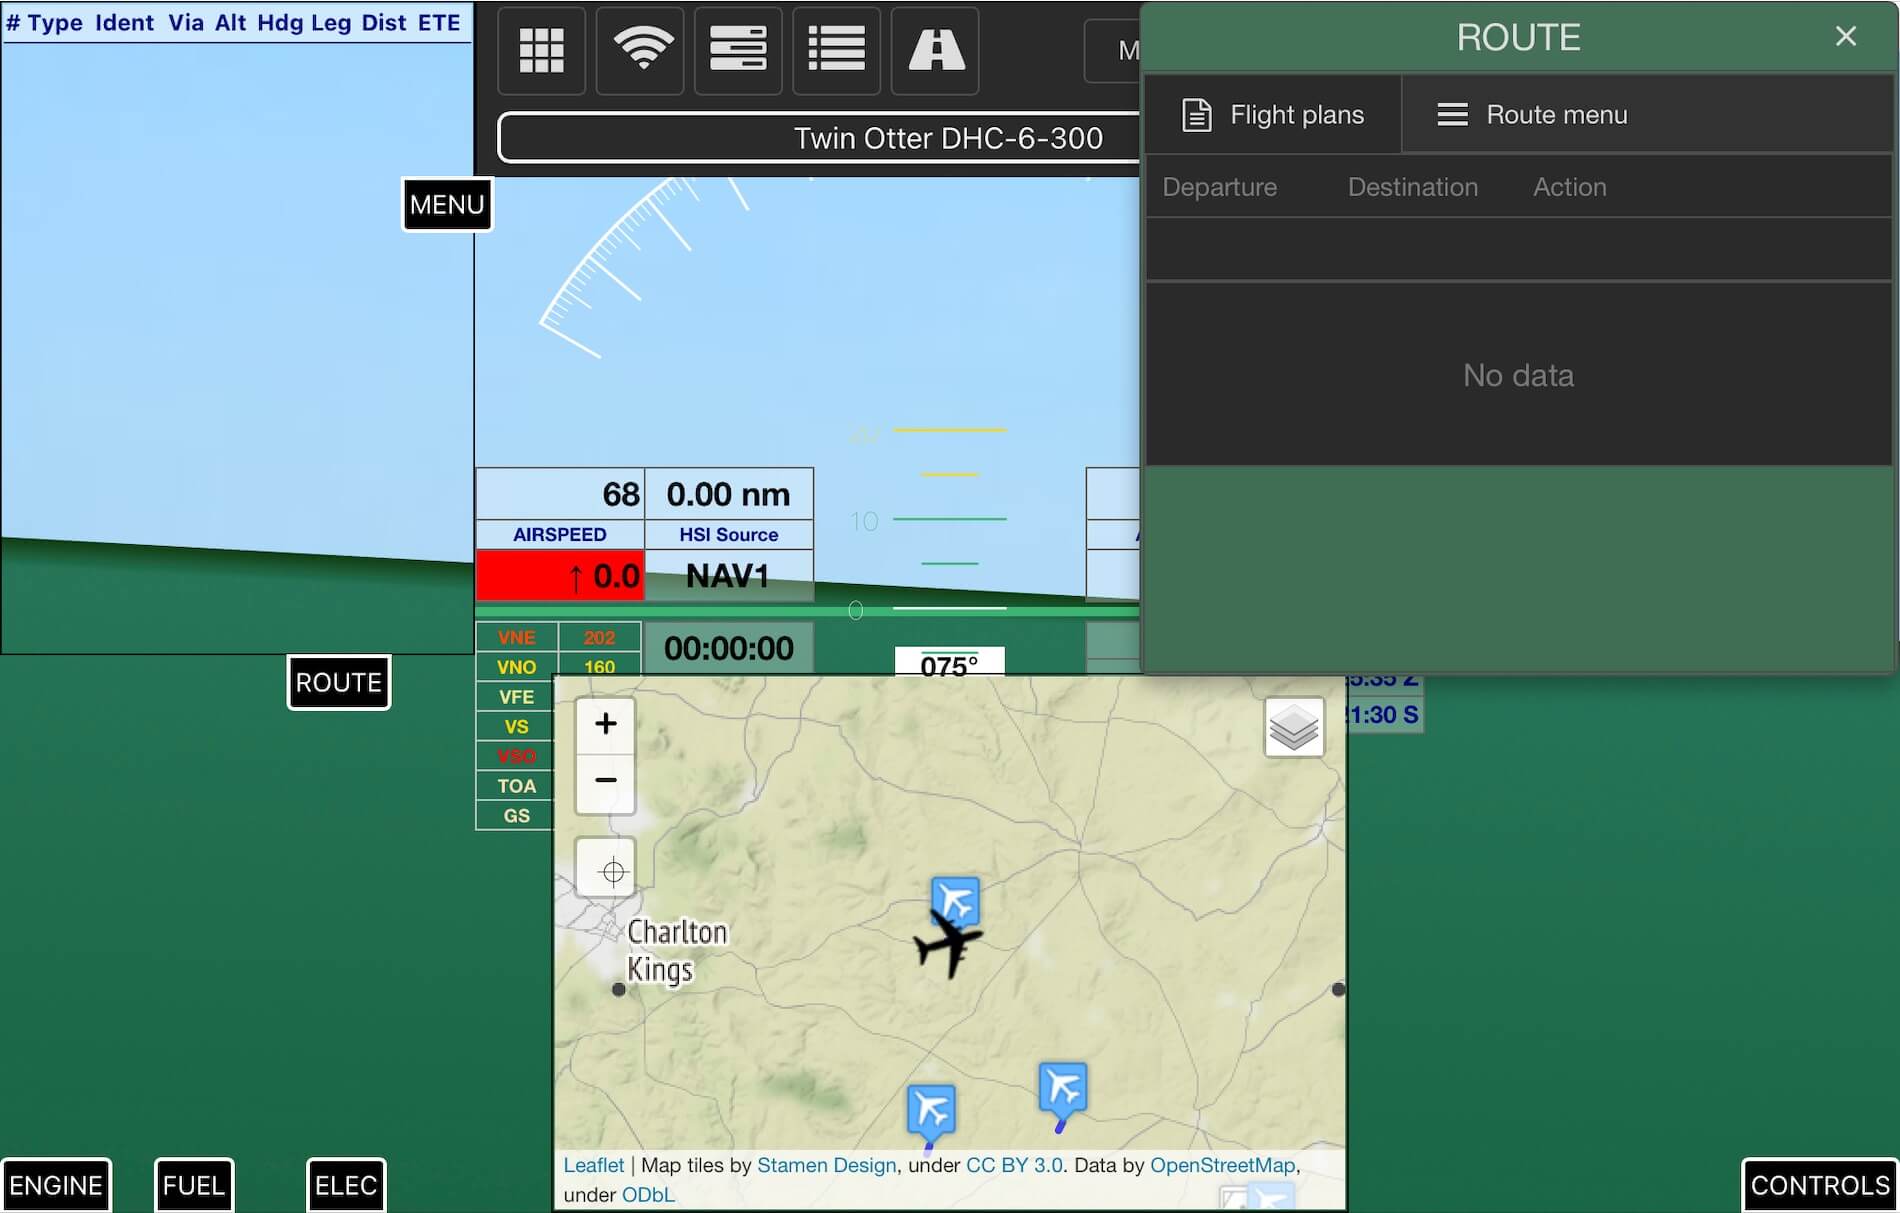
The second “wifi” look alike button gives you the RADIO/NAV panels. The third button shows you the FUEL page with all kind of adjustments. Then – 4th button – you get the ROUTE page. On this page you can create or select a “fms” route. On purpose I write “fms” since this is the default Flight Plan format and flight plans should be stored in the Output/FMS Plans folder. and the 5th button allows you to select and search for airports. For your convenience, find some of the above discussed pages below.


Following the icons.
The next icon is identified as MAIN. When clicked, it brings you back to the previous PFD page with the first set of MENU text box icons. The “X” does the same that brings you back to the SkyScout start page with the blue buttons. And last but not least, the 3 dots button.This option leads to a popup menu with additional icons and thus additional functions.

First, the “calculator” look alike icon gives you access to, if installed, the add-on WebFMC. If you haven’t installed the WebFMC app, then you only see a green page. Closing the popup window is done with the “X” at the right-hand upper corner.
The second icon looks like an “eye“. It will show you all kind of cockpit and plane views as well as changing the time of the day and the FOV. Next in row is a “cloud” look alike icon. This page allows you to change weather conditions on-the-fly. The page comes up with “weather presets” but you also have tabs for “Atmospheric Conditions”, “Clouds”, “Wind” and “Real Weather”.
The next icon is a “monitor” look like icon. When you click this icon, you end up with a SIM page. The page offers different tabs for different simulator modifications while on each tab except “Quick View” you have light green buttons to make your choice. They all speak for themselves. One additional note for the “Performance tab. This page gives you detailed FPS (Frames Per Second) statistics. It shows you the current, max, min and average frame rates. Besides that, you have the option to “BOOST” the frame rates although it seems to be experimental.
And the last icon deals with music. It can be a bit boring while flying and only listening to the engine sound and if you have, ATC. I can imagine that you want to hear some background music to relax a bit while flying. That’s the idea XPlane Aviator had too. You’re able to select from worldwide music stations and play their music or copy sound/music files from yourself and store them in the dedicated SkyScout music folder.
To get an idea on what to expect, find some of the above discussed pages below.


I’m aware that I haven’t explained every sub web page in full detail, but I think I’ve given you a good idea what to expect when using this PFD page. When you went thru all the paragraphs and sections with their related screenshots, you’ve noticed that with the SkyScout add-on you can almost, perhaps not all, control, manipulate or change X-Plane settings. While writing this PFD section, I’ve been amazed about all the possible options or perhaps I should write, the almost unlimited possibilities! But there’s still some work to do. I still need to explain the MFD, XPD and MAP buttons although these are a bit easier to explain.
Join me?
Running SkyScout – MFD
Overview
At first, SkyScout MFD (Multi Function Display) doesn’t look like the SkyScout PFD. On the other hand, when you observe the MFD a bit closer, several functions, popups and icons are similar. But let me first start with how the “at first start-up” MFD looks like or how it is organized.

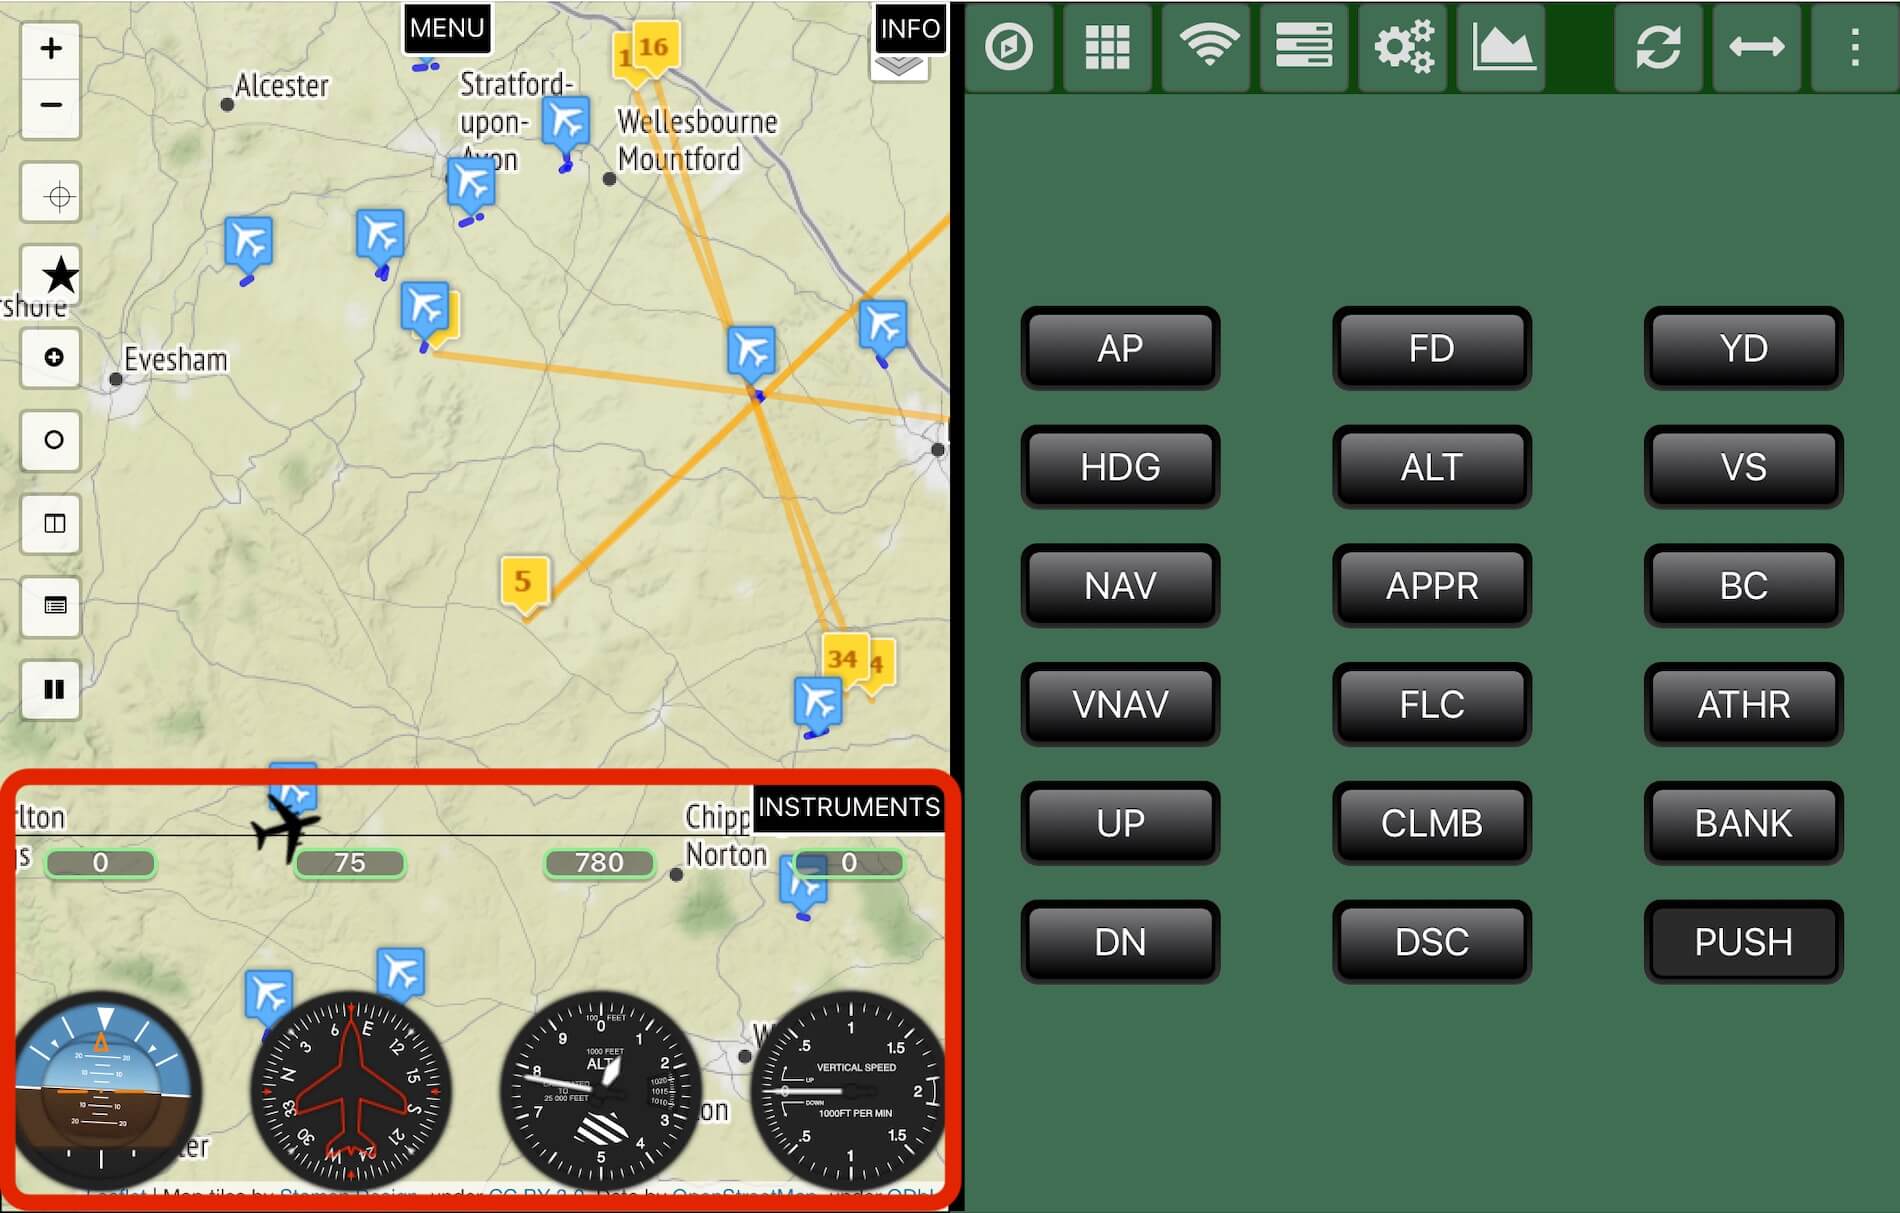
As you can see on the above screenshot, the MFD doesn’t have the same lay-out as the PFD, but on the other hand, on the left side I see a MAP. If the black text boxes aren’t visible, tap once on the iPad screen, you and I will see text boxes for MENU, INFO and INSTRUMENTS. The easiest one to explain are the basic distances and time parameters, represented with the INFO button.
The INSTRUMENTS information is an interesting function since it will show you on the lower left-hand bottom the basic aircraft analog flight instruments like the horizon, heading, altimeter and IVSI (Inertial Vertical Speed Indicator).

LH MFD Side
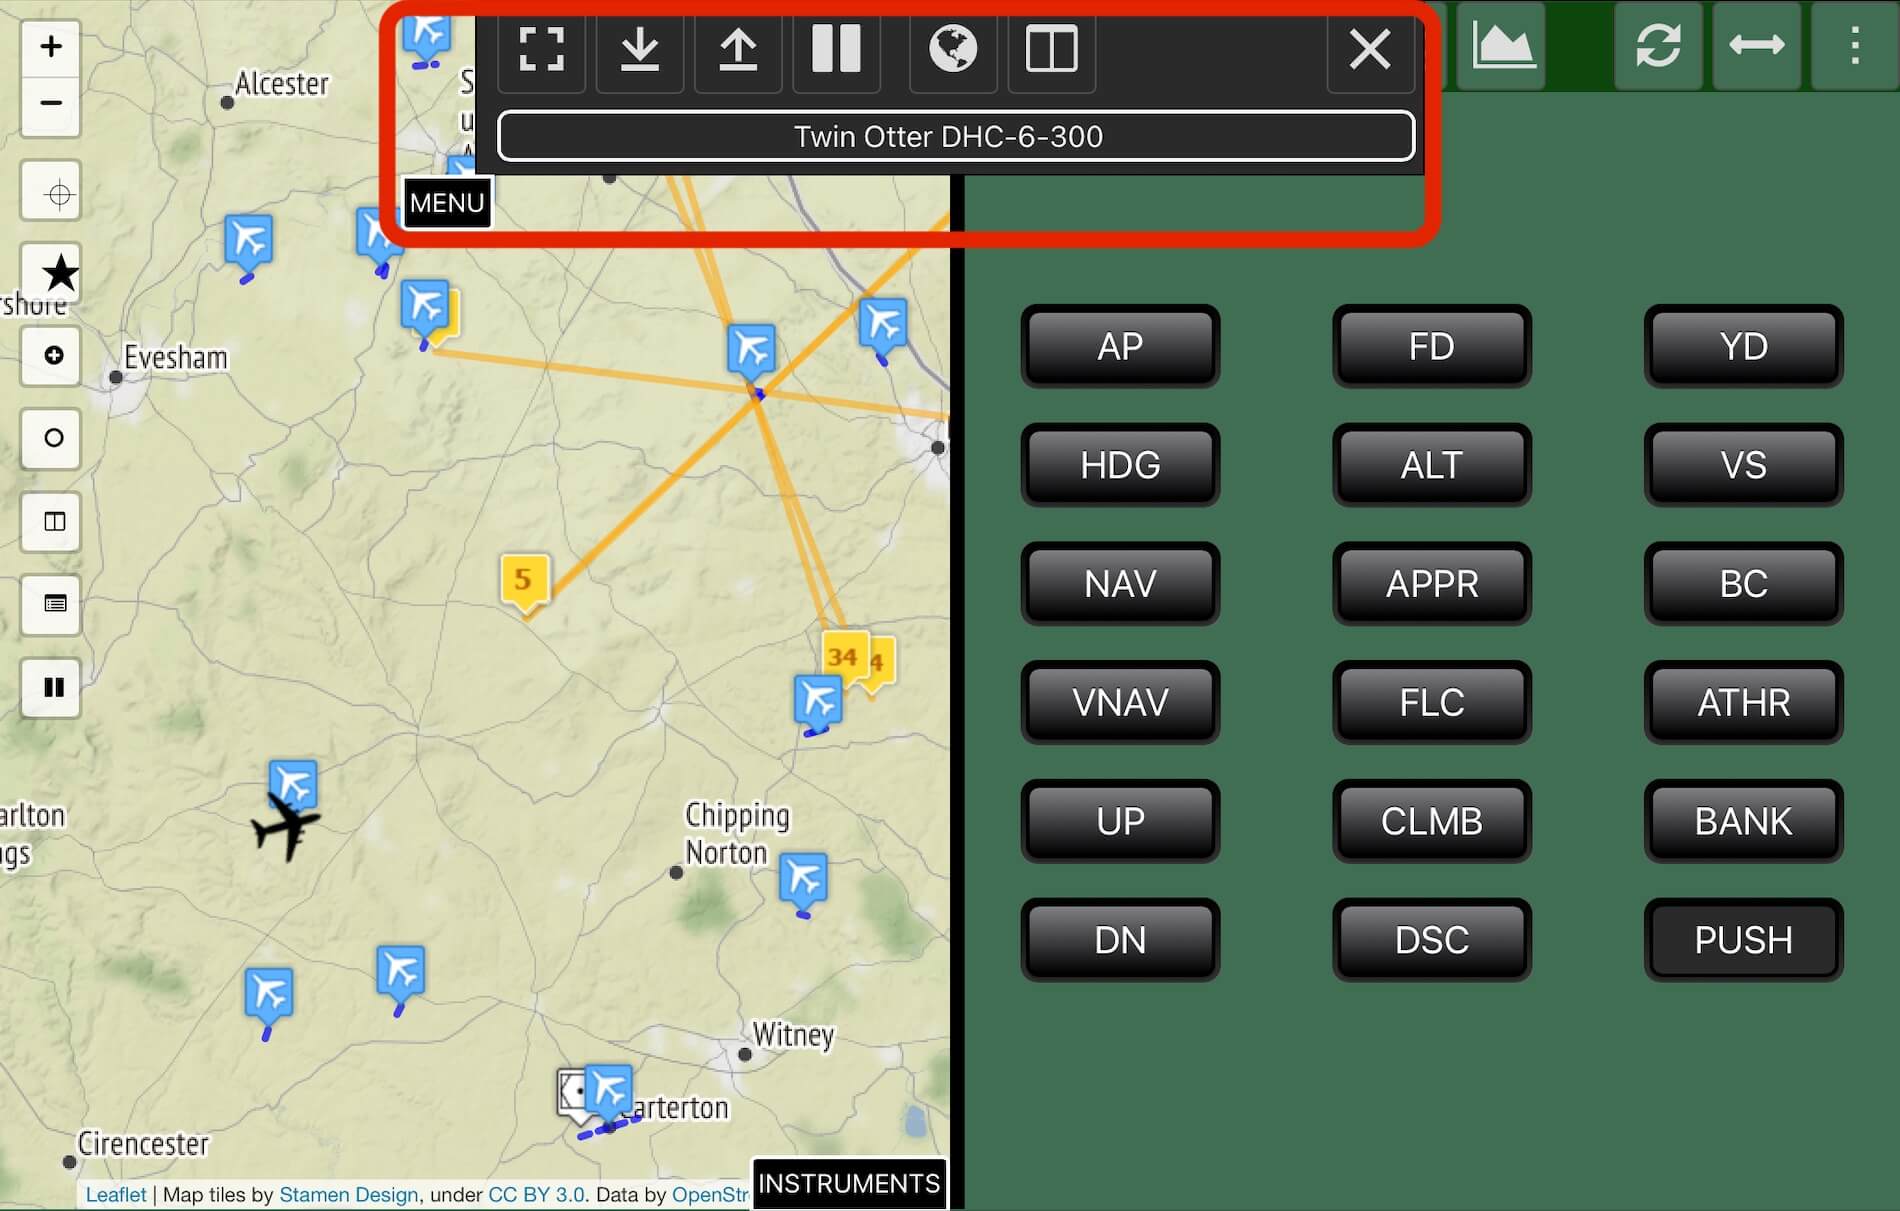
On the left side of the MAP you see some squares. Most of them are self explanatory, but one has my full attention and that’s the icon that shows a “split screen”. When I tap with my finger on this one, the iPad screen changes to a FULL MAP mode. Quite interesting isn’t it?
Keep in mind, I do this on my iPad, and since it’s an additional device, I can use it as a flying map. And yes, I know, there are plenty X-Plane applications – also a function within X-Plane itself by undocking the map – that can show you an external map on either a 2nd monitor or tablet/iPad, so it is not unusual, but it’s the combination of all kind of other parameters that can be seen within this add-on.
And one more thing to tell you is “which parameters” do you want to see on the MAP? In the right-hand upper corner you see an icon like a paper stack. I click or tap it and I’m able to select aviation related parameters. Some are already ticked, but I can add more. To make it easy, I tick them all, tap somewhere on the MAP screen not in the popup window, and when you’re lucky, additional added parameters become visible. Cool and that on-the-fly!


Perhaps there’s no need to mention this, but just in case: there’s a huge advantage using a tablet or iPad versus a second monitor. Tablet/iPad have touchscreens while most of the 2nd monitors don’t have this. That said, on a tablet or iPad you can zoom IN/OUT the map/chart either via the icons “-” and “+” or much easier with your fingers as you do normally also on a tablet or iPad.
When you want to go back to the double view mode, tap or click (on an iMac) again the split screen icon.
RH MFD Side
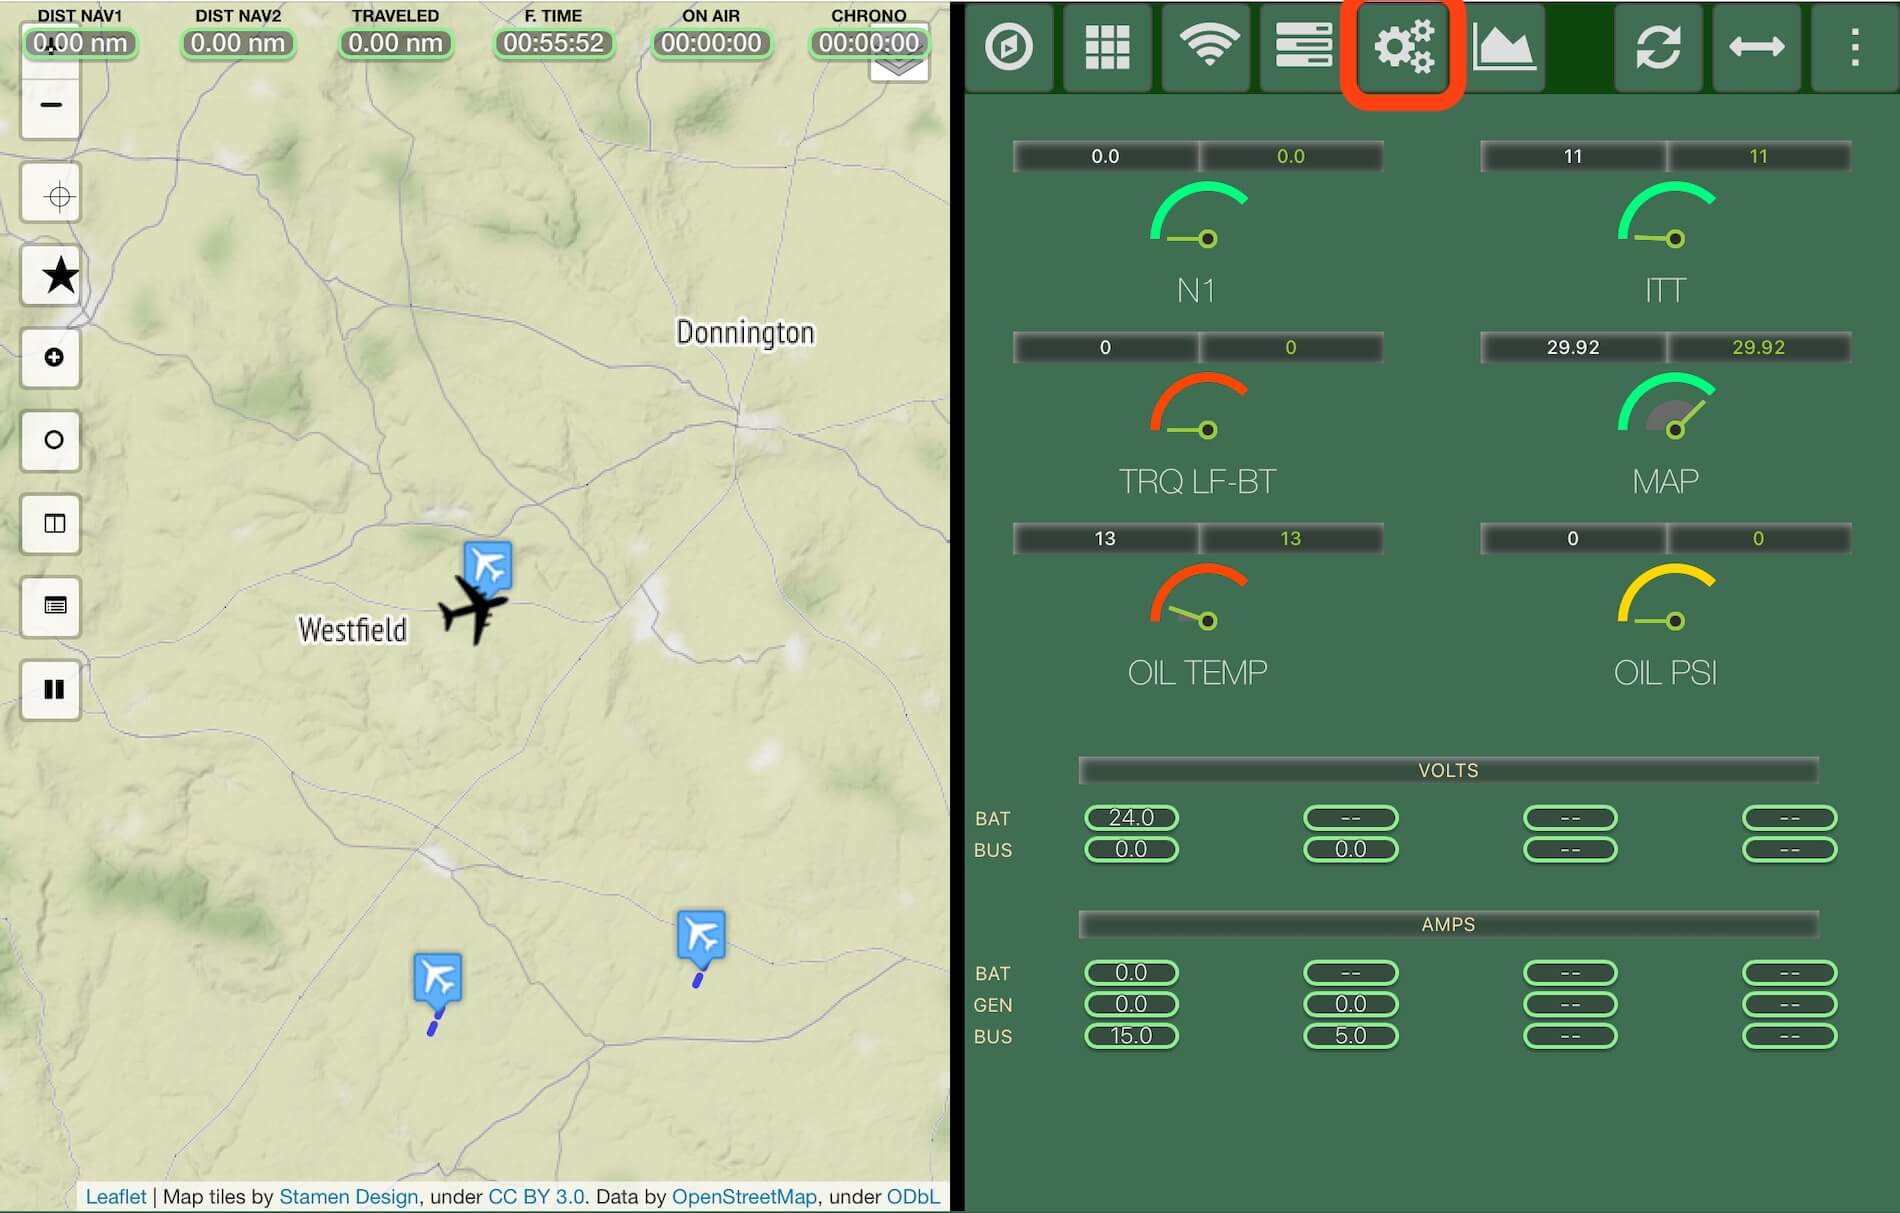
By default, the right-hand side of the MFD shows you from top to bottom the ENGINE- and ELEC parameters. Not really new since we’d seen them before. On top of these parameters I spot several icons. You will get detailed information from me within a minute, but first this screenshot.
From left to right the first icon/button deals with the Auto Pilot. Tap this icon and the AP functions pop up on the right half of the MFD screen. The second button should be familiar to you since it shows you the SWITCHES page. We had seen this before during my explanation of the SkyScout PFD. The WIFI look alike icon represents the RADIO COM/NAV page and that one we’d seen before too. The 4th icon brings up the FUEL page. This should be familiar too since I discuss that one page during my PFD explanation.
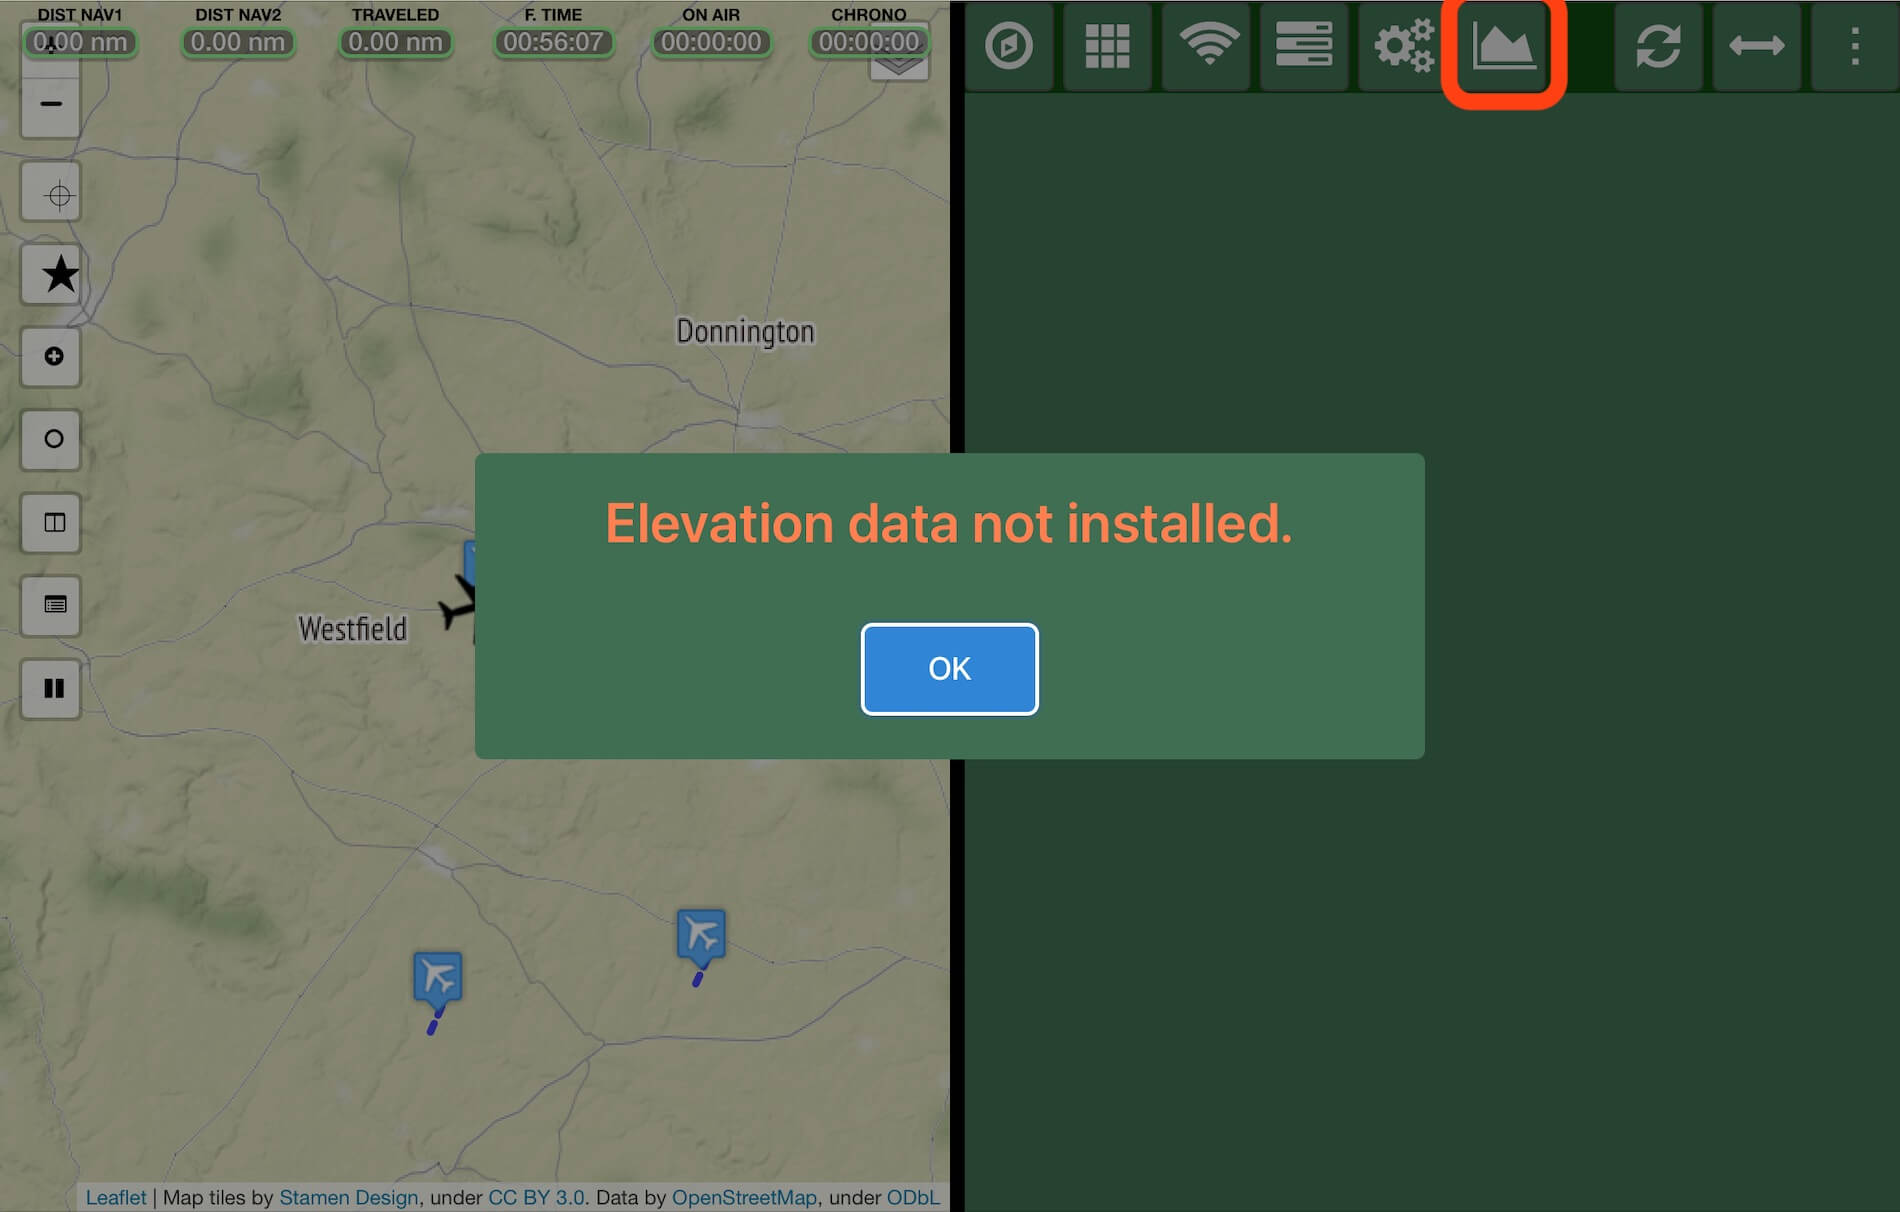
The GEARS icon is the startup page as we saw when we started with the MFD. The MOUNTAIN look alike icon isn’t yet active since no elevation data is available. The 7th icon allows you to swap the split MFD screen. Then, almost at the end, is the STRETCH icon that stretches out the right-hand MFD over the full width of your iPad. This mean you’ve no longer the MAP mode. It could be handy, but personally I prefer the split MFD mode. Time to show you how the right-hand MFD looks like.


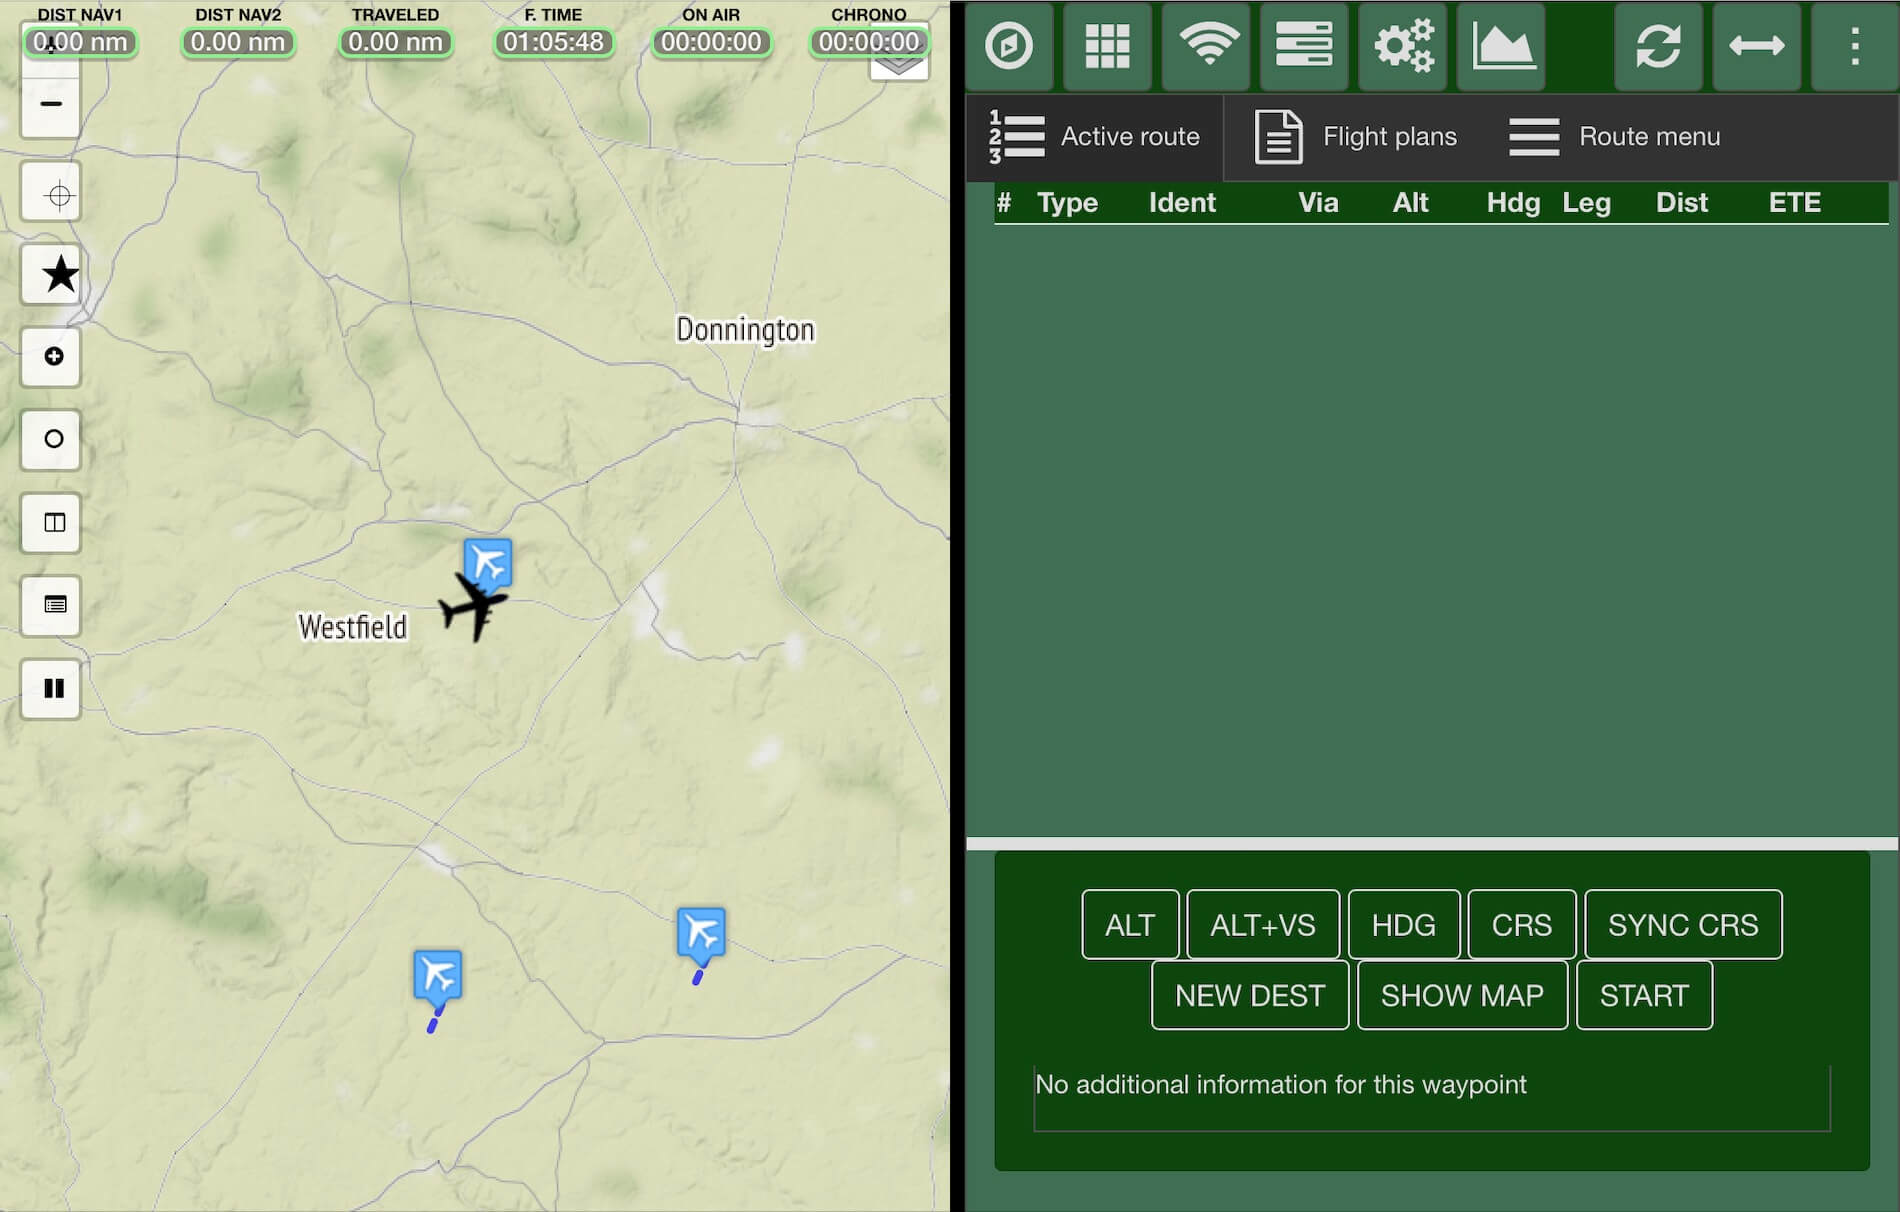
There’s one more icon that needs to be explained. We have seen this one before while explaining the PFD. I’m talking about the 3 dotted icon with the popup window. The upper icon in the popup window brings you to the route and flight plan page. As you can see on the following screenshot it’s empty, but when one or more flight plans are available, you can see and select them. The lower icon should be familiar too. When we tap or click NEXT, the icons on top of the display are replaced by the same icons we have seen and discussed in the PFD section “MENU Text Box – Part II“.


I hope you’re still with me since it’s a long read, but SkyScout offers so much, that it’s even for me with so many years if review experience not always easy to find the right flow. This section concludes the SkyScout MFD.
Did I cover everything so far? Most of it, but more important, when you like the SkyScout DEMO and read this review, you’ll get the right “flow” too. Time to move on to the XPD.
Running SkyScout – XPD
Overview
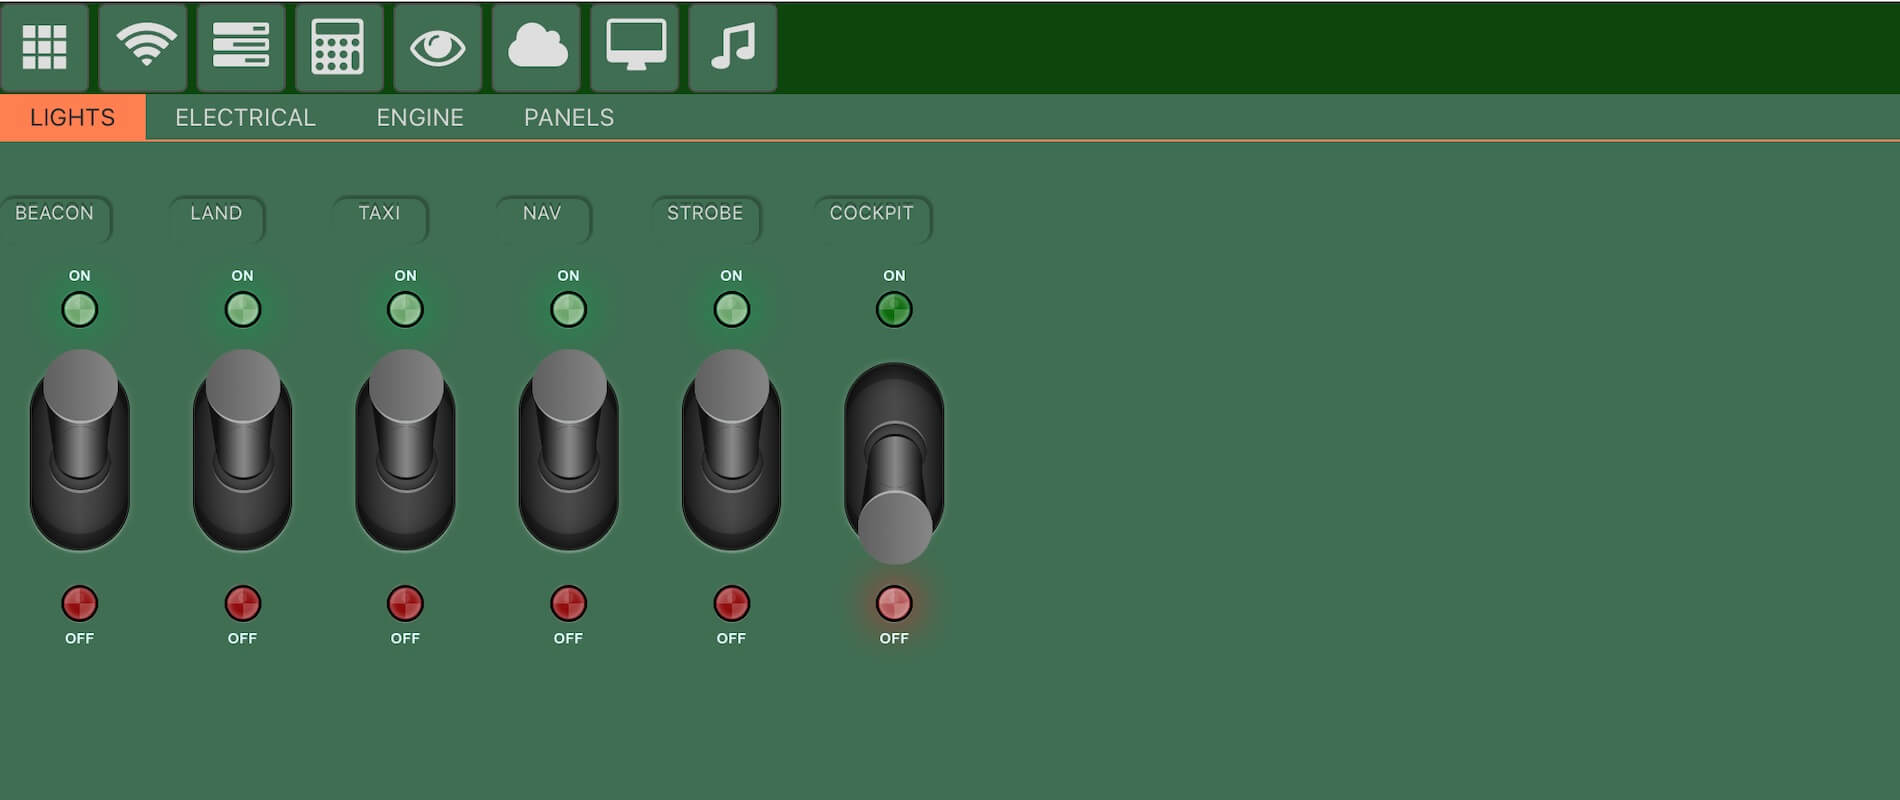
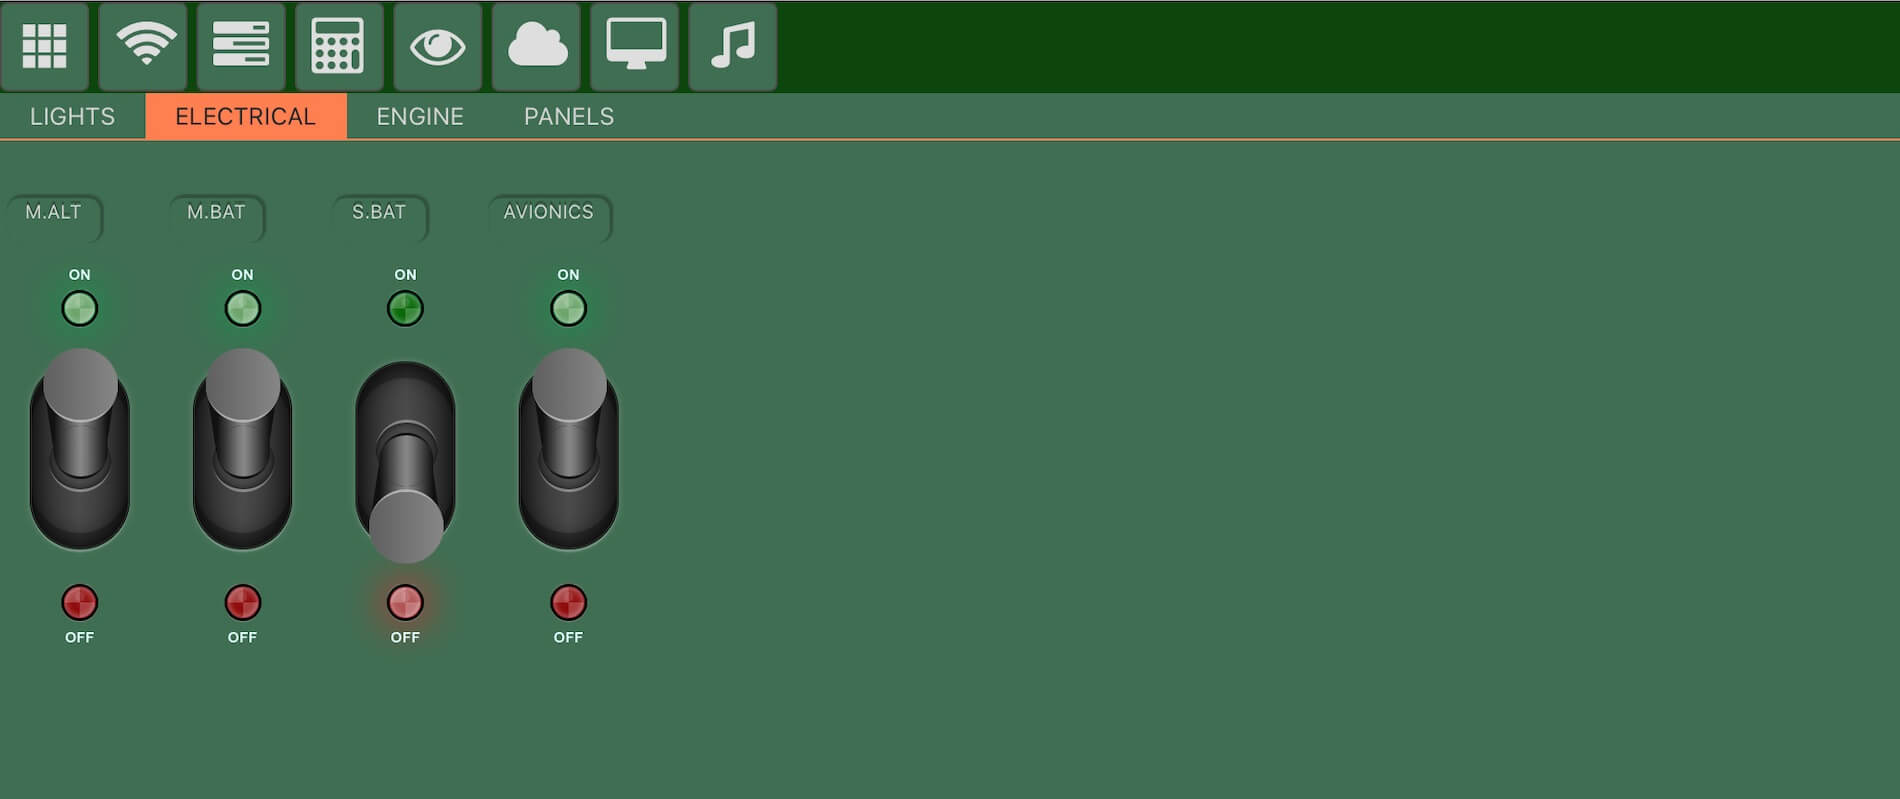
XPD or I assume Switch Panel Display offers over the full width of your iPad screen the different switch panels. Yes, you’re right, we’d seen these switching tabs/pages before. This XPD offers 4 switch tabs namely LIGHTS, ELECTRICAL, ENGINE and PANELS. Lights page shows all external lighting switches. The Electrical page offers switches related to the alternator, battery and avionics. The engine page comes with switches like for the fuel pump, pitot heater, magneto and start button. And finally, the panels page comes with 4 rheostats – dimmers – for the different panel or cockpit lighting systems and the seatbelt and no smoking switches. and believe me, it all works on -the-fly.
On top of that, I see icons we’d seen before when discussing the right-hand MFD. So, for that I refer to the section “Running SkyScout – MFD | RH MFD Side”. Although you will have an idea what to expect, find below some screenshots of the XPD pages.


Running SkyScout – MAP
Overview
And last but not least, the SkyScout MAP mode. We’ve seen the map page before, so there’s not so much new to tell. On the other hand, the advantage of having the MAP button on the SkyScout start page gives you immediately access to the map or chart, whatever you prefer. And, as previously highlighted, we can change the type of map or perhaps it’s better to say the map source and what you want to see for aviation related parameters. I discussed this during my PFD explanation too.
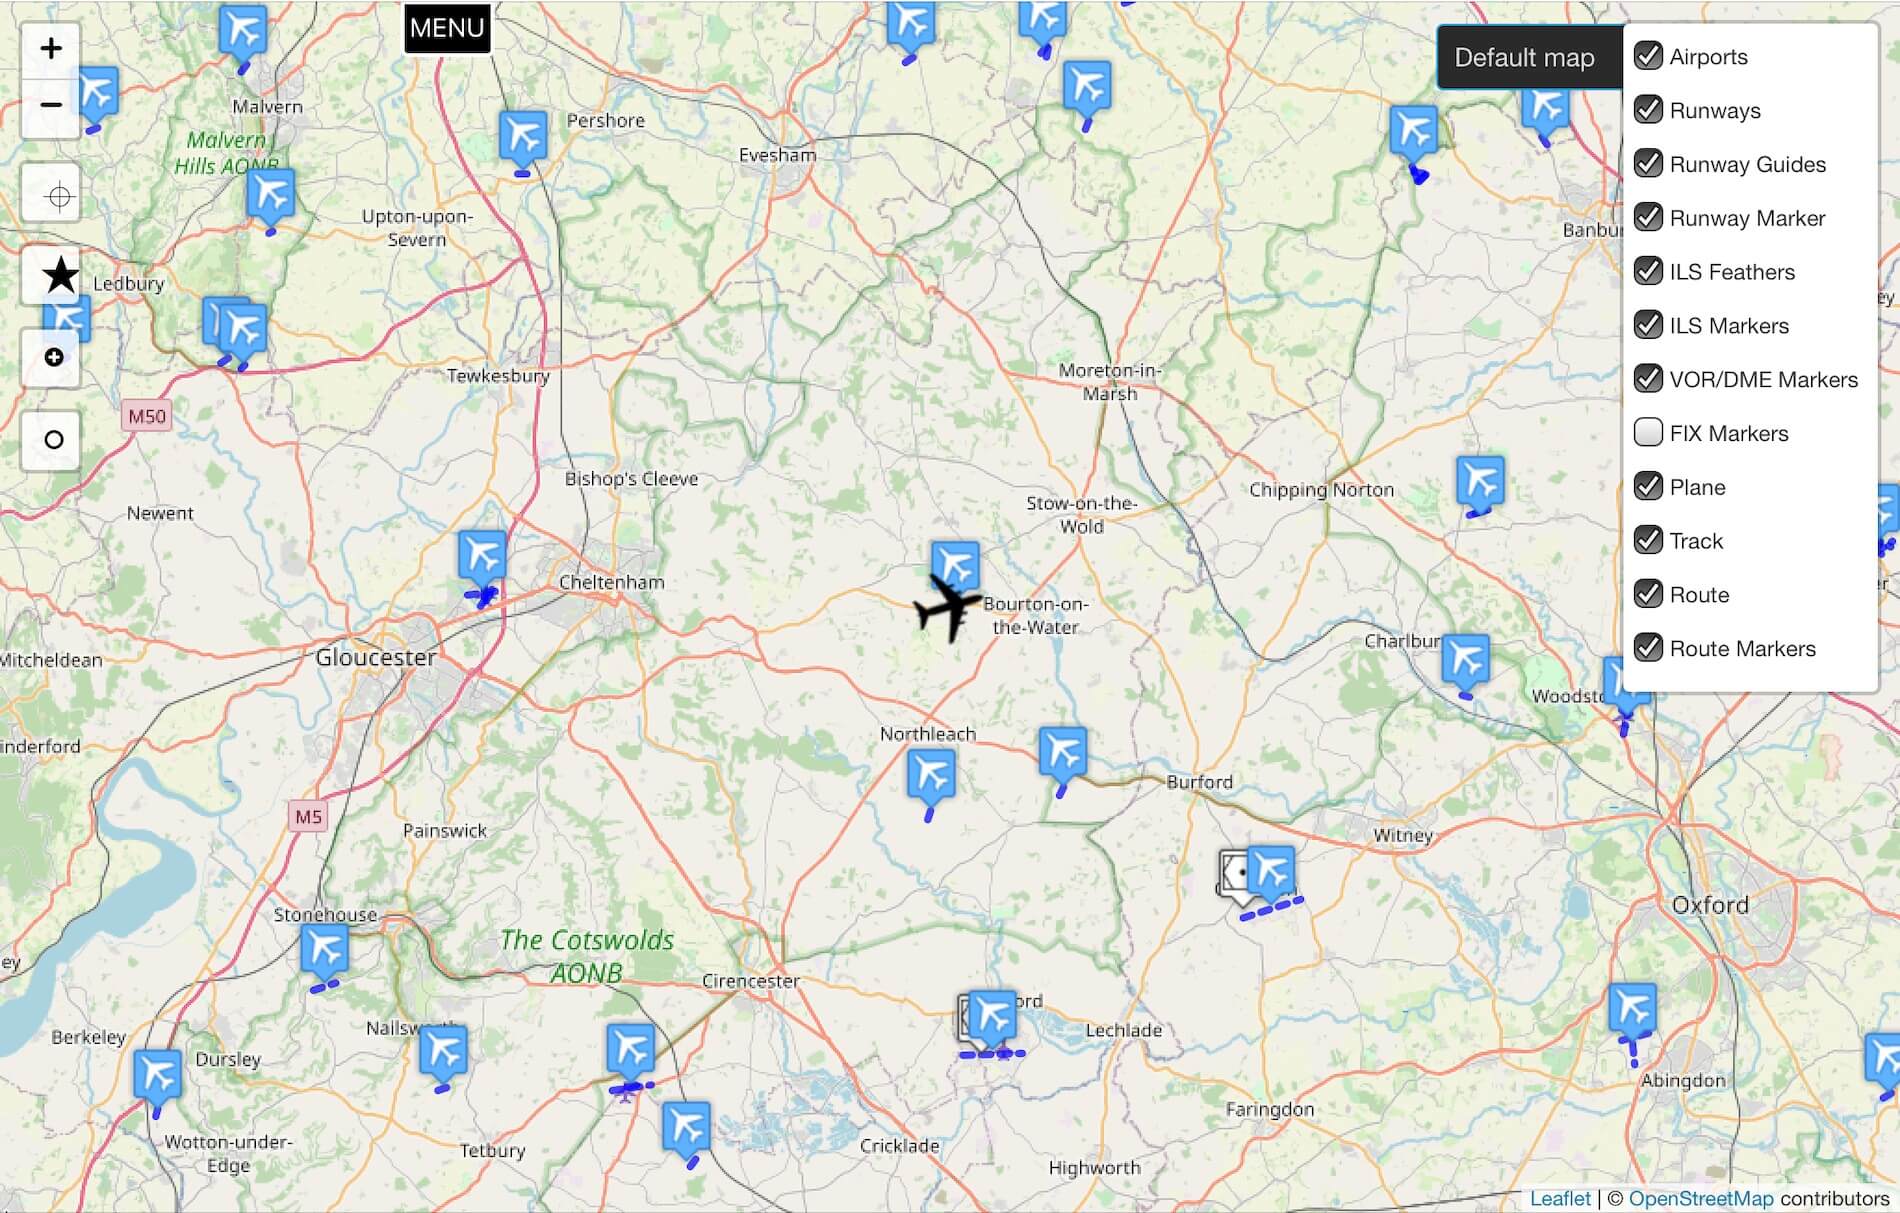
As you can see on the above screenshots, one screenshot shows you the popup window that allows me to select the source and thus the way the map looks like. The other screenshot gives me the option to select certain aviation related parameters like runway data, ILS data, VOR/DME beacons and so on. It is of course thru that when you hover at a higher altitude while flying, you will have less detailed information on the map then when you are at a lower altitude, in particular valid above or nearby airports and then I talk about ILS information, and/or runway data.
Final Round
As mentioned in the beginning, my goal was to discuss the four main buttons of SkyScout. As you know now, the start page of SkyScout has besides these four buttons – PFD, MFD, XPD and MAP – several other buttons, but most buttons and thus their function speak for themself.
When you check the above screenshot, you won’t expect that some buttons can do a bit more than perhaps expected like for example the CONFIGURATION” button. I can imagine that some buttons go a bit too far for you, but check the top line of this Configuration page and see the “license” tab or the “FlyWithLua’ tab. The license tab refers to your SkyScout license data while the FlyWithLua allows you to, in case you haven’t done yet, to download and install FlyWithLua. A very nice feature I must say.
Then, before I forget it, there’s the “Elevation” tab. Can you remember that during my PFD exploration I got a message “Elevation Data Not Available”? When you tick or tap this tab, you can download and install the necessary elevation data. Another cool feature, right? And, how does the elevation and FlyWithLua tabs look like? Check it out below.


Summary
Finally, I made it!
It wasn’t an easy review. It took a while to get the right flow. That has nothing to do with the product. It’s just different finding your way then reviewing an aircraft, an airport, a scenery or hardware.
Most likely, and looking to myself too, simmers who have interest in buying SkyScout will use the upper four SkyScout functions (buttons) which are, just in case, the PFD, MFD, XPD and MAP. Looking to myself, I found the PFD very useful since it offers almost every feature you can imagine. The MAP button/function is very handy for those who want a separate device that shows them a chart or map with one tap/click. I’m also pleased to see that many things you can change are instantly activated and yes, my iPad Pro isn’t the newest one. It’s a 3rd generation iPad Pro from 2015 and I can’t say anything else then it’s fast in relation to SkyScout and via wifi communication with my iMac Pro running X-Plane.
As of this writing, November 10 th 2020, this review covers SkyScout version 1.0. I know from XPlane Aviator that he’s busy with updating the program and implementing new features that will see daylight in version 1.1. For now, I’m pleased that I finally wrote this review since it has a lot of potential and many features. Which one of the four buttons – PFD, MFD, XPD or MAP – will have your preference, the program offers something for everybody.
And yes, always that same question, did I cover everything or did I perhaps forget something? I can tell you that a review is never perfect, but from a simmers point of view I tried to cover those features I know simmers will like this and that and so on.
At the end, I’m happy that I’ve finished the review, and I can add to it that my iPad will have a new feature ….. running SkyScout!
More information can be found at the dedicated X-Plane.Org store page. At the moment SkyScout cost 39.95 USD. I would like to thank XPlane Aviator for his assistance as well as that he managed to create such a useful program.
Feel free to contact me if you’ve got additional questions related to this impression. You can reach me via email Angelique.van.Campen@gmail.com or to Angelique@X-Plained.com.
With Greetings,
Angelique van Campen
| Add-on: | Payware XPlane Aviator SkyScout |
|---|---|
| Publisher | Developer: | X-Plane.Org | XPlane Aviator |
| Description: | SkyScout for X-Plane |
| Software Source / Size: | Download / Approximately 149MB (unzipped Mac) |
| Reviewed by: | Angelique van Campen |
| Published: | November 9th 2020 |
| Hardware specifications: | - iMac Pro - Intel 3GHz Intel Xeon W / 4.5Ghz - Radeon Pro Vega 64 16368 MB - 64 GB 2666 MHz DDR4 - 1 internal shared 1TB SSD (Big Sur 11.x) - 1 internal shared 1TB SSD (Bootcamp Windows 10) - 1 external 2TB LaCie Rugged Pro SSD (Big Sur 11.x) - Saitek Pro Flight System X-52 Pro and X-56 Rhino - Honeycomb Alpha Flight Controls - Honeycomb Bravo Throttle Quadrant |
| Software specifications: | - macOS Big Sur (10.15.x) - X-Plane 11.5x |
0 Comments